

BOSCH GSN36BI30, GSN36BW30, KSV36BI30 User Manual [ru]

de Montageanleitung
Standgerät
tr Montaj kılavuzu
Solo cihaz
en Installation instructions
Free-standing appliance
fr Notice de montage
Appareil indépendant
it Istruzioni per il montaggio
Apparecchio indipendente
nl Montagevoorschrift
Vrijstaand apparaat
es Instrucciones de montaje
Aparato de libre instalación
pt Instruções de montagem
Aparelho Solo
el Οδηγίες τοποθέτησης
Ανεξάρτητη συσκευή
da Monteringsvejledning
Gulvmodel
no Monteringsanvisning
Frittstående apparat
sv Monteringsanvisning
Fristående skåp
fi Asennusohjeet
Vapaasti sijoitettava laite
ru Инcтpyкция пo мoнтaжy
Напольный прибор
pl Instrukcja montażu
Urządzenie wolnostojące

de Inhaltsverzeichnis
Montageanleitung verwenden .............. 5
Aufstellort .................................................. 5
Geräte nebeneinander aufstellen ......... 6
Türanschlag wechseln ........................... 6
en Table of Contents
Using the installation instructions ........ 8
Installation location ................................. 8
Installing appliances next
to each other ............................................ 9
fr Table des matières
Utiliser la notice de montage ............. 11
Lieu d’installation ................................. 11
Installation côte à côte
des appareils ........................................ 12
it Indice
Uso delle istruzioni per il montaggio 14
Luogo d’installazione ........................... 14
Disposizione affiancata degli
apparecchi ............................................ 15
Inversione della porta .......................... 15
Türgriff wechseln ..................................... 7
Wandabstandshalter montieren ........... 7
Gerät ausrichten ..................................... 7
Changing over the door hinges ........... 9
Changing the door handle ................. 10
Fitting the wall spacer ......................... 10
Aligning the appliance ........................ 10
Inversion du sens d’ouverture
de porte ................................................. 12
Changer la poignée de porte ............ 13
Monter les écarteurs muraux ............ 13
Ajuster l’appareil .................................. 13
Sostituzione della maniglia
della porta ............................................. 16
Montaggio del distanziatore murale . 16
Livellare l’apparecchio ........................ 16
nl Inhoud
Montagehandleiding gebruiken ........ 17
De juiste plaats ..................................... 17
Apparaten naast elkaar opstellen ..... 18
Verwisselen van de deurophanging . 18
Deurgreep verwisselen ....................... 19
Wandafstandhouder monteren ......... 19
Apparaat horizontaal zetten ............... 19

es Índice
Instalar el aparato de conformidad
con las instrucciones de montaje ..... 20
Lugar de emplazamiento .................... 20
Yuxtaposición de los aparatos .......... 21
pt Índice
Utilizar as Instruções de montagem . 23
Local da instalação ............................. 23
Instalação dos aparelhos
um ao lado do outro ........................... 24
el Πίνακας περιεχομένων
Χρήση των οδηγιών τοποθέτησης ..... 26
Τόπος τοποθέτησης ............................. 26
Εγκατάσταση των συσκευών ημία
δίπλα στην άλλη .................................... 27
Αλλαγή της φοράς της πόρτας .......... 27
Cambiar el sentido de apertura de
la puerta ................................................ 21
Cambiar la manilla de la puerta ....... 22
Montar los distanciadores ................. 22
Nivelar el aparato ................................ 22
Alteração do sentido de abertura
da porta ................................................. 24
Alteração da localização
do puxador da porta ........................... 25
Montar o distanciador da parede ..... 25
Alinhar o aparelho ............................... 25
Αλλαγή της λαβής της πόρτας .......... 28
Τοποθέτηση του τεμαχίου διατήρησης
απόστασης από τον τοίχο .................. 28
Ευθυγράμμιση της συσκευής ............ 28
tr İçindekiler
Montaj kılavuzunun kullanılması ........ 29
Cihazın kurulacağı yer ......................... 29
Cihazların yan yana kurulması ........... 30
Kapı menteşelerinin değiştirilmesi .... 30
da Indholdsfortegnelse
Monteringsvejledning anvendes ....... 32
Opstillingssted ...................................... 32
Opstilling af skabene ved siden
af hinanden ........................................... 33
Kapı kolunun değiştirilmesi ................ 31
Duvar mesafesi koruyucunun monte
edilmesi ................................................. 31
Cihazın doğru konumlandırılması ..... 31
Ændring af dørens åbningsretning .. 33
Udskiftning af dørgrebet ..................... 34
Vægafstandsholder monteres ........... 34
Justering af skabet .............................. 34

no Innholdsfortegnelse
Bruk av monteringsveiledningen ...... 35
Plasseringssted .................................... 35
Oppstilling av apparatene
ved siden av hverandre ...................... 36
Omhengsling av døren ....................... 36
sv Innehållsförteckning
Använd monteringsanvisningen ........ 38
Platsen ................................................... 38
Ställa skåpen bredvid varandra ........ 39
Hänga om dörren ................................ 39
fi Sisällysluettelo
Näin käytät asennusohjetta ................ 41
Sijoituspaikka ........................................ 41
Laitteiden sijoitus vierekkäin .............. 42
Oven kätisyyden vaihto ....................... 42
ru Coдepжaниe
Применение инструкции
по монтажу ........................................... 44
Mecтo ycтaнoвки ................................. 44
Установка приборов рядом
друг сдругом....................................... 45
Skift av dørhåndtak ............................. 37
Montering av avstandsholderen
til veggen ............................................... 37
Innretting av apparatet ........................ 37
Flytta handtag ....................................... 40
Montera väggavståndshållare ........... 40
Ställa upp skåpet ................................. 40
Ovikahvan vaihto ................................. 43
Seinävälilevyn asennus ....................... 43
Laitteen suoristaminen ........................ 43
Измeнeниe нaпpaвлeния
oткpывaния двepцы ........................... 45
Смена местоположения
ручки дверцы ....................................... 46
Монтаж дистанцирующего
элемента ............................................... 46
Bыpaвнивaниe прибора .................... 46
pl Spis treści
Używanie instrukcji montażu .............. 47
Miejsce ustawienia ............................... 47
Ustawianie urządzeń obok siebie ..... 48
Zmiana zawiasów ................................. 48
Zmiana uchwytu drzwi ........................ 49
Montaż elementów dystansowych .... 49
Wypoziomowanie urządzenia ............ 49

deInhaltsverzeichnis
deMontageanleitung
S tand ge rät
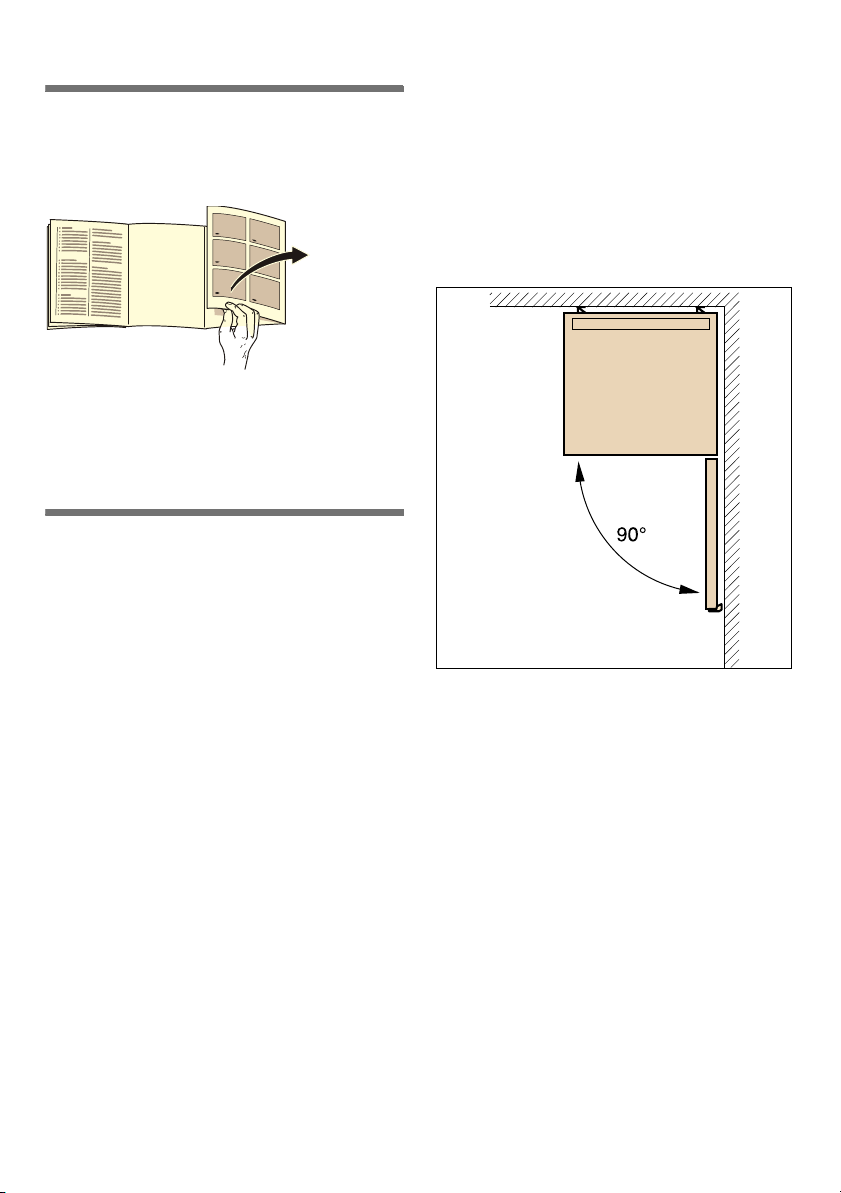
Montageanleitung verwenden
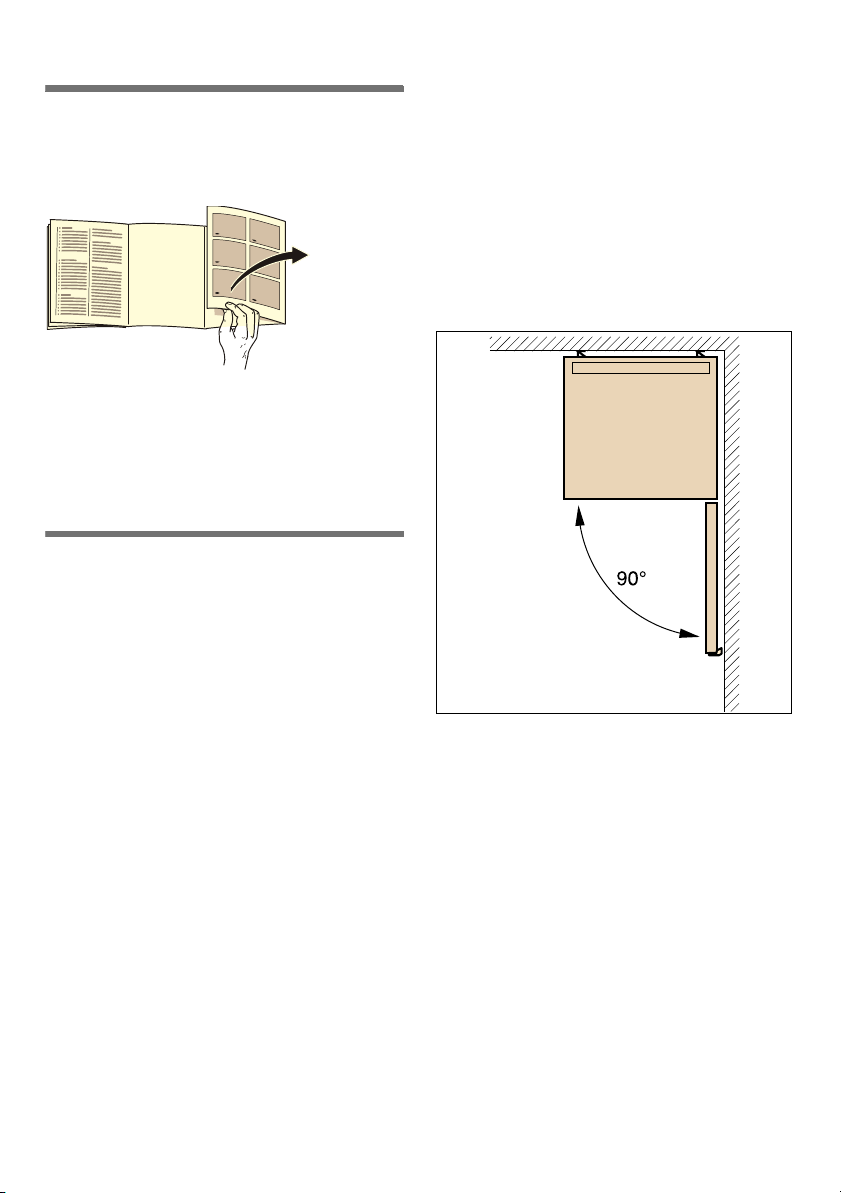
Bitte klappen Sie die letzte Seite mit den
Abbildungen aus.
Diese Montageanleitung gilt für mehrere
Modelle.
Abweichungen bei den Abbildungen sind
möglich.
Aufstellort
Als Aufstellort eignet sich ein trockener,
belüftbarer Raum. Der Aufstellort sollte
nicht direkter Sonnenbestrahlung
ausgesetzt und nicht in der Nähe einer
Wärmequelle wie Herd, Heizkörper etc.
sein. Wenn das Aufstellen neben einer
Wärmequelle unvermeidbar ist,
verwenden Sie eine geeignete
Isolierplatte oder halten Sie folgende
Mindestabstände zur Wärmequelle ein:
■ Zu Elektro- und Gasherden 3 cm.
■ Zu Öl- oder Kohleanstellherden
30 cm.
de
Der Boden am Aufstellort darf nicht
nachgeben. Boden eventuell verstärken.
Eventuelle Bodenunebenheiten mit
Unterlagen ausgleichen.
Wandabstand
Gerät so aufstellen, dass ein
Türöffnungswinkel von 90° gewährleistet
ist.
5

de
Geräte nebeneinander aufstellen
Bild 2
Achten Sie beim Aufstellen von zwei
Geräten darauf, dass das Kühlgerät links
und das Gefriergerät rechts steht.
Die rechte Seitenwand des Kühlgerätes
wird leicht beheizt. Dies verhindert
Schwitzwasserbildung zwischen den
Geräten.
Abstandshalter montieren
Bild 3
1. Auf der rechten Seite des Kühlgerätes
die Klebestellen mit Waschbenzin
oder Spiritus entfetten.
2. Abstandshalter in alle vier Ecken mit
einem Abstand von je 5 cm zu den
Seitenkanten kleben, damit ein
Mindestabstand zwischen den
Geräten gewährleistet ist.
Hinweis
Einen Verbindungssatz können Sie über
Ihren Händler beziehen.
Türanschlag wechseln
(falls erforderlich)
Wir empfehlen den Türanschlag durch
unseren Kundendienst wechseln zu
lassen. Die Kosten für einen
Türanschlagwechsel können Sie bei
Ihrem zuständigen Kundendienst
erfragen.
ã=Warnung
Während des Türanschlagwechsels darf
das Gerät nicht am Stromnetz
angeschlossen sein. Vorher Netzstecker
ziehen. Um die Geräterückseite nicht zu
beschädigen, ausreichend
Polstermaterial unterlegen. Gerät
vorsichtig auf die Rückseite legen.
Wechseln Sie den Türanschlag in
Reihenfolge der Zahlen. Bild 1
Hinweis
Wird das Gerät auf den Rücken gelegt,
darf der Wandabstandshalter nicht
montiert sein.
6
de
SW 22
Türgriff wechseln
(falls erforderlich)
Bild 4
Wechseln Sie den Türgriff in Reihenfolge
der Zahlen.
Wandabstandshalter montieren
Bild 5
Falls vorhanden:
Wandabstandshalter montieren, um die
ausgewiesene Energieaufnahme des
Gerätes zu erreichen. Ein reduzierter
Wandabstand schränkt das Gerät in
seiner Funktion nicht ein. Die
Energieaufnahme kann sich dann
geringfügig erhöhen.
Abstand zur Rückwand
Ein Abstand von 75 mm darf nicht
überschritten werden.
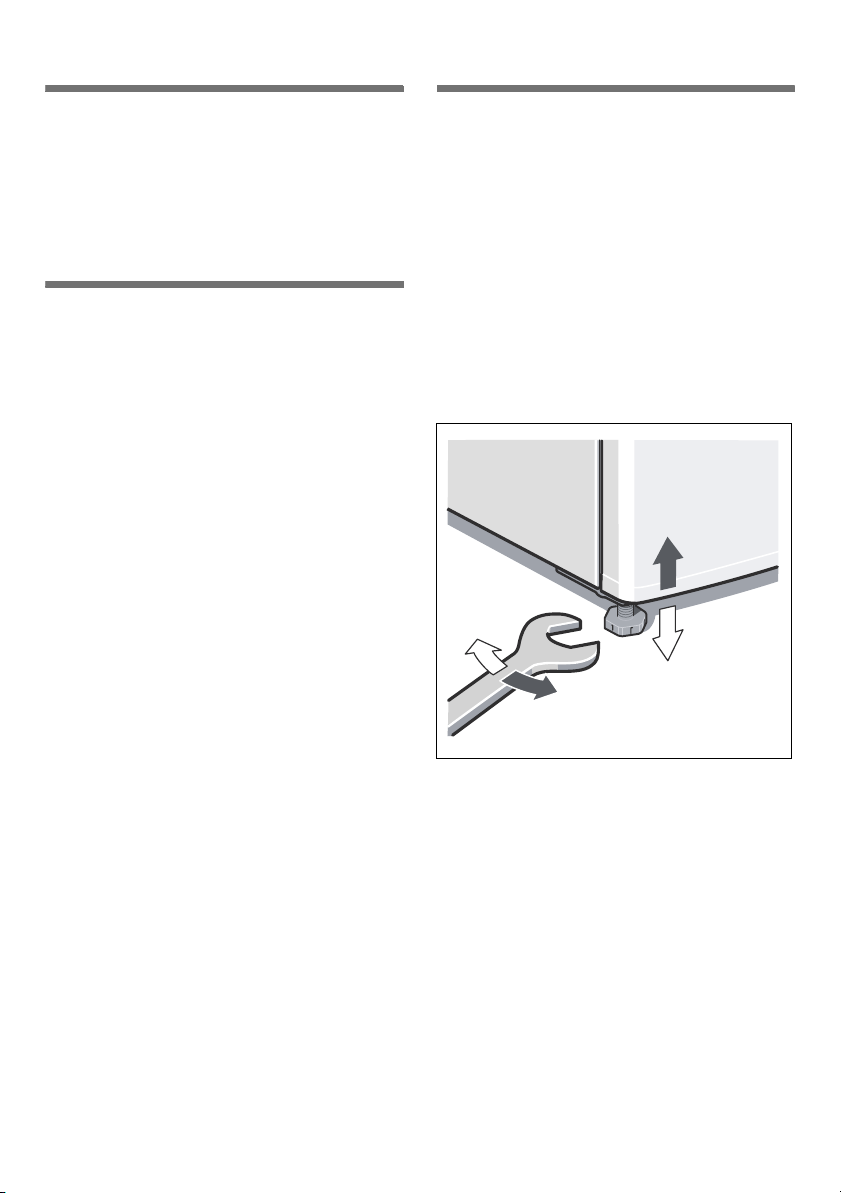
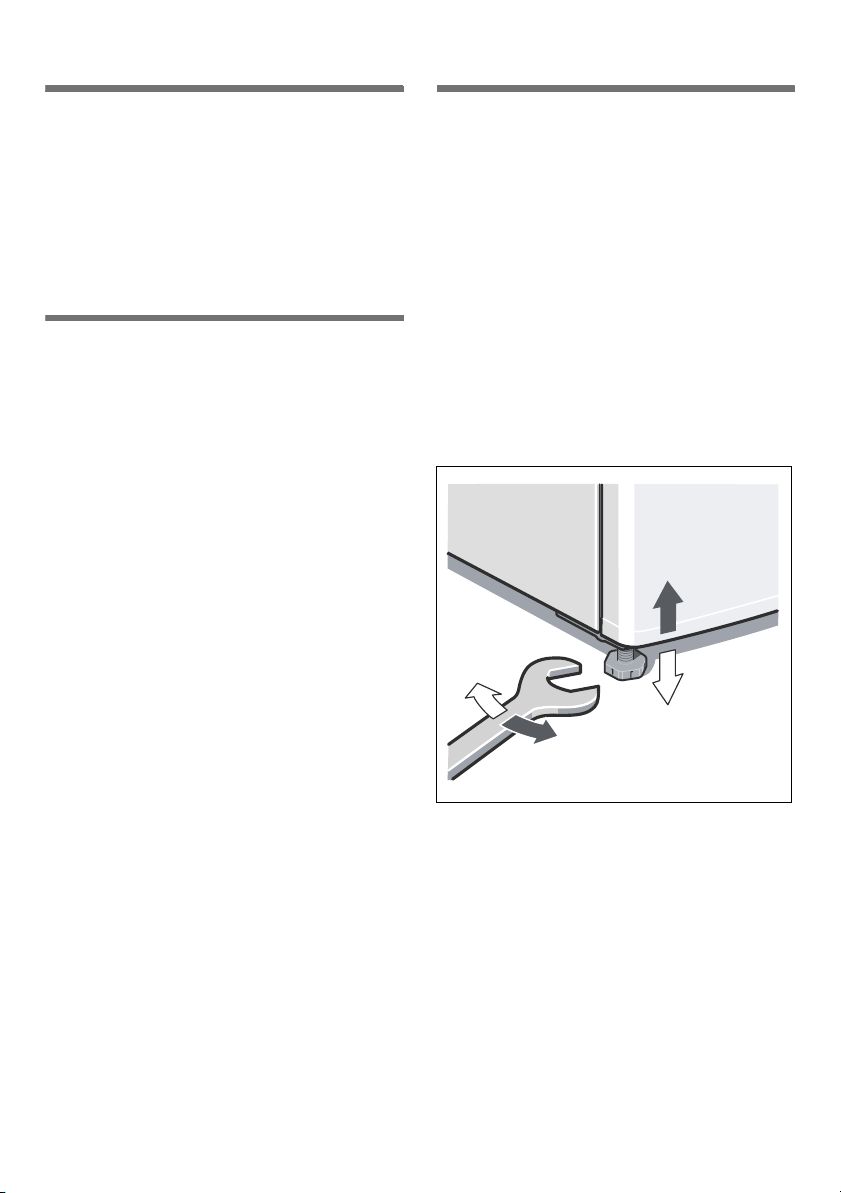
Gerät ausrichten
Gerät auf den vorgesehenen Platz stellen
und ausrichten. Es muss fest und eben
stehen. Unebenheiten des Bodens durch
die beiden vorderen Schraubfüße
ausgleichen. Zum Verstellen der
Schraubfüße einen Schraubenschlüssel
verwenden.
Hinweis
Das Gerät muss senkrecht stehen.
Richten Sie es mit Hilfe einer
Wasserwaage aus.
7
en
enTable of Content s
enInstallation instructions
Free-standing appliance
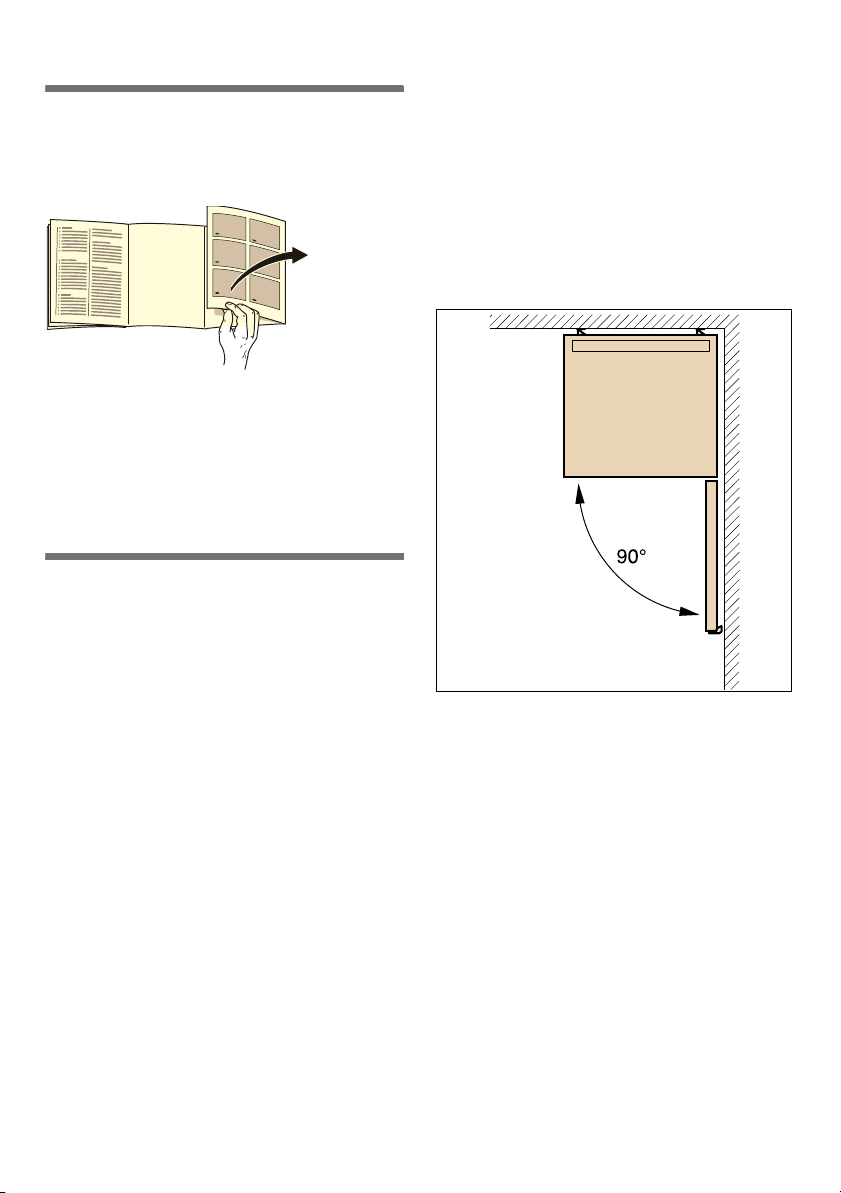
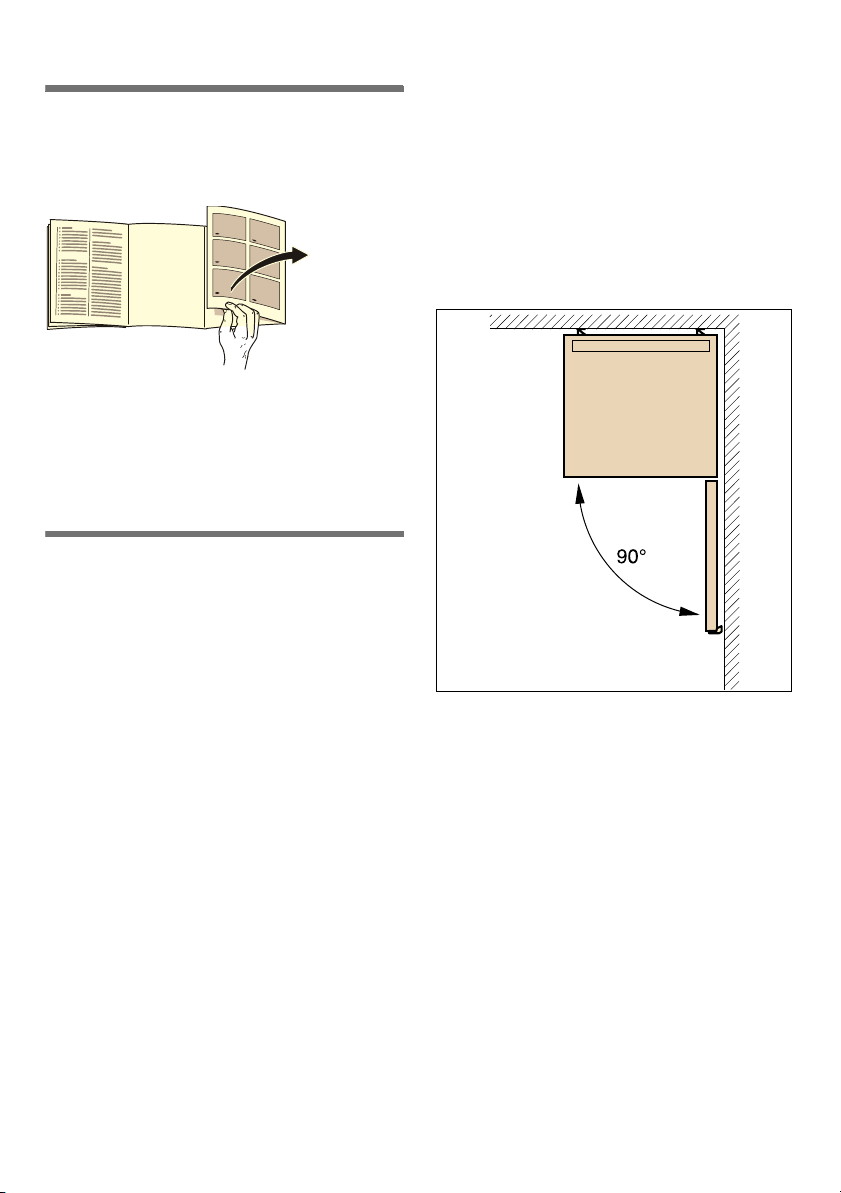
Using the installation instructions
Please fold out the illustrated last page.
These installation instructions refer to
several models.
The diagrams may differ.
Installation location
A dry, well ventilated room is suitable as
an installation location. The installation
location should not be exposed to direct
sunlight and not placed near a heat
source, e.g. a cooker, radiator, etc. If
installation next to a heat source is
unavoidable, use a suitable insulating
plate or observe the following minimum
distances from the heat source:
The floor of the installation location must
not give way; if required, reinforce floor. If
the floor is uneven, compensate with
supports.
Distance from wall
When installing the appliance, ensure
that the door can be opened by 90°.
■ 3 cm to electric or gas cookers.
■ 30 cm to an oil or coal-fired cooker.
8

en
Installing appliances next to each other
Fig. 2
When installing two appliances, ensure
that the refrigerator is on the left and the
freezer is on the right.
The right side panel of the refrigerator is
heated slightly. This prevents
condensation from forming between the
appliances.
Attaching spacers
Fig. 3
1. On the right side of the refrigerator
degrease the adhesive areas with
petroleum ether or spirit.
2. Stick spacers in all four corners at
a distance of 5 cm from the side
edges to ensure a minimum gap
between the appliances.
Note
You can purchase a connection set from
your dealer.
Changing over the door hinges
(if required)
We recommend that you have the door
hinges changed over by our customer
service. You can find out the costs for
changing over the door hinges from your
appropriate customer service.
ã=Warning
While changing over the door hinges,
ensure that the appliance is not
connected to the power supply. Pull out
the mains plug beforehand. To prevent
damaging the back of the appliance,
place adequate padding underneath.
Carefully place the appliance on its back.
Change over the door hinges
in numerical sequence. Fig. 1
Note
If the appliance is placed on its back,
ensure that the wall spacer is not fitted.
9
en
Changing the door handle
(if required)
Fig. 4
Change the door handle in numerical
sequence.
Fitting the wall spacer
Fig. 5
If available:
Fit wall spacers to obtain the indicated
energy rating of the appliance.
A reduced wall gap will not restrict
the function of the appliance. The energy
rating may then increase slightly.
Distance to the back wall
The distance of 75 mm must not be
exceeded.
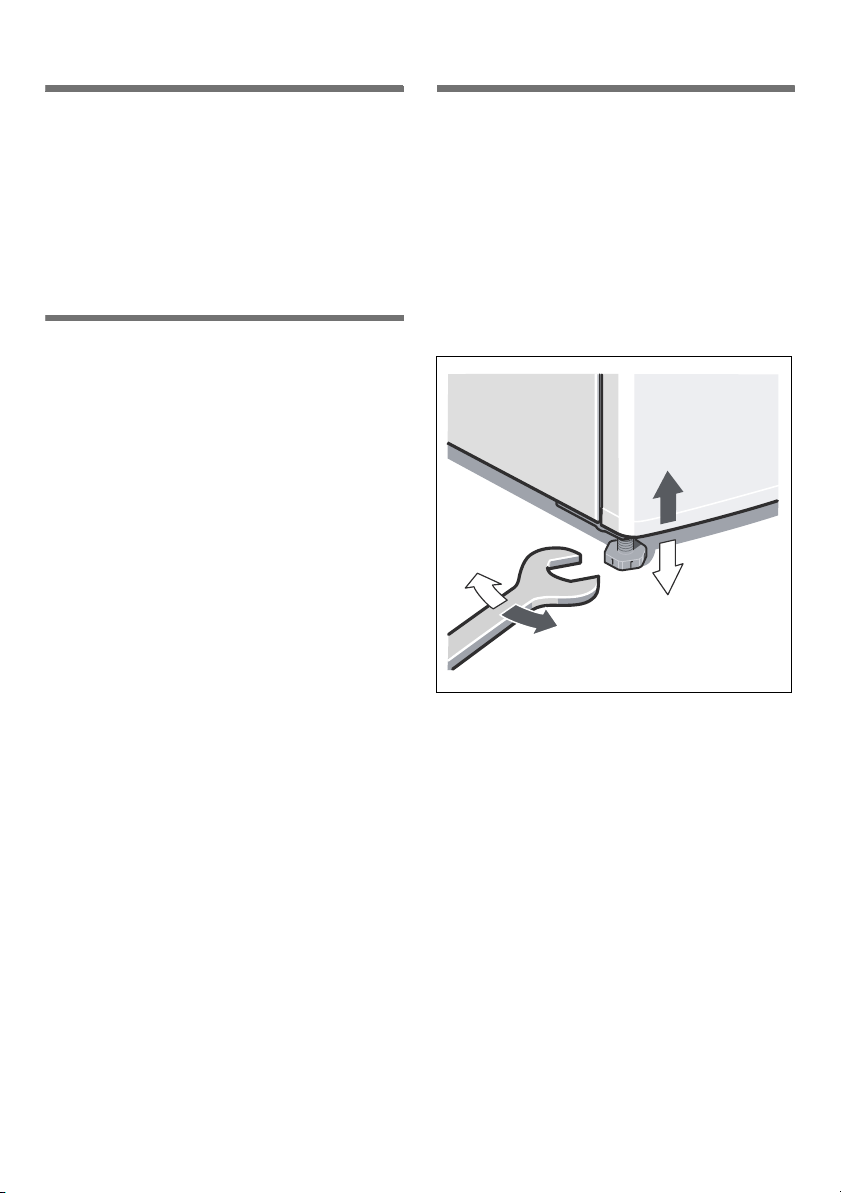
Aligning the appliance
Place the appliance in the designated
location and align. The appliance must
be level. If the floor is uneven, use
the front height-adjustable feet. Adjust
the height-adjustable feet with a wrench.
Note
The appliance must be upright. Please
align it with a spirit level.
SW 22
10
frTable des matières
frNotice de montage
Appareil indépendant
Utiliser la notice de montage
Veuillez déplier la dernière page,
illustrée, de la notice. Cette notice
de montage vaut pour plusieurs
modèles.
Selon le modèle, l’appareil peut différer
du contenu des illustrations.
Lieu d’installation
Un local sec et aérable convient comme
lieu d’installation. Il faudrait que le lieu
d’installation ne soit pas directement
exposé aux rayons solaires et pas
à proximité d’une source de chaleur
(cuisinière, radiateur, etc.).
Si l’installation à côté d’une source
de chaleur est inévitable, veuillez utiliser
un panneau isolant approprié ou
respecter les écarts minimums suivants
par rapport à la source de chaleur :
fr
Sur l’emplacement, le sol ne doit pas
s’affaisser. Renforcez-le le cas échéant.
Placez des garnitures sous l’appareil
pour compenser les inégalités du sol
éventuelles.
Écart mural
Implantez l’appareil de sorte à garantir
un angle d’ouverture de porte de 90°.
■ 3 cm par rapport aux cuisinières
électriques ou à gaz.
■ 30 cm par rapport à un appareil
de chauffage au fuel ou au charbon.
11

fr
Installation côte à côte des appareils
Fig. 2
Lorsque vous installez deux appareils,
placez le réfrigérateur à gauche
du congélateur.
Le réfrigérateur chauffe légèrement sa
paroi latérale droite. Ceci empêche
l’humidité dans l’air de se condenser
entre les appareils.
Montage de l’écarteur
Fig. 3
1. Dégraissez les emplacements
de collage visibles sur le côté droit
du réfrigérateur en utilisant
de l’essence à détacher ou de
l’alcool.
2. Collez les écarteurs aux quatre coins,
chacun à 5 cm des arêtes latérales,
afin de garantir un écart minimum
entre les appareils.
Remarque
Vous pouvez vous procurer un kit de
jonction par le biais de votre revendeur.
Inversion du sens d’ouverture de porte
(si nécessaire)
Nous recommandons de confier
l’inversion du sens d’ouverture de porte
à notre service après-vente. Pour
connaître le prix d’une inversion du sens
d’ouverture de porte, consultez votre
service après-vente compétent.
ã=Mise en garde
Pendant le changement du sens
d’ouverture de porte, l’appareil ne doit
pas être relié au secteur. Avant
le changement, débranchez la fiche
mâle de la prise de courant. Pour ne pas
endommager le dos de l’appareil, placez
en dessous suffisamment de matériau
amortisseur. Couchez prudemment
l’appareil sur le dos.
Inversez le sens d’ouverture de la porte
dans l’ordre des chiffres. Fig. 1
Remarque
Si l’appareil va être couché sur le dos, il
ne faut pas monter l’écarteur mural
latéral.
12
fr
SW 22
Changer la poignée de porte
(si nécessaire)
Fig. 4
Changez la poignée de porte dans
l’ordre des chiffres.
Monter les écarteurs muraux
Fig. 5
Si présent :
Montez les écarteurs muraux pour
parvenir à la quantité mentionnée
d’énergie absorbée par l’appareil.
Un écart moins élevé par rapport au mur
ne restreint pas le fonctionnement
de l’appareil. Dans ce cas, l’énergie
absorbée peut augmenter légèrement.
L'écart par rapport à la paroi arrière
Il ne faut pas dépasser un écart
de 75 mm.
Ajuster l’appareil
Amenez l’appareil sur l’emplacement
prévu puis ajustez-le pour qu’il se
retrouve bien d’aplomb. Veillez à ce que
l’appareil repose parfaitement d’aplomb
sur un sol plan. Si le sol présente des
inégalités, compensez-les à l’aide des
deux pieds à vis situés à l’avant
de l’appareil. Pour modifier le réglage
des pieds à vis, servez-vous d’une clé
àfourche.
Remarque
L’appareil doit reposer à la verticale.
Ajustez-le à l’aide d’un niveau à bulle.
13
it
itIndice
itIstruzio ni per il montaggio
Appare cch io ind i pe ndente
Uso delle istruzioni per il montaggio
Aprire l’ultima pagina con le figure. Il
presente manuale di montaggio vale
per più modelli.
Nelle illustrazioni sono possibili
differenze.
Luogo d’installazione
Il luogo d’installazione idoneo è un
locale asciutto, ventilabile. Il luogo
d’installazione non deve essere esposto
ad irraggiamento solare diretto e non
essere vicino ad una fonte di calore,
cucina, calorifero ecc. Se è inevitabile
l’installazione accanto ad una fonte
di calore, utilizzare un idoneo pannello
isolante, oppure rispettate le seguenti
distanze minime dalla fonte di calore:
Il pavimento nel luogo d’installazione
non deve cedere, rinforzarlo se
necessario. Compensare gli spessori
le eventuali disuguaglianze
del pavimento.
Distanza dal muro
Installare l'apparecchio in modo da
garantire un angolo di apertura della
porta di 90°.
■ Da cucine elettriche o a gas 3 cm.
■ Da stufe ad olio o a carbone 30 cm.
14

it
Disposizione affiancata degli apparecchi
Figura 2
Nella installazione di due apparecchi
prestare attenzione che il frigorifero sia
a sinistra ed il congelatore a destra.
La fiancata del frigorifero viene riscaldata
leggermente. Questo impedisce
la formazione di condensa fra gli
apparecchi.
Montaggio dei distanziatori
Figura 3
1. Sul lato destro del frigorifero
sgrassare i punti d’incollaggio con
benzina o alcol.
2. Per garantire una distanza minima fra
gli apparecchi, incollare i distanziatori
su tutti i quattro angoli ad una distanza
di 5 cm da ciascun bordo laterale.
Avvertenza
Un kit di collegamento può essere
acquistato presso il proprio fornitore.
Inversione della porta
(se necessario)
Consigliamo di fare invertire la chiusura
della porta dal nostro Servizio Assistenza
Clienti. Chiedere il costo per
un’inversione dell’apertura della porta
al servizio assistenza clienti competente
per la zona.
ã=Avviso
Durante l’inversione della porta
l’apparecchio non deve essere collegato
alla rete elettrica. Estrarre prima la spina
di alimentazione. Per non danneggiare la
parte posteriore dell’apparecchio,
mettere sotto sufficiente materiale
morbido. Deporre l’apparecchio
con cautela sul lato posteriore.
Cambiare il lato cerniere della porta
seguendo l'ordine numerico. Figura 1
Avvertenza
Il distanziatore murale non deve essere
montato se si depone l'apparecchio sul
dorso.
15

it
SW 22
Sostituzione della maniglia della porta
(se necessario)
Figura 4
Sostituire la maniglia della porta
seguendo l'ordine numerico.
Montaggio del distanziatore murale
Figura 5
Se disponibile:
Per raggiungere l’assorbimento
di energia indicato dell’apparecchio
montare il distanziatore murale. Una
minore distanza dal muro non influisce
sulla funzionalità dell’apparecchio. Può
tuttavia causare una piccola
aumentazione di assorbimento
di energia.
Distanza dalla parete posteriore
Non superare la distanza di 75 mm.
Livellare l’apparecchio
Disporre e livellare l’apparecchio
nel luogo previsto. L’apparecchio deve
poggiare stabilmente sul pavimento
ed essere livellato. Compensare
le disuguaglianze del pavimento
per mezzo dei due piedini a vite anteriori.
Per regolare i piedini a vite utilizzare
un cacciavite.
Avvertenza
L’apparecchio deve essere verticale.
Livellarlo con una livella a bolla d'aria.
16
nlInhoud
nlMontagevoorschrift
Vrijstaand appa raat
Montagehandleiding gebruiken
De laatste bladzijde met de afbeeldingen
uitklappen. Dit montagevoorschrift is van
toepassing voor meerdere modellen.
Kleine afwijkingen in de afbeeldingen zijn
mogelijk.
De juiste plaats
Elke droge, goed te ventileren ruimte
is geschikt. Het apparaat niet in de zon
of naast een fornuis,
verwarmingsradiator of een andere
warmte bron plaatsen. Is plaatsing naast
een warmtebron niet te vermijden, maak
dan gebruik van een isolerende plaat of
neem de volgende minimumafstanden
tot de warmtebron in acht:
nl
De vloer op de plaats van opstelling mag
niet meegeven, vloer eventueel
verstevigen. Eventuele oneffenheden
in de vloer opheffen door er iets onder te
leggen.
Afstand tot de wand
Het apparaat zodanig opstellen dat de
deur 90° kan worden geopend.
■ Naast elektrische- of gasfornuizen
3cm.
■ Naast een CV-installatie 30 cm.
17
 Loading...