

Montageanleitung und Gebrauchsanleitung
Installation and use instructions
Notice de montage et mode d’emploi
Montagevoorschrift en het Gebruiksaanwijzing
Istruzioni per il montaggio e l’uso
Instrucciones de montaje y de servicio
Instruções de Montagem e Serviçio
Instruktioner för installation och användning
Instruksjoner for installasjon og bruk
Asennus ja käyttö
Instruktioner til installation og brug
Instrukcja instalacji i u¿ytkowania
de
en
fr
nl
it
es
pt
sv
DID09T950
no
fi
da
pl

de Seite 3-12
en page 13-22
fr page 23-32
nl pagina 33-42
it pagina 43-52
es página 53-62
pt página 63-72
sv sid 73-82
no side 83-92
fi sivu 93-102
da side 103-112
pl strony 113-122
2
Vor dem Lesen, bitte die Seiten mit den
Abbildungen ausklappen
Wichtige Hinweise
Altgeräte sind kein wertloser Abfall.
Durch umwelt-gerechte Entsorgung
können wertvolle Rohstoffe
wiedergewonnen werden.
Bevor Sie das Altgerät entsorgen, machen
Sie es unbrauchbar.
Ihr neues Gerät wurde auf dem Weg
zu Ihnen durch die Verpackung geschützt.
Alle eingesetzten Materialien sind
umweltverträglich und wieder verwertbar.
Bitte helfen Sie mit und entsorgen Sie die
Verpackung umweltgerecht.
Über aktuelle Entsorgungswege
informieren Sie sich bitte bei Ihrem
Fachhändler oder bei Ihrer
Gemeindeverwaltung.
Die Dunstabzugshaube ist für Abluftbetrieb verwendbar.
Die Duntabzugshaube immer über die
Mitte der Kochstelle anbringen
Mindestabstand zwichen
Elektrokochstellen und Unterkante der
Dunstabzugshaube: 550mm. (siehe
Abbildungen).
Empfohlen: 700 mm.
Über einer Feuerstätte für feste
Brennstoffe, von der eine Brandgefahr
(z.b. Funkenflug) ausgehen kann, ist die
Montage der Dunstabzugshaube nur dann
zulässig, wenn die Feuerstätte eine
geschlossene nicht abnehmbare
Abdeckung hat und die länderspezifischen
Vorschriften eingehalten werden. Diese
Einschränkung gilt nicht für Gas-Herde
und Gas-Mulden.
Dunstabzugshaube Tropfen bilden
können.
Zusätzliche Hinweise bei Gas
Kochgeräten:
Bei der Montage von Gaskochstellen
sind die National einschlägigen
gesetzlichen Bestimmungen (z.B. in
Deutschland: technische Regeln
Gasinstallation TRGI) zu beachten.
Es müssen die jeweils gültigen
Einbauvorschriften und die
Einbauhinweise der Gas-Gerätehersteller
beachtet werden.
Die Dunstabzugshaube darf nur an
einer Seite neben einem Hochschrank
oder einer hohen Wand eingebaut
werden. Abstand mind. 50mm
Mindestabstand bei Gas-Kochstelle
zwischen Oberkante Topfträger und
Unterkante der Dunstabzugshaube: 650
mm, (Siehe Abbildungen).
Empfohlen: 700mm.
Dieses Gerät ist
entsprechend der
europäischen Richtlinie
2002/96/EG über
Elektro und Elektronikaltgeräte (waste
electrical and electronic
equipment WEEE)
gekennzeichnet. Diese
Richtlinie gibt den Rahmen für eine EUWERT gültige Rücknahme und
Verwertung der Altgeräte vor.
Je kleiner der Abstand zwischen
Dunstabzugshaube und Kochstelle desto
größer ist die Möglichkeit, dass sich durch
aufsteigenden Wasserdampf unten an der
3
Vor der Montage
Optimale Leistung der
Dunstabzugshaube:
Kurzes, glattes Abluftrohr.
Möglichst wenig Rohrbögen.
Möglichst große Rohrdurchmesser
und große Rohrbögen.
Der Einsatz von langen, rauen
Abluftrohren, vielen Rohrbögen
oder kleineren Rohrdurchmessern
führt zu einer Abweichung von der
optimalen Luftleistung und
gleichzeitig zu einer
Geräuscherhöhung.
Rundrohre: wir empfehlen
Innendurchmesser 150 mm.
Flachkanäle müssen einem
gleichwertigen Innenquerschnitt wie
Rundrohre haben.
Sie sollten keine scharfen
Umlenkungen haben.
Ø 150 mm ca. 177cm
Bei abweichenden
Rohrdurchmessern: Dichtstreifen
einsetzen.
Bei Abluftbetrieb für ausreichend
Zuluft sorgen.
Anschluss Abluftrohr Ø 150 mm:
Abluftrohr direkt am Luftstutzen
befestigen. Kleinere
Abluftdurchmesser als 150 sind nicht
zulässig.
Mit größer werdendem Abstand zur
Kochstelle sinkt die Leistungsfähigkeit
der Absaugung. Beachten Sie bei der
Planung der Abhängungsmaße auch
das trichterförmige Aufsteigen des
Kochdunstes mit ca. 10 bis 15°
Neigung.
2
Vorbereiten der Decke:
Die Decke muss eben und
waagerecht sein.
Für festen Halt der Dübel ist zu
sorgen.
Die beiliegenden Dübel sind für Beton
und Naturstein geeignet.
Bei anderen Deckenmaterialien
müssen dafür geeignete
Befestigugnsmittel verwendet werden
Achtung: Die Dunstabzugshaube wird
mit Standardbefestigungselementen
ausgeliefert. Der Monteur muss
sicherstellen, dass die
Befestigungselemente für die
vorgefundene Decke geeignet sind. Für
Schäden die auf unsachgemäße
Installation und / oder die Verwendung
von ungeeigneten Befestigungselementen
zurückzuführen sind, wird keine Haftung
übernommen.
Für das Gewicht, schauen Sie Bitte die M
Abbildungen. Konstruktionsänderungen im
Rahmen der technischen Entwicklung
bleiben vorenthalten.
4
Elektrischer Anschluss
Die Dunstabzughaube darf nur an eine
vorschriftmäßig installierte Schutzkontaktsteckdose angeschlossen werden.
Die Schutzkontaktsteckdose möglichst
direkt hinter der Kaminverblendung
anbrigen.
Elektrische Daten:
Sie sind auf dem Typenschild nach
Abnahme der Filterrahmen – im
Innenraum des Gerätes – zu finden.
Bei Reparaturen die
Dunstabzugshaube generell stromlos
machen.
Länge der Anschlussleitung: 1,30 m.
Bei erforderlichem Festanschluss:
Die Dunstabzugshaube darf in jedem Fall
nur durch einen beim zuständigen
Elektrizitäts-Versorgungsunternehmen
eingetragenen Elektro-Installateur
angeschlossen werden.
Installationsseitig ist eine Trennvorrichtung
vorzusehen. Als Trennvorrichtung gelten
Schlalter mit einer Kontaktöffnung von
mehr als 3 mm und allpoliger Abschaltung.
Dazu gehören LS-Schalter und Schütze.
Einbauen
Die Insel Dunstabzugshaube ist zur
Montage an die Küchendecke oder eine
stabile abgehängte Decke vorgesehen.
Auf Mindestabstand KochstelleDunstabzugshaube von 550 mm bei
Elektro-Kochstellen bzw. 650 mm bei Gas
Kochstelle achten.
Achtung: Die empfindlichen
Edelstahloberflächen nicht beschädigen.
Die Haube einbauen, wie in der M
Abbildungen gezeigt.
Wenn die Anschlussleitung dieses
Gerätes beschädigt wird, muss sie durch
den Hersteller oder seinen Kundendienst
oder eine ähnlich qualifizierte Person
ersetzt werden, um Gefährdung zu
vermeiden.
Diese Dunstabzugshaube entspricht den
EG-Funkentstörbestimmungen.
5
Vor dem ersten Benutzen
Wichtige Hinweise:
Diese Gebrauchsanleitung gilt für
mehrere Geräte-Ausführungen. Es ist
möglich, dass einzelne
Ausstattungsmerkmale beschrieben
sind, die nicht auf ihr Gerät zutreffen.
Diese Dunstabzugshaube entspricht
den einschlägigen
Sicherheitsbestimmungen.
Reparaturen dürfen nur von
Fachkräften durchgeführt werden.
Durch unsachgemäße Reparaturen
können erhebliche Gefahren für
den Benutzer entstehen.
Sicherheitshinweise:
Unter der Dunstabzugshaube nicht
flambieren. Brandgerfahr am Fettfilter
durch aufsteigende Flammen.
Die Kochstelle müssen immer mit
Kochgeschirr abgedeckt sein.
Über einer Feuerstätte für feste
Brennstoffe (Kohle, Holz und dgl.) ist der
Betrieb der Dunstabzugshaube nur
bedingt gestattet (siehe
Montageanleitungen).
Ist das Geräet beschädigt, dürfen Sie
es nicht in Betrieb nehmen.
Anschluss und Inbetriebnahme dürfen
nur von einem Fachmann durchgeführt
werden.
Diese Dunstabzugshaube ist nur für
den Betrieb in Haushalten bestimmt.
Dunstabzugshaube nur mit
eingesetzten Lampen betrieben.
Defekte Lampen sollten sofort ersetzt
werden, um Überlastung der restlichen
Lampen zu vermeiden.
Dunstabzugshaube nie ohne Fettfilter
betreiben.
Überhitze Fette oder Öle können sich
leicht entzünden. Darum Speise mit Fetten
oder Ölen, z.B Pommes frites, nur unter
Aufsicht zubereiten.
Dunstabzugshaube vor der ersten
Inbetriebnahme sorgfältig reinigen.
Keine Gegenstände auf der
Dunstabzugshaube abstellen.
Wenn die Anschlussleitung dieses
Gerätes beschädigt wird, muss sie duch
den Hersteller oder seinen Kundendienst
oder eine ähnlich qualifizierte Person
ersetzt werden, um Gefährdung zu
vermeiden.
Verpackungsmaterial ordnungsgemäß
entsorgen .
Kinder nicht mit dem Gerät spielen
lassen.
Erwachsene und Kinder dürfen nie
unbeaufsichtigt das Gerät betreiben:
- wenn sie körperlich oder geistig dazu
nicht in der Lage sind.
- Oder wenn ihnen Wissen und Erfahrung
fehlen, das Gerät richtig und sicher zu
bedienen.
Gas-Kochmulden/Gas-Herde
Betreiben Sie nicht alle GasKochstellen gleichzeitig über längere Zeit
(max. 15 Minuten) bei höchster
Wärmebelastung, sonst besteht
Verbrennungsgefahr bei Berührung der
Gehäuseoberfläche bzw. Gefahr der
Beschädigung der Dunstabzugshaube.
Bei Betrieb der Dunstabzugshaube über
einem Gas-Kochfeld muss bei
gleichzeitigem Betrieben von drei oder
mehr Gas-Kochstellen die Haube in der
Maximalstufe betrieben werden.
6
Beachten Sie, dass ein Großbrenner
mit mehr als 5 Kw (wok) der Leistung
von zwei Gasbrenner entspricht.
Betreiben Sie eine Gaskochstelle nie
ohne aufgesetztes Kochgeschirr.
Regeln Sie die Flamme so, dass sie
nicht über das Kochgeschirr
hinausragt.
Bevor Sie das neue Gerät benutzen,
lesen Sie bitte sorgfältig die
Gebrauchsanleitung. Sie enthält
wichtige Informationen für Ihre
Sicherheit sowie zum Gebrauch und
zur Pflege des Gerätes.
Bewahren Sie die Gebrauchs-und
Montageanleitung ggf. für einen
Nachbesitzer gut auf.
Betriebsarten
Abluftbetrieb: M Abbildungen.
Der Lüfter der Dunstabzugshaube
saugt den Küchendunst an und leitet
ihn durch den Fettfilter ins Freie.
Der Fettfilter nimmt die fettigen
Bestandteile des Küchendunstes auf.
Die Küche bleibt weitgehend frei von
Fett und Geruch.
Die Abluft wird über einen
Lüftungsschacht nach oben, oder direkt
durch die Außenwand ins Freie geleitet.
) Die Abluft darf weder in einen in Betrieb
befindlichen Rauch-oder Abgaskamin
noch in einen Schlacht, welcher der
Entlüftung von Aufstellungsräumen von
Feuerstätten dient, abgegeben werden.
Bei der Ableitung von Abluft sind die
behördlichen und gesetztlichen
Vorschriften (z.B.
Landesbauordnungen) zu beachten.
Bei Abführung der Luft in nicht in Betrieb
befindliche Rauch-oder Abgaskamine ist
die Zustimmung des zuständigen
Schornsteinfegermeisters einzuholen.
) Bei Abluft der Dunstabzugshaube
und gleichzeitigem Betrieb
schornsteinabhängiger Feuerungen
(wie z. B. Gas-, Öl- oder Kohleheizgeräte,
Durchlauferhitzer, Warmwassebereiter),
muss für ausreichend Zuluft gesorgt
werden, die von der Feuerstätte zur
Verbrennung benötigt wird.
Ein gefahrloser Betrieb ist möglich, wenn
der Unterdruck im Aufstellraum der
Feuerstätte von 4 Pa (0,04mbar) nicht
überschritten wird.
Dies kann erreicht werden, wenn durch
nicht verschließbare Öffnungen, z.B. in
Türen, Fenstern und in Verbindung mit
Zuluft-/Abluftmauerkasten oder durch
andere technischen Maßnahmen, wie
gegenseitige Verriegelung o.ä., die
Verbrennungsluft nachströmen kann.
Bei nicht ausreichender Zuluft besteht
Vergiftungsgefahr durch
zurückgesaugte Verbrennungsgase.
Ein Zuluft-/Abluftmauerkasten allein stellt
die Einhaltung des Grenzwertes nicht
sicher.
Anmerkung: Bei der Beurteilung muss
immer der gesamte Lüftungsverbund der
Wohnung beachtet werden. Bei Betrieb
von Kochgeräten, z.B. Kochmulde und
Gasherd wird diese Regel nicht
angewendet.
Wird die Abluft durch die Außenwand
geleitet, sollte ein Teleskop-Mauerkasten
verwendet werden.
7
Bedienen der
f
Dunstabzugshaube
Um die Funktionen zu aktivieren,
genügt ein kurzes Antippen auf die
Tasten. Wenn die Taste zu lange gedrückt
werden, wird keine Funktion aktiviert.
Der Küchendunst wird am
wirkungsvollsten beseitigt durch:
Einschalten der
Dunstabzugshaube bei Kochbeginn.
Ausschalten der
Dunstabzugshaube erst einige
Minuten nach Kochende.
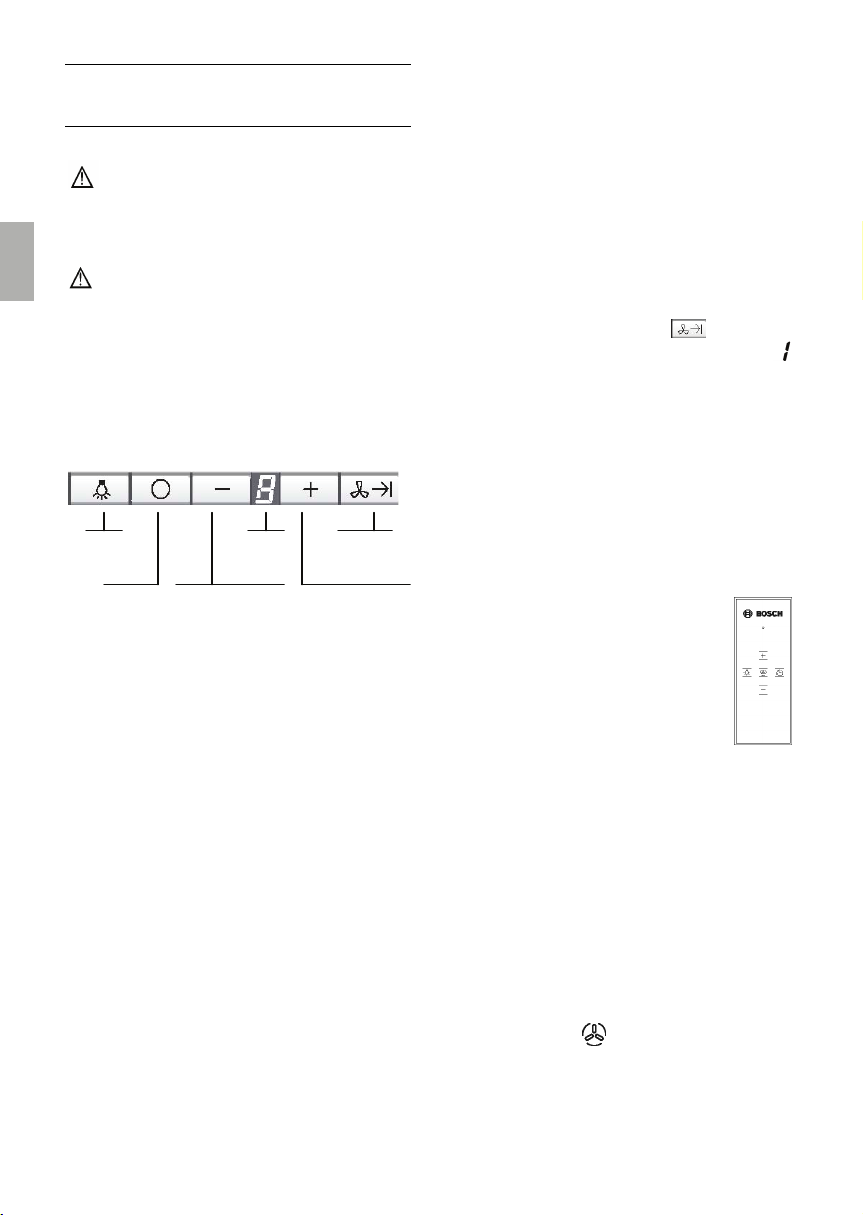
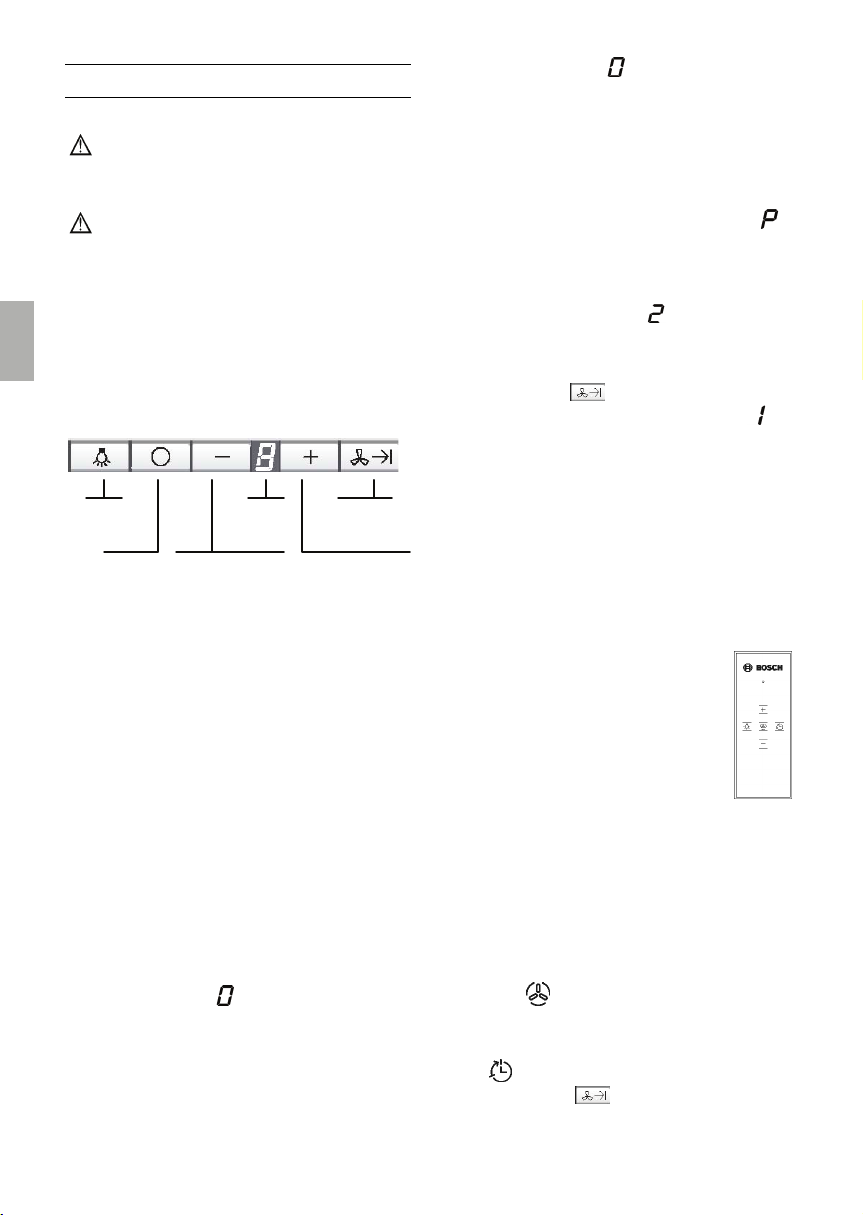
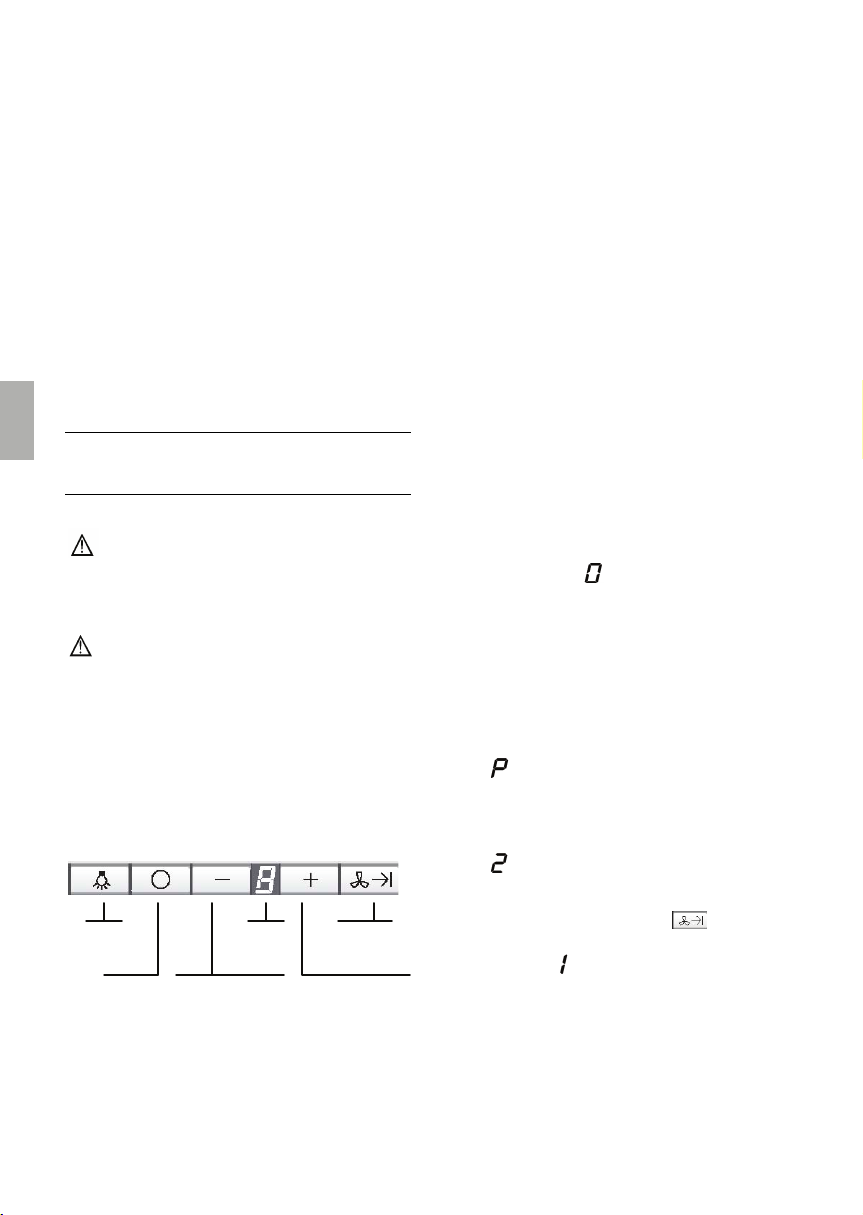
Licht
Anzeige
Lüfterstufen
Lüfter - Aus
Lüfter zurückschalten
Signalton:
Beim Drücken einer Taste ertönt zur
Bestätigung ein Signalton.
Einschalten des Lüfters:
Drücken Sie die Taste +.
Einstellen der gewünschten
Lüfterstufe:
Drücken Sie die Taste +.
Der Lüfter schaltet eine Stufe höher.
Drücken Sie die Taste -.
Der Lüfter schaltet eine Stufe zurück.
Ausschalten des Lüfters
Drücken Sie die Taste O.
Oder
Drücken Sie die Taste - so oft, bis der
Lüfter ausschaltet.
Die Anzeige O erlischt nach kurzer
Zeit.
8
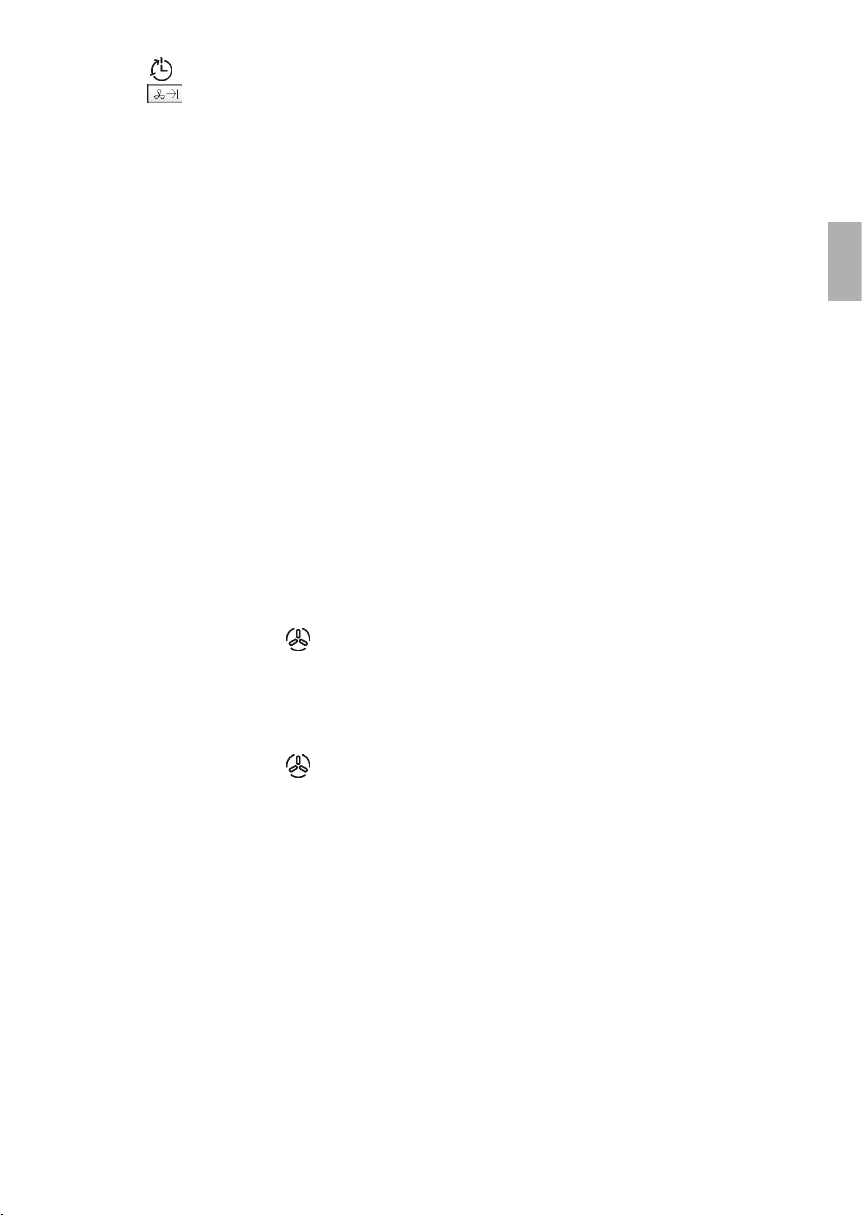
Lüfternachlau
Lüfter ein- und hochschalten
Intensivstufe
Intensivstufe:
Durch die Intensivstufe wird die höchste
Leistung erreicht. Sie wird kurzzeitig
benötigt.
Drücken Sie die Taste + so oft, bis die
P leuchtet.
Wird die Intensivstufe nicht von Hand
ausgeschaltet, schaltet der Lüfter
nach 10 Minuten auf Stufe 2.
Lüfternachlauf:
Drücken Sie die Taste
Der Lüfter läuft 10 Minuten in Stufe
dabei blinkt in der Anzeige ein Punkt.
Danach schaltet der Lüfter selbsttätig
aus.
Beleuchtung:
Die Beleuchtung kann zu jeder Zeit
verwendet werden, auch wenn der
Lüfter ausgeschaltet ist.
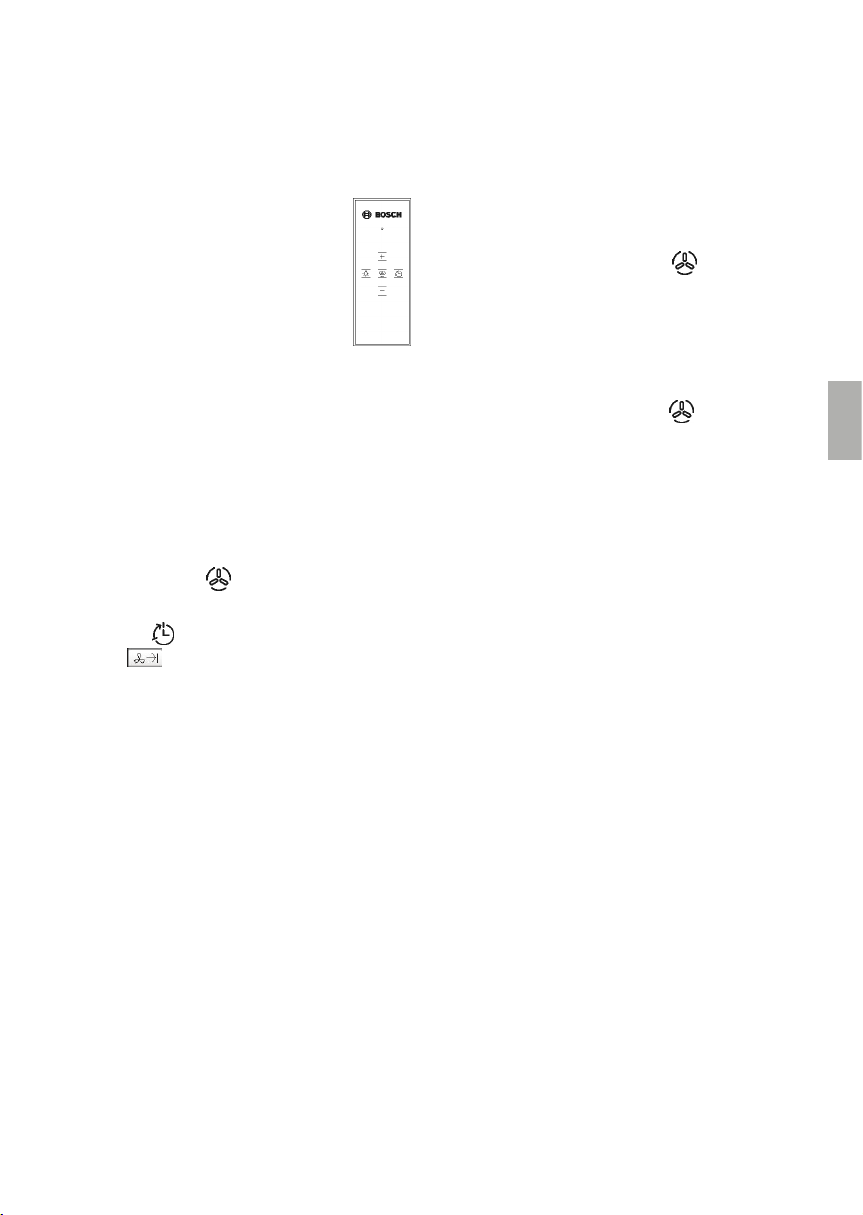
Fernbedienung
Der Hersteller programmiert die
Fernbedienung.
Wenn sich in unmittelbarer Nähe
der Haube diese nicht mit der
Fernbedienung bedienen lässt,
gehen Sie folgendermaßen vor.
Inbetriebnahme der
Fernbedienung
Halten Sie die Taste “+” der
Fernbedienung gedrückt und legen die
Haube an die Netzspannung an (ggf.
Netzsicherung einschalten). Zur
Bestätigung der Kopplung der
Fernbedienung an das Gerät, ertönt ein
langes akustisches Signal. Wenn kein
akustisches Signal innerhalb vor 30
Sekunden ertönt, wiederholen Sie das
Verfahren.
Funktionen der Fernbedienung
Die Tasten +, -,
und Licht haben die
gleiche Funktionen wie bei der direkten
Bedienung.
.
Die Taste : hat die gleiche Funktion wie
die Taste .
Intervallschaltung
Diese Haube verfügt über eine
Intervallschaltung.
Die Intervallschaltung aktiviert den Lüfter
für 10 Minuten pro Stunde, in der
angezeigten Lüfterstufe.
Diese Funktion kann man mit der direkten
Bedienung oder mit der Fernbedienung
aktivieren.
Aktivierung der Intervallschaltung mit
Steuerung:
Gleichzeitig die Tasten O und +
drücken, auf der Anzeige erscheint 1;
Drücken Sie die Taste +, die Anzeige
zeigt folgende für die Lüfterstufen
2→3→1→2 …;
Gleichzeitig die Taste O und +
drücken um die Laufstufe der
Intervallschaltung zu bestätigen.
Aktivierung der Intervallschaltung mit
Fernbedienung:
Drücken Sie die Taste
Anzeige erscheint 1;
Drücken Sie die Taste +, die Anzeige
zeigt folgende Lüfterstufen
2→3→1→2 …;
Drücken Sie die Taste
Lüfterstufen zu bestätigen;
Wenn bei der Programmierung die
angezeigte Funktion der
Intervallschaltung nicht innerhalb
einiger Sekunden bestätigt wird,
dann wird der Modus der
Programmierung der
Intervallschaltung beendet.
Mit dem Drücken jeder Taste (Ausnahme
Licht) ist die Intervallschaltung deaktiviert.
Die Fernbedienung ist batteriebetrieben.
Falls die Batterie leer ist und deshalb
ausgetauscht werden muss:
: auf der
um die
1. Lösen Sie hinten die zwei Schrauben
und öffnen Sie den Deckel.
2. Nehmen Sie die Batterie heraus und
ersetzten diese mit einer Batterie
desselben Typs.
3. Schließen Sie den Deckel und
schrauben Sie den Deckel fest.
Beachten Sie die nationalen Normen und
Vorschriften für die Entsorgung der
entleerten Batterien.
9
Filter und Wartung
Fettfilter:
Zur Aufnahme der fettigen Bestandteile
des Küchendunstes sind MetallFettfilter eingesetzt.
Die Filtermatten bestehen aus
unbrennbarem Metall.
Achtung:
Bei zunehmender Sättigung mit
fetthaltigen Rückständen erhöht sich die
Entflammbarkeit und die Funktion der
Dunstabzugshaube kann beeinträchtig
werden.
Wichtig:
Durch rechtzeitiges Reinigen der MetallFettfilter wird der Brandgefahr vorgebeugt,
die durch Hitzestau beim Frittieren oder
Braten entstehen kann.
Sättigunganzeige:
Bei Sättigung der Fettfilter leuchtet die
Anzeige
Mit dem Ausschalten des Lüfters wird
auch das Signal ausgeschaltet.
Spätestens dann sollten die Fettfilter
gereinigt werden.
Reinigen der Metall-Fettfilter:
Bei normalem Betrieb (täglich 1 bis 2
Das Reinigen kann in der
Beim Reinigen von Hand, die Fettfilter
10
.
Stunden) müssen die Metall-Fettfilter
1x im Monat gereinigt werden.
Geschirrspülmaschine erfolgen.
Dabei ist eine leichte Verfärbung
möglich. Der Filter muss locker in der
Geschirrspülmaschine liegen. Er darf
nicht eingeklemmt sein.
Wichtig:
Stark gesättigte Metall-Fettfilter nicht
zusammen mit Geschirr reinigen.
in heißer Spüllauge einweichen.
Danach abbürsten, gut ausspülen
und abtropfen lassen.
Aus und Einbauen der Metall-Fettfilter:
Achtung: Die Halogenlampen müssen
ausgeschaltet und abgekühlt sein.
1. Folgen Sie was in der M Abbildungen
geschrieben ist.
2. Drücken Sie die Griffe an den
Fettfiltern nach unten und klappen Sie
die Fettfilter ab.
3. Reinigen Sie die Fettfilter
4. Setzen Sie die gereinigte Filter wieder
ein.
5. Löschen Sie die Anzeige
Drücken Sie 2xhintereinander die
Taste O. Ein Signal ertönt und
die Anzeige
erlischt.
.
Reinigen und Pflegen
Dunstabzugshaube durch Ziehen des
Netzsteckers bzw Ausschalten der
Sicherung stromlos machen.
Dunstabzugshaube nicht mit
kratzendem Schwämmen und nicht mit
sand-soda-säure oder chloridhaltigen
Putzmitteln reinigen!
Zum Reinigen der Dunstabzugshaube
heiße Spüllauge oder mildes Fensterputzmittel verwenden.
Kratzen Sie angetrocknete
Verschmutzung nicht ab, sondern
weichen Sie diese mit einem feuchten
Tuch auf.
Beim Reinigen der Fettfilter die
zugänglichen Gehäuseteile von
abgelagertem Fett reinigen. Dadurch
wird der Brangefahr vorgebeugt und
die optimale Funktion bleibt erhalten
Hinweis: Alkohol (Spiritus) nicht auf
Kunststofflächen anwenden, es
könnten matte Stellen entstehen.
Vorsicht! Küche ausreichend
belüften, keine offene Flamme.
Aluminium, Lack und
Kunststoffoberflächen:
Keine trockenen Tücher verwenden.
Verwenden Sie ein mildes Fenster-
reinigungsmitteli.
Keine aggressive, säure- oder
laugenaltigen Reiniger verwenden.
Beachten Sie die
Garantiebestimmungen im beiligenden
Service-Heft.
Die Bedienstasten nur mit milder
Spüllauge und einem weichen, feuchten
Tuch reinigen. Keinen Edelstahlreiniger für
die Bedientasten verwenden.
Edelstahloberflächen:
Verwenden Sie einen milden nicht
scheurnden Edelstahlreiniger.
Reinigen Sie nur in Schliffrichtung
11
Auswechseln der Lampen
1. Schalten Sie die Dunstabzugshaube
aus und machen Sie durch Ziehen
des Netz-steckers oder Ausschalten
der Sicherung die Dunstabzugshaube
stromlos.
Die Halogenbirnen werden bei Betrieb
sehr heiß. Auch einige Zeit nach dem
Ausschalten besteht noch
Verbrennungsgefahr.
2. Folgen Sie der Schritten der L
Abbildungen um die Lampen auszu
tauschen.
3. Tauschen Sie die defekte
Halogenlampen mit einer desselben
Typs.
4. Stellen Sie durch Einstecken des
Netzsteckers oder durch Einschalten
der Sicherung die Stromversorgung
wieder her.
Hinweis: Sollte die Beleuchtung nicht
funktionnieren, kontrollieren Sie, ob die
Lampen richtig eingesteckt sind.
Störungen
Wenn im Display
Sehen Sie Abschnitt Filter und
Wartung”.
Wenn sich die Dunstabzugshaube nicht
bedienen lässt:
Für ca 1 Minute die
Dunstabzugshaube durch Ziehen des
Netzsteckers bzw Ausschalten oder
Sicherung stromlos machen. Danach
neu einschalten.
Wenn die Halogenlampen nur schwach
eingeschaltet sind, wenn die Haube in
stand by ist, bitte schalten Sie Stecker um
(Phase mit Nulleiter umkehren).
Bei eventuelllen Rückfragen oder
Störungen, Kundendienst anrufen. (Siehe
Kundendienstverzeichniss).
Bei Anruf bitte angeben:
E-Nr. FD
Tragen Sie die Nummer in obige Felder
ein.
Die Nummern sind auf dem Typenschild
nach Abnahme der Fettfilter, im
Innenraum der Dunstabzugshaube zu
finden.
oder blinkt:
Für Beastandungen die auf Planung
und Ausführung der Rohrstrecke
zurückzuführen sind, übernimmt der
Hersteller der Dunstabzugshaube keine
Gewährleistung.
12
Before reading these instructions,
please open out the folded page with the
illustration.
Important information
Old appliances are not worthless
rubbish. Valuable raw materials can be
reclaimed by recycling old appliances.
Before disposing of your old appliance,
render it unusable.
Your received your new appliance in a
protective shipping carton. All packaging
materials are environmentally friendly and
recyclable. Please contribute to a better
environment by disposing packaging
materials in an environmentally-friendly
manner.
Please ask your dealer or inquire at
your local authority about current means
of disposal.
The exactractor hood can be used in
exhaust air mode.
Always mount the extractor over the
centre of the hob.
Minimum distance between electric
hob and bottom edge of the extractor
hood: 550mm. (See figures).
Advised: 700 mm
Additional information concerning gas
cookers:
When installing gas hotplates, comply
with the relevant national statutory
regulations (e.g. in Germany – Technische
Regeln Gasinstallation TRGI).
Always comply with the currently valid
regulations and installation instructions
supplied by gas appliance manufacturer.
Only one side of the extractor hood
may be installed next to a high-sided unit
or high wall. Gap at least 50 mm.
Minimum distance on gas hotplates
between the upper edge of the trivet and
the lower edge of the extractor hood: 650
mm. (see figures).
Advised: 700 mm
This appliance is
labelled in accordane
with European Directive
2002/96/EG concerning
used electrical ad
electronic appliances
(waste electrical and
elettronic equipmentWEEE).
The guideline determines the framework
for the return and recycling of used
applainces as applicable throughout the
EU.
The extractor hood must not be
installed over a solid fuel cooker – a
potential fire hazard (e.g. flying sparks)unless the cooker features a closed non
removable cover and all national
regulations are observed.
This limitation is not valid if you use gas
cooking top and gas cooker.
The smaller the gap between the
extractor hood and hotplates, the greater
the likelihood that droplets will form on the
underside of the extractor hood.
13
Prior to installation
For optimum extractor hood efficiency:
Short, smooth air exhaust pipe.
As few bends in the pipes as possible
Diameter of pipe to be as large as
possible and no tight bends in pipe.
If long rough exhaust-air pipes,
many pipe bends or smaller pipe
diameters are used, the air
extraction rate will no longer be at
an optimum level and there will be
an increase in noise.
Round pipes:
we recommend internal diameter: 150
mm.
Flat duct must have an internal cross
section that equates to that of round
pipes.
There should be no sharp bends.
Ø 150 mm ca. 177cm2
If pipes have different diameters:
insert sealing strip.
For exhaust-air mode, ensure that
there is an adequate supply of fresh
air.
Connecting a Ø 150 mm exhaust air
pipe:
Mount the pipe directly onto the air
outlet on the hood. Duct smaller than
150 mm are not reliable.
With higher distance from the cooking
hob, the air delivery performances are
reduced. During the design and
layout of the mounting of the cooker
hood, kindly consider also the funnelshape of the vapour rising with
inclination of ca 10 – 15°.
Preparing the celing:
The ceiling must be flat and
horizontal.
Ensure that the ceiling is capable of
providing a firm hold for mounting screws
and plugs.
The enclosed plugs are suitable for
concrete and stonework. If the ceiling is
made of any other material, use
appropriate mounting components.
Attention: The cooker hood is
equipped with standard fixing material.
The person who is mounting the hood
should make sure that fixing elements are
suitable for the ceiling that is found. The
manufacturer declines any responsibility
for damages caused by a wrong mounting
oder use of unsuitable fixing elements for
the ceiling found.
For the weight kindly look at the M
Figures. We reserve the right to
construction changes within the context of
technical development.
14
Electrical connection
WARNING: THIS APPLIANCE MUST BE
EARTHED.
The appliance must be installed so that
plug is accessible.
IMPORTANT: Fitting a different plug.
The wires in the mains leads are coloured
in accordance with the following codes:
Green and Yellow – Earth
Bleu – Neutral
Brown – Live
If you fit your own plug, the colours of
these wires may not correspond with the
identifying marks on the plug terminals.
This is what you have to do.
1. Connect the green and yellow (Earth)
wire to the terminal in the plug market
“E “ or with the symbol ( ), or
coloured green or green and yellow.
2. Connect the bleu (Neutral) wire to the
terminal in the plug marked ‘N’ or
coloured black.
3. Connect the brown (Live) wire to the
terminal marked “L” or coloured red.
The extractor hood should only be
connected to an earthed socket that has
been installed according to relevant
regulations.
If possible, site the earthed socket directly
above the chimney panelling in the ceiling.
Electrical Data:
Are to be found on the name plate inside
the appliance after removal of the filter
frame.
If it is necessary to wire the extractor
hood directly into the mains:
The extractor hood should only be
connected to the electricity supply by a
properly qualified electrician.
A separator must be installed in the
household circuit. A suitable separator is a
switch that has a contact gap of more than
3 mm and interrupts all poles. Such
devices include circuit breakers and
contactors.
If the connection cable for this
appliance is damaged, the cable must be
replaced by the manufacturer or his
customer service or a similarly qualified
person in order to prevent serious inury to
the user.
This extractor corresponds to EC
regulations concerning RF interference
suppression.
Installation
The island extractor hood is designed to
be fitted to the kitchen ceiling or a rigid
suspended ceiling.
Ensure that the minimum distance
between hotplate and extractor hood is
550 mm for electric hotplates and 650 mm
for gas hotplates.
Ensure that the inox surface is not
damaged.
Follow the mounting steps as shown in M
Figures.
Before undertaking any repairs,
always disconnect the extractor hood from
the electricity supply.
Length of the connecting cable: 1,3 m.
15
Before using for the first time
Important notes
The instructions for Use apply to
several version of this appliance,
Accordingly you may find description
of individual features that do not apply
to your specific appliance.
This extractor hood complies with all
relevant safety regulation.
Repairs should be carried out by
qualified technicians only.
Improper repairs may put the user
at considerable risk.
Do not flambé food directly under the
extractor hood.
! Risk of grease filter catching fire due to
flames.
The hotplates must always be covered
with a utensil.
Restrictions apply to the use of the
extractor hood over a solid-fuel burner
(coal wood, etc.) (See “Installation”
instructions).
Do not use the appliance if damaged.
The appliance must be connected to
the mains by a qualified technician only.
This extractor hood is designed for
domestic use only.
Light bulbs must always be fitted when
the extractor hood is in use.
Defective bulbs should be replaced
immediately to prevent the remaining
bulbs from overloading.
Never operate the extractor without a
grease filter.
Overheated fat or oil can easily catch
fire. If you are cooking with fat or oil, e.g.
chips etc. never leave the cooker
unattended.
16
Carefully clean the extractor hood
before switching on for the first time.
Do not place any object on the
extractor hood.
If the connecting cable for this
appliance is damaged, the cable must be
replaced by the manufacturer or his
customer service or a simiòaròu qualified
person in order to prevent serious injury to
the user.
Dispose of packaging materials
properly (see installation instruction).
Never allow children to play with the
appliance. Do not let adults or children
operate the appliance unsupervised:
- If they are mentally or physically unable
to use the appliance safely or correctly.
- If they don’t have the knowledge and
experience to use the appliance safely
and correctly.
Gas hobs/Gas cookers
Do not use all the gas hotplates
simultaneously for a prolonged period
(max. 15 minutes) at maximum thermal
load, otherwise there is a risk of burns if
the housing surface are touched or a risk
of damage to the extractor hood. If the
extractor hood is situated over a gas hob,
operate the hood at maximum setting if
three or more gas hotplates are operated
simultaneously.
Note that one large burner of more than
5 KW (Wok) is equivalent to the power
of 2 gas burners.
Never operate a gas cooking area
without a cooking utensil on it.
Regulate the flame in such a way that it
does not project over the cooking
utensil.
Before using your appliance for the
first time, please read these
instructions for use carefully. They
contain important information
concerning your personal safety as
well as on use and care of your
appliance
Please retain the operating and
installation instructions for a
subsequent owner.
Operating modes
Exhaust air mode. See M Figures.
The extractor-hood fan extracts the
kitchen vapours and conveys them
through the grease filters into the
atmosphere.
The grease filter absorbs the solid
particles in the kitchen vapours.
The kitchen ist kept almost free of
grease and odours.
The exhaust air is discharged upwards
through a ventilation shaft or directly
through the outside wall into the open.
) Exhaust air should neither be directed
into a smoke or exhaust flue that is
currently used for other purposes, nor into
a shaft that is used for ventilation rooms in
which stoves or fireplaces are also
located.
Exhaust air may be discharged in
accordance with official and statutory
regulations only (e.g. national builing
regulations).
Local authority regulations must be
observed when discharging air into smoke
or exhaust air flues that are not otherwise
in use.
) When the extractor hood is operated
in exhaust-air mode simultaneously
with a different burner (such as gas, oil
or coal-fired heaters, continuous-flow
heaters, hot-water boilers) care must be
taken to ensure that there is an
adequate supply of fresh air which will
be needed by the burner for combustion.
Safe operaration is possible provided that
the underpressure in the room where the
burner is installed does not exceed 4 Pa
(0,04 mbar).
This can be achieved if combustion air can
flow through non- lockable openings, e.g.
in doors, windows and via the airintake/exhaust air wall box, or by the other
technical measures, such as reciprocal
interlocking. Etc…
If the air intake is inadequate there is a
risk of poisoning from combustion
gases which are drawn back into the
room.
An air-intake/exhaust air wall box by itself
is no guarantee that the limiting value will
not be exceeded.
Note: when assessing the overall
requirement, the combined ventilation
system for the entire household must be
taken into considertion. This rule does not
apply to the use of cooking appliances,
such as hobs and ovens.
If the exhaust air is going to be
discharged into the open, a telescopic
wall box should be fitted into the
outside wall.
17
Operating procedure
To activate the functions simply tap
the buttons. If the buttons are pressed for
too long, no function is activated.
The most effective method of
removing vapours produced during
cooking is to:
Switch the ventilator ON
as soon as you begin cooking.
Switch the ventilator OFF
a few minutes after you have finished
cooking.
Light
Speeds
Indicator
It switches
motor off
It decreases the
speeds
Acoustic signal
When a push button is pressed, this is
verified by an acoustic signal.
Switching the fan ON
Press the + Push button
Setting the required fan speed
Press the + Push button
The fan speed is increased by one
step.
Press the - Push button
The fan speed is reduced by one
step.
Switching the fan OFF
Press the O Push button
the displayed
goes out shortly
afterwards.
Or
Keep pressed the – push button until
the fan switches off.
18
Timer
It switches motor on
and increases the
speeds
The displayed
goes out shortly
afterwards.
Intensive Setting:
Maximum power is obtained at the
intensive setting. It is only required for
short intervals.
Keep pressed the + button until a
appears in the display.
If the intensive setting is not cancelled
by hand, the fan will automatically
switch back to step
after 10
minutes.
Fan follow on:
Press the
. button
The fan continues to run at step
10 minutes and at the same time a
dot flashes in the display. After this
period the fan switches off
automatically.
Lighting:
The light can be switched on at any
time, even though the fan is switched
on.
Remote control:
The remote control is set up by
the manufacturer. If the remote
control is not controlling motor or
light nearby the cooker hood,
please do the following.
Set up of the remote control.
Keep pressing the “+” button of
the remote control and then connect the
cooker hood, to confirm that the remote
control has been recognized a long beep
is issued. If you do not hear the acoustic
signal within 30 seconds, please repeat
the steps as described.
Functions of the remote control.
The +, -, and Light Push button have
the same functions as on the controls of
the hood.
: Push button has the same
The
function as the .
for

Interval Function:
A specific function of this appliance is the
Interval Function which consists in
activating the motor in automatic way 10
minutes each hour at the speed flashing in
the display.
This function can be activated on the
control of the hood or by remote control.
Interval Function by controls:
Keep pressing at the same time the O
and + push buttons, then release
them: the display will show the 1;
Keep pressing at the same time the +
push button, the display will show
the following for the speeds of the
motor 2→3→1→2 …;
Keep pressing at the same time the O
and + push buttons to confirm the
speed for the motor you wish for the
interval function.
Interval Function by remote control:
Keep pressing the
The display will show 1;
Keep pressing the + push button, the
display will show the following for the
speeds of the motor 2→3→1→2 …;
Press the
the speed of the motor for the interval
function.
When you are in the setting phase, if the
interval function shown is not confirmed
within some seconds, then you get out of
the setting mode for the interval function.
By pressing any push button, light
excluded, the interval function is excluded.
The remote control has a battery – When
the battery is exhausted you need to:
1. loosen the 2 screws on the rear part
and remove the cover.
2. take the battery out and replace it with
one with the same characteristics.
3. Close the cover again and tighten the
screws.
push button to confirm
: push button.
Follow National norms for waste disposal
of exhausted batteries.
19
Filters and maintenance
Grease filters:
Metal filters are used to trap the greasy
element of the vapours that develop
during cooking.
The filter mats are made from noncombustible metal.
Caution:
As the filter becomes more and more
saturated with grease, not only does the
risk of catching fire increase, but the
efficiency of the extractor hood can also
be adversely affected.
Important:
By cleaning the metal grease filters at
appropriate intervals, the possibility of
them catching fire as a result of a build-up
of heat such as occurs when deep-fat
frying or roasting is taking place, is
reduced.
Saturation indicator:
When the grease filters are saturated
flashes. If you switch the hood off, then
the acoustic signal is removed.
The grease filters should be cleaned
straight away.
Cleaning the metal grease filters:
In normal operation (1-2 hours daily)
the metal grease filter must be
cleaned 1x a month.
The filters can be cleaned in a dish
washer. It is however possible that
they become slightly discoloured.
The filters must be placed loosely and
NOT wedged in the dishwasher
Important: Metal filters that are
saturared with grease should not be
washed together with other dishes.
When clearing the filters by hand,
soak them in hot soapy water first of
20
all. Do not use aggressive, acidic or
caustic cleaners. Then brush the
filters clean, rinse them thoroughly
and leave the water to drain off.
Removing and installing the metal
grease filters:
Attention: the halogen bulbs must be
switched off and must have cooled down.
1. Follow the steps shown in the M
figures.
2. Depress the handles on the grease
filters and fold down the grease filters.
3. Clean the grease filters.
4. Re-install the cleaned grease filters.
5. Clearing the
Press 2x in succession the O
push button. An acoustic signal is
issued and the
out.
display.
display goes

Cleaning and care
Isolate the extractor hood by pulling
out the mains plug or switching off the
fuse.
Do not clean the extractor hood with
abrasive sponges or with cleaning agents
which contain sand, soda, acid or chlorine.
Clean the extractor hood with a hot
soap solution or a mild window
cleaner.
Do not scrape off dried-on dirt but
wipe off with a damp cloth.
When clearing the grease filters,
remove grease deposits from
accessibile parts of the housing. This
prevents the risk of fire and ensures
that the extractor hood continues
operating at maximum efficiency.
Note: do not use alcohol (spirit) on
plastic surfances, as dull marks may
appear.
Caution! Ensure that kitchen is
adequately ventilated. Avoid naked
flames.
Do not use aggressive, acid or caustic
cleaners.
Observe the warranty regulations in the
enclosed service booklet.
Clean the operating buttons with a
mild soapy solution and soft, damp cloth
only.
Do not use stainless-steel cleaner to clean
the operating buttons.
Stainless Steel surfances:
Use a mild non abrasive stainless
steel cleaner.
Clean the surface in the same
direction a sit has been ground and
polished.
Aluminium and plastic surfaces:
Do not use dry cloths.
Use a mild window cleaning agent.
21
Replacing the light bulbs
1. Switch off the extractor hood and pull
out the mains plug or switch off the
electricity supply at the fuse box
When switched on, the halogen bulbs
become very hot. Even for some time after
the bulbs have been switched off there is
stil a risk of burns.
2. Follows the steps shown in the L
Series for replacing the lamps.
3. Replace the damaged halogen light
bulb wth a new one with same
characteristics.
4. Plug the appliance into the mains or
switch it on at the fuse box.
Note: if the light does not function, check
that the bulbs have been inserted
correctly.
If you encounter a problem
If a
or appears in the display:
See “Filters and Maintenance“
Section.
If it is not possible to operate the
extractor hood:
Disconnect the extractor hood from
the mains electricity supply by pulling
out the plug or switching it off at the
main fuse box. Wait for approx. 1
Minute and then switch it on again.
If the lights of the lamps is weak when the
hood is in stand-by, then invert the plug
(invert phase with neutral).
If you have any questions or if a fault
occurs, please call Customer Service.
(see list of Customer Service
representatives).
When you call please quote the following:
E-Nr. FD
Enter the relevant numbers into the box
above. The E-Nr. (Product no.) and FD
(Production date) are shown on the
nameplace which can be seen inside the
extractor hood after the filter frame has
been detached.
The manufacturer of the extractor
hood accepts no liability for complaints
which can be attributed to the design
and layout of the pipework.
22
Avant de lire ce qui suit, veuillez déplier
les volets illustrés.
Remarques importantes
Les anciens appareils ne sont pas des
déchet sans valeur. Leur élimination
respectueuse de l’ environnement permet
de récupérer de précieuses matières
premières. Avant de vous débarrasser de
l’appreil, rendez-le inutilisable
Pour vous parvenir en parfait état,
votre nouvel appareil a été conditionné
dans un emballage qui le protège
efficacement. Tous les matériaux
d’emballage utilisés sont compatibles avec
l’environnement et recyclables. Aideznous à èliminer l’emballage en respectant
l’environnement.
Demandez à votre revendeur ou à
votre mairie quelles sont les formes de
recyclage actuellement possibles.
Cette hotte peut vacue l’air à
l’extérieur.
Fixez toujours la hotte bien centrée
au-dessus des foyers de la table de
cuisson.
L’écart minimum entre les foyers
électriques et le bord inférieur de la hotte
doit être de 550 mm, voir figures
Recommandation: 700mm.
Au-dessus d’un foyer à combustible
solide génératuer d’un risque d’incendie
(par projection d’etincelles par ex.) le
montage de la hotte ne sera admis que si
ce foyer est équipé d’un couvercle fermé
et inamovible et si le montage ne
contrevient pas à la réglementation
nationale. Cette restriction ne vaut pas
pour les cuisinières à gaz et les foyers aux
gaz.
.
condense et forme des gouttes sur la face
inférieure de la hotte.
Remarques supplémentaires
concernant le cuisinières à gaz:
Lors du montage de foyers gaz,
veuillez respecter les dispositions légales
en vigueur dans votre pays (en Allemagne
par example: les Règles techniques TRGI
régissant l‘installation du gaz).
Respectez les prescriptions et
consignes d’encastrement en leur version
applicable, publiées par les fabricants
d’appareils au gaz
La hotte aspirante ne pourra cotoyer
que sur un côté un meuble haut ou une
paroi haute. Ecart minimum: 50 mm.
Ecart minimum, en présence de foyers
au gaz, entre le bord supérieur de la grille
support et le bord inférieur de la hotte:
650 mm. (voir figures).
Recommandation: 700 mm.
Cet appareil est
marqué selon la directive
européenne 2002/96/CE
relative aux appareils
électriques usagés
(waste electrical and
electronic equipment
(WEEE).
La directive définit le
cadre pour une reprise et une
récupération des appareils usagés
applicables dans les pays de la CE.
.
Plus l’ecart est faible entre la hotte
aspirante et le foyer et plus il se pourra
que la vapeur montant des casseroles se
23
Avant le montage
Pour que la hotte aspirante ait le
meilleur rendement, veillez à ce que:
Le conduit d’évacuation soit court et
lisse.
Il y ait le moins possible de coudes.
Il y ait le plus fort diamètre et que les
coudes soient les plus arrondis
possibiles.
L’emploi de conduits d’air vicié
longs, rugueux, formant de
nombreux coudes ou d’un trop
petit diamètre fait descendre le
débit d’air en dessous du débit
optimal, tout en accroissant le bruit
d’aspiration.
Conduits de section ronde:
Nous recommandons des conduits au
diamètre intérieur de 150 mm.
Les conduits plats doivent avoir une
section intérieure équivalente au
diamètre intérieur des conduits ronds.
Les conduits ne doivent comporter
aucun coude prononcé.
Ø 150 mm ca. 177 cm
Si les conduits ont des diamètres
différents: utilisez du ruban adhésif à
étancher.
Si la hotte évacue l’air à l’extérieur,
veillez à ce que l’apport d’air soit
suffisant.
2
de section
entonnoir de la montée des buées de
cuisson avec inclination de ca 10 °ou
15°.
Préparation du plafond:
Le plafond doit être plat et horizontal.
Veuillez à ce que les chevilles soient
bien fixées.
Les chevilles ci-jointes conviennnent
pour fixer la hotte dans un
mur/plafond en bèton ou en pierre
naturelle.
Si le matériau constitutif du plafond
est différent, veuillez utiliser des
moyens de fixation appropriés.
Attention: la hotte est equipée avec de
materiaux standards pour le montage.
Le monteur doit verifier que les elements
de fixage sont appropriés aux parois et
aux plafonds trouvés.
La maison constructrice decline toute
responsabilité pour des endommegements
causés par de montage qui n’on pas eté
faits de manière correcte et/ou pour
l’utilisation de materiaux de montage pas
appropriés au plafond trouvè.
Pour le poids, voir les figures de la Série
M. Sous réserve de modification
constructives dans l’ intérêt du progrès
technique.
Branchement du conduit d’èvacuation
Ø 150 mm:
Fixez le conduit d’ évacuation
directement sur l’ orifice. Des conduits
plus pétits que 150 mm ne sont pas
confiants.
Avec une distance plus grande du
plan de cuisson, on a la reduction des
performances du debit d’ air. Pendant
la conception du montage et la pose,
il faut aussi considerer la forme à
24
Branchement électrique
La fiche mâle de la hotte aspirante ne
pourra être branchée que dans une prise
secteur à contacts de terre
réglementairement posée. Installer cette
prise autant que possible directement
derrière le capotage de la hotte de façon
que la fiche soit accessible.
Caractéristiques électriques:
Vous les trouverez après avoir retiré le
cadre pour filtre, sur la plaque
signalétique, à l’interieur de l’appareil.
Toujour mettre l’appareil hors tension
avant d’effectuer des réparations.
Longueur du cordon de branchement:
1,3 m.
Si le cordon doit être raccordé
definitivement au secteur:
Dans ce cas le branchement de la hotte
ne pourra être effectué que par un
èlectricien-installateur agrée auprès de la
compagnie locale/nationale distributrice d’
électricité.
Prevoir un dispositif de coupure côtè
secteur. Valent comme tel les
commutateurs dont l’ouverture entre
contacts dépasse 3 mm et qui sectionnent
tous les pôles. Figurent parmi eux
également les disjoncteurs et contacteurs.
Encastrement
La hotte aspirante ilôt est prevue pour
être installée au plafond de la cuisine ou à
un faux plafond stable.
L’ ècart minimum entre les foyer set la
hotte aspirante doit être de 550 mm pour
des foyers électriques et de 650 mm pour
des foyers à gaz.
Attention: veillez bien à ne pas
endommager les surfaces delicates, en
acier inoxydable.
Suivre les instructions de montage comme
montré dans les figures de la Série M.
Si le cordon d’alimentation de cet
appareil est endomagé, il faut confier son
replacement au fabricant ou à son service
après-vente, ou encore à une personne
possédant des qualifications identiques,
pour éviter de créer des risques.
Cet hotte aspirante est conforme aux
dispositions CEE sur l’antiparasitage des
appareils électriques.
25
Avant la première utilisation
Remarques importantes:
La présente notice d’emploi vaut pour
plusieurs versions de l’appareil. Elle
peut contenir des descriptions
d’accessoires ne figurant pas dans
votre appareil.
Cette hotte aspirante est conforme
aux dispositions de sécurité
applicables.
Les réparations ne doivent être
effectuées que par un spécialiste.
Des réparations inexpertes
s’assortissent de risques
considérables pour l’utilisateur.
Ne flambez aucun mets sous la hotte.
! Les flammes risqueraient d’atteindre le
filtre à graisse et d’y mettre le feu.
Lorsque les foyers sont allumés des
ustensiles de cuisson doivent toujours se
trouver dessus.
L’utilisation d’une hotte aspirante audessus d’un foyer à combustibile solide
(charbon, bois, etc.) n’est autorisée qu’ à
certaines conditions (voir la notice de
montage).
Si l‘appareil est endommagé, sa mise
en service est proscrite.
Le branchement et la mise en service
ne doivent être effectués que par un
spécialiste.
Cette hotte aspirante n’est destinée à
servir que pour couvrir les besoin d’un
ménage.
Ne faites marcher la hotte aspirante
qu’ à ampoules montées sur leur douille.
Remplacez immédiatement les
ampoules défectueuses pour empêcher
une surcharge des ampoules restantes.
26
N’ utilisez jamais la hotte aspirante
sans filtre à graisse.
Les graisses ou huiles surchauffées
peuvent s’enflammer facilement.
Par conséquent, surveillez toujours les
plats (frites par ex.) qui se préparent à
l’aide de matières grasses ou d’huiles.
Avant la première mise en service
nettoyez soigneusement la hotte
aspirante.
Si le cordon d’alimentation de cet
appareil a eté endommagé. Il faut confier
son remplacement au fabricant ou à son
service après vente, ou encore à une
personne possédant des qualifications
identiques, pour éviter de créer des
risques.
Ne poser aucun object sur la hotte
aspirante.
Eliminez les matériaux d’emballage
conformément à la réglementation (voir la
notice de montage).
Ne pas laisser des enfants jouer avec
l’appareil.
Ne jamais laisser des adultes ou des
enfants se servir de l’ appareil sans
surveilance
- s’ils ne sont pas en mesure de le faire
pour des raisons physiques, sensorielles
ou mentales.
- Ou bien s’ils ne possèdent ni les
connnaissances ni l’ expérience
nécessaires pour utiliser l’appareil de
manière correcte et sûre.
Tables de cuisson au gaz/Cuisinières à
gaz.
Ne faites jamais marcher tous les
foyers au gaz en même temps et à pleine
puissance pendant assez longtemps (15
minutes max.) sinon vous risquez de vous
brûler en touchant la surface du corps de
la hotte, ou d’endommager carrément
cette dernière. Si la hotte doit marcher audessus d’ une table de cuisson au gaz ,
faites simultanément marcher la hotte à la
puissance d’aspiration maximale si Vous
avez allumé trois foyers ou plus.
Rappelez-vous que la puissance d’ un
grand brûleur de plus de 5 KW
( Wok )représente celle de 2 brûleurs
gaz normaux.
Ne faites jamais marcher un foyer gaz
sans avoir posé d’ustensile de cuisson
dessus. Ajustez la flamme de telle sorte
qu’ elle ne dépasse pas le bord
inférieur de l’ustensile de cuisson.
Lisez attentivement la présente notice
d’emploi avant d’utiliser votre appareil
pour la première fois. Elle contient
des informations importantes non
seulement pour votre sécurité mais
aussi pour l’utilisation et l’entretien de
l’appareil.
Rangez la présente notice d’ emploi
soigneusement pour pouvoir la
remettre à un futur propriétaire de
l‘appareil.
Utilisation de la hotte
aspirante
Evacuation de l’air à l’extérieur Figures
de la Série M.
Le ventilateur de la hotte aspire les
buées de cuisson qui traversent un
filtre à graisse avant de regagner l’
atmosphère extérieure.
Ce filtre retient les particules grasses
solides en suspension dans les buées
de cuisson .
Les particules grasses ne se
déposent plus dans la cuisine, les
odeurs de cuisson disparaissent.
L’air vicié est évacué vers le haut par un
conduit d’aération ou directement à l’air
libre par traversée du mur extérieur.
) L’air vicié ne doit jamais être evacué
vers une cheminée en service, rejetant
des fumes ou des gaz de combustion, ni
vers un conduit servant à l’aeration de
locaux dans lesquels se trouvent des
foyers à combustibles solides, liquides et
gazeux.
Le mode d’evacuation de l’air vicié
devra être conforme aux arrêtés
municipaux, préfectoraux, et aux
presciptions légales (par. ex. aux
ordonnances publiques applicables au
bâtiment).
Si l’air vicié doit être évacué par de
cheminées d’ evacuation des fumées et
gaz de combustion qui ne sont pas en
service, veuillez respecter la
réglementation locale et nationale
applicable.
) Si la hotte évacue l’air à l’exterieur et
si le logement comporte des moyen de
chauffage (tels par ex. des appareils de
chauffage au gaz, au fuel ou au charbon,
chauffe-eau instantanés ou à
accumulation) raccordés à une
cheminée, veiller impèrativement à ce
que l’apport d’air soit suffisant pour
assurer la marche du chauffage à
combustion.
Un fonctionnement sans risque est
possible si la depression dans le local où
le foyer de chauffage est implanté ne
depasse pas 4 Pascals (0,04mbar).
On y parvient en presence d’ouvertures
non obturables ménagées par ex. dans
les portes, fenêtres et en association avec
des ventouses télescopiques
d’admission/evacuation de l’air à travers la
maçonnerie ou par d’ autre mesures
techniques telles qu’ un verrouillage
réciproque ou assimilé
d’affluer pour assurer la combustion.
permettant à l’air
27
En cas d’afflux d’air insuffisant, risque
r
d’intoxication par réaspiration des gaz
de combustion.
La présence d’ une ventouse télescopique
d’ apport et d’évacuation d’air ne suffit pas
à assurer le respect de la valeur limite.
Remarque: lors de l’evaluation de la
situation, toujours tenir compte de
l’ensemble des moyens d’aeration du
logement. Cette règle ne vaut
généralement pas si vous utilisez des
appareils de cuisson (table de cuisson et
cuisinière à gaz).
Si l’air vicié traverse le mur extérieur,
utilisez une ventouse tèlescopique.
Utilisation de la hotte
aspirante
Pour activer les fonctions, il suffit d’
effleurer brièvement les touches. Si vous
appuyez trop longtemps sur les touches,
aucune function ne s’ active.
La méthode la plus efficace pour
supprimer les buées de cuisson consiste
à:
Enclencher la hotte aspirante
en début de cuisson.
Eteindre la hotte aspirante
quelques minutes seulement après la
fin de la cuisson
Lumière
Hors du
ventilateur
Indication des
vitesses
Il fait diminuer les
vitesses
Poursuite de
marche du
ventilateu
Il enclenche le
ventilateur et augmente
les vitesses
Signale sonore
Lorsque vous appuyez sur une
touche, un signal sonore retentit à
titre de confirmation.
Enclenchement du ventilateur
Appuyez sur la touche +.
Réglage du ventilateur sur la vitesse
désirée
Appuyer sur la touche +.
Le ventilateur passe au gradin de
vitesse immédiatement supérieur.
Appuyer sur la touche -.
Le ventilateur passe au gradin de
vitesse immédiatement inférieur.
Coupure du ventilateur
Appuyer sur la touche O.
Ou
Appuyer sur la touche – autant de fois
que nécessaire à ce que le ventilateur
s’eteigne.
La mention
s’ éteint au bout d’ un
temps bref.
Ventilation intensive:
Au niveau intensif, le ventilateur
développe sa plus grande puissance.
Vous n’ en aurez que brièvement besoin.
Appuyez sur la touche + autant de
fois que nécessaire à ce que la lettre
s’ affiche.
Si vous n’ éteignez pas manuellement
la ventilation intensive, le ventilateur
revient automatiquement à la vitesse
au bout de 10 minutes.
Poursuite de marche du ventilateur
Appuyez sur la touche
Le ventilateur tourne 10 minutes à la
vitesse , un point clignote à l’
affichage. Ensuite le ventilateur s’
eteint automatiquement.
.
28
Eclairage
Vous pouvez utiliser l ‘éclairage à tout
moment, mème quand le ventilateur
est éteint.
Télécommande
La programmation du
télécommande est faite par le
producteur. Si le télécommande
ne controle pas le moteur et les
lumières près de la hottes, prière
de faire ce qui suit.
Programmation du
télécommande
Continuer à appuyer sur la touche “+” du
télécommande et ensuite brancher la
hotte. Pour confirmer que le
télécommande a eté reconnu, un biep
prolongé est emis. Si le signal sonore n’
est pas entendu dans les 30 secondes
répétez à nouveau la procédure.
Fonctions du télécommande
Les touches +, -, et la lumière ont les
mème fonctions que dans les controles.
La touche
touche .
Fonction d’intervalle
Specifique dans cet appareil nous avons
la fonction d’ interval qui consiste dans
l’activation automatique du moteur 10
minutes chaque heure à la vitesse qui
clignote dans le display.
Cette fonction peut être activée par les
boutons ou par le télécommande.
Activation de la fonction intervalle par
les controles:
Appuyez en mème temps sur les
touche O et + et puis relâcher les
boutons: le numero 1 s’ affiche dans
le display;
En appuyant sur la touche +, le
display va montrer la séquence
: a la mème fonction que la
suivante pour les vitesses du moteur
2→3→1→2 …;
Appuyer en mème temps sur les
touches O et + pour confirmer la
vitesse à laquelle le moteur doit
fonctionner à la fonction intervalle.
Activation de la fonction intervalle par
le télécommande:
Appuyez sur la touche
1 va s’ afficher sur le display
En appuyant sur la touche +, le
display va montrer la séquence
suivante pour les vitesses du moteurs
2→3→1→2 …;
Appuyer sur la touche pour
confirmer la vitesse à laquelle le
moteur doit fonctionner à la fonction
intervalle.
Pendant la programmation, si l’on ne
confirme pas la fonction intervalle montrée
dans quelques seconde, l’on sort de la
modalité de programmation de la fonction
intervalle.
En appuyant sur toute touche, sauf la
lumière, la fonction intervalle est exclue.
Le télecommande a une batterie.
Quand la batterie est epuisée il faut:
1. Enlever les deux vis dans la partie
posterieure et demonter le couvercle.
2. Extraire la batterie et la remplacer
avec une nouvelle qui a les même
characteristiques.
3. Remonter le couvercle et fermer les
vis.
Suivre les normes nationales pour la mise
à côtè des batteries epuisées.
: Le numero
29
Filtres et entretien
Filtres à graisse:
Vous pouvez utiliser des filtres métalliques
pour retenir les particules grasses en
suspension dans les buées de cuisson.
Ces nattes filtrantes sont en métal
incombustible.
Attention:
Plus elles se saturent en particules
grasses et plus elles risquent de
s’enflammer.
D’autre part, leur saturation risque de
gêner le bon fonctionnement de la hotte.
Important:
Prévenez tout risque d’ incendie en
nettoyant à temps les filtres à graisse en
métal.
Ce risque est dû à l’accumulation de
chaleur pendant la friture ou le rôtissage.
Indicateur de saturation:
Lorsque les filtres à graisse sont saturés,
la mention
signal sonore, éteignez le ventilateur.
Vous deve nettoyer les filtres à graisse au
plus tard à ce stade de saturation.
Nettoyage de filtres à graisse en mètal.
En service normale (1-2 heures par
jour) il faudra nettoyer les filtres à
graisse métalliques 1 fois par mois.
Ces filtres sont nettoyable au lave-
vaisselle – ils peuvent changer
légèrement de couleur au lavage.
Le filtre doit reposer non serré dans le
lave-vaisselle. Il ne doit pa être
coincé.
Important:
Ne lavez pas en même temps la
clignote . Pour arrêter le
vaisselle et le filtres métalliques
fortement saturés en matière grasse.
Si Vous les nettoyez à la main,
mettez les filtres à tremper pendand
plusieurs heures dans de l’ eau très
chaude additionnée de produit à
vaisselle.
N’utilisez pas de détergents
aggressifs contentant un acide ou
une base.
Ensuite, brossez les filtres, rincez-les
bien puis laissez-les goutter.
Demontage et Montage des filtres
métalliques à graisses:
Attention: les ampoules halogènes
doivent être éteintes et avoir eu le temps
de refroidir.
1. Suivres les phases des figures de la
série M.
2. Enfoncez les poignées des filtres à
graisses puis basculez les filtres vers
le bas.
3. Nettoyer les filtres à graisses.
4. Une fois nettoyés, remettez les filtres
à graisse en place.
5. Effacez le contenu de l’ affichage
.
Appuyez 2 fois de suite sur la
touche O. Un signal sonore
retentit et le contenu de l’
affichage s’ éteint.
30

Nettoyage et entretien
Avant tout nettoyage et entretien,
mettez d’ abord la hotte hors tension
en débranchant la fiche mâle de la
prise de courant ou en coupant le
disjoncteur/fusible.
Ne nettoyez pas la hotte aspirante à
l’aide d’éponges à dos récurant. N’utilisez
pas non plus de produits de nettoyage
contenant du sable, de la soude, de
l’acide ou du chlrorure.
Pour la nettoyez, utilisez de l’eau
chaude additionnée de produit à
vaisselle ou non liquide non agressif à
laver les fenêtres.
Ne tentes pas de gratter les
salissures. Ramollissez-les avec un
essuie-tout humite.
Lors du nettoyage des filtres à
graisse, nettoyez la graisse qui‘ est
déposée dans les endroits accessibile
du corps de la hotte. Vous prévenez
ainsi les risques d’ incendie et
garantissez ainsi un fonctionnement
optimal de la hotte.
Remarque: ne nettoyez pas les
surfaces en plastique avec de l’alcool
(à brûler) car des taches mates
pourraient apparaître.
Prudence! Ventilez suffisamment la
cuisine, n’utilisez jamais de flamme
nue.
Surface en acier inox:
Veuillez utiliser un produit pour l’ acier
inox qui le nettoie sans le rayer.
Frotter toujours l’ acier inox dans le
sens de son polissage.
Surface en aluminium et en plastique:
N’utilisez pas de chiffons secs.
Utilisez un produit pour vitres mais
non aggressif.
N’utilisez pas de détergents
aggressifs contenant un acide ou une
base.
Respectez les conditions de garantie
figurant dans le cahier de service joint.
Ne nettoyez les touches de
commande qu’ avec de l’eau additionnée
d’un peu de produit à vaisselle. Utilisez un
chiffon doux et humide.
N’utilisez jamais de détergent pour acier
pour nettoyer les touches de commande.
31

Changer les ampoules
halogènes
1. Mettez la hotte hors tension en
débranchant la fiche mâle de la prise
de courant ou en coupant le
disjoncteur/fusible.
Les ampoules halogène allumées
deviennent très chaudes. Le risque de
vous brûler demeure, même un moment
après les avoir éteints.
2. Suivres les phases indiquées dans
les figures de la série L pour changer
les ampoules halogenes.
3. Remplacer l’ ampoule halogène avec
une nouvelle ayant les mêmes
characteristiques.
4. Pour remettre la hotte sous tension,
rebrancher la fiche mâle dans la prise
de courant ou remontez le
fusible/réarmez le disjoncteur.
Remarque: si l’èclairage ne fonctionne
pas, contrôlez si les ampoules sont
correctement enfoncées.
Dérangement
Si
ou apparaît à l’ indicateur:
Voir la section intitulée “Filtre et
entretien”.
Si les touches de la hotte aspirante
restent inopérantes:
Débranchez pendant une minute
environ la fiche mâle de la hotte
aspirante ou retirez le fusible pour la
mettre hors tension. Ensuite,
réenclenchez la hotte.
Se les lumières sont allumées de façon
faible quand la hotte est en stand-by,
intervertir la fiche (phase avec neutre).
Si Vous avez des questions à poser ou en
cas de dèrangement, appeler s.v.p. le
service apres vente (voir la liste des
agences du service après vente).
Lors de Votre appel, veuillez mentionner
les numeros suivants:
E-Nr. FD
Inscrivez les numéros correspondants de
votre hotte dans le cadre ci-dessus. Ces
numéros se trouvent à l’intérieur de
l’appareil, sur la plaque signalétique
accessible une fois la grille de filtre retirèe.
Si des réclamations résultent de la
conception et de la pose de la
conduite,le fabricant de la hotte
aspirante décline toute garantie.
32

Klap voor het lezen, de pagina’s met de
afbeeldingen naar buiten.
Belanrijke voorschriften
Oude apparaten zijn geen waardeloos
afval. Door een milieubewuste afvoer
kunnen waardevolle materialen opnieuw
worden gebruikt. Maak het oude apparaat
onbruikbaar voordat u het afvoert
Uw nieuwe apparaat wordt tijdens het
vervoer beschermd door de verpakking.
Alle gebruikte materialen zijn
milieuvriendelijk en kunnen opnieuw
worden gebruikt. Lever uw bijdrage door
de verpakking milieubewust af te voeren.
Informeer bij uw vakhandel of bij de
gemeente naar de beste manier om ow
oude apparaat en de verpakking af te
voeren.
De wasemafzuigkap is geschikt voor
gebruik met luchtafvoer
.
De wasemafzuigkap altijd boven het
midden van het fornuis aanbrengen.
Minimumafstand tussen elektrische
kookzones en de onderkant van de
wasemafzuigkap: 550 mm. (zie afb.).
Advies: 700 mm.
Boven een fornuis voor vaste
brandstoffen waarvan brandgevaar kan
uitgaan (bijvoorbeeld door vonken) is de
montage van de wasemafzuigkap alleen
toegestaan als het fornuis een gesloten,
niet verwijderbare afscherming heeft en
de voor het desbetreffende land geldende
voorschriften in acht worden genomen.
Deze beperking geldt niet voor
gazfornuizen en gasplateaus
.
.
Extra voorschriften bij gaskookapparatuur:
Bij de montage van gaskoozones
moeten de geldende wettelijke nationale
voorschriften (bijv. In Duitsland:
Technische regels gasinstallatie TRGI) in
acht worden genomen.
De geldende inbouwvoorschriften en
de aanwijzingen van de fabrikant van het
gasfornuis moeten in acht worden
genomen.
Slechts aan één zijde van de
wasemafzuigkap mag zich na de inbouw
een hoge kast of hoge wand bevinden.
Afstand minstens 50 mm
Bij gaskoozones betraagt de
minimumafstand tussen de bovenkant van
de pandrager en de onderkant van de
afzuigkap: 650 mm. (zie afb.).
Advies: 700 mm.
Dit apparat is
gekenmerkt in
overeenstemming met de
Europese richtlijn
2002/96/EG betreffende
afgedankte elektrische en
elektronische apparatuur i
(waste electrical and
electronic equipment
(WEEE). De richtlijn geeft het kader aan
voor de in de EU geldige terugneming en
verwerking van oude apparaten.
Hoe kleiner de afstand tussen
wasemafzuigkap en branders is, hoe
groter de mogelijkheid is dat zich door
opstijgende waterdamp onder aan de
wasemafzuigkap druppels kunnen
vormen
.
33

Voor de montage
Optimaal vermogen van de wasemafzuigkap:
Korte, gladde luchtafvoerpijp.
Zo min mogelijk bochten.
Zo groot mogelijke buisdiameter en
grote bochten.
Gebruik van lange, ruwe
luchtafvoerbuizen veel
buisbochten of kleine
buisdiameters vermindert de
afzuigcapaciteit en veroorzaakt
bovendien hardere geluiden.
Ronde buizen:, wij adviseren een
inwendige diameter van 150 mm.
Platte kanalen moeten een gelijk-
waardige inwendige diameter als
ronde buizen hebben. Ze dienen
geen scherpe bochten te hebben.
Ø 150 mm ca. 177cm
Bij afwijkende buisdiameters:
dichtstrips gebruiken.
Bij gebruik van de wasemafzuigkap
met luchtafvoer moet voor
voldoende luchttoevoer worden
gezorgd.
Aansluiting luchtafvoerpijp Ø 150 mm:
Luchtafvoerpijp rechtstreeks aan de
luchtaansluiting bevestigen.
Luchtavoerleidingen meet een
diameter kleiner dan 150 zijn niet
toegestaan .
Als de afstand tot de kookplaat groter
wordt, dan daalt de afzuigcapaciteit van
de afzuigkap.
Attentie: bij de planning van de ophanging
rekening houden met het opstijgen van de
kookdampen in trechtervorm met een
afbuiging van ca 10° tot 15°.
2
Vorbereiden van het plafond.
Het plafond moet vlak en recht zijn.
De pluggen moeten stevig vastzitten.
De meegeleverde pluggen zijn
geschikt voor beton en natuursteen.
Bij ander plafondmateriaal moeten
daarvoor geschikte bevestigingsmiddelen worden gebruikt.
Attentie: de schouwkap word met
standaard bevestigingselementen
geleverd. De monteur dient zich ervan te
verzekeren, dat de bevestigingselementen
voor het aanwezige plafond geschikt zijn.
Voor schade die verband hebben met
onjuiste installatie en/of het gebruik van
ongeschikte bevestigingselementen zijn
wij niet aansprakelijk.
Voor het gewicht zie afbeelding M
Constructiewijzigingen in het kader van
technische verbeteringen voorbehouden.
34

Elektrische aansluiting
De wasemafzuigkaap mag alleen worden
aangesloten aan een volgens de
voorschriften geïnstalleerd, geaard
stopcontact.
Het geaarde stopcontact indien moegelijk
vlak achter de schoorsteenafscherming op
het plafond aanbrengen.
Elektrische gegevens:
Staan op het typeplaatje in de
binnenruimte van het apparaat vermeld en
zijn zichtbaar als het filterframe wordt
afgenommen.
Bij reparaties moet de
wasemafzuigkap altijd stroomloos worden
gemaakt.
Lengte van de aansluitkabel: 1,3 m.
Als vaste aanslluiting nodig is:
De wasemafzuigkap mag uitsluidend door
een erkende installateur worden
aangesloten.
In de installatie moet een scheidingsvoorziening worden aangebracht. Als
scheidingsvoorzieningen gelden
schakelaars met een contactopening van
meer dan 3 mm en uitschakeling met alle
pollen.
Daarbij horen aardlekschakelaars en
veiligheidsschakelaars.
Inbouwen
De Plafond- wasemafzuigkap is
bedoeld voor montage op een
keukenplafond of op een stevig
verlaagd plafond-
Zorg bij elektrische kookzones voor en
minimumafstand van 550 mm en bij
gaskookzones voor een minimumafstand
van 650 mm tussen de kookzone en de
afzuigkap.
Attentie: Het gevoelige roestvrijstalen
oppervlak niet beschadigen.
Voor het inbouwen van de afzuigkap zie
afbeelding M.
Als de elektriciteitskabel van het
apparaat beschadigt raakt, moet deze
worden vervangen door de klantenservice
van de fabrikant of door een
gekwalificeerd vakman, om gevaren te
voorkomen.
Deze wasemafzuigkap voldoet aan de
EG-bepalingen voor radio-ontstoring.
35

Voor het eers gebruik
Belangrijke aanwijzingen:
Deze gebruiksaanwijzing geldt voor
verschillende uitvoeringen van het
apparaat. Het is mogelijk dat er een
aantal kenmerken worden
beschreven die niet van toepassing
zijn op uw apparaat.
Deze afzuigkap voldoet aan de
geldende veiligheidsvoorschriften.
Reparaties mogen uitsluitend worden
uitgevoerd door een vakman.
Door ondeskundige reparaties
kunnen aanzienlijke gevaren voor
de gebruiker ontstaan.
Oververhit vet en olie is gemakkelijk
ontvlambaar. Daarom gerechten met vet
of olie, b.v. patates frites, alleen onder
toezicht toebereiden.
De afzuigkap voor het eerste gebruik
zorgvuldig reinigen.
Geen voorwerpen ob de afzuigkap
zetten.
Als de aansluitkabel van dit apparaat
beschadigd raakt, moet deze worden
vervangen door de fabrikant, diens
klantenservice of een andere
gekwalificeerde vakman, om gevaren te
voorkomen.
Verpakkingsmateriaal volgens de
voorschriften afvoeren (zie het montagevoorschrift).
Onder de afzuigkap niet flamberen.
! Brandgevaar bij het vetfilter door
opstijgende vlammen.
De kookzones moeten altijd bedekt
zijn met pannen.
Boven een fornuis voor vaste
brandstoffen (steenkool, hout, e.d.) is het
gebruik van de afzuigkap alleen beperkt
toegestaan (zie montagevoorschrift).
Indien het apparaat beschadigd is,
mag u het niet in gebruik nemen.
Aansluiting en ingebruikneming mogen
alleen door een vakman worden
uitgevoerd.
Deze afzuigkap is uitsluitend bedoeld
voor huishoudelijk gebruik.
Afzuigkap uitsluitend met
ingeschroefde lampen gebruiken.
Defecte lampen dienen onmiddellijk
vervangen te worden om overbelasting
van de overige lampen te voorkomen.
Afzuigkap nooit zonder vetfilter
gebruiken.
36
Geen voorwerpen op de afuzuigkap
zetten,
Laat kinderen niet met het apparaat
spelen.
Volwassenen en kinderen mogen het
apparaat nooit zonder toezicht in gebruik
nemen:
- wanneer zij lichamelijk, zintuiglijk of
mentaal niet in staat zijn;
- of bij gebrek aan kennis en ervaring om
het apparaat op een juiste en veilige wijze
te bedienen.
Gaskookplaten/gasfornuizen
Gebruik niet alle gaskookzones
tegelijk langdurig (max. 15 minuten) op de
hoogste stand, anders bestaat er kans op
brandwonden bij aanraking van de
oppervlakken van de behuizing en gevaar
van beschadiging van de afzuigkap.
Bij gebruik van de afzuigkap boven een
gaskookplaat waarvan gelijktijdig drie of
meer gaskookzones worden gebruikt,
moet de afzuigkap op de maximumstand
worden gezet.

Denk eraan dat een grote brander met
meer dan 5 Kw (WOK) overeenkomt
met het vermogen van twee
gasbranders.
Vlammen van gaskookapparatuur
moeten altijd met een pan zijn afgedekt.
Regel de vlam zodanig dat hij niet
buiten de panbodem uitkomt.
Lees de gebruiksaanwijzing
zorgvuldig voordat u het nieuwe
apparaat gebruikt. Ze bevat
belangrijke informatie voor uw
veiligheid en voor het gebruik en het
onderhoud van het apparaat.
Bewaar de gebruikaanwijzing en het
montagevoorschrift zorgvuldig,
eventueel voor een volgende bezitter
van het apparaat.
Gebruiksmogelijkheden
Gebruik met luchtafvoer (zie afbeelding
M).
De ventilator van de afzuigkap zuigt
de keukenwasem aan en leidt deze
via het vetfilter naar buiten.
Het vetfilter neemt de vaste
bestanddelen van de keukenwasem
op.
De keuken blijft in grote mate vrij van
vet en reuk.
De afvoerlucht wordt via een
afvoerschacht naar boven of rechtstreeks
door de buitenmuur naar buiten geleid.
) De afvoerlucht mag niet worden
afgevoerd via een in gebruik verkerende
rook – of afvoergasschoorsteen of via een
schacht die dient voor de ventilatie van
ruimten waarin stookinstallaties zijn
opgesteld
Bij de afvoer van afvoerlucht moeten
de officiële en wettelijke voorschriften
(bijv. nationale bouwvoorschriften)
worden nageleefd.
.
Als de lucht wordt afgevoerd via een in
gebruik verkerende rook-of
afvoergasschoornsteen moet de
toestemming van de bevoegde instantie
worden verkregen.
) Als de wasemafzuigkap wordt
gebruikt met luchtafvoer en
tegelijkertijd schoorsteenafhankelijke
stook-installaties worden gebruikt
(zoals gas, olie- of kolenstookapparaten,
geisers, warmwaterbereidingsapparaten)
moet voor voldoende aanvoer van lucht
worden gezorgd, die nodig is voor de
vebranding.
Gebuik zonder gevaar is mogelijk als de
onderdruk van 4 Pa (0,04 mbar) in de
opstellingsruimte van de stookinstallatie
niet wordt overschreden.
Dit kan men bereiken wanneer er door niet
-afsluitbare openingen, bijv. in deuren,
ramen en d.m.v. luchtaanvoer/luchtafvoersleuven in de muur of door
andere technische maatregelen, zoals,
wederzijdse vergrendeling e.d.,
verbrandingslucht kan toestromen.
Wanner er onvoldoende lucht wordt
aangevoert, bestaat er
vergiftingingsgevaar door
teruggezogen verbrandingsgassen.
Alleen een muurkast voor luchttoevoer en
luchtafvoer is geen waarborg voor het
aanhouden van de grenswaarde.
Opmerking: bij de beoordeling moet altijd
de complete ventilatie van de woning in
acht worden genomen. Bij het gebruik van
kookapparatuur, bijvoorbeeld kookplateau
en gasfornuis, wordt deze regel niet
goegepast.
Als de afvoerlucht door de buitenmuur
wordt geleid, moet een telescoop-
muurkast worden gebruikt.
37

Bedienen van de
r
wasemafzuigkap
Om de functies te activeren, hoeft
men allen de toetsen kort aan te
raken.Wanneer de toetsen te lang
worden ingedrukt, wordt er geen functie
geactiveerd.
De keukenwasem wordt op de
doeltreffendste manier verwijderd door.
Inschakelen van de afzuigkap
bij het begin van het koken.
Uitschakelen van de afzuigkap
pas enkele minuten na het einde van
het koken.
verlichting
zet de
ventilator uit
weergave
snelheid
ventilato
zet de ventilator
zachter
Signaal:
Bij het indrukken van een toets klinkt
een signaal ter bevestiging.
Ventilator inschakelen:
Druk op de toets +.
Gewenste ventilatorstand instellen:
Druk op de toets +.
De ventilator wordt een stand hoger
ingesteld.
Druk op de toets -.
De ventilator wordt een stand lager
ingesteld.
Ventilator uitschakelen
Druk op de toets O.
Of
uitlopen
ventilator
zet de ventilator
aan/sterker
Druk op de toets – een aantal keren
in totdat de ventilator wordt
uitgeschakeld.
De indicatie O gaat na korte tijd uit.
Intensieve Stand:
Met de intensieve stand wordt het hoogste
vermogen bereikt. Dit is voor korte tijd
nodig.
Druk op de toets + een aantal keren
in totdat de aanduiding Intensieve
Stand gaat branden.
Als de intensieve stand niet met de
hand wordt uitgeschakeld, wordt de
ventilator na 10 minuten automatisch
naar stand
teruggeschakeld.
Uitlopen van de ventilator
Druk op de toets
.
De ventilator loopt 10 minuten in
stand , daarbij knippert er een punt
als indicatie. Daarna wordt de
ventilator automatisch uitgeschakeld.
Verlichting:
De verlichting kan op elk moment
worden gebruikt, ook als de ventilator
is uitgeschakeld.
Afstandsbediening
De programmering van de
afstandsbediening wordt door de
fabrikant gedaan. Indien de
afstandsbediening niet de motor
en/of de verlichting in de
nabijheid van de afzuigkap
bestuurt, ga dan als volgt te
werk.
Programmering afstandsbediening
Houd de toets “+” op de
afstandsbediening ingedrukt en sluit
vervolgens de afzuigkap aan. Ter
bevestiging hoort u een lang
geluidssignaal. Als u dit niet binnen 30
seconden hoort, dient u deze stappen te
herhalen.
38

Functies van de afstandsbediening
De toetsen +, -,
dezelfde functie als die van de bediening
op de kap.
Toets : heeft dezelfde functie als de
toets .
Intervalfunctie
Een speciale functie van dit apparaat is de
intervalfunctie, waarmee de ventilatie
automatisch ieder uur 10 minuten wordt
ingeschakeld met de snelheid die knippert
op het display.
Deze functie kan geactiveerd worden met
de toetsen op de kap of met de
afstandsbediening.
Activering intervalfunctie met de
toetsen op de kap:
druk tegelijkertijd de toetsen O en + in
en laat ze los: het display geeft 1 aan;
als u op de toets + drukt, geeft het
display de volgende sequentie aan
voor de snelheden van de ventilator
2→3→1→2 …;
druk tegelijkertijd de toetsen O en + in
om de snelheid te bevestigen
waarmee de ventilator in de
intervalfunctie moet werken.
Activering intervalfunctie met de
afstandsbediening:
druk de toets
1 aan;
als u op de toets + drukt, geeft het
display de volgende sequentie aan
voor de snelheden van de ventilator
2→3→1→2 …;
druk de toets in om de snelheid te
bevestigen waarmee de ventilator in
de intervalfunctie moet werken.
Als tijdens het programmeren de
weergegeven intervalfunctie niet binnen
enkele seconden wordt bevestigd, verlaat
en verlichting hebben
in: het display geeft
u de programmeringsmodus van de
intervalfunctie.
Door op een willekeurige toets te drukken,
behalve die voor de verlichting, wordt de
intervalfunctie gedeactiveerd.
De afstandsbediening werkt op een
batterij. Wanneer deze leeg is dient u:
1. De twee schroeven op de achterkant
los te draaien en het klepje te
verwijderen.
2. De batterij te vervangen door een
nieuwe van hetzelfde type.
3. Het klepje terug te plaatsen en de
schroeven aan te draaien.
Neem de nationale regels in acht voor de
inzameling en recycling van lege
batterijen.
39

Filter en onderhoud
Vetfilters:
Voor de opname van de vettige
bestand-delen van de keukenwasem
worden metalen vetfilters gebruikt.
De filtermatten bestaan uit onbrandbaar
materiaal.
Let op:
Bij toenemende verzadiging met
vethoudende resten neemt de
ontvlambaarheid toe en kan de werking
van de wasemafzuigkap nadelig worden
beïnvloed.
Belangrijk:
Het op tijd reinigen van de metalen
vetfilters voorkomt brandgevaar dat kan
ontstaan door ophoping van warmte
tijdens het frituren of braden.
Verzadigingsaanduiding:
Bij verzadiging van de vetfilters gaat
indicatie
Bij uitschakeling van de ventilator wordt
ook het signaal uitgeschakeld.
Uiterlijk dan moeten de vetfilters worden
gereinigd.
Reiniging van de metalen vetfilters:
Bij normaal gebruik (dagelijks 1 tot 2
De filters kunnen worden gereinigd in
Als de filters met de hand worden
40
branden en klikt een signaal.
uur) moeten de metalen vetfilters 1 x
per maand worden gereinigd.
de vaatwasmachine. Daarbij is een
lichte verkleuring mogelijk.
Belangrijk:
Zeer verzadigde vetfilters niet samen
met vaatwerk reinigen.
gereinigd, moeten deze eerst in een
heet sopje worden gezet om het vuil
los te weken.
Gebruik geen agressieve, zuur- of
looghoudende reinigingsmiddelen.
Daarna afborstelen, goed
schoonspoelen en laten afdruipen.
Demonteren en monteren van de
metalen vetfilters:
Attentie: De halogeenlampen moeten
uitgeschakeld en afgekoeld zijn.
1. Volg wat op afbeelding M wordt
aangegeven.
2. Druk de handgrepen van de vetfilters
omlaag en klap de vetfilters omlaag.
3. Reinig de vetfilters.
4. Breng de gereinigde vetfilters weer
aan.
5. Wis de indicatie
Druk 2 x achter elkaar op de
toets O.
Er klinkt een signaal en de
indicatie
.
gaat uit.

Reiniging en onderhoud
Wasemafzuigkap stroomloos maken
door de stekker uit het stopcontact te
trekken of de zekering uit te schakelen.
De wasemafzuigkap niet reinigen met
schuursponsjes of met zand-, soda-, zuur
of chloorhoudende schoonmaakmiddelen!
Gebruik voor het reinigen van de
wasemafzuigkap een heet sopje of
een mild schoonmaakmiddel voor het
reinigen van ruiten.
Vastgekoekt vuil niet loskrabben,
maar losweken met een vochtige
doek.
Als de vetfilters worden gereinigd,
moet vetaanslag van de bereikbare
delen van het huis worden verwijderd.
Daardoor wordt brandgevaar
voorkomen en blijft de optimale
werking in stand.
Let op: alcohol (spiritus) gebruiken
op kunststof oppervlakken, er kunnen
doffe plekken ontstaan.
Voorzichtig: Keuken voldoende
ventileren, geen open vuur gebruiken.
Gebruik een mild
glasreinigingsmiddel.
Gebruik geen agressieve, zuur of
looghoudende reinigingsmiddelen.
Neem de garantievoorwaarden in het
bijgevoegde serviceboekje in acht.
De bedieningstoetsen alleen reinigen
met een mild afwasmiddel en een zachte
vochtige doek.
Geen edelstaalreiniger gebruiken voor de
bedieningstoetsen.
Edelstalen oppervlakken:
Gebruik een milde, niet-schurende
edelstaalreiniger.
reinig alleen in de slijprichting.
Aluminium, gelakte en kunststof
oppervlakken:
Geen droge doeken gebruiken.
41

Lamp vervangen
1. Schakel de wasemafzuigkap uit en
maak het apparaat stroomloos door
de stekker uit het stopcontact te
trekken of de zekering uit de
schakelen.
De halogeengloeilampen worden zeer
heet tijdens het gebruik. Ook nadat ze zijn
uitgeschakeld bestaat er nog enige tijd
verbrandingsgevaar.
2. Volg de stappen van afbeelding L om
de lampen te verwisselen.
3. Vervang de halogeenlamp-
4. Herstel de stroomtoevoer door de
stekker in het stopcontact te steken of
de zekering in te schakelen.
NB: Controleer of de lampen goed zijn
aangebracht als de verlichting niet goed
werkt.
Storingen
Wanneer op de indicatie een
:
Zie de paragraaf “Filters en
onderhour“
Als de afzuigkap niet kan worden
bediend:
De afzuigkap uitschakelen door de
stekker uit het stopcontact te trekken
of de zekering uit te schakelen en
gedurende. ca. 1 minuut
uitgeschakeld laten. Daarna opnieuw
inschakelen.
Als in stand-by stand de verlichting slechts
zwak brandt, dan adviseren wij u om de
stekker om te draaien ( fase en nulleider
wisselen ).
Bij eventuele vragen of storingen kunt u
bellen met de klantenservice (Zie de lijst
met klantenservicecentra).
Vermeld bij uw klacht de volgende
gegevens:
E-Nr. FD
Vul het nummer in de bovenstaande
vakjes in. De nummers staan op het
typeplaatje dat u vindt in de binnenruimte
van de afzuigkap nadat u het filterrooster
hebt verwijderd.
of een
De fabrikant van de afzuigkap is
niet aansprakelijk voor klachten die
terug te leiden zijn op de planning en
uitvoering van de buisleiding.
42

Prima di leggere si prega di aprire le
pagine con le illustrazioni.
Avvertenze importanti
Gli apparecchi dismessi sono rifiuti
senza valore.
Attraverso lo smaltimento ecologico
possono essere recuperati materiali
pregiati.
Rendere insevibile l’apparecchio dimesso
prima di rottamarlo.
L’imballaggio ha protetto il Vostro
nuovo apparecchio fino a Voi. Tutti i
materiali utilizzati sono compatibili con
l’ambiente e riciclabili. Siete pregati di
collaborare, smaltendo l’imballaggio in
modo ecologicamente corretto.
Informatevi sulle attuali possibilità di
smaltimento presso il Vostro rivenditore
specializzato, oppure presso la Vostra
amministrazione comunale.
La cappa aspirante può essere
utilizzata per il funzionamento ad
espulsione d’aria.
Montare la cappa aspirante sempre
centrata sopra il piano di cottura.
Distanza minima fra fornelli elettrici e
bordo inferiore della cappa aspirante: 550
mm. (vedi figure).
Consigliata: 700mm.
Sopra ad un focolare per combustibili
solidi, dal quale può derivare un pericolo
d’incendio (p.es.scintilla), il montaggio
della cappa aspirante è consentito solo se
il focolare è dotato di una copertura chiusa
non smontabile e se
contemporaneamente vengono osservate
le pertinenti norme nazionali.
Questa limitazione non è valida per le
cucine a gas e per i piani di cottura a gas.
Quanto minore è la distanza tra la
cappa aspirante ed i fornelli, tanto
maggiore è la possibilità che nella parte
inferiore della cappa aspirante possano
condensarsi gocce a causa del vapore
acqueo che sale.
Avvertenze supplementari per
apparecchi di cottura a gas:
Nel montaggio dei fornelli a gas
devono essere osservate le pertinenti
norme di legge nazionali (per es. in
Germania: Regole Tecniche per
Installazioni a Gas TRGI).
E’ indispensabile osservare le norme
di montaggio in vigore e le istruzioni per il
montaggio della casa produttrice degli
apparecchi a gas.
E’ consentito il montaggio della cappa
aspirante con un solo lato accanto ad un
mobile alto oppure ad un muro alto.
Distanza minima 50mm.
Distanza minima per fornelli a gas fra
bordo superiore della grigia d’appoggio
pentole e bordo inferiore della cappa
aspirante: 650mm. (vedi figure).
Consigliata: 700mm.
Questo apparecchio
dispone di contrassegno
ai sensi della direttiva
europea 2002/96/CE in
materia di apparecchi
elettrici ed elettronici
(waste electrical and
electronic equipment
(WEEE).
Questa direttiva definisce le norme per la
raccolta ed il riciclaggio degli apparecchi
dismessi valide su tutto il territorio dell’
Unione Europea.
43

Prima del montaggio
Rendimento ottimale della cappa
aspirante:
Tubo di scarico corto, liscio.
Il minor numero possibile di gomiti di
tubo.
Diametri di tubo possibilmente grandi
e gomiti grandi.
L’impiego di lunghi tubi di
espulsione ruvidi, di più gomiti di
tubo o di diametri piccoli, causa
una difformità dall’indice di
ricambio aria ottimale e
contemporaneamente un aumento
del rumore.
Tubi tondi, consigliamo un diametro
interno di 150 mm.
I canali a sezione quadra devono
avere una sezione trasversale interna
equivalente a quella di tubi tondi.
Essi non dovrebbero presentare
forti deviazioni.
Ø 150 mm ca. 177 cm
Nel caso di diametri di tubo diversi:
applicare il nastro di tenuta.
Nel funzionamento a scarico d’aria
provvedere ad una sufficiente
alimentazione dell’aria.
Collegamento del tubo di scarico Ø 150
mm:
fissare il tubo di scarico direttamente
al manicotto dell’aria.
Tubi piu’ piccoli di 150 mm, non sono
affidabili.
Con la maggiore distanza dal piano
cottura si riducono le prestazioni dell’
aspirazione. Durante la progettazione del
montaggio tenere conto anche della forma
a imbuto della salita del fumo con
inclinazione di c.ca 10 – 15°.
2
Preparazione del soffitto:
Il soffitto deve essere piano ed
orizzontale.
Provvedere ad un solido arresto dei
tasselli.
I tasselli a corredo sono idonei per il
calcestruzzo e pietra naturale.
Nel caso di soffitti di altro materiale è
necessario utilizzare mezzi di
fissaggio idonei.
Attenzione: La cappa aspirante è
equipaggiata con materiale di fissaggio
standard. Chi esegue l’istallazione
Deve assicurarsi che i dispositivi di
fissaggio siano idonei alle pareti e/o soffitti
trovati. La ditta costruttrice declina ogni
responsabilità per danni da ricondursi ad
impropria installazione o all’utilizzo di
elementi di fissaggio non adatti.
Per il peso vedi figure serie M. Con riserva
di modifiche costruttive nel quadro
dell’evoluzione tecnica.
44

Allacciamento elettrico
La cappa aspirante deve essere
collegata solo ad una presa di corrente
con contatto di terra installata a norma.
L’apparecchio deve essere installato in
maniera tale che la spina sia accessibile.
Dati elettrici:
da vedere sulla targhetta del modello
dopo lo smontaggio dei filtri nel vano
interno dell’apparecchio.
In caso di riparazioni togliere sempre
corrente alla cappa aspirante.
Lunghezza del cavo di allacciamento:
1,30 m.
In caso di necessità di allacciamento
fisso:
la cappa aspirante deve essere comunque
collegata solo da un elettroinstallatore
autorizzato dalla competente azienda di
distribuzione dell’energia elettrica.
Nell’impianto deve essere previsto un
dispositivo di separazione. Sono
dispositivi di separazione gli interruttori
con un’apertura tra i contatti superiore ai 3
mm e con interruzione onnipolare.
Rientrano tra questi gli interruttori
automatici ed i relè.
Montaggio
La cappa aspirante ad isola è prevista
per il montaggio a soffitto di una cucina o
ad un soffitto pensile resistente.
Rispettare una distanza minima tra
fornelli e la cappa aspirante di 550 mm,
nel caso di fornelli elettrici, e di 650 mm
nel caso di fornelli a gas.
Attenzione: non danneggiare le
delicate superfici di acciaio inox.
Montare il prodotto come indicato nelle
figure serie M.
Se il cavo di alimentazione di questo
apparecchio viene danneggiato, per
evitare pericoli deve essere sostituito dalla
casa produttrice, dal suo servizio
assistenza clienti, oppure da una persona
specializzata.
Questa cappa aspirante è conforme alle
norme CEE sulla schermatura contro i
radio disturbi.
45

Precede la prima utilizzazione
Primo impiego:
Questo libretto di istruzioni per l’uso è
previsto per più versioni
dell’apparecchio.
E’ possibile che siano descritti singoli
particolari della dotazione che non
riguardano il Vostro apparecchio.
Questa cappa aspirante è conforme
alle pertinenti norme di sicurezza.
Le riparazioni devono essere
eseguite solo da personale
specializzato.
Le riparazioni non eseguite a
regola d’arte possono causare
pericoli gravi per l’utilizzatore.
Non fiammeggiare pietanze sotto alla
cappa aspirante. Pericolo di incendio del
filtro antigrasso se raggiunto dalle fiamme.
I fornelli devono essere sempre coperti
con pentole.
E’ consentito solo limitatamente (vedi
capitolo “Istruzioni per il montaggio”) l’uso
della cappa aspirante su focolari per
combustibili solidi (carbone, legna e
simili).
Se l’apparecchio è danneggiato, non
dovete metterlo in funzione.
L’allacciamento e la messa in funzione
devono essere eseguiti solo da un
tecnico.
Questa cappa aspirante è destinata
solo all’uso domestico.
Usare la cappa aspirante solo con le
lampade sempre montate.
Le lampadine fulminate dovrebbero
essere sostituite subito, per evitare un
sovraccarico sulle altre lampadine.
46
Non usare mai la cappa aspirante
senza filtro grassi.
Grassi ed olio surriscaldati possono
infiammarsi facilmente.
Cucinare perciò pietanze con grassi
oppure con olio, p. es. le patatine fritte,
solo sotto controllo.
Alla prima messa in funzione pulire
accuratamente la cappa aspirante.
Non deporre oggetti sulla cappa
aspirante.
Se il cavo di alimentazione di questo
apparecchio viene danneggiato, per
evitare pericoli deve essere sostituito dalla
casa produttrice, dal suo servizio
assistenza cliente, oppure da una persona
specializzata.
Non far giocare i bambini con
l’apparecchio.
Adulti e bambini non devono mai usare
l’apparecchio senza sorveglianza nel caso
in cui:
- non siano in grado dal punto di vista
fisico, sensoriale o mentale;
- gli manchino le conoscenze e
l’esperienza per usare l’apparecchio in
modo corretto e sicuro.
Piani di cottura a gas/Fornelli a gas
Non usare tutti i fornelli
contemporaneamente al massimo carico
termico per un periodo prolungato (max.
15 minuti), altrimenti sussiste il pericolo di
scottature, se si tocca la superficie
dell’involucro o pericolo di danni alla
cappa aspirante. Nell’uso della cappa
aspirante sopra un piano di cottura a gas,
in caso d’utilizzazione contemporanea di
tre o più fornelli a gas, la cappa aspirante
deve funzionare alla massima potenza di
aspirazione.
Tenete presente che un bruciatore
grande con più di 5 Kw (Wok) di

potenza corrisponde alla potenza di
due bruciatori a gas.
Non usare mai un fornello a gas senza
stoviglie sovrapposte. Regolate la
fiamma in modo che non sporga oltre il
fondo delle stoviglie da cucina.
Prima di usare il nuovo apparecchio,
leggete attentamente le istruzioni per
l’uso. Esse contengono informazioni
importanti per la Vostra sicurezza, e
anche per l’uso e manutenzione
dell’apparecchio.
Conservate bene il libretto delle
istruzioni per l’uso e il montaggio, per
un eventuale successivo proprietario.
Modi di funzionamento
Funzionamento a scarico d’aria fig.
serie M.
Il ventilatore della cappa aspirante
aspira i vapori di cottura e li invia
all’aperto attraverso il filtro antigrasso.
Il filtro antigrasso trattiene i
componenti grassi dei vapori di
cottura.
La cucina resta completamente libera
da grasso ed odori.
L’aria di scarico viene condotta verso
l’alto, attraverso un pozzo di ventilazione,
oppure direttamente all’aperto, attraverso
la parete esterna.
) E’ vietato immettere l’aria di scarico in
un camino per il fumo o in un camino per
gas di scarico funzionanti, oppure in un
pozzo, che serve al deflusso dell’aria di
locali, nei quali sono installati focolari.
Nell’espusione d’aria devono essere
osservate le norme amministrative e
legali (per es. regolamenti edilizi
nazionali).
Nel caso di scarico dell’aria in camini per il
fumo o in camini per i gas di scarico non
funzionanti, è necessario ottenere
l’autorizzazione dell’autorità competente.
) Per il funzionamento a scarico d’aria
della cappa aspirante, con
contemporaneo funzionamento di
combustioni dipendenti dal camino
(come per es. apparecchi di riscaldamento
a gas, ad olio combustibile oppure a
carbone, scaldacqua a flusso continuo,
scaldabagni), è necessario provvedere
ad una sufficiente alimentazione
dell’aria, che è necessaria al focolare per
la combustione.
Un funzionamento senza pericolo è
possibile, se nel locale d’installazione del
focolare non viene superata la
depressione di 4 Pa (0,04 mbar).
E’ possibile ottenere ciò quando l’aria per
la combustione può continuare ad affluire
attraverso aperture non chiudibili, per es.
di porte, finestre ed in combinazione con
cassette murali per
l’alimentazione/espulsione dell’aria o con
altre misure tecniche, come interdizione
reciproca o simili.
Se l’aria di alimentazione non è
sufficiente, sussiste pericolo
d’intossicazione a causa di ritorno di
gas combusti.
Una cassetta murale di
alimentazione/scarico dell’aria da sola non
garantisce il rispetto del valore limite.
Nota: nella stima si deve considerare
sempre il bilancio totale dell’aerazione
dell’abitazione. Questa regola non si
applica per il funzionamento di apparecchi
di cottura per es. piano di cottura e cucina
a gas.
Se l’aria di scarico viene condotta
attraverso la parete esterna, si dovrebbe
utilizzare una cassetta murale telescopica.
47

Uso della cappa aspirante
Per attivare le funzioni associate ai
tasti è necessario imprimere sugli stessi
un piccolo impulso (poca forza per un
breve istante). Pressioni eccessive e
prolungate non attivano le funzioni
associate.
Per eliminare nel modo più efficace i
vapori di cottura.
Accendere la cappa aspirante
all’inizio della cottura.
Spegnere la cappa aspirante
solo alcuni minuti dopo la fine della
cottura.
luce
spegne il
ventilatore
indicazione
gradi ventilatore
ridurre ventilatore
Segnale acustico
Quando si preme un pulsante viene
emesso per conferma un segnale
acustico.
Accendere il ventilatore
Premere il tasto +.
Regolare il grado di aspirazione
desiderato
Premere il tasto +.
Aumento di un grado.
Premere il tasto -.
Riduzione di un grado.
Spegnere il ventilatore
Premere il tasto O.
Poco dopo l’indicazione
Oppure
post-funzionamento
ventilatore
accendere/aumentare
ventilatore
Grado forte
scompare.
Premere il tasto – finché il ventilatore
si spegne.
Poco dopo l’indicazione
Grado forte:
Con il grado forte si raggiunge la massima
potenza. Questa è necessaria per breve
tempo.
Premere il tasto + più volte, finché
non compare l’indicazione
Se il grado forte non viene disinserito
manualmente, dopo 10 minuti il
ventilatore riduce automaticamente al
grado .
Post-funzionamento ventilatore
Premendo il tasto
.
Il ventilatore gira 10 minuti al grado
, in questo tempo nel display
lampeggia un punto. Poi il ventilatore
si spegne automaticamente.
Illuminazione
L’illuminazione può essere usata
sempre, anche quando il ventilatore è
escluso.
Telecomando
La programmazione del
telecomando viene eseguita dal
costruttore. Se il telecomando
non dovesse comandare motore
e luci in prossimità della cappa,
eseguire la seguente procedura.
Programmazione telecomando
Premere e mantenere premuto il tasto “+”
del telecomando e successivamente
alimentare la cappa; a conferma
dell’avvenuto riconoscimento viene
emesso un segnale acustico prolungato.
Se non si sente il segnale acustico entro
30 secondi ripetere la procedura.
scompare.
.
48

Funzioni telecomando
I tasti +, -,
funzionamento di quelli del comando.
Tasto : stesso funzionamento del tasto
post funzionamento.
Funzione intervallo
Una particolarità di questo apparecchio è
rappresentato dalla funzione intervallo che
consiste nell’attivazione automatica della
ventilazione 10 minuti ogni ora alla
velocità lampeggiante visualizzata nel
display.
Questa funzione può essere attivata
tramite comando o telecomando.
Attivazione intervallo tramite comando:
premere contemporaneamente i tasti
O e + e rilasciare i tasti: il display
visualizzerà 1;
premendo il tasto +, il display
visualizzerà la seguente sequenza
per le velocità del ventilatore
2→3→1→2 …;
premere contemporaneamente i tasti
O e + per confermare la velocità alla
quale deve funzionare il ventilatore
nella funzione intervallo.
Attivazione intervallo tramite
telecomando:
premere il tasto
luminoso visualizzerà la velocità 1;
premendo il tasto +, l’indicatore
luminoso visualizzerà in sequenza le
velocità del ventilatore 2→3→1→2
…;
premere il tasto per confermare la
velocità alla quale deve funzionare il
ventilatore nella funzione intervallo.
In fase di programmazione, se la funzione
intervallo visualizzata non viene
confermata entro alcuni secondi, si esce
e luce hanno lo stesso
: l’indicatore
dalla modalità di programmazione
intervallo.
Premendo qualsiasi tasto, tranne quello
luce, la funzione intervallo viene
disattivata.
Il telecomando è alimentato con una
batteria. Quando la batteria è esaurita
bisogna:
1. Svitare le due viti poste nella parte
posteriore ed asportare il coperchio.
2. Estrarre la batteria e sostituirla con
una nuova avente le stesse
caratteristiche.
3. Richiudere il coperchio e avvitare le
viti.
Seguire le norme nazionali per lo
smaltimento delle batterie esaurite.
49

Filtri e manutenzione
Filtro grassi:
Per trattenere i componenti grassi dei
vapori di cottura si utilizzano filtri
metallici grassi.
Le stuoie del filtro sono costituite da
materiale ininfiammabile.
Attenzione:
A causa della progressiva saturazione con
residui grassi, l’infiammabilità aumenta, ed
il funzionamento della cappa aspirante
può essere pregiudicato.
Importante:
Pulendo tempestivamente i filtri metallici
grassi, si previene il rischio d’incendio che
può essere causato da un accumulo di
calore durante la frittura o l’arrosto.
Indicazione di saturazione:
Quando i filtri grassi sono saturi si
accende la spia
segnale acustico.
Spegnendo la ventola si disattiva il
segnale acustico.
Non attendere oltre per lavare i filtri grassi.
Pulizia dei filtri metallici grassi:
Con un uso normale (1-2 ore al
giorno) i filtri metallici per grassi
devono essere lavati una volta al
mese.
Il lavaggio può essere eseguito nella
lavastoviglie. Nel lavaggio è possibile
una lieve alterazione del colore.
Importante:
non lavare filtri metallici grassi molto
sporchi insieme alle stoviglie.
Per il lavaggio a mano, fare
ammorbidire i filtri grassi per più ore
in una soluzione di lavaggio bollente.
Non usare detersivi corrosivi, acidi o
e viene emesso un
alcalini. Poi spazzolare, sciacquare
bene con acqua pulita e far
sgocciolare.
Smontaggio e montaggio dei filtri
metallici grassi:
Attenzione: le lampade devono essere
spente e raffreddate.
1. Seguire le fasi indicate nelle figure
serie M.
2. Premere le maniglie dei filtri grassi
verso il basso, ribaltare e togliere i
filtri.
3. Pulire i filtri grassi.
4. Inserire di nuovo i filtri grassi.
5. Cancellare l’indicazione
Premere 2 volte
consecutivamente il tasto O.
Viene emesso un segnale
acustico e l’indicazione
scompare.
.
50

Pulizia e manutenzione
Togliere corrente alla cappa aspirante
estraendo la spina di alimentazione,
oppure togliendo il fusibile.
Non pulire la cappa aspirante con
spugne dure e prodotti per la pulizia
contenenti sabbia, soda, acido o cloro!
Per pulire la cappa aspirante usare
una soluzione di acqua e detersivo
ben calda, oppure un detergente per
vetri delicato.
Non rimuovere lo sporco secco
aderente graffiandolo, ma
ammorbidendolo con un panno
umido.
Quando si lavano i filtri per grassi,
pulire anche i depositi di grasso sulle
pareti accessibili della carcassa.
Con ciò si previene un pericolo
d’incendio e si assicura il
funzionamento ottimale.
Avvertenza: non usare alcool (spirito)
sulle superfici in plastica. Si
potrebbero formare zone opache.
Attenzione! Arieggiare
sufficientemente la cucina, non usare
fiamme libere.
Superfici di alluminio, vernice e
plastica:
Non usare panni asciutti.
Usare un detergente delicato per
vetri.
Non usare detergenti corrosivi, acidi o
alcalini.
Osservare le norme di garanzia, nell’
accluso libretto di manutenzione.
Pulire i tasti di comando solo con una
soluzione di acqua e detersivo delicato e
con un panno morbido, umido.
Per i tasti di comando non usare pulitori
per acciaio inox.
Superfici in acciaio inox:
Usare un detergente per acciaio inox
delicato, non abrasivo.
Pulire strofinando solo nel senso della
satinatura.
51

Cambio delle lampade
1. Spegnere la cappa aspirante e
togliere corrente sfilando la spina di
alimentazione, oppure togliendo il
fusibile.
Le lampade alogene accese si
surriscaldano. Anche alcuni minuti dopo
averle spente vi è pericolo di scottature.
2. Seguire le fasi indicate nelle figure
serie L per la sostituzione delle
lampade.
3. Sostituire la lampada rovinata con
una lampada nuova avente le stesse
caratteristiche.
4. Ripristinare l’alimentazione elettrica
inserendo di nuovo la spina di
alimentazione o il fusibile.
Avvertenza: se l’illuminazione non
funzionasse controllare che le lampade
siano inserite correttamente.
Guasti
Se nel display compare una
:
Vedi capitolo “Filtri e manutenzione”.
Se la cappa aspirante non risponde al
comando:
Togliere tensione alla cappa aspirante
per ca. 1 minuto estraendo la spina di
alimentazione o disinserendo
l’interruttore di sicurezza. Quindi
inserire di nuovo.
Se le luci rimangono debolmente accese
quando la cappa è in stand-by, invertire la
spina di alimentazione (invertire fase con
neutro).
In caso di eventuali chiarimenti o di guasti,
rivolgersi al servizio assistenza clienti.
(vedi elenco dei centri di assistenza).
In caso di chiamata indicare i dati
seguenti:
E-Nr. FD
Riportare nello specchietto qui sopra
questi dati. Essi si trovano nella targhetta
d’identificazione, dopo avere tolto la griglia
del filtro, nel vano interno della cappa
aspirante.
oppure
Il produttore delle cappe aspiranti
non concede garanzia per reclami che
sono da attribuire alla progettazione ed
all’esecuzione del percorso dei tubi.
52

Antes de la lectura, se aconseja abrir las
páginas con las ilustraciones.
Advertencias importantes
Los aparatos eléctricos usados incorporan
materiales valiosos que se pueden recuperar.
Por ello deberán entregarse a dicho efecto en un
centro oficial de recogida o recuperación de
materiales reciclables (por ejemplo Servicio o centro
municipal de desguace o instituciones semejantes).
Su Ayuntamiento o Administración local le
facilitarán gustosamente las señas del centro de
recuperación de materiales más proximo. Antes de
deshacerse de su aparato usado deberá inutilizarlo.
Su nuevo aparato está protegido durante el
transporte hasta su hogar por un embalaje protector.
Todos los materiales de embalaje utilizados son
respetuosos con el medio ambiente y pueden ser
reciclados o reutilizados. Contribuya activamente a la
protección del medio ambiente insistendo en unos
métodos de eliminación y recuperación de los
materiales de embalaje respetuosos con el medio
ambiente. Su Distribuidor o Administración local le
informará gustosamente sobre las vias y
posibilidaded más eficaces y actuales para la
eliminación respetuosa con el medio ambiente de
estos materiales.
La presente campana extractora es apropiada
para trabajar con evacuación del aire al exterior.
Montar la campana extactora siempre por
encima del centro de la zonas de cocción o los
quemadores (según el tipo di cocina que se
utilice).
La distancia minima a observar entre las
zonas de cocción (de una placa o cocina
eléctrica) y el borde inferior de la campana es
de 550 mm ( ver Fig.).
Distancia aconsejada: 700 mm.
La campana sólo se podrá montar por
encima de hogares para combustibles sólidos
con peligro de incendio (por ejemplo proyección
de chispas) si el hogar está provisto de una
protección cerrada no desmontable y se
cumplen las normas y disposiciones nacionales
vigentes. Esta restricción no es válida para
cocinas y placas de gas.
Cuanto menor sea la distancia entre la campana
extractora y los quemadores, mayor posibilidad existe
de que se former gotas de agua en la parte inferior de
la campana extractora debidas a la condensación del
vapour de agua.
Advertencias adicionales relativas a las cocinas
de gas:
Al proceder al montaje de los quemadores de
una placa de cocción o cocina de gas deberán
observarse estrictamente las normas y disposiciones
legales vigentes en cada pais (en Alemania,por
ejemplo, son las Normas Técnicas para Instalación
de Equipos de Gas TRGI).
Respectar las normas y disposiciones, así como
las instrucciones y consejos de montaje facilitadas
por los fabricantes de lac cocinas y aparatos de gas.
Esta campana extractora sólo deberá montarse
con un lateral junto a un armario o pared alta.
Distancia minima a observar: 50 mm.
La distancia minima entre el borde inferiore de la
campana extractora y el borde superior de la parilla
para colocar recipientes de las zonas de cocción
(quemadores) de una placa de cocción o cocina de
gas 650 mm (ver Fig ).
Distancia aconsejada: 700 mm.
Esto aparato cumple con la
Directiva europea 2002/96/CE
sobre aparatos eléctricos y
electronicos identificata como
Residuo de aparatos eléctricos y
electrónicos. (waste electrical
and electronic equipment
WEEE).
La directiva proporciona el marco
general válido en todo el ámbito de la Unión Europea
para la retirada y la reutilización de los residuos de los
aparatos eléctricos y electrónicos.
53

Antes del montaje
Condiciones necesarias para lograr la
optima potencia y rendimiento de la
campana extractora:
Tubo de evacuación corto y liso.
Menor número de codas posible.
Usar en lo possible tubos de gran
diámetro, así como codos de gran
tamaňo.
Los tubos de evacuación largos y
con desigualdades, y la utilización
de muchos tubos y codos de
diámetro pequeňo perjudica el
rendimiento óptimo del aparato y
provoca un aumento de ruidos
desagradables durante su
funcionamento.
Tubos redondos:
Se aconseja emplear tubos con un
diámetro interior 150 mm.
Los canales planos deberán poseer
una sección interior equivalente a la
de los tubos redondos.
No deben presentar ángulos
demasiado agudos.
Ø 150 mm ca. 177cm
En caso de usar tubos con
diferentes diámetros: colocar una
tira estanqueizante.
Al trabajar con sistema de
ecavuación del aire al exterior:
procurar una suficiente alimentación
de aire.
Conexión de los tubos de evacuación
Tubo con diámetro de 150 mm:
Fijar directametne el tubo de
evacuacion el aire en el racor de
empalme.
Tubos inferiore de 150 no son
aconsejables. Aumentando la
distancia de la zona de cocción
reducimos las pretaciones de la
aspiracin. Durante el montaje tener
2
en cuenta también la forma de
embudo de la salida de humos con
inclinacn de ca 10° - 15°.
Preparativos en el techo:
El techo tiene que ser liso y
horizontal.
Asegurar el anclaje seguro de los
tacos en el techo.
Los tachos suministrados con el
aparato son apropiados para techos
de hormigon o piedra natural.
Para techos de otros materiales y
caracteristicas deberán usarse tacos
especificos para el material en
cuestiόn.
La campana extractora está equipada
con material de fijación estándar. El
encargado de realizar la instalación debe
asegurarse de utilizar dispositivos de
fijación adecuados para el techo
correspondiente. La empresa fabricante
declina toda responsabilidad por daños
causados por una instalación errónea o
una utilización incorrecta de dispositivos
de fijación no adecuados para el techo
correspondiente.
Para el peso ver la Figura M. Nos
reservamos el derecho de introducir
modificaciones o cambios constructivos
en los aparatos como consecuencia dell
progeso técnico.
54

Conexión eléctrica
La campana extractora sólo podrá
conectarse a una toma (caja) de corriente
provista de puesta a tierra.
La toma de corriente deberá encontrarse
o montarse directamente detrás del
revestimiento decorativo de la campana.
Características eléctricas:
figuran en la placa de caracteristicas que
es accessible después de quitar los
marcos de filtro, en la parte interior del
aparato.
En caso de reparación de la
campana deberá desconecarse siempre el
aparato de la red elèctrica, antes de iniciar
los trabajos correspondiente.
Longitud del cable de conexión a la red
eléctrica: 1,30 m.
En caso de necesitar una conexión fija
a la red eléctrica:
El aparado slo deberá ser conectado a la
red eléctrica por un instalador-electricista
registrado como tal en la empresa de
abastecimiento de energia eléctrica de la
zona. Como dispositivo de separación se
admiten interruptores con una abertura de
contacto superior a 3 mm y desconexión
de todas las fases. Esto incluye
interruptores LS y contactores.
Montaje
Esta campana extractora ha sido
diseñada para el montaje en el techo de la
cocina o en un techo suspendido de
suficiente estabilidad y capacidad de
sustentación.
Prestar atención a las distancias
minimas a observar entre la zona de
cocción y la campana extractora de 550
mm para las placas de cocción eléctricas
y 650 mm para las placas de cocción de
gas.
Seguir las instrucciones de montaje como
se indica en les Figuras M.
En caso de producirse daños en el
cable de connexión de aparato, éste solo
podrá ser sustituido por el fabricante, un
técnico especializado del Servicio de
Asistencia Técnica Oficial o un técnico
especializado del ramo, a fin de evitar
situaciones de peligro.
La campana extractora cumple las normas
comunitarias en materia de radiodesparasitaje.
55

Antes de la primera
utilizaciόn
Antes de la puesta en marcha inicial
del aparato:
Las presentes instrucciones de
servicio son válidas para diferentes
modelos de aparato: por ello puede
ser posible que se describan detalles
y características de equipamiento que
no concuerden íntegramente con las
de su aparato en concreto.
Esta campana extractora cumple las
normas y disposiciones especificas
en materia de seguridad.
Las reparaciones que fuera
necesario efectuar en el aparato sólo
podrán ser ejecutadas por técnicos
especializados del ramo.
Las reparaciones ejecutadas de
modo erróneo o incorrecto pueden
dar lugar a situaciones de serio
peligro para el usuario.
No preparar alimentos o platos
flameados directamente debajo de la
campana extractora.
¡La grasa acumulada en el filtro antigrasa
podria incendiarse por las llamas que
suben!
Las llamas de los quemadores de gas
de las zonas de cocciόn deberán
encontrarse siempre cubiertas con un
recipiente.
El montaje de la campana extractora
por encima de hogares para combustibles
sόlidos (carbόn, leña, etc) sόlo está
permitido si ésta cumple una serie de
condiciones restrictivas (véanse al
respecto las instrucciones de montaje de
la campana extractora).
Si el aparato presentara daños o
desperfectos, no deberá ser utilizado.
La conexiόn y puesta en marcha del
aparato sόlo podrán ser efectuadas por un
técnico especialista del ramo.
La presente campana extractora sόlo
es adecuada para uso doméstico.
Utilizar la campana extractora sόlo con
las lámparas de iluminaciόn montadas.
Sustituir immediatamente las lámparas
defectuosas a fin de evitar la sobrecarga
de las lámparas restantes.
No usar nunca la campana extractora
sin incorporar el filtro antigrasa.
Las grasas y aceites calentados
excesivamente pueden inflamarse
rápidamente. Por ello los alimentos o
platos que requieran grasa o aceite
caliente, como por ejemplo patatas fritas
etc., sόlo deberán prepararse bajo
vigilancia.
Limpiar a fondo la campana extractora
antes de usarla por vez primera.
No colocar objetos encima de la
campana.
En caso de producirse daños en el
cable de conexión del aparato, éste sólo
podrá ser sustituido por el fabricante, un
técnico especializado del Servivio de
Asistencia Técnica Oficial o un técnico
especializado del ramo, a fin de evitar
situaciones de peligro.
Deseche los envases y el material de
embalaje de acuerdo a las normas
correspondientes para la protecciόn del
medio ambiente (véanse al respecto las
instrucciones de montaje de la campana
extractora).
No dejar que los niños jueguen con el
aparato.
- El aparato no debe ser utilizado si se
carece del conocimiento y la experiencia
56

necesarios para que su uso sea adecuado
y seguro.
- Los niños y adultos con algún tipo de
discapacidad fisica, sensorial o mental
nunca deben usar el aparato sin
supervisiόn.
Placas de cocción de gas/Cocinas de
gas
No trabajar simultáneamente con
todas las zonas de cocción (quemadores)
durante un tiempo prolongado (como
máximo 15 minutos) ajustadas a su
máxima potencia. De lo contrario existe
peligro de quemadura en caso de tocar la
campana o de ocasionar daños en la
misma. En caso de instalar y trabajar con
la campana por encima de una placa de
cocción de gas, hay que ajustar ésta a su
máxima potencia en caso de trabajar
simultáneamente con tres o más zonas de
cocción (quemadores).
Tenga presente que la potencia de un
quemador rápido (grande) con más de
5 Kw (Wok) equivale a la potencia de
dos quemadores de gas normales.
No hacer funcionar nunca las zonas de
cocción de gas (quemadores) sin
recipientes adecuados colocados
sobre las mismas. Ajustar la llama
siempre de modo que no sobresalga
respecto al recipiente colocado sobre
la zona de cocción.
Antes de emplear el aparato nuevo
deberá leer detenidamente las
instrucciones de servicio de la cocina
eléctrica. En ella se facilitan
informaciones y consejos importantes
para su seguridad personal, así como
para el correcto manejo y cuidado de
la cocina.
Guarde las instrucciones de servicio y
de montaje para un posible
propietario posterior.
Modalidades de
funcionamento
Evacuaciόn del aire hacia el exterior M.
FIG.
El ventilador que incorpora la
campana extractora aspira los vahos
de la cocina y los evacúa hacia el
exterior, haciéndolos pasar
previamente a través del filtro
antigrasa.
El filtro antigrasa absorbe las
partículas sόlidas contenidas en los
vahos de la cocina.
La cocina queda así prácticamente
libre de grasa y olores.
El aire de evacuación pasa a través de un
túnel de ventilación hacia arriba o
directamente hacia el exterior, a través de
la correspondiente pared.
) El aire de evacuación no debe pasar a
ninguna chimenea de humos o gases de
escape en servicio ni tampoco a túneles
de ventilación de locales con hogares.
Ante de proceder a los trabajos de
evacuación del aire el exterior, deberà
observar las disposicones legales de
su localiad (por ejemplo el reglamento
local para el permiso de edificación).
En caso de hacer pasar el aire de
evacuación de la campana a una
chimenea de humos o gases de escape
fuera de servicio, deberá consultarse con
el deshollinador del distrito competente,
observando asimismo las norma y
disposiciones nacionales vigentes.
) Si se utiliza la campana con
evacuación del aire al exterior
simultáneamente con un hogar
dependiente de una chimenea (por
ejemplo calefacciones de gas, gas-oil o
carbón, calentadores instantaneous,
calentadores de agua), hay procurer que
exista una suficiente alimentación de
57

aire, necesario para el proceso de
r
combustión del hogar
.
Este funcionamiento es possible sin
peligro si en el local de emplazamiento del
hogar no se sobrepasa la depresión
admissible de 4 Pa (0,04mbar).
Para ello, es necesario que existan
aperturas no bloqueables por las que el
aire de combustion pueda renovarse y
ventilarse sin dificultad, por ejemplo por
puertas, ventanas o cajas murales para la
alimentación o evacuación del aire o
también pueden tomarse otras medidas
como por ejemplo instalando cerrojos
invertidos o similares.
Ceciorarse de que existe una
alimentación suficiente deI aire. De lo
contrario el aire evacuado se vuelve a
utilizar para la admisión y se corre el
peligro de intoxicación
.
La solo presencia de una caja mural para
alimentación o evacuación del aire, sin
embargo, no constituye una garantia para
la observación de los limites de tolerancia
válidos.
Nota: En las consideraciones y
valoraciones a este respecto siempre
habrá que tener cuenta todo el conjunto
del sistema de ventilación exixtente en la
vivienda. Esta regla no es válida para las
cocinas y placas de cocción de gas.
Si el aire es evacuado pasando a través
de la pared exterior, deberá utilisarse
una caja mural telescopica.
Manejo de la campana
extractora
La manera más eficaz de absorber los vahos
producidos en la cocina durante la preparaciόn
de los alimentos es:
Conectando la campana extractora
al comenzar a trabajar.
Desconectando la campana extractora
al cabo de unos minutos después de
haber concluido los trabajos.
Luz
Apaga el
ventilador
Señal acústica:
Al pulsar una tecla se escucha una señal
acústica de confirmación.
Conectar en ventilador:
Pulsar la tecla +.
Conectar el ventilador:
Pulsar la tecla +.
El ventilador pasa a funcionar con un
escalόn de potencia superior.
Pulsar la tecla -.
El ventilador pasa a funcionar con un
escalón de potencia inferior.
Ajustar el escalón de potencia del
ventilador:
Pulsar la tecla O.
O
Pulsar la tecla de reducciόn – repetidas
veces, hasta que el ventilador se
desconecte.
Escalón intensivo:
Seleccionando el escalόn de funcionamiento
intensivo, el ventilador desarrolla su máxima
potencia. Este escalόn se suele usar sólo
durante cortos períodos.
Indicación de
grados del
ventilado
Reducir ventilador
Postfuncionamiento
del ventilador
Encender/aumentar
Ventilador
Grado fuerte
58

Pulsar la tecla + repetidas veces, hasta
que en la pantalla de visualizaciόn se
ilumine la letra
En caso de no desconectar manualmente
el escalόn intensivo, el ventilador conmuta
al cabo de 10 minutos automáticamente al
escalón de potencia
Funcionamento del ventilador tras su
desconexiόn:
Pulsar la tecla
El ventilador funciona durante 10 minutos
en el escalón
visualizaciόn destella un punto. El
ventilador se desconecta automáticamente
una vez transcurrido dicho período.
Iluminaciόn:
La iluminación se puede conectar en
cualquier momento, con independencia de
que el ventidador funcione o no.
Mando a distancia
La programación del mando a
distancia es realizada por el
fabricante. En caso de que el mando
a distancia no activase motor y luces
en proximidad de la campana, lleve a
cabo el siguiente procedimiento.
Programación del mando a
distancia
Pulsar y mantener pulsada la tecla “+” del
mando a distancia y luego alimentar la
campana; como confirmación de que se ha
producido el reconocimiento se emite una señal
acústica prolongada. Si no se escucha la señal
acústica en 30 segundos, repita el
procedimiento.
Funciones del mando a distancia
Las teclas +, -,
funcionamiento que las del control.
Tecla
Función intervalo
Una particularidad de este aparato es la función
intervalo, que consiste en la activación
: mismo funcionamiento que la tecla
.
.
.
.
. En la pantalla de
y luz tienen el mismo
automática de la ventilación 10 minutos cada
hora a la velocidad parpadeante visualizada en
la pantalla.
Esta función se puede activar por medio del
control o del mando a distancia.
Activación del intervalo mediante el control:
Pulsar al mismo tiempo las teclas O y + y
soltar las teclas: la pantalla mostrará 1;
Pulsando la tecla +, la pantalla mostrará la
siguiente secuencia para las velocidades
del ventilador 2→3→1→2 …;
Pulsar al mismo tiempo las teclas O y +
para confirmar la velocidad a la cual debe
funcionar el ventilador en la función
intervalo.
Activación del intervalo mediante el mando
a distancia:
Pulsar la tecla
Pulsando la tecla +, la pantalla mostrará la
siguiente secuencia para las velocidades
del ventilador 2→3→1→2 …;
Pulsar la tecla
velocidad a la cual debe funcionar el
ventilador en la función intervalo;
En la fase de programación si la función
intervalo visualizada no es confirmada en
varios segundos, se sale de la modalidad de
programación de intervalo.
Pulsando cualquier tecla, excepto la de la luz,
la función intervalo es desactivada.
El mando a distancia funciona con pilas.
Cuando las pilas estén agotadas hay que:
1. Desatornillar los dos tornillos de la parte
posterior y quitar la tapa.
2. Extraer las pilas y sustituirlas por una
nuevas que tengan las mismas
características.
3. Volver a cerrar la tapa y atornillar los
tornillos.
Seguir las normas nacionales para el desecho
de las pilas usadas.
: la pantalla mostrará 1;
para confirmar la
59

Filtros y mantenimiento
Filtro antigrasa:
Para retener las partículas de grasa
contenidas en el vaho de la cocina se
montan filtros metálicos.
Las esterillas de filtro son de metal
antiinflamable
¡Atenciόn!:
A medida que crece el grado de
saturaciόn de la esterilla de filtro con
partículas de grasa, aumenta su
inflamabilidad, influyendo negativamente
en el funcionamiento de la campana.
¡Importante!:
La limpieza a tiempo de los filtros
metálicos, eliminando las partículas de
grasa adheridas en el mismo, puede
prevenir el peligro de incendio a causa de
una acumulaciόn de calor al freír o asar
alimentos.
Indicaciόn del grado de saturaciόn de
grasa del filtro:
En caso de saturación de los filtros
antigrasa parpadea
señal acústica. A más tardar en este
momento deberán lavarse los filtros
antigrasa.
Limpieza del filtro antigrasa metálico:
Bajo unas condiciones de
funcionamento normal (1-2 horas
diarias), el filtro antigrasa metálico
tiene que limpiarse una vez a mes.
Los filtros antigrasa metálicos se
pueden limpiar en un lavavajillas. Ello
puede dar lugar a una ligera
decoloración de los mismos.
Importante:
No mezclar con la vajilla normal los
filtros antigrasa metálicos muy
saturados de grasa.
y se emite una
En caso de limpiar los filtros
metálicos a mano, colocar la caja del
filtro durante varias horas en una
solución detergente (para vajila) muy
caliente, para reblandecer la grasa
adherida. No utilizar agentes
limpiadores agresivos que contengan
ácidos o álcalis.
Limpiarlos a continuación con un
cepillo, enjuagarlos bien y dejarlos
escurrir.
Desmontar y montar los segmentos de
aspiración de los bordes y los filtros
antigrasa de metal:
¡Atención!: Las lámparas halόgenas
tienen que estar desactivadas y frías.
1. Seguir todo lo descrito en la Figura M.
2. Empujar las asas de los filtros
antigrasa hacia abajo y abatir los
filtros hacia abajo.
3. Limpiar los filtros antigrasa.
4. Colocar los filtros antigrasa limpios en
su sitio.
5. Apagar la pantalla de visualización
.
Pulsar dos veces consecutivas la
tecla O. Se produce una señal
acústica de aviso y la pantalla de
visualización
se apaga.
60

Limpieza y cuidados
Desconectar la campana extractora de
la red eléctrica extrayendo el cable de
conexión de la toma de corriente o a
través del fusible.
No limpiar la campana extractora con
esponjas abrasivas ni emplear agentes
que contengan arena, sosa, ácidos o
cloruro.
Utilizar una soluciόn de agua y
agente lavavajillas de uso corriente
caliente para limpiar la campana
extractora.
En caso de suciedad más resistente y
fuertemente acumulada, utilizar un
agente limpiacristales suave.
Al limpiar los filtros antigrasa, limpiar
la grasa acumulada en los puntos
accesibles del cuerpo de la campana
extractora. De este modo se previene
el peligro de que se inflame los restos
de grasa antiguos y la campana
conserva optimo funcionamiento.
Atenciόn: No limpiar las superficies y
elementos de plásticos con alcohol de
quemar, dado que podrían producirse
zonas o puntos de color mate.
¡Atenciόn! Procurar una buena
ventilaciόn de la cocina. ¡ No trabajar
con llamas abiertas!
el cuaderno de servicio adjunto.
Superficies de aluminio y plástico:
No utilizar paños secos.
Utilizar un agente limpiacristales
suave
No utilizar agentes limpiadores
agresivos que contengan ácidos o
álcalis.
Ténganse en cuenta los términos de la
garantía que figuran en el cuaderno de
servicio.
Limpiar el mando desplazable del
ventilador sόlo con un paño suave y
húmedo (usar una soluciόn de agua y
agente lavavajillas suave).
¡No usar limpiadores de acero para limpiar
el mando desplazable!
Superficies de acero inoxidable:
Usar un limpiador para acero
inoxidable suave, no abrasivo.
Limpiar el metal sόlo en direcciόn al
pulido.
61

Sustituir las lámparas
1. Desconectar la campana extractora
de la red eléctrica, extrayendo el
cable de conexiόn de la toma de
corriente o a través del fusible.
Las lámparas halógenas alcanzan
durante su funcionamiento unas elevadas
temperaturas .Para retirar la lámpara,
sujetarla con un paño limpio.
2. Seguir las fases indicadas en la
Figura L para el cambio de bombillas.
3. Sustituir la lámpara halόgena por una
lámpara halógena corriente que tirne
las mismas caracteristicas.
4. Restablecer la alimentaciόn de
corriente introduciendo el cable de
conexión en la toma de corriente o a
través del fusible.
Advertencia: En caso de no funcionar la
iluminaciόn de la campana, verificar si se
han montado las lámparas correctas.
Averías y perturbaciones
En caso de que en la pantalla de
visualizaciόn aparezcan las letras
Véase al respecto el capitulo “Filtros y
mantenimiento”.
En caso de no poder accionar los
mandos ni activar las funciones de la
campana extractora:
Dejar la campana sin corriente
durante aproximadamente 1 minuto
extrayendo el enchufe de la toma de
corriente o desconectando el fusible
de la red. Conectar a continuaciόn la
campana extractora.
Si las luces se mantien debilmente
encendidas cuando la campana esta en
stand by, invertir el cable de alimentación
(invertir fase con neuro).
En caso de consultas o averías de la
campana extractora, no dude en llamar al
Servicio de Asistencia Técnica. (Véase al
respecto la lista con las delegaciones y
distribuidores oficiales).
Para cualquier consulta deberán indicarse
los números de producto y de fabricaciόn.
E-Nr. FD
Anote las números correspondientes a su
aparato en los espacios correspondientes.
Los números figuran en la placa de
características, a la que se accede tras
desmontar la rejilla del filtro dentro de la
campana extractora.
:
Las reclamaciones atribuibles o
relacionadas con la planificaciόn y
ejecuciόn de la instalaciόn de las
tuberías de la campana extractora, no
están cubiertas por el servicio de
garantía del fabricante.
62

Ante de iniciar a leitura destas
instruções, queira desdobrar as páginas
com illustrações.
Advertências importantes
Aparelhos velhos não são, de forma
alguma, lixo.
Através de reciclagem compatível com o
meio ambiente, è possível recuperar
matérias primas valiosas.
Ante de enviar o aparelho para
reciclagem, inutilize-o.
O seu novo aparelho esteve protegido
pela embalagem até chegar a sua casa.
Todos os materiais aplicados na
emblagem são compatíveis com o meio
ambiente e reutilizáveis. Por favor
contribua também para a preservação do
meio ambiente, recilando a embalagem
em conformidade.
Junto do Agente Especializado cu na
Câmara Municipal de su área de
residência informe-se sobre os processos
de reciclagem disponíveis.
O exaustor pode funcionar com
exaustãu.
Instalar o exaustor sempre centrado
com a placa de cozinha.
Respeitar a distância minima entre a
placa eléctrica de cozinha e o canto
inferior do esaustor: 550 mm (vide
Figuras).
Recomendaçao: 700 mm.
A montagem do esausto s è possível
sobre uma zona de chama alimentada por
combustíveis slidos, da qual pode
resultar perigo de incêndio (por. ex. o
saltar de uma faúlha), se essa zona
estiver protegida com uma cobertura
fechada inamovível e se forem
respeitadas as normas especificas do
país. Esta limitação não se aplica a
fogões ou placas a gás.
Quanto menor for a distância entre o
exaustor e a placa de cozinha, maior é a
possibilidade de se formarem bolhas de
água na zona inferior do exaustor,
resultantes da subida do vapor de água.
Instruções adicionais para placas a
gás:
Na montagem de aparelhos de
cozinhar a gás(= fogões e placas), têm
que ser respeitadas as respectivas
normas nacionais em vigor (p.ex. ma
Alemanha; Regulamentações Técnica
sobre Instalações Técnicas de Gás TRGI).
Têm que se respeitadas as instruções
e as normas de instalação do fabbricante.
O exaustor só pode ser instalado junto
de um armário superior ou de uma parede
alta. Distância mínima: 50 mm.
A distância mínima, no caso de
queimadores a gás, entre a aresta
superior dos recipientes e a aresta inferior
do esaustor: 650mm. ( Vig. Figuras).
Recomendaçao: 700 mm.
Este aparelho está
marcado em
conformidade com a
Directiva 2002/96/CE
relativa aos resíduos de
equipamentos eléctricos e
electrónicos ( waste
electrical and electronic
equipment (WEEE).
A directiva estabelece o quadro para a
criação de um sistema de recolha e
valorização dos equipamentos usados
válido em todos os Estados-Membros da
União Europeia.
63

Antes da montagem
Potência optimizada do exaustor:
Tubo de exaustão curto e liso.
Tubo com número mínimo de curvas.
Diâmetro do tubo e curvas tão
grandes quanto possível.
A utilização te tubos de aspiração
longos e rugosos no seu interior,
muitas curvas, ou diâmetros
reduzidos, provoca uma alteração
nas condicões optimizadas de
ventilação e, simultaneamente, um
aumento do nível de ruídos.
Tubos circulares: recomendamos
um diâmetro interior de 150 mm.
Canais planos têm que ter rum
seçção equivalente ao diêmetro dos
tubos.
Eles não devem ter nenhum desvio
muito pronunciado.
Ø 150 mm ca. 177 cm2
Se os diâmetros dos tubos
apresentarem diferenças: deverão
ser aplicado cintas de vedação.
No funcionamento com exaustão
de ar, deve ser garantida uma
renovação de ar suficiente.
Ligação do tubo de exaustão Ø 150
mm:
Fixar o tubo de exaustão
directamente no bocal.
Tubos menores que 150 não são
confiáveis.
Com uma distância maio de plano de
cozimento reduz-se o desempenho
da aspiração. Durante o
planejamento da montagem, ter em
consideração também a forma de
embutir de saida de fumaça com
inclinação de cerca 10° – 15°.
Preparação do tecto:
O tecto tem que estar plano e
horizontal.
Tem que ser prevista uma fixação
segura das buchas.
As buchas anexa são indicadas para
betão e pedra naturais.
No caso dos materiais do tecto serem
diferentes, têm que ser aplicado
meios de fixação indicatos para isso.
A coifa aspirante é equipada com
material de fixação padrão. Quem executa
a instalação deve assegurar-se de utilizar
dispositivos de fixação adequados para o
tipo de teto em que será fixado. O
fabricante declina de toda
responsabilidade por danos causados por
erros na instalação ou uso de dispositivos
de fixação inadequados para o tipo de
teto encontrado.
Para o peso, vide as Figuras M.
Reservados todos os direitos quanto a
alterações de costrução no âmbito da
evolução técnica.
64
Ligação eléctrica
O exaustor só deve ligado a uma tornada
com protecção de terra e instalada de
acordo com as normas em vigor.
A tornada, com protecção de terra, deve
ser instalada no tecto, se possível
directamente sobre o revestimento da
chaminé.
Características eléctricas:
Encontram-se na chapa de características
no interior do aparelho – que está à vista
depois de retirar os caixilhos do filtro.
Para reparações, desligar o
exaustor da corrente eléctrica.
Comprimento do cabo de ligação: 1,3
m.
No caso de ser necessário uma ligação
fixa:
O exaustor só pode ser ligado à corrente
por um instalador eléctrico credenciado
pela empresa distribuidora de
electricidade.
Relativamente à instalação, deve ser
previsto um dispositivo de corte. Como
dispositivo de corte, são válidos
interruptores com uma abertura de
contactos superior a 3 mm e corte
multipolar. Daqui fazem parte os
interruptores LS e protecções.
Montagem
O exaustor tem que ser montado no tecto
da cozinha o unum tecto falso
sufficientemente resistente para este fim.
Te rem atenção a distância mínima
entre a placa ou fogão de cozinhar e o
esausto de 550 mm para discos eléctricos
ou de 650 mm para queimadores a gás.
Atençao: Não danificar as superficies
delicata de inox.
Montar a coifa como mostrado nas
Figuras M.
Se o cabo de ligação deste aparelhho
estiver danificado, ele terá que ser
substituido pelo fabbricante,pelos seus
Serviços Técnicos ou, ainda, por uma
pessoa qualificada, a fim de se evitarem
situações de perigo para o utilizator.
Este exaustor corresponde às normas Ue
sobre protecção antiparasitária.
65

Precede a primeira utilização
Primeiro uso:
este livreto de instruções para uso é
previsto para diversas versões do
aparelho.
É possível que sejam descritos
detalhes que não sejam referentes ao
Vosso aparelho em particular.
este exaustor está em conformidade
com as normas de segurança
pertinentes.
Os reparos devem ser executados
somente por pessoal especializado.
Os reparos não executados de
acordo com a regra de arte podem
causar perigos graves para o
usuário.
Não flambar alimentos sob o exaustor.
Perigo de incêndio no filtro antigordura se
for alcançado pelas chamas.
Os queimadores devem estar sempre
cobertos por panelas.
É consentido apenas de modo limitado
(vide capítulo “Instruções para a
montagem”) o uso do exaustor sobre
lareiras a combustível sólido (carvão,
lenha e similares).
Se o aparelho for danificado, não
colocá-lo para funcionar.
A ligação e o primeiro funzionamento
devem ser executados somente por um
técnico.
Este exaustor é exclusivamente para
uso doméstico.
Usar o exaustor apenas com as
lâmpadas instaladas.
As lâmpadas queimadas devem ser
substituídas imediatamente, para evitar
66
uma sobrecarga sobre as demais
lâmpadas.
Nunca usar o exaustor sem filtro para
gorduras.
Gorduras e óleos super-aquecidos
podem inflamar-se facilmente.
Portanto, cozinhar alimentos com
gorduras ou com óleo, p. ex. batatinhas
fritas, somente sob controlo.
No primeiro funzionamento, limpar
cuidadosamente o exaustor.
Se o cabo de alimentação desse
aparelho vier danificado, para evitar
perigo, deve ser substituído pelo
fabricante, pelo seu serviço de assistência
ao cliente ou por uma pessoa
especializada.
Eliminar o material da embalagem de
acordo com as normas (vide capítulo
“instruções para a montagem”).
Nunca coloque objectos pesados
sobre a parte superior do aparelho.
Nunca deixe as crianças brincarem
com o aparelho.
Sem supervisão, adultos e crinças nunca
deverão utilizar o aparelho, no caso de:
- não se encontrarem em perfeitas
condições físicas, sensoriais ou mentais;
- não possuírem, conhecimentos e
experiência acerca de como utilizar o
aparelho de maneira correcta e segura.
Fogões a gás/Queimadores
Não usar todos os queimadores
contemporaneamente em carga térmica
máxima por um período prolongado (máx.
15 minutos), caso contrário existe perigo
de queimaduras ao tocar a superfície do
invólucro ou perigo de danos ao exaustor.
No uso do exaustor sobre um fogão a
gás, em caso de uso contemporâneo com
três ou mais queimadores, o exaustor

deve funcionar em potência máxima de
aspiração.
Tenha presente que um queimador
grande com mais de 5 kW (Wok) de
potência corresponde à potência de
dois queimadores a gás.
Não usar nunca os queimadores a gás
sem vasilhas sobre. Regule a chama de
modo que não supere o fundo da
vasilha onde se cozinha.
Antes de usar o novo aparelho, ler
cuidadosamente as instruções de
uso. Essas contêm informações
importantes para a Vossa segurança
e também para o uso e manutenção
do aparelho.
Conserve bem o livreto de instruções
para uso e montagem para um
eventual proprietário sucessivo.
Tipos de funcionamento
Funcionamento com exaustão Figuras M
O ventilador do exaustor aspira os
vapores da cozinha e, através do filtro de
gordura, encaminha-os para o ar livre.
O filtro de gordura retém as partículas
gordurosas dos vapores da cozinha.
A cozinha mantém-se livre de gorduras e
cheiros.
O ar de exaustão è conduzido para cima
através de um canal, ou directamente para o
exterior através da parede.
) A exaustão do ar não pode ser feita através
de uma chaminé de saída de fumoso u de
gases de combustão, nem através de um canal
que sirva para ventilação de locais, onde se
encontrem aparelhos de queima.
Na derivaçao do ar evacuado, têm que ser
respeitadas as prescrições municipais e as
normas legais (p.ex. Departamento
Regulador da Construção Civil).
Para condução do ar de exaustão para uma
chaminé de fumos ou de gases de combustão,
que não esteja em funcionamento, é
necessária uma autorização das entidades
competentes.
) Se o exaustor funcionar com exaustão, o
funcionamento simultâneo de aparelhos
dependentes de uma chaminé (como por ex.
aquecedores a gás, óleo ou carvão,
esquentadores e acumuladores) tem que ser
garantida a renovação do ar necessário,
para a combustão perfeita dos aparelhos antes
referidos.
Es possível um funcionamento sem qualquer
perigo, se não for ultrapassada a depressão de
4 Pa (0,04 mbar) no local de instalação dos
aparelhos de queima.
I sto pode ser conseguido se o ar necessário à
combustão puder ser reposto, através de
abertura não fecháveis, p.ex. em portas,
janelas e em ligação com caixas murais de
alimentação ou de saída de ar, ou ainda
através doutras medidas tecnica, como
trancagem recíproca ou semelhantes.
Se a renovação de ar fresco não for
suficiente, existe o perigo de
envenenamento, provocado pelo retorno
dos gases provenientes da combustão.
Uma caixa mural de entrada/saída de ar não
garante, po si só, o cumprimento do valor
limite.
Nota: Na avaliação tem que ser considerada
sempre a necessidade global de ventilação da
habitação.
No funzionamento de aparelhos de cozinhar,
como por. Es. placas e fogões a gás, esta regra
não se aplica.
Se o ar de exaustão for conduzido através
de parede exterior, deve ser utilizada uma
caixa mural telescópica.
67

Comando do exaustor
r
r
Para activar as funções, basta um
ligeiro toque nas teclas. No caso de
uma pressão mais prolongada das
teclas, não será activada qualquer
funçao.
Os vapores da cozinha são eliminados
de forma mais eficaz:
Se o exaustor for ligado no início do
cozinhado.
Se o esaustor for desligado, sό
alguns minutos, depois de terminado
o cozinhado.
luz
desligar o
ventilador
indicação do
grau do
ventilado
reduzir ventilador
Sinal acústico:
Premindo qualquer tecla, soa um
sinal de confimação.
Ligar o exaustor:
Premir a tecla +.
Regulação da fase de exaustão
pretendida:
Premir la tecla +.
O exaustor comuta para a fase
imediatametne superior.
Premir la tecla -.
O exaustor comuta para a fase
imediatamente inferior.
Desligar o exaustor:
Premir a tecla O.
Pouco depois a indicação
desaparece.
Ou
Premir la tecla – até que o desligue.
68
pós-funcionamento do
ventilado
ligar/aumentar
ventilador
Grau alto
Pouco depois a indicação
desaparece.
Fase intensiva:
Com a fase intensiva obtêm-se o
rendimento máximo. Ela sό é necessária
por curtos períodos de tempo.
Premir a tecla + até que a indicação
figue iluminada.
Se a fase intensiva não for desligada
manualmente, o exaustor, apόs 10
minutos cumuta automaticamente
para a fase .
Funcionamento do exaustor com
descomutação automática
Premir la tecla
.
O exaustor funciona durante 10
minutos na fase
está um ponto a piscar. Depois o
, e na indicação
exaustor desliga automaticamente.
Iluminação
A iluminação pode ser utilizada em
qualquer momento, mesmo se o
esausto estiver desligado.
Controlo remoto
A programação do controlo
remoto é executada pelo
fabricante. Se o controlo remoto
deve comandar motor e luzes
nas proximidades do exaustor,
executar o seguinte
procedimento.
Programação do controlo remoto
Pressionar e manter pressionada a tecla
“+” do controlo remoto e sucessivamente
ligar o exaustor; para confirmar o
reconhecimento é emitido um sinal
acústico prolongado. Se o sinal acústico
não for ouvido dentro de 30 segundos,
repetir o procedimento.

Funções do controlo remoto
As teclas +, -,
função daquelas do comando.
Tecla : mesma função da tecla .
Funções intervalo
Uma particolaridade desse aparelho é
representada pela função intervalo que
consiste na activação automática da
ventilação por 10 minutos a cada hora na
velocidade a piscar visualizada no ecrã.
Esta função pode ser activada através do
comando ou do controlo remoto.
Activação do intervalo através do
comando:
premir ao mesmo tempo as teclas O
e + e soltar as teclas: no ecrã será
visualizado 1;
premindo a tecla +, o ecrã mostrará
a seguinte sequência para a
velocidade do ventilador 2→3→1→2
…;
premir ao mesmo tempo as teclas O
e + para confirmar a velocidade que
deve funcionar o ventilador na função
intervalo.
Activação do intervalo através do
controlo remoto:
premir a tecla
premindo a tecla +, o ecrã mostrará
a seguinte sequência para a
velocidade do ventilador 2→3→1→2
…;
premir a tecla
velocidade que deve funcionar o
ventilador na função intervalo.
Na fase de programação, se a função
intervalo visualizada não for confirmada
dentro de alguns segundos, sairá da
modalidade de programação do intervalo.
Premindo qualquer tecla, menos aquela
da luz, a função intervalo é desactivada.
e luzes têm a mesma
: o ecrã mostrará 1;
para confirmar a
O controlo remoto é alimentado por uma
bateria. Quando a bateria estiver
descarregada é necessário:
1. Desparafusar os dois parafusos
colocados na parte posterior e retirar
a cobertura.
2. Retirar a bateria e substituí-la por
uma nova com as mesmas
características.
3. Recolocar a cobertura e apertar os
parafusos.
Seguir as normas nacionais para
eliminação das baterias descarregadas.
69

Filtros e Manutenção
Filtro de gordura:
Para retenção das partículas de
gordura existentes nos vapores da
cozinha são utilizados filtros metálicos.
A malha do filtro é de metal não
inflamável.
Atenção:
Em caso de saturação do filtro com
resíduos gordurosos, aumentam as
possibilidades de incêndio do mesmo e a
função do aparelho pode ser prejudicada.
Importante:
A limpeza atempada do filtro evita o
perigo de incêndio que se pode verificar
com a concentração de calor proveniente
de fritos ou assados.
Indicação de saturação:
Em caso de saturação dos filtros de
gordura, a indicação
é emitido um sinal acústico.
O mais tardar nesta altura, os filtros de
gordura deverão ser lavados.
Limpeza dos filtros metálicos:
Tenha em atenção que, neste caso, o
filtro de gordura deve ser limpo em
intervalos de tempo regulares (1
mês).
A limpeza destes filtros pode ser feita
na máquina de lavar loiça. Com este
processo, pode verifica-se uma ligeira
alteração na cor dos filtros.
Importante:
Os filtros de metal muito saturados
não devem ser lavados juntamente
com a outra loiça.
Se a limpeza for feita manualmente,
colocar primeiro os filtros numa
solução de água quente com
detergente.
70
começa a piscar e
Não utilizar produtos de limpeza
agressivos, que contenham ácido ou
lixívia.
Passado algum tempo, escovar os
filtros com uma escova prόpria e,
depois enxaguá-los e secá-los bem.
Desmontagem e montagem dos
segmentos de exaustão periférica e
dos filtros metálicos de gordura.
Atenção: As lâmpadas de halogéneo
devem estar desligadas e frias.
1. Seguir a descrição nas figuras M.
2. Pressionar para baixo os puxadores
nos filtros de godura e retirar os
filtros.
3. Limpar os filtros de gordura.
4. Montar os segmentos de exaustão
periférica na sequência inversa.
5. Apagar a indicação
Premir 2 vezes seguidas a tecla
O. Soa um sinal e a indicação
apaga-se.
.

Limpeza e manutenção
Desligar o exaustor da corrente,
desligando a ficha da tomada o fusível
ou o disjuntor.
Não limpar o exaustor com esponjas
ásperas, nem utilizar produtors abrasivos
ou com teor de soda, ácidos ou cloro!
Para limpar o exaustor, utilizar uma
solução de água quente e detergente
ou um detergente suave para janelas.
Não raspar sujidades secas
acumuladas devendo sim, amolecêlas com um pano húmido.
Quando limpar os filtros de gordura
deverá também limpar as zonas
acessíveis do aparelho, onde
existirem depόsitos de gordura. Evitase assim o perigo de incêndios e o
mau funcionamento do aparelho.
Nota: Não aplicar álcool sobre as
superficies sintéticas pois isto pode
provocar manchas.
Atenção! Arejar suficientemente a
cozinha e não fazer chamas livres.
Utilizar um produto suave para limpar
janelas.
Não utilizar produtos de limpeza
agressivos, que contenham ácido ou
lixívia.
Dê atenção às Condições de Garantia
constantes da brochura anexa sobre
“Service“.
As teclas de comando devem ser
limpas com uma solução de água com um
detergente suave e um pano macio e
húmido.
Não aplicar, nas teclas de comando,
produto para limpeza de inox.
Superficies de aço inox:
Utilizar um produto para inox suave e
não abrasivo.
Limpar apenas no sentido do
polimento.
Superfícies de alumínio e material
sintético:
Não utilizar panos secos
71

Substituição das lâmpadas
1. Cortar a alimentação de corrente ao
exaustor, desligando a ficha da
tomada ou os fusíveis.
As lâmpadas de halogéneo ficam
muito quentes, quando em
funcionamento. Mesmo pouco tempo de
depois de ligadas, há perigo de
queimaduras.
2. Seguir a fases indicadas nas figuras L
para trocar as lâmpadas.
3. Substituir a lâmpada de halogéneo
Con un avente le stesse
caratteristiche.
4. Restabeleça a alimentação de
corrente ao exaustor, voltando a ligar
a ficha á tomada ou os fusíves.
Nota: Se a iluminação não funcionar,
deverá verificar, se a lâmpada está bem
encaixada.
Anomalias
Se na indicação aparecer um
Ver o capitulo “Filtros e Manutenção“.
Se não for possível utilizar o exaustor:
Desligar o exaustor da corrente
eléctrica durante 1 minuto, retirando a
ficha da tomada ou desligando o
fusível. Depois volte a ligar o
aparelho à corrente.
Se as luzes permanecem acesas de modo
fraco quando a coifa está em stand by,
inverter a tomada de alimetaçao (inverter
fase com neutro).
Para mais informações ou em caso de
avaria consulte os nossos Serviços
Técnicos (Ver índice em anexo).
Quando recorrer aos Serviços Técnicos
indique por favor:
E-Nr. FD
Registe estes números nos campos
acima. Eles constam de chapa de
caracteristicas que encontrará no interior
do aparelho, apόs retirar a armação do
filtro.
:
O fabricante do exaustor não
assume qualquer responsabilidade nas
reclamações atribuídas ao
planeamento e instalação de tubagem.
72

Öppna uppslaget med bilder innan du
läser texten
Viktigt att veta
Gamla uttjänta produkter är inte avfall
utan värde.
Om de får tas om hand på miljöriktigt sätt
kan värdefulla råmaterial återvinnas.
Förstör den gamla apparaten innan den
lämnas till skrotning.
Den nya apparaten har skyddats av
förpackningsmaterial på sin väg till dig.
Samtliga material som använts är
miljövänliga och kan återanvändas. Vi ber
dig att samarbeta för att materialet
avyttras på ett miljövänligt sätt.
Informera dig hos din återförsäljare eller
hos din kommun var du kan lämna
förpackningsmaterialet så att det tas om
hand på bästa miljöriktiga sätt.
Fläkten kan användas med frånlufts
funktion.
Spisfläkten ska alltid placeras mitt över
spishällen.
Minimumavstånd mellan elektriska
kokplattor och fläkten: 550 mm. (se
bilder).
Rekommenderat: 700mm.
Fläkten får monteras över eldstad för
fast bränsle, som kan ge upphov till
brandfara (t. ex.gnistor), endast om
eldstaden är försedd med slutet ej
avtagbart skyddshölje och i enlighet med
gällande bestämmelser i resp. land.
Denna inskränkning gäller ej för
gasspis/häll.
Ju mindre avståndet är mellan
spisfläkten och spishällen, desto större är
risken för att vattendroppar bildas på
fläktens undersida p.g a stigande
vattenånga.
Kompletterande anvisningar vid montering över gasspis/häll:
Vid montering av gasspis/häll måste
gällande nationella föreskrifter respekteras
(t.ex. i Tyskland Tekniska regler för
gasinstallation TRGI).
Det är obligatoriskt att observera
gällande föreskrifter och tillverkarens
instruktioner för installationen av
gasapparater.
Fläkten får monteras med endast en
sida mot högskåp eller hög vägg.
Minimumavstånd 50mm.
För gashällar gäller att minsta avstånd
mellan fläktens underkant till gallret som
tillagningskärlet står på, ska vara: 650mm.
(se bilder).
Rekommenderat: 700mm.
Denna apparat är
märkt i enlighet med det
europeiska direktivet
2002/96/CE för avfall som
utgörs av eller innehåller
elektroniska produkter
(waste electrical and
electronic equipment
(WEEE).
Direktivet anger ramarna för, inom EU
giltig uppsamling och återvinning av
uttjänta apparater .
73

Före monteringen
Sä här fungerar fläkten mest effektivt:
Kort, slät imkanal.
Så få rörkrökar som möjligt.
Eventuellt rör och rörkrökar med stor
diameter.
Långa icke släta frånluftsrör,
många rörkrökar eller med liten
diameter, orsakar dåligt luftutbyte
och ökar samtidigt bullret.
Runda rör, vi rekommenderar en
intern diameter på 150 mm.
Kvadratiska kanaler måste ha ett
internt tvärsnitt som motsvarar de
runda rörens diameter.
Inga betydande avvikelser får
föreligga.
Ø 150 mm ca. 177 cm2
I händelse av olika rördiameter:
Sätt in tätningslister.
Vid frånlufts funktion:
Sörj för tillräcklig lufttillförsel.
Anslutning frånluftsslang Ø 150 mm:
Fäst röret direkt i kanalhylsan.
Rör med diameter under 150 mm, är
inte pålitliga.
Större avstånd till spishällen försämrar
uppsugningen. Vid förberedelsen för
monteringen, räkna även med den
stigande rökens trattform med lutning på
ungefär 10 – 15°.
Förberedelse i taket:
Taket måste vara jämnt och vågrätt .
Kontrollera att pluggarna sitter
ordentligt fast.
De bifogade pluggarna är lämpliga för
betong och natursten.
Vid tak i annat material, ska lämpliga
fästanordningar för typen av material
användas.
Varning: Fläkten är utrustad med
fästningsmaterial av standard typ. Den
som utför installationen måste försäkra sig
att fästningsanordningarna är lämpliga för
de existerande väggarna och/eller taket.
Tillverkaren avsäger sig allt ansvar för
skador som har sitt upphov ur felaktig
installation eller användning av ej lämpliga
fästanordningar.
För vikten hänvisas till bilder, serie M. Med
reservation för konstruktions modifieringar
beroende på teknisk utveckling.
74
Elektrisk anslutning
Spisfläkten får endast anslutas till ett
jordat vägguttag, som är installerat enligt
gällande bestämmelser.
Apparaten ska vara installerad på så sätt
att stickkontakten är tillgänglig.
Elektriska data:
Uppgifterna finns på typskylten.
Typskylten syns inuti fläkten om du tar ut
filterramen.
För reparationer Gör alltid spisfläkten
strömlös.
Anslutningskabelns längd: 1,30 m.
Om fast anslutning krävs:
Anslutningen av spisfläkten får
hursomhelst utföras endast av elektriker,
auktoriserad av det behöriga företaget för
eldistribution.
Anläggningen måste vara försedd med
frånskiljare. Som frånskiljare räknas
strömbrytare med en öppning på över 3
mm mellan kontakterna och med enpolig
brytning. Dit hör automatiska brytare och
relä.
Montering
Den frihängande fläkten för köksö
förutser takmontering i ett kök eller vid ett
motståndskraftigt hängtak.
Observera ett minimumavstånd mellan
spishällen och fläkten på 550 mm, för
elektrisk spishäll, och på 650 mm för
gasspis/häll.
Varning: skada inte de ömtåliga ytorna
i rostfritt stål.
Montera produkten som anges på
bilderna, serie M.
Om anslutningskabeln till denna
apparat skadas måste den ersättas av
tillverkaren, hans kundtjänst eller annan
fackman för att undvika fara.
Denna spisfläkt överensstämmer med EG
bestämmelserna för avskärming mot
radiostörningar.
75

Före första användningen
Första användning:
Denna bruksanvisning gäller för flera
olika varianter av apparaten.
Det är därför möjligt att här finns
beskrivningar av enstaka detaljer av
utrustningen som inte avser just din
apparat.
Denna köksfläkt överensstämmer
med gällande säkerhetsföreskrifter.
Reparationer får endast utföras av
fackman.
Reparationer som inte utförts på
ett sakkunnigt sätt kan innebära
stor fara för användaren.
Flambera inte under köksfläkten.
Fettfiltren kan ta eld om de nås av
flammorna.
Kokplattorna måste alltid vara täckta
av kokkärl.
Köksfläkten får bara under vissa
omständigheter installeras över eldstad
som drivs med fast bränsle ( kol, trä och
liknande) (se kapitlet “Instruktioner för
monteringen”).
Apparaten får inte användas om den
är skadad.
Anslutning och idrifttagning får utföras
endast av en tekniker.
Denna köksfläkt är avsedd endast för
normal hushållsanvändning.
Använd aldrig fläkten utan iskruvade
lampor.
Uttjänta lampor bör ersättas
omedelbart, för att undvika att överbelasta
de övriga lamporna.
Använd aldrig köksfläkten utan
fettfilter.
76
Överhettat fett och matolja kan lätt
självantändas.
Håll därför alltid arbetsplatsen under
uppsyn vid tillagning av maträtter med fett
eller olja, t.ex pommes frites .
Rengör fläkten noggrant före första
användningen.
Placera inte föremål på köksfläkten.
Om anslutningskabeln till denna
apparat skadas måste den ersättas av
tillverkaren , hans kundtjänst eller annan
fackman för att undvika fara.
Låt inte barn leka med apparaten.
Barn och vuxna får inte använda
apparaten utan uppsikt om:
- de inte klarar användningen fysiskt,
sensoriskt eller mentalt;
- de inte har kännedom eller erfarenhet av
korrekt och säker användning av
apparaten.
Gashällar/Gasspisar
Använd inte alla gasplattorna samtidigt
under en längre tid (max 15 minuter) i
högsta läge, eftersom detta medför risk för
brännskador om man råkar röra vid
fläktens hölje, eller risk för skador på
fläkten. Vid användning av fläkten över en
gashäll med tre eller flera gasplattor
påslagna samtidigt, ska fläkten ställas på
max. läge.
Observera att en stor brännare med en
effekt som överstiger 5 Kw (Wok)
motsvarar två gasbrännare.
Använd aldrig en gashäll utan at täcka
lågorna med kokkärl. Reglera lågan så
att den inte går utanför kokkärlets
botten.
Läs noggrant bruksanvisningen innan
apparaten används för första gången.
Bruksanvisningen innehåller viktig
information angående din säkerhet,

och även för användning och skötsel
av apparaten.
Ta vara på bruks-och
monteringsanvisningen åt den som
eventuellt tar över apparaten efter dig.
Funktionssätt
Frånlufts funktion bild serie M.
Fläkten suger upp matoset som leds
ut i det fria via fettfiltret.
Fettfiltret binder de beståndsdelar av
matoset som innehåller fett.
Köket blir på så sätt helt fritt från fett
och os.
Frånluften leds uppåt, genom en
ventilationstrumma, eller direkt ut i den fria
luften genom ytterväggen.
) Det är förbjudet att leda frånluften till en
fungerande skorsten för rök eller en
skorsten för gasutsläpp eller till en
ventilationstrumma som nyttjas för
luftutsläpp från lokaler där eldstäder finns
installerade.
För frånluft, måste gällande
administrativa och lagenliga
föreskrifter (t. ex nationella
byggnadsföreskrifter) följas.
I händlese av frånluft via ej fungerande
skorstenar för rök eller skorstenar för
gasutsläpp, måste man begära tillstånd
från behöriga myndigheter
) Om fläkten används med
frånluftsfunktion, med samtidig
användning av förbränning som är
beroende av skorstenen (som t.ex gas-
olje-eller koluppvärmning,
varmvattenberedare), måste det finnas
tillräckligt med förbränningsluft, för
varje ugn.
En riskfri funktion är möjlig om i
eldstadens installationslokal undertrycket
inte överstiger 4 Pa (0,04 mbar).
Detta kan man uppnå om
förbränningsluften leds genom öppningar
som inte går att stänga t.ex. i dörrar och i
fönster och i kombination med väggbox för
tilluft/frånluft eller med andra tekniska
lösningar som ömsesidigt samverkande
etc.
Om inte tillräckligt med tilluft tillförs,
föreligger risk för förgiftning eftersom
rökgas kommer tillbaka in i rummet.
Enbart en väggbox för tilluft och frånluft är
inte tillräckligt för att garantera att värdena
hamnar inom tillåtna gränser.
Observera: Vid beräkningen måste man
alltid utgå ifrån hela bostadens ventilation.
Denna regel gäller inte för spisar, t.ex
gashällar och gasspisar.
Om frånluften leds via ytterväggen, bör
man använda en teleskopisk väggbox.
77

Så används köksfläkten
g
r
För att aktivera knapparnas
funktioner, är det nödvändigt att trycka lätt
på dessa (lite kraft bara för ett ögonblick).
Överdrivet hårda eller långdragna tryck
aktiverar inte de relativa funktionerna.
För att på mest effektift sätt avlägsna
matos.
Sätt på köksfläkten
vid matlagningens början.
Stäng av köksfläkten
Inte förrän några minuter efter
avslutad matlagning.
ljus
Stänger av
fläkten
Anger
fläktens
rade
Minska effekten
Ljudsignal
Ett tryck på en tangent bekräftas med
en ljudsignal.
Start
Tryck på tangenten +.
Ställ in önskad fläkthastighet
Tryck på tangenten +.
Fläkthastigheten ökar med en grad.
Tryck på tangenten -.
Fläkthastigheten minskar med en
grad.
Stopp
Tryck på tangenten O.
Efter en kort stund slocknar
teckenrutan.
Eller
Tryck upprepade gånger på
tangenten – tills fläkten stängs av.
Fläktens
eftersläp
funktion
Sätter på/ökar fläktens
effekt. Intensivläge
i
Efter en kort stund slocknar
teckenrutan.
Intensivläge:
I intensivläget arbetar fläkten på högsta
effekt. Detta läge behövs endast under en
kort tid.
Tryck upprepade gånger på
tangenten +, tills det står
teckenrutan.
Om du inte manuellt stänger av
intensivläget kommer fläkten
automatiskt efter 10 minuter att
koppla ned till hastighet
Stopp med eftersläp
Tryck på tangenten
Under 10 minuter arbetar nu fläkten i
hastighet
punkt. Därefter stängs fläkten
automatiskt av.
, I tecken rutan blinkar en
Belysning
Belysningen kan användas även när
fläkten är avstängd.
Fjärrkontroll
Programmeringen av
fjärrkontrollen utförs av
tillverkaren. Om fjärrkontrollen
inte kontrollerar motor och
belysning i fläktens närhet, utför
följande procedur.
Programmering av
fjärrkontroll
Tryck och håll intryckt tangenten “+” på
fjärrkontrollen och sätt sedan på fläkten;
för att bekräfta utförd avkänning utlöses
en lång ljudsignal. Upprepa proceduren
om ingen ljudsignal hörs inom 30
sekunder.
i
i
.
.
78

Fjärrkontrollens funktioner
Tangenterna +, -,
samma funktioner som fläktens
kontrolltangenter.
Tangenten : har samma funktion som
tangenten för eftersläp.
Intervall funktion
En speciell egenskap för denna apparat,
är intervall funktionen som består i
automatisk aktivering av fläkten 10
minuter varje timme vid hastigheten som
visas blinkande på displayen.
Denna funktion kan aktiveras både direkt
på fläkten och med fjärrkontrollen.
Aktivering av intervallfunktion på
fläkten:
Tryck samtidigt på tangenterna O och
+ och släpp sedan tangenterna:
displayen kommer att visa 1;
Genom att trycka på tangenten +,
kommer displayen att visa följande
sekvens för fläktens hastigheter
2→3→1→2 …;
Tryck samtidigt på tangenterna O och
+ för att bekräfta vid vilken hastighet
fläkten ska fungera vid
intervallfunktionen.
Aktivering av intervallfunktion med
fjärrkontroll:
Tryck på tangenten
indikatorlampan kommer att visa
hastighet 1;
Genom att trycka på tangenten +,
kommer indikatorlampan att visa
följande sekvens för fläktens
hastigheter 2→3→1→2 …;
Tryck på tangenten
vid vilken hastighet fläkten ska
fungera vid intervallfunktionen.
Om den visade intervallfunktionen inte
bekräftas inom ett fåtal sekunder, vid
och belysning har
:
för att bekräfta
programmeringsfasen, kommer man att
lämna programmeringsläget för
intervallfunktionen.
Genom att trycka på vilken tangent som
helst, med undantag för
belysningstangenten, kommer
intervallfunktionen att avaktiveras.
Fjärrkontrollen är batteridriven. När
batteriet är uttjänt ska du:
1. Skruva av de två skruvarna på
baksidan och avlägsna locket.
2. Ta ut batteriet och ersätta det med ett
nytt, med samma egenskaper.
3. Stänga locket och skruva fast
skruvarna igen.
Följ nationella lagar för nedsmältning av
uttjänta batterier.
79

Filter och underhåll
Fettfilter:
Metallfettfiltret binder de beståndsdelar
i matoset som innehåller fett.
Filtermattorna består av obrännbart
material.
Varning:
Allt eftersom filtret fylls med fetthaltiga
ämnen, ökar risken för antändning.
Dessutom påverkas fläktens sugeffekt
negativt.
Viktigt:
Genom att omedelbart rengöra
metallfettfiltret förebyggs brandrisken som
kan orsakas av värmeansamlingen i
samband med fritering eller stekning.
Ljus-och ljudsignal när filtret behöver
rengöras:
När fettfiltrena är fulla, tänds ljussignalen
och en ljudsignal utlöses.
Genom att stänga av fläkten disaktiveras
ljudsignalen.
Rengör genast filtren.
Rengöring av metallfettfilter:
Vid normal användning (1-2 timmar
om dagen ) ska metallfettfiltrena
rengöras en gång i månaden.
Filtren kan rengöras i diskmaskin. Vid
tvätten kan metallen missfärgas
något.
Viktigt:
Diska inte kraftigt nedsmutsade
metallfettfilter tillsammans med
porslin.
Vid handdisk: låt filtren ligga i blöt i
hett diskvatten i flera timmar.
Använd inte frätande, syrabaserade
eller alkalina rengöringsmedel. Borsta
sedan filtrena och skölj ordentligt med
rent vatten och låt dropptorka.
Ta ut/sätta tillbaka metallfettfiltren:
Varning: Lamporna måste vara släckta
och kalla.
1. Följ faserna som anges på bilderna
serie M.
2. Tryck fettfiltrenas låsbyglar nedåt, fäll
ned dem och avlägsna filtrena.
3. Rengör fettfiltrena.
4. Sätt tillbaka fettfiltrena.
5. Radera indikatorn .
Tryck 2 gånger i följd på
tangenten O. En ljudsignal hörs
och indikatorn slocknar.
80

Rengöring och underhåll
Gör köksfläkten strömlös genom att
dra ut anslutningskabeln eller genom
att skruva ur säkringen.
Rengör inte fläkten med hårda
svampar eller rengöringsprodukter som
innehåller sand, soda, syra eller klorid!
Använd varmt vatten med diskmedel
eller ett milt fönsterrengöringsmedel.
Skrapa inte bort smuts som fastnat
utan blöt upp det med en fuktig trasa.
Rengör även de delar av fläkten som
du kommer åt i samband med
rengöringen av fettfiltren.
Därigenom förebygger du risken för
bränder och garanterar fläktens
optimala funktion.
Observera: använd inte alkohol
(sprit) på plastytor eftersom detta kan
ge upphov till matta fläckar.
Varning! Ventilera köket ordentligt.
Använd inte öppna lågor.
Ytor av aluminium och plast, lackerade
ytor:
Använd inte torr torkduk.
Använd ett milt
fönsterrengöringsmedel.
Använd inte frätande, syrabaserade
eller alkalina rengöringsmedel.
Läs garantibestämmelserna i det
bifogade skötselhäftet.
Rengör tangenterna endast med milt
diskmedel upplöst i vatten, med en mjuk
fuktig trasa.
Använd aldrig rengöringsmedel för rostfritt
stål, på tangenterna.
Ytor i rostfritt stål:
Använd ett milt rengöringsmedel utan
repande effekt, avsett för rostfritt stål.
Gnid endast i slipriktningen.
81

Byte av lampor
1. Stäng av fläkten och dra ut
anslutningskabeln eller skruva ur
säkringen.
Halogenlamporna blir mycket heta när
de lyser. Det finns risk för brännskador
även flera minuter efter att de släckts.
2. Följ faserna som anges i serie L för
utbyte av lamporna.
3. Byt ut den defekta lampan med en ny
lampa med samma egenskaper.
4. Återställ strömtillförseln genom att på
nytt ansluta kabeln eller skruva i
säkringen.
Obs.: om belysningen inte fungerar,
kontrollera att du satt fast lamporna på rätt
sätt.
Fel
Om displayen visar
Se kapitlet “Filter och underhåll”.
Om köksfläkten inte fungerar:
Gör köksfläkten strömlös för ungefär
1 minut genom att dra ut
anslutningskabeln eller genom att
avaktivera säkerhetsbrytaren. Anslut
sedan på nytt.
Om lamporna förblir svagt tända när
fläkten är i stand-by, omvänd
anslutningskontakten (omvänd fas med
neutral).
Vid behov av förklaringar eller vid fel,
kontakta kundtjänst.
(se listan för serviceverkstäder).
Uppge följande uppgifter vid kontakt med
serviceverkstad:
E-Nr. FD
Fyll i dessa uppgifter i ovanstående ruta.
Uppgifterna finns på apparatens typskylt
som blir synlig efter att ha avlägsnat
filterramen inuti köksfläkten.
eller :
Tillverkaren av köksfläktarna åtar
sig inget ansvar för reklamationer som
kan hänföras till hur rördragningen har
planerats och utförts.
82

du begynner å lese anbefales det å åpne
illustrasjonssidene.
Viktige merknader
Kasserte apparater er avfall uten verdi.
Ved økologisk kassering kan det utvinnes
verdifulle materialer.
Gjør apparatet ubrukelig før det skal
skrapes.
Emballasjen har beskyttet apparatet
frem til mottak hos dere. Alle materialer
brukt i produksjonen av dette produktet er
miljøvennlige og resirkulerbare. Vi ber om
deres samarbeide ved at dere kvitter dere
med emballasjen på en økologisk korrekt
måte.
Søk informasjon hos forhandler eller den
kommuneadministrasjonen angående
aktuelle kasseringsmuligheter.
Ventilatorviften kan bli brukt til å blåse
ut luften.
Alltid monter ventilatorviften sentrert
over stekeplaten.
Minimum distanse mellom elektrisk
ovn og viftehetten: 550 mm. (se figur).
Anbefales: 700mm.
Over en ovn for fast brensel, hvor det
kan eksistere en fare for selvantennelse
(f.eks. ved gnist), er monteringen av
ventilatorviften anbefalt kun hvis ovnen er
dekket av en udemonterbar lukket hette
og samtidig er i henhold til nasjonal
lovgivning.
Denne begrensningen eksisterer ikke for
gasskjøkken og gassdrevne stekeplater.
Jo større avstanden mellom
ventilatorviften og ovnen er, jo større er
muligheten for at den nedre delen av
ventilatorviften utvikler dråper av kondens
grunnet vanndamp som siver opp.
Ytterligere merknader for
gassapparater:
Ved montering av gassovner må
gjeldende nasjonale lover etterfølges (for
eksempel i Tyskland: Tekniske
retningslinjer for installasjon av
gassenheter TRGI).
Det er viktig å observere normene for
montering og instruksjonene for montering
av gassapparater nøye.
Det anbefales at ventilatorviften
monteres med kun den ene siden nærme
et høyt skap eller en vegg.
Minimum avstand 50mm.
Minimum avstand for gassovner fra
øvre del av stekeplaten og nedre kant av
ventilatorhetten: 650mm. (se figurer).
Anbefales: 700mm.
Dette apparatet er
merket i henhold til
europeisk direktiv
2002/96/CE for elektriske
og elektroniske apparater
(waste electrical and
electronic equipment,
WEEE).
Dette direktivet definerer
reglene for innsamling og resirkulering av
kasserte apparater i hele EU-sonen.
83

Før montering
Maksimum effektivitet for
ventilatorviften:
Kort, mykt luftavtrekksrør.
Så få bøyer som mulig i røret.
Mulig stor rørdiameter og stor
bøy/vinkel.
Hvis lange, grove avtrekksrør med
mange bøyer eller liten diameter
tas i bruk, vil ikke avtrekket være
optimalt og det vil lettere
forekomme ulyder.
Ved bruk av runde rør anbefaler vi
en innvendig diameter på 150 mm.
Firkantede kanaler må ha et
innvendig tverrsnitt tilsvarende det til
de runde rørene.
Disse må derfor ikke ha skarpe
bøyer.
Ø 150 mm ca. 177 cm2
Hvis piper har annen diameter: sett
inn tetningslist.
For luftavtrekksmodus må det
påses at det tilføre nok luft.
Kople til et Ø 150mm avtrekksrør:
kople avtrekksrøret direkte inn i
avtrekket på hetten.
Rør med mindre enn 150 mm
diameter kan ikke brukes.
Med en lengre avstand fra stekeplaten
reduseres avtrekksytelsen. Under
monteringen må man også huske på
formen til røykkanalen, som burde ha en
stigning på ca. 10 – 15°.
Forberedelse av taket:
Taket må være flatt og horisontalt.
Se til at det er godt feste i
forsterkningene.
Festene som følger med passer for
betong og naturstein.
Hvis taket er av et annet materiale er
det nødvendig å bruke tilpassede
festeanordninger.
Advarsel: Avtrekkshetten er utstyrt
med standard festemateriale. Den som
utfører monteringen
Må forsikre seg om at festeanordningene
er tilpasset de aktuelle veggene og/eller
takene. Produsenten fraskriver seg
ethvert ansvar for skader som følge av
mangelfull montering eller bruk av
festeanordninger som ikke er tilpasset.
For vekt, referer til figuren serie M. Med
84

Elektrisk tilkopling
Ventilatorviften må kun koples til en
jordet stikkontakt som er installert i
henhold til reguleringer fastsatt av
myndighetene.
Apparatet må monteres på en slik måte at
støpselet ikke er dekket til.
Elektriske data:
Finnes på informasjonsplaten inne i
apparatet etter at filtrene er fjernet.
Ved reparasjon må alltid strømmen
koples fra ventilatorviften.
Tilkoplingskabelens lengde: 1,30 m.
I tilfelle tilkobling er nødvendig:
Ventilatorhetten må i alle tilfeller kun
koples opp av en autorisert elektriker fra
en kompetent elektrikerselskap.
En separatorenhet må tilkoples anlegget.
En passende separatorenhet er en bryter
som har en kontaktavstand på mer enn
3mm og som avbryter alle poler. Slike
enheter inneholder automatsikringer og
relé.
Montering
Avtrekksviften er tilpasset takmontering
på kjøkken eller et tak med egnede
festeegenskaper.
Hold en minimumsavstand fra ovnen til
ventilatorviften på 550 mm hvis ovnen er
elektrisk, og 650 mm hvis du har en
gassovn.
Advarsel: se til å ikke skade den
delikate rustfrie ståloverflaten.
Monter produktet som vist i figuren i serie
M.
Hvis tilkoplingskabelen for dette
apparatet blir skadet må den byttes ut for
å unngå farer. Dette må gjøres av
produsent, kvalifisert servicepersonell eller
annen spesialist.
Denne ventilatorhetten er produsert i
henhold til CEE-reguleringer mot RFforstyrrelser.
85

Før første gangs bruk
Første gangs bruk:
Denne instruksjonsboken er utformet
for flere versjoner av apparatet.
Det er mulig at noen punkter i denne
håndboken ikke gjelder deres
apparat.
Denne ventilatorviften er i
overensstemmelse med aktuelle
sikkerhetsnormer.
Reparasjoner må kun utføres av
spesialisert personell.
Reparasjoner som ikke følger de
nyeste standardene kan føre til
farlige situasjoner for brukeren.
Ikke flamber matretter under
ventilatorviften. Antifettfilteret kan
antennes hvis det nås av flammene.
Platene må alltid være dekket til med
kjeler.
Det er kun delvis tillatt (se kapittelet
"Instruksjoner for montering") å bruke
ventilatorviften på ovner for brennbare
materialer (karbon, treverk eller lignende).
Hvis apparatet er skadet må det ikke
tas i bruk.
Tilkobling og første oppstart må kun
utføres av en tekniker.
Denne ventilatorviften er kun til
hjemmebruk.
Bruk kjøkkenviften kun med lampene
montert.
Hvis en lyspære er gåen må den
byttes ut umiddelbart slik at ikke de andre
lyspærene overbelastes.
Bruk aldri kjøkkenviften uten fettfilter.
86
Overopphetede oljer og fett er
lettantennelige.
Lag derfor mat med fett eller olje, f. eks
pommes frittes, kun under oppsyn.
Rengjør kjøkkenviften før første gangs
bruk.
Ikke legg gjenstander på
kjøkkenviften.
Hvis tilkoplingskabelen for dette
apparatet blir skadet må den byttes ut for
å unngå farer. Dette må gjøres av
produsent, kvalifisert servicepersonell eller
annen spesialist.
Ikke la barn leke med apparatet.
Voksne og barn må aldri bruke apparatet
uten oppsyn hvis:
- De ikke er i stand til det mentalt eller
fysisk.
- De mangler kunnskap eller erfaring i
sikker bruk av slike apparat.
Stekeplate/Gasskomfyr
Ikke bruk alle gasstoppene på maks
samtidig over lengre tid (maks. 15
minutter). Dette kan føre til brannskade
hvis man berører overflaten, samt skade
på viften og hetten. Ved bruk av
kjøkkenvifte over en gassdrevet ovn med
tre eller flere gasstopper i bruk samtidig,
må kjøkkenviften stå på maks avtrekk.
Husk at en stor gasstopp som er
kraftigere enn 5 Kw (Wok) har høyere
potens enn to vanlige gasstopper.
Bruk aldri gassen uten at det står
kasseroller eller lignende over
gasstoppen. Reguler flammen slik at
den ikke skader bunnen av
kasserollene som er i bruk.
Les bruksinstruksjonene nøye før du
bruker det nye apparatet. Disse
inneholder viktig informasjon for deres
sikkerhet, og for bruken og
vedlikeholdet av apparatet.

Oppbevar instruksjonsboken for bruk
og vedlikehold på et sikkert sted for
en eventuell fremtidig bruker.
Funksjonsmodus
Modus for avtrekksluft fig. serie M.
Ventilatoren i kjøkkenviften suger opp
stekedamp og sender den ut gjennom
antifettfilteret.
Antifettfilteret holder på
fettkomponentene i stekedampen.
Kjøkkenet holdes helt fritt for fett og
vond lukt.
Avtrekksluften blåses oppover gjennom en
ventilasjonssjakt, eventuelt direkte ut i
friluft gjennom en åpning i veggen.
) Det er forbudt å styre avtrekksluften
mot et ildsted eller et sted for
avtrekksgasser, ei heller inn i sjakter som
brukes for å ventilere rom der det er
montert ovner eller peiser.
Avtrekksluften må blåses ut i henhold
til reguleringer fastsatt av
myndighetene (for eksempel nasjonale
bygningsreguleringer).
I tilfelle utblåsing av avtrekksluft i ildsteder
eller steder for avtrekksgasser, er det
nødvendig å fremskaffe en autorisasjon
fra kompetente myndigheter.
) Når kjøkkenviften drives i modus for
avtrekksluft samtidig som et annet
apparat bruker samme pipe (slik som
oppvarmingsenheter drevet med gass-,
olje- eller kull, vannkokere, undervarme på
bad osv.) må man passe på at det er
nok tilførsel av luft, noe som er
nødvendig for at avtrekket skal kunne
fungere skikkelig.
Sikker drift er mulig gitt at undertrykket på
monteringsstedet ikke overstiger 4 Pa
(0,04 mbar).
Dette oppnås hvis forbrenningsluften kan
strømme ikke-låsbare åpninger, for
eksempel dører, vinduer, inntak/avtrekk
eller andre tekniske løsninger som
vekselblokkert avtrekk.
Hvis luftinntaket er utilstrekkelig er det
risiko for forgiftning fra
forbrenningsgasser.
En boks for inntak/avtrekk er ikke en
garanti i seg selv for at grenseverdien ikke
vil overstiges.
Merk: Man må alltid tenke på generelle
luftbalansen i bopelen. Denne regelen
gjelder ikke for steke- og kokeapparater,
for eksempel kokeplate og gasskjøkken.
Hvis avtrekksluften skal føres rett ut i
friluft, må man sette opp en uttrekkbar
veggkasse.
87

Bruk av kjøkkenviften:
r
For å bruke knappefunksjonene er det
nok å trykke meget løst (liten kraft i et kort
øyeblikk). Overdreven kraft eller
nedtrykkstid aktiverer ikke
knappefunksjonene.
For å suge opp stekedampen på en
effektiv måte.
Sett på kjøkkenviften
ved oppstart av kokeplaten.
Slå av kjøkkenviften
kun noen minutter etter at kokeplaten
er slått av.
lys
slår av
ventilatoren
senker
ventilatorstyrken
Akustisk signal
Når man trykker på en knapp vil et
akustisk signal bekrefte handlingen.
Slå på ventilatoren
Trykk på+knappen.
Still inn ønsket avtrekksgrad.
Trykk på +knappen.
En grads økning.
Trykk på -knappen.
En grads reduksjon.
Slå av ventilatoren
Trykk på Oknappen.
Rett etter at indikasjonen går bort.
Eller
Trykk på – knappen til ventilatoren
slår seg av.
Rett etter vil indikasjonen forsvinne.
visning av
grader i
ventilatoren
ventilator ette
bruk
slå på/øke
ventilatorstyrke
Sterk grad
Sterk grad:
Ved sterk grad når man maksimal potens.
Dette er nødvendig for en kort periode.
Trykk på +knappen mange ganger
helt til indikasjonen
Hvis sterk grad ikke deaktiveres
manuelt, vil ventilatoren redusere
graden automatisk etter 10 minutter
.
Ventilator etter bruk
Trykk på knappen
Ventilatoren kjører 10 minutter på
, i denne perioden lyser et
grad
punkt i displayet. Så slår ventilatoren
seg automatisk av.
Belysning
Belysningen kan alltid brukes, også
når ventilatoren er avslått.
Fjernkontroll
Programmeringen av
fjernkontrollen utføres ved
fabrikken. Følg denne
prosedyren hvis fjernkontrollen
ikke styrer motoren og lysene fra
en posisjon i nærheten av viften.
Programmering av
fjernkontroll
Trykk og hold tasten "+" på fjernkontrollen
nede og slå så på viften. Et langt akustisk
signal vil bekrefte handlingen. Hvis man
ikke hører det akustiske signalet innen 30
sekunder etter prosedyren.
Funksjoner for fjernkontroll
Tastene +, -,
og lys har samme
funksjon som de på fjernkontrollen.
Tast : samme funksjon for tasten etter
bruk.
vises.
.
88

Intervallfunksjon
En særegenhet ved dette apparatet er
intervallfunksjonen som aktiverer
ventilasjonen automatisk 10 minutter hver
time med hastigheten som blinker på
displayet.
Denne funksjonen kan aktiveres på selve
viften eller med fjernkontroll.
Intervallaktivering med viftekontroll:
Trykk samtidig på tastene O og + og
slipp opp tastene: Displayet vil vise 1;
Ved å trykk på +tasten vil displayet
vise følgende sekvens for hastigheten
til ventilator 2→3→1→2 …;
Trykk samtidig på tasteneO og + for å
bekrefte hastigheten til ventilatoren i
intervallmodus.
Intervallaktivering med fjernkontroll:
Trykk på tasten
indikatoren vil vise hastigheten 1;
Ved å trykke på +tasten vil den
lysende indikatoren vise sekvens for
hastigheten til ventilator 2→3→1→2
…;
Trykk på tasten
hastigheten til ventilatoren i
intervallmodus
I programmeringsfasen, hvis
intervallfunksjonen ikke bekreftes innen
noen sekunder, går man ut av
programmeringsmodus for intervall.
Ved å holde en hvilken som helst knapp,
bortsett fra lys, vil intervallfunksjon
deaktiveres.
Fjernkontrollen går på batteri. Når batteriet
er dødt må man;
1. Skru ut de to skruene fra bakdelen og
fjern dekslet.
2. Ta ut batteriet og bytt det ut med et
nytt med de samme karakteristikker.
3. Lukk dekslet og skru på igjen
skruene.
: Den lysende
for å bekrefte
Følg nasjonale lover for avfallshåndtering
av tomme batterier.
89

Filtre og vedlikehold
Fettfilter:
For å absorbere fettkomponentene i
stekekdampen bruker man metalliske
fettfiltre.
Matteringen i filtret består av uantennelig
materiale.
Advarsel:
Grunnet den progressive metningen med
fettrester øker brennbarheten, og
funksjonen til viften kan bli nedsatt.
Viktig:
Jevnlig rengjøring av de metalliske
fettfiltrene hindrer risiko for antenning som
er forårsaket av varmeopphoping ved
fritering eller biffsteking.
Metningsindikasjon:
Når fettfiltrene er mettet vil
indikasjonslyset
akustisk signal vil høres.
Når viften slås av vil det akustiske signalet
deaktiveres.
Ikke vent lenger med å rengjøre
fettfiltrene.
Rengjøring av de metalliske fettfiltrene:
Ved normal bruk (1-2 timer per dag)
må de metalliske fettfiltrene rengjøres
en gang i måneden.
Rengjøring kan utføres i
oppvaskmaskin. Ved vasking kan en
fargeforandring finne sted.
Viktig:
Ikke rengjør metalliske fettfiltre som er
veldig møkkete sammen med bestikk
og lignende.
Ved vasking for hånd må fettfiltrene
legges i bløtt i mange timer i en
kokende blanding.
Ikke bruk etsende, syrebaserte eller
slå seg på og et
alkaliske vaskemidler. Du kan børste,
skylle med rent vann og tørke.
Montering og demontering av de
metalliske fettfiltrene:
Advarsel: Lampene må være slått av og
nedkjølte.
1. Følg punktene som vist i figuren i
serie M.
2. Trykk håndtakene til fettfiltrene
nedover, tipp til siden og fjern filtrene.
3. Rengjør fettfiltrene.
4. Sett inn nye fettfiltre.
5. Fjerne indikasjonenn
Trykk to ganger på tasten O. Et
akustisk signal høres og
indikasjonen forsvinner.
.
90

Rengjøring og vedlikehold
Koble fra strømmen til viften ved å ta ut
kontakten, eventuelt
Ikke rengjør kjøkkenviften med
svamper og rengjøringsprodukter som
inneholder sand, natriumkarbonat eller
klor!
For å rengjøre kjøkkenviften må man
bruke en varm såpevannsblanding
eller et delikat vindusvaskemiddel.
Ikke skrap bort tørre flekker, men bruk
en våt klut for å myke de opp.
Ved rengjøring av fettfiltrene må man
også rengjøre fettlagrene på veggen.
Disse kan nås gjennom rammen.
Slik motvirker man brannfare og sikrer
optimal produktfunksjon.
Merknad: Ikke bruk alkohol (sprit) på
plastikkoverflatene. Dette kan føre til
mattelse i stålet.
Advarsel! Ventiler kjøkkenet, og ikke
bruk åpne flammer.
Overflater med aluminium, maling eller
plastikk:
Ikke bruk tørre kluter.
Bruk et delikat rengjøringsmiddel for
vinduer.
Ikke bruk etsende rengjøringsmidler,
syrer eller alkaliske rengjøringsmidler.
Rett deg etter garantireglene som
finnes i den vedlagte
vedlikeholdshåndboken.
Rengjør kontrolltastene kun med en
såpevannsløsning og en tørr klut.
Ikke bruk rengjøringsapparater for rustfritt
stål på kontrolltastene.
Overflater i rustfritt stål:
Bruk et delikat vaskemiddel for
rustfritt stål som ikke er abrasivt.
Rengjør ved å gnikke i
børsteretningen.
91

Bytte av pærer
1. Slå av kjøkkenviften og kutt
strømmen ved å trekke ut
strømledningen, eventuelt ta ut
sikringen.
Halogenlamper som er påslått er
meget varme. Man kan brenne seg på
disse også mange minutter etter at de er
blitt slått av.
2. Følg punktene som vist i figuren i
serie L for bytte av lyspærer.
3. Bytt ut pæren med en ny pære med
de samme karakteristikker.
4. Slå på strømmen ved å plugge i
strømkabelen eller sikringen.
Merknad: Hvis belysningen ikke fungerer
må man kontroller at lyspærene er riktig
satt i.
Skader
Hvis displayet viser
Se kapittelet om filtre og vedlikehold.
Hvis kjøkkenviften ikke svarer på
kommandoen:
Kutt strømmen til viften i cirka ett
minutt ved å trekke ut strømledningen
eller slå av sikkerhetsbryteren. Plugg
inn strømledningen igjen.
Hvis pærene fortsatt lyser dårlig når viften
er i stand-by, vri om på strømstøpselet
(nøytral).
Henvend deg til kundeservice for videre
avklaringer eller ved feil.
(se liste over servicepunkter).
Oppgi følgende informasjon når du ringer:
E-Nr. FD
Skriv disse dataene i vinduet over.
Dataene finner du på identifikasjonsplaten
bak filtergrillen, i det innvendige avlukket i
kjøkkenviften.
eller :
Kjøkkenvifteprodusenten godtar
ikke reklamasjoner som kan tilskrives
utformingen og monteringen av rørene.
92

Käännä ennen lukemista kuvasivut esiin.
Tärkeitä ohjeita
Käytöstä poistetut laitteet ovat
arvottomia jätteitä.
Käytöstä poistetut laitteet voidaan käyttää
hyväksi toimittamalla ne kierrätykseen,
jolloin niistä saadaan raaka-aineita
uusiokäyttöön.
Tee käytöstä poistettu laite
käyttökelvottomaksi ennen hävittämistä.
Pakkaus on suojannut laitettanne aina
siihen asti, kun se on teille saapunut.
Kaikki pakkauksessa käytetyt materiaalit
ovat ympäristöystävällisiä ja ne voidaan
kierrättää. Suojele ympäristöä hävittämällä
pakkausmateriaalit ympäristöystävällisesti.
Myyntiliike tai kunnan tai kaupungin
jätehuoltoasioista vastaavat henkilöt
antavat neuvoja paikallisesta
jätehuollosta.
Liesituuletinta voidaan käyttää
ilmanpoistoa varten.
Asenna liesituuletin aina keittotason
keskikohdan yläpuolelle.
Sähkölieden keittotason ja
liesituulettimen alareunan välisen
etäisyyden tulee olla vähintään: 550 mm.
(katso kuvat).
Suositeltu: 700mm.
Liesituulettimen asennus on sallittu
(esim. kipinöinnistä aiheutuvan)
palovaaran vuoksi kiinteillä polttoaineilla
toimivien liesien yläpuolelle vain, jos liesi
on varustettu suljetulla kiinteällä kannella
ja jos noudatetaan maakohtaisia
määräyksiä.
Tämä rajoitus ei koske kaasuliesiä eikä
kaasukeittotasoja.
Mitä pienempi liesituulettimen ja
keittotason välinen etäisyys on, sitä
suurempi on mahdollisuus, että ylös
kohoava vesihöyry muodostaa pisaroita
liesituulettimen alaosaan.
Kaasulla toimivia keittotasoja ja liesiä
koskevia lisäohjeita:
Noudata kaasulla toimivien
keittotasojen asennuksessa maakohtaisia
lakisääteisiä määräyksiä (esim. Saksassa:
Tekniset määräykset kaasuasennuksista
TRGI).
Noudata voimassaolevia
asennusmääräyksiä ja kaasulaitteiden
valmistajien asennusohjeita.
Asenna liesituuletin siten, että
ainoastaan sen toisella puolella on korkea
kaappi tai seinä.
Vähimmäisetäisyys 50mm.
Kaasulla toimivat keittotasot:
keittotason ja liesituulettimen alareunan
välillä tulee olla tilaa vähintään: 650mm.
(katso kuvat).
Suositellaan: 700mm.
Tämän laitteen
merkintä perustuu
käytettyjä sähkö- ja
elektroniikkalaitteita
(waste electrical and
electronic equipment
(WEEE) koskevaan
direktiiviin 2002/96/CE.
Tämä direktiivi määrittää
käytettyjen laitteiden palautus- ja
kierrätyssäännökset koko EU:n alueella.
93

Ennen asennusta
Liesituulettimen paras mahdollinen
teho:
Lyhyt sileä poistoputki.
Mahdollisimman vähän mutkia.
Halkaisijaltaan isot putket ja loivat
mutkat.
Jos käytetään pitkiä,
karkeapintaisia poistoilmaputkia,
paljon mutkia tai halkaisijaltaan
pieniä putkia, ei tuulettimen teho
ole enää optimaalinen ja samalla
melu lisääntyy.
Pyöreät putket, suositeltava
sisähalkaisija 150 mm.
Litteiden kanavien sisäpinta-alan
tulee olla yhtä suuri kuin pyöreiden
putkien sisäpinta-ala.
Niissä ei saa olla jyrkkiä
käännöksiä.
Ø 150 mm n. 177 cm
Jos putken halkaisija on erilainen:
käytä tiivistenauhaa.
Hormiliitännässä on huolehdittava
riittävän tuloilman saannista.
2
Katon esivalmistelut:
Katon tulee olla tasainen ja
vaakasuora.
Varmista, että tulpat on kiinnitetty
kunnolla.
Tuulettimen mukana toimitettavat
tulpat sopivat betoniin ja
luonnonkiveen.
Jos katto on muuta materiaalia, käytä
siihen soveltuvia kiinnitystarvikkeita.
Huomio: Liesituulettimen mukana
toimitetaan standardikiinnitysmateriaalit.
Asennuksesta vastaavan tulee varmistua
siitä, että kiinnityslaitteet soveltuvia seinille
ja/tai katoille.
Valmistaja ei ole vastuussa vääränlaisesta
asennuksesta tai vääristä
kiinnitysvälineistä johtuvista vahingoista.
Katso M- sarjan kuvia painoa varten.
Oikeus muutoksiin teknisen kehityksen
puitteissa pidätetään.
Poistoilmaputken liitäntä Ø 150 mm:
Kiinnitä poistoilmaputki suoraan
asennuskaulukseen.
Putket, jotka ovat pienempiä kuin 150
mm, eivät ole luotettavia.
Imusuoritus vähenee, mitä kauemmas
keittotasosta mennään.
Asennussuunnittelun aikana tulee ottaa
huomioon myös savunpoiston
suppilomuoto, jonka kallistuvuus on noin
10 – 15°.
94

Sähköliitäntä
Liesituulettimen saa liittää vain
määräysten mukaisesti asennettuun
suojakosketinpistorasiaan.
Laite tulee asentaa niin, että
pistokkeeseen päästään.
Sähkötiedot:
Sähkötiedot löytyvät laitteen sisäosan
tyyppikilvestä kun suodatinkehys on
poistettu.
Korjaustöiden ajaksi liesituuletin on
irrotettava sähköverkosta.
Liitäntäjohdon pituus: 1,30 m.
Kun liitäntä on kiinteä:
Liesituulettimen liitännän saa tehdä
ainoastaan paikallisen sähkölaitoksen
valtuuttama sähköasentaja.
Asennuspaikassa on oltava katkaisija,
jonka kosketinväli on yli 3 mm ja joka
katkaisee virran kaikkinapaisesti. Tälläisia
katkaisijoita ovat automaattiset katkaisijat
ja releet.
Asennus
Liesituuletin on tarkoitettu asennettavaksi
keittiön kattoon tai tukevaa alaslaskettuun
kattorakenteeseen.
Ota huomioon, että keittotason ja
liesituulettimen välillä tulee olla tilaa
vähintään 550 mm (sähköliedet) tai 650
mm (kaasuliedet).
Huom.: Varo vahingoittamasta herkkiä
teräspintoja.
Asenna tuote M-sarjassa osoitettujen
kuvien mukaisesti.
Jos liesituulettimen liitäntäjohto
vioittuu, sen saa vaihtaa vain valmistaja tai
valtuutettu huoltoliike tai huoltomies
vahinkojen välttämiseksi
Tämä liesituuletin vastaa EU:n
häiriönpoistomääräyksiä.
95

Ennen ensimmäistä käyttöä
Ensimmäinen käyttö:
Tämä käyttöohje on tarkoitettu eri
malleille.
Tästä johtuen on mahdollista, että
kaikki tässä kuvatut ominaisuudet ja
varusteet eivät koske hankkimaasi
laitetta.
Tämä liesituuletin vastaa
sähkölaitteita koskevia
turvallisuusohjeita.
Korjauksia saavat suorittaa vain alan
ammattilaiset.
Ammattitaidottomasti tehdyt
korjaukset voivat aiheuttaa laitteen
käyttäjälle suuria vaaroja.
Älä suorita liekitystä liesituulettimen
alla. Nousevat liekit aiheuttavat
palovaaran rasvasuodattimessa.
Keittotason tulee aina olla keitto- tai
paistoastioiden peittämä.
Liesituulettimen käyttö kiinteillä
polttoaineilla (hiili, puu tai tms.) toimivien
tulisijojen yläpuolella on sallittu vain
varauksin (katso asennusohje).
Jos laite on vaurioitunut, sitä ei saa
ottaa käyttöön.
Liitännän ja käyttöönoton saa suorittaa
vain alan ammattilainen.
Tämä liesituuletin on tarkoitettu vain
kotitalouskäyttöön.
Käyttä liesituuletinta vain yhdessä
paikoilleen asennettujen lamppujen
kanssa.
Vaihda rikki menneiden lamppujen
tilalle heti uudet jäljellä olevien lamppujen
ylikuormittumisen välttämiseksi.
Liesituuletinta ei saa käyttää ilman
rasvasuodatinta.
Ylikuumentuneet rasvat tai öljyt
syttyvät helposti palamaan.
Käytä siksi öljyä tai rasvaa ruoan, esim.
ranskan perunoiden, valmistukseen vain
valvonnan alaisena.
Puhdista liesituuletin huolellisesti
ennen sen ensimmäistä käyttöä.
Liesituulettimen päälle ei saa asettaa
esineitä.
Jos liesituulettimen liitäntäjohto
vioittuu, sen saa vaihtaa vain valmistaja tai
valtuutettu huoltoliike tai huoltomies
vahinkojen välttämiseksi.
Älä anna lasten leikkiä laitteella.
Laitetta ei saa käyttää ilman valvontaa
sellaiset henkilöt tai alaikäiset lapset,
- jotka eivät fyysisiltä tai henkisiltä
kyvyiltään siihen pysty;
- tai joilla ei ole riittävästi tietoa ja
kokemusta laitteen oikeaoppiseen ja
turvalliseen käyttöön.
Kaasulla toimivat keittotasot/liedet
Paloturvallisuuden, palovammojen ja
laitteen vaurioitumisen ehkäisemiseksi älä
käytä kaikkia kaasulla toimiva keittoalueita
samanaikaisesti maksimiteholla
pidemmän aikaa (maks. 15 minuuttia).
Kun liesituuletin on asennettu kaasulla
toimivan keittotason yläpuolelle, kytke
liesituuletin maksimiteholle, jos käytät
samanaikaisesti vähintään kolmea
kaasulla toimivaa keittoaluetta.
Muista, että yli 5 Kw:n suurtehopoltin
(Wok), vasta kahden kaasupolttimen
tehoa.
Älä ikinä käytä kaasulla toimivia
keittoalueita ilman, että niiden päällä on
keittoastioita. Säädä liekki niin, että se
ei ylitä keittiöastioiden reunoja.
96
Lue huolellisesti käyttöohjeet, ennen
kuin käytät uutta laitetta. Niissä on
tärkeää turvallisuuteen ja käyttöön
liittyvää tietoa sekä laitteen hoitoohjeita.
Säilytä hyvin käyttö- ja
asennusohjeet, jotta laitteen
mahdollinen uusi omistaja voi tutustua
niihin.
Toimintatavat
Hormiliitäntäinen M-sarjan kuva.
Liesituuletin imee keittiöhöyryn ja
johtaa sen rasvasuodattimen läpi
ulkoilmaan.
Rasvasuodatin kerää keittiöhöyryn
rasvapitoiset aineet.
Keittiö pysyy puhtaana rasvasta ja
hajusta.
Poistoilma johdetaan ylöspäin
ilmanvaihtohormin kautta tai suoraan ulos,
ulkoseinän kautta.
) Poistoilmaa ei saa johtaa toiminnassa
olevaan savu- tai ilmanvaihtohormiin, jota
tarvitaan niiden tilojen ilmanvirtaukseen,
joihin on asennettu tulisijat.
Kun poistoilma johdetaan ulos, on
noudatettava maakohtaisia
lakisääteisiä määräyksiä (esim.
maakohtaisia rakentamista koskevia
säädöksiä).
Mikäli poistoilma johdetaan
käyttämättöminä oleviin savu- tai
savukaasuhormeihin, siihen on saatava
lupa paikallisilta viranomaisilta.
) Kun liesituuletin on hormiliitäntäinen
ja samanaikaisesti käytössä on
huoneilmaa tarvitseva tulisija (kuten
esim. kaasu-, öljy-, tai hiililämmitteinen
lämmityslaite tai vedenlämmitin), on
huolehdittava riittävästä tuloilman
saannista, jotta tulisija saisi tarpeeksi
ilmaa palamista varten.
Vaaraton toiminta on mahdollista, jos
tulisijan sijoitushuoneessa alipaine ei ole
korkeampi kuin 4 Pa (0,04 mbar).
Tähän päästään, jos palamiseen tarvittava
ilma voi aina virrata avoimien aukkojen
kautta, joita on esim. ovissa, ikkunoissa,
tulo- ja poistoilman liitännöissä, tai
ilmanvirtaus on järjestetty muita teknisiä
toimenpiteitä käyttäen, esim. keskinäisen
lukituksen tms. avulla.
Jos tuloilman saanti ei ole riittävä,
aiheuttavat takaisinimetyt
palamiskaasut myrkytysvaaran.
Tuloilma-/poistoilmahormi ei yksistään
takaa raja-arvojen pysymistä annetuissa
rajoissa.
Huomautus: Tilannetta arvioitaessa on
aina otettava huomioon asunnon
ilmastoinnin kokonaisratkaisu. Tämä
sääntö ei koske keittolaitteiden, esim.
keittotason tai kaasulieden, käyttöä.
Jos poistoilma johdetaan ulos
ulkoseinän läpi, on syytä käyttää
teleskooppiliitosta.
97

Liesituulettimen käyttö
Painikkeisiin liittyvien toimintojen
aktivoimiseksi näitä tulee painaa kevyesti
(lyhyen aikaa vähäisellä voimalla). Liian
voimakas ja pitkäkestoinen painaminen ei
aktivoi kyseisiä toimintoja.
Näin keittiöhöyry poistuu
tehokkaimmin:
Käynnistä tuuletin
alkaessasi valmistaa ruokaa.
Kytke tuuletin toiminnasta
vasta muutaman minuutin jälkeen
lopetettuasi ruoanvalmistuksen.
valo
Tuuletusteho
n näyttö
Tuuletinpois päältä
Tuuletustehon
pienentäminen
Äänimerkki
Kun painiketta painetaan, kuuluu
äänimerkki toiminnon vahvistukseksi.
Tuulettimen käynnistys
Paina painiketta +.
Tuuletustehon valinta
Paina painiketta +.
Tuuletin kytkeytyy seuraavaksi
suuremmalle teholle.
Paina painiketta -.
Tuuletin kytkeytyy edellistä
pienemmälle teholle.
Tuulettimen kytkeminen toiminnasta
Paina painiketta O.
Näyttö
sammuu hetken kuluttua.
Tai:
Tuulettimen
jälkikäynti
Tuulettimen käynnistys
ja tuuletustehon
lisääminen Korkein teho
Paina painiketta – niin usein, että
tuuletin kytkeytyy pois päältä.
Näyttö sammuu hetken päästä.
Korkein teho:
Tuuletin toimii tällöin maksimiteholla. Tätä
tuuletustehoa tarvitaan vain lyhyen aikaa.
Paina painiketta + niin usein, että
näytölle syttyy
.
Jos et kytke korkeinta tehoa pois
päältä käsin, niin tuuletin kytkeytyy
10 minuutin kuluttua automaattisesti
teholle .
Tuulettimen jälkikäynti
Paina painiketta
.
Tuuletin käy 10 minuuttia teholla
näytöllä vilkkuu samalla piste. Sen
jälkeen tuuletin kytkeytyy
automaattisesti pois päältä.
Valaistus
Voit käyttää valaisinta milloin tahansa,
myös silloin kun tuuletin ei ole
toiminnassa.
Kaukosäädin
Valmistaja huolehtii
kaukosäätimen ohjelmoinnista.
Jos kaukosäädin ei ohjaa
liestituulettimen yhteydessä
olevia moottoria ja valoja,
noudata seuraavia toimenpiteitä.
Kaukosäätimen ohjelmointi
Paina kaukosäätimen “+”-painiketta, pidä
sitä painettuna ja käynnistä sitten
liesituuletin; suoritetun tunnistamisen
vahvistus on pitkä äänimerkki. Jos
äänimerkkiä ei kuulu 30 sekunnin
kuluessa, toista toimenpiteet.
,
98

Kaukosäätimen toiminnot
+, -,
toiminnot kuin kaukosäätimellä.
tuulettimen jälkikäyttö -painikkeen.
Aikavälitoiminto
Tämän laitteen erityispiirre on
aikavälitoiminto, jonka ansiosta tuuletus
käynnistyy 10 minuutin ajaksi joka tunti
näytössä näkyvän vilkkuvan nopeuden
mukaisesti.
Tämä toiminto voidaan aktivoida ohjaimen
tai kaukosäätimen avulla.
Aikavälin aktivointi ohjaimella:
paina samanaikaisesti painikkeita O
kun painat painiketta + , näytölle tulee
paina samanaikaisesti painikkeita O
Aikavälin aktivointi kaukosäätimellä:
paina painiketta
painamalla painiketta +, valaistu
paina painiketta vahvistaaksesi
Jos ohjelmointivaiheessa näytettyä
aikavälitoimintoa ei vahvisteta muutaman
sekunnin kuluessa, aikaväliohjelmoinnista
poistutaan.
Painamalla mitä tahansa painiketta,
valopainiketta lukuunottamatta,
aikavälitoiminto kytketään pois päältä.
merkinnöillä ja valolla on samat
-painikkeen tarkoitus on sama kuin
ja + ja päästä ne irti: näytöllä näkyy
numero 1;
näkyviin seuraava sarja tuulettimen
nopeuksiin liittyen: 2→3→1→2 …;
ja + vahvistaaksesi nopeuden, jolla
tuulettimen tulee toimia
aikavälitoiminnolla.
: valaistu osoitin
näyttää nopeuden 1;
osoitin näyttää tuulettimen nopeudet
sarjassa 2→3→1→2 …;
nopeuden, jolla tuulettimen tulee
toimia aikavälitoiminnolla.
Kaukosäädin on paristokäyttöinen. Kun
paristo loppuu, seuraavat toimenpiteet
tulee suorittaa:
1. Ruuvaa irti takana olevat kaksi ruuvia
jo poista kansi.
2. Poista paristo ja vaihda se uuteen
samanlaiseen.
3. Sulje kansi uudelleen ja ruuvaa ruuvit
kiinni.
Noudata maakohtaisia standardeja tyhjien
paristojen hävittämiseksi.
99

Suodattimet ja huolto
Rasvasuodatin:
Keittiöhöyryn rasvaisten osasten
keräämiseen käytetään metallisia
rasvansuodattimia.
Suodattimet ovat syttymätöntä materiaalia.
Huom.:
Syttymisvaara kasvaa, kun rasva kyllästää
suodatinta; liesituulettimen toiminta
saattaa tällöin heikentyä.
Tärkeää:
Kun puhdistat metalliset
rasvansuodattimet ajoissa, vältyt
palovaaralta, jonka friteeraamisen tai
voimakkaan paistamisen yhteydessä
syntyvä kuumuus voi aiheuttaa.
Kyllästysasteen näyttö:
Kun rasvasuodatin on kyllästynyt, näyttö
syttyy ja kuuluu merkkiääni.
Kun kytket tuulettimen pois toiminnasta,
kytkeytyy myös merkkiääni pois päältä.
Pese rasvasuodattimet viimeistään nyt.
Metallisten rasvasuodatinten
puhdistus:
Puhdista metallinen rasvasuodatin
normaalikäytössä (1-2 tuntia
päivässä) kerran kuukaudessa.
Voit pestä suodattimen
astianpesukoneessa. Suodattimen
väri saattaa tällöin hieman muuttua.
Tärkeää:
erittäin likaisia rasvasuodattimia ei
saa pestä yhdessä astioiden kanssa.
Kun puhdistat rasvasuodattimen
käsin, anna sen ensin liota muutaman
tunnin kuumassa pesuliuoksessa.
Älä käytä voimakkaita, happamia tai
emäksisiä pesuaineita. Puhdista
sitten suodatin harjaamalla, huuhtele
hyvin ja anna valua kuivaksi.
Metallisten rasvasuodattimien irrotus ja
kiinnitys:
Huom.: varmista, että lamput on kytketty
pois päältä ja jäähtyneet.
1. Noudata M-sarjan kuvissa osoitettuja
vaiheita.
2. Paina rasvasuodattimien kahvat alas
ja käännä rasvasuodattimet pois
paikoiltaan.
3. Puhdista rasvasuodattimet.
4. Kiinnitä puhtaat suodattimet takaisin
paikoilleen.
5. Poista näyttö
Paina 2 x peräkkäin O.
Äänimerkki kuuluu ja symboli
poistuu näytöstä.
.
100
 Loading...