

Bosch DCN-SWSACC Software Manual
Bosch DCN Standalone Automatic Camera Control
DCN-SWSACC
en Software Manual


Bosch DCN Standalone Automatic Camera
Control
Table of Contents | en 3
Bosch Security Systems B.V. Software Manual DCN-SWSACC_V4.0 | V1.0 | 2011.10
Table of Contents
1 Introduction 5
1.1 System license key 5
2 Installation 6
2.1 Allegiant video switcher 6
2.1.1 Configuration 6
2.1.2 Operation 7
2.2 AutoDome 7
2.2.1 Configuration 7
2.2.2 Operation 8
2.3 Cables 8
2.4 Software Installation 9
3 The DCN-SWSACC application 10
3.1 The application main screen 10
3.1.1 Menu (1) 11
3.1.2 Workflow buttons (2) 11
3.1.3 Configuration list (3) 11
3.1.4 Content panel (4) 11
4System 12
4.1 PC Communication Settings 12
4.2 Video Url 12
5 Cameras 13
5.1 Camera System Type 13
5.2 Camera Control Settings 13
5.3 Add/Remove camera 14
5.4 Camera Information 14
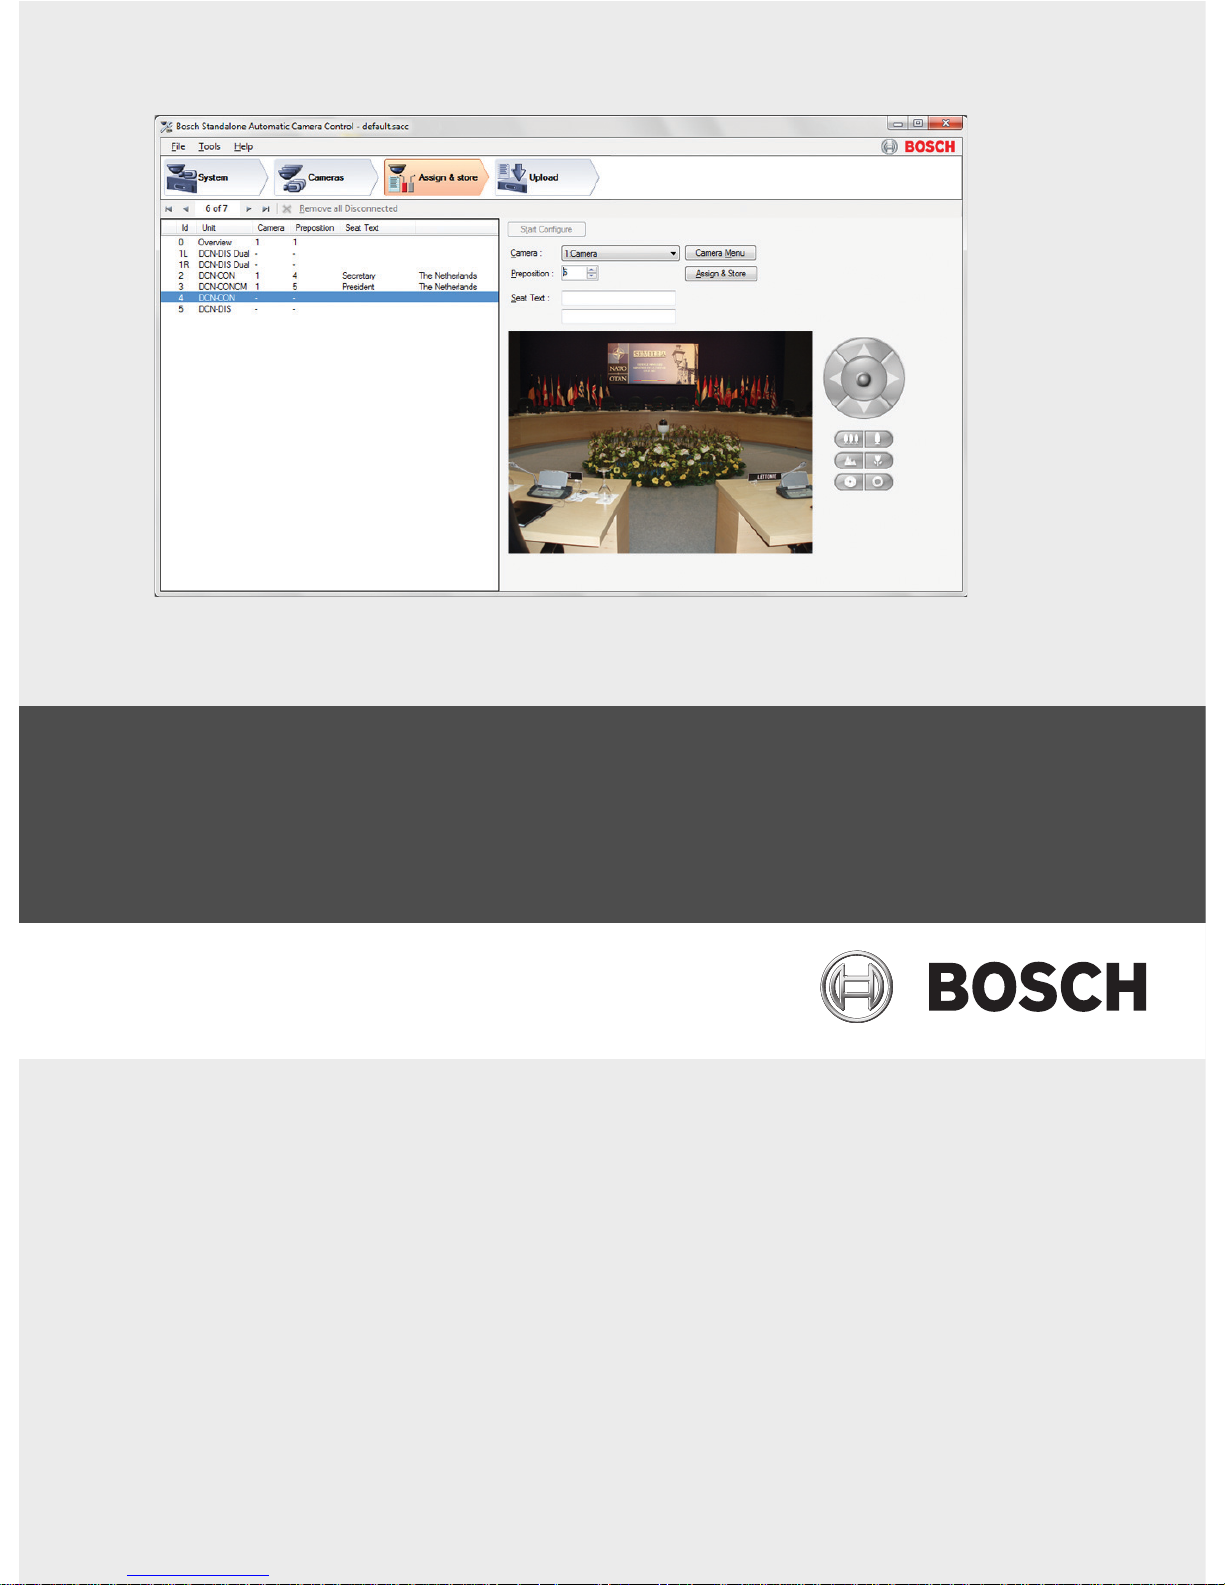
6 Assign & store 15
6.1 Temporarily PC with 2 serial ports 16
6.1.1 Start configure 16
6.1.2 Assigning the overview 16
6.1.3 Assigning cameras and prepositions to a unit 17
6.1.4 Remove disconnected units 17
6.1.5 Camera menu 17
6.2 Temporarily PC with 1 serial port 18

4 en | Table of Contents
Bosch DCN Standalone Automatic Camera
Control
DCN-SWSACC_V4.0 | V1.0 | 2011.10 Software Manual Bosch Security Systems B.V.
7Upload 19
8 Print layout 20
9 Warning and error reports 21
Index 26
Bosch DCN Standalone Automatic Camera
Control
Introduction | en 5
Bosch Security Systems B.V. Software Manual DCN-SWSACC_V4.0 | V1.0 | 2011.10
1 Introduction
Version 4.0, 2011-10-24.
DCN-SWSACC Standalone Automatic Camera Control of the DCN Conference systems
interfaces with the Bosch Allegiant or AutoDomes. It selects fixed or prepositioned cameras to
be activated to display the current active speaker at a conference.
Automatic Camera Control in conference applications
When a chairman’s or delegate’s microphone is activated on the equipment, the camera
assigned to that position is activated. When no microphones are active, an ‘overview’ is
automatically selected. The image can be displayed on hall displays or other screens together
with information about the current speaker, such as delegate identification (seat text). The
system operator has a screen, which also displays information about which camera is active.
Automatic Camera Control provides an extra dimension to conference proceedings.
Configuration
The DCN-SWSACC software runs on a PC which is temporarily connected to configure the
DCN Next Generation or DCN Wireless Discussion System and the Bosch Allegiant or
AutoDomes. With this PC the camera positions can be defined using the on-screen Pan, Tilt
and Zoom control and stored as prepositions in the AutoDome camera. At the same time a
delegate position is linked to a camera preposition. When all delegate positions are linked to
camera prepositions the configuration needs to be uploaded to the DCN Conference system
where it will be stored persistent in the CCU or NCO. The configuration file can be printed and
stored on the temporarily PC for later use. After configuration the PC is removed and Bosch
Allegiant or AutoDome is directly connected to the DCN Conference system.
Copyright
No part of this documentation may be reproduced or transmitted in any form by any means,
electronic, mechanical, photocopying, recording, or otherwise, without the prior written
permission of the publisher.For information on getting permission for reprints and excerpts,
contact Bosch Security Systems B.V.
1.1 System license key
The use of the DCN Standalone Automatic Camera Control is depending on the DCN system
license key. Depending on the license key, which is located in the system’s Control Unit,
functions are enabled or disabled.
The license key can be uploaded to the system with the Download and License Tool.
NOTICE!
For demo purposes a demo license is available. In case you have a demo license the Bosch
logo in the right top of the application will note "Demo version not for sale". The demo version
is fully operational but will not be supported. Contact your local Bosch representative if you
have a demo license while you purchased an official license.

6 en | Installation
Bosch DCN Standalone Automatic Camera
Control
DCN-SWSACC_V4.0 | V1.0 | 2011.10 Software Manual Bosch Security Systems B.V.
2 Installation
This chapter describes how to setup the DCN system and the Camera system. Two different
types of DCN systems are available: single CCU systems and multi CCU systems. Also the
Camera system exists in two different versions: Allegiant video switcher with multiple
cameras and AutoDome which is a single camera.
The system needs to be configured before it can be used operational. To do so, first the
choice has to be made which Camera system is used:
– Section 2.1 Allegiant video switcher, or
– Section 2.2 AutoDome.
– Section 2.3 Cables
– Section 2.4 Software Installation
2.1 Allegiant video switcher
2.1.1 Configuration
1. Set the PC Communication Settings:
– Allegiant: set the baud-rate of the Allegiant to 19k2. Please refer to the Allegiant
user manual how to set the Allegiant’s baud-rate.
– DCN-CCU2: set the protocol for the serial port via menu 8H to allegiant.
– DCN-CCU (S500): set the protocol for serial port which is connected to the
temporarily PC to camera control and set the baud-rate to 19k2
–
– DCN-NCO: set the baud-rate for camera control to 19k2 using menu item 7l.
2. Make the connections to the temporarily PC according the image below:
–
– Refer to Section 2.3 Cables for cable type (1,6* and 2).
3. Start the DCN-SWSACC software.
– Configure the camera control as described in: Section 3 The DCN-SWSACC
application, Section 4 System, Section 5 Cameras and Section 6 Assign & store.
4. Disconnect the temporarily PC from the DCN system: and the Allegiant.
Bosch DCN Standalone Automatic Camera
Control
Installation | en 7
Bosch Security Systems B.V. Software Manual DCN-SWSACC_V4.0 | V1.0 | 2011.10
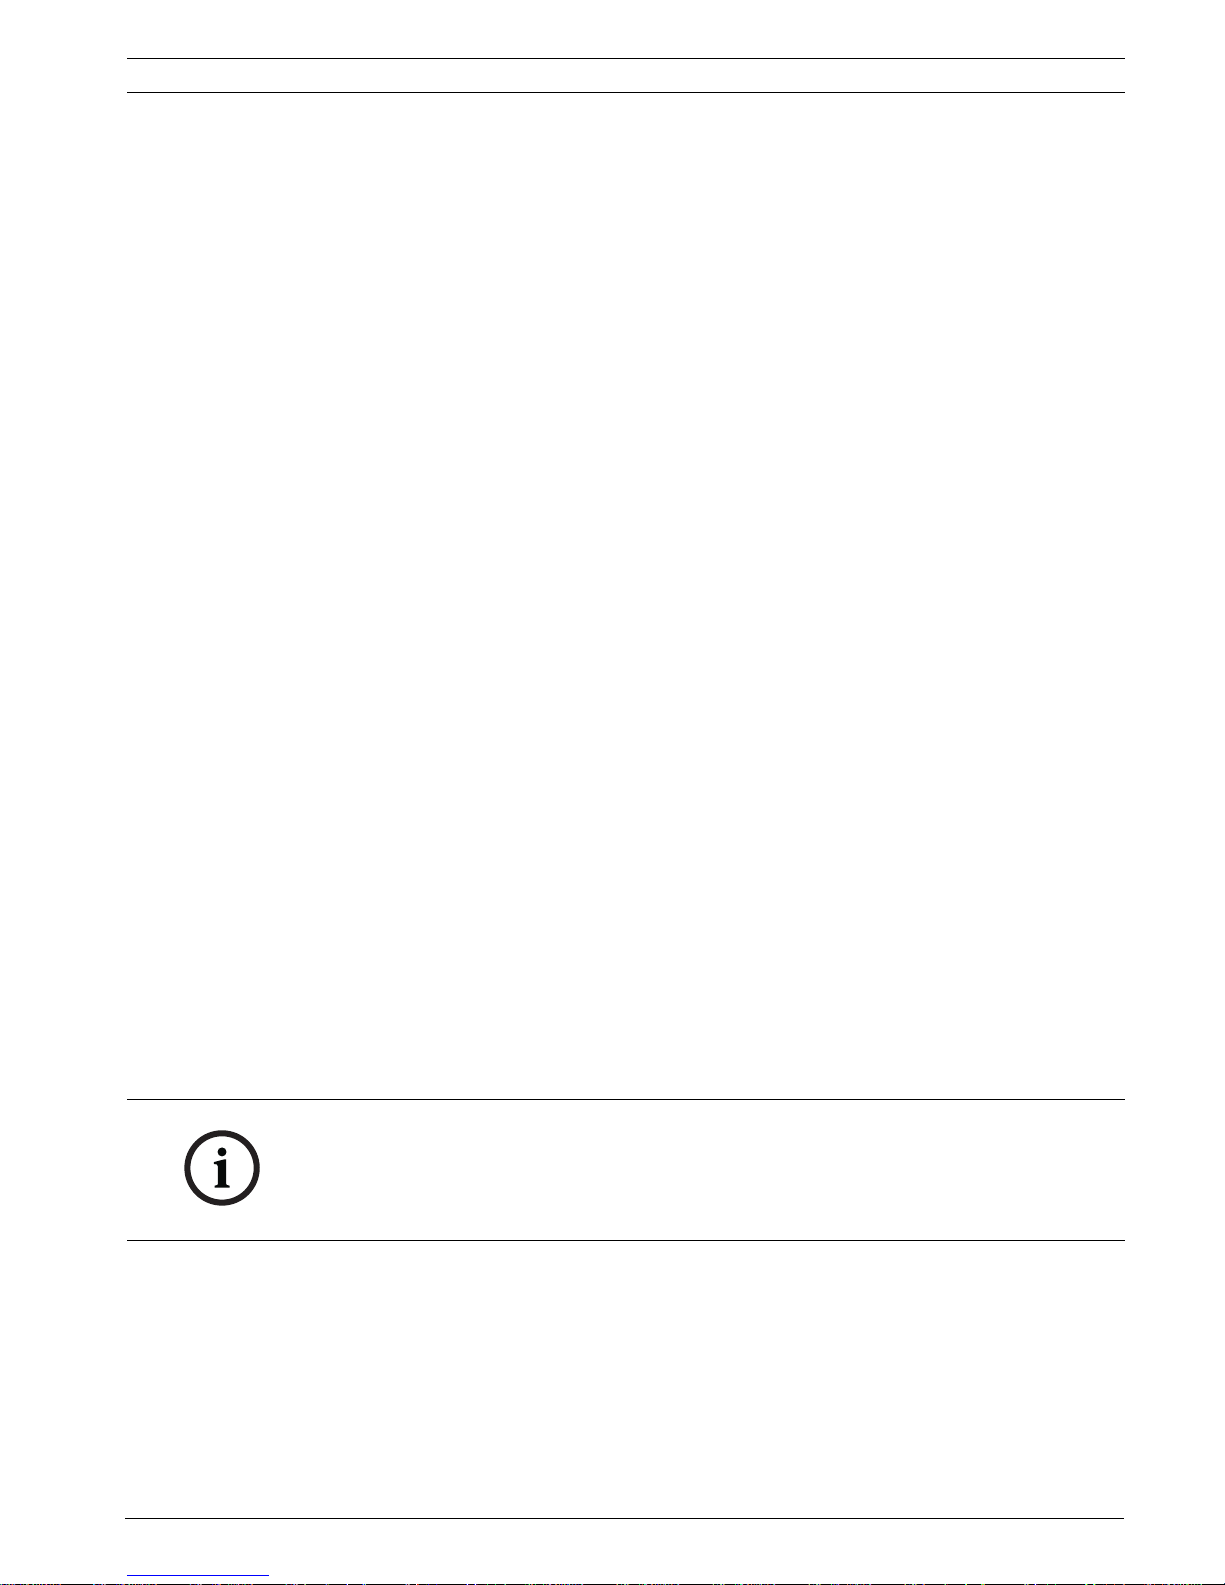
2.1.2 Operation
1. Make the connections according the image below:
–
–Refer to Section 2.3 Cables for cable type 3.
2.2 AutoDome
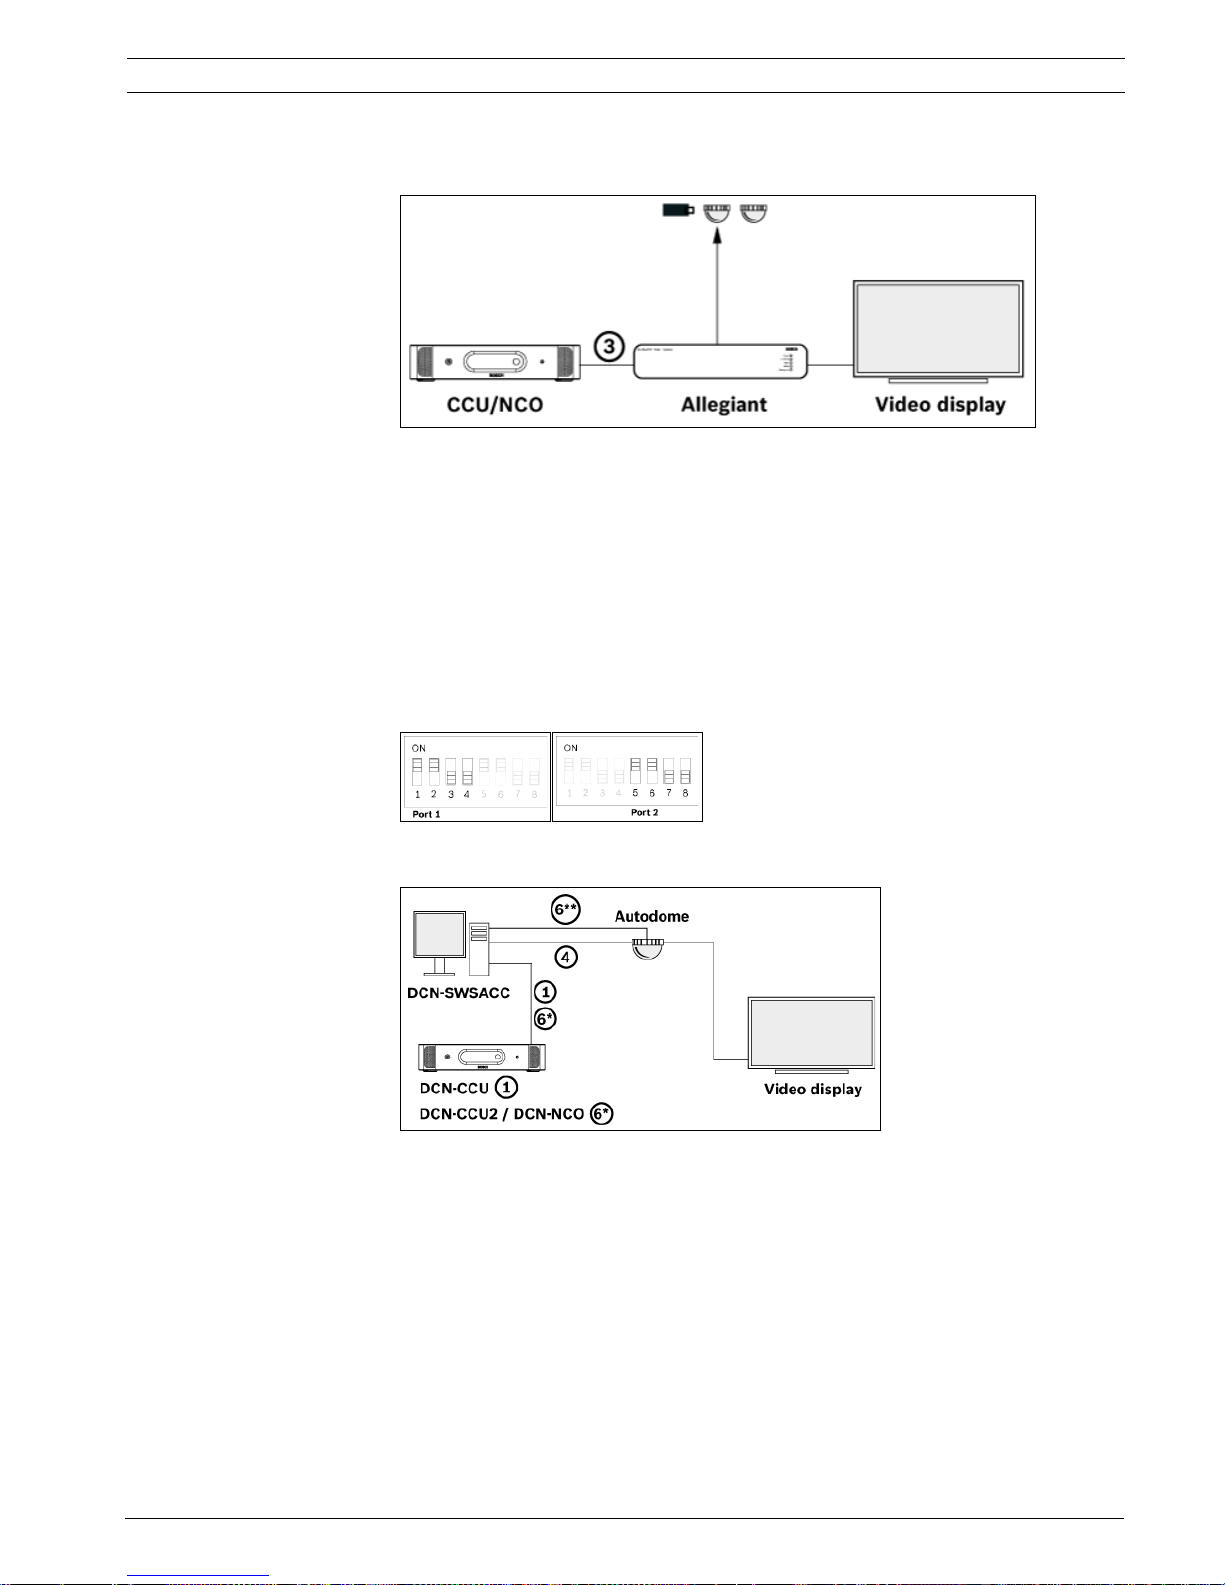
2.2.1 Configuration
1. Set the communication settings:
– AutoDome: set the baud-rate to 9600. Please refer to the AutoDome user manual
how to set the baud-rate.
– DCN-CCU2: set the protocol for the serial port via menu 8H to AutoDome.
– DCN-CCU (S500): set the protocol for serial port which is connected to the
temporarily PC to camera control and set the baud-rate to 9600.
–
– DCN-NCO: set the baud-rate for camera control to 9600 using menu item 7l.
2. Make the connections to the temporarily PC according the image below:
–
–Refer to Section 2.3 Cables for cable types 1,6*, 4 and 6** (**optional: to see a video
image of an AutoDome camera with IP-module in the browser of Assign & store).
3. Start the DCN-SWSACC software. Refer to Section 2.4 Software Installation.
– Configure the ‘camera control’ as described in Section 3 The DCN-SWSACC
application, Section 4 System, Section 5 Cameras and Section 6 Assign & store.
4. Disconnect the temporarily PC from the DCN system: and the AutoDome.
8 en | Installation
Bosch DCN Standalone Automatic Camera
Control
DCN-SWSACC_V4.0 | V1.0 | 2011.10 Software Manual Bosch Security Systems B.V.
2.2.2 Operation
1. Make the connections according the image below:
–
– Refer to Section 2.3 Cables for cable type 5.
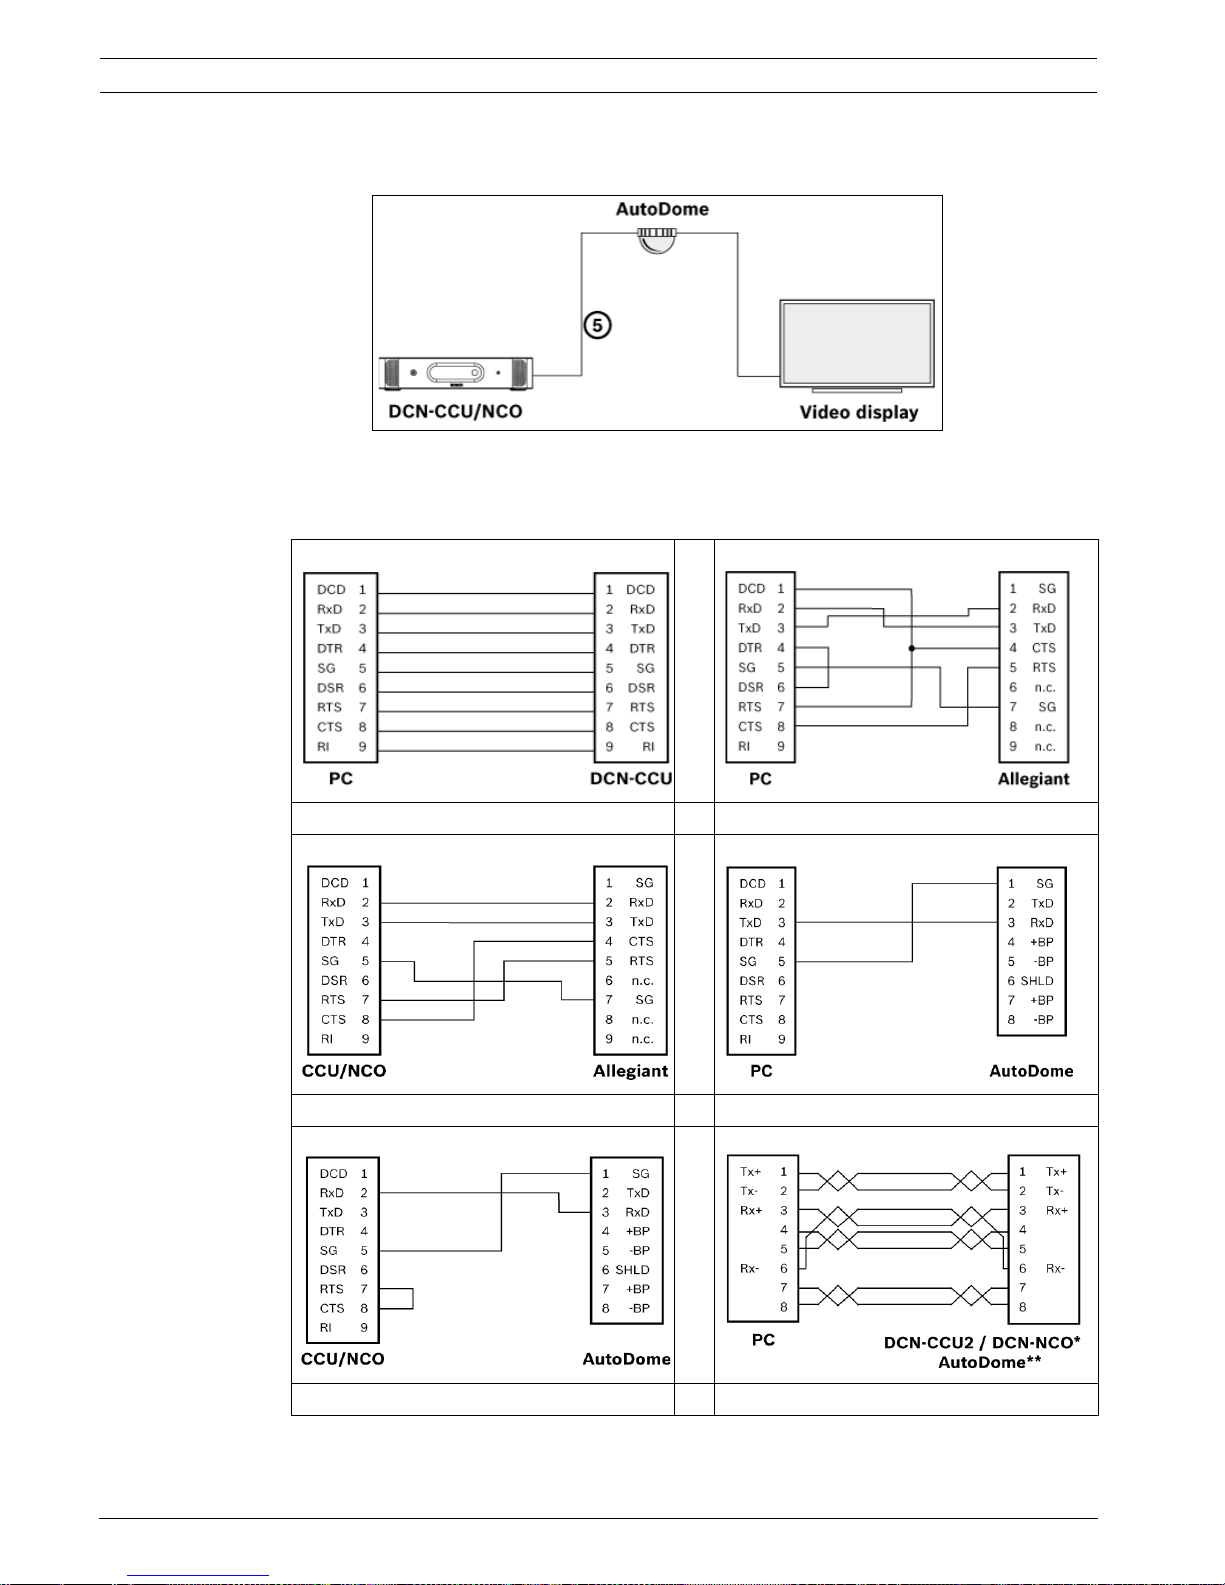
2.3 Cables
Cable 1. PC to DCN-CCU Cable 2. PC to Allegiant
Cable 3. CCU/NCO to Allegiant Cable 4. PC to AutoDome
Cable 5. CCU/NCO to AutoDome Cable 6. Standard Ethernet cable

Bosch DCN Standalone Automatic Camera
Control
Installation | en 9
Bosch Security Systems B.V. Software Manual DCN-SWSACC_V4.0 | V1.0 | 2011.10
2.4 Software Installation
PC requirements
DCN-SWSACC is compatible with Windows Vista and Windows 7 both 32 and 64 bits versions.
Starter editions are not supported.
PC requirements are the same as requested for Windows Vista and Windows 7 by Microsoft.
The DCN system must have version 2.60 or higher.
Installing DCN-SWSACC
DCN-SWSACC needs to be installed from the DVD delivered with the DCN system (check
Bosch Security Systems extranet for the latest version of the software):
1. Insert the DVD (the software starts automatically).
– When the software does not start automatically:
– Select ‘Run...’ from the ‘Start’ menu on the Windows Task bar.
– Type d:\setup.exe (where d is the DVD drive).
2. Browse to ‘software’ and select the DCN-SWSACC.
3. Follow the on-screen instructions.
 Loading...