

Page 1

b
o
My
g
et
sc
Reg
n
ew
B
osch
fr
ee
h
-h
we
iste
device
n
ben
o
me
lco
me
r
ow
efit
.co
y
on
our
an
s
m/
d
:
Combi steam oven
CSG7361.1
[en]
User manual and installation instructions
Page 2
en Safety
Further information and explanations are available online:
Table of contents
INFORMATION FOR USE
1 Safety...................................................................2
2 Preventing material damage ..............................4
3 Environmental protection and saving en-
ergy ......................................................................5
4 Familiarising yourself with your appliance .......6
5 Operating modes ................................................8
6 Accessories.......................................................10
7 Before using for the first time ..........................11
8 Basic operation .................................................13
9 Rapid heating ....................................................14
10 Time-setting options.........................................14
11 Steam.................................................................16
12 Dishes ................................................................19
13 Favourites..........................................................20
14 Childproof lock..................................................21
15 Basic settings....................................................21
16 HomeConnect ..................................................23
17 Cleaning and servicing.....................................24
18 Cleaning aid.......................................................27
19 Descaling...........................................................27
20 Drying ................................................................28
21 Appliance door..................................................28
22 Rails ...................................................................32
23 Troubleshooting................................................33
24 Disposal.............................................................35
25 Customer Service..............................................35
26 Information regarding Free and Open
Source Software................................................36
27 Declaration of Conformity ................................36
28 How it works......................................................36
29 INSTALLATION INSTRUCTIONS ......................45
29.1 General installation instructions....................
..45
1 Safety
Observe the following safety instructions.
1.1 General information
¡ Read this instruction manual carefully.
¡ Keep the instruction manual and the
product information safe for future reference or for the next owner.
¡ Do not connect the appliance if it has been
damaged in transit.
1.2 Intended use
This appliance is designed only to be built
into kitchen units. Read the special installation
instructions.
Only a licensed professional may connect appliances without plugs. Damage caused by incorrect connection is not covered under the
warranty.
Only use this appliance:
¡ To prepare meals and drinks.
¡ in private households and in enclosed
spaces in a domestic environment.
¡ up to an altitude of max. 2000m above
sea level.
1.3 Restriction on user group
This appliance may be used by children aged
8 or over and by people who have reduced
physical, sensory or mental abilities or inadequate experience and/or knowledge,
provided that they are supervised or have
been instructed on how to use the appliance
safely and have understood the resulting
dangers.
Do not let children play with the appliance.
Children must not perform cleaning or user
maintenance unless they are at least 15 years
old and are being supervised.
2
Page 3

Safety en
Keep children under the age of 8 years away
from the appliance and power cable.
1.4 Safe use
Always place accessories in the cooking compartment the right way round.
→"Accessories", Page10
WARNING‒Risk of fire!
Combustible objects that are left in the cooking compartment may catch fire.
▶ Never store combustible objects in the
cooking compartment.
▶ If smoke is emitted, the appliance must be
switched off or the plug must be pulled out
and the door must be held closed in order
to stifle any flames.
Loose food remnants, fat and meat juices
may catch fire.
▶ Before using the appliance, remove the
worst of the food residues and remnants
from the cooking compartment, heating ele-
ments and accessories.
Opening the appliance door creates a
draught. Greaseproof paper may come into
contact with the heating element and catch
fire.
▶ Never place greaseproof paper loosely
over accessories when preheating the ap-
pliance and while cooking.
▶ Always cut greaseproof paper to size and
use a plate or baking tin to hold it down.
WARNING‒Risk of burns!
The appliance and its parts that can be
touched become hot during use.
▶ Caution should be exercised here in order
to avoid touching heating elements.
▶ Young children under 8 years of age must
be kept away from the appliance.
Accessories and cookware get very hot.
▶ Always use oven gloves to remove ac-
cessories or cookware from the cooking
compartment.
When the cooking compartment is hot, any alcoholic vapours inside may catch fire. The appliance door may spring open. Hot steam and
jets of flame may escape.
▶ Only use small quantities of drinks with a
high alcohol content in food.
▶ Do not heat spirits (≥ 15% vol.) when undi-
luted (e.g. for marinating or pouring over
food).
▶ Open the appliance door carefully.
WARNING‒Risk of scalding!
The accessible parts of the appliance become
hot during operation.
▶ Never touch these hot parts.
▶ Keep children at a safe distance.
Hot steam may escape when you open the
appliance door. Steam may not be visible, depending on the temperature.
▶ Open the appliance door carefully.
▶ Keep children at a safe distance.
If there is water in the cooking compartment
when it is hot, this may create hot steam.
▶ Never pour water into the cooking compart-
ment when the cooking compartment is
hot.
WARNING‒Risk of injury!
Scratched glass in the appliance door may
develop into a crack.
▶ Do not use any harsh or abrasive cleaners
or sharp metal scrapers to clean the glass
on the oven door, as they may scratch the
surface.
The appliance and its parts that can be
touched may have sharp edges.
▶ Take care when handling and cleaning
them.
▶ If possible, wear protective gloves.
The hinges on the appliance door move when
the door is opened and closed, which could
trap your fingers.
▶ Keep your hands away from the hinges.
Components inside the appliance door may
have sharp edges.
▶ Wear protective gloves.
WARNING‒Risk of electric shock!
Improper repairs are dangerous.
▶ Repairs to the appliance should only be
carried out by trained specialist staff.
▶ Only use genuine spare parts when repair-
ing the appliance.
▶ If the power cord of this appliance is dam-
aged, it must be replaced by trained spe-
cialist staff.
If the insulation of the power cord is damaged, this is dangerous.
▶ Never let the power cord come into contact
with hot appliance parts or heat sources.
▶ Never let the power cord come into contact
with sharp points or edges.
▶ Never kink, crush or modify the power
cord.
3
Page 4

en Preventing material damage
An ingress of moisture can cause an electric
shock.
▶ Do not use steam- or high-pressure clean-
ers to clean the appliance.
If the appliance or the power cord is damaged, this is dangerous.
▶ Never operate a damaged appliance.
▶ Never pull on the power cord to unplug the
appliance. Always unplug the appliance at
the mains.
▶ If the appliance or the power cord is dam-
aged, immediately unplug the power cord
or switch off the fuse in the fuse box.
▶ Call customer services. →Page35
WARNING‒Risk of suffocation!
Children may put packaging material over
their heads or wrap themselves up in it and
suffocate.
▶ Keep packaging material away from chil-
dren.
▶ Do not let children play with packaging ma-
terial.
Children may breathe in or swallow small
parts, causing them to suffocate.
▶ Keep small parts away from children.
▶ Do not let children play with small parts.
1.5 Steam
Follow these instructions when using a steam
function.
WARNING‒Risk of scalding!
The water in the water tank may become very
hot if you operate the appliance for long periods.
▶ Always empty the water tank after using the
steam function.
Hot steam is generated in the cooking compartment.
▶ Do not reach into the cooking compartment
when using steam.
Hot liquid may spill over the sides of the accessory when it is removed from the cooking
compartment.
▶ Remove hot accessories with care and al-
ways wear oven gloves.
WARNING‒Risk of fire!
Due to the hot surfaces, vapours from flammable liquids may catch fire in the cooking
compartment (explosion). The appliance door
may spring open. Hot steam and jets of flame
may escape.
▶ Do not pour flammable liquids (e.g. alco-
holic drinks) into the water tank.
▶ Only fill the water tank with water or with
the descaling solution we have recommen-
ded.
2 Preventing material damage
2.1 General
ATTENTION!
Alcoholic vapours may catch fire in the hot cooking
compartment and cause permanent damage to the appliance. The appliance door may spring open due to
an explosion and it may fall off. The door panels may
shatter and fragment. Due to the resulting negative
pressure, the cooking compartment may become considerably deformed inwards.
▶ Do not heat spirits (≥ 15% vol.) when undiluted (e.g.
for marinating or pouring over food).
If there is water on the cooking compartment floor
when operating the appliance at temperatures above
120°C, this will damage the enamel.
▶ Do not use the appliance if there is water on the
cooking compartment floor.
▶ Wipe away any water on the cooking compartment
floor before operation.
Objects on the cooking compartment floor at over
50°C will cause heat to build up. The baking and
roasting times will no longer be correct and the enamel
will be damaged.
▶ Do not place any accessories, greaseproof paper or
foil of any kind on the cooking compartment floor.
▶ Only place cookware on the cooking compartment
floor if a temperature under 50°C has been set.
When the cooking compartment is hot, any water inside it will create steam. The change in temperature
may cause damage.
▶ Never pour water into the cooking compartment
when it is still hot.
▶ Never place cookware containing water on the
cooking compartment floor.
The prolonged presence of moisture in the cooking
compartment leads to corrosion.
▶ Allow the cooking compartment to dry after use. To
do this, open the cooking compartment door com-
pletely or use the drying function.
▶ Do not keep moist food in the cooking compartment
for a long time with the door closed.
▶ Do not store food in the cooking compartment.
4
Page 5

Environmental protection and saving energy en
▶ Take care not to trap anything in the appliance
door.
Fruit juice dripping from the baking tray leaves stains
that cannot be removed.
▶ When baking very juicy fruit flans, do not pack too
much on the baking tray.
▶ If possible, use the deeper universal pan.
Using oven cleaner in a hot cooking compartment
damages the enamel.
▶ Never use oven cleaner in the cooking compartment
when it is still warm.
▶ Remove all food remnants from the cooking com-
partment and the appliance door before you next
heat up the appliance.
If the seal is very dirty, the appliance door will no
longer close properly during operation. This may damage the front of adjacent kitchen units.
▶ Keep the seal clean at all times.
▶ Never operate the appliance if the seal is damaged
or missing.
Sitting or placing objects on the appliance door may
damage it.
▶ Do not place, hang or support objects on the appli-
ance door.
▶ Do not place cookware or accessories on the appli-
ance door.
With certain models, accessories may scratch the door
pane when closing the appliance door.
▶ Always push accessories fully into the cooking com-
partment.
If aluminium foil comes into contact with the door pane,
it could cause permanent discolouration.
▶ Do not allow aluminium foil in the cooking compart-
ment to come into contact with the door pane.
2.2 Steam
Follow these instructions when using the steam function.
ATTENTION!
Silicone bakeware is not suitable for combined operation with steam.
▶ Cookware must be heat- and steam-resistant.
Using cookware with rust spots may cause corrosion in
the cooking compartment. Even the smallest spots of
rust can cause corrosion.
▶ Do not use cookware with rust spots.
Dripping liquids make the cooking compartment floor
dirty.
▶ When steaming with a perforated cooking container,
always place the baking tray, the universal pan or
the unperforated cooking container underneath. This
will catch any liquid that drips down.
Hot water in the water tank may damage the steam
system.
▶ Only fill the water tank with cold water.
If there is water on the cooking compartment floor
when operating the appliance at temperatures above
120°C, this will damage the enamel.
▶ Do not use the appliance if there is water on the
cooking compartment floor.
▶ Wipe away any water on the cooking compartment
floor before operation.
A lot of steam is produced during operation with the
types of steam heating. Condensate that collects in the
drip trough underneath the cooking compartment may
overflow and damage adjacent units.
▶ Do not open the appliance door, or open it as infre-
quently as possible, while the appliance is in opera-
tion.
If descaling solution comes into contact with the control
panel or other delicate surfaces, it will damage them.
▶ Remove descaling solution immediately with water.
Cleaning the water tank in the dishwasher will damage
it.
▶ Do not clean the water tank in the dishwasher.
▶ Clean the water tank with a soft cloth and standard
washing-up liquid.
If several steam operations are carried out one after
the other without wiping out the cooking compartment
floor and the condensate tray afterwards in each case,
the water collected may overflow and may damage furniture panels or bases.
▶ Wipe down the cooking compartment floor and the
condensate tray after every steam operation.
3 Environmental protection and saving energy
3.1 Disposing of packaging
The packaging materials are environmentally compatible and can be recycled.
▶
Sort the individual components by type and dispose
of them separately.
3.2 Saving energy
If you follow these instructions, your appliance will use
less power.
Only preheat the appliance if the recipe or the recommended settings tell you to do so.
→"How it works", Page36
Not preheating the appliance can reduce the en-
¡
ergy used by up to 20%.
Use dark-coloured, black-coated or enamelled baking
tins.
These types of baking tin absorb the heat particu-
¡
larly well.
Open the appliance door as little as possible during
operation.
This maintains the temperature in the cooking com-
¡
partment and eliminates the need for the appliance
to reheat.
When baking multiple dishes, do so in succession or
in parallel.
The cooking compartment is heated after baking
¡
the first dish. This reduces the baking time for the
second cake.
5
Page 6
en Familiarising yourself with your appliance
1
2 2
1
2
If the cooking time is relatively long, you can switch
the appliance off 10minutes before the cooking time
ends.
There will be enough residual heat to finish cooking
¡
the dish.
Remove any accessories that are not being used from
the cooking compartment.
Accessories that are not being used do not need to
¡
be heated.
Allow frozen food to defrost before cooking.
This saves the energy that would otherwise be re-
¡
quired to defrost it.
Switch off the display in the basic settings.
→"Basic settings", Page21
Energy is saved when the display is switched off.
¡
Note:
The appliance requires:
¡ A maximum of2W in networked standby mode
¡ A maximum of 0.5W in non-networked standby
mode with the display switched off
4 Familiarising yourself with your appliance
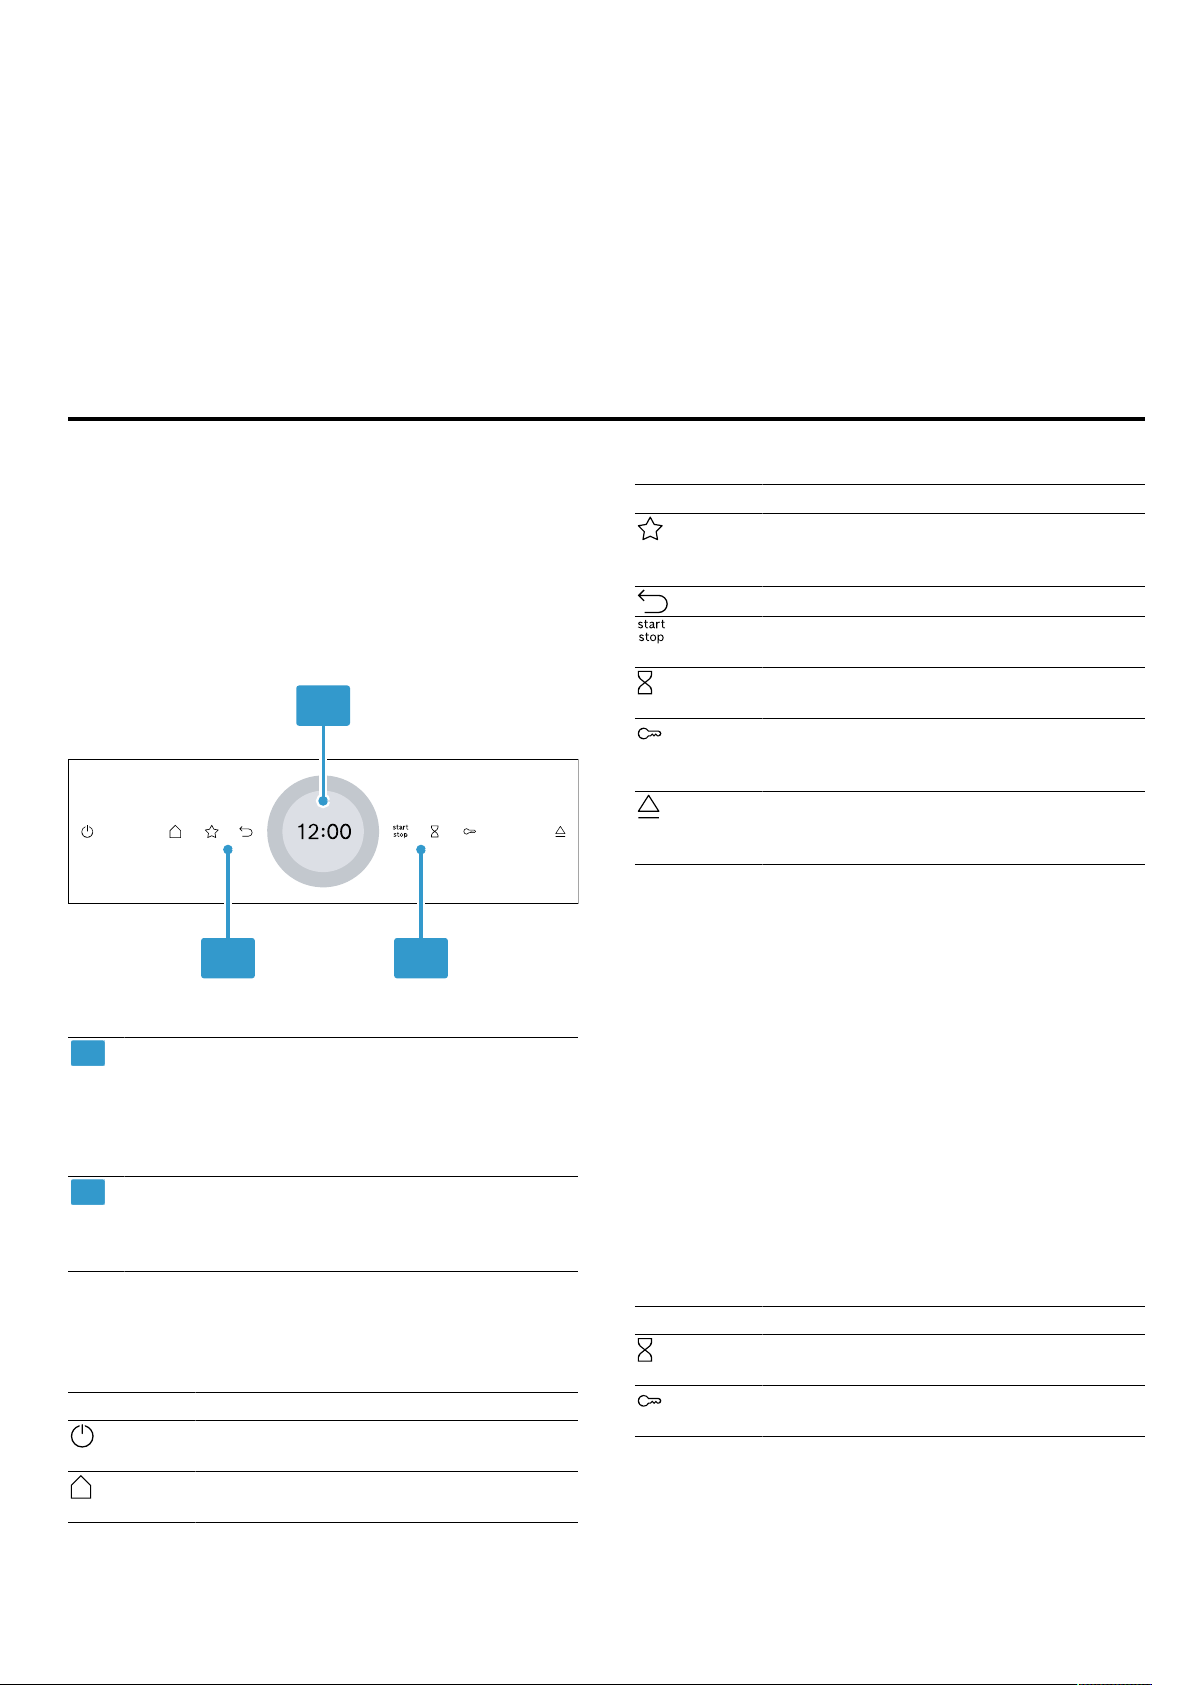
4.1 Control panel
You can use the control panel to configure all functions
of your appliance and to obtain information about the
operating status.
On certain models, specific details such as colour and
shape may differ from those pictured.
Button Function
Select the favourites operating mode
directly.
→"Favourites", Page20
Go back one setting.
Start or pause operation.
→"Basic operation", Page13
Select the timer.
→"Setting the timer", Page15
Press and hold for approx. 4seconds
to activate the childproof lock.
→"Childproof lock", Page21
Open the control panel to remove the
water tank.
→"Filling the water tank", Page16
Display with setting ring
You can use the digital setting ring to set the
appliance via the display.
You will see the current setting values, options
or relevant information.
→"Display", Page6
Buttons
You can use the buttons to directly set various
functions.
→"Buttons", Page6
4.2 Buttons
You can use the buttons to directly select various functions.
Button Function
Switch the appliance on or off.
→"Basic operation", Page13
Open the "Operating modes" menu.
→"Operating modes", Page8
4.3 Display
The display is divided into different areas.
Digital setting ring
You can use the digital setting ring on the display to
change the setting values.
When you reach the minimum or maximum value available, this value remains on the display. If required, use
the setting ring to turn the value back again.
Finely tuned setting values
To fine-tune the setting values, e.g. to set a time to the
precise minute, press and hold the corresponding area
in the setting ring for around 1-2 seconds. The finely
tined setting values are shown in dots.
Status indicator
Status information is shown at the top of the display.
Symbol Meaning
Timer is activated.
→"Setting the timer", Page15
Childproof lock is activated.
→"Childproof lock", Page21
6
Page 7
Familiarising yourself with your appliance en
Symbol Meaning
WiFi signal strength for HomeConnect.
The more lines of the symbol are filled,
the better the signal.
If the symbol is struck through , there
is no WiFi signal.
If there is an "x" at the symbol , there
is no connection to the HomeConnect
server.
→"HomeConnect ", Page23
Remote start with HomeConnect is activated.
→"HomeConnect ", Page23
Remote diagnostics with HomeConnect for maintenance is activated.
→"HomeConnect ", Page23
Settings area
The settings area is in the centre of the display.
You can see current options and settings that have
already been made in the settings area.
The menu and other setting options are arranged horizontally. Selection lists for functions are vertically arranged. Swipe over the display to scroll in the settings
area. To select a function, press the function on the display.
→"Setting the operating mode", Page13
Possible symbols in the settings area
Symbol Meaning
Confirm the setting value.
Reset the setting value.
Change the setting value while the appliance is in operation.
Note:A blue marking "new" or a blue dot on a function
indicates that a new function, a new favourite or an update was downloaded to your appliance using the
HomeConnect app.
4.4 Cooking compartment
Various functions in the cooking compartment provide
support when operating your appliance.
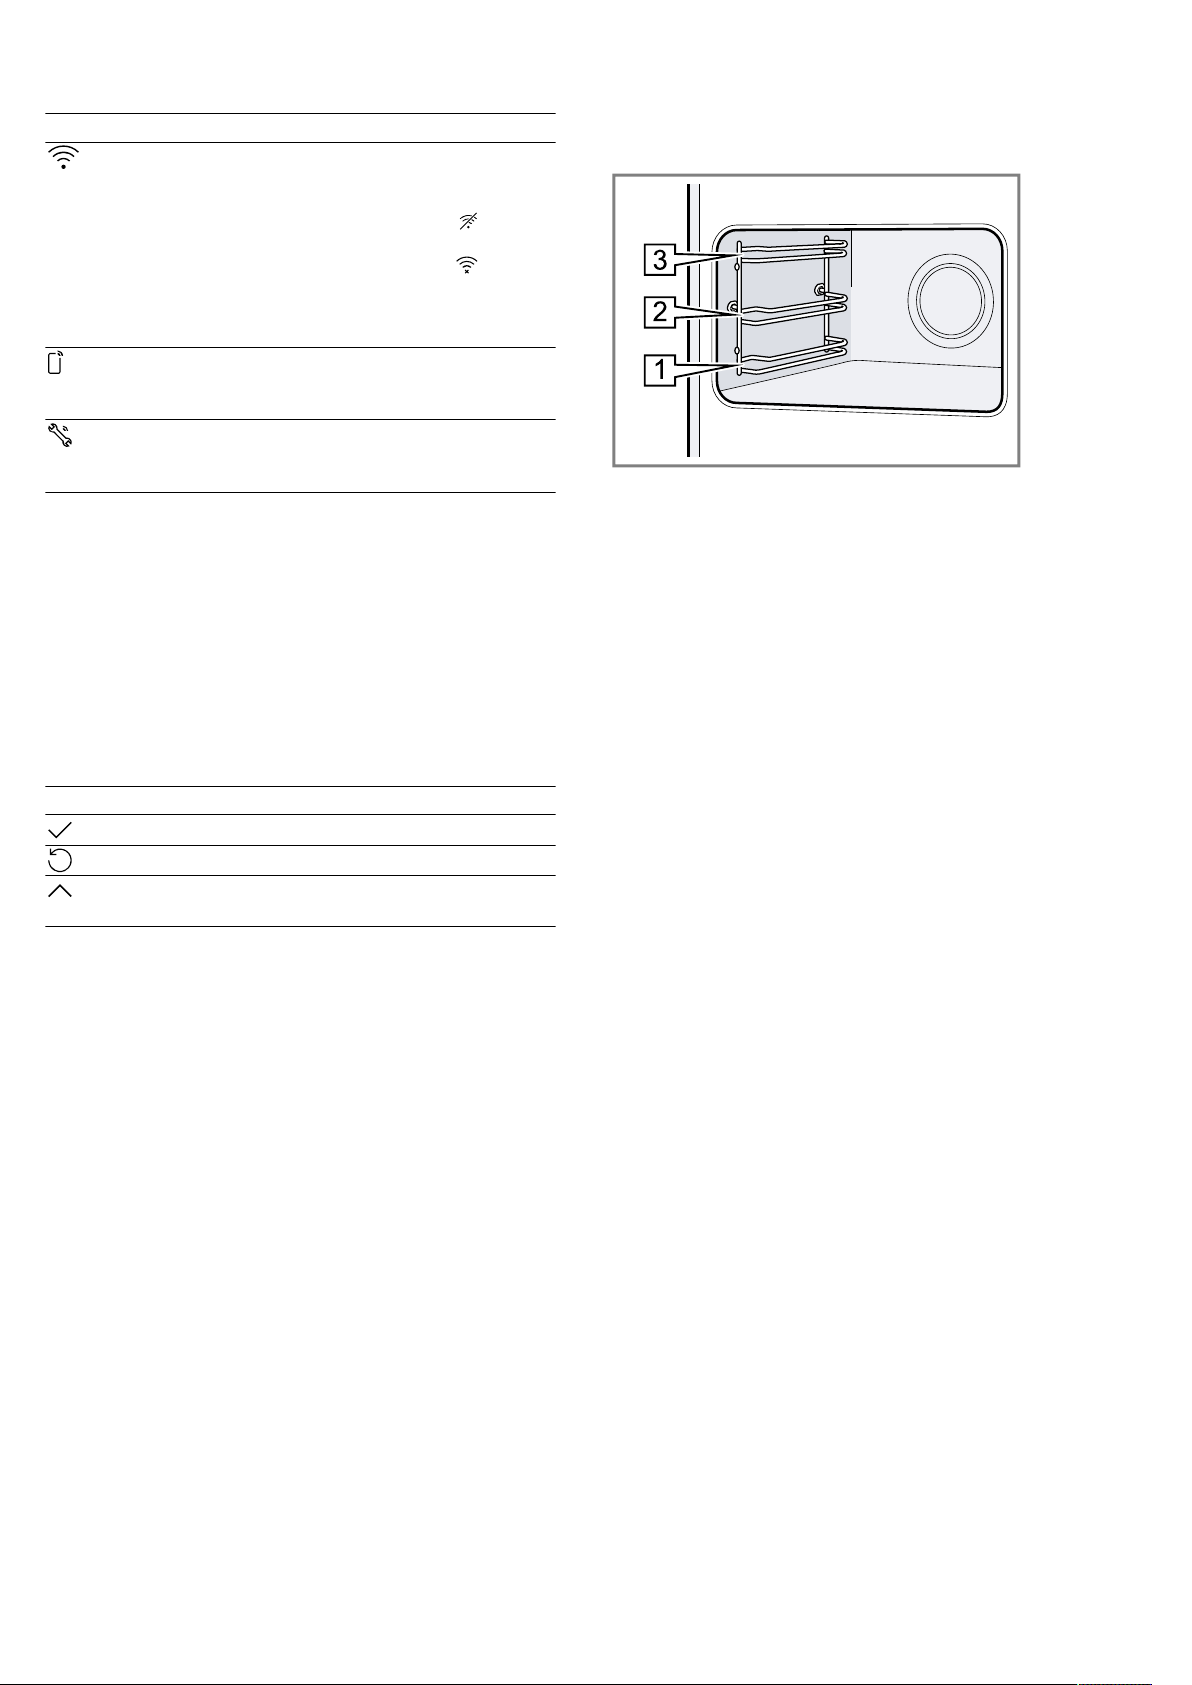
Shelf supports
The shelf supports in the cooking compartment enable
you to place accessories at different heights.
→"Accessories", Page10
Your appliance has 3 shelf positions. The shelf positions are numbered from bottom to top.
You can remove the shelf supports, e.g. for cleaning.
→"Rails", Page32
Self-cleaning surfaces
The back panel in the cooking compartment is selfcleaning. The self-cleaning surfaces are coated with a
porous, matt ceramic layer and have a rough surface.
When the appliance is in operation, the self-cleaning
surfaces absorb splashes from roasting or grilling and
break them down.
If the self-cleaning surfaces no longer clean themselves
adequately during operation, heat up the cooking compartment specifically to the right temperature.
→"Regenerating self-cleaning surfaces in the cooking
compartment", Page26
Lighting
One or more oven lights illuminate the cooking compartment.
When you open the appliance door, the light in the
cooking compartment switches on. If the appliance
door remains open for longer than around 18 minutes,
the light switches off again.
For most operating modes, the lighting is switched on
during operation. The lighting switches off again when
the operation ends.
Cooling fan
The cooling fan switches on and off depending on the
appliance's temperature. The hot air escapes above
the door.
ATTENTION!
Covering the ventilation slots will cause the appliance
to overheat.
▶ Do not cover the ventilation slots.
To ensure that the appliance cools down more quickly
after operation, the cooling fan continues to run for a
certain period afterwards.
Appliance door
If you open the appliance door during operation, the
operation stops. If you close the appliance door, operation resumes automatically.
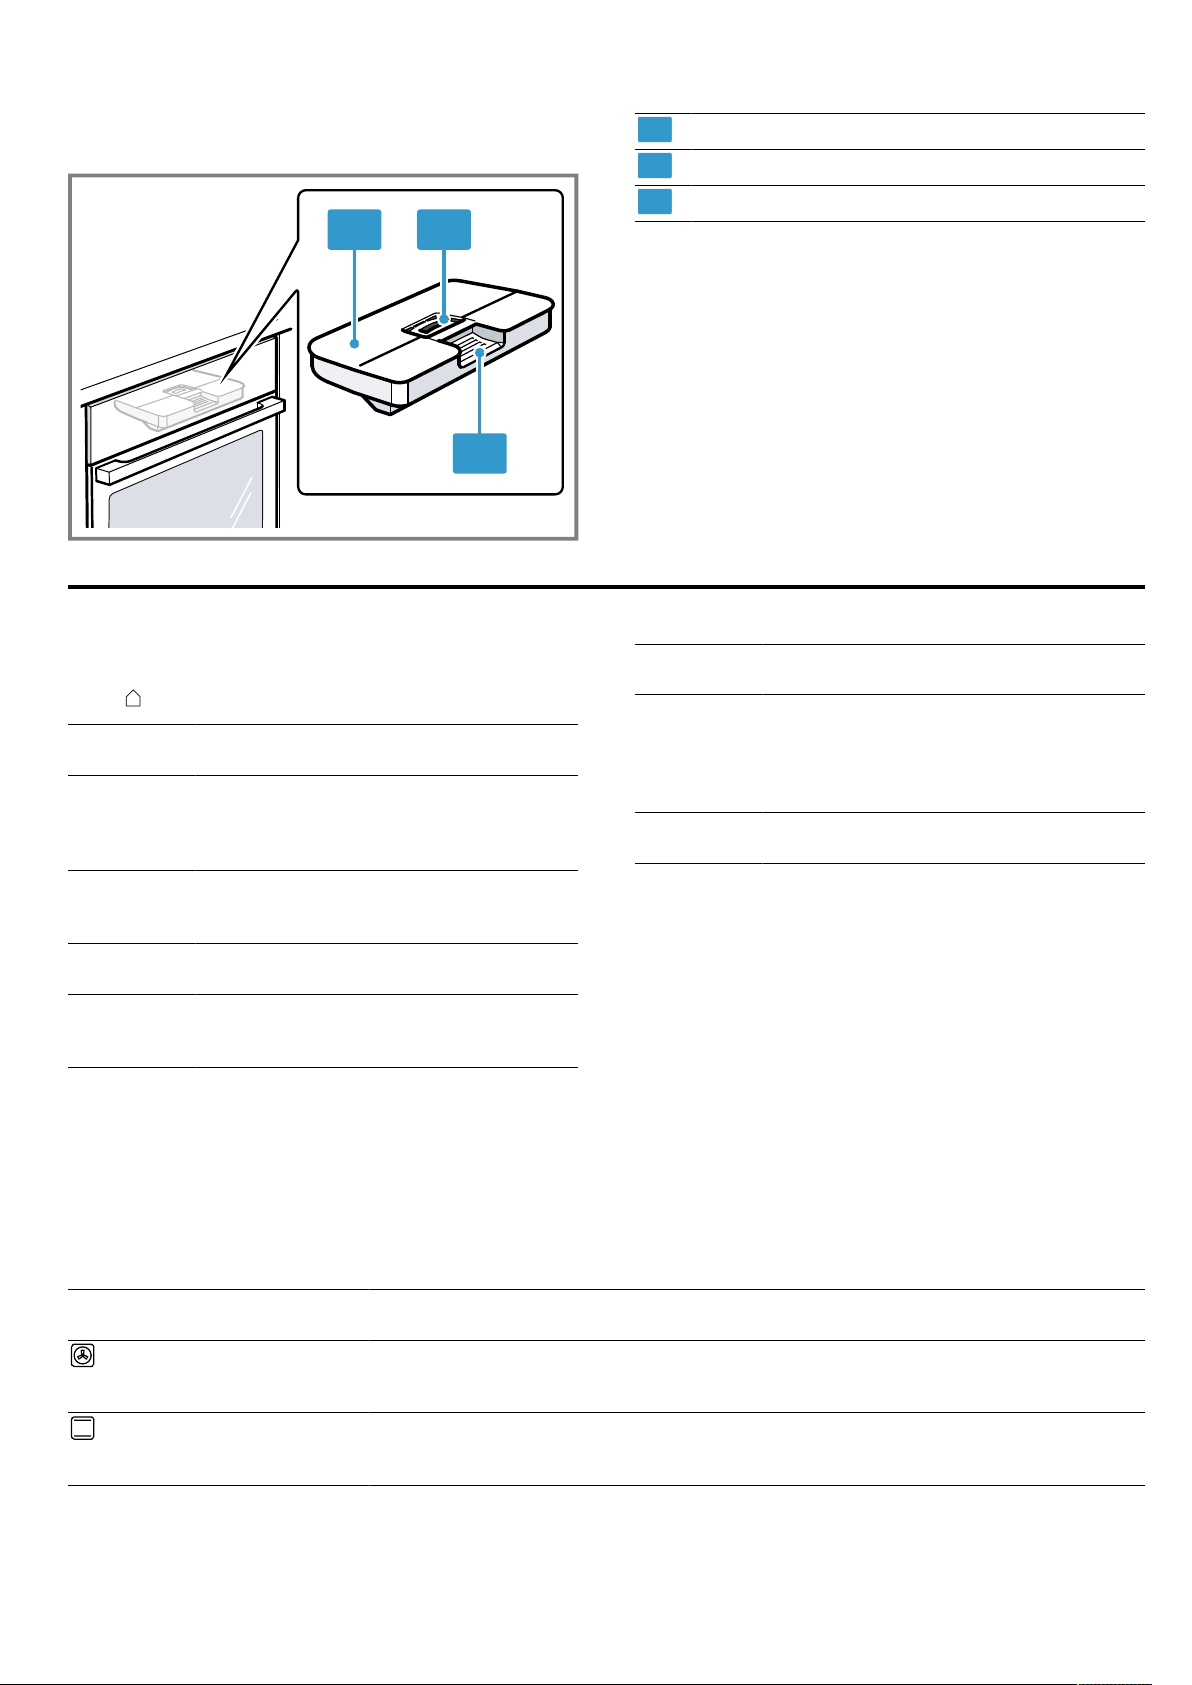
Water tank
You need the water tank for the types of steam heating.
7
Page 8
en Operating modes
1 2
3
1
2
3
The water tank is behind the control panel.
→"Filling the water tank", Page16
5 Operating modes
This is where you can find an overview of your appliance's operating modes and main functions.
Press
Operating
mode
Types of
heating
Steam Gently prepare food with types of steam
Favourites Use your own saved settings.
Dishes Use programmed, recommended set-
to open the menu.
Use
Select finely tuned types of heating for
the optimal preparation of your food.
→"Types of heating", Page8
→"Basic operation", Page13
heating.
→"Steam", Page16
→"Favourites", Page20
tings for various types of food.
→"Dishes", Page19
Tank cover
Opening for filling and emptying
Handle for removing and inserting
Operating
mode
Cleaning Select the cleaning function for the
Basic settings
HomeConnect
With HomeConnect, you can connect and remotely
control the oven with a mobile device, and use the full
functionality of the appliance.
Depending on the appliance type, additional or more
comprehensive functions are available for your appliance with the HomeConnect app. You can find more
information about this in the app.
→"HomeConnect ", Page23
Use
cooking compartment.
→"Cleaning aid", Page27
→"Descaling", Page27
→"Drying", Page28
Adjust the basic settings.
→"Basic settings", Page21
5.1 Types of heating
To ensure that you always find the right type of heating
to cook your food, we explain the differences and applications below.
The symbols for each type of heating help you to remember them.
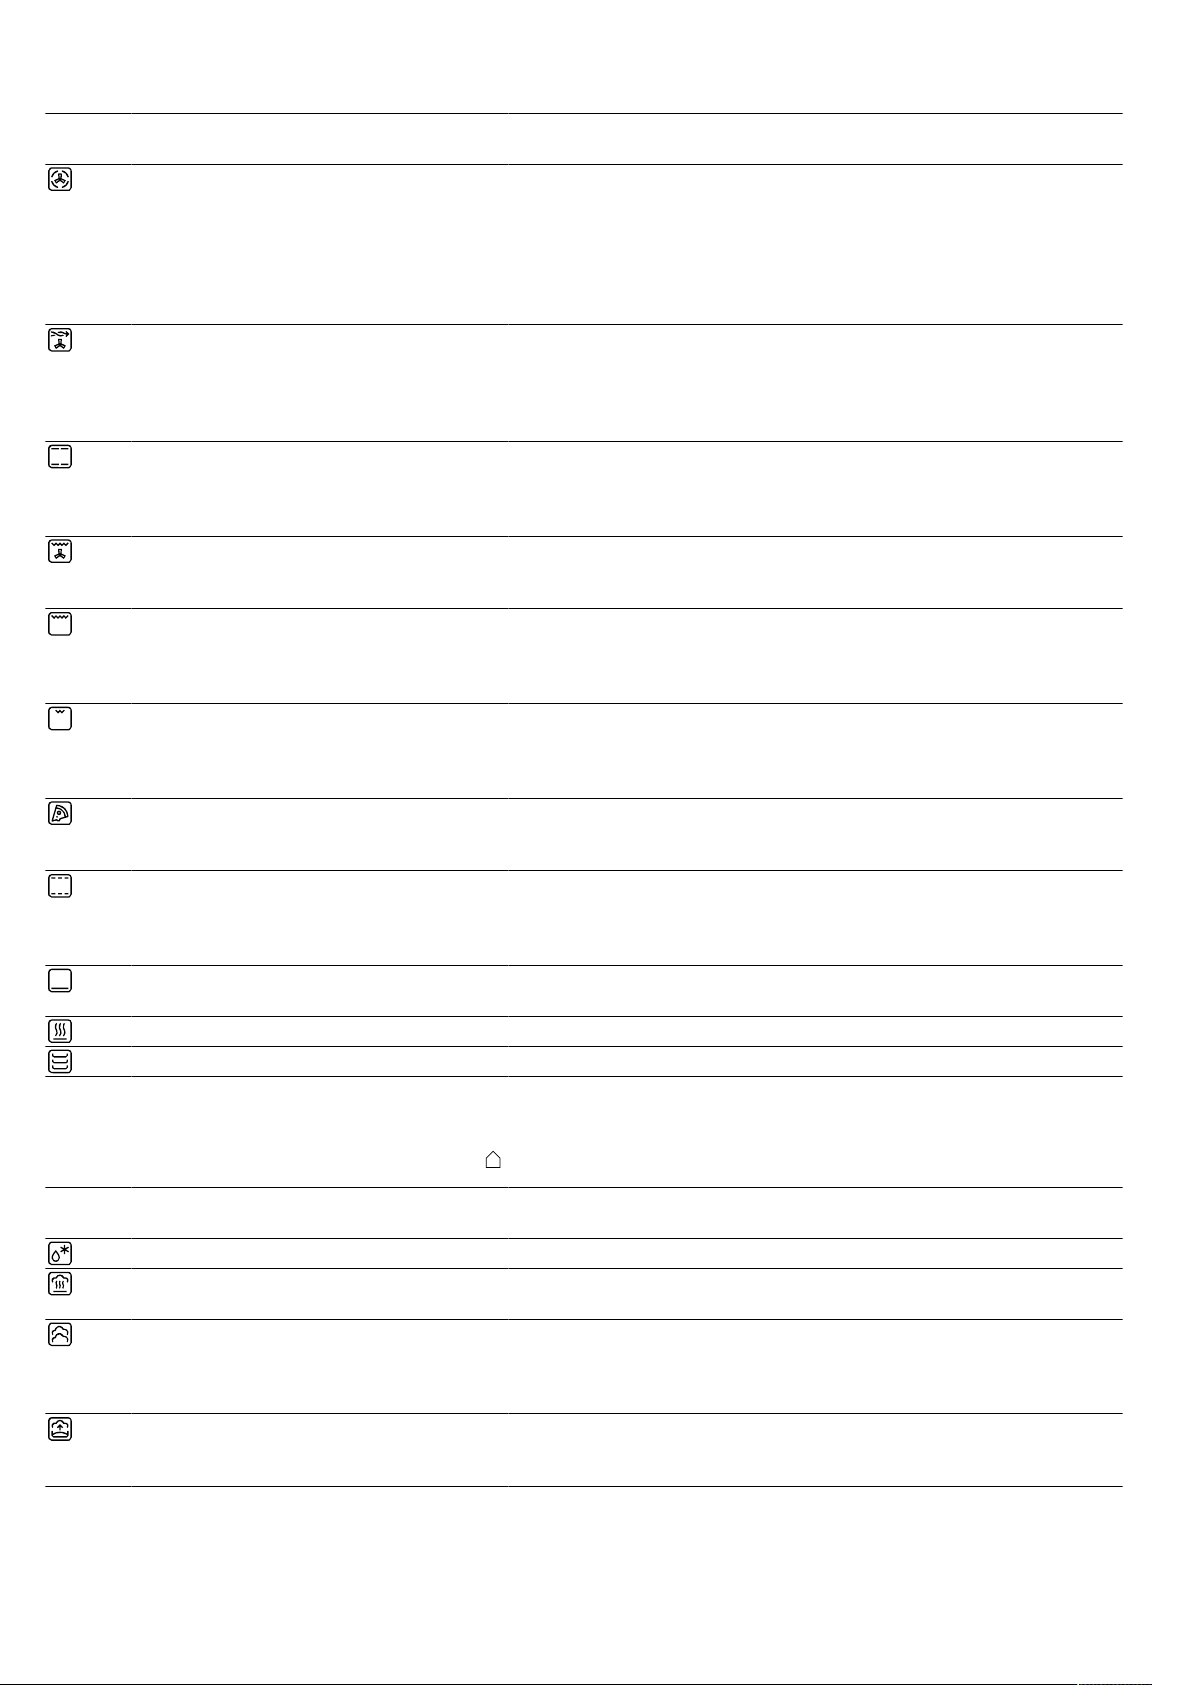
Symbol Type of heating Temperature
range
4D hot air 30 - 250°C Bake or roast on one or more levels.
Top/bottom heating 30 - 250°C Traditionally bake or roast on one level. This type of heating is
8
When you select a type of heating, the appliance suggests a suitable temperature or setting. You can use
these values or change them within the specified
range.
For grill setting3, the appliance reduces the temperature to grill setting1 after approx. 40minutes.
What it's used for and how it works
The fan distributes the heat from the ring-shaped heating element
in the back wall evenly around the cooking compartment.
especially good for cakes with moist toppings.
The heat is emitted evenly from above and below.
Page 9
Operating modes en
Symbol Type of heating Temperature
range
Gentle hot air 125 - 250 °C Cook selected dishes gently on one level without preheating.
Air Fry 30 - 250 °C Cook until crispy, on one level with little fat. Especially suitable
Gentle top/bottom
heating
Circulated air grilling 30 - 250°C Roast poultry, whole fish or larger pieces of meat.
Full-surface grill Grill settings:
Centre-area grill Grill settings:
Pizza setting 30 - 250°C Cook pizza or food that requires a lot of heat from below.
Slow cooking 70 - 120°C Slowly and gently cook seared, tender pieces of meat in un-
Bottom heating 30 - 250°C Final baking or cooking food in a bain marie.
Keeping warm 50 - 100°C Keep cooked food warm.
Plate warming 30 - 90°C Preheat cookware.
150-250°C Gently cook selected dishes.
1 = low
2 = medium
3 = high
1 = low
2 = medium
3 = high
What it's used for and how it works
The fan distributes the heat from the ring-shaped heating element
in the back wall evenly around the cooking compartment. The
food is cooked in phases using residual heat.
Always keep the appliance door closed when cooking.
This type of heating is used to determine the energy consumption in air recirculation mode and the energy efficiency class.
for food that is usually fried in oil, e.g. chips.
The fan circulates heat from the grill element around the food at
high speed. The exhaust air is extracted more intensively from of
the cooking compartment.
Heat is emitted from above and below.
This type of heating is used to measure the energy consumption
in the conventional mode.
The grill element and the fan switch on and off alternately. The
fan circulates the hot air around the food.
Grill flat items such as steak and sausages, or make toast. Gratinate food.
The entire area below the grill element becomes hot.
Grill small quantities such as steak and sausages, or make toast.
Gratinate small quantities of food.
The central area below the grill element becomes hot.
The bottom heating element and the ring-shaped heating element in the back wall heat the cooking compartment.
covered cookware.
The heat is emitted evenly from above and below at a low temperature.
The heat is emitted from below.
Types of steam heating
The types of steam heating can be found in the
Symbol Type of heating Temperature
range
Defrost 30 - 60°C Gently defrost frozen food.
Reheating 80 - 180°C Gently reheat plated meals and baked items.
Steam Plus 30 - 120°C Gently steam vegetables, meat, fish and cereal. Juice fruit.
Proving dough 30 - 50°C Leave the yeast dough to prove.
menu under "Steam".
What it's used for and how it works
The steam ensures that the food does not dry out.
Blanch food.
In order to reduce the cooking time, more robust food can be
steamed at above 100°C.
The dough rises considerably more quickly than at room temperature. The surface of the dough does not dry out.
9
Page 10
en Accessories
5.2 Temperature
With most types of heating
temperature in the cooking compartment from approx.30°C and the set temperature side-by-side on
the display during heating, e.g.120|210°C.
When you are preheating the appliance, the optimal
time to place the food in the cooking compartment is
as soon as the displayed temperature in the cooking
compartment and the set temperature are the same.
, you can read the current
Note:Due to thermal inertia, the temperature that is
displayed may differ slightly from the actual temperature inside the cooking compartment.
Residual heat indicator
When the appliance is switched off, a red line around
the control ring indicates the residual heat in the cooking compartment. The further the temperature drops,
the darker the ring. The ring goes out completely at approx. 60°C.
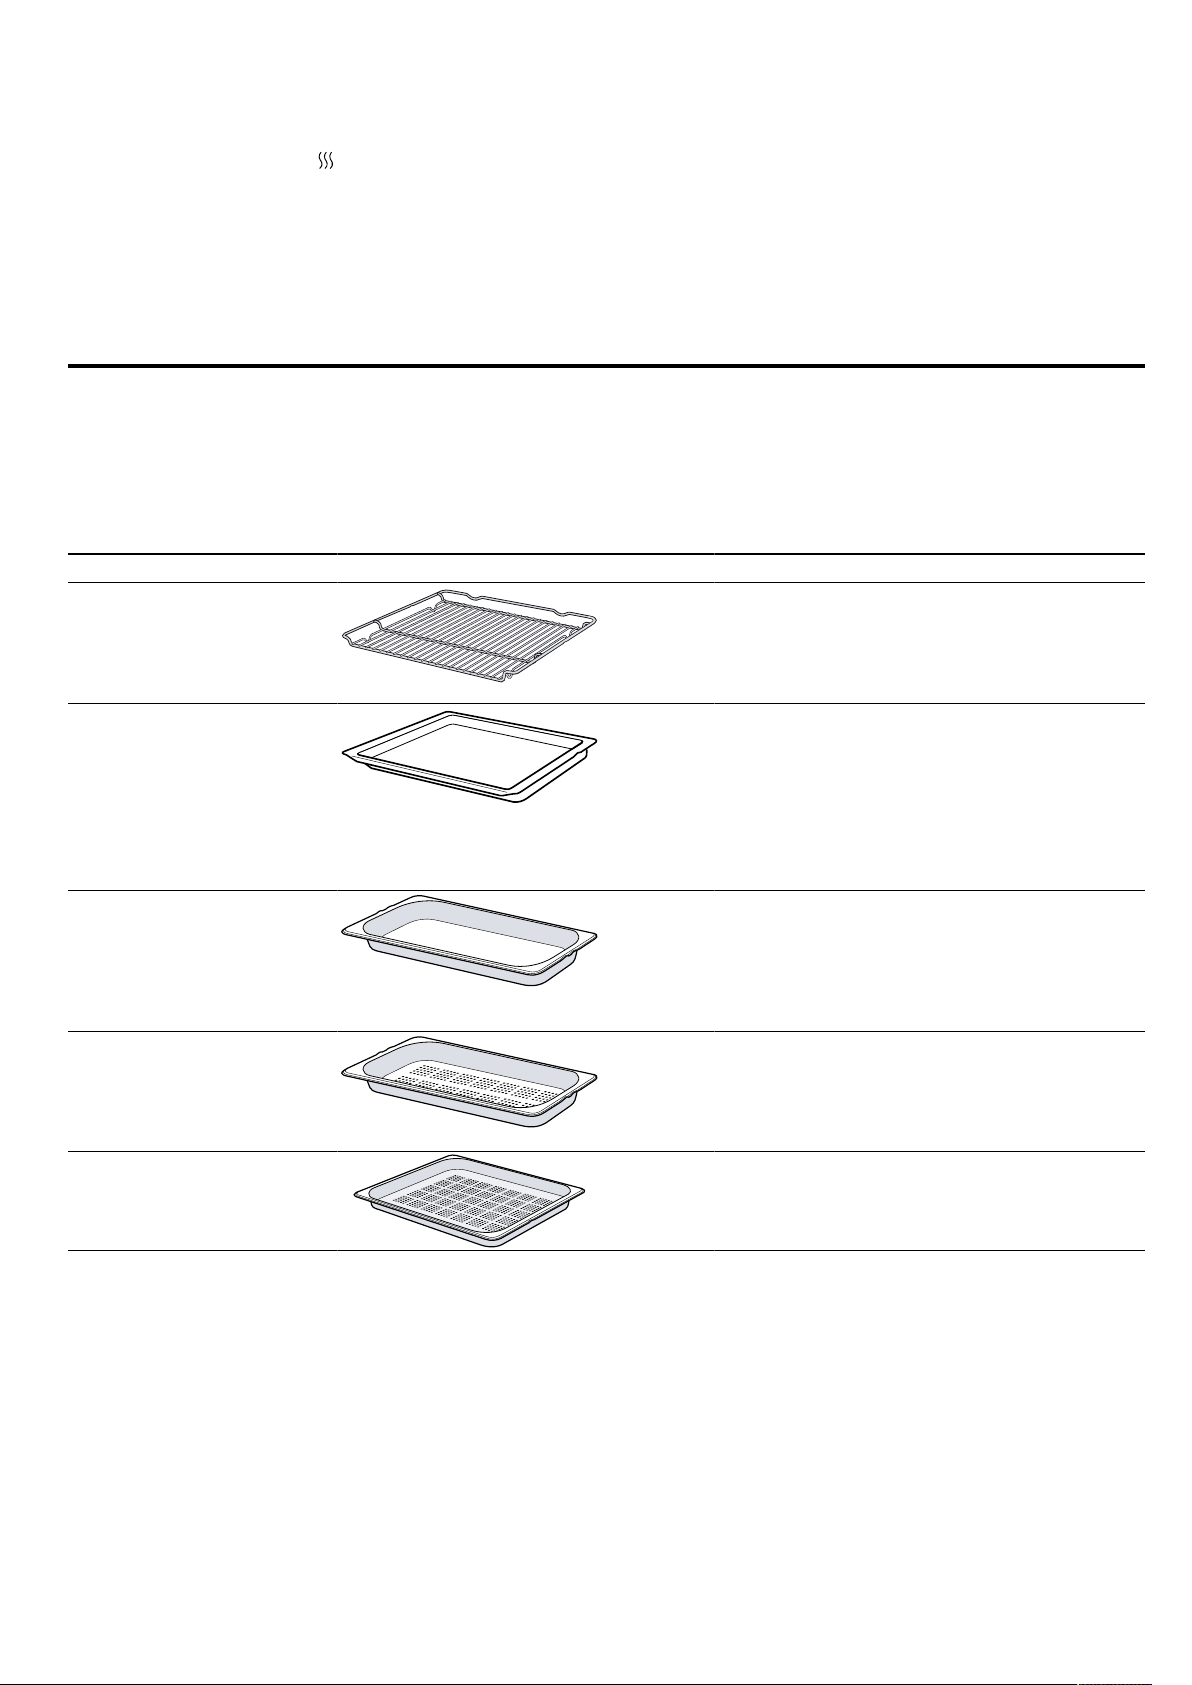
6 Accessories
Use original accessories. These have been made especially for your appliance.
Note:Accessories may become deformed if they get
hot. Deformation has no effect on function. As the accessory cools down, it will regain its original shape.
Accessories Use
Wire rack ¡ Cake tins
Universal pan ¡ Moist cakes
Steam container, solid, size
M
Steam container, perforated, size M
Perforated steam container,
size XL
The accessories supplied may differ depending on the
appliance model.
¡ Ovenproof dishes
¡ Cookware
¡ Meat, e.g. roasting joints or steak
¡ Frozen meals
¡ Baked items
¡ Bread
¡ Large roasts
¡ Frozen meals
¡ Catch dripping liquids, e.g. fat when
grilling food on the wire rack or water
when cooking with steam.
Cooking:
¡ Rice
¡ Pulses
¡ Cereals
Do not place the steam container on the wire
rack.
¡ Steaming vegetables.
¡ Juicing berries.
¡ Defrosting.
Do not place the steam container on the wire
rack.
Steaming large quantities of food.
6.1 Information on accessories
Some accessories are only suitable for certain types of
heating.
Steam container
The steam containers are suitable for steam-only types
of heating up to 120°C.
The steam containers are not suitable for higher temperatures or other types of heating. The containers become permanently discoloured and deformed.
10
6.2 Locking function
The locking function prevents the accessories from tilting when they are pulled out.
You can pull out the accessories approximately halfway
without them tipping. The accessories must be inserted
into the cooking compartment correctly for the tilt protection to work properly.
Page 11
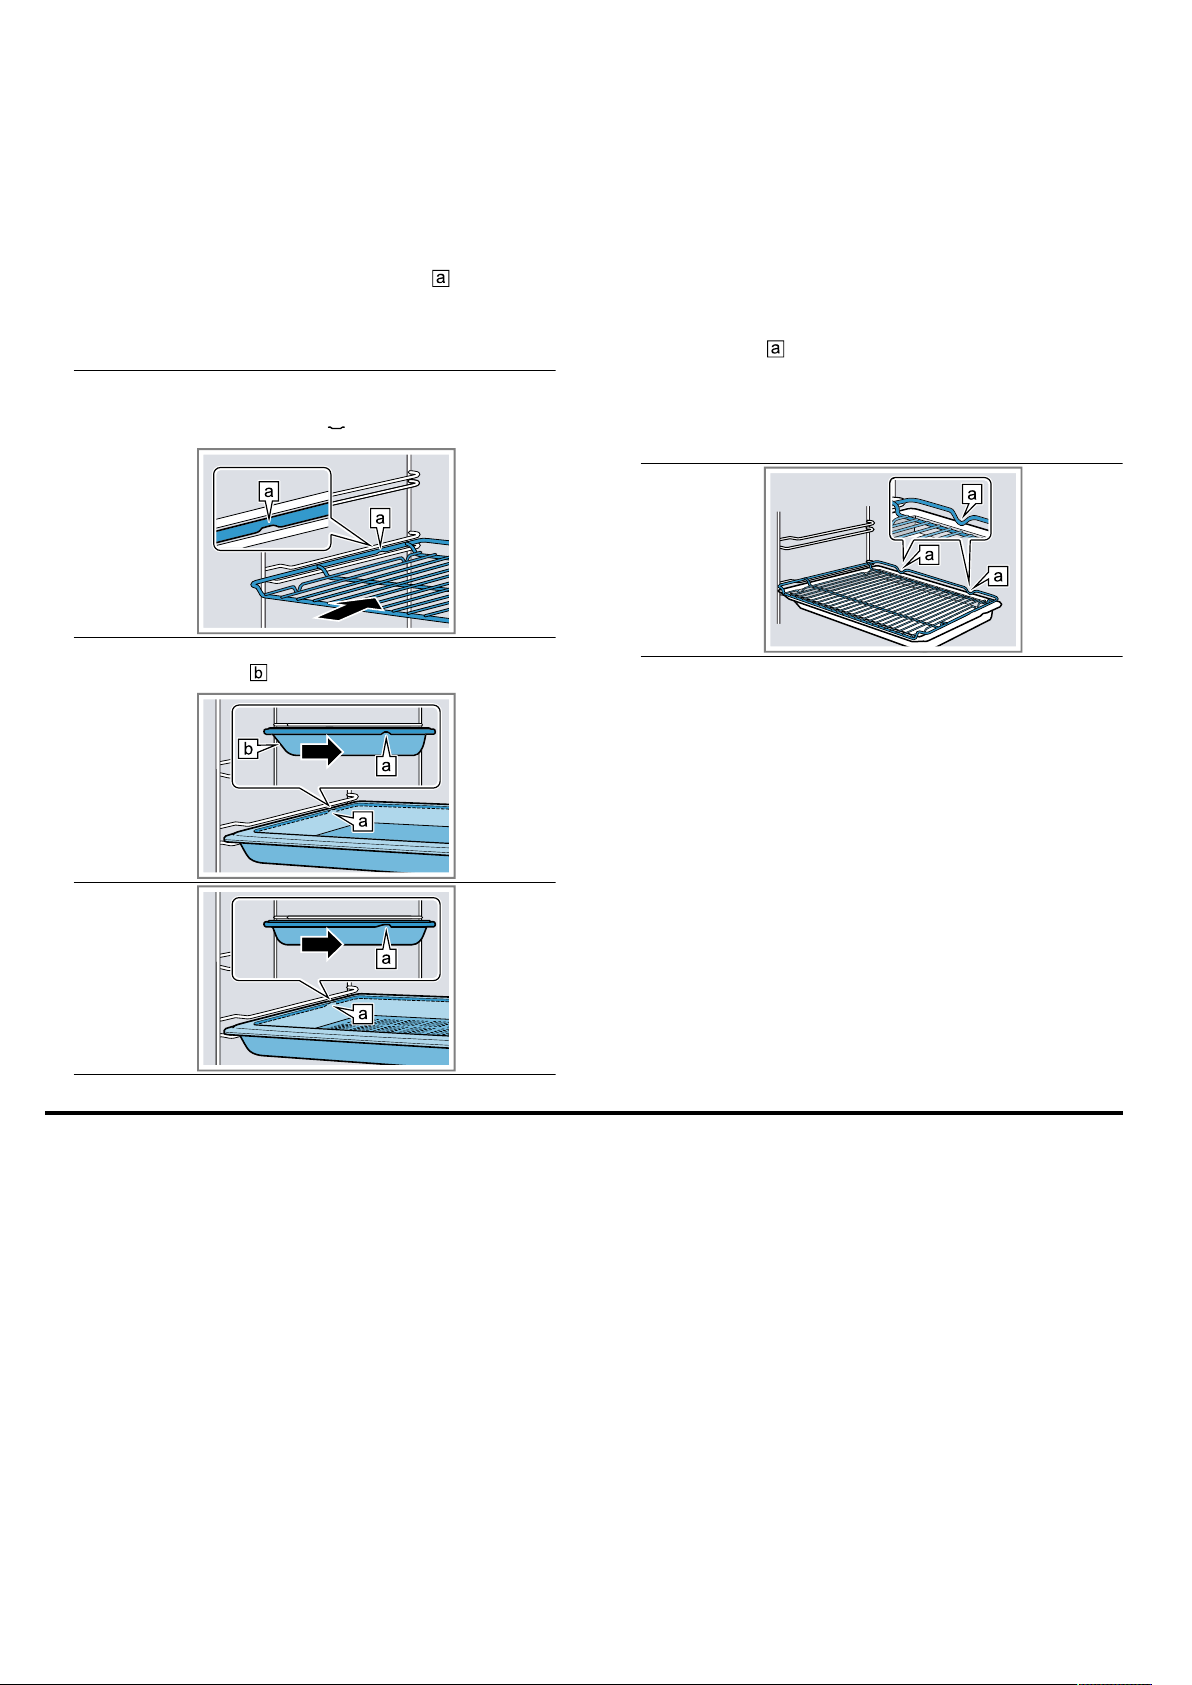
6.3 Sliding accessories into the cooking compartment
Always slide the accessory into the cooking compartment the right way round. This is the only way to ensure that accessories can be pulled out approximately
halfway without tipping.
1.
Turn the accessories so that the notch
rear and is facing downwards.
2.
Insert the accessory between the two guide rods for
a shelf position.
Wire rack Insert the wire rack with the open
side facing the appliance door and
the curved lip facing downwards.
is at the
Before using for the first time en
3.
Push the accessory all the way in, making sure that
it does not touch the appliance door.
Note:Take any accessories that you will not be using
out of the cooking compartment while the appliance is
in operation.
Combining accessories
You can combine the wire rack with the universal pan
to catch any liquid that drips down.
1.
Place the wire rack on the universal pan so that
both spacers
sal pan.
2.
Insert the universal pan between the two guide rods
for a shelf position. In so doing, the wire rack is on
top of the upper guide rod.
Wire rack
on universal pan
are on the rear edge of the univer-
Baking tray
E.g. universal pan or
baking tray
Steam container, perforated,
size XL
Slide the tray in with the sloping
edge towards the appliance door.
6.4 Other accessories
You can purchase other accessories from our aftersales service, specialist retailers or online.
You will find a comprehensive range of products for
your appliance in our brochures and online:
www.bosch-home.com
Accessories vary from one appliance to another. When
purchasing accessories, always quote the exact
product number (E no.) of your appliance.
You can find out which accessories are available for
your appliance in our online shop or from our aftersales service.
7 Before using for the first time
Implement the settings for the initial configuration. Calibrate the appliance. Clean the appliance and accessories.
7.1 Determining the water hardness before switching on the appliance for the first time
Before using the appliance for the first time, ask your
water supplier about the hardness of your tap water. To
ensure that the appliance can reliably remind you to
descale it when required, you must set your water hardness range correctly.
ATTENTION!
If the wrong water hardness has been set, the appliance cannot remind you to descale it at the right time.
▶ Set the water hardness correctly.
Using unsuitable liquids may damage the appliance.
▶ Do not use distilled water, highly chlorinated tap wa-
ter (>40 mg/l) or other liquids.
▶ Only use cold, fresh tap water, softened water or
non-carbonated mineral water.
Malfunctions may occur when using filtered or demineralised water. The appliance may request that you top
up the water tank even though it may be full, or operation with steam is cancelled after approx. twominutes.
▶ If required, mix filtered or demineralised water with
the bottled non-carbonated mineral water with a ra-
tio of onetoone.
11
Page 12
en Before using for the first time
Notes
¡ If you are using mineral water, set the water hard-
ness range to "very hard". If you are using mineral
water, you must only use non-carbonated mineral
¡ If your tap water is very hard, we recommend that
you use softened water. If you are using only
softened water, set the "softened" water hardness
range.
water.
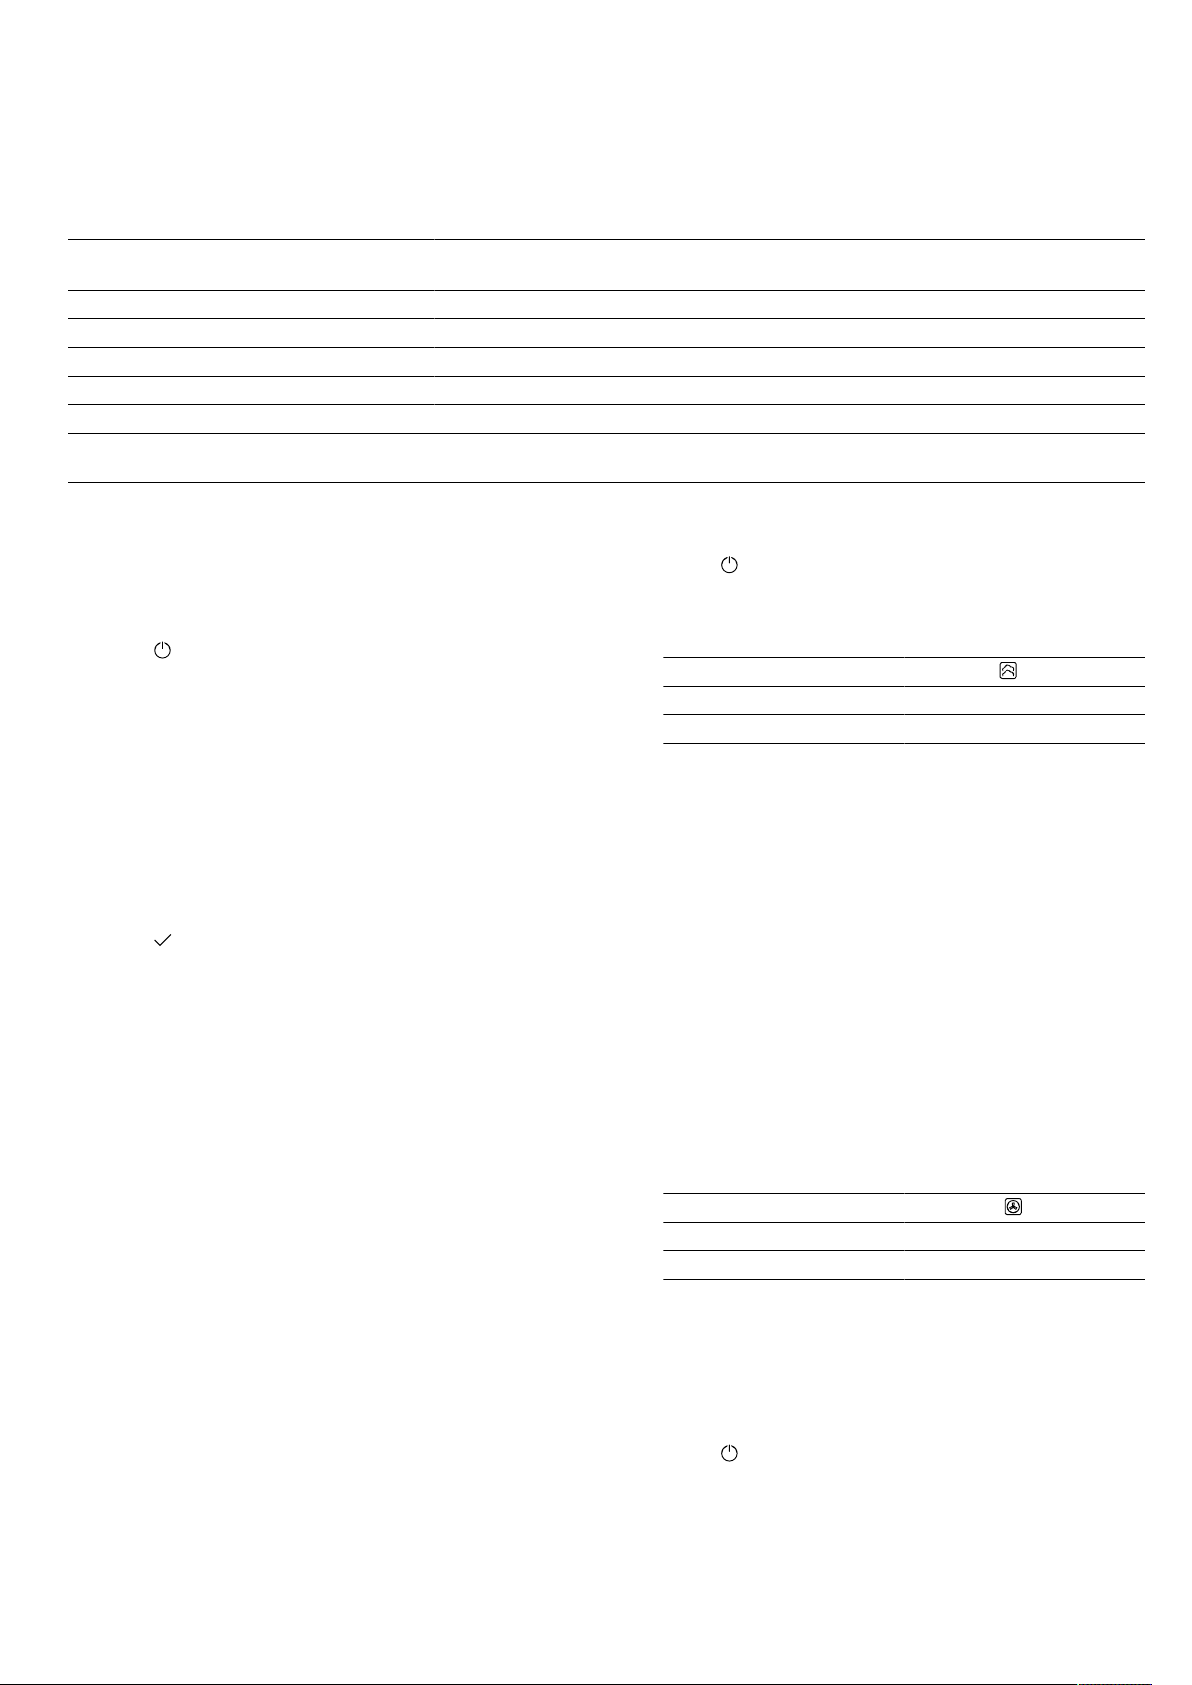
Setting Water hardness in
German hardness °dH French hardness °fH
mmol/l
0 (softened)
1
- - 1 (soft) Up to 1.5 Up to 8.4 Up to 15
2 (medium) 1.5-2.5 8.4-14 15-25
3 (hard) 2.5-3.8 14-21.3 25-38
4 (very hard)
1
Only set this if you will be using solely softened water.
2
Also set for mineral water. Only use non-carbonated mineral water.
7.2 Performing initial start-up
After connecting the appliance to the power supply,
you must configure the settings for its initial start-up. It
may take a few minutes for the settings to appear on
the display.
1.
Press
a The first setting appears.
2.
To change the setting as required, press a value in
the list or change the value using the setting ring.
Possible settings:
– Language
– HomeConnect →"HomeConnect ", Page23
– Time
→"Setting the time", Page22
– Water hardness
→"Determining the water hardness before
switching on the appliance for the first time",
Page11
3.
Press
4.
Work through the settings and make changes as required.
a After the last setting, a message appears on the dis-
play confirming that the initial start-up is complete.
5.
To check the appliance before heating for the first
time, open and close the appliance door once.
2
to switch the appliance on.
and switch to the next setting.
Over 3.8 Over 21.3 Over 38
2.
Wipe the smooth surfaces in the cooking compartment with a soft, damp cloth.
3.
Press
4.
Fill the water tank.
to switch the appliance on.
→"Filling the water tank", Page16
5.
Apply the following settings:
Type of heating Steaming
Temperature 100 °C
Cooking time 30 minutes
→"Basic operation", Page13
6.
Start the operation.
‒ Ventilate the kitchen while the appliance is heat-
ing.
a Calibration starts. This creates a lot of steam.
a When the time has elapsed, a signal sounds. A
message appears on the display confirming that the
operation has finished.
7.
Allow the appliance to cool down and then dry the
cooking compartment floor thoroughly.
8.
ATTENTION!
If there is water on the cooking compartment floor
when operating the appliance at temperatures
above 120°C, this will damage the enamel.
▶ Do not use the appliance if there is water on the
cooking compartment floor.
7.3 Calibrating and cleaning the appliance before using it for the first time
▶ Wipe away any water on the cooking compart-
ment floor before operation.
Apply the following settings:
To ensure that the appliance is automatically calibrated, allow the appliance to run empty in steam operation. Before using the appliance to cook food for the
first time, you must clean the cooking compartment
and accessories.
Note:The boiling point of water depends on the air
pressure. During the calibration process, the appliance
makes adjustments to adapt to the pressure conditions
in the location where it is installed.
Do not open the appliance door while calibration is in
progress, as this will cancel the calibration process.
Requirement:The cooking compartment is cold or at
room temperature.
1.
Remove the product information and the accessories from the cooking compartment. Remove any
leftover packaging, such as polystyrene pellets, and
any adhesive tape that is in or on the appliance.
Type of heating 4Dhot air
Temperature Maximum
Cooking time 30 minutes
→"Basic operation", Page13
9.
Start the operation.
‒ Ventilate the kitchen while the appliance is heat-
ing.
a When the time has elapsed, a signal sounds. A
message appears on the display confirming that the
operation has finished.
10.
Press
11.
Once the appliance has cooled down, clean the
to switch the appliance off.
smooth surfaces in the cooking compartment with a
detergent solution and a dish cloth.
12.
Clean the accessories thoroughly using a detergent
solution and a dish cloth or soft brush.
12
Page 13

13.
Dry the appliance.
→"After using steam operation", Page18
Note:Following a power cut, the calibrated settings are
retained.
8 Basic operation
8.1 Switching on the appliance
▶
Press
a The display shows the menu.
8.2 Switching off the appliance
Switch your appliance off when you are not using it.
The appliance will switch itself off automatically if it is
not used for a certain period of time.
▶
Press
a The appliance switches off. Any functions currently
in progress are cancelled.
a The time or residual heat indicator appears on the
display.
8.3 Starting the operation
You must start each operation.
ATTENTION!
If there is water on the cooking compartment floor
when operating the appliance at temperatures above
120°C, this will damage the enamel.
▶ Do not use the appliance if there is water on the
cooking compartment floor.
▶ Wipe away any water on the cooking compartment
floor before operation.
▶
Press
a The settings appear on the display.
8.4 Interrupting the operation
You can interrupt the operation and then continue
again.
1.
To interrupt the operation, press
2.
Press again to resume the operation.
8.5 Setting the operating mode
After you have switched on the appliance, the menu
appears on the display.
1.
To scroll through the various selection options,
swipe to the left or right on the display.
‒ Swipe right or left to scroll through the menu and
‒ Swipe down or up to scroll through selection
2.
To select a function, press the function on the display.
a Depending on the function, possible setting values
or other tiles are available for selection.
3.
To go back to a setting if necessary, press
4.
To change the setting values, use the digital setting
ring:
‒ Swipe over the setting ring clockwise or anti-
‒ Or press a specific position on the setting ring.
to switch the appliance on.
to switch the appliance off.
to start the operation.
.
other setting options.
lists.
.
clockwise, as required.
Basic operation en
To adjust the appliance to a new installation location
after moving house, reset the basic settings to the factory settings. Restart the calibration process.
5.
Use to confirm the setting.
6.
Press to start the operation.
7.
If the operation is ended:
‒ If required, you can select other settings and re-
start the operation.
‒ When the food is ready, use to switch the ap-
pliance off.
Note:You can save your settings as "Favourites"
and use these again.
→"Favourites", Page20
8.6 Setting the type of heating and the temperature
1.
Press "Types of heating" in the menu.
2.
Press the type of heating that you want to use.
3.
Press the temperature in °C or, depending on the
type of heating, the setting.
4.
Use the setting ring to set the temperature.
5.
Press
ure.
If required, you can implement additional settings:
– →"Rapid heating", Page14
– →"Time-setting options", Page14
– →"Steam", Page16
6.
Press
a The appliance starts heating.
a The setting values and how long the appliance has
already been in operation are shown on the display.
7.
If the operation is ended:
‒ If required, you can select other settings and re-
‒ When the food is ready, use
Note:The most suitable type of heating for your food
can be found in the description of the type of heating.
→"Types of heating", Page8
Changing the type of heating
When you change the type of heating, the other settings are also reset.
1.
Press
2.
Press .
3.
Press the type of heating that you want to use.
4.
Reset the operation and use to start.
Changing the temperature
Once the operation has started, you can change the
temperature at any time.
1.
Press
2.
Press the temperature.
3.
Change the temperature with the setting ring.
4.
To confirm the change, press
a The change is applied.
on the display to confirm the set temperat-
to start the operation.
start the operation.
to switch the ap-
pliance off.
.
on the display.
on the display.
13
Page 14
en Rapid heating
8.7 Displaying information
In most cases, you can call up information about the
function that you have just started. The appliance automatically displays certain information, e.g. to ask you to
do/confirm something or to issue a warning.
1.
Press
a Information is displayed for a few seconds.
2.
To scroll through lots of content in the message,
swipe over the display.
3.
If necessary, use
"Info".
to exit the message.
8.8 Sabbath-compliant use
If you want to operate your appliance so that it is Sabbath-compliant, use the time-setting options and
change the basic setting for the lighting.
Note:If you open the appliance door during operation,
the appliance stops heating. When you close the appliance door, the appliance continues to heat again. To
operate your appliance so that it is Sabbath-compliant,
do not open the appliance door until after operation.
1.
Change the "Lighting" basic setting to "Always off".
→"Basic settings", Page21
This will ensure that the light in the cooking compartment is always off while the appliance is in operation and when you open the appliance door.
2.
Set the required operating mode.
→"Setting the operating mode", Page13
→"Setting the type of heating and the temperature",
Page13
3.
Set the required cooking time depending on the operating mode.
→"Setting the cooking time", Page15
→"Time-setting options", Page14
4.
Use "End time" to set the time at which the operation should end.
→"Setting the end time", Page15
→"Time-setting options", Page14
5.
Place the food in the cooking compartment before
the appliance starts to heat.
6.
Press
a The display shows the time remaining until the oper-
ation starts. The appliance is in standby mode.
a Once the start time has been reached, the appli-
ance starts heating and the cooking time starts
counting down.
7.
When the operation has ended, remove the food
from the cooking compartment. The appliance automatically switches off completely after approximately
15 to 20minutes.
Note:If necessary, change the basic setting for the
lighting again.
to start the operation.
9 Rapid heating
To save time, rapid heating
ing time for set temperatures over 100°C.
Rapid heating is possible for the following types of
heating:
¡ 4Dhot air
¡ Top/bottom heating
9.1 Setting rapid heating
To ensure an even cooking result, do not place the
food in the cooking compartment until rapid heating
has come to an end.
Note:Do not set a cooking time until rapid heating has
come to an end.
can shorten the preheat-
10 Time-setting options
For an operation, you can set the cooking time and the
time at which the operation should be finished. The
timer runs independently of the operation.
Time-setting
option
Cooking time If you set a cooking time, the appli-
Use
ance stops heating automatically
once this time has elapsed.
1.
Set a suitable type of heating and a temperature of
at least 100°C.
Rapid heating automatically switches off at temperatures of 200°C and above.
2.
Press "Rapid heating".
a The
3.
a Rapid heating starts.
a Once rapid heating has ended, a signal sounds.
4.
symbol lights up red.
Press
The
Place the food in the cooking compartment.
to start the operation.
symbol changes back to white.
Cancelling rapid heating
1.
Press
2.
Press "Rapid heating".
a The symbol changes back to white.
Time-setting
option
End time Along with the cooking time, you can
Timer You can set the timer to run inde-
on the display.
Use
set the time at which you want the
operation to end. The appliance
starts up automatically so that the
operation finishes at the required
time.
pendently of the appliance during operation. It does not affect the appliance.
14
Page 15

10.1 Setting the cooking time
You can set the cooking time for the operation up to
24hours.
Requirement:An operating mode and temperature or
level have been set.
1.
Press
2.
To set the cooking time, press the relevant time
"Cooking time".
value, e.g. hour display "h" or minute display "m".
a The selected value is marked in blue.
3.
Use the setting ring to set the cooking time.
If required, use
4.
To confirm the set cooking time, press on the dis-
to reset the setting value.
play.
5.
Press to start the operation.
a The appliance starts to heat and the time counts
down.
a When the time has elapsed, a signal sounds. A
message appears on the display confirming that the
operation has finished.
6.
Once the cooking time has elapsed:
‒ If required, you can select other settings and re-
start the operation.
‒ When the food is ready, use to switch the ap-
pliance off.
Changing the cooking time
You can change the cooking time at any time.
1.
Press on the display.
2.
Press the cooking time .
3.
Use the setting ring to change the cooking time.
4.
To confirm the change, press on the display.
a The change is applied.
Cancelling the cooking time
You can cancel the cooking time at any time.
1.
Press
2.
Press the cooking time .
3.
Reset the cooking time using .
Note:For operating modes that always require a
cooking time, the appliance resets the cooking time
to the preset value.
4.
To confirm the change, press on the display.
a The change is applied.
on the display.
10.2 Setting the end time
You can delay the time at which the cooking time for
the operation is due to end by up to 24 hours.
Notes
¡ To achieve good cooking results, do not delay the
time once the operation has already started.
¡ Food will spoil if you leave it in the cooking com-
partment for too long.
Requirements
¡ An operating mode and temperature or level have
been set.
¡ A cooking time is set.
1.
Press
2.
To set the time, press the hour display or the minute
display.
a The selected value is marked in blue.
3.
Use the setting ring to delay the time.
If required, use
4.
To confirm the set time, press on the display.
"End time".
to reset the setting value.
Time-setting options en
5.
Press to start the operation.
a The display shows the time remaining until the oper-
ation starts. The appliance is in standby mode.
a Once the start time has been reached, the appli-
ance starts heating and the cooking time starts
counting down.
a When the time has elapsed, a signal sounds. A noti-
fication appears on the display confirming that the
operation has finished.
6.
Once the cooking time has elapsed:
‒ If required, you can select other settings and re-
start the operation.
‒ When the food is ready, use to switch the ap-
pliance off.
Changing the end time
To achieve good cooking results, only change the set
time before the operation starts and before the cooking
time starts counting down.
1.
Press
2.
Press the end time .
3.
Use the setting ring to change the end time.
4.
To confirm the change, press on the display.
on the display.
a The change is applied.
Cancelling the end time
You can delete the set end time at any time.
1.
Press
2.
Press the end time .
3.
Use to reset the end time.
on the display.
Note:For operating modes that always require a
cooking time, the appliance resets the time at which
the cooking time ends to the next possible time.
4.
To confirm the change, press on the display.
a The change is applied.
10.3 Setting the timer
The timer runs independently during the operation. You
can set the timer for up to 24hours. The timer has its
own signal so that you can tell whether it is the timer or
a cooking time that has elapsed.
1.
Press
2.
To set the timer, press the relevant time value on
the display, e.g. minute display "m" or second display "s".
a The selected value is marked in blue.
3.
Set the timer using the setting ring.
If required, use
4.
To start the timer, press on the display.
a The timer counts down.
a The timer remains visible on the display if the appli-
ance is switched off.
a When the appliance is switched on, the display
shows the settings for the current operation. The
timer is displayed in the status display.
a Once the timer has elapsed, a signal sounds. A no-
tification appears on the display confirming that the
timer has finished.
Changing the timer
You can change the timer at any time.
1.
If the timer is running in the background, use
select the timer beforehand.
2.
Press .
.
to reset the setting value.
to
15
Page 16
en Steam
3.
Change the timer using the setting ring.
4.
Press
to confirm.
Cancelling the timer
You can cancel the timer at any time.
11 Steam
Food can be cooked particularly gently using steam.
You can use the special types of steam heating, or use
steam assistance with certain types of heating.
WARNING‒Risk of scalding!
Hot steam may escape when you open the appliance
door. Steam may not be visible, depending on the temperature.
▶ Open the appliance door carefully.
▶ Keep children at a safe distance.
11.1 Before using the steam function
Before using the steam function each time, make sure
that your appliance is supplied with sufficient water.
Filling the water tank
WARNING‒Risk of fire!
Due to the hot surfaces, vapours from flammable liquids may catch fire in the cooking compartment (explosion). The appliance door may spring open. Hot
steam and jets of flame may escape.
▶ Do not pour flammable liquids (e.g. alcoholic drinks)
into the water tank.
▶ Only fill the water tank with water or with the descal-
ing solution we have recommended.
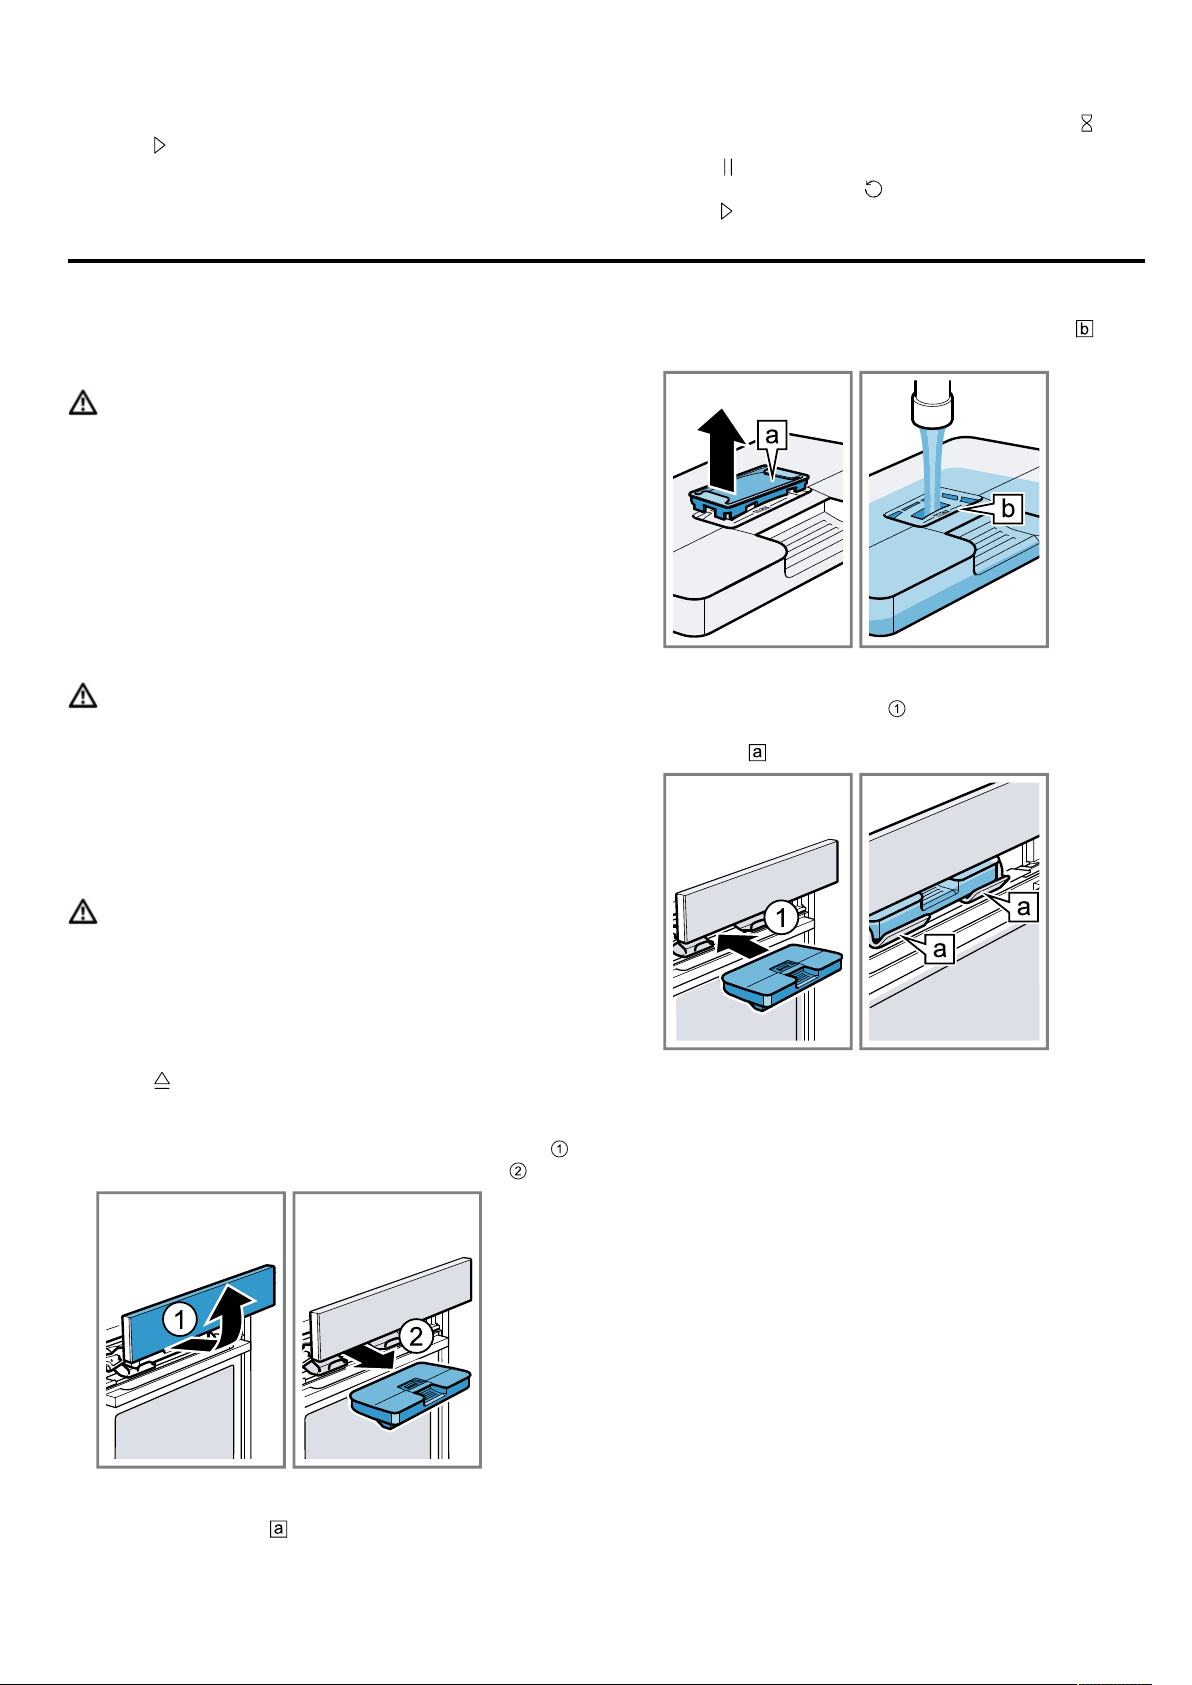
1.
If the timer is running in the background, use
select the timer beforehand.
2.
Press .
3.
Reset the timer using .
4.
Press to confirm.
6.
Fill the water tank with water up to the "max"
mark.
7.
Put the cover back into the opening on the water
tank.
8.
Insert the full water tank . When doing so, make
sure that the water tank clicks into place behind the
retainers .
to
WARNING‒Risk of burns!
The water tank may heat up while the appliance is in
operation.
▶ Wait until the water tank has cooled down from the
previous operation.
▶ Remove the water tank from the tank recess.
Requirement:The water hardness is set correctly.
1.
Press
a The control panel pops out automatically.
2.
Pull the control panel towards you with both hands
and then push it upwards until it clicks into place
3.
Remove the water tank from the tank recess .
4.
Press down on the water tank lid along the seal to
prevent water from leaking out of the water tank.
5.
Remove the cover on the water tank.
.
9.
Slowly slide the control panel downwards and then
push it away from you until it is closed completely.
.
11.2 Setting options with steam
There are various ways in which you can prepare your
food with steam.
Types of steam heating
A variety of types of steam heating are available for
which hot steam is used to gently prepare food.
ATTENTION!
A lot of steam is produced during operation with the
types of steam heating. Condensate that collects in the
drip trough underneath the cooking compartment may
overflow and damage adjacent units.
▶ Do not open the appliance door, or open it as infre-
quently as possible, while the appliance is in operation.
16
Page 17

Steaming
During steaming
, the food is enveloped by hot
steam, which helps to retain the nutrients. This cooking
method also helps to retain the shape, colour and typical flavour of the food.
When temperatures between 105°C and 120°C are
set, the cooking time is reduced. This means that even
more nutrients and vitamins are retained when steaming.
Reheating
The reheating function
can be used to warm up food
that has already been cooked, or bread and pastries
from the day before, without affecting their quality.
Proving dough
Dough proves considerably more quickly using the
dough proving
steam heating type than at room tem-
perature and does not dry out.
Defrost
Use the defrost function
to defrost deep-frozen and
frozen products gently without affecting the quality.
Added steam
When you cook with added steam, the appliance introduces steam into the cooking compartment at various
intervals. This gives your food a crispy crust and a
shiny surface. Meat stays juicy and tender, and only undergoes a minimum reduction in volume.
You can combine added steam with the following
functions:
¡ Types of heating →Page13
– 4Dhot air
– Top/bottom heating
– Circulated air grilling
– Keeping warm
¡ →"Dishes", Page19
Steam jet
You can use the steam jet function to specifically add
intensive steam at various intervals. This makes bread
and bread rolls in particular wonderfully crispy and
gives them a golden colour.
The appliance adds clouds of steam to the cooking
compartment for approx. 3to 5minutes. Depending on
the operation, you can activate the steam jet several
times.
You can add the steam jet for the following functions:
¡ Types of heating →Page13
– 4Dhot air
– Top/bottom heating
– Circulated air grilling
Note:Only use the steam jet when cooking compartment temperatures are above 120°C.
11.3 Setting the type of steam heating
Note:
Observe the instructions for the types of steam heating:
¡ →"Types of steam heating", Page16
Requirement:The water tank has been filled. If the water tank runs dry during operation, a message appears
on the display. Operation is stopped.
→"Filling the water tank", Page16
1.
Press "Steam" in the menu.
Steam en
2.
Press the required type of steam heating.
3.
Press the temperature in °C.
4.
Use the setting ring to set the temperature.
5.
Press
on the display to confirm the set temperat-
ure.
6.
Press "Cooking time".
A cooking time must always be set for types of
steam heating.
7.
To change the preset cooking time, press the relevant time value, e.g. hour display"h" or minute display"m".
a The selected value is marked in blue.
8.
Use the setting ring to set the cooking time.
If required, use
9.
To confirm the set cooking time, press on the dis-
to reset the setting value.
play.
10.
Press to start the operation.
a The appliance starts to heat and the time counts
down.
a When the time has elapsed, a signal sounds. A
message appears on the display confirming that the
operation has finished.
11.
Once the cooking time has elapsed:
‒ If required, you can select other settings and re-
start the operation.
‒ When the food is ready, use to switch the ap-
pliance off.
12.
Empty the water tank and dry the cooking compartment.
→"After using steam operation", Page18
Changing the type of heating
When you change the type of heating, the other settings are also reset.
1.
Press
2.
Press .
3.
Press the type of heating that you want to use.
4.
Reset the operation and use to start.
.
Changing the temperature
Once the operation has started, you can change the
temperature at any time.
1.
Press
2.
Press the temperature.
3.
Change the temperature with the setting ring.
4.
To confirm the change, press on the display.
on the display.
a The change is applied.
Changing the cooking time
You can change the cooking time at any time.
1.
Press
2.
Press the cooking time .
3.
Use the setting ring to change the cooking time.
4.
To confirm the change, press on the display.
a The change is applied.
on the display.
17
Page 18
en Steam
11.4 Setting added steam
Requirements
¡ Observe the information about the respective operat-
ing mode.
→"Setting options with steam", Page16
¡ The water tank has been filled. If the water tank runs
dry during operation, a message appears on the display. The appliance continues to operate but without
injecting steam into the cooking compartment.
→"Filling the water tank", Page16
1.
Press the operating mode that you require in the
menu.
2.
Select the settings for the operating mode, e.g. type
of heating and temperature.
3.
Press
4.
Use the setting ring to set the steam level.
"Added steam".
Steam level Added steam
1 Low
2 Medium
3 High
5.
To confirm the set steam level, press on the display.
6.
Press to start the operation.
a The appliance starts heating.
a The setting values and how long the appliance has
already been in operation are shown on the display.
7.
When the food is ready, use
to switch the appli-
ance off.
8.
Empty the water tank and dry the cooking compartment.
→"After using steam operation", Page18
Changing added steam
You can change or deactivate the added steam function at any time.
1.
Press
2.
Press added steam .
3.
Change or deactivate added steam using the setting
ring.
4.
To confirm the change, press on the display.
a The change is applied.
on the display.
11.5 Setting the steam jet function
Requirements
¡ Observe the information about the respective operat-
ing mode.
→"Setting options with steam", Page16
¡ The water tank has been filled. If the water tank runs
dry during operation, a message appears on the display. Operation is stopped.
→"Filling the water tank", Page16
1.
Press the operating mode that you require in the
menu.
2.
Select the settings for the operating mode, e.g. type
of heating and temperature.
3.
Press
4.
Press on the display at the desired time.
Do not use the steam jet until the appliance has
completely heated up.
5.
Press "Steam jet".
a The symbol lights up red and the appliance heats
up the water.
to start the operation.
6.
When the water is heated up, press "Steam jet"
again.
Note:If rapid heating is activated, the steam jet
can only be triggered once rapid heating is complete.
a The steam jet is triggered and the appliance adds
clouds of steam to the cooking compartment for approx. 3 to 5 minutes.
a When the steam jet has finished, the operation con-
tinues to run as normal. Depending on the operation, the steam jet can be triggered again if necessary.
7.
When the food is ready, use to switch the appliance off.
8.
Empty the water tank and dry the cooking compartment.
→"After using steam operation", Page18
Cancelling the steam jet
You can cancel the steam jet at any time.
1.
Press
2.
Press "Steam jet".
on the display.
a The symbol changes back to white.
a The operation continues without the steam jet.
11.6 After using steam operation
Dry the appliance after each steam operation.
Note:Traces of limescale may remain in the cooking
compartment after operation with steam. The functionality of the appliance is not affected by this. You can remove traces of limescale using hot water or a cloth
soaked in vinegar. Observe the information on cleaning.
→"Cleaning and servicing", Page24
Emptying the water tank
WARNING‒Risk of burns!
The water tank may heat up while the appliance is in
operation.
▶ Wait until the water tank has cooled down from the
previous operation.
▶ Remove the water tank from the tank recess.
ATTENTION!
Drying the water tank in the hot cooking compartment
leads to damage to the water tank.
▶ Do not dry the water tank in the hot cooking com-
partment.
Cleaning the water tank in the dishwasher will damage
it.
▶ Do not clean the water tank in the dishwasher.
▶ Clean the water tank with a soft cloth and standard
washing-up liquid.
1.
2.
3.
4.
5.
6.
7.
8.
9.
to open the control panel.
Use
Remove the water tank.
Carefully remove the lid of the water tank.
Empty the water tank, clean it with detergent and
then rinse it thoroughly with clean water.
Dry all parts with a soft cloth.
Rub the seal on the lid until dry.
Leave the water tank to dry with the lid open.
Place the lid on the water tank and push down on it.
Insert the water tank and close the control panel.
18
Page 19
Drying the condensation tray
WARNING‒Risk of burns!
The appliance becomes hot during operation.
▶ Allow the appliance to cool down before cleaning.
Requirement:The cooking compartment has cooled
down.
1.
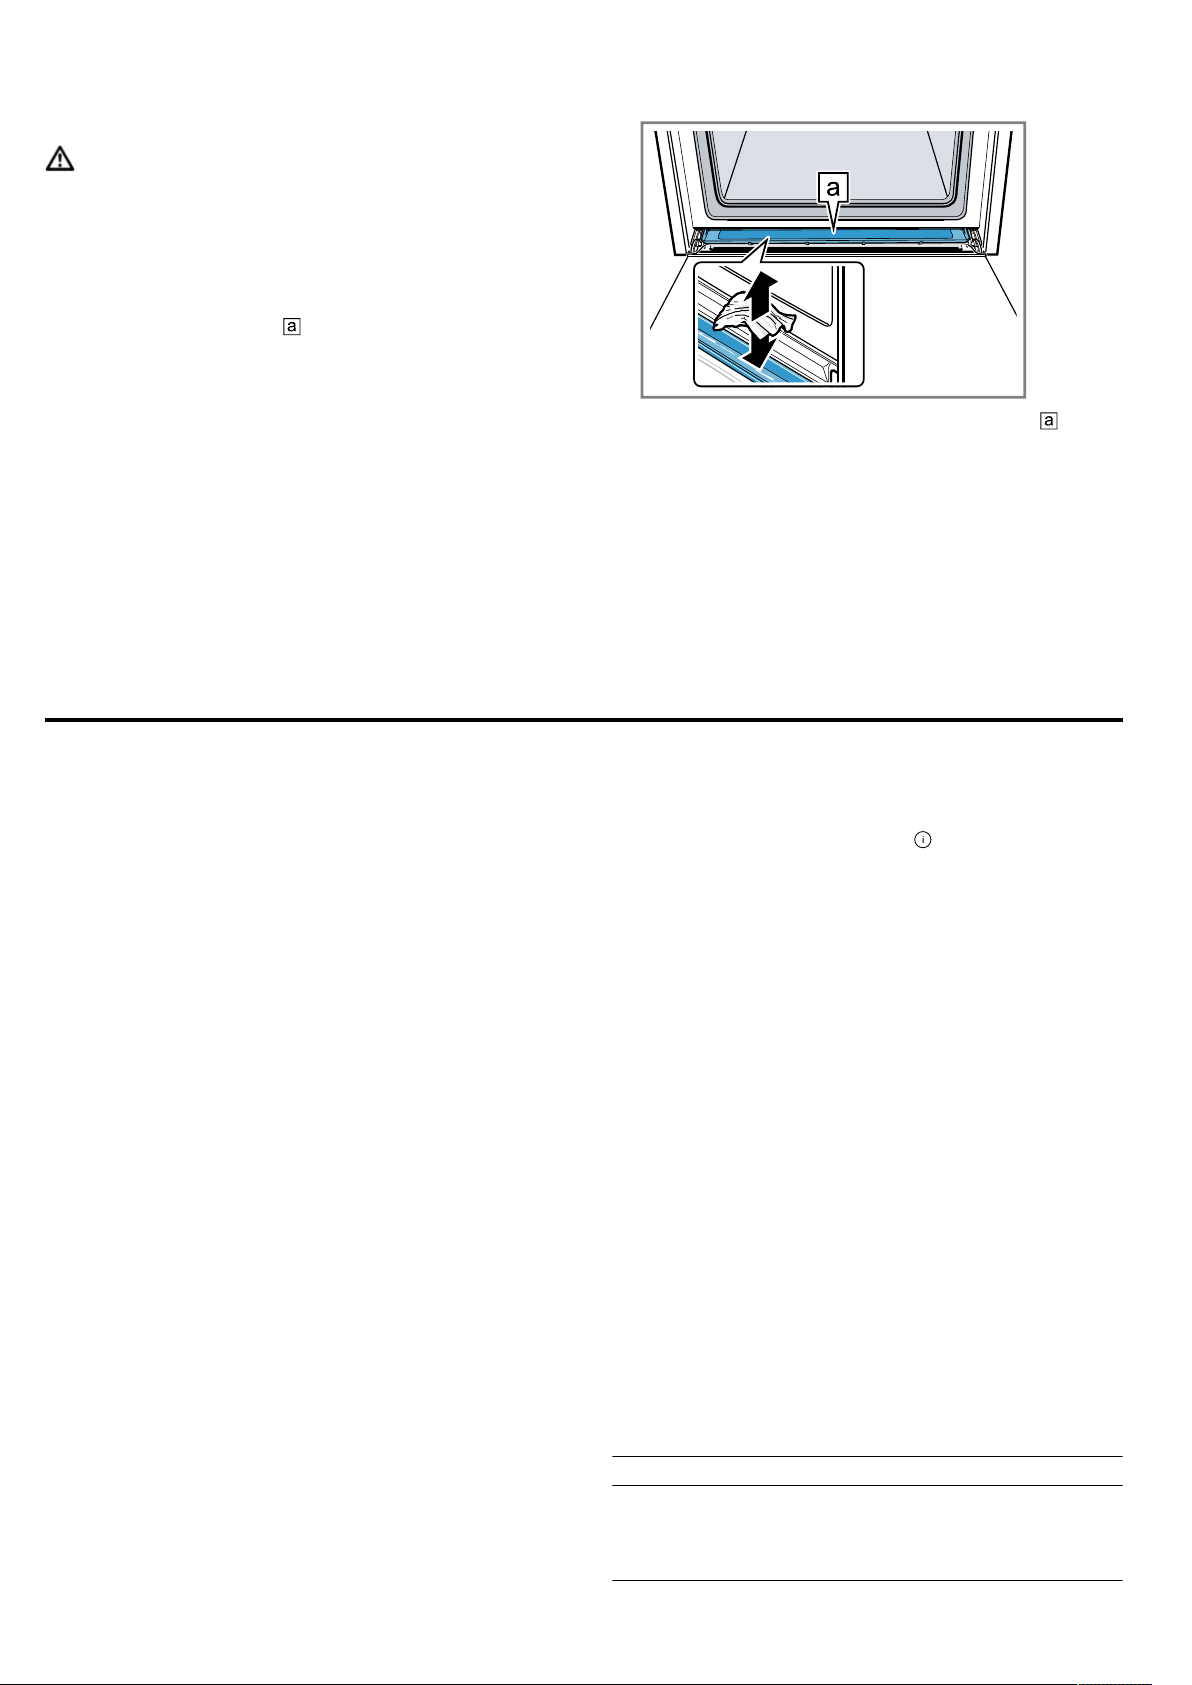
Open the appliance door.
2.
Note:
The condensation tray
compartment.
is underneath the cooking
Dishes en
Soak up the water in the condensation tray with a
tea towel and wipe it carefully.
Note:You can remove the condensation tray in order
to clean it.
→"Removing the condensate tray", Page29
Drying the cooking compartment
Dry the cooking compartment after each steam operation.
▶
Dry the cooking compartment by hand or use the
drying function.
→"Drying", Page28
12 Dishes
The "Dishes" operating mode helps you to use your appliance to prepare different meals by selecting the optimum settings automatically.
12.1 Cookware for dishes
The cooking result depends on the composition of the
meat and the size of cookware.
You should therefore use heat-resistant cookware that
is suitable for temperatures up to 300°C. Glass or
glass ceramic cookware is best. The joint should cover
approx.2/3 of the cookware base.
Cookware made from the following material is not
suitable:
¡ Bright, shiny aluminium
¡ Unglazed clay
¡ Plastic or plastic handles
12.2 Setting options for the dishes
To cook the dishes perfectly, the appliance uses different settings depending on the dish.
The display shows you the settings that are used. You
can adjust certain settings. Follow the instructions on
the display.
Note:The cooking result depends on the quality and
composition of the food. Use fresh and, ideally, chilled
food. Use frozen food straight from the freezer.
Tips and information about the settings
If you set a dish, the display shows relevant information
for this dish, e.g.:
¡ Suitable shelf position
¡ Suitable accessory or cookware
¡ Added liquid
¡ Time for turning or stirring
When this time is reached, a signal sounds.
To call up the information, press
sages are displayed automatically.
"Info". Some mes-
Programmes
The optimum type of heating, temperature and cooking
time are preset for programmes.
To achieve an optimal cooking result, you must also
set the weight, thickness or the cooking level. You can
set the weight only in the intended range.
Unless otherwise indicated, set the total weight for your
dish.
Recommended settings
For the recommended settings, the optimum type of
heating is preset as a fixed value.
You can adjust the preset temperature and the cooking
time.
12.3 Overview of the dishes
You can find out which individual dishes are available
to you on the appliance when you call up the operating
mode. The selection of dishes depends on the features
of your appliance.
The dishes are sorted by category and food.
Note:In the basic settings, you can regionally specialise the displayed dishes.
→"Basic settings", Page21
Category Food
Cakes Cakes in tins
Cakes on a baking tray
Small baked items
Biscuits
19
Page 20
en Favourites
Category Food
Bread,
bread rolls
Pizza, savoury cakes
Bakes,
soufflés
Poultry Chicken
Meat Pork
Fish. Fish, whole
Frozen
products
Side dishes,
vegetables
Desserts,
compote
Bread
Bread rolls
Pizza
Savoury cakes, quiche
Bake, savoury, fresh, cooked ingredients
Potato gratin, raw ingredients, 4cm
deep
Fresh lasagne
Lasagne, chilled
Bake, sweet, fresh
Fruit crumble
Soufflés in individual moulds
Yorkshire pudding
Duck, goose
Turkey
Beef
Veal
Lamb
Game
Meat dishes
Fish fillet
Fish cutlet
Fish dishes
Seafood
Pizza
Bakes
Potato products
Vegetables
Poultry, fish
Bread rolls
Potatoes
Rice
Cereals
Vegetables
Pulses
Pasta, dumplings
Eggs
Yeast dumplings
Crème caramel
Rice pudding
Fruit compote
Yoghurt in glass jars
Category Food
Preserving,
extracting
juice, sterilising
Reheating,
crisping up
Defrosting
food
Preserving food
Extracting juice
Bottles, sterilise
Baked items
Side dishes
Vegetables
Menu
Fruit, vegetables
12.4 Setting a dish
1.
Press "Dishes" in the menu.
2.
Press the required category.
3.
Press the required food.
4.
Press the required dish.
Tip:For some dishes, you can select a preferred
cooking method.
→"Setting options for the dishes", Page19
a The settings for the dish appear on the display.
5.
Adjust the settings if required.
You can adjust only certain settings depending on
the dish.
→"Setting options for the dishes", Page19
6.
For information about the accessory and shelf posi-
tion, for example, press
7.
Press to start the operation.
a The appliance starts to heat and the time counts
down.
a Once the dish is ready, a signal sounds. The appli-
ance stops heating.
8.
Once the cooking time has elapsed:
‒ If required, you can select other settings and re-
start the operation.
‒ When the food is ready, use to switch the ap-
pliance off.
"Info".
12.5 Automatic switch-off function
The automatic switch-off function
allows you to bake and fry without any stress.
When the operation has finished, the appliance automatically stops heating.
To achieve an optimum cooking result, remove your
dish from the cooking compartment once the operation
has finished.
for the dishes
13 Favourites
In the "Favourites", you can save your settings and use
these again.
Note:Depending on the appliance type/software
status, you must first download this function to your appliance. You can find more information in the
HomeConnect app.
20
13.1 Saving favourites
You can save up to 30 different operating modes as
your favourites.
▶
If you set an operating mode, at the end of the se-
lection list, press
To rename a favourite, you must use the HomeCon-
nect app. When your appliance is connected, follow
the instructions in the app.
"Save as favourites".
Page 21
13.2 Selecting favourites
If you have saved favourites, you can use these to set
the operation.
1.
Press "Favourites" in the menu.
‒ Or select the favourites directly using the
but-
ton.
2.
Press the required favourites.
3.
If required, you can change the settings.
4.
Press to start the operation.
a The setting values are shown on the display.
Note:
Observe the instructions for the various operating
modes:
¡ →"Steam", Page16
13.3 Changing favourites
You can change, sort or delete your saved favourites at
any time.
1.
To sort or rename the favourites, you must use the
HomeConnect app. When your appliance is connected, follow the instructions in the app.
Childproof lock en
2.
To change the setting values on the appliance,
press "Favourites" in the menu.
‒ Or select the favourites directly using the
ton.
3.
Press the required favourites.
4.
At the end of the selection list, press "Edit favourite"
5.
Change the setting values.
6.
Confirm the change.
Deleting favourites
1.
To delete a favourite, press "Favourites" in the
menu.
‒ Or select the favourites directly using the
ton.
2.
Press the required favourites.
3.
At the end of the selection list, press "Delete favourite"
4.
Confirm the deletion.
but-
but-
14 Childproof lock
You can secure your appliance to prevent children
from accidentally switching it on or changing the settings.
14.1 Activating the childproof lock
The childproof lock can be activated regardless of
whether the appliance is on or off.
▶
Press and hold for approx. 4seconds to activate
the childproof lock.
a A confirmation message appears on the display.
a The control panel is locked. The appliance can only
be switched off using
.
15 Basic settings
You can configure the basic settings for your appliance
to meet your needs.
15.1 Overview of the basic settings
Here you can find an overview of the basic settings
and factory settings. The basic settings depend on the
features of your appliance.
You can find more information about the individual basic settings on the display using "Info".
Basic settings Selection
Language See selection on the appliance.
HomeConnect Connect the oven to a mobile device
and remotely control it.
→"HomeConnect ", Page23
Time Time in 24-hour format.
a When the appliance is switched on, lights up.
When the appliance is switched off, does not light
up.
14.2 Deactivating the childproof lock
You can deactivate the childproof lock at any time.
1.
Press anywhere on the display.
2.
To deactivate the childproof lock:
‒ Follow the instructions on the display so that the
graphic on the ring fills up completely.
‒ Alternatively, press and hold
4seconds.
a A confirmation message appears on the display.
Display Selection
Brightness ¡ Levels 1, 2, 3, 4 and 5
Standby
screen
Clock ¡ Digital
¡ On for a limited time
¡ On (this setting increases energy
consumption)
1
¡ Off
1
¡ Analogue
Alignment ¡ Align the display horizontally and
vertically.
1
Factory setting (may vary according to model)
for approximately
1
21
Page 22
en Basic settings
Tone Selection
Button tone ¡ On
1
¡ Off
Signal tone ¡ Very short duration (once)
¡ Short duration (ap-
prox.5seconds)
¡ Medium duration
(approx.10seconds)
1
¡ Long duration (ap-
prox.30seconds)
1
Factory setting (may vary according to model)
Appliance set-
Selection
tings
Fan run-on
time
¡ Minimum
¡ Recommended
1
¡ Long
¡ Very long
Pull-out system ¡ Not retrofitted (if shelf supports
and a single set of pull-out rails
are fitted)
1
¡ Retrofitted (if 2 or 3 sets of pull-
out rails are fitted)
Pull-out system ¡ Not retrofitted (if shelf supports
and a single set of pull-out rails
are fitted)
1
¡ Retrofitted (if 2 or 3 sets of pull-
out rails are fitted)
Lighting ¡ When cooking and when the door
is opened
1
¡ Only when the door is opened
¡ Always off
Water hardness
¡ 4 (very hard)
¡ 3 (hard)
1
¡ 2 (medium)
¡ 1 (soft)
¡ 0 (softened)
1
Factory setting (may vary according to model)
Personalisa-
Selection
tion
Regional
dishes
1
¡ All
¡ European dishes
¡ British dishes
Dishes ¡ All
1
¡ No pork
¡ Kosher only
Childproof
lock
Automatic
rapid heating
1
Factory setting (may vary according to model)
Factory set-
¡ Button lock only
¡ Deactivated
¡ off
1
¡ On
Selection
1
tings
Factory set-
¡ Restore
tings
Info Display
Appliance information
Display technical information about
the appliance.
15.2 Changing the basic settings
1.
Press "Basic settings" in the menu.
2.
Press the required basic settings area.
3.
Press the required basic setting.
4.
Press to select the required basic setting.
a The change is applied directly for most basic set-
tings.
5.
To change additional basic settings, use
back and select a different basic setting.
6.
To exit the basic settings, use to go back to the
main menu or switch off the appliance using .
a The changes are saved.
Note:Your changes to the basic settings will be retained even after a power failure.
to go
Personalisa-
Selection
tion
Brand logo ¡ Display
1
¡ Do not display
Operation after
switch-on
¡ Main menu
¡ Types of heating
1
¡ Steam
¡ Dishes
¡ Favourites
Elapsed cooking time
1
Factory setting (may vary according to model)
¡ Do not display
¡ Display
1
22
15.3 Setting the time
1.
Press "Basic settings" in the menu.
2.
Press "Time".
3.
To set the time, press the hour display or the minute
display.
a The selected value is marked in blue.
4.
Use the setting ring to set the time.
‒ The minutes are counted in 5-minute increments.
To set it to the precise minute, press and hold
the corresponding area in the setting ring for
around 1-2 seconds. The minutes are shown in
dots. Use the setting ring to set the minutes.
5.
To exit the basic settings, use
main menu or switch off the appliance using .
a The time is saved.
to go back to the
Page 23
16 HomeConnect
HomeConnect en
This appliance is network-capable. Connecting your appliance to a mobile device lets you control its functions
via the HomeConnect app, adjust its basic settings
and monitor its operating status.
The HomeConnect services are not available in every
country. The availability of the HomeConnect function
depends on the availability of HomeConnect services
in your country. You can find information about this at:
www.home-connect.com.
The HomeConnect app guides you through the entire
login process. Follow the instructions in the HomeConnect app to configure the settings.
Tips
¡ Please consult the documents supplied by
HomeConnect.
¡ Please also follow the instructions in the HomeCon-
nect app.
Notes
¡ Please note the safety precautions in this instruction
manual and make sure that they are also observed
when operating the appliance via the HomeConnect app.
→"Safety", Page2
¡ Operating the appliance on the appliance itself al-
ways takes priority. During this time it is not possible
to operate the appliance using the HomeConnect
app.
¡ In networked standby mode, the appliance requires
a maximum of2W.
16.1 Setting up HomeConnect
Requirements
¡ The appliance is connected to the power supply and
is switched on.
¡ You have a mobile device with a current version of
the iOS or Android operating system, e.g. a smartphone.
¡ The mobile device and the appliance are within
range of your home network's Wi-Fi signal.
1.
Download the HomeConnect app.
2.
Open the HomeConnect app and scan the following QR code.
3.
Follow the instructions in the HomeConnect app.
16.2 HomeConnect settings
You can adjust the HomeConnect settings and network settings in your appliance's basic settings.
Which settings the display shows will depend on whether HomeConnect has been set up and whether the appliance
is connected to your home network.
Basic setting Possible settings Explanation
Home Connect assistant
Wi-Fi On
Remote control status Monitoring
Start the assistant
Disconnect
Off
Manual remote start
Permanent remote start
You can connect your appliance to the Home Connect app via
the Home Connect assistant.
Note:If you are using the Home Connect assistant for the first
time, only the "Start assistant" setting is available.
You can use the Wi-Fi to switch off the network connection for
your appliance. When you have connected successfully once,
you can deactivate the Wi-Fi and not lose your detailed data.
As soon as you activate Wi-Fi again, the appliance connects
automatically.
Note:In networked standby mode, the appliance requires a
maximum of 2W.
During monitoring, you can only view the operating status of
the appliance in the app.
For manual remote start, you must activate the remote start
each time before you can start the appliance via the app. If
you open the appliance door within 15minutes of activating
remote start or of the operation ending, remote start is deactivated.
For permanent remote start, you can start and operate the appliance remotely at any time. If you often operate the appliance
remotely, it is helpful to set the remote start to "Permanent".
23
Page 24

en Cleaning and servicing
16.3 Operating the appliance with the
HomeConnect app
You can use the HomeConnect app to set and start
the appliance remotely.
WARNING‒Risk of fire!
Combustible objects that are left in the cooking compartment may catch fire.
▶ Never store combustible objects in the cooking
compartment.
▶ If smoke is emitted, the appliance must be switched
off or the plug must be pulled out and the door
must be held closed in order to stifle any flames.
Requirements
¡ The appliance is switched on.
¡ The appliance is connected to the home network
and to the HomeConnectapp.
¡ In order to be able to set the appliance via the app,
the manual or permanent remote start must be selected in the "Remote control status" basic setting.
1.
To activate remote start, press
2.
Configure a setting in the HomeConnectapp and
send it to the appliance.
Notes
¡ If you open the appliance door within 15minutes
of activating remote start or of the operation ending, the manual remote start is deactivated.
¡ When you start the oven using the controls on
the appliance itself, the remote start function is
activated automatically. You can use the
HomeConnectapp to adjust the settings or start
a new programme.
.
16.4 Software update
Your appliance's software can be updated using the
software update function, e.g. for the purposes of optimisation, troubleshooting or security updates.
To do this, you must be a registered HomeConnectuser, have installed the app on your mobile device
and be connected to the HomeConnectserver.
As soon as a software update is available, you will be
informed via the HomeConnectapp and will be able to
start the software update via the app. Once the update
has been successfully downloaded, you can start in-
stalling it via the HomeConnectapp if you are in your
WLAN home network (Wi-Fi). The HomeConnectapp
will inform you once installation is successful.
Notes
¡ You can continue to use your appliance as normal
while updates are downloading. Depending on your
personal settings in the app, software updates can
also be set to download automatically.
¡ We recommend that you install security updates as
soon as possible.
¡ Installation takes a few minutes. You cannot use
your appliance during installation.
16.5 Remote diagnostics
Customer Service can use Remote Diagnostics to access your appliance if you contact them, have your appliance connected to the HomeConnect server and if
Remote Diagnostics is available in the country in which
you are using the appliance.
Tip:For further information and details about the availability of Remote Diagnostics in your country, please
visit the service/support section of your local website:
www.home-connect.com.
16.6 Data protection
Please see the information on data protection.
The first time your appliance is registered on a home
network connected to the Internet, your appliance will
transmit the following types of data to the
HomeConnect server (initial registration):
¡ Unique appliance identification (consisting of appli-
ance codes as well as the MAC address of the Wi-Fi
communication module installed).
¡ Security certificate of the Wi-Fi communication mod-
ule (to ensure a secure data connection).
¡ The current software and hardware version of your
appliance.
¡ Status of any previous reset to factory settings.
This initial registration prepares the HomeConnect
functions for use and is only required when you want to
use the HomeConnect functions for the first time.
Note:Please note that the HomeConnect functions
can only be utilised with the HomeConnect app. Information on data protection can be retrieved in the
HomeConnect app.
17 Cleaning and servicing
To keep your appliance working efficiently for a long
time, it is important to clean and maintain it carefully.
17.1 Cleaning products
In order to avoid damaging the various oven surfaces
on the appliance, do not use unsuitable cleaning
products.
WARNING‒Risk of electric shock!
An ingress of moisture can cause an electric shock.
▶ Do not use steam- or high-pressure cleaners to
clean the appliance.
24
ATTENTION!
Unsuitable cleaning agents damage the surfaces of the
appliance.
▶ Do not use harsh or abrasive cleaning products.
▶ Do not use cleaning products with a high alcohol
content.
▶ Do not use hard scouring pads or cleaning
sponges.
▶ Do not use any special cleaners for cleaning the ap-
pliance while it is hot.
Page 25

Cleaning and servicing en
Using oven cleaner in a hot cooking compartment
damages the enamel.
▶ Never use oven cleaner in the cooking compartment
when it is still warm.
▶ Remove all food remnants from the cooking com-
partment and the appliance door before you next
heat up the appliance.
Suitable cleaning agents
Only use cleaning agents that are suitable for the different surfaces on your appliance.
Appliance front
Surface Suitable cleaning agents Information
Stainless steel ¡ Hot soapy water
¡ Special stainless steel
cleaning products
suitable for hot surfaces
Plastic or painted
¡ Hot soapy water Do not use glass cleaner or a glass scraper.
surfaces
E.g. control panel
Appliance door
To prevent corrosion, remove any patches of limescale, grease,
starch or albumin (e.g. egg white) from stainless steel surfaces immediately.
Apply a thin layer of the stainless steel cleaning product.
To avoid permanent stains, immediately remove any descaling agent
that gets onto the surface.
If different cleaning agents are mixed together, there
may be a chemical reaction between these.
▶ Do not mix cleaning agents.
▶ Completely remove any cleaning agent residue.
Salt contained in new sponge cloths may damage surfaces.
▶ Wash new sponge cloths thoroughly before use.
Follow the instructions on cleaning the appliance.
→"Cleaning the appliance", Page26
Area Suitable cleaning agents Information
Door panels ¡ Hot soapy water
¡ Oven cleaners
Do not use a glass scraper or stainless steel wool.
Tip:Remove the door panels in order to clean them thoroughly.
→"Appliance door", Page28
Door cover ¡ Made of stainless
steel:
Stainless steel cleaner
¡ Made from plastic:
Do not use glass cleaner or a glass scraper.
Do not use stainless steel care products.
Tip:Remove the door cover for thorough cleaning.
→"Appliance door", Page28
Hot soapy water
Stainless steel interior door frame
¡ Stainless steel cleaner Discolouration can be removed using stainless steel cleaner.
Do not use stainless steel care products.
Door handle ¡ Hot soapy water To avoid permanent stains, immediately remove any descaling agent
that gets onto the surface.
Door seal ¡ Hot soapy water Do not remove or scrub.
Cooking compartment
Area Suitable cleaning agents Information
Enamel surfaces ¡ Hot soapy water
¡ Vinegar water
¡ Oven cleaners
Soak any heavily soiled areas and use a brush or steel wool.
Leave the appliance door open to dry the cooking compartment
after cleaning it.
Notes
¡ Enamel burns at very high temperatures, causing minor discol-
ouration. The functionality of your appliance is not affected by
this.
¡ The edges of thin trays cannot be completely enamelled and may
be rough. This does not impair the corrosion protection.
¡ Food residues leave a white coating on the enamel surfaces. The
coating does not pose a health risk. The functionality of your appliance is not affected by this. You can remove residues with
lemon juice.
Self-cleaning surfaces
- Follow the instructions for self-cleaning surfaces.
→"Regenerating self-cleaning surfaces in the cooking compart-
ment", Page26
25
Page 26

en Cleaning and servicing
Area Suitable cleaning agents Information
Shelf supports ¡ Hot soapy water Soak any heavily soiled areas and use a brush or steel wool.
Note:To clean thoroughly, detach the shelf supports.
→"Rails", Page32
Accessories ¡ Hot soapy water
¡ Oven cleaners
Soak any heavily soiled areas and use a brush or steel wool.
Enamelled accessories are dishwasher-safe.
Do not use stainless steel wool on steam containers made from
stainless steel.
Use a vinegar solution to remove any dirt on stainless steel steam
containers caused by starchy foods (e.g. rice).
Water tank ¡ Hot soapy water To remove residual detergent after cleaning, rinse thoroughly with
clean water.
To dry the water tank after cleaning, leave the water tank to dry with
the lid open. Dry the seal on the lid.
Do not clean in the dishwasher.
17.2 Cleaning the appliance
In order to avoid damaging the appliance, you must
clean your appliance only as specified, and with suitable cleaning products.
WARNING‒Risk of burns!
The appliance and its parts that can be touched become hot during use.
▶ Caution should be exercised here in order to avoid
touching heating elements.
▶ Young children under 8 years of age must be kept
away from the appliance.
WARNING‒Risk of fire!
Loose food remnants, fat and meat juices may catch
fire.
▶ Before using the appliance, remove the worst of the
food residues and remnants from the cooking compartment, heating elements and accessories.
Requirement:Read the information on cleaning
products.
→"Cleaning products", Page24
1.
Clean the appliance using hot soapy water and a
dish cloth.
‒ For some surfaces, you can use alternative
cleaning agents.
→"Suitable cleaning agents", Page25
2.
Dry with a soft cloth.
Regenerating self-cleaning surfaces in the cooking compartment
The back panel in the cooking compartment is selfcleaning. The self-cleaning surfaces are coated with a
porous, matt ceramic layer and have a rough surface.
When the appliance is in operation, the self-cleaning
surfaces absorb splashes from baking, roasting or
grilling, and break them down. If the self-cleaning surfaces no longer clean themselves adequately during
operation, heat up the cooking compartment specifically to the right temperature.
ATTENTION!
If you do not clean the self-cleaning surfaces regularly,
they may become damaged.
▶ If dark stains are visible on the self-cleaning sur-
faces, heat up the cooking compartment.
▶ Do not use oven cleaner or abrasive cleaning aids.
If oven cleaner accidentally comes into contact with
the self-cleaning surfaces, dab it off immediately using water and a sponge cloth. Do not rub.
1.
Remove accessories and cookware from the cooking compartment.
2.
Detach the shelf supports and remove them from
the cooking compartment.
→"Rails", Page32
3.
Remove coarse dirt using soapy water and a soft
cloth:
– From the smooth enamel surfaces
– From the inside of the appliance door
– From the glass cover on the oven lamp
This prevents stains that cannot be removed.
4.
Remove any objects from the cooking compartment.
The cooking compartment must be empty.
5.
Set the 4D hot air type of heating.
6.
Set the maximum temperature.
7.
Start the operation.
8.
Switch off the appliance after 1hour.
9.
Once the appliance has cooled down, wipe the
cooking compartment with a damp cloth.
Note:Marks may appear on the self-cleaning surfaces. Residues of sugar and egg white in the food
are not removed and stick to the surfaces. Red
stains are residues from salty food – they are not
rust. The stains are not hazardous to health. These
marks do not impair the cleaning ability of the selfcleaning surfaces.
10.
Attach the shelf supports.
→"Rails", Page32
26
Page 27

18 Cleaning aid
Cleaning aid en
The cleaning aid
ally cleaning the cooking compartment. The cleaning
aid softens dirt by evaporating the soapy water. It is
then easier to remove the dirt.
is a quick alternative for occasion-
18.1 Setting the cleaning aid
WARNING‒Risk of scalding!
If there is water in the cooking compartment when it is
hot, this may create hot steam.
▶ Never pour water into the cooking compartment
when the cooking compartment is hot.
Note:The oven light does not come on while the cleaning aid is running.
Requirement:The cooking compartment must have
cooled down completely.
1.
Remove any accessories from the cooking compartment.
2.
ATTENTION!
Distilled water in the cooking compartment leads to
corrosion.
▶ Do not use distilled water.
Mix 0.4litres water with a drop of washing-up liquid
and pour into the centre of the cooking compartment floor.
3.
Press "Cleaning" in the menu.
4.
Press "Cleaning aid".
The duration cannot be changed.
5.
Press .
a A notification stating that you should carry out the
necessary preparatory work for the cleaning aid appears on the display.
6.
Confirm the message.
a The cleaning aid starts and the duration counts
down.
a Once the cleaning aid has ended, a signal tone
sounds. A message appears on the display confirming that the operation has finished.
7.
Press
8.
→"Cleaning the cooking compartment after using
the cleaning aid", Page27.
to switch the appliance off.
18.2 Cleaning the cooking compartment after using the cleaning aid
ATTENTION!
The prolonged presence of moisture in the cooking
compartment leads to corrosion.
▶ After using the cleaning assistance, wipe the cook-
ing compartment and allow it to dry completely.
1.
Allow the appliance to cool down.
2.
Wipe out the remaining water in the cooking compartment using an absorbent sponge cloth.
3.
Clean the smooth enamel surfaces in the cooking
compartment with a dish cloth or a soft brush. Remove stubborn food remnants using a stainless
steel scouring pad.
4.
Remove limescale with a cloth soaked in vinegar,
and wipe this away with clean water.
5.
Dry the cooking compartment with a soft cloth.
6.
To dry the cooking compartment completely, leave
the appliance door open for approx.1hour or use
the drying function.
→"Setting the drying process", Page28
19 Descaling
Regular descaling
appliance continues to operate correctly.
How frequently you need to run the descaling programme depends on the water hardness and how
many times you have used the steam-assisted operations. The appliance indicates when only another 5 or
fewer steam-assisted operations are possible. If you do
not carry out descaling, you can no longer set any operation with steam.
Descaling comprises several steps and takes
approximately 70-95minutes:
¡ Descaling (approx.55-70minutes)
¡ First rinse cycle (approx.8 -12minutes)
¡ Second rinse cycle (approx. 8 -12minutes)
For reasons of hygiene, the descaling programme must
be run in full.
If descaling is interrupted, you can no longer set any
operation. To ensure that the appliance is ready for operation again, carry out 2 rinse cycles.
is necessary to ensure that your
19.1 Preparing descaling
ATTENTION!
The length of time for which the descaler is left to work
is based on the recommended, liquid descaler. Other
descalers may damage the appliance.
▶ Only use the liquid descaler recommended by us
for the descaling programme.
If descaling solution comes into contact with the control
panel or other delicate surfaces, it will damage them.
▶ Remove descaling solution immediately with water.
1.
Mix the descaling solution:
‒ 200ml liquid descaler
‒ 400ml water
2.
Open the control panel.
3.
Remove the water tank and fill it with descaling solu-
tion.
4.
Once the descaling solution has been poured into
the water tank, slide the tank back in.
5.
Close the control panel.
19.2 Setting the descaling programme
Requirement:→"Preparing descaling", Page27
1.
Press "Cleaning" in the menu.
27
Page 28
en Drying
2.
Press
"Descaling".
The duration cannot be changed.
3.
Press .
a A notification stating that you should carry out the
necessary preparatory work for descaling appears
on the display.
4.
Confirm the message.
a The descaling programme starts and the duration
counts down.
a Once the first part of the descaling programme has
finished, a signal tone sounds. The appliance
prompts you to rinse twice.
20 Drying
To prevent residual moisture , dry the cooking compartment following operation with steam and after using the
cleaning aid.
ATTENTION!
If there is water on the cooking compartment floor
when operating the appliance at temperatures above
120°C, this will damage the enamel.
▶ Do not use the appliance if there is water on the
cooking compartment floor.
▶ Wipe away any water on the cooking compartment
floor before operation.
20.1 Drying the cooking compartment
You can leave the cooking compartment to dry or use
the drying function.
1.
Allow the appliance to cool down.
2.
Remove any dirt from the cooking compartment.
3.
Wipe away any water in the cooking compartment.
4.
Dry the cooking compartment.
‒ To dry the cooking compartment, leave the appli-
ance door open for 1hour.
5.
To rinse the appliance, for each rinse cycle:
‒ Open the control panel and remove the water
tank.
‒ Thoroughly rinse the water tank and fill it with
fresh water.
‒ Slide in the water tank and close the control
panel.
a A signal tone sounds when each rinse cycle has
ended.
6.
Once the second rinse cycle is complete:
‒ Empty and dry the water tank.
→"Emptying the water tank", Page18
‒ Press
‒ To use the drying function, set "Drying function".
to switch the appliance off.
→"Setting the drying process", Page28
Setting the drying process
Requirement:→"Drying the cooking compartment",
Page28
1.
Press "Cleaning" in the menu.
2.
Press
The duration cannot be changed.
3.
Press .
a A notification stating that you should carry out the
necessary preparatory work for the drying appears
on the display.
4.
Confirm the message.
a The drying process starts and the duration counts
down.
a Once the drying has ended, a signal tone sounds. A
message appears on the display confirming that the
operation has finished.
5.
Press to switch the appliance off.
6.
To dry the cooking compartment completely, leave
the appliance door open for 1 to 2minutes.
"Drying function".
21 Appliance door
To clean the appliance door thoroughly, you can disassemble the appliance door.
Note:Wipe the condensate trough without pressure.
21.1 Detaching the appliance door
WARNING‒Risk of injury!
Components inside the appliance door may have sharp
edges.
▶ Wear protective gloves.
The hinges on the appliance door move when the door
is opened and closed, which could trap your fingers.
▶ Keep your hands away from the hinges.
1.
Open the appliance door fully.
28
Page 29
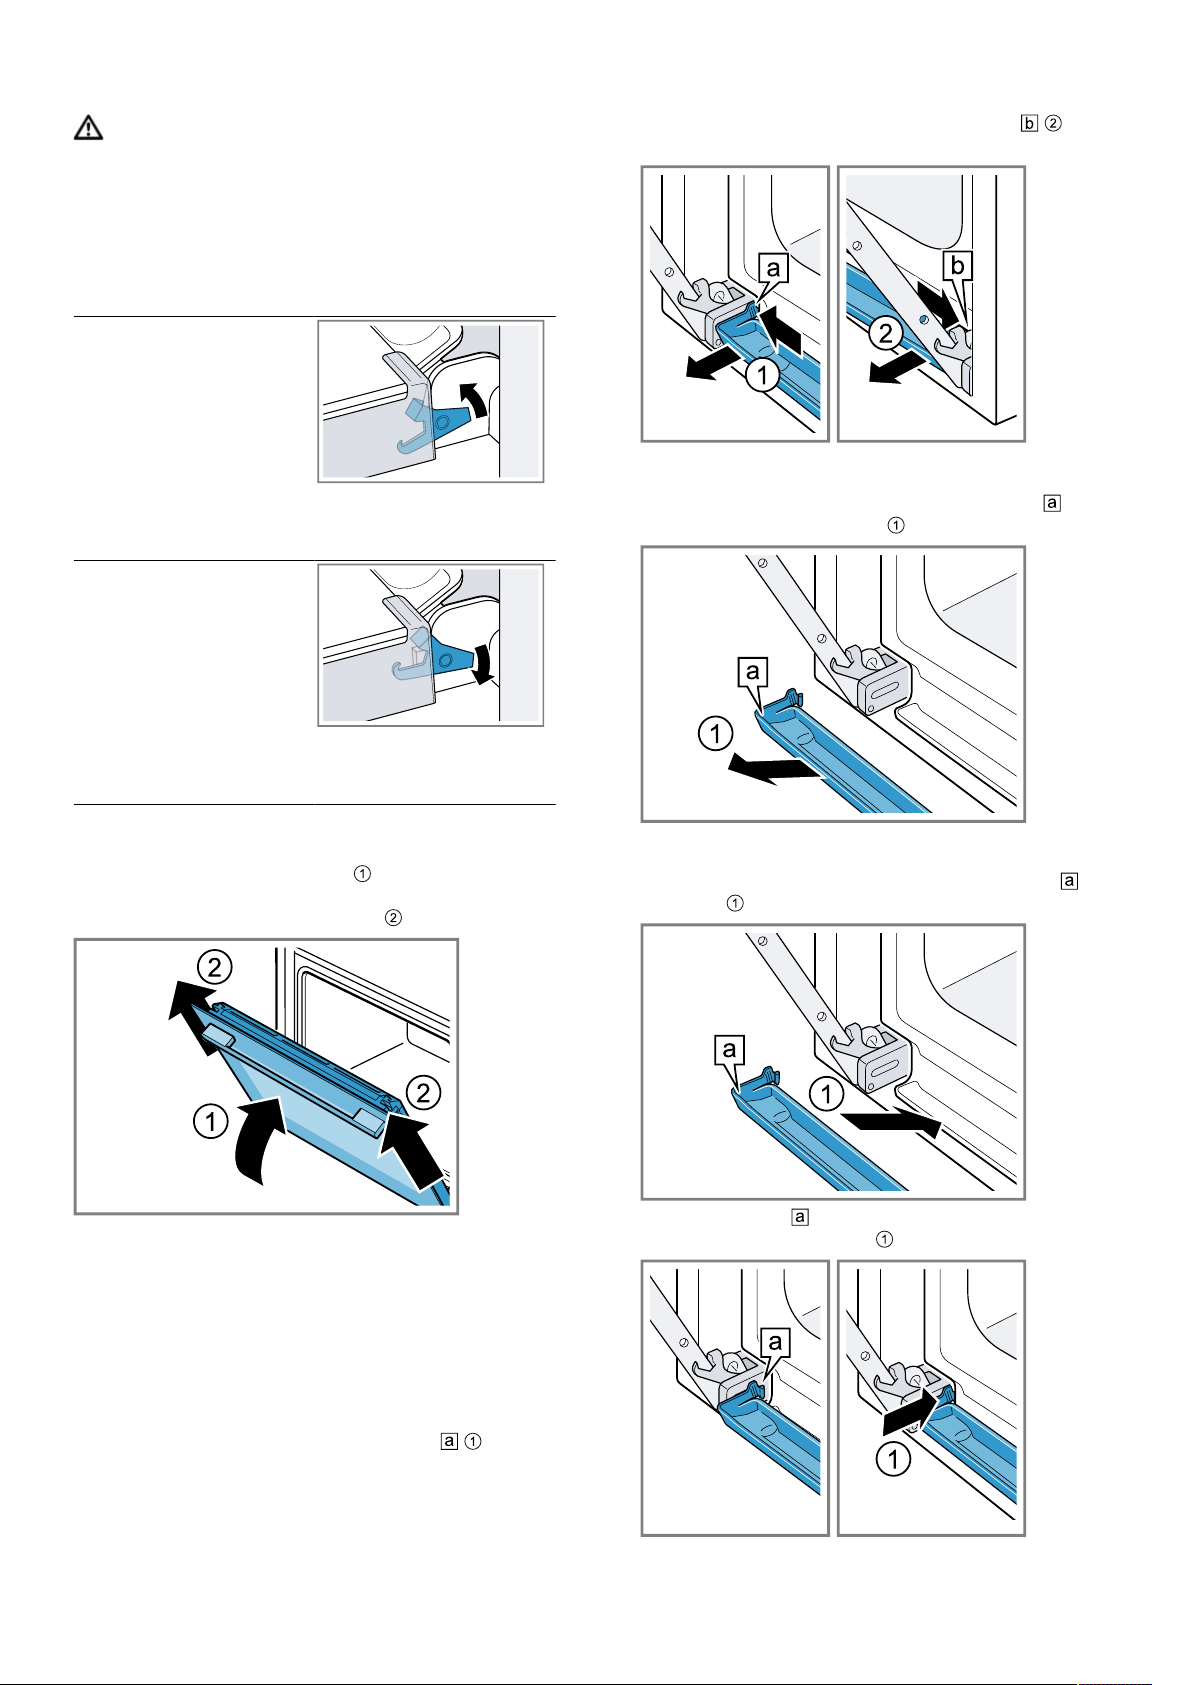
Appliance door en
2.
WARNING‒Risk of injury!
When the hinges are not secured, they can snap
shut with great force.
▶ Make sure that the locking levers are always
either fully closed or (when detaching the oven
door) fully open.
Open the locking levers on the left- and right-hand
hinges.
Locking levers opened
The hinge is now secured and cannot snap
shut.
Locking levers closed
2.
Press on the right-hand pressure surface until
the hook is released.
3.
Tilt the condensate tray forwards slightly until the
lower retaining hooks are released.
4.
Use both hands to pull the condensate tray up-
wards and out at an angle .
The appliance door is
secured and cannot be
detached.
a The locking levers are open. The hinges are now se-
cured and cannot snap shut.
3.
Close the appliance door fully
. Grab hold of the
appliance door with both hands (on the left and
right) and pull it upwards and out .
4.
Carefully place the appliance door on a level surface.
Removing the condensate tray
Notes
¡ Wipe down the condensate tray after every steam
operation or before removing it.
¡ Do not clean the condensate tray in the dishwasher
Requirement:The appliance door must be removed.
1.
Press on the left-hand pressure surface
the hook is released.
until
Installing the condensate tray
1.
Use both hands to insert the condensate tray
an angle .
2.
Snap the hooks on the left and right of the condensate tray into the gap .
at
29
Page 30
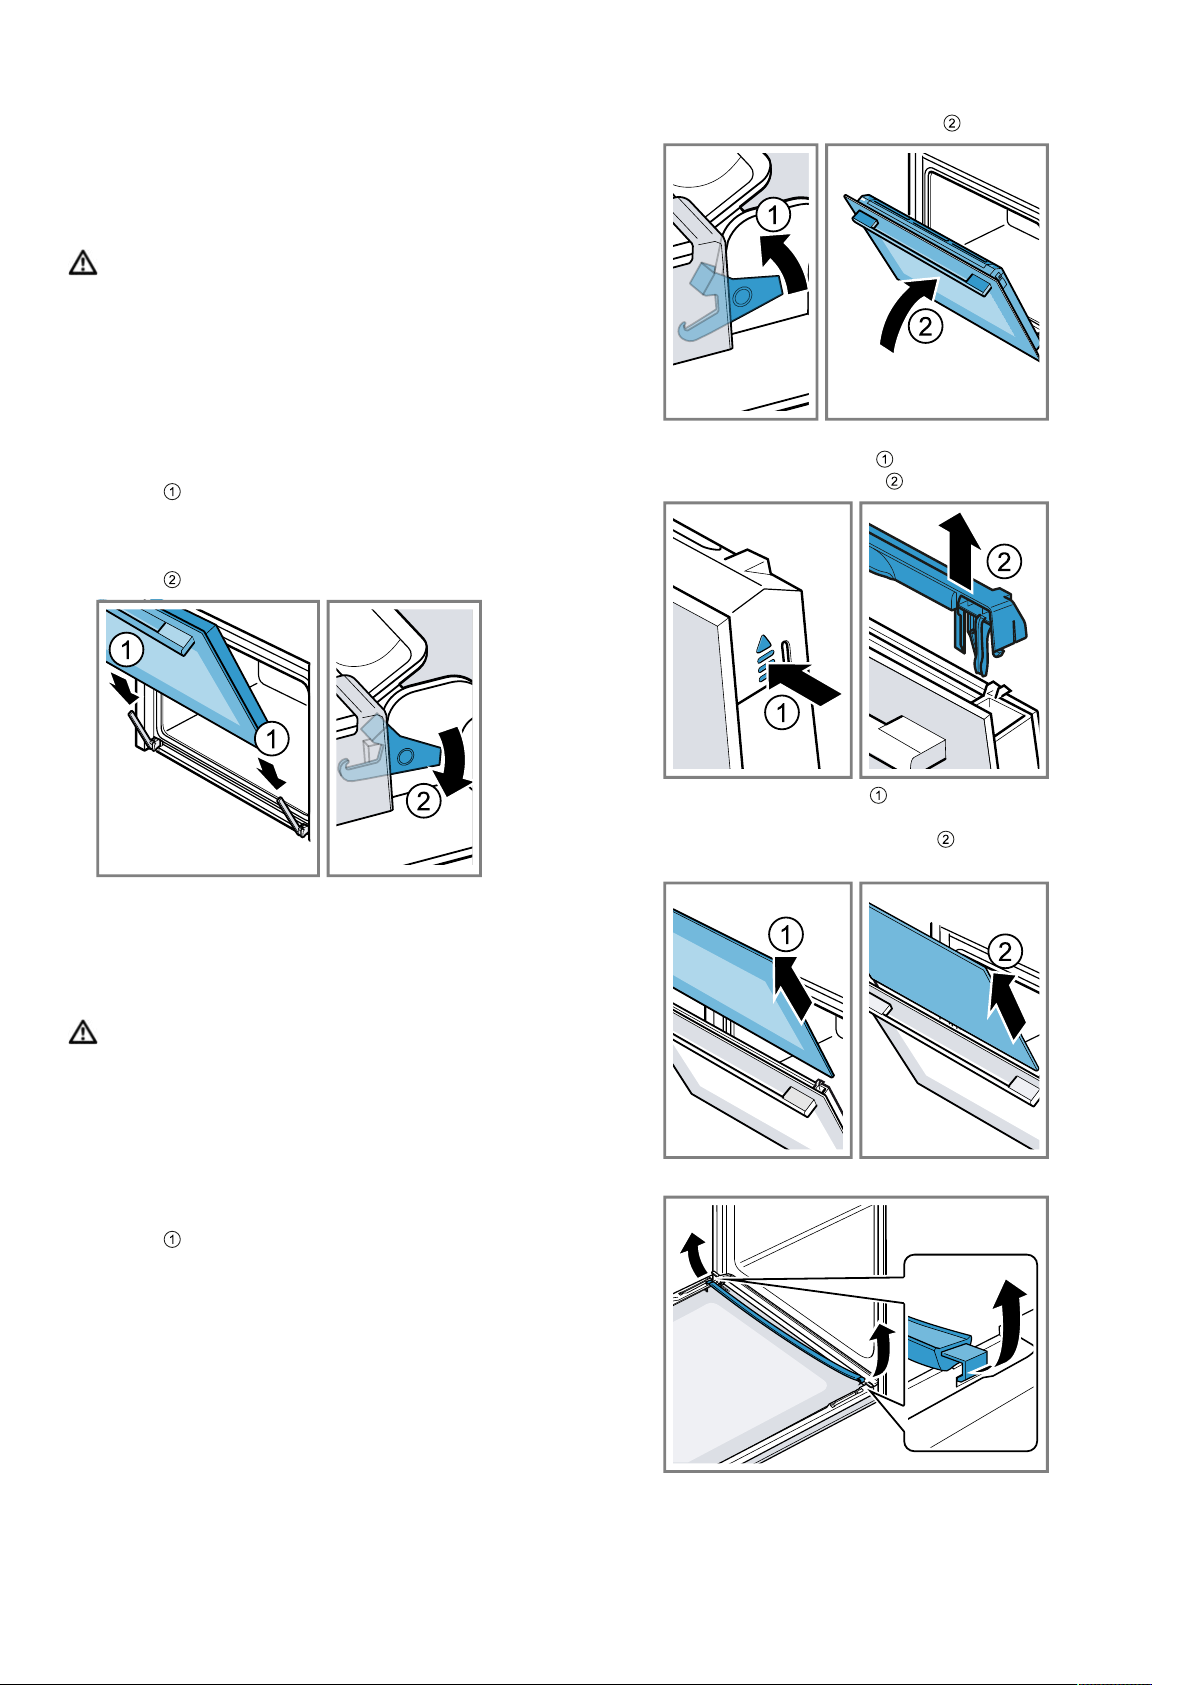
en Appliance door
3.
Push the condensate tray until the hooks on the
right, left and bottom click into place.
a The condensate tray is installed horizontally.
21.2 Attaching the appliance door
WARNING‒Risk of injury!
The hinges on the appliance door move when the door
is opened and closed, which could trap your fingers.
▶ Keep your hands away from the hinges.
When the hinges are not secured, they can snap shut
with great force.
▶ Make sure that the locking levers are always either
fully closed or (when detaching the oven door) fully
open.
1.
Slide the appliance door straight onto the two
hinges
will go.
2.
Open the appliance door fully.
3.
Close the locking levers on the left- and right-hand
hinges .
. Slide the appliance door on as far as it
3.
Close the appliance door fully .
4.
Push on the left- and right-hand side of the door
cover from the outside until it is released.
5.
Remove the door cover .
a The locking levers are closed. The appliance door is
secured and cannot be detached.
4.
Close the appliance door.
21.3 Removing the door panes
WARNING‒Risk of injury!
The hinges on the appliance door move when the door
is opened and closed, which could trap your fingers.
▶ Keep your hands away from the hinges.
Components inside the appliance door may have sharp
edges.
▶ Wear protective gloves.
1.
Open the appliance door fully.
2.
Open the locking levers on the left- and right-hand
hinges
a The locking levers are open. The hinges are now se-
cured and cannot snap shut.
.
6.
Lift out the inner pane and set it down carefully
on a flat surface.
7.
Lift out the intermediate pane and set it down
carefully on a flat surface.
8.
Open the appliance door and remove the door seal.
30
Page 31
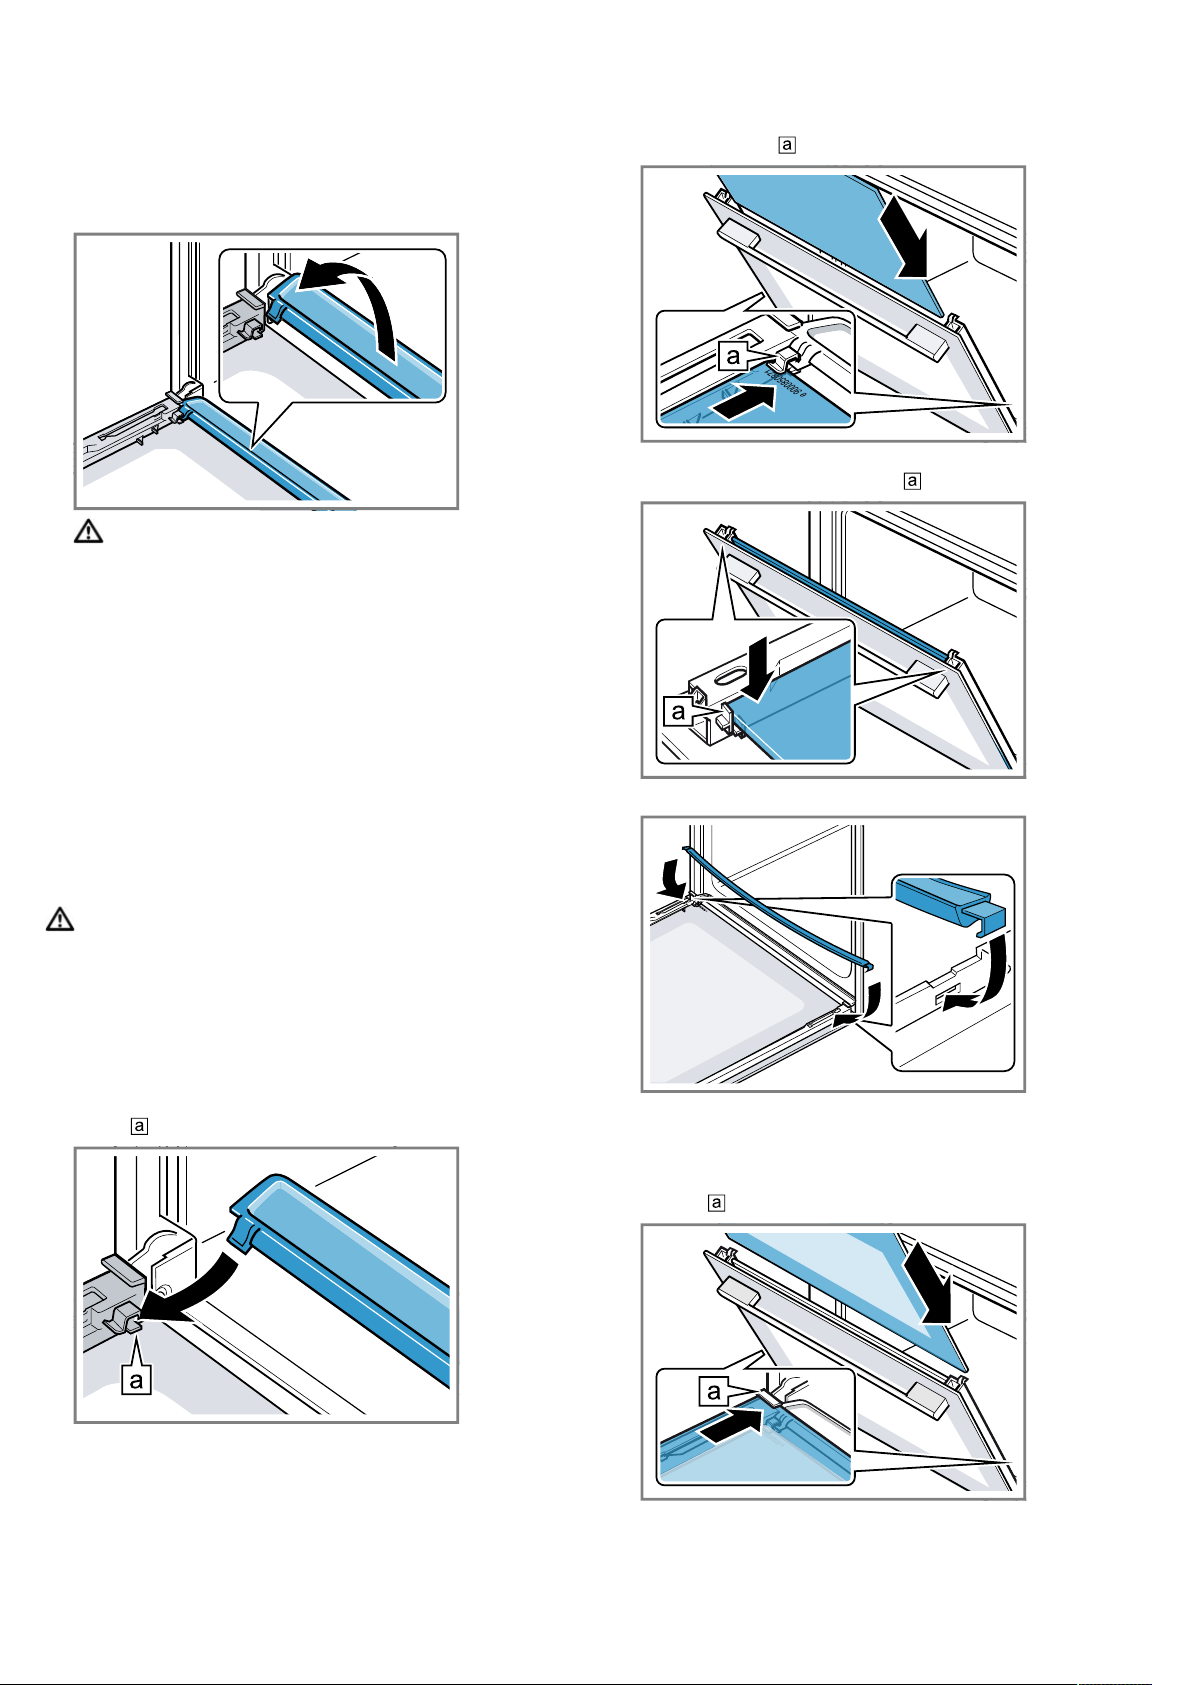
Appliance door en
9.
If necessary, you can remove the condensate
trough for cleaning.
‒ Open the appliance door.
‒ Tilt the condensate trough upwards and remove
it.
10.
WARNING‒Risk of injury!
Scratched glass in the appliance door may develop
into a crack.
▶ Do not use any harsh or abrasive cleaners or
sharp metal scrapers to clean the glass on the
oven door, as they may scratch the surface.
Clean the removed door panels on both sides with
glass cleaner and a soft cloth.
11.
Clean the condensate trough with a cloth and hot
soapy water.
12.
Clean the appliance door.
→"Suitable cleaning agents", Page25
13.
Dry the door panels and refit them.
→"Fitting the door panes", Page31
3.
Slide the intermediate pane into the left- and righthand retainers .
4.
Push the intermediate pane upwards until it is in the
left- and right-hand retainers .
5.
Open the appliance door and attach the door seal.
21.4 Fitting the door panes
WARNING‒Risk of injury!
The hinges on the appliance door move when the door
is opened and closed, which could trap your fingers.
▶ Keep your hands away from the hinges.
Components inside the appliance door may have sharp
edges.
▶ Wear protective gloves.
1.
Open the appliance door fully.
2.
Place the condensate trough vertically into the retainer
and turn it downwards.
6.
Note:When sliding the pane in, ensure that the
glossy side of the pane is on the outside and the
cut-outs on the left and right are at the top.
Slide the inner pane into the left- and right-hand retainers
.
31
Page 32
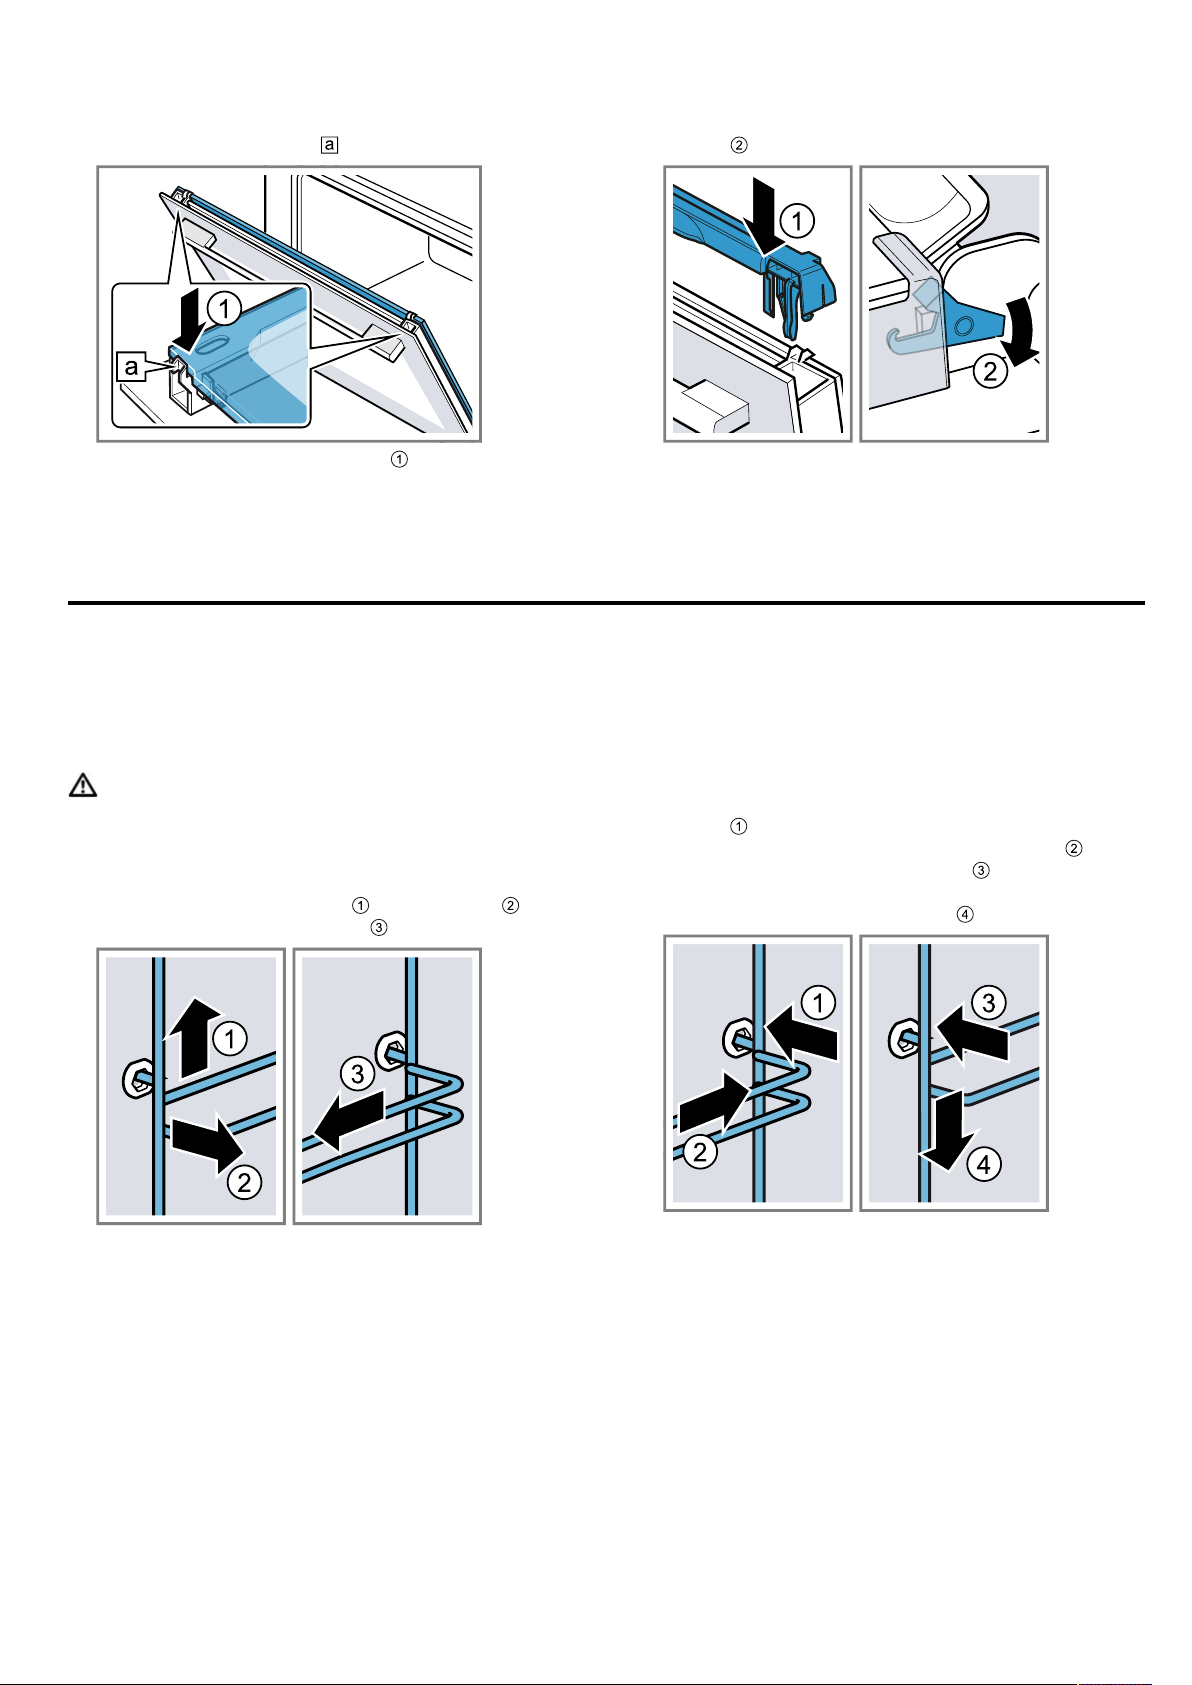
en Rails
7.
Push the inner pane upwards until it is in the leftand right-hand retainers
8.
Put the door cover into position and push down
on it until you hear it click into place.
9.
Open the appliance door fully.
.
22 Rails
To thoroughly clean the rails and the cooking compartment, or to replace the rails, you can remove the rails.
22.1 Detaching the rails
WARNING‒Risk of burns!
The shelf supports get very hot
▶ Never touch the shelf supports when hot.
▶ Always allow the appliance to cool down.
▶ Keep children at a safe distance.
1.
Lift the rail forwards slightly and detach it .
2.
Pull the whole rail to the front and remove it.
10.
Close the locking levers on the left- and right-hand
hinges
a The locking levers are closed. The appliance door is
secured and cannot be detached.
11.
Close the appliance door.
Note:Do not use the cooking compartment again until
the door panes have been correctly fitted.
.
22.2 Attaching the rails
Notes
¡ The rails only fit on the right or left.
¡ For both rails, ensure that the curved rods are at the
front.
1.
First, push the rail into the middle of the rear
socket
compartment wall, and then push this back .
2.
Push the rail into the front socket until the rail
also rests against the cooking compartment wall,
and then press this downwards .
until the rail rests against the cooking
3.
Clean the rail.
→"Cleaning products", Page24
32
Page 33
23 Troubleshooting
Troubleshooting en
You can rectify minor faults on your appliance yourself.
Read the troubleshooting information before contacting
after-sales service. This will avoid unnecessary costs.
WARNING‒Risk of injury!
Improper repairs are dangerous.
▶ Repairs to the appliance should only be carried out
by trained specialist staff.
▶ If the appliance is defective, call Customer Service.
→"Customer Service", Page35
23.1 Malfunctions
Fault Cause and troubleshooting
The appliance is not
working.
"Sprache Deutsch"
appears in the display.
The operation does
not start or is interrupted.
Appliance does not
heat up.
The time is not displayed when the appliance is switched
off.
HomeConnect is not
working properly.
The control panel
cannot be opened.
The circuit breaker in the fuse box has tripped.
▶
Check the circuit breaker in the fuse box.
There has been a power cut.
▶
Check whether the lighting in your kitchen or other appliances are working.
Electronics fault
1.
Disconnect the appliance from the power supply for at least 30 seconds by switching off
the fuse.
2.
Reset the basic settings to the factory settings.
→"Basic settings", Page21
There has been a power cut.
▶
Configure the initial configuration settings.
→"Performing initial start-up", Page12
Different causes are possible.
▶
Check the notifications that appear on the display.
→"Displaying information", Page14
Malfunction
▶
Call the after-sales service.
→"Customer Service", Page35
Demo mode is switched on.
1.
Briefly disconnect the appliance from the power supply by switching the circuit breaker in
the fuse box off and then on again.
2.
Switch off demo mode in the basic settings within approx.5minutes.
→"Changing the basic settings", Page22
There has been a power cut.
▶
Open and close the appliance door once after a power failure.
a The appliance is checked and is ready to use.
Basic setting has been changed.
▶
Change the basic setting for the time display.
→"Basic settings", Page21
Different causes are possible.
▶
Go to www.home-connect.com.
The circuit breaker in the fuse box has tripped.
▶
Check the circuit breaker in the fuse box.
There has been a power cut.
▶
Check whether the lighting in your kitchen or other appliances are working.
WARNING‒Risk of electric shock!
Improper repairs are dangerous.
▶ Repairs to the appliance should only be carried out
by trained specialist staff.
▶ Only use genuine spare parts when repairing the
appliance.
▶ If the power cord of this appliance is damaged, it
must be replaced by trained specialist staff.
33
Page 34

en Troubleshooting
Fault Cause and troubleshooting
The control panel
cannot be opened.
Malfunction
1.
Call the after-sales service.
→"Customer Service", Page35
2.
If there is water in the water tank, empty the water tank:
‒ Open the appliance door.
‒ Grip on the right and left below the control panel.
‒ Slowly pull out the control panel and push it upwards.
Intense steam generation when steaming.
The appliance is automatically calibrated.
No action required.
If the cooking times are too short, the appliance is not automatically calibrated.
If a lot of steam is generated repeatedly, the appliance is recalibrated.
1.
Reset the appliance to the factory setting.
→"Basic settings", Page21
2.
Repeat the calibrations.
→"Before using for the first time", Page11
The appliance requests descaling
without the counter
appearing in advance.
The appliance
prompts you to rinse
it.
"Fill water tank" appears in the display
even though the water tank has been
filled.
The set water hardness range is too low.
1.
Descale the appliance.
→"Descaling", Page27
2.
Check the water hardness and set this in the basic settings.
→"Basic settings", Page21
During the descaling, the power supply is interrupted or the appliance is switched off.
▶
Rinse the appliance.
→"Descaling", Page27
The water tank has not clicked into place.
▶
Insert the water tank correctly so that it engages in the holder.
→"Filling the water tank", Page16
The water tank has fallen out. Shaking has caused parts to come loose in the water tank.
The water tank is leaking.
▶
Order a new water tank.
→"Customer Service", Page35
Malfunction
▶
Do not use deionised or filtered water.
→"Determining the water hardness before switching on the appliance for the first time",
Page11
The sensor is defective.
▶
Call the after-sales service.
→"Customer Service", Page35
Buttons are flashing. Condensation has formed behind the control panel.
No action required. As soon as the condensation has evaporated, the buttons no longer
flash.
"Plopping" sounds
can be heard when
Water vapour requires the cold/heat effect for frozen food.
No action required.
cooking with steam.
The appliance hums
during operation and
Functional test of the pump creates operating noise.
No action required.
after it is switched off.
The interior lighting
does not work.
Basic setting has been changed.
▶
Change the basic setting for the lighting.
→"Basic settings", Page21
The LED light is defective.
▶
Call the after-sales service.
→"Customer Service", Page35
34
Page 35
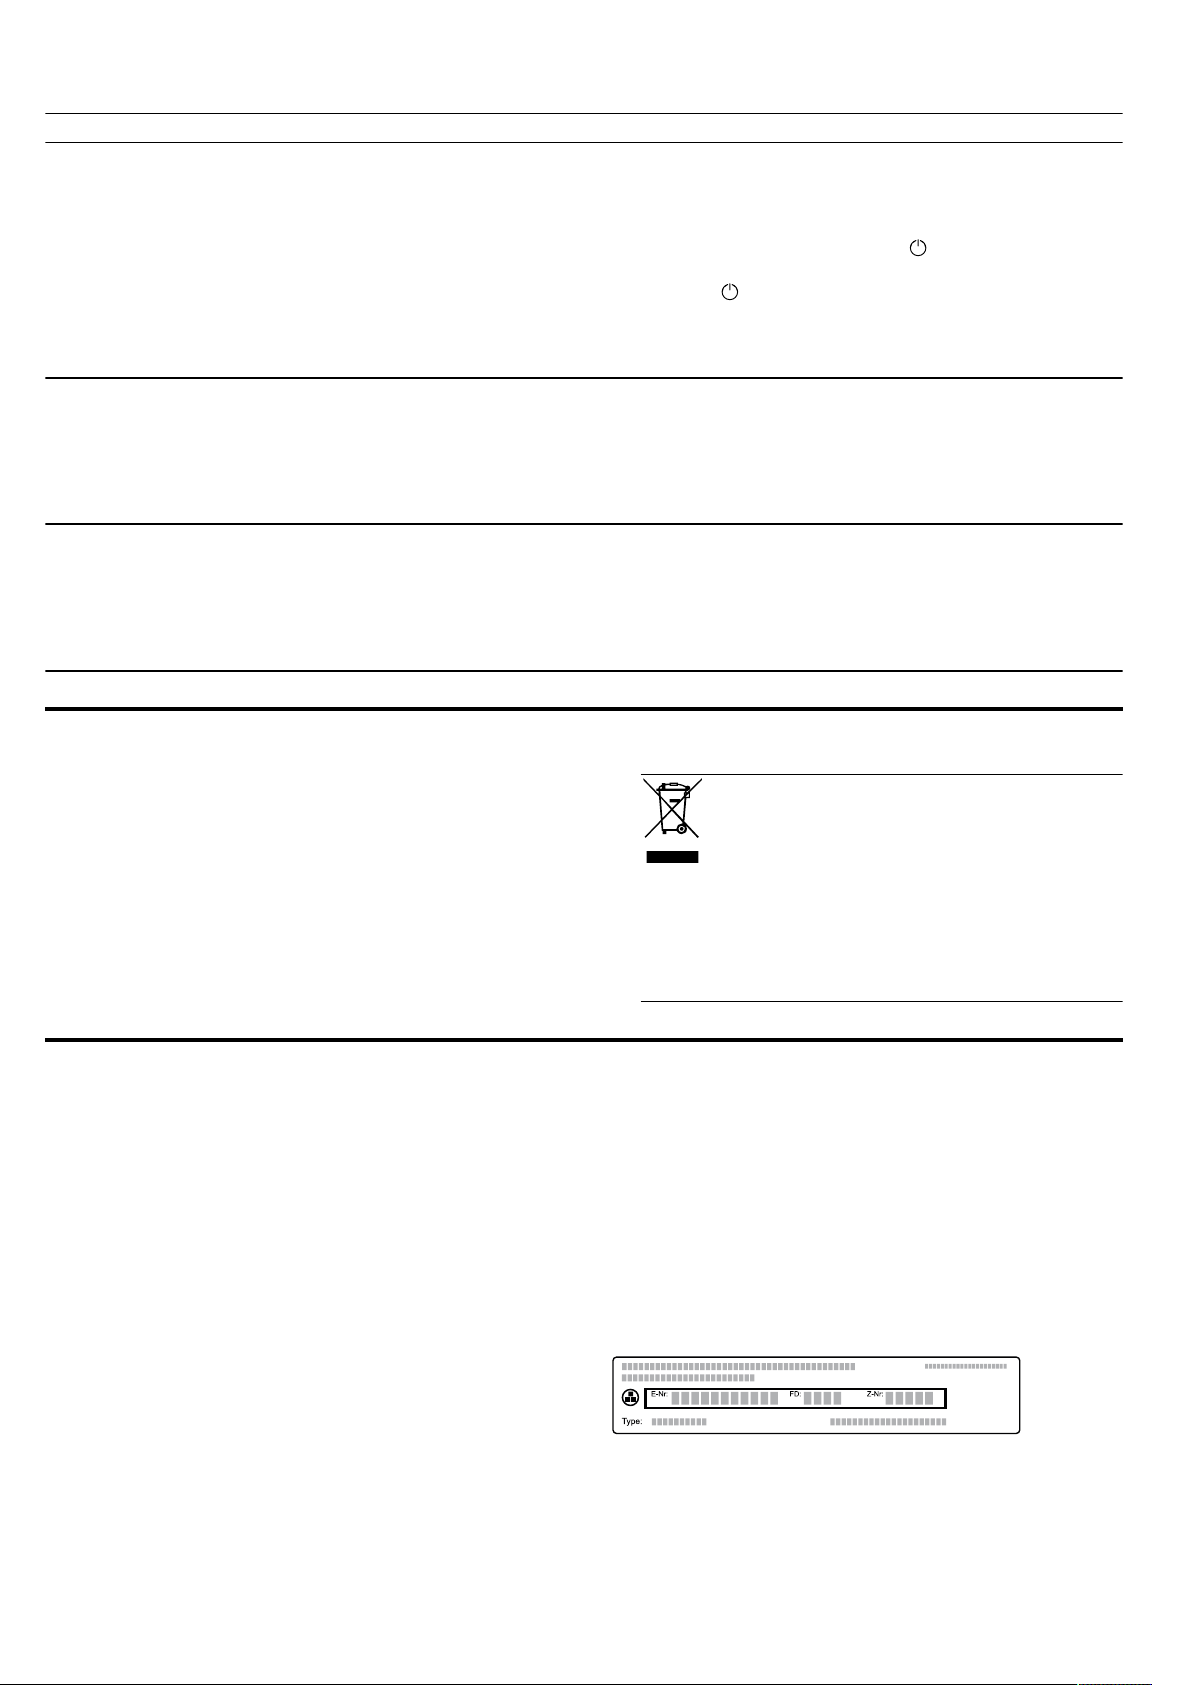
Fault Cause and troubleshooting
Maximum operating
time reached.
Error code made up
of letters and numbers appears on the
display, e.g. E0111.
The cooking result is
not satisfactory.
To prevent an unwanted permanent operation, the appliance automatically stops heating
after several hours if the settings are unchanged. A message appears in the display.
The point at which the maximum operating time is reached is determined by the corresponding settings for an operating mode.
1.
To continue operation, switch the appliance off and on again using . Reset and start
the operation.
2.
If you do not need to use the appliance, press to switch it off.
Tip:To prevent the appliance from switching off when you do not want it to, set a cooking
time.
→"Time-setting options", Page14
The electronics have detected a fault.
1.
Switch the appliance off and on again.
a If the fault was a one-off, the message disappears.
2.
If the message appears again, call the after-sales service. Please specify the exact error
message when calling.
→"Customer Service", Page35
Settings were unsuitable.
Adjustment values, e.g. temperature or cooking time, depend on the recipe, quantity and
food.
▶
Next time, set lower or higher values.
Tip:A lot of other information about the food preparation and corresponding adjustment
values can be found in the HomeConnect app or on our website www.bosch-home.com.
Disposal en
24 Disposal
24.1 Disposing of old appliance
Valuable raw materials can be reused by recycling.
1.
Unplug the appliance from the mains.
2.
Cut through the power cord.
3.
Dispose of the appliance in an environmentally
friendly manner.
Information about current disposal methods are
available from your specialist dealer or local authority.
25 Customer Service
Detailed information on the warranty period and terms
of warranty in your country is available from our aftersales service, your retailer or on our website.
If you contact Customer Service, you will require the
product number (E-Nr.), the production number (FD)
and the consecutive numbering (Z-Nr.) of your appliance.
The contact details for Customer Service can be found
in the enclosed Customer Service directory or on our
website.
This product contains light sources from energy efficiency class G. These light sources are available as a
spare part and should only be replaced by trained specialist staff.
This appliance is labelled in accordance with European Directive
2012/19/EU concerning used electrical and electronic appliances
(waste electrical and electronic equipment - WEEE).
The guideline determines the framework for the return and recycling of
used appliances as applicable
throughout the EU.
25.1 Product number (E-Nr.), production
number (FD) and consecutive numbering (ZNr.)
You can find the product number (E-Nr.), the production number (FD) and the consecutive numbering (ZNr.) on the appliance's rating plate.
You will see the rating plate with these numbers if you
open the appliance door. On some appliances with
steam-assisted cooking, you will find the rating plate
behind the control panel.
Make a note of your appliance's details and the Customer Service telephone number to find them again
quickly.
You can also display the appliance information in the
basic settings.
→"Basic settings", Page21
35
Page 36
en Information regarding Free and Open Source Software
26 Information regarding Free and Open Source Software
This product includes software components that are licensed by the copyright holders as free or open
source software.
The applicable licence information is stored on your
home appliance. You can also access the applicable licence information via your HomeConnect app: "Profile
-> Legal information -> Licence Information".1 You can
download the licence information on the brand product
website. (Please search on the product website for
your appliance model and additional documents). Alternatively, you can request the relevant information
from [email protected] or BSH Hausgeräte GmbH,
Carl-Wery-Str. 34, 81739 Munich, Germany.
27 Declaration of Conformity
BSH Hausgeräte GmbH hereby declares that the appliance with Home Connect functionality conforms to the
essential requirements and other relevant provisions of
Directive 2014/53/EU.
A detailed RED Declaration of Conformity can be found
online at www.bosch-home.com among the additional
documents on the product page for your appliance.
The source code will be made available to you on request.
Please send your request to [email protected] or
BSH Hausgeräte GmbH, Carl-Wery-Str.34, 81739 Munich, Germany.
Subject: „OSSREQUEST“
The cost of performing your request will be charged to
you. This offer is valid for three years from the date of
purchase or at least as long as we offer support and
spare parts for the relevant appliance.
Hereby, BSH Hausgeräte GmbH declares that the appliance with HomeConnect functionality is in compliance with relevant statutory requirements.
A detailed Declaration of Conformity can be found online at www.bosch-home.co.uk among the additional
documents on the product page for your appliance.
2.4 GHz band (2400–2483.5MHz): Max. 100mW
5 GHz band (5150–5350MHz + 5470–5725MHz):
max. 200mW
2
2
BE BG CZ DK DE EE IE EL ES
FR HR IT CY LI LV LT LU HU
MT NL AT PL PT RO SI SK FI
SE NO CH TR IS UK (NI)
5GHz WLAN (Wi-Fi): For indoor use only.
AL BA MD ME MK RS UK UA
5GHz WLAN (Wi-Fi): For indoor use only.
28 How it works
Here, you can find the ideal settings for various types
of food as well as the best accessories and cookware.
We have perfectly tailored these recommendations to
your appliance.
Tip:A lot of other information about the food preparation and corresponding adjustment values can be
found in the HomeConnect app or on our website
www.bosch-home.com.
28.1 General cooking tips
Take note of the following information when cooking all
types of food.
¡ The temperature and cooking time depend on the
amount of food and the recipe. Settings ranges are
specified for this reason. Try using the lower values
to start with.
¡ The setting values apply to food placed in the cook-
ing compartment while the cooking compartment is
still cold. If you want to preheat anyway, do not
place accessories into the cooking compartment until it has finished preheating.
¡ Remove any accessories that are not being used
from the cooking compartment.
28.2 Baking tips
¡ Dark-coloured metal baking tins are most suitable
for baking cakes, bread and other baked goods.
¡ Use wide, shallow cookware for bakes and gratins.
Food takes longer to cook in deep, narrow cookware and it browns more on top.
1
Depending on the appliance specifications
2
Only applies to Great Britain
36
Page 37
How it works en
¡ If you are cooking bakes directly in the universal
pan, place the universal pan into the cooking compartment at level1.
¡ The setting values for bread dough apply to both
dough placed on a baking tray and dough placed in
a loaf tin.
ATTENTION!
When the cooking compartment is hot, any water inside it will create steam. The change in temperature
may cause damage.
▶ Never pour water into the cooking compartment
when it is still hot.
▶ Never place cookware containing water on the
cooking compartment floor.
Shelf positions
You will obtain the best results if you use the following
shelf positions.
If you are baking on one level, use shelf position 1.
Baking on 2levels Height
Universal pan
Baking tray
Baking tins/dishes on two wire racks 3
Use the 4Dhot air heating function.
Note:Items that are placed in the appliance on baking
trays or in baking tins/dishes at the same time will not
necessarily be ready at the same time.
3
1
1
28.3 Roasting, braising and grilling tips
¡ The recommended settings are for fridge-temperat-
ure food and unstuffed, oven-ready poultry.
¡ Place the poultry onto the cookware breast-side or
skin-side down.
¡ Turn roasting joints, grilled items or whole fish after
approx. ½ to ⅔ of the specified time.
Roasting on the wire rack
Food roasted on the wire rack will become very crispy
on all sides. You can roast large poultry, for example,
or multiple individual pieces at the same time.
¡ Roast pieces of a similar weight and thickness. The
grilled food will brown evenly and will remain succulent and juicy.
¡ Place the food to be roasted directly on the wire
rack.
¡ To catch any liquids that drip down, place the uni-
versal pan, with the wire rack inside it, into the cooking compartment at the specified shelf height.
¡ Add up to ½litre of water to the universal pan, de-
pending on the size and type of food that you want
to roast.
You can make a sauce from the juices that are collected. This also means that less smoke is produced and the cooking compartment does not become as dirty.
Roasting in cookware
If you cover the cookware when you cook your food,
this will keep the cooking compartment cleaner.
General information about roasting in cookware
¡ Use heat-resistant, ovenproof cookware.
¡ Place the cookware on the wire rack.
¡ Glass cookware is best.
¡ Follow the manufacturer's instructions for your roast-
ing dishes.
Roasting in uncovered cookware
¡ Use a deep roasting dish.
¡ If you do not have any suitable cookware, you can
use the universal pan.
Roasting in covered cookware
¡ Use a suitable lid that seals well.
¡ When roasting meat, there should be at least 3cm
between the food and the lid. The meat may expand.
WARNING‒Risk of scalding!
Very hot steam may escape when the lid is opened
after cooking. Steam may not be visible, depending on
the temperature.
▶ Lift the lid in such a way that the hot steam can es-
cape away from you.
▶ Keep children away from the appliance.
Grilling
Grill food if you want it to be crispy.
The "Grill" type of heating is good for cooking thinner
pieces of poultry, meat and fish such as steaks, drumsticks and burgers. It is also excellent for toasting
bread.
Circulated air grilling is very well suited to cooking
whole poultry and fish, as well as meat, e.g. roast pork
with crackling.
¡ When grilling several food items, choose pieces that
are of a similar weight and thickness. The grilled
food will brown evenly and will remain succulent
and juicy.
¡ Place the food to be grilled directly onto the wire
rack.
¡ To catch any liquids that drip down, place the uni-
versal pan into the cooking compartment at least
one level below the wire rack.
Notes
¡ The grill element switches on and off continuously.
This is normal. The grill setting that you use determines how frequently this occurs.
¡ Smoke may be produced when grilling.
28.4 Cooking tips for steaming
Cook your food gently. The food remains particularly
succulent.
In contrast to cooking with added steam, the meat
does not become crispy on the outside.
¡ Use uncovered, heat-resistant cookware that is suit-
able for cooking with steam.
¡ The perforated steaming tray, size XL, is the best
option here. To catch any liquid that drips down,
slide the universal pan into the cooking compartment one level below.
Alternatively, you can place a glass dish onto the
wire rack.
¡ Cover food that you would normally cook in a bain
marie with film, e.g. cling film.
37
Page 38
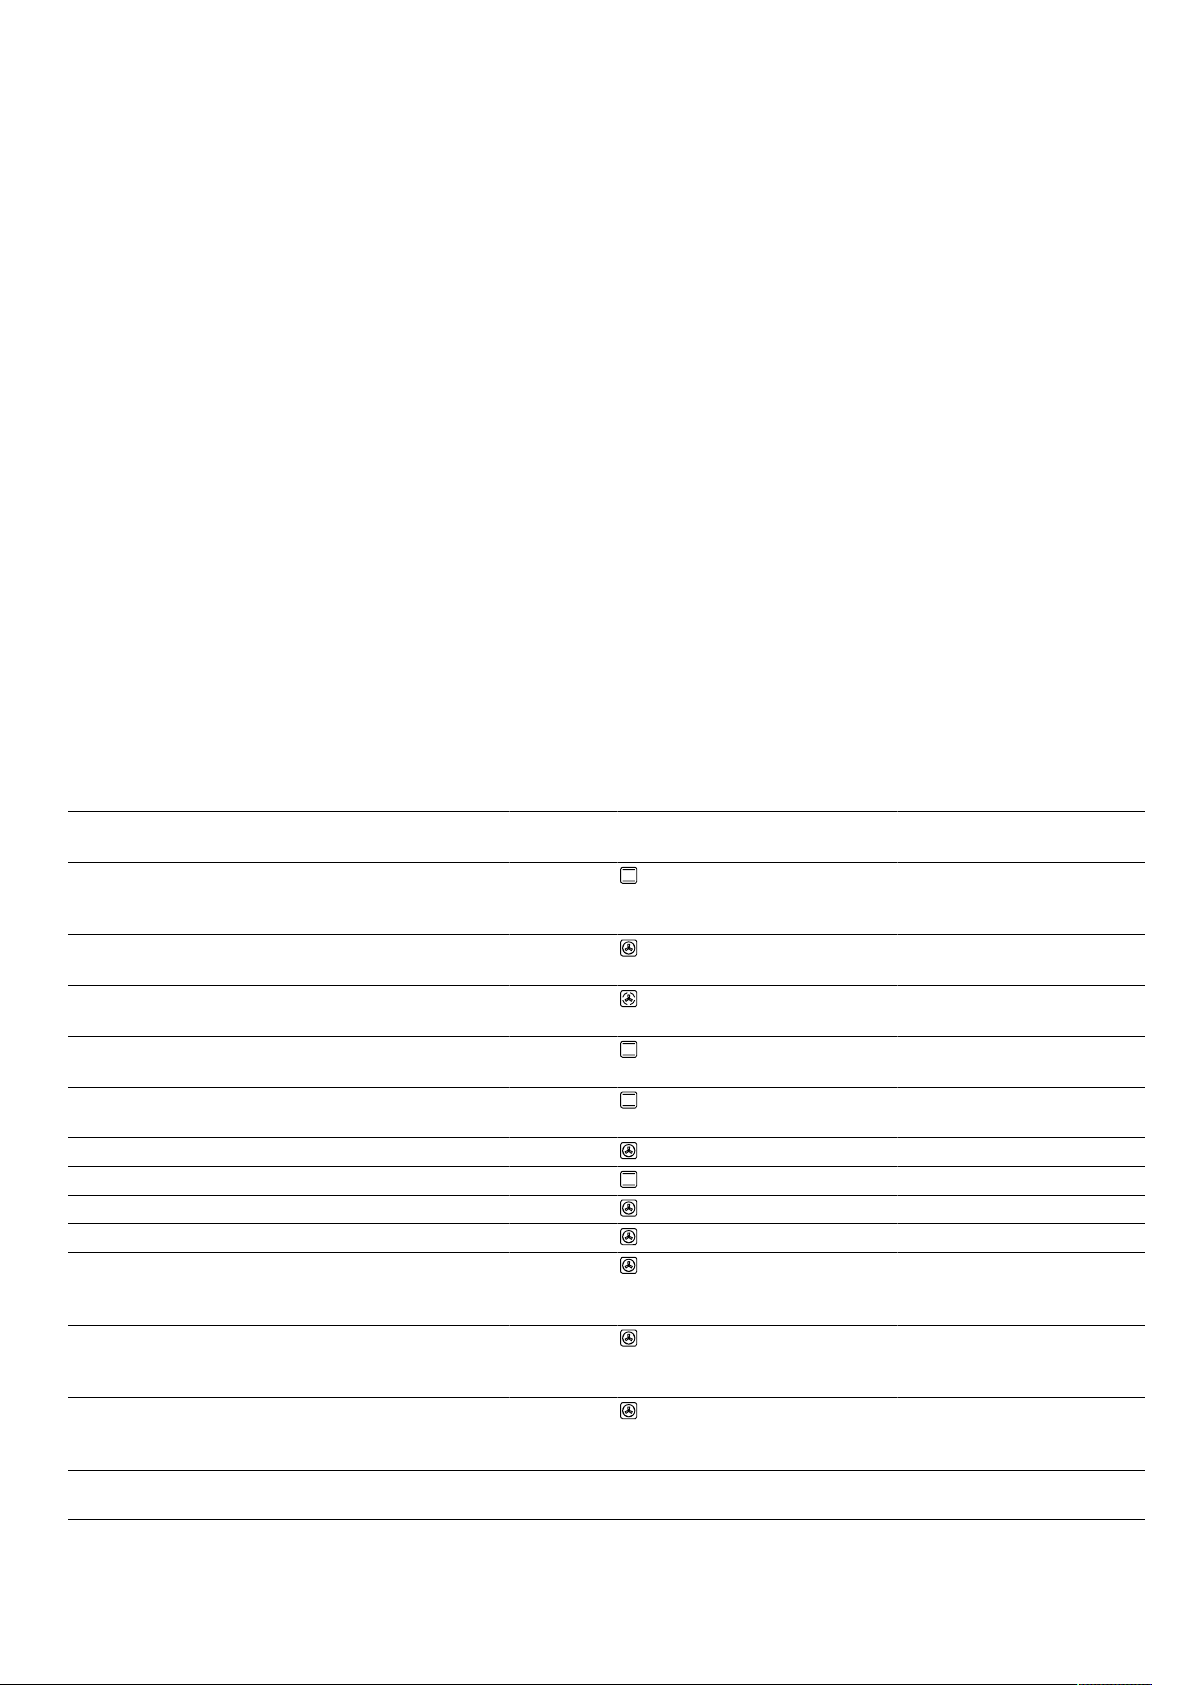
en How it works
¡ You do not need to turn the food.
¡ To obtain a slightly different flavour, you can sear
the meat, poultry or fish before steaming. Reduce
the cooking time.
Rice or cereal products
¡ Add water or liquid in the specified ratio.
For example, 1:1.5 means add 150ml liquid for
every 100g rice.
¡ Larger food items require a longer heat-up time and
a longer cooking time.
¡ If you are using several pieces which are the same
weight, the appliance's heat-up time is increased.
The cooking time remains the same.
¡ Open the door as infrequently as possible during
steaming. Wipe the condensate drip tray after preparation. If the condensate drip tray overflows, this
may cause damage to kitchen units.
¡ The main part of the user manual contains informa-
tion on how to configure the steam settings.
→"Steam", Page16
28.5 Cooking instructions for ready meals
¡ The cooking result greatly depends on the quality of
the food. Pre-browning and irregularities may
already be present in the food before cooking.
¡ Do not use frozen products that are covered with a
thick layer of ice. Remove any ice on the food.
¡ Take ready meals out of the packaging.
¡ If you are warming or cooking the ready meal in
cookware, make sure that the cookware is heat-resistant.
¡ Distribute foods that are in the form of separate
Vegetables on several levels
You can easily cook more than one type of food or
even whole menus, e.g. broccoli and potatoes, on 2
levels. →Page40
pieces, such as bread rolls and potato products, so
that they are spread out flat and evenly on the accessory. Leave a little space between the individual
pieces.
¡ Follow the manufacturer's instructions on the pack-
aging.
28.6 List of foods
Recommended settings for a variety of foods, sorted into food categories.
Recommended settings for various types of food
Food Accessory/cook-
ware
Fruit tart or cheesecake
with shortcrust pastry
Springform cake
tin, diameter 26 cm
base
Sponge flan, 6 eggs Springform cake tin
Ø 28 cm
Sponge flan, 6 eggs Springform cake tin
Ø 28 cm
Shortcrust tart with moist
Universal pan 1 160-180 - 60-80
topping
Yeast cake with moist
Universal pan 1 180-190 - 30-45
topping
Swiss roll Baking tray 1 190-210
Muffins Muffin tray 1 170-190 - 15-30
Small yeast cakes Baking tray 1 160-180 2 25-35
Biscuits Baking tray 2 140-160 - 15-30
Biscuits, 2levels Universal pan
+
Baking tray
Bread, 750g Universal pan
or
Loaf tin
Bread, 1500g Universal pan
or
Loaf tin
1
Preheat the appliance.
2
Turn the dish 2/3 of the way through the cooking time.
Height Heating
function
Temperature in
°C/grill setting
Steam
level
Cooking time
in mins
1 170-180 - 60-80
1 150-160 1
Off
1. 10
2. 25-35
1 150-160 - 50-60
1
1 10-15
3+1 130-150 - 20-35
1 1. 210-220
2. 180-190
1 1. 210-220
2. 180-190
3
Off
3
Off
1. 10-15
2. 25-35
1. 10-15
2. 45-55
38
Page 39
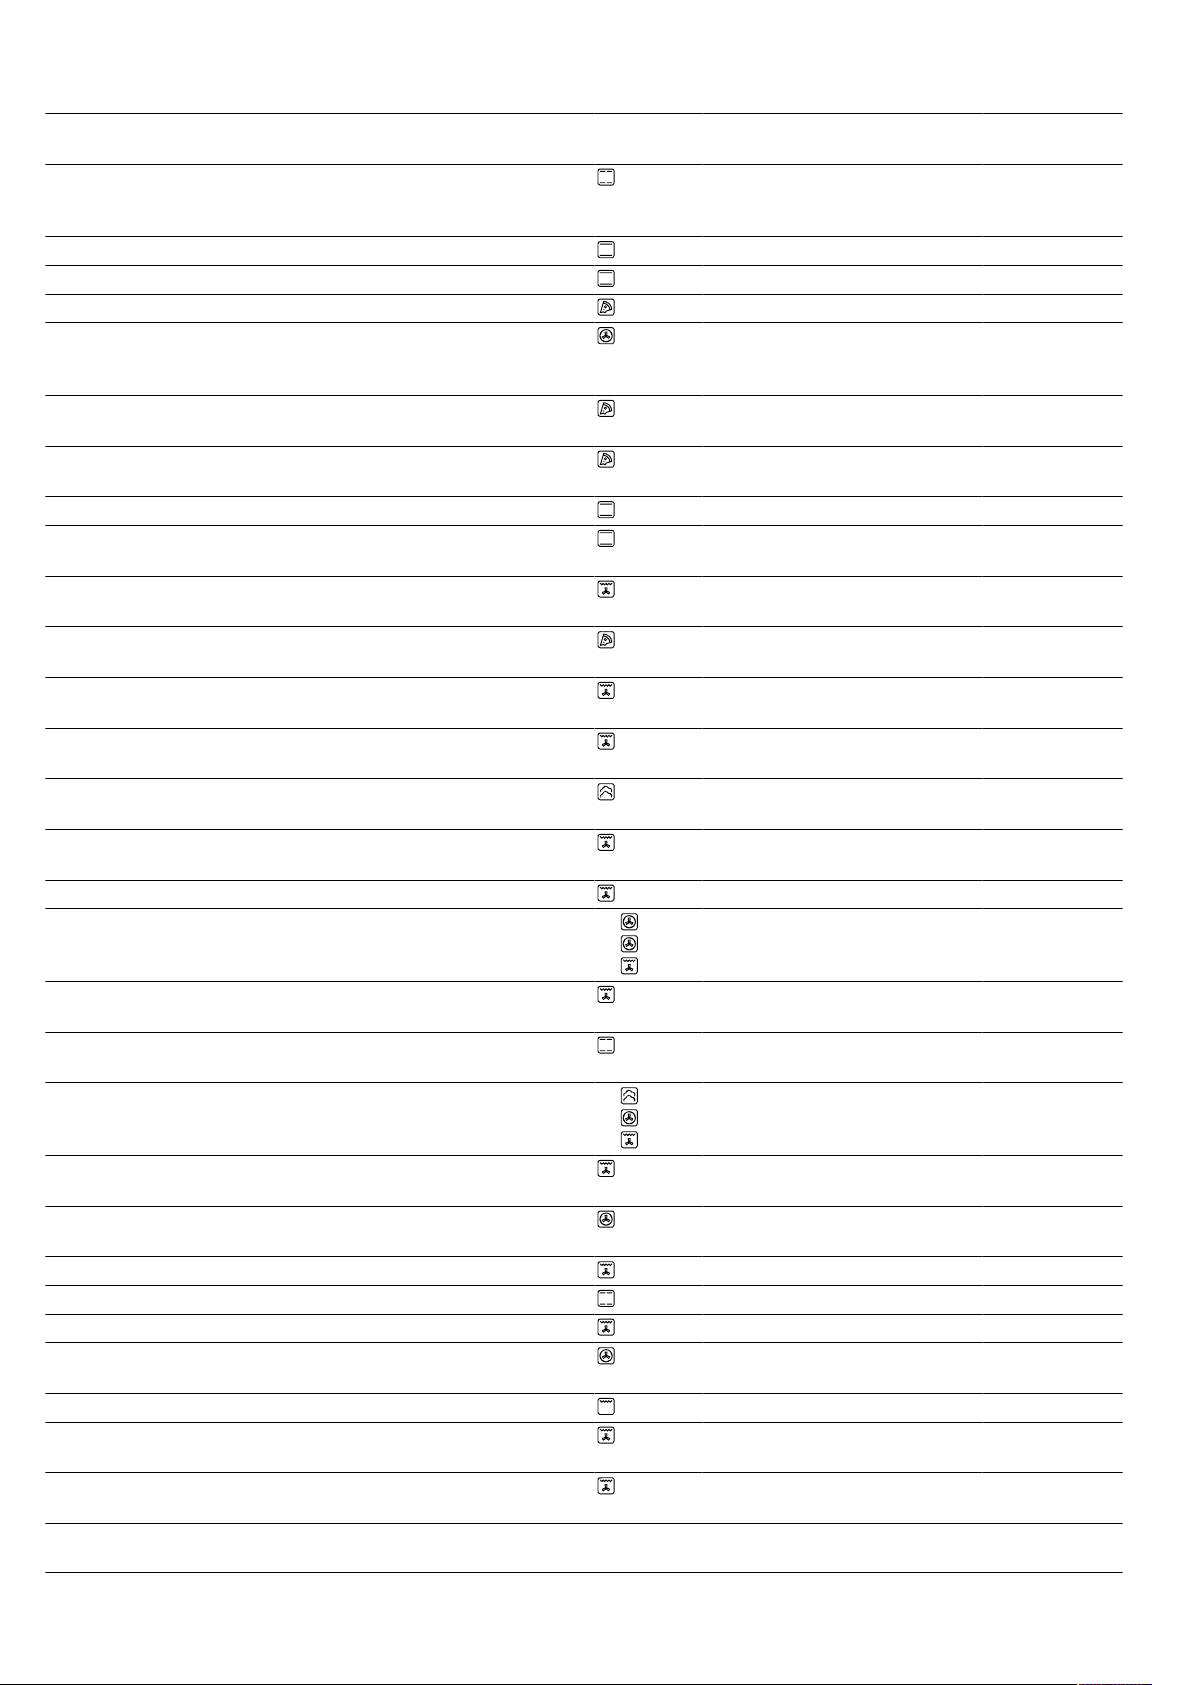
How it works en
Food Accessory/cook-
ware
Bread, 1500g Universal pan
Height Heating
function
Temperature in
°C/grill setting
Steam
level
Cooking time
in mins
1 200-210 - 35-45
or
Loaf tin
Flatbread Universal pan 2 220-230 3 20-30
Bread rolls, fresh Baking tray 1 200-220 2 20-30
Pizza, fresh Baking tray 1 200-220 - 20-30
Pizza, fresh, 2 levels Universal pan
3+1 180-190 - 35-45
+
Baking tray
Pizza, fresh, thin-crust, on
Pizza tray 1 210-230 - 20-30
a pizza tray
Quiche Dark coated
1 190-210 - 30-45
quiche tin
Tarte flambée Universal pan 1 240-250
Bake, savoury, cooked
Ovenproof dish 1 200-220 - 35-55
1
- 10-18
ingredients
Bake, savoury, cooked
Ovenproof dish 1 160-170 2 40-50
ingredients
Potato gratin, raw in-
Ovenproof dish 1 170-180 - 50-65
gredients, 4cm deep
Chicken, 1.3kg, un-
Wire rack 1 200-220 - 60-70
stuffed
Chicken, 1.3kg, un-
Wire rack 1 200-220 2 50-60
stuffed
Chicken breast fillet,
steaming
Small chicken portions,
Perforated steam-
2 100 - 15-25
ing tray
Wire rack 2 200-220 2 30-45
250g each
Goose, unstuffed, 3kg Wire rack 1 160-180 - 120-150
Goose, unstuffed, 3kg Wire rack 1 1.
2.
3.
Joint of pork without rind,
Wire rack 1 180-200 - 120-130
1. 130-140
2. 150-160
3. 170-180
2
2
Off
1. 110-120
2. 20-30
3. 30-40
e.g. neck, 1.5kg
Joint of pork without rind,
e.g. neck, 1.5kg
Joint of pork with rind,
e.g. shoulder, 2kg
Fillet of beef, medium,
Uncovered cook-
1 180-190 - 120-140
ware
Uncovered cookware
1 1.
2.
3.
1. 100
2. 170-180
3. 200-210
Off
1
Off
1. 25-30
2. 60-80
3. 20-30
Wire rack 1 210-220 - 40-50
1kg
Fillet of beef, medium,
1kg
Uncovered cookware
1 190-200 1 50-60
Pot-roasted beef, 1.5 kg Covered cookware 1 200-220 - 130-140
Pot-roasted beef, 1.5 kg Covered cookware 1 200-220 - 140-160
Sirloin, medium, 1.5kg Wire rack 1 220-230 - 60-70
Sirloin, medium, 1.5kg Uncovered cook-
1 190-200 1 65-80
ware
Burger, 3–4cm thick Wire rack 2 3 - 20-30
Leg of lamb, boned, me-
Wire rack 1 170-190 - 50-70
2
dium, 1.5kg
Leg of lamb, boned, me-
dium, 1.5kg
1
Preheat the appliance.
2
Turn the dish 2/3 of the way through the cooking time.
Uncovered cookware
1 170-180 1 80-90
39
Page 40
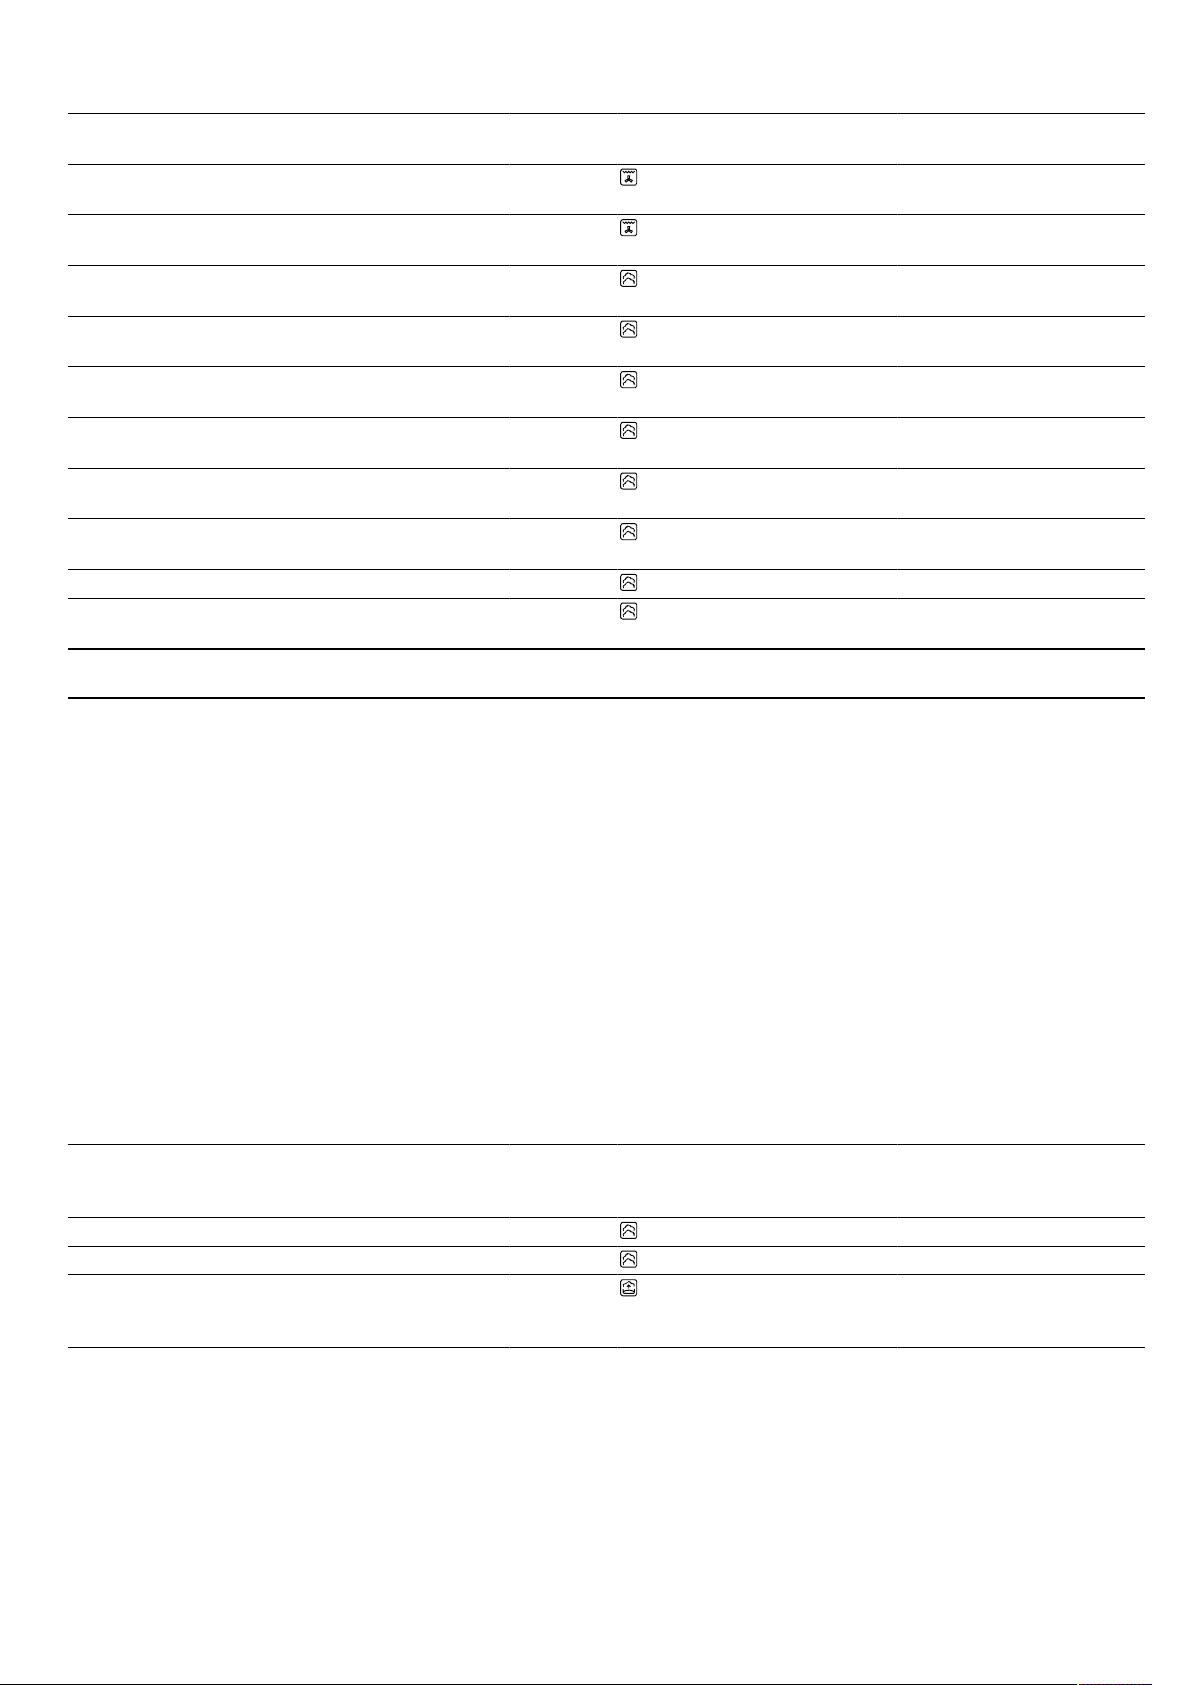
en How it works
Food Accessory/cook-
ware
Fish, grilled, whole,
Wire rack 1 170-190 - 20-30
Height Heating
function
Temperature in
°C/grill setting
Steam
level
Cooking time
in mins
300g, e.g. trout
Fish, baked, whole,
300g, e.g. trout
Fish, steamed, whole,
300g, e.g. trout
Fish fillet, plain, steamed Perforated steam-
Universal pan 1 1. 170-180
2. 160-170
Perforated steam-
2 80-90 - 15-25
ing tray
2 80-100 - 10-16
2
Off
1. 15-20
2. 5-10
ing tray
Cauliflower, whole,
steaming
Sliced carrots, steaming Perforated steam-
Perforated steaming tray
2 120 - 20-30
2 120 - 5-7
ing tray
Spinach, steaming Perforated steam-
2 100 - 2-3
ing tray
Unpeeled boiled potatoes, whole
Perforated steaming tray
2 120 - 30-35
Long-grain rice, 1:1.5 Shallow cookware 1 110 - 12-17
Eggs, hard-boiled Perforated steam-
2 100 - 9-12
ing tray
1
Preheat the appliance.
2
Turn the dish 2/3 of the way through the cooking time.
Desserts
Making crème caramel or crème brûlée
1.
Use your preferred recipe to make the mixture for
the crème.
2.
Pour the mixture into moulds until the mixture is
2-3cm deep.
3.
Place the moulds into the perforated steaming tray
(size XL).
4.
Cover food that you would normally cook in a bain
marie with film, e.g. cling film.
5.
Use the recommended settings when configuring
the appliance settings.
6.
If the moulds are made from very thick material, extend the cooking time.
Making yoghurt
1.
Remove the accessories and shelves from the
cooking compartment.
2.
Heat 1litre of whole milk (3.5% fat) to 90°C on the
hob and then leave it to cool down to 40°C.
It is sufficient to heat UHT milk to 40°C.
3.
Mix 150g of chilled yoghurt into the milk.
4.
Pour the mixture into small containers, e.g. cups or
small jars.
5.
Cover the containers with film, e.g. cling film.
6.
Place the containers on the cooking compartment
floor.
7.
Use the recommended settings when configuring
the appliance settings.
8.
After making the yoghurt, leave it to cool in the refrigerator for at least 12hours.
Recommended settings for desserts and compote
Food Accessory/cook-
ware
Height Type of
heating
Temperature in°CSteam in-
tensity
Cooking time
in mins
→Page8
Crème brûlée Individual moulds 1 85 - 20-30
Crème caramel Individual moulds 1 85 - 25-35
Yoghurt Individual moulds Cooking
35-40 - 300-360
compartment floor
Cooking whole menus with steam
Recommended settings and further information for
cooking a whole menu at once.
Tips for cooking whole menus
¡ Use suitable accessories and ensure that you place
them into the oven the right way round. →Page10
40
Page 41
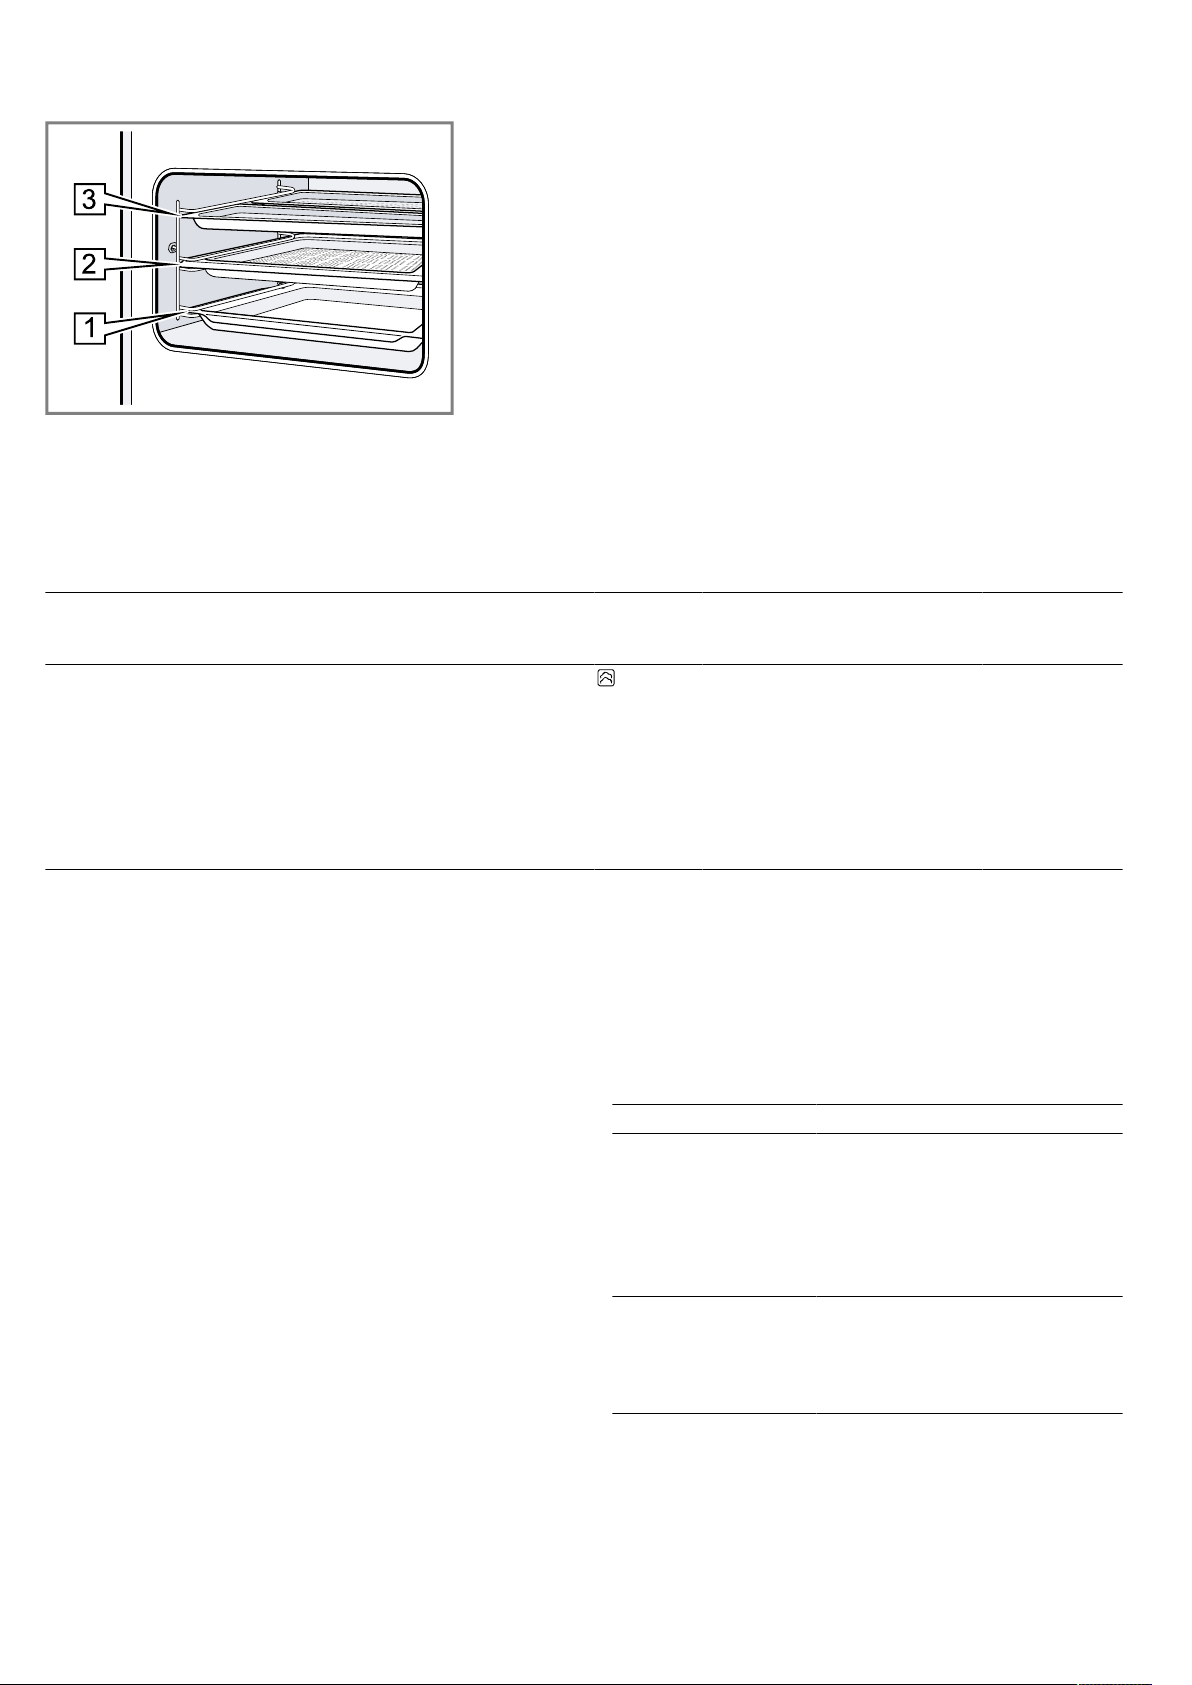
¡ Shelf positions:
– Steaming tray, size M: Shelf position 3
– Steaming tray, size XL: Shelf position 2
– Universal pan: Shelf position1
Recommended settings for cooking whole menus
How it works en
¡ Place the food with the longest cooking time into
the cooking compartment first. Add the rest of the
food at the appropriate time. This means that all the
food will be ready at the same time.
¡ Follow the cooking instructions for each of the differ-
ent foods.
– The heat-up time varies depending on the size
and weight of the food.
– The cooking time is unaffected by the quantity of
food.
– Use cookware that is steam-resistant.
– Cover the soufflé with film, e.g. cling film.
– Always insert the universal pan at level 1.
¡ The overall cooking time is extended when cooking
whole meals with steam, as a little steam escapes
each time the appliance door is opened and the
cooking compartment has to be reheated.
¡ Wipe the cooking compartment and dry the con-
densate drip tray after using it to cook the meal.
Food Accessory/cook-
ware
Peeled boiled potatoes,
quartered
Frozen salmon fillets
Broccoli
Perforated steaming tray, size M
+
Unperforated
steaming tray, size
M
+
Steam containers,
XL size
Height Type of
3+3+2 100 - 1. 30
28.7 Special cooking methods and other applications
Information and recommended settings for special
cooking methods and other applications, e.g. slow
cooking.
Slow cooking
Cook prime cuts of meat slowly at a low temperature,
e.g. tender cuts of beef, veal, lamb or poultry.
Slow cooking poultry or meat
Note:When using the slow cooking type of heating,
you cannot delay the start of the programme by setting
an end time.
Requirement:The cooking compartment is cold.
1.
Use fresh, clean, hygienic meat without bones.
2.
Place the cookware onto the wire rack at level 1 in
the cooking compartment.
3.
Preheat the cooking compartment and cookware for
approx. 15minutes.
4.
Sear the meat on all sides on the hob at a very high
heat.
Temperature in°CSteam inheating
→Page8
5.
Immediately place the meat into the pre-warmed
cookware in the cooking compartment.
To ensure that the temperature in the cooking compartment remains constant, keep the cooking compartment door closed during slow cooking.
Tips for slow cooking
Here you will find tips for achieving good results when
slow cooking food.
Issue Tip
You want to slow
cook a duck breast.
You want to serve
your slow-cooked
meat as hot as possible.
tensity
¡ Place the cold duck breast
into a pan.
¡ Sear the skin side first.
¡ Slow cook the duck breast.
¡ After slow cooking, grill the
duck breast for 3 to
5minutes until crispy.
¡ Preheat the serving plate.
¡ Make sure that the sauces
that accompany the duck
breast are very hot when
you serve them.
Cooking time
in mins
2. 20
3. 10
41
Page 42
en How it works
Recommended settings for slow cooking
Food Accessory/
cookware
Height Searing
time in
mins
Duck breast, medium
rare, 300g each
Fillet of pork, whole Uncovered
Uncovered
cookware
1 6-8 95
1 4-6 85
cookware
Fillet of beef, 1kg Uncovered
1 4-6 85
cookware
Veal medallions,
4cm thick
Saddle of lamb,
boned, 200g each
1
Preheat the appliance.
Uncovered
cookware
Uncovered
cookware
1 4 80
1 4 85
Air Fry
Cook food with Air Fry until crispy and with little fat. Air
Fry is particularly suitable for meals that are normally
fried in oil.
Cooking tips for Air Fry
Observe this information when cooking food with Air
Fry.
¡ Only one level can be used when cooking with Air
Fry.
¡ The Air Fry accessory makes food crispier. If the Air-
Fry accessory is not included with the appliance as
standard, you can obtain the Air-Fry accessory as
an optional accessory.
¡ Do not preheat the oven.
¡ Do not use greaseproof paper. The air must circu-
late in the cooking compartment.
Heating
function
Temperature in °C
1
1
1
1
1
Steam
level
Cooking time
in mins
- 45-60
- 45-70
- 90-120
- 40-60
- 30-45
¡ Do not defrost frozen food.
¡ Cover the Air-Fry accessory or the universal pan
evenly with the food. If possible, only distribute the
food on the accessory in a single layer.
¡ Insert the accessory into the cooking compartment
at level 2. If you use the Air Fry accessory, you can
insert an empty universal pan at level 1 to protect
against dirt.
¡ Turn the food halfway through cooking. If you are
cooking larger quantities, turn the food twice.
Tip:Do not season the food until after you have
cooked it. This makes the food crispier.
Breaded vegetables are also suitable for cooking with
Air Fry. To save fat, use a sprayer to spray the coating
with oil. This forms a crispy crust with little fat.
Recommended settings for Air Fry
Food Accessory/cook-
ware
Height Heating
function
Temperature in°CSteam
level
Cooking time
in mins
Chips Universal pan 2 190-210 - 20-25
Potato pockets, filled Universal pan 2 190-210 - 20-25
Potato rösti Universal pan 2 190-210 - 20-25
Chicken goujons, nug-
Universal pan 2 190-210 - 10-15
gets, frozen
Fish fingers Universal pan 2 190-210 - 15-20
Broccoli, breaded Universal pan 2 190-210 - 15-25
Sterilisation and hygiene
You can sterilise heat-resistant cookware or baby
bottles that are in perfect condition. The process is
equivalent to normal sterilisation by boiling.
Sterilising bottles
1.
Clean the bottles with a bottle brush immediately
after use.
2.
Wash the bottles in the dishwasher.
3.
Place the bottles into the steaming tray (size XL) in
such a way that they do not touch one another.
4.
Start the "Sterilise" programme.
5.
Dry the bottles with a clean cloth.
6.
Wipe down the appliance interior after sterilising.
Useful information on sterilising
Please take note of the following information if you are
sterilising cookware.
¡ You can use your appliance to prepare jam jars or
preserving jars and their lids.
¡ You can perform an additional processing step at
the end in order to improve the jam's shelf life.
¡ Sterilise only heat-resistant cookware that is suitable
for cooking with steam.
¡ Only use clean jars and lids that are in perfect con-
dition.
¡ Ideally, you should wash the cookware in the dish-
washer before sterilising it.
42
Page 43
Recommended settings for hygiene
How it works en
Food Accessory/cook-
ware
Height Type of
heating
Temperature in°CSteam in-
tensity
Cooking time
in mins
→Page8
Sterilise clean cookware Perforated steam-
1 100 - 15-20
ing tray
3.
Proving dough
Yeast dough proves more quickly in your appliance
than at room temperature and does not dry out.
Requirement:The cooking compartment is cold.
1.
Slide the wire rack into the cooking compartment.
2.
Place the dough onto the wire rack in a bowl.
Do not cover the bowl.
Use the recommended settings when configuring
the appliance settings.
The values are guide values only. The temperature
and proving time are dependent on the type and
quantity of the ingredients.
4.
Do not open the appliance door while the dough is
proving, otherwise moisture will escape.
5.
Wipe the cooking compartment dry before baking in
it.
Recommended settings for proving dough
Food Accessory/cook-
ware
Rich dough, e.g. pan-
Bowl on wire rack 1 40-45 - 40-90
ettone
White bread Bowl on wire rack 1 35-40 - 30-40
Height Heating
function
Temperature in°CSteam
level
Cooking time
in mins
Reheating
Gently warm up food with added steam. The food
tastes and looks as though it has been freshly cooked.
You can even warm and crisp up baked goods from
the day before.
Tips for reheating food
¡ Use uncovered, heat-resistant cookware that is suit-
able for cooking with steam.
¡ Use wide, shallow cookware. Cold cookware ex-
¡ Place the cookware on the wire rack.
¡ Place food that you are not reheating in cookware
(e.g. bread rolls) directly onto the wire rack at
level1.
¡ Do not cover the food.
¡ Do not open the cooking compartment door while
the food is being reheated, otherwise large amounts
of steam will escape.
¡ Wipe the cooking compartment and dry the con-
densate drip tray after using it to reheat food.
tends the reheating time.
Recommended settings for heating and reheating
Food Accessory/cook-
ware
Plated meal, chilled,
1portion
Uncovered cookware
Height Heating
Temperature in°CSteam
function
1 120-130 - 15-25
Pizza, cooked, chilled Wire rack 1 170-180
Bread rolls, baguette,
Wire rack 1 150-160
baked
Pizza, cooked, frozen Wire rack 1 170-180
Bread rolls, baguette,
Wire rack 1 160-170
baked, frozen
1
Preheat the appliance.
Cooking time
level
1
1
1
1
- 5-15
- 10-20
- 5-15
- 10-20
in mins
Keeping food warm
Tips for keeping food warm
¡ Using the "Keep warm" heating function prevents
condensation from forming. You will not have to
wipe down the cooking compartment.
¡ Do not cover the food.
¡ Do not keep food warming for longer than 2 hours.
¡ Be aware that some types of food will actually con-
tinue cooking when you are keeping them warm in
the oven.
The different added steam levels are suitable for
keeping the following foods warm:
¡ Level 1: Joints and briefly roasted food
¡ Level 2: Bakes and side dishes
¡ Level 3: Stews and soups
43
Page 44
en How it works
28.8 Test dishes
The information in this section is provided for test institutes to facilitate testing of the appliance in accordance with
EN 60350‑1.
Baking
¡ The setting values apply to food that is placed into a
cold cooking compartment.
¡ Take note of the information on preheating in the re-
commended settings tables. These setting values
apply without rapid heat-up.
¡ For baking, use the lower of the temperatures indic-
ated first.
¡ Items that are placed in the appliance on baking
trays or in baking tins/dishes at the same time will
not necessarily be ready at the same time.
Recommended settings for baking
¡ Shelf positions when baking on 2levels:
– Universal pan: Shelf position3
Baking tray: Shelf position1
¡ Hot water sponge cake
– When baking on 2levels, place the springform
tins at diagonally opposite corners of the wire
racks.
– As an alternative to a pan support, you can also
use the Air Fry baking tray offered by us.
Food Accessory/cook-
ware
Height Type of
heating
Temperature in°CSteam in-
→Page8
Shortbread Baking tray 1 150-160
Shortbread Baking tray 1 140-150
Shortbread, 2 levels Universal pan
3+1 140-150
+
Baking tray
Small cakes Baking tray 1 160
Small cakes Baking tray 1 150
Small cakes, 2 levels Universal pan
3+1 150
1
1
1
+
Baking tray
Hot water sponge cake Springform cake
1 160-170
tin, diameter 26 cm
Hot water sponge cake Springform cake
1 160-170
tin, diameter 26 cm
Hot water sponge cake Springform cake
tin, diameter 26 cm
1
Preheat the appliance for five minutes. Do not use the rapid heating function.
2
Preheat the appliance. Do not use the rapid heating function.
Steaming
Slide the universal pan into the cooking compartment
below the perforated steaming tray (sizeXL) if instructed to do so in the recommended settings table.
Shelf positions
1 1. 150-160
2. 150-160
¡ Perforated steaming tray, sizeXL: Shelf position2
Shelf positions when steaming on two levels:
¡ Use a maximum of 1.8kg per level.
¡ Perforated steaming tray, sizeXL: Shelf position3
¡ Perforated steaming tray, sizeXL: Shelf position2
Shelf positions when steaming on one level:
¡ Use a maximum of 2.5kg.
Cooking time
tensity
1
1
1
- 25-40
- 25-40
- 30-40
in mins
- 25-35
- 25-35
- 25-35
2
2
2
- 25-35
- 25-35
1
Off
1. 10
2. 20-30
44
Page 45
Recommended settings for steaming
Installation instructions en
Food Accessory/cook-
ware
Peas, frozen, two containers
Broccoli, fresh, 300g Steam containers,
Broccoli, fresh, one container
1
The test is over when 85 °C is reached at the coldest spot (see IEC 60350-1).
2
Preheat the appliance.
3
A comparable degree of cooking between the reference sample and the main sample is achieved if the reference
sample is cooked for 5 minutes (produced as described in IEC 60350-1).
x 2
Steam containers,
XL size
+
Universal pan
XL size
Steam containers,
XL size
Height Type of
heating
→Page8
3+2+1 100 - -
2 100
2 100
Temperature in°CSteam in-
tensity
2
2
- 8-9
- 10-11
Cooking time
in mins
1
Grilling
Recommended settings for grilling
Food Accessory/cook-
ware
Toasting bread Wire rack 3 3
1
Do not preheat the appliance.
Height Type of
heating
→Page8
Temperature in
°C/grill setting
1
Steam intensity
- 3-6
Cooking time
in mins
3
3
29 Installation instructions
29.1 General installation instructions
Follow these instructions before you start installing the appliance.
¡ The safe operation of this appliance can
only be guaranteed if it has been installed
to a professional standard in accordance
with these installation instructions. The installer shall be liable for damages incurred
as a result of incorrect installation.
¡ Check the appliance for damage after un-
packing it. Do not connect the appliance if
it has been damaged in transit.
¡ Before starting up the appliance, remove
any packaging material and adhesive film
from the cooking compartment and the
door.
¡ Proceed in accordance with the installation
sheets for installing accessories.
¡ Fitted units must be heat-resistant up to
95°C, and adjacent unit fronts up to
70°C.
¡ Do not install the appliance behind a decor-
ative door or the door of a kitchen unit.
There is a risk of overheating.
¡ Cut-out work on the units should be carried
out before installing the appliance. Remove
any shavings. Otherwise, the correct operation of electrical components may be adversely affected.
¡ The mains socket for the appliance must
either be located in the hatched area
or
outside of the area where the appliance is
installed.
Any unsecured units must be secured to
the wall using a standard bracket
.
45
Page 46
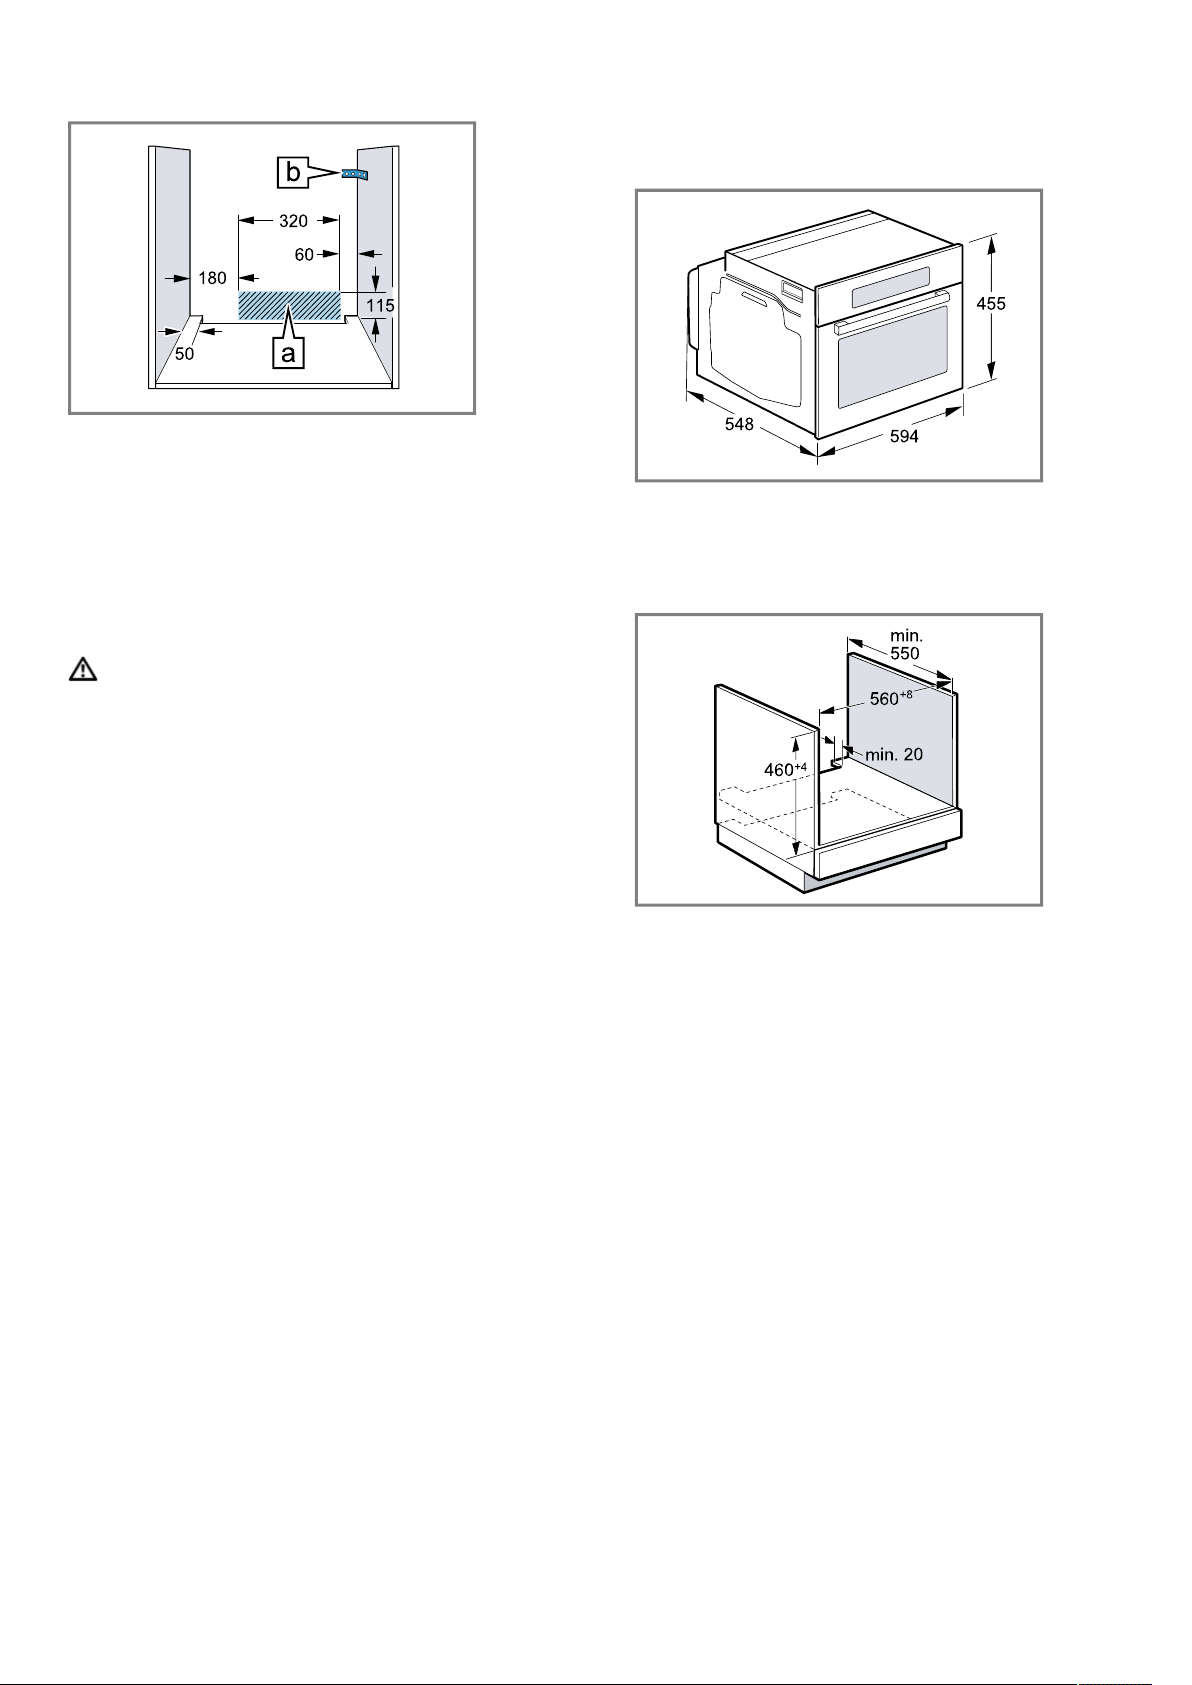
en Installation instructions
¡ For appliances that have a hinged switch
panel, make sure that the switch panel
does not hit adjacent kitchen units when
you open it.
¡ Wear protective gloves so that you do not
cut yourself. Parts that are accessible during installation may have sharp edges.
¡ Dimensions of the figures in mm.
29.2 Appliance dimensions
You will find the dimensions of the appliance here
29.3 Installation below a worktop
Observe the installation dimensions and the installation
instructions when installing below a worktop.
WARNING‒Risk of fire!
It is dangerous to use an extended power
cord and non-approved adapters.
▶ Do not use multiple socket strips.
▶ Only use extension cables that are certified,
have a minimum cross section of 1.5mm²
and comply with the applicable national
safety requirements.
▶ If the power cord is too short, contact cus-
tomer service.
▶ Only use adapters and power cords ap-
proved by the manufacturer.
ATTENTION!
Carrying the appliance by the door handle
could break it. The door handle cannot support the weight of the appliance.
▶ Do not carry or hold the appliance by the
door handle.
¡ To ventilate the appliance, the intermediate floor
must have a ventilation cut-out.
¡ The worktop must be secured to the fitted unit.
¡ Observe any available installation instructions for the
hob.
¡ Observe different national installation instructions for
the hob.
46
Page 47
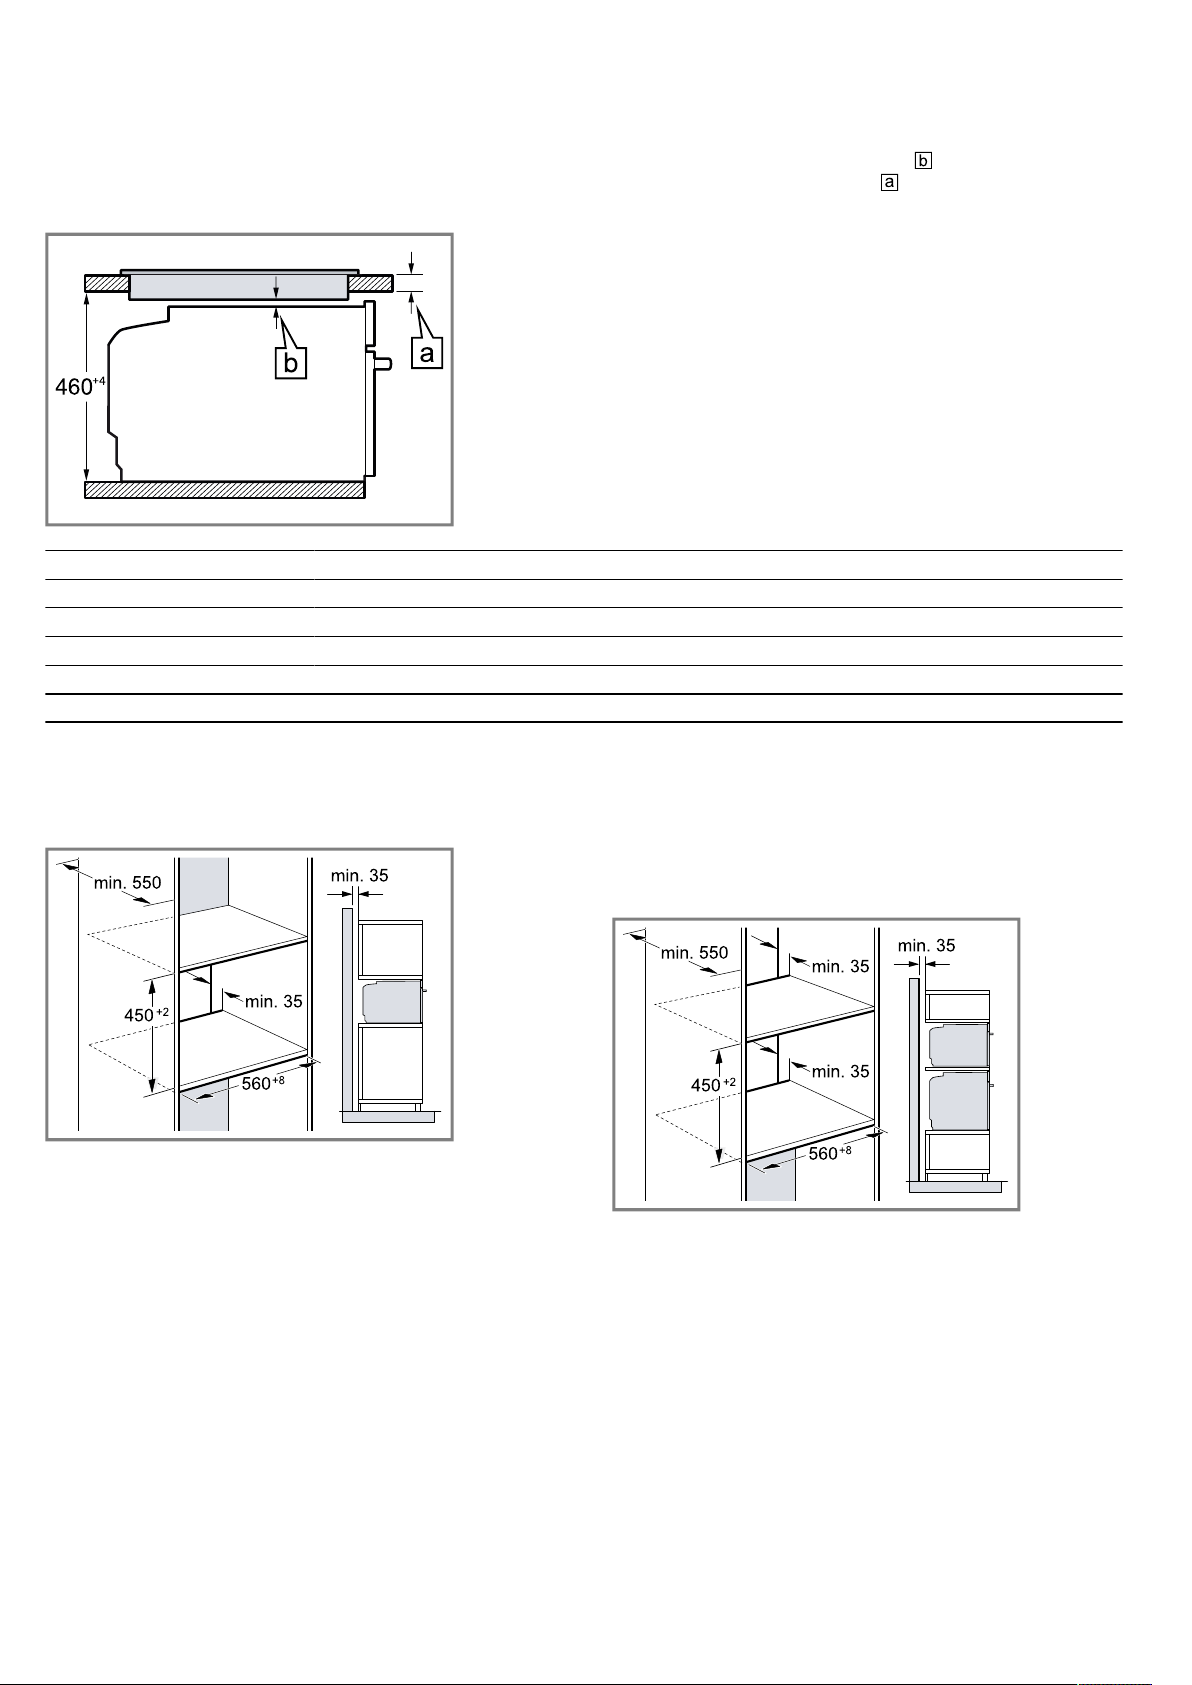
Installation instructions en
29.4 Installation underneath a hob
If the appliance is installed under a hob, the following
minimum dimensions must be adhered to (including
substructure, if applicable).
Hob type a raised in mm a flush in mm b in mm
Induction hob 42 43 5
Full-surface induction hob 52 53 5
Gas hob 32 43 5
Electric hob 32 35 2
1
Observe different national installation instructions for the hob.
The minimum worktop thickness a is based on the
required minimum clearance .
1
29.5 Installation in a tall unit
Observe the installation dimensions and the installation
instructions when installing in a tall unit.
¡ To ventilate the appliance, the intermediate floors
must have a ventilation cut-out.
¡ If the tall unit has another back panel in addition to
the element back panels, this must be removed.
¡ Only fit the appliance up to a height which allows
accessories to be easily removed.
29.6 Installing two appliances on top of each other
Your appliance can also be installed above or below
another appliance. Observe the installation dimensions
and the installation instructions when installing appliances on top of each other.
¡ To ventilate the appliances, the intermediate floor
must have a ventilation cut-out.
¡ To ensure sufficient ventilation of the two appli-
ances, there must be a ventilation opening of at
least 200cm² in the base area. To do this, trim the
base panel or fit a ventilation grille.
47
Page 48
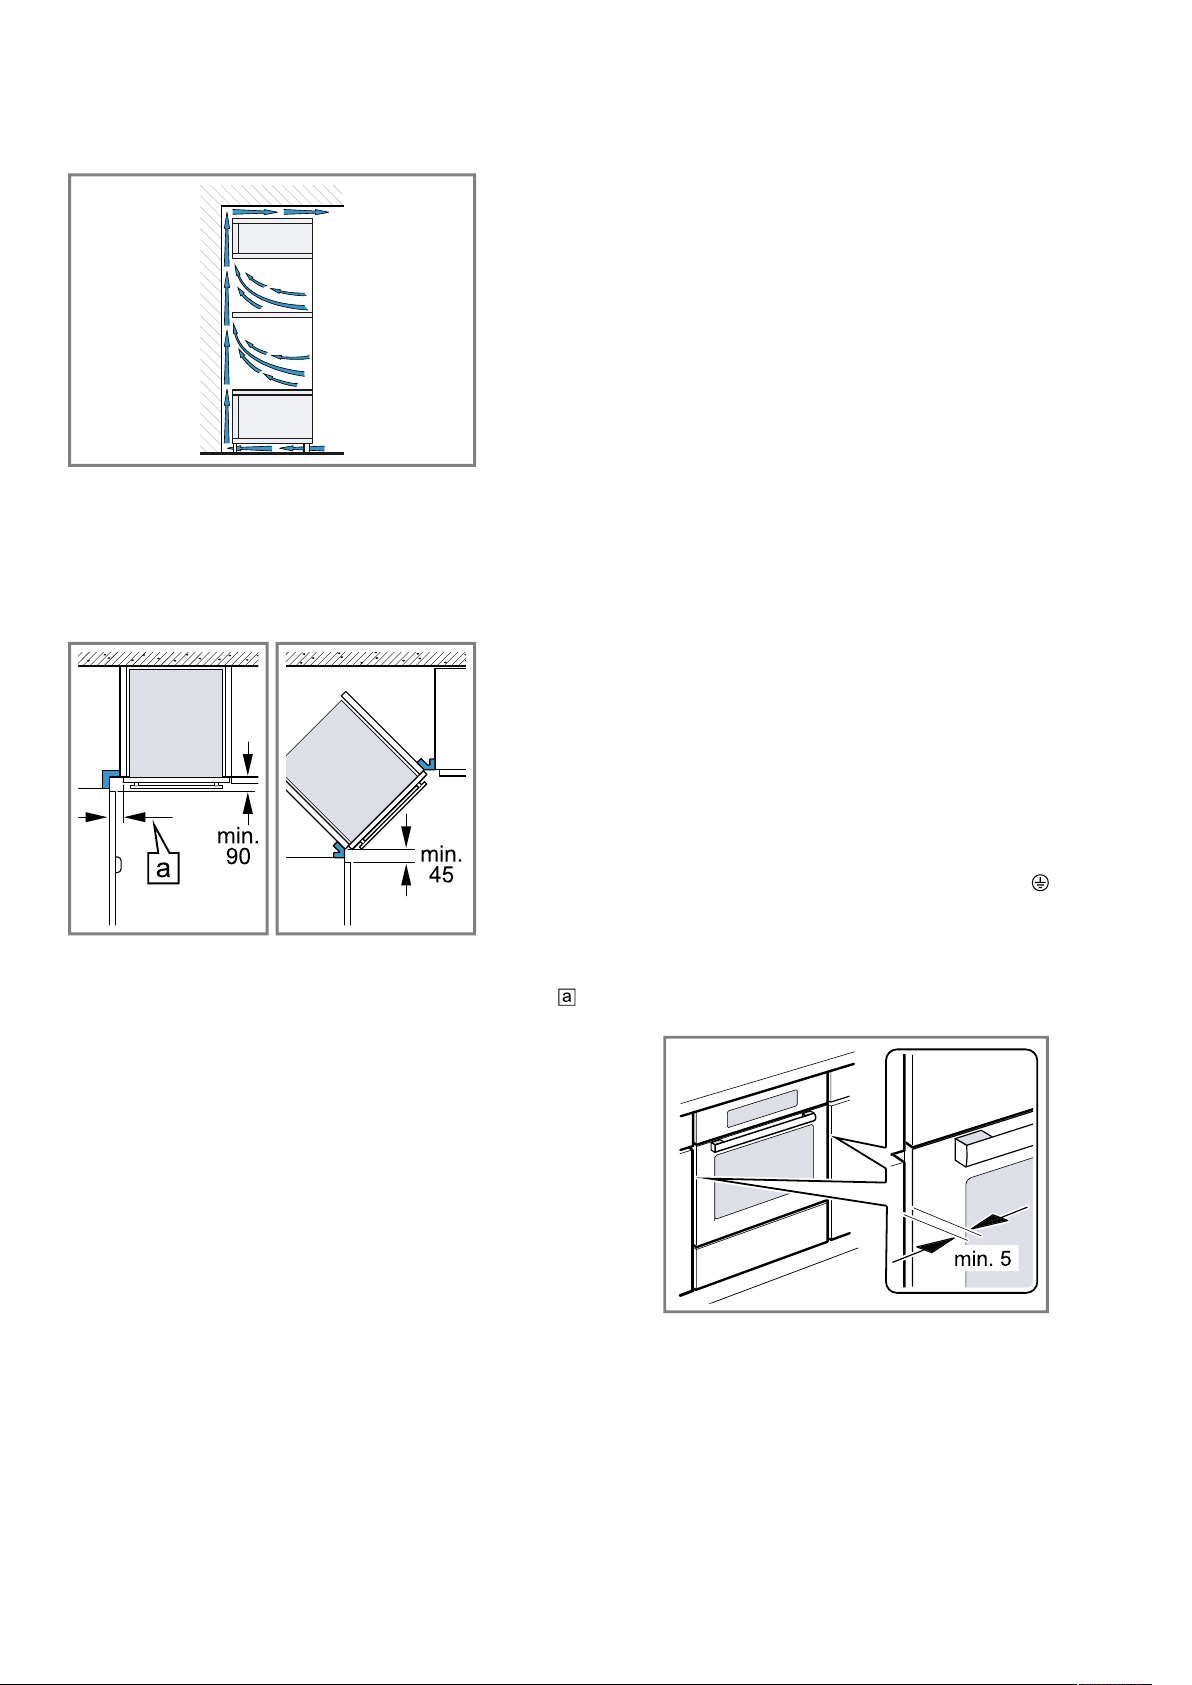
en Installation instructions
¡ Ensure that air exchange is guaranteed in accord-
ance with the diagram.
¡ Only fit appliances up to a height that allows ac-
cessories to be easily removed.
29.7 Corner installation
Observe the installation dimensions and the installation
instructions when installing in a corner.
¡ To ensure that the appliance door can be opened,
you must take the minimum dimensions into consideration when installing in a corner. The dimension
is dependent on the thickness of the unit front and
the handle.
¡ Contact protection must be guaranteed by the in-
stallation.
¡ If the display on the appliance remains dark, it has
not been connected correctly. Disconnect the appliance from the mains and check the connection.
Electrically connect the appliance with the protective contact plug
Note:The appliance must only be connected to a pro-
tective contact socket that has been correctly installed.
▶
Insert the plug into the protective contact socket.
When the appliance is installed, the mains plug of
the power cord must be freely accessible. If free access is not possible, an isolating switch must be integrated into the permanent electrical installation according to the installation regulations.
Electrically connecting an appliance without a protective contact plug
Note:Only licensed specialists may connect the appli-
ance. Damage caused by incorrect connection is not
covered under the warranty.
An isolating switch must be integrated into the permanent electrical installation according to the installation
regulations.
1.
Identify the phase and neutral conductors in the
socket.
The appliance may be damaged if it is not connected correctly.
2.
Connect the hob in accordance with the connection
diagram.
See the rating plate for the voltage.
3.
Connect the wires of the mains power cable according to the colour coding:
‒ Green/yellow = Protective conductor
‒ Blue = Neutral conductor
‒ Brown = Phase (external conductor)
29.9 Installing the appliance
1.
Slide the appliance in fully and centre it.
29.8 Electrical connection
In order to safely connect the appliance to the electrical system, follow these instructions.
¡ The appliance corresponds to protection class I and
must only be operated with a protective earth connection.
¡ The fuse protection must correspond to the power
rating specified on the appliance's rating plate and
to the local regulations.
¡ The appliance must be disconnected from the
power supply whenever installation work is being
carried out.
¡ The appliance must only be connected using the
power cable provided.
¡ The power cable must be plugged in at the rear of
the appliance until you hear a clicking sound. A 3 m
power cable can be obtained from the after-sales
service.
¡ The power cable must only be replaced with a cable
from the original manufacturer. This is available from
after-sales service.
48
Page 49
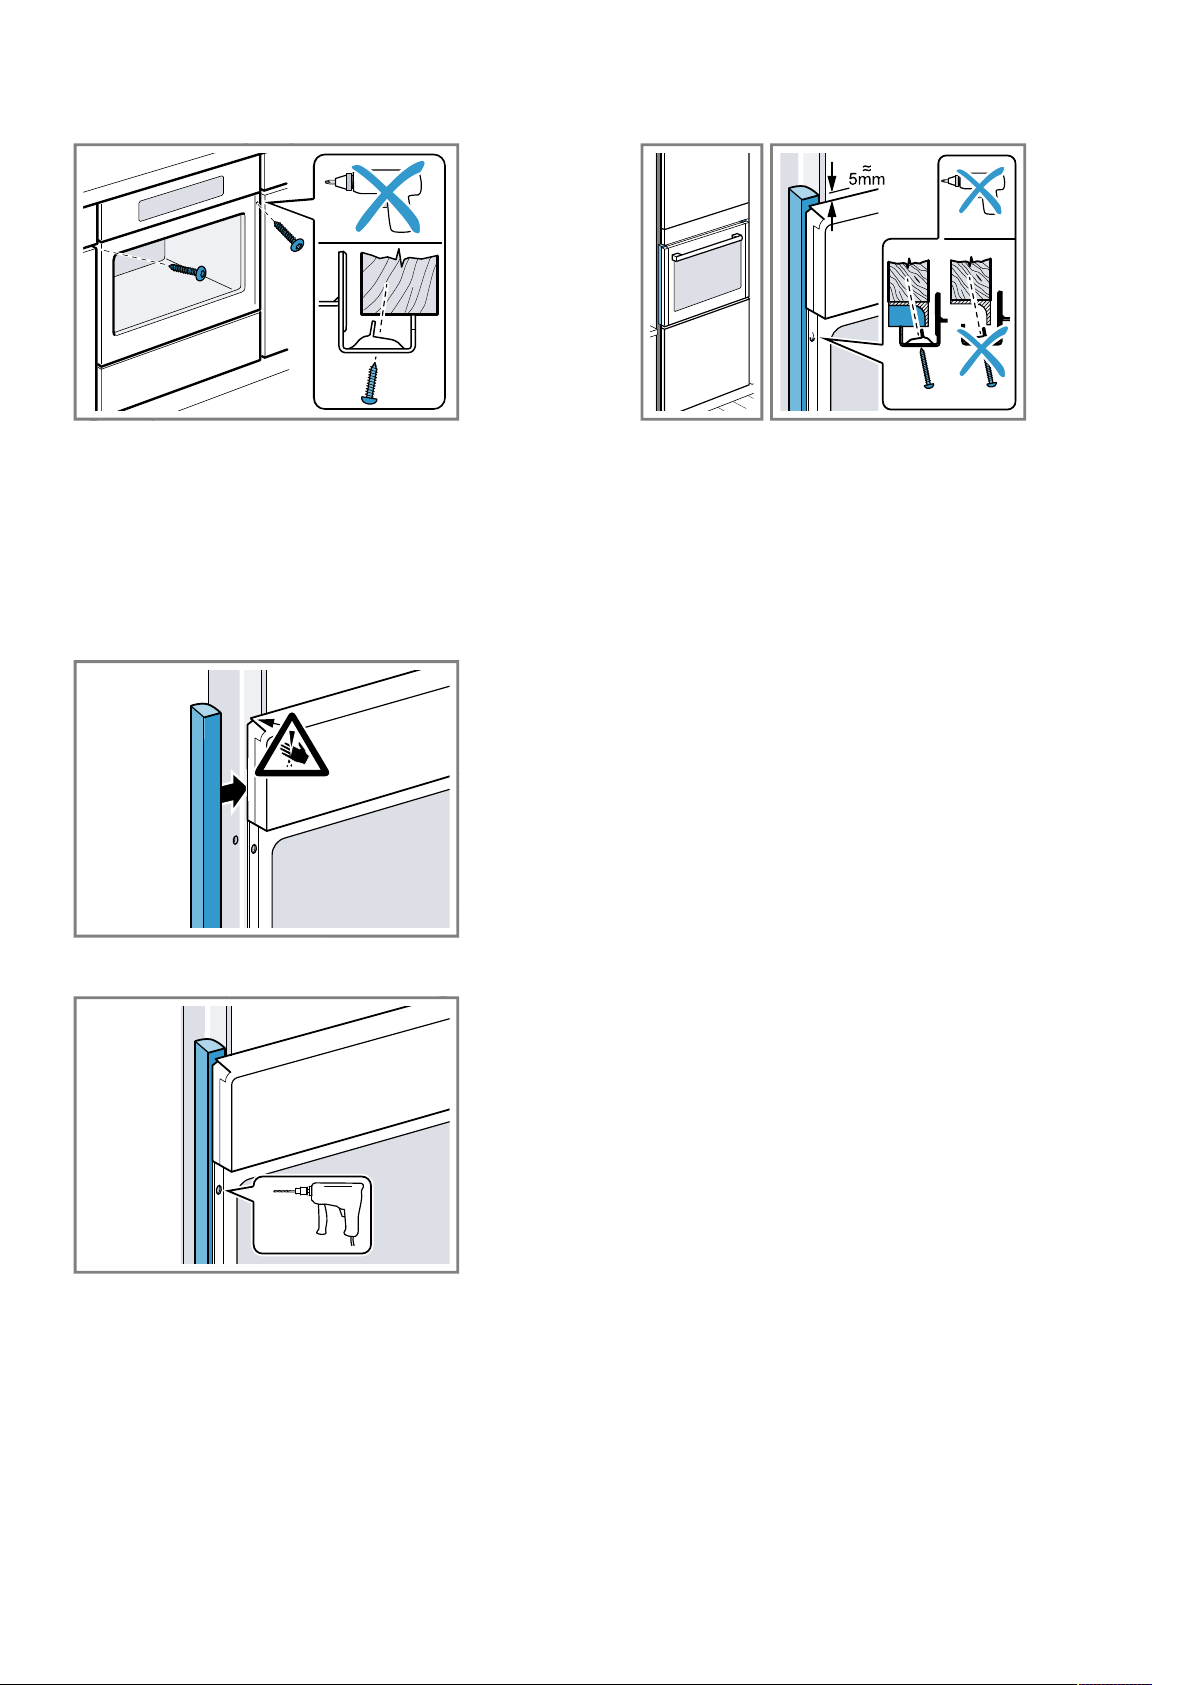
Installation instructions en
2.
Screw the appliance into place.
Note:The gap between the worktop and the appliance
must not be closed by additional battens.
Thermal insulation strips must not be fitted to the side
panels of the surround unit.
29.10 For handleless kitchens with vertical bar handle strips:
1.
Attach a suitable filling piece in order to cover any
sharp edges and to guarantee a safe installation.
3.
Secure the appliance using a suitable screw.
29.11 Removing the appliance
1.
Disconnect the appliance from the power supply.
2.
Undo the fastening screws.
3.
Lift the appliance slightly and pull it out completely.
2.
Pre-drill aluminium profiles to establish a screw connection.
49
Page 50

Page 51

Page 52
Thank you for buying a
Bosch Home Appliance!
Register your new device on MyBosch now and profit directly from:
• Expert tips & tricks for your appliance
• Warranty extension options
• Discounts for accessories & spare-parts
• Digital manual and all appliance data at hand
• Easy access to Bosch Home Appliances Service
Free and easy registration – also on mobile phones:
www.bosch-home.com/welcome
Looking for help?
You'll find it here.
Expert advice for your Bosch home appliances, help with problems
or a repair from Bosch experts.
Find out everything about the many ways Bosch can support you:
www.bosch-home.com/service
Contact data of all countries are listed in the attached service directory.
BSH Hausgeräte GmbH
Carl-Wery-Straße 34
81739 München, GERMANY
www.bosch-home.com
Valid within Great Britain:
A Bosch Company
*9001682500*
9001682500 (030411)
en
Imported to Great Britain by
BSH Home Appliances Ltd.
Grand Union House
Old Wolverton Road
Wolverton, Milton Keynes
MK12 5PT
United Kingdom
 Loading...