

Page 1
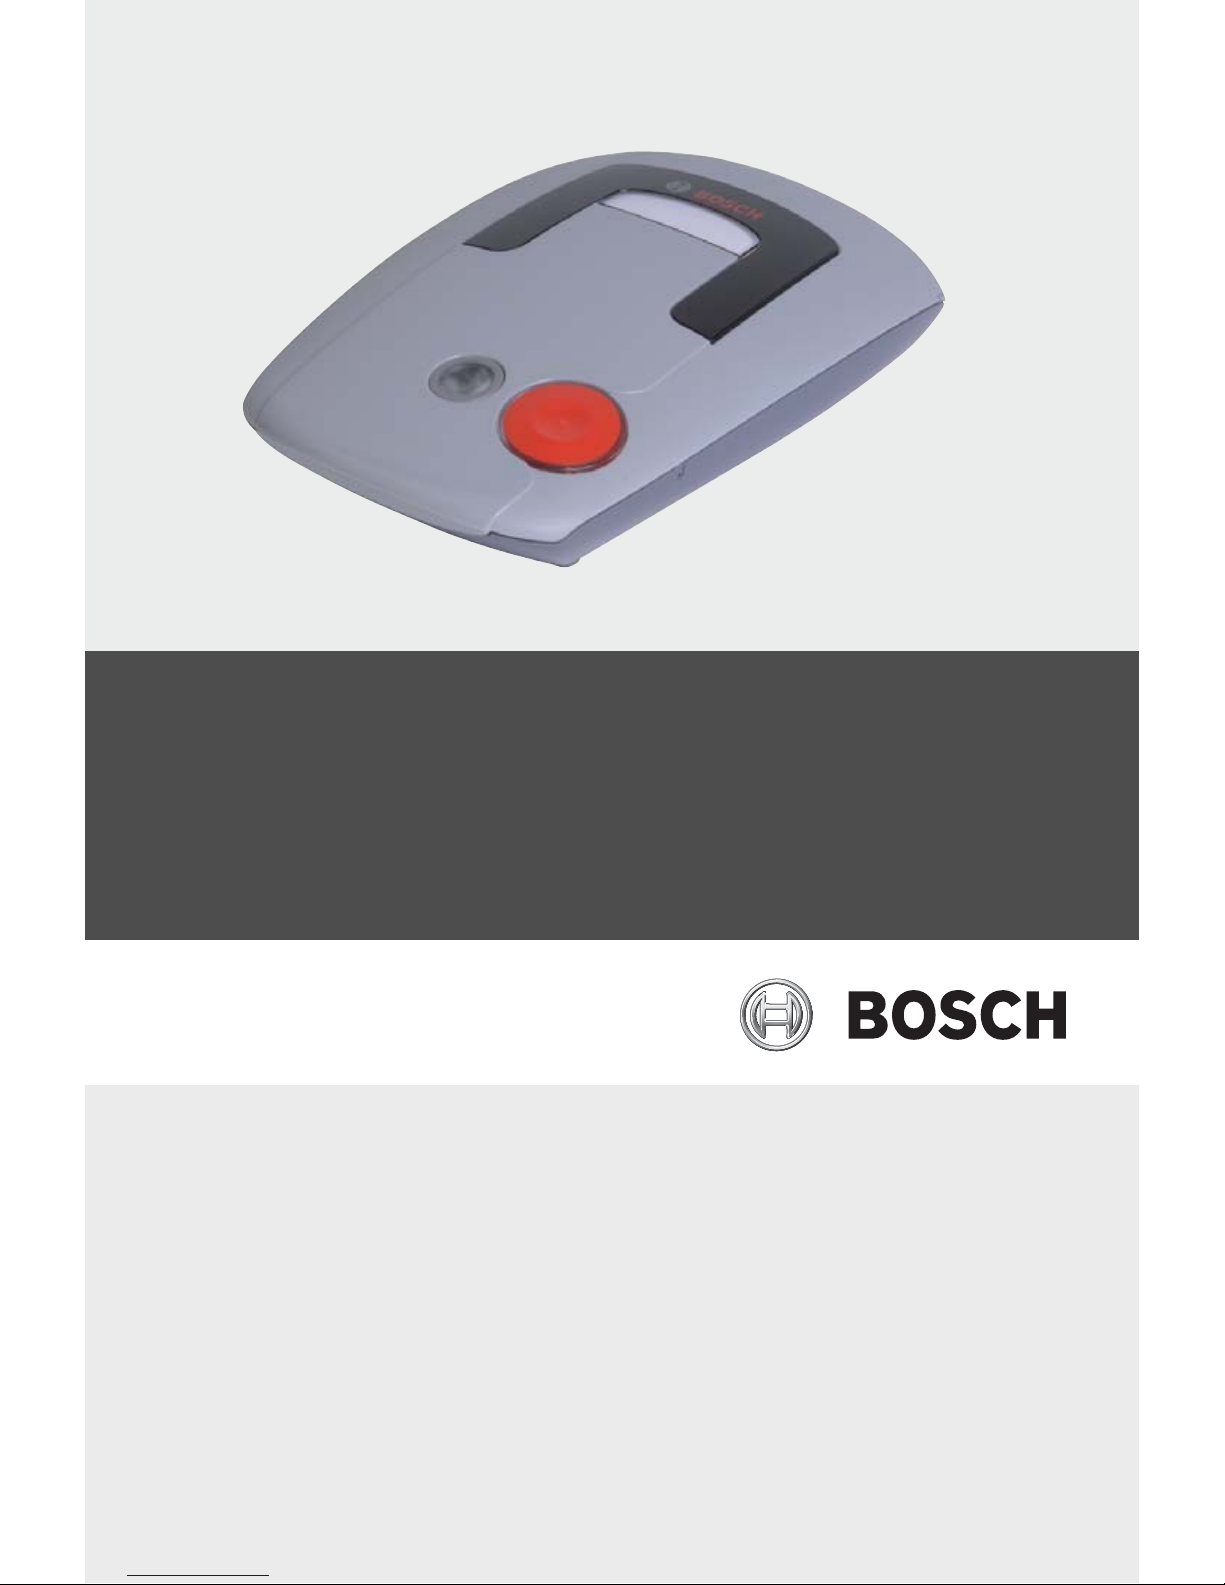
Carephone 50
ISA-50-MS
en User and Programming Manual
Page 2

Page 3

Carephone 50 Table of Contents | en 3
Bosch Security Systems User Manual ISA-50-MS V2 I 2008.02
Table of Contents
1Safety Notes 5
2Features 6
3 Scope of Delivery 7
4 Unit Description 8
5 Functions 8
5.1 Emergency Call Button 8
5.2 S Button 9
5.3 RF Transmitter 10
6 Taking Phone Calls 11
7 Emergency Call to a Call Centre 12
8 Emergency Call to a Private Phone 12
9 Cleaning 14
10 Device Acknowledgements 15
10.1 Light Signals 15
10.2 Voice Messages of the HTS50 16
11 Installation 18
11.1 Placing the HTS50 18
11.2 Connecting the HTS50 20
11.3 Connection Configuration 22
11.4 De-installation 23
Page 4

4 en | Table of Contents Carephone 50
ISA-50-MS V2 I 2008.02 User Manual Bosch Security Systems
12 Programming 24
12.1 Programming Methods 24
12.2 Programming in Steps 25
12.3 Opening the Unit 26
12.4 Key Functions During Programming 26
12.5 Programming Procedure 27
12.6 The Main Programming Steps 28
12.7 Resetting the HTS50 to its factory defaults 36
13 Maintenance 36
14 Conformity 36
15 Replacing the Backup Battery 37
16 Battery Disposal 38
17 Technical Specifications 39
18 Appendix 41
18.1 Drilling Template 41
18.2 Programming Tables 42
Page 5

Carephone 50 Safety Notes | en 5
Bosch Security Systems User Manual ISA-50-MS V2 I 2008.02
1Safety Notes
X Choose a non-slip surface on which to install the
Carephone 50 (HTS50).
X Do not install the unit near a central heating radiator. Do
not expose the unit to direct sunlight.
X Do not attempt to open the unit or the power adapter. For
repairs, contact your Bosch dealer.
X When unplugging the unit from the power outlet, never pull
on the power cord but always grip the power adapter.
X Never touch the power adapter with wet hands.
X The backup battery has a limited operating life and should
be replaced after approximately 3 years. Use original parts
only.
X Electrolytes or gases may be emitted from the battery
should it leak under exceptional circumstances. If this
happens, deactivate the unit by isolating it from the phone
network and power supply. Battery replacement must be
carried out by trained service personnel only.
X The manufacturer can accept no liability for damage
resulting from the improper use of the unit.
X Do not install any DECT telephones in the immediate
vicinity of the HTS50.
!
CAUTION! Read through the user manual carefully before using
the unit for the first time. It contains important information
about the connection, use and safety of the unit.
Page 6

6 en | Features Carephone 50
ISA-50-MS V2 I 2008.02 User Manual Bosch Security Systems
2 Features
The Carephone HTS50 is used to transmit emergency calls over
the telephone network.
The person requiring emergency assistance activates a call by
pressing a button on the HTS50 or by using an RF transmitter.
This action establishes a telephone connection between the
person requiring assistance and the emergency call recipient,
enabling information to be exchanged and emergency
assistance measures to be initiated.
In addition, the HTS50 can be used to report an emergency
(when used in conjunction with a fire detector, for example).
The device has two basic operating modes:
1. The HTS50 forms part of a social alarm system that
consists of a call centre that can be reached at any time
using the Carephone. Emergency calls are sent to this call
centre.
2. The unit is operated as an individual phone. Emergency
calls are sent to private phones.
The HTS50 can be connected to up to 10 RF detectors.
The unit can also be programmed to initiate service calls
(e.g. "meals on wheels") at the touch of a button.
Page 7
Carephone 50 Scope of Delivery | en 7
Bosch Security Systems User Manual ISA-50-MS V2 I 2008.02
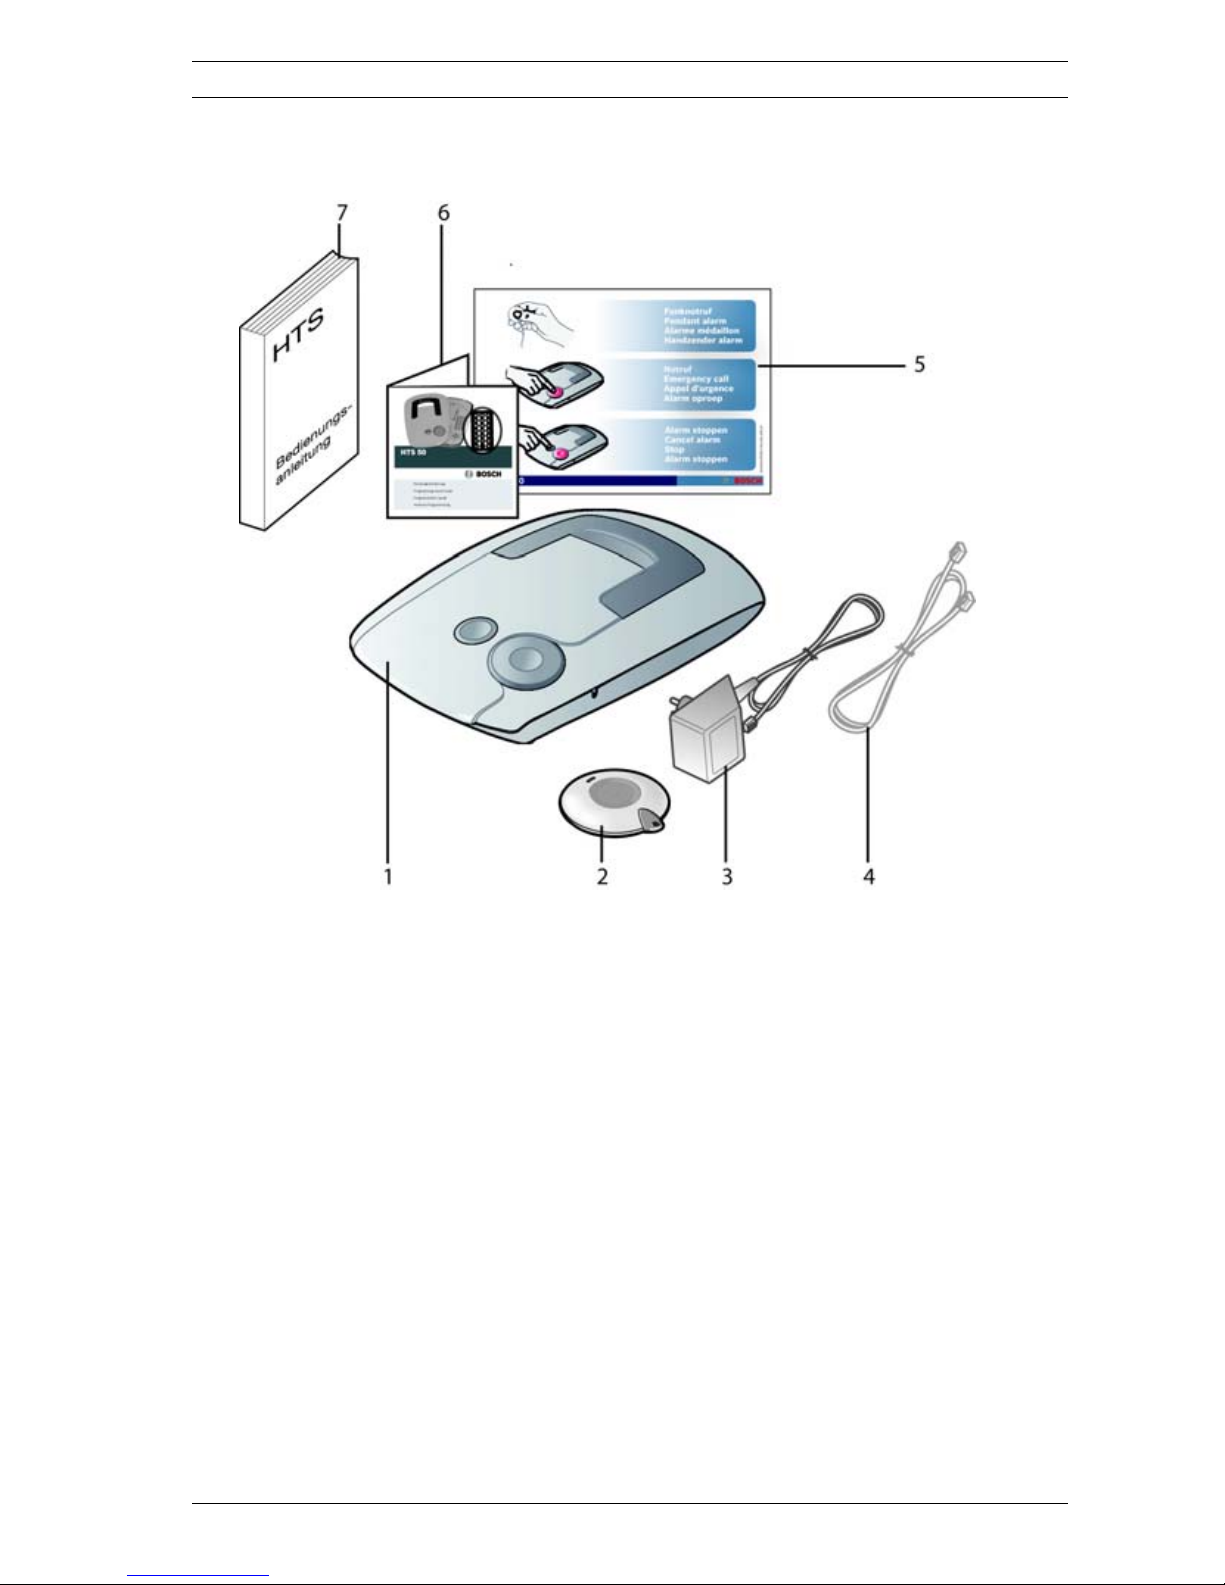
3 Scope of Delivery
1. HTS50
2. RF transmitter
3. Power adapter
4. Telephone cord
5. Getting started guide
6. Quick programming guide
7. User and programming manual
Page 8
8 en | Unit Description Carephone 50
ISA-50-MS V2 I 2008.02 User Manual Bosch Security Systems
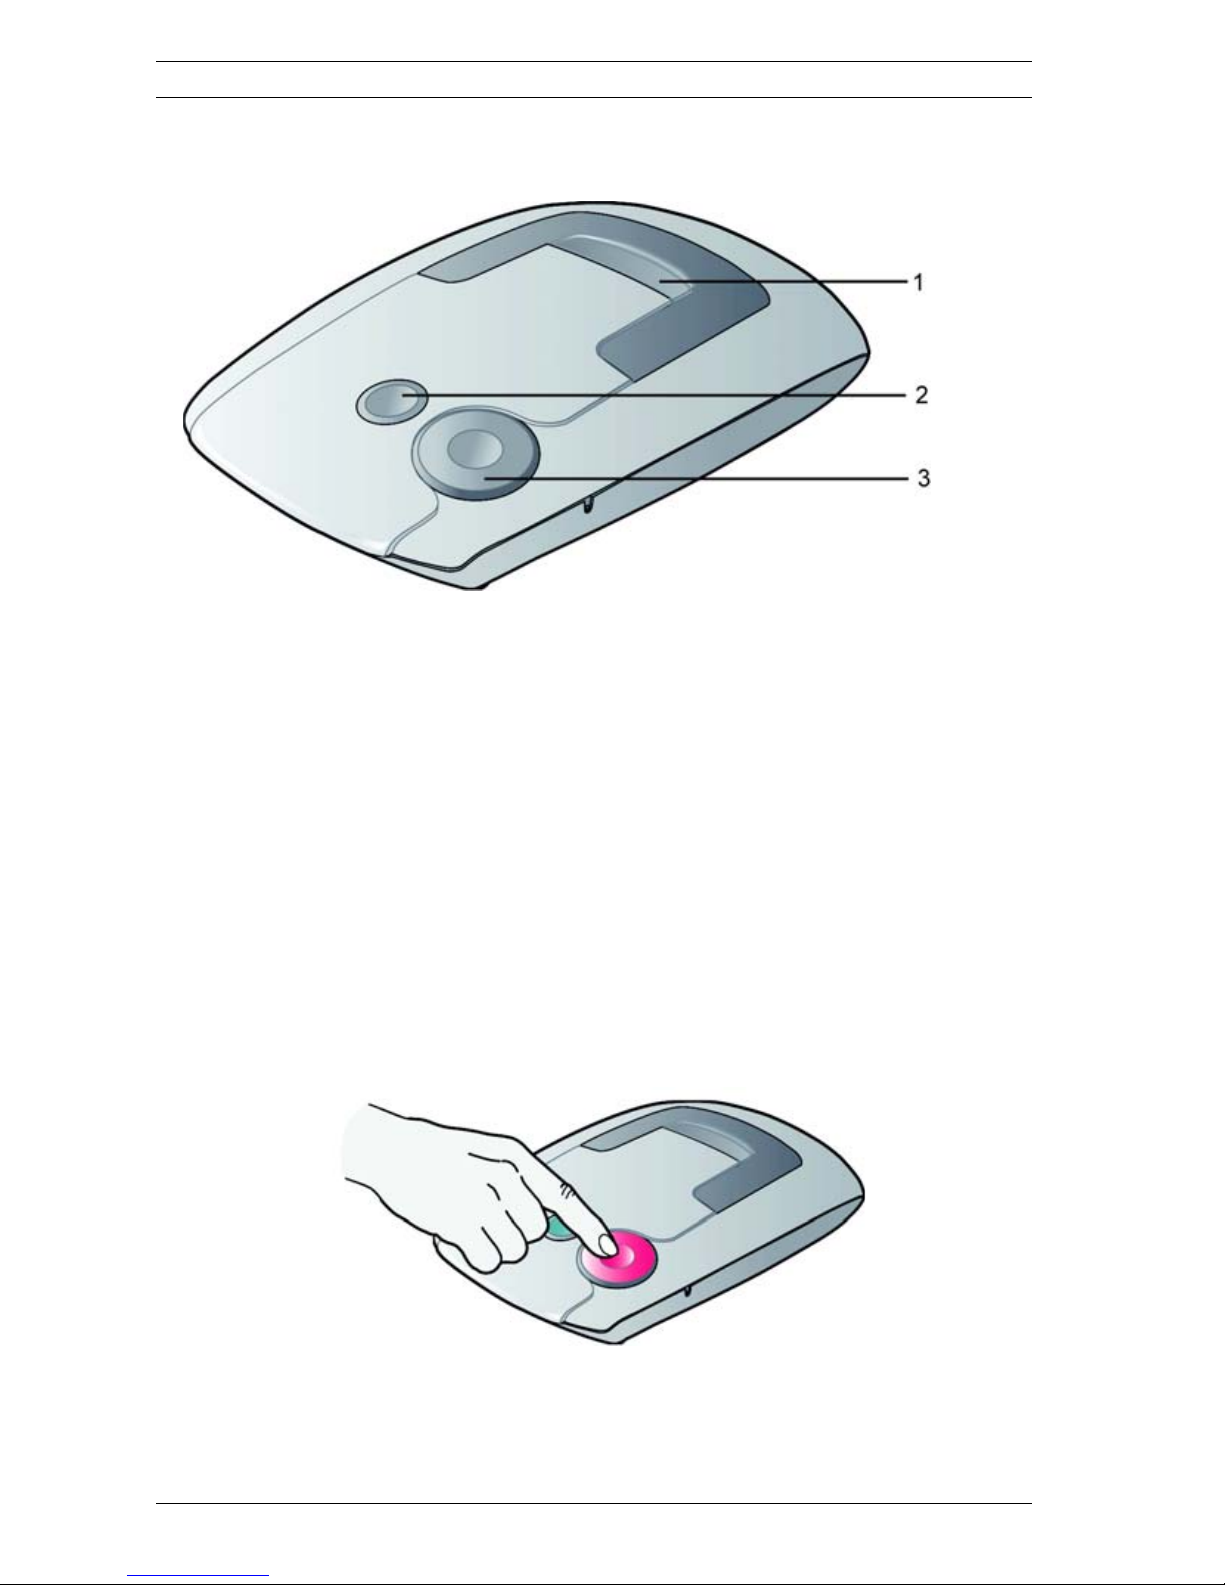
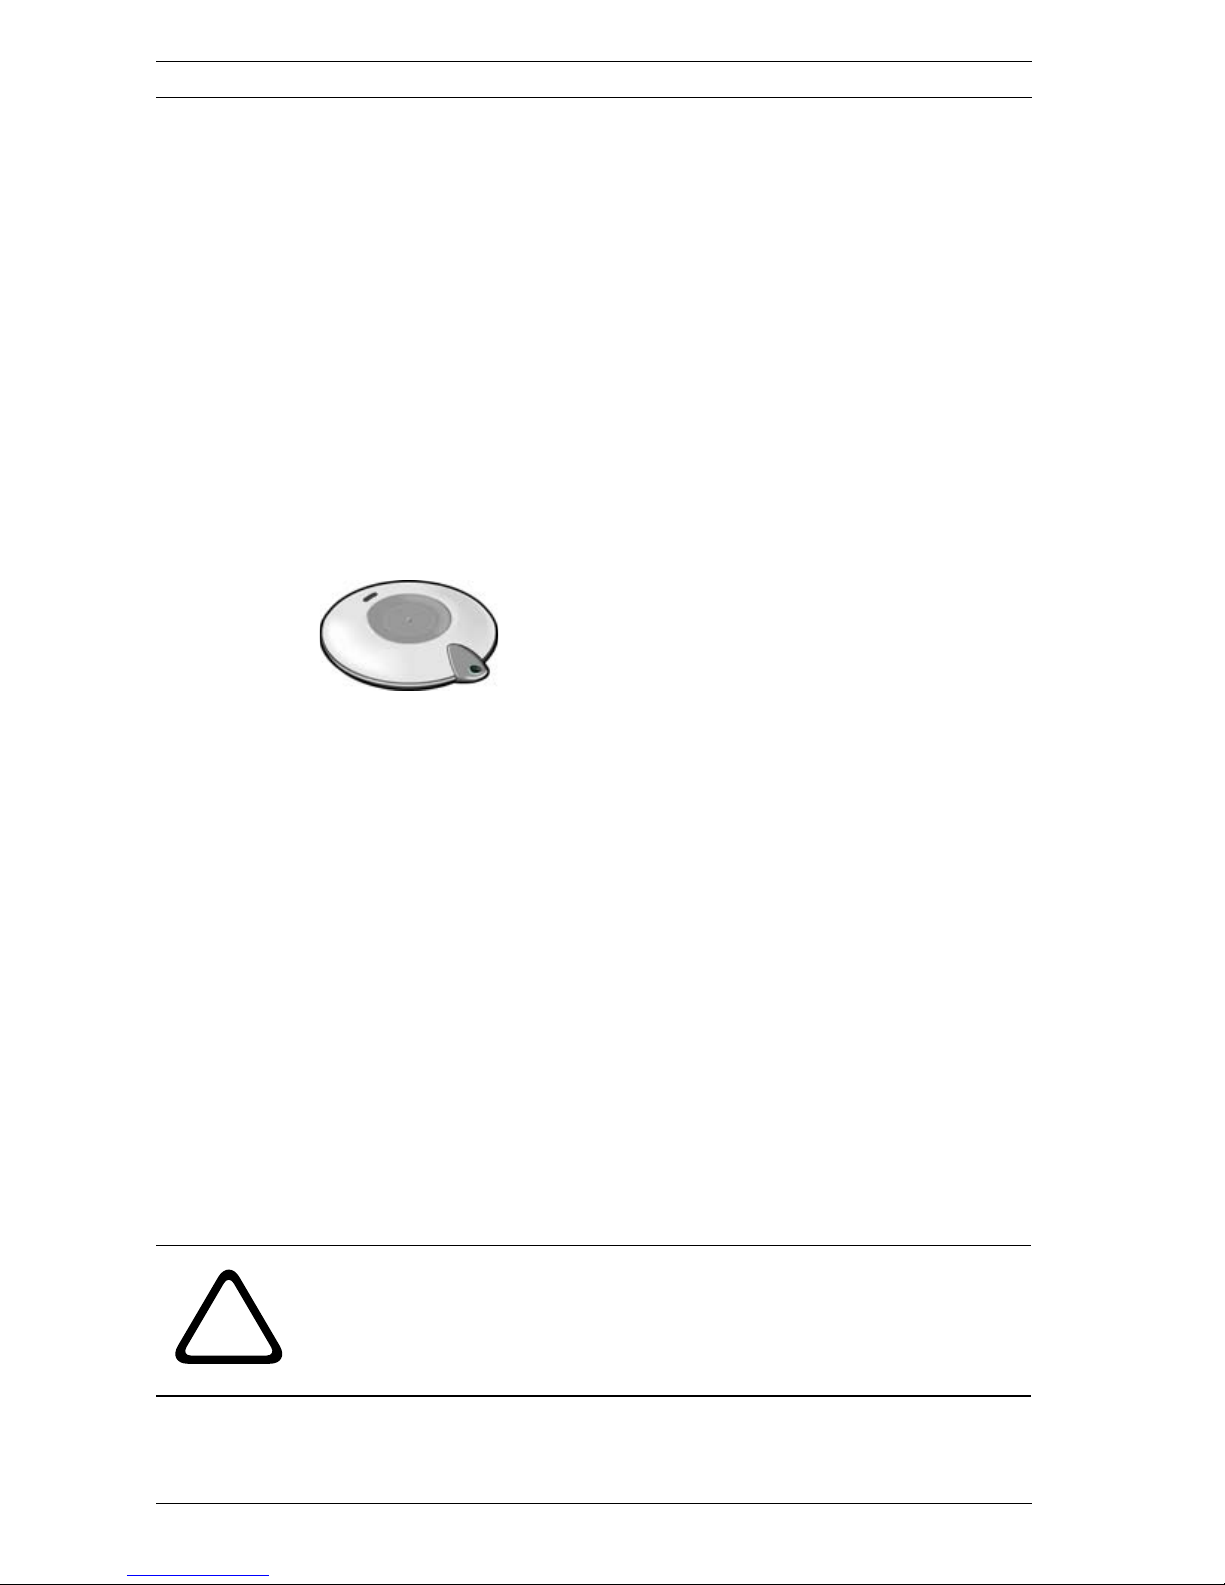
4 Unit Description
1. Window
2. Grey S button
3. Red emergency call button
5Functions
5.1 Emergency Call Button
The emergency call button on the HTS50 is used to initiate an
emergency call. If you require help,
X press the emergency call button.
The call will be answered either by a person at the social alarm
monitoring centre or the private individual who takes the
emergency call.
Page 9
Carephone 50 Functions | en 9
Bosch Security Systems User Manual ISA-50-MS V2 I 2008.02
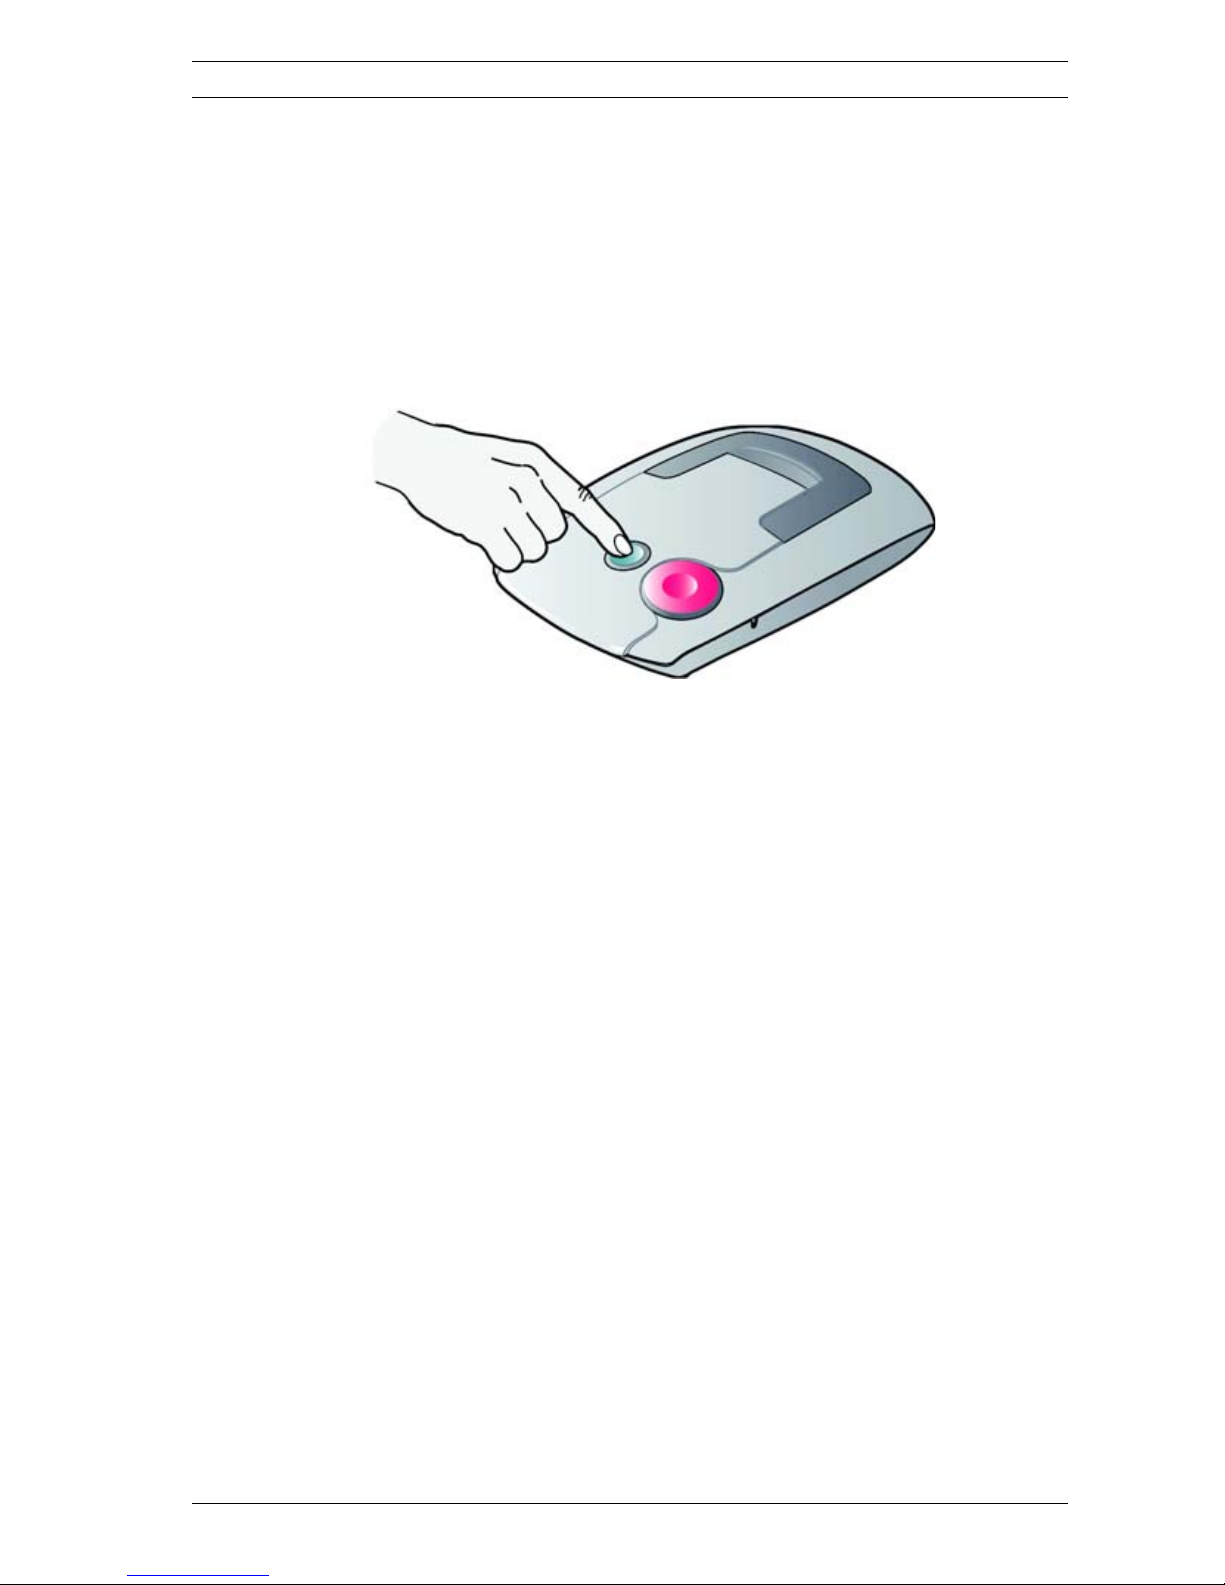
5.2 S Button
Cancel emergency call
You can use the grey S button to cancel an emergency call,
e.g. if you have pressed the emergency call button by mistake.
To cancel an emergency call,
X press the S button until the unit announces stop.
To stop false alarms and emergency calls being made by
mistake, the HTS50 has a pre-alarm.
The pre-alarm is the waiting time which elapses after the alarm
button is pressed and during which the alarm is transmitted.
The time in which the pre-alarm can be cancelled (pre-alarm
time) can be programmed to suit your individual requirements.
The emergency call cannot be cancelled once the pre-alarm
time has expired.
Service call
The S button can also be programmed as a service button.
If you press the button and hold it (for at least 2 seconds), the
unit dials a call number that has been programmed for the
service call, e.g. "meals on wheels".
When this function is activated,
X press the S button until you hear the announcement
service call.
The service call number is dialled.
Page 10
10 en | Functions Carephone 50
ISA-50-MS V2 I 2008.02 User Manual Bosch Security Systems
Unit status
The S button lights up if there is a fault. To check the unit's
status,
X press the S button for at least 2 seconds.
The unit's status is announced.
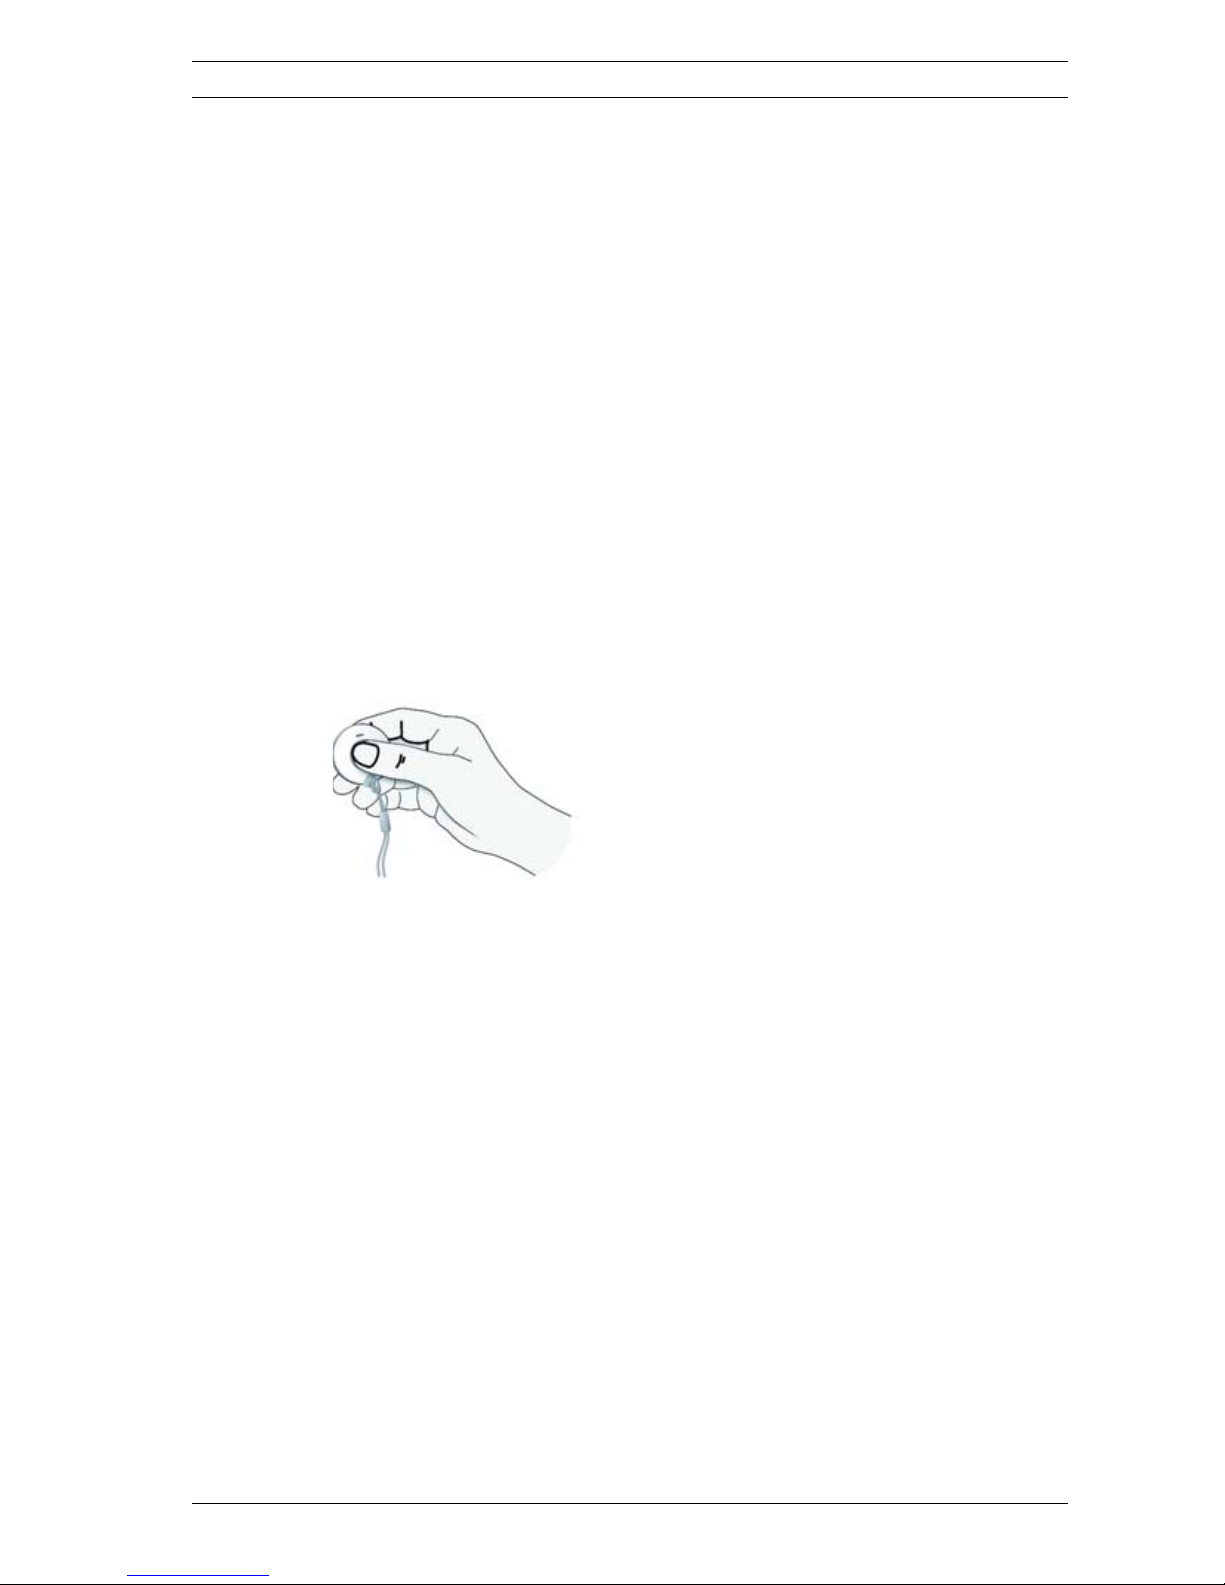
5.3 RF Transmitter
The RF transmitter that is supplied with the HTS50 is used to
make emergency calls. It allows you to move around your home
freely within radio range, without having to sacrifice your safety
and security.
X Always carry the RF transmitter around with you whenever
you are home.
To make an emergency call using the RF transmitter,
X press the button on the RF transmitter.
The indicator light lights up once as confirmation.
The HTS50 sounds the announcement radio button and the
emergency call is sent.
The call will be answered either by a person at the social alarm
monitoring centre or by a private individual who takes the
emergency call.
An emergency call made in error can be cancelled during the
pre-alarm by pressing the S button on the HTS50, see
Section 5.2 S Button, Page 9.
!
CAUTION! The radio range between the RF transmitter and the
HTS50 depends largely on the environment in which the
devices are used. Test the range within your own home
environment!
Page 11
Carephone 50 Taking Phone Calls | en 11
Bosch Security Systems User Manual ISA-50-MS V2 I 2008.02
6 Taking Phone Calls
The HTS50 can be programmed so that you can take phone
calls using the emergency call button on the unit or using the
RF transmitter. You can speak from anywhere in the room as
the HTS has a hands-free function.
Taking phone calls with the HTS50
To take a phone call with the HTS50,
X press the emergency call button when the phone rings.
To terminate the call,
X press the emergency call button again.
Taking phone calls with the RF transmitter
To take a phone call with the RF transmitter,
X press your RF transmitter when the phone rings.
To terminate the call,
X press your RF transmitter again.
Page 12

12 en | Emergency Call to a Call Centre Carephone 50
ISA-50-MS V2 I 2008.02 User Manual Bosch Security Systems
7 Emergency Call to a Call Centre
If you initiate an emergency call with your HTS50, it will usually
be forwarded to a social alarm call centre where it will be
processed.
How the emergency call is processed at the call centre
1. You send an emergency call using the HTS50 or the
RF transmitter.
2. The emergency call is transmitted.
3. An operator at the call centre takes your emergency call.
4. You speak to the operator.
5. The controller arranges for assistance to be dispatched
depending on the circumstances.
6. Wait until assistance arrives.
8 Emergency Call to a Private Phone
The HTS50 can be programmed to send an emergency call to a
private phone belonging to an individual such as a relative.
The emergency call from the HTS50 is received just like a
normal phone call.
How the emergency call is received on a private phone
1. You send an emergency call using the HTS50 or the RF
transmitter.
2. The emergency call is transmitted.
3. The phone of the person to whom the emergency call is
being sent rings.
4. The receiver must be picked up.
5. The HTS50 responds immediately with the announcement
call, call to the person rendering assistance.
6. This is followed by an announcement telling the person
about how the emergency call was made, e.g. with the
emergency call button or RF detector, and who made it.
7. The announcement can be repeated as often as required
by pressing the 2 key on the phone.
Page 13
Carephone 50 Emergency Call to a Private Phone | en 13
Bosch Security Systems User Manual ISA-50-MS V2 I 2008.02
8. When the announcement ends, a speak/listening
connection in hands-free mode is set up between the
person calling for assistance and the person responding to
the call.
9. The call remains connected for approx. 3 minutes. Three
tones sound when the time has expired. There are two
options:
10. The emergency call can be terminated at any time by
pressing the 0 key.
11. The call can be extended by a further 3 minutes by
pressing the 1 key. The call can be extended as often as
required in this way. The call is terminated by pressing the
0 key.
i
NOTE! Instead of the unit ID, a personal message can be
recorded, e.g. This is Mrs Brown's emergency call unit..., see
Section 12.6 The Main Programming Steps, Page 28.
!
CAUTION! If you do not terminate an emergency call when
prompted to do so in the announcement by pressing the 0 key,
or if you do not extend the call by pressing 1 at the right time,
the call will not be properly processed. The HTS50 will
automatically dial the next emergency call number when the
existing emergency call has been cancelled.
Page 14

14 en | Cleaning Carephone 50
ISA-50-MS V2 I 2008.02 User Manual Bosch Security Systems
Key functions on the destination phone
The following list shows the other key functions on your phone
that can be used for an emergency call from the HTS50.
9Cleaning
– Regularly clean the surface of the HTS50 with a soft cloth.
If required, dampen the cloth lightly with a pH-neutral
cleaning product.
– Do not spray cleaning product onto the unit housing. The
surface of the housing can be damaged or destroyed by
abrasive products or products containing alcohol or
solvents.
– Never use: alcohol, cleaning products containing alcohol or
vinegar, cleaning products for glass or plastics,
disinfectants except Incidur®, methylated spirits,
petroleum ether, other aggressive agents.
– If necessary, remove the top cover of the HTS50 and clean
the spaces in between the buttons. The buttons can be
detached by applying light pressure.
Key Function
0 Terminate call with confirmation
1 Extend call by another 3 minutes
2 Repeat alarm message
3 Speak with normal volume to the HTS50
4 Listen to the HTS
5 Increase the volume at the HTS50 and speak to the HTS50
6 Reduce the volume at the HTS50 and speak to the HTS50
7 Full-duplex voice
8 Press 0 to acknowledge a repeated emergency call.
9 Reject and terminate call.
HTS50 dials the next number on the list.
Page 15

Carephone 50 Device Acknowledgements | en 15
Bosch Security Systems User Manual ISA-50-MS V2 I 2008.02
10 Device Acknowledgements
10.1 Light Signals
The HTS50 has two indicator lights that display the status of
the unit.
The meaning of the light signals is explained in the table below:
Light signal Meaning
Lamp shines bright/dull
Lamp flashes
Status Description/Action Yellow Green Blue Red
Initialisation 2 sec. after power-on
or programming
Fault Fault message is
announced once. Press
the S button to repeat
(0.1s/2s)
Standby mode Unit is ready
Pre-alarm Cancel with stop
button
Connection Establish connection
Speak Display for the hearing-
impaired
(0.5s/0.5s)
Listen Listen (display for the
hearing-impaired)
(0.1s/2s)
Repeat emergency
call active
If the emergency call is
not acknowledged, a
new emergency call is
made to the centre
when the programmed
time elapses
(0.5s/0.5s)
Page 16

16 en | Device Acknowledgements Carephone 50
ISA-50-MS V2 I 2008.02 User Manual Bosch Security Systems
10.2 Voice Messages of the HTS50
When button is pressed
What the HTS says Meaning
Alarm input When the external alarm input is activated.
RF transmitter [x] When an RF detector is pressed; x = 1-10.
Emergency call When the emergency call button is pressed.
Call activated Connection failed - unit calling again.
Service call When the S button is pressed, if it is
programmed as a service button.
Stop When the S button is pressed during the pre-
alarm. The emergency call is cancelled.
Page 17

Carephone 50 Device Acknowledgements | en 17
Bosch Security Systems User Manual ISA-50-MS V2 I 2008.02
Error messages
What the HTS says Meaning
Power failure Power failure. The indicator lamp in the daily
button flashes.
Check the power connection of the HTS50.
Power restored When power is restored.
Unit battery empty The HTS backup battery no longer has its full
capacity. Contact the social alarm call centre or
customer service.
Line failure The connection to the telephone network has
been lost. Check the plug on the unit and the
telephone socket.
Transmission failure An activated emergency call cannot be sent
despite 15 repeated dialling attempts. Press the
S button to stop the error message
announcement. Contact the social alarm
monitoring centre service provider or customer
service.
Error zero one External signal detected
The indicator lamp in the daily button continues
to flash until the message has reached the
centre.
Failure two-X RF transmitter battery empty
(X is the transmitter number)
Failure three-X Radio link monitoring faulty. The indicator lamp
in the daily button continues to flash until the
message has reached the centre.
(X is the transmitter number)
Page 18

18 en | Installation Carephone 50
ISA-50-MS V2 I 2008.02 User Manual Bosch Security Systems
11 Installation
– Only connect the HTS50 to a professionally installed 230 V
AC/50 Hz power outlet.
– Use only the original line power adapter. Any other power
adapter could damage your unit.
– Do not install in a wet or humid environment.
– Do not install on a soft surface as this may impair the voice
quality of the HTS.
– Do not install in the proximity of TV sets, large metal
objects, microwave appliances or radio telephones. This
will impair the reception of signals from the RF transmitter.
– Take care not to obstruct the microphone mounted on the
right-hand side of the unit.
11.1 Placing the HTS50
The HTS50 can be set up either on a level surface or mounted
on the wall.
Setting up
The HTS50 is designed for use in the home environment. Many
items of furniture are coated with a wide variety of paints,
varnishes and plastics, and are treated with different types of
care product. The feet of the HTS50 may leave marks on
furniture surfaces as a result of chemical processes. To avoid
this, place the unit on a non-slip surface.
Wall mounting
You can mount the HTS50 on the wall either using a wall
bracket that can be ordered as a special accessory, or you can
fix the unit directly to the wall without a bracket. The wall
bracket stabilises the HTS and makes installation easier.
!
CAUTION!
Before starting to install and program the HTS50, read through
the user manual carefully as it contains important information.
Page 19

Carephone 50 Installation | en 19
Bosch Security Systems User Manual ISA-50-MS V2 I 2008.02
For wall mounting you will need two screws with a shank
diameter of less than 5 mm and a head diameter between 7 and
9 mm, and two suitable wall plugs.
1. Position the plugs and screws so that the distance
between the screw centres measures 95 mm: you will find
a drilling template on the last page.
2. Mount the HTS50 by locating the screws in the holes
provided in the base of the HTS.
3. Adjust the screw depth so that the unit can be mounted
safely on the screws.
Page 20

20 en | Installation Carephone 50
ISA-50-MS V2 I 2008.02 User Manual Bosch Security Systems
11.2 Connecting the HTS50
1. Insert the plug on the mains power adapter supplied into
the socket on the HTS50. To prevent strain on the cord,
feed it through the cable channel and then through the
opening on the back of the unit.
2. Insert the plug on the telephone cord into the socket on
the HTS50. To prevent strain on the cord, feed it through
the cable channel and then through the opening on the
back of the unit.
i
NOTE! There should be a 230 V AC/50 Hz power outlet and a
TAE telephone socket (NFN, NF or NFF) near to the position
where the HTS50 is installed.
Page 21

Carephone 50 Installation | en 21
Bosch Security Systems User Manual ISA-50-MS V2 I 2008.02
3. Now fit the plug on the telephone cord into the N socket of
your telephone outlet.
4. Plug the power adapter into the line power outlet.
All the indicator lamps light up for around 2 seconds (battery
test). The indicator lamps on the daily button and the
emergency call button now light up. The unit immediately offers
a choice of languages and then switches to standby mode, see
Section 12.6 The Main Programming Steps, Page 28,
Programming step 01. The unit can now be programmed.
!
CAUTION! Only connect the unit to a telephone outlet that has
been correctly installed by your telephone service provider.
i
NOTE! If you perform step 4 before step 3, you will hear the
announcement line failure.
!
CAUTION! The backup battery will now be charged up. The
battery is fully charged after 12 hours. The unit's full volume will
not be available until the battery is fully charged.
Page 22

22 en | Installation Carephone 50
ISA-50-MS V2 I 2008.02 User Manual Bosch Security Systems
11.3 Connection Configuration
To check whether an emergency call can be sent,
1. Make a phone call in the normal way.
2. While the call is in progress, press the emergency call
button to initiate an emergency call.
If the unit has been correctly installed the phone call will be
automatically disconnected.
3. The test call described above should be made each time
the unit is reinstalled.
The unit can now be programmed as described in Section 12.
i
NOTE! In the event of an emergency, the unit must be able to
send out an emergency call even if a phone call is in progress at
the time. The HTS50 must interrupt the phone call in order to
do this.
!
CAUTION! With a private branch exchange (PABX) there is no
guarantee that an ongoing call connection will be automatically
interrupted by the emergency call. For more information, please
contact your PABX supplier.
Page 23

Carephone 50 Installation | en 23
Bosch Security Systems User Manual ISA-50-MS V2 I 2008.02
11.4 De-installation
To switch off the HTS50 you must remove the power plug from
the unit. This also shuts down the battery.
NOTE! If you remove the power plug from your power outlet,
the unit will announce a power failure. The unit will
automatically switch over to battery operation.
Page 24

24 en | Programming Carephone 50
ISA-50-MS V2 I 2008.02 User Manual Bosch Security Systems
12 Programming
Before you program the HTS50 you must be familiar with all of
the unit's functions. Programming is specifically intended for
trained users who are familiar with the first part of the user
manual.
12.1 Programming Methods
The HTS50 can be programmed in different ways:
Remote programming from a social alarm call centre
To program the HTS50 from a social alarm call centre,
X connect to the centre by pressing the emergency call
button.
The centre can now upload preset parameters to your HTS or it
can poll the unit's programming status and change it.
Programming with a programming unit
The HTS50 can be programmed with a programming unit and
the associated PC software.
Please refer to the user manual of the programming unit for full
details of this procedure.
i
NOTE! Programming the HTS50 is an important step towards
ensuring the unit functions correctly. When you program the
HTS, you change settings such as the call number of the social
alarm call centre.
i
NOTE! Only an approved BOSCH social alarm call centre can
guarantee that all parameters will be correctly programmed.
Page 25

Carephone 50 Programming | en 25
Bosch Security Systems User Manual ISA-50-MS V2 I 2008.02
Programming on the HTS50
The HTS50 can be programmed quickly and easily using the
programming keypad on the unit itself.
12.2 Programming in Steps
The whole programming process of the HTS50 consists of
individual programming steps. These programming steps are
defined by BOSCH and numbered 01 to 99.
A programming step consists of a number and associated
settings.
Example:
– Programming step 74 means Mute Alarm and has the
settings 0 for off and 1 for on.
When you program the HTS50, this means that you are changing
the way the unit behaves.
i
NOTE! A quick programming guide is provided on the inside of
the cover of the HTS50 unit for experienced users who are very
familiar with programming the HTS.
Page 26

26 en | Programming Carephone 50
ISA-50-MS V2 I 2008.02 User Manual Bosch Security Systems
12.3 Opening the Unit
You must open the unit in order to gain access to the
programming keypad:
12.4 Key Functions During Programming
C Save new settings.
Settings that are not confirmed with the C key will not be saved!
Save the entered settings and go to the next programming step
A The setting entered for the programming step is deleted
* Return to the beginning of the programming mode
** End programming
Programming also ends automatically if no entries are made for
more than 10 minutes. The unit announces: Set-up ended
0 to 9 Enter the programming data
P The unit announces the program step’s current content
R Cancels programming, saved data is not lost
Switch off backup battery
P+R Reset factory defaults
Page 27

Carephone 50 Programming | en 27
Bosch Security Systems User Manual ISA-50-MS V2 I 2008.02
12.5 Programming Procedure
To program the HTS50 on the unit itself,
1. Remove the cover from the HTS.
2. Press P to go to the programming mode. The HTS
announces Set-up.
3. Enter the PIN. The PIN factory setting is 246810. If the PIN
is entered correctly, the unit announces Selection.
4. On the programming keypad, enter the programming step
whose setting you wish to change. The programming steps
can be carried out in any order.
5. Enter the new setting as required.
6. Press the C key to confirm your entries. The HTS
automatically goes to the next programming step.
To leave the programming mode,
7. Press the * key twice.
Page 28

28 en | Programming Carephone 50
ISA-50-MS V2 I 2008.02 User Manual Bosch Security Systems
12.6 The Main Programming Steps
Programming mode
To go to the programming mode,
X press the P key.
Prog.
Step(s)
Explanation/Instructions
01 Language selection
As soon as the HTS50 is powered on, it announces a choice of
six different languages:
–English: Selection one
–French: Selection deux
– Flemish (Belgium): Keuze drie
– Italian: Selezione quattro
–Dutch: Keuze vijf
–German: Auswahl sechs
1. Enter the language setting which you require.
2. Press C.
The HTS is now ready for further programming.
NOTE! You can select your language as soon as you hear it
without listening to the whole announcement.
Page 29

Carephone 50 Programming | en 29
Bosch Security Systems User Manual ISA-50-MS V2 I 2008.02
11 - 19 Phone number of the emergency call recipient
1. Select programming step 11.
2. Enter the phone number of the emergency call recipient.
3. Press C to confirm.
The HTS switches automatically to programming step 12 and you
can enter the next number.
NOTE! When an emergency call is made, if the call to the first
call number is unsuccessful, the HTS will try the other numbers
in the sequence 2 to 10. If the last number has been dialled
unsuccessfully, the unit starts with the first number again and
continues until it either sends an emergency call successfully or
all of the programmed numbers have been tried 15 times.
B= Dial pause
D= Dial tone detection
#= Flash (see Section 18.2 Programming Tables, Page 42,
Programming step 21)
Example: HTS50 on an exchange line
Call number:
1. Call number of the emergency call recipient
2. Area code
3. Dial tone detection
After entering the call number, you enter the call destination,
e.g. the social alarm call centre. You program:
X 0 = social alarm call centre (Bosch protocol)
X 4 = to phone
NOTE! After programming step 19 the HTS goes to programming
step 10.
Page 30

30 en | Programming Carephone 50
ISA-50-MS V2 I 2008.02 User Manual Bosch Security Systems
20 Dialling modes
Ascertain whether the telephone line operates with the pulse
dialling mode (PD) or with tone dial. You can identify tone dial by
the fact that when you dial you hear tones of different pitch in
the telephone receiver. Selecting pulse dialling will only be
necessary in exceptional cases.
You program:
X 0 = PD
X 1 = Tone dial
23 Waiting time for repeated emergency call
This function is used to check whether a person rendering
assistance arrives promptly. An emergency call is repeated until
it is acknowledged by pressing the S button on the HTS50.
The emergency call is repeated if this time is exceeded.
X Enter a time between 0 and 99 minutes.
0 = Off.
24 Confirmation with call
When the repeated emergency call has been acknowledged, you
can speak directly to the call centre.
You program:
X 0 = the repeated emergency call is acknowledged by
pressing the S button; a call is not made to the call centre.
X 1 = the repeated emergency call is acknowledged by
pressing the S button; a call is made to the call centre. The
person rendering assistance can speak to the call centre
immediately.
25 Radio link monitoring
The HTS50 can monitor the RF transmitters that are assigned to
it. The RF transmitters send a signal to the HTS50 at regular
intervals (every 31 hours). A fault message is sent to the centre if
the HTS50 does not receive this signal at least once a week.
You program:
X 0 = radio link monitoring off
X 1 = radio link monitoring on
Page 31

Carephone 50 Programming | en 31
Bosch Security Systems User Manual ISA-50-MS V2 I 2008.02
29 Hear/speech impaired on/off
For users with speaking or hearing difficulties.
Once a connection to the social alarm call centre has been
established, a speech connection is established. If the user now
presses the emergency call button again, the word emergency
call is sent to the social alarm call centre. If the stop button is
pressed, then the user's recorded message (e.g. false alarm) is
sent to the social alarm call centre.
You program:
X 0 = Off
X 1 = On (see programming step 72.)
30 Unit ID
When an emergency call is made, this number is sent to the
emergency call recipient. The number can be up to 6 digits long.
NOTE! The numbers 0 and 9999 may not be used in the RB2000
protocol.
34 Individual voice recording
In an emergency call, a recorded message will be transmitted
instead of the unit ID. The max. message length is 6 seconds
1. Press D to start recording.
2. The unit announces This is the social alarm unit. A signal
tone introduces the recording of your message.
3. Speak your message.
4. Recording is ended with a signal tone.
5. Press F to play back your voice recording.
To delete your voice recording, press the A key.
To end the recording early, press the E key.
58 Registration call
Following an emergency call to a phone, a registration call can
be sent to a social alarm call centre where it will be stored in the
alarm history. The service call and technical messages do not use
this function. The call destination must be a social alarm call
centre.
The function is deactivated by selecting a blank call number or a
call number with the telephone.
Page 32

32 en | Programming Carephone 50
ISA-50-MS V2 I 2008.02 User Manual Bosch Security Systems
60 Message repetition to telephone
You can use programming step 60 to specify how often the
Carephone will repeat the message.
Example:
1. The HTS sends an emergency call to a phone.
2. The emergency call is taken by a private individual rendering
assistance.
3. The HTS plays the announcement: This is social alarm
unit 123.
4. The HTS repeats the announcement according to the
setting.
You can program a setting from 1 to 9 for the required number.
61 Incoming call recognition
Incoming phone calls can be accepted by the HTS50 and the call
can be conducted with the hands-free feature. The call can be
accepted and terminated using the emergency call button. A call
can also be taken using the RF pendant if it is programmed for
emergency call initiation. The call tone on the HTS can be
switched on or off and the volume can be adjusted. You program:
X 0 = Off
X 1 = HTS registers call with call tone
X 2 = HTS registers call with loud call tone
X 3 = HTS registers call with soft call tone
X 4 = HTS registers call with no call tone (the phone rings)
Page 33

Carephone 50 Programming | en 33
Bosch Security Systems User Manual ISA-50-MS V2 I 2008.02
62 Default volume
This step is used to program the default volume as well as the
soft and loud settings.
Default volume: This is the volume at which the centre
communicates via the HTS.
Soft setting: Low volume, is adjusted by the centre during a call.
Loud setting: High volume, is adjusted by the centre during a call.
Use settings 1 to 8 to program
1. the basic volume, e.g. 4
2. the loud setting, e.g. 6
3. the soft setting, e.g. 2
70 Test call interval
This step is used to program the interval between automatic test
calls from the HTS50 to the social alarm call centre in days.
Select a setting between 0 and 28 days (0 = Off).
71 Service button
If the S button is to be used as a service button as well, this is
programmed here. You program:
X 0 = Off
X 1 = On
77 Pre-alarm time
The pre-alarm time of the HTS50 can be programmed in steps of
10 seconds. This is the time within which an emergency call that
has been initiated can still be stopped. Select a setting between
0 and 6. 0 = Off.
Page 34

34 en | Programming Carephone 50
ISA-50-MS V2 I 2008.02 User Manual Bosch Security Systems
81-89 Assigning RF detectors
The registered RF detectors can be programmed to trigger
different alarm functions, e.g. a fire alarm.
1. First, register the RF detectors on the HTS50; refer to
programming step 90-99.
2. To assign a function to RF detector 91, select programming
step 81.
3. Select a function:
X 0 = Radio transmission activation
X 1 = Emergency call button
X 4 = Service call
X 7 = Connection with individual call number
4. Press C to confirm.
The unit advances to programming step 82. You can now
proceed to program the function of RF detector 92, and so on.
NOTE! After programming step 89 the unit advances to
programming step 80.
Page 35

Carephone 50 Programming | en 35
Bosch Security Systems User Manual ISA-50-MS V2 I 2008.02
91-99 Registering RF detectors
Up to 10 RF detectors can be registered with a code number that
is stored in the button itself. These code numbers must be
stored in the HTS50. Only the code number of the 1st RF
transmitter is stored when the product leaves the factory.
To register more RF detectors,
1. Select programming step 92.
1. HTS50: Selection 92 is...
2. Press the corresponding RF transmitter.
3. HTS50: Selection 92 is...
4. Press C to confirm.
The second RF transmitter is now stored in the HTS50. The HTS
advances to programming step 93, and additional RF detectors
can now be registered.
NOTE! After programming step 99 the unit advances to
programming step 90.
NOTE! Make a note of the code numbers in the corresponding
box in the programming table, see Section 18.2 Programming
Tables, Page 42.
WARNING! Resetting the unit will delete all registered
RF detectors.
Page 36

36 en | Maintenance Carephone 50
ISA-50-MS V2 I 2008.02 User Manual Bosch Security Systems
12.7 Resetting the HTS50 to its factory defaults
To reset the HTS50 to its factory defaults,
X press the P and R keys together for at least two seconds.
The unit announces: Set-up reset.
The unit is now ready for language selection.
13 Maintenance
Check the unit housing for damage such as cracks or chips.
Test the functions of the keys and check that the spaces in
between the keys are clean. If necessary, remove the keys from
the housing cover and clean them.
The backup battery of the HTS unit should be replaced every
3 years. Regularly check the cords for damage, especially close
to cable guides/channels and sockets.
14 Conformity
All connected parts must meet the electric strength of TNV3,
DIN EN 60950.
The Carephone HTS50 is designed for operation on the public
analogue telephone network.
The RF transmitter that is supplied with the unit uses the
frequency specially reserved for social alarm calls in Europe.
We, Bosch Security Systems, declare that the above mentioned
products are manufactured in compliance with Annex II
(Telephony) / IV (RF Transmission) of Directive 5/1999/EC.
Conformity with EU Directive 5/1999/EC is assured:
CE (R&TTE 1999/5/EC, LVD 73/23/EEC, EMC 89/336/EEC).
!
CAUTION! This function deletes all of the settings programmed
by the user. The unit is reset to its factory defaults.
Page 37

Carephone 50 Replacing the Backup Battery | en 37
Bosch Security Systems User Manual ISA-50-MS V2 I 2008.02
15 Replacing the Backup Battery
The battery of the HTS50 should be replaced every 3 years.
To replace the battery:
1. Disconnect the power cord from the unit.
2. Open the bottom cover of the HTS50 by using a suitable
screwdriver to release the bottom cover from its clips.
3. Take out the battery (1).
4. Disconnect the plug on the battery cable from the socket (2).
5. Now plug the cable of the new battery into the socket.
6. Place the new battery in the unit.
7. Close the bottom cover.
Page 38

38 en | Battery Disposal Carephone 50
ISA-50-MS V2 I 2008.02 User Manual Bosch Security Systems
16 Battery Disposal
Battery distributors are required by law to take back spent
batteries; they must not be thrown away as household waste.
Please return used (rechargeable) batteries to your specialist
retailer or take them to a recycling centre intended for this
purpose.
Page 39

Carephone 50 Technical Specifications | en 39
Bosch Security Systems User Manual ISA-50-MS V2 I 2008.02
17 Technical Specifications
Power supply Power supply unit 230 V primary, 8.2 V secondary
Uninterrupted power supply 6 V NiMH battery, 1.2 - 1.6 Ah,
sufficient for at least 24 hours standby
Current consumption Standby mode approx. 30 mA
Phone line connection TAE 6 N
Dial mode PD, tone dial, Flash1, Flash 2
Frequency 869.2125 MHz
Certificates CE (R&TTE 1999/5/EC, LVD 73/23/EEC,
EMC 89/336/EEC), Care Aids Directory
Standards complied with EN50134-2:2000
EN50134-3:2002
EN301489-1 v1.4.1 (2002-08)
EN301489-3 v1.4.1 (2002-08)
EN300220 v2.1.1
Class 1 radio receiver
EN50371
EN60950-1:2001
EN50130-4 (04-1998)
EN55022 (01-2003)
ETS300683 (06-1997)
Receiver Complies with class 1 as specified in
EN 300 220 V2.1.1, duty cycle <0.1%
Environmental class I
Programmable call numbers 10 call numbers with up to 22 digits and freely
assignable to any type of triggering
(triggering groups)
Max. number of RF transmitters
10
Volume settings 8 levels
Page 40

40 en | Technical Specifications Carephone 50
ISA-50-MS V2 I 2008.02 User Manual Bosch Security Systems
Emergency call protocols Multi-protocol enabled (ANT, RB2000, others on
request)
Hands-free range > 5 m
Volume settings 8 levels
User guidance By voice output
Voice message Recordable
Programming Programming keypad on the unit, remote
programming from the social alarm centre or by
separate programming unit, protected by PIN
Dimensions 55 x 160 x 230 mm (H x W x D)
Weight Approx. 0.7 kg
Housing colour Similar to Pantone 430 U
Protection class IP32 (IP30 wall mounting), IP67 RF pendant
Ambient temperature range +5 °C to +40 °C
Humidity 85%
Page 41

Carephone 50 Appendix | en 41
Bosch Security Systems User Manual ISA-50-MS V2 I 2008.02
18 Appendix
18.1 Drilling Template
Page 42

42 en | Appendix Carephone 50
ISA-50-MS V2 I 2008.02 User Manual Bosch Security Systems
18.2 Programming Tables
Page 43

Carephone 50 Appendix | en 43
Bosch Security Systems User Manual ISA-50-MS V2 I 2008.02
Page 44

Bosch Security Systems Ltd
Broadwater Park
North Orbital Road
Denham
UB9 5HN
Tel: +49 (0) 1895-878088
Fax +49 (0) 1895-878089
uk.securitysystems@bosch.com
www.boschsecurity.co.uk
© Bosch Security Systems Ltd, 2007
 Loading...