

Bosch CAD 12, 7 620 210 015, 7 620 210 020, 7 620 210 021, 7 620 210 022 Operating And Installation Instructions
Page 1
CAD 12
7 620 210 015
7 620 210 020
7 620 210 021
7 620 210 022
de Bedienungs- und Einbauanleitung
en Operating and installation
instructions
fr Mode d’emploi et de montage
it Istruzioni d’uso e di installazione
es Instrucciones de manejo e
instalación
pt Instruções de serviço e de
montagem
nl Gebruiksaanwijzing en inbou-
whandleiding
sw Bruks- och monteringsanvisning
tr Kullanım ve montaj kılavuzu
dk Betjenings- og installationsvejled-
ning
fi Käyttö- ja asennusohje
pl Instrukcja obsługi i instalacji
cz Návod k obsluze a montáži
ru Руководство по эксплуатации и
монтажу
Page 2
2
1
17
16
2
15
3
4
14
5
6
7
8
13
9 12
10
11
1918 20 23222117
3031 29 28 27 2526 24
7 620 210 015/020-022 | 05.2015 Robert Bosch Car Multimedia GmbH
Page 3
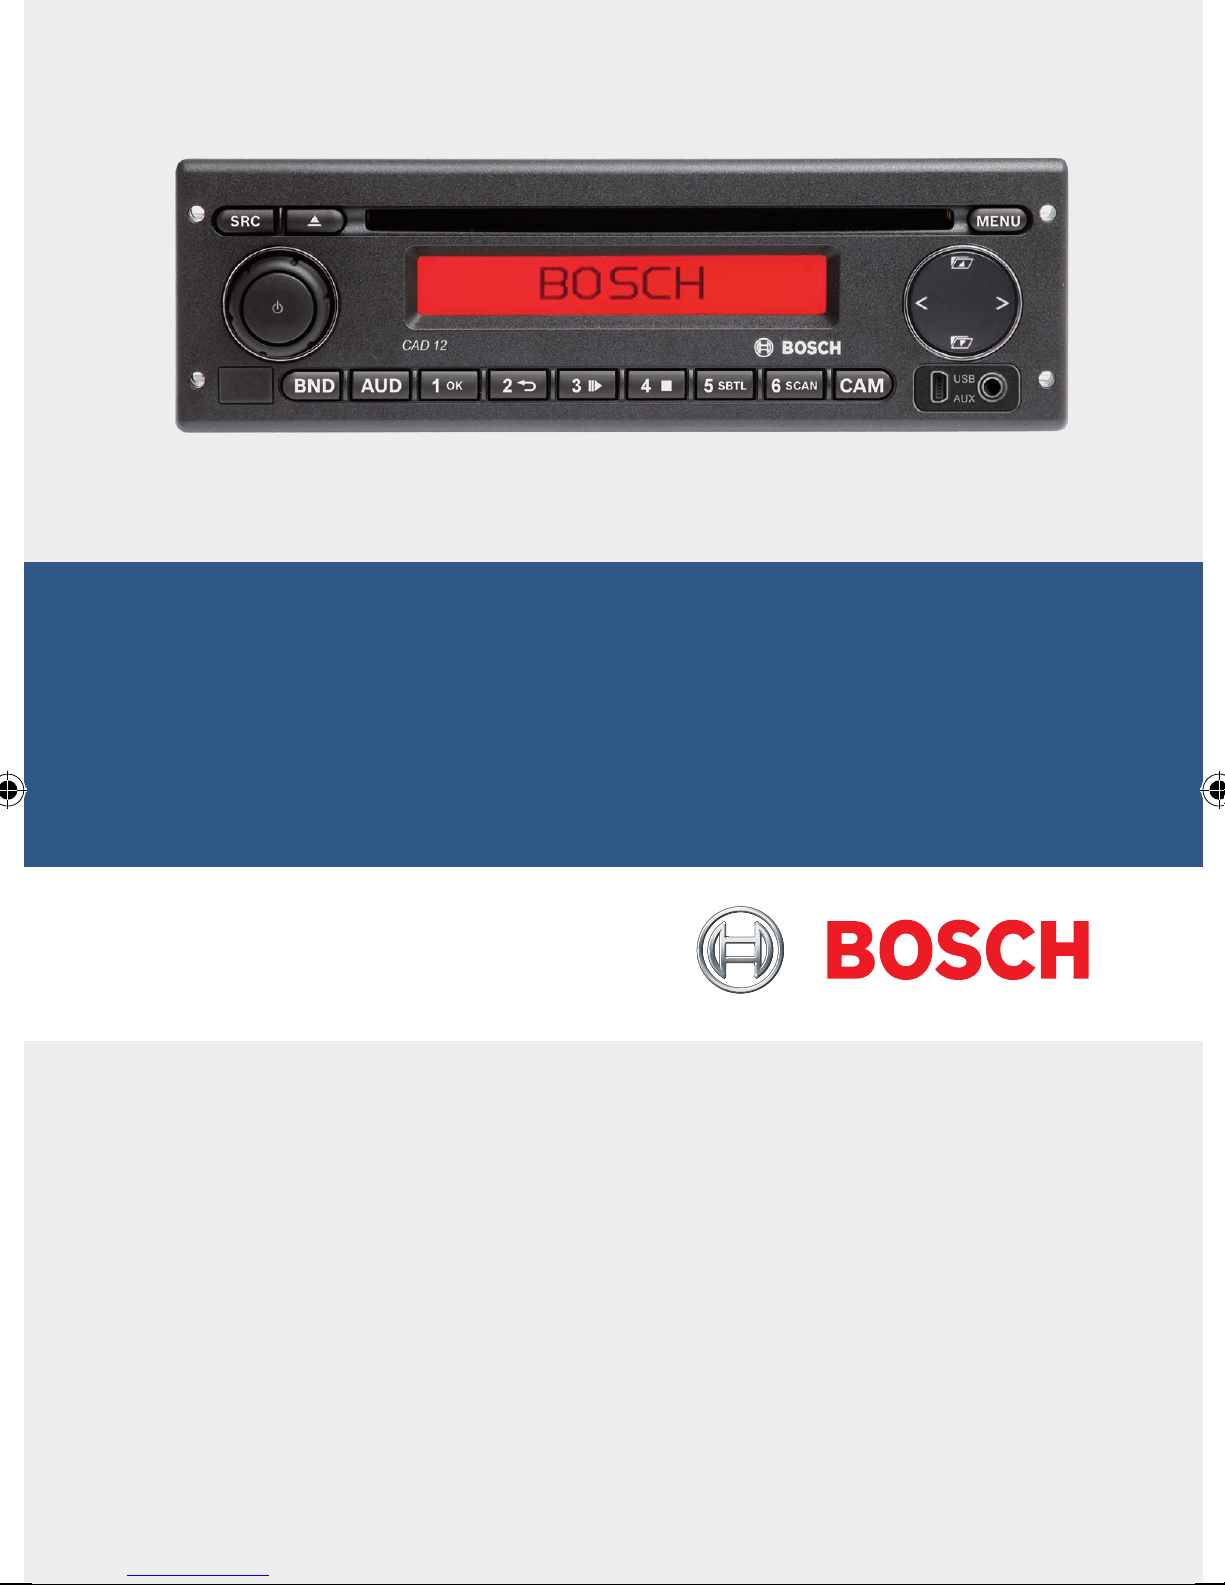
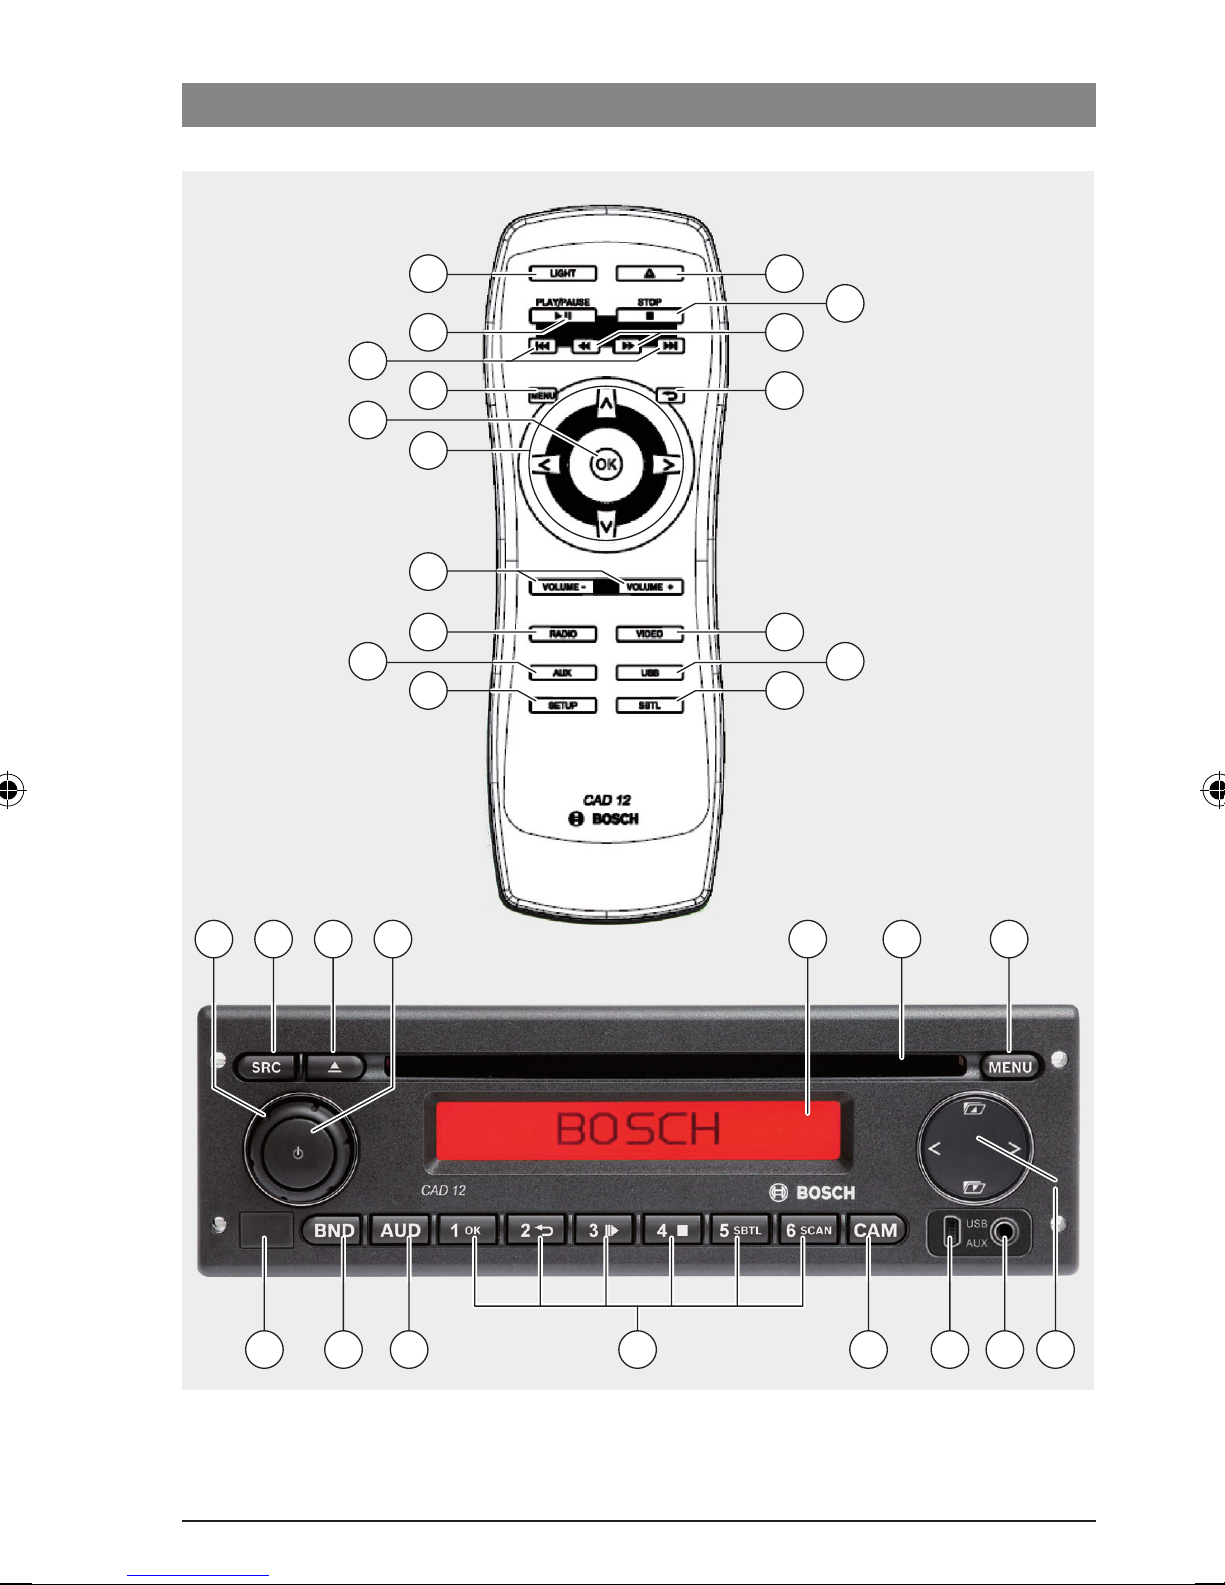
Bedienelemente
de | 3
1 LIGHT, zum Einschalten der Tastenbe-
leuchtung der Fernbedienung für etwa 10
Sek.
2 PLAY/PAUSE / , zum Starten und
Unterbrechen der Wiedergabe.
3 / , zum Überspringen von Kapi-
teln bzw. Titeln.
4 MENU, zum Aufrufen des DVD-Stamm-
menüs.
5 OK / ENTER, zum Auswählen und Bestä-
tigen von Menüeinträgen im Stammmenü
und Starten der Wiedergabe.
: SETUP, zum Aufrufen des DVD-Setup-
Menüs.
de
; SBTL, zum Umschalten zwischen den
verfügbaren Untertiteln der DVD.
< USB, zum Wechseln in den USB-Betrieb.
= VIDEO, zum Umschalten zwischen DVD-/
CD-/MP3-Betrieb und einer externen
Audio-/Video-Quelle.
> , im Menü zum Wechsel in die über-
geordnete Menüebene.
? / , zum Einschalten des schnellen
Rücklaufs / Vorlaufs.
6 Pfeiltasten für Titel- und Ordnerwahl und
die Navigation in den Menüs.
/ , zum Wechsel zu anderen Titeln,
zum Ändern von Einstellungen in Menüs,
zum Auswählen von Einträgen im DVDMenü.
/ , zum Wechseln in andere Ordner
(bei MP3-/WMA-/Daten-CDs/DVDs), zum
Auswählen von Einträgen in Menüs und im
DVD-Menü.
7 VOLUME –/+, zum Ändern der Lautstär-
ke.
8 RADIO, zum Wechseln in den Radiobe-
trieb.
@ STOP / , zum Beenden der Wiederga-
be.
A , zum Auswerfen der CD/DVD.
9 AUX, zum Wechseln in den AUX-Betrieb.
7 620 210 015/020-022 | 05.2015Robert Bosch Car Multimedia GmbH
Page 4

4 | de
Bedienelemente
B Lautstärkeregler zum Ändern der Laut-
stärke.
C SRC, zur Quellenwahl zwischen Radio und
DVD/CD, USB, AUX und externer Videoquelle
D , zum Ein-/Ausschalten des Gerätes;
Stummschaltung.
E Display
F DVD-Schacht
G MENU, zum Aufrufen der Menüs für die
Grundeinstellungen
H Multifunktionswippe
I Front-AUX-IN-Buchse
J Mini-USB-Buchse
K CAM, zum Umschalten zwischen verfüg-
baren Kamerabildern
L Tastenblock 1– 6
M AUD-Taste
Kurzdruck: Audio-Menü zur Einstellung
von Bässen, Mitten, Höhen, Balance und
Loudness öffnen
Langdruck: Werksseitige Klangeinstellungen wiederherstellen
N BND
Kurzdruck: Wahl der Speicherebene bzw.
des Wellenbereichs.
Langdruck: Start der Travelstore-Funktion
O IR-Sensor
7 620 210 015/020-022 | 05.2015 Robert Bosch Car Multimedia GmbH
Page 5

Inhaltsverzeichnis
Inhaltsverzeichnis
de | 5
8 Allgemeine Hinweise
8 Bestimmungsgemäßer Gebrauch
9 DVD-Regionalcodes
9 Altgerät-Entsorgung
9 Inbetriebnahme der Fernbedie-
nung
9 Einlegen der Batterien
9 IR-Eingang auswählen
10 Verwenden der Fernbedienung
10 Ein-/Ausschalten
10 Ein-/Ausschalten mit der Ein-/
Aus-Taste
10 Ein-/Ausschalten mit dem Mikrofon
11 Aus-/Einschalten über die Fahrzeug-
zündung
11 Ausschaltzeit einstellen (HOUR)
11 Lautstärke einstellen
11 Stummschaltung (MUTE)
11 Mute aufheben
11 Mikrofonbetrieb
11 Mikrofonbetrieb starten (MIC)
11 Lautstärke einer Mikrofondurchsage
einstellen
12 Anschlusskabel
12 Bestätigungston (BEEP)
ein-/ausschalten
12 Maximale Einschaltlautstärke
einstellen (ONVOL)
13 Klang und Display
13 Höhen (TREB), Mitten (MID) und
Bässe (BASS) einstellen
13 Lautstärkeverteilung links/rechts
(BAL) einstellen
13 Loudness (LD) ein-/ausschalten
13 Klangeinstellungen zurücksetzen
14 Displayhelligkeit einstellen
de
7 620 210 015/020-022 | 05.2015Robert Bosch Car Multimedia GmbH
Page 6

6 | de
Inhaltsverzeichnis
14 Radiobetrieb
14 Radiobetrieb einschalten
14 RDS-Komfortfunktion (AF, REG)
15 RDS-Komfortfunktion ein- bzw.
ausschalten
15 REG ein-/ausschalten
(nur für Tuner-Region EUROPE)
15 Wellenbereich/Speicherebene
wählen
16 Sender einstellen
16 Automatischer Sendersuchlauf
16 Empfindlichkeit des Sendersuchlaufs
einstellen (SENS)
16 Manuelle Senderabstimmung
16 Sender speichern
16 Sender manuell speichern
17 Sender automatisch speichern
(T-STORE)
17 Gespeicherte Sender abrufen
17 Gespeicherte Sender anspielen
(PRSTSCAN)
17 Anspielen starten
18 Anspielen beenden
18 Empfangbare Sender anspielen
(BANDSCAN)
18 Anspielen starten
18 Anspielen beenden
18 Radiotext ein-/ausschalten
(RADIOTXT)
18 Programm-Typ (PTY)
19 PTY ein-/ausschalten
19 Programm-Typ auswählen
19 PTY-Suchlauf starten
19 Störabhängige Höhenabsenkung
einstellen (HCUT)
20 Tastenfunktion einstellen (
KEY PRG
)
20 Verkehrsfunk
20 Vorrang für Verkehrsfunk ein-/
ausschalten
21 Lautstärkeanhebung für Verkehrs-
durchsagen einstellen
21 Verkehrsdurchsagen ausblenden
21 DVD-Betrieb
22 DVD/CD einlegen und Wiedergabe
starten
23 DVD/CD entnehmen
23 Wiedergabe starten, unterbrechen
und beenden
23 Wiedergabe unterbrechen/beenden
23 Standbild
23 Wiedergabe fortsetzen
23 Schneller Vor-/Rücklauf
24 Kapitel überspringen
24 Kapitel oder Titel wiederholt
abspielen
24 Untertitel einblenden
24 Bevorzugte Sprache für die Audiowie-
dergabe, Untertitel und das DVD-
Menü wählen
25 DVD-Menü
25 DVD-Menü anzeigen lassen
25 Menüeinträge auswählen und
bestätigen
7 620 210 015/020-022 | 05.2015 Robert Bosch Car Multimedia GmbH
Page 7
Inhaltsverzeichnis
de | 7
25 Externe Video-Quelle
26 Videoquelle für den Fahrer
26 CD-/MP3- und USB-Betrieb
26 Video-CD-Betrieb
26 Audio-/MP3-CD- und USB-Betrieb
26 Eigenschaften von MP3-/WMA-
Dateien
27 Vorbereitung eines USB-Datenträgers
27 ID3-Tags
27 Wiedergabe starten/unterbrechen/
beenden
28 Titel überspringen
28 Ordner überspringen (nur MP3)
28 Schneller Suchlauf (hörbar)
28 Wiederholfunktion
29 Zufallswiedergabe
29 Anzeige von Titelinformationen als
Laufschrift ein-/ausschalten (SCRL)
29 Weitere Einstellungen
29 Einstellungen für angeschlossene
Geräte
29 Bildschirmformat einstellen
30 Farbfernsehnorm des Bildschirms
einstellen
30 Kindersicherung
31 Kindersicherung festlegen
31 Externe Audioquellen
31 Front-AUX-Eingang
31 Pegel des AUX-Eingangs einstellen
32 Vorverstärkerausgang
32 Einbau
32 Hinweise für den Einbau
32 Lieferumfang
33 Montage
34 Technische Daten
34 Verstärker
34 Tuner
34 Video
de
445 ISO connector
7 620 210 015/020-022 | 05.2015Robert Bosch Car Multimedia GmbH
Page 8

8 | de
Allgemeine Hinweise
Allgemeine Hinweise
Vielen Dank, dass Sie sich für ein Bosch
Produkt entschieden haben. Wir wünschen
Ihnen viel Freude mit Ihrem neuen Gerät.
Lesen Sie bitte vor der ersten Benutzung diese
Bedienungsanleitung.
Für unsere innerhalb der Europäischen Union
gekauften Produkte geben wir eine Herstellergarantie. Für außerhalb der Europäischen
Union gekaufte Geräte gelten die von unserer
jeweils zuständigen Landesvertretung
herausgegebenen Garantiebedingungen.
Bestimmungsgemäßer Gebrauch
Das Gerät ist für den Betrieb in einem
Nutzfahrzeug mit 12 V-Bordnetzspannung und
für den Einbau in einen 1-DIN-Schacht
Verletzungsgefahr
Bei diesem Gerät handelt es sich um
ein CLASS1-Laser-Produkt.
f Schauen Sie niemals in den
Laserstrahl.
f Versuchen Sie nicht, in das
Gehäuse zu blicken oder dieses
zu öffnen.
f Lassen Sie Servicearbeiten nur
vom qualifizierten Fachpersonal
durchführen.
Unfall-, Verletzungs- und
Feuergefahr
Das Zerlegen des Gerätes kann einen
elektrischen Schlag oder Feuer
konzipiert.
Verkehrssicherheit
Die Verkehrssicherheit ist oberstes
Gebot.
f Machen Sie sich vor Fahrtantritt
mit dem Gerät vertraut.
f Bedienen Sie dieses Gerät nur,
wenn es die Verkehrslage
zulässt.
f Der Fahrer des Fahrzeugs darf
nur bei stehendem Fahrzeug
Videobilder anschauen.
Akustische Warnsignale der Polizei,
Feuerwehr und von Rettungsdiensten
müssen im Fahrzeug rechtzeitig
wahrgenommen werden können.
verursachen.
Flüssigkeit, die in das Gerät eindringt, kann kann einen elektrischen
Schlag, Kurzschluss oder Feuer verursachen.
Ein fehlerhaftes Gerät (z. B. zu
erkennen an eingefrohrenem Display
oder schlechter Audioqualität) kann
einen Unfall, elektrischen Schlag
oder Feuer verursachen.
f Versuchen Sie nicht, das
Gehäuse zu öffnen.
f Stellen Sie keine Getränke oder
andere Flüssigkeiten in der Nähe
des Gerätes ab.
f Benutzen Sie ein fehlerhaftes
Gerät nicht weiter.
f Hören Sie deshalb während der
Fahrt Ihr Programm in angemes-
sener Lautstärke.
7 620 210 015/020-022 | 05.2015 Robert Bosch Car Multimedia GmbH
Page 9
Allgemeine Hinweise | Inbetriebnahme der Fernbedienung
de | 9
DVD-Regionalcodes
Teilenummer Regionalcode
7 620 210 015 RC2 (Europa)
7 620 210 020 RC1 (NAFTA)
7 620 210 021 RC4 (Lateinamerika)
7 620 210 022 RC5 (Afrika, Asien)
Altgerät-Entsorgung
Entsorgen Sie Ihr Altgerät bitte nicht in den
Hausmüll!
Nutzen Sie zur Entsorgung des Altgerätes die
zur Verfügung stehenden Rückgabe- und
Sammelsysteme.
Inbetriebnahme der
Fernbedienung
Wenn Sie das Gerät zum ersten Mal in Betrieb
nehmen, müssen Sie zuerst die Batterien der
Fernbedienung einlegen.
Einlegen der Batterien
f Öffnen Sie das Batteriefach, indem Sie
den Deckel abnehmen.
f Legen Sie die neuen Batterien ein.
Batterieklasse: Zwei Batterien der Klasse
AAA. Vergewissern Sie sich, dass die Pole
der Batterien so positioniert werden, wie
im Batteriefach abgebildet.
f Schließen Sie das Batteriefach.
IR-Eingang auswählen
de
Das Gerät kann an einem Ort installiert sein, an
dem der integrierte IR-Sensor O nicht von der
Fernbedienung erreicht wird. In diesem Fall
können Sie einen optionalen externen
IR-Sensor (7 607 005 726)an einem geeigneten Ort installieren und über Kammer D des
ISO-Anschlusses mit dem Gerät verbinden.
Falls der externe IR-Sensor verwendet werden
soll, müssen Sie den IR-Eingang über Kammer D auswählen.
Um zwischen dem IR-Eingang über Kammer D
(REAR IR) und dem integrierten IR-Sensor O
(FRONT IR) umzuschalten,
f drücken Sie die Taste MENU G, um das
Menü zu öffnen.
f Drücken Sie die Taste MENU G so oft,
bis „REAR IR“ bzw, „FRONT IR“ im Display
angezeigt wird.
7 620 210 015/020-022 | 05.2015Robert Bosch Car Multimedia GmbH
Page 10
10 | de
Inbetriebnahme der Fernbedienung | Ein- und Ausschalten
f Drehen Sie den Lautstärkeregler B nach
links bzw. rechts, um zwischen den
Einstellungen zu wechseln.
Um das Menü zu verlassen,
f drücken Sie ggf. mehrfach die Taste
MENU G.
Hinweis:
Wenn der externe IR-Eingang über
Kammer D aktiviert ist, ist der
integrierte IR-Sensor K deaktiviert.
Verwenden der Fernbedienung
Richten Sie die Fernbedienung auf den
Infrarotempfänger in der Gerätevorderseite
(oder, falls montiert, auf den separaten
Infrarotempfänger).
Ein-/Ausschalten
Zum Ein- bzw. Ausschalten des Geräts stehen
Ihnen verschiedene Möglichkeiten zur
Verfügung:
Ein-/Ausschalten mit der Ein-/AusTaste
f Zum Einschalten drücken Sie die Ein-/
Aus-Taste 3.
f Zum Ausschalten halten Sie die Ein-/
Aus-Taste 3 länger als zwei Sekunden
gedrückt.
Hinweis:
Zum Schutz der Fahrzeugbatterie
wird das Gerät bei ausgeschalteter
Fahrzeugzündung automatisch nach
Der Infrarotempfänger „sieht“ von seiner
Vorderseite aus einen Bereich von etwa 30° in
jeder Richtung. Halten Sie die Fernbedienung
beim Drücken einer Taste in diesem Bereich.
einer einstellbaren Zeit ausgeschaltet
(siehe Abschnitt „Ausschaltzeit
einstellen“ in diesem Kapitel).
Ein-/Ausschalten mit dem Mikrofon
Bei Anschluss eines Mikrofons an das System
kann das Gerät auch mit dem Durchsagemikrofon ein- und ausgeschaltet werden. Weitere
Hinweise hierzu finden Sie auch im Kapitel
„Lautstärke einstellen“, Abschnitt „Mikrofonbetrieb“.
f Schalten Sie bei ausgeschaltetem Gerät
das Mikrofon ein.
Das Gerät wird automatisch eingeschaltet und
kann über die angeschlossenen Lautsprecher
für Durchsagen genutzt werden.
f Schalten Sie das Mikrofon aus.
7 620 210 015/020-022 | 05.2015 Robert Bosch Car Multimedia GmbH
Das Gerät wird ebenfalls ausgeschaltet.
Page 11

Ein- und Ausschalten | Lautstärke
de | 11
Aus-/Einschalten über die
Fahrzeugzündung
Wenn das Gerät mit der Fahrzeugzündung
verbunden ist und es nicht mit der Ein-/AusTaste 3 ausgeschaltet wurde, wird es mit der
Fahrzeugzündung aus- bzw. eingeschaltet.
Ausschaltzeit einstellen (HOUR)
f Drücken Sie die Taste MENU 7, um das
Menü zu öffnen.
f Drücken Sie die Taste MENU 7 so oft,
bis „HOUR“ und die aktuelle Einstellung im
Display angezeigt werden.
f Drehen Sie den Lautstärkeregler 1 nach
links bzw. rechts, um die Ausschaltzeit
zwischen 1 und 60 Minuten einzustellen.
Um das Menü zu verlassen,
Lautstärke einstellen
Die Systemlautstärke ist in Schritten von 0
(aus) bis 32 (maximal) regelbar.
f Um die Systemlautstärke zu erhöhen,
drehen Sie den Lautstärkeregler 1 nach
rechts.
f Um die Systemlautstärke zu verringern,
drehen Sie den Lautstärkeregler 1 nach
links.
Stummschaltung (MUTE)
Sie können die Systemlautstärke schlagartig
stummschalten (Mute).
f Drücken Sie kurz die Taste 3.
Mute aufheben
Um die vorher gehörte Lautstärke wieder zu
de
f drücken Sie ggf. mehrfach die Taste
MENU 7.
aktivieren,
f drücken Sie erneut kurz die Taste 3.
Mikrofonbetrieb
Sie können ein Mikrofon an das Gerät anschließen.
Mikrofonbetrieb starten (MIC)
f Schalten Sie das Mikrofon ein.
Im Display erscheint „MIC“.
Mikrofondurchsagen werden über die
angeschlossenen Lautsprecher wiedergegeben.
Lautstärke einer Mikrofondurchsage einstellen
Um die Mikrofonlautstärke einzustellen,
f drehen Sie während einer Durchsage den
Lautstärkeregler 1.
7 620 210 015/020-022 | 05.2015Robert Bosch Car Multimedia GmbH
Page 12
12 | de
Lautstärke
Hinweis:
Die zuletzt eingestellte Mikrofonlautstärke bleibt gespeichert.
Anschlusskabel
Zum Anschluss des Mikrofons an das Gerät ist
unter der Teilenummer 8 675 501 012 ein
Mikrofonkabel erhältlich.
Bestätigungston (BEEP)
ein-/ausschalten
Auf bestimmte Aktionen, z.B. länge res
Drücken einer Taste, ertönt ein Bestätigungston (Beep). Sie können den Bestätigungston
abschalten:
f Drücken Sie die Taste MENU 7, um das
Menü zu öffnen.
Hinweis:
Um das Gehör zu schützen, ist die
maximale Einschaltlautstärke auf den
Wert 25 begrenzt.
f Drücken Sie die Taste MENU 7, um das
Menü zu öffnen.
f Drücken Sie die Taste MENU 7 so oft,
bis „ONVOL“ und die aktuelle Einstellung
im Display angezeigt werden.
f Drehen Sie den Lautstärkeregler 1 nach
links bzw. rechts, um die Einschaltlautstärke zwischen 5 und 25 einzustellen.
Um das Menü zu verlassen,
f drücken Sie ggf. mehrfach die Taste
MENU 7.
f Drücken Sie die Taste MENU 7 so oft,
bis „BEEP“ und die aktuelle Einstellung
„ON“ (ein) oder „OFF“ (aus) im Display
angezeigt werden.
f Drehen Sie den Lautstärkeregler 1 nach
links bzw. rechts, um den Bestätigungston
aus- bzw. einzuschalten.
Um das Menü zu verlassen,
f drücken Sie ggf. mehrfach die Taste
MENU 7.
Maximale Einschaltlautstärke
einstellen (ONVOL)
Wenn Sie das Gerät einschalten, spielt es in
der zuletzt gewählten Lautstärke. Wenn Sie die
Lautstärke vor dem Ausschalten jedoch höher
als die maximale Einschaltlautstärke eingestellt
hatten, wird die Lautstärke beim Wiedereinschalten automatisch auf die eingestellte
Einschaltlautstärke begrenzt.
7 620 210 015/020-022 | 05.2015 Robert Bosch Car Multimedia GmbH
Page 13
Klang und Display
de | 13
Klang und Display
Höhen (TREB), Mitten (MID) und
Bässe (BASS) einstellen
f Drücken Sie die Taste AUD ;, um das
Menü zu öffnen.
f Drücken Sie die Taste AUD ; so oft, bis
„BASS“ (Bässe), „MID“ (Mitten) bzw.
„TREB“ (Höhen) und die aktuelle Einstellung im Display angezeigt werden.
f Drehen Sie den Lautstärkeregler 1 nach
links bzw. rechts, um den Bass-, Mittenbzw. Höhenpegel zwischen +7 und -7
einzustellen.
Um das Menü zu verlassen,
f drücken Sie ggf. mehrfach die Taste AUD
;.
f Drücken Sie die Taste AUD ; so oft, bis
„LD" und die aktuelle Einstellung „ON“
(ein) oder „OFF“ (aus) im Display
angezeigt werden.
f Drehen Sie den Lautstärkeregler 1 nach
links bzw. rechts, um Loudness aus- bzw.
einzuschalten.
Um das Menü zu verlassen,
f drücken Sie ggf. mehrfach die Taste AUD
;.
Klangeinstellungen zurücksetzen
Sie können alle Klangeinstellungen auf die
jeweiligen Werkseinstellungen zurücksetzen
(TREB, MID, BASS, BAL: 0; LD: OFF).
f Drücken Sie die Taste AUD ;, um das
Menü zu öffnen.
de
Lautstärkeverteilung links/rechts
(BAL) einstellen
f Drücken Sie die Taste AUD ;, um das
Menü zu öffnen.
f Drücken Sie die Taste AUD ; so oft, bis
„BAL“ und die aktuelle Einstellung im
Display angezeigt werden.
f Drehen Sie den Lautstärkeregler 1 nach
links bzw. rechts, um die Latstärkeverteilung zwischen +10 und –10 einzustellen.
Um das Menü zu verlassen,
f drücken Sie ggf. mehrfach die Taste AUD
;.
Loudness (LD) ein-/ausschalten
f Drücken Sie die Taste AUD ;, um das
f Drücken Sie die Taste AUD ; so oft, bis
„RESET N“ im Display angezeigt werden.
f Drehen Sie den Lautstärkeregler 1 nach
rechts, um die Einstellung „RESET Y“ zu
wählen.
Nach etwa 2 Sekunden werden alle Klangeinstellung zurückgesetzt.
Um das Menü zu verlassen,
f drücken Sie ggf. mehrfach die Taste AUD
;.
Hinweis:
Halten Sie die Taste AUD ; länger
als 2 Sekunden gedrückt, um die
werksseitigen Klangeinstellungen für
die aktuell wiedergegebene Quelle
wiederherzustellen.
Menü zu öffnen.
7 620 210 015/020-022 | 05.2015Robert Bosch Car Multimedia GmbH
Page 14

14 | de
Klang und Display | Radiobetrieb
Displayhelligkeit einstellen
f Drücken Sie die Taste MENU G, um das
Menü zu öffnen.
f Drücken Sie die Taste MENU G so oft,
bis „DIMTN“ und die aktuelle Einstellung
im Display angezeigt werden.
f Drehen Sie den Lautstärkeregler B nach
links bzw. rechts, umdie Displayhelligkeit
zwischen +5 und –5 einzustellen.
f Drücken Sie ggf. mehrfach die Taste
MENU G, um das Menü zu verlassen.
Radiobetrieb
Dieses Gerät ist mit einem RDS-Radioempfänger ausgestattet. Viele zu empfangenden FM-Sender senden ein Signal aus, das
neben dem Programm auch Informationen wie
den Sendernamen und den Programm-Typ
(PTY) enthält.
Der Sendername wird, sobald er empfangbar
ist, im Display angezeigt.
Radiobetrieb einschalten
Wenn Sie sich in einer anderen Betriebsart
befinden,
f drücken Sie die Taste BND 2,
oder
f drücken Sie die Taste SRC > so oft, bis
„RADIO“ im Display erscheint.
Im Display wird die aktuelle Frequenz bzw.der
Sendername angezeigt.
RDS-Komfortfunktion (AF, REG)
Die RDS-Komfortfunktionen AF (Alternativfrequenz) und REG (Regional) erweitern das
Leistungsspektrum Ihres Radiogerätes:
f AF: Wenn die RDS-Komfortfunktion
aktiviert ist, sucht das Gerät im Hinter-
grund automatisch nach der am besten zu
empfangenden Frequenz des eingestellten
Senders.
f REG: Einige Sender teilen zu bestimmten
Zeiten ihr Programm in Regionalpro-
gramme mit unterschiedlichem Inhalt auf.
Mit aktivierter REG-Funktion wird
verhindert, dass das Gerät auf Alternativ-
7 620 210 015/020-022 | 05.2015 Robert Bosch Car Multimedia GmbH
frequenzen des eingestellten Senders
wechselt, die einen anderen Programm-
inhalt haben.
Page 15
Radiobetrieb
de | 15
Hinweise:
f RDS ist werksseitig eingeschal-
tet.
f REG ist werksseitig ausgeschal-
tet muss gesondert im Menü
ein- bzw.ausgeschaltet werden.
RDS-Komfortfunktion ein- bzw.
ausschalten
f Wechseln Sie ggf. zuerst in den FM-Radio-
betrieb.
f Drücken Sie die Taste MENU 7, um das
Menü zu öffnen.
f Drücken Sie die Taste MENU 7 so oft,
bis „RDS“ und die aktuelle Einstellung
„ON“ (ein) oder „OFF“ (aus) im Display
angezeigt werden.
f Drehen Sie den Lautstärkeregler 1 nach
links bzw. rechts, um REG aus- bzw.
einzuschalten.
f Drücken Sie ggf. mehrfach die Taste
MENU 7, um das Menü zu verlassen.
Hinweis:
Die Einstellung REG ON/OFF wirkt
sich nur aus, wenn die RDS-Funktion
eingeschaltet ist.
Wellenbereich/Speicherebene
wählen
Je nach Tuner-Region können Sie mit diesem
Gerät Programme der folgenden Frequenzbänder empfangen:
f Europa: FM, MW, LW und KW
de
f Drehen Sie den Lautstärkeregler 1 nach
links bzw. rechts, um RDS aus- bzw.
einzuschalten.
f Drücken Sie ggf. mehrfach die Taste
MENU 7, um das Menü zu verlassen.
Die RDS-Komfortfunktionen sind aktiv, wenn
das RDS-Symbol im Display angezeigt wird.
REG ein-/ausschalten
(nur für Tuner-Region EUROPE)
f Wechseln Sie ggf. zuerst in den Radiobe-
trieb.
f Drücken Sie die Taste MENU 7, um das
Menü zu öffnen.
f Drücken Sie die Taste MENU 7 so oft,
bis „REG“ und die aktuelle Einstellung
„ON“ (ein) oder „OFF“ (aus) im Display
f US: FM, AM und WB (Wetterband)
f Sonstige: FM und AM
Für den Wellenbereich FM stehen drei
Speicherebenen FM1, FM2 und FMT und für
die Wellenbereiche MW, LW, KW, AM und WB je
eine Speicherebene zur Verfügung. Zusätzlich
gibt es eine weitere Speicherebene AMT, MWT,
LWT bzw. KWT. Auf jeder Speicherebene
können 6 Sender gespeichert werden.
Um zwischen den Wellenbereichen bzw.
Speicherebenen umzuschalten,
f drücken Sie die Taste BND 2.
angezeigt werden.
7 620 210 015/020-022 | 05.2015Robert Bosch Car Multimedia GmbH
Page 16
16 | de
Radiobetrieb
Sender einstellen
Sie haben verschiedene Möglichkeiten, Sender
einzustellen.
Automatischer Sendersuchlauf
Hinweis:
Der automatische Sendersuchlauf
steht nur zur Verfügung, wenn im
Menü die Einstellung „AUTOSEEK“ für
die Tasten bzw. 8 ausgewählt
ist (siehe Abschnitt „Tastenfunktion
einstellen“ in diesem Kapitel).
f Drücken Sie die Taste bzw. 8.
Der nächste empfangbare Sender wird
eingestellt.
f Drücken Sie die Taste MENU 7 so oft,
bis „SENS“ und die aktuelle Einstellung
„LO“ (geringe Empfindlichkeit) bzw. „DX“
(hohe Empfindlichkeit) im Display
angezeigt werden.
f Drehen Sie den Lautstärkeregler 1 nach
links bzw. rechts, um zwischen den
Einstellungen zu wecheln.
f Drücken Sie ggf. mehrfach die Taste
MENU 7, um das Menü zu verlassen.
Manuelle Senderabstimmung
Um die eingestellte Frequenz in kleinen
Schritten zu ändern,
f drücken Sie dieTaste bzw. 8.
Hinweis:
Hinweise:
f Ist der Vorrang für Verkehrsfunk
eingeschaltet und „PTY“
ausgeschaltet, wird der nächste
Verkehrsfunksender eingestellt.
f Ist „PTY“ eingeschaltet, wird der
nächste Sender des gewählten
Programmtyps eingestellt.
Empfindlichkeit des Sendersuchlaufs einstellen (SENS)
Sie können wählen, ob bei geringer Empfindlichkeit nur starke oder bei hoher Empfindlichkeit auch schwache Sender eingestellt werden
sollen.
f Wechseln Sie ggf. zuerst in den Radiobe-
Die schrittweise Frequenzänderung
steht nur zur Verfügung, wenn im
Menü die Einstellung „MANSEEK“ für
die Tasten bzw. 8 im Menü
ausgewählt ist (siehe Abschnitt
„Tastenfunktion einstellen“ in diesem
Kapitel).
Um die eingestellte Frequenz schnell zu
ändern,
f halten Sie die Taste bzw. 8
gedrückt
Sender speichern
Sender manuell speichern
f Wählen Sie die gewünschte Speicher-
trieb.
f Drücken Sie die Taste MENU 7, um das
Menü zu öffnen.
7 620 210 015/020-022 | 05.2015 Robert Bosch Car Multimedia GmbH
ebene bzw. den Wellenbereich.
f Stellen Sie den Sender ein.
Page 17
Radiobetrieb
de | 17
f Halten Sie die Stationstaste 1 – 6 <, auf
die der Sender gespeichert werden soll,
länger als 2 Sekunden gedrückt.
Der Bestätigungston ertönt. Der Sender ist auf
der gewählten Stationstaste gespeichert.
Solange der gespeicherte Sender eingestellt
ist, wird sein Speicherplatz (z. B. „P3“) im
Display angezeigt.
Sender automatisch speichern
(T-STORE)
Sie können die 6 stärksten Sender aus der
Region automatisch speichern. Für den
Wellenbereich FM erfolgt die Speicherung auf
der Speicherebene FMT, für den Wellenbereich
AM (NAFTA) auf der Speicherebene AMT. Für
die Wellenbereiche MW, LW und KW (Europa)
f Wählen Sie den gewünschten Wellenbe-
reich.
f Halten Sie die Taste BND 2 länger als
zwei Sekunden gedrückt.
Die Speicherung beginnt. Im Display wird
„T-STORE“ angezeigt. Nachdem der Vorgang
abgeschlossen ist, wird der Sender auf
Speicherplatz eins der Speicherebene FMT
bzw. AMT, MWT, LWT oder KWT gespielt.
Gespeicherte Sender abrufen
f Wählen Sie die Speicherebene bzw. den
Wellenbereich.
f Drücken Sie die Stationstaste 1 – 6 <,
auf der der gewünschte Sender gespei-
chert ist.
de
steht eine gemeinsame Speicherebene zur
Verfügung, die als MWT, LWT bzw. KWT
angezeigt wird (entsprechend des Wellenbereichs, in dem zuletzt die T-STORE-Funktion
genutzt wurde).
Hinweise:
f Zuvor auf dieser Ebene gespei-
cherte Sender werden dabei
durch neu gefundene Sender
ersetzt.
f Ist der Vorang für Verkehrsfunk
eingeschaltet, werden nur
Sender mit Verkehrsfunk
gespeichert.
f Ist PTY eingeschaltet, werden
nur Sender mit dem aktuell
Gespeicherte Sender anspielen
(PRSTSCAN)
Mit dieser Funktion können Sie alle gespeicherten Sender der aktuellen Speicherebene für
jeweils etwa 5 Sekunden anspielen lassen.
Hinweis:
Diese Funktion steht nur zur
Verfügung, wenn im Menü die
Einstellung „PRSTSCAN“ für die
Tasten bzw. 8 im Menü
ausgewählt ist (siehe Abschnitt
„Tastenfunktion einstellen“ in diesem
Kapitel).
Anspielen starten
f Drücken Sie die Taste bzw. 8.
gewählten Programmtyp
gespeichert.
Im Display wird kurz „PRSTSCAN“ angezeigt.
Jeder gespeicherte Sender der aktuellen
Speicherebene wird für etwa 5 Sekunden
7 620 210 015/020-022 | 05.2015Robert Bosch Car Multimedia GmbH
Page 18
18 | de
Radiobetrieb
angespielt. Dabei wird die eingestellte
Frequenz bzw. der Sendername angezeigt.
Anspielen beenden
f Drücken Sie die Taste bzw. 8.
Der Scanvorgang wird beendet. Der zuletzt
gespielte Sender bleibt eingestellt.
Empfangbare Sender anspielen
(BANDSCAN)
Mit dieser Funktion können Sie alle empfangbaren Sender für jeweils etwa 5 Sekunden
anspielen lassen.
Hinweis:
Diese Funktion steht nur zur
Verfügung, wenn im Menü die
Radiotext ein-/ausschalten
(RADIOTXT)
Ein FM-Sender kann RDS-Radiotext aussenden.
Um die Anzeige von Radiotext ein- bzw.
auszuschalten,
f wechseln Sie ggf. zuerst in den FM-Radio-
betrieb.
f Drücken Sie die Taste MENU G, um das
Menü zu öffnen.
f Drücken Sie die Taste MENU G so oft,
bis „RADIOTXT“ gefolgt von der aktuellen
Einstellung „TEXT ON“ (ein) oder „TEXT
OFF“ (aus) im Display angezeigt wird.
f Drehen Sie den Lautstärkeregler B nach
links bzw. rechts, um zwischen den
Einstellungen zu wechseln.
Einstellung „BANDSCAN“ für die
Tasten bzw. 8 im Menü
ausgewählt ist (siehe Abschnitt
„Tastenfunktion einstellen“ in diesem
Kapitel).
Anspielen starten
f Drücken Sie die Taste bzw. 8.
Im Display wird kurz „BANDSCAN“ angezeigt.
Das Gerät sucht im aktuellen Wellenbereich
nach Sendern. Jeder gefundene Sender wird
für etwa 5 Sekunden angespielt. Dabei wird die
eingestellte Frequenz bzw. der Sendername
angezeigt.
Anspielen beenden
f Drücken Sie die Taste bzw. 8.
f Drücken Sie ggf. mehrfach die Taste
MENU G, um das Menü zu verlassen.
Programm-Typ (PTY)
Neben dem Sendernamen übermitteln einige
FM-Sender auch Informationen über den Typ
ihres Programms. Solche Programm-Typen
können z.B. sein:
CULTURE (Kultur) TRAVEL (Reise)
WEATHER (Wetter) JAZZ MUSIC (Jazz)
NEWS (Nachrichten) POP MUSIK (Pop)
Mit der PTY-Funktion können Sie gezielt
Sender eines bestimmten Programm-Typs
auswählen.
Wenn PTY eingeschaltet ist und ein PTYSuchlauf gestartet wurde, wechselt das Gerät
automatisch vom aktuellen Sender bzw. aus
Der Scanvorgang wird beendet. Der zuletzt
gespielte Sender bleibt eingestellt.
7 620 210 015/020-022 | 05.2015 Robert Bosch Car Multimedia GmbH
einer anderen Betriebsart zu dem Sender mit
dem gewählten Programm-Typ.
Page 19
Radiobetrieb
de | 19
PTY ein-/ausschalten
f Wechseln Sie ggf. zuerst in den FM-Radio-
betrieb.
f Drücken Sie die Taste MENU 7, um das
Menü zu öffnen.
f Drücken Sie die Taste MENU 7 so oft,
bis „PTY“ im Display angezeigt wird.
f Drehen Sie den Lautstärkeregler 1 nach
links bzw. rechts, um die Einstellung „PTY
ON“ (ein) oder „PTY OFF“ (aus) zu
wählen.
f Drücken Sie ggf. mehrfach die Taste
MENU 7, um das Menü zu verlassen.
Programm-Typ auswählen
Hinweis:
die Tasten bzw. 8 ausgewählt
ist (siehe Abschnitt „Tastenfunktion
einstellen“ in diesem Kapitel).
f Drücken Sie die Taste bzw. 8, um
den Suchlauf zu starten.
Falls ein Sender mit dem aktuell ausgewählten
Programm-Typ gefunden wird, wird dieser
eingestellt. Wird kein Sender mit diesem
Programmtyp gefunden, wird der zuletzt
eingestellte Sender wieder eingestellt.
Störabhängige Höhenabsenkung
einstellen (HCUT)
Die „HCUT-Funktion bewirkt eine Wiedergabeverbesserung bei schlechtem Radioempfang. Wenn Empfangsstörungen vorhan-
de
„PTY“ muss eingeschaltet sein.
f Wechseln Sie ggf. zuerst in den FM-Radio-
betrieb.
f Drücken Sie die Taste MENU 7, um das
Menü zu öffnen.
f Drücken Sie die Taste MENU 7 so oft,
bis „PTYTYPE“ im Display angezeigt wird.
f Drehen Sie den Lautstärkeregler 1, um
einen Programmtyp auszuwählen.
f Drücken Sie ggf. mehrfach die Taste
MENU 7, um das Menü zu verlassen.
PTY-Suchlauf starten
Hinweis:
Der PTY-Suchlauf steht nur zur
den sind, wird automatisch der Störpegel
abgesenkt.
f Wechseln Sie ggf. zuerst in den Radiobe-
trieb.
f Drücken Sie die Taste MENU 7, um das
Menü zu öffnen.
f Drücken Sie die Taste MENU 7 so oft,
bis „HCUT“ und die aktuelle Einstellung
„OFF“ (aus), 1 oder 2 (Stärke der
Störpegelabsenkung) im Display ange-
zeigt werden.
f Drehen Sie den Lautstärkeregler 1 nach
links bzw. rechts, um „HCUT“ einzustellen
bzw. auszuschalten.
f Drücken Sie ggf. mehrfach die Taste
MENU 7, um das Menü zu verlassen.
Verfügung, wenn „PTY“ eingeschaltet
ist und im Menü die Einstellung
„AUTOSEEK“ bzw. „BANDSCAN“ für
7 620 210 015/020-022 | 05.2015Robert Bosch Car Multimedia GmbH
Page 20
20 | de
Radiobetrieb | Verkehrsfunk
Tastenfunktion einstellen (
KEY PRG
Sie können die Kurzdruck-Funktion der Tasten
bzw. 8 im Radiobetrieb einstellen.
Folgende Einstellungen stehen zur Verfügung:
f AUTOSEEK: Automatische Suche des
nächsten empfangbaren Sernders.
f MANSEEK: Manuelle schrittweise
Frequenzänderung.
f PRSTSCAN: Anspielen der auf der
aktuellen Speicherebene gespeicherten
Sender.
f BANDSCAN: Anspielen der empfangbaren
Sender des aktuellen Wellenbereichs.
f Wechseln Sie ggf. zuerst in den Radiobe-
trieb.
f Drücken Sie die Taste MENU 7, um das
)
Verkehrsfunk
Vorrang für Verkehrsfunk ein-/
ausschalten
Hinweise:
f Diese Funktion ist nur in der
Tuner-Regio Europa verfügbar.
f Sie können den Vorrang für
Verkehrsfunk nur einschalten,
wenn RDS eingeschaltet ist.
Um den Vorrang für Verkehrsfunk ein- bzw.
auszuschalten,
f wechseln Sie ggf. zuerst in den Radiobe-
trieb.
f Drücken Sie die Taste MENU G, um das
Menü zu öffnen.
f Drücken Sie die Taste MENU 7 so oft,
bis „KEY PRG“ im Display angezeigt wird.
f Drehen Sie den Lautstärkeregler 1 nach
links bzw. rechts, um zwischen den
Einstellungen zu wechseln.
f Drücken Sie ggf. mehrfach die Taste
MENU 7, um das Menü zu verlassen.
Menü zu öffnen.
f Drücken Sie die Taste MENU G so oft,
bis „TP“ im Display angezeigt wird.
f Drehen Sie den Lautstärkeregler B nach
links bzw. rechts, um die Einstellung „ON“
(ein) oder „OFF“ (aus) zu wählen.
f Drücken Sie ggf. mehrfach die Taste
MENU G, um das Menü zu verlassen.
Hinweis:
In den Betriebsarten DVD/CD, USB,
AUX und Video steht diese Funktion
nur zur Verfügung, wenn zuletzt im
Wellenbereich FM ein Verkehrsfunksender eingestellt war.
Der Vorrang für Verkehrsdurchsagen ist
7 620 210 015/020-022 | 05.2015 Robert Bosch Car Multimedia GmbH
aktiviert, wenn im Display das TP-Symbol
angezeigt wird. Sobald das Gerät eine
Verkehrsdurchsage empfängt, wird sie
Page 21
Verkehrsfunk | DVD-Betrieb
de | 21
durchgestellt. Im Display wird für die Dauer der
Durchsage „TRAFFIC“ angezeigt.
Lautstärkeanhebung für Verkehrsdurchsagen einstellen
Sie können einstellen, um wie viele Lautstärkestufen Verkehrsdurchsagen lauter als die eingestellte Lautstärke wiedergegeben werden:
f Wechseln Sie ggf. zuerst in den FM-Radio-
betrieb.
f Drücken Sie die Taste MENU 7, um das
Menü zu öffnen.
f Drücken Sie die Taste MENU 7 so oft,
bis „TA DIFF“ und die aktuelle Einstellung
im Display angezeigt werden.
f Drehen Sie den Lautstärkeregler 1 nach
links bzw. rechts, um die Lautstärkeanhe-
DVD-Betrieb
Sie können mit diesem Gerät DVDs, Video-CDs
(VCD), Super-Video-CDs (SVCD) und handelsübliche Audio-CDs sowie MP3-CDs abspielen.
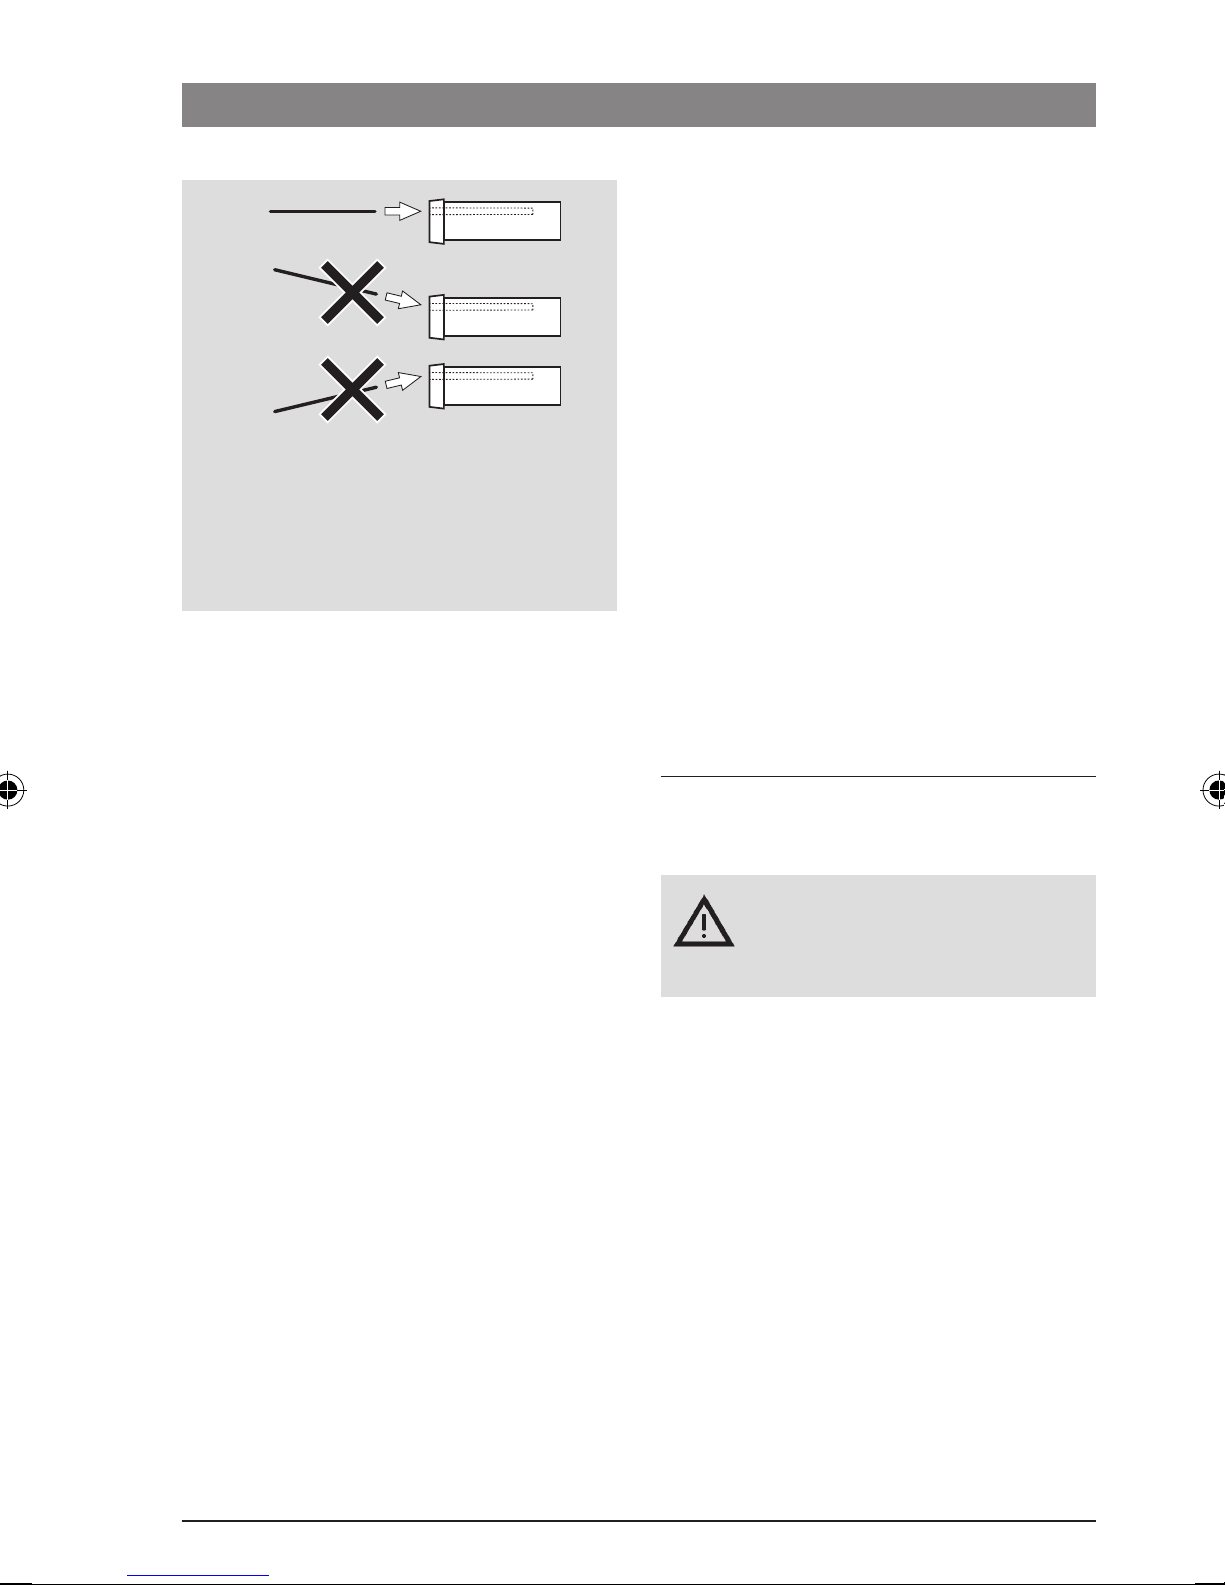
Zerstörungsgefahr des
DVD-Laufwerks!
f Unrund konturierte CDs
(Shape-CDs) dürfen nicht
verwendet werden.
f Kleben Sie keine Aufkleber auf
die Datenträger, auch keine
Beschriftungsetiketten oder
Labels. Diese können sich lösen
und das DVD-Laufwerk beschädigen.
f Das gleichzeitige Einlegen von 2
de
bung zwischen 0 und 10 einzustellen.
Um das Menü zu verlassen,
f drücken Sie ggf. mehrfach die Taste
MENU 7.
Hinweis:
Sie können während einer Verkehrsdurchsage die Lautstärke mit dem
Lautstärkeregler 1 für die Dauer der
Durchsage einstellen.
Verkehrsdurchsagen ausblenden
Um eine laufende Verkehrsdurchsage abzubrechen und zur zuvor gehörten Audioquelle
zurückzukehren,
f drücken Sie die Taste SRC =.
Der Vorrang für Verkehrsdurchsagen bleibt
DVDs/CDs beschädigt das
DVD-Laufwerk.
Achten Sie darauf, dass Sie
immer nur eine DVD/CD einlegen
und dass sich beim Einlegen
nicht bereits eine DVD/CD im
Laufwerk befindet.
Befindet sich bereits eine DVD/
CD im Laufwerk, leuchtet im
Display das DVD-Symbol .
f Durch schiefes Einlegen der
DVD/CD wird die DVD/CD nicht
korrekt in das DVD-Laufwerk
eingeführt. Dies kann die DVD/
CD beschädigen.
Achten Sie darauf, dass Sie eine
DVD/CD immer gerade einlegen.
eingeschaltet.
7 620 210 015/020-022 | 05.2015Robert Bosch Car Multimedia GmbH
Page 22
22 | de
DVD-Betrieb
Von diesem Player unterstützte Disc-Formate:
f DVD/CD mit 12 cm oder 8 cm Durchmes-
ser
f DVD±R/±RW
f Audio/Video DVD mit UDF-Dateisystem
f CD-DA (Audio-CD), CD-R, CD-RW
f Video CD (VCD)
f Super Video CD (SVCD)
Für Beschädigungen des DVD-Laufwerks durch ungeeignete DVDs/CDs
bzw. durch unsachgemäßes Einlegen
wird keine Haftung übernommen.
Dieses Gerät ist für die Wiedergabe von DVDs
mit dem Regionalcode Ihrer Region vorgesehen.
So genannte CD-Rs und CD-RWs („selbst
gebrannte“ CDs) können in der Regel abgespielt werden. Aufgrund der unterschiedlichen
CD-Qualität kann Bosch für eine einwandfreie
Funktion keine Gewähr übernehmen.
Für eine einwandfreie Funktion verwenden Sie
nur CDs mit dem Compact-Disc-Logo. CDs mit
Kopierschutz können zu Abspielschwierigkeiten führen. Bosch kann die einwandfreie
f MP3 CD mit MP3-Dateien zur Musikwie-
dergabe. Es werden nur MP3-CDs der
Formate „Joliet“ oder „ISO 9660“
unterstützt.
Folgende Discs werden von diesem Player
nicht unterstützt:
f CDV
f CD-G
DVD/CD einlegen und Wiedergabe
starten
Hinweis:
Der Einzug der DVD/CD darf nicht
behindert oder unterstützt werden.
f Schieben Sie die DVD/CD mit der
Funktion von kopiergeschützten CDs nicht
gewährleisten!
Selbst erstellte Medien wie VCD/SVCD sowie
DVD±R und DVD±RW können in der Regel
abgespielt werden.
Abhängig von den beschreibbaren Medien und
der Software, mit der diese Medien erstellt
bzw. beschrieben wurden, kann Bosch für eine
einwandfreie Kompatibilität und Wiedergabe
keine Gewähr übernehmen.
7 620 210 015/020-022 | 05.2015 Robert Bosch Car Multimedia GmbH
bedruckten Seite nach oben in den
DVD-Schacht E an der Vorderseite des
Gerätes bis Sie einen leichten Widerstand
spüren.
Die DVD/CD wird in das Laufwerk eingezogen,
der Einzug der DVD/CD darf nicht behindert
oder unterstützt werden.
Die DVD/CD wird geladen, die Wiedergabe
beginnt automatisch. Bei einer DVD wird
entweder das DVD-Menü angezeigt (siehe
Kapitel „DVD-Menü“) oder die Wiedergabe des
Page 23
DVD-Betrieb
de | 23
ersten Titels beginnt. Dies ist abhängig von der
eingelegten DVD.
DVD/CD entnehmen
f Drücken Sie die Taste A.
Die DVD/CD wird ausgeschoben.
Hinweis:
Der Ausschub der DVD/CD darf nicht
behindert oder unterstützt werden.
f Entnehmen Sie die DVD vorsichtig.
Hinweis:
Wenn Sie eine ausgeschobene DVD/
CD nicht entnehmen, wird sie nach
etwa 10 Sekunden automatisch
Um die Wiedergabe vollständig zu beenden,
f drücken Sie erneut die Taste 4 L
oder STOP / @.
Standbild
f Drücken Sie während der Wiedergabe die
Taste 3 L oder PLAY/PAUSE /
2.
Die Wiedergabe wird unterbrochen und zu
einem Standbild eingefroren.
Wiedergabe fortsetzen
f Drücken Sie die Taste 3 L oder
PLAY/PAUSE / 2.
Falls Sie die Wiedergabe zuvor nur unterbrochen haben, wird sie an der selben Stelle der
DVD wieder aufgenommen. Falls Sie die
de
wieder eingezogen.
Wiedergabe starten, unterbrechen
und beenden
Nach Einlegen der CD startet die Wiedergabe
automatisch.
Wenn bereits eine DVD im Laufwerk ist,
f drücken Sie die Taste SRC C so oft, bis
„DVD“ im Display erscheint.
Hinweis:
Wenn keine DVD eingelegt ist, wird
ein Schwarzbild angezeigt.
Wiedergabe unterbrechen/beenden
f Drücken Sie die Taste 4 L oder STOP
/ @.
Wiedergabe vollständig beendet haben, wird
die DVD neu gestartet.
Schneller Vor-/Rücklauf
Die DVD kann vorwärts und rückwärts in
erhöhter Geschwindigkeit abgespielt werden.
Um die DVD schnell vor- bzw. zurücklaufen zu
lassen,
f drücken Sie die Taste / ? so
oft, bis die gewünschte Geschwindigkeit
erreicht ist, oder halten Sie die Taste /
H gedrückt.
Die Geschwindigkeit wird mit jedem Drücken
der Taste / ? in Schritten bis zu
64facher Geschwindigkeit erhöht.
Um zur normalen Geschwindigkeit zurückzukehren,
Die Wiedergabe wird unterbrochen; der
Bildschirm wird schwarz. Im Display wird
„CONTINUE“ angezeigt.
f drücken Sie die Taste PLAY/PAUSE /
2 bzw. lassen Sie Taste / H los.
7 620 210 015/020-022 | 05.2015Robert Bosch Car Multimedia GmbH
Page 24
24 | de
DVD-Betrieb
Hinweise:
f Die Geschwindigkeitsänderung
wird nicht im Display angezeigt.
f Einige DVDs können nur bis zu
16fach schneller gespielt
werden.
Kapitel überspringen
Ein Titel der DVD kann in mehrere Kapitel
unterteilt sein.
Um zum nächsten oder einem weiteren Kapitel
zu springen,
f drücken Sie ein- oder mehrmals die Tas te
3 oder H.
Die Wiedergabe springt zum Anfang des
nächsten bzw. entsprechend später folgenden
Kapitels.
f TITL (Titel wiederholen)
f CH (Kapitel wiederholen)
f OFF (Wiederholung beenden)
f Drücken Sie ggf. mehrfach die Taste
MENU G, um das Menü zu verlassen.
Untertitel einblenden
Um Untertitel ein- bzw. auszublenden und die
Sprache der Untertitel auszuwählen,
f drücken Sie die Taste SBTL L so oft, bis
die gewünschte Sprache bzw. keine Untertitel („SBTL OFF“) angezeigt werden.
Hinweis:
Die jeweils gewählte Untertitelsprache wird nicht im Display angezeigt.
Um zum Anfang des aktuellen oder einem der
vorangehenden Kapitel zu springen,
f drücken Sie ein- oder mehrmals die Tas te
3 oder H.
Die Wiedergabe springt zum Anfang des
aktuellen bzw. eines entsprechend vorangehenden Kapitels.
Kapitel oder Titel wiederholt
abspielen
Eine DVD kann mehrere Titel enthalten, die
jeweils in mehrere Kapitel unterteilt sein
können.
f Drücken Sie die Taste MENU G, um das
Menü zu öffnen.
f Drücken Sie die Taste MENU G so oft,
bis „RPT“ im Display angezeigt wird.
Bevorzugte Sprache für die Audiowiedergabe, Untertitel und das
DVD-Menü wählen
Um das Setup-Menü aufzurufen,
f drücken Sie die Taste SETUP :.
f Wählen Sie mit der Taste oder 6
den Menüpunkt „LANGUAGE“.
f Drücken Sie die Taste OK 5.
f Wählen Sie mit der Taste oder 6
einen dieser Menüpunkte:
f DVD MENU (DVD-Menü)
f DVD SUBT (Untertitel)
f DVD AUD (Audio)
f Drücken Sie dieTaste OK 5.
f Wählen Sie mit der Taste oder 6
eine der verfügbaren Sprachen aus.
f Drücken Sie die Taste SETUP :, um das
f Drehen Sie den Lautstärkeregler B nach
links bzw. rechts, um eine dieser Einstellung zu wählen:
7 620 210 015/020-022 | 05.2015 Robert Bosch Car Multimedia GmbH
Menü zu verlassen oder die Taste >,
um in das übergeordnete Menü zu
gelangen.
Page 25

DVD-Betrieb | Externe Video-Quelle
de | 25
DVD-Menü
Das DVD-Menü ist auf der DVD gespeichert und
erscheint automatisch auf dem Bildschirm,
wenn die DVD eingelegt und geladen ist.
Das DVD-Menü stellt in der Regel verschiedene
Untermenüs und Optionen wie z. B. „Film
starten“, „Kapitelauswahl“, „Sprachen“ usw.
zur Verfügung.
Hinweis:
Welche Auswahlmöglichkeiten Ihnen
das DVD-Menü anbietet, hängt von
der jeweiligen DVD ab.
DVD-Menü anzeigen lassen
f Drücken Sie die Taste MENU 4.
Die Wiedergabe wird unterbrochen und das
Externe Video-Quelle
Sie können eine externe Video-Quelle wie z. B.
einen Fernsehtuner über Kammer D des
ISO-Anschlusses (Pins D1 und D2) an dieses
Gerät anschließen.
Hinweis:
Falls die externe Quelle auch
Audiosignale ausgibt, verbinden Sie
den Audioausgang der externen
Quelle mit einem geeigneten
Audioeingang wie AUX-IN über
Kammer C3 des ISO-Anschlusses
(Pins 18 bis 20).
Sie können eine externe Videoquelle mit der
Taste SRC > auswählen. Im Display erscheint
de
DVD-Menü oder Stammmenü wird angezeigt.
Hinweis:
Um das DVD-Menü ohne Auswahl
einer Funktion zu verlassen und zur
Wiedergabe zurückzukehren,
drücken Sie die Taste MENU 4.
Menüeinträge auswählen und
bestätigen
Um zwischen den einzelnen Menüeinträgen zu
wählen,
f drücken Sie eine der Tasten / / /
6 bzw. / / / H.
Um einen Menüeintrag zu bestätigen,
f drücken Sie die Taste OK 5 / L.
Wenn Sie im DVD-Menü eine entsprechende
dann „EXT VID“.
Hinweis:
Wenn keine externe Videoquelle
angeschlossen ist oder die Videoquelle ausgeschaltet ist, wird ein
Schwarzbild angezeigt.
Auswahl treffen, z. B. „Film starten“, verlassen
Sie das DVD-Menü automatisch und die
Wiedergabe wird gestartet bzw. wieder
aufgenommen.
7 620 210 015/020-022 | 05.2015Robert Bosch Car Multimedia GmbH
Page 26
26 | de
Videoquelle für den Fahrer | CD-/MP3- und USB-Betrieb
Videoquelle für den
Fahrer
Sie können über einen (optionalen) KameraUmschalter bzw. eine (optionale) Video Box
angeschlossene Kameras auf einem Cockpitmonitor (z. B. 7“ Cockpit Display)wiedergeben. Diese Kameras können z. B. für die
rückwärtige Sicht aus dem Bus oder für die
Überwachung des Fahrgastraums eingesetzt
werden. Zusätzlich kann hier eine weitere
Videoquelle, z. B. die Kartendarstellung eines
Navigationssystems, angeschlossen werden.
Um die Kamera- und Videobilder auf dem
Cockpitmonitor wiederzugeben,
f drücken Sie die Taste CAM K.
Um während der Wiedergabe zwischen
verschiedenen Kameras und Video umzuschal-
CD-/MP3- und USBBetrieb
Hinweise:
f Die unterstützten Disc-Formate
finden Sie im Kapitel „DVDBetrieb“.
f Das Gerät ünterstützt USB-
Massenspeicher (USB 1.1 und
2.0) von bis zu 8 GB Speicherkapazität, die mit dem Dateisystem
FAT16 bzw. FAT32 formatiert
sind.
Video-CD-Betrieb
Die Wiedergabe startet automatisch nach
Einlegen der CD.
ten,
f drücken Sie ein- oder mehrmals die Taste
CAM K.
Befinden sich mehrere Titel auf der CD,
werden diese wie auf der CD gespeichert
nacheinander wiedergegeben.
Audio-/MP3-CD- und USB-Betrieb
Eigenschaften von MP3-/WMADateien
Hinweis:
Das Gerät unterstützt nicht die
folgenden WMA-Typen:
f Mit DRM (Digital Rights Manage-
ment) verschlüsselte Dateien
f Variable Bitraten
f WMA Pro
f 5.1 Surround
7 620 210 015/020-022 | 05.2015 Robert Bosch Car Multimedia GmbH
Wenn Sie eine CD mit MP3-/WMA-Dateien
erstellen, können Sie die Dateien und Ordner
Page 27

CD-/MP3- und USB-Betrieb
de | 27
benennen. Die Namen werden im Display des
Gerätes angezeigt.
Hinweis:
Andere Dateien als MP3-/WMADateien und Ordner, die keine MP3-/
WMA-Dateien enthalten werden vom
Gerät ignoriert.
Das Gerät behandelt MP3-/WMA-Dateien, die
im Root-Verzeichnis der CD gespeichert sind,
als Dateien im Ordner „Root“.
Beachten Sie Folgendes bei der Benennung
der MP3-/WMA-Dateien:
f Dateinamen müssen mindest ein Zeichen
enthalten.
einer Sampling-rate von min. 44,1
kHz.
de
Vorbereitung eines USB-Datenträgers
Damit das Gerät einen USB-Datenträger
erkennt, muss dieser als Massenspeicher
(Mass Storage Device) spezifiziert und im
Dateisystem FAT16 oder FAT32 formatiert sein
sowie MP3- oder WMA-Dateien enthalten.
Sie können auf einem USB-Datenträger
maximal 5000 Titel (ohne ID3-Tags) anlegen.
Die Verzeichnisse und die Titel können mit
diesem Gerät einzeln angewählt werden.
Verwenden Sie Titel mit ID3-Tags, verringert
sich diese maximale Anzahl der Dateien.
Bosch kann nicht für die einwandfreie Funktion
f Umlaute dürfen nicht verwendet werden.
f Die Dateiendung muss „.mp3“ bzw. „wma“
lauten.
MP3-Dateien sollten folgende Eigenschaften
aufweisen:
f Bitrate von 32 kbit/s bis 320 kbit/s.
f Sampling-Rate von 8 kHz bis 48 kHz.
WMA-Dateien sollten folgende Eigenschaften
haben:
f Konstante Bitrate von 8 kbit/s bis 384
kbit/s.
f Sampling-Rate von 8 kHz bis 48 kHz.
Hinweis:
Um eine geringe Wiedergabequalität
aller auf dem Markt erhältlichen USB-Daten-
träger garantieren.
ID3-Tags
MP3-Titel können zusätzliche Informationen
wie Interpret, Titelname und Album enthalten
(ID3-Tags). Dieses Gerät kann ID3-Tags der
Version 1 und der Version 2 im Display
anzeigen.
Wiedergabe starten/unterbrechen/
beenden
Nach Einlegen der CD startet die Wiedergabe
automatisch.
Wenn bereits eine CD im Laufwerk ist,
f drücken Sie die Taste SRC C so oft, bis
„CD“ im Display erscheint.
zu vermeiden, empfehlen wir die
Verwendung von Musikdateien mit
einer Bitrate von min. 128 kbit/s und
Um einen USB-Datenträger (z.B. USB-Stick
oder USB-Festplatte) anschließen zu können,
7 620 210 015/020-022 | 05.2015Robert Bosch Car Multimedia GmbH
Page 28
28 | de
CD-/MP3- und USB-Betrieb
muss das USB-Kabel an die Mini-USB-Buchse
angeschlossen werden.
J
f Schließen Sie den USB-Datenträger an
das USB-Kabel an.
Sobald ein USB-Datenträger angeschlossen
ist, kann er mit der Taste SRC C ausgewählt
werden. Im Display erscheint dann „USB“.
Um die Wiedergabe zu unterbrechen,
f drücken Sie die Taste 4 L oder STOP
/ @ oder die Taste PLAY/PAUSE /
2.
Um die Wiedergabe vollständig zu beenden,
f drücken Sie zweimal dieTaste 4 L
oder STOP / @.
Um eine unterbrochene Wiedergabe fortzusetzen bzw. um bei beendeter Wiedergabe die CD
Schneller Suchlauf (hörbar)
Um den schnellen Suchlauf vorwärts oder
rückwärts zu starten,
f drücken Sie die Taste / ? so
oft, bis die gewünschte Geschwindigkeit
erreicht ist, oder halten Sie die Taste /
H gedrückt.
Die Geschwindigkeit wird mit jedem Drücken
der Taste / ? in Schritten bis zu
64facher Geschwindigkeit erhöht.
Um zur normalen Geschwindigkeit zurückzukehren,
f drücken Sie die Taste PLAY/PAUSE /
2 bzw. lassen Sie Taste / H los.
Hinweis:
Die Geschwindigkeitsänderung wird
von vorn zu spielen,
f drücken Sie die Taste 3 L PLAY/
PAUSE / 2.
Titel überspringen
Um während der Wiedergabe zu einem
vorherigen bzw. einem der nächsten Titel zu
wechseln,
f drücken Sie ein- oder mehrmals die Taste
oder 3 bzw. die Taste /
.
H
Ordner überspringen (nur MP3)
Um während der Wiedergabe zu einem
vorherigen bzw. einem der nächsten Ordner zu
wechseln,
f drücken Sie ein- oder mehrmals die Taste .
nicht im Display angezeigt.
Wiederholfunktion
f Drücken Sie die Taste MENU G, um das
Menü zu öffnen.
f Drücken Sie die Taste MENU G so oft,
bis „RPT“ im Display angezeigt wird.
f Drehen Sie den Lautstärkeregler B nach
links bzw. rechts, um eine dieser Einstellung zu wählen:
f TRK (Titel wiederholen)
f DIR (Ordner wiederholen; nur MP3)
f OFF (Wiederholung beenden)
f Drücken Sie ggf. mehrfach die Taste
MENU G, um das Menü zu verlassen.
/ 6 bzw. die Taste oder
H.
7 620 210 015/020-022 | 05.2015 Robert Bosch Car Multimedia GmbH
Page 29

CD-/MP3- und USB-Betrieb | Weitere Einstellungen
de | 29
Zufallswiedergabe
Hinweis:
Diese Funktion steht bei der
Wiedergabe von VCD, SVCD und
DVD-Video nicht zur Verfügung.
f Drücken Sie die Taste MENU G, um das
Menü zu öffnen.
f Drücken Sie die Taste MENU G so oft,
bis „MIX“ im Display angezeigt wird.
f Drehen Sie den Lautstärkeregler B nach
links bzw. rechts, um eine dieser Einstellung zu wählen:
f MED / ALL (ganzes Medium zufällig
wiedergeben)
f DIR (Ordner zufällig wiedergeben;
f Drehen Sie den Lautstärkeregler B nach
links bzw. rechts, um Laufschrift aus- bzw.
einzuschalten.
f Drücken Sie ggf. mehrfach die Taste
MENU G, um das Menü zu verlassen.
Bei der Einstellung „SCRL OFF“ wird die Titelinformation in Abschnitten von jeweils 8 Zeichen
im Display angezeigt. Dabei wird jeder
Textabschnitt sowie Titelnummer und Spielzeit
im kontinuierlichen Wechsel für jeweils
5 Sekunden anzeigt.
Weitere Einstellungen
Das Setup des Gerätes bietet Ihnen Möglichkeiten, Einstellungen nach Ihren Anforderungen
vorzunehmen.
de
nur MP3)
f OFF (Zufallswiedergabe beenden)
f Drücken Sie ggf. mehrfach die Taste
MENU G, um das Menü zu verlassen.
Anzeige von Titelinformationen als
Laufschrift ein-/ausschalten (SCRL)
Um die Anzeige von Titelinformationen beim
Start eines Titels als Laufschrift ein- bzw auszuschalten,
f wechseln Sie ggf. zuerst in den CD- bzw.
MP3-/WMA-Betrieb.
f Drücken Sie die Taste MENU G, um das
Menü zu öffnen.
f Drücken Sie die Taste MENU G so oft,
bis „SCRL“ und die aktuelle Einstellung
„OFF“ (aus) oder „ON“ (ein) im Display
Einstellungen für angeschlossene
Geräte
Bildschirmformat einstellen
Ihnen stehen die folgenden Einstellungen für
das Bildschirmformat zur Verfügung:
f NORM PS: Der DVD-Player ist an einem
4:3-Bildschirm angeschlossen. Das
Breitbild wird auf dem Bildschirm in voller
Breite mit schwarzen Balken am oberen
und unteren Rand des Bildschirms
gezeigt.
f NORM LB: Der DVD-Player ist an einem
4:3-Bildschirm angeschlossen. Das
Breitbild wird über die volle Höhe des
Bildschirms gezeigt. Der linke und rechte
Rand des Breitbildes werden automatisch
angezeigt werden.
abgeschnitten.
f WIDE / BREIT: Der DVD-Player ist an
einem 16:9-Bildschirm angeschlossen.
7 620 210 015/020-022 | 05.2015Robert Bosch Car Multimedia GmbH
Page 30
30 | de
Weitere Einstellungen
Das Breitbild wird auf dem Bildschirm in
voller Größe gezeigt.
Um das Setup-Menü aufzurufen,
f drücken Sie die Taste SETUP :.
f Wählen Sie mit der Taste oder 6
den Menüpunkt, der die aktuelle Einstellung anzeigt („NORM PS“, „NORM LB“
oder „WIDE“).
f Wählen Sie mit der Taste oder 6 die
gewünschte Einstellung aus.
f Drücken Sie die Taste SETUP :, um das
Menü zu verlassen, oder die Taste oder
6, um einen anderen Menüpunkt
auszuwählen.
Farbfernsehnorm des Bildschirms
f Wählen Sie mit der Taste oder 6 die
gewünschte Einstellung aus.
f Drücken Sie die Taste SETUP 8, um das
Menü zu verlassen, oder die Taste oder
6, um einen anderen Menüpunkt
auszuwählen.
Kindersicherung
Sie können die Wiedergabe von DVDs, die für
Minderjährige ungeeignet sind, durch
Festlegen einer Altersfreigabe (Rating Level)
verhindern. Unterstützt eine DVD die Altersfreigabe und entspricht sie nicht der am Gerät
eingestellten Altersfreigabe, wird sie nicht
wiedergegeben.
Hinweis:
einstellen
Für eine optimale Bildqualität stellen Sie am
DVD-Player die Farbfernsehnorm ein, nach der
der angeschlossene Bildschirm arbeitet.
„PAL“ ist die für den europäischen Raum,
„NTSC“ die für den amerikanisch/asiatischen
Raum gültige Farbfern sehnorm.
Hinweis:
Eine Änderung dieser Einstellung
wird erst nach dem Ausschalten und
Wiedereinschalten des Gerätes mit
der Fahrzeugzündung wirksam.
Um das Setup-Menü aufzurufen,
f drücken Sie die Taste SETUP 8.
f Wählen Sie mit der Taste oder 6
Nicht alle DVDs unterstützen
Altersfreigaben.
Die folgenden Altersfreigaben (orientiert an
den Vorgaben des Verbands der amerikanischen Filmindustrie MPAA) stehen zur
Verfügung:
f KID SAVE: Zugelassen für Kinder
f GAMMA: Zugelassen für Kinder
f PG: Begleitung während der Wiedergabe
durch einen Erwachsenen wird empfohlen.
f PG13: Begleitung durch einen Erwachse-
nen wird empfohlen, nicht für Kinder
unter 13 Jahren geeignet.
f PGR: Begleitung durch einen Erwachse-
nen wird empfohlen, Inhalt mit Darstelden Menüpunkt, der die aktuelle Einstellung anzeigt („PAL“ oder „NTSC“).
7 620 210 015/020-022 | 05.2015 Robert Bosch Car Multimedia GmbH
lung von Gewalt, obszöne Sprache usw.
f R: Verboten für Kinder und Jugendliche,
Inhalt mit Darstellung von Gewalt,
Page 31

Weitere Einstellungen | Externe Audioquellen
de | 31
obszöne Sprache usw.
f NC17: Inhalt für Jugendliche unter 17
Jahren nicht geeignet.
f ADULT: Inhalt nur für Erwachsene:
Gewalt, Sex etc.
Kindersicherung festlegen
Um das Setup-Menü aufzurufen,
f drücken Sie die Taste SETUP :.
f Wählen Sie mit der Taste oder 6
den Menüpunkt „PARENTAL“.
f Drücken Sie die Taste OK 5.
f Wählen Sie mit der Taste oder 6 die
gewünschte Einstellung aus.
f Drücken Sie die Taste SETUP :, um das
Menü zu verlassen, oder die Taste
>, um in das jeweils übergeordnete
Externe Audioquellen
Sie können über die Front-AUX-IN-Buchse (AUX
FRNT) verschiedene Arten von externen
Audioquellen an das Gerät anschließen.
Front-AUX-Eingang
Erhöhte Verletzungsgefahr
durch Stecker!
Hervorstehende Stecker in der
Front-AUX-IN-Buchse I können im
Falle eines Unfalls zu Verletzungen
führen.
Verwenden Sie aus diesem Grund nur
abgewinkelte Klinkenstecker.
Sobald eine externe Audioquelle an die
de
Menü zu gelangen.
Front-AUX-IN-Buchse I angeschlossen ist,
kann sie mit der Taste SRC C ausgewählt
werden. Im Display erscheint dann „AUX
FRNT“.
Pegel des AUX-Eingangs einstellen
Sie können den Pegel des AUX-Eingangs
einstellen und so den Pegel der externen
Audioquelle an den Pegel der geräteeigenen
Audioquellen (wie z.B. Radio und USB)
anpassen.
Hinweis:
Sie können den Pegel für den
AUX-Eingang nur einstellen, wenn er
mit der Taste SRC C als Audioquelle
angewählt ist.
7 620 210 015/020-022 | 05.2015Robert Bosch Car Multimedia GmbH
Page 32

32 | de
Externe Audioquellen | Vorverstärkerausgang | Einbau
f Drücken Sie ggf. die Taste SRC C so oft,
bis die AUX-Quelle im Display angezeigt
wird.
f Drücken Sie die Taste MENU G.
„GAIN“ und die aktuelle Einstellung werden
angezeigt.
f Drehen Sie den Lautstärkeregler C nach
links bzw. rechts, um den Pegel zwischen
–9 und +9 einzustellen.
Um das Menü zu verlassen,
f drücken Sie ggf. mehrfach die Taste
MENU G.
Vorverstärkerausgang
Sie können einen zusätzlichen Verstärker an
das Gerät anschließen. Dazu muss der
Verstärker an der Geräterückseite angeschlos-
Einbau
Hinweise für den Einbau
Bei der Wahl des Einbauortes ist folgendes zu
beachten:
f Unter der Fläche, auf die das Gerät
montiert werden soll, dürfen sich keine
Drähte oder Rohrleitungen befinden.
Installieren Sie das Gerät nicht an einem Ort,
f der direkter Sonneneinstrahlung ausge-
setzt ist,
f der sich in der Nähe von Warmluft-
auslässen (Heizung usw.) befindet,
f der Regen oder Feuchtigkeit ausgesetzt
ist,
f der Staub oder Schmutz ausgesetzt ist,
f der starken Vibrationen ausgesetzt ist.
sen werden.
Lieferumfang
f Bedienungsanleitung
f Einbaurahmen
f Führungsbolzen
f Zubehör für Kammer A und B
(8 649 494 026)
f Anschlusskabel für Kammer C1
(8 649 492 033)
f Anschlusskabel für Kammer C3
(8 649 492 022)
f USB-Anschlusskabel
(8 649 494 018)
f Mikrofon-Anschlusskabel
(8 675 501 012)
f IR-Fernbedienung (inkl. zwei Batterien
1,5 V)
7 620 210 015/020-022 | 05.2015 Robert Bosch Car Multimedia GmbH
f Ausbauwerkzeug
Page 33

Einbau
de | 33
Montage
Hinweis:
Beachten Sie beim Anschluss des
Gerätes das Kapitel „ISO connector“.
Wenn Sie das Gerät selbst einbauen möchten,
verwenden Sie dazu den mitgelieferten Einbaurahmen.
Den DVP können Sie in einem Winkel von –20°
bis +60° um die Querachse und in einem
Winkel von –20° bis +20° um die Längsachse
einbauen.
Die optimale Wiedergabeleistung des Laufwerks wird bei einem Montagewinkel von ±5°
zur Horizontalen erreicht (nach vorn/hinten
und/oder rechts/links).
Hinweis:
Achten Sie darauf, dass bei der
Montage die Anschlusskabel nicht
gequetscht werden.
de
53
182
165
1-20
7 620 210 015/020-022 | 05.2015Robert Bosch Car Multimedia GmbH
Page 34

34 | de
Technische Daten
Technische Daten
Betriebsspannung: 12 V
Ruhestromaufnahme: < 1 mA
Betriebstemperatur: –20˚C bis +70˚C
Verstärker
Ausgangsleistung: 2 x 20 Watt V rms
an 4 Ohm
Preamp-Ausgang: 2 x 1.0 V rms
Tuner
Wellenbereiche Europa:
VHF (FM): 87.5 – 108 MHz
MW: 522 – 1629 kHz
Wellenbereiche Philippinen:
FM: 87.5 – 108.0 MHz
AM: 522 – 1629 kHz
Wellenbereiche Australien/Neu-Seeland:
FM: 87.5 – 108.0 MHz
AM: 522 – 1710 kHz
Video
Laser: 655/785 nm
Farbnormen: PAL, NTSC
Frequenzbereich: 20 Hz bis 20 kHz
Video-Ausgangspegel
Graustufen: 1,0 Vpp, 75 Ω
LW: 153 – 279 kHz
SW: 5800 – 6300 kHz
NAFTA-Wellenbereiche:
FM: 87.7 – 107.9 MHz
AM: 530 – 1710 kHz
WTH: 162.4 – 162.55 MHz
APAC- und MENA-Wellenbereiche:
FM: 87.5 – 108.0 MHz
AM: 531 – 1602 kHz
Wellenbereiche Südamerika:
FM: 87.5 – 108.0 MHz
AM: 530 – 1710 kHz
Wellenbereiche Taiwan:
Gewicht: ca. 1,42 kg
Abmessungen
(BxHxT in mm): 178 x 50 x 162
Normen: CE, E1, FCC, RoHS,
MVSS302, WEEE
FM: 87.7 – 107.9 MHz
AM: 531 – 1602 kHz
7 620 210 015/020-022 | 05.2015 Robert Bosch Car Multimedia GmbH
Änderungen vorbehalten.
Page 35

Controls
en | 35
1 LIGHT to switch on the button illumina-
tion of the remote control for about 10
seconds
2 PLAY/PAUSE / to start and pause
playback
3 / to skip chapters or titles
4 MENU to open the main menu of the DVD.
5 OK / ENTER to select and confirm menu
entries in the main menu of the DVD and
start playback
6 Arrow buttons for title and folder selection
and navigation within the menus
; SBTL to switch between the subtitles
available on the DVD
< USB to switch to USB mode
= VIDEO to toggle between DVD/CD/MP3
mode and an external audio/video source
en
> for switching in the menu to the next
higher menu level
? / to activate fast rewind / fast
forward
@ STOP / to stop playback
A to eject the CD/DVD
/ to switch to other titles, to change
menu settings and to select entries in the
DVD menu
/ to switch to other folders (with
MP3/WMA/data CDs/DVDs), to select
entries in menus and in the DVD menu
7 VOLUME –/+ to change the volume
8 RADIO to switch to radio mode
9 AUX to switch to AUX mode
: SETUP to open the DVD Setup menu
7 620 210 015/020-022 | 05.2015Robert Bosch Car Multimedia GmbH
Page 36

36 | en
Controls
B Volume control to change the volume
C SRC button to select between radio and
DVD/CD, USB, AUX and external video
D to switch the device on and off; mute
function
E Display
F DVD slot
G MENU to call up the menu for basic set-
tings
H Multifunction rocker
I Front AUX-IN socket
J Mini USB socket
K CAM to toggle between available camera
inputs
L Button group 1–6
M AUD button
Short press: To open the audio menu for
setting bass, middle, treble, balance and
loudness
Long press: To restore factory tone settings
N BND
Short press: To select the memory bank
or waveband
Long press: To start the Travelstore
function
O IR sensor
7 620 210 015/020-022 | 05.2015 Robert Bosch Car Multimedia GmbH
Page 37

Table of Contents
Table of Contents
en | 37
40 General notes
40 Intended use
41 DVD country codes
41 Disposal of old unit
41 Preparing the remote control for
use
41 Inserting the batteries
41 Selecting the IR input
42 Using the remote control
42 Switching on/off
42 Switching on/off with the On/Off
button
42 Switching on/off with a microphone
43 Switching on/off via the vehicle
ignition
43 Setting the switch-off time (HOUR)
43 Adjusting the volume
43 Mute (MUTE)
43 Canceling mute
43 Microphone mode
43 Starting microphone mode (MIC)
43 Adjusting the volume of the micro-
phone announcement
44 Connection cable
44 Switching the confirmation beep
(BEEP) on/off
44 Adjusting the maximum power-on
volume (ONVOL)
45 Tone and display
45 Adjusting the treble (TREB), middle
(MID) and bass (BASS)
45 Adjusting the left/right volume
balance (BAL)
45 Switching the loudness (LD) on and
off
45 Resetting the tone
46 Adjusting the display brightness
en
7 620 210 015/020-022 | 05.2015Robert Bosch Car Multimedia GmbH
Page 38

38 | en
Table of Contents
46 Radio operation
46 Switching to radio mode
46 RDS convenience functions (AF, REG)
47 Switching the RDS convenience
function on/off
47 Switching REG on/off (only when the
tuner region is EUROPE)
47 Selecting the waveband / memory
bank
47 Tuning into a station
47 Automatic station search
48 Adjusting the sensitivity of the station
search (SENS)
48 Manual radio station tuning
48 Storing stations
48 Storing stations manually
48 Storing stations automatically
(T-STORE)
49 Listening to stored stations
49 Scanning through the preset stations
(PRSTSCAN)
49 Starting the scan
49 Stopping the scan
49 Scanning receivable stations
(BANDSCAN)
49 Starting the scan
49 Stopping the scan
50 Switching radio text on/off
(RADIOTXT)
50 Program type (PTY)
50 Switching PTY on and off
50 Selecting the program type
50 Starting the PTY search
51 Treble reduction feature during
interference (HCUT)
51 Setting button functions (
KEY PRG
)
52 Traffic information
52 Switching traffic information priority
on/off
52 Setting the volume increase for traffic
announcements
52 Canceling traffic announcements
53 DVD operation
54 Inserting a DVD/CD and starting
playback
54 Removing a DVD/CD
54 Starting/pausing/stopping playback
54 Pausing/stopping playback
54 Freeze frame
54 Continuing playback
55 Fast forward/reverse search
55 Skipping a chapter
55 Repeated playback of a chapter or
title
55 Displaying subtitles
55 Selecting the preferred language for
audio playback, subtitles and the
DVD menu
56 DVD menu
56 Displaying the DVD menu
56 Selecting and confirming menu
entries
57 External video source
57 Video source for the driver
7 620 210 015/020-022 | 05.2015 Robert Bosch Car Multimedia GmbH
Page 39

Table of Contents
en | 39
58 CD/MP3 and USB mode
58 Video CD mode
58 Audio/MP3 CD and USB mode
58 Properties of MP3/WMA files
59 Preparing a USB data carrier
59 ID3 tags
59 Starting/pausing/stopping playback
59 Skipping a track
59 Skipping a folder (only MP3)
59 Fast searching (audible)
60 Repeat function
60 Mix function
60 Switching the display of track
information as scrolling text on/off
(SCRL)
61 Additional settings
61 Settings for connected devices
61 Adjusting the display format
61 Adjusting the color television
standard of the display
61 Parental control
62 Setting the parental control
62 External audio sources
62 Front AUX input
62 Adjusting the level of the AUX input
63 Preamplifier output
63 Installation
63 Installation notes
63 Scope of delivery
64 Installation
65 Technical data
65 Amplifier
65 Tuner
65 Video
en
445 ISO connector
7 620 210 015/020-022 | 05.2015Robert Bosch Car Multimedia GmbH
Page 40

40 | en
General notes
General notes
Thank you for choosing a Bosch product. We
hope you enjoy using this new piece of
equipment.
Please read these operating instructions
before using the equipment for the first time.
We provide a manufacturer warranty for our
products bought within the European Union.
Devices purchased outside the European
Union are subject to the warranty terms
published by our respective regional agency.
Intended use
The device has been designed to operate in a
commercial vehicle with a 12 V vehicle power
supply and to be fitted in a 1-DIN slot.
Danger of injuries
This device is a CLASS 1 laser
product.
f Never look directly into the laser
beam.
f Do not attempt to look inside the
housing or to open it.
f Service work should be
performed only by qualified
personnel.
Danger of accidents, injuries
or fire
Dismantling the device may cause an
electric shock or fire.
Liquid that enters the device may
Road safety
Road safety has absolute priority.
f Familiarize yourself with the
device before setting off on your
journey.
f Only operate this device if the
road and traffic conditions allow
you to do so.
f The driver of the vehicle may
view video images only while
the vehicle is stationary.
You should always be able to hear
police, fire and ambulance sirens in
good time from inside your vehicle.
f For this reason, listen to your car
sound system at a suitable
volume level during your journey.
cause electric shock, short circuit or
fire.
A malfunctioning device (e.g.
indicated by a frozen display or poor
audio quality) may cause acidents, an
electric shock or fire.
f Do not attempt to open the
housing.
f Do not place drinks or other
liquids near the device.
f Do not continue to use a
malfunctioning device.
7 620 210 015/020-022 | 05.2015 Robert Bosch Car Multimedia GmbH
Page 41

General notes | Preparing the remote control for use
en | 41
DVD country codes
Part number Country code
7 620 210 015 RC2 (Europe)
7 620 210 020 RC1 (NAFTA)
7 620 210 021 RC4 (Latin America)
7 620 210 022 RC5 (Africa, Asia)
Disposal of old unit
Do not dispose of your old device in the
household trash!
Use the return and collection systems available
to dispose of the old device.
Preparing the remote
control for use
When you operate the device for the first time,
you must first insert the batteries in the remote
control.
Inserting the batteries
en
f Open the battery compartment by
removing the cover.
f Insert the new batteries. Battery classifi-
cation: Two AAA batteries. Make sure that
the battery poles are positioned as shown
in the battery compartment.
f Close the battery compartment.
Selecting the IR input
The device may be installed in a location where
the integrated IR sensor O cannot be reached
by the remote control. In this case you can
install an optional external IR sensor
(7 607 005 726) in a suitable location and
connect it to the device via chamber D of the
ISO connector. If the external IR sensor is to be
used, you have to select the IR input via
chamber D.
To toggle between the IR input via chamber D
(REAR IR) and the integrated IR sensor O
(FRONT IR),
f press the MENU G button to open the
menu.
f Press the MENU G button repeatedly
until “REAR IR” or “FRONT IR” appears on
the display.
f Turn the volume control B to the left or
right in order to switch between the
settings.
7 620 210 015/020-022 | 05.2015Robert Bosch Car Multimedia GmbH
Page 42

42 | en
Preparing the remote control for use | Switching on/off
In order to leave the menu,
f press the MENU G button, repeatedly if
necessary.
Note:
When the external IR input via
chamber D is activated, the integrated IR sensor O is deactivated.
Using the remote control
Point the remote control at the infrared
receiver at the front of the device (or at
the separate infrared receiver, if installed).
From its front side, the infrared receiver can
“see” an area of approximately 30° in all
directions. Hold the remote control in this area
when you press a button.
Switching on/off
There are various ways of switching the device
on/off:
Switching on/off with the On/Off
button
f Press the On/Off button D to switch on.
f To switch the device off, press and hold
down the On/Off button D for longer
than two seconds.
Note:
To protect the vehicle battery, the
device is automatically switched off
after an adjustable time period if the
vehicle ignition is switched off (see
the section “Setting the switch-off
time” in this chapter).
Switching on/off with a microphone
If a microphone is connected to the device, the
device can be switched on and off with the
microphone for making announcements. For
further details read the “Microphone mode”
section in the “Adjusting the volume” chapter.
f Switch the microphone on while the
device is switched off.
The device automatically switches on and
allows you to make announcements over the
connected loudspeakers.
f Switch off the microphone.
The device switches off again.
7 620 210 015/020-022 | 05.2015 Robert Bosch Car Multimedia GmbH
Page 43

Switching on/off | Adjusting the volume
en | 43
Switching on/off via the vehicle
ignition
If the device is connected to the vehicle’s
ignition and you did not switch the device off
by pressing the On/Off button D, it is
switched on or off with the vehicle ignition.
Setting the switch-off time (HOUR)
f Press the MENU G button to open the
menu.
f Press the MENU G button repeatedly
until “HOUR” appears on the display along
with the current setting.
f Turn the volume control B to the left or
right in order to set the switch-off time to
between 1 and 60 minutes.
In order to leave the menu,
Adjusting the volume
You can adjust the system volume in increments from 0 (off) to 32 (maximum).
f To increase the system volume, turn the
volume control B clockwise.
f To reduce the system volume, turn the
volume control B counterclockwise.
en
Mute (MUTE)
To mute the system volume abruptly,
f briefly press the D button.
Canceling mute
To return to your previously set volume level,
f briefly press the D button again.
Microphone mode
f press the MENU G button, repeatedly if
necessary.
You can connect one microphone to the
device.
Starting microphone mode (MIC)
f Switch on the microphone.
“MIC” appears in the display.
The microphone announcement is outputted
over the radio’s loudspeakers.
Adjusting the volume of the microphone announcement
To adjust the volume,
f turn the volume control B while
microphone mode is active.
Note:
The microphone volume that was set
last remains stored in the memory.
7 620 210 015/020-022 | 05.2015Robert Bosch Car Multimedia GmbH
Page 44

44 | en
Adjusting the volume
Connection cable
A microphone cable (part no. 8 675 501 012)
is available for connecting the microphone to
the device.
Switching the confirmation beep
(BEEP) on/off
For certain actions, e.g. long press of a button,
a confirmation beep sounds. You can switch off
the confirmation beep:
f Press the MENU G button to open the
menu.
f Press the MENU G button repeatedly
until "BEEP" appears on the display, along
with the current setting “ON” or “OFF”.
f Turn the volume control B to the left or
right in order to switch the confirmation
f Press the MENU G button to open the
menu.
f Press the MENU G button repeatedly
until “ONVOL” appears on the display
along with the current setting.
f Turn the volume control B to the left or
right in order to set the switch-on volume
to between 5 and 25.
In order to leave the menu,
f press the MENU G button, repeatedly if
necessary.
tone on or off.
In order to leave the menu,
f press the MENU G button, repeatedly if
necessary.
Adjusting the maximum power-on
volume (ONVOL)
When you switch on the device, it plays at the
previously selected volume. However, if you
adjusted the volume before switch-off to be
higher than the maximum power-on volume,
the volume is automatically limited to the
adjusted power-on volume when you switch it
on again.
Note:
To protect your hearing, the maximum power-on volume is limited to
25.
7 620 210 015/020-022 | 05.2015 Robert Bosch Car Multimedia GmbH
Page 45

Tone and display
en | 45
Tone and display
Adjusting the treble (TREB), middle
(MID) and bass (BASS)
f Press the AUD M button to open the
menu.
f Press the AUD M button repeatedly until
“BASS”, “MID” or “TREB” appears on the
display along with the current setting.
f Turn the volume control B to the left or
right in order to set the bass, middle or
treble levels to between +7 and -7.
In order to leave the menu,
f press the AUD M button, repeatedly if
necessary.
Adjusting the left/right volume bal-
Switching the loudness (LD) on
and off
f Press the AUD M button to open the
menu.
f Press the AUD M button repeatedly until
“LD” appears on the display, along with
the current setting “ON” or “OFF”.
en
f Turn the volume control B to the left or
right in order to switch the loudness on or
off.
In order to leave the menu,
f press the AUD M button, repeatedly if
necessary.
Resetting the tone
You can reset all the tone adjustments to their
factory default settings (TREB, MID, BASS,
ance (BAL)
f Press the AUD M button to open the
menu.
f Press the AUD M button repeatedly until
“BAL” appears on the display along with
the current setting.
f Turn the volume control B to the left or
right in order to set the volume balance to
between +10 and -10.
In order to leave the menu,
f press the AUD M button, repeatedly if
necessary.
BAL: 0; LD: OFF).
f Press the AUD M button to open the
menu.
f Press the AUD M button repeatedly until
“RESET N” appears in the display.
f Turn the volume control B to the right in
order to select “RESET Y”.
After about 2 seconds all the tone adjustments
will be reset.
In order to leave the menu,
f press the AUD M button, repeatedly if
necessary.
Note:
You can reset the tone adjustments at
any time by holding down the AUD
M button for longer than 2 seconds.
This resets all tone adjustments for
the audio source being used at the
time.
7 620 210 015/020-022 | 05.2015Robert Bosch Car Multimedia GmbH
Page 46

46 | en
Tone and display | Radio operation
Adjusting the display brightness
f Press the MENU G button to open the
menu.
f Press the MENU G button repeatedly
until “DIMTN” appears on the display along
with the current setting.
f Turn the volume control B to the left or
right in order to set the display brightness
to between +5 and -5.
In order to leave the menu,
f press the MENU G button, repeatedly if
necessary.
Radio operation
This device is equipped with an RDS radio
receiver. Many of the receivable FM stations
broadcast a signal that carries not only the
program, but also additional information such
as the station name and program type (PTY).
The station name appears in the display as
soon as the tuner receives it.
Switching to radio mode
If you are in a different operating mode,
f press the BND N button
or
f press the SRC C button repeatedly until
“RADIO” appears on the display.
The display shows the current frequency or the
station name.
RDS convenience functions (AF,
REG)
The RDS convenience functions AF (Alternative
Frequency) and REG (Regional) expand the
range of performance of your radio device:
f AF: If the RDS convenience function is
activated, the device automatically
searches in the background for the best
receivable frequency of the set station.
f REG: At certain times, some radio stations
divide their program into regional
programs providing different content. The
activated REG function prevents the
device from switching to alternative
frequencies of the adjusted station that
are transmitting a different program
content.
7 620 210 015/020-022 | 05.2015 Robert Bosch Car Multimedia GmbH
Page 47

Radio operation
en | 47
Note:
f RDS is switched on at the
factory.
f The factory setting for REG is off,
and it must be switched on or off
separately in the menu.
Switching the RDS convenience
function on/off
f If necessary, first switch to FM radio
operation.
f Press the MENU G button to open the
menu.
f Press the MENU G button repeatedly
until “RDS” appears on the display, along
with the current setting “ON” or “OFF”.
f Turn the volume control B to the left or
Note:
The REG ON/OFF setting takes effect
only if the RDS function is active.
Selecting the waveband / memory
bank
This device can be used to receive programs
en
from the following frequency bands, depending on the tuner region:
f Europe: FM, MW, LW and SW
f NAFTA: FM, AM and WB (weather band)
f Others: FM and AM
There are three memory banks available for the
FM waveband (FM1, FM2 and FMT) and one
for each of the MW, LW, SW, AM and WB
wavebands. In addition, there is another AMT,
MWT, LWT or SWT memory bank. Six stations
right in order to switch RDS on or off.
f Press the MENU G button, repeatedly if
necessary, to close the menu.
The RDS convenience functions are active if
the RDS symbol appears on the display.
Switching REG on/off (only when
the tuner region is EUROPE)
f If necessary, first switch to radio opera-
tion.
f Press the MENU G button to open the
menu.
f Press the MENU G button repeatedly
until “REG” appears on the display, along
with the current setting “ON” or “OFF”.
f Turn the volume control B to the left or
right in order to switch REG on or off.
can be stored in each memory bank.
In order to switch between the wave bands or
memory banks,
f press the BND N button.
Tuning into a station
There are various ways of tuning into a station.
Automatic station search
Note:
Automatic station searching is only
available if the “AUTOSEEK” setting
for the or H buttons has been
selected (see the section on "Setting
button functions" in this chapter).
f Press the MENU G button, repeatedly if
necessary, to close the menu.
f Press the or H button.
The radio tunes into the next receivable
station.
7 620 210 015/020-022 | 05.2015Robert Bosch Car Multimedia GmbH
Page 48

48 | en
Radio operation
Note:
f If the priority for traffic informa-
tion is activated and if “PTY” is
switched off, the nearest traffic
information station is selected.
f If PTY is activated, the next
station of the selected program
type is selected.
Adjusting the sensitivity of the
station search (SENS)
You can select whether only strong stations
should be tuned into with low sensitivity or also
weak stations with high sensitivity.
f If necessary, first switch to radio opera-
tion.
f Press the MENU G button to open the
has been selected in the menu (see
the section on “Setting button
functions” in this chapter).
To change the set frequency quickly,
f hold down the or H button.
Storing stations
Storing stations manually
f Select the desired memory bank or
waveband.
f Tune into the station.
f Hold down one of the station buttons 1–6
L, on which you want to store the
station, for longer than two seconds.
The confirmation beep sounds. The station is
menu.
f Press the MENU G button repeatedly
until “SENS” appears on the display, along
with the current setting, “LO” (low
sensitivity) or “DX” (high sensitivity).
f Turn the volume control B to the left or
right in order to change between the
settings.
f Press the MENU G button, repeatedly if
necessary, to close the menu.
Manual radio station tuning
To change the set frequency in small increments,
f press the or H button.
Note:
stored on the selected station button. As long
as the saved station remains tuned, its memory
location (e.g. “P3”) is shown on the display.
Storing stations automatically
(T-STORE)
You can automatically store the six strongest
stations in the region. For the FM waveband,
the stations are stored in the FMT memory
bank, and for the AM (NAFTA) waveband in the
AMT memory bank. A common memory bank is
available for the MW, LW and SW (Europe)
wave bands. It is displayed as MWT, LWT or
SWT (depending on the wave band in which
the T-STORE function was last used).
Note:
Changing the frequency in steps is
only available if the “MANSEEK”
setting for the or H buttons
7 620 210 015/020-022 | 05.2015 Robert Bosch Car Multimedia GmbH
f Any stations that were previously
stored in this memory bank are
Page 49

Radio operation
en | 49
replaced by newly found
stations.
f If priority for traffic information
is active, only stations that carry
traffic information will be saved.
f If PTY is activated, only stations
of the currently selected
program type will be saved.
f Select the desired waveband.
f Press and hold down the BND N button
for longer than two seconds.
The storing procedure begins. The display
shows “T-STORE”. After the process has
completed, the radio will play the station that
is stored in memory location one of the FMT,
AMT, MWT, LWT or SWT memory banks.
“PRSTSCAN” briefly appears on the display.
Each station saved in the current memory bank
is played for about 5 seconds. At the same
time, the display shows the current frequency
or the station name.
Stopping the scan
en
f Press the or H button.
The scan process is stopped. The device
remains tuned to the previously played station.
Scanning receivable stations
(BANDSCAN)
This function allows you to scan all receivable
stations for about 5 seconds each.
Note:
Listening to stored stations
f Select the memory bank or waveband.
f Press the station button 1–6 L where
the desired station is stored.
Scanning through the preset stations (PRSTSCAN)
This function allows you to hear all the stored
stations for about 5 seconds each.
Note:
This function is only available if the
“PRSTSCAN” setting for the or
buttons has been selected in the
H
menu (see the section on “Setting
button functions” in this chapter).
This function is only available if the
“BANDSCAN” setting for the or
buttons has been selected in the
H
menu (see the section on "Setting
button functions" in this chapter).
Starting the scan
f Press the or H button.
“BANDSCAN” briefly appears on the display.
The device searches for stations in the current
waveband. Every station found is played for
about 5 seconds. At the same time, the display
shows the current frequency or the station
name.
Stopping the scan
f Press the or H button.
Starting the scan
f Press the or H button.
The scan process is stopped. The device
remains tuned to the previously played station.
7 620 210 015/020-022 | 05.2015Robert Bosch Car Multimedia GmbH
Page 50

50 | en
Radio operation
Switching radio text on/off
(RADIOTXT)
An FM station may broadcast RDS radio text. In
order to switch the display of radio text on or
off,
f first switch to FM radio operation if
necessary.
f Press the MENU G button to open the
menu.
f Press the MENU G button repeatedly
until “RADIOTXT” appears on the display
followed by the current setting “TEXT ON”
or “TEXT OFF”.
f Turn the volume control B to the left or
right in order to change between the
settings.
f Press the MENU G button, repeatedly if
Switching PTY on and off
f If necessary, first switch to FM radio
operation.
f Press the MENU G button to open the
menu.
f Press the MENU G button repeatedly
until "PTY" appears in the display.
f Turn the volume control B to the left or
right in order to select “PTY ON” or “PTY
OFF”.
f Press the MENU G button, repeatedly if
necessary, to close the menu.
Selecting the program type
Note:
“PTY” must be switched on.
necessary, to close the menu.
Program type (PTY)
Besides transmitting the station name, some
FM stations also provide information on the
type of program that they are broadcasting.
Examples of these program types could be:
CULTURE TRAVEL
WEATHER JAZZ MUSIC
NEWS POP MUSIC
You can use the PTY function to select stations
of a particular program type.
If PTY is switched on and a PTY seek tuning has
been started, the device automatically changes
from the current station or from another
operating mode to the station with the selected
program type.
f If necessary, first switch to FM radio
operation.
f Press the MENU G button to open the
menu.
f Press the MENU G button repeatedly
until “PTYTYPE” appears in the display.
f Turn the volume control B to select the
program type.
f Press the MENU G button, repeatedly if
necessary, to close the menu.
Starting the PTY search
Note:
PTY searching is only available if the
“PTY” is switched on, and if “AUTO-
7 620 210 015/020-022 | 05.2015 Robert Bosch Car Multimedia GmbH
SEEK” or “BANDSCAN” has been
selected for the or H buttons
Page 51

Radio operation
en | 51
(see the section on “Setting button
functions” in this chapter).
f Press the or H button to start seek
tuning.
If a station with the currently selected program
type is found, it is tuned into. If no station is
found offering this program type, the station
that was being received most recently is
restored.
Treble reduction feature during
interference (HCUT)
The HCUT function results in improved
playback in case of weak radio reception. If
reception interferences are present, the
interference level is automatically reduced.
f MANSEEK: Manually alter the frequency in
steps.
f PRSTSCAN: Sample the stations stored in
the current memory bank.
f BANDSCAN: Sample receivable stations in
the current waveband.
en
f If necessary, first switch to radio opera-
tion.
f Press the MENU G button to open the
menu.
f Press the MENU G button repeatedly
until “KEY PRG” appears in the display.
f Turn the volume control B to the left or
right in order to change between the
settings.
f Press the MENU G button, repeatedly if
f If necessary, first switch to radio opera-
tion.
f Press the MENU G button to open the
menu.
f Press the MENU G button repeatedly
until “HCUT” appears on the display, along
with the current setting of “OFF”, 1 or 2
(strength of the interference level cut).
f Turn the volume control B to the left or
right in order to adjust "HCUT" or to turn it
off.
f Press the MENU G button, repeatedly if
necessary, to close the menu.
Setting button functions (
KEY PRG
You can set the short press function of the
and H buttons in radio operation. The
necessary, to close the menu.
)
following settings are available:
f AUTOSEEK: Automatically search for the
next receivable station.
7 620 210 015/020-022 | 05.2015Robert Bosch Car Multimedia GmbH
Page 52

52 | en
Traffic information
Traffic information
Switching traffic information priority on/off
Notes:
f Traffic information priority is
only available in the tuner region
Europe.
f To switch the priority for traffic
information on, RDS must be
switched on.
To switch the priority for traffic information on
or off,
f if necessary, first switch to radio opera-
tion.
display shows “TRAFFIC” for the duration of
the announcement.
Setting the volume increase for
traffic announcements
You can adjust the number of volume steps
with which the traffic announcements are
played back louder than the set volume:
f If necessary, first switch to FM radio
operation.
f Press the MENU G button to open the
menu.
f Press the MENU G button repeatedly
until “TA DIFF” appears on the display
along with the current setting.
f Turn the volume control B to the left or
right in order to set the increase in volume
f Press the MENU G button to open the
menu.
f Press the MENU G button repeatedly
until “TP” appears in the display.
f Turn the volume control B to the left or
right in order to select “ON” or “OFF”.
f Press the MENU G button, repeatedly if
necessary, to close the menu.
Note:
This function is only available in the
DVD/CD, USB, AUX and video
operating modes if a TP station in the
FM waveband was tuned to last.
The priority for traffic announcements is
activated if the display shows the TP symbol.
to between 0 and 10.
In order to leave the menu,
f press the MENU G button, repeatedly if
necessary.
Note:
Using the volume control B, you can
adjust the volume during a traffic
announcement for the duration of
that announcement.
Canceling traffic announcements
To cancel an ongoing traffic announcement and
return to the previously playing audio source,
f press the SRC C button.
The priority for traffic announcements remains
activated.
As soon as the device receives a traffic
announcement, it is switched through. The
7 620 210 015/020-022 | 05.2015 Robert Bosch Car Multimedia GmbH
Page 53

DVD operation
en | 53
DVD operation
This device can be used to play DVDs, video
CDs (VCD), super video CDs (SVCD), commercial audio CDs and MP3 CDs.
Risk of severe damage to
the DVD drive!
f Noncircular contoured CDs
(shape CDs) must not be used.
f Do not affix stickers or labels to
the discs. These could peel off
and damage the DVD drive.
f Inserting 2 DVDs/CDs simulta-
neously damages the DVD drive.
Take care that you always insert
only one DVD/CD and make sure
that there is no DVD/CD already
We accept no responsibility for any
damage to the DVD drive that may
occur as a result of unsuitable DVDs/
CDs or an improperly inserted DVD/
CD.
This device is intended for the playback of
en
DVDs with the country code applying to your
region.
CD-Rs and CD-RWs (CDs you have burned
yourself) can usually be played. Due to the
varying quality of CDs, however, Bosch cannot
guarantee the proper functioning of all CDs.
To ensure proper functioning, use only CDs
with the Compact Disc logo. Copy-protected
CDs can cause playback problems. Bosch
cannot guarantee the proper functioning of
in the DVD drive.
If there is already a DVD/CD in
the DVD drive, the DVD symbol
is shown in the display.
f If the DVD/CD is inserted at a
slant, the DVD/CD will not enter
the DVD drive correctly. This can
damage the DVD/CD.
Take care to always insert the
DVD/CD straight.
copy-protected CDs!
Media you have created yourself, such as VCD/
SVCD, DVD±R and DVD±RW, can usually be
played.
Bosch cannot guarantee a perfect compatibil-
ity and flawless playback due to the wide
variety of available recordable media and
software used to create and write these media.
Disc formats supported by this player:
f DVD/CD with 12 cm or 8 cm diameter
f DVD±R/±RW
f Audio/video DVD with UDF file system
f CD-DA (audio CD), CD-R, CD-RW
f Video CD (VCD)
f Super video CD (SVCD)
f MP3 CD with MP3 files for music
playback. Only “Joliet” or “ISO 9660”
MP3 CD formats are supported.
7 620 210 015/020-022 | 05.2015Robert Bosch Car Multimedia GmbH
Page 54

54 | en
DVD operation
The following discs are not supported by this
player:
f CDV
f CD-G
Inserting a DVD/CD and starting
playback
Note:
You must not hinder or assist the
drive as it draws in the DVD/CD.
f Slide the DVD/CD with the printed side
facing upward into the DVD/CD slot F on
the front of the device until you feel a
slight resistance.
The DVD/CD is drawn into the drive; this
Note:
If you do not remove an ejected DVD/
CD, it is automatically pulled in again
after approx. 10 seconds.
Starting/pausing/stopping playback
After inserting the DVD, playback starts
automatically.
If there is already a DVD in the drive,
f press the SRC C button repeatedly until
“DVD” appears on the display.
Note:
If no DVD is inserted, a black screen
is displayed.
Pausing/stopping playback
process must not be hindered or aided.
The DVD/CD is loaded and playback starts
automatically. In the case of a DVD, either the
DVD menu is displayed (see the chapter “DVD
menu”) or playback of the first title begins.
This action is dependent upon the inserted
DVD.
Removing a DVD/CD
f Press the button A.
The DVD/CD is ejected.
Note:
You must not hinder or assist the
drive as it ejects the DVD/CD.
f Carefully remove the DVD/CD.
f Press the 4 button L or the STOP /
button @.
Playback is paused; the screen turns black.
The display shows “CONTINUE”.
To completely stop playback,
f press the 4 button L or the STOP /
button @.
Freeze frame
f During playback, press the 3 button
L or the PLAY/PAUSE / button 2.
Playback is paused and shown as a freeze
frame.
Continuing playback
f Press the 3 button L or the PLAY/
PAUSE / button 2.
7 620 210 015/020-022 | 05.2015 Robert Bosch Car Multimedia GmbH
If you previously only paused playback, it starts
again at the same point on the DVD. If you
Page 55

DVD operation
en | 55
completely stopped playback, the DVD is
restarted.
Fast forward/reverse search
The DVD can be played forward and reversed
at increased speed.
To play the DVD fast forward or fast reverse,
f press the / button ? repeatedly
until the desired speed is reached or press
and hold the or button H.
With every press of the / button ?
the speed is increased in increments up to 64
times.
To return to normal speed,
f press the PLAY/PAUSE / button 2 or
release the or button H.
Repeated playback of a chapter or
title
A DVD may contain several titles which, in turn,
can be divided into several chapters.
f Press the MENU G button to open the
menu.
f Press the MENU G button repeatedly
en
until “RPT” appears in the display.
f Turn the volume control B to the left or
right in order to select one of these menu
settings:
f TITL (repeat title)
f CH (repeat chapter)
f OFF (cancel repeat)
f Press the MENU G button, repeatedly if
necessary, to close the menu.
Notes:
f The changed speed will not be
indicated on the display.
f For some DVDs, the speed can
only be increased to 16 times.
Skipping a chapter
A DVD title can be divided into several
chapters.
To jump to the next or another chapter,
f press the button 3 or button H
once or several times.
Playback jumps to the beginning of the next or
the corresponding following chapter.
To jump to the beginning of the current or a
previous chapter,
f press the button 3 or button H
Displaying subtitles
To show or hide subtitles and to select the
language of the subtitles,
f press the SBTL button L repeatedly until
the desired language or no subtitles
(“SBTL OFF”) are displayed.
Note:
The selected language will not be
indicated on the display.
Selecting the preferred language
for audio playback, subtitles and
the DVD menu
To open the setup menu,
f press the SETUP button :.
f Press the or button 6 repeatedly
once or several times.
Playback jumps to the beginning of the current
or the corresponding previous chapter.
until “LANGUAGE” appears in the display.
f Press the OK button 5.
7 620 210 015/020-022 | 05.2015Robert Bosch Car Multimedia GmbH
Page 56

56 | en
DVD operation
f Select one of these menu items using the
or button 6:
f DVD MENU (DVD menu)
f DVD SUBT (subtitles)
f DVD AUD (audio)
f Press the OK button 5.
f Select one of the available languages
using the or button 6.
f Press the SETUP button : to exit the
menu or the button > to return to a
higher menu level.
DVD menu
The DVD menu is stored on the DVD and
appears automatically on the screen after
inserting and loading the DVD.
The DVD menu generally provides different
Selecting and confirming menu
entries
To switch between the individual menu entries,
f press one of the buttons / / /
6 or / / / H.
To confirm a menu entry,
f press the OK button 5 / L.
When you make a corresponding selection in
the DVD menu, e.g. “Start movie”, you
automatically leave the DVD menu and
playback starts or resumes.
submenus and options, such as “Start movie”,
“Chapter selection”, “Languages” etc.
Note:
The selection options offered by the
DVD menu are dependent upon the
respective DVD.
Displaying the DVD menu
f Press the MENU button 4.
Playback is paused and the DVD menu or main
menu is displayed.
Note:
To exit the DVD menu without
selecting a function and to return to
playback, press the MENU button
4.
7 620 210 015/020-022 | 05.2015 Robert Bosch Car Multimedia GmbH
Page 57

External video source | Video source for the driver
en | 57
External video source
You can connect an external video source, such
as a TV tuner, to this device via chamber D of
the ISO connector (pins D1 and D2).
Note:
If the external source also provides
audio signals, connect the audio
output of the external source to a
suitable audio input such as AUX-IN
via chamber C3 of the ISO connector
(pins 18 to 20).
You can select an external video source with
the SRC C button. The display shows “EXT
VID”.
Video source for the
driver
You can display the picture from connected
cameras on a cockpit monitor (e.g. 7” Cockpit
Display) via a Camera Switch (optional) or a
Video Box (optional). These cameras can be
used, for instance, to provide a rear view out of
en
the bus or for cabin surveillance. Furthermore,
an additional video source can be connected,
such as the map display of a navigation system.
To display the camera and video pictures on
the cockpit monitor,
f press the CAM button K.
To switch between various cameras and video
while a picture is being displayed,
f press the CAM button K once or several
times.
Note:
A black screen is displayed if no
external video source is connected or
if the video source is switched off.
7 620 210 015/020-022 | 05.2015Robert Bosch Car Multimedia GmbH
Page 58

58 | en
CD/MP3 and USB mode
CD/MP3 and USB mode
Notes:
f Supported disc formats are
listed in the chapter “DVD
mode”.
f The device supports USB 1.1
and 2.0 mass storage devices of
up to 8 GB storage capacity that
are formatted using the FAT16 or
FAT32 file system.
Video CD mode
Playback starts automatically after inserting
the CD.
If the CD contains several titles, they are played
successively in the order in which they are
Note:
Folders containing files other than
MP3 or WMA tracks are not displayed.
If MP3 or WMA files are stored in the root
directory itself, the root directory will also be
treated as a folder. The device then shows the
directory name “Root” as the folder name.
You must observe the following when assigning
file names:
f File names must be at least one character
long.
f Umlauts cannot be used when naming
files.
f File names must have the extension „mp3“
stored on the CD.
Audio/MP3 CD and USB mode
Properties of MP3/WMA files
Note:
The equipment does not support the
following types of WMA file:
f DRM (Digital Rights Manage-
ment) encrypted files
f Variable bit rate
f WMA Pro
f 5.1 Surround
When you create a disc with compressed
music files, you can assign names to the
or „.wma“.
The equipment supports the following types of
MP3 file:
f Constant and variable bit rates from 32
kbit/s to 320 kbit/s
f Sampling rates of 8 kHz to 48 kHz
The equipment supports the following types of
WMA file:
f Constant bit rates from 8 kbit/s to 384
kbit/s
f Sampling rates of 8 kHz to 48 kHz
Note:
Only use tracks with a bit rate of at
tracks and folders.
The radio/navigation system uses these
names for the corresponding display.
7 620 210 015/020-022 | 05.2015 Robert Bosch Car Multimedia GmbH
least 128 kbit/s and a sampling rate
of at least 44.1 kHz. Lower rates can
Page 59

CD/MP3 and USB mode
en | 59
cause a noticeable deterioration in
quality.
Preparing a USB data carrier
For the device to recognize a USB data carrier,
it must be specified as a mass storage device
and formatted using the FAT16 or FAT32 file
system, and it must contain MP3 or WMA files.
You can put up to 5,000 files on a USB data
carrier (without ID3 tags). The directories and
tracks can be selected individually with this
device. If you use tracks with ID3 tags, the
maximum number of files is reduced.
Bosch cannot guarantee the proper functioning
of all USB data carriers available on the market.
ID3 tags
To pause playback,
f press the 4 button L, the STOP /
button @, the 3 button L or the
PLAY/PAUSE / button 2.
To completely stop playback,
f press the 4 button L or the STOP /
button @ twice.
en
To resume paused playback or to play the CD
from the beginning if you stop playback,
f press the 3 button L or the PLAY/
PAUSE / button 2.
Skipping a track
To change to a previous or one of the next
tracks during playback,
f press the / button 3 or the
/ button H once or several times.
MP3 tracks can contain additional information
such as the artist, album and track name (ID3
tags). This device can display version 1 and 2
ID3 tags.
Starting/pausing/stopping playback
After inserting a CD, CD playback starts
automatically.
If there is already a CD in the drive,
f press the SRC C button repeatedly until
“CD” appears on the display.
In order to be able to connect a USB data
carrier (e.g. a USB stick or a USB drive), the
USB cable must be connected to the mini-USB
socket J.
f Connect the USB device to the USB cable.
Skipping a folder (only MP3)
To change to a previous or one of the next
folders during playback,
f press the / button 6 or the /
button H once or several times.
Fast searching (audible)
To start searching fast forward or reverse,
f press the / button ? repeatedly
until the desired speed is reached or press
and hold the or button H.
With every press of the / button ?
the speed is increased in increments up to 64
times.
To return to normal speed,
f press the PLAY/PAUSE / button 2 or
As soon as a USB data carrier is connected, it
can be selected with the SRC C button. The
display shows “USB”.
release the or button H.
7 620 210 015/020-022 | 05.2015Robert Bosch Car Multimedia GmbH
Page 60

60 | en
CD/MP3 and USB mode
Note:
The changed speed will not be
indicated on the display.
Repeat function
f Press the MENU G button to open the
menu.
f Press the MENU G button repeatedly
until “RPT” appears in the display.
f Turn the volume control B to the left or
right in order to select one of these menu
settings:
f TRK (repeat track)
f DIR (repeat folder; only MP3)
f OFF (cancel repeat)
f Press the MENU G button, repeatedly if
necessary, to close the menu.
Switching the display of track information as scrolling text on/off
(SCRL)
In order to switch the display of title information on or off when a track starts as scrolling
text,
f first switch to CD or MP3/WMA operation
if necessary.
f Press the MENU G button to open the
menu.
f Press the MENU G button repeatedly
until “SCRL” appears on the display, along
with the current setting “OFF” or “ON”.
f Turn the volume control B to the left or
right in order to switch scrolling text on or
off.
f Press the MENU G button, repeatedly if
Mix function
Note:
This function is not applicable for
VCD, SVCD and DVD video playback.
f Press the MENU G button to open the
menu.
f Press the MENU G button repeatedly
until “MIX” appears in the display.
f Turn the volume control B to the left or
right in order to select one of these menu
settings:
f MED / ALL (mix medium)
f DIR (mix folder; only MP3)
f OFF (cancel mix)
necessary, to close the menu.
If “SCRL OFF” is set, the title information is
shown on the display in segments of 8
characters at a time. Each section of text, along
with the track number and the playing time, are
displayed here for 5 seconds at a time in a
continuous cycle.
f Press the MENU G button, repeatedly if
necessary, to close the menu.
7 620 210 015/020-022 | 05.2015 Robert Bosch Car Multimedia GmbH
Page 61

Additional settings
en | 61
Additional settings
The device's setup menu allows you to make
changes to the settings to suit your preferences.
Settings for connected devices
Adjusting the display format
The following settings are available for the
display format:
f NORM PS: The DVD player is connected to
a 4:3 display. The wide-screen image is
displayed on the screen at full width with
black bars at the top and bottom edge of
the screen.
f NORM LB: The DVD player is connected to
a 4:3 display. The wide-screen image is
Adjusting the color television
standard of the display
For perfect image quality: On the DVD player
you must set the color television standard that
is used by the connected display.
“PAL” is the standard used in Europe; “NTSC” is
the standard for the American/Asiatic region.
en
Note:
If this setting is changed, it takes
effect only after the device is
switched off and on again via the
vehicle ignition.
To open the setup menu,
f press the SETUP button :.
f Using the or button 6, select the
displayed using the full height of the
screen. The left and right edge of the
wide-screen image are automatically cut
off.
f WIDE: The DVD player is connected to a
16:9 display. The wide-screen image is
displayed on the screen at full size.
To open the setup menu,
f press the SETUP button :.
f Using the or button 6, select the
menu item showing the current setting
(“WIDE”, “NORM LB” or “NORM PS”).
f Select the desired setting using the or
button 6.
f Press the SETUP button : to exit the
menu or the or button 6 to select
menu item showing the current setting
(PAL or NTSC).
f Select the desired setting using the or
button 6.
f Press the SETUP button : to exit the
menu or the or button 6 to select
another menu item.
Parental control
You can prevent playback of DVDs that are
unsuitable for minors by defining a rating level.
If a DVD supports rating levels and it does not
correspond to the rating level set on the
device, it will not be played.
Note:
Not all DVDs support rating levels.
another menu item.
7 620 210 015/020-022 | 05.2015Robert Bosch Car Multimedia GmbH
Page 62

62 | en
Additional settings | External audio sources
The following rating levels are available (based
on the specifications of the Motion Picture
Association of America, MPAA):
f KID SAFE: Approved for children
f GAMMA: Approved for children
f PG: Accompanying adult during playback
is recommended.
f PG-13: Accompanying adult is recom-
mended, not suitable for children under
the age of 13.
f PG-R: Accompanying adult is recom-
mended, content portrays violence,
obscene language, etc.
f R: Prohibited for children and adoles-
cents, content portrays violence, obscene
language, etc.
f NC-17: Content not suitable for adoles-
External audio sources
You can connect different types of external
audio sources to the device via the front
AUX-IN socket (AUX FRNT).
Front AUX input
Increased risk of injury from
plugs!
Plugs that stick out of the front
AUX-IN socket I can cause injuries
in the event of an accident.
For this reason, you should only use
angled jack plugs.
As soon as an external audio source is inserted
into the front AUX-IN socket I it can be
cents under the age of 17.
f ADULT: Content for adults only:
violence, sex, etc.
Setting the parental control
To open the setup menu,
f press the SETUP button :.
f Press the or button 6 repeatedly
until “PARENTAL” appears in the display.
f Press the OK button 5.
f Select the desired setting using the or
button 6.
f Press the SETUP button : to exit the
menu or the button > to return to a
higher menu level.
selected with the SRC C button. The display
shows “AUX FRNT”.
Adjusting the level of the AUX
input
You can adjust the level of the AUX input in
order to match the level of the external audio
source to the level of the device’s own audio
sources (such as the radio and USB).
Note:
You can adjust the level for the AUX
input only when it is selected as an
audio source with the SRC C
button.
f Press the SRC C button until the AUX
7 620 210 015/020-022 | 05.2015 Robert Bosch Car Multimedia GmbH
source is displayed.
f Press the MENU G button.
“GAIN” and the current setting are displayed.
Page 63

External audio sources | Preamplifier output | Installation
en | 63
f Turn the volume control B to the left or
right in order to set the level to between -9
and +9.
In order to leave the menu,
f press the MENU G button, repeatedly if
necessary.
Preamplifier output
You can connect an additional amplifier to the
device. To do this, the amplifier must be
connected to the rear of the device.
Installation
Installation notes
Note the following when selecting a place for
installation:
f No wires or pipes must be located
beneath the surface on which the device
en
is to be installed.
Do not install the device in places
f subjected to direct sunlight,
f near hot air outlets (heating etc.),
f subjected to rain or moisture,
f subjected to dust or dirt,
f subjected to strong vibrations.
Scope of delivery
f User manual
f Mounting frame
f Guide pin
f Accessories for chambers A and B
(8 649 494 026)
f Connection cable for chamber C1
(8 649 492 033)
f Connection cable for chamber C3
(8 649 492 022)
f USB connection cable
(8 649 494 018)
f Mic connection cable
(8 675 501 012)
f IR remote control (including two 1.5 V
batteries)
f Removal tools
7 620 210 015/020-022 | 05.2015Robert Bosch Car Multimedia GmbH
Page 64

64 | en
Installation
Note:
When you connect the device, refer
to the chapter “ISO connector”.
If you want to install the device yourself, please
use the supplied mounting frame.
The device can be installed at an angle of –20°
to +60° to the transverse axis and at an angle
of –20° to +20° to the longitudinal axis.
An optimum drive performance is achieved at
an installation angle to ±5° to the horizontal
(forwards/backwards and/or left/right).
Installation
Note:
Ensure that the connecting cables are
not pinched during installation.
53
182
165
1-20
7 620 210 015/020-022 | 05.2015 Robert Bosch Car Multimedia GmbH
Page 65

Technical data
en | 65
Technical data
Operating voltage: 12 V
Standby power consumption:
<1 mA
Operating temperature:
–20 °C to +70 °C
Amplifier
Output power: 2 x 20 watts V rms
into 4 ohms
Preamp output: 2 x 1.0 V rms
Tuner
Wavebands in Europe:
Wavebands in Taiwan:
FM: 87.7–107.9 MHz
AM: 531–1602 kHz
Wavebands in the Philippines:
FM: 87.5–108.0 MHz
AM: 522–1629 kHz
en
Wavebands in Australia/New Zealand:
FM: 87.5–108.0 MHz
AM: 522–1710 kHz
Video
Laser: 655/785 nm
Color standards: PAL, NTSC
VHF (FM): 87.5–108 MHz
MW: 522–1629 kHz
LW: 153–279 kHz
SW: 5800–6300 kHz
NAFTA wavebands:
FM: 87.7–107.9 MHz
AM: 530–1710 kHz
WTH: 162.4–162.55 MHz
APAC and MENA wavebands:
FM: 87.5–108.0 MHz
AM: 531–1602 kHz
Wavebands in South America:
FM: 87.5–108.0 MHz
AM: 530–1710 kHz
Frequency range: 20 Hz to 20 kHz
Video output level
Grayscale: 1.0 Vpp, 75 Ω
Weight: approx. 1.42 kg
Dimensions
(WxHxD in mm): 178 x 50 x 162
Standards: CE, E1, FCC, RoHS,
MVSS302, WEEE
Subject to change
7 620 210 015/020-022 | 05.2015Robert Bosch Car Multimedia GmbH
Page 66

66 | fr
Éléments de commande
1 LIGHT, activer l’éclairage des touches de
la télécommande pour une durée d’env.
10 sec.
2 PLAY/PAUSE / , démarrer et inter-
rompre la lecture.
3 / , sauter les chapitres ou les
titres.
4 MENU, afficher le menu DVD principal.
5 OK / ENTER, sélectionner et confirmer les
éléments de menu dans le menu principal
et démarrer la lecture.
6 Touches flèches pour sélectionner les
; SBTL, basculer entre les sous-titres dis-
ponibles du DVD.
< USB, passer en mode USB.
= VIDEO, basculer entre les modes DVD/
CD/MP3 et une source audio/vidéo externe.
> , dans le menu pour passer au niveau
supérieur du menu.
? / , activer le recul rapide /
l’avance rapide.
@ STOP / , arrêter la lecture.
titres et les dossiers, et se déplacer dans
les menus.
/ , passer à d’autres titres, modifier
les paramètres dans les menus, sélectionner les fonctions dans le menu DVD.
/ , changer de dossiers (pour les
DVD/CD de données/MP3/WMA), sélectionner les éléments de menu dans les
menus et dans le menu DVD.
7 VOLUME –/+, modifier le volume.
8 RADIO, passer en mode Radio.
9 AUX, passer en mode AUX.
: SETUP, afficher le menu de configuration
A , éjecter le CD/DVD.
DVD.
7 620 210 015/020-022 | 05.2015 Robert Bosch Car Multimedia GmbH
Page 67

Éléments de commande
fr | 67
B Bouton de réglage du volume.
C SRC, choisir la source : radio et DVD/CD,
USB, AUX ou source audio externe.
D , mettre en marche / arrêter l’appareil ;
coupuer le son.
E Écran
F Fente d’insertion du DVD
G MENU, afficher les menus de configura-
tion.
H Touche multi-fonction
I Prise d’entrée AUX en façade
J Mini-prise USB
K CAM, basculer entre les images dispo-
nibles de la caméra
L Pavé de touches 1– 6
M Touche AUD
Appuyer brièvement : ouvrir le menu audio pour le réglage des graves, médianes,
aiguës, balance et loudness
Appuyer longuement : rétablir les réglages
sonores par défaut
fr
N BND
Appuyer brièvement : choisir le niveau de
mémoire ou la gamme d’ondes..
Appuyer longuement : démarrer la fonction Travelstore
O Capteur infrarouge
7 620 210 015/020-022 | 05.2015Robert Bosch Car Multimedia GmbH
Page 68

68 | fr
Table des matières
Table des matières
71 Remarques générales
71 Utilisation conforme
72 Codes régionaux DVD
72 Élimination des appareils usagés
72 Mise en service de la télécom-
mande
72 Insertion des piles
72 Sélection de l’entrée IR
73 Utilisation de la télécommande
73 Marche/Arrêt
73 Marche/Arrêt avec la touche Marche/
Arrêt
73 Marche/Arrêt avec le microphone
74 Marche/Arrêt via le contact du
véhicule
74 Réglage du temps de coupure
(HOUR)
74 Réglage du volume
74 Coupure du son (MUTE)
74 Annulation de la coupure du son
74 Mode microphone
74 Démarrer le mode microphone (MIC)
74 Régler le volume d’une annonce au
microphone
75 Câble de raccordement
75 Activation / Désactivation du bip de
confirmation (BEEP)
75 Réglage du volume maximal à la mise
en marche (ONVOL)
76 Son et écran
76 Régler les aiguës (TREB), les
médianes (MID) et les graves (BASS)
76 Réglage de la répartition du volume à
droite/gauche (BAL)
76 Activation / Désactivation du
loudness (LD)
76 Réinitialisation des réglages sonores
77 Réglage de la luminosité de l’écran
77 Mode Radio
77 Activation du mode Radio
77 Fonction « confort » RDS (AF, REG)
78 Activation / Désactivation de la
fonction « confort » RDS
78 Activation / Désactivation de REG
(seulement pour région tuner
EUROPE)
78 Sélection de la gamme d'ondes / du
niveau de mémoire
79 Réglage des stations
79 Recherche automatique des stations
79 Réglage de la sensibilité de la
recherche des stations (SENS)
79 Réglage manuel des stations
79 Mémorisation de stations
79 Mémorisation manuelle de stations
80 Mémorisation automatique de
stations (T-STORE)
80 Appel des stations mémorisées
80 Balayage des stations mémorisées
(PRTSCAN)
80 Démarrage du balayage
81 Annulation du balayage
7 620 210 015/020-022 | 05.2015 Robert Bosch Car Multimedia GmbH
Page 69

Table des matières
fr | 69
81 Balayage de stations pouvant être
reçues (BANDSCAN).
81 Démarrage du balayage
81 Annulation du balayage
81 Activation / Désactivation du texte
radio (RADIOTXT)
81 Type de programme (PTY)
81 Activation / Désactivation de PTY
82 Sélection du type de programme
(PTY)
82 Démarrage de la recherche PTY
82 Réglage de la réduction des aiguës en
fonction des parasites (HCUT)
83 Programmation de la fonction de
touche (
KEY PRG
)
83 Diffusion d'informations routières
83 Activer / Désactiver la priorité aux
informations routières
84 Réglage de l'amplification sonore
pour les informations routières
84 Annuler la diffusion d'informations
routières
85 Mode DVD
86 Insertion d’un DVD/CD et démarrage
de la lecture
86 Retrait du DVD/CD
86 Démarrage, interruption ou arrêt de
la lecture
86 Interruption ou arrêt de la lecture
86 Image figée
87 Continuer la lecture
87 Avance/recul rapide
87 Saut des chapitres
87 Lecture répétée de chapitres ou de
titres
88 Affichage des sous-titres
88 Sélection de la langue préférée pour
la lecture audio, les sous-titres et le
menu DVD
88 Menu DVD
88 Affichage du menu DVD
88 Sélection et confirmation des
éléments de menu
fr
89 Source vidéo externe
89 Source audio pour le conducteur
7 620 210 015/020-022 | 05.2015Robert Bosch Car Multimedia GmbH
Page 70

70 | fr
Table des matières
90 Mode CD/MP3 et USB
90 Mode CD vidéo
90 Mode CD audio/MP3 et USB
90 Caractéristiques des fichiers MP3/
WMA
91 Préparation d'un support de données
MP3
91 Balises ID3
91 Démarrage, interruption ou arrêt de la
lecture
91 Saut de titres
91 Saut de dossiers (seulement MP3)
92 Recherche rapide (audible)
92 Fonction de répétition
92 Lecture aléatoire
92 Activer / Désactiver le défilement
d’informations relatives aux titres
(SCRL)
93 Autres réglages
93 Réglages pour appareils raccordés
93 Définition du format d’écran
94 Réglage de la norme de télévision de
l’écran
94 Contrôle parental
94 Activer le contrôle parental
95 Sources audio externes
95 Entrée AUX en façade
95 Réglage du gain de l’entrée AUX
96 Sortie préampli
96 Montage
96 Consignes de montage
96 Fourniture
97 Montage
98 Caractéristiques
techniques
98 Amplificateur
98 Tuner
98 Vidéo
445 ISO connector
7 620 210 015/020-022 | 05.2015 Robert Bosch Car Multimedia GmbH
Page 71

Remarques générales
fr | 71
Remarques générales
Nous vous remercions d’avoir porté votre choix
sur un produit Bosch. Nous espérons que votre
nouvel appareil vous donnera entière satisfaction.
Prenez le temps de lire la présence notice
d’emploi avant d’utiliser l’appareil pour la
première fois.
Notre garantie fabricant s’étend à tous les
produits achetés à l’intérieur de l’Union
Européenne. Pour les appareils achetés en
dehors de l’Union Européenne, les conditions
de garantie applicables sont celles définies par
notre représentant agréé dans le pays en
question.
Utilisation conforme
volume sonore raisonnable pour
vos déplacements.
Risque de blessure
Cet appareil est un produit laser de
CLASSE 1.
f Ne regardez jamais dans le rayon
laser.
f N’essayez pas de regarder dans
le boîtier ou de l’ouvrir.
f Confiez les opérations de
maintenance uniquement à des
spécialistes.
Risque d’accident, de
fr
L’appareil est conçu pour fonctionner dans un
véhicule utilitaire avec une tension de réseau
de bord de 12 V et pour être installé dans un
espace 1 DIN.
Sécurité routière
La sécurité routière est impérative.
f Familiarisez-vous avec l’appareil
avant de prendre la route.
f Utilisez cet appareil uniquement
si les conditions de circulation le
permettent.
f Le conducteur peut visionner les
images uniquement lorsque le
véhicule est à l’arrêt.
Les avertisseurs sonores de la police,
des sapeurs-pompiers et des services
blessure et d’incendie
Désassembler l’appareil peut causer
un choc électrique ou un incendie.
Tout liquide pénétrant dans l’appareil
peut provoquer un choc électrique,
un court-circuit ou un incendie.
Un appareil défectueux (par ex.
identifiable à l’écran gelé ou à la
mauvaise qualité sonore) peut
provoquer un accident, un choc
électrique ou un incendie.
f N’essayez pas d’ouvrir le boîtier.
f Ne posez pas de boissons ou
autres liquides à proximité de
l’appareil.
f Si l’appareil est défectueux, ne
continuez pas de l’utiliser.
de secours doivent pouvoir être
perçus à temps dans le véhicule.
f Choisissez en conséquence un
7 620 210 015/020-022 | 05.2015Robert Bosch Car Multimedia GmbH
Page 72

72 | fr
Remarques générales| Mise en service de la télécommande
Codes régionaux DVD
Réf. Code régional :
7 620 210 015 RC2 (Europe)
7 620 210 020 RC1 (NAFTA)
7 620 210 021 RC4 (Amérique latine)
7 620 210 022 RC5 (Afrique, Asie)
Élimination des appareils usagés
Ne jetez pas votre appareil usagé dans les
ordures ménagères !
Utilisez les systèmes de récupération et de
collecte disponibles en vue de son élimination.
Mise en service de la
télécommande
Lorsque vous mettez l’appareil en service pour
la première fois, vous devez d’abord insérer les
piles de la télécommande.
Insertion des piles
f Ouvrez le compartiment des piles en
retirant le couvercle.
f Insérez les piles neuves. Classe de pile :
Deux piles de la classe AAA. Assurez-vous
que les pôles des batteries sont bien
positionnés comme illustré dans le
compartiment des piles.
f Fermez le compartiment des piles.
Sélection de l’entrée IR
L’appareil peut être installé à un endroit où la
télécommande n’atteint pas le capteur IR
intégré O. Vous avez la possibilité dans ce cas
d’installer un capteur IR externe optionnel
(7 607 005 726) à un endroit adéquat et de le
relier à l’appareil via la section D du connecteur
ISO. Au cas où le capteur IR externe doit être
utilisé, vous devez sélectionner l’entrée IR via
la section D.
Pour basculer entre l’entrée IR via la section D
(REAR IR) et le capteur IR intégré O (FRONT
IR),
f appuyez sur la touche MENU G pour
ouvrir le menu.
f Appuyez sur la touche MENU G autant
de fois que nécessaire jusqu’à ce que
« REAR IR » ou « FRONT IR » apparaisse
7 620 210 015/020-022 | 05.2015 Robert Bosch Car Multimedia GmbH
sur l’écran.
Page 73

Mise en service de la télécommande | Marche/Arrêt
fr | 73
f Tournez le bouton de réglage du
volume B vers la gauche ou vers la droite
pour passer d’une option à l’autre.
Pour quitter le menu,
f appuyez plusieurs fois si nécessaire sur la
touche MENU G.
Note :
Si l’entrée IR externe via la section D
est activée, le capteur IR intégré O
est désactivé
Utilisation de la télécommande
Dirigez la télécommande sur le récepteur
infrarouge qui se trouve sur la face avant de
l’appareil (ou, s’il est monté, sur le récepteur
infrarouge séparé).
Marche/Arrêt
Pour arrêter ou mettre l'appareil en marche,
différentes possibilités vous sont offertes :
Marche/Arrêt avec la touche Marche/Arrêt
f Pour mettre l'appareil en marche, appuyez
sur la touche Marche/Arrêt D.
f Pour arrêter l'appareil, maintenez la
touche Marche/Arrêt D appuyée
pendant plus de 2 secondes.
fr
Note :
Afin de protéger la batterie du
véhicule, l'appareil s'arrête automatiquement après une durée définissa-
ble, le contact du véhicule étant
Le récepteur infrarouge couvre, depuis sa face
avant, une zone d’environ 30° dans toutes les
directions. Lorsque vous appuyez sur une
touche, tenez la télécommande dans cette
zone.
coupé (cf. section « Réglage du
temps de coupure » de ce chapitre).
Marche/Arrêt avec le microphone
Si un microphone est raccordé au système,
l’appareil peut être mis en marche et arrêté au
moyen du microphone d’annonces. Pour plus
d’informations à ce sujet, reportez-vous aussi
au chapitre « Réglage du volume », section
« Mode Microphone ».
f Mettez le microphone en marche,
l’appareil étant éteint.
L’appareil se met automatiquement en marche
et peut être utilisé pour diffuser les annonces
via les haut-parleurs raccordés.
f Coupez le microphone.
L’appareil est également hors service.
7 620 210 015/020-022 | 05.2015Robert Bosch Car Multimedia GmbH
Page 74

74 | fr
Marche/Arrêt | Réglage du volume
Marche/Arrêt via le contact du
véhicule
Si l'appareil est relié au contact du véhicule et
s'il n'a pas été arrêté avec la touche Marche/
Arrêt D, il s'arrête ou se met en marche avec
le contact du véhicule.
Réglage du temps de coupure
(HOUR)
f Appuyez sur la touche MENU G pour
ouvrir le menu.
f Appuyez sur la touche MENU G autant
de fois que nécessaire jusqu'à ce que
« HOUR » et l'option actuelle apparaissent
sur l'écran.
f Tournez le bouton de réglage du volume
vers la gauche ou vers la droite pour
B
régler la durée de coupure entre 1 et 60
Réglage du volume
Le volume du système est réglable de 0
(volume désactivé) à 32 (volume maximum).
f Pour augmenter le volume du système,
tournez le bouton de réglage du volume
vers la droite.
B
f Pour réduire le volume du système,
tournez le bouton de réglage du volume
vers la gauche.
B
Coupure du son (MUTE)
Vous pouvez couper le son du système
instantanément.
f Appuyez brièvement sur la touche D.
Annulation de la coupure du son
Pour réactiver le volume sonore précédent,
f réappuyez brièvement sur la touche D.
minutes.
Pour quitter le menu,
f appuyez sur la touche MENU G à
plusieurs reprises si nécessaire.
Mode microphone
Vous pouvez raccorder un microphone à
l’appareil.
Démarrer le mode microphone
(MIC)
f Mettez le microphone en marche.
« MIC » apparaît sur l’écran.
Les annonces au microphone sont transmises
via les haut-parleurs raccordés.
Régler le volume d’une annonce au
microphone
Pour régler le volume du microphone,
f tournez le bouton de réglage B pendant
la diffusion d’une annonce.
7 620 210 015/020-022 | 05.2015 Robert Bosch Car Multimedia GmbH
Page 75

Réglage du volume
fr | 75
Note :
Le dernier volume réglé du microphone reste mémorisé.
Câble de raccordement
Pour raccorder le microphone à l’appareil, un
câble de microphone séparé est disponible
sous la référence 8 675 501 012.
Activation / Désactivation du bip
de confirmation (BEEP)
Un bip de confirmation (bip sonore) retentit en
réaction à certaines fonctions, par ex. à la
pression d'une touche. Vous pouvez désactiver
le bip de confirmation :
f Appuyez sur la touche MENU G pour
ouvrir le menu.
f Appuyez sur la touche MENU G autant
volume sera, à la remise en marche, automatiquement limité au volume à la mise en marche
que vous avez réglé.
Note :
Pour protéger l'ouïe, le volume
maximal à la mise en marche est
limité à 25.
f Appuyez sur la touche MENU G pour
ouvrir le menu.
f Appuyez sur la touche MENU G autant
de fois que nécessaire jusqu'à ce que
« ONVOL » et l'option actuelle apparaissent sur l'écran.
f Tournez le bouton de réglage du volume
vers la gauche ou vers la droite pour
B
régler le volume à la mise en marche entre
fr
de fois que nécessaire jusqu'à ce que
« BEEP » et l'option actuelle « ON »
(activé) ou « OFF » (désactivé) apparaissent sur l'écran.
f Tournez le bouton de réglage du volume
vers la gauche ou vers la droite pour
B
activer ou désactiver le bip de confirmation.
Pour quitter le menu,
f appuyez sur la touche MENU G à
plusieurs reprises si nécessaire.
Réglage du volume maximal à la
mise en marche
(ONVOL)
Quand vous mettez l'appareil en marche, il
fonctionne au dernier volume sélectionné. Si
5 et 25.
Pour quitter le menu,
f appuyez sur la touche MENU G à
plusieurs reprises si nécessaire.
vous avez par contre réglé le volume plus haut
que le volume maximal à la mise en marche, le
7 620 210 015/020-022 | 05.2015Robert Bosch Car Multimedia GmbH
Page 76

76 | fr
Son et écran
Son et écran
Régler les aiguës (TREB), les
médianes (MID) et les graves
(BASS)
f Appuyez sur la touche AUD M pour
ouvrir le menu.
f Appuyez sur la touche AUD M autant de
fois que nécessaire jusqu’à ce que
« BASS » (graves), « MID » (médianes) ou
« TREB » (aiguës) et l’option actuelle
apparaissent sur l’écran.
f Tournez le bouton de réglage du volume
B vers la gauche ou vers la droite pour
régler le niveau des graves, des médianes
ou des aiguës entre +7 et -7.
Pour quitter le menu,
Activation / Désactivation du
loudness (LD)
f Appuyez sur la touche AUD M pour
ouvrir le menu.
f Appuyez sur la touche AUD M autant de
fois que nécessaire jusqu'à ce que « LD »
et l'option actuelle « ON » (activé) ou
« OFF » (désactivé) apparaissent sur
l'écran.
f Tournez le bouton de réglage du volume
vers la gauche ou vers la droite pour
B
activer ou désactiver le loudness.
Pour quitter le menu,
f appuyez sur la touche AUD M à plusieurs
reprises si nécessaire.
Réinitialisation des réglages
f appuyez sur la touche AUD M à plusieurs
reprises si nécessaire.
Réglage de la répartition du volume
à droite/gauche (BAL)
f Appuyez sur la touche AUD M pour
ouvrir le menu.
f Appuyez sur la touche AUD M autant de
fois que nécessaire jusqu’à ce que « BAL »
et le réglage actuel apparaissent sur
l’écran.
f Tournez le bouton de réglage du
volume B vers la gauche ou vers la droite
pour régler la répartition du volume
sonore entre +10 et –10.
Pour quitter le menu,
f appuyez plusieurs fois si nécessaire sur la
sonores
Vous avez la possibilité de rétablir tous les
réglages sonores à leurs valeurs par défaut
respectives (TREB, MID, BASS, BAL : 0 ;
LD : OFF).
f Appuyez sur la touche AUD M pour
ouvrir le menu.
f Appuyez sur la touche AUD M autant de
fois que nécessaire jusqu'à ce que
« RESET N » apparaisse sur l'écran.
f Tournez le bouton de réglage du volume
vers la droite pour sélectionner
B
l'option « RESET Y ».
Tous les réglages sonores sont réinitialisés au
bout de 2 secondes environ.
Pour quitter le menu,
f appuyez sur la touche AUD M à plusieurs
touche AUD M.
7 620 210 015/020-022 | 05.2015 Robert Bosch Car Multimedia GmbH
reprises si nécessaire.
Page 77

Son et écran | Mode Radio
fr | 77
Note :
Maintenez la touche AUD M
appuyée pendant plus de 2 secondes
pour rétablir les réglages sonores par
défaut pour la source restituée
actuellement.
Réglage de la luminosité de l’écran
f Appuyez sur la touche MENU G pour
ouvrir le menu.
f Appuyez sur la touche MENU G autant
de fois que nécessaire jusqu’à ce que
« DIMTN » et le réglage actuel apparaissent sur l’écran.
f Tournez le bouton de réglage du
volume B vers la gauche ou vers la droite
pour régler la luminosité de l’écran entre
Mode Radio
Cet appareil est équipé d'un récepteur radio
RDS. De nombreuses stations FM reçues
émettent un signal qui contient, en plus du
programme, des informations telles que le nom
de la station et le type de programme (PTY).
Le nom de la station apparaît sur l'écran dès
qu'il peut être reçu.
Activation du mode Radio
Si vous vous trouvez dans un autre mode,
f appuyez sur la touche BND N,
ou
f appuyez sur la touche SRC C autant de
fois que nécessaire jusqu'à ce que
« RADIO » apparaisse sur l'écran.
La fréquence actuelle ou le nom de la station
fr
+5 et –5.
f Appuyez plusieurs fois si nécessaire sur la
touche MENU G pour quitter le menu.
apparaît sur l'écran.
Fonction « confort » RDS (AF, REG)
Les fonctions « confort » RDS AF (fréquence
alternative) et REG (régional) viennent
compléter l'éventail des fonctions offertes par
votre autoradio :
f AF : lorsque cette fonction confort RDS
est activée, l'appareil recherche automatiquement en arrière-plan la fréquence de
la station écoutée offrant le signal le plus
puissant.
f REG : certaines stations répartissent à
certaines heures leur programme en
programmes régionaux offrant un contenu
différent. La fonction REG empêche que
l'appareil bascule sur des fréquences
alternatives de la station écoutée offrant
un autre contenu de programme.
7 620 210 015/020-022 | 05.2015Robert Bosch Car Multimedia GmbH
Page 78

78 | fr
Mode Radio
Notes :
f La fonction RDS est activée par
défaut.
f La fonction REG est désactivée
par défaut. Elle doit être activée
ou désactivée séparément dans
le menu.
Activation / Désactivation de la
fonction « confort » RDS
f Passez d'abord en mode Radio FM si
nécessaire.
f Appuyez sur la touche MENU G pour
ouvrir le menu.
f Appuyez sur la touche MENU G autant
de fois que nécessaire jusqu'à ce que
« RDS » et l'option actuelle « ON » (activé)
f Appuyez sur la touche MENU G autant
de fois que nécessaire jusqu'à ce que
« REG » et l'option actuelle « ON » (activé)
ou « OFF » (désactivé) apparaissent sur
l'écran.
f Tournez le bouton de réglage du volume
vers la gauche ou vers la droite pour
B
activer ou désactiver la fonction REG.
f Appuyez sur la touche MENU G à
plusieurs reprises si nécessaire.
Note :
L'option REG ON/OFF agit uniquement si la fonction RDS est activée.
Sélection de la gamme d'ondes / du
niveau de mémoire
ou « OFF » (désactivé) apparaissent sur
l'écran.
f Tournez le bouton de réglage du volume
vers la gauche ou vers la droite pour
B
activer ou désactiver la fonction RDS.
f Appuyez sur la touche MENU G à
plusieurs reprises si nécessaire.
Les fonctions confort RDS sont actives quand
le symbole RDS est visible à 'écran.
Activation / Désactivation de REG
(seulement pour région tuner
EUROPE)
f Passez d'abord en mode Radio si
nécessaire.
f Appuyez sur la touche MENU G pour
ouvrir le menu.
En fonction de la région de tuner, cet appareil
vous permet de recevoir les programmes des
bandes de fréquences suivantes :
f Europe : FM, MW (PO), LW (GO) et SW
(OC)
f US : FM, AM et WB (bande météo)
f Autres : FM et AM
Trois niveaux de mémoire FM1, FM2 et FMT
sont disponibles pour la gamme d'ondes FM et
un niveau de mémoire pour chacune des
gammes d'ondes MW (PO), LW (GO), SW
(OC), AM et WB. Il existe de plus un autre
niveau de mémoire AMT, MWT, LWT ou SWT. 6
stations peuvent être mémorisées sur chaque
niveau de mémoire.
Pour basculer entre les gammes d'ondes ou les
niveaux de mémoire,
7 620 210 015/020-022 | 05.2015 Robert Bosch Car Multimedia GmbH
f appuyez sur la touche BND N.
Page 79

Mode Radio
fr | 79
Réglage des stations
Différentes possibilités vous sont offertes pour
régler des stations.
Recherche automatique des stations
Note :
La recherche automatique des
stations n'est disponible que si
l'option « AUTOSEEK » du menu est
sélectionnée pour la touche ou
(cf. section « Programmation
H
d'une fonction de touche » de ce
menu).
f Appuyez sur la touche ou H.
f Passez d'abord en mode Radio si
nécessaire.
f Appuyez sur la touche MENU G pour
ouvrir le menu.
f Appuyez sur la touche MENU G autant
de fois que nécessaire jusqu'à ce que
« SENS » et l'option actuelle « LO » (faible
sensibilité) ou « CX » (haute sensibilité)
apparaissent sur l'écran.
f Tournez le bouton de réglage du volume
vers la gauche ou vers la droite pour
B
passer d'une option à l'autre.
f Appuyez sur la touche MENU G à
plusieurs reprises si nécessaire pour
quitter le menu.
Réglage manuel des stations
fr
L'autoradio se règle sur la station suivante
pouvant être reçue.
Note :
f Si la priorité aux informations
routières est activée et « PTY »
désactivé, l'autoradio se règle
sur la prochaine station
d'informations routières.
f Si « PTY » est activé, l'autoradio
se règle sur la prochaine station
du type de programme sélectionné.
Réglage de la sensibilité de la
recherche des stations (SENS)
Vous pouvez choisir si l'autoradio se règlera
Pour modifier la fréquence réglée en petites
étapes,
f appuyez sur la touche ou H.
Note :
La modification de fréquence par
étapes n'est disponible que si l'option
« MANSEEK » du menu est sélectionnée pour les touches ou H (cf.
section « Programmation d'une
fonction de touche » de ce menu).
Pour modifier rapidement la fréquence réglée,
f maintenez la touche ou H appuyée.
Mémorisation de stations
seulement sur des stations puissantes (faible
sensibilité) ou aussi sur des stations de faible
réception (haute sensibilité).
Mémorisation manuelle de stations
f Sélectionnez le niveau de mémoire voulu
ou la gamme d'ondes voulue.
7 620 210 015/020-022 | 05.2015Robert Bosch Car Multimedia GmbH
Page 80

80 | fr
Mode Radio
f Mettez-vous à l'écoute d'une station.
f Maintenez la touche de station 1 – 6 L
sur laquelle vous voulez mémoriser la
station, pendant plus de 2 secondes.
Le bip de confirmation retentit. La station est
mémorisée sur la touche de station sélectionnée. Tant que vous êtes à l'écoute de la station
mémorisée, son emplacement en mémoire
(par ex . « P3 ») est visible à l'écran.
Mémorisation automatique de
stations (T-STORE)
Vous pouvez mémoriser automatiquement les
6 stations les plus puissantes de la région.
Pour la gamme d'ondes FM, la mémorisation
s'effectue sur le niveau de mémoire FMT, pour
la gamme d'ondes AM (NAFTA) sur le niveau de
f Sélectionnez la gamme d'ondes voulue.
f Maintenez la touche de station BND N
appuyée pendant plus de deux secondes.
La mémorisation commence. Sur l'écran
apparaît « T-STORE ». Une fois l'opération
terminée, la station est diffusée à la première
place du niveau de mémoire FMT ou AMT,
MWT, LWT ou SWT.
Appel des stations mémorisées
f Sélectionnez le niveau de mémoire ou la
gamme d'ondes.
f Appuyez sur la touche de station 1 – 6 L
sur laquelle la station voulue est mémori-
sée.
Balayage des stations mémorisées
mémoire AMT. Pour la gamme d'ondes MW
(PO), LW (GO) et SW (OC) (Europe), il existe
un niveau de mémoire commun qui est affiché
en tant que MWT, LWT ou SWT (en fonction de
la gamme d'ondes dans laquelle la fonction
T-STORE a été utilisée précédemment).
Note :
f Les stations précédemment
mémorisées sur ce niveau sont
ici remplacées par les nouvelles
stations trouvées.
f Si la priorité aux informations
routières est activée, seulement
les stations d'informations
routières seront mémorisées.
f Si PTY est activé, seulement les
(PRTSCAN)
Cette fonction permet d'écouter toutes les
stations mémorisées sur le niveau de mémoire
actuel pendant 5 secondes environ.
Note :
Cette fonction n'est disponible que si
l'option « PRTSCAN » du menu est
sélectionnée pour les touches ou
H (cf. section « Programmation
d'une fonction de touche » de ce
chapitre).
Démarrage du balayage
f Appuyez sur la touche ou H.
« PRTSCAN » apparaît brièvement sur l'écran.
Chaque station mémorisée sur le niveau de
stations du type de programme
actuellement sélectionné seront
mémorisées.
7 620 210 015/020-022 | 05.2015 Robert Bosch Car Multimedia GmbH
mémoire actuel est balayée pendant
5 secondes environ. La fréquence réglée ou le
nom de station apparaît pendant ce temps.
Page 81

Mode Radio
fr | 81
Annulation du balayage
f Appuyez sur la touche ou H.
Le balayage est annulé. La station dernièrement écoutée reste réglée.
Balayage de stations pouvant être
reçues (BANDSCAN).
Cette fonction permet d'écouter toutes les
stations pouvant être reçues pendant
5 secondes environ.
Note :
Cette fonction n'est disponible que si
l'option « BANDSCAN » du menu est
sélectionnée pour les touches ou
H (cf. section « Programmation
d'une fonction de touche » de ce
Pour activer ou désactiver l’affichage des
textes radio,
f passez d’abord en mode Radio FM si
nécessaire.
f Appuyez sur la touche MENU G pour
ouvrir le menu.
f Appuyez sur la touche MENU G autant
de fois que nécessaire jusqu’à ce que
« RADIOTXT » suivi de l’option sélectionnée « TEXT ON » (activé) ou « TEXT OFF »
(désactivé) apparaisse sur l’écran.
f Tournez le bouton de réglage du
volume B vers la gauche ou vers la droite
pour passer d’une option à l’autre.
f Appuyez plusieurs fois si nécessaire sur la
touche MENU G pour quitter le menu.
fr
chapitre).
Démarrage du balayage
f Appuyez sur la touche ou H.
« BANDSCAN » apparaît brièvement sur
l'écran. L'appareil recherche des stations dans
la gamme d'ondes actuelle. Chaque station
trouvée est écoutée pendant environ
5 secondes. La fréquence réglée ou le nom de
station apparaît pendant ce temps.
Annulation du balayage
f Appuyez sur la touche ou H.
Le balayage est annulé. La station dernièrement écoutée reste réglée.
Activation / Désactivation du texte
Type de programme (PTY)
En plus du nom de station, certaines stations
FM transmettent également des informations
sur le type de programme qu'elles diffusent.
Ces types de programme peuvent être par ex. :
CULTURE (culture) TRAVEL (voyage)
WEATHER (météo) JAZZ MUSIC (jazz)
NEWS (actualités) POP MUSIK (pop)
La fonction PTY vous permet de sélectionner
de façon ciblée les stations d'un certain type
de programme.
Si PTY est activé et une recherche PTY a été
démarrée, l'appareil passe automatiquement
de la station actuelle ou d'un autre mode à la
station du type de programme sélectionné.
Activation / Désactivation de PTY
radio (RADIOTXT)
Une station TM peut émettre des textes radio
RDS.
f Passez d'abord en mode Radio FM si
nécessaire.
7 620 210 015/020-022 | 05.2015Robert Bosch Car Multimedia GmbH
Page 82

82 | fr
Mode Radio
f Appuyez sur la touche MENU G pour
ouvrir le menu.
f Appuyez sur la touche MENU G autant
de fois que nécessaire jusqu'à ce que
« PTY » apparaisse sur l'écran.
f Tournez le bouton de réglage du volume
vers la gauche ou vers la droite pour
B
choisir l'option « PTY ON » (activé) ou
« PTY OFF » (désactivé)
f Appuyez sur la touche MENU G à
plusieurs reprises si nécessaire pour
quitter le menu.
Sélection du type de programme
(PTY)
Note :
que si « PTY » est sélectionné et si
l'option « AUTOSEEK » ou « BANDSCAN » du menu est sélectionnée pour
les touches ou H (cf. section
« Programmation d'une fonction de
touche » de ce chapitre).
f Appuyez sur la touche ou H pour
démarrer la recherche.
Au cas où une station offrant le type de
programme sélectionné est trouvée, l'autoradio se règle sur celle-ci. Si aucune station de ce
type de programme n'est trouvée, l'autoradio
revient à la station dernièrement écoutée.
Réglage de la réduction des aiguës
en fonction des parasites (HCUT)
« PTY » doit être activé.
f Passez d'abord en mode Radio FM si
nécessaire.
f Appuyez sur la touche MENU G pour
ouvrir le menu.
f Appuyez sur la touche MENU G autant
de fois que nécessaire jusqu'à ce que
« PTYTYPE » apparaisse sur l'écran.
f Tournez le bouton de réglage du volume
pour sélectionner un type de pro-
B
gramme.
f Appuyez sur la touche MENU G à
plusieurs reprises si nécessaire pour
quitter le menu.
Démarrage de la recherche PTY
La fonction HCUT améliore la restitution
sonore en cas de mauvaise réception. En cas
de parasites, le niveau de perturbation baisse
automatiquement.
f Passez d'abord en mode Radio si
nécessaire.
f Appuyez sur la touche MENU G pour
ouvrir le menu.
f Appuyez sur la touche MENU G autant
de fois que nécessaire jusqu'à ce que
« HCUT » et l'option actuelle « OFF »
(désactivé), 1 ou 2 (intensité de la
réduction du niveau de perturbation)
apparaissent sur l'écran.
f Tournez le bouton de réglage du volume
vers la gauche ou vers la droite pour
B
activer ou désactiver « HCUT ».
Note :
La recherche PTY n'est disponible
7 620 210 015/020-022 | 05.2015 Robert Bosch Car Multimedia GmbH
f Appuyez sur la touche MENU G à
plusieurs reprises si nécessaire pour
quitter le menu.
Page 83

Mode Radio | Diffusion d’informations routières
fr | 83
Programmation de la fonction de
touche (
Vous pouvez régler la fonction de programmation des touches ou H en mode Radio.
Les options disponibles sont les suivantes :
f AUTOSEEK : Recherche automatique de la
f MANSEEK : Modification progressive
f PRSTSCAN : Balayage des stations
f BANDSCAN : Balayage des stations
f Passez d’abord en mode Radio si
KEY PRG
station suivante pouvant être reçue
manuelle de la fréquence.
mémorisées sur le niveau de mémoire
actuel.
pouvant être reçues de la gamme d'ondes
actuelle.
)
Diffusion d'informations
routières
Activer / Désactiver la priorité aux
informations routières
Note :
f Cette fonction est seulement
disponible dans la région de
tuner Europe.
f Vous pouvez activer la priorité
aux informations routières
seulement quand la fonction
RDS est activée.
Pour activer ou désactiver la priorité aux
informations routières,
fr
nécessaire.
f Appuyez sur la touche MENU G pour
ouvrir le menu.
f Appuyez sur la touche MENU G autant
de fois que nécessaire jusqu'à ce que
« KEY PRG » apparaisse sur l'écran.
f Tournez le bouton de réglage du volume
vers la gauche ou vers la droite pour
B
passer d'une option à l'autre.
f Appuyez sur la touche MENU G à
plusieurs reprises si nécessaire pour
quitter le menu.
f passez d’abord en mode Radio si
nécessaire.
f Appuyez sur la touche MENU G pour
ouvrir le menu.
f Appuyez sur la touche MENU G autant
de fois que nécessaire jusqu’à ce que
« TP » apparaisse sur l’écran.
f Tournez le bouton de réglage du
volume B vers la gauche ou vers la droite
pour choisir entre l’option « ON » (activé)
et « OFF » (désactivé).
f Appuyez plusieurs fois si nécessaire sur la
touche MENU G pour quitter le menu.
Note :
Dans les modes DVD/CD, USB et
AUX, cette fonction est disponible
seulement si la dernière station
écoutée dans la bande FM était une
station info-route.
7 620 210 015/020-022 | 05.2015Robert Bosch Car Multimedia GmbH
Page 84

84 | fr
Diffusion d’informations routières
La priorité aux informations routières est
activée quand le symbole TP est visible à
l’écran. L'information routière est transmise
dès sa réception. « TRAFFIC » s'affiche sur
l'écran pendant la durée du message.
Réglage de l'amplification sonore
pour les informations routières
Vous pouvez définir le niveau d'amplification
sonore des informations routières par rapport
au volume réglé.
f Passez d'abord en mode Radio FM si
nécessaire.
f Appuyez sur la touche MENU G pour
ouvrir le menu.
f Appuyez sur la touche MENU G autant
de fois que nécessaire jusqu'à ce que
Annuler la diffusion d'informations
routières
Pour annuler une information routière en cours
de diffusion et revenir à la source audio
précédemment écoutée,
f appuyez sur la touche SRC C.
La priorité aux informations routières reste
activée.
« TA DIFF » et l'option actuelle apparaissent sur l'écran.
f Tournez le bouton de réglage du volume
vers la gauche ou vers la droite pour
B
régler l'amplification sonore entre 0 et 10.
Pour quitter le menu,
f appuyez sur la touche MENU G à
plusieurs reprises si nécessaire.
Note :
Pendant la diffusion d'une information routière, vous pouvez régler le
volume au moyen du bouton de
réglage du volume B pour la durée
de l'information diffusée.
7 620 210 015/020-022 | 05.2015 Robert Bosch Car Multimedia GmbH
Page 85

Mode DVD
fr | 85
Mode DVD
Cet appareil vous permet de lire des DVD, des
CD vidéo (VCD), des CD Super Vidéo (SVCD),
des CD audio courants et des CD MP3.
Risque de détérioration du
lecteur DVD !
f Il n’est pas autorisé d’utiliser les
« shape CD » de forme autre que
circulaire.
f Ne collez pas d’étiquettes ni
d’autocollants sur les supports
de données. Ils pourraient se
décoller et endommager le
lecteur DVD.
f L’insertion simultanée de 2 DVD
/ CD endommage le lecteur DVD.
Nous déclinons toute responsabilité
pour les dommages causés au lecteur
DVD à la suite de l’utilisation de DVD/
CD inappropriés ou d’une insertion
incorrecte.
Cet appareil convient à la lecture de DVD munis
du code régional de votre région.
En règle générale, il est possible de lire les
CD-R et CD-RW (CD gravés par l’utilisateur).
En raison des différentes qualités de CD,
Bosch n’est pas en mesure de garantir un
fonctionnement parfait.
Pour éviter tout problème de fonctionnement,
utilisez uniquement les CD portant le logo
Compact Disc. Des problèmes de lecture sont
possibles avec les CD munis d’une protection
fr
Assurez-vous de bien insérer un
seul DVD/CD et que le lecteur ne
contient pas déjà de DVD/CD au
moment de l’insertion.
Si un DVD/CD est déjà inséré
dans le lecteur, le symbole DVD
s’allume sur l’écran.
f Si vous insérez le DVD/CD de
travers, il sera mal introduit dans
le lecteur DVD/CD. Ceci peut
endommager le DVD/CD.
Assurez-vous de toujours insérer
le DVD/CD en le tenant droit.
contre la copie. Bosch ne peut garantir le bon
fonctionnement de ses appareils avec des CD
protégés contre la copie !
En règle générale, le lecteur permet la lecture
de supports gravés par les utilisateurs, tels que
les VCD/SVCD, les DVD±R et DVD±RW.
En fonction des supports vierges et des
logiciels servant à réaliser ou à graver ces
supports, Bosch ne peut garantir une compatibilité et une lecture parfaites.
Formats de disque pris en charge par ce
lecteur :
f DVD/CD de 12 cm ou de 8 cm de
diamètre
f DVD±R/±RW
f DVD audio/vidéo avec système de
fichier UDF
f CD-DA (CD audio), CD-R, CD-RW
7 620 210 015/020-022 | 05.2015Robert Bosch Car Multimedia GmbH
Page 86

86 | fr
Mode DVD
f CD vidéo (VCD)
f CD Super Vidéo (SVCD)
f CD MP3 avec fichiers MP3 pour la
restitution musicale. Seuls les CD MP3
des formats « Joliet » ou « ISO 9660 »
sont pris en charge.
Les disques suivants ne sont pas pris en charge
par ce lecteur :
f CDV
f CD-G
Insertion d’un DVD/CD et démarrage de la lecture
Note :
Ne pas aider ou empêcher l’entrée du
DVD/CD.
Note :
Ne pas aider ou empêcher l’entrée du
DVD/CD.
f Retirez le DVD avec précaution.
Note :
Si vous ne retirez pas le DVD/CD
éjecté, il rentre automatiquement
dans le lecteur au bout de 10
secondes environ.
Démarrage, interruption ou arrêt
de la lecture
La lecture démarre automatiquement une fois
le DVD inséré.
Si un DVD est déjà inséré dans le lecteur,
f Insérez le DVD/CD avec la face imprimée
orientée vers le haut dans la fente
d’insertion du DVD/CD F qui se trouve
sur la face avant de l’appareil jusqu’à que
vous ressentiez une légère résistance.
Le DVD/CD est ensuite entraîné dans le lecteur,
l’insertion du DVD/CD ne devant pas être
gênée ni assistée.
Le DVD/CD est chargé et la lecture démarre
automatiquement. Dans le cas d’un DVD, soit le
menu DVD apparaît (cf. chapitre « Menu DVD
») soit la lecture du premier titre démarre. Cela
dépend du DVD inséré.
Retrait du DVD/CD
f Appuyez sur la touche A.
f appuyez sur la touche SRC C autant de
fois que nécessaire jusqu’à ce que « DVD »
apparaisse sur l’écran.
Note :
Une image noire apparaît sur l’écran
quand aucun DVD n’est inséré.
Interruption ou arrêt de la lecture
f Appuyez sur la touche 4 L ou STOP /
@.
La lecture est interrompue et l’écran devient
noir. Sur l’écran apparaît « CONTINUE».
Pour arrêter complètement la lecture,
f appuyez de nouveau sur la touche 4
L ou STOP / @.
Le DVD/CD est éjecté.
7 620 210 015/020-022 | 05.2015 Robert Bosch Car Multimedia GmbH
Image figée
f Appuyez pendant la lecture sur la touche 3
L ou PLAY/PAUSE / 2.
Page 87

Mode DVD
fr | 87
La lecture s’interrompt et l’image se fige.
Continuer la lecture
f Appuyez sur la touche 3 L ou PLAY/
PAUSE / 2.
Si vous avez uniquement interrompu la lecture
auparavant, celle-ci reprend au même endroit
du DVD. Si vous avez stoppé entièrement la
lecture, le DVD redémarre.
Avance/recul rapide
Le DVD peut être avancé et reculé à une vitesse
élevée.
Pour avancer et reculer rapidement le DVD,
f appuyez sur la touche / ?
autant de fois que nécessaire jusqu’à ce
que la vitesse voulue soit atteinte, ou
Pour passer au chapitre suivant ou à l’un des
chapitres suivants,
f appuyez une ou plusieurs fois sur la
touche 3 ou H.
La lecture saute au début du chapitre suivant
ou de l’un des chapitres suivants.
Pour revenir au début du chapitre en cours ou
de l’un des chapitres précédents,
f appuyez une ou plusieurs fois sur la
touche 3 ou H.
La lecture saute au début du chapitre en cours
ou de l’un des chapitres précédents.
Lecture répétée de chapitres ou de
titres
Un DVD peut contenir plusieurs titres qui
peuvent être divisés en plusieurs chapitres.
fr
maintenez la touche /
appuyée.
H
À chaque fois que vous appuyez sur la touche
/ ?, la vitesse augmente progressivement jusqu’à une valeur 64x supérieure.
Pour revenir à la vitesse normale,
f appuyez sur la touche PLAY/PAUSE /
2 ou bien relâchez la touche /
H.
Note :
f Le changement de vitesse n’est
pas affiché sur l’écran.
f Certains DVD peuvent être lus
seulement jusqu’à 16 fois plus
vite.
Saut des chapitres
f Appuyez sur la touche MENU G pour
ouvrir le menu.
f Appuyez sur la touche MENU G autant
de fois que nécessaire jusqu’à ce que
« RPT » apparaisse sur l’écran.
f Tournez le bouton de réglage du
volume B vers la gauche ou vers la droite
pour sélectionner l’une des options
suivantes :
f TITL (répéter le titre)
f CH (répéter le chapitre)
f OFF (stopper la répétition)
f Appuyez plusieurs fois si nécessaire sur la
touche MENU G pour quitter le menu.
Un titre du DVD peut être divisé en plusieurs
chapitres.
7 620 210 015/020-022 | 05.2015Robert Bosch Car Multimedia GmbH
Page 88

88 | fr
Mode DVD
Affichage des sous-titres
Pour afficher ou masquer les sous-titres et
sélectionner la langue des sous-titres,
f appuyez sur la touche SBTL L autant de
fois que nécessaire jusqu’à ce que la
langue voulue ou aucun sous-titre (« SBTL
OFF ») apparaisse sur l’écran.
Note :
La langue du sous-titrage sélectionnée n’est pas affichée sur l’écran.
Sélection de la langue préférée
pour la lecture audio, les soustitres et le menu DVD
Pour afficher le menu de configuration,
f Appuyez sur la touche SETUP :.
Le menu DVD propose généralement divers
sous-menus et options, par ex. « Démarrage du
film », « Sélection des chapitres » , « Langues ».
Note :
Les options proposées par le menu
DVD varient en fonction du DVD.
Affichage du menu DVD
f Appuyez sur la touche MENU 4.
La lecture est interrompue et le menu DVD ou
le menu principal apparaît.
Note :
Pour quitter le menu sans sélectionner une fonction et revenir à la
lecture, appuyez sur la touche
f Sélectionnez avec la touche ou 6
le sous-menu « LANGUAGE ».
f Appuyez sur la touche OK 5.
f Sélectionnez avec la touche ou 6
l’un des sous-menus :
f DVD MENU (menu DVD)
f DVD SUBT (sous-titrage)
f DVD AUD (audio)
f Appuyez sur la touche OK 5.
f Sélectionnez avec la touche ou 6
l’une des langues disponibles.
f Appuyez sur la touche SETUP : pour
quitter le menu ou sur la touche >
pour accéder au menu supérieur.
Menu DVD
Le menu DVD est mémorisé sur le DVD et
MENU 4.
Sélection et confirmation des
éléments de menu
Pour choisir entre les différents éléments de
menu,
f appuyez sur l’une des touches / / /
6 ou / / / H.
Pour confirmer un élément de menu,
f appuyez sur la touche OK 5 / L.
Lorsque vous effectuez une sélection dans le
menu DVD, par ex. « Démarrage du film », vous
quittez le menu DVD automatiquement et la
lecture démarre ou reprend.
apparaît automatiquement sur l’écran lorsque
le DVD est inséré, puis chargé.
7 620 210 015/020-022 | 05.2015 Robert Bosch Car Multimedia GmbH
Page 89

Source vidéo externe | Source audio pour le conducteur
fr | 89
Source vidéo externe
Vous pouvez raccorder une source vidéo
externe, par ex. un tuner TV, à cet appareil via
la section D du connecteur ISO (broches D1 et
D2).
Note :
Si la source externe émet aussi des
signaux audio, reliez la sortie audio
de la source externe à une entrée
audio appropriée comme AUX-IN via
la section C3 du connecteur ISO
(broches 18 à 20).
Vous pouvez sélectionner une source vidéo
externe au moyen de la touche SRC C.
« EXT VID » apparaît ensuite sur l’écran.
Source audio pour le
conducteur
Vous pouvez restituer les images des caméras
raccordées au moyen d’un commutateur de
caméra (en option) ou d’une Video Box (en
option) sur le moniteur du cockpit (par ex.
écran de cockpit de 7»). Ces caméras peuvent
être par exemple utilisées pour voir à l’arrière
du bus ou pour surveiller l’espace passagers.
De plus, il est possible de raccorder une autre
source vidéo, par ex. pour l’affichage des
cartes d’un système de navigation.
Pour restituer les images vidéo et des caméras
sur le moniteur du cockpit,
f appuyez sur la touche CAM K.
Pour basculer entre les différentes caméras et
les sources vidéo pendant la restitution,
fr
Note :
Une image noire est visible sur l’écran
quand aucune source vidéo externe
n’est connectée ou quand la source
audio est désactivée.
f appuyez une ou plusieurs fois sur la
touche CAM K.
7 620 210 015/020-022 | 05.2015Robert Bosch Car Multimedia GmbH
Page 90

90 | fr
Mode CD/MP3 et USB
Mode CD/MP3 et USB
Note :
f Les formats de disque pris en
charge sont indiqués dans le
chapitre « Mode DVD ».
f L’appareil prend en charge les
supports de mémoire de masse
USB (USB 1.1 et 2.0) allant
jusqu’à 8 Go de capacité,
formatés avec le système de
fichiers FAT16 ou FAT32.
Mode CD vidéo
La lecture démarre automatiquement une fois
le CD inséré.
Si le CD contient plusieurs titres, ceux-ci
Note :
Les fichiers autres que les fichiers
MP3/WMA et les dossiers qui ne
contiennent pas de fichiers MP3/
WMA sont ignorés par l’appareil.
L’appareil traite les fichiers MP3/WMA,
enregistrés dans le répertoire racine du CD, en
tant que fichiers dans le dossier « Root ».
Suivez les instructions suivantes pour la
désignation des fichiers MP3/WMA.
f Les noms de fichier doivent contenir au
moins un caractère.
f Ne pas utiliser de caractères spéciaux
comme les trémas.
f L’extension de fichier doit être « .mp3 » et
seront restitués successivement.
Mode CD audio/MP3 et USB
Caractéristiques des fichiers MP3/
WMA
Note :
L’appareil ne prend pas en charge les
types WMA suivants :
f Fichiers chiffrés par DRM (Digital
Rights Management)
f Débits binaires variables
f WMA Pro
f 5.1 Surround
Lorsque vous créez un CD contenant des
« .wma ».
Les fichiers MP3 doivent présenter les
caractéristiques suivantes :
f Débit binaire de 32 kbit/s à 320 kbit/s.
f Taux d’échantillonnage de 8 kHz à 48 kHz.
Les fichiers WMA devraient présenter les
caractéristiques suivantes :
f Débit binaire constant de 8 kbit/s à 384
kbit/s.
f Taux d’échantillonnage de 8 kHz à 48 kHz.
Note :
Pour éviter une faible qualité de
lecture, nous vous conseillons
d’utiliser des fichiers de musique
fichiers MP3/WMA, vous pouvez nommer les
fichiers et les dossiers. Les noms apparaissent
sur l’écran de l’appareil.
7 620 210 015/020-022 | 05.2015 Robert Bosch Car Multimedia GmbH
présentant un débit binaire minimal
de 128 kbit/s et un taux d’échan-
tillonnage minimal de 44,1 kHz.
Page 91

Mode CD/MP3 et USB
fr | 91
Préparation d'un support de données MP3
Afin que l'appareil identifie un support de
données USB, ce dernier doit être spécifié
comme mémoire de masse (Mass Storage
Device) et formaté en FAT16 ou FAT32 et
contenir des fichiers MP3 ou WMA.
Vous pouvez mémoriser un maximum de 5000
titres (sans balises ID3) sur le support de
données USB. Les répertoires et les titres
peuvent être sélectionnés individuellement
avec cet appareil. Si vous utilisez des titres
avec des balises ID3, le nombre maximal de
fichiers diminue en conséquence.
Bosch ne peut pas garantir le fonctionnement
parfait de l'ensemble des supports USB
disponibles sur le marché.
USB), le câble USB doit être raccordé à la
mini-prise USB J .
f Raccordez le support de données USB au
câble USB.
Dès qu’un support de données USB est
raccordé, celui-ci peut être sélectionné au
moyen de la touche SRC C. « USB » apparaît
ensuite sur l’écran.
Pour interrompre la lecture,
f appuyez sur la touche 4 L ou STOP /
@ ou sur la touche PLAY/PAUSE /
2.
Pour arrêter complètement la lecture,
f appuyez deux fois sur la touche 4 L
ou STOP / @.
Pour reprendre la lecture interrompue ou
redémarrer le CD du début une fois la lecture
fr
Balises ID3
Les titres MP3 peuvent aussi contenir des
informations telles que le nom de l'interprète,
le titre et le nom de l'album (balises ID3). Cet
appareil peut afficher les balises ID3 de la
version 1 et de la version 2 sur l'écran.
Démarrage, interruption ou arrêt
de la lecture
La lecture démarre automatiquement une fois
le CD inséré.
Si un CD est déjà inséré dans le lecteur,
f appuyez sur la touche SRC C autant de
fois que nécessaire jusqu’à ce que « CD »
apparaisse sur l’écran.
stoppée,
f appuyez sur la touche 3 L PLAY/
PAUSE / 2.
Saut de titres
Pour passer à un titre précédent ou à l’un des
titres suivants pendant la lecture,
f appuyez une ou plusieurs fois sur la
touche ou 3 ou bien sur la
touche /
H
.
Saut de dossiers (seulement MP3)
Pour passer à un dossier précédent ou à l’un
des dossiers suivants pendant la lecture,
f appuyez une ou plusieurs fois sur la
touche / 6 ou bien sur la touche
ou H.
Pour pouvoir connecter un support de données
USB (par ex. une clé USB ou un disque dur
7 620 210 015/020-022 | 05.2015Robert Bosch Car Multimedia GmbH
Page 92

92 | fr
Mode CD/MP3 et USB
Recherche rapide (audible)
Pour démarrer la recherche rapide en avant ou
en arrière,
f appuyez sur la touche / ?
autant de fois que nécessaire jusqu’à ce
que la vitesse voulue soit atteinte, ou
maintenez la touche / H appuyée.
À chaque fois que vous appuyez sur la touche
/ ?, la vitesse augmente progressivement jusqu’à une valeur 64x supérieure.
Pour revenir à la vitesse normale,
f appuyez sur la touche PLAY/PAUSE /
2 ou bien relâchez la touche /
H.
Note :
Le changement de vitesse n’est pas
Lecture aléatoire
Note :
Cette fonction n’est pas disponible
pendant la lecture de vidéos DVD,
VCD et SVCD.
f Appuyez sur la touche MENU G pour
ouvrir le menu.
f Appuyez sur la touche MENU G autant
de fois que nécessaire jusqu’à ce que
« MIX » apparaisse sur l’écran.
f Tournez le bouton de réglage du
volume B vers la gauche ou vers la droite
pour sélectionner l’une des options
suivantes :
f MED / ALL (lecture aléatoire du
affiché sur l’écran.
Fonction de répétition
f Appuyez sur la touche MENU G pour
ouvrir le menu.
f Appuyez sur la touche MENU G autant
de fois que nécessaire jusqu’à ce que
« RPT » apparaisse sur l’écran.
f Tournez le bouton de réglage du
volume B vers la gauche ou vers la droite
pour sélectionner l’une des options
suivantes :
f TRK (répéter le titre)
f DIR (répéter le dossier ; seulement
MP3)
f OFF (stopper la répétition)
f Appuyez plusieurs fois si nécessaire sur la
support intégral)
f DIR (lecture aléatoire du dossier ;
seulement MP3)
f OFF (stopper la lecture aléatoire)
f Appuyez plusieurs fois si nécessaire sur la
touche MENU G pour quitter le menu.
Activer / Désactiver le défilement
d’informations relatives aux titres
(SCRL)
Pour activer ou désactiver le défilement
d’informations relatives aux titres au démarrage d’un titre,
f passez d’abord en mode CD ou MP3/WMA
si nécessaire.
f Appuyez sur la touche MENU G pour
ouvrir le menu.
touche MENU G pour quitter le menu.
7 620 210 015/020-022 | 05.2015 Robert Bosch Car Multimedia GmbH
Page 93

Mode CD/MP3 et USB | Autres réglages
fr | 93
f Appuyez sur la touche MENU G autant
de fois que nécessaire jusqu’à ce que
« SCRL » et l’option actuelle « OFF »
(désactivé) ou « ON » (activé) apparaissent sur l’écran.
f Tournez le bouton de réglage du volume
vers la gauche ou vers la droite pour
B
activer ou désactiver le défilement.
f Appuyez sur la touche MENU G à
plusieurs reprises si nécessaire pour
quitter le menu.
L’option « SCRL OFF » permet d’afficher les
informations relatives aux titres en sections de
8 caractères. Chaque section de texte ainsi
que le numéro du titre et la durée de lecture
sont affichés en alternance pendant respectivement 5 secondes.
Autres réglages
Le menu de configuration de l’appareil vous
permet de définir d’autres réglages en fonction
de vos besoins.
Réglages pour appareils raccordés
Définition du format d’écran
Différentes options sont disponibles pour le
format d’écran :
f NORM PS : Le lecteur DVD est raccordé à
un écran 4/3. L’image large est affichée
sur toute la largeur de l’écran, avec des
barres noires en haut et en bas de l’écran.
f NORM LB : Le lecteur DVD est raccordé à
un écran 4/3. L’image large est affichée
sur toute la hauteur de l’écran. Le bord
fr
gauche et le bord droit de l’image sont
rognés automatiquement.
f WIDE / LARGE : Le lecteur DVD est
raccordé à un écran 16/9. L’image large
est affichée sur l’écran dans toute sa
grandeur.
Pour afficher le menu de configuration,
f appuyez sur la touche SETUP :.
f Sélectionnez avec la touche ou 6
le sous-menu qui affiche l’option actuellement sélectionnée (« NORM PS »,
« NORM LB » ou « WIDE »).
f Sélectionnez avec la touche ou 6
l’option voulue.
f Appuyez sur la touche SETUP : pour
quitter le menu ou sur la touche ou 6
pour sélectionner un autre sous-menu.
7 620 210 015/020-022 | 05.2015Robert Bosch Car Multimedia GmbH
Page 94

94 | fr
Autres réglages
Réglage de la norme de télévision
de l’écran
Pour une qualité optimale, sélectionnez sur le
lecteur DVD la norme de télévision d’après
laquelle l’écran raccordé fonctionne.
« PAL » est la norme de télévision valable pour
l’espace européen tandis que « NTSC »
s’applique à l’espace américain/asiatique.
Note :
Le changement de ce réglage
s’applique seulement après avoir
arrêté et remis en marche l’appareil
avec le contact du véhicule.
Pour afficher le menu de configuration,
f appuyez sur la touche SETUP :.
Note :
Les DVD ne prennent pas tous en
charge les niveaux de contrôle
parental.
Les niveaux de contrôle parental disponibles
(selon les niveaux définis par la Motion Picture
Association of America - MPAA) sont les
suivants :
f KID SAVE : autorisé aux enfants
f GAMMA : autorisé aux enfants
f PG : présence recommandée d’un adulte
pendant la lecture.
f PG13 : présence recommandée d’un
adulte pendant la lecture, ne convient pas
aux enfants de moins de 13 ans.
f PGR : présence recommandée d’un adulte
f Sélectionnez avec la touche ou 6
la fonction qui affiche l’option actuellement sélectionnée (« PAL » ou « NTSC »).
f Sélectionnez l’option voulue avec la
touche ou 6 .
f Appuyez sur la touche SETUP : pour
quitter le menu ou sur la touche ou
6 pour sélectionner une autre
fonction.
Contrôle parental
Vous pouvez empêcher la lecture de DVD non
appropriés aux mineurs en définissant un
niveau de contrôle parental (Rating Level). Si
un DVD prend en charge la fonction de niveau
de contrôle parental et si le niveau de contrôle
parental ne correspond à celui défini sur
pendant la lecture, contenu avec images
violentes, langue obscène etc.
f R : interdit aux enfants et aux adolescents,
contenu avec images violentes, langues
obscène etc.
f NC17 : contenu ne convenant pas aux
adolescents de moins de 17 ans
f ADULT : contenu destiné uniquement aux
adultes : violence, sexe etc.
Activer le contrôle parental
Pour afficher le menu de configuration,
f Appuyez sur la touche SETUP :.
f Sélectionnez avec la touche ou 6 le
sous-menu « PARENTAL ».
f Appuyez sur la touche OK 5.
f Sélectionnez avec la touche ou 6
l’appareil, le DVD ne sera pas lu.
7 620 210 015/020-022 | 05.2015 Robert Bosch Car Multimedia GmbH
l’option voulue.
Page 95

Autres réglages | Sources audio externes
fr | 95
f Appuyez sur la touche SETUP : pour
quitter le menu ou sur la touche >
pour accéder au menu respectivement
supérieur.
Sources audio externes
Vous avez la possibilité de raccorder différents
types de sources audio externes à l’appareil au
moyen de la prise d’entrée AUX en façade (AUX
FRNT).
Entrée AUX en façade
Risque de blessure accru dû
aux connecteurs !
Les connecteurs en saillie dans la
prise d’entrée AUX en façade I
peuvent provoquer des blessures en
cas d’accident.
Utilisez par conséquent des connecteurs jack coudés seulement.
fr
Dès qu’une source audio externe est raccordée
à la prise d’entrée AUX en façade I, elle peut
être sélectionnée avec la touche SRC C.
« AUX FRNT » apparaît ensuite sur l’écran.
Réglage du gain de l’entrée AUX
Vous pouvez régler séparément le gain de
l’entrée AUX et adapter ainsi le gain de la
source audio externe à celui des sources audio
propres à l’appareil (comme par ex. radio et
USB).
Note :
Vous pouvez régler le gain pour
l’entrée AUX seulement si cette
entrée a été sélectionnée comme
source audio avec la touche SRC C.
7 620 210 015/020-022 | 05.2015Robert Bosch Car Multimedia GmbH
Page 96

96 | fr
Sources audio externes | Sortie préampli | Montage
f Appuyez si nécessaire sur la touche
SRC C autant de fois que nécessaire
jusqu’à ce que la source AUX apparaisse
sur l’écran.
f Appuyez sur la touche MENU G.
« GAIN » et l’option actuelle sont affichés sur
l’écran.
f Tournez le bouton de réglage du
volume B vers la gauche ou vers la droite
pour régler le gain entre –9 et +9.
Pour quitter le menu,
f appuyez plusieurs fois si nécessaire sur la
touche MENU G.
Sortie préampli
Vous avez la possibilité de raccorder un
amplificateur supplémentaire à l’appareil. À
Montage
Consignes de montage
Respectez les consignes suivantes dans le
choix de l’emplacement :
f Il ne doit pas y avoir de fils ni de conduites
sous la surface sur laquelle vous voulez
monter l’appareil.
N’installez pas l’appareil à un endroit où il
serait
f directement exposé aux rayons du soleil,
f à proximité des sorties d’air chaud
(chauffage etc.),
f exposé à la pluie ou à l’humidité,
f exposé aux poussières ou à la saleté,
f exposé à de fortes vibrations.
cette fin, l’amplificateur doit être raccordé au
dos de l’appareil.
Fourniture
f Mode d’emploi
f Cadre de montage
f Boulon de guidage
f Accessoires pour sections A et B
(8 649 494 026)
f Câble de raccordement pour section C1
(8 649 492 033)
f Câble de raccordement pour section C3
(8 649 492 022)
f Câble de raccordement USB
(8 649 494 018)
f Câble de raccordement de microphone
(8 675 501 012)
f Télécommande infrarouge (deux piles 1,5
V fournies)
f Outillage de démontage
7 620 210 015/020-022 | 05.2015 Robert Bosch Car Multimedia GmbH
Page 97

Montage
fr | 97
Montage
Note :
Reportez-vous au chapitre « Connecteur ISO » pour raccorder l’appareil.
Si vous voulez installer l’appareil par vos
propres soins,utilisez le cadre de montage
fourni.
Vous pouvez monter le DVP dans un angle de
–20° à +60° autour de l’axe transversal et dans
un angle de –20° a +20° autour de l’axe
longitudinal.
La performance de lecture optimale du lecteur
est obtenue avec un angle de montage de ±5°
par rapport à l’horizontale (vers l’avant/l’arrière
et/ou vers la gauche/la droite).
Note :
Assurez-vous de ne pas coincer les
câbles de raccordement au cours du
montage.
53
182
165
fr
1-20
7 620 210 015/020-022 | 05.2015Robert Bosch Car Multimedia GmbH
Page 98

98 | fr
Caractéristiques techniques
Caractéristiques
techniques
Tension de service : 12 V
Puissance absorbée
au repos : < 1 mA
Température de
service : de –20˚C à +70˚C
Amplificateur
Puissance de sortie : 2 x 20 watts V RMS
sur 4 ohms
Sortie préampli: 2 x 1.0 V RMS
Tuner
Gammes d’ondes Taïwan :
FM : 87.7 – 107.9 MHz
AM : 531 – 1602 kHz
Gammes d’ondes Philippines :
FM : 87.5 – 108.0 MHz
AM : 522 – 1629 kHz
Gammes d’ondes Australie/Nouvelle-Zélande
FM : 87.5 – 108.0 MHz
AM : 522 – 1710 kHz
Vidéo
Laser : 655/785 nm
Normes couleur : PAL, NTSC
Gammes d’ondes Europe :
VHF (FM) : 87.5 – 108 MHz
PO : 522 – 1629 kHz
GO : 153 – 279 kHz
OC : 5800 – 6.300 kHz
Gammes d’ondes NAFTA :
FM : 87.7 – 107.9 MHz
AM : 530 – 1710 kHz
WTH : 162.4 – 162.55 MHz
Gammes d’ondes APAC et MENA :
FM : 87.5 – 108.0 MHz
AM : 531 – 1602 kHz
Gammes d’ondes Amérique latine :
FM : 87.5 – 108.0 MHz
Plage de fréquences : de 20 Hz à 20 kHz
Niveau de sortie vidéo
niveaux de gris : 1,0 Vpp, 75 Ω
Poids : approx. 1,42 kg
Dimensions
(LxHxP en mm) : 178 x 50 x 162
Normes : CE, E1, FCC, RoHS,
MVSS302, WEEE
AM : 530 – 1710 kHz
7 620 210 015/020-022 | 05.2015 Robert Bosch Car Multimedia GmbH
Sous réserve de modifications.
Page 99

Comandi
it | 99
1 LIGHT, per accendere la luce dei tasti del
telecomando per circa 10 sec.
2 PLAY/PAUSE / , per avviare e inter-
rompere la riproduzione.
3 / , per saltare capitoli o brani.
4 MENU, per visualizzare il menù principale
del DVD.
5 OK / ENTER, per selezionare e conferma-
re le voci del menù principale e avviare la
riproduzione.
6 Tasti freccia per selezionare brani e cartel-
le e per la navigazione nei menù.
: SETUP, per visualizzare il menù Setup del
DVD.
; SBTL, per passare tra i sottotitoli disponi-
bili sul DVD.
< USB, per passare in modalità USB.
= VIDEO, per passare tra le modalità DVD/
CD/MP3 e una sorgente audio/video
esterna.
> , nel menù per passare al livello supe-
riore di menù.
? / , per accendere l’avanzamento/
riavvolgimento rapido.
it
/ , per passare ad altri titoli, per
modificare impostazioni nei menù, per
selezionare voci nel menù del DVD.
/ , per passare in altre cartelle (in
DVE e CD MP3/WMA/dati), per selezionare voci nei menù e nel menù del DVD.
7 VOLUME –/+, per modificare il volume.
8 RADIO, per passare alla modalità radio.
9 AUX, per passare alla modalità AUX.
@ STOP / , per concludere la riproduzio-
ne.
A , per far uscire il CD/DVD.
7 620 210 015/020-022 | 05.2015Robert Bosch Car Multimedia GmbH
Page 100

100 | it
Comandi
B Manopola per regolare il volume.
C SRC, per selezionare la sorgente tra radio
e DVD/CD, USB, AUX e sorgente video
esterna
D , per accendere/spegnere l’apparec-
chio; modalità silenziosa.
E Display
F Vano DVD
G MENU, per visualizzare i menù delle impo-
stazioni di base
H Tasto basculante multifunzione
I Presa AUX IN frontale
J Mini presa USB
K CAM, per passare tra le immagini di
videocamera disponibili
L Blocco dei tasti 1– 6
M Tasto AUD
Premuto brevemente: aprire il menù
Audio per impostare bassi, medi, alti,
balance e loudness
Premuto a lungo: ripristinare le impostazioni di suono della fabbrica
N BND
Premuto brevemente: selezione del livello
di memoria o della gamma d’onda.
Premuto a lungo: avvio della funzione
Travelstore
O Sensore IR
7 620 210 015/020-022 | 05.2015 Robert Bosch Car Multimedia GmbH
 Loading...