

Bosch BSG81396UC User Manual

a
Use and Care Manual
For Household Use Only
Notice d’utilisation et d’entretien
Usage domestique uniquement
Manual de instrucciones y cuido
Sólo para uso doméstico antes de
utilizar el equipo lea las instrucciones
Vacuum cleaner/Aspirateur/Aspiradora cleaner
BSG81396UC

Use and Care Manual. . . . . . . . . . . . . . . . . . . . . . . . . . . . . . . . . . . . . . . . . . . . . . . . . . . . . . 3
Notice d’utilisation et d’entretien . . . . . . . . . . . . . . . . . . . . . . . . . . . . . . . . . . . . . .18
Manual de instrucciones y cuidado . . . . . . . . . . . . . . . . . . . . . . . . . . . . . . . . . . . .32
2

Important Safeguards
Use as directed
NOTE
This vacuum cleaner is intended for use in the home and not for industrial purposes.
The vacuum cleaner must be used exclusively in accordance with the
specifications stated in the instructions.
The manufacturer shall not be held liable for any damages which arise from use
which is not as directed or has been caused by an incorrect operation of the vacuum
cleaner. Therefore, please ensure that the following information is observed and heeded.
Safety information
To reduce the risk of fire, electric shock, or injury:
READ ALL INSTRUCTIONS BEFORE USING THIS APPLIANCE
!
∆
WARNING
Do not use the vacuum cleaner to pick up flammable or combustible liquids.
Do not use the vacuum cleaner in the presence of flammable or combustible
vapors.
Handling the cord on this product will expose you to lead, a chemical known to
the State of California to cause birth defects or other reproductive harm.
Wash hands after handling.
!
∆
CAUTION
Do operate the appliance only with original dust bags.
Do operate the appliance only by using original spare parts, accessories or
optional accessories.
Do only use as described in this manual.
Do connect and start up the vacuum cleaner only in accordance with the information
stipulated on the identification plate.
Do protect the vacuum cleaner from external weather conditions, dampness and heat
sources.
Do switch off and unplug the appliance before any assembly, cleaning and before
servicing.
Do supervise children whenever they are around an operating appliance to prevent
injury to the child and possible damage from misuse of the appliance.
Do switch off and unplug the appliance if it stops sucking or at the event of any
other fault.
Do keep hair, loose clothing, fingers, and all parts of body away from openings and
moving parts.
Do turn of all controls before unplugging.
Do use extra care when cleaning on stairs.
Do hold plug when rewinding onto cord reel. Do not allow plug to whip when rewinding.
3

Do unplug before connecting the Turbo Universal floor brush.
Do fully extend the power cord if the appliance is to be used continously for several
hours.
Do always turn off this appliance before connecting or disconnecting either hose or
motorized nozzle.
To reduce the risk of electric shock, this appliance has a polarized plug (one blade is
wider than the other). This plug will fit in a polarized outlet only one way. If the plug
does not fit fully in the outlet, reverse the plug. If it still does not fit, contact a qualified
electrician to install the proper outlet. Do not change the plug in any way.
The hose contains electrical wires. Do not use when damaged, cut, or punctured.
Avoid picking up sharp objects.
Do not leave appliance when plugged in. Unplug from outlet when not in use and
before servicing.
Do not use outdoors or on wet surfaces.
Do not allow to be used as a toy. Close attention is necessary when used by or near
children.
Do not use with damaged cord or plug. If appliance is not working as it should, has
been dropped, damaged, left outdoors, or dropped into water, return it to a service
center.
Do not pull or carry by cord, use cord as a handle, close a door on cord, or pull cord
around sharp edges or corners. Do not run appliance over cord. Keep cord away from
heated surfaces.
Do not unplug by pulling on cord. To unplug, grasp the plug, not the cord.
Do not handle plug or appliance with wet hands.
Do not put any object into openings. Do not use with any opening blocked; keep free
of dust, lint, hair and anything that may reduce air flow.
Do not pick up anything that is burning or smoking, such as cigarettes, matches, or
hot ashes.
Do not use without dust bag and/or filters in place.
Do not vaccum up damp substances or liquids to avoid electrical shock hazards.
Do not operate the brush on or next to people or animals or let the tube or nozzles get
close to your face or head to prevent entanglement or possible injury from flying debris.
Do not operate the vacuum if any part of it is damaged to prevent injury to the operator
or bystanders.
Do not use machine as a step.
Do not re-use or wash the filters.
Do not remove any screws.
Do not vaccum up sharp objects to prevent injuries when opening or emptying the
appliance.
Do not use a damaged vaccum appliance.
SAVE THESE INSTRUCTIONS!
4
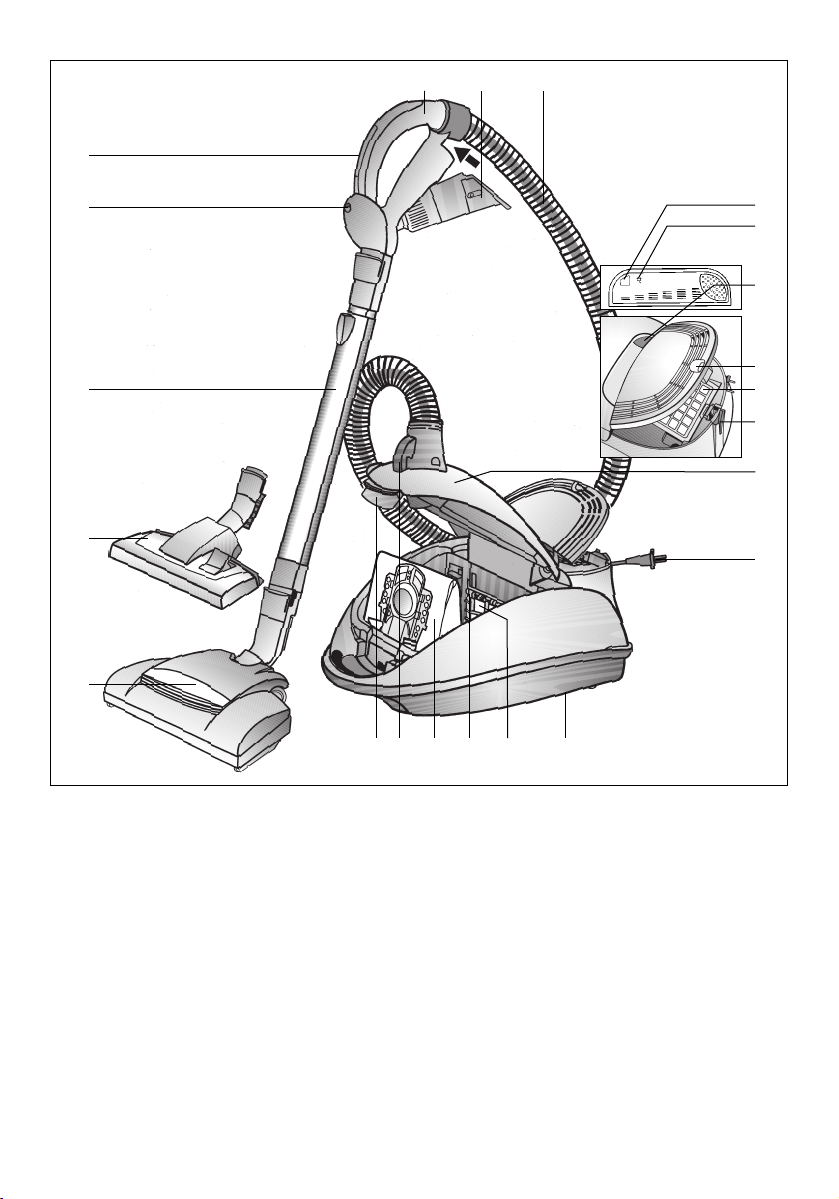
22
13
2
21
20
19
18
4
5
6
7
8
9
10
11
121314151617
1 Ergoplus handle with integral accessory
holder
2 4in1 accessory
3 Suction hose
4 Change dust bag indicator
5 Power indicator
6 ON/OFF button
7 Exhaust grille latch
8 Exhaust filter
9 Parking aid
10 Dust compartment cover
11 Power cord
12 Parking aid (on unit underside)
13 Motor protection filter
14 Filter bracket
®
15 MEGAfilt
Super TEX dust bag
16 Socket for electrobrush
17 Dust compartment latch
18 Electrobrush with snap connector
19 Dual action nozzle with carpet lifter
and snap connector
20 Incord telescopic tube
21 Electrobrush on/off button
22 Suction adjustment
5
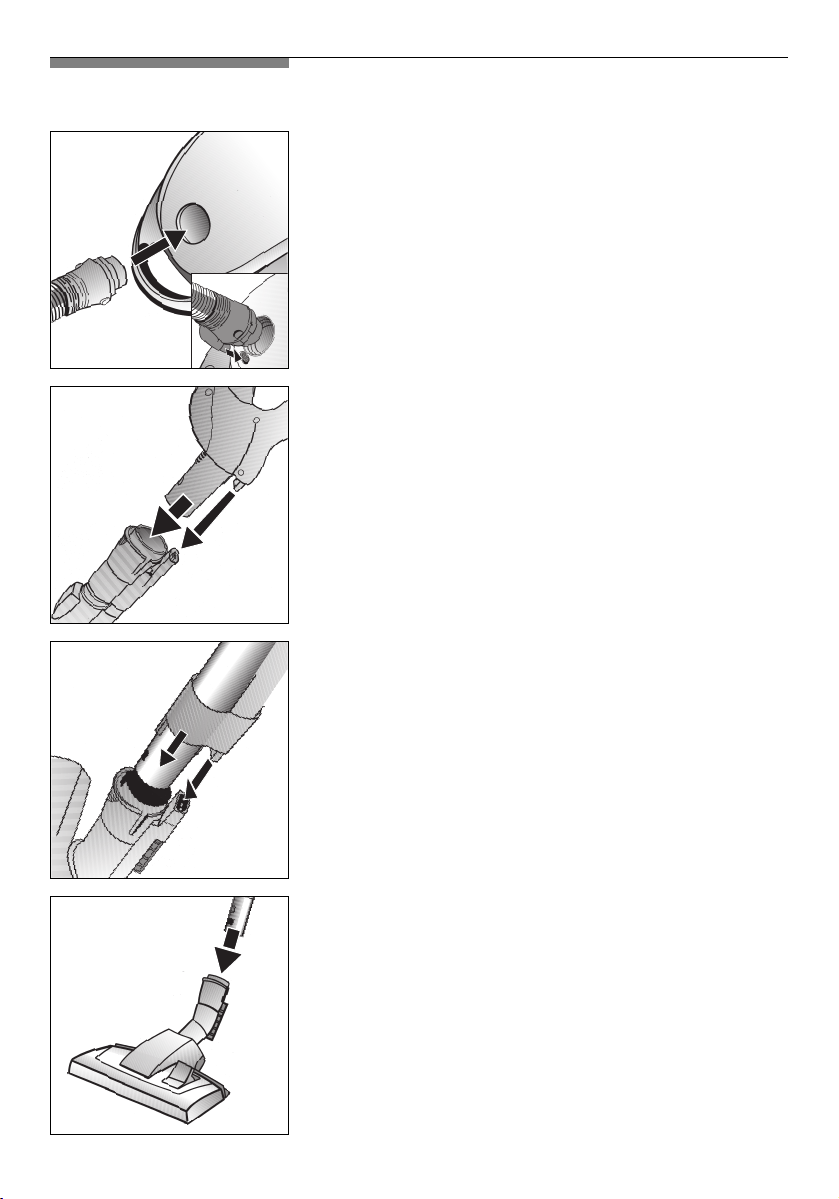
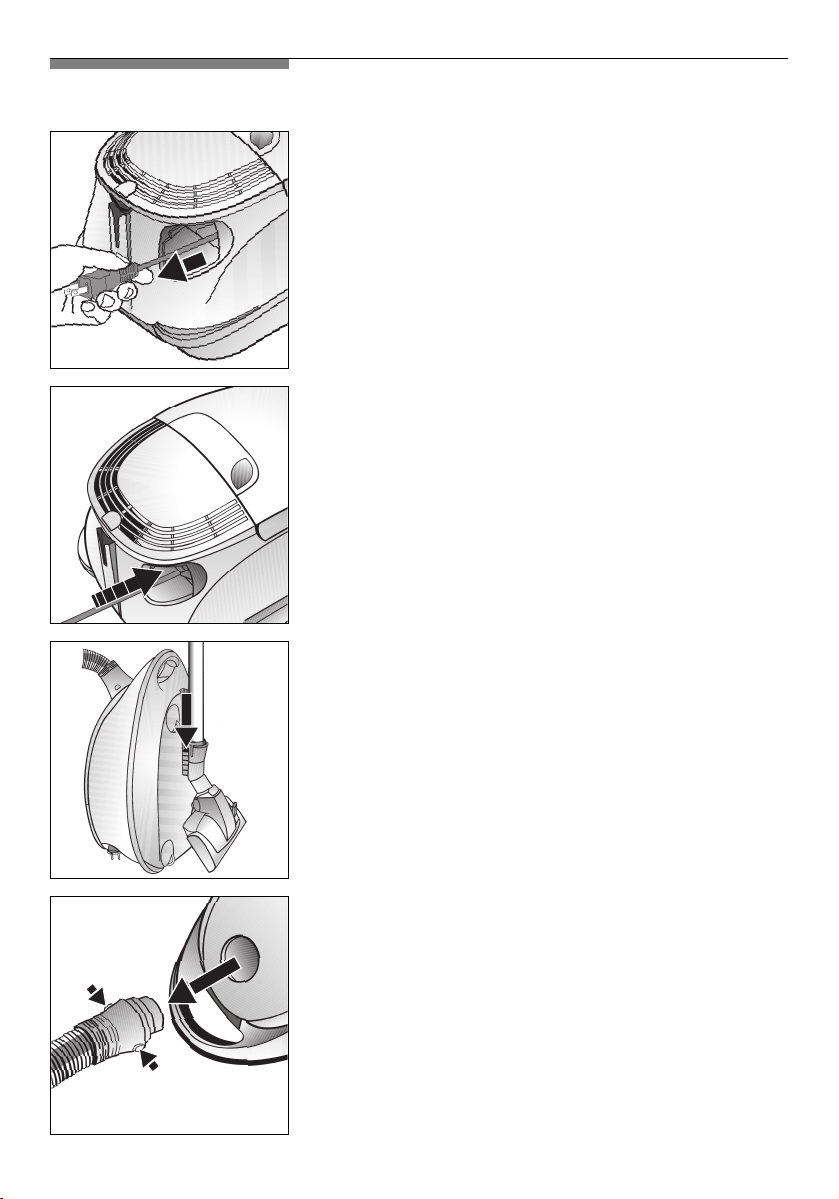
Starting up
Insert the suction hose connector into the suction
opening until it engages.
You must ensure that the plug-in part of the suction
hose connector is inserted into the appliance socket.
Push the handle into the incord telescopic tube until it
engages.
Push the incord telescopic tube into the electrobrush
connection piece until it engages.
You must ensure that the plug-in part of the incord
telescopic tube is inserted into the corresponding
recess on the electrobrush connection piece.
An electrical contact with the vacuum cleaner is
established when the plug-in part is engaged.
When using the dual action nozzle
Push the incord telescopic tube into the connecting
piece of the floor nozzle until it engages.
6
Electrobrush
For notes on the use and maintenance of the electrobrush, see the separate
instruction manual provided.
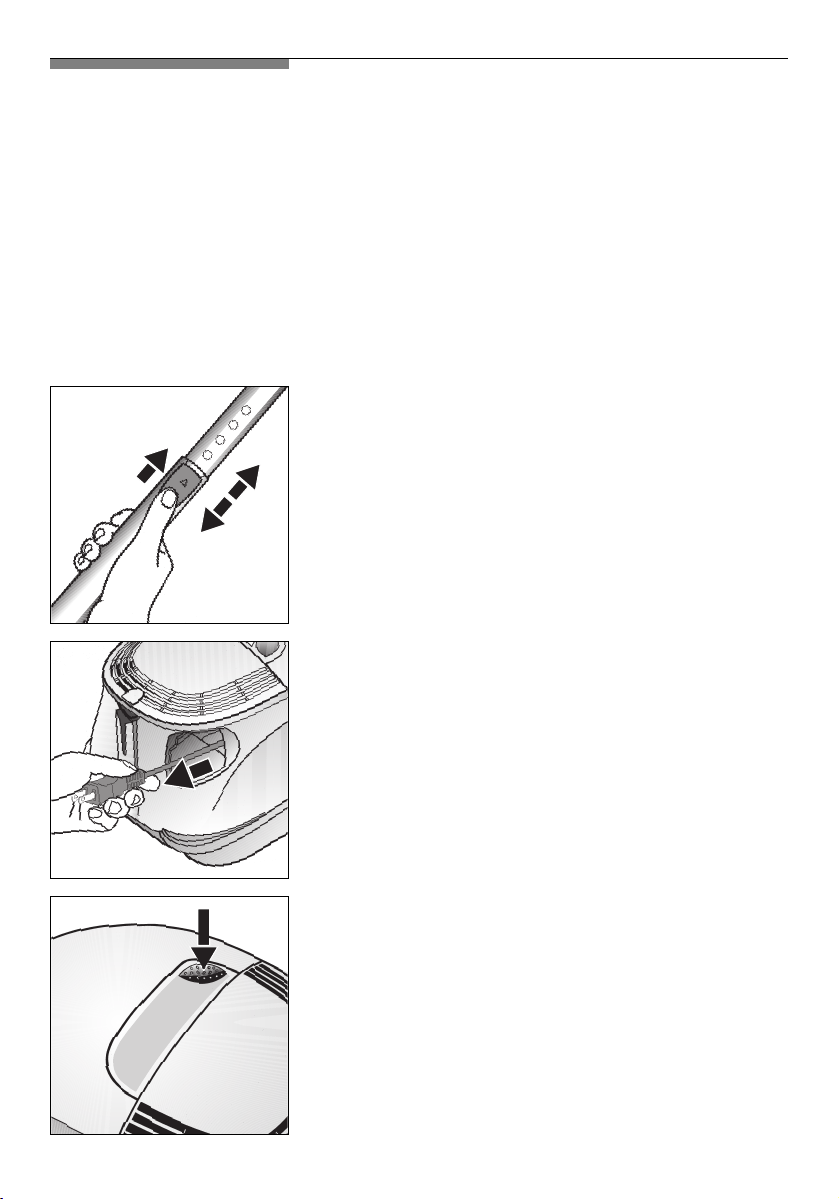
To adjust the length of the incord telescopic tube,
press the sliding lock in the direction of the arrow and
adjust the tube to the required length.
Grasp the plug and pull the power cord to the
required length and insert the plug in a wall socket
To switch your vacuum cleaner on and off, press the
ON/Off button in the direction of the arrow.
7
Suction adjustment
off
off
on
Pressing the suction adjustment switch in the direction
of the arrow reduces or increases the suction power.
The LED on the appliance lights up to display the
suction level.
Low suction range:
For cleaning delicate fabrics, such as curtains.
Middle suction range:
For daily cleaning of lightly soiled surfaces.
High suction range:
For cleaning durable floor coverings, hard floors and
for heavily soiled surfaces.
Pushing the sliding switch too far in the direction of the
arrow switches off the vacuum cleaner and puts it into
“Stand by” mode.
=> The lowest power level flashes in blue
Pushing the sliding switch in the opposite direction
switches the appliance back on.
The electrobrush can be switched on or off while you
are vacuuming by pressing the knob.
8

Vacuuming
IMPORTANT
You have bought an extremely powerful device.
The highest suction setting is therefore only recommended for heavily soiled,
durable carpeted and hard floors.
Adjusting the floor nozzle:
For cleaning rugs
and carpets =>
For cleaning hard floors =>
Floor nozzle with carpet lifter
When you pull the floor nozzle backwards,
the rug is lifted, allowing you to clean underneath
the carpet edge.
9

CLICK!
CLICK!
a
b c
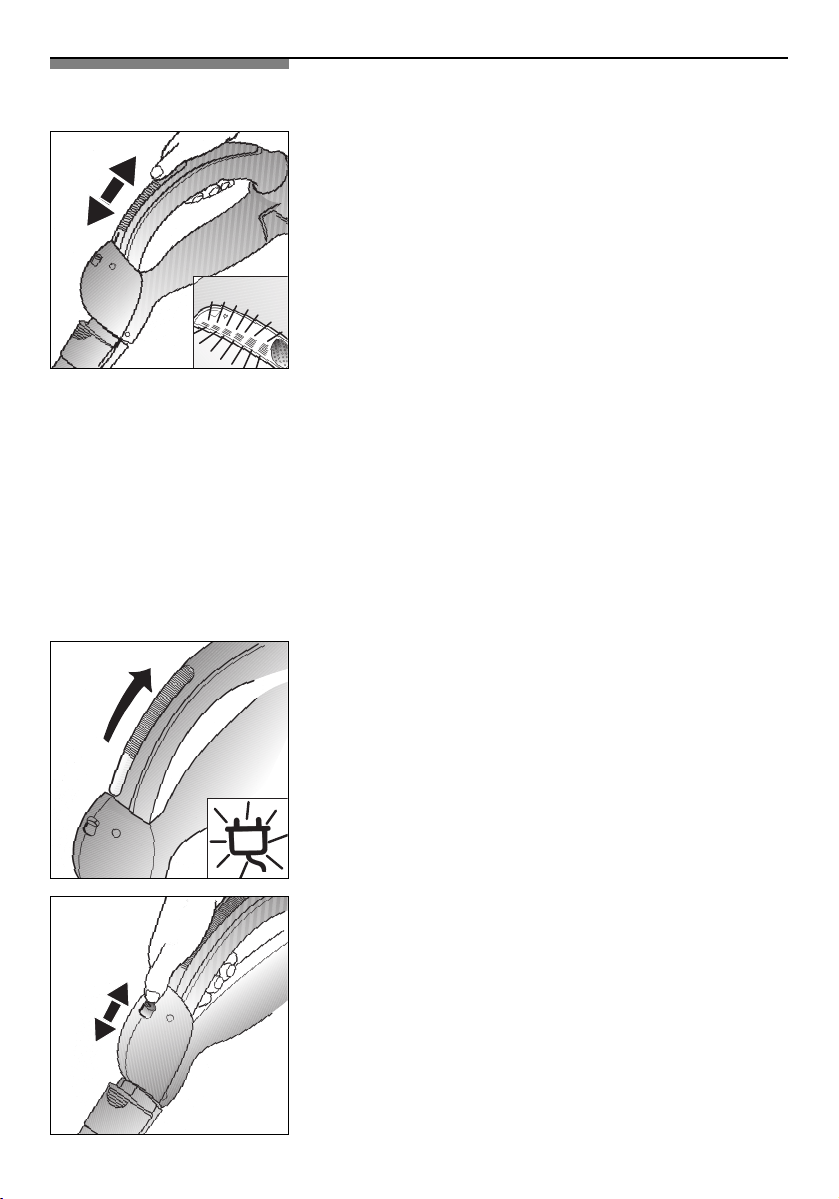
Vacuuming with accessories
Pull the 4in1 accessory in the direction of the arrow to
remove it from the accessory holder.
a) Crevice nozzle
For vacuuming in crevices and corners. For difficult
to get to places, the 4in1 accessory can be
extended in two stages to 14 inches (or 360 mm)
by pulling out the crevice nozzle.
Extend the crevice nozzle to the second stop until
you can hear it engage.
To push the crevice nozzle together again, release
the telescope lock (by pressing in arrow direction).
b)Upholstery nozzle
For cleaning upholstery, curtains, etc.
c) Furniture brush
For window frames, cabinets, lamp shades etc.
Fold the upholstery nozzle over in the direction of
the arrow.
To extend the brush ring, turn in the direction of
the arrow.
Before replacing the 4in1 accessory in the
accessory holder, retract the bush ring and fold
the upholstery nozzle back.
10
Caution: to prevent damage to the nozzle / furniture
!
brush, fold the upholstery nozzle out only when the
furniture brush is retracted.
When you stop cleaning for a moment, you can use
the parking aid at the back of the vacuum cleaner.
Slide the plastic tab on the nozzle connector into the
groove at the back of the vacuum cleaner.
Switch the vacuum cleaner to “Stand by” mode first
After work
Switch the vacuum cleaner off and unplug the
power cord.
Tug the power cord and let go. The power cord then
winds itself up automatically.
To store or transport the vacuum cleaner, you can use
the parking aid on the cleaner’s underside. Place the
vacuum cleaner upright.
Slide the plastic tab on the floor nozzle into the
groove on the unit underside.
To remove the suction hose, press the two buttons
together and pull the hose out.
11

To release the connection, press the snap connector
and pull the incord telescopic tube out.
To release the connection, press the snap connector
and pull the telescopic tube out.
12

Changing the dust bag
Replacing the MEGAfilt®SuperTEX dust bag
If the dust bag change indicator lights up brightly
and uniformly when the nozzle is lifted from the floor
and the vacuum is on its highest setting, you
should change the dust bag, even if it is not yet full.
In this case it is essential to change the dust bag
due to the type of material it contains.
Turn the dust compartment locking lever in the
direction of the arrow to open the dust compartment
cover.
Seal the
sealing strip and pull up to remove the bag.
Place a new MEGAfilt®SuperTEX dust bag in the
holder and close the dust bag compartment cover.
!
MEGAfilt®Super TEX
Caution: The dust bag compartment cover will
only close when the MEGAfilt
bag, textile filter or dust collector has been
inserted.
If the dust bag change indicator continues to
light up after the dust bag has been changed,
please check whether the nozzle, pipe or
vacuum hose are obstructed.
dust bag by pulling the
®
SuperTEX dust
13
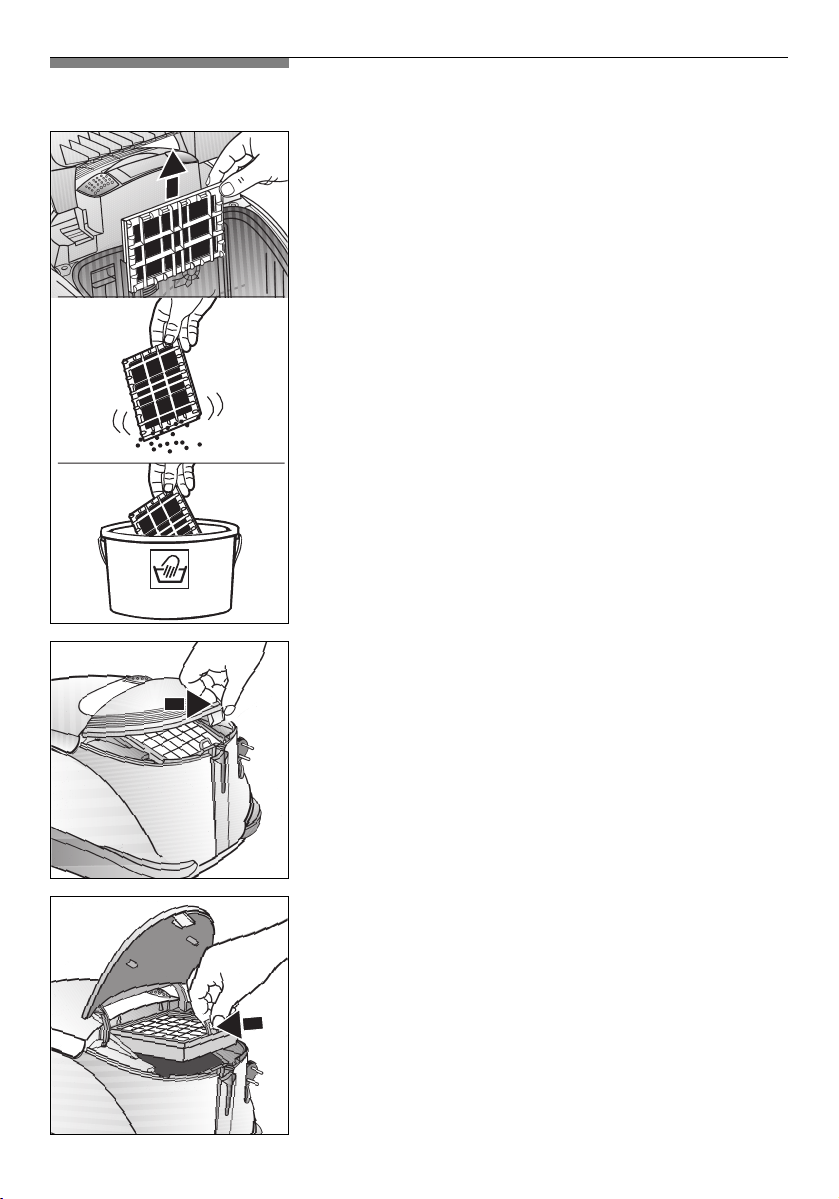
Cleaning the motor protection filter
The motor protection filter should be cleaned at
regular intervals by tapping it or washing it out.
Open the dust compartment cover.
Remove the motor protection filter in the direction of
the arrow.
Empty the motor protection filter by tapping it.
If the motor protection filter is very dirty, wash it out.
Leave the filter to dry for at least 24 hours.
After cleaning, insert the motor protection filter in the
machine and close the dust compartment cover.
Replacing the HEPA / Activated carbon filter
Press the exhaust grille latch in the direction of the
arrow to unlatch the exhaust grille and open it.
14
Press the filter frame latch in the direction of the arrow
to unlatch the filter frame and remove it
.
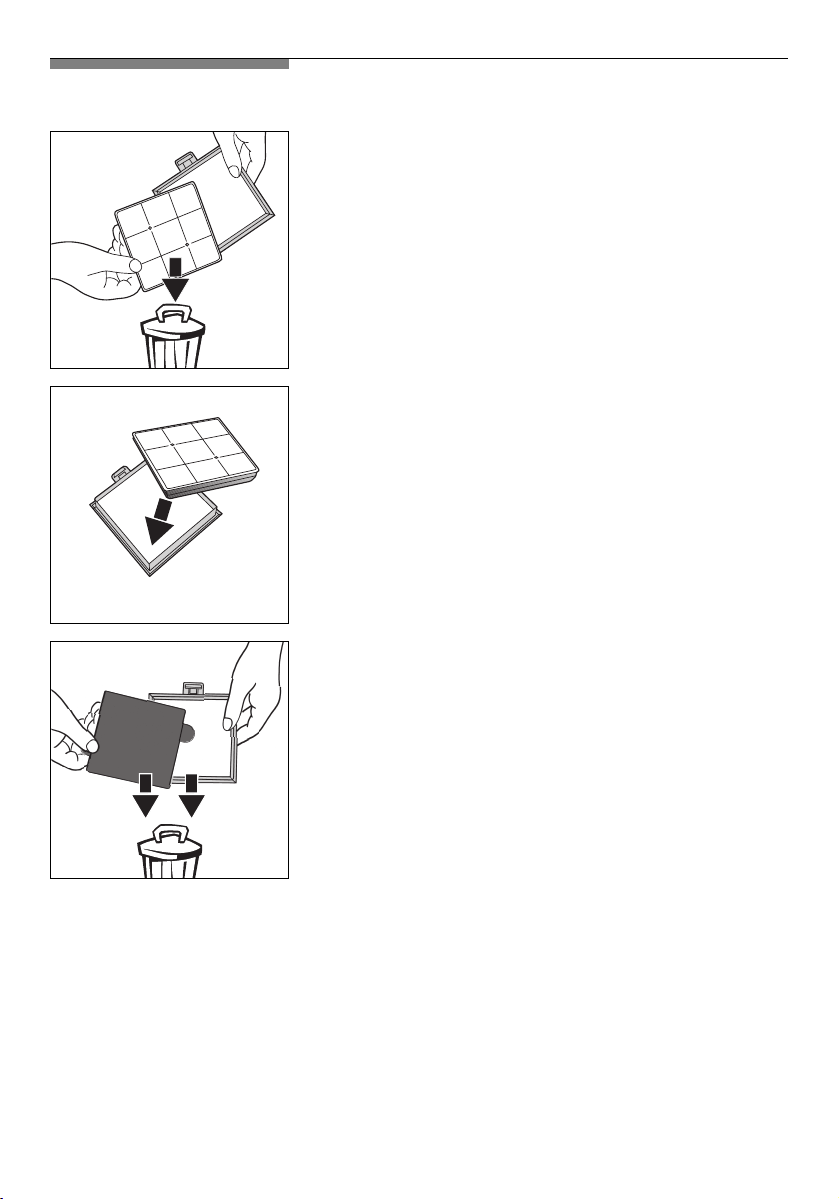
*
Replacing the active carbon filter*
If your vacuum cleaner is fitted with an active carbon filter, this must be replaced once a year.
Remove the active carbon filter and dispose of it with
the household rubbish.
Depending on version
*
*
Insert a new active carbon filter.
Depending on version
*
HEPA filter
Every twelve months:
Dispose of both the activated carbon filter and the
HEPA filter and frame and replace them both.
Dispose of both filters in the household rubbish
If you have used the vacuum cleaner for fine dust particles
(such as plaster or cement), clean the motor protection filter by tapping it and,
if necessary, replace the motor protection filter and the microsan filter.
15

Slide the filter frame under the two retaining ribs and
turn in the direction of the arrow until it engages.
Close the exhaust grille.
Maintenance
Before the appliance is cleaned, ensure that it has been switched off and unplugged.
Vacuum cleaners and accessories made of plastic can be cleaned using a general
commercial plastic cleaner.
Do not use scouring agents, glass or all-purpose cleaners.
Never immerse the vacuum cleaner in water!
If necessary, the dust compartment can be cleaned using another vacuum cleaner,
or simply cleaned with a dry dust cloth / dust brush.
Subject to change without notice.
16
 Loading...