

Bosch BSG813 Use And Care Manual
a
Use and Care Manual
For Household Use Only
Notice d’utilisation et d’entretien
Usage domestique uniquement
Manual de instrucciones y cuido
Sólo para uso doméstico antes de
utilizar el equipo lea las instrucciones
Vacuum cleaner /Aspirateur/ Aspiradora
BSG813..

2
Use and Care Manual . . . . . . . . . . . . . . . . . . . . . . . . . . . . . . . . . . . . . . . . . . . . . . . . . 3
Notice d’utilisation et d’entretien . . . . . . . . . . . . . . . . . . . . . . . . . . . . . . . . .23
Manual de instrucciones y cuidado . . . . . . . . . . . . . . . . . . . . . . . . . . . . . . .44

Important Safeguards
3
Use as directed
NOTE
This vacuum cleaner and electric brush are intended for use in the home and not for
industrial purposes.
The vacuum cleaner and the electric brush must be used exclusively in accordance
with the specifications stated in the instructions.
The manufacturer shall not be held liable for any damages which arise from use
which is not as directed or has been caused by an incorrect operation of the vacuum
cleaner or the electric brush. Therefore, please ensure that the following information
is observed and heeded at all times.
Safety information
To reduce the risk of fire, electric shock, or injury:
READ ALL INSTRUCTIONS BEFORE USING THIS APPLIANCE
∆
!
WARNING
䡲 Do not use the vacuum cleaner to pick up flammable or combustible liquids.
䡲 Do not use the vacuum cleaner in the presence of flammable or combustible
vapors.
䡲 Handling the cord on this product will expose you to lead, a chemical known to
the State of California to cause birth defects or other reproductive harm.
Wash hands after handling.
∆
!
CAUTION
䡲 Do operate the vacuum cleaner only with original dust bags.
䡲 Do operate the vacuum cleaner only by using original spare parts, accessories or
optional accessories.
䡲 Do only use as described in this manual.
䡲 Do connect and start up the appliances only in accordance with the information
stipulated on the identification plate.
䡲 Do protect the appliances from external weather conditions, dampness and heat
sources.
䡲 Do switch off and unplug the appliance before any assembly, cleaning and before
servicing.
䡲 Do always turn off the vacuum cleaner before connecting or disconnecting either
hose or motorized nozzle.
䡲 Do supervise children whenever they are around an operating appliance to prevent
injury to the child and possible damage from misuse of the appliance.

4
䡲 Do switch off and unplug the appliance if suction stops or in the event of any
other fault.
䡲 Do only connect and operate the electric brush in accordance with the operating
instructions. In the event of a fault, disconnect the electric brush from the vacuum
cleaner. Unplug the power cord.
䡲 Do use the socket of the vacuum cleaner only for connecting the electric brush.
Unplug the power cord prior to connecting the electric brush.
䡲 Do ensure that any repair work or replacement of spare parts is only carried out by
an authorized customer services department.
䡲 Do unplug the power cord after vacuuming.
䡲 Do use extra care when cleaning on stairs.
䡲 Do keep hair, loose clothing, fingers, and all parts of body away from openings and
moving parts.
䡲 Do turn off all controls before unplugging.
䡲 Do hold plug when rewinding onto cord reel. Do not allow plug to whip when
rewinding.
䡲 Do fully extend the power cord if the appliance is to be used continuously for
several hours.
䡲 Do not operate the electric brush on or next to people or animals or let the electric
brush get close to your face or head to prevent entanglement or possible injury
from flying debris.
䡲 Do not operate the electric brush if any part of it is damaged to prevent injury to
the operator or bystanders.
䡲 Do not reach into the running brush roller.
䡲 Do not drive over the power cord while the brush roller is running.
䡲 Do not leave the electric brush standing on the carpet when the brush roller is
rotating, it must be kept moving (could damage the pile).
䡲 Do not leave appliance when plugged in. Unplug from outlet when not in use and
before servicing.
䡲 Do not use outdoors or on wet surfaces.
䡲 Do not allow to be used as a toy. Close attention is necessary when used by or
near children.
䡲 Do not use with damaged cord or plug. If appliance is not working as it should, has
been dropped, damaged, left outdoors, or dropped into water, return it to a
service center.
䡲 Do not pull or carry by cord, use cord as a handle, close a door on cord, or pull
cord around sharp edges or corners. Do not run appliance over cord. Keep cord
away from heated surfaces.
䡲 Do not unplug by pulling on cord. To unplug, grasp the plug, not the cord.
䡲 Do not handle plug or appliance with wet hands.
䡲 Do not put any object into openings. Do not use with any opening blocked; keep
free of dust, lint, hair and anything that may reduce air flow.

5
䡲 Do not pick up anything that is burning or smoking, such as cigarettes, matches, or
hot ashes.
䡲 Do not use without dust bag and/or filters in place.
䡲 Do not vaccum up damp substances or liquids to avoid electrical shock hazards.
䡲 Do not operate the vacuum if any part of it or the electric brush is damaged to
prevent injury to the operator or bystanders.
䡲 Do not use machine as a step.
䡲 Do not re-use or wash the filters.
䡲 Do not remove any screws.
䡲 Do not vaccum up sharp objects to prevent injuries when opening or emptying the
appliance.
䡲 Do not use a damaged appliance.
䡲 Do not use the electric brush to clean another electrical appliance.
䡲 Do not immerse any part of the vacuum cleaner or electric brush in water
directives.
䡲 To reduce the risk of electric shock, this vacuum cleaner has a polarized plug (one
blade is wider than the other). This plug will fit in a polarized outlet only one way.
If the plug does not fit fully in the outlet, reverse the plug. If it still does not fit,
contact a qualified electrician to install the proper outlet. Do not change the plug
in any way.
䡲 The hose contains electrical wires. Do not use when damaged, cut, or punctured.
Avoid picking up sharp objects.
SAVE THESE INSTRUCTIONS!
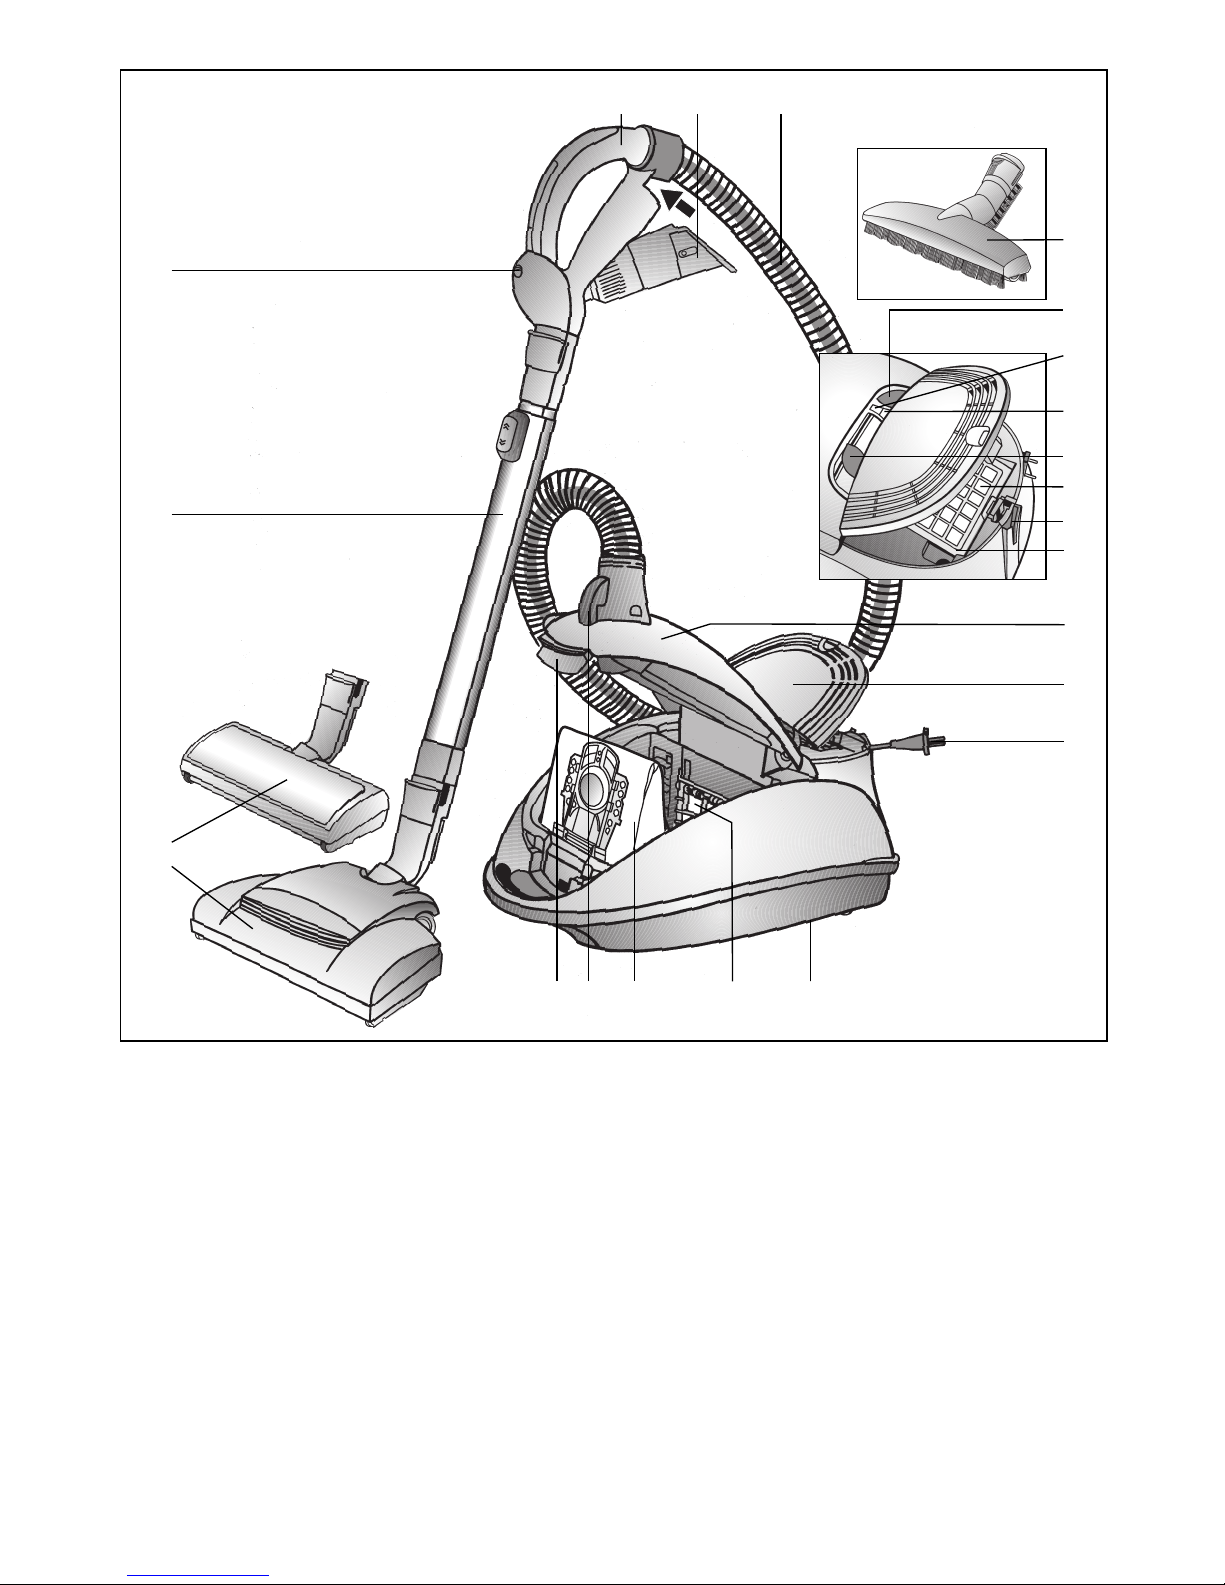
13 Exhaust grille
14 Power cord
15 Parking aid (on unit underside)
16 Motor protection filter
17 MEGAfilt
®
Super TEX dust bag
18 Socket for electric brush
19 Dust compartment latch
20 Electric brush with snap connector*
21 Incord telescopic tube
22 Electric brush on/off button
* depending on design
6
1 Ergoplus handle with integral
accessory holder
2 4-in-1 accessory tool
3 Suction hose
4 Hard floor nozzle with snap connector*
5 ON/OFF button
6 Power indicator*
7 Change dust bag indicator
8 Suction adjustment
9 Exhaust filter
10 Parking aid (with automatic OFF*)
11 Frame for exhaust filter
12 Dust compartment cover
22
13
14
1516171819
21
20*
12
13
2
5
6*
9
11
7
8
10*
4*
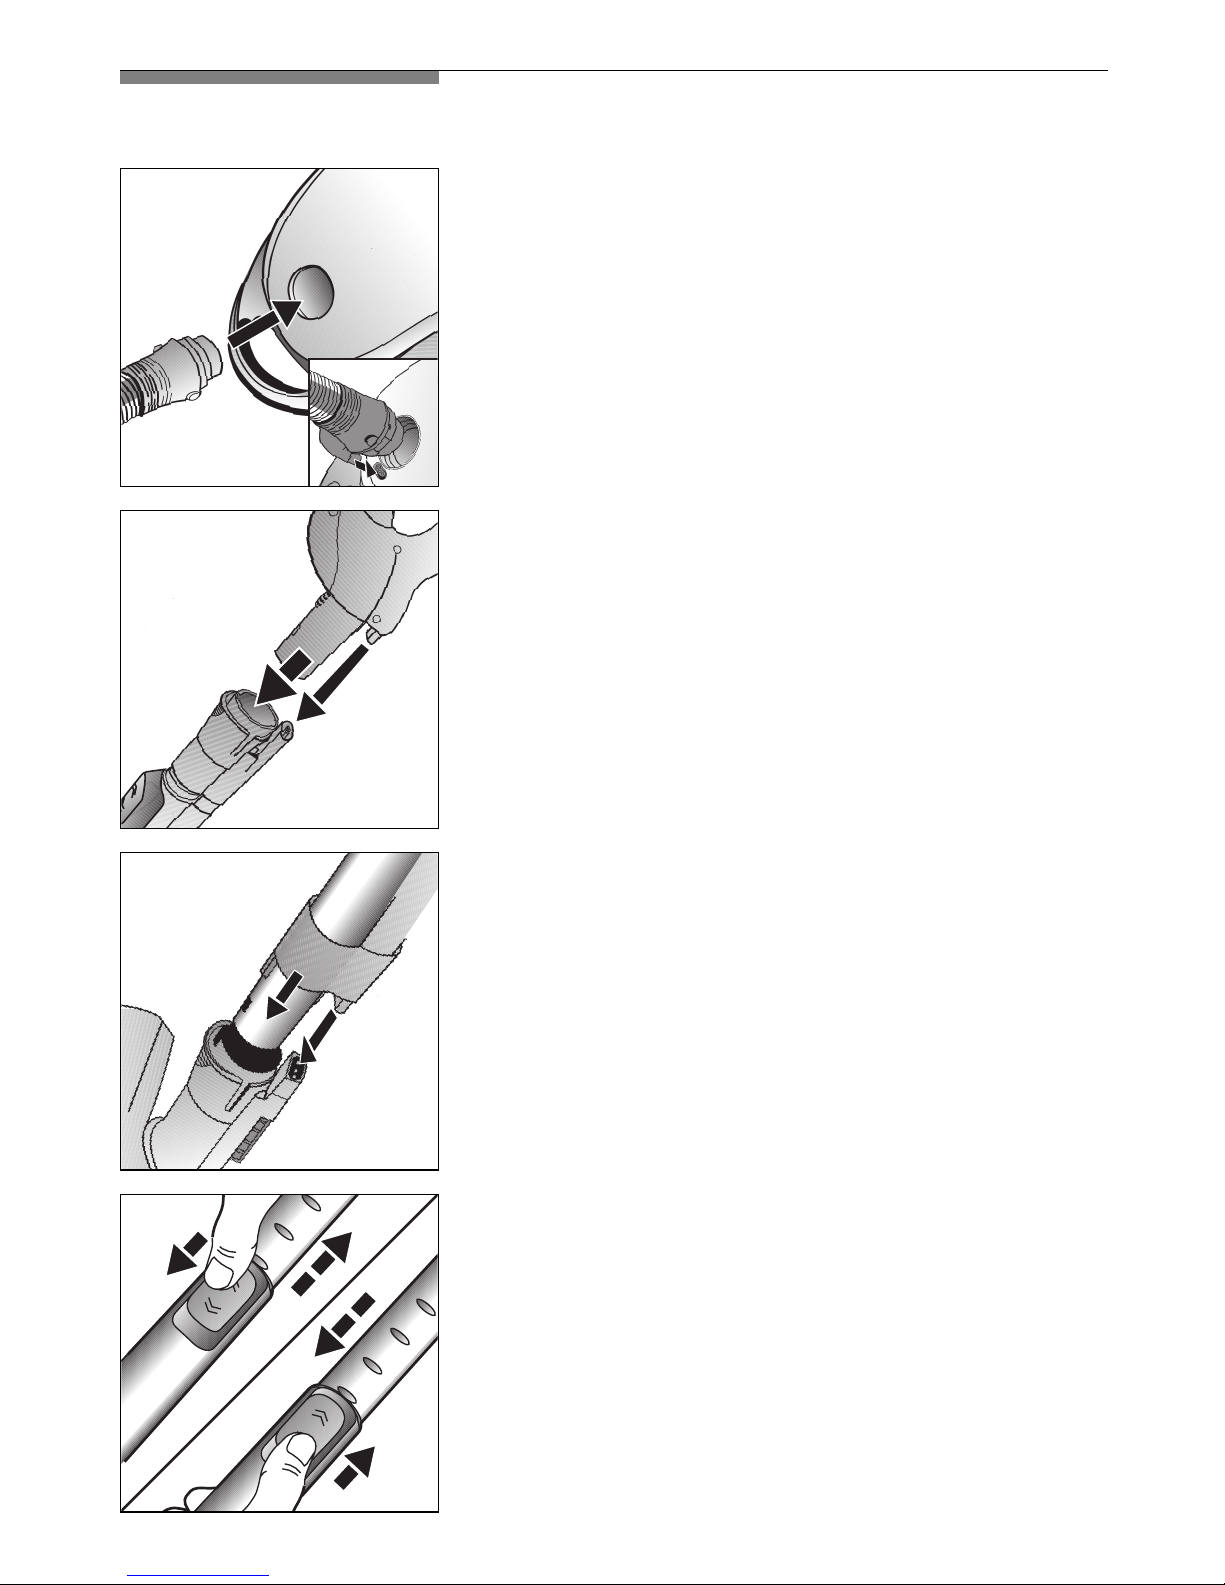
7
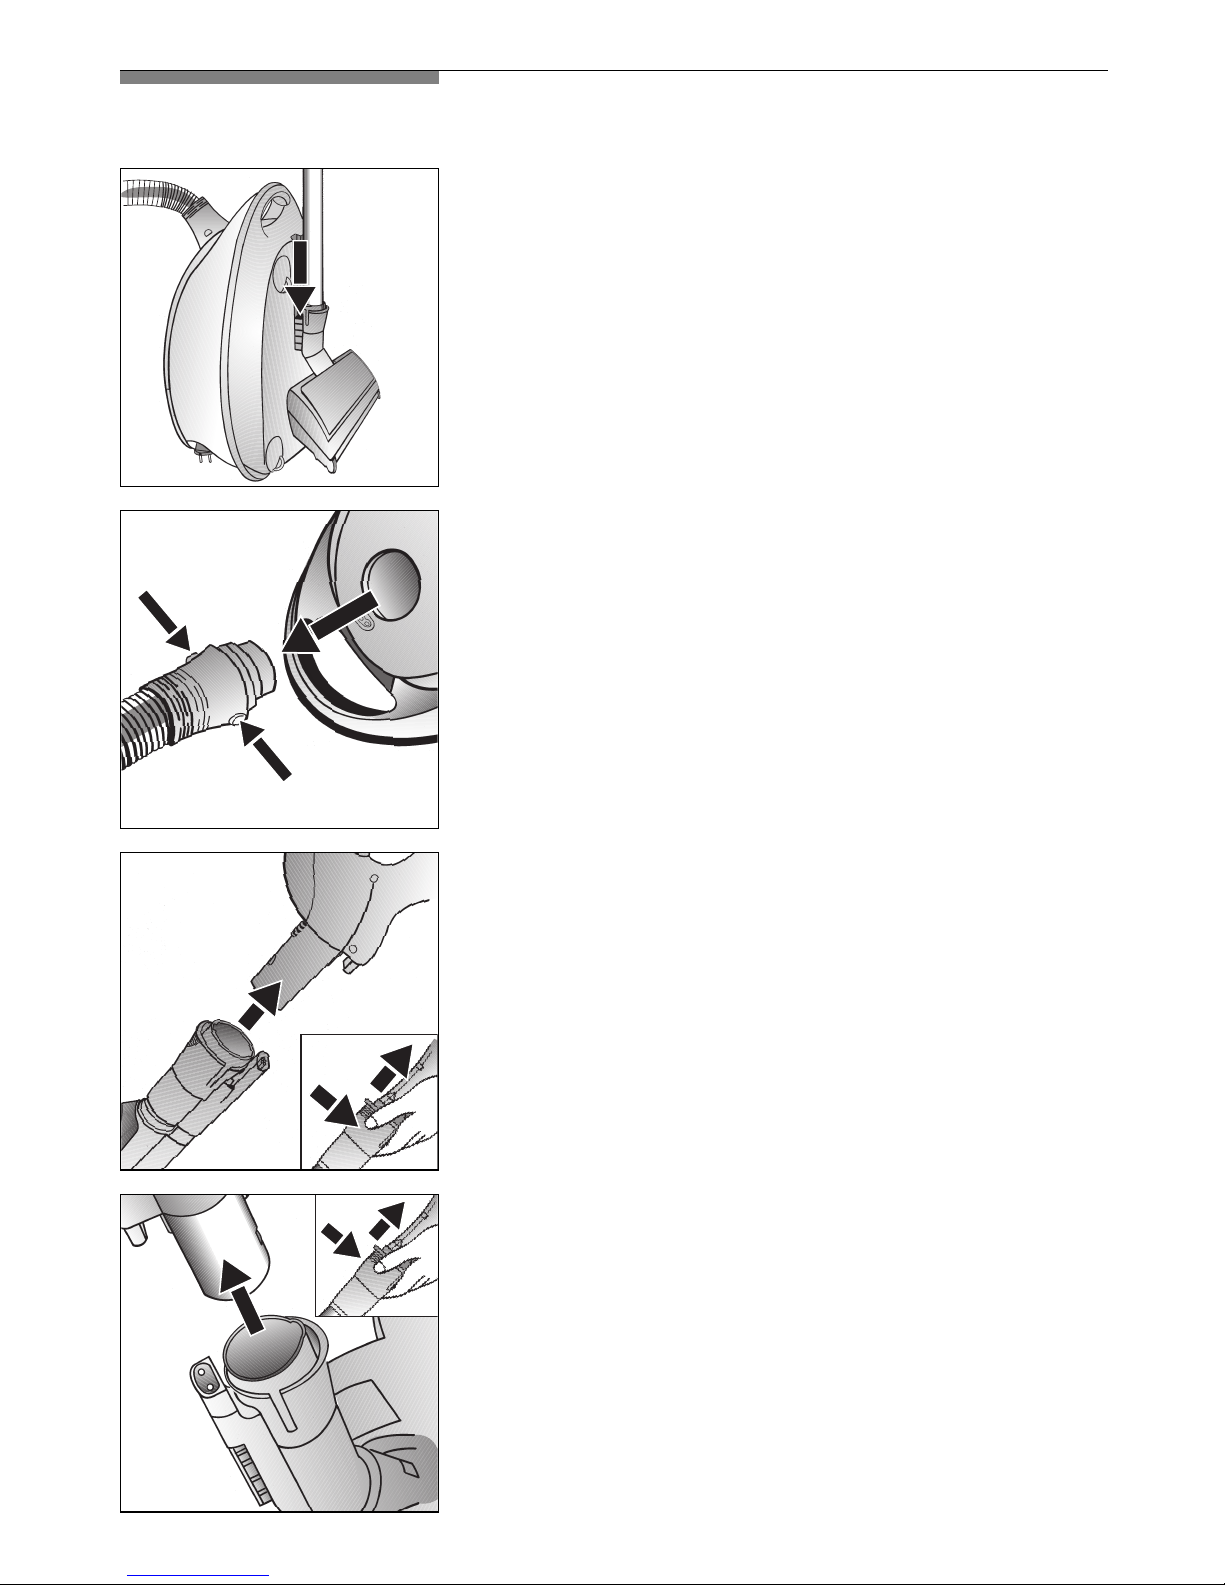
Insert the suction hose connector into the suction
opening until it engages.
You must ensure that the plug-in part of the
suction hose connector is inserted into the
appliance socket.
Push the handle into the incord telescopic tube
until it engages.
Push the incord telescopic tube into the
electric
brush connection piece until it engages.
You must ensure that the plug-in part of the incord
telescopic tube is inserted into the corresponding
recess on the
electric brush connection piece.
An electrical contact with the vacuum cleaner is
established when the plug-in part is engaged.
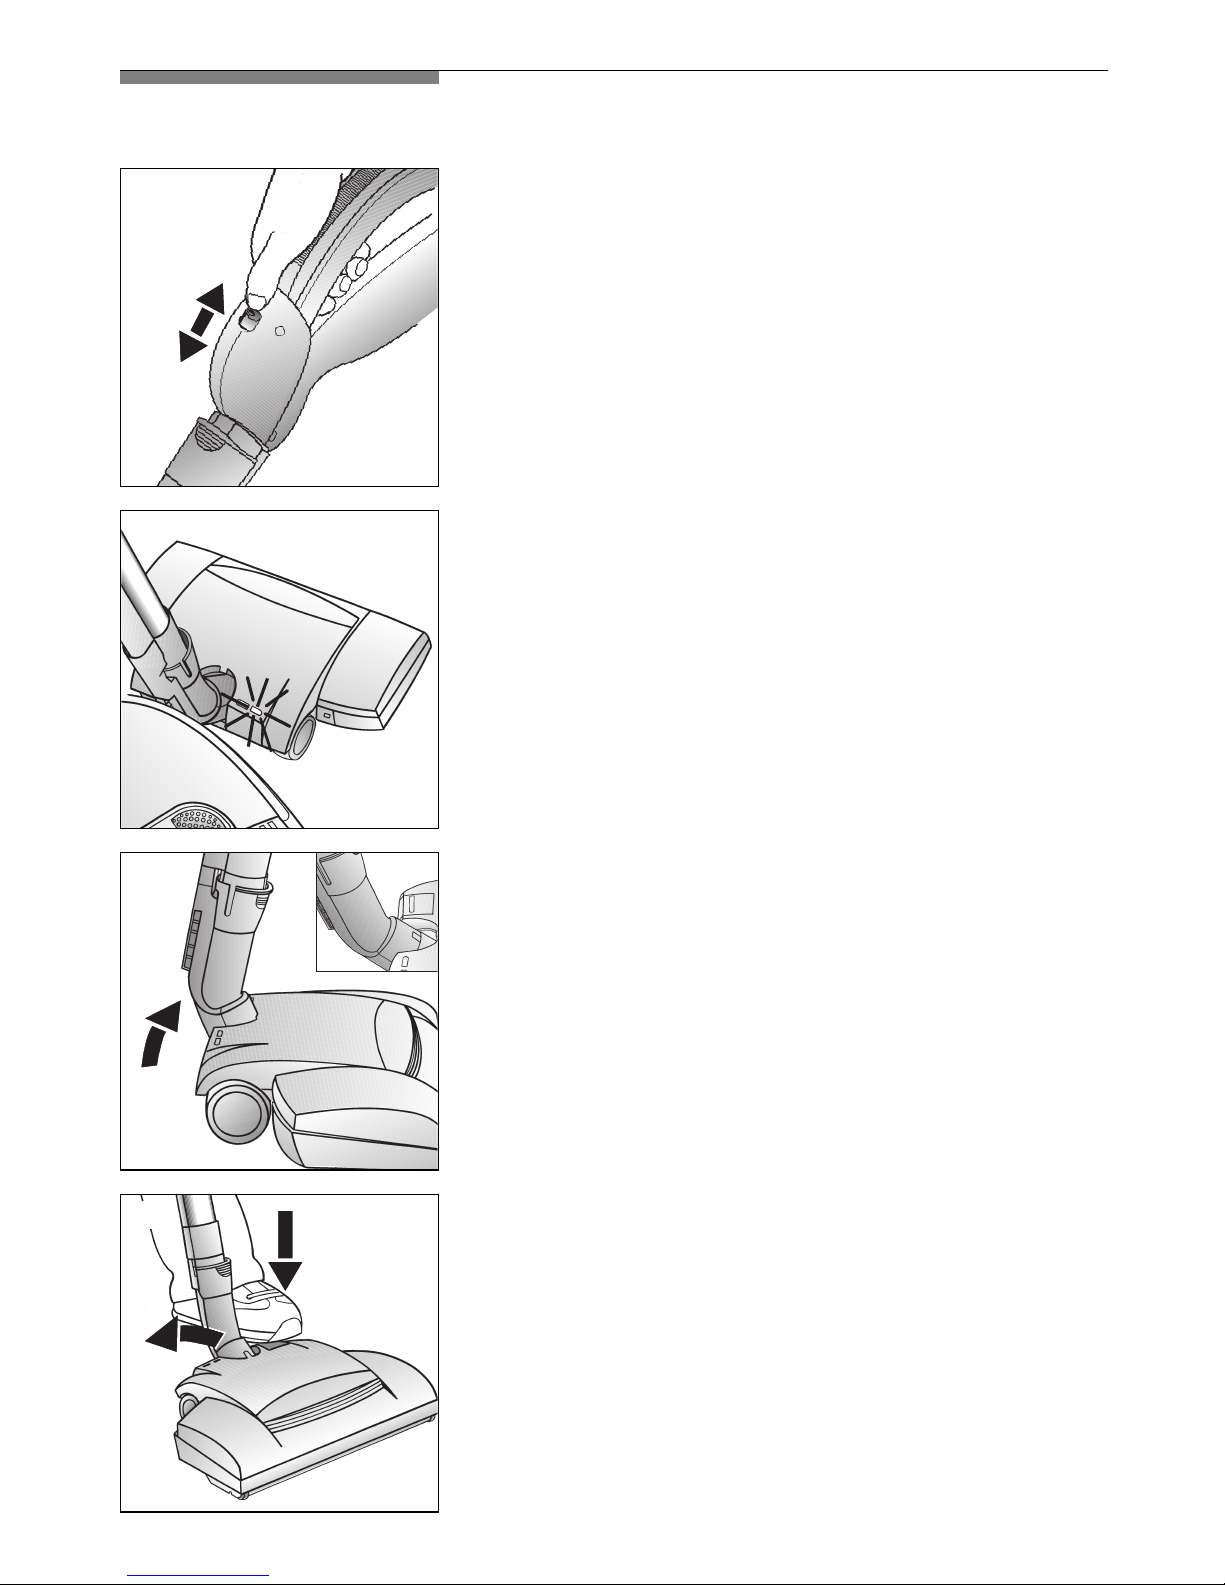
Starting up
To adjust the length of the incord telescopic tube,
press the sliding lock in the direction of the arrow
and adjust the tube to the required length.
8
Suction adjustment
Use the suction adjuster to adjust the suction to
the required level.
䡲
Low suction range:
For cleaning delicate fabrics, such as curtains.
䡲
Middle suction range:
For daily cleaning of lightly soiled surfaces.
䡲
High suction range:
For cleaning durable floor coverings, hard floors
and for heavily soiled surfaces.
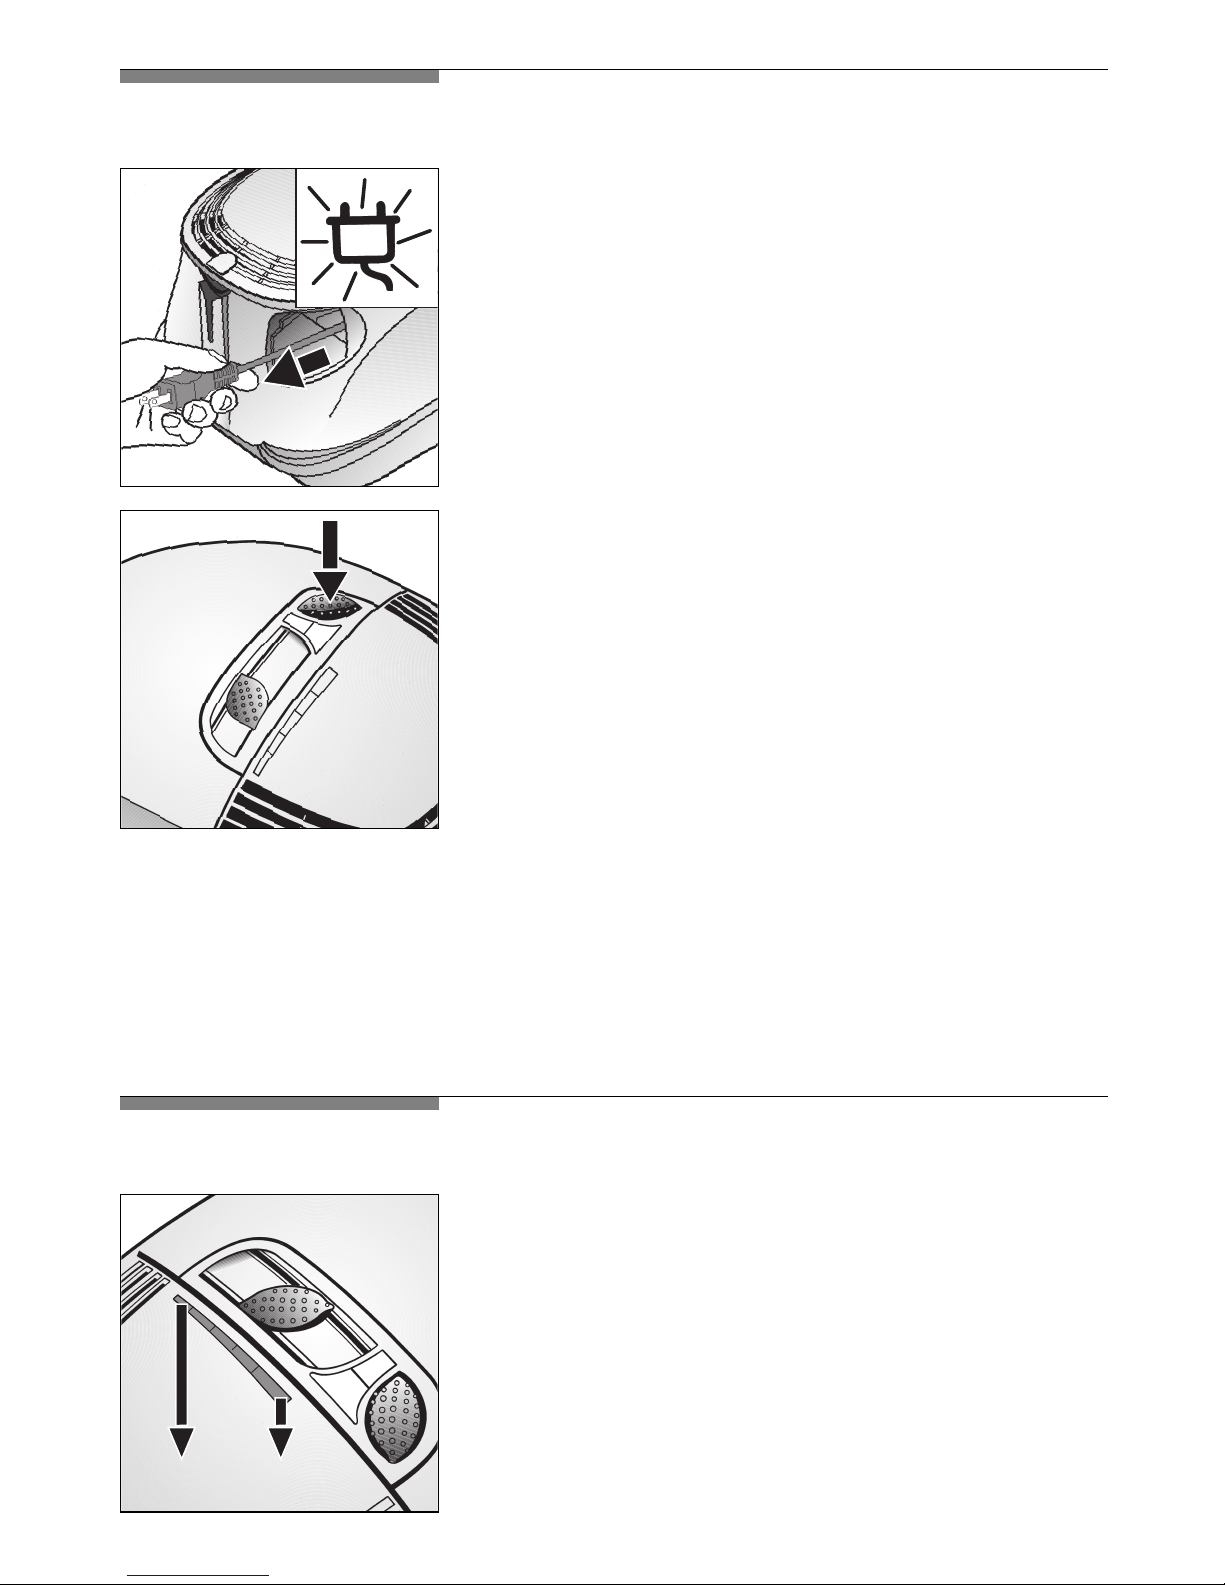
min max
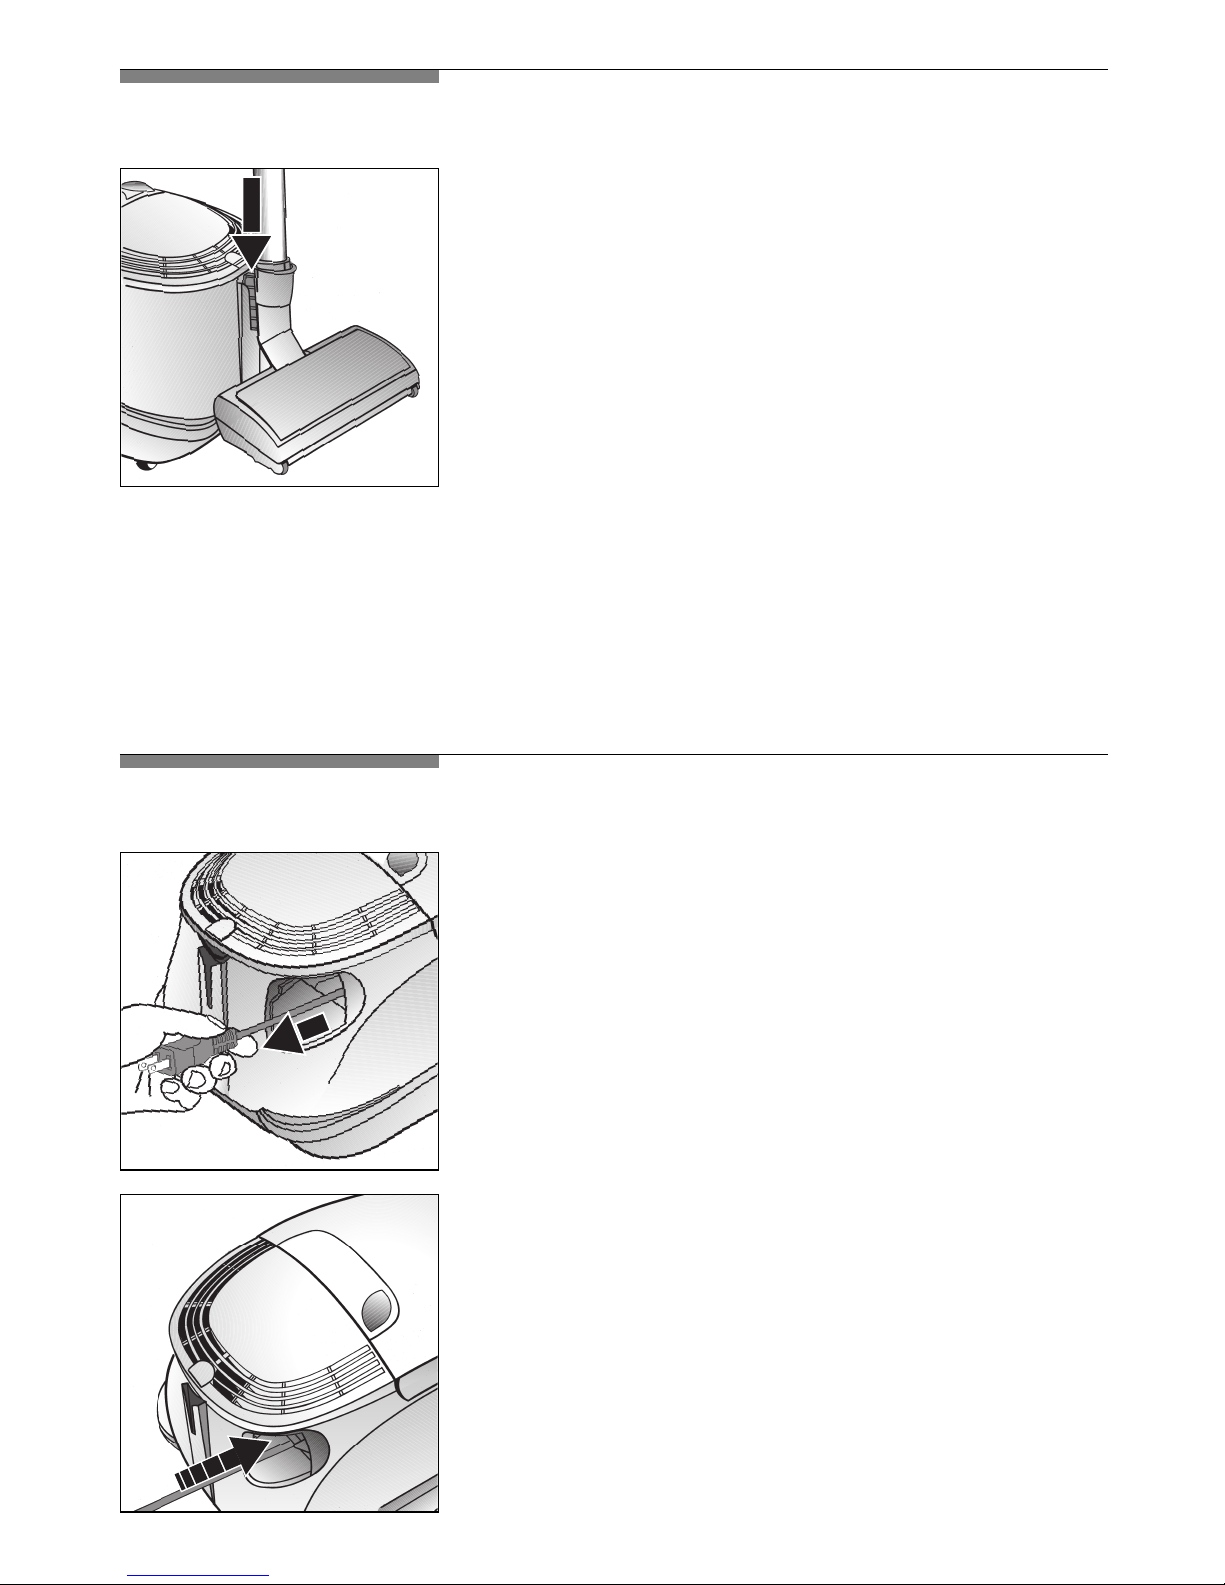
Grasp the plug and pull the power cord to the
required length and insert the plug in a wall
socket
=> Power indicator lights up in green.
!
Caution: Pull the cord to its fullest extension if
the appliance is expected to be used
continuously for several hours.
To switch your vacuum cleaner on and off, press
the ON/Off button in the direction of the arrow.
9
off
on
Vacuuming
IMPORTANT
You have bought an extremely powerful device.
The highest suction setting is therefore only
recommended for heavily soiled,
durable carpeted and hard floors.
The electric brush can be switched on or off while
you are vacuuming by pressing the knob.
The control lamp lights »green«.
* depending on design
*
*
If the pivoting connecting piece is raised to its
storage position, it automatically engages.
The brush roller switches off.
* depending on design
Release the connecting piece by pressing the
foot switch.
The brush roller switches on again.
* depending on design
ON
*
10
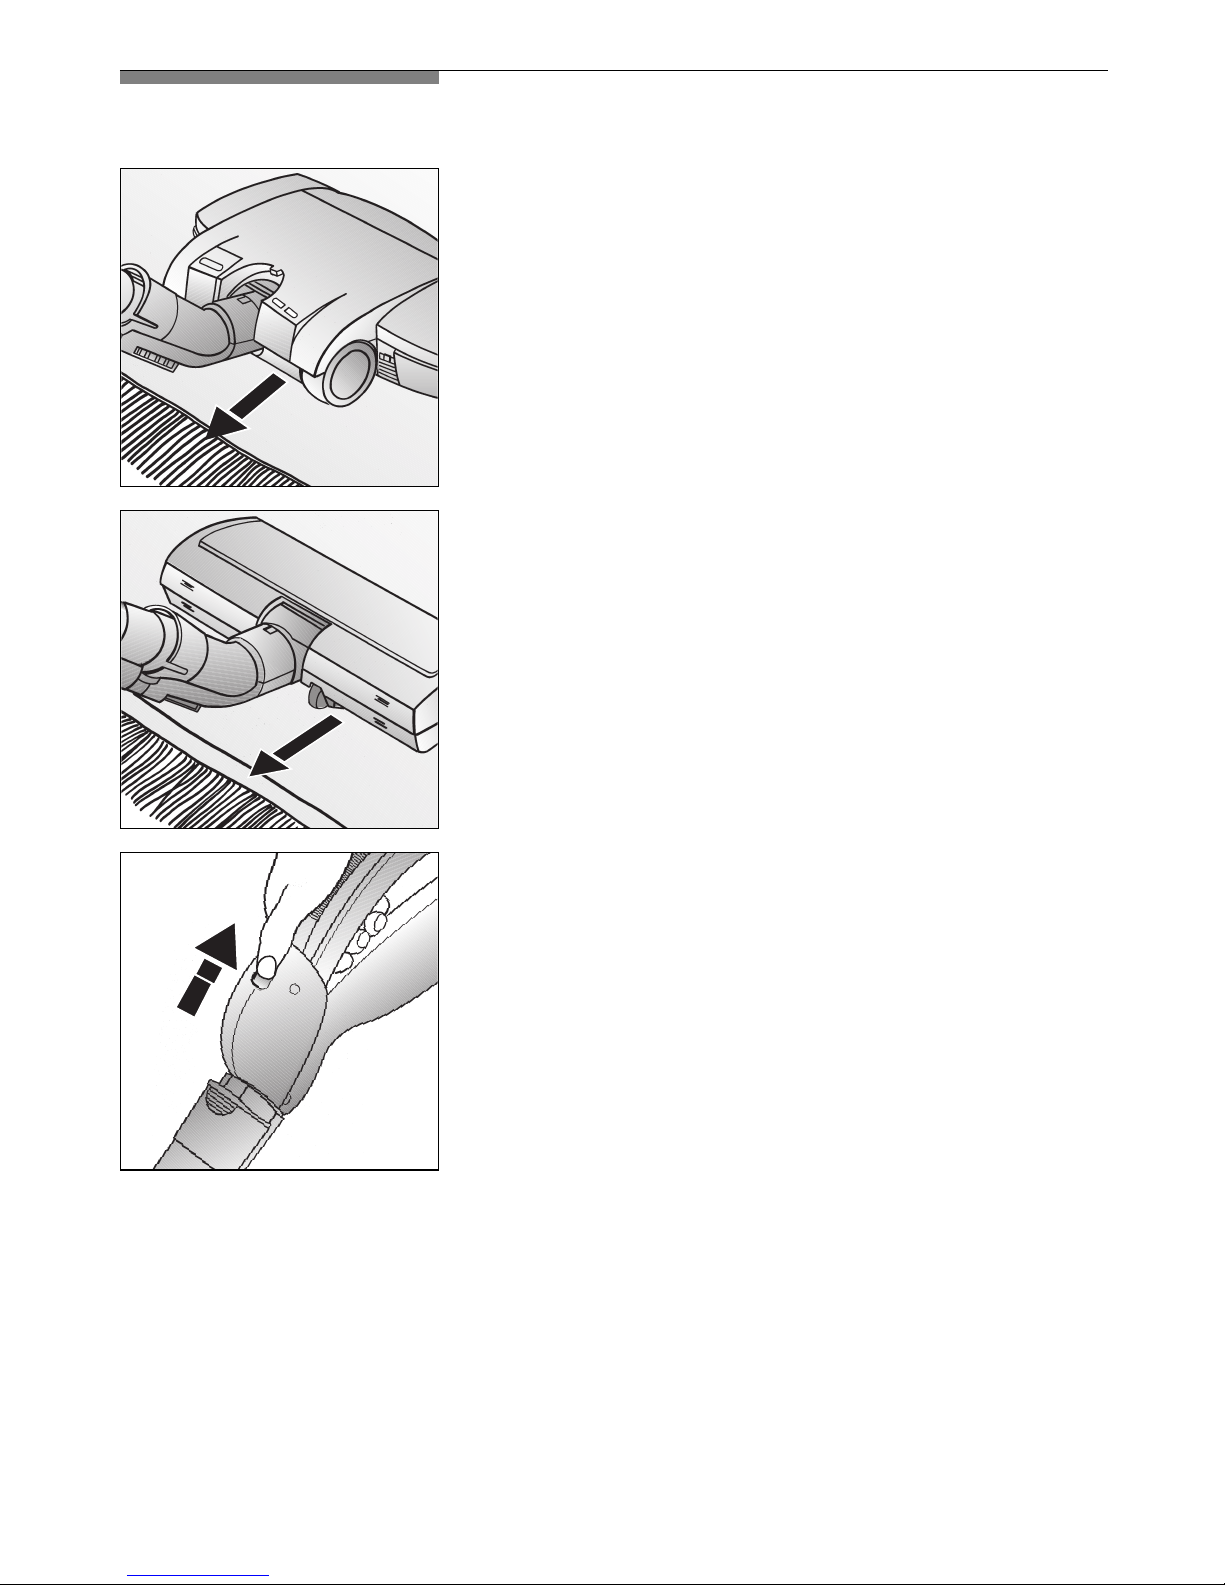
Brush vacuuming
To achieve the best cleaning performance, slowly
push the electric brush back and forth.
Always vacuum rug fringes in the direction
indicated by the arrow.
* depending on design
*
*
When vacuuming delicate wool rugs, especially
thick pile rugs, fur rugs and the like, always switch
off the brush roller to avoid damaging them.
off
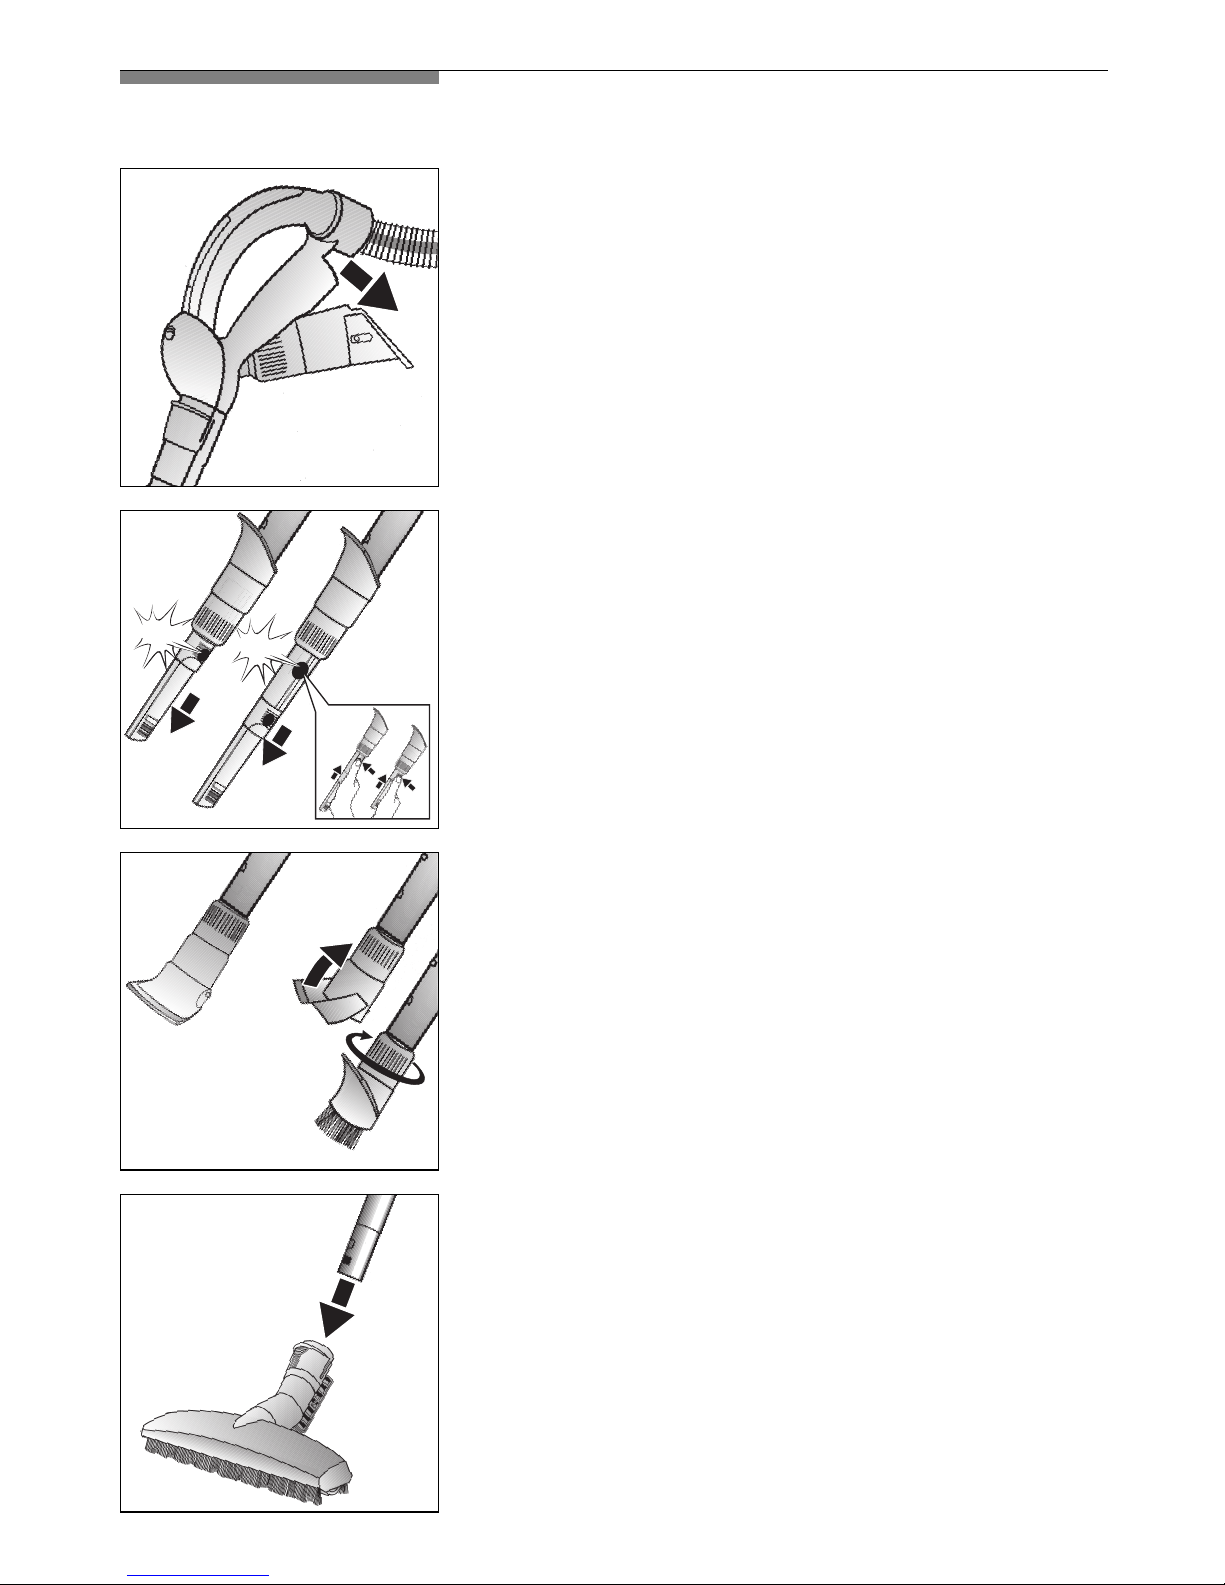
Vacuuming with accessories
Pull the 4-in-1 accessory in the direction of the
arrow to remove it from the accessory holder.
a)Crevice nozzle
For vacuuming in crevices and corners. For diffi
cult to get to places, the 4-in-1 accessory can be
extended in two stages to 14 inches
(or 360 mm)
by pulling out the crevice nozzle.
䡲
Extend the crevice nozzle to the second stop
until you can hear it engage.
䡲
To push the crevice nozzle together again, release the telescope lock (by pressing in arrow
direction).
b)Upholstery nozzle
For cleaning upholstery, curtains, etc.
c)Furniture brush
For window frames, cabinets, lamp shades etc.
䡲
Fold the upholstery nozzle over in the
direction of the arrow.
䡲
To extend the brush ring, turn in the direction
of the arrow.
䡲
Before replacing the 4-in-1 accessory in the
accessory holder, retract the bush ring and
fold the upholstery nozzle back.
!
Caution: to prevent damage to the nozzle / furniture
brush, fold the upholstery nozzle out only when the
furniture brush is retracted.
11
Hard floor nozzle
For vacuuming hard floor surfaces (tiles, wood,
vinyl, parquet etc.)
CLICK!
CLICK!
a
b
c
12
After work
䡲
Switch the vacuum cleaner off and unplug the
power cord from the mains.
䡲
Tug the power cord and let go. The cable then
rewinds automatically.
䡲
To reactivate or deactivate the cable brake,
quickly tug the power cord.
When you stop cleaning for a moment, you can
use the parking aid at the back of the vacuum
cleaner.
Switch the electric brush to »OFF« mode first.
Slide the plastic tab on the nozzle connector into
the groove at the back of the vacuum cleaner.
The vacuum cleaner will switch itself off.
13
To store or transport the vacuum cleaner, you can
use the parking aid on the cleaner’s underside.
Place the vacuum cleaner upright.
Slide the plastic tab on the electric brush into the
groove on the unit underside.
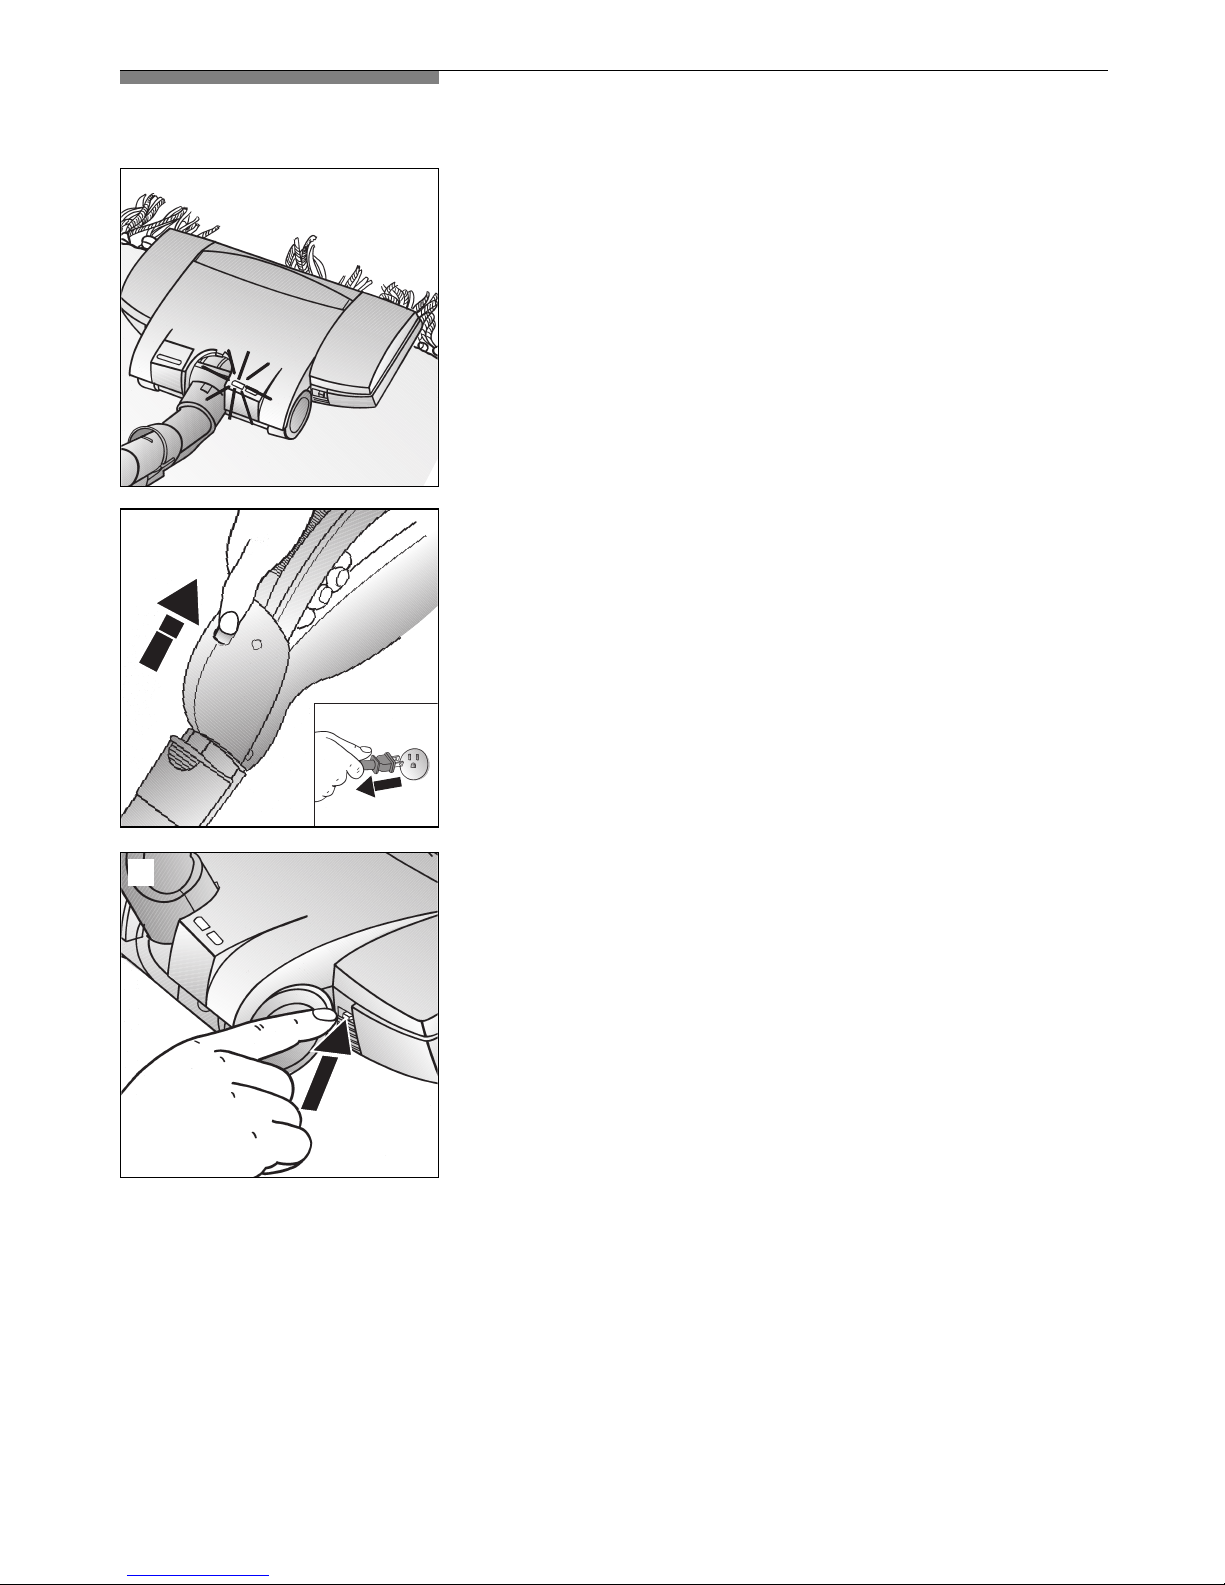
To remove the suction hose, press the two buttons together and pull the hose out.
To release the connection, press the snap connector and pull the incord telescopic tube out.
To release the electric brush, press the snap
connector and pull out the telescopic tube.
14
Place a new
MEGAfilt®Super TEX
dust bag into the
holder and close the dust compartment cover.
!
Important
A
MEGAfilt®Super TEX
dust bag or textile filter
must be properly in place or the dust compartment cover will not close. Do not force the
cover if it does not close easily. Inspect the
bag installation and adjust it as needed.
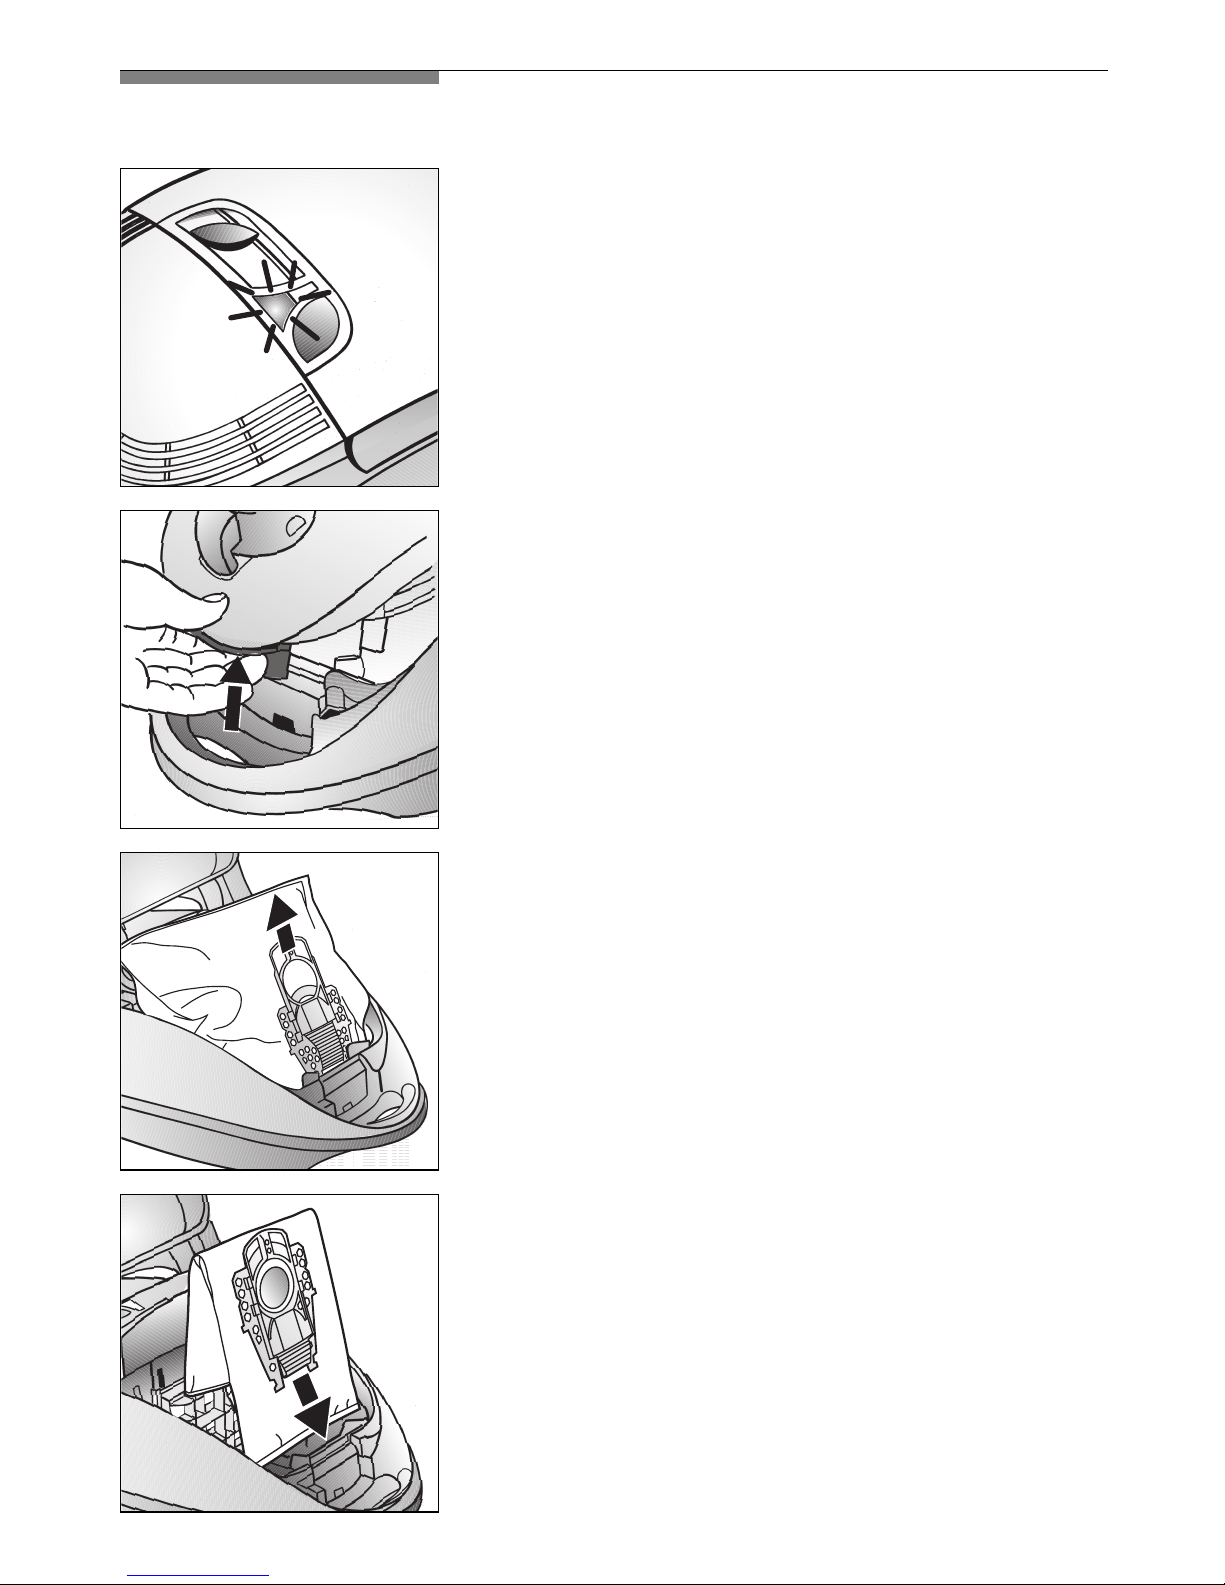
Changing the dust bag
Replacing the
MEGAfilt®Super TEX
dust bag
䡲
If the dust bag change indicator lights up
brightly and constantly while the nozzle is not
on the carpet and the highest suction setting is
being used, you must:
a)check whether the nozzle, the suction pipe or
the hose are blocked.
b)sometimes the type of waste in the bag
nessitates the change even if the bag is not full.
䡲
Operate the dust compartment handle in the
direction of the arrow to open the dust
compartment cover.
Seal the
MEGAfilt®Super TEX
dust bag by pulling
the sealing strip and pull up to remove the bag.
15
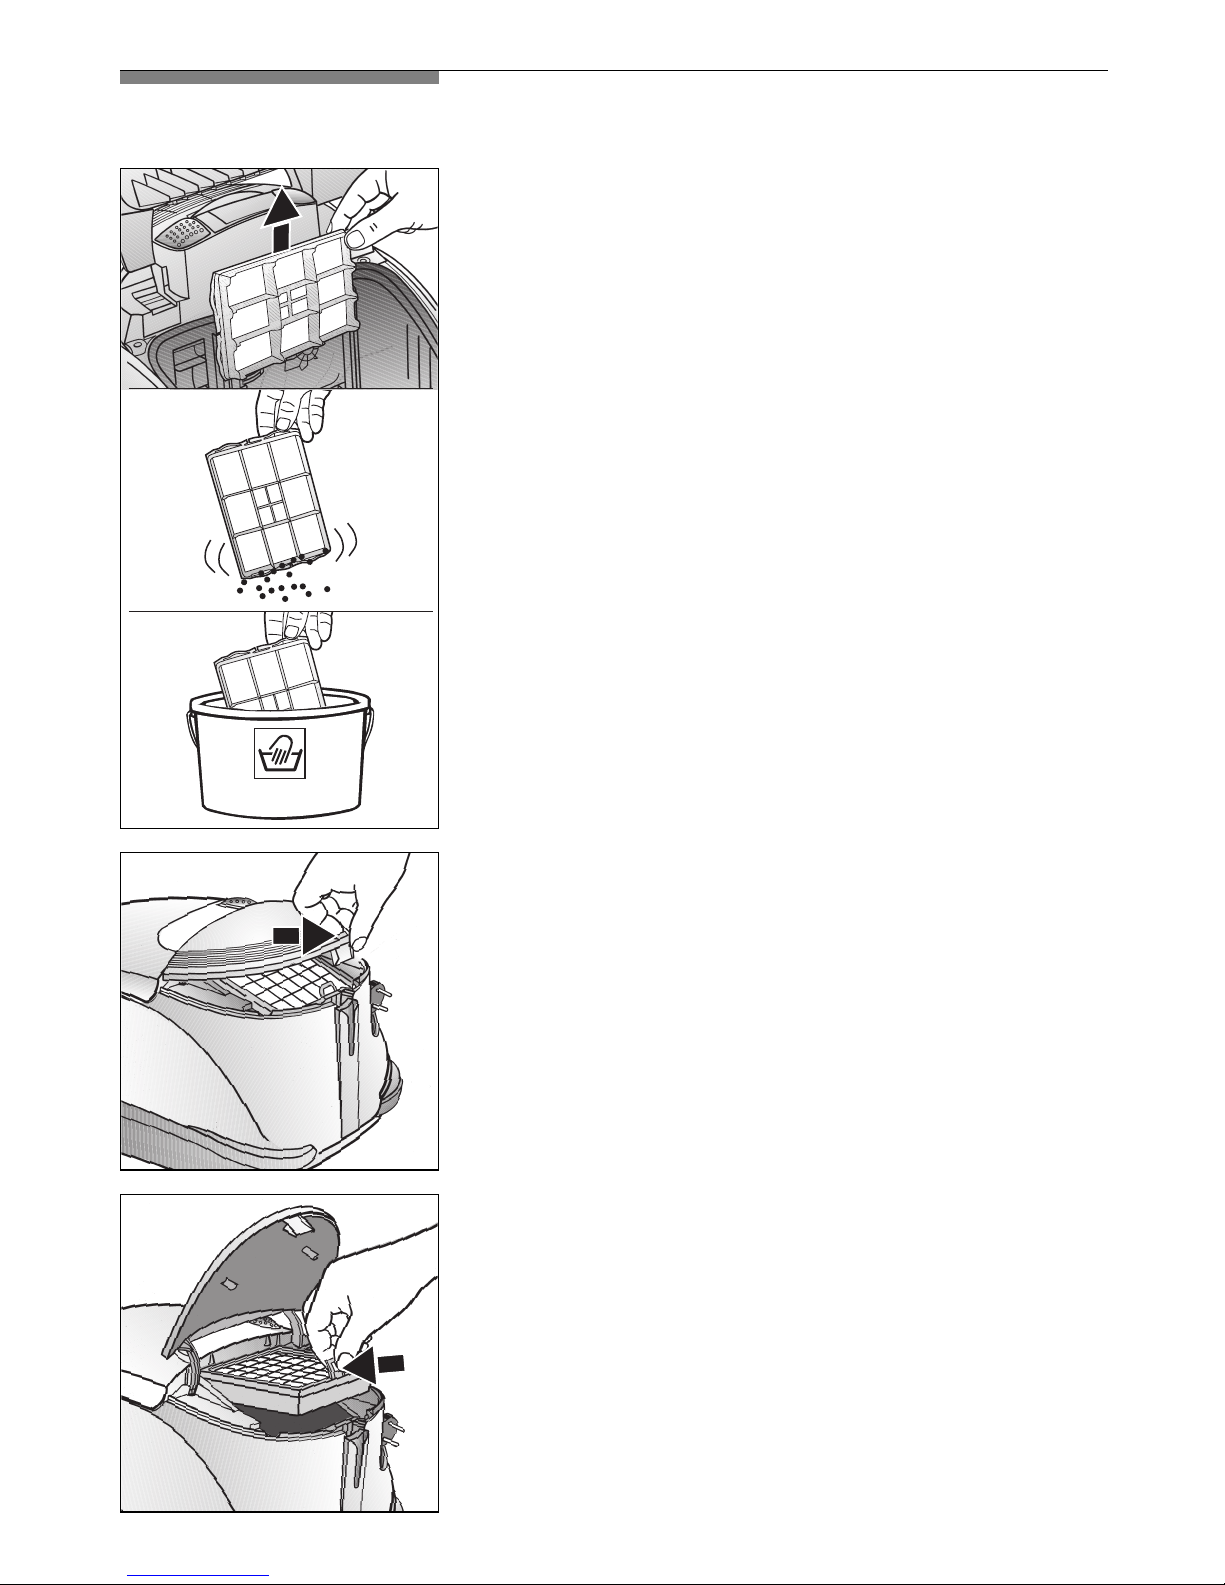
Cleaning the motor protection filter
The motor protection filter should be cleaned regularly by knocking out the dirt and rinsing.
䡲
Open the dust bag compartment lid.
䡲
Pull out the motor protection filter in the direction of the arrow.
䡲
Clean the motor protection filter by tapping it.
䡲
If it is very dirty, the motor protection filter
should be rinsed.
The filter must then be left to dry for at least 24
hours.
䡲
After cleaning, insert the motor protection filter
into the appliance as far as it will go and close
the dust bag compartment lid.
You can obtain a new motor protection filter on
request as a spare part from the after-sales service.
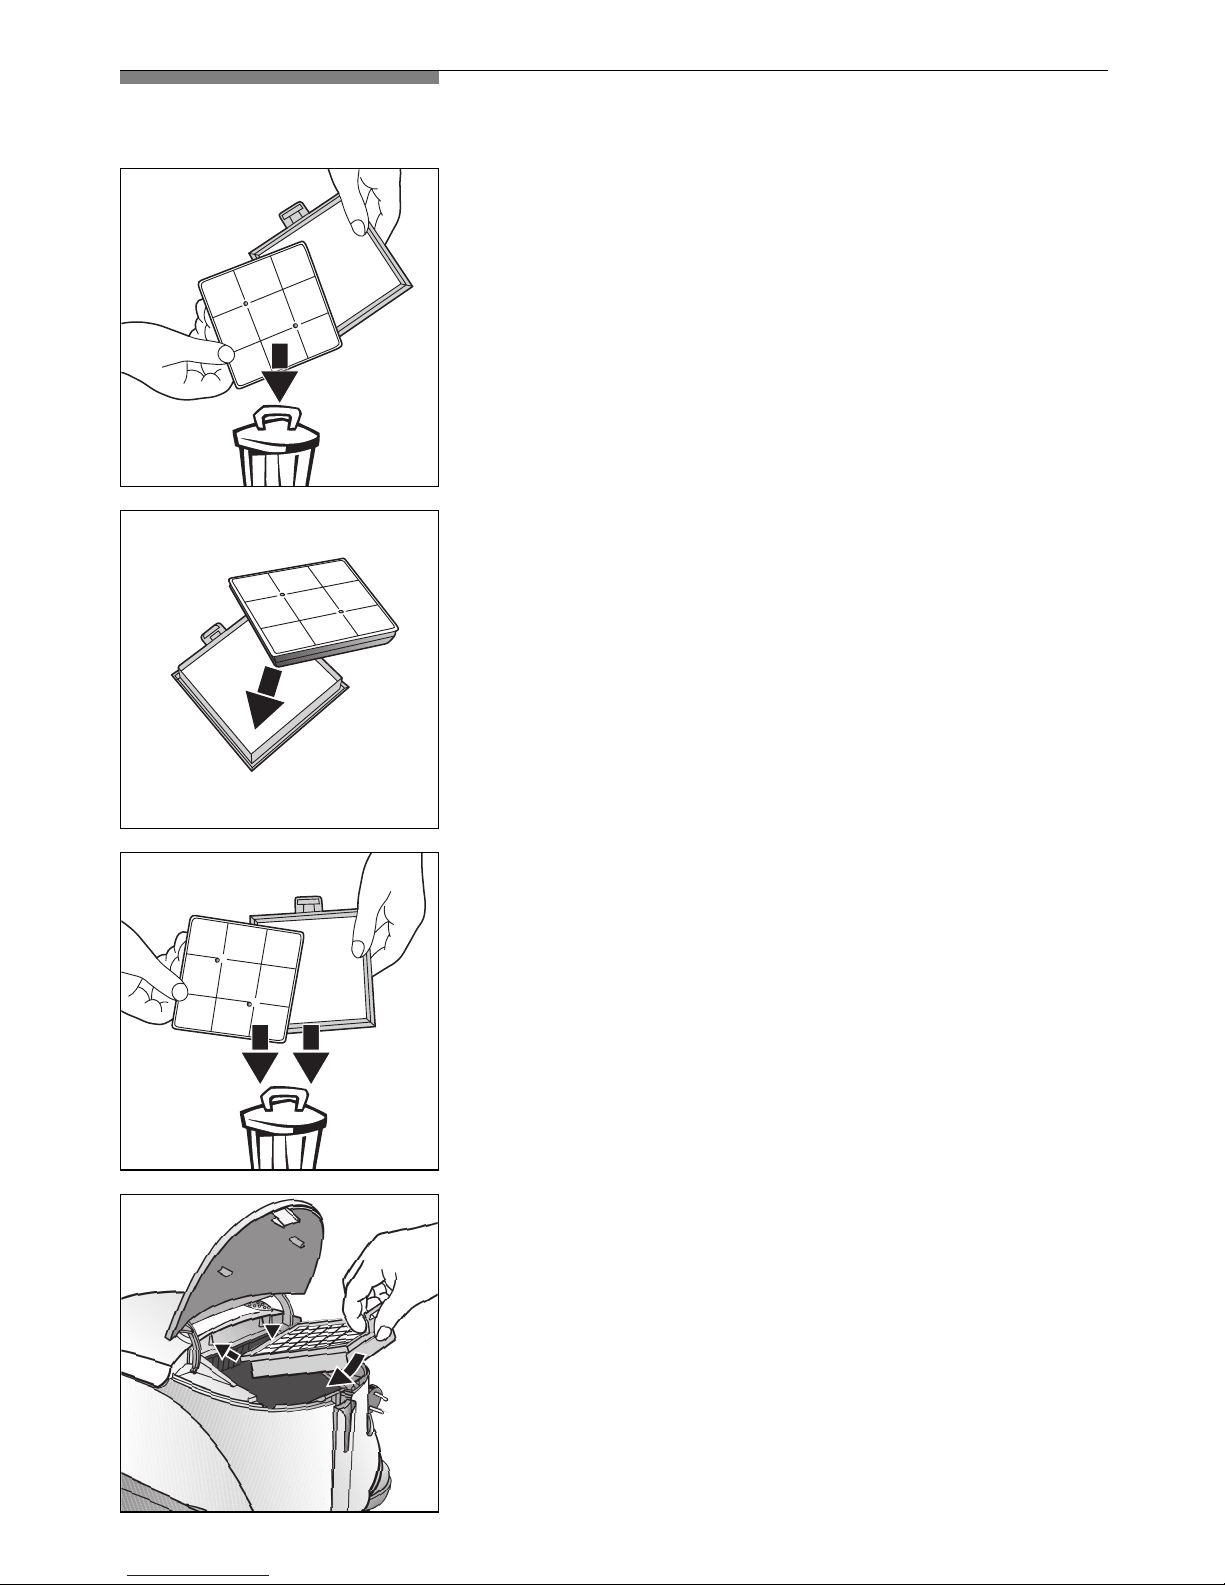
Replacing the HEPA / Activated carbon
cartridge
Press the exhaust grille latch in the direction of
the arrow to unlatch the exhaust grille and open
it.
Press the filter frame latch in the direction of the
arrow to unlatch the filter frame and remove it
.
16
Insert a new activated carbon cartridge.
* depending on design
HEPA filter
Every twelve months:
Dispose of both the activated carbon
cartridge
and
the HEPA filter and frame and replace them both.
Dispose of both filters in the household rubbish.
Replacing the activated carbon cartridge*
If your vacuum cleaner is also fitted with an activated
carbon cartridge, this must be replaced once a year.
Remove the activated carbon cartridge and dispose of it with the household rubbish.
If you have used the vacuum cleaner for fine
dust particles (such as plaster or cement), clean
the motor protection filter by tapping it and, if
necessary, replace the motor protection filter
and the microsan filter.
䡲
Slide the filter frame under the two retaining
ribs and turn in the direction of the arrow until
it engages.
䡲
Close the exhaust grille.
*
*
17
The motor switches off automatically if it becomes
overstressed, for example if the brush roller is
blocked by obstructive foreign objects or the
fringes of a carpet become wrapped around it.
The warning light shines »red«.
* depending on design
Troubleshooting
Switch off the brush roller and unplug the power
cord of the vacuum cleaner from the power socket.
off
After you have unblocked the brush roller, press
the red reset button. You may now safely switch
the vacuum cleaner on again.
* depending on design
*
*
18
Maintenance
䡲
Before the appliance is cleaned, ensure that it has been switched off and
unplugged.
䡲
Vacuum cleaners and accessories made of plastic can be cleaned using a damp
cloth.
Do not use scouring agents, glass or all-purpose cleaners.
Never immerse the vacuum cleaner in water!
䡲
If necessary, the dust compartment can be cleaned using another vacuum
cleaner, or simply cleaned with a dry dust cloth / dust brush.
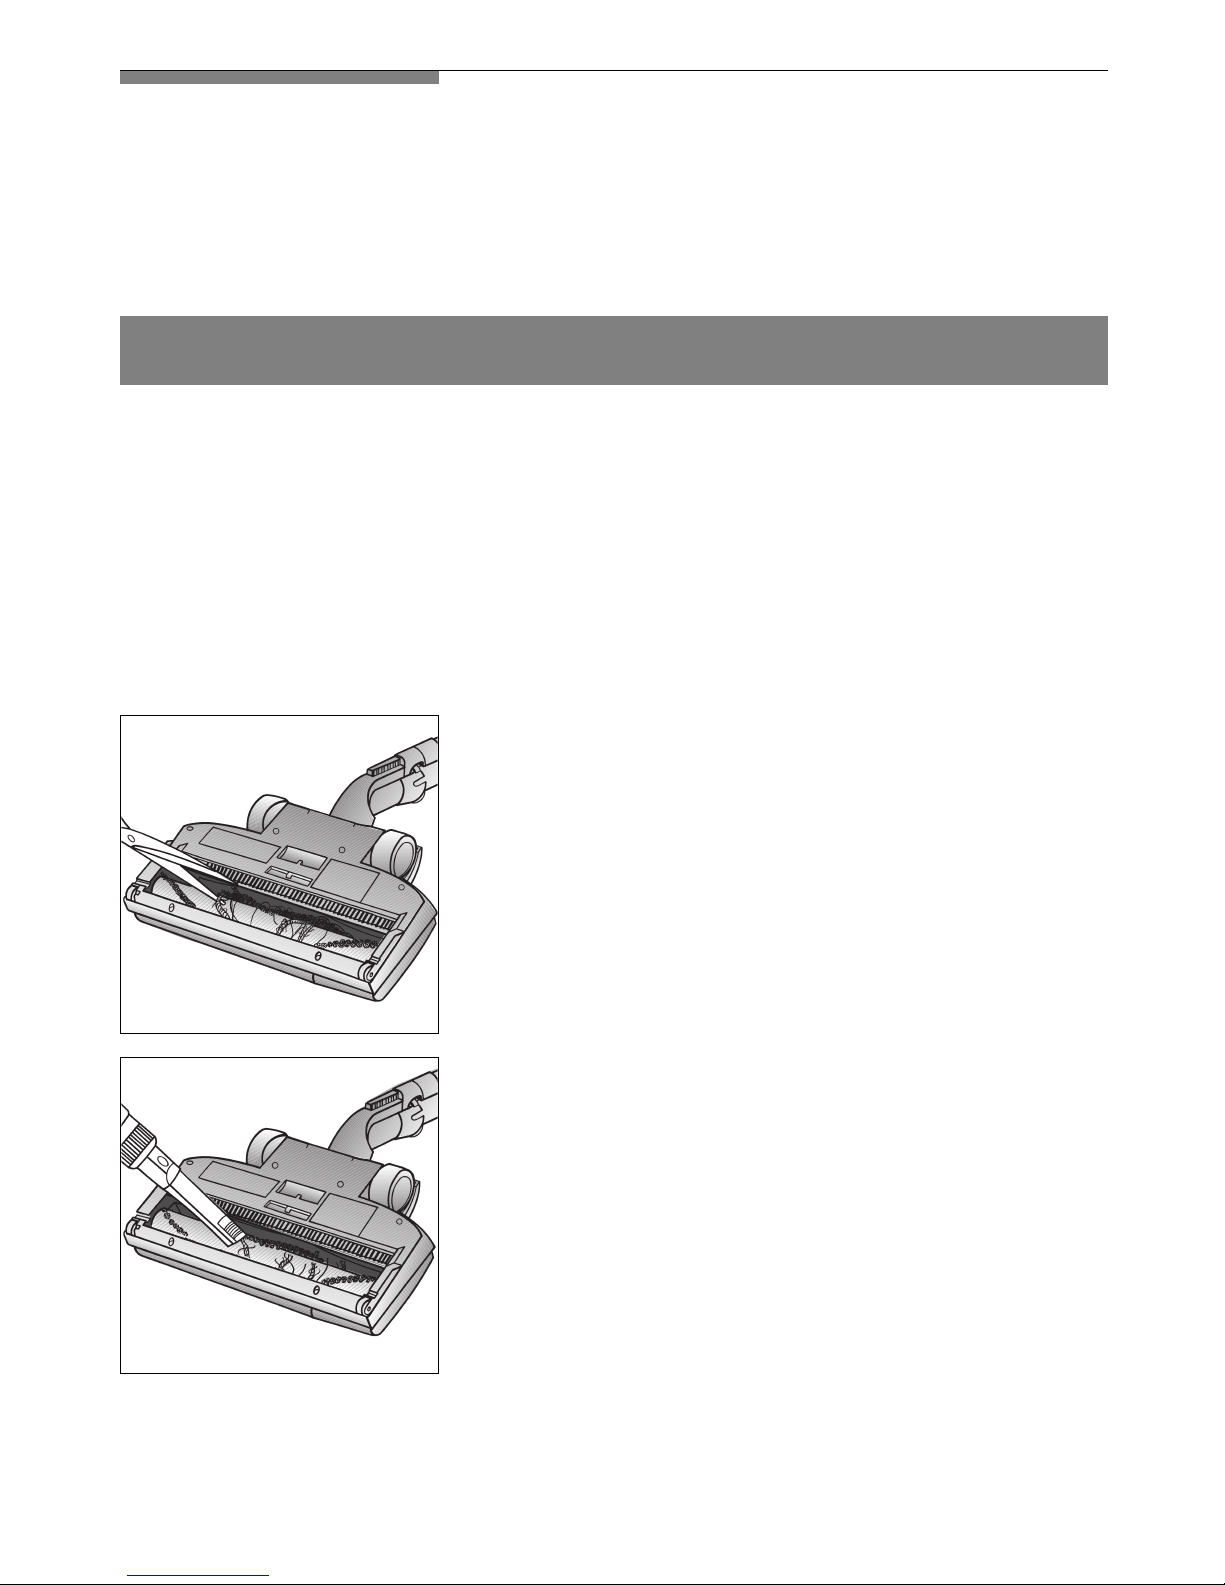
Use a pair of scissors to cut through any threads or
hair that has become wrapped around the brush
roller.
Always unplug the vacuum cleaner from the power outlet before carrying out
any work on the electric brush!
All other service and maintenance work must be performed only by authorized
service personnel.
Subject to change without notice.
Vacuum up the threads and hair using the crevice
tool.
19
Spare parts and optional accessories
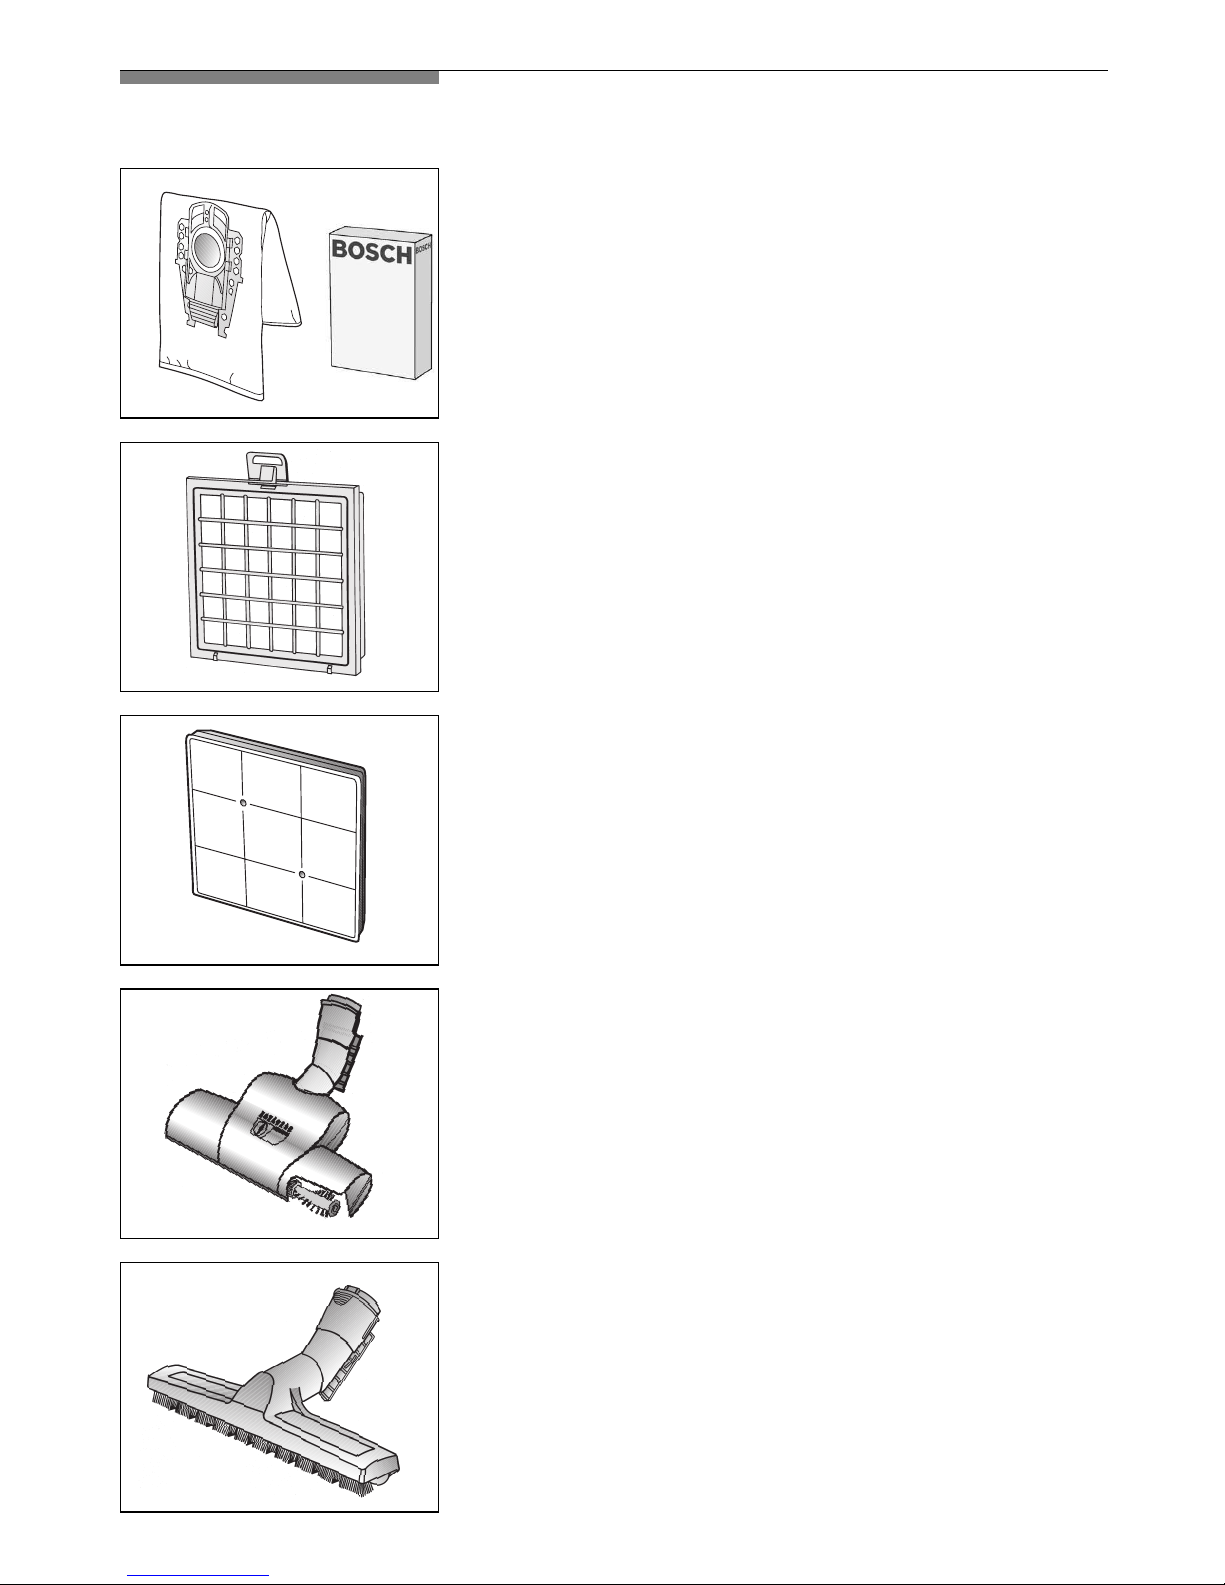
Replacement dust bag packaging BBZ52AFP2UC
contains :
5
MEGAfilt®Super TEX replacement dust bags with
auto-seal
1 Microsan filter
1 protective motor filter
HEPA filter BBZ151HFUC
Recommended for allergy sufferers. Purifies the
discharge air so that it is cleaner than the normal
ambient air. Filters even such small particles that
it complies with the European standard for clean
air of HEPA class 12.
Activated carbon cartridge BBZ190AFUC
Extra-thick activated carbon cartridge. Combats
unpleasant odours. Replace once a year. Can be
used only in combination with HEPA filter
(BBZ151HFUC) or micro-hygiene filter. If used with
a micro-hygiene filter, remove the foam from the filter frame and replace with the activated carbon cartridge.
Turbo brush for floors BBZ101TBUC
Brushes and vacuums simultaneously. Suitable for
all floors. Good pick-up of fluff, threads and hair.
Flattened pile is restored. Side air control for
adapting roller speed to floor type. The brush roller is driven by the suction power of the vacuum
cleaner.
No electrical supply required.
Brush for parquet and hard floors BBZ121HDUC
Specially for parquet and sensitive hard floors
Fitted with 2 castors and extra soft bristles, glides
over floors effortlessly, taking up dust, dirt from
cracks and crevices.

20
STATEMENT OF LIMITED PRODUCT WARRANTY
Bosch Small Domestic Appliances
What this Warranty Covers & Who it Applies to: The limited warranty provided
BSH Home Appliances Bosch in this Statement of Limited Product Warranty
applies only to the Bosch Small Domestic Appliances (“Product”) sold to you,
the first using purchaser, provided that the Product was purchased: (1) for your
normal, household (non-commercial) use, and has in fact at all times only been
used for normal household purposes; (2) new at retail (not a display, “as is”, or
previously returned model), and not for resale, or commercial use; and (3) within the United States or Canada, and has at all times remained within the country of original purchase. The warranties stated herein apply only to the first
purchaser of the Product and are not transferable.
How Long the Warranty Lasts: Bosch warrants that the Product is free from
defects in materials and workmanship for a period of three hundred sixty-five
days (365) days from the date of purchase. The foregoing timeline begins to
run upon the date of purchase, and shall not be stalled, tolled, extended, or
suspended, for any reason whatsoever.
Repair/Replace as Your Exclusive Remedy: During this warranty period, Bosch
or one of its authorized service providers will repair your Product without charge to you (subject to certain limitations stated herein) if your Product proves to
have been manufactured with a defect in materials or workmanship. If reasonable attempts to repair the Product have been made without success, then
Bosch will replace your Product (upgraded models may be available to you, in
Bosch’s sole discretion, for an additional charge). All removed parts and components shall become the property of Bosch at its sole option. All replaced
and/or repaired parts shall assume the identity of the original part for purposes of this warranty and this warranty shall not be extended with respect to
such parts. Bosch’s sole liability and responsibility hereunder is to repair manufacturer-defective Product only, using a Bosch -authorized service provider
during normal business hours. For safety and property damage concerns,
Bosch highly recommends that you do not attempt to repair the Product yourself, or use an un-authorized servicer; Bosch will have no responsibility or liability for repairs or work performed by a non-authorized servicer. If you choose to
have someone other than an authorized service provider work on your Product,
THIS WARRANTY WILL AUTOMATICALLY BECOME NULL AND VOID. Authorized
service providers are those persons or companies that have been specially trained on Bosch products, and who possess, in Bosch’s opinion, a superior reputation for customer service and technical ability (note that they are independent entities and are not agents, partners, affiliates or representatives of
Bosch). Notwithstanding the foregoing, Bosch will not incur any liability, or

21
have responsibility, for the Product if it is located in a remote area (more than
100 miles from an authorized service provider) or is reasonably inaccessible,
hazardous, threatening, or treacherous locale, surroundings, or environment; in
any such event, if you request, Bosch would still pay for labor and parts and
ship the parts to the nearest authorized service provider, but you would still be
fully liable and responsible for any travel time or other special charges by the
service company, assuming they agree to make the service call.
Out of Warranty Product: Bosch is under no obligation, at law or otherwise, to
provide you with any concessions, including repairs, pro-rates, or Product
replacement, once this warranty has expired.
Warranty Exclusions: The warranty coverage described herein excludes all
defects or damage that are not the direct fault of Bosch, including without limitation, one or more of the following:
(1) use of the Product in anything other than its normal, customary and intended manner (including without limitation, any form of commercial use, use or
storage of an indoor product outdoors, use of the Product in conjunction with
air or water-going vessels); (2) any party’s willful misconduct, negligence, misuse, abuse, accidents, neglect, improper operation, failure to maintain, improper
or negligent installation, tampering, failure to follow operating instructions,
mishandling, unauthorized service (including self-performed “fixing” or exploration of the appliance’s internal workings); (4) adjustment, alteration or modification of any kind; (5) a failure to comply with any applicable state, local, city,
or county electrical, plumbing and/or building codes, regulations, or laws,
including failure to install the product in strict conformity with local fire and
building codes and regulations; (6) ordinary wear and tear, spills of food,
liquid, grease accumulations, or other substances that accumulate on, in, or
around the Product; and (7) any external, elemental and/or environmental forces and factors, including without limitation, rain, wind, sand, floods, fires,
mud slides, freezing temperatures, excessive moisture or extended exposure to
humidity, lightning, power surges, structural failures surrounding the appliance,
and acts of God. In no event shall Bosch have any liability or responsibility
whatsoever for damage to surrounding property, including cabinetry, floors,
ceilings, and other structures or objects around the Product. Also excluded
from this warranty are scratches, nicks, minor dents, and cosmetic damages on
external surfaces and exposed parts; Products on which the serial numbers
have been altered, defaced, or removed; service visits to teach you how to use
the Product, or visits where there is nothing wrong with the Product; correction of installation problems (you are solely responsible for any structure and
setting for the Product, including all electrical, plumbing or other connecting
facilities, for proper foundation/flooring, and for any alterations including without limitation cabinetry, walls, floors, shelving, etc.); and resetting of breakers
or fuses.
 Loading...