

Bosch BSG72200GB User Manual
BSG7....GB
Instructions for use

Intended use . . . . . . . . . . . . . . . . . . . . . . . . . . . . . . . . . . . . . . . . . . . . . . . . . . . . . . . . . . . . . . . . . . . . . . . .3
Safety information . . . . . . . . . . . . . . . . . . . . . . . . . . . . . . . . . . . . . . . . . . . . . . . . . . . . . . . . . . . . . . . . . . . .3
Disposal information . . . . . . . . . . . . . . . . . . . . . . . . . . . . . . . . . . . . . . . . . . . . . . . . . . . . . . . . . . . . . . . . . .3
Your vacuum cleaner . . . . . . . . . . . . . . . . . . . . . . . . . . . . . . . . . . . . . . . . . . . . . . . . . . . . . . . . . . . . . . . . . .4
Setting up . . . . . . . . . . . . . . . . . . . . . . . . . . . . . . . . . . . . . . . . . . . . . . . . . . . . . . . . . . . . . . . . . . . . . . . . . .5
Vacuuming . . . . . . . . . . . . . . . . . . . . . . . . . . . . . . . . . . . . . . . . . . . . . . . . . . . . . . . . . . . . . . . . . . . . . . . . . .7
When the work is done . . . . . . . . . . . . . . . . . . . . . . . . . . . . . . . . . . . . . . . . . . . . . . . . . . . . . . . . . . . . . . . .9
Changing the dust bag and filters . . . . . . . . . . . . . . . . . . . . . . . . . . . . . . . . . . . . . . . . . . . . . . . . . . . . . . .11
Care . . . . . . . . . . . . . . . . . . . . . . . . . . . . . . . . . . . . . . . . . . . . . . . . . . . . . . . . . . . . . . . . . . . . . . . . . . . . . .12
Replacement parts and accessories . . . . . . . . . . . . . . . . . . . . . . . . . . . . . . . . . . . . . . . . . . . . . . . . . . . . .13
2

Please keep this instruction manual.
Please pass on this instruction manual if you pass this
vacuum cleaner on to a new owner.
Intended use
This vacuum cleaner is intended for domestic use and
not for commercial use.
This vacuum cleaner should only be used in accordance
with this instruction manual.
The manufacturer will not accept any responsibility for
damage caused by improper use or incorrect operation.
Therefore, please note the following points.
The vacuum cleaner must only be operated with:
Manufacturer’s original dust bags
Manufacturer’s replacement parts, accessories
and optional accessories
The vacuum cleaner is not to be used for:
Vacuuming persons or animals
Vacuuming up:
– insects or spiders
– hazardous, sharp-edged, hot or burning substances
– damp or liquid substances
– highly flammable or explosive substances and
gases
– Ash, soot from tiled stoves and central heating
systems
Safety information
This vacuum cleaner complies with the recognised
rules of technology and the relevant safety regulations.
We confirm compliance with the following European
directives: 89/336/EEC (amended by Directives
91/263/EEC, 92/31/EEC and 93/68/EEC). 73/23/EEC
(amended by Directive 93/68/EEC).
Always observe the information on the rating plate
when using the vacuum cleaner and connecting to
the power supply.
Never use the vacuum cleaner without a dust bag
fitted.
=> This can damage the vacuum cleaner.
Only allow children to use the vacuum cleaner under
strict supervision.
This appliance may not be operated by persons with
impaired physical, sensory or mental capacities, or
who lack experience/knowledge (including children),
unless they have been instructed in the use of the
appliance by a responsible individual.
Keep the vacuum cleaner away from the face when
using tools and tubes.
=> Risk of injury.
Never carry the vacuum cleaner by the power
cord.
Fully extend the power cord when using the vacuum
cleaner continuously for several hours.
When disconnecting the appliance from the mains,
pull the plug, not the power cord.
Do not pull the power cord around sharp corners or
allow it to become trapped.
Unplug the vacuum cleaner from the mains before
carrying out any work on it.
Do not use the vacuum cleaner if it is damaged.
Unplug the power cord from the mains if a fault is
detected.
To prevent you from being exposed to risks, vacuum
cleaner repairs and the fitting of replacement parts
must only be carried out by the authorised aftersales service.
The vacuum cleaner should be protected from
outside weather conditions, moisture and sources of
heat.
The vacuum cleaner is not suitable for use on
building sites.
=> Vacuuming up building rubble could damage the
vacuum cleaner.
Switch off the vacuum cleaner when it is not in use.
At the end of its life, the vacuum cleaner should be
disposed of in an appropriate manner.
For safety reasons, vacuum cleaners with a power
rating of more than 2,000 W are fitted with a
temperature safety switch.
This automatically switches off the vacuum cleaner if
it is blocked and overheating. Unplug the vacuum
cleaner from the mains and make sure that the
nozzles, suction pipe and hose are not blocked and
check whether the filter needs replacing.
Having cleared the blockage, leave the vacuum
cleaner to cool down for at least one hour. It can
then be switched back on again.
Disposal information
Packaging
The packaging is designed to protect the vacuum
cleaner from being damaged during transportation.
It is made of environment-friendly materials and can
be recycled.
Dispose of packaging that is no longer required at an
appropriate recycling point.
Used vacuum cleaners
Used vacuum cleaners still contain many recyclable
materials.
Therefore, please take used vacuum cleaners to your
retailer or recycling centre so that they can be
recycled.
For current disposal methods, please enquire at your
appliance dealership or local council.
Please note
!
Only connect the appliance to a socket that is
protected by at least a 16 amp fuse.
If a fuse should blow when you switch on the vacuum
cleaner, this may be because other electrical
appliances which have a high current draw are
connected to the same power circuit.
To prevent the fuse from tripping, select the lowest
power setting before switching the vacuum cleaner
on, and increase the power only once it is running.
3
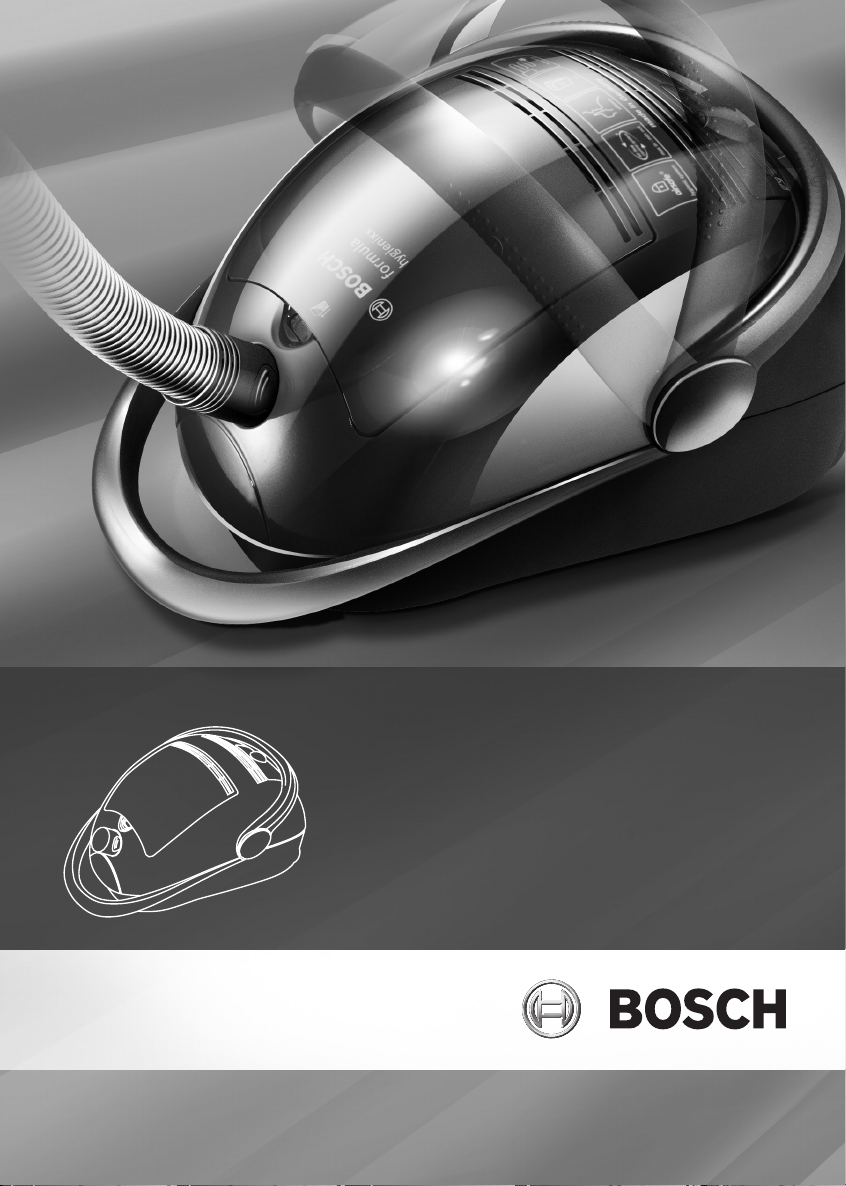
Your vacuum cleaner
4
3
5
6
7
8
9
2
10
11
12
1
13
1 Adjustable floor tool
2 Telescopic tube with sliding switch *
3 Handle
4 Flexible hose
5 Hard furnishings brush
6 Upholstery nozzle
7 Crevice nozzle
8 Dust bag change indicator
9 Accessories compartment
10 Cover
11 Electronic slide control
4
161819
17
12 Swing handle; also used as an ON/OFF button and
carrying handle
13 Power cord
14 ON/OFF button
15 Parking aid
16 Exhaust filter (micro-hygiene filter)
17 Storage aid (on underside of unit)
18 Motor protection filter
MEGAfilt® SuperTEX dust bag
19
15 14
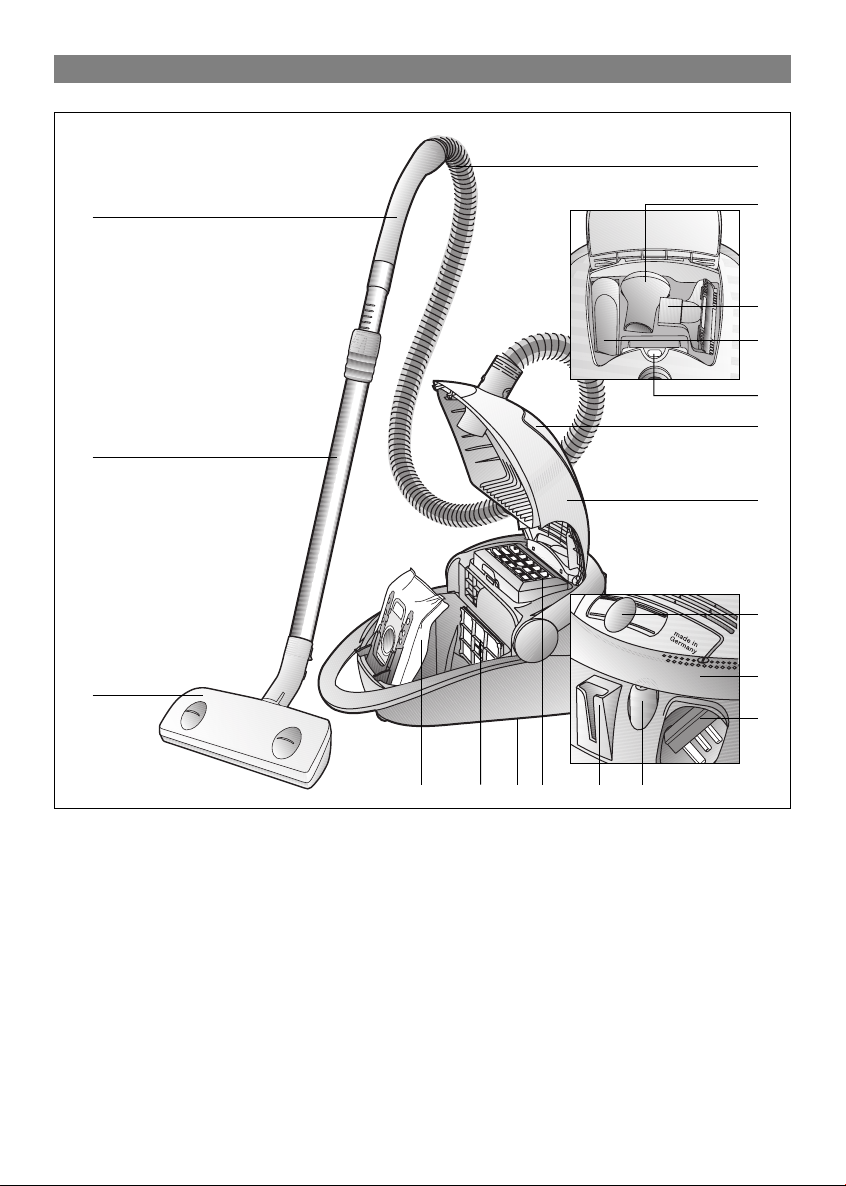
Setting up
CLICK!
Before using for the first time
Push the handle onto the flexible hose until it engages.
Insert the flexible hose connector into the opening on the vacuum cleaner
until it engages.
Push the handle into the telescopic tube.
Connect the floor tool and the telescopic tube together
5
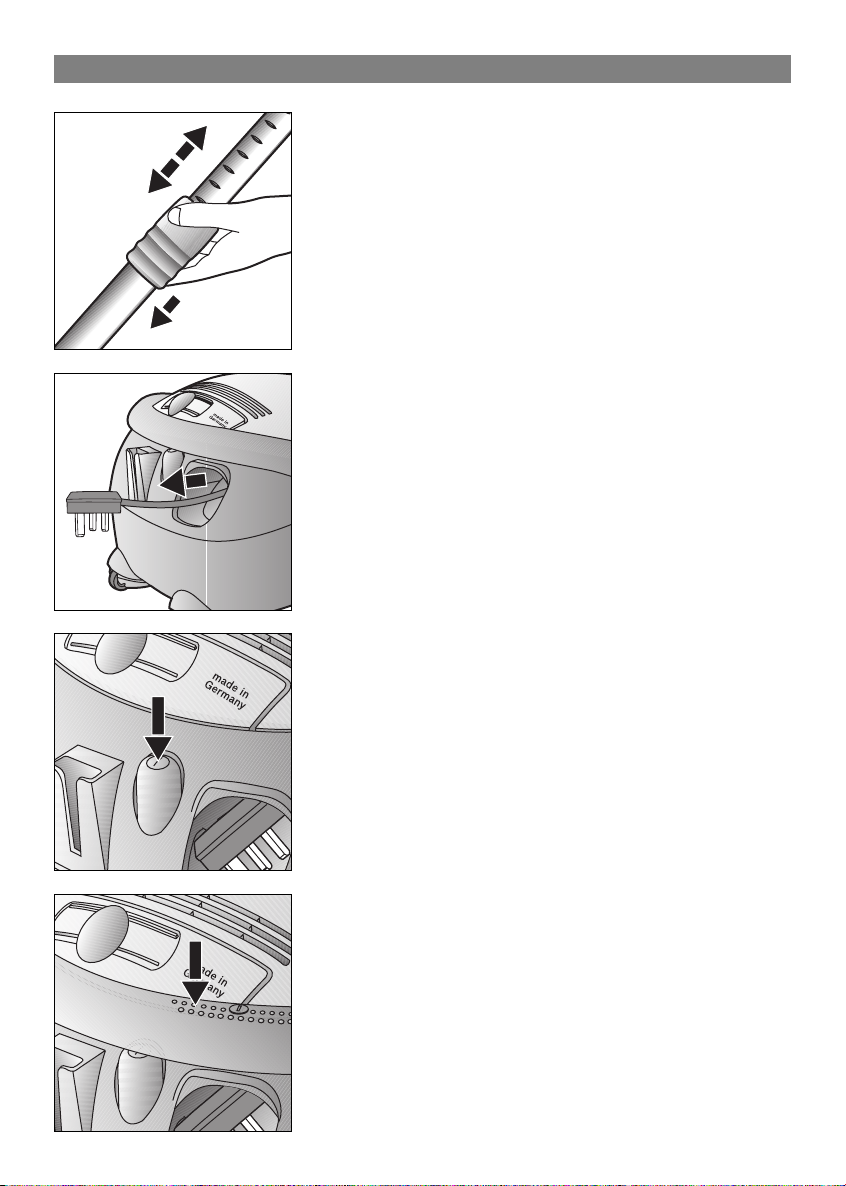
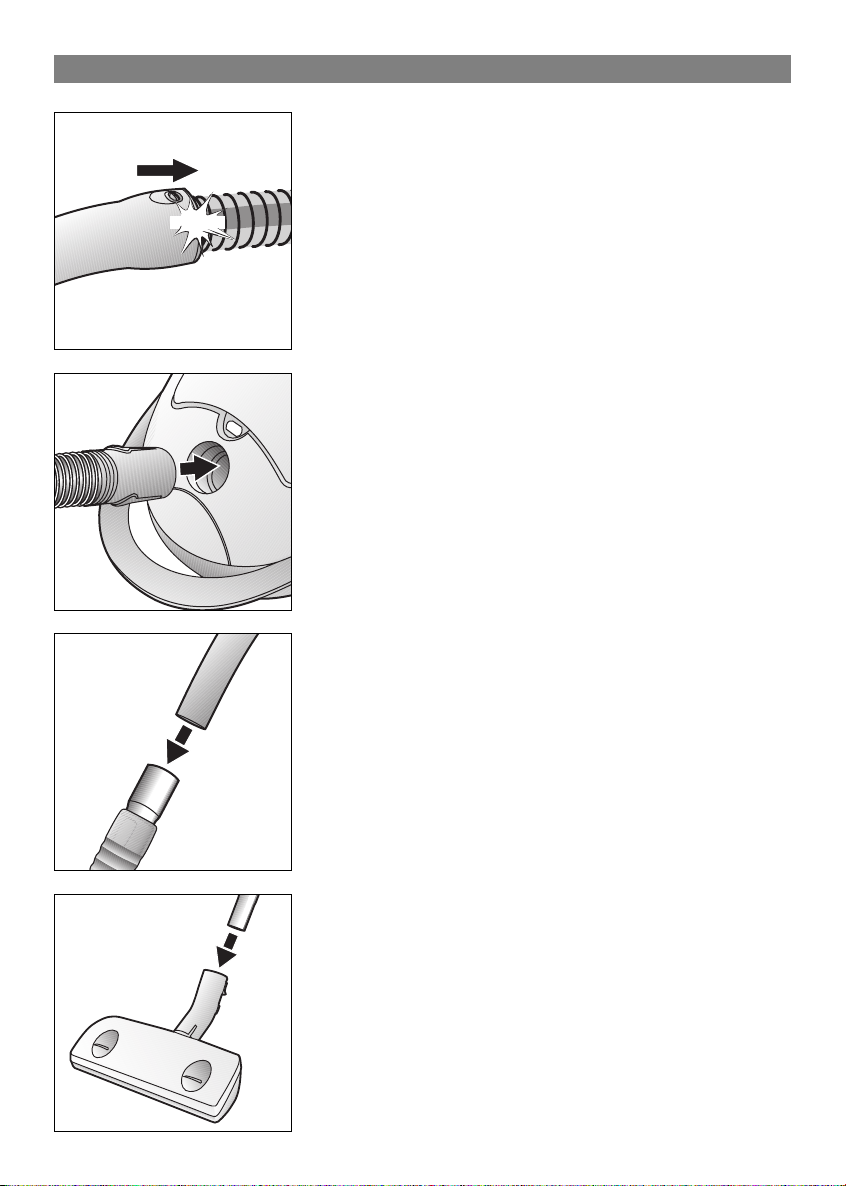
Setting up
Release the telescopic tube by moving the adjusting sleeve/sliding switch
in the direction of the arrow and adjust the tube to the required length.
Take the mains plug, pull the mains cable to the required length and insert
the plug into a wall socket.
To switch your vacuum cleaner on, press the On/Off button in direction of
arrow.
The button can also be pressed using the swing handle.
6
 Loading...