


IMPORTANT UPDATES
BUILT-IN OVEN INSTALLATION INSTRUCTIONS
AND USE AND CARE MANUAL
IMPORTANTES MISES À JOUR
NOTICE D'INSTALLATION ET GUIDE D'UTILISATION
ET D'ENTRETIEN POUR FOUR ENCASTRÉ
ACTUALIZACIONES IMPORTANTES
INSTRUCCIONES DE INSTALACIÓN
Y MANUAL DE USO Y CUIDADO DEL HORNO EMPOTRADO
9000976223 • Rev A • 03/14 • 5V0T7A

IMPORTANT UPDATES
BUILT-IN OVEN INSTALLATION INSTRUCTIONS
AND USE AND CARE MANUAL
The following content updates the built-in oven Installation Instructions and the Use & Care Manual. Please note
the referenced sections and refer to the content below for updated information.
Note:
Removing Packaging
• Cut straps on the outside of the box.
• Remove the cardboard box by lifting it up and off the
unit.
• Remove all top and side cardboard and Styrofoam
braces.
• Place the oven (leaving it on the shipping base) in front
of the cabinet where it is to be installed.
• Remove all accessories, racks, packing materials and
literature from the oven cavity (for double ovens,
remove such items, if present, from both cavities).
• Unscrew unit from packaging brackets as shown below
in “Packaging Bracket Removal.”
Note: The screws near the base mounting bracket are
all torx head (T-20 size). Only the one screw that goes
through the slotted hole in the mounting bracket on the
left and right sides of the unit needs to be removed in
order to lift the unit from the mounting base (the screw
circled and shown as “A” in the illustration below.)
NOTICE
Different models use different packaging materials. Actual
brackets may look differently. The bracket remains in the
packaging base. The unit should stay on the packaging
base until ready to be lifted into cabinet cutout.
Installation
Parts Provided
Oven Mounting Screws
8 screws are included to
secure the oven trim to the
cabinet. The screws are
located in a small plastic
bag affixed to the literature
pack bag.
The bottom trim pictured below is pre-installed at the
factory. The part is not included as a separate piece as
noted in the installation manual.
Oven Bottom trim (installed at factory)
Remove one screw only from each bracket. This
will release your oven from the shipping base. Do
not remove any additional screws from the oven.
Packaging Bracket Removal (left and right sides)
English 1
Omit Step 5 in the “Placing the Oven Into the Cabinet
Opening” section referencing installation of the oven
bottom trim. The bottom trim is already installed.
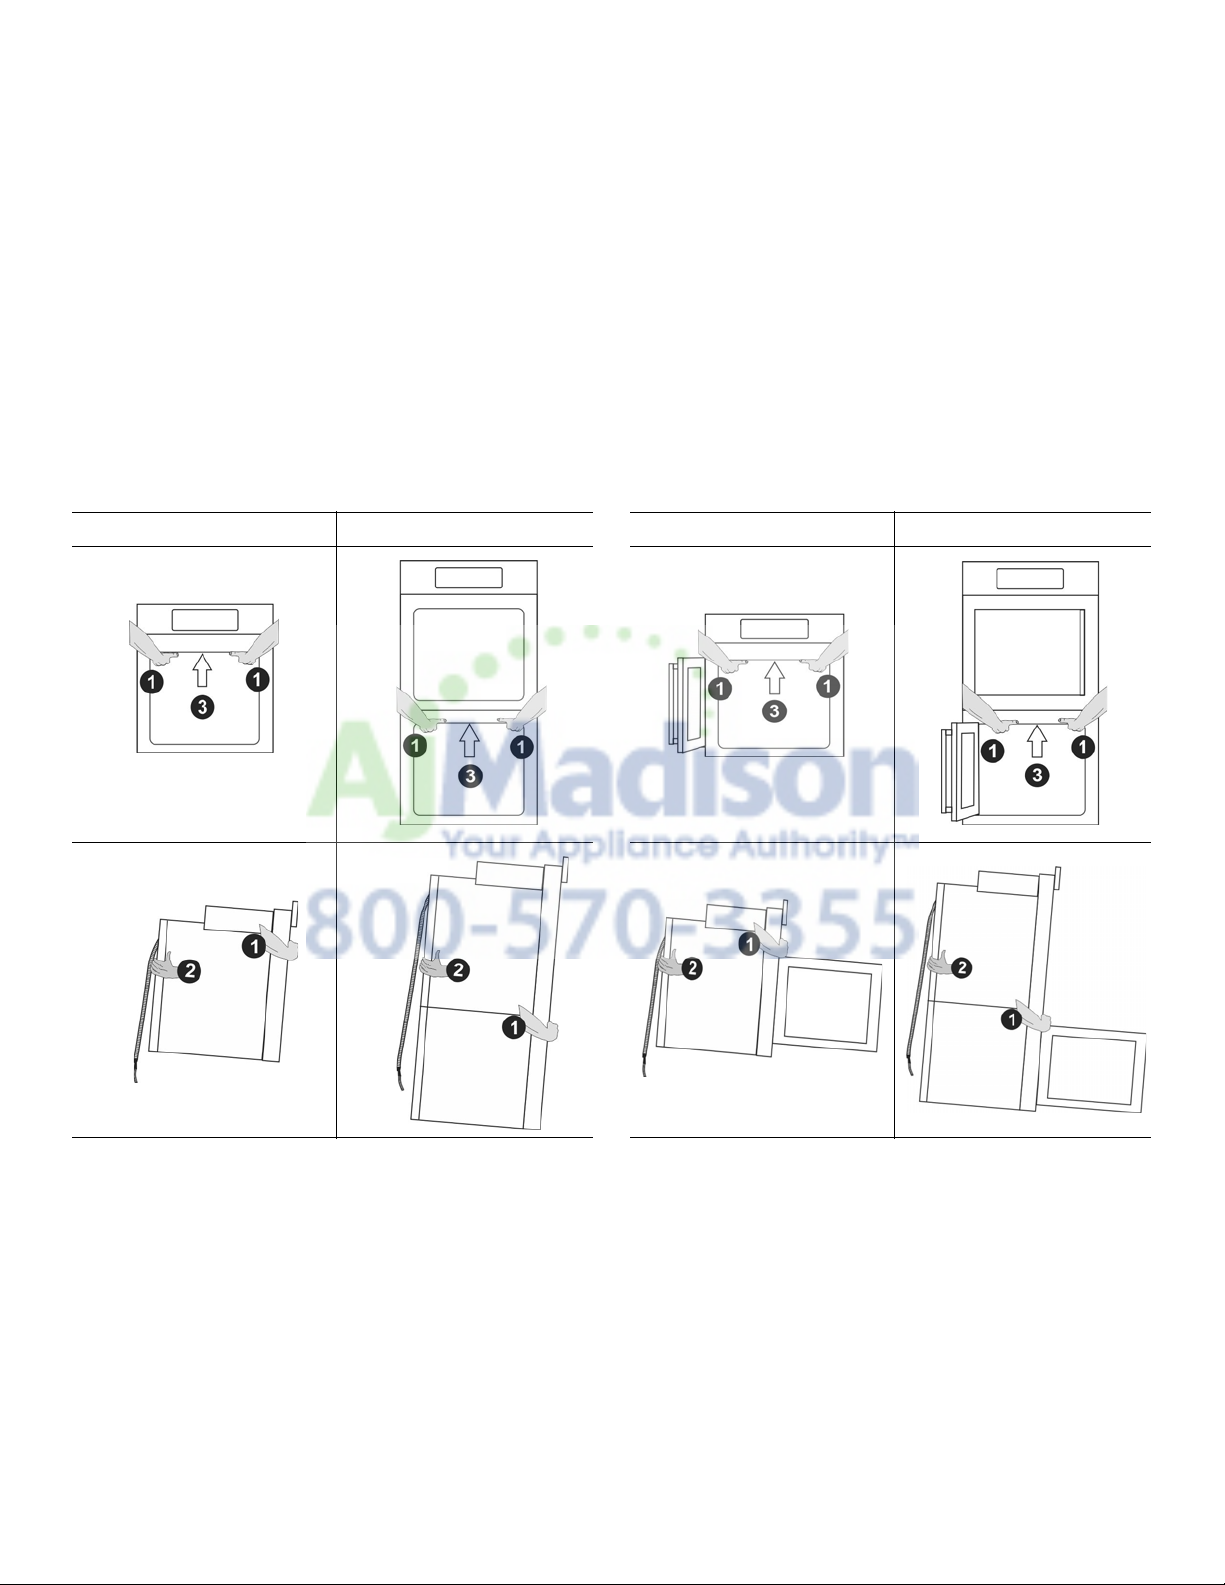
Lifting Recommendations Vary Dependent Upon Oven Door Type
Bottom Hinge Door
Lift Locations (with door(s) removed)
Lift points (1) on the front of the unit are for lifting from the
sides of the unit. Lift point (3) on the front of the unit is for a
third person to help lift the unit.
Lift point (2) on the back of the unit shows the location of
the opposite hand for the helpers lifting from the sides of
the unit. Adjust the location as needed to facilitate the lift.
Wear gloves, a long sleeved shirt, and avoid sharp edges
to reduce the risk of cuts or abrasions to the arms or hands.
Single Oven Double/Combo Oven
Side Hinge Door
Lift Locations (with lower door opened to 90°-110°)
Lift points (1) on the front of the unit are for lifting from the
sides of the unit. Lift point (3) on the front of the unit is for a
third person to help lift the unit.
Lift point (2) on the back of the unit shows the location of
the opposite hand for the helpers lifting from the sides of
the unit. Adjust the location as needed to facilitate the lift.
Wear gloves, a long sleeved shirt, and avoid sharp edges
to reduce the risk of cuts or abrasions to the arms or hands.
Single Oven Double/Combo Oven
English 2
Bottom Hinge Doors Only - Remove
Placing the Oven Into the Cabinet
Prior to Install
Important: Do not attempt to remove the side hinge
door (side hinge doors are found only on select models).
Ovens with bottom hinge doors permit the oven door(s) to
be removed prior to lifting the unit into place. Each door
weighs approximately 40 pounds (18.1 kg). Removing and
replacing the door are routinely simple procedures.
Removing the door lightens the unit significantly and
provides easier access to the recommended handhold
inside the oven cavity. See instructions below.
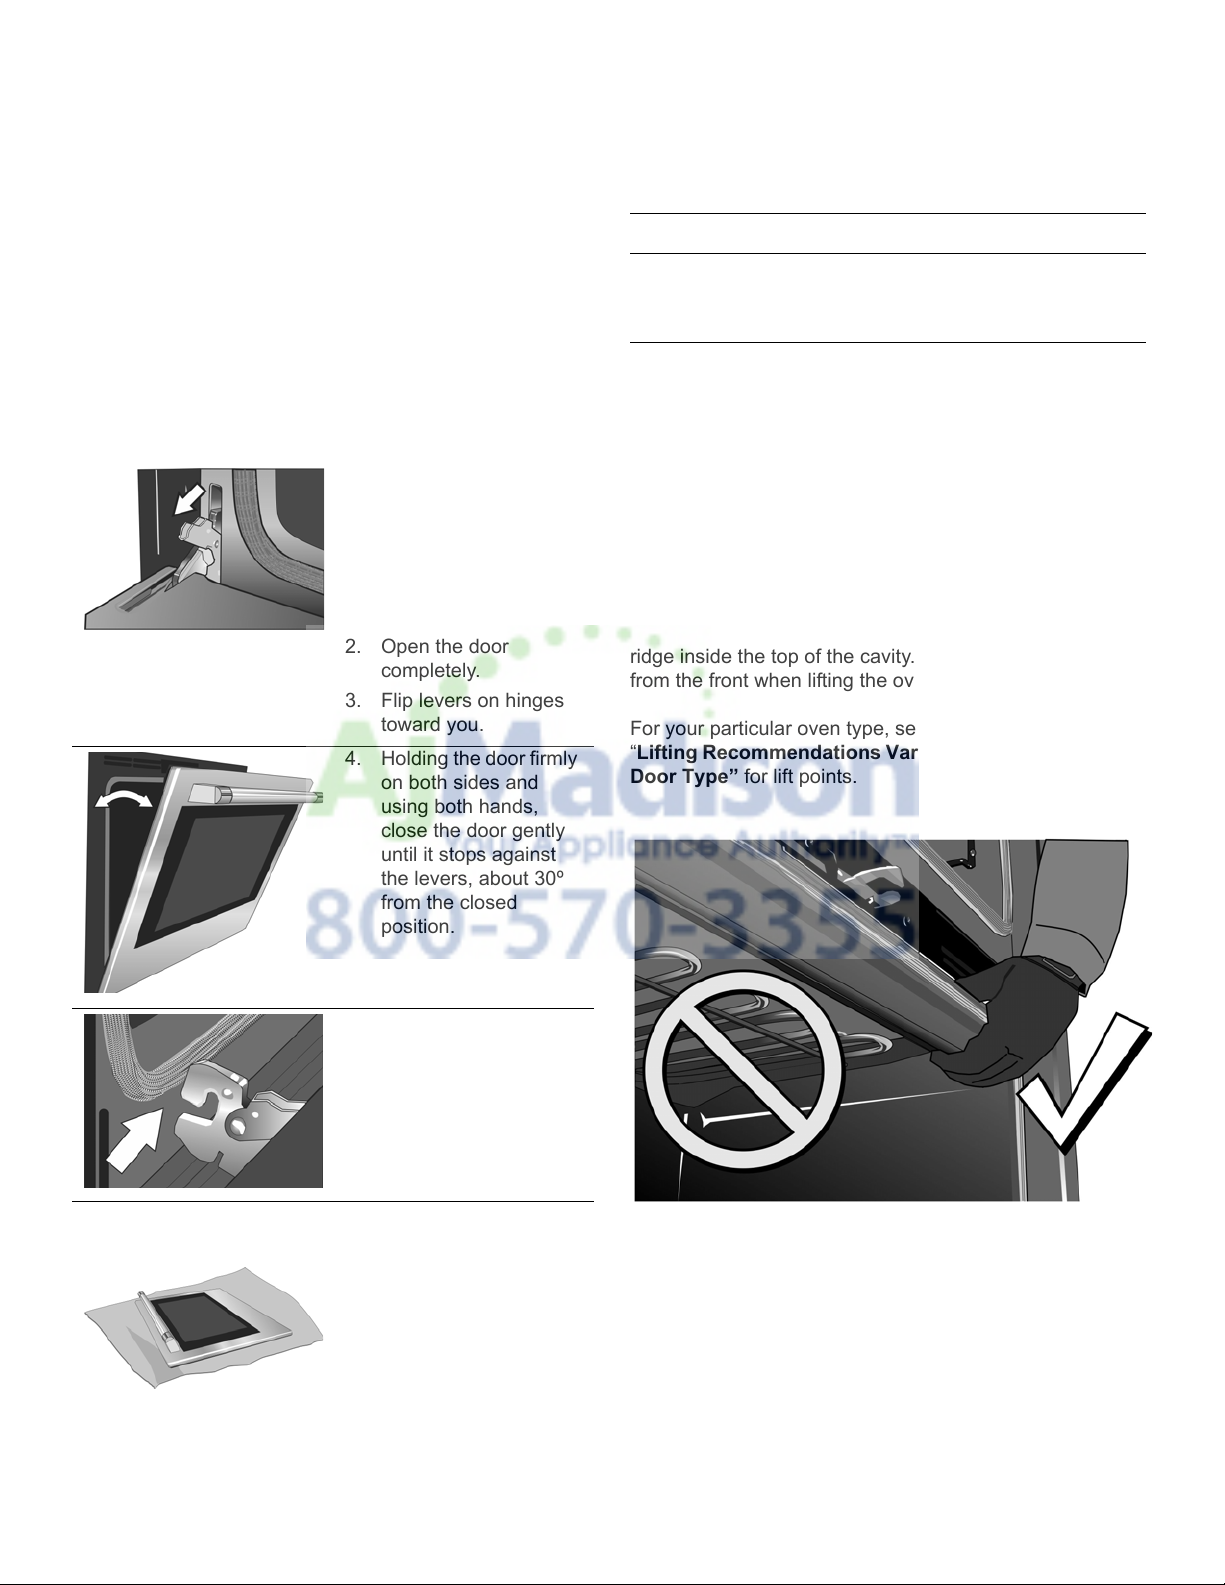
1. Be sure to read all
warnings and cautions
in the installation
manual regarding the
door removal before
attempting to remove
the door.
2. Open the door
completely.
3. Flip levers on hinges
toward you.
4. Holding the door firmly
on both sides and
using both hands,
close the door gently
until it stops against
the levers, about 30º
from the closed
position.
Opening - All Ovens
9 CAUTION
To avoid damage to the door do not lift, pull or push
the unit during installation by using the oven door
handle as a gripping point.
Note: It is recommended to wear gloves and long sleeves
to protect hands and forearms from abrasion and
potential scratches during the lifting process. It is
also recommended to take off watches and jewelry
and to wear work shoes during installation for foot
protection.
When lifting the unit into place avoid grasping the upper
element to avoid damaging it. See the illustration following
for the correct lifting point for a bottom hinge double oven
with the lower door removed. This illustration shows a
detailed view of the oven cavity. Note the location of the
ridge inside the top of the cavity. This is the area to grip
from the front when lifting the oven.
For your particular oven type, see the preceeding section
“Lifting Recommendations Vary Dependent Upon Oven
Door Type” for lift points.
English 3
5. Carefully lift the door
up and out of the
hinge slots. Hold
firmly; the door is
heavy.
6. Place the door in a
convenient and stable
location unitl you are
ready to reinstall it.
Lay the door on a
towel or section of
protective foam
padding to avoid
damage to the door or
the floor.
Ovens with Side Hinge Doors Only
Fig. B
Fig. A
Side Hinge Door Aligment
Note: Only align the side hinge oven doors after the unit is
fully installed into the cabinet.
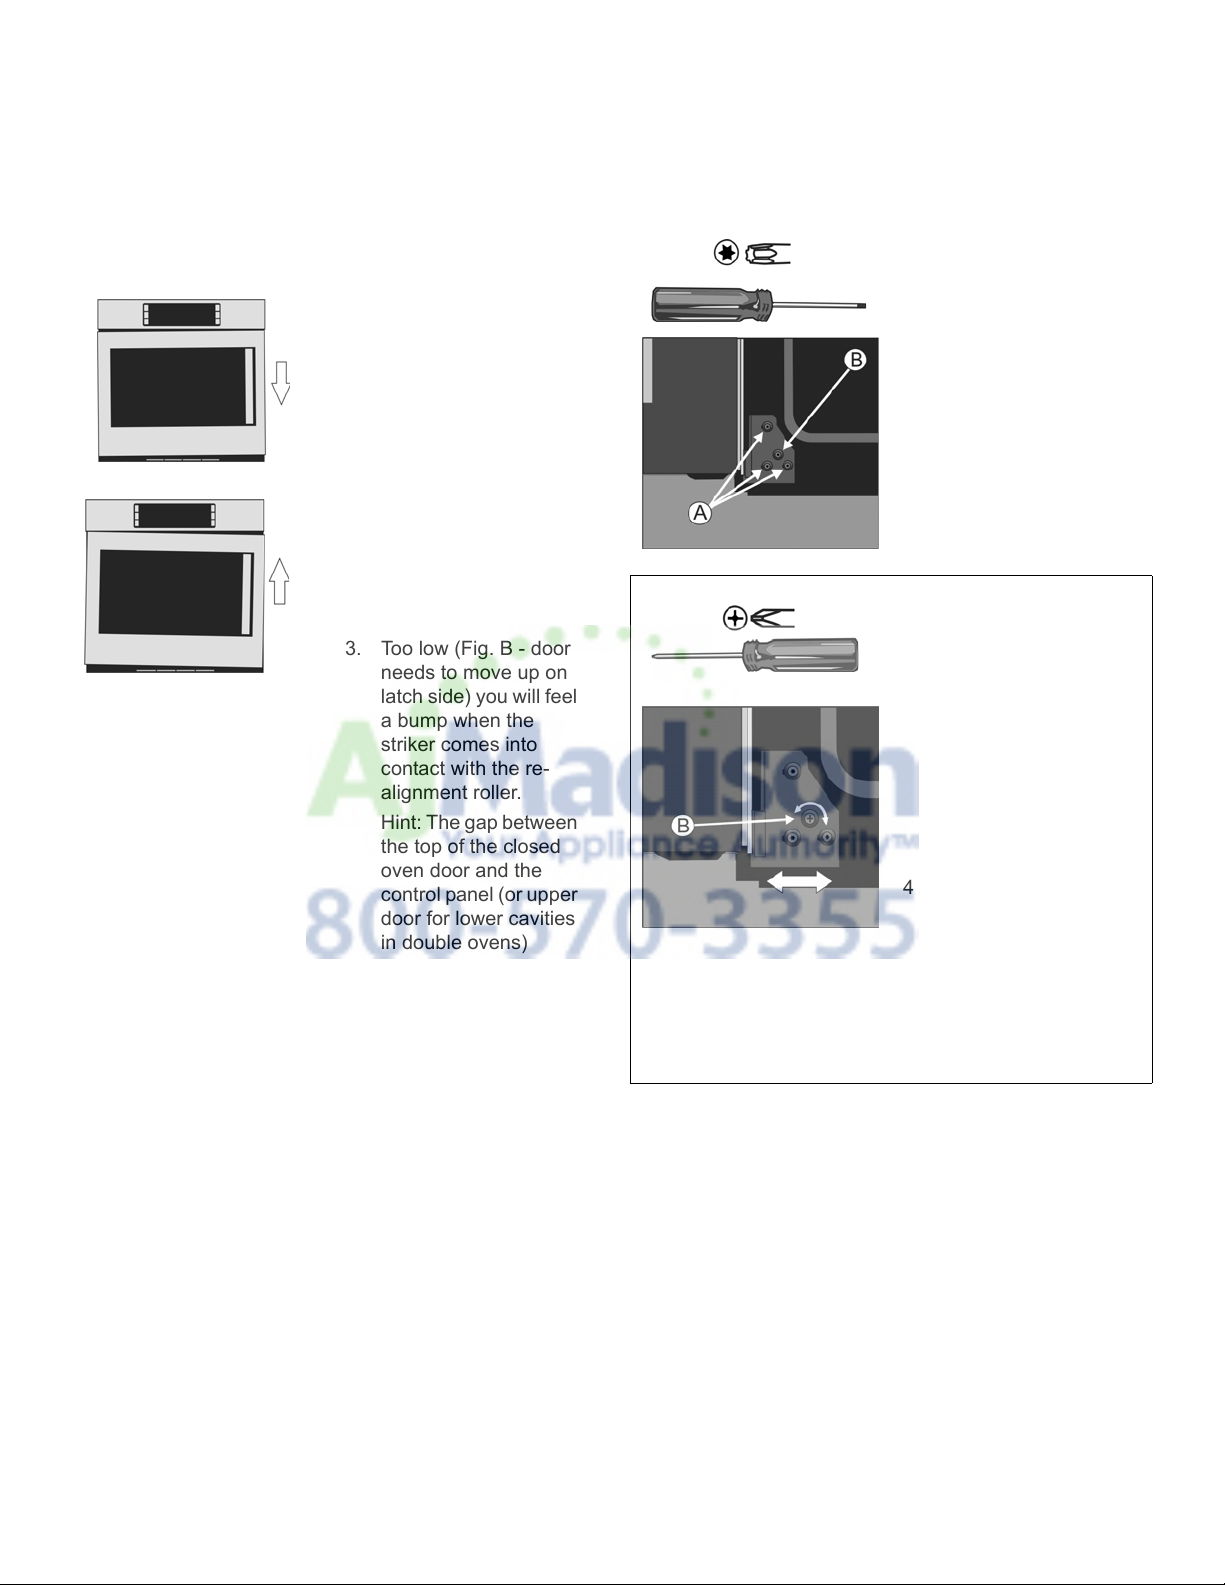
1. Check to see if the
side hinge oven doors
are properly aligned.
The door should pull
itself closed smoothly
when the striker
engages the roller as
the door is closed.
2. Too high (Fig. A - door
needs to move down
on latch side) you will
feel interference
between the striker
and the catch receiver.
3. Too low (Fig. B - door
needs to move up on
latch side) you will feel
a bump when the
striker comes into
contact with the re-
alignment roller.
Hint: The gap between
the top of the closed
oven door and the
control panel (or upper
door for lower cavities
in double ovens)
should be fairly
uniform from side to
side.
Side Hinge Door Alignment Procedure
1. Open the door to
approximately 135°.
2. Using a Torx T-20 starhead screwdriver,
loosen the 3 screws
(A) on the lower hinge
by 1 to 2 full turns.
Note: All adjustment is
made with the lower
hinge only. The upper
hinge is fixed in place
and cannot be
adjusted.
3. Using a #2 philips
head screwdriver, turn
the cam (B) right or left
to adjust the hinge
position in the desired
direction.
Note: 1mm of hinge
movement (left or
right) will move the
door up or down
approximately 1.5mm
at the door catch.
4. Re-tighten the screws
before closing the
door to test. Be careful
not to overtighten.
5. Check for proper door
alignment. Repeat
adjustment procedure
as necessary.
English 4
Side Hinge Door Opening/Closing Troubleshooting Guide
Primary observation Additional observations Cause: Solution
The door does not pull
itself closed and feels
difficult to open as well.
The door does not hold
itself closed.
The door does not close
onto the striker
smoothly.
Once closed, the door
opens without incident.
The door does not close
onto the striker
smoothly.
Once closed, the door
may also appear to
stick while pulling the
door open
The side edge of the inner
door (on the handle side of
the door) appears to make
contact with the unit's side
trim.
Very little force is required
to pull open the door.
When closing the door onto
the striker, the door lifts
itself upwards.
You will feel a slight bump
as the roller (internal to the
door) hits the tip of the
striker and lifts the door.
If the door needs to lift
substantially, the door will
no longer pull itself closed,
and assistance is required
to push it closed fully.
While trying to open the
door from a closed position,
you feel an interference that
catches the door and may
prevent it from opening.
You feel a similar
interference when closing.
The installation is
causing the side
trim to be pushed
too far inwards.
The door catch
mechanism
internal to the
door has
inadvertently
tripped while the
door was open.
The door
alignment is too
low to engage
properly with the
striker.
See figure B in the
side hinge door
alignment
instructions.
The door
alignment is too
high to engage
properly with the
striker.
See figure A in the
side hinge door
alignment
instructions.
Check the installation of the unit in the
cabinetry. Try to move the unit in the cabinet
towards the side of the hinges as much as
possible to allow the interfering side trim to
open up.
May also try to adjust the location of the side
trim screws to hold the trim away from the
door.
Check again the cabinet opening to ensure
that it is not too narrow. Widen the cutout as
necessary.
To reset the mechanism, close the door
completely and while closed, push in firmly on
the door handle until the mechanism resets.
A firm push may be required. Open to test.
Refer to the side hinge door alignment
procedure to raise the handle side of the door
until the door closes smoothly.
It should open smoothly and pull itself closed
smoothly without hearing or feeling an
interference.
To open a sticking door, apply pressure
downward on the handle while pulling.
Refer to the side hinge door alignment
procedure to lower the handle side of the door
u
ntil the door closes smoothly.
It should open smoothly and pull itself closed
smoothly without hearing or feeling an
interference.
Remove Safety Cap before Using
Probe
Some models include a temperature probe used to sense
internal tempererature of meats during cooking.
The probe ships with a black plastic safety cap over the
pointed metal end of the probe. The cap must be removed
prior to use.
English 5
.
 Loading...