

Bosch BORECTWODWRH161 User Manual

B20CS30SNS
en Instructions for use and
installation
fr Notice d'utilisation et de
montage
es Instrucciones de uso y de
montaje

en Table of Contents 3
fr Table des matières 31
es Índice 60
2

en-us
en Table of contents
enInstructions for use
IMPORTANT SAFETY INSTRUCTIONS ............... 4
Disposal information .................................................... 5
Scope of Delivery .......................................................... 6
Installing the appliance .............................................. 6
Installation dimensions ............................................... 8
Door opening angle ..................................................... 9
Connecting the appliance ......................................... 9
Fitting the doors ......................................................... 12
Getting to know the appliance ............................. 13
Switching on the appliance ................................... 15
Setting the temperature .......................................... 15
Fast cooling function ................................................ 15
Fast freezing function ............................................... 16
Panel lock ...................................................................... 16
Alarm functions ........................................................... 16
Temperature units ...................................................... 17
Energy-saving mode ................................................. 17
Water filter symbol ..................................................... 17
Usable capacity .......................................................... 18
Fridge compartment ................................................. 18
Freezer compartment ............................................... 18
Max. freezing capacity ............................................. 19
Freezing food ............................................................... 19
Purchasing and storing deep-frozen food ...... 19
Thawing frozen food ................................................. 19
Ice and water dispenser ......................................... 20
Water filter ..................................................................... 22
Performance Data Sheet ........................................ 24
Fittings ............................................................................. 25
Switching off and disconnecting
the appliance
............................................................... 26
Defrosting ...................................................................... 26
Cleaning the appliance ........................................... 26
Smells .............................................................................. 27
LED light ......................................................................... 27
Saving energy .............................................................. 27
Operation noises ........................................................ 28
Rectifying minor faults yourself ........................... 28
Customer service ....................................................... 30
3

en-us
, IMPORTANT SAFETY INSTRUCTIONS
READ AND SAVE THESE INSTRUCTIONS!
IMPORTANT SAFETY INSTRUCTIONS
Definitions
: WARNING
This indicates that death or serious injuries may
occur as a result of not observing this warning.
: CAUTION
This indicates that minor to moderate injuries may
occur as a result of not observing this warning.
NOTICE
This indicates that damage to appliance or property
may occur as a result of not observing this warning.
Note:
This alerts you to important information and/or tips.
WARNING: Before you turn on the appliance
Please read the Operating and Installation Instructions
carefully, including the following. They contain
important safety information and instructions for
installation, use and maintenance of the appliance.
The manufacturer is not responsible if you fail to
comply with the instructions and warnings. Retain all
documents for subsequent use or for the next owner.
Technical safety
Improper installations and repairs may put the user at
risk.
Repairs must be performed by an authorized service
provider.
Only use original parts supplied by the manufacturer.
Only original manufacturer supplied parts satisfy safety
requirements.
If the power cord of this appliance is damaged, it must
be replaced by an authorized servicer.
The appliance comes with a UL listed 3-wire Power
Cord.
Never sever or remove the third (ground) conductor
from the power cord.
This appliance requires a 3-wire grounded wall outlet.
The wall outlet must be installed by a licensed
electrician and it must be done in accordance with local
codes.
Where there is a 2-wire standard wall receptacle, it is
the responsibility of the customer to have this
receptacle replaced with a correctly grounded 3-wire
wall receptacle. Do not use any adapter plugs.
Important information when using the appliance
■ Never use electrical devices inside the appliance.
Risk of explosion!
■ Never use a steam cleaner to defrost or clean the
appliance. The steam may penetrate electrical parts
and cause a short-circuit. Risk of electric shock!
■ Do not use pointed or sharp-edged objects to
remove frost or layers of ice. You could damage the
refrigerant tubes. Leaking refrigerant may ignite or
cause eye injuries.
■ Do not store products that contain flammable
propellants (e.g. spray cans) or explosive
substances in the appliance. Risk of explosion!
■ Do not stand or support yourself on the base,
drawers or doors or other parts of the appliance. You
could damage the appliance or be injured.
■ To clean the appliance, pull out the power cord plug
or switch off the electrical breaker or fuse! Do not
pull out the power cord plug by tugging the cable.
■ Bottles that contain a high percentage of alcohol
must be sealed and stored in an upright position.
■ Keep plastic parts and the door seals free of oil and
grease. Otherwise, plastic parts and door seal will
become porous.
■ Never cover or block the ventilation openings for the
appliance. This forces the appliance to work harder,
increasing its power consumption.
■ This appliance must not be used by children without
adult supervision.
■ Do not store bottled or canned drinks (especially
carbonated drinks) in the freezer compartment.
Bottles and cans may explode!
■ Do not place popsicles or ice cubes straight from the
freezer compartment into your mouth. Risk of lowtemperature burns!
■ Do not touch frozen surfaces or food in the freezer
with wet hands. Skin may adhere to these extremely
cold surfaces. Risk of injury!
■ Do not scrape off frost or stuck frozen food with a
knife or pointed object. You could damage the
appliance or be injured.
4

, IMPORTANT SAFETY INSTRUCTIONS
READ AND SAVE THESE INSTRUCTIONS!
Children in the household
Disposal information
en-us
: WARNING
Risk of suffocation from cardboard boxes and
plastic film! Keep packaging and packaging
components away from children.
Do not allow children to play with the appliance! If
the appliance features a lock, keep the key out of the
reach of children.
General requirements
The appliance is suitable for:
■ refrigerating food
■ freezing food
■ making ice
■ dispensing drinking water.
This appliance is intended for use in the home and the
home environment.
The refrigeration circuit has been tested for leaks
before leaving the factory.
State of California Proposition 65 Warnings
: WARNING
This product can expose you to chemicals including
vinyl chloride, which is known to the State of
California to cause cancer and birth defects or other
reproductive harm.
For more information go to
www.p65warnings.ca.gov.
* Disposal of packaging
The packaging protects your appliance from damage
during transit. All utilized materials are environmentally
safe and recyclable. Please help us by disposing of the
packaging in an environmentally friendly manner.
Remove all packaging materials, such as any
protective films on shelves, drawers and surfaces, after
installation and prior to operation of this appliance.
Remove handles from the packaging before disposal.
Please ask your dealer or inquire at your local authority
about current means of disposal.
* Disposal of your old appliance
Old appliances are useful! Valuable raw materials can
be reclaimed by recycling old appliances.
: WARNING
Risk of child entrapment!
Children can lock themselves in the appliance.
Before disposing of the old refrigerator:
Remove the doors and the freezer compartment
drawer.
Leave the shelves and containers in place so that
children may not easily climb inside.
Proper disposal of appliances:
1. Pull out the power plug.
2. Cut off the power cord and discard with the power
plug.
3. Do not take out the trays and shelves. This helps to
prevent children from climbing in!
4. Do not allow children to play with the appliance.
Could cause suffocation!
Refrigerators contain refrigerants and their insulation
contains gases. Refrigerant and gases must be
disposed of properly. Follow local ordinances for
disposal. Ensure that the tubing of the refrigerant circuit
is not damaged prior to proper disposal.
5

en-us
, IMPORTANT SAFETY INSTRUCTIONS
READ AND SAVE THESE INSTRUCTIONS!
Installation location
Scope of Delivery
After unpacking all parts, check for any damage in
transit.
If there is damage, do not plug in your appliance.
Please contact the dealer.
The following parts are included:
■ Free-standing appliance
■ Interior fittings (depending on model)
■ Bag containing installation materials
■ Operating instructions
■ Installation instructions
■ Registration card
■ Information on energy consumption and noises
Installing the appliance
Have a qualified technician install and connect the
appliance according to the enclosed Installation
Instructions.
: WARNING
Do not install the appliance:
■ outdoors,
■ in an environment subject to drips of water,
■ in rooms with risk of freezing temperatures.
Transporting
The appliance is heavy and must be secured during
transport and installation.
The castors are provided for installation purposes only.
Do not use the castors for transporting the appliance.
: WARNING
Risk of explosion!
Do not install the appliance near explosive or
flammable substances.
A dry, well-ventilated room is suitable as an installation
location. The installation location should not be
exposed to direct sunlight or placed near a heat
source, e.g. a cooker, radiator, etc. If installation next to
a heat source is unavoidable, use a suitable insulating
plate or observe the following minimum distances from
the heat source:
1
■ 1
/4” (3 cm) to electric or gas stoves.
13
■ 11
/16” (30 cm) to oil or solid fuel stoves.
To ensure that the Ice Maker functions correctly, the
appliance must be upright and level.
If installing the refrigerator next to another refrigerator/
freezer, there must be a minimum clearance of
1” (25 mm) between the appliances to prevent
condensation.
If a panel or cupboard is installed above the appliance,
ensure to leave a
appliance can be pulled out of the recess if required.
The air heated at the back of the appliance must be
allowed to escape unhindered.
To ensure that the doors can open all the way, maintain
the lateral minimum clearances when installing the
appliance in a corner or recess (see section
”Installation dimensions”).
If the depth of the adjacent kitchen equipment exceeds
1
/8” (75 cm), maintain the minimum lateral
29
clearances in order to utilize the full door opening angle
(see section ”Door opening angle”).
13
/32” (10 mm) gap so that the
: WARNING
Risk of injury!
The appliance is very heavy. It can fall over and
cause serious injuries during transport and
installation. At least two people are required to
install the appliance safely. Keep the refrigerator
doors closed until the appliance is upright and level
at the installation location.
Hidden surfaces may have sharp edges. During
transport, wear protective gloves. Use caution when
reaching behind or under appliance.
6
en-us
Subsurface
NOTICE
The appliance is very heavy.
The floor on which the appliance is to be installed
must be rigid. Reinforce the floor, if necessary.
Weight of appliance when empty:
Basic model 245 lb (111 kg)
Wall clearance
If the appliance is positioned in the corner of a room or
a recess, minimum clearances (see section ”Installation
dimensions”) at the sides must be maintained so that
the appliance doors can be fully opened.
If the depth of the adjacent kitchen fittings exceeds
25.6” (65 cm), minimum clearances at the sides must
be maintained so that the full opening width of the
doors can be utilized (see section ”Door opening
angle”).
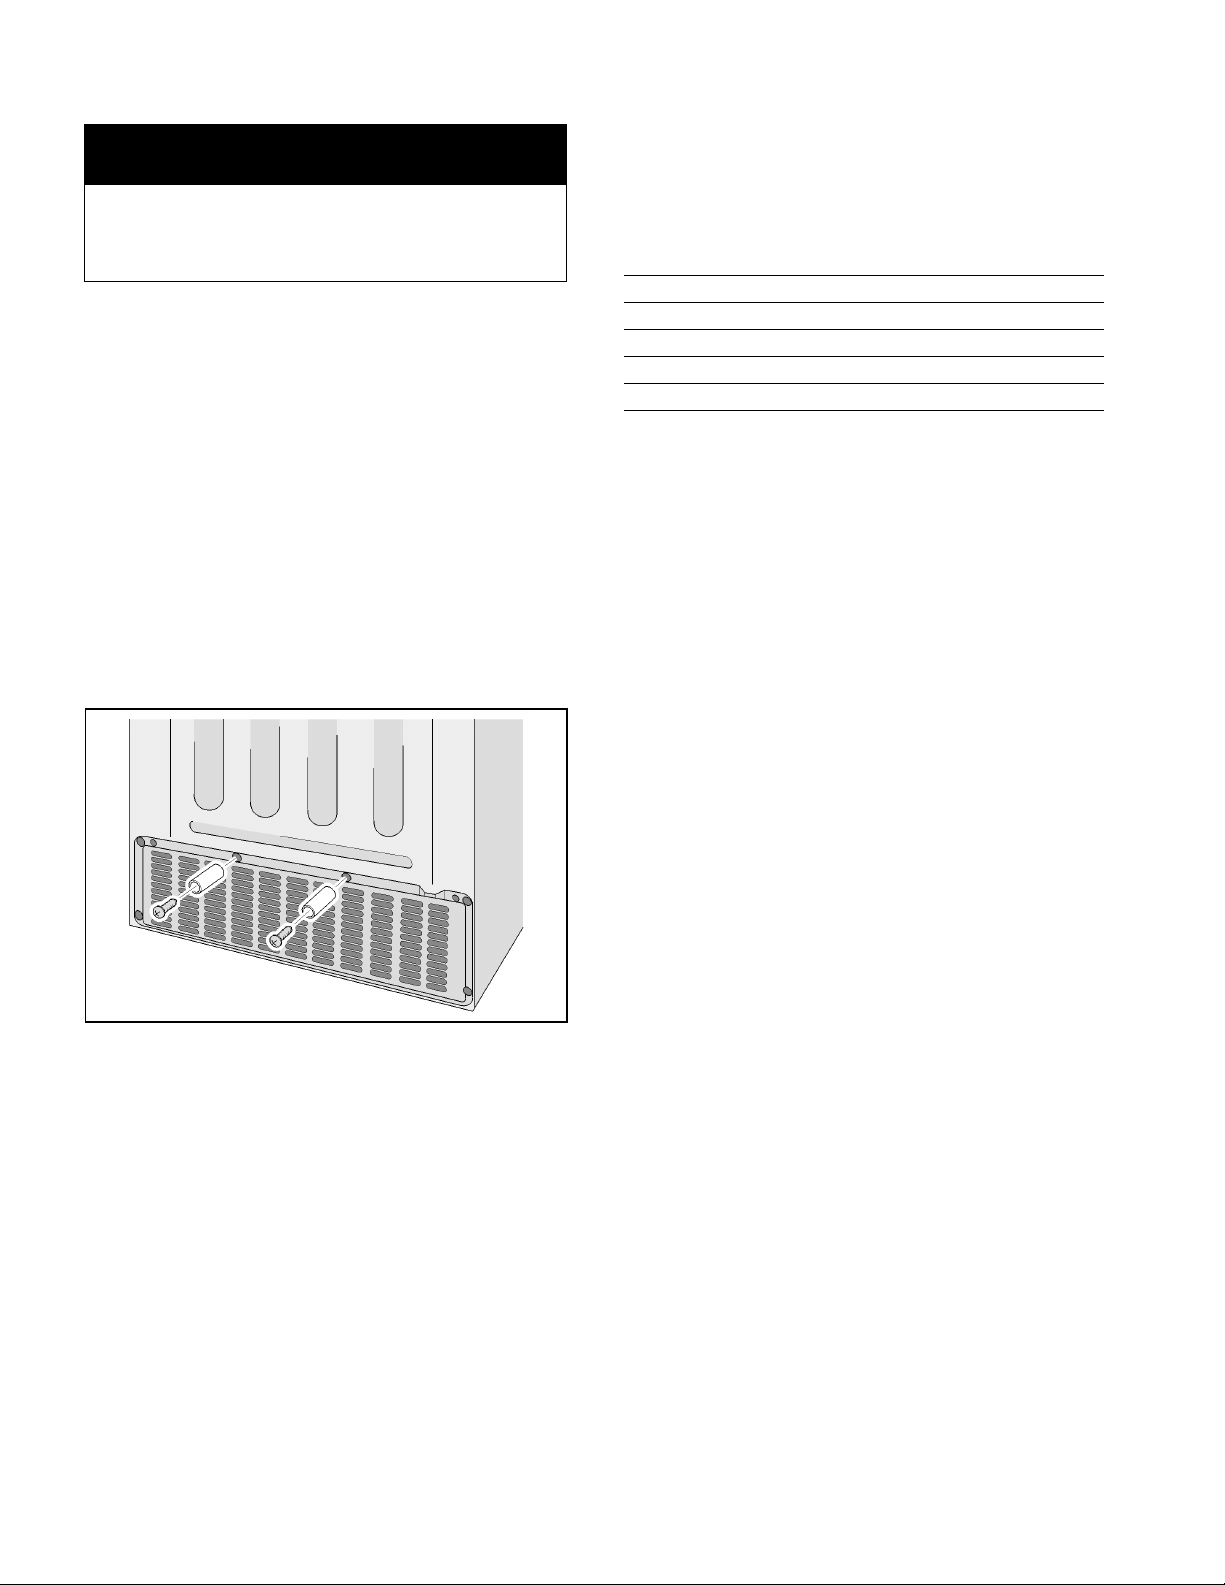
Minimum clearance at rear
Fix the spacers supplied to the holes provided on the
rear of the appliance using the screws.
Observe the room temperature and ventilation requirements
Room temperature
The appliance is designed for a certain climate class.
Depending on the climate class, the appliance can be
operated at the following ambient temperatures.
The climate class is specified on the rating plate.
Climatic class Permitted ambient temperature
SN 50 °F to 90 °F (+10 °C to 32 °C)
N 61 °F to 90 °F (+16 °C to 32 °C)
ST 61 °F to 100 °F (+16 °C to 38 °C)
T 61 °F to 110 °F (+16 °C to 43 °C)
Note:
The appliance is fully functional within the room
temperature limits of the specified climate class. If an
appliance in the SN climate class is operated at lower
ambient temperatures, damage to the appliance can be
excluded up to a temperature of 41 °F (+5 °C).
Ventilation
The heated air must be able to escape unimpeded.
Otherwise, the refrigerating unit has to work harder,
which increases the appliance's power consumption.
Therefore, never cover over or block the air vent.
Important:
The spacers maintain the minimum clearance of
2” (50 mm) from the wall, thus providing adequate
ventilation.
7
en-us
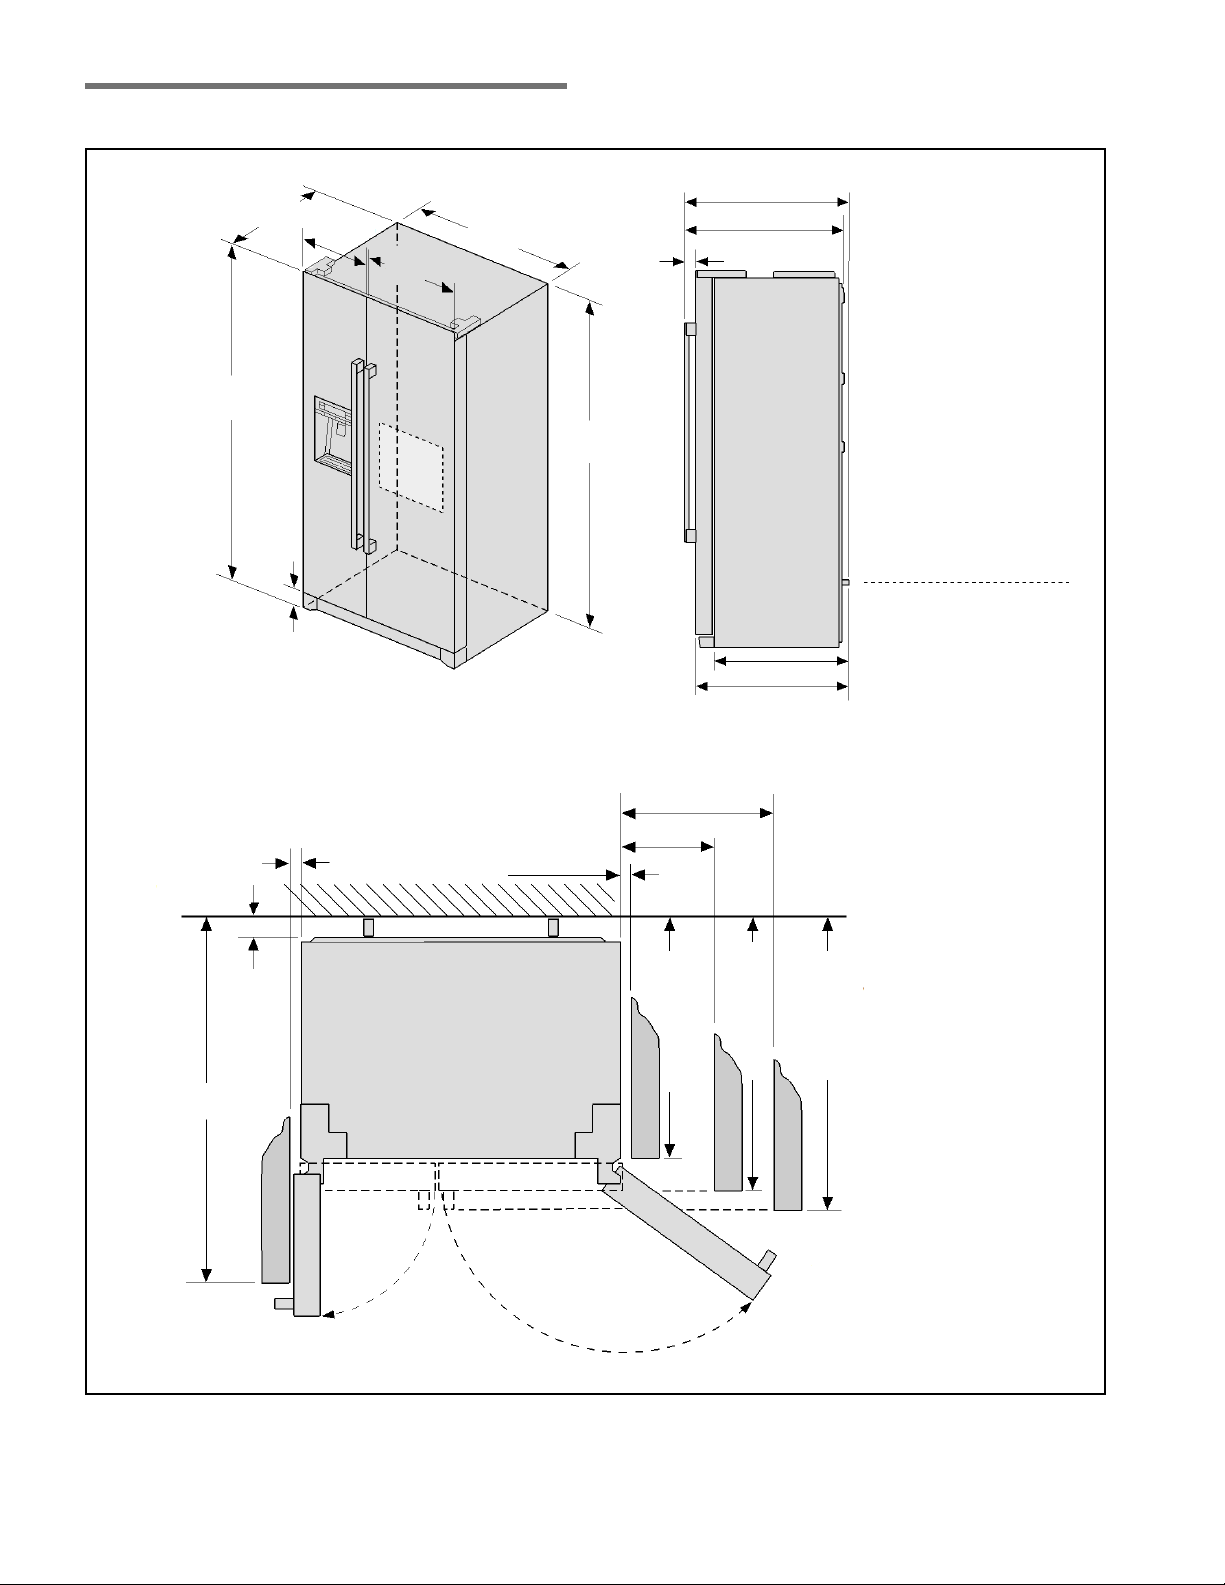
Installation dimensions
1
*27
⁄2”
(698,6 mm)
15
(383.7 mm)
6911⁄16”
(1770 mm)
35⁄64”
78 mm)
*
291⁄2” (749 mm) with spacers
7
⁄64”
6
20
⁄10”
(522 mm)
359⁄10” (912 mm)
6835⁄64”
(1741 mm)
3
⁄25” (792 mm)
31
1
29
⁄2” (750 mm)
1
2
⁄32” (51,4 mm)
63
⁄
25
100
17
⁄
29
100
Spacers
” (651 mm)
” (741 mm)
min. 2” (50.8 mm)
3
⁄8” (1000 mm)
39
3
⁄4” (19 mm)
90°
13
⁄64” (5 mm)
7
7
29
5
⁄32” (150 mm)
145°
⁄8” (200 mm)
” (651 mm)
100
⁄
63
25
Side panel clearance
Side panel depth
” (741 mm)
100
⁄
17
29
” (792 mm)
25
⁄
3
31
Drawers can be pulled out fully
at door opening of 145°
8
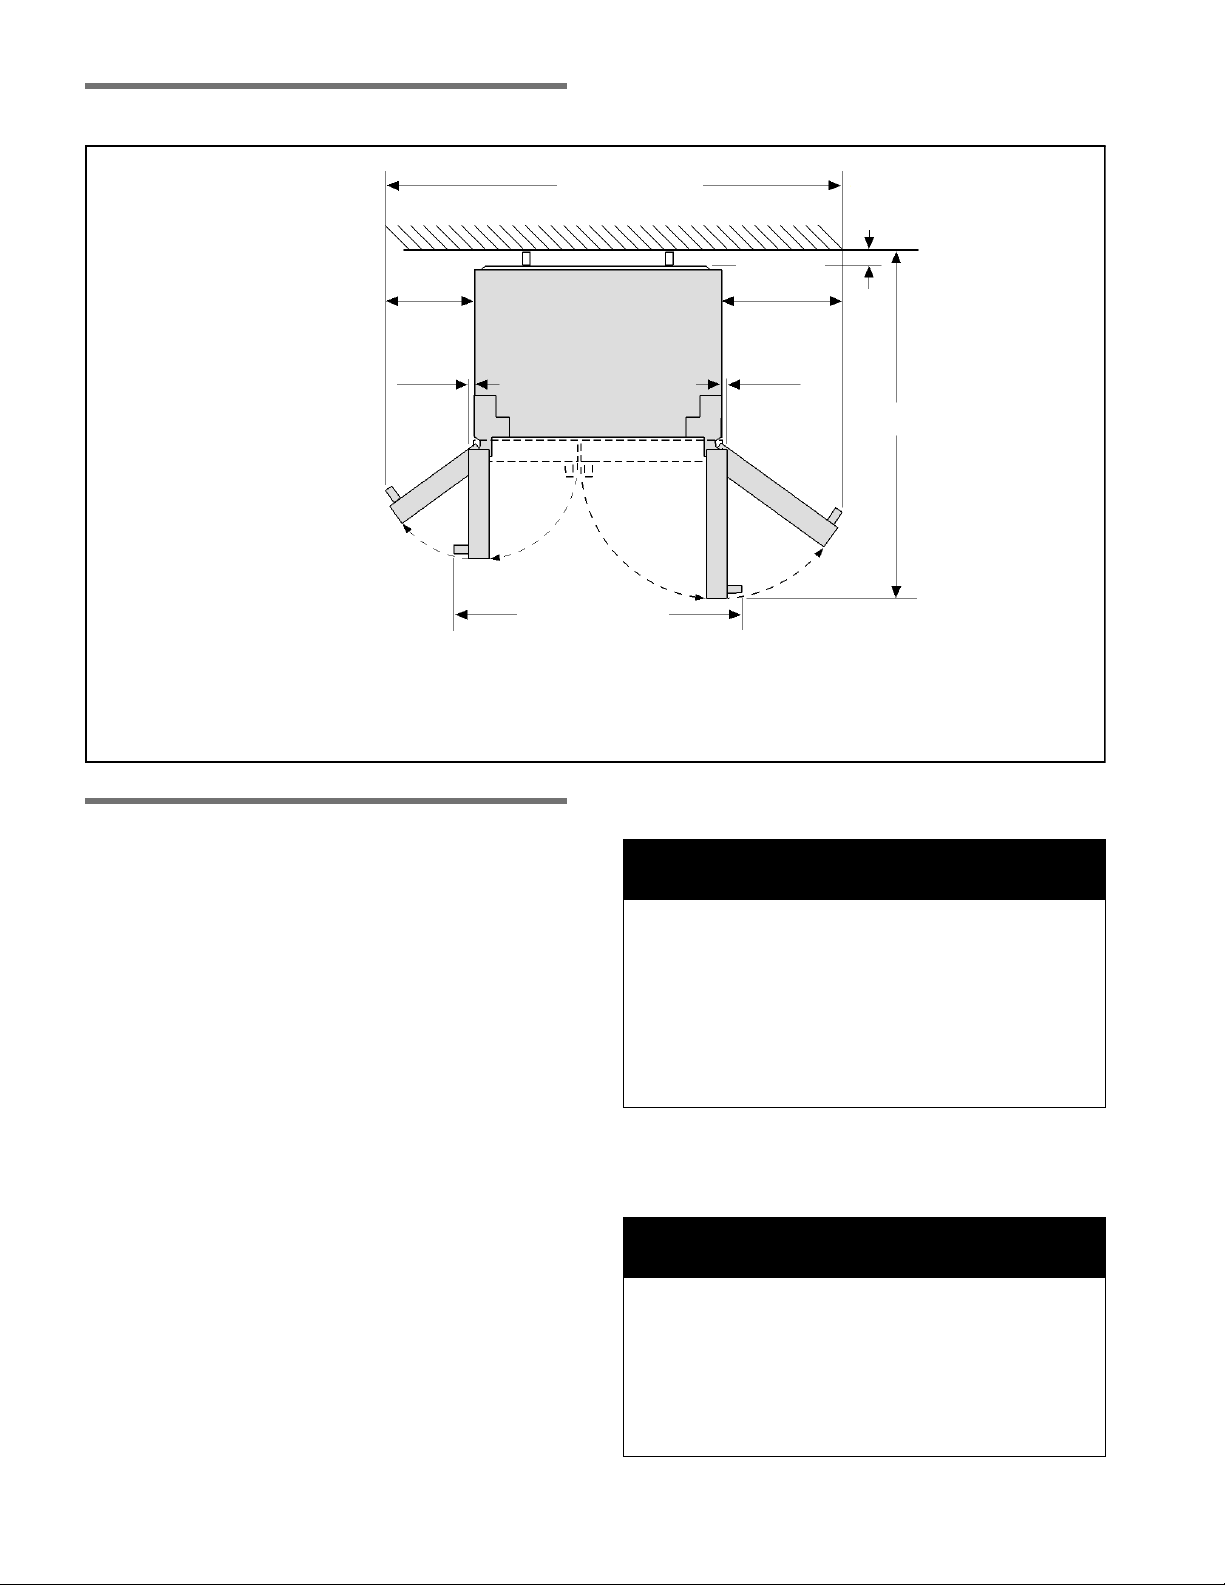
Door opening angle
Drawers can be pulled out fully
at door opening of 145°
min. 2” (50.8 mm)
651⁄2” (1664 mm)
19
⁄25”
(19.5 mm)
19
⁄25”
(19.5 mm)
90°
145°
145°
90°
414⁄85” (1047 mm)
465⁄6” (1215 mm)
12
19
⁄32”
(320 mm)
171⁄8”
(435 mm)
en-us
Connecting the appliance
Have a technician install and connect the appliance
according to the enclosed Installation Instructions.
Do not remove the transportation protection devices
from the shelves and storage compartments until the
appliance has been installed and aligned.
Always connect the water before the power.
Apart from statutory national regulations, you should
comply with all applicable local electricity and water
companies' codes and requirements.
After installing the appliance, wait at least 6 hours
before switching the appliance on. During
transportation the oil in the compressor may have
flowed into the refrigeration system.
Before switching the appliance on for the first time,
clean the interior of the appliance (see section
“Cleaning the Appliance”).
Water connection
: WARNING
Risk of electric shock and damage to the appliance!
Disconnect the appliance from the power source
before performing any work on the water
connection.
Only a qualified installation technician may connect
the appliance to the water supply in accordance
with plumbing and relevant water utility company
regulations.
Connect the appliance to a drinking water line only:
■ Minimum pressure: 14.5 psi (1.0 bar)
■ Maximum pressure: 116 psi (8.0 bar)
: CAUTION
If the water pressure is more than 80 psi (5.5 bar), a
pressure limiter valve must be fitted; otherwise
there is a risk of water damage. If the water pressure
is below 14.5 psi (1.0 bar), the ice-maker will not
function.
Contact a plumbing professional if you are
uncertain how to check your water pressure.
9
en-us
The water should be connected only by a competent
plumber according to the local regulations of the
appropriate Water Supply company.
The appliance may only be connected to a cold water
pipe.
A separate Shut-Off-Valve should be installed in the
cold-water inflow.
The Shut-Off-Valve should not be located behind the
appliance. It is recommended that you mount the ShutOff-Valve directly next to the appliance or at another
place that is easily accessible.
When installing the water connection, pay attention to
the permissible installation area for the water line.
For connection to the drinking water line use only water
pipes that are suitable for drinking water. Observe
national regulations and the connection conditions of
the local Water Supply companies.
The taste and smell of the water can be improved by
installing the filter cartridge supplied. If doing so, take
note of the different connection specifications (see
section “Water filter”).
Note:
After the appliance has been switched on, water can
drip from the water dispenser. After approx. 24 hours,
when the appliance has reached its operating
temperature, the dripping stops.
Electrical connection
: WARNING
Risk of electric shock and fire if electrical
connection is not installed properly!
Plug into a fixed, grounded 3-prong outlet only. The
outlet must be installed and grounded according to
code by a qualified electrician. If necessary, have
the installation inspected by a qualified technician
to ensure it is properly grounded.
Do not use an extension cord or power strip.
Never connect the appliance to an electronic energy
saver plug (such as Ecoboy, Sava Plug, etc.) or to
power inverters which convert direct current (DC) to
alternating current (AC) (such as for solar
equipment, power supplies on ships, etc.).
The outlet for the appliance must be located close the
appliance and must be easy to access also after
installation.
Connect the appliance to a properly installed
115 V/60 Hz AC outlet. The fuse for the outlet must be
rated either 15 A or 20 A.
If the appliance is to be used in a country other than the
U.S., check the rating plate to determine if the specified
voltage and current type correspond to the ratings of
your power supply. If the voltage and current type do
not match, the appliance must not be operated. The
power cord may only be replaced by a qualified
electrician.
10
en-us
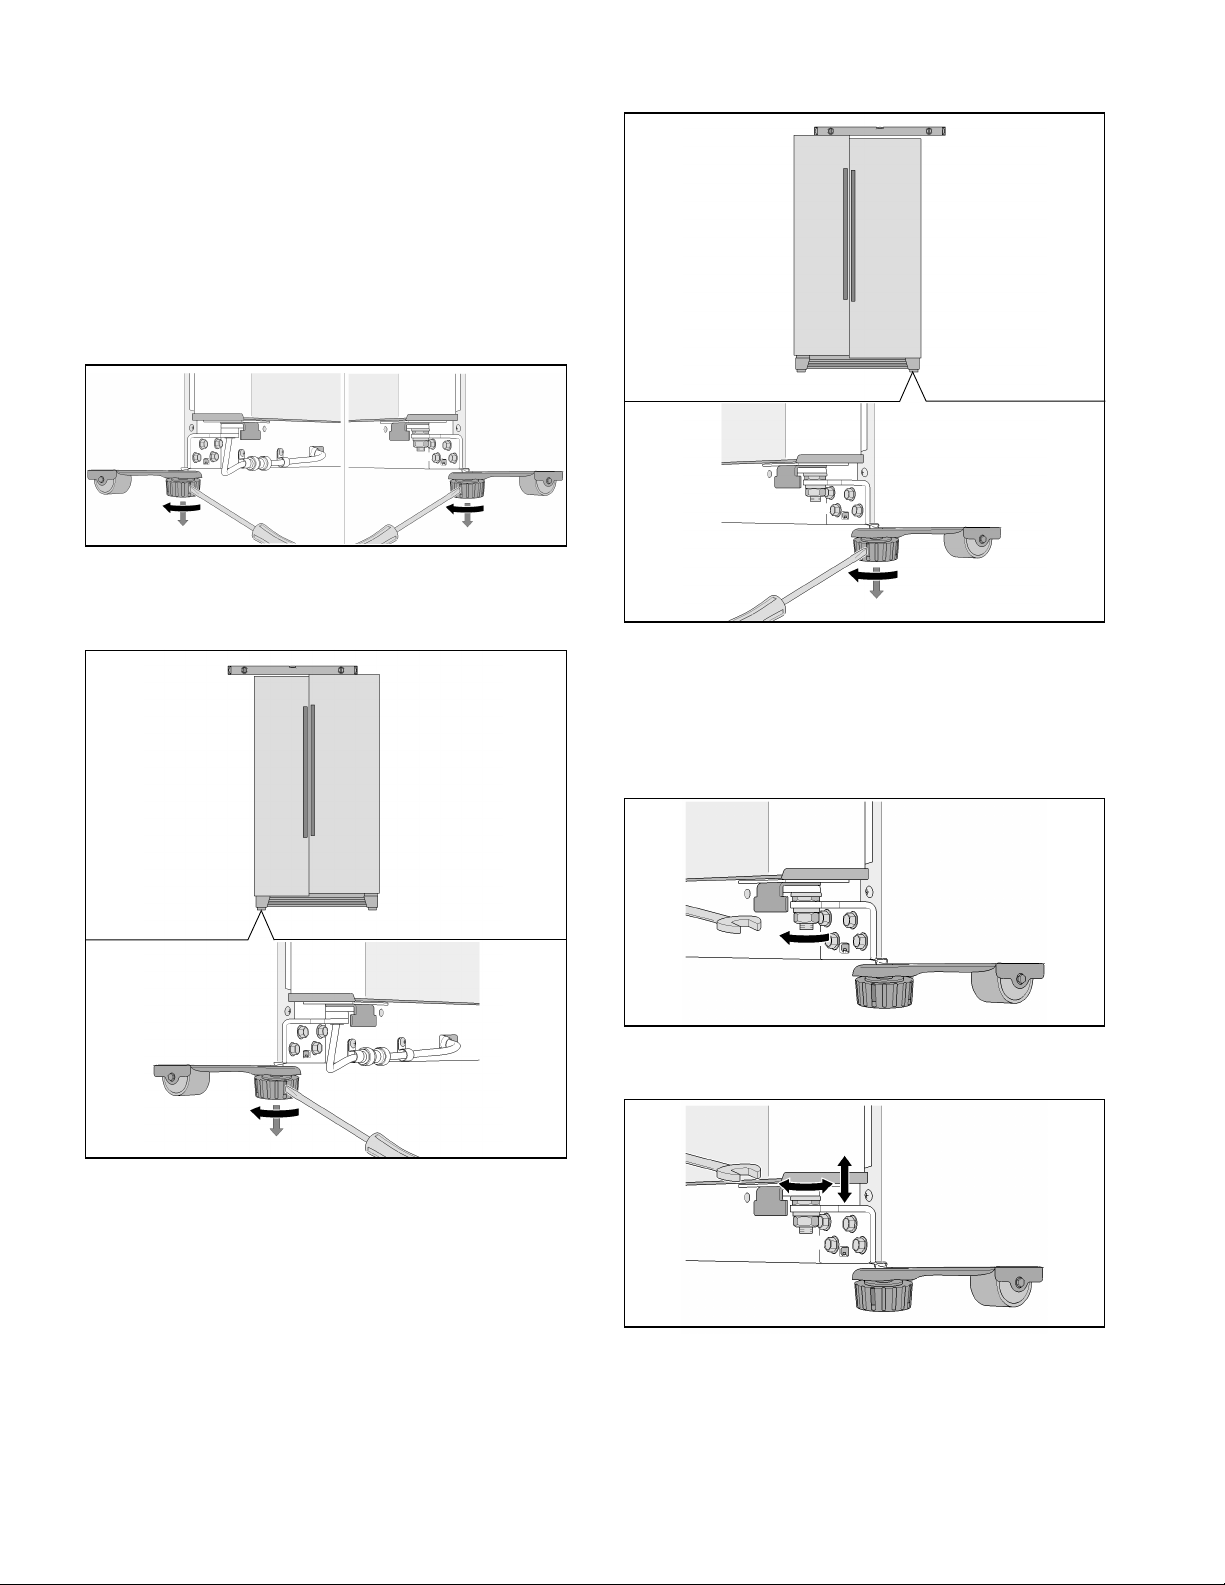
Leveling the appliance
Note:
To ensure that it functions properly, the appliance must
be set level using a spirit level.
If the appliance is not level, it could cause the water to
run out of the ice-maker, produce unevenly sized ice
cubes or prevent the doors closing properly.
1. Move the appliance into its intended installation
position.
2. So that the appliance cannot move, unscrew the two
front feet until they are standing firmly on the floor.
3. Screw the feet in/out until the appliance is exactly
level. Use the appliance doors as a reference point.
4. If the freezer compartment door is lower:
5. If the fridge compartment door is lower:
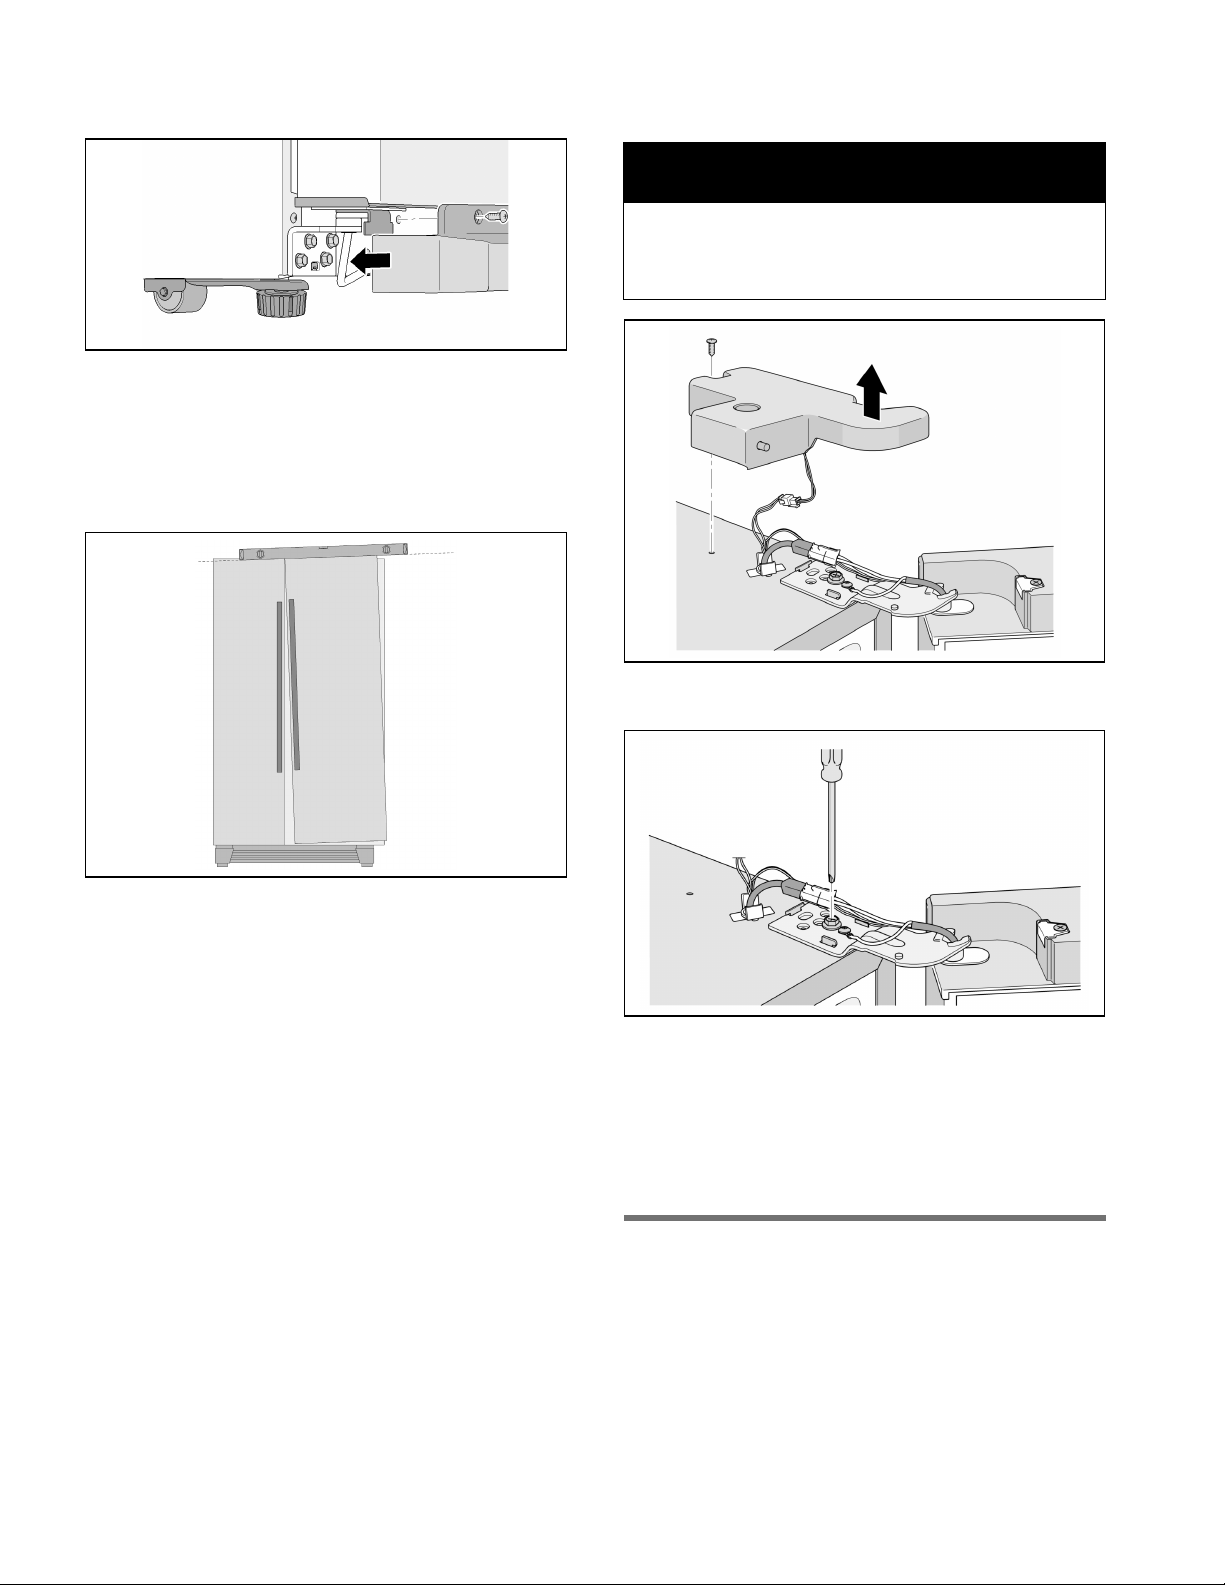
If the appliance is exactly level but one of the doors is
lower than the other:
1. Open the appliance doors.
2. Unscrew the 3 screws holding the base panel and
remove it.
3. Undo the nut.
4. Turn the adjusting nut until the appliance doors are
aligned.
5. If the freezer compartment door is lower: Turn the
adjusting nut counter-clockwise.
6. If the fridge compartment door is lower: Turn the
adjusting nut clockwise.
7. Tighten the nut.
11
en-us
8. Put the base panel back in place and secure it with
the 3 screws.
Note:
Due to its own weight or when the door is filled with
foodstuffs, it is possible that the fridge compartment
door leans even when the appliance is standing up
vertically. The door gap at the top and at the bottom is
not identical.
If the door gap at the top and at the bottom is not
identical:
: WARNING
Risk of electric shock!
Disconnect the appliance from the electricity mains
before removing the top hinged cover.
1. Unscrew 2 screws and remove the top hinged
cover.
2. Slacken the hinge screw.
Do not unscrew the screw completely!
3. Adjust the fridge compartment door‘s vertical
alignment.
4. Tighten the hinge screw.
5. Apply the hinged cover and fasten with 2 screws.
Fitting the doors
If the appliance is too big to fit through the doors of
your home, the door handles or the appliance doors
can be unscrewed.
Note:
The door handles or the appliance doors may only be
removed by an Authorized Service technician. Your
local Customer Support center will advise you of the
cost.
12
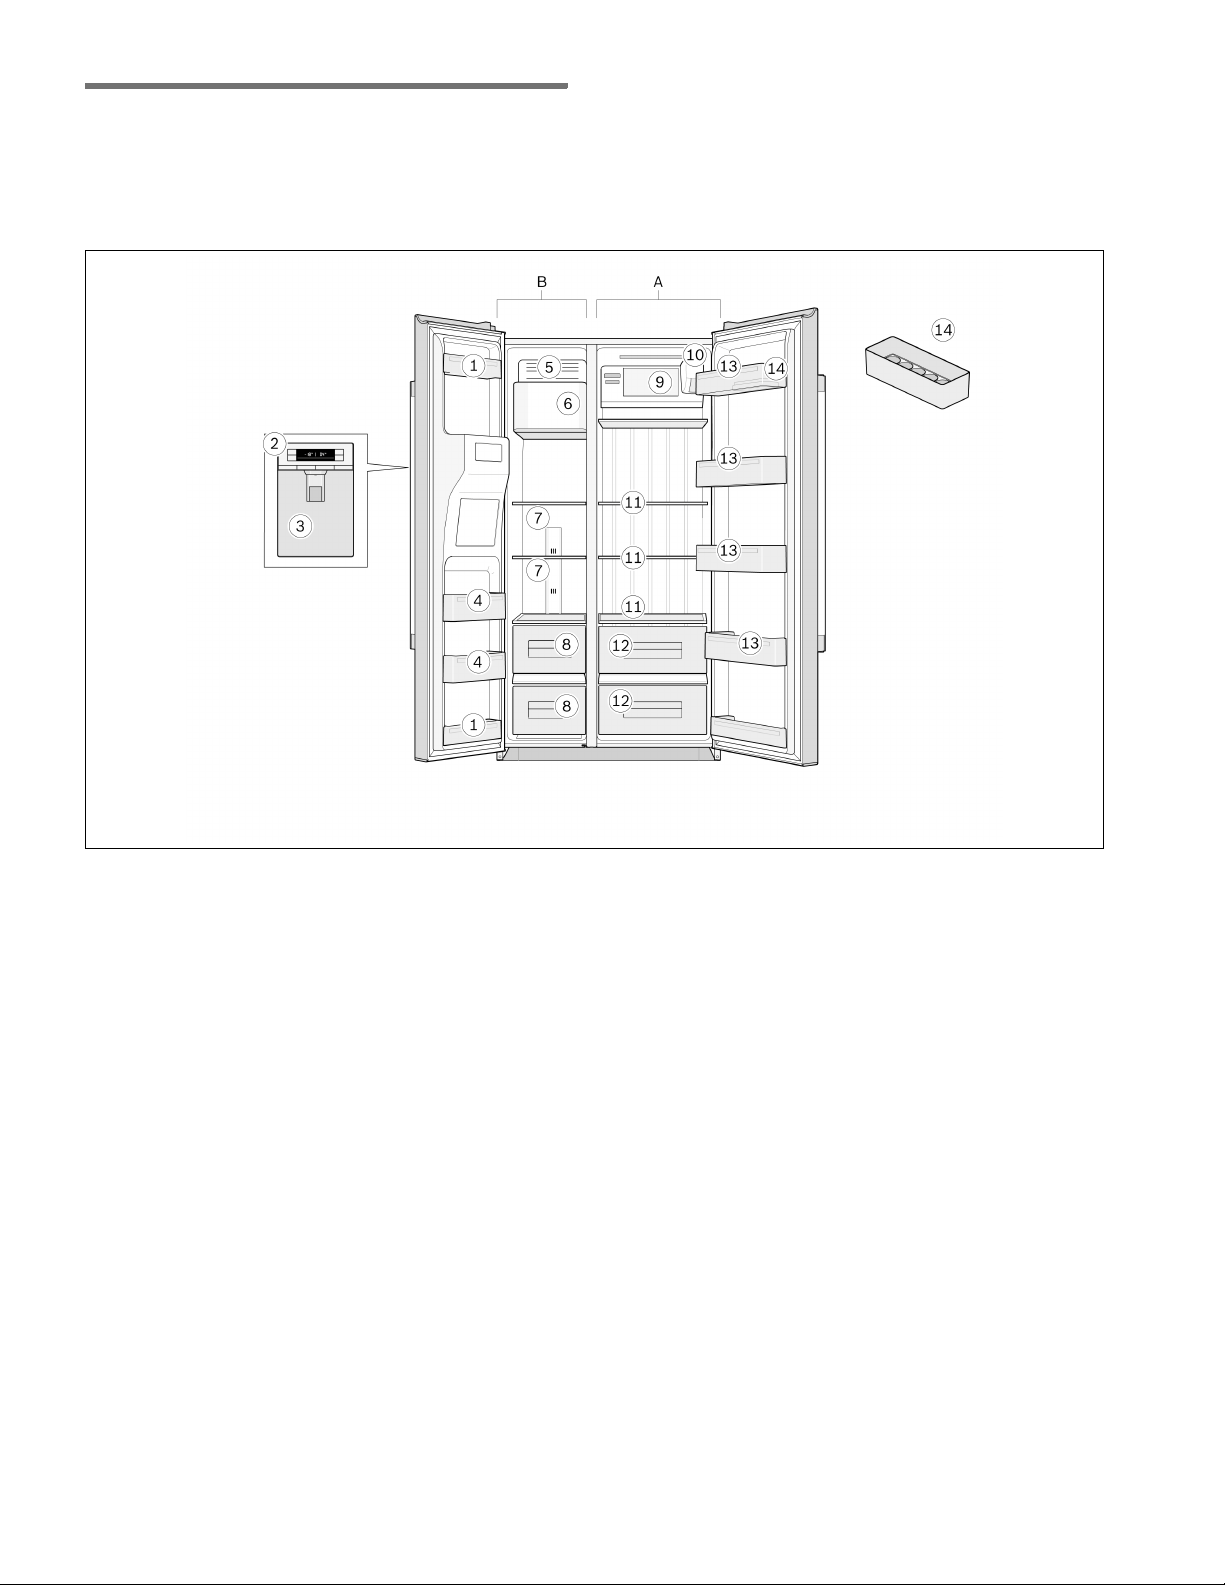
Getting to know the appliance
Appliance
The features of the models may vary.
The illustrations may differ from your particular model.
en-us
A Fridge compartment
B Freezer compartment
1 Door pockets
2 Operating controls
3 Ice and water dispenser
4 Freezer door pockets
5 Ice-cube tray
6 Ice maker
7 Freezer compartment glass shelves
8 Freezer compartment drawers
9 Shelf
10 Water filter
11 Fridge compartment glass shelves
12 Multi box drawers
13 Fridge door pockets
14 Egg tray
13
en-us
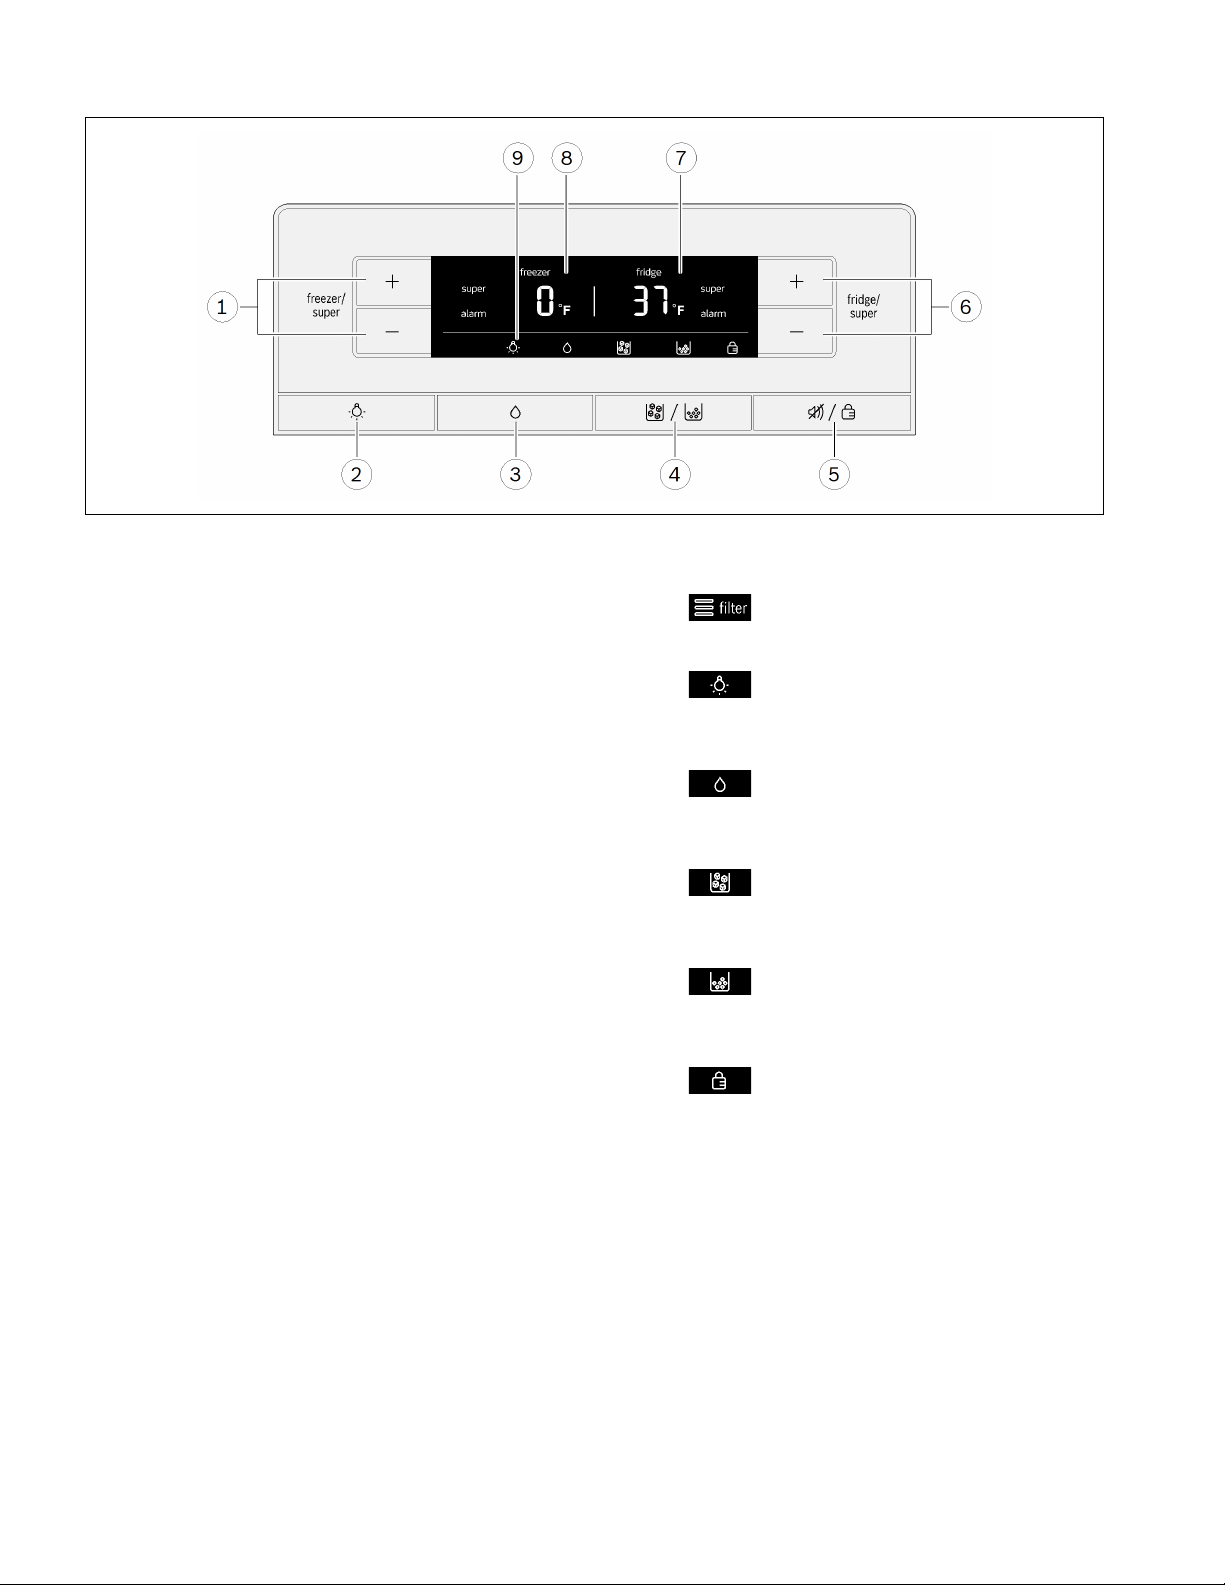
Operating controls
1 "freezer/super" buttons
■ For setting the temperature in the freezer
compartment.
■ For switching fast freezing function on and off.
2 "Light/Filter" button
■ Switches the light for the ice/water dispenser
on or off.
■ Resets the filter indicator.
3"Water" button
4 "Ice cubes/Crushed ice" button
5 "Alarm off/Lock" button
■ Switches off the display of the temperature
alarm.
■ Switches the panel lock on or off.
6 "fridge/super" buttons
■ For setting the temperature in the fridge
compartment.
■ For switching the fast cooling function on and
off.
7 Fridge compartment display panel
■ Fridge compartment temperature.
■ "super" symbol shown when fast cooling
function is active.
■ "alarm" symbol shown when fridge
compartment alarm is active.
9 Symbols on the display panel
Water filter
Condition of filter cartridge.
Lighting
Ice and water dispenser light is
switched on.
Water
Water dispenser function is switched
on.
Ice cubes
Ice-cube dispenser function is
switched on.
Crushed ice
Crushed ice dispenser function is
switched on.
Panel lock
Panel lock is switched on.
8 Freezer compartment display panel
■ Freezer compartment temperature.
■ "super" symbol shown when fast freezing
function is active.
■ "alarm" symbol shown when freezer
compartment alarm is active.
14
Switching on the appliance
Plug the power plug into the electrical outlet socket.
The appliance will start cooling.
When the appliance is switched on for the first time, the
alarm function is deactivated until the appliance has
reached the set temperature. If the appliance is
switched off for an extended period, the temperature
alarm may be triggered when it is first switched on
again.
The temperatures flash and the display panels show
the "alarm" symbol until the appliance has reached the
set temperatures.
By pressing the "Alarm off/Lock" button the
temperature warning is switched off.
The lights come on when the appliance doors are
opened.
The following temperatures are recommended by the
manufacturer and pre-set at the factory:
■ Fridge compartment 37 °F (3 °C)
■ Freezer compartment 0 °F (-18 °C)
Notes on using the appliance
■ After switching on the appliance, it may be several
hours before the set temperatures are reached.
Do not put any food in the appliance before then.
■ Thanks to the fully automatic NoFrost system, the
freezer compartment remains free of ice. Defrosting
is not required.
■ Some of the casing end faces are slightly heated to
prevent condensation forming in the door seal area.
■ If you cannot open the freezer compartment door
again immediately after closing it, wait a moment for
the low pressure created to equalize.
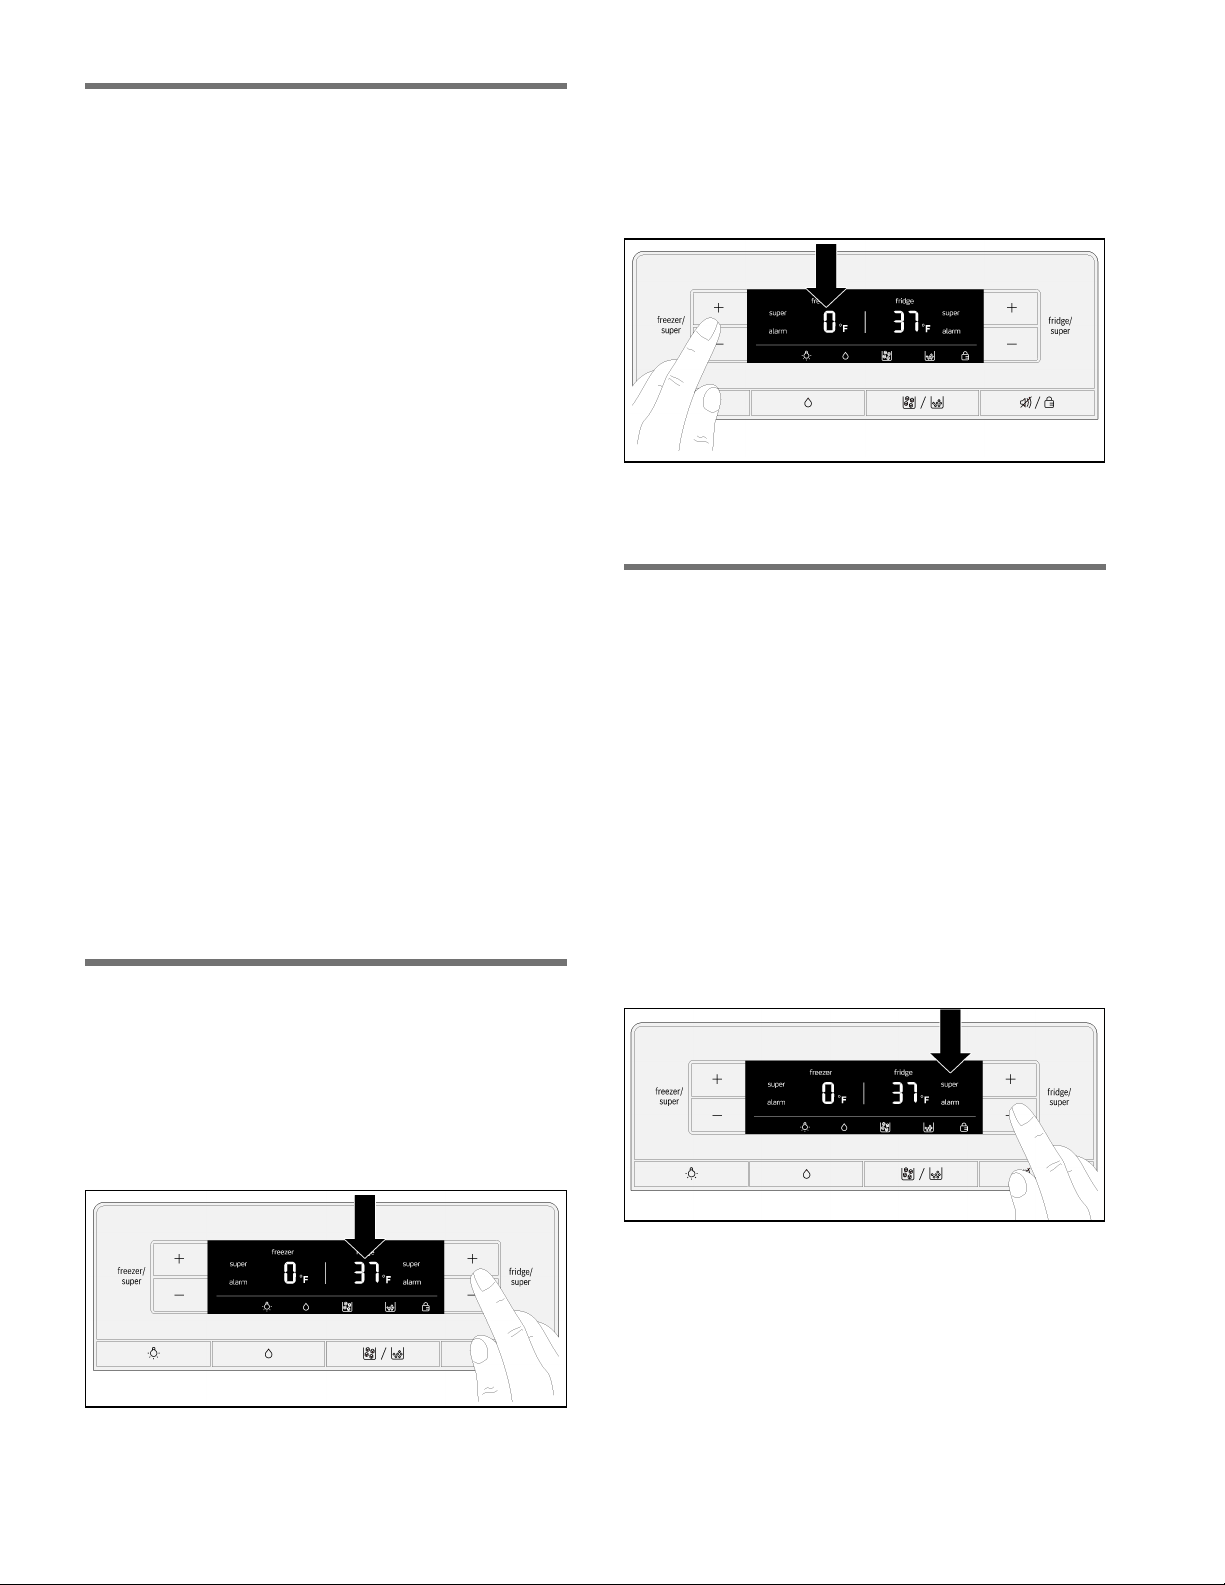
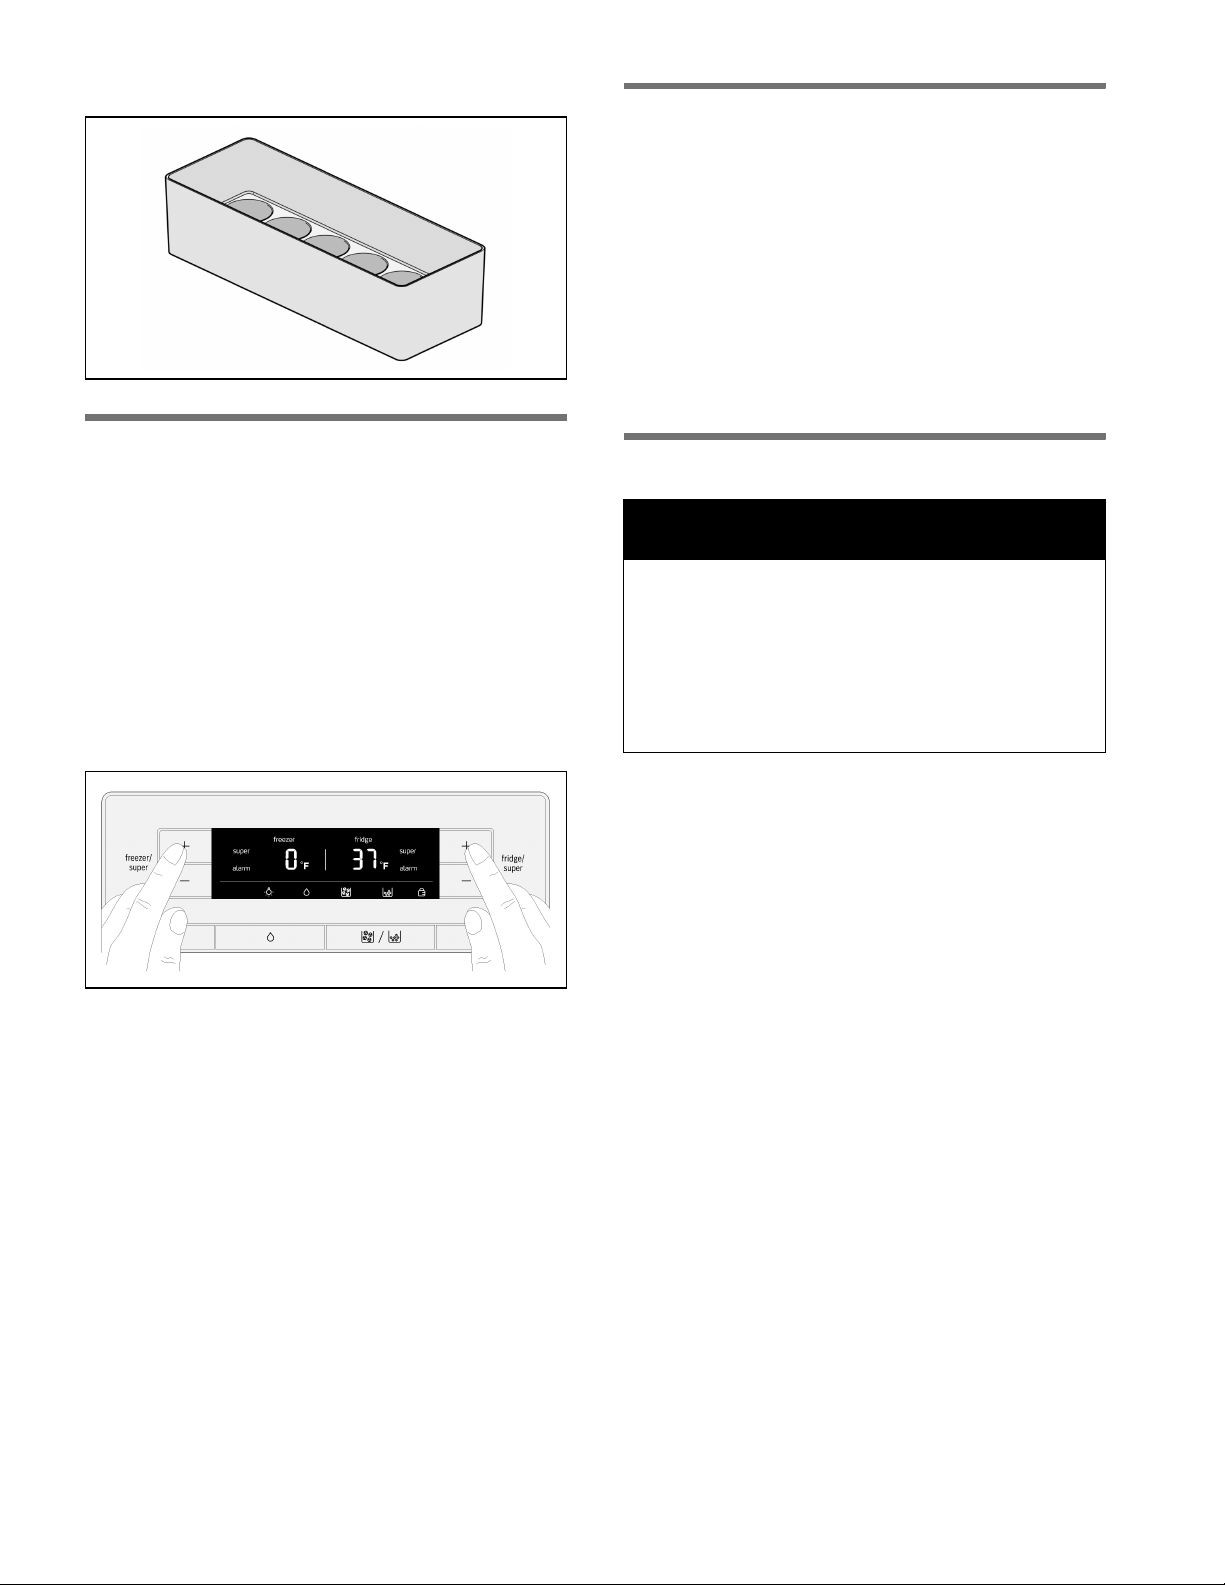
Setting the temperature
en-us
Freezer compartment
The temperature can be adjusted between
3°F(-16°C) up to -7°F(-22°C).
Repeatedly press the "freezer/super +"
or "freezer/super –" button until the desired freezer
compartment temperature is set.
The temperature last set is saved. The set temperature
is shown on the freezer compartment display panel.
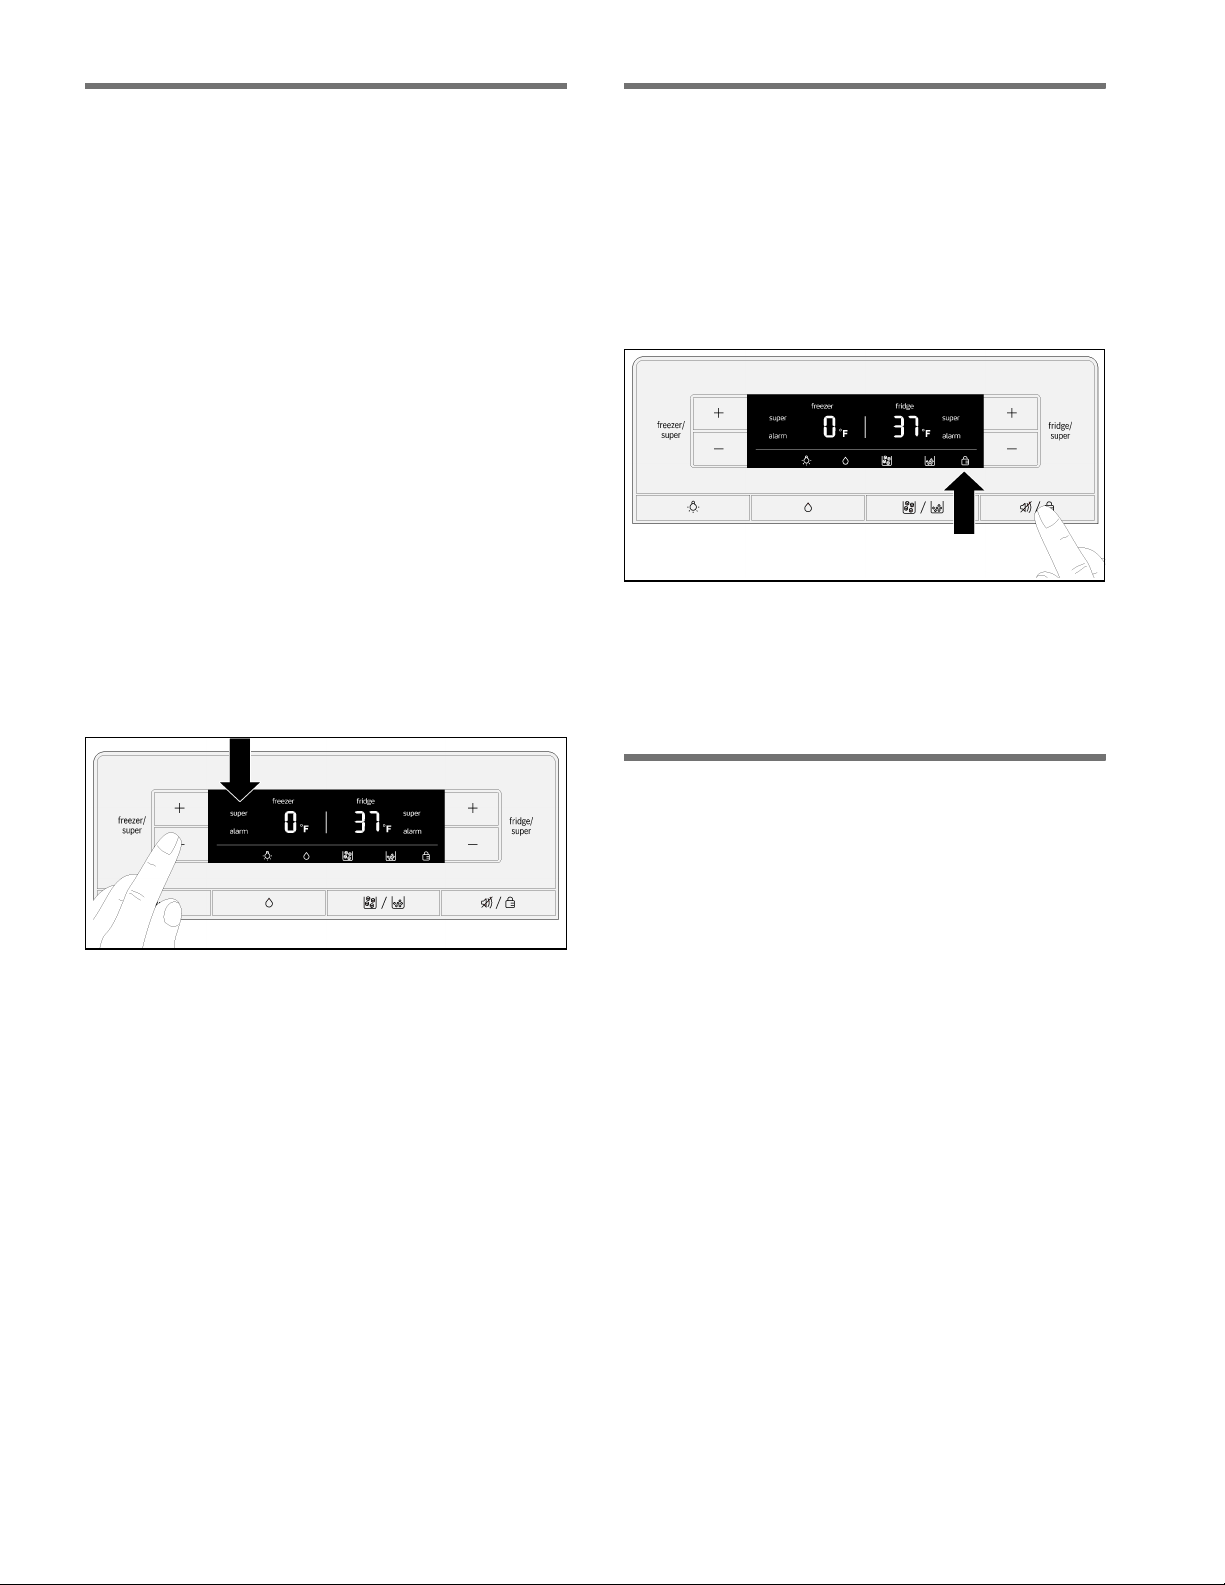
Fast cooling function
Super cooling cools the refrigerator compartment down
as low as possible for approximately 40 minutes. The
temperature is then automatically reset to 37 °F (3 °C).
Super cooling is particularly recommended for the
following:
■ Before placing large quantities of food in the
refrigerator compartment.
■ To cool drinks quickly.
Note:
When fast cooling is switched on, the appliance may
make more noise.
Switching on
Press the "fridge/super -" button until "super" appears
on the right on the display panel.
Fridge compartment
The temperature can be adjusted between
33 °F (1 °C) up to 45 °F (7 °C).
Repeatedly press the "fridge/super +"
or "fridge/super –" button until the desired fridge
compartment temperature is set.
The temperature last set is saved. The set temperature
is shown on the fridge compartment display panel.
Switching off
Press the "fridge/super +" button.
Note:
The display panel no longer shows "super". The
temperature setting automatically reverts to
37 °F (3 °C).
15
en-us
Fast freezing function
Food should be frozen thoroughly as quickly as
possible. This ensures that vitamins, nutritional values,
the look and the taste of the food is retained.
Switch on fast freezing a few hours before placing fresh
food in the freezer in order to prevent a drop in
temperature.
In general, 4 - 6 hours is sufficient.
When the function is switched on, the appliance
operates continuously. As a result, a very cold
temperature in the freezer compartment is achieved.
Fast freezing automatically switches off after
about48hours.
If the maximum freezing capacity is to be used, fast
freezing should be switched on 24 hours before
placing the fresh food in the freezer.
Small quantities of food for freezing (up to 4.5 lb (2 kg))
can be frozen without using the fast freezing function.
Note:
When fast freezing is switched on, the appliance may
make more noise.
Switching on
Press the "freezer/super -" button until "super" appears
on the left on the display panel.
Panel lock
When the panel lock is activated, all of the buttons on
the control and display panel are locked.
Note:
When the panel lock is activated, use the ”Alarm off/
Lock” button to switch off the warning signal.
Switching on
Press the "Alarm off/Lock" button.
The display panel shows the "Panel lock" symbol.
Switching off
Press and hold the "Alarm off/Lock" button for
3seconds.
Switching off
Press the "freezer/super +" button.
Note:
The display panel no longer shows "super". The
temperature automatically switches back to the
temperature set before the "Fast freezing" function was
activated.
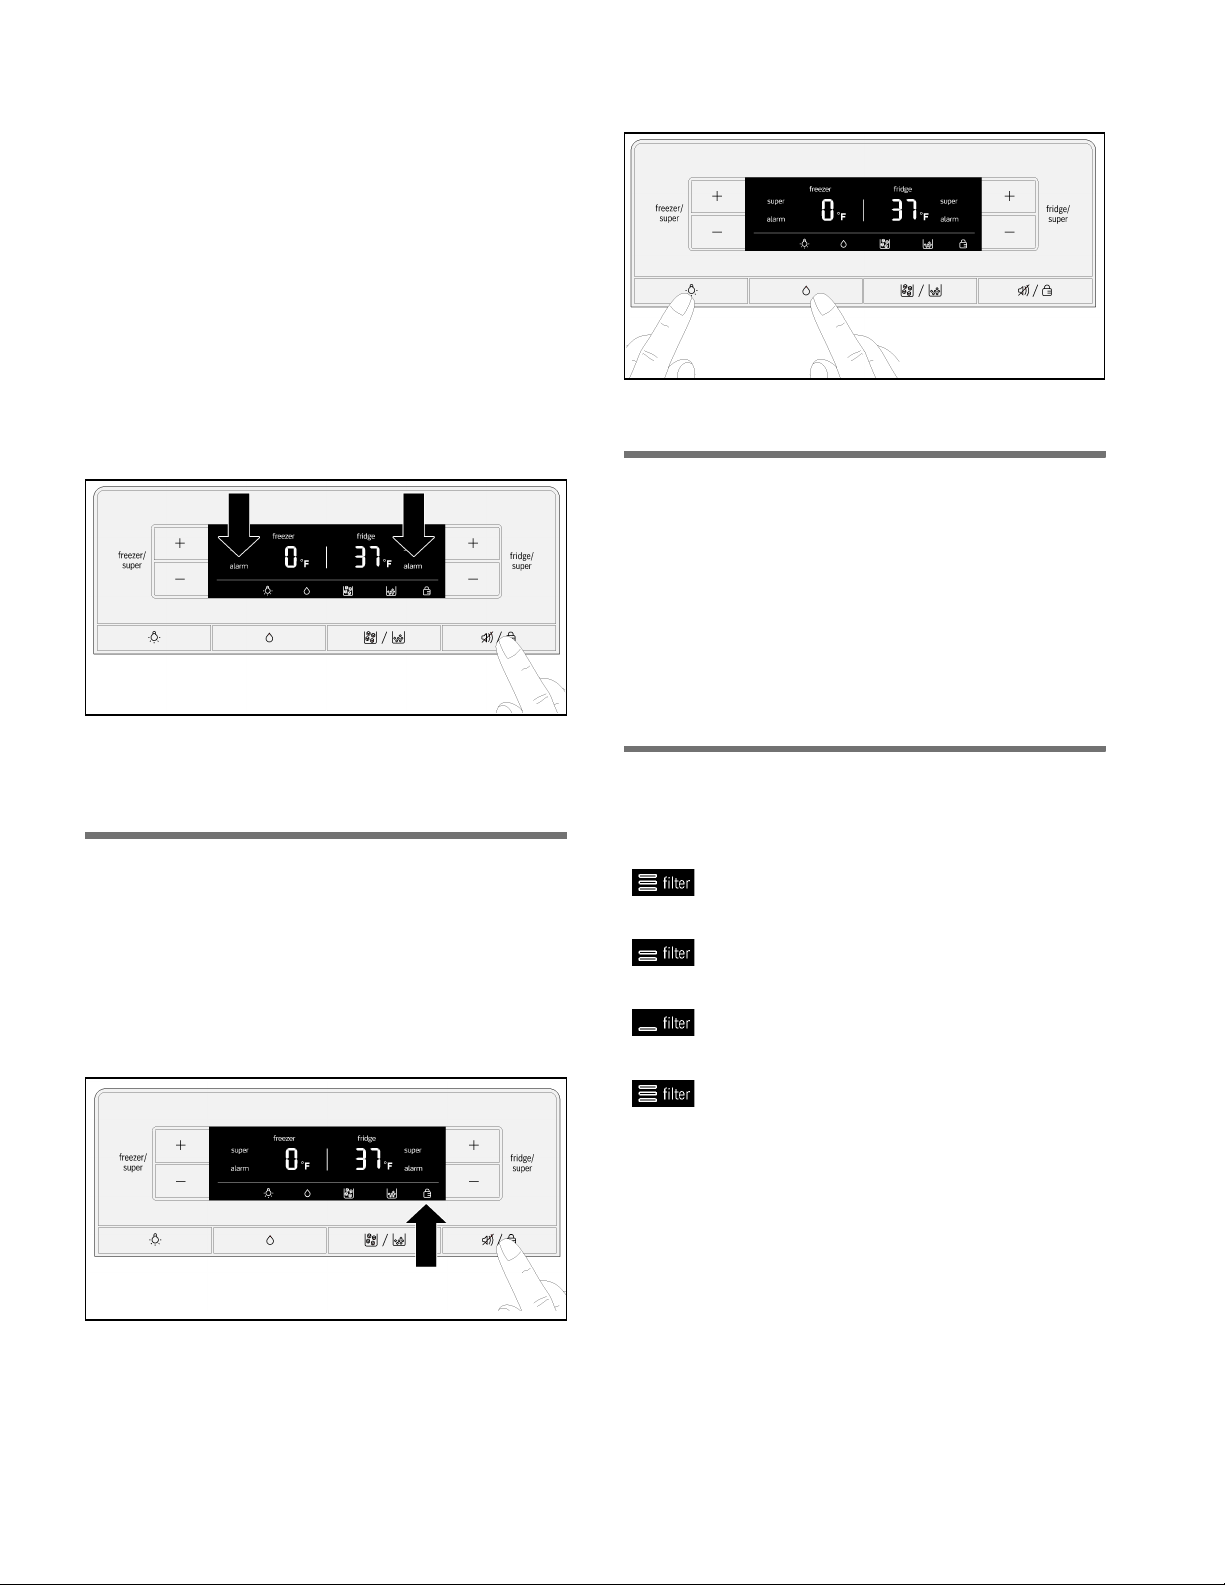
Alarm functions
Door alarm
The door alarm switches on if one of the appliance
doors is open for longer than one minute. The warning
sound repeats every 60 seconds for a period of
5 minutes. Closing the door switches off the warning
sound.
Temperature alarm
The display panel shows the temperature alarm if the
fridge or freezer compartment becomes too warm and
the food is at risk.
The relevant display panel shows the highest
temperature and "alarm".
Fridge compartment
If the temperature in the fridge compartment has
become too high, before eating any food that has got
warm, make sure you heat it through properly. If in
doubt, do not use raw food.
16
en-us
Freezer compartment
Do not refreeze defrosted food. It can only be refrozen
after it has been made into a ready-to-eat meal (cooked
or roasted).
Do not then leave the food in the freezer for the
maximum storage period.
Without any risk to the frozen food, the alarm may be
triggered:
■ when the appliance is first used.
■ when putting large quantities of fresh food in the
freezer.
■ if the freezer compartment door is left open for too
long.
Switching off the alarm
Press the "Alarm off/Lock" button.
2. Simultaneously press and hold the "Light/Filter" and
"Water" buttons for 10 seconds.
The temperature units change.
Energy-saving mode
20 seconds after the doors are closed or the last
button is pressed, the display panel switches to energysaving mode. The display panel switches off and leaves
only the words "freezer" and "fridge" and the symbol for
the selected dispenser mode (water, ice cubes or
crushed ice) dimly illuminated.
As soon as a door is opened or a button pressed, the
display panel switches on and returns to the normal
brightness.
Note:
As soon as the set temperature is reached again, the
display stops showing "alarm".
Temperature units
The temperature can be displayed in degrees
Celsius (°C) or Fahrenheit (°F).
When the appliance is first switched on, the display
panel shows the temperature in degrees Celsius (°C).
Setting
1. Press the "Alarm off/Lock" button.
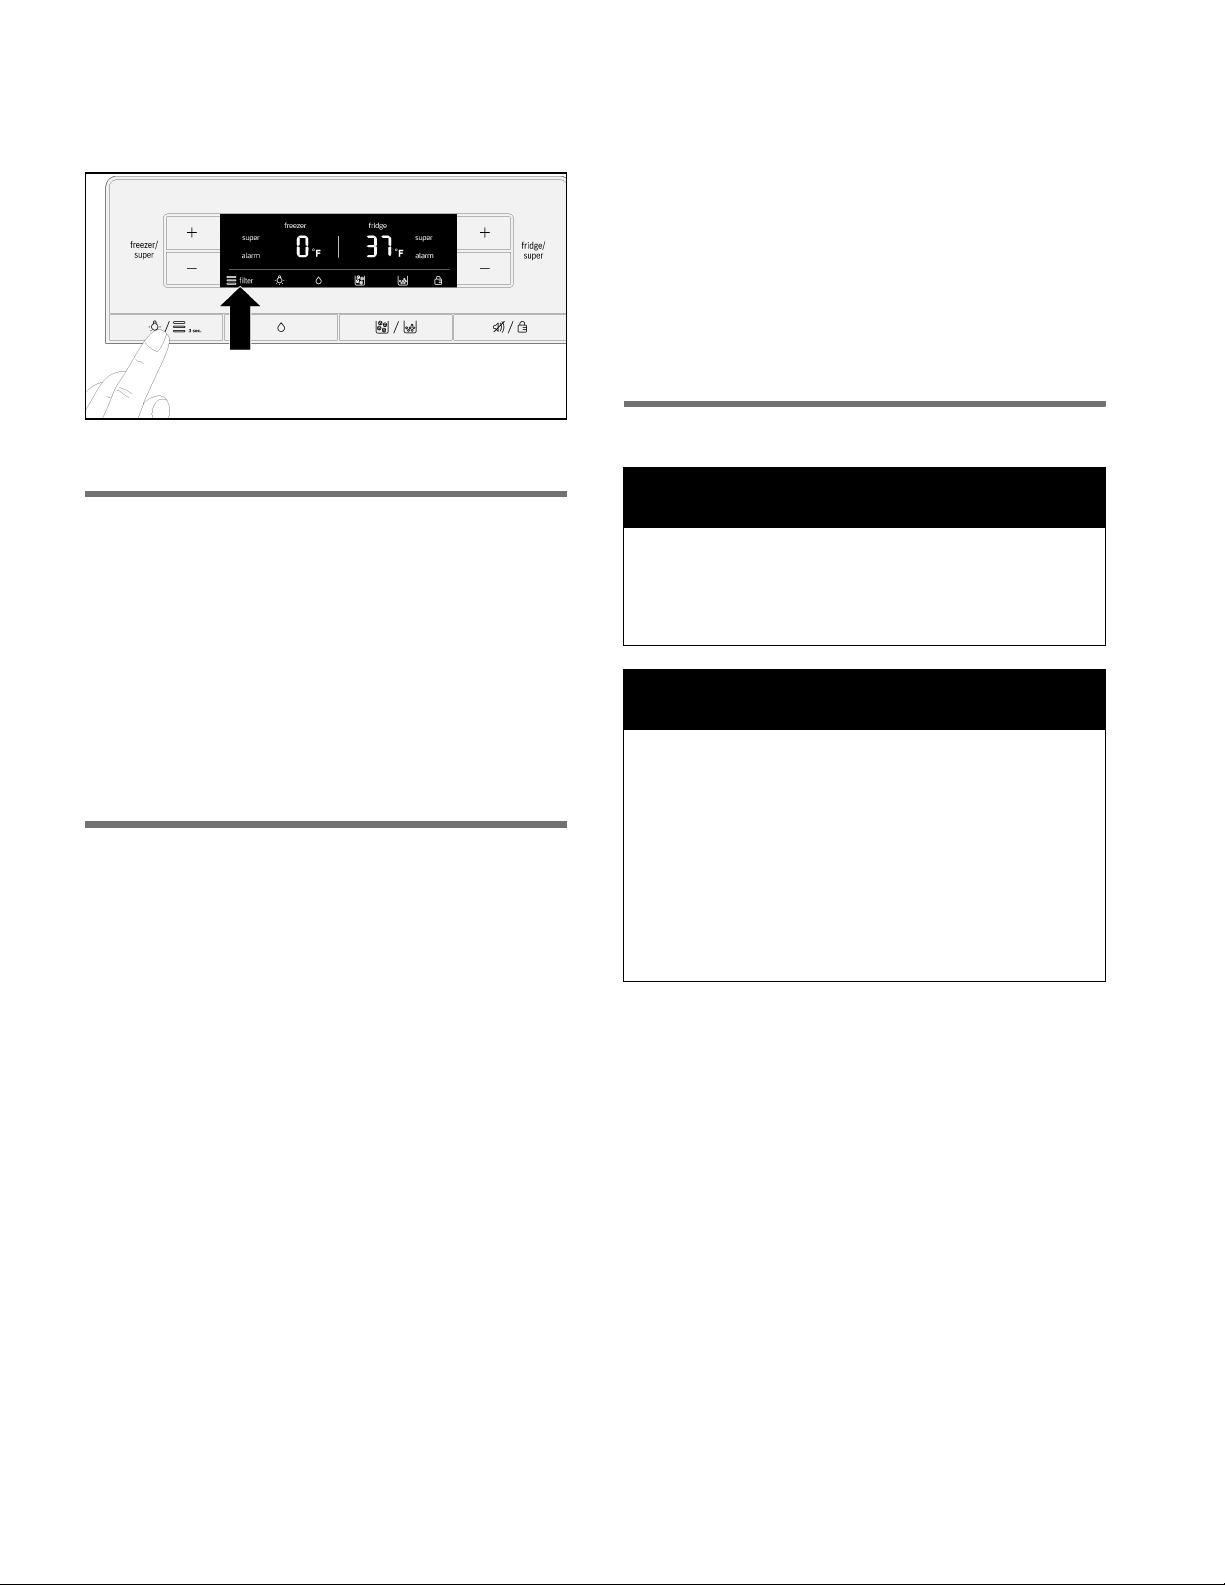
Water filter symbol
This symbol indicates how long the filter cartridge can
still be used.
Up to six months
Up to four months
Up to two months
Up to 10 days:
the three bars of the symbol start flashing.
Change the filter cartridge.
Note:
If the appliance is switched off, the water filter indicator
is reset.
The display panel shows the "Panel lock" symbol.
17
en-us
After changing the filter cartridge, reset the water filter indicator as follows:
Press and hold the "Light/Filter" button for 3 seconds.
The symbol will then stop flashing.
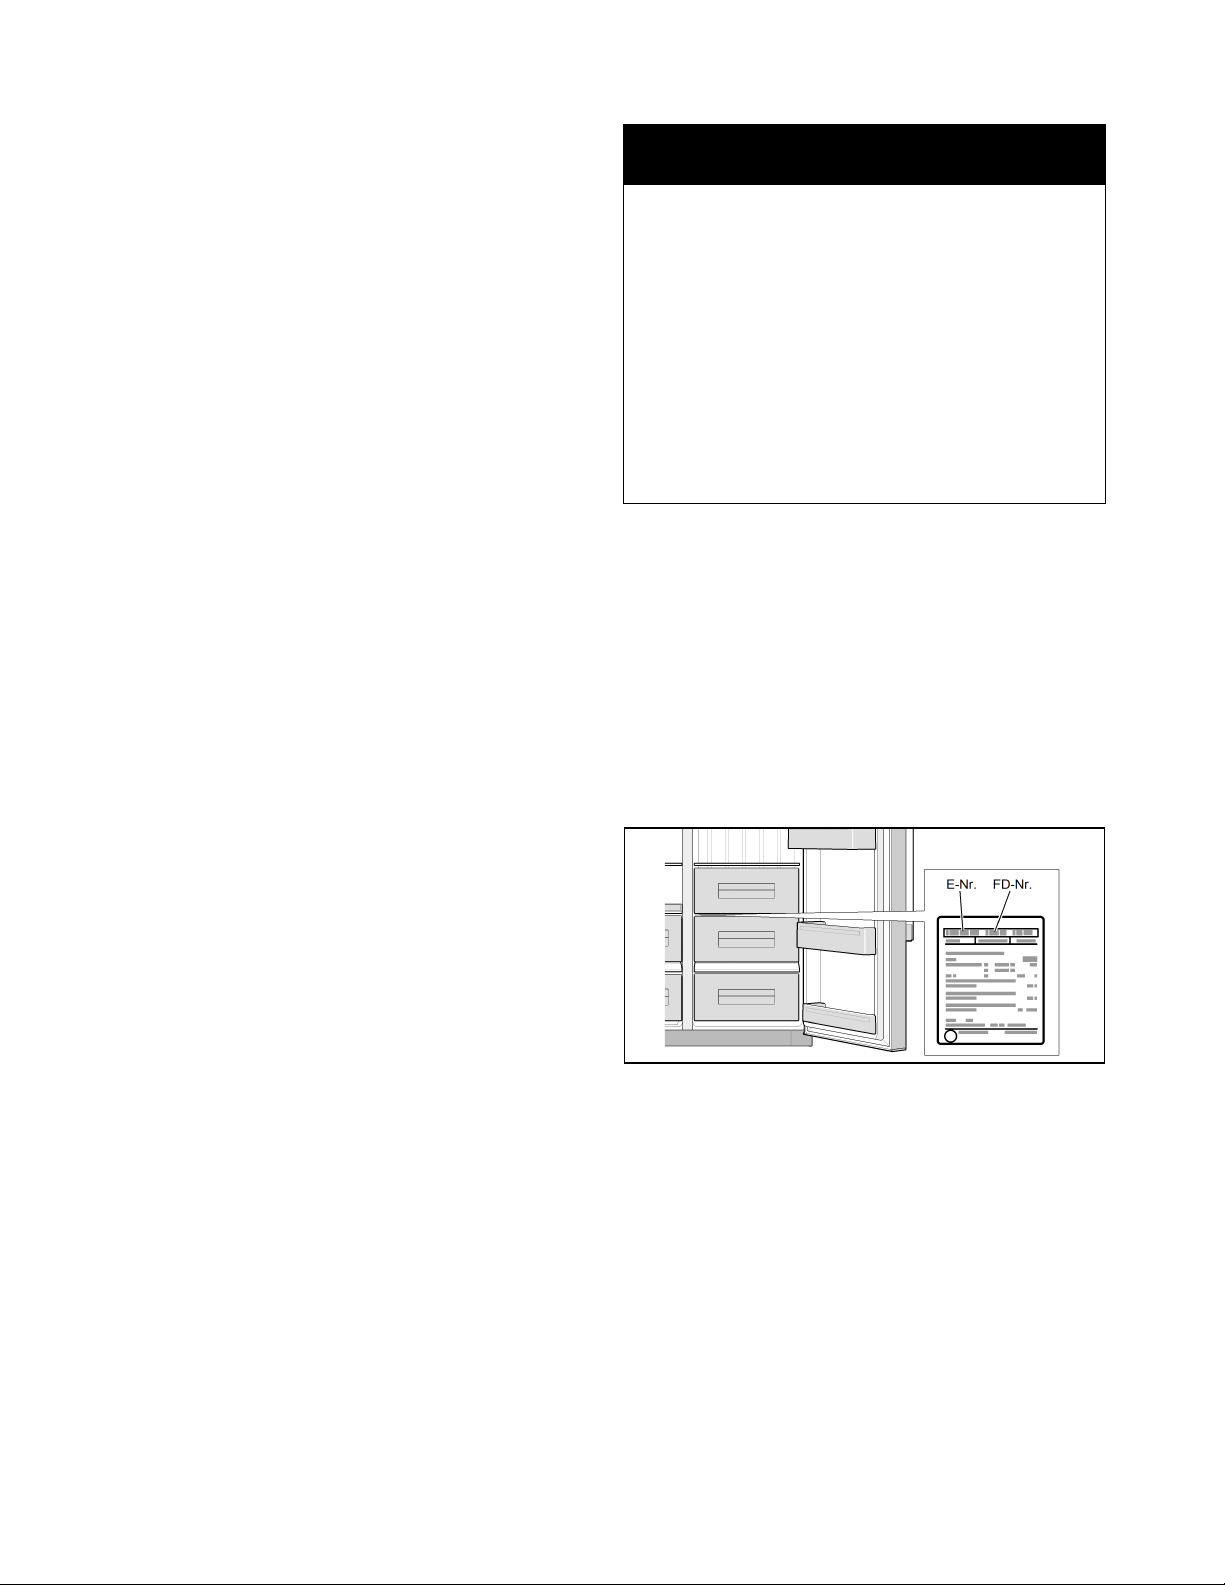
Usable capacity
You will find the details of the usable capacity on the
rating plate inside the appliance.
Using the entire freezing capacity
To accommodate the maximum quantity of frozen food,
you can remove all of the fittings from inside the
appliance. You can then stack the food directly on the
shelves and the bottom of the freezer compartment.
How to remove and refit the fittings is described in the
section headed Fittings.
Fridge compartment
The fridge compartment is the perfect place for keeping
ready meals, bread and pastries, jams and preserves,
condensed milk and hard cheeses.
When placing food in the fridge, follow these guidelines:
■ Keep fresh, untouched food in the fridge. In that way
it will keep longer and stay fresher.
■ In the case of ready-made products and packaged
foods and liquids, pay attention to the manufacturer's
specified best-before or use-by date.
■ In order to maintain flavor, color and freshness, keep
food well packed or covered over. That also prevents
flavors from mixing and the plastic parts from
becoming discolored in the fridge compartment.
■ Allow warm food and beverages to cool before
putting them into the appliance.
Note:
Keep food from coming into contact with the rear panel.
Otherwise, the air circulation will be impaired.
Food or packaging could also become frozen to the
rear panel.
Pay attention to the temperature zones in the fridge compartment
The air circulation produces different temperature
zones in the fridge compartment:
■ The coldest zones are close to the rear panel.
■ The warmest zone is at the very top of the door.
Note:
Keep items such as hard cheese and butter in the
warmest zone. That will allow the cheese to continue
developing its flavor and the butter will remain
spreadable.
Freezer compartment
: WARNING
Risk of explosion!
Never store products containing flammable
propellants (such as spray cans) or explosive or
easily combustible substances in the appliance.
NOTICE
Make sure that the freezer compartment door is
always kept closed. The frozen food will thaw if the
freezer compartment door is open. The freezer
compartment will become covered with thick ice. Also:
Energy will be lost due to high power consumption.
When the freezer compartment door is closed, low
pressure occurs inside the compartment.
If you cannot reopen the freezer compartment door
right away, wait two to three minutes until the low
pressure has adjusted itself.
Use the freezer compartment to
■ store deep-frozen food
■ freeze food
■ make and store ice cubes.
18

en-us
Max. freezing capacity
You will find information on the maximum freezing
capacity in 24 hours on the rating plate.
Conditions for use of max. freezing capacity
■ Switch on the fast freezing function before placing
the food in the freezer (see section ”Fast freezing
function”).
■ Remove the freezer compartment fittings.
■ Stack the food directly on the shelves and the
bottom of the freezer compartment.
Note:
Do not cover over the ventilation slots in the rear
panel with the food you are freezing.
■ Preferably, large quantities of food for freezing
should be placed in the top compartment. There it
will freeze quickly and, therefore, without adversely
affecting the food quality.
Freezing food
Freeze fresh and undamaged food only. Separate food
to be frozen from food that is already frozen. Place food
in airtight containers to prevent it from losing its flavor
or drying out.
How to wrap food correctly
■ Make sure the packaging is not damaged.
■ Check the ”sell by” date.
■ Seal the packaging.
■ Label the package with the contents and date.
Items not suitable for wrapping food:
Wrapping paper, greaseproof paper, cellophane,
garbage bags and used shopping bags.
Items suitable for wrapping food:
Plastic film, polyethylene blown film, aluminum foil and
freezer cans.
These products can be purchased from your retailer.
Items suitable for sealing wrapped food:
Rubber bands, plastic clips, string, cold-resistant
adhesive tape or similar items.
Bags and polyethylene blown film can be sealed with a
film sealer.
Purchasing and storing deepfrozen food
Follow these guidelines when purchasing deep-frozen
food:
■ Place food in packaging.
■ Press out any air.
■ The temperature of the supermarket freezer should
be lower than 0 °F (-18 °C). If not, this shortens the
storage life of the frozen food.
■ Pick up deep-frozen food last when shopping. Wrap
in newspaper or place in a cold bag and take home.
■ At home, immediately place deep-frozen food in the
freezer compartment. Use the deep-frozen food
before the ”sell by” date.
Thawing frozen food
: CAUTION
Risk of poisoning!
Do not refreeze food that is beginning to thaw or has
already thawed. The food cannot be refrozen until it
has been prepared (boiled or fried). Do not store
these refrozen products for the maximum storage
period.
Depending on the type of food and its intended use,
frozen food can be thawed as follows:
■ at room temperature
■ in the refrigerator
■ in an electric oven with/without fan-assisted hot air
■ in the microwave.
Storage life of frozen food
The storage life depends on the type of food.
At a temperature of 0 °F (-18 °C):
■ Fish, sausage, ready meals and cakes and pastries:
up to 6 months
■ Cheese, poultry, meat:
up to 8 months
■ Fruit and vegetables:
up to 12 months
19
en-us
Ice and water dispenser
The following may be dispensed as necessary:
■ cooled water
■ crushed ice
■ ice cubes
Ice making switches off automatically when the ice
cube container is full.
The ice maker can make approximately 140 ice cubes
within 24 hours when ice cubes are discharged several
times during the day.
As the ice cubes are being made, the sound of the
buzzing water valve, the water flowing into the ice
storage bin and the falling ice cubes can be heard.
: WARNING
Risk of injury from broken glass!
Never use fragile glassware to catch ice when
dispensed.
: WARNING
Risk of injury from rotating crusher blades!
Never reach into the ice cube dispenser opening.
NOTICE
Risk of damage to the appliance!
Do not place bottles or food in the ice cube container
in order to cool them quickly. The ice maker may
become blocked and damaged.
When switching on the appliance, note the following
The ice and water dispenser only works when the
appliance is connected to the water supply.
After the appliance has been switched on, it will take
24 hours before the first batch of ice cubes are ready.
When the appliance is connected, air bubbles will still
be in the lines.
Extract the drinking water and discard until water can
be dispensed without bubbles. Discard the first five
glasses of water.
When using the ice maker for the first time, discard the
first 30 to 40 ice cubes. Do not use ice cubes for
hygienic reasons.
Drinking water quality
: CAUTION
The water filter included with the appliance only
filters out particles from the supplied water and
does not filter out bacteria or microbes.
All materials used in the water dispenser are odorless
and tasteless.
If the water has an aftertaste, this may be caused by:
■ Mineral and chlorine content in the drinking water
■ Materials from which the domestic water line or
connection line are made
■ Freshness of the drinking water. If water has not
been dispensed for an extended period of time, the
water may have a ”stale” taste. In this case,
dispense approx. 15 glasses of water and discard.
The taste and smell of the water can be improved by
installing the included filter cartridge at the water intake
point.
We recommend that you regularly draw off a certain
amount of water from the water dispenser and do not
switch the appliance off. This will maintain the best
water quality.
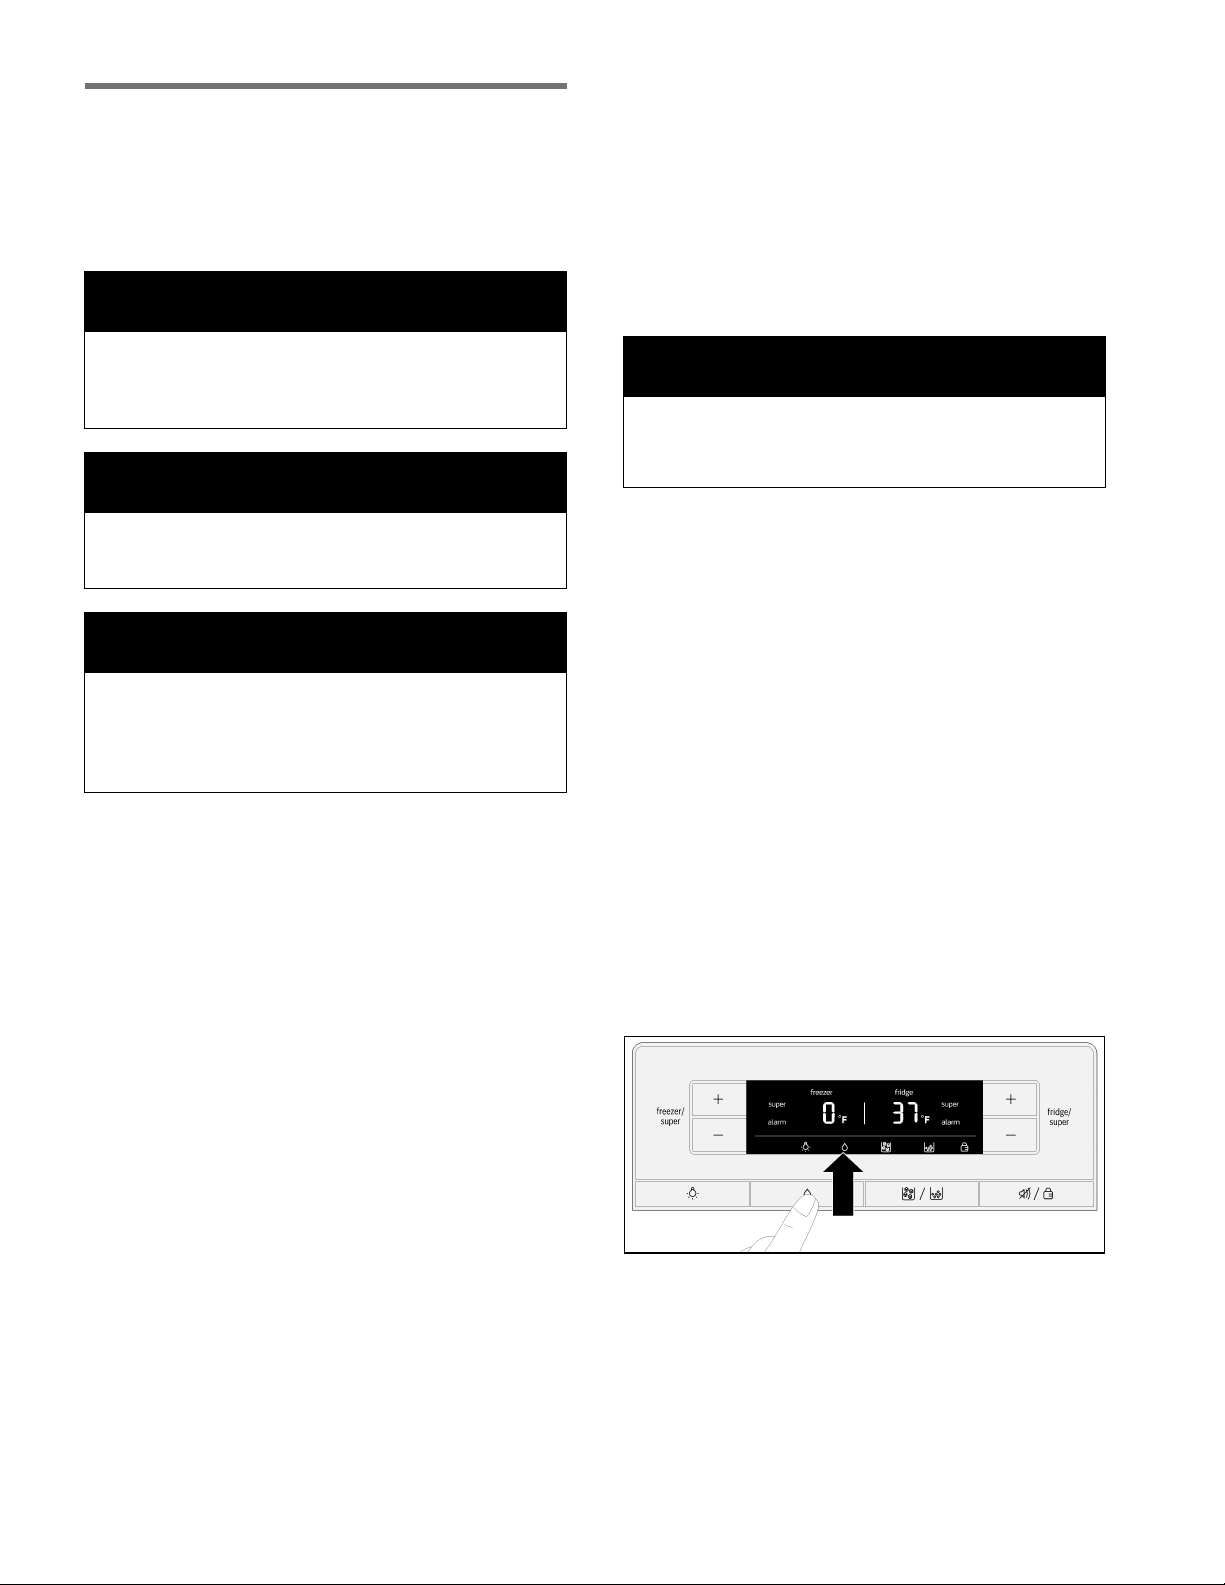
Dispensing water
1. Press the "Water" button. The display panel shows
the "Water" symbol.
Operating the ice maker
Once the freezer compartment has reached its freezing
temperature, water flows into the ice maker and freezes
into ice cubes. The ice cubes are automatically
discharged into the ice cube container when they are
ready.
After the appliance is first switched on, it takes roughly
24 hours for the first portion of ice cubes to be
produced.
The sides of the ice cubes may occasionally stick
together. They usually break away from each other as
they move to the dispenser opening.
20
en-us
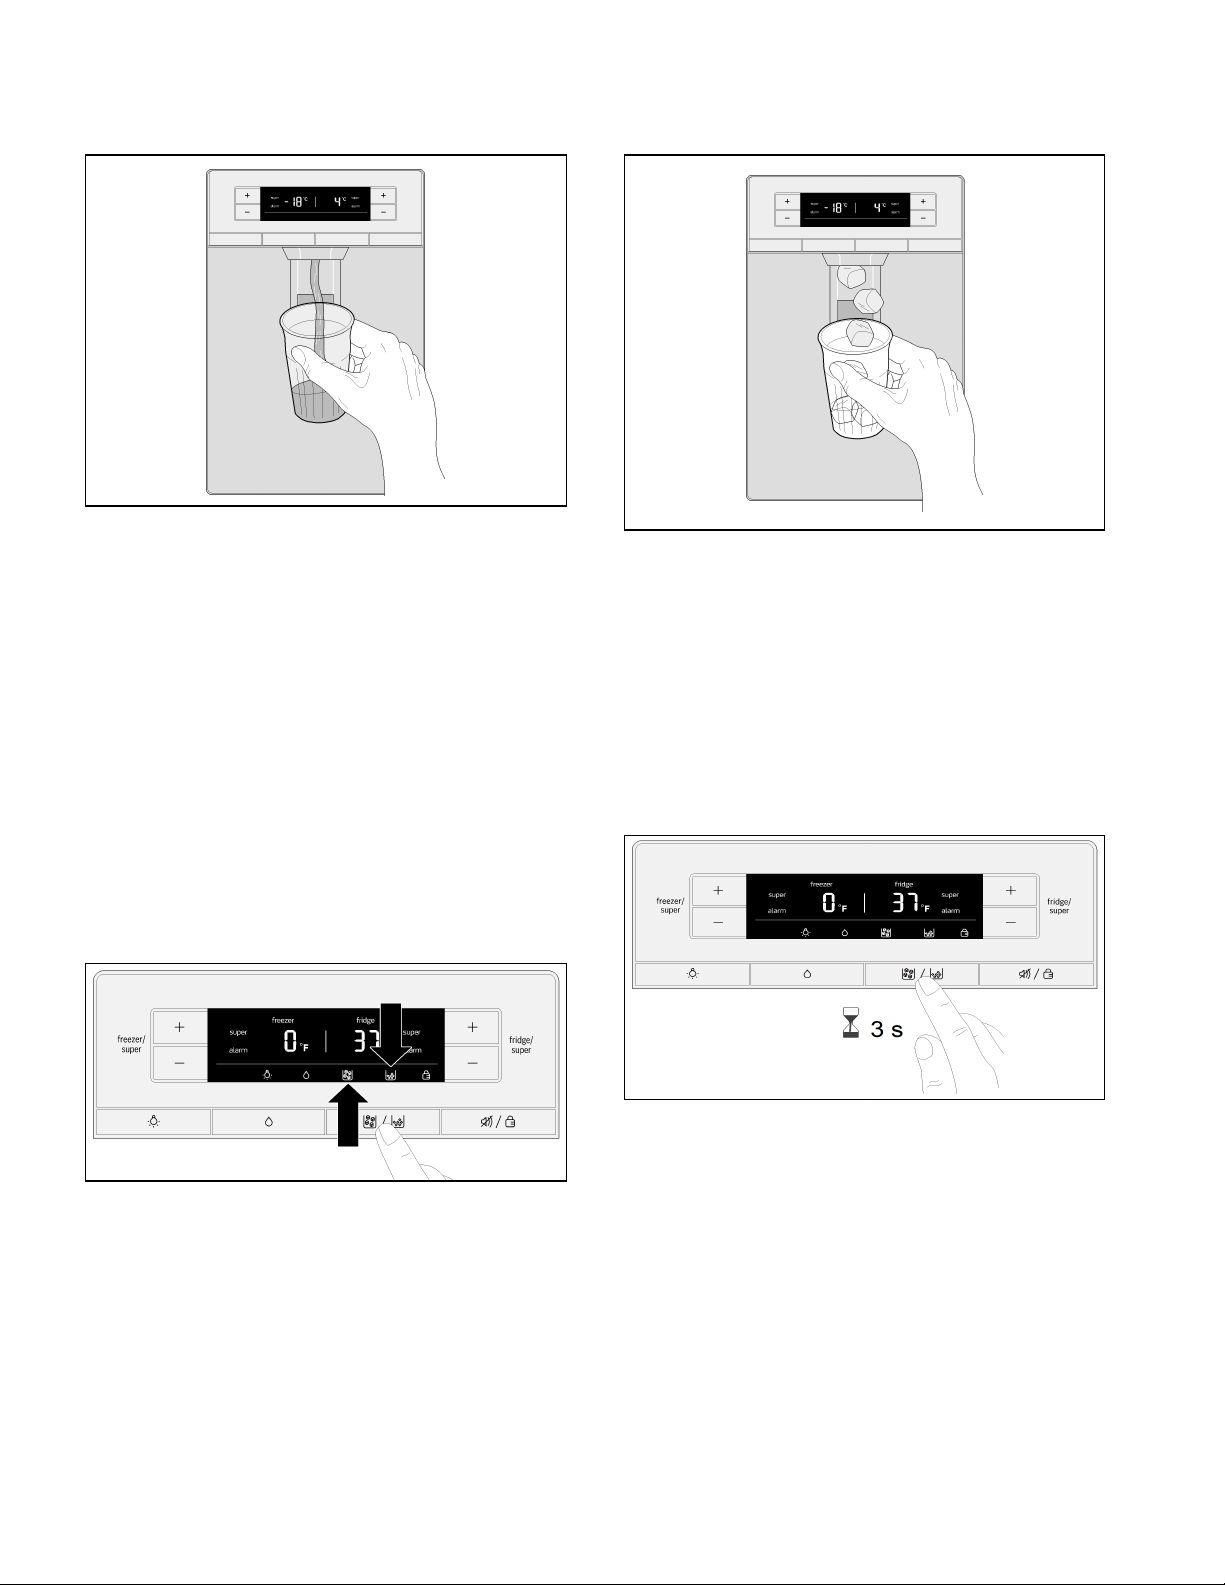
2. Press a glass or container against the dispenser
lever until the glass is filled with the desired amount
of water.
Note:
The water from the water dispenser is cooled to a
pleasant temperature for drinking. If you prefer the
water to be colder, dispense some ice cubes into the
glass before drawing the water.
Dispensing ice
Only hold the container against the dispenser lever until
the container is half full of ice. Otherwise, the ice in the
ice-cube dispenser spout may cause the container to
overflow or block the ice cube dispenser spout.
If crushed ice was dispensed before dispensing ice
cubes, there may still be some crushed ice in the
dispenser spout. It will come out together with the first
few ice cubes.
2. Press a suitable glass or container against the
dispenser lever until it is filled with the desired
amount of ice.
Switching off the ice-maker
Note:
It is imperative to turn off the water supply to the
appliance several hours before switching off the
ice-maker.
If you do not expect to be using the ice-maker for
longer than 1 week (e.g. when going on holiday), the
ice-maker should be temporarily switched off to stop
the ice cubes freezing together.
1. Press and hold the "Ice cubes/Crushed ice" button
for 3 seconds.
1. Press the "Ice cubes/Crushed ice" button until the
display shows the "Ice cubes" or "Crushed ice"
symbol.
In the display, the symbols "Ice cubes", "Crushed ice"
and "Lock" flash for approx. 3 seconds.
Then the water dispensing is switched on and the
symbol "Water" lights up.
Note:
When the "Ice cubes/Crushed ice" button is pressed,
when the ice-maker is switched off, an alarm sounds
and the symbols "Ice cubes" , "Crushed ice" and "Lock"
flash for approx. 3 seconds.
21
en-us
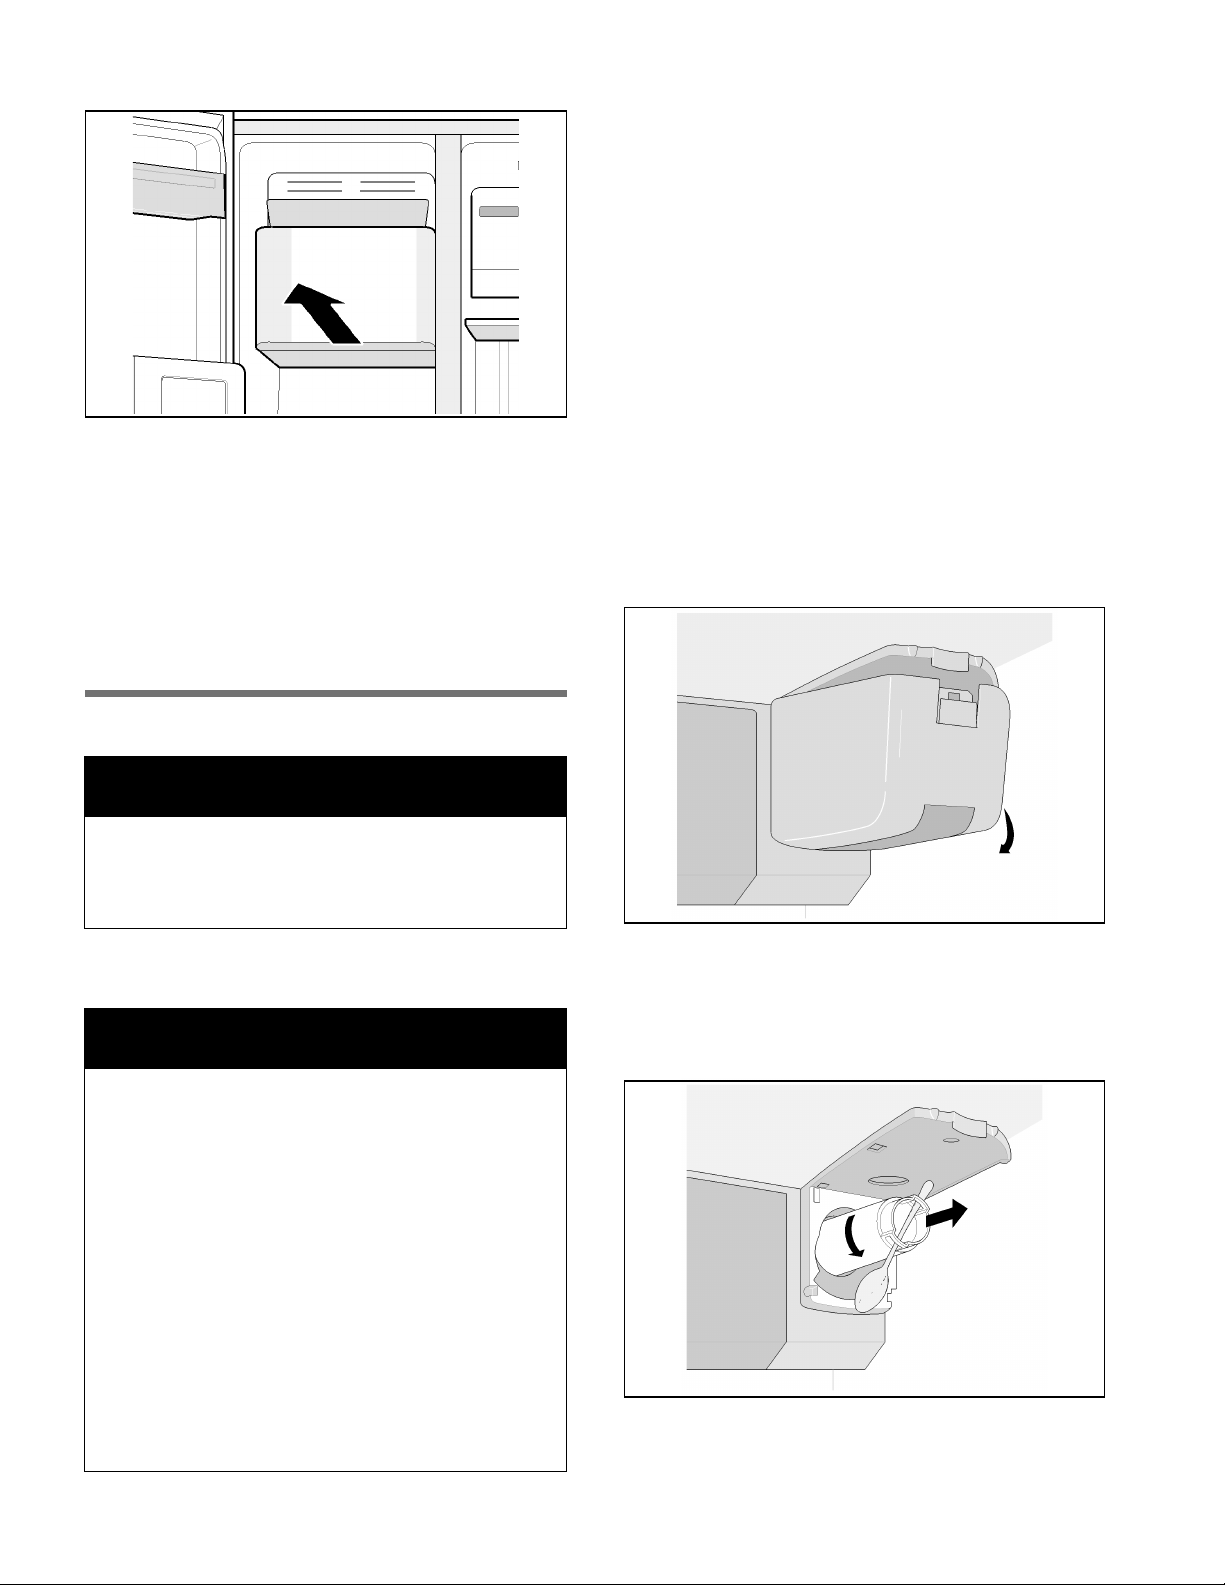
2. Pull out the ice-cube container.
3. Empty the ice-cube container and clean it.
4. Push the ice-cube container all the way back on the
runners until it snaps into place.
Switching on the ice-maker
Press and hold the "Ice cubes/Crushed ice" button for
3seconds.
An alarm sounds as soon as the ice-maker is switched
on.
Important notes on the water filter
■ After use, the water system is slightly under
pressure. Take care when removing the filter
cartridge.
■ If the appliance has not been used for an extended
period or the water has an unpleasant taste or smell,
flush the water system through. To do so, draw water
from the dispenser continuously for several minutes.
If the unpleasant taste or smell persists, change the
filter cartridge.
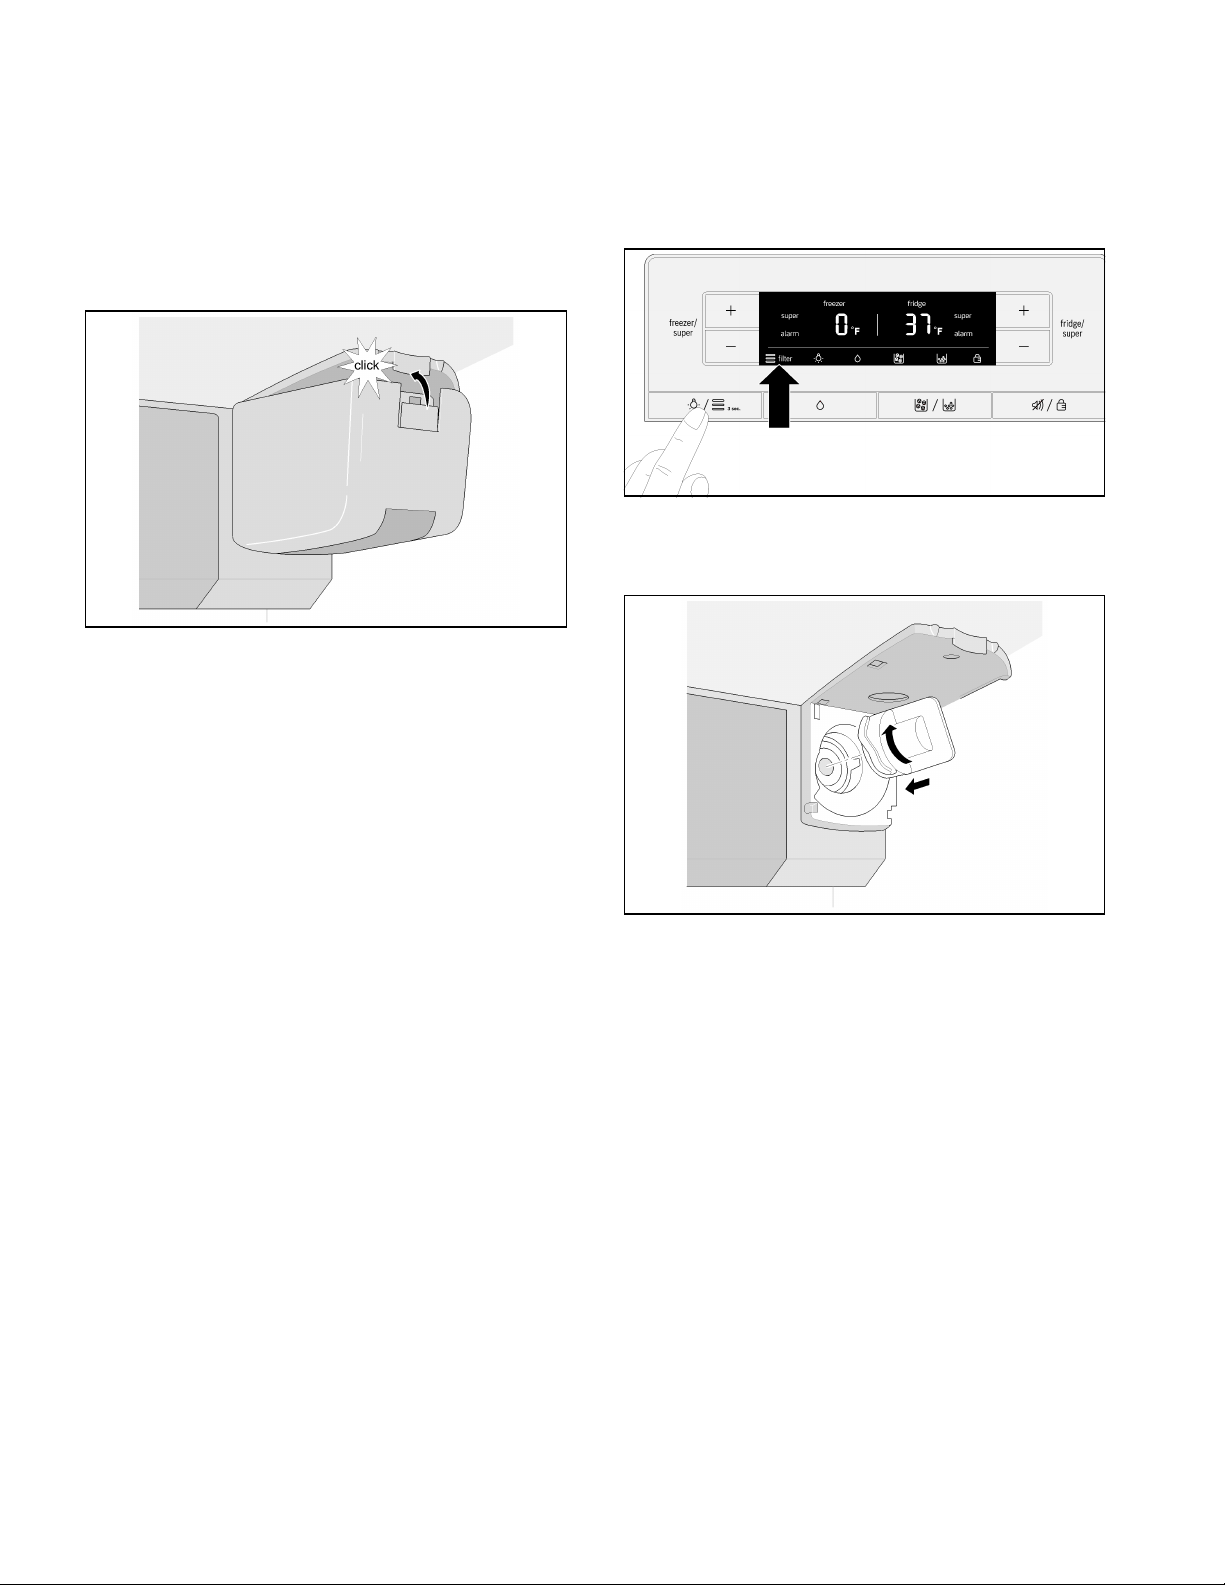
Changing the filter cartridge
After six months has elapsed, the water filter symbol
starts flashing as a prompt to change the filter cartridge
(see section "Water filter symbol").
The filter cartridge must be replaced after six months at
the latest.
1.
Caution! Unplug the appliance from the mains or
switch off the circuit-breaker.
2. Turn off the water supply to the appliance.
3. Press the button and remove the lid.
Water filter
: WARNING
In localities where the water quality is not ideal or
not known, do not use the appliance without
suitable means of disinfection on the inlet and outlet
side of the filter.
Filter cartridges for the water filter can be obtained from
Customer Support.
: CAUTION
■ After fitting a new filter cartridge, always throw away
the first 24 hours' worth of ice produced after
switching on the ice-maker.
■ If the ice has not been used for an extended period,
throw away all the ice cubes in the ice-cube
container as well as the ice produced over the next
24 hours.
■ If the appliance has not been used or no ice has
actually been dispensed for several weeks or
months, or if the ice cubes have an unpleasant
taste or smell, change the filter cartridge.
■ Air trapped in the system can cause water to spurt
out and eject the filter cartridge. Take care when
removing it.
■ The filter cartridge must be replaced at least every
6months.
Note:
Take care when removing the filter cartridge.
The water system is slightly under pressure after use.
4. Carefully turn the filter cartridge 90° counterclockwise e.g. with a spoon and pull it out.
22
en-us
5. Take the new filter cartridge out of its packaging
and remove the safety cap.
6. Insert the new filter cartridge and carefully turn it
90° clockwise as far as the stop e.g. with a spoon.
Note:
The filter cartridge must be tightened by hand so that
no leaks are created and that the appliance is correctly
supplied with water.
7. Refit the lid and snap it into place.
8. Turn on the water supply to the appliance.
9. Switch on the appliance.
10.Draw off several liters of water from the water
dispenser. This will remove any air from the water
system.
11.Pour the water out of the old filter cartridge. The filter
cartridge can be disposed of together with the
normal household waste.
12.Press and hold the "Light/Filter" button for
3 seconds. That resets the water filter indicator. The
symbol will then stop flashing. The new filter has
now been activated.
Note:
The ice and water dispenser can also be used without
a water filter. In that case, fit the cover cap.
23

en-us
Performance Data Sheet
Model 9000 777508, 9000 705475 and 9000 225170
Use Replacement Cartridge 9000 674655.
The concentration of the indicated substances in water entering the system was reduced to a concentration less than or equal to the permissible limit
for water leaving the system as specified in NSF/ANSI Standard 42 and Standard 53.
System tested and certified by NSF International against NSF/ANSI Standard 42 and Standard 53 for the reduction of
the claims specified on the Performance Data Sheet.
Capacity 739.68 Gallons (2800 Liters)
Contaminant Reduction Determined by NSF testing.
Contaminant
Reduction
Chlorine Taste and
Odor
Nominal Particulate
Class I, ≥ 0,5 to < 1,0
μm
Cyst* 170.000 cysts/l Minimum
* Based on the use of Cryptosporidium parvum oocysts
Application Guidelines/Water Supply Parameters
Service Flow 0.75 gpm (2.83 lpm)
Water Supply Potable Water
Water Pressure 30 - 120 psi (207 - 827 kPa)
Water Temperature 33 °F - 100 °F (0.6 °C - 38 °C)
It is essential that the manufacturer’s recommended installation,
maintenance and filter replacement requirements be carried out for the
product to perform as advertised. See Installation Manual for Warranty
information.
Note: While the testing was performed under standard laboratory
conditions, actual performance may vary.
Replacement Cartridge: 9000 674655. For estimated costs of
replacement elements please contact your local dealer or
call 1-800-578-6890.
Average
Influent
2,1 mg/l 2,0 mg/L ± 10 % 97.6 % 0.05 mg/L N/A ≥ 50 % J-00121313
9.100.000 pts/ml At least 10.000
NSF specified
Challenge
Concentration
particles/mL
50.000 cysts/l
Avg %
Reduction
98.8 % 111,817 pts/ml N/A ≥ 85 % J-00099871
99.99 % 0.001 cyst/L N/A ≥ 99.95 % J-00109715
Average Product
Water
Concentration
Max Permissible
Product Water
Concentration
NSF
Reduction
Requirements
NSF Test
Report
NOTICE
To reduce the risk associated with property damage due to
water leakage or flooding:
■ Read and follow all Instructions before installation and use of this
system.
To reduce the risk of water leakage or flooding, and to ensure
optimal filter performance:
■ Change the disposable filter cartridge every six months or sooner
if you observe a noticeable reduction in water flow rate.
■ Failure to replace the disposable filter cartridge at recommended
intervals may lead to reduced filter performance and cracks in the
filter housing, causing water leakage or flooding.
: WARNING
To reduce the risk associated with ingestion of contaminants:
■ Do not use with water that is microbiologically unsafe or of
unknown quality without adequate disinfection before and after
the system. Systems certified for cyst reduction may be used on
disinfected water that may contain filterable cysts.
EPA Establishment Number 10350-MN-005
24
Fittings
Glass shelves
The glass shelves can be removed and fitted at
different heights.
Removing
Lift the glass shelf at the back and pull it out.
Inserting
Slide the glass shelf backwards on the guide rails until
it snaps downwards into place.
en-us
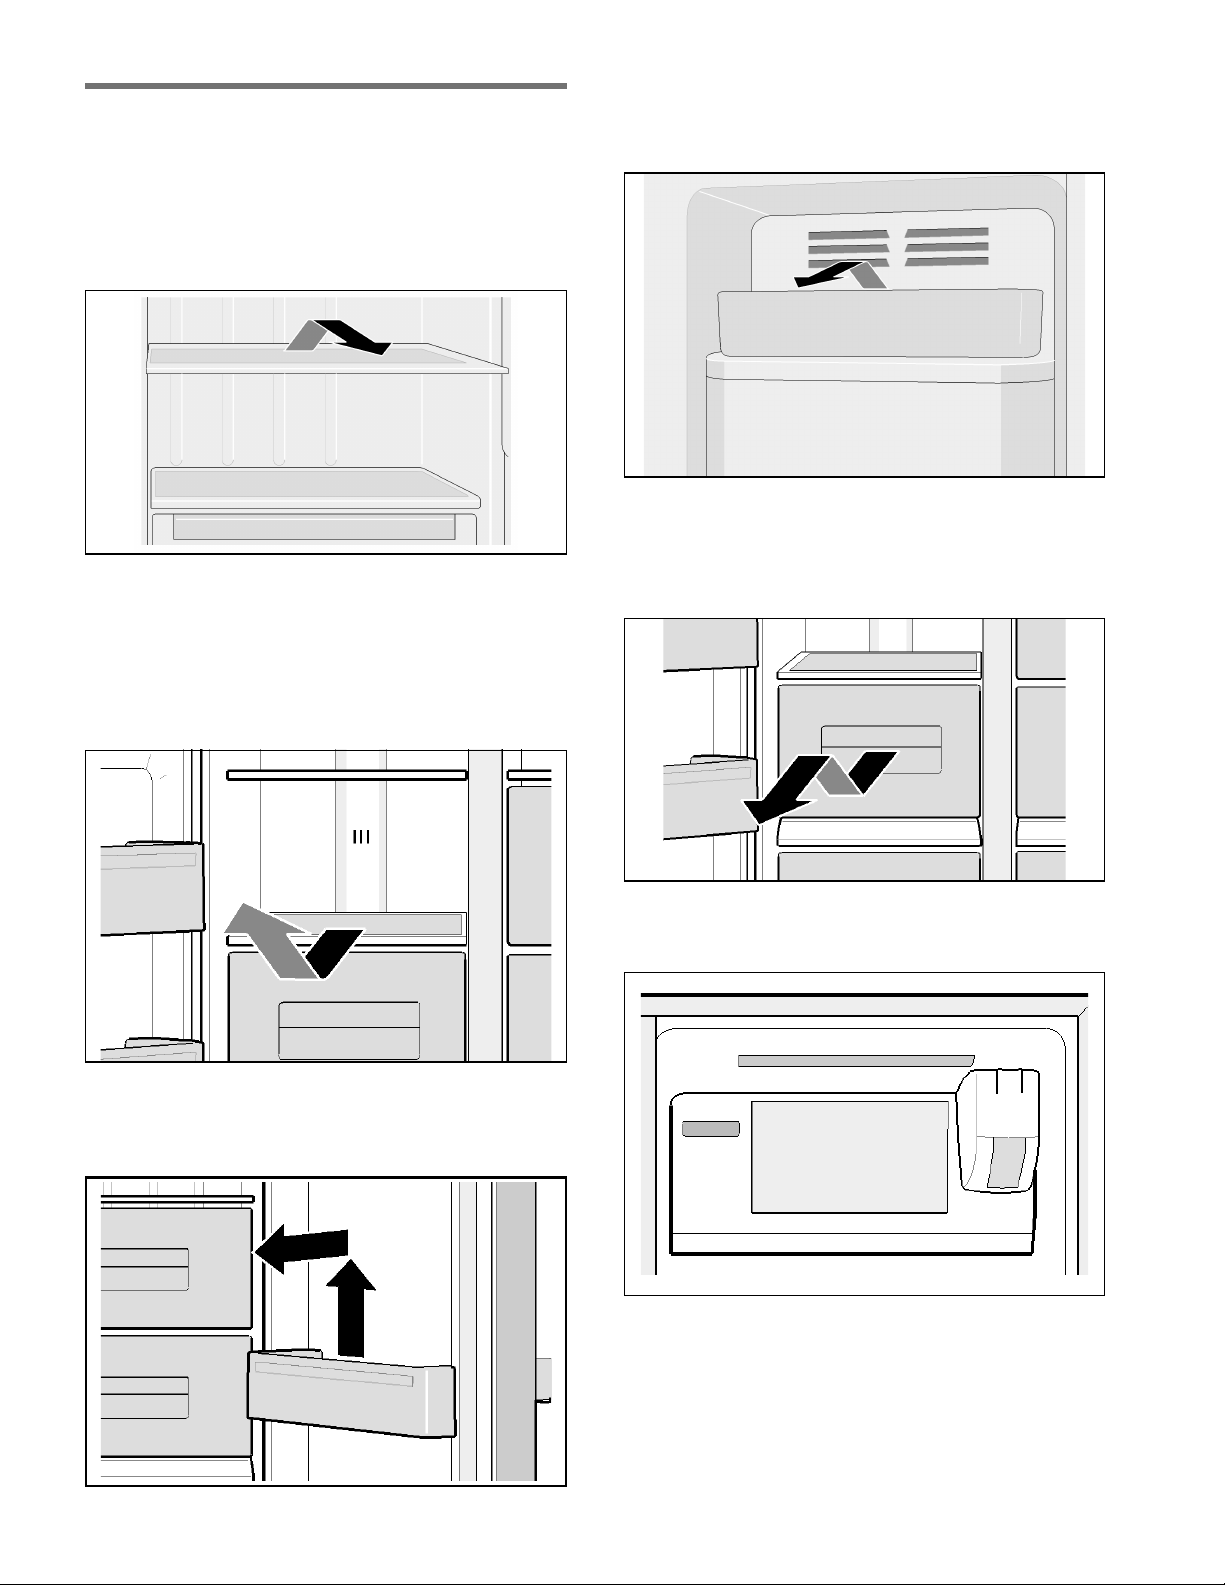
Ice-cube tray
The ice-cube tray is for keeping ice cubes in.
Lift the ice-cube tray slightly at the front and unhook it.
Drawers
The drawers can be removed.
Pull the drawer out as far as the stop, lift it at the front
and remove it completely.
Glass shelves over the drawers
The glass shelves can be removed.
Pull the shelf out and lift it upwards to remove it.
Door pockets
The door pockets can be removed.
Pull the door pockets upwards to remove.
Shelf
For holding drinks cans.
25
en-us
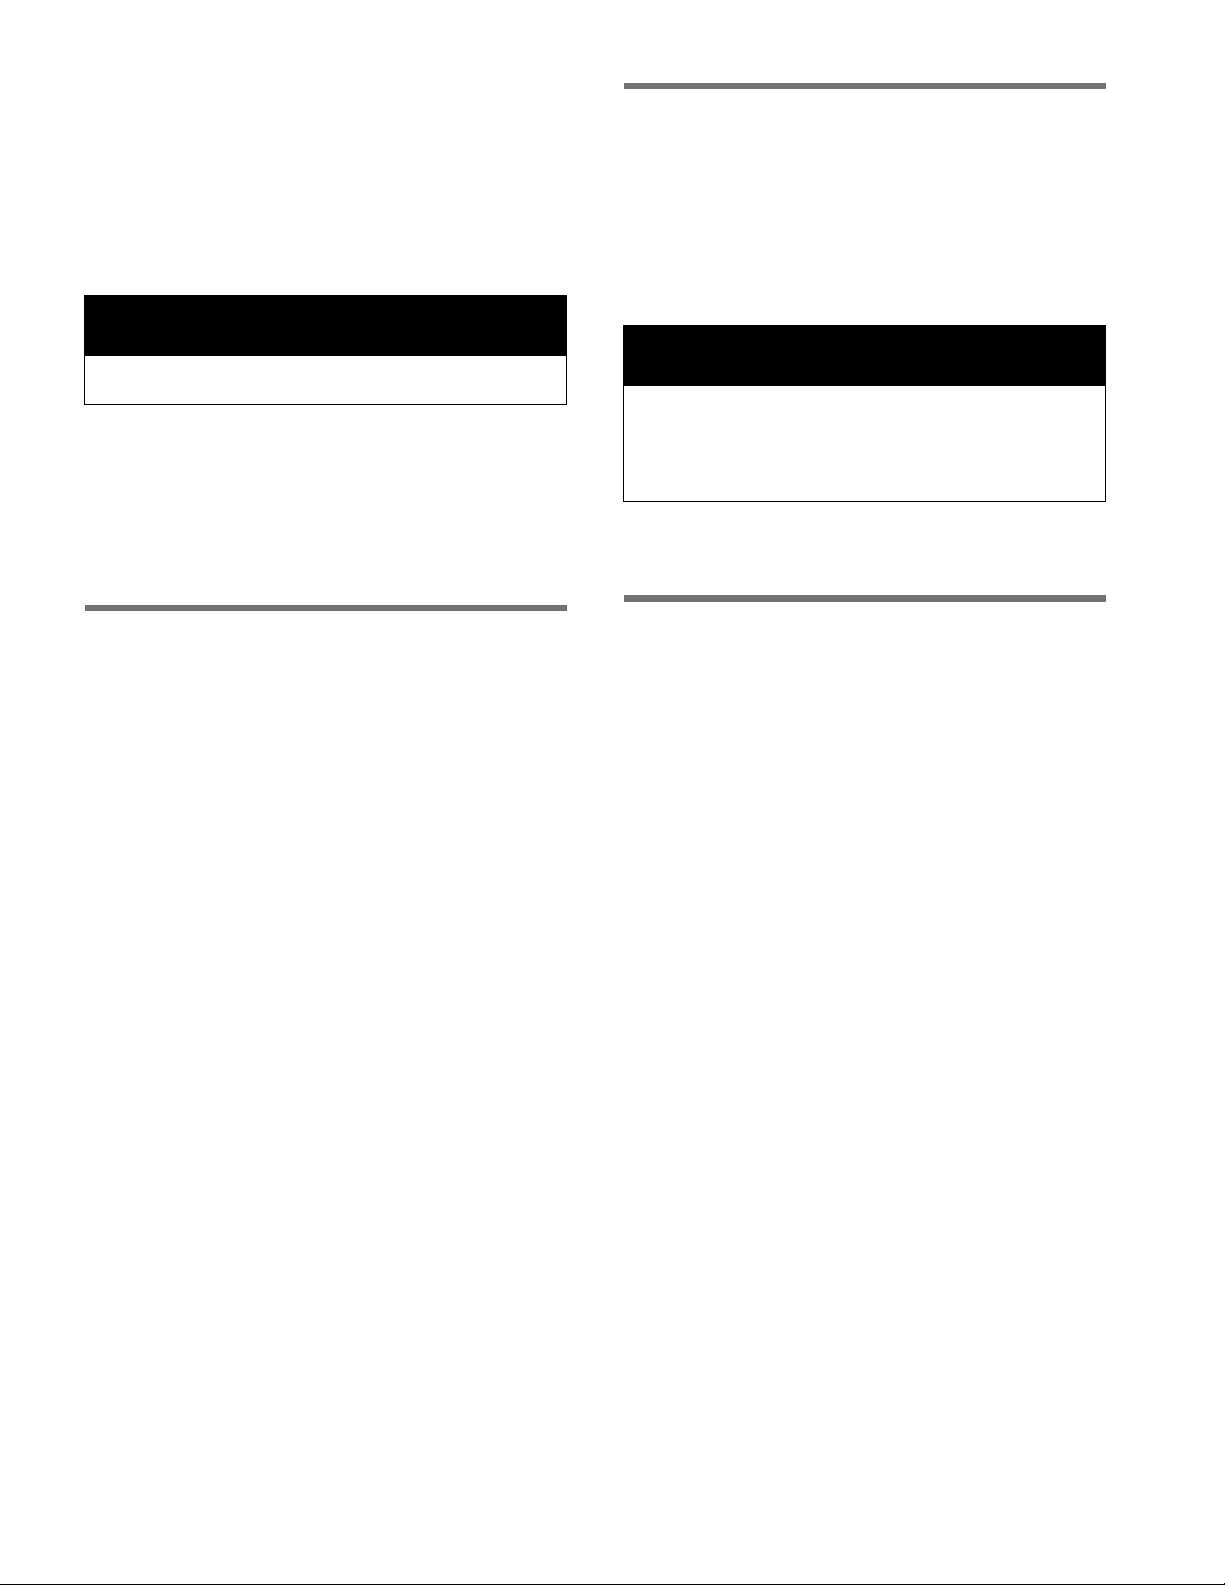
Egg tray
Defrosting
Fridge compartment
While the appliance is in use, drops of condensation or
frost form on the back of the fridge compartment. As
the rear panel defrosts automatically, it is not necessary
to remove the frost or the condensation.
Freezer compartment
Thanks to the fully automatic NoFrost system, the
freezer compartment remains free of ice. There is no
longer any need to defrost it.
Switching off and disconnecting the appliance
Switch off the appliance
Unplug the appliance from the mains or switch off the
circuit-breaker.
The refrigeration system and lights switch off.
If the appliance is to be switched off but not unplugged
(e.g. while you are on holiday):
Press and hold the "freezer/super +"
and "fridge/super +" buttons for 5 seconds. When the
appliance is off, the temperature displays will show "- -".
The rest of the display panel is off.
Switching on the appliance:
Press and hold the "freezer/super +"
and "fridge/super +" buttons for 5 seconds.
Disconnecting the appliance
If the appliance is not used for an extended period of
time:
1. It is imperative that you disconnect the water supply
to the appliance for a few hours before switching off
the appliance.
2. Remove all food from the appliance.
3. Unplug the appliance.
4. Remove and dispose of the filter cartridge.
5. Empty and clean the ice cube container.
6. Clean the appliance interior (see section "Cleaning
the appliance”).
7. To prevent odors, leave the appliance doors open.
Cleaning the appliance
: CAUTION
■ Do not use gritty, acidic or chlorine-based cleaning
agents or solvents.
■ Do not use abrasive cleaning pads or sponges that
may scratch surfaces. This may lead to corrosion of
the metallic surfaces.
■ Never clean the shelves or containers in the
dishwasher. The parts may warp.
Proceed as follows:
1. Switch off the appliance before cleaning.
2. Unplug the appliance from the mains or switch off
the circuit-breaker.
3. Take out the food and store it in a cool place. Place
an ice block (if you have one) on the food.
4. Wait until the layer of frost has thawed out.
5. Clean the appliance with a soft cloth, lukewarm
water, and a little pH-neutral washing-up liquid. The
washing-up liquid solution must not be allowed to
get into the lights or run into the evaporation tray
through the drain hole.
6. Only wipe the door seal with clean water and then
rub it until it is dry.
7. After cleaning, reconnect the appliance to the mains
and switch it on.
8. Put the food back in.
26
Fittings
All the variable components of the appliance can be
removed for cleaning (see section "Fittings").
Ice-cube container
If no ice-cubes are dispensed for an extended period,
the ice cubes in the container shrink, taste stale and
stick together. Therefore, the ice-cube container should
be cleaned regularly.
: CAUTION
The ice-cube container is heavy when it is full.
1. Press and hold the "Ice cubes/Crushed ice" button
for 3 seconds.
2. Pull out the ice-cube container.
3. Empty the ice-cube container and clean it.
4. Push the ice-cube container all the way back on the
runners until it snaps into place.
en-us
LED light
The appliance features a maintenance-free LED light.
When the doors are opened, the interior light becomes
gradually brighter and when the doors are closed, it
gradually dims.
When switched on, the light of the Ice and water
dispenser becomes gradually brighter and when
switched off, it gradually dims.
: CAUTION
Risk of eye injury from Class 1M laser light
(IEC 60825)!
Do not look directly into the light with optical
instruments.
These lights must be repaired by customer service or
authorized technicians only.
Smells
If you notice unpleasant smells:
1. Unplug the appliance from the mains or switch off
the circuit-breaker.
2. Remove all food from the appliance.
3. Clean the inside of the appliance (see
section "Cleaning the appliance”).
4. Clean all packaging.
5. Pack strongly smelling food in air-tight containers to
prevent odors.
6. Switch on the appliance again.
7. Arrange the food.
8. After 24 hours, check again to see if the smells
have reappeared.
Saving energy
■ Install the appliance in a dry, well ventilated room.
The appliance must be installed out of direct sunlight
and away from heat sources (e.g. heating elements,
cooker).
Use an insulating plate if necessary.
■ Allow hot food and drinks to cool before placing
them in the appliance.
■ Place frozen food in the fridge compartment to
defrost and utilize the low temperature of the frozen
food to cool other food.
■ Only open the appliance doors for as short a time as
possible.
■ To prevent the food warming up quickly in the event
of a power cut or a fault, place blocks of ice in the
top compartment directly on top of the food.
■ Make sure that the freezer compartment door is
always closed.
■ The arrangement of the fittings has no effect on the
energy consumption of the appliance.
■ To prevent increased power consumption,
occasionally clean the air vent with a soft brush or
vacuum cleaner.
27
 Loading...