

Page 1
en Operating and installation instructions
fr Notices d’utilisation et de montage
es Instrucciones de uso y de montaje
B26FT..
Page 2

en Table of Contents 3.................................................
fr Table de matières 29.................................................
es Índice 55............................................................
Page 3

en Index
en-us
IMPORTANT SAFETY INSTRUCTIONS 4.......
Congratulations 5...........................
Disposal information 5.......................
Installation 6................................
Installing and connecting the appliance 7......
Appliance and installation dimensions 10.......
Getting to know your appliance 11.............
Control and display panel 12..................
Operating tips 13.............................
Switching on the appliance 13.................
Setting the temperature 13....................
Alarm function 13.............................
Panel lock 14................................
Super cooling 14.............................
Super freezing 14.............................
quick ice 14..................................
Water filter symbol 14.........................
Temperature unit 15..........................
Refrigerator compartment 15..................
Vita Fresh compartment 15....................
Deli drawer 16................................
Variable interior design 16.....................
Freezer compartment 17......................
Freezing food 17.............................
Purchasing and storing deep-frozen food 17....
Thawing frozen food 17.......................
Freezer compartment features 18..............
Ice and water dispenser 18....................
Water filter 20................................
Specification and performance data sheet 21...
Energy-saving tips 22.........................
Operating noises 22..........................
Defrosting 22.................................
Switching off and disconnecting the appliance 22
Cleaning 22..................................
LED light 23..................................
Troubleshooting minor issues 24...............
Customer service 27..........................
3
Page 4

en-us
IMPORTANT SAFETY INSTRUCTIONS
READ AND SAVE THESE INSTRUCTIONS!
Before operating the
appliance
Please read the operating and
installation instructions carefully!
They contain important information on
how to install, use and maintain the
appliance.
Keep all documentation for
subsequent use or for the next owner.
Technical safety
Only customer service technicians
may change the power cord and carry
out any other repairs. Improper
installations and repairs may put the
user at considerable risk.
Important information when
using the appliance
S Never use electrical devices inside
the appliance (such as heaters,
electric ice makers, etc.). Risk of
explosion!
S Never use a steam cleaner to
defrost or clean the appliance. The
steam may penetrate electrical
parts and cause a short-circuit or
electric shock.
S Before cleaning, unplug the
appliance or switch off the fuse.
Do not tug on the cord to unplug
the appliance.
S Do not store products in the
appliance that contain flammable
propellants (such as spray cans)
or explosive substances. Risk of
explosion!
S Bottles containing a high
percentage of alcohol must be
sealed and stored in an upright
position.
S Do not store bottled or canned
liquids (especially carbonated
drinks) in the freezer compartment.
Bottles and cans may explode!
S Do not stand or support yourself
on the base, drawers or doors or
other parts of the appliance. You
could damage the appliance.
S Keep plastic parts and the door
seals free of oil and grease.
Otherwise, plastic parts and door
seal will become porous.
S Never cover or block the
ventilation openings for the
appliance. This forces the
refrigerator to work harder,
increasing its power consumption.
S Individuals with physical, sensory
or mental limitations or limited
knowledge about the appliance
must be supervised or must be
provided with more detailed
instructions before using the
appliance.
S Do not place popsicles or ice
cubes straight from the freezer
compartment into your mouth. Risk
of low-temperature burns!
S Do not touch frozen surfaces or
food in the freezer with wet hands.
Skin may adhere to these
extremely cold surfaces. Risk of
injury!
S Do not scrape off frost or stuck
frozen food with a knife or pointed
object. You could damage the
appliance.
Children in the household
S Do not allow children to play with
the appliance!
S If the appliance features a lock,
keep the key out of the reach of
children.
General requirements
The appliance is suitable for
S refrigerating food
S freezing food
S making ice
S dispensing drinking water.
This appliance is designed for
household use only.
The appliance is shielded from
interference and voltage peaks.
The refrigerant circuit has been tested
for leaks.
Definitions
WARNING
This indicates that death or serious
injuries may occur as a result of
not observing this warning.
CAUTION
This indicates that minor to
moderate injuries may occur as a
result of not observing this
warning.
NOTICE
This indicates that damage may
occur as a result of not observing
this warning.
4
Page 5
en-us
Congratulations
By purchasing this new Fridge‐freezer,
you have opted for a modern, high
quality household appliance.
This Fridge‐freezer is distinguished by
its economical energy consumption.
Each appliance that leaves our factory
is inspected thoroughly to ensure that
it is working properly and is in perfect
condition.
If you have any questions, particularly
with regard to installing and
connecting the appliance, please do
not hesitate to contact our customer
service.
You can visit our Internet site to obtain
more information and view our range
of products.
Disposal information
x Disposal of packaging
The packaging protects the appliance
from damage in transit. All packaging
materials are environmentally friendly
and recyclable.
Please contribute to a better
environment by disposing of
packaging materials in an
environmentally friendly manner.
Please contact your local dealer or
local authority about current disposal
options.
WARNING
Risk of suffocation from cardboard
boxes and plastic film!
Keep packaging and packaging
components away from children.
x Disposal of your old
appliance
Old appliances are not worthless junk!
Valuable raw materials can be
reclaimed by recycling old appliances.
WARNING
Risk of child entrapment!
Children can lock themselves in the
appliance.
Before disposing of the old
refrigerator:
Remove the doors and the freezer
compartment drawer.
Leave the shelves and containers in
place so that children may not
easily climb inside.
Disused appliances:
1. Disconnect the power plug.
2. Cut off the power cord and discard
with the power plug.
Refrigerators contain refrigerants and
their insulation contains gases.
Refrigerant and gases must be
disposed of properly. Ensure that the
tubing of the refrigerant circuit is not
damaged prior to proper disposal.
5
Page 6
en-us
Installation
Transport and installation
The appliance is heavy and must be
secured during transport and
installation.
WARNING
Risk of injury!
The appliance is very heavy. It can
fall over and cause serious injuries
during transport and installation. At
least two people are required to
install the appliance safely. Keep
the refrigerator doors closed until
the appliance is upright and level at
the installation location.
Installation location
WARNING
Risk of explosion!
Do not install the appliance near
explosive or flammable
substances.
NOTICE
If a panel or cupboard is installed
above the appliance, ensure to leave
a 13/32I (10 mm) gap so that the
appliance can be pulled out of the
recess if required.
The air heated at the back of the
appliance must be allowed to escape
unhindered.
To ensure that the doors can open all
the way, maintain the lateral minimum
clearances when installing the
appliance in a corner or recess (see
section on ”Appliance and installation
dimensions”).
If the depth of the adjacent kitchen
equipment exceeds 29
maintain the minimum lateral
clearances in order to utilize the full
door opening angle (see section
”Door opening angle”).
1/8
I
(75 cm),
Subsurface
NOTICE
The appliance is very heavy.
The floor on which the appliance is
to be installed must be rigid.
Reinforce the floor, if necessary.
Weight of appliance when empty:
Basic model 324 lb
(147 kg)
Ventilation
Never cover the ventilation openings
on the front base panel or rear cover
plate.
This forces the appliance to work
harder, increasing its power
consumption.
Do not install the appliance
outdoors.
The installation location should be
dry and should not be exposed to
frost.
The best installation location is a dry,
well ventilated room. The installation
location should neither be exposed to
direct sunlight nor should it be near a
heat source, such as a stove, radiator,
etc. If installation next to a heat source
is unavoidable, use a suitable
insulating plate or observe the
following minimum distances to the
heat source:
I
1/4
S 1
S 11
If installing the refrigerator next to
another refrigerator/freezer, there
must be a minimum clearance of 1”
(25 mm) between the appliances to
prevent condensation.
(3 cm) to electric or gas
stoves.
I
3/16
(30 cm) to oil or solid fuel
stoves.
6
Page 7
en-us
Installing and
connecting the
appliance
S Have a technician install and
connect the appliance according
to the installation instructions in
this manual.
S After installing the appliance, wait
at least 8 hours before plugging in
the appliance. The oil in the
compressor may have flowed into
the refrigeration system during
transport.
S Clean the interior of the appliance
before operating it for the first time
(see ”Cleaning the appliance”).
S Always connect the water before
the power.
S In addition to statutory national
regulations, compliance with the
connection requirements of local
electricity and water utility
companies is also required.
S Do not remove transport protection
devices from the shelves and
storage compartments until after
the appliance has been installed.
S Only a customer service technician
should remove the appliance
doors if this is necessary in order
to bring the appliance through any
household doors.
Water connection
WARNING
Risk of electric shock and damage
to the appliance!
Disconnect the appliance from the
power source before performing
any work on the water connection.
Only a qualified installation
technician may connect the
appliance to the water supply in
accordance with plumbing and
relevant water utility company
regulations.
Connect the appliance to the water
line:
S Minimum pressure:
14.5 psi (1.0 bar)
S Maximum pressure:
119 psi (8.2 bar)
If the water pressure exceeds 119 psi
(8.2 bar), a pressure reducing valve
must be installed. The ice maker will
not work if the water pressure is
below 14.5 psi (1.0 bar).
Install a separate shut-off valve for the
water line.
Do not install the shut-off valve behind
the appliance. The shut-off valve
should be placed directly next to the
appliance or in another easily
accessible location.
The taste and smell of the water can
be improved by installing the filter
cartridge included with the appliance.
In this case, observe the separate
connection requirements related to
the filter (see ”Water filter”).
The water hose has a
3/4 inch connection.
Electrical connection
WARNING
Risk of electric shock and fire if
electrical connection is not
installed properly!
Plug into a fixed, grounded 3-prong
outlet only. The outlet must be
installed and grounded according
to code by a qualified electrician. If
necessary, have the installation
inspected by a qualified technician
to ensure it is properly grounded.
Do not use an extension cord or
power strip.
Never connect the appliance to an
electronic energy saver plug (such
as Ecoboy, Sava Plug, etc.) or to
power inverters which convert
direct current (DC) to alternating
current (AC) (such as for solar
equipment, power supplies on
ships, etc.).
The outlet for the appliance must be
located close the appliance and must
be easy to access also after
installation.
Connect the appliance to a properly
installed 115 V/60 Hz AC outlet. The
fuse for the outlet must be rated
between 15 A or 20 A.
If the appliance is to be used in a
country other than the U.S., check the
rating plate to determine if the
specified voltage and current type
correspond to the ratings of your
power supply. If the voltage and
current type do not match, the
appliance must not be operated. The
power cord may only be replaced by
a qualified electrician.
7
Page 8
en-us
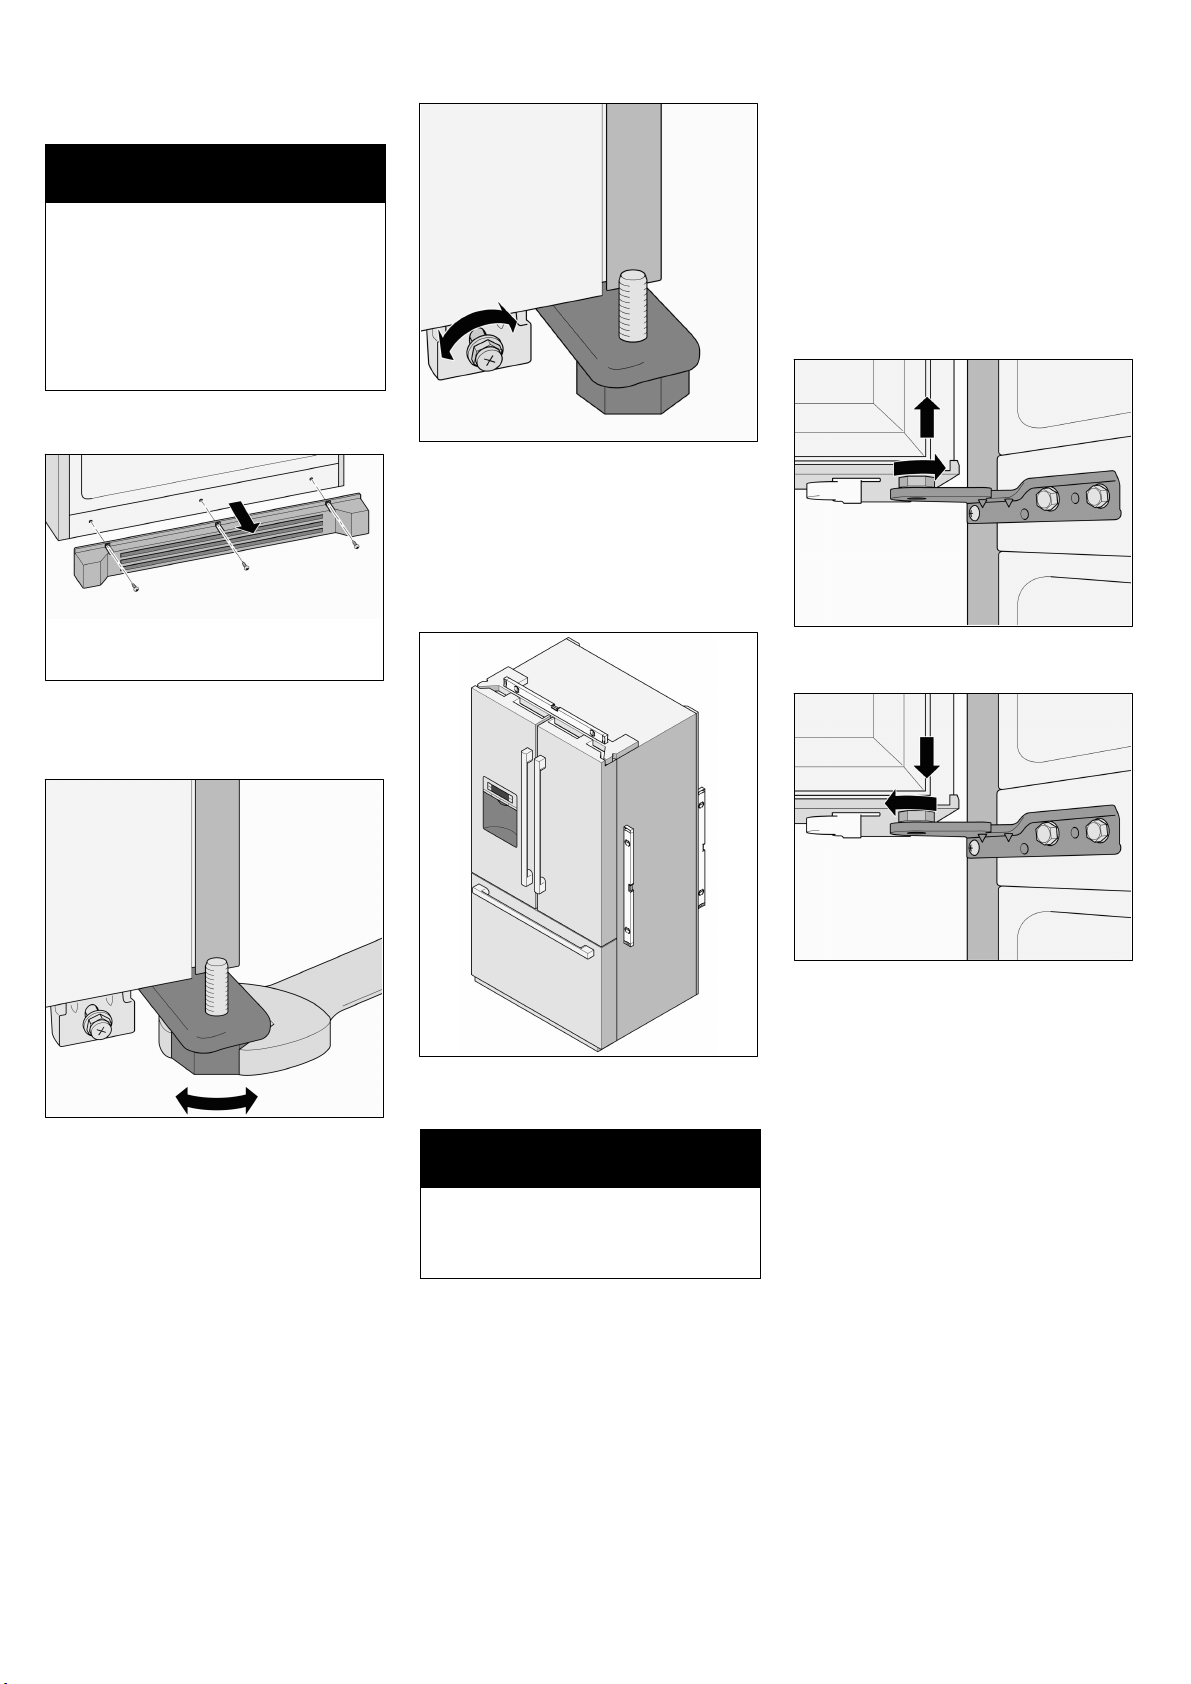
Aligning the appliance
NOTICE
To ensure that the appliance
operates correctly, use a level to
align the appliance.
If the appliance is not level, water
may flow out of the ice maker, ice
cubes may be irregular, or the doors
may not close properly.
1. Place the appliance in the
designated location.
2. Remove the three screws from the
base panel.
3. Remove the base panel.
Adjusting a refrigerator door
If the height of the refrigerator doors
is uneven:
1. Determine which refrigerator door
needs to be raised.
2. Turn the screw nut on the lower
hinge to adjust the refrigerator
door.
To raise a refrigerator door:
Turn the screw counterclockwise.
5. Use a hexagonal wrench to turn
the screws and then align the rear
of the appliance.
To raise the rear of the appliance:
Turn the screw clockwise.
To lower the rear of the appliance:
Turn the screw counterclockwise.
To lower a refrigerator door:
Turn the screw clockwise.
4. Use a hexagonal wrench to loosen
the two front feet until they are
firmly planted on the floor and then
align the front of the appliance.
8
6. Use the level to check if the
appliance is level.
NOTICE
To ensure that the appliance does
not move, the front feet must be
firmly planted on the floor.
7. If the height of the refrigerator
compartment doors are uneven or
if the freezer compartment drawer
is slanted after adjusting the level
of the appliance, use the following
method to adjust them.
Page 9
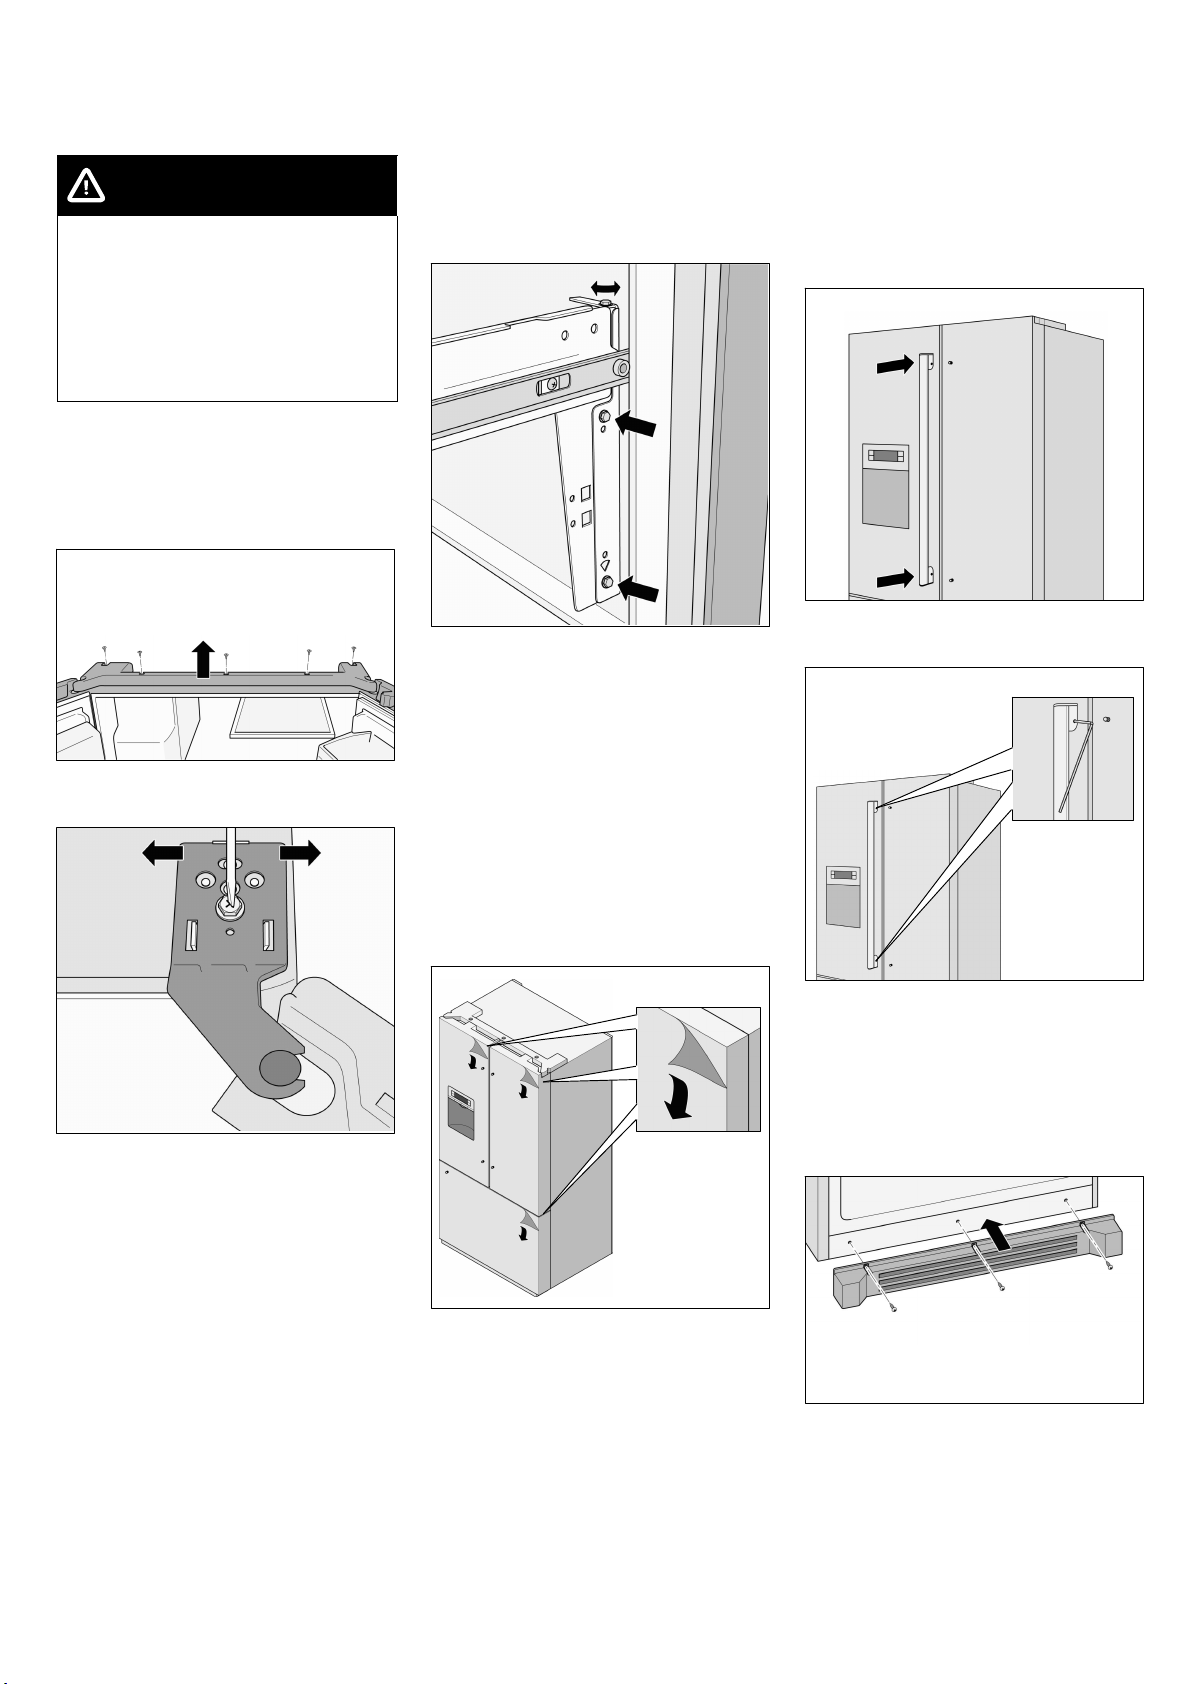
If the refrigerator doors are not
properly aligned:
WARNING
Risk of electric shock!
Before removing the top panel:
1. Shut off the water supply to the
appliance.
2. Unplug the appliance or switch
off the fuse.
1. Determine which refrigerator door
needs adjustment.
2. Remove the five screws on the top
panel.
3. Raise the panel.
Adjusting the freezer
compartment drawer
1. Determine which side needs
adjustment.
2. Loosen the two screws.
Do not remove the screws!
3. Use the top screw to adjust the
freezer compartment drawer.
4. Tighten the two screws.
en-us
2. Insert the door handles into the
guides.
S Refrigerator doors: The handle
screws must face the center of
the appliance.
S Freezer compartment drawer:
The handle screws must face
down.
3. Tighten the handle screws with the
accompanying Allen wrench.
4. Loosen the screw.
Do not remove the screw!
5. Move the hinge sideways to adjust
the refrigerator door.
6. Tighten the screw.
7. Realign panel.
8. Insert and tighten the five screws.
Installing the handles
Do not install the handles until the
appliance is installed in its designated
location and is level.
All handles are the same and are
installed in the same manner.
1. Remove the protective films from
the refrigerator doors and the
freezer compartment drawer.
Installing the base plate
1. Remove the three screws on the
appliance.
2. Mount the base plate.
3. Insert the three screws and
tighten.
9
Page 10
en-us
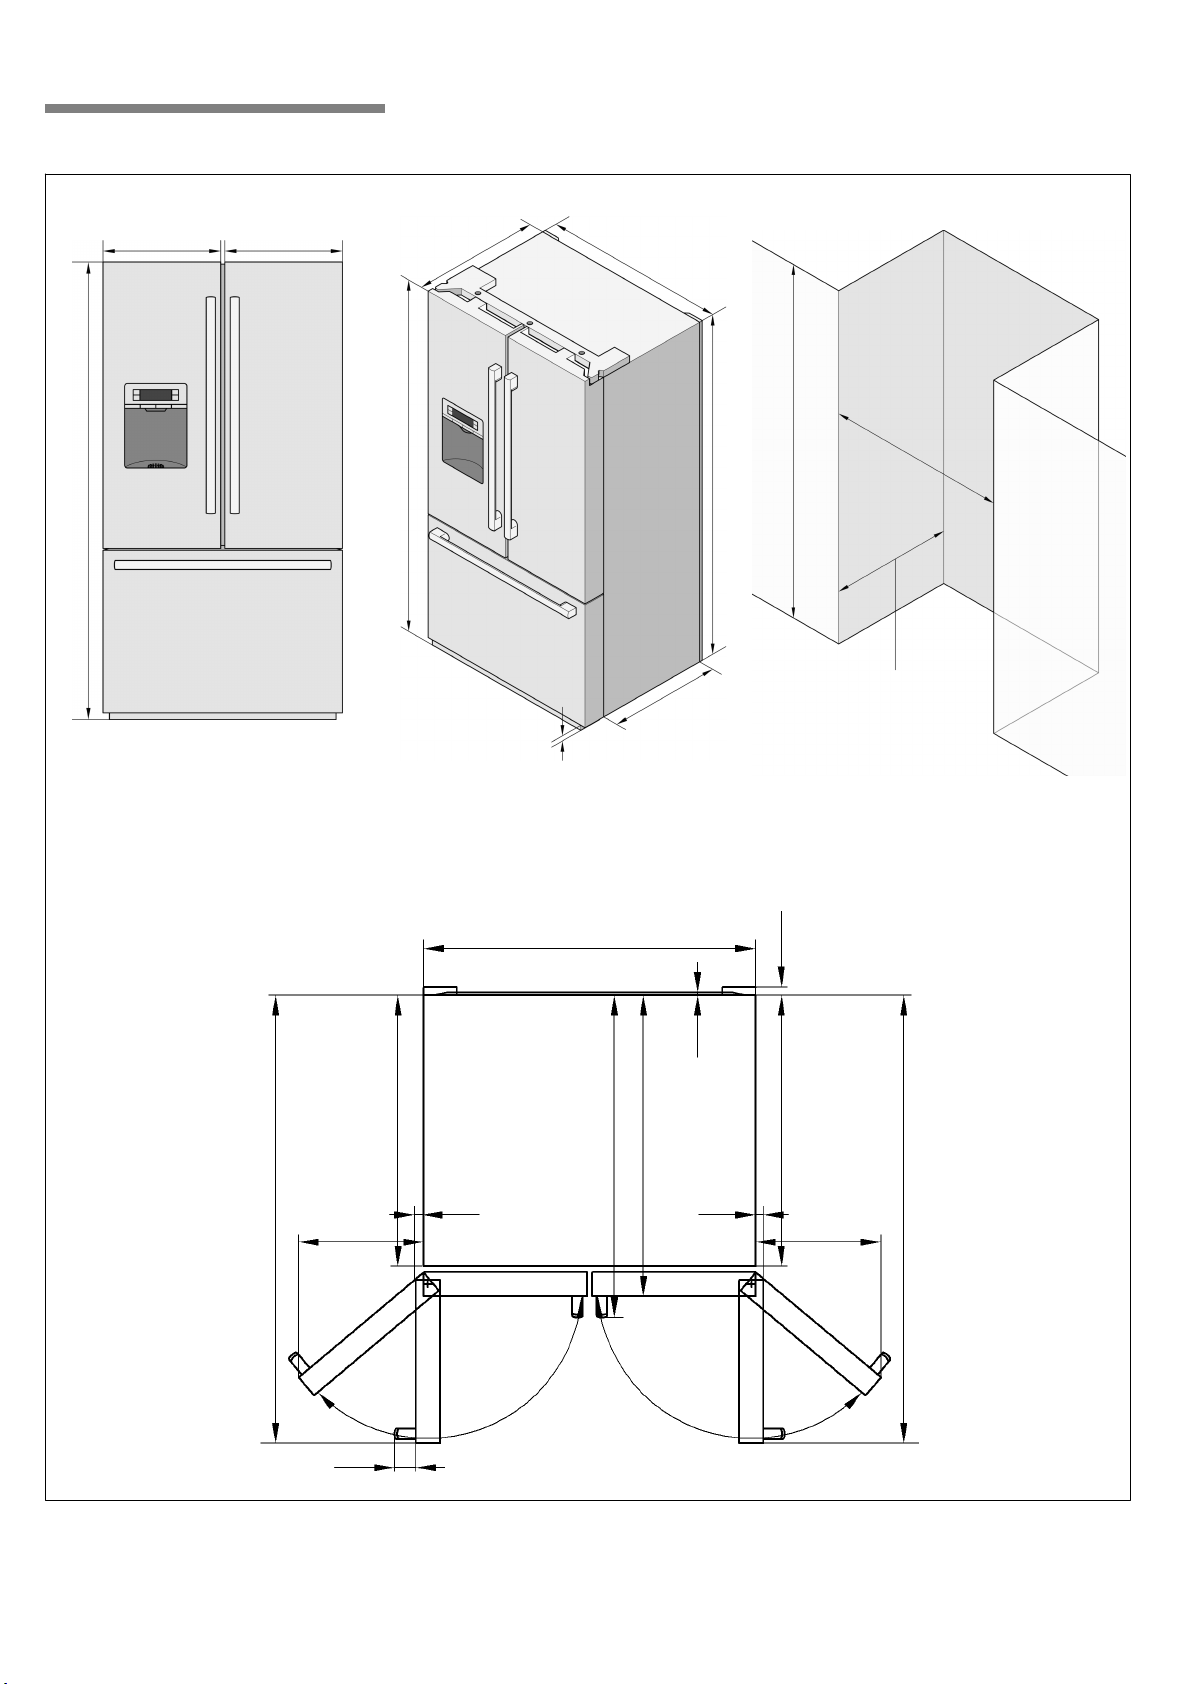
Appliance and installation dimensions
3/4I
69
17
27/32I
17
27/32I
3/4I
69
33
13/32I
2
5/8I
35
- 3
5/8I
2/8I
29
1/8I
19/32I
68
I
min. 69
30
3/8I
36
I
5/32I
48
2
15
1405
5/32I
5/8I
35
I
1/8I
13/32
29
15/32I
5/8I
32
34
905
1
8/82I
8/82I
1
I
905
1/3I
1
1/8I
29
15
1405
5/32I
48
I
10
Page 11
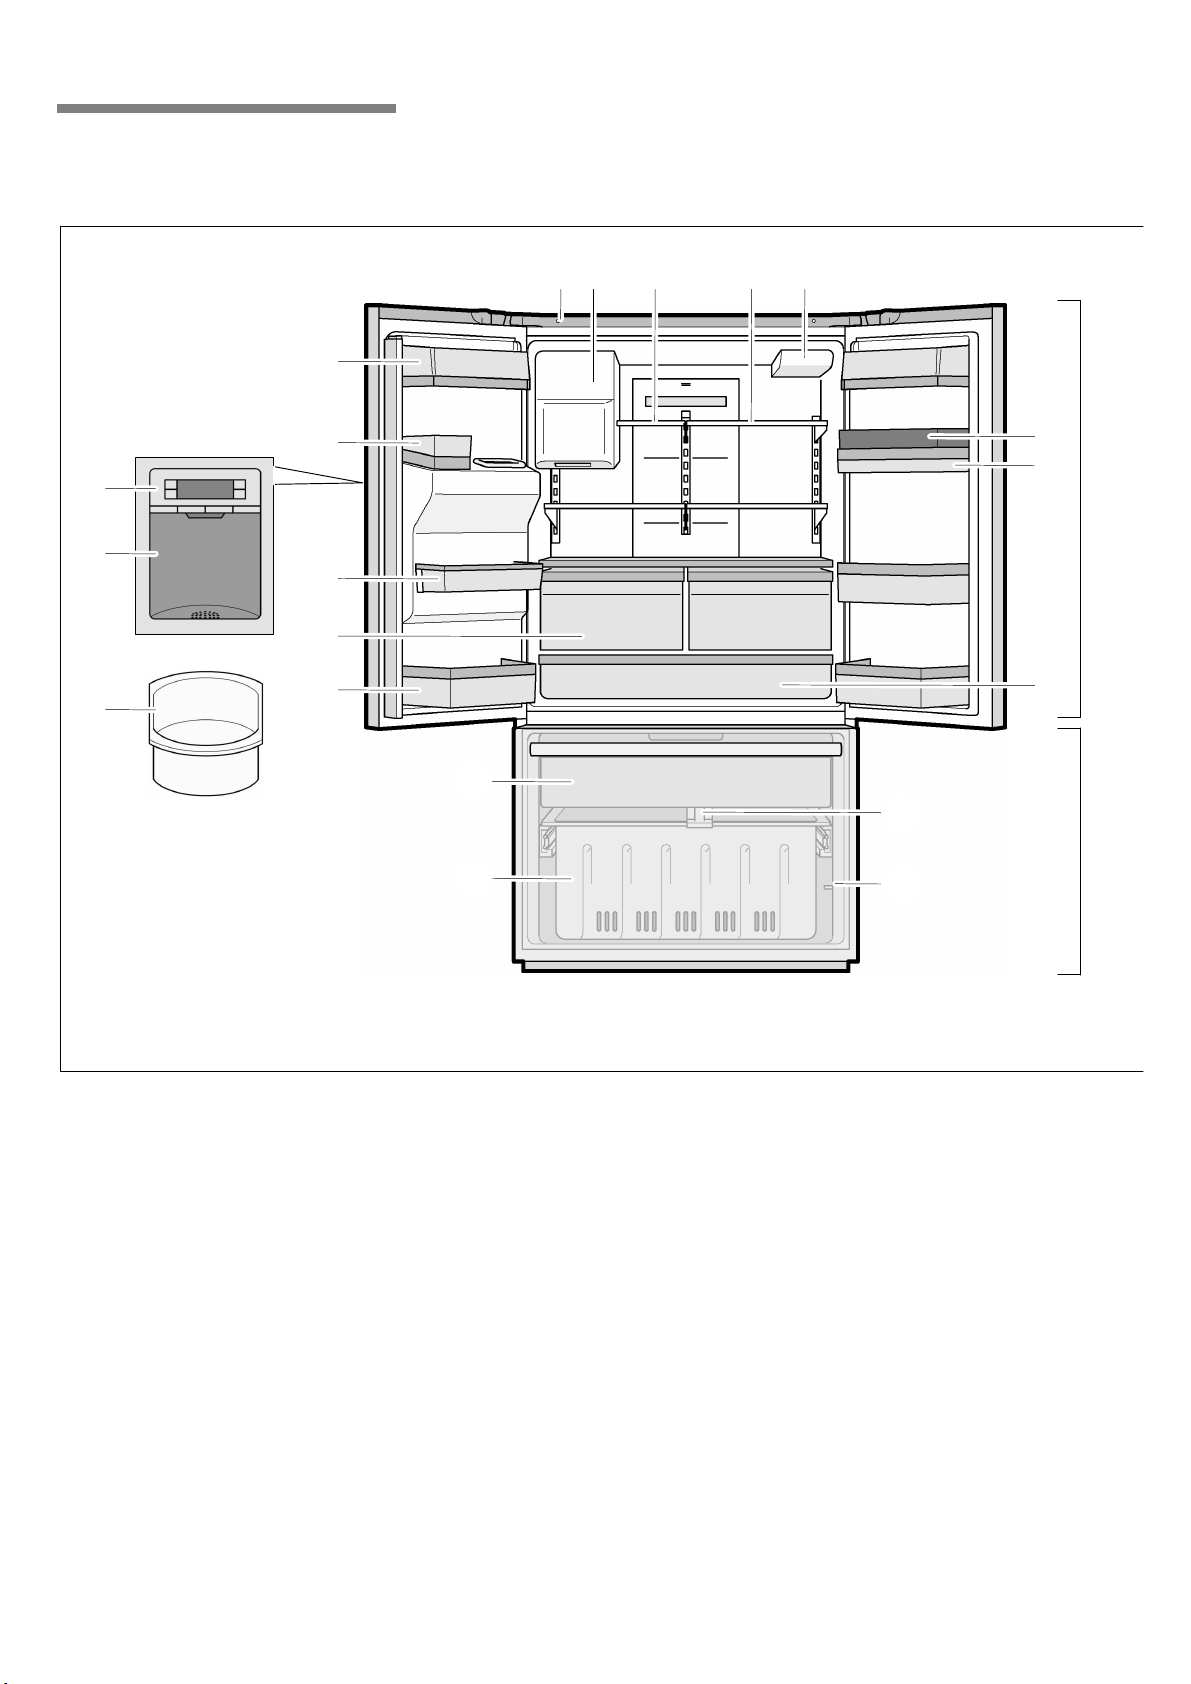
Getting to know your appliance
These operating and installation instructions apply to several models. The illustrations may differ from your particular
model.
19 16
20
1
18
17
en-us
2
3
4
6
7
5
8
9
12
10
11
15
14
A
13
B
A Refrigerator compartment
can be adjusted
between 35 °F (+2 °C)
and 46 °F (+8 °C)
B Freezer compartment
can be adjusted
between 5 °F (-15 °C)
and -7 °F (-22 °C)
1 Butter and cheese compartment
2 Can bin
3 Control and display panel
4 Ice and water dispenser
5 Ice storage bin
6 Door storage compartment
7 Vita Fresh compartment with LED
light
8 Removable door storage
compartment
9 Top freezer drawer
10 Bottom freezer drawer
11 Freezer compartment light switch
12 Freezer compartment divider
13 Deli drawer with LED light
14 Door storage compartment
15 Egg compartment
16 Water filter
17 Adjustable glass shelf
18 Small glass shelf
19 Ice maker/Ice cube container
20 Refrigerator compartment light
switch
11
Page 12
en-us
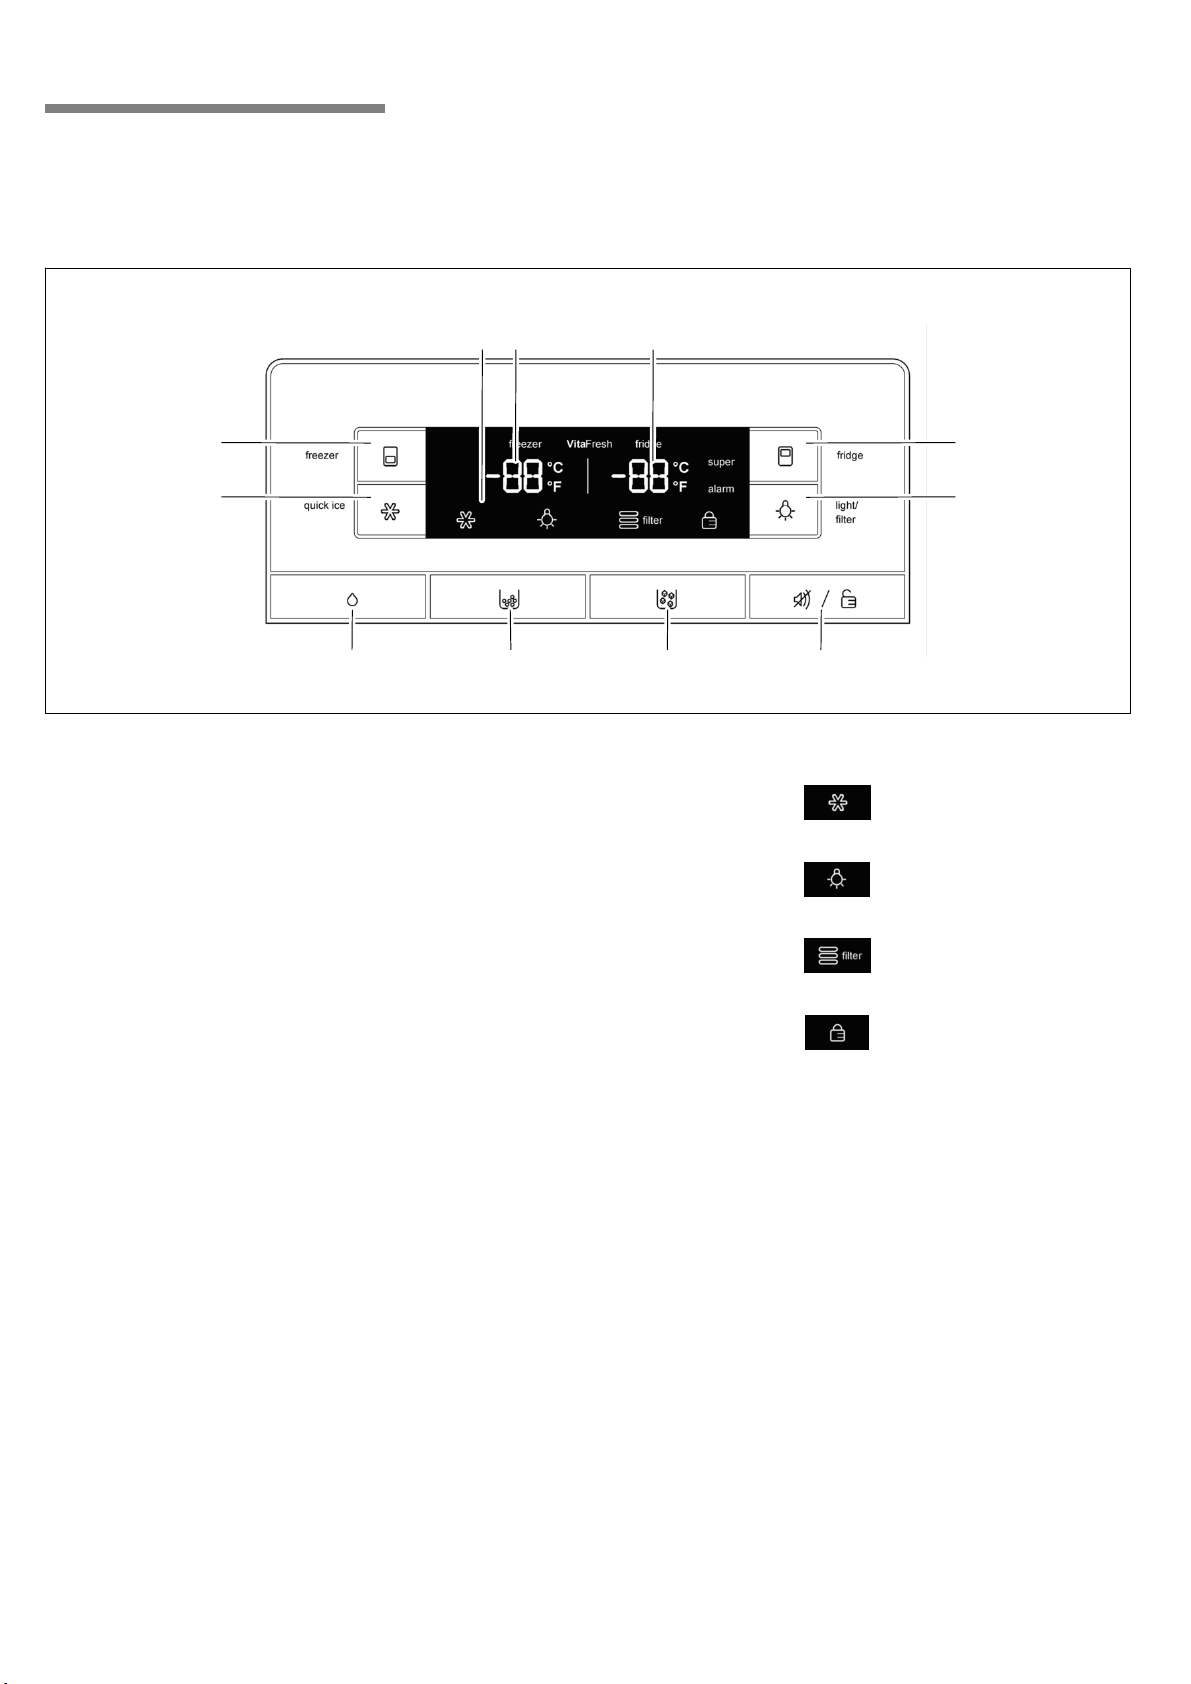
Control and display panel
The control and display panel on the left refrigerator door consists of a touch pad.
Touch the keypad to activate the corresponding function.
The light of the control and display panel goes out after approx. 1 min when no keypad was touched.
10
11 9
1
2 7
1 “freezer” button
Button for
S adjusting the freezer
compartment temperature
S switching the ”Super freeze”
function on/off.
2 ”quick ice” button
Quick ice cube production on/off
switch.
3 Water dispenser button
4 Crushed ice dispenser button
5 Ice cube dispenser button
6 ”alarm/lock” button
Button for
S switching the warning signal off
S switching panel lock on/off.
3 4 5 6
7 ”light/filter” button
Button for
S switching the ice and water
dispenser light on/off
S reset the filter indicator.
8 “fridge” button
Button for
S adjusting the temperature in the
refrigerator compartment
S switching the ”Super cool”
function on/off.
9 Refrigerator compartment
temperature display
Displays the temperature set for
the refrigerator compartment.
10 Freezer compartment
temperature display
Displays the temperature set for
the freezer compartment.
11 Symbols on the display panel
8
”quick ice”
Appears when the ”quick
ice” function is on.
”Light”
Appears when the ice and
water dispenser light is on.
”Water filter”
Displays the status of the
filter cartridge.
”Panel lock”
Appears when the panel
lock is on.
12
Page 13
Operating tips
Opening and closing the
refrigerator compartment
doors
The refrigerator compartment doors
can be opened and closed
independently.
The left refrigerator compartment door
has a foldaway door bar.
NOTICE
Risk of damage to the appliance!
The door bar could become
damaged if you attempt to close the
left refrigerator compartment door
when the door bar is not folded
back.
Before closing the refrigerator
compartment doors, make sure that
the door bar is folded at a right
angle to the door.
Switching on the
appliance
NOTICE
After installing the appliance, wait at
least 8 hours before plugging in the
appliance. The oil in the compressor
may have flowed into the
refrigeration system during
transport.
Connect the appliance plug to the
outlet.
After the appliance has been plugged
in, the refrigeration process will begin.
The interior light in the refrigerator
compartment switches on when the
door is open.
It will take several hours for the inside
of the appliance to reach the
temperatures set at the factory. Do not
place food in the appliance until these
temperatures are reached.
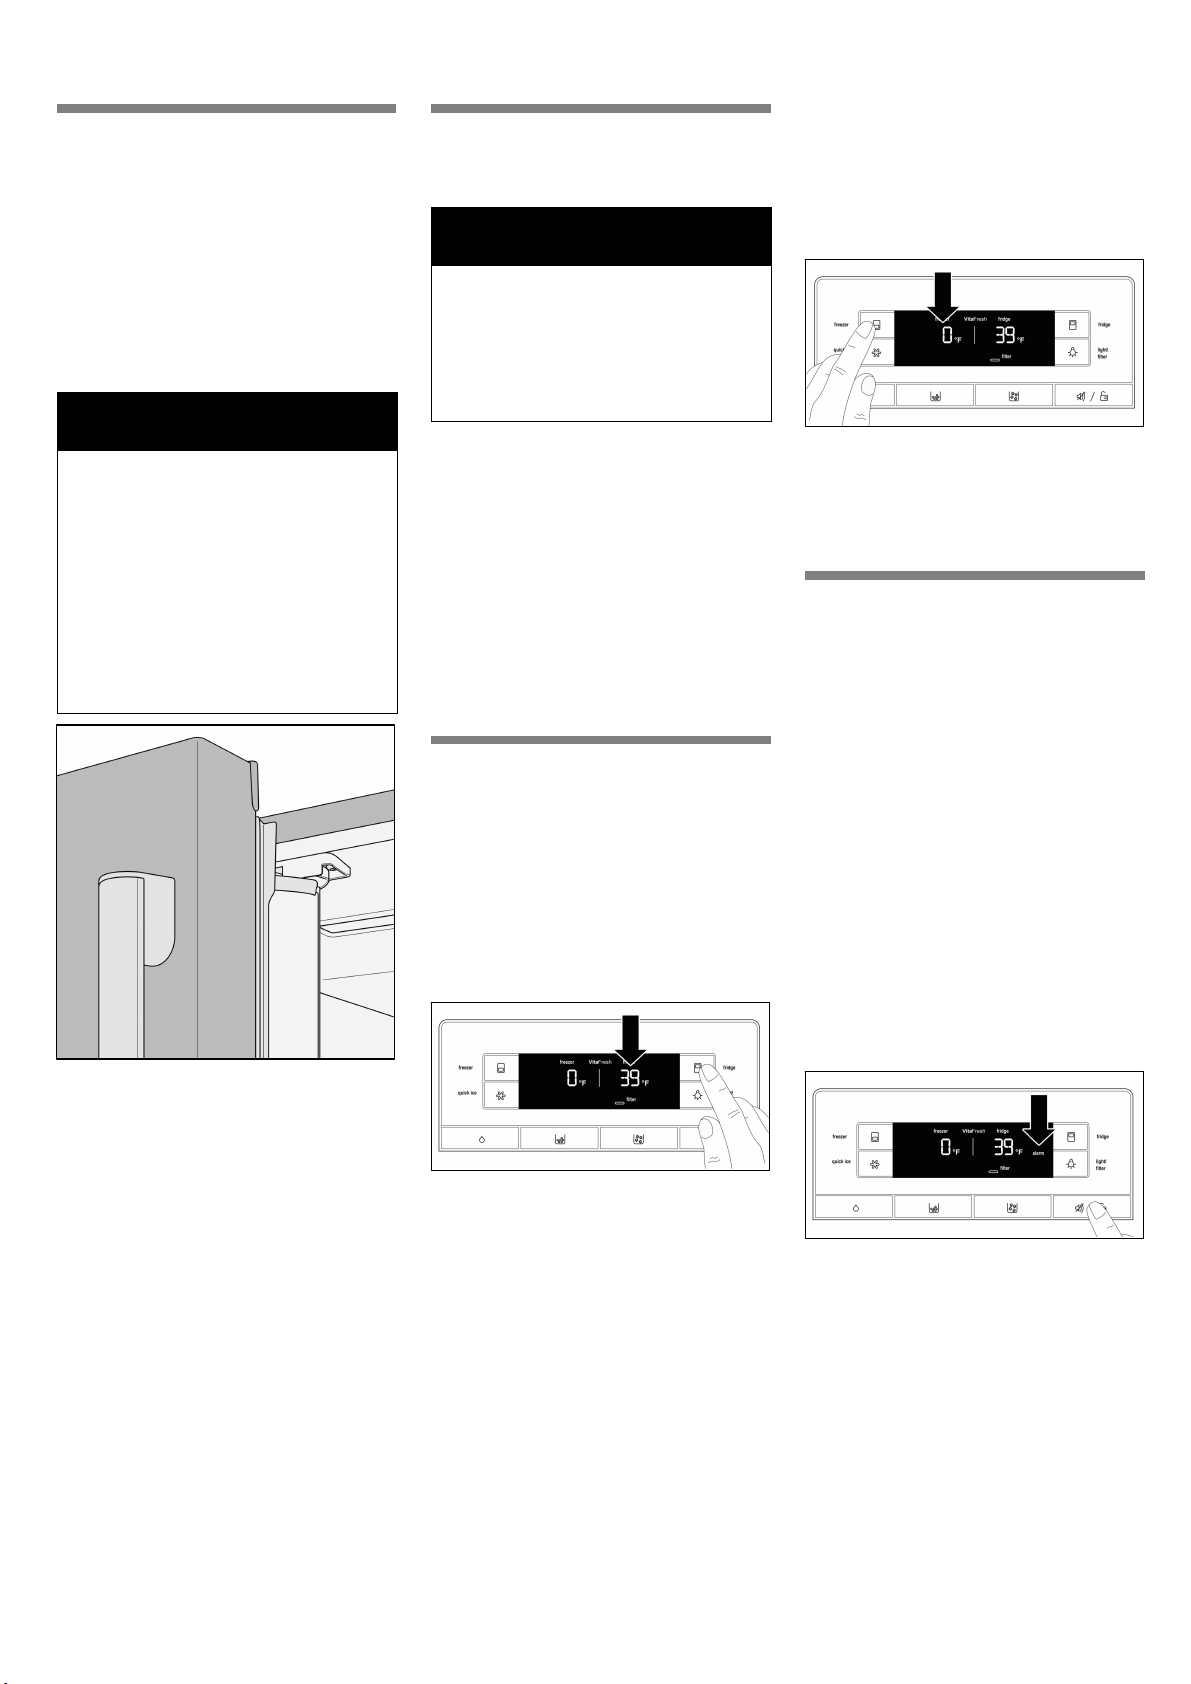
Setting the
temperature
en-us
Freezer compartment
(can be adjusted between
5 °F (-15 °C) and -7 °F (-22 °C))
Press the ”freezer” button until the
desired freezer compartment
temperature is set.
The most recent temperature value
will be stored.
We recommend a setting of 0 °F
(-18 °C).
Alarm function
The door warning signal sounds if the
temperature inside the appliance is
too high or one of the appliance doors
is open for more than three minutes.
The warning signal will sound three
times and will sound for one minute
each time it is triggered. There will be
a one-minute pause between signals.
When closing the left refrigerator
compartment door, the door bar
folds behind the right refrigerator
compartment door, forming a seal
between the refrigerator
compartment doors.
Refrigerator compartment
(can be adjusted between
35 °F (+2 °C) and 46 °F (+8 °C))
Press the ”fridge” button until the
desired refrigerator compartment
temperature is set.
The most recent temperature value
will be stored.
We recommend a setting of 39 °F
(+4 °C).
Perishable foods should not be stored
at temperatures higher than 39 °F
(+4 °C).
Refrigerator compartment
The word ”alarm” will appear on the
right on the display panel.
To switch off the warning signal:
Press ”alarm/lock” or close the
refrigerator compartment doors.
The word ”alarm” will blink on the
display panel until the temperature is
close to the set temperature.
13
Page 14

en-us
Freezer compartment
The word ”alarm” will appear on the
left on the display panel.
To switch off the warning signal:
Press ”alarm/lock” or close the
freezer compartment drawer.
The word ”alarm” will blink on the
display panel until the temperature is
close to the set temperature.
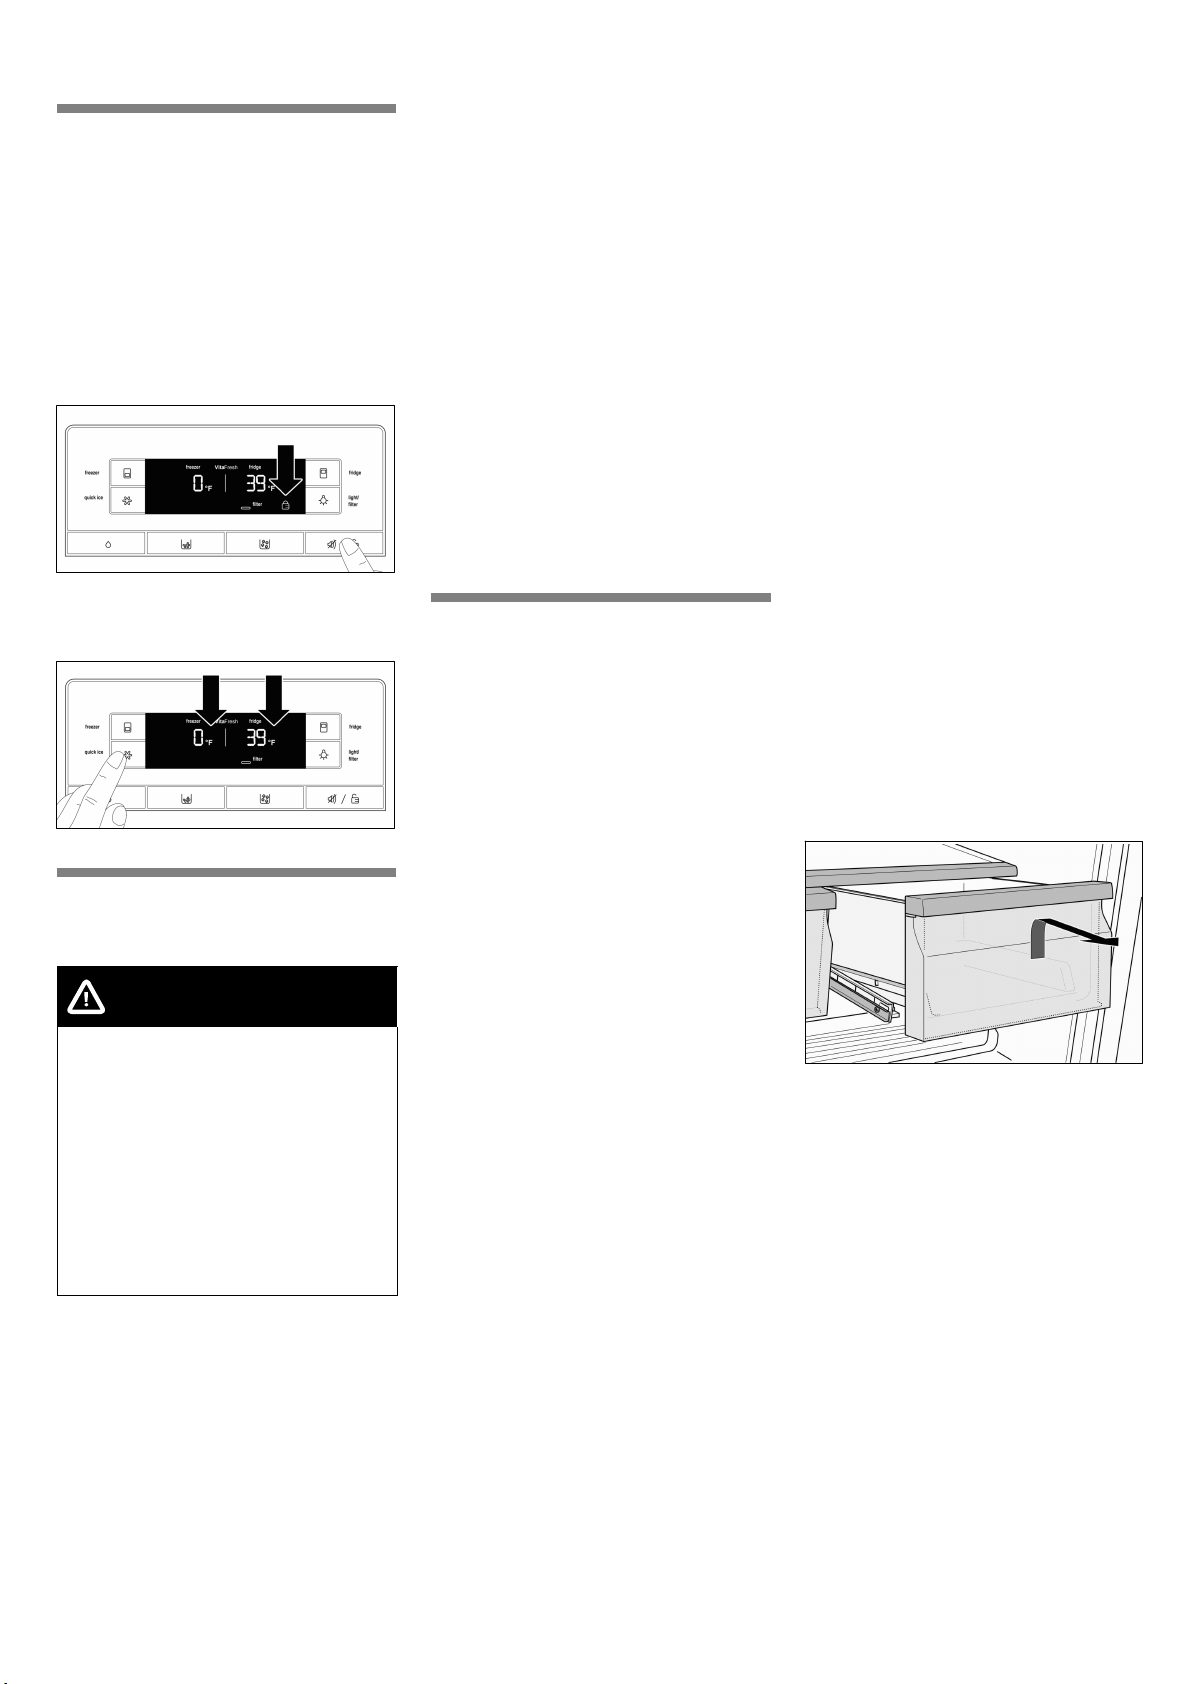
Panel lock
When the panel lock is activated, all of
the buttons on the control and display
panel are locked.
NOTICE
When the panel lock is activated,
use the ”alarm/lock” button to
switch off the warning signal.
To switch the panel lock on or off:
Press ”alarm/lock” for 2 seconds.
The ”Panel lock” symbol appears
when the panel lock is activated.
To switch on super cooling:
Press ”fridge” until ”super” appears
on the right on the display panel.
To switch off super cooling:
Press ”fridge”.
The word ”super” disappears on the
display panel. The temperature is
automatically set to 39 °F (+4 °C).
Super freezing
Food should be frozen as quickly as
possible in order to retain their
vitamins, nutritional value, appearance
and flavor.
To prevent an undesirable rise in
temperature when placing fresh food
in the freezer compartment, switch on
super freezing several hours
beforehand.
As a rule, 4 to 6 hours is adequate.
Allow for a minimum of 24 hours if
planning to use the maximum freezing
capacity.
Smaller quantities of food can be
frozen without super freezing.
To switch on super freezing:
Press ”freezer” until ”super” appears
on the left on the display panel.
quick ice
Use this function to accelerate the
production of ice cubes.
To switch on quick ice:
Press ”quick ice”.
The ”quick ice” symbol appears on
the display panel.
When the ice cube container is full,
quick ice automatically shuts off after
a few hours.
NOTICE
When quick ice is activated, the
power of the appliance is increased
temporarily. This increases its
energy consumption.
Water filter symbol
The symbol indicates the filter
cartridge's period of use.
Up to two months.
Up to four months.
Up to six months.
Super cooling
Super cooling cools the refrigerator
compartment down as low as possible
for approximately 6 hours. The
temperature is then automatically
reset to 39 °F (+4 °C).
Super cooling is particularly
recommended for the following:
S Before placing large quantities of
food in the refrigerator
compartment.
S To cool drinks quickly.
14
To switch off super freezing:
Press ”freezer”.
The word ”super” disappears on the
display panel. The temperature is
automatically set to 0 °F (-18 °C).
NOTICE
Super freezing switches off
automatically after approximately
2 days.
After six months,
the symbol flashes.
Replace the filter
cartridge.
When the appliance is turned off, the
water filter symbol is reset.
To reset the water filter symbol after
replacing the filter cartridge:
Press and hold the ”light/filter” button
for 3 seconds.
The symbol stops flashing.
Page 15
en-us
Temperature unit
The temperature can be displayed in
degrees Fahrenheit (°F) or
Celsius (°C).
After the appliance is switched on, the
temperature appears in degrees
Fahrenheit (°F).
To set the temperature unit:
Press ”alarm/lock” for 2 seconds.
The ”Panel lock” symbol appears.
Press and hold ”quick ice” for
15 seconds until the temperature unit
switches.
Refrigerator
compartment
WARNING
Risk of explosion!
Never store products containing
flammable propellants (such as
spray cans) or explosive or easily
combustible substances in the
appliance.
Bottles containing a high
percentage of alcohol must be
tightly sealed and stored in an
upright position.
Using the refrigerator
compartment
For storage of ready meals, cakes
and pastries, canned food,
condensed milk, cheese, spreads,
sauces, dips and eggs.
Follow these guidelines
when storing food:
- Allow warm food and drinks to cool
down outside the appliance.
- Place food in airtight containers to
prevent it from losing its flavor or
drying out.
- To prevent poor air circulation in
the appliance, do not block
ventilation openings with food.
- Avoid contact of oil and grease with
plastic parts and door seal.
Vita Fresh
compartment
(not included on all models)
The temperature inside the Vita Fresh
compartment is kept at almost 32 °F
(0 °C). The low temperature provides
optimum storage conditions for
perishable food.
Food can be stored much longer in
the Vita Fresh compartment than in
the regular refrigerator compartment
without losing its freshness.
The Vita Fresh compartment is
covered by a special humidity filter.
The special humidity filter optimizes
the humidity in the Vita Fresh
compartment. Depending on how full
the Vita Fresh compartment is, the
humidity can reach up to 90 percent
which is ideal for all garden and field
products such as vegetables,
lettuces, herbs and fruit.
Vita Fresh is suitable for:
Basically any food that is fresh and is
to be kept fresh longer, such as meat
and meat products, fresh fish,
seafood, milk, butter, soft cheese,
cottage cheese, fruit and vegetables.
Vita Fresh is not suitable for:
Fruit and vegetables sensitive to cold,
such as tropical fruits, avocados,
papayas, passion fruit, eggplant,
cucumbers, bell peppers as well as
fruit that has to ripen, green tomatoes
and potatoes.
When buying food, please
note:
The ”freshness at purchase” is
important for the storage life of your
food. In general, the fresher the
products are when placed in the
Vita Fresh compartments, the longer
they will stay fresh. Therefore, when
purchasing food, always check how
fresh it is.
Removing the Vita Fresh
drawers
1. Pull out the Vita Fresh drawers as
far as possible.
2. Lift up the front of the Vita Fresh
drawers and pull them out.
3. Inserting the Vita Fresh drawers:
Insert the Vita Fresh drawers into
the rail and push toward the back.
The refrigerator compartment
temperature can be adjusted between
35 °F (+2 °C) and 46 °F (+8 °C).
We recommend a setting of 39 °F
(+4 °C).
Perishable foods should not be stored
at temperatures higher than 39 °F
(+4 °C).
15
Page 16
en-us
Deli drawer
The temperature in the deli drawer is
kept at a constant temperature just
below freezing. This provides
optimum storage conditions for meat
and meat products, fish, seafood,
dairy products as well as hard and
soft cheese.
NOTICE
Never store foods that are sensitive
to cold in the deli drawer.
Removing the deli drawer
1. Pull out the deli drawer as far as
possible.
2. Lift up the front of the deli drawer
and pull it out.
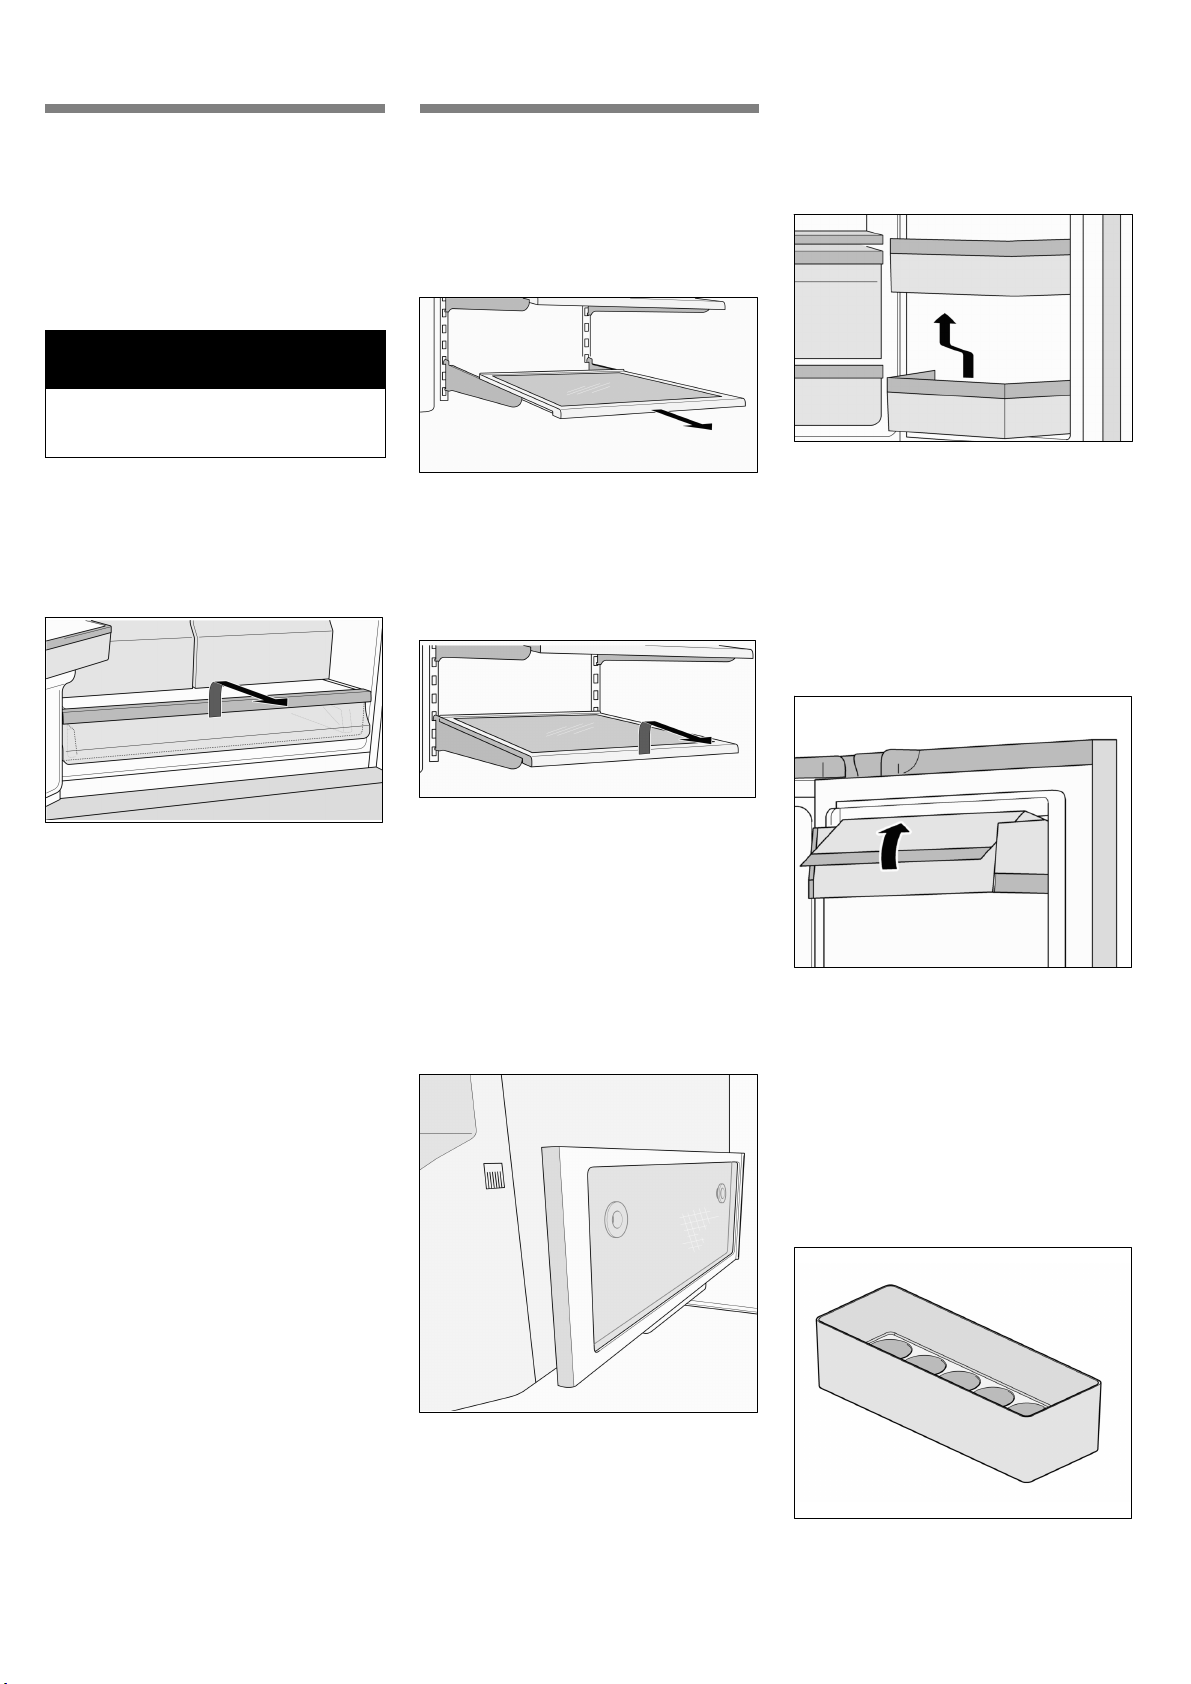
Variable interior
design
Glass shelves
The adjustable glass shelves can be
removed.
You can pull out the adjustable glass
shelves and place them at varying
heights.
Removing a glass shelf
Lift up and pull the shelf toward you.
Unhook and then remove the shelf.
Door storage compartments
To remove door storage
compartments:
Lift door compartment and take it out.
To install door storage
compartments:
Place the compartment above the
bracket at the desired height and
press down.
Butter and cheese
compartment
Raise the cover on the butter and
cheese compartment.
3. Inserting the drawer: Insert the deli
drawer into the rail and push
toward the back.
Installing the glass shelf
Lift up the front of the shelf and insert
the hooks into the openings at the
desired height. Lower the front of the
shelf.
Small top glass shelf
The glass shelf can be removed and
placed in the holder underneath the
ice maker. This provides room to
place taller items such as tall bottles
next to the ice maker.
To remove the butter and cheese
compartment:
Lift up the compartment and take it
out.
To install the butter and cheese
compartment:
Place the compartment above the
bracket at the desired height and
press down.
Egg compartment
16
Page 17
en-us
Freezer compartment
WARNING
Risk of explosion!
Never store products containing
flammable propellants (such as
spray cans) or explosive or easily
combustible substances in the
appliance.
The freezer compartment temperature
can be adjusted between 5 °F (-15
°C) and -7 °F (-22 °C).
We recommend a setting of 0 °F
(-18 °C).
NOTICE
Make sure that the freezer
compartment drawer is always kept
closed. The frozen food will thaw if
the freezer compartment drawer is
open. The freezer compartment will
become covered with thick ice. Also:
Energy will be lost due to high
power consumption.
When the freezer compartment door
is closed, low pressure occurs
inside the compartment.
If you cannot reopen the freezer
compartment door right away, wait
two to three minutes until the low
pressure has adjusted itself.
Use the freezer compartment
to
- store deep-frozen food
- freeze food
- make and store ice cubes.
Freezing food
Freeze fresh and undamaged food
only. Separate food to be frozen from
food that is already frozen. Place food
in airtight containers to prevent it from
losing its flavor or drying out.
How to wrap food correctly:
1. Place food in packaging.
2. Press out any air.
3. Seal the packaging.
4. Label the package with the
contents and date.
Items not suitable for wrapping food:
Wrapping paper, greaseproof paper,
cellophane, garbage bags and used
shopping bags.
Items suitable for wrapping food:
Plastic film, polyethylene blown film,
aluminum foil and freezer cans.
These products can be purchased
from your retailer.
Items suitable for sealing wrapped
food:
Rubber bands, plastic clips, string,
cold-resistant adhesive tape or similar
items.
Bags and polyethylene blown film can
be sealed with a film sealer.
Storage life of frozen food
The storage life depends on the type
of food. At a temperature setting of
0 °F (-18 °C):
S Fish, sausage, ready meals and
cakes and pastries:
up to 6 months
S Cheese, poultry and meat:
up to 8 months
S Fruit and vegetables:
up to 12 months.
Purchasing and
storing deep-frozen
food
Follow these guidelines when
purchasing deep-frozen food:
S Make sure the packaging is not
damaged.
S Check the ”sell by” date.
S The temperature of the
supermarket freezer should be
lower than 0 °F (-18 °C). If not, this
shortens the storage life of the
frozen food.
S Pick up deep-frozen food last when
shopping. Wrap in newspaper or
place in a cold bag and take
home.
S At home, immediately place
deep-frozen food in the freezer
compartment. Use the deep-frozen
food before the ”sell by” date.
Thawing frozen food
CAUTION
Risk of poisoning!
Do not refreeze food that is
beginning to thaw or has already
thawed. The food cannot be
refrozen until it has been prepared
(boiled or fried). Do not store these
refrozen products for the maximum
storage period.
Depending on the type of food and its
intended use, frozen food can be
thawed as follows:
S at room temperature
S in the refrigerator
S in an electric oven with/without
fan-assisted hot air
S in the microwave.
17
Page 18

en-us
Freezer compartment
features
Top freezer drawer
The freezer drawer can be removed.
To remove the top freezer drawer:
1. Pull out the top freezer drawer as
far as possible.
2. Carefully pull out the clips on both
sides and lift up the front of the
freezer drawer.
3. Pull out the freezer drawer.
Bottom freezer drawer
The freezer drawer can be removed.
To remove the bottom freezer
drawer:
Lift the freezer drawer up and out.
Ice and water
dispenser
The following may be dispensed as
necessary:
S cooled water,
S crushed ice,
S ice cubes.
WARNING
Risk of injury from broken glass!
Never use fragile receptacles for
dispensing water or ice.
WARNING
Risk of injury from rotating crusher
blades!
Never reach into the ice cube
dispenser opening.
NOTICE
Risk of damage to the appliance!
Do not place bottles or food in the
ice cube container in order to cool
them quickly. The ice maker may
become blocked and damaged.
When switching on the
appliance, note the following
The ice and water dispenser only
works when the appliance is
connected to the water supply.
After the appliance has been switched
on, it will take 24 hours before the first
batch of ice cubes are ready.
When the appliance is connected, air
bubbles will still be in the lines.
Extract the drinking water and discard
until water can be dispensed without
bubbles. Discard the first five glasses
of water.
When using the ice maker for the first
time, do not use the first 30 to 40 ice
cubes for reasons of hygiene.
Operating the ice maker
Once the freezer compartment has
reached its freezing temperature,
water flows into the ice maker and
freezes into ice cubes. The ice cubes
are automatically discharged into the
ice cube container when they are
ready.
The sides of the ice cubes may
occasionally stick together. They
usually break away from each other
as they move to the dispenser
opening.
Ice making switches off automatically
when the ice cube container is full.
The ice maker can make
approximately 100 ice cubes within
24 hours when ice cubes are
discharged several times during the
day.
As the ice cubes are being made, the
sound of the buzzing water valve, the
water flowing into the ice storage bin
and the falling ice cubes can be
heard.
18
Page 19

en-us
Drinking water quality
CAUTION
The water filter included with the
appliance only filters out particles
from the supplied water and does
not filter out bacteria or microbes.
All materials used in the water
dispenser are odorless and tasteless.
If the water has an aftertaste, this may
be caused by:
S Mineral and chlorine content in the
drinking water
S Materials from which the domestic
water line or connection line are
made
S Freshness of the drinking water. If
water has not been dispensed for
an extended period of time, the
water may have a ”stale” taste.
In this case, dispense
approx. 15 glasses of water and
discard.
The taste and smell of the water can
be improved by installing the included
filter cartridge at the water intake
point.
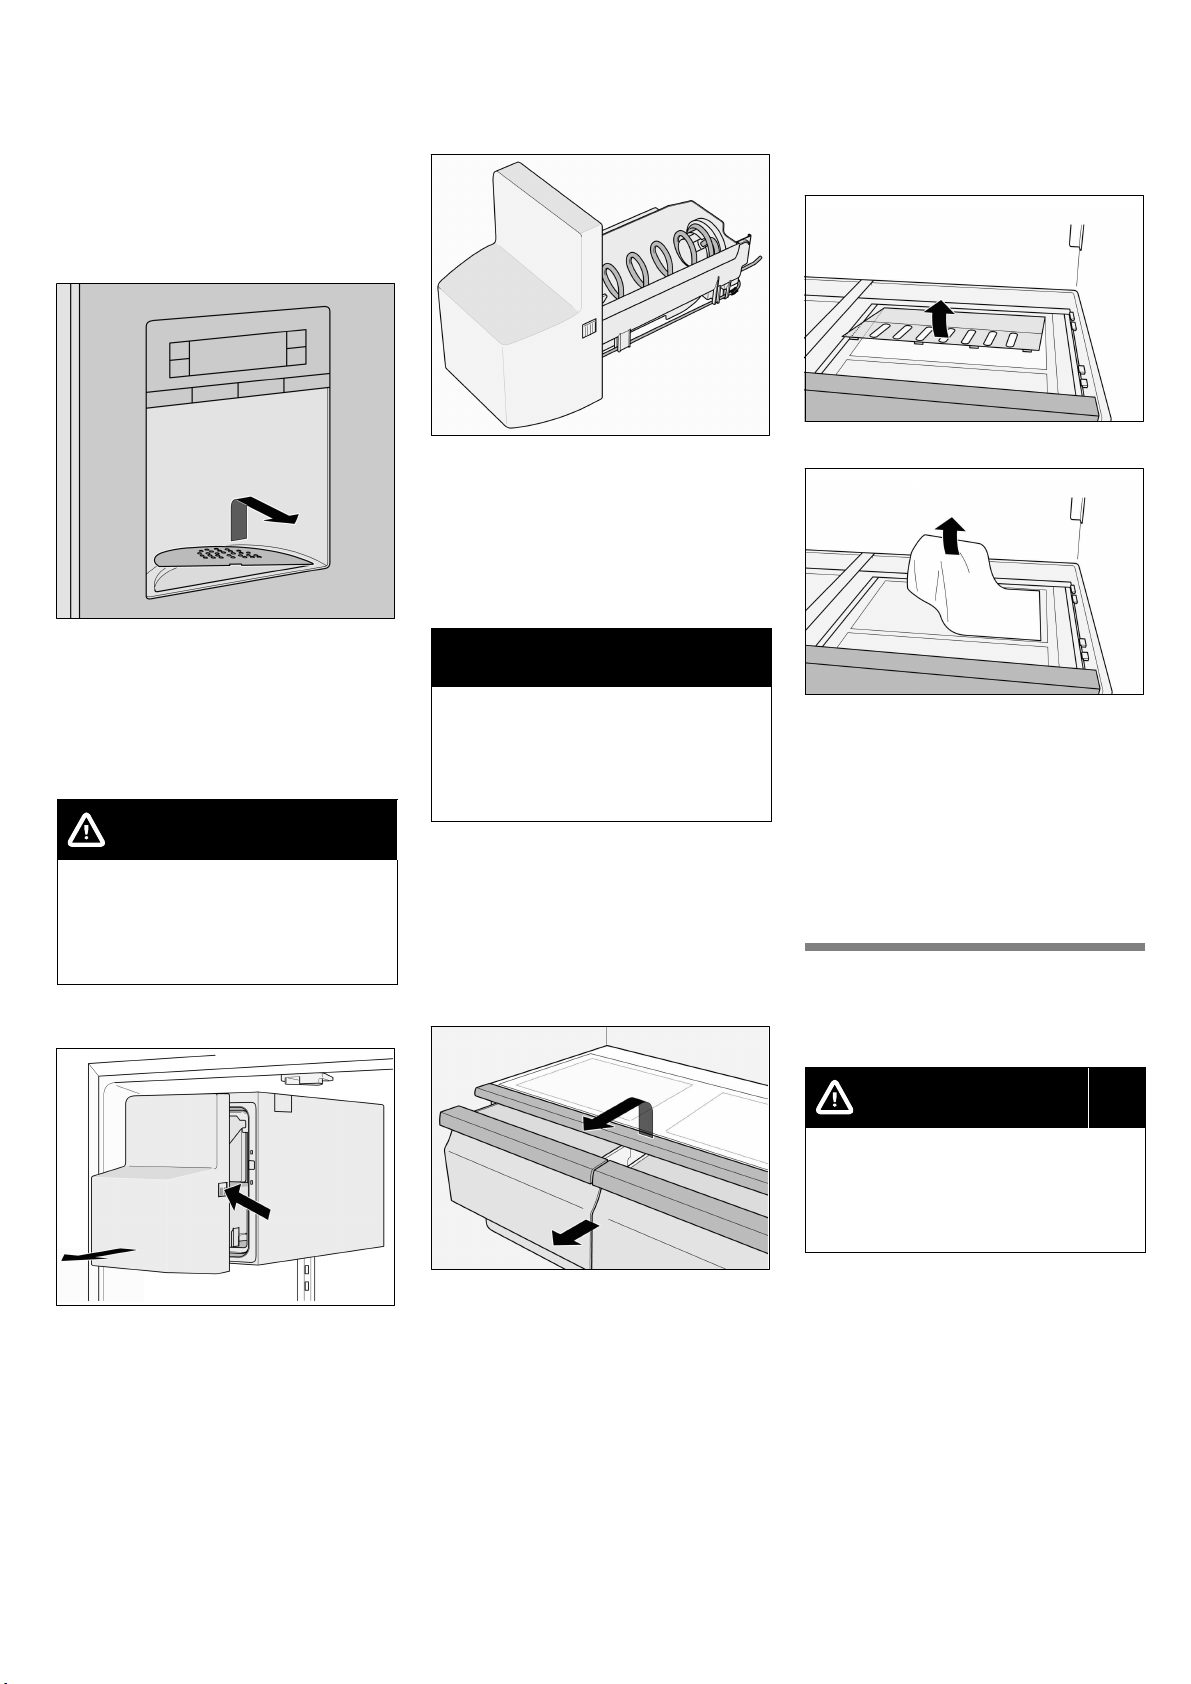
Dispensing water
1. Hold an appropriate receptacle
under the ice and water dispenser.
2. Keep the water dispenser button
pressed until the desired amount
of water is in the receptacle.
Dispensing ice
NOTICE
Keep the ice cube or crushed ice
button pressed and then stop once
the desired amount of ice is in the
receptacle. Ice in the ice cube
dispenser opening may otherwise
overfill the receptacle or block the
ice cube dispenser opening.
If crushed ice was dispensed before
ice cubes are dispensed, some
crushed ice may still be in the ice
cube dispenser opening. The
crushed ice will be dispensed with
the first batch of ice cubes.
1. Hold an appropriate receptacle
under the ice and water dispenser.
2. Keep the ice cube or crushed ice
button pressed until the desired
amount is in the receptacle.
Ice storage bin
The ice storage bin stores a reserve
supply of ice cubes the freezer
compartment. The ice storage bin fits
perfectly into the ice and water
dispenser due to its shape.
Disconnecting the ice maker
NOTICE
Make sure to shut off the water
supply to the appliance a few hours
before disconnecting the ice maker.
If ice cubes will not be dispensed for
more than 1 week (such as due to
vacation), temporarily disconnect the
ice cube maker to prevent the ice
cubes from freezing together.
1. Press the release button and
remove the ice cube container.
2. Press the button for 3 seconds
(led lamp is off) behind the ice
cube container - the ice maker is
deactivated.
Tip:
The water from the water dispenser is
cooled to a palatable temperature. If
you would like colder water, place ice
cubes in the glass before dispensing
the water.
3. Empty and clean out the ice cube
container.
4. Push the ice cube container all the
way back onto the supports until it
locks into position.
Reactivating the ice maker:
S Press the button for 3 seconds
(led lamp is on) behind the ice
cube container - the ice maker is
activated.
19
Page 20
en-us
Water filter
CAUTION
Do not use the appliance in places
where the water quality is unsafe or
unknown without taking suitable
disinfection precautions before and
after filtering.
A filter cartridge for filtering particles
can be obtained from customer
service.
The water filter should be replaced
after 6 months at the latest.
After 6 months, the flashing water
filter symbol prompts you to replace
the filter cartridge (see ”Water filter
symbol”).
Other connection
requirements
Do not install the filter cartridge if the
water pressure exceeds 120 psi
(8.2 bar).
If the water pressure exceeds 80 psi
(5.5 bar), a pressure reducing valve
must be installed.
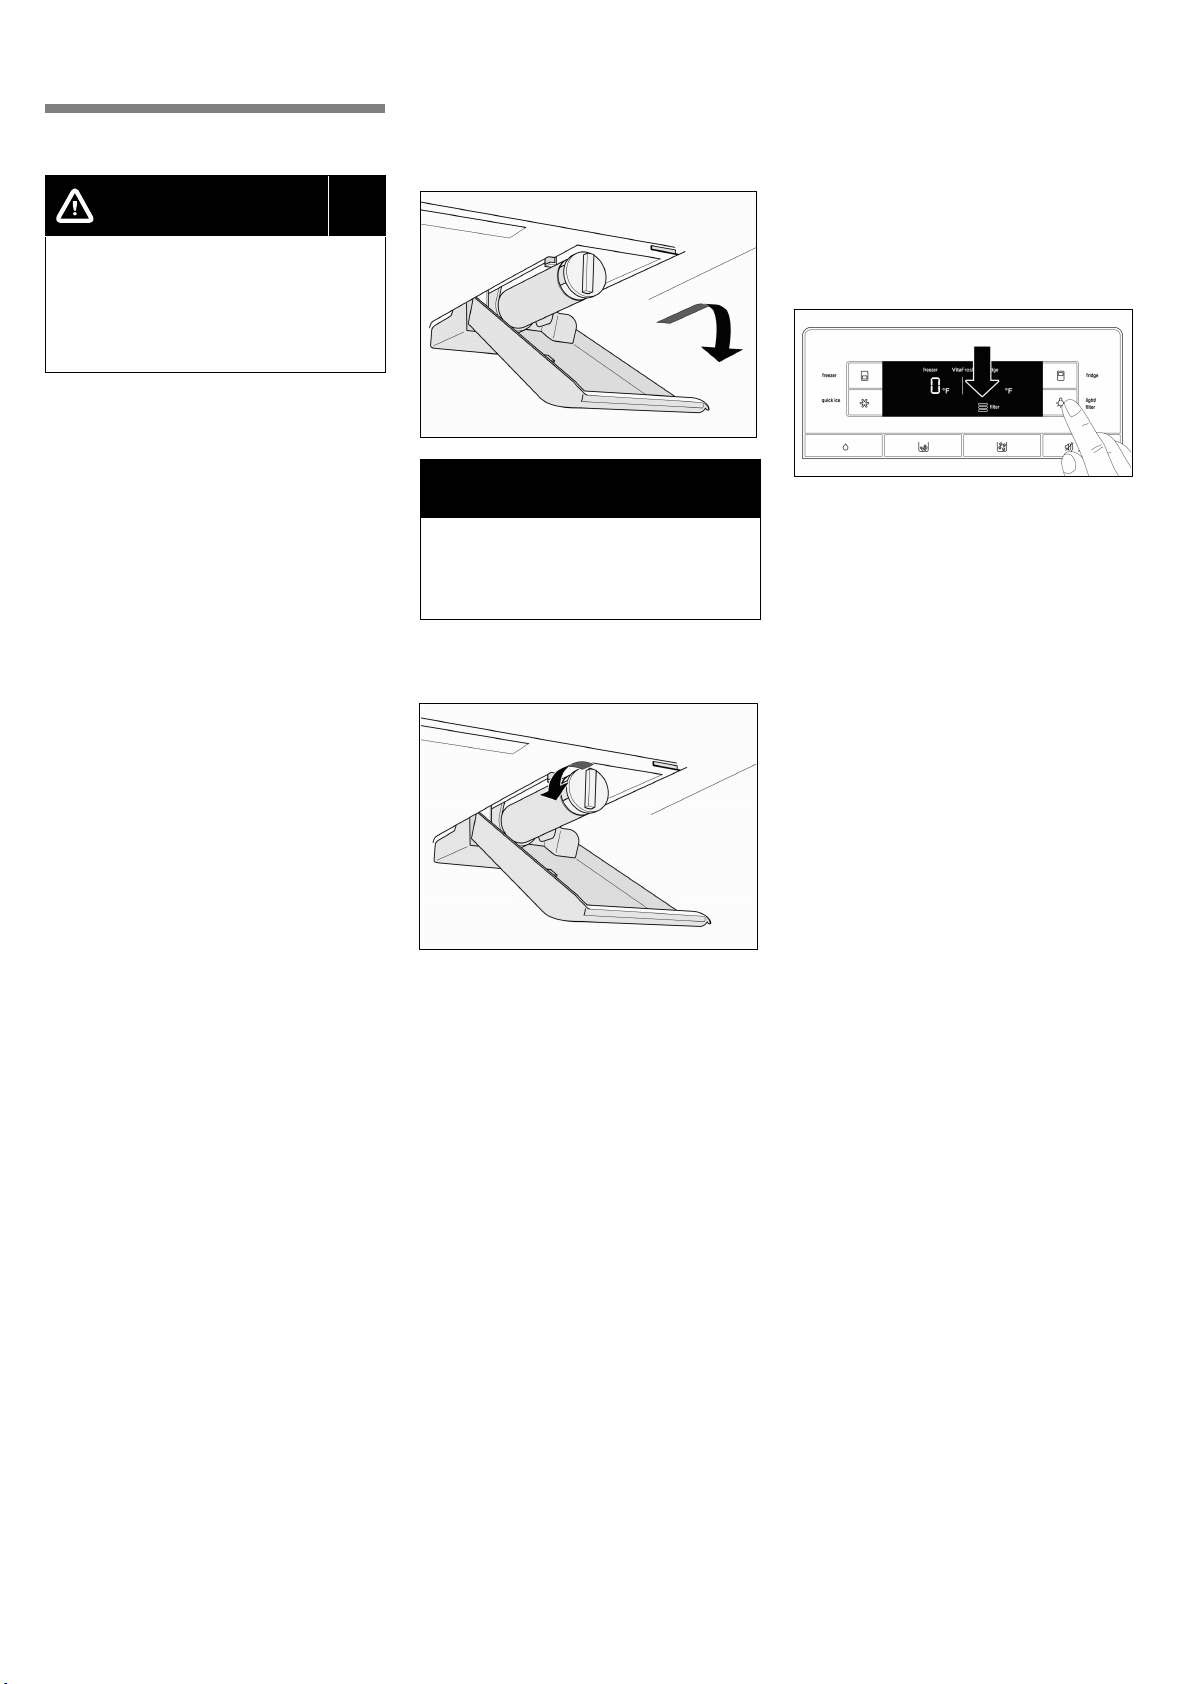
Installing and replacing the
filter cartridge
1. Pull out and then lower the cover.
NOTICE
Remove the filter cartridge carefully!
The water system is under low
pressure after use.
2. Gently rotate the filter cartridge or
bypass cap counterclockwise by
90° and remove.
8. Pour out the water in the used filter
cartridge. The filter cartridge can
be disposed of in the household
garbage.
9. Press and hold the ”light/filter”
button for 3 seconds. The water
filter symbol is reset. The symbol
stops flashing. The new filter
cartridge is activated.
Important note
S Rinse the water system thoroughly
if the appliance has not been used
for a long period of time, or the
water has an unpleasant taste or
smell. To do this, extract water
from the water dispenser for
several minutes. Replace the filter
cartridge if the unpleasant taste or
smell persists.
S The ice maker and water
dispenser can be used without the
filter cartridge. In this case, replace
the water filter with the bypass cap.
3. Take the new filter cartridge out of
the packaging.
4. Insert the new filter cartridge and
gently rotate it clockwise by 90°
until it clicks into place.
5. Raise the cover up and lock it in
place.
6. Turn on the water supply to the
appliance.
7. Draw about a gallon of water from
the water dispenser. This will
remove air from the water system.
20
Page 21

Specification and performance data sheet
For filter model: 9000 077 095 and 9000 077 096
Using replacement cartridge 9000 077 104
The model has been tested by NSF
International in accordance with
ANSI/NSF Standards 42 & 53 and
certified for the reduction of the
substances listed below.
The system was tested and certified on model 9000 077 095 and 9000 077 096 by NSF International in
accordance with ANSI/NSF Standard 53 for the reduction of cysts and turbidity, as well as in accordance
with ANSI/NSF Standard 42 for the reduction of the taste and odor of chlorine.
Rated particulate class: I
Rated service life: 739.68 Gallons (2,800 Liters)
The concentration of the indicated
substances dissolved in the water
entering the system was reduced to a
concentration less than or equal to
the permissible limit for water
discharged from the appliance as
specified in NSF/ANSI 42 and 53.
en-us
Note:
Even though the tests were
conducted under standard laboratory
conditions, actual performance may
vary.
Substance
Cysts * 122,500 cysts/l Minimum
Turbidity 10.8 NTU 11 ± 1 NTU 98.8 < 0.16 NTU 0.5 NTU 95.5 % J-00058972
Nominal
Particulate
Class I
w 0.5 to < 1 μm
Chlorine taste
and odor
* Based on the use of Cryptosporidium parvum oocysts.
Application guidelines/Water supply
parameters:
Water pressure 30 - 120 psi
Water temperature 33 °F - 100 °F
Service flow 0.75 gpm (2.83 lpm)
S The system is to be installed and
operated according to the
guidelines recommended by the
manufacturer.
S Change the filter every 6 months.
S Rinse new filter thoroughly for
5 minutes.
Average influent NSF specified
challenge
concentration
50,000 cysts/l
13,666,666
pts/ml
2.0 mg/l 2.0 mg/l
At least
10,000
particles/ml
±10 %
DO NOT use this product with water
that is microbiologically unsafe or of
unknown quality without adequate
disinfection before or after
(207 – 827 kPa)
connection to the system. Systems
certified for cyst reduction may be
used in disinfected water that may
(0.6 °C – 38 °C)
contain filterable cysts.
Average
reduction
in %
99.99 < 1 cyst/l N/A
99.00 143,333 pts/ml N/A
97.5 < 0.05 mg/l N/A
Average
product water
concentration
Max
permissible
product water
concentration
NSF
reduction
requirements
w 99.95 %
w 85 %
w 50 %
NSF test
report
J-00056513
J-00056506
J-00056501
The entire system (except the
disposable cartridge) is covered by a
one-year warranty. The disposable
cartridge is covered by warranty for
material and processing defects only.
The service life of the disposable filter
is not under warranty, since the
service life depends on local water
conditions.
More detailed information on spare
part prices is available from your local
appliance dealer or parts supplier.
Manufactured by:
Cuno Engineered Products
1000 Apollo Road
Eagan, MN 55121-2240 U.S.A
S More detailed information can be
found on the warranty card.
21
Page 22
en-us
Energy-saving tips
S Install the appliance in a dry, well
ventilated room, but not in direct
sunlight and not near a heat
source (radiator, stove, etc.). Use
an insulating plate, if required.
S Allow warm food and drinks to cool
down before placing in the
appliance.
S When thawing frozen food, place it
in the refrigerator compartment.
The low temperature of the frozen
products cools the food in the
refrigerator.
S Open and close the appliance
doors as quickly as possible.
Operating noises
Normal noises
Humming - refrigerating unit is
running. The fan in the circulating air
system is running.
Bubbling, whirring or gurgling noises refrigerant is flowing through the
tubing or water is flowing into the ice
maker.
Clicking - motor is switching on or off.
The solenoid valve at the water
connection is opening or closing.
Rumbling - ready ice cubes from the
ice maker are falling into the ice cube
container.
Solving simple noise
problems
The appliance is not level
Align the appliance using a level. Use
the height-adjustable feet or place
something under the feet.
The appliance is touching adjacent
units or appliances
Move the appliance away from
adjacent units or appliances.
Loose or sticking drawers, baskets
or storage areas
Check the removable parts and, if
required, reinsert them.
Receptacles are touching each other
Move bottles or receptacles slightly
away from each other.
Defrosting
Freezer compartment
The fully automatic Nofrost system
ensures that the freezer compartment
remains free of ice. Defrosting is no
longer required.
Refrigerator compartment
Defrosting takes place automatically.
The condensation runs through the
drainage hole into an evaporation pan
at the rear of the appliance.
Switching off and
disconnecting the
appliance
Switching off the appliance
Unplug the appliance or switch off the
fuse.
Disconnecting the appliance
If the appliance is not used for an
extended period of time:
1. It is imperative that you disconnect
the water supply to the appliance
for a few hours before switching off
the appliance.
2. Remove all food from the
appliance.
3. Unplug the appliance.
4. Remove and dispose of the filter
cartridge.
5. Empty and clean the ice cube
container.
6. Clean the appliance interior (see
”Cleaning the appliance”).
To prevent odors, leave the appliance
doors open.
Cleaning
WARNING
Risk of electric shock!
Unplug the appliance or switch off
the fuse before cleaning the
appliance.
CAUTION
To avoid personal injury or damage
to property, observe the following:
Never use a steam cleaner to clean
the appliance.
Do not use abrasive or acidic
cleaning agents or solvents.
Wipe lights and the control and
display panel with a damp cloth
only. Do not let water used for
cleaning drip into the lights or onto
the control and display panel.
Do not let cleaning water run into
the drainage hole in the
evaporation area.
Never clean shelves and containers
in a dishwasher. The parts may
warp.
Cleaning the appliance
The Vita Fresh compartments and deli
drawer can be removed for cleaning.
1. Unplug the appliance or switch off
the fuse.
2. Remove all food from the
appliance and store in a cool
location.
3. Clean the appliance with a soft
cloth, using lukewarm water and a
small amount of pH-balanced
dishwashing liquid.
4. Rub dry when done.
5. Wipe the door seal with clear water
only and then thoroughly wipe dry.
6. After cleaning, reconnect to switch
on the appliance.
22
Page 23
Cleaning the water collecting
tray
Spilled water collects in the water
collecting tray.
Remove the strainer to empty and
clean. Wipe out the water collecting
tray with a sponge or absorbent cloth.
2. Empty the ice cube container and
clean with lukewarm water.
en-us
3. Reach between the openings of
the cover, carefully unhook the
front 4 notches and pull out the
cover.
Cleaning the ice cube
container
Ice cubes will shrink, have a stale
taste and stick together if they have
not been dispensed for an extended
period of time.
CAUTION
Risk of injury!
A fully filled ice cube container is
very heavy. Use caution when
removing the ice cube container.
1. Press the release button and
remove the ice cube container.
3. Thoroughly dry the container and
screw conveyor to prevent new ice
cubes from sticking.
Inserting the ice cube container
4. Push the ice cube container all the
way back onto the supports until it
locks into position.
NOTICE
If the container cannot be pushed all
the way back, twist the screw
conveyor slightly or remove any ice
cubes that may have stuck to the
insertion area.
Removing special humidity
filter
1. Pull out Vita Fresh drawers by
approx. 4 inches (approx. 10 cm).
2. Flip up the glas plate above the
Vita Fresh drawers and take them
out.
4. Remove the special humidity filter.
5. Clean the special humidity filter
with lukewarm water and let it dry.
6. Insert the special humidity filter.
7. Reattach the rear of the cover,
move it down and make sure the
front part engages.
8. Insert the glass plate and close the
Vita Fresh drawers.
LED light
The appliance features a
maintenance-free LED light.
CAUTION
Risk of eye injury from Class 1M
laser light (IEC 60825)!
Do not look directly into the light
with optical instruments.
These lights must be repaired by
customer service or authorized
technicians only.
23
Page 24
en-us
Troubleshooting minor issues
Before contacting customer service:
S Please check whether you can troubleshoot the problem yourself based on the following information.
Customer service will charge you for advice, even if the appliance is still under warranty.
Refrigerator compartment and freezer compartment
Problem
No display on the
display panel, interior
light is not working, and
the appliance is not
working.
The interior light is not
working.
Food is too cold. Temperature has been set too low. Adjust to a higher temperature.
Food is too warm. Door will not close properly.
Possible cause Corrective action
The power cord is not plugged in. Plug in the power cord.
The fuse has blown or circuit breaker has
been tripped.
Power outage. Wait until power has been restored. If necessary,
The light switch to the freezer or refrigerator
compartment is sticking.
The LED bulb is defective. See ”LED light”.
Temperature has been set too high. Select a lower temperature.
Ventilation opening is blocked. Remove any food blocking the ventilation
Doors were opened frequently or were open
for an extended period of time.
Replace fuse or reset the circuit breaker.
Check if electricity is present at outlet.
contact an electrician or the utility company.
Check whether the light switch can be moved.
Align the appliance with a level. See ”Aligning
the appliance”.
Check the position of the drawers and correct, if
necessary.
Check the door seals and foldaway door bar; if
necessary, clean or correct position.
opening.
Wait until the temperature in the appliance drops.
Appliance has an
unpleasant odor.
Water droplets are
forming on the exterior
of the appliance.
A large amount of fresh food has been
placed in refrigerator.
Food with a strong odor was placed in the
refrigerator.
The interior compartment is dirty. Clean the interior compartment.
Door will not close properly.
Humidity is too high. This may be normal in certain regions.
Fresh food must first reach the correct storage
temperature.
Wrap up the food or place it in an airtight
container.
Align the appliance with a level. See ”Aligning
the appliance”.
Check the position of the drawers and correct, if
necessary.
Check the door seals and foldaway door bar; if
necessary, clean or correct position.
24
Page 25

en-us
Problem
Water droplets are
forming inside the
appliance.
Drawers can only be
closed with great
difficulty.
Humidity is too high or doors have been
opened frequently.
The door seals are not tight. Check the door seals and foldaway door bar; if
The drawer has not been inserted correctly. Insert the drawer correctly.
The drawer rails are dirty. Clean the drawer rails.
Ice and water dispenser
Problem
The water filter symbol
is flashing.
The ice maker is not
making enough ice
cubes or the ice cubes
are deformed.
Possible cause Corrective action
The filter cartridge is old. Replace the filter cartridge.
After replacing the filter cartridge, the water
filter symbol was not reset.
The appliance or ice maker was just recently
switched on.
A large amount of ice has been taken out. It takes approx. 24 hours before the ice storage
Water pressure is too low. Have the water pressure checked.
Corrective actionPossible cause
Do not open doors as frequently or do not keep
them open too long.
necessary, clean or correct position.
Reset the water filter symbol.
It takes approx. 24 hours before it starts making
ice.
bin is full again.
The ice maker is not
making enough ice
cubes or any ice cubes
at all.
The ice cube container
contains ice cubes that
are not being
dispensed.
The ice maker is not
making ice cubes.
The filter cartridge is clogged or old. Replace the filter cartridge.
An ice cube is jammed on the arm that
measures the level of the ice cube container.
When switching from ice cubes to crushed
ice , an ice cube may become jammed
inside the dispenser opening. The ice cube
will begin to melt and water will drip into the
ice and water dispenser.
There is a layer of ice on the screw
conveyor.
Ice cubes are frozen to one another. Remove and clean the ice cube container.
The ice maker is switched off. Switch on the ice maker.
The appliance is not being supplied with
water.
The water connection line has kinks in it. Shut off the water supply. Straighten out the
Water pressure is too low. Have the water pressure checked.
Remove the ice cube container and release the
jammed ice cubes with a blunt plastic tool. Do
not use sharp or pointy objects as this could
damage the appliance.
Release the jammed ice cube from the
dispenser opening using a blunt plastic tool. Do
not use sharp or pointy objects as this could
damage the appliance.
Remove and clean the ice cube container.
Have a qualified technician check the water
connection.
kinks. Have damaged water connection lines
replaced with original manufacturer parts.
The ice cube container is not inserted
correctly.
The water connection is installed incorrectly. If the water connection is not installed correctly,
Insert the ice cube container correctly.
this can cause low water pressure and can
damage the appliance.
25
Page 26

en-us
Problem
Very little or no water is
dispensed from the
water dispenser.
The dispensed water is
not cold.
The water is cloudy. Air or air bubbles in water. This is normal when using the water dispenser
There are particles
floating in the water or
suspended in the ice
cubes.
The filter cartridge is clogged or old. Replace the filter cartridge.
Water pressure is too low. Have the water pressure checked.
The shut-off valve is not open all the way. Adjust the shut-off valve so it is open all the way.
The water connection line has kinks in it. Shut off the water supply. Straighten out the
The appliance was just recently installed. It takes approx. 12 hours for the water to cool
The water has been in the lines for an
extended period of time and has adjusted to
the room temperature.
The first time the water flows through the
filter cartridge, it may contain carbon dust
from the filter cartridge.
Suspended particles are formed by mineral
deposits when water is frozen and then
allowed to thaw.
Corrective actionPossible cause
kinks. Have damaged water connection lines
replaced with original manufacturer parts.
down.
Fill and discard the first 15 glasses of water.
for the first time and will disappear after a short
period of time.
These suspended particles are not harmful!
They will disappear after a short period of time.
These suspended particles are not harmful!
This occurs naturally in the water supply.
26
Page 27

Customer service
Before contacting customer service:
Determine if you can solve the
problem yourself using the information
under ”Troubleshooting minor issues.”
If this information does not solve the
problem, additional help is available
by contacting Bosch customer
service.
U.S.A.:
Contact the Bosch Customer
Interaction Center by calling
1-800-944-2904 (toll-free).
Canada:
Contact your designated Bosch
Canada service company or call
1-800-944-2904.
To better assist you, write down the
information about your appliance
below for future reference:
en-us
Dealer name
Address
Phone number
Purchase date
Model number (E number)
Serial number (FD number)
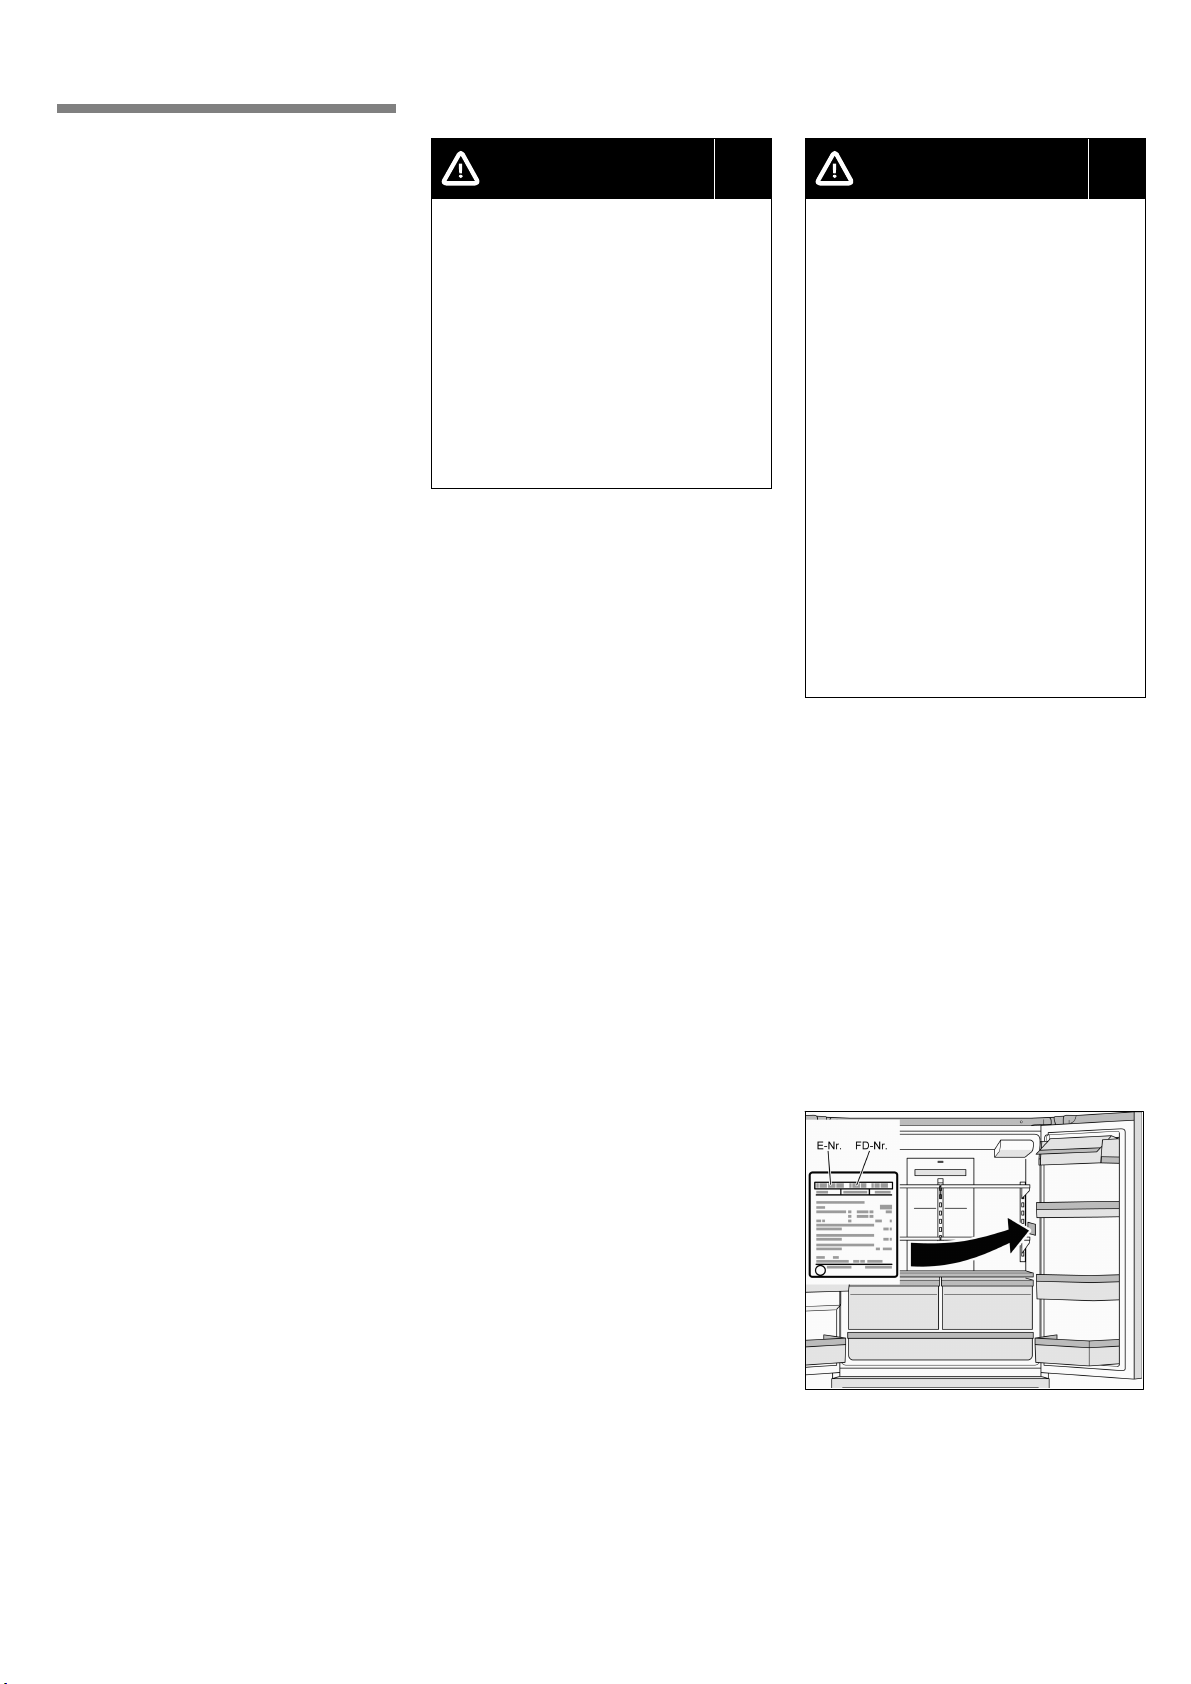
Please provide customer service with
the appliance model number
(E number) and serial number
(FD number).
You can find this information on the
rating plate inside the refrigerator
compartment on the right.
27
Page 28

fr-ca
fr Table des matières
INSTRUCTIONS DE SÉCURITÉ IMPORTANTES 29
Félicitations 30...............................
Informations relatives au recyclage et à la
mise au rebut 30.............................
Installation 31................................
Installation et raccordement de l'appareil 32....
Dimensions de l'appareil et cotes
d'encombrement 35...........................
Présentation de l'appareil 36...................
Panneau de commande et d'affichage 37.......
Conseils d'utilisation 38.......................
Enclenchement de l'appareil 38................
Réglage de la température 38.................
Function d'alarme 38..........................
Blocage du panneau 39.......................
Superréfrigération 39..........................
Supercongélation 39..........................
Production rapide de glaçons 39...............
Symbole du filtre à eau 39.....................
Unité de température 40.......................
Compartiment réfrigérateur 40.................
Compartiment Vita Fresh 40...................
Tiroir pour aliments fins 41.....................
Agencement variable du compartiment intérieur 41
Compartiment congélateur 42.................
Congélation d'aliments 42.....................
Achat et stockage de produits surgelés 42......
Décongélation des produit 42..................
Équipement du compartiment congélateur 43...
Distributeur de glaçons et d'eau 43.............
Filtre à eau 45................................
Fiche de spécifications et de performances 46..
Conseils pour économiser l'énergie 47.........
Bruits de fonctionnement 47...................
Dégivrage 47.................................
Arrêt et débranchement de l'appareil 47........
Nettoyage 47.................................
Éclairage (DEL) 48............................
Diagnostic et résolution de problèmes mineurs 49
Service après-vente 52........................
28
Page 29

INSTRUCTIONS DE SÉCURITÉ
IMPORTANTES
VEUILLEZ LIRE ET CONSERVER CES INSTRUCTIONS !
fr-ca
Avant l'utilisation de
l'appareil
Veuillez lire attentivement et
entièrement les informations figurant
dans les notices d'utilisation et de
montage !
Elles contiennent des remarques
importantes concernant l'installation,
l'utilisation et l'entretien de l'appareil.
Conservez toute la documentation
pour pouvoir la consulter à nouveau
ultérieurement ou si l'appareil doit
changer un jour de propriétaire.
Sécurité technique
Seuls les techniciens du service
après-vente peuvent remplacer le
cordon d'alimentation et effectuer
toute autre réparation. Les
installations ou réparations
incorrectes pourraient présenter des
risques considérables pour les
utilisateurs.
Consignes importantes
concernant l'utilisation de
l'appareil
S N'utilisez jamais des équipements
électriques (tels que des
réchauffeurs ou distributeurs
électriques de glaçons) dans
l'appareil. Risque d'explosion !
S N'utilisez jamais de nettoyeur à
vapeur pour dégivrer ou nettoyer
l'appareil. La vapeur pourrait
pénétrer dans des composants
électriques, entraînant un
court-circuit ou un choc électrique.
S Débranchez ou coupez le fusible /
disjoncteur avant de nettoyer
l'appareil.
Ne tirez pas sur le cordon
d'alimentation pour débrancher
l'appareil.
S Ne stockez aucun produit
contenant des agents propulsifs
(p.ex. des bombes aérosols), ni
aucune substance explosive dans
l'appareil. Risque d'explosion !
S Conservez les bouteilles d'alcools
concentrés uniquement fermées et
placées debout.
S Ne stockez pas les liquides en
bouteille ou en canette (surtout les
boissons gazeuses) dans le
compartiment congélateur. Les
bouteilles et canettes risquent
d'exploser !
S Ne montez pas sur le socle, les
tiroirs, les portes ou sur toute autre
partie de l'appareil. Vous pourriez
endommager l'appareil.
S Ni huile, ni graisse ne doit entrer
en contact avec les pièces en
plastique et les joints des portes,
faute de quoi ces pièces et portes
peuvent devenir poreux.
S Ne recouvrez en aucun cas les
orifices d'aération de l'appareil.
Sinon l'appareil se trouverait
sollicité plus fortement, ce qui
augmenterait la consommation de
courant.
S Il faut surveiller ou fournir des
instructions plus détailles aux
personnes dont les habiletés
physiques, sensorielles ou
mentales sont limitées ou qui
disposent de connaissances
limitées relatives à l'appareil avant
qu'elles n'utilisent l'appareil.
S Ne mettez pas les bâtons de
popsicle ou les glaçons dans la
bouche aussitôt après les avoir
sortis du congélateur. Risques de
brûlures à basse température !
S Ne touchez pas les surfaces
froides à l'intérieur du
compartiment si vos mains sont
humides ou mouillées. La peau
risquerait de rester collée sur ces
surfaces extrêmement froides.
Risque de blessures !
S N'enlevez pas le givre ou les
aliments congelés collés à l'aide
d'un couteau ou autre objet effilé.
Vous pourriez endommager
l'appareil.
Enfants à la maison
S Ne laissez pas les enfants jouer
avec l'appareil !
S Si l'appareil est muni d'un verrou,
gardez la clé hors de la portée des
enfants.
Dispositions générales
L'appareil convient
S à réfrigérer des produits
alimentaires.
S à congeler des produits
alimentaires.
S à confectionner des glaçons.
S à distribuer de l'eau potable.
Cet appareil est destiné uniquement à
un usage domestique.
Cet appareil est protégé contre
l'interférence électrique et les
surtensions.
Le circuit du fluide réfrigérant a fait
l'objet d'un contrôle de fuites.
Définitions
AVERTISSEMENT
Le non-respect des instructions
correspondantes pourrait entraîner
la mort ou des blessures graves.
ATTENTION
Le non-respect des instructions
correspondantes pourrait entraîner
des blessures ou de blessures
légères.
REMARQUE
Le non-respect des instructions
correspondantes pourrait entraîner
des dégâts.
29
Page 30

fr-ca
Félicitations
Avec l'achat de ce réfrigérateur
congélateur, vous venez d'opter pour
un appareil électroménager moderne
et de haute qualité.
Ce réfrigérateur-congélateur se
distingue par sa consommation
économique d'électricité.
Chaque appareil subit, avant de
quitter notre usine, des contrôles
fonctionnels destinés à vérifier qu'il se
trouve dans un état impeccable.
Si vous souhaitez demander des
précisions, notamment en ce qui
concerne l'installation et le
raccordement de l'appareil, notre
service après-vente se tient à votre
disposition.
Pour obtenir des informations
supplémentaires et découvrir la
gamme de nos produits, rendez-vous
sur notre site Web.
Informations relatives
au recyclage et à la
mise au rebut
x Recyclage de l'emballage
L'emballage protège l'appareil
pendant le transport. Tous les
éléments de l'emballage sont
écologiques et recyclables.
Veuillez aider à protéger
l'environnement en assurant le
recyclage de l'emballage.
Veuillez contacter votre revendeur ou
les autorités locales pour en savoir
plus sur les possibilités qui s'offrent à
vous.
AVERTISSEMENT
Risque d'asphyxie des boîtes en
carton et des feuilles en plastique !
Tenez l'emballage et les
composants de l'emballage hors de
la portée des enfants.
x Mise au rebut de votre
ancien appareil
Les vieux appareils ne sont pas des
détritus sans valeur ! Le recyclage de
vieux appareils permet de récupérer
des matières brutes valorisables.
AVERTISSEMENT
Risque d'enfermement pour les
enfants !
Les enfants risquent de s'enfermer
dans l'appareil.
Avant de mettre votre ancien
réfrigérateur au rebut :
Enlevez les portes et le tiroir
inférieur du congélateur.
Laissez les clayettes à l'intérieur
pour empêcher que les enfants
puissent pénétrer facilement
dedans.
Appareils redondants :
1. Débranchez le cordon
d'alimentation.
2. Coupez le cordon d'alimentation, y
compris la prise, et jetez-le.
Les réfrigérateurs contiennent du
fluide réfrigérant et leur matériau
isolant contient des gaz. Le fluide
réfrigérant et les gaz doivent être
retirés et éliminés de manière
adéquate. Assurez-vous que les
tubulures du circuit du fluide
réfrigérant ne sont pas endommagées
avant la mise au rebut adéquat de
l'appareil.
30
Page 31

Installation
Transport et installation
L'appareil est très lourd et doit être
fixé en place pendant le transport et
l'installation.
AVERTISSEMENT
Risque de blessures !
L'appareil est très lourd. Il peut se
renverser pendant le transport et
l'installation, entraînant des
blessures graves. Il faudra au
moins deux personnes pour
installer l'appareil de manière sûre.
Tenez les portes du réfrigérateur
fermées jusqu'à ce que vous le
mettiez debout et que vous
l'horizontaliser au lieu
d'installation.
Lieu d'installation
AVERTISSEMENT
Il faut maintenir un écart latéral
minimum de 1” (25 mm) pour éviter
la condensation d'eau en cas
d'installation à côté d'un autre
réfrigérateur ou congélateur.
Si l'on monte un bandeau ou un
placard au sommet de l'appareil, il
faudra prévoir un interstice de 13/32
(10 mm) afin de pouvoir suivant
besoin sortir l'appareil de la cavité.
L'air qui s'est échauffé au dos de
l'appareil doit pouvoir s'échapper
sans rencontrer d'obstacle.
En cas d'installation dans un coin de
pièce ou une cavité et afin de pouvoir
ouvrir les portes jusqu'à la butée, il
faut respecter des écarts latéraux
minimums (voir le chapitre « Appareils
et cotes d'encombrement »).
Si la profondeur des équipements de
cuisine voisins dépasse 29
cm), il faudra respecter des écarts
latéraux minimums pour pouvoir
exploiter intégralement l'angle
d'ouverture de porte (voir le chapitre
« Angle d'ouverture de porte »).
1/8
I
(75
Surface porteuse
fr-ca
Aération
Ne recouvrez en aucun cas les
orifices d'entrée et de sortie d'air
situés à l'avant, contre le panneau du
socle, ou à l'arrière, contre la plaque
du couvercle.
I
Sinon l'appareil se trouverait sollicité
plus fortement, ce qui augmenterait la
consommation de courant.
Risque d'explosion !
Ne stockez ni n'utilisez
pasd'essence ou d'autres liquides
etvapeurs inflammables à
proximitéde cet appareil.
REMARQUE
N'installez pas l'appareil en plein air.
Le lieu d'installation devrait être sec
et ne devrait pas être exposé au
risque de gel.
Le meilleur lieu d'installation est un
local sec et aérable. Évitez de placer
l'appareil à un endroit directement
exposé aux rayons solaires ou à
proximité d'une source de chaleur
telle une cuisinière, un radiateur, etc.
Si l'installation près d'une source de
chaleur est inévitable, utilisez une
plaque isolante appropriée ou
respectez les distances minimales
suivantes :
I
1/4
S 1
S 11
(3 cm) par rapport aux
cuisinières électriques ou à gaz,
I
3/16
(30 cm) par rapport à un
appareil de chauffage au fuel ou
au charbon.
REMARQUE
L'appareil est très lourd.
Sur l'emplacement, le sol ne doit
pas s'affaisser. Renforcez-le le cas
échéant.
Poids à vide :
Modèle de base 324 lb
(147 kg)
31
Page 32

fr-ca
Installation et
raccordement de
l'appareil
S Faites installer et raccorder
l'appareil par un spécialiste qui
procédera selon la notice de
montage ci-jointe.
S Après avoir installé l'appareil,
attendez au moins 8 heures avant
de brancher son cordon
d'alimentation. Il peut en effet
arriver, pendant le transport, que
l'huile présente dans le
compresseur se déplace vers le
circuit frigorifique.
S Avant la première mise en service,
nettoyez le compartiment intérieur
de l'appareil. (Voir le chapitre
« Nettoyage de l'appareil »).
S Réalisez le raccordement de l'eau
impérativement avant celui de
l'électricité.
S Outre les prescriptions légales en
vigueur dans chaque pays, il
faudra respecter les conditions de
branchement stipulées par les
compagnies locales / nationales
distributrices d'électricité et d'eau.
S N'enlevez les cales de transport
retenant les clayettes et
balconnets qu'après l'installation.
S Le démontage des portes de
l'appareil doit se faire uniquement
par un technicien du service
après-vente, le cas échéant, pour
faire passer l'appareil par la porte
d'entrée de votre logement.
Raccordement de l'eau
AVERTISSEMENT
Risque de choc électrique et de
dégâts à l'appareil !
Débranchez l'appareil de la source
d'alimentation avant d'entreprendre
des travaux quelconque sur le
raccordement de l'eau.
Le raccordement de l'eau est une
opération exclusivement réservée à
un installateur professionnel qui
respectera ce faisant les
prescriptions publiées par la
compagnie distributrice d'eau dans
votre localité.
Raccordez l'appareil à la conduite
d'eau :
S Pression minimale :
14,5 psi (1,0 bar)
S Pression maximale :
119 psi (8,2 bar)
Si la pression de l'eau dépasse
119 psi (8,2 bar), il faut installer un
réducteur de pression. Le distributeur
de glaçons ne fonctionne pas si la
pression de l'eau est inférieure à
14,5 psi (1,0 bar).
Dans le cadre du raccordement de
l'eau à l'appareil, il faut installer une
vanne de fermeture séparée.
Cette vanne de fermeture ne doit pas
se trouver derrière l'appareil. Il est
recommandé de la placer directement
à côté de l'appareil (unité de base) ou
en tout autre endroit facile d'accès.
Vous pouvez intercaler le filtre à eau
ci-joint sur la conduite d'arrivée si
l'eau a un goût et une odeur. Dans ce
cas-là, respectez les exigences de
raccordement relatives au filtre (voir le
chapitre « Filtre à eau »).
La conduite d'eau est munie d'un
raccord de 3/4 pouces.
Branchement électrique
AVERTISSEMENT
Risque de choc électrique et
d'incendie en cas de branchement
électrique incorrect !
Branchez la fiche mâle uniquement
dans une prise à 3 orifices femelles
fixe reliée à la terre. L'installation et
la mise à la terre de cette prise est
une opération exclusivement
réservée à un électricien agréé. Si
vous n'êtes pas sûr, faites vérifier
que l'appareil est correctement
relié à la terre par un électricien
agréé ou un technicien du service
après-vente s'il le faut.
N'utilisez pas de prolongateur, ni
de barre d'alimentation.
Ne branchez jamais l'appareil sur
une prise destinée à économiser
l'énergie (p.ex. Ecoboy, Sava Plug,
etc.) ou à un convertisseur de
courant continu (CC) e courant
alternatif (CA) (tel que celui d'un
équipement solaire, d'un bateau ou
navire, etc).
La prise de l'appareil doit être située
près de l'appareil et doit être facile
d'accès après l'installation également.
Branchez l'appareil sur une prise
correctement installée de
115 V/60 Hz CA. La puissance
nominale du fusible de la prise doit
être entre 15 A ou 20 A.
Si l'appareil est destiné à être utilisé
hors des États-Unis, consultez la
plaque signalétique pour savoir si le
type courant et le nombre de volts
prescris correspondent aux valeurs
de l'alimentation disponible. Si
l'alimentation ne répond pas aux
valeurs prescrites, il ne faut pas
mettre l'appareil en service. Le
remplacement du cordon
d'alimentation est une opération
exclusivement réservée à un
électricien agréé.
32
Page 33

fr-ca
Mise à niveau de l'appareil
REMARQUE
Afin que l'appareil fonctionne
impeccablement, il faut
l'horizontaliser à l'aide d'un niveau à
bulle.
S'il n'est pas d'aplomb, l'eau risque
de fuir du distributeur de glaçons,
qui va produire des glaçons
difformes, ou les portes risquent de
ne pas bien fermer.
1. Amenez l'appareil sur
l'emplacement prévu.
2. Enlevez les trois vis du panneau
du socle.
3. Retirez le panneau du socle.
5. Serrez les vis à l'aide d'une clé
hexagonale, puis alignez de
l'arrière de l'appareil.
Pour soulever l'arrière de l'appareil
:
Faites tourner la vis dans le sens
horaire.
Pour abaisser l'arrière de l'appareil
:
Faites tourner la vis dans le sens
antihoraire.
Ajustement des portes du
réfrigérateur
Si les portes du réfrigérateur ne sont
pas au niveau :
1. Déterminez quelle porte doit être
montée.
2. Réglez la hauteur de la porte en
faisant tourner la vis de réglage de
la charnière inférieure.
Pour faire monter une porte :
Faites tourner la vis dans le sens
antihoraire.
Pour faire descendre une porte :
Faites tourner la vis dans le sens
horaire.
4. Ajustez la hauteur des pieds avant
à l'aide d'une clé hexagonale
jusqu'à ce qu'ils se posent
fermement sur le plancher, puis
alignez l'avant de l'appareil.
6. Assurez-vous que l'appareil repose
d'aplomb à l'aide d'un niveau à
bulle.
REMARQUE
Pour assurer que l'appareil ne
bougera pas, vérifiez que les pieds
avant se posent fermement sur le
plancher.
7. Si les portes du compartiment
réfrigérateurs ne sont pas alignées
ou si la porte du compartiment
congélateur se trouve inclinée,
ajustez-les en suivant la procédure
ci-dessous.
33
Page 34

fr-ca
Si les portes sont mal alignées :
AVERTISSEMENT
Risque de choc électrique !
Avant d'enlever le panneau
supérieur :
1. Fermez l'arrivée d'eau à
l'appareil.
2. Débranchez la fiche mâle du
secteur ou ramenez le
disjoncteur en position éteinte.
1. Déterminez quelle porte doit être
ajustée.
2. Enlevez les cinq vis du panneau
supérieur.
3. Soulevez le panneau.
Ajustement du tiroir du
compartiment congélateur
1. Déterminez quel côté doit être
ajusté.
2. Desserrez les deux vis.
N'enlevez pas les vis !
2. Introduisez les poignées des
portes dans les fentes.
S Portes du réfrigérateur : Les vis
de la poignée doivent faire face
vers le centre de l’appareil.
S Tiroir du compartiment
congélateur : Les vis de la
poignée doivent faire face vers
le bas.
4. Desserrez la vis.
N'enlevez pas la vis !
Figure
5. Ajustez la position de la charnière
sur l'axe horizontale pour régler
l'alignement de la porte.
6. Serrez la vis.
7. Ajustez à nouveau l'alignement du
panneau.
8. Insérez les cinq vis et serrez-les.
3. Ajustez le tiroir du compartiment
congélateur à l'aide de la vis
supérieure.
4. Serrez les deux vis.
Installation des poignées
N'installez les poignées qu'après avoir
installé l'appareil et vérifié qu'il repose
d'aplomb.
Toutes les poignées sont identiques
et sont installées de la même façon.
1. Retirez les films protecteurs des
portes du réfrigérateur et du tiroir
du congélateur.
3. Serrez les vis de la poignée avec
la clef Allen incluse.
Installation du panneau du
socle
1. Enlevez les trois vis de l'appareil.
2. Montez le panneau du socle.
3. Insérez les trois vis et serrez-les.
34
Page 35

Dimensions de l'appareil et cotes d'encombrement
fr-ca
3/4I
69
17
27/32I
17
27/32I
3/4I
69
33
I
13/32
5/8I
35
I
19/32
68
min. 69
I
30
1/8I
29
5/8I
2
- 3
2/8I
3/8I
36
I
5/32I
48
2
15
1405
5/32I
5/8I
35
I
1/8I
13/32
29
15/32I
5/8I
32
34
905
1
8/82I
8/82I
1
I
905
1/3I
1
1/8I
29
15
1405
5/32I
48
I
35
Page 36

fr-ca
Présentation de l'appareil
La présente notice d'utilisation vaut pour plusieurs modèles. Selon le modèle, l'appareil peut différer du contenu des
illustrations.
19 16
20
1
18
17
2
15
14
3
A
4
6
7
8
13
5
9
12
B
10
11
A Compartiment réfrigérateur
réglable
entre 35 °F (+2 °C)
et 46 °F (+8 °C)
B Compartiment congélateur
réglable
entre 5 °F (-15 °C)
et -7 °F (-22 °C)
36
1 Casier à beurre et à fromage
2 Support à canettes
3 Panneau de commande et
d'affichage
4 Distributeur de glaçons et d'eau
5 Bac à glaçons
6 Support en contre-porte
7 Compartiment Vita Fresh avec
voyant DEL
8 Support en contre-porteamovible
9 Tiroir supérieur du congélateur
10 Tiroir inférieur du congélateur
11 Interrupteur de l'éclairage du
compartiment congélateur
12 Diviseur du compartiment
congélateur
13 Tiroir pour aliments fins avec
voyant DEL
14 Support en contre-porte
15 Bac à œufs
16 Filtre à eau
17 Clayette en verre réglable
18 Petite clayette en verre
19 Distributeur de glaçons / Bac à
glaçons
20 Interrupteur de l'éclairage du
compartiment réfrigérateur
Page 37

fr-ca
Panneau de commande et d'affichage
Le panneau de commande et d'affichage à la porte gauche du réfrigérateur comprend un champ tactile.
Appuyez sur une touche tactile pour déclencher la fonction correspondante.
L'éclairage du panneau de commande et d'affichage s'éteint au bout d'environ 1 minute si on n'appuie sur aucune touche
tactile.
10
11 9
1
2 7
3 4 5 6
1 Bouton « freezer » [congélateur]
Fonction :
S Ajustement de la température
du compartiment congélateur
S Activation et désactivation de la
fonction « Super freeze »
[« Supercongélation »].
2 Bouton « quick ice » [production
rapide de glaçons]
Interrupteur des la production
rapide de glaçons.
3 Interrupteur du distributeur d'eau
4 Bouton du distributeur de glace
pilée
5 Bouton du distributeur de
glaçons
6 Bouton « alarm/lock »
[alarme/verrouillage]
Fonction :
S Extinction de l'alarme sonore
S Activation et désactivation du
blocage du panneau.
7 Bouton « light/filter »
[éclairage/filtre]
Fonction :
S Activation et désactivation du
distributeur de glaçons et
d'eau.
S Réinitialisation de l'indicateur
de l'utilisation du filtre.
8 Bouton « fridge » [réfrigérateur]
Fonction :
S Ajustement de la température
du compartiment réfrigérateur
S Activation et désactivation de la
fonction « Super cool »
[superréfrigération].
9 Affichage de température du
compartiment réfrigérateur
Affiche le réglage du la
température du compartiment
réfrigérateur.
10 Affichage de température du
compartiment congélateur
Affiche le réglage du la
température du compartiment
congélateur.
8
11 Symboles du panneau
d'affichage
« quick ice » [production
rapide de glaçons]
S'affiche lorsque la
fonction « quick ice » [de
production rapide de
glaçons] est activée.
« Light » [Éclairage]
S'affiche lorsque
l'éclairage du distributeur
de glaçons et d'eau est
allumé.
« Water filter » [Filtre à eau]
Affiche l'état de la
cartouche du filtre à eau.
« Panel lock » [Blocage du
panneau]
S'affiche lorsque le
blocage du panneau est
activé.
37
Page 38

fr-ca
Conseils d'utilisation
Ouverture et fermeture des
portes du compartiment
réfrigérateur
Les portes du compartiment
réfrigérateur peuvent s'ouvrir
indépendamment l'une de l'autre.
La porte gauche du compartiment
réfrigérateur comprend un minibar
escamotable.
REMARQUE
Risque de dégâts à l'appareil !
Si vous essayez de fermer la porte
gauche du compartiment
réfrigérateur sans avoir replié le
minibar de la porte, celui-ci pourrait
être endommagé.
Avant de fermer les portes du
compartiment réfrigérateur,
assurez-vous que le minibar est
replié à angle droit par rapport à la
porte.
Lors de la fermeture de la porte
gauche du compartiment
réfrigérateur, le minibar se replie
derrière la porte droite en formant un
joint étanche derrière. les portes du
compartiment réfrigérateur
Enclenchement de
l'appareil
REMARQUE
Après avoir installé l'appareil,
attendez au moins 8 heures avant
de brancher son cordon
d'alimentation. Il peut en effet
arriver, pendant le transport, que
l'huile présente dans le
compresseur se déplace vers le
circuit frigorifique.
Branchez la fiche mâle dans la prise
murale.
Une fois l'appareil branché, le
processus de réfrigération se met en
marche. L'éclairage intérieur du
compartiment réfrigérateur s'allume
lorsque la porte est ouverte.
Il faudra plusieurs heures pour que
l'intérieur atteigne la température
préréglée en usine. Ne mettez pas
d'aliments dans l'appareil avant que
cette température ne soit atteinte.
Réglage de la
température
Compartiment réfrigérateur
(réglable entre 35 °F (+2 °C) et 46 °F
(+8 °C))
Appuyez sur la touche « fridge »
[réfrigérateur] jusqu'à ce que la
température voulue du compartiment
réfrigérateur soit atteinte.
Compartiment congélateur
(réglable entre 5 °F (-15 °C) et -7 °F
(-22 °C))
Appuyez sur la touche « freezer »
[congélateur] jusqu'à ce que la
température voulue du compartiment
congélateur soit atteinte.
La valeur de température la plus
récente est enregistrée.
Nous conseillons de régler l'appareil
sur 0 °F (-18 °C).
Function d'alarme
Le signal d'avertissement se fait
entendre lorsque l'intérieur de
l'appareil est trop chaud ou que les
portes de l'appareil restent ouvertes
pendant plus de trois minutes.
L'alarme retentit trois fois, puis une
minute en continu chaque fois qu'elle
s'enclenche. Il y a une pause d'une
minute entre les signaux d'alarme.
Compartiment réfrigérateur
La mention « alarm » s'affiche au côté
droit du panneau d'affichage.
Pour éteindre l'alarme sonore :
Appuyez sur la touche « alarm/lock »
ou fermez les portes du compartiment
réfrigérateur.
La mention « alarm » clignote sur le
panneau d'affichage jusqu'à ce que la
température s'approche de la
température sélectionnée.
38
Le système mémorise la valeur
affichée en dernier.
Nous conseillons de régler l'appareil
sur 39 °F (+4 °C).
Évitez de stocker les produits
alimentaires délicats à une
température supérieure à 39 °F
(+4 °C).
Page 39

Compartiment congélateur
La mention « alarm » s'affiche au côté
gauche du panneau d'affichage.
Pour éteindre l'alarme sonore :
Appuyez sur la touche « alarm/lock »
ou fermez les portes du compartiment
congélateur.
La mention « alarm » clignote sur le
panneau d'affichage jusqu'à ce que la
température s'approche de la
température sélectionnée.
Appuyez sur la touche « fridge »
jusqu'à ce que la mention « super »
s'affiche au côté droit de l'affichage.
Pour désactiver la superréfrigération
:
Appuyez sur la touche « fridge ».
La mention « super » disparaît de
l'affichage. L'appareil commute
automatiquement sur une température
de 39 °F (+4 °C).
fr-ca
Production rapide de
glaçons
Cette fonction permet de produire
rapidement des glaçons.
Pour activer la production rapide de
glaçons :
Appuyez sur la touche « quick ice ».
La mention « quick ice » s'affiche.
Blocage du panneau
Lorsque le blocage du panneau est
activé, toutes les touches du panneau
de commande et d'affichage sont
verrouillées.
REMARQUE
Lorsque le blocage du panneau est
activé, il faut utiliser la touche
« alarm/lock » éteindre l'alarme
sonore.
Pour activer et désactiver le blocage
du panneau :
Appuyez sur la touche « alarm/lock »
pendant 2 secondes.
Le symbole « Blocage du panneau »
s'affiche lorsque cette fonction est
activée.
Supercongélation
Les aliments doivent congeler à cœur
aussi vite que possible pour qu'ils
conservent vitamines, valeur nutritive,
aspect et goût.
Pour éviter une augmentation
indésirable de la température lorsque
vous rangez des produits alimentaires
frais, appuyez sur la touche de
supercongélation quelques heures
avant de les ranger.
4 à 6 heures suffisent généralement.
Si vous désirez congeler des
quantités correspondant à la capacité
de congélation maximale, vous devrez
enclencher la supercongélation
24 heures avant.
Si vous ne voulez congeler que de
petites quantités d'aliments vous
n'avez pas besoin d'enclencher la
supercongélation.
Pour activer la supercongélation :
Appuyez sur la touche « freezer »
jusqu'à ce que la mention « super »
s'affiche au côté gauche de
l'affichage.
Une fois que le distributeur de
glaçons est plein, la fonction de
production rapide de glaçons se
désactive automatiquement au bout
de quelques heures.
REMARQUE
Lorsque la fonction de production
rapide de glaçons est activée,
l'appareil augmente temporairement
sa puissance. Sa consommation
d'énergie augmente en
conséquence.
Symbole du filtre à
eau
Ce symbole indique la durée de
l'utilisation de la cartouche filtrante.
Jusqu'à deux mois.
Jusqu'à quatre mois.
Jusqu'à six mois.
Superréfrigération
Pendant la superréfrigération, la
température dans le compartiment
réfrigérateur descend le plus bas
possible pendant environ 6 heures.
Ensuite, l'appareil commute sur une
température de 39 °F (+4 °C).
La superréfrigération est
particulièrement recommandée :
S Avant de ranger de grandes
quantités d'aliments.
S Pour refroidir rapidement des
boissons.
Pour activer la superréfrigération :
Pour désactiver la supercongélation :
Appuyez sur la touche « freezer ».
La mention « super » disparaît de
l'affichage. L'appareil commute
automatiquement sur une température
de 0 °F (-18 °C).
REMARQUE
La supercongélation se désactive
automatiquement au bout d'environ
2 jours.
Après six mois, le symbole
clignote. Changez la
cartouche filtrante.
Lorsque l'appareil est éteint,
l'indicateur d'utilisation du filtre à eau
se réinitialise.
Pour réinitialiser l'indicateur
d'utilisation après un changement de
filtre :
Maintenez enfoncée la touche
« light/filter » pendant 3 secondes.
Le symbole arrête de clignoter.
39
Page 40

fr-ca
Unité de température
L'affichage de la température peut se
faire en degrés Fahrenheit (°F) ou
Celsius (°C).
Après l'enclenchement de l'appareil,
la température s'affiche en degrés
Fahrenheit (°F).
Pour régler l'unité de température :
Appuyez sur la touche « alarm/lock »
pendant 2 secondes.
Le symbole « Blocage du panneau »
s'affiche.
Maintenez enfoncée la touche « quick
ice » pendant 15 secondes jusqu'au
changement de l'unité de
température.
Utilisation du compartiment
réfrigérateur
Pour entreposer les repas prêts à
consommer, les gâteaux et
pâtisseries, les aliments en conserve,
le lait concentré, le fromage, les pâtes
à tartiner, les sauces, les sauces
froides et les œufs.
Consignes de rangement à
respecter :
- Attendez que les boissons et
aliments chauds aient refroidi à la
température de la pièce avant de
les ranger dans l'appareil.
- L'air ne doit pas pénétrer dans
l'emballage pour que les aliments
ne perdent pas leur goût ni ne
sèchent pas.
- Veillez à ce que les produits
alimentaires n'obstruent pas les
orifices de sortie d'air car cela
gênerait sa circulation.
- Les huiles et graisses ne doivent
pas entrer en contact avec les
pièces en plastique et le joint de la
porte.
Vita Fresh convient pour :
Par définition tous les produits
alimentaires frais et qui doivent le
rester encore assez longtemps tels
que la viande et la charcuterie, le
poisson frais, les fruits de mer, le lait,
le beurre, le fromage à pâte molle, le
fromage blanc, les fruits et légumes.
Vita Fresh ne convient pas
pour :
Fruits et légumes craignant le froid
tels que les fruits tropicaux, avocats,
papayes, fruits de la passion,
aubergines, cornichons, poivrons, en
outre les fruits finissant de mûrir, les
tomates vertes, pommes de terre.
Attention lors de l'achat de
denrées alimentaires :
La fraîcheur du produit à l'achat est
un facteur crucial dans la durée
conservation des denrées. En
général, plus les produits sont frais au
moment de l'entreposage dans les
compartiments Vita Fresh, plus ils
gardent leur fraîcheur longtemps. Par
conséquent, vérifiez toujours la
fraîcheur des denrées au moment de
l'achat.
Compartiment
réfrigérateur
AVERTISSEMENT
Risque d'explosion !
Ne stockez aucun produit
contenant des agents propulsifs
(p.ex. des bombes aérosols), ni
aucune substance explosive ou
facilement inflammable dans
l'appareil.
Conservez les bouteilles d'alcools
concentrés uniquement bien
fermées et placées debout.
La température du compartiment
réfrigérateur se règle entre 35 °F
(+2 °C) et 46 °F (+8 °C).
Nous conseillons de régler l'appareil
sur 39 °F (+4 °C).
Évitez de stocker les produits
alimentaires délicats à une
température supérieure à 39 °F
(+4 °C).
Compartiment Vita
Fresh
(selon le modèle)
La température à l'intérieur du
compartiment Vita Fresh est
maintenue à près de 32 °F (0 °C). Ce
bas niveau de température offre des
conditions d'entreposage optimales
pour les denrées périssables.
Le compartiment Vita Fresh permet
de conserver les aliments plus
longtemps qu'un compartiment de
réfrigérateur classique, tout en
gardant leur fraîcheur.
Le compartiment Vita Fresh est
recouvert d'un filtre d'humidité
spécial. Ce filtre optimise le taux
d'humidité à l'intérieur du
compartiment Vita Fresh. Selon la
quantité de denrées entreposées
dans compartiment Vita Fresh, le taux
d'humidité peut atteindre jusqu'à
90 %, ce qui est idéal pour les
produits maraîchers et de plein
champ tels que les légumes, la
salade, les fines herbes et les fruits.
Extraction des tiroirs Vita
Fresh
1. Tirez les tiroirs Vita Fresh au
maximum.
2. Soulevez la partie avant des tiroirs
Vita Fresh et retirez ces derniers.
3. Insertion des tiroirs Vita Fresh :
Engagez les tiroirs Vita Fresh dans
les glissières et poussez-les vers
l'arrière.
40
Page 41

Tiroir pour aliments
fins
La température du tiroir pour aliments
fins est maintenue à un degré
constant, juste en dessous du point
de congélation. Ceci permet de
conserver les viandes et les produits
à base de viande, le poisson, les
fruits de mer, les produits laitiers ainsi
que le fromage à pâte dure et molle
dans des conditions d'entreposage
optimales.
REMARQUE
Ne jamais entreposer de denrées
sensibles au froid dans un tiroir
pour aliments fins.
Extraction du tiroir pour
aliments fins
1. Tirez le tiroir pour aliments fins au
maximum.
2. Soulevez la partie avant du tiroir
pour aliments fins et retirez
celui-ci.
Agencement variable
du compartiment
intérieur
Clayettes en verre
Il est possible de retirer les clayettes
en verre.
Vous pouvez retirer les clayettes en
verre et régler leur hauteur.
Retrait d'une clayette en verre
Soulevez la clayette et tirez-la à vous.
Sortez les languettes du support, puis
retirez la clayette.
fr-ca
Supports en contre-porte
Pour enlever un support en
contre-porte :
Soulevez le support en contre-porte et
retirez-le.
Pour enlever un support en
contre-porte :
Positionnez le support à la hauteur
voulue et abaissez-le pour le fixer en
place.
Casier à beurre et à fromage
Soulevez le couvercle du casier à
beurre et à fromage.
3. Insertion du tiroir : Engagez le tiroir
pour aliments fins dans les
glissières et poussez vers l'arrière.
Installation d'une clayette en verre
Soulevez l'avant de la clayette et
introduisez les languettes dans le
support à la hauteur voulue. Abaissez
l'avant de la clayette.
Petite clayette en verre
Il est possible d'enlever cette clayette
et de la ranger sous le distributeur de
glaçons. Cela permet de ranger de
grands articles telles que des
grandes bouteilles à côté du
distributeur de glaçons.
Pour enlever le casier à beurre et à
fromage :
Soulevez le casier et retirez-le.
Pour installer le casier à beurre et à
fromage :
Positionnez le casier à la hauteur
voulue et abaissez-le pour le fixer en
place.
Bac à œufs
41
Page 42

fr-ca
Compartiment
congélateur
AVERTISSEMENT
Risque d'explosion !
Ne stockez aucun produit
contenant des agents propulsifs
(p.ex. des bombes aérosols), ni
aucune substance explosive ou
facilement inflammable dans
l'appareil.
La température du compartiment
congélateur se règle entre 5 °F
(-15 °C) and -7 °F (-22 °C).
Nous conseillons de régler l'appareil
sur 0 °F (-18 °C).
REMARQUE
Veillez à ce que la porte du
compartiment congélateur soit
toujours fermée. Si cette porte reste
ouverte, les produits surgelés
dégèleront. Le compartiment
réfrigérateur se couvrira de givre. En
outre, vous gaspillerez de l'énergie
vu la forte consommation de
courant.
Le fait de refermer la porte du
compartiment congélateur engendre
une dépression dedans.
Si vous n'arrivez pas à ouvrir
aussitôt la porte du compartiment
congélateur, attendez deux à trois
minutes, temps nécessaire à la
dépression pour se résorber.
Utilisez le compartiment
congélateur pour :
- ranger des produits surgelés,
- congeler des produits alimentaires,
- confectionner et stocker des
glaçons.
Congélation
d'aliments
N'utilisez que des aliments frais et d'un
aspect impeccable. Veillez à ce que les
produits alimentaires à congeler
n'entrent pas en contact avec des
produits déjà congelés. L'air ne doit
pas pénétrer dans l'emballage pour
que les aliments ne perdent pas leur
goût ni ne sèchent pas.
Pour emballer correctement :
1. Placez les aliments dans
l'emballage.
2. Chassez complètement l'air de
l'emballage.
3. Obturez l'emballage
hermétiquement.
4. Inscrivez sur l'emballage le nom
du contenu et la date de
congélation.
Emballages inadaptés :
Papier d'emballage, papier sulfurisé,
cellophane, sacs-poubelles, sacs
d'achat déjà utilisés.
Emballages adaptés :
Feuilles en plastique, feuilles en
polyéthylène, feuilles d'aluminium,
boîtes de congélation.
Ces produits sont en vente dans le
commerce spécialisé.
Pour obturer les emballages, utilisez
des :
Caoutchoucs, clips en plastique,
ficelles, rubans adhésifs résistants au
froid, ou assimilé.
Vous pouvez fermer les sachets et
feuilles en polyéthylène au moyen
d'un appareil à souder.
Durée de conservation des
aliments congelés
La durée de conservation dépend de
la nature des produits alimentaires. Si
la température a été réglée sur 0 °F
(-18 °C) :
S Poisson, charcuterie, plats
pré-cuisinés, pâtisseries :
jusqu'à 6 mois
S Fromage, volaille, viande :
jusqu'à 8 mois
S Fruits et légumes :
jusqu'à 12 mois.
Achat et stockage de
produits surgelés
Au moment d'acheter des produits
surgelés, tenez compte de ce qui suit
:
S Vérifiez que l'emballage n'est pas
endommagé.
S Vérifiez la date limite de
consommation recommandée.
S La température maximale indiquée
par le thermomètre du congélateur
commercial ne doit pas dépasser
0 °F (-18 °C). Si ce n'est pas le
cas, la durée de conservation des
produits surgelés diminue en
conséquence.
S Achetez les produits surgelés en
dernier. Emballez-les dans du
papier journal ou utilisez un sac
isotherme pour le transport.
S Une fois revenu chez vous, rangez
les produits surgelés
immédiatement dans le
compartiment congélateur.
Consommez les produits surgelés
avant la date limite de
consommation recommandée.
Décongélation des
produit
ATTENTION
Risque d'empoisonnement !
Ne remettez pas à congeler des
produits alimentaires partiellement
ou entièrement décongelés. Ne
recongelez les produits qu'après
les avoir transformés (cuisson ou
rôtissage). Dans ce cas,
consommez-les nettement avant la
date limite de conservation.
Selon la nature et l'utilisation des
produits surgelés, vous pouvez
choisir entre plusieurs possibilités :
S À la température ambiante.
S Dans le réfrigérateur.
S Dans le four électrique, avec ou
sans ventilateur à air chaud.
S Dans le micro-ondes.
42
Page 43

Équipement du
compartiment
congélateur
Tiroir supérieur du
congélateur
Il est possible de retirer le tiroir du
congélateur.
Pour retirer le tiroir supérieur du
congélateur :
1. Tirez le compartiment supérieur du
congélateur jusqu'à la butée.
2. Retirez avec soin les attaches des
deux côtés, puis soulevez l'avant
du tiroir du congélateur.
3. Retirez le tiroir du congélateur.
Tiroir inférieur du
congélateur
Il est possible de retirer le tiroir du
congélateur.
Pour retirer le tiroir inférieur du
congélateur :
Soulevez le tiroir du congélateur et
retirez-le.
Distributeur de
glaçons et d'eau
Vous pouvez prélever, suivant
besoins :
S de l'eau réfrigérée,
S de la glace pilée,
S des glaçons.
AVERTISSEMENT
Risque de blessures de verre
brisé !
Ne prélevez jamais d'eau ou de
glaçons dans un récipient fragile.
AVERTISSEMENT
Risque de blessure du broyeur à
glace !
N'introduisez jamais les doigts
dans l'orifice de distribution des
glaçons.
REMARQUE
Risque de dégâts à l'appareil !
Ne mettez jamais de bouteilles ou
produits alimentaires dans le
distributeur de glaçons pour les
faire refroidir rapidement. Il
risquerait de se bloquer et de
s'endommager.
fr-ca
Consignes pour la mise en
service de l'appareil
La distribution de glaçons et d'eau ne
fonctionne que si l'appareil a été
raccordé au réseau d'eau.
Après la mise en service de l'appareil,
il faut environ 24 heures pour que les
premiers glaçons soient prêts.
Après le raccordement, les conduites
contiennent encore des bulles d'air.
Prélevez de l'eau et jetez-la jusqu'à ce
qu'elle sorte sans bulles. Jetez le
contenu des 5 premiers verres.
Si vous utilisez le distributeur de
glaçons pour la première fois,
n'utilisez pas, pour des motifs
d'hygiène, les 30 à 40 premiers
glaçons.
Remarques concernant le
fonctionnement du
distributeur de glaçons
Une fois que le compartiment
congélateur a atteint la température
de congélation, l'eau afflue dans ce
distributeur et se solidifie dans ses
compartiments pour former des
glaçons. Les glaçons finis sont
automatiquement transférés dans le
bac à glaçons.
Parfois, plusieurs glaçons à la fois
s'accumulent sur le côté. Ils se
détachent généralement d'eux‐mêmes
pendant leur transfert vers l'orifice de
distribution.
Une fois que le distributeur de
glaçons est plein, la préparation de
glaçons cesse automatiquement.
Le distributeur à glaçons peut
produire environ 100 glaçons dans un
délai de 24 heures lorsque le bac à
glaçons est vidé à plusieurs reprises
au cours d'une journée.
Lors de la confection des glaçons, on
entend le bourdonnement de
l'électrovanne à eau, l'afflux d'eau
dans le bac à glaçons et la chute des
glaçon.
43
Page 44

fr-ca
Qualité de l'eau potable
ATTENTION
Le filtre à eau livré avec l'appareil
filtre exclusivement les particules
en suspension dans l'eau entrante.
Il ne retient ni les bactéries, ni les
microbes.
Tous les matériaux utilisés dans le
distributeur d'eau sont inodores et
sans saveur.
Si l'eau devait avoir un goût, les
raisons peuvent être les suivantes :
S Teneur de l'eau potable en sels
minéraux et en chlore
S Matériau de la conduite
d'adduction d'eau à la maison ou
de raccordement
S Fraîcheur de l'eau potable. Si
aucune eau n'a été prélevée
pendant longtemps, elle peut
prendre un goût « pas frais ».
Dans ce cas-là, prélevez environ
15 verres d'eau et jetez leur
contenu.
Vous pouvez intercaler le filtre à eau
ci-joint sur la conduite d'arrivée si
l'eau a un goût et une odeur.
Prélèvement de l'eau
1. Tenez un récipient adéquat sous le
distributeur de glaçons et d'eau.
2. Appuyez sur la touche de
prélèvement d'eau jusqu'à ce que
la quantité souhaitée soit dans le
récipient.
Prélèvement de glaçons et de
glace pilée
REMARQUE
Appuyez sur la touche de
prélèvement de glaçons ou de
glace pilée jusqu'à ce que la
quantité souhaitée soit dans le
récipient, puis relâchez-la. La
présence de glaçons dans l'orifice
de distribution des glaçons pourrait
entraîner le débordement du
récipient ou le blocage de l'orifice
du distributeur.
Si vous obtenez de la glace pilée
avant les glaçons, l'ouverture du
distributeur de glaçons peut
contenir encore quelques particules
de glace pilée. Ces particules se
mélangeront au prochain lot de
glaçons produit.
1. Tenez un récipient adéquat sous le
distributeur de glaçons et d'eau.
2. Appuyez sur la touche de
prélèvement de glaçons ou de
glace pilée jusqu'à ce que la
quantité souhaitée soit dans le
récipient.
Désactivation du distributeur
de glaçons
REMARQUE
Assurez-vous de coupure le
raccordement de l'eau à l'appareil
quelques heures avant de
désactiver le distributeur de
glaçons.
Si vous prévoyez de ne pas prélever
de glaçons pendant plus d'une
semaine (départ en vacances p. ex.),
il faudrait désactiver temporairement
le distributeur pour empêcher que les
glaçons ne se soudent entre eux.
1. Appuyez sur le bouton de retrait et
retirez le bac à glaçons.
2. Appuyez sur le bouton derrière le
bac à glace pendant 3 secondes
(la lumière DEL est éteinte) pour
désactiver la machine à glaçons.
Un conseil :
L'eau sortant du distributeur d'eau se
trouve à une température fraîche
adaptée à sa dégustation. Si vous
voulez de l'eau plus froide, mettez
quelques glaçons dans le verre avant
d'en prélever.
44
Bac à glaçons
Le bac à glaçons stocke des glaçons
de réserve dans le compartiment
congélateur. Le bac à glaçons, de par
sa forme, s'adapte parfaitement au
distributeur de glaçons et d'eau.
3. Videz le bac à glaçons et
nettoyez-le.
4. Poussez le bac à glaçons
complètement à l'arrière sur les
surfaces d'appui, jusqu'à ce qu'il
encoche.
Remise en service du distributeur de
glaçons :
S Appuyez sur le bouton derrière le
bac à glace pendant 3 secondes
(la lumière DEL est allumée) pour
activer la machine à glaçons.
Page 45

Filtre à eau
ATTENTION
Dans les localités où la qualité de
l'eau est douteuse ou
insuffisamment connue, n'utilisez
pas l'appareil sans avoir intercalé
un moyen de désinfection
approprié en amont et en aval du
dispositif de filtrage.
Vous pouvez, via le service
après‐vente, vous procurer une
cartouche pour le filtre à particules.
Il faudrait changer cette cartouche au
plus tard au bout de six mois.
Au bout de 6 mois, le symbole du
filtre à eau clignote pour vous inviter à
changer la cartouche filtrante. (Voir le
chapitre « Symbole du filtre à eau »).
Autres exigences relatives au
raccordement
N'installez pas la cartouche filtrante si
la pression de l'eau dépasse 120 psi
(8,2 bar).
Si la pression de l'eau dépasse 80 psi
(5,5 bar), il faut installer un réducteur
de pression.
Installation et changement
de la cartouche filtrante
1. Tirez le couvercle, puis
abaissez-le.
REMARQUE
Prudence lorsque vous enlevez la
cartouche filtrante !
Après utilisation, le circuit d'eau se
trouve légèrement sous pression.
2. Faites tourner doucement le filtre
ou le capuchon de dérivation 90°
dans le sens antihoraire, puis
retirez-le.
fr-ca
8. Videz l'eau encore présente dans
l'ancienne cartouche filtrante. Vous
pouvez ensuite la mettre à la
poubelle des déchets
domestiques.
9. Maintenez enfoncée la touche
« light/filter » pendant 3 secondes.
L'indicateur d'utilisation du filtre
compteur du filtre se réinitialise. Le
symbole arrête de clignoter. La
nouvelle cartouche filtrante est
activée.
Consignes importantes
S Si l'appareil est resté assez
longtemps sans servir ou si l'eau a
un goût ou une odeur
désagréable, rincez bien le circuit
d'eau. Pour ce faire, prélevez de
l'eau pendant plusieurs minutes au
distributeur d'eau. Si le goût ou
l'odeur désagréable persistent,
changez la cartouche filtrante.
S Le distributeur de glaçons et d'eau
peut s'utiliser sans cartouche
filtrante. Dans ce cas, remplacez la
cartouche filtrante par le capuchon
de dérivation.
3. Sortez la nouvelle cartouche
filtrante de l'emballage.
4. Mettez la cartouche filtrante neuve
en place et faites-la tourner
doucement 90° dans le sens
horaire jusqu'à ce qu'elle encoche.
5. Soulevez le couvercle et fermez-le.
6. Ouvrez l'arrivée d'eau à l'appareil.
7. Soutirez quelques litres d'eau par
le biais du distributeur d'eau. Cette
précaution chasse l'air du circuit
d'eau.
45
Page 46

fr-ca
Fiche de spécifications et de performances
Modèle de filtre : 9000 077 095 and 9000 077 096
avec utilisation de la cartouche de rechange 9000 077 104
Ce modèle a été testé par NSF
International en conformité avec les
standards ANSI/NSF 42 & 53, et
certifié capable de réduire les teneurs
en substances énoncées ci-après.
Le système a été testé et certifié dans le modèle 9000 077 095 de NSF International, par rapport au standard
ANSI/NSF 53 visant à réduire les kystes et turbidités, ainsi que par rapport au standard ANSI/NSF 42 visant
à réduire le goût et l'odeur de chlore.
Classe particulaire nominale : I
Durée utile nominale : 739,68 gallons (2 800 litres)
La concentration des substances
indiquées, dissoutes dans l'eau, qui
pénètrent dans le système a été
ramenée à une valeur inférieure ou
égale à la valeur limite admissible
selon NSF/ANSI 42 et 53 applicable à
l'eau déviée hors de l'appareil.
Remarque :
Bien que les tests aient été réalisés
dans des conditions de laboratoire
standardisées, les performances
réelles peuvent différer de ceux-ci.
Substance
Kystes * 122 500
Turbidité 10,8 unités
Classe
particulaire
nominale I
w 0,5 à < 1 μm
Goût et odeur
de chlore
* Basé sur l'utilisation d'ookystes de Cryptosporidium parvum.
Directives d'application / Paramètres
d'alimentation en eau :
Pression de l'eau 30 - 120 psi
Température de l'eau 33 °F - 100 °F
Vitesse d'écoulement 0,75 gpm
Flux entrant
en moyenne
kystes/l
NTU
13 666 666
particules/ml
2,0 mg/l 2,0 mg/l
Concentration
d'essai prévue
par NSF
50 000 kystes
/l au minimum
11 ± 1 NTU 98,8 < 0,16 NTU 0,5 NTU 95,5 % J-00058972
Au moins
10 000
particules/ml
±10 %
(207 – 827 kPa)
(0,6 °C – 38 °C)
(2,83 l/min.)
Réduction
moyenne
en %
99,99 < 1 kyste/l s.o.
99,00 143 333
97,5 < 0,05 mg/l s.o.
DO Il ne FAUDRAIT PAS utiliser ce
produit lorsque l'eau est
microbiologiquement nocive ou
d'une qualité inconnue, sans
désinfection avant et après
raccordement au système. Un
système certifié capable de réduire la
teneur en kystes ne doit être affecté
qu'à de l'eau désinfectée, c'est-à-dire
de l'eau contenant selon les
circonstances des kystes filtrables.
S Le système devra être installé et
exploité conformément aux
directives recommandées par le
fabricant.
S Il faut changer le filtre tous les
6 mois.
S Rincer le filtre neuf pendant
5 minutes.
S Consultez la carte de garantie pour
de plus amples détails.
Concentration
moyenne
dans l'eau
sortante
particules/ml
Concentration
max.
admissible
dans l'eau
sortante
s.o.
Exigences de
réduction NSF
w 99,95 %
w 85 %
w 50 %
L'ensemble du système bénéficie
d'une garantie d'un an (sauf la
cartouche à usage unique). La
garantie des cartouches à usage
unique ne porte que sur les vices de
matière et de fabrication. La durée
d'exploitation des cartouches filtrantes
à usage unique dépend de la qualité
locale de l'eau, de sorte qu'il est
impossible de garantir une durée
d'exploitation précise.
Le vendeur auprès duquel vous avez
acheté l'appareil ou votre fournisseur
de pièces représentant sur place
vous fourniront de plus amples détails
concernant les prix des pièces de
rechange.
Fabriqué par :
Cuno Engineered Products
1000 Apollo Road
Eagan, MN 55121-2240 U.S.A.
Rapport
d'essai NSF
J-00056513
J-00056506
J-00056501
46
Page 47

Conseils pour
économiser l'énergie
S Placez votre appareil dans un
endroit sec et bien aéré. Veillez à
ce qu'il ne soit pas exposé aux
rayons solaires et qu'il ne se
trouve pas à proximité d'une
source de chaleur (radiateur etc.).
Utilisez le cas échéant une plaque
isolante.
S Attendez que les boissons et
aliments chauds aient refroidi à la
température de la pièce avant de
les ranger dans l'appareil.
S Lorsque vous décongelez des
aliments, vous pouvez utiliser le
froid qu'ils ont emmagasiné pour
refroidir les aliments stockés dans
le réfrigérateur. Vous profitez ainsi
de leur excédent de froid pour
refroidir les aliments déjà présents
dans ce compartiment.
S N'ouvrez la porte de l'appareil que
le plus brièvement possible.
Bruits de
fonctionnement
Bruits parfaitement normaux
Bourdonnements étouffés : Ces bruits
normaux se font entendre pendant
que le compresseur est en marche.
Le ventilateur du système de
circulation d'air fonctionne.
Gargouillis, murmures ou clapotis
légers : Le fluide frigorigène circule
dans les tubulures. Eau en train
d'affluer dans le distributeur de
glaçons.
Cliquetis : Le moteur se met en
marche ou s'arrête. L'électrovanne
située sur le raccordement de l'eau
s'ouvre ou se ferme.
Bruit de chute : Les glaçons finis de
se solidifier chutent du distributeur
dans le bac.
Résolution de problèmes de
bruit simples
L'appareil ne repose pas d'aplomb
Vérifiez l'horizontalité de l'appareil à
l'aide d'un niveau à bulle. Ajustez
ensuite l'horizontalité par les pieds à
vis ou placez un objet dessous.
L'appareil touche quelque chose
Éloignez l'appareil de meubles ou
d'appareils voisins.
Des tiroirs, paniers ou surfaces de
rangement vibrent ou se coincent
Vérifiez les pièces amovibles puis
remettez-les en place correctement.
Des récipients se touchent
Éloignez légèrement les bouteilles ou
récipients les uns des autres.
Dégivrage
Compartiment congélateur
Grâce au système Nofrost
entièrement automatique, le
compartiment congélateur ne se
couvre pas de givre. La nécessité de
dégivrer disparaît.
Compartiment réfrigérateur
Le dégivrage a lieu automatiquement.
L'eau de condensation sort par
l'orifice d'écoulement puis gagne le
bac d'évaporation au dos de
l'appareil.
Arrêt et
débranchement de
l'appareil
Arrêt de l'appareil
Débranchez la fiche mâle du secteur
ou ramenez le disjoncteur en position
éteinte.
Débranchement de l'appareil
Si l'appareil doit rester longtemps
sans servir :
1. Coupez impérativement l'arrivée
d'eau à l'appareil quelques heures
avant de l'éteindre.
2. Sortez tous les produits
alimentaires de l'appareil.
3. Débranchez la fiche mâle de la
prise de courant.
4. Enlevez la cartouche filtrante et
mettez-le à la poubelle des
déchets domestiques.
5. Videz le bac à glaçons et
nettoyez-le.
6. Nettoyez l'intérieur de l'appareil
(voir le chapitre « Nettoyage de
l'appareil »).
Pour éviter l'apparition de mauvaises
odeurs, laissez les portes ouvertes.
fr-ca
Nettoyage
AVERTISSEMENT
Risque de choc électrique !
Débranchez ou coupez le fusible/
disjoncteur avant de nettoyer
l'appareil.
ATTENTION
Pour éviter des blessures
corporelles ou des dégâts
matériels, veuillez respecter les
instructions suivantes :
Ne nettoyez jamais l''appareil avec
un nettoyeur à vapeur.
N'employez pas de produits de
nettoyage ou solvants contenant du
sable ou des acides ; ils pourraient
endommager les surfaces de
l'appareil.
N'essuyez les éclairages et le
panneau de commande et
d'affichage qu'avec un chiffon
humide. Veillez bien à ce que l'eau
de nettoyage ne puisse pas
pénétrer dans l'éclairage ou sous le
panneau de commande.
Veillez bien à ce que l'eau de
nettoyage ne coule pas dans
l'orifice d'écoulement du bac
d'évaporation.
Ne nettoyez jamais les clayettes et
les bacs au lave-vaisselle. Ces
pièces pourraient se déformer.
Nettoyage de l'appareil
Les compartiments Vita Fresh et le
tiroir pour aliments fins peuvent être
retirés pour le nettoyage.
1. Débranchez la fiche mâle du
secteur ou ramenez le disjoncteur
en position éteinte.
2. Sortez tous les produits
alimentaires de l'appareil et
déposez-les dans un endroit frais.
3. Nettoyez l'appareil avec un chiffon
doux, en utilisant de l'eau tiède
additionnée d'un peu de produit à
vaisselle à pH équilibré.
4. Ensuite, séchez-le en frottant avec
un essuie-tout sec.
5. N'essuyez le joint de porte qu'avec
un chiffon et de l'eau propre ;
ensuite, séchez-le à fond en
frottant avec un essuie-tout sec.
6. Après le nettoyage, rebranchez la
fiche mâle de l'appareil puis
réenclenchez-le.
47
Page 48

fr-ca
Nettoyage du bac
récupérateur d'eau
L'eau renversée afflue dans le bac de
récupération.
Pour le vider et le nettoyer, retirez le
crible. Essuyez le bac récupérateur
d'eau avec une éponge ou un
essuie-tout absorbant.
Nettoyage du bac à glaçons
Si vous n'avez pas prélevé de glaçons
pendant une période prolongée, ceux
déjà confectionnés rapetissent,
perdent leur fraîcheur et collent entre
eux.
ATTENTION
Risque de blessures !
Un bac rempli de glaçons est lourd.
Faites attention lorsque vous
enlevez le bac à glaçons.
1. Appuyez sur le bouton de retrait et
retirez le bac à glaçons.
2. Videz le bac à glaçons et
nettoyez-le en utilisant de l'eau
tiède.
3. Essuyez bien le bac et la vis
transporteuse sans fin avec un
essuie-tout sec pour que les
nouveaux glaçons ne viennent pas
coller contre la surface mouillée.
Mise en place du bac à glaçons
4. Poussez le bac à glaçons
complètement à l'arrière sur les
surfaces d'appui, jusqu'à ce qu'il
encoche.
REMARQUE
Si le bac ne se laisse pas déplacer
complètement jusqu'en arrière,
tournez un peu la vis transporteuse
dans le bac et retirez les glaçons
soudés dans la zone d'introduction.
Extraction du filtre
d'humidité spécial
1. Sortez les tiroirs Vita Fresh
d'environ 4 po (10 cm).
2. Rabattez la tablette en verre
au-dessus des tiroirs Vita Fresh et
retirez ces derniers.
3. Passez la main entre les
ouvertures du couvercle, dégagez
délicatement les 4 encoches avant
et retirez le couvercle.
4. Retirez le filtre d'humidité spécial.
5. Nettoyez le filtre d'humidité avec
de l'eau tiède et faites-le sécher.
6. Remettez le filtre d'humidité
spécial en place.
7. Remettez la partie arrière du
couvercle en place, abaissez le
couvercle et assurez-vous que sa
partie avant s'engage
correctement.
8. Remettez la tablette de verre en
place et fermez les tiroirs Vita
Fresh.
Éclairage (DEL)
Votre appareil est équipé d'un
éclairage par DEL ne demandant pas
d'entretien.
48
ATTENTION
Risque de lésions oculaires du
rayonnement laser de classe 1 M
(norme IEC 60825) !
N'observez jamais le rayonnement
des instruments optiques.
Les réparations de tels éclairages
sont exclusivement réservées au
service après-vente ou à des
spécialistes autorisés.
Page 49

fr-ca
Diagnostic et résolution de problèmes mineurs
Avant d'appeler le service après-vente (SAV) :
S Veuillez vérifier si vous ne pouvez pas remédier vous-même au problème à l'aide des instructions qui suivent.
Vous éviterez des dépenses inutiles car le déplacement du technicien du SAV vous sera facturé même pendant la période
de garantie.
Compartiment du réfrigérateur et compartiment du congélateur
Problème
Rien ne s'affiche à
l'écran, l'éclairage
intérieur ne fonctionne
pas, l'appareil ne
fonctionne pas.
L'éclairage intérieur ne
fonctionne pas.
La température des
aliments est trop
froide.
La température des
aliments n'est pas
assez froide.
Une odeur
désagréable échappe
de l'appareil.
De l'eau se condense
contre l'extérieur de
l'appareil.
Cause possible Mesure corrective
Fiche mâle non branchée sur la prise
murale.
Fusible grillé ou disjoncteur déclenché. Remplacez le fusible ou remettez le disjoncteur en
Panne d'électricité Attendez le rétablissement de l'électricité.
L'interrupteur du compartiment congélateur
ou réfrigérateur se coince.
Éclairage par DEL défectueux. Voir le chapitre « Éclairage (DEL) ».
La température est réglée sur une valeur
trop basse.
Une porte ne ferme pas correctement.
La température est réglée sur une valeur
trop élevée.
Un ou des orifices d'apport et d'évacuation
d'air sont recouverts.
Les portes ont étés ouvertes trop
fréquemment ou sont restées ouvertes trop
longtemps.
Beaucoup de produits alimentaires frais ont
été mis d'un coup dans le réfrigérateur.
Des aliments à odeur forte ont été mis
dans le réfrigérateur.
L'intérieur a besoin d'être nettoyé. Nettoyez l'intérieur.
Une porte ne ferme pas correctement.
L'environnement de l'appareil est trop
humide.
Branchez le cordon d'alimentation sur la prise de
courant.
fonction.
Vérifiez que la prise murale est alimentée.
Contactez au besoin un électricien ou la
compagnie d'électricité.
Vérifiez le mouvement de l'interrupteur.
Réglez la commande de température sur un
réglage moins froid.
Vérifiez que l'appareil repose d'aplomb à l'aide d'un
niveau à bulle. Voir le chapitre « Mise à niveau de
l'appareil».
Vérifiez la position des tiroirs et remettez-les en
place correctement, le cas échéant.
Vérifiez les joints des portes et le minibar
escamotable de la porte ; nettoyez-le ou remettez-le
en place correctement, le cas échéant.
Réglez la commande de température sur un
réglage plus froid.
Déplacez tout produit alimentaire qui obstrue un
orifices de sortie d'air.
Attendez à ce que la température diminue à
l'intérieur de l'appareil.
Les produits alimentaires doivent atteindre la
température de stockage appropriée.
Emballez ces aliments ou mettez-les dans un
emballage hermétiquement clos.
Vérifiez que l'appareil repose d'aplomb à l'aide d'un
niveau à bulle. Voir le chapitre « Mise à niveau de
l'appareil».
Vérifiez la position des tiroirs puis remettez-les en
place correctement, le cas échéant.
Vérifiez les joints des portes et le minibar
escamotable de la porte ; nettoyez-le ou remettez-le
en place correctement, le cas échéant.
Ceci pourrait être normal, selon la région.
49
Page 50

fr-ca
Problème
De l'eau se condense
à l'intérieur de
l'appareil.
Un tiroir se ferme
difficilement.
L'environnement de l'appareil est trop
humide ou les portes sont ouvertes trop
fréquemment.
Les joints des portes n'assurent pas
l'étanchéité.
Le tiroir n'est pas installé correctement. Installez le tiroir correctement.
Les supports du tiroir ont besoin d'être
nettoyés.
Distributeur de glaçons et d'eau
Mesure correctiveCause possible
N'ouvrez pas les portes aussi fréquemment ou ne
les gardez pas ouvertes trop longtemps.
Vérifiez les joints des portes et le minibar
escamotable de la porte ; nettoyez-le ou remettez-le
en place correctement, le cas échéant.
Nettoyez les supports du tiroir.
Problème
Le symbole du filtre à
eau clignote.
Le distributeur de
glaçons ne produit pas
assez de glaçon ou
ceux-ci sont déformés.
La machine à faire les
glaçons ne fabrique
pas suffisamment de
glaçons ou ne
fonctionne pas du tout.
Cause possible Mesure corrective
La cartouche filtrant a besoin d'être
changée.
L'indicateur d'utilisation du filtre n'a pas été
réinitialisé lors d'un changement de filtre.
L'appareil ou le distributeur de glaçons
vient d'être mis en service.
Une grande quantité de glaçons a été
prélevée.
La pression de l'eau est trop basse. Faites vérifier la pression de l'eau.
La cartouche filtrante est bouchée ou a
besoin d'être changée.
Un glaçon est coincé sur le bras de
détection du niveau de glaçons dans le
bac à glaçons.
Lorsque l'on passe de l'option glaçons à
l'option glace pilée, un glaçon peut rester
coincé à l'intérieur de l'ouverture du
distributeur. Ce glaçon commencera à se
fondre et de l'eau tombera goutte à goutte
dans le distributeur de glace et d'eau.
Une couche de glace recouvre le
transporteur à vis.
Changez la cartouche filtrante.
Réinitialisez l'indicateur de l'utilisation du filtre.
Après la mise en service de l'appareil, il faut
environ 24 heures pour que les premiers glaçons
soient prêts.
Il faut environ 24 heures pour que le bac à glaçons
soit à nouveau plein.
Changez la cartouche filtrante.
Retirer le bac à glaçons et dégager les glaçons
coincés à l'aide d'un outil contondant en plastique.
Ne pas utiliser d'objet pointu ou tranchant au
risque d'endommager l'appareil.
Dégager le glaçon de l'ouverture du distributeur à
l'aide d'un outil contondant en plastique. Ne pas
utiliser d'objet pointu ou tranchant au risque
d'endommager l'appareil.
Retirer et nettoyer le bac à glaçons.
Le bac à glaçons
contient des glaçons
qui ne sont pas
éjectés.
Le distributeur de
glaçons ne produit pas
de glaçons.
50
Les glaçons adhèrent les uns aux autres. Retirer et nettoyer le bac à glaçons.
Le distributeur de glaçons est éteint. Allumez distributeur de glaçons.
L'appareil n'est pas alimenté en eau. Faites vérifier le raccordement de l'eau par un
technicien agréé.
La conduite d'eau s'est entortillée. Fermez l'arrivée d'eau à l'appareil. Détortillez la
conduite d'eau. Faites remplacer toute conduite
endommagée par des pièces d'origine du
fabricant.
La pression de l'eau est trop basse. Faites vérifier la pression de l'eau.
Le bac à glaçons n'est pas installé
correctement.
L'alimentation en eau n'est pas raccordée
correctement.
Installez correctement le bac à glaçons.
Si l'alimentation en eau n'est pas raccordée
correctement, la pression de l'eau pourrait être trop
basse, ce qui peut endommager l'appareil.
Page 51

fr-ca
Problème
Il n'y a pas d'eau ou
presque pas à sortir du
distributeur d'eau.
La température de
l'eau prélevée n'est
pas assez froide.
L'eau est trouble. Il y a de l'air ou des bulles dans l'eau. Ceci est normal lorsque l'on utilise le distributeur
Il y a des particules en
suspension dans l'air
ou dans les glaçons.
La cartouche filtrante est bouchée ou a
besoin d'être changée.
La pression de l'eau est trop basse. Faites vérifier la pression de l'eau.
La vanne de fermeture n'est pas
complètement ouverte.
La conduite d'eau s'est entortillée. Fermez l'arrivée d'eau à l'appareil. Détortillez la
L'appareil vient d'être installé. Il faut environ 12 heures pour que l'eau refroidisse.
L'eau est restée dans les conduites
pendant une période prolongée et s'est
adaptée à la température ambiante.
Lorsque l'eau passe à travers la cartouche
filtrante pour la première fois, il se peut
qu'elle contienne de la poussière de
charbon issue de la cartouche filtrante.
Les particules en suspension se forment à
partir de dépôts minéraux lorsque l'eau
gèle et puis dégèle.
Mesure correctiveCause possible
Changez la cartouche filtrante.
Ajuster la vanne de fermeture pour qu'elle soit
complètement ouverte.
conduite d'eau. Faites remplacer toute conduite
endommagée par des pièces d'origine du
fabricant.
Prélevez de l'eau et jetez le contenu des
15 premiers verres.
d'eau pour la première fois. L'eau s'éclaircit après
un court laps de temps.
Ces particules en suspension ne sont pas nocives
!
Ces particules disparaîtront après un court laps de
temps.
Ces particules en suspension ne sont pas nocives
!
Ces particules sont présentes naturellement dans
les sources d'approvisionnement en eau.
51
Page 52

fr-ca
Service après-vente
Avant d'appeler le service
après-vente (SAV) :
Veuillez vérifier si vous ne pouvez pas
remédier vous-même au problème à
l'aide des instructions fournies dans le
chapitre « Diagnostic et résolution de
problèmes mineurs ».
Si ces informations s'avèrent
insuffisantes pour résoudre le
problème, une assistance
supplémentaire est disponible auprès
du service après-vente de Bosch.
Aux États-Unis :
Contactez le Bosch Customer
Interaction Center en appelant le
1-800-944-2904 (numéro gratuit).
Au Canada :
Contactez votre société de service
agréée par Bosch ou appelez le
1-800-944-2904.
Veuillez noter séparément les
informations suivantes concernant
votre appareil pour référence
ultérieure. Elles vous faciliteront
l'obtention d'aide ou la demande
d'une intervention du service
après-ventesi cela devait être
nécessaire.
Nom du revendeur
Adresse
Numéro de téléphone
Date d'achat
Numéro de modèle (Numéro E)
Numéro de série (Numéro FD)
Veuillez indiquer au technicien le
numéro complet du modèle de
l'appareil (numéro E) et le numéro de
série complet (numéro FD).
Vous trouverez ces informations sur la
plaque signalétique située contre
l'intérieur du compartiment
réfrigérateur à droite.
52
Page 53

es Índice
es-mx
INSTRUCCIONES DE SEGURIDAD
IMPORTANTES 54............................
Felicidades 55................................
Información acerca de la eliminación 55........
Instalación 56................................
Instalación y conexión del electrodoméstico 57..
Dimensiones del electrodoméstico
e instalación 60..............................
Conozca su electrodoméstico 61..............
Panel de control y de la pantalla 62............
Consejos de operación 63....................
Encendido del electrodoméstico 63............
Programación de la temperatura 63............
Función de alarma 63.........................
Bloqueo de panel 64..........................
Superfrío 64..................................
Supercongelado 64...........................
Hielo rápido 64...............................
Símbolo de filtro de agua 64...................
Unidad de temperatura 65.....................
Compartimiento del refrigerador 65.............
Compartimiento Vita Fresh 65..................
Cajón para fiambres 66.......................
Diseño interior variable 66.....................
Compartimiento del congelador 67.............
Cómo congelar alimentos 67..................
Cómo comprar y almacenar alimentos
congelados 67...............................
Cómo descongelar alimentos congelados 67...
Características del compartimiento
del congelador 68............................
Dispensador de hielo y agua 68...............
Filtro de agua 70.............................
Hoja de datos de especificaciones
y rendimiento 71.............................
Consejos para ahorro de energía 72...........
Ruidos durante la operación 72................
Descongelamiento 72.........................
Apagado y desconexión del electrodoméstico 72
Limpieza 72..................................
Luz LED 73..................................
Resolución de problemas menores 74..........
Servicio a clientes 77.........................
53
Page 54

es-mx
INSTRUCCIONES DE SEGURIDAD
IMPORTANTES
¡LEA Y CONSERVE ESTAS INSTRUCCIONES!
Antes de operar el
electrodoméstico
¡Lea atentamente las instrucciones de
operación e instalación!
Contienen información importante
acerca de cómo instalar, usar y
mantener el electrodoméstico.
Conserve toda la documentación para
su uso posterior o para el próximo
propietario.
Seguridad técnica
Únicamente los técnicos de servicio a
clientes pueden cambiar el cable de
alimentación y llevar a cabo cualquier
otra reparación. Las instalaciones y
las reparaciones incorrectas pueden
poner al usuario en situaciones de
riesgo considerable.
Información importante al
usar el electrodoméstico
S Nunca use dispositivos eléctricos
dentro del electrodoméstico (tales
como calentadores, máquinas de
hielo eléctricas, etcétera). ¡Riesgo
de explosión!
S Nunca use un limpiador por chorro
de vapor para descongelar o
limpiar el electrodoméstico. El
vapor puede penetrar en las
piezas eléctricas y provocar un
corto circuito o una descarga
eléctrica.
S Antes de limpiar, desenchufe el
electrodoméstico o desconecte el
fusible.
No tire del cable para desenchufar
el electrodoméstico.
S No almacene en el
electrodoméstico productos que
contengan propelentes inflamables
(tales como latas de aerosol) o
sustancias explosivas. ¡Riesgo de
explosión!
S Las botellas que contienen un alto
porcentaje de alcohol deben estar
selladas y almacenarse en
posición vertical.
S No almacene líquidos
embotellados ni enlatados
(especialmente bebidas
carbonatadas) en el
compartimiento del congelador.
¡Las botellas y las latas pueden
explotar!
S No se pare ni se apoye sobre la
base, los cajones ni las puertas, ni
sobre otras piezas del
electrodoméstico. Podría dañarlo.
S Mantenga las piezas de plástico y
los sellos de la puerta sin aceite ni
grasa. De lo contrario, las piezas
de plástico y el sello de la puerta
se volverán porosos.
S Nunca cubra ni obstruya las
aberturas de ventilación del
electrodoméstico. Esto hace que
el refrigerador deba trabajar más y
provoca un aumento del consumo
de energía.
S Las personas que tengan
limitaciones físicas, sensoriales o
mentales, o que tengan
conocimientos limitados acerca
del electrodoméstico deben ser
supervisadas o deben recibir
instrucciones más detalladas antes
de usar el electrodoméstico.
S No se lleve a la boca paletas de
helado ni cubos de hielo sacados
directamente del compartimiento
del congelador. ¡Riesgo de
quemaduras de baja temperatura!
S No toque superficies congeladas
ni alimentos que se encuentren en
el congelador con las manos
mojadas. La piel puede adherirse
a estas superficies sumamente
frías. ¡Riesgo de lesiones!
S No raspe la escarcha ni ningún
alimento congelado atascado con
un cuchillo ni con un objeto
punzante. Podría dañar el
electrodoméstico.
Niños en el hogar
S ¡No deje que los niños jueguen
con el electrodoméstico!
S Si el electrodoméstico tiene una
traba, mantenga la llave fuera del
alcance de los niños.
Requisitos generales
El electrodoméstico es apto para
S refrigerar alimentos
S congelar alimentos
S hacer hielo
S dispensar agua potable.
Este electrodoméstico ha sido
diseñado para uso doméstico
únicamente.
El electrodoméstico está protegido
contra interferencias y picos de
voltaje.
El circuito del refrigerante ha sido
probado para detectar fugas.
Definiciones
ADVERTENCIA
Este símbolo indica que se pueden
producir lesiones graves o la
muerte como resultado de no
cumplir con esta advertencia.
ATENCIÓN
Este símbolo indica que se pueden
producir lesiones de leves a
moderadas como resultado de no
cumplir con esta advertencia.
NOTA
Este símbolo indica que se pueden
producir daños como resultado de
no cumplir con esta advertencia.
54
Page 55

Felicidades
Al comprar este nuevo
refrigerador‐congelador, usted ha
elegido un electrodoméstico moderno
y de alta calidad.
Este refrigerador‐congelador se
distingue por su consumo de energía
económico.
Cada electrodoméstico que sale de
nuestra fábrica es inspeccionado en
profundidad para asegurar que
funcione correctamente y que se
encuentre en perfectas condiciones.
Si tiene alguna pregunta, en especial
en cuanto a la instalación y conexión
del electrodoméstico, no dude en
comunicarse con nuestro servicio a
clientes.
Puede visitar nuestro sitio de Internet
para obtener más información y ver
nuestra gama de productos.
Información acerca de
la eliminación
x Eliminación del embalaje
El embalaje protege el
electrodoméstico contra los daños
ocasionados durante el traslado.
Todos los materiales de embalaje son
ecológicos y reciclables.
Ayude a lograr un mejor
medioambiente eliminando los
materiales de embalaje de manera
ecológica.
Comuníquese con su distribuidor
local o autoridad local a fin de
conocer las opciones de eliminación
vigentes.
ADVERTENCIA
¡Riesgo de asfixia con las cajas de
cartón y la película de plástico!
Mantenga el embalaje y los
componentes del embalaje alejados
de los niños.
es-mx
x Eliminación de su
electrodoméstico viejo
¡Los electrodomésticos viejos no son
basura sin valor alguno! Es posible
recuperar valiosas materias primas
reciclando electrodomésticos viejos.
ADVERTENCIA
¡Riesgo de que los niños queden
atrapados!
Los niños pueden quedarse
encerrados dentro del
electrodoméstico.
Antes de eliminar el refrigerador
viejo:
Retire las puertas y le cajón inferior
del congelador.
Deje los estantes y los cajones en
su lugar de modo que los niños no
puedan meterse adentro con
facilidad.
Electrodomésticos en desuso:
1. Desconecte el enchufe de
alimentación.
2. Corte el cable de alimentación y
elimine el cable junto con el
enchufe de alimentación.
Los refrigeradores contienen
refrigerantes y su aislamiento
contiene gases. El refrigerante y los
gases deben eliminarse
correctamente. Antes de hacerlo,
asegúrese de que los tubos del
circuito del refrigerante no estén
dañados.
55
Page 56

es-mx
Instalación
Transporte e instalación
El electrodoméstico es pesado y
debe asegurarse durante el
transporte y la instalación.
ADVERTENCIA
¡Riesgo de lesiones!
El electrodoméstico es muy
pesado. Puede caerse y provocar
lesiones graves durante el
transporte y la instalación. Se
requieren, al menos, dos personas
para instalar el electrodoméstico de
manera segura. Mantenga las
puertas del refrigerador cerradas
hasta que el electrodoméstico
quede en posición vertical y
nivelado con respecto al lugar de
instalación.
Lugar de instalación
ADVERTENCIA
Si el refrigerador se instala al lado de
otro refrigerador/congelador, debe
haber un espacio libre mínimo de 1”
(25 mm) entre los electrodomésticos
para impedir la condensación.
Si se instala un panel o un armario
arriba del electrodoméstico,
asegúrese de dejar una separación
de 13/32
pueda sacar el electrodoméstico del
hueco, en caso de que sea
necesario.
Se debe permitir que el aire caliente
de la parte trasera del
electrodoméstico salga sin
obstáculos.
Para asegurar que las puertas
puedan abrirse completamente,
mantenga los espacios libres laterales
mínimos al instalar el
electrodoméstico en una esquina o
en un hueco (ver la sección
“Dimensiones del electrodoméstico e
instalación”).
Si la profundidad de los equipos
adyacentes de la cocina excede
29
espacios libres laterales mínimos a fin
de utilizar el ángulo de apertura de la
puerta completo (ver la sección
“Ángulo de apertura de la puerta”).
I
(10 mm) para que se
I
1/8
(75 cm), mantenga los
Ventilación
Nunca cubra las aberturas de
ventilación del panel de la base
delantera ni de la placa de la cubierta
trasera.
Esto hace que el electrodoméstico
deba trabajar más y provoca un
aumento del consumo de energía.
¡Riesgo de explosión!
No instale el electrodoméstico
cerca de sustancias explosivas o
inflamables.
NOTA
No instale el electrodoméstico en
exteriores.
El lugar de instalación debe estar
seco y no debe estar expuesto a
escarcha.
El lugar ideal de instalación es una
habitación seca, bien ventilada. El
lugar de instalación no debe estar
expuesto a la luz solar directa ni debe
estar cerca de una fuente de calor,
como una estufa, un radiador, etc. Si
no se puede evitar realizar la
instalación junto a una fuente de
calor, use una placa aislante
adecuada o cumpla con las
siguientes distancias mínimas
medidas desde la fuente de calor:
I
1/4
S 1
S 11
(3 cm) de estufas eléctricas
o de gas.
I
3/16
(30 cm) de estufas de
aceite o de combustible sólido.
Subsuperficie
NOTA
El electrodoméstico es muy pesado.
El piso sobre el que se instalará el
electrodoméstico debe ser rígido. Si
es necesario, refuerce el piso.
Peso del electrodoméstico cuando
está vacío:
Modelo básico 324 lb
(147 kg)
56
Page 57

Instalación y conexión
del electrodoméstico
S Haga que un técnico instale y
conecte el electrodoméstico según
las instrucciones de instalación de
este manual.
S Después de instalar el
electrodoméstico, espere al menos
8 horas antes de enchufarlo. El
aceite que se encuentra en el
compresor puede haber ingresado
en el sistema de refrigeración
durante el traslado.
S Limpie el interior del
electrodoméstico antes de
operarlo por primera vez (ver
“Limpieza del electrodoméstico”).
S Siempre conecte el agua antes
que la alimentación eléctrica.
S Además de cumplir con las
reglamentaciones legales
nacionales, se deben cumplir los
requisitos de conexión de las
compañías de servicios públicos
de electricidad y agua locales.
S No retire los dispositivos de
protección para transporte de los
estantes y los compartimientos de
almacenamiento hasta después de
que el electrodoméstico haya sido
instalado.
S Únicamente un técnico de servicio
a clientes debe retirar las puertas
del electrodoméstico si es
necesario para pasar el
electrodoméstico por las puertas
del hogar.
Conexión de agua
ADVERTENCIA
¡Riesgo de descarga eléctrica y
daños al electrodoméstico!
Desconecte el electrodoméstico de
la fuente de alimentación eléctrica
antes de realizar cualquier trabajo
en la conexión de agua.
Únicamente un técnico calificado
para realizar la instalación puede
conectar el electrodoméstico al
suministro de agua, de
conformidad con las
reglamentaciones sobre plomería y
las de la compañía de servicios
públicos de agua correspondiente.
Conecte el electrodoméstico a la línea
de agua:
S Presión mínima:
14.5 psi (1.0 bar)
S Presión máxima:
119 psi (8.2 bar)
Si la presión del agua excede 119 psi
(8.2 bar), se debe instalar una válvula
de reducción de presión. La máquina
de hielo no funcionará si la presión
del agua es inferior a 14.5 psi
(1.0 bar).
Instale una válvula de paso por
separado para la línea de agua.
No instale la válvula de paso detrás
del electrodoméstico. La válvula de
paso debe colocarse directamente al
lado del electrodoméstico o en otro
lugar de fácil acceso.
El gusto y el olor del agua puede
mejorarse instalando un cartucho
filtrante que se incluye con el
electrodoméstico. En este caso,
respete los requisitos de conexión por
separado relacionados con el filtro
(ver “Filtro de agua”).
La manguera de agua tiene una
conexión de 3/4 pulgada.
Conexión eléctrica
ADVERTENCIA
¡Riesgo de descarga eléctrica e
incendio si la conexión eléctrica no
está instalada correctamente!
Enchufe el electrodoméstico
únicamente en una toma de
corriente fija, de tres espigas,
conectada a tierra. La toma de
corriente debe ser instalada y
conectada a tierra por un
electricista calificado, de
conformidad con los códigos
correspondientes. Si es necesario,
haga que un electricista calificado
inspeccione la instalación para
asegurarse de que esté conectada
a tierra correctamente.
No use un cable de extensión ni un
múltiple. Nunca conecte el
electrodoméstico a un enchufe
electrónico para ahorro energético
(como Ecoboy, Sava Plug, etc.) ni a
inversores de corriente, que
convierten la corriente continua
(CC) a corriente alterna (CA) (como
para equipos solares, fuentes de
alimentación eléctrica en
embarcaciones, etcétera).
La toma de corriente del
electrodoméstico debe estar ubicada
cerca del electrodoméstico y debe
ser de fácil acceso también después
de la instalación.
Conecte el electrodoméstico a una
toma de corriente de CA de
115 V/60 Hz instalada correctamente.
El fusible de la toma de corriente
debe tener una capacidad nominal de
entre 15 A o 20 A.
es-mx
Si el electrodoméstico se utilizará en
otro país que no sea EE. UU.,
verifique la placa de valores
nominales para determinar si el
voltaje y el tipo de corriente
especificados corresponden a las
capacidades nominales de su fuente
de alimentación eléctrica. Si el voltaje
y el tipo de corriente no coinciden, el
electrodoméstico no debe operarse.
El cable de alimentación puede ser
reemplazado únicamente por un
electricista calificado.
57
Page 58

es-mx
Alineación del
electrodoméstico
NOTA
Para asegurarse de que el
electrodoméstico opere
correctamente, use un nivel para
alinear el electrodoméstico.
Si el electrodoméstico no está
nivelado, es posible que salga agua
de la máquina de hielo, que los
cubos de hielo sean irregulares o
que las puertas no cierren
correctamente.
1. Coloque el electrodoméstico en el
lugar designado.
Ajuste de la puerta del
refrigerador
Si la altura de las puertas del
refrigerador es despareja:
1. Determine qué puerta del
refrigerador necesita levantar.
2. Gire la tuerca del tornillo de la
bisagra inferior para ajustar la
puerta del refrigerador.
Para levantar la puerta del
refrigerador:
Gire el tornillo hacia la izquierda.
5. Use una llave hexagonal para girar
los tornillos y, luego, alinee la parte
trasera del electrodoméstico.
Para levantar la parte trasera del
electrodoméstico:
Gire el tornillo hacia la derecha.
Para bajar la parte trasera del
electrodoméstico:
Gire el tornillo hacia la izquierda.
Para bajar la puerta del
refrigerador:
Gire el tornillo hacia la derecha.
2. Retire los tres tornillos del panel
de la base.
3. Retire el panel de la base.
4. Use una llave hexagonal para
aflojar las dos patas delanteras
hasta que estén apoyadas
firmemente en el piso y, luego,
alinee la parte delantera del
electrodoméstico.
6. Use el nivel para verificar si el
electrodoméstico está nivelado.
NOTA
Para asegurarse de que el
electrodoméstico no se mueva, las
patas delanteras deben estar
apoyadas firmemente en el piso.
7. Si la altura de las puertas del
compartimiento del refrigerador es
despareja o si el cajón del
compartimiento del congelador
está inclinado después de ajustar
el nivel del electrodoméstico, use
el siguiente método para
ajustarlos.
58
Page 59

Si las puertas del refrigerador no
están alineadas correctamente:
ADVERTENCIA
¡Riesgo de descarga eléctrica!
Antes de retirar el panel superior:
1. Cierre el suministro de agua al
electrodoméstico.
2. Desenchufe el electrodoméstico
o desconecte el fusible.
1. Determine qué puerta del
refrigerador necesita ajustes.
2. Retire los cinco tornillos del panel
superior.
3. Levante el panel.
Ajuste del cajón del
compartimiento del
congelador
1. Determine qué lado necesita
ajustes.
2. Afloje los dos tornillos.
¡No retire los tornillos!
es-mx
2. Inserte las manijas de la puerta
dentro de las guías.
S Puertas del refrigerador: Los
tornillos de las manijas deben
apuntar al centro del
electrodoméstico.
S Cajón del compartimiento del
congelador: Los tornillos de las
manijas deben apuntar hacia
abajo.
4. Afloje el tornillo.
¡No retire el tornillo!
Figura
5. Mueva la bisagra hacia el costado
para ajustar la puerta del
refrigerador.
6. Apriete el tornillo.
7. Vuelva a alinear el panel.
8. Inserte los cinco tornillos y
apriételos.
3. Use el tornillo superior para ajustar
el cajón del compartimiento del
congelador.
4. Apriete los dos tornillos.
Instalación de las manijas
No instale las manijas hasta que el
electrodoméstico esté instalado en su
lugar designado y quede nivelado.
Todas las manijas son iguales y se
instalan del mismo modo.
1. Retire las películas protectoras de
las puertas del refrigerador y del
cajón del compartimiento del
congelador.
3. Ajuste los tornillos de las manijas
con la llave Allen que se incluye.
Instalación de la placa de la
base
1. Retire los tres tornillos del
electrodoméstico.
2. Monte la placa de la base.
3. Inserte los tres tornillos y
apriételos.
59
Page 60

es-mx
Dimensiones del electrodoméstico e instalación
3/4I
69
17
27/32I
17
27/32I
3/4I
69
33
13/32I
2
5/8I
35
- 3
5/8I
2/8I
29
1/8I
19/32I
68
I
min. 69
30
3/8I
36
I
5/32I
48
2
15
1405
5/32I
5/8I
35
I
1/8I
13/32
29
15/32I
5/8I
32
34
905
1
8/82I
8/82I
1
I
905
1/3I
1
1/8I
29
15
1405
5/32I
48
I
60
Page 61

Conozca su electrodoméstico
Estas instrucciones de operación e instalación se aplican a diversos modelos. Las ilustraciones pueden diferir de su
modelo específico.
19 16
20
1
18
17
es-mx
2
15
14
3
A
4
6
7
8
13
5
9
12
B
10
11
A El compartimiento del refrigerador
se puede ajustar
entre 35 °F (+2 °C)
y 46 °F (+8 °C)
B El compartimiento del congelador
se puede ajustar
entre 5 °F (-15 °C)
y -7 °F (-22 °C)
1 Compartimiento para mantequilla
y quesos
2 Recipiente para latas
3 Panel de control y de la pantalla
4 Dispensador de hielo y agua
5 Recipiente de almacenamiento de
hielo
6 Compartimiento de
almacenamiento de la puerta
7 Compartimiento Vita Fresh con luz
de LED
8 Compartimiento de
almacenamiento de la puerta
desmontable
9 Cajón superior del congelador
10 Cajón inferior del congelador
11 Interruptor de la luz del
compartimiento del congelador
12 Divisor del compartimiento del
congelador
13 Cajón para fiambres con luz de
LED
14 Compartimiento de
almacenamiento de la puerta
15 Compartimiento para huevos
16 Filtro de agua
17 Estante de vidrio ajustable
18 Estante de vidrio pequeño
19 Máquina de hielo/Recipiente para
cubos de hielo
20 Interruptor de la luz del
compartimiento del refrigerador
61
Page 62

es-mx
Panel de control y de la pantalla
El panel de control y de la pantalla que se encuentra en la puerta izquierda del refrigerador consiste en un teclado con
pantalla táctil.
Toque el teclado para activar la función correspondiente.
La luz del panel de control y de la pantalla se apaga después de aprox. 1 minuto cuando no se toca ninguna tecla.
10
11 9
1
2 7
3 4 5 6
1 botón “freezer”
Botón para
S ajustar la temperatura del
compartimiento del congelador
S encender/apagar la función
“Super freeze”
(supercongelado).
2 botón “quick ice”
Interruptor on/off
(encendido/apagado) de la
fabricación rápida de cubos de
hielo.
3 botón dispensador de agua
4 botón dispensador de hielo
picado
5 botón dispensador de cubos de
hielo
6 botón “alarm/lock”
Botón para
S apagar la señal de advertencia
S apagar/encender el bloqueo de
panel.
7 botón “light/filter”
Botón para
S encender/apagar la luz del
dispensador de hielo y agua
S reprogramar el indicador del
filtro.
8 botón “fridge”
Botón para
S ajustar la temperatura del
compartimiento del refrigerador
S encender/apagar la función
“Super cool” (superfrío).
9 Pantalla de temperatura del
compartimiento del refrigerador
Muestra la temperatura
programada para el
compartimiento del refrigerador.
10 Pantalla de temperatura del
compartimiento del congelador
Muestra la temperatura
programada para el
compartimiento del congelador.
8
11 Símbolos que aparecen en el
panel de la pantalla
“Hielo rápido”
Aparece cuando la función
“quick ice” (hielo rápido)
está encendida.
“Luz”
Aparece cuando la luz del
dispensador de hielo y
agua está encendida.
“Filtro de agua”
Muestra el estado del
cartucho filtrante.
“Bloqueo de panel”
Aparece cuando el
bloqueo de panel está
encendido.
62
Page 63

Consejos de
operación
Abrir y cerrar las puertas del
compartimiento del
refrigerador
Las puertas del compartimiento del
refrigerador pueden abrirse y cerrarse
independientemente.
La puerta izquierda del
compartimiento del refrigerador tiene
una varilla de puerta plegable.
Encendido del
electrodoméstico
NOTA
Después de instalar el
electrodoméstico, espere al menos
8 horas antes de enchufarlo. El
aceite que se encuentra en el
compresor puede haber ingresado
en el sistema de refrigeración
durante el traslado.
es-mx
Compartimiento del
congelador
(puede ajustarse entre 5 °F (-15 °C) y
-7 °F (-22 °C))
Presione el botón “freezer” hasta que
se programe la temperatura deseada
del compartimiento del congelador.
NOTA
¡Riesgo de daños al
electrodoméstico!
La varilla de la puerta podría
dañarse si intenta cerrar la puerta
izquierda del compartimiento del
refrigerador cuando la varilla de la
puerta no está replegada.
Antes de cerrar las puertas del
compartimiento del refrigerador,
asegúrese de que la varilla de la
puerta esté plegada en el ángulo
correcto de la puerta.
Al cerrar la puerta izquierda del
compartimiento del refrigerador, la
varilla de la puerta se pliega detrás
de la puerta derecha del
compartimiento del refrigerador y
forma un sello entre las puertas del
compartimiento del refrigerador.
Conecte el enchufe del
electrodoméstico en la toma de
corriente.
Una vez que el electrodoméstico ha
sido enchufado, comenzará el
proceso de refrigeración. La luz
interior del compartimiento del
refrigerador se enciende cuando la
puerta está abierta.
El interior del electrodoméstico
demorará varias horas en alcanzar las
temperaturas programadas de fábrica.
No coloque alimentos en el
electrodoméstico hasta que se
alcancen estas temperaturas.
Programación de la
temperatura
Compartimiento del
refrigerador
(puede ajustarse entre 35 °F (+2 °C) y
46 °F (+8 °C))
Presione el botón “fridge” hasta que
se programe la temperatura deseada
del compartimiento del refrigerador.
Se almacenará el valor de la
temperatura más reciente.
Recomendamos una programación
de 39 °F (+4 °C).
Los alimentos perecederos no deben
almacenarse a temperaturas mayores
que 39 °F (+4 °C).
Se almacenará el valor de la
temperatura más reciente.
Recomendamos una programación
de 0 ° 〈-18 °C).
Función de alarma
La señal de advertencia suena
cuando el interior del
electrodoméstico está demasiado
caliente o cuando la puerta del
electrodoméstico ha estado abierta
durante más de tres minutos.
La señal de advertencia sonará tres
veces durante un minuto cada vez
que se active. Habrá una pausa de un
minuto entre señales.
Compartimiento del
refrigerador
La palabra “alarm” parecerá en la
parte derecha del panel de la
pantalla.
Para apagar la señal de advertencia:
Presione “alarm/lock” o cierre las
puertas del compartimiento del
refrigerador.
La palabra ”alarm” titila en el panel de
la pantalla hasta que la temperatura
está cerca de la temperatura
seleccionada.
63
Page 64

es-mx
Compartimiento del
congelador
La palabra “alarm” aparecerá en la
parte izquierda del panel de la
pantalla.
Para apagar la señal de advertencia:
Presione “alarm/lock” o cierre el
cajón del compartimiento del
congelador.
La palabra ”alarm” titila en el panel de
la pantalla hasta que la temperatura
está cerca de la temperatura
seleccionada.
Bloqueo de panel
Cuando la función panel lock
(bloqueo de panel) está activada,
todos los botones en el panel de
control y de la pantalla se bloquean.
NOTA
Cuando la función panel lock
(bloqueo de panel) está activada,
use el botón “alarm/lock”
(alarma/bloqueo) para apagar la
señal de advertencia.
Para encender o apagar el bloqueo
de panel:
Presione “alarm/lock” durante
2 segundos.
El símbolo “panel lock” aparece
cuando se activa el bloqueo de panel.
Para encender la función super
cooling (superfrío):
Presione “fridge” hasta que aparezca
“super” en la parte derecha del panel
de la pantalla.
Para apagar la función super cooling
(superfrío):
Presione “fridge”.
La palabra “super” desaparece del
panel de la pantalla. La temperatura
se programa automáticamente en
39 °F (+4 °C).
Supercongelado
Los alimentos deben congelarse tan
pronto como sea posible a fin de
conservar sus vitaminas, su valor
nutricional, su aspecto y su sabor.
Para evitar un incremento no deseado
de la temperatura al colocar alimentos
frescos en el compartimiento del
congelador, encienda la función super
freezing (supercongelado) con varias
horas de anticipación.
Como regla general, entre 4 y 6 horas
son suficientes. Deje transcurrir un
mínimo de 24 horas si planea usar la
capacidad de congelamiento máxima.
Es posible congelar cantidades más
pequeñas de alimentos sin la función
super freezing (supercongelado).
Para encender la función super
freezing (supercongelado):
Presione “freezer” hasta que
aparezca “super” en la parte
izquierda del panel de la pantalla.
Hielo rápido
Use esta función para acelerar la
fabricación de cubos de hielo.
Para encender quick ice (hielo
rápido):
Presione “quick ice”.
El símbolo “quick ice” (hielo rápido)
aparece en el panel de la pantalla.
Cuando el recipiente para cubos de
hielo está lleno, la función quick ice
(hielo rápido) se apaga
automáticamente después de algunas
horas.
NOTA
Cuando la función quick ice (hielo
rápido) está activada, la
alimentación eléctrica del
electrodoméstico aumenta
temporalmente. Esto aumenta el
consumo de energía.
Símbolo de filtro de
agua
El símbolo indica el período de uso
del cartucho filtrante.
Hasta dos meses.
Hasta cuatro meses.
Hasta seis meses.
Superfrío
La función Super cooling (superfrío)
enfría el compartimiento del
refrigerador tanto como sea posible
durante, aproximadamente, 6 horas.
Entonces, la temperatura se
reprograma automáticamente en
39 °F (+4 °C).
La función Super cooling (superfrío)
está recomendada particularmente en
los siguientes casos:
S Antes de colocar grandes
cantidades de alimentos en el
compartimiento del refrigerador.
S Para enfriar bebidas rápidamente.
64
Para apagar la función super freezing
(supercongelado):
Presione “freezer”.
La palabra “super” desaparece del
panel de la pantalla. La temperatura
se programa automáticamente en
0 °F (-18 °C).
NOTA
La función Super freezing
(supercongelado) se apaga
automáticamente después de
aproximadamente 2 días.
Después de seis meses,
el símbolo titila.
Reemplace el cartucho
filtrante.
Cuando el electrodoméstico está
apagado, el símbolo de filtro de agua
se reprograma.
Para reprogramar el símbolo de filtro
de agua después de reemplazar el
cartucho filtrante:
Presione el botón “light/filter” durante
3 segundos.
El símbolo deja de titilar.
Page 65

es-mx
Unidad de
temperatura
La temperatura puede mostrarse en
grados Fahrenheit (°F) o Celsius (°C).
Una vez que se enciende el
electrodoméstico, la temperatura
aparece en grados Fahrenheit (°F).
Para programar la unidad de
temperatura:
Presione “alarm/lock” durante
2 segundos.
Aparece el símbolo “Panel lock”
(Bloqueo de panel).
Presione “quick ice” durante
15 segundos hasta que cambie la
unidad de temperatura.
Compartimiento del
refrigerador
ADVERTENCIA
¡Riesgo de explosión!
Nunca almacene productos que
contengan propulsores inflamables
(tales como latas de aerosol) o
sustancias explosivas o fácilmente
combustibles en el
electrodoméstico.
Las botellas que contienen un alto
porcentaje de alcohol deben estar
herméticamente selladas y
almacenarse en posición vertical.
Uso del compartimiento del
refrigerador
Para almacenar comidas elaboradas,
pasteles y pastelería, alimentos
enlatados, leche condensada, queso,
productos para untar, salsas, dips y
huevos.
Siga estas pautas al
almacenar alimentos:
- Deje que los alimentos y bebidas
calientes se enfríen fuera del
electrodoméstico.
- Coloque alimentos en recipientes
herméticos para evitar que estos
pierdan su sabor o se sequen.
- Para evitar que haya poca
circulación de aire en el
electrodoméstico, no obstruya las
aberturas de ventilación con
alimentos.
- Evite el contacto de aceite y grasa
con las piezas de plástico y con el
sello de la puerta.
Compartimiento Vita
Fresh
(no disponible en todos los modelos)
La temperatura dentro del
compartimiento Vita Fresh se
mantiene a casi 32 °F (0 °C). La
temperatura baja proporciona
condiciones óptimas de
almacenamiento para los alimentos
perecederos.
Los alimentos pueden almacenarse
en el compartimiento Vita Fresh
durante mucho más tiempo que en el
compartimiento habitual de los
refrigeradores sin perder su frescura.
El compartimiento Vita Fresh está
cubierto por un filtro especial para
humedad. El filtro especial para
humedad optimiza la humedad en el
compartimiento Vita Fresh. Según
cuán lleno esté el compartimiento Vita
Fresh, la humedad puede alcanzar
hasta un máximo del 90 %, que es
ideal para todos los productos de
huerta y de campo, tales como
verduras, lechugas, hierbas y frutas.
Vita Fresh es apto para:
Básicamente, cualquier alimento
fresco que deba mantenerse fresco
durante más tiempo, como carne y
productos derivados de la carne,
pescado fresco, mariscos, leche,
mantequilla, quesos blandos, queso
cottage, frutas y verduras.
Vita Fresh no es apto para:
Frutas y verduras sensibles al frío,
como frutas tropicales, ahuacates,
papayas, maracuyás, berenjenas,
pepinos, pimientos, así como fruta
que tenga que madurar, tomates
verdes y papas.
Al comprar alimentos, tenga
en cuenta:
La ”frescura en el momento de la
compra” es importante para la
duración en almacenamiento de sus
alimentos. Por lo general, cuanto más
frescos estén los productos en el
momento de colocarlos en los
compartimientos Vita Fresh, mayor
será el tiempo en que permanecerán
frescos. Por lo tanto, al comprar
alimentos, verifique siempre su grado
de frescura.
Cómo retirar los cajones Vita
Fresh
1. Jale los cajones Vita Fresh hacia
afuera, tanto como sea posible.
2. Levante el frente de los cajones
Vita Fresh y jálelos hacia afuera.
3. Cómo insertar los cajones Vita
Fresh: Inserte los cajones Vita
Fresh dentro del riel y empuje
hacia la parte posterior.
La temperatura del compartimiento
del refrigerador puede ajustarse entre
35 °F (+2 °C) y 46 °F (+8 °C).
Recomendamos una programación
de 39 °F (+4 °C).
Los alimentos perecederos no deben
almacenarse a temperaturas mayores
que 39 °F (+4 °C).
65
Page 66

es-mx
Cajón para fiambres
La temperatura en el cajón para
fiambres se mantiene constante,
apenas bajo cero. Esto proporciona
condiciones óptimas de
almacenamiento para carnes,
productos derivados de la carne,
pescados, mariscos, productos
lácteos, así como quesos duros y
blandos.
NOTA
Nunca almacene alimentos
sensibles al frío en el cajón para
fiambres.
Cómo retirar el cajón para
fiambres
1. Jale el cajón para fiambres hacia
afuera, tanto como sea posible.
2. Levante el frente del cajón para
fiambres y jálelo hacia afuera.
Diseño interior
variable
Estantes de vidrio
Los estantes de vidrio ajustables
pueden retirarse.
Puede extraer los estantes de vidrio
ajustables y ubicarlos a distintas
alturas.
Cómo retirar un estante de vidrio
Levante y jale el estante hacia usted.
Desenganche y, luego, retire el
estante.
Compartimientos de
almacenamiento de la puerta
Para retirar los compartimientos de
almacenamiento de la puerta:
Levante el compartimiento de la
puerta y sáquelo.
Para instalar los compartimientos de
almacenamiento de la puerta:
Coloque el compartimiento por
encima del soporte a la altura
deseada, y presione hacia abajo.
Compartimiento para
mantequilla y quesos
Levante la cubierta que se encuentra
sobre el compartimiento para
mantequilla y quesos.
3. Cómo insertar el cajón: Inserte el
cajón para fiambres dentro del riel
y empuje hacia la parte posterior.
Instalación del estante de vidrio
Levante la parte delantera del estante
e introduzca los ganchos en las
aberturas a la altura deseada. Baje la
parte delantera del estante.
Estante de vidrio superior pequeño
El estante de vidrio puede retirarse y
colocarse en el soporte debajo de la
máquina de hielo. Esto proporciona
espacio para colocar artículos de
mayor altura, como botellas altas,
junto a la máquina de hielo.
Para retirar el compartimiento para
mantequilla y quesos:
Levante el compartimiento y sáquelo.
Para instalar el compartimiento para
mantequilla y quesos:
Coloque el compartimiento por
encima del soporte a la altura
deseada y presione hacia abajo.
Compartimiento para huevos
66
Page 67

es-mx
Compartimiento del
congelador
ADVERTENCIA
¡Riesgo de explosión!
Nunca almacene productos que
contengan propulsores inflamables
(tales como latas de aerosol) o
sustancias explosivas o fácilmente
combustibles en el
electrodoméstico.
La temperatura del compartimiento
del congelador puede ajustarse entre
5 °F (-15 °C) y -7 °F (-22 °C).
Recomendamos una programación
de 0 ° 〈-18 °C).
NOTA
Asegúrese de que el cajón del
compartimiento del congelador se
mantenga siempre cerrado. Los
alimentos congelados se
descongelan si se abre el cajón del
compartimiento del congelador. El
compartimento del congelador se
cubre con una capa gruesa de
hielo. Además, se pierde energía
debido al elevado consumo de
energía.
Cuando se cierra la puerta del
compartimiento del congelador, se
produce baja presión dentro del
compartimiento.
Si no puede volver a abrir la puerta
del compartimiento del congelador
de inmediato, espere de dos a tres
minutos hasta que se haya ajustado
la baja presión.
Use el compartimiento del
congelador para
- almacenar alimentos congelados
- congelar alimentos
- hacer y almacenar cubos de hielo.
Cómo congelar
alimentos
Congele alimentos frescos e intactos
únicamente. Separe los alimentos que
deban congelarse de los que ya estén
congelados. Coloque los alimentos en
recipientes herméticos para evitar que
pierdan su sabor o que se sequen.
Cómo envolver los alimentos
correctamente:
1. Coloque los alimentos en un
envoltorio.
2. Elimine todo el aire.
3. Selle el envoltorio.
4. Identifique el envoltorio con el
contenido y la fecha.
Artículos no aptos para envolver
alimentos:
Papel de regalo, papel manteca,
celofán, bolsas de residuos ni bolsas
de compra usadas.
Artículos aptos para envolver
alimentos:
Película de plástico, película soplada
de polietileno, papel de aluminio y
latas para congelador.
Estos productos pueden adquirirse de
su vendedor minorista.
Artículos aptos para sellar alimentos
envueltos:
Bandas de hule, ganchos de plástico,
cordón, cinta adhesiva resistente al
frío o artículos similares.
Las bolsas y la película soplada de
polietileno pueden sellarse con un
sellador para película.
Vida en almacenamiento de
alimentos congelados
La vida en almacenamiento depende
del tipo de alimentos. A una
programación de temperatura de 0 °F
(-18 °C):
S Pescado, salchicha, comidas
preparadas y pasteles y pastelería:
hasta 6 meses
S Queso, ave y carne:
hasta 8 meses
S Frutas y verduras:
hasta 12 meses.
Cómo comprar y
almacenar alimentos
congelados
Siga estas pautas al comprar
alimentos congelados:
S Asegúrese de que el envase no
esté dañado.
S Verifique la fecha “límite de venta”.
S La temperatura del congelador del
supermercado debe ser inferior a
0 °F (-18 °C). En caso contrario, se
puede reducir la vida en
almacenamiento de los alimentos
congelados.
S Recoja por último los alimentos
congelados al realizar compras.
Envuélvalos en periódico o
colóquelos en una bolsa térmica y
llévelos a su hogar.
S En su hogar, coloque
inmediatamente los alimentos
congelados en el compartimiento
del congelador. Use los alimentos
congelados antes de la fecha
“límite de venta”.
Cómo descongelar
alimentos congelados
ATENCIÓN
¡Riesgo de intoxicación!
No vuelva a congelar alimentos que
hayan comenzado a descongelarse
o que ya se hayan descongelado.
Los alimentos no pueden volver a
congelarse hasta que se hayan
preparado (hervido o freído). No
almacene estos productos
recongelados durante el período de
almacenamiento máximo.
Según el tipo de alimentos y su uso
previsto, los alimentos congelados
pueden descongelarse de la siguiente
manera:
S a temperatura ambiente
S en el refrigerador
S en un horno eléctrico con/sin aire
caliente asistido por ventilador
S en el horno de microondas.
67
Page 68

es-mx
Características del
compartimiento del
congelador
Cajón superior del
congelador
El cajón del congelador puede
retirarse.
Para retirar el cajón superior del
congelador:
1. Extraiga todo lo posible el cajón
superior del congelador.
2. Extraiga cuidadosamente los
ganchos a ambos lados y levante
la parte delantera del cajón del
congelador.
3. Extraiga el cajón del congelador.
Dispensador de hielo
y agua
Según sea necesario, se puede
dispensar lo siguiente:
S agua fría,
S hielo picado,
S cubos de hielo.
ADVERTENCIA
¡Riesgo de lesiones provocadas
por vidrio roto!
Nunca utilice receptáculos frágiles
para dispensar agua o hielo.
ADVERTENCIA
Al encender el
electrodoméstico, tenga en
cuenta lo siguiente
El dispensador de hielo y agua solo
funciona cuando el electrodoméstico
está conectado al suministro de agua.
Una vez que se ha encendido el
electrodoméstico, el primer lote de
cubos de hielo demorará 24 horas en
realizarse.
Cuando se conecta el
electrodoméstico, quedan burbujas
de aire en las líneas.
Extraiga el agua potable y deséchela
hasta que el agua pueda dispensarse
sin burbujas. Deseche los primeros
cinco vasos de agua.
Al usar la máquina de hielo por
primera vez, no use los primeros 30 a
40 cubos de hielo por razones de
higiene.
Cajón inferior del congelador
El cajón del congelador puede
retirarse.
Para retirar el cajón inferior del
congelador:
Levante el cajón del congelador hacia
arriba y hacia afuera.
¡Riesgo de lesiones provocadas
por las cuchillas picadoras
giratorias!
Nunca introduzca la mano dentro
de la abertura del dispensador de
cubos de hielo.
NOTA
¡Riesgo de daños al
electrodoméstico!
No coloque botellas ni alimentos en
el recipiente para cubos de hielo
para enfriarlos rápidamente. La
máquina de hielo puede obstruirse y
dañarse.
Operación de la máquina de
hielo
Una vez que el compartimiento del
congelador ha alcanzado su
temperatura de congelamiento, el
agua fluye dentro de la máquina de
hielo y se congela en forma de cubos
de hielo. Los cubos de hielo se
descargan en forma automática
dentro del recipiente para cubos de
hielo una vez que están listos.
Es posible que los lados de los cubos
de hielo se peguen ocasionalmente.
Por lo general, se separan a medida
que se desplazan hacia la abertura
del dispensador.
La fabricación de hielo se interrumpe
automáticamente cuando el recipiente
para cubos de hielo está lleno.
La máquina de hielo permite hacer,
aproximadamente, 100 cubos de
hielo en el término de 24 horas
cuando, durante el día, se descargan
los cubos de hielo varias veces.
A medida que se producen los cubos
de hielo, pueden oírse el zumbido de
la válvula de agua, el agua que fluye
en el contenedor de almacenamiento
de hielo y los cubos de hielo que van
cayendo.
68
Page 69

es-mx
Calidad del agua potable
ATENCIÓN
El filtro de agua incluido con el
electrodoméstico filtra únicamente
partículas provenientes del agua
suministrada y no filtra bacterias ni
microbios.
Todos los materiales usados en el
dispensador de agua son inoloros e
insípidos.
Si el agua tiene un gusto residual,
este puede estar provocado por lo
siguiente:
S Contenido de minerales y cloro en
el agua potable
S Materiales de los que están
hechas la línea de agua doméstica
o la línea de conexión
S Frescura del agua potable. Si no
se ha dispensado agua durante un
período prolongado, el agua
puede tener un gusto “rancio”. En
este caso, dispense
aproximadamente 15 vasos de
agua y deséchelos.
El gusto y el olor del agua pueden
mejorarse instalando el cartucho
filtrante incluido en el punto de
entrada de agua.
Cómo dispensar el agua
1. Sostenga un receptáculo
apropiado debajo del dispensador
de hielo y agua.
2. Mantenga el botón del
dispensador de agua presionado
hasta que el receptáculo tenga la
cantidad de agua deseada.
Cómo dispensar hielo
NOTA
Mantenga presionado el botón de
cubos de hielo o hielo picado, y
suéltelo una vez que el receptáculo
tenga la cantidad de hielo deseada.
Por el contrario, si hay hielo en la
abertura del dispensador de cubos
de hielo, es posible que se
sobrecargue el receptáculo o que
se obstruya la abertura del
dispensador de cubos de hielo.
Si se dispensó hielo picado antes
de dispensar cubos de hielo, es
posible que todavía queden algunas
partículas de hielo picado en la
abertura del dispensador de cubos
de hielo. Estas se dispensarán junto
con el próximo lote de cubos de
hielo.
1. Sostenga un receptáculo
apropiado debajo del dispensador
de hielo y agua.
2. Mantenga el botón de cubos de
hielo o hielo picado presionado
hasta que el receptáculo tenga la
cantidad deseada.
Recipiente de almacenamiento de
hielo
El recipiente de almacenamiento de
hielo almacena un suministro de
reserva de cubos de hielo en el
compartimiento del congelador. El
recipiente de almacenamiento de
hielo encaja perfectamente en el
dispensador de hielo y agua debido a
su forma.
Cómo desconectar la
máquina de hielo
NOTA
Asegúrese de cerrar el suministro
de agua al electrodoméstico unas
horas antes de desconectar la
máquina de hielo.
Si no se van a dispensar cubos de
hielo por más de 1 semana (por
ejemplo, por vacaciones), desconecte
temporalmente la máquina de cubos
de hielo para evitar que los cubos de
hielo se congelen juntos.
1. Presione el botón para abrir y
retire el recipiente para cubos de
hielo.
2. Presione durante 3 segundos el
botón (la lámpara LED se apaga)
que se encuentra detrás del
recipiente para cubos de hielo. La
máquina de hielo está
desactivada.
Consejo:
El agua del dispensador de agua se
enfría hasta una temperatura
agradable. Si desea agua más fría,
coloque cubos de hielo en el vaso
antes de dispensar el agua.
3. Vacíe y limpie el recipiente para
cubos de hielo.
4. Empuje el recipiente para cubos
de hielo completamente hacia
atrás sobre los soportes hasta que
se trabe en su posición.
Cómo reactivar la máquina de hielo:
S Presione durante 3 segundos el
botón (la lámpara LED se
enciende) que se encuentra detrás
del recipiente para cubos de hielo.
La máquina de hielo está activada.
69
Page 70

es-mx
Filtro de agua
ATENCIÓN
No use el electrodoméstico en
lugares donde la calidad del agua
sea insegura o desconocida sin
tomar las medidas de desinfección
adecuadas antes y después del
filtrado.
Se puede adquirir un cartucho filtrante
para filtrar partículas de servicio a
clientes.
El filtro de agua debe reemplazarse
después de 6 meses como máximo.
Después de 6 meses, el símbolo de
filtro de agua que titila le indica que
reemplace el cartucho filtrante (ver
“Símbolo de filtro de agua”).
Otros requisitos de conexión
No instale el cartucho filtrante si la
presión de agua supera las 120 psi
(8.2 bar).
Si la presión de agua supera las
80 psi (5.5 bar), se debe instalar una
válvula de reducción de presión.
Instalación y reemplazo del
cartucho filtrante
1. Extraiga y, luego, baje la cubierta.
NOTA
¡Retire el cartucho filtrante con
cuidado!
El sistema de agua se encuentra a
baja presión después de usarlo.
2. Gire suavemente el cartucho
filtrante o la tapa de desvío hacia
la izquierda 90° y retírelo.
8. Elimine el agua que haya en el
cartucho filtrante usado. El
cartucho filtrante puede
desecharse junto con la basura
doméstica.
9. Presione el botón “light/filter”
durante 3 segundos. El símbolo de
filtro de agua se reprograma. El
símbolo deja de titilar. Se activa el
nuevo cartucho filtrante.
Nota importante
S Limpie profundamente el sistema
de agua si el electrodoméstico no
se ha usado durante un período
prolongado, o el agua tiene un
gusto u olor desagradables. Para
hacerlo, extraiga el agua del
dispensador de agua durante
varios minutos. Reemplace el
cartucho filtrante si el gusto o el
olor desagradables persisten.
S La máquina de hielo y el
dispensador de agua pueden
usarse sin el cartucho filtrante. En
este caso, reemplace el filtro de
agua con la tapa de desvío.
3. Saque el nuevo cartucho filtrante
del embalaje.
4. Introduzca el nuevo cartucho
filtrante y gírelo suavemente hacia
la derecha 90° hasta que se trabe
en su lugar.
5. Levante la cubierta y trábela en su
lugar.
6. Encienda el suministro de agua al
electrodoméstico.
7. Extraiga alrededor de un galón de
agua del dispensador de agua.
Esto eliminará el aire del sistema
de agua.
70
Page 71

Hoja de datos de especificaciones y rendimiento
Para el modelo del filtro: 9000 077 095 y 9000 077 096
Uso del cartucho de reemplazo 9000 077 104
El modelo ha sido probado por NSF
International de acuerdo con las
normas ANSI/NSF 42 y 53, y cuenta
con una certificación de reducción de
las sustancias mencionadas a
continuación.
El sistema fue probado y certificado en los modelos 9000 077 095 y 9000 077 096 por NSF International de
acuerdo con la Norma ANSI/NSF 53 con respecto a la reducción de quistes y de turbidez, así como de
acuerdo con la Norma ANSI/NSF 42 con respecto a la reducción de gusto y olor a cloro.
Clase de partículas calificada: I
Vida útil de servicio calificada: 739.68 galones (2,800 litros)
Se redujo la concentración de las
sustancias indicadas disueltas en el
agua que ingresa en el sistema a una
concentración menor o igual al límite
permitido para el agua descargada
del electrodoméstico, según lo
especificado en las normas NSF/ANSI
42 y 53.
es-mx
Nota:
Si bien las pruebas fueron realizadas
en condiciones estándares de
laboratorio, el rendimiento real puede
variar.
Sustancia Entrada
Quistes * 122,500
Turbidez 10.8 NTU 11 ± 1 NTU 98.8 < 0.16 NTU 0.5 NTU 95.5 % J-00058972
Partículas
nominales Clase
I
w 0.5 a < 1 μm
Gusto y olor a
cloro
promedio
quistes/l
13,666,666
partículas/ml
2.0 mg/l 2.0 mg/l ±10% 97.5 < 0.05 mg/l N/A
Concentración
deseable
especificada
por NSF
Mínimo de
50,000 quistes/l
Al menos
10,000
partículas/ml
Reducción
promedio
en %
99.99 < 1 quiste/l N/A
99.00 143,333
Concentración
promedio de
agua del
producto
partículas/ml
Concentración de
agua del
producto máxima
permitida
N/A
Requisitos de
reducción de
NSF
w 99.95 %
w 85 %
w 50 %
Informe de
pruebas de
NSF
J-00056513
J-00056506
J-00056501
* Basado en el uso de ovoquistes de Cryptosporidium parvum.
Pautas de aplicación/Parámetros de
suministro de agua:
Presión del agua 30 - 120 psi
(207 – 827 kPa)
Temperatura del agua 33 °F - 100 °F
(0.6 °C – 38 °C)
Flujo del servicio 0.75 gpm (2.83 lpm)
S El sistema debe instalarse y
operarse de acuerdo con las
pautas recomendadas por el
fabricante.
S Cambie el filtro cada 6 meses.
S Lave profundamente el nuevo filtro
durante 5 minutos.
S Puede encontrarse más
información en la tarjeta de
garantía.
NO use este producto con agua que
sea insegura desde el punto de vista
microbiológico o de calidad
desconocida sin realizar una
desinfección adecuada antes o
después de la conexión al sistema.
Pueden usarse sistemas certificados
con respecto a la reducción de
quistes en agua desinfectada que
pueda contener quistes filtrables.
El sistema completo (excepto el
cartucho desechable) está cubierto
por una garantía de un año. El
cartucho desechable está cubierto
por la garantía con respecto a
defectos en el material y en la
elaboración únicamente. La vida útil
de servicio del filtro desechable no
está cubierta por la garantía, dado
que la vida útil de servicio depende
de las condiciones del agua local.
Puede obtener información más
detallada sobre el precio de
repuestos de su distribuidor de
electrodomésticos o proveedor de
piezas local.
Fabricado por:
Cuno Engineered Products
1000 Apollo Road
Eagan, MN 55121-2240 EE. UU.
71
Page 72

es-mx
Consejos para ahorro
de energía
S Instale el electrodoméstico en una
habitación seca y bien ventilada,
pero no en la luz solar directa ni
cerca de una fuente de calor
(radiador, estufa, etc.). Use una
placa de aislamiento, si es
necesario.
S Deje que los alimentos y bebidas
calientes se enfríen antes de
colocarlos en el electrodoméstico.
S Cuando descongele alimentos
congelados, colóquelos en el
compartimiento del refrigerador. La
baja temperatura de los productos
congelados enfría los alimentos
que se encuentran en el
refrigerador.
S Abra y cierre las puertas del
electrodoméstico lo más rápido
posible.
Ruidos durante la
operación
Ruidos normales
Zumbido: la unidad de refrigeración
está funcionando. El ventilador en el
sistema de circulación de aire está
funcionando.
Ruidos de burbujas, aleteo o
zabuqueo: el refrigerante está
fluyendo por la tubería o el agua está
fluyendo dentro de la máquina de
hielo.
Pulsación: el motor se está
encendiendo o apagando. La válvula
solenoide de la conexión de agua se
está abriendo o cerrando.
Ruido seco: cubos de hielo listos
están cayendo en el recipiente para
cubos de hielo desde la máquina de
hielo.
Resolución de problemas de
ruido simples
El electrodoméstico no está nivelado
Alinee el electrodoméstico usando un
nivel. Use las patas de altura
ajustable o coloque algún objeto
debajo de las patas.
El electrodoméstico está tocando
unidades o electrodomésticos
adyacentes
Aleje el electrodoméstico de las
unidades o los electrodomésticos
adyacentes.
Cajones, cestos o áreas de
almacenamiento flojos o atascados
Revise las piezas desmontables y, si
es necesario, vuelva a introducirlas.
Los receptáculos se están tocando
Separe levemente las botellas o los
receptáculos.
Descongelamiento
Compartimiento del
congelador
El sistema Nofrost (Antiescarcha)
completamente automático asegura
que el compartimiento del congelador
permanezca sin hielo. Ya no es
necesario realizar el
descongelamiento.
Compartimiento del
refrigerador
El descongelamiento se realiza en
forma automática.
La condensación pasa a través del
orificio de drenaje hacia una bandeja
de evaporación que se encuentra en
la parte trasera del electrodoméstico.
Apagado y
desconexión del
electrodoméstico
Apagado del
electrodoméstico
Desenchufe el electrodoméstico o
desconecte el fusible.
Desconexión del
electrodoméstico
Si el electrodoméstico no se usa
durante un período prolongado:
1. Es necesario que desconecte el
suministro de agua al
electrodoméstico durante unas
horas antes de apagar el
electrodoméstico.
2. Retire todos los alimentos del
electrodoméstico.
3. Desenchufe el electrodoméstico.
4. Retire y deseche el cartucho
filtrante.
5. Vacíe y limpie el recipiente para
cubos de hielo.
6. Limpie el interior del
electrodoméstico (ver “Limpieza
del electrodoméstico”).
Para evitar olores, deje abiertas las
puertas del electrodoméstico.
Limpieza
ADVERTENCIA
¡Riesgo de descarga eléctrica!
Desenchufe el electrodoméstico o
desconecte el fusible antes de
limpiar el electrodoméstico.
ATENCIÓN
Para evitar lesiones personales o
daños a los bienes, siga estas
indicaciones:
Nunca use un limpiador por chorro
de vapor para limpiar el
electrodoméstico.
No use agentes de limpieza ni
solventes abrasivos ni ácidos.
Limpie las luces del panel de
control y de la pantalla con un paño
húmedo únicamente. No permita
que el agua usada para limpiar
caiga dentro de las luces ni del
panel de control y de la pantalla.
No permita que el agua de limpieza
pase por el orificio de drenaje y
llegue al área de evaporación.
Nunca limpie los estantes y los
recipientes en un lavavajillas. Las
piezas pueden combarse.
Limpieza del
electrodoméstico
Los compartimientos Vita Fresh y el
cajón para fiambres pueden retirarse
para limpiarlos.
1. Desenchufe el electrodoméstico o
desconecte el fusible.
2. Retire todos los alimentos del
electrodoméstico y almacénelos
en un lugar fresco.
3. Limpie el electrodoméstico con un
paño suave, usando agua
templada y una pequeña cantidad
de detergente líquido con
pH-balanceado.
4. Una vez realizada la limpieza, frote
el electrodoméstico para secarlo.
5. Limpie el sello de la puerta sólo
con agua limpia y, luego, seque
completamente.
6. Después de la limpieza, vuelva a
conectar el electrodoméstico para
encenderlo.
72
Page 73

Limpieza de la bandeja de
recolección de agua
El agua derramada se recolecta en la
bandeja de recolección de agua.
Retire el filtro para vaciar y limpiar.
Limpie la bandeja de recolección de
agua con una esponja o un paño
absorbente.
2. Vacíe el recipiente para cubos de
hielo y límpielo con agua
templada.
es-mx
3. Introduzca la mano entre las
aberturas de la tapa, desenganche
con cuidado las 4 muescas
frontales y jale la tapa hacia
afuera.
Limpieza del recipiente para
cubos de hielo
Los cubos de hielo se encogen,
tienen un gusto rancio y se pegan si
no son dispensados durante un
período prolongado.
ATENCIÓN
¡Riesgo de lesiones!
Un recipiente para cubos de hielo
completamente lleno es muy
pesado. Tenga cuidado al retirar el
recipiente para cubos de hielo.
1. Presione el botón para abrir y
retire el recipiente para cubos de
hielo.
3. Seque completamente el
recipiente y el transportador
helicoidal para evitar que los
nuevos cubos de hielo se peguen.
Introducción del recipiente para
cubos de hielo
4. Empuje el recipiente para cubos
de hielo completamente hacia
atrás sobre los soportes hasta que
se trabe en su posición.
NOTA
Si el recipiente no puede empujarse
completamente hacia atrás, gire
suavemente el transportador
helicoidal o retire cualquier cubo de
hielo que pueda haberse atascado
en el área de inserción.
Cómo retirar el filtro especial
para humedad
1. Jale los cajones Vita Fresh hacia
afuera, aprox., 4 pulgadas (aprox.
10 cm).
2. Lleve hacia arriba la placa de
vidrio que se encuentra encima de
los cajones Vita Fresh y
extráigalos.
4. Retire el filtro especial para
humedad.
5. Limpie el filtro especial para
humedad con agua tibia y déjelo
secar.
6. Inserte el filtro especial para
humedad.
7. Vuelva a colocar la parte trasera
de la tapa, muévala hacia abajo y
asegúrese de que la parte frontal
se enganche.
8. Inserte la placa de vidrio y cierre
los cajones Vita Fresh.
Luz LED
El electrodoméstico tiene una luz LED
que no requiere mantenimiento.
ATENCIÓN
¡Riesgo de lesión ocular provocada
por la luz láser Clase 1M (IEC
60825)!
No mire directamente a la luz con
instrumentos ópticos.
Estas luces deben ser reparadas
únicamente por servicio a clientes o
por técnicos autorizados.
73
Page 74

es-mx
Resolución de problemas menores
Antes de comunicarse con servicio a clientes:
S Verifique si puede resolver el problema usted mismo basándose en la siguiente información.
¡Servicio a clientes le cobrará por el asesoramiento, incluso si el electrodoméstico aún se encuentra en garantía!
Compartimiento del refrigerador y compartimiento del congelador
Problema
No se muestra nada en
el panel de la pantalla,
la luz interior no
funciona y el
electrodoméstico no
funciona.
La luz interior no
funciona.
Los alimentos están
demasiado fríos.
Los alimentos están
demasiado calientes.
Causa posible Medida correctiva
El cable de alimentación no está enchufado. Enchufe el cable de alimentación.
Se ha quemado el fusible o el disyuntor se
ha desactivado.
Corte de suministro eléctrico. Espere hasta que se haya restablecido la
El interruptor de la luz del compartimiento
del congelador o del refrigerador está
atascado.
El foco LED está defectuoso. Ver “Luz LED”.
La temperatura se ha programado
demasiado baja.
La puerta no cierra correctamente.
Reemplace el fusible o restablezca el disyuntor.
Verifique si hay electricidad en la toma de
corriente.
alimentación eléctrica. Si es necesario,
comuníquese con un electricista o con la
compañía de servicios públicos.
Verifique si el interruptor de la luz puede
moverse.
Ajuste a una temperatura más alta.
Alinee el electrodoméstico con un nivel. Ver
“Alineación del electrodoméstico”.
Verifique la posición de los cajones y corrija, si
es necesario.
Verifique los sellos de la puerta y la varilla de la
puerta plegable; si es necesario, limpie o corrija
la posición.
El electrodoméstico
tiene un olor
desagradable.
Se están formando
gotas de agua en el
exterior del
electrodoméstico.
La temperatura se ha programado
demasiado alta.
La abertura de ventilación está obstruida. Retire cualquier alimento que pueda estar
Las puertas se abrieron con mucha
frecuencia o se abrieron durante en período
prolongado.
Se ha colocado una gran cantidad de
alimentos frescos en el refrigerador.
Se colocaron alimentos con un olor fuerte en
el refrigerador.
El compartimiento interior está sucio. Limpie el compartimiento interior.
La puerta no cierra correctamente.
La humedad es demasiado elevada. Esto puede ser normal en determinadas
Seleccione una temperatura más baja.
obstruyendo la abertura de ventilación.
Espere hasta que baje la temperatura del
electrodoméstico.
Los alimentos frescos deben alcanzar primero la
temperatura de almacenamiento correcta.
Envuelva los alimentos o colóquelos en un
recipiente hermético.
Alinee el electrodoméstico con un nivel. Ver
“Alineación del electrodoméstico”.
Verifique la posición de los cajones y corrija, si
es necesario.
Verifique los sellos de la puerta y la varilla de la
puerta plegable; si es necesario, limpie o corrija
la posición.
regiones.
74
Page 75

es-mx
Problema
Se están formando
gotas de agua en el
interior del
electrodoméstico.
Los cajones se pueden
cerrar sólo con gran
dificultad.
La humedad es demasiado elevada o las
puertas se han abierto con mucha
frecuencia.
Los sellos de la puerta no están ajustados. Verifique los sellos de la puerta y la varilla de la
El cajón no se ha introducido correctamente. Introduzca el cajón correctamente.
Los rieles del cajón están sucios. Limpie los rieles del cajón.
Dispensador de hielo y agua
Problema
El símbolo de filtro de
agua titila.
La máquina de hielo no
está fabricando la
cantidad suficiente de
cubos de hielo o los
cubos de hielo están
deformados.
Causa posible Medida correctiva
El cartucho filtrante está viejo. Reemplace el cartucho filtrante.
Después de reemplazar el cartucho filtrante,
no se reprogramó el símbolo de filtro de
agua.
El electrodoméstico o la máquina de hielo se
han encendido recientemente.
Se ha sacado una gran cantidad de hielo. Transcurren, aproximadamente, 24 horas hasta
La presión de agua es demasiado baja. Verifique la presión del agua.
Medida correctivaCausa posible
No abra las puertas con mucha frecuencia o no
las mantenga abiertas durante mucho tiempo.
puerta plegable; si es necesario, limpie o corrija
la posición.
Reprograme el símbolo de filtro de agua.
Transcurren, aproximadamente, 24 horas hasta
que se comienza a fabricar el hielo.
que el recipiente de almacenamiento de hielo
vuelve a llenarse.
La máquina de hielo no
está fabricando la
cantidad suficiente de
cubos de hielo o no
está fabricando cubos
de hielo.
El recipiente para
cubos de hielo contiene
cubos de hielo que no
están siendo
dispensados.
El cartucho filtrante está tapado o viejo. Reemplace el cartucho filtrante.
Un cubo de hielo está atascado en el brazo
que mide el nivel de hielo en el recipiente
para cubos de hielo.
Al cambiar de cubos de hielo a hielo picado,
es posible que un cubo de hielo quede
atascado en la abertura del dispensador. El
cubo de hielo comenzará a derretirse, y el
agua caerá en el dispensador de hielo y
agua.
Hay una capa de hielo en el transportador
helicoidal.
Los cubos de hielo están congelados uno
cerca del otro.
Retire el recipiente para cubos de hielo y quite
los cubos de hielo atascados con una
herramienta de plástico sin filo. No use objetos
filosos ni puntiagudos, ya que esto podría dañar
el electrodoméstico.
Quite el cubo de hielo atascado de la abertura
del dispensador usando una herramienta de
plástico sin filo. No use objetos filosos ni
puntiagudos, ya que esto podría dañar el
electrodoméstico.
Retire y limpie el recipiente para cubos de hielo.
Retire y limpie el recipiente para cubos de hielo.
75
Page 76

es-mx
Problema
La máquina de hielo no
está fabricando cubos
de hielo.
El dispensador de agua
dispensa muy poca
agua o no dispensa
agua en absoluto.
Medida correctivaCausa posible
La máquina de hielo está apagada. Encienda la máquina de hielo.
No se está suministrando agua al
electrodoméstico.
La línea de la conexión de agua tiene
torceduras.
La presión de agua es demasiado baja. Verifique la presión del agua.
El recipiente para cubos de hielo no está
introducido correctamente.
La conexión de agua no está instalada
correctamente.
El cartucho filtrante está tapado o viejo. Reemplace el cartucho filtrante.
La presión de agua es demasiado baja. Verifique la presión del agua.
La válvula de cierre no está completamente
abierta.
La línea de la conexión de agua tiene
torceduras.
Solicite a un técnico calificado que verifique la
conexión de agua.
Cierre el suministro de agua. Enderece las
torceduras. Reemplace las líneas de la conexión
de agua dañadas con piezas originales del
fabricante.
Introduzca el recipiente para cubos de hielo
correctamente.
Si la conexión de agua no está instalada
correctamente, esto puede provocar baja
presión de agua y puede dañar el
electrodoméstico.
Ajuste la válvula de cierre por estár
completamente abierta.
Cierre el suministro de agua. Enderece las
torceduras. Reemplace las líneas de la conexión
de agua dañadas con piezas originales del
fabricante.
El agua dispensada no
está fría.
El agua está turbia. Aire o burbujas de aire en el agua. Esto es normal al usar el dispensador de agua
Hay partículas que
flotan en el agua o
están suspendidas en
los cubos de hielo.
El electrodoméstico fue recientemente
instalado.
El agua ha permanecido en las líneas
durante un período prolongado y se ha
ajustado a la temperatura ambiente.
La primera vez que el agua fluye a través del
cartucho filtrante, puede contener polvo de
carbono proveniente del cartucho filtrante.
Las partículas suspendidas se forman como
consecuencia de depósitos minerales
cuando el agua se congela y luego se deja
descongelar.
Transcurren, aproximadamente, 12 horas hasta
que el agua se enfría.
Llene 15 vasos de agua y deséchelos.
por primera vez y desaparece después de un
período breve.
¡Estas partículas suspendidas no son peligrosas!
Desaparecen después de un período breve.
¡Estas partículas suspendidas no son peligrosas!
Esto se produce en el suministro de agua en
forma natural.
76
Page 77

Servicio a clientes
Antes de comunicarse con servicio a
clientes:
Determine si puede resolver el
problema usted mismo basándose en
la información de la sección
“Resolución de problemas menores”.
Si esta información no resuelve el
problema, puede obtener ayuda
adicional comunicándose con el
servicio a clientes de Bosch.
EE. UU.:
Comuníquese con el Centro de
Interacción de Clientes de Bosch
llamando al 1-800-944-2904 (llamada
gratuita).
Canadá:
Comuníquese con su compañía de
servicio técnico de Bosch Canada
designada o llame al 1-800-944-2904.
A fin de poder brindarle una mejor
asistencia, anote la información sobre
su electrodoméstico que se
encuentra a continuación para
referencia futura:
es-mx
Nombre del distribuidor
Dirección
Número de teléfono
Fecha de compra
Número de modelo (número E)
Número de serie (número FD)
Proporcione a servicio a clientes el
número de modelo (número E) y el
número de serie (número FD) del
electrodoméstico.
Puede encontrar esta información en
la placa de valores nominales que se
encuentra dentro del compartimiento
del refrigerador, del lado derecho.
77
Page 78

1901 Main Street, Suite 600, Irvine, CA, 92614 • 1-800-944-2904
www.boschappliances.com • © BSH Home Appliances Corporation 2011
9000769248 (9204)
en-us, fr-ca, es-mx
*9000769248*
 Loading...