

Bosch Active Line BDU310 User Manual
OBJ_BUCH-3107-001.book Page 1 Thursday, April 20, 2017 1:53 PM
C9985612-GB
Active Line Active Line
Robert Bosch GmbH
Bosch eBike Systems
72703 Reutlingen
GERMANY
www.bosch-ebike.com
0 275 007 AD4 (2017.04) T / 52 WEU
Drive Unit 25 km/h
BDU310: 0 275 007 046
30/08/2017
0 275 007 AD4 | (20.4.17) Bosch eBike Systems
2 |
1
2
3
5
–
17 mm
A
OBJ_BUCH-3107-001.book Page 2 Thursday, April 20, 2017 2:21 PM

English–1
Bosch eBike Systems 0 275 007 ADC | (1.4.16)
Safety Notes
Read all safety warnings and all instructions. Failure to follow the warnings and in-
structions may result in electric shock, fire
and/or serious injury.
Save all safety warnings and instructions for future reference.
The term “battery pack” used in these operating instructions, irrespective of model, refers both to standard battery packs (battery packs with holder on the bike frame) and to rack-type battery packs (battery packs with holder in the rear rack/carrier).
f Do not open the drive unit yourself. The drive unit must
be repaired only by qualified experts and only with
original spare parts. This will ensure that the safety of the
drive unit is maintained. Unauthorised opening of the drive
unit will void warranty claims.
f All components mounted to the drive unit and all other
components of the eBike drive (e. g., the chainwheel,
chainwheel seat, pedals) may be replaced only with
identical components or components specifically approved for your eBike by the bicycle manufacturer. This
protects the drive unit against overload and damage.
f Remove the battery pack from the eBike before begin-
ning work (e.g. inspection, repair, assembly, maintenance, work on the chain, etc.) on the eBike, transporting it by car or plane, or storing it. Unintentional
activation of the eBike system poses a risk of injury.
f The eBike system can switch itself on when the eBike is
pushed backwards.
f The push-assistance function may only be used when
pushing the eBike. Danger of injury when the wheels of
the eBike do not have ground contact while using the pushassistance function.
f If the push assistance is switched on, the pedals will
also rotate on bikes with back-pedalling function. When
the push assistance is activated, make sure that your legs
are a sufficient distance away from the rotating pedals.
There is a risk of injury.
f Use only original Bosch battery packs approved for your
eBike by the manufacturer. Using other battery packs can
lead to injuries and pose a fire hazard. When using other battery packs, Bosch shall not assume any liability and warranty.
f Do not make any modifications to your eBike system or
fit any other products which would be suitable for increasing the performance of your eBike system. This
normally reduces the lifetime of the system and risks damage to the drive unit and the bike. There is also a risk of losing the guarantee and warranty claims on the bike you have
purchased. By handling the system improperly you are also endangering your safety and that of other road users,
thus running the risk of high personal liability costs and
possibly even criminal prosecution in the event of accidents attributable to manipulation.
f Please observe all national regulations on registering
and using eBikes.
f Read and observe the safety warnings and instructions
in all operating instructions of the eBike system and in
the operating instructions of your eBike.
Product Description and
Specifications
Intended Use
The drive unit is intended only for driving your eBike and must
not be used for other purposes.
Product Features
The numbering of the components shown refers to the illustrations on the graphic pages at the beginning of the manual.
Individual illustrations in these operating instructions may differ slightly from the actual circumstances depending on the
equipment of your eBike.
1 Drive unit
2 Speed sensor
3 Spoke magnet of the speed sensor
Technical Data
Drive Unit Drive Unit
Article number
0 275 007 040
0 275 007 042
Rated continuous output
W 250
Torque at drive, max.
Nm 50
Rated voltage
V 36
Operating temperature °C –5 ...+ 40
Storage temperature °C –10 ...+ 50
Degree of protection IP 54 (dust and splash
water protected)
Weight, approx.
kg 4
Bike lights
1)
Voltage, approx.
2)3)
V 6/12
Maximum output
– Front light
– Taillight
W
W
8.4/17.4
0.6/0.6
1) Not possible via the eBike battery pack in all country-specific versions, depending on the statutory regulations
2) The voltage level is preset and can be changed only by the bicycle
dealer.
3) When changing the bulbs, ensure that the bulbs are compatible with
the Bosch eBike system (ask your bicycle dealer) and that the specified
voltage matches. Bulbs must be replaced only with bulbs of the same
voltage.
f Incorrectly inserted bulbs can be destroyed!
OBJ_BUCH-2793-001.book Page 1 Friday, April 1, 2016 9:50 AM
English–2
0 275 007 ADC | (1.4.16) Bosch eBike Systems
Assembly
Inserting and removing the battery pack
For inserting and removing the eBike battery pack in/from the
eBike, please read and observe the battery pack operating instructions.
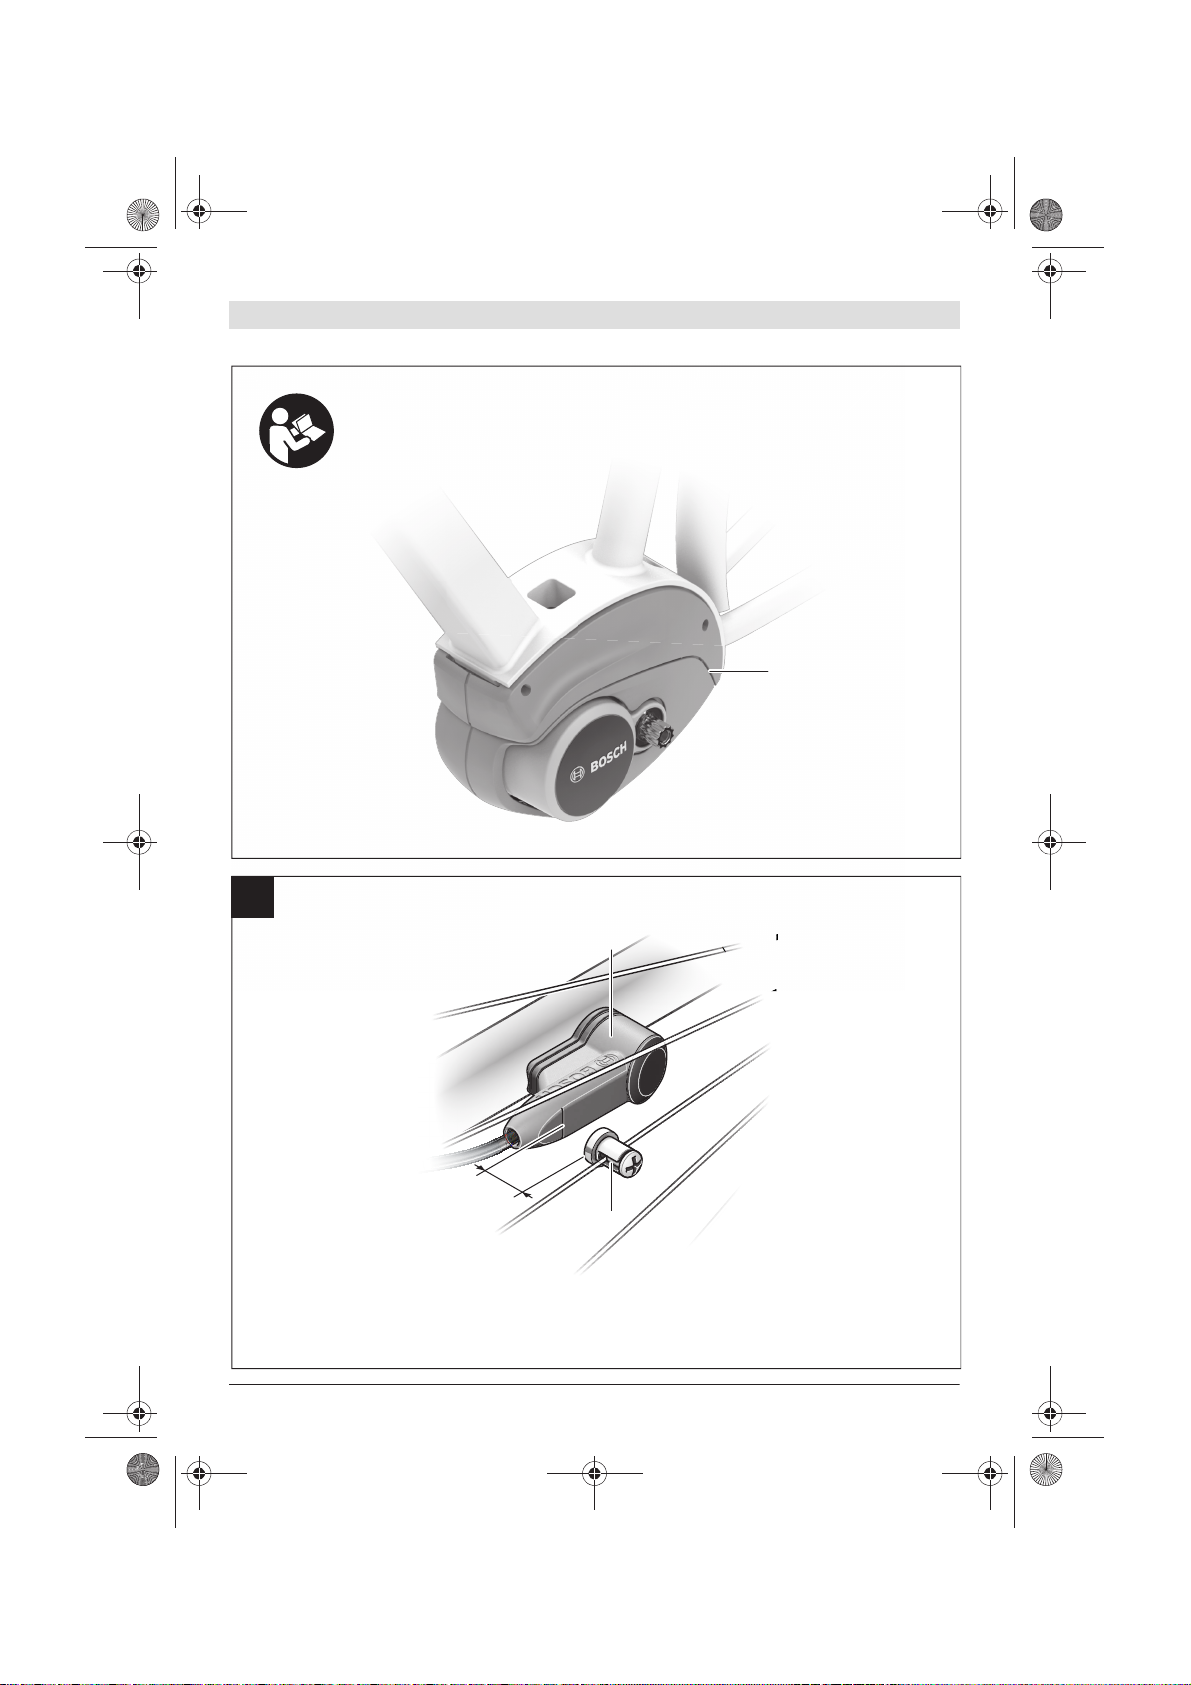
Checking the Speed Sensor (see figure A)
The speed sensor 2 and its spoke magnet 3 must be mounted
in such a manner that the spoke magnet, after a turn of the
wheel, moves past the speed sensor with a clearance of at
least 5 mm, yet no more than 17 mm.
Note: If the distance between speed sensor 2 and spoke mag-
net 3 is too small or too large, or if the speed sensor 2 is not
properly connected, the speed indication will fail, and the
eBike drive unit will operate in emergency mode.
In this case, loosen the screw of the spoke magnet 3 and fasten the spoke magnet to the spoke in such a manner that it
runs past the mark of the speed sensor at the correct clearance. If the speed is still not being indicated in the speed indication after this, please contact an authorised bicycle dealer.
Operation
Initial Operation
Requirements
The eBike system can only be activated when the following
requirements are met:
– A sufficiently charged battery pack is inserted (see battery
pack operating instructions).
– The on-board computer is properly inserted in the holder
(see on-board computer operating instructions).
– The speed sensor is connected properly (see “Checking
the Speed Sensor”, page English –2).
Switching the eBike System On/Off
Options for switching on the eBike system:
– If the on-board computer is already switched on when you
insert it into the holder, then the eBike system will be
switched on automatically.
– With the on-board computer and the eBike battery pack in-
serted, briefly press the On/Off button of the on-board computer (see on-board computer operating instructions).
– When the on-board computer is inserted, press the On/Off
button of the eBike battery pack (see battery pack operating instructions).
The drive is activated as soon as you step on the pedals (except when in the push aid feature, see “Switching the Pushassistance mode On/Off”, page English –3). The motor output depends on the settings of the assistance level on the onboard computer.
As soon as you stop pedaling when in normal operation, or as
soon as you have reached a speed of 25 km/h, the assistance
from the eBike drive is switched off. The drive is automatically
re-activated as soon you start pedaling again and the speed is
below 25 km/h.
Options for switching off the eBike system:
– Press the On/Off button of the on-board computer.
– Switch the eBike battery pack off by its On/Off button (see
battery pack operating instructions).
– Remove the on-board computer out of its holder.
If the eBike is not moved and no button is pressed on the on-
board computer for 10 minutes, the eBike system will shut
down automatically in order to save energy.
eShift (optional)
eShift is the integration of automatic gear shifting systems into the eBike system. The eShift components are electrically
connected to the drive unit by the manufacturer. The operation of automatic gear shifting systems is described in the operating instructions of the on-board computer.
Setting the Assistance Level
On the on-board computer you can set how much the eBike
drive assists you while pedalling. The assistance level can be
changed at any time, even while cycling.
Note: For individual versions, it is possible that the assistance
level is pre-set and cannot be changed. It is also possible that
less assistance levels are available for selection than listed
here.
The following assistance levels (max.) are available:
– “OFF”: The motor assistance is switched off, and the eBike
can be moved as a normal bicycle only by pedalling. The
push assistance cannot be activated in this assistance level.
– “ECO”: Effective assistance at maximum efficiency for
maximum cruising range
– “TOUR”: Uniform assistance, for touring with long cruising
range
– “SPORT”: Powerful assistance for sportive riding off road
as well as for urban traffic
– “TURBO”: Maximum assistance, supporting highest ca-
dence for sportive riding
The requested motor output appears on the display of the onboard computer. The maximum motor output depends on the
selected assistance level.
Assistance Level Assistance Factor *
“ECO” 40%
“TOUR” 100%
“SPORT” 150%
“TURBO” 250 %
* The motor output can vary for individual versions.
OBJ_BUCH-2793-001.book Page 2 Friday, April 1, 2016 9:50 AM
English–3
Bosch eBike Systems 0 275 007 ADC | (1.4.16)
Switching the Push-assistance mode On/Off
The push-assistance feature makes it easier to push the
eBike. The speed in this function depends on the set gear and
cannot exceed 6 km/h (max.). The lower the set gear, the lower the speed in the push-assistance function (at full output).
f The push-assistance function may only be used when
pushing the eBike. Danger of injury when the wheels of
the eBike do not have ground contact while using the pushassistance function.
To activate the push-assistance function, briefly press button “WALK” on your on-board computer. After activation,
press button “+” within 3 s and keep it pressed. The eBike
drive is switched on.
Note: The push assistance cannot be activated in the “OFF”
assistance level.
The push assistance is switched off as soon as one of the following occurs:
– you release button “+”,
– the wheels of the eBike are blocked (e.g. by actuating the
brakes or impacting against an obstacle),
– the speed exceeds 6 km/h.
Note: On some systems the push-assistance function can be
started directly by pressing the “WALK” button.
Back-pedalling function (optional)
For bikes with back-pedalling function, the pedals rotate
when the push aid is switched on. If the rotating pedals are
blocked, the push aid switches off.
Switching bike lights on/off
In the version which has the bike lights powered by the eBike
system, the front and rear lights can be switched on and off at
the same time via the on-board computer.
Notes on Riding with the eBike System
When does the eBike Drive Unit Operate?
The eBike drive unit assists you when riding, as long as you
step into the pedals. Without pedaling, there is no assistance.
The motor output always depends on the amount of your pedaling power.
When applying less pedaling power, the assistance or support
will be lower than when applying a lot of pedaling power. This
applies independent of the assistance Level.
The eBike drive automatically switches off at speeds in excess
of 25 km/h. When the speed falls below 25 km/h, the drive is
automatically available again.
An exception applies to the push-assistance function, in which
the eBike can be pushed at low speed without pedalling. The
pedals may also rotate when the push assistance is used.
The eBike can also be ridden as a normal bicycle without assistance at any time, by either switching off the eBike system
or setting the assistance level to “OFF”. The same applies
when the battery pack is empty.
Interaction of the eBike System with the Bicycle Gears
The bicycle gears should be used as with a normal bicycle,
even with eBike motor assistance (please observe the operating instructions of your eBike).
Independent of the type of gearing, it is recommended to
briefly interrupt the pedaling while changing gears. This
makes changing gears easier and reduces the wear of the
drive train.
By selecting the right gear, you can increase the speed and
range with the same pedaling effort.
Gathering First Experience
It is recommended to gather first experience with the eBike
away from roads with heavy traffic.
Test the various assistance levels. Start with the lowest assistance level. As soon as you feel confident, you can ride your
eBike in traffic like any other bike.
Test the operating range of your eBike under different conditions before planning longer and more challenging rides.
Influences on the Operating Range
The range is affected by a number of factors, such as:
– Assistance level
– Speed
– Gear changing behaviour
– Tyre type and tyre pressure
– Age and condition of the battery
– Route profile (gradients) and conditions (road surface)
– Headwind and ambient temperature
– Weight of eBike, driver and luggage.
For this reason, it is not possible to precisely predict the
range before and during a trip. General rules:
– With the same assistance level on the eBike drive: The less
energy you need to exert in order to reach a certain speed
(e.g. by changing gears optimally), the less energy the
eBike drive will consume and the higher the range per battery charge will be.
– The higher the assistance level under otherwise same con-
ditions, the lower the range.
Careful Handling of the eBike
Please observe the operating and storage temperatures of the
eBike components. Protect the drive unit, on-board computer
and battery against extreme temperatures (e.g. from intense
sunlight without adequate ventilation). The components (especially the battery pack) can become damaged through extreme temperatures.
OBJ_BUCH-2793-001.book Page 3 Friday, April 1, 2016 9:50 AM
English–4
0 275 007 ADC | (1.4.16) Bosch eBike Systems
Maintenance and Service
Maintenance and Cleaning
When changing the bulbs, ensure that the bulbs are compatible with the Bosch eBike system (ask your bicycle dealer) and
that the specified voltage matches. Bulbs must be replaced
only with bulbs of the same voltage.
Do not immerse any components, including the drive unit, in
water or clean them with pressurised water.
Have your eBike system checked by an expert at least once a
year (including mechanical parts, up-to-dateness of system
software).
For service or repairs on the eBike, please refer to an authorised bicycle dealer.
After-sales Service and Application Service
In case of questions concerning the eBike system and its components, please refer to an authorised Bosch eBike dealer.
For contact data of authorised Bosch eBike dealers, please
refer to www.bosch-ebike.com
Disposal
The drive unit, on-board computer including operating unit, battery pack, speed sensor, accessories and
packaging should be disposed of in an environmentally correct manner.
Do not dispose of eBikes and their components into household waste!
Only for EC countries:
According to the European Guideline
2012/19/EU, electrical devices/tools that are
no longer usable, and according to the European
Guideline 2006/66/EC, defective or used battery packs/batteries, must be collected separately and disposed of in an environmentally correct manner.
Subject to change without notice.
OBJ_BUCH-2793-001.book Page 4 Friday, April 1, 2016 9:50 AM
TURBO
S
TOUR
KM/H
ic
hw
eite
MM
IN
PH
/H
OBJ_BUCH-2795-002.book Page 1 Wednesday, April 19, 2017 11:20 AM
Active Line/Performance Line Active Line/Performance Line
TURBO
SPORT
TOUR
ECO
OFF
MPH
KM/H
AMM
PMWH
/H
MIN
MPH
KM
Robert Bosch GmbH
Bosch eBike Systems
72703 Reutlingen
GERMANY
www.bosch-ebike.com
1 270 020 XBI (2017.04) T / 99 WEU
RESET
Reichweite
Intuvia
BUI251: 1 270 020 906
BUI255: 1 270 020 909
1 270 020 XBI | (19.4.17) Bosch eBike Systems
2 |
TURBO
SPORT
TOUR
ECO
OFF
MPH
KM/H
Reichweite
AMM
PMWH
MIN
MPH
KM
/H
RESET
TURB
O
T
S
TOUR
KM/
H
ichweite
/H
TURBO
SPORT
TOUR
ECO
OFF
MPH
KM/H
Reichweite
AMM
PMWH
MIN
MPH
KM/H
3
2
1
7 8
d
b
c
a
f
g
h
i
e
6
5
4
OBJ_BUCH-2795-002.book Page 2 Wednesday, April 19, 2017 11:55 AM
| 3
Bosch eBike Systems 1 270 020 XBI | (19.4.17)
ECO
MPH
KM/H
Reichweite
KM
/H
RESET
O
PH
KM/H
chw
e
ite
/H
12
13
10
11
9
4
3
14
15
A
OBJ_BUCH-2795-002.book Page 3 Wednesday, April 19, 2017 11:55 AM
English– 1
1 270 020 XBI | (19.4.17) Bosch eBike Systems
Safety Notes
Read all safety warnings and all instructions. Failure to follow the warnings and in-
structions may result in electric shock, fire
and/or serious injury.
Save all safety warnings and instructions for future
reference.
The term “battery” is used in these instructions to mean all
original Bosch eBike rechargeable battery packs.
f Do not use the on-board computer as a handle. Lifting
the eBike up by the on-board computer can cause irreparable damage to the on-board computer.
f Make sure to not be distracted by the display of the on-
board computer. If you do not focus exclusively on the
traffic, you risk being involved in an accident. If you want to
make entries in your on-board computer other than switching the assistance level, stop and enter the appropriate
data.
f Read and observe the safety warnings and instructions
in all operating instructions of the eBike system and in
the operating instructions of your eBike.
Product Description and
Specifications
Intended Use
The Intuvia on-board computer is designed to control Bosch
eBike systems and display riding data.
In addition to the functions shown here, changes to software
relating to troubleshooting and functional enhancements may
be introduced at any time.
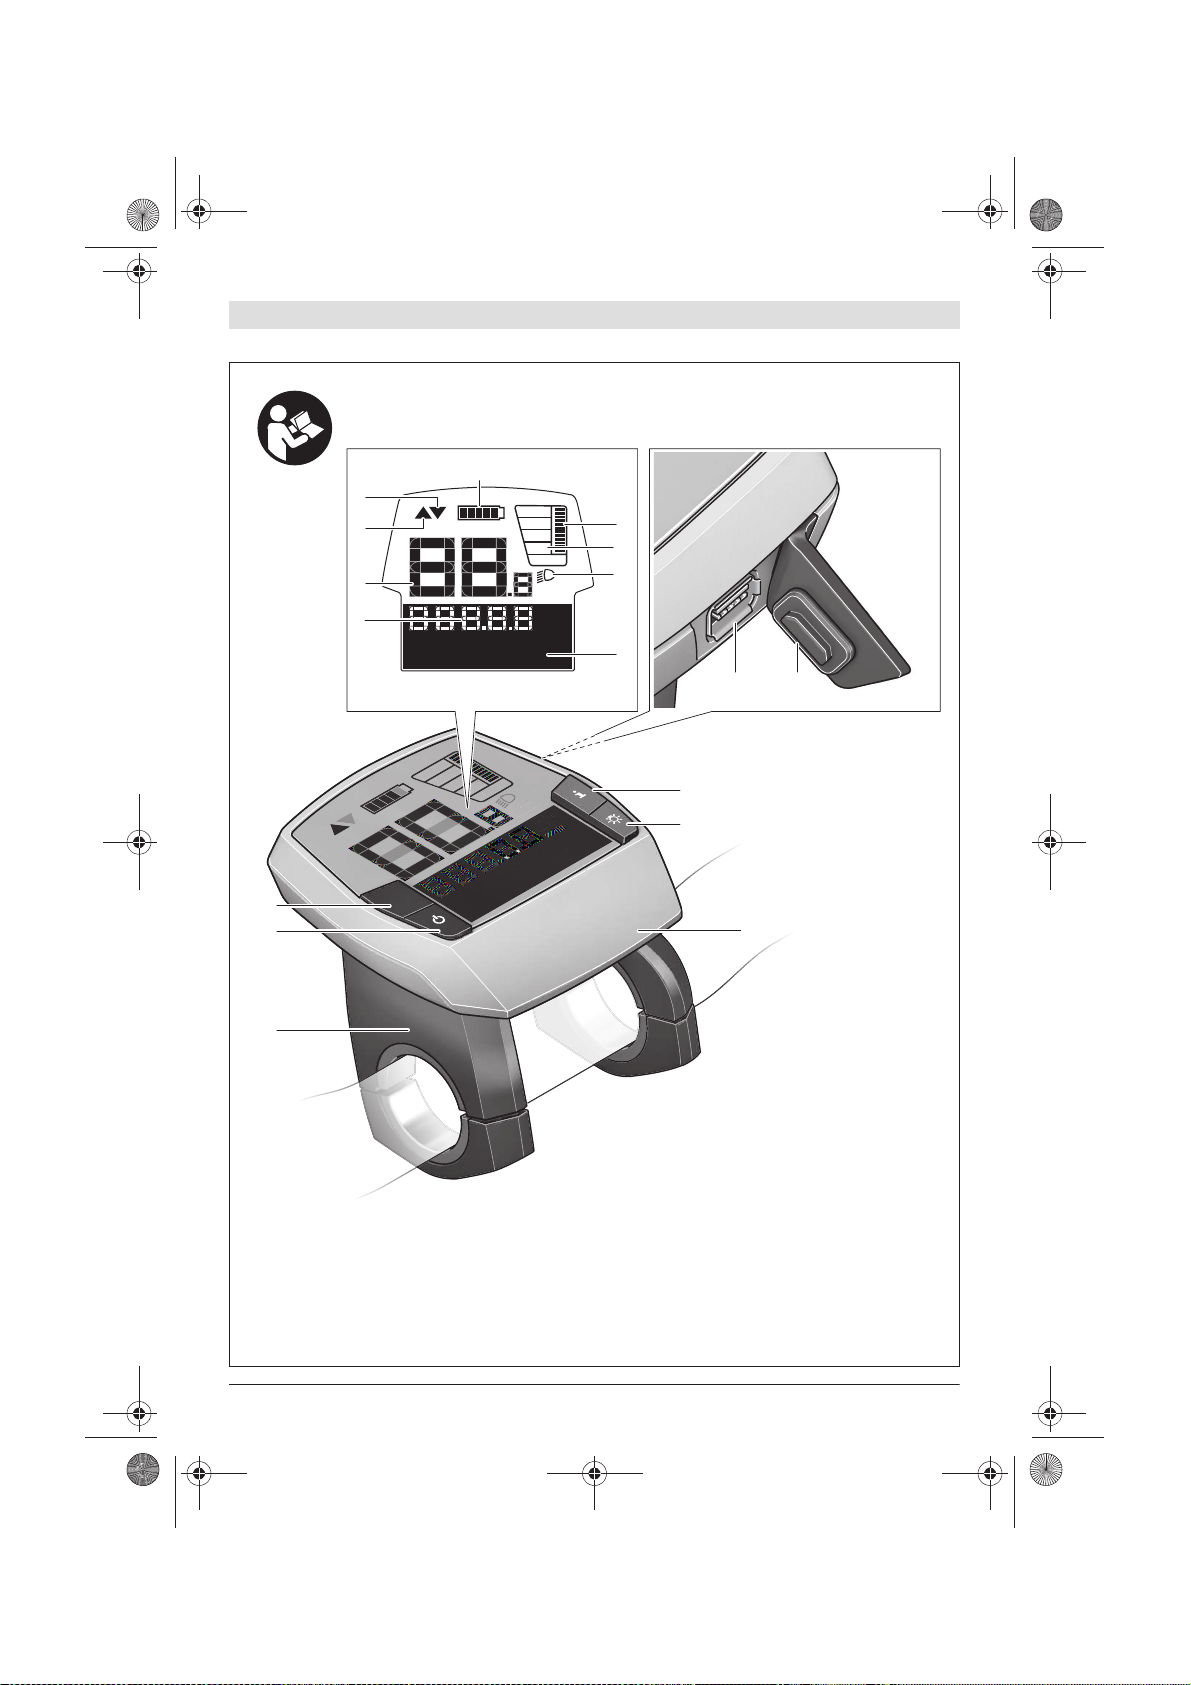
Product Features
The numbering of the components shown refers to the illustrations on the graphic pages at the beginning of the manual.
Individual illustrations in these operating instructions may differ slightly from the actual circumstances depending on the
equipment of your eBike.
1 Display-function button “i”
2 Bike lights button
3 On-board computer
4 Holder for on-board computer
5 On/Off button for on-board computer
6 “RESET” button
7 USB port
8 Protective cap of USB port
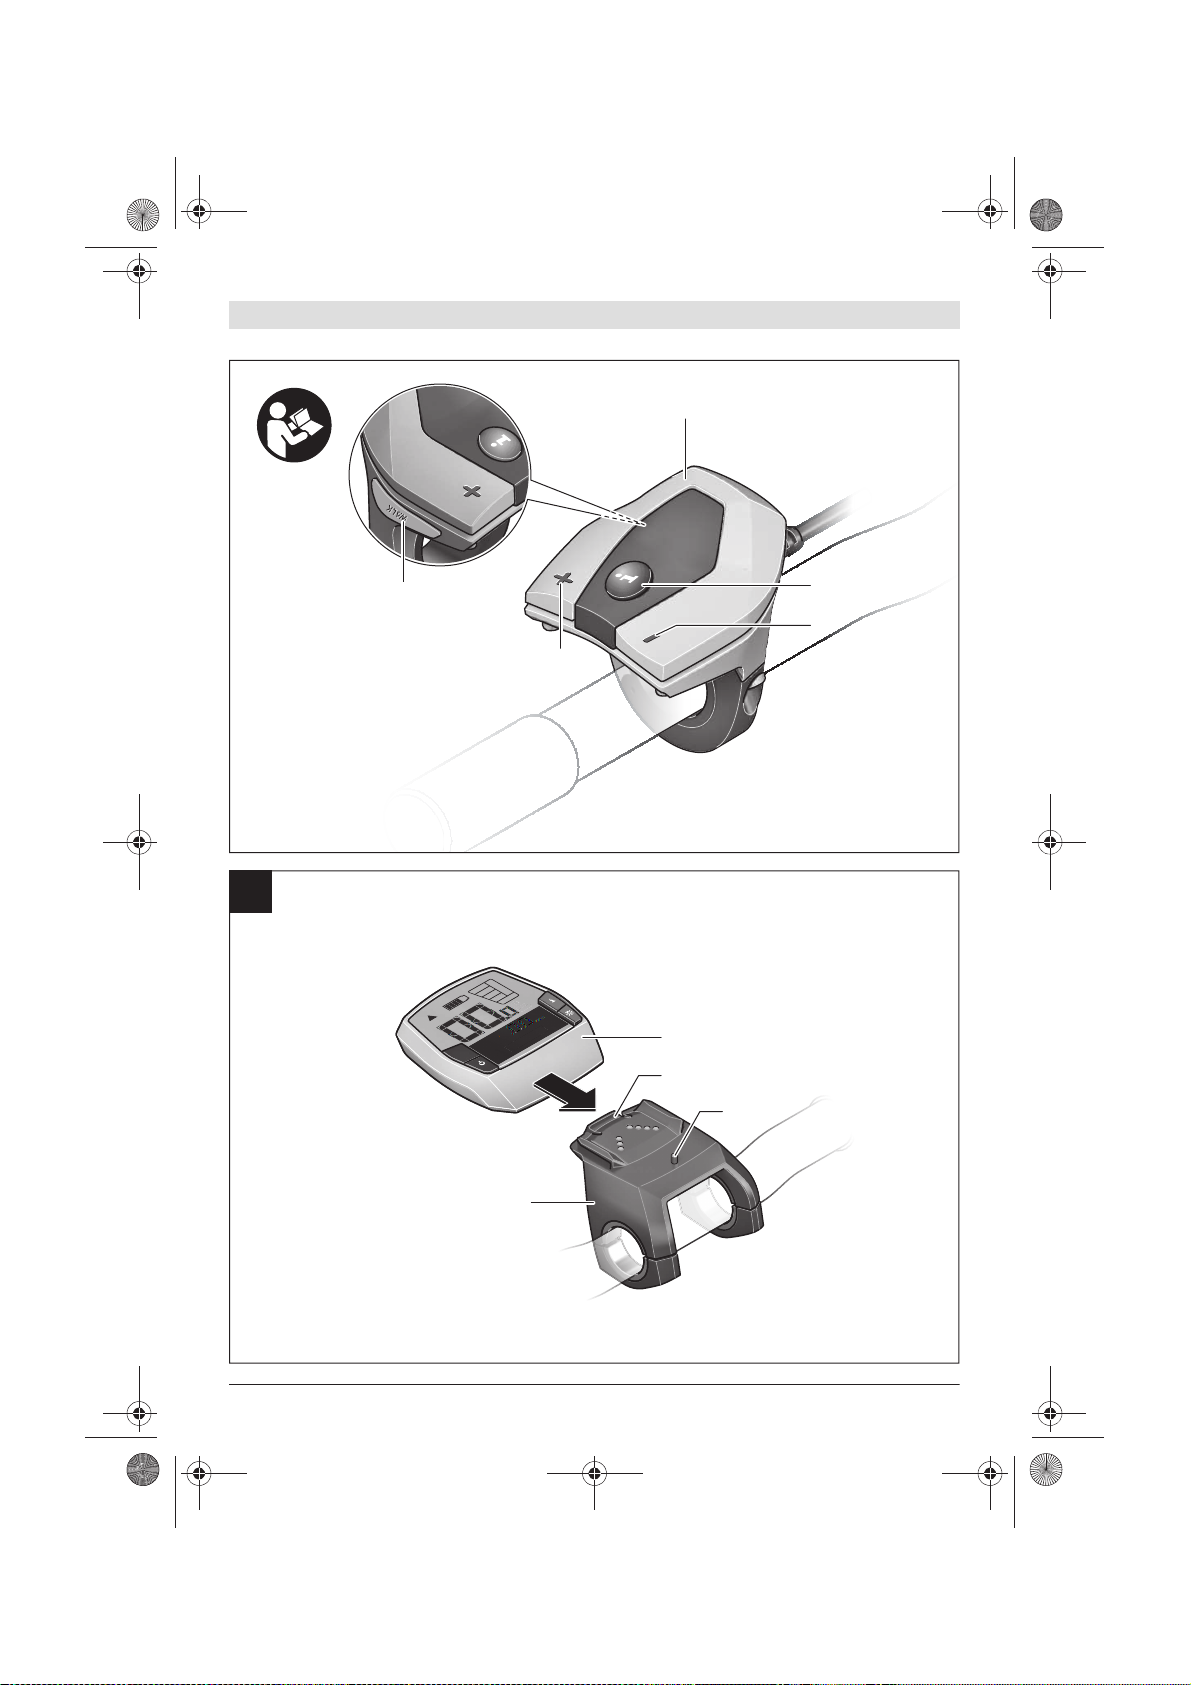
9 Operating unit
10 Display-function button “i” on the operating unit
11 Decrease assistance level/scroll down button “ –”
12 Increase assistance level/scroll up button “+”
13 Push-assistance button “WALK”
14 Lock latch for on-board computer
15 Locking screw for on-board computer
USB charging cable (Micro A – Micro B) *
* not illustrated; available as accessory
Display elements of on-board computer
a Drive unit assistance indicator
b Assistance-level indicator
c Light indicator
d Text indication
e Value indication
f Speed indication
g Shift recommendation: higher gear
h Shift recommendation: lower gear
i Battery charge-control indicator
Technical Data
On-board computer Intuvia
Article number
1 270 020 906/909
Max. charging current,
USB connection
mA 500
Charging voltage,
USB connection
V 5
USB charging cable
1)
1 270 016 360
Operating temperature
°C –5 ...+ 40
Storage temperature
°C –10 ...+ 50
Charging temperature
°C 0...+ 40
Internal lithium-ion battery
V
mAh
3.7
230
Protection type
2)
IP 54 (dust and splash
water protected)
Weight, approx.
kg 0.15
1) Not included in standard scope of delivery
2) When USB cover is closed
Bosch eBike system uses FreeRTOS (see www.freertos.org)
OBJ_BUCH-2795-002.book Page 1 Wednesday, April 19, 2017 11:55 AM
English–2
Bosch eBike Systems 1 270 020 XBI | (19.4.17)
Assembly
Inserting and removing the battery pack
For inserting and removing the eBike battery pack in/from the
eBike, please read and observe the battery pack operating instructions.
Inserting and removing the on-board computer
(see figure A)
To insert the on-board computer 3, slide it from the front into
the holder 4.
To remove the on-board computer 3, press the lock latch 14
and slide the on-board computer toward the front out of the
holder 4.
f Remove the on-board computer when you park the
eBike.
It is possible to secure the on-board computer against removal in the holder. To do so, remove the holder 4 from the handlebar. Put the on-board computer in the holder. Screw the
locking screw 15 (thread M3, 8 mm long) from below into the
thread provided in the holder. Mount the holder back onto the
handlebar.
Note: The locking screw is not designed to prevent theft.
Operation
Initial Operation
Requirements
The eBike system can only be activated when the following
requirements are met:
– A sufficiently charged battery pack is inserted (see battery
pack operating instructions).
– The on-board computer is properly inserted in the holder
(see “Inserting and removing the on-board computer”,
page English– 2).
– The speed sensor is connected properly (see drive unit
operating instructions).
Switching the eBike System On/Off
Options for switching on the eBike system:
– If the on-board computer is already switched on when you
insert it into the holder, then the eBike system will be
switched on automatically.
– When the on-board computer and the eBike battery pack
are inserted, briefly press the On/Off button 5 of the onboard computer.
– With the on-board computer inserted, push the On/Off
button on the eBike battery (bicycle manufacturer solutions are possible whereby there is no access to the battery On/Off button; see the battery operating instructions).
The drive is activated as soon as you step on the pedals (except for in the push assistance function or in assistance level
“OFF”). The motor output depends on the settings of the assistance level on the on-board computer. As soon as the system is activated, “Active Line/Performance Line” will appear briefly on the display.
As soon as you stop pedaling when in normal operation, or as
soon as you have reached a speed of 25/45 km/h, the assistance from the eBike drive is switched off. The drive is automatically re-activated as soon you start pedaling again and the
speed is below 25/45 km/h.
Options for switching off the eBike system:
– Press the On/Off button 5 of the on-board computer.
– Switch off the eBike battery using its On/Off button (bicy-
cle manufacturer-specific solutions are possible whereby
there is no access to the battery On/Off button; see the bicycle manufacturer operating instructions).
– Remove the on-board computer out of its holder.
If the eBike is not moved and no button is pressed on the on-
board computer for 10 minutes, the eBike system will shut
down automatically in order to save energy.
eShift (optional)
eShift is the integration of electronic gear shifting systems into the eBike system. The eShift components are electrically
connected to the drive unit by the manufacturer. The separate
operating instructions describe how to operate the electronic
gear-shifting systems.
Displays and configurations of the
on-board computer
Energy supply of the on-board computer
If the on-board computer is in the holder 4, a sufficiently
charged battery pack is inserted in the eBike and the eBike
system is turned on, then the on-board computer is powered
by the battery pack of the eBike.
If the on-board computer is removed from the holder 4, the
energy is supplied via an internal battery pack. If the internal
battery pack is weak when the on-board computer is switched
on, “Attach to bike” will appear in text indication d for 3 s.
The on-board computer will then turn off again.
To charge the internal battery pack, put the on-board computer back in the holder 4 (when a battery pack is inserted in the
eBike). Switch the eBike battery pack on by its On/Off button
(see battery pack operating instructions).
You can also charge the on-board computer via the USB port.
Open the protective cap 8. Connect the USB port 7 of the onboard computer via a suitable USB cable to a standard USB
charger or the USB port of a computer (5 V charging voltage,
max. 500 mA charging current). “USB connected” will appear in text indication d of the on-board computer.
OBJ_BUCH-2795-002.book Page 2 Wednesday, April 19, 2017 11:55 AM
English– 3
1 270 020 XBI | (19.4.17) Bosch eBike Systems
Switching on/shutting down the on-board computer
To switch on the on-board computer, briefly press the On/Off
button 5. The on-board computer can also be switched on
when it is not inserted in the holder (if the internal battery
pack is sufficiently charged).
To switch off the on-board computer, press the On/Off button 5.
If the on-board computer is not inserted in the holder, it automatically switches off after 1 minute to save energy if no button is pressed.
f If you are not going to be using your eBike for several
weeks, remove the on-board computer from its mount.
Store the on-board computer in a dry environment at room
temperature. Regularly recharge the on-board computer's
battery (at least every 3 months).
Battery Charge-control Indicator
The battery charge-control indicator i displays the charge level of the eBike battery pack, not that of the on-board computer’s internal battery pack. The charge level of the eBike battery pack can also be checked on the LEDs of the battery pack
itself.
If the on-board computer is removed from the holder 4, the
last displayed battery charge level is saved.
If an eBike is operated with two battery packs, the battery
charge-control indicator i displays the level of both battery
packs.
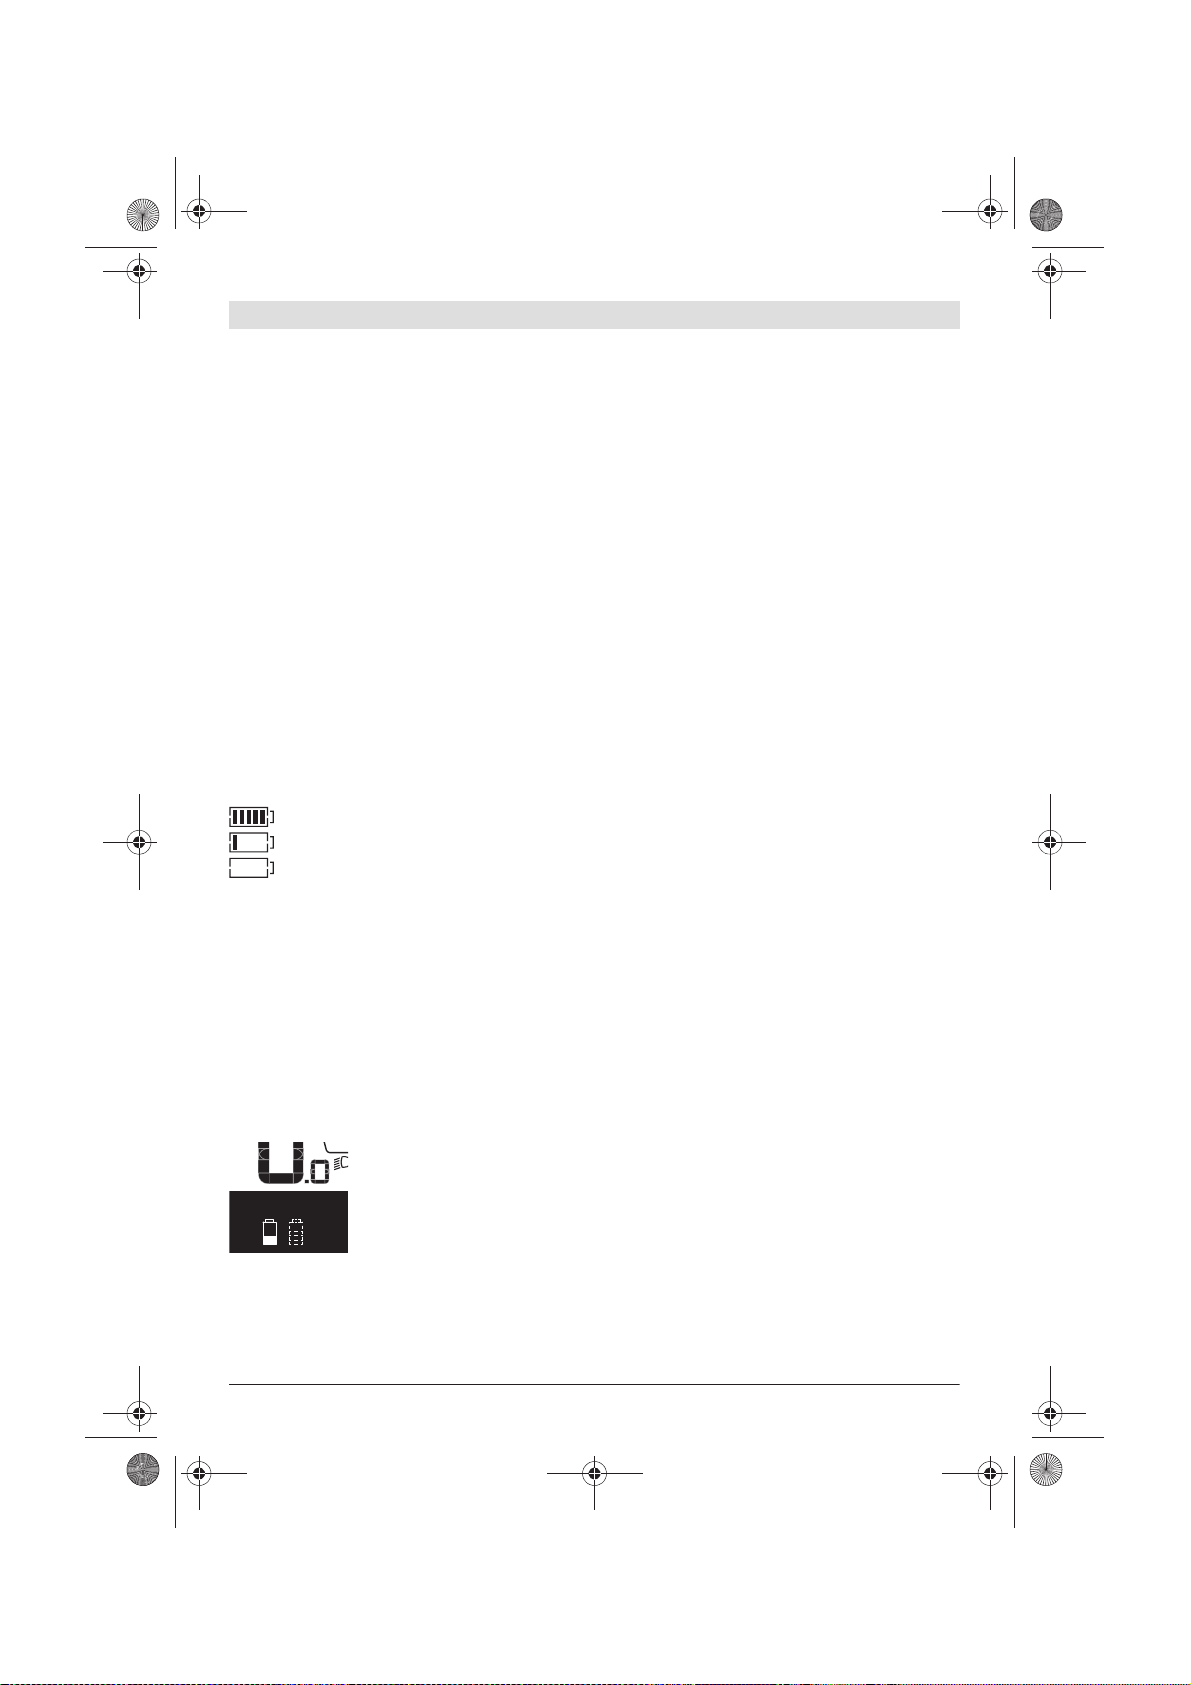
If an eBike has two battery packs inserted into it and both battery packs are
charged on the bike, the charging progress of both battery packs will be indicated on the display (the left-hand battery pack is being charged in the
illustration). You can tell by the flashing
indicator on the battery pack which of
the two battery packs is being charged.
Setting the Assistance Level
On the operating unit 9 you can set how much the eBike drive
assists you while pedalling. The assistance level can be
changed at any time, even while cycling.
Note: For individual versions, it is possible that the assistance
level is pre-set and cannot be changed. It is also possible that
less assistance levels are available for selection than listed
here.
If the manufacturer has configured the eBike with “eMTB
Mode” and an Intuvia on-board computer is being used on the
bicycle, “eMTB Mode” will appear briefly on the display when
the “SPORT” assistance level is selected. In “eMTB Mode”,
the assistance factor and torque are dynamically adjusted as
a function of the force you exert on the pedals. “eMTB Mode”
is only available for Performance Line CX drives.
The following assistance levels (max.) are available:
– “OFF”: The motor assistance is switched off, and the eBike
can be moved as a normal bicycle only by pedalling. The
push assistance cannot be activated in this assistance
level.
– “ECO”: Effective assistance at maximum efficiency for
maximum cruising range
– “TOUR”: Uniform assistance, for touring with long cruising
range
– “SPORT”/“eMTB”:
“SPORT”: Powerful assistance for sportive riding off road
as well as for urban traffic
“eMTB”: Optimal assistance whatever the terrain, rapid
acceleration when starting from a standstill, improved dynamics and top performance.
– “TURBO”: Maximum assistance, supporting highest ca-
dence for sportive riding
To increase the assistance level, press the “+” 12 button on
the operating unit until the desired assistance level appears in
the display b. To decrease the assistance level, press the button “–” 11.
The requested motor output is displayed in indicator a. The
maximum motor output depends on the selected assistance
level.
When the on-board computer is removed from the holder 4,
the last indicated assistance level is stored; the motor-output
indicator a remains empty.
Interaction of the eBike System with the Bicycle Gears
The bicycle gears should be used as with a normal bicycle,
even with eBike motor assistance (please observe the operating instructions of your eBike).
Independent of the type of gearing, it is recommended to
briefly interrupt the pedaling while changing gears. This
makes changing gears easier and reduces the wear of the
drive train.
By selecting the right gear, you can increase the speed and
range with the same pedaling effort.
On indicator i, each bar of the battery pack symbol is equivalent to a capacity of approx. 20 %:
The eBike battery pack is fully charged.
The eBike battery pack should be recharged.
The LEDs of the charge-control indicator on the
battery pack extinguish. The capacity for assisting
the drive has been used up, and assistance is gently switched off. The remaining capacity is made
available for the lighting and the on-board computer. The indicator flashes.
The capacity of the eBike battery pack is enough
for about 2 hours of lighting. This does not account
for other consumers (e.g. automatic gearbox,
charging external devices at the USB port).
OF
MP
H
KM
/
OBJ_BUCH-2795-002.book Page 3 Wednesday, April 19, 2017 11:55 AM

English–4
Bosch eBike Systems 1 270 020 XBI | (19.4.17)
For this reason, follow the shift recommendations provided
by indications g and h on your display. If indication g is displayed, you should shift to a higher gear with lower cadence.
If indication h is displayed, you should select a lower gear with
higher cadence.
Switching bike lights on/off
In the model in which the lighting is powered by the eBike system, the front and rear lights can be switched on and off at the
same time via the on-board computer with button 2.
When the lighting is switched on “Lights on” appears and
when the lighting is switched off “Lights off” appears for
approx. 1 s in text indication d. The lighting symbol c is displayed when the light is on.
Switching the bike light on and off has no effect on the back
lighting of the display.
Switching the Push-assistance mode On/Off
The push-assistance feature makes it easier to push the
eBike. The speed in this function depends on the set gear and
cannot exceed 6 km/h (max.). The lower the set gear, the lower the speed in the push-assistance function (at full output).
f The push-assistance function may only be used when
pushing the eBike. Danger of injury when the wheels of
the eBike do not have ground contact while using the pushassistance function.
To activate the push-assistance function, briefly press button “WALK” on your on-board computer. After activation,
press button “+” within 3 s and keep it pressed. The eBike
drive is switched on.
Note: The push assistance cannot be activated in the “OFF”
assistance level.
The push assistance is switched off as soon as one of the
following occurs:
– You release the “+” 12 button;
– The wheels of the eBike are prevented from turning (e.g.
by braking or being hit by your leg);
– The speed exceeds 6 km/h.
Note: On some systems the push-assistance function can be
started directly by pressing the “WALK” button.
The push-assistance function is subject to local regulations;
the way it works may therefore differ from the description
above.
Displays and configurations of the on-board
computer
Speed and Distance Indication
The speed indication f always displays the current speed.
The following functions are available in the function indica-
tion (combination of text indication d and value indication e):
– “Clock”: Current time
– “Max. speed”: Maximum speed achieved since the last
reset
– “Avg. speed”: Average speed achieved since the last reset
– “Trip time”: Trip time since the last reset
– “Range”: Estimated range of the available battery-pack
charge (for constant conditions such as assistance level,
route profile, etc.)
– “Odometer”: Display of the total distance travelled with
the eBike (cannot be reset)
– “Trip distance”: Distance covered since the last reset
To switch between display functions, press button “i” 1 on
the on-board computer or button “i” 10 on the operating unit
repeatedly until the required function is displayed.
To reset “Trip distance”, “Trip time” and “Avg. speed”,
switch to any of the three functions and then press and hold
the “RESET” button 6 until the indication is set to zero. This
also resets the values of the other two functions.
To reset the “Max. speed”, switch to this function and then
press and hold the “RESET” button 6 until the indication is set
to zero.
To reset “Range”, switch to this function and then press the
“RESET” 6 button until the display is reset to the value of the
factory setting.
If the on-board computer is removed from the holder 4, all values of the features are saved and can still be displayed.
Displaying/Adapting Basic Settings
The basic settings can be displayed and changed regardless
of whether the on-board computer is inserted in the holder 4
or not. Some settings are visible and changeable only when
the operating computer is inserted. Some menu items may be
missing depending on the equipment of your eBike.
To access the basic settings menu, press and hold the
“RESET” button 6 and the “i” button 1 until “Configuration”
is displayed in text indication d.
To switch between the basic settings, press button “i” 1 on
the on-board computer repeatedly until the required basic
setting is displayed. If the on-board computer is inserted in
the holder 4, you can also press button “i” 10 on the operating unit.
To change the basic settings, press the On/Off button 5 next
to indication “– ” to reduce or scroll down, or the lighting button 2 next to indication “+” to increase or scroll up.
If the on-board computer is inserted in the holder 4, it is also
possible to change using buttons “ –” 11 and “+” 12 on the
operating unit.
To exit the function and save a changed setting, press the
“RESET” button 6 for 3 s.
The following basic settings are available:
– “– Clock +”: The current time can be set here. Pressing
and holding the setting buttons fast-forwards the setting
speed.
– “– Wheel circum. +”: You can change this value pre-set by
the manufacturer by ± 5 %. This menu item is displayed only when the on-board computer is in the holder.
OBJ_BUCH-2795-002.book Page 4 Wednesday, April 19, 2017 11:55 AM
English– 5
1 270 020 XBI | (19.4.17) Bosch eBike Systems
– “– English +”: You can change the language of the text in-
dications. You can choose between German, English,
French, Spanish, Italian, Portuguese, Swedish, Dutch and
Danish.
– “– Unit km/mi +”: The speed and distance can be dis-
played either in kilometres or miles.
– “– Time format +”: The time can be displayed either in the
12 hour or 24 hour format.
– “– Shift recom. on/off +”: You can switch the indication
of a shift recommendation on and off.
– “Power-on hours”: Indicates the total travel duration with
the eBike (not changeable).
– “Displ. vx.x.x.x”: This is the software version of the dis-
play.
– “DU vx.x.x.x”: This is the software version of the drive
unit. This menu item is displayed only when the on-board
computer is in the holder.
– “DU xxxxxxxxx”: This is the serial number of the drive
unit. This menu item is displayed only when the on-board
computer is in the holder.
– “ Service MM/YYYY”: This menu item is displayed
when the bike manufacturer has set a fixed service appointment.
– “ Serv. xx km/mi”: This menu item is displayed when
the bike manufacturer has set a fixed service appointment
after a certain mileage has been reached.
– “Bat. vx.x.x.x”: This is the software version of the battery
pack. This menu item is displayed only when the on-board
computer is in the holder.
– “1. Bat. vx.x.x.x”: When using 2 battery packs this is the
software version of one of the battery packs. This menu
item is displayed only when the on-board computer is in
the holder.
– “2. Bat. vx.x.x.x”: When using 2 battery packs this is the
software version of the other battery pack. This menu item
is displayed only when the on-board computer is in the
holder.
Error Code Indication
The components of the eBike system are continuously and automatically monitored. When an error is detected, the respective error code is indicated in text indication d.
Press any button on the on-board computer 3 or on the operating unit 9 to return to the standard indication.
Depending on the type of error, the drive unit is automatically
shut off, if required. Continued travel without assistance from
the drive unit is possible at any time. However, have the eBike
checked before attempting new trips.
f Have all repairs performed only by an authorised bike
dealer.
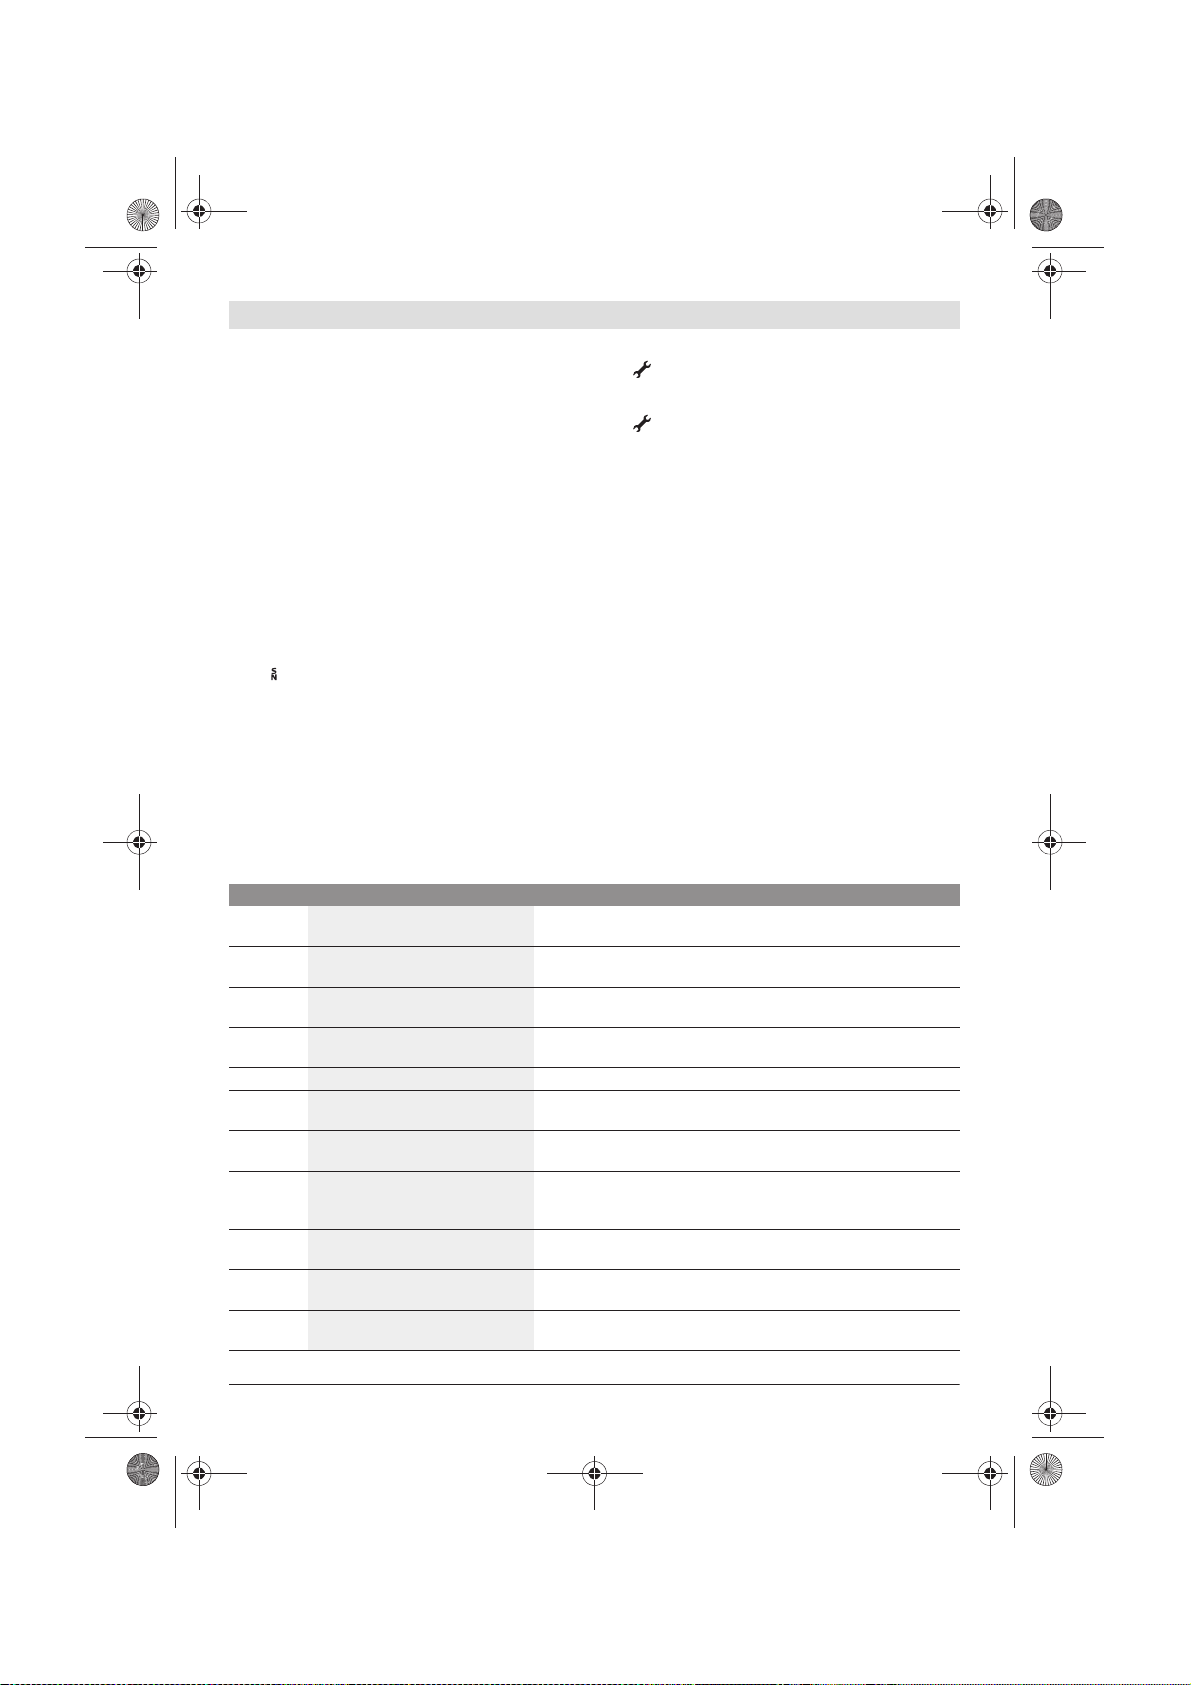
Code Cause Corrective Measure
410
One or more buttons of the on-board
computer are blocked.
Check if any buttons are blocked, e. g. from dirt or debris. Clean the
buttons, if required.
414 Connection problem of the operating
unit
Have connections and contacts checked.
418
One or more buttons of the operating
unit are blocked.
Check if any buttons are blocked, e. g. from dirt or debris. Clean the
buttons, if required.
419
Configuration error Restart the system. If the problem persists, contact your Bosch eBike
dealer.
422 Connection problem of the drive unit Have connections and contacts checked.
423
Connection problem of the eBike
battery pack
Have connections and contacts checked.
424
Communication error among the
components
Have connections and contacts checked.
426
Internal time-out error Restart the system. If the problem persists, contact your Bosch eBike
dealer. In this error status, it is not possible to display or adjust the wheel
circumference in the basic settings menu.
430
Internal battery pack of the on-board
computer is empty.
Charge the on-board computer (in the holder or via the USB port).
431 Software version error Restart the system. If the problem persists, contact your Bosch eBike
dealer.
440
Internal error of the drive unit Restart the system. If the problem persists, contact your Bosch eBike
dealer.
OBJ_BUCH-2795-002.book Page 5 Wednesday, April 19, 2017 11:55 AM
 Loading...