

Page 1
NL | INSTRUCTIES
FR | INSTRUCTIONS
EN | INSTRUCTIONS
IT | INSTRUZIONE
www.boretti.com
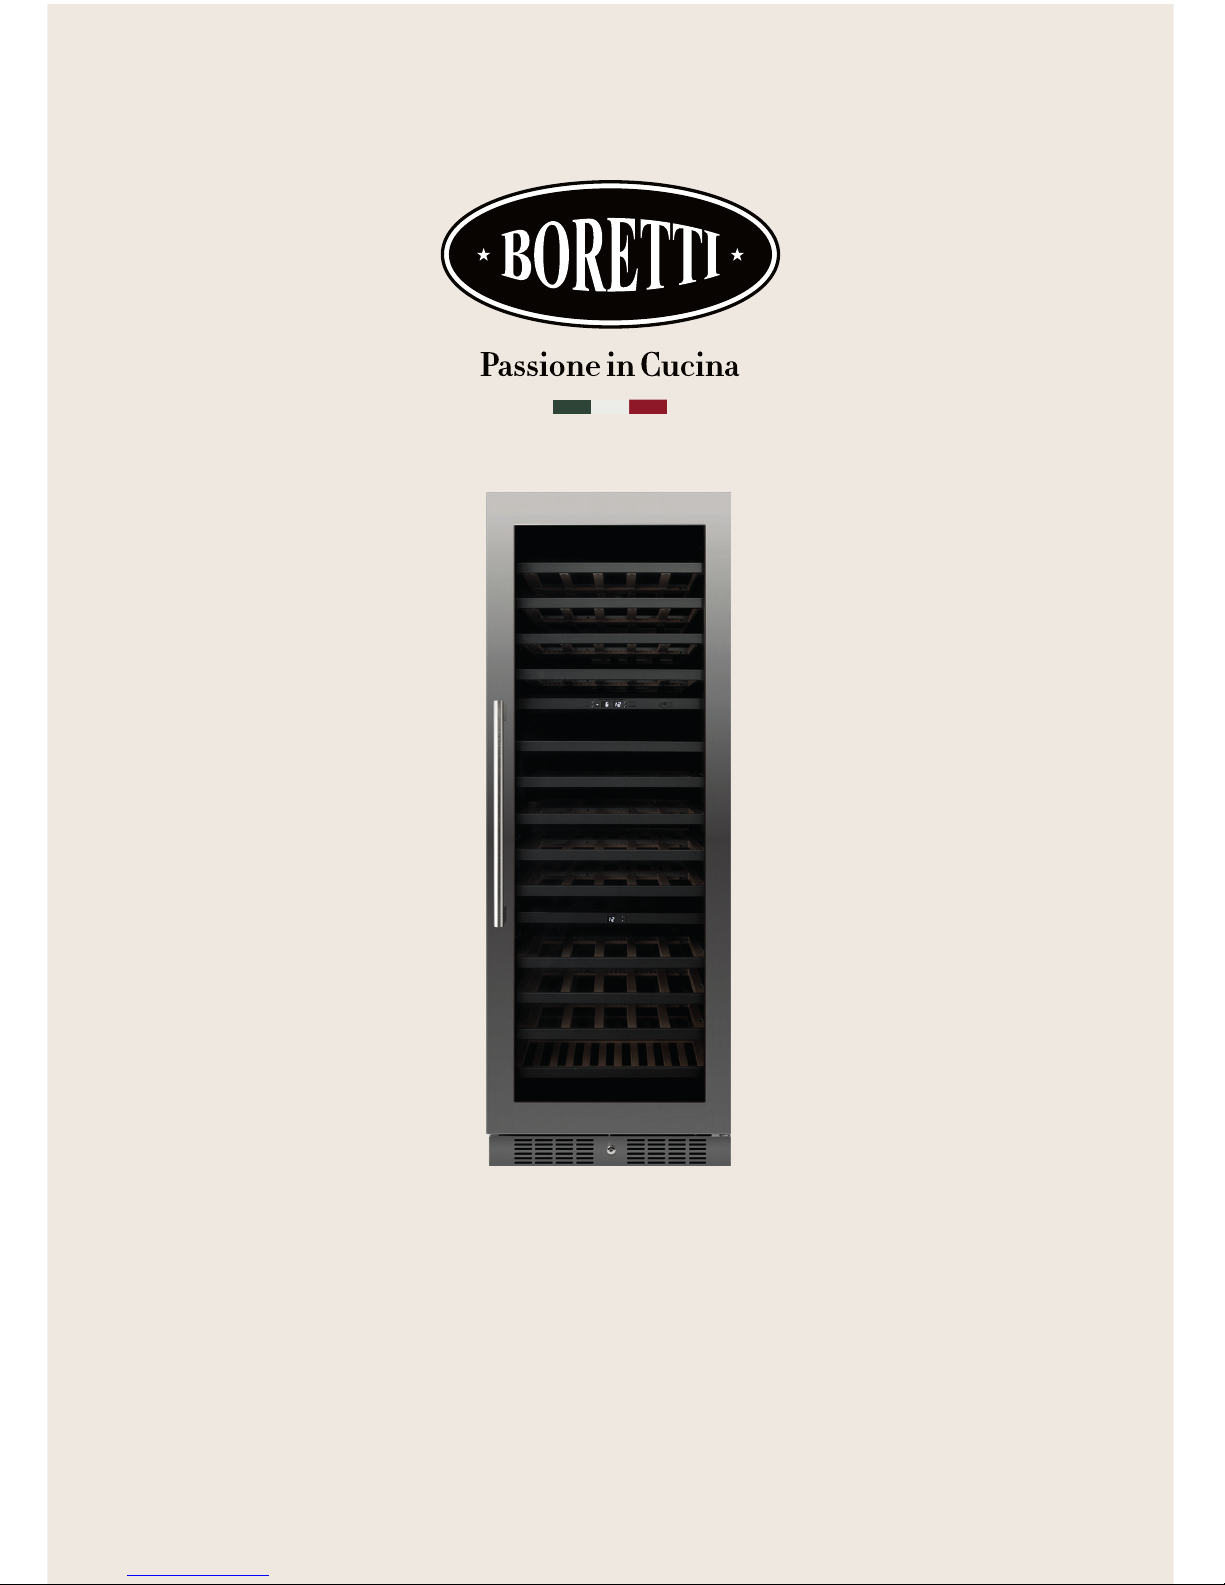
BPWKN 177
Page 2

Gefeliciteerd! U bent nu ofcieel eigenaar van een Boretti
wijnklimaatkast. U zult in de aankomende jaren ontdekken dat het
werken daarmee een andere dimensie geeft aan het woord koelen.
Wij adviseren u om voor het gebruik van uw nieuwe aanwinst deze
handleiding aandachtig door te lezen zodat u het apparaat van binnen
en buiten leert kennen. Mocht u na het lezen van de handleiding of
tijdens het gebruik ervan vragen hebben, dan vernemen wij dat graag.
U bent vanzelfsprekend altijd welkom in ons Experience Center, we
staan voor u klaar.
Wij wensen u veel koelplezier!
Boretti
2
Voorwoord
Boretti Wijnklimaatkasten / Instructies NL
Page 3
3
Voorwoord 2
Voor gebruik 4
Belangrijke veiligheidsinstructies 5
Installatie van de wijnklimaatkast 6
De wijnklimaatkast gebruiken
* De bediening (bovenste en middelste zone) 7
* De bediening (onderste zone) 8
* “Temperatuur” herinneringsfunctie 9
* “Deur sluiten” herinneringsfunctie 9
* Verwijderen van het plateau 10
De draairichting van de deur veranderen
* De draairichting van de deur veranderen 11
* De wijnklimaatkast reinigen 12
* Stroomuitval 12
* Vakanties 12
* De wijnklimaatkast verplaatsen 12
* Energie bespaartips 12
Problemen met de wijnklimaatkast? 13
Verwijdering van oude apparaten 15
Inhoud
Boretti Wijnklimaatkasten / Instructies NL
Page 4

Waarschuwing
Open de deur gedurende 5 minuten om de wijnklimaatkast te
ventileren voor u het apparaat inschakelt. Lees de instructies
door die bij het apparaat zijn geleverd - het niet installeren of
gebruiken van deze wijnklimaatkast in overeenstemming met de
instructies, kan de garantie ongeldig maken. Boretti aanvaardt
geen enkele aansprakelijkheid voor schade veroorzaakt door
onjuist gebruik of onjuiste installatie. Installeer dit apparaat
niet indien het tijdens het transport is beschadigd. Dit geldt ook
voor de stekker en het netsnoer. Bewaar deze instructies op een
veilige plaats voor toekomstig gebruik.
Let op
Dit apparaat is uitsluitend bedoeld voor het bewaren van drank.
4
Voor gebruik
Boretti Wijnklimaatkasten / Instructies NL
Page 5
* Om schade aan de deur en het deurrubber te voorkomen, moet u
ervoor zorgen dat de deur volledig is geopend voordat u één van de
planken uittrekt.
* Verplaats de wijnkast niet wanneer deze met wijn is gevuld, hierdoor
kunt u het apparaat vervormen.
* Als het netsnoer beschadigd raakt, mag het alleen worden
vervangen door de fabrikant of een gekwaliceerd persoon.
* Houd kinderen uit de buurt van de bediening van het apparaat.
* Reinig de onderdelen van het apparaat nooit met ontvlambare vloeistoffen.
* Bewaar of gebruik geen benzine of andere ontvlambare dampen
en vloeistoffen in de buurt van dit apparaat. Dit kan brand of een
explosie veroorzaken.
* Vergeet niet om het apparaat los te koppelen voordat u het
schoonmaakt. Trek bij het loskoppelen van de elektriciteitstoevoer
aan de stekker, niet aan het netsnoer.
* Gebruik geen elektrische apparaten in de wijnkast.
* Alle reparaties moeten worden uitgevoerd door een gekwaliceerde
onderhoudsmonteur. Onjuiste reparaties kunnen leiden tot een gevaar
voor de gebruiker en maken iedere vorm van garantie ongeldig.
* Bewaar nooit gevaarlijke, of brandbare stoffen in het apparaat, zoals
explosieven, sterke zuren of alkali, etc.
* Houd alle ventilatieopeningen altijd vrij. Mochten ze geblokkeerd
raken, maak ze dan meteen vrij.
* Zorg ervoor dat de stekker zich op een toegankelijke plaats bevindt
wanneer de installatie is voltooid zodat je er achteraf makkelijk bij kunt.
* Gebruik dit apparaat alleen voor huishoudelijke doeleinden in
overeenstemming met deze instructies.
* De wijnklimaatkast is geschikt voor het bewaren van drank. Het is
niet geschikt voor het bewaren van vers of bevroren voedsel.
Waarschuwing
Mocht het koelsysteem beschadigd raken, gebruik het
apparaat dan niet voordat dit aan u wordt gevraagd door een
onderhoudsmonteur. Koelvloeistof kan ontbranden of schade
aan de ogen veroorzaken bij lekkage.
5
Belangrijke veiligheidsinstructies
Boretti Wijnklimaatkasten / Instructies NL
Page 6

Opmerking
Voordat u de wijnklimaatkast op de stroombron aansluit,
moet u hem ongeveer 24 uur rechtop laten staan. Dit
vermindert de kans dat een storing in het koelsysteem
optreedt als gevolg van het transport.
* Verwijder de buiten- en binnenverpakking.
* Reinig het binnenoppervlak met lauw water met een zachte doek.
* Monteer het handvat op de deur.
* Plaats de wijnklimaatkast op een ondergrond die sterk genoeg is
wanneer de wijnklimaatkast volledig gevuld is.
* Plaats de wijnklimaatkast uit de buurt van direct zonlicht
en warmtebronnen (bijv. radiator, etc.). Direct zonlicht kan
de acrylcoating aantasten en warmtebronnen kunnen het
elektriciteitsverbruik doen toenemen. Bijzonder koude
omgevingstemperaturen kunnen ook tot gevolg hebben dat het
apparaat niet goed werkt.
* Plaats het apparaat niet op een vochtige plaats.
* De wijnklimaatkast moet zo worden geplaatst dat de
omgevingstemperatuur tussen 5°C en 35°C ligt. Als de
omgevingstemperatuur hoger of lager is dan dit bereik, kan dit
invloed hebben op de prestaties van het apparaat. Als het apparaat
in extreem koude of warme omstandigheden wordt geplaatst,
kunnen de binnentemperaturen uctueren. Het bereik van de
ingestelde temperaturen wordt dan mogelijk niet bereikt.
* Steek de stekker van de wijnklimaatkast in een geschikt
stopcontact. Als de stekker moet worden vervangen, laat dit dan
doen door een gekwaliceerde onderhoudsmonteur.
Openingsrichting van deur omkeren
De scharnieren van de wijnklimaatkast kunnen aan de linker- of rechterkant
worden geplaatst. Wanneer de unit geleverd wordt zit de deuropening
standaard aan de linkerkant. Voor instructies voor het omkeren van de
openingsrichting kunt u contact opnemen met onze serviceafdeling.
6
Installatie van de wijnklimaatkast
Boretti Wijnklimaatkasten / Instructies NL
Page 7
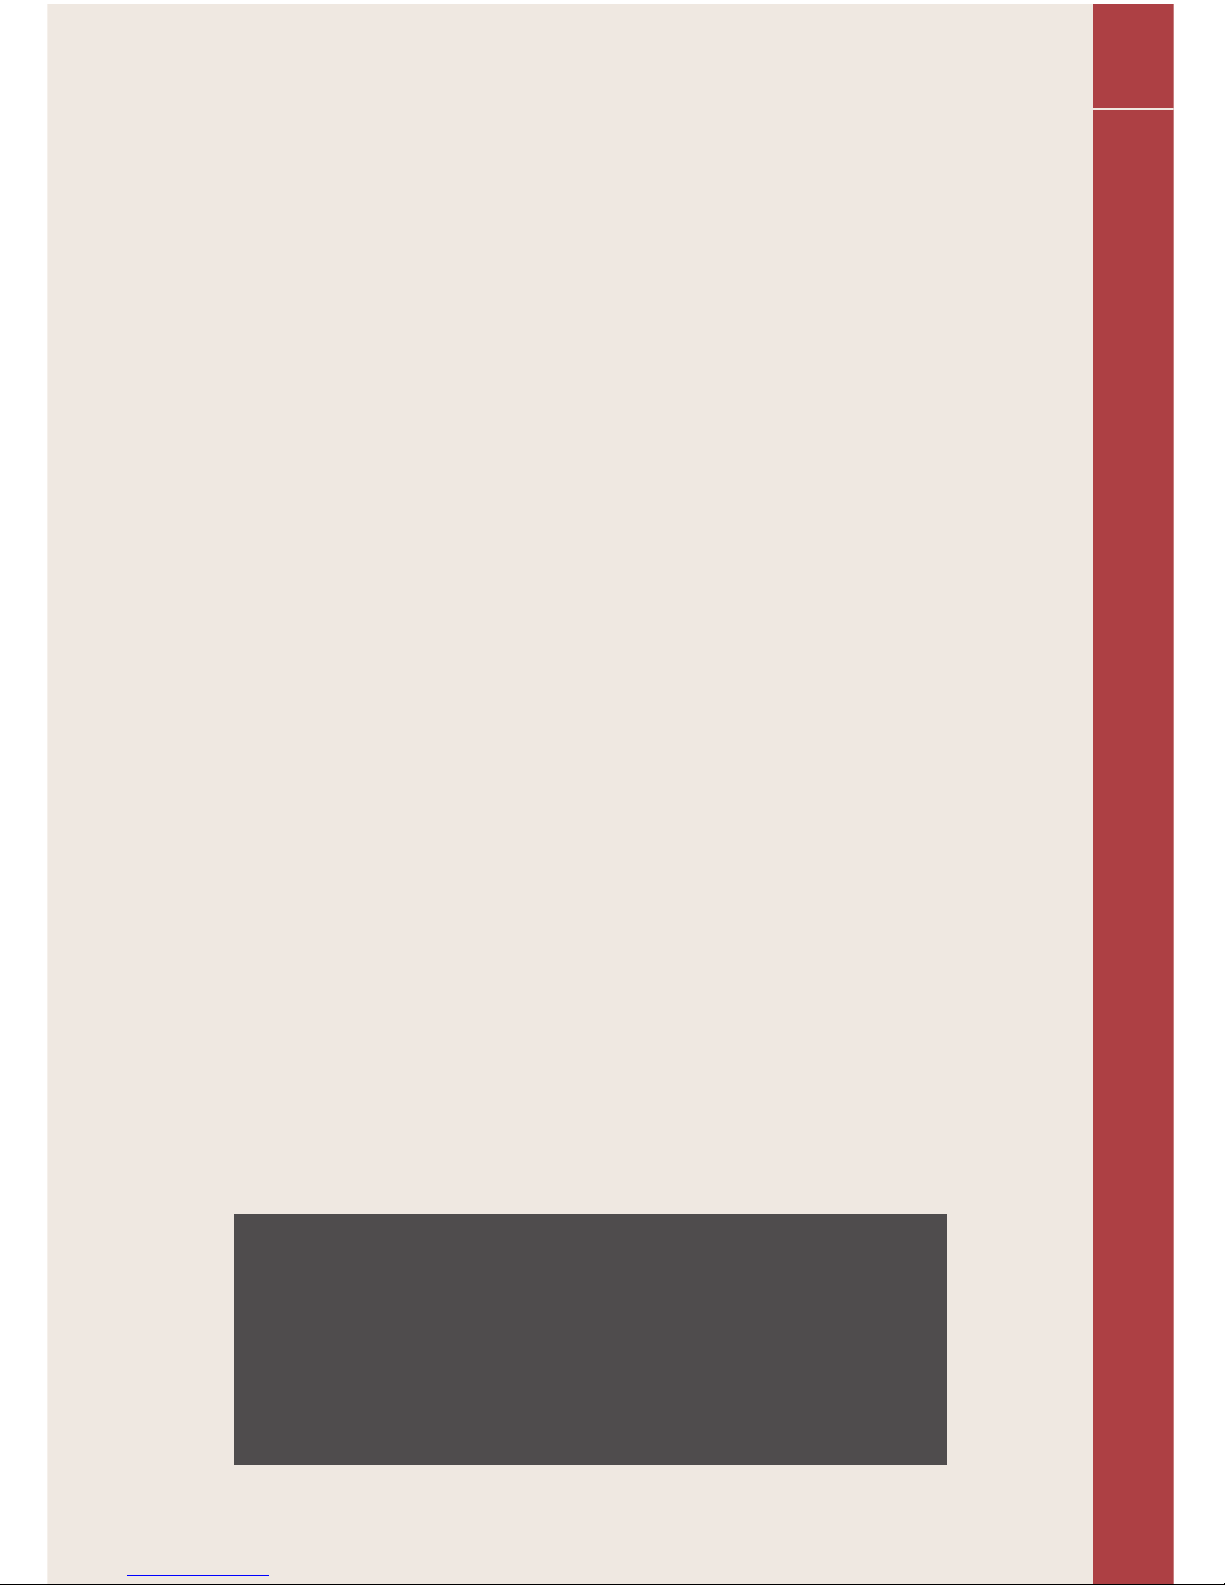
De bediening (bovenste en middelste zone)
* Run
Het indicatielampje brandt om aan te geven dat het koelsysteem
momenteel actief is.
* “Light”
De binnenverlichting aan/uit doen. U kunt de binnenverlichting aanof uitdoen door op de “LIGHT”-knop te drukken.
* Het LED-lampje schakelt na 10 minuten automatisch uit om energie
te besparen. Druk opnieuw op de “LIGHT”-knop om de verlichting
weer in te schakelen.
* Om het LED-lampje continu aan te laten, houdt u de “LIGHT”-knop
voor 5 seconden ingedrukt, het display toont dan de code “LP”.Na
4 seconden keert het display terug naar normaal en blijft het lampje
branden totdat het handmatig wordt uitgeschakeld.
* Om terug te keren naar de normale stand en energie te besparen
(aanbevolen), houdt u de “LIGHT”-knop opnieuw gedurende 5
seconden ingedrukt, op het display verschijnt de code “LF”. Na 4
seconden keert het display terug naar normaal en na 10 minuten
wordt het licht dan automatisch uitgeschakeld.
Let op
Wanneer de deur open is, kunt u handmatig op de “LIGHT”
knop drukken om het licht aan of uit te doen. Wanneer de deur
gesloten is, blijft het licht branden volgens uw laatste handeling
voordat de deur werd gesloten. Maar wanneer u de deur
opnieuw opent, blijft het lampje automatisch branden.
7
De wijnklimaatkast gebruiken
Boretti Wijnklimaatkasten / Instructies NL
Page 8
* “Power”
Om het apparaat aan/uit te schakelen.
* “Set Up” button
Om de temperatuur van het bovenste zone in te stellen.
* “Set Middle” button
Om de temperatuur van het onderste zone in te stellen.
* “Up chamber”
Vertoont de temperatuur van het bovenste zone.
* “Middle chamber”
Vertoont de temperatuur van het onderste zone.
Bovenste zone: De temperatuurinstelling kan worden aangepast van
5°C tot 10°C.
Middelste zone: De temperatuurinstelling kan worden aangepast van
10°C tot 18°C.
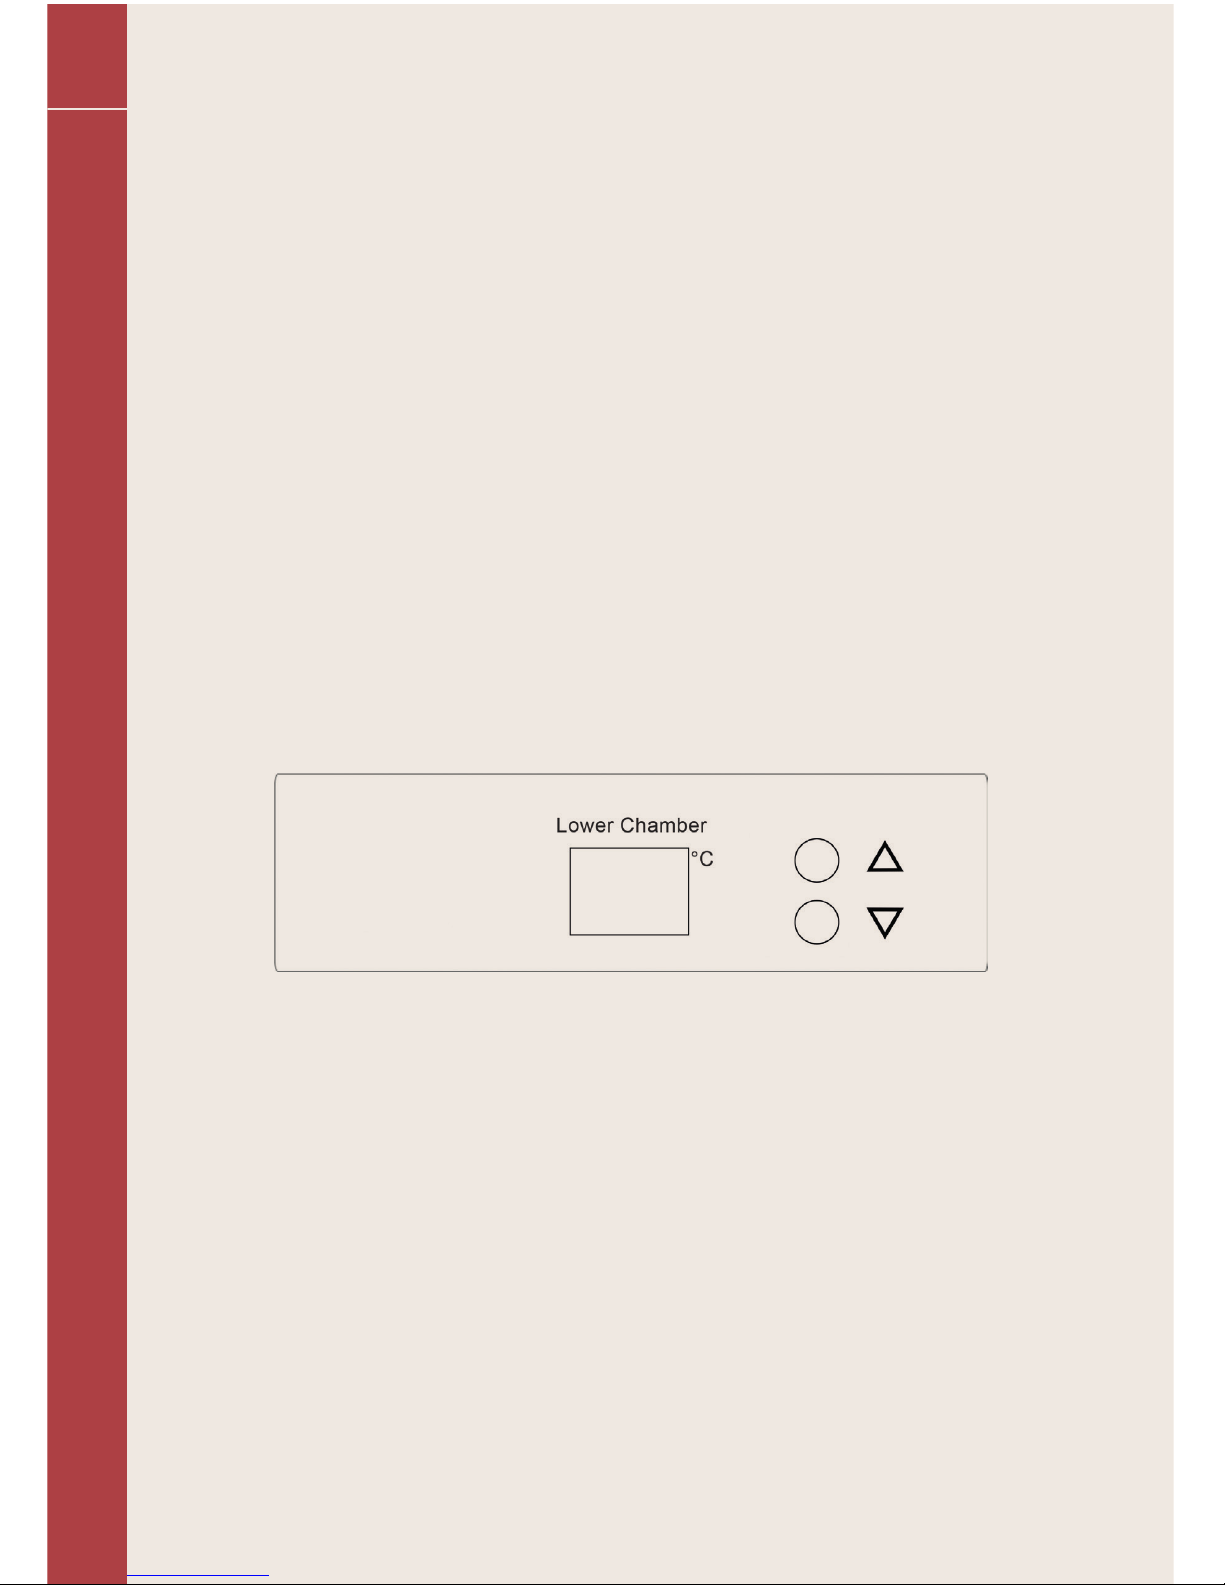
De bediening (onderste zone)
* “Up” button
Om de temperatuur te verhogen (warmer) in stappen van 1°C.
* “Down” button
Om de temperatuur te verlagen (kouder) in stappen van 1°C.
* Display
Toont de temperatuur van de onderste zone.
Onderste zone: De temperatuur van de middelste zone kan worden
aangepast van 10°C tot 18°C.
8
Boretti Wijnklimaatkasten / Instructies NL
Page 9
Opmerking
Als het apparaat is losgekoppeld, stroom heeft verloren of is
uitgeschakeld, moet u 3 tot 5 minuten wachten voordat u het apparaat
opnieuw start. Als u probeert opnieuw op te starten vóór deze tijd
verstreken is, start de wijnkoeler niet. Wanneer u de wijnklimaatkast
voor de eerste keer gebruikt of de wijnkoeler opnieuw start nadat
deze lange tijd uitgeschakeld is geweest, kan er een afwijking van
enkele graden zijn tussen de geselecteerde temperatuur en de
temperatuur die op de LED-indicatie is aangegeven. Dit is normaal en
komt door de lengte van de niet-activeringstijd. Als de wijnkoeler een
paar uur in gebruik is, wordt de temperatuur weer correct getoond.
“Temperatuur” herinneringsfunctie
Als de stroom plotseling wordt onderbroken, wordt de ingestelde
temperatuur door het apparaat opgeslagen. Als de stroom weer is
ingeschakeld, staat het apparaat op dezelfde temperatuur ingesteld.
“Deur sluiten” herinneringsfunctie
Als er vergeten is om de deur te sluiten of als de deur niet compleet
gesloten is, zal er een geluidssignaal klinken na 5 minuten.
9
Boretti Wijnklimaatkasten / Instructies NL
Page 10
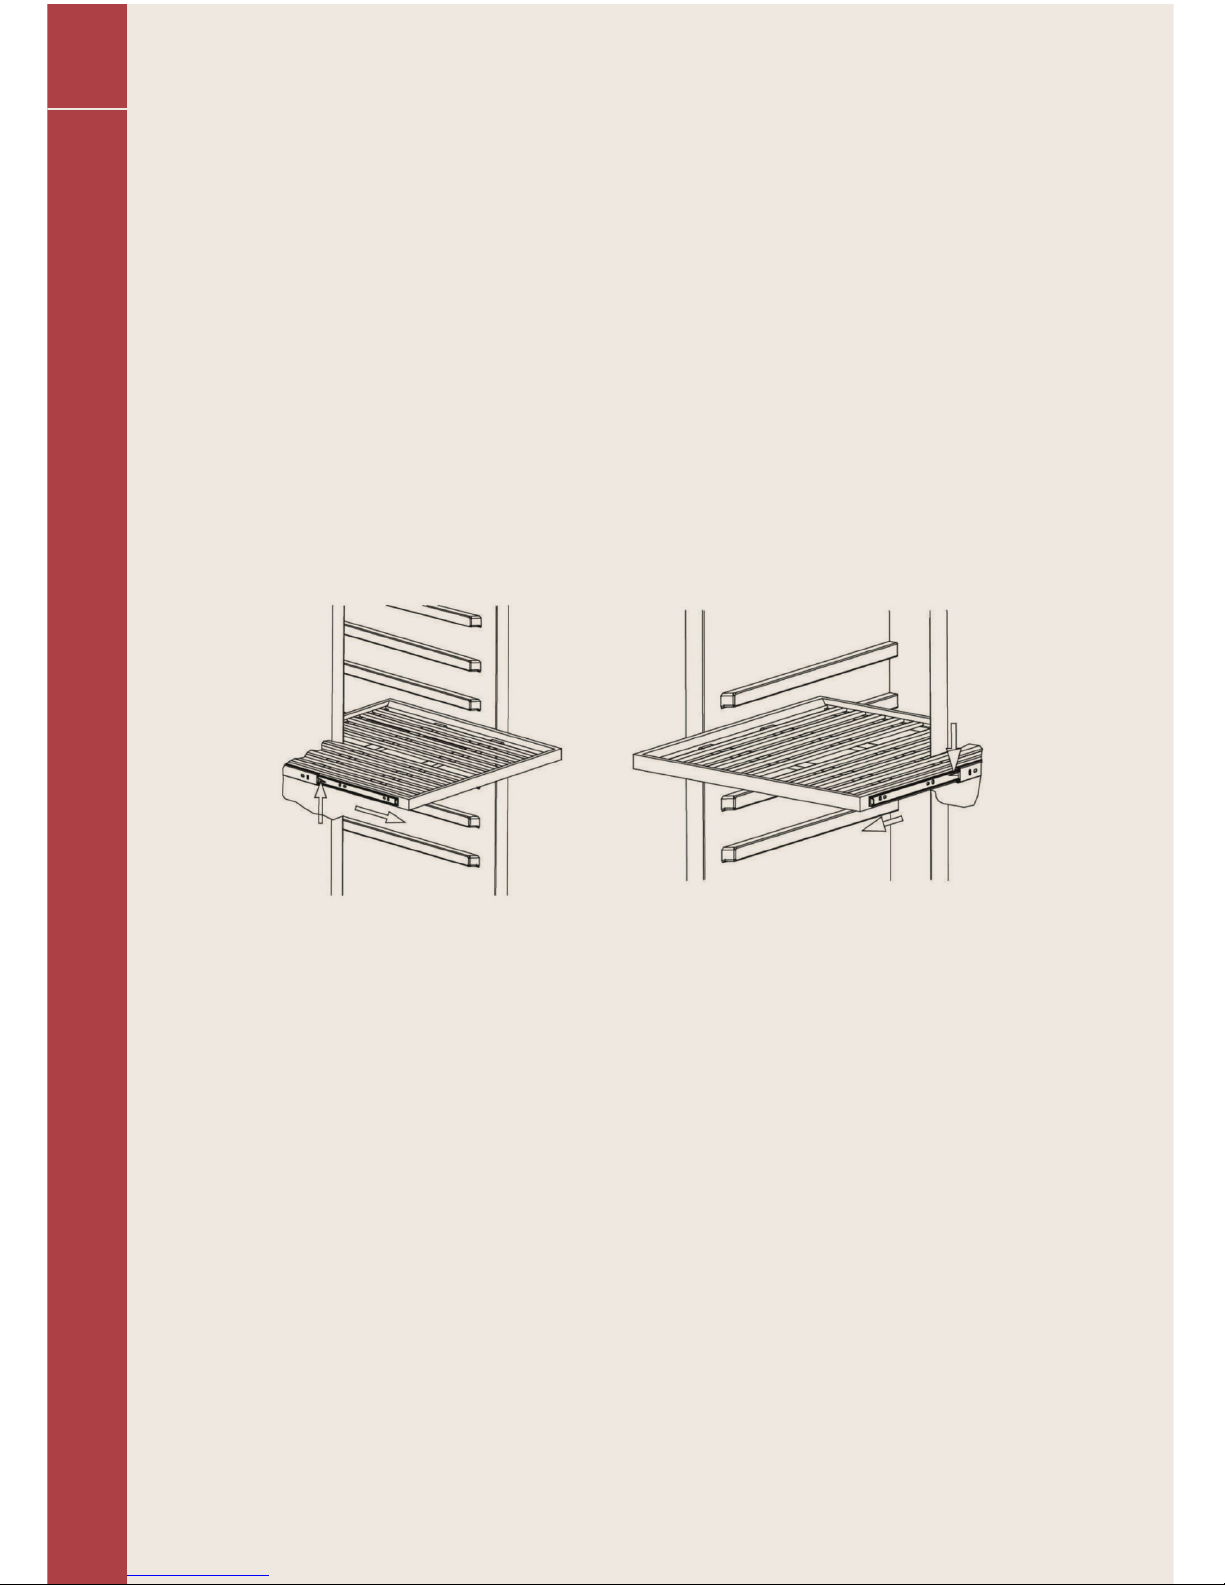
Verwijderen van het plateau
* Open de deur volledig.
* Verwijder alle essen die op het plateau aanwezig zijn, indien aanwezig.
* Trek het plateau naar u toe totdat deze volledig is uitgetrokken.
* Het plateau heeft aan beide zijden plastic lipjes zoals aangegeven in
het onderstaande schema. Terwijl u voor de wijnklimaatkast staat,
drukt u de plastic lip aan de rechterkant naar beneden terwijl u de
linker lip omhoogtrekt. U kunt ervoor kiezen om dit handmatig te
doen of met een schroevendraaier met platte kop.
* Trek de plank gelijkmatig uit totdat deze volledig uit het
binnencompartiment is verwijderd.
10
Boretti Wijnklimaatkasten / Instructies NL
Page 11
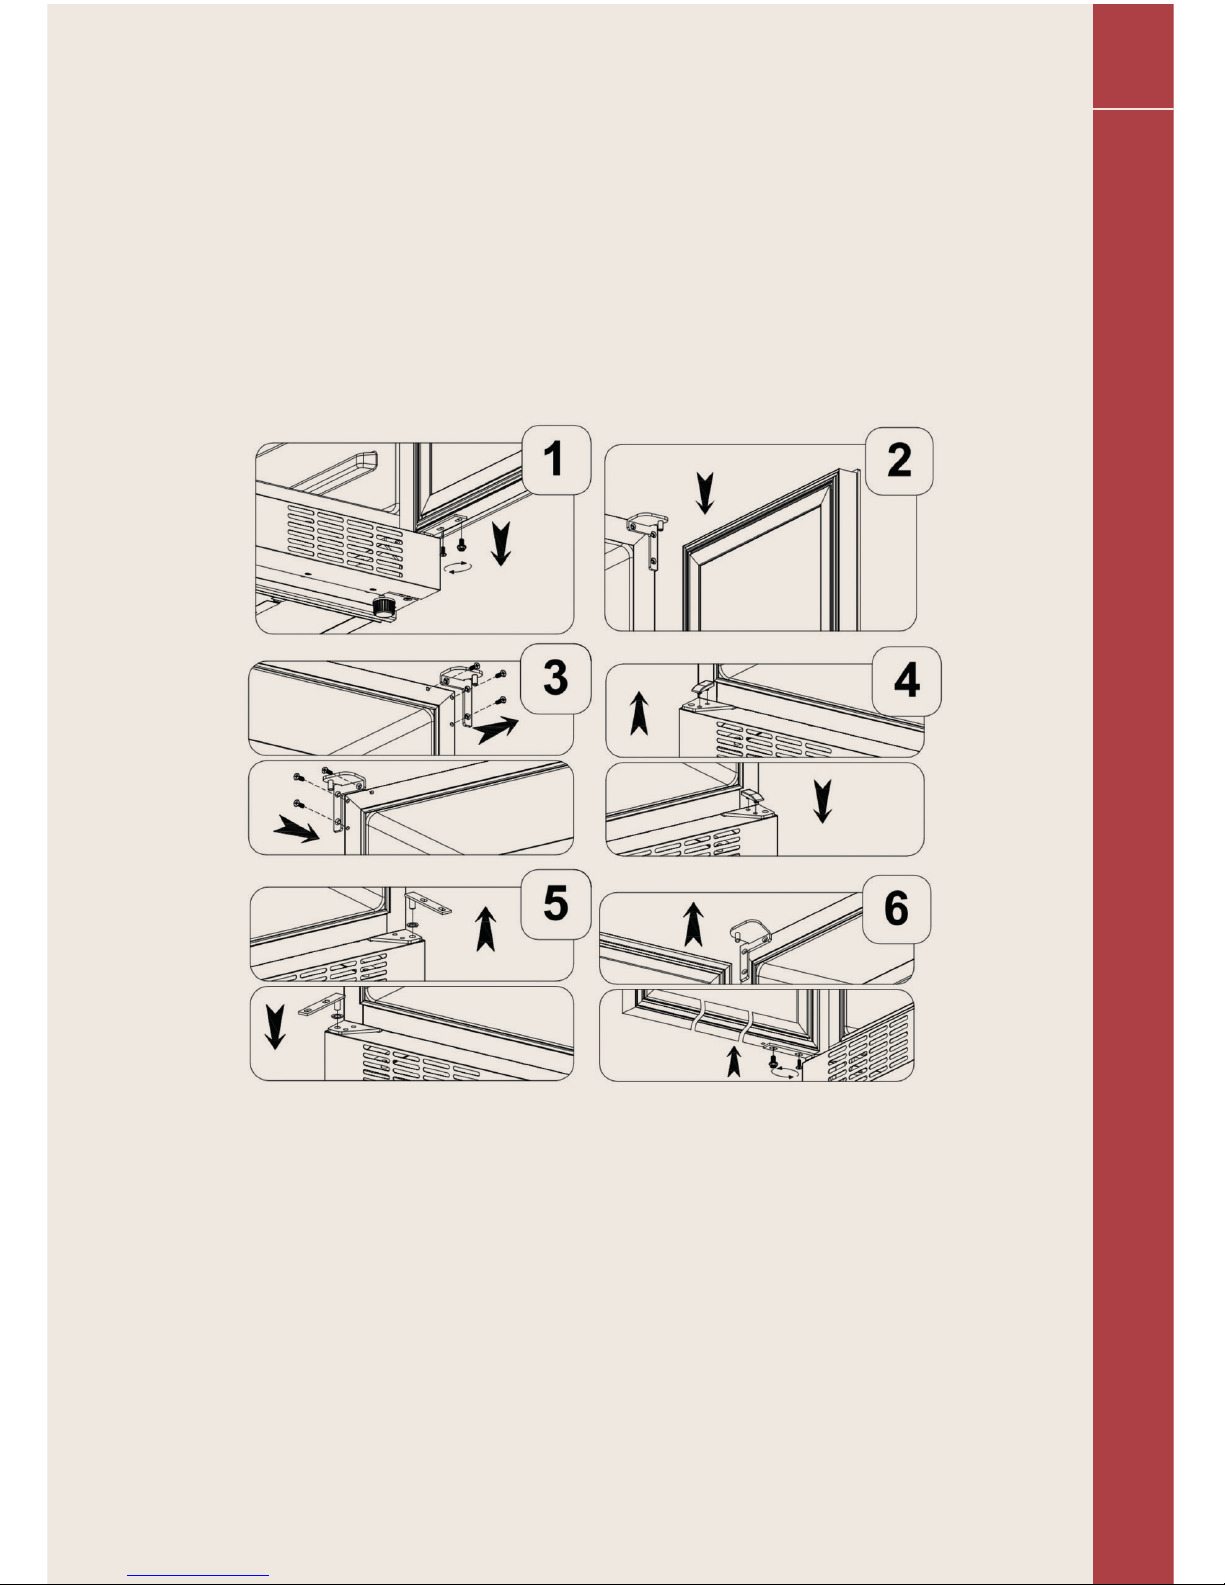
* Open de deur, verwijder de twee schroeven in het onderste scharnier
en til de deur eruit. (Afb. 1/2)
* Bevestig het bijgevoegde bovenste scharnier aan de andere kant.
Verplaats de plastic steun naar de andere kant. (Afb. 3/4)
* Verplaats de scharnieren en sluitring naar de andere kant. Monteer
de deur en schroeven weer terug. (Afb. 5/6)
11
De draairichting van de deur veranderen
Boretti Wijnklimaatkasten / Instructies NL
Page 12

De wijnklimaatkast reinigen
* Schakel de stroom uit, haal de stekker uit het stopcontact en
verwijder alle inhoud, inclusief de plateaus.
* Reinig de binnenkant en de plateaus met een milde zeepoplossing.
* Wring overtollig water uit de spons of doek bij het schoonmaken van
de bedieningsknoppen of elektrische onderdelen.
* Reinig de buitenkant van de kast met warm water en een mild
vloeibaar schoonmaakmiddel. Goed afspoelen en afdrogen met een
schone, zachte doek.
Stroomuitval
De meeste stroomstoringen worden binnen enkele uren opgelost en
hebben geen invloed op de temperatuur van uw wijnklimaatkast als u de
deur niet te vaak opendoet. Als de stroom voor een langere periode uit
staat, moet u de juiste stappen nemen om uw inhoud te beschermen.
Vakanties
* Korte vakanties: Laat de wijnkoeler gedurende vakanties korter dan
drie weken gewoon aanstaan.
* Lange vakanties: Als het apparaat enkele maanden niet zal worden
gebruikt, verwijder dan alle inhoud en schakel het apparaat uit. Reinig
en droog de binnenkant, plateaus en overige onderdelen binnen in de
wijnklimaatkast grondig. Om geurtjes en schimmelgroei te voorkomen,
laat u de deur een beetje open staan: xeer de deur indien nodig.
De wijnklimaatkast verplaatsen
* Verwijder alle essen.
* Plak alle losse items (planken) veilig vast in uw apparaat.
* Draai de verstelbare voetjes naar binnen om schade te voorkomen.
* Tape de deur dicht.
* Zorg ervoor dat het apparaat tijdens transport veilig in de
rechtopstaande positie blijft. Bescherm de buitenkant van het
apparaat met een deken of iets dergelijks.
Energie bespaartips
De wijnklimaatkast moet zich in het koelste deel van een ruimte
bevinden, uit de buurt van warmtebronnen en uit direct zonlicht.
12
Boretti Wijnklimaatkasten / Instructies NL
Page 13

Een aantal problemen met de wijnklimaatkast kunnen gemakkelijk
opgelost worden, waardoor u de kosten van een servicebezoek
kunt besparen. Probeer de suggesties hieronder om te zien of u het
probleem kunt oplossen alvorens een monteur te bellen.
Probleemoplossingsgids
PROBLEEM MOGELIJKE OORZAAK
De wijnklimaatkast werkt niet. * Niet aangesloten.
* Het apparaat is uitgeschakeld.
* De stroomonderbreker is
geactiveerd of er is een
gesprongen zekering in
de meterkast.
De wijnklimaatkast is niet
koud genoeg.
* Controleer de instelling van de
temperatuurregeling.
* Externe omgeving vereist
mogelijk een hogere instelling.
* De deur wordt te vaak geopend.
* De deur is niet volledig gesloten.
* Het deurrubber van de deur
sluit niet goed.
De wijnklimaatkast schakelt vaak
aan en uit.
* De kamertemperatuur is hoger
dan normaal.
* Een grote hoeveelheid
essen is toegevoegd aan de
wijnklimaatkast.
* De deur wordt te vaak geopend.
* De deur is niet volledig gesloten.
* De temperatuurregeling is niet
correct ingesteld.
* Het deurrubber van de deur
sluit niet goed.
13
Problemen met de wijnklimaatkast?
Boretti Wijnklimaatkasten / Instructies NL
Page 14
PROBLEEM MOGELIJKE OORZAAK
Het licht werkt niet. * Niet aangesloten op
stroomnetwerk.
* De stroomonderbreker is
geactiveerd of er is een
gesprongen zekering in
de meterkast.
* De lamp is defect.
* De lichtknop staat op “OFF”.
Vibraties. * Controleer of de wijnklimaatkast
waterpas staat.
De wijnklimaatkast lijkt te veel
lawaai te maken.
* Het ratelende geluid kan
afkomstig zijn van de stroom
van het koelmiddel, wat
normaal is.
* Terwijl elke cyclus eindigt,
kunt u gorgelende geluiden
horen die worden veroorzaakt
door de koelmiddelstroom in
de wijnklimaatkast.
* Door het krimpen en uitzetten
van de binnenwanden kunnen
knapperende en knetterende
geluiden veroorzaken.
* De wijnklimaatkast staat
niet waterpas.
De deur wil niet volledig sluiten. * De wijnklimaatkast staat
niet waterpas.
* De deur is omgedraaid, maar
niet correct geïnstalleerd.
* Het deurrubber is vuil.
* De plateaus zitten niet goed
op hun plaats.
14
Boretti Wijnklimaatkasten / Instructies NL
Page 15
Voordat u een oud apparaat weggooit, verwijdert u alle stekkers en
voedingskabels om ervoor te zorgen dat het apparaat uitgeschakeld is.
Verwijder de deur, maar laat de planken op hun plaats.
Dit symbool op het product geeft aan dat het niet mag worden
weggegooid als huishoudelijk afval. In plaats daar van moet het
worden ingeleverd bij het betreffende inzamelingspunt voor het
recyclen van elektrische en elektronische apparatuur.
Verwijdering moet worden uitgevoerd in overeenstemming met de
plaatselijke milieuvoorschriften voor afvalverwerking. Door dit product op
de juiste manier weg te gooien, helpt u mogelijk negatieve gevolgen voor
het milieu en de menselijke gezondheid te voorkomen, die anders zouden
worden veroorzaakt door onjuiste afvalverwerking van dit product.
Waarschuwing
Zorg er bij het weggooien van een oud apparaat voor dat de
leidingen niet beschadigd raken.
15
Verwijdering van oude apparaten
Boretti Wijnklimaatkasten / Instructies NL
Page 16

Félicitations ! Vous êtes désormais ofciellement propriétaire
d’une cave à vin Boretti. Vous découvrirez au l des années que
l’utilisation d’une cave à vin Boretti donne une dimension différente
au mot « réfrigération ». Avant la première utilisation, nous vous
conseillons de lire attentivement ce manuel an de vous familiariser
avec ce merveilleux appareil. N’hésitez pas à nous faire part de
vos éventuelles questions. Notre Centre d’Expérience est à votre
disposition et nous serons ravis de vous inspirer et de vous aider à
répondre à vos questions.
Nous vous souhaitons beaucoup de plaisir et de fraîcheur !
Boretti
16
Préface
Boretti Armoire à Vin / Instructions FR
Page 17

17
Préface 16
Avant d’utiliser 18
Consignes de sécurité importantes 19
Installation de votre cave à vin 20
Utilisation de votre cave à vin
* Les commandes de votre cave à vin (la zone supérieur et central) 21
* Les commandes de votre cave à vin (la zone inférieure) 22
* Fonction de mémorisation de la température 23
* Fonction de rappel “fermer porte” 23
* Retirer la clayette 24
Changer le sens de l’ouverture de la porte
* Changer le sens de l’ouverture de la porte 25
* Nettoyer votre cave à vin 26
* Coupure de courant 26
* Vacances 26
* Déplacer votre cave à vin 26
* Conseils d’économie d’énergie 26
Des problèmes avec votre cave à vin ? 27
Traitement des anciens appareils 29
Index
FR Boretti Armoire à Vin / Instructions
Page 18

Avertissement
avant de mettre la cave à vin sous tension, aérez-la en ouvrant
la porte pendant 5 minutes. Lisez les instructions fournies
avec l’appareil. Si vous n’installez pas ou n’utilisez pas l’appareil
conformément aux instructions, la garantie peut être annulée.
Boretti décline toute responsabilité en cas de dommages causés
par une utilisation inappropriée ou une installation incorrecte.
N’installez pas cet appareil s’il a été endommagé pendant le
transport. Cela s’applique également à la prise électrique et
au cordon d’alimentation. Conservez ces instructions dans un
endroit sûr pour une utilisation future.
Remarque
l’utilisation de cet appareil est réservée uniquement au stockage et à
la réfrigération du vin.
18
Avant d’utiliser
Boretti Armoire à Vin / Instructions FR
Page 19

* Pour éviter d’endommager la porte et le joint de la porte, assurez-vous
que celle-ci est complètement ouverte avant de retirer l’une des clayettes.
* Ne déplacez pas la cave à vin lorsqu’elle est remplie de bouteilles, car
cela pourrait déformer l’appareil.
* Si le cordon d’alimentation est endommagé, il ne doit être remplacé que
par le fabricant ou une personne qualiée.
* Ne laissez jamais les enfants utiliser l’appareil ou jouer avec.
* Ne nettoyez jamais les composants de l’appareil avec des
liquides inflammables.
* Ne stockez pas ou n’utilisez pas d’essence ou d’autres vapeurs et liquides
inammables à proximité de cet appareil. Cela pourrait provoquer un
incendie ou une explosion.
* N’oubliez pas de débrancher l’appareil avant de le nettoyer. Lorsque
vous débranchez l’alimentation électrique, tirez la prise et non pas le
cordon d’alimentation.
* N’utilisez pas d’appareils électriques dans la cave à vin.
* Toutes les réparations doivent être effectuées par un technicien qualié.
Des réparations inadéquates pourraient entraîner un danger pour
l’utilisateur et annuler toute forme de garantie.
* Ne stockez jamais dans l’appareil des substances dangereuses ou
inammables telles que des explosifs, des acides forts ou des alcalis, etc.
* Gardez toujours toutes les ouvertures de ventilation dégagées. Si elles
sont obstruées, dégagez-les immédiatement.
* Assurez-vous que la prise électrique est accessible une fois
l’installation terminée.
* Utilisez cet appareil uniquement à des ns domestiques,
conformément à ces instructions.
* La cave à vin est destinée au stockage du vin (ou d’autres boissons
en bouteille). Son utilisation n’est pas prévue pour le stockage
d’aliments frais ou surgelés.
Avertissement
Ne laissez pas le circuit réfrigérant s’endommager pendant
le fonctionnement ou l’installation de l’appareil. S’il est
endommagé, n’utilisez pas l’appareil avant qu’un technicien
de maintenance ne vous ait autorisé à le faire. Le liquide de
refroidissement peut s’enammer ou causer des dommages
aux yeux en cas de fuite.
19
Consignes de sécurité importantes
FR Boretti Armoire à Vin / Instructions
Page 20

Remarque
Avant de brancher la cave à vin à la source d’alimentation,
vous devez la laisser à la verticale pendant environ 2 heures.
Cela réduira les risques de défaillance du système de
réfrigération résultant des manipulations lors du transport.
* Retirez les emballages extérieur et intérieur.
* Nettoyez la surface interne avec de l’eau tiède et un chiffon doux.
* Montez la poignée sur le côté gauche de la porte.
* Placez votre cave à vin sur un sol sufsamment solide pour la
supporter lorsqu’elle est entièrement remplie.
* Placez la cave à vin à l’abri de la lumière directe du soleil et des
sources de chaleur (cuisinière, chauffage, radiateur, etc.). La lumière
directe du soleil peut endommager le revêtement acrylique et les
sources de chaleur peuvent augmenter la consommation d’électricité.
Les températures ambiantes extrêmement froides peuvent
également empêcher l’appareil de fonctionner correctement.
* Évitez de placer l’appareil dans un endroit humide.
* La cave à vin doit être placée dans un endroit où la température
ambiante est comprise entre 5 °C et 35 °C. Si la température
ambiante est supérieure ou inférieure à cette plage, cela peut
affecter les performances de l’appareil. Si l’appareil est placé dans
des conditions extrêmement froides ou chaudes, les températures
intérieures peuvent varier et, dans ce cas, la plage de température
nécessaire à son bon fonctionnement peut ne pas être atteinte.
* Branchez la prise de la cave à vin dans un socle mural approprié. Si la
prise doit être remplacée, faites-vous aider par un technicien qualié.
Inverser le côté d’ouverture
Les charnières de la cave à vin peuvent s’installer à gauche ou à
droite. L’appareil est toutefois livré avec l’ouverture de la porte par le
côté gauche. Si vous souhaitez inverser le sens d’ouverture, veuillez
contacter notre Service après-vente pour les instructions d’inversion.
20
Installation de votre cave à vin
Boretti Armoire à Vin / Instructions FR
Page 21

Les commandes de votre cave à vin (la zone supérieur et central)
* Run
Le voyant est allumé pour indiquer que le mode de réfrigération est activé.
* “Light”
Vous pouvez allumer ou éteindre l’éclairage intérieur en appuyant
sur le bouton « LIGHT ».
* La lumière LED s’éteindra automatiquement après 10 minutes an
d’économiser de l’énergie. Appuyez à nouveau sur le bouton « LIGHT »
pour allumer l’éclairage.
* La lumière LED restera continuellement allumée si vous appuyez sur
le bouton « LIGHT » et le maintenez enfoncé pendant 5 secondes.
La mention « LP » s’afchera alors à l’écran.Après 4 secondes,
l’afchage reviendra à la normale et l’éclairage restera allumé
jusqu’à ce qu’il soit éteint manuellement.
* Pour revenir en arrière et économiser l’énergie (recommandé),
appuyez et maintenez enfoncé le bouton « LIGHT » à nouveau
pendant 5 secondes. La mention « LF » s’afchera à l’écran. Après 4
secondes, l’afchage reviendra à la normale et l’éclairage s’éteindra
automatiquement après 10 minutes.
Attention
lorsque la porte est ouverte, vous pouvez appuyer
manuellement sur le bouton “LIGHT” pour allumer ou éteindre
la lumière, et lorsque la porte est fermée, la lumière restera
comme elle était durant votre dernière opération avant que la
porte ne soit fermée. Mais quand vous ouvrez à nouveau la
porte, la lumière reste allumée automatiquement.
21
Utilisation de votre cave à vin
FR Boretti Armoire à Vin / Instructions
Page 22

* “Power”
Pour allumer/éteindre cet appareil.
* “Set Up” button
Pour régler la température du compartiment supérieur.
* “Set Middle” button
Pour régler la température du compartiment inférieur.
* “Up chamber”
Indique la température du compartiment supérieur.
* “Middle chamber”
Indique la température du compartiment central.
Compartiment supérieur : Le réglage de la température peut être
ajusté de 5°C à 10°C.
Compartiment central : Le réglage de la température peut être ajusté
de 10°C à 18°C.
Les commandes de votre cave à vin (la zone inférieur)
* “Up” button
Il sert à augmenter la température d’un 1°C à chaque pression.
* “Down” button
Il sert à baisser la température d’un 1°C à chaque pression.
* Display
Il sert à afcher la température du compartiment inférieur.
Compartiment inférieur : Le réglage de la température peut être ajusté
de 10°C à 18°C.
22
Boretti Armoire à Vin / Instructions FR
Page 23

Remarque
Si l’appareil est débranché, coupé ou éteint, vous devez attendre 3
à 5 minutes avant de le redémarrer. Si vous tentez de redémarrer
la cave à vin avant ce délai, elle ne démarrera pas. Lorsque vous
utilisez la cave à vin pour la première fois ou que vous la redémarrez
après une longue période d’arrêt, il peut y avoir une variation de
quelques degrés entre la température que vous sélectionnez et
celle indiquée sur l’afchage à LED. Cette éventuelle variation est
normale et est due à la durée du temps d’activation. Après quelques
heures de fonctionnement, la température redeviendra normale.
Fonction de mémorisation de la température
Si l’alimentation est soudainement perdue, la température réglée sera
sauvegardée par l’appareil. Une fois l’alimentation rétablie, l’appareil
sera à la même température que celle précédemment réglée.
Fonction de rappel “fermer porte”
Lorsque vous oubliez de fermer la porte ou que la porte n’est pas
complètement fermée, un signal d’alarme vous avertira au bout de 5 minutes.
23
FR Boretti Armoire à Vin / Instructions
Page 24

Retirer la clayette
* Ouvrez complètement la porte.
* Retirez, le cas échéant, tout le contenu chargé sur la clayette.
* Tirez la clayette vers vous jusqu’à ce qu’elle soit complètement sortie.
* La clayette est munie de languettes en plastique des deux côtés,
comme l’indique le schéma ci-dessous. Lorsque vous êtes face à
l’appareil, appuyez sur la languette en plastique sur le côté droit vers
le bas tout en tirant la languette gauche vers le haut. Vous pouvez
choisir de le faire manuellement ou avec un tournevis à tête plate.
* Tirez la clayette uniformément jusqu’à ce qu’elle soit complètement
retirée du compartiment interne.
24
Boretti Armoire à Vin / Instructions FR
Page 25

* Ouvrez la porte, retirez les deux vis de la charnière inférieure et
soulevez la porte pour la retirer. (Fig. 1/2)
* La charnière supérieure fournie doit maintenant être montée sur le côté
opposé. Déplacez le support en plastique du côté opposé. (Fig. 3/4)
* Déplacez la goupille et la rondelle de charnière sur le côté opposé.
Remontez la porte et revissez les vis. (Fig. 5/6)
25
Changer le sens de l’ouverture de la porte
FR Boretti Armoire à Vin / Instructions
Page 26

Nettoyer votre cave à vin
* Mettez l’appareil hors tension, débranchez le cordon d’alimentation
et retirez tout le contenu, y compris les clayettes.
* Nettoyez l’intérieur avec une solution à base d’eau chaude et de
bicarbonate de soude. La proportion devrait être d’environ 2 cuillères
à soupe de bicarbonate de soude pour un litre d’eau.
* Nettoyez les clayettes avec une solution détergente douce.
* Essorez l’excès d’eau de l’éponge ou du chiffon lors du nettoyage
des boutons de commande ou des pièces électriques.
* Nettoyez l’extérieur de la cave à vin avec de l’eau chaude et un détergent
liquide doux. Rincez bien et séchez avec un chiffon propre et doux.
Coupure de courant
La plupart des coupures de courant sont résolues en quelques heures
et n’affectent pas la température de votre cave à vin si vous n’ouvrez pas
la porte trop souvent. Si l’alimentation est coupée pendant une période
plus longue, vous devez prendre les mesures appropriées pour protéger
le contenu de votre cave à vin.
Vacances
* Vacances courtes : Laissez la cave à vin allumée pendant des
vacances de moins de trois semaines.
* Longues vacances : Si vous prévoyez de ne pas utiliser l’appareil
pendant plusieurs mois, éteignez-le et retirez tout son contenu.
Nettoyez et séchez soigneusement l’intérieur. Pour éviter les odeurs
et la formation de moisissure, laissez la porte légèrement ouverte : si
nécessaire, bloquez-la en position ouverte..
Déplacer votre cave à vin
* Retirez toutes les bouteilles.
* Fixez avec du ruban adhésif tous les objets instables (clayettes)
à l’intérieur de votre appareil.
* Tournez les pieds réglables vers le haut pour éviter tout dommage.
* Fermez la porte et fixez-la avec du ruban adhésif.
* Assurez-vous que l’appareil est sécurisé et qu’il reste constamment
à la verticale pendant le transport. Protégez l’extérieur de l’appareil
avec une couverture ou quelque chose de similaire.
Conseils d’économie d’énergie
La cave à vin doit être située dans la partie la plus froide de la pièce,
loin de toute source de chaleur et de la lumière directe du soleil.
26
Boretti Armoire à Vin / Instructions FR
Page 27

Vous pourrez résoudre facilement un grand nombre de problèmes liés
à l’utilisation de votre cave à vin, vous permettant ainsi d’économiser les
coûts du service d’assistance. Suivez les instructions du guide ci-dessous
pour essayer de résoudre votre problème avant d’appeler un technicien.
Guide de dépannage
PROBLÈME CAUSE POSSIBLE
La cave à vin ne marche pas. * L’appareil n’est pas branché.
* L’appareil est éteint.
* Le disjoncteur est déclenché
ou il y a un fusible grillé.
La cave à vin n’est pas assez
froide.
* Vériez le réglage du contrôle de
température.
* L’environnement externe peut
nécessiter un réglage plus élevé.
* La porte est ouverte trop souvent.
* La porte n’est pas
complètement fermée.
* Le joint de la porte ne se ferme
pas correctement.
La cave à vin s’allume et s’éteint
souvent.
* La température de la pièce est
plus élevée que la normale.
* Une grande quantité de
bouteilles a été ajoutée dans la
cave à vin.
* La porte est ouverte trop souvent.
* La porte n’est pas
complètement fermée.
* Le contrôle de température
n’est pas réglé correctement.
* Le joint de la porte ne se ferme
pas correctement.
27
Des problèmes avec votre cave à vin ?
FR Boretti Armoire à Vin / Instructions
Page 28

PROBLÈME CAUSE POSSIBLE
La lumière ne marche pas. * L’appareil n’est pas branché.
* Le disjoncteur est déclenché
ou il y a un fusible grillé.
* La lampe a grillé.
* L’interrupteur d’éclairage est
réglé sur “OFF”.
Vibrations. * Vériez que la cave à vin est de
niveau.
La cave à vin semble faire trop
de bruit.
* Le bruit de cliquetis peut
provenir de l’écoulement du
liquide de refroidissement, ce
qui est normal.
* À la n de chaque cycle, vous
entendez des gargouillis
causés par le débit du liquide
de refroidissement dans votre
cave à vin.
* La contraction et l’expansion
des parois internes peuvent
provoquer des craquements et
claquements.
* La cave à vin n’est pas de niveau.
La porte ne veut pas se fermer
complètement.
* La cave à vin n’est pas de niveau.
* La porte a été inversée mais
mal installée.
* Le joint est sale.
* Les clayettes ne sont pas bien
positionnées.
28
Boretti Armoire à Vin / Instructions FR
Page 29

Avant de jeter un ancien appareil, retirez toutes les prises électriques et
les cordons d’alimentation an de vous assurer que l’appareil est hors
de fonctionnement. Retirez la porte mais laissez les clayettes en place.
Ce symbole sur le produit indique qu’il ne doit pas être jeté avec
les ordures ménagères. Il doit en revanche être déposé à un
point de collecte approprié pour le recyclage des équipements
électriques et électroniques. Le traitement doit être effectué
conformément aux réglementations environnementales locales prévues
en matière de traitement des déchets. En traitant ce produit
correctement, vous aiderez à prévenir les éventuelles conséquences
négatives pour l’environnement et la santé humaine qu’un traitement
inadéquat pourrait causer.
Avertissement
Lorsque vous procédez au traitement d’un ancien appareil, assurezvous de ne pas endommager les tuyaux du système de réfrigération.
29
Traitement des anciens appareils
FR Boretti Armoire à Vin / Instructions
Page 30

Congratulations! You are the ofcial owner of a Boretti wine cabinet
now. In the years to come you will discover that the use of a Boretti
wine cabinet gives a new dimension to cooling. We advise you to read
this manual carefully before usage to get to know all the ins and outs
of this beautiful appliance. Please inform us if you have any questions.
You are welcome to visit our Experience Center anytime, we are happy
to inspire and help with your questions.
We wish you a lot of cooling pleasure!
Boretti
30
Introduction
Boretti Wine Cabinets / Instructions EN
Page 31

31
Introduction 30
Before use 32
Important safety instructions 33
Installation of the wine cabinet 34
Usage of the wine cabinet
* The controls (up and middle zone) 35
* The controls (lower zone) 36
* Temperature memory function 37
* “Close door” reminder function 37
* How to remove the shelf 38
Changing door opening side
* Changing door opening side 39
* Cleaning the wine cabinet 40
* Power failure 40
* Vacation time 40
* Moving the wine cabinet 40
* Energy saving tips 40
Problems with the wine cabinet 41
Disposal of old appliances 43
Contents
Boretti Wine Cabinets / Instructions EN
Page 32

Warning
Before powering up the wine cabinet, please open the door
for 5 minutes to ventilate it. Read the instructions supplied
with the appliance – failure to install or use the appliance in
accordance with the instructions may invalidate any warranty.
Boretti does not accept any liability for damage caused
through improper use, or incorrect installation. Do not install
this appliance if it has been damaged during transportation.
This includes the plug and supply cord. Please keep these
instructions in a safe place for future reference.
Note
This appliance is intended to be used exclusively for the storage
and cooling of wine.
32
Before use
Boretti Wine Cabinets / Instructions EN
Page 33

* To prevent damage to the door and door gasket, make sure the door
is fully opened before pulling out any shelves.
* Do not move the wine cabinet when it is loaded with wine, you might
distort the appliance.
* If the power lead becomes damaged it should only be replaced by
the manufacturer or a suitably qualied person.
* Never allow children to operate, play with the appliance.
* Never clean appliance parts with ammable uids.
* Do not store or use gasoline or any other ammable vapours and
liquids in the vicinity of this or any other appliance. This can create a
re hazard or explosion.
* Always remember to unplug the appliance before cleaning.
When disconnecting from the electricity supply, pull the plug,
not the power cord.
* Do not use anything electrical inside the wine cabinet.
* All repairs must be carried out by a qualied service engineer.
Inadequate repairs may result in a major source of danger for the
user and invalidate any warranty.
* Never store anything dangerous inside the appliance, such as
combustibles, explosives, strong acid or alkali etc.
* Always keep any ventilation openings clear of obstruction. Should
they become blocked, clear them straight away.
* Make sure that the plug is in an accessible place when installation
is complete.
* Only use this appliance for domestic purposes in accordance with
these instructions.
* The wine cabinet is suitable for storing wine (or other bottled
beverages). It is not suitable for storing fresh or frozen foods.
Warning
Do not allow the refrigerant circuit to become damaged while
using or installing the appliance. Should it become damaged,
do not use the appliance until you are instructed to do so by a
service engineer. Refrigerant can ignite or cause damage to the
eye when leaking.
33
Important safety instructions
Boretti Wine Cabinets / Instructions EN
Page 34

Note
Before connecting the wine cabinet to the power source, let
it stand upright for approximately 2 hours. This will reduce
the possibility of a malfunction in the cooling system from
handling during transportation.
* Remove the exterior and interior packing.
* Clean the interior surface with lukewarm water using a soft cloth.
* Install the handle on the left side of the door.
* Place the wine cabinet on a oor that is strong enough to support it
when it is fully loaded.
* Locate the wine cabinet away from direct sunlight and sources
of heat (stove, heater, radiator, etc.). Direct sunlight may affect
the acrylic coating and heat sources may increase electrical
consumption. Extreme cold ambient temperatures may also cause
the unit not to perform properly.
* Avoid locating the unit in moist areas.
* The wine cabinet should be positioned where the ambient
temperature is between 5°C and 35°C. If the ambient temperature
is above or below this range, the performance of the unit may be
affected. Placing the appliance in extreme cold or hot conditions
may cause the interior temperatures to uctuate. The range of
setting temperatures may not be reached.
* Put the plug of the wine cabinet into an appropriate socket. Should
the plug require changing, get help from a qualied service technician.
Reversing the door swing of the wine cabinet
This appliance has the capability of the door opening from either the left
or right side. The unit is delivered to you with the door opening from the
left side. Should you desire to reverse the opening direction, please call
service for reversal instructions.
34
Installation of the wine cabinet
Boretti Wine Cabinets / Instructions EN
Page 35

The wine cabinet should be placed in where the ambient temperature
is between 0°C to 35°C. If the ambient temperature is above or below
this range, the performance of the unit may be affected. For example,
placing your unit in extreme cold or hot conditions may cause interior
temperatures to uctuate. The range of 5°C to 18°C may not be reached.
The controls (up and middle zone)
* Run
Indicator light illuminates to signify the cooling mode is currently
in operation.
* “Light”
To control the inner light turn on/off. You can turn the interior light
ON or OFF by pushing the button marked with the “LIGHT” button.
* The LED light will be turned off automatically after 10 minutes to
save energy. Press the button with the “LIGHT” button again to turn
the light on.
* The LED light can be remained on continuously by pressing and
holding the “LIGHT” buttonfor5seconds andthedisplaywillshow
“LP”. After 4 seconds, thedisplaywillrevertbacktonormal. Then
the light will remain “ON” until manually switched off.
* To revert back and conserve energy (recommended), press and hold
the “LIGHT” button again for 5 seconds, the display will show “LF”.
After 4 seconds, the display will revert back to normal, and the light
will be automatically switched off after 10 minutes.
35
Usage of the wine cabinet
Boretti Wine Cabinets / Instructions EN
Page 36

*
Caution
When the door is open, you can manually press the “LIGHT”
button to turn on or off the light, and when the door is closed,
the light settings wont change from your last operation before
the door closed. But when you open the door again, the light will
remain on automatically.
“Power”
To turn this appliance on/off.
* “Set Up” button
To set the temperature of the upper chamber.
* “Set Middle” button
To set the temperature of the middle chamber.
* “Up chamber”
To show the temperature of the up chamber.
* “Middle chamber”
To show the temperature of the middle chamber.
Upper zone: The temperature setting can be adjusted from 5°C to 10°C.
Middle zone: The temperature setting can be adjusted from 10°C to 18°C.
The controls (lower zone)
* “Up” button
Use to raise (warm) the temperature in 1°C.
* “Down” button
Use to lower (cool) the temperature in 1°C.
* Display
Shows the temperature of the lower compartment.
Lower zone: The temperature setting can be adjusted from 10°C to 18°C.
36
Boretti Wine Cabinets / Instructions EN
Page 37

Note
If the unit is unplugged, power lost, or turned off, you must
wait 3 to 5 minutes before restarting the unit. If you attempt
to restart before this time delay, the wine cabinet will not start.
When you use the wine cabinet for the rst time or restart the
wine cabinet after having been shut off for a long time, there could
be a few degrees variance between the temperature you select
and the one indicated on the LED readout. This is normal and it is
due to the length of the activation time. Once the wine cabinet is
running for a few hours everything will be back to normal.
Temperature memory function
If the power is suddenly lost, the set temperature will be saved by the unit.
Once the power is back on, the unit will be at the same set temperature.
“Close door” reminder function
When you forget to close the door or the door is not fully closed, there
will be warning alarm after 5 minutes.
37
Boretti Wine Cabinets / Instructions EN
Page 38

How to remove the shelf
* Open the door completely.
* Remove all of the contents loaded on the shelf, if applicable.
* Pull the shelf towards yourself until it is fully extended outward.
* The shelf has plastic posts on both sides as indicated in the
diagram below. While facing the unit, press the plastic post on the
right side down while pulling up on the left plastic post. You may
choose to do this by hand or by using a athead screwdriver.
* Evenly pull out the shelf from the track until it is completely removed
from the inner compartment.
38
Boretti Wine Cabinets / Instructions EN
Page 39

* Open the door, remove the two screws in the bottom hinge and lift
out the door. (Fig. 1/2)
* The enclosed top hinge should be tted at the opposite side. Move
the plastic support to the opposite side. (Fig. 3/4)
* Move the hinge pin and washer to the opposite side. Mount the door
and screws again. (Fig. 5/6)
39
Changing door opening side
Boretti Wine Cabinets / Instructions EN
Page 40

Cleaning the wine cabinet
* Turn off the power, unplug the appliance, and remove all items
including shelves and rack.
* Wash the inside surfaces with a warm water and baking soda
solution. The proportion should be about 2 tablespoons of baking
soda to a quart of water.
* Wash the shelves with a mild detergent solution.
* Wring excess water out of the sponge or cloth when cleaning area
of the controls, or any electrical parts.
* Wash the outside cabinet with warm water and mild liquid
detergent. Rinse well and wipe dry with a clean soft cloth.
Power failure
Most power failures are corrected within a few hours and should not
affect the temperature of your appliance if you minimize the number
of times the door is opened. If the power is going to be off for a longer
period of time, you need to take the proper steps to protect your contents.
Vacation time
* Short vacations: Leave the wine cabinet operating during vacations
of less than three weeks.
* Long vacations: If the appliance will not be used for several months,
remove all items and turn off the appliance. Clean and dry the interior
thoroughly. To prevent odor and mold growth, leave the door open
slightly: blocking it open if necessary.
Moving the wine cabinet
* Remove all items.
* Securely tape down all loose items (shelves) inside your appliance.
* Turn the adjustable leg up to the base to avoid damage.
* Tape the door shut.
* Be sure the appliance stays secure in the upright position during
transportation. Also protect outside of appliance with a blanket, or a
similar item.
Energy saving tips
The wine cabinet should be located in the coolest area of the room,
away from heat producing appliances, and out of the direct sunlight.
40
Boretti Wine Cabinets / Instructions EN
Page 41

You can solve many common wine cabinet problems easily, saving
you the cost of a possible service call. Try the suggestions below to
see if you can solve the problem before calling the servicer.
Troubleshooting guide
PROBLEM POSSIBLE CAUSE
The wine cabinet is not operative. * It isn’t plugged in.
* The appliance is turned off.
* The circuit breaker tripped or
there is a blown fuse.
The wine cabinet isn’t cold enough. * Check the temperature
control setting.
* External environment may
require a higher setting.
* The door is opened too often.
* The door isn’t closed completely.
* The door gasket doesn’t
seal properly.
The wine cabinet turns on and
off frequently.
* The room temperature is
hotter than normal.
* A large amount of contents has
been added to the wine cabinet.
* The door is opened too often.
* The door isn’t closed completely.
* The door gasket doesn’t
seal properly.
* The temperature control isn’t
set correctly.
41
Problems with the wine cabinet
Boretti Wine Cabinets / Instructions EN
Page 42

PROBLEM POSSIBLE CAUSE
The light doesn’t work. * The light isn’t plugged in.
* The circuit breaker tripped or
there is a blown fuse.
* The bulb has burned out.
* The light button is “OFF”.
Vibrations. * Check to assure that the wine
cabinet is level.
The wine cabinet seems to make
too much noise.
* The rattling noise may
come from the ow of the
refrigerant, which is normal.
* As each cycle ends, you may
hear gurgling sounds caused
by the ow of refrigerant in the
wine cabinet.
* Contraction and expansion
of the inside walls may cause
popping and crackling noises.
* The wine cabinet isn’t level.
The door won’t close properly. * The wine cabinet isn’t level.
* The door was reversed and
not properly installed.
* The gasket is dirty.
* The shelves are out of position.
42
Boretti Wine Cabinets / Instructions EN
Page 43

Before disposing an old appliance remove any plugs and power leads
to ensure that the appliance is inoperative.
Remove the door, but leave the shelves in place.
This symbol on the product indicates that it must not be
discarded as general household waste. Instead it should be
handed over to the applicable collection point for the recycling
of electrical and electronic equipment.
Disposal must be carried out in accordance with local environmental
regulations for waste disposal. By disposing this product correctly you
will help prevent potential negative consequences for the environment
and human health, which would otherwise be caused by inappropriate
waste handling of this product.
Warning
When disposing of an old appliance make sure that the pipe
work does not get damaged.
43
Disposal of old appliances
Boretti Wine Cabinets / Instructions EN
Page 44

Congratulazioni per aver acquistato una cantinetta frigo Boretti! Negli
anni a venire, scoprirete che la cantina aggiunge una dimensione tutta
nuova alla parola “refrigerazione”. Si consiglia di leggere attentamente
questo manuale prima di utilizzare il prodotto, in modo da conoscerne
dettagliatamente il funzionamento. In caso di dubbi o domande sui
contenuti di questo manuale o durante l’uso dell’apparecchio, non
esitate a contattarci. Il nostro Experience Center è sempre a vostra
disposizione e saremo felici di conoscervi e aiutarvi a soddisfare ogni
vostra necessità.
Vi auguriamo un ‘fresco’ divertimento!
Boretti
44
Prefazione
Boretti Cantinetta Frigo / Instruzione IT
Page 45

45
Prefazione 44
Prima di installare e utilizzare 46
Importanti istruzioni di sicurezza 47
Installazione della vostra cantinetta frigo 48
Utilizzare la cantinetta frigo
* I comandi della cantinetta frigo (parte superiore e di mezzo) 49
* I comandi della cantinetta frigo (parte inferiore) 50
* Funzione di memorizzazione della temperatura 51
* Funzione promemoria di ‘Chiusura porta’ 51
* Rimozione dei ripiani 52
Cambiare la direzione di apertura della porta
* Cambiare la direzione di apertura della porta 53
* Pulire la cantinetta frigo 54
* Mancanza di corrente 54
* Vacanze 54
* Spostare la cantinetta frigo 54
* Consigli per il risparmio energetico 54
Problemi con la cantinetta frigo? 55
Smaltimento apparecchi obsoleti 57
Indice
Boretti Cantinetta Frigo / Instruzione IT
Page 46

Attenzione
Prima di accendere l’apparecchio, aprire e lasciare aperta la
porta per 5 minuti per consentire un’adeguata ventilazione.
Leggere le istruzioni fornite con l’apparecchio: installare o
utilizzare questa cantinetta in modo non conforme con le
istruzioni può invalidare la garanzia. Boretti non si assume
alcuna responsabilità per danni causati da un uso improprio o
da un’installazione errata. Non installare questo apparecchio se
ha riportato danni durante il trasporto. Lo stesso vale anche per
la spina e il cavo di alimentazione. Conservare queste istruzioni
in un luogo sicuro per future consultazioni.
Nota
Questo apparecchio è destinato esclusivamente alla conservazione e
al raffreddamento di bottiglie di vino.
46
Prima di installare e utilizzare
Boretti Cantinetta Frigo / Instruzione IT
Page 47

* Per evitare danni alla porta e alla sua guarnizione, è necessario
assicurarsi che essa sia completamente aperta prima di estrarre
uno dei ripiani.Non spostare la cantinetta quando è piena di vino:
l’apparecchio potrebbe deformarsi.
* Se il cavo di alimentazione viene danneggiato, può essere sostituito
solo dal produttore o da personale qualicato.
* Non consentire ai bambini di giocare con l’apparecchio.
* Non pulire mai le parti della cantinetta con liquidi inammabili.
* Non conservare o usare benzina o altri vapori o liquidi inammabili nelle
vicinanze di questo apparecchio. Pericolo di incendio o esplosione.
* Non dimenticare di scollegare l’apparecchio prima di pulirlo. Quando
si scollega il cavo di alimentazione, tirare la spina, non il cavo.
* Non utilizzare alcun dispositivo elettrico all’interno della cantinetta.
* Tutte le riparazioni devono essere eseguite da un tecnico qualicato.
Eventuali riparazioni errate possono comportare rischi per l’utente e
invalidare qualsiasi forma di garanzia.
* Non conservare mai sostanze pericolose o inammabili come
esplosivi, acidi forti o alcali, ecc. all’interno della cantinetta.
* Mantenere sempre libere le aperture di aerazione. Se si dovessero
ostruire, eliminare immediatamente il blocco.
* Al termine dell’installazione, assicurarsi che la spina si trovi in un luogo
accessibile, in modo che sia sempre possibile raggiungerla con facilità.
* Utilizzare questo apparecchio solo per scopi domestici in
conformità con queste istruzioni.
* La cantinetta frigo è adatta per la conservazione del vino. Non è
adatta per la conservazione di cibi freschi o surgelati.
Attenzione
Non permettere che il circuito di raffreddamento si danneggi
durante l’uso o l’installazione dell’apparecchio. Qualora
accadesse, non utilizzare la cantinetta prima di aver ricevuto
istruzioni da un tecnico qualicato alla manutenzione. In caso
di perdite, il liquido di raffreddamento può incendiarsi o causare
danni agli occhi.
47
Importanti istruzioni di sicurezza
Boretti Cantinetta Frigo / Instruzione IT
Page 48

Nota
Prima di collegare l’apparecchio ad una fonte di
alimentazione, è necessario lasciarlo in posizione verticale
per circa 2 ore. Ciò riduce la possibilità che si verichino
malfunzionamenti dovuti al trasporto.
* Rimuovere i materiali di imballaggio esterni e interni.
* Pulire la supercie interna con acqua tiepida usando un panno morbido.
* Fissare la maniglia sul lato sinistro della porta.
* Posizionare la cantinetta frigo su una supercie piana e
sufcientemente robusta da poterla sostenere quando è
completamente piena.
* Posizionare la cantinetta frigo lontano dalla luce diretta del sole
e lontano da fonti di calore (stufe, termosifoni, radiatori, ecc.).
La luce solare diretta può danneggiare il rivestimento acrilico e le
fonti di calore possono aumentare il consumo di energia. Anche
una temperatura ambientale particolarmente bassa può causare il
malfunzionamento dell’apparecchio.
* Non installare l’apparecchio in un luogo umido.
* La cantinetta frigo deve essere posizionata in modo tale che
la temperatura ambientale sia compresa tra 5°C e 35°C. Se la
temperatura ambientale è superiore o inferiore a questi valori, le
prestazioni dell’apparecchio potrebbero risentirne. Se la cantinetta
viene posta in ambienti troppo caldi o troppo freddi, la temperatura
interna può variare e, in tal caso, è possibile che non si raggiunga il
range di valori necessario per il suo funzionamento.
* Collegare la cantinetta frigo ad una presa adeguata. Se occorre sostituire
la spina, far eseguire questa operazione da un tecnico qualicato.
Modificare il lato di apertura della porta
Le cerniere della cantinetta per il vino possono essere installate sul lato
sinistro o destro. L’unità, tuttavia, viene consegnata con la porta che si apre
dal lato sinistro. Se si desidera invertire la direzione di apertura, si prega di
contattare il nostro servizio di assistenza per le istruzioni di inversione.
48
Installazione della vostra cantinetta frigo
Boretti Cantinetta Frigo / Instruzione IT
Page 49

I comandi della cantinetta frigo (parte superiore e di mezzo)
* Run
La spia si accende per indicare che la modalità di raffreddamento
è attiva.
* “Light”
Per controllare la luce interna, premere on/off.
È possibile accendere o spegnere la luce interna premendo il
pulsante contrassegnato con il tasto “LIGHT”.
* La luce a LED si spegne automaticamente dopo 10 minuti per
risparmiare energia. Premere di nuovo il pulsante “LIGHT” per
accendere la luce.
* La luce a LED può rimanere accesa continuamente premendo e
tenendo premuto il pulsante con il tasto “LIGHT” per 5 secondi
e il display mostrerà “LP”. Dopo 4 secondi, il display tornerà alla
normalità e la luce rimarrà accesa no allo spegnimento manuale.
* Per invertire il processo e risparmiare energia (consigliato), premere
e tenere premuto di nuovo il pulsante “LIGHT” per 5 secondi. A
questo punto, il display mostrerà “LF”. Dopo 4 secondi, il display
tornerà alla normalità e la luce si spegnerà automaticamente dopo
10 minuti.
*
Nota
Quando la porta è aperta, è possibile premere manualmente
il tasto “LIGHT” per accendere o spegnere la luce. Quando la
porta è chiusa, la luce rimane nello stato dell’ultima preferenza
impostata prima che la porta venisse chiusa. Ma quando si apre
nuovamente la porta, la luce rimarrà automaticamente accesa.
49
Utilizzare la cantinetta frigo
Boretti Cantinetta Frigo / Instruzione IT
Page 50

* “Power”
Accende e spegne l’apparecchio.
* “Set Up” button
Per impostare la temperatura della camera superiore.
* “Set Middle” button
Per impostare la temperatura della camera mezzo.
* “Up chamber”
Mostra la temperatura della camera superiore.
* “Middle chamber”
Mostra la temperatura della camera mezzo.
Cabina superiore : l’impostazione della temperatura può essere
regolata da 5°C a 10°C.
Cabina di mezzo : l’impostazione della temperatura può essere
regolata da 10°C a 18°C.
I comandi della cantinetta frigo (parte inferiore)
* “Up” button
Utilizzare per alzare (riscaldare) la temperatura di 1°C.
* “Down” button
Utilizzare per abbassare (raffreddare) la temperatura di 1°C.
* Display
Mostra la temperatura della cabina inferiore.
Cabina inferiore: l’impostazione della temperatura può essere
regolata da 10°C a 18°C.
50
Boretti Cantinetta Frigo / Instruzione IT
Page 51

Nota
Quando l’apparecchio è scollegato, non è alimentato o è spento,
è necessario attendere da 3 a 5 minuti prima di riavviarlo.
Se si tenta di riavviare l’apparecchio prima che sia trascorso
questo lasso di tempo, l’apparecchio non si avvierà. Quando si
utilizza per la prima volta la cantinetta frigo o quando si riavvia
l’apparecchio dopo che è rimasto spento per un periodo di
tempo prolungato, può esserci una differenza di diversi gradi tra
la temperatura selezionata e la temperatura visualizzata sul LED.
Questo è normale ed è dovuto al prolungato periodo di inattività.
Una volta che la cantinetta sarà rimasta in funzione per alcune
ore, la temperatura visualizzata risulterà corretta.
Funzione di memorizzazione della temperatura
Se l’alimentazione viene interrotta improvvisamente, la temperatura
impostata verrà salvata dall’apparecchio. Quando tornerà la corrente,
la temperatura rientrerà nei parametri precedenti.
Funzione promemoria di ‘Chiusura porta’
Se si dimentica di chiudere la porta o la porta non è completamente
chiusa, dopo 5 minuti verrà emesso un segnale acustico di avvertimento.
51
Boretti Cantinetta Frigo / Instruzione IT
Page 52

Rimozione dei ripiani
* Aprire completamente la porta.
* Estrarre tutte le bottiglie che si trovano sul ripiano che occorre
rimuovere, se ce ne sono.
* Tirare il ripiano in avanti no a quando non fuoriesce
completamente.
* Il ripiano è dotato di supporti in plastica su entrambi i lati, come
mostrato nell’immagine qui sotto. Ponendosi di fronte alla
cantinetta, premere il supporto di destra verso il basso e, allo stesso
tempo, premere quello di sinistra verso l’alto. Quest’operazione può
essere eseguita manualmente o usando un cacciavite a testa piatta.
* Estrarre gradualmente il ripiano no a quando non sarà uscito
completamente dallo scomparto interno.
52
Boretti Cantinetta Frigo / Instruzione IT
Page 53

* Aprire la porta, rimuovere le due viti nella cerniera inferiore e
sollevare la porta. (Fig. 1/2)
* La cerniera superiore inclusa deve essere montata sul lato opposto.
Spostare il supporto di plastica sul lato opposto. (Fig. 3/4)
* Spostare il perno della cerniera e la rondella sul lato opposto.
Montare nuovamente la porta e le viti. (Fig. 5/6)
53
Cambiare la direzione di apertura della porta
Boretti Cantinetta Frigo / Instruzione IT
Page 54

Pulire la cantinetta frigo
* Spegnere l’apparecchio, staccarlo dalla rete elettrica e svuotarlo di
ogni contenuto, ripiani inclusi.
* Pulire l’interno con una soluzione di acqua calda e bicarbonato
di sodio. Il rapporto dovrebbe essere di circa 2 cucchiaini di
bicarbonato di sodio per litro di acqua.
* Lavare i ripiani con un detergente delicato.
* Eliminare l’acqua in eccesso dalla spugna o dal panno prima di
pulire i pulsanti di controllo o le parti elettriche.
* Pulire la parte esterna della cantinetta con acqua tiepida e un
detergente liquido delicato. Sciacquare bene ed asciugare con un
panno morbido pulito.
Mancanza di corrente
La maggior parte delle interruzioni di corrente viene risolta entro poche
ore e non inuisce sulla temperatura della cantinetta frigo se non si
apre la porta troppo spesso. Se il blackout dovesse durare a lungo,
occorre adottare misure adeguate per proteggere il vino.
Vacanze
* Vacanze brevi: Per assenze inferiori a tre settimane, lasciare la
cantinetta frigo accesa.
* Vacanze lunghe: se l’apparecchio non verrà utilizzato per diversi
mesi, rimuoverne il contenuto e staccare la spina. Pulire e asciugare
accuratamente l’interno, i ripiani e le altre parti della cantinetta. Per
evitare la formazione di odori e muffe, lasciare la porta leggermente
aperta e, se necessario, assicurarla in questa posizione.
Spostare la cantinetta frigo
* Rimuovere tutte le bottiglie.
* Fissare tutte le parti mobili (ripiani) all’interno dell’apparecchio con
del nastro adesivo, in modo da impedirne lo spostamento.
* Girare il piedino regolabile verso l’alto per evitare danni.
* Chiudere la porta con del nastro adesivo.
* Assicurarsi che l’apparecchio rimanga in posizione verticale durante
il trasporto. Proteggere l’esterno dell’apparecchio con una coperta o
altro ausilio.
Consigli per il risparmio energetico
La cantinetta frigo andrebbe posizionata nella parte più fresca della
stanza prescelta, lontano da fonti di calore e dalla luce solare diretta.
54
Boretti Cantinetta Frigo / Instruzione IT
Page 55

E’ possibile risolvere in autonomia molti problemi comuni correlati all’uso
della cantinetta, evitando così i costi del servizio assistenza. Prima di
rivolgervi ad un tecnico, dunque, provate a seguire i suggerimenti qui sotto.
Guida alla risoluzione dei problemi
PROBLEMA POSSIBILE CAUSA
La cantinetta frigo non funziona. * Non è collegata alla rete
elettrica.
* L’apparecchio è spento.
* E’ scattato il salvavita o è
saltato un fusibile.
La cantinetta frigo non è
abbastanza fredda.
* Controllare le impostazioni
della temperatura. L’ambiente
esterno potrebbe richiedere
un’impostazione più alta.
* La porta viene aperta troppo
spesso.
* La porta non è
completamente chiusa.
* La guarnizione della porta non
chiude in modo adeguato.
La cantinetta si accende e si
spegne spesso.
* La temperatura ambientale è
più alta del normale.
* Sono state aggiunte molte
bottiglie nella cantinetta frigo.
* La porta viene aperta troppo
spesso.
* La porta non è completamente
chiusa.
* La temperatura non è
impostata correttamente.
* La guarnizione della porta non
chiude in modo adeguato.
55
Problemi con la cantinetta frigo?
Boretti Cantinetta Frigo / Instruzione IT
Page 56

PROBLEMA POSSIBILE CAUSA
La luce non funziona. * Manca la corrente.
* E’ scattato il salvavita o è
saltato un fusibile.
* La lampadina si è bruciata.
* Il tasto Luce si trova nella
posizione “OFF”.
Vibrazioni. * Controllare che la cantinetta sia
in piano.
La cantinetta fa molto rumore. * Il usso del refrigerante può
causare un tintinnio, il che è
normale.
* Alla ne di ciascun ciclo,
è possibile sentire un
gorgoglio causato dal liquido
di raffreddamento della
cantinetta.
* La contrazione e l’espansione
delle pareti interne possono
causare rumori tipo schiocchi.
* La cantinetta non è in piano.
La porta non si chiude
completamente.
* La cantinetta non è in piano.
* E’ stato cambiato il verso
di apertura della porta ma
l’operazione non è stata
eseguita in modo corretto.
* La guarnizione è sporca.
* I ripiani non sono al posto
giusto.
56
Boretti Cantinetta Frigo / Instruzione IT
Page 57

Prima di eliminare un apparecchio obsoleto, rimuovere tutte le spine e
i cavi di alimentazione per assicurarsi che l’apparecchio sia disattivato.
Togliere la porta ma lasciare i ripiani in posizione.
Questo simbolo sul prodotto indica che non può essere
smaltito insieme ai riuti domestici. Deve invece essere
consegnato al punto di raccolta corretto per il riciclaggio di
dispositivi elettrici ed elettronici. Lo smaltimento deve essere
effettuato in conformità con le normative ambientali locali vigenti in
materia. Eliminando il prodotto il modo corretto, si contribuirà a
prevenire conseguenze dannose per l’ambiente e la salute umana, che
uno smaltimento improprio potrebbe altrimenti causare.
Attenzione
Quando si procede allo smaltimento di un vecchio apparecchio,
assicurarsi che le linee del sistema di raffreddamento non
vengano danneggiate.
57
Smaltimento apparecchi obsoleti
Boretti Cantinetta Frigo / Instruzione IT
Page 58

Page 59

Salute
Page 60

Abberdaan 114 | 1046 AA Amsterdam | The Netherlands | www.boretti.com
 Loading...