

Page 1
INTERACTIVE OVENS
G e b r u i k s a a n w i j z i n G
O p e r at i n G i n s t r u c t i O n s
i s t r u z i O n i p e r l ’ u s O
n O t i c e d ’ e m p l O i
a n w e i s u n G e n z u r V e r w e n d u n G
NL
EN
I
FR
DE
BPO-45
BPO-60
Page 2
INTERACTIVE OVENS BPO 45/60
Installatie - Gebruik - Onderhoud
NL
INTERACTIVE OVENS BPO 45/60
Installation - Use - Maintenance
FORNO INTERACTIVE BPO 45/60
Installazione - Uso - Manutenzione
FOUR INTERACTIVE BPO 45/60
Installation - Emploi - Entretien
INTERACTIVE
Installation - Gebrauch - Wartung
OFEN PBO 45
/60
EN
I
FR
DE
Page 3
Geachte klant,
Wij willen u bedanken en u feliciteren met
uw keuze. Dit nieuwe Boretti product is met
zorg ontworpen en gebouwd met behulp
van hoogwaardige materialen en zorgvuldig getest om ervoor te zorgen dat het aan
al uw culinaire eisen voldoet. Lees en bekijk
deze eenvoudige instructies aub aandachtig door, zodat u vanaf de eerste keer dat u
het apparaat gebruikt, het optimale resultaat bereikt.
Boretti B.V.
NL
Nederlands
EN
English
Italiano
I
FR
Français
DE
Deutsch
NL
DIT PRODUCT IS BEDOELD VOOR HUISHOUDELIJK
GEBRUIK. DE FABRIKANT KAN NIET AANSPRAKELIJK
WORDEN GESTELD VOOR PERSOONLIJK LETSEL OF
MATERIËLE SCHADE VEROOR ZAAKT DOOR VERKEERDE
INSTALLATIE OF EEN ONJUIST, OF VERKEERD GEBRUIK.
HET APPARAAT MAG NIET WORDEN GEBRUIKT DOOR
PERSONEN (INCLUSIEF KINDEREN) MET FYSISCHE,
SENSORISCHE OF MENTALE HANDICAP, OF DOOR
MENSEN ZONDER DE NODIGE ERVARING OF KENNIS,
TENZIJ ZE ONDER TOEZICHT ZIJN VAN EEN PERSOON
VERANTWOORDELIJK VOOR HUN VEILIGHEID.
KINDEREN MOETEN ONDER TOEZICHT ZIJN,
OM TE GARANDEREN DAT ZE NIET MET HET
3GB3
APPARAAT SPELEN. ALUMINIUMFOLIE, PANNEN
OF SOORTGELIJKE VOORWERPEN MOGEN NIET
IN CONTACT MET DE BODEM VAN DE OVEN
KOMEN, OM BESCHADIGING VAN DE BODEM
TE VOORKOMEN. HET APPARAAT WORDT HEET
TIJDENS HET GEBRUIK. WAARSCHUWING: RAAK
DE WARMTE-ELEMENTEN IN DE OVEN NOOIT
AAN!
Page 4
INHOUD
NL
Gebruiksaanwijzing, 5
Eerste gebruik, 5
Zelf reinigende wanden (indien aanwezig), 6
Respect voor het milieu, 6
Inleiding oven, 7
Installatie en inbedrijfstelling, 7
Voordat U de stekker in de wandcontactdoos
steekt, 7
Demonstratie modus, 7
Het instellen van de klok, 8
Akties die mogelijk zijn als de oven uitgeschakeld
is, 9
Aanzetten van de oven, 9
Blokkering of kinder beveiliging, 10
Primaire functies, 11
Wat zie ik op het bedienpaneel?, 11
Oven functies, 12
Gebruiksaanwijzing, 13
Temperatuur sonde, 15
Speciale functies: Boost, Clean , 20
Oven licht besturing, 21
Eenvoudig de oven starten, 21
Het instellen van de temperatuur, 22
Rest warmte, 22
Programmeren van de oven, 22
Timer programmering: kook tijd, 24
Automatische functies; Recepten, 27
Persoonlijke recepten, 28
Uitnemen van de ovendeur, 30
Het vervangen van de ovenlamp, 31
BELANGRIJK
Het typeplaatje van de oven is ook toegankelijk na
installatie van het apparaat. Het typeplaatje wordt
zichtbaar als u de deur opendoet. Zorg dat u de
gegevens hierop bij de hand heeft, als u een service
aanvraag doet, of onderdelen wilt bestellen.
Installatie instructies,
Inbouw van de oven, 32
Electrische aansluitingen, 34
4GB4
Page 5
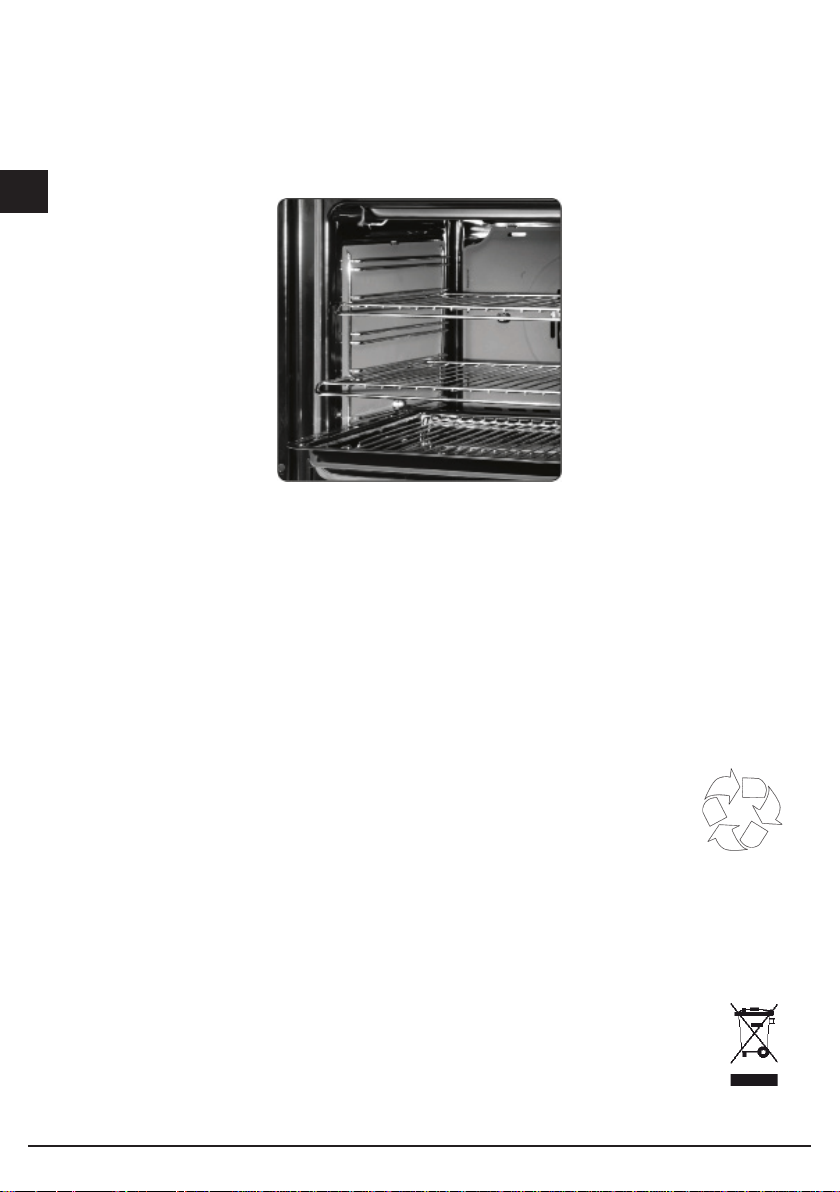
Gebruiksaanwijzing
EERSTE GEBRUIK
Reinig voor het eerste gebruik de oven grondig.
Verwarm de oven voor ongeveer 30 minuten tot de maximum temperatuur; Dit verbrand alle
resterende productie-oliën die ongewenste geuren kunnen veroorzaken. Verwarm hiervoor de oven
met de hetelucht functie, zonder roosters e.d. in de oven. Reinig vervolgens de roosters met een
vochtige doek en een ontvetter voor u ze in de kamer plaatst.
BELANGRIJK:
Haal als voorzorgmaatregel, altijd de stekker uit de wandcontactdoos voor u de oven gaat
schoonmaken. Gebruik geen zure of basische stoen om de oven schoon te maken (citroensap,
azijn, zout, tomaten, etc.). Gebruik geen op chloor gebaseerde producten, zuren of schuurmiddelen
om de beschilderde oppervlakten schoon te maken.
NL
5GB5
Page 6
ZELF REINIGENDE KATALYTISCHE WANDEN (Indien aanwezig)
NL
ZELF REINIGENDE WANDEN.
de CLEAN functie aktiveert de reactie die reiniging tot gevolg heeft.
Onze gladde wanden kunnen bekleed worden met zelfreinignende panelen.
Ze zijn bedekt met een speciaal, micro-poreuze katalytische email die oxideert en geleidelijk de spatten
van vet en olie verdampt bij koken op temperaturen boven de 200 ° C. Als de oven niet schoon is na het
koken van vet voedsel, zet dan de lege oven gedurende 60 minuten aan bij maximale temperatuur. Was de
zelfreinigende panelen nooit schoon met schurende, zure of alkalische producten.
RESPECT VOOR HET MILIEU
De documentatie voor dit apparaat is gedrukt op chloorvrij gebleekt papier of gerecycleerd papier, om het
milieu niet zwaarder te belasten dan strikt noodzakelijk. De verpakking van uw apparaat is gemaakt met
als uitgangspunt het voorkomen van milieu schade, en zijn ecologische producten die kunnen worden
hergebruikt. Recycling van het verpakkingsmateriaal bespaart grondstoen en vermindert de hoeveelheid
industrieel en huishoudelijk afval.
HET VERPAKKINGS MATERIAAL is 100% recyclebaar en voorzien van het recycling symbool. Voer
deze af conform de lokale regels. Het verpakkingsmateriaal (plastic zakken, polystyreen delen,
etc.) moet buiten het bereik van kinderen worden gehouden omdat dit potentieel gevaarlijk is.
Dit apparaat is geproduceerd in overeenstemming met Europese richtlijn 2002/96/EC, voor afgedankte
en elektronische (WEEE). Door ervoor te zorgen dat dit apparaat op de juiste wijze wordt afgevoerd,
draagt de gebruiker bij aan het voorkomen van negatieve gevolgen voor het milieu en de gezondheid.
Dit SYMBOOL op de bijgesloten documentatie geeft aan dat dit product mag worden behandeld als
huishoudelijk afval, maar moet worden ingeleverd bij een speciaal inzamelpunt voor de recycling van
elektrische en elektronische apparatuur.
Het afvoeren van dit apparaat dient te gebeuren conform de lokale wetten voor afvalverwijdering.
Voor extra informatie over de behandeling, terugwinning of recycling van dit product, kunt u contact
opnemen met de lokale autoriteiten de ophaaldienst voor huishoudelijk afval, of de winkel waar u
het product heeft gekocht. Maak het product onklaar als u het weggooit, door het elektriciteitssnoer
door te snijden.
6GB6
Page 7

INLEIDING OVEN
U heeft een nieuwe oven gekocht, die is uitgerust met de een computer, welke voortdurend de werking
volgt, om de prestaties te optimaliseren.
De tiptoets bediening is van de beste in zijn soort, nauwkeurig en betrouwbaar.
De interface is elegant, ordelijk en discreet, intuïtiever dan ooit.
U heeft maar een paar knoppen, en alle functies zijn snel en eenvoudig te kiezen, zonder ingewikkelde
toetscombinaties, meestal werkt uw oven al in 2 klikken!
INSTALLATIE EN INBEDRIJFSTELLING
Deze oven is een geavanceerd elektronisch apparaat, De installatie vereist gekwaliceerde professionals,
voor het plaatsen van het apparaat in uw keuken en het aansluiten op de elektra.
(Zie montage instructies op pagina 32).
Voor u de stekker in de wandcontactdoos steekt…
Wanneer de oven voor het eerst wordt aangesloten op de elektra, zal de display u vragen om uw taal.;
Gebruik knoppen om de taal van uw keuze te kiezen. (Nederlands)
Gebruik knop om de keuze te bevestigen.
NL
(Vanaf nu blijft de taal keuze bewaard, zelfs al is er geen 230 volt op de oven aanwezig.).
De stoomoven gaat nu in de DEMONSTRATIE MODUS
DEMONSTRATIE MODUS
De oven zal altijd in demonstratie modus staan als de spanning van het apparaat af is geweest.
De oven gedraagt zich als bij de eerste installatie: u kunt zonder dat er elementen aangaan
testen en alle functies en programma’s uitsonderen.
In deze modus, is de oven nooit ECHT ingeschakeld. De verwarmingselementen zullen niet
warm worden. Het toetsenbord werkt niet, en de oven reageert niet op commando’s!
7GB7
Page 8
NL
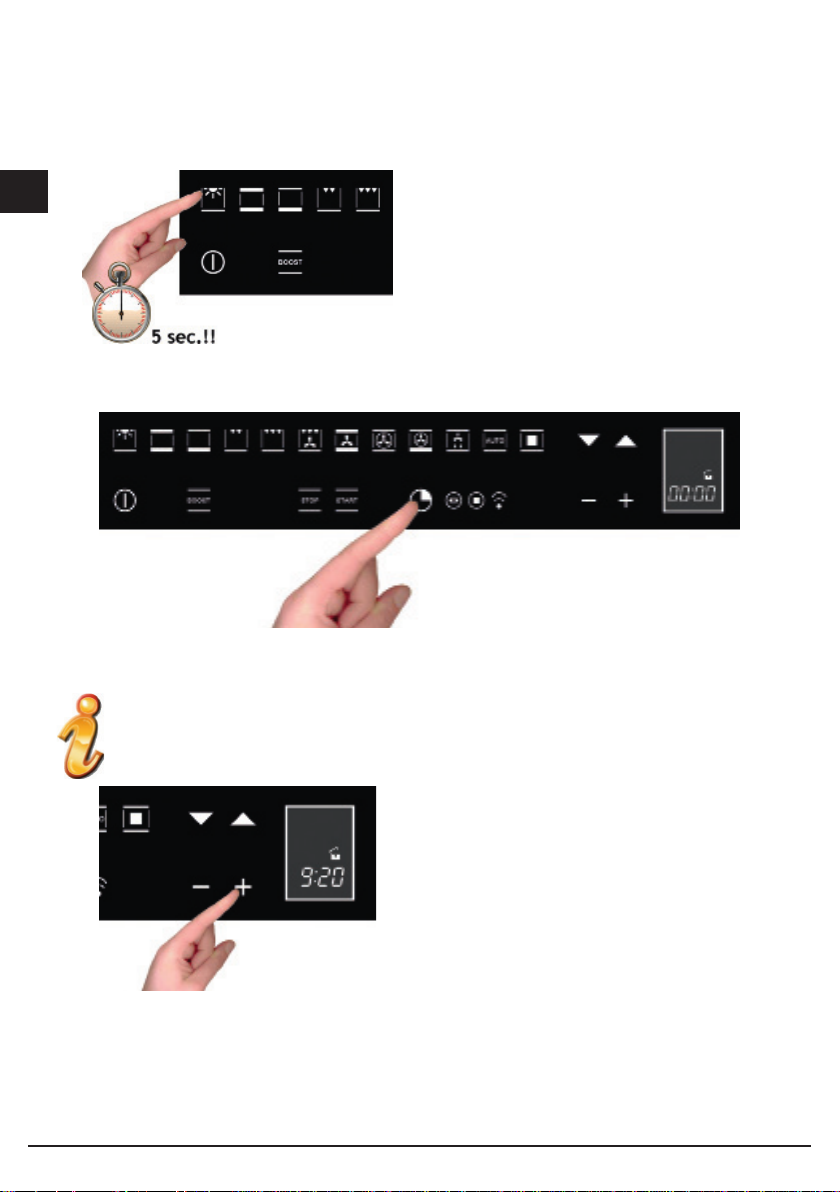
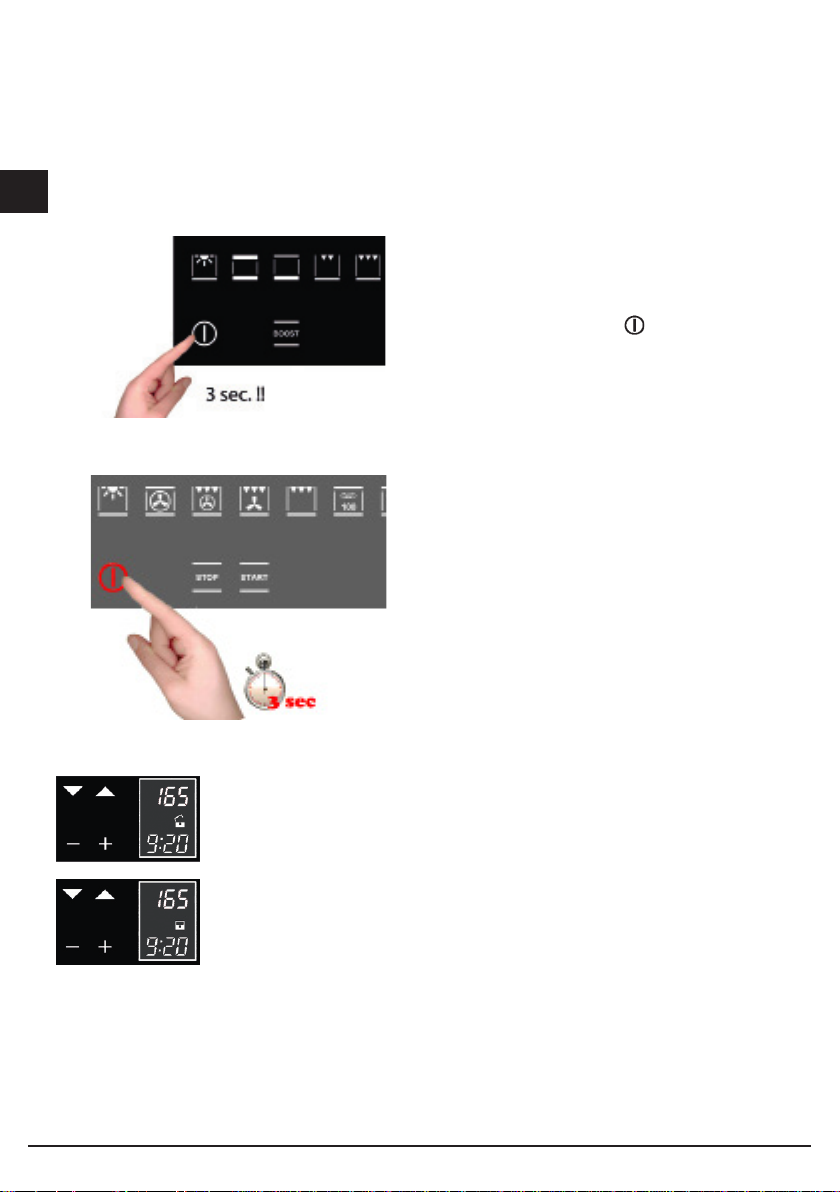
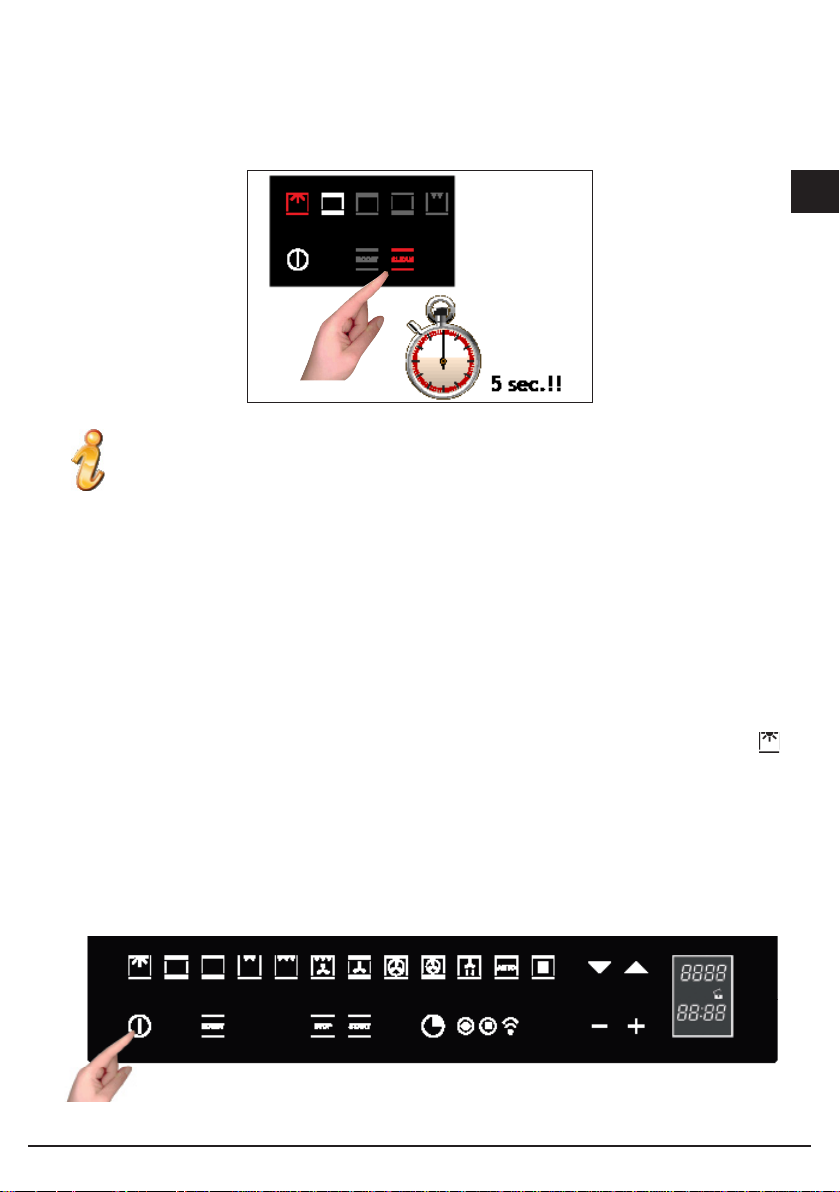
Om de demonstratie modus te beëindigen raakt
u de licht toets 5 seconden aan: Het toetsenbord
zal normaal werken en is klaar om ingeschakeld te
worden.
U kunt nu de tijd instellen, maar om de oven te
kunnen gebruiken is dat niet noodzakelijk.
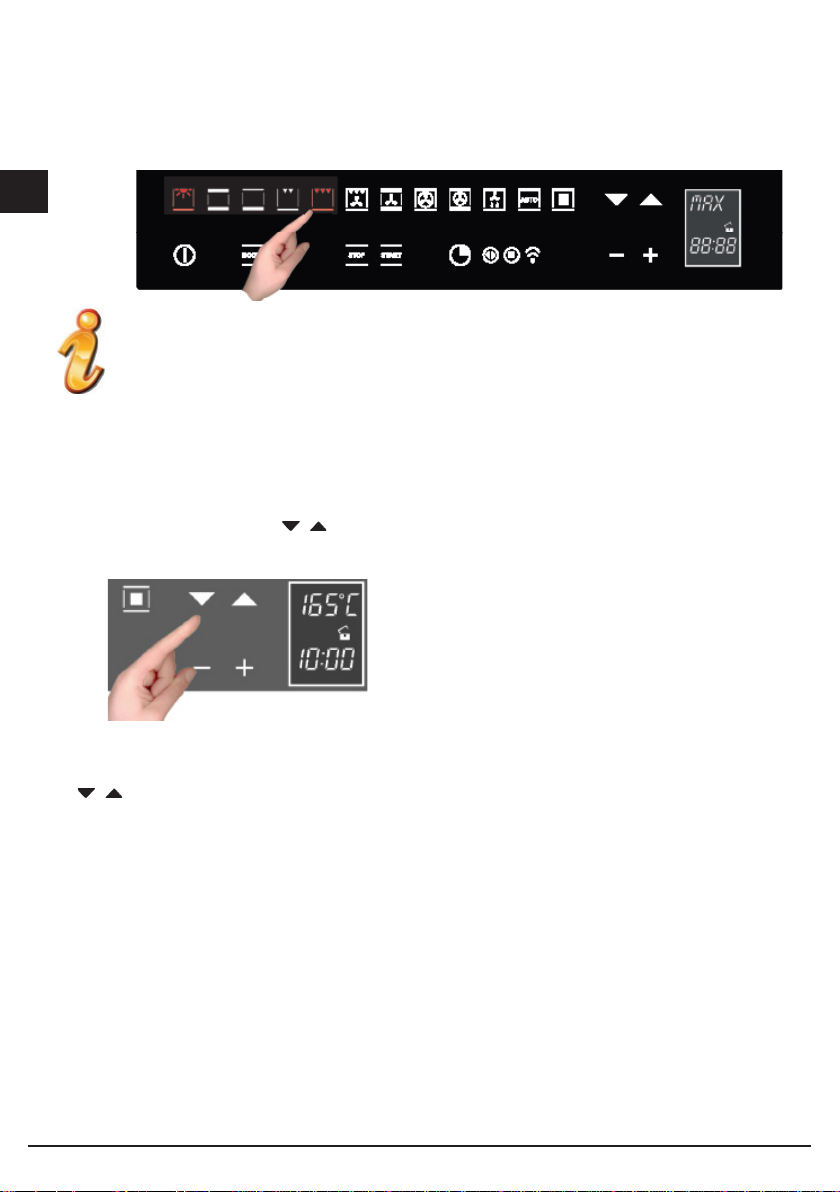
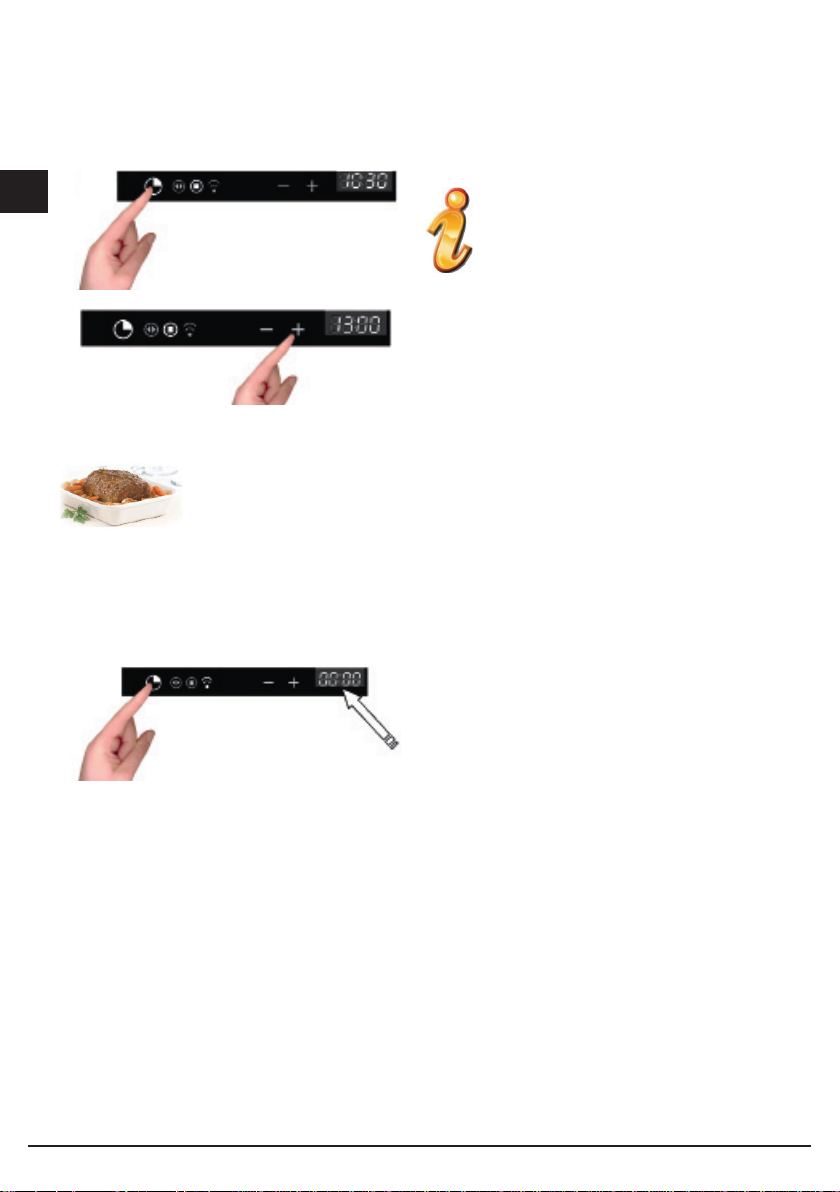
HET INSTELLEN VAN DE KLOK
De oven zal aangeven dat hij is aangesloten op de 230 volt door een dubbele piep.
Om de tijd in te stellen, toetst u de “TIMER FUNCTIE” button minimaal 3 seconden in.
Elke opdracht is bevestigd door een piep.
Stel de klok in met de + en- toetsen: Tijdens het
instellen zullen de puntjes in de display knipperen.
De tijd is ingesteld zodra de puntjes constant
branden.
8GB8
Page 9
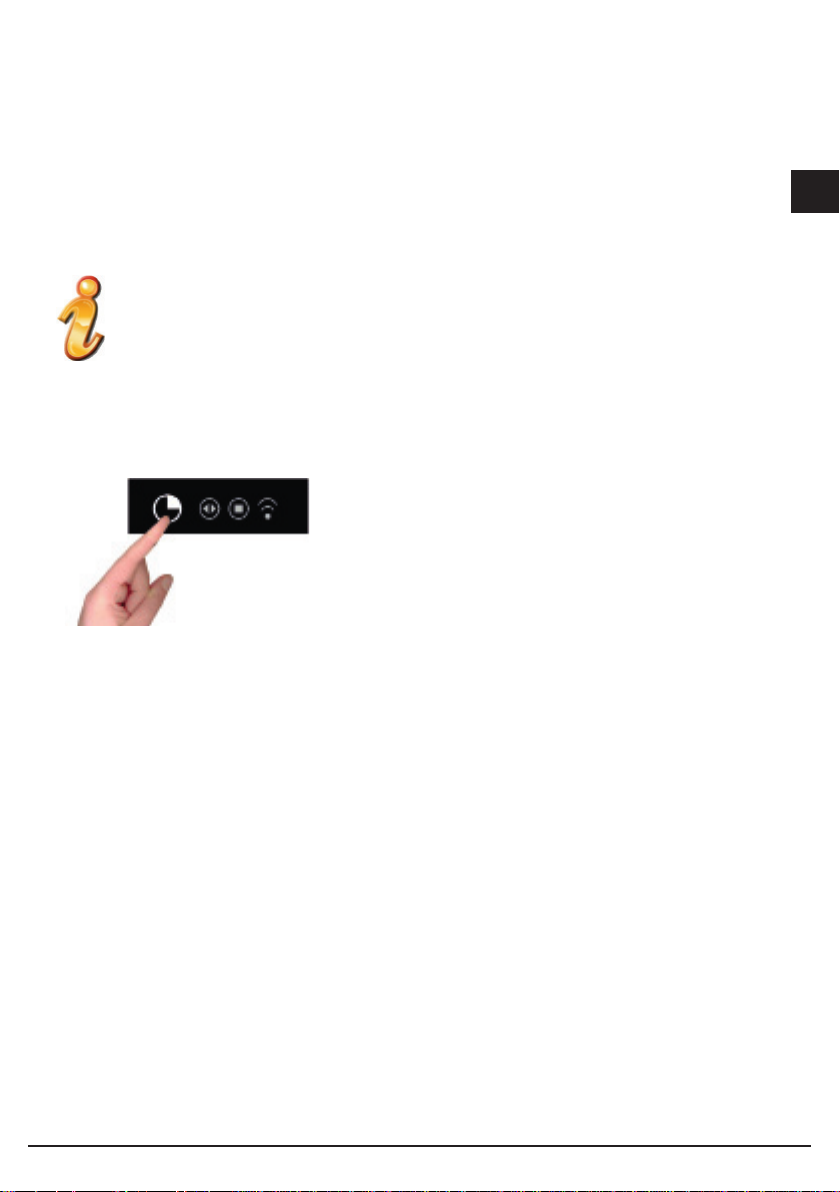
ACTIES DIE MOGELIJK ZIJN ALS DE OVEN UITGESCHAKELD IS.
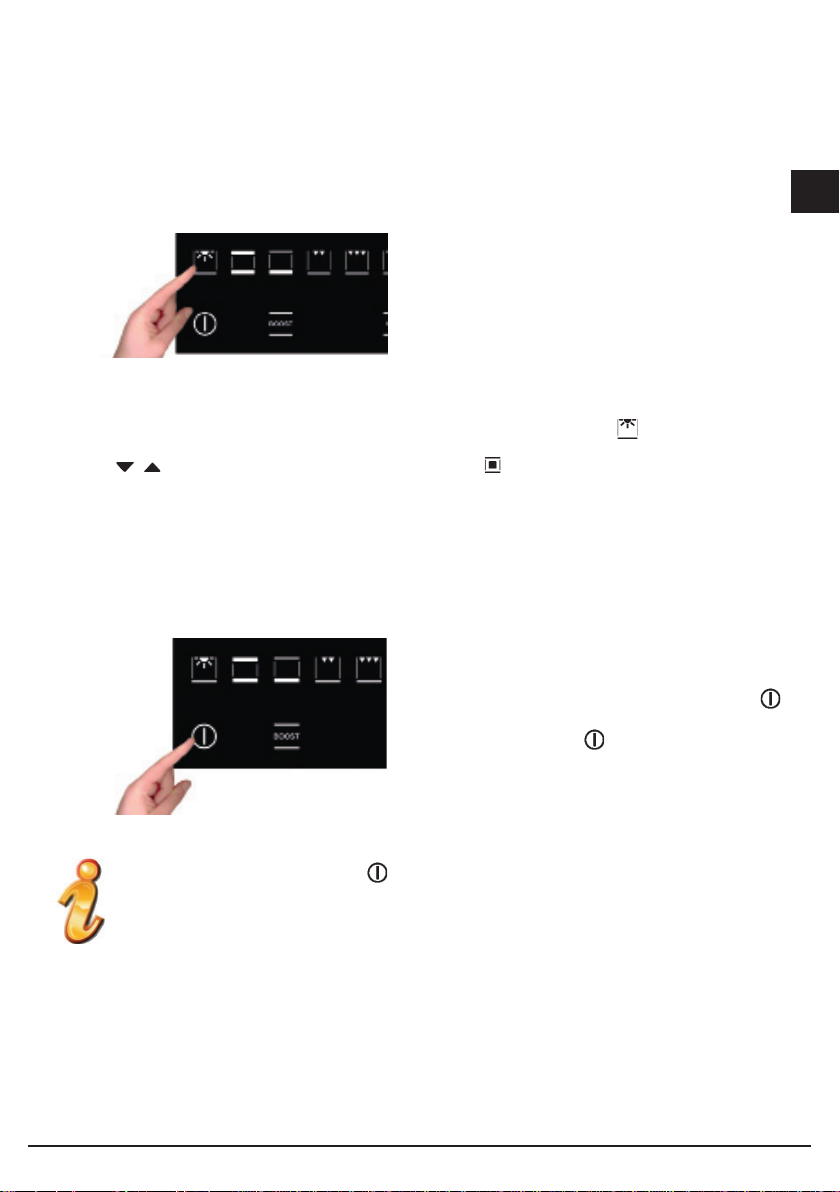
-Aanzetten van het ovenlicht
Het ovenlicht wordt aan en uit gezet door het
symbool aan te raken, zoals in de tekening.
-De taal instelling veranderen
Als de oven uit is, kunt u de taal van de display veranderen door tegelijk de en de + toets in de
rechter onder hoek minimaal 3 seconde in te drukken.
Gebruik om de taal te selecteren, en bevestig dit met de toets.
Instellen van de kookwekker
Zie de sectie op pagina 22.
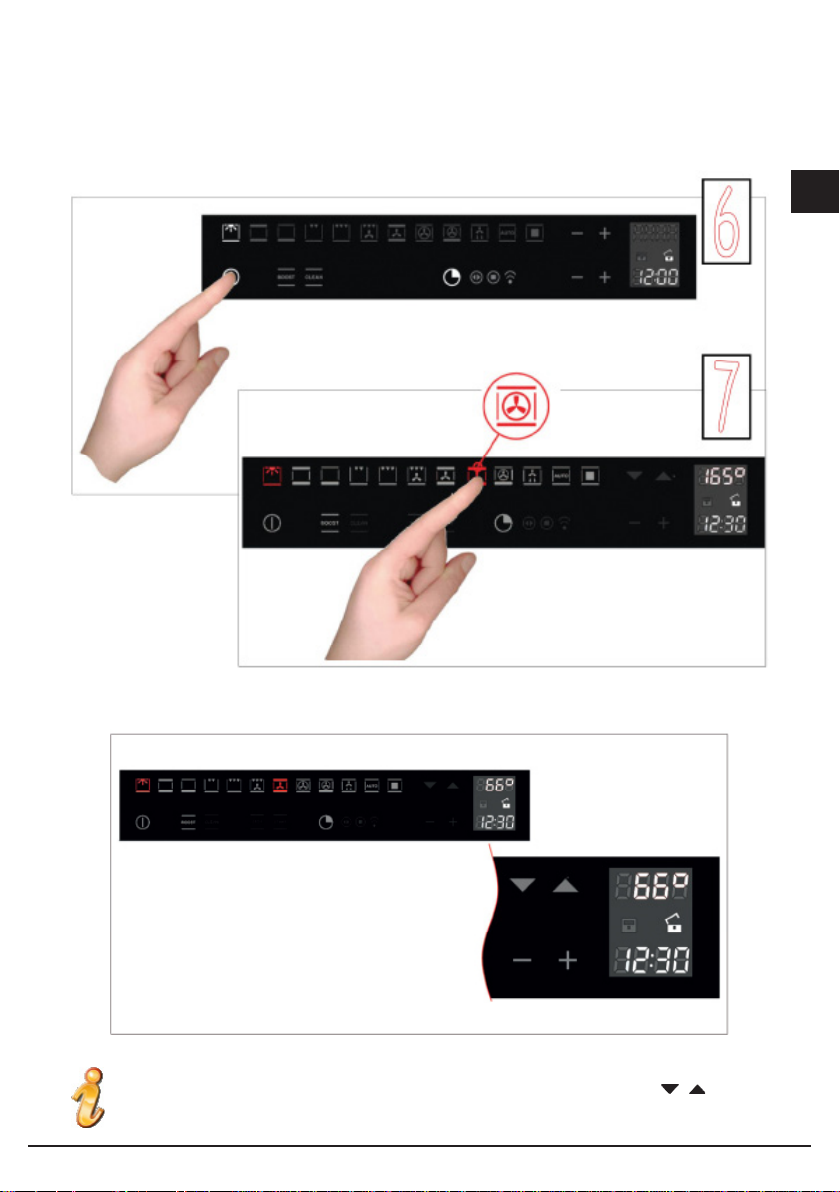
AANZETTEN VAN DE OVEN
Zet de oven aan door te drukken op het
symbool, zoals aangegeven in het guur. Door
het indrukken van het symbool. Activeert u de
verlichting in het bediendeel.
NL
Opmerking: De oven kan alleen aangezet worden als de kinderbeveiliging is gedeactiveerd.
OPMERKING: Na indrukken van de toets geeft de display gedurende 1 minuut “ON” aan.
Mocht u geen verder actie nemen in die tijd, dan zal de oven er vanuit gaan dat de toets per
ongeluk is ingedrukt, en gaat de oven na 1 minuut weer uit. u ziet dan gedurende enkele
seconden “OFF” in de display.
9GB9
Page 10
NL
BLOKKERING OF KINDER BEVEILIGING
Om de kinder beveiliging te activeren of te
deactiveren, houdt u de toets gedurende
minimaal 3 seconden ingedrukt.
u kunt zo de oven op ieder moment vergrendelen
of weer vrijgeven.
Als het hangslotje op de display open is, dan is de kinderbeveiliging niet actief.
Als het hangslotje op de display dicht is, dan is de kinderbeveiliging wel actief.
10GB10
Page 11
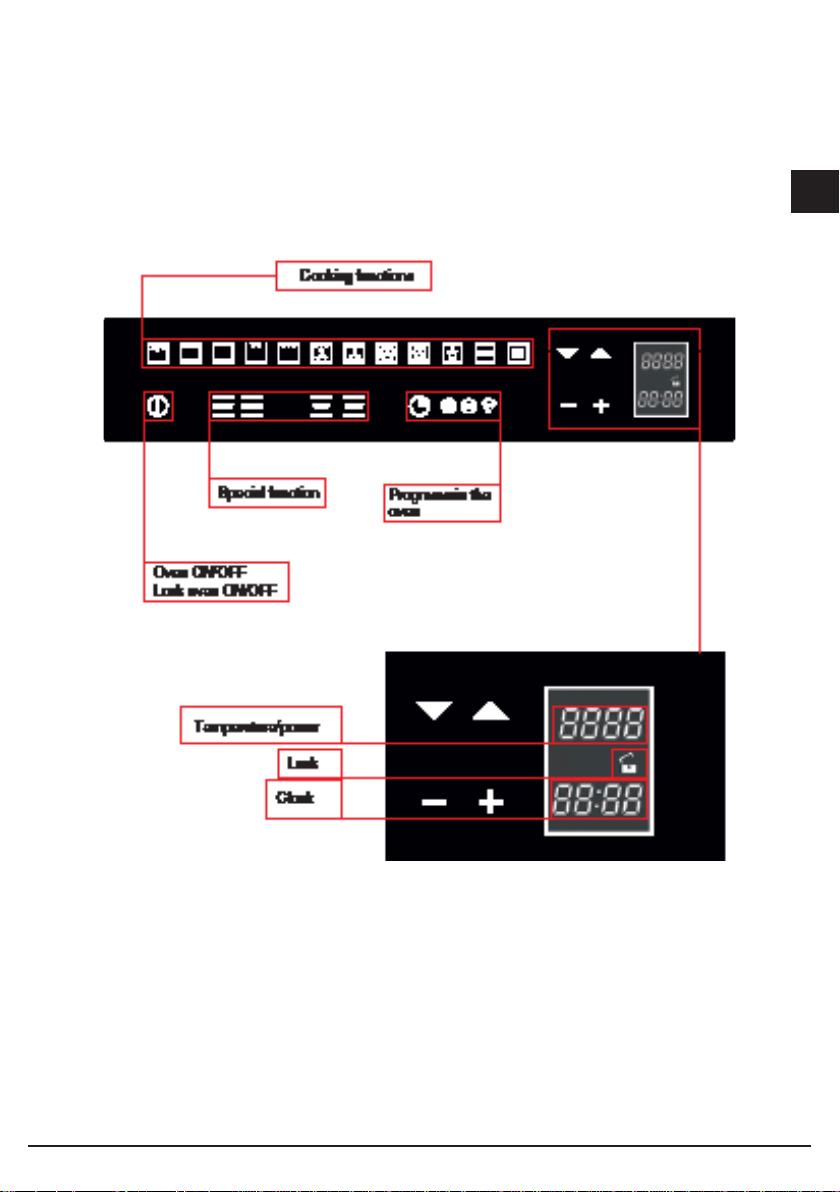
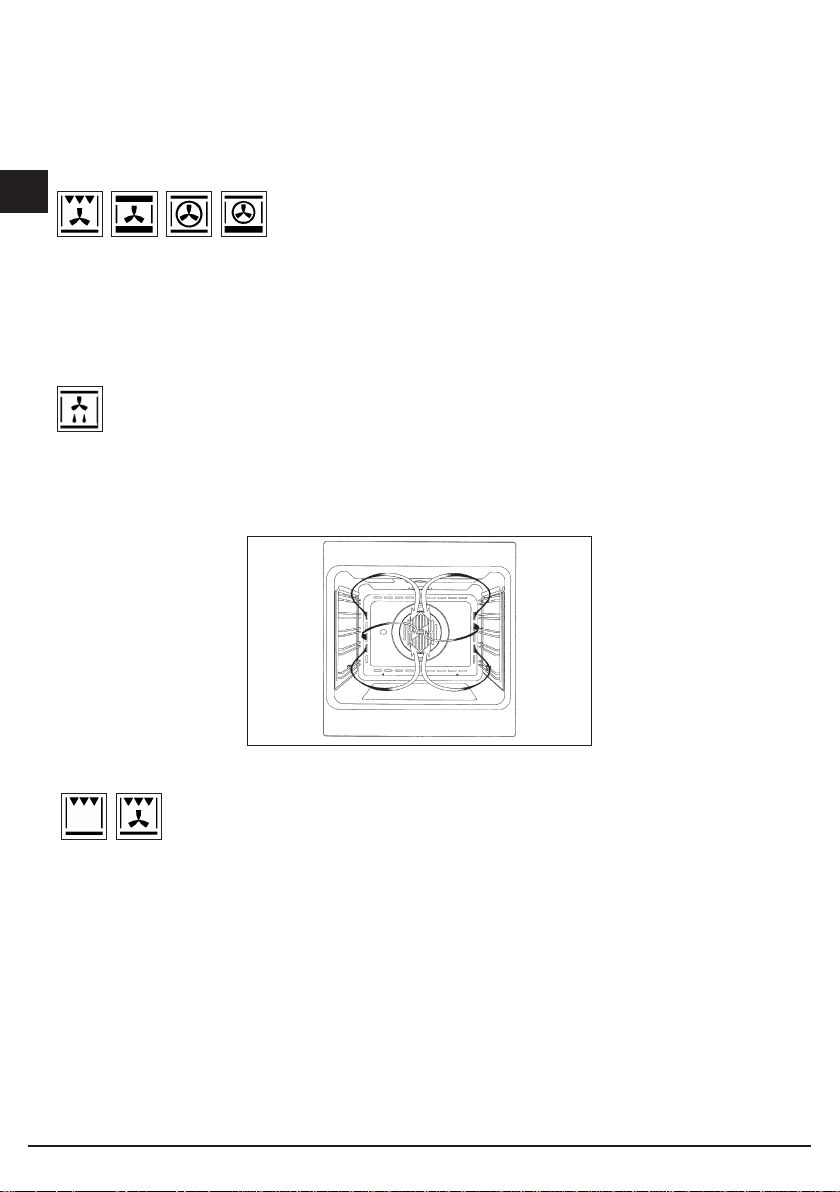
PRIMAIRE FUNCTIES
Wat zie ik op het bedienpaneel ?
NL
De Kookprogramma’s:
Uw oven heeft 11 speciale kookprogramma’s. Om een programma te kiezen, raakt u het bijbehorende
symbool aan. Elk programma heeft een basisinstelling voor de temperatuur, die overeenkomt, met de
meest gebruikte recepten. Deze temperatuur kunt u echter naar wens verhogen of verlagen.
Let op:
“Tijdens het gebruik kunnen de toegankelijke delen van de oven zeer heet worden. Kinderen moeten op een
afstand gehouden worden, U moet ook oppassen dat u de verwarmingselementen in de oven niet aanraakt.”
11GB11
Page 12
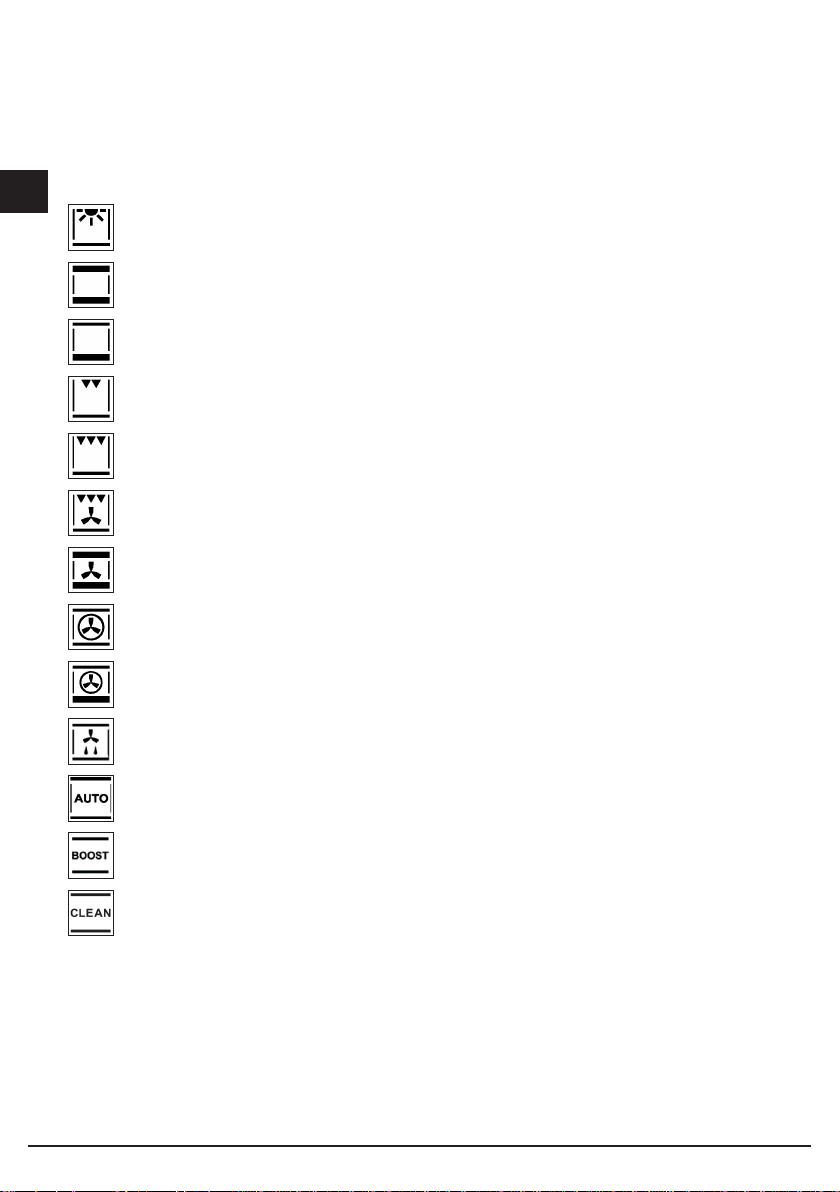
Oven functies
NL
De oven lamp. Deze zal altijd branden als de deur open is. Om energie te sparen wordt de
lamp tijdens het koken uitgeschakeld.
Boven- en onder verwarmingselementen. Ingesteld op 190 ° C. Regulatie van de
thermostaat van 50 ° C tot MAX
Laat verwarmingselement. Pre-op 50 ° C. Regulatie van de thermostaat van 50 ° C tot MAX
Boven verwarmingselement (grill oppervlak en verminderd vermogen). Vooraf ingesteld op
MAX. Regulatie van de thermostaat van 50 ° C tot MAX.
Dubbel verwarmingselement (grote grill oppervlakte). Vooraf ingesteld op MAX. Regulatie
van de thermostaat van 50 ° C tot MAX.
Dubbel bovenste verwarmingselement met ventilator (grote grill oppervlakte).
Voorafingesteld op165 ° C. Regulatie van de thermostaat van 50 ° C tot MAX.
Boven en onder verwarmingselement, met ventilator. Voorafingesteld top 165 ° C. Regulatie
van de thermostaat van 50 ° C tot MAX.
Rond verwarmingselement met ventilator. Voorafingesteld op 165 ° C. Regulatie van de
thermostaat van 50 ° C tot MAX.
Rond verwarmingselement met ventilator en onderwarmte. Voorafingesteld op 165 ° C.
Regulatie van de thermostaat van 50 ° C tot MAX.
Ventilator voor ontdooien. Regulatie van de thermostaat 0-60 ° C.
Toegang tot vooraf ingestelde recepten
Snelle voorverwarming
Snelle reininging (voor ovens met zelf-reinigende catalytische wanden)
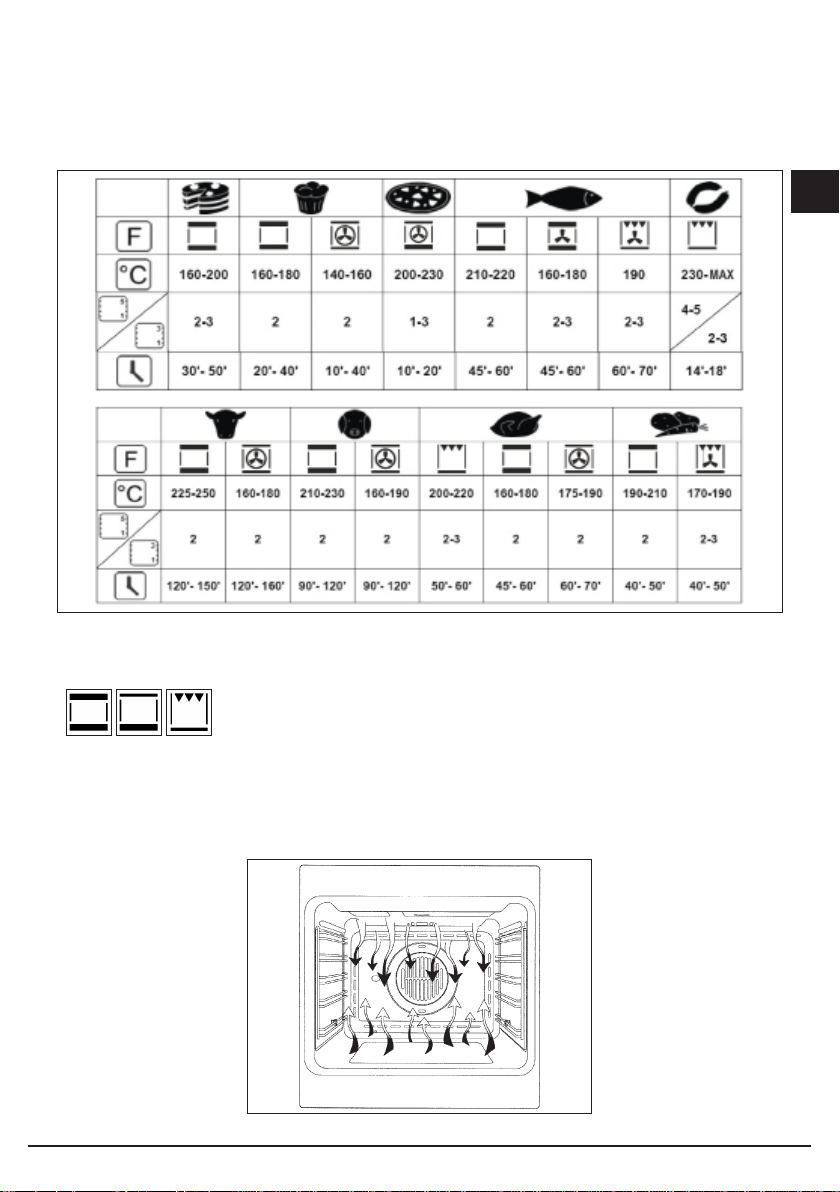
De hiernaast vermelde tabel laat de resultaten zien die wij hebben gemeten in onze laboratoria. De waarden
zijn echter
slechts indicatief, en dienen als basis om zelf uw eigen optimale instelling te bepalen !
12GB12
Page 13
GEBRUIKSAANWIJZING
Conventioneel koken
Een klassieke manier van koken, waarbij onder en/of boven elementen worden gebruikt voor het bereiden van
uw gerecht. Het is aan te raden het gerecht pas in de oven te plaatsen nadat de op de ingestelde temperatuur
is gekomen. U ziet dat als de C niet meer knippert, en u een pieptoon heeft gehoord.
Als u tijdens het kookproces de temperatuur wilt verhogen of verlagen, dan kan dat met de + en – toetsen.
Tijdens het koken opent u de deur bij voorkeur zo min mogelijk.
NL
13GB13
Page 14
Geventileerd koken
NL
Bij deze wijze van koken draait er een ventilator achter in de oven, om de warme lucht door de kuip te
circuleren. Hierdoor is de temperatuur overal in de kuip gelijkmatig, en zal uw gerecht sneller klaar zijn.
Deze manier van koken leent zicht erg als u met meerdere roosters tegelijk werkt. U kunt zelfs meerdere
typen eten tegelijk verwarmen (vis, vlees, etc.).
Ontdooien
Wanneer u geventileerd koken selecteert en de temperatuur instelt op 0 ° C, zal de ventilator koude
lucht circuleren in de oven, voor het snel ontdooien van diepvriesproducten.
Voorverwarmen is niet nodig, maar het is beter om het te doen als u gebak wilt maken.
Koken onder de grill
Voor het grillen of bruin kleuren van gerechten. U kunt het beste uw gerecht op het 1e of 2e niveau van
boven plaatsen.
Verwarm de kuip 5 minuten voor.
Rest warmte
Wanneer u de oven gebruikt, slaat de oven de warmte van de mantel op. Deze warmte wordt afgezonderd van
de rest van de keuken door overvloedige isolatie en bepaalde constructie technieken.
De ventilator gaat draaien als de oven boven de 80 graden komt, en zal weer stoppen als de temperatuur
onder de 50 graden komt.
14GB14
Page 15
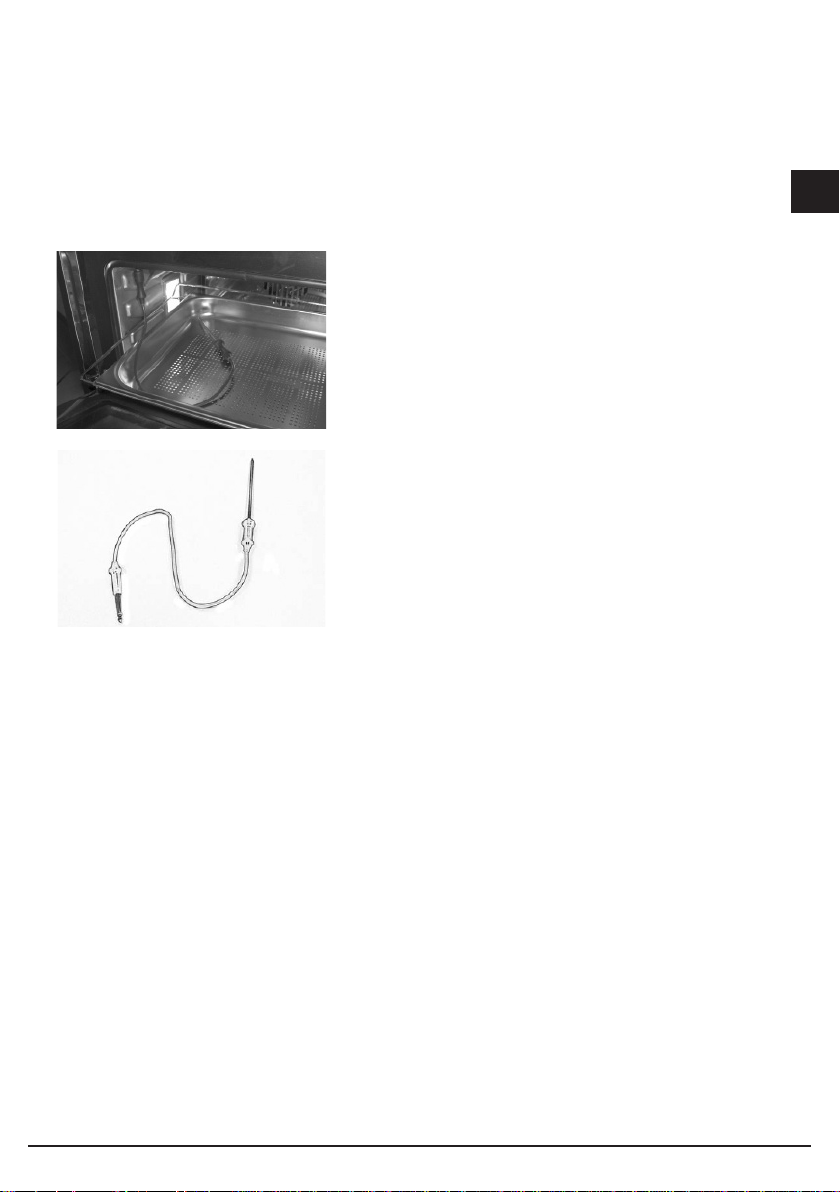
Temperatuur sonde.
Sappigheid, smaak en aroma zijn het resultaat van het
gebruik van onze temperatuursonde.
De temperatuursonde is een thermometer die de
temperatuur meet in de kern van uw gerecht. u kunt
daarmee de mate van garing erg nauwkeurig bepalen.
Vlees zal roze zijn aan de binnenkant en gaar aan de
buitenkant!
De temperatuur die het voedsel bereikt tijdens het koken
houdt nauw verband met problemen met betrekking tot
gezondheid en hygiëne. Bacteriën komen voor in alle
soorten vlees, gevogelte, vis, en rauwe eieren.
Bepaalde soorten bacteriën maken dat voedsel bederft,
terwijl anderen, zoals Salmonella, Campylobacter
jejuni, Listeria monocytogenes, Escherichia coli en
Staphylococcus aureus ernstig schadelijk kunnen zijn voor
de menselijke gezondheid.
Bacteriën zullen snel vermeerderen boven een temperatuur
van 4,4° tot 60° C. u moet daarom voorkomen dat bacteriën
vermenigvuldigen, o.a. door de volgende maatregelen:
• Ontdooi geen gerechten op kamer temperatuur.Ontdooi altijd in de koelkast of in de oven m.b.v.het
ontdooi programma. Als u het gerecht in de oven heeft ontdooit, kook het dan direct daarna.
• Marineergerechtenindekoelkast.Laatdemarinadedusnietopkamertemperatuurintrekken.
• Gebruik als vlees, vis of gevogelte meer dan 5 cm dik is, altijd de temperatuur sonde, zodat u weet
dat er voldoende garing plaats vindt.
• Voorkom dat het kookproceswordt onderbroken. Als eten warm wordt weggezet neemt de groei van
bacteriën exponentieel toe.
• Roostervleesengevogelteindeovenoptemperaturenvanminimaal165graden.,
NL
15GB15
Page 16
Gebruik van de temperatuur sonde.
NL
De voeleringang is gelegen in de bovenhoek van de voorkant van de oven,
beschermd door een metalen deksel (1).
Til de metalen kap op. (2)
Steek de stekker zo ver mogelijk naar binnen. Als deze goed is geplaatst, zal
de besturing een dubbele pieptoon geven.(3)
Schuif de sonde in het midden van het eten, vermijd daarbij het aanraken van
botten of van vette gebieden.
De sonde zal niet werken als het wordt aangesloten nadat de oven is al ingeschakeld!
16GB16
Page 17
Selecteer de beste
functie voor u
recept.
NL
Na 5 secenden zal de display de temperatuur
weer gaan geven die de sonde meet.
Na korte tijd zal de oven beginnen met het programma. De display laat de ingestelde
kerntemperatuur zien (66 °C pre-set) van de sonde, die bij te stellen is met de
toetsen tussen de 30 en 99 °C.
17GB17
Page 18
NL
Wij adviseren u onderstaande tabel te gebruiken.
eten MINIMUM INTERNE TEMP.
Hamburger 71°C
Varken, koe, lam e.d. 74°C
Kip kalkoen 74°C
Gebraden vlees
Rauw
Medium-rauw 63°C
Medium 71°C
gaar 77°C
Ribben, roast
Medium 71°C
gaar 77°C
Verse ham 71°C
Verse worst 71°C
Hele kip of stukken kip 82°C
Eend 82°C
Hele kalkoen (niet gevuld) 82°C
Kalkoen borst 77°C
Gehakt
Rundvlees, lam
De temperatuur wordt niet aangegeven, omwille van veiligheid.
Varken
Gevogelte
OPMERKING: Als de plug van de sonde wordt verwijderd nadat het programma is begonnen,
dan blokkeert de computer de oven en gaat de oven piepen. Plaats de plug weer terug en
herstart het programma.
Als u gaat koken met behulp van de sonde worden alle vooraf ingestelde temperaturen
veranderd in 165 graden. u kunt deze daarna regelen tussen 120 graden en 250 graden. Het
ontdooi programma is gedeactiveerd.
18GB18
Page 19
Als de kerntemperatuur wordt bereikt, zal de oven uitschakelen, en geeft een pieptoon. Vergeet niet
de sonde los te maken van de oven voor u het gerecht uitneemt.
Let op: De sonde is erg heet na het koken!!
NL
19GB19
Page 20
Speciale functies
NL
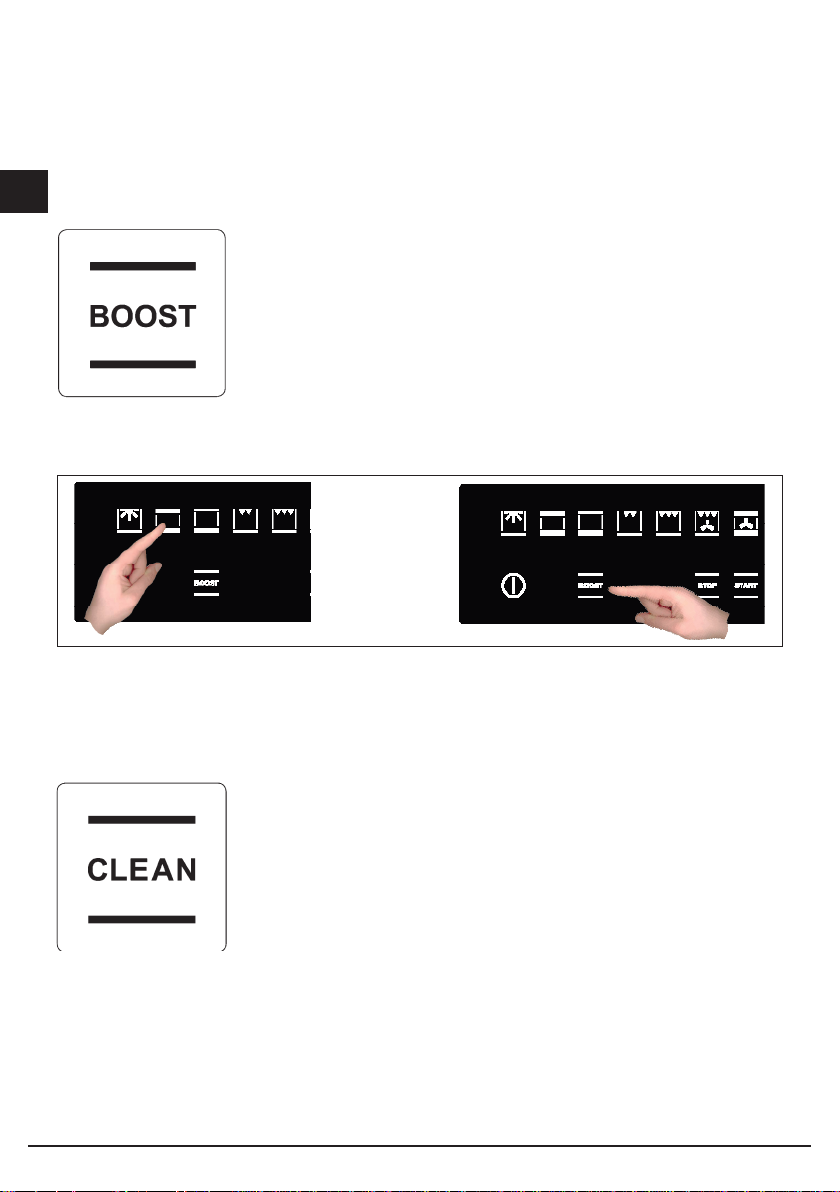
Boost (snelle voorverwarming)
BOOST – Om snel de oven op bedrijfs rtemperatuur te krijgen
Deze speciale functie kan worden geactiveerd na selectie van een kookfunctie en wordt gebruikt om
de tijd die nodig is om de ingestelde kooktemperatuur te berijken te verkorten.
U kunt de Boost functie op ieder moment stoppen,
Clean (snel reiniging)
AUTOMATISCHE REINIGING Hoge temperatuur cyclus (250 ° C),
gecombineerd met zelfreinigende panelen voor het automatische reinigen
van de ovenkamer.
U kunt de CLEAN funcie alleen gebruiken als er geen andere functie actief is, en u moet de toets
gedurende 5 seconden indrukken om te starten.
20GB20
Page 21
Het reinigen vindt plaats bij een temperatuur van 250 ° C en duurt een uur. Gebruik deze
functie niet voor het bereiden van voedsel!
De panelen mogen alleen met kraan water worden schoongemaakt, en moeten na verzadiging worden
vervangen. U kunt de panelen los kopen bij uw gespecialiceerde dealer, of bij Boretti. (zie www.boretti.
nl).
Oven licht besturing.
De ovenlichtbesturing is actief in alle programma’s en werkt geheel onafhankelijk van de rest van de
oven. Dit betekent dat de verlichting aan en uit geschakeld kan worden, wanneer u licht nodig heeft.
Het ovenlicht zal normaal gesproken branden tijdens het verwarmen en blijft daarna nog 3 minuten
branden, waarna het wordt uitgeschakeld om energie te besparen. Om te controleren of uw gerecht al
klaar is, moet u de binnenverlichting zelf weer aandoen. Om dit te doen, toetst het licht symbool .
Het licht zal 3 minuten aanblijven en daarna weer vanzelf uitgaan, Om nogmaals het licht aan te doen,
drukt u op de verlichtings knop.
Als de deur open is, zal het licht altijd branden.
NL
Eenvoudig de oven starten.
Door de eenvoudige bediening zijn er maar twee handelingen nodig om uw oven te starten; Oven inschakelen
en daarna programma kiezen…
21GB21
Page 22
NL
Indien u de temperatuur niet meer aanpast na het kiezen van het gewenste programma, zal de
oven na enkele seconden vanzelf starten!
Het instellen van de temperatuur.
De oven gebruikt een temperatuursensor die voor een maximale betrouwbaarheid bij het koken een
nauwkeurigheid garandeert van ± 5 °C.
Kunt u de temperatuur op elk moment aanpassen aan uw wens. Na het selecteren van het gewenste
programma raakt het symbool aan en de instelling varieert van +50 ° C tot MAX. U hoeft de
wijziging niet te bevestigen, de verandering wordt vanzelf definitief na een paar seconden.
Tijdens het verwarmen knippert de
temperatuur Indicatie, om aan te geven dat de
bedrijfstemperatuur nog niet is bereikt. Wanneer
de ingestelde temperatuur wordt bereikt, klinkt er
een piep.
Opmerking: Sommige modellen geven tijdens het voorverwarmen tot de ingestelde temperatuur is
bereikt de actuele temperatuur aan in de oven, . Wil t u controleren welke temperatuur is ingesteld? Druk dan
op de toets, waarbij de temperatuur dan eventueel ook kan worden aangepast.
22GB22
Page 23
REST WARMTE
Tijdens het gebruik van de oven zal de kuip warmte afgeven aan de mantel. Na gebruik zal daarom de
koel ventilator nog blijven doordraaien tot de mantel een temperatuur van minder dan 50 graden heeft
bereikt.
Gebruik deze eigenschap om U eten rustig te laten garen.
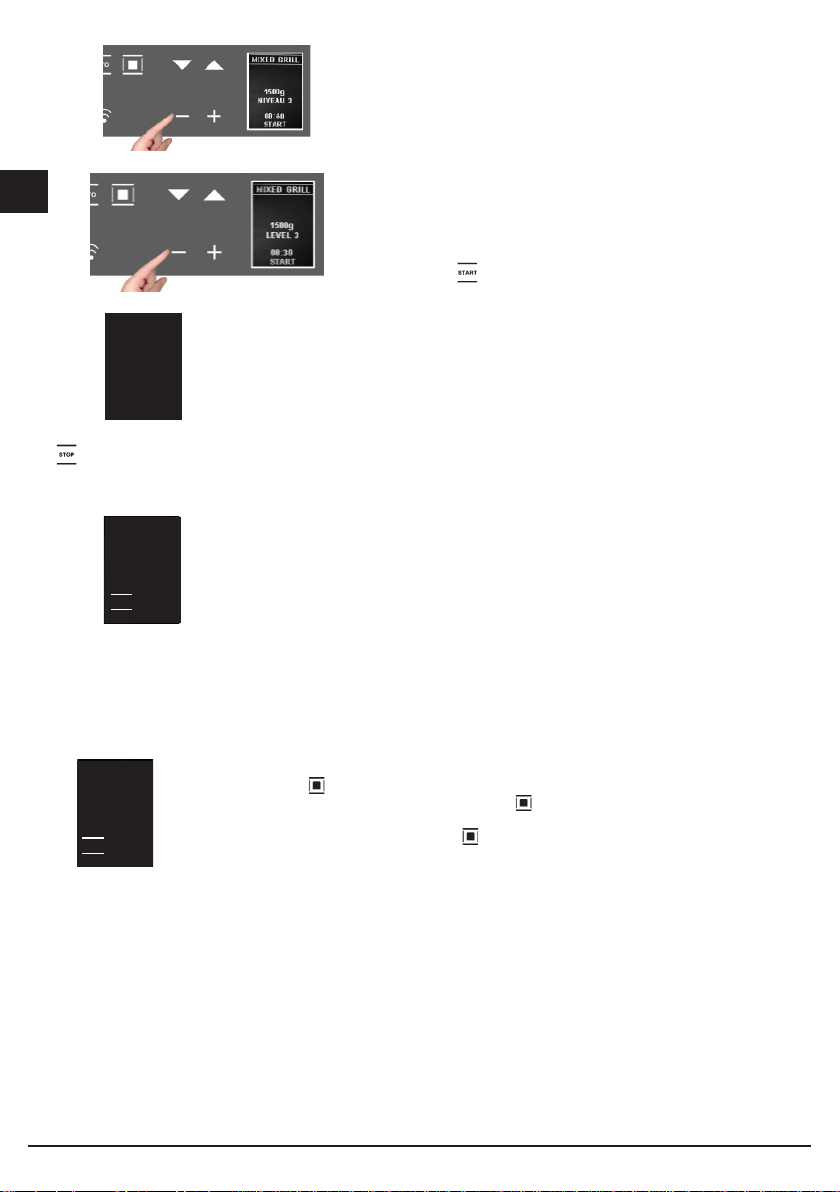
PROGRAMMEREN VAN DE OVEN
Uw oven heeft drie programmas die maken dat u oven start en stopt wanneer het u past.
De timer functies kunnen worden geselecteerd door om de
beurt de toetsen van links naar rechts aan te raken. Bij iedere
aanraking zal het betreende symbool oplichten.
NL
23GB23
Page 24
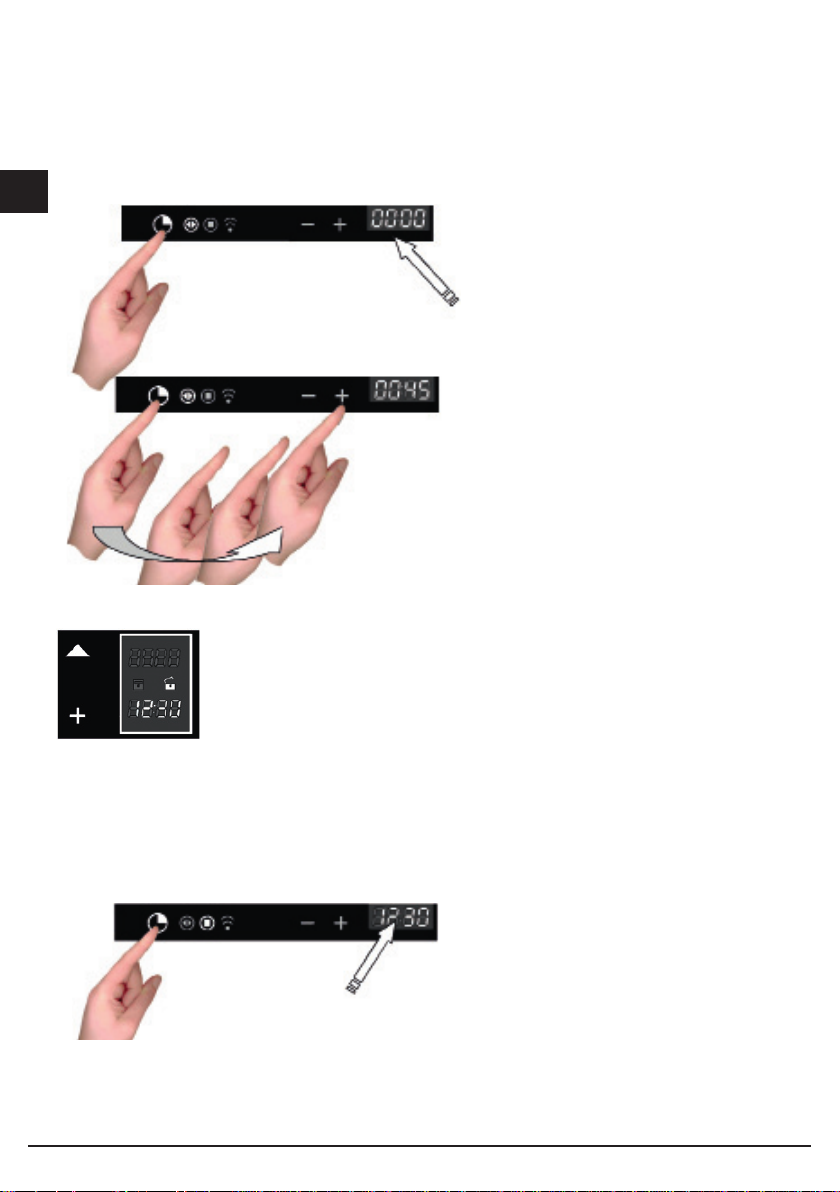
Timer programmeren: kooktijd
NL
Zodra de stoptijd is ingesteld, zal de display weer de actuele tijd weergeven en licht het
kooktijd symbool op.
Raak het timer symbool één keer aan, en
het symbool zal oplichten. Daarnaast zal
de klok niet meer de actuele tijd aangeven
maar op 00:00 springen.
De scheidingspunten zullen knipperen
om aan te geven dat u de kooktijd in kunt
stellen.
Het terugtellen begint nu. Nadat de ingestelde tijd is verstreken, zal de oven piepen en worden
verwarmingselementen uitgeschakeld. De volgende melding verschijnt in de display: “PROGRAMMA
TEN EINDE GERECHT UITHALEN”. raak een willekeurige toets aan om het piepen te stoppen, of open
de deur. De oven zal na 1 minuut automatisch uit gaan, als u niets doet.
Timer programmeren: stoptijd
Nadat de kooktijd is ingesteld, geeft de display
weer de actuele tijd aan, en het “kooktijd”
symbool licht op.
De scheidingspunten zullen knipperen om aan
te geven dat u de kooktijd in kunt stellen.
24GB24
Page 25
Stel de stoptijd in door het aanraken van de “+”
en “-” symbolen.
Zodra de stoptijd is ingesteld, zal de display weer de actuele tijd weergeven en licht het
stoptijd symbool op.
Het terugtellen begint nu. Nadat de ingestelde tijd is verstreken, zal de oven piepen en worden
verwarmingselementen uitgeschakeld. De volgende melding verschijnt in de display: “PROGRAMMA
TEN EINDE GERECHT UITHALEN”. raak een willekeurige toets aan om het piepen te stoppen, of open
de deur. De oven zal na 1 minuut automatisch uit gaan, als u niets doet.
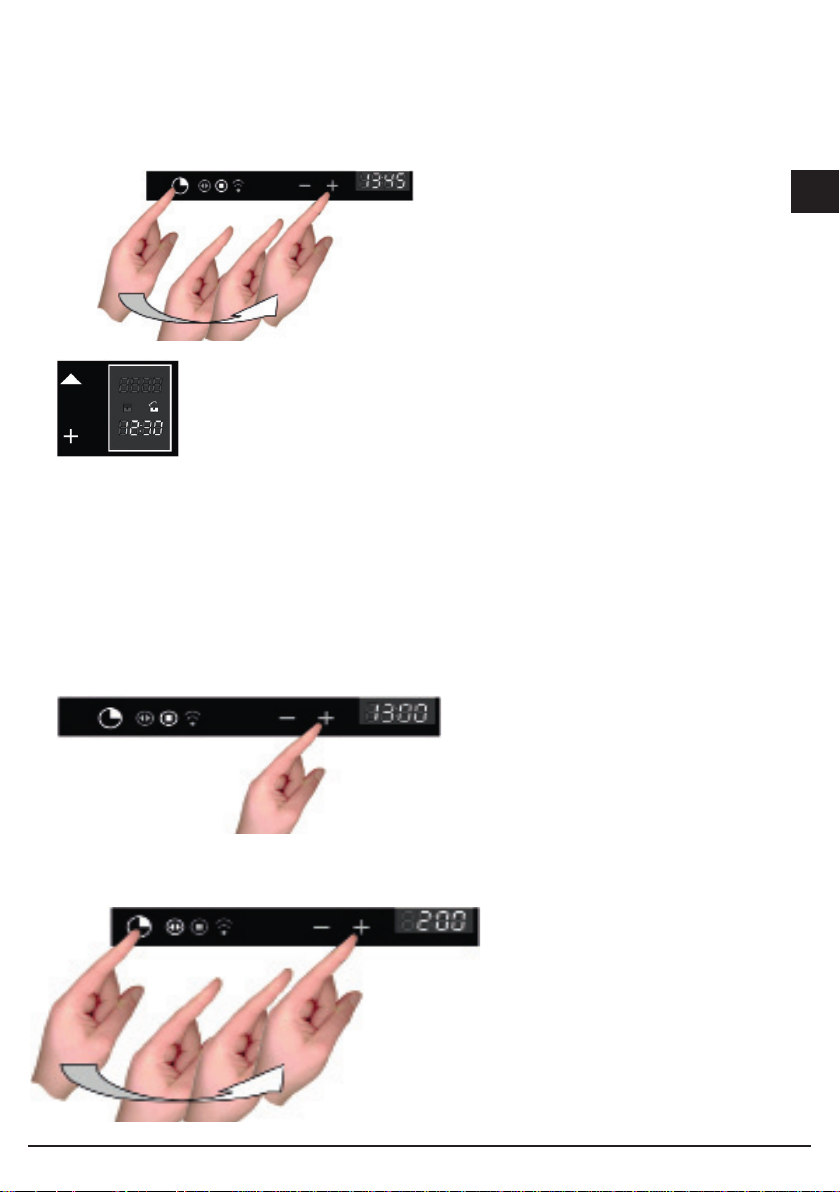
Timer programmeren: uitgesteld koken instellen
Door het combineren van de baktijd en de stoptijd kunt u de oven programmeren zodat deze start op het door
u gewenste moment , en dan gedurende het gewenste aantal minuten aanblijft.
Voorbeeld: u wilt om 8:30 uur dat de oven aan gaat, en het gerecht klaar is om 13:00 uur.
U handelt als volgt:
Maak het gerecht gereed en zet het
in de oven.
NL
Zet de oven aan en selecteer het gewenste programma en temperatuur.
Stel de kooktijd in; in dit voorbeeld
2 2 uur.
25GB25
Page 26
NL
Verander de stoptijd naar de gewenste tijd, in ons
voorbeeld 13:00 uur.
De oven gaat nu stand-by, en het licht gaat uit.
De computer zal nu de oven automatisch inschakelen om 11:00 uur (13:00 – 2:00) en
uitschakelen om 13:00 uur. Uw gerecht zal klaar zijn als u thuis komt!
Stel nu de stoptijd in. De display zal
initieel de actuele tijd + 2 uur laten zien,
in dit voorbeeld 8:30 uur +2:00 = 10:30
uur..
Timer programmeren: kookwekker.
De kookwekker is een functie die onafhankelijk werkt van de rest van de oven. Hiermee schakelt u dus niets in,
maar heeft u een alarm dat afgaat na het ingestelde aantal minuten.
Om de terugloop timer te activeren drukt u 3x op het timer symbool.
De scheidingspunten knipperen en u kunt de timer
instellen.
Raak de + en – symbolen aan om de tijd in te stellen.
De terugloop timer start direct en na het aantal ingestelde minuten zal de oven gaan piepen, tot u een
willekeurige toets indrukt.
Timer programmeren: een ingesteld programma annuleren
Om een programma te annuleren kunt u de ingestelde tijd op 0 zetten, of het apparaat uitzetten.
26GB26
Page 27

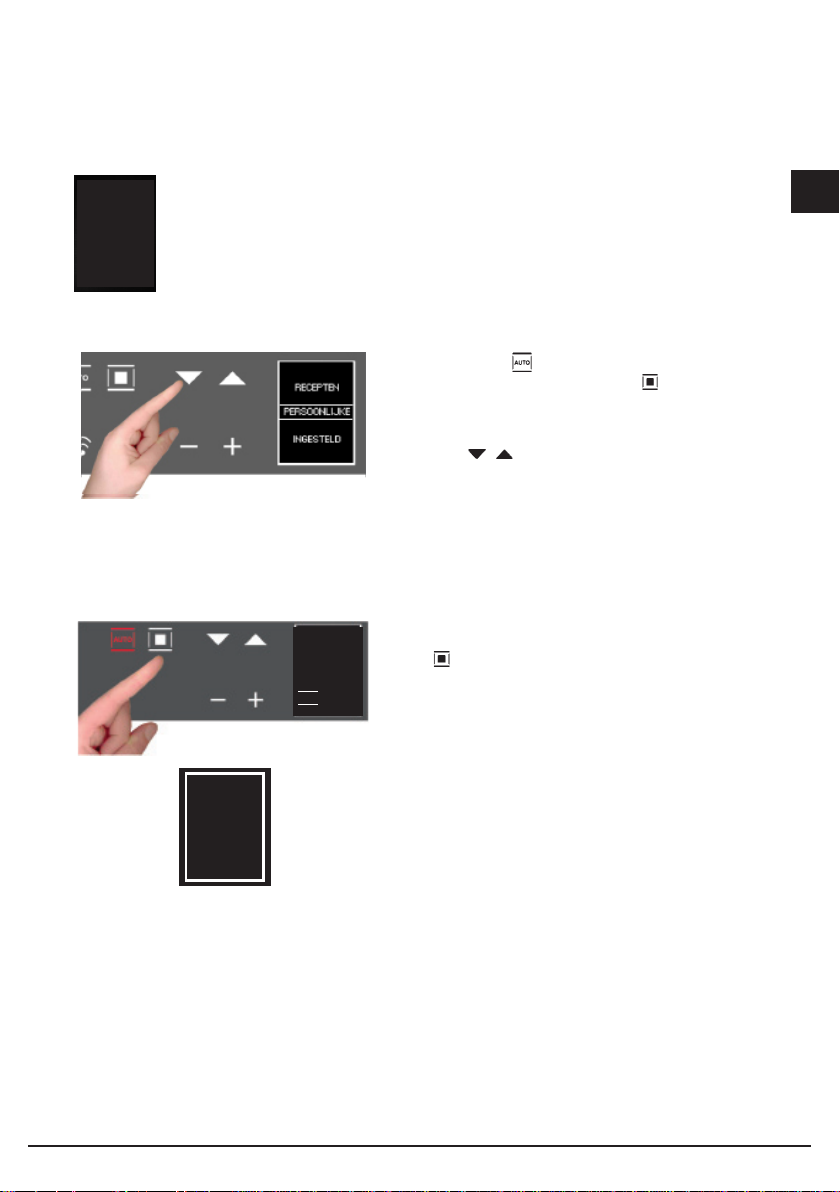
AUTOMATISCHE FUNCTIES: RECEPTEN
Volg deze procedure om toegang te krijgen tot de recepten functie.
Toets AAN/UIT (
Selecteer de AUTOMATISCH ( ) functie;
);
De display laat 2 opties zien:
- persoonlijke recepten;
- vooringestelde recepten
Kies de gewenste optie met de toetsen;
Gebruik de Toets, om uw keuze te bevestigen;
Het volgende menu verschijnt;
toets de knoppen om het gerecht te kiezen en de
knop om de keuze te bevestigen.
Toets de knoppen om het type te kiezen en de knop om
de keuze te bevestigen.
NL
Toets de
de keuze te bevestigen.
et scherm om gewicht in te stellen verschijnt.
Toets de knoppen om het type te kiezen en de knop om
de keuze te bevestigen.
knoppen om het type te kiezen en de
knop om
27GB27
Page 28
Wanneer alles is ingesteld, laat de display zien welk recept is
NL
gekozen. De dubbele punt in de kooktijd (00:30) zal knipperen om
aan te geven dat het kan worden aangepast.
Om het te veranderen, gebruik de - + toetsen.
Of selecteer de functie direct waarna het ingestelde programma
direct start met terugtellen vanaf een preset tijd op de display.
LET OP: bepaalde recepten gebruiken voorverwarming, waarbij u het gerecht
PROGRAMMA
TEN EINDE
HET GERECHT
UITHALEN
pas in de oven plaatst als de gewenste temperatuur is bereikt en de display
“VOORVERFWARMING TEN EINDE HET GERECHT INBRENGEN” laat zien.
De piep en de tekst “PROGRAMMA TEN EINDE GERECHT UITHALEN” op de display
geeft aan dat het programma beëindigd is. Druk op een willekeurige toets, of open de
deur om het piepen te stoppen..
OPMERKING: Als u een fout maakt, of iets wilt veranderen in de gekozen in stelling, kunt u op ieder moment , de
toets indrukken, wat het mogelijk maakt opnieuw te beginnen met de procedure.
RECEPT
OPSLAAN?
NEE JA
Hoe u recepten bewaart ziet u in het volgende hoofdstuk.
PERSOONLIJKE RECEPTEN
Nadat u een recept heeft gebruikt, kunt u dit (met behoud van ingesteld gewicht en kooktijd) opslaan, in de persoonliijke
gerechten. Zodra de oven klaar is met een ingesteld recept; komt de volgende melding op de display:
• -Met de + toets kiest u “JA”
• bevestig met de toets, De verbruikte tijd wordt nu weergegeven
• verander dit met de + en – toets en bevestig met de toets., Nu wordt het gewicht
getoond
• verander dit eventueel met de + en – toets toets, u krijgt nu de melding “Recipe
saved POS. 1/1, en zo verder, oplopend genummerd.
RECEPT
OPSLAAN?
NEE JA
Elke keer dat u nu de persoonlijke recepten kiest, zult u dit recept terug vinden.
28GB28
Page 29
GEHEUGEN VOL
ONMOGELIJK
OPSLAAN
Als het geheugen vol is, kunt u geen recept meer opslaan en krijgt u de melding “memory full
unable to save”
Voor dat u nu weer recepten kunt opslaan moet u eerst oude recepten verwijderen.
• - selecteer de functie;
• - ga dan, door het indrukken van de toets naar het
“persoonlijke recepten” gedeelte, waar de opgeslagen
recepten zijn te vinden;
- gebruik de knoppen om door het menu te
bladeren, en het recept te selecteren dat u wilt verwijderen
OPMERKING: de namen worden door het menu bepaald.
Het scherm zal standaard op “NEE” staan, maar door op de +
RECEPT
VERWIJDER.?
NEE JA
en – toets te drukken kunt u “JA” selecteren en dit bevestigen
met de toets.
NL
RECEPT
VERWIJDERD
- De display geeft aan dat het recept is verwijderd.
29GB29
Page 30
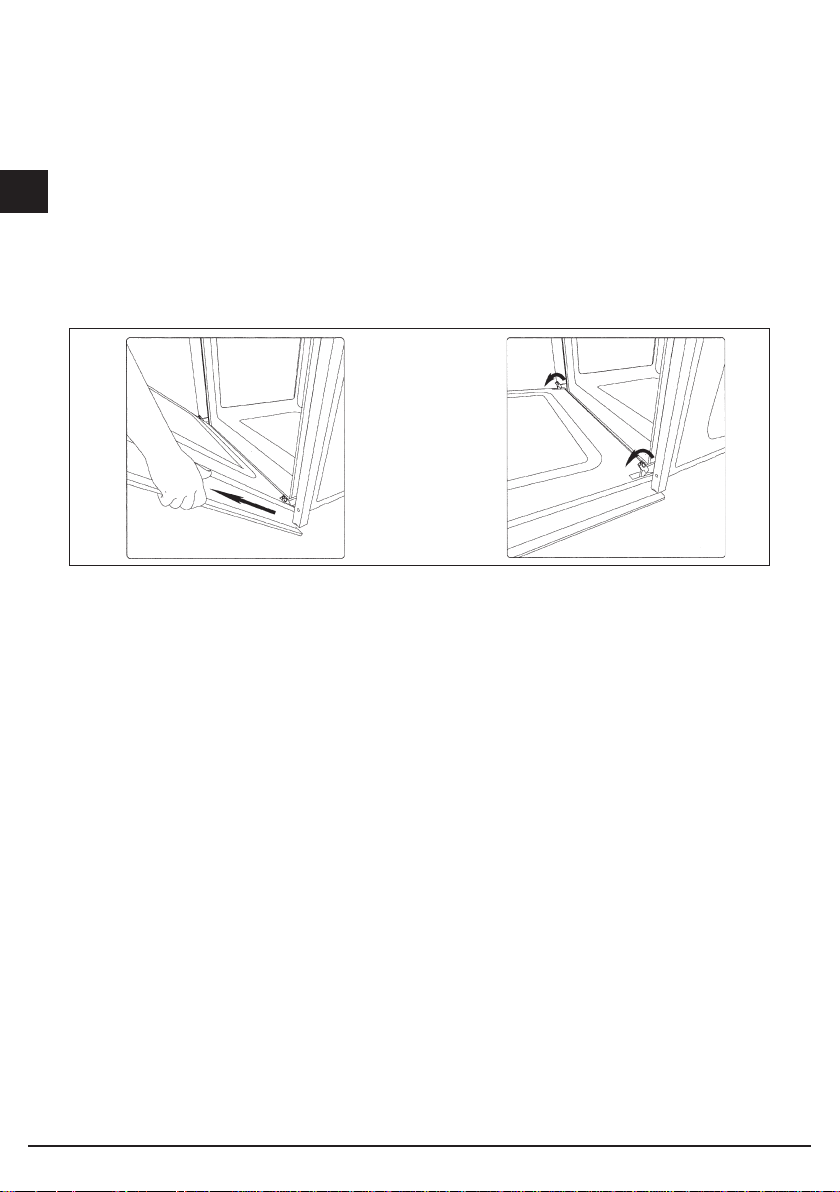
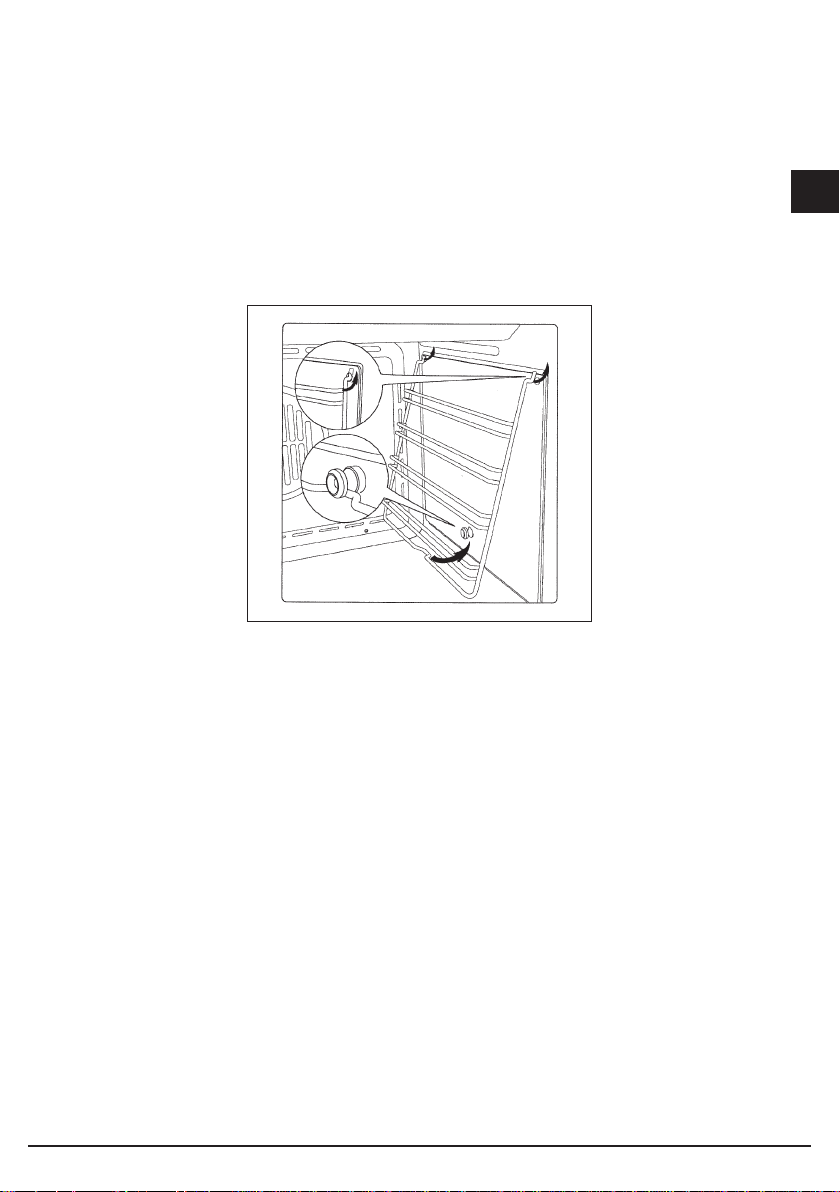
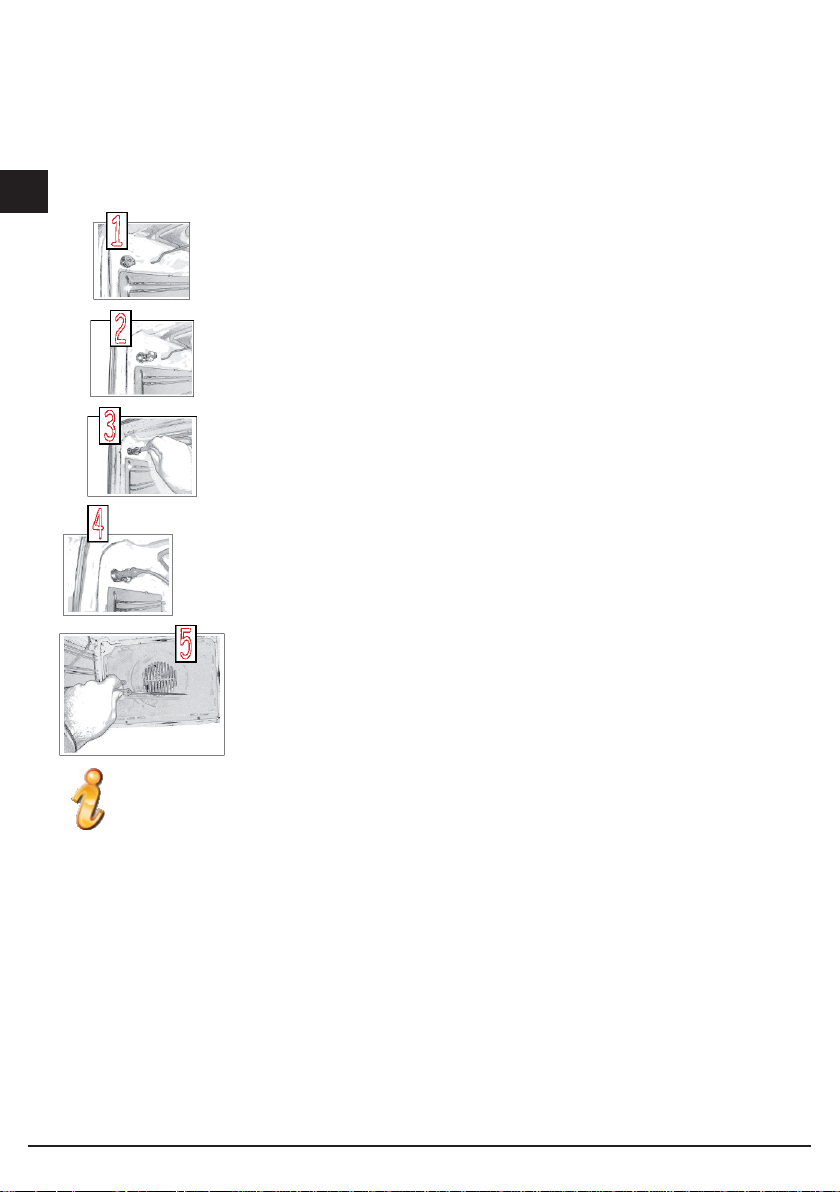
Uitnemen van de ovendeur.
NL
De deur kan snel en eenvoudig worden verwijderd. Om dit te doen, gaat u als volgt te werk:
- Open de deur.
- Til de twee hendels zoals in in Fig. hieronder;
- Sluit de deur op de eerste aanslag (veroorzaakt door het verhoogde hefbomen).
- Til de deur naar boven en naar buiten om deze te verwijderen uit de bevestigingen.
Voor het vervangen van de deur, hang de scharnieren in hun bevestigingen en verlaag de twee hendels.
30GB30
Page 31

HET VERVANGEN VAN DE OVEN LAMP.
Belangrijk:
Voor het vervangen van de lamp dient u de oven spanningsloos te maken.
De lamp moet aan de volgende eisen voldoen: 300 graden, 230 volt, 25 Watt, G9 connector.
- Gebruik een schroevendraaier om het glas dat voor de lamp zit los te wippen.
- Neem de oude lamp uit. Let op dat u het glas niet breekt.
- Plaats de nieuwe lamp op de plaats van de oude, zonder het glas met de vingers aan te raken!
(U kunt bijvoorbeeld een latex handschoen dragen). Huidvet zal de lamp in zeer korte tijd
vernietigen!
- Plaats het glas dat voor de lamp hoort weer terug en druk dit stevig aan.
- Zet de spanning weer op de oven.
NL
31GB31
Page 32

Installatie instructies
De oven kan geïnstalleerd worden onder een kookplaat, in een
NL
schroeven en bussen. Let er bij het plaatsen op dat er voldoende
ventilatie openingen in plint en kast moeten worden gemaakt, om
een goede ventilatie te waarborgen.
meubel, of in combinatie met een borden warmer
in een 60 cm gat. De afmetingen van de ruimtes
worden vermeld in de tekening hieronder. Het
materiaal waar de kast van gemaakt is, moet
bestand zijn tegen de afgegeven hitte. De oven
moet gecentreerd worden in de kast, en daarna
vastgeschroefd worden met de meegeleverde
32GB32
Page 33

33GB33NL34GB34
Page 34

ELEKTRISCHE AANSLUITINGEN
Voordat u de oven aansluit op het lichtnet, zorg dan dat:
- De voedingsspanning overeenkomt met de gegevens op het plaatje op de voorzijde van de oven.
- De netvoeding een eciënte aarde (massa) verbinding heeft die voldoet aan alle van toepassing
zijnde wet- en regelgeving.
NL
De juiste aarding (massa) is een wettelijke verplichting. De kabel mag een temperatuur van 50 ° C
boven de omgevingstemperatuur niet bereiken op elk punt in de lengterichting.
Indien een vast toestel niet is voorzien van een stroomkabel met een stekker, of een andere inrichting
die kan worden losgekoppeld van het elektriciteitsnet, met een kloof tussen de contacten groot genoeg
om klasse III overspanningsbeveiliging te garanderen, dan zal een dergelijk apparaat moeten worden
gemonteerd op de stroomvoorziening voor de naleving van de regelgeving voor elektrische installaties.
Het stopcontact of de schakelaar moet makkelijk te bereiken zijn als de apparatuur geïnstalleerd is.
N.B. De fabrikant wijst elke aansprakelijkheid voor schade en/of letsel als bovenstaande instructies
niet worden opgevolgd.
TYPE EN MINIMALE DIAMETER VAN DE KOPERDRADEN
SASO
H05RR-F 3x1,5 mm² H05RR-F 3x2,5 mm²
H05VV-F 3x1,5 mm² H05VV-F 3x2,5 mm²
H05RN-F 3x1,5 mm² H05RN-F 3x2,5 mm²
H05V2V2-F 3x1,5 mm² H05V2V2-F 3x2,5 mm²
Page 35

Dear Customer,
we would like to thank you and congratulate
you on your choice.
This new product has been carefully
designed and built using top quality
materials, and meticulously tested to ensure
that it meets all your culinary requirements.
Please read and observe these simple
instructions, which will enable you to
achieve excellent results from the very
first time you use it. This state-of-the-art
appliance comes to you with our very best
wishes.
THE MANUFACTURER
NL
Nederlands
EN
English
Italiano
I
FR
Français
DE
Deutsch
EN
THIS PRODUCT IS DESIGNED FOR DOMESTIC
USE. THE MANUFACTURER DECLINES ALL
RESPONSIBILITY FOR DAMAGES TO THINGS
OR PEOPLE DERIVING FROM INCORRECT
INSTALLATION OR IMPROPER, ERRONEOUS OR
UNSUITABLE USE.
THE APPLIANCE MUST NOT BE USED BY PEOPLE
(INCLUDING CHILDREN) WITH PHYSICAL,
SENSORIAL OR MENTAL IMPAIRMENTS,
OR BY PEOPLE WITHOUT THE NECESSARY
EXPERIENCE OR KNOWLEDGE, UNLESS THEY
ARE SUPERVISED OR INSTRUCTED IN THE USE
OF THE APPLIANCE BY A PERSON RESPONSIBLE
FOR THEIR SAFETY.
THE APPLIANCE AND ITS ACCESSIBLE PARTS
BECOME VERY HOT DURING USE. BE CAREFUL
NOT TO TOUCH THE HEATING ELEMENTS INSIDE
THE OVEN. CHILDREN UNDER 8 YEARS OF AGE
MUST BE KEPT AWAY IF NOT CONTINUALLY
MONITORED.
DO NOT PLACE POTS OR PANS OR ALUMINIUM
OR SIMILAR METAL FOILS IN CONTACT WITH THE
BASE OF THE OVEN FOR COOKING.
THE HEATING ACTION OF THE LOWER HEATING
ELEMENT CAUSES OVERHEATING OF THE
LOWER PART OF THE OVEN CAUSING DAMAGE
AND SERIOUS CONSEQUENCES (RISK OF FIRE)
EVEN TO THE COUNTER UNDER THE OVEN .
DO NOT USE ROUGH ABRASIVES OR SHARP
METAL SCRAPERS TO CLEAN THE GLASS DOOR
OF THE OVEN BECAUSE THEY COULD SCRATCH
THE SURFACE AND CAUSE THE GLASS TO
SHATTER.
USE ONLY THE THERMAL PROBE RECOMMENDED
FOR THIS OVEN. DO NOT USE STEAM CLEANERS
TO CLEAN THE OVEN.
35
Page 36

Contents
User instructions, 37
The first time you use the oven, 37
Self-cleaning catalytic panels (Where present), 38
EN
Respect for the environment, 38
Introduction to the oven, 39
Installation and hook-up, 39
Before hook-up, 39
Demonstration mode, 39
Setting the clock, 40
Actions that are possible with the oven off, 41
Turning on the oven, 41
Key (or child safety) function, 42
Main functions, 43
Overview of the command panel, 43
The cooking functions, 43
Control panel functions, 44
Instructions for use, 45
Food probe, 47
Special functions: Boost, Clean , 52
Oven light control, 53
Simple cooking commands, 53
Setting the temperature, 54
Residual heat, 54
Programming the oven, 54
Timer programming: cooking time, 56
Automatic function: recipes, 59
Personalising recipes, 60
Removing the oven door, 62
IMPORTANT
The oven’s data plate is accessible even
with the oven fully installed. The plate is
visible simply by opening the door. Always
quote the details from it to identify the
appliance when ordering spare parts.
Installation instructions,
Install the oven in the counter 45, 64
Flush fitting 60, 65
Electrical connections, 66
36
Page 37

User instructions
The first time you use the oven
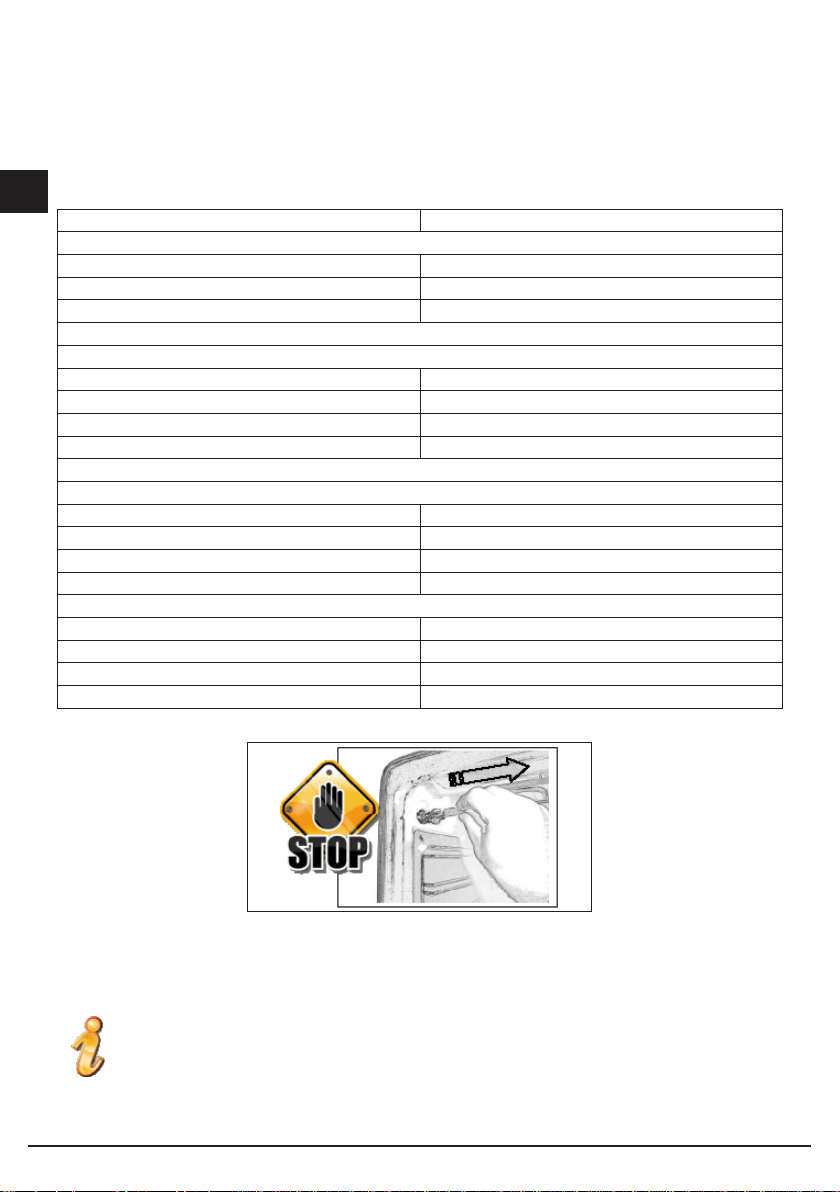
Clean the oven thoroughly with soapy water and rinse well. To remove the lateral frames from smooth-walled
ovens, proceed as shown in the figure.
Operate the oven for about 30 minutes at maximum temperature to burn off all traces of grease which might
otherwise create unpleasant smells when cooking.
Do not use rough abrasives or sharp metal scrapers to clean the glass door of the oven because they could
scratch the surface and cause the glass to shatter.
Important:
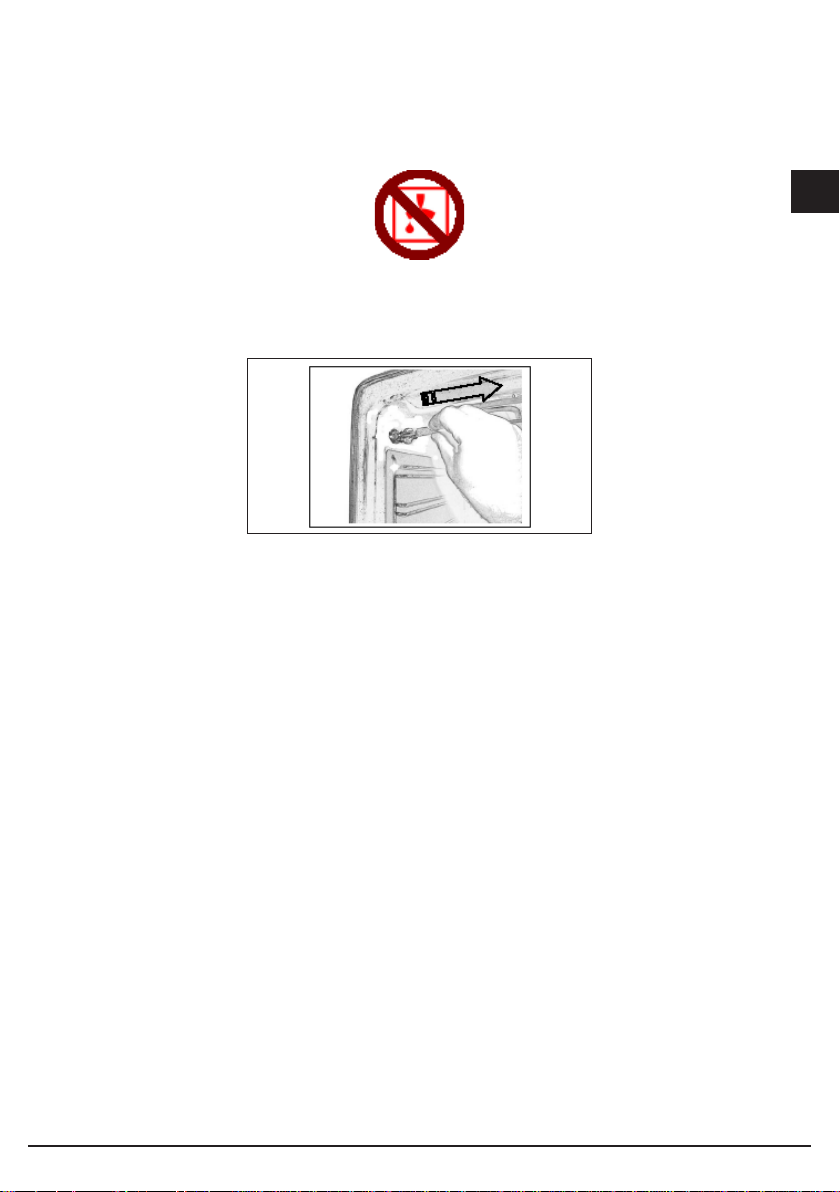
As a safety precaution, before cleaning the oven, always disconnect the plug from the power socket or the
power cable from the oven. Do not use acid or alkaline substances to clean the oven (lemon juice, vinegar,
salt, tomatoes etc.). Do not use chlorine based products, acids or abrasive products to clean the painted
surfaces of the oven.
Do not use steam cleaners to clean the appliance.
EN
37
Page 38

Self-cleaning catalytic panels (Where present)
EN
SELF-CLEANING PANELS
The CLEAN (where present) function activates the reaction
that causes cleaning.
Our smooth walled ovens can be fitted with selfcleaning panels to cover the inside walls.
These special panels are simply hooked on to the walls before the side frames are fitted. They are coated
in a special, micro-porous catalytic enamel which oxidises and gradually vaporises splashes of grease and
oil at cooking temperatures above 200° C.
If the oven is not clean after cooking fatty foods, operate the empty oven for 60 minutes (max.) at maximum
temperature.
Never wash or clean selfcleaning panels with abrasive, acid, or alkaline products.
Respect for the environment
The documentation for this appliance is printed on paper bleached without chlorine or recycled
paper to contribute to protecting the environment. The packaging was designed to prevent
damage to the environment; they are ecological products that can be recovered or recycled.
Recycling the packing saves raw materials and reduces the volume of industrial and domestic
waste.
THE PACKING MATERIAL is 100% recyclable and marked with the recycling symbol. Dispose of in
conformity with local law. The packing material (plastic bags, polystyrene parts, etc.) must be kept out of
the reach of children because it is potentially dangerous. THIS APPLIANCE is marked in conformity with
European Directive 2002/96/EC, Waste Electrical and Electronic Equipment (WEEE). By making sure that
this product is disposed of correctly, the user contributes to preventing potential negative consequences
for the environment and health.
THE SYMBOL on the product or accompanying documentation indicates that this product must not
be treated as domestic waste but must be delivered to a suitable collection point for the recycling
of electrical and electronic equipment.
DISPOSAL MUST BE MADE in conformity with local laws on waste disposal.
38
Page 39

FOR ADDITIONAL INFORMATION about the treatment, recovery and recycling of this product, contact
the local office of competence, the domestic waste collection service or the store where the product was
purchased.
BEFORE SCRAPPING, make it unusable by cutting the electrical cord.
Introduction to the oven
Dear Customer, your new oven is controlled by an electronic board that constantly monitors its operation
to improve its performance.
The touch controls are state-of-the-art, precise and reliable.
The interface is elegant, orderly and discrete, more intuitive than ever!
A few buttons, many functions and no combination or sequence is difficult to enter, so you can
concentrate on following the recipe and the oven is ready in two clicks!
Installation and hook-up
Dear Customer, this oven is a sophisticated electronic appliance, classified as a durable good. Its
installation requires qualified professionals for both the hook-up of the power line and itsplacement in
the kitchen counter.
(SEE ASSEMBLY INSTRUCTIONS ON PAGE 62)
Before hook-up
When the oven is connected to the electric mains for the first time, the display will ask you to select your
language;use the buttons to select the language you want;
use the button to confirm the choice;
EN
(from now on, the language choice will remain fixed even when their are power outages).
Now, it goes into demonstration mode.
Demonstration mode
This is the mode that the oven is normally in every time that there is a power failure and, consequently,
when it is first hooked-up:
the purpose is to show how you can control it with a recorded sequence of commands.
39
Page 40

In this mode, the oven is never REALLY turned on, i.e., the heating elements are never powered!
The control panel is INACTIVE and, so, the oven will not respond to commands!
EN
To disable the demonstration mode, touch the light
symbol for five seconds: the control will go to
normal operation and ready for turning on.
Now you can set the time but it is not necessary for
turning on the oven.
Setting the clock
The oven will signal that it is connected to the power mains with a double beep.
To set the system time, press the “TIMER FUNCTIONS” button for at least 3 seconds
Each command activated is confirmed by a beep.
Set the clock with the + and - buttons: during
setting the separator dots flash, the time has been
set when the dots remain steady on.
40
Page 41

ACTIONS THAT ARE POSSIBLE WITH THE OVEN OFF
- Turn on oven light
The oven light is turned on/off by touching the
symbol as shown in the figure.
- Change the Language
When the oven is off, you can change the language of the display by simultaneously selecting and
the + in the lower right for at least 3 seconds.
Then use to select the language and confirm the choice with .
- Setting the “minute-counter” timer function
See the appropriate section on page 58.
Turning on the oven
Turn the oven on by pressing the symbol shown
in figure.
to activate the oven functions, always press
except for the light and timer functions, which are
independent
The command activates all the icons by lighting up
their backgrounds.
NOTE: Remember that the oven only turns on if the key function is deactivated
EN
The word ON appears on the display for a minute. The control is waiting for you to select a
cooking function. Otherwise, the oven assumes that it was turned on by accident and, for
safety reasons, it automatically turns off displaying the word OFF for several seconds.
41
Page 42

Key (or child safety) function
EN
The key function is activated/deactivated by
pressing the button for at least 3 seconds.
You can activate and deactivate the operating
mode of the oven at any time.
The padlock OPEN symbol means that the key function is not active.
The padlock CLOSED symbol means that the key function is active.
42
Page 43

MAIN FUNCTIONS
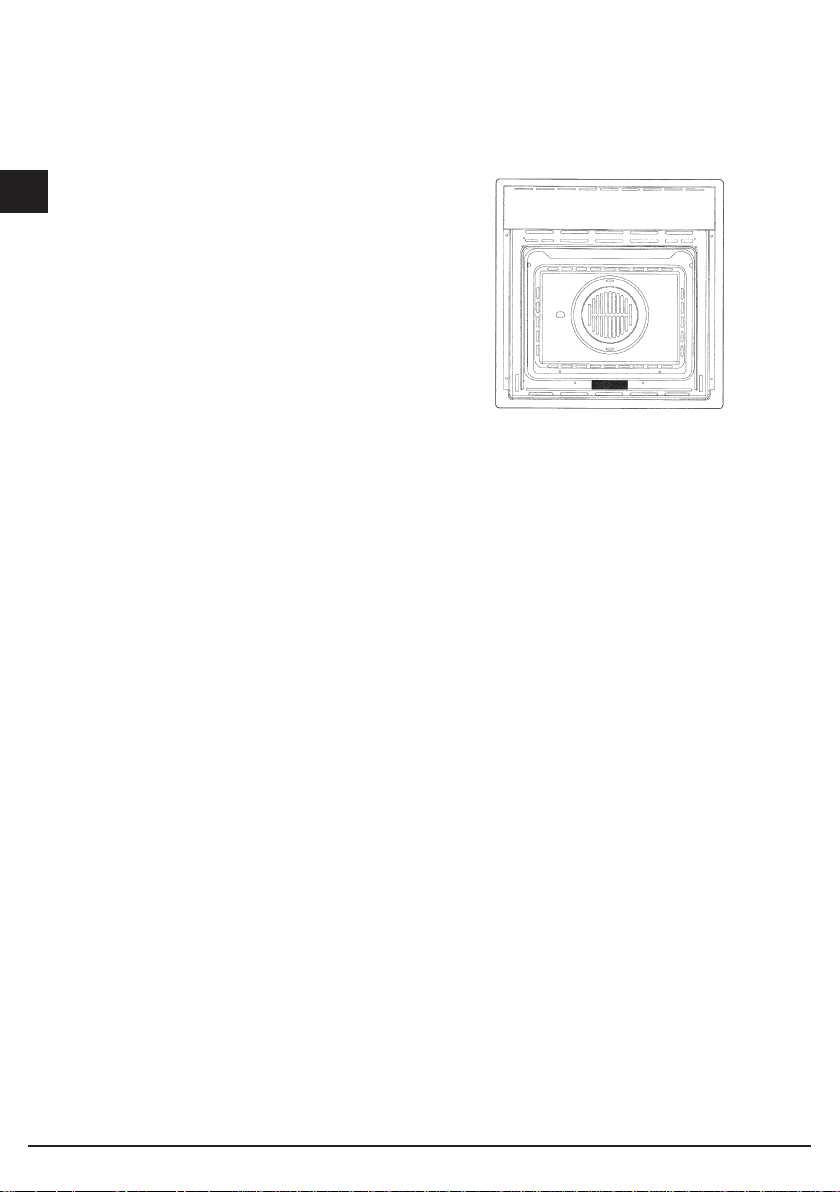
Overview of the command panel
EN
The cooking functions
The provides eleven specific cooking functions!
To activate a function, just touch the corresponding symbol.
Each function has a temperature setting selected on the basis of cooking tests of the recipes that are
typically used, which can be easily changed based on your own experience.
Attention:
“During use, the accessible parts of the oven can become very hot. Children should be kept
at a distance; you should also be careful not to touch the heating elements inside the oven.”
43
Page 44

Control panel functions
The oven lamp always turns on when the door is opened and, to save energy, it is managed
by the system in the other modes.
EN
Upper and lower heating elements. Preset to 190 °C. Regulation of the thermostat from
50° C to MAX
Lower heating element. Pre-set to 50 °C. Regulation of the thermostat from 50° C to MAX
Upper heating element (grill surface and reduced power). Preset to MAX. Regulation of the
thermostat from 50 °C to MAX.
Double heating element (large grill surface area). Preset to MAX. Regulation of the thermostat
from 50 °C to MAX.
Double upper heating element with fan (large grill surface area). Pre-set to 165 °C. Regulation
of the thermostat from 50 °C to MAX.
Upper heating element, lower with fan. Pre-set to 165 °C. Regulation of the thermostat from
50° C to MAX.
Circular heating element with fan. Pre-set to 165 °C. Regulation of the thermostat from 50° C
to MAX.
Lower heating element + Circular heating element with fan. Pre-set to 230 °C. Regulation of
the thermostat from 50° C to MAX.
Fan for defrosting. Regulation of the Thermostat from 0 to 60° C.
Access to preset recipes
Rapid preheating
Rapid cleaning (for ovens with self-cleaning catalytic panels)
The table below shows the results of the cooking tests conducted in our laboratories by a professional
cook. In any case, these are only indicative and the values that we have selected are only a starting
point for your to experiment with your own recipes to obtain better results!
44
Page 45

Instructions for use
Conventional cooking
A classic system that uses upper and lower heat suitable for cooking a single dish.
It is a good idea to insert the food when the oven has reached its preset temperature, i.e., when the °C
is locked and you have heard the beep.
If you need to lower or raise the temperature towards the end of cooking, press the most suitable
cooking symbol and adjust the temperature as you see fit.
We recommend opening the door as little as possible during cooking.
EN
45
Page 46

Fan cooking
In this type of cooking, a fan located in the rear part circulates warm air inside the oven, distributing it
uniformly. This cooks food faster than conventional cooking.
EN
This system is good for cooking on several shelves and even for different types of foods (fish, meat,
etc. ).
Defrosting
When you select ventilated cooking and set the temperature to 0 °C, the fan will circulate cold air inside
the oven, favouring the rapid defrosting of frozen foods.
Pre-heating is not necessary but it is better to do it for pastries (you can increase the temperature up
to 60 °C).
Grill cooking
Type of cooking for grilling or browning foods.
Some ovens can even have a motorised rod for cooking on a spit.
The grill with the food to be cooked is placed in the 1st or 2nd position from the bottom.
Pre-heat for 5 minutes. Regulate the temperature from 50 °C to MAX.
Cooling fan
The fan is located on the upper part of the oven and creates a flow of cooling air inside the cabinet and
across the front of the oven.
It starts when the oven chamber reaches about 80 °C.
The fan turns off when the temperature of the oven chamber falls below about 60 °C.
46
Page 47

Food probe (or probe thermometer)
TEMPERATURE PROBE
Tenderness, taste and flavour are the result of precise ad functional control.
The food probe is a thermometer which, when inserted into the food, makes it possible to check the
internal temperature and use it to establish the end of cooking.
For example, meat may look like it is cooked on the outside, but still be pink on the inside!
EN
The temperature reached by food during cooking is closely linked to problems relating to health and
hygiene. Bacteria can be contained in every kind of meat, poultry and fish, as well as raw eggs.
Certain types of bacteria make food go off, while others, such as Salmonella, Campylobacter jejuni,
Listeria monocytogenes, Escherichia coli and Staphylococcus aureus can be seriously harmful to
human health.
Bacteria multiply very quickly above a temperature of 4.4° up to 60°C. Mince is particularly at risk from
this point of view.
To prevent bacteria from multiplying, it is necessary to take the following measures:
•Donot defrost food at room temperature, always in the fridge or in the oven using the specic
function. In the latter case, cook the food immediately afterwards.
•Stuffchickenjustbeforeeatingit.Neverbuypre-packedready-stuffedchickenandonlybuyready-
cooked stuffed chicken when you intend to eat it within 2 hours.
•Marinatefoodinthefridge,notatroomtemperature.
•Useafoodprobetocheckthetemperatureofmeat,shandpoultryiftheyaremorethan5cmthick,
47
Page 48

to ensure that the minimum cooking temperatures are reached.
The greatest hazards are posed by poorly cooked chicken, particularly at risk from Salmonella.
•Avoid interrupting the cooking process, i.e., partially cooking food, storing it and completing
the cooking process later. This sequence encourages the growth of bacteria due to the “warm”
temperatures reached inside the food.
•Roastmeatandpoultryintheovenattemperaturesofatleast165°C.
EN
Using the food probe
The food probe socket is situated in the top front corner of the oven cavity,
protected by a metal cover (1).
Lift the metal cover (2)
Push the plug in as far as it will go. If it is correctly inserted, the control will
give off a double beep.(3)
Push the probe into the centre of the food, avoiding touching bones or fatty
areas.
Remember that the probe will not work if it is connected when the oven is already switched on!
48
Page 49

Select the best
cooking function for
your recipe.
EN
After 5 sec. the temperature display switches to
indicate the temperature of the food probe, i.e.,
the temperature which mustbe reached inside
the food.
With you can change the minimum required internal temperature in a range of +30 °C
to +99 °C but we recommend consulting the table below, which is taken from the “National
Food Safety Database (USA)”
49
Page 50

Remember that, if you want to change the temperature parameters of the food probe or the internal
temperature of the oven, you must proceed as follows:
•Select (white for the probe and red for the oven chamber)
•with you can increase or decrease the temperatures at will
EN
Whole chicken or chicken pieces 82°C
Whole turkey (not stuffed) 82°C
FOOD MINIMUM INTERNAL TEMPERATURE
Mince
Hamburger 71°C
Beef, veal, lamb, pork 74°C
Chicken, turkey 74°C
Beef, veal, lamb
Roasts and steaks:
Rare
Medium-rare 63°C
Medium 71°C
Well done 77°C
Chops, roasts, ribs:
Medium 71°C
Well done 77°C
Fresh ham 71°C
Fresh sausages 71°C
Duck 82°C
Turkey breast 77°C
The cooking temperature for rare meat is not indicated by
the NFSD as it is unsafe for health reasons
Pork
Poultry
If the plug is removed after cooking begins, the control blocks the oven and signals the error by
beeping: plug the probe in again to resume cooking!
When cooking with the aid of the food probe, all the pre-set temperatures are changed, to maintain
consistency with the philosophy of use, to 165°C: they can be varied from a minimum of 120°C to a
maximum of 250°C. For the same reason, the defrosting function is deactivated.
50
Page 51

The end of cooking, established by reaching the internal temperature set for the food probe. All the
oven programming functions (timer functions) are stopped, apart from the beeper (minute counter).
When the food probe detects the temperature for which it was set, the oven is automatically turned off
and you are notified by a beep and “Program finished remove the dish” on the display.
When the cooking time is up, remember to disconnect the food probe and remove it from the oven.
CAUTION: the probe is very hot after cooking.
EN
51
Page 52

Special functions
Boost (quick preheat)
EN
BOOST – FAST TIMES
To shorten cooking times with fast pre-heating
This special function can be activated after selecting a cooking function and is used to reduce the time
required to reach the set cooking temperature.
It is possible to disconnect the turbo heat function “BOOST“ or change cooking function at any time.
Clean (quick cleaning)
ASSISTED CLEANING
High temperature cycle (250°C), combined with self-cleaning panels for
gentle, non-invasive cleaning of the cooking chamber.
Correct operation is combined with the use of the lateral panels and catalytic fan cover: the oven is
treated with special enamel with a micro-porous structure, which breaks down the fat projected thanks
to a catalytic oxidisation process which transforms residues into gaseous products.
The turbo clean function is only activated when no cooking function has been selected, so: switch on
the oven and touch the symbol as shown in the figure for five seconds.
52
Page 53

The cleaning process takes place at a temperature of 250°C and lasts one hour. Do not use
it for cooking food!!
The oven light is activated and can be switched off and on again at any time.
All the self-cleaning panels will perform effectively for thirty cleaning processes, after this limit the
panels must be replaced.
The panels should be cleaned exclusively with tap water and replacements can be ordered from your
specialised dealer.
Oven light control
The light control is active on all the cooking functions and is independent, meaning that it can be
switched on or off to suit your requirements, when you want!
The oven light is usually kept on throughout the heating time and then for three minutes after reaching
the temperature set. From then on, the oven light switches off to save power.
To check the cooking, it may be necessary to switch on the internal light. All you have to do is touch the
light symbol: the light will stay on for three minutes and then switch off automatically. Naturally you can
switch it off immediately by touching the light symbol again.
Some models are equipped with a door control. This feature uses sensor technology to detect the
position of the door to control the oven light: the opening of the door is indicated by a beep and the
light comes on. It switches off when the door is closed again.
EN
Simple cooking commands
Thanks to state-of-the-art controls, only two touches are required to set a cooking mode: turn on the
oven and select the most suitable function for the dish you are about to cook… you choose it and you
touch it!
53
Page 54

EN
The control suggests a temperature for each function, which you can change at any time, but
if you consider it suitable, you don’t need to do anything else, the oven will start by itself in just
a few seconds!
Setting the temperature
The uses a temperature probe that is accurate to ±5 °C for the maximum reliability of the cooking
temperatures requested.
You can change the temperature at any time. After selecting the cooking function, just touch the
symbols and the setting range varies from +50 °C to MAX.
You don’t need to confirm the change, the control turns on by itself after a few seconds.
During heating, the centigrade symbol (°C) flashes
to indicate that it is heating up to reach the selected
temperature. When the temperature is reached, it
beeps.
NOTE: some models may display the current temperature in the oven until the temperature set is
reached. If you want to check the temperature set, press any one of the buttons and, if you wish,
you can use them to change the temperature set.
54
Page 55

Residual heat
While cooking food, the structure of the oven stores heat. This heat is kept isolated from the rest of the
kitchen thanks to generous heat insulation and certain construction techniques.
This heat is gradually dissipated over time and can still be a resource in the kitchen, if it is managed:
the control shows the internal temperature after the oven is turned off until it falls to 50 °C.
Use this characteristic to keep foods warm or to complete their cooking gently!
PROGRAMMING THE OVEN
The programming of the oven provides three modes for controlling the cooking time. They can be used
in combination with normal cooking functions.
The functions can be selected in sequence, from left to right, by
touching the clock symbol.
At each touch, a symbol lights up in sequence.
EN
55
Page 56

Timer programming: cooking time
EN
Once the cooking time is entered, the display will flash the current time again and
the “cooking time” symbol will be lit.
Touch the timer symbol once and the relative
symbol will light up. Plus, the clock display
will replace the current time:
The separator dots flash to indicate that you
can program the cooking time.
The countdown begins now. After the indicated time has elapsed, the oven will beep and the heating
elements, and cooking, will be turned off. The following words will appear on the display: “Program
finished remove the dish”: press any button to stop the beeping or open the door.
After one minute, the oven will automatically turn off, if other cooking functions have not been set.
Timer programming: end-of-cooking time
Touch the timer symbol two times and the
relative symbol will light up.
The separator does will flash to indicate that
you can set the end-of-cooking time.
56
Page 57

Set the end-of-cooking time by touching the
“+” and “-” symbols.
Once the end-of-cooking time is entered, the display will flash the current time
again and the “end-of-cooking time” symbol will be lit.
The countdown starts now. When the set time has been reached, the oven will beep and the heating
elements will turn off, ending cooking. The following words will appear on the display: “Program finished
remove the dish”: press any button to stop the beeping or open the door.
After eight seconds, the oven will automatically turn off, if other cooking functions have not been set.
Timer programming: delayed cooking
By combining the two modes, “cooking time” and “end-of-cooking time”, you can program the oven so
that cooking starts later than the current time.
For example, if you want to go out at 8:30 and you want a roast to be ready when you return at 13:00,
do this:
Prepare the roast for cooking and put it in the oven
EN
Turn on the oven, select the cooking function and set the temperature.
Then set the cooking time, which we assume
to be two hours.
57
Page 58

Now, set the end-of-cooking time: the
control normally adds the cooking time
to the current time, so it proposes an
end-of-cooking time, which in our case
EN
Change the end-of-cooking time to what you want,
in our example 13:00
The oven goes to standby mode, turning off the oven light.
The control automatically turns the oven on at 11:00 (13:00-2:00) and turns it off at
13:00. The roast will be ready when you return!
would be 10:30 (8:30+2:00).
Programming the timer: minute-counter
The minute-counter is a function of the timer that is independent from the operation of the oven, i.e., it
does not stop cooking or turn off the oven but functions as an alarm. You can set it at any time, such as
to remind you when to check cooking on the burners, in addition to the oven, or for other kitchen tasks.
It is even available when the oven is off and, in this case, just touch the timer function symbol one time.
But, if you are using it with the oven on, you must touch the time function symbol three times:
The separator dots flash to indicate you can set the
time.
Touch the “+” and “-” symbols to set the minutes.
The countdown starts now. After the indicated time passes, the over will and the dedicated symbol will
flash: press any button to stop the beep.
Programming the timer: cancelling the program
To cancel a program, you must set the previously assigned value to zero or turn on the oven.
58
Page 59

Automatic functions: recipes
To access the recipe function, proceed as follows:
Turn on the oven with ;
Select the AUTOMATIC function
The display shows the 2 options:
- personal recipes;
- preset recipes
Choose the desired setting with the buttons;
using the button, confirm the choice;
the following menu appears;
press the buttons to select the type of dish and the button
to confirm the choice.
Press the buttons to select the type and the to confirm
the choice.
EN
Press the buttons to select the type and the to confirm
the choice.
The weight screen appears. Use the buttons to select the
preset values and confirm the choice with the button.
59
Page 60

When finished with the settings, the display summarizes the recipe
set. The colon in the cooking time (00:30) will be flashing to indicate
that it can be changed.
To change it, use the - + buttons.
EN
ATTENTION: certain recipes use pre-heating, so put the dish in when the oven has
reached the set temperature and the display shows “PRE-HEATING FINISHED PUT IN
THE DISH”
When cooking is finished the display will flash “PROGRAM FINISHED REMOVE THE
Note: at any moment, if you make a mistake choosing the values and/or you want to change the settings of your
recipe, you can select which cancels it and allows you start over from the beginning of the procedure.
NOTE: If you are cooking with the modified parameters of a pre-set recipe, while the oven beeps at the end of
cooking, you will see:
DISH” and, at the same time, the oven will beep until you press a key or open the door.
see how to save recipes in the next paragraph.
Or select the function directly and, in this way, the cooking
program starts with a countdown of the preset time on the display.
Personalising recipes
Once you have changed the cooking time of a preset recipe and executed it, you can save it for the
next by storing the new parameters you used (weight and cooking time).
At the end of the cooking cycle of the modified recipe, the icon below will appear and, to save it,
proceed as follows:
- with the + key select “YES”
- confirm with the time used is displayed,
- change it with + and - and confirm with , the weight used appears,
- change it with + and - and confirm with , you will see the message
“Recipe saved POS. 001”, and so on, in ascending order
Each time you access the “PERSONAL RECIPES” menu, you will find it saved in your recipes.
60
Page 61

If there is insufficient memory for saving your personal recipes, you will see this
message displayed: “MEMORY FULL UNABLE TO SAVE”.
Before saving your recipe, you must delete others from the menu in this way:
- select the function ;
- select the “PERSONAL RECIPES” section where you
will find all the saved recipes;
- with scroll the menu and select the recipe that
you want to delete.
Note: the menu provides the names by default;
When the recipe to be deleted is displayed, select
holding it down until the next screen appears:
By default, the selection will be set to NO, but, by
pressing the + and - scroll keys, select YES and confirm
with ;
- The display tells you that the recipe has been deleted;
EN
61
Page 62

Removing the oven door
The oven door can be removed quickly and easily. To do so, proceed as follows:
- Open the door fully.
- Lift the two levers shown in Fig. below;
- Close the door as far as the first stop (caused by the raised levers).
EN
- Lift the door upwards and outwards to remove it from its mountings.
To replace fit the door, fit the hinges in their mountings and lower the two levers.
Replacing the oven lamp
IMPORTANT: disconnect the appliance from the power supply line to avoid electrical shocks!
The oven lamp must have precise characteristics:
a) Structure suitable for high temperatures (up to 300 °C);
b) Power supply: see the V/Hz value on the serial number plate;
c) Power 25W;
d) Type G9 connector.
- To avoid damage, spread a tea towel for pots and pans inside the oven;
62
Page 63

- Use a screwdriver to detach the glass pressure fitted on the lamp holder;
- Remove the old lamp by sliding it out of its seat and taking care not to break it;
- Insert the new bulb taking care not to touch it with your hands (we recommend using a disposable
latex glove);
- Reattach the glass cover, pressing it firmly into the lamp holder until it is totally inserted in the joint;
- Connect the power line to the appliance.
EN
63
Page 64

Installation instructions
Installing the oven in a cabinet 45
The oven can be installed under a cook top, in a column, or
combined with the relative food-warmer drawer. The dimensions
of the cabinet must be as shown in the figures below. The cabinet
EN
material must be able to withstand the heat.
The oven must be centred with respect to the walls of the cabinet
and fastened with the screws and bushings provided as shown in
the figure to the side, taking care not to force the screws too much,
breaking the bushings.
64
Page 65

Flush fitting 60
The oven can be installed under a work top or in a cooking column. Figure shows the installation
dimensions.
Make sure that surrounding materials are heat resistant. Align the oven centrally with respect to the side
walls of the units surrounding it and fix it in place with the screws and Allen screws provided.
See the accompanying instructions for combining the oven with multi-functional gas or gas-electric
cookers.
EN
65
Page 66

Electrical connections
Before connecting the oven to the mains power supply, make sure that:
- The supply voltage corresponds to the specifications on the data plate on the front of the oven.
- The mains supply has an efficient earth (ground) connection complying with all applicable laws and
regulations. Correct earthing (grounding) is a legal requirement.
EN
The power cable should never reach a temperature 50° C above ambient temperature at any point
along its length.
If a fixed appliance is not provided with a power cable and plug, or some other device permitting it
to be disconnected from the mains electricity supply, with a gap between the contacts big enough to
guarantee class III overvoltage protection, then such a device must be fitted to the power supply in
compliance with the regulations governing electrical installations.
The socket or switch must be easily reachable with the oven fully installed.
N.B. The manufacturer declines all responsibility for damage or injury if the above
instructionsntinfortunistiche non vengano rispettate.
CABLE TYPES AND MINIMAL DIAMETERS
SASO
H05RR-F 3x1,5 mm² H05RR-F 3x2,5 mm²
H05VV-F 3x1,5 mm² H05VV-F 3x2,5 mm²
H05RN-F 3x1,5 mm² H05RN-F 3x2,5 mm²
H05V2V2-F 3x1,5 mm² H05V2V2-F 3x2,5 mm²
66
Page 67

Caro Cliente,
sentitamente La ringraziamo e ci
congratuliamo per la scelta da Lei fatta.
Questo nuovo prodotto, accuratamente
progettato e costruito con materiali di
primissima qualità, e stato accuratamente
collaudato per poter soddisfare tutte le Sue
esigenze di una perfetta cottura.
La preghiamo pertanto di leggere e
rispettare le facili istruzioni che Le
permetteranno di raggiungere eccellenti
risultati sin dalla prima utilizzazione.
Con questo moderno apparecchio Le
formuliamo i nostri più vivi auguri.
IL COSTRUTTORE
NL
Nederlands
EN
English
Italiano
I
FR
Français
DE
Deutsch
I
QUESTO PRODOTTO È STATO CONCEPITO PER
UN IMPIEGO DI TIPO DOMESTICO.
IL COSTRUTTORE DECLINA OGNI
RESPONSABILITÀ NEL CASO DI EVENTUALI
DANNI A COSE O PERSONE DERIVANTI DA UNA
NON CORRETTA INSTALLAZIONE O DA USO
IMPROPRIO, ERRONEO OD ASSURDO.
L’APPARECCHIO NON DEVE ESSERE USATO DA
PERSONE (COMPRESI BAMBINI) CON RIDOTTE
CAPACITÀ FISICHE, SENSORIALI O MENTALI, O
DA PERSONE CHE MANCANO DELL’ESPERIENZA
E DELLE CONOSCENZE NECESSARIE SE NON
SOTTO LA SUPERVISIONE O DIETRO ISTRUZIONI
SULL’USO DELL’APPARECCHIO DA PARTE DI
UNA PERSONA RESPONSABILE PER LA LORO
SICUREZZA.
L’APPARECCHIO E LE SUE PARTI ACCESSIBILI
DIVENTANO MOLTO CALDE DURANTE L’USO. SI
DEVE PRESTARE ATTENZIONE A NON TOCCARE
GLI ELEMENTI RISCALDANTI ALL’INTERNO DEL
FORNO. I BAMBINI CON MENO DI 8 ANNI DI ETA’
DEVONO ESSERE TENUTI LONTANI SE NON
CONTINUAMENTE SORVEGLIATI.
VIETATO APPORRE PENTOLE O SIMILI, CARTA
STAGNOLA O SIMILI A CONTATTO CON LA BASE
DEL FORNO PER CUCINARE.
L’AZIONE DEL RISCALDAMENTO DELLA
RESISTENZA INFERIORE PROVOCA IL
SURRISCALDAMENTO DELLA PARTE BASSA DEL
FORNO PROVOCANDONE IL DANNEGGIAMENTO
E ADDIRITTURA GRAVI CONSEGUENZE (RISCHIO
DI INCENDIO) ANCHE SUL MOBILE DI SUPPORTO
DEL FORNO STESSO.
NON USARE PER LA PULIZIA MATERIALI RUVIDI
O ABRASIVI O RASCHIETTI METALLICI AFFILATI
PER PULIRE LE PORTE DI VETRO DEL FORNO
DATO CHE POSSONO GRAFFIARE LA SUPERFICIE
E CAUSARE LA FRANTUMAZIONE DEL VETRO.
USARE SOLO LA SONDA TERMICA
RACCOMANDATA PER QUESTO FORNO. NON
UTILIZZARE PULITORI A VAPORE PER LA PULIZIA
DEL FORNO.
67
Page 68

Indice
Istruzioni per l’utente, 69
Primo utilizzo, 69
Pannelli autopulenti, 70
Rispetto dell’ambiente, 70
Presentazione del forno, 71
Installazione e allacciamento,71
Primo allacciamento, 71
I
Modalità di dimostrazione, 71
Regolazione dell’orologio, 72
Azioni possibili a forno spento, 73
Accensione del forno, 73
Funzione chiave, 74
Funzioni Principali, 75
Panoramica del frontalino comandi, 75
Le funzioni di cottura, 75
Funzionalità del forno, 76
Istruzioni di funzionamento, 77
Sonda cibo, 79
Funzioni speciali: BOOST e CLEAN, 84
Controllo della luce forno, 85
Semplici gesti per cucinare, 85
Regolazione della temperatura, 86
Calore Residuo, 86
Programmazione del forno, 87
Programmazione timer, 88
Funzione automatico: ricette, 91
Personalizzazione ricette, 92
Smontaggio della porta del forno, 94
IMPORTANTE
La targhetta delle caratteristiche del forno
è accessibile anche ad apparecchio
installato. In questa targhetta, visibile
aprendo la porta, sono riportati tutti i dati
di identificazione dell’apparecchio a cui
si dovrà fare riferimento per richiesta di
ricambi.
Istruzioni per l’installatore,
Incasso del forno 45, 96
Incasso del forno 60, 97
Allacciamento elettrico, 98
68
Page 69

Istruzioni per l’utente
Primo utilizzo
Il forno va pulito a fondo con acqua e sapone e risciacquato accuratamente. Per togliere i telai laterali nei
forni con pareti lisce procedere come illustrato in figura.
Riscaldare il forno per circa 30 minuti alla massima temperatura; verranno così eliminati tutti i residui grassi
di lavorazione che potrebbero causare sgradevoli odori in fase di cottura.
Non usare per la pulizia materiali ruvudi abrasivi o raschietti metallici affilati per pulire le porte di vetro del
forno dato che possono graffiare la superficie e causare le frantumazione del vetro.
Importante:
come precauzione di sicurezza prima di procedere a qualsiasi operazione di pulizia del forno staccare
sempre la spina della presa di corrente o togliere la linea di alimentazione dell’apparecchio. Inoltre evitare
di usare sostanze acide o alcaline (succhi di limone, aceto, sale, pomodori ecc.). Evitare di usare prodotti
a base di cloro, acidi o abrasivi specialmente per la pulizia delle pareti verniciate.
Non utilizzare pulitori a vapore per la pulizia dell’apparecchio.
I
69
Page 70

Pannelli autopulenti catalici (dove presenti)
I
PANNELLI AUTOPULENTI
La funzione CLEAN (dove presente) attiva la reazione che
provoca la pulizia.
I nostri forni con pareti lisce hanno la possibilità di montare all’interno della muffola dei pannelli autopulenti
che ricoprono le pareti.
Questi speciali pannelli, da agganciare alle pareti prima dei telai laterali, sono ricoperti di uno speciale
smalto catalitico microporoso che ossida e vaporizza gradualmente gli schizzi di olio e grasso eliminandoli
durante le cotture sopra i 200° C.
Se dopo una cottura di cibi molto grassi il forno non è pulito, farlo funzionare a vuoto alla massima
temperatura per un tempo massimo di 60 minuti.
I pannelli autopulenti non devono essere lavati né puliti con prodotti abrasivi o prodotti contenenti acidi o
alcali.
Rispetto per l’ambiente
La documentazione del presente apparecchio utilizza carta sbiancata, senza cloro, oppure
carta ricilata allo scopo di contribuire alla protezione dell’ambiente.
Gli imballaggi sono concepiti per non danneggiare l’ambiente; possono essere recuperati o
riciclati essendo prodotti ecologici.
Riciclando l’imballaggio, si contribuirà ad un risparmio di materie prime e ad una riduzione del
volume degli scarti industriali e domestici.
IL MATERIALE DI IMBALLAGGIO è riciclabile al 100% ed è contrassegnato dal simbolo del riciclaggio. Per
lo smaltimento seguire le normative locali. Il materiale di imballaggio (sacchetti di plastica, parti in polistirolo,
ecc.) deve essere tenuto fuori dalla portata dei bambini in quanto potenziale fonte di pericolo. QUESTO
APPARECCHIO è contrassegnato in conformità alla Direttiva Europea 2002/96/CE, Waste Electrical and
Electronic Equipment (WEEE). Assicurandosi che questo prodotto sia smaltito in modo corretto, l’utente
contribuisce a prevenire le potenziali conseguenze negative per l’ambiente e la salute.
IL SIMBOLO sul prodotto o sulla documentazione di accompagnamento indica che questo
prodotto non deve essere trattato come rifiuto domestico, ma deve essere consegnato presso
l’idoneo punto di raccolta per il riciclaggio di apparecchiature elettriche ed elettroniche.
70
Page 71

LO SMALTIMENTO DEVE ESSERE EFFETTUATO seguendo le normative locali per lo smaltimento dei rifiuti.
PER ULTERIORI INFORMAZIONI sul trattamento, recupero e riciclaggio di questo prodotto, contattare
l’ufficio locale competente, il servizio di raccolta dei rifiuti domestici o il negozio presso il quale il prodotto
è stato acquistato.
PRIMA DELLA ROTTAMAZIONE, renderlo inservibile tagliando il cavo elettrico di alimentazione.
Presentazione del forno
Caro Cliente, il suo nuovo forno è gestito da una scheda elettronica che si occupa di monitorarne in
ogni istante il funzionamento per migliorarne le prestazioni, tutte.
Il controllo touch control è di ultima generazione, preciso, affidabile.
L’interfaccia è elegante, ordinata e discreta, più intuitiva che mai!
Pochi tasti, molte funzioni, nessuna combinazione o sequenza difficile di tasti, concentratevi a seguire
la ricetta, il forno è pronto con due gesti!
Installazione e allacciamento
Caro Cliente, questo forno è un apparecchio elettronico sofisticato, classificato come bene duraturo.
Necessita di essere installato da personale qualificato che operi secondo la regola dell’arte sia per gli
allacciamenti alla linea di alimentazione sia per l’installazione nel mobile della cucina.
(VEDI ISTRUZIONI DI MONTAGGIO A PAG. 96)
Primo allacciamento
Quando il forno viene collegato alla rete elettrica per la prima volta può apparire sul display l’indicazione
di quale lingua scegliere;
con i tasti selazionare la lingua desiderata;
con il tasto confermare la scelta.
I
(d’ora in avanti la lingua prescelta rimmarrà fissa anche per le successive mancanze di alimentazione).
Ora entra in funzione La modalità dimostrazione.
La modalità dimostrazione - DEMO MODE
Si chiama così la modalità nella quale il forno si presenta ogni volta che l’alimentazione viene a
mancare, e di conseguenza al primo allacciamento:
lo scopo è di visualizzare tutte le potenzialità del controllo con una sequenza registrata di comandi.
71
Page 72

In questa modalità il forno non vieni MAI azionato realmente, cioè non vengono accese le
resistenze termiche!!
Il pannello di controllo è INATTIVO e quindi il forno non risponderà ai comandi!
Per disabilitare la modalità dimostrazione toccare
per cinque secondi il simbolo luce: il forno
entrerà in funzionamento normale e pronto per
l’accensione.
I
Ora la regolazione dell’ora è possibile, ma non
necessaria, per procedere all’accensione del
forno.
Regolazione dell’orologio
Il forno segnalerà l’avvenuto collegamento alla rete elettrica con un doppio segnale acustico.
Per regolare l’ora di sistema tenere attivo il tasto “FUNZIONI TIMER” per almeno 3 sec.
Ogni comando attivato viene confermato da un segnale acustico.
Regolare l’orologio con i tasti + e - : durante
l’impostazione lampeggiano i puntini separatori,
l’ora viene acquisita quando i puntini divengono
fissi.
72
Page 73

AZIONI POSSIBILI A FORNO SPENTO
- Accensione luce del forno
La luce forno viene attivata/disattivata digitando il
simbolo come in figura.
- Cambio della Lingua
A forno spento è possibile cambiare la Lingua nel display selezionando
contemporaneamente e il tasto + in basso a destra per almeno 3 secondi.
Poi con scegliere la lingua e confermare la scelta con .
- Impostazione funzione timer “contaminuti”
Si consulti la sezione apposita a pag 26.
ACCENSIONE DEL FORNO
Il forno si accende agendo sul simbolo
schematizzato in figura.
per attivare le funzionalità del forno digitare sempre
a parte le funzioni luce forno e timer che sono
indipendenti
Il controllo attiva tutte le icone illuminandone lo
sfondo.
I
NOTA: ricordarsi che l’accensione avviene solamente se la funzione chiave è disattivata
Per un minuto dall’accensione appare la scritta ON sul display, il controllo aspetta che una
funzione di cottura venga scelta. In caso contrario interpreta l’accensione come accidentale
e, per motivi di sicurezza, spegne automaticamente il forno appare la scritta OFF sul display
per qualche secondo.
73
Page 74

Funzione chiave (o sicurezza bambini)
I
Il simbolo lucchetto APERTO specifica che la funzione chiave non è attiva.
Il simbolo lucchetto CHIUSO specifica che la funzione chiave è attiva.
La funzione chiave viene attivata/disattivata
digitando il tasto per almeno 3 secondi.
Si può attivare e disattivare in qualsiasi momento e
modo di funzionamento del forno.
74
Page 75

FUNZIONI PRINCIPALI
Panoramica del frontalino comandi
I
Le funzioni di cottura
Il controllo mette a disposizione ben tredici funzioni specifiche di cottura (a seconda del modello)!
Per attivare una funzione è sufficiente toccare il simbolo corrispondente. Ogni funzione ha una
temperatura impostata scelta in base a prove di cottura su ricette che tipicamente la utilizzano e
possono essere facilmente variate a seconda della propria esperienza.
Attenzione:
“Durante l’uso le parti accessibili del forno potrebbero diventare molto calde. I bambini dovrebbero
essere tenuti a distanza; si dovrebbe inoltre fare attenzione a non toccare gli elementi riscaldanti
all’interno del forno.”
75
Page 76

Funzionalità del forno
Lampada forno, si accende sempre quando si apre la porta e per risparmio energetico,
viene gestita dal sistema, nelle altre modalità.
Resistenza superiore ed inferiore. Preimpostata a 190°C. Regolazione del termostato,
da 50° C a MAX.
I
Resistenza inferiore. Preimpostata a 50°C. Regolazione del termostato da 50° C a MAX.
Resistenza superiore (grill superficie e potenza ridotta). Preimpostata a MAX. Regolazione
del termostato da 50° a MAX.
Doppia resistenza superiore (grill grande superficie). Preimpostata a MAX. Regolazione del
termostato da 50° a MAX.
Doppia resistenza superiore con ventilatore (grill grande superficie). Preimpostata a 165°C.
Regolazione del termostato da 50° a MAX.
Resistenza superiore, inferiore con ventilatore. Preimpostata a 165°C. Regolazione del
termostato da 50° C a MAX.
Resistenza circolare con ventilatore. Preimpostata a 165°C.Regolazione del termostato da
50° C a MAX.
Resistenza inferiore + Resistenza circolare con ventilatore. Preimpostata a 230°C.Regolazione
del termostato da 50°C a MAX.
Ventilatore per scongelamento. Regolazione del termostato da 0 a 60° C.
Accesso alle ricette pre-impostate
Preriscaldo Rapido
Rapida pulizia (per forni con pannelli autopulenti catalitici)
Nella seguente tabella indichiamo i risultati delle prove di cottura eseguite presso i nostri laboratori
da un cuoco professionista, in ogni caso si tratta di indicazioni e i valori che proponiamo servono per
partire a sperimentare le proprie ricette ed ottenere sempre i migliori risultati!
76
Page 77

Istruzioni di funzionamento
Cottura convenzionale
Sistema classico che utilizza calore superiore ed inferiore adatto per la cottura di un solo piatto.
E’ bene che il cibo venga inserito quando il forno ha raggiunto la temperatura prestabilita, cioè quando
si e’ bloccato il °C e avete udito un bip sonoro.
Se verso fine cottura si avesse necessità di incrementare la temperatura inferiore o superiore, digitare
il simbolo la cottura più idonea e regolare la temperatura come meglio credete.
Si consiglia di aprire il meno possibile la porta del forno durante la cottura.
I
77
Page 78

Cottura ventilato
Con questo tipo di cottura, un ventilatore posto nella parte posteriore fa circolare l’aria calda all’interno
del forno, distribuendola in modo uniforme. La cottura avviene più rapidamente rispetto alla cottura
convenzionale.
Il sistema risulta idoneo per la cottura su più ripiani ed anche per cibi di natura diversa (pesce, carne
ecc. ).
I
Scongelamento
Selezionando questa funzione di cottura ventilato e regolando la temperatura a 0°C, il ventilatore farà
circolare all’interno del forno aria fredda, favorendo così un rapido scongelamento dei cibi congelati.
Non e’ necessario il preriscaldamento, ma per pasticceria e’ preferibile farlo (potete aumentare la
temperatura fino a 60°C).
Cottura al grill
Tipo di cottura per la grigliatura o doratura dei cibi.
Alcuni forni possono essere completi di motorino asta e spiedo per cottura al girarrosto.
La griglia con il cibo da cuocere va inserito nella 1ª o 2ª posizione da sopra.
Preriscaldare per 5minuti. Regolare la temperatura da 50°C al MAX.
78
Page 79

Ventilatore di raffreddamento
Il ventilatore è posto sulla parte superiore del forno e crea un circolo d’aria di raffreddamento
all’interno del mobile e attraverso il frontale del forno stesso.
Entra in funzione quando la cavità del forno raggiunge i 80°C ca.
Lo spegnimento del ventilatore avviene quando la cavità del forno scende attorno i 60°C ca.
Sonda cibo (o termometro a sonda)
SONDA TEMPERATURA
La tenerezza, il gusto ed il sapore sono il risultato di un controllo preciso e
funzionale.
La sonda cibo è un termometro che, inserito nella pietanza, permette di controllarne la temperatura
interna e di usarla per stabilire la fine della cottura. Infatti può capitare che all’esterno la carne, ad
esempio, sembri ben cotta ma all’interno sia ancora al sangue!
I
79
Page 80

I
La temperatura raggiunta dai cibi, durante la cottura, è strettamente collegata con problemi di ordine
igienico/salutistico, infatti i batteri possono essere presenti in qualunque carne, così come nel pollame
nel pesce e nelle uova crude.
Alcuni batteri fanno andare a male il cibo, altri, come la Salmonella, Campylobacter jejuni, Listeria
monocytogenes, Escherichia coli e lo Staphylococcus aureus, possono nuocere, anche gravemente,
alla salute.
I batteri si moltiplicano molto rapidamente sopra i 4.4º e fino a 60ºC. La carne macinata è particolarmente
a rischio da questo punto di vista.
Per evitare la moltiplicazione dei batteri è necessario:
•Nonscongelareicibiatemperaturaambiente,manelfrigooppurenelfornoconl’appositafunzione.
In quest’ultimo caso cucinare il cibo immediatamente dopo.
•Riempire il pollame poco prima di mangiarlo; non acquistare pollame ripieno confezionato e
comprare il pollame ripieno già cotto solo se lo si mangerà entro 2 ore.
•Marinareilciboinfrigo,nonatemperaturaambiente.
•Usareunasondacibopercontrollarelatemperaturadellacarne,delpesceedelpollamesesono
più spessi di 5 cm in modo da accertarsi che vengano raggiunte le temperature minime di cottura.
I maggiori pericoli vengono dal pollame cotto male, particolarmente pericoloso per la Salmonella;
•Evitarediinterromperelacottura,cioèdicuocereparzialmente,conservareequindiniredicucinare
più tardi, è possibile che in questo modo si raggiungano nel cibo temperature “tiepide” favorevoli
alla crescita batterica.
•Arrostirelacarneedilpollameinfornoatemperaturedialmeno165°C.
Come utilizzare la sonda cibo?
La presa della sonda cibo è situata nell’angolo frontale in alto a sinistra della
cavità forno, protetta da un coperchio metallico (1).
Sollevare il coperchio metallico (2)
80
Page 81

Inserire lo spinotto fino in fondo: se inserito correttamente, il controllo avviserà
con un segnale acustico (3).
Inserire la sonda al centro del cibo, evitando di toccare ossa o parti grasse.
Tenete presente che la sonda cibo non funziona se viene connessa a forno già acceso!
I
Selezionate la
funzione di cottura
più idonea alla
vostra ricetta.
81
Page 82

I
Dopo 5sec. il display temperature si commuta
per visualizzare la temperatura della sonda
cibo cioè quella che dovrà essere raggiunta
all’interno della pietanza.
Con potete modificare il valore della temperatura interna minima richiesta in un
intervallo da +30°C a +99°C ma consigliamo di consultare la tabella sottostante presa dal
“THE NATIONAL FOOD SAFETY DATABASE (USA)”
Si ricorda che se durante la cottura vorrete cambiare i parametri della temperatura sia della Sonda cibo
che dell’interno del forno dovrete agire in questo modo:
•Selezionare (bianco per la sonda e rosso per la cavità del forno)
•con potrete incrementare o decrementare a vostro piacimento le temperature
ALIMENTO TEMPERATURA INTERNA MINIMA
Hamburger 71°C
Manzo, Vitello, Agnello, Maiale 74°C
Pollo, Tacchino 74°C
al sangue
media al sangue 63°C
media 71°C
ben cotta 77°C
Braciole, Arrosti, Costolette:
media 71°C
ben cotta 77°C
Prosciutto, fresco 71°C
Salsicce, fresche 71°C
Pollo, intero o a pezzi 82°C
Anatra 82°C
Tacchino intero (non ripieno) 82°C
Tacchino petto 77°C
Macinati
Manzo, Vitello, Agnello
Arrosti e Bistecche:
La temperatura per la cottura al sangue non viene riportata dal
NFSD perchè non sicura dal punto di vista sanitario
Maiale
Pollame
82
Page 83

Se lo spinotto viene tolto a cottura iniziata, il controllo blocca il forno e avvisa dell’errore con segnali
acustici: reinserire lo spinotto per riprendere la cottura!
Quando si cucina con l’ausilio della sonda cibo, tutte le temperature preimpostate vengono modificate,
per coerenza con la filosofia di utilizzo, a 165°C: si potranno variare da un minimo di 120°C al massimo
di 250°C. Per lo stesso motivo la funzione scongelamento viene disattivata.
La fine della cottura è discriminata dal raggiungimento della temperatura interna impostata per la
sonda cibo, tutte le funzioni di programmazione del forno (funzioni timer) vengono inibite, tranne la
funzione avvisatore acustico (contaminuti).
Quando la sonda cibo rileverà la temperatura per la quale è stata impostata, automaticamente il forno
verrà disattivato e verrete avvisati da un segnale acustico e sul display sarà visualizzato: “Programma
terminato estrarre la pietanza”.
Al termine della cottura ricordarsi di scollegare la sonda cibo ed estrarla dal forno.
ATTENZIONE : dopo la cottura la sonda e’ molto calda.
I
83
Page 84

Funzioni speciali
Boost (rapido preriscaldo)
BOOST - TEMPI RAPIDI
Per abbreviare i tempi delle cotture con un preriscaldamento rapido.
I
Questa funzione speciale è attivabile dopo aver selezionato una funzione di cottura ed il suo utilizzo
serve per diminuire il tempo necessario a raggiungere la temperatura impostata di cottura.
In ogni momento è possibile disinserire la funzione “BOOST” o cambiare funzione di cottura.
Clean (Solo per modelli con pannelli autopulenti)
CLEAN - PULIZIA ASSISTITA
Ciclo ad alta temperatura (250 °C), combinato con i pannelli autopulenti
per la pulizia dolce e non invasiva del vano cottura.
Il corretto funzionamento è abbinato all’utilizzo dei pannelli laterali e del copriventola catalitico: si
tratta di uno speciale smalto a struttura microporosa che decompone il grasso proiettato mediante un
processo catalitico di ossidazione che trasforma i residui in prodotti gassosi.
Il turbo clean si attiva solo se non è stata selezionata una funzione di cottura, quindi: accendere il forno
e toccare per cinque secondi il simbolo come in figura.
84
Page 85

Il processo di pulizia avviene ad una temperatura di 250°C per la durata di un’ora, NON
utilizzarla per la cottura dei cibi!
La luce forno viene attivata, è possibile in ogni momento spegnerla e riaccenderla.
Tutti i pannelli autopulenti hanno un’efficacia di rendimento pari a circa trenta utilizzi, dopo tale limite i
pannelli dovrebbero essere sostituiti.
I pannelli vanno puliti solamente con acqua corrente e possono essere richiesti al Vs. rivenditore
specializzato.
Controllo della luce forno
Il controllo della luce è attivo su tutte le funzioni di cottura ed è indipendente da esse cioè può essere
accesa o spenta, a seconda delle Vostre necessità, quando lo volete!
Normalmente la luce del forno è tenuta accesa durante il riscaldamento e poi per tre minuti dopo il
raggiungimento della temperatura impostata. A partire da quel momento la luce forno viene spenta per
motivi di risparmio energetico.
Per verificare la cottura può rendersi necessario accendere la luce interna, per questo basta toccare
il simbolo della luce: resterà accesa per tre minuti per poi spegnersi da sola, naturalmente potete
spegnerla subito dopo toccando nuovamente il simbolo luce.
In alcuni modelli è disponibile il controllo della porta .Questa caratteristica si avvale di una tecnologia
di rilevamento della posizione della porta per controllare la luce del forno: l’apertura della porta forno
viene segnalata da un segnale acustico e la luce viene accesa, viene poi spenta quando è richiusa.
Semplici gesti per cucinare
Bastano due semplici gesti per impostare una cottura grazie alla logica di controllo di ultima generazione:
accendere il forno e scegliere la funzione più idonea alla pietanza che state per cucinare…la scegliete
e semplicemente la toccate!
I
85
Page 86

I
Il controllo propone una temperatura per ogni funzione, è possibile in qualsiasi momento
modificarla, ma se la ritenete idonea non occorre fare altro, il forno si attiverà da solo in pochi
secondi!
Regolazione della temperatura
Il controllo si avvale di una sonda temperatura con precisione di ± 5°C per la massima affidabilità delle
temperature di cottura richieste.
La modifica della temperatura può essere eseguita in qualsiasi momento, dopo aver selezionato la
funzione di cottura basta agire sui simboli e il campo di regolazione varia da +50 °C a MAX.
Non occorre confermare la modifica, il controllo si attiva dopo pochi secondi in maniera autonoma.
Durante il riscaldamento il simbolo di grado
centigrado (°C) lampeggia ad indicare la
termoregolazione per raggiungere la temperatura
scelta.
Al raggiungimento lo segnalerà con un segnale
acustico.
NB: alcuni modelli possono avere la visualizzazione della temperatura all’interno del forno istantanea,
fino al raggiungimento della temperatura impostata. Se durante la fase di innalzamento voglio verificare
la temperatura impostata, digito indifferentemente uno dei tasti e se voglio, con gli stessi, posso
cambiare la temperatura impostata.
86
Page 87

Calore residuo
Durante la cottura dei cibi la struttura del forno immagazzina calore, questo calore è mantenuto
isolato dal resto della cucina grazie ad un isolamento termico generoso e ad alcuni accorgimenti di
costruzione.
Questo calore viene disperso gradualmente nel tempo e può rappresentare ancora una risorsa in
cucina se viene gestito: il controllo indica la temperatura interna, dopo lo spegnimento del forno, fino
al raggiungimento dei 50°C.
Sfruttate questa caratteristica per mantenere i cibi caldi, oppure per terminarne la cottura in
maniera dolce!
PROGRAMMAZIONE DEL FORNO
La programmazione del forno mette a disposizione tre modalità per il controllo della durata di cottura.
Sono disponibili in abbinamento alle normali funzioni di cottura.
Le funzioni sono selezionabili in sequenza, da sinistra a destra,
toccando il simbolo orologio ad ogni tocco si illuminerà un
simbolo, in sequenza.
NB: non è possibile programmare le ricette preimpostate.
I
87
Page 88

Programmazione timer: tempo di cottura
I
Una volta definito il tempo di cottura, il display visualizzerà ancora l’ora corrente,
il simbolo “durata cottura” sarà acceso.
Toccare una volta il simbolo timer, si
accenderà il simbolo relativo. Inoltre il
display dell’orologio sostituirà l’indicazione
dell’ora corrente.
I puntini separatori lampeggiano ad indicare
che è possibile programmare il tempo di
cottura
A partire da ora inizia il conteggio. Trascorso il tempo indicato il forno lo segnalerà acusticamente,
le resistenze termiche vengono spente terminando quindi la cottura. Nel display apparirà la
scritta “Programma terminato estrarre la pietanza”: premere un tasto qualsiasi per interrompere la
segnalazione acustica o aprire la porta.
Il forno, dopo 1 minuto, si spegnerà autonomamente se altre funzioni di cottura non vengono impostate.
Programmazione timer: ora di fine cottura
Toccare due volte il simbolo timer, si accenderà
il simbolo relativo.
I puntini separatori lampeggiano ad indicare
che è possibile programmare l’ora di fine
cottura.
88
Page 89

Impostare l’ora di fine cottura toccando i
simboli “+” e “-“.
Una volta definita l’ora di fine cottura, il display visualizzerà ancora l’ora corrente,
il simbolo “fine cottura” sarà acceso.
A partire da ora inizia il conteggio. Raggiunta l’ora impostata, il forno lo segnalerà acusticamente,
le resistenze termiche verranno spente, terminando quindi la cottura. Nel display apparirà la
scritta “Programma terminato estrarre la pietanza”: premere un tasto qualsiasi per interrompere la
segnalazione acustica o aprire la porta.
Il forno, dopo otto secondi, si spegnerà autonomamente se altre funzioni di cottura non vengono
impostate.
Programmazione timer: cottura posticipata
Tramite la combinazione delle due modalità “tempo di cottura” e “ora di fine cottura” si può impostare
il forno in modo che cominci la cottura ad un’ora posticipata rispetto all’attuale.
Per esempio, sono le ore 8:30 e state per uscire di casa ma volete che al vostro rientro alle ore 13:00
sia pronto un arrosto, ecco come fare:
I
Preparate l’arrosto per la cottura, infornatelo
Accendete il forno, scegliete la funzione di cottura e impostate la temperatura.
A questo punto impostate la durata di cottura,
supponiamo due ore.
89
Page 90

Definite adesso l’ora di fine cottura : il
controllo normalmente somma all’ora
attuale il tempo di cottura e la propone
come ora di fine cottura, nel nostro caso
proporrà le ore 10:30 (8:30+2:00).
I
Il forno si pone ora in attesa (stand-by) spegnendo la luce forno.
Il controllo attiverà autonomamente il forno alle ore 11:00 (13:00-2:00) e lo spegnerà
alle 13:00, al vostro rientro troverete l’arrosto pronto!
Modificate l’ora di fine cottura per farla coincidere
con quella da Voi desiderata, nel nostro esempio le
13:00.
Programmazione del timer: contaminuti
Il contaminuti è una funzione del timer che è indipendente dal funzionamento del forno, cioè non
blocca la cottura e non spegne il forno, funziona come avvisatore acustico.
Lo potete impostare in qualsiasi momento, per esempio come promemoria di controllo della cottura ai
fornelli, oltre che del forno o di altre attività di cucina.
E’ disponibile anche a forno spento, in questo caso basta toccare una volta il simbolo delle funzioni
timer.
Se invece lo utilizzate a forno acceso, dovete toccare in sequenza il simbolo funzioni timer tre volte:
I puntini separatori lampeggiano ad indicare che è
possibile impostare il valore.
Impostare i minuti agendo sui simboli “+” e “-“ a partire da ora inizia il conteggio. Trascorso il tempo
indicato il forno lo segnalerà acusticamente, lampeggerà il simbolo dedicato : premere un tasto
qualsiasi per interrompere la segnalazione acustica
Programmazione del timer: cancellazione del programma
Per cancellare una programmazione è necessario portare a zero il valore assegnato precedentemente,
oppure spegnere il forno.
90
Page 91

Funzioni automatiche: ricette
Per accedere alla funzione ricette eseguire la seguente procedura:
Accendo il forno col tasto ;
Seleziono la funzione AUTOMATICO;
Il display visualizza le 2 opzioni:
- ricette personali;
- ricette impostate
Scegliere l’impostazione desiderata con ;
con il tasto confermo la scelta;
Compare il seguente menù;
agire sui tasti per scegliere la tipologia della
pietanza e con il tasto confermo la scelta.
I
agire sui tasti per scegliere la tipologia e con il tasto
confermo la scelta.
agire sui tasti per scegliere la tipologia e con il tasto
confermo la scelta.
Compare la schermata del peso e agendo sui tasti scelgo
uno dei valori pre-impostati e con il tasto confermo la scelta.
91
Page 92

Al termine delle impostazioni il display riassume la ricetta
impostata.
I due punti del tempo durata cottura (00:40) saranno
lampeggianti ad indicare la possibilità di poterlo modificare.
Per modificarlo agire sui tasti - + .
Oppure seleziono direttamente la funzione che sta
lampeggiando e così inizia il programma cottura con il
countdown del tempo prestabilito sul display.
I
NB: in qualsiasi istante, se nella scelta dei valori commetto un errore e/o voglio cambiare l’impostazione
della mia ricetta, posso selezionare che annulla e mi permette di ripartire dall’inizio della procedura.
N.B.: Se vengono eseguite cotture con i parametri del tempo modificati delle ricette preimpostate,
durante il bip sonoro a termine cottura comparirà la scritta:
ATTENZIONE: certe ricette usano il preriscaldamento, quindi introdurre la pietanza
una volta che il forno sarà arrivato in temperatura e nel display comparirà la scritta
“PRERISCALDAMENTO TERMINATO INSERIRE LA PIETANZA”
Una volta terminata la cottura sul display appare la scritta intermittente
“PROGRAMMA TERMINATO, ESTRARRE LA PIETANZA”, simultaneamente si
accende l’avviso acustico che rimane tale fino a che non agisco premendo un
qualsiasi tasto o aprendo la porta.
vedi come salvare le ricette nel paragrafo successivo.
Personalizzazione delle ricette
Una volta modificato il tempo di cottura di una ricetta pre-impostata ed eseguita, possiamo andare a
salvarla per la prossima volta, memorizzando i nuovi parametri usati (peso e tempo di cottura).
A fine ciclo di cottura della ricetta modificata apparirà l’icona sotto e per poterla salvare dovrò agire
in questo modo:
- con il tasto + scegliere “SI”
- dare conferma con il tasto si visualizza il tempo utilizzato,
- modificare con + e - e confermare con , appare il peso utilizzato,
- modificare con + e - e confermare con , comparirà il messaggio
Ogni volta che accedo al menù “ RICETTE PERSONALI “ trovo salvate in elenco le mie ricette.
“Ricetta salvata POS. 001, e così via in numero crescente
92
Page 93

Se la memoria dedicata al salvataggio delle ricette personali dovesse essere
insufficiente il display visualizza il messaggio: “MEMORIA PIENA IMPOSSIBILE
SALVARE”.
Prima di salvare la mia ricetta devo cancellarne altre dal menù in questo modo:
- seleziono la funzione ;
- digitando entro nella sezione “RICETTE PERSONALI”
dove trovo tutte le ricette salvate;
- con i tasti scorro il menù per andare a
selezionare la ricetta che voglio eliminare.
NB: i nomi vengono dati per default dal menù;
Una volta visualizzata la ricetta da eliminare seleziono
il tasto tenendolo premuto fino alla comparsa della
schermata successiva:
Di default la selezione sarà impostata su NO, ma
premendo i tasti di scroll + e - seleziono SI e confermo
con ;
- Il display comunica l’ avvenuta eliminazione della
ricetta;
I
93
Page 94

Smontaggio della porta forno
Lo smontaggio della porta forno può essere facilmente effettuato operando come segue:
- aprire totalmente la porta;
- sollevare le due leve tte indicate in fig. sotto;
- richiudere la porta sul primo scatto di arresto determinato da lle due levette sollevate in precedenza;
- sollevare la porta verso l’alto e verso l’esterno del forno per estrarla dalle sedi;
Per rimontare la porta, inserire le cerniere nelle apposite sedi e quindi riportare le due levette nella
posizione di chiusura.
I
Sostituzione lampada forno
IMPORTANTE: staccare l’apparecchio alla linea dell’alimentazione per evitare scosse elettriche!
La lampada del forno deve avere precise caratteristiche:
a) Struttura adatta alle alte temperature (fino a 300°C);
b) Alimentazione: vedere valore V/Hz indicato sulla targa matricola;
c) Potenza 25W;
d) Attacco di tipo G9.
- Per evitare danni stendere all’interno del forno uno strofinaccio per stoviglie;
94
Page 95

- Con un cacciavite a taglio sganciare il vetro inserito a pressione sul portalampada;
- Levare la vecchia lampada sfilandola dalla sede stando attenti che non si rompa;
- Inserire la nuova lampadina avendo l’accortezza di non toccarla con le mani (consigliamo l’uso di un
guanto in lattice da gettare poi);
- Fissare nuovamente la calotta in vetro premendola forte nel portalampada fino al totale incastro;
- Collegare nuovamente l’apparecchio alla linea di alimentazione.
I
95
Page 96

Istruzioni per l’installatore
Il forno può essere installato sotto un piano di cottura, in colonna,
oppure abbinato al relativo cassetto scaldavivande. Le dimensioni
dell’incasso devono essere come riportato nelle figure sotto.
Il materiale del mobile deve essere in grado di resistere al calore.
Il forno deve essere centrato rispetto alle pareti del mobile e
fissato con le viti e bussole che sono fornite in dotazione come
da figure a fianco avendo cura di non forzare troppo le viti, pena
la rottura delle bussole stesse.
Incasso del forno 45
I
96
Page 97

Incasso del forno 60
Il forno può essere installato sotto un piano di cottura oppure in colonna. Le dimensioni dell’incasso
devono essere come riportato in figura.
Il materiale del mobile deve essere in grado di resistere al calore. Il forno deve essere centrato rispetto
alle pareti del mobile e fissato con le viti e bussole che sono fornite in dotazione.
Per l’abbinamento del forno con i piani di cottura polivalenti gas o combi elettrici vedere le istruzioni
allegate.
I
97
Page 98

Allacciamento elettrico
Prima di effettuare l’allacciamento elettrico accertarsi che:
- le caratteristiche dell’impianto siano tali da soddisfare quanto indicato sulla targa matricola applicata
sul fronte del forno;
- l’impianto sia munito di un efficace collegamento di terra secondo le norme e le disposizioni di legge
in vigore.
La messa a terra è obbligatoria a termini di legge. Il cavo in nessun punto dovrà raggiungere una
temperatura superiore di 50° C quella ambiente.
Questo forno deve essere connesso all’alimentazione per mezzo di un cavo di alimentazione con
I
un’apposita spina che sia compatibile con la presa montata nell’impianto elettrico che alimenta questo
forno.
Se un apparecchio fisso non è provvisto di cavo di alimentazione e di spina, o di altro dispositivo
che assicuri la disconnessione dalla rete, con una distanza di apertura dei contatti che consenta
la disconnessione completa nelle condizioni della categoria di sovratensione III, tali dispositivi di
disconnessione devono essere previsti nella rete di alimentazione conformemente alle regole di
installazione.
La presa o l’interruttore onnipolare devono essere facilmente raggiungibili con l’apparecchiatura
installata.
N.B. Il costruttore declina ogni responsabilità nel caso che quanto sopra e le usuali norme
antinfortunistiche non vengano rispettate.
TIPI E DIAMETRO MINIMO DEI CAVI
SASO
H05RR-F 3x1,5 mm² H05RR-F 3x2,5 mm²
H05VV-F 3x1,5 mm² H05VV-F 3x2,5 mm²
H05RN-F 3x1,5 mm² H05RN-F 3x2,5 mm²
H05V2V2-F 3x1,5 mm² H05V2V2-F 3x2,5 mm²
98
Page 99

Cher Client,
Vous venez d’acheter l’un de nos produits et
nous vous en remercions vivement.
Ce nouveau produit, minutieusement conçu
et construit avec des matériaux de tout
premier choix, a été soigneusement testé afin
de satisfaire chacune de vos exigences en
matière de cuisson.
Nous vous prions de lire et de respecter ces
instructions simples qui vous permettront
d’obtenir d’excellents résultats dès la première
utilisation. Nous vous souhaitons une bonne
cuisine avec cet appareil moderne.
LE CONSTRUCTEUR
NL
Nederlands
EN
English
Italiano
I
FR
Français
DE
Deutsch
FR
CE PRODUIT A ETE CONÇU POUR UN USAGE
DOMESTIQUE.
LE CONSTRUCTEUR DECLINE TOUTE
RESPONSABILITÉ EN CAS DE DOMMAGES
SUBIS PAR LES CHOSES OU LES PERSONNES
DERIVANT D’UNE INSTALLATION INCORRECTE
OU D’UN USAGE IMPROPRE, ERRONE OU
INCOHERENT.
NE PAS CONFIER L’UTILISATION DE L’APPAREIL
A DES PERSONNES (Y COMPRIS DES
ENFANTS) AYANT DES CAPACITES PHYSIQUES,
SENSORIELLES OU MENTALES REDUITES,
OU A DES PERSONNES QUI NE POSSEDENT
PAS L’EXPERIENCE ET LES CONNAISSANCES
NECESSAIRES ; LA SUPERVISION D’UN ADULTE
RESPONSABLE POUR LEUR SECURITE ET EN
MESURE DE COMPRENDRE LE MODE D’EMPLOI
DE L’APPAREIL EST OBLIGATOIRE.
L’APPAREIL ET SES PARTIES ACCESSIBLES
DEVIENNENT TRES CHAUDES DURANT L’EMPLOI.
VEILLEZ A NE PAS TOUCHER LES ÉLÉMENTS
CHAUFFANTS A L’INTÉRIEUR DU FOUR. LES
ENFANTS DE MOINS DE 8 ANS DOIVENT RESTER
A L’ECART S’ILS NE SONT PAS CONSTAMMENT
SURVEILLES.
INTERDIT DE POSER DES CASSEROLES OU
DES OBJETS SIMILAIRES, DU PAPIER ALU OU
SIMILAIRES EN CONTACT AVEC LA BASE DU
FOUR POUR CUISINER.
L’ACTION DU RECHAUFEMENT DE LA
RESISTANCE INFERIEURE PROVOQUE LA
SURCHAUFFE DE LA PARTIE BASSE DU FOUR
EN EN PROVOQUANT L’ENDOMMAGEMENT ET
MEME DE GRAVES CONSEQUENCES (RISQUE
D’INCENDIE) MEME SUR LE MEUBLE DE
SUPPORT DU FOUR.
EVITEZ LES MATERIAUX RECHES, ABRASIFS,
OU LES RACLOIRS METALLIQUES TRANCHANTS
POUR NETTOYER LES PORTES EN VERRE DU
FOUR CAR ILS PEUVENT RAYER LA SURFACE ET
FAIRE VOLER LE VERRE EN ECLATS.
UTILISER LA SONDE THERMIQUE RECOMMANDEE
POUR CE FOUR. NE PAS UTILISER DE NETTOYEUR
A VAPEUR POUR NETTOYER LE FOUR.
99
Page 100

Indice
Instructions pour l’utilisateur, 101
Première utilisation, 101
Panneaux autonettoyants, 102
Respect de l’environnement, 102
Présentation du four, 102
Installation et raccordement,103
Premier branchement, 103
La modalité « démontration, 103
Réglage de l’horloge, 104
Actions possibles lorsque le four est éteint, 105
Allumage du four, 105
Fonction clé, 106
FR
Fonctions principales, 107
Vue d’ensemble du bandeau de commande, 107
Les fonctions de cuisson, 107
Fonctionnement du four, 108
Instructions pour le fonctionnement, 109
Sonde des aliments, 111
Fonctions spéciales: Boost & Clean, 116
Contrôle de la lumière du four, 117
Des gestes simples pour cuisiner, 118
Réglage de la température, 118
Chaleur résiduelle, 119
Pro grammation du four, 119
Programmation temporisateur, 120
Fonctions automatiques: recettes, 123
Personnalisation des recettes, 125
Demontage de la porte du four, 126
IMPORTANT
“Il est possible d’accéder à la plaque des
caractéristiques du four même lorsque
l’appareil est installé. Cette plaque, que l’on
voit en ouvrant la porte, présente toutes les
données d’identification de l’appareil qu’il
est nécessaire de citer pour toute demande
de pièces de rechange”.
Instructions pour l’installateur, 127
Encastrement du four 45, 128
Encastrement du four 60, 129
Branchement electrique, 130
100
 Loading...