

Page 1

4530 SERIES
RF POWER METER
INSTRUCTION MANUAL
This manual is applicable to: Revision date: 11/26/2002Revision date: 11/26/2002
Instrument serial numbers: ALL* Manual P/N: 98404800C
Operating Firmware Versions: 20021 1 19 and later* CD P/N: 98404899C
*earlier firmware may not contain all capabilities listed herein
ersions: 20021 1 19 and later* CD P/N: 98404899C
Manual P/N: 98404800C
%
BOONTON ELECTRONICS Web Site: www .boonton.com
A subsidiary of Noise/Com -- A Wireless T elecom Group Company Email: boonton@boonton.com
25 Eastmans Road T elephone: 973-386-9696
Parsippany , NJ 07054-0465 Fax: 973-386-9191
Page 2

& 1998-2001, 2002 Boonton Electronics. All rights reserved.
% is a registered trademark of Boonton Electronics, a subidiary
of Noise/Com, a Wireless T elecom Group Company
Boonton Electronics
25 Eastmans Road
Parsippany , NJ 07054-0465
Information contained in this manual is subject to change without notice. Boonton Electronics makes no warranty of
any kind with regard to this material, including, but not limited to, the implied warraties of merchantability and fitness
for a particular purpose. Boonton Electronics shall not be liable for errors contained herein or for incidental or
consequential damages in connection with the furnishings, performance, or use of this material. No part of this
document may be photocopied, reproduced, or translated to another language without the prior written consent of
Boonton Electronics.
Page 3

Boonton Electronics Contents
4530 Series RF Power Meter
Contents
CHAPTER/SECTION PAGE
List of Tables . . . . . . . . . . . . . . . . . . . . . . . . . . . . . . . . . . . . . . . . . . . . . vii
List of Illustrations. . . . . . . . . . . . . . . . . . . . . . . . . . . . . . . . . . . . . . . . . . . . . viii
Safety Summary . . . . . . . . . . . . . . . . . . . . . . . . . . . . . . . . . . . . . . . . . . . . . ix
Repair Policy and Warranty . . . . . . . . . . . . . . . . . . . . . . . . . . . . . . . . . . . . . xi
1. GENERAL INFORMA TION
1.1 Description . . . . . . . . . . . . . . . . . . . . . . . . . . . . . . . . . . . . . . . . . . 1-1
1.2 Features . . . . . . . . . . . . . . . . . . . . . . . . . . . . . . . . . . . . . . . . . . . . 1-2
1.3 Accessories . . . . . . . . . . . . . . . . . . . . . . . . . . . . . . . . . . . . . . . . . . 1-2
1.4 Specifications . . . . . . . . . . . . . . . . . . . . . . . . . . . . . . . . . . . . . . . . 1-2
1.4.1 General . . . . . . . . . . . . . . . . . . . . . . . . . . . . . . . . . . . . . . . 1-2
1.4.2 Calibration Sources . . . . . . . . . . . . . . . . . . . . . . . . . . . . . . 1-3
1.4.3 Trigger . . . . . . . . . . . . . . . . . . . . . . . . . . . . . . . . . . . . . . . . 1-3
1.4.4 Sampling Characteristics . . . . . . . . . . . . . . . . . . . . . . . . . . 1-3
1.4.5 Measurement Characteristics . . . . . . . . . . . . . . . . . . . . . . . 1-3
1.4.6 Sensor Characteristics . . . . . . . . . . . . . . . . . . . . . . . . . . . . 1-4
1.4.7 Interface . . . . . . . . . . . . . . . . . . . . . . . . . . . . . . . . . . . . . . 1-4
1.4.8 Environmental Specifications . . . . . . . . . . . . . . . . . . . . . . . 1-5
1.4.9 Physical Specifications . . . . . . . . . . . . . . . . . . . . . . . . . . . . 1-6
2. INST ALLA TION
2.1 Unpacking and Re-Packing . . . . . . . . . . . . . . . . . . . . . . . . . . . . . . 2-1
2.2 Power Requirements . . . . . . . . . . . . . . . . . . . . . . . . . . . . . . . . . . . 2-1
2.3 Internal Battery . . . . . . . . . . . . . . . . . . . . . . . . . . . . . . . . . . . . . . . 2-1
2.4 Preliminary Check . . . . . . . . . . . . . . . . . . . . . . . . . . . . . . . . . . . . . 2-1
3. OPERA TION
3.1 Operating Controls, Indicators and Connections . . . . . . . . . . . . . . . 3-1
3.2 Key Function Summary . . . . . . . . . . . . . . . . . . . . . . . . . . . . . . . . . 3-2
i
Page 4

Contents Boonton Electronics
4530 Series RF Power Meter
Contents (Cont)
CHAPTER/SECTION PAGE
3.3 Display Functions . . . . . . . . . . . . . . . . . . . . . . . . . . . . . . . . . . . . . 3-5
3.3.1 Header . . . . . . . . . . . . . . . . . . . . . . . . . . . . . . . . . . . . . . . 3-5
3.3.2 Measurement Window. . . . . . . . . . . . . . . . . . . . . . . . . . . . 3-5
3.3.3 Status Window . . . . . . . . . . . . . . . . . . . . . . . . . . . . . . . . . 3-5
3.3.4 Channel Selection . . . . . . . . . . . . . . . . . . . . . . . . . . . . . . . 3-5
3.3.5 Header / Page Selection. . . . . . . . . . . . . . . . . . . . . . . . . . . 3-5
3.4 Operating Mode Summary. . . . . . . . . . . . . . . . . . . . . . . . . . . . . . . 3-6
3.4.1 Menu Mode . . . . . . . . . . . . . . . . . . . . . . . . . . . . . . . . . . . 3-6
3.4.2 Text Mode . . . . . . . . . . . . . . . . . . . . . . . . . . . . . . . . . . . . 3-6
3.4.3 Graph Mode . . . . . . . . . . . . . . . . . . . . . . . . . . . . . . . . . . . 3-7
3.4.4 Edit Mode . . . . . . . . . . . . . . . . . . . . . . . . . . . . . . . . . . . . . 3-7
3.4.5 Zero/Calibration Mode . . . . . . . . . . . . . . . . . . . . . . . . . . . 3-7
3.5 Menu Mode Operation . . . . . . . . . . . . . . . . . . . . . . . . . . . . . . . . . 3-8
3.5.1 Entry . . . . . . . . . . . . . . . . . . . . . . . . . . . . . . . . . . . . . . . . . 3-8
3.5.2 Navigation . . . . . . . . . . . . . . . . . . . . . . . . . . . . . . . . . . . . . 3-8
3.5.3 Menu Items . . . . . . . . . . . . . . . . . . . . . . . . . . . . . . . . . . . . 3-8
3.5.4 Menu Screen Display . . . . . . . . . . . . . . . . . . . . . . . . . . . . . 3-9
3.5.5 Menu Syntax . . . . . . . . . . . . . . . . . . . . . . . . . . . . . . . . . . . 3-10
3.6 Text Mode Operation . . . . . . . . . . . . . . . . . . . . . . . . . . . . . . . . . . 3-10
3.6.1 Entry . . . . . . . . . . . . . . . . . . . . . . . . . . . . . . . . . . . . . . . . . 3-11
3.6.2 Measurement Page Selection . . . . . . . . . . . . . . . . . . . . . . . 3-11
3.6.3 Channel Selection . . . . . . . . . . . . . . . . . . . . . . . . . . . . . . . 3-11
3.6.4 Measurement Control . . . . . . . . . . . . . . . . . . . . . . . . . . . . 3-11
3.6.5 Parameter Editing from Text Mode. . . . . . . . . . . . . . . . . . . 3-11
3.7 Graph Mode Operation . . . . . . . . . . . . . . . . . . . . . . . . . . . . . . . . . 3-11
3.7.1 Entry . . . . . . . . . . . . . . . . . . . . . . . . . . . . . . . . . . . . . . . . . 3-12
3.7.2 Measurement Page Selection . . . . . . . . . . . . . . . . . . . . . . . 3-12
3.7.2 Channel Selection . . . . . . . . . . . . . . . . . . . . . . . . . . . . . . . 3-12
3.7.3 Measurement Control . . . . . . . . . . . . . . . . . . . . . . . . . . . . 3-12
3.7.4 Parameter Editing from Graph Mode . . . . . . . . . . . . . . . . . 3-12
3.8 Edit Mode Operation. . . . . . . . . . . . . . . . . . . . . . . . . . . . . . . . . . . 3-12
3.8.1 Entry, Exit and Channel Selection . . . . . . . . . . . . . . . . . . . . 3-12
3.8.2 Screen Display . . . . . . . . . . . . . . . . . . . . . . . . . . . . . . . . . 3-12
3.8.3 Parameter Selection . . . . . . . . . . . . . . . . . . . . . . . . . . . . . . 3-12
3.8.4 Parameter Editing . . . . . . . . . . . . . . . . . . . . . . . . . . . . . . . 3-13
ii
Page 5

Boonton Electronics Contents
4530 Series RF Power Meter
Contents (Cont)
CHAPTER/SECTION PAGE
3.9 Display Formats . . . . . . . . . . . . . . . . . . . . . . . . . . . . . . . . . . . . . . 3-14
3.9.1 Channel Selection and Paging. . . . . . . . . . . . . . . . . . . . . . . 3-14
3.9.2 Mixed Mode Operation . . . . . . . . . . . . . . . . . . . . . . . . . . . 3-15
Operation . . . . . . . . . . . . . . . . . . . . . . . . .
3.10 Sensor Connection and Calibration . . . . . . . . . . . . . . . . . . . . . . . . 3-16
3.10.1 Sensor Connection . . . . . . . . . . . . . . . . . . . . . . . . . . . . . . 3-17
3.10.2 Zero Offset Adjustment . . . . . . . . . . . . . . . . . . . . . . . . . . . 3-18
3.10.3 Fixed Calibration . . . . . . . . . . . . . . . . . . . . . . . . . . . . . . . . 3-18
3.10.4 Automatic (step) Calibration . . . . . . . . . . . . . . . . . . . . . . . 3-18
3.10.5 Frequency Calibration . . . . . . . . . . . . . . . . . . . . . . . . . . . . 3-18
3.10.6 Calibrator Selection . . . . . . . . . . . . . . . . . . . . . . . . . . . . . . 3-18
3.10.7 Calibration Volatility . . . . . . . . . . . . . . . . . . . . . . . . . . . . . . 3-19
3.10.8 Zero/Cal Menu Navigation. . . . . . . . . . . . . . . . . . . . . . . . . 3-19
3.11 Menu Reference . . . . . . . . . . . . . . . . . . . . . . . . . . . . . . . . . . . . . . 3-21
3.11.1 Measure Menu . . . . . . . . . . . . . . . . . . . . . . . . . . . . . . . . . 3-22
3.11.2 Channel Menu . . . . . . . . . . . . . . . . . . . . . . . . . . . . . . . . . . 3-23
3.11.3 Markers Menu . . . . . . . . . . . . . . . . . . . . . . . . . . . . . . . . . 3-30
3.11.4 Trig/Time Menu . . . . . . . . . . . . . . . . . . . . . . . . . . . . . . . . . 3-31
3.11.5 Statisticl Menu. . . . . . . . . . . . . . . . . . . . . . . . . . . . . . . . . . 3-34
3.11.6 Calibratr Menu . . . . . . . . . . . . . . . . . . . . . . . . . . . . . . . . . 3-35
3.11.7 Save/Recl Menu . . . . . . . . . . . . . . . . . . . . . . . . . . . . . . . . 3-37
3.11.8 Utilities Menu . . . . . . . . . . . . . . . . . . . . . . . . . . . . . . . . . . 3-37
3.11.9 Help Menu . . . . . . . . . . . . . . . . . . . . . . . . . . . . . . . . . . . . 3-43
3.11.10Defaults Menu . . . . . . . . . . . . . . . . . . . . . . . . . . . . . . . . . . 3-43
3.11.11 Menu Summary . . . . . . . . . . . . . . . . . . . . . . . . . . . . . . . . . 3-44
and Calibration . . . . . . . . . . . . . . . . . . . . . .
. . . . . . . . . . . . . . . . . . . . . . . . . . . .
Adjustment . . . . . . . . . . . . . . . . . . . . . . . . .
. . . . . . . . . . . . . . . . . . . . . . . . . . . . . .
(step) Calibration . . . . . . . . . . . . . . . . . . . . .
Calibration . . . . . . . . . . . . . . . . . . . . . . . . . .
3.12 Error Messages and Status Codes . . . . . . . . . . . . . . . . . . . . . . . . . 3-47
3.13 Recorder Output Calibration . . . . . . . . . . . . . . . . . . . . . . . . . . . . . 3-49
3.14 Firmware Update . . . . . . . . . . . . . . . . . . . . . . . . . . . . . . . . . . . . . 3-50
4. REMOTE OPERA TION
4.1 GPIB Configuration . . . . . . . . . . . . . . . . . . . . . . . . . . . . . . . . . . . . 4-1
4.2 Serial Port Operation . . . . . . . . . . . . . . . . . . . . . . . . . . . . . . . . . . . 4-1
4.3 SCPI Language Syntax . . . . . . . . . . . . . . . . . . . . . . . . . . . . . . . . . 4-2
iii
Page 6

Contents Boonton Electronics
4530 Series RF Power Meter
Contents (Cont)
CHAPTER/SECTION PAGE
4.4 Basic Measurement Operation . . . . . . . . . . . . . . . . . . . . . . . . . . . . 4-3
4.5 Command Reference . . . . . . . . . . . . . . . . . . . . . . . . . . . . . . . . . . . 4-4
4.5.1 MEASure Queries . . . . . . . . . . . . . . . . . . . . . . . . . . . . . . . 4-4
4.5.2 INITiate and ABORt Commands . . . . . . . . . . . . . . . . . . . . 4-5
4.5.3 FETCh Commands . . . . . . . . . . . . . . . . . . . . . . . . . . . . . . 4-6
4.5.4 READ Subsystem . . . . . . . . . . . . . . . . . . . . . . . . . . . . . . . 4-9
4.5.5 Native Mode Queries . . . . . . . . . . . . . . . . . . . . . . . . . . . . 4-12
4.4.6 SENSe Subsystem . . . . . . . . . . . . . . . . . . . . . . . . . . . . . . 4-19
4.5.7 Calculate Subsystem . . . . . . . . . . . . . . . . . . . . . . . . . . . . . 4-24
4.5.8 MARKer Subsystem . . . . . . . . . . . . . . . . . . . . . . . . . . . . . 4-28
4.5.9 DISPlay Subsystem . . . . . . . . . . . . . . . . . . . . . . . . . . . . . . 4-29
4.5.10 TRIGger Subsystem . . . . . . . . . . . . . . . . . . . . . . . . . . . . . 4-33
4.5.11 TRACe Data Array Commands . . . . . . . . . . . . . . . . . . . . . 4-36
4.5.12 SENSe:MBUF Data Array Commands . . . . . . . . . . . . . . . 4-37
4.5.13 SENSe:SBUF Data Array Commands . . . . . . . . . . . . . . . . 4-39
4.5.14 SENSe:HIST & SENSe:CAL T AB Data Array Cmnds. . . . 4-40
4.5.15 CALibration Sybsystem . . . . . . . . . . . . . . . . . . . . . . . . . . . 4-42
4.5.16 MEMory Subsystem . . . . . . . . . . . . . . . . . . . . . . . . . . . . . 4-43
4.5.17 OUTput Subsystem . . . . . . . . . . . . . . . . . . . . . . . . . . . . . . 4-44
4.5.18 SYSTem Subsystem . . . . . . . . . . . . . . . . . . . . . . . . . . . . . 4-48
4.5.19 ST AT us Com mands . . . . . . . . . . . . . . . . . . . . . . . . . . . . . . 4-50
4.5.20 IEEE-488.2 Commands . . . . . . . . . . . . . . . . . . . . . . . . . . 4-52
4.5.21 Remote Interface Command Summary . . . . . . . . . . . . . . . . 4-56
Queries . . . . . . . . . . . . . . . . . . . . . . . . . .
. . . . . . . . . . . . . . . . . . . . . . . . . . . .
Subsystem . . . . . . . . . . . . . . . . . . . . . . . . . . .
Subsystem . . . . . . . . . . . . . . . . . . . . . . . . . . .
. . . . . . . . . . . . . . . . . . . . . . . . . . . .
. . . . . . . . . . . . . . . . . . . . . . . . . . .
Array Commands . . . . . . . . . . . . . . . . . . .
Data Array Commands . . . . . . . . . . . . .
Data Array Commands. . . . . . . . . . . . . .
4.6 Remote Sensor Calibration . . . . . . . . . . . . . . . . . . . . . . . . . . . . . . 4-61
4.6.1 AutoCal . . . . . . . . . . . . . . . . . . . .
4.6.1 AutoCal . . . . . . . . . . . . . . . . . . . . . . . . . . . . . . . . . . . . . . 4-61
4.6.2 Zero and Fixed Cal . . . . . . . . . . . .
4.6.2 Zero and Fixed Cal . . . . . . . . . . . . . . . . . . . . . . . . . . . . . . 4-61
Native Mode Programming . . . . . . . . . . . .
4.7 Native Mode Programming . . . . . . . . . . . . . . . . . . . . . . . . . . . . . . 4-62
4.8 SCPI Example Program Fragments . . . . . . . . . . . . . . . . . . . . . . . . 4-63
SCPI Example Program Fragments . . . . . .
4.8.1 Pulse Mode . . . . . . . . . . . . . . . . . . . . . . . . . . . . . . . . . . . . 4-63
4.8.1 Pulse Mode . . . . . . . . . . . . . . . . . .
4.8.2 Modulated Mode . . . . . . . . . . . . . . . . . . . . . . . . . . . . . . . 4-65
4.8.2 Modulated Mode . . . . . . . . . . . . .
4.8.3 CW Mode . . . . . . . . . . . . . . . . . . . . . . . . . . . . . . . . . . . . 4-65
4.8.3 CW Mode
4.8.4 Statistical Mode - CDF, CCDF, DISTRIBUTION . . . . . . 4-66
4.9 Error and Status Codes . . . . . . . . . . . . . . . . . . . . . . . . . . . . . . . . . 4-67
. . . . . . . . . . . . . . . . . . . 4-61
. . . . . . . . . . . . . . . . . . . 4-61
. . . . . . . . . . . . . . . . . . . 4-62
. . . . . . . . . . . . . . . . . . . 4-63
. . . . . . . . . . . . . . . . . . . 4-63
. . . . . . . . . . . . . . . . . . . 4-65
4-65
iv
Page 7

Boonton Electronics Contents
4530 Series RF Power Meter
Contents (Cont)
CHAPTER/SECTION PAGE
5. MAKING MEASUREMENTS
5.1 Sensor Types. . . . . . . . . . . . . . . . . . . . . . . . . . . . . . . . . . . . . . . . . 5-1
5.1.1 Thermal RF Power Sensors . . . . . . . . . . . . . . . . . . . . . . . . 5-1
5.1.2 CW Dual-Diode RF Power Sensors . . . . . . . . . . . . . . . . . 5-1
5.1.3 R F Voltage Sensors . . . . . . . . . . . . . . . . . . . . . . . . . . . . . . 5-2
5.1.4 Peak Power Sensors . . . . . . . . . . . . . . . . . . . . . . . . . . . . . 5-2
5.2 Selecting the Right Sensor . . . . . . . . . . . . . . . . . . . . . . . . . . . . . . . 5-3
5.2.1 CW Signals . . . . . . . . . . . . . . . . . . . . . . . . . . . . . . . . . . . . 5-3
5.2.2 Modulated Signals . . . . . . . . . . . . . . . . . . . . . . . . . . . . . . . 5-3
5.3 Measurement Modes . . . . . . . . . . . . . . . . . . . . . . . . . . . . . . . . . . . 5-3
5.3.1 CW Mode . . . . . . . . . . . . . . . . . . . . . . . . . . . . . . . . . . . . 5-3
5.3.2 Modulated Mode . . . . . . . . . . . . . . . . . . . . . . . . . . . . . . . 5-4
5.3.3 Statistical Mode. . . . . . . . . . . . . . . . . . . . . . . . . . . . . . . . . 5-4
5.3.4 Pulse Mode . . . . . . . . . . . . . . . . . . . . . . . . . . . . . . . . . . . . 5-5
5.4 Selecting the Right Measurement Mode . . . . . . . . . . . . . . . . . . . . . 5-6
5.4.1 CW Mode . . . . . . . . . . . . . . . . . . . . . . . . . . . . . . . . . . . . 5-6
5.4.2 Modulated Mode . . . . . . . . . . . . . . . . . . . . . . . . . . . . . . . 5-6
5.4.3 Pulse Mode . . . . . . . . . . . . . . . . . . . . . . . . . . . . . . . . . . . . 5-6
5.4.4 Statistical Mode. . . . . . . . . . . . . . . . . . . . . . . . . . . . . . . . . 5-7
. . . . . . . . . . . . . . . . . . . . . . . . . . . . . . . . . . .
Power Sensors . . . . . . . . . . . . . . . . . . . . . .
. . . .
Sensors . . . . . . . . . . . . . . . . . . . . . . . . . . . .
Sensors
Measurement Mode . . . . . . . . . . . . . . . . . . .
Mode . . . . . . . . . . . . . . . . . . . . . . . . . . . . .
. . . . . . . . . . . . . . . . . . . . . . . . . . . . . . . . . .
Mode. . . . . . . . . . . . . . . . . . . . . . . . . . . . . . .
5.5 Setting Measurement Parameters . . . . . . . . . . . . . . . . . . . . . . . . . . 5-7
5.5.1 What You Need to Know . . . . . . . . . . . . . . . . . . . . . . . . . 5-7
5.5.2 Channel Parameters Menu Settings . . . . . . . . . . . . . . . . . . 5-7
5.5.3 Trig/Time Menu Settings . . . . . . . . . . . . . . . . . . . . . . . . . . . 5-8
5.6 Settings for some Common Signal Types . . . . . . . . . . . . . . . . . . . . 5-9
5.6.1 Measuring GSM and EDGE . . . . . . . . . . . . . . . . . . . . . . . 5-9
5.6.2 Measuring NADC . . . . . . . . . . . . . . . . . . . . . . . . . . . . . . . 5-9
5.6.3 Measuring iDEN . . . . . . . . . . . . . . . . . . . . . . . . . . . . . . . . 5-10
5.6.4 Measuring Bluetooth . . . . . . . . . . . . . . . . . . . . . . . . . . . . . 5-11
5.6.5 Measuring CDMA. . . . . . . . . . . . . . . . . . . . . . . . . . . . . . . 5-12
5.6.6 Measuring HDTV . . . . . . . . . . . . . . . . . . . . . . . . . . . . . . . 5-13
5.7 Measurement Accuracy . . . . . . . . . . . . . . . . . . . . . . . . . . . . . . . . . 5-13
5.7.1 Error Contributions . . . . . . . . . . . . . . . . . . . . . . . . . . . . . . 5-14
5.7.2 Discussion of Error Terms . . . . . . . . . . . . . . . . . . . . . . . . . 5-14
5.7.3 Sample Uncertainty Calculations . . . . . . . . . . . . . . . . . . . . 5.17
Parameters . . . . . . . . . . . . . . . . . . . . . . . .
Need to Know
Menu Settings . . . . . . . . . . . . . . . .
v
Page 8

Contents Boonton Electronics
4530 Series RF Power Meter
Contents (Cont)
CHAPTER/SECTION PAGE
APPENDIX A
Available Sensors . . . . . . . . . . . . . . . . . . . . . . . . . . . . . . . . . . . . . . . . . . A-1 . . . . . . . . . . . . . . . . . . . . . . . . . . . . . . . . . . . .
APPENDIX B
Model 2530 1 GHz Calibrator . . . . . . . . . . . . . . . . . . . . . . . . . . . . . . . . B-1
Accessories . . . . . . . . . . . . . . . . . . . . . . . . . . . . . . . . . . . . . . . . . . . . . B-1
Specification . . . . . . . . . . . . . . . . . . . . . . . . . . . . . . . . . . . . . . . . . . . . . B-1
vi
Page 9

Boonton Electronics Contents
4530 Series RF Power Meter
List of Tables
TABLE PAGE
3-1 Keyboard Controls, Indicators and Connectors . . . . . . . . . . . . . . . . 3-2Indicators and Connectors . . . . . . . . . . . . . . .
3-2 4530 Graph and Text Mode Edit Menus . . . . . . . . . . . . . . . . . . . . . . 3-13
3-3 Measurement Pages . . . . . . . . . . . . . . . . . . . . . . . . . . . . . . . . . . . . . 3-14
3-4 Zero/Cal Menu. . . . . . . . . . . . . . . . . . . . . . . . . . . . . . . . . . . . . . . . . 3-20
3-5 Main Menu Summary . . . . . . . . . . . . . . . . . . . . . . . . . . . . . . . . . . . . 3-44
3-6 Graph/Text Header Error and Status Messages . . . . . . . . . . . . . . . . . 3-47
3-7 Sensor and Probe Error Messages . . . . . . . . . . . . . . . . . . . . . . . . . . 3-47
3-8 Sensor Zero / Cal Status Codes . . . . . . . . . . . . . . . . . . . . . . . . . . . . 3-48
3-9 Startup Error Messages . . . . . . . . . . . . . . . . . . . . . . . . . . . . . . . . . . 3-48
4-1 Remote Command Summary . . . . . . . . . . . . . . . . . . . . . . . . . . . . . . 4-55
4-2 Remote Interface Error Codes . . . . . . . . . . . . . . . . . . . . . . . . . . . . . 4-67
4-3 Measurement Result Status Codes . . . . . . . . . . . . . . . . . . . . . . . . . . 4-67
Mode Edit Menus . . . . . . . . . . . . . . . . . . . . .
. . . . . . . . . . . . . . . . . . . . . . . . . . . . . . . . . . . .
. . . . . . . . . . . . . . . . . . . . . . . . . . . . . . . . . . . . .
. . . . . . . . . . . . . . . . . . . . . . . . . . . . . . . . . . .
vii
Page 10

Contents Boonton Electronics
4530 Series RF Power Meter
List of Illustrations
ILLUSTRATION PAGE
C-1 4530 Series RF Power Meter . . . . . . . . . . . . . . . . . . . . . . . . . . . . . . x
2-1 Unpacking and Packing . . . . . . . . . . . . . . . . . . . . . . . . . . . . . . . . . . 2-2
3-1 4530 Series, Front Panel . . . . . . . . . . . . . . . . . . . . . . . . . . . . . . . . . 3-1
3-2 4530 Series, Rear Panel . . . . . . . . . . . . . . . . . . . . . . . . . . . . . . . . . . 3-1
3-3 Display Areas. . . . . . . . . . . . . . . . . . . . . . . . . . . . . . . . . . . . . . . . . . 3-5
3-4 Menu Mode Display . . . . . . . . . . . . . . . . . . . . . . . . . . . . . . . . . . . . . 3-6
3-5 Text Mode Display . . . . . . . . . . . . . . . . . . . . . . . . . . . . . . . . . . . . . . 3-6
3-6 Graph Mode Display . . . . . . . . . . . . . . . . . . . . . . . . . . . . . . . . . . . . 3-7
3-7 Edit Mode Display . . . . . . . . . . . . . . . . . . . . . . . . . . . . . . . . . . . . . . 3-7
3-8 Zero/Cal Mode Display . . . . . . . . . . . . . . . . . . . . . . . . . . . . . . . . . . 3-8
3-9 Main Menu . . . . . . . . . . . . . . . . . . . . . . . . . . . . . . . . . . . . . . . . . . . . 3-8
3-10 Digit Editing Mode Display . . . . . . . . . . . . . . . . . . . . . . . . . . . . . . . . 3-9
3-11 Menu Mode Display. . . . . . . . . . . . . . . . . . . . . . . . . . . . . . . . . . . . . 3-9
3-12 Text Mode Display . . . . . . . . . . . . . . . . . . . . . . . . . . . . . . . . . . . . . . 3-10
3-13 Graph Mode Display . . . . . . . . . . . . . . . . . . . . . . . . . . . . . . . . . . . . 3-11
3-14 Edit Mode Display . . . . . . . . . . . . . . . . . . . . . . . . . . . . . . . . . . . . . . 3-13
3-15 Graphic Mixed Mode Measurement Displays . . . . . . . . . . . . . . . . . . 3-15
3-16 Graphic Mixed Mode Edit Displays . . . . . . . . . . . . . . . . . . . . . . . . . 3-15Edit Displays . . . . . . . . . . . . . . . . . . . . . . . .
3-17 Text Mixed Mode Measurement Displays . . . . . . . . . . . . . . . . . . . . . 3-16
Displays . . . . . . . . . . . . . . . . . . . .
3-18 Text Mixed Mode Edit Displays . . . . . . . . . . . . . . . . . . . . . . . . . . . . 3-16
3-19 External Calibrator Connection . . . . . . . . . . . . . . . . . . . . . . . . . . . . . 3-19
3-20 Zero/Calibration Menu . . . . . . . . . . . . . . . . . . . . . . . . . . . . . . . . . . . 3-19
Displays . . . . . . . . . . . . . . . . . . . . . . . . . . .
Connection . . . . . . . . . . . . . . . . . . . . . . . . . . . .
. . . . . . . . . . . . . . . . . . . . . . . . . . . . . . . . . .
viii
Page 11

Boonton Electronics Contents
4530 Series RF Power Meter
SAFETY SUMMARY
The following general safety precautions must be observed during all phases of operation and maintenance of this
instrument. Failure to comply with these precautions or with specific warnings elsewhere in this manual violates safety
standards of design, manufacture, and intended use of the instrumenmts. Boonton Electronics Corporation assumes
no liability for the customer’s failure to comply with these requirements.
INSTRUMENT MUST BE GROUNDED
T o minimize shock hazard, the instrument chassis and cabinet must be connected to an electrical ground. The instrument is equipped with a three conductor, three prong AC power cable. The power cable must either be plugged into an
approved three-contact electrical outlet or used with a three-contact to a two-contact adapter with the (green) grounding wire firmly connected to an electrical ground at the power outlet.
DO NOT OPERA TE THE INSTRUMENT IN AN EXPLOSIVE A TMOSPHERE
Do not operate the instrument in the presence of flammable gases or fumes.
KEEP A WA Y FROM LIVE CIRCUITS
Operating personnel must not remove instrument covers. Component replacement and internal adjustments must be
made by qaulified maintenance personnel only. Never replace components or operate the instrument with the covers
removed and the power cable connected. Even with the power cable cable removed, dangerous voltages may be
present. Always remove all jewelry (rings, watches, etc.) and discharge circuits before touching them. Never attempt
internal service or adjustment unless another person, capable of rendering first aid and resusitaion, is present.
DO NOT SUBSTITUTE P ARTS OR MODIFY INSTRUMENT
Do not substitute parts or perform any unauthorized modification of the instrument. Return the instrument to
Boonton Electronics for repair to insure that the warrenty and safety features are maintained.
! This safety requirement symbol has been adopted by the International
Electrotechnical Commission. Document 66 (Central Office) 3, Paragraph
5.3, which directs that an instrument be so labeled if, for the correct use of
the instrument, it is necessary to refer to the instruction manual. In this
case it is recommended that reference be made to the instruction manual
when connecting the instrument to the proper power source. Verify that
the correct fuse is installed for the power available.
NOTE NOThe appearance of NOTE
CAUTION The CAUTION sign denotes a hazard. It calls attention to an operating
The appearance of TE indicates that clarifying information follows
immediately
immediately. In many cases this information is necessary for proper operation or is a further explanation of important data.
procedure which, if not correctly performed or adhered to, could result in
damage to the instrument or equipment under test. Do not procedeed
beyond a CAUTION sign until the indicated conditions are fully understood and met.
WARNING The WARNING sign denotes a hazard. It calls attention to an operating
procedure, which, if not correctly performed or adhered to could result in
personal injury. Do not procedeed beyond a WARNING sign until the
indicated conditions are fully understood and met.
ix
Page 12
Contents Boonton Electronics
4530 Series RF Power Meter
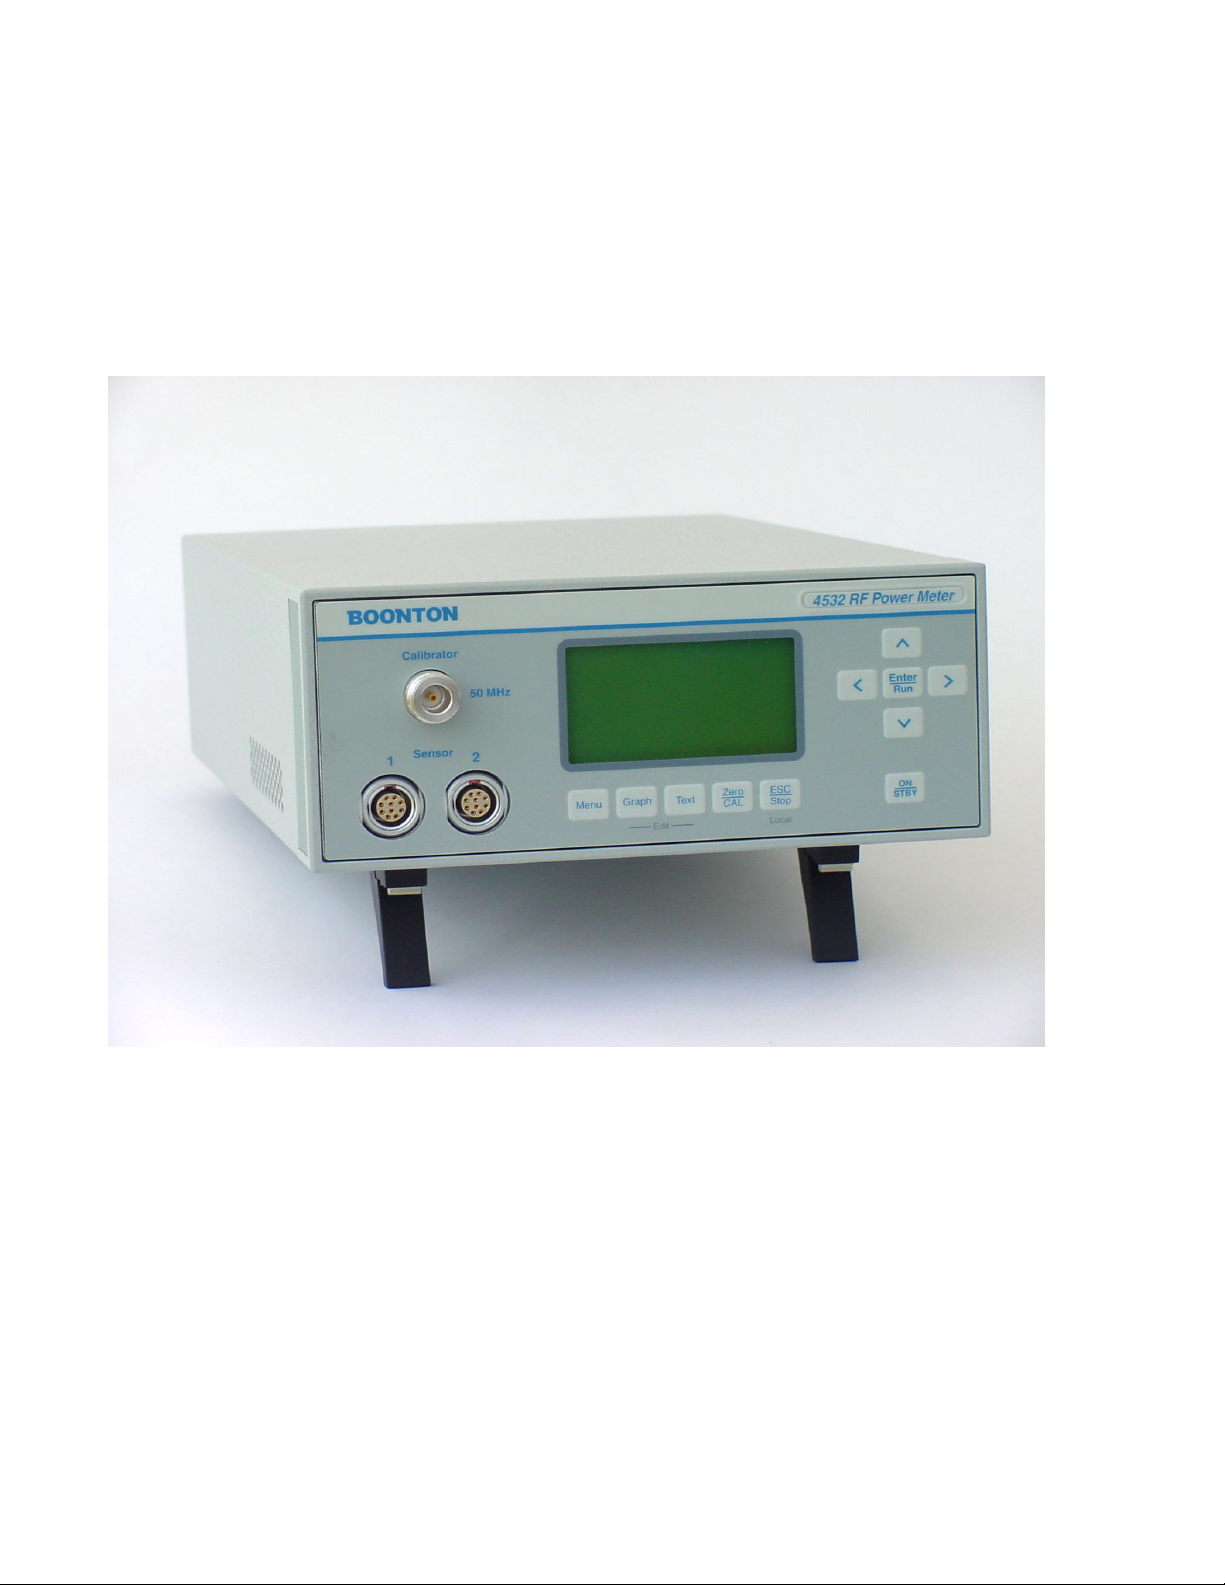
Figure C-1 4530 Series RF Power Meter
x
Page 13

Boonton Electronics Contents
4530 Series RF Power Meter
Repair Policy
Model 4531 / 4532 Instrument. If the Boonton Model 4531/4532 RF Power Meter is not operating correctly and
requires service, contact the Boonton Electronics Service Department for return authorization. You will be provided
with an RMA number and shipping instructions. Customers outside the USA should contact the authorized Boonton
distributor for your area. The entire instrument must be returned in its original packing container. If the original
container is not available, Boonton Electronics will ship a replacement container and you will be billed for the container
cost and shipping charges.
Boonton Peak Power Sensors. Damaged or defective peak power sensors are repaired as separate accessories.
Note that sensors which have failed due to overloading, improper mating, or connecting to an out-of-tolerance connector are not considered defective and will not be covered by the Boonton Warranty. If repair is needed, contact the
Boonton Electronics Service Department for return authorization. You will be provided with an RMA number and
shipping instructions. Customers outside the USA should contact the authorized Boonton distributor for your area.
Only the defective sensor should be returned to Boonton, not the entire instrument. The sensor must be returned in its
original packing container. If the original container is not available, Boonton Electronics will ship a replacement
container and you will be billed for the container cost and shipping charges. If a new sensor is ordered, note that it
does not include a sensor cable - this item must be ordered separately.
arranty
.
Contacting Boonton. Customers in the United States having questions or equipment problems may contact
Boonton Electronics directly during business hours (8 AM to 5 PM Eastern) by phoning (973) 386-9696. FAX messages may be sent at any time to (973) 386-9191. Email inquiries should be sent to service@boonton.com.
International customers should contact their authorized Boonton Electronics representative for assistance. A current
list of authorized US and international representatives is available on the Boonton website at www.boonton.com.
Limited W arranty
Boonton Electronics warrants its products to the original Purchaser to be free from defects in material and workmanship and to operate within applicable specifications for a period of one year from date of shipment for instruments,
probes, power sensors and accessories. Boonton Electronics further warrants that its instruments will perform within
all current specifications under normal use and service for one year from date of shipment. These warranties do not
cover active devices that have given normal service, sealed assemblies which have been opened, or any item which has
been repaired or altered without Boonton’s authorization.
Boonton’s warranties are limited to either the repair or replacement, at Boonton’s option, of any product found to be
defective under the terms of these warranties.
There will be no charge for parts and labor during the warranty period. The Purchaser shall prepay inbound shipping
charges to Boonton or its designated service facility and shall return the product in its original or an equivalent
shipping container. Boonton or its designated service facility shall pay shipping charges to return the product to the
Purchaser for domestic shipping addresses. For addresses outside the United States, the Purchaser is responsible for
prepaying
all shipping charges, duties and taxes (both inbound and outbound).
THE FOREGOING W ARRANTIES ARE IN LIEU OF ALL OTHER W ARRANTIES, EXPRESS OR IMPLIED, INCLUDING, BUT NOT LIMITED TO, THE IMPLIED W ARRANTIES OF MERCHANT ABILITY AND FITNESS FOR A P ARTICULAR PURPOSE. Boonton will not be liable for any incidental damages or for any consequential damages, as
defined in Section 2-715 of the Uniform Commercial Code, in connection with products covered by the foregoing
warranties.
xi
Page 14

Contents Boonton Electronics
4530 Series RF Power Meter
xii
Page 15

Boonton Electronics Chapter 1
4530 Series RF Power Meter General Information
GENERAL INFORMATION 1
1.1 DESCRIPTION
The 4530 Series RF Power Meter is a new generation of instruments. It allows high-resolution power measurement of
a wide range of CW and modulated RF signals over a dynamic range of up to 90dB depending on sensor. The power
meter is available configured as the single-channel Model 4531, or as the dual-channel Model 4532. For the remainder
of this manual, the series designation of 4530 will be used to indicate either model, except when otherwise stated.
The 4530 is really several instruments in one, and can function as a CW Power Meter, a Peak Power Meter , a Statistical
Power Analyzer, and an RF Voltmeter. It accepts the full series of Boonton RF power and voltage sensors, which
includes coaxial dual-diode sensors and thermal sensors. Sensor data and calibration information is automatically
downloaded from the sensor or “smart adapter” whenever a new sensor is connected, eliminating the need to manually
enter calibration factors.
When used as a CW power meter, the 4530 provides seamless measurement performance due to the extremely wide
dynamic range of its input stage. Thermal and peak power sensors require no range switching under any conditions,
and even CW diode sensors spanning a 90dB dynamic range require only two widely overlapping ranges. This means
that practically any measurement can be performed without the interruptions and non-linearities associated with the
range changes of conventional power meters.
For modulated signals, the 4530 can make accurate average and peak power measurements with modulation bandwidths as high as 20MHz, making it ideal for high-speed digitally modulated carriers such as CDMA, W-CDMA, GSM,
TDMA, HDTV and UMT . Periodic and pulse waveforms can be displayed in graphical format, and a host of automatic
measurements are available which characterize the time and power profiles of the pulse. Effective sampling rates up to
50MSa/sec and user programmable cursors allow instantaneous power measurements at precise time delays from the
pulse edge or an external trigger as well as time gated or power gated peak and average power.
For spread-spectrum or randomly modulated signals such as CDMA, the 4530’s powerful statistical analysis mode
allows full profiling of the power probability at all signal levels. Sustained acquisition rates in excess of one million
readings per second along with rangeless operation insure that a representative population can be acquired and
analyzed in minimum time. By analyzing the probability of occurrence of power levels approaching the absolute peak
power, it is possible to characterize the occasional power peaks that result in amplifier compression and data errors.
Because of the random and very infrequent nature of these events, they are next to impossible to spot with the
conventional techniques used in other universal power meters. In addition, the instrument’s extremely wide video
bandwidth insures that even the fastest peaks will be accurately measured.
The 4530’s powerful dual-processor architecture permits advanced measurement capabilities with unprecedented
speed and performance. A high-speed, floating-point digital signal processor (DSP) performs the measurements. It
gathers and processes the power samples from the sensors, performs time-stamping, linearity correction, gain adjustment and filtering, all in fractions of a microsecond. The processed measurements are then passed to a dedicated,
32-bit I/O processor that monitors the keyboard, updates the LCD display and responds to RS-232 and GPIB requests
for formatted measurements. This design eliminates the speed tradeoffs between measurement data input (acquisition)
and output (over the GPIB) that are so common among other power meters.
, the 4530 provides seamless measurement performance due to the extremely wide
Instrument operating firmware is stored in flash memory that may be field reprogrammed with any PC via the onboard
RS-232 port. Free firmware upgrades permit the easy addition of new features or capabilities that may become available
in the future. Visit the Boonton website at WWW.BOONTON.COM for upgrade information and to download the
latest firmware version.
1-1
Page 16

Chapter 1 Boonton Electronics
General Information 4530 Series RF Power Meter
1.2 FEATURES
Multi-mode capability Utilizes CW sensors, Peak Power sensors and V oltage probes with automatic sens-
ing and setup for each type. Measures conventional CW power and voltage,
power versus time for pulse analysis, and statistical power distributions for spread
spectrum signals.
Text and Graphics The backlit LCD display shows numerical results as well as graphical results for all
measurements. Measurements are displayed using a large, easy-to-read numerical
format, or in graph mode with a fast-updating, oscilloscope-like trace.
Dual Independent ChannelsDual Independent Channels Model 4532 is equipped with two identical independent measurement channels
with the capability to display two pulse measurements, two statistical measurements or two CW measurements at the same time.
Remote Programming All functions except power on/off can be controlled by a GPIB interface or via an
RS-232 serial connection. The programming language follows the SCPI model with
added non-SCPI commands for special applications.
1.3 ACCESSORIES
Supplied accessories: 1 – NEMA type power cable
1 – Fuse Kit
1 – 4530 Series Operators Instruction Manual
Other accessories: Rack Mounting Kit
See Boonton Electronics Power Sensor Manual for power sensors available.
Options: Model 4531 Single Channel RF Power Meter
Model 4532 Dual Channel RF Power Meter
Rear panel sensor inputs
Rear panel calibrator output
1.4 SPECIFICATIONS MODTIONS MODEL 4531 and 4532 4531 and 4532
1.4.1 General.
Sensor Inputs (Performance depends upon sensor model selected)
Channels: Single Input: Model 4531
Dual Input: Model 4532
RF Frequency Range: 10 kHz to 110 GHz ( Sensor dependent )
Peak Power Measurement Range: -40 to +20 dBm ( Sensor dependent )
CW Measurement Range: -70 to +44 dBm ( Sensor dependent )
Relative Offset Range: ±99.99 dB
V ideo Bandwidth: 20 MHz (Sensor dependent)
Single Shot Bandwidth: 250 kHz (based on 10 samples per pulse)
Pulse Repetition Rate: 1.8 MHz maximum for stable, internal trigger
1-2
Page 17

Boonton Electronics Chapter 1
4530 Series RF Power Meter General Information
1.4.2 Calibration Sources
Internal Calibrator
Output Frequency: 50 MHz ± 0.005%
Level: -60 to +20 dBm
Resolution: 0.1 dB steps
Source SWR: 1.05 (reflection coefficient = 0.024)
Accuracy, 0° to 20°C, NIST traceable: At 0 dBm: ±0.055 dB (1.27%)
+20 to -39 dBm: ±0.075 dB (1.74%)
-40 to -60 dBm: ±0.105 dB (2.45%)
RF Connector: T ype N
External Calibrator (See Appendix B)
Model 2530 1 GHz Calibrator (Purchased separately if required)
1.4.3 T rigger ( Peak power modes only . )
Modes: Pre-trigger and post-trigger
Trigger Time Resolution: 20 ns
Trigger Delay: ±900µs for timespans 5µs and faster
±4ms for timespans 10µs to 50µs
± (80 x TimeSpan) for timespans 50µs to 2ms
± (30 x TimeSpan) for timespans 5ms and slower
Trigger Holdoff: 0 µs to 1 sec, resolution 1µs
Internal Trigger Range: Equivalent to -30 to +20 dBm pulse amplitude range.
External Trigger Range: ±5 volts, ±50 volts with 10:1 divider probe.
External Trigger Input: 1 megohm in parallel with approximately 15pF , dc coupled.
External Trigger Connector: Rear-panel BNC input
1.4.4 Sampling Characteristics
Effective sampling rate: 50 Megasamples per second (each channel, pulse mode)
Sustained sampling rate: 2.5 Megasamples per second (each channel, pulse mode)
Measurement Technique: Continuous and triggered (burst) sampling
1-3
Page 18

Chapter 1 Boonton Electronics
General Information 4530 Series RF Power Meter
1.4.5 Measurement Characteristics
Measurements: Average Power*
Maximum A verage Power*
Minimum A verage Power*
Maximum Instantaneous (“Peak”) Power*
Minimum Instantaneous Power*
Peak to A verage Power Ratio*
Cumulative Distribution Functions: CDF , 1- CDF ,
Probability Distribution (histogram)
Power at a percent statistical probability
Statistical probability at a power level
CW Power
RF V oltage
* All measurements marked with an asterisk (*) may be performed con-
tinuously, or in a synchronous, triggered mode. When triggered, these
measurements may be made at a single time offset relative to the trigger ,
or over a defined time interval. The time offset or interval may be before
or after, or may span the trigger interval.
Channel Math: Displays the ratio, sum (power sensors) or difference (voltage sensors)
between channels or between a channel and a reference measurement
(Modulated and CW modes only).
Trace A veraging: 1 to 4096 samples per data point.
Panel setup storage: 4 complete setups.
Measurement rate (via GPIB): Greater than 200 two-channel measurements per second, neglecting bus
master overhead, or 500 single-channel measurements per sec.
1.4.6 Sensor Characteristics
CW Power Sensors
Power Detection Technique: Dual diode, single diode or thermo-electric.
Internal Data: Frequency and linearity calibration tables, frequency range, power range,
sensor type, serial number and other sensor dependent information are
stored in EEPROM within the sensor cable or in a cable-adapter for use
with existing CW sensors.
Peak Power Sensors
Power Detection Technique: Dual diode with selectable detector bandwidth.
Signal compression: The use of logarithmic signal compression circuitry in the sensor enables
the instrument to measure and analyze changes in power exceeding 60
dB in a single range.
Internal Data: Frequency, linearity and temperature calibration tables, frequency range,
power range, sensor type, serial number and other sensor dependent
information are stored in EEPROM within the peak power sensor.
Sensor Cable: The sensor cable is detachable from both sensor and instrument. The
standard cable length is 5 feet. Optional cable lengths are 10, 20, 25, and
50 feet. Additional cable length will affect measurement bandwidth.
RF V oltage Sensors Dual diode detector.
1-4
Page 19

Boonton Electronics Chapter 1
4530 Series RF Power Meter General Information
1.4.7 Interface
Video Output: Compressed representation of detected RF envelope of peak channel(s)
envelope for external oscilloscope monitor or external device synchronization. This output is roughly logarithmic with input power, is not
calibrated, and can not be used for making any measurements.
Recorder Output: Programmable voltage output which may be used for monitoring mea-
surements or status of either channel, or for outputting a fixed,
programmable voltage. When used as a measurement monitor, the output is proportial to displayed signal level with programmable or automatic
scaling.
Output range: 0 to 10V (unipolar), or -10V to +10V (bipolar)
Output resolution: 5.0mV
Output impedance: 9 K
Absolute accuracy: ±100mV typical, ±200mV max, uncalibrated
±20mV after user calibration
Linearity: 0.1% typical
GPIB Interface: Complies with IEEE-488.1. Implements AH1, SH1,T6, LE0, SR1, RL1, PP0,
DC1, DT1, C0, and E1.
RS-232 Interface: Accepts GPIB commands (except bus dependent commands). Provides
for user software updates.
Remote Programming: SCPI (1990) compliant and Native Mode commands via GPIB or RS-232
interfaces.
Software Drivers: LABVIEW drivers available.
1.4.8 Environmental Specifications
General: Manufactured to the intent of MIL-T 28800E, T ype III, Class 5, Style E
CE Mark: Conforms to EU specifications:
EN 61010-1(90)(+A1/92)(+A2/95)
EN 61010-2-031
EN 61326-1(97)
EN 55022(94)(A2/97)Class B
Display: Graphic type LCD, with LED backlight. T ext and trace displays.
Operating Temperature: 0 to 5 0° C
Ventilation: Fan cooledFan cooled
Altitude: Operation up to 15,000 feet.
Storage Temperature: -40 to 75° C
Humidity: 95% ±5% maximum (non-condensing).
Operation up to 15,000 feet.
-40 to 75° C
95% ±5% maximum (non-condensing).
Shock: Withstands ±20G, 42ms impulse in X, Y , and Z axes, as per MIL-STD-810.
V ibration: Conforms to MIL-STD-167-1.
Power Requirements: 90 to 260 V AC, 47 to 63 Hz, <50 VA , <30 Watts. No voltage switching
Battery: One Lithium coin cell for maintaining non-volatile memory information.
Withstands ±20G, 42ms impulse in X, Y ,
Conforms to MIL-STD-167-1.
90 to 260 V AC, 47 to 63 Hz, <50 VA
required.
Not user replaceable. Typical battery life: 10 years.
1-5
Page 20

Chapter 1 Boonton Electronics
General Information 4530 Series RF Power Meter
1.4.9 Physical Specifications
Dimensions: 3.5 inches (8.9 cm) high,
8.4 inches (21.3 cm) wide,
13.5 inches (34.3 cm) deep,
All dimensions are approximate, and exclude clearance for feet and
connectors. Feet may be removed for rack mounting.
Weight: 7 lbs. (3.2kg)
Connector location option: Sensor input(s) and calibrator connector: Front or rear panel.
Construction: Surface mount, multilayer printed circuit boards mounted to rigid alumi-
num frame and front extrusion/casting with aluminum sheet metal
enclosure.
Note: All specifications are subject to change without notice.
1-6
Page 21

Boonton Electronics Chapter 2
4530 Series RF Power Meter Installation
INSTALLATION 2
2.1 UNP ACKING & REP ACKING
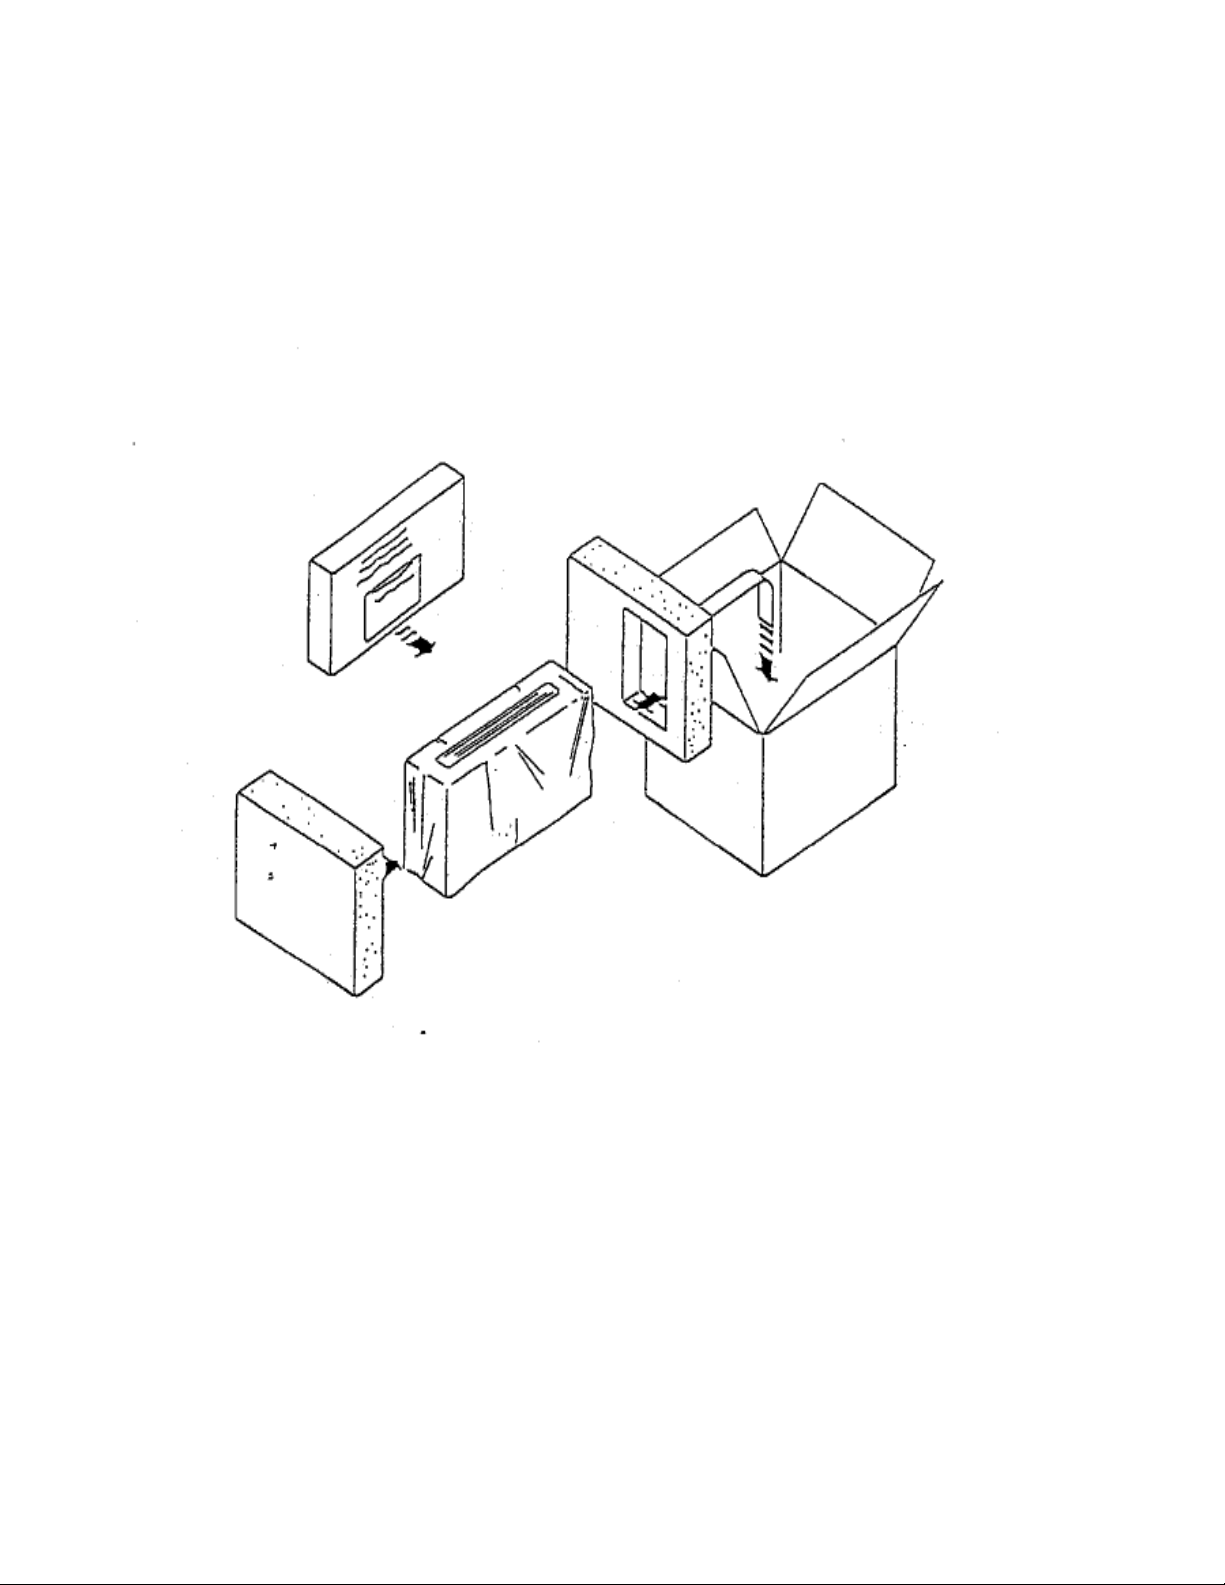
The 4530 Series RF Power Meter is shipped complete and ready to use upon receipt. Figure 2-1 shows the packaging
material. Save the packing material and container to ship the instrument if necessary . If the original materials are not
available, contact Boonton Electronics to purchase replacements. Store materials in a dry environment.
2.2 POWER REQUIREMENTS
The 4530 Series is equipped with a switching power supply that permits operation from a 90 to 260 volt, 47 to 63 Hz,
single-phase AC power source. Power consumption is 50 VA maximum. For replacement fuses, use the fuse kit
supplied.
CAUTION
Before connecting the instrument to the power source, make certain that the correct
fuse(s) are installed in the power entry module on the rear panel.
W ARNING
Before removing the instrument cover for any reason, place the entry module power
switch in the OFF (0=Off) position and remove the line cord from the entry module.
2.3 INTERNAL BA TTERY
The 4530 Series contains a coin cell Lithium battery to provide memory backup when the power source is off. The
battery has an expected life of ten years and is not user replaceable.
2.4 PRELIMINARY CHECK
The following preliminary check verifies that the instrument is operational and has the correct software installed. It
should be performed before the instrument is placed into service. T o perform the preliminary check, proceed as follows:
1. Connect the AC power cord to a suitable AC power source.
2. Press the upper half of the rocker type power switch located in the power entry module on the rear panel.
3. If the instrument does not start up, press the ON/STBY key on the front panel.
4. A banner message should appear on the LCD display, followed by a self-check display and sensor detection
messages. If any fatal errors occur during the startup, the process will terminate with a failure message on the
display. Any marginal conditions detected will be indicated with a cautionary message, but the startup process
will be allowed to proceed.
5 . When the startup process is complete, press the Menu key twice to force the Main Menu to be displayed. Using
the arrow keys to move through the list of menu items and the Enter key to select Utilities > Sys-Tests >
SystemInf display. Verify that the Serial Number matches the number on the rear panel tag. If the numbers do not
match, contact Boonton Electronics technical support.
2-1
Page 22
Chapter 2 Boonton Electronics
Installation 4530 Series RF Power Meter
6. The sensors supplied with the instrument may vary widely in model number and type. Refer to Section 3-9 for
information on connecting and calibrating sensors.
7. Upon successful calibration of the supplied sensors, the instrument is ready for use.
Figure 2-1. Packing and Unpacking Diagram
2-2
Page 23

Boonton Electronics Chapter 3
4530 Series RF Power Meter Operation
OPERATION 3
3.1 OPERATING CONTROLS, INDICA TORS AND CONNECTIONS
Controls, indicators and connectors for the 4530 Series RF Power Meter are shown in figures 3-1 and 3-2. The front
panel is illustrated in figure 3-1 and the rear panel in figure 3-2.
12345
12 11 10 9 8 7 6
Figure 3-1. 4530 Series, Front Panel
12 13 1
18 17 16 15 14 19
Figure 3-2. 4530 Series, Rear Panel
3-1
Page 24

Chapter 3 Boonton Electronics
Operation 4530 Series RF Power Meter
3.2 KEY FUNCTION SUMMARY
Table 3-1 references each operating key or connector to a callout in Figure 3-1or 3-2 and briefly describes the key
function
Table 3-1. Keyboard Controls and Connectors
Item Figure 3-1 Function
50 MHz Calibrator 1 The output of the built-in 50MHz programmable calibrator is available
from a Type-N connector located on the front or optionally on the rear
panel of the instrument. This calibrator is used to automatically calibrate
sensor offset and linearity, and can also be used as a general purpose
calibration signal source.
Display 2 The 4530 Series RF Power Meter uses a 160x80 pixel graphic liquid crystal
display module with a switchable LED backlight. The display contrast
may be adjusted by holding down the ESC key while pressing the
keys.
∧∧
∧
or
∧∧
∨∨
∨
∨
∨
< and > Keys 3 Used to navigate between levels of the menu structure while in Menu
Mode or Zero/Cal Mode and to select individual editing numeric parameters. In Text Mode and Graph mode these keys can be used to switch
the display between channels. In T ext or Graph Edit Modes, the < and >
keys scroll the header line left or right through a list of editable parameters.
∧∧
∨∨
and ∨ Keys 4 Used to scroll up and down through a list of items when in Menu Mode
∧
∨
∧
∧
∨
or Zero/Cal Mode. They are also used to increment and decrement parameter values or individual digits when editing. In certain Text Modes,
these keys can be used to page up or down through a series of measurement screens.
∧∧
(Key Repeat) -- - Note - If the ∧ or ∨ key is pressed and held when incrementing or
decrementing a variable, it enters auto-repeat mode. At first, there is a
short delay, and then the number begins to increment at a slow rate. The
increment rate accelerates to a medium rate after 2 seconds, and to a high
rate after 7 seconds. To select and hold the medium repeat rate, doubleclick the key - releasing and immediately pressing the key will inhibit the
high-speed auto-repeat rate so the value doesn’t “run away” just as the
desired number is being approached.
Enter/Run Key 5 Activates a menu selection or completes update of a parameter in Menu
Mode or Zero/Cal Mode. Pressing Enter/Run while stopped in Text
Mode or Graph Mode will start (or restart) the measurement process.
∨∨
∧
∨
∧
∨
ON/STBY Key 6 Switches the power meter between on and standby modes. When in
standby, some circuitry remains powered to reduce drain on the battery
used to maintain the non-volatile memory.
3-2
Page 25

Boonton Electronics Chapter 3
4530 Series RF Power Meter Operation
Table 3-1. Keyboard Controls and Connectors (Cont)
Item Figure 3-1 Function
ESC/Stop K ey 7 Aborts any operation in progress when in Menu Mode or Zero/Cal Mode.
Pressing ESC/Stop while running in T ext Mode or Graph Mode first causes
the measurement process to stop. Pressing it when already stopped will
clear the screen and reset all measurement values. Pressing ESC/Stop
when the instrument is in remote mode (the GPIB has control of the
instrument and keyboard entry is disabled) will return it to local mode
(the instrument is under keyboard control) unless the local lockout command, LLO, has been issued by the controller.
Zero/CAL Key 8 Places the instrument in Sensor Zero/Calibration Mode and displays a
menu to allow automatic sensor offset and gain adjustments using the
built-in 50MHz calibrator or an external calibrator.
Text Ke y 9 Places the instrument in Text Mode to display the current measurements
in a numeric format. Pressing Text while already in Text Mode toggles the
top portion of the display between the normal T ext Mode header and Edit
Mode for each active channel.
Graph K ey 1 0 Places the instrument in Graph Mode to display the current measurement
waveforms in a graphical format. Pressing Graph while already in Graph
Mode toggles the top portion (header) of the display between the normal
Graph Mode header and Edit Mode for the active channel.
Menu Key 11 Places the instrument in Menu Mode to allow navigation of the menu
structure. Pressing Menu while already in Menu Mode returns the user
to the top-level Main Menu.
Sensor 1 - 2 12 One or two sensor inputs are located on the front, or optionally on the
rear panel of the instrument. These are 10-pin precision connectors designed to accept only Boonton Peak or CW power sensors and Boonton
voltage sensors. The sensor inputs are not measurement terminals and
cannot be used for other than the intended purpose.
CAUTION
Do not attempt to connect anything other than a
Boonton sensor or sensor adapter to the Sensor inputs!
GPIB 13 A rear-panel 24-pin GPIB (IEEE-488) connector is available for connect-
ing the power meter to the remote control General Purpose Instrument
Bus. GPIB parameters can be configured through the menu.
3-3
Page 26

Chapter 3 Boonton Electronics
Operation 4530 Series RF Power Meter
Table 3-1. Keyboard Controls and Connectors (Cont)
Item Figure 3-1 Function
EXT CAL CONTROL 14 An RJ-11 type modular telephone jack is used to connect the instrument
to a Boonton Model 2530 1GHz Programmable Calibrator. This feature
must be used to calibrate peak power sensors that cannot be calibrated at
50MHz, the operating frequency of the built-in calibrator.
CAUTION
Do not attempt to connect the External Calibrator
Control RJ-11 port to a telephone line or to any device
other than a Boonton Model 2530, 1 GHz Calibrator!
RECORDER OUT 15 A rear-panel BNC programmable analog output is available for connec-
tion to an external chart recorder or other device. The output voltage
range is unipolar or bipolar 10 volts, and a 9K output impedance allows
for simple scaling using a single external load resistor. The output can be
programmed to produce a voltage proportional to signal level, or a logiclevel status voltage for signaling when the RF power is above or below
preset “alarm limit” thresholds. Recorder output parameters can be configured through the menu.
VIDEO OUT 1-2 1 6 Two rear-panel video BNC outputs are used to view the demodulated RF
envelope for each channel on an external oscilloscope when using peak
sensors. The output voltage is 0 to 2.5 volts, and is approximately proportional to the logarithm of the sensor power. These outputs are
uncalibrated, and should not be used for making any type of external
measurement.
EXT TRIGGER 17 A rear-panel BNC input is available for connecting an external trigger
source to the power meter. The input impedance is 1 megohm to allow
triggering from a common 10x oscilloscope probe, and the input voltage
range is +5 to -5 volts to simplify triggering from logic-level signals.
RS-232 18 A rear-panel 9-pin female “D” connector is used to connect the instru-
ment to a PC or other serial device. The power meter will directly interface
with most PC serial ports
RS-232 parameters can be configured through the menu.
AC Line Input 19 A multi-function power input module (lower right of rear panel) is used to
house the AC line input, main power switch, and safety fuse. The module
accepts a standard AC line cord, included with the power meter. The
power switch is used to shut off main instrument power . The safety fuse
may also be accessed once the line cord is removed. The instrument’s
power supply accepts 90 to 260VAC, so no line voltage selection switch
is necessary.
using a straight-through type RS-232 cable.
CAUTION
Replace fuse only with specified type and rating!
3-4
Page 27
Boonton Electronics Chapter 3
4530 Series RF Power Meter Operation
3.3 DISPLAY FUNCTIONS
The screen display of the 4530 is divided into three sections: the header, the measurement window and the status
window. Because these functions apply to all modes of operation, it is very important to understand them thoroughly.
∧∧
∨∨
∧
Note that the display contrast may be adjusted by holding down the ESC key while pressing the
Header Status Window
Measurement Window
Figure 3-3. Display Functions
∧
∧
∨ or ∨ keys.
∨
3.3.1
Header. The header appears at the top of the screen. It displays a title line and a line of text describing the
status of the currently highlighted item (sensor status, measurement status or auxiliary measurement values).
If the item is a submenu, a short description of the menu’s function will appear . If it is a parameter , the present
value for that parameter is shown. If it is an action item, the action will be described, and upon activation, the
message will change to indicate that the action has occurred. The header is also used as a two-line parameter
editing window when in the Edit mode.
3.3.2 Measurement Window. The major portion of the screen displays the current measurement results in a single
(4531) or split-channel (4532) format. The text display shows a trace for the primary measurement of the
channel(s) (usually average power), which updates as samples are acquired. In addition, while in the text mode,
the channel source (sensor, reference, or math function) is displayed along with measurement units. While in
the Graph mode, at slower display timebases, the trace will roll from right to left in chart recorder format, while
faster timebases use an oscilloscope-like sweep.
3.3.3 Status Window. The right-hand portion of the screen displays six annunciators that indicate status for the
GPIB, calibrator and measurement. The first four indicate GPIB status: REM, TLK, LSN, and SRQ. Position five
is a measurement status indicator, that can display: STOP, RUN, AUTO, ARMD, or SNGL. Position six displays
CAL when the calibrator output is active.
3.3.4 Channel Selection. Pressing the < or > keys while in text or graph mode toggles the measurement window
between channels. If Channel 1 is active, pressing < from a split-channel display will display only Channel 1,
and pressing > at that point returns to the split channel display. Similarly, pressing > from the split-channel
screen switches to the Channel 2 only display and < returns to the split-channel format. Note that in the singlechannel Model 4531, there is no “Channel 2 only” display , and while the split-channel display is present, there
are no measurements for Channel 2.
3.3.5 Header / Page Selection. Pressing the
a series of three “measurement pages”, each displaying a different set of measurements or status indicators. In
single-channel text mode, the entire measurement window may change, while in graph mode or split-channel
format, only the “auxiliary” measurements shown in the header will change.
∧∧
∨∨
∧
∨ and ∨ Keys while in text or graph mode scrolls the display through
∧∧
∨
3-5
Page 28
Chapter 3 Boonton Electronics
Operation 4530 Series RF Power Meter
3.4 OPERATING MODE SUMMARY
The 4530 can operate in several modes. It is possible to move between these modes without interrupting the measurements currently being performed, even though the measurement display may not always be present.
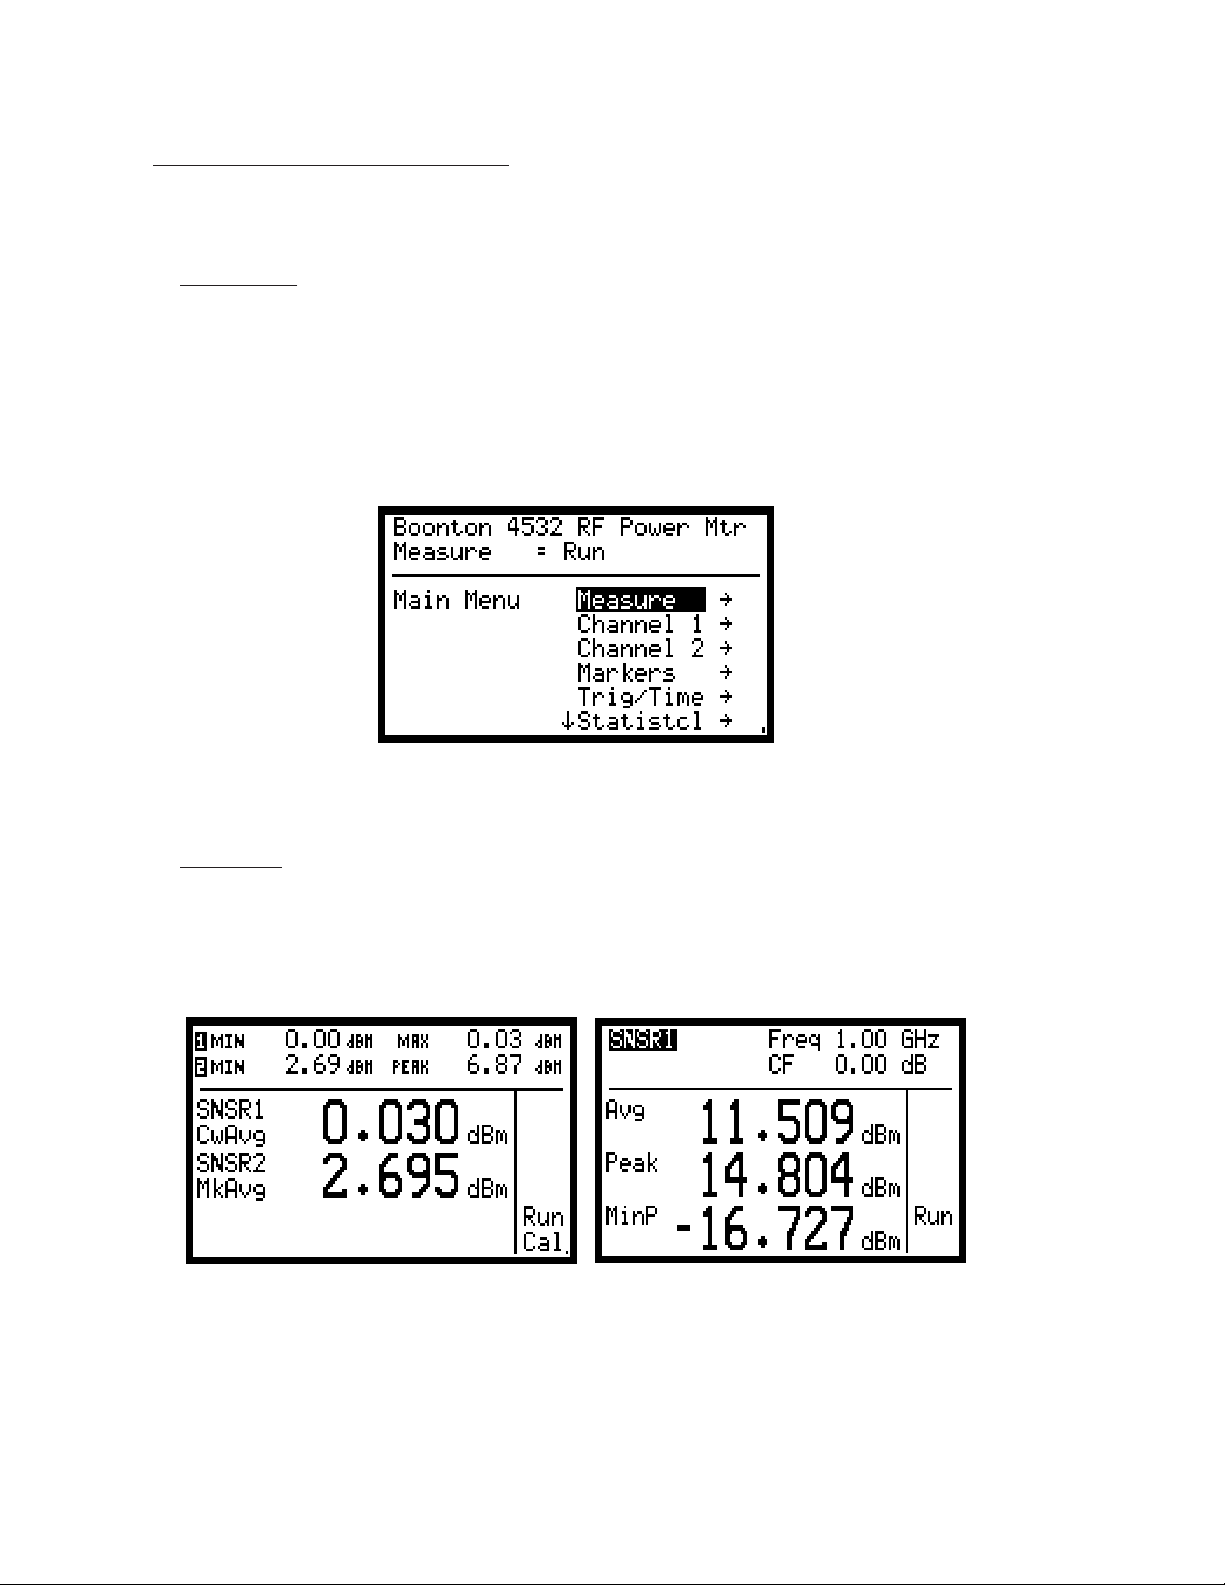
3.4.1 Menu Mode. The Menu Mode and is used to set operating parameters and start or stop measurements. A
series of displayed menus may be navigated using the front-panel arrow keys to access any instrument
function. The menu is an inverted tree, which begins at the top-level Main Menu, and branches downwards
through several levels of menu items and submenus. Refer to Table 3-5 for a summary of the instrument’s
entire menu structure. The first time the Menu key is pressed after power-up, the instrument enters the Menu
Mode and displays the Main Menu. Subsequent entries into Menu Mode will return the user to the same
position in the menu tree that was last used. Pressing the Menu key twice (or pressing it at any time when
already in Menu Mode) will always return to the Main Menu.
Figure 3-4. Menu Mode
3.4.2 Text Mode. In T ext Mode, the measurements are presented in a numerical format. A summary split-channel
(4532) display which shows the key measurement values for each channel in a large font may be selected, or
detailed single-channel (4531) display that presents a number of different measurements in a tabular format.
In the dual-channel text display, a programmable bargraph can be displayed to aid in viewing fluctuating
signals.
Dual Channel (Example) Single Channel (Example)
Figure 3-5. Text Mode
3-6
Page 29

Boonton Electronics Chapter 3
4530 Series RF Power Meter Operation
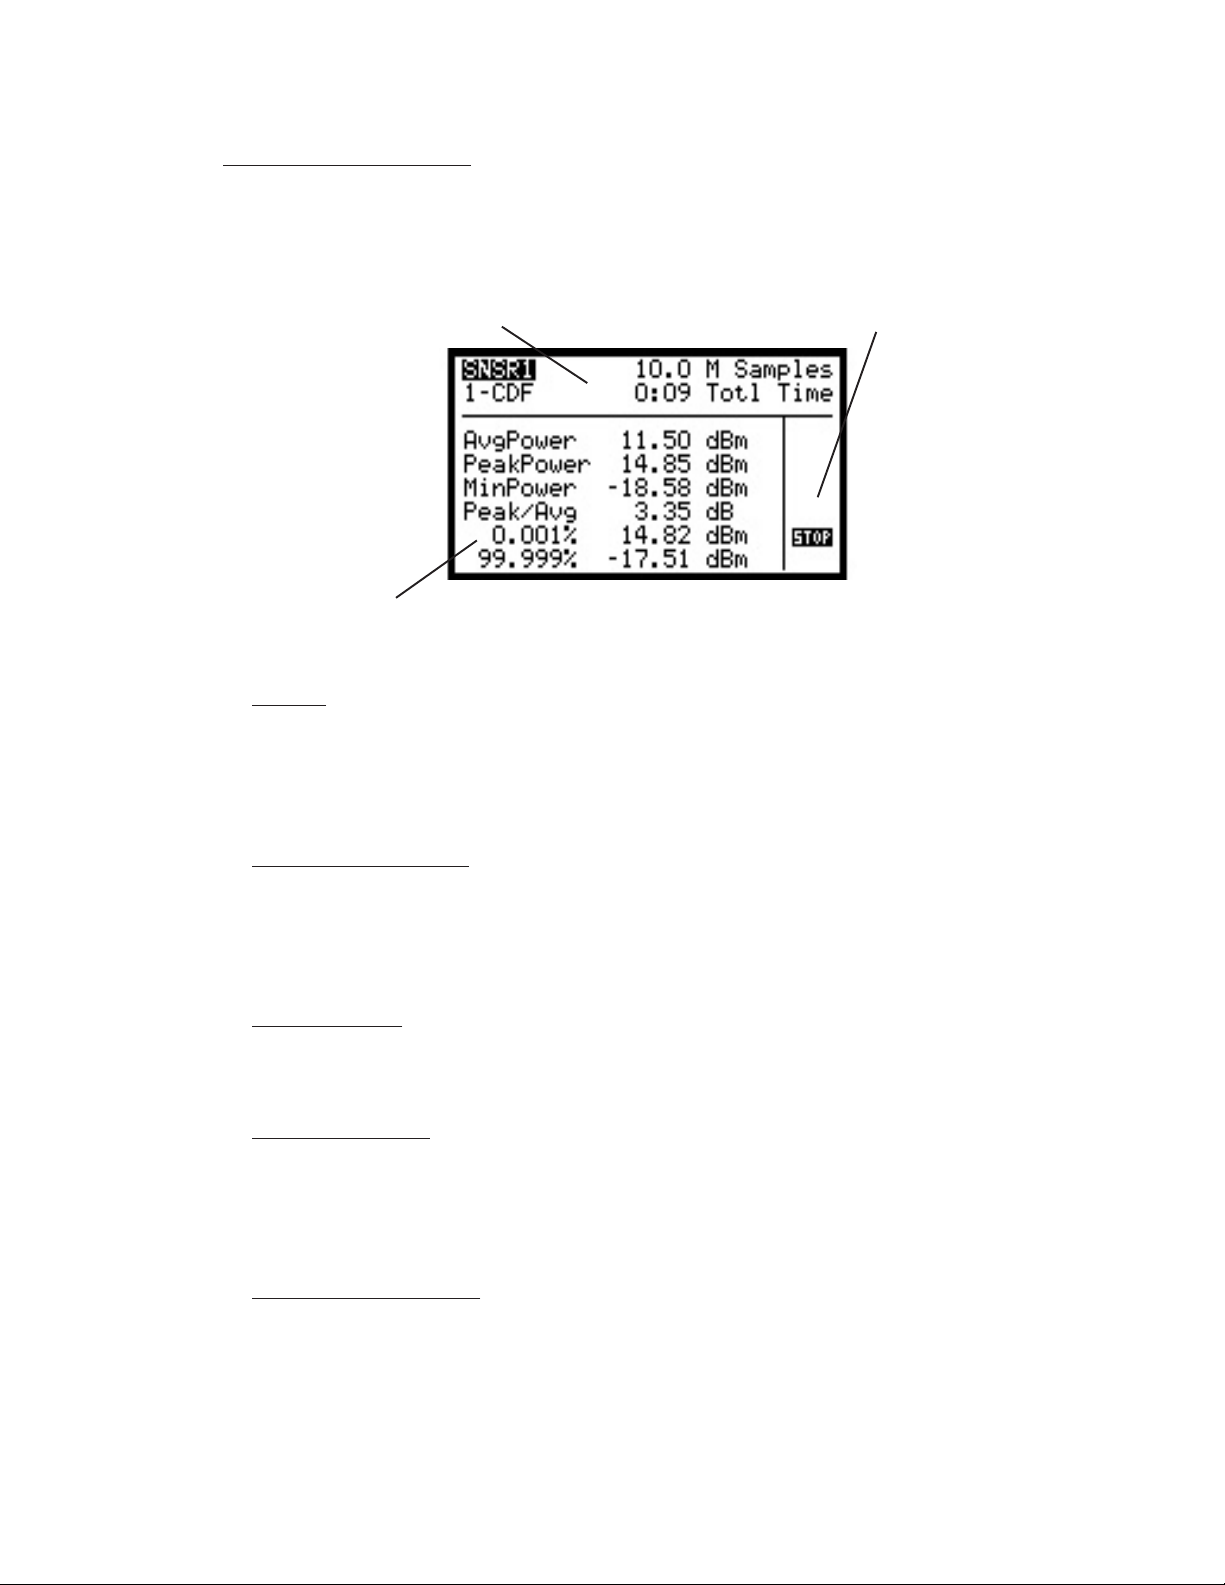
3.4.3 Graph Mode. The Graph Mode can present an oscilloscope style trace of power versus time or power
versus percent probability in statistical mode. Each channel may be viewed individually, or both can be
overlaid to make channel-to-channel comparisons. User programmable cursors can be moved back and forth
or up and down on the trace to define measurement regions of interest.
Figure 3-6. Graph Mode (Example)
3.4.4
Edit Mode. Edit Mode is an extension of the basic Graph Mode or Text Mode operation. The screen’s
measurement window continues to display and update the active measurement, but the two-line header area
at the top of the screen is used as an edit window. The arrow keys scroll through a list of commonly accessed
parameters, and allow these parameters to be updated “on the fly” without the need to return to Menu Mode.
Channel Edit Parameter List
Selected Parameter and current V alue
Figure 3-7. Edit Mode (Example)
3.4.5
Zero/Calibration Mode. When the 4530 is placed in Zero/Calibration Mode, a special menu is displayed
that allows quick, single-key access to the instrument’s sensor zeroing and linearity calibration functions. A
configuration submenu is available for each channel to set up certain calibration parameters.
3-7
Page 30

Chapter 3 Boonton Electronics
Operation 4530 Series RF Power Meter
Figure 3-8. Zero/Cal Mode (Example)
3.5 MENU MODE OPERA TION
3.5.1
Entry. When the Menu key is pressed, the instrument enters Menu Mode (See Figure 3-9). The first time the
Menu key is pressed after power-up, the instrument will always enter Menu Mode displaying the Main Menu.
Subsequent entries into Menu Mode will return the user to the same position in the menu tree that was last
used.
Figure 3-9. Main Menu Screen
3.5.2 Navigation. The menu tree is navigated using the arrow keys until the desired menu is highlighted, and then
∧∧
that item may be activated. The
menu’s item list. Pressing > or Enter/Run will activate the highlighted item and move to a subordinate menu
item associated with the selected item. Pressing < or ESC will return to the parent menu. Pressing Graph, Text
or Zero/Cal will exit Menu mode and abort any parameter editing in progress.
∨ ∨
∧
∨ and ∨ keys are used to move the cursor up and down through the current
∧∧
∨
3.5.3 Menu Items. Menu items may be one of four types: Submenu, Numerical Value, Picklist , or Action.
a. Submenus. A submenu is simply a menu at a lower level containing more items. Activating a submenu item
will cause the current menu to become the parent menu, and the submenu will then be opened and become the
current menu.
b. Numerical Values. A numerical value is an operating parameter that can be edited. When a numerical value
item is activated, that item name (parameter) is displayed along with the highlighted current value of the
parameter. Editing is performed with the arrow keys. The default edit mode is increment/decrement mode.
∧∧
∨∨
∧
Only the
∨ and ∨ keys are used to increment or decrement the parameter’s value by a preset amount.
∧
∨
∧
3-8
Page 31

Boonton Electronics Chapter 3
4530 Series RF Power Meter Operation
If a precise value is required, a special digit editing mode (Figure 3-10) may be selected. This mode is entered
from increment/decrement mode by pressing the > key. When > is pressed, a digit pointer will be displayed
∧∧
∨∨
∧
below the leftmost digit field, and the
Pressing > or < will move the digit pointer right or left so any digit of the numeric parameter may be selected.
Pressing < when the leftmost digit is selected will return to increment/decrement mode.
Figure 3-10. Digit Editing Mode (Example)
∨ and ∨ keys will change that digit of the parameter by one count.
∧
∨
∧
In either editing mode, the parameter’s value is always clamped to valid limits, and cannot be advanced
beyond these limits. When editing is complete, press Enter/Run to save the new value and return to the
previous level menu. Press ESC to abort the edit and restore the original value before returning.
c. Picklist. A picklist is used to select a parameter’s value from a list of two or more fixed entries. When a picklist
∧∧
is activated, the list of available values is displayed with the current value highlighted. Use the
to move the cursor up and down through the list until the desired value is highlighted. Press Enter/Run to
save the new value and return to the previous level menu, or press ESC to abort the edit and restore the
original value before returning. If the number of items in the picklist exceeds what can be displayed on the
↓↓
↑ ↑
or ↑ will appear to the left of the top or bottom item to indicate that there are more list items that
↓
screen, a
are scrolled off the top or bottom of the display.
d. Action Item. An action item is a menu selection that causes an event to occur or be initiated immediately when
the item is activated. In some cases (such as AutoSetup), the user will first be prompted to confirm the action
before continuing.
↑
↓
↑
↓
∨∨
∧
∨
and ∨ keys
∧∧
∨
3.5.4 Menu Screen Display. The menu screen is divided into three sections: the header, the path, and the list
of menu items (see figure 3-11).
Menu Path Header Menu Items
Figure 3-1 1. T ypical Menu Screen
3-9
Page 32

Chapter 3 Boonton Electronics
Operation 4530 Series RF Power Meter
a. Header. The header displays a title line and a line of text describing the currently highlighted item (sensor or
measurement status, or auxiliary measurement values). A short description of a selected submenu, or action
item, is listed or the value of a selected parameter is displayed.
b. Path. The path appears on the left side of the screen, and is a list of each branch of the menu tree used to get
to the current position. Each time a new menu item is opened, that item is highlighted, and then that item may
be activated. Pressing > or Enter will activate the highlighted item and move to a subordinate menu item
associated with the selected item. Pressing < or ESC will return to the parent menu. Pressing Graph, Text or
Zero/CAL will exit Menu Mode, and abort any parameter editing in progress. T able 3-5 shows the complete
menu structure of the 4530.
c. Menu items. The list of menu items appears on the right side of the screen, where individual selections maybe
highlighted and activated. The menu is always entered with the top item highlighted, and the ∧ and ∨ keys
may be used to move the cursor up and down through the list. If a ↓ or ↑ appears to the left of the top or
bottom menu item, it means that the list extends above or below what is currently displayed on the screen. In
this case, the list can be scrolled up or down to allow access to these additional items.
As each item is highlighted, the header will show a brief description of that item or its current value. If the item
is a submenu, numeric value or picklist, a → will be shown to the right of the item to indicate that activating
that item moves you down another menu level or an edit screen. Action items have nothing displayed to the
right of the item since there is no “next level” associated with them.
3.5.5 Menu Syntax. When referring to item locations within the menu hierarchy, it is convenient to describe them
by their path. Each menu level will be separated by a “>” (indicating the > or Enter/Run key must be pressed
at this point to move down a level). Since Menu Mode always remains within the Main Menu, this manual will
always show the path beginning with the first item picked from the Main Menu level. For example, to set the
IEEE-488 bus address to 13, the following path string will be used:
Utilities > IEEE-488 > Bus Setup > Address > 13
To execute this function, you must first enter Menu Mode by pressing the Menu key.
3.6 TEXT MODE OPERA TION
In Text Mode, the current measurements are displayed in a numeric format with optional fast-responding bargraph
readouts. Since the 4530 can measure more than just average power, most modes have a number of measurements
associated with them. The flexible text presentation allows you to view key average power measurements in a traditional format or a tabular format to show a larger number of items on the screen.
Figure 3-12. T ext Mode (Example)
3-10
Page 33

Boonton Electronics Chapter 3
4530 Series RF Power Meter Operation
3.6.1 Entry. When the Text key is pressed, the 4530 enters Text Mode.
∧∧
3.6.2 Measurement Page Selection. Pressing the
series of pages that contain all the measurements being performed in the current mode. See paragraph 3.9
(Display Formats) for a list of what measurements are displayed in each format.
3.6.3 Channel Selection. Pressing the < or > keys while in Text mode switches the display between channels.
The keys toggle the display between “CH1 < > BOTH < > CH2”. In addition to the primary measurement, the
CH1 and CH2 displays may show a number of secondary measurements for that channel. The BOTH display
format shows the primary measurements only in the main display window, along with an optional bar graph. In
some cases, secondary measurements for each channel may appear in the header. Single-channel units
(Model 4531) can only page between the CH1 and BOTH display formats. See paragraph 3.9 (Display
Formats) for a list of what measurements are displayed in each format.
3.6.4 Measurement Control. Pressing Enter/Run while in Text Mode starts the measurement if it is stopped, or
arms the trigger if single-sweep mode is active. Pressing ESC/Stop stops the measurement if it is running and
holds the current measurement values. Once stopped, pressing ESC/Stop again clears the measurement
result, and resets for a new measurement. Anytime measurement is stopped, you can change display settings
or certain measurement parameters, and the current measurements displayed are updated accordingly.
∨∨
∧
∨ or ∨ keys while in T ext Mode pages up or down through a
∧∧
∨
3.6.5 Parameter Editing from Text Mode. Pressing Text while already in Text Mode will enter Edit mode for the
first active channel. The screen’s measurement window continues to display and update the active measurement, but the two-line header area at the top of the screen is used as an edit window. Pressing Text again
switches to Edit Mode for the second channel, if active. Another press of the Text key will return to normal
T ext Mode. See paragraph 3.8 (Edit Mode Operation) for more details.
3.7 GRAPH MODE OPERA TION
Graph Mode is used to present the current measurements in a real-time graphic or trace-type format. This can be a plot
of signal amplitude (usually power) versus time, similar to an oscilloscope screen, or power versus percent probability.
Power is always presented on the Y-axis, while time or probability is on the X-axis. Both axes can be scaled, and vertical
or horizontal cursors can be positioned on the trace to perform measurements at specific time or percent offsets of each
cursor or in the region between the two cursors.
Figure 3-13. Graph Mode (Example)
3-11
Page 34

Chapter 3 Boonton Electronics
Operation 4530 Series RF Power Meter
3.7.1 Entry. When the Graph key is pressed, the 4530 enters Graph Mode.
3.7.2 Measurement Page Selection. Pressing the ∧ or ∨ keys while in Graph Mode pages the header display up
or down through several commonly used measurements or parameters. See paragraph 3.9 (Display Formats) for
a list of what measurements are displayed in each format.
3.7.3 Channel Selection. Pressing the < or > keys while in Text mode switches the display between channels.
The keys toggle the display between “CH1 < > BOTH < > CH2”. This is helpful to distinguish between traces
when two channels are being viewed, or to concentrate on settings for one of the channels. Single-channel
units (Model 4531) can only page between the CH1 and BOTH display formats.
3.7.4 Measurement Control. Pressing Enter/Run while in Graph Mode starts the measurement, if it is stopped, or
arms the trigger if Single-Sweep Mode is active. Pressing ESC/Stop stops the measurement if it is running and
holds the current measurement values. Once stopped, pressing ESC/Stop again clears the measurement result,
and resets for a new measurement. Any time measurement is stopped, it is possible to change display settings
or certain measurement parameters, and the current measurements displayed will be updated accordingly.
Also, cursors can be moved around to view the power at selected times without the need to restart the
measurement.
3.7.5 Parameter Editing from Graph Mode. Pressing Graph while already in Graph Mode will enter Edit Mode
for the first active channel. The screen’s measurement window continues to display and update the active
measurement, but the two-line header area at the top of the screen is used as an edit window. Pressing Graph
again switches Edit Mode to the second channel, if active. Another press of the Graph key returns to normal
Graph Mode. See paragraph 3.8 (Edit Mode Operation) for more details.
3.8 EDIT MODE OPERA TION
Edit mode is an extension of Graph Mode or T ext Mode operation which allows common measurement parameters to be
edited in the header area while the active measurements continue to update in the measurement window. The arrow
keys scroll through a list of commonly accessed parameters, and allow these parameters to be updated “on the fly”
without the need to return to Menu Mode. This interactive mode allows parameters to be changed in real time while
viewing the effect of these changes as they are made.
3.8.1 Entry, Exit, and Channel Selection. Edit Mode is entered from T ext Mode by pressing the Text key or from
Graph Mode by pressing the Graph key. Edit mode is always entered for the first active channel currently
displayed. If the display is in single-channel mode, only one channel is displayed and Edit Mode is entered
for that channel. If both channels are active and displayed, Channel 1 will be active first. Pressing Text or
Graph again switches to the next active channel, or returns to regular T ext Mode or Graph Mode once both
channels have been accessed or if the next channel is not active.
3.8.2 Screen Display. When Edit Mode is active, the two-line header area becomes the edit window while the rest
of the display continues to function normally . The top line of the Edit Window is used for parameter selection.
It is a list of parameters that are commonly accessed from the present mode. The second line displays the
active channel and the value of the currently selected parameter for that channel. Note that some parameters
are global (not channel specific), and may be accessed from either channel with the same results.
3.8.3 Parameter Selection. The < and > keys are used to scroll the top header line to select an item to display
or edit. The list is a continuous loop, which may be scrolled left or right, and the center item on the display is
always highlighted to indicate it is currently selected.
3-12
Page 35

Boonton Electronics Chapter 3
to
M
to
M
4530 Series RF Power Meter Operation
3.8.4 Parameter Editing. The ∧ and ∨ keys are used to increment or decrement the value of the currently selected
edit parameter. The increment and decrement intervals are preset, although their values may change depending on current settings. Note that key repeat is active, and holding the key will cause the parameter to
continue to advance. See the “Key Repeat” section above for tips on most effective use of the auto-repeat
feature.
Note that if a specific value that is considerably different from the current value of the parameter is desired,
it may be more convenient to enter Menu Mode, and edit the parameter using digit editing mode rather than
try to increment or decrement a long distance to the new value.
Channel Edit Parameter List
Selected Parameter and Current V alue
Figure 3-14. Edit Mode Operation (Example)
Table 3-2. Graph and Text Mode Edit Menus
Meas Mode Edit Menu Parameters / Values
Freq* Units Resoltn Filter Ld/ClrR DutyCyc Offset
CW 0.01 to
(Text) 1 to 3 None, Auto,
0.001 to dBm significant 0.01 to
odulated 110.00 GHz Watts digits 15.00 sec Off, InstHld
(Text) Volts AvgHold
* Impedance dBV TimeSpn TrigDly TrigLvl Marker1 Marker2
Pulse for voltage dBmV 2.5µS to TimeSpan -40dBm to Trace start to trace end
(Text) sensors: dBuV 5 seconds Dependent +20dBm in display window
50-2500Ω StatMode TermCnt MarkrMod Marker1 Marker2
Statistical CDF , 1-CDF, 2M to Off, Vertical, V ert: 0.000 to 100.000%
(Text) Distribution 4000M Horizontal Horz: -99.99 to +99.99dBm
VertSpn VertCtr TimeSpan Filter Ld/ClrR DutyCyc Offset
CW 0.01 to
(Graph) Log Scaling: Log Scaling: 1 second None, Auto,
0.1dB to -100dBm to to 1 hour 0.01 to
odulated 100d B +100dBm 15.00 sec Off, InstHld
(Graph) AvgHold
Linear Scaling: Linear Scaling: TimeSpn TrigDly TrigLvl Marker1 Marker2
Pulse 1nW to (V ertSpan 2.5µS to TimeSpan -40dBm to Trace start to trace end
(Graph) 1MW dependent) 5 seconds Dependent +20dBm in display window
HorzSpn %Offset MarkrMod Marker1 Marker2
Statistical 1 to 100% HorzSpan Off, Vertical, Vert: 0.000 to 100.000%
(Graph) Dependent Horizontal Horz: -99.99 to +99.99dBm
∧∧
∧ to Ld Ref 100.00% -100.00dB
∧∧
∨∨
∨ to Clr Ref PeakHld +100.00dB
∨∨
∧∧
∧ to Ld Ref 100.00% -100.00dB
∧∧
∨∨
∨ to Clr Ref PeakHld +100.00dB
∨∨
3-13
Page 36

Chapter 3 Boonton Electronics
l
s
rs
Operation 4530 Series RF Power Meter
3.9 DISPLAY FORMATS
3.9.1
Channel Selection and Paging. Pressing the ∧ or ∨ keys while in Graph Mode or Text Mode pages the
measurement window and header display up or down through a series of up to three measurement “pages”,
each showing one or more common measurements or parameters. Pressing the < or > keys switches the
display between channels in a “CH1 < > BOTH < > CH2” format. In the single-channel T ext Mode display, the
page selection may change only the header display, only the main measurement window, or both. In Graph
Mode and the dual-channel Text Mode, the page selection changes only the header, while the main measurement window shows only the primary measurement or trace. Between page selection and channel selection,
there are a considerable number of possible displays for each operating mode. T able 3-3 shows what measurements are displayed for each combination of measurement mode, channel and page setting. Note that singlechannel units (Model 4531) can only page between the CH1 and BOTH display formats.
Table 3-3. Measurement Pages
Measurement Single Channel Dual Channel Single Channel Dual Channe
Mode / Text Mode Text Mode Graph Mode Graph Mode
Display Page Main Window Header Main Window Header Header Header
CW Frequency Frequency Frequency
Page 1 CalFactor CalFactor CalFactor
CW Average
CW Max Hold Frequency CW Average, Max Hold DutyCycle Max Hold
Pg 2 Min Hold CalFactor Opt. Bargraph Min Hold PulsePower Min Hold
CW Duty Cycle CW Average CW Average
Pg 3 Pulse Power Pulse Power Pulse Power
Modulated Frequency Frequency Frequency
Pg 1 CalFactor CalFactor CalFactor
Modulated Avg
Modulated Peak Hold Snsr Temp Modulated Avg Pk or Max Hold PkToAvg Ratio Pk or Max Hold
Pg 2 Min Hold Acal T emp Opt. Bargraph Min Hold Min Hold
Modulated PkToAvg Ratio Modulated Avg Modulated Avg
Pg 3 PkT oAvg Ratio PkT oAvg Ratio
Pulse Marker Pwr@Mrkr 1 Pwr@Mrkr 1
Pg 1 Measurements Pwr@Mrkr 2 Pwr@Mrkr 2
Pulse Waveform Time Mrkr1 Position Avg Betw Mrkrs Pk Betw Mrkrs Mrkr1 Position Pk Betw Mrkrs
Pg 2 Measurements Mrkr2 Position Opt. Bargraph Min Betw Mrkrs Mrkr2 Position Min Betw Mrkrs
Pulse Waveform Power Avg Betw Mrkrs Avg Betw Mrkr
Pg 3 Measurements Pk/Avg Bet Mrkrs Pk/Avg Bet Mrk
Statistical Pwr@Mrkr 1 Pwr@Mrkr 1
Pg 1 LongTerm Avg Pwr@Mrkr 2 Pwr@Mrkr 2
Peak Power
Statistical Min Power # MegaSamples LongTerm Avg Peak Power # MegaSamples Peak Power
Pg 2 PkT oAvg Ratio T otal T ime Opt. Bargraph Min Power Total Time Min Power
Mrkr1 Pwr & %
Statistical Mrkr2 Pwr & % Long Term Avg Long Term Avg
Pg 3 PkT oAvg Ratio PkT oAvg Ratio
3-14
Page 37

Boonton Electronics Chapter 3
4530 Series RF Power Meter Operation
3.9.2 Mixed Mode Operation. All of the measurement functions of the 4532 series can be performed in two
independent channels. The trigger system is common to both channels, but either can be selected as the
trigger source. There are some restrictions imposed on two-channel operation when both channels are not in
the same measurement mode. This situation is referred to as “mixed mode”.
Pulse Mode cannot be combined with Modulated Mode or Statistical Mode when two peak sensors are
connected. The CW voltage and power modes can be freely combined with any measurement mode in the
opposite channel. When Statistical mode is used CW or modulated mode, the graphical display must be
interpreted as having two overlapping horizontal axes with different dimensions. The statistical graph will be
referred to a horizontal axis with percentage units, while the CW/modulated graph will be referred to a
horizontal axis with time units.
Channel 1 Both Channels Channel 2
CW Sensor Peak Sensor (Pulse Mode)
Figure 3-15. Graphic Mixed Mode Displays
Channel 1 Both Channels Channel 2
CW Sensor Peak Sensor (Pulse Mode)
Figure 3-16. Graphic Mixed Mode Edit Displays
3-15
Page 38

Chapter 3 Boonton Electronics
Operation 4530 Series RF Power Meter
Channel 1 Both Channels Channel 2
CW Sensor Peak Sensor (Pulse Mode)
Figure 3-17. Text Mixed Mode Measurement Displays
Channel 1 Both Channels Channel 2
CW Sensor Peak Sensor (Pulse Mode)
Figure 3-18. Text Mixed Mode Edit Displays
3.10 SENSOR CONNECTION AND CALIBRA TION
RF Power Sensors or Voltage Probes are used to sense the high-frequency RF signal and convert it to a voltage that is
proportional to the input amplitude. A number of different sensor types are available depending on the frequency,
power level, modulation and impedance of the signal to be measured. These sensors generally consist of an input
connector appropriate for the signal’s frequency band, and internal RF detection and processing circuitry, as well as a
non-volatile EEPROM memory that stores sensor characteristics and calibration information. A power sensor cable
routes the sensor’s output signal to the sensor input connectors on the 4530’ s front or rear panel. In CW sensors, the
EEPROM is located at the instrument end of the sensor cable rather than in the sensor itself.
3-16
Page 39

Boonton Electronics Chapter 3
4530 Series RF Power Meter Operation
Since each sensor is different, the power meter must know the precise relationship between RF input amplitude and the
sensor’s detected output. Information about this relationship can be characterized at the factory, and stored in the
sensor’s EEPROM, then used by the power meter to calculate the input power from the sensor’s output. This technique
is known as shaping, because it corrects the shape of the sensor’s nonlinear transfer function into a linear function of
power. Because the sensor’ s output curve is not perfectly stable with time and temperature, greater absolute accuracy
may be gained by calibrating points on the transfer function at the time of measurement, and including these factors in
the shaping calculation.
The most basic field calibration consists of two reference points on the curve. By correcting these two points so they
read the expected values, the accuracy of the entire curve is increased. Generally, 0mW and 1mW are chosen as
calibration points. The 0mW calibration is known as a Zero adjustment, and the 1mW (0dBm) calibration is know as a
FixedCal. These power reference levels are generated by a precision RF calibrator that is built in to the power meter.
The accuracy of the shaping technique can be further improved by increasing the number of power calibration points.
For this purpose, the 4530 is equipped with a programmable step calibrator, which generates precise RF power levels
between +20dBm and -60dBm. By stepping through the entire power range of the sensor (including zero power), the
basic accuracy of the shaping technique is significantly increased over a simple, two-point calibration. This technique
is known as an AutoCal.
All peak sensors and most CW sensors are calibrated using a precision step calibrator. The Model 4530 has a built-in
50 MHz step calibrator, and can program an optional Model 4530 1 GHz Calibrator Accessory (see Appendix B). All
57000 series peak sensors can be calibrated using either calibrator. Most 56000 series peak sensors require the 1 GHz
calibrator. All CW sensors except waveguide types, and sensors with more than 20 dB attenuation, can also use the
FixedCal method. This method uses either calibrator at a fixed level in combination with shaping curves to produce a
correct reading, but offers less accuracy than a full step calibration. W aveguide sensors and a few other models must
use the FreqCal method. An external 0 dBm source at the calibration frequency is required. All calibration data is saved
in non-volatile memory. No calibration is required for voltage probe/sensors; only zero of fset adjustment is available.
When a peak or CW sensor is step calibrated (AutoCal) a zeroing procedure is performed followed by a power step
calibration in small increments over the entire dynamic range of the sensor. The resulting calibration table is saved in
non-volatile memory. If a new peak sensor, which has not been AutoCal’ed, is plugged in, the AutoCal message will
appear in the graphics and text headers indicating that a calibration must be performed before any measurements can
be made, since there is not yet a valid calibration table for the peak sensor in use. When a new calibration has
successfully completed, the previous one will be overwritten.
Occasionally, a zero or calibration procedure may not complete successfully. In most cases, this can be traced to the
sensor not being connected to the active calibrator. Zeroing can be performed any time the signal source is turned
completely off or the sensor RF port is disconnected. Fixed or autocal must be performed with the sensor connected
to the instrument’s internal calibrator port, or the port of a Model 2530 1GHz Calibrator. In either case, the active
calibration source must be set to match the calibrator being used in the Zero/Cal > CalSource menu. If zeroing ro
calibration fails, a status code is reported on the display. See table 3-8 for a list of calibration status codes.
3.10.1 Sensor Connection. Connect the sensor to the 4530 by plugging one end of a sensor cable into the power
sensor and the other end into the sensor input on the instrument’s front (or rear) panel. Peak power sensor
cables are the same on both ends, so it does not matter which end of the cable is inserted into the sensor. CW
power sensors and RF voltage probes use a two-pin connector on the sensor, and the cable has a multi-pin
smart adapter on the instrument end. This adapter contains the EEPROM that holds the sensor’s characteristics and calibration information, so the cable/adapter assembly must be matched to the sensor. Serial
number labels on each should be used to identify matching assemblies.
When the sensor is connected to the 4530, message is displayed indicating the type and model of the sensor,
and will download its calibration information. At this point, CW and voltage sensors may be used to take
measurements using the default shaping calibration technique. For best accuracy, however, a sensor zero
and/or calibration should be performed. Peak sensors require a multi-point calibration (autocal) before measurements can be taken for the first time.
3-17
Page 40

Chapter 3 Boonton Electronics
Operation 4530 Series RF Power Meter
3.10.2 Zero Offset Adjustment. After a CW sensor is connected, and anytime a low-level measurement is about
to be taken, the sensor should be zeroed. To zero a sensor, press the Zero/CAL button to display the Zero/
Calibration menu. Peak sensors may also be zeroed once they have been autocaled, but this is not necessary
immediately following an autocal, since zeroing is performed as part of any autocal process. If more than one
sensor is connected to the 4530, the < and > keys may be used to select the desired sensor. The Zero/Cal menu
is shown in Table 3-4. Connect the sensor to the instrument’s calibrator or to a terminated connector with no
RF present, and use the ∧ and ∨ keys to select Zero Chan, then press Enter/Run to start the process. Zeroing
the sensor takes approximately 20 seconds, and the instrument will display a status line indicating progress.
When zeroing is complete, the sensor can be removed from the calibrator and measurements can be started,
or a Fixed Calibration can be performed to adjust for gain errors.
3.10.3 Fixed Calibration (CW sensors). Fixed calibration adjusts the slope (gain) of the sensor’s shaping curve
by measuring power at a single, reference level (usually 0dBm, or 1mW) from the internal calibrator. To
perform a fixed calibration, connect the sensor to the instrument’s calibrator and press the Zero/CAL key.
∧∧
∨∨
∧
Use the
seconds. When fixed calibration is complete, the sensor can be removed from the calibrator and measurements can be taken. Fixed calibration is very fast, and provides good accuracy for many applications.
However, for best accuracy , a step calibration (AutoCal) is recommended when available.
3.10.4 Automatic (step) Calibration. A multi-point step calibration, or autocal uses the 4530’s built-in 50MHz
programmable calibrator or an external Model 2530 1GHz programmable calibrator to step through the entire
power range of the sensor and store a shaping correction at each point. To perform an autocal, connect the
sensor to the instrument’s calibrator and press the Zero/Cal key. Use the
then press Enter/Run to start the process. The autocal process takes from one to two minutes, during which
time the instrument will display a status line indicating the current power point being calibrated. When
autocal is complete, the sensor can be removed from the calibrator and measurements can be taken.
∨ and ∨ keys to select Fixed Cal, and then press Enter/Run to start the process. This will take several
∧
∨
∧
∧∧
∨∨
∧
∨ and ∨ keys to select AutoCal, and
∧
∨
∧
3.10.5 Frequency Calibration. If no other calibration factor is entered, the instrument calculates a calibration
factor for the current operating frequency by interpolating between entries from this list. If, however, greater
accuracy is desired, the user may perform a single-point frequency calibration using an external 0 dBm
reference signal at the desired test frequency . T o perform a frequency calibration, first make sure the channel’s
operating frequency is set to the frequency of the external reference signal to be used. Connect the sensor to
∧∧
∨∨
∧
the reference source, set the source for 0.00 dBm, and press the Zero/Cal key . Use the
FreqCal, and then press Enter/Run to start the process. The process takes several seconds. When the
frequency calibration is complete, the sensor can be removed from the reference source and measurements
can be taken.
∨ and ∨ keys to select
∧
∨
∧
3.10.6 Calibrator Selection. Certain peak power sensors have a video bandwidth that is too high to permit
calibration using the 4530’s built-in 50MHz calibrator . In this case, an external 1GHz calibrator must be used
to autocal the sensor. The Boonton Model 2530 1GHz Programmable Calibrator is designed to connect
directly to the 4530 and operate under instrument control in the same manner as the internal calibrator. (See
Appendix B.) To use an external 2530 calibrator to calibrate sensors, first make sure the 2530 is connected to
the EXT CAL CONTROL connector on the rear of the instrument using a standard RJ-11 type modular
telephone cable (see Figure 3-20). The calibrator’s power must be turned on, and proper connection can be
verified by pressing MainMenu > Calibratr > SelectExt to select the external calibrator, then pressing
MainMenu > Calibratr > ExtStatus to view status information from the 2530. If an error message appears,
check the connections and repeat the process.
3-18
Page 41

Boonton Electronics Chapter 3
4530 Series RF Power Meter Operation
BOONTON ELECTRONICS BOONTON ELECTRONICS
MODEL 4530 MODEL 2530
RF POWER METER 1GHZ RF CALIBRA TOR
Once proper connection has been verified, the 2530 may be used to automatically calibrate sensors. T o select
it as the calibration source, press the Zero/Cal key. Use the
Enter/Run to view the configuration menu for the selected channel. Select 2530/1GHz as the calibrator for
that sensor, and then press Enter/Run. Now anytime a fixed cal or autocal is performed on that channel, the
sensor must be connected to the 2530 calibrator rather than the internal 50MHz calibrator. The status line
during any zero or calibration process will display the currently active calibrator. If the sensor is connected to
the wrong calibration source or not connected at all, the calibration will usually fail and an error message will
be displayed.
EXT CAL EXT CAL
CONTROL CONTROL
RJ-11 Telephone Cable
Figure 3-20. External Calibrator Connection
∧∧
∨∨
∧
∨ and ∨ keys to select Configure, and then press
∧∧
∨
3.10.7 Calibration Volatility. When any user calibration process (zero, fixed cal, frequency cal, autocal) is per-
formed, the 4530 saves the correction factors calculated during that process. If instrument power is switched
off, these factors are all restored when power is reapplied. They are also preserved if the sensor is unplugged
and reconnected to the same input. Removing a sensor and replacing it with a different sensor will require that
a new calibration be performed, unless there have been no other calibrations done on that channel since that
sensor was last connected. If instrument power is switched off, these factors are all restored when power is
restored, although it is a good idea to repeat the zero adjustment before any low-level measurements.
3.10.8 Zero/Cal Menu Navigation. Navigating the Zero/Cal menu is similar to navigating the 4530’s main menu.
Press the Zero/Cal key to enter the menu from any display mode. The ∧ and ∨ keys are used to scroll up and
down through the available menu selections, and the < and > keys select between Sensor 1 and Sensor 2.
Pressing Enter will start the selected calibration procedure, and pressing ESC will exit the Zero/Cal menu.
When the procedure is complete, the instrument will generally return the display mode that was active when
the Zero/Cal key was pressed. If CalSource is selected, the ∧ and ∨ keys are used to select either the internal
50MHz or external 1GHz calibrator.
Figure 3-19. Zero/Calibration Menu
3-19
Page 42

Chapter 3 Boonton Electronics
Operation 4530 Series RF Power Meter
Table 3-4. Zero/Cal Menu
Zero Chan (ALL SENSOR TYPES) Zero the sensor to remove the low-level power offsets of the sensor without
doing a complete AutoCal. This procedure is used to remove the effects of thermal drift. On nontemperature compensated peak sensors, an advisory message will appear in the graphical and text
headers when the sensor's temperature changes more than 4 degrees Celsius from the calibration
temperature. This is not an error message. The need to zero is determined by the signal level
measured and the desired repeatability. It is recommended that a sensor be re-zeroed immediately
before performing any measurement in the lowest 10 dB of the sensor’s dynamic range.
When a sensor zero is performed, the sensor must be removed from any RF source, or connected to
the selected calibrator. Allow the sensor to settle for at least 30 seconds before zeroing if a high level
signal was previously applied.
GPIB Command Syntax: CALibration:{INTernal|EXTernal}:ZERO[?]
NOTE
The CALibrate commands ending with a question mark (?) are combined command/queries. At the
end of the calibration procedure, they return a zero character in the read buffer if successful, and
a one character if unsuccessful. This is in addition to any service request flags in use.
AutoCal (PEAK AND CW SENSORS) Performs a zero and complete step calibration of the sensor over its
specified dynamic range. This is required when the sensor is changed or when the temperature of the
environment has changed a significant amount. Peak sensor bandwidth is automatically set to low
and restored to its original setting at the end of the calibration process. This is the preferred method
of calibration for most CW sensors, and the required method for peak sensors. Frequency is automatically set to the correct value during calibration and restored to the previous value afterward.
GPIB Command Syntax: CALibration:{INTernal|EXTernal}:AUTOcal[?]
FixedCal (CW SENSORS ONLY) Perform a fixed level calibration of the CW sensor . The calibration signal level
used depends upon the sensor's input attenuation. A Zero adjustment should always be performed
before a FixedCal. Frequency is automatically set to the correct value during calibration and restored
to the previous value afterwards. In most cases, AutoCal provides a more accurate calibration.
Attenuation Calibration Level Example
0 dB 0 dBm 51075
10 dB +10 dBm 51077
20 dB +20 dBm 51079
GPIB Command Syntax: CALibration:{INTernal|EXTernal}:FIXEDcal[?]
FreqCal (ALL POWER SENSORS) A single frequency, 0 dBm calibration with a user supplied reference
source of known accuracy. Set the channel's frequency parameter to the frequency of the external
power reference. On peak sensors, an AutoCal of the sensor must be completed before a FreqCal
may be performed.
GPIB Command Syntax: CALibration:USER:FREQcal[?]
NOTE
To change the calibration method of the sensor in use from the AutoCal to the FreqCal method,
perform a CancelCal to erase the AutoCal data.
3-20
Page 43

Boonton Electronics Chapter 3
4530 Series RF Power Meter Operation
Table 3-4. Zero/Cal Menu - (Cont)
CalSource Selects the calibrator to be used for calibration. Two calibration sources are possible for FixedCal
and AutoCal procedures, and the Zero command also allows a calibrator to be specified. In the case
of the zero, it does not actually use the selected calibrator, but the CalSource is used to determine
which calibrator’s RF output will be turned off during sensor zeroing. All Model 4530 Series RF
Power Meters contain a 50 MHz step calibrator. An optional accessory 1 GHz calibrator Model 2530
can also be used for sensor calibration to reduce measurement uncertainty on signals close to or
above 1 GHz (See Appendix B). The CalSource setting has no effect on FreqCal, since it uses a user
source for the power reference.
Int/50MHz Select the internal 50 MHz calibrator
Ext/1GHz Select the external 1 GHz 2530 calibrator
GPIB Command Syntax: CALibration:INTernal:{ZERO|AUTOcal|FIXEDcal|}[?] for 50 MHz
CALibration:EXTernal:{ZERO|AUTOcal|FIXEDcal|}[?] for 1 GHz
CalCancel Cancel the sensor calibration and zero data in non-volatile memory and set default values. Do not
use this function to abort a calibration in progress. Press the ESC/Stop key to abort calibration and
restore saved values. There is no equivalent GPIB command for this menu item.
3.11 MENU REFERENCE
The section contains a list of all menu commands accepted by the Model 4530. The list is grouped by menus, with the
“Main Menu” as the top level. When a sub-menu or item is highlighted, pressing the Enter/Run key will activate that
option or, in some cases, take you to a further submenu or option. For example, to set markers to the Vertical Mode,
scroll to and highlight Markers. Press Enter/Run and scroll to Mrkr Mode, highlight and press Enter/Run. Highlight
Vertical and press Enter/Run.
Main Menu > Markers > Mrkr Mode > Vertical (> = Enter key or right arrow key)
Sections 3.11.1 to 3.11.10 contain detailed descriptions of all items in each top-level menu, and the final section
contains a summary of the entire menu structure.
Menu Description Section Page
Measure . . . . . . . Select Run/Stop Capture . . . . . . . . . 3.11.1 3-22
Channel 1 . . . . . . Edit Channel 1 Settings . . . . . . . . . . . 3.11.2 3-23
Channel 2 . . . . . . Edit Channel 2 Settings . . . . . . . . . . . 3.11.2 3-23
Markers . . . . . . . Set/Position Markers . . . . . . . . . . . . 3.11.3 3-30
Trig/Time . . . . . . Set Trigger/Time Span . . . . . . . . . . . . 3.11.4 3-31
Statistcl . . . . . . . Set Statistical Mode Parameters . . . . 3.11.5 3-34
Calibratr . . . . . . . Calibrator Controls . . . . . . . . . . . . . . 3.11.6 3-35
Save/Recl . . . . . . Save and Recall Settings . . . . . . . . . . 3.11.7 3-37
Utilities . . . . . . . . Status, Display, Bus, Clock . . . . . . . . 3.11.8 3-37
Help . . . . . . . . . . Keyboard Help Display . . . . . . . . . . 3.11.9 3-43
Defaults . . . . . . . Initialize to Default Settings . . . . . . . 3.11.10 3-43
Summary . . . . . . Summary of entire menu tree . . . . . . 3.11.11 3-44
3-21
Page 44

Chapter 3 Boonton Electronics
Operation 4530 Series RF Power Meter
3.11.1 Measure Menu. The Measure menu contains items that control the taking of measurements.
Main Menu>Measure> Select Run/Stop Capture
Stop Stop data capture.
INITiate:CONTinuous OFF
Run Restart Data Capture.
INITiate[:IMMediate[:ALL] or INITiate:CONTinuous ON
SnglSweep Perform Single Sweep. For time span (TSPAN) settings from 2 µsec to 50µsec, the
single trace will be made up of 125 pixels at 1 sample/pixel. For TSP AN settings
from 5 sec to 5 µsec, the 125 trace pixels will each be the average of 2 or more
samples.
1) With INITiate:CONT inuous OFF, and TRIGger:SOURce BUS trigger a single measurement with *TRG or {GET}.
2) With INITiate:CONTinuous OFF, and TRIGger:SOURce
BUS>SNSR1 arm for a single measurement with *TRG or {GET}. When
the sensor signal trigger qualifiers are met, a single trace measurement
will be made.
NOTE
For TSPAN settings from 20 µsec to 2.5 µsec, multiple triggers are needed to fill
all 125 pixels. For this reason, a triggered measurement with averaging set to
one is recommended if repetitive triggers are possible. This procedure will use
the minimum number of triggers to fill all 125 pixels.
Clr/Reset In the Stop mode clear all measurement results. This will cause all displayed
readings to be replaced by dashes. For GPIB operation this occurs when measurements are initiated using the INITiate command. This guarantees fresh measurement data rather than a re-read of previously read (stale) data. The measurement
status flag that precedes each GPIB query result also warns of stale data.
AutoSetup For the Pulse Mode automatically adjust the trigger and position controls to pro-
duce a waveform on the display. This does not override a channel set to OFF.
3-22
Page 45

Boonton Electronics Chapter 3
4530 Series RF Power Meter Operation
3.11.2 Channel Menu. The Channel menu contains items that affect a single measurement channel. The “channel”
is a full measurement path, starting at (and sometimes before) the sensor, and including data acquisition,
processing of measurements, and display of the processed information. The Model 4531 single channel
power meter has only a Channel 1 menu, while the dual-channel Model 4532 has separate menus for Channel
1 and Channel 2.
Main Menu > Channel 1 | 2 > MeasMode
Set or return the measurement mode of the selected channel. CW and MODULATED are continuous measurement modes, PULSE is a triggered, oscilloscope-like mode, and CDF , CCDF and DIST are various presentation formats of statistical mode, which gathers and analyzes a large number of samples over a relatively long
time interval.
Off Disable measurement
Modulated Measure the true average power of the applied signal. (Peak sensor default)
PulseMode Measure power versus time of a triggered signal. (Peak sensors only)
Statistcl Measure the CCDF, CDF or Distribution of the input signal. See Paragraph 3.1 1.5
for Statistical Mode Parameter Settings. (Peak sensors only)
CW Measure the CW input signal. (CW & Voltage sensor default)
Remote Command: CALCulate:MODe <Modulated, Pulse, CDF, CCDF, DIST , CW>
Main Menu > Channel 1 | 2 > Params > dB Offset
Set a constant measurement offset. Used to account for attenuators and couplers in the RF signal path. In the
main TEXT display, a small triangle (Delta) symbol will appear above the units if the of fset is not set to zero.
Range: -100.00 to 100.00 dB
Default: 0.00 dB
Remote Command: SENSe:CORRection:OFFset <n>
Main Menu > Channel 1 | 2 > Params > Frequency
Set the frequency of the input signal. Causes frequency cal factor to be automatically calculated from sensor
EEPROM data and applied to the measurement.
Range: 0.001 to 110.000 GHz
Default: 0.050 GHz (CW sensor) or 1.000 GHz (peak sensor)
Remote Command: SENSe:CORRection:FREQuency <n>
Main Menu > Channel 1 | 2 > Params > Averaging
Set the number of traces averaged together in pulse mode to form the measurement result. Used to reduce
noise. Also known as “video averaging” on competitive peak power meters.
Range: 1 to 4096
Default: 4
Remote Command: SENSe:AVERage <n>
3-23
Page 46

Chapter 3 Boonton Electronics
Operation 4530 Series RF Power Meter
Main Menu > Channel 1 | 2 > Params > Filter
Set the integration time of the digital filter to reduce noise in Modulated and CW modes. Longer filter times
reduce noise, but increase the settling time of the measurement. The AUTO setting will adaptively set the
filter time for a good tradeoff between noise and settling time based on the signal’ s current power level. The
digital filter performs an unweighted average of the measured power during the last N seconds, where N is the
filter time setting. The settling time of the filter is exactly equal to the filter time.
Range: Auto, None, 0.01 to 15.00 seconds
Default: Auto
Remote Command: SENSe:FILT er:ST A Te <OFF , ON, AUT O>
SENSe:FIL T er:TIME <n> (forces ST ATE to ON)
Main Menu > Channel 1 | 2 > Params > Peak Hold
Set the operating mode of the peak hold feature in Pulse, CW and Modulated modes.
Off Peak readings are held for a short time, then automatically decayed according to
the averaging selected. This is useful for slowly fluctuating modulated signals.
(Default)
Inst Hold The maximum instantaneous peak value is held until reset.
A vg Hold Holds the maximum average (filtered) power until reset.
Remote Command: CALCulate:PKHLD <OFF, INST, A VG>
Main Menu > Channel 1 | 2 > Params > CalFactor
Displays or changes the current frequency cal-factor value in dB. Selecting the menu item will show the
calfactor currently in use, whether manually entered or automatically calculated from sensor data and the
current frequency. Entering a value temporarily overrides the sensor table value. Changing the frequency
restores sensor table values.
Range: -3.00 to 3.00 (dB)
Default: 0.00 dB
Remote Command: SENSe:CORRection:CALFactor <n>
Main Menu > Channel 1 | 2 > Params > Video BW
Selects the peak sensor’s video bandwidth.
High Setting normally used for measurements. Actual bandwidth is determined by the
peak sensor model used. (Default)
Low Setting used during calibration and available for measurements. For 57000 series
peak sensors, the low video bandwidth is less than 500 kHz to allow calibration at
50 MHz.
Remote Command: SENSe:BANDwidth <HIGH, LOW>
3-24
Page 47

Boonton Electronics Chapter 3
4530 Series RF Power Meter Operation
Main Menu > Channel 1 | 2 > Params > DutyCycle
Sets the duty-cycle in percent for calculated CW pulse power measurements. Valid only for thermal sensors
and CW sensors in the square-law region and subject to the accuracy of the duty-cycle value. Setting the
duty-cycle to 100% is equivalent to a CW measurement. Note that this method of measuring pulse power
should be used only if a peak power measurement cannot be used.
Range: 0.01 to 100.00 %
Default: 100.00 %
Remote Command: CALCulate:DCYC <n>
Main Menu > Channel 1 | 2 > Params > Def Pulse >
This submenu is used to sets the define pulse reference levels and times which are used to calculate all
readings that are referenced to pulse parameters. The distal, mesial and proximal parameters are related to
pulse geometry in accordance with IEEE definitions. Time gating is used to define the “useful portion” of a
pulse or burst - the interval over which power should be averaged, and represents a percentage
Main Menu > Channel 1 | 2 > Params > Def Pulse > [ Distal, Mesial, Proximal ]
The mesial level defines the “midpoint” of the pulse transition, and is used for pulse width and power
measurements. The proximal and distal levels are the lower and upper thresholds used for edge transition time
measurements. These power levels are entered as a percentage, and the actual power levels are calculated by
multiplying this percentage by the pulse’s current top power.
Range: 0 to 100%
Default: Proximal: 10%, Mesial: 50%, Distal: 90%
Remote Command: SENSe:PULSe:{DISTal | PROXimal | MESIal} <n>
Main Menu > Channel 1 | 2 > Params > Def Pulse > Units
Set the units to which the pulse parameters apply. Note that 90% voltage level corresponds to 81% power
level; 50% voltage to 25% power; and 10% voltage to 1% power. This relationship must be preserved in order
to relate risetime and bandwidth in the voltage and power domains.
Volts Choosing this setting and the default distal and proximal levels above will pre-
serve the conventional assumption that risetime equals 0.35/BANDWIDTH. (Default)
Watts Choosing this setting and 81% and 1% distal and proximal levels, respectively , will
preserve the bandwidth assumption above.
Remote Command: SENSe:PULSe:UNITs VOL TS
3-25
Page 48

Chapter 3 Boonton Electronics
Operation 4530 Series RF Power Meter
Main Menu > Channel 1 | 2 > Params > Def Pulse > [ StartGate, EndGate ]
The average power of a pulse can be measured with “automatic gating” rather than by “time specified gating
with markers”. This is useful in GSM and TDMA applications to exclude the rising and falling transition
intervals. The gate start and end is automatically determined as a percentage of detected pulse width and the
average power during the “useful portion” of the pulse is returned as AvgPulse power in the auto-measure
array. The pulse start and end are defined as the times at which the pulse’ s rising and falling edges crosses the
mesial level. Setting to 0 and 100% will measure average power over the entire pulse from start to end.
Range: StartGate: 0 to 40%, EndGate: 60 to 100%
Default: StartGate: 5%, EndGate: 95%
Remote Command: SENSe:PULSe:{STARTGT | ENDGT} <n>
Main Menu > Channel 1 | 2 > Params > Range
Select the instrument's internal measurement range when using CW power sensors or Voltage sensors. The
4530 series uses two widely overlapping ranges for power measurements, and voltage sensors add a third
range for very high level signals. Auto is the preferred setting, and should be used in all cases except when
the signal makes frequent, large, level transitions, or when the absolute fastest settling is needed after a large
power step. Note that improper range settings may result in incorrect or overrange readings.
Auto Automatically chooses the best range for the current signal. (Default)
Range 0 Range 0 is used for low-level signals (below approximately -10dBm)
Range 1 Range 1 is used for higher signals (above approximately -30dBm).
Range 2 Range 2 is only needed for voltage measurements above 3 volts.
Remote Command: CALCulate:RANGe <AUTO, 0, 1, 2>
Main Menu > Channel 1 | 2 > Params > Alarm >
Controls the power limit alarm operation. When alarm operation is enabled (ON), the “primary measurement”
(average power in CW or Modulated modes, average power between markers in Pulse mode) is monitored, and
compared to preset upper and lower power limits. If the power is beyond either of these limits, a
appear in the main text display above the units to indicate an out-of-limit measurement. Additionally, remote
interface flags are set to save a trip condition even if the power has returned to within the normal limits.
Off Disable alarms (Default)
On Enable alarms
Remote Command: CALCulate:LIMit:STA T e <OFF, ON>
Hi Limit, Lo Limit Set the upper and lower alarm limits.
Range: -100.00 to 100.00 dBm
↑↑
↓↓
↑
↓ or ↓ will
↑
↓
↑
Default: H i Limit: 100.00dBm, Lo Limit: -100.00dBm
Remote Command: CALCulate:LIMit:UPPer <n>
3-26
Page 49

Boonton Electronics Chapter 3
4530 Series RF Power Meter Operation
Main Menu > Channel 1 | 2 > Params > Impedance
Characteristic impedance is used only for voltage to power conversions. This is useful for calculating and
displaying power from a voltage measured across a load impedance using a voltage probe.
Range: 10.0 to 2500.0 ohms
Default: 50.0 ohms
Remote Command: SENSe:IMPEDance <n>
Main Menu > Channel 1 | 2 > Display > VertSpan
Select the vertical sensitivity for the full height of the graph display in a 1-2-5 scaling sequence. Note that the
vertical span setting controls only the graph display presentation, and has no effect on measurement. Full
dynamic range measurements are always availably even if the trace is off scale.
Range: 0.1 to 100 dB in a 1-2-5 sequence (log units)
1nW to 1MW in a 1-2-5 sequence (watts)
1nV to 1MV in a 1-2-5 sequence (volts)
1% to 10000% in a 1-2-5 sequence (ratiometric mode with linear units)
Default: 100 dB (log units)
Remote Command: DISPlay:TRACe:{LOGSPAN | LINSP AN | PCTSP AN} <n>
Main Menu > Channel 1 | 2 > Display > VertCntr
Set the power or voltage level that corresponds to the center of the display. Note that the vertical center
setting controls only the graph display presentation, and has no effect on measurement. Full dynamic range
measurements are always availably even if the trace is off scale.
Range: -100.00 to 100.00 dBm (log units)
1nW to 1MW (watts)
1nV to 1MV (volts)
0.01 to 9999.99% (ratiometric mode with linear units)
Default: 0dBm (log units)
Remote Command: DISPlay:TRACe:{LOGCNTR | LINCNTR | PCTCNTR} <n>
Main Menu > Channel 1 | 2 > Display > Units
Select the measurement units for both the display and remote interface. Note that some display settings have
different sets of values depending on the measurement units selected.
Log-dBm Power in dB relative to 1 milliwatt (Default)
Lin-Watts Power in watts (calculated from voltage and user-supplied impedance for voltage
probes)
Lin-Volts RF Voltage (calculated from power and sensor impedance for power sensors)
Log-dBV Voltage in dB relative to 1 volt
Log-dBmV V oltage in dB relative to 1 millivolt
Log-dBuV Voltage in dB relative to 1 microvolt
VSWR Calculated VSWR (ratiometric measurements only)
Remote Command: CALCulate1:UNITs <DBM, W A TTS, VOLTS, DBV , DBMV , DBUV, VSWR>
3-27
Page 50

Chapter 3 Boonton Electronics
Operation 4530 Series RF Power Meter
Main Menu > Channel 1 | 2 > Display > Resolutn
Select the display resolution for the main readings. Note display resolution has no effect on internal measurement accuracy or the resolution of readings returned over the remote interface. Measurements are always
made with full, internal resolution. Log resolution specifies a radix point following one leading digit with the
number of remaining places selected. Linear resolution specifies a total number of places without regard to
the radix point.
Range: Log units: 1 (x.x), 2 (x.xx) 3 (x.xxx), Linear units: 1 (xxx), 2 (xxxx), 3 (xxxxx)
Default: Maximum resolution (3, x.xxx or xxxxx)
Remote Command: DISPlay:TEXT1:RESolution <1, 2, 3>
Main Menu > Channel 1 | 2 > Display > Disp Srce
Select the source or sources combined in an arithmetic operation for the displayed reading. For ratio, sum and
difference calculations, both sensors must be of the same type, i.e. power or voltage. For power sensors, the
power ratio of two sources in dB relative (dBr) or percent and the sum of the power of two sources in dBm or
linear units is provided. For voltage sensors, the voltage ratio of two sources in dB relative (dBr) or percent
and the voltage difference between two sources in volts or log units are provided. The following list shows
only the available settings for channel 1, but channel 2 (on 2 channel units) has a matching list of settings.
Sensor 1 Display Sensor 1 power or voltage. (Default)
Ref 1 Display Reference1 power or voltage
Sen1/Ref1 Ratio of Sensor1 to Ref1
Sen1+Ref1 Power Sum (power sensors only): Sensor1 (watts) + Ref1 (watts)
Sen1-Ref1 Voltage Difference (voltage sensors only) Sensor1 (volts) - Ref1 (volts)
Sen1/Sen2 Ratio of Sensor1 to Sensor2
Sen1+Sen2 Power Sum (power sensors only): Sensor1 (watts) + Sensor2 (watts)
Sen1-Sen2 Voltage Difference (voltage sensors only): Sensor1 (volts) - Sensor2 (volts)
Remote Command: CALCulate:MATH <CH1, REF1, REF_RA T , REF_SUM, REF_DIFF , CH_RA T ,
CH_SUM, CH_DIFF>
Main Menu > Channel 1 | 2 > Display > Bar Graph
Enable or disable the bar graph feature. The bar graph appears along the bottom of the main Text display and
gives a visual indication of the size and variation of the reading. In the Model 4532, there are two independent
bar graphs, one for each channel.
Off Disable bar graph. (Default)
On Enable bar graph
Remote Command: DISPlay:TEXT BARgraph <OFF, ON>
Main Menu > Channel 1 | 2 > FrDepOfst >
Submenu to control the Frequency Dependent Offset feature. Frequency dependent offsets are used to
compensate for external devices such as couplers or attenuators in the RF signal path that have know loss
characteristics that vary with frequency. In the main TEXT display , an asterisk (“*”) symbol will appear above
the units if a frequency dependent offset table is in use (setting is TBLA or TBLB). A frequency dependent
offset is similar to a sensor calfactor - it is changed automatically when the operating frequency parameter is
changed. The value is looked up or interpolated from entries in the active FDOF table.
3-28
Page 51

Boonton Electronics Chapter 3
4530 Series RF Power Meter Operation
Main Menu > Channel 1 | 2 > FrDepOfst > Ofst Src
Select which, if either, of the two frequency dependent offset tables is to be used.
Off Disable the frequency dependent offset feature. (Default)
T able-A Enable the frequency dependent offset feature using “Table A” offset data.
T able-B Enable the frequency dependent offset feature using “Table B” offset data.
Remote Command: SENSe:CORRection:FDOFfset <OFF, TBLA, TBLB>
Main Menu > Channel 1 | 2 > FrDepOfst > [ Modify-A, Modify-B ]
View or edit the frequency dependent offset tables. When this item is selected, the display will show the
current table. Three columns will be displayed: On the left is the table index (entry number), the center column
is the frequency in GHz, and the right column is the offset in dB for that frequency . By positioning the cursor
on the index, the ∧ and ∨ keys will move the cursor up and down to different entries. T o edit an entry , position
the cursor on that index, then use the < and > keys to select either the frequency or offset for that entry . To
make a new table entry, position the cursor on the “Add” index. To delete an entry, select the entry, and use
the ∨ key to change its frequency to “-.--- GHz” (just below 0.000 GHz). When done editing, press ENTER to
save the table, or ESC to abort and restore the old table.
Remote Command: MEMory:FDOFfset <entire table>
Main Menu > Channel 1 | 2 > Snsr Data >
Submenu to view sensor parameters stored in the sensor’s EEPROM.
Main Menu > Channel 1 | 2 > Snsr Data > SensrInfo
Displays a sensor information screen showing key operating parameters that are stored in the EEPROM of the
currently installed sensor. A list is displayed showing type, model number , serial number, EEPROM checksum
result, input attenuation, input impedance, and power range. Pressing the ∨ key will display a screen showing
sensor temperature compensation information for all sensors with this feature.
Remote Command: TKSDATA (SYSTem:LANGuage must be set to BOON)
Main Menu > Channel 1 | 2 > Snsr Data > [ FastTable, SlowTable, FreqTable ]
Displays a sensor information screen showing the frequency calfactor table that is stored in the EEPROM of
the currently installed sensor. The list shows each frequency and its corresponding calfactor. Use the ∧ and
∨ keys to scroll up or down through the list. Peak sensors contain a “fast” and “slow” table for high and low
video bandwidth settings, respectively. CW sensors contain a single “frequency” table.
Remote Command: TKSFAST , TKSLOW (SYSTem:LANGuage must be set to BOON)
Main Menu > Channel 1 | 2 > Snsr Data > TempComp
Enable or disable peak sensor temperature compensation. This feature is only available if the installed
sensor’s calibration includes a factory temperature charactization, otherwise the menu item is not displayed.
If temperature compensation is active, the temperature drift warning will not be displayed until temperature
has drifted by 30C from the Autocal temperature. T empComp always defaults to ON when the instrument is
powered up or whenever a new sensor is installed.
Remote Command: SENSe:CORRection:TEMPComp <ON, OFF>
3-29
Page 52

Chapter 3 Boonton Electronics
Operation 4530 Series RF Power Meter
Main Menu > Channel 1 | 2 > Snsr Data > GainConst
Displays a sensor information screen showing the linearity calibration table that is stored in the EEPROM of
the currently installed sensor (CW sensors only). The list shows each “range” (measurement segment), along
with an Upscale and Downscale coefficient for that range. CW sensors have 7 ranges, for a total of 14
coefficients. Voltage sensors add a midscale coefficient and an eighth range, for a total of 24 coefficients.
Remote Command: TKSCWRG (SYSTem:LANGuage must be set to BOON)
Main Menu > Channel 1 | 2 > Load Ref
Loads the current average power level as the ratiometric mode reference level, and switches the measurement
to ratiometric (relative) mode. The power level applied to the sensor is stored as the reference level, and all
power readings will be in dBr, relative to this level. Immediately after the reference is loaded, the display
should always indicate 0.000 dBr until the applied power changes.
Remote Command: CALCulate[1|2]:REFerence:COLLect
Main Menu > Channel 1 | 2 > Ref Off
Disables ratiometric (reference) mode. The measurement will revert to a normal, absolute (non-ratiometric)
power measurement mode. The stored reference level is, however, preserved, and it is possible to enter
ratiometric mode without reloading the reference by using the Channel > Display > DispSrc menu item to
set the display source to “Snsr1 / Ref1”.
Remote Command: CALCulate[1|2]:REFerence:STA T e OFF
Main Menu > Channel 1 | 2 > Enter Ref
Enters a ratiometric reference level from the keyboard, and switches the measurement to ratiometric (relative)
mode. The power level entered is always in dBm, and the arrow keys are used to edit the value. All power
readings will be in dBr, relative to this level.
Remote Command: CALCulate[1|2]:REFerence:DAT A <n>
3.11.3 Markers Menu. The Markers menu is used to configure and locate measurement markers (cursors) at
specific points on the processed measurement waveform. Markers are used in Pulse mode to perform measurements at or between two time offsets relative to the trigger, and in Statistical mode to measure the power
at a particular statistical percent, or the percent at a specified power level. In Pulse mode, the markers can only
be placed on the visible portion of the trace (as defined by the timespan and trigger delay settings), while
Statistical mode markers may be placed at any power or percent value and will still return readings.
Main Menu > Markers > Mrkr Mode
Selects the global marker orientation for the pulse and statistical modes. Markers 1 and 2 are always paired
and operate together. Markers are not used in the CW and modulated modes.
Off Markers are not displayed, and no marker measurements are performed.
Vertical Vertical markers appear as vertical bars on the graph display, and measure the
power at a particular time (Pulse mode) or percent (Statistical mode). (default)
3-30
Page 53

Boonton Electronics Chapter 3
4530 Series RF Power Meter Operation
Horizontal Horizontal markers appear as horizontal bars, and measure the percent at a particu-
lar power level in Statistical mode. Horizontal markers may also be used in Pulse
mode graph display as “reference lines”, to indicate certain power levels. In this
case they are strictly visual tools, and no marker measurements can be performed.
Remote Command: MARKer:MODe <OFF, VERT, HORZ>
Main Menu > Markers > [Mrk1 Pos, Mrk2 Pos]
Sets the position of Marker 1 or Marker 2. The function and parameter range for this menu item are dependent
on marker mode and measurement mode.
V ertical Markers, Pulse Mode: Sets the marker position in time relative to the trigger . Note that time markers
must be positioned within the time limits of the trace window in the graph display. If any attempt is
made to position them outside these limits, they will be forced back into the range of the trace
window. Note that if timespan, trigger delay, or trigger position settings are changed, the marker
positions on the graph display will remain unchanged, but their times relative to the trigger
change. For this reason, it is a good idea to set all timing and trigger parameters before setting the
marker times. Time limits are: TrigDly - (TimeSpan / 2) < MarkerTime < TrigDly + (TimeSpan / 2).
Vertical Markers, Statistical Mode: Sets the marker position in percent probability. Note that the power
value returned for each marker will depend on the setting of CALCulate:MODe. When set to CDF ,
the highest power levels are towards the right side of the screen, with maximum (highest peak) power
occurring at 100%. When set to CCDF (also called 1-CDF), the highest levels are towards the left,
with peak power at 0%.
will
Horizontal Markers: Sets the marker position in absolute power. Note that horizontal markers may be
positioned at any power level, regardless of the vertical span setting, and will not necessarily appear
on the graph display.
Range: -150.0 to 150.0 sec (V ert Markers, Pulse Mode - see restrictions above)
0.000 to 100.000 % (V ertical Markers, Statistical Mode)
-99.99 to +99.99 dBm (Horizontal Markers)
Remote Command: MARKer:POSition[1|2]:TIMe <n> (Vertical Markers, Pulse Mode)
MARKer:POSition[1|2]:PERcent <n> (Vertical Markers, Statistical Mode)
MARKer:POSition[1|2]:POWer <n> (Horizontal Markers)
3.11.4 Trig/Time Menu. The Trig/Time menu is used to configure trigger and timing settings for time domain
measurements. In pulse mode, the timebase and trigger settings are very similar to those of a digital storage
oscilloscope for a familiar operating feel. They control selection of a hardware trigger source and polarity,
setting a trigger level, configuring delay and holdoff timing, and setting the trigger position on the display.
The Time Span setting also controls the graph mode display for Modulated and CW modes, although it has
no effect on the measurement.
Main Menu > Trig/Time > TimeSpan
Select the horizontal time span of the display for Pulse, CW and Modulated modes. The 4530 has fixed
timespan settings in a 1-2-5 sequence. Note that trigger delay and holdoff settings are restricted to certain
values based on the timespan setting, and marker positions must always fall within the trace window. It is
always a good idea to set the timespan before setting any other parameters when in Pulse mode. In CW or
Modulated mode, this setting affects the display only, and has no effect on the measurement.
Range: 2.5e-6 to 5.0 seconds (Pulse), 1.0 to 3600 seconds (CW , Modulated)
Default: 0.001 second (Pulse), 1 second (CW, Modulated)
Remote Command: DISPlay:TSPAN <n>
3-31
Page 54

Chapter 3 Boonton Electronics
Operation 4530 Series RF Power Meter
Main Menu > Trig/Time > Trig Pos
Selects the position of the trigger event on displayed sweep. The following descriptions assume zero trigger
delay. If trigger delay is positive, the trigger position will move further to the left (less pre-trigger and more
post-trigger information is shown. Negative trigger delay has the opposite effect.
Left The trigger location will be at the left edge of the display, and the entire trace will
be pre-trigger.
Middle The trigger location will be at the center of the display. The left portion of the trace
will be pre-trigger, and the right portion will be post-trigger . (Default)
Right The trigger location will be at the right edge of the display , and the entire trace will
be post-trigger.
Remote Command: TRIGger:POSition <LEFT, MIDDLE, RIGHT>
Main Menu > Trig/Time > TrigDelay
Sets the trigger delay time with respect to the trigger. Positive values cause the actual trigger to occur after the
trigger condition is met. This places the trigger event to the left of the trigger point on the display, and is
useful for viewing events during a pulse, some fixed delay time after the rising edge trigger. Negative trigger
delay places the trigger event to the right of the trigger point on the display, and is useful for looking at events
before the trigger edge. Due to memory limitations, positive or negative trigger delay is restricted in all
timespans, but is always at least 30 times the timespan setting, and considerably greater for some settings.
Range: -900µs < TrigDly < 900µs for timespans 5µs and faster
-4.00ms < TrigDly < 4.00ms for timespans 10µs to 50µs
(-80 x TimeSpan) < TrigDly < (80 x TimeSpan) for timespans 50µs to 2ms
(-30 x TimeSpan) < TrigDly < (30 x TimeSpan) for timespans 5ms and slower
Default: 0.0 seconds
Remote Command: DISPlay:DELay <n>
Main Menu > Trig/Time > TrigLevel
Sets the trigger threshold signal level for synchronizing data acquisition with the a pulsed input signal or
external trigger pulses. If there is an global offset applied to the channel, the trigger level should be entered
in offset units. For internal trigger, the trigger level is always set/returned in dBm, and for external trigger , the
units are volts. Note that there is a small amount of hysteresis built in to the trigger system, and the signal
should have at least one dB greater swing than the trigger level setting, and somewhat more at low levels.
Note that setting a trigger level when Trigger Mode is set to PkT oPk will force the trigger mode back to Auto.
Range: [-40.0 to +20.0] + Offset (dBm) (Trigger Source = Sensor)
-5.0 to +5.0 (Trigger Source = External)
Default: -3.0 dBm (Sensor), 0 V olts (External)
Remote Command: TRIGger:LEVel <n>
Main Menu > Trig/Time > TrigSlope
Sets the slope or polarity for the active trigger edge.
Pos (+) Triggers will be generated when a signal’s rising edge crosses the trigger level
threshold. (Default)
Neg (-) Triggers will be generated when a signal’ s falling edge crosses the trigger level
threshold.
Remote Command: TRIGger:SLOPe <POS, NEG>
3-32
Page 55

Boonton Electronics Chapter 3
4530 Series RF Power Meter Operation
Main Menu > Trig/Time > HoldOff
Sets the trigger holdoff time. Trigger holdoff is used to disable the trigger for a specified amount of time after
each trigger event. The holdoff time starts immediately after each valid trigger edge, and will not permit any
new triggers until the time has expired. When the holdoff time is up, the trigger re-arms, and the next valid
trigger event (edge) will cause a new sweep. This feature is used to help synchronize the power meter with
burst waveforms such as a TDMA or GSM frame. The trigger holdoff resolution is one microsecond, and it
should be set to a time that is just slightly shorter than the frame repetition interval.
Range: 10 e-6 to 0.999999 seconds, 0.0 = no holdoff
Default: 0.0 seconds
Remote Command: TRIGger:HOLDoff <n>
Main Menu > Trig/Time > Trig Srce
Select the source of the trigger signal. In the Modulated, CW and Statistical modes, a measurement can be
triggered. In the Pulse mode, the trace can be triggered to synchronize the waveform and the combination of
the waveform and measurement can be triggered as well. Any trigger source that includes “BUS” uses a GPIB
measurement trigger qualifier. In these cases, the GPIB trigger arms a signal trigger circuit. This permits bus
synchronization of a process that includes a signal-triggered measurement. These modes DO NOT APPL Y to
manual operation. Use ESC/Stop and Enter/Run from the keypad. It is a reportable error to attempt to make
triggered measurements with INITiate:CONTinuous ON. "INITiate:CONTinuous OFF" is required.
Immediate No trigger. Measurement starts on INIT iate.
Bus Group Execute Trigger or *TRG from GPIB. No hardware trigger.
Sensor1 Internal signal from sensor1 (Pulse Mode only) (Default)
Sensor2 Internal signal from sensor2 (Pulse Mode only)
External External signal input (Pulse Mode only)
Bus/Snsr1 GET or *TRG arms the Sensor1 trigger. (Pulse Mode only)
Bus/Snsr2 GET or *TRG arms the Sensor2 trigger. (Pulse Mode only)
Bus/Ext GET or *TRG arms the External trigger. (Pulse Mode only)
Remote Command: TRIGger:SOURce < IMMEDIA TE, BUS, SENSOR1, SENSOR2,
EXTERNAL, BUS>SNSR1, BUS>SNSR2, BUS>EXT >
Main Menu > Trig/Time > Trig Mode
Selects the trigger mode for synchronizing data acquisition with pulsed signals.
Norm Normal mode will cause a sweep to be triggered each time the power level crosses
the preset trigger level in the direction specified by TRIGger:SLOPe. If there are
no edges that cross this level, no data acquisition will occur.
Auto Auto mode operates in much the same way as Normal mode, but will automatically
generate a trace if no trigger edges are detected for a period of time (100 to 500
milliseconds, depending on timespan). This will keep the trace updating even if
the pulse edges stop.
PkToPk Peak-T o-Peak mode operates the same as AUTO mode, but will adjust the trigger
level to halfway between the highest and lowest power levels detected. This aids
in maintaining synchronization with a pulse signal of varying level. Note that a
setting of PKTOPK will be overridden and forced back to AUTO if a trigger level is
set. (Default)
Remote Command: TRIGger:MODe <NORM, AUTO, PKTOPK>
3-33
Page 56

Chapter 3 Boonton Electronics
Operation 4530 Series RF Power Meter
3.11.5 Statisticl Menu. The Statisticl menu is used to configure data acquisition and measurement parameters for
statistical mode operation. Statistical mode is a special operating mode that acquires a very large sample
population, and analyzes the distribution of power levels rather than the measuring power in the time domain
as is done in conventional power meters. This mode uses peak power sensors only, and is useful for
measuring signals that don’t have a periodic or predictable time component on which to trigger .
Main Menu > Statisticl > Horz Span
Select the horizontal display span for the Statistical Mode graph display. Note that display scaling does not
affect the statistical mode measurement in any way . Full power and probability resolution are available in all
settings.
Range: 1 to 100% in a 1-2-5 sequence.
Default: 100%
Remote Command: DISPlay:%SPAN <n>
Main Menu > Statisticl > % Offset
Select the horizontal display offset for the Statistical Mode graph display . Note that display scaling does not
affect the statistical mode measurement in any way . Full power and probability resolution are available in all
settings.
Range: 0 to (100 - HorzSpan) %
Default: 0%
Remote Command: DISPlay:%OFST <n>
Main Menu > Statisticl > Stat Mode
Select the Statistical Mode display presentation format.
CDF Stat Cumulative distribution function. The measurement is the probability that the
power will be below a particular level. This results in the highest probabilities
corresponding to the highest power levels. The peak power is at 100.0% CDF,
which will appear on the right side of the graph display. (Default)
1 - CDF Inverse (complimentary) CDF, also known as CCDF. The measurement is the prob-
ability that the power will be above a particular level. This results in the lowest
probabilities corresponding to the highest power levels. The peak power is at
0.0% CCDF , which will appear on the left side of the graph display. This display
presentation is generally easier to use, since changing the span will have the effect
of zooming in on the peak power area
Distribut Probability distribution histogram. A bar-type histogram is displayed. Ten bars
are displayed, which represent an equal spread of ten power ranges across the
current vertical span setting. When log units are in use, each histogram bar will
span an even number of dBm. For linear units, each bar spans an even number of
milliwatts.
Remote Command: CALCulate:MODe <CDF, 1-CDF, DIST>
3-34
Page 57

Boonton Electronics Chapter 3
4530 Series RF Power Meter Operation
Main Menu > Statisticl > TrmCount
Sets the terminal count (sample population size) for statistical mode acquisition. When the terminal count is
reached, the CDF is considered “complete”, and the instrument will halt acquisition if INITiate:CONTinuous
is set to OFF . If INITiate:CONTinuous is ON, sample acquisition will continue in the manner specified by the
TRIGger:CDF:DECImate setting.
Range: 2 to 4000 MegaSamples
Default: 4000 MegaSamples
Remote Command: TRIGger:CDF:COUNt <n>
Main Menu > Statisticl > TrmAction
Select the action to be taken when the Statistical Mode terminal count is reached.
Stop Stop sampling when the terminal count is reached. The measurement halts and no
further samples are added to the population. (Default)
Restart Clear the measurement and restart acquisition of a new sample population once
the terminal count is reached. This setting is used when the signal changes and
old data must be periodically flushed to maintain valid statistics. Note that it may
take several seconds after each restart before enough samples are taken for a
statistically significant population.
Decimate Decimate the current sample population (divide all sample counts in half), and
continue adding new samples to the same population. The effect is to “decay” the
old information, and more heavily weight the new information. This provides a
technique for coping with changing signals without the invalid interval associated
with the Restart setting, but the setting should be used with caution, as it may take
some time for all old data to be decimated away, depending on the T erminal Count
setting.
Remote Command: INITiate:CONTinuous <OFF , ON> for Stop or Continous running
TRIGger:CDF:DECimate <OFF , ON> to select between Restart and Decimate.
3.11.6 Calibratr Menu. The Calibratr Menu is used to control both the internal, 50 MHz RF calibrator, and an
optional, external 1 GHz accessory calibrator (Model 2530). Both calibrators may be used as precision RF
reference levels for testing or measurements. The internal calibrator is CW only , while the external calibrator
may be pulse modulated using either a built-in pulse generator, or via a rear-panel BNC pulse input. Note that
this menu does not contain any items related to sensor calibration - it is only for controlling the calibrator for
use as a signal source. For sensor calibration information, refer to Section 3.10 of this manual.
3-35
Page 58

Chapter 3 Boonton Electronics
Operation 4530 Series RF Power Meter
Main Menu > Calibratr > [ Int Signal, Ext Signal ]
Control the on/off state of the selected calibrator, and modulation source for the External Calibrator.
Off Disable the selected calibrator’s RF output. (Power-on default)
On CW Enable the selected calibrator’s RF output. The output signal will be unmodulated
(CW).
Int/Pulse Enable the external calibrator’s RF output, modulated by the calibrator’s internal
pulse generator.
Ext/Pulse Enable the external calibrator’ s RF output, modulated by the rear-panel pulse modu-
lation input.
Remote Commands: OUTPut:{INT ernal | EXT ernal}:SIGNAL <ON, OFF>
OUTPut:EXT ernal:MODulation <CW , PULSE> (controls modulation)
OUTPut:EXT ernal:PULSe:SOURce <INT, EXT> (modulation source)
Main Menu > Calibratr > [ Int Level, Ext Level ]
Set the output level of the selected calibrator in 0.1dB steps.
Range: -60.0 to +20.0 dBm
Default: 0.0 dBm
Remote Command: OUTPut:{INTernal | EXTernal}:LEVEL <n>
Main Menu > Calibratr > PlsPeriod
Select the pulse period for the internal pulse modulator of the external calibrator.
Range: 10, 1.0 or 0.1 millisecond (100 Hz, 1kHz or 10kHz)
Default: 1 0 ms
Remote Command: OUTPut:EXTernal:PULSe:PERiod <10, 1, 0.1>
Main Menu > Calibratr > DutyCycle
Select the duty cycle for the internal pulse modulator of the external calibrator.
Range: 10% to 90% in 10% steps
Default: 10%
Remote Command: OUTPut:EXTernal:PULse:DCYC <10, 20, 30, 40, 50, 60, 70, 80, 90)
Main Menu > Calibratr > [ IntStatus, ExtStatus ]
Display a status screen for the selected calibrator. For the internal calibrator , this monitors the oscillator drive
level to verify proper operation. For the external calibrator the software version, serial number, calibration
date, internal temperature and calibration factor are shown.
Remote Command: None.
3-36
Page 59

Boonton Electronics Chapter 3
4530 Series RF Power Meter Operation
Main Menu > Calibratr > [ SelectInt, SelectExt ]
Selects the active calibrator. Only the menu item for the currently inactive calibrator is displayed. Note that
attempting to select the external calibrator will generate an error if it is not connected or turned on.
Remote Command: No explicit command. INT or EXT is embedded in any command that requires a
calibrator to be specified.
3.11.7 Save/Recl Menu. The Calibratr Menu is used to control both the internal, 50 MHz RF calibrator, and an
optional, external 1 GHz accessory calibrator (Model 2530). Both calibrators may be used as precision RF
reference levels for testing or measurements. The internal calibrator is CW only , while the external calibrator
may be pulse modulated using either a built-in pulse generator, or via a rear-panel BNC pulse input. Note that
this menu does not contain any items related to sensor calibration - it is only for controlling the calibrator for
use as a signal source. For sensor calibration information, see section 3.10 of this manual.
Main Menu > Save/Recl > SetupSave
Save the instrument setup to one of four non-volatile memory locations for later recall.
Range: Memory 1, Memory 2, Memory 3 or Memory 4
Remote Command: MEMory:SYS[n]:STORe <1, 2, 3, 4>
Main Menu > Save/Recl > SetupRecl
Recalls the instrument setup from one of four non-volatile memory locations. NOTE: The Recall function
returns with the Calibrator output OFF even if it was on when the setup was saved. This is a safety measure
to prevent damage to sensitive circuits that may have been connected to the output since the setup was
saved. Also, the communications parameters for the GPIB and RS-232 interfaces remain unaffected. This is
necessary because the recall function can be commanded using the GPIB or RS-232. If these parameters are
changed by the recall, communications may be terminated with a fatal error.
Range: Memory 1, Memory 2, Memory 3 or Memory 4
Remote Command: MEMory:SYS[n]:LOAD <1, 2, 3, 4>
3.11.8 Utilities Menu. The Utilities Menu is used to control instrument functions and systems that are not directly
related to performing measurements. This includes hardware, communication, and auxiliary output configuration, as well as system tests and diagnostics.
Main Menu > Utilities > InstrStat
Displays a status screen for the current measurement setup. The screen contents show the setup for one
channel. If a second channel is present, the ∧ and ∨ keys may be used to scroll up and down between
channels. Exact display is somewhat mode dependent.
Main Menu > Utilities > Display > Contrast
Adjust the contrast of the LCD backlight. This setting updates immediately upon pressing the ∧ and ∨ keys,
and once changed, cannot be restored by hitting the ESC key..
Remote Command: None
3-37
Page 60

Chapter 3 Boonton Electronics
Operation 4530 Series RF Power Meter
Main Menu > Utilities > Display > Backlight
Selects the operating mode of the LCD backlight. Turning the backlight off reduces power consumption of
the power meter, and extends the life of the display.
On Backlight is always on (Default).
On/5 min Backlight turns on with any user input, off after 5 minutes of inactivity .
On/1 min Backlight turns on with any user input, off after 1 minute of inactivity .
Off Backlight is always off
Remote Command: SYSTem:LIGHT <ON, ON_5, ON_1, OFF>
Main Menu > Utilities > Key Beep
Enables or disables the audible key beep. Also affects beep during errors.
Off Key beep is disabled (Default).
On Key beep is enabled.
Remote Command: SYSTem:BEEP <OFF, ON>
Main Menu > Utilities > IEEE-488 > Bus Setup > Address
Set the primary GPIB address. This parameter must be set - setting instrument defaults has no effect.
Range: 0 to 30
Remote Command: SYSTem:COMMunicate:GPIB:ADDRess <n>
Main Menu > Utilities > IEEE-488 > Bus Setup > ListnT erm
Select the LISTENER line termination (EOS) character. This character is used to terminate any command the
instrument receives over the GPIB. However, since the instrument always responds to an EOI command from
the controller, it is not necessary for the user to transmit the EOS character unless the controller doesn’t set
EOI on the last command byte. This parameter must be set - setting instrument defaults has no effect.
CR Use carriage return (ASCII CR, 13, 0x0D hex) as listen termination character.
LF Use line feed (ASCII LF , 10, 0x0A hex) as listen termination character.
Remote Command: SYSTem:COMMunicate:GPIB:LISTen <CR, LF>
Main Menu > Utilities > IEEE-488 > Bus Setup > Talk T erm
Select the T ALKER line termination (EOS) character(s). This character(s) is sent by the instrument at the end
of any response string it transmits. However, since it always asserts EOI on the last character of any string,
it may not be necessary to use any EOS character if the controller recognizes the EOI. In this case, set the talk
termination to NONE. This parameter must be set - setting instrument defaults has no effect.
CRLF Use carriage return followed by a line feed to terminate all strings sent, with EOI.set
on the last (LF) byte.
CR Use a carriage return only (with EOI set) to terminate all strings sent.
LF Use a line feed only (with EOI set) to terminate all strings sent.
None Don’t use any termination character when sending strings - just set EOI on the last
byte of the message.
Remote Command: SYSTem:COMMunicate:GPIB:T ALK <CRLF, CR, LF , NONE>
3-38
Page 61

Boonton Electronics Chapter 3
4530 Series RF Power Meter Operation
Main Menu > Utilities > IEEE-488 > SRQ Mask
Set the GPIB Service Request Enable mask value. This value is used to enable particular bits for generating a
service request (SRQ) over the GPIB when certain conditions exist in the Status Byte register. When a mask
bit is set, and the corresponding STB bit goes true, an SRQ will be generated. No SRQ can be generated for
that condition if the mask bit is clear. The bits in the Status Byte register are generally summary bits, which are
the logical OR of the enabled bits from other registers. This parameter must be set - setting instrument
defaults has no effect.
Range: 0 to 255
Remote Command: *SRE <n>
Main Menu > Utilities > IEEE-488 > View Bufr
View the contents of the GPIB listen (receive) and talk (transmit) buf fers on the LCD display . This is useful for
debugging communication difficulties. A command sequence may be sent to the power meter , and then the
listen buffer may be examined to see if the entire command was received correctly . Similarly , examining the talk
buffer will show the response that the instrument has generated and is prepared to send (or has sent). The ∧
and ∨ keys are used to scroll between the two buffers.
Main Menu > Utilities > IEEE-488 > Mnemonic
View a table of all valid SCPI remote interface command mnemonics on the LCD display. This table is in
alphabetical order by command group or subsystem, and is useful for reviewing the command names and their
acceptable shortcut forms, but it should be no substitute for studying this manual.
Main Menu > Utilities > Serial > Baud Rate
Select the serial port’s baud rate (speed). If it appears characters are being skipped during serial communications, try a lower baud rate setting. This parameter must be set - setting instrument defaults has no effect.
Range: 1200, 2400, 4800, 9600, 19200, 38400
Remote Command: SYSTem:COMMunicate:SERial:BAUD <n>
Main Menu > Utilities > Serial > Data Bits
Select the number of data bits for the serial port. This parameter must be set - setting instrument defaults has
no effect.
Range: 7 or 8
Remote Command: SYSTem:COMMunicate:SERial:BITS <n>
Main Menu > Utilities > Serial > Stop Bits
Select the number of stop bits for the serial port. This parameter must be set - setting instrument defaults has
no effect.
Range: 1 or 2
Remote Command: SYSTem:COMMunicate:SERial:SBITS <n>
3-39
Page 62

Chapter 3 Boonton Electronics
Operation 4530 Series RF Power Meter
Main Menu > Utilities > Serial > ParityBit
Select whether the serial port will transmit a parity bit, and if so, its polarity. This parameter must be set setting instrument defaults has no effect.
None Don’t transmit any parity bit.
Odd Transmit an odd parity bit: sends a 1 if the number of 1’s in the data bits is odd,
otherwise sends a 0.
Even Transmit an even parity bit: sends a 1 if the number of 1’s in the data bits is even,
otherwise sends a 0.
Remote Command: SYSTem:COMMunicate:SERial:P ARity <NONE, ODD, EVEN>
Main Menu > Utilities > Serial > Handshake
Select the serial port handshake mode for the RTS line. This parameter must be set - setting instrument
defaults has no effect.
None No handshaking takes place - the RTS line is ignored, and the DTR line is always
asserted.
RTS The R TS line is used for hardware handshaking.
Remote Command: SYSTem:COMMunicate:SERial:CONT rol:RTS <OFF , ON>
Main Menu > Utilities > Recorder > Outp.Sig
Select whether the recorder output will be enabled.
Off The recorder output is disabled, and will always output 0.0 volts. (Default)
On The recorder output is enabled, using the defined mode.
Remote Command: OUTput:RECOrder:SIGnal <OFF, ON>
Main Menu > Utilities > Recorder > Channel
Select which channel’s measurement will be tracked by the recorder output.
Channel 1 The recorder output will generate a voltage proportional to the primary measure-
ment of channel 1. (Default)
Channel 2 The recorder output will generate a voltage proportional to the primary measure-
ment of channel 2.
Remote Command: OUTput:RECOrder:SOURce <CH1, CH2>
Main Menu > Utilities > Recorder > Meas Mode
Select the measurement and scaling mode for the recorder output.
Auto The recorder output will generate an automatically ranged signal that follows the
primary reading of the selected channel. The output voltage is automatically
scaled, and will span the full output voltage once for each decade of signal level.
The voltage will be proportional to power when linear units are in use, and proportional to the log of power when logarithmic units are in use. (Default)
3-40
Page 63

Boonton Electronics Chapter 3
4530 Series RF Power Meter Operation
Manual The recorder output will generate a manually ranged signal that follows the pri-
mary reading of the selected channel. The output voltage is scaled using the
preset minimum and maximum signal levels to correspond to minimum and maximum output voltages. The voltage will be proportional to power when linear units
are in use, and proportional to the log of power when logarithmic units are in use.
Alarm The recorder output is used as an alarm condition indicator so external circuitry
may detect when the selected channel’s primary measurement has exceeded the
acceptable range of conditions (see the Channel > Parameters > Alarm submenu).
The output is TTL compatible, and will be zero volts for a normal condition, and +5
volts when an alarm condition exists.
Remote Command: OUTput:RECOrder:MEAS <AUTO, MANUAL, ALARM>
Main Menu > Utilities > Recorder > Outp.Mode
Select the output polarity mode (span) for the recorder output.
Unipolar Minimum voltage = 0.0 volts, Maximum voltage = +10.0 volts. (Default)
Bipolar Minimum voltage = -10.0 volts, Maximum voltage = +10.0 volts.
Remote Command: OUTput:RECOrder:POLarity <UNIPOLAR, BIPOLAR>
Main Menu > Utilities > Recorder > [ Set Min, Set Max ]
Set the signal levels corresponding to the minimum scale (0.0V or -10.0V, depending on polarity setting) and
maximum scale (+10.0V) recorder output signal.
Range: -100.00 to +100.00 dBm
Default: 0.00 dBm
Remote Command: OUTput:RECOrder:{MIN | MAX} <n>
Main Menu > Utilities > Recorder > Fast Mode
Select whether Fast Mode is active for the recorder output.
Off Use standard recorder output speed - typically about 50ms update rate. Display
and other functions have priority over the recorder output. (Power-on default)
On Enable a special, high-speed recorder output mode. This mode gives priority to
updating the recorder output, and should only be used where the absolute, fastest
recorder output response is required. Latency will be under 10ms in Modulated
Mode. Note that display update speed may slow down.
Remote Command: OUTput:RECOrder:FAST <OFF , ON>
Main Menu > Utilities > Recorder > Force
Sets the recorder output to a user specified voltage. This will override all other recorder settings in effect, but
is only temporary. Setting Recorder > Outp.Sig will cancel the force voltage, and restore normal recorder
output operation. Although the setting resolution is 1mV, the recorder’s actual resolution is 5mV, so the
nearest value will be set.
Range: -10.000 to +10.000 volts
Remote Command: OUTput:RECOrder:FORCE <n>
3-41
Page 64

Chapter 3 Boonton Electronics
Operation 4530 Series RF Power Meter
Main Menu > Utilities > Recorder > Calibrate > Slope Adj
Adjusts the slope, or gain of the recorder output. This command is typically used with a recorder Zero Adj
command to calibrate the recorder output for maximum absolute accuracy. The setting represents the deviation in percent from the factory default slope value, and may be adjusted in 0.01% increments, corresponding
to 1mV at fullscale, although actual output resolution is 5mV. Changing the slope “pivots” the curve around
the 0.0 volt setting, and will have maximum effect at -10.0 volts and +10.0 volts. Note that this setting is not
permanent unless “Save Cal” is used.
Range: -10.00 to +10.00% (corresponds to actual slope of 90.00 to 110.00% of default)
Remote Command: OUTput:RECOrder:CALibration:SLOPe <n>
Main Menu > Utilities > Recorder > Calibrate > Zero Adj
Adjusts the zero, or voltage offset of the recorder output. This command is typically used with a recorder
Slope Adj command to calibrate the recorder output for maximum absolute accuracy . The setting increases or
decreases the actual output voltage by a fixed amount, and may be adjusted in 1mV increments, although
actual output resolution is 5mV. Changing the offset moves the entire curve up or down, and has equal effect
at all output levels. Note that this setting is not permanent unless “Save Cal” is used.
Range: -1.000 to +1.000V
Remote Command: OUTput:RECOrder:CALibration:ZERO <n>
Main Menu > Utilities > Recorder > Calibrate > Save Cal
Saves the recorder Zero and Slope adjustments to the instrument’s non-volatile calibration memory once they
have been set. If this step is not performed, the settings will revert back to the previous settings next time
instrument power is applied.
Remote Command: OUTput:RECOrder:CALibration:SAVE <n>
Main Menu > Utilities > Sys-T ests > SystemInf
Display a set of information screens showing system information. Info includes: serial number, model number ,
internal firmware versions, calibration information, accumulated hours, power cycles, memory checksums,
and sensor calibration settings. The information will be on two or more pages, and the ∧ and ∨ keys may be
used to scroll back and forth.
Main Menu > Utilities > Sys-T ests > Voltages
Display an of information screen showing internal system voltages and current sensor temperature. Pressing
the ∧ and ∨ keys may be used to scroll back and forth between the measured values, and the raw A/D counts.
Main Menu > Utilities > Sys-Tests > Disp Test
Perform a diagnostic test on the LCD display. The screen will first set and clear all pixels by wiping across,
then will display the full character set of each of the internal fonts. Note that if the display appears too light
or dark, the contrast may be adjusted by holding down the ESC key while pressing the
Main Menu > Utilities > Sys-T ests > Keypad
Perform a diagnostic test of the front panel keypad. Pressing any key should highlight the symbol for that key,
and pressing it multiple times should cause the count to increment each time. To test the full keypad, press
each key at least once. Press the ESC key last, as this key terminates the test.
3-42
∧∧
∧
∧∧
∨∨
∨ or ∨ keys.
∨
Page 65

Boonton Electronics Chapter 3
4530 Series RF Power Meter Operation
Main Menu > Utilities > Sys-T ests > Recorder
Perform a diagnostic test of the recorder output. While the test is running, the recorder output should
generate a repeating ramp waveform that spans the full output range of the recorder output from -10.0V to
+10.0 volts. The signal may be monitored with an external oscilloscope, and it is normal for the waveform to
have a “stair-step” appearance. Pressing any key terminates the test.
Main Menu > Utilities > Sys-T ests > CycleRly
Perform a diagnostic test of the power meters internal relays. This test is used primarily at the factory to
burnish the relay contacts that are in the signal or calibration path. This significantly improves the repeatability of the relay’s contact resistance. Press the ESC key to terminate the test.
Main Menu > Utilities > Sys-Tests > DnldFlash
Restart the power meter in a special mode for downloading new firmware. Although new firmware can be
downloaded and installed anytime the system is in Menu Mode, rebooting to the special Download Menu
always sets the serial port for the maximum baud rate, and insures that no other processes are running that
might interfere with firmware download and programming. This insures the fastest possible update speed.
The Download Menu may also be entered by turning on instrument power while holding down the ESC key.
When this is done, the power on diagnostic may report a stuck ESC key, but this is not a problem.
Main Menu > Utilities > Sys-T ests > EraseSnsr
Erase the contents of the selected sensor EEPROM. This is a special utility that is only intended for customers that have an existing sensor “Smart Adapter”, and need to use it on a different sensor . It erases
identity and calibration information from the adapter or sensor EEPROM. Be absolutely certain this is what
you intend to do before executing this command - once erased, there is no way to restore the calibration
information, and the sensor must be recalibrated. A confirmation dialog will appear, prompting the user to
press ENTER to complete the erase operation. Press any other key to abort.
Adapter 1 Erase the information in the smart adapter or sensor plugged into the Sensor 1
input.
Adapter 2 Erase the information in the smart adapter or sensor plugged into the Sensor 2
input.
all sensor
3.11.9 Help Menu. The Help Menu displays a series of help screens describing keyboard operation of the Model
4530. These screens show only the top-level function of the keys, and are no substitute for the detailed
information that is available by consulting Chapter 3 of this manual.
3.11.10Defaults Menu. The Defaults Menu item is used to reset the operating configuration of the power meter to
a known, default state. Most measurement and some system parameters are set to the default settings, which
are listed in this section 3.11 of this manual. Communication parameters for the GPIB and serial port are not
affected by this operation.
Remote Command: *RST
3-43
Page 66

Chapter 3 Boonton Electronics
Operation 4530 Series RF Power Meter
3.11.1 1Menu Summary. The following table is a compressed summary the entire menu structure of the Model 4530.
Each level of indent indicates a new submenu
Table 3-5. Main Menu Summary
Measure . . . . . . . . . . . . . . . . . . . . . Measurement Control Menu
Stop . . . . . . . . . . . . . . . . . . . . . Stop data capture
Run . . . . . . . . . . . . . . . . . . . . . Restart data capture
SnglSweep . . . . . . . . . . . . . . . . . . . Arm for Single Sweep
Clr/Reset . . . . . . . . . . . . . . . . . . . . Clear current measurement
AutoSetup . . . . . . . . . . . . . . . . . . . Setup automatically using current signal
Channel / Channel 2 . . . . . . . . . . . . . Channel Settings Menu
Meas Mode . . . . . . . . . . . . . . . . . . Select mode <Off, CW, Modulated, Pulse, Statistical>
Params . . . . . . . . . . . . . . . . . . . . . Channel Parameters Submenu
dB Offset . . . . . . . . . . . . . . . . . . . . Set measurement offset
Frequency . . . . . . . . . . . . . . . . . . . Set operating frequency
Averaging . . . . . . . . . . . . . . . . . . . . Set video averaging (Pulse Mode only)
Filter . . . . . . . . . . . . . . . . . . . . . . . . Set filter time (CW & Modulated modes)
Peak Hold . . . . . . . . . . . . . . . . . . . Select PeakHold mode (Peak Sensors only)
CalFactor . . . . . . . . . . . . . . . . . . . . Set CalFactor (Power Sensors only)
Video BW . . . . . . . . . . . . . . . . . . . . Select sensor BW (Peak Sensors only)
Duty Cycle . . . . . . . . . . . . . . . . . . . Set pulse duty cycle (CW Sensors only)
Def Pulse . . . . . . . . . . . . . . . . . . . . Pulse Config Submenu (Pulse Mode only)
Distal . . . . . . . . . . . . . . . . . . . . . . . Set Distal %
Mesial . . . . . . . . . . . . . . . . . . . . . . Set Mesial %
Proximal . . . . . . . . . . . . . . . . . . . . Set Proximal %
PulsUnits . . . . . . . . . . . . . . . . . . . . Set pulse units <%Volts or %Watts>
StartGate . . . . . . . . . . . . . . . . . . . . Define pulse start %
EndGate . . . . . . . . . . . . . . . . . . . . Define pulse end %
Range . . . . . . . . . . . . . . . . . . . . . . . Select Gain Range (CW & Voltage Sensors only)
Alarm . . . . . . . . . . . . . . . . . . . . . . . Alarm Configuration Submenu
Off . . . . . . . . . . . . . . . . . . . . . . . . . Disable Alarm
On . . . . . . . . . . . . . . . . . . . . . . . . . Enable Alarm
HiLimit . . . . . . . . . . . . . . . . . . . . . . Set upper alarm power limit
LoLimit . . . . . . . . . . . . . . . . . . . . . . Set lower alarm power limit
Impedance . . . . . . . . . . . . . . . . . . . Set probe impedance (Voltage Sensors only)
Display . . . . . . . . . . . . . . . . . . . . . Display Configuration Submenu
Vert Span . . . . . . . . . . . . . . . . . . . . Set graph mode vertical sensitivity
Vert Cntr . . . . . . . . . . . . . . . . . . . . Set graph mode vertical center
Units . . . . . . . . . . . . . . . . . . . . . . . Select display units
Resolution . . . . . . . . . . . . . . . . . . . Select text mode display resolution
DispSrce . . . . . . . . . . . . . . . . . . . . Select channel math functions
Bar Graph . . . . . . . . . . . . . . . . . . . Enable/disable bargraph
3-44
Page 67

Boonton Electronics Chapter 3
4530 Series RF Power Meter Operation
Table 3-5. Main Menu Summary - (Cont)
FrDepOfst . . . . . . . . . . . . . . . . . . . . Freq Dependent Offset Submenu
Ofst Src . . . . . . . . . . . . . . . . . . . . . Select Offset Table <None, TableA, TableB>
Modify-A . . . . . . . . . . . . . . . . . . . . . View/edit Freq Dep Offset Table A
Modify-B . . . . . . . . . . . . . . . . . . . . . View/edit Freq Dep Offset Table B
Snsr Data . . . . . . . . . . . . . . . . . . . . Sensor Data Submenu
SensrInfo . . . . . . . . . . . . . . . . . . . . View general sensor information
FastTable . . . . . . . . . . . . . . . . . . . . View high-bw calfactor table (Peak Sensors only)
SlowTable . . . . . . . . . . . . . . . . . . . . View low-bw calfactor table (Peak Sensors only)
FreqTable . . . . . . . . . . . . . . . . . . . . View frequency calfactor table (CW Sensors only)
GainConst . . . . . . . . . . . . . . . . . . . View linearity calibration table (CW Sensors only)
TempComp . . . . . . . . . . . . . . . . . . . Select temperature compensation mode <On, Off>
Load Ref . . . . . . . . . . . . . . . . . . . . . Load Reference level from currently measured power
Ref Off . . . . . . . . . . . . . . . . . . . . . Disable Reference
Enter Ref . . . . . . . . . . . . . . . . . . . . Enter Reference level from keyboard
Markers . . . . . . . . . . . . . . . . . . . . . Marker Control Menu
Mrkr Mode . . . . . . . . . . . . . . . . . . . Select Marker Mode <Off, Vertical, Horizontal>
Mrk1 Pos . . . . . . . . . . . . . . . . . . . . Set Marker 1 position
Mrk2 Pos . . . . . . . . . . . . . . . . . . . . Set Marker 2 position
Trig/Time . . . . . . . . . . . . . . . . . . . . . Trigger / Time Configuration Menu
Time Span . . . . . . . . . . . . . . . . . . . Select measurement time span
Trig Pos. . . . . . . . . . . . . . . . . . . . . . Select trigger position (Pulse Mode only)
TrigDelay . . . . . . . . . . . . . . . . . . . . Set trigger delay time (Pulse Mode only)
TrigLevel . . . . . . . . . . . . . . . . . . . . . Set trigger level (Pulse Mode only)
TrigSlope . . . . . . . . . . . . . . . . . . . . Select trigger slope (Pulse Mode only)
HoldOff . . . . . . . . . . . . . . . . . . . . . Set trigger holdoff time (Pulse Mode only)
Trig Srce . . . . . . . . . . . . . . . . . . . . . Select trigger source (Pulse Mode only)
Trig Mode . . . . . . . . . . . . . . . . . . . . Select trigger mode <Auto, Norm, Pk-to-Pk>
Statisticl . . . . . . . . . . . . . . . . . . . . . Statistical Mode Configuration Menu
Horz Span . . . . . . . . . . . . . . . . . . . Select horizontal axis sensitivity
% Offset . . . . . . . . . . . . . . . . . . . . . Set horizontal axis display center
Stat Mode . . . . . . . . . . . . . . . . . . . . Select mode <CDF, 1-CDF, Histogram>
TrmCount . . . . . . . . . . . . . . . . . . . . Set number of samples to acquire
TrmAction . . . . . . . . . . . . . . . . . . . . Select action at TermCount <stop, restart, decimate>
Calibratr . . . . . . . . . . . . . . . . . . . . . Calibration Control Menu
[Int | Ext] Signal . . . . . . . . . . . . . . . Select output signal <Off, On, (Int-Pulse, Ext-Pulse)>
Level . . . . . . . . . . . . . . . . . . . . . Set calibrator output level
PlsPeriod . . . . . . . . . . . . . . . . . . . . Select Pulse Period (external calibrator only)
DutyCycle . . . . . . . . . . . . . . . . . . . . Select Pulse Duty Cycle (external calibrator only)
[Int | Ext] Status . . . . . . . . . . . . . . . View status of internal/external calibrator
Select [Int | Ext] . . . . . . . . . . . . . . . Select internal/external calibrator
Save/Recl . . . . . . . . . . . . . . . . . . . . . Instrument Save/Recall Menu
SetupSave . . . . . . . . . . . . . . . . . . . Save current setup to memory[1,2,3,4]
SetupRecl . . . . . . . . . . . . . . . . . . . . Recall current setup from memory[1,2,3,4]
3-45
Page 68

Chapter 3 Boonton Electronics
Operation 4530 Series RF Power Meter
Table 3-5. Main Menu Summary - (Cont)
Utilities . . . . . . . . . . . . . . . . . . . . . Instrument Utilities Menu
InstrStat . . . . . . . . . . . . . . . . . . . . . View configuration status
Display . . . . . . . . . . . . . . . . . . . . . Adjust display settings
Contrast . . . . . . . . . . . . . . . . . . . . . Adjust LCD display contrast
Backlight . . . . . . . . . . . . . . . . . . . . Select backlight mode <On, 1-min, 5-min, Off>
Key Beep . . . . . . . . . . . . . . . . . . . . Select key beep <On, Off>
IEEE-488 . . . . . . . . . . . . . . . . . . . . IEEE-488 Configuration Submenu
Bus Setup . . . . . . . . . . . . . . . . . . . Bus Setup submenu
Address . . . . . . . . . . . . . . . . . . . . . Set instrument address
ListnTerm . . . . . . . . . . . . . . . . . . . . Select Listen Terminator <CR, LF>
Talk Term . . . . . . . . . . . . . . . . . . . . Select Talk Terminator <CRLF, LF, CR, none>
SRQ Mask . . . . . . . . . . . . . . . . . . . Set SRQ mask value
View Bufr . . . . . . . . . . . . . . . . . . . . View Talk/Listen Buffers
Mnemonic . . . . . . . . . . . . . . . . . . . View list of SCPI remote commands
Serial . . . . . . . . . . . . . . . . . . . . . Serial Port Configuration Submenu
Baud Rate . . . . . . . . . . . . . . . . . . . Select baud rate
Data Bits . . . . . . . . . . . . . . . . . . . . Select data bits
Stop Bits . . . . . . . . . . . . . . . . . . . . Select stop bits
ParityBit . . . . . . . . . . . . . . . . . . . . . Select parity bit
Handshake . . . . . . . . . . . . . . . . . . . Select hardware handshake mode
Recorder . . . . . . . . . . . . . . . . . . . . . Recorder Output Configuration Submenu
Outp.Sig . . . . . . . . . . . . . . . . . . . . . Select recorder enable <Off, On>
Channel . . . . . . . . . . . . . . . . . . . . . Select recorder channel <Channel1, Channel2>
Meas Mode . . . . . . . . . . . . . . . . . . Select recorder mode <Auto, Manual, Alarm>
Outp.Mode . . . . . . . . . . . . . . . . . . . Select recorder polarity <Unipolar, Bipolar>
Set Min . . . . . . . . . . . . . . . . . . . . . Set recorder lower manual limit
Set Max . . . . . . . . . . . . . . . . . . . . . Set recorder upper manual limit
Fast Mode . . . . . . . . . . . . . . . . . . . Select fastest update (slows GPIB & display)
Force . . . . . . . . . . . . . . . . . . . . . . . Force recorder output to a voltage level
Calibrate . . . . . . . . . . . . . . . . . . . . Recorder Output Calibration Submenu
Slope Adj . . . . . . . . . . . . . . . . . . . . Calibrate slope (gain) of recorder output
Zero Adj . . . . . . . . . . . . . . . . . . . . . Calibrate zero offset of recorder output
Save Cal . . . . . . . . . . . . . . . . . . . . Save current slope and zero adjustments
Sys-Tests . . . . . . . . . . . . . . . . . . . . System Test Submenu
SystemInf . . . . . . . . . . . . . . . . . . . . Display system information screens
Voltages . . . . . . . . . . . . . . . . . . . . . Display internal voltages
Disp Test . . . . . . . . . . . . . . . . . . . . Test LCD display
Keypad . . . . . . . . . . . . . . . . . . . . . . Test front panel keypad
Recorder . . . . . . . . . . . . . . . . . . . . Test recorder output
CycleRly . . . . . . . . . . . . . . . . . . . . Cycle internal relays for burn-in
DnldFlash . . . . . . . . . . . . . . . . . . . . Reboot in firmware update mode
EraseSnsr . . . . . . . . . . . . . . . . . . . Erase sensor 1 or 2 adapter information
Help . . . . . . . . . . . . . . . . . . . . . Keyboard Help Display
Defaults . . . . . . . . . . . . . . . . . . . . . Set instrument to default state
3-46
Page 69

Boonton Electronics Chapter 3
4530 Series RF Power Meter Operation
3.12 ERROR MESSAGES AND ST ATUS CODES
The following tables show the various error, warning or status messages that may appear from time to time, along with
an explanation of the meaning of the message. In some cases, the messages may be ignored, while other messages
indicate a major malfunction or error that prevents the power meter from performing measurements.
Table 3-6. Graph/Text Header Error and Status Messages
These messages may appear in the Header at the top of the display in Graph or Text mode.
NoSensor There is no sensor present on this channel.
SnsrCalT The sensor’s (internal EEPROM) cal factor tables are invalid.
AutoCal The peak sensor’s serial/model number does not match the previous device that
was auto-calibrated on this channel. A new AutoCal is needed.
InstrCal The DSP cal table for this peak sensor is not initialized. An AutoCal is needed.
TmpDrift The temperature of the peak sensor has drifted by more than 4 degrees C from
the temperature at which the sensor was AutoCaled. For best measurement
accuracy, a new auto-calibration should be performed.
Meas Off The measurement mode (or display mode) for this channel is turned off.
Table 3-7. Sensor and Probe Error Messages
These messages may appear briefly on the main display when a sensor or probe is plugged-in.
Page Error: nnnnnnnn One or more of the sensor’s internal EEPROM tables contains a checksum error.
*No Calib. Tables* No peak sensor calibration tables have been saved. A new auto-cal is needed
before measurements can be made.
*AutoCal Required* The peak sensor’s serial and model number do not match the sensor for which
calibration tables have been saved. A new auto-cal is needed before measure-
ments can be made.
*Using Default Cal* The CW sensor’s serial and model number do not match the sensor for which
the zero or fixed-cal factors were last performed. Default values will be used
until a zero and fixed-cal or AutoCal are done for this sensor.
3-47
Page 70

Chapter 3 Boonton Electronics
Operation 4530 Series RF Power Meter
Table 3-8. Sensor Zero / Cal Status Codes
00 operation complete, no errors
03 coarse peak offset failed
04 top power code too low or too high
0 5 zero power point invalid
06 power entries nonmonotonic
07 code entries nonmonotonic (sensor may not be warmed up - try again)
0 8 too far (over 32dB) to extend table
1 3 zero offset signal level too low
14 zero offset signal level too high (sensor probably connected to signal source)
15 zero offset code value out of range (sensor probably connected to signal source)
23 step calibration signal level too high
2 4 zero offset adjustment invalid
26 autocal step signal level too high
27 autocal step signal level too low (sensor probably not connected to correct calibrator)
28 step calibration linearity questionable (sensor may not be warmed up - try again)
2 9 fixed cal power level invalid (fixed cal should be attempted only at 0dBm)
2A fixed cal input power level too high
2 B fixed cal input power level too low
Table 3-9. Startup Error Messages
These messages appear briefly during startup if a system error is detected. The error status may also be viewed on
the display menu Utilities>Sys-T ests>SystemInf. T ry a power off/on cycle to recover normal operation. If this fails,
service may be required.
DSP S/W Failed The DSP is not running or failed to respond.
DSP - NoResp During normal operation, the DSP failed to respond to a command.
DSP-CalTbl During the boot-up process, an error occurred while down loading the calibra-
tion tables to the DSP.
DSP-IniErr During the boot-up process, an error occurred while down loading the channel
parameters to the DSP.
No System Calib. T ables The calibrator is missing its internal calibration tables. This requires factory
recalibration of the internal 50 MHz calibrator for proper operation.
No DC Calibration Data The instrument is missing its CW channel gain calibration table. This requires
factory recalibration for proper operation.
Chan# Cal Table: Err The DSP cal table for this peak sensor is not initialized. An autocal is needed.
Sensor# EEProm: Err Checksum Error in one of the EEPROM pages. If this error occurs again after a
power cycle, sensor service may be required.
No DSP Data Records The flash memory does not contain valid DSP instruction code. Try reinstalling
operating firmware.
3-48
Page 71

Boonton Electronics Chapter 3
4530 Series RF Power Meter Operation
3.13 RECORDER OUTPUT CALIBRA TION
The recorder output may be user calibrated for maximum in-system accuracy when used as a measurement monitor. The
output span of the hardware is -10.0 to +10.0 volts. This span is covered by a 12-bit D/A converter, which generates
4096 voltage steps to cover the 20 volt span, or about 5 millivolts per step. The absolute accuracy specification is
about 100 millivolts at any point on the transfer function, which may be further degraded by loading of the output.
However, the zero offset and gain may be adjusted by the user to provide better absolute accuracy stand-alone and in
system. After calibration, an absolute accuracy of 20mV at all points should be easily achievable. It should be noted,
however, that calibration of the gain and of fset does not change the minimum and maximum voltages that are generated, only the transfer function in between. The minimum and maximum voltages are determined by hardware tolerances, and are still subject to the 100 millivolt absolute accuracy specification.
The procedure to adjust the recorder output consists of setting the recorder output voltage level to two different
values, recording the voltage, and adjusting offset and slope to achieve the desired readings. From the front panel, the
following menu commands are used for the calibration. See the section 3.11.8 for detailed descriptions of these menu
commands.
Utilities > Recorder > Force (sets voltage)
Utilities > Recorder > Calibrate > Zero Adj (adjusts offset)
Utilities > Recorder > Calibrate > Slope Adj (adjusts slope, or gain)
Utilities > Recorder > Calibrate > Save Cal (saves the adjustment to nonvolatile calibration memory)
If performing the calibration from the remote interface, the bus commands should be substituted for the menu commands. See section 4.5.17 for detailed descriptions of these remote commands.
OUTPut:RECOrder:FORCE
OUTPut:RECOrder:CALibration:ZERO
OUTPut:RECOrder:CALibration:SLOPe
OUTPut:RECOrder:CALibration:SA VE
T o perform the recorder output calibration, the following steps should be followed:
1. Connect a precision, high-impedance (10M or greater) DVM to the recorder output, with the recorder also connected to your monitoring system, if desired.
2 . Force voltage to 0.000 volts using the Force command, and record the DVM reading. Other voltages may be used,
if desired.
3 . Use the Zero Adj command to adjust the zero offset, and achieve a reading as close to the force setting (normally
∧∧
0.000 volts) as possible, typically within 3mV. Use the
Enter/Run to update the voltage. The zero offset may be adjusted up or down by 1.000 volt, corresponding to
approximately 10% of the range. If the DVM reading is positive, the zero offset setting should be decreased by
approximately that same value. For example, if the reading is 27.2mV , and the current Zer o Adj setting is 0.004 volts,
the new setting should be: 4.0mV - 27.2mV = -23.2mV = -0.023 volts. Note that the output voltage resolution is only
5mV, so not all setting changes will result in a change in the output voltage.
4 . Force the voltage to 9.000 volts using the Force command, and record the DVM reading. Other voltages may be
used, if desired.
∨∨
∧
∨
and ∨ keys to adjust the value up or down, then press
∧∧
∨
5 . Use the Slope Adj command to adjust the slope, or gain of the output., and achieve a reading as close to the force
∧∧
∨∨
setting (normally 9.000 volts) as possible, typically within 3mV. Use the
down, then press Enter/Run to update the voltage. The slope is stored adjusted as a “delta percent” from the
default slope, and may be adjusted up or down by 10% (corresponding to 90% to 110% of default). If the DVM
reading is positive, the slope setting should be decreased by an appropriate amount. For example, if the reading
is 9.260 volts, and the current Slope Adj setting is 1.61%, the slope is too high by: ((9.260 / 9.000) - 1) x 100 = 2.89%.
This means the new slope setting should be 1.61 - 2.89 = -1.28%. Note that the output voltage resolution is only
5mV, so not all setting changes will result in a change in the output voltage.
and ∨ keys to adjust the value up or
∧
∨
∧
∧
∨
3-49
Page 72

Chapter 3 Boonton Electronics
Operation 4530 Series RF Power Meter
6 . The slope adjustment has no effect on the output voltage when the force setting is 0.000 volts. If a voltage other
than zero volts was chosen for setting the offset in step 2, it will be necessary to iteratively repeat steps 2 through
5 to achieve convergence upon the desired transfer line. If you are calibrating the recorder output to a “custom”
transfer line (the output voltages desired are not exactly equal to the “force” settings), modify steps 3 and 5 by
substituting your desired output voltage for the force setting in the equations.
7. Verify the output voltage for several voltage levels by forcing a voltage, and checking the DVM reading. An
optimally calibrated output should be within about 5mV at all points, and 8mV worst case. This allows some room
for time and temperature drift while still staying within the 20mV absolute calibrated accuracy specification.
8 . Once it has been verified that the recorder output calibration is acceptable, it should be saved to the instrument’s
non-volatile EEPROM calibration memory using the Save Cal command. Once this has been performed, the slope
and zero offset adjustment settings will become permanent, and will be reloaded whenever instrument power is
turned on.
3.14 FIRMWARE UPDATE
The 4530 Series RF Power Meter uses field reprogrammable “flash” memory to store the operating firmware. From time
to time, Boonton Electronics may release new firmware versions for the instrument which add new features, enhance
performance, or extend operating capabilities. Firmware is automatically updated to the latest version any time the
power meter is returned for factory service or calibration, but it is also possible to download firmware from the Boonton
Electronics website ( www.boonton.com ), and install the firmware into the instrument via the serial port on most
personal computers (Windows 95, 98, 2000, ME, XP, and NT).
To update instrument firmware, the following steps should be followed:
1. Locate the software update executable file (the filename will be something like: upd4530_000425.exe). If you
downloaded the update file from the web or via email, a file icon should be embedded in the message, or the file
should be saved in your default directory for downloads or email attachments.
2 . Connect a nine-pin serial port extension cable (DB9 M-F) from your computer's serial communication port (COM1)
to the 4530's RS-232 connector on the rear panel. The cable should be a “straight-through type” - DO NOT use a
null modem cable or adapter! (If your computer only has COM2 available, see special instructions below).
3 . From the main menu select:
Utilities > Sys-T ests > DnldFlash [ENTER]
Then, when prompted, press [ENTER] again to confirm the download.
The instrument will re-boot with the 4530 Downloader menu for setting serial communication parameters.
4 . Execute the update file by double-clicking on the filename or file icon from your browser or email client. If you save
the file to disk, you can also execute the file from Windows Explorer , by typing the filename (or the full pathname)
at a command prompt (“MS-DOS”) window, or from the RUN selection in the W indows Startup menu.
5 . The program will immediately attempt to establish serial communication with the 4530. If successful, it will report
the baud rate and serial parameters used and begin loading the new software.
The progress of loading and programming will be reported on your computer's display and on the 4530's front
panel. It takes about 6 minutes to complete the download. When finished, the word “Done.” will appear. The
program has terminated at this point and it is safe to close the window.
If the 4530 does not restart at the end of the loading process, turn the power off and on to force a restart. From the
main menu select Utilities > Sys-Tests > SystemInf [ENTER]. Two Software date codes should be displayed: a
3-50
Page 73

Boonton Electronics Chapter 3
4530 Series RF Power Meter Operation
main software version, and a DSP software version. They may not be the same, but the more recent of these dates
should match the datecode of the update file just downloaded. If the updated versions do not appear, the
download failed and the old software is still installed.
TROUBLESHOOTING:
If serial communication cannot be established, the update program will respond: "Unable to determine baud rate", or
“No response on COM1”. If this happens, check the following items:
1. Make sure you are connected to COM1.
2. Make sure you are using a 9-pin straight-through type serial cable.
3. Try setting the 4530 to download at a slower baud rate. The update program will automatically detect the 4530
baud rate if it is set to 9600, 19200 or 38400 baud, so there is no need to change settings on the computer.
When the downloader is invoked, the 4530's initial serial port settings are always:
Baud rate: 38400
Data bits: 8
Stop bits: 1
Parity bit: none
Handshake: none
Check to make certain that these settings are correct. If you wish to try a slower baud rate, try selecting Serial >
BaudRate > 19200 from the downloader menu.
4 . If COM1 is not available on your computer (perhaps it is in use by another device or program), you may force the
install program to use COM2 by executing it with “-2” in the command line. T o do this, you must either execute
from a command prompt or from the Windows Start Menu, and specify the “-2” command line ar gument. Note that
the file must be saved to a disk first. This action cannot be performed from a browser or email client.
a) FROM A COMMAND PROMPT (“MS-DOS”) WINDOW:
Open a command prompt window , and type the full pathname of the install file, followed by a space and “ -2”.
Alternatively , CD to the directory containing the install file, and just type the filename followed by “ -2”. The
following example assumes the install file is in a directory called “download” under the root directory.
CD c:\download <enter>
UPD4530_020501 -2 <enter>
b) FROM WINDOWS ST AR T MENU:
Click on the Windows “Start” button, and select “Run”. When the dialog appears, click “Browse”, and locate
the install file. Select (highlight) the file, then click “OK”, and the full pathname of the install file should appear
in the “Open” box of the Run window. Next, place the mouse cursor at the end of the filename, and add “ -2”
(don’t forget the space), then click “OK” to execute the program.
5 . Note that versions of the installation program prior to firmware version 20020501 accessed the serial port hardware
directly, and some newer Microsoft operating systems may impose limitations on this type of operation which
slow or totally prevent serial communications from taking place. It is recommended that MS-DOS, Windows 3.x, or
Windows 95 be used when loading these firmware versions. Version 20020501 (filename UPD4530_020501.EXE)
and later use standard, 32-bit, Windows calls for widest compatibility, but will not operate under MS-DOS or
Windows 3.x operating systems. Should you require a firmware loader that runs under MS-DOS or W indows 3.x,
please contact the factory.
Windows
®
is a registered trademark of Microsoft Corporation.
3-51
Page 74

Chapter 3 Boonton Electronics
Operation 4530 Series RF Power Meter
3-52
Page 75

Boonton Electronics Chapter 4
4530 Series RF Power Meter Remote Operation
REMOTE OPERATION 4
4.1 GPIB CONFIGURA TION.
The 4530 Series GPIB interface is configured using the main menu key at menu level Main Menu>Utilities>IEEE488>BusSetup. The primary listen/talk address (ML TA) under menu item >Address can be set to any value from 0 to
30. The value assigned must be unique to each GPIB device. Secondary address is not implemented.
The Listen string terminator character (EOS) can be set under menu item >ListnTerm to ASCII character LF (or NL,
decimal 10) or CR (decimal 13). The 4530 Series always responds to the GPIB end signal (EOI), which may be sent by
the controller with the last character of the command string or with the EOS character. If the controller does not, or
cannot send the EOI signal, a mutually agreed upon EOS character must be used.
The Talk string terminator character (EOS) can be set under menu item >TalkTerm to ASCII character LF (or NL,
decimal 10), CR (decimal 13), the two character sequence CRLF or None. The 4530 Series always sends the GPIB end
signal (EOI) with the last character of every string. If a one or two character EOS is selected, the EOI signal will be sent
with the last EOS character. If EOS is set to None, the EOI signal will be sent with the last character of the string. In
accordance with IEEE-488 specifications the EOI signal and EOS characters are not used with serial poll status byte
messages.
The string terminators must agree or be compatible with the controller in use for communication to take place. For SCPI
operation, both EOS characters should be set to LF (or NL, decimal 10).
At menu item >IEEE488>SRQ MASK, the bus service request enable byte mask value can be set. If the value is zero,
SRQ is disabled.
The menu item IEEE-488>View Buffer shows the current contents of the Listen and T alk internal buf fers. Use the
∨∨
and ∨ arrow keys to alternate between the Talk and Listen buf fer displays. This feature is very useful for analyzing bus
∨
∨
communication problems. The buffers show what has been received from the controller and what has been returned.
The menu item IEEE-488>MNEMONIC is a multi-page list of all valid SCPI mnemonics in an outline format. Use the
∨∨
and ∨ arrow keys to scan through the pages. For non-SCPI commands and more detailed information, refer to this
∨
∨
manual.
4.2 SERIAL PORT OPERA TION.
General.
command set and data transfer protocol are nearly identical to those for the GPIB. The Main Menu>Utilities>Serial
menu is used to configure the serial interface to match the settings the terminal or host computer in use. In serial remote
operation, the GPIB end-of-string termination characters and SRQ Mask values are used for the serial port as well. All
the normal SCPI and native-mode control commands are available over the serial port; only GPIB-specific functions
such as SRQ, serial poll, LLO, and GET can not be used in serial port remote operation.
The RS-232 serial interface is available for 4530 Series remote control when the GPIB is not in use. The
Serial Remote Mode. The 4530 enters serial remote mode when the ASCII “SI” control code (hexadecimal 0F , Ctrl-
O) is received. In the remote state, the front panel keyboard is disabled, except for the ESC/Stop key, which serves as
the return to local function. The status window on the LCD display will show the SER annunciator to indicate that
serial remote mode is active. The instrument can also be returned to local mode by sending it the ASCII “SO”
(hexadecimal 0E, Ctrl-N) control code. When in remote mode and set for native-mode operation, the 4530 will continuously place formatted measurements in its talk buffer, which can be transmitted by issuing a single character.
∧∧
∧
∧∧
∧∧
∧
∧
∧
Serial Listen and T alk Addressing. Since the RS-232 serial port is a single-device full-duplex interface, the 4530
is always active as both a talker and a listener in serial remote mode. Any character the remote terminal transmits over
the interface will be received by the instrument, and there is no provision to “unaddress” the 4530 as a listener.
Requesting a response or measurement is accomplished by issuing the ASCII “DC2” (hexadecimal 12, Ctrl-R) control
4-1
Page 76

Chapter 4 Boonton Electronics
Remote Operation 4530 Series RF Power Meter
code. Upon receiving this code, the instrument immediately transmits the string currently in its talk buffer . If the buffer
is empty, the response will be delayed until a string is available. Once a single string and its terminator has been sent,
the instrument will not send any further data until another DC2 has been received. Although this behavior is similar to
the GPIB when it is addressed to talk, the RS-232 transmitter is always “on the bus”, and actively transmitting a high or
low signal level; there is no way to “unaddress” it and force the transmitter to a high impedance state.
4.3 SCPI LANGUAGE SYNT AX.
The 4530 Series instruments follow the SCPI programming language conventions and also provide a non-SCPI protocol
extension for special situations. The default language is:
SYST em:LANGuage SCPI
The SCPI Model of the 4530 Series provides a single or dual SENSe sub-system to handle sensor input and a matching
single or dual CALCulate sub-system to process the data obtained from the sensors into useful results. A TRIGger
sub-system provides for measurement and signal synchronization. The CALibration sub-system is used to calibrate
both CW and Peak Power sensors. For the dual channel Mode1 4532, channel dependent commands end with a 1 or 2
to indicate the desired channel. If the number is omitted, channel 1 is selected by default. For the single channel Model
4531, only channel 1 is valid. The number 1 can be specified or omitted as desired.
Commands may be transmitted together if separated by a semicolon “;” character. The 4530’ s listen buf fer can accept
over 1000 characters, so buffer overflow should not be a problem. It is a good idea, however, to limit strings of
commands to a manageable size for ease in troubleshooting communication difficulties. Also, programmers should be
aware that sending long strings of commands reduces the “sequential” nature of the command execution, and can
cause some of the more complex commands (such as mode changes), which take longer to complete, to “overlap” the
short commands. If some commands are mode or context dependent, it may be a good idea to use the *WAI IEEE-488.2
command to force sequential execution.
Most commands have an optional short form that reduces the number of characters necessary over the bus. When
commands are printed in this document, the short form letters will be capitalized, with the remaining characters in lower
case. If a channel number designation and/or query ? symbol is needed, it is appended to either the long or short form
of the command. Commands which take numerical or literal arguments require an ASCII space between the command
and the argument.
Example:
CALCULA TE1:STATE? queries the current value of channel 1’s measurement state
CALC1:ST AT? is the short form equivalent
SENSE:AVERAGE 128 sets channel 1’ s trace averaging to 128 (channel 1 is implied)
SENS:A VER 128 is the short form equivalent
SENS:CORR:OFF 0.42;TRIG:LEV 14.2 is two commands issued together as one string
In the discussion and tables below, the following notation will be used:
Command name long and short form: SYSTem
Optional command name in brackets: SYSTem:ERRor[:NEXT]?
Command with channel dependence: CALCulate[1|2]:REFerence:COLLect
Default channel 1: CALCulate:REFerence:COLLect
Explicit channel 1: CALCulate1:REFerence:COLLect
Select channel 2: CALCulate2:REFerence:COLLect
Short Form: CALC2:REF:COLL
4-2
Page 77

Boonton Electronics Chapter 4
4530 Series RF Power Meter Remote Operation
Command which takes numeric argument: SENSe1:AVERage <n>
Command with literal text argument: TRIGger:SOURce <asc>
Command to set a parameter: CALCulate[1|2]:LIMit:UPPer <n>
Same command; query that parameter: CALCulate[1|2]:LIMit:UPPer?
Command with no query form: *CLS
Command with query form only: SENSe[1|2]:TEMPerature?
NOTES
A literal argument denoted by <asc> indicates a text string, which must exactly match one of the
choices for the command, while an argument denoted by <n> is a string which can be converted
to a number which is within the range of valid arguments. Numerical values can generally be in
any common form including decimal and scientific notation.
The vertical separator bar | character is used to separate a set of optional command choices. This
character is for showing syntax only, and should not be entered as part of the command.
Square brackets [ ] are used to enclose one or more optional command entries, separated by the
vertical separator bar | character. None or one of the enclosed options may be inserted into the
command, and the brackets should not be entered as part of the command.
Curly braces { } are used to enclose two or more possible choices for a mandator y entry , separated
by the vertical separator bar | character. One of the enclosed options MUST be inserted into the
command, and the braces should not be entered as part of the command.
4.4 BASIC MEASUREMENT OPERA TION.
The easiest way to obtain a reading is by use of the MEASure command. This command initiates one complete
measurement sequence which includes a default configuration. Examples are:
MEAS1:POWER? To return the average power of channel 1, or
MEAS1:VOLTAGE? To return the average voltage of channel 1.
For finer control over the measurement, individual configuration and function commands should be used. Readings
are obtained using the FETCh[1|2]? command for current data or the READ[1|2]? command for fresh data. These
commands may return multiple results if an array is read.
Readings are in fundamental units as set by the CALCulate[1|2]:UNITs command. Each reading is preceded by a
condition code, which has the following meaning:
- 1 Measurement is STOPPED. V alue returned is not updated.
0 Error return. Measurement is not valid.
1 Normal return. No error.
2 An Over-range or Under-range condition exists.
These conditions may also be retrieved from the error system by command.
With the INITiate:CONTinuous OFF condition, a single measurement cycle is started by use of the
INITiate[:IMMEDIATE] command, where bracketed commands are optional. Multiple triggered measurement cycles
are enabled by INITiate:CONTinuous ON and a TRIGger source selection. If TRIGger:SOURce IMMediate is
selected, a free running measurement process is started. Otherwise, a measurement cycle begins with each valid trigger
condition.
4-3
Page 78

Chapter 4 Boonton Electronics
Remote Operation 4530 Series RF Power Meter
4.5 COMMAND REFERENCE.
This section contains a list of all remote commands accepted by the 4530. The list is grouped by SCPI or IEEE488
function, and detailed descriptions of each commands may be located by section. The final section contains a
summary list of commands.:
Command Group Section Page
MEASure Queries. . . . . . . . . . . . . . . . . . . . . . . . . . . . . . . . . . . . 4.5.1 . . . . . . . . . 4-4
INITiate and ABORt Commands . . . . . . . . . . . . . . . . . . . . . . . . 4.5.2 . . . . . . . . . 4-5
FETCh Queries . . . . . . . . . . . . . . . . . . . . . . . . . . . . . . . . . . . . . . 4.5.3 . . . . . . . . . 4-6
READ Queries. . . . . . . . . . . . . . . . . . . . . . . . . . . . . . . . . . . . . . . 4.5.4 . . . . . . . . . 4-9
Native Mode Commands . . . . . . . . . . . . . . . . . . . . . . . . . . . . . . 4.5.5 . . . . . . . . . 4-12
SENSe Subsystem. . . . . . . . . . . . . . . . . . . . . . . . . . . . . . . . . . . . 4.5.6 . . . . . . . . . 4-19
CALCulate Subsystem . . . . . . . . . . . . . . . . . . . . . . . . . . . . . . . . 4.5.7 . . . . . . . . . 4-24
MARKer Subsystem. . . . . . . . . . . . . . . . . . . . . . . . . . . . . . . . . . 4.5.8 . . . . . . . . . 4-28
DISPlay Subsystem. . . . . . . . . . . . . . . . . . . . . . . . . . . . . . . . . . . 4.5.9 . . . . . . . . . 4-29
TRIGger Subsystem . . . . . . . . . . . . . . . . . . . . . . . . . . . . . . . . . . 4.5.10 . . . . . . . . 4-33
TRACe Data Array Commands. . . . . . . . . . . . . . . . . . . . . . . . . . 4.5.11 . . . . . . . . 4-36
SENSe:MBUF Data Array Commands . . . . . . . . . . . . . . . . . . . . 4.5.12 . . . . . . . . 4-37
SENSe:SBUF Data Array Commands . . . . . . . . . . . . . . . . . . . . . 4.5.13 . . . . . . . . 4-39
SENSe:HIST and SENSe:CAL T AB Data Array Commands . . . . 4.5.14 . . . . . . . . 4-40
CALibration Subsystem . . . . . . . . . . . . . . . . . . . . . . . . . . . . . . . 4.5.15 . . . . . . . . 4-42
MEMory Subsystem . . . . . . . . . . . . . . . . . . . . . . . . . . . . . . . . . . 4.5.16 . . . . . . . . 4-43
OUTPut Subsystem . . . . . . . . . . . . . . . . . . . . . . . . . . . . . . . . . . 4.5.17 . . . . . . . . 4-44
SYSTem Subsystem . . . . . . . . . . . . . . . . . . . . . . . . . . . . . . . . . . 4.5.18 . . . . . . . . 4-48
STATus Subsystem . . . . . . . . . . . . . . . . . . . . . . . . . . . . . . . . . . 4.5.19 . . . . . . . . 4-50
IEEE-488.2 Commands . . . . . . . . . . . . . . . . . . . . . . . . . . . . . . . . . 4.5.20 . . . . . . . . 4-52
Remote Interface Command Summary . . . . . . . . . . . . . . . . . . . . 4.5.21 . . . . . . . . 4-56
4.5.1 MEASure Queries - The MEASure group of commands is used to acquire data using a set of high level
instructions. They are structured to allow the user to trade off interchangeability with fine control of the measurement
process. MEASure? provides a complete capability where the power meter is configured, a measurement taken, and
results returned in one operation. The instrument is set to a basic, predefined measurement state with little user
intervention necessary or possible. Sometimes, more precise control of measurement is required. In these cases,
MEASure? should not be used. Rather, a sequence of configuration commands, generally from the CALCulate and
SENSe groups should be used to set up the instrument for the measurement, then READ? or FETCH? commands are
used to return the desired measurement data in a specific format.
MEASure:POWer
Description: Return average power using a default instrument configuration
Syntax: Measure[1|2]:POWer?
Returns: Average power in dBm
Modes: Automatically sets to Modulated or CW voltage mode before measurement
4-4
Page 79

Boonton Electronics Chapter 4
4530 Series RF Power Meter Remote Operation
MEASure:VOLTage
Description: Return average voltage using a default instrument configuration.
Syntax: MEASure[1|2]:VOLTage?
Returns: Average voltage in linear volts
Valid Modes: Automatically sets to Modulated or CW voltage mode before measurement.
4.5.2 INITiate and ABORt Commands - The purpose of the INITiate group of commands is to start and
control the process of data acquisition once a measurement has been configured. Depending on settings, the power
meter may be commanded to begin either a single measurement (INITiate:CONTinuous OFF) which stops when
complete, or enter a “free-run” mode where data acquisition occurs continuously (INITiate:CONTinuous ON). The
ABORt command terminates any operation in progress and prepares the instrument for an INITiate command. In some
operating modes, the INITiate commands do not actually start measurements, but rather arm a hardware trigger , which
is then used to gate the actual measurements cycle.
INITiate:CONTinuous
Description: Set or return the data acquisition mode for single or free-run measurements. If
INITiate:CONTinuous is set to ON, the 4530 immediately begins taking measurements
(Modulated, CW and Statistical modes), or arms its trigger and takes a measurement each
time a trigger occurs (Pulse mode). If set to OFF , the measurement will begin (or be armed)
as soon as the INITiate command is issued, and will stop once the measurement criteria
(averaging, filtering or sample count) has been satisfied. Note that INITiate:IMMediate
and READ commands are only valid when INITiate:CONTinuous is set to OFF.
Syntax: INITiate:CONTinuous <asc>
Argument: <asc> = ON, OFF
V alid Modes: Any
INITiate:IMMediate
Description: Starts a single measurement cycle when INITiate:CONTinuous is set to OFF. In CW or
Modulated mode, the measurement will complete once the power has been integrated for
the full FILTer time. In Pulse mode, enough trace sweeps must be triggered to satisfy the
AVERaging setting. In Statistical mode, acquisition stops once the sample count reaches
the preset terminal count. In each case, no reading will be returned until the measurement
is complete. This command is not valid when INITiate:CONTinuous is ON.
Syntax: INITiate[:IMMediate[:ALL]]
Argument: None
V alid Modes: Any
Restrictions: INITiate:CONTinuous must be OFF
4-5
Page 80

Chapter 4 Boonton Electronics
Remote Operation 4530 Series RF Power Meter
ABORt
Description: Terminates any measurement in progress and resets the state of the trigger system. Note
that ABORt will leave the measurement in a stopped condition, and forces
INITiate:CONTinuous to OFF .
Syntax: ABORt
Argument: None
V alid Modes: Any
4.5.3 FETCh Queries - The FETCh? group of queries is used to return specific measurement data from a
measurement cycle that has been INITiated and is complete or free-running. FETCh? performs the data output portion
of the measurement. FETCh? does not start a new measurement, so a series of FETCh? queries may be used to return
more than one set of processed measurements from a complete set of acquired data. FETCh? usually returns the
current value of measurements, and should be used anytime free running data acquisition is taking place
(INITiate:CONTinuous ON). If FETCh? is used for single measurements (INITiate:CONTinuous OFF), no data will be
returned until a measurement has been INITiated and is complete.
FETCh:CW:POWer
Description: Returns the current average reading of the specified channel in power units.
Syntax: FETCh[1|2]:CW:POWer?
Returns: power in <dBm, Watts>
Valid Modes: CW, Modulated and Statistical modes
Special Case: If in ratiometric mode, reading will be in units of dBr (log) or Percent Power (linear).
FETCh:CW:VOLTage
Description: Returns the current average reading of the specified channel in voltage units.
Syntax: FETCh[1|2]:CW:VOLTage?
Returns: voltage in <dBuV , dBmV , dBV, Volts>
Valid Modes: CW, Modulated and Statistical modes
Special Case: If in ratiometric mode, reading will be in units of dBr (log) or Percent V oltage (linear).
FETCh:MARKer:POWer
Description: Returns the current power reading at the specified marker on the specified channel.
Syntax: FETCh[1|2]:MARKer[1|2]:POWer?
Returns: power or voltage in active units
Valid Modes: Pulse and Statistical modes
Restrictions: MARKer:MODe must be set to VERT
4-6
Page 81

Boonton Electronics Chapter 4
4530 Series RF Power Meter Remote Operation
FETCh:ARRay:MARKer:POWer
Description: Returns the current power readings at both markers on the specified channel.
Syntax: FETCh[1|2]:ARRay:MARKer:POWer?
Returns: Pwr@Marker1, Pwr@Marker2 in active units
Valid Modes: Pulse and Statistical modes
Restrictions: MARKer:MODe must be set to VERT
FETCh:ARRay:MARKer:PERcent
Description: Returns the current statistical percent readings at both markers on the specified channel.
Syntax: FETCh[1|2]:ARRay:MARKer:PERcent?
Returns: Percent@Marker1, Percent@Marker2
V alid Modes: Statistical mode only
Restrictions: MARKer:MODe must be set to HORZ
FETCh:ARRay:CW:POWer
Description: Returns the current average, maximum, minimum powers and peak-to-average ratio in dB
(peak sensor) or pulse power (CW sensor) of the specified channel. Note that the values for
maximum and minimum power will depend on the peak hold mode; see the description of the
CALCulate:PKHLD command for details. If a CW sensor is used, the pulse power returned
is computed from the measured average power and the preset duty cycle (see
CALCulate:DCYC command).
Syntax: FETCh[1|2]:ARRay:CW:POWer?
Returns: Pavg, Pmax, Pmin, PkToA vgRatio (Modulated mode) or Ppulse (CW mode)
Valid Modes: CW and Modulated modes
FETCh:ARRay:CW:VOLTage
Description: Returns the current average, maximum, minimum voltage and peak-to-average ratio in dB
(peak sensor) or pulse voltage (CW sensor) for the specified channel. Note that the values
for maximum and minimum voltage will depend on the peak hold mode; see the description
of the CALCulate:PKHLD command for details. If a CW sensor is used, min and max
powers returned are always the highest and lowest filtered average readings that have
occurred since the start of the measurement, and the pulse voltage returned is computed
from the measured average power and the preset duty cycle (see CALCulate:DCYC command). Note the peak-to-average ratio is returned in dB for log units, and percent for linear
units.
Syntax: FETCh[1|2]:ARRay:CW:VOLTage?
Returns: Vavg, Vmax, Vmin, PkT oAvgRatio (Modulated mode) or Vpulse (CW mode)
Valid Modes: CW and Modulated modes
4-7
Page 82

Chapter 4 Boonton Electronics
Remote Operation 4530 Series RF Power Meter
FETCh:ARRay:PULse:POWer
Description: Returns an array of the current marker measurements for the specified channel. The array
consists of the average, maximum, and minimum power and peak-to-average ratio between
the two markers, powers at both markers, and the ratio of the two markers. Note the peakto-average ratio and marker ratio are returned in dB for log units, and percent for linear units.
Syntax: FETCh[1|2]:ARRay:PULSe:POWer?
Returns: Pavg, Pmax, Pmin, PkToAvgRatio, Pwr@Marker1, Pwr@Marker2, Mrk1/Mrk2
ratio
Valid Modes: Pulse mode only
FETCh:ARRay:AMEAsure:TIMe
Description: Returns an array of the current automatic timing measurements performed on a periodic
pulse waveform. Measurements performed are: the frequency, period, width, offtime and
duty cycle of the pulse waveform, and the risetime and falltime of the edge transitions. For
each of the measurements to be performed, the appropriate items to be measured must be
visible on the screen if the power meter is place in GRAPH mode. Pulse frequency, period,
offtime and duty cycle measurements require that an entire cycle of the pulse waveform
(minimum of three edge transitions) be present. Pulse width measurements require that at
least one full pulse is visible, and are most accurate if the pulse width is at least 15% of the
screen width (timespan). Risetime and falltime require that the edge being measured is
visible, and will be most accurate if the transition takes at least 5% of the screen width. It is
always best to have the power meter set on the fastest timespan possible that meets the
edge visibility restrictions. Set the trace averaging as high as practical to reduce fluctuations and noise in the pulse timing measurements. Note that the timing of the edge transitions is defined by the settings of the SENSe:PULSe:DISTal, :MESIal and :PROXimal
settings; see the descriptions for those commands.
Syntax: FETCh[1|2]:ARRay:AMEAsure:TIMe?
Returns: PulseFreq, PulsePeriod, PulseWidth, Of ftime, DutyCycle, Risetime, Falltime in fundamental
units
Valid Modes: Pulse mode only
Restrictions: Timespan must be set appropriately to allow measurements (see above)
FETCh:ARRay:AMEAsure:POWer
Description: Returns an array of the current automatic power measurements performed on a periodic
pulse waveform. Measurements performed are: peak power during the pulse, average
power over a full cycle of the pulse waveform, average power during the pulse, IEEE top
amplitude, IEEE bottom amplitude, and overshoot. Note the pulse overshoot is returned in
dB for log units, and percent for linear units. Also, the pulse “on” interval used for peak
and average power calculations is defined by the SENSe:PULSe:STRTGT and :ENDGT
time gating settings. A full pulse must be visible to make average and peak pulse power
measurements, and a full cycle of the waveform must be visible to calculate average cycle
power.
Syntax: FETCh[1|2]:ARRay:AMEAsure:POWer?
Returns: PulseOnPeak, PulseCycleAvg, PulseOnA vg, PulseTop, PulseBot, Overshoot.
Valid Modes: Pulse mode only
Restrictions: Timespan must be set appropriately to allow measurements (see above)
4-8
Page 83

Boonton Electronics Chapter 4
4530 Series RF Power Meter Remote Operation
FETCh:ARRay:AMEAsure:POWer
Description: Returns an array of the current automatic statistical measurements performed on a sample
population. Measurements performed are: long term average, peak and minimum powers,
peak-to-average ratio, power at each marker, statistical percent at each marker, and the
sample population size in megasamples. Note the peak-to-average ratio is returned in dB
for log units, and percent for linear units. Depending on the setting of MARKer:MODe,
either the power or the percent can be the marker position, and the opposite item will be the
calculated value at that position.
Syntax: FETCh[1|2]:ARRay:AMEAsure:POWer?
Returns: Pavg, Ppeak, Pmin, PkToA vgRatio, Pwr@Mrk1, Pwr@Mrk2, Pct@Mrk1, Pct@Mrk2, SampCnt
V alid Modes: Statistical mode only
4.5.4 READ Queries - The purpose of the READ? group of queries is to initiate a measurement cycle, acquire
data, and return specific measurement data. READ? performs the initiation, data acquisition, postprocessing, and data
output portions of the measurement. READ? is equivalent to ABORting any operation in progress, INITiating a new
measurement, then FETChing the data when it is ready. READ? generally does not return data unless acquisition is
complete. Since READ? INITiates a new measurement every time it is issued, READ? queries should not be used for
free running data acquisition (INITiate:CONTinuous ON) - in this case, use FETCh queries instead. For CW and
Modulated modes, the measurement is generally considered complete when the integration filter (see SENSe:FILTer)
is filled. In Pulse mode, the measurement is considered complete when all the number of complete traces specified by
the SENSe:AVERage command have been acquired and averaged together. In statistical mode, the measurement is
considered complete when the number of samples specified by TRIGger:CDF:COUNt has been gathered.
READ:CW:POWer
Description: Performs a single measurement and returns the average reading of the specified channel in
Syntax: READ[1|2]:CW:POWer?
Returns: power in <dBm, Watts>
Valid Modes: CW, Modulated and Statistical modes
Special Case: If in ratiometric mode, reading will be in units of dBr (log) or Percent Power (linear).
READ:CW:VOLTage
Description: Performs a single measurement and returns the average reading of the specified channel in
Syntax: READ[1|2]:CW:VOLTage?
Returns: voltage in <dBuV , dBmV, dBV , Volts>
Valid Modes: CW, Modulated and Statistical modes
Special Case: If in ratiometric mode, reading will be in units of dBr (log) or Percent V oltage (linear).
power units.
voltage units.
4-9
Page 84

Chapter 4 Boonton Electronics
Remote Operation 4530 Series RF Power Meter
READ:MARKer:POWer
Description: Performs a single measurement and returns the power reading at the specified marker on the
specified channel.
Syntax: READ[1|2]:MARKer[1|2]:POWer?
Returns: power or voltage in active units
Valid Modes: Pulse and Statistical modes
Restrictions: MARKer:MODe must be set to VERT
READ:ARRay:MARKer:POWer
Description: Performs a single measurement and returns the power readings at both markers on the
specified channel.
Syntax: READ[1|2]:ARRay:MARKer:POWer?
Returns: Pwr@Marker1, Pwr@Marker2 in active units
Valid Modes: Pulse and Statistical modes
Restrictions: MARKer:MODe must be set to VERT
READ:ARRay:MARKer:PERcent
Description: Performs a single measurement and returns the statistical percent readings at both markers
on the specified channel.
Syntax: READ[1|2]:ARRay:MARKer:PERcent?
Returns: Percent@Marker1, Percent@Marker2
V alid Modes: Statistical mode only
Restrictions: MARKer:MODe must be set to HORZ
READ:ARRay:CW:POWer
Description: Performs a single measurement and returns the average, maximum, minimum powers and
peak-to-average ratio in dB (peak sensor) or pulse power (CW sensor) of the specified
channel. Note that the values for maximum and minimum power will depend on the peak
hold mode; see the description of the CALCulate:PKHLD command for details. If a CW
sensor is used, the pulse power returned is computed from the measured average power
and the preset duty cycle (see CALCulate:DCYC command).
Syntax: READ[1|2]:ARRay:CW:POWer?
Returns: Pavg, Pmax, Pmin, PkToA vgRatio (Modulated mode) or Ppulse (CW mode)
Valid Modes: CW and Modulated modes
4-10
Page 85

Boonton Electronics Chapter 4
4530 Series RF Power Meter Remote Operation
READ:ARRay:CW:VOLTage
Description: Performs a single measurement and returns the average, maximum, minimum voltage and
peak-to-average ratio in dB (peak sensor) or pulse voltage (CW sensor) for the specified
channel. Note that the values for maximum and minimum voltage will depend on the peak
hold mode; see the description of the CALCulate:PKHLD command for details. If a CW
sensor is used, min and max powers returned are always the highest and lowest filtered
average readings that have occurred since the start of the measurement, and the pulse
voltage returned is computed from the measured average power and the preset duty cycle
(see CALCulate:DCYC command). Note the peak-to-average ratio is returned in dB for log
units, and percent for linear units.
Syntax: READ[1|2]:ARRay:CW:VOL Tage?
Returns: Vavg, Vmax, Vmin, PkT oAvgRatio (Modulated mode) or Vpulse (CW mode)
Valid Modes: CW and Modulated modes
READ:ARRay:PULse:POWer
Description: Performs a single measurement and returns an array of marker measurements for the speci-
fied channel. The array consists of the average, maximum, and minimum power and peak-toaverage ratio between the two markers, powers at each of the markers, and the ratio of the
two marker powers. Note the peak-to-average ratio and marker ratio are returned in dB for
log units, and percent for linear units.
Syntax: READ[1|2]:ARRay:PULSe:POWer?
Returns: Pavg, Pmax, Pmin, PkToA vgRatio, Pwr@Marker1, Pwr@Marker2, Mrk1/Mrk2 ratio
Valid Modes: Pulse mode only
READ:ARRay:AMEAsure:TIMe
Description: Performs a single measurement and returns an array of automatic timing measurements
performed on a periodic pulse waveform. Measurements performed are: the frequency,
period, width, offtime and duty cycle of the pulse waveform, and the risetime and falltime of
the edge transitions. For each of the measurements to be performed, the appropriate items
to be measured must be visible on the screen if the power meter is place in GRAPH mode.
Pulse frequency , period, offtime and duty cycle measurements require that an entire cycle of
the pulse waveform (minimum of three edge transitions) be present. Pulse width measurements require that at least one full pulse is visible, and are most accurate if the pulse width
is at least 15% of the screen width (timespan). Risetime and falltime require that the edge
being measured is visible, and will be most accurate if the transition takes at least 5% of the
screen width. It is always best to have the power meter set on the fastest timespan possible
that meets the edge visibility restrictions. Set the trace averaging as high as practical to
reduce fluctuations and noise in the pulse timing measurements. Note that the timing of the
edge transitions is defined by the settings of the SENSe:PULSe:DISTal, :MESIal and
:PROXimal settings; see the descriptions for those commands.
Syntax: READ[1|2]:ARRay:AMEAsure:TIMe?
Returns: PulseFreq, PulsePeriod, PulseWidth, Of ftime, DutyCycle, Risetime, Falltime in fundamental
units
Valid Modes: Pulse mode only
Restrictions: Timespan must be set appropriately to allow measurements (see above)
4-11
Page 86

Chapter 4 Boonton Electronics
Remote Operation 4530 Series RF Power Meter
READ:ARRay:AMEAsure:POWer
Description: Performs a single measurement and returns an array of automatic power measurements
performed on a sample population. Measurements performed are: peak power during the
pulse, average power over a full cycle of the pulse waveform, average power during the
pulse, IEEE top amplitude, IEEE bottom amplitude, and overshoot. Note the pulse amplitude is returned in dB for log units, and percent for linear units. Also, the pulse “on”
interval used for peak and average power calculations is defined by the
SENSe:PULSe:STRTGT and :ENDGT time gating settings. A full pulse must be visible
to make average and peak pulse power measurements, and a full cycle of the waveform must
be visible to calculate average cycle power.
Syntax: READ[1|2]:ARRay:AMEAsure:POWer?
Returns: PulseOnPeak, PulseCycleAvg, PulseOnA vg, PulseTop, PulseBot, Overshoot
Valid Modes: Pulse mode only
Restrictions: Timespan must be set appropriately to allow measurements (see above)
READ:ARRay:AMEAsure:POWer
Description: Performs a single measurement and returns an array of automatic statistical measurements
performed on the sample population. Measurements performed are: long term average,
peak and minimum powers, peak-to-average ratio, power at each marker, statistical percent
at each marker, and the sample population size in megasamples. Note the peak-to-average
ratio is returned in dB for log units, and percent for linear units. Depending on the setting
of MARKer:MODe, either the power or the percent can be the marker position, and the
opposite item will be the calculated value at that position.
Syntax: READ[1|2]:ARRay:AMEAsure:POWer?
Returns: Pavg, Ppeak, Pmin, PkToA vgRatio, Pwr@Mrk1, Pwr@Mrk2, Pct@Mrk1, Pct@Mrk2, SampCnt
V alid Modes: Statistical mode only
4.5.5 Native Mode Commands - The 4530 native instructions are not SCPI commands, and do not follow
standard SCPI syntax. They are used for special purposes - primarily as optimized queries issued in combination with
SCPI configuration commands to return measurements with significantly less overhead and higher speed than is
possible using SCPI compliant queries. In most cases, the data formats are similar to FETCh? queries, but a single
native-mode query (“talkmode” command) is issued in advance, and the measurement data is returned every time the
4530 is re-addressed. There is no need to transmit the query command for each measurement - simply re-address the
power meter as a talker. By processing the measurement data to be returned in the desired format in advance and
saving the overhead of transmitting a query for each measurement, much higher sustained measurement speed is
possible over the GPIB. Native mode supports all SCPI instructions for compatibility. Note that in SCPI mode, the
instrument returns data only in response to an explicit query, while in native mode it will always return a value when
addressed to talk. This can potentially result in some confusion when interleaving control and measurement commands. See Section 4.7 for more information on programming the power meter in native mode.
4-12
Page 87

Boonton Electronics Chapter 4
4530 Series RF Power Meter Remote Operation
CH1
Description: Configures native mode talk instructions to return Channel 1 measurement data
Syntax: CH1
Argument: None
V alid Modes: Al l
Restrictions: SYSTem:LANGuage must be set to BOON to use native mode instructions
CH2
Description: Configures native mode talk instructions to return Channel 2 measurement data
Syntax: CH2
Argument: None
V alid Modes: Al l
Restrictions: SYSTem:LANGuage must be set to BOON to use native mode instructions
TALKMODE
Description: Returns the current native mode active channel and talk mode.
Syntax: TALKMODE?
Returns: Active channel <CH1, CH2> and talkmode mnemonic
V alid Modes: Al l
Restrictions: SYSTem:LANGuage must be set to BOON to use native mode instructions
TKERR
Description: Returns the next queued error code number , 0 if no error . See section 4.9 for a more detailed
Syntax: TKERR?
Returns: <numeric error code>
V alid Modes: Al l
Restrictions: SYSTem:LANGuage must be set to BOON to use native mode instructions
TKERRMSG
Description: Returns the next queued error code number followed by a quoted ASCII text string describ-
description of the error codes that may be returned.
ing the error. See section 4.9 for a more detailed description of the error codes that may be
returned.
Syntax: TKERRMSG?
Returns: <numeric error code>, “QUOTED ERROR DESCRIPTION”
V alid Modes: Al l
Restrictions: SYSTem:LANGuage must be set to BOON to use native mode instructions
4-13
Page 88

Chapter 4 Boonton Electronics
Remote Operation 4530 Series RF Power Meter
TKSDATA
Description: Returns the sensor data table from sensor’s EEPROM. Note that year codes are excess-
1990, that is 5 means 1995, and 11 means 2001. Power and attenuation levels are coded as
dBm x 100; that is, -3500 means -35.00 dBm. All other values are in fundamental units.
Model numbers are only shown as the base number - any special “S” version number will
not appear.
Syntax: TKSDATA?
Returns: numeric array < type, model#, build month, day, year, serial#, calibration month, day , year ,
attenuation, impedance, min pwr, max pwr , CW min pwr, CW max pwr >
V alid Modes: Al l
Restrictions: SYSTem:LANGuage must be set to BOON to use native mode instructions
TKSSLOW
Description: Returns the low bandwidth frequency calfactor table from sensor’ s EEPROM. Frequencies
are in GHz and the calfactors are in dB. Count is the total number of data items in the string
including the upper and lower frequency limits.
Syntax: TKSSLOW?
Returns: numeric array < Count, LowerFreq, UpperFreq, Freq0, CF0, Freq1, CF1, Freq2, CF2... FreqN,
V alid Modes: Al l
Restrictions: SYSTem:LANGuage must be set to BOON to use native mode instructions
TKSFAST
Description: Returns the high bandwidth frequency calfactor table from sensor’s EEPROM. Frequen-
Syntax: TKSFAST?
Returns: numeric array < Count, LowerFreq, UpperFreq, Freq0, CF0, Freq1, CF1, Freq2, CF2... FreqN,
V alid Modes: Al l
Restrictions: SYSTem:LANGuage must be set to BOON to use native mode instructions
CFn >
cies are in GHz and the calfactors are in dB. Count is the total number of data items in the
string including the upper and lower frequency limits.
CFn >
4-14
Page 89

Boonton Electronics Chapter 4
4530 Series RF Power Meter Remote Operation
TKSCWRG
Description: Returns the CW sensor linearity calibration table from sensor’s EEPROM. CW power
sensors have 7 pairs of upscale / downscale gain factors, and voltage probes have eight
pairs of upscale / midscale / downscale gain factors. Upscale factors have a nominal value
of 5000, and midscale and downscale factors have a nominal value of 0. On voltage probes,
the eighth pair of up/downscale factors and all eight midscale factors is returned at the end
of the array for compatibility with CW sensors.
Syntax: TKSCWRG?
Returns: numeric array: < DS0,US0,DS1,US1, ...DS6,US6 [,DS7,US7,MS0,MS1, ...MS7] >
V alid Modes: Al l
Restrictions: SYSTem:LANGuage must be set to BOON to use native mode instructions
TKSMSG
Description: Returns the sensor text message from sensor’ s EEPROM. This message is programmed at
the factory or during sensor calibration.
Syntax: TKSMSG?
TKAVG
Returns: <Message String>
V alid Modes: Al l
Restrictions: SYSTem:LANGuage must be set to BOON to use native mode instructions
Description: Sets the talkmode to return the average power of the selected channel each time the 4530 is
addressed to talk. This is a “permanent” talkmode, and will remain in effect until a new
talkmode is set. Use this command in 4530 native mode for the fastest possible sustained
reading rate of single-channel average power over the bus. Power is returned in current
units.
Syntax: TKAVG
Returns: Average (or CW) Power
Valid Modes: CW and Modulated modes
Restrictions: SYSTem:LANGuage must be set to BOON to use native mode instructions
Special Case: If in ratiometric mode, reading will be in units of dBr (log) or Percent Power (linear).
4-15
Page 90

Chapter 4 Boonton Electronics
Remote Operation 4530 Series RF Power Meter
TKPWR
Description: Sets the talkmode to return the average, maximum and minimum power and peak-to-average
ratio (or pulse power, for CW sensors) for the selected channel each time the 4530 is
addressed to talk. This is a “permanent” talkmode, and will remain in effect until a new
talkmode is set. Power is returned in current units, and peak-to-average ratio is in dB for log
units, and percent for linear units.
Syntax: TKPWR
Returns: Pavg, Pmax, Pmin, PkToA vgRatio (Modulated mode) or Ppulse (CW mode)
Valid Modes: CW and Modulated modes
Restrictions: SYSTem:LANGuage must be set to BOON to use native mode instructions
Special Case: If in ratiometric mode, average power readings will be in units of dBr (log) or Percent Power
(linear).
TKBOTH
Description: Sets the talkmode to return the average power of both channels each time the 4530 is
addressed to talk. This is a “permanent” talkmode, and will remain in effect until a new
talkmode is set. Power is returned in current units. Use this command in 4530 native mode
for the fastest possible sustained reading rate of two-channel average power over the bus.
TKMK1
Syntax: TKBOTH
Returns: Pavg (ch1), Pavg (ch2)
Valid Modes: CW and Modulated modes
Restrictions: SYSTem:LANGuage must be set to BOON to use native mode instructions
Special Case: If in ratiometric mode, power readings will be in units of dBr (log) or Percent Power (linear).
Description: Sets the talkmode to return the reading at marker 1 for the active channel each time the 4530
is addressed to talk. This is a “permanent” talkmode, and will remain in effect until a new
talkmode is set. Power is returned in current units.
Syntax: TKMK1
Returns: Pwr@Marker1
Valid Modes: Pulse and Statistical modes
Restrictions: MARKer:MODe must be set to VERT . SYSTem:LANGuage must be set to BOON to use
native mode instructions.
4-16
Page 91

Boonton Electronics Chapter 4
4530 Series RF Power Meter Remote Operation
TKMK2
Description: Sets the talkmode to return the reading at marker 2 for the active channel each time the 4530
is addressed to talk. This is a “permanent” talkmode, and will remain in effect until a new
talkmode is set. Power is returned in current units.
Syntax: TKMK2
Returns: Pwr@Marker2
Valid Modes: Pulse and Statistical modes
Restrictions: MARKer:MODe must be set to VERT . SYST em:LANGuage must be set to BOON to use
native mode instructions.
TKPLSTIM
Description: Sets the talkmode to return an array of automatic timing measurements performed on a
periodic pulse waveform each time the 4530 is addressed to talk. Measurements performed
are: the frequency, period, width, offtime and duty cycle of the pulse waveform, and the
risetime and falltime of the edge transitions. For each of the measurements to be performed,
the appropriate items to be measured must be visible on the screen if the power meter is
place in GRAPH mode. Pulse frequency, period, offtime and duty cycle measurements
require that an entire cycle of the pulse waveform (minimum of three edge transitions) be
present. Pulse width measurements require that at least one full pulse is visible, and are
most accurate if the pulse width is at least 15% of the screen width (timespan). Risetime and
falltime require that the edge being measured is visible, and will be most accurate if the
transition takes at least 5% of the screen width. It is always best to have the power meter set
on the fastest timespan possible that meets the edge visibility restrictions. Set the trace
averaging as high as practical to reduce fluctuations and noise in the pulse timing measure-
ments. Note that the timing of the edge transitions is defined by the settings of the
SENSe:PULSe:DISTal, :MESIal and :PROXimal settings; see the descriptions for those
commands. This is a “permanent” talkmode, and will remain in effect until a new talkmode
is set. Power is returned in current units.
Syntax: TKPLSTIM
Returns: PulseFreq, PulsePeriod, PulseWidth, Of ftime, DutyCycle, Risetime, Falltime in fundamental
units
Valid Modes: Pulse mode only
Restrictions: Timespan must be set appropriately to allow measurements (see above).
SYSTem:LANGuage must be set to BOON to use native mode instructions.
4-17
Page 92

Chapter 4 Boonton Electronics
Remote Operation 4530 Series RF Power Meter
TKPLSPWR
Description: Sets the talkmode to return an array of automatic power measurements performed on a
periodic pulse waveform each time the 4530 is addressed to talk. Measurements performed
are: peak power during the pulse, average power over a full cycle of the pulse waveform,
average power during the pulse, IEEE top amplitude, IEEE bottom amplitude, and overshoot. Note the pulse overshoot is returned in dB for log units, and percent for linear units.
Also, the pulse “on” interval used for peak and average power calculations is defined by
the SENSe:PULSe:STRTGT and :ENDGT time gating settings. A full pulse must be
visible to make average and peak pulse power measurements, and a full cycle of the waveform must be visible to calculate average cycle power. This is a “permanent” talkmode, and
will remain in effect until a new talkmode is set. Power is returned in current units.
Syntax: TKPLSPWR
Returns: PulseOnPeak, PulseCycleAvg, PulseOnA vg, PulseTop, PulseBot, Overshoot
Valid Modes: Pulse mode only
Restrictions: Timespan must be set appropriately to allow measurements (see above).
SYSTem:LANGuage must be set to BOON to use native mode instructions.
TKMKMEAS
Description: Sets the talkmode to return an array of marker measurements for the specified channel each
Syntax: TKMKMEAS
Returns: Pavg, Pmax, Pmin, PkToA vgRatio, Pwr@Marker1, Pwr@Marker2, Mrk1/Mrk2 ratio
Valid Modes: Pulse mode only
Restrictions: SYSTem:LANGuage must be set to BOON to use native mode instructions.
TKSMEAS
Description: Sets the talkmode to return an array of automatic statistical measurements performed on the
time the 4530 is addressed to talk. The array consists of the average, maximum, and minimum power and peak-to-average ratio between the two markers, powers at each of the
markers, and the ratio of the two marker powers. Note the peak-to-average ratio and marker
ratio are returned in dB for log units, and percent for linear units. This is a “permanent”
talkmode, and will remain in effect until a new talkmode is set. Power is returned in current
units.
sample population each time the 4530 is addressed to talk. Measurements performed are:
long term average, peak, and minimum powers, peak-to-average ratio, power at each marker,
statistical percent at each marker, and the sample population size in megasamples. Note the
peak-to-average ratio is returned in dB for log units, and percent for linear units. Depending
on the setting of MARKer:MODe, either the power or the percent can be the marker position, and the opposite item will be the calculated value at that position.. This is a “permanent” talkmode, and will remain in effect until a new talkmode is set. Power is returned in
current units.
Syntax: TKSMEAS
Returns: Pavg, Ppeak, Pmin, PkToA vgRatio, Pwr@Mrk1, Pwr@Mrk2, Pct@Mrk1, Pct@Mrk2, SampCnt
V alid Modes: Statistical mode only
Restrictions: SYSTem:LANGuage must be set to BOON to use native mode instructions.
4-18
Page 93

Boonton Electronics Chapter 4
4530 Series RF Power Meter Remote Operation
4.5.6 SENSE Subsystem - The purpose of the SENSe command subsystem is to directly configure device
specific settings used to make measurements, generally parameters related to the RF power sensor and signal processing. The SENSe commands are used to configure the power meter for acquiring data. SENSe enables you to change
measurement parameters such as filtering or averaging, sensor bandwidth, operating frequency and calfactors, and
measurement gain or offset. The numeric suffix of the SENSe program mnemonic in the SENSe commands refers to a
hardware measurement “channel”, that is SENSe1 and SENSe2 represent the power meter’s SENSOR 1 and SENSOR 2
signal paths, respectively. The SENSe commands generally DO NOT af fect the data processing and display portion of
the measurement (see the CALCulate subsystem, below). Note that SENSe2 commands will generate an error if used
with a single channel Model 4531.
SENSe:AVERage
Description: Set or return the number of traces averaged together to form the measurement result on the
selected channel. Can also be used to reduce display noise on both the visible trace, and on
marker and automatic pulse measurements. Trace averaging is a continuous process in
which the measurement points from each sweep are weighted (multiplied) by a appropriate
factor, and averaged into the existing trace data points. In this way , the most recent data will
always have the greatest effect on the trace shape, and older measurements will be decayed
at a rate determined by the averaging setting and trigger rate. Note that for timespans faster
than 50uS, the 4530 acquires samples using a technique called equivalent time or inter-
leaved sampling. In this mode, not every pixel on the trace gets updated on each sweep,
and the total number of sweeps needed to satisfy the AVERage setting will be increased by
the sample interleave ratio of that particular timespan.
Syntax: SENSe[1|2]:AVERage <n>
Argument: <n> = Numeric value from 1 to 4096 (1 = no trace averaging)
V alid Modes: Pulse
SENSe:FILTer:STATe
Description: Set or return the current setting of the integration filter on the selected channel. OFF
provides no filtering, and can be used at high signal levels when absolute minimum settling
time is required. ON allows a user-specified integration time, from 10 milliseconds to 15
seconds (see SENSe:FILTer:TIMe command). Note that setting the filter time will force the
state to ON. AUTO uses a variable amount of filtering, which is set automatically by the
power meter based on the current signal level to a value that gives a good compromise
between measurement noise and settling time at most levels.
Syntax: SENSe[1|2]:FILTer:ST A T e <asc>
Argument: <asc> = OFF , ON, AUTO
Valid Modes: CW and Modulated modes
4-19
Page 94

Chapter 4 Boonton Electronics
Remote Operation 4530 Series RF Power Meter
SENSe:FILTer:TIMe
Description: Set or return the current length of the integration filter on the selected channel. If the filter
state is set to AUTO, querying the time will return -0.01, and if set to OFF , a time query will
return 0.00. Note that setting the filter time will force the state to ON.
Syntax: SENSe[1|2]:FILTer:TIMe <n>
Argument: <n> = 0.01 to 15.00 seconds
Valid Modes: CW and Modulated modes
SENSe:BANDwidth
Description: Set or return the sensor video bandwidth for the selected sensor. HIGH is the normal
setting for most measurements. The actual bandwidth is determined by the peak sensor
model used. For 57000 series peak sensors the LOW video bandwidth is less than 500 kHz
to allow calibration at 50 MHz. Use LOW bandwidth for additional noise reduction when
measuring CW or signals with very low modulation bandwidth. If LOW bandwidth is used
on signals with fast modulation, measurement errors will result because the sensor cannot
track the fast changing envelope of the signal.
Syntax: SENSe[1|2]:BANDwidth <asc>
Argument: <asc> = LOW , HIGH
Valid Modes: Peak sensors only
SENSe:IMPEDance
Description: Set or return voltage probe sensor impedance for power calculations for the selected chan-
nel. Characteristic impedance is used only for voltage to power conversions. This can be
used to calculate and display power from a voltage measurement across a load impedance
using a voltage probe.
Syntax: SENSe[1|2]:IMPEDance <n>
Argument: <n> = 10 to 2500 ohms
Valid Modes: Voltage probes only
SENSe:CORRection:OFFset
Description: Set or return a measurement of fset in dB for the selected sensor . This is used to compensate
for external couplers, attenuators or amplifiers in the RF signal path ahead of the power
sensor. In the main TEXT display , a small triangle (delta symbol) will appear above the units
if the offset is not set to zero.
Syntax: SENSe[1|2]:CORRection:OFFset <n>
Argument: <n> = -100.00 to 100.00 dB
V alid Modes: Any
4-20
Page 95

Boonton Electronics Chapter 4
4530 Series RF Power Meter Remote Operation
SENSe:CORRection:FDOFfset
Description: Set or return the name of the current frequency dependent offset table in use on the se-
lected channel. T wo tables (T ableA and T ableB) are available, and each holds a list of up to
64 frequencies and corresponding offset values. See the MEMory:FDOFfset commands
for entering these tables. Whenever the operating frequency is changed with one of the
tables active, a new frequency dependent offset value will be calculated and applied. Set-
ting the active table to OFF cancels any frequency dependent offset. Frequency depen-
dent offsets are used to compensate for external devices such as couplers or attenuators in
the RF signal path that have know loss characteristics that vary with frequency. In the main
TEXT display, an asterisk (“*”) symbol will appear above the units if a frequency depen-
dent offset table is in use (setting is TBLA or TBLB).
Syntax: SENSe[1|2]:CORRection:FDOFfset <asc>
Argument: <asc> = OFF , TBLA, TBLB
Valid Modes: All Power Sensors
SENSe:CORRection:FREQuency
Description: Set or return the RF frequency for the current sensor, and apply the appropriate frequency
calfactor from the sensor’s EEPROM table. Application of this calfactor cancels out the
effect of variations in the flatness of the sensor’s frequency response. If an explicit calfac-
tor has been set, either manually or via the SENSe:CORRection:CALFactor command,
entering a new frequency will override this calfactor and use only the “automatic” fre-
quency calfactor.
Syntax: SENSe[1|2]:CORRection:FREQuency <n>
Argument: <n> = 0.01 to 110.00 GHz
Valid Modes: All Power Sensors
SENSe:CORRection:CALFactor
Description: Set or return the frequency calfactor currently in use on the selected channel. Note setting
a calfactor with this command will override the “automatic” frequency calfactor that was
calculated and applied when the operating frequency was set, and setting the operating
frequency will override this calfactor setting.
Syntax: SENSe[1|2]:CORRection:CALFactor <n>
Argument: <n> = -3.00 to 3.00 dB
Valid Modes: All Power Sensors
SENSe:CORRection:TEMPComp
Description: Set or return the state of the peak sensor temperature compensation system. This system
compensates for drift that might otherwise be caused by changes in the temperature of the
peak power sensors. When set to OFF , a warning will be displayed if the sensor tempera-
ture drifts more than 4 degrees C from the autocal temperature. When ON, the warning will
not appear until temperature has drifted by 30C.
Syntax: SENSe[1|2]:CORRection:TEMPComp <asc>
Argument: <asc> = OFF , ON (always defaults to ON on power up, or when new sensor inserted)
Valid Modes: Peak Sensors Only
4-21
Page 96

Chapter 4 Boonton Electronics
Remote Operation 4530 Series RF Power Meter
SENSe:PULSe:UNITs
Description: Set the units for entering the pulse distal, mesial and proximal levels. If units is set to
VOL TS, the pulse transition levels will be defined as the specified percentage in voltage. If
set to WA TTS, the levels are defined in percent power . Many pulse measurements call for
10% to 90% voltage (which equates to 1% to 81% power) for risetime and falltime measurements, and measure pulse widths from the half-power (-3dB, 50% power, or 71% voltage)
points.
Syntax: SENSe[1|2]:PULSe:UNIT s <asc>
Argument: <asc> = WA TTS, VOLTS
Valid Modes: Pulse mode only
SENSe:PULSe:DISTal
Description: Set or return the pulse amplitude percentage, which is used to define the end of a rising
edge or beginning of a falling edge transition. Typically, this is 90% voltage or 81% power
relative to the “top level” of the pulse. This setting is used when making automatic pulse
risetime and falltime calculations returned by FETCh:ARRay:AMEASure:POWer.
Syntax: SENSe[1|2]:PULSe:DIST al <n>
Argument: <n> = 0 to 100 percent
Valid Modes: Pulse mode only
SENSe:PULSe:MESIal
Description: Set or return the pulse amplitude percentage, which is used to define the midpoint of a rising
or falling edge transition. Typically, this is 50% voltage or 25% power relative to the “top
level” of the pulse. This setting is used when making automatic pulse width and duty cycle
calculations returned by FETCh:ARRay:AMEASure:POWer.
Syntax: SENSe[1|2]:PULSe:MESIal <n>
Argument: <n> = 0 to 100 percent
Valid Modes: Pulse mode only
SENSe:PULSe:PROXimal
Description: Set or return the pulse amplitude percentage, which is used to define the beginning of a
rising edge or end of a falling edge transition. Typically, this is 10% voltage or 1% power
relative to the “top level” of the pulse. This setting is used when making automatic pulse
risetime and falltime calculations returned by FETCh:ARRay:AMEASure:POWer.
Syntax: SENSe[1|2]:PULSe:PROXimal <n>
Argument: <n> = 0 to 100 percent
Valid Modes: Pulse mode only
4-22
Page 97

Boonton Electronics Chapter 4
4530 Series RF Power Meter Remote Operation
SENSe:PULSe:STARTGT
Description: Set or return the point on a pulse, which is used to define the beginning of the pulse’s
“active” interval. This point is defined in percent of the total pulse duration, with 0%
corresponding to the midpoint of the rising edge, and 100% corresponding to the midpoint
of the falling edge, as defined by the mesial setting. For most pulse “on” average power
measurements, it is desirable to exclude the rising and falling intervals, and only measure
power over the active portion of the pulse. This is often known as time gating, and is used
for the automatic pulse measurements returned by FETCh:ARRay:AMEASure:POWer.
Syntax: SENSe[1|2]:PULSe:STAR TGT <n>
Argument: <n> = 0 to 40 percent
Valid Modes: Pulse mode only
SENSe:PULSe:ENDGT
Description: Set or return the point on a pulse, which is used to define the end of the pulse’s “active”
interval. This point is defined in percent of the total pulse duration, with 0% corresponding
to the midpoint of the rising edge, and 100% corresponding to the midpoint of the falling
edge, as defined by the mesial setting. For most pulse “on” average power measurements,
it is desirable to exclude the rising and falling intervals, and only measure power over the
active portion of the pulse. This is often known as time gating, and is used for the automatic
pulse measurements returned by FETCh:ARRay:AMEASure:POWer.
Syntax: SENSe[1|2]:PULSe:ENDGT <n>
Argument: <n> = 60 to 100 percent
Valid Modes: Pulse mode only
SENSe:TEMPerature
Description: Return the current internal temperature of the selected peak power sensor. This tempera-
ture may be compared to the autocal temperature (see SENSe:CALTemp?) to aid in decid-
ing whether the sensor temperature has drifted enough to warrant a new autocal. The 4530
displays a warning message on the LCD if a non-temperature compensated peak sensor is
in use, and the temperature has drifted more than 4C from the autocal temperature.
Syntax: SENSe[1|2]:TEMPerature?
Returns: SensorTemp in degrees C
Valid Modes: Peak Sensors only
SENSe:CALTemp
Description: Return the internal peak power sensor temperature at the time of autocalibration. This
temperature may be compared to the current sensor temperature (see SENSe:TEMPerature?)
to aid in deciding whether the sensor temperature has drifted enough to warrant a new
autocal. The 4530 displays a warning message on the LCD if a non-temperature compen-
sated peak sensor is in use, and the temperature has drifted more than 4C from the autocal
temperature.
Syntax: SENSe[1|2]:CALTemp?
Returns: AutocalTemp in degrees C
Valid Modes: Peak Sensors only
4-23
Page 98

Chapter 4 Boonton Electronics
Remote Operation 4530 Series RF Power Meter
4.5.7 CALCulate Subsystem - The CALCulate group of the command subsystem is used to configure post
acquisition data processing. Functions in the CALCulate subsystem are used to configure the measurement mode and
control which portions of the acquired measurement data is used and how it is processed to yield a finished measurement. In addition to measurement mode, CALCulate is used to define mathematical operations, measurement units, and
limit monitoring. The numeric suffix of the CALCulate program mnemonic in the CALCulate commands refers to a
processing and display “channel”, that is CALCulate1 and CALCulate2 represent the power meter’s Channel 1 and
Channel 2 functions. The CALCulate commands generally DO NOT affect the data acquisition portion of the measurement (see the SENSe subsystem, above). In a signal-flow block diagram, the CALCulate block operations will follow
those of the SENSe block. Note that CALCulate2 commands will generate an error if used with a single channel Model
4531.
CALCulate:STATe
Description: Set or return the measurement state of the selected channel. When ON, the channel per-
forms measurements; when OFF, the channel is disabled and no measurements are performed.
Syntax: CALCulate[1|2]:STA Te <asc>
Argument: <asc> = ON, OFF
V alid Modes: Any
CALCulate:MODe
Description: Set or return the measurement mode of the selected channel. CW and MODULATED are
Syntax: CALCulate[1|2]:MODe <asc>
Argument: <asc> = CW , MODULA TED, PULSE, CDF , CCDF , DIST
Valid Modes: Sensor dependent. CW and voltage sensors may select CW mode only. If CW mode is
CALCulate:MATH
Description: Set or return the signal source or sources combined in an arithmetic operation for the
continuous measurement modes, PULSE is a triggered, oscilloscope-like mode, and CDF ,
CCDF and DIST are various presentation formats of statistical mode, which gathers and
analyzes a large number of samples over a relatively long time interval.
selected for a peak sensor, it will be forced to MODULATED mode.
displayed reading on the selected channel. Ratiometric displays may be made between two
sensors, or between a sensor and a stored reference (see CALCulate:REFerence commands), and sum or difference operations may be performed between two sensors, depending on sensor type. For power sensors, the power ratio of two sources in dB relative (dBr)
or percent power, or the sum of power of two sources in dBm or linear units is available.
Voltage sensors allow voltage ratios in dBr or percent power, and voltage difference in log
or linear voltage units.
Syntax: CALCulate[1|2]:MATH <asc>
Argument: <asc> = CH{1|2}, REF{1|2}, REF_RA T , REF_SUM, REF_DIFF, CH_RA T , CH_SUM, CH_DIFF
Valid Modes: CW and Modulated modes
Restrictions: For calculations between sensors, both sensors must be of the same type (power or voltage
sensors).
4-24
Page 99

Boonton Electronics Chapter 4
4530 Series RF Power Meter Remote Operation
CALCulate:DCYC
Description: Set or return the pulse duty cycle in percent of the input waveform of the selected channel.
This value is used to calculate the theoretical pulse power based on an average power
measurement of a periodic pulse waveform. The pulse power result is valid only for thermal
sensors or for CW diode sensors operating in the square-law (true-RMS) region of their
dynamic range, and subject to the accuracy of the duty cycle value. Setting the duty cycle
to 100% is equivalent to a CW measurement.
Syntax: CALCulate[1|2]:DCYC <n>
Argument: <n> = 0.01 to 100 %
Valid Modes: CW Sensors only
CALCulate:RANGe
Description: Set or return the hardware measurement range for the selected CW channel. When set to
AUTO, the 4530 automatically selects the best range for noise and overload headroom. For
certain applications with large, frequent signal swings, setting the range manually can
improve settling time. Range 0 is used below approximately -10dBm on CW diode sensors
and on all thermal sensors. Range 1 is used above approximately -30dBm on CW diode
sensors. Range 2 is used only on voltage sensors when the input is above about 3.0 volts.
Syntax: CALCulate[1|2]:RANGe <asc>
Argument: <asc> = AUTO, 0, 1, 2
Valid Modes: CW and Voltage sensors only
CALCulate:PKHLD
Description: Set or return the operating mode of the selected channel’ s peak hold function. OFF: instan-
Syntax: CALCulate[1|2]:PKHLD <asc>
Argument: <asc> = OFF , A VG, INST
Valid Modes: Modulated and Pulse modes
taneous peaks are only held for a short time, and then decayed towards the average power
at a rate proportional to the filter time. This is the best setting for most signals, because the
peak will always represent the peak power of the current signal, and the resulting peak-to-
average ratio will be correct shortly after any signal level changes. INST: instantaneous
peaks are held until reset by a new INITiate command. This setting is used to hold the
highest peak over a long measurement interval. AVG: The held peaks correspond to the
highest and lowest filtered average power, and are held until reset. This is useful for
monitoring average power fluctuations over a period of time. In the case of pulse mode,
note that all average and peak hold measurements are performed on the interval between
the markers. Note that because CW sensors do not measure instantaneous power, they
always operate with the PKHLD mode equivalent to AVG.
4-25
Page 100

Chapter 4 Boonton Electronics
Remote Operation 4530 Series RF Power Meter
CALCulate:UNITs
Description: Set or return default programming/display units for the selected channel. For power sen-
sors, voltage is calculated with reference to the sensor input impedance. For voltage
sensors, power is calculated using the user supplied impedance parameter. Note that in
ratiometric mode, the current UNIT s setting will be overridden: log units will always return
as dBr (dB relative), and linear units will represent the ratio in percent power (for W ATTS)
or percent voltage (for VOL TS).
Syntax: CALCulate[1|2]:UNIT s <asc>
Argument: <asc> = W A TTS, DBM, VOL TS, DBV, DBMV , DBUV
V alid Modes: Any
CALCulate:REFerence:STATe
Description: Set or return the state of the ratiometric reference mode for the selected channel. When
reference level is loaded or entered, enabling reference mode will cause the channel’s
primary measurement to calculate the ratio of the current average power to the stored
reference. Units will be changed to dBr (dB relative) for log units, or percent (power or
voltage) for linear units. Note that the stored reference should be loaded from the same
sensor that is currently in use on the channel.
Syntax: CALCulate[1|2]:REFerence:STA Te <asc>
Argument: <asc> = OFF , ON
Valid Modes: CW and Modulated modes
CALCulate:REFerence:COLLect
Description: Load (or “collect”) the current average power level as the ratiometric mode reference level
for the selected channel. The power level applied to the sensor is stored as the reference
level, and all power readings will be in dBr, relative to this level. Immediately after the
reference is loaded, the ratiometric power reading will always be 0.000 dBr until the applied
power changes.
Syntax: CALCulate[1|2]:REFerence:COLLect
Argument: None
Valid Modes: CW and Modulated modes
CALCulate:REFerence:DATA
Description: Set or return the ratiometric mode reference level for the selected channel. When the
reference level is set using this command, the power specified by the argument will become
the current reference level, and all power readings will be in dBr, relative to this level.
Syntax: CALCulate[1|2]:REFerence:DAT A <n>
Argument: <n> = Power in current units
Valid Modes: CW and Modulated modes
4-26
 Loading...