

Page 1
KÄSEREIBE KR 444 CB
Kaasrasp • Râpe de fromage • Rallador de queso • Ralador de queijo
Grattugia per formaggio • Cheese grater • Urządzenie do tarcia sera
Struhadlo na sýr • Sajtreszelő • Тертка • Тёрка для сыра
Bedienungsanleitung/Garantie
Gebruiksaanwijzing • Mode d’emploi • Instrucciones de servicio
Manual de instruções • Istruzioni per l’uso • Instruction Manual
Instrukcja obsługi/Gwarancja • Návod k použití • Használati utasítás
Інструкція з експлуатації • Руководство по эксплуатации
Page 2
УКРАЇНСЬКА
ENGLISH
JĘZYK POLSKI
ČESKY
MAGYARUL
РУССКИЙ
ENGLISHENGLISH
Contents
Overview of the Components ..................................... Page 3
Instruction Manual ....................................................... Page 18
Technical Data............................................................. Page 19
JĘZYK POLSKIJĘZYK POLSKI
Spis tres´ci
Przegląd elementów obłsugi ..................................... Strona 3
Instrukcja obsługi ......................................................Strona 20
Dane techniczne .......................................................Strona 21
Gwarancja ................................................................. Strona 21
ČESKYČESKY
Obsah
Přehled ovládacích prvků ..........................................Strana 3
Návod k použití ..........................................................Strana 23
Technické údaje ........................................................Strana 24
MAGYARULMAGYARUL
Tartalom
A kezelőelemek áttekintése ........................................ Oldal 3
Használati utasítás ...................................................... Oldal 25
Műszaki adatok ........................................................... Oldal 26
УКРАЇНСЬКАУКРАЇНСЬКА
Зміст
Огляд елементів управління ...............................сторінка 3
Інструкція з експлуатації ......................................сторінка 27
Технічні параметри ..............................................сторінка 28
РУССКИЙРУССКИЙ
Содержание
Обзор деталей прибора .............................................. стр. 3
Руководство по эксплуатации .................................... стр. 29
Технические данные ................................................... стр. 30
2
ENGLISH
JĘZYK POLSKI
ČESKY
MAGYARUL
УКРАЇНСЬКА
РУССКИЙ
Page 3
Übersicht der Bedienelemente
Overzicht van de bedieningselementen • Liste des différents éléments de commande
Indicación de los elementos de manejo • Descrição dos elementos • Elementi di comando
Overview of the Components • Przegląd elementów obsługi • Přehled ovládacích prvků
A kezelőelemek áttekintése • Огляд елементів приладу • Обзор деталей прибора
3
Page 4
ENGLISH
General Safety Instructions
Read the operating instructions carefully before putting the
appliance into operation and keep the instructions including the
warranty, the receipt and, if possible, the box with the internal
packing. If you give this device to other people, please also pass
on the operating instructions.
• The appliance is designed exclusively for private use and
for the envisaged purpose. This appliance is not fi t for commercial use.
• The mains adapter is only suitable for use in dry rooms.
• Please check whether the output current and voltage and
the polarity of the mains adapter is the same as the information stated on the connected device!
• Do not touch the connected mains adapter with wet hands!
• Be for cleaning the device, disconnect it from the mains
adapter.
• The device and the mains lead have to be checked regularly
for signs of damage. If damage is found the device must not
be used.
• Do not try to repair the appliance on your own. Always
contact an authorized technician. To avoid the exposure
to danger, always have a faulty cable be replaced only by
the manufacturer, by our customer service or by a qualifi ed
person and with a cable of the same type.
• Use only original spare parts.
• Pay careful attention to the following “Special Safety Instructions“.
Children and Frail Individuals
• In order to ensure your children‘s safety, please keep all
packaging (plastic bags, boxes, polystyrene etc.) out of their
reach.
ENGLISH
WARNING!
Caution! Do not allow small children to play with the foil
as there is a danger of suffocation!
• This device is not intended to be used by individuals (including children) who have restricted physical, sensory or mental
abilities and/or insuffi cient knowledge and/or experience, unless they are supervised by an individual who is responsible
for their safety or have received instructions on how to use
the device.
• Children should be supervised at all times in order to ensure
that they do not play with the device.
Symbols in these Instructions for Use
Important information for your safety is specially marked. It is
essential to comply with these instructions in order to avoid accidents and prevent damage to the machine:
WARNING:
This warns you of dangers to your health and indicates
possible injury risks.
CAUTION:
This refers to possible hazards to the machine or other
objects.
NOTE: This highlights tips and information.
Special safety instructions
• Never use any adapter other than that supplied with the
machine.
• The container is not locked in place on the device. When
transporting the device you should always hold the housing
and the attached container tightly.
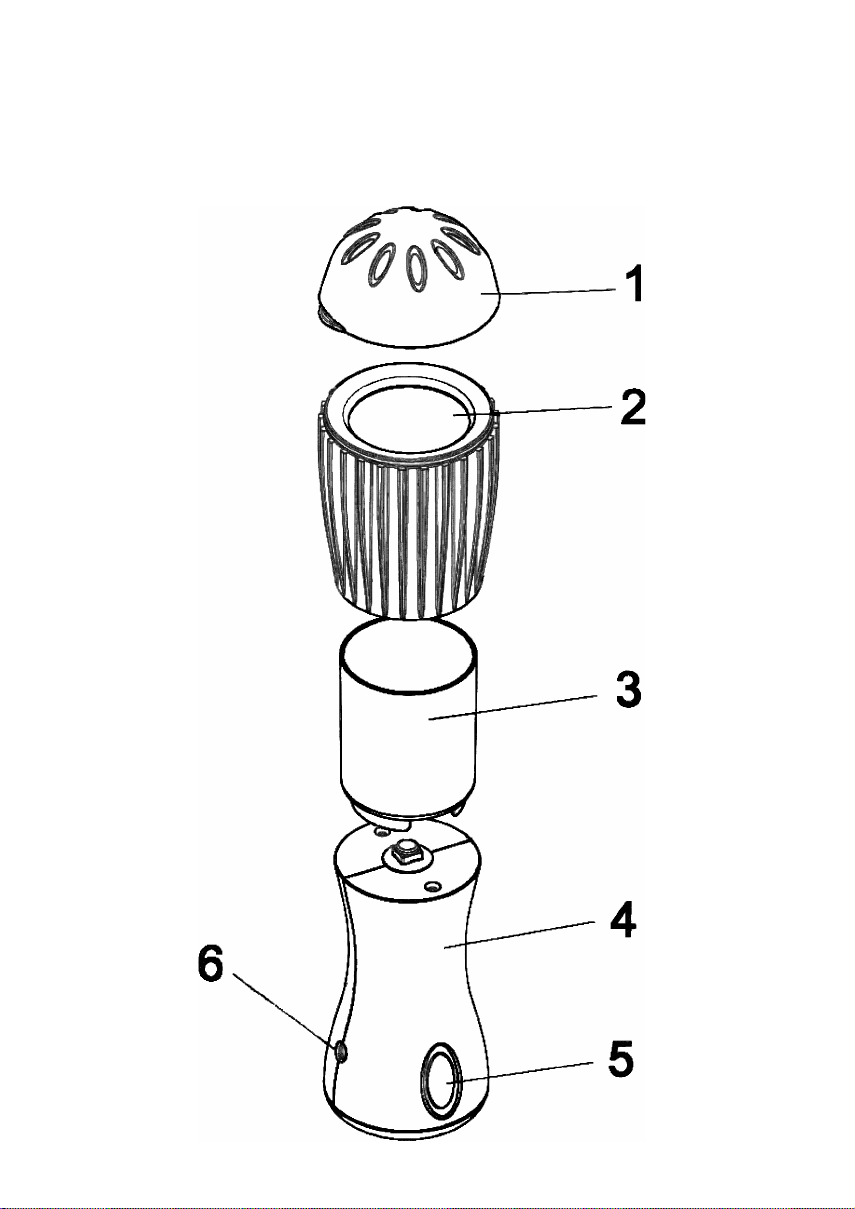
Overview of the Components
1 Lid
2 Container with grater attachment
3 Vessel for the food to be grated
4 Motor housing
5 Switch
6 Connection socket for the mains adapter
Accessories (not shown)
Replacement container
Mains adapt
er (charger)
Instructions for Use
With the cheese grater you can easily grate different types of
cheese, dry bread, nuts or blocks of chocolate.
NOTE:
For a better result please use cooled cheese that is not too
soft.
Select a container (2) with the appropriate grater attachment.
Preliminary Cleaning
Before using the device for the fi rst time you should clean it
in order to remove any residues from the production process.
Please follow the instructions contained in the „Cleaning“ section.
Charging the Battery
• Connect the plug of the power pack to the DC 3 V socket (6)
on the device.
• Insert the mains adapter to a 230 V/50 Hz power socket.
• Charge the battery for 9 hours before initial use.
• Subsequent charging times are also 9 hours.
NOTE: Operation from the mains is not possible.
CAUTION:
After the device has been charged up for 9 hours you should
always remove the plug from the mains socket.
18
Page 5
ENGLISH
USEFUL TIPS ON BATTERY LIFE
Battery life can be lengthened by paying attention to the
following instructions:
• Wait until the battery is almost completely fl at before
charging it.
• Never leave the machine connected to the charger for
more than 9 hours.
• Charge the machine only with room temperatures between 0 and +40°C.
Assembly
Place the vessel (3) on the motor housing (4) until it is heard to
click into place. Please note the recess.
Use
• Place the food to be grated into the vessel (3).
• Place a container (2) with the lid (1) on the vessel (3).
• Hold the device tightly with one hand so that you can press
the switch (5) without diffi culty.
• Press the switch in order to turn the motor on. Press the
container at the same time on to the food to be grated.
• When you have fi nished grating the food, pull the container
upwards off the vessel. You can portion the grated food
through the sprinkle opening in the lid. Or you can empty the
container by removing the lid.
Cleaning
WARNING:
• Before cleaning the device you should always disconnect
it from the mains adapter!
• Under no circumstances should you immerse the device
in water for cleaning purposes.
CAUTION:
• Do not use a wire brush or any abrasive items.
• Do not use any acidic or abrasive detergents.
• Always clean the device immediately after use. Rinse the
removable parts (lid (1), container (2) and vessel (3)) in
warm soapy water. Wipe until thoroughly dry afterwards.
CAUTION:
Do not clean these parts in the dishwasher.
• Wipe the casing with a dampcloth.
Noise development
The sound pressure level in the ear of an operator (LpA) was
measured according to DIN EN ISO 3744.
Sound pressure level detected: 77 dB(A) (no limit)
Technical Data
Model: .......................................................................... KR 444 CB
Power supply of mains adapter: .................... 230 V, 50 Hz, 2,4 W
Mains adapter output: ..........................................DC 3 V, 200 mA
Mains adapter protection class: .................................................. ΙΙ
Battery: ......................................................... 2 X 1,2 V, 1300 mAh
Operation time: .................................................... max. 20 minutes
Charging time: ................................................................... 9 hours
Net weight: ......................................................................0,416 kg
This device has been tested according to all relevant current
CE guidelines, such as electromagnetic compatibility and low
voltage directives, and has been constructed in accordance with
the latest safety regulations.
Subject to technical changes without prior notice!
Removing the Batteries / Battery Disposal
The device contains rechargeable nickel metal
hydride batteries. Remove these batteries before
you dispose of the device. As a consumer you
are required by law to return used (rechargeable)
batteries.
WARNING:
Disconnect the device from the mains before you remove the
battery!
• Use a small Philips screwdriver in order to release the
screws from the bottom of the device. Take off the bottom of
the housing.
• Remove the battery.
• Use a pair of scissors to cut through the wires on the battery.
These can be returned to a collection point for old batteries or
special refuse. Contact your local authority for further information.
Meaning of the “Dustbin” Symbol
Protect our environment: do not dispose of electrical equipment
in the domestic waste.
Please return any electrical equipment that you will no longer
use to the collection points provided for their disposal.
This helps avoid the potential effects of incorrect disposal on the
environment and human health.
This will contribute to the recycling and other forms of reutilisation of electrical and electronic equipment.
Information concerning where the equipment can be disposed of
can be obtained from your local authority.
ENGLISH
19
Page 6
JĘZYK POLSKI
Ogólne wskazówki bezpieczeństwa
Przed uruchomieniem urządzenia proszę bardzo dokładnie
przeczytać instrukcję obsługi. Proszę zachować ją wraz z kartą
gwarancyjną, paragonem i w miarę możliwości również kartonem z opakowaniem wewnętrznym. Przekazując urządzenie
innej osobie, oddaj jej także instrukcję obsługi.
• Proszę wykorzystywać urządzenie jedynie dla prywatnego
celu, jaki został przewidziany dla urządzenia. Urządzenie to
nie zostało przewidziane do użytku w ramach działalności
gospodarczej.
• Zasilacz sieciowy jest przeznaczony do używania w suchych
pomieszczeniach.
• Sprawdź, czy prąd i napięcie wyjściowe oraz ułożenie
biegunów zasilacza zgadzają się z informacjami podanymi
na podłączonym urządzeniu!
• Nie dotykaj podłączonego zasilacza mokrymi rękami!
• W razie potrzeby do czyszczenia odłącz urządzenie od
zasilacza sieciowego.
• Należy regularnie sprawdzać, czy urządzenie i kabel sieciowy nie są uszkodzone. W razie uszkodzenia należy przestać
korzystać z urządzenia.
• W razie awarii proszę nie naprawiać urządzenia samemu
lecz skorzystać z pomocy autoryzowanego specjalisty. Jeżeli przewód zasilający nieodłączalny ulegnie uszkodzeniu, to
powinien on być wymieniony u producenta lub w specjalnym
zakładzie naprawczym albo przez wykwalifi kowaną osobę w
celu uniknięcia zagrożenia.
• Proszę stosować tylko oryginalne akcesoria.
• Prosimy pamiętać o podanych dalej „Specjalnych wskazówkach dotyczących bezpiecznego użytkowania“.
Dzieci i osoby niepełnosprawne
• Dla bezpieczeństwa dzieci proszę nie zostawiać swobodnie
dostępnych części opakowania (torby plastikowe, kartony,
styropian itp.).
OSTRZEŻENIE!
Nie pozwalaj dzieciom bawić się folią.
JĘZYK POLSKI
Niebezpieczeństwo uduszenia!
• To urządzenie nie może być używane przez osoby (w tym
dzieci) o ograniczonych możliwościach fi zycznych, motorycznych lub umysłowych lub nie posiadające niezbędnego
doświadczenia i/lub wiedzy. Użytkowanie urządzenia przez
takie osoby jest możliwe wyłącznie pod nadzorem opiekuna
lub po otrzymaniu wskazówek dotyczących używania urządzenia.
• Nie pozwalaj dzieciom bawić się urządzeniem.
Symbole użyte w tej instrukcji obsługi
Ważne informacje dotyczące bezpieczeństwa użytkownika są
specjalnie wyróżnione. Koniecznie stosuj się do tych wskazówek, aby uniknąć wypadków i uszkodzenia urządzenia.
OSTRZEŻENIE:
Ostrzega przed zagrożeniami dla zdrowia i wskazuje na
potencjalne ryzyka obrażeń.
UWAGA:
Wskazuje na potencjalne zagrożenia dla urządzenia lub
innych przedmiotów.
WSKAZÓWKA:
Wyróżnia porady i informacje ważne dla użytkownika.
Specjalne wskazówki dotyczące bezpiecznego
użytkowania tego urządzenia
• Proszę W ŻADNYM WYPADKU nie używać innego adaptera sieci niż załączony w dostawie.
• Pojemnik nie jest przymocowany do urządzenia na stałe.
Podczas transportu należy zawsze trzymać obudowę i
założony pojemnik razem.
Przegląd elementów obsługi
1 Pokrywa
2 Zbiornik z nasadką ucierającą
3 Pojemnik na ucierany produkt
4 Obudowa silnika
5 Przełącznik
6 Gniazdo do podłączania zasilacza
Akcesoria (bez rysunków)
Wymienny pojemnik
Zasilacz (łado
warka)
Porady dotyczące użytkowania
Tarka do sera służy do łatwego rozdrabniania różnych gatunków
sera, suchego chleba, orzechów lub czekolady w tabliczkach.
WSKAZÓWKA:
W celu uzyskania lepszych efektów ser powinien być
schłodzony i niezbyt miękki.
Wybierz pojemnik (2) z odpowiednią nasadką ucierającą.
Pierwsze czyszczenie
Przed użyciem przyrządu po raz pierwszy, oczyść go, aby
usunąć pozostałości po procesie produkcji. Uwzględnij punkt
„Czyszczenie”.
Ładowanie akumulatora
• Podłącz wtyczkę zasilacza sieciowego z gniazdem DC 3 V
(6) na urządzeniu.
• Podłącz zasilacz sieciowy do gniazda sieci 230 V/50 Hz.
• Urządzenie należy ładować przed pierwszym użyciem przez
9 godzin.
• Kolejne cykle ładowania trwają również 9 godzin.
20
Page 7

JĘZYK POLSKI
WSKAZÓWKA:
Zasilanie bezpośrednio z sieci jest niemożliwe.
UWAGA:
Po upływie 9 godzin ładowania zawsze wyciągaj wtyczkę z
gniazda.
WSKAZÓWKI DOTYCZĄCE OKRESU PRZYDATNOŚCI
AKUMULATORÓW
Przedłużą Państwo okres przydatności akumulatorów, jeżeli
będą Państwo przestrzegać następujących zasad:
• Proszę odczekać z ładowaniem akumulatorów, aż będą
one zupełnie rozładowane.
• Proszę nie pozostawiać urządzenia podłączonego do
ładowarki dłużej niż 9 godziny.
• Proszę ładować urządzenie tylko przy temperaturze
otoczenia wynoszącej między 0° a +40° C.
Dane techniczne
Model: .......................................................................... KR 444 CB
Napięcie zasilacza: ....................................... 230 V, 50 Hz, 2,4 W
Wyjście zasilacza: ................................................DC 3 V, 200 mA
Stopień ochrony zasilacza sieciowego: ...................................... ΙΙ
Akumulatorek: .............................................. 2 X 1,2 V, 1300 mAh
Czas pracy urządzenia: ............................ maksymalnie 20 minut
Czas ładowania: ...............................................................9 godzin
Masa netto: ......................................................................0,416 kg
Niniejsze urządzenie odpowiada wymaganiom normy bezpieczeństwa użytkowania oraz spełnia wymagania dyrektywy niskonapięciowej i kompatybilności elektromagnetycznej.
Zastrzega się prawo do zmian technicznych!
Montaż
Załóż zbiornik (3) na obudowę silnika (4) tak, aby było słychać
odgłos zatrzaskiwania. Zwróć przy tym uwagę na wyżłobienie.
Obsługa
• Włóż do zbiornika (3) produkt do utarcia.
• Załóż pojemnik (2) z pokrywką (1) na zbiornik (3).
• Trzymaj urządzenie jedną ręką w taki sposób, aby można
było swobodnie wciskać przełącznik (5).
• Naciśnij przełącznik, aby włączyć silnik. Równocześnie
wciśnij pojemnik, dociskając go do ucieranego produkt.
• Po zakończeniu ucierania zdejmij pojemnik ze zbiornika,
kierując go do góry. Utarty produkt można dzielić na porcje
przy użyciu otworów w pokrywce. Pojemnik można również
opróżnić po zdjęciu pokrywki.
Czyszczenie
OSTRZEŻENIE:
• Przed każdym czyszczeniem odłączaj urządzenie od
zasilacza sieciowego!
• Urządzenia parze nie wolno do czyszczenia zanurzać w
wodzie.
UWAGA:
• Nie używaj szczotki drucianej ani innych podobnych
przed-miotów.
• Nie używaj ostrych lub ściernych środków czyszczących.
• Urządzenie należy czyścić zawsze od razu po użyciu.
Opłucz zdejmowane części [pokrywka (1), pojemnik (2) i
zbiornik (3)] w ciepłej wodzie z dodatkiem środka myjącego.
Następnie wytrzyj je do dokładnie sucha.
UWAGA:
Tych części nie czyść w zmywarce do naczyń.
• Obudowę można wytrzeć miękką, wilgotną ściereczką.
OGÓLNE WARUNKI GWARANCJI
Producent / Dystrybutor udziela 24 miesięcy gwarancji na zakupione urządzenie. Okres gwarancji liczony jest od daty zakupu
urządzenia.
W tym okresie uszkodzone urządzenie będzie bezpłatnie wymienione na wolne od wad. W przypadku, gdy wymiana będzie
niemożliwa do zrealizowania, Nabywca otrzyma zwrot ceny
zakupu urządzenia.
Za uszkodzone urządzenie uważa się takie, które nie spełnia
funkcji określonych w instrukcji obsługi, a przyczyną takiego
stanu jest wewnętrzna wada fabryczna lub materiałowa.
Gwarancją nie są objęte uszkodzenia mechaniczne, chemiczne,
termiczne, powstałe w wyniku działania sił zewnętrznych (np.
przepięcie w sieci energetycznej czy wyładowania atmosferyczne), jak również wady powstałe w wyniku obsługi niezgodnej z
instrukcją obsługi urządzenia.
Nabywcy przysługuje prawo do wymiany urządzenia na wolne
od wad lub, jeśli wymiana jest niemożliwa, zwrotu gotówki tylko
po dostarczeniu do punktu zakupu kompletnego urządzenia z
oryginalnymi akcesoriami, instrukcją obsługi i w oryginalnym
opakowaniu wraz z dowodem zakupu i prawidłowo wypełnioną kartą gwarancyjną (pieczątka sklepu, data sprzedaży
urządzenia).
Gwarancja oraz zawarte w niej warunki obowiązują na terenie
Rzeczpospolitej Polskiej.
Niniejsza gwarancja nie wyłącza, nie ogranicza ani nie zawiesza
uprawnień Nabywcy wynikających z przepisów Ustawy z dnia 27
lipca 2002 r. o szczególnych warunkach sprzedaży konsumenckiej oraz o zmianie kodeksu cywilnego (Dz. U. z 2002 r. Nr 141,
poz. 1176).
JĘZYK POLSKI
21
Page 8

JĘZYK POLSKI
Wyjmowanie akumulatorków / Utylizacja baterii
Urządzenie jest wyposażone w ładowalne akumulatorki NiMH. Przed wyrzuceniem wyeksploatowanego urządzenia wyjmij te akumulatorki. Jako
użytkownik jesteś zobowiązany ustawowo do
zwrotu zużytych baterii/akumulatorów.
OSTRZEŻENIE:
Przed wyjęciem akumulatora odłącz urządzenie od sieci!
• Do odkręcenia śrub znajdujących się na spodzie urządzenia
użyj małego wkrętaka krzyżowego. Zdejmij spód obudowy.
• Wyjmij akumulator.
• Przetnij nożyczkami druty przy akumulatorze.
Mogą je Państwo oddać w punkcie zbiorczym na stare baterie
wzgl. na odpady specjalne. Proszę poinformować się w tej
kwestii w swojej gminie.
Znaczenie symbolu „Pojemnik na śmieci“
Proszę oszczędzać nasze środowisko, sprzęt elektryczny nie
należy do śmieci domowych.
Proszę korzystać z punktów zbiorczych, przewidzianych do
zdawania sprzętu elektrycznego, i tam proszę oddawać sprzęt
elektryczny, którego już nie będą Państwo używać.
Tym sposobem pomagają Państwo unikać potencjalnych
następstw niewłaściwego usuwania odpadów, mających wpływ
na środowisko i zdrowie ludzi.
Tą drogą przyczyniają się Państwo do ponownego użycia,
do recyklingu i do innych form wykorzystania starego sprzętu
elektrycznego i elektronicznego.
Informacje, gdzie można zdać sprzęt, otrzymają Państwo w
swoich urzędach komunalnych lub w administracji gminy.
JĘZYK POLSKI
22
Page 9

ČESKY
Všeobecné bezpečnostní pokyny
Před uvedením tohoto přístroje do provozu si velmi pozorně přečtěte návod k obsluze a tento návod spolu se záručním listem,
pokladním blokem a podle možností i s obalem a vnitřním vybavením obalu dobře uschovejte. Pokud budete přístroj předávat
třetím osobám, odevzdejte jim i tento návod k obsluze.
• Používejte tento přístroj výlučně pro soukromou potřebu a
pro stanovené účely. Tento přístroj není určen pro komerční
použití.
• Síťový zdroj je vhodný pro použití pouze v suchém prostředí.
• Zkontrolujte, zda výstupní proud, napětí a polarita síťového
zdroje souhlasí s údaji na připojeném přístroji!
• Připojeného síťového zdroje se nedotýkejte vlhkýma rukama!
• Z důvodu čištění přístroj příp. odpojte ze síťového zdroje.
• Přístroj a síťový kabel je nutné pravidelně kontrolovat, zda
nejsou poškozeny. Bude-li poškození zjištěno, přístroj se již
nesmí používat.
• Neopravujte přístroj vlastními silami, nýbrž vyhledejte
autorizovaného opraváře. Abyste eliminovali rizika, nechejte
poškozený přívodní kabel nahradit kabelem se stejnými
hodnotami pouze výrobcem, naším servisem pro zákazníky
nebo jinou kvalifi kovanou osobou.
• Používejte jen originální příslušenství.
• Respektujte prosím následující „Speciální bezpečnostní
pokyny“.
Děti a slabé osoby
• Z důvodu zajištění bezpečnosti Vašich dětí neponechávejte
v jejich dosahu žádné součásti obalu (plastové pytlíky,
kartón, styropor atd.).
VÝSTRAHA!
Zabraňte tomu, aby si malé děti hrály s fólií.
Hrozí nebezpečí udušení!
• Tento přístroj není určen k tomu, aby ho používaly osoby
(včetně dětí) s omezenými fyzickými, smyslovými a duševními vlastnostmi nebo s nedostatkem zkušeností a/nebo
nedostatkem znalostí, s výjimkou případů, že by na ně dohlížela osoba odpovědná za bezpečnost nebo od ní obdržely
pokyny, jak se má přístroj používat.
• Mělo by se dohlížet na děti, aby se zajistilo, že si s přístrojem nehrají.
Symboly v tomto návodu k obsluze
Důležitá upozornění pro Vaši bezpečnost jsou speciálně označena. Bezpodmínečně dbejte těchto upozornění, aby nedošlo
k nehodám a škodám na přístroji.
VÝSTRAHA:
Varuje před nebezpečím pro Vaše zdraví a upozorňuje na
možná rizika zranění.
POZOR:
Upozorňuje na možná nebezpečí pro přístroj či jiné předměty.
• V žádném případě nepoužívejte jiný než dodávaný síťový
• Zásobník není upevněn na přístroji. Při přepravě držte vždy
1 Víko
2 Zásobník s nástavcem struhadla
3 Nádoba na strouhané suroviny
4 Těleso motoru
5 Spínač
6 Připojovací zdířka pro síťový zdroj
Příslušenství (bez obr.)
Výměnný zásobník
Síťový zdroj (nabíječ baterie)
Pomocí struhadla na sýr můžete lehce strouhat různé druhy
sýrů, suché pečivo, oříšky či blok čokolády.
Zvolte zásobník (2) s vhodným nástavcem struhadla.
Předčištění
Předtím než zařízení po prvé uvedete do provozu, měli byste je
krátce vyčistit, aby se odstranily zbytky výroby. K tomu dbejte
laskavě na odstavec „Čištění“.
Nabíjení baterie
• Napojte síťovou zástrčku do zásuvky DC 3 V (6) na přístroji.
• Vložte síťový zdroj do zásuvky 230 V/50 Hz.
• Před prvním použitím nabijte přístroj 9 hodin.
• I další doba nabíjení činí 9 hodin.
Speciální bezpečnostní pokyny
pro tento přístroj
adaptér.
pevně těleso a nasazený zásobník.
Přehled ovládacích prvků
Pokyny pro použití
UPOZORNĚNÍ:
Pro dosažení lepšího výsledku použijte vychlazený, ne příliš
měkký sýr.
UPOZORNĚNÍ: Čisté síťové napájení není možné.
POZOR:
Po uplynutí 9 hodin nabíjení vždy vytáhněte zástrčku ze
zásuvky.
ŽIVOTNOST AKUMULÁTORU
Životnost akumulátoru můžete prodloužit, jestliže budete dbát
následujících pokynů:
• S nabíjením vyčkejte do doby, kdy je akumulátor téměř
vybitý.
• Nenechávejte přístroj připojený k nabíječce déle než
9 hodin.
• Přístroj nabíjejte jen při tehdy, jestliže teplota okolí se
pohybuje 0° a +40° C.
ČESKY
UPOZORNĚNÍ: Upozorňuje Vás na tipy a informace.
23
Page 10

ČESKY
Montáž
Nasaďte nádobu (3) na těleso motorku (4), dokud slyšitelně
nezaklapne. Přitom dbejte na drážky.
Obsluha
• Vložte strouhané potraviny do nádoby (3).
• Položte zásobník (2) s víkem (1) na nádobu (3).
• Jednou rukou držte přístroj tak pevně, abyste mohli spínač
(5) lehce stisknout.
• Stisknutím spínače zapnete motorek. Současně stiskněte
zásobník na strouhané potraviny.
• Je-li proces strouhání ukončen, vytáhněte zásobník z nádoby směrem nahoru. Strouhané potraviny můžete porcovat
otvory ve víku. Nebo zásobník můžete vyprázdnit odejmutím
víka.
Čištění
VÝSTRAHA:
• Před každým čištěním příp. odpojte přístroj ze síťového
zdroje!
• Pro čištění přístroje ho nenořte v žádném případě do
vody.
POZOR:
• Nepoužívejte drátěný kartáč ani jiné drhnoucí předměty.
• Nepoužívejte žádné ostré či drhnoucí čisticí prostředky.
• Vždy po použití přístroj hned vyčistěte. Omyjte odnímatelné
díly (víko (1), zásobník (2) a nádobu (3)) v teplé lázni. Pak
ho dobře do sucha utřete.
POZOR: Tyto části nemyjte v myčce nádobí.
• Kryt je možné otírat mírně vlhkýmhadříkem.
Technické údaje
Model: .......................................................................... KR 444 CB
Elektrické napájení síťového zdroje: ............. 230 V, 50 Hz, 2,4 W
Výstup síťového zdroje: ........................................DC 3 V, 200 mA
Třída ochrany síťového zdroje: .................................................... ΙΙ
Akumulátor: ..................................................2 X 1,2 V, 1300 mAh
ČESKY
Délka provozu: ..............................................maximálně 20 minut
Doba nabíjení: ....................................................................9 hodin
Čistá hmotnost: ...............................................................0,416 kg
Vyjmutí baterií / Likvidace baterií
Přístroj obsahuje opět dobíjitelné nikl-metalhydridové baterie. Tyto baterie vyjměte před tím, než
přístroj odstraníte do odpadu. Jakožto spotřebitel
jste ze zákona povinni upotřebené baterie/akumulátory vrátit.
VÝSTRAHA:
Dříve než akumulátor vyjmete, odpojte přístroj od elektrické
sítě!
• Pro uvolnění šroubu z podstavce přístroje použijte malý
šroubovák s křížovou drážkou. Sejměte podstavec tělesa.
• Vyjměte baterii.
• Pro přestřižení drátu na akumulátoru použijte nůžky.
Můžete je odevzdat ve sběrně starých baterií, resp. na místě pro
sběr zvláštního odpadu. Informujte se u Vašeho obecního úřadu.
Význam symbolu „Popelnice“
Chraňte naše životní prostředí, elektropřístroje nepatří do
domovního odpadu.
Pro likvidaci elektropřístrojů použijte určených sběrných míst a
odevzdejte zde elektropřístroje, jestliže je už nebudete používat.
Pomůžete tak předejít možným negativním dopadům na životní
prostředí a lidské zdraví, ke kterým by mohlo dojít v důsledku
nesprávné likvidace.
Přispějete tím ke zhodnocení, recyklaci a dalším formám zhodnocení starých elektronických a elektrických přístrojů.
Informace o tom, kde lze tyto přístroje odevzdat k likvidaci, obdržíte prostřednictvím územně správních celků nebo obecního
úřadu.
Tento přístroj byl testován podle všech příslušných, v současné
době platných směrnic CE, jako je např. elektromagnetická
kompatibilita a direktiva o nízkonapěťové bezpečnosti, a byl zkonstruován podle nejnovějších bezpečnostně-technických předpisů.
Vyhrazujeme si technické změny!
24
Page 11

MAGYARUL
Általános biztonsági rendszabályok
A készülék használatba vétele előtt gondosan olvassa végig a
használati utasítást, és őrizze meg a garancialevéllel, a pénztári
nyugtával és lehetőleg a csomagolókartonnal, ill. az abban
lévő bélésanyaggal együtt! Amennyiben a készüléket harmadik
személynek adja tovább, a használati útmutatót is adja a
készülékhez.
• Kizárólag személyi célra használja a készüléket, és csupán
arra, amire való! A készülék nem ipari jellegű használatra
készült.
• A tápegység csak száraz helységben való használatra
alkalmas.
• Ellenőrizze, hogy a kimeneti áram és feszültség, valamint a
tápegység pólusai megegyeznek-e a csatlakoztatott készülék adataival!
• Ne érjen hozzá vizes kézzel a csatlakoztatott tápegységhez!
• Tisztításhoz válassza le a készüléket a hálózatról.
• A készüléket és a hálózati kábelt rendszeresen ellenőrizni
kell, hogy nincs-e rajta sérülés jele. Ha sérülést lát rajta, a
készüléket nem szabad használni.
• A kockázatok elkerülése végett ne maga javítsa a készüléket, hanem keressen fel egy erre kiképzett szakembert! Ha
hibás a csatlakozó kábel, csak a gyártótól, a vevőszolgálatunktól vagy hasonló képzettségű személytől kérjen helyette
azonos értékű másik kábelt!
• Csak eredeti tartozékokat használjon!
• Tartsa be az itt következő „Speciális biztonsági rendszabályokat“.
Gyermekek és legyengült személyek
• Gyermekei biztonsága érdekében ne hagyja általuk elérhető
helyen a csomagolóelemeket (műanyag zacskó, karton,
sztiropor stb.)!
FIGYELMEZTETÉS!
Kisgyermekeket ne engedjen a fóliával játszani. Fulladás
veszélye állhat fenn!
• A készülék nem arra való, hogy korlátozott fi zikai, érzékszervi vagy szellemi képességű személyek (beleértve a gyerekeket is) vagy tapasztalat ill. tudás hiányában használják,
kivéve, ha biztonságukért felelős személye felügyel rájuk
vagy utasításokat kaptak arra vonatkozólag, hogy hogyan
kell használni a készüléket.
• Gyermekeket nem szabad felügyelet nélkül hagyni, nehogy
játsszanak a készülékkel.
A használati útmutatóban található szimbólumok
Az Ön biztonságára vonatkozó utasítások kifejezetten meg
vannak különböztetve. Kérjük, mindenképpen ügyeljen ezekre
annak érdekében, hogy elkerülje a baleseteket és a készülék
károsodását:
FIGYELMEZTETÉS:
Egészségét károsító veszélyforrásokra fi gyelmeztet és rámutat a lehetséges sérülési lehetőségekre.
VIGYÁZAT:
Lehetéges veszélyre utal, mely a készülékben vagy más
tárgyakban kárt tehet.
TÁJÉKOZTATÁS: Tippeket és információkat emel ki.
A készülékre vonatkozó speciális
biztonsági szabályok
• Semmi esetre se használjon más hálózati adaptert, mit
amelyet a készülékkel együtt kapott.
• A tartó nincs a készülékre rögzítve. Ha felveszi, mindig fogja
meg a burkolatot és a felhelyezett tartót.
A kezelőelemek áttekintése
1 Fedő
2 Tartó reszelővel
3 Tartály a reszelendő élelmiszerhez
4 Motorház
5 Kapcsoló
6 Csatlakozóalj a tápegységhez
Tartozék (illusztráció nélkül)
Cseretartó
Tápegység (töltő)
Használati tudnivalók
A sajtreszelővel különböző sajtfajtákat, száraz kenyeret, diót,
mogyorót, vagy bevonó csokoládét lehet egyszerűen ledarálni.
TÁJÉKOZTATÁS:
Ha jobb eredményt szeretne elérni, használjon lehűtött, nem
túl puha sajtot.
Válassza ki a megfelelő reszelőt tartalmazó tartót (2).
Előzetes tisztítás
Mielőtt a készüléket először üzemeltetné, tisztítsa azt meg, hogy
a gyártási maradványokat eltávolítsa. Ezzel kapcsolatban vegye
fi gyelembe a „Tisztítás“ bekezdést.
Az elemek töltése
• Kösse össze a hálózati csatlakozót a készüléken lévő
DC 3 V (6) aljzattal.
• Csatlakoztassa a tápegységet egy 230 V/50 Hz konnektorhoz.
• Az első használat előtt a készüléket 9 órán keresztül töltse
fel.
• A feltöltési időtartam máskor is 9 óra.
TÁJÉKOZTATÁS:
Tisztán hálózatról történő üzemelés nem lehetséges.
VIGYÁZAT:
9 óra töltési idő után mindig húzza ki a csatlakozót a dugaszoló aljzatból.
MAGYARUL
25
Page 12

MAGYARUL
FIGYELMEZTETÉS AZ AKKUMULÁTOR ÉLETTAR-
TAMÁRA VONATKOZÓLAG
Az akku élettartamát meghosszabbíthatja, ha ügyel a
következőkre:
• csak akkor töltse fel az akkut, amikor már csaknem teljesen kimerült.
• ne tartsa a készüléket 9 óránál hosszabb ideig a töltőhöz
kapcsolva.
• mindig csak 0° és +40° C közötti környezeti
hőmérsékleten töltse fel a készüléket.
Összeszerelése
Helyezze a tartályt (3) a motorházra (4), amíg az hallhatóan
bepattan a helyére. Ügyeljen a mélyedésre.
Kezelés
• Helyezze reszelendő élelmiszert a tartályba (3).
• Helyezze a tartót (2) a fedéllel (1) együtt a tartályra (3).
• Egyik kezével fogja meg a készüléket, hogy a kapcsolót (5)
egyszerűen meg tudja nyomni.
• Nyomja meg a kapcsolót, ha be szeretné kapcsolni a motort.
Egyszerre nyomja a tartót a reszelendő élelmiszerre.
• Ha befejezte a reszelést, húzza le felfele a tartót a tartályról.
A lereszelt élelmiszert a fedél szórónyílásán keresztül
adagolhatja. Vagy vegye le a fedelet és így ürítse ki a tartót.
Tisztítás
FIGYELMEZTETÉS:
• Tisztítás előtt mindig válassza le a készüléket a hálózatról!
• A készüléket semmiképpen ne merítse vízbe tisztítás
közben.
VIGYÁZAT:
• Ne használjon drótkefét vagy más súroló hatású tárgyat.
• Ne használjon agresszív vagy súroló hatású tisztítószert.
• Használat után mindig azonnal tisztítsa meg a készüléket. Meleg mosogatószeres vízben mossa el a levehető részeket (fedél
(1), tartó (2) és tartály (3)). Ezt követően jól szárítsuk meg.
VIGYÁZAT:
A tartozékokat ne tisztítsa mosogatógépben.
• A burkolatot enyhén nedves vászonnal töröljük le.
Műszaki adatok
Modell: ......................................................................... KR 444 CB
MAGYARUL
Tápegység feszültségellátása: ...................... 230 V, 50 Hz, 2,4 W
Tápegység kimenet: .............................................DC 3 V, 200 mA
Tápegység védelmi osztálya: ...................................................... ΙΙ
Akku: ............................................................2 X 1,2 V, 1300 mAh
Működtetési idő: ........................................................max. 20 perc
Töltési idő: ............................................................................. 9 óra
Nettó súly: ........................................................................0,416 kg
26
Ezt a készüléket az Európa Tanács minden vonatkozó aktuális
irányelve szerint (pl. elektromágnesesség-elviselő képesség
vagy kisfeszültség-elviselő képesség) ellenőriztük, és a legújabb
biztonságtechnikai előírások szerint készült.
A műszaki változtatások jogát fenntartjuk.
Az akkuk kiszerelése /
Az elemek ártalmatlanítása
A készülék újratölthető nikkel-fém-hidrid akkukat
tartalmaz. Vegye ki ezeket az akkukat, mielőtt
ártalmatlanítaná a készüléket. Ön, mint fogyasztót
törvény kötelezi a használt elem/akkumulátor
leadására.
FIGYELMEZTETÉS:
Válassza le a készüléket a hálózatról az akkumulátor eltávolítása előtt!
• Használjon kis csillag csavarhúzót a készülék alján lévő
csavarok kioldásához. Vegye le a készülék alját.
• Vegye ki az akkut.
• Használjon ollót az akkun lévő drótok szétvágására.
Használtelem-, ill. veszélyeshulladék-gyűjtőhelyeken lehet őket
leadni. Tájékozódjék az önkormányzatnál!
A „kuka“ piktogram jelentése
Kímélje környezetünket, az elektromos készülékek nem a
háztartási szemétbe valók!
Használja az elektromos készülékek ártalmatlanítására kijelölt
gyűjtőhelyeket, ott adja le azokat az elektromos készülékeit,
amelyeket többé már nem kíván használni!
Ezzel segítséget nyújt ahhoz, hogy elkerülhetők legyenek azok a
hatások, amelyeket a helytelen „szemétre dobás“ gyakorolhat a
környezetre és az emberi egészségre.
Ezzel hozzájárul az újrahasznosításhoz, a recyclinghoz és a
kiöregedett elektromos és elektronikus készülékek értékesítésének egyéb formáihoz.
Az önkormányzatoknál vagy a polgármesteri hivatalokban
tájékoztatást kaphat arról, hogy hova viheti a kiselejtezett
készülékeket.
Page 13

УКРАЇНСЬКА
Загальні вказівки щодо безпеки
Перед прийняттям в експлуатацію цього приладу дуже
уважно читайте інструкцію з експлуатації та зберігайте її
разом з гарантійним талоном, касовим чеком та, по мірі
можливості, з картонною коробкою і внутрішньою упаковкою. У разі, що прилад буде передано третім особам, слід
передавати його разом з цією інструкцією з експлуатації.
• Використайте прилад виключно в приватних цілях та за
передбаченим призначенням. Прилад не призначено
для промислового використання.
• Блок живлення від електромережі придатний для застосування тільки в сухих приміщеннях.
• Перевірте, чи відповідає вихідний струм, його напруга і
полярність блоку живлення технічним даним, що вказані
на електроприладі, що підключено!
• Не доторкуйтеся до підключеного блоку живлення
вологими руками!
• Перед очищенням прилад слід виключити з електричної
мережі
• Прилад та кабель живлення слід регулярно обстежити
на ознаки пошкоджень. При виявленні пошкоджень приладом заборонено користуватись.
• Не ремонтуйте прилад самі, але зверніться до авторизованого фахівця. Для запобігання загрозі пошкоджений кабель живлення слід замінити на еквівалентний
виключно виробником, або нашою сервісною службою
або іншою кваліфікованою особою.
• Користуйтеся виключно оригінальними комплектувальними деталями.
• Зверніть увагу на наступні “Спеціальні вказівки щодо
безпеки”.
Діти та немічні особи
• Для безпеки своїх дітей не залишайте доступними пакувальні матеріали (пластикові пакети, картонні коробки,
пенопласт тощо).
ЗАСТЕРЕЖЕННЯ!
Не дозволяйте малим дітям гратись із пливкою.
Існує загроза задухи!
• Цей прилад не призначений для використання людьми
(включаючи дітей) з обмеженими фізичними, чуттєвими
або розумовими здібностями, недостатнім досвідом та/
або знаннями – крім випадків, коли за ними доглядає
відповідальна за їх безпеку особа або вони отримали
вказівки щодо використання приладу.
• Дітям не дозволено гратись з цим приладом. Потрібен
догляд за ними.
Символи в цій інструкції з експлуатації
Важливі вказівки для Вашої безпеки спеціально відмічені.
Для запобігання нещасних випадків та пошкоджень приладу
обов’язково притримуйтесь цих вказівок.
ЗАСТЕРЕЖЕННЯ:
Попереджує про загрози для Вашого здоров’я та вказує
на можливі ризики травм.
УВАГА:
Вказує на можливі загрози для приладу або інших
предметів.
ВКАЗІВКА:
Виділяє підказки та інформацію для Вас.
Спеціальні рекомендації з безпеки праці
• Ні в якому разі не використовуйте інші зарядні пристрої
ніж той, що належить до приладу.
• Контейнер не закріплено на приладі. Коли Ви переносите прилад, притримуйте завжди корпус та контейнер, що
находиться в ньому.
Огляд елементів управління приладом
1 Кришка
2 Контейнер з насадкою - терткою
3 Ємність для продукту, що перетирається
4 Корпус мотору
5 Перемикач
6 Отвір для штекеру
Приладдя (без малюнків)
Змінний контейнер
Блок живлення (зарядний пристрій)
Терткою Ви можете з легкістю перетирати різні сорти сиру,
сухій хліб, горіхи або твердий шоколад.
ВКАЗІВКА:
Щоб досягнути кращого результату, беріть охолоджений,
а не м‘який сир.
Підберіть контейнер (2) з насадкою, що Вам потрібна.
Попереднє очищення
Перед тим як застосовувати прилад перший раз, його слід
очистити для видалення слідів виробництва. Просимо Вас дотримуватися при цьому рекомендацій розділу „Очищення“.
Рекомендації з використання
УКРАЇНСЬКА
27
Page 14

УКРАЇНСЬКА
Зарядка акумулятору
• Вставте штекер зарядного пристрою в гніздо DC 3 В (6)
на приладі.
• Підключіть блок живлення в розетку 230 В/50 Гц.
• Перед першим застосуванням зарядіть прилад протягом
9 годин.
• Тривалість подальшої зарядки складає також 9 годин.
ВКАЗІВКА:
Використання приладу з живленням безпосередньо від
електромережі неможливе.
УВАГА:
Після 9 годин зарядки завжди витягуйте штекер блоку
живлення з розетки.
ТЕРМІН ЕКСПЛУАТАЦІЇ АКУМУЛЯТОРУ:
Ви продовжите тривалість експлуатації акумулятору, якщо
будете дотримуватись наступних правил:
• Перед зарядкою дайте батареї розрядитися майже
повністю.
• Не залишайте прилад підключеним к мережі довше
ніж 9 годин.
• Заряджайте прилад тільки при температурі
навколишнього середовища від 0° до + 40°C.
Монтаж
Поставте ємність (3) на корпус мотору (4) так, щоб пристрій
блокування клацнув. При цьому зверніть увагу на положення виїмки.
• Завжди очищуйте прилад після використання. Промивайте його знімні елементи (кришку (1), контейнер (2)
і ємність (3)) в теплій воді з миючими засобами. Після
цього її слід ретельно витерти і висушити.
Не очищуйте ці елементи в посудомийній машині.
• Корпус приладу можна очищувати тканиною, що злегка
зволожена.
Модель: ...................................................................... KR 444 CB
Енергозабезпечення через зарядний пристрій:
Вихід зарядного пристрою: ...............................DC 3 В, 200 мА
Клас захисту зарядного пристрою: .......................................... ΙΙ
Акумуляторна батарея: .............................. 2 X 1,2 В, 1300 мАч
Тривалість операції: .................................20 хвилин максимум
Час зарядки: ....................................................................9 годин
Вага нетто: ...................................................................... 0,416 кг
Цей прилад було перевірено згідно всіх відповідних,
актуальних директив СЕ, наприклад щодо електромагнітної
сумісності та низьковольтної директиви, та збудовано з а
новітніми положеннями техніки безпеки.
Залишаємо за собою право на технічні зміни!
Обслуговування
• Покладіть продукт, що Ви хочете потерти, в ємність (3).
• Поставте контейнер (2) з кришкою (1) на ємність (3).
• Притримуйте одною рукою прилад так, щоб можна було
без зусиль натиснути перемикач (5).
• Натисніть на перемикач, щоб включити мотор. Одночасно натисніть контейнер на продукт, що має бути
перетертим.
• Коли процес перетирання продукту закінчено, підніміть
ємність з контейнера вверх. Ви можете висипати потертий продукт через отвір в контейнері порціями або
повністю, для чого слід зняти кришку контейнера.
УВАГА:
Технічні параметри
. 230 В, 50 Гц, 2,4 Вт
Очищення
ЗАСТЕРЕЖЕННЯ:
• Перед очищенням слід обов’язково виключати прилад
із електричної мережі!
• Забороняється опускати прилад в воду з метою
очищення.
УКРАЇНСЬКА
УВАГА:
• Забороняється використати для очищення дротяні
щітки або абразивні предмети.
• Забороняється використати їдкі або абразивні миючі
засоби.
28
Page 15

РУССКИЙ
Общие указания по технике безопасности
Перед началом эксплуатации прибора внимательно прочитайте прилагаемую инструкцию по эксплуатации и сохраните ее в надежном месте, вместе с гарантийным талоном,
кассовым чеком и, по возможности, картонной коробкой с
упаковочным материалом. Если даете кому-либо попользоваться прибором, обязательно дайте впридачу данную
инструкцию по эксплуатации.
• Пользуйтесь прибором только частным образом и по назначению. Прибор не предназначен для коммерческого
использования.
• Блок питания предназначен для использования только в
сухих помещениях.
• Проверьте, соответствует ли выходной ток, напряжение
на выходе и полярность блока питания параметрам подключенного прибора!
• Не трогайте блок питания мокрыми руками!
• Перед очисткой отключайте прибор от электросети.
• Прибор и кабель сетевого питания необходимо регулярно обследовать на наличие следов повреждения.
При обнаружении повреждения пользоваться прибором
запрещяется.
• Ни в коем случае не ремонтируйте прибор самостоятельно, а обращайтесь в таком случае за помощью к
специалисту, имеющему соответствующий допуск. Из
соображений безопасности, замена сетевого шнура
на равнозначный допускается только через заводизготовитель, нашу сервисную мастерскую или соответствующего квалифицированного специалиста.
• Используйте только оригинальные запчасти.
• Пожалуйста, соблюдайте нижеследующие „Специальные указания по технике безопасности“.
Дети и лица нуждающиеся в присмотре
• Из соображений безопасности для детей не оставляйте
лежать упаковку (пластиковые мешки, картон, пенопласт и т.д.) без присмотра.
ПРЕДУПРЕЖДЕНИЕ!
Не позволяйте детям играть с полиэтиленовой
пленкой. Опасность удушья!
• Этот прибор не предназначен для пользования лицами
(включая детей) с ограниченными физическими, сенсорными или умственными способностями или лицами, не
имеющими опыта и /или необходимых знаний. Исключение составляют случаи, когда они находятся под присмотром лица, ответственного за их безопасность, или
когда от этого лица получены указания по пользованию
прибором.
• Необходимо присматривать за детьми, чтобы убедиться
в том, что они не играют с прибором.
Символы применяемые в данном руководстве пользователя
Важные рекомендации для обеспечения вашей безопасности обозначены по особенному. Обязательно следуйте этим
рекомендациям, чтобы преотвратить несчастный случай или
поломку изделия:
ПРЕДУПРЕЖДЕНИЕ:
Предупреждает об опасности для здоровья и возможном
риске получения травмы.
ВНИМАНИЕ:
Указывает на возможную опасность для изделия и других
окружающих предметов.
ПРИМЕЧАНИЕ: Дает советы и информацию.
Специальные указания по технике безопас-
• Ηи в коем случае не пользуйтесь каким-либо другим
сетевым адаптером кроме того, который прилагается к
прибору.
• Контейнер не закреплен на приборе. При переноске
всегда придерживайте корпус и находящийся в нем
контейнер.
1 Крышка
2 Контейнер с насадками - терками
3 Емкость для перетираемых продуктов
4 Корпус мотора
5 Переключатель
6 Гнездо подключения блока питания
Принадлежности (без рисунка.)
Сменный контейнер
Блок питания (зарядное устройство)
Вы можете легко перетирать теркой различные сорта сыра,
сухой хлеб, орехи или твердый шоколад.
ПРИМЕЧАНИЕ:
Для достижения лучших результатов берите
охлажденный, а не мягкий сыр.
Выберите контейнер (2) с требуемой теркой - насадкой.
Предварительная чистка
Перед первым пользованием прибор необходимо подвергнуть небольшой чистке, чтобы удалить остатки производственных загрязнений. Пожалуйста, обратите при этом
внимание на раздел „Чистка“.
ности для этого прибора
Обзор деталей прибора
Примечания к эксплуатации
29
РУССКИЙ
Page 16

РУССКИЙ
Зарядка аккумулятора
• Соедините штекер блока питания с гнездом DC 3 В (6)
на приборе.
• Подключите блок питания к штепсельной розетке на
230 В / 50 Гц.
• Перед первым употреблением заряжайте прибор в
течение 9 часов.
• Последующие подзарядки длятся тоже 9 часов.
ПРИМЕЧАНИЕ:
Прибор нельзя включать непостредственно в электросеть.
ВНИМАНИЕ:
Через 9 часов зарядки всегда обязательно вынимайте
штепсельную вилку из розетки.
РЕКОМЕНДАЦИИ ПО УДЛИНЕНИЮ СРОКА СЛУЖБЫ
АККУМУЛЯТОРА
Срок службы аккумулятора удлиняется если соблюдать
следующие правила:
• Перед подзарядкой дайте аккумулятору почти
полностью разрядится.
• Не оставляйте прибор в подзарядном устройстве
более 9 часов.
• Проводите подзарядку при температуре окружающей
среды между 0° и + 40° С.
Монтаж
Поставьте емкость (3) на корпус мотора (4) так, чтобы
послышался щелчок крепления. Обратите внимание на
положение выемки.
Порядок работы
• Положите в емкость продукт, который должен быть
перетертым (3).
• Поставьте контейнер (2) с крышкой (1) на емкость (3).
• Придерживайте рукой прибор так, чтобы можно было
легко нажать переключатель (5).
• Нажмите переключатель, чтобы включить мотор.
Одновременно надавите контейнером на продукт,
который должен быть перетертым.
• После окончания операции поднимите контейнер с
емкости. Вы можете высыпать натертый продукт через
отверстие в крышке порциями или полностью, для чего
следует снять крышку.
ПРЕДУПРЕЖДЕНИЕ:
• Перед каждой очисткой обязательно отключайте
прибор от электросети!
• Ни в коем случае не окунайте для чистки прибор в
воду.
ВНИМАНИЕ:
• Не используйте провочные щётки или другие царапающие предметы.
• Не используйте сильные или царапающие чистящие
средства.
• Всегда очищайте прибор сразу же после использования.
Промывайте съемные части (крышку (1), контейнер
(2) и емкость (3)) в теплой воде с добавлением
моющих средств. Затем тщательно вытрите её насухо,
пожалуйста.
Не мойте эти детали в посудомоечной машине.
• Корпус можно протирать слегка влажной тряпкой.
Модель: ...................................................................... KR 444 CB
Електропитание через зарядное устройство
Выход зарядного устройства: ...........................DC 3 В, 200 мА
Класс защиты зарядного устройства: ...................................... ΙΙ
Аккумулятор:............................................... 2 X 1,2 В, 1300 мАч
Время работы: ............................................20 минут максимум
Время подзарядки: .........................................................9 часов
Вес нетто: ....................................................................... 0,416 кг
Это изделение прошло все необходимые и актуальные проверки, предписанные директивой СЕ, к прим. на электромагнитную совместимость и соответствие требованиям к
низковольтной технике, оно было также сконструировано
и построено с учетом последних требований по технике
безопасности.
Мы оставляем за собой право на технические изменения!
Чистка
ВНИМАНИЕ:
Технические данные
: .230 В, 50 Гц, 2,4 ватт
РУССКИЙ
30
Page 17

Page 18

Page 19

Page 20

GARANTIE-KARTE
Garantiebewijs • Carte de garantie
Certifi cato di garanzia • Tarjeta de garantia
Cartão de garantia • Guarantee card
Karta gwarancyjna • Záruční list • Garancia lap
Гарантійний талон
• Гарантийная карточка
KR 444 CB
24 Monate Garantie gemäß Garantie-Erklärung • 24 maanden
garantie overeenkomstig schriftelijke garantie • 24 mois de garantie
conformément à la déclaration de garantie • 24 meses de garantie
según la declaratión de garantía • 24 meses de garantia, conforme a
declaração de garantia • 24 mesi di garanzia a seconda della spiegazione
della garanzia • 24 months guarantee according to guarantee declaration
24 miesiące gwarancji na podstawie karty gwarancyjnej • Záruka 24 měsíců
podle prohlášení o záruce • A garanciát lásd a használati utasításban
24 місяці гарантії згідно з гарантійним листом • Гарантийные
обязательства – смотри руководство пользователя
Kaufdatum, H ändlerst empel, Unter schrif t • Koopdatum, S tempel van de l everancier,
Handteken ing • Date d‘achat, cac het du revendeur, sign ature • Fecha de comp ra, Sello del
vendedor, Fir ma • Data de compr a, Carimbo do ve ndedor, Assinat ura • Data dell‘aq uisto,
timbro del c ommerciante, fi rma • Purchase date, Deale r stamp, Signature • Data kupna,
Pieczątka sklepu, Podpis • Datum koupě, Razítko prodejce, Podpis • A vásárlási dátum,
a vásárlási hely bélyegzője, aláirás • Дата купівлі, печатка та підпис торгівця
Дата покупки, печать торговца, подпись
Heinrich-Horten-Str. 17 · D-47906 Kempen
Heinrich-Horten-Str. 17 · 47906 Kempen
C. Bomann GmbH
Tel.: 0 21 52/8998-0 · Fax: 0 2152/8 99 89 11
e-mail: mail@bomann.de · Internet: www.bomann.de
Stünings Medien, Krefeld • 04/09
 Loading...