

Page 1
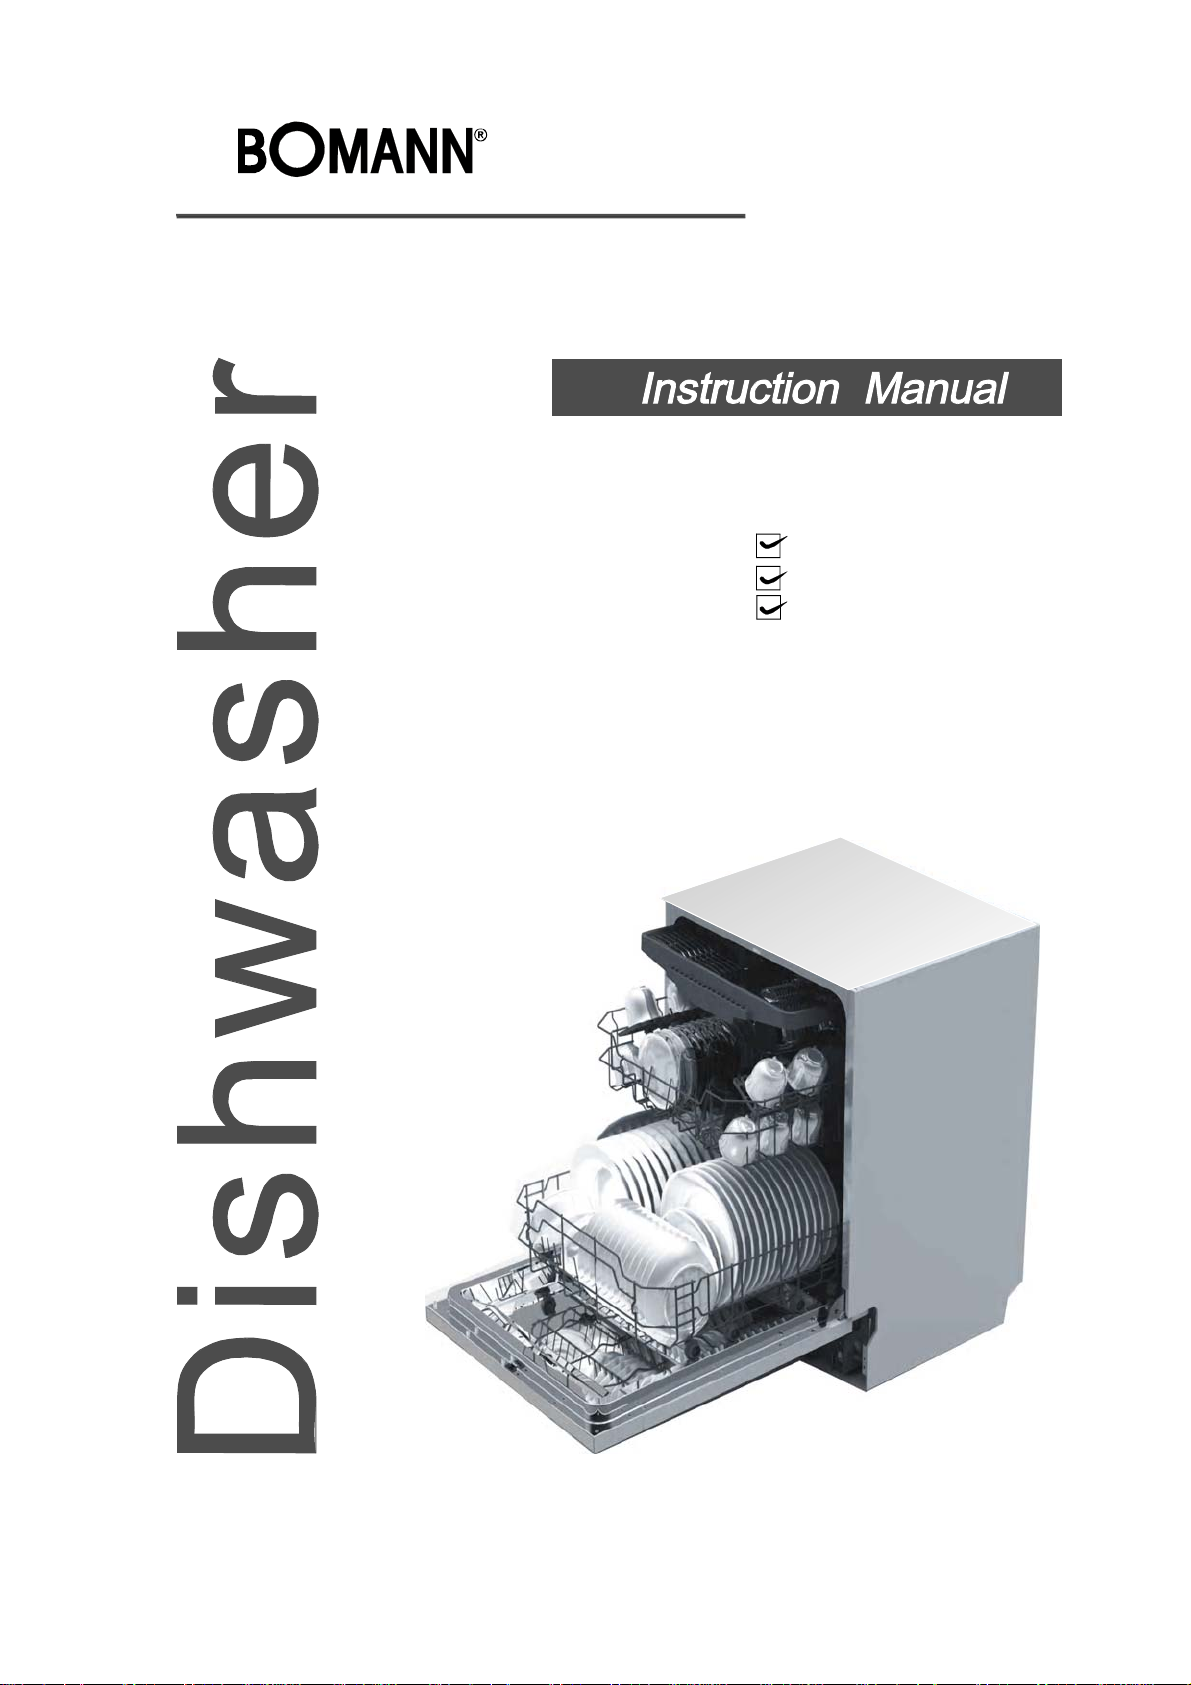
GSPE 871
10 place settings
Alt function
Auto program
Page 2
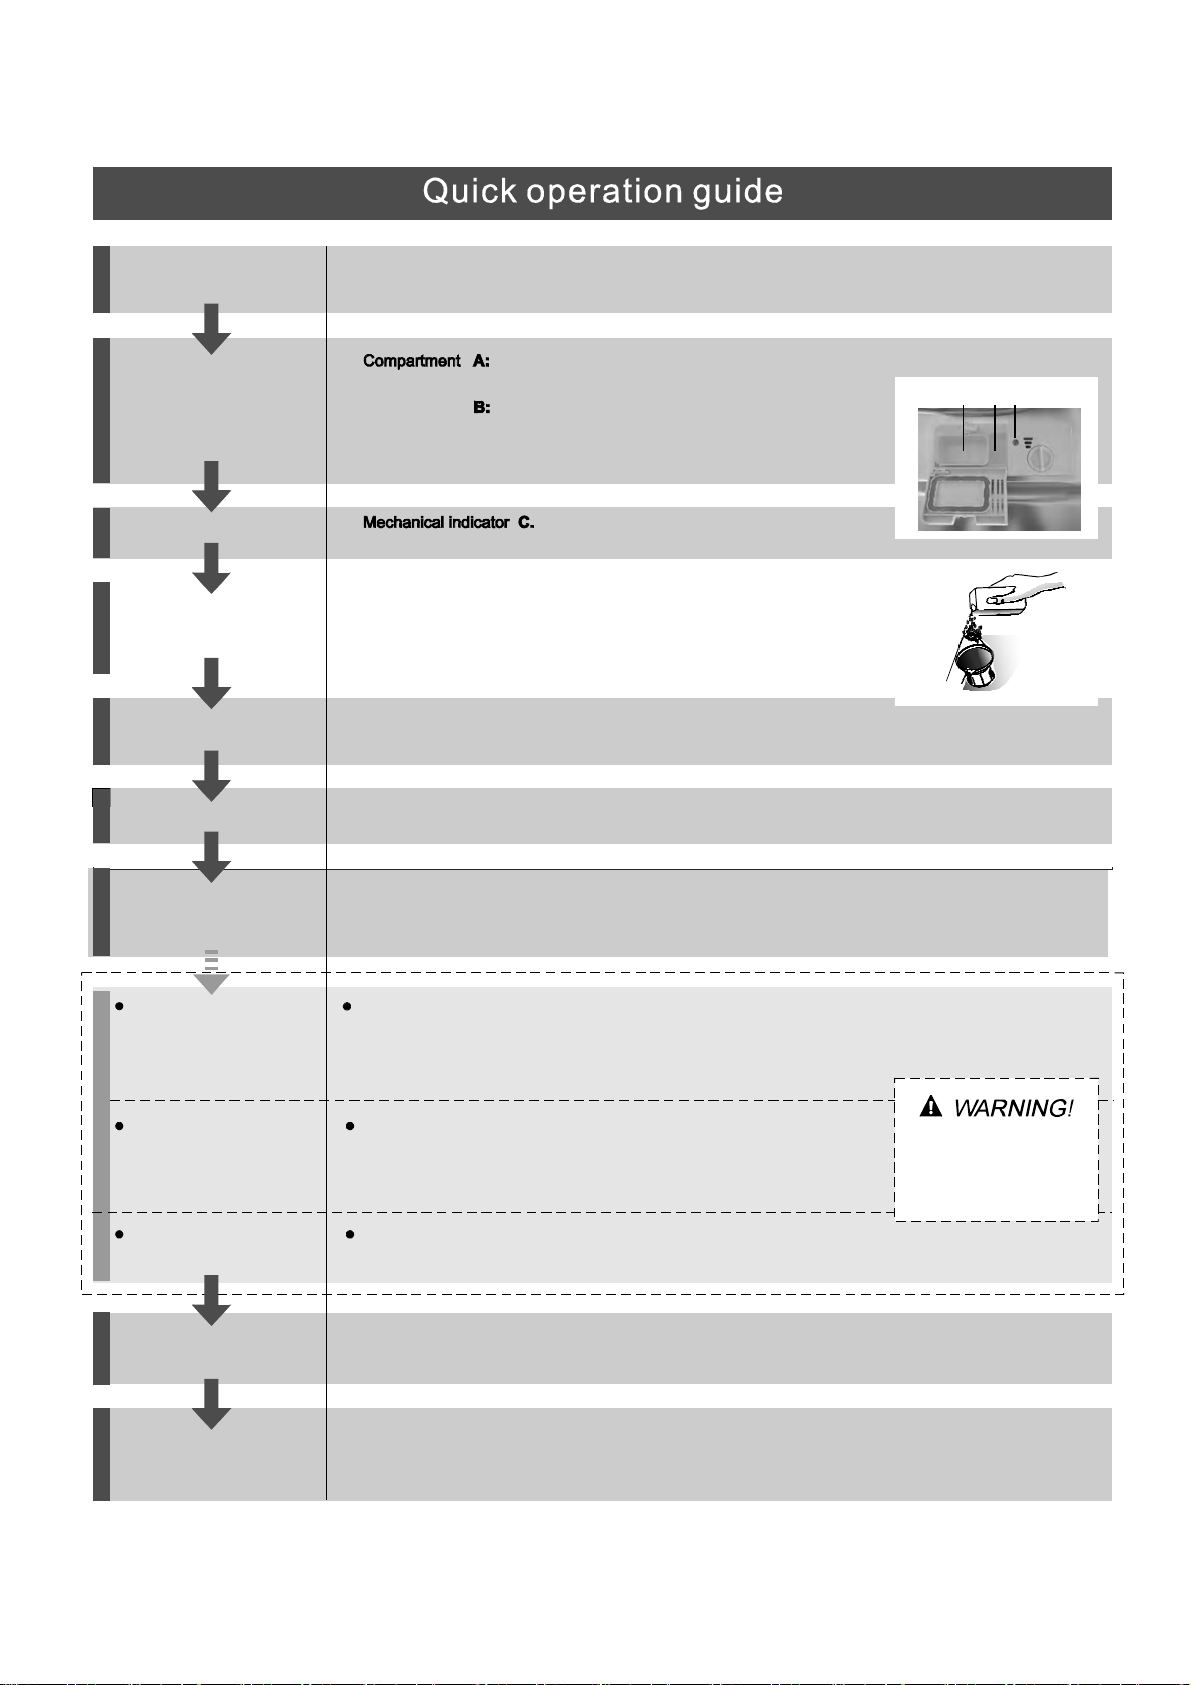
Fordetailedoperatingmethodread thecorrespondingcontent on t he instructionmanual.
Switch on the appliance Open the door ,press the On/Off button to switch on the appliance .
Fill the detergent dispenser
Check the rinse aid level
Checkthe regeneration
salt level
Load the baskets
Select a programme
Running thedishwasher
Witheachwashcycle.
Compartment
For programmes with pre-wash only.
(Follow the user instructions!)
Electric indicator on control panel(if provided).
(On models with watersoftener system only.)
Electricindicator on control panel (if provided).
B
A
C
If there is no salt warning light in the control panel
(for some models), you can estimate when to fill the salt into
the softener by the number of cycles the dishwasher has run.
Scrapeoff any large amount of leftover food. Soften remnants of burntfood in pans,
thenload the baskets. Refer to the dishwasher loadinginstructions.
Press the Programme Buttonuntil the selected programme lights up.
( See the section entitled Operationg instruction )“”
Turnonthewatertap,closethedoor.Themachinewillstartworkingafterabout10seconds.
Changing theprogramme
Add forgottendishes in the
dishwasher.
If the appliance is switched
off during a wash cycle.
Switch off the appliance
Turn off the water tap,
unload the baskets
1.A running cycle canonly be modified if it has been running for a short time. Otherwise the detergent
may have already been released and the water alreadydrained. If this is the case, the detergent
dispensermust be refilled.
2. Press the for more than3 seconds tocancel the running programme.
3. Select a new programme.
4. Restartthe dishwasher.
1.Open the door a little to stop the dishwasher.
2.After the spray arms stop working, you can open the door completely.
3.Add the forgotten dishes.
4.Close the door, the dishwasher will start running again after 10 seconds.
If the appliance is switched off during a wash cycle, when switched
on again, please re-select the washing cycle and operate the dishwasher
according to the original Power-on state ).
When the working cycle has finished, the buzzer of the
dishwasher will sound 8 times, then stop.
Turn off the appliance using the On/Off Button.
Warning: wait a few minutes(about 15 minutes) before unloading the dishwasher to avoid handling
the dishes and utensils while they are still hot and more susceptible to break.
They will alsodry better.Unload theappliance, starting from thelower basket.
Programme Button
Open the door careful ly.
Hots team may esc ape
when the doorisopened!
Page 3
Dear Customer,
This appli ance is intended t o be use d in h ousehol d
andsimilarapplications suchas:
-staff kitch en ar eas in s hops, off ices and other
workin g en viro nme nts;
-farm houses;
-by cli ents inh otels , motels and othe r residen tial
ty pe e nvir o nment s;
-bed andbreakfasttypeenvironments.
-thedishwash er is not intended for outdoor use
Pleasecarefully read this manualbefore usingthe
dishwasher, it willhelpyou to useandmaintainthe
dishwasher properly.
Keep it as a r ef er in the later days .
Passit onto any subsequentownerof the appliance.
Thismanual containssections on safetyInstructions,
Operating Instructions, Installation I nstructions and
Trouble sho o tin g Tip s, etc.
ControlPanel...................................................3
Dishwasher Features.......................................3
A WaterS oft ener...... ...... ....... ..... ...... ...... ..... ..4、
B Loadingthe Salt into the Softener.................5、
C Fill the Ri nse Aid Dispense r..... ..... . .. ............5、
D Funct i on of D et e rg ent .. .. ... .. . ......... . ... .. . .. . .... 6
、
Attenti on b efore or afte r lo ading the Dish was her
Baskets..........................................................9
Loadi n g the uppe r . ... .. ... ... .. .... ... . ..... . .. .10Basket
Loadingthe Lower ...............................10Basket
WashCycleTable...........................................11
Turning on th eApplia nce.................. .. .. ..... .. . ..11
Changethe Programme.............. ................12....
At theEndofthe WashCycle...........................12
Toreview the section on t roublesho oting Tips
will helpyout osolvesome common problems
byyourself .
Ifyou can not solve the problems by yo urself ,
please ask fo r the help of p rofessional technician s.
The manufactu rer,following a p olicy ofconstant
development a nd updati ng of the product, may
make modificatio ns witho ut givi ng prior notice.
Filtering System.............................................13
Carin g for the Dishw as he r.... . .... . . ... .. ... . . .... .. . ..1 4.
..................................15Install atio n p repara tion
...16Aesth etic pan e l 's dimensions and installation
..............18Tension a djus tment of t he door spring
..............................18Connectionof drainhoses
......................... 19Dishwasher inst a llation steps
AboutElectricity Connecting...........................20
Water Connection.......... ......................21.........
Beforecallingfor service........................... .....22.
Errorcodes.................................... ..............23.
Technicalinformation.............................. .....24..
Page 4
When using y our dishw asher, follow t he precaut ions list ed below:
This appliance must be grounded. In the event of a
malfunction or breakdown, grounding will reduce
the risk of anelectric shock by providing a path of
least resistance of electric current. This appliance
is equipped with a cord having an equipmentgrounding conductor and a grounding plug.
The plug must be plugged into an appropriate outlet
that is installed and grounded in accordance with
all local codes and ordinances.
Donotabuse,siton,orstandonthedoorordish
rack of the dishwasher.
Do not operate your dishwasher unless all
enclosure panels are properly in place. Open
the door very carefully if the dishwasher is
operating, there is a risk of water squirting out.
Do not place any heavy objects the
door when it is open. The appliance could tip
forward.
When loadin g items to be washed :
1) Locate sharp items so t hat theyare not likely
to damage the door seal;
2 Warning: Kni ves and other ute nsils wi th
)
sharp points must be l oaded in t he ba sket
with their points down orplaced in a
horizontal position.
Check that th e deterge nt comparm ent is e mpty
after completio n of the wash cycle.
Do not wash plastic items unless they are marked
dishwasher safe or the equivalent. For plastic items
n
ot so marked, check the manufacturer's
recommendations.
Use only det ergent and rinse additives
design ed for an a ut omati c dishwas her.
Never use so ap, laun dry dete rgent, or h and
washing dete rgent in your dishwasher. Keep
these pr oducts o ut of th e reach of chi ldren.
Keep children away from detergentand rinse aid,
keep child away from the open door of the
dishwasher, there could still be some detergent
left inside.
ren
on or stand on
Improper connection of the equipment-grounding
conductor can result in the risk of an electric shock.
Check with a qualified electrician or service
representative if you are in doubt whether the
appliance is properly grounded. Do not modify the
plug provided with the appliance; If it does not fit
the outlet. Have a proper outlet installed by a
qualified electrician.
Thisappliance can be used by children aged from8
years and above if they have been given supervision or
instruction concerning the safe use of the appliance
understands the hazards involved.
Children shall not play with the appliance.
Cleaning a nd mainten ance by the user shall not be
mad e by child ren u n l ess they ar e ol d e r 8 ye ars a nd
supervised.
Dishwash er deter gents ar e stro ngly alk aline, th ey
ca n be ex trem e ly da ngero us if sw allowed. Av oid
contactwith skinandeyes andkeepchildren away
from t he dishwasher when t he door is open.
The door should not be left o pen,
since this could increase t he risk o f trippi ng.
Ifthe s upply cord i s da maged, itmust be rep laced
by the man ufacturer or its serv ice agent or a
similarly quali fied person in order to avoid a
hazard.
Remove the door to the washing compartment when
removing an old dishwasher from service or discarding it.
Please dispose ofpacking m aterials properly.
The dishwasher is not intended for outdoor use.
During installati on, t he power su pply must n ot
be exces sively or dangerously bent or flattened.
Do not tamper with controls.
The appl iance is t o be connected to th e water
mains using new hosesetsand that old hose-sets
should no t be reused.
Themaximum nu m b er of pl ace sett ings t o b e
washed is10.
Themaximum pe r miss i bl e inle t wa t er pres s ur e i s
1Mpa.
Themini mum permiss ible inl et water pr es sure i s
0.04Mpa.
1
Page 5
Dispose o f the d ishwasher packaging mater ial corre ctly.
All packagi ng mate rials ca n be rec ycled .
Plastic pa rts ar e marked w ith th e standar d internat ional a bbreviation s:
PE for polyethylene, e.g. s heet wrapping materia l
PS forpolystyrene,e.g.padding m aterial
POM polyoxymethylene, e.g. plastic clips
PP polypropylene , e.g. Salt filler
ABS Acrylonitri le Bu tadiene Sty rene, e.g. Control Panel .
Packagingmaterialcouldbe dangerousforchildren!
For di sposing of pa ckage a nd thea ppliance please goto a re cycling centre. Therefore cut
offthepowers upplycableandmakethe door closing deviceunusable.
Cardboard packagingismanufactured from recycled paperandshould be disposedin the
waste p aper collec tion f or recy cling.
By ensurin g thi s product is disposed of correctly, you wil l help pre vent po tential n egative
consequences for the e nvironment and human h ealth, w hich cou ld otherw ise be c aused
byinappropriate wastehandling of thisproduct.
For m ore deta iled infor mation a bout rec ycling o f this product, please con tact your local
city office and your hou sehold w aste dispos al servic e.
DISPOSAL: Do not dispose this product as unsorted m unicipal waste. Collect ion of such
waste separa tely forspecial tr eatment is necessary.
2
Page 6
Toget the bestperformance fr omyourdishwasher,read all operatingins tructions
beforeusing it for the first time.
Rinse
Aid
Salt
Aid
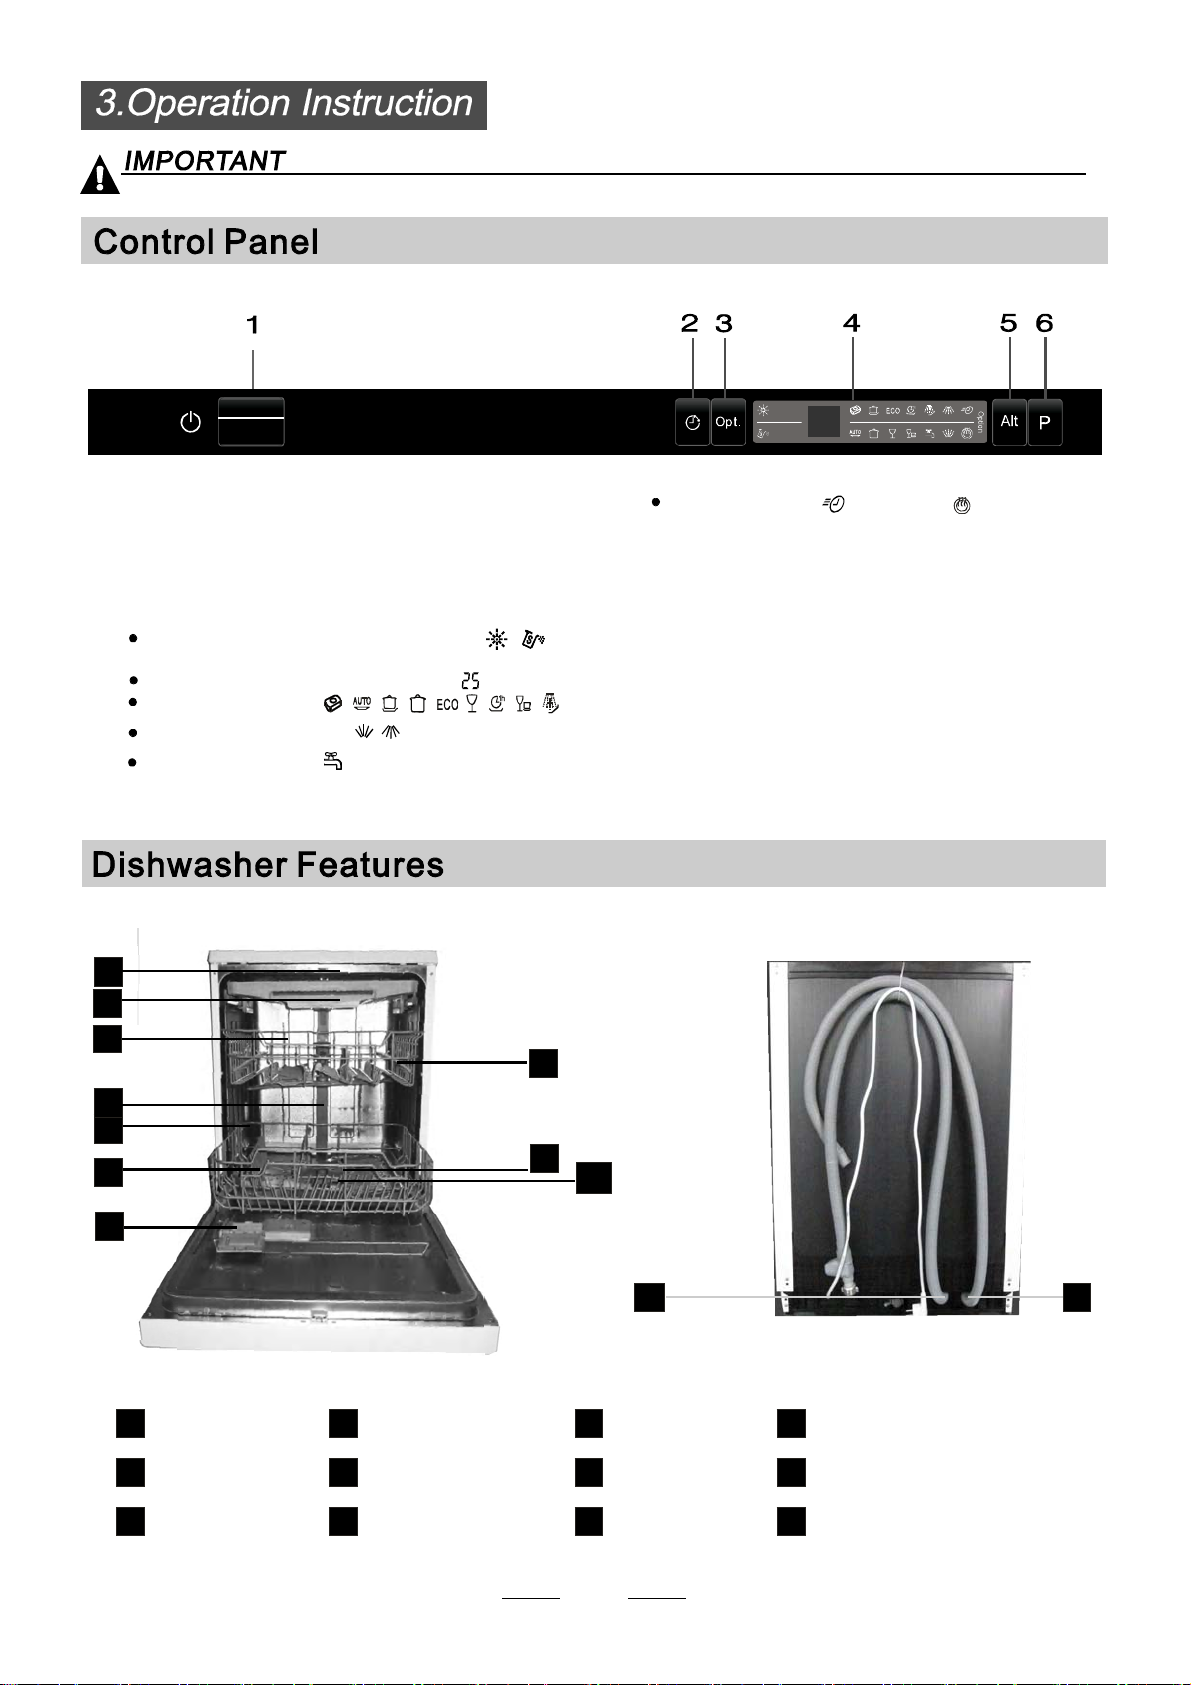
1.On/Off Butto n: To turn on/off the power supply.
2.Delay Butt on : ToPr ess the button to delay.
3.Option Bu tton: to press this button to sel ect a e xpr ess
or extra drying
4.Display screen: to sh ow the error code,delay t ime etc.
Rinse Aid indicato r,Add salt ind i cator:
Indicates w hen the dispenser needs to be ref illed.
Delay t ime or err or codes in di cator:
Program indicat ors:
Alt functions indicator:
InfallWarningLight :
Being on Whe n fauce ts is not opened.
Front view
1
2
3
8
Option Indicator:
Expressc anbeuse whenchoose IntensiveNormal
Eco G lass .
Extra dryingcan b eusewhen choose Intensive
Normal Eco Glass 1hour.
5.
Alt Button : Dual zone wash function, press the
button to sel ect either upper bask et or l ower ba sket
loaded.
6. Program B utton : To Press the bu tton t o select a
washProgram.
(Express)
Back View
(Extra dryi ng)
4
5
6
7
Topspr a y arm
1
Cutlery rack
2
Upper basket
3
Inner pipe
4
Lower basket
5
Salt co nta in er
6
9
10
Dispenser
7
Cup sh elf
8
Spra y arm s
9
3
11
Filt er assembl y
10
11
Inlet pipe connector
12
Drainpipe
12
Page 7
Before using you r dishwa sher for the first time:
A. Set the water soften er
B. Add1.5Kgdishwasher sa lt an d then full fill t he sal t con tainer w ith w ater
C. Filltherinseaiddispenser
D. Fill in detergen t
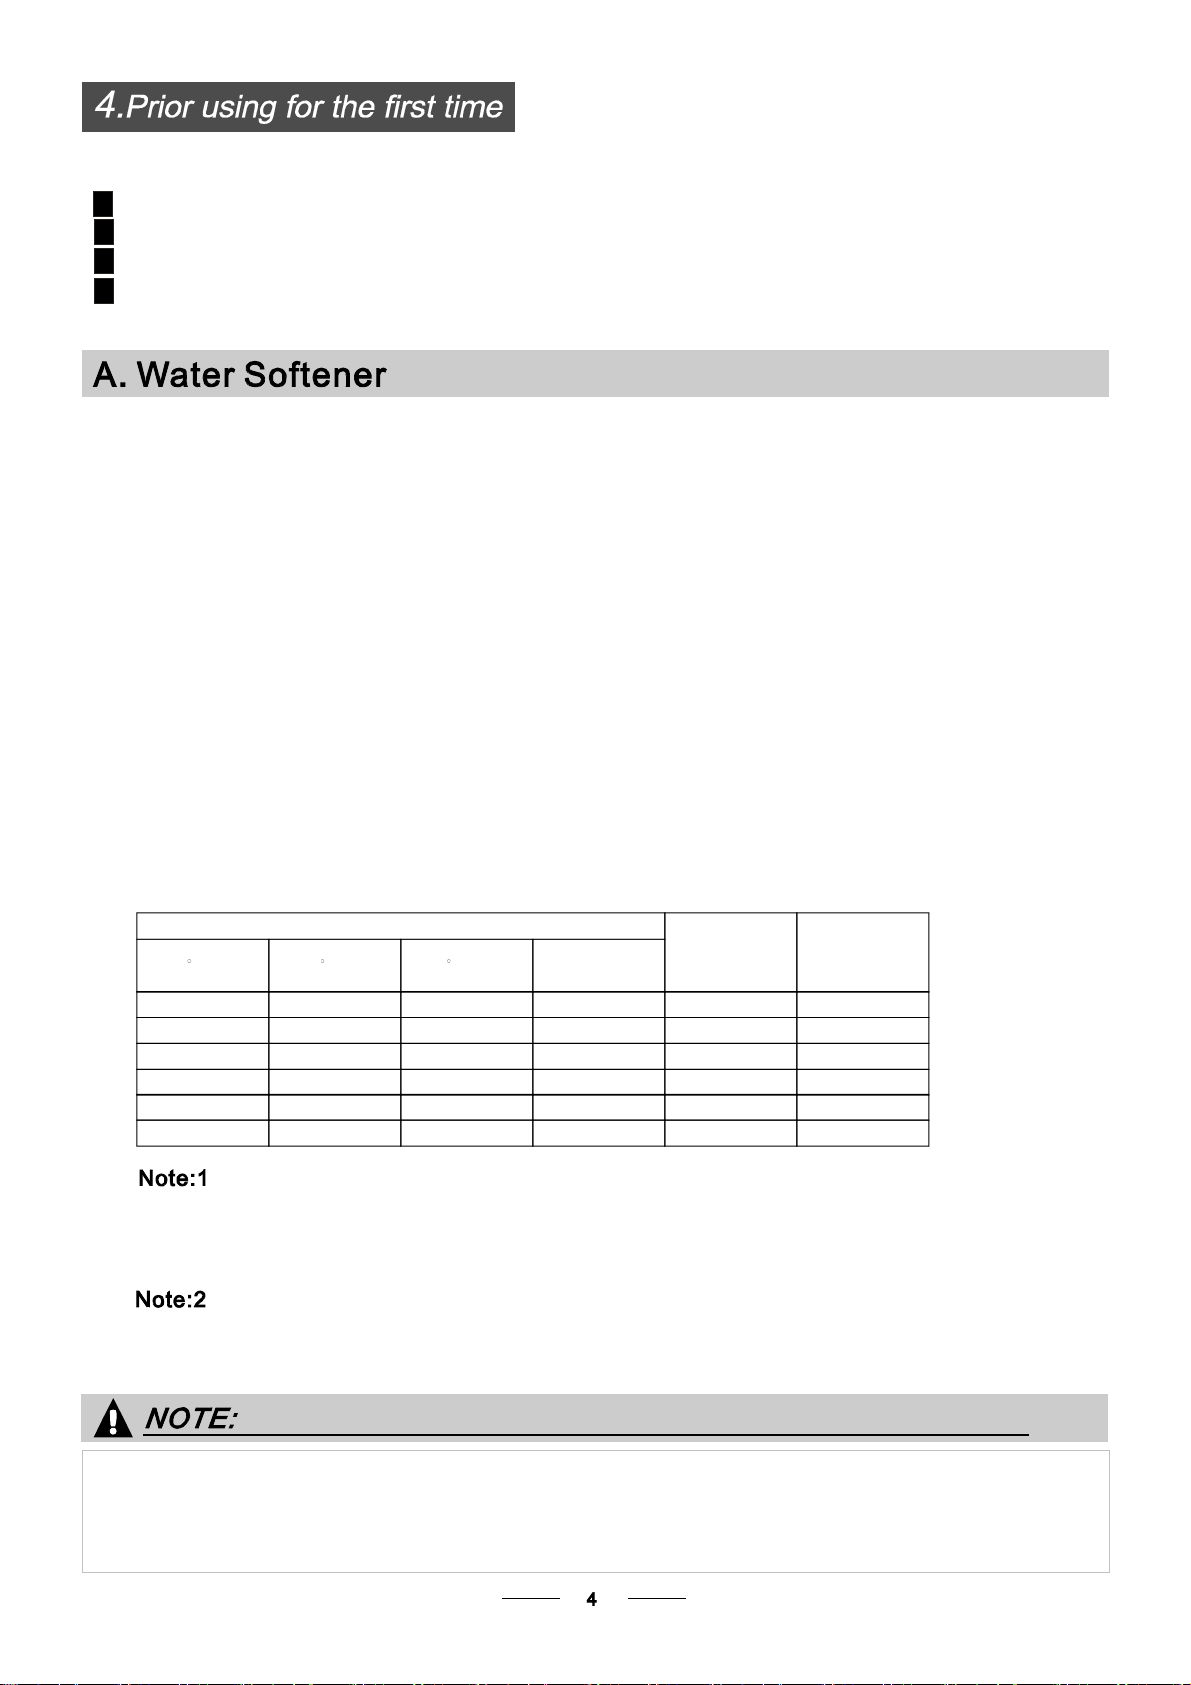
The water soften er must be set m anually, using the w ater ha rdness di al.
The water soften er is des igned to remove min erals an d salts from the water, wh ich woul d have
a detrimental o r adverse effect on the operation of the app liance.
The higher the content of these minerals and salts , the har der your water is .
The softener sho uld be adjusted accord ing to the hardness of the wate r in you r area. Yourlocal WaterA uthority
can advise youon thehardness o fthewater inyour area.
Adjusting Salt Consumption
The dishwasher is designed to allow for adjustment in the am ount of salt co nsumed bas ed o n the ha rdness of
the waterused.Thisis intendedto optimiseandcustomisethelevel o f saltconsumption.
Pleasefollowthestepsbelowfor adjustment insalt consumption.
1. Open the door ,Sw itch on the applia nce;
2. Press the Program button for m ore than 5 second s to start the w ater soft ener
set mod el withi n 60sec onds afte r the a ppliance was switched on( The Salt a nd
Rinseaidwarning lights willbe on periodicallyw henitg et inthe setmodel );
3. Press the Program button to select the proper set acc ording t o your local envi ronment,
the sets w ill change in the following sequence: H1- >H2->H3- >H4->H5-> H6;
4. Press the Power b utton to end the set up model.
WATERHARDNESS
dH
6-11
12-17 2.1-3.0
18-22 31-40 22-28 3.1- 4.0
23-34 4.1-6.0
35-55 61-98 43-69 6.1- 9.8
dH=1.25Clarke=1.78 fH=0.178mmol/l
1
fH
0~90~5 0~0.94
10-20
21-30
41-60
Clarke
0~6
7-14
15-21
29-42
mmol/l
1.0-2.0 H2 9
Selector Position
H1
H3
H4
H5
H6
Salt consumption
(gram/cycle)
0
12
20
30
60
DH: Germ a n deg ree
fH: Frenchdegree
Clark: Britishdegree
The manufa ctory s etting: H4 (EN 50242)
Contact your local water board for inf ormation on the har dness of your water su pply.
If yo urm odel doe sno t have any water softener,you may s kip this section.
WATER SOFTENER
Thehardness o f the wa ter varie s from p lace to place. If hard water i s used i n the di shwasher, deposits w ill
form on the dishes and utensils.
Theappliance i s equipp ed with aspecial soften er that uses a salt container spe cifically designed to el iminate
lime an d mi nera ls fr om the wat er.
Page 8
Always use the salt i ntended f or u se with dishwasher.
The salt c ontain er is l ocated beneath the lower bas ket and should b e filled a s e xplained
inthe f ollowing :
Attention!
Only use salt spe cifi cally desi gned for t he use i n dishwa shers! Every other type of
salt not specifically de signed fo r the u se in ad ishwa sher, especially t able salt, will
damage the w ater softener.I n caseof dama ges caused by the use of un suitable
salt the manufacturer doe s not g ive anywarranty nor is li able for any damage s caused.
Only fill wi th salt justbefore starting one of the co mplete wa shing pro grams.
This will p revent any grains ofsalt or salty wate r,wh ich may have b een spi lled,
remaining on the bottom o f th e machi ne for any period of time, which may cause
corrosion.
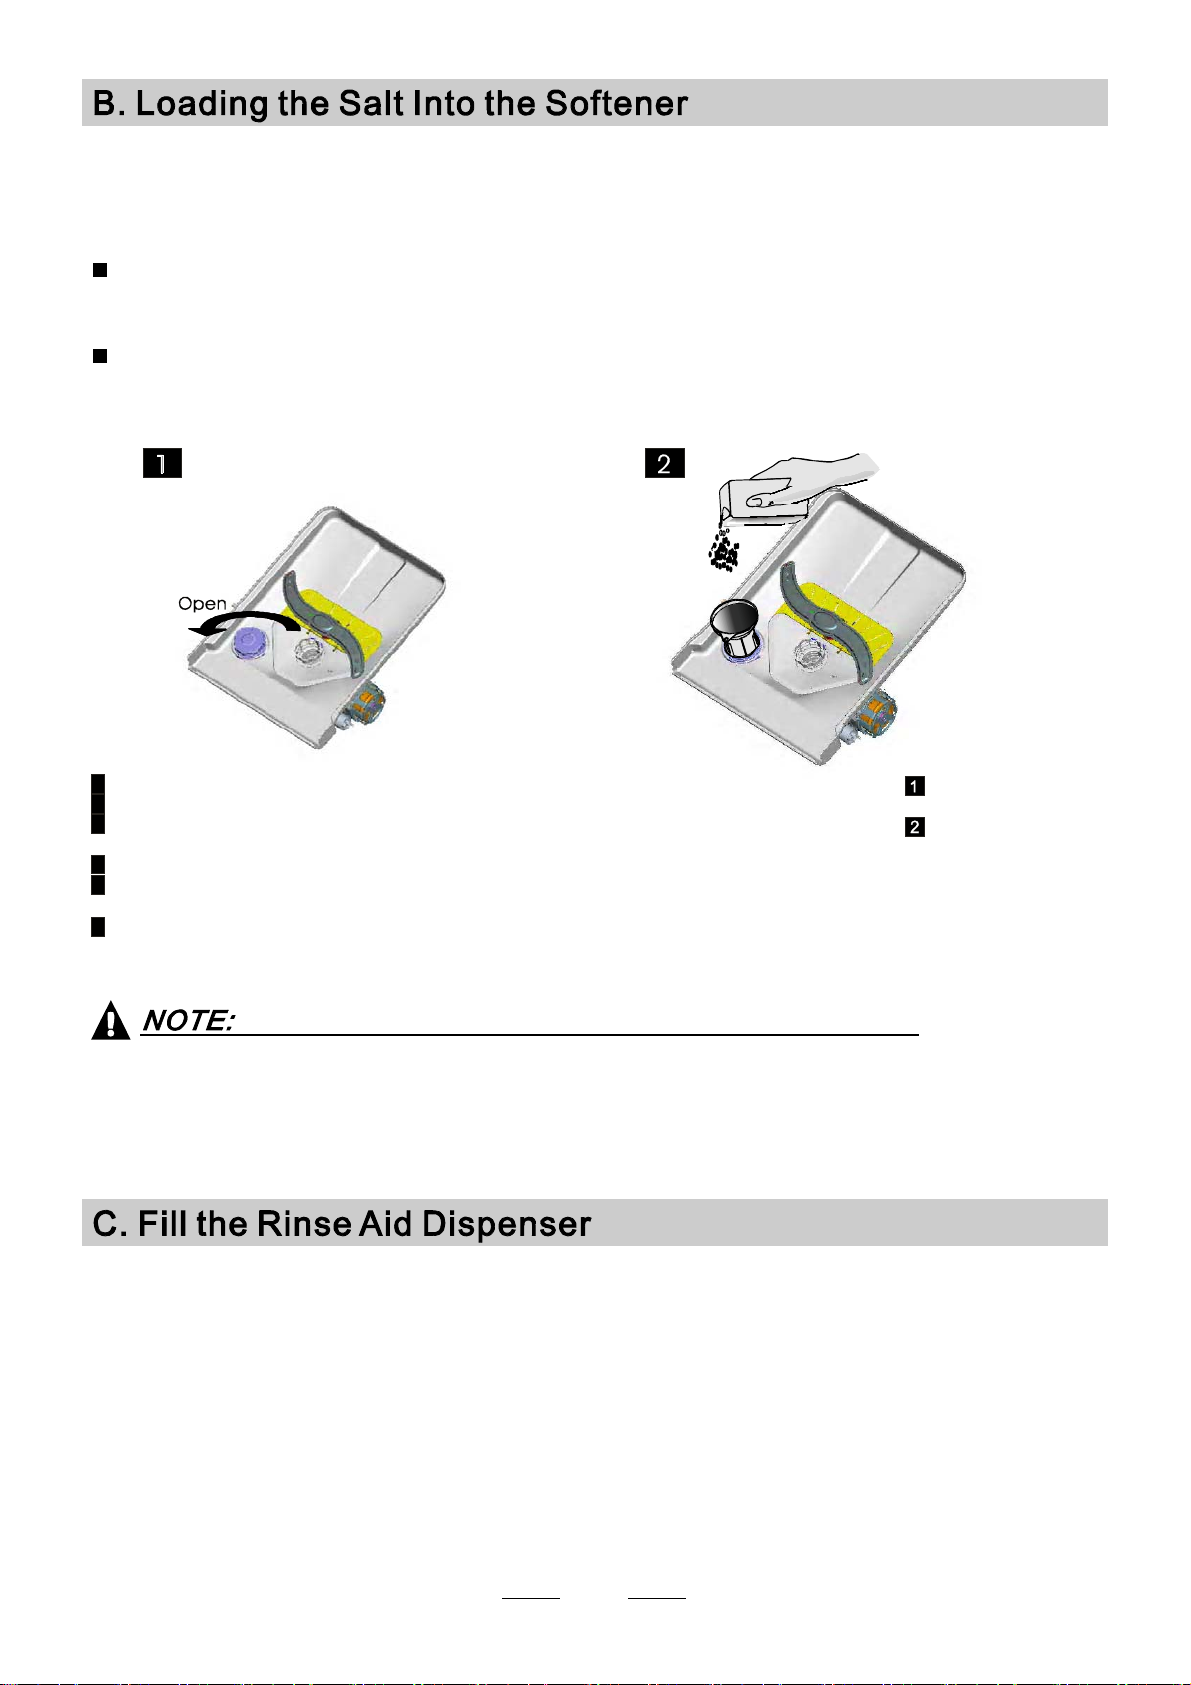
A After th e low er ba sket ha s be en re moved, unscrew and remove the cap from the salt conta iner.
B Place the en d o f the fu nnel ( supp lied) i nto t he ho le a nd in trodu ce abou t 1.5 kg o f dis hwasher salt.
C
Fullfill the saltcontainer with w ater,It isnormalfor asmallamount of water to comeout ofthe
salt cont ainer.
D Afte r fil ling th e co ntainer , screw th e c ap t ightly b ack clockwise.
E The saltwarning light will stop being after thesaltcontainer hasbeenfilledwith salt.
F Immediately a fter f illin g t he salt into th e salt container, a w ashing program should be started
program O therwise the filt er sy stem, pump or other im portant parts ofthe ma chine m ay be damaged
bysalty water.This is outof warranty.
).
1.The salt con tainer mu st only be refil led when the salt warning light in the cont rol pan el comes on.
Depending on how well t he salt dissolve s, the s alt warni ng light may still be on even though the
salt container is filled.
If there is n o salt warning li ght in the control panel (for some Models),you can estimate when to f ill
the salt int o the so ftener by the cyc les that the dishw asher has run.
2. If there a re spills of the salt, a soak or a rapid program should be run to remove the excessive salt.
(Wesuggest to use a short
RinseAid D ispenser
The ri nse aid is rel eas ed d uring the final rin se to preve nt water fro m forming droplets on yo ur dis he s, wh ich can
leave spots andstreaks. It also improves dry ing by allowing water tor oll offt he di shes. Your d ishwasher i s
designedto use liquidrinseaids.The rinse aid dispenserislocatedinsidethedoor nexttothedetergentdispenser.
To fil l the dispens er, open the c ap an d pour the rinse aid in to th e d ispe nser until the le vel i n dicator turn s c omplete ly
black. The volume of the rinseaidcontainer is about 110ml.
Function of Rinse Aid
Rinse aid is automa tically a dded during t he last rinse, ensuring thorough rinsing, and spot an d s treak fr ee drying.
Attention!
Only usebranded rinse aid fordishwasher. Never fillthe rinseaiddispenser with any other substances
(e.g. Dishwasher cleaning ag ent, liq uid d eterge nt). Th is would damage t he app lian ce.
5
Page 9
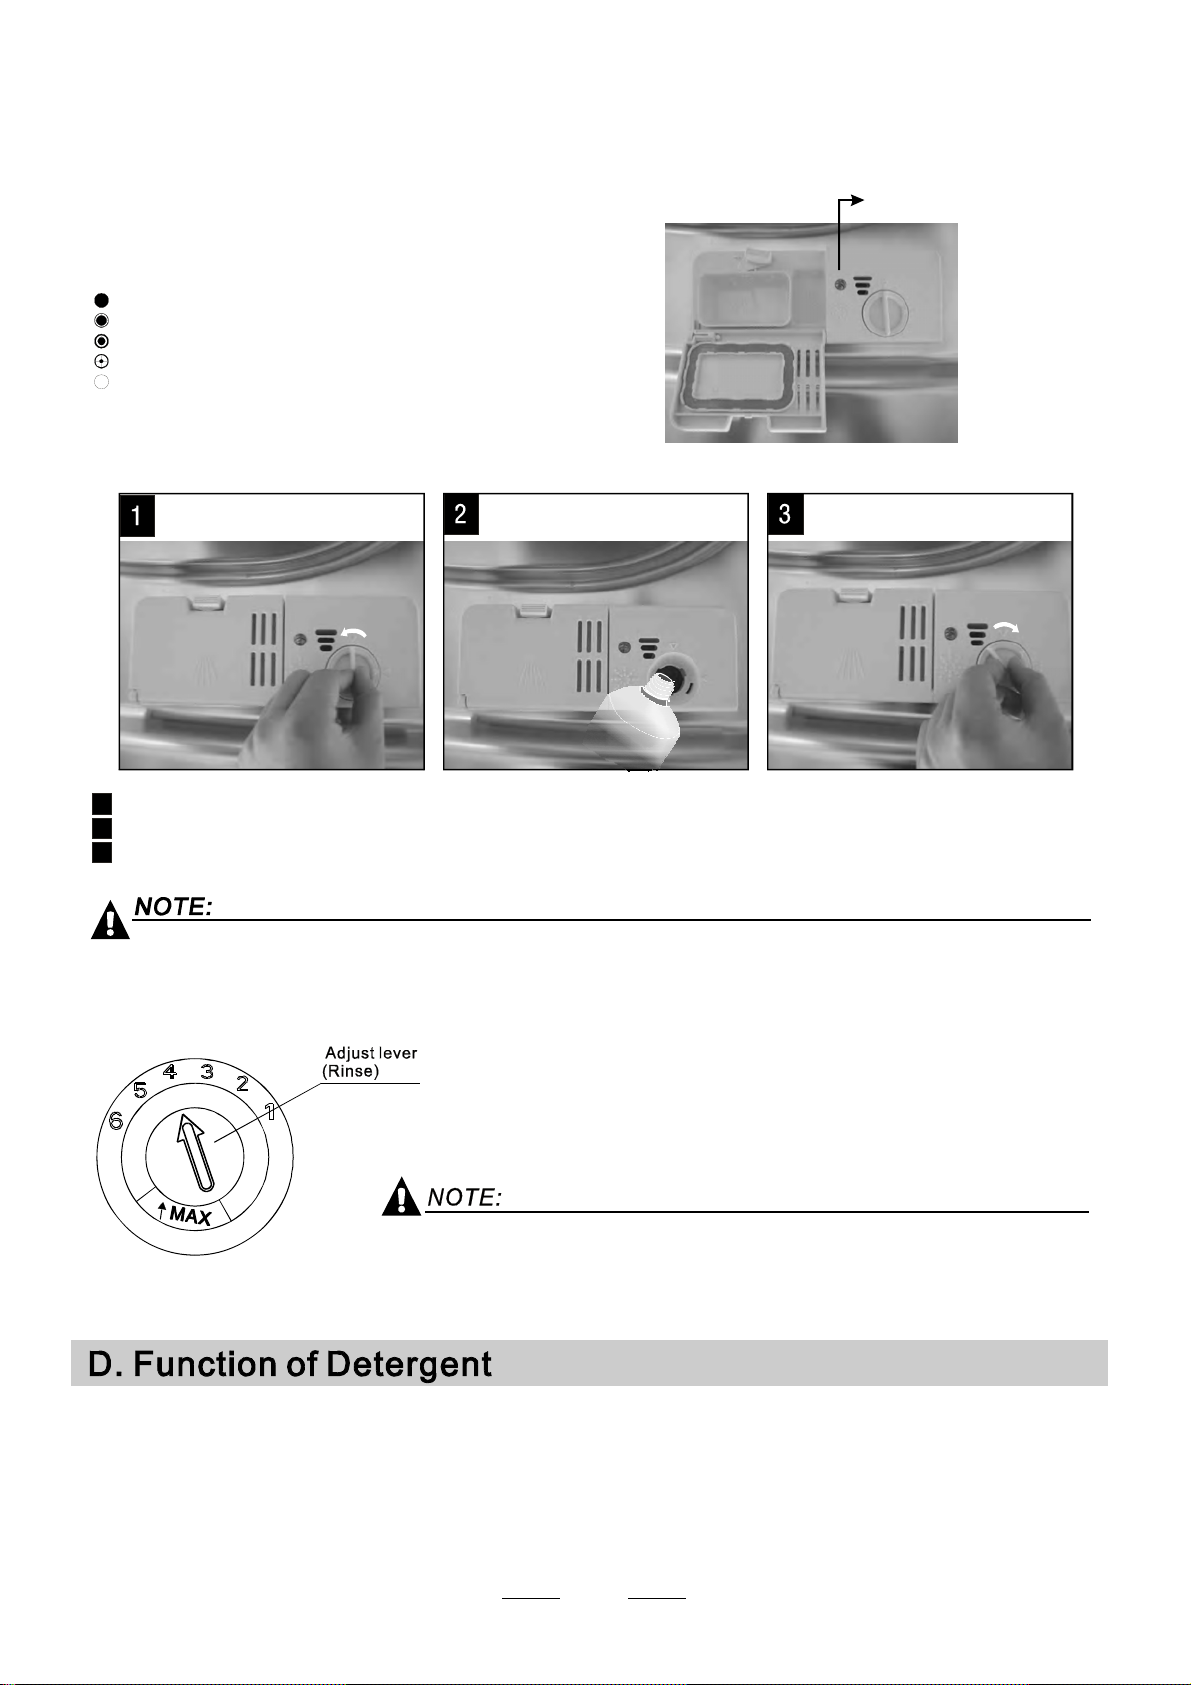
WhentoRefill the RinseAid Dispenser
Ifthere is no rinse-aid warning ligh t in thecontrol p anel, you can estimat e the amount from the colour
ofthe opti cal level indicator C located ne xt to t he cap. When the rin se-aid c ontai ner is ful l, the whole
indicator will be dark .As the rinse-aid diminishes, t he size o f the dark dot de creases. Youshould never let
the ri nse aid l ev el fall 1 / 4 ful l.
Asthe rinse aid dimin ishes, th e siz eof the black dot
ontherinseaid level indicator changes,as illustrated below.
Full
3/4full
1/2full
1/ 4 full- Should refillto eliminatespotting
Empty
""
C (Rinse-Aid indicator)
To op en the dispen ser, tur n the cap to the "open" ( left) arrow a nd lift it o ut.
1
Pour t he ri nse aid into th e dis pen ser, being caref ul n ot to ov erfill .
2
Replace the capby inserti ng it a ligned with "open" arrow and turning it t o the cl osed (righ t) arrow.
3
Cl ean up an y r inse aid spi lled w hile dur in g f illingwith an ab sorb ent c loth to avoid ex cess ive f oamin g
during the next wash.
Don't for get to re place the cap be fore you close dis hwasher do or.
Adjusti ng RinseAid D ispense r
The rinse aid dispe nser ha s six or four s ettings. Always start wi th the d ispens er
set on "4". If spots and poor drying are a proble m, increa se t he amoun t of r inse
aid dispensed b y removing the d ispe nser li d and r otating the dial to "5". If the
dishes st ill are notdrying properly o r are show spots, a djust th e di al to the next
higher lev er until your dish es are spot-free. The recommend ed setti ng is "4".
(Factoryvalue is "4".)
Increase the dose if thereare dropsof waterorlimespotson thedishesafterwashing.
Reduce it if thereare sticky whitish stainson your disheso ra bluish filmonglassware o r
knifeblades.
Detergents with its chem ic al ingred ients are ne cessary t o rem ove dirt,crus h dirt an d transport it out of the di shwasher.
Mostof the commercial qualitydetergents are suitableforthis purpose.
Attention!
ProperUse ofDetergent
Useonly det ergent s pecifically m ade for the use i n dis hwashers. K eep yourdetergent fr esh and dry.
Don't put powdered detergentinto thedispenseru ntil you're ready towashdishes.
6
Page 10
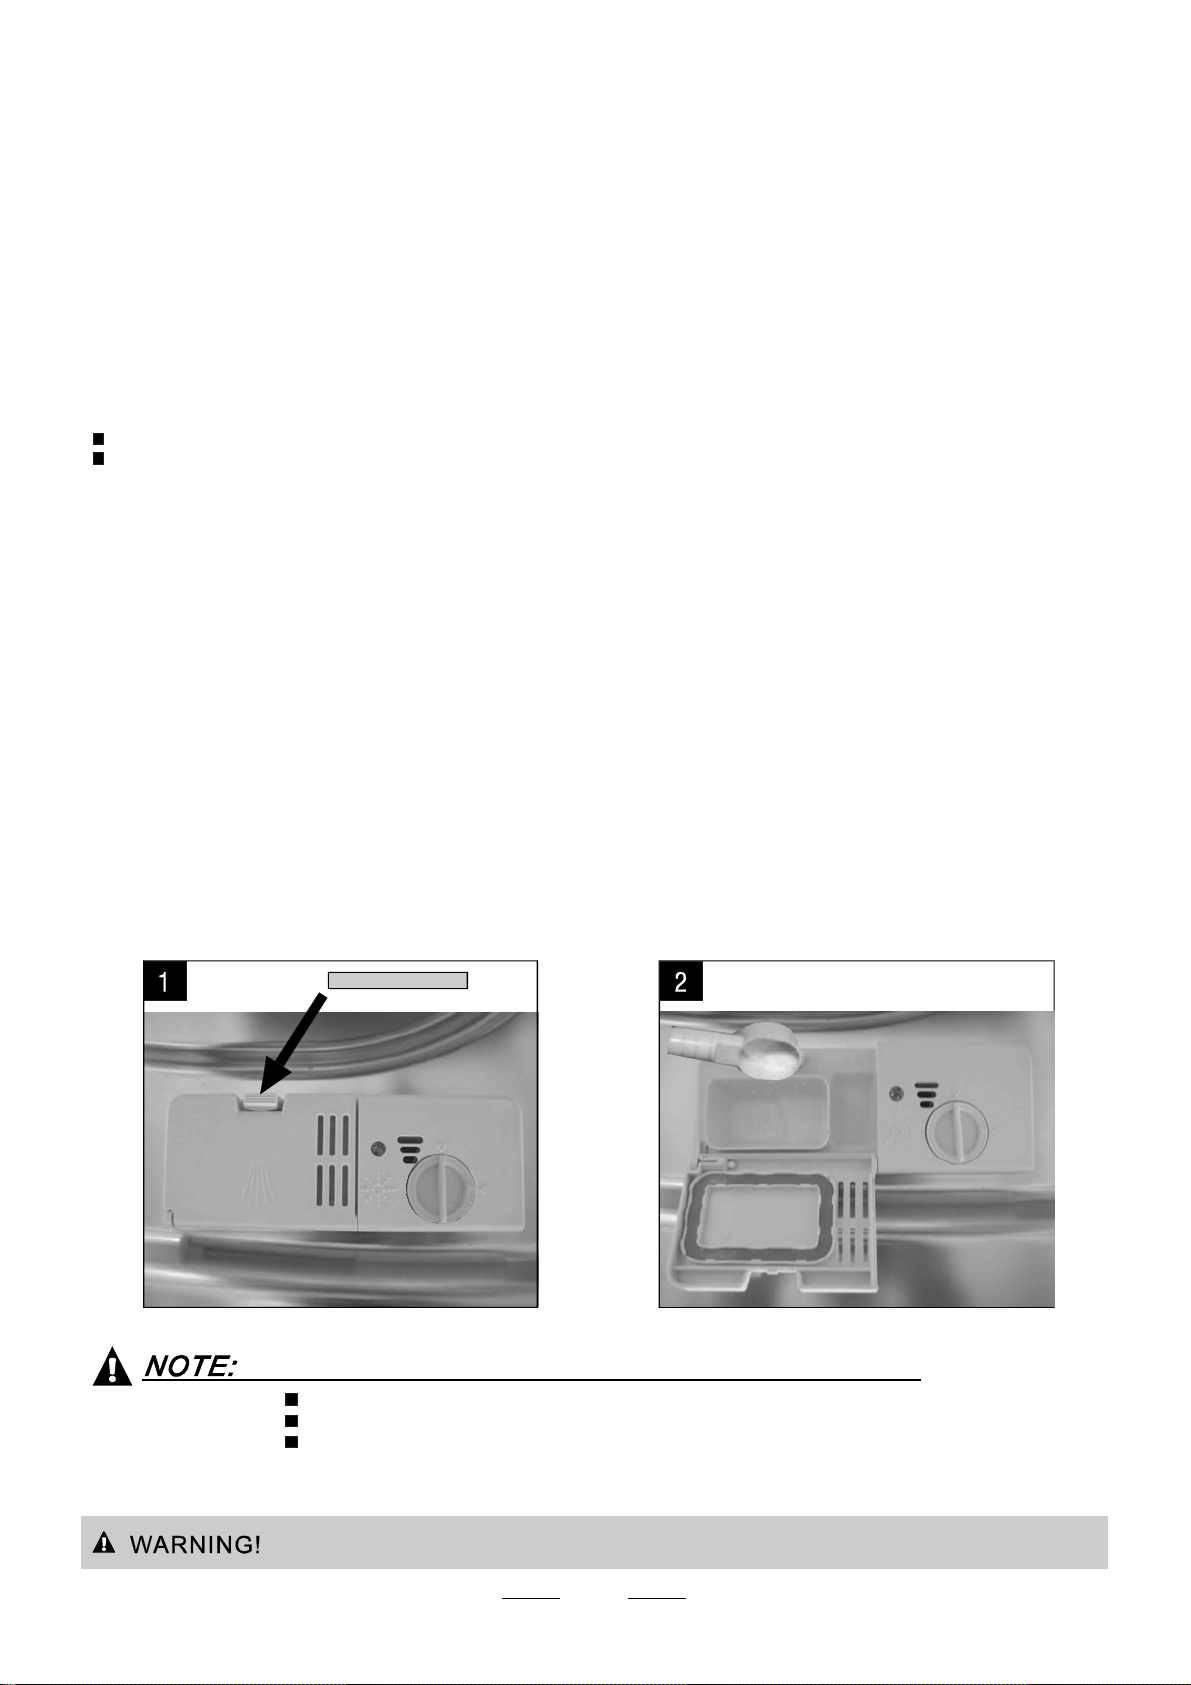
Deterg ents
The rear e 3 sor t s of detergents
1.Withphosphate and withchlorine
2.Withphosph ate andwithout c hlorine
3.Withoutph osphate and without chlorine
Normally new pu lverised detergent is without phos phate. Thus the water so ftener fu nction o f
phosphate is not given. In this c a se we recomm e nd to fi ll s a l t in th e sa lt contai n er even when
the hardness of water is o nly 6 d H. If detergents w ithout phosp hate are used in the case of hard water
often white s pots app ear on d ishes an d glasse s. In th is case please add m ore d etergent to reach
better r esults. D eter gent s withou t ch lorin e do on ly bl e ach a li ttle. Strongand co l o u red spots wi ll no t
beremoved completely.I n thi scase p lease ch oose a p rogram with a hi gher temperature.
°
Concentr ated Deterge nt
Basedon theirchemicalcomposition, detergentscanbesplit in twobasictypes:
conventional,alkalinedetergentsw ith caustic components
lo w alkaline conce ntra t ed d eter ge nts with natu ral e nzym es
DetergentTablets
Detergenttabletsofdifferentbrands dissolveat differentspeeds. Forthisr easonsome
detergent tablets ca nnot dissolve and develop their fu ll cle aning power during short
programs. There fore please u se l ong prog rams wh en usin g deterg ent table ts, t o
ens ure t he complete removal of d e terge n t re sidu als.
Detergent Dispenser
The dispenser m ust be re filled be fore the start of e ach was h cycle f ollowing the instructions
provided in t he w ash cycle ta ble . Your dishwa sher uses less detergent and rinse aid than
Conventionaldishwasher.Generally, only one tablespoon ofdetergent is needed for
anormalwashload.Moreheavily soiled itemsneedmoredetergent. Always add the
detergen t j ust b e fore starting the dishwas her, othe rwis e it coul d g et da mp and w ill not
dissolv e pr operly.
Amountof Detergentto Use
Push latch to open
If the lid is closed: press release button.The lid will spring open.
Always add th e detergent just before st arting ea ch wash cycl e.
Only usebranded detergentaid for dishwasher.
Dishwasher de tergent i s corrosive! Takecare to keepit out of reach of c hildren.
7
Page 11
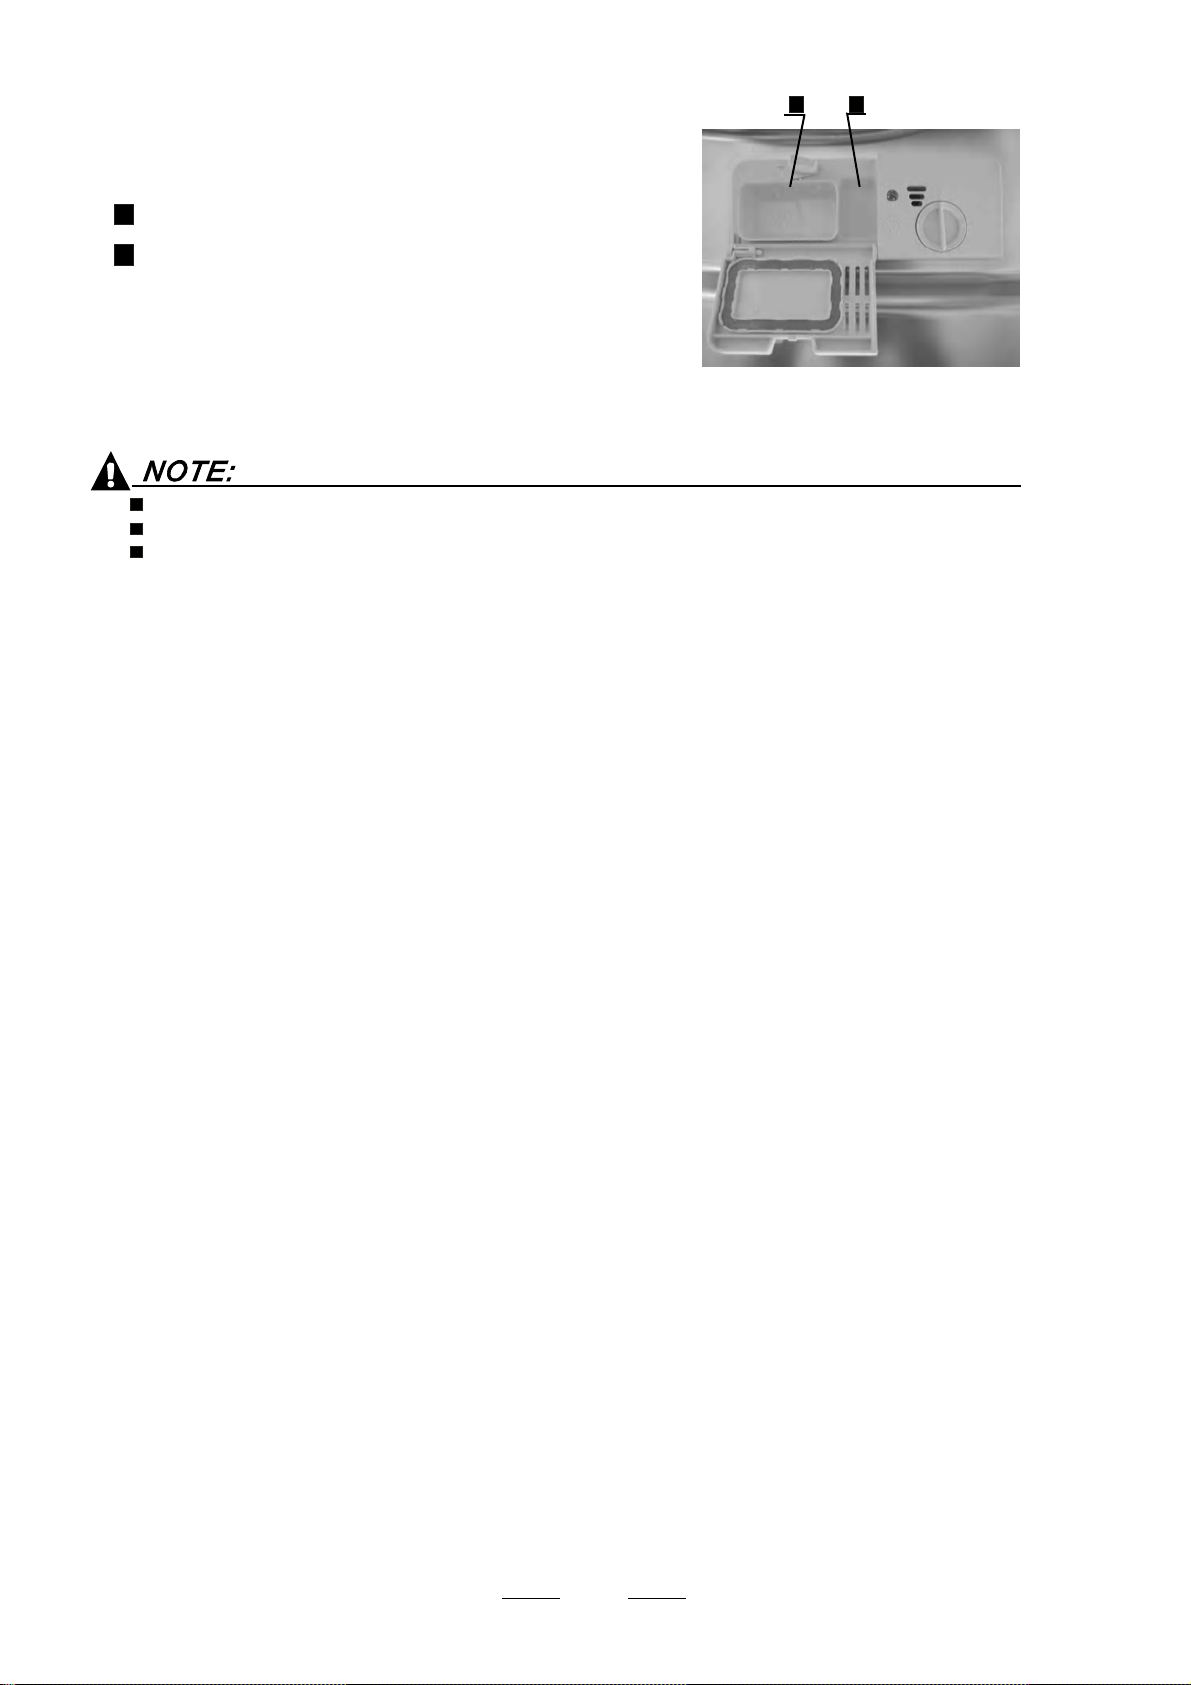
Fillin Detergent
Fillthe de tergent disp enser w ith deter gent.
The marking i n d icates th e dosing l e vels , as
illus t ra ted on t he ri gh t:
The place o f main w ash cycle de tergent placed.
A
The place o f pr e-wash cycle det ergent place d.
B
Pleaseobserve th e manu facturers do sing and storage
Recommendationsas stated on thedetergent packaging.
Closethe lid and pressuntil i t locks in place.
If the dishes a re heavily s o il ed, place anad ditio nal
detergent do sein the pre-wash det ergent chamber.This d etergen t will take effect durin g the pre -wash p hase.
Youfind i nformatio n about the amount o f de tergent for the single programme onthe last page.
Please aw are, tha t accordi ng t othe lev el soiling and the specific hardnes s of waterdifference sare possib le.
Please observe themanufacturer'srecommendations onthe detergentpackaging.
A
B
8
Page 12
Considerbuying utensilswhich areidentifiedas dishwasher-proof.
Use a mild detergent thatis describedas 'kind to dishes'.If necessary,seekfurther
information from thedetergentmanufacturers.
Forparticularitems, select aprogramwithas low a temperatureas possible.
To prev ent damag e, d o no t take gla ss a nd c utl ery out of the d ishw ashe r immediat ely
after t he p r ogram me h as e nde d.
Are not sui table
Cutlerywithwooden, hornchina or
mother-of-pearl handles
Plastic ite ms that are not h eat resis tant
Older cutl ery with glued parts t hat a re not
temperatureresistant
Bonded cutl ery ite ms or dishes
Pewter or cooper items
Crystal glass
Steel items subject t o rusting
Wooden platters
Items made fromsyntheticfibres
(For best perf ormance of the di shwasher,follow the se loading guidelines.
Features and ap peara nce of baske ts and cutlery ba skets may var y fr om your mod el.)
Scrape off any large amount s o f leftover food. Soften r emnants of burnt f ood in pans.
It is no t necess ary to ri nse t he d ishes under running water.
Place objects in the dishwasher in following way:
1.Itemssuch as cups, g lasses, pots/pans, etc. a re faced downwards.
2.Curvedi tems, or ones with recesses, shoul d be loade d asla nt so th at water can run off.
3.Allu tensils a re stacked securely and can not tip over.
4.Allutensils are placed in t he way t hat the spray arms can rotate f reely during washin g.
Very sm all it ems should n ot be w ashed i n the dishwasher as they could eas ily fall out of the basket.
Are of limitedsuitability
Some types ofglasses c an become
dull after a large number of washes
Silver an d a lumi num part s ha ve a
tendencyto discolour duringwashing
Glazedpatterns mayfadeif machine
washed frequent ly
Load hollow it ems suc h as cup s, glasses, pans etc. With the opening facing downwards so that
wat e r canno t collec t in the c ontai n e r or a deepb a se.
Dishes anditemsof cutlerymust not lieinsideoneanother,or cover eachother.
To avoi ddamage to glasse s, they m ust not touch.
Load larg e ite ms which are most difficul t to c lean in to the lower basket.
The upper basket is de signed to hold more d elicate and lighter d ishware such as glasses , coffee
andtea cups
Long blad ed kni ves sto red in a n upr ight po sition are a potenti al haza rd!
Long and/or sharp itemsof cutlery such as carving knives must bepositione d
horizon tally in the upper b aske t.
Please do not ove rload yo ur di shwashe r. T his is important f or good results and for
reasonab le consu mption of energy.
To prevent water drippi ng fr om the uppe r basket into the lower baske t, we recommend tha t you
empty the lower basket first and t hen the upper ba sket.
9
Page 13
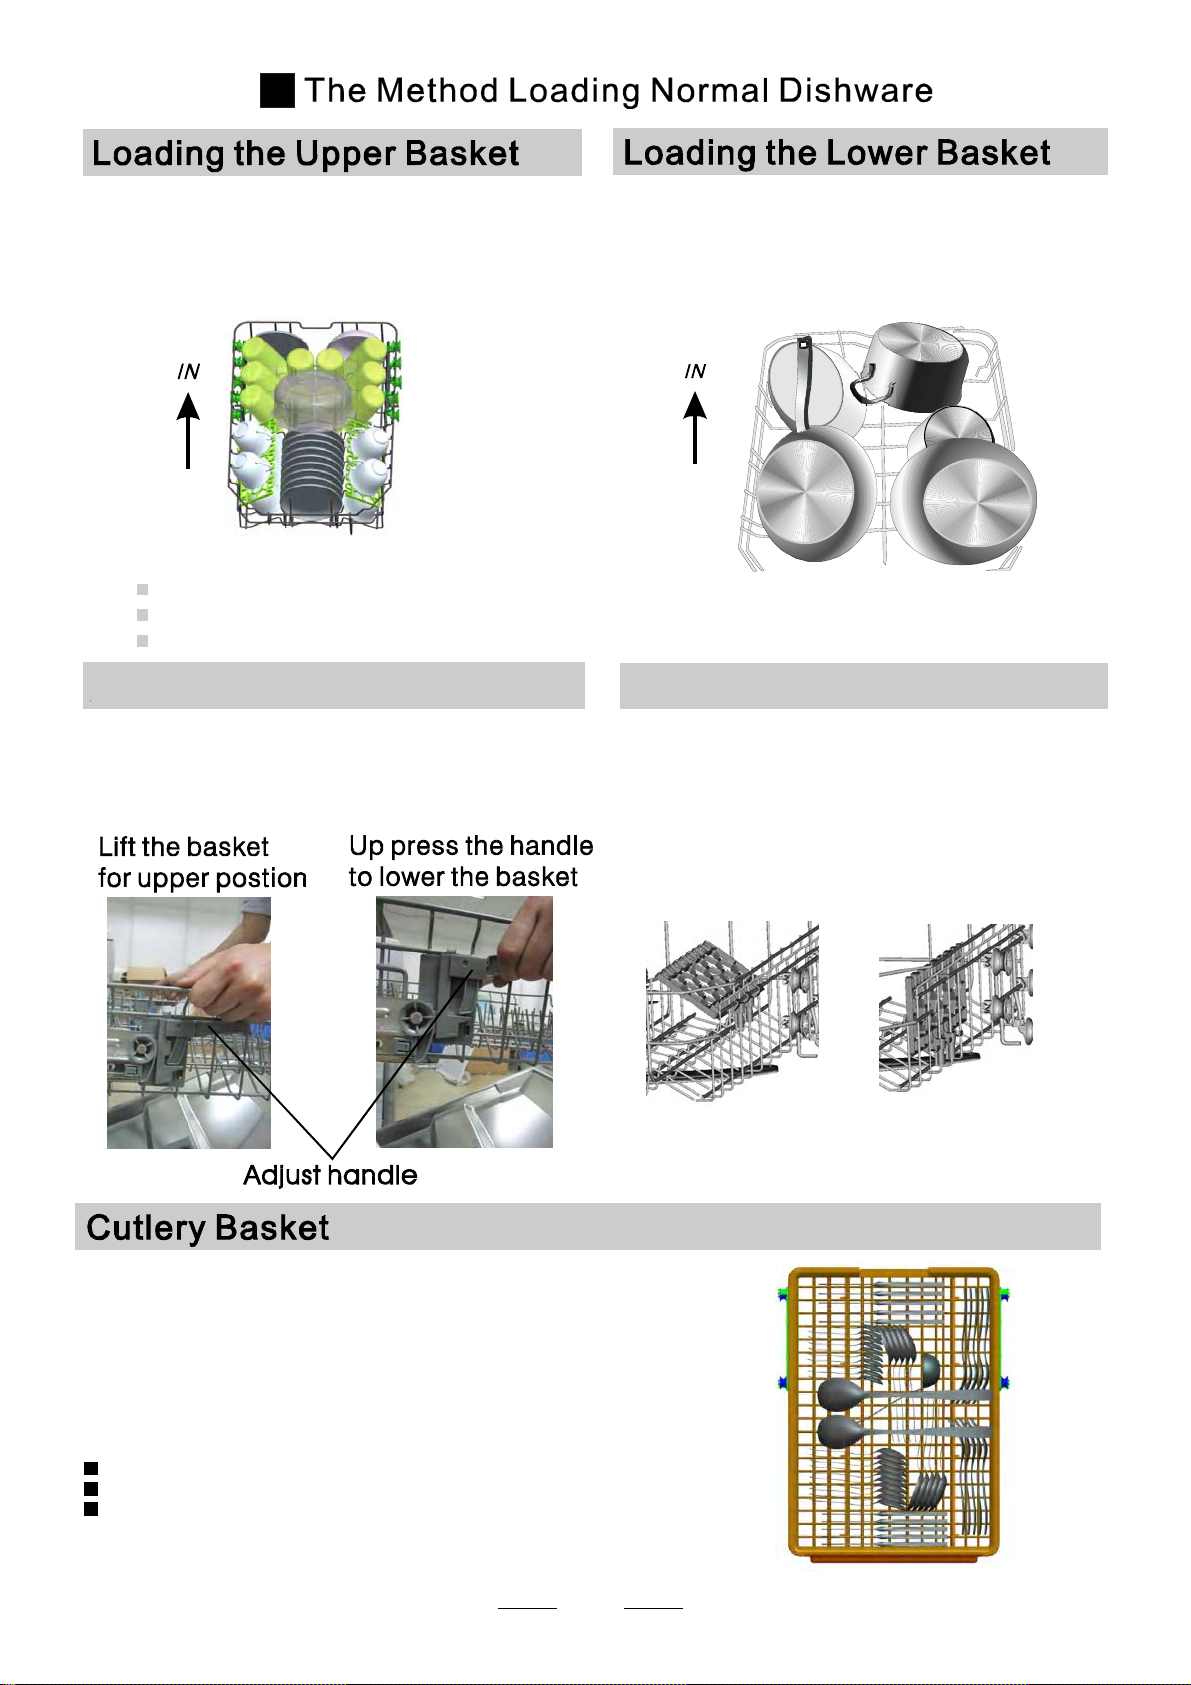
The u pper basket is designed t o ho ld more delicate
and lighter di shware such as glasses, coffee and
teacupsandsaucers,aswell as plates,smallbowls
andshallow pans(aslongasthey arenottoodirty).
Positionthe dishes andcookwareso that they will
notgetmoved by thespray ofwater.
Please be remin ded that :
Pots,servingbowls,etc,mustalwaysbeplacedtopdown.
D eep pots sh o u ld be slanted t o allow wate r to f low out .
The B otto m B ask et fe atur es folding sp ikes so tha t l arge r or more po t s an d p ans can be l o aded.
We sugges t tha t you pl ace large items and t he m ost
difficultto clean items are tobeplaced into the lower
basket: su ch as po ts, pans, lids, serving d ishes and
bowls, as show n in th e figur e bel ow. It is preferable t o
pla ce s ervi n g di shes a nd li ds on the s i d e of th e r a cks
in order to avoid blocking t he ro tation of the t op spray
arm.
Adju stin g the Upper Baske t
The height of the uppe r basket can be a djusted in order t o
create more space for large utensil s both for the upper
/lower ba sket. The hei ght o f the up per basket can be
adjusted by lift up the basket for the up per position, and up
press the handle tolower the upper basket, see the p ict u re
below:
Folding back the cup shelives
For better stacking of pots and pans,
the spikes can befolded down as
show in the picture right.
Cutleryshouldbe placed inthecutlery rackseparately
from each ot her i n th e ap propriate positions, and d o
make sure the utensils d o not nest together, this ma y
cause badperformance.
For a top quality cleani ng, place th e silverw are in the b asket
making sure that:
They do n ot nest together.
Silverware is placed wi th the maleface up.
Long utensils in the middl e.
10
Page 14
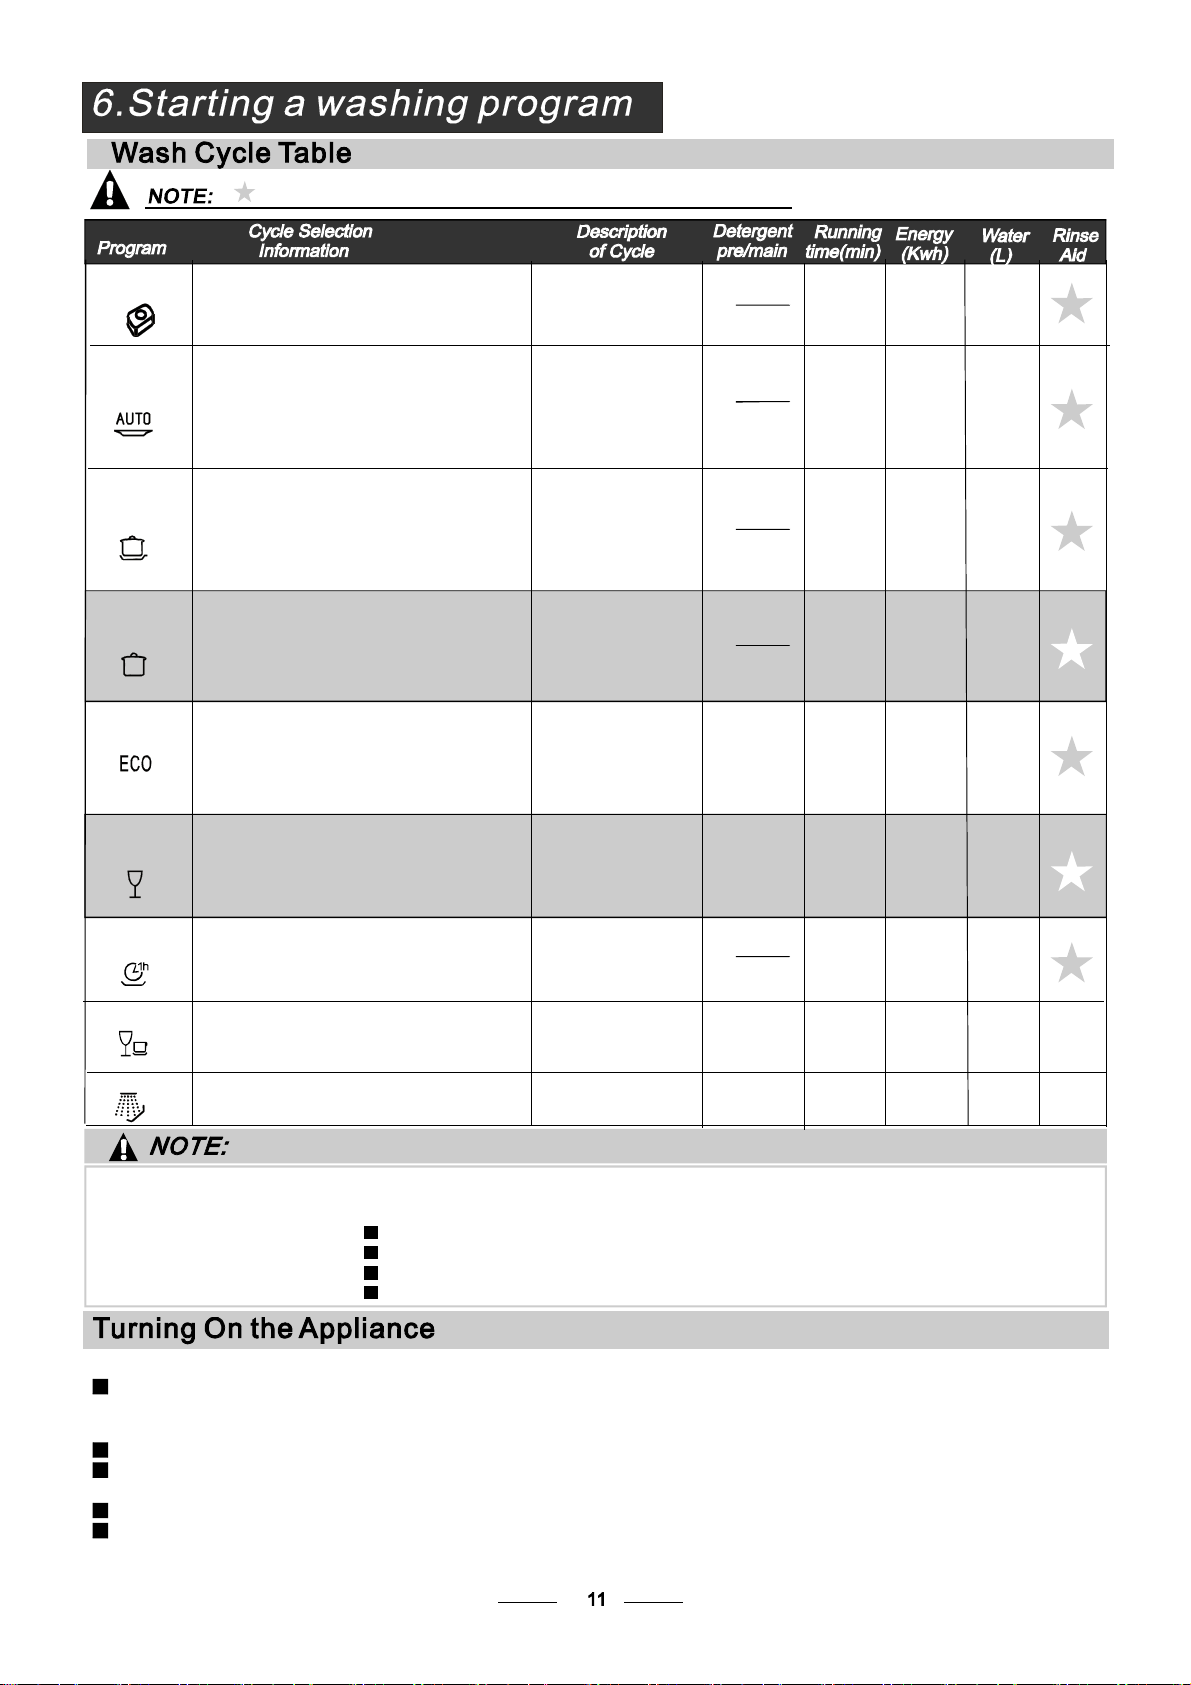
()
Means:need tofill rinseinto the Rinse-AidD ispenser.
All in 1
Auto
Intensi ve
Normal
Eco
(*EN 50242)
Glass
1Hour
Rapid
Soak
For normallysoiled l oads,
suchas , plates,glasses
pots
andlightly soiled pans.
Auto sensing wash, lightly,
normallyor heavily soiled
crockery, w ithorwithout
dried-onfood
For hea v i es t soi led cro c k ery,
andnormally soiled pots
pans dishesetc withdried
、
、
onsoiling.
For normallysoiled l oads,
suchas , plates,glasses
pots
andlightly soiled pans.
This is Standard programme, it is suitable
to clean normallys oiled tableware and
it is the most efficient programme in
teams of its combined energy and water
consumption for that type of tableware.
Forlightly soiled crockery
and gla ss
Forlightly soiled loadsthat
donot need excellent dry ing
efficiency.
Ashorter wash for lightly
soil e d loa d s tha t do not
need drying.
Torinse dishes thatyou plan
towashlaterthatday.
Pre-wash( 45 )
Wash (55 )
Rinse
Rinse (65 )
Drying
Pre-wash
℃
℃
℃
(45 )
℃
Autowash
(50 - 60 )
℃
Rinse
Rinse
(60 )
℃
Drying
Pre-wash(50 )
Wash (65 )
℃
℃
Rinse
Rinse
Rinse(55 )
℃
Drying
Pre-wash( 45 )
Wash (55 )
℃
℃
Rinse
Rinse (6 5 )
℃
Drying
Pre-wash
Wash (50 )
Rinse(65 )
℃
℃
Drying
Pre-wash
wash(40 )
℃
Rinse
Rinse(60 )
℃
Drying
Pre -wa sh ( 50 )℃
Wash (65 )
Rinse (55 )
℃
℃
Drying
Wash (40 )
℃
Rinse
Rinse (4 5 )
℃
Pre-wash
3/22g
(Or )3in1
3/22g
(Or )3in1
3/22g
(Or )3in1
3/22g
(Or )3in1
25g
25g
3/22g
(Or )3in1
20g
175
120~180
160
175
170
110
60 90.85
40
8
1.0
0.77~1 .1 2 8~12 .3
1.15
1.0
0.75
0.75
0.45
0.01
12
16
12
8.5
12
10
3.5
*EN 50242 : Th is p rogramme i s the test cycl e. T heinform ation fo r compa rability t est
in accordance with EN 5 0242, as follows:
Capacity: 10 setting
Position Upper basket: upper wheels on r ails
Rinseaid setting:6
Pl:0.49w;Po:0.45w.
Start in g a cycl e w ash
Draw out the lower and upper b asket, l oad the d ishes and pu sh them back.
1
It is co mmended to load the lower basket first, then the uppe r one ( see t he sec tion ent itled
“”
Loading th e Dishw asher ).
Pour in the detergent (see the section entit led Salt, Detergent and RinseAid ).
2
Insert the plug into t he socket. The power su pply is 2 20-240 VAC /50 HZ , the sp ecificatio n
3
“”
of the so cket is 1 0A 250VAC. Make sure that the wa ter supp ly is turned on to full pressure.
Open the door,p ress the ON/OFF Button.
4
Press the pr ogra m Button , the w ash progr am w ill be cha nged as fol lo ws directi on:
5
All in 1->Auto->Intensive->Normal->ECO->Glass->1Hour ;->Rapid->Soak
If a p rogram i s selected , the response light will light . Then c lose the door,the dishwasher
begins to start.
Page 15
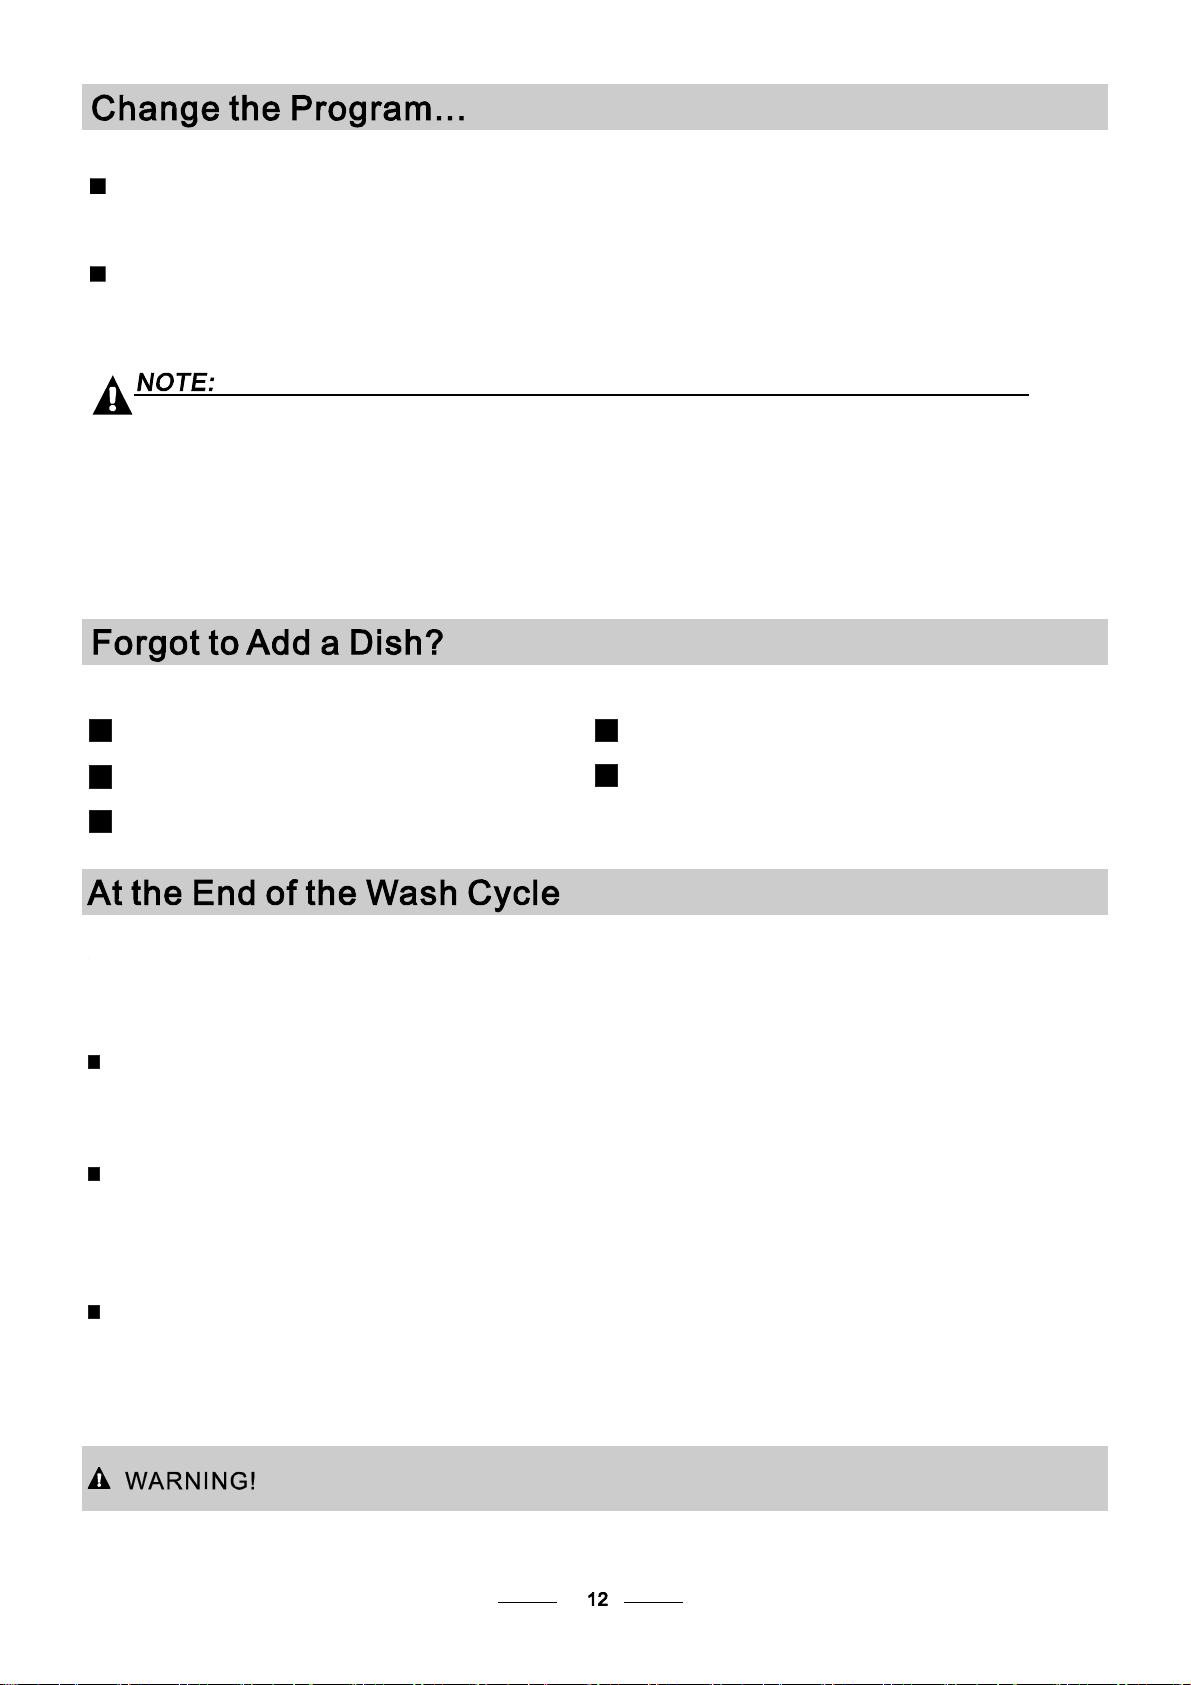
Premise:
1
Acycl e that is underw ay can on ly be modified if it has only been r unning for a s hort time. Otherwise, the
detergent m ay hav e alr eady be en re leased, a nd the appliance m ay have already drained the w ash wa ter.
If t his is the case, th e deter gent disp enser must be refi lled ( see t he sec tion ent itled " Loading t he
Detergent " ).
Open the door ,p ress the Program b utton , the mach ine w ill be in standb y sta te,
2
then yo u can ch ange the program to the desi red cycle setting (see the sect ion en titled "Starting a
wash cycle. . ." ).
more than 3 seconds
Ifyou open the door ,the machinewill pause. The programlightw ill
duringawashcycle
stopblinkingandthe buzzerwill mooing every minuteunless you close the door.After
you c lose the door ,the mac hine will keep on worki ng after 10 second s.
Aforgottendish can be added any time bef ore the detergent cup opens.
Open thedoor a little .
1
After the spray arms stop working, you can open the door
2
completely.
Add forgotten dishes.
3
When th e workin g cy cle has finished, the bu zzer of th e dishwa sher wil l so u nd for 8 seco n d s , th en stop. Turn o ff
the appliance using the ON/OFF b utton, shut off the wa ter s upply and op en t he door of the di shwashe r.
Wait for a few minutes bef ore unlo ading th e dishwa sher to a voi dhandlin g the dishes and ute nsils wh ile they
are still hot and m ore suscept ible tobreakage. The y will al so dry be tter.
Close the door
4
The dishwasher will run after 10 seconds.
5
SwitchOff the Dishwasher
The program light is off, only in this case the p rogram me has en ded.
1.Switchoff the dishwa sher bypressing the ON/OFF button.
2.Turnoffthewatertap!
Openthe door carefully.
Hot dishes are sensitive to knocks. The di shes shou ld ther efore be a llowed t o cool d own arou nd 15 minutes
beforeremoving from the appliance.
Open the d ishwasher's door,leave it ajar and wai t a few minutes before removing the dishes. In this way they
will be cool er and t he dryi ng will be improved.
Unloading thedishwasher
Itis normal that the di shwasher is wet insid e.
Empty the l ower ba sket first a nd the n the upper one. Thi s will avoid water dripping fro m the upper Basket on to
the dishes in the lower one.
Washth e arms in soapy a nd war m wa ter and use a sof t bru sh t o
cleanthe jets.Replace themafter rinsing themthoroughly.
When following this procedure from step1 to step 3, the filter system will be removed;
when following it from S tep 3 to Step 1, the f ilter system will be installed.
It is dan gerous to ope n th e door when was hi ng , be c a us e the hot wat e r may scald you.
Page 16
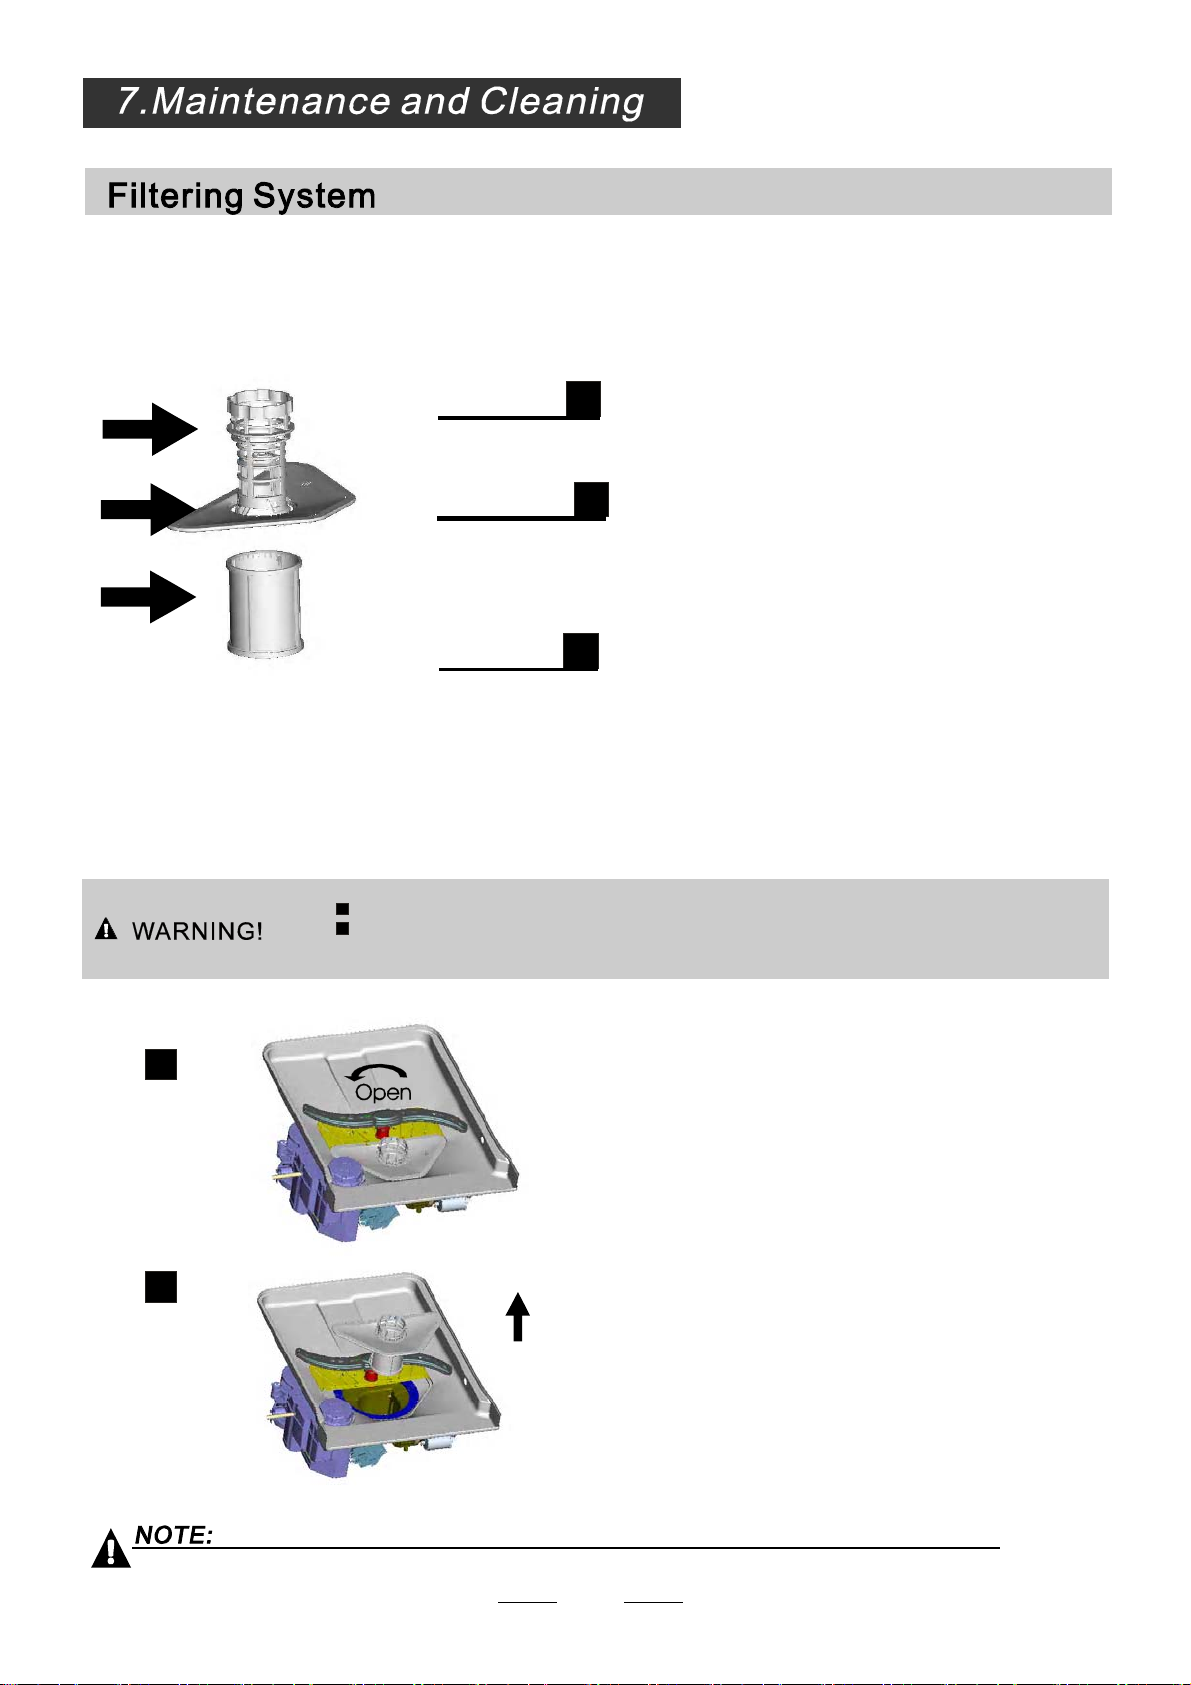
The filter prevents lar ger remnants of food or ot her obj ects from getting insi de th epum.
Theresidues mayblockthefilter, inthiscasetheymustbe removed.
The filter system c onsists of a coarse fi lter,aflat (Main f ilter)
An d a microfilter(F i ne filt er).
1
2
3
2
1
3
Main filter
Foodand soil particlestrapped inthisfilter are pulverizedby a
special jet on the l ower spr ay arm an d washe d down todrain.
Coarse filter
Large r items, suc h as p i e c esof bones or gl ass, tha t coul d block
thedrainaretrappedinthecoarsefilter. To remove theitems
caught by the fil ter,gen tly s queeze the tap on th e top of this
filterand l ift out.
Fine filter
This filterholdssoiland food residuesinthe sump a rea a nd
preventsit frombeing r edeposit on thedishesduring washc ycle.
Filterassembly
Thefilterefficiently
For best performance and results, the filte r must be cleaned re gularly. t his r eason, it is a goodidea to
remove th e larger food par ticles tr apped in the filter after each wash cyc le by rin sing the semicirc ular filte r and
cup unde r runnin g water. To remove th e filt er device , pull t he cup handle in t he upwa rd direct ion.
removes food particles fro m the wa sh wate r,al lowing it to be rec ycled du ring t he cycl e.
For
Th e d is h washer m us t n e ver beused w i thout the filter s.
Improper replacement of the filter may reduce the performanc e level of the appliance
anddamagedishes andutensils.
2
1
Step 1 Turn the filter in anti-clockwise d irection,:
Step 2 lift the filter assy up:
When following this procedure from step1 to step 2, the filter system will be removed;
when following it from S tep 2 to Step 1, the f ilter system will be installed.
13
Page 17
Remarks:
- Inspect t he filter s for blo cking a fter e very time th e dis hwasher ha s been u sed.
- By unscrew ing the c oarse fi lter, you can remove the filter syst em. Re move any foo d remna nts and
cleanthefilters under running water.
Theentire filterassemblyshouldbe cleanedoncea week.
Cleaning the Filter
To c lean the c o a rse f ilter a nd t he fine filt e r, use a clea ning b ru sh. Reassemb l e thefilter p ar t s as s ho wn in t h e f i gures
on the la st page a nd r eins ert the e nti re assembly in the dis hwa sher, pos itio ning it in its seat and pressing dow nwar ds.
Whenc leaningthefilters,don'tknockonthem.Otherwise,thefilterscouldbe
contorted andtheperformanceofthedishwashercould bedecreased.
The control p anel can be clea ned by u sing a l ightly dam pened c loth.
After cleaning, m ake sureto dry it thoroughly.
For the exterior, use a good a pp lia nc e po lish w ax .
Neveruse sharp objects, sco uring pads o r har sh clean ers on a ny part o f the dishwasher.
CleaningTheDoor
To clean th e edge around the door, you s hould u se only a soft wa rm, dam p cloth.
To avoid pene tration o f wate r into t he door l ock and electrical com ponents, d o not
usea spray cleaner of any kind.
Never use a spr ay c leaner t o clean t he d oor panel as it m ay damage the door loc k
and electricalcomponents.
Abrasive agents o r som e paper towels should not be used b ecause of the risk of
scra tching or leaving sp ots on the s t ainl es s steel s urfa ce.
Protec tAga inst Freezing
please t ake frost protection meas ures o nthe di shwasher in winter. Every fter washing c ycles,
please op erate as follows
1.Cutoff theelectricalpowertothe dishwasher.
2.Turnoff the water su pply an d disconnec t th e water i nlet pi pe from the water val ve.
3.Drain the water from the inlet pipe an d water valve. (Use a pan to gather the w ater)
4.Reconnect the wate r inlet pipe to t he wate r valve.
5.Remove the filte r at the bottom of the tub and use a sponge to soak up water in the sump.
:
If your dishwasher cannot work because of t he ice,
please con tact pr ofessiona l service persons.
timea
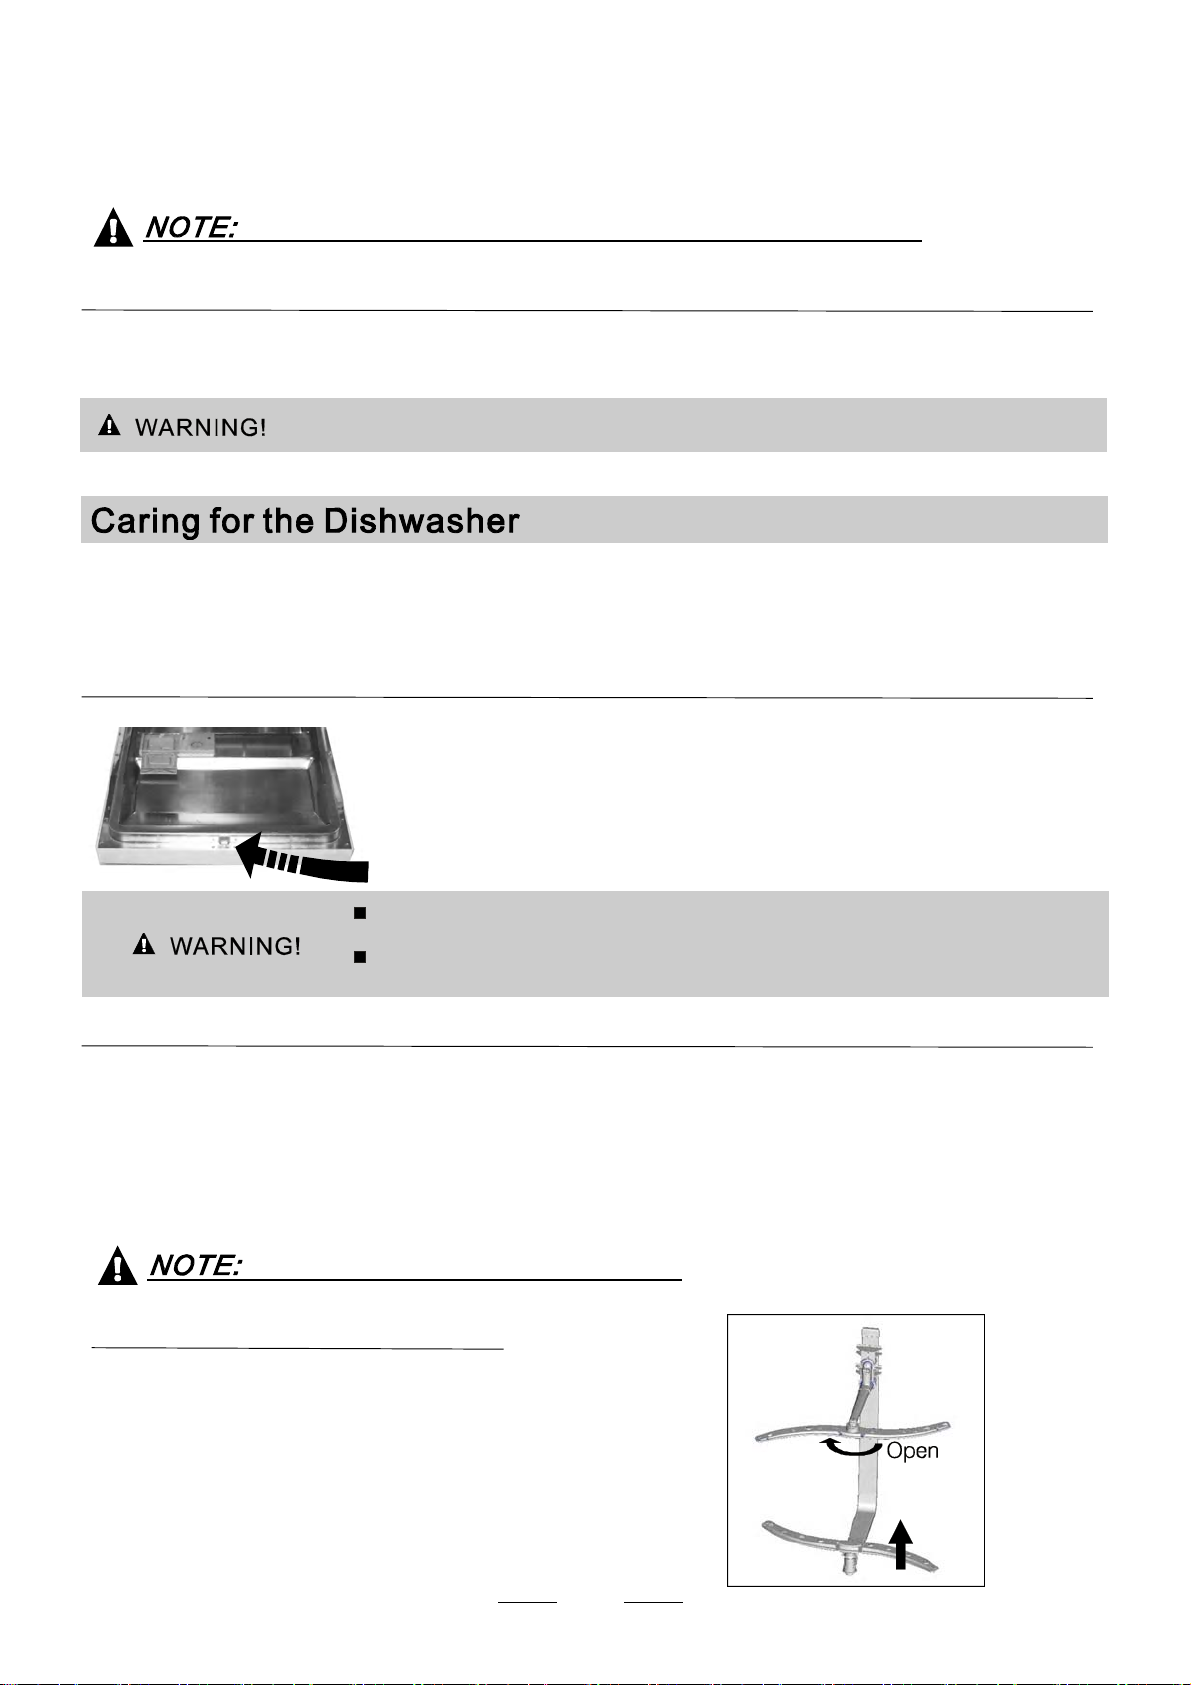
Cleani ng th e Spra yArms
It is ne ce ssar y to c l e an t h e sp ray a r ms regularly fo r ha r d
water chemicals w ill clog thespray arm jetsand bearings.
Tore m ov e the u pper sp r a y a rm , hold the nut, rot ate the arm
clockwise toremove it.
Toremove thelower spray arm,pullout the sprayarmupward.
Washthe arms in soapy and w arm water and use a soft brush to
clean the jets . Repl ace them after rinsin g them thoroughly.
14
Page 18
AfterEvery Wash
After ever y wash, turn off the w ater supply to th e
appliance and leave th e doo r slightl y open sot ha t
moisture a nd odour s ar e not tra pped in side.
Removethe Plug
Before cleani ng or p erformi ng mainten ance, always
remove the plug from the socket.
No Sol vent s or Abras ive Cleanin g
To clean theexterior and rubber parts of the dishwasher,
donot usesolvents or abrasivecleaning products.
Only use a clo th with warm so apy water.
Torem ove s p ots o r st a ins from the sur face of t he
interi or, use a clot h da mpe ned with wa ter ana l ittle
vinegar,o r a cleaning pro duct mad e speci fically for
dishwashers.
Whennotin Use for aLongTime
It isrecommend t hatyourunawashcyclewith the
dishwasher empt y and the n remove th e plu g from the
socket, turn o ff the wa ter supp ly and l eave the door of
the app lian c e sl ight ly op en. Th is will help th e d oo r
sealstolastl ongerand prevent odours fromforming
withinthe appliance.
Moving theAp plia nce
If the app liance m ust be moved, try to keep it in the
verticalposition.If absolutely necessary,itcanbe
positioned on its back.
Seals
Oneofthefactorsthatcauseodourstoforminthe
dishwasher is foo d th at remain s trappe din the seals.
Periodic cleaning with a damp sponge will prev ent t his
fro m occurr ing.
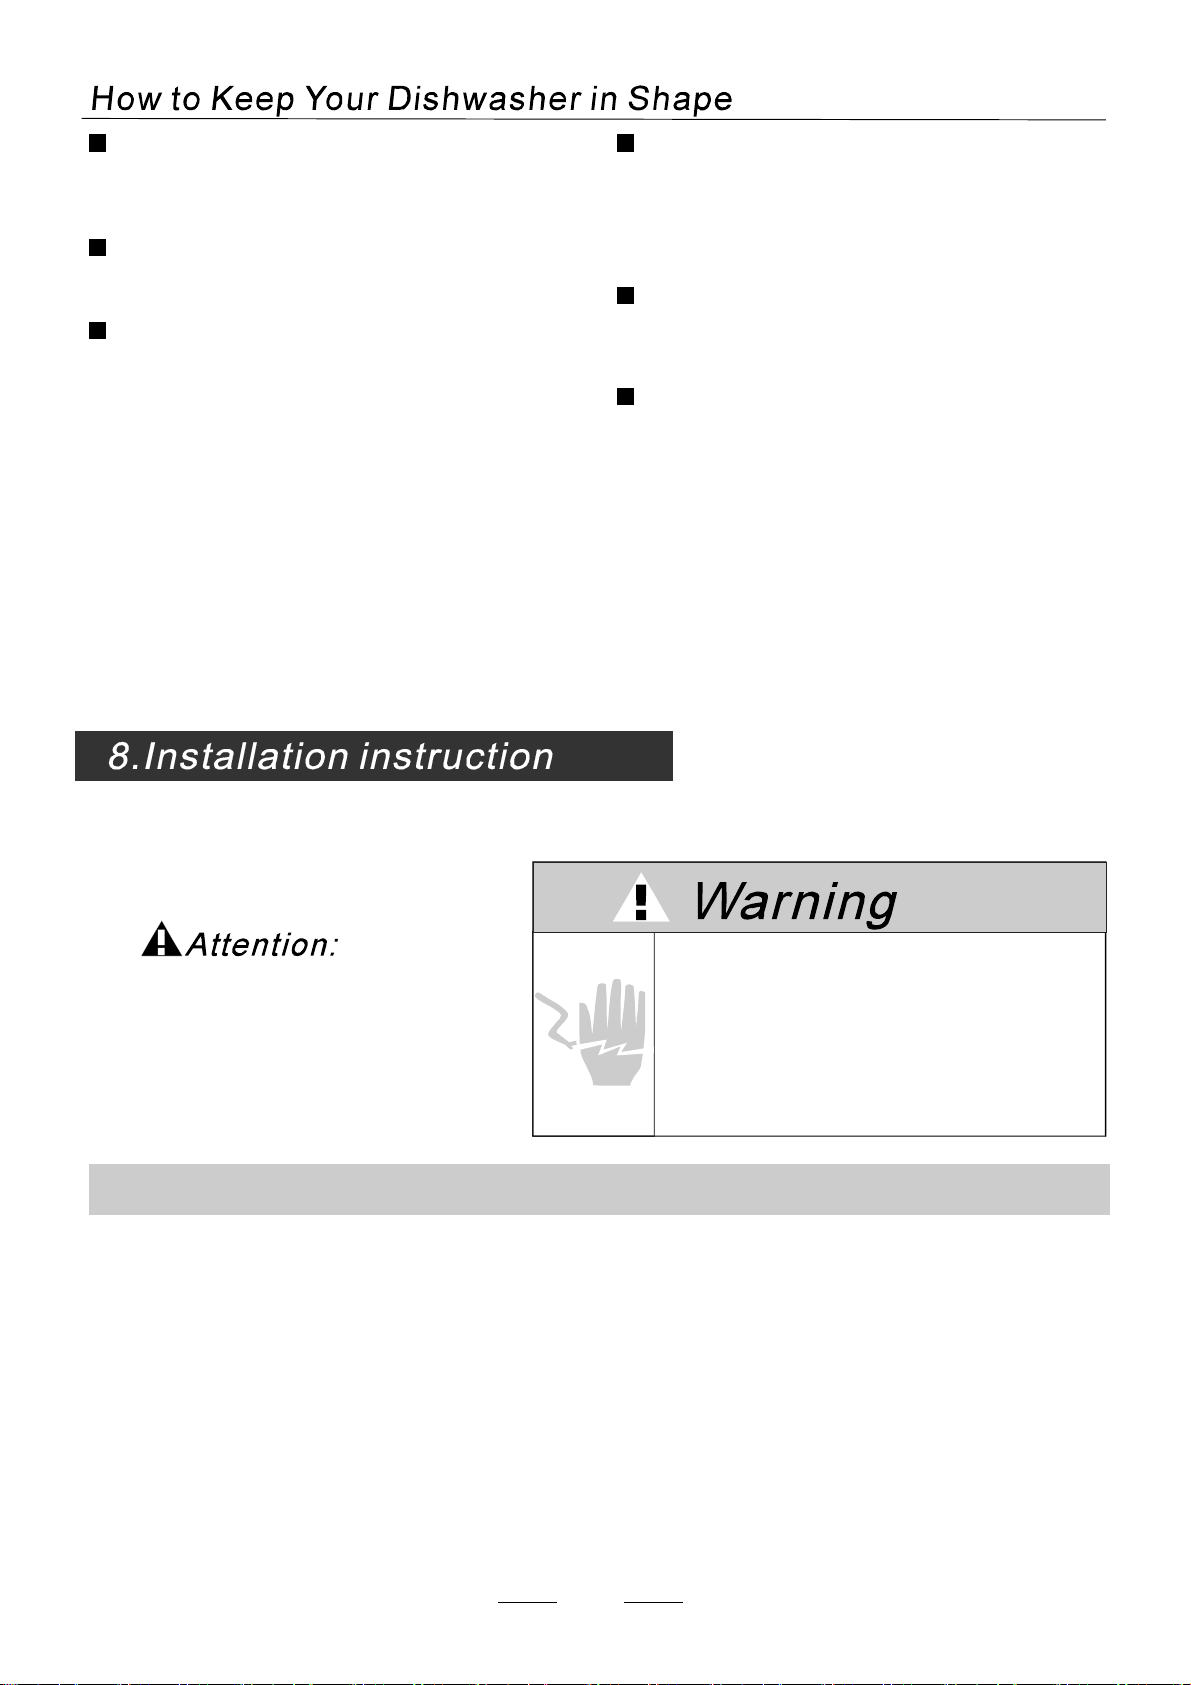
Electrica l Shock Hazar d
Theinstallationof the pipes
and electricalequipments
shouldbe done byprofessionals.
Disconnect elec trical power before
installing dishwasher.
Failuretodosocanresultindeathor
electrical shock.
●
Installationpreparation
The installa tion p osition of dis hwasher should be near the existing inlet and d rain hoses and
powercord.
One side of the cab inet sink sh ould be chos en t o fa cilitate thecon nect ion of drain hoses o f
the dishwasher.
Note: pleas e check th e accompany ing install ation accessories( hook for ae sthetic pane l,
screw)
15
Page 19
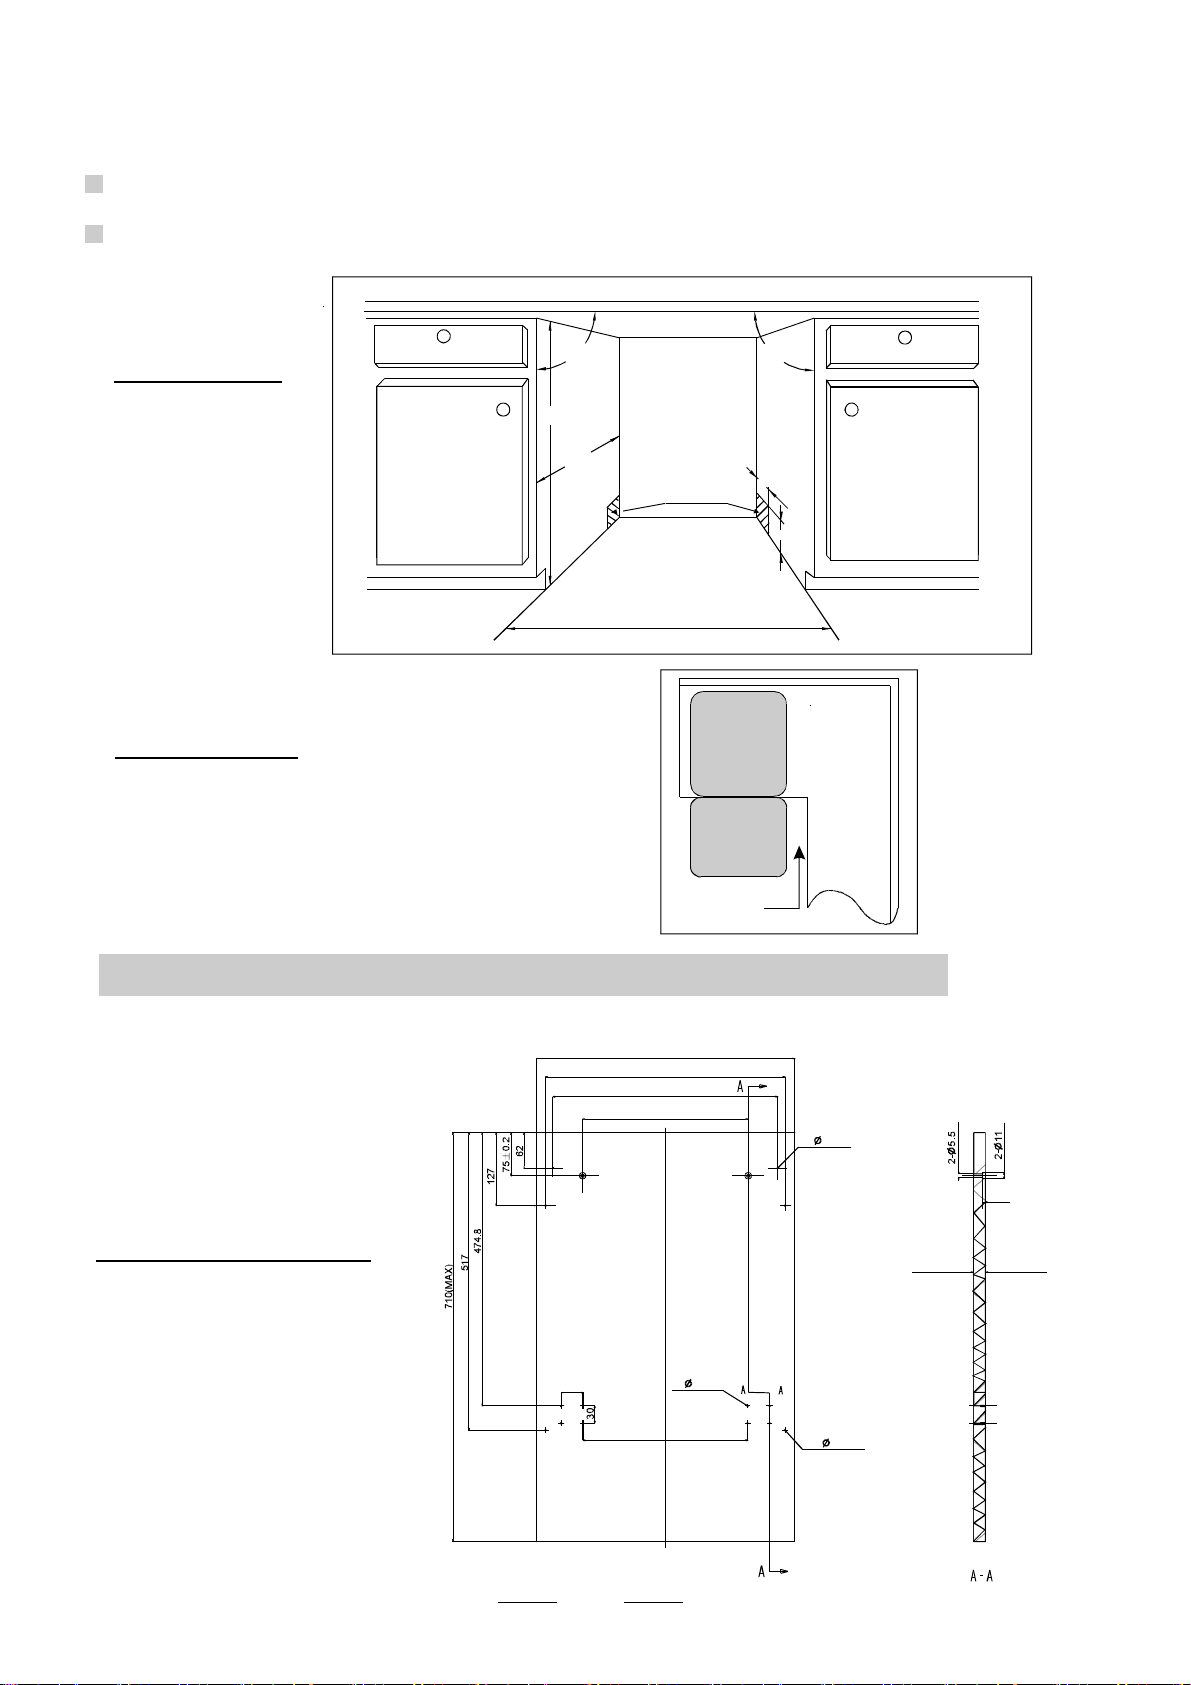
Please carefully read theinstallation instruction.
Illustrations of cabinetdimensions a ndinstallation position of the dishwasher
Preparations should b emade befo re moving the dishwas her tot he i nstallatio n place.
Choose a place near the sink to facilitate t he ins talla tion of in let a nd drain hoses
1
(see figur e 1).
2
If dishwas her isinstalled a t the corner of the ca binet , the re shoul dbe some s p ace
(illustratedin figure 2) whenthedoor is opened.
【】Figure1
Cabinetdimensions
Lessthan 5mm
between the top
ofdishwashera nd
cabinetand the
outer dooraligned
tocabinet.
【】Figure2
Minimumspace when
the door is opened
820mm
580mm
90 °
Electrical, drain and
watersupply line
entrances
Spacebetween c abinet
bottomandfloor
450 mm
Dishwasher
Door of
dishwasher
Minimumspaceof50mm
90 °
80
100
Cabinet
●
Aesthetic panel's dimensionsand installation
1
The aestheticwoodenp anelcouldbe processedaccordingtothe Figure 3.
439
416 0 .2±
390 0 .2±
287.5 0.2±
【】Figure 3
The ae sthe t ic pa nel sh oul d
be proc ess e d in accor dan c e
withtheillustrateddimensions
dp8
38
(Unit: mm)
8- 2
286
2- 2
4- 2
dp8
5
20 MAX()
dp8
16
Page 20
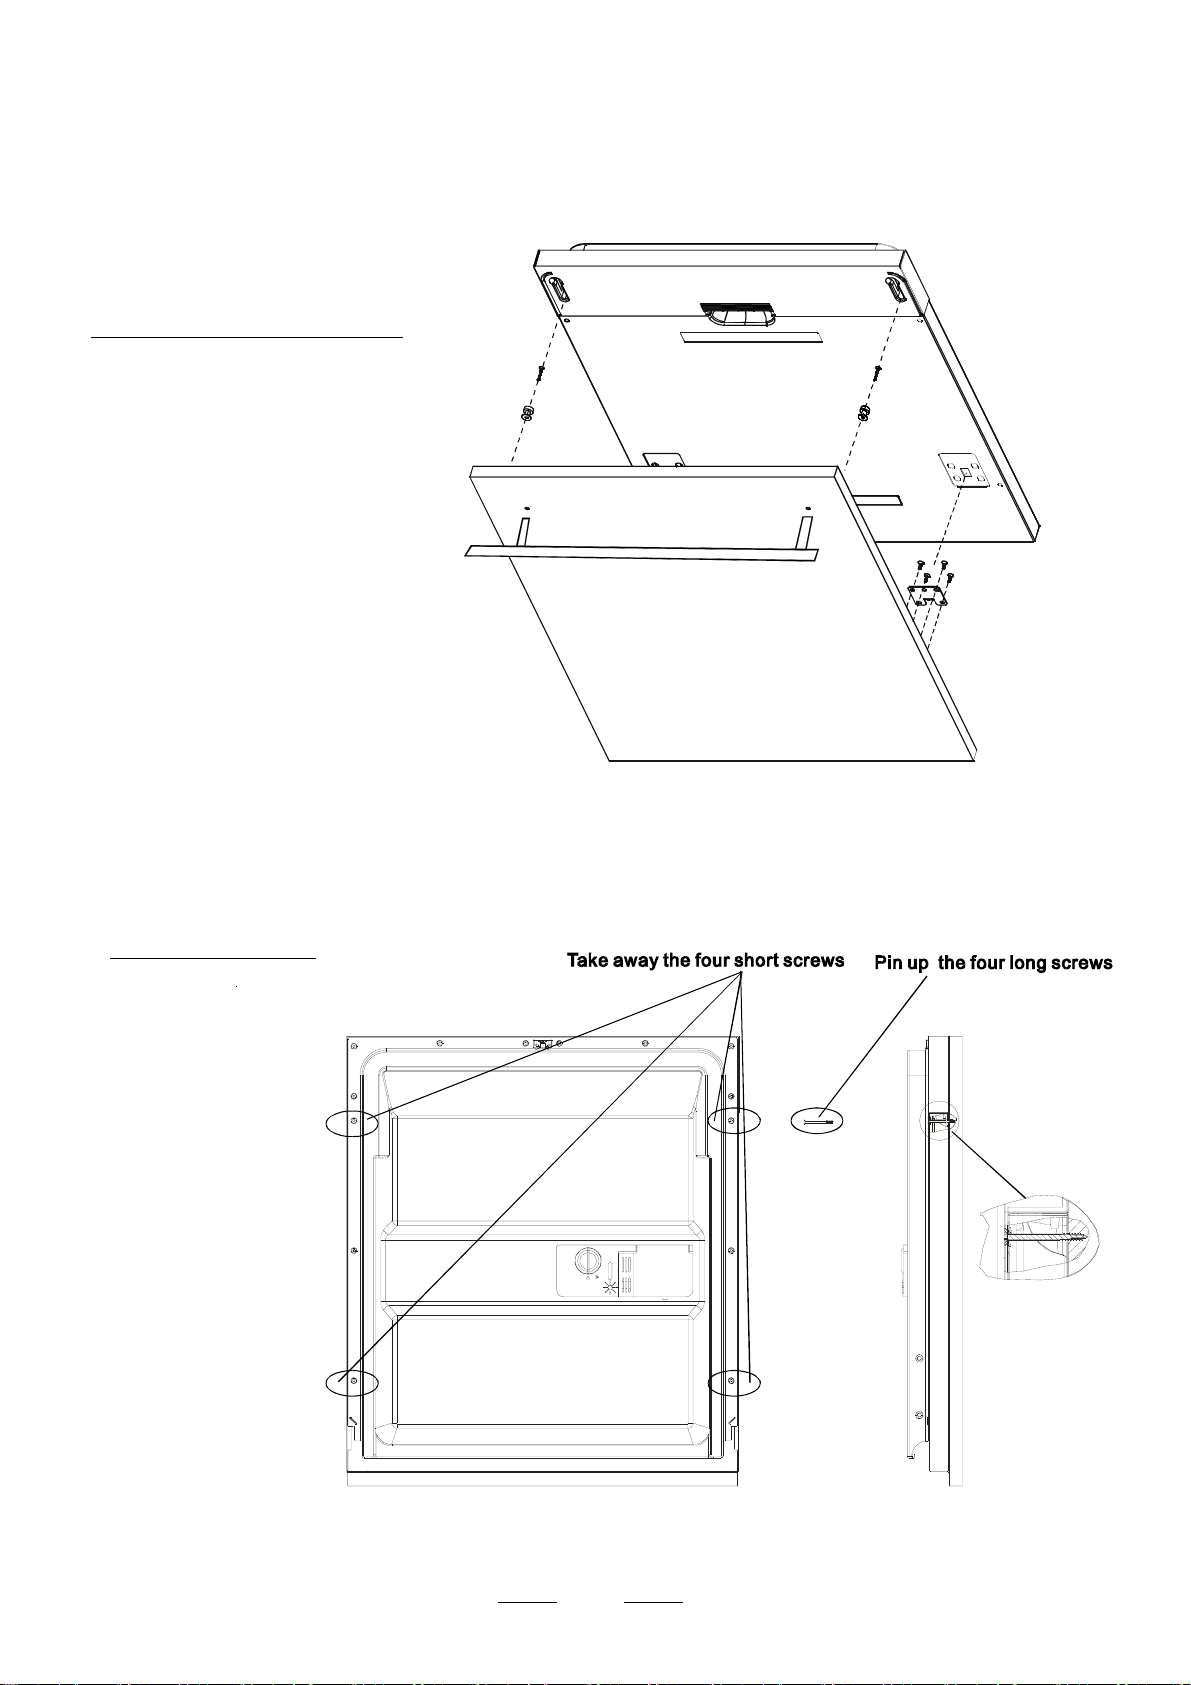
2 Installthe hook on the aesthetic wooden panela ndp ut the hookinto the slot of the outerd oor of
dishw as her ( see fi gur e 4 a ). Af ter posi ti o nin g of th e p an el , f ix the panel onto the outer doo r b y
screwsand bolts(Seefigure 4b).
【】Figure 4a
Installationof aestheticpanel
【】Figure4b
Installationof aesthetic
woodenpanel
.take away the four
1
sho rt sc r ew s
2
. pin up the four long
scre ws
17
Page 21
●
Tension adjustment ofthe door spring
Thedoor springsareset atthe factoryto theproper tensionfor theouter door.
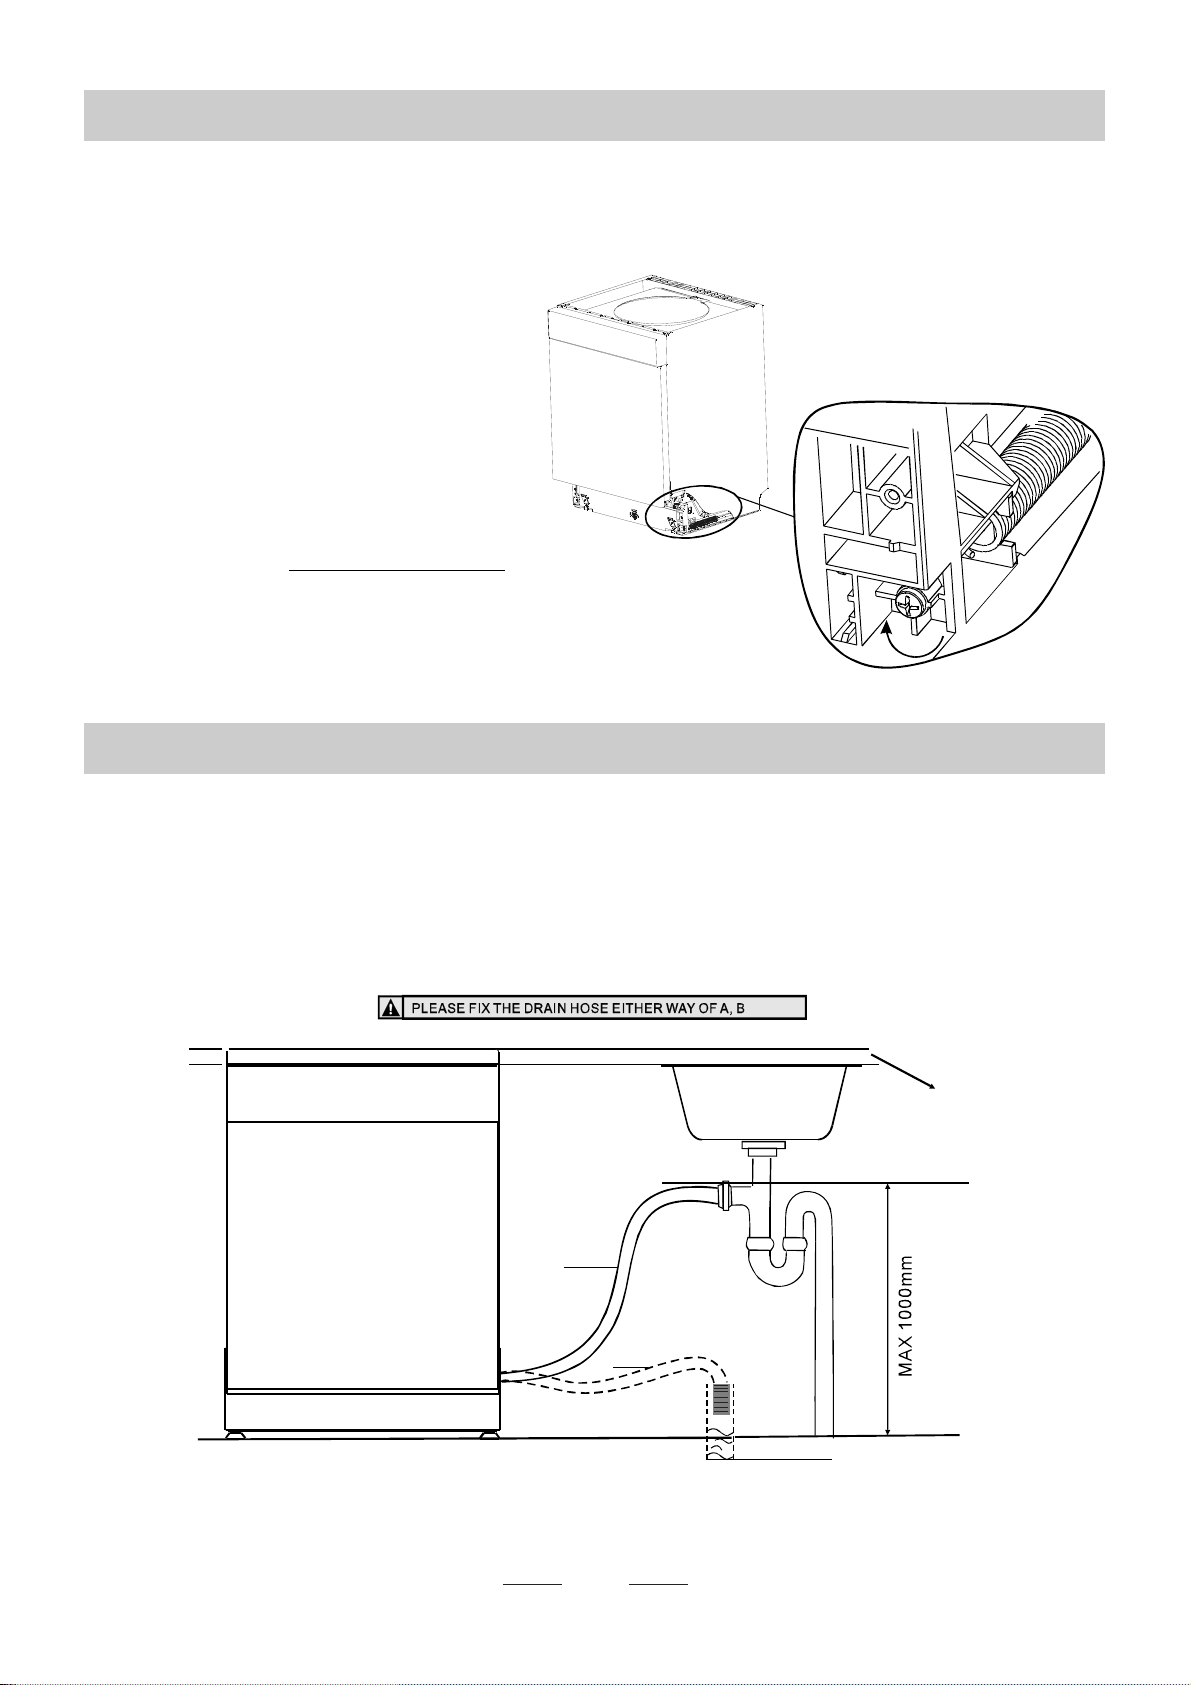
If ae sth etic wooden panel are inst alle d, y ou w ill have to adjust the do or spring tensi on.
Rotatethe adjustingscrewto drivethe adjustorto strainor relax the steelcable
(seefigure5).
Doo r spring tensi on is c orre ct when
the doorremainshorizontali nt he
fullyo penedposition yet rises
toaclosewiththeslightliftofa
finger.
,
【】Figure5
Tension adjustment
ofthe door spring
●
Connectionof drain hoses
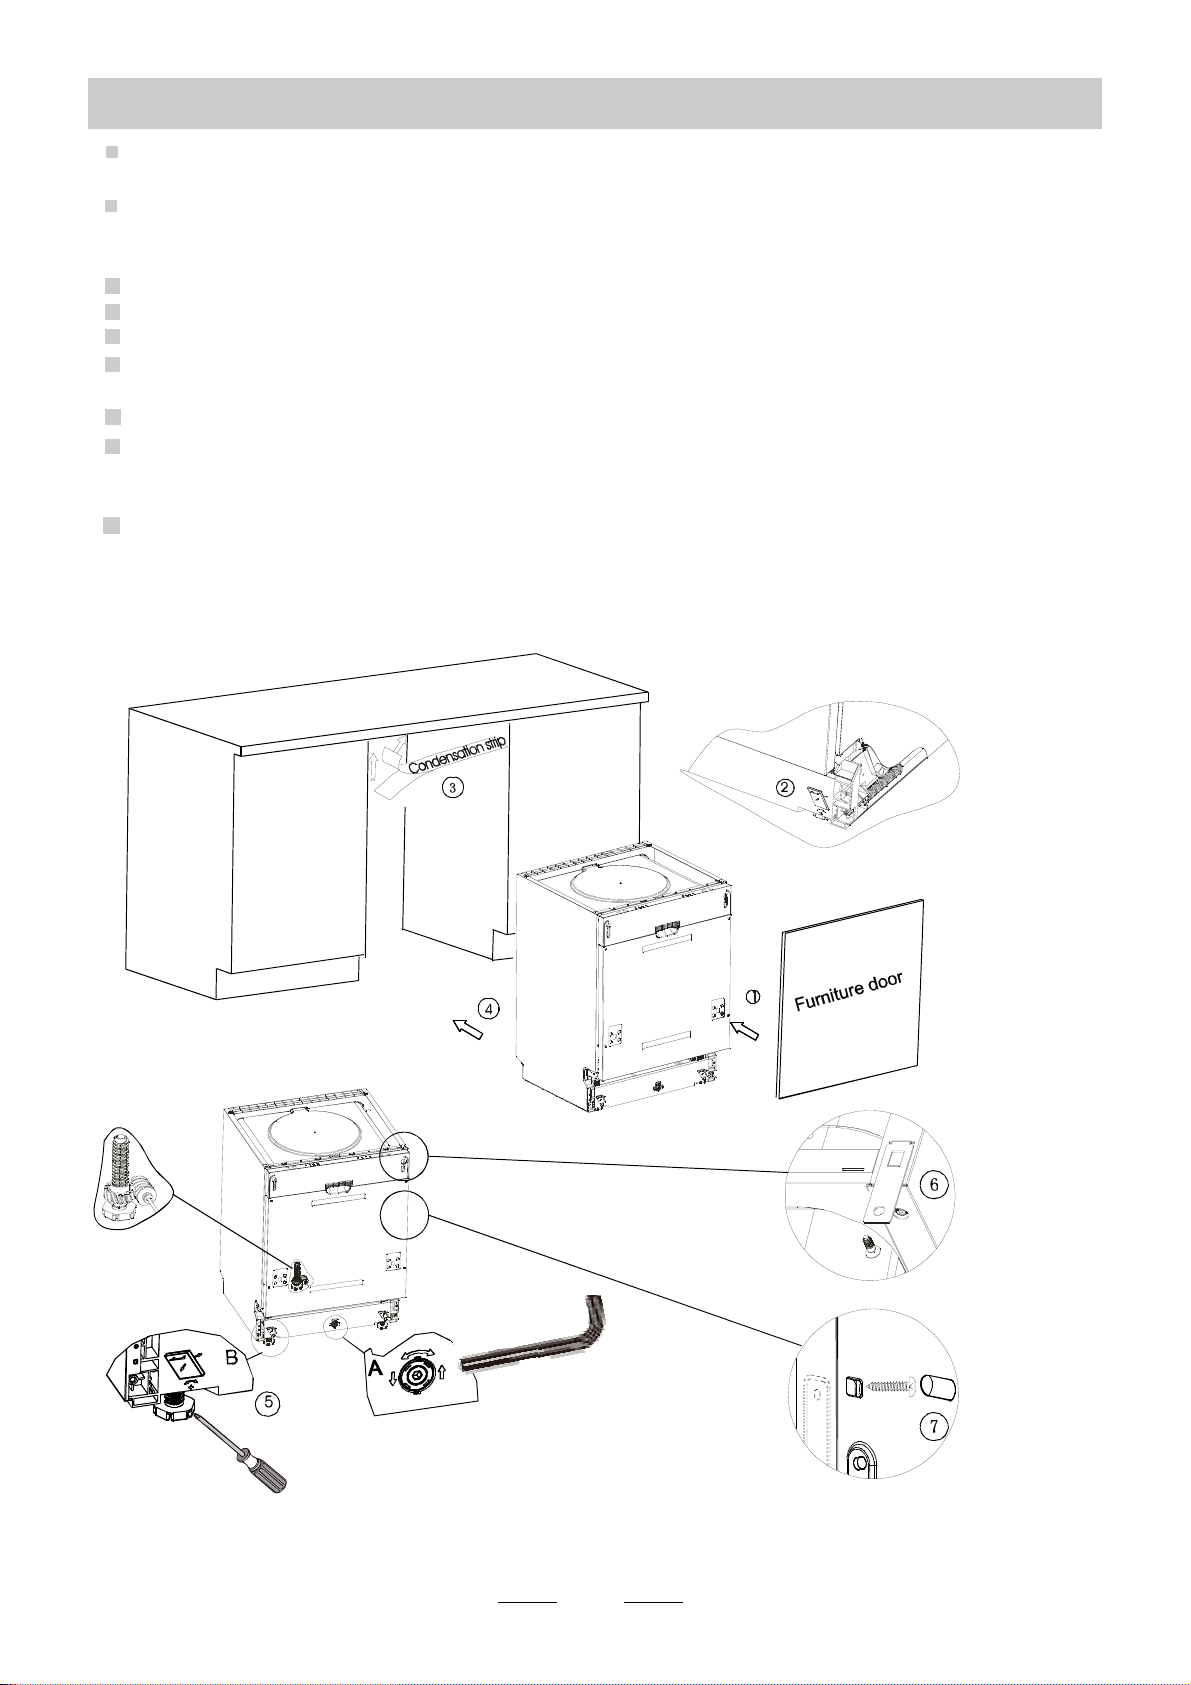
Insert the drainhose into adrain p ipe with a minimum diameter of 4 0mm, or let it run into the sink, making sure to
avoid bending or crimpingit.The top of thehose mustbe lesst han 1000mm.
Front
Counter
NOTE
The top of the hose
must be less than
A
1000mm.
Drain pipe
B
φ 40mm
18
Page 22
Dishwash er i nstallati on ste ps
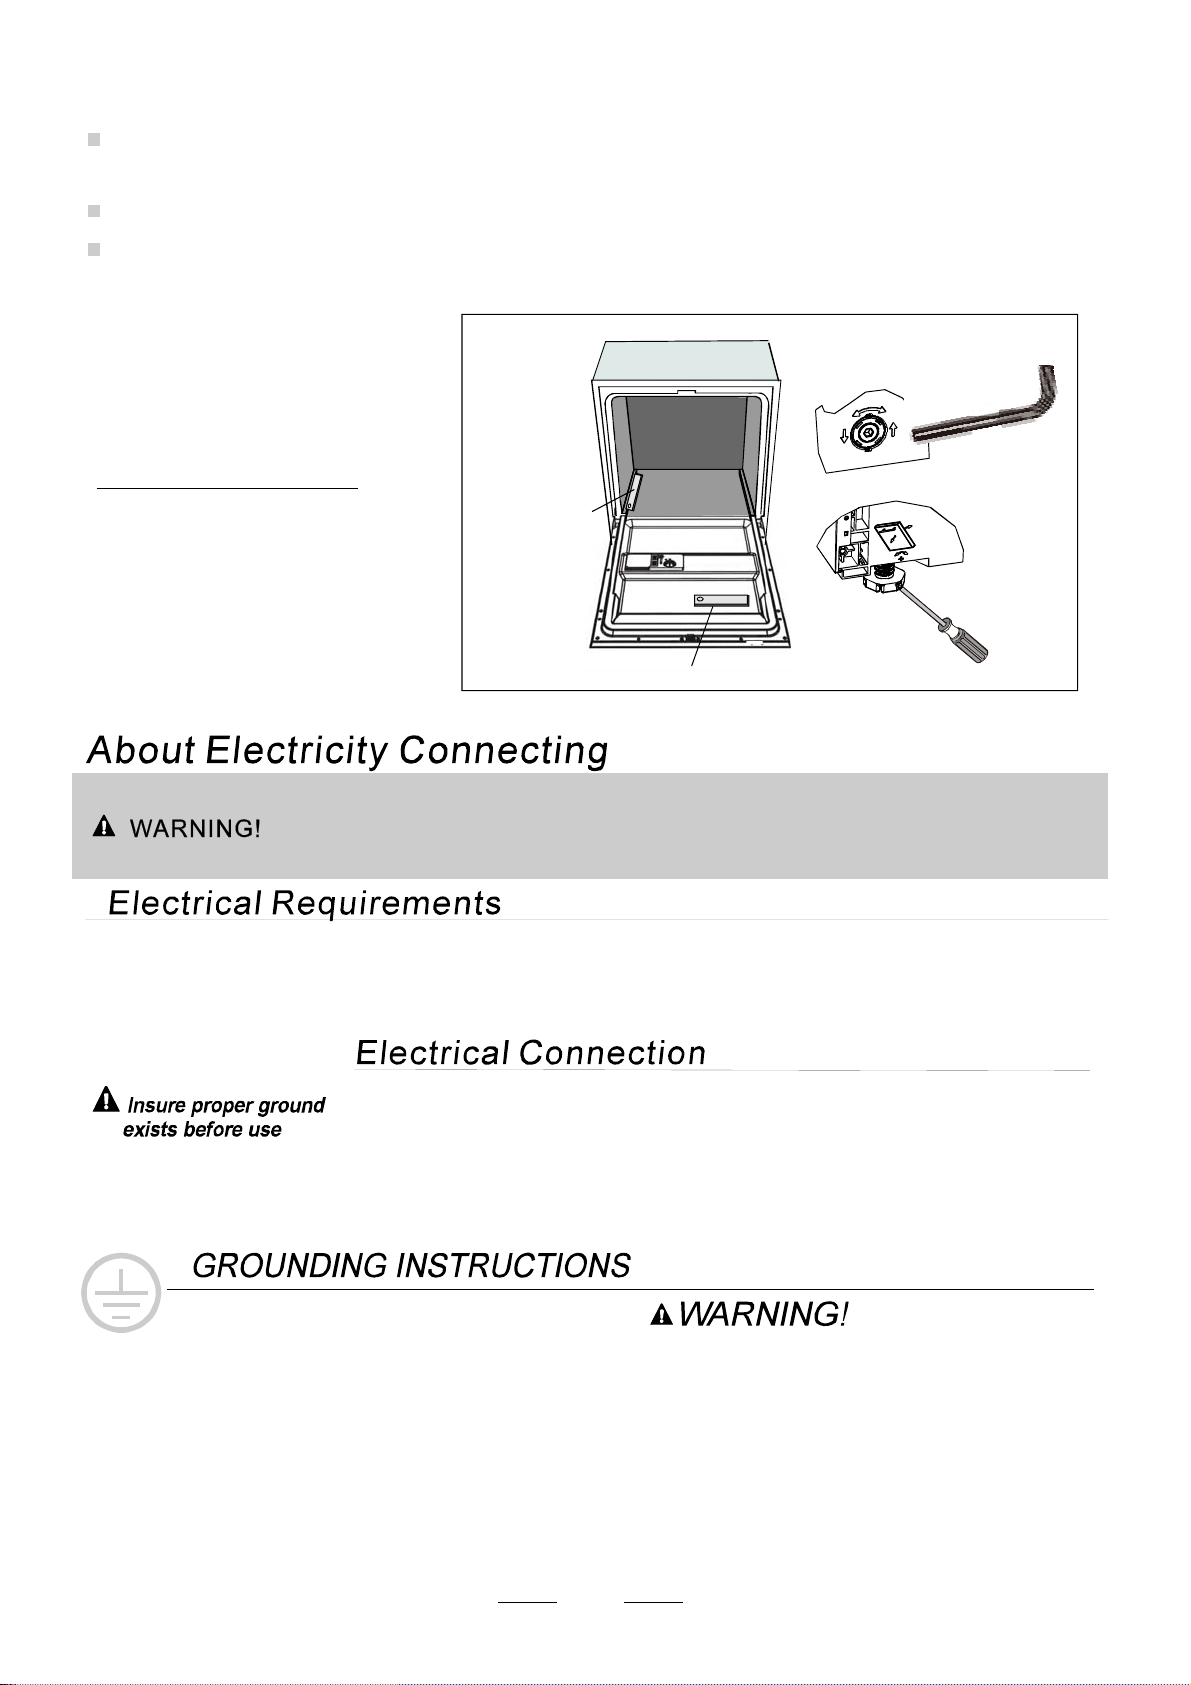
1
Install the furniture door t o the outer door of t he di shwasher using the brac kets prov ided. Re fer
to the template for positioning o f the bracket s.
Adjustthe t ension of the door springs by using anA llen key turn ing ina clockwise mo tion to
2
tightentheleftandrightdoor springs.Failuretodothiscouldcausedamage to yourdishwasher
(Illust ration 2)
Connect the inlet hose to the cold wat er su pply
3.
Connect the drain ho se. Refer t o diagram (Figure 6)
4.
Connect the power c ord
5.
6
Affix the condensation s trip u nder the wor k su rface of cabinet. Please e nsure the co ndensation
strip is flushwithedgeof worksurface.
Place the dishwasher into pos ition.(Ill ustration 4)
7
Lev e l th e di shwa sh e r. Th e rear food c an b e adjusted f rom the f r on t of the dishwa sh er by turning
8
theAllen s crew in the m iddle of t he base of d ishwasher u se a nAllen k ey (I llustration 5A). To ad just
thefrontfeet,usea flatscrewdriver and turnthe frontfeetuntilthedishwasher is level (Illustration 5B).
9 The dishwas her must be secured in place. There ar e two ways t o do this:
A. Normal wo r k sur f ace:Put th e installation h oo k into th e slot of t h e s ide plane and sec ur e i t to t h e
work sur f ac e wit h th e wo od sc re w s (I l lus t r ati o n 6).
B. Marble o r gr anit e wor k t o p:Fi x t he sid e wi th Sc rew. (Il l ustra tion 7).
.
【】Figure7
19
Page 23
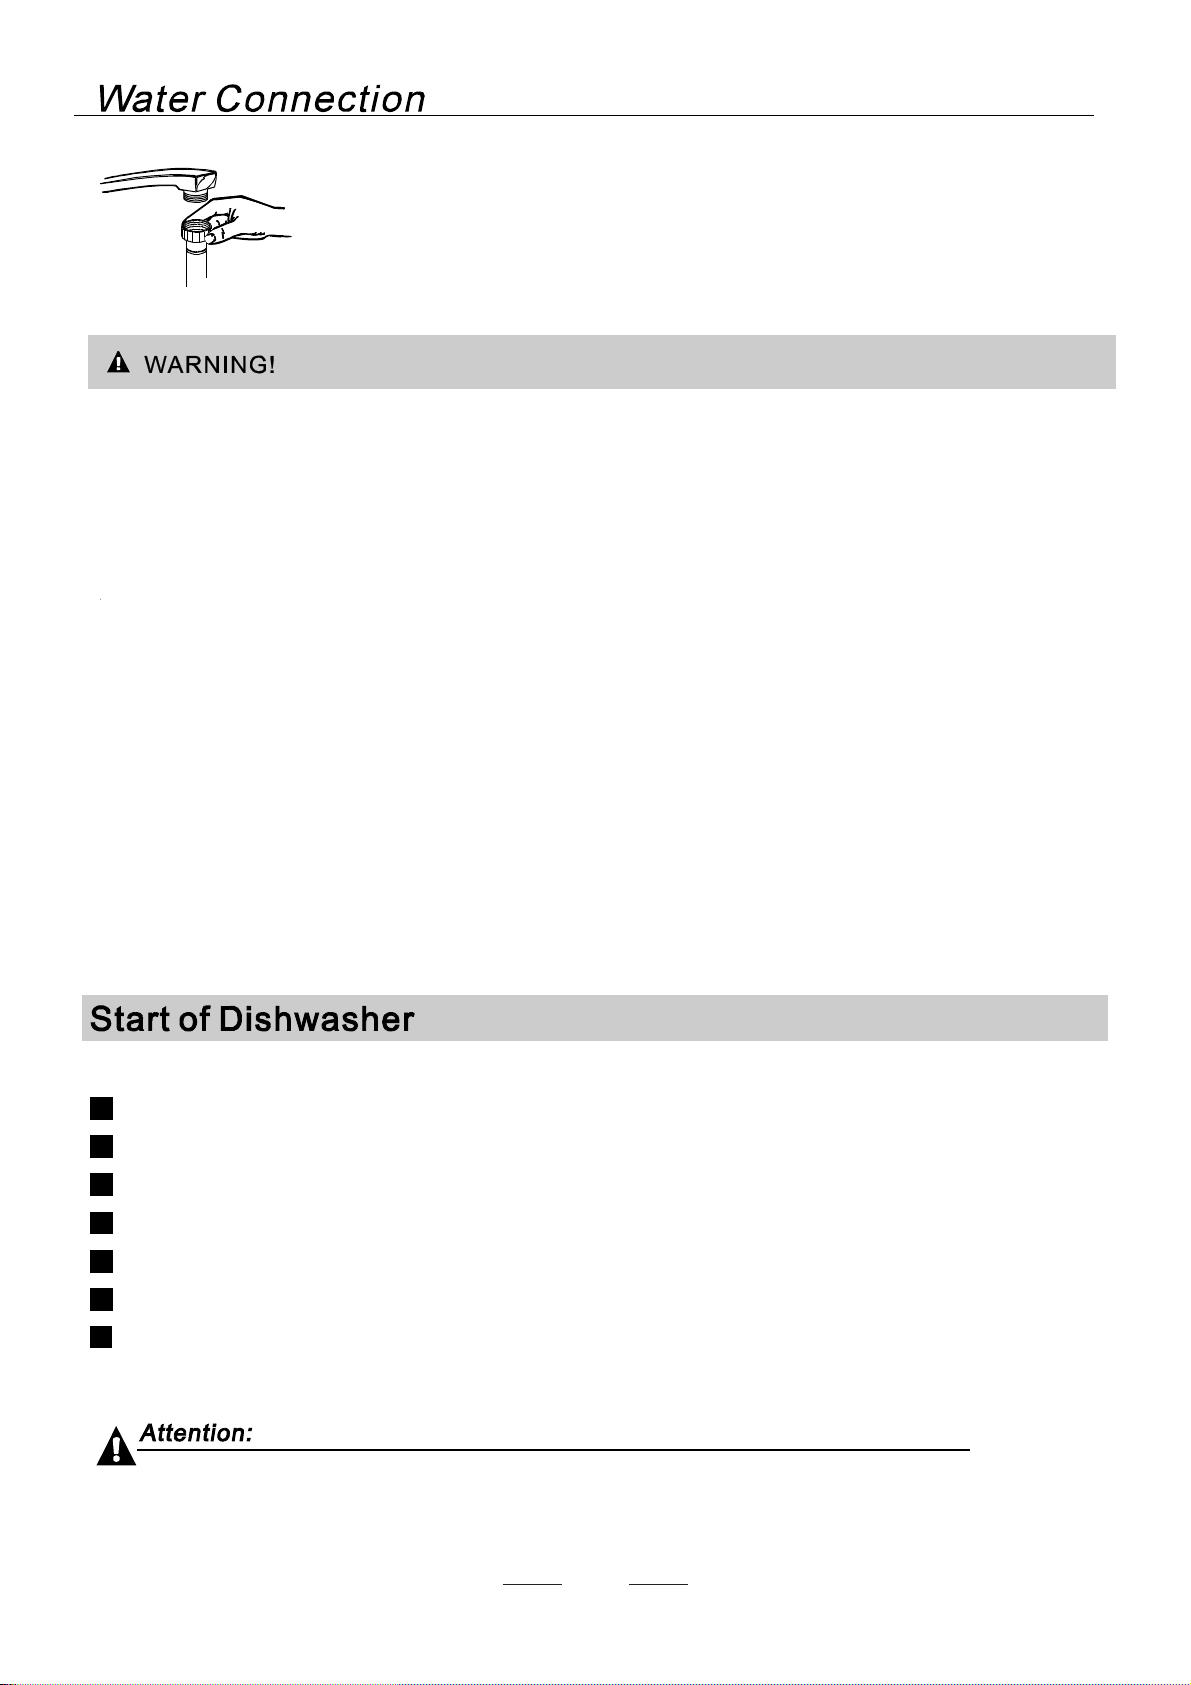
Dishw ashe r m ust be level for pr oper dish ra ck operation and w ash perform anc e.
Placea spiritlevel on door andrack trackinside the tubasshown to checkthat the
1
dishwasheris le vel.
levelthe dishwasherby adjusting the three levellinglegs individually.
2
3
Whenlevel the dishwasher,please pay attentionnot to letthe dishwashertip over.
【】Figu re 8
Illustra tion o f feet ad justment
NOTE:
Themaximum adjustment
heightofthefeet is 50 mm.
For personalsafety:
DO NOT USEAN EXTENSION CORD ORANADAPTERPLUGWITHTHISAPPLIANCE.
DO N OT,UNDERANY CIRCUMSTANCES, CUT OR R EMOVE T HE EARTHING
CONNECTION FROMTHE POWER CORD.
Please lo ok at the ra ting lab el to know th e rat ing vol tage a nd conn ect t he d ishwash er to t he app ropr iate pow er s upply.
Use ther equi red fuse 10 amp, time delay fuse or circuit bre aker rec ommended and prov ide sepa rate cir cuit s erving
only thi s app liance.
Check level
Front to Back
Spirit level
Che c k l evel s ide to side
Ensurethevoltage and frequencyof thepowerbeing correspondsto
thoseo n the rating plate. Only insert theplug into an electricalso cketwhichi searthed
properly. If th e electr ical socket to w hich the appl iance m ust b e conne cted is not
appropriate forthe plug, replace thesocket,ratherthanusing a adaptorsorthe likeas
they coul d ca use ove rheating a nd bu rns.
This applia nce m ust b e earthed . In the event
of a malf unction or brea kdown, earthing wil l
reduce the risk of el ectric sho ck by providing a
path of leastresistance forthe electriccurrent.
This app liance is equip ped w ith a cord havin g an
equipment-ea rthin g condu ctor and an earthi ng
plug. The plug must b e plu gged int o an appropriat e
outlet t hat is installed a nd eart hed i n accor dance
with all local sta ndards a nd r equiremen ts.
20
Impr oper connecti on of the equipme ntgrou nding conduc tor can re sult i n th e r isk
of an electric shock. C heck wi th a qu alified
electricianor servicerepresentative if you
are i n d oubt w het her the app lian ce is prop erly
grou nded. Do not modify the pl ug p ro vided w ith
theappliance;Ifitisnotfit fortheoutlet.
Have a properoutletinstalled bya qualified
electrician.
Page 24
Connectthe cold wa tersupplyhosetoa threaded 3/4(inch)connector and make sure
that it is fas tened tightly in place.
If the water pipes are new or have not been used for an extended period of time, let the
waterrunto make sure thatthe water is clear.This precautionis neededto avoid the
risk of the water inlet to be blockedanddamage the appliance.
pleaseclose thehydrant afterusing.
Positioning theAp pliance
Position the ap pliance i n the desired loca tion. The bac k should rest against the wall behind it, an dthe sid es,
along the adjacent c abinets or walls. The dishwasher i s equipp ed with water supply and drai n hoses that can
bepositionedeither to the rightortheleftsidesto facilitate properinstallation.
How to Dr ain Exc ess Water Fro m H oses
If the si nk is 100 0 hi gher from the floor, the exces s wa ter in ho ses cann ot be dr ained di rectly
intothe sink. It will be necessarytod rain excesswater from hosesintoabowlo r suitable
container th at is he ld outside and lower than the sink.
Water Outlet
Connect the water drainhose. The drai n hose must be corr ectly f itted to avoid water leaks.
Ensure tha t the w ater d rain hose is not kinked or squashed.
Exte nsio n Ho se
Ifyou n eed a dr ain h ose exte nsion, m ake sur e to use a simil ar dra in ho se.
Itmust be no longer than 4 m etre s; other wise the cleanin geffect o f the di shwa sher cou ld b e reduce d.
Syphon Connection
Insert the d rain hos e into a d rain pipe with a minimum dia meter of 40mm, or let it run in to th e sink, m aking sure to
avoid b e n ding or c r imping it. The to p of the hose must be less t ha n 10 00m m.
Thefollowingthingsshould be checked beforestartingthe dishwasher.
1 The dishwasheris leveland fixed properly
2 The inletvalve is open
3 There isa leakageat the connectionsof the conducts
4 The wiresare tightly connected
5 The poweris switched on
6 The inletand drain hoses areknotted
7 Allpacking materialsand printingsshould betaken out from thedishwasher
Afterinstallation,please make sureto keep this manual.
Thecontent of this manualis very helpfulto the users.
21
Page 25
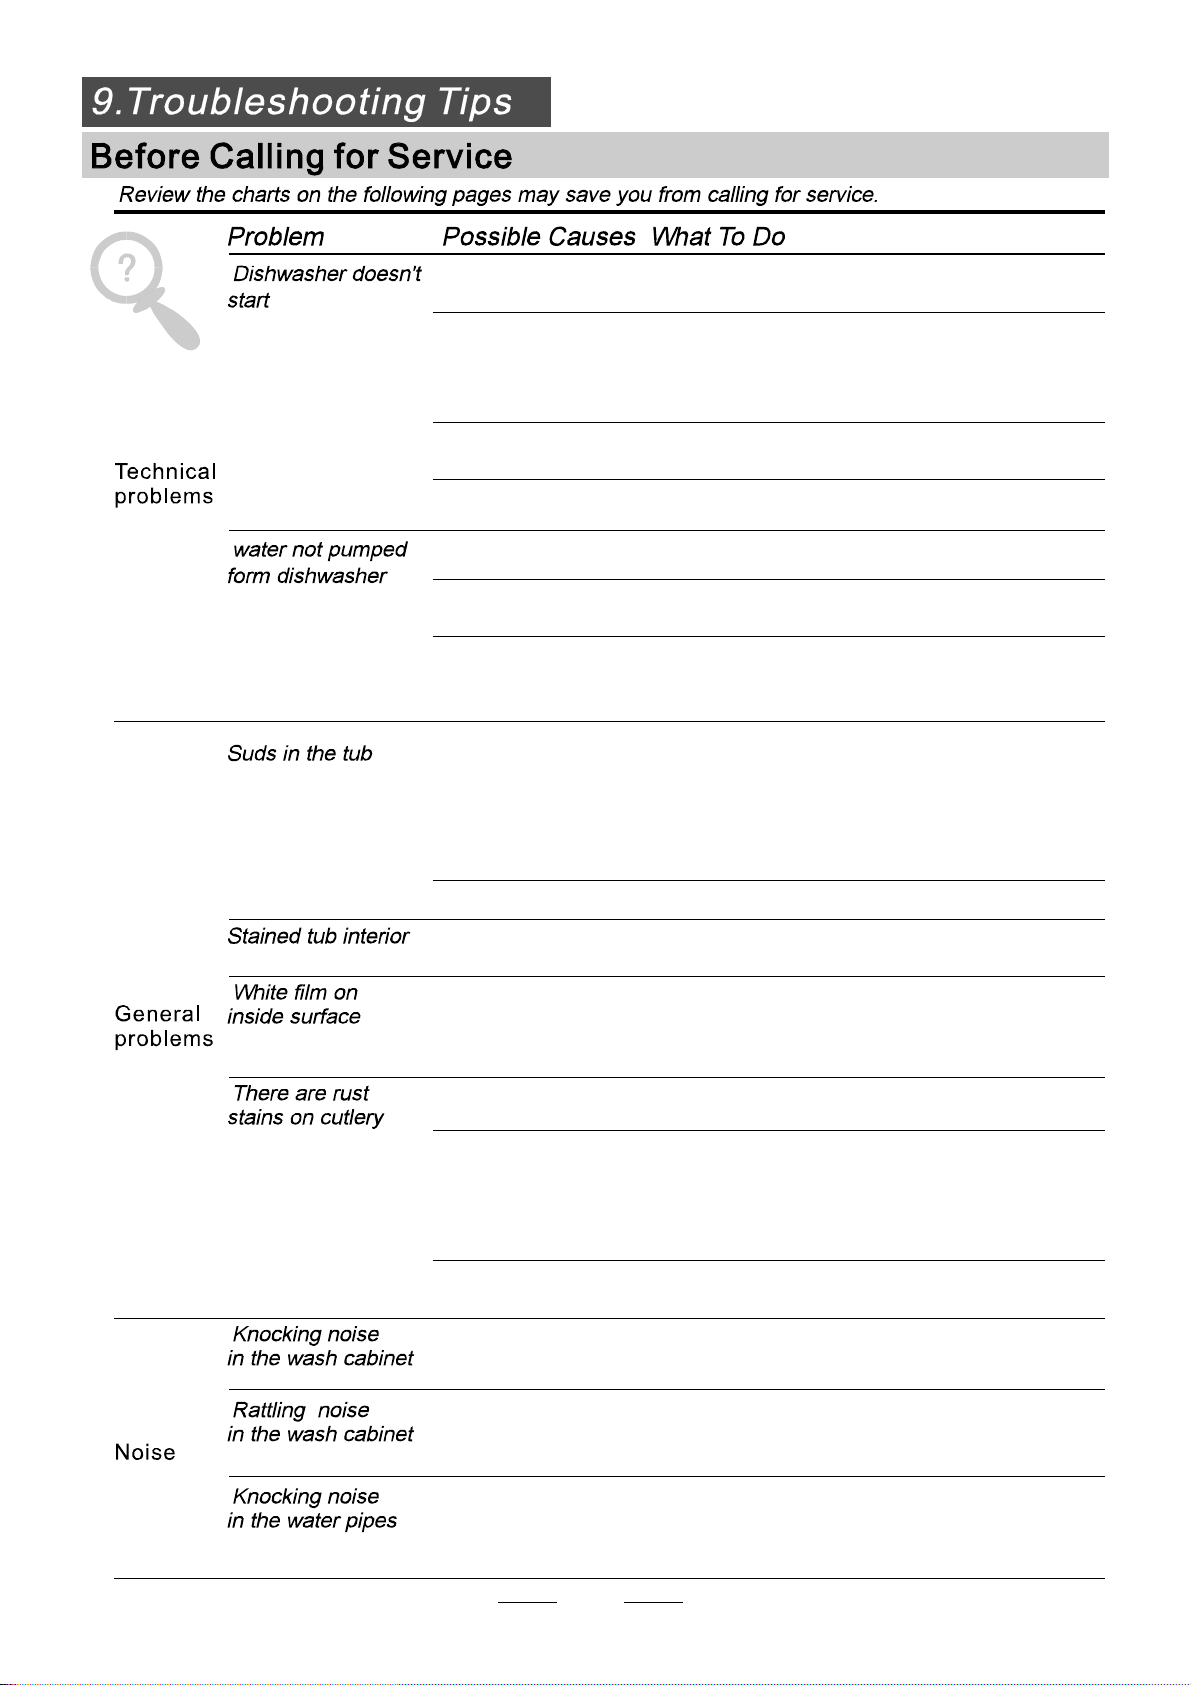
Fuse blown, or the
circuit breaker acted
Replace fuse or reset circuit breaker. Remove any other
appliance s sharing the same circuit with the dishwasher
Power supplyis not
turned on
Water pressure is low
Door of dishwasher
not properly closed.
Kink in drain hose
Filter clogged
Kitchen sink clogged
Improper detergent
Spilled rinse-aid
Make sure the dishwasher is turned on and the door is
closed securely.
Make sure the power cord is properly plugged into the
wall socket.
Check that the water supply is connected properly and
the water is turned on.
Make sure to close the door properly and latch it.
Check drain hose.
Check coarse the filter
(see section titled )" Cleaning The Filter "
Check the kitchen sink to make sure it is draining well.
If the problem is the kitchen sink not draining ,you may
need a plumber rather than a serviceman for dishwash ers.
Use only the special dishwasher detergent to avoid suds.
If this occurs, open the dishwasher and let suds evaporate.
Add 1 gallonof cold water to the tub. Close and latch the
dishwasher, then select anycycle.Dishwasherwill drain
outthewaterat the first step.Open the door after draining
is stop and check if the suds is disappeared.
Repeat if necessary.
Always wipe up rinse-aid spills immediately.
Detergent with
colourant was used
Hard wat er minerals
The affected items are
notcorrosionresistant.
A programme was not
run after dishwasher
salt was added.
Traces of salt have
gotten into the wash cycle.
The lid of the softer
is loose
Aspayarmis
r
knocking against
an itemin a basket
Items of crockery
are loose in the
wash cabinet
This may be caused
by on-site installation
or the cross-section of
the piping.
Make sure that the detergent is the one without
colourant.
To clean the interior, use a damp sponge with
dishwasher detergent and wear rubber gloves.
Never use any other cleaner than dishwasher
detergent for the risk of foaming or suds.
Always run the quick wash programme .
without any crockery in the dishwasher and
without selecting the Turbo function (if present),
after adding dishwasher salt.
Check the lip .Ensure the fixis fine.
Interrupt the programme, and rearrange the items
which are obstructing the sp ay arm.r
Interrupt the programme,
and rearrange the items of crockery.
This hasno influence on the dishwasher function.
if in doubt, contact a suitably qualified plumber.
22
Page 26
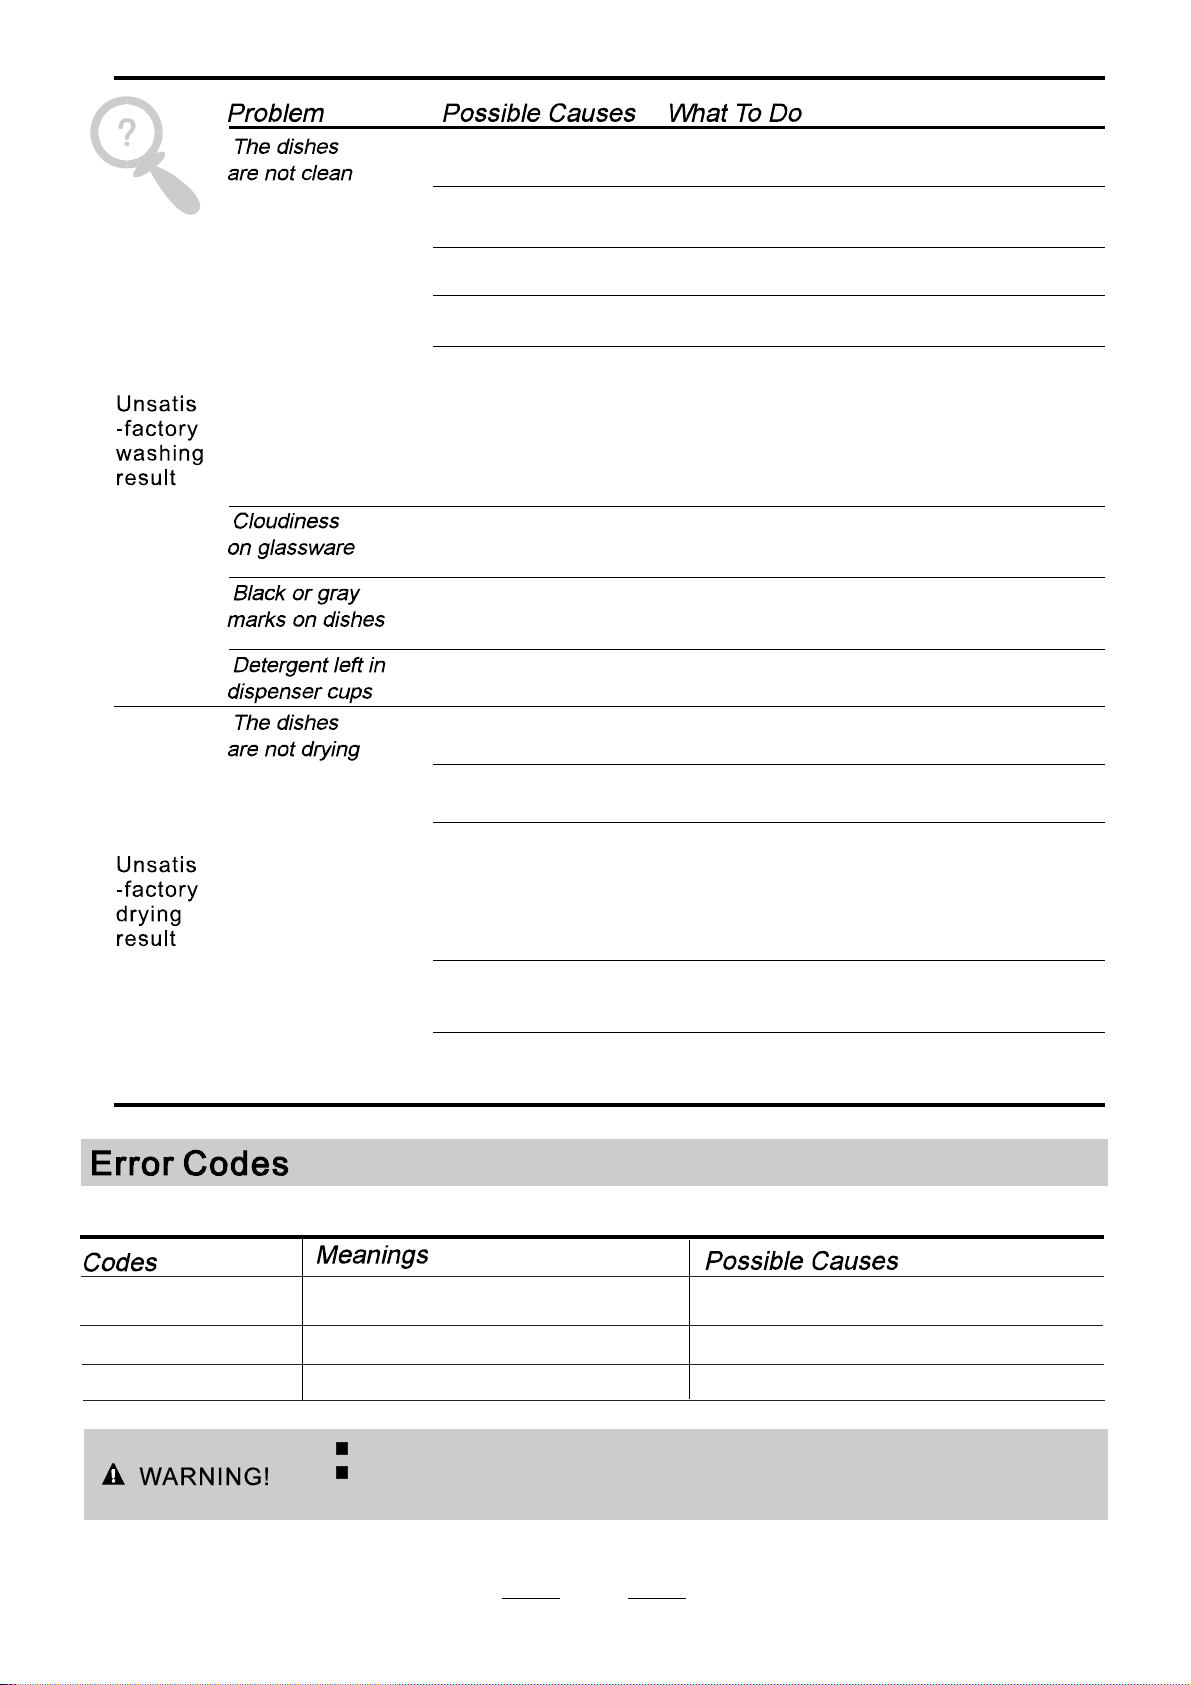
The dishes were not
loaded correctly.
See notes in " Loading the Dishwasher Baskets ".
Theprogrammewas
notpowerfulenough.
Not enough detergent
wasdispensed.
Items are blocking
the path of sp ay arms.r
The filter combination
inthebaseofwash
cabinet is not clean or
is not correctly fitted.
This may cause
the sp ay arm jets
r
to get blocked.
Combination of soft
water andtoo much
detergent.
Aluminum utensils
have rubbed against
dishes.
Dishes block
detergentcups.
Improper loading
Too little rinse-aid
Select a more intensive programme.
See" Wash Cycle Table ."
Use more detergent, or change your detergent.
Rearrange the items so that the sp ay can rotate freely.r
Clean and/or fit the filter combination correctly.
Clean the sp ay arm jets. See "Cleaning the Spray
Arms".
Use less detergent if you have soft water and select
a shortest cycle to wash the glassware and to get
them clean.
Use a mild abrasive cleaner to eliminate those marks.
Re-loadin g the dishes properly.
Load the dishwasher as suggested in the directions.
Increase the amount of rinse-aid/refill the rinse-aid
dispenser.
r
Dishes are removed
too soon
Wrong program
has been selected
Useof cutlery with
a low-quality coating
Empty the l ower ba sket first and then t he up per
one. This wil l avoid w ater d ripping from the u pper
Basket onto the dishes in the lower one
In short program the washing temperature is lower.
This also lowers cleaning performance. Choose
a program with a long washing time.
Water drainage is more difficult with these items.
Cutlery or dishes of this type are not suitable for
washing in the dishwasher.
When some malfunctions come on, the appliance will display error codes to warn you:
E1
E4
E8
Longer inlet time.
Overflow.
Failur e of or ie nt at i on of di st r ib utar y valve.
Faucets is not opened, or water intake is
restricted,or water pressure is too low.
Some element of dishwasher leaks .
Opencircuit orbreakof distributary valve.
If overflow occurs, turn off the main water supply before calling a service.
If there is water in the base pan because of an overfill or small leak,
the water should be removed before restarting the dishwasher.
23
Page 27
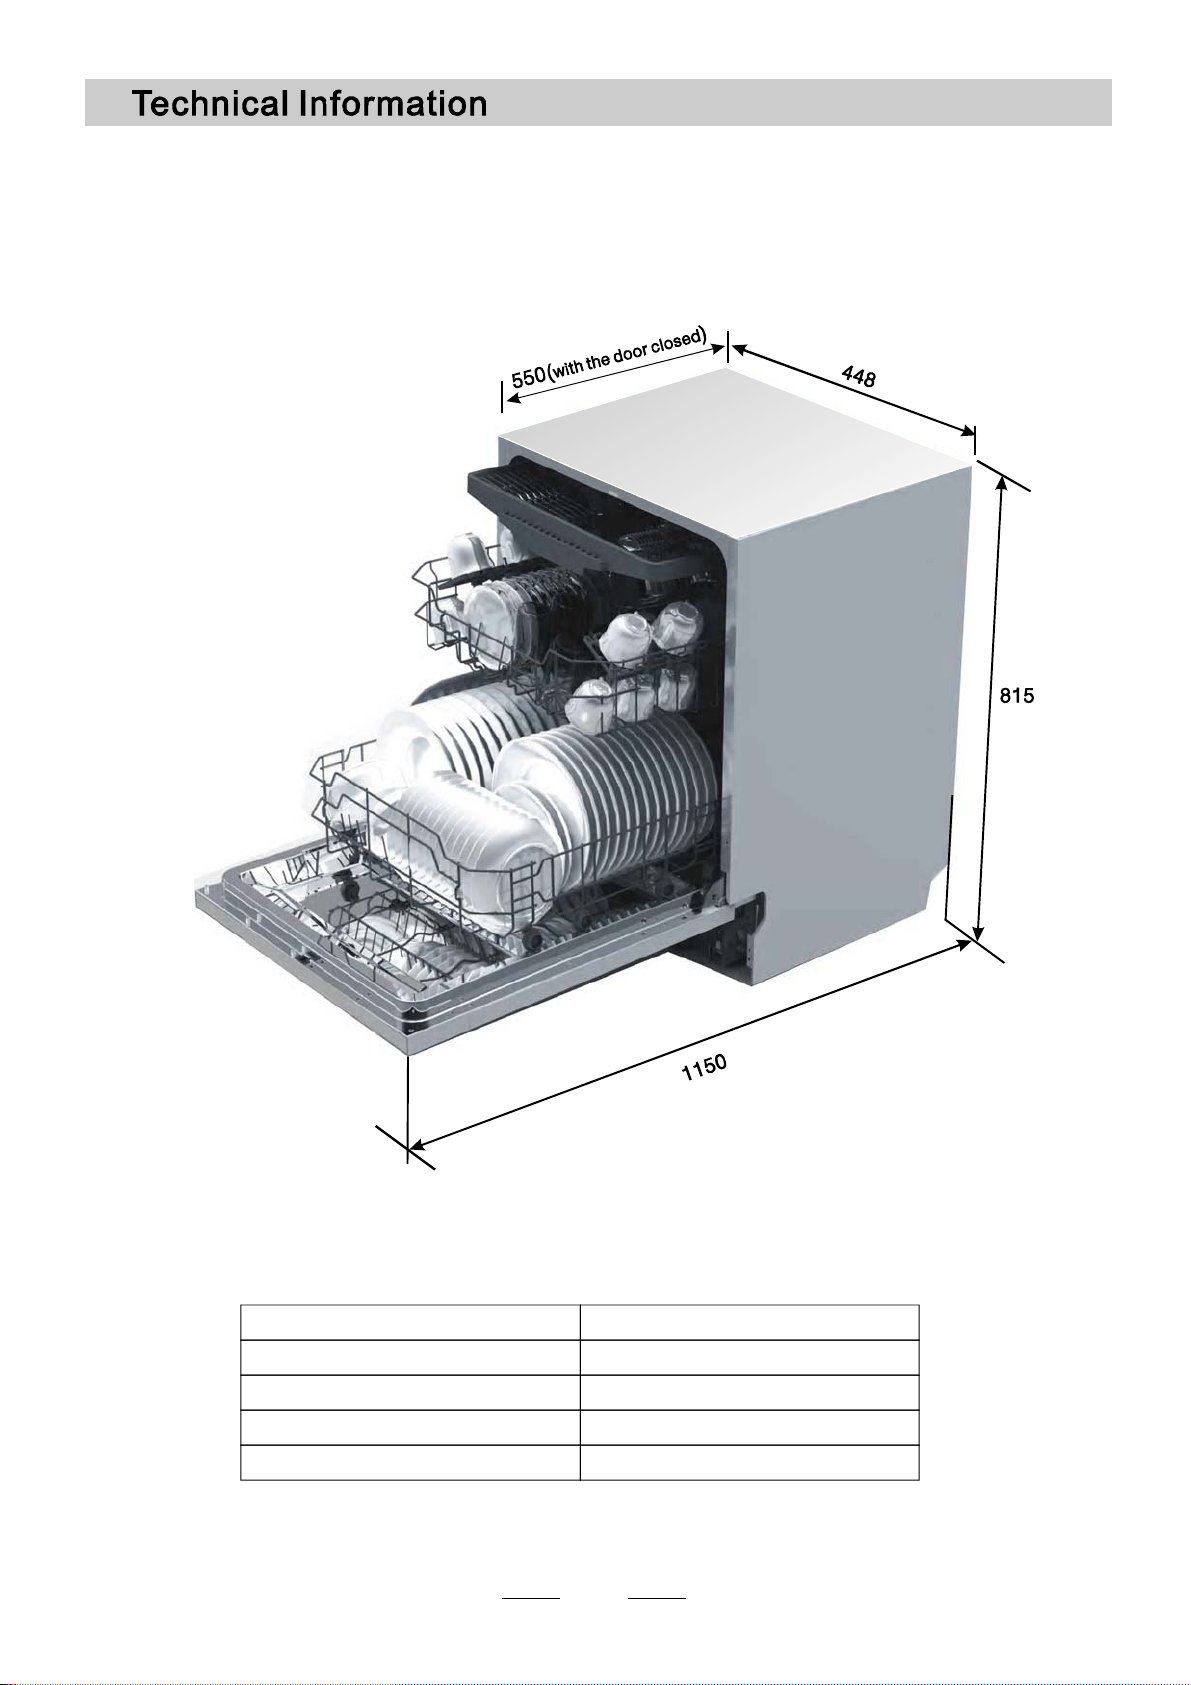
Height: 815mm
Widt h : 44 8mm
()
Depth: 550mm
with th e door closed
Powersupply: see rating label
Capacity: 10place settings
24
Page 28
Page 29
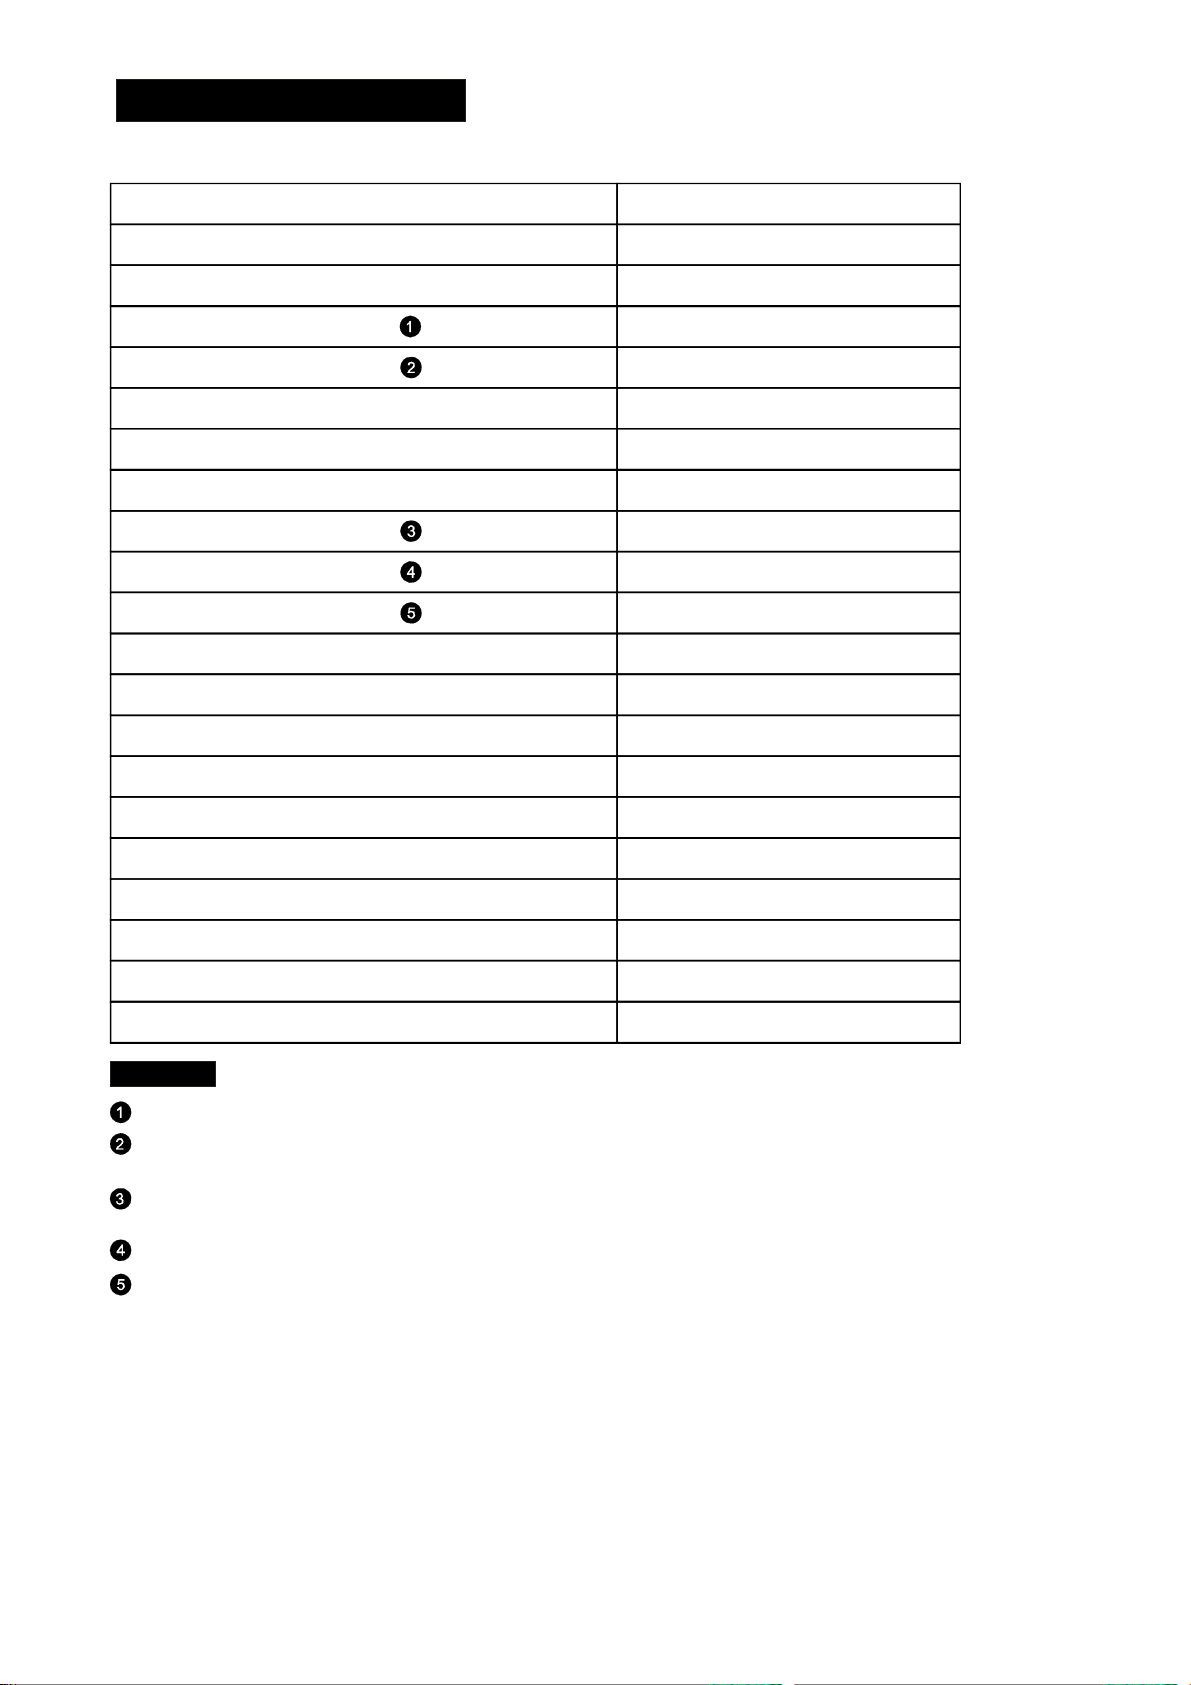
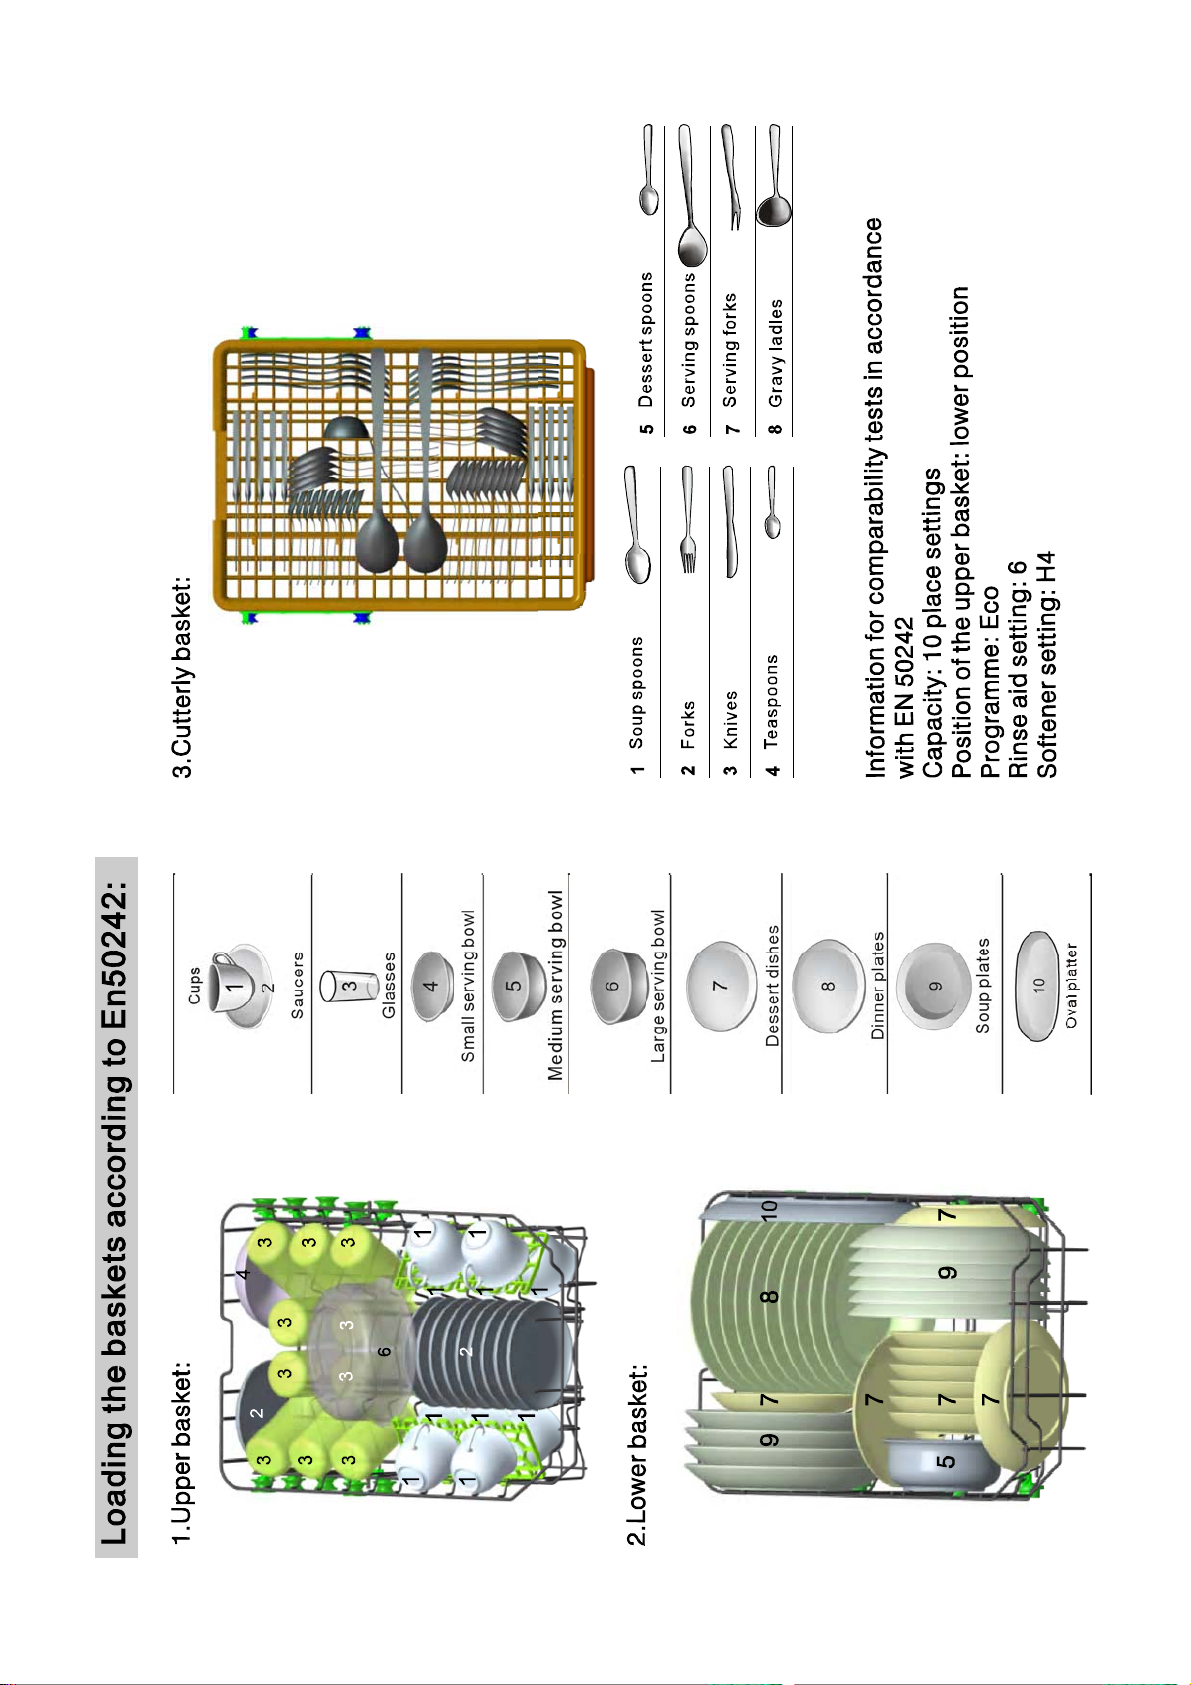
TechnicalDataSheet
Sheet of household dis hwasher a ccord ing to EU D irecti ve 1 059/2010:
Manufacturer
Type / Description
Standard p lace sett ings
En ergy efficiency class
Annual ene rgy c onsumption
En ergy con su mpti on of t he s ta ndard cl eani ng cy cle
Power consum ption ofoff-mode
Power consum ption ofleft-on m ode
Annual waterconsumption
Dr y i n g efficienc y cl a ss
Standard c leaning c ycle
Program durati on o f the standard cleani ng cycle
Noisel evel
Mounting
Couldb ebu ilt-in
BOMAN N
GSPE8 71
10
A++
211 kWh
0.75 kWh
0.45 W
0.49 W
2380 liter
A
ECO 50
170 min
45dB(A) re 1 pW
build under
Yes
℃
Height
Width
Depth(with connectors)
Power consum ption
Rated voltage/ frequency
Waterpressure (flow pressure)
NOTE:
A+ ++ (highest efficiency) to D (lo west efficiency)
Energy consumpti on 211 kWh per y ear, based on 2 80 standar d cleani ng cycles u sing co ld water fill and
the consumpti on of t he low power mode s.Actual ene rgy consum ption w ill dep end on how the app liance i s used.
Waterconsumption 2380 litres per yea r,b ased on 280 standar d cleaning cycles.A ctual w ater consum ption
will depend on how the appliance is used.
A(highest efficiency) to G (lowest efficiency)
This program i s suitab le for cleaning soi led nor mally so iled table ware and that it is the
most efficient p rogramme in terms of i ts combined energy a nd water consumption for
that type of tableware.
The device m eets th e Europe an standards and the directives in the current version at de livery:
- LVD20 06/95/ EC
- EMC2004/108/ EC
- EUP 2010/10 16
“”
“”
81.5 cm
44.8 cm
55cm
1930 W
230 V~ / 50Hz
0.4-10 bar = 0.04-1 M
Pa
The above val ues have been measur ed in acc ordance with standards under spe cified oper atin gconditions.
Results may vary greatly a ccording to quantity a nd polluti on of t he dis hes, water hardness,
amount of de tergent, etc.
The manual is based on the Europea n Union' s standar ds and rules.
 Loading...