

BMW Z4 2005 User Manual

Owner's Manual
Contents
A-Z
Online Edition for Part-No. 01 41 0 158 704 - © 10/04 BMW AG
for Vehicle
The Ultimate
Driving Machine

Online Edition for Part-No. 01 41 0 158 704 - © 10/04 BMW AG

Z4 2.5i
Online Edition for Part-No. 01 41 0 158 704 - © 10/04 BMW AG
Z4 3.0i
Congratulations, and thank you for choosing a BMW.
Thorough familiarity with your vehicle will provide you with
enhanced control and security when you drive it. Therefore, we
have one request:
Please take the time to read this Owner's Manual and familiarize
yourself with the information that we have compiled for you
before starting off in your new BMW. The manual contains
important data and instructions intended to assist you in obtaining maximum satisfaction from your BMW's unique array of
advanced technical features. It also contains information on vehicle maintenance designed to enhance operating safety while
simultaneously helping you to maintain your BMW's value
throughout an extended service life. For additional information
refer to the supplemental manuals.
This Owner's Manual should be considered a permanent part of
this vehicle. It should stay with the vehicle when sold to provide
the next owner with important operating, safety and maintenance
information.
We wish you an enjoyable driving experience.
BMW AG

© 2004 Bayerische Motoren Werke
Online Edition for Part-No. 01 41 0 158 704 - © 10/04 BMW AG
Aktiengesellschaft
Munich, Germany
Reprinting, including excerpts, only with the
written consent of BMW AG, Munich.
Order No. 01 41 0 158 704
US English IX/04
Printed in Germany
Printed on environmentally friendly paper,
bleached without chlorine, suitable for recycling.

Contents
Online Edition for Part-No. 01 41 0 158 704 - © 10/04 BMW AG
The fastest way to find information on special
topics is by using the index starting on
page 106.
Using this Owner's Manual
4 Notes
At a glance
10 Cockpit
Controls
16 Opening and closing
27 Adjustments
33 Transporting children safely
36 Driving
46 Everything under control
50 Technology for safety and driving
convenience
56 Lamps
58 Controlling the climate for pleasant
driving
64 Interior conveniences
Driving tips
68 Special operating instructions
Mobility
76 Refueling
78 Wheels and tires
84 In the engine compartment
89 Maintenance
91 Replacement procedures
96 Giving and receiving assistance
Reference
102 Technical data
106 Everything from A to Z
Reference At a glanceControlsDriving tipsMobility

Notes
Online Edition for Part-No. 01 41 0 158 704 - © 10/04 BMW AG
About this Owner's Manual
Notes
We have made every effort to ensure that you
are able to find what you need in this Owner's
Manual as quickly as possible. The fastest way
to find certain topics is by using the detailed
index at the end. If you wish to gain an initial
overview of your vehicle, you will find what you
are looking for in the first chapter.
Should you sell your BMW at some time in the
future, please remember to pass the Owner's
Manual on to the new owner. The manual represents an important component of the vehicle.
Additional sources of information
If you have additional questions, your BMW
center will be glad to advise you.
You can find more information about BMW, for
example on its technology, on the Internet
under www.bmw.com.
Symbols used
Indicates precautions that must be fol-
lowed precisely in order to avoid the possibility of personal injury and serious damage to
the vehicle.
Indicates information that will assist you
in gaining the optimum benefit from your
vehicle and enable you to care more effectively
for your vehicle.
Refers to measures that can be taken to
help protect the environment.
< Marks the end of a specific item of informa-
tion.
* Indicates special equipment, country-specific
equipment and optional extras, as well as
equipment and functions not yet available at the
time of printing.
Vehicle Memory, Key Memory, refer to
page 31. Identifies functions that can be
specifically adapted for a particular key or vehicle. These adjustments can be performed by
your BMW center.
Symbol on vehicle parts
Indicates that you should consult the rel-
evant section of this Owner's Manual for
information on a particular part or assembly.
4

Your individual vehicle
Online Edition for Part-No. 01 41 0 158 704 - © 10/04 BMW AG
On b uy in g y ou r B MW , you ha ve de ci de d in fa vo r
of a model with individualized equipment and
features. This Owner's Manual describes all
models and equipment that BMW offers within
the same group.
We hope you will understand that equipment
and features are included which you might not
have chosen for your vehicle. Any differences
can easily be identified since all optional accessories and special equipment are marked with
an asterisk
If your BMW features equipment not described
in this Owner's Manual, please observe the
enclosed supplementary Owner's Manuals.
*.
Status at time of printing
BMW pursues a policy of continuous, ongoing
development that is conceived to ensure that
our vehicles continue to embody the highest
quality and safety standards combined with
advanced, state-of-the-art technology. In
exceptional cases, the features described in
this Owner's Manual could therefore differ from
those on your vehicle.
5
Reference At a glanceControlsDriving tipsMobility

For your own safety
Online Edition for Part-No. 01 41 0 158 704 - © 10/04 BMW AG
Maintenance and repair
Notes
Advanced technology, e.g. the use of
modern materials and high-performance
electronics, requires specially adapted maintenance and repair methods. Therefore, only have
corresponding work on your BMW carried out
by a BMW center or a workshop that works
according to BMW repair procedures with correspondingly trained personnel. If work is carried out improperly there is a danger of consequential damage and the related safety risks.<
California Proposition 65 warning
California laws require us to state the following
warning:
Engine exhaust and a wide variety of
automobile components and parts,
including components found in the interior furnishings in a vehicle, contain or emit chemicals
known to the State of California to cause cancer
and birth defects and reproductive harm. In
addition, certain fluids contained in vehicles and
certain products of component wear contain or
emit chemicals known to the State of CA to
cause cancer and birth defects or other reproductive harm.
Battery posts, terminals and related accessories contain lead and lead compounds. Batteries also contain other chemicals known to the
State of California to cause cancer. Wash your
hands after handling.
Used engine oil contains chemicals that have
caused cancer in laboratory animals. Always
protect your skin by washing thoroughly with
soap and water.<
BMW warrants these parts to be free from
defects in material and workmanship.
BMW will not accept any liability for damage
resulting from installation of parts and accessories not approved by BMW.
BMW cannot test every product made by other
manufacturers to verify if it can be used on a
BMW safely and without risk to either the vehicle, its operation, or its occupants.
Original BMW Parts, BMW Accessories and
other products approved by BMW, together
with professional advice on using these items,
are available from all BMW retailers.
Installation and operation of non-BMW
approved accessories such as alarms, radios,
amplifiers, radar detectors, wheels, suspension
components, brake dust shields, telephones,
including operation of any portable cellular
phone from within the vehicle without using an
externally mounted antenna, or transceiver
equipment, e.g. C.B., walkie-talkie, ham radio or
similar, may cause extensive damage to the
vehicle, compromise its safety, interfere with
the vehicle's electrical system or affect the
validity of the BMW Limited Warranty. See your
BMW center for additional information.
Do not use key or remote control to lock doors
or trunk with anyone inside the vehicle. Refer to
the Owner's Manual for more details.<
Maintenance, replacement or repair of
the emission control devices and systems may be performed by any automotive
repair establishment or individual using any certified automotive part.<
Parts and accessories
For your own safety, use parts and acces-
sories approved by BMW.
When you purchase accessories tested and
approved by BMW and Original BMW Parts, you
simultaneously acquire the assurance that they
have been thoroughly tested by BMW to ensure
optimum performance when installed on your
vehicle.
6

Service and warranty
Online Edition for Part-No. 01 41 0 158 704 - © 10/04 BMW AG
This manual is supplemented by a Service and
Warranty Information Booklet for US models,
Warranty and Service Guide Booklet for Canadian models.
We recommend that you read this publication
thoroughly.
Your BMW is covered by the following warranties:
> New Vehicle Limited Warranty
> Rust Perforation Limited Warranty
> Federal Emissions System Defect Warranty
> Federal Emissions Performance Warranty
> California Emission Control System Limited
Warranty.
Detailed information about these warranties is
listed in the Service and Warranty Information
Booklet for US models, Warranty and Service
Guide Booklet for Canadian models.
Reporting safety defects
The following only applies to vehicles owned
and operated in the US.
If you believe that your vehicle has a defect
which could cause a crash or could cause injury
or death, you should immediately inform the
National Highway Traffic Safety Administration
NHTSA in addition to notifying BMW of North
America, LLC, P.O. Box 1227, Westwood, New
Jersey 07675-1227, telephone toll-free
1-800-831-1117.
If NHTSA receives similar complaints, it may
open an investigation, and if it finds that a safety
defect exists in a group of vehicles, it may order
a recall and remedy campaign. However,
NHTSA cannot become involved in individual
problems between you, your retailer, or BMW of
North America, LLC.
To contact NHTSA, you may either call the Auto
Safety Hotline toll-free at 1-800-424-9393 or
366-0123 in Washington, D.C. area, or write to:
NHTSA, U.S. Department of Transportation,
Washington, D.C. 20590. You can also obtain
other information about motor vehicle safety
from the Hotline.
7
Reference At a glanceControlsDriving tipsMobility

Online Edition for Part-No. 01 41 0 158 704 - © 10/04 BMW AG

At a glance
Online Edition for Part-No. 01 41 0 158 704 - © 10/04 BMW AG
At a glance
The overviews of buttons, switches and
displays presented in this chapter will help you
find your way around your vehicle.
You will also be familiarized with the concepts
behind the operation of the features
available to you.

Cockpit
Online Edition for Part-No. 01 41 0 158 704 - © 10/04 BMW AG
Control elements
Cockpit
1 Parking lamps/Low beams 56
2 > Turn signal indicators 42
> Standing lamps 57
> High beams 57
> Headlamp flasher 42
> Computer
3 Fog lamps
4 Horn
5 Washer/wiper system/Rain sensor
6 Hazard warning flashers
7 Central locking system 16
* 48
* 57
10
* 43
8 Buttons in steering wheel
Volume
Press briefly:
Accept incoming call, start dialing, terminate
call
Extended pressure:
Activate and deactivate voice entry
*

Display/hide telephone book. Display the
Online Edition for Part-No. 01 41 0 158 704 - © 10/04 BMW AG
entries one after another with the forward/backward buttons
Fast forward/rewind
> Radio
Press briefly: next station stored
Extended pressure: station search
> CD
Press briefly: jump to next track
Extended pressure: fast forward/rewind
> Telephone
Scan register of names
9 Cruise control
10 Hood release 84
11 Luggage compartment lid release 18
* 44
At a glanceControlsDriving tipsMobilityReference
11

Instrument cluster
Online Edition for Part-No. 01 41 0 158 704 - © 10/04 BMW AG
Cockpit
1 Speedometer
2 Indicator and warning lamps 12
3 Tachometer 46
with indicator and warning lamps 12
4 Engine coolant temperature gauge 46
5 Fuel gauge 46
6 Button for
> Time 47
> Service interval display 47
7 Display field for selector lever and program
indicator
> Automatic transmission
> Sequential manual gearbox SMG
8 Button for
> Trip odometer, reset to zero 46
> Setting time 47
9 Display for
> Trip odometer/Odometer 46
> Clock 47
> Service interval 47
> Computer
* 48
* 38
* 40
Indicator and warning lamps
Technology that monitors itself
Indicator and warning lamps that are identified
+ are tested for proper functioning whenever
by
the ignition key is turned. They each light up
once for different periods of time.
If a malfunction occurs in one of the monitored
systems, the corresponding light does not go
out after the engine has started, or it lights up
again while the vehicle is in motion. You can find
more information about each system on the
specified pages.
Safety belt reminder + 30
Airbags
Battery charge current + 94
+ 53
12

Engine oil pressure/Engine oil level/
Online Edition for Part-No. 01 41 0 158 704 - © 10/04 BMW AG
Engine oil sensor
+ 86
Fog lamps 57
Brake system
+
Parking brake released 88
Parking brake applied 37
With other warning lamps 51
Brake warning lamp for Canadian
models
Antilock Brake System ABS/Driving
stability control systems
+ 50
Antilock Brake System ABS/Driving
stability control systems for Canadian
models
Dynamic Stability Control
+ 50
DSC
Dynamic Traction Control
+ 50
DTC
Flat Tire Monitor
+ 52
Automatic transmission/Sequential
manual gearbox SMG
Brake pads
+ 88
+ 39, 41
Add coolant 87
Check gas cap
+ 76
Headlamp flasher/High beams 42, 57
Electric Power Steering
+ 42
Doors or luggage compartment lid
open
Engine electronics
+
Malfunction in the engine electronics.
You can continue to drive with
reduced engine output or engine
speed. Please have the system
inspected by your BMW center.
Colors
The indicator and warning lamps can light up in
various colors and combinations.
> Red:
Stop the vehicle immediately
or
an important reminder
> Red and yellow:
Continue driving cautiously
> Yellow:
Have the system checked soon
or
for your information
> Green or blue:
For your information.
At a glanceControlsDriving tipsMobilityReference
Service engine soon + 90
Service engine soon indicator lamp for
Canadian models
Defective bulb 56
Turn signal indicators 42
13
Online Edition for Part-No. 01 41 0 158 704 - © 10/04 BMW AG

Controls
Online Edition for Part-No. 01 41 0 158 704 - © 10/04 BMW AG
Controls
This chapter provides you with the information
you need for complete control over your
vehicle. It describes all features used for driving
and for ensuring your safety and comfort.
Opening and closing
Online Edition for Part-No. 01 41 0 158 704 - © 10/04 BMW AG
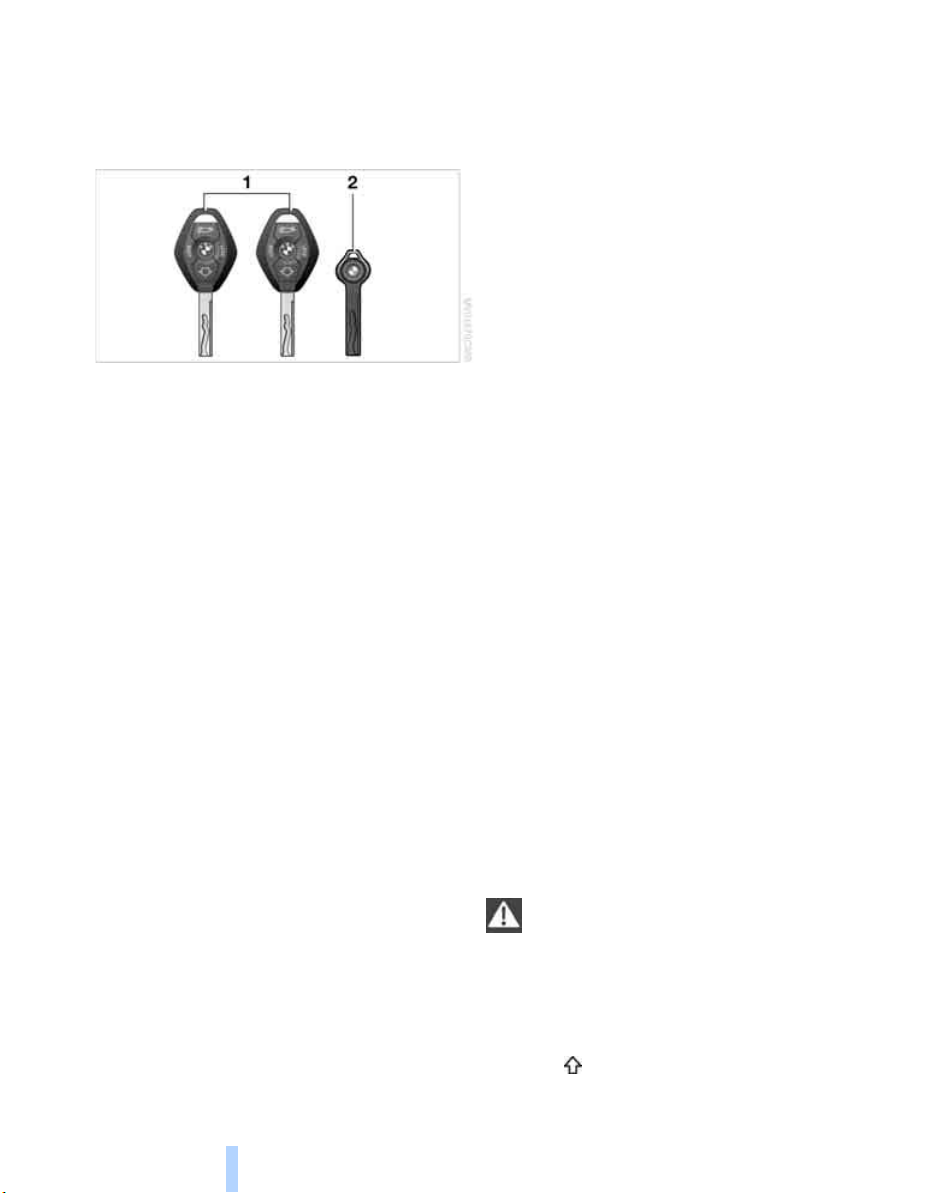
The key set
1 Master keys with remote control
Opening and closing
Each key is powered by an extended-life
battery that is charged automatically in the
ignition lock as you drive. For this reason,
use every master key at least twice a year to
keep its battery charged. Depending on
which master key is recognized when the
vehicle is unlocked, different settings are
called up and carried out in the vehicle, refer
to Key Memory on page 31.
2 Spare key
For storage in a safe place, e.g. in your wallet.
This key is not intended for constant use.
> storage compartment between the back-
rests
> opened manual convertible top.
The central locking system can be operated
> from outside using the remote control or via
the driver's door lock
> from inside via the central locking system
button.
If it is operated from inside, the fuel filler door
will not be locked. Refer to page 18.
The anti-theft system is automatically activated
whenever you activate the central locking system from outside the vehicle. It prevents the
doors from being unlocked with the lock buttons or release handles. The alarm system is
also armed.
In the event of a sufficiently severe accident, the
central locking system unlocks automatically. In
addition, the hazard warning flashers and interior lamps come on.
Opening and closing: from outside
New keys
You can obtain new keys, whether as additional
keys or replacement keys, at your BMW center.
Central locking system
The concept
The central locking system is ready for operation whenever the driver's door is closed. The
system simultaneously engages and releases
the locks on the
> doors
> luggage compartment lid
> fuel filler door
16
With the remote control
Whenever you unlock or lock the vehicle, you
simultaneously deactivate/activate the antitheft system, disarm/arm the alarm system and
switch the interior lamps on/off.
You will find more information about the alarm
system on page 25.
Since persons or animals in the vehicle
could lock the doors from the inside,
always take the vehicle keys with you so that
the vehicle can be opened again from the outside at any time.<
To unlock
Press the button.

Press the button once to unlock the driver’s
Online Edition for Part-No. 01 41 0 158 704 - © 10/04 BMW AG
door and the fuel filler door; press a second time
to disengage all vehicle locks.
Convenience opening mode
Keep the button pressed:
The windows and the fully automatic convertible top are opened.
To lock and secure
Press the button.
The hazard warning flashers light up once.
If you wish, you can have this special feature activated/deactivated.<
To switch on the interior lamps
With the vehicle locked:
Press the button.
With this function, you can also search for your
vehicle when parked in an underground garage,
for instance.
To open the luggage compartment
Press button briefly.
The luggage compartment lid will open slightly,
regardless of whether it was locked or
unlocked.
Before and after a trip, be sure that the
luggage compartment lid has not been
opened unintentionally.<
If it is no longer possible to lock the vehicle with
the remote control, the battery is discharged.
Use this remote control key while driving for an
extended period in order to recharge the battery, refer to page 16.
For US owners only
The transmitter and receiver units comply with
part 15 of the FCC, Federal Communications
Commission, regulations. Operation is governed by the following:
FCC ID: LX8EWS
LX8FZVS
LX8FZVE
Compliance statement:
This device complies with part 15 of the FCC
Rules. Operation is subject to the following two
conditions:
> This device may not cause harmful interfer-
ence, and
> this device must accept any interference
received, including interference that may
cause undesired operation.
Any unauthorized modifications to these
devices could void the user's authority to
operate the equipment.<
At the door lock
Panic mode*
By pressing and holding button for more
than approx. two seconds, you can trigger the
alarm systems
danger.
To switch off the alarm: press any of the buttons.
* in response to any impending
Malfunction
Local radio waves can impede the functioning
of the remote control.
Should this occur, open and close the vehicle
using the master key in either a door or the luggage compartment lock.
One turn of the key in the driver's door lock
unlocks the driver's door and the fuel filler door.
Turn the key a second time to disengage all
other vehicle locks.
When the vehicle is locked, the hazard warning
flashers light up once.
If you wish, you can have this special feature activated/deactivated.<
17
Reference At a glanceControlsDriving tipsMobility

Convenience operation
Online Edition for Part-No. 01 41 0 158 704 - © 10/04 BMW AG
You can also operate the windows and the fully
automatic convertible top via the door lock.
> To open:
With the door closed, hold the key in the
Unlock position
> To close:
With the door closed, hold the key in the
Lock position.
Watch the closing process to ensure that
no one is trapped. Releasing the key
stops the operation.<
Manual operation
If there is an electrical malfunction, you can
Opening and closing
unlock or lock the driver's door by turning the
key in the lock all the way to the left or right.
Opening and closing: from inside
To unlock and open
> Either unlock the doors together with the
button for the central locking system and
then pull each of the release handles above
the armrests
or
> pull the release handle for each door twice:
the initial pull unlocks the door, and the second one opens it.
To lock
> Either use the central locking button to lock
both doors at once or
> press the individual door lock buttons
down.
To prevent the driver from being inadvertently locked out of the vehicle, the
driver's door lock button will not engage as
long as the door is open.<
Since persons or animals in the vehicle
could lock the doors from the inside,
always take the vehicle keys with you so that
the vehicle can be opened again from the outside at any time.<
You can use this button to control the central
locking system whenever the doors are closed.
The doors and luggage compartment lid are
unlocked or locked only. The anti-theft system
is not activated.
If only the driver's door was unlocked from the
outside and you press the button, then, with the
driver's door still open, the luggage compartment lid and the fuel filler door will unlock, too. If
the driver's door is closed, it will be locked.
If you desire, the central locking system
can be activated automatically as soon as
you begin to drive. This can be adjusted to be
key-specific.<
18
Luggage compartment lid
To open from the outside
Turn the master key to the left as far as it will go.
The luggage compartment lid will open slightly.
If the alarm system is armed, opening the luggage compartment with the key will trigger an
alarm; refer also to page 25.
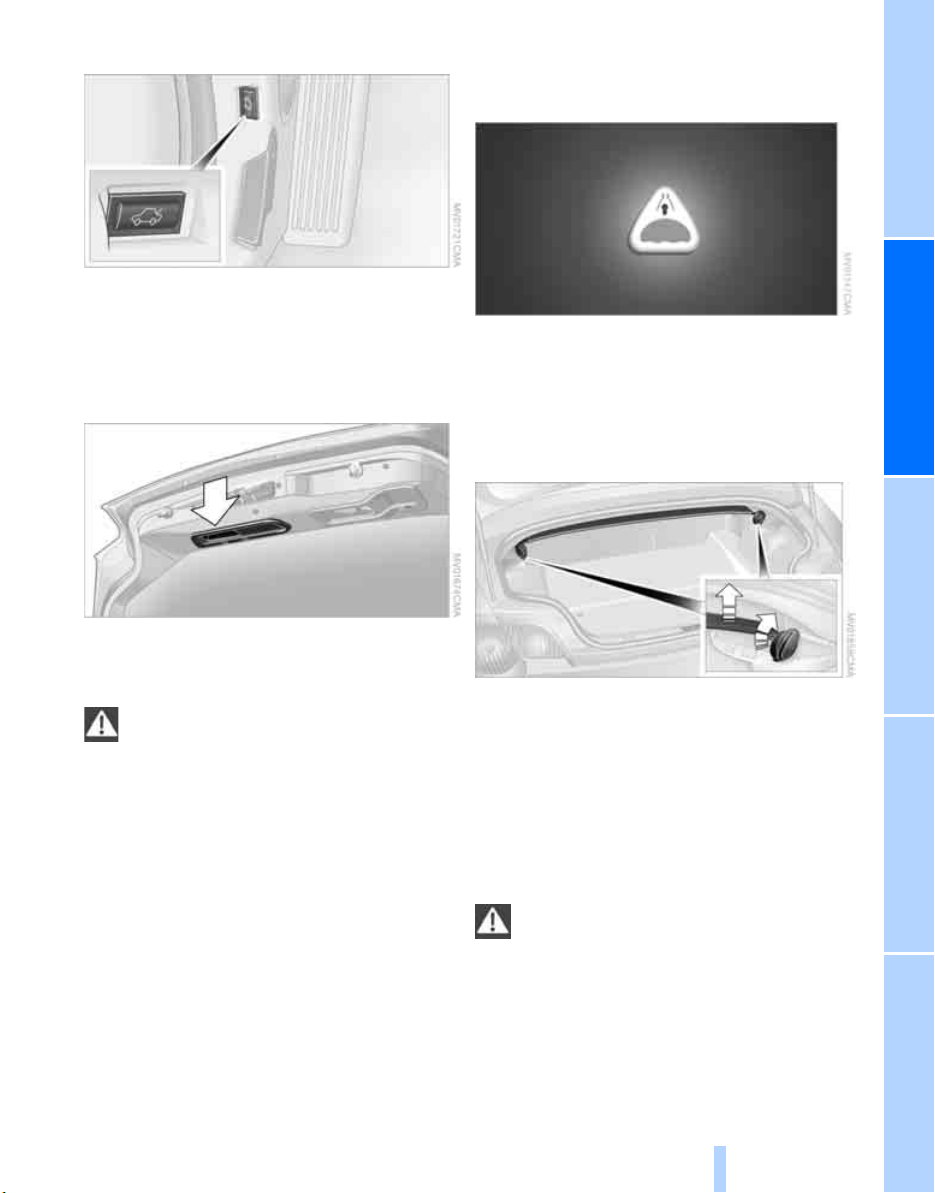
To open from inside the vehicle
Online Edition for Part-No. 01 41 0 158 704 - © 10/04 BMW AG
If the luggage compartment lid has not been
locked separately, you can open it with this button in the footwell on the driver's side when the
vehicle is stationary.
Luggage compartment
Emergency release
This lever releases the luggage compartment
lid from inside the luggage compartment.
To close
The handle recess in the interior trim panel of
the luggage compartment lid makes it easier to
pull the lid down.
To avoid injuries, be sure that the travel
path of the luggage compartment lid is
clear when it is closed, following the same precautions as with all closing procedures.<
To enlarge the luggage compartment
The luggage compartment can be enlarged
when the convertible top is closed.
Simultaneously turn the handles on both sides
of the luggage compartment outward past the
resistance point.
The convertible top compartment panel is
raised.
Before opening the convertible top:
Turn both handles inward.
The convertible top compartment panel is lowered.
Before opening the convertible top, make
sure that the convertible top compartment panel has been folded down in the luggage compartment to avoid any possible damage.<
19
Reference At a glanceControlsDriving tipsMobility

Windows
Online Edition for Part-No. 01 41 0 158 704 - © 10/04 BMW AG
To open and close a window
Ignition key in position 1 or higher:
> Press the switch downward until you feel
Opening and closing
resistance: the window continues to move
downward as long as you continue to press
the switch
> Tap the switch past the pressure point:
the window moves downward automatically. Tapping the switch again stops the
opening cycle.
You can close the window in the same manner
by pulling the switch upward.
If you wish, you can have this special feature activated/deactivated.<
After the ignition has been switched off
You can still open or close the windows for up to
15 minutes, as long as no one opens any of the
doors.
When leaving the vehicle, always remove
the ignition key from the lock and remember to close the doors, since children could otherwise operate the windows and injure themselves, etc.<
For convenience operation via the remote control or the door lock, refer to page 17 or 18,
respectively.
Pressure-sensitive finger guard
system
If the closing force exceeds a certain value while
a window is being raised, the system will
respond by stopping the window and then
retracting it a small distance.
Despite the finger guard system, make
sure that the windows can close without
obstruction, since in some cases, e.g. with thin
objects, it is not guaranteed that the closing
operation will be interrupted.
The finger guard system function is restricted
when the switch is pulled and held beyond the
pressure point.<
After a power supply interruption
After a power supply interruption, for instance
after disconnecting the battery, the pressuresensitive finger guard system must be reinitialized:
Ensure that the doors and convertible top are
closed before initializing. Perform the following
procedure twice for each window:
> Open and close the window completely
> With the window closed, keep pulling the
switch upward for approx. 1 second.
Manual convertible top
The fabric top offers perfect protection against
the weather and it can be opened easily and
quickly by one person alone.
Here are a few tips so that you get the most out
of your BMW:
> It is advisable to close the convertible top
when the vehicle is parked. The closed convertible top not only protects the passenger
compartment from unforeseeable damage
from the weather, but also provides a certain degree of theft protection
> In addition, only keep valuables in the
locked luggage compartment, even with the
convertible top closed
> When the convertible top is open, the cen-
tral locking system also locks the release
button for the convertible top. The convertible top cannot be operated. This provides
better theft protection for valuables stored
in the luggage compartment
> Never mount a roof-mounted luggage rack
system on the convertible top.
20

Never store the convertible top for longer
Online Edition for Part-No. 01 41 0 158 704 - © 10/04 BMW AG
than one day while it is wet to avoid per-
manent damage from moisture.<
To open
Operate the convertible top only when
the vehicle is stationary.
Before opening the convertible top, make sure
that the convertible top compartment panel has
been folded down in the luggage compartment
to avoid any possible damage, refer to
page 19.<
1. Flip the handle out and turn it to the end
stop
2. Fold the handle back in
Do not guide the convertible top
towards the rear with the handle
folded out, as the convertible top's headliner could otherwise be damaged.<
3. Open the convertible top and push it toward
the rear of the vehicle
4. Gently swing the convertible top downward
and press until it engages audibly.
To close
1. Press button 1.
The convertible top is released and moves
up slightly
2. Holding on to the handle, pull the convert-
ible top forward onto the windshield frame
3. Turn the handle until it audibly engages.
The convertible top is locked.
At higher speeds, a vacuum effect in the
passenger compartment can cause the
convertible top to begin fluttering. Increase the
air supply so that a low pressure draft does not
occur in the vehicle.<
Fully automatic convertible top*
The fully automatic convertible top combines
assured protection against the elements with
simple and easy handling.
Here are a few tips so that you get the most out
of your BMW:
> It is advisable to close the convertible top
when the vehicle is parked. When closed,
21
Reference At a glanceControlsDriving tipsMobility

the top not only guards the passenger com-
Online Edition for Part-No. 01 41 0 158 704 - © 10/04 BMW AG
partment from unforeseeable damage from
the weather, but also affords a degree of
protection against theft. In addition, only
keep valuables in the locked luggage compartment, even with the convertible top
closed
> Never mount a roof-mounted luggage rack
system on the convertible top
> To avoid damage, do not operate the con-
vertible top at temperatures below 147/
–106.
To avoid permanent damage from mois-
ture, never store the convertible top while
it is wet.
Driving when the opening or closing process
Opening and closing
has not been completed can cause vehicle
damage or personal injury.
Do not lay objects on the convertible top, since
they could fall off when the convertible top is
operated and cause damage or injuries.
Do not reach into the convertible top mechanism during opening and closing. Keep children
away from the moving parts of the convertible
top during operation.<
If possible, only operate the convertible
top with the vehicle stopped, as otherwise the process may be interrupted.
If you set the convertible top in motion while the
vehicle is stationary and then have to start suddenly, for instance at a traffic light, you can still
complete the procedure by driving as slowly as
possible and again holding the corresponding
button pressed.
At higher speeds, a vacuum effect in the passenger compartment can cause the convertible
top to begin fluttering. Increase the air supply
so that a low pressure draft does not occur in
the vehicle.<
Opening and closing
1 To close
2 To open
If at all possible, only operate the convert-
ible top if the engine is running. This
saves unnecessary battery wear.
Before closing the convertible top, remove any
objects from the windshield frame that could
keep the convertible top from closing properly.<
Ignition key in position 1 or higher.
With the vehicle standing.
1. Read and comply with the preceding safety
precautions
2. Make sure that the convertible top com-
partment panel in the luggage compartment is lowered; refer to page 19. Otherwise the convertible top cannot be opened
3. Ensure that the luggage compartment lid is
closed
4. Press and hold the corresponding button
for convertible top operation.
If the convertible top should halt right before the
closing phase is completed, press against the
front part of the convertible top frame from the
outside to help the closing process along. Keep
pressing the button while doing so until the top
starts up again on its own.
Indicator lamps
> The red indicator lamp in the button will
light up while the convertible top is in
motion. It goes out as soon as the opening
or closing operation has been completed
> If the red indicator lamp in the button
flashes after the button has been released,
22

then the opening or closing operation has
Online Edition for Part-No. 01 41 0 158 704 - © 10/04 BMW AG
not yet been completed.
The sequence can be continued in the
desired direction by pressing this button
> If the yellow indicator lamp in the button
lights up continuously with the button
pressed, then the convertible top compartment panel is raised and the convertible top
cannot be moved.
The side windows will lower slightly when you
press the button for operating the convertible
top.
After the opening or closing operation, the side
windows will go back up if you keep the button
pressed for more than 2 seconds after the indicator lamp has gone out.
Interruption
The automatic sequence will be interrupted
immediately if you release the button that operates the top. The sequence can be continued in
the desired direction by pressing this button.
If the convertible top operation has been
interrupted, do not close the side windows using the power window buttons. Otherwise the side windows may not close properly
against the rubber seal of the convertible top.<
After the convertible top has been stored
for an extended period of time in the convertible top compartment, e.g. in the winter
months because the hardtop was being used,
you may have to support the convertible top by
hand when closing it for the first time.<
To close manually in the event of
an electrical malfunction
1. Pull out the handle in the luggage compart-
ment as far as it will go
2. Turn the handle 903 until it engages
3. Pull on the cord in the luggage compart-
ment panel.
The storage compartment between the
seat backrests is unlocked, refer also to
page 64
4. Press button 1.
The convertible top is released and moves
up slightly
Convenience operation
Remote control
Refer to page 17.
Driver's door
Refer to page 18.
23
Reference At a glanceControlsDriving tipsMobility

5. Grab the convertible top at its frame and pull
Online Edition for Part-No. 01 41 0 158 704 - © 10/04 BMW AG
it up to the windshield frame
6. Pull out the cover panel that is in the center
of the front convertible top frame
Opening and closing
7. Insert the Allen wrench into the hex slot.
The Allen wrench is located in the vehicle
tool pouch, refer to page 91
partment to a minimum, thus providing you with
a pleasant drive, even at higher speeds.
Installation
Insert the wind deflector in its proper orientation into the guides 1 provided on the rollover
bars.
Refer to the labeling on the wind deflector to
determine its proper orientation.
The wind deflector must engage firmly, as
it could otherwise become detached at
higher vehicle speeds.<
The wind deflector panels 2 in the rollover bars
cannot be removed.
Removal
8. Pull the convertible top frame down as far as
possible
9. Continue turning the Allen wrench to the
left until the convertible top frame has
locked onto the windshield frame.
Wind deflector*
With the convertible top open, the wind deflector keeps air movement in the passenger com-
24
Slide both locks inward and remove the wind
deflector.

Clothes hooks
Online Edition for Part-No. 01 41 0 158 704 - © 10/04 BMW AG
Clothes hooks 1 are located on the wind deflector panels in the rollover bars.
Do not hang heavy objects on the hooks.
If you do, they could endanger the pas-
sengers, for example during braking or evasive
maneuvers.<
Storage
For storage, e.g. to achieve a better view to the
rear when the convertible top is closed, there
are two brackets on the inside of the luggage
compartment lid.
Insert the wind deflector into the brackets.
Make sure that the wind deflector cannot
be damaged by objects in the luggage
compartment.<
Alarm system*
The concept
The vehicle alarm system responds:
> When a door, the hood or the luggage com-
partment lid is opened
> When attempts are made to start the vehi-
cle
> When there are movements in the vehicle
interior: interior motion sensor, refer to
page 26
> To alterations in the vehicle tilt, e.g. as
would occur during attempts to steal the
wheels or tow the vehicle
> To interruption of battery voltage.
The alarm produced by the system in the event
of unauthorized vehicle entry and attempted
theft depends on the country version:
> Sounding of an acoustical alarm for
30 seconds
> Activation of the hazard warning flashers for
approx. five minutes.
Arming and disarming the alarm
system
When the vehicle is locked or unlocked either
with the remote control or at the driver's door
lock, the alarm system is simultaneously armed
or disarmed.
The hazard warning flashers blink once when
the alarm system has been properly armed.
You can have different acknowledgment
signals set to confirm arming and disarm-
ing.<
You can still open the luggage compartment
even when the system is armed by pressing the
button on the remote control, refer to
page 17. When it is closed, the lid is once again
secured.
Manual operation of the luggage com-
partment lid triggers the alarm. Refer to
page 18.<
25
Reference At a glanceControlsDriving tipsMobility

Stopping the alarm
Online Edition for Part-No. 01 41 0 158 704 - © 10/04 BMW AG
> Unlock the vehicle with the remote control,
refer to page 16
> or turn the ignition key to position 1, refer to
page 36.
Indicator lamp displays
Opening and closing
Tilt alarm sensor and interior motion
sensor
Tilt alarm sensor
The inclination of the vehicle is monitored. The
alarm system reacts, e.g. to attempts to steal
the wheels or tow the vehicle.
Interior motion sensor*
The system monitors the footwells and the
seating areas of the driver and passenger. Even
when the convertible top is open, the alarm system including the interior motion sensor is
armed. Objects falling into the vehicle, e.g.
leaves, can trigger unintentional alarms, refer to
Avoiding unintentional alarms.
> The indicator lamp beneath the interior mir-
ror flashes continuously:
The system is armed
> The indicator lamp flashes immediately
after the vehicle is locked:
Doors or luggage compartment lid are not
completely closed. Even if you do not close
the area causing the alert, the remaining
areas are secured and the indicator lamp
flashes continuously after 10 seconds.
However, the interior motion sensor is not
activated
> If the indicator lamp goes out immediately
after the vehicle is unlocked:
No manipulation or attempted intrusions
have been detected in the period since the
system was armed
> If the indicator lamp flashes for 10 seconds
immediately after the vehicle is unlocked:
An attempted entry has been detected in
the period since the system was armed.
After an alarm has been triggered, the indicator
lamp will flash continuously.
Avoiding unintentional alarms
The tilt alarm sensor and interior motion sensor
can be deactivated at the same time. In this way
you can avoid unintentional alarms, e.g. in the
following situations:
> In duplex garages
> When the vehicle is being transported on a
car-carrying train
> If animals are to be left in the vehicle.
To deactivate the tilt alarm and interior
motion sensors
Press the button on the remote control
a second time immediately after locking.
The indicator lamp lights up briefly and then
flashes continuously. The tilt alarm sensor and
the interior motion sensor are deactivated until
the vehicle is again unlocked and locked.
26

Adjustments
Online Edition for Part-No. 01 41 0 158 704 - © 10/04 BMW AG
Safe seating position
For relaxed driving with as little fatigue as possible, you should select a seating position that
reflects your personal requirements. In combination with the safety belts and airbags, the correct seating position also plays an important
role in enhancing occupant safety in the event
of an accident. To ensure that the vehicle's
safety systems provide you with optimal protection, we request that you direct your careful
attention to the following section.
For supplementary information on transporting
children refer to page 33.
Airbags
Always maintain an adequate distance
between yourself and the airbags. Always
hold the steering wheel by its rim with hands at
the 9 and 3 o'clock positions to minimize the
ris k o f i nj ur ie s to y ou r h an ds or ar ms in th e e ve nt
of airbag deployment.
Never allow any objects, individuals or animals
to obstruct the areas between passengers and
airbags.
Never use the front airbag's cover as a storage
tray or support for objects of any kind. Ensure
that the passenger is correctly seated, i.e. does
not prop feet or legs against the dashboard.
Otherwise, leg injury could result if the knee airbag and front airbag suddenly deployed.
Never let an occupant's head rest near or on a
side airbag because the inflating airbag could
cause a serious or fatal injury.<
Even when all these guidelines are observed,
the risk of injury as a result of contact with the
airbags cannot entirely be ruled out in some situations. In sensitive individuals, the ignition and
inflation noise may induce a mild hearing loss
that is temporary in most cases.
For airbag locations and additional information
on airbags, refer to page 53.
Safety belts
Always fasten your safety belt before starting
off. As supplemental restraint devices, the airbags are designed to enhance the effectiveness of the safety belts, and not to replace
them.
Your vehicle offers two sitting positions, each of
which is equipped with a safety belt.
At all times, occupants should sit upright
and be properly restrained: infants and
small children in appropriate child-restraint systems; larger children and adults using the safety
belts.
Expectant mothers should always wear their
safety belts, taking care to position the belt in
the pelvic area against the lower hips, where it
will not exert pressure against the abdomen.
Ne ver al low mo re tha n on e pers on to w ear a single safety belt. Never allow infants or small children to ride in a passenger's lap.
Do not route the belt across your neck, or run it
across sharp edges. Be sure that the belt does
not become caught or jammed. Avoid twisting
the belt while routing it firmly across the hips
and shoulder; wear it as snugly against your
body as possible. Do not allow the belt to rest
against hard or fragile objects. Otherwise, the
belt in the pelvic area could slide over the hips in
the event of a frontal impact, leading to abdominal injury. Avoid wearing bulky clothing and pull
the belt in the upper-body area upward periodically to retension it. Otherwise, the restraining
effect of the safety belt could be diminished.<
For information on using the safety belts, refer
to page 30.
27
Reference At a glanceControlsDriving tipsMobility

Seats
Online Edition for Part-No. 01 41 0 158 704 - © 10/04 BMW AG
Before adjusting your seat, always
observe the following precautions
Never try to adjust your seat while operat-
ing the vehicle. The seat could respond
with an unexpected movement, and the ensuing loss of vehicle control could result in an
accident.
Never ride with the backrest inclined to an
Adjustments
extreme angle – this also applies to the passenger seat. If you do, there is a risk that you will
slide under the safety belt in the event of an
accident, thus reducing the protection provided
by the safety belt.<
In addition, observe the instructions regarding
damaged safety belts on page 30.
Seat adjustment
3Backrest
Pull lever 3 and apply weight to or remove
weight from the backrest as required.
Head restraints
Head restraints reduce the risk of neck
injuries in the event of an accident. Adjust
the head restraint in such a way that its center is
at approximately ear level.<
Adjusting the height
1 Backward/forward
Pull lever 1 and slide the seat into the desired
position.
After releasing the lever, move the seat backwards or forwards slightly to ensure that the
latch engages securely
2Height
Pull lever 2 and apply weight to or remove
weight from the seat as required
28
> To move up: pull.
> To move down: press button 1 and push
the head restraint downward.
Removal
1. Pull up the head restraint as far as it will go.
2. Press button 1 and pull out the head
restraint completely.
Installation
Insert the head restraint into the guides.
 Loading...