

Page 1

ETHERNET RJ-45 200 Mbps
POWERLINE TURBO
TWin pack
Manuel d'utilisation
Page 2

Françai s
Ethernet RJ-45 200 Mbps
Powerline TURBO
Twin pack
Introduction
Félicitations. Vous venez d’acheter le pack de
Ce sont des Adaptateurs Ethernet Powerline 200 Mbps
qui transforment le câblage électrique existant de votre
maison en une puissante infrastructure réseau. Branchez
simplement un adaptateur Ethernet Powerline 200 Mbps
sur une prise de courant alternatif ordinaire qui étendra
facilement votre connexion à large bande câblée/xDSL
prise électrique dans toutes les pièces de votre maison,
lignes électriques existantes installées dans une maison
pour transmettre des données numériques, voix, audio et
vidéo entre périphériques.
2 Adaptateurs Ethernet Powerline.
ou votre réseau Ethernet (LAN) existant à toute autre
sans avoir besoin d’un nouveau câblage.
Cet Adaptateur Ethernet Powerline
prend en charge un débit de
données allant jusqu’à 200 Mbps
sur les lignes électriques
domestique existantes. Avec
des débits de 200 Mbps,
une application multimédia
complète peut être facilement
prise en charge partout dans la
maison en plus de l’accès à Internet.
Cet Adaptateur Ethernet Powerline utilise les
2
Page 3

1. Caractéristiques clés
Homeplug Turbo
• Un débit de données à haute vitesse jusqu’à 200 Mbps.
• Entièrement compatible HomePlug 1.0.
• Rétrocompatible avec le standard HomePlug 1.0.
• Fonctionne avec une entrée en c.a. de 100V ~ 240V.
• Adaptation intelligente du canal qui maximise le débit
dans des conditions de canal difficiles.
• Fonctions de Qualité de Service intégrées.
• Cryptage DES 56 bits avec gestion des clés pour des
communications haut débit sécurisées.
• Distance d’utilisation jusqu’à 200 m par le réseau
électrique domestique.
Pré-requis
• Au moins deux prises de courant alternatif 100V ~ 240
V avec alimentation électrique domestique standard.
• Un ordinateur comportant ce qui suit :
- Système d’exploitation avec TCP/IP installé.
- Processeur compatible Pentium III et supérieur.
- Carte LAN Ethernet installée avec protocole TCP/IP.
- 64 Mo RAM ou supérieur.
- 50 Mo d’espace disque libre (minimum).
- Lecteur de CD-ROM.
2. Contenu
Le kit Adaptateur Ethernet Powerline 200 Mbps contient les
articles suivants :
2 x Adaptateur Ethernet Powerline 200 Mbps
2 x câble Ethernet CAT-5
1 CD-ROM
Si l’un des articles ci-dessus est endommagé ou manquant,
veuillez contacter votre revendeur immédiatement.
(Utilitaire / Manuel / Guide d’installation rapide)
3
Page 4

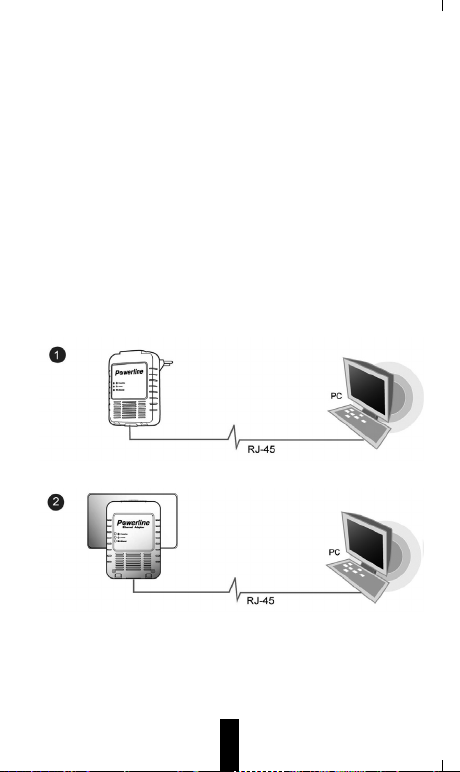
3. Connexion matériel – ordinateur
Les étapes de connexion de l’Adaptateur Ethernet Powerline
à votre ordinateur sont les suivantes :
1. Mettez votre PC ou ordinateur portable hors tension.
2. Connectez le câble Ethernet (RJ-45) fourni au port
Ethernet de l’Adaptateur Ethernet Powerline.
3. Connectez l’autre extrémité du câble Ethernet (RJ-45)
au port LAN de votre ordinateur.
4. Branchez l’Adaptateur Ethernet Powerline à une prise
de courant murale proche de l’ordinateur.
5. Allumez votre ordinateur.
6. Vérifiez et confirmez que les LED Power et Ethernet
de l’Adaptateur Ethernet Powerline sont allumées.
4
Page 5
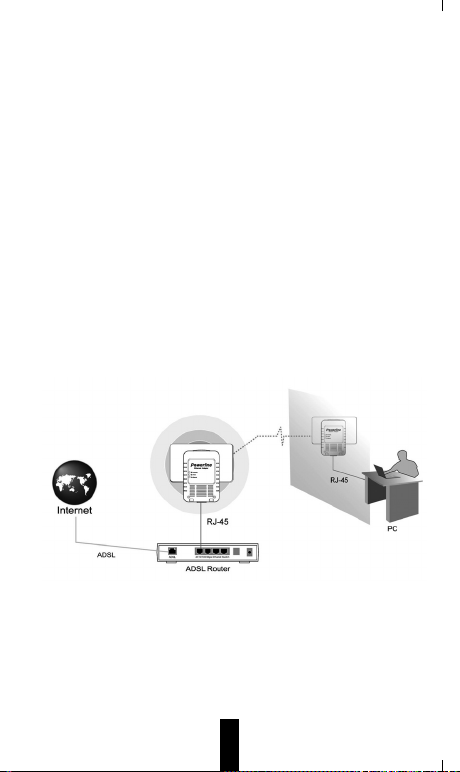
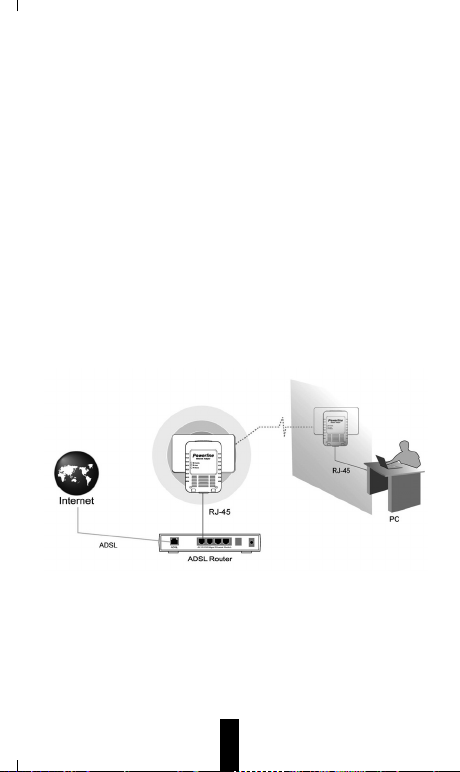
4. Connexion matériel – Internet
Suivez les procédures décrites ci-dessous afin de connecter
l’Adaptateur Ethernet Powerline à votre connexion ADSL
haut débit :
1. Mettez votre PC ou ordinateur portable hors tension.
2. Connectez le câble Ethernet (RJ-45) fourni au port
Ethernet de l’Adaptateur Ethernet Powerline.
3. Connectez l’autre extrémité du câble Ethernet (RJ-45)
à un port Ethernet disponible sur votre routeur ADSL
haut débit.
4. Branchez l’Adaptateur Ethernet Powerline à une prise
de courant murale proche de l’ordinateur.
5. Allumez votre ordinateur.
6. Vérifiez et confirmez que les LED Power, Powerline et
Ethernet de l’Adaptateur Ethernet Powerline sont
allumées.
5
Page 6
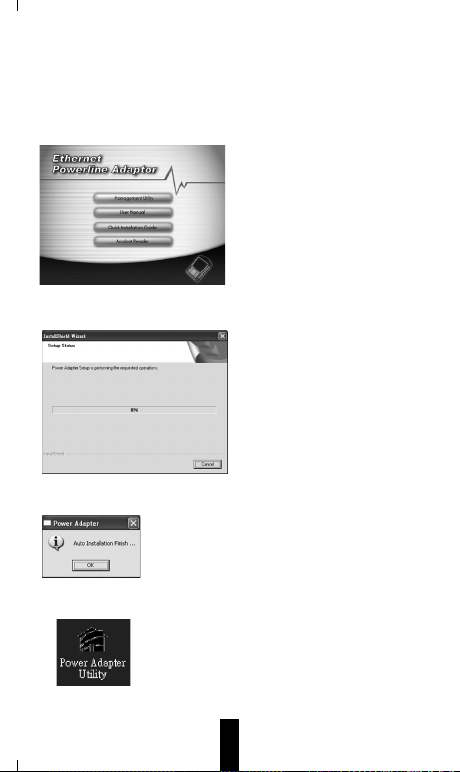
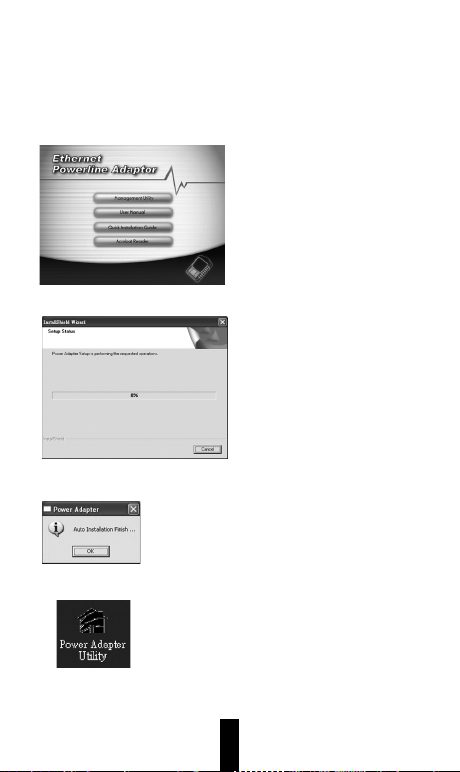
5. Installation de l’Utilitaire de gestion
Suivez les procédures suivantes d’installation de l’utilitaire
de gestion (Management Utility) fourni :
Etape 1 :
Allumez votre ordinateur et
insérez le CD fourni dans le
lecteur de CD-ROM, l’écran
suivant apparaîtra automatiquement. Cliquez sur
«Management Utility» pour
installer l’utilitaire de
gestion.
Etape 2 :
Le processus d’installation
du programme exécutera et
copiera automatiquement
tous les fichiers nécessaires
sur votre système.
Etape 3 :
L’écran suivant apparaîtra lorsque l’utilitaire de l’adaptateur électrique (Power
Adaptor Utility) est installé avec succès.
Etape 4 :
Après l’installation, un raccourci vers
l’icône d’application “Power Adaptor
Utility” est affiché sur le bureau windows.
(Management Utility)
6
Page 7
Fonction avancée : Utilisation des boutons-poussoirs
᧶
:
Couplage (Sécurisé avec AES de 128 bits)
L'Adaptateur de Réseau AV standard utilise l'AES (Advanced Encryption Standard - Norme de cryptage
avancée) de 128 bits pour transmettre des données sécurisées entre adaptateurs de réseau.. Pour
communiquer les uns avec les autres, les Adaptateurs de Réseau doivent tous utiliser la même Clé
d'Appartenance au Réseau (Network Membership Key, ou NMK). Ils ne peuvent autrement déchiffrer les
données cryptées transmises sur le réseau porteur.
Le bouton Couplage vous permettra d'établir une connexion sécurisée avec d'autres appareils en réseaux
porteurs compatibles avec Homeplug AV et avec la fonction Couplage.
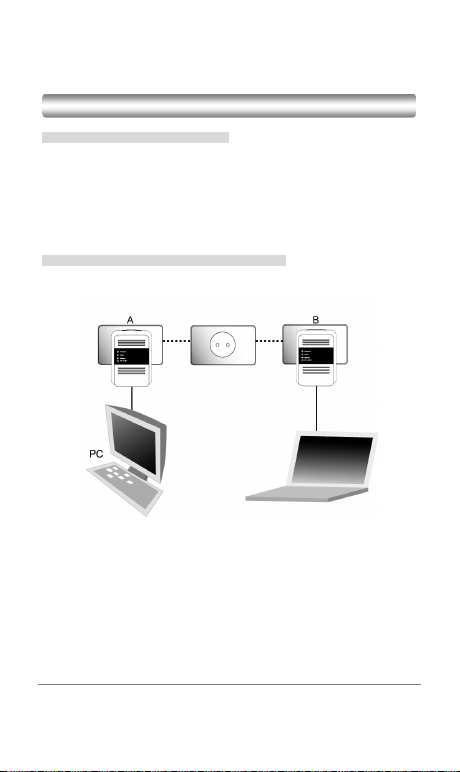
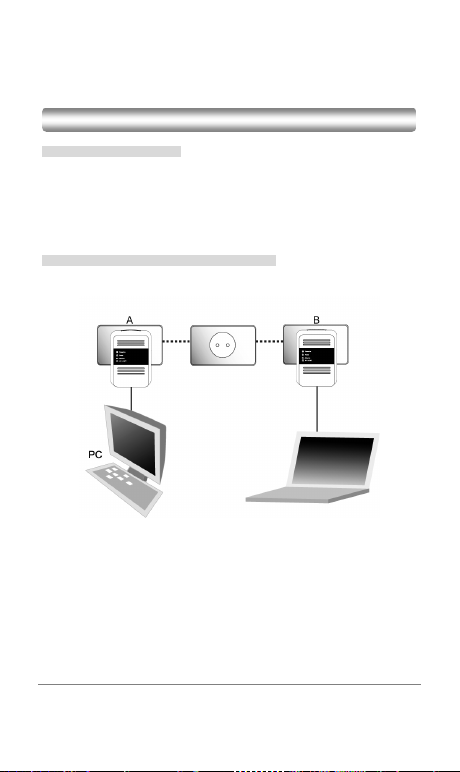
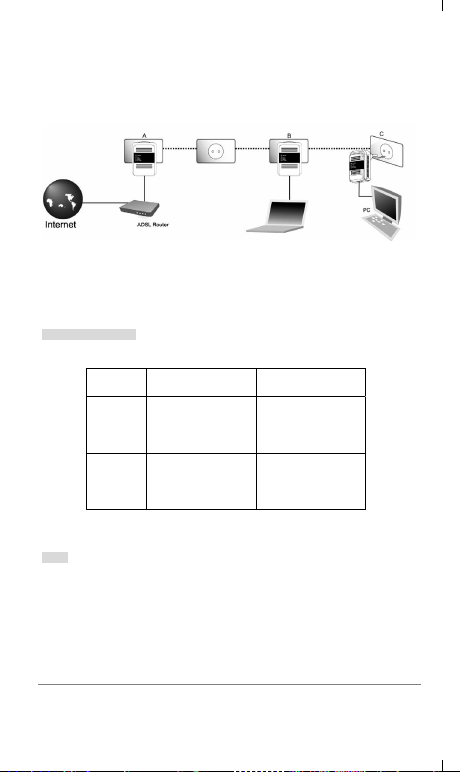
Établir un Réseau Porteur AV avec le bouton Couplage
On peut connecter de nombreux appareils sur un réseau porteur, mais on ne peut utiliser le bouton Couplage
que sur deux appareils à la fois.
Création d'un réseau Porteur avec le bouton Couplage
étape 1. Disposez un adaptateur de réseau porteur A auprès d'un autre appareil de réseau porteur B. Après
avoir réglé le premier adaptateur de réseau, vous disposerez de 120 secondes pour ajuster le second
appareil de réseau.
Étape 2. Appuyez sur le bouton Couplage sur l'un de vos adaptateurs de réseau A pendant plus de 10
secondes jusqu'à ce que le voyant de réseau porteur soit éteint. On réinitialise ainsi le nom du réseau
à une valeur aléatoire et l'appareil est ainsi retiré du réseau auquel il pouvait appartenir.
Étape 3. Appuyez pendant 2 secondes sur le bouton Couplage de l'autre adaptateur de réseau B que vous
voulez connecter.
(Ceci doit être fait dans les 120 secondes après avoir actionné le bouton Couplage du premier
adaptateur.)
Adaptateur Réseau Ethernet sur Courants Porteurs 1
Page 8
Étape 4. Attendez environ 60 secondes que s'établisse la connexion entre vos adaptateurs de réseau. Les
:
voyants de Réseau porteur des deux adaptateurs s'allument quand la connexion est établie.
Votre Réseau porteur AV est désormais sécurisé contre un accès non autorisé.
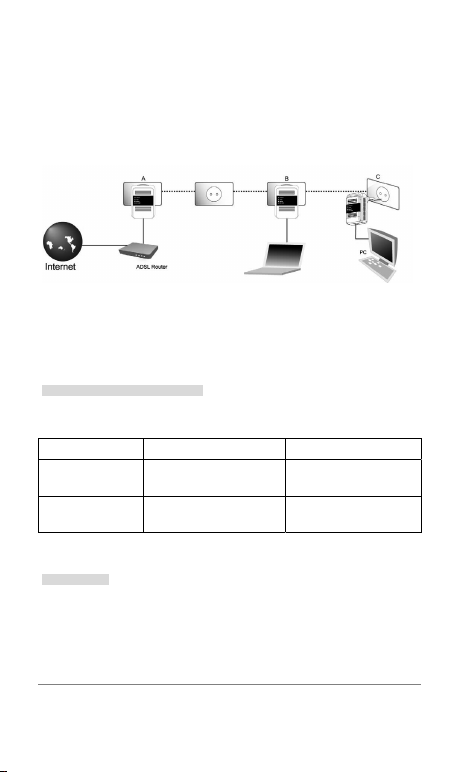
Entrer dans un Réseau porteur AV
1. A ppuyez sur le bouton Couplage de l'adaptateur de réseau C pendant plus de 10 secondes jusqu'à ce que
le voyant de Réseau porteur s'allume.
2. Puis répétez les Étapes 3 et 4 de cette section avec n'importe quel appareil de réseau A ou B) .
Comportement du bouton Couplage
Le tableau suivant résume les effets produits quand le bouton Couplage est actionné pendant des durées
spécifiques .
Bouton Couplage
Action
moins de 3 secondes
plus de 10 secondes
État
L'adaptateur entre dans un réseau.
Il adopte le même nom de réseau que
les autres adaptateurs du réseau
porteur.
L'adaptateur quitte tout réseau auquel
il est associé et son nom de réseau
prend une valeur aléatoire.
Comportement du voyant de
Réseau
Le voyant de Réseau s'allume si
votre adaptateur est connecté à un
autre adaptateur de réseau ou un
réseau porteur.
Le voyant de Réseau s'éteint quand il
quitte le réseau porteur.
Réinitialisation
Pour réinitialiser l'appareil de Réseau AV,
1.Assurez-vous que le Voyant DEL est allumé et ne clignote pas.
2.Appuyez et maintenez enfoncé le bouton Réinitialisation pendant moins de trois secondes. Relâchez le
bouton Réinitialisation quand le Voyant DEL commence à clignoter. Les réglages par défaut ont été restaurés.
Adaptateur Réseau Ethernet sur Courants Porteurs 2
Page 9

Engli sh
Ethernet RJ-45 200 Mbps
Powerline TURBO
Twin pack
Introduction
Congratulations on your purchase of this outstanding
Ethernet Powerline Adaptor twin pack.
These devices are 200Mbps Powerline Ethernet Adaptor
which transforms your house’s existing electrical wiring
into an ubiquitous networking infrastructure. Simply plug
this 200Mbps Ethernet Powerline Adaptor into an ordinary
AC power outlet which will easily extend your Cable/xDSL
broadband connection or existing Ethernet (LAN) network
to any other electrical outlet in any room of a house
without the need of any new cabling.
These Ethernet Powerline Adaptor supports up to 200Mbps
data rate over the existing household
power circuit. With data rates of
200Mbps, full multimedia
application can easily be
supported throughout the
whole house in addition to
Internet access. These Ethernet
Powerline Adaptor uses the
existing power lines installed in a
home as a path to transmit digital data,
voice, audio and video between devices.
7
Page 10

1. Key Features
Homeplug Turbo
• High speed data transfer rate up to 200Mbps.
• Fully compatible to HomePlug 1.0.
• Backward-compatible to HomePlug standard 1.0.
• Works with AC input of 100V ~ 240V.
• Intelligent channel adaptation maximizes throughput
under harsh channel conditions.
• Integrated Quality of Service (QoS) features.
• 56-bit DES Link Encryption with key management for
secure power-line communications.
• Transmission range up to 200m over household power
supply grid.
System Requirement
• At least two AC 100V ~ 240V power outlets with
standard home power wiring.
• A computer with the following:
- Operating System with TCP/IP installed.
- Pentium III compatible processor and above.
- Ethernet LAN card installed with TCP/IP protocol.
- 64 MB RAM or more.
- 50 MB of free disk space (Minimum).
- CD-ROM Drive.
2. Packet Contents
The 85Mbps Ethernet Powerline Adaptor package contains
the following items:
Two 200Mbps Ethernet Powerline Adaptor.
Two CAT-5 Ethernet Cable.
One CD-ROM (Utility / Manual / Quick Setup Guide).
If any of the above items are damaged or missing, please
contact your dealer immediately.
8
Page 11
3. Hardware Connection – Computer
Following are the steps to properly connect the Ethernet
Powerline Adaptor to your computer:
1. Power off your PC or Notebook.
2. Connect the provided Ethernet (RJ-45) cable to the
Ethernet Powerline Adaptor’s Ethernet port.
3. Connect the other end of the Ethernet (RJ-45) cable to
you computer’s LAN port.
4. Plug the Ethernet Powerline Adaptor into a wall socket
next to the computer.
5. Turn on your computer.
6. Check and confirm that the Power and Ethernet LEDs
on the Ethernet Powerline Adaptor are ON.
9
Page 12
4. Hardware Connection – Internet
Follow the procedures describe below to connect the Ethernet
Powerline Adaptor to your ADSL broadband connection:
1. Power off your PC or Notebook.
2. Connect the provided Ethernet (RJ-45) cable to the
Ethernet Powerline Adaptor’s Ethernet port.
3. Connect the other end of the Ethernet (RJ-45) cable to
an available Ethernet port of your ADSL broadband
Router.
4. Plug the Ethernet Powerline Adaptor into a wall socket
next to the computer.
5. Turn on your computer.
6. Check and confirm that the Power, Powerline and
Ethernet LEDs on the Ethernet Powerline Adaptor are
ON.
10
Page 13
5. Management Utility Install
:
Follow the following procedures to properly installing the
provided Management Utility:
Step 1:
Power on your computer
and insert the provided CD
into the CD-ROM drive, the
following screen will pop-up
automatically. Click on “Ma-
nagement Utility” to install
the Management Utility.
Step 2:
The program installation
process will carry out and
automatically copying all the
necessary files to your system.
Step 3:
The following screen will pop-up when the
Power Adaptor Utility is successfully installed.
Step 4:
After the installation, a shortcut to the
“Power Adaptor Utility” application icon
is provided on the windows desktop.
11
Page 14
Advance Feature: How to Use the Push buttons
:
Pair( Secure with 128 bits-AES)
The Powerline AV standard uses 128-bit AES (Advanced Encryption Standard) to safely transmit data
between powerline adapters. For the powerline adapters to communicate with each other they all need to use
the same Network Membership Key (NMK). Otherwise, they cannot unscramble the encrypted data sent in
the powerline network.
The Pair button allows you to set up a secure powerline connection with other HomePlug AV compliant
powerline devices which also support the Pair feature.
Set Up a Powerline AV Network with the Pair button
You can connect a number of devices on a powerline network, but you can use the Pair button on only two
devices at a time.
Create a Powerline network using the Pair button
Step 1.Place a powerline adaptor A close to another powerline device B . After you set up the first powerline
adaptor, you have 120 seconds to set up the second powerline device.
Step 2. Press the Pair button at one of your powerline adaptor A for more than 10 seconds until the Powerline
light is off. This resets the network name to a random value and removes your device from any
network it may belong to.
Step 3. Press the Pair button at the other of your powerline adaptor B you wish to connect for 2 seconds.
(This must be done within 120 seconds of pressing the Pair button on the first adaptor.)
Step 4. Wait for about 60 seconds while your powerline adaptors connect. The Powerline lights on both
adaptors turn on when the connection is made.
Ethernet Powerline Adaptor 1
Page 15
Your Powerline AV network is now protected against unauthorized access.
:
Join an existing Powerline AV Network
1. Press the Pair button on powerline adaptor C for more than 10 seconds until the Powerline light flashes.
2. Then repeat Steps 3 and Step 4 in this section using any powerline device (A or B) .
Pair Button Behavior
The following table summarizes the actions that occur when the Pair button is pressed for specific time.
Pair button
Action
less than 3
seconds
more than 10
seconds
Status Powerline Light Behavior
The adaptor joins a network.
It shares the same network
name as other adaptors on
the powerline network.
The adaptor leaves any
network it is associated with
and its network name
assumes a random value.
The Powerline light turns on
if your adaptor is connected
to another powerline adaptor
or a powerline network.
The Powerline light turns off
when it disconnects from the
powerline network.
Reset
To reset the Powerline AV device,
1.Make sure the Power LED is on and not blinking.
2.Press and hold the Reset button for lesss than three seconds. Release the Reset button when the Power
LED begins to blink. The default settings have been restored.
Ethernet Powerline Adaptor 2
Page 16

Deutch
Ethernet RJ-45 200 Mbps
Powerline TURBO
Twin pack
Vorwort
Wir gratulieren Ihnen zum Kauf dieses Ethernet
Der 85Mbps Powerline Ethernet Adapter verwandelt das
heimische Stromnetz Ihres Haushalts in eine universelle
Netzwerksinfrastruktur. Stecken Sie diesen 200Mbps
Ethernet Powerline Adapter einfach in eine gewöhnliche
Wechselstromsteckdose und erweitern Sie auf dieses
Weise problemlos Ihre Kabel/xDSL Breitbandverbindung
oder Ihr existierendes Ethernet (LAN) Netzwerk kabellos
bis hin zu jeder beliebigen Steckdose in jedem Raum des
Stromnetz als Datenautobahn zur Übertragung digitaler,
vokaler, Audio- und Videodaten zwischen Ihren unterschiedlichen Geräten.
Powerline Adapter Doppelpacks.
Hauses.
Dieser Ethernet Powerline Adapter bietet
eine Übertragungsrate von bis zu
200Mbps über den gewöhnlichen
Stromkreislauf Ihres Haushalts.
Mit Übertragungsgeschwindigkeiten von bis zu 200Mbps werden im gesamten Haus parallel
zu Ihrem Internetanschluss
sämtliche Multimedia Anwen-
dungen unterstützt. Dieser Ethernet
Powerline Adapter verwendet das heimische
12
Page 17

1. Technische Daten
Homeplug Turbo
• Hochgeschwindigkeits-Datenübertragungsrate von
85Mbps.
• Voll kompatibel HomePlug 1.0.
• Rückwärts kompatibel zu HomePlug Standard 1.0.
• Funktioniert mit Wechselstromstecker 100V ~ 240V.
• Intelligente Kanalabstimmung für optimale Übertragung
selbst bei schwierigen Kanalbedingungen.
• Integrierte QoS-Funktionen.
• 56-bit DES Link Verschlüsselung mit Schlüsselmanagement für Übertragungssicherheit über das Stromnetz.
• Übertragungsstrecke von 200 m über die Stromversorgung des Haushalts.
Systemvoraussetzungen
• Mindestens zwei AC 100V ~ 240V Steckdosen mit
Standardverkabelung
• Computer-Voraussetzungen:
- Betriebssystem mit TCP/IP.
- Pentium III kompatibler Prozessor, oder mehr.
- Installierte Ethernet LAN Karte mit TCP/IP Protokoll.
- Mindestens 64 MB RAM.
- 50 MB freier Speicher (Mindestens).
- CD-ROM Laufwerk.
2. Inharlt des pakets
Der 85Mbps Ethernet Powerline Adapter Pack enthält die
folgenden Geräte:
Zwei 200Mbps Ethernet Powerline Adapter.
Zwei CAT-5 Ethernet Kabel.
Eine CD-ROM
Bei Fehlen eines der oben genannten Elemente, nehmen Sie
bitte sofort mit Ihrem Händler Kontakt auf.
(Dienstprogramm/Handbuch/Installationsleitfaden).
13
Page 18

3. Hardware Anschluss – Computer
Für den Anschluss des Ethernet Powerline Adapters an
Ihren Computer gehen Sie bitte wie folgt vor:
1. PC oder Notebook abschalten.
2. Das mitgelieferte Ethernet (RJ-45) Kabel an den Ethernet-
Port des Ethernet Powerline Adapters anschließen.
3. Das andere Ende des Ethernet (RJ-45) Kabels an den
LAN-Port Ihres Computers anschließen.
4. Den Ethernet Powerline Adapter in eine Wandsteck-
dose in der Nähe Ihres Computers einstecken.
5. Den Computer einschalten.
6. Überprüfen, dass die Power- und Ethernet-LEDs am
Ethernet Powerline Adapter auf ON stehen.
14
Page 19

4. Hardware-Anschluss – Internet
Zum Anschluss des Ethernet Powerline Adapters an Ihre
ADSL Breitband-Verbindung folgen Sie bitte den folgenden
Anweisungen:
1. PC oder Notebook abschalten.
2. Das mitgelieferte Ethernet (RJ-45) an den Ethernet-Port
des Ethernet Powerline Adapters anschließen.
3. Das andere Ende des Ethernet (RJ-45) Kabels an einen
verfügbaren Ethernet-Port Ihres ADSL Breitband-Routers anschließen.
4. Den Ethernet Powerline Adapter in eine Wandsteck-
dose in der Nähe Ihres Computers einstecken.
5. Den Computer einschalten.
6. Überprüfen, dass die Power-, Powerline- und Ethernet-
LEDs am Ethernet Powerline Adapter auf ON stehen.
15
Page 20

5. Installierung des Dienstprogramms
Für eine korrekte Installierung des Dienstprogramms,
befolgen Sie bitte die nachstehenden Anweisungen:
Schritt 1:
Computer einschalten und die
mitgelieferte CD in das CDRom-Lesegeräte einlegen.
Der nachstehende Bildschirm
scheint automatisch auf. Zur
Installierung des Dienstprogramms auf “Management
Utility” klicken.
Schritt 2:
Die Programminstallation
wird automatisch gestartet
und die notwendigen
Dateien werden auf Ihr
System kopiert.
Schritt 3:
Ist die Installierung des Dienstprogramms
des Power Adaptors erfolgreich abgeschlossen, scheint folgender Bildschirm auf:
Schritt 4:
Nach der Installierung ist scheint das
Schnellstartsymbol “Power Adaptor Uti-
lity” direkt auf dem Windows Desktop auf.
16
Page 21

Erweiterte Funktion: Wie benutzt man die Drucktasten
:
:
Pair (sicher mit 128 Bit-AES)
Der standardmäßige Powerline AV benutzt 128-bit AES (Advanced Encryption Standard) zur sicheren
Übertragung von Daten zwischen Powerline-Adaptern. Zur Kommunikation untereinander müssen die
Powerline-Adapter alle den gleichen Network Membership Key (NMK). Andernfalls können sie die an das
Powerline-Netzwerk gesendeten chiffrierten Daten nicht entschlüsseln.
Die Pair-Tasteermöglicht Ihnen, eine sichere Powerline-Verbindung mit anderen HomePlug AV-konformen
Powerline-Geräten herzustellen, die ebenfalls die Pair-Funktion unterstützen.
Einrichten eines Powerline AV-Netzwerkes mit Pair-Taste
Sie können etliche Geräte an ein Powerline-Netzwerk anschließen, aber Sie können die Pair-Taste nur an
zwei Geräten gleichzeitig benutzen.
Erstellen eines Powerline-Netzwerkes unter Nutzung der Pair-Taste
Schritt 1.Positionieren Sie einen Powerline-Adaptor A in der Nähe eines anderen Powerline-Gerätes B. Nach
der Konfiguration des ersten Powerline-Adapters haben Sie 120 Sekunden Zeit, um das zweite
Powerline-Gerät zu konfigurieren
Schritt 2. Drücken Sie die Pair-Taste auf einem Ihrer Powerline-Adapter A über einen Zeitraum von
mindestens 10 Sekunden, bis die Powerline-Leuchte erlischt. Auf diese Weise wird der
Netzwerkname auf einen Zufallswert zurückgesetzt und Ihr Gerät wird aus jedem beliebigen Netzwerk
entfernt.
Schritt 3. Drücken Sie 2 Sekunden lang die Pair-Taste auf Ihrem anderen Powerline-Adapter B, den Sie
anschließen möchten.
(Dieser Vorgang muss innerhalb eines Zeitraums von 120 Sekunden erfolgen, indem Sie die
Pair-Taste auf dem ersten Adapter drücken.)
Ethernet Powerline-Adaptor 1
Page 22

Schritt 4. Warten Sie etwa 60 Sekunden, während Ihre Powerline-Adapter verbunden werden. Die
:
Powerline-Leuchten auf beiden Adaptern werden aktiviert, wenn die Verbindung aufgebaut wurde.
Ihr Powerline AV-Netzwerk ist jetzt gegen einen unbefugten Zugriff geschützt.
Anbindung an ein vorhandenes Powerline AV-Netzwerk
1. Drücken Sie die Pair-Taste auf dem Powerline Adaptor C über einen Zeitraum von über 10 Sekunden, bis
die Powerline-Leuchte blinkt.
2. Wiederholen Sie dann Schritt 3 und Schritt 4 dieses Abschnitts unter Einsatz eines beliebigen
Powerline-Gerätes (A oder B) .
Verhalten Pair-Taste
Die folgende Tabelle fasst die Auswirkungen zusammen, die auftreten, wenn die Pair-Taste über einen
bestimmten Zeitraum gedrückt wird.
Auswirkung
Pair-Taste
Der Adapter wird an ein
Netzwerk angeschlossen. Er
unter 3
teilt denselben
Sekunden
Netzwerk-Namen, wie
andere Adapter des
Powerline-Netzwerkes.
Der Adaptor verlässt jedes
beliebige Netzwerk, an das
über 10
er angebunden ist und sein
Sekunden
Netzwerk-Name nimmt einen
Zufallswert an.
Status
Ethernet Powerline-Adaptor 2
Verhalten
Powerline-Leuchte
Die Powerline-Leuchte wird
aktiviert, wenn Ihr Adapter an
einen anderen
Powerline-Adapter oder ein
Powerline-Netzwerk
angeschlossen wird.
Die Powerline-Leuchte
erlischt, wenn sie von dem
Powerline-Netzwerk getrennt
wird.
Page 23

Reset
Gehen Sie wie folgt vor, um das Powerline AV-Gerät zurückzusetzen:
1. Stellen Sie sicher, dass die Strom-LED leuchtet und nicht blinkt.
2. Drücken Sie die Reset-Taste und halten Sie sie weniger als 3 Sekunden gedrückt. Lösen Sie die
Reset-Taste, wenn die Strom-LED zu blinken beginnt. Die vorgegebenen Einstellungen wurden
wiederhergestellt.
Ethernet Powerline-Adaptor 3
Page 24

Italy
Ethernet RJ-45 200 Mbps
Powerline TURBO
Twin pack
Introduction
Congratulazioni per aver acquistato questa doppia
confezione di Ethernet Powerline Adaptor.
Questi dispositivi sono adattatori Powerline Ethernet
a 200Mbps che trasformano la vostra rete elettrica di casa
in un’infrastruttura di rete ubiquitaria. Basta inserire
questo adattatore Ethernet Powerline a 200Mbps in
una normale presa di corrente per estendere facilmente
la vostra connessione a banda larga Cavo/xDSL o
la vostra rete Ethernet (LAN) esistente a qualsiasi altra
presa elettrica in qualunque stanza della vostra
casa senza necessità di ulteriori cavi.
Questo adattatore Ethernet Powerline
supporta il trasferimento dati fino a
200Mbps sul circuito elettrico
abitativo esistente. Con un
trasferimento dati ad 200Mbps,
possono essere supportare
programmi multimediali
completi in tutta la casa oltre
all’accesso Internet. Questi
adattatori Ethernet Powerline utilizzano
casa come tracciato per trasmettere dati digitali, voce, audio
e video tra dispositivi.
le linee elettriche esistenti installate in una
17
Page 25

1. Caratteristiche principali
Homeplug Turbo
• Alta velocità di trasferimento dati fino a 200Mbps.
• Completamente compatibile con HomePlug 1.0.
• Compatibile con versioni precedenti di HomePlug standard 1.0.
• Funziona con alimentazione AC da 100V ~ 240V.
• L’adattamento intelligente del collegamento tra terminali innalza la velocità del trasferimento dati in condizioni di collegamento difficili.
• Caratteristiche integrate di QoS (Quality of Service).
• DES Link Encryption a 56-bit con gestione delle chiavi
per comunicazioni sicure su linea elettrica.
• Portata di trasmissione fino a 200m sulla rete elettrica
familiare.
Requisiti di sistema
• Almeno due prese di corrente AC 100V ~ 240V con
impianto elettrico standard per abitazioni.
• Un computer provvisto di:
- Sistema operativo con TCP/IP installato.
- Processore compatibile con Pentium III o superiori.
- Scheda Ethernet LAN installata con protocollo TCP/IP.
- 64 MB RAM o superiori.
- 50 MB si spazio su disco (minimo).
- Unità CD-ROM.
2. Contenuto della confezione
La confezione dell’adattatore Ethernet Powerline a 200Mbps
contiene i seguenti articoli:
Due adattatori Ethernet Powerline a 200Mbps.
Due cavi Ethernet CAT-5.
Un CD-ROM
(Utility/Manuale/Guida d’installazione rapida).
18
Page 26

Se qualcuno dei summenzionati articoli fosse danneggiato
o mancante, vi preghiamo di contattare immediatamente il
vostro rivenditore.
3. Connessione Hardware – Computer
Seguite le seguenti fasi per connettere correttamente
l’adattatore Ethernet Powerline al vostro computer:
1. Spegnete il vostro PC o Notebook.
2. Collegate il cavo Ethernet (RJ-45) fornito alla porta
Ethernet dell’adattatore Ethernet Powerline.
3. Collegate l’altra estremità del cavo Ethernet (RJ-45) alla
porta LAN del vostro computer.
4. Inserite l’adattatore Ethernet Powerline in una presa a
muro vicina al computer.
5. Accendete il vostro computer.
6. Controllate e assicuratevi che i LED Power e Ethernet
sull’adattatore Ethernet Powerline siano ACCESI.
19
Page 27

4. Connessione Hardware – Internet
Seguite la procedura qui di seguito descritta per collegare
l’adattatore Ethernet Powerline alla vostra connessione
ADSL a banda larga:
1. Spegnete il vostro PC o Notebook.
2. Collegate il cavo Ethernet (RJ-45) fornito alla porta
Ethernet dell’adattatore Powerline Ethernet.
3. Collegate l’altra estremità del cavo Ethernet (RJ-45) ad
una porta Ethernet disponibile sul vostro router ADSL
a banda larga.
4. Inserire l’adattatore Ethernet Powerline in una presa a
muro vicina al computer.
5. Accendete il vostro computer.
6. Controllate e assicuratevi che i LED Power, Powerline
e Ethernet sull’adattatore Ethernet Powerline siano
ACCESI.
20
Page 28

5. Installazione utility di gestione
Seguite le seguenti procedure per installare correttamente
l’utility di gestione fornita:
Fase 1:
Accendete il vostro computer
e inserite il CD fornito
nell’unità CD-ROM, apparirà
automaticamente la seguente
schermata. Cliccate su
“Management Utility” per
installare l’utility di gestione.
Fase 2:
Il processo d’installazione
del programma si avvierà e
copierà automaticamente
tutti i file necessari sul vostro
sistema.
Fase 3:
Quando l’utility Power Adaptor sarà installata correttamente apparirà la schermata
seguente.
Fase 4:
Dopo l’installazione, un’icona di scelta rapida dell’applicazione “Power Adaptor
Utility” apparirà sul desktop di Windows.
21
Page 29

Funzionalità avanzate: Come utilizzare i pulsanti
:
:
Pair (Garantito da AES a 128 bit)
Lo standard Powerline AV utilizza l’AES (Advanced Encryption Standard) a 128 bit per trasmettere dati in
sicurezza tra adattatori presenti sulla linea elettrica. Per fare in modo che gli adattatori posti sulla linea
elettrica possano comunicare tra loro bisogna che tutti utilizzino la stessa Network Membership Key (NMK).
In caso contrario, non potrebbero decodificare i dati crittografati inviati alla rete tramite linea elettrica.
Il pulsante Pair vi consente di configurare una connessione su linea elettrica sicura con altri HomePlug AV
compatibili con periferiche presenti sulla linea elettrica a loro volta in grado di supportare la funzionalità Pair.
Come preparare una Rete Powerline AV con pulsante Pair
Potete collegare un certo numero di periferiche sulla linea elettrica esistente, ma potete utilizzare il pulsante
Pair solamente con due periferiche alla volta.
Creare una rete domestica Powerline utilizzando il pulsante Pair
Fase 1.Posizionare l’adattatore di linea elettrica A vicino ad un altro dispositivo Powerline B . Dopo aver
preparato il primo adattatore di linea elettrica, avete 120 secondi per preparare il secondo dispositivo
Powerline.
Fase 2. Premere il pulsante Pair del vostro adattatore di linea elettrica A per più di 10 secondi finché la luce
del dispositivo Powerline si spegne. Questa operazione ripristina il nome di rete su un valore casuale
e rimuove da qualsiasi rete di appartenenza la vostra periferica.
Fase 3. Premere per 2 secondi il pulsante Pair sull’altro adattatore di linea elettrica B che desiderate
collegare. (Questa operazione dev’essere effettuata entro 120 secondi dall’aver premuto il pulsante
Pair sul primo adattatore.)
Fase 4. Attendere per circa 60 secondi che gli adattatori di linea elettrica si connettano. Quando la
connessione ha luogo le luci dei dispositivi Powerline si accendono su entrambe gli adattatori.
Adattatore Ethernet Powerline 1
Page 30

Adesso la vostra rete Powerline AV è protetta dagli accessi non autorizzati.
:
Per collegarsi ad una rete Powerline AV esistente
1. Premere il pulsante Pair sull’adattatore di linea elettrica C per più di 10 secondi fino a che la luce del
dispositivo Powerline lampeggia.
2. Quindi ripetere la fase 3 e la fase 4 presenti in questa sezione utilizzando qualsiasi dispositivo di linea
elettrica (A o B) .
Funzionamento del pulsante Pair
La seguente tabella riassume ciò che accade quando il pulsante Pair viene premuto per un certo tempo.
Intervento sul
pulsante Pair
meno di 3
secondi
più di 10
secondi
Stato
L’adattatore si connette a
una rete. Condivide lo stesso
nome di rete degli altri
adattatori presenti in rete
tramite linea elettrica.
L’adattatore abbandona
qualsiasi rete cui è associato
e il suo nome di rete assume
un valore casuale.
Funzionamento della luce
del dispositivo Powerline
La luce del Powerline si
accende se il vostro
adattatore è collegato ad una
altro adattatore Powerline o
alla rete su linea elettrica.
La luce del Powerline si
spegne quando si scollega
dalla rete su linea elettrica.
Ripristino
Per ripristinare il dispositivo Powerline AV,
1.Assicuratevi che il LED Power sia acceso e non stia lampeggiando.
2.Tenere premuto il pulsante Reset per meno di tre secondi. Rilasciare il pulsante Reset quando il LED
Power inizia a lampeggiare. I parametri standard sono stati ripristinati.
Adattatore Ethernet Powerline 2
Page 31

Portugues
Ethernet RJ-45 200 Mbps
Powerline TURBO
Twin pack
Introdução
Agradecemos a sua compra deste fantástico
pacote duplo Ethernet Powerline Adaptor.
Estes dispositivos são Powerline Ethernet Adaptor
de 200Mbps que transformam a rede eléctrica da sua casa
já existente numa infra-estrutura de rede ubíqua.
Só precisa de ligar este Ethernet Powerline Adaptor
de 200Mbps a uma tomada eléctrica CA normal que irá
facilmente alargar a sua ligação de banda larga
Cabo/ADSL ou a sua rede Ethernet (LAN) existente a
qualquer outra ficha eléctrica em qualquer divisão
da casa sem precisar de nenhum cabo.
Este Ethernet Powerline Adaptor suporta
uma velocidade de transmissão até
200 Mbps através do circuito
eléctrico já existente em sua
casa. Graças à velocidade de
transmissão de 200 Mbps, as
aplicações multimédia completas
são facilmente suportadas
através de toda a casa além do
line Adaptor utiliza os cabos eléctricos existentes
instalados numa casa como caminho para transmitir dados
digitais de voz, áudio e vídeo entre aparelhos.
acesso à Internet. Este Ethernet Power-
22
Page 32

1. Características principais
Homeplug Turbo
• Transferência de dados a alta velocidade até 200 Mbps.
• Totalmente compatível com HomePlug 1.0.
• Retrocompatível com a norma HomePlug 1.0.
• Funciona com corrente de entrada de 100V a 240V.
• Adaptação de canal inteligente para maximizar o débito
com más condições de canal.
• Funções de Qualidade de serviço integrada (QoS).
• Encriptação de ligação DES de 56 bits com gestão dos
códigos para comunicações sobre cabo eléctrico seguras.
• Alcance de transmissão até 200 m através da rede eléctrica da casa.
Requisitos do sistema
• Pelo menos duas tomadas de corrente eléctrica CA de
100V a 240V com cabo eléctrico doméstico standard.
• Um computador com o seguinte:
- Sistema operativo com TCP/IP instalado.
- Processador compatível Pentium III ou superior.
- Placa Ethernet LAN instalada com protocolo TCP/IP.
- RAM de 64 MB ou superior.
- 50 MB de espaço livre no disco (Mínimo).
- Unidade de leitura de CD-ROM.
2. Conteúdo da embalagem
A embalagem do Ethernet Powerline Adaptor de 200 Mbps
contém os seguintes elementos:
Dois Ethernet Powerline Adaptor de 200 Mbps.
Dois cabos Ethernet de CAT-5.
Um CD-ROM
Se um destes elementos estiver danificado ou em falta,
contacte imediatamente o revendedor.
(Utilitários/Manual/Manual de iniciação rápida).
23
Page 33

3. Ligação de Hardware – Computador
A seguir estão descritos os procedimentos para ligar
correctamente o Ethernet Powerline Adaptor ao seu
computador:
1. Desligue o seu PC ou computador portátil.
2. Ligue o cabo Ethernet (RJ-45) à porta Ethernet do
Ethernet Powerline Adaptor.
3. Ligue a outra ponta do cabo Ethernet (RJ-45) à porta
LAN do computador.
4. Ligue o Ethernet Powerline Adaptor a uma tomada
eléctrica próxima do computador.
5. Ligue o computador.
6. Verifique e confirme que os LED Power e Ethernet
existentes no Powerline Adaptor estão acesos (ON).
24
Page 34

4. Ligação do hardware – Internet
Siga os procedimentos descritos abaixo para ligar o Ethernet Powerline Adaptor à sua ligação de banda larga ADSL:
1. Desligue o seu PC ou computador portátil.
2. Ligue o cabo Ethernet (RJ-45) à porta Ethernet do
Ethernet Powerline Adaptor.
3. Ligue a outra ponta do cabo Ethernet (RJ-45) a uma
porta Ethernet livre do Router de banda larga ADSL.
4. Ligue o Ethernet Powerline Adaptor a uma tomada
eléctrica próxima do computador.
5. Ligue o computador.
6. Verifique e confirme que os LED Power, Powerline e
Ethernet existentes no Ethernet Adaptor estão acesos
(ON).
25
Page 35

5. Instalar o Management Utility
Siga os procedimentos seguintes para instalar correctamente o Management Utility (Utilitário de gestão) fornecido:
Procedimento 1:
Ligue o computador e insira
o CD fornecido na unidade
de CR-ROM, aparece automaticamente o seguinte
ecrã: Clique em “Manage-
ment Utility” para instalar o
Management Utility.
Procedimento 2:
O processo de instalação do
programa será executado e
copia automaticamente
todos os ficheiros necessários para o seu computador.
Procedimento 3:
Aparece o seguinte ecrã quando o Power
Adaptor Utility estiver instalado com
sucesso.
Procedimento 4:
Após a instalação, aparece um ícone de
atalho para a aplicação “Power Adaptor
Utility” no ambiente de trabalho do
Windows.
26
Page 36

Característica Avançada: Como Usar os Botões de Pressão
Par (Fixo com 128 bits-AES)
O Powerline AV padrão usa 128-bit AES (Padrão de Encriptação Avançada) para transmitir com segurança
dados entre adaptadores Powerline. Para que os adaptadores Powerline comuniquem entre si, só precisam
de usar a mesma Chave de Membro da Rede (NMK). Caso contrário, não conseguem ordenar os dados
encriptados enviados pela rede Powerline.
O botão Par permite-lhe configurar uma ligação segura da Powerline com outros dispositivos da Powerline
em conformidade com outras Fichas Domésticas AV que também suportem a característica Par.
Configurar uma Rede Powerline AV com o botão Par
Pode ligar vários dispositivos numa Powerline, mas só pode usar o botão Par com dois dispositivos em
simultâneo.
Criar uma rede Powerline usando o botão Par:
Passo 1. Coloque o adaptador Powerline A perto de outro dispositivo Powerline B. Após configurar o
primeiro adaptador Powerline, tem 120 segundos para configurar o segundo dispositivo Powerline.
Passo 2. Prima o botão Par no adaptador A da Powerline durante mais de 10 segundos, até que a luz da
Powerline se desligue. Isto reinicia o nome da rede para um valor aleatório e retira o seu dispositivo
de qualquer rede a que possa pertencer.
Passo 3. Prima o botão Par no outro adaptador B da Powerline que deseja ligar, durante 2 segundos.
(Isto tem de ser feito no espaço de 120 segundos após premir o botão Par do primeiro adaptador.)
Passo 4. Espere cerca de 60 segundos enquanto os seus adaptadores Powerline se ligam. A Powerline
acende em ambos os adaptadores quando a ligação for feita.
A sua rede Powerline AV está agora protegida contra acesso sem autorização.
Adaptador Powerline por Ethernet 1
Page 37

Juntar-se a uma Rede Powerline AV existente:
1. Prima o botão Par no adaptador C da Powerline durante mais de 10 segundos, até que a luz da Powerline
comece a piscar.
2. De seguida, repita os passos 3 e 4 nesta secção, usando qualquer dispositivo Powerline (A ou B).
Comportamento do Botão Par
A tabela seguinte resume as acções que ocorrem quando premir o botão Par durante um tempo específico.
Acção
do botão Par
menos de 3
segundos
mais de 10
segundos
Estado
O adaptador junta-se a uma
rede. Partilha a mesma rede
com outros adaptadores na
rede da Powerline.
O adaptador deixa qualquer
rede a que esteja associado
e o seu nome de rede
assume um valor aleatório.
Comportamento da Luz da
Powerline
A Powerline acende se o seu
adaptador estiver ligado a
outro adaptador da
Powerline, ou a uma rede
Powerline.
A luz Powerline desliga
quando for desligada da rede
da Powerline.
Reiniciar
Para reiniciar o dispositivo Powerline AV:
1. Certifique-se de que o LED da energia está ligado e não está a piscar.
2. Prima e mantenha premido o botão “Reset” (reiniciar) durante menos de três segundos. Deixe de premir o
botão Reset quando o LED da energia começar a piscar. As configurações predefinidas foram recuperadas.
Adaptador Powerline por Ethernet 2
Page 38

Spani sh
Ethernet RJ-45 200 Mbps
Powerline TURBO
Twin pack
Introducción
Enhorabuena por la adquisición de este paquete
de dos adaptadores Ethernet Powerline.
Estos dispositivos son adaptadores Ethernet Powerline
de 200Mbps que transforman la instalación eléctrica
existente en su casa en una infraestructura de red común.
Simplemente, enchufe el Adaptador Powerline de
200Mbps en un enchufe corriente y, de esta forma,
extenderá fácilmente su conexión de banda ancha
Cable/xDSL o su red Ethernet (LAN) a cualquier otro
enchufe en cualquier habitación de una casa sin necesi-
Este Adaptador Powerline Ethernet permite tasas de trans-
voz, audio y video digital entre dispositivos.
dad de ningún nuevo cableado.
ferencia de datos de hasta 200Mbps
sobre el circuito eléctrico existente
de la casa. Con tasas de trans-
ferencia de 200Mbps, puede
permitirse fácilmente el uso de
aplicaciones multimedia completas por toda la casa, además
del acceso a Internet. Estos
adaptadores Ethernet Powerline
utilizan la instalación eléctrica existente
en una casa como medio para transmitir datos,
27
Page 39

1. Características principales
Homeplug Turbo
• Alta tasa de transferencia de datos hasta 200Mbps.
• Totalmente compatible con HomePlug 1.0.
• Compatible con versiones anteriores de HomePlug
standard 1.0.
• Funciona con una entrada AC de 100V ~ 240V.
• El canal inteligente de adaptación maximiza la capacidad
de procesamiento en condiciones difíciles.
• Características integradas de calidad de servicio (QoS).
• Cifrado de conexión DES de 56 bits con administración
de claves para realizar comunicaciones powerline
seguras.
• Rango de transmisión de hasta 200m sobre la red de
distribución.
Requisitos del sistema
• Al menos dos enchufes AC 100V ~ 240V en una instalación
eléctrica estándar.
• Un ordenador con lo siguiente:
- Sistema operativo con TCP/IP instalado.
- Procesador Pentium III o superior.
- Tarjeta de red Ethernet LAN con protocolo TCP/IP.
- 64 MB de RAM o más.
- 50 MB de espacio libre de disco (Mínimo).
- Unidad de CD-ROM.
2. Contenido del paquete
El paquete del Adaptador Ethernet Powerline de 200Mbps
incluye los siguientes elementos:
Dos Adaptadores Powerline Ethernet 200Mbps.
2 cables Ethernet CAT-5.
Un CD-ROM
(Utilidad/Manual/Guía de instalación rápida).
28
Page 40

Si cualquiera de los elementos anteriores está dañado o no
está incluido, contacte con su distribuidor inmediatamente.
3. Conexión de Hardware - Ordenador
A continuación, encontrará los pasos para conectar correctamente el Adaptador Ethernet Powerline a su equipo:
1. Apague su PC o Portátil.
2. Conecte el cable Ethernet (RJ-45) proporcionado al
puerto Ethernet del Adaptador Powerline.
3. Conecte el otro extremo del cable Ethernet (RJ-45) al
puerto LAN de su ordenador.
4. Enchufe el Adaptador Ethernet Powerline a una toma
de corriente cercana al equipo.
5. Encienda su equipo.
6. Compruebe y confirme que los indicadores luminosos
Power y Ethernet del adaptador Ethernet Powerline
estén encendidos.
29
Page 41

4. Conexión de Hardware - Ordenador
Siga los procedimientos siguientes para conectar el
Adaptador Powerline Ethernet a su conexión ADSL.
1. Apague su PC o Portátil.
2. Conecte el cable Ethernet (RJ-45) proporcionado al
puerto Ethernet del Adaptador Powerline.
3. Conecte el otro extremo del cable Ethernet (RJ-45) a
un puerto Ethernet disponible de su Router ADSL.
4. Enchufe el Adaptador Ethernet Powerline a una toma
de corriente cercana al equipo.
5. Encienda su equipo.
6. Compruebe y confirme que los indicadores luminosos
Power, Powerline y Ethernet del adaptador Ethernet
Powerline estén encendidos.
30
Page 42

5. Instalar la utilidad de administración
Siga el procedimiento siguiente para instalar apropiadamente la utilidad de administración proporcionada:
Paso 1:
Encienda su equipo e introduzca el CD proporcionado
dentro de la unidad de CDROM. Aparecerá la siguiente
pantalla, de forma automática. Haga clic en “Manage-
ment Utility” para instalar la
utilidad de administración.
Paso 2:
El proceso del programa de
instalación llevará a cabo la
copia de los archivos necesarios de su sistema.
Paso 3:
La siguiente pantalla aparecerá cuando la
utilidad del Adaptador de corriente se
haya instalado correctamente.
Paso 4:
Después de la instalación, tendrá un
acceso directo a la aplicación “Power
Adaptor Utility” en el escritorio de windows.
31
Page 43

Característica Avanzada: ¿Cómo Utilizar los Botones?
Pair (Protegido con 128 bits – AES)
El Powerline AV estándar utiliza 128 bits AES (Advanced Encryption Standard - Estándar de Codificación
Avanzado) para transmitir con seguridad datos entre adaptadores de corriente. Para que los adaptadores de
corriente se comuniquen entre sí, necesitan utilizar todos la misma Clave de Miembro de Red (NMK). En
caso contrario, no podrían descifrar los datos encriptados enviados en la red de corriente.
El botón Pair le permite configurar una conexión de corriente segura con otro dispositivo de corriente
compatible con HomePlug AV que también soporte la característica Pair.
Configuración de una Red Powerline AV con el botón Pair
Puede conectar un número de dispositivos en una red de corriente, pero puede utilizar el botón Pair en sólo
dos dispositivos a la vez.
Creación de una red de corriente mediante el botón Pair:
Paso 1. Sitúe el adaptador de corriente A cerca de otro dispositivo de corriente B. Después de configurar el
primer adaptador de corriente, dispone de 120 segundos para configurar el segundo dispositivo de
corriente.
Paso 2. Pulse el botón Pair en su adaptador de corriente A durante más de 10 segundos hasta que la luz del
Powerline se apague. Esto restablece el nombre de la red poniendo un valor aleatorio y quita su
dispositivo de cualquier red a la que pueda pertenecer.
Paso 3. Pulse el botón Pair en el otro adaptador B que desee conectar durante 2 segundos.
(Esto debe realizarse en 120 segundos tras pulsar el botón Pair del primer adaptador).
Paso 4. Espere alrededor de 60 segundos mientras se conectan sus adaptadores de corriente.Las luces del
Powerline de los dos adaptadores se encienden cuando se realiza la conexión.
Su red de Powerline AV está ahora protegida contra los accesos no autorizados.
Adaptador Powerline a Ethernet
1
Page 44

Juntar-se a uma Rede Powerline AV existente:
1. Prima o botão Par no adaptador C da Powerline durante mais de 10 segundos, até que a luz da Powerline
comece a piscar.
2. De seguida, repita os passos 3 e 4 nesta secção, usando qualquer dispositivo Powerline (A ou B).
Comportamento do Botão Par
A tabela seguinte resume as acções que ocorrem quando premir o botão Par durante um tempo específico.
Acção
do botão Par
menos de 3
segundos
mais de 10
segundos
Estado
O adaptador junta-se a uma
rede. Partilha a mesma rede
com outros adaptadores na
rede da Powerline.
O adaptador deixa qualquer
rede a que esteja associado
e o seu nome de rede
assume um valor aleatório.
Comportamento da Luz da
Powerline
A Powerline acende se o seu
adaptador estiver ligado a
outro adaptador da
Powerline, ou a uma rede
Powerline.
A luz Powerline desliga
quando for desligada da rede
da Powerline.
Reiniciar
Para reiniciar o dispositivo Powerline AV:
1. Certifique-se de que o LED da energia está ligado e não está a piscar.
2. Prima e mantenha premido o botão “Reset” (reiniciar) durante menos de três segundos. Deixe de premir o
botão Reset quando o LED da energia começar a piscar. As configurações predefinidas foram recuperadas.
Adaptador Powerline por Ethernet 2
Page 45

Nederland
Ethernet RJ-45 200 Mbps
Powerline TURBO
Twin pack
Inleiding
Gefeliciteerd met uw aankoop van dit
Ethernet Powerline Adapter twin pack.
Deze toestellen zijn een 85Mbps Powerline Ethernet
Adapter die uw bestaande elektrische bedrading in huis
omvormt tot een alomtegenwoordige netwerkinfrastructuur.
Sluit deze 200Mbps Ethernet Powerline Adapterplug
eenvoudigweg aan op een gewoon AC-elektriciteitsstop-
contact die uw kabel/xDSL-breedbandaansluiting of uw
bestaande Ethernet (LAN)-netwerk gemakkelijk zal uitbreiden
tot elk ander elektrisch stopcontact in om het even welke
kamer zonder dat u nieuwe bekabeling nodig heeft.
Deze Ethernet Powerline Adapter
ondersteunt tot 200Mbps datasnel-
heid via het bestaande elektrici-
teitsnet van de woning. Met
datasnelheden van 200Mbps
kunnen, naast de Internettoegang, volledige multimediatoepassingen gemakkelijk worden
ondersteund in heel de woning.
gebruik van de bestaande elektriciteitsleidingen in de
woning als pad om digitale gegevens, stem, audio en video
tussen toestellen over te maken.
Deze Ethernet Powerline Adapter maakt
32
Page 46

1. Hoofdkenmerken
Homeplug Turbo
• Hoge snelheid datatransfers tot 200Mbps.
• Volledig compatibel met HomePlug 1.0.
• Achterwaarts compatibel met HomePlug standard 1.0.
• Werkt met de AC-input van 100V ~ 240V.
• Intelligente kanaalaanpassing maximaliseert de
verwerkingscapaciteit in moeilijke kanaalomstandigheden.
• Geïntegreerde eigenschappen van Servicekwaliteit
(QoS).
• 56-bit DES-Linkcodering met key management voor
veilige communicaties via de elektriciteitsleidingen.
• Transmissiebereik tot 200m via het huishoudelijk
elektriciteitsnetwerk.
Systeemvereisten
• Ten minste twee AC 100V ~ 240V stopcontacten met de
standaard elektriciteitsbedrading voor woningen.
• Een computer met:
- Werksysteem met geïnstalleerde TCP/IP.
- Pentium III compatibele processor en hoger.
- Ethernet LAN-kaart geïnstalleerd met TCP/IP-protocol.
- 64 MB RAM of meer.
- 50 MB vrije schijfruimte (Minimum).
- Cd-rom Drive.
2. Inhoud van het pakket
Het pakket van de 200Mbps Ethernet Powerline Adapter
bevat volgende items:
Twee 200Mbps Ethernet Powerline Adapters.
Twee CAT-5 Ethernetkabels.
Een cd-rom (Utility/Handleiding/Snelle Installatiegids).
33
Page 47

Indien een van bovenstaande items ontbreekt of beschadigd is, neemt u onmiddellijk contact op met uw verdeler.
3. Hardwareaansluiting – Computer
Dit zijn de stappen om de Ethernet Powerline Adapter
correct op uw computer aan te sluiten:
1. Schakel uw pc of notebook uit.
2. Sluit de bijgeleverde Ethernet (RJ-45)-kabel aan op de
poort van de Ethernet Powerline Adapter.
3. Sluit het andere uiteinde van de Ethernet (RJ-45)-kabel
aan op de LAN-poort van uw computer.
4. Plug de Ethernet Powerline adapter in een wandcon-
tactdoos in de buurt van uw computer.
5. Zet uw computer aan.
6. Controleer en bevestig dat de elektriciteits- en Ethernet
led’s op de Ethernet Powerline Adapter op ON staan.
34
Page 48

4. Hardwareaansluiting – Internet
Volg onderstaande procedures om de Ethernet Powerline
Adapter aan uw ADSL breedbandaansluiting aan te sluiten:
1. Schakel uw pc of notebook uit.
2. Sluit de bijgeleverde Ethernet (RJ-45)-kabel aan op de
Ethernetpoort van de Ethernet Powerline Adapter.
3. Sluit het andere uiteinde van de Ethernet (RJ-45)-kabel
aan op een beschikbare Ethernetpoort van uw ADSL
breedbandrouter.
4. Plug de Ethernet Powerline Adapter in een wandcon-
tactdoos in de buurt van uw computer.
5. Zet uw computer aan.
6. Controleer en bevestig dat de Elektriciteit, Powerline
en Ethernet led’s van de Ethernet Powerline Adapter
op ON staan.
35
Page 49

5. Installatie Management Utility
Volg onderstaande procedures om de voorziene Management
Utility correct te installeren:
Stap 1:
Schakel uw computer in en
steek de bijgeleverde cd in
de cd-rom drive, u krijgt
automatisch volgend scherm.
Klik op “Management
Utility” om de Management
Utility te installeren.
Stap 2:
Het programma wordt
geïnstalleerd en alle vereiste
bestanden worden automatisch naar uw systeem
gekopieerd.
Stap 3:
U krijgt onderstaand scherm wanneer de
Powerline Adapter met succes werd
geïnstalleerd.
Stap 4:
Na de installatie komt er een shortcut naar
de toepassingsicoon van de “Powerline
Adapterutility” op het scherm van de
desktop.
36
Page 50

Geavanceerde eigenschap: Hoe de drukknoppen gebruiken
Pair( beveiligd met 128 bits-AES)
De AV elektriciteitsleiding maakt standaard gebruik van de 128-bit AES (Advanced Encryption Standard) om
veilig gegevens tussen elektriciteitsleidingadapters over te maken. Opdat de adapters van de elektrische
leidingen met mekaar communiceren, dienen ze beiden gebruik te maken van dezelfde Network Membership
Key (NMK). Zoniet kunnen ze de gecodeerde gegevens die door het netwerk van de elektriciteitsleiding
worden verstuurd niet decoderen.
Met de Pair-knop kunt u steeds een beveiligde elektriciteitsverbinding maken met andere compatibele
HomePlug AV-toestellen die eveneens de Pair-eigenschap ondersteunen.
Instellen van een AV Network-elektriciteitsleiding met de Pair-knop
U kunt een aantal toestellen aansluiten op een netwerk van elektriciteitsleidingen, maar u kunt de Pair-knop
voor slechts twee toestellen tegelijkertijd gebruiken.
Een elektrisch leidingnetwerk aanmaken door het gebruik van de Pair-knop
Stap 1.Plaats een elektriciteitsleidingadaptor A in de buurt van een ander elektriciteitsleiding toestel B .
Nadat u de eerste elektriciteitsleidingadapter ingesteld heeft, heeft u 120 seconden om het tweede
toestel in te stellen.
Stap 2. Druk gedurende meer dan 10 seconden op de Pair-knop op een van de elektriciteitsleidingadapters A
tot de lamp van de elektriciteitsleiding uitgaat. Zo wordt de netwerknaam gereset naar een
willekeurige waarde en verwijdert uw toestel van elk netwerk waartoe het behoort.
Stap 3. Druk gedurende 2 seconden op de Pair-knop op uw andere elektriciteitsleidingadapter B die u wenst
aan te sluiten.
(dit moet gebeuren binnen de 120 seconden nadat u de Pair-knop op de eerste adapter ingedrukt
hebt).
Ethernet Powerline Adaptor 1
Page 51

Stap 4. Wacht ongeveer 60 seconden terwijl uw elektriciteitsleidingadapters worden verbonden. De lampjes
van de elektriciteitsleiding op beide adapters gaan branden nadat de verbinding tot stand is gekomen.
Uw AV elektriciteitsleidingnetwerk is nu beschermd tegen niet-toegelaten toegang.
Aansluiten bij een bestaand AV elektriciteitsnetwerk:
1. Druk op de Pair-knop op de elektriciteitsleidingadapter C gedurende meer dan 10 seconden tot de lamp
van de elektriciteitsleiding gaat branden.
2. Herhaal Stappen 3 en 4 van dit hoofdstuk door gebruik te maken van een elektriciteitsleidingtoestel (A of
B) .
Gedrag van de Pair-knop
Onderstaande tabel geeft een samenvatting van de acties die plaatsvinden wanneer de Pair-knop gedurende
een bepaalde tijd wordt ingedrukt.
Actie
Pair-knop
Minder dan 3
seconden
Meer dan 10
seconden
Status
De adapter sluit aan bij een
netwerk. Ze deelt dezelfde
netwerknaam als andere
adapters op het netwerk.
De adapter verlaat elk
netwerk waarop ze is
aangesloten en haar
netwerknaam krijgt een
willekeurige waarde.
Gedrag lamp
elektriciteitsleiding
De lamp van de
elektriciteitsleiding gaat
branden indien uw adapter is
aangesloten op een andere
elektriciteitsleidingadapter of
op een
elektriciteitsleidingnetwerk.
De lamp van de
elektriciteitsleiding gaat uit
wanneer ze van het netwerk
wordt afgesloten.
Ethernet Powerline Adaptor 2
Page 52

Resetten
Om een AV elektriciteitsleidingstoestel te resetten:
1.Ga na of de elektriciteitsled aan is en niet knippert.
2. Druk de reset-knop in en houd hem gedurende maximaal 3 seconden ingedrukt. Los de reset-knop
wanneer de led van de elektriciteitsleiding begint te knipperen. De defaultinstellingen werden hersteld.
Ethernet Powerline Adaptor 3
 Loading...