

Page 1

Page 2
User
Manual
English
Thank you for buyin g the
AlarmDock,
charge dock with alarm cloc k radio for iPod.
Please ensure you take a few minutes to read this user
manual full y before use and retain it for future reference
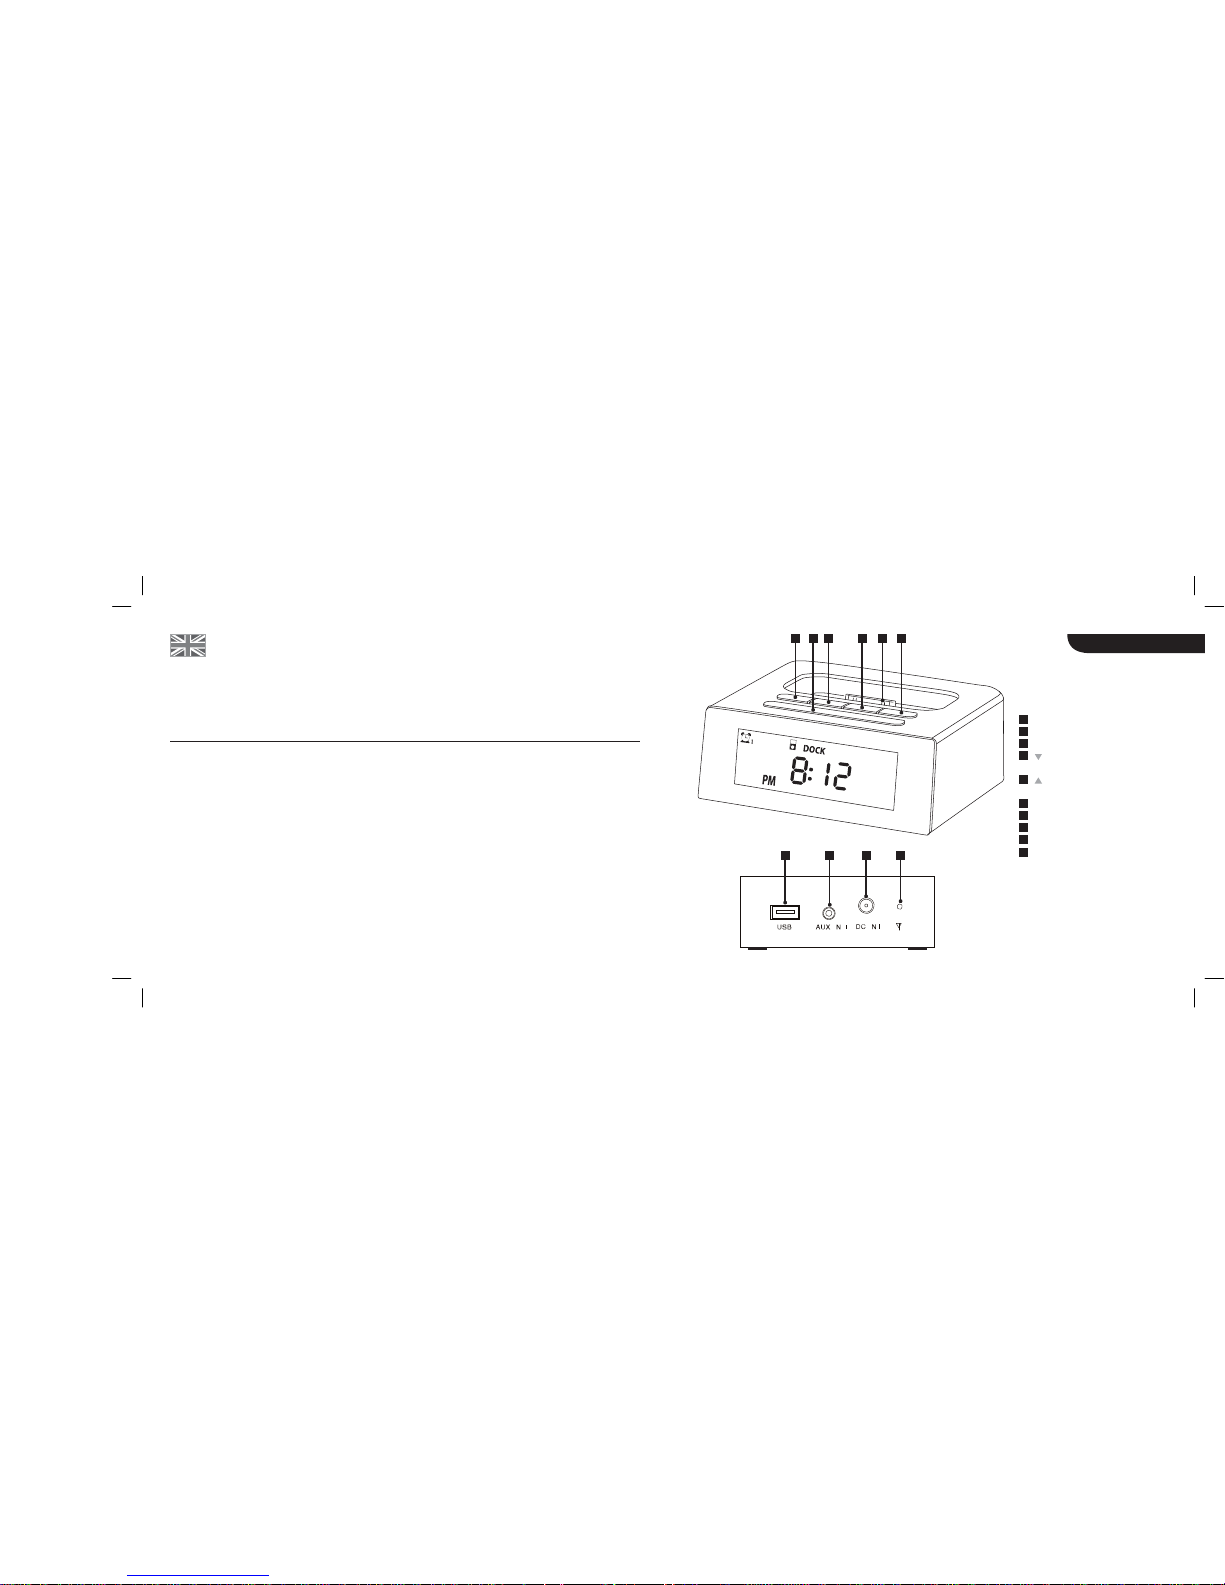
AlarmDock
controls
UNIVERSAL DOCK
POWER/MODE
SET
VOL-/SCROLL DOWN
/FREQUENCY
VOL+/SCROLL UP
/FREQUENCY
SNOOZE/SLEEP
USB PORT
AUX In
DC In
FM RADIO ANTENNA
Box Conten ts
•
AlarmDock
•
User manual
•
Power supply
•
USB
cable
•
3 doc k adapters for iPod:
–
nano G4
–
touch G2
–
classic 1 20Gb
Product
Features
• 1
2/24 hour alarm clock.
•
Wake up to your music, the radio
or alarm buzzer.
• FM radio.
•
Snooze and sleep button with
5
and 10 minute int ervals.
•
Built i n battery to back up alarm clock.
•
Line-in port for use with other music
players.
•
Charges iPo d when docked.
• Sync. via USB.
Getting
started
To set up your AlarmDock, please follow
these steps:
•
Remove the yellow sticky label
from
the base.
•
P
lug th e power cable i nto the back of the
unit an d then into the mains supply.
•
Select and insert the c orrect dock adapter
for your iPod.
•
Press
POWER
to activat e the speaker.
• Hold
POWER
for two seconds
to turn
off (standby ).
2
3
G H
I
J
F
G
H
I
J
E
A
B
C
D
B
F C
D A E
Page 3

Mode
To select the mode:
•
Press
POWER
intermitt ently to scroll
through the different modes (iPod, FM, Aux).
For use with iPod:
To sync y our iPod
For use as a FM
radio
Clock
To set the clock:
Alarm
To set the alarm time:
English
•
•
Ensure
the spe aker is in stand by mode.
Connect the AlarmDock to y our computer
via USB.
Carefully insert your iPod into th e dock.
Your
iPod will automatically sy nc with the
computer, allowing you to sync with iTunes.
•
•
Press
POWER to scroll to FM mode
To change the frequency, press and hold
the
SET button. With the butt on held
down, h old
or to scan t he
frequencies or tap to f ine tune.
•
•
Ensure
the Ala rmDock is in stand by mode
Press
SET.
The hour display
will start
flashing
Press or to adj ust the hour.
Press
SET to save.
Press or to adjust the minute.
Press
SET once to s ave, then again to
return t o the main display.
Any unsaved changes will be canc elled
after 5 minutes.
To switch between 12-ho ur an d
24-hour
clock mod e, press and hold
SNOOZE/
SLEEP
for 2 seconds, this can be done
when the AlarmDock is turned on or
off.
•
•
Ensure the unit is powered on.
Press and hold
SET
for 2
seconds.
The alarm display will start
flashing.
Press or to adju st
the hou r.
Press
SET
to save
Press or to adj ust the minutes .
Press
SET
to save
Tap
SET
to scroll between th e
alarm modes (buzzer, FM, iPod, off ).
Your selection will be save d after 2
seconds Swit ch the speaker off or set
the
sleep timer.
The snooze timer can be set at 5 min ute
intervals u p to 20 minutes
. To sn ooze, tap
the
SNOOZE/SLEEP button once to
snooze for 5 minutes. Tap
intermittently for
10, 15 or 20 minutes.
The alarm indicator will flash to in dicate the
snooze function is active
Press
POWER to switch the alarm off.
N.B. Aux is not available as an alarm
function.
If
you have the alarm set in iPod mode, you must
ensure that your iPod is doc ked; other
-
wise
there will be no soun d from the al arm and the
screen will flash. The alar m will us e the current
speaker volume
•
•
•
•
•
•
•
Ensure the speaker is switched on.
Carefully insert your iPod into t he dock.
Press play on th e iPod.
Press or to adjust the volume.
Screen
display:
When in use, the AlarmDock display will b e at
its brightest level. Yo u can alter th e brightness
of the sc reen when in standby:
•
•
N.B. The Alarm Dock will charg e the iPod when
connecte d via USB.
The AlarmDock itself will
not be powered by USB.
For use with other audio devices:
•
Sleep
To set the sleep
timer:
•
N.B. The volume control on the iPod
itself will
not work .
•
Ensure
the Ala rmDock is powered
off (standby )
Press and hold
SET
for 2 seconds. The
clock dis play will start flashing. Tap
SET
twice to scroll to the brightness menu
Press or to scroll through t he
levels. Tap
SET to save your settings.
•
•
•
•
Ensure the unit is powered on
Tap
SNOOZE/SLEEP to scro ll through
the timer options (90, 80…10).
Press
SET
to select. Alternatively, your selection
will
automatically save after 5 seconds
To cancel sle ep mode, tap
SNOOZE/
SLEEP
again.
•
Connect your music source to the
AlarmDock, by plugging the 3.5mm cable
(not included) into the
AUX IN port.
Press POWER to scroll to AUX mode
Select the trac k and press play on your
music s ource.
•
•
•
•
•
•
•
•
4
5
Page 4

All rights reserved. Reproduction in whole or in part
is
prohibited.
iPod is a trade mark of Apple Inc.,
registered in US
and other count ries. All other produc t
names are or may be trademarks of and used to
identify prod ucts or servic es of their respective
owners. Brands are used for illustration purposes
only and should n ot be used to infer any relationship
between
BLUEST ORK
and respective owners.
Manuel
d’utilisa
tion
WARNING
To reduce
the risk of fi re or electric sho ck, do not
expose this un it to rain or moistur e.
CAUTION
Use of contr ols or adjustments of performance of
procedures ot her than those spec ified may result in
hazardous rad iation exposure.
UNPACKIN G AND INSTALLATI ON
Unpack your unit carefully. We recommend that yo u
save the pack aging in case you e ver need to store
your unit. To avoid damage, never place t he unit or it’s
batteries near radiators, in front of heating vents, under
direct sunlight or near water.
FOR YOUR SAFETY
When discon necting the power ad apter, pull the
power plug fir st. Do not pull the cord by itself.
Never handl e the power plug wit h wet hands, as this
could cause fi re or electric shoc k.
Refer servici ng to qualified per sonnel only.
Do not open t he housing.
Do not twist or pinch the power supply cord. If th e
plug or power supply cord need s to be replaced,
ensure that it complies with t he manufactur er’s
recommendati on
.
Only use BL UESTORK approved accessories.
Unplug the u nit during lightning storms and when
unused for ext ended periods of time.
The lightning flash wi th arrowhead
symbol, within an equilateral triangle, is
intended to alert user to the presence of
uninsulated ‘Dangerous Voltage’ within
the product’s enclosure that may be of suffici ent
magnitude t o constitute ri sk of electric shock to person
Français
Merci d’avoir choisi le système AlarmDock de
BLUESTORK
Radio-réveil avec dock de chargement pour iPod
Veillez à lire attentivement cette notice d’utilisation avant de
l’utiliser,
et
conservez-la pour vous y
référer par la suite.
The exclamation point within an equilat-
eral triangle is intend ed to alert user to
the presence of important operating and
maintenance (ser vicing) instruction in the
literature accompanying the appliance
Contenu du coffret :
Caractéristiques du produit :
Prise en main :
Pour installer votre AlarmDock, procédez
comme suit:
•
•
•
•
•
AlarmDock
Notice
d’utilisation
Alimentation
Câble USB
3 ad aptateurs de stat ion
d’accueil
pour iPod
–
nano G4
–
touch G 2
–
classic 1 20Gb
•
•
Réveil 12/24 heures
Réveillez-v ous au son de votre musique,
de la radio o u de l’alarme .
Radio FM.
Bouton de ra ppel d’alarme et d’arrêt
sommeil av ec intervalles de 5 et 10
minutes.
Pile intégrée pour la prise en ch a
rge du
réveil.
Prise d’entr ée pour d’autres l ecteurs
de musique .
Chargez v otre iPod lorsqu’il
est connecté au Dock.
Sychronisati on par USB.
MANUF
ACTURER :
POWER ADAPTER:
INPUT:
OUTPU T:
DISRUPTIVE
Ltd
AD83005-1000
100-240V~50/60Hz 0.42A
•
•
Retirez l’étiquette jaune de la base
Branchez le câble de courant alt ernatif au
dos de l’ap pareil, puis branchez
l’autre
extrémité au secteur
Sélectionnez et insérez l’adaptateur
convenant à v otre modèle d’iP od
Appuyez su
r la touche de
MARCHE/
ARRET
pour activ er l’appareil
Maintenez enfonc ée la touche de
MARCHE/ARRET pendant deux
secondes pour éteindre l’a ppareil
(mode veille)
•
5V 1.0A
•
•
•
DISPOS AL
Accordin g to the European
Directive
2002/96/EC all electrical and electronic
products must be collected separately by a
local collection system. Please act accord
ing to your l ocal rules and do not dispose
of your old products with your normal
household waste
.
•
•
•
•
6
7
RISK OF ELECTRIC SHOCK
DO N OT OPE N
CAUTION: TO REDUCE THE RISK OF ELECTRIC
SHOCK,
DO NOT REMOVE COVER (OR
BACK).
NO
USER-SER VICEABLE
PARTS
INSIDE.
REFER
SERVICING
TO
QUALIFIED SERVICE PERSONNEL.
C A U T I O N
Page 5

Mode :
Pour sélectionn er le mode:
•
Appuyez sur la touche de
MARCHE/ARRÊT par interm ittence,
pour faire défiler les différe nts modes (iPod
,
FM, Aux)
Pour synchroniser votre iPod:
Français
•
Vérifiez que l’appareil se trouve en
mode veille.
Connectez l’AlarmDock à votre ordinateur
par son câble USB.
Insérez
doucement votre iPod dans le dock.
Votre iP od se s ynchronise
automati quement
avec votre ordi nateur et par conséquent
avec iTunes.
Utilisation en radio FM:
•
•
Appuyez sur la touche de
MARCHE/ARRÊT pour passe r
en mode FM.
Pour modifier la fréquence, appuyez et
maintenez enfonc ée la touche
SET
.
Une
fois la touche enfoncée, appuyez sur
ou pour rec hercher la fréque nce
désirée, ou appuyez sur ces touches par
intermit
tence pour un réglage plus
fin.
•
•
Commandes de
l’Ala r
mDoc
k
•
•
•
•
•
Vérifiez
que le sy stème est allumé.
Insérez
doucement votre iPod dans le dock.
Appuyez
sur la t ouche de lectu re de l’iPod .
Utilisez les touches
ou pour régler le
volume.
DOCK UNIVERSAL
MARCHE/MODE
MEMORY/SATION
VOLUME - / DEFILEMENT
/FREQUENCY
VOLUME + / DEFILEMENT
/FREQUENCY
RAPPEL D’ALARME / ARRET
SOMMEIL
PORT USB
ENTREE AUX
ENTREE CC
ANTENNE RADIO FM
Rema rque : l ’Ala rmDoc k re char ge l ’iPo d
lors qu’i l es t co nnect é pa r US B. L ’Ala rmDoc k
lui- même n’e st p as al imen té p ar U SB.
Utilisation avec d ’autres
périphériq ues audio
Écran
d’achage
:
Lorsque l’app areil est ut ilisé, la lumin osité de
l’écran est à son niveau le plus élevé. Vous
pouvez modifier la luminosité de l’écran en
mode veille
:
Remarque : la comm ande de volume de l’iPod
ne fonctionne pas lorsque l’iPod est dans
son dock.
•
Connectez votre lecteur
de
musique
au
système AlarmDoc k, en
branchant le câble de 3,5 mm dans le
port d’e ntrée
AUX
(non fournies)
Appuyez sur la touche de
MARCHE/ARRÊT pour passe r en
mode AU X Sélectionnez la piste à é couter
et appuyez sur la touche de lecture de
l’appareil .
•
•
Vérifiez que le système est éteint (en veille)
Maintenez enfonc ée la touche
SET
pendant 2 secondes. L’écr an de l’horloge
commence à clignoter. Appuyez deux fois
sur la t ouche
SET
pour faire défiler le
menu de l uminosité.
Appuyez sur les touches ou pour
faire défiler les différents niveaux. Appuyez
sur
SET
pour mém oriser les réglages.
•
•
8
9
G H I
J
G
H
I
J
F
E
A
B
C
D
B
F C D A E
Page 6

Horloge
Réglage de
l’horloge:
Alarme
Réglage de
l’alarme
• L’indicate ur d’alarme
clig note, pour si gnaler
que la fonc tion de rapp el d’alarme est
Active.
Appuyez sur la t ouche de marche /arrêt
pour arr êter l’alarme
.
AVERTISSEMENT
Pour réduire le ris que d’incendie ou d’électrocution, ne
pas exposer cet appareil à la pluie ni à
l’humidité.
ATTENTION
L’utilisation des commandes ou les réglages de
performances par des procédures a utres que celles
spécifiées risquent d’entraîner une exposition à des
radiations dangereuses.
• Débrancher l ’appareil pendant les orages avec
foudre et lors qu’il n’est pas utilisé pendan
t une
période prolongée.
Français
• Vérifiez que l’appareil se trouve en
mode veille.
Appuyez sur la touche
SET
L’a c hage de
l’heure cli gnote.
Appuyez sur les touches ou pour
régler l’heu re. Appuyez sur la touche
SET
pour enregist rer ce nouveau régla ge.
Appuyez sur les touches
ou pour
régler les minutes. A ppuyez une fois sur la
touche
SET
pour enre gistrer, puis
rappuyez pour revenir à l’a chage principal.
Toutes les mod ifications no n enregistrées
sont annulées au bout de
5 minutes .
Pour passer entre les modes
d’ chage
de l’heur e en 12 ou 24 heures, appuyez
sur la t ouche
SNOOZE/SLEEP
pendant 2 secondes, que l’AlarmDock
soit allum é ou éteint.
•
Vérifiez que l’appareil est allumé M aintenez
enfoncée la touche
SET pendant
2
secondes. L’a chage de l’heure de l’alarme
clignote.
Appuyez sur les touches ou pour
régler l’heu re. Appuyez sur la touche
SET
pour enregist rer ce nouveau régla ge.
Appuyez sur les touches
ou pour
régler les minutes. Appuyez sur la touche
SET
pour enregist rer ce nouveau régl age.
Appuyez
par intermit tence sur la touche
SET
pour faire défiler les modes d’alarme
(alarme, FM, iPod, éteint). Votre choix est
enregistré au bout de 2 secondes.
Éteignez l’appareil ou réglez la minuterie
La fonction
de
rappel d’alarm e peut
être
réglée à intervalles de
5 minutes,
jusqu’à
20 m inutes. Pour rap peler
l’alarme, appuyez une fois sur la touche
SNOOZE/SLEEP.
Le rappel es t réglé
sur
5
minutes. Rap puyez une fois pour
passer à
10, 15 ou 20 minutes.
•
MISE AU REBUT
Conformément à la directive européenne
2002/96/ EC,
tout a ppareil é lectrique ou électron ique do it
être
collecté séparém ent par un systè me local de collecte
des déchets électriq ues et électroniques. Respecter les
lois et réglementations en vigueur et ne pas mettre au
rebut dans le s déchets ménagers.
•
Remarque : le mode AUX
n’est
pas disponible
pour la fo nction d’alarm e. Si votre alarme es t
réglée sur le mode iPod, v érifiez que votre iPod
se trouve sur son dock. Dans le cas contrair e,
aucun son ne retentira et l’écran clignotera.
L’alarme utilise le niveau actuel de volume.
Arrêt somme il
Réglage de la m inuterie :
•
•
Tous dro its réservé s. Reprod uction part ielle ou tota le
interdite . iPod est une mar que dép osée d’A pple Inc.,
déposée aux États -Unis et dan s d’autre s pays. T ous les
autres n oms de prod uits sont o u peuvent ê tre des
marques de com- merce et ser vent à ident ifier les
produits et service s apparten ant à leurs d étenteurs
respectif s. Les nom s de marqu es sont utili sés aux seul es
ns d’illus tration et ne doive nt pas ê tre utilisé s pour
insinuer une relation entre BL UESTORK et leurs
détenteu rs respectif s.
DÉBALLAGE ET INSTALLATION
Déballer l’appareil avec soin. Nous recommandons de
conserver l’emballage, pour to ut stockage prolongé
éventuel de l’appareil. Pour éviter tout endo mmage-
ment, ne jamais placer l’appareil ou ses batteries
près d’un radiateur, près d’une bouch e d’aéra
tion, sur
un rebord de fenêtre exposé au soleil ni près d’ une
source d’eau.
•
•
Le symbole de l’écl air dans un triangle
équilatér al a
pour but d’alerter
l’utilisateur s ur la présence d’une tension
dangereuse non isol ée à l’intérieur du
boîtier du produit. Cette tension peut suffire à
électrocuter
l’utilisa
teur.
•
•
Vérifiez que l’appareil est allumé Ap puyez
par intermit tence sur la touche
SNOOZE/SLEEP
pour faire défiler
les
options de minuterie (90, 80…10). Ap-
puyez sur
SET
pour sélectionne r. Dans le
cas contraire, votre choix est automatique
ment e nregistré au bo ut de 5 secondes .
Pour annuler le mode d’ar rêt s ommeil,
rappuyer sur la touche
SNOO ZE/SL EEP
•
•
•
DANS L’INTERÊT DE LA SECURITE
• Pour débrancher l’adaptateur d’ali mentation, tirer sur la
fiche. Ne jamais tirer sur le cordon.
• Ne jamais manipuler la
che d’alimentation avec des
mains mouillées, sous peine d’électrocution ou
d’incendie.
• Consulter exclusivement un personnel quali
é
pour toute réparation.
• Ne pas ouvrir le boîtier.
• Ne pas tordre ni pincer le cordon d’alimentati on. Si la
che ou le cordon doivent être remplacés, véri
er qu’ils
sont conformes aux recommandations du f abricant.
• N’utiliser que les accessoires B LUESTORK agréés.
Le symbole du point d’exclamation dans
un triangle équilatéral a pour but d’alerter
l’utilisateur s ur la présence d’instr uctions
importantes d’utilisation et
de maintenance dans la documentation
accompagnant
l’a
ppareil.
•
10
11
 Loading...