

Page 1

BX88269
Clear LED Bulb & Socket Tail Light Wiring Kit
Installation Instructions
WARNING: Improper wiring may result in blown
fuses, damaged wiring, re, and/or bodily injury. Blue
Ox® recommends that a trained professional install
the tail light wiring kit. Blue Ox® will not be
responsible for any personal property damage or
bodily injury caused by improper wiring or misuse of
this product.
Tools Required
Wire Terminal Crimper Wire Stripper
Small Wire Cutter Phillip Screw Driver
Electrical Tape 9/16" Drill Bit
Parts List
Part
No. Qty. Description
201-0654 .........1 ........#10-16 x 1" Self Tapping Screw
229-0540 .........1 ........................8' 16 Ga. Brown Wire
229-0541 .........1 ........................8' 16 Ga. Green Wire
294-0250 .........6 .................16-14 Ga. Butt Connector
294-0327 .........1 ...................10-12 Ga. Ring Terminal
294-0562 .........1 ........................... 26' Wiring Harness
294-0990 .........2 ........ Clear LED Bulb & Socket Assy.
Installation
1. Starting in the engine compartment of the towed
vehicle, run the 26 ft. harness through the re
wall, under the driver's side door sill plate, under
the back seat, into the trunk area or run harness
through engine compartment and beside frame
rail to the back of vehicle. Depending on the
motorhome set up, the wire at the front of the
engine compartment should be wired into either a
4 or 6 pin connector that is mounted to the front of
the towed vehicle.
2. The bulb and sockets are installed into the
backside of the vehicles tail light assemblies.
The location should be as at as possible, with
enough clearance for the bulb on the inside and
the socket on the back side. Use a 9/16" drill bit
to drill a hole into each housing at the selected
location.
4. Insert the bulb and socket into the holes by gently
pushing them into place. Seal socket to tail light
housing with a good silicone caulk.
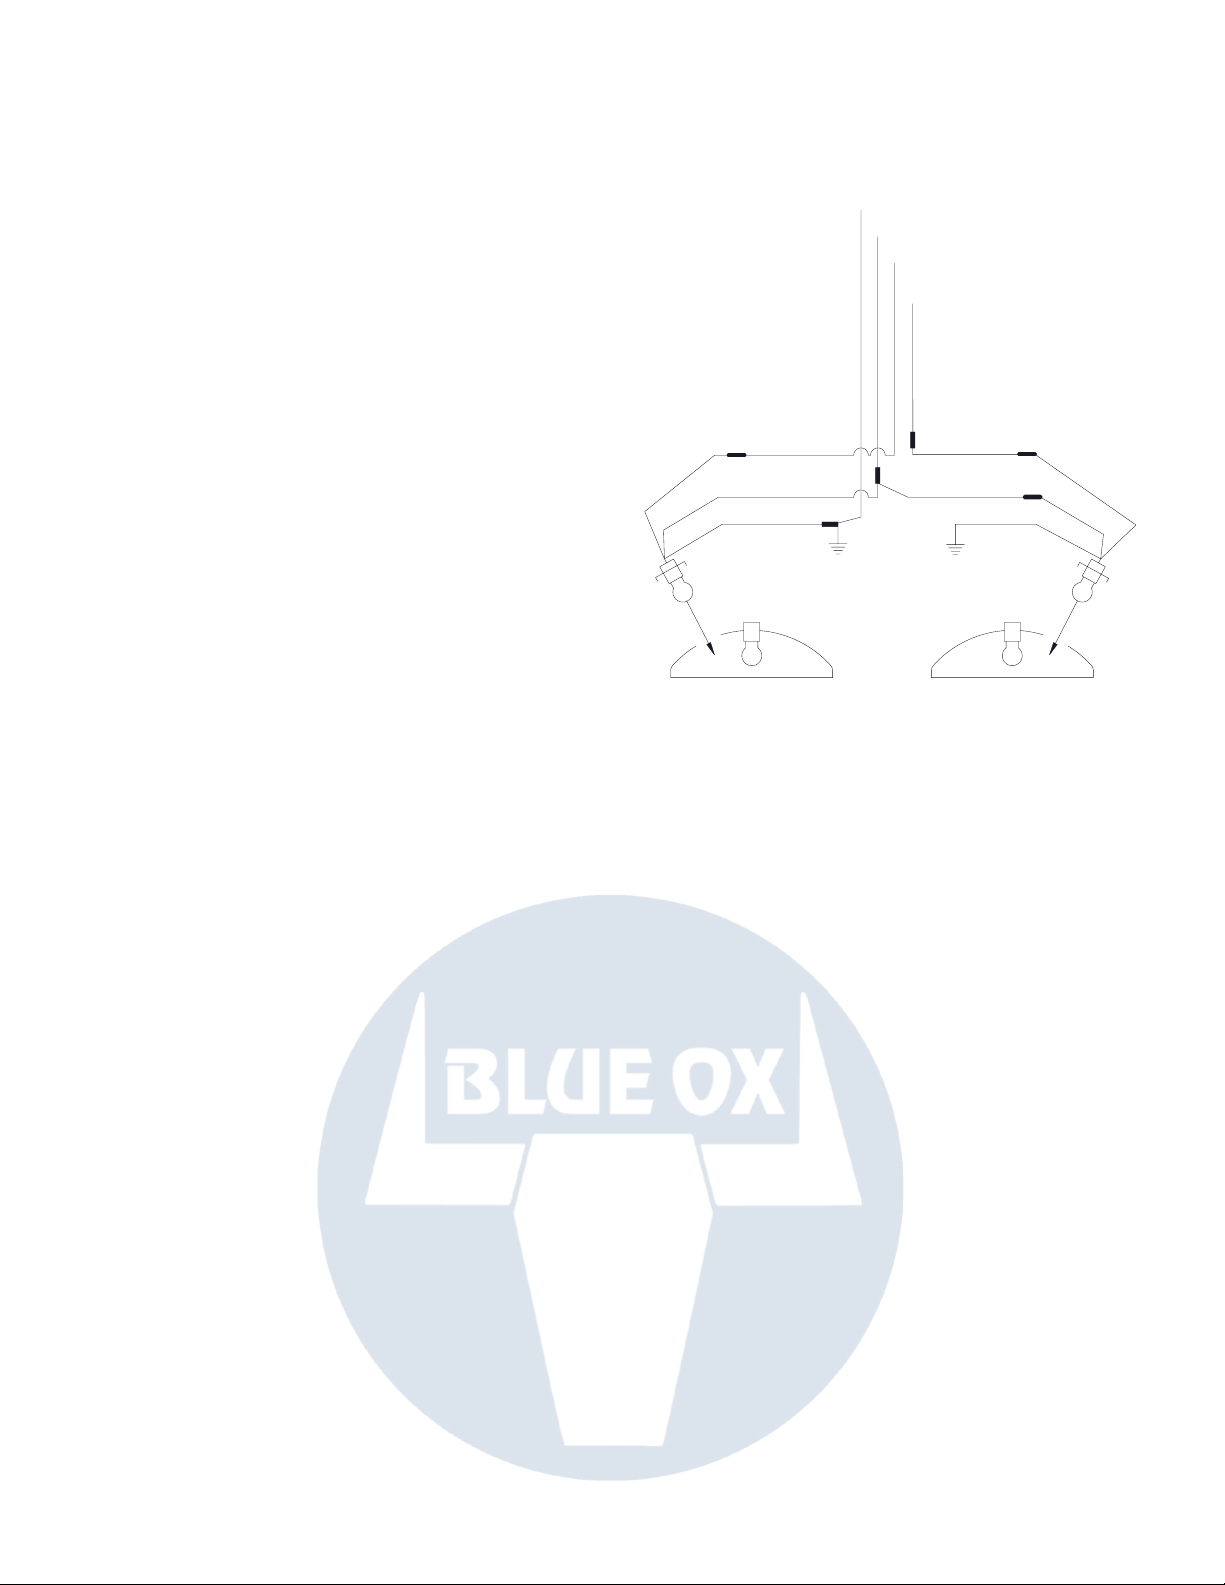
5. Run the black/red and brown/white wires from the
passenger's side socket to the drivers side where
the four wire loom is.
6. Crimp the three brown/white wires together. Now
crimp the green turn signal/brake wire from the
four wire loom, the green wire and the black/red
(brake/turn signal) wire from the passenger's side
together. The white/green (ground) wires should
be grounded to the frame with ring terminals and
self tapping screws. The white wire from the four
wire loom should be connected with the white/
green wire from the driver's side socket then
grounded. Refer to Figure 1.
7. At the driver's side socket connect the black/red
(brake/turn signal) wire and the yellow (brake/turn
signal) wire from the four wire loom. See Figure 1.
8. Place the wires out of the way. Test the system
before attaching the tail light assemblies back onto
the vehicle. To test the system, a 4-wire or 6-wire
trailer plug must be installed on the front of the
towed vehicle using the 4-wire harness installed.
Once installed, plug the vehicles together with
coach and test each turn signal and the brake
lights. If lights do not work properly, there must
be a loose connection, or a wiring error. Recheck
to insure all connections were made correctly,
especially the ground connections.
NOTE: If the towing vehicle is equipped with separate
amber turn signals and red brake lights, a tail light
converter (not included in wiring kit) is needed
to convert the amber/red 5-wire system to the
standard “red only” 4-wire system.
NOTE: A heavy duty asher unit may be required in
the towing vehicle to power the added circuit load
of a towed vehicle.
3. The black/red wire is the brake/ turn signal wire
and the brown/white is the tail light wire. The
white/green wire is used for the ground wire.
405-0245 Page 1 of 2 8/21/13
Page 2
BX88269
Clear LED Bulb & Socket Tail Light Wiring Kit
Installation Instructions
TROUBLE SHOOTING
PROBLEM - LIGHTS ARE DIM AND/OR ACTIVATES
ANOTHER LIGHT.
POSSIBLE CAUSES/SOLUTIONS
• Short circuit in the system on either or both vehicles
• Towing vehicle alternator too small
• Towing vehicle wiring is too light to handle extra
power requirements
• Towing vehicle may require a heavy duty asher unit
to handle the extra load
PROBLEM - DOESN'T WORK WHEN ACTIVATING
BLINKER, TAIL LIGHTS OR BRAKES.
POSSIBLE CAUSES/SOLUTIONS
• Wiring error to the bulb and sockets.
• Bad ground on either or both vehicles.
• Fuse in towing vehicle is blown. Check continuity
of all wires to ground to assure harness is not short
circuited
• Bad connection between female and male plugs
• Check for solid connection.
• Clean both four way connections.
WHITE
BROWN
YELLOW
GREEN
YELLOW
BLACK/RED
BROWN/WHITE
WHITE/GREEN
DRIVER'S SIDE
Note: Original inventory of the wiring kits were received
with red/green/white wiring. The newer inventory has the
standard black/brown/white wiring.
Please reference the above diagram for proper wire colors.
GREEN
BROWN/WHITE
WHITE/GREEN
BLACK/RED
PASSENGER'S SIDE
CUSTOMER SERVICE COMMITMENT
Blue Ox® is committed to providing you with exceptional customer care throughout your lifetime with our
products. Our team is here to assist you with any questions you may have regarding the performance of your
product. Simply call (402) 385-3051 and you can speak with our customer care team.
Additionally, please visit our website to see which rallies our Destination America team will be attending. For a
nominal fee, our service technician will service your towing system to ensure it’s in proper working condition.
Also, as a commitment to our customers, should you visit our factory, you can stay at our full service Blue Ox®
campground at no charge along with enjoying a factory tour.
Again, thank you for being our customer and for the condence you have shown in the performance of our
products. It is because of customers like you we enjoy the success we have today.
One Mill Road, Industrial Park
Pender, Nebraska 68047
405-0245 Page 2 of 2 8/21/13
© 2013 Blue Ox
Phone: (402) 385-3051
Fax: (402) 385-3360
www.blueox.com
 Loading...