

Page 1
BX3612 Installation Instructions
2003-04 Subaru Forester AWD
The front fascia, tie down brackets and fog lights are removed for baseplate installation. Drilling is required.
The BX8869 is available for the vehicle. Attachment Tabs are 20 inches center to center and a height of
15 inches.
Serial No.
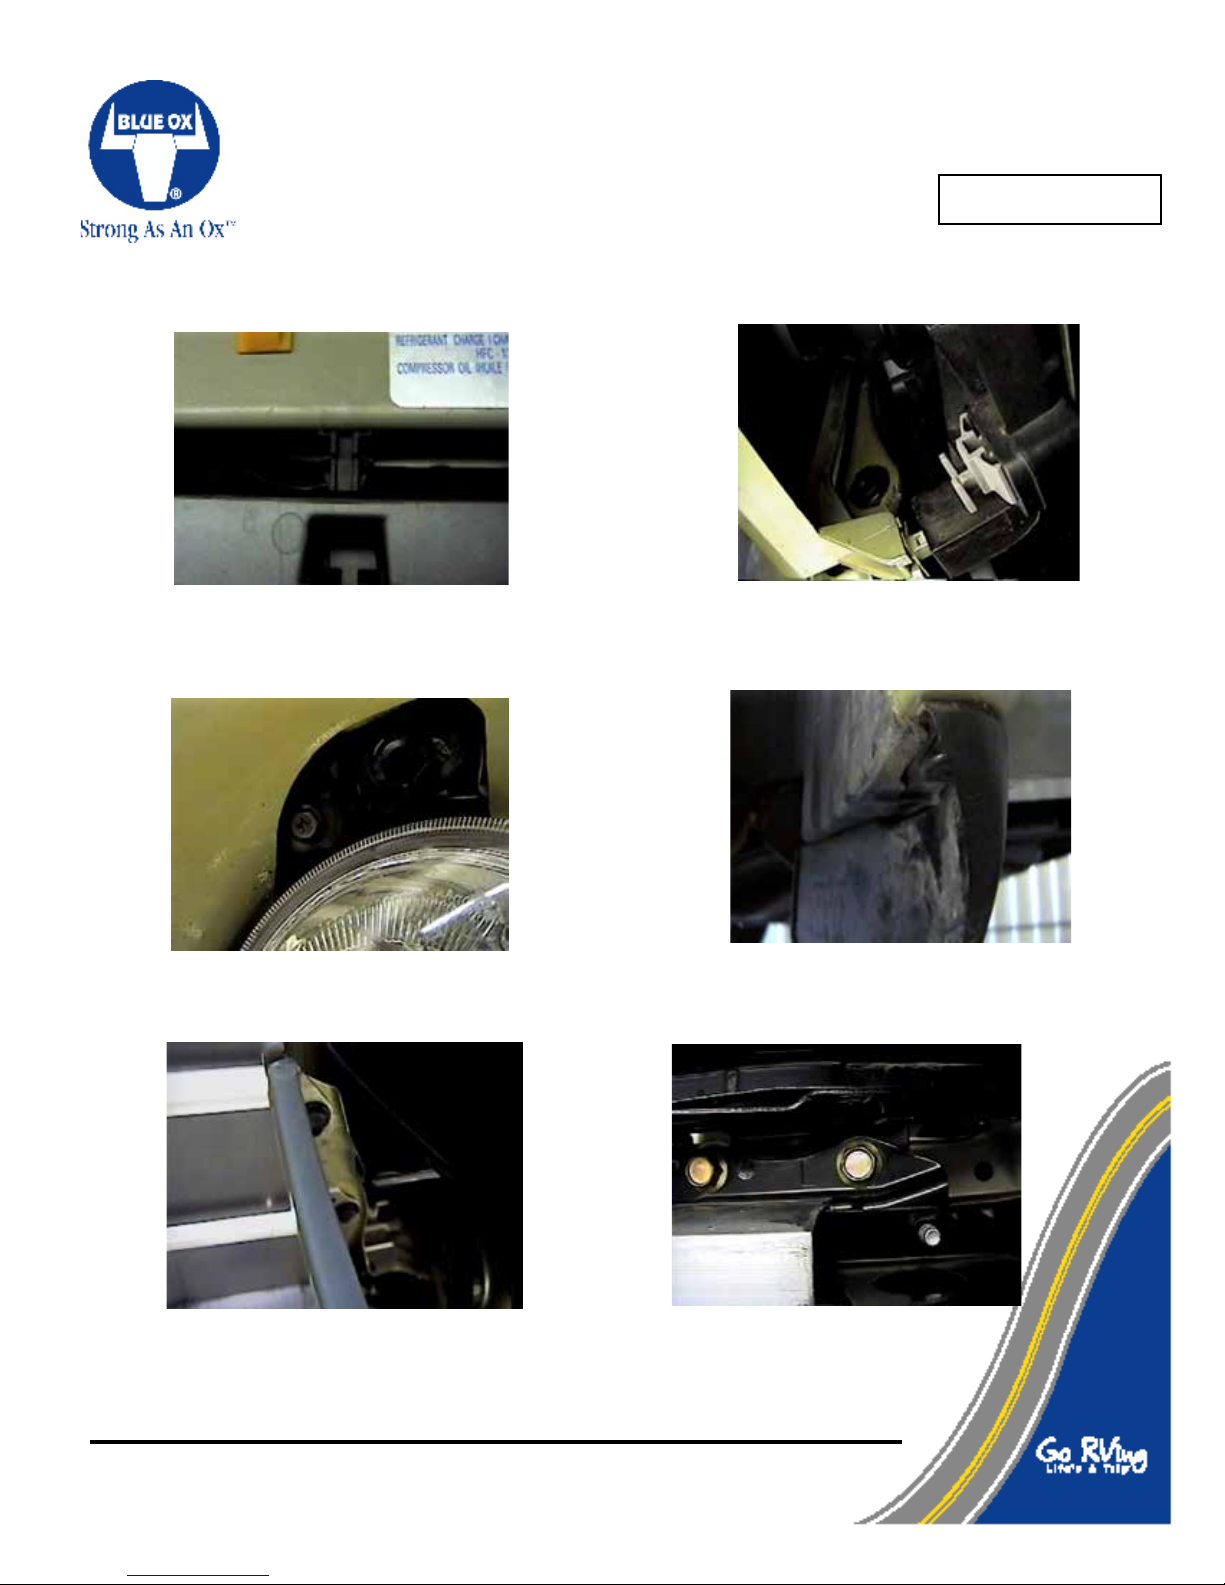
1. Unsnap the two clips on the upper grill, pull
forward, unsnap one clip in the center of the
grill and set grill aside. Remove the four push
pins from the top side of fascia.
3. Just above fog lights remove one metric
bolt with the 10MM socket and one push
pin, both sides.
2. Unsnap clip on fascia just inside
headlights, both sides. Remove
ve push pins from the top of metal
bumper.
4. Just forward of front tire is one push
pin to remove, both sides. Remove
four push pins from the bottom of
front fascia.
5. Just forward of front tire, pull wheel well back
and remove two push pins from fascia's
corner, both sides. Pull fascia corner to the
side and forward, disconnect electrical plugs
and set aside.
© 2002 Blue Ox Division, Automatic Equipment Mfg. Co. • One Mill Road, Industrial Park
Pender, Nebraska 68047 • Phone 402-385-3051 • Fax 402-385-3360 • www.blueox.us
Page 1 of 3 292-6051 10/28/08
6. Using the 14MM socket, remove
three metric bolts from bumper
bracket, both sides, pull forward
and set aside.
Page 2
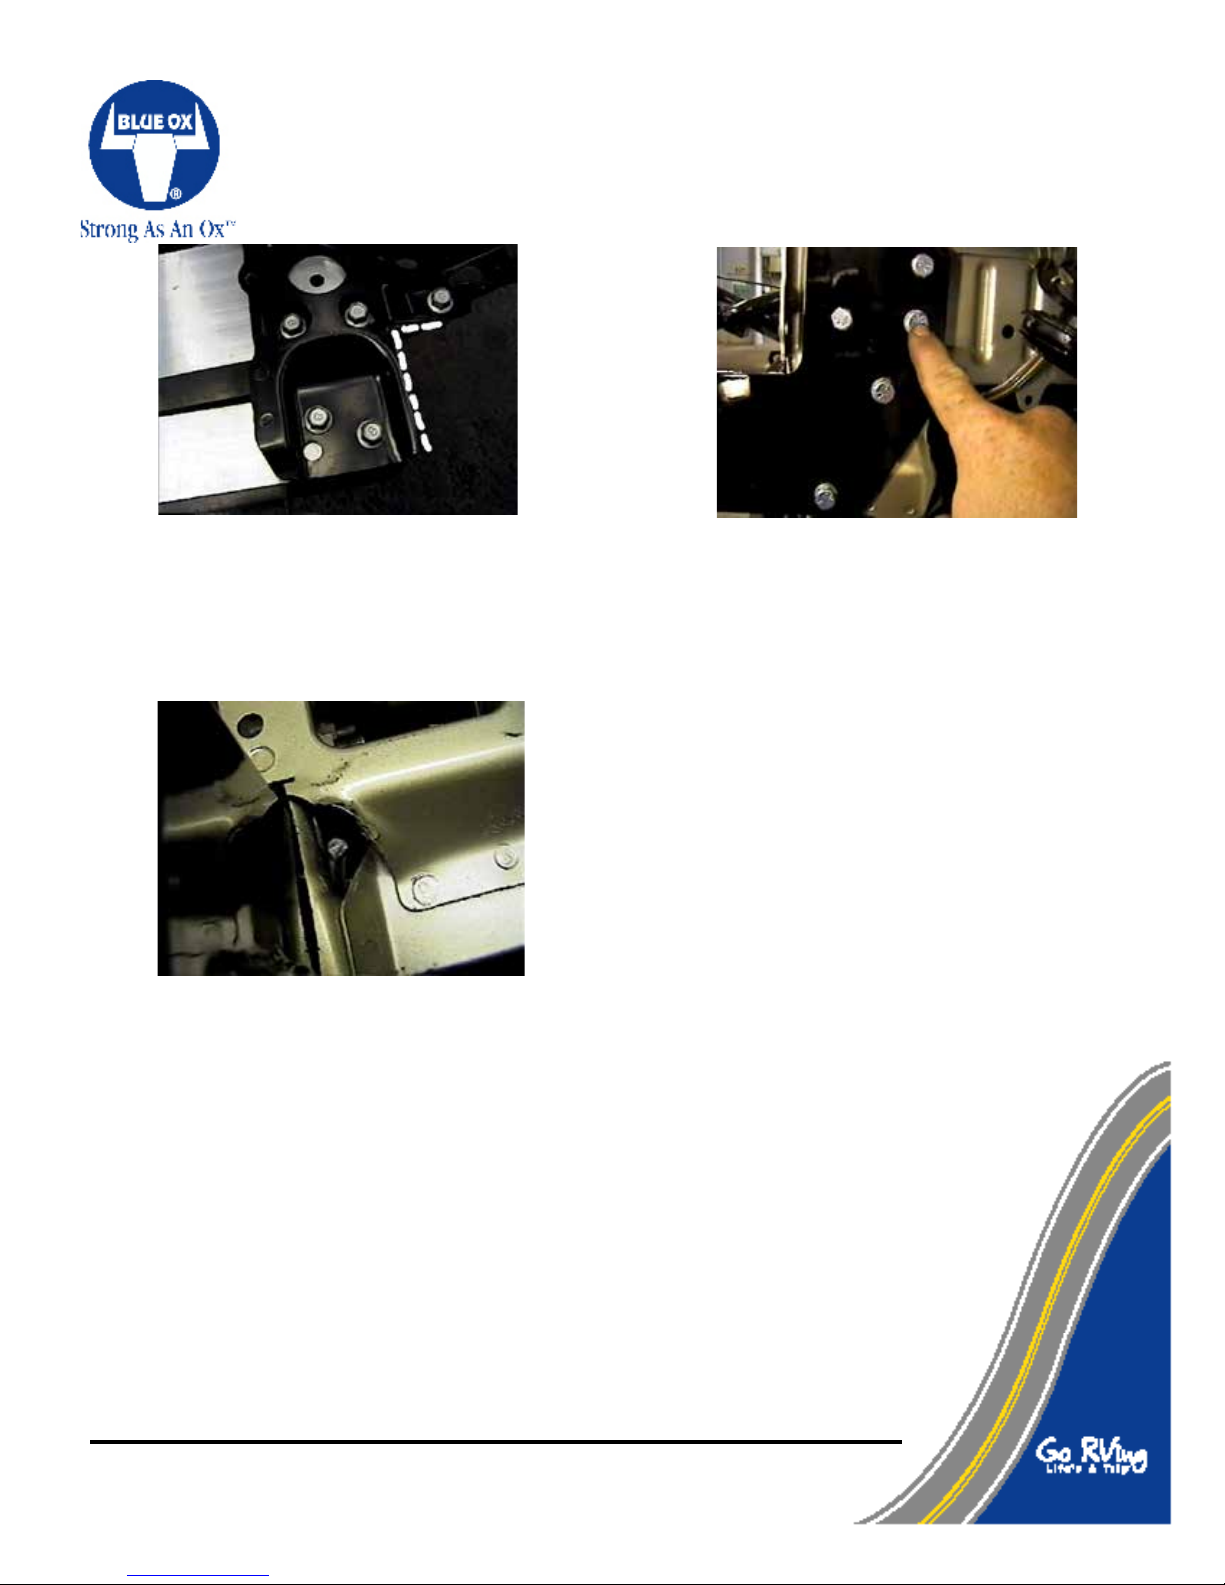
7. Set front bumper face down on at surface and
remove two lower metric bolts with the 13MM
socket, both sides. Discard lower tube. Using
the hack saw, cut side brace off, according to
photo, to relieve area for baseplate on frame
sides and cut webbing just behind bumper
bracket (see arrow on photo step 9).
9. Using the pry bar, open area to insert item 4 to
align with drilled hole and install items 6 and 7,
both sides. Install lower bolt, items 4, 6 and 7,
both sides. Be sure and use loctite on all bolts
before tightening.
8. 2003 Model: Remove existing metric bolt
from outside of frame rail and discard, both
sides. Align item 1 with existing threaded
holes on frame, slide item 2 between frame
and item 1. Install items 8 and 9, both
sides. 2004 Model: Align the back tow
holes on baseplate end with the existing
holes in frame, clamp in place with vise
grips and level baseplate on vehicle.
Using the baseplate as a template, drill
out these two holes with the 13/32" drill
bit. Install 3/8 x 1 1/2" hex bolts and lock
washers into baseplate, insert nut plates
into frame end to align with bolts and
tighten. Be sure and use loctite on all
bolts before tightening. Drill remaining
holes in baseplate with the 13/32" drill bit.
Insert item 3 into frame end and install
items 5 and 7. Be sure and use loctite
on all bolts before tightening. Tighten
all bolts according to Torque Chart in
the General Instruction sheet.
10. Reinstall bumper, fascia and upper grill. Be sure all electrical connections are plugged in properly.
11. The dimensional variations between otherwise identical cars can be considerable. While the location
and size of the holes in the baseplate were designed to allow for easy installation, it may be necessary
to le a hole slightly to allow a bolt to clear.
12. Install the tow bar and safety cables according to the instructions included in their packages.
13. Do not substitute other devices if the tow bar pin and clip are lost.
14. DEALER OR INSTALLER: BE CERTAIN THE USER RECEIVES THE INSTRUCTION SHEET.
© 2002 Blue Ox Division, Automatic Equipment Mfg. Co. • One Mill Road, Industrial Park
Pender, Nebraska 68047 • Phone 402-385-3051 • Fax 402-385-3360 • www.blueox.us
Page 2 of 3 292-6051 10/28/08
Page 3
Tools Required
9/16" Socket Loctite 10MM Socket
13mm Socket 14MM Socket 13/32" Drill Bit
Hack Saw Pry Bar
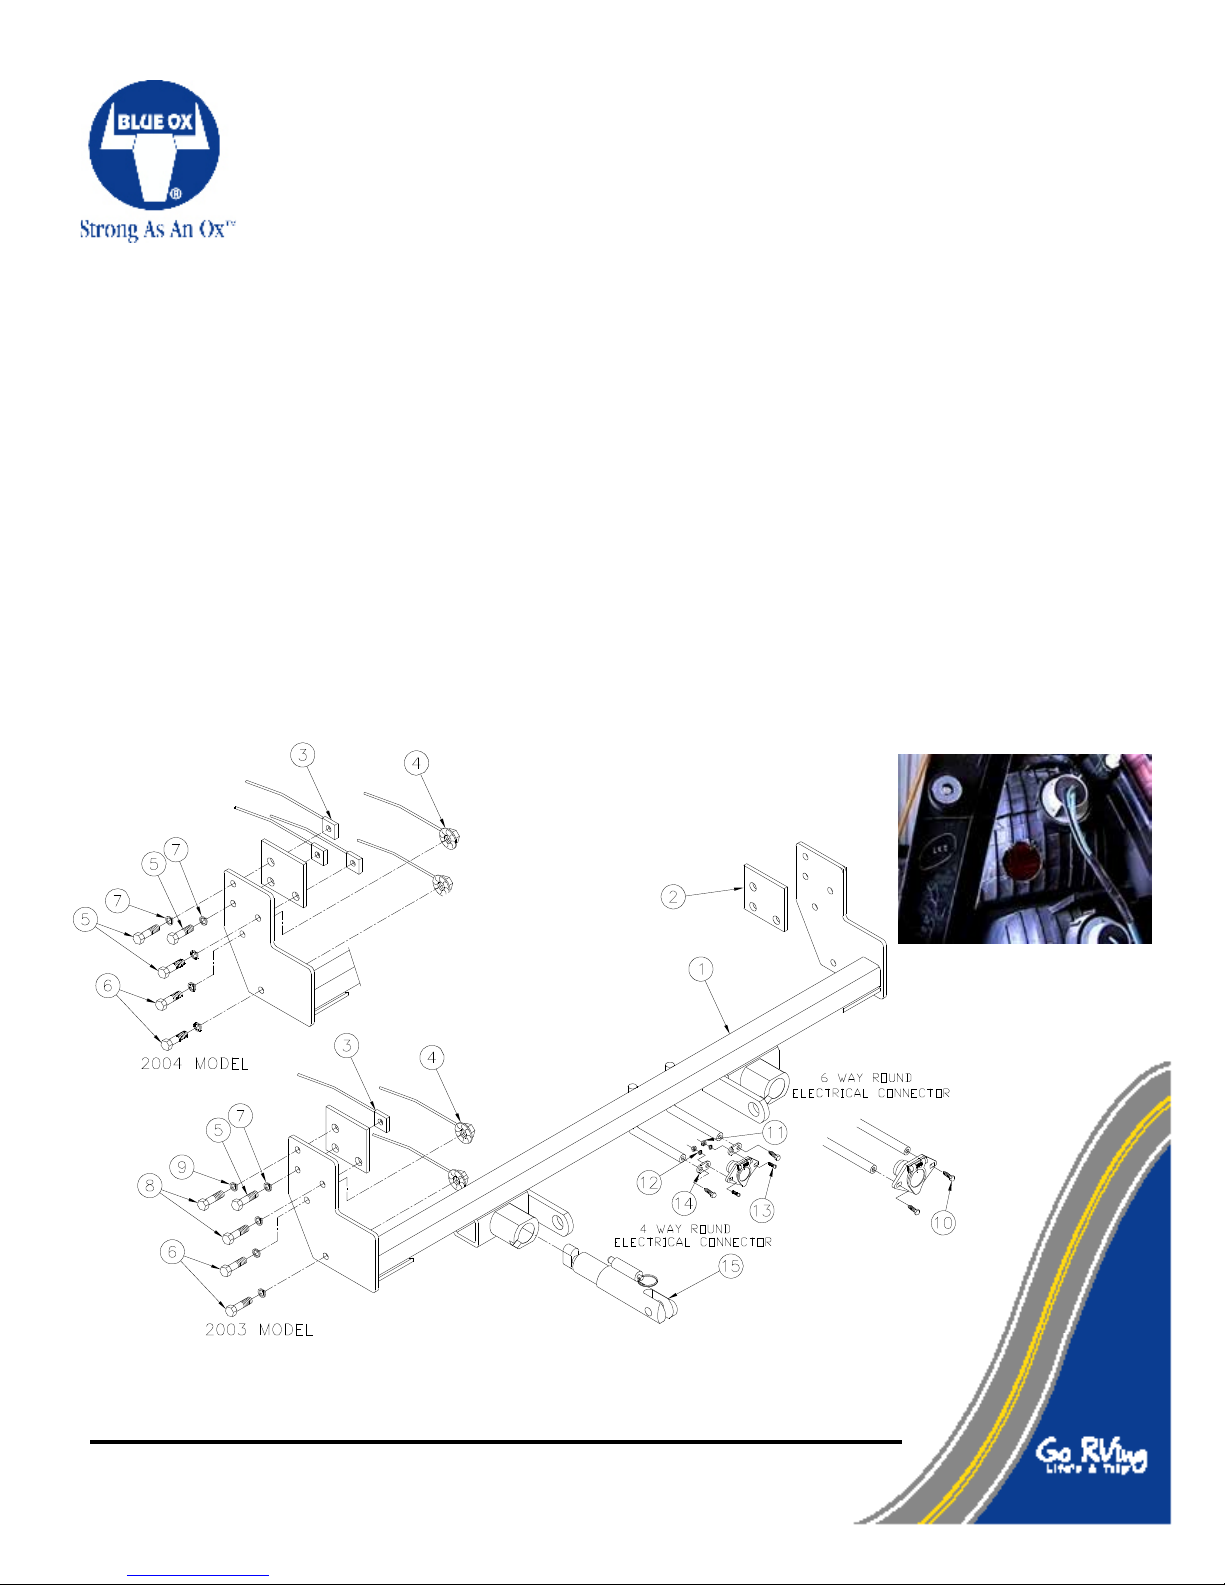
Parts List
Ref. No. Qty. Part No. Description
1 1 61-5830 ..................................................................... Weldment, Base Plate, BX3612
2 2 102-6328 .................................................................................. Spacer Plate, BX3612
3 6 61-5208 ............................................................................................. 3/8-16 Nut Plate
4 4 61-4978 ................................................................ 3/8-16 Whiz Nut, with 14 Inch Wire
5 6 201-0440 ......................................................................3/8-16 x 1 1/2 Bolt, Grd. 5, ZP
6 4 201-0368 ......................................................................3/8-16 x 1 1/4 Bolt, Grd. 5, ZP
7 6 203-0010 .................................................................................... 3/8 Lock Washer, ZP
8 4 201-0418 .................................................... 8MM-1.25 x 35MM Hex Bolt, Grd 8.8, ZP
9 4 203-0102 ................................................................................. 8MM Lock Washer, ZP
10 2 201-0553 ..........................................................1/4-20 x 1/2 Hx. Wshd, Type F Screw
11 2 101-5822 ........................................................................... Adapter, 4 Way Connector
12 2 201-0192 ................................................................. #10-32 x 1/2 Slot, Rd. Hd. Screw
13 2 203-0054 ..........................................................................................#10 Lock Washer
14 2 202-0047 ............................................................................................ #10-32 Hex Nut
15 2 62-3468 .................................................... Attachment, Assembly, SF/ SB (One Hole)
2 226-0046 ..........................................Baseplate Safety Cable, 36" CL III (Not Shown)
2 229-0359 .................................................................... Quicklink, 3/8, ZP (Not Shown)
2 290-0437 ......................................................... Receiver, Cap Plug (Blk) (Not Shown)
Location for the BX8869
on driver's side.
IMPORTANT: Use only genuine factory replacement parts on your Base Plate. Do not substitute
homemade or nontypical parts. If a bolt is lost or in need of replacement, for your safety and the
preservation of your Base Plate, be sure to use a replacement bolt of the same grade (Usually Grade 5,
refer to parts list). Repair parts may be ordered through your nearest Blue Ox dealer or distributor.
© 2002 Blue Ox Division, Automatic Equipment Mfg. Co. • One Mill Road, Industrial Park
Pender, Nebraska 68047 • Phone 402-385-3051 • Fax 402-385-3360 • www.blueox.us
Page 3 of 3 292-6051 10/28/08
 Loading...