


Care and use guide
1 Bluelab
Connect Stick
required to
data log
(sold seperately)
*6 months for pH probe

English
2
Contents
page
Features |
3 |
|
|
Bluelab pH Controller Connect |
3 |
What’s in the box? |
4 |
|
|
IMPORTANT - Bluelab pH |
|
Probe care |
5 |
Set up the Bluelab Connect |
|
Software |
6 |
|
|
Installing the pH controller |
|
connect |
6 |
Connect the Bluelab pH Probe |
6 |
|
|
Connect the Bluelab |
|
Temperature Probe |
6 |
SAFETY - Handling pH up or |
|
pH down solution |
6 |
|
|
Set up inlet dosing tube |
7 |
Set up outlet dosing tube |
7 |
|
|
Connect power adaptor |
8 |
Display menu and buttons |
8 |
|
|
Factory settings |
9 |
Change the display language |
9 |
|
|
pH calibration |
10 |
Placement of the probes |
12 |
|
|
Set the required pH |
12 |
|
|
|
|
page |
|
|
|
|
|
|
|
Set the dose direction - |
|
|
for pH up or down solution |
12 |
|
Set the dosing OnTime |
|
|
and Off Time |
13 |
|
|
|
|
Set alarms (optional) |
14 |
|
View current settings |
14 |
|
|
|
|
Priming the pump |
15 |
|
Set the mode |
15 |
|
|
|
|
Change the screen backlight |
|
|
and/or contrast |
16 |
|
Using the connect software |
16 |
|
|
|
|
Hydrating the pH probe |
17 |
|
Cleaning the pH probe |
17 |
|
|
|
|
Troubleshooting guide |
18 |
|
Frequently Asked Questions |
|
|
(FAQs) |
19 |
|
|
|
|
Technical specifications |
20 |
|
Bluelab pH Controller Connect |
|
|
accessories and spare parts |
21 |
|
|
|
|
Limited product guarantee |
23 |
|
Limitation of liability |
23 |
|
|
|
|
Contact details |
23 |

English
Features
ONE Bluelab Connect Stick is required, sold seperately |
Flashing high and low alarm with safety |
|
control lockouts |
||
|
|
|
Local and Cloud data logging capability (download Free |
‘Plant-safe’ green back lit LCD with |
|
Bluelab Connect Software) |
adjustable brightness and contrast |
|
|
|
|
Adjustment of control settings from a local PC via |
Auto resume dosing on restart after |
|
connect software |
power loss |
|
|
|
|
Option to view data and current status remotely via |
Water resistant, wall mount design |
|
Google Docs™* |
||
|
||
Automatic control and monitoring of system pH with |
13 foot (4 meter) acid/alkaline resistant |
|
reservoirs up to 200 US Gallons / 760 Liters |
tubing supplied |
|
Large, easy to read display |
International power supply |
|
|
|
|
Simple push button pH calibration with on screen |
Separate Bluelab Temperature Probe |
|
instructions |
(for pH ATC) |
|
|
|
|
Easy to navigate menu to program and adjust settings |
Replaceable double junction pH probe |
|
|
|
|
Dosing lockouts to protect from over-dosing |
Replaceable peristaltic pump and tubing |
|
|
|
What is Plant Safe? Green lights are safe for continued growth during a plant’s fruiting stage when hours of darkness are required.
What are Dosing Lockouts for? They are a built-in safety feature that stops pH dosing if an error is detected in the system (see FAQs for more detail).
Bluelab pH Controller Connect
pH display |
|
successful pH calibration symbol |
||||
Alarm on |
|
|
|
|
|
|
symbol |
|
|
|
|
|
|
|
|
|
|
|
|
Enter button |
Control dosing |
|
|
|
|
|
Menu button |
|
|
|
|
|||
up or down |
|
|
|
|
|
Up button |
symbols |
|
|
|
|
|
|
|
|
|
|
|
|
|
pH calibration |
|
|
|
|
|
|
button |
|
|
|
|
|
Down button |
|
|
|
|
|||
pH controller |
|
|
|
|
|
Bluelab |
connect status |
|
|
|
|
|
|
|
|
|
|
|
pH Probe |
|
|
|
|
|
|
|
|
Peristaltic |
|
|
|
|
|
|
pump with |
|
|
|
|
|
|
cover |
|
|
|
|
|
pH probe |
Inlet tube |
|
|
|
|
|
storage cap |
|
Bluelab Temperature |
|||||
Outlet tube |
|
Probe (for pH ATC) |
||||
|
|
|
|
|
|
|
Power input |
|
pH probe BNC |
||||
|
connector |
|||||
|
|
|||||
ATC symbol |
|
Temperature probe input |
||||
|
|
|||||
ATTENTION |
Keep your pH probe tip wet |
|||||
3If it dries, it dies!
at all times to avoid permanent damage

English
4
PLEASE FOLLOW THE MANUAL STEP BY STEP BEFORE FIRST USE BEGINS
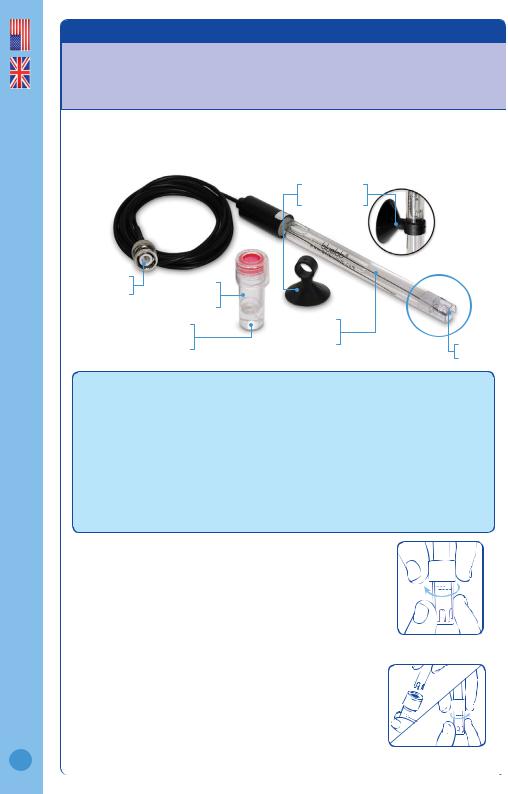
1.0What’s in the box?
Please verify the box contents from the information below.
6 |
7 |
8 |
9 |
5
1
2
3
14 |
4 |
|
11
13
12
10
1 |
Bluelab pH Controller Connect |
9 |
NZ / Australia plug adaptor |
|
2 |
Bluelab pH Probe with storage cap |
10 |
13 foot (4 meter) Acid/Alkali |
|
3 |
Bluelab Temperature Probe |
|
resistant dosing tube with connectors |
|
4 |
Bluelab pH Probe holder with suction cup |
11 |
4 x mounting fasteners |
|
|
|
|||
5 |
24V DC 0.4Amp power supply |
12 |
20ml pH 7.0 and pH 4.0 single-use |
|
|
calibration solution sachets |
|||
6 |
Europe plug adaptor |
|
||
13 |
Inlet tube cap for pH stock solution |
|||
7 |
UK plug adaptor |
|||
14 |
Replaceable peristaltic pump with cover |
|||
8 |
North American plug adaptor |
|||
|
|
English
5
2.0IMPORTANT - Bluelab pH Probe care
pH probes DO NOT last forever. They age through normal use and will eventually fail. The life time of a pH probe depends on the environment it is used in and the way that it is treated. To receive a long life from your Bluelab pH Probe, please ensure you follow the guide below.
pH probes contain glass and are therefore FRAGILE. With good care, they will give a long service life.
Bluelab pH Probe
pH probe holder suction cup
 pH probe tip
BNC connector |
pH probe |
|
|
|
|
|
storage cap |
|
|
pH probe KCl |
Glass tube inside |
|
plastic barrel |
|
|
storage solution |
|
|
|
|
|
|
Glass bulb |
DO NOT let the pH probe tip dry. IF IT DRIES IT DIES!
DO NOT bend the probe; this will break its internal glass tube.
DO NOT knock the probe; this will break its internal glass tube or external glass bulb.
DO NOT plunge a cold pH probe into a hot liquid, or a hot probe into cold liquid. Sudden temperature changes can crack the glass and permanently damage the probe.
DO NOT immerse in oils, proteins or suspended solids that will leave a coating on the glass bulb. DO NOT ‘kink’ or bend the lead sharply.
DO NOT attempt to lengthen the lead on the pH probe. DO NOT wet the BNC connector at the end of the lead.
Always remove pH probe storage cap before use
1.Grip the top of the cap and gently twist the base one rotation clockwise to loosen slightly.
2.Next slowly slide the cap off the pH probe. DO NOT completely remove the base of the cap from the top of the cap.
3.Store the storage cap in a safe place.
Storing the pH probe
When storing the pH probe, the pH probe tip must be kept moist.
To prepare the pH probe for storage, add enough Bluelab pH Probe KCl Storage Solution to the storage cap so the probe tip is covered. Then replace the cap and store in a secure place. DO NOT use RO (Reverse Osmosis), Distilled or De-ionized water. Pure water changes the chemistry in the reference, causing the probe to die.
If the pH probe has been accidentally allowed to dry out;
The pH probe must be ‘hydrated’ for 24 hours in KCl storage solution (never use RO, Distilled or De-ionized water). Following this; carry out a calibration to check if the probe has already suffered permanent damage.
Removing pH probe storage cap
Ensure probe tip is covered by the KCl storage solution in cap

English
6
3.0Set up the Bluelab Connect Software
1Note the 4 character KEY CODE on the rear of the Bluelab pH Controller Connect.
2Follow instructions in the Bluelab Connect Stick ‘Getting Started’ guide to install the connect stick and connect software. Add the pH controller connect to the software.
4.0Installing the pH controller connect
1Select a suitable location that is:
•Less than 5.65 feet / 2 meters from your reservoir. The probes must be immersed in solution at all times.
•Less than 4.9 feet / 1.5 meters from an electrical mains outlet.
•Less than 5.56 feet / 2 meters from pH Up or Down solution. The inlet tube must reach the bottom of the container.
•At a suitable height to see the display and for easy operation (recommend slightly below eye level when standing).
NOTE: Avoid placing the pH controller connect where it can be damaged by direct sunlight, water, nutrient salts or pH adjuster.
2Fix the fasteners through the desired mounting holes in the top and bottom of the case.
Mounting holes at top
Mounting holes at bottom
5.0Connect the Bluelab pH Probe
1Connect the pH probe to the pH controller connect by lining up the lugs of the BNC fittings.
2Fasten securely by pushing the pH probe connector on and twisting one quarter turn.
Inserting Twisting Attached
6.0Connect the Bluelab Temperature Probe
1 Insert the temperature probe connector to
the base of the pH controller connect where
‘ATC’ is labelled. Ensure the connector is fully inserted.
temperature probe connection
7.0SAFETY - Handling pH up and down solutions
1Bluelab pH Up or pH Down Solutions are available in North America. They can be used undiluted with the pH controller connect. Always follow the manufacturer’s instructions for use and handling.
CAUTION: Wear eye protection and gloves when handling this product. Harmful if swallowed. Keep out of the reach of children. Store under cool and dry conditions. Not for food, drug or household use. Read MSDS before use.

English
7
8.0Set up inlet dosing tube
1 |
To straighten tube: |
|
|
Bend tube in the opposite direction and |
|
|
straighten by running through closed fingers. |
|
|
|
Inlet ‘’ |
|
|
arrow on |
|
|
pump cover |
2 |
Insert one end of the dosing tube with |
|
|
connector into the LEFT peristaltic pump tube. |
Left pump |
|
This is the ‘inlet dosing tube’. |
tube |
|
|
|
|
|
Connector |
3 Ensure the inlet dosing tube will reach the bottom of the pH stock solution container.
There also needs to be enough tube left for the outlet dosing tube to go into the reservoir/tank.
Cut the inlet dosing tube to the desired length.
Use inlet tube cap supplied to place on |
Inlet dosing |
|||||||||||
Bluelab Up or Down 500ml or 1 Liter bottles. |
tube |
|
|
|
|
|
|
|||||
|
|
|
|
|||||||||
|
|
|
|
|
|
|
|
|
|
|
|
|
This will hold the tube in position. Insert the |
|
|
|
|
|
|
|
|
|
|
|
|
inlet dosing tube through the hole in the cap |
|
|
|
|
|
|
|
|
|
|
|
Inlet tube cap |
|
|
|
|
|
|
|
|
|
|
|
||
and pierce the induction seal on the bottle. |
pH stock |
|
|
|
|
|
|
|
|
|
||
|
solution |
|
|
|
|
|
|
|
||||
|
|
|
|
|
|
|
|
|
|
|
|
Dosing tube reaches |
|
|
|
|
|
|
|
|
|
|
|
|
bottom of container |
|
|
|
|
|
|
|
|
|
|
|
|
|
|
|
|
|
|
|
|
|
|
|
|
|
|
9.0Set up outlet dosing tube
1 |
Insert the remaining dosing tube with |
|
|
|
connector into the RIGHT peristaltic pump |
|
Outlet ‘’ arrow |
|
tube. This is the ‘outlet dosing tube’. |
|
on pump cover |
|
|
|
Right pump tube |
|
|
|
Connector |
2 |
Cut the outlet dosing tube so that the tube |
|
|
|
sits above the maximum solution level of the |
|
|
|
reservoir/tank. The pH stock solution must |
|
|
|
drip into the nutrient reservoir/tank. |
|
|
|
Note: If the outlet dosing tube is immersed |
|
|
|
in reservoir/tank solution, it could create |
|
Outlet dosing |
|
a syphon. This would cause the pH stock |
Inlet dosing |
tube |
|
tube |
|
|
|
solution to overflow. |
|
|
|
|
|
pH stock |
Nutrient solution |
solution |
reservoir / tank |
 Loading...