

Page 1

Care and use guide
*6 months
for pH probe
1 Bluelab
Connect Stick
required to
data log
(sold seperately)
Page 2

Contents
page page
English
Features 3
Bluelab pH Controller Connect 3
What’s in the box? 4
IMPORTANT - Bluelab pH
Probe care 5
Set up the Bluelab Connect
So ware 6
Installing the pH controller
connect 6
Connect the Bluelab pH Probe 6
Connect the Bluelab
Temperature Probe 6
SAFETY - Handling pH up or
pH down solution 6
Set up inlet dosing tube 7
Set up outlet dosing tube 7
Connect power adaptor 8
Display menu and buttons 8
Factory settings 9
Set the dose direction for pH up or down solution 12
Set the dosing OnTime
and O Time 13
Set alarms (optional) 14
View current settings 14
Priming the pump 15
Set the mode 15
Change the screen backlight
and/or contrast 16
Using the connect so ware 16
Hydrating the pH probe 17
Cleaning the pH probe 17
Troubleshooting guide 18
Frequently Asked Questions
(FAQs) 19
Technical speci cations 20
Bluelab pH Controller Connect
accessories and spare parts 21
Change the display language 9
pH calibration 10
Placement of the probes 12
Set the required pH 12
2
Limited product guarantee 23
Limitation of liability 23
Contact details 23
Page 3
English
Features
ONE Bluelab Connect Stick is required, sold seperately
Flashing high and low alarm with safety
control lockouts
Local and Cloud data logging capability (download Free
Bluelab Connect Software)
‘Plant-safe’ green back lit LCD with
adjustable brightness and contrast
Adjustment of control settings from a local PC via
connect software
Auto resume dosing on restart after
power loss
Option to view data and current status remotely via
Google Docs™*
Water resistant, wall mount design
Automatic control and monitoring of system pH with
reservoirs up to 200 US Gallons / 760 Liters
13 foot (4 meter) acid/alkaline resistant
tubing supplied
Large, easy to read display International power supply
Simple push button pH calibration with on screen
instructions
Separate Bluelab Temperature Probe
(for pH ATC)
Easy to navigate menu to program and adjust settings Replaceable double junction pH probe
Dosing lockouts to protect from over-dosing Replaceable peristaltic pump and tubing
What is Plant Safe? Green lights are safe for continued growth during a plant’s fruiting
stage when hours of darkness are required.
What are Dosing Lockouts for? They are a built-in safety feature that stops pH dosing if
an error is detected in the system (see FAQs for more detail).
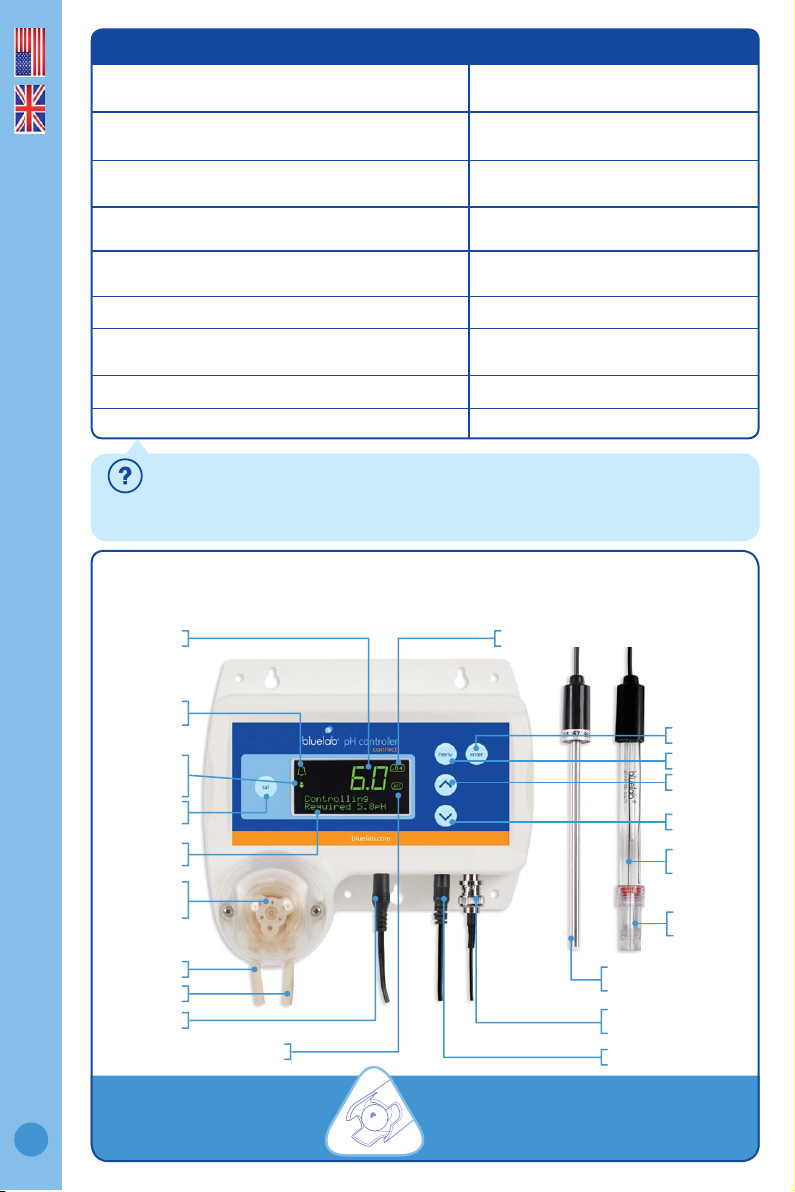
Bluelab pH Controller Connect
pH display successful pH calibration symbol
Alarm on
symbol
Control dosing
up or down
3
symbols
pH calibration
button
pH controller
connect status
Peristaltic
pump with
cover
Inlet tube
Outlet tube
Power input
ATC symbol
ATTENTION
If it dries, it dies!
Bluelab Temperature
Probe (for pH ATC)
pH probe BNC
connector
Temperature probe input
Keep your pH probe tip wet
at all times to avoid permanent damage
Enter button
Menu button
Up button
Down button
Bluelab
pH Probe
pH probe
storage cap
Page 4
PLEASE FOLLOW THE MANUAL STEP BY STEP BEFORE FIRST USE BEGINS
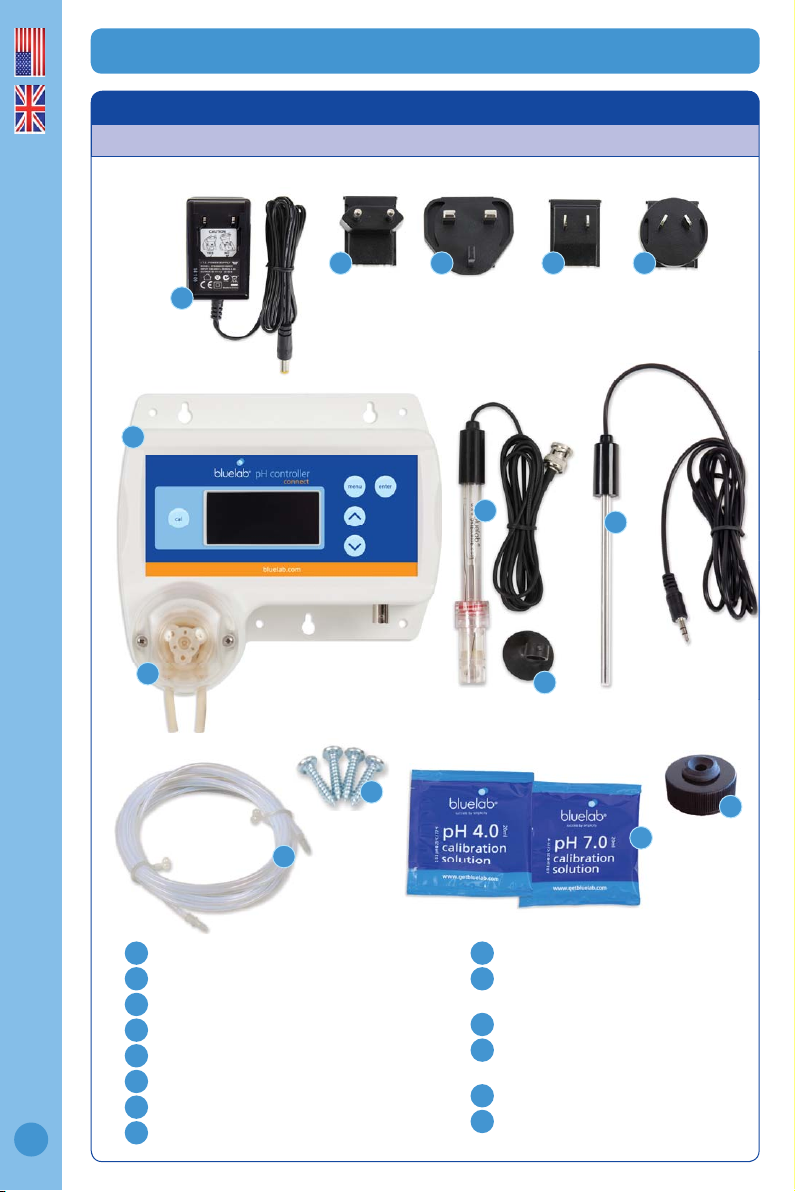
1.0 What’s in the box?
Please verify the box contents from the information below.
English
6 7 8 9
5
1
2
14
11
10
1
Bluelab pH Controller Connect
2
Bluelab pH Probe with storage cap
3
Bluelab Temperature Probe
4
Bluelab pH Probe holder with suction cup
5
24V DC 0.4Amp power supply
6
Europe plug adaptor
7
UK plug adaptor
8
4
North American plug adaptor
9
10
resistant dosing tube with connectors
11
12
calibration solution sachets
13
14
4
NZ / Australia plug adaptor
13 foot (4 meter) Acid/Alkali
4 x mounting fasteners
20ml pH 7.0 and pH 4.0 single-use
Inlet tube cap for pH stock solution
Replaceable peristaltic pump with cover
3
13
12
Page 5
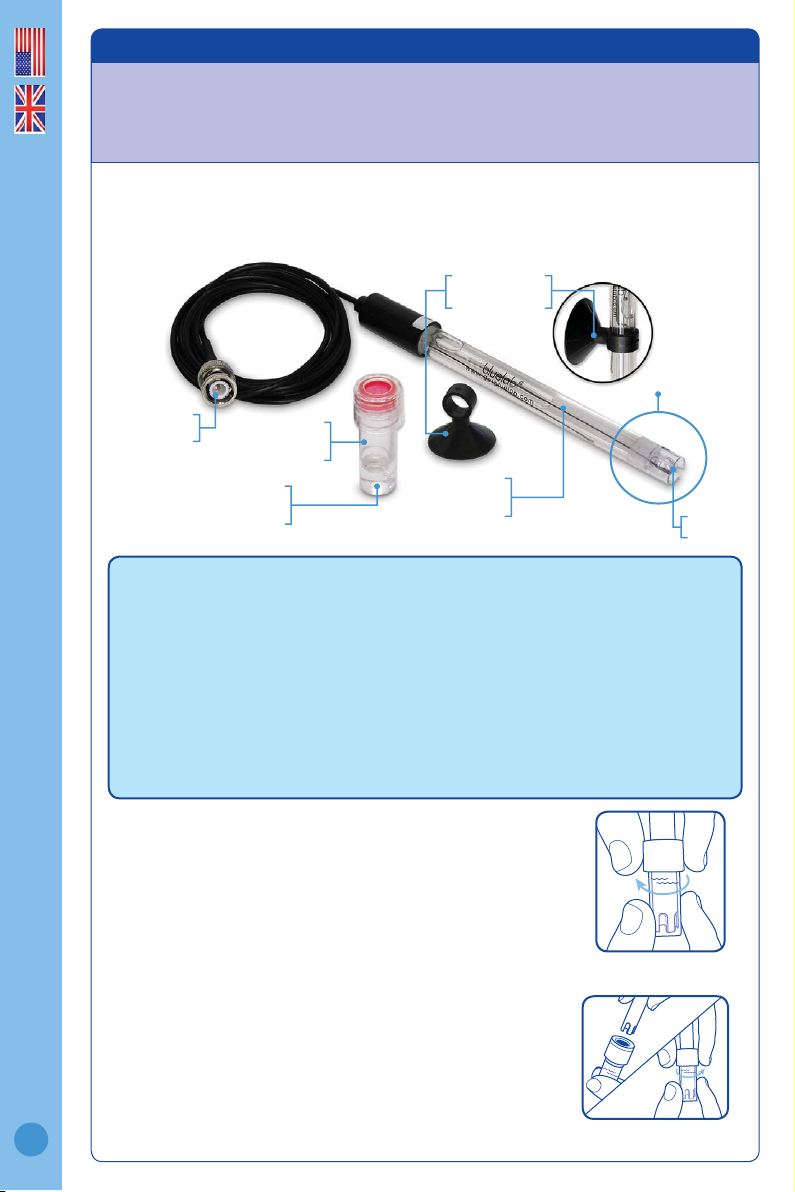
2.0 IMPORTANT - Bluelab pH Probe care
pH probes DO NOT last forever. They age through normal use and will eventually fail.
The life time of a pH probe depends on the environment it is used in and the way
that it is treated. To receive a long life from your Bluelab pH Probe, please ensure you
follow the guide below.
English
pH probes contain glass and are therefore FRAGILE. With good care, they will
give a long service life.
Bluelab pH Probe
pH probe holder
suction cup
BNC connector
pH probe
storage cap
pH probe tip
pH probe KCl
storage solution
Glass tube inside
plastic barrel
Glass bulb
DO NOT let the pH probe tip dry. IF IT DRIES IT DIES!
DO NOT bend the probe; this will break its internal glass tube.
DO NOT knock the probe; this will break its internal glass tube or external glass bulb.
DO NOT plunge a cold pH probe into a hot liquid, or a hot probe into cold liquid. Sudden
temperature changes can crack the glass and permanently damage the probe.
DO NOT immerse in oils, proteins or suspended solids that will leave a coating on the glass bulb.
DO NOT ‘kink’ or bend the lead sharply.
DO NOT attempt to lengthen the lead on the pH probe.
DO NOT wet the BNC connector at the end of the lead.
Always remove pH probe storage cap before use
1. Grip the top of the cap and gently twist the base one rotation
clockwise to loosen slightly.
2. Next slowly slide the cap off the pH probe. DO NOT completely
remove the base of the cap from the top of the cap.
3. Store the storage cap in a safe place.
Storing the pH probe
When storing the pH probe, the pH probe tip must be kept moist.
To prepare the pH probe for storage, add enough Bluelab pH Probe KCl Storage
Solution to the storage cap so the probe tip is covered. Then replace the cap
and store in a secure place. DO NOT use RO (Reverse Osmosis), Distilled or
De-ionized water. Pure water changes the chemistry in the reference, causing
the probe to die.
Removing pH probe
storage cap
If the pH probe has been accidentally allowed to dry out;
The pH probe must be ‘hydrated’ for 24 hours in KCl storage solution (never use
5
RO, Distilled or De-ionized water). Following this; carry out a calibration to check if
the probe has already suffered permanent damage.
Ensure probe tip is covered by
the KCl storage solution in cap
Page 6
English
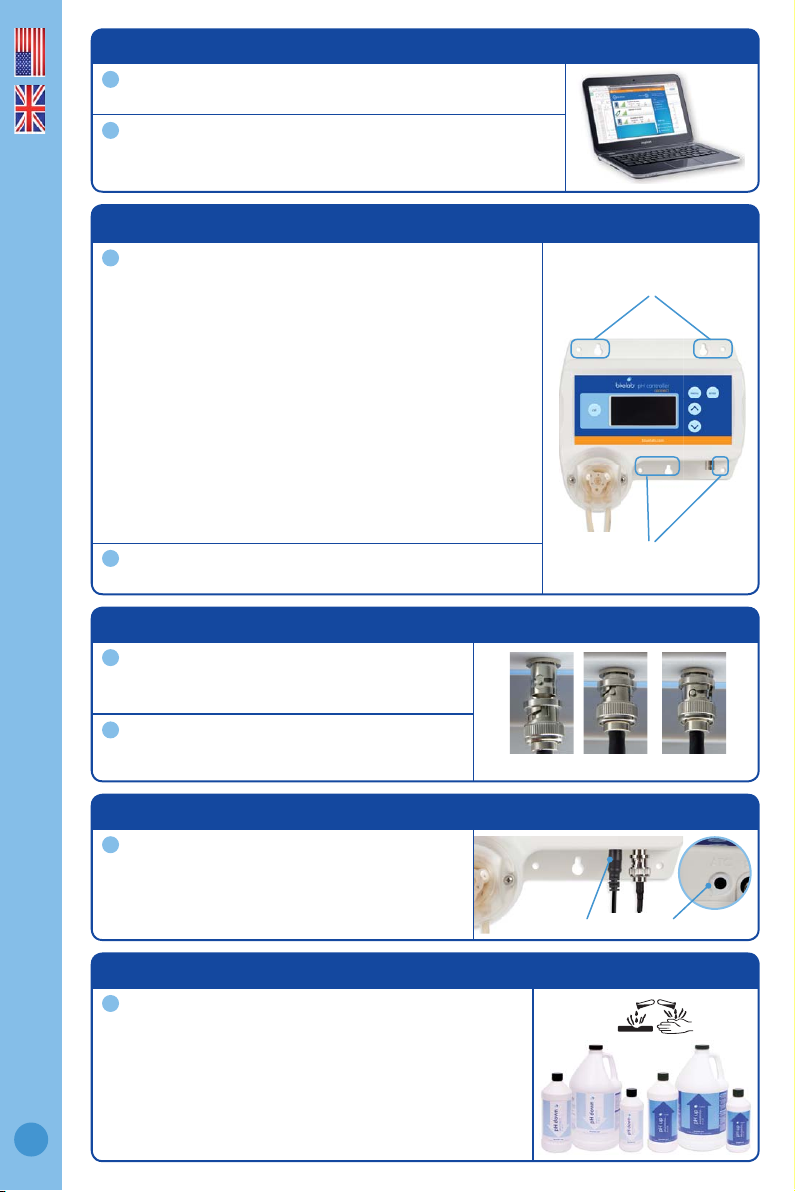
6.0 Connect the Bluelab Temperature Probe
Insert the temperature probe connector to
the base of the pH controller connect where
‘ATC’ is labelled. Ensure the connector is fully
inserted.
4.0 Installing the pH controller connect
Select a suitable location that is:
• Less than 5.65 feet / 2 meters from your reservoir.
The probes must be immersed in solution at all times.
• Less than 4.9 feet / 1.5 meters from an electrical
mains outlet.
• Less than 5.56 feet / 2 meters from pH Up or Down
solution. The inlet tube must reach the bottom of the
container.
• At a suitable height to see the display and for easy
operation (recommend slightly below eye level
when standing).
NOTE: Avoid placing the pH controller connect where
it can be damaged by direct sunlight, water, nutrient
salts or pH adjuster.
Fix the fasteners through the desired mounting holes in
the top and bottom of the case.
5.0 Connect the Bluelab pH Probe
Connect the pH probe to the pH controller
connect by lining up the lugs of the BNC
fi ttings.
Fasten securely by pushing the pH probe
connector on and twisting one quarter turn.
3.0 Set up the Bluelab Connect So ware
Note the 4 character KEY CODE on the rear of the Bluelab
pH Controller Connect.
Follow instructions in the Bluelab Connect Stick ‘Getting
Started’ guide to install the connect stick and connect
software. Add the pH controller connect to the software.
7.0 SAFETY - Handling pH up and down solutions
Bluelab pH Up or pH Down Solutions are available
in North America. They can be used undiluted
with the pH controller connect. Always follow the
manufacturer’s instructions for use and handling.
CAUTION: Wear eye protection and gloves when handling
this product. Harmful if swallowed. Keep out of the reach
of children. Store under cool and dry conditions. Not for
food, drug or household use. Read MSDS before use.
1
2
1
Mounting holes at top
2
1
2
Inserting Twisting Attached
6
1
1
Mounting holes at bottom
temperature probe connection
Page 7

9.0 Set up outlet dosing tube
Insert the remaining dosing tube with
connector into the RIGHT peristaltic pump
tube. This is the ‘outlet dosing tube’.
Cut the outlet dosing tube so that the tube
sits above the maximum solution level of the
reservoir/tank. The pH stock solution must
drip into the nutrient reservoir/tank.
Note: If the outlet dosing tube is immersed
in reservoir/tank solution, it could create
a syphon. This would cause the pH stock
solution to overfl ow.
8.0 Set up inlet dosing tube
To straighten tube:
Bend tube in the opposite direction and
straighten by running through closed fi ngers.
Insert one end of the dosing tube with
connector into the LEFT peristaltic pump tube.
This is the ‘inlet dosing tube’.
Ensure the inlet dosing tube will reach the
bottom of the pH stock solution container.
There also needs to be enough tube left for the
outlet dosing tube to go into the reservoir/tank.
Cut the inlet dosing tube to the desired length.
Use inlet tube cap supplied to place on
Bluelab Up or Down 500ml or 1 Liter bottles.
This will hold the tube in position. Insert the
inlet dosing tube through the hole in the cap
and pierce the induction seal on the bottle.
1
English
2
3
1
Inlet ‘’
arrow on
pump cover
Left pump
tube
Connector
Inlet dosing
tube
pH stock
solution
Inlet tube cap
Dosing tube reaches
bottom of container
Outlet ‘’ arrow
on pump cover
Right pump tube
Connector
2
7
Inlet dosing
tube
pH stock
solution
Outlet dosing
tube
Nutrient solution
reservoir / tank
Page 8

11.0 Display menu and buttons
One press of the ‘menu’ button will take you into the
menu. To exit the menu, press ‘menu’ again. Changes
will not be saved.
The ‘’ (up arrow) button allows you to move up the
menu items or increase a value shown.
The ‘’ (down arrow) button allows you to move down
the menu items or decrease a value shown.
The ‘enter’ button allows you to select the desired option
shown on the display, or save a chosen value.
The ‘cal’ button is used to calibrate your pH probe. A
long press enters the calibration sequence.
The following symbols, numbers or characters will show on the display to indicate:
To use the ‘Auto-repeat’ feature: Press and hold the ‘’
(up arrow) or ‘’ (down arrow) button to scroll through
options. Release when you see the desired option or
value on the screen.
10.0 Connect power adaptor
Select and connect the appropriate mains plug
adaptor for your country to the power supply unit.
Connect the power adaptor into the base of the
pH controller connect where ‘PWR’ is labelled.
Plug the adaptor into mains power supply.
Switch on power adaptor at the mains. The pH
controller connect will complete a display test
sequence.
The default setting, when the unit is fi rst
powered up, is ‘monitoring’ mode.
Note: pH calibration must be completed before
the fi rst use, see section 14.0.
1
2
English
3
4
1
connect
power
adaptor
2
3
4
5
6
Alarm is on
pH control
direction up OR down
Reading display
8
7
pH controller status, menu options
or instructions
Succesful pH
calibration
indicators
Automatic
Temperature
Compensation if
Temperature Probe
is connected
Page 9

English
12.0 Factory settings
The pH controller connect is set to the following values by default:
Note: ‘Pump runtime’ [HH:MM:SS] is the time the pump has dosed for. ‘Product
runtime’ [Hrs] is the duration of time the pH controller connect has been in use for.
Pump runtime and product runtime are never reset, even after pump replacement.
To restore the pH controller connect to the above factory settings at any stage:
• Disconnect the power
• Press and hold the ‘cal’ button then reconnect the power.
• When ‘Restored Factory Defaults’ is displayed on the screen, release the ‘cal
button’.
13.0 Change the display language
Press ‘menu’. Press ‘’ to fi nd language. Press
‘enter’ to select.
Press ‘’ or ‘’ to fi nd the required language.
Press ‘enter’ to save the language selection.
Press ‘menu’ to exit the menu.
1
• Mode Monitor
• Set pH 5.8
• Alarm On
• HighAlarm 6.5
• LowAlarm 5.6
• Dose Up/Dn Down/Acid
• OnTime 1Sec
2
• OffTime 10Min
• Backlight 100% On
• Contrast 16
• 2/3pt Cal 2
• EarthLink Off
• Language eng
• pH Calibration none
1
2
3
9
Page 10

14.0 pH calibration
pH calibration is important before fi rst use. It ensures pH measurements and/or
pH stock solution dosing is accurate. The Bluelab Temperature Probe DOES NOT
require calibration.
For accurate pH readings the pH probe is cleaned and recalibrated when:
• It has been 30 days since the last pH calibration, and the successful calibration
indicators are not showing.
• The reading is different to what you were expecting.
• The pH controller connect is reset to factory default.
• The pH probe is replaced with a new one.
If the pH probe has been in use it must be cleaned before pH calibration. See pH probe
cleaning in section 26.0. New pH probes do not need to be cleaned.
For best pH calibration
pH reading accuracy is dependant on the accuracy and age of the calibration
solutions used, and use and cleanliness of the pH probe tip.
• Ensure the pH probe has been cleaned and rinse with clean water between
calibration solutions to reduce contamination of the pH solutions.
• Only fresh uncontaminated solutions should be used.
• Calibrate the pH at the same temperature as the solution to be measured.
• ALWAYS calibrate the pH probe with pH 7.0 then to pH 4.0 and/or pH 10.0.
• Place the temperature probe into the calibration solution with the pH probe during
calibration.
The pH calibration involves cleaning the pH probe tip and then calibrating in TWO or
THREE SOLUTIONS.
If you are calibrating to TWO solutions, remember:
If a reading below pH 7.0 is expected, use pH 7.0 and pH 4.0 calibration solutions.
If a reading above pH 7.0 is expected, use pH 7.0 and pH 10.0 calibration solutions.
You would require calibration in THREE solutions if:
Readings above and below pH 7.0 are expected, use pH 7.0, pH 4.0 then pH 10.0
calibration solutions. You will need to enable 3 point calibration in the settings menu.
Follow the steps on the next page for pH calibration.
Storage and use of calibration solutions
• Always place the lid back onto the bottle after use or
evaporation will occur rendering the solution useless.
• DO NOT measure directly into the bottle. Tip a small
amount into a clean container and discard after use.
• Never add water to solutions.
• Store in a cool place.
English
10
Page 11

14.0 pH calibration cont.
To calibrate the pH
Clean pH probe tip.
See section 26.0 (the pH probe does not
require cleaning before the fi rst use).
The calibration default is set at two point
calibration. If a three point calibration is
required:
a) Press ‘menu’.
b) Press ‘’ to fi nd ‘2/3 point cal’. Press ‘enter’.
c) Press ‘’ to select ‘3’. Press ‘enter’. When
‘saved’ is displayed on screen, three point
calibration is now available.
In separate plastic containers, prepare a
small amount of: fresh tap water, pH 7.0, pH
4.0 and/or pH 10.0 calibration solutions.
pH 7.0 calibration
a) Ensure the pH controller connect is plugged in.
b) Press and hold ‘cal’ for three seconds. ‘pH 7
Calibrate’ will be displayed.
c) Place the clean pH probe tip in the pH 7.0
calibration solution. Press ‘cal’.
d) Calibration is complete when all the ‘’s
on the screen become solid. The screen
will display ‘OK’ and the ‘pH 7’ indicator
will appear to indicate successful pH 7.0
calibration.
e) Now you can calibrate to pH 4.0 and/or pH
10.0
pH 4.0 and/or pH 10.0 calibration
a) Rinse the probe tip in fresh tap water,
shake off excess water. Place the clean
pH probe tip in either pH 4.0 or pH 10.0
calibration solution. Press ‘cal’.
b) Calibration is complete when all the ‘’s
on the screen become solid. The screen
will display ‘OK’ and the ‘pH 4’ or ‘pH 10’
indicator will appear to indicate successful pH
calibration.
c) If you require three point calibration, repeat
‘5a’ and ‘5b’ using the pH 4.0 or pH 10.0,
whichever solution was not used.
d) The pH controller connect is now
calibrated, and ready for use.
After pH calibration, the pH controller
connect reverts to ‘Monitor’ mode.
Change to ‘Control’ mode if required.
NOTE: If ‘Failed <e>’ is displayed on the screen during
calibration, see section 27.0 Troubleshooting.
1
English
2
3
4
5
6
11
clean the pH probe
pH 7.0
calibration
solution
successful pH 7 calibration
ready for pH 4 or pH 10 calibration
rinse in tap water
pH 4.0 or
pH 10.0
calibration
solution
successful
pH 7 and pH 4
calibration
pH 7, 4 and pH 10
press cal button
press cal button
successful
calibration
Page 12

English
15.0 Placement of the probes
The tip of the Bluelab pH Probe must be submerged in the liquid for a measurement to
occur. It is optional to use the Bluelab Temperature Probe, but required for automatic
temperature compensation (ATC) to occur, or to enable ‘Earthlink’.
• Do not pour concentrated nutrient solution or pH adjuster directly onto probes when
in the reservoir. Strong acids, alkali and nutrients damage the probes, trigger the
alarms (if on), cause the pump to accidentally dose or stop dosing, or interfer with
the control program.
• For accuracy, ensure the probes are in an area where the reservoir/tank solution is
well mixed.
• pH and temperature probes can be fully submerged in the solution.
Fit the (optional) pH probe holder to the stem of the
pH probe using a gentle twisting motion.
Place the pH probe into the reservoir/tank and push
the suction cup onto the side of the reservoir but far
enough down so the pH probe tip is always in the
solution. This prevents damage to the probe from any
movement in the reservoir/tank.
Place the temperature probe alongside the pH probe.
16.0 Set the required pH
Press ‘menu’.
Press ‘’ to fi nd ‘Set pH’. Press ‘enter’ to
select.
Press ‘’ or ‘’ until the required pH is shown
in the main display. Press ‘enter’ to save the
value.
Note: If you have already set high and low
alarm values, you may see the values change
depending on the pH value being set.
17.0 Set the dosing direction - for pH up or down solution
Press ‘menu’.
Press ‘’ to fi nd ‘Dose Up/Dn’. Press the enter
button to select.
Press ‘’ or ‘’ to select the dosing direction
that matches the pH stock solution being
used in the system. Press ‘enter’ to save.
Note: Select ‘Dn/Acid’ for acid (pH down
solution). Select ‘Up/Alkali’ for alkali (pH up
solution).
1
2
3
1
2
12
3
1
2
3
Page 13

18.0 Set the dosing OnTime and O Time
A dosing cycle includes the OnTime and the OffTime that the peristaltic pump
doses the system for. The arrow symbol on the display will fl ash during the dose
cycle. Adjustments for OnTime and OffTime will be required so that three dosing
cycles only change the pH value by 0.1 pH.
• ‘OnTime’ is the length of time the peristaltic pump will dose for. The ‘OnTime’
can be set from 1 to 60 seconds.
• ‘OffTime’ is the delay time between each dose. This gives the system time to
mix the pH stock solution thoroughly, so the pH controller connect can measure
the changes being made before needing to dose again. The ‘OffTime’ can be set
from 1 to 60 minutes.
• Start with a long ‘OffTime’ and adjust back as you go. The more thorough the
mixing in the tank, the shorter the ‘OffTime’ can be.
To set the OnTime value:
Press ‘menu’.
Press ‘’ to fi nd ‘OnTime’. Press ‘enter’.
Press ‘’ or ‘’ to select the dosing on time in
seconds. Press ‘enter’ to save.
To set the OffTime value:
Press ‘’ to fi nd ‘OffTime’. Press ‘enter’.
Press ‘’ or ‘’ to select the dosing off time in
minutes. Press ‘enter’ to save.
English
1
2
3
1
2
13
Page 14

English
19.0 Set alarms (optional)
The alarm function alerts you when the solution deviates too far from the desired pH.
When an alarm condition is present, the pH value and the alarm symbol will fl ash on
the screen. This is an ‘alarm lockout’ state. All dosing will stop.
If the measurement changes back to within the limits you have chosen, the
fl ashing will stop and dosing will start.
To set the ‘High Alarm’ value:
Press ‘menu’.
Press ‘’ to select ‘Alarm High’. Press ‘enter’.
Press ‘’ or ‘’ to select the desired value.
Press ‘enter’ to save.
To set the ‘Low Alarm’ value:
Press ‘’ to select ‘Alarm Low’. Press ‘enter’.
Press ‘’ or ‘’ to select the desired value.
Press ‘enter’ to save.
To turn on the alarm:
Press ‘’ to fi nd ‘Alarm’. Press ‘enter’.
Press ‘’ or ‘’ to select ’On’. Press ‘enter’ to
save the value and turn on the alarm. Press
‘menu’ to exit back to the main display.
20.0 View current settings / status
Use this option to view your programmed settings at any time.
Press ‘’ or ‘’ while in ‘monitor’ or ‘control’
mode. The setting for each value is displayed
at the bottom of the screen.
The display will revert to displaying ‘Required
pH’ if no button is pressed after 1 minute.
1
2
3
1
2
1
2
1
2
14
Page 15

English
21.0 Priming the pump / manual dosing
‘Pump Ovrde’ allows you to fi ll the inlet and outlet tubes with dosing solution before
fi rst use (removing any air in the tubes), and to manually dose the tank if required.
Always ensure the inlet dosing tube reaches to the bottom of the pH stock solution
container. Ensure the outlet dosing tube is above the highest water line so that pH
stock solution drips into the tank/reservoir.
NOTE: If priming the pump, temporarily move the outlet dosing tube so it runs into the
pH stock solution container (if not already fi xed in place). This will avoid adding pH stock
solution to your tank/reservoir unintentionally.
Press ‘menu’.
Press ‘’ to fi nd ‘Pump Ovrde’. Press ‘enter’ to select.
Press ‘’ to manually operate the pump. Release
the button to stop the pump when you see the stock
solution begins to drip from the outlet dosing tube
into the tank. Press ‘menu’ to exit.
If the outlet dosing tube was temporarily moved in step 1,
place it back, so pH solution will drip into the tank/reservoir.
CHANGING STOCK SOLUTION: If you are changing from pH Up to pH Down, or vice versa, you
MUST fl ush the dosing tube with water FIRST to avoid a chemical reaction in the tube.
22.0 Set the mode
Use ‘mode’ to select the pH controller connect function. ‘Monitor’ mode shows the
current solution pH reading. It is the factory default setting. ‘Control’ mode allows the
controller to dose pH stock solution to the set values. Dosing will NOT occur when:
• The pH controller connect is in ‘monitor’ mode
• The pH controller connect is in an alarm state
• If the pH controller connect senses dosing is not having an effect on the system
(after 15 dose cycles)
• The solution temperature is above 50 °C / 122 °F, or below 0 °C / 32 °F
To set ‘monitor’ mode:
Press ‘menu’.
Press ‘’ to select ‘Mode’. Press ‘enter’.
Press ‘’ or ‘’ to select ‘monitor’, then press
‘enter’ to save the mode. Press ‘menu’ to exit.
To set ‘control’ mode:
Press ‘menu’.
Press ‘’ to select ‘Mode’. Press ‘enter’.
Press ‘’ or ‘’ to select ‘control’, then press
‘enter’ to save the mode. Press ‘menu’ to exit.
The display will show a countdown before the pump
can start. This is the ‘Pump start delay’, which is set
to these times: 15Sec when exiting the menu with
control mode enabled; 60Sec if power off/on occurs.
1
2
3
15
1
2
3
1
2
3
Page 16

English
24.0 Using the connect so ware
Once the pH controller connect is set up and added to the connect software you can now
data log and adjust your settings from your PC.
For the latest features and help, refer to the Bluelab Connect Software page online at
www.bluelab.com
Data log to a local PC.
Adjust control settings from a local PC.
Option to view data and status from a remote device
via the cloud with Google Docs™. Internet connection
required for data logging to the cloud.
23.0 Change the screen backlight and/or contrast
These can be adjusted to best suit the light levels of the environment the pH
controller connect is being used in.
Backlight can be set at 0%, 25%, 50%, 75% or 100%.
Contrast can be set between 0 and 30.
To change the screen backlight:
Press ‘menu’.
Press ‘’ to fi nd ‘Backlight’. Press ‘enter’.
Press ‘’ or ‘’ to select the desired value.
Press ‘enter’ to save, then ‘menu’ to exit back
to the main display.
To change the screen contrast:
Press ‘menu’.
Press ‘’ to fi nd ‘Contrast’. Press ‘enter’.
Press ‘’ or ‘’ to select the desired value.
Press ‘enter’ to save. Press ‘menu’ to exit.
1
2
3
1
2
3
1
2
3
16
Page 17

English
26.0 Cleaning the Bluelab pH Probe
To ensure accurate readings the pH probe tip needs to be rinsed in water and cleaned
prior to calibration using the following instructions. After cleaning, use the probe
straight away, or place the storage cap on the probe tip. Always ensure the cap
contains enough Bluelab pH Probe KCl Storage Solution to cover the probe tip.
Remove storage cap from pH probe.
Hold the top of the storage cap, twist the cap to
loosen then remove.
Rinse pH probe tip under fresh tap water.
Fill a small plastic container with clean tap
water. Add a small amount of Bluelab pH Probe
Cleaner or mild detergent (dishwashing liquid).
Gently stir the probe tip in the mixture.
Ensure that you do not ‘knock’ the pH probe
on the side of the container as this may cause
damage to the probe. Rinse well under fresh
running water to remove all traces of the
detergent mixture.
If the probe tip requires removal of heavy
contamination: Gently brush around the
glassware with a few drops of Bluelab pH Probe
Cleaner or mild detergent (dishwashing liquid)
and a soft toothbrush.
Rinse well under fresh running tap water to
remove all traces of the detergent mixture.
Calibrate pH probe after cleaning, see section
14.0. After calibration use straight away or
store pH probe in the storage cap, ensuring KCl
Storage Solution covers the probe tip.
25.0 Hydrating the pH probe
Hydrate the pH probe in Bluelab pH Probe KCl Storage Solution when:
• the probe tip has not always been stored in KCl storage solution, to improve the
reading response speed.
• the probe tip has been accidentally allowed to dry out.
Never store the pH probe in RO (Reverse Osmosis), De-ionized or Distilled water. Pure water changes the chemistry
in the reference, causing the probe to die.
Clean the pH probe tip. Ensure the probe tip is cleaned
before hydrating. See section 26.0 for instructions.
Add enough Bluelab pH Probe KCl Storage Solution to a
plastic container to submerge the pH probe tip.
Loosen, then remove the storage cap (if required). Place
the pH probe upright in a the KCl solution.
Leave to soak for up to 24 hours. After hydration, always
calibrate the pH probe to ensure accuracy, see section 14.0.
1
2
Bluelab pH
3
4
Probe KCl
Storage
Solution
1
2
3
4
17
5
6
7
1
3
5
6
2
4
7
Page 18

27.0 Troubleshooting guide
Trouble Reason Correction
Device doesn’t add
to connect software
Device authentication code incorrect.
Enter correct 4 charactor key code on rear of
product into software.
Weak signal and/or device is outside
connect stick range.
Move device closer to stick. Also refer to positioning
your devices document on www.bluelab.com
Device doesn’t
reconnect when I
move it to its location
Device outside connect stick range.
Move device closer to stick. Also refer to positioning
your devices document on www.bluelab.com
Device loses
connection when
it’s signal strength
is good
Device may be connected through
another device, if the closest device
drops out all connected devices also
drop out.
Increase the signal strength of the device
connected to the stick.
pH reading
inaccurate
pH probe not plugged in. Connect pH probe. Check pH probe connection.
Using factory default calibration. Calibrate pH probe.
Contaminated pH probe / glassware
not clean.
Clean pH probe, then calibrate.
Calibration old. Calibrate pH probe.
Broken glass bulb, tube or connector. Replace pH probe.
pH probe damaged or old. Replace pH probe.
Bad grounding (noisy/jumpy pH
readings).
Earthlink required. Attach temperature probe. Go
to Menu, turn Earthlink on.
Display shows
‘Failed <e>’
during calibration
Old or contaminated solutions used for
calibration.
Use fresh calibration solutions.
Dirty or contaminated pH probe. Clean pH probe.
pH probe tip been allowed to dry. Hydrate pH probe.
pH probe damaged or old. Replace pH probe.
No display
Mains not switched on. Switch mains power on.
Power adaptor not plugged in. Plug power adaptor into the socket marked ‘PWR’.
Mains on, power adaptor plugged in. Replace power adaptor.
No display after
initial LCD test, when
plugged in
Backlight set to minimum.
Increase Backlight setting in MENU, or hold <cal>
button down while applying power, to restore
Factory Defaults.
pH displays
‘or’, ‘ur’, ‘-.-‘
‘or’ Over range pH.
‘ur’ Under range pH.
Check pH probe connection. pH probe could be
faulty. Clean pH probe, then calibrate.
‘-.-’ Temperature over/under range.
Solution <0°C / 32°F or >51°C / 122°F. Check
solution temperature. Ensure temperature probe
plug is fully inserted.
Temperature
displays
‘or’, ‘ur’, ‘- -‘
‘or’ Over range temperature.
‘ur’ Under range temperature.
‘- -’ Temperature probe not connected.
Solution >51 °C / 122 °F.
Solution <0 °C / 32 °F.
Ensure temperature probe plug is fully inserted.
Temperature probe is faulty, replace.
pH symbols fl ashing
It has been more than a month since
last pH calibration.
Clean pH probe, then calibrate.
‘HELP’ fl ashing
[Ineffective control
detected]
Dosing solution container empty. Refi ll dosing solution container.
Dose direction setting incorrect for
your system.
Ensure setting refl ects dosing solution in use. i.e.
For Acid select Down.
Dose on/off times incorrect.
See section 18.0 for setting Dose On/Off times
correctly.
Output from tube not dripping into
solution.
Ensure tube output drips into tank.
Solution is not mixing.
Ensure pH correction solution is being mixed in
tank.
pH probe not seeing pH changes, after
dosing
Ensure pH probe is in tank/reservoir solution
with adequate mixing.
English
18
Page 19

28.0 Frequently asked questions
Question Answer
Why is the ‘’ or ‘’
fl ashing but the pump
is not turning?
The ‘’ or ‘’ will fl ash when ever the pH controller connect is in a dose
cycle. This includes the ‘OnTime’ and ‘OffTime’. The pump does not turn
during the ‘OffTime’.
What are dosing
lockouts?
A feature that stops the pH controller connect from dosing if:
• The temperature probe measures a solution temperature of less
than 0 °C / 32 °F or more than 50 °C / 122 °F.
• The pH reading does not change after 15 dose cycles.
Do I need to use the
temperature probe
with ATC for pH?
You can omit use of the ATC probe if:-
1) You do not use EarthLink On setting to stabilise the pH value
2) Your solution temperature is stable and you calibrate the pH probe
in calibration solutions at the same temperature as the reservoir /
tank solution.
3) Your pH is close to 7.0 pH
Why should I use
earthlink?
To remove/reduce any “mains earthloop” issues affecting the pH value’s
stability.
How do I use Earthlink?
Ensure the ATC probe is installed and in the same solution as the pH
probe.
Press ‘’ to view status of pH mV value behaviour. Change the Earthlink
setting in MENU and watch the pH mV value again.
Select the Earthlink option that gives the least pH mV noise/variation.
If neither option improves pH stability:
1) Calibrate pH probe, see section 14.0.
2) Suspect Mains electrical problems. Obtain Electrician assistance.
How do I determine
the best Dose OnTime/
OffTime values?
Adjust OnTime such that 3 to 5 doses shifts the pH by only 0.1pH.
If <= 2 doses moves pH more than 0.1pH, you risk overdosing. (pH
changes past Required Value).
If it takes >=5 doses you will have a slow response to any changes. You
may also get “HELP” displayed if pH hasn’t moved enough if 15 dose
cycles.
If < 3 doses at 1 sec OnTime shifts the pH more than 0.1pH, you will need
to dilute the dosing solution to a lower concentration.
Adjust OffTime such that the last dose is fully mixed before the next
dose cycle starts.
If OffTime is too short, you risk overdosing (pH changes past Required
Value).
If OffTime is too long, correction to pH changes will take longer than
necessary.
How do I reset the pH
controller connect to
“as Shipped Defaults”?
Hold <cal> button down and apply power. Release button when “Restored
Factory Defaults” appears on screen.
How do I reset
pH calibration to
“Defaults”?
You shouldn’t need to. The pH probe can be calibrated anytime to the pH
controller connect. Follow the calibration steps in section 14.0.
English
19
Page 20

29.0 Technical speci cations
pH
Control parameter
pH - user selectable single direction
(up or down)
Control range
0.1 – 13.9 pH
Dose rate
10 ml per minute
Resolution
0.1 pH
Accuracy at 25°C/77°F
±0.1 pH
Calibration
Two or three point
(pH 7.0 and pH 4.0, and/or pH 10.0)
Temperature compensation
Yes
(if temperature probe is in the
same solution as pH probe)
Operating environment
0 - 50°C / 32 - 122°F
Signal range
Indoor / Urban: Up to 66 feet / 20 meters
Outdoor / RF line-of-sight:
Up to164 feet / 50 meters
Frequency band
2.4 GHz ISM
System Requirements
Microsoft Windows XP or greater for Bluelab
Connect Software. *Internet connection
required for data logging to the cloud
Certifi cations
CE, FCC, IC.
Contains Model XBEE2 Radio, IC:
4214A-XBEE2, FCC ID: OUR-XBEE2
Power source
Input: 100-240 Vac, 50-60 Hz, 5 VA,
4 interchangeable plug types
(USA, Euro, UK, NZ/AUS)
Output: 24VDC 0.4Amp
Screen display languages
English, Deutsch, Español,
Français, Nederlands
English
20
Page 21

Bluelab pH Up and pH Down Solutions
Optimum growth needs optimum pH. And we make optimum simple.
If your pH isn’t in the right range – and that’s 5.5-6.5 for most
plant varieties – your nutrients are likely wasted.
We say that’s a problem you don’t need. At Bluelab, we want our customers
to have optimum growth and the best plants possible. So we’ve made it
English
easy to raise or lower pH levels, whenever you need, and keep them just
where they should be.
Bluelab’s pH Up and pH Down are formulated to the highest standards.
Just add what’s required to lift or reduce growing solution acidity. Your
plants will thank you for it. The main thing is, you’ll see the difference in
your harvest. Optimum inputs. Optimum results. Simple.
Available in:
› Bluelab pH Up 500ml
› Bluelab pH Up 1 Liter
› Bluelab pH Up 1 Gallon
Bluelab pH Probe replacement
pH probes do not last forever.
They age through normal use and will
eventually fail.
To ensure you receive a long life from your pH
probe, please read the instructions provided with it.
When the time comes to replace your Bluelab pH Probe
all you have to do is order a replacement from your supplier!
› Bluelab pH Down 500ml
› Bluelab pH Down 1 Liter
› Bluelab pH Down 1 Gallon
21
Bluelab Probe Care Kits
The instrument is only as accurate as the probe is clean!
Probe cleaning is one of the most important parts of owning and operating any
Bluelab meter, monitor or controller.
If the probe is contaminated (dirty) it affects the accuracy of the reading displayed.
Bluelab Probe Care Kit range is available for:
• pH probe care
• pH & conductivity probe care
• Conductivity probe care
All the tools you need are included in each kit.
To re-stock your care kit, choose from the
Bluelab Solutions range.
Bluelab Probe Care Kit - pH contains:
› Probe care instructions
› 3 x plastic cups
› 20ml single-use Bluelab Solution
Sachets, 2 each of: pH 7.0 & pH 4.0, KCl
› Bluelab pH Probe Cleaner
› Toothbrush (pH probe cleaning
instrument)
Page 22

Bluelab Connect Stick
The Bluelab Connect Stick receives wireless data from
one or more Bluelab connect devices.
Your data can then be logged to your local computer and/
or to the cloud.
You can add other Bluelab Connect devices to your Connect Software
at the click of a button.
English
Bluelab Connect Range Extender
A Bluelab Connect Range Extender boosts the data
signal strength.
Extend the wireless range by positioning a range extender
between your Bluelab Connect devices and your connect stick.
Using the Bluelab Connect Range Extender requires you to already have a
connect stick and one or more Bluelab Connect enabled devices.
Bluelab Peristaltic Pump
Replacement pump motor, cover and tubing for
Bluelab pH Controllers.
Quick and simple to replace when required.
All you have to do is order a replacement from your supplier!
22
Bluelab Acid/Alkali Resistant Dosing
Tube with Connectors
Replacement inlet/outlet tube - 13 foot / 4 meters.
For use with Bluelab pH Controllers and stock solution.
Dosing tube comes with connectors, so replacement is easy. Bluelab Dosing
Tube can be used with undiluted Bluelab pH Up or Bluelab pH Down.
Bluelab pH Probe KCl Storage Solution
The perfect solution to store and hydrate your Bluelab
pH products.
Bluelab pH Probe KCl Storage Solution is designed to increase response
time and maximize the life of Bluelab pH pens and pH probes.
For best results, use the KCl solution to store the pH pen/probe after use and
hydrate monthly. Instructions are on the label of the bottle.
Use Bluelab pH Probe KCl Storage Solution with:
› Bluelab pH Pen
› Bluelab Soil pH Pen
› Bluelab pH Probes
› Bluelab Soil pH Probes
Page 23

English
Bluelab pH Controller Connect limited product guarantee
Bluelab Corporation Limited guarantees the Bluelab pH Controller Connect for a
period of 2 years (24 months) from the date of sale to the original purchaser.
The Bluelab pH Probe is guaranteed for a period of 6 months.
Standard Terms and Conditions of the Bluelab Limited Product Guarantee:
How Long Does The Coverage Last? 1) The product guarantee becomes effective from the
date of purchase by the fi rst purchaser. Coverage terminates if you sell or otherwise transfer
the product; 2) The repair of your product under guarantee will not extend the period of the guarantee.
How Do You Get Service? 1) Products are to be returned to point of purchase; 2) Any parts replaced
will become the property of Bluelab Corporation Limited (“Bluelab”).
What is covered? Provided you supply proof of purchase via a store-printed receipt, we will repair or replace
your product if your product is found, within the guarantee period, to be defective due to defective materials or
workmanship existing at the time of purchase. If any part is no longer available or out of manufacture, Bluelab will
replace it with a functionally-equivalent replacement part.
What is not covered? Bluelab shall not be liable for costs of repair or replacement of a product incurred as a
result of: 1) Normal wear and tear; 2) Accidental damage, faults caused by negligent use or care, neglect, careless
operation or handling of the product which is not in accordance with the Bluelab Instruction Manuals; 3) Use of
parts not assembled or installed in accordance with the instructions of Bluelab; 4) Use of parts or accessories
other than those produced or recommended by Bluelab; 5) External sources such as transit damage or weather;
6) Repairs or alterations carried out by parties other than Bluelab or its authorised agents; 7) Serial numbers
defaced or missing.
TO THE MAXIMUM EXTENT PERMITTED BY LAW, THIS GUARANTEE AND THE REMEDIES SET FORTH ABOVE ARE
EXCLUSIVE AND IN LIEU OF ALL OTHER WARRANTIES, GUARANTEES AND REMEDIES, WHETHER ORAL OR WRITTEN,
EXPRESS OR IMPLIED. ANY IMPLIED WARRANTIES THAT MAY BE IMPOSED BY LAW (INCLUDING, WITHOUT LIMITATION,
MERCHANTABILITY) ARE LIMITED IN DURATION TO THE PERIOD OF THIS LIMITED GUARANTEE.
How Does State Law Relate to This Warranty? Some states do not allow limitations on how long an implied
warranty lasts, so the above limitation may not apply to you. Additionally, some states do not allow the exclusion or
limitation of incidental or consequential damages, so the above limitation or exclusion may not apply to you. This
guarantee gives you specifi c legal rights, and you may also have other rights, which vary from state to state.
Register your guarantee online at www.bluelab.com
Limitation of liability
Under no circumstances shall Bluelab Corporation Limited be liable for any claims, losses, costs
and damages of any nature whatsoever (including any consequential loss) that result from the
use of, or the inability to use, these instructions.
23
If you need assistance or advice - we’re here to help you.
North Am Ph: 909 599 1940 NZ Ph: +64 7 578 0849
Fax: +64 7 578 0847 Email: support@bluelab.com
Looking for specifi cations or technical advice?
Visit us online at www.bluelab.com
Bluelab Corporation Limited
8 Whiore Avenue, Tauriko Business Estate
Tauranga 3110, New Zealand
Instruction Manual English CONTPHCON_V01_021014
© Copyright 2014, all rights reserved, Bluelab Corporation Limited
North America Use: Not for use in a computer room as defi ned in the Standard
for the Protection of Information Technology Equipment, ANSI/NFPA 75
 Loading...