

Page 1

Care and use guide
In just one glance the
Bluelab Guardian Monitor
magically measures all
3 critical parameters for
successful growth:
pH, conductivity AND
temperature
Page 2
Contents
page page
English
Features 3
Bluelab Guardian Monitor 3
What’s in the box? 4
IMPORTANT - Bluelab pH
Probe care 5
Mounting the Bluelab Guardian
Monitor - if wall mounting 6
Mounting the Bluelab Guardian
Monitor - if mounting on a
support or bar 6
Install correct plug adaptor 6
Connect power adaptor
and Bluelab pH Probe 6
Power up 7
Select the desired
conductivity unit 7
Select the desired
temperature unit 7
Select the desired brightness
level of the LED displays 7
pH calibration 8
Placement of probes 10
Set alarms (optional) 11
Cleaning the conductivity/
temperature probe 13
Cleaning the pH probe 14
Hydrating the pH probe 14
Troubleshooting guide 15
Technical speci cations 16
Bluelab pH Probe replacement 17
Bluelab Probe Care 17
Product guarantee 18
Limitation of liability 18
Contact details 18
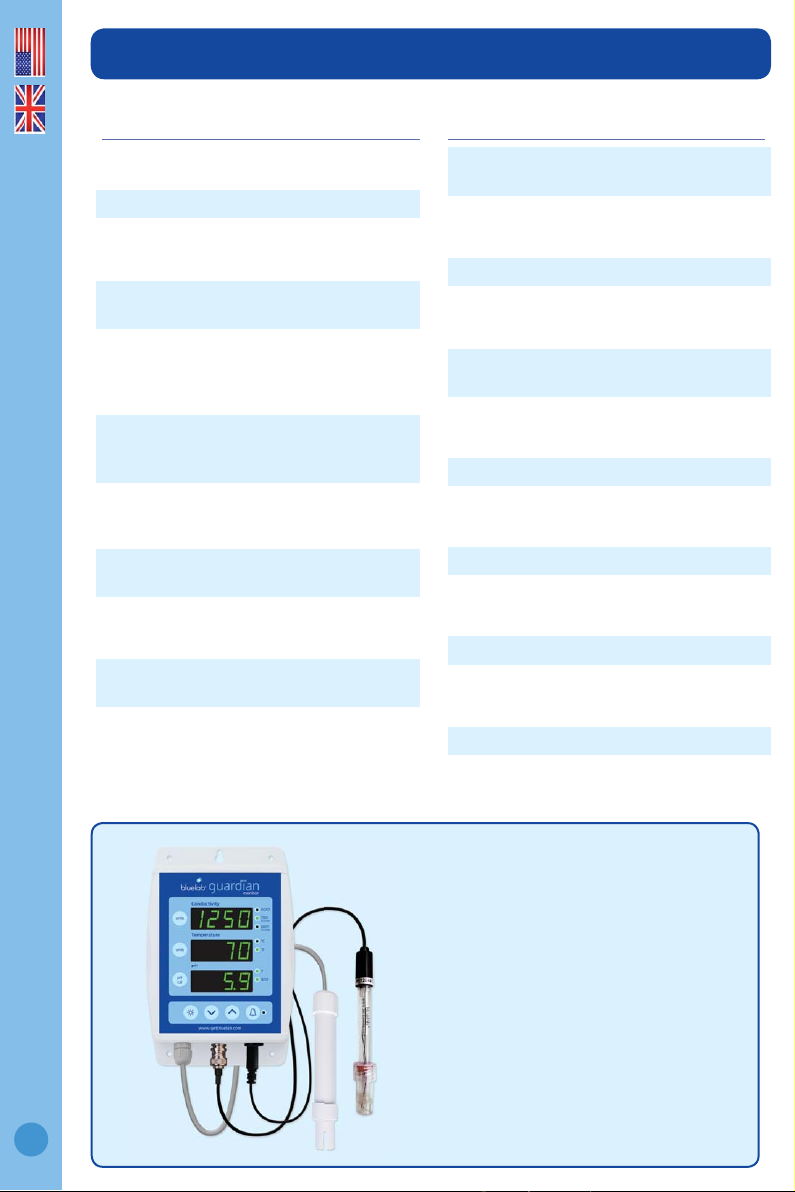
Congratulations on
purchasing the Bluelab
Guardian Monitor
The Bluelab Guardian Monitor is a
continuous indicator of the current
levels of EC, pH and temperature
of your nutrient solution, enabling
you to optimise these parameters
as your crop progresses through
each growing phase.
2
Page 3
English
Features
‘Plant Safe’ green LED display Visual alarm for both high and low settings
Large easy to read displays
Greater tolerance to RF/electronic
interference provided
No calibration required for conductivity
or temperature
Water resistant design
Selectable units for conductivity and
temperature
International power supply
Simple push button pH calibration Adjustable display brightness
Replaceable double junction pH probe
Settings retained when power lost
(non volatile memory)
What is Plant Safe? Green LED’s are safe for continued growth during a plant’s fruiting
stage when hours of darkness are required.
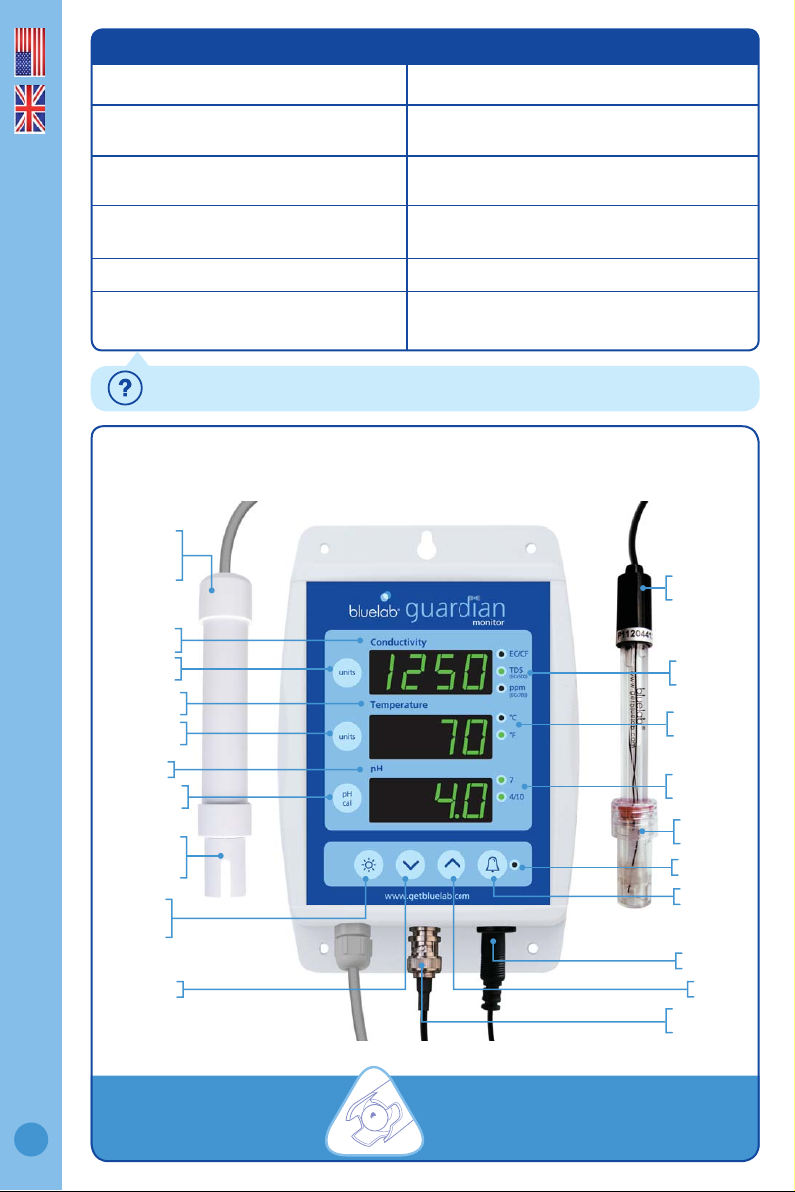
Bluelab Guardian Monitor
Bluelab
Conductivity/
Temperature
Probe
Conductivity
display
Conductivity
units button
Temperature
display
Temperature
units button
pH display
pH calibration
button
Conductivity/
temperature
3
probe shroud
Display
brightness
button
Down button
ATTENTION
If it dries, it dies!
Keep your pH probe tip wet
at all times to avoid permanent damage
Bluelab
pH Probe
Conductivity
LEDs
Temperature
LEDs
pH calibration
LEDs
pH probe
storage cap
Alarm on LED
Alarm button
Power input
Up button
pH probe BNC
connector
Page 4
PLEASE FOLLOW THE MANUAL STEP BY STEP BEFORE FIRST USE BEGINS
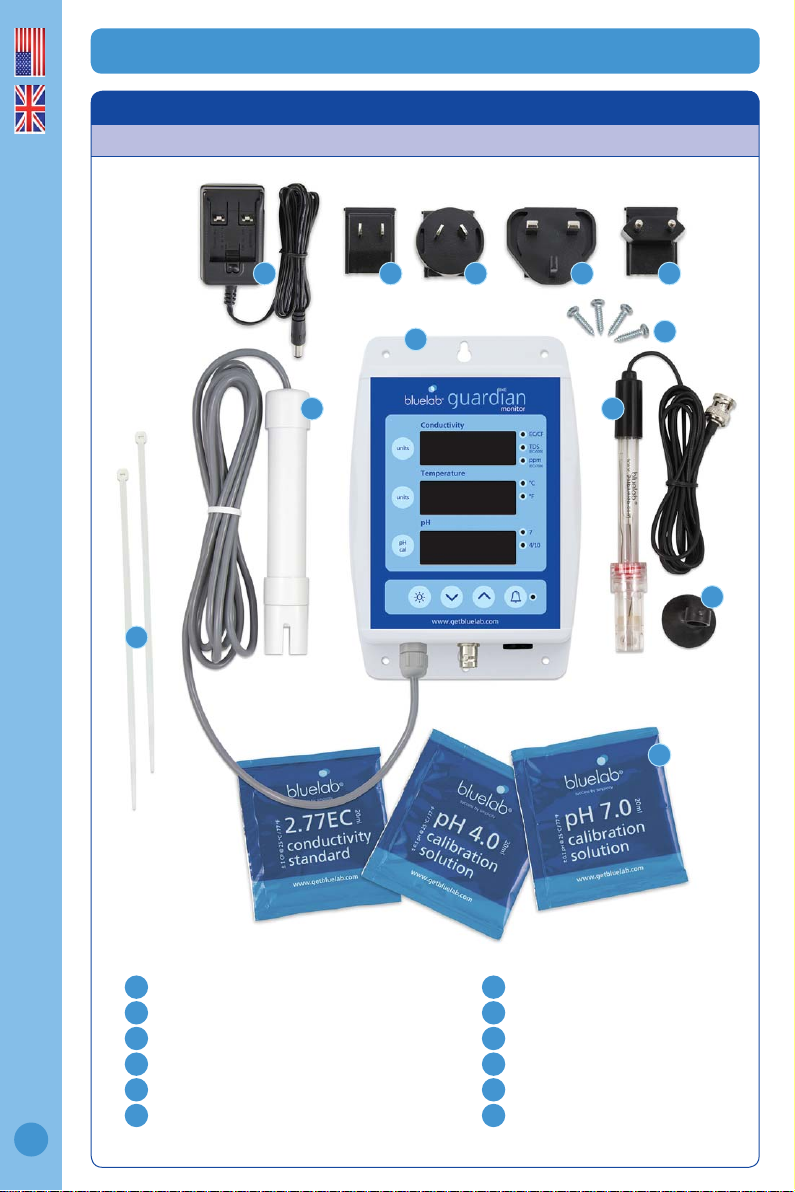
1.0 What’s in the box?
Please verify the box contents from the information below.
English
5 6 7 8 9
11
1
3
10
2
4
12
1
Bluelab Guardian Monitor
2
Bluelab pH Probe with storage cap
3
Bluelab Conductivity/Temperature Probe
4
Bluelab pH Probe holder with suction cup
5
5V DC power supply
6
North American plug adaptor
4
7
NZ / Australian plug adaptor
8
UK plug adaptor
9
European plug adaptor
10
4 x mounting fasteners
11
2 x cable ties
12
pH 7.0, pH 4.0 and EC 2.77 single
use calibration solution sachets
Page 5
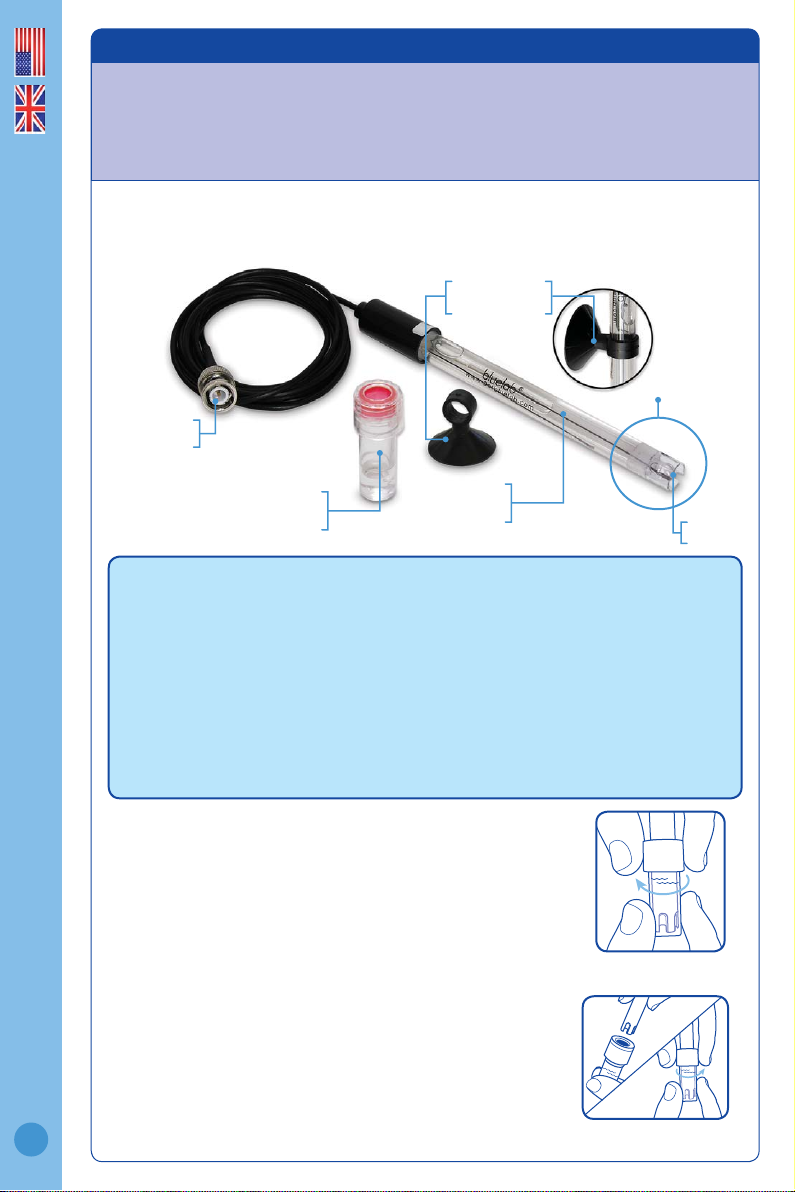
2.0 IMPORTANT - Bluelab pH Probe care
The Bluelab pH Probe is the only part of the Bluelab Guardian Monitor that should
ever require replacing. pH probes DO NOT last forever. They age through normal use
and will eventually fail. The life time of a pH probe depends on the environment it is
used in and the way that it is treated. To receive a long life from your pH probe, please
ensure you follow the guide below.
English
pH probes contain glass and are therefore FRAGILE. With good care, they will
give a long service life.
Bluelab pH Probe
pH probe holder
suction cup
BNC connector
pH probe tip
pH probe
storage cap
Glass tube inside
plastic barrel
Glass bulb
DO NOT let the pH probe tip dry. IF IT DRIES IT DIES!
DO NOT bend the probe; this will break its internal glass tube.
DO NOT knock the probe; this will break its internal glass tube or external glass bulb.
DO NOT plunge a cold pH probe into a hot liquid - sudden temperature changes can crack the
glass and permanently damage the probe.
DO NOT immerse in oils, proteins or suspended solids that will leave a coating on the glass bulb.
DO NOT ‘kink’ or bend the lead sharply.
DO NOT attempt to lengthen the lead on the pH probe.
DO NOT wet the BNC connector at the end of the lead.
Always remove pH probe storage cap before use
1. Grip the top of the cap and gently twist the base one rotation
clockwise to loosen slightly.
2. Next slowly slide the cap off the pH probe. DO NOT completely
remove the base of the cap from the top of the cap.
3. Store the storage cap in a safe place.
Storing the pH probe
When storing the pH probe, the pH probe tip must be kept moist.
To prepare the pH probe for storage, add enough Bluelab pH Probe KCl Storage
Solution to the storage cap so the probe tip is covered. Then replace the cap
and store in a secure place. DO NOT use RO (Reverse Osmosis), Distilled or
De-ionized water. Pure water changes the chemistry in the reference, causing
the probe to die.
Removing pH probe
storage cap
If the pH probe has been accidentally allowed to dry out;
The pH probe must be ‘hydrated’ for 24 hours in KCl storage solution (never use
5
RO, Distilled or De-ionized water). Following this; carry out a calibration to check if
the probe has already suffered permanent damage.
Ensure probe tip is covered by
the KCl storage solution in cap
Page 6
3.0 Mounting the Bluelab Guardian Monitor if wall mounting
Select a suitable location that is less than 2 meters
from your reservoir, and less than 1.5 meters from an
electrical mains outlet.
NOTE: Avoid placing the Guardian Monitor where it can
be damaged by direct sunlight, water or nutrient salts.
Option 1
a) Install two fasteners (top and bottom) to the wall
172mm / 6.¾” apart.
b) Slide the Guardian Monitor onto the fasteners
using the keyholes.
Option 2
a) Fix the four fasteners through each mounting hole
in each corner of the case.
3.1 Mounting the Bluelab Guardian Monitor if mounting on a support or bar
Select a suitable location that is less than 2 meters
from your reservoir, and less than 1.5 meters from an
electrical mains outlet.
NOTE: Avoid placing the Guardian Monitor where it can
be damaged by direct sunlight, water or nutrient salts.
Fix each of the cable ties provided through the small
mounting holes in the top of the case and wrap
around the support or bar and secure.
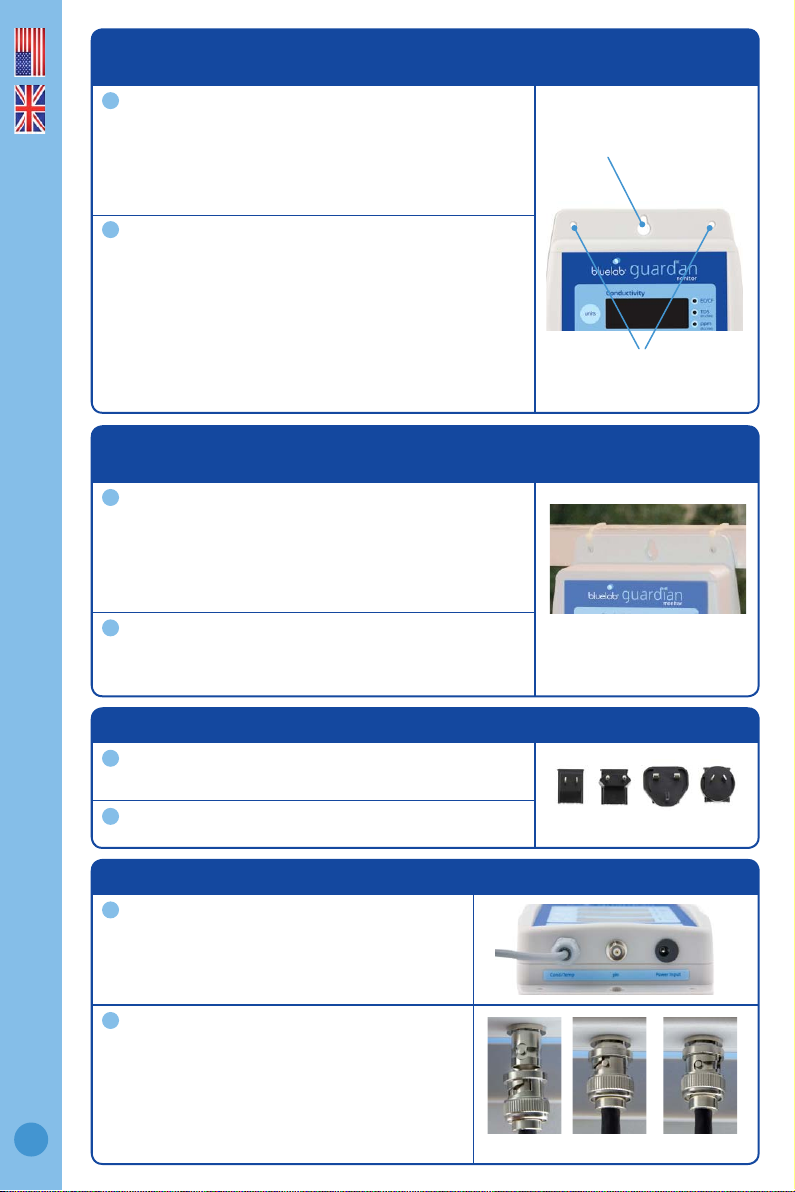
4.0 Install correct plug adaptor
Select the appropriate mains plug adaptor for your
country.
Connect the plug adaptor to the power supply.
5.0 Connect power adaptor and Bluelab pH Probe
Connect the power adaptor into the base of
the Guardian Monitor where ‘Power Input’ is
labelled. Plug the adaptor into mains power
supply.
Connect the pH probe to the Guardian Monitor
by lining up the lugs of the BNC fi ttings.
Fasten securely by pushing the pH probe
connector on and twisting one quarter turn.
1
Option 1
Mounting keyholes
top and bottom
English
2
Option 2
Mounting holes
top and bottom
1
2
1
Cable ties fi xed through small
mounting holes around a
support or bar.
2
6
1
2
Inserting Twisting Attached
Page 7

English
6.0 Power up
Switch on power adaptor at the mains.
When power is applied the Guardian Monitor will complete a display test sequence.
7.0 Select the desired conductivity unit
Conductivity readings can be displayed in EC, CF, TDS or ppm 700. The selected unit
is indicated by one of the 3 LEDs next to the conductivity window. When the EC/CF
LED is on, the Guardian Monitor is displaying conductivity in units of EC or CF.
If there is a decimal point present in the conductivity display, the units are EC. If
there is no decimal point the units are CF.
Press and hold the conductivity unit
button and after 3 seconds it will
change to the next unit indicated by
the glowing LED.
Release.
Repeat steps 1 and 2 until the desired
unit is selected.
8.0 Select the desired temperature unit
Temperature readings can be displayed in either degrees celsius (°C) or degrees
fahrenheit (°F). The selected unit is indicated by one of the two LEDs next to the
temperature window.
Press and hold the temperature unit
button and after 3 seconds it will
change to the next unit indicated by the
glowing LED.
Release.
Repeat steps 1 and 2 until the desired
unit is selected.
9.0 Select the desired brightness level of the LED displays
These can be adjusted to best suit the light levels of the environment. There are
8 levels of ‘brightness’ that can be selected.
Press and hold the brightness button
and at the same time press either
the up or down buttons to change the
brightness. Brightness levels are shown
in the pH window.
1 = least bright, 8 = brightest
1
2
1
2
3
1
2
3
7
1
Page 8

10.0 Calibration
pH calibration is required before fi rst use to ensure that the fi rst reading is
accurate.
• The Bluelab Conductivity/Temperature Probe DOES NOT require calibration.
• The pH of the Bluelab Guardian Monitor DOES require calibration.
For accurate pH readings the pH probe is cleaned and recalibrated when:
• The reading is different to what you were expecting.
• The Guardian Monitor is reset to factory default.
• The pH probe is replaced with a new one.
• It has been a month since the last successful calibration and hte calibration indicator
lights are fl ashing.
When calibrating the pH after fi rst use the pH probe needs to be cleaned. See pH probe
cleaning in section 14.0.
For best pH calibration
pH reading accuracy is dependant on the accuracy and age of the calibration
solutions used, and use and cleanliness of the pH probe tip.
• Ensure the pH probe has been cleaned and rinse the pH probe with clean water
between calibration solutions to reduce contamination of the pH solutions.
• Only fresh uncontaminated solutions should be used.
• Calibrate the pH at the same temperature as the solution to be measured.
• ALWAYS calibrate the pH probe with pH 7.0 then pH 4.0 or pH 10.0.
NOTE: The conductivity/temperature probe does not need to be calibrated, but must be
cleaned to remove any build up of nutrient salts. See Section 13.0.
The pH calibration involves cleaning the pH probe tip and then calibrating in TWO
SOLUTIONS.
If a reading below pH 7.0 is expected, use pH 7.0 and pH 4.0 calibration solutions.
If a reading above pH 7.0 is expected, use pH 7.0 and pH 10.0 calibration solutions.
Follow the steps on the following page for Guardian Monitor pH calibration.
Storage and use of calibration solutions
• Always place the lid back onto the bottle after use or evaporation will occur rendering
the solution useless.
• DO NOT measure directly into the bottle. Tip a small
amount into a clean container and discard after use.
• Never add water to solutions.
• Store in a cool place.
pH reading accuracy is dependant on the accuracy
and age of the calibration solutions used, and use
and cleanliness of the pH probe tip.
English
English
8
Page 9

10.0 pH calibration cont.
To calibrate the pH
Clean pH probe tip.
See section 14.0 (the pH probe does not
require cleaning before the fi rst use).
pH 7.0 calibration
a) Prepare a small amount of pH 7.0
calibration solution in a container.
b) Ensure the Guardian Monitor is plugged
in and in operation mode.
c) Rinse the pH probe tip in fresh water,
shake off excess water and place in the
pH 7.0 calibration solution. Wait at least
one minute for reading to stabilize.
d) Press and hold the pH cal button for a few
seconds until ‘PH’ and ‘CAL’ appear in the
windows, then release the pH cal button.
The ‘7’ LED will glow green. All three
windows will return to monitoring mode
with all current values being displayed.
e) If ‘Err’ is displayed see the
troubleshooting guide on section 16.0.
pH 4.0/10.0 calibration
a) Prepare a small amount of pH 4.0 or
pH 10.0 calibration solution in a container.
b) Rinse the pH probe tip in fresh water,
shake off excess water and place in
either pH 4.0 or pH 10.0 calibration
solution. Wait at least one minute for
reading to stabilize.
c) Press and hold the pH cal button for a few
seconds until ‘PH’ and ‘CAL’ appear in the
windows, then release the pH cal button.
The 4/10 LED will glow green. All three
windows will return to monitoring mode
with all current values being displayed.
d) If ‘Err’ is displayed see the
troubleshooting guide on section 16.0.
e) The Guardian Monitor is now calibrated
and ready for use.
1
English
2
clean the pH probe
pH 7.0
calibration
solution
rinse in tap water
3
9
pH 4.0 or
pH 10.0
calibration
solution
Successful pH 7 and pH 4 calibration
Page 10

English
10.0 pH calibration cont.
pH calibration LEDs
The LEDs next to the pH window will let you know the
status of calibration. See the table below.
NOTE: The pH probe and hence calibration will eventually
fail due to;
• Contamination and age of pH probe.
• pH probe used to measure solutions at temperatures above 50 °C (122 °F) or
below 0 °C (32 °F).
• pH probe exposed to aggressive chemicals.
• Internal damage to the pH probe from rough treatment.
• Damage to the cable of the pH probe from rough treatment.
• pH probe repeatedly drying out.
• Moisture getting inside the BNC connector on the pH probe cable.
pH LEDs
Using factory default calibration values. Both LEDs off.
Readings may be unreliable.
pH 7 calibrated OK. Using factory default for pH 4/10. pH 7
calibrated OK. Using factory default for pH 4/10. Readings
may be unreliable.
pH 7 and pH 4 or pH 10 calibrated OK.
30 days passed since last full calibration - calibration due.
If 7 is fl ashing and 4/10 is off, calibration is also required as
4/10 was never calibrated.
11.0 Placement of probes
Both the Bluelab pH Probe and Bluelab Conductivity/Temperature Probe require
submersion in the liquid for a measurement to occur.
• Do not pour concentrated nutrient solution or pH adjuster directly onto probes
when in the reservoir, as very strong acid may damage the probes or your
alarms (if set) may trigger.
Fit the (optional) pH probe holder to the stem of the
pH probe using a gentle twisting motion.
Place the pH probe into the reservoir and push the
suction cup onto the side of the reservoir but far
enough down so the pH probe tip is in the solution.
The holder prevents damage to the pH probe from
banging onto the side of the reservoir with movement
of the solution.
Place the conductivity/temperature probe into the
reservoir selected.
1
2
10
3
Page 11

12.0 Set alarms (optional)
The alarm function warns you when the solution
deviates from the desired levels you have chosen
for each measurement.
When an alarm condition is present, the display
of the affected measurement will fl ash.
If the measurement changes back to within the
limits you have chosen, the fl ashing will stop.
Even though the resolution of the Guardian is 10 ppm / TDS, the alarms will set only
in 50 ppm and 70 ppm increments.
There are two ways to set the alarm, ‘quick-set’ or ‘detailed-set’.
Alarm ‘quick-set’
This allows you to quickly set the ‘alarm HIGH’ and ‘alarm LOW’ values for all of the
three measurements. The table below shows the values that are pre-set when ‘quickset’ is used.
NOTE: Before you use the quick-set function, the solution in the tank/reservior
must be adjusted to the desired/actual levels for all three parameters and the
levels displayed in each of the windows. If this is not done you should use the alarm
‘detailed-set’.
To activate the ‘quick-set’ alarm;
Press and hold the alarm button until ‘AL H’
is displayed in all three windows.
Release the alarm button.
Press the brightness button once.
All three windows will display Auto for 1
second and then SAVE will be displayed in
the conductivity window. The alarms are now
auto set and the alarm mode will be turned
on. The alarm LED will glow.
Alarm low Alarm high
Conductivity
actual value –
2 CF / 0.2 EC
100 TDS
140 ppm
actual value +
2 CF / 0.2 EC
100 TDS
140 ppm
Temperature
actual value –
3 °C / 5 °F
actual value +
3 °C / 5 °F
pH
actual value –
0.5 pH
actual value +
0.5 pH
English
1
2
3
11
Page 12

12.0 Set alarms (optional) cont.
Turn alarm ON/OFF
Press the alarm button to change between alarm ON and alarm OFF.
When the alarm is ON the alarm LED will glow.
NOTE: If you press and hold the alarm button you will enter the
alarm setting mode.
Alarm ‘detailed-set’
To set the detailed ‘alarm HIGH’ and ‘alarm
LOW’ values;
Press and hold the alarm button until ‘AL H’ is
displayed in all three windows.
Release the button and the current ‘alarm
HIGH’ values are displayed in each window.
To set conductivity alarm high value, press the
conductivity unit button then the up and down
buttons to change its value.
To set temperature alarm high value, press the
temperature unit button then the up and down
buttons to change its value.
To set pH alarm high value, press the pH
unit button then the up and down buttons to
change its value.
Press the alarm button to now select the low
alarm values.
Set the low alarm values the same way as you
did the high alarms.
Press the alarm button. SAVE is briefl y
displayed in the conductivity window and the
Guardian Monitor will return to its normal
monitoring mode.
NOTES:
To review current alarm settings without
changing the values, repeatedly press the alarm
button to step through the high and low alarms.
If you want to exit the alarm settings mode
without keeping any changes you have
made DO NOT press any keys. The Guardian
Monitor will ‘timeout’ and return to its normal
monitoring mode without saving any changes
after 1 minute.
The software will prevent you from setting low
alarm values higher than the high alarm values.
English
1
2
3
4
5
6
7
8
12
Page 13

13.0 Cleaning the conductivity/temperature probe
Cleaning the Bluelab Conductivity/Temperature Probe
Cleaning the conductivity/temperature probe periodically ensures accurate readings.
The conductivity/temperature probe is cleaned using the Bluelab Conductivity Probe Cleaner, or “Jif”
a trade name for a liquid scourer cream used in home bathrooms and kitchens. Similar products are
called “Liquid Vim”, “Soft Scrub”, “Cif cream”, or “Viss”. Never use scented varieties as they contain
oils that contaminate the conductivity/temperature probe.
Follow the steps below to clean the conductivity/temperature probe.
Remove shroud.
Warm the shroud in your hand for a few
seconds to help with removal. Hold the
body and pull the shroud off.
Clean the conductivity probe face.
Place one or two drops of Bluelab
Conductivity Probe Cleaner onto the probe
face and rub with the Bluelab Chamois or
your fi nger fi rmly and vigorously.
Rinse the conductivity probe face.
Rinse off all traces of cleaner under
running tap water while scrubbing the
probe face with the other side of the
Bluelab Chamois or the same fi nger.
Check that the water forms a smooth
fi lm on the probe face. Ensure you have
a clean, smooth fi lm without any beads
of water.
If you have beads of water, repeat steps 2
and 3.
Refi t the shroud and test in 2.77 EC
Conductivity Standard Solution to
ensure adequate cleaning.
Place the probe tip into the solution, wait
for the reading to stabilize to a constant
value. This can take a few minutes while
the probe adjusts to the temperature of
the solution.
Repeat the cleaning process if the reading
given is not within 0.1 EC, 1 CF, 50 ppm or
70 ppm of the values in the table below.
Testing the Bluelab Conductivity/Temperature Probe
The conductivity/temperature probe is tested in either
2.77EC/27.7CF/1385 ppm or 1940 ppm solution
depending on the unit of conductivity chosen.
Use the standard solutions in the table to the
right. Bluelab solutions are recommended.
NOTE: The shroud MUST be left on the probe when taking readings.
Unit
chosen
EC CF
ppm
500
ppm
700
Solution
required
2.77 27.7 1385 1940
English
1
1
2
3
3
4
3
5
clean, smooth
fi lm of water
5
2
uneven beads
of water
2.77 EC Conductivity
Standard Solution
13
Page 14

English
14.0 Cleaning the Bluelab pH Probe
To ensure accurate readings the pH probe tip needs to be rinsed in water after each use
and cleaned prior to calibration using the following instructions.
The storage cap must always be put back on after cleaning. Always ensure it contains
enough Bluelab pH Probe KCl Storage Solution to cover the probe tip.
Remove storage cap from pH probe.
Hold the top of the storage cap, twist the cap to
loosen then remove.
Rinse pH probe tip under fresh tap water.
Never use RO (Reverse Osmosis), Distilled or Deionized water.
Fill a small plastic container with clean tap water.
Add a small amount of Bluelab pH Probe Cleaner
or mild detergent (dishwashing liquid).
Gently stir the probe tip in the mixture.
Ensure that you do not ‘knock’ the soil pH probe
on the side of the container as this may cause
damage to the probe.
Rinse well under fresh running water to remove all
traces of the detergent mixture.
If the probe tip requires removal of heavy
contamination: Gently brush around the
glassware with a few drops of Bluelab pH Probe
Cleaner or mild detergent (dishwashing liquid) and
a soft toothbrush.
Rinse well under fresh running tap water to
remove all traces of the detergent mixture.
Calibrate pH probe after cleaning, see section
10.0 After calibration, store pH probe in the
storage cap, ensuring there is enough KCl Storage
Solution to cover the probe tip.
15.0 Hydrating the pH probe
Hydrate the pH probe in Bluelab pH Probe KCl Storage Solution when:
• the probe tip has not always been stored in KCl storage solution, to improve the
reading response speed.
• the probe tip has been accidentally allowed to dry out.
Never use RO (Reverse Osmosis), De-ionized or Distilled water. Pure water changes the chemistry in the reference,
causing the probe to die.
Loosen, then remove the storage cap. Place the pH probe
upright in a plastic container.
Clean the pH probe tip. Ensure the probe tip is cleaned
before hydrating. See section 14.0 for instructions.
Add enough Bluelab pH Probe KCl Storage Solution to a
plastic container to submerge the pH probe tip.
Leave to soak for at least 24 hours. After hydration, always
calibrate the pH probe to ensure accuracy, see section 10.0.
1
2
1
2
3
4
3
14
5
6
7
1
2
3
4
5
6
Bluelab pH
Probe KCl
Storage
Solution
4
7
Page 15

16.0 Troubleshooting guide
Trouble Reason Correction
Nutrient reading
low
Contaminated conductivity/temperature
probe.
Clean conductivity/temperature probe
(see section 13.0) .
Temperature of conductivity/
temperature probe and solution
different.
Wait 5-10 minutes for conductivity/
temperature probe to reach solution
temperature.
Temperature
reading
inaccurate
Temperature of conductivity/
temperature probe different to solution
temperature.
Wait 5-10 minutes for conductivity/
temperature probe to reach solution
temperature.
pH reading
inaccurate
Contaminated pH probe / glassware
not clean.
Clean pH probe (see Section 14.0); then
calibrate (see Section 10.0).
Using factory default calibration. Calibrate pH probe (see section 10.0).
Calibration old. Calibrate pH probe (see section 10.0).
Broken glass bulb, tube or connector. Check pH probe for damage.
pH probe damaged or old. Replace pH probe.
Display shows
‘Err’ during
calibration
An attempt was made to calibrate with
pH 4.0 or pH 10.0 calibration solution
more than one hour after calibration
with the pH7.0 solution.
Calibrate to pH 7.0 again then do pH 4.0
/ pH 10.0 calibration within one hour.
Old or contaminated solutions used for
calibration.
Use fresh calibration solutions.
Dirty or contaminated pH probe. Clean pH probe (see section 14.0).
pH probe tip been allowed to dry. Hydrate pH probe (see section 15.0).
pH probe damaged or old. Replace pH probe.
No display
Mains not switched on. Switch mains power on.
Power adaptor not plugged into the
Guardian Monitor.
Plug power adaptor into the base of the
Guardian Monitor labeled ‘Power Input’.
pH displays ‘or’
pH displays ‘ur’
Over range pH.
Under range pH.
Solution > 14.0 pH.
Solution < 0.0 pH.
Check pH probe connection. pH probe
could be faulty. Guardian Monitor could
be wet inside.
temp displays
‘or’
temp displays
‘ur’
Over range temperature.
Under range temperature.
Solution >51 °C / 122 °F.
Solution <0 °C / 32 °F.
Conductivity/temperature probe or
Guardian Monitor faulty.
conductivity
displays ‘or’
Over range conductivity/nutrient.
Over range conductivity >9.9 EC, 99 CF,
1990 ppm. Conductivity/temperature
probe or Guardian Monitor faulty.
A display shows
_ _ _ _
EC and pH cannot be determined as
temperature range is over/under.
(see technical specifi cation range
section 17.0).
Test pH probe in calibration solutions
and conductivity/temperature probe in
a known conductivity standard solution
to eliminate these as a cause of this
problem. Check solution tank/reservoir
for problems.
English
15
Page 16

17.0 Technical speci cations
Specifi cations pH Conductivity Temperature
Range
0.0 – 14.0 pH
0 – 5.0 EC,
0 – 50 CF,
0 – 2500 TDS
(ECx500),
0 – 3500 ppm
(ECx700)
0 – 50 °C
32 - 122 °F
Resolution
0.1 pH
0.1 EC,
1 CF,
10 TDS,
10 ppm
1 °C
1 °F
Accuracy at
25°C/77°F
±0.1 pH
±0.1 EC, ±1 CF
±50 TDS, ±70 ppm
±1 °C
±2 °F
Calibration
Two point
(pH 7.0 and
pH 4.0 or
pH 10.0)
Not required
(factory calibrated)
Not required
(factory
calibrated)
Temperature
compensation
Yes
(if conductivity/
temperature
probe is in same
solution as pH
probe)
Yes -
Operating
environment
0 - 50°C / 32 - 122°F
Power source
Input: 100-240 Vac, 50-60 Hz, 5 VA,
4 interchangeable plug types (USA, Euro, UK, NZ/AUS)
Output: 5VDC 1Amp
English
16
Page 17

English
Bluelab pH Probe replacement
The Bluelab pH Probe is the only part of the
Bluelab pH Meter that requires replacing.
pH probes do not last forever. They age
through normal use and will eventually fail.
To ensure you receive a long life from your pH
probe, please read the instructions provided with it.
When the time comes to replace your Bluelab
pH Probe all you have to do is order a replacement from your supplier!
Bluelab Probe Care Kits
The instrument is only as accurate as the probe is clean!
Probe cleaning is one of
the most important parts
of owning and operating
any Bluelab meter,
monitor or controller.
If the probe is contaminated
(dirty) it affects the accuracy
of the reading displayed.
pH Conductivity
17
Bluelab Probe Care Kits - available in:
› Bluelab Probe Care Kit - pH
Kits contain instructions and all the tools you need to clean Bluelab probes or pens.
› Bluelab Probe Care Kit - Conductivity
Bluelab pH Probe KCl Storage
Solution
The perfect solution to store and hydrate
your Bluelab pH products.
Bluelab pH Probe KCl Storage Solution is designed
to increase response time and maximize the life of
Bluelab pH pens and pH probes.
For best results, use the KCl solution to store the pH pen/
probe after use and hydrate monthly.
Instructions are on the label of the bottle.
Use Bluelab pH Probe KCl Storage Solution with:
› Bluelab pH Pen
› Bluelab Soil pH Pen
› Bluelab pH Probes
› Bluelab Soil pH Probes
Page 18

English
Bluelab Guardian Monitor product guarantee
Bluelab Corporation Limited guarantees this product for a period of
2 years (24 months) from the date of sale to the original purchaser.
(This guarantee does not cover the Bluelab pH Probe. The Bluelab
pH Probe is covered by a separate 6 month guarantee).
The product will be repaired or replaced should it be found faulty due to
component failure, or faulty workmanship. The faulty product should be
returned to the point of purchase.
The guarantee is null and void should any internal parts or fi xed external parts be tampered with or
altered in any way, or should the unit have been incorrectly operated, or in any way be maltreated.
This guarantee does not cover reported faults which are shown to be caused by any or all of
the following: Contaminated measuring tip (see instruction manual for cleaning instructions), or
connection to the incorrect power supply, or connection of any other devices other than approved
units to the output of the unit (if applicable), or ingress of moisture into the product.
NO RESPONSIBILITY will be accepted by Bluelab or any of its agents or resellers should any
damage or unfavourable conditions result from the use of this product, should it be faulty or
incorrectly operated.
Register your guarantee online at www.getbluelab.com
Limitation of Liability
Under no circumstances shall Bluelab Corporation Limited be liable for any claims,
losses, costs and damages of any nature whatsoever (including any consequential
loss) that result from the use of, or the inability to use, these instructions.
To watch instruction videos, visit our online video library:
vimeopro.com/bluelab/videos
18
If you need assistance or advice - we’re here to help you.
Phone: +64 7 578 0849 Fax: +64 7 578 0847
Email: support@getbluelab.com
Looking for specifi cations or technical advice?
Visit us online at www.getbluelab.com
Bluelab Corporation Limited
8 Whiore Avenue, Tauriko Industrial Park
Tauranga 3110, New Zealand
Instruction Manual English MONGUA_V01_030713
© Copyright 2011, all rights reserved, Bluelab Corporation Limited
 Loading...