

Page 1
Care and use guide
Guía de uso y cuidados
Notice d’utilisation et d’entretien
Gebruikershandleiding
Bedienungs- und Pegeanleitung
www.getbluelab.com
Page 2
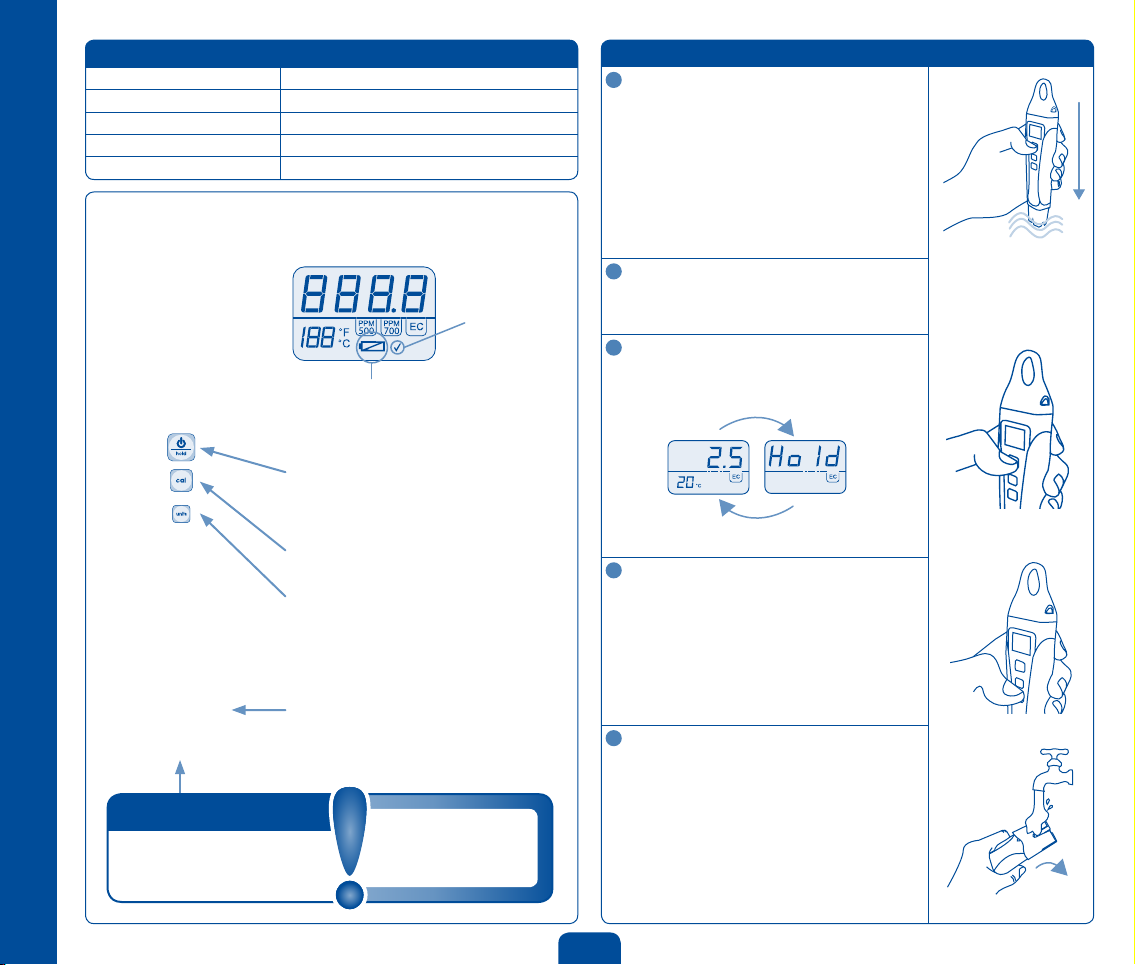
1.0 To operate
Turn pen on
Press power button.
The last measurement is recalled for 3 seconds.
To turn pen off
Press and hold the power button until OFF is
displayed.
NOTE: The pen will automatically turn off after
4 minutes to conserve battery power.
Measure EC
Place probe in solution and wait for reading to
stabilize.
To hold a reading
If you want to “hold” the reading on the screen,
short press the power button. To exit the hold
function press the power button again.
To change units
Hold down the units button for 3 seconds until the
conductivity and temperature units start flashing.
Short press units button again to cycle between
unit combinations. To exit this mode don’t press
anything for 3 seconds.
NOTE: You can change units while in hold mode
by holding down the units button.
Rinse conductivity probe
To reduce the build-up of nutrient salts, rinse
under running water after each use.
The probe needs to be cleaned once every two
weeks to ensure accurate readings. To clean the
probe follow the cleaning instructions in
section 2.0.
Features
Backlit LCD display Calibration optional
Hold reading function Fully waterproof
Fully guaranteed for 1 year Auto off function
Low battery warning Automatic Temperature Compensation (ATC)
Successful calibration indicator Selectable units for conductivity and temperature
English
1
Quick guide
2
Low battery
warning
Appears when
batteries are low.
Power button / hold
Short press to turn on.
Short press to hold reading.
Long press to turn off.
Calibrate button
See calibration section.
Units button
Hold until units ash then short press to
change units.
Screen will change back when no buttons.
have been pressed for 3 seconds.
Shroud
Attention:
The conductivity probe must be
cleaned regularly to remove built up
nutrient salts to ensure an accurate
reading (See cleaning instructions).
“The instrument is
only as accurate as
the probe is clean.”
Tick to indicate
successful
calibration
3
1 second alternating displays
4
5
2
Page 3

4.0 Calibration
Calibration of conductivity is not required for this unit as it is factory calibrated.
However; if you wish to calibrate the unit follow the instructions below.
YOU MUST CLEAN THE PROBE BEFORE CALIBRATING.
See section 2.0.
Rinse probe in fresh water and place it in a known
standard solution. See chart below for the correct
solution.
Wait for reading to stabilize.
Hold down the cal button for 3 seconds until CAL
appears.
Release button and CAL P should be displayed. If Err is
displayed check the probe is clean and that the calibration
solution is fresh and uncontaminated.
A tick will appear on the screen to indicate that the calibration
was successful. The tick will disappear after 30 days. To reset
back to factory default remove/replace battery.
NOTE: If you need to test or calibrate in a 1500 ppm
solution, you MUST set the pen to EC, then multiply your
result by 540. If calibrating, multiply 2.8 by 540
(2.8 x 540 = 1512).
This unit DOES NOT measure in the 540 ppm scale.
1
EC ppm 500
(TDS)
ppm 700
(EC x 700)
Solution value
2.77 1385 1940
Displayed value
2.8 1390 1940
5.0 Error messages
The following error messages appear for the following reasons.
2.0 Cleaning and maintenance
Cleaning the EC pen probe periodically ensures accurate readings. The probe is
cleaned using the Bluelab Conductivity Probe Cleaner, or “Jif” a trade name for a liquid
scourer cream used in home bathrooms and kitchens. Similar products are called
“Liquid Vim”, “Soft Scrub”, “Cif cream”, or “Viss”. Never use scented varieties as they
contain oils that contaminate the probe. Follow the steps below to clean the probe.
Remove shroud
Hold the body and pull the shroud off. Holding your
hand around the shroud for a few seconds will help
with removal.
Clean probe face
Place one or two drops of probe cleaner onto the probe
face and rub with your finger or Bluelab Chamois firmly
and vigorously, to clean the probe face.
If a heavy build up occurs around the temperature sensor
clean with a soft toothbrush to remove contamination.
Rinse probe
Rinse off all traces of cleaner under running water using
the same finger or other side of Bluelab Chamois.
Check that the water forms a film on the probe face with
no “beads” of water. If beading is present repeat the
cleaning process.
Replace shroud and test in a known solution to
ensure the unit has been adequately cleaned.
3.0 Battery replacement
The EC pen is powered with 1 x AAA alkaline battery. Do not use rechargeable
batteries. A low battery warning is indicated by a battery symbol appearing on the
screen. Only remove the battery cap when the batteries require changing. Battery
life is expected to be 350 hours. Follow these steps to replace the battery.
Remove old battery
Undo battery cap fasteners. Remove battery cap and tip out
the old battery.
Check for corrosion
Flat batteries may leak and cause corrosion. Check battery
contacts and the battery for any sign of corrosion. Battery
contacts should be cleaned first if corrosion is found before
proceeding to step 3.
Fit new battery
Insert the new batteries positive (+) end down into the body.
Ensure waterproof battery cap seal is clean
Waterproof seal will fail if any dirt is around the seal and
body where the cap seals.
Replace battery cap
Tighten fasteners on battery cap until there is no space
left between the cap and body. This ensures the unit
remains 100% waterproof.
1
2
3
4
1
2
3
4
5
Waterproof seal
Pull
2
3
4
Temperature
under range
Temperature
over range
1385
ppm
Hold for 3
seconds
Temperature
error
Hardware
error
EC over range
3
Page 4

Contact details Limitation of liability
Bluelab Corporation Limited, 8 Whiore Avenue, Tauriko Industrial Park, Tauranga 3110,
New Zealand, Ph +64 7 578 0849 Fax +64 7 578 0847 Email support@getbluelab.com
www.getbluelab.com
Under no circumstances shall Bluelab Corporation Limited be liable for any claims,
losses, costs and damages of any nature whatsoever (including any consequential
loss) that result from the use of, or the inability to use, these instructions.
6.0 Troubleshooting
Trouble Correction
EC pen gives low readings
Low readings usually mean the probe is
contaminated. Clean the probe and retest in a
known solution. Ensure unscented cleaner is used
eg. Bluelab Conductivity Probe Cleaner, Jif, Liquid
Vim, Soft Scrub, Cif cream or Viss.
EC pen gives high readings
Calibrate pen in a known standard solution. Check
the table in section 4.0 for what solution to use for
your selected conductivity unit.
Screen does not turn on
Replace battery.
7.0 Technicalspecications
Range
0.0 - 10.0 EC, 0 - 7000 ppm (700 ppm),
0 - 5000 ppm (500 ppm/TDS)
0 - 50 °C / 32 - 122 °F
Resolution
0.1 EC, 10 ppm (700), 10 ppm (500)
1 °C / 1 °F
Accuracy
± 0.1EC @ 25°C (@2.77EC)
± 50 ppm (ppm 500) @ 25 °C (@ 1385 ppm)
± 70 ppm (ppm 700) @ 25 °C (@ 1940 ppm)
± 1 °C / ± 1 °F / ± 2 °F
Temperature compensation Automatic
Operating temperature 0 - 50 °C, 32 - 122 °F
Calibration Factory calibrated / manual calibration optional
Units EC, 700 ppm, 500 ppm, °C, °F
Power source 1 x AAA alkaline battery
Information about the scales available on the
Full colour instructions
Calibration solutions
Decanter vessels
Bluelab probe cleaner
Toothbrush
Full colour instructions
Conductivity standard solution
Decanter vessel
Bluelab probe cleaner
Bluelab chamois (probe
cleaning instrument)
Bluelab EC Pen
EC
Is a measure of electrically charged nutrient ions in a solution and is the only
absolute measure of conductivity.
Pure water will not conduct electricity. Water usually conducts electricity because it
is full of impurities, in our case, electrically charged nutrient ions. The two black dots
on the end of a conductivity probe are called electrodes. When these are placed
in a solution, an electrical current passes from one electrode, through the water to
the other electrode and counts the number of electrically charged ions present. This
represents the units measured - EC.
ppm measures parts per million
There are many different scales used for different industries around the world and
for many different reasons! Did you even know there are more than two scales? The
most widely used scales in Hydroponics are the 500 scale, 650 scale and the 700
scale.
What’s the difference?
The instrument is only as
accurate as the probe is clean!
Bluelab cleaning kits
Bluelab pH Cleaning and Calibration Kit:
The ppm 500 scale is based on measuring the KCl or potassium chloride content
of a solution. The ppm 700 is based on measuring the NaCl or sodium chloride
content of a solution. Individual nutrient ions have different electrical effects! The
true ppm of a solution can only be determined by a chemical analysis. ppm cannot
be accurately measured by an EC meter. They are present on Bluelab products as a
conversion guide only. The conversion is as follows;
2.4 EC x 500 = 1200 ppm (500 scale) or 1200 ppm / 500 = 2.4 EC
2.4 EC x 700 = 1680 ppm (700 scale) or 1680 ppm / 700 = 2.4 EC
If you are wanting to measure your solution in ppm, you will need
to know the following:
• What ppm scale is your meter using?
• Which calibration standard should you use for your meter?
• What ppm scale is my nutrient referring to?
4
Bluelab Conductivity Probe Cleaning Kit:
Page 5

Please register your guarantee online at:
www.getbluelab.com
Orllouttheformbelowandpost,emailorfaxto:
Bluelab Corporation Limited
8 Whiore Avenue, Tauriko Industrial Park,
Tauranga 3110, New Zealand
Phone +64 7 578 0849
Fax: +64 7 578 0847
Email: support@getbluelab.com
Product details
Product name
Serial number
Date purchased
Purchaser details
Purchaser’s name
Address
City
Country
Email (optional)
Purchased from (Dealers details)
Purchased from
Address
City
Country
Phone number
(optional)
Product
P
R
E
O
E
D
U
C
T
G
U
Bluelab EC pen
Bluelab Corporation Limited guarantees this
product for a period of 1 year (12 months)
from the date of sale to the original purchaser.
The product will be repaired or replaced, should
it be found faulty due to component failure, or
faulty workmanship. The faulty product should
be returned to the point of purchase.
The guarantee is null and void should any
internal parts or fixed external parts be
tampered with or altered in any way, or should
the unit have been incorrectly operated, or in
any way be maltreated. This guarantee does
not cover reported faults which are shown
to be caused by any or all of the following:
Contaminated measuring tip (see instruction
manual for cleaning instructions), flat or
damaged batteries or batteries that have
been incorrectly inserted, or damaged battery
contacts or connections caused by incorrect
battery replacement or ingress of moisture
from incorrect positioning of the battery cap
and waterproof seal.
guarantee
T
N
A
R
A
NO RESPONSIBILITY will be accepted by
Bluelab or any of its agents or resellers should
any damage or unfavourable conditions result
from the use of this product, should it be faulty
or incorrectly operated.
Page 6

The instrument is only as accurate as the probe is clean!
Full colour instructions
Calibration solutions
Decanter vessels
Bluelab probe cleaner
Toothbrush
Full colour instructions
Conductivity standard
solution
Decanter vessel
Bluelab probe cleaner
Bluelab chamois (probe
cleaning instrument)
Bluelab cleaning kits
Probe cleaning is one of the most important parts of owning and operating any Bluelab
meter,monitororcontroller.Iftheprobeiscontaminated(dirty)itaffectstheaccuracyof
the reading displayed.
The probe surface is where the instrument takes the reading of the solution. The information is sent back
from the probe to the electronic brain of the instrument.
A calculation is then done in the instrument’s brain or micro computer and a reading is then displayed. If the
information sent back from the probe is inaccurate due to probe surface contamination then the reading will
be inaccurate. Cleaning the probes is a very easy task and will prolong the life of the probes.
The Bluelab cleaning kits have it all there for you:
pH Cleaning and Calibration Kit:
Conductivity Probe Cleaning Kit:
Page 7

Bluelab EC Pen
guarantee.
P
R
O
D
U
C
T
G
A
U
The Bluelab product range all come with a free repair or replacement guarantee for your added benet.
E
E
T
N
A
R
If you need assistance or advice - we’re here to help you.
Phone: +64 7 578 0849 Fax: +64 7 578 0847
Email: support@getbluelab.com
Looking for specications or technical advice?
Visit us online @ www.getbluelab.com
Bluelab Corporation Limited
8 Whiore Avenue, Tauriko Industrial Park, Tauranga 3110, New Zealand
Under no circumstances shall Bluelab Corporation Limited be liable for any claims,
losses, costs and damages of any nature whatsoever (including any consequential loss)
that result from the use of, or the inability to use, these instructions.
Instruction Manual, Version 01: 220811/00775_0711
Copyright 2011, all rights reserved, Bluelab Corporation Limited
 Loading...