

Page 1
INCLUDES BASE FOR FILTER AND PUMP
NE6150 / NE6170
TOOLS REQUIRED
• Phillips head screwdriver
• Flat head screwdriver
• O-ring lube
6420
Page 2
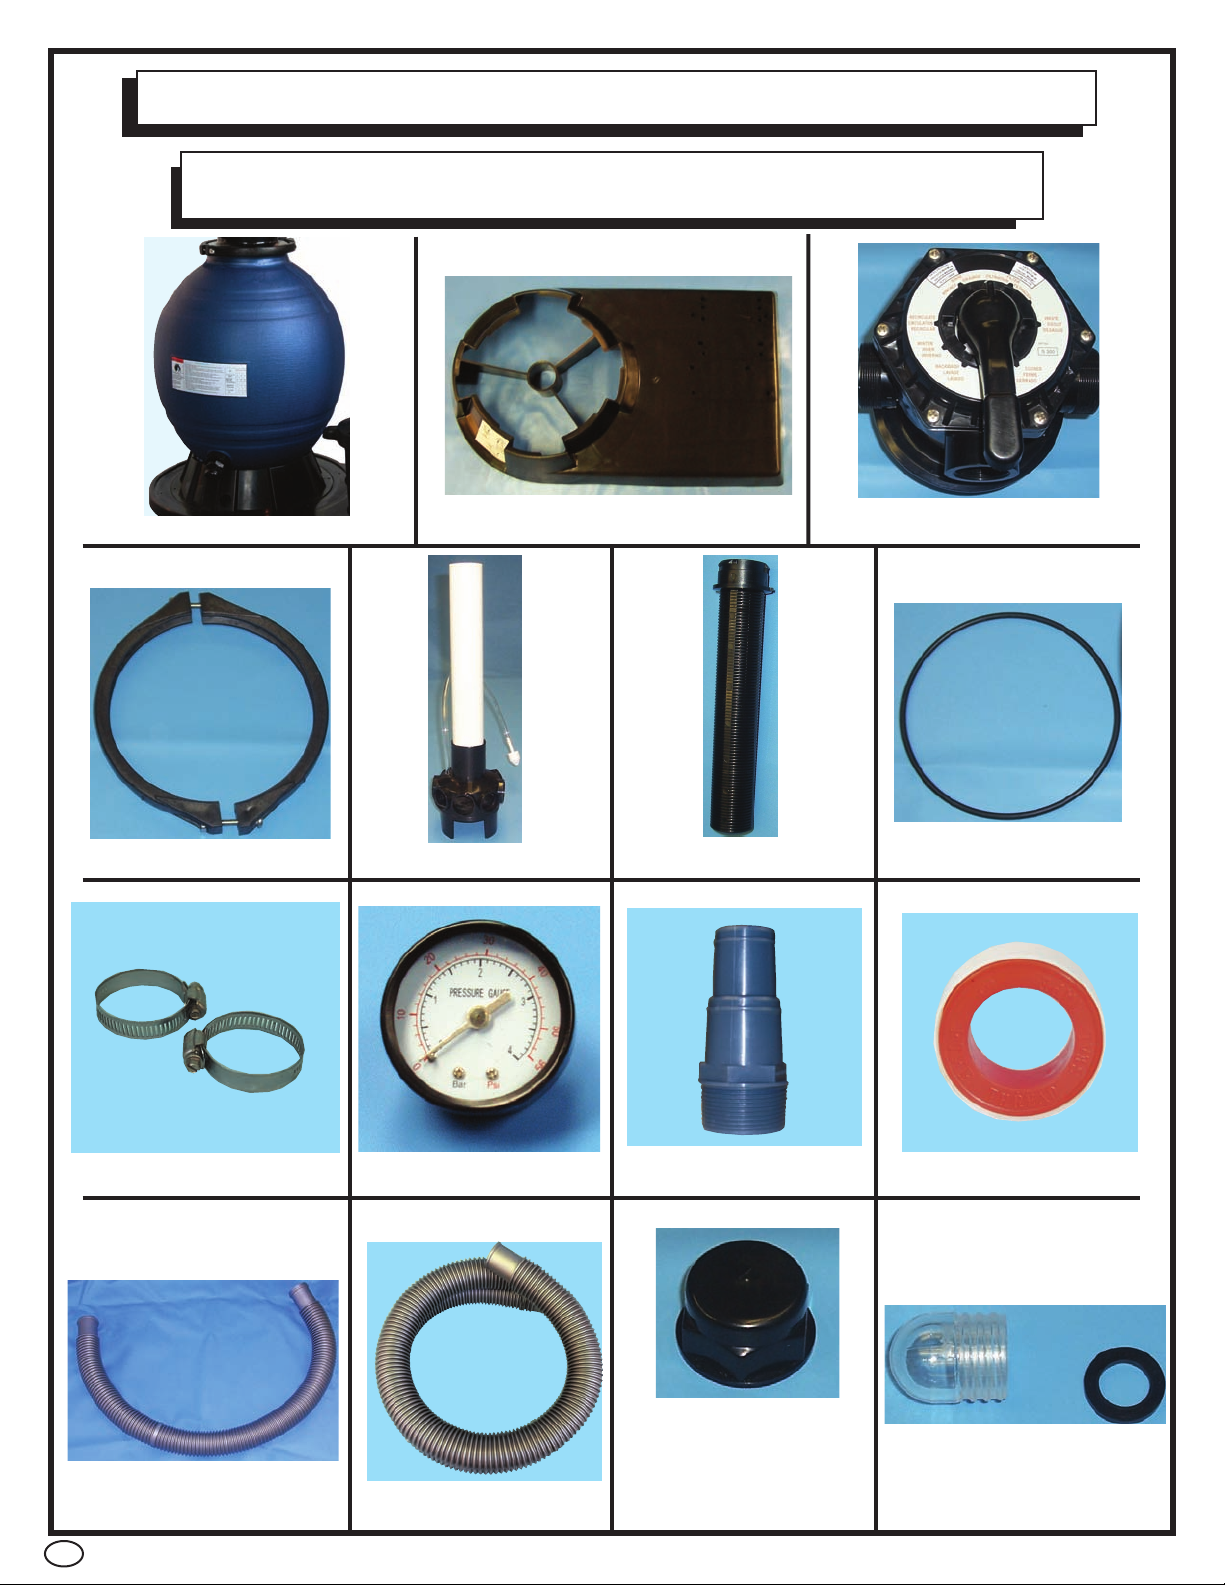
PARTS FOR SAND FILTER
NOTE
A. FILTER TANK
The quantity of parts and part numbers will vary for each filter.
See breakdown on following page for model specific part lists.
B. BASE
C. 6 WAY VALVE
D. CLOSURE CLAMP
H. HOSE CLAMPS (6)
E. STANDPIPE
I. PRESSURE GAUGE
J. STRAIGHT FITTING
F. LATERALS (8)
(3)
N. DRAIN PLUG
G. VALVE O-RING
K. TEFLON TAPE
L. 3’ 1-1/2” HOSE
2
M. 6’ 1-1/2” HOSE (2)
NOTE: Pre-installed on
tank
O. SIGHT GLASS
Page 3

SANDMANFILTERPARTSNE6150A(18")&NE6170A(22")
REF # Mrf Model # Order # Descripton Qty
1A
1B
2
3
4 A
4 B
5 A
5 B
6 A
6 B
7
8
9
AC 18601 NEP2121 18" sand filter base
AC 22601 NEP2122 22"sand filter base
AC 22602 NEP2123 Drain plug assembly
AC 18604 NEP2124 Lateral for 18" and 22" sand filter
AC 18605 NEP2125 Center pipe & folding umbrella lateral holder for 18" sand filter
AC 22605 NEP2126 Center pipe & folding umbrella lateral holder for 22" sand filter
AC 18606 NEP2127 Air release assembly 18" sand filter 380 mm
AC 22606 NEP2128 Air release assembly 22" sand filter 490mm
AC 18607 NEP2129 18" Filter tank
AC 22607 NEP2130 22" Filter tank
AC 18608 NEP2131 Flange clamp
AC 18609 NEP2132 O-ring for valve/tank
AC 08621RP NEP2133 6-way valve
1
1
1
1
1
1
1
1
1
1
1
1
1
Page 4
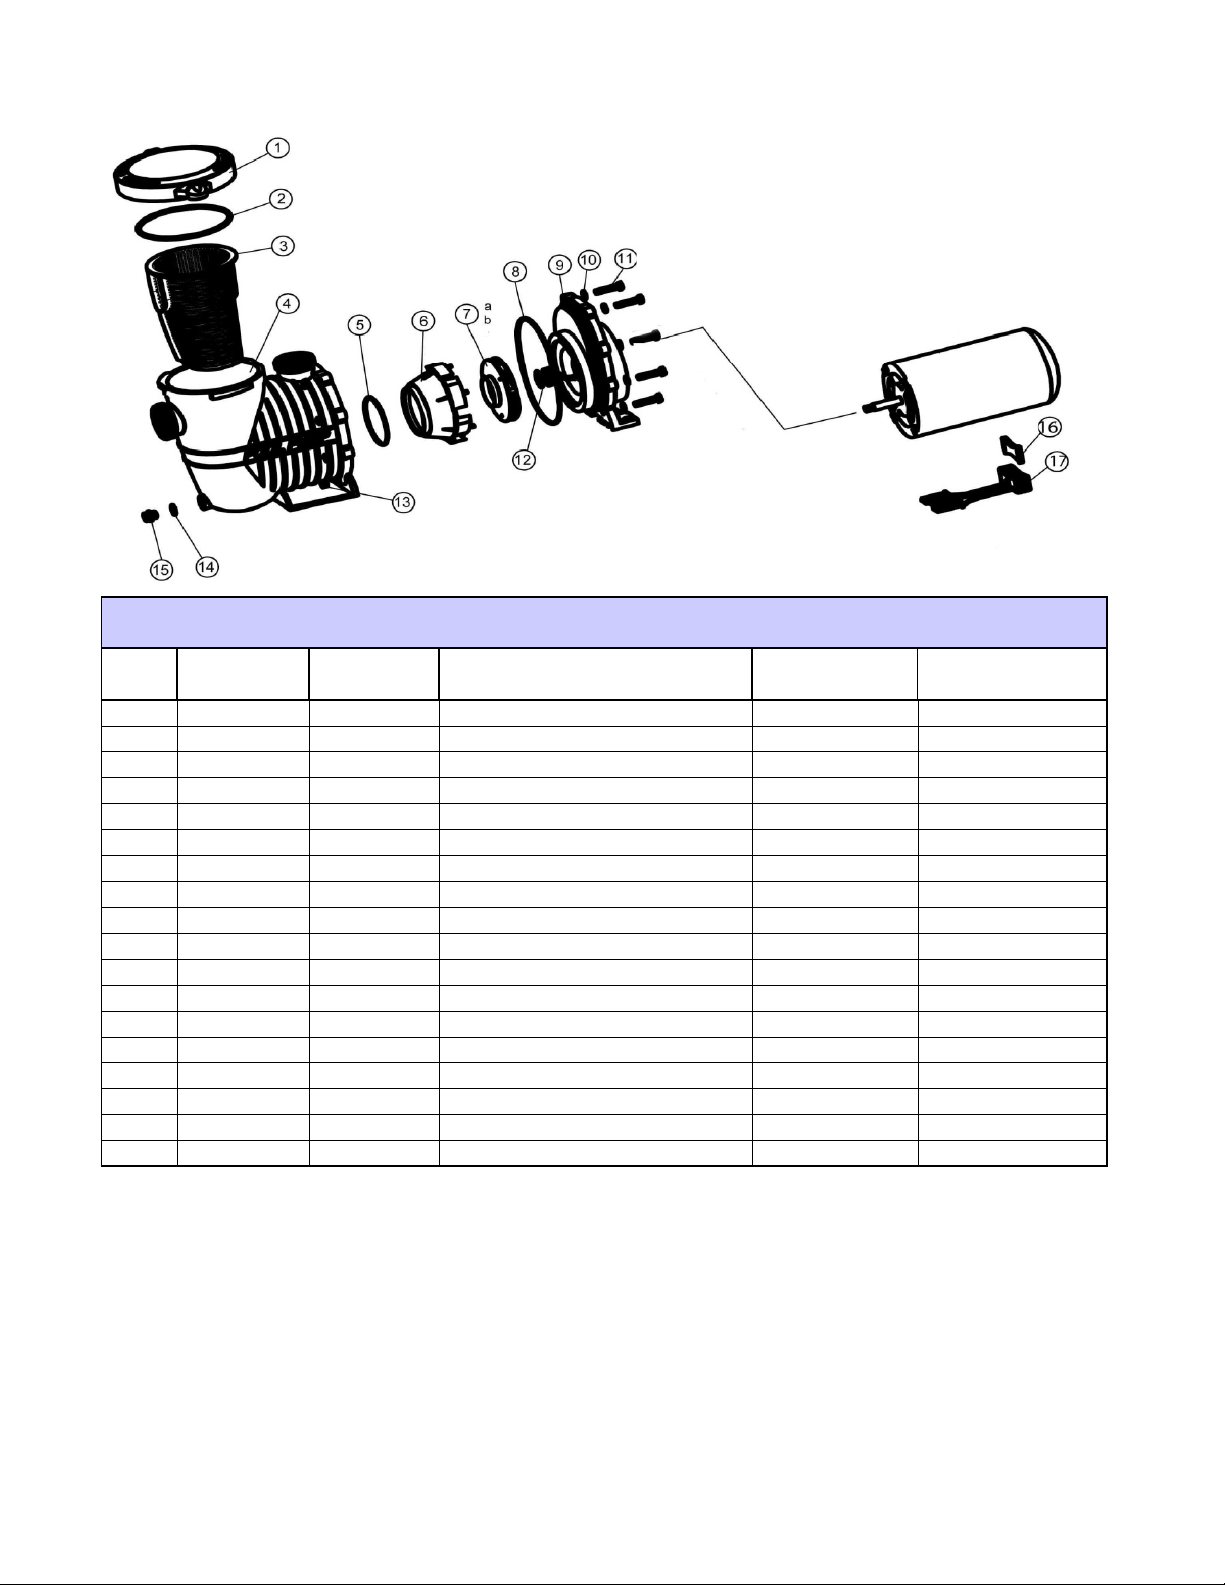
SANDMANPUMPNE6150B/6170BPARTSBREAKDOWN
1HP 1.5HP
KEY #
7A AC81493 NEP2140 IMPELLAR1.HP 1
7B AC81507 NEP2141 IMPELLAR1.5HP 1
10 AC81558 NEP2145 HOUSINGWASHER 8 8
10 AC81566 NEP2146 HOUSINGBOLTS 88
12 AC81574 NEP2147 SEALSET 1 1
13 AC81582 NEP2148 HOUSINGNUTS 88
14 AC81590 NEP2149 DRAINPLUGO‐RING
15 AC81620 NEP2150 DRAINPLUG 11
16 AC81655 NEP2151 BASEBRACKET 11
17 AC84476 NEP2152 BRACEBRACKETSUPPORT 1 1
MFR Part # Order #
1AC81361 NEP2134 PUMPLID 1 1
2AC81396 NEP2135 PUMPLIDO‐RING 1 1
3AC81434 NEP2136 PUMPBASKET 11
4AC81469 NEP2137 STRAINERCASING 1 1
5AC81477 NEP2138 DIFUSSERO‐RING 1 1
6AC81485 NEP2139 DIFUSSER 11
8AC81523 NEP2143 CASINGO‐RIG 1 1
9AC81531 NEP2144 SEALPLATE 1 1
Description NE6150B NE6170B
1 1
Page 5

ASSEMBLY INSTRUCTIONS
FOR SAND FILTER
NOTE
Filter is partially assembled; however, nothing has been properly
tightened. DO NOT operate filter system without completing
assembly instructions.
STEP 1
• Using Phillips head screwdriver, remove the closure clamp (D) from the valve assembly.
need to unscrew one side completely as it can be removed and reinstalled without unscrewing
both screws
• Remove the valve (C) from the tank and place it to the side until instructed to reattach it.
.
You only
• Inside the tank you will find the standpipe (E) and
a plastic bag containing the laterals (F).
• Attach lateral to standpipe by pushing into opening
and turning to the right as shown above.
• Repeat for remaining seven laterals.
NOTE
4
You MUST install the laterals on the
standpipe INSIDE the tank as the
standpipe will not fit back through the
opening once laterals are attached.
Page 6

STEP 2
• The filter and pump should be attached to the base prior to filling the filter with sand as it
will be difficult to maneuver after the tank is full.
• In order to attach your pump to the base, determine which of the two pumps shown below
is most like your pump and follow the corresponding instructions for installation to the base.
A. CRADLE STYLE MOUNT
• Pumps with cradles located directly under the motor
should be aligned with the holes on the base in the
raised area where the six holes are close together.
This type of mount will require the use of two to four
mounting bolts from the hardware supplied with the
base.
• Line the pump up with the set of holes which are the
best fit for the pump and bolt in place.
• Proceed to STEP 3.
B. PLASTIC PUMP HOUSING MOUNT
• Pumps with plastic pump housing mounts should be
attached by aligning the openings with a set of the
OVAL shaped holes which are towards the center of
the base. This type of mount will require the use of
TWO mounting bolts from the hardware supplied with
the base.
If you are attaching a Speck SS E90 or SS E91
pump, use the larger oval holes towards the back
of the base.
• Bolt the housing of the pump through the base and
tighten.
• Proceed to STEP 3.
5
Page 7

STEP 3
• Before filling tank with sand, cover
standpipe with a plastic bag to prevent sand from
entering standpipe. Secure in place with rubber
band so it does not fall off.
• Once bag is secured, place standpipe in the bottom of
the sand tank. Make sure pipe is centered in tank
BEFORE pouring sand into tank because you will
NOT be able to move it once sand is in.
NOTE
NOTE
Sand should be filled no less than 1/2 way up the tank and no more
than 3/4. Over-filling will result in permanent damage to your
Filter System.
If the drain plug is not lined up with the third arrow OR it lifts
off the base, retry the aforementioned steps to properly
attach tank to base.
• Clear plastic tube attached to standpipe is an
air relief. As you are adding the sand into the
tank, try to hold the tube up against the stand
The white piece on the end of this tube
pipe.
should be ABOVE sand level when you are
done adding sand to the filter.
-
NOTE
DO NOT pull too hard when holding up air relief tube, if you
pull it off the bottom of the standpipe, sand will be able to
enter your pool through the hole.
6
Page 8

STEP 3 — CONTINUED
• Add filter grade sand (sold separately) to
filter tank around standpipe. The approximate
amount of sand necessary will vary based on
the size filter you purchased.
18” Tank .... 110 Lbs.
22” Tank
26” Tank
NOTE
• Remove plastic bag and fill tank with water until the tank is filled right below opening
of standpipe.
.... 220 Lbs.
.... 360 Lbs.
NEVER FILL SAND TANK MORE THAN 1/2 TO 3/4 OF THE WAY.
Adding too much sand can cause weak return flow.
STEP 4
• Locate o-ring (G) on bottom of 6-way valve (C).
• Lubricate with o-ring lube to ensure proper seal
on tank.
• Push o-ring against the lip of the valve. It MUST sit
flat against the lip to protect from leaking at the valve.
• Clean off any sand or debris on top lip of filter and
position valve over the opening of the standpipe.
• Valve will slide ONTO standpipe when positioned
properly in tank (as shown). Push down firmly to
make sure valve slides on all the way.
NOTE
You CANNOT pull standpipe up to secure
the valve. Pulling up can damage the
laterals and cause sand to get sent back
with water flow to pool.
7
Page 9

STEP 5
• Once valve is in place, hold clamp (D) as shown and
position clamp around lip of filter and over edge of
valve.
• The clamp should sit flat around the lip of the tank
and valve. If it is not sitting flat the clamp will leak.
• Cover threads of pressure gauge (I) with
tape
(K) and thread into the open hole on the
valve and hand tighten only.
eflon
T
• Make sure that the screws of the clamp are lined
up with the seams of the tank
on clamp a little at a time.
side so that both sides are tighten equally.
Failure to follow these instructions will result in
a leak at the clamp.
. Tighten two screws
Alternating from side to
8
Page 10

STEP 6
• The valve ports are labeled “RETURN”, “PUMP” and “WASTE” with raised
letters next to the openings.
• Cover the threads of each straight fitting (J) with Teflon tape (K) and thread
one fitting into each of the 1-1/2” threaded openings on the valve.
• Attach one 6’ hose (M) to the bottom of the thru-wall skimmer and to the front
of the pump with (2) hose clamps
• Clamp one end of 3’ hose (L) to the top of the pump and the other end to the
threaded fitting on the
• Attach second 6’ hose (M) to the fitting on the “RETURN” port and secure the
opposite end to the fitting on the pool’s return with clamp.
• “WASTE” port will accept a standard fitting and a backwash hose
(sold separately) which will be used during maintenance.
• Check drain plug (N) at bottom of filter to ensure that it is screwed on tight.
“PUMP” port of the valve.
(H).
9
Page 11

OPERATING YOUR FILTER
NOTE
• Prime filter prior to starting up filter system. DO NOT turn motor on until system has been primed,
you can damage your pump.
• Make sure water in pool is up to middle of skimmer(s) and that there is nothing blocking water
flow from return(s) and skimmer(s) (i.e. plug, plate).
• Push down selector handle on valve and turn to notch labeled
and the valve is now in backwash position. Make sure backwash hose (sold separately) is
attached to the waste port so water will not spray all over you once pump is started.
• Remove lid of strainer basket on pump (if applicable) and fill with water. Skimmer and return lines
should be filled with water as well (when water level is in proper place in pool this will happen
naturally).
• Place cover back on basket and plug in/switch on pump. When pump starts up, water will come
out through the backwash hose. If the pump is properly primed, the water in the strainer basket
will fill completely and air pocket will be eliminated.
• Repeat above until all air is purged from the system then turn of
out of system, double check all connections to make sure they are properly tightened and try
again.
• To use filter, with pump OFF, push down selector handle on valve and turn to notch labeled
• Connect pump to power to start filter operation.
• Note pressure gauge reading at this time.
Your filter cannot be run if the water is not at the proper level in the
pool. Running the filter without water can cause serious damage to
your pump and filter.
BACKWASH
f the pump. If this does not get air
. Let go of handle
FILTER
.
• When pressure through return fades and pressure gauge reads 5 psi above starting pressure,
you will need to backwash the filter system to remove debris.
• Turn pump off before moving selector to
back on.
• Water will come out through the waste port, so position backwash hose where you would like
water to run out.
• NEVER backwash for longer than ONE MINUTE at a time! Backwashing longer than one minute
will cause sandblasting of internal components and can lead to damage of standpipe and/or
laterals and
urn pump of
• T
out the lines and prevent a puf
• Rinse for approximately 15 seconds and turn off pump again. Move selector back to filter and turn
pump back on. You are now filtering water.
• The
•
WASTE
• If there is a point where you would like to take water directly out of the pool, this is the option
available to do so.
• You may also vacuum on waste to take serious debris straight out of the pool if/when necessary.
• Remember, this is taking water out of the pool so watch the water level to protect your pump and
filter. If water drops below skimmer level you
RECIRCULA
used when adding chemicals to the pool, during pool opening or regular maintenance.
VOIDS WARRANTY.
f and move selector to
f of sand or debris back into the pool after backwashing.
position does not allow water to pass through the filter.
TE
allows you to move water in the pool WITHOUT filtering the water
BACKWASH
RINSE
position. Once in backwash, turn pump
position. Rinse will allow water to flow through to clear
MUST turn pump off.
This is usually
.
10
NOTE
NEVER move selector handle while pump is on. Pump MUST be
switched off to change the position of the valve. Failure to comply
ARRANTY
will cause damage to your valve and is not covered by
W
.
Page 12

TROUBLESHOOTING
LOW
WATER FLOW
1. Check skimmer and pump
strainer baskets for debris.
2. Check for restrictions in intake
and discharge lines.
3. Check for air leak in intake
line (indicated by bubbles
returning to pool).
4. Backwash filter.
5. Bring sand level in filter down
to 1/2 full.
SHORT
FILTER CYCLES
1. Check for algae in pool and
superchlorinate as required.
2. Be sure chlorine and pH levels
are in proper range.
Adjust as required.
3. Check surface of filter sand for
crusting or caking. Remove
1” of sand if necessary.
4. Check hair and lint basket on
pump for possible air leak,
lubricate basket lid O-Ring as
necessary.
POOL WATER
WON’T CLEAR UP
1. Check chlorine, pH and total
alkalinity levels and adjust as
required.
2. Be sure flow rate through filter
is sufficient.
3. Operate filter for longer
periods.
4. Be sure valve is set on
“Filter” position.
5. Be sure sand is between
1/2 and 3/4 full in tank.
WINTERIZING
NOTE
• At the end of the season once you disconnect filter system, remove the valve from the tank. Valve
selector handle should be positioned BETWEEN any of the notches to allow for air ventilation
through the valve to protect from cracking.
• Remove drain plug from bottom of sand tank to drain water out of the filter tank. Keep this plug off
for the winter to allow any potential water build-up to escape from the tank.
• Empty ALL sand from the filter system and dispose of as it is recommended to replace sand
EACH season.
• Rinse out inside of tank and air dry
tank.
• Store tank in an area where it will be protected from the elements and keep valve and tank stored
APART to protect from condensation forming and causing cracks in the tank or valve.
• Run hose water through pump to rinse out and store in a warm, dry place for the winter.
Failure to winterize your filter properly may result in damage to the
tank which is NOT covered under any warranty
You
.
MAYremove laterals from standpipe and standpipe from
.
1
1
Page 13

NE6150 & NE6170
One Year Sandman Filter System
Warranty Registration Card
1745 Wallace Ave, Ste. B
St. Charles, IL 60174
1. Sandman Filter System has a one year warranty against defects in materials and workmanship.
To receive the warranty, the card must be filled
2. Filter System must be returned with a recei
idge was purchased. No warranty claim will be honored without a receipt.
cartr
3. Please notify Blue Wave Products in advance of any Sandman warranty claim prior to shipping the item back. Contact
our warranty claim department at warranty@splashnetxpress.com
4. The freight on the Sandman Filter System when returned must be prepaid.
5. Warranty claims will only be resolved with the shipment of a replacement product, no refunds will be given.
6. Improper installation, misuse or damages resulting from acts of nature will render this warranty null and void.
7. This warranty is in lieu of all other warranties expressed or implied and no responsibility is assumed for future damage
due to misuse. This warranty does not cover any damage from the elements such as wind, snow, heavy rains, etc. We are
not responsible for damage to the filter due to improper installation or excessive wear.
To send in this warranty card: Fill out below, detach and mail to the following address:
SANDMAN ABOVE-GROUND FILTER SYSTEM WARRANTY REGISTRATION FORM
Date Purchased: _____/_____/_____
Purchaser: _ _ _ _ _ _ _ _ _ _ _ _ _ _ _ _ _ _ _ _ _ _ _ _ _ _ _ _ _ _ _ _ _ _ _ _ _ _ _ _ _ _ _ _ _ _ _ _ _ _
Address: _ _ _ _ _ _ _ _ _ _ _ _ _ _ _ _ _ _ _ _ _ _ _ _ _ _ _ _ _ _ _ _ _ _ _ _ _ _ _ _ _ _ _ _ _ _ _ _ _ _ _
City/State/Zip: _ _ _ _ _ _ _ _ _ _ _ _ _ _ _ _ _ _ _ _ _ _ _ _ _ _ _ _ _ _ _ _ _ _ _ _ _ _ _ _ _ _ _ _ _ _ _ _
Phone: ( ) _ _ _ _ _ _ _ _ _ _ _ _ _ _ _ _ _ _ _ _ _ _ Email: _ _ _ _ _ _ _ _ _ _ _ _ _ _ _ _ _ _ _ _ _ _ _
Purchased from: _ _ _ _ _ _ _ _ __ _ _ _ _ _ _ _ _ _ _ _ _ _ _ __ _ _ _ _ _ _ _ _ _ _ _ _ _ _ __ _ _ _ _ _ _
Item Number: _ _ _ _ _ _ _ _ _ _ _ _ _ _ _ _ _ _ _ Purchase Price: _ _ _ _ _ _ _ _ _ _ _ _ _ _ _ _ _ _ _ __
out completely and returned.
pt showing date of purchase, purchase price, and the dealer from which the
.
BLUE WAVE PRODUCTS
1745 Wallace Ave. Suite B
St. Charles, IL 60174
 Loading...