

Page 1
Table of Contents
Index
How to Use This Guide
TO
P
Ba
c
k
Pre
vious Ne
xt
Please read this guide bef
o
re operating this equipment.
After you nish readin
g this guide
, store it in a saf
e
place
fo
r future reference .
Ad
vanced Send
Feat
ures
Advanced Cop
y
Feat
ures
Netw ork
Remot
e UI
System Monitor
System Mana
ger
Settings
Reports and Lists
Tr
oub
leshooting
Advanced Operation Guide
Appendix
BPS 907 N
Page 2
1
2
3
4
5
7
8
9
6
TO P
Ba
c
k
Pre
vious Ne
xt
i
Table of Contents
Inde x
Ad
vanced Send
Feat
ures
Ad vanced Cop
y
Feat
ur
es
Network
Remot
e UI
System Monitor
System Mana
g
er
Settings
Reports and Lists
Tr
oubleshooting
Appendix
Manuals for the Machine
Mac
hine Set-Up
Sof t
ware Installat
i
on
Basic Features
Maintenance
Quic
k Star t Guide
Ba
sic Features
Maintenance
Mac
hine Settings
Specications
Basic Operation Guide
Adva
nced Features
Ne
twork and Remote User Inte
rface
System Mo
nitor
Re
ports and Lists
Ad
vanced Operation Guide
(This Document)
Scanni
ng
Features
Scanner Driver Guide
Indicat
es th
e manua
l is supplied
in PDF f o
rmatin th
e ac
companyingCD-R OM.
To
view
the manuals in PDF
format, Adobe Reader/Acrobat Rea
der/Acro
bat is required
. If Adob
e
Re
ader/Acroba
t Rea
der/Ac
robat is not in
stal
led on your system, please down
loadit from the Adobe
Syste
ms Incor
porated we bsite
.
Co nsiderableeort ha s b
een made to mak
e sure that the man uals for the
mach
ine
are free of
inaccur
acies and omission s . However,
as w
e a re constantly impro
ving our pro
ducts, if
y
ou nee d an e xact
spe
cication, please contact BLUE
The machin e illustration on the co ve
r ma y di
er
slightly from y
our machin e
.
CD-R OM
CD-R
OM
CD-R OM
CD-R
OM
Page 3

1
2
3
4
5
7
8
9
6
TO P
Ba
c
k
Pre
vious Ne
xt
ii
Table of Contents
Inde x
Ad
vanced Send
Feat
ur es
Ad vanced Cop
y
Feat
ur
es
Network
Remot
e UI
System Monitor
System Mana
g
er
Settings
Reports and Lists
Tr
oub
l
eshooting
Appendix
Legal Notices
Trademarks
BLUE, the Blue logo, iR, and NetSpot are trademarks of Blue Inc.
Microsoft and Windows are registered trademarks of Microsoft Corporation.
All other product and brand names are registered trademarks, trademarks or service marks of their respective owners.
Copyright
Copyright © 2006 by BLUE . All rights reserved. No part of this publication may be reproduced, transmitted, transcribed, stored in a retrieval
system, or translated into any language or computer language in any form or by any means, electronic, mechanical, magnetic, optical, chemical,
manual, or otherwise, without the prior written permission of BLUE.
Disclaimer
The information in this document is subject to change without notice.
BLUE MAKES NO WARRANTY OF ANY KIND WITH REGARD TO THIS MATERIAL, EITHER EXPRESS OR IMPLIED, EXCEPT AS
PROVIDED HEREIN, INCLUDING WITHOUT LIMITATION, THEREOF, WARRANTIES AS TO MARKETABILITY, MERCHANTABILITY,
FITNESS FOR A PARTICULAR PURPOSE OF USE OR AGAINST INFRINGEMENT OF ANY PATENT. BLUE. SHALL NOT BE LIABLE
FOR ANY DIRECT, INCIDENTAL, OR CONSEQUENTIAL DAMAGES OF ANY NATURE, OR LOSSES OR EXPENSES RESULTING FROM
THE USE OF THIS MATERIAL.
Page 4

1
2
3
4
5
7
8
9
6
TO P
Ba
c
k
Pre
vious Ne
xt
iii
Table of Contents
Inde x
Ad
vanced Send
Feat
ur es
Ad vanced Cop
y
Feat
ur
es
Netw ork
Remot
e UI
System Monitor
System Mana
g
er
Settings
Repor ts and Lists
Tr
oubleshooting
Appendix
A v
ailable Featur
es
Th
e pr oceduresdescr ibed in this ma nual a
re b
ased on
the BPS 907 N..
Depending on t
he
s
yste mconfiguration and product purc
ha
se
d
, s
o
me f
eat
ur
es de
scri
bed in th
e man
u
als ma
y not be functional.
Thetabl
e belo w
showsth
e a vailabl
e fe atures on a product b
asis .
: a
vailab
l
e
– : n
ot ava
ilabl
e
opt.
: opt
io
nal
COPY
PR INT
(U FR
II LT)
PR INT
(PC
L
)
SCAN
F
AX
IF
AX/E-MAIL/
FTP/SM
B
RU
I
(Net wor
k
Boar
d)
ADF
BPS 907 N
– Optional Card Reader-E1 and Cassette Feeding Module-N1 are available
– Optional handset is not available in the U.K.
Page 5
1
2
3
4
5
7
8
9
6
TOP
Back Previous Next
iv
Table of Contents
Index
Advanced Send
Features
Advanced Copy
Features
Network
Remote UI
System Monitor
System Manager
Settings
Reports and Lists
Troubleshooting
Appendix
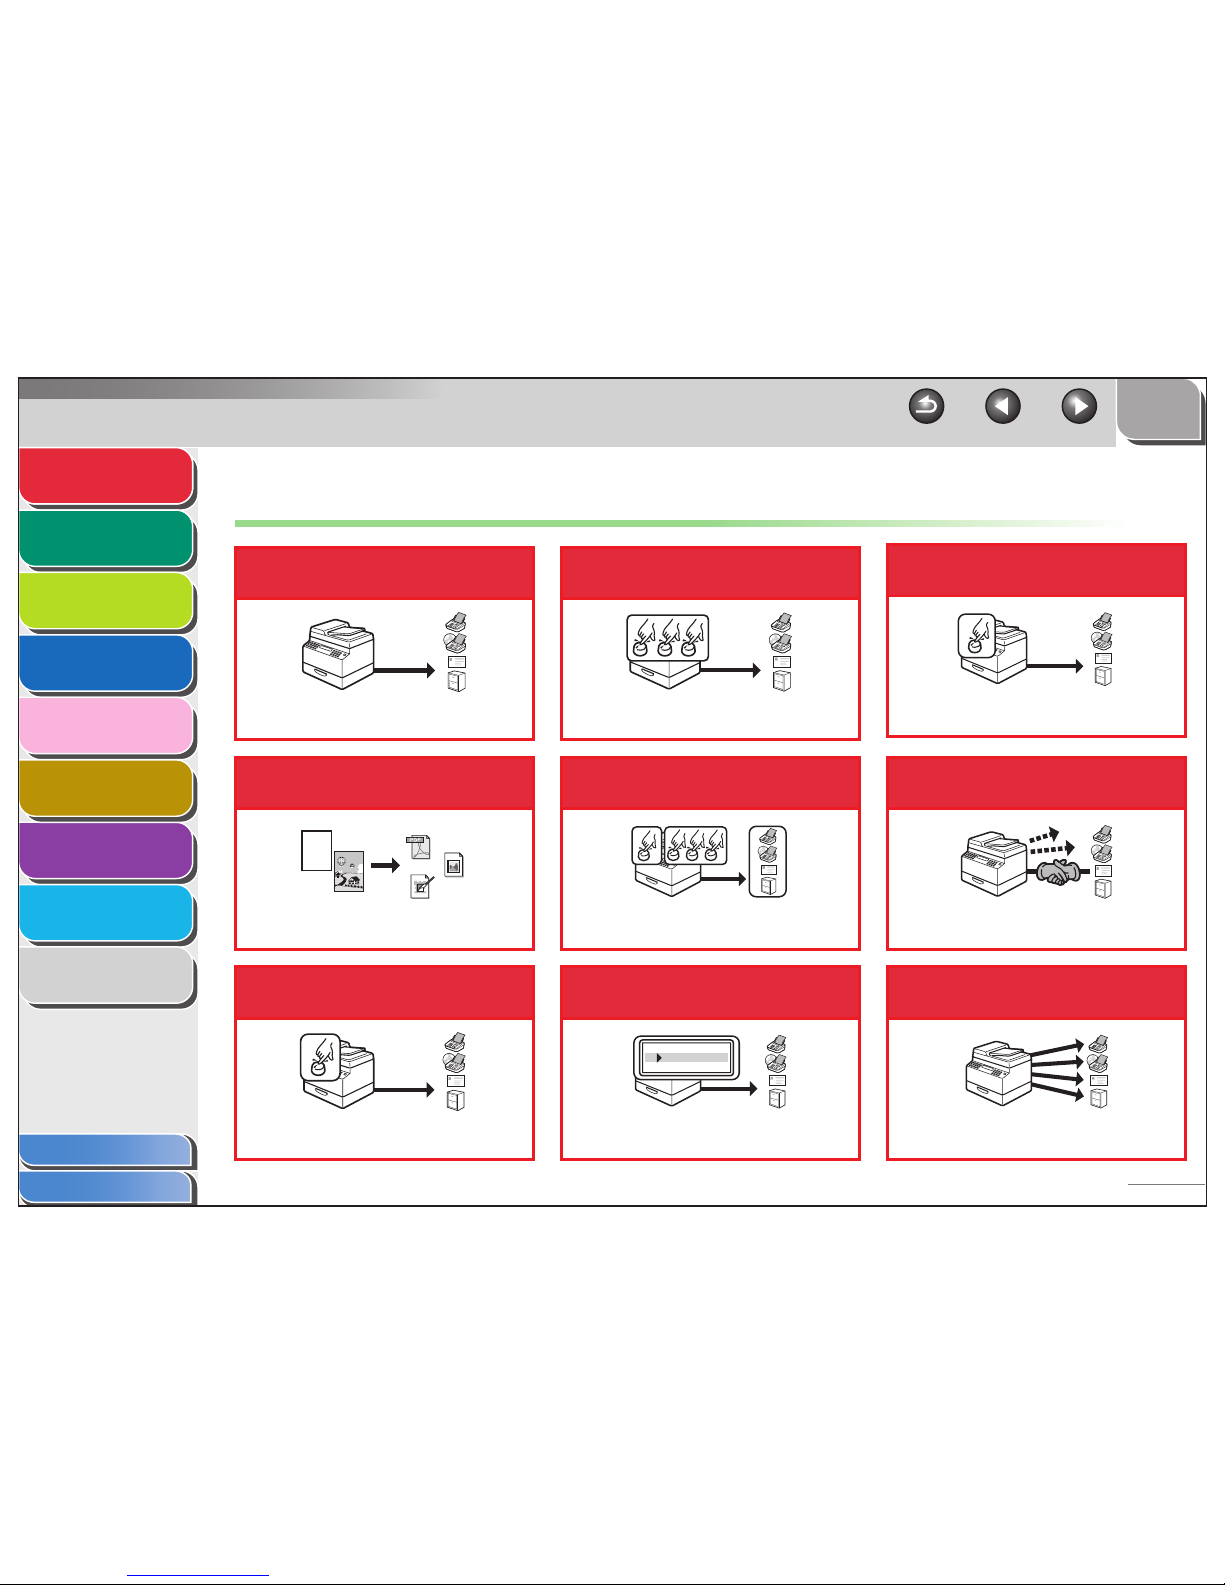
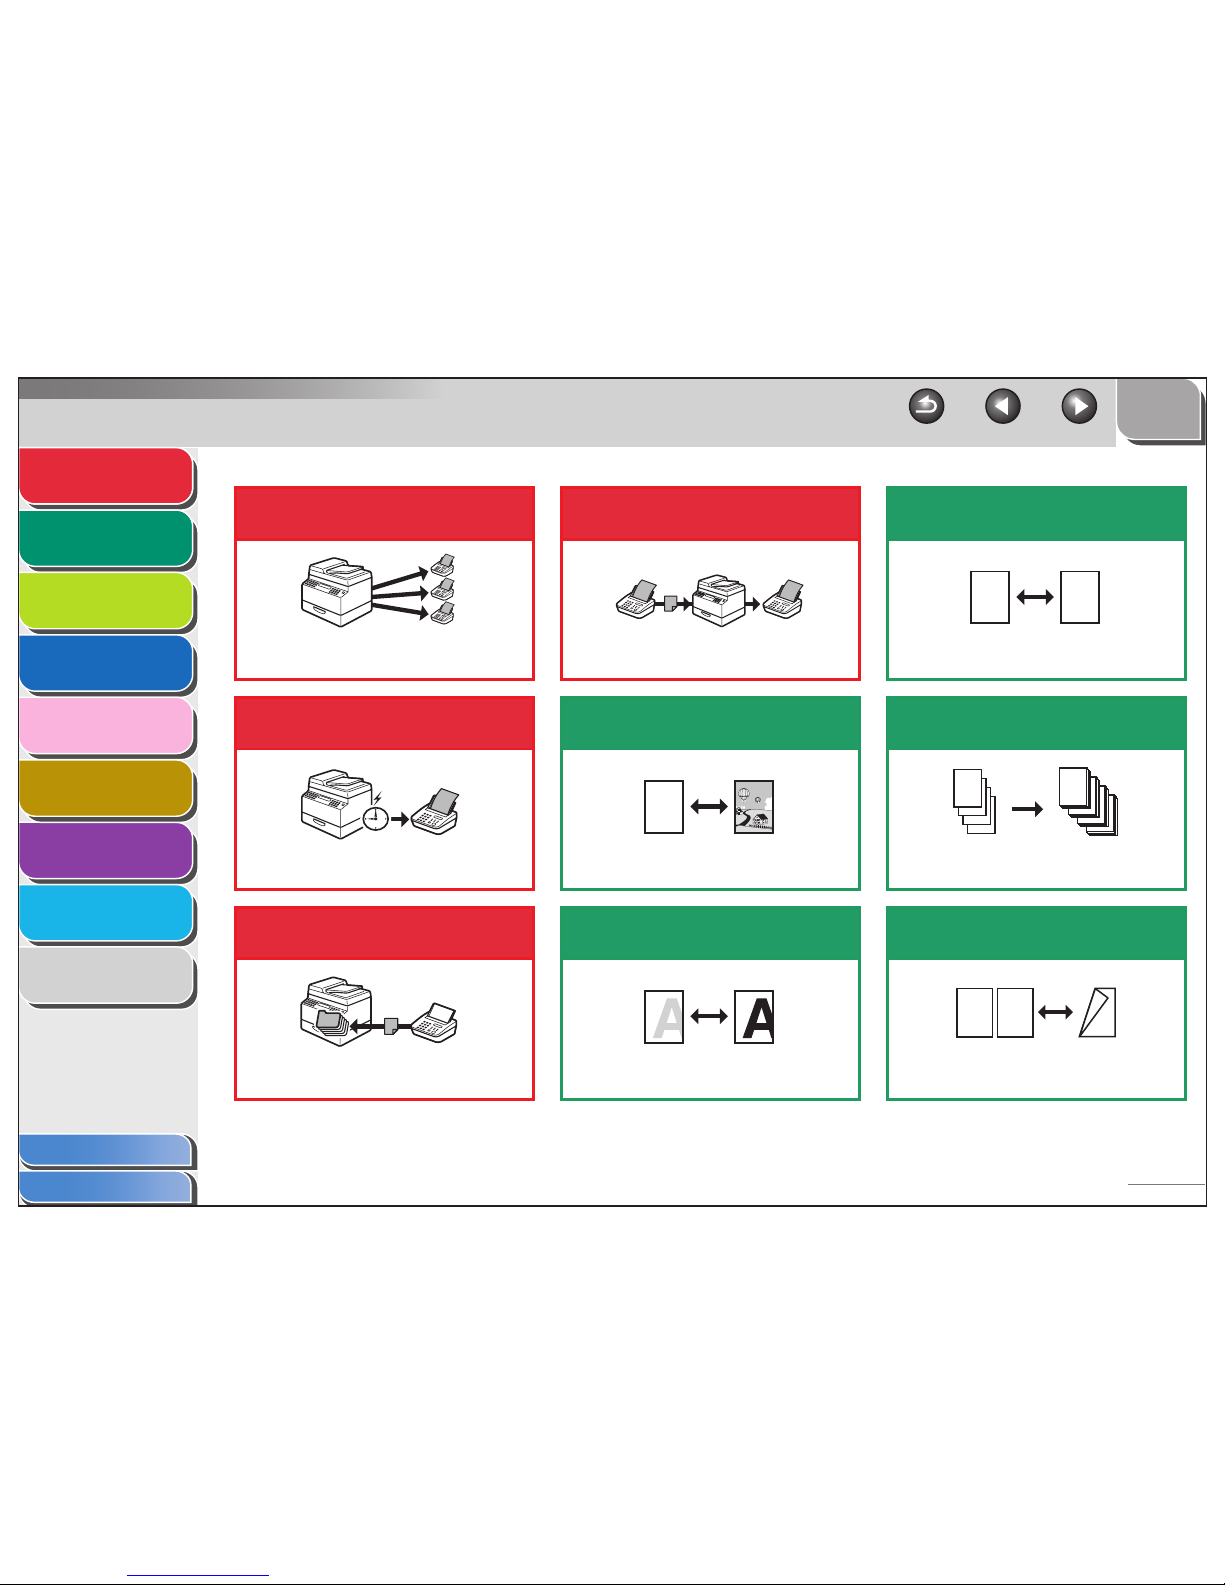
Things You Can Do
Send documents with diverse
sending methods
Fax, E-Mail, I-Fax, and File Server
→ Basic Operation Guide
Send documents in a variety
of file formats
Send Settings
→ Basic Operation Guide
Specify a recipient with a
single key
Sending with One-Touch Keys
→ Basic Operation Guide
ABC
ABC
ABC
ABC
PDF
JPEG
TIFF
Specify a recipient with a
three-digit code
Sending with Coded Dial Codes
→ Basic Operation Guide
Specify multiple recipients as a
group
Sending to Group Addresses
→ Basic Operation Guide
Look up a particular
recipient
Address Book Search
→ Basic Operation Guide
AAAAA
BBBBB
CCCCC
Specify a recipient with its
scan/send settings
Favorites Buttons
→ Basic Operation Guide
Retry sending documents
automatically
Auto Retry
→ p. 1- 7
Send documents to multiple
recipients
Broadcasting
→ p. 1- 4
M1
Page 6
1
2
3
4
5
7
8
9
6
TOP
Back Previous Next
v
Table of Contents
Index
Advanced Send
Features
Advanced Copy
Features
Network
Remote UI
System Monitor
System Manager
Settings
Reports and Lists
Troubleshooting
Appendix
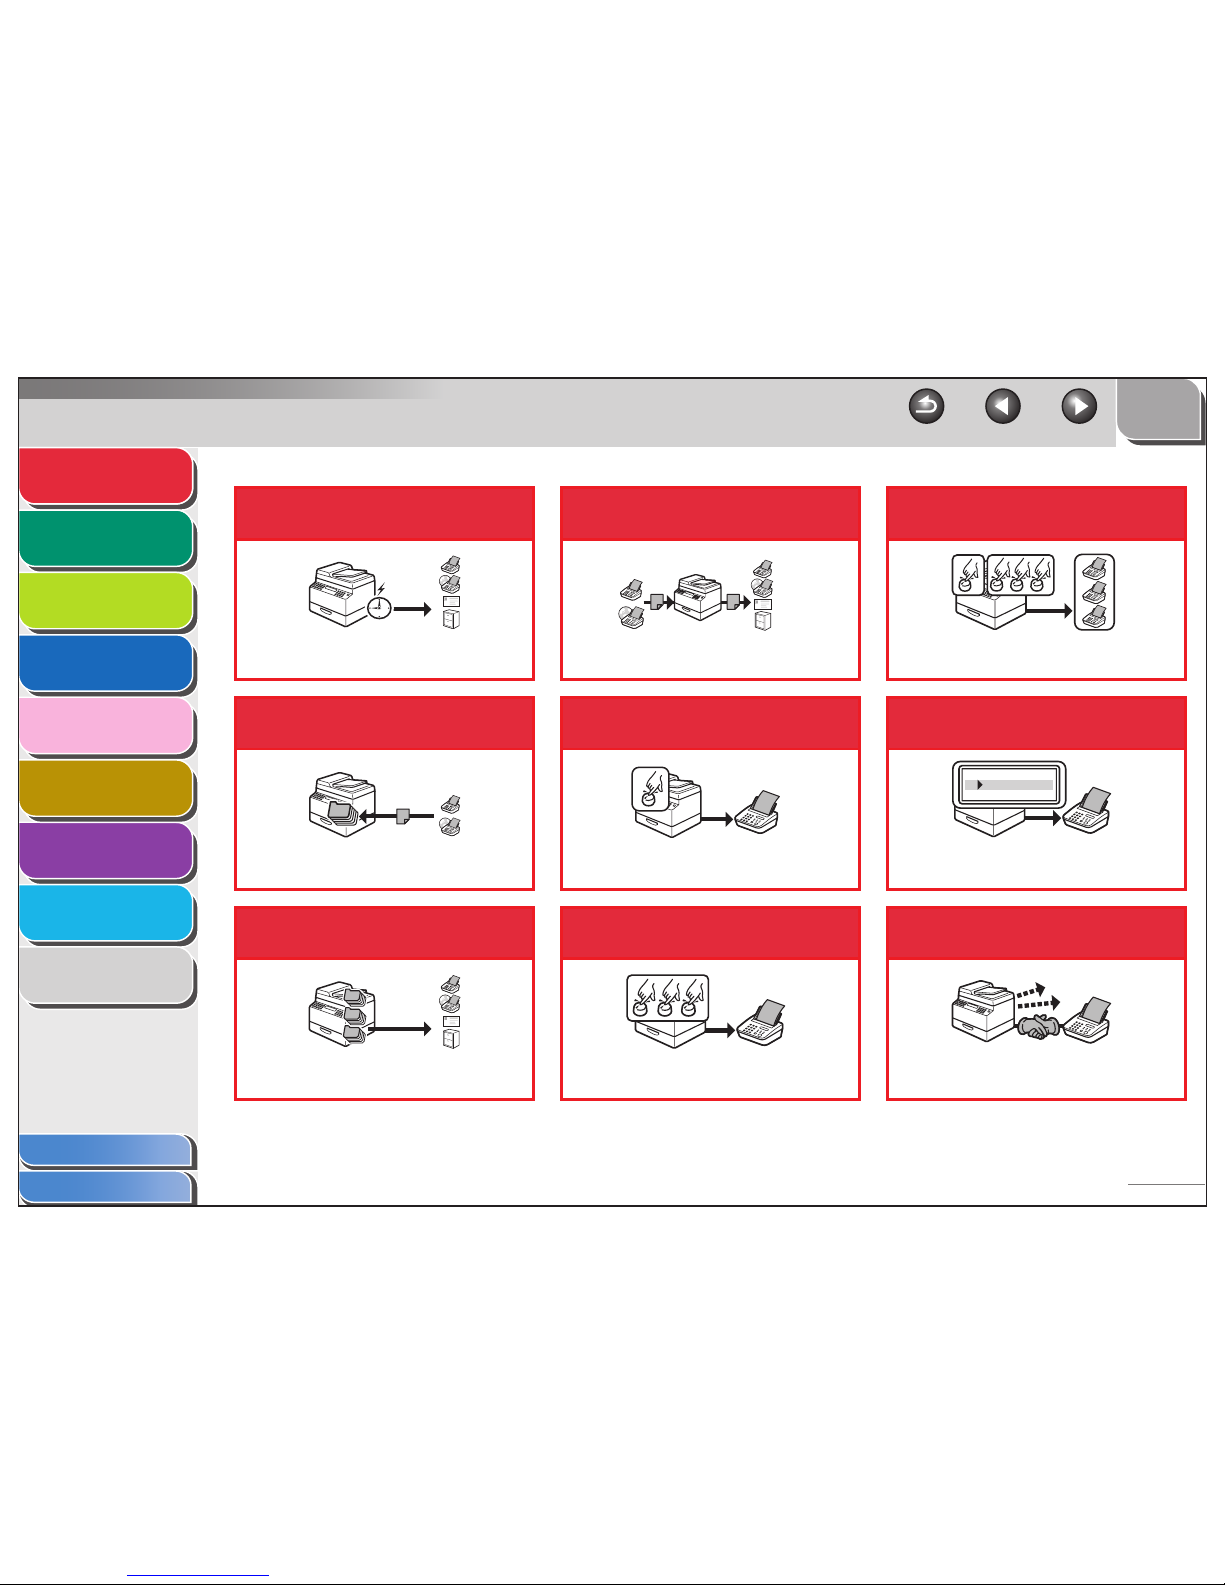
Send documents at a
specified time
Delayed Sending
→ p. 1- 5
Receive faxes/I-faxes in
memory
Memory Reception
→ p. 1- 17
Recall the last three sending
jobs
Job Recall
→ p. 1- 6
1
2
3
Forward received fax/I-fax
documents
Forwarding Documents
→ p. 1-19, p. 4-18
Specify a recipient with a
single key (FAX)
One-Touch Speed Dialing
→ Basic Operation Guide
Specify a recipient with a
three-digit code (FAX)
Coded Speed Dialing
→ Basic Operation Guide
Specify multiple recipients as a
group (FAX)
Group Dialing
→ Basic Operation Guide
Look up a particular
recipient (FAX)
Address Book Dialing
→ Basic Operation Guide
Redial when the line is busy
(FAX)
Automatic Redialing
→ p. 1- 7
AAAAA
BBBBB
CCCCC
Page 7
1
2
3
4
5
7
8
9
6
TOP
Back Previous Next
vi
Table of Contents
Index
Advanced Send
Features
Advanced Copy
Features
Network
Remote UI
System Monitor
System Manager
Settings
Reports and Lists
Troubleshooting
Appendix
Send a fax to multiple
recipients (FAX)
Broadcasting
→ p. 1- 4
Send a fax at a specified
time (FAX)
Delayed Sending
→ p. 1- 5
Receive faxes in memory
without printing out (FAX)
Memory Reception
→ p. 1- 17
Forward received fax
documents (FAX)
Forwarding Documents
→ p. 1-19, p. 4-18
Select a scan mode depending
on the type of image
Image Quality
→ Basic Operation Guide
Adjust the density level of
scanned images
Density
→ Basic Operation Guide
ABC
ABC
ABC
ABC
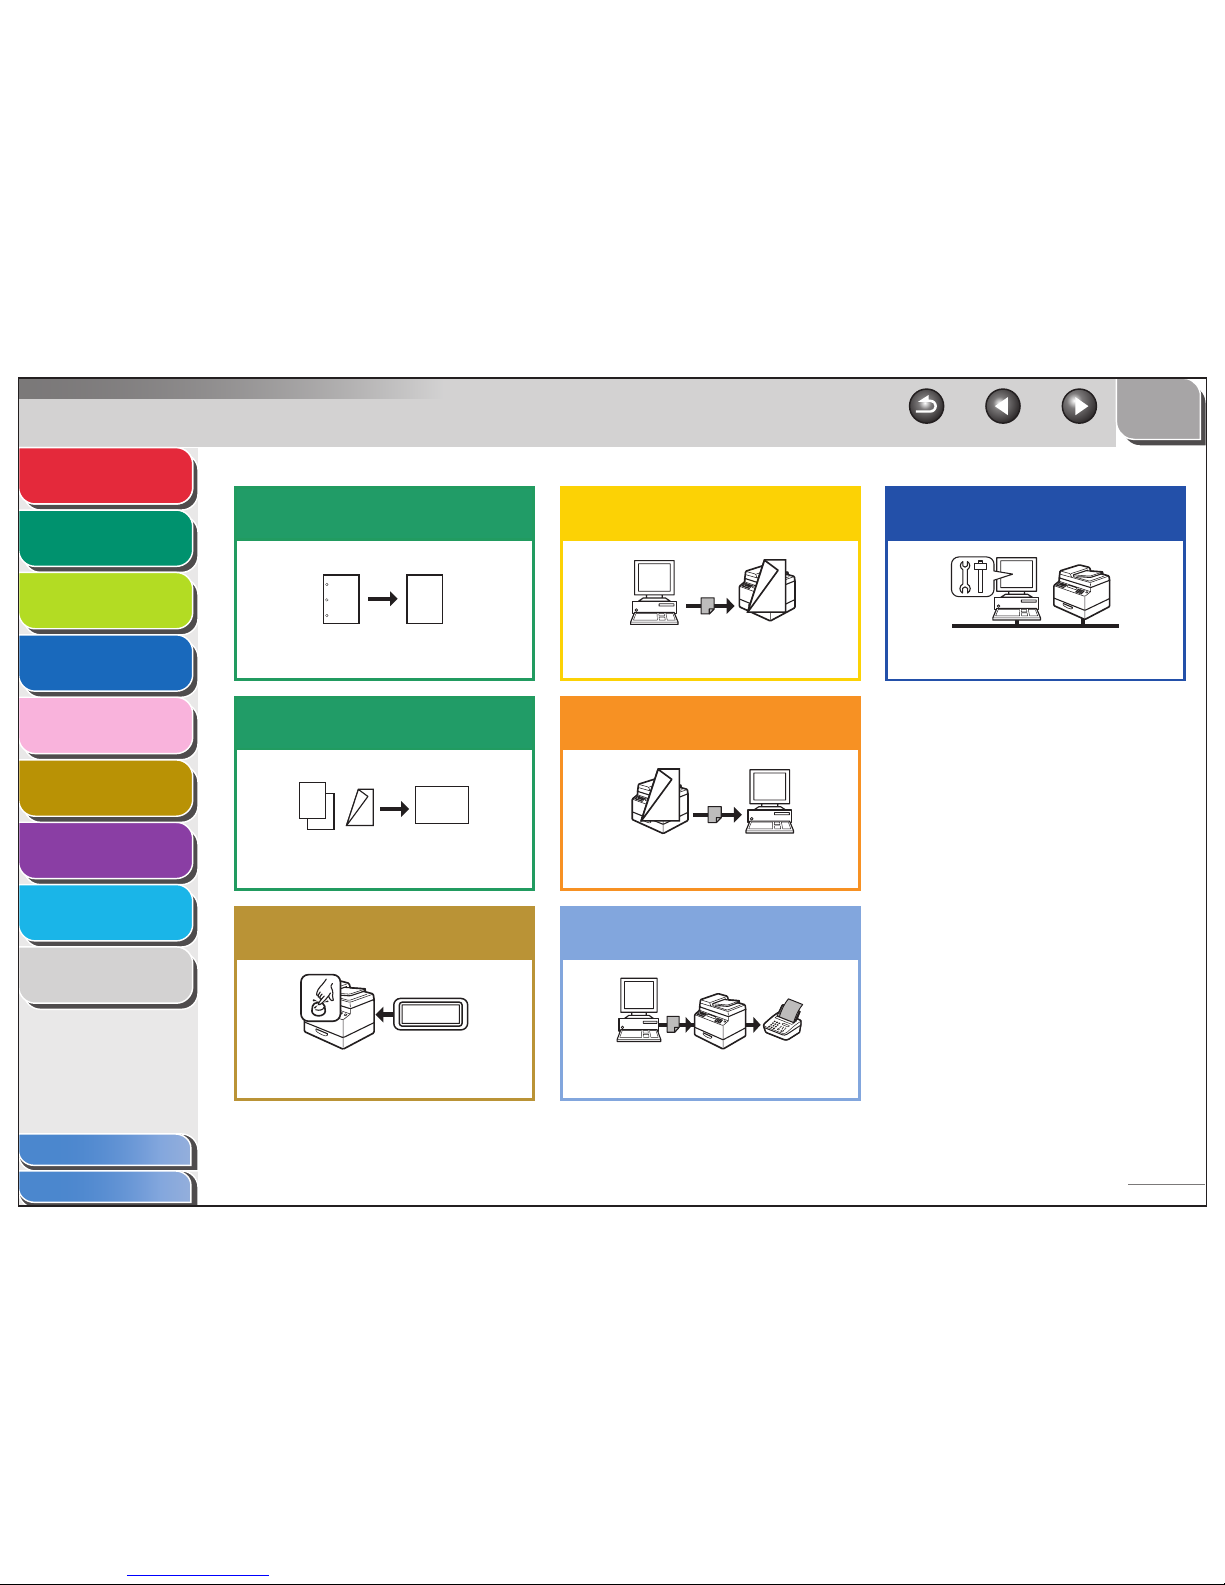
Enlarge or reduce copied
images
Zoom Ratio
→ Basic Operation Guide
Sort copies by page order
Collate Copying
→ p. 2-2
Make two-sided copies
Two-Sided Copy
→ p. 2-3
A
A
DDDD
DDDD
DDDD
DDDD
4
CCCC
CCCC
CCCC
CCCC
3
BBBB
BBBB
BBBB
BBBB
2
AAAA
AAAA
AAAA
AAAA
1
AAAA
AAAA
AAAA
AAAA
1
AAAA
AAAA
AAAA
AAAA
1
AAAA
AAAA
AAAA
AAAA
1
AAAA
AAAA
AAAA
AAAA
1
DE F
DE F
DE F
DE F
2
ABC
ABC
ABC
ABC
1
ABC
ABC
ABC
ABC
1
Page 8
1
2
3
4
5
7
8
9
6
TOP
Back Previous Next
vii
Table of Contents
Index
Advanced Send
Features
Advanced Copy
Features
Network
Remote UI
System Monitor
System Manager
Settings
Reports and Lists
Troubleshooting
Appendix
Erase shadows and lines in
copies
Frame Erase Copy
→ p. 2-7
Copy two documents on one
sheet
2 on 1 Combination
→ p. 2-6
Restrict the use of the
machine with department IDs
Department ID Management
→ p. 6-4
ABC
ABC
ABC
ABC
ABC
ABC
ABC
ABC
DE F
DE F
DE F
DE F
2
ABC
ABC
ABC
ABC
1
ABC
ABC
ABC
ABC
1
ABC
ABC
ABC
ABC
1
DE F
DE F
DE F
DE F
2
000001
ID
Print a document from a PC
Printing
→ Online Help
Specify detailed scanning
options to suit various images
Scanning
→ Scanner Dr iver Guide
Send a fax from a PC
PC Faxing
→ Online Help
ABC
ABC
ABC
ABC
1
ABC
ABC
ABC
ABC
1
Access and manage the
machine from a PC
Remote UI
→ p. 4-1
Page 9

1
2
3
4
5
7
8
9
6
TOP
Back Previous Next
viii
Table of Contents
Index
Advanced Send
Features
Advanced Copy
Features
Network
Remote UI
System Monitor
System Manager
Settings
Reports and Lists
Troubleshooting
Appendix
Table of Contents
Manuals for the Machine ................................................................................i
Legal Notices................................................................................................. ii
Available Features........................................................................................ iii
Things You Can Do ...................................................................................... iv
How to Use This Guide................................................................................xx
Using the Top Page ..............................................................................xx
Using the Chapter Topic List................................................................ xxi
Page 10

1
2
3
4
5
7
8
9
6
TOP
Back Previous Next
ix
Table of Contents
Index
Advanced Send
Features
Advanced Copy
Features
Network
Remote UI
System Monitor
System Manager
Settings
Reports and Lists
Troubleshooting
Appendix
1 Advanced Send Features .............................................................................................. 1-1
Sending Features ...................................................................................... 1-4
Broadcasting ....................................................................................... 1-4
Delayed Sending................................................................................. 1-5
Job Recall ........................................................................................... 1-6
Customizing Sending Features ................................................................. 1-7
Setting Number of Retry Attempts ...................................................... 1-7
Setting Automatic Redialing ................................................................ 1-7
Send Settings...................................................................................... 1-9
Fax Dialing Features ............................................................................... 1-11
Redialing Manually............................................................................ 1-11
Dialing Through a Switchboard ......................................................... 1-11
Switching Temporarily to Tone Dialing.............................................. 1-12
Dialing an Overseas Number (With Pauses)..................................... 1-13
Page 11

1
2
3
4
5
7
8
9
6
TOP
Back Previous Next
x
Table of Contents
Index
Advanced Send
Features
Advanced Copy
Features
Network
Remote UI
System Monitor
System Manager
Settings
Reports and Lists
Troubleshooting
Appendix
Receiving Features.................................................................................. 1-15
Setting Receive Mode ....................................................................... 1-15
Memory Reception ............................................................................ 1-17
Forwarding Received Fax/I-Fax Documents..................................... 1-19
Remote Reception ............................................................................ 1-19
Printing Received Documents ........................................................... 1-21
Address Book Settings ............................................................................ 1-23
Registering/Editing File Server Addresses in
One-Touch Keys/Coded Dial Codes ................................................. 1-23
Storing Favorites Buttons.................................................................. 1-26
Canceling TX/RX Jobs ............................................................................ 1-34
Page 12

1
2
3
4
5
7
8
9
6
TOP
Back Previous Next
xi
Table of Contents
Index
Advanced Send
Features
Advanced Copy
Features
Network
Remote UI
System Monitor
System Manager
Settings
Reports and Lists
Troubleshooting
Appendix
2 Advanced Copy Features.............................................................................................. 2-1
Advanced Copy Features .......................................................................... 2-2
Collate Copy........................................................................................ 2-2
Reserved Copy ................................................................................... 2-3
Two-Sided Copying............................................................................. 2-3
2 on 1 Combination ............................................................................. 2-6
Frame Erase ....................................................................................... 2-7
Canceling Copy Jobs............................................................................... 2-11
3 Network........................................................................................................................... 3-1
System Requirements ............................................................................... 3-4
Printing or Sending a Fax from a Computer........................................ 3-4
Using E-Mail/I-Fax............................................................................... 3-5
Sending Data ...................................................................................... 3-5
Page 13

1
2
3
4
5
7
8
9
6
TOP
Back Previous Next
xii
Table of Contents
Index
Advanced Send
Features
Advanced Copy
Features
Network
Remote UI
System Monitor
System Manager
Settings
Reports and Lists
Troubleshooting
Appendix
Network Environment Setup Procedures .................................................. 3-7
Interface Settings....................................................................................... 3-8
Communication Environment Setup ........................................................ 3-10
Using a TCP/IP Network.......................................................................... 3-13
Protocol Settings for TCP/IP Network ..................................................... 3-14
Settings from the Operation Panel of the Machine ........................... 3-14
Setting Up a Computer for Printing/Sending a Fax ................................. 3-23
Machine Connection Method (LPD/Raw).......................................... 3-23
Print Server Settings ......................................................................... 3-26
Setting Up a Computer as a FTP Server................................................. 3-27
Using a NetBIOS Network ....................................................................... 3-37
Page 14

1
2
3
4
5
7
8
9
6
TOP
Back Previous Next
xiii
Table of Contents
Index
Advanced Send
Features
Advanced Copy
Features
Network
Remote UI
System Monitor
System Manager
Settings
Reports and Lists
Troubleshooting
Appendix
Protocol Settings for NetBIOS Network................................................... 3-38
Settings from the Operation Panel of the Machine ........................... 3-38
Setting Up a Computer as a File Server.................................................. 3-41
Connecting to a TCP/IP Network ...................................................... 3-41
Connecting to a NetBIOS Network and
Configuring a Shared Folder ............................................................. 3-41
Machine Management ............................................................................. 3-52
Machine Management Using Web Browser (Remote UI) ................. 3-52
Machine Management Using NetSpot Device Installer..................... 3-52
Machine Management Using NetSpot Console ................................ 3-52
4 Remote UI ....................................................................................................................... 4-1
System Requirements ............................................................................... 4-3
Page 15

1
2
3
4
5
7
8
9
6
TOP
Back Previous Next
xiv
Table of Contents
Index
Advanced Send
Features
Advanced Copy
Features
Network
Remote UI
System Monitor
System Manager
Settings
Reports and Lists
Troubleshooting
Appendix
Using the Remote UI ................................................................................. 4-4
Starting the Remote UI........................................................................ 4-4
Displaying Device Status and Information................................................. 4-6
Job Management....................................................................................... 4-7
Managing Print Jobs ........................................................................... 4-7
Viewing the Print Log .......................................................................... 4-8
Viewing the Activity Log ...................................................................... 4-9
Managing the Address Book ................................................................... 4-10
Customizing System Settings .................................................................. 4-15
Customizing System Information ...................................................... 4-15
Specifying Forwarding Settings ............................................................... 4-18
Page 16

1
2
3
4
5
7
8
9
6
TOP
Back Previous Next
xv
Table of Contents
Index
Advanced Send
Features
Advanced Copy
Features
Network
Remote UI
System Monitor
System Manager
Settings
Reports and Lists
Troubleshooting
Appendix
Managing the Department/User ID.......................................................... 4-25
Import/Export Function ............................................................................ 4-30
Saving the Address Book.................................................................. 4-30
Loading an Address Book ................................................................. 4-31
Saving User Management Data in Files (Export).............................. 4-33
Loading User Management Data Files (Overwrite/Import)................ 4-34
Saving Additional Functions Settings in Files (Export)...................... 4-36
Loading Additional Functions Settings Files (Overwrite/Import)........ 4-37
Device Custom Settings .......................................................................... 4-39
Page 17

1
2
3
4
5
7
8
9
6
TOP
Back Previous Next
xvi
Table of Contents
Index
Advanced Send
Features
Advanced Copy
Features
Network
Remote UI
System Monitor
System Manager
Settings
Reports and Lists
Troubleshooting
Appendix
5 System Monitor .............................................................................................................. 5-1
Checking Job and Machine Status ........................................................... 5-2
Checking Transmission/Reception Results......................................... 5-2
Checking and Deleting Documents Stored in Memory........................ 5-2
Transferring Documents Received in Memory.................................... 5-3
Checking and Deleting Copy Jobs ...................................................... 5-3
Checking and Deleting Print Jobs ....................................................... 5-4
Checking and Deleting Report Jobs.................................................... 5-4
Checking the Arrival of I-Fax............................................................... 5-5
6 System Manager Settings ............................................................................................. 6-1
Specifying the System Manager Settings.................................................. 6-2
Page 18

1
2
3
4
5
7
8
9
6
TOP
Back Previous Next
xvii
Table of Contents
Index
Advanced Send
Features
Advanced Copy
Features
Network
Remote UI
System Monitor
System Manager
Settings
Reports and Lists
Troubleshooting
Appendix
Department ID Management ..................................................................... 6-4
Registering the Department ID, Password, and Page Limit................ 6-4
Changing the Password and Page Limit ............................................. 6-6
Erasing the Department ID and Password.......................................... 6-8
Checking Counter Information ............................................................ 6-9
Clearing Page Totals........................................................................... 6-9
Printing Counter Information ............................................................. 6-10
Accepting Print Jobs with Unknown IDs............................................ 6-11
Using the Optional Card Reader ............................................................. 6-12
7 Reports and Lists........................................................................................................... 7-1
Summary of Reports and Lists .................................................................. 7-2
Page 19

1
2
3
4
5
7
8
9
6
TOP
Back Previous Next
xviii
Table of Contents
Index
Advanced Send
Features
Advanced Copy
Features
Network
Remote UI
System Monitor
System Manager
Settings
Reports and Lists
Troubleshooting
Appendix
Printing Reports Automatically .................................................................. 7-4
TX REPORT........................................................................................ 7-4
RX REPORT ....................................................................................... 7-5
ACTIVITY REPORT ............................................................................ 7-6
8 Troubleshooting............................................................................................................. 8-1
General Problems ..................................................................................... 8-2
Paper Feeding Problems .......................................................................... 8-4
Sending/Receiving Problems ................................................................... 8-6
Sending Problems............................................................................... 8-6
Receiving Problems .......................................................................... 8-11
Copying Problems .................................................................................. 8-17
Page 20

1
2
3
4
5
7
8
9
6
TOP
Back Previous Next
xix
Table of Contents
Index
Advanced Send
Features
Advanced Copy
Features
Network
Remote UI
System Monitor
System Manager
Settings
Reports and Lists
Troubleshooting
Appendix
Printing Problems ................................................................................... 8-18
Telephone Problems .............................................................................. 8-20
Network Problems .................................................................................. 8-22
9 Appendix......................................................................................................................... 9-1
Glossary .................................................................................................... 9-2
Index........................................................................................................ 9-15
Page 21
1
2
3
4
5
7
8
9
6
TO
P
Ba c
k
Previous Next
xx
Table of Contents
Inde
x
Ad vanced Send
Feat ur es
Ad vanced Cop y
Features
Netw ork
Remot e UI
System Monitor
System Mana g
er
Settings
Reports and Lists
Troub
leshooting
Appendix
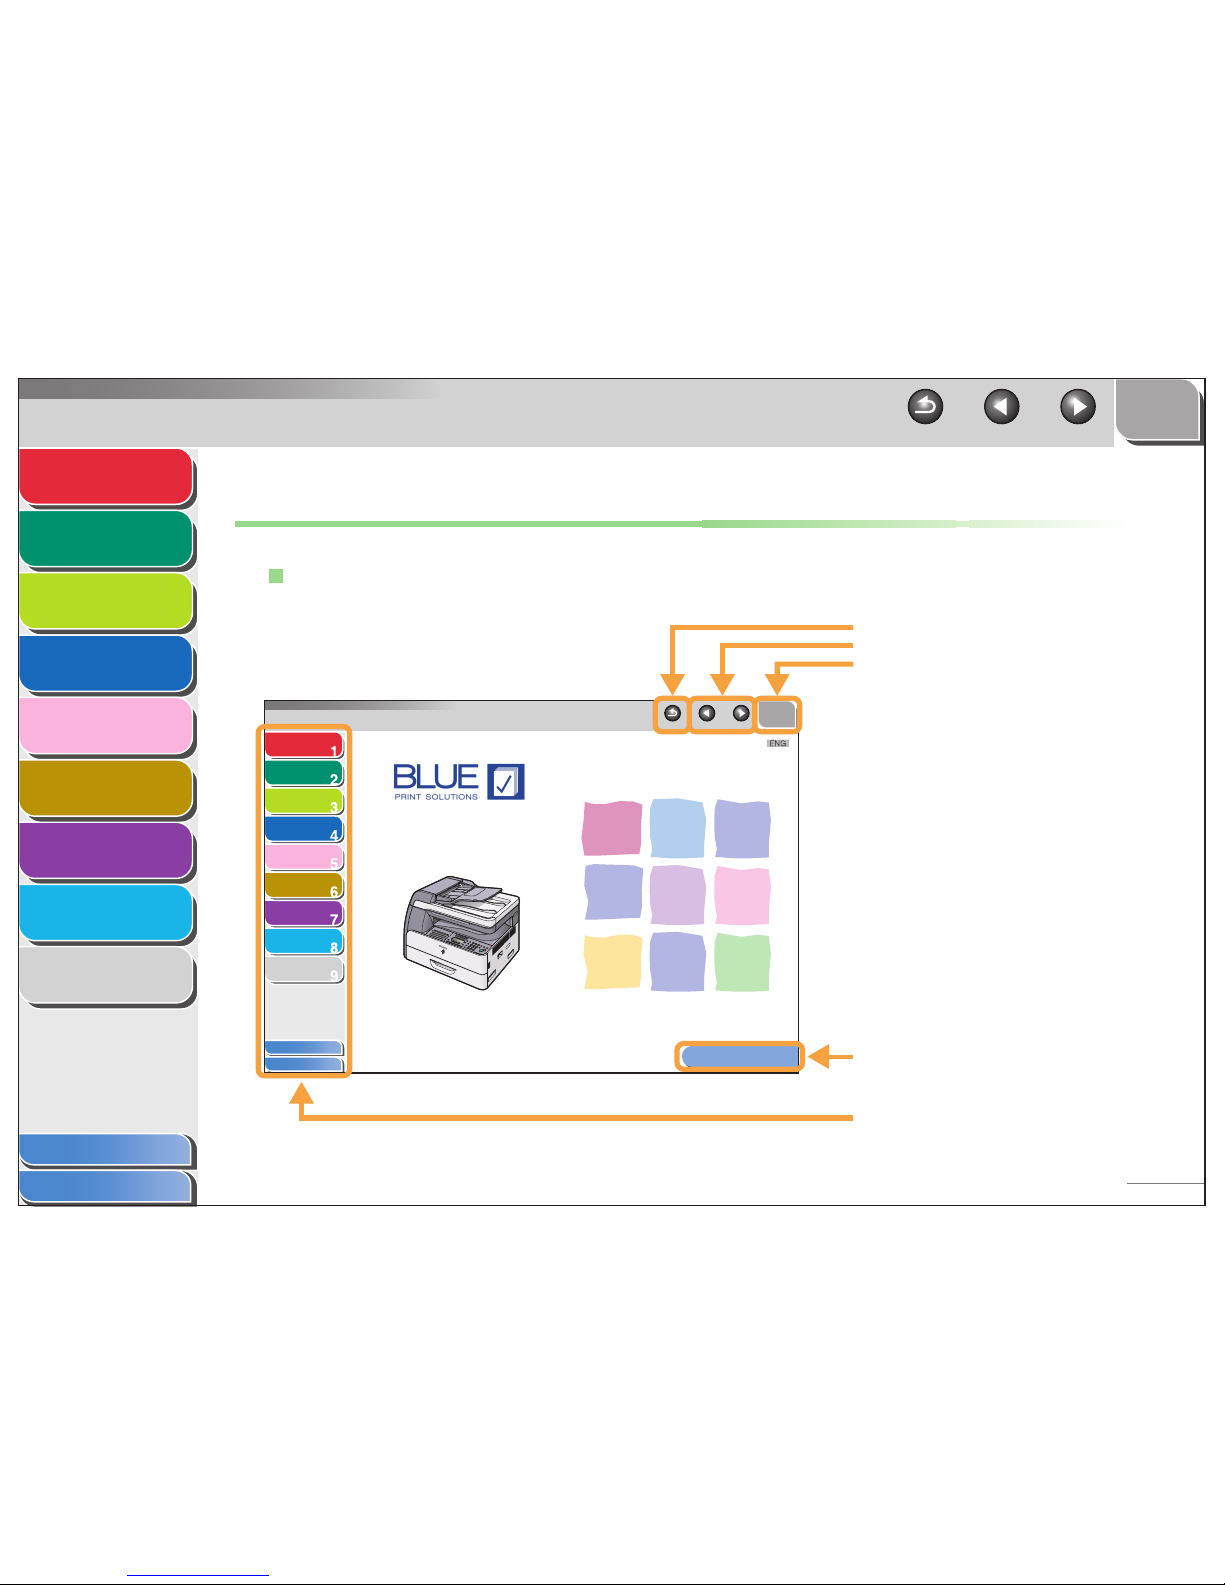
How to Use This Guide
Using the T
o
p P
ag
e
T
a
bl
e of Contents
Inde x
Ho
w to Use This Guide
TOP
Bac k Pre vious Next
Please read this guide bef ore operating this equipment.
After y
ou nish readin g this guide , store it in a saf e place
f
o
r future ref
erence
.
Ad
v
anced Send
Featur es
Advanced Cop y
Featur
es
Netw
ork
Remote UI
System Monitor
System Mana
ge
r
Settings
Repor ts and Lists
Troub
leshooting
Appendix
Dis
plays the pr
eviou
s ornext pa
ge.
Returns to the last page op ened .
Returns to the top page.
Dis p
lays the “How to Use This Guide” page.
Qu
ic k li
nk s to the l i st ofthin gs you ca ndo,
topics
for ea
ch chapter, table of
contents,
and the index .
Advanced Operation Guide
BPS 907 N
Page 22
1
2
3
4
5
7
8
9
6
TOP
Back Previous Next
xxi
Table of Contents
Index
Advanced Send
Features
Advanced Copy
Features
Network
Remote UI
System Monitor
System Manager
Settings
Reports and Lists
Troubleshooting
Appendix
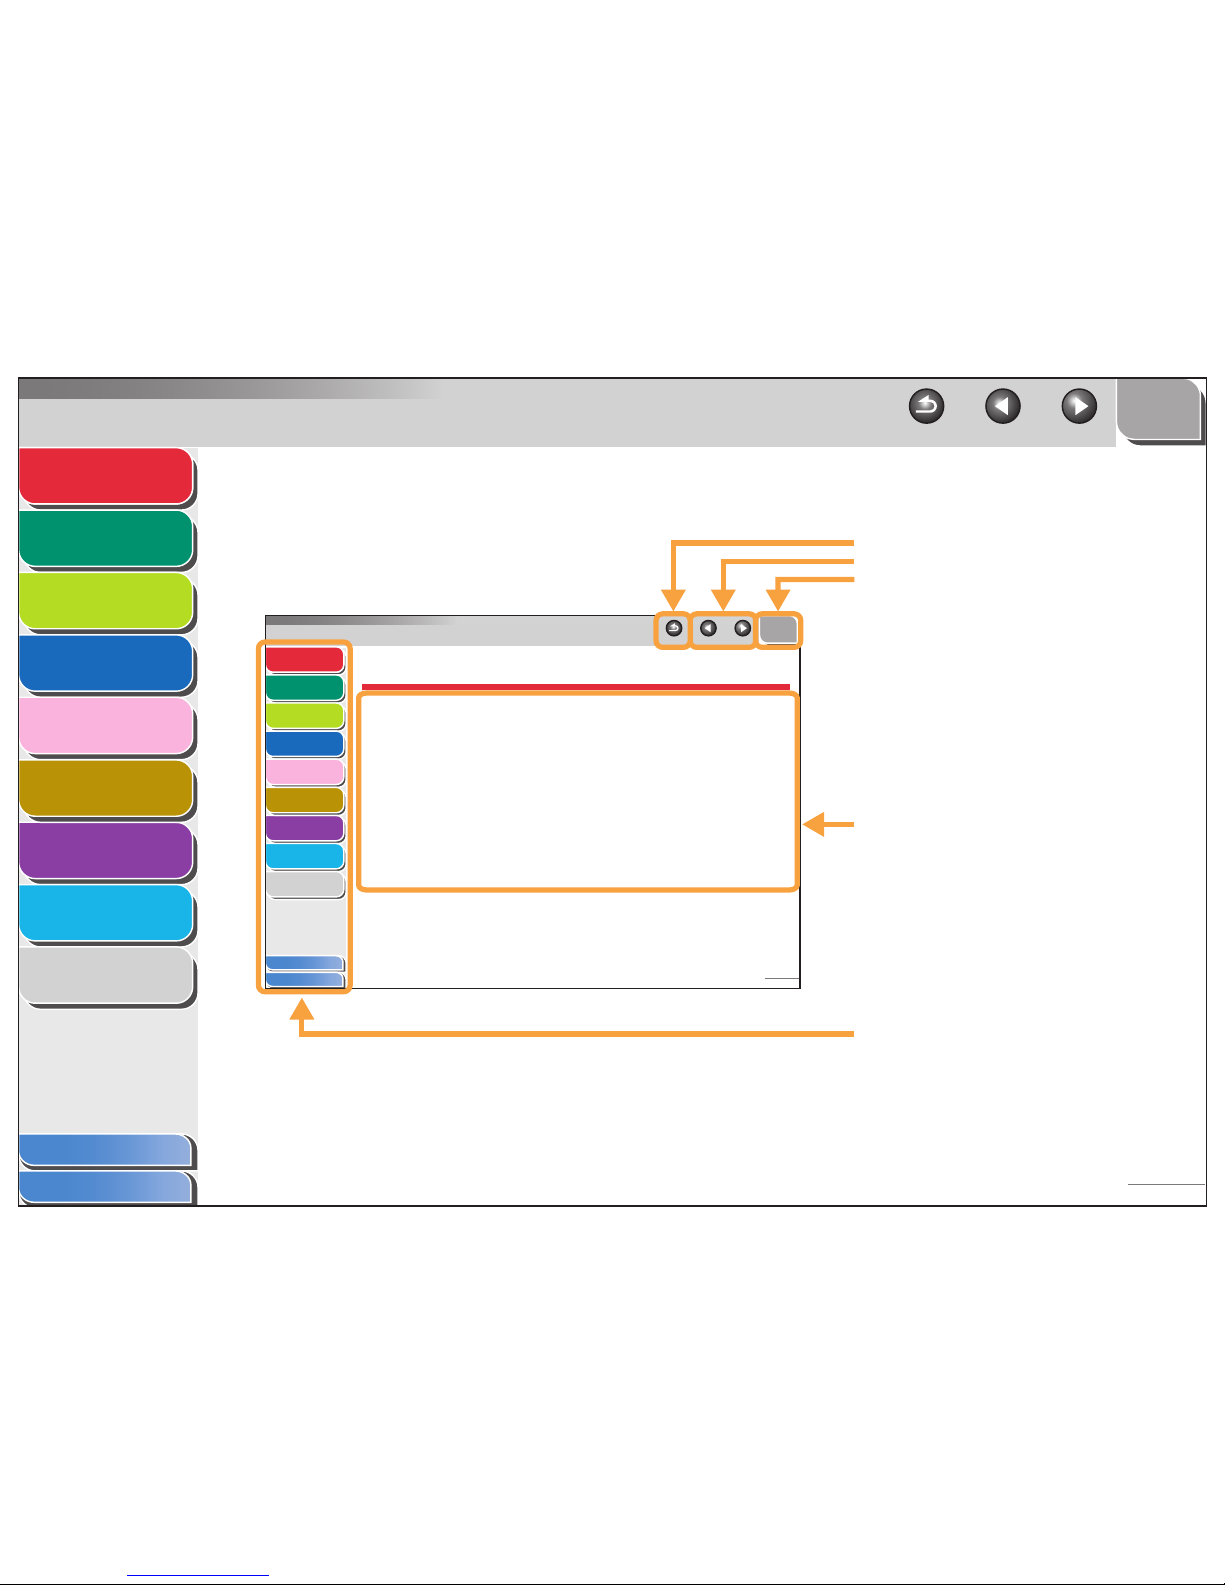
■ Using the Chapter Topic List
1
2
3
4
5
7
8
9
6
TOP
Back Previous Next
1-1
Table of Contents
Index
Advanced Send
Features
Advanced Copy
Features
Network
Remote UI
System Monitor
System Manager
Settings
Reports and Lists
Troubleshooting
Appendix
1 Advanced Send Features
Sending Features .................................................................................... 1-4
Broadcasting........................................................... 1-4
Delayed Sending ....................................................1-5
Job Recall............................................................... 1-6
Customizing Sending Features.............................................................. 1-7
Setting Number of Retry Attempts.......................... 1-7
Setting Automatic Redialing.................................... 1-7
Send Settings .........................................................1-9
Returns to the last page opened.
Displays the previous or next page.
Returns to the top page.
Table of contents for the chapter.
Quick links to the list of things you can do, topics
for each chapter, table of contents, and the index.
Page 23

1
2
3
4
5
7
8
9
6
TOP
Back Previous Next
xxii
Table of Contents
Index
Advanced Send
Features
Advanced Copy
Features
Network
Remote UI
System Monitor
System Manager
Settings
Reports and Lists
Troubleshooting
Appendix
The following symbols are used throughout the manuals for the machine and indicate the warnings, cautions and notes you should
keep in mind when using the machine.
WAR NING
Indicates a warning that may lead to death or serious injury if not observed.
CAUTION
Explains how to avoid actions that could injure you or damage your machine.
NOTE
Explains operating restrictions and how to avoid minor difficulties.
In addition, this guide uses distinctive notations to identify keys and information in the LCD:
– The keys you press appear in square brackets: [Stop].
– Information in the LCD appears in angle brackets: <STOP KEY PRESSED>.
Page 24

1
2
3
4
5
7
8
9
6
TOP
Back Previous Next
1-1
Table of Contents
Index
Advanced Send
Features
Advanced Copy
Features
Network
Remote UI
System Monitor
System Manager
Settings
Reports and Lists
Troubleshooting
Appendix
1 Advanced Send Features
Sending Features .................................................................................... 1-4
Broadcasting........................................................... 1-4
Delayed Sending .................................................... 1-5
Job Recall............................................................... 1-6
Customizing Sending Features.............................................................. 1-7
Setting Number of Retry Attempts.......................... 1-7
Setting Automatic Redialing.................................... 1-7
Send Settings ......................................................... 1-9
Page 25

1
2
3
4
5
7
8
9
6
TOP
Back Previous Next
1-2
Table of Contents
Index
Advanced Send
Features
Advanced Copy
Features
Network
Remote UI
System Monitor
System Manager
Settings
Reports and Lists
Troubleshooting
Appendix
Fax Dialing Features.............................................................................. 1-11
Redialing Manually.........................................1-11
Dialing Through a Switchboard.......................1-11
Switching Temporarily to Tone Dialing ............1-12
Dialing an Overseas Number (With Pauses) ........ 1-13
Receiving Features................................................................................ 1-15
Setting Receive Mode .......................................... 1-15
Memory Reception ............................................... 1-17
Forwarding Received Fax/I-Fax Documents ......... 1-19
Remote Reception................................................ 1-19
Printing Received Documents .............................. 1-21
Page 26

1
2
3
4
5
7
8
9
6
TOP
Back Previous Next
1-3
Table of Contents
Index
Advanced Send
Features
Advanced Copy
Features
Network
Remote UI
System Monitor
System Manager
Settings
Reports and Lists
Troubleshooting
Appendix
Address Book Settings ......................................................................... 1-23
Registering/Editing File Server Addresses
in One-Touch Keys/Coded Dial Codes ............1-23
Storing Favorites Buttons ..................................... 1-26
Canceling TX/RX Jobs .......................................................................... 1-34
Page 27
1
2
3
4
5
7
8
9
6
TO P
Ba
c
k
Pre
vious Ne
xt
1-4
Table of Contents
Inde x
Ad
vanced Send
Feat
ur es
Ad vanced Cop
y
Feat
ur
es
Netw ork
Remot
e UI
System Monitor
System Mana
g
er
Settings
Repor ts and Lists
Tr
oub
l
eshooting
Appendix
Sending Featur
es
Th e mac h
ine prov
ides the f o
llo wing additiona
l s
e
nding
feature s : br
oad
cas
ting, dela
y
eds e
nding , andjob
recall.
Br
oadcasting
Br
oad
castin g en
ablesyou to send th
e
same document to
m
u
ltiple rec
i
pients.
NO
TE
–
A
ma
ximum of
20
1 de
stinations
ca
n
be sp e
cifi
e
d
at
the
same time
.
(Out o
f the 201 destinations, a n umber or a ddress can be
spe cied
with the nu
mer
ic k
e
ys .) If you spec
ify a gr
oup
, which
is
made
up o f
se vera
l desti
nations, each de
stin
ati
on in the g
roup
is counted as a
se
parate a
ddre
ss .
–Ify
o
u freq
uently send
documents to multiple destinatio
ns
,
it is
re
comme
nded tha t
you store th ose destinations as a group.
1.
Set documents.
2.
Press [SEND]/[F
AX].
3.
Press [ ]
or [
]
to select the sending
method, then press [OK].
– Ifyouare spe
cifyi
ng destinatio ns registe
r
ed i
n Add
r
ess Book,
you can skip this
step.
4. Specify the destination.
Use the n
u
mer
i
c k
eys, one -tou
ch k
eys
, coded di
al cod es
,
favorites b uttons, or [Address Book] k
ey to sp ecify destinatio
ns.
NOT E
Onlyone de stin
ation can bespecied usi
ng the n ume
ri
c k
eys
.
Page 28

1
2
3
4
5
7
8
9
6
TO P
Back
Pre
vious Ne
xt
1-5
Table of Contents
Inde x
Ad
vanced Send
Feat
ur es
Ad vanced Cop
y
Feat
ur es
Netw ork
Remot
e UI
System Monitor
System Mana
ger
Settings
Repor ts and Lists
Tr
oub
leshooting
Appendix
5. Repeat step 4 to enter all required recipients.
NO
T
E
– I
f y
ou w
ant to
en
te
r
a fa
x nu
mber or e-mail /I-fax addre s s usi
ng
the nu
meri
c k e
ys i
n
th
e mi ddleof the proced ure,pre
ss
[SEN D], select the
se ndin
g
method, and then
ente
r
the
number or address
.
–
Toche
ck all th e
spe
cied destina
tion
s, press [ ]
or
[
]
to
scroll the display.
–
You can enter
the sen
d
se
ttin
gs bypres si
ng [SEN
D] an
d
sele
cting th
e protocol f
o
r which
y
o
u want
to pe
rfor
m send
settings . F o
r de
tails, see Ch apter 4, “Send ing Do cuments
,
” in
the Basic Operation Gui de.
6. Pr ess [Star
t
].
W
henyou se t the docume n
ts on
the platen gla
ss ,press
[
]
or
[
]
to select thed
o
cumen
t siz e, then pre s s [Sta
r
t] forea
ch
document. When scanning is co
mplete, press [O K]
to st
ar t
se
nding
.
Delayed Sendi ng
Delayed se
nd
ing
ena
bles
you to
start
tr
ansmissionat a sp
ecie
d
time
. Y
ou can st
ore up t
o
64delayed send ingjobs.
1.
Set documents.
2.
Press [SEND]/[F
AX].
3.
Press [
]
or [
]
to select a sending
method, then press [OK].
.
–
Ifyouare spe
cifyi
ng
destinations reg
i
ste
red i
n Add
ress Book,
you can skip this
step.
4. Open the one-touch panel.
5. Press [Delayed TX].
6. Use the n
u
meric keys to enter the time y
ou
want to star
t sendi
ng, then press [OK].
–Enter
thetime
in
the 2 4-hour format.
–Enter all the n umbers,
including z eros.
7. Specify the destination.
T X T I M E S E T T I N G
2 0 : 0 0
Ex.
Page 29
1
2
3
4
5
7
8
9
6
TO P
Ba
c
k
Pre
vious Ne
xt
1-6
Table of Contents
Inde x
Ad
vanced Send
Feat
ur es
Ad vanced Cop
y
Feat
ur
es
Netw ork
Remot
e UI
System Monitor
System Mana
g
er
Settings
Repor ts and Lists
Tr
oub
l
eshooting
Appendix
8.
Pr
ess [Start].
The do cument is
sca nnedand stor
ed in
to memor
y
. It wil
l be sent
to the specie
d destinatio
n at the speci
fied time
.
W
henyou se
t th
e docume n
ts on the pl
aten gla
ss
,
p
r
ess
[
]
or
[
] to select th
e documen t
siz e, then pre s s [Sta
rt]f
o
r
each
document. When scanning is co
mplete, press [O K]
to star t
se
nding
.
NO
T E
– W
hen <
T IME OUT> is set
to <ON> in <TX SET TING
S>
in
<F
AX SETTINGS> in <TX/RX SET
TINGS>
, an
d if y
o
uhave
speci f
ied the destinatio
n byan
y othermethod
than
using
nu
meric k
eys, the machin e star
ts sca nnin
g
automatical
ly
without pressing [Star
t
], after the pre
set time fo
r
thi
ssetting
is
ela
p
sed
.
.
– I
f the documen
t can notbe
sent at
the time sp ecied
f
o
r
dela
ye
d sendi
ng due
to a temporar
y powe
r fa
ilure (tha
t
recove
rs within an hour),
it wi
ll b
e sen
t at th
e spe ciedtime on
the ne
xt da
y.
Job Recall
You can r
ecall
the
last
t
h
ree de
stinatio
ns,
scan settings,
a
nd
send se ttings
whichhav
e been s
et, a
nd then se nd your
do
cu
men
ts
.
1.
Set documents.
2.
Press [SEND].
3. Press [Recall]/[Recall/P ause].
4. Press [ ]
or [ ]
to select <1 BEFORE>,
<2
BEFORE>, or <3
BEFORE>, then press
[OK].
5. C
o
nfirm that t h
e des
ired recipient is
displa
y
ed.
You
can
cha nge
the reca lled scan andsend se
tting
s i
f
nece
ssary
.
6. Press [Star t].
When y ou set thedo
cuments on th e platen gl
ass ,
pre s
s [] or
[ ]
to
select the do cumentsiz
e
, then press [Star
t
] f
or each
docume
nt. Wh
en scann
ing is comple
te, press
[OK] to
star t
send ing.
Page 30
1
2
3
4
5
7
8
9
6
TOP
Back Previous Next
1-7
Table of Contents
Index
Advanced Send
Features
Advanced Copy
Features
Network
Remote UI
System Monitor
System Manager
Settings
Reports and Lists
Troubleshooting
Appendix
Customizing Sending Features
■ Setting Number of Retry Attempts
You can set how many times the machine automatically resends
data when the data cannot be sent because the receiver is busy
sending or receiving, or when an error occurs.
1. Press [Additional Functions].
2. Press [ ] or [ ] to select <TX/RX
SETTINGS>, then press [OK].
3. Press [ ] or [ ] to select <COMMON
SETTINGS>, then press [OK].
4. Press [ ] or [ ] to select <TX
SETTINGS>, then press [OK].
5. Press [ ] or [ ] to select <RETRY
TIMES>, then press [OK].
6. Use [ ], [ ], or numeric keys to enter the
number of retry attempts (0 to 5 times) the
machine will make, then press [OK].
7. Press [Stop] to return to the standby mode.
■ Setting Automatic Redialing
Automatic redialing enables the machine to automatically redial
the recipient’s fax number if the recipient cannot be reached due
to a busy line, or if a sending error occurs. Auto Redial can be
turned <ON> or <OFF>. If you set <AUTO REDIAL> to <ON>,
you can set how many times the machine redials the number,
and the redial interval.
1. Press [Additional Functions].
2. Press [ ] or [ ] to select <TX/RX
SETTINGS>, then press [OK].
Page 31

1
2
3
4
5
7
8
9
6
TOP
Back Previous Next
1-8
Table of Contents
Index
Advanced Send
Features
Advanced Copy
Features
Network
Remote UI
System Monitor
System Manager
Settings
Reports and Lists
Troubleshooting
Appendix
3. Press [ ] or [ ] to select <FAX
SETTINGS>, then press [OK].
4. Press [ ] or [ ] to select <TX
SETTINGS>, then press [OK].
5. Press [ ] or [ ] to select <AUTO
REDIAL>, then press [OK].
6. Press [ ] or [ ] to select <ON>, then
press [OK].
7. Confirm that <REDIAL TIMES> is displayed,
then press [OK].
8. Use [ ], [ ], or numeric keys to enter the
number of redials (1 to 10 times) the machine
will make, then press [OK].
9. Confirm that <REDIAL INTERVAL> is
displayed, then press [OK].
10.Use [ ], [ ], or numeric keys to enter the
time (2 to 99 minutes, in one-minute
increments) between redials, then press
[OK].
11.Confirm that <TX ERROR REDIAL> is
displayed, then press [OK].
12.Press [ ] or [ ] to select <ON> or
<OFF>, then press [OK].
<ON>: Resends all pages if an error occurs during transmission.
<OFF>: Does not redial even if an error occurs during
transmission.
13.Press [Stop] to return to the standby mode.
Page 32

1
2
3
4
5
7
8
9
6
TOP
Back Previous Next
1-9
Table of Contents
Index
Advanced Send
Features
Advanced Copy
Features
Network
Remote UI
System Monitor
System Manager
Settings
Reports and Lists
Troubleshooting
Appendix
■ Send Settings
You can set the document’s name, a subject line, message body
text, and reply-to address, and e-mail priority common to all
sending jobs. The following settings will be effective when
sending documents depending on the sending method you
select:
– E-mail: <TX FILE NAME>, <SUBJECT>, <MESSAGE
TEXT>, <REPLY-TO>, <E-MAIL PRIORITY>
– I-fax: <TX FILE NAME>, <SUBJECT>, <MESSAGE TEXT>,
<REPLY-TO>
– File server (FTP and SMB): <TX FILE NAME>, <MESSAGE
TEXT>
1. Press [Additional Functions].
2. Press [ ] or [ ] to select <TX/RX
SETTINGS>, then press [OK].
3. Confirm that <COMMON SETTINGS> is
selected, then press [OK].
4. Confirm that <TX SETTINGS> is selected,
then press [OK].
5. Press [ ] or [ ] to select <SEND
SETTINGS>, then press [OK].
6. Confirm that <TX FILE NAME> is displayed,
then press [OK].
7. Use the numeric keys to enter the
document’s name (up to 24 characters), then
press [OK].
8. Confirm that <SUBJECT> is displayed, then
press [OK].
9. Use the numeric keys to enter the subject (up
to 40 characters), then press [OK].
10.Confirm that <MESSAGE TEXT> is displayed,
then press [OK].
Page 33

1
2
3
4
5
7
8
9
6
TOP
Back Previous Next
1-10
Table of Contents
Index
Advanced Send
Features
Advanced Copy
Features
Network
Remote UI
System Monitor
System Manager
Settings
Reports and Lists
Troubleshooting
Appendix
11.Use the numeric keys to enter the message
body text (up to 140 characters), then press
[OK].
12.Confirm that <REPLY-TO> is displayed, then
press [OK].
13.Use the numeric keys to enter the reply-to
address (up to 120 characters), then press
[OK].
14.Confirm that <E-MAIL PRIORITY> is
displayed, then press [OK].
15.Press [ ] or [ ] to select the priority
(<NORMAL>, <LOW> or <HIGH>), then press
[OK].
16.Press [Stop] to return to the standby mode.
Page 34

1
2
3
4
5
7
8
9
6
TO P
Ba
c
k
Pre
vious Ne
xt
1-11
Table of Contents
Inde x
Ad
vanced Send
Feat
ur es
Advanced Cop
y
Feat
ur
es
Netw ork
Remot
e UI
System Monitor
System Mana
g
er
Settings
Repor ts and Lists
Tr
oub
l
eshooting
Appendix
Fax Dialing Feature
s
Re
dialing Man
uall y
1.
Set documents.
2. Press [F
AX].
3.
Press [Redial/P
ause] to
dial the last number
you dialed.
To cancel manual redialing, pre ss [Reset].
4.
Pr ess [Start].
W
hen youse
t th
e docume n
ts on the pl
aten glass, us e []o
r
[] to select thedocument size, then press [Sta r
t] for
ea ch
document. When scanning is co
mplete
, press [O K] to st
ar t
d
iali
ng.
NO
T E
When < T
IME OUT>
is set to <ON> in <T X SETTINGS> in <
FAX
SETTINGS> in
<TX/RX
SETTIN GS>, and if you ha
ve
specied
the de stin
ation by an
y other me
thod than usi ng numeri
c k
eys ,
the machi ne starts sca
nni
ng automatical
ly without pressing
[St art], after t
h
e preset time for this setting is elapsed.
Dialing Thr
o
ugh a Switchboard
If your machine is connected to a PBX, register the [R] k
ey so
y
ou can easily ac
cess the
outside line .
Registering the [R] Key
1.
Press [Add
itional Functions].
2.
Press [ ]
or [ ]
to select <SYSTEM
SETTINGS>, then press [OK].
3.
Press [
]
or [ ]
to select
<COMMUNICA TIONS>, then press [OK].
4. Press [ ]
or [
] to select <F AX
SETTINGS>, then press [OK].
5. Press [ ]
or [ ]
to select <R-KEY
SETTING>, then press [OK].
Page 35

1
2
3
4
5
7
8
9
6
TO P
Ba
c
k
Pre
vious Ne
xt
1-12
Table of Contents
Inde x
Ad
vanced Send
Feat
ur es
Advanced Cop
y
Feat
ur
es
Netw ork
Remot
e UI
System Monitor
System Mana
g
er
Settings
Repor ts and Lists
Tr
oub
l
eshooting
Appendix
6.
Press [
]
or [
]
to
select <PBX>, then
press [OK].
7.
Press [
]
or [
]
to select <PREFIX>, then
press [OK].
8. Use the n umeric ke
ys
to enter the prex
number (up to 20 digits).
9.
Press [Recall/P
ause]/[Re dial/P
ause] to enter
a pause, then press [OK].
<p>in thefa
x/tele
phone n
u
mber represe n
ts a cer
t
ain amou
nt
of
p
ause time
, set in
the <P AU
SE TIME> men u
.
10. Press [Stop] to return to the standby mode
.
Dialing using the [R] K
e
y
1. Pr ess [SEND]/ [
FAX]
.
2.
Conrm that <F
AX> is displa
yed, then press
[OK].
3.
Press [R] to access the outside line
.
4.
Use the n u
meric keysto enter the fax
nu
mber
.
Switc
hing Te
mporarily to T
one Dialing
If
your
ma ch
ine is set
for pulse dia
ling,
use t h
e proc
edure belo
w
to s
witch to ton
e dialin
g to
us
e inform
ation
ser v
ices (e
.g., bank s ,
air
lin
ere
ser va
tio
ns
, an
d hotelreservations
).
NO
TE
T
o tal
k
to
th
e othe
r par ty, y ou will ne ed to co nnect the o
p
tional ha
ndse t
or
an
ex ternal telephoneto the
machi
ne.
1. Press [SEND]/[F
AX].
2. Conrm that <FAX> is displa
yed, then press
[OK].
P R E F I X
Ex.
Page 36

1
2
3
4
5
7
8
9
6
TO P
Ba
c
k
Pre
vious Ne
xt
1-13
Table of Contents
Inde x
Ad
vanced Send
Feat
ur es
Advanced Cop
y
Feat
ur
es
Netw ork
Remot
e UI
System Monitor
System Mana
g
e r
Settings
Repor ts and Lists
Tr
oub
l
eshooting
Appendix
3.
Press [Hook].
Yo
u ca
n also lift the
o
pti
ona
l hand
set in
stea
d.
NO
T
E
Make sure to co
nr
m th
e dial tone be
f
ore en ter
i
ng a f
a
x n
u
mber
.
If youente
r
the n
u
mber before the dial tone
can be he
ard,
the
cal l
ma
y not be conne
cte
d
, or the wrong
numb
er may
b
e
dia
l
ed.
4.
Use the n
u
meric keysto dial the required
inf
ormation service
.
5.
When the record
ed message of the
inf ormation ser v
ice ans
wer s, press [T
one] to
s witch
to tone dialing.
If you p
ressed[Hook] in
step 3,
you
can pickup the
op
ti
ona
l
h
andse
t if yo
u need
to talk to the otherparty.
6.
Use the nu
meric keysto enter the n
umber
s
requested b
y the information ser
v
ice .
7. If y ou want to recei
ve faxes, press [Star
t].
If yo
u are
u
sing the op
tionalhandse t
or th
e e
xter
nal tele
phone
,
h
ang
up
the
ha
ndse
t
afte
r pre ssi
ng [Star t].
Diali n
g an Over
seas Number (With
Pauses)
When you d
i
alorregister an over
seasnumb
er, y ou ma
y n
eed to
inser
t a pa
us
e within th
e n umb
er.
1. Set documents.
2. Press [SEND]/[F
AX].
3. Conrm that <FAX> is displa
yed, then press
[OK].
4. Adjust any necessar y settings f
o
r y our
documents.
5. Use the n
u
meric keys to
dial the international
access code
.
F
or detai ls on inter
national access codes ,contact y
our lo
ca l
telephon
e co
mpany
.
Page 37

1
2
3
4
5
7
8
9
6
TOP
Back Previous Next
1-14
Table of Contents
Index
Advanced Send
Features
Advanced Copy
Features
Network
Remote UI
System Monitor
System Manager
Settings
Reports and Lists
Troubleshooting
Appendix
6. If necessary, press [Recall/Pause]/[Redial/
Pause] to insert a pause.
– The letter <p> is displayed between the numbers.
– You can enter successive pauses within the fax number to
make the pause time longer.
– You can change the length of a pause inserted within the fax
number in the <PAUSE TIME> menu. The default setting is
four second.
7. Use the numeric keys to dial the country
code, the area code, and the fax/telephone
number of the recipient.
8. Press [Recall/Pause]/[Redial/Pause] to enter
a pause at the end of the number.
– The letter <P> appears at the end of the fax number.
– Pauses entered at the end of fax numbers are always 10
seconds long.
9. Press [Start].
When you set the documents on the platen glass, press [ ] or
[ ] to select the document size, then press [Start] for each
document. When scanning is complete, press [OK] to start
sending.
Page 38

1
2
3
4
5
7
8
9
6
TOP
Back Previous Next
1-15
Table of Contents
Index
Advanced Send
Features
Advanced Copy
Features
Network
Remote UI
System Monitor
System Manager
Settings
Reports and Lists
Troubleshooting
Appendix
Receiving Features
You can set the fax receive mode to suit your needs, set the
machine to receive fax/I-fax documents into memory
(memory lock), forward received fax/I-fax documents to
other machines or file servers, and use the external
telephone connected to the machine to receive faxes
manually (remote reception). You can also set how the
received documents are printed.
■ Setting Receive Mode
To determine the right mode for you, see “Set the Machine for
Receiving Faxes,” in the Quick Start Guide.
1. Press [Additional Functions].
2. Press [ ] or [ ] to select <TX/RX
SETTINGS>, then press [OK].
3. Press [ ] or [ ] to select <FAX
SETTINGS>, then press [OK].
4. Press [ ] or [ ] to select <RX
SETTINGS>, then press [OK].
5. Press [ ] or [ ] to select <RX MODE>,
then press [OK].
6. Press [ ] or [ ] to select the desired
receive mode, then press [OK].
<FaxOnly>: Answers all calls as faxes.
<FaxTel>: Switches between fax and voice calls automatically.
For optional settings, see “FaxTel: Optional Settings,” on p. 1-16.
<AnsMode>: Receives faxes automatically and records voice
messages.
<Manual>: Does not answer any calls. You have to manually
receive faxes.
NOTE
– For <FaxTel> or <Manual>, make sure the optional handset or
handset of an external telephone is connected to the
machine.
– For <FaxTel>, make sure <INCOMING RING> is set to <ON>
so that the external telephone rings when the machine
receives a voice call.
– For <AnsMode>, make sure an answering machine is
connected to the machine.
7. Press [Stop] to return to the standby mode.
Page 39

1
2
3
4
5
7
8
9
6
TOP
Back Previous Next
1-16
Table of Contents
Index
Advanced Send
Features
Advanced Copy
Features
Network
Remote UI
System Monitor
System Manager
Settings
Reports and Lists
Troubleshooting
Appendix
Manual Reception
When you select <Manual> in <RX MODE>, follow the
procedure below to receive a fax.
1. When the telephone rings, pick up the
optional handset or handset of the external
telephone.
2. Confirm that the modem’s connecting sound
is heard, then press [Start].
When you set the documents on the platen glass, press [ ] or
[ ] to select the document size, then press [Start] for each
document. When scanning is complete, press [OK] to start
sending.
3. Hang up the optional handset or handset of
the external telephone.
FaxTel: Optional Settings
If required, change the optional settings as follows:
1. Press [Additional Functions].
2. Press [ ] or [ ] to select <TX/RX
SETTINGS>, then press [OK].
3. Press [ ] or [ ] to select <FAX
SETTINGS>, then press [OK].
4. Press [ ] or [ ] to select <RX
SETTINGS>, then press [OK].
5. Press [ ] or [ ] to select <FAX/TEL OPT.
SET>, then press [OK].
6. Confirm that <RING START TIME> is
displayed, then press [OK].
7. Use [ ], [ ], or the numeric keys to
specify the period of time (0 to 30 seconds)
before the machine starts ringing after
receiving a voice call, then press [OK].
If the machine receives a fax, the machine does not ring and
switches to the receive mode automatically.
8. Confirm that <F/T RING TIME> is displayed,
then press [OK].
Page 40

1
2
3
4
5
7
8
9
6
TOP
Back Previous Next
1-17
Table of Contents
Index
Advanced Send
Features
Advanced Copy
Features
Network
Remote UI
System Monitor
System Manager
Settings
Reports and Lists
Troubleshooting
Appendix
9. Press [ ] or [ ] to select the duration (15
to 300 seconds) for the phone to ring, then
press [OK].
10.Confirm that <F/T SWITCH ACTION> is
displayed, then press [OK].
11.Press [ ] or [ ] to select the action the
machine will take after the ringing ends, then
press [OK].
<RECEIVE>: Switches to the receive mode.
<DISCONNECT>: Disconnects the call.
12.Press [Stop] to return to the standby mode.
■ Memory Reception
The machine automatically receives faxes in memory when
printing is disabled under certain conditions (e.g., toner or paper
has run out). You can also set the machine to store all
documents in memory without automatically printing them.
1. Press [Additional Functions].
2. Press [ ] or [ ] to select <SYSTEM
SETTINGS>, then press [OK].
If the System Manager ID and System Password have been set,
enter the System Manager ID and System Password using the
numeric keys, then press [Log In/Out].
3. Press [ ] or [ ] to select
<COMMUNICATIONS>, then press [OK].
4. Press [ ] or [ ] to select <MEMORY
LOCK>, then press [OK].
If the memory lock password has already been set, enter the
password, then press [OK].
5. Press [ ] or [ ] to select <ON>, then
press [OK].
NOTE
When you select <OFF>, the machine starts to print the
received documents in memory.
6. Confirm that <PASSWORD> is displayed,
then press [OK].
Page 41

1
2
3
4
5
7
8
9
6
TOP
Back Previous Next
1-18
Table of Contents
Index
Advanced Send
Features
Advanced Copy
Features
Network
Remote UI
System Monitor
System Manager
Settings
Reports and Lists
Troubleshooting
Appendix
7. Use the numeric keys to enter the memory
reception password (up to seven digits), then
press [OK].
8. Confirm that <REPORT PRINT> is displayed,
then press [OK].
9. Press [ ] or [ ] to select <ON> or
<OFF>, then press [OK].
<OFF>: Does not print a RX report.
<ON>: Prints a RX report.
NOTE
<RX REPORT> should also be set to <ON> so that RX reports
are automatically printed when documents are received in
memory. For instructions, see “RX REPORT,” on p. 7-5.
10.Confirm that <MEMORY RX TIME> is
displayed, then press [OK].
If you do not need to set the timer for memory lock, skip to
step 16.
11.Press [ ] or [ ] to select <ON>, then
press [OK].
12.Confirm that <MEM RX START TIME> is
displayed, then press [OK].
13.Use the numeric keys to enter the start time
(in 24-hour format), then press [OK].
14.Confirm that <MEM. RX END TIME> is
displayed, then press [OK].
15.Use the numeric keys to enter the end time,
then press [OK].
16.Press [Stop] to return to the standby mode.
PASSWORD
1234567
Ex.
MEM RX START TIME
00:00
Ex.
Page 42

1
2
3
4
5
7
8
9
6
TOP
Back Previous Next
1-19
Table of Contents
Index
Advanced Send
Features
Advanced Copy
Features
Network
Remote UI
System Monitor
System Manager
Settings
Reports and Lists
Troubleshooting
Appendix
Printing All Documents Stored in Memory
1. Perform step 1 to 3 in “Memory Reception,”
on p. 1-17.
2. Press [ ] or [ ] to select <MEMORY
LOCK>, then press [OK].
3. Use the numeric keys to enter the memory
reception password, then press [OK].
4. Press [ ] or [ ] to select <OFF>, then
press [OK].
The received documents are printed.
5. Press [Stop] to return to the standby mode.
■ Forwarding Received Fax/I-Fax
Documents
You can set the machine to forward received fax/I-fax
documents to other machines or file servers. If a received
document matches the forwarding conditions, it is forwarded to
the specified destination. Forwarding settings can be made
using the Remote UI.
NOTE
For instructions on forwarding settings and how to turn ON and OFF the
forward mode, see “Specifying Forwarding Settings,” on p. 4-18.
■ Remote Reception
Remote reception enables you to use an external telephone
connected to the machine to receive faxes manually. This can
be useful when the machine is not nearby or is being used by
someone else.
NOTE
This function is not available when <ENERGY IN SLEEP> in
<COMMON SETTINGS> is set to <LOW>.
Page 43

1
2
3
4
5
7
8
9
6
TOP
Back Previous Next
1-20
Table of Contents
Index
Advanced Send
Features
Advanced Copy
Features
Network
Remote UI
System Monitor
System Manager
Settings
Reports and Lists
Troubleshooting
Appendix
Registering Remote Reception ID
Follow this procedure if you want to change the default remote
reception ID of 25.
1. Press [Additional Functions].
2. Press [ ] or [ ] to select <TX/RX
SETTINGS>, then press [OK].
3. Press [ ] or [ ] to select <FAX
SETTINGS>, then press [OK].
4. Press [ ] or [ ] to select <RX
SETTINGS>, then press [OK].
5. Press [ ] or [ ] to select <REMOTE RX>,
then press [OK].
6. Press [ ] or [ ] to select <ON>, then
press [OK].
7. Press [Clear] twice to delete the default
remote reception ID of 25.
8. Use the numeric keys to enter a new remote
reception ID (a combination of two
characters using 0 to 9, and #), then press
[OK].
9. Press [Stop] to return to the standby mode.
Receiving a Fax Remotely
1. When you receive a call, pick up the external
telephone.
2. Use the numeric keys to enter the two-digit
remote reception ID to start reception.
NOTE
If the machine is set for pulse dialing, press [Tone] to switch to
tone dialing before pressing the remote reception ID.
3. When the reception is complete, hang up the
telephone.
Page 44

1
2
3
4
5
7
8
9
6
TOP
Back Previous Next
1-21
Table of Contents
Index
Advanced Send
Features
Advanced Copy
Features
Network
Remote UI
System Monitor
System Manager
Settings
Reports and Lists
Troubleshooting
Appendix
■ Printing Received Documents
The machine provides the following printing features: two-sided
printing and received image reduction.
Two-Sided Printing
You can print received documents on both sides of the paper.
1. Press [Additional Functions].
2. Press [ ] or [ ] to select <TX/RX
SETTINGS>, then press [OK].
3. Press [ ] or [ ] to select <COMMON
SETTINGS>, then press [OK].
4. Press [ ] or [ ] to select <RX
SETTINGS>, then press [OK].
5. Press [ ] or [ ] to select <TWO-SIDED
PRINT>, then press [OK].
6. Press [ ] or [ ] to select <ON>, then
press [OK].
7. Press [Stop] to return to the standby mode.
Received Image Reduction
You can print received documents in a reduced size.
1. Press [Additional Functions].
2. Press [ ] or [ ] to select <TX/RX
SETTINGS>, then press [OK].
3. Press [ ] or [ ] to select <COMMON
SETTINGS>, then press [OK].
4. Press [ ] or [ ] to select <RX
SETTINGS>, then press [OK].
5. Press [ ] or [ ] to select <RECEIVE
REDUCTION>, then press [OK].
6. Press [ ] or [ ] to select <ON>, then
press [OK].
Page 45

1
2
3
4
5
7
8
9
6
TOP
Back Previous Next
1-22
Table of Contents
Index
Advanced Send
Features
Advanced Copy
Features
Network
Remote UI
System Monitor
System Manager
Settings
Reports and Lists
Troubleshooting
Appendix
7. Press [ ] or [ ] to select <RX
REDUCTION> or <REDUCE DIRECTION>,
then press [OK].
If you select <REDUCE DIRECTION>, skip to step 11.
8. Press [ ] or [ ] to select <AUTO> or
<FIXED REDUCTION>, then press [OK].
If you select <AUTO>, adjust the image reduction automatically.
Skip to step 10.
9. Press [ ] or [ ] to select a preset
reduction ratio (97%, 95%, 90%, or 75%), then
press [OK].
10.Confirm that <REDUCE DIRECTION> is
displayed, then press [OK].
11.Press [ ] or [ ] to select <VERTICAL
ONLY> or <HORIZ & VERTICAL>, then press
[OK].
<VERTICAL ONLY>: Reduces the document vertically only.
<HORIZ & VERTICAL>: Reduces the document both horizontally
and vertically.
12.Press [Stop] to return to the standby mode.
Page 46

1
2
3
4
5
7
8
9
6
TOP
Back Previous Next
1-23
Table of Contents
Index
Advanced Send
Features
Advanced Copy
Features
Network
Remote UI
System Monitor
System Manager
Settings
Reports and Lists
Troubleshooting
Appendix
Address Book Settings
The Address Book is a feature used for storing fax, e-mail,
I-fax, and file server destinations. The Address Book is
divided into one-touch keys and coded dial codes. You can
store up to 23 destinations in one-touch keys, and 177
destinations in coded dial codes, for a total of 200
destinations in the whole Address Book. You can also
register multiple destinations of various types in a group
address, and assign a one-touch key or coded dial code to
this group. Registering a destination in the Address Book
saves you the effort of entering that destination's address
each time you send a job.
NOTE
– You can also register a destination in favorites buttons together with a
specific combination of scan and send settings. One-touch keys 01 to
04 can be used for this feature. For instructions on registering
favorites buttons, see “Storing Favorites Buttons,” on p. 1-26.
– Destinations stored in the Address Book can be exported to your
computer as a file, which can be imported into the machine. For
information on exporting the Address Book, see “Import/Export
Function,” on p. 4-30.
■ Registering/Editing File Server
Addresses in One-Touch Keys/Coded
Dial Codes
To send documents to a file server, the destination must be
registered in Address Book.
Registering File Server Addresses
1. Press [Additional Functions].
2. Press [ ] or [ ] to select <ADDRESS
BOOK SET.>, then press [OK].
3. Press [ ] or [ ] to select <1-TOUCH SPD
DIAL> or <CODED SPD DIAL>, then press
[OK].
Page 47

1
2
3
4
5
7
8
9
6
TOP
Back Previous Next
1-24
Table of Contents
Index
Advanced Send
Features
Advanced Copy
Features
Network
Remote UI
System Monitor
System Manager
Settings
Reports and Lists
Troubleshooting
Appendix
4. Press [ ] or [ ] to select a one-touch
key (01 to 23) or coded dial code (000 to 176)
for which you want to register the address,
then press [OK].
You can also select a one-touch key or coded dial code by
pressing the corresponding one-touch key, or [Coded Dial]
followed by the desired three-digit code.
5. Press [ ] or [ ] to select the server
protocol (<FTP> or <SMB>), then press [OK].
<FTP>: Select this protocol if you are sending documents to a
computer running Sun Solaris 2.6 or later, Mac OS X or later,
Internet Information Services 5.0 under Windows 2000 Server,
Internet Information Services 5.1 under Windows XP
Professional, Internet Information Services 6.0 under Windows
2003 Server.
<SMB>: Select this protocol if you are sending documents to a
computer running Windows 98/Me/2000/XP/Server 2003.
6. Confirm that <NAME> is displayed, then
press [OK].
7. Use the numeric keys to enter the
destination’s name (up to 16 characters),
then press [OK].
8. Confirm that <HOST NAME> is displayed,
then press [OK].
9. Use the numeric keys to enter the name of
the file server on the network (up to 120
characters), then press [OK].
If no DNS server is available, the host name setting should be
specified using the IP address of the FTP server.
10.Confirm that <FILE PATH> is displayed, then
press [OK].
11.Use the numeric keys to specify the folder to
which the job is to be sent (up to 120
characters), then press [OK].
12.Confirm that <LOGIN NAME> is displayed,
then press [OK].
HOST NAME :1
canon01
Ex.
Page 48

1
2
3
4
5
7
8
9
6
TOP
Back Previous Next
1-25
Table of Contents
Index
Advanced Send
Features
Advanced Copy
Features
Network
Remote UI
System Monitor
System Manager
Settings
Reports and Lists
Troubleshooting
Appendix
13.Use the numeric keys to enter the login
name, then press [OK].
You can enter up to 24 characters for the login name.
14.Confirm that <PASSWORD> is displayed,
then press [OK].
15.Use the numeric keys to enter the password,
then press [OK].
You can enter up to 24 characters (14 characters when <SMB> is
selected as the server protocol) for the password.
To register another one-touch key or coded dial code, repeat the
procedure from step 4.
16.Press [Stop] to return to the standby mode.
Editing File Server Addresses
NOTE
You cannot change the server protocol setting (FTP or SMB) of the
destination registered in Address Book. To change the server protocol,
cancel the registration once, then register with the correct server
protocol again.
1. Press [Additional Functions].
2. Press [ ] or [ ] to select <ADDRESS
BOOK SET.>, then press [OK].
3. Press [ ] or [ ] to select <1-TOUCH SPD
DIAL> or <CODED SPD DIAL>, then press
[OK].
4. Press [ ] or [ ] to select a one-touch
key (01 to 23) or coded dial code (000 to 176)
you want to edit, then press [OK].
You can also select a one-touch key or coded dial code by
pressing the corresponding one-touch key, or [Coded Dial]
followed by the desired three-digit code.
5. Press [ ] or [ ] to select the item you
want to edit, then press [OK].
You can edit <NAME>, <HOST NAME>, <FILE PATH>, <LOGIN
NAME>, and <PASSWORD>.
6. Press [ ] repeatedly to go back to the
character you want to edit, then press [Clear].
To delete the entire entry, press and hold [Clear].
Page 49

1
2
3
4
5
7
8
9
6
TO P
Back
Pre
vious Ne
xt
1-26
Table of Contents
Inde x
Ad
vanced Send
Feat
ur es
Ad vanced Cop
y
Feat
ur es
Netw ork
Remot
e UI
System Monitor
System Mana
ger
Settings
Repor ts and Lists
Tr
oub
leshooting
Appendix
7. Use the nu
meric keys to enter a ne
w
character, then press [OK].
8. Repeat step 5 to 7 to edit the desi
red items.
9. Press [Stop] to return to the standby mode
.
Deleting a File Ser
ver Ad
dress
1. Press [Add
itional Functions].
2. Pre ss [ ]
or [
]
to
select <ADDRESS
BOOK SET
.>, then press [OK].
3.
Press [ ]
or [ ] to select <1-T
OUCH SPD
DIAL> or <CODED SPD DIAL>, then press
[OK].
4. Press [
]
or [
]
to
select a one-touc
h
ke
y (01 to 23) or coded
dial code (000 to 176)
y
o
u want to delete,then press [OK].
Yo
u
ca
n also sele
ct a one-tou
ch k e y or
coded dia
l co de by
pre
ssing the correspo
nding one -touchkey, or [Co ded
Di
al]
f
o
llowe
d b
y the desired th
ree-di gitcode.
5.
Press [
]
or [ ]
to
select <HOST NAME>,
then press [OK].
6.
Press and hold [Clear] to delete the entire
entr
y
, then press [OK].
You canalso use [C
lear] to de
lete characterson
e by one.
NOT
E
If y
ou del
ete the l
e se rv
er na me
, th
e re
st of the se
tting
s
are
clea re
d automatical
ly.
7. Press [Stop] to return to the standby mode
.
Stor ing F
avorites Buttons
You
canregi
st
e
r a de
st
ination t
ogeth
er
wit
h an
y possib l
e
co
mbinat
ion
of
sen dsett
ings in
a favoritesbu
tt
on
.One-touch
keys 01 to
04
ca n
be regi
ster
ed as favorites butt
ons.
Page 50

1
2
3
4
5
7
8
9
6
TO P
Ba
c
k
Pre
vious Ne
xt
1-27
Table of Contents
Inde x
Ad
vanced Send
Feat
ur es
Advanced Cop
y
Feat
ur
es
Netw ork
Remot
e UI
System Monitor
System Mana
g
er
Settings
Repor ts and Lists
Tr
oub
l
eshooting
Appendix
Registering a Fa x Number
1.
Press [Add
itional Functions].
2.
Pre ss [
]
or [
]
to select <ADDRESS
BOOK SET
.>, then press [OK].
3.
Press [
]
or [
]
to
select <FAVORITES
B
U
TT ONS>, then press [OK].
4.
Press [
]
or [
]
to
select a one-touc
h
ke
y (01 to 04), then press [OK].
If
a one-touch de
stination is alre ady registered in
the d e
sired
o
ne-touch k ey, se lect a
nothe
r key,ordelete the destination
rst.
5. Press [
]
or [
]
to
select <F
AX>, then
press [OK].
6.
Conrm that <NAME>
is displa
yed, then
press [OK].
7. Use the n umeric ke
ys to enter the
destination’
s name (up
to 16 c
haracters),
then press [OK].
8.
Con
f
irm tha
t <T EL NUMBER ENTRY> is
displa
y
ed, then press [OK].
9.
Use the n
u
meric ke
ys to enter the
destination’
s fax number (up to 120
c
haracter
s), then press [OK].
10.
Conr
m that < IMA GEQUALITY> is display
ed,
then press [OK].
11. Press [ ]
or [
]
to select the image
quality (<FINE>, <PHO
TO>, <SUPER FINE>,
<UL
TRA FINE>, or <ST
A
ND
ARD>), then press
[OK].
12. Con firm tha t <OPTIONAL SETTING> is
displa
yed, then press [OK].
13. Press [ ]
or [
]
to select <ON> or
<OFF>, then press [OK].
If you do
not want
to se
t the optio
nal settings,se
lect <O FF>,then
skip to step20
.
If y
ou want to se
t th
e options
forsen dingfaxe s,
se lect
<ON>.
Page 51

1
2
3
4
5
7
8
9
6
TOP
Back Previous Next
1-28
Table of Contents
Index
Advanced Send
Features
Advanced Copy
Features
Network
Remote UI
System Monitor
System Manager
Settings
Reports and Lists
Troubleshooting
Appendix
14.Confirm that <ECM> is displayed, then press
[OK].
15.Press [ ] or [ ] to select <ON> or
<OFF>, then press [OK].
16.Confirm that <TX SPEED> is displayed, then
press [OK].
17.Press [ ] or [ ] to select the sending
speed (33600 bps, 14400 bps, 9600 bps, or
4800 bps), then press [OK].
18.Confirm that <INTERNATIONAL> is
displayed, then press [OK].
19.Press [ ] or [ ] to select the
transmission option (<DOMESTIC>, <LONG
DISTANCE 1>, <LONG DISTANCE 2>, or
<LONG DISTANCE 3>), then press [OK].
NOTE
If errors occur during international fax transmissions, try the
setting from <LONG DISTANCE 1> through <LONG
DISTANCE 3>.
20.Press [Stop] to return to the standby mode.
Registering an E-Mail/I-Fax Address
1. Press [Additional Functions].
2. Press [ ] or [ ] to select <ADDRESS
BOOK SET.>, then press [OK].
3. Press [ ] or [ ] to select <FAVORITES
BUTTONS>, then press [OK].
4. Press [ ] or [ ] to select a one-touch
key (01 to 04), then press [OK].
5. Press [ ] or [ ] to select <E-MAIL> or
<IFAX>, then press [OK].
6. Confirm that <NAME> is displayed, then
press [OK].
7. Use the numeric keys to enter the
destination’s name (up to 16 characters),
then press [OK].
Page 52

1
2
3
4
5
7
8
9
6
TOP
Back Previous Next
1-29
Table of Contents
Index
Advanced Send
Features
Advanced Copy
Features
Network
Remote UI
System Monitor
System Manager
Settings
Reports and Lists
Troubleshooting
Appendix
8. Confirm that <E-MAIL ADDRESS> or <I-FAX
ADDRESS> is displayed, then press [OK].
9. Use the numeric keys to enter the
destination’s address, then press [OK].
If you are registering an I-fax address, skip to step 12.
10.If you are registering an e-mail address,
confirm that <IMAGE FORMAT> is displayed,
then press [OK].
11.Press [ ] or [ ] to select the file format
(<PDF>, <TIFF (B&W)>, <PDF (COMPACT)>,
or <JPEG>), then press [OK].
<PDF>, <TIFF (B&W)>: Select for sending images in black-andwhite.
<PDF (COMPACT)>, <JPEG>: Select for sending color images.
12.Confirm that <DIVIDE INTO PAGES> is
displayed, then press [OK].
13.Press [ ] or [ ] to select <ON> or
<OFF>, then press [OK].
<OFF>: Sends multiple images as a single file without dividing
them.
<ON>: Separates multiple images and send them as separate
files.
NOTE
If you have selected <JPEG> as the file format in step 11,
multiple images are sent as separate files even if you set
<DIVIDE INTO PAGES> to <OFF>.
14.Confirm that <IMAGEQUALITY> is displayed,
then press [OK].
Page 53

1
2
3
4
5
7
8
9
6
TOP
Back Previous Next
1-30
Table of Contents
Index
Advanced Send
Features
Advanced Copy
Features
Network
Remote UI
System Monitor
System Manager
Settings
Reports and Lists
Troubleshooting
Appendix
15.Press [ ] or [ ] to select the resolution,
then press [OK].
You can select from <200x200dpi>, <200x400dpi>,
<300x300dpi>, <400x400dpi>, <600X600dpi>, <100X100dpi>,
<150X150dpi>, and <200x100dpi>.
NOTE
– If you are registering an e-mail address, note the following:
– If you want to send color images in the <PDF (COMPACT)>
format, select <300x300dpi>. Otherwise, the image is sent
in black-and-white.
– If you want to send color images in the <JPEG> format,
select <100X100dpi>, <150X150dpi>, <200x200dpi>, or
<300x300dpi>. Otherwise, the image is sent in black-andwhite.
– If you have selected <PDF> or <TIFF> as the file format in
step 11 and <100X100dpi> or <600X600dpi> as the
resolution, the image is sent in <200x200dpi> resolution.
– If you are registering an I-fax address, the image is sent in
<200x200dpi> even if you select <200x400dpi>,
<300x300dpi>, <400x400dpi>, <600X600dpi>,
<100X100dpi>, or <150X150dpi>.
16.Confirm that <ORIGINAL TYPE> is displayed,
then press [OK].
17.Press [ ] or [ ] to select the original
type (<TEXT/PHOTO>, <TEXT>, or <PHOTO>),
then press [OK].
NOTE
If you have selected <PDF (COMPACT)> as the file format in
step 11, the original type is automatically set to <TEXT/
PHOTO>. Skip to step 18.
18.Press [Stop] to return to the standby mode.
Registering a File Server Address
1. Press [Additional Functions].
2. Press [ ] or [ ] to select <ADDRESS
BOOK SET.>, then press [OK].
3. Press [ ] or [ ] to select <FAVORITES
BUTTONS>, then press [OK].
4. Press [ ] or [ ] to select a one-touch
key (01 to 04), then press [OK].
Page 54

1
2
3
4
5
7
8
9
6
TOP
Back Previous Next
1-31
Table of Contents
Index
Advanced Send
Features
Advanced Copy
Features
Network
Remote UI
System Monitor
System Manager
Settings
Reports and Lists
Troubleshooting
Appendix
5. Press [ ] or [ ] to select the server
protocol (<FTP> or <SMB>), then press [OK].
For details on each protocol, see step 5 in “Registering File
Server Addresses,” on p. 1-23.
6. Confirm that <NAME> is displayed, then
press [OK].
7. Use the numeric keys to enter the
destination’s name (up to 16 characters),
then press [OK].
8. Confirm that <HOST NAME> is displayed,
then press [OK].
9. Use the numeric keys to enter the name of
the file server on the network (up to 120
characters), then press [OK].
For instructions on entering the file server name, see step 9 in
“Registering File Server Addresses,” on p. 1-23.
10.Confirm that <FILE PATH> is displayed, then
press [OK].
11.Use the numeric keys to enter the file path to
the folder to which the job is to be sent (up to
120 characters), then press [OK].
12.Confirm that <LOGIN NAME> is displayed,
then press [OK].
13.Use the numeric keys to enter the login
name, then press [OK].
You can enter up to 24 characters for the login name.
14.Confirm that <PASSWORD> is displayed,
then press [OK].
15.Use the numeric keys to enter the password,
then press [OK].
You can enter up to 24 characters (14 characters when <SMB> is
selected as the server protocol) for the password.
16.Confirm that <IMAGE FORMAT> is displayed,
then press [OK].
Page 55

1
2
3
4
5
7
8
9
6
TOP
Back Previous Next
1-32
Table of Contents
Index
Advanced Send
Features
Advanced Copy
Features
Network
Remote UI
System Monitor
System Manager
Settings
Reports and Lists
Troubleshooting
Appendix
17.Press [ ] or [ ] to select the file format
(<PDF>, <TIFF (B&W)>, <PDF (COMPACT)>,
or <JPEG>), then press [OK].
<PDF>, <TIFF (B&W)>: Select for sending images in black-andwhite.
<PDF (COMPACT)>, <JPEG>: Select for sending color images.
18.Confirm that <DIVIDE INTO PAGES> is
displayed, then press [OK].
19.Press [ ] or [ ] to select <ON> or
<OFF>, then press [OK].
<OFF>: Sends multiple images as a single file without dividing
them.
<ON>: Separates multiple images and send them as separate
files.
NOTE
If you have selected <JPEG> as the file format in step 17,
multiple images are sent as separate files even if you set
<DIVIDE INTO PAGES> to <OFF>.
20.Confirm that <IMAGEQUALITY> is displayed,
then press [OK].
21.Press [ ] or [ ] to select the resolution,
then press [OK].
You can select from <200x200dpi>, <200x400dpi>,
<300x300dpi>, <400x400dpi>, <600X600dpi>, <100X100dpi>,
<150X150dpi>, and <200x100dpi>.
NOTE
– If you want to send color images in the <PDF (COMPACT)>
format, select <300x300dpi>. Otherwise, the image is sent in
black-and-white.
– If you want to send color images in the <JPEG> format, select
<100X100dpi>, <150X150dpi>, <200x200dpi>, or
<300x300dpi>. Otherwise, the image is sent in black-andwhite.
– If you have selected <PDF> or <TIFF> as the file format in
step 17 and <100X100dpi> or <600X600dpi> as the
resolution, the image is sent in <200x200dpi> resolution.
22.Confirm that <ORIGINAL TYPE> is displayed,
then press [OK].
Page 56

1
2
3
4
5
7
8
9
6
TOP
Back Previous Next
1-33
Table of Contents
Index
Advanced Send
Features
Advanced Copy
Features
Network
Remote UI
System Monitor
System Manager
Settings
Reports and Lists
Troubleshooting
Appendix
23.Press [ ] or [ ] to select the original
type (<TEXT/PHOTO>, <TEXT>, or <PHOTO>),
then press [OK].
NOTE
If you have selected <PDF (COMPACT)> as the file format in
step 17, the original type is automatically set to <TEXT/
PHOTO>. Skip to step 24.
24.Press [Stop] to return to the standby mode.
Page 57

1
2
3
4
5
7
8
9
6
TOP
Back Previous Next
1-34
Table of Contents
Index
Advanced Send
Features
Advanced Copy
Features
Network
Remote UI
System Monitor
System Manager
Settings
Reports and Lists
Troubleshooting
Appendix
Canceling TX/RX Jobs
Cancel an ongoing job (sending or receiving) as follows.
1. Press [Stop].
2. When the <STOP KEY PRESSED> message
appears, press [OK].
●When scanning using the ADF:
●When scanning using the platen glass:
When the <CANCEL DURING TX/RX?>
message appears, press [ ] to select
<YES>.
NOTE
For sending jobs, remove any unscanned documents from the
ADF.
STOP KEY PRESSED
PRESS OK KEY
STOP KEY PRESSED
CANCEL DURING TX/RX?
< YES NO >
Page 58

1
2
3
4
5
7
8
9
6
TOP
Back Previous Next
2-1
Table of Contents
Index
Advanced Send
Features
Advanced Copy
Features
Network
Remote UI
System Monitor
System Manager
Settings
Reports and Lists
Troubleshooting
Appendix
2 Advanced Copy Features
Advanced Copy Features........................................................................ 2-2
Collate Copy ........................................................... 2-2
Reserved Copy....................................................... 2-3
Two-Sided Copying................................................. 2-3
2 on 1 Combination ................................................ 2-6
Frame Erase ........................................................... 2-7
Canceling Copy Jobs ............................................................................ 2-11
Page 59

1
2
3
4
5
7
8
9
6
TOP
Back Previous Next
2-2
Table of Contents
Index
Advanced Send
Features
Advanced Copy
Features
Network
Remote UI
System Monitor
System Manager
Settings
Reports and Lists
Troubleshooting
Appendix
Advanced Copy Features
■ Collate Copy
You can copy documents collated into sets arranged in page
order. This feature can be used together with both “Two-Sided
Copying” (see p. 2-3) and “2 on 1 Combination” (see p. 2-6).
1. Set documents.
Place the first page on the platen glass if you are not using the
ADF.
2. Press [COPY].
NOTE
If <AUTO COLLATE> is set to <COLLATE> in <STANDRD
SETTINGS> in <COPY SETTINGS>, skip step 3 and 4.
3. Press [Collate].
<COLLATE> appears in the LCD.
4. Press [ ] or [ ] to select <ON>, then
press [OK].
5. Use the numeric keys to enter the desired
copy quantity (1 to 99).
6. Press [Start].
When the documents are loaded in the ADF, collate copying
starts and no further operation is required.
If the document is placed on the platen glass and <ORIGINAL
SIZE> is displayed in the LCD, press [ ] or [ ] to select the
original size, then press [OK].
7. Place the next page of the document on the
platen glass, then press [Start].
Repeat this step to scan all pages. The machine prints only one
copy of each page.
8. Press [OK].
– The machine prints the remaining sets of copies.
– To cancel all settings, press [Reset].
NOTE
When scanning multiple page documents, <MEMORY FULL>
may appear in the LCD and scanning may be canceled. If this
happens, press [Stop] to return to the standby mode.
Page 60

1
2
3
4
5
7
8
9
6
TOP
Back Previous Next
2-3
Table of Contents
Index
Advanced Send
Features
Advanced Copy
Features
Network
Remote UI
System Monitor
System Manager
Settings
Reports and Lists
Troubleshooting
Appendix
■ Reserved Copy
You can make copy settings and scan documents even if the
machine is currently printing. The scanned documents are
processed after the current job is complete.
1. Set documents.
2. Press [COPY].
3. Set the desired copy mode and quantity (1 to
99), then press [Start].
You can reserve up to 5 copy jobs, with different settings for each
job.
■ Two-Sided Copying
Two-sided copying enables you to make two-sided copies from
one-sided or two-sided documents, or make one-sided copies
from two-sided documents. This feature can be used together
with both “Collate Copy” (see p. 2-2) and “2 on 1 Combination”
(see p. 2-6).
1 to 2-Sided Copying
2 to 2-Sided Copying
Originals
Copy
Book Type
selected
Calendar
Type
selected
Copy
Original
Copy
Copy
Book Type
selected
Calendar
Type
selected
Page 61

1
2
3
4
5
7
8
9
6
TOP
Back Previous Next
2-4
Table of Contents
Index
Advanced Send
Features
Advanced Copy
Features
Network
Remote UI
System Monitor
System Manager
Settings
Reports and Lists
Troubleshooting
Appendix
2 to 1-Sided Copying
NOTE
Paper used to make two-sided copies must conform to the following
specifications:
– Paper size: A4 (LGL or LTR loaded on the stack bypass are available
as well.)
– Paper weight: 64 to 90 g/m
2
1 to 2-Sided
You can make two-sided copies from one-sided documents.
1. Set documents.
2. Press [COPY].
3. Press [Two-Sided].
4. Press [ ] or [ ] to select <1 > 2-SIDED>,
then press [OK].
5. Press [ ] or [ ] to select <BOOK TYPE>
or <CALENDAR TYPE>, then press [OK].
<BOOK TYPE>: The front and back sides of the copy will have
the same top-bottom orientation.
<CALENDAR TYPE>: The front and back sides of the copy will
have opposite top-bottom orientations.
6. Press [Start].
To cancel all settings, press [Reset].
NOTE
When you set the document on the platen glass, press [Start] for
each document. When scanning is complete, press [OK].
Original
Copies
Copies
Book Type
selected
Calendar
Type
selected
Page 62

1
2
3
4
5
7
8
9
6
TOP
Back Previous Next
2-5
Table of Contents
Index
Advanced Send
Features
Advanced Copy
Features
Network
Remote UI
System Monitor
System Manager
Settings
Reports and Lists
Troubleshooting
Appendix
2 to 2-Sided
You can make two-sided copies from two-sided documents.
1. Set documents.
2. Press [COPY].
3. Press [Two-Sided].
4. Press [ ] or [ ] to select <2 > 2-SIDED>,
then press [OK].
5. Press [ ] or [ ] to select <BOOK TYPE>
or <CALENDAR TYPE> (for the documents),
then press [OK].
<BOOK TYPE>: The front and back sides of the document have
the same top-bottom orientation.
<CALENDAR TYPE>: The front and back sides of the document
have opposite top-bottom orientations.
6. Press [ ] or [ ] to select <BOOK TYPE>
or <CALENDAR TYPE> (for the copies), then
press [OK].
<BOOK TYPE>: The front and back sides of the copy will have
the same top-bottom orientation.
<CALENDAR TYPE>: The front and back sides of the copy will
have opposite top-bottom orientations.
7. Press [Start].
To cancel all settings, press [Reset].
NOTE
When you set the document on the platen glass, press [Start] for
each document. When scanning is complete, press [OK].
2 to 1-Sided
You can make one-sided copies from two-sided documents.
1. Set documents.
2. Press [COPY].
Page 63

1
2
3
4
5
7
8
9
6
TOP
Back Previous Next
2-6
Table of Contents
Index
Advanced Send
Features
Advanced Copy
Features
Network
Remote UI
System Monitor
System Manager
Settings
Reports and Lists
Troubleshooting
Appendix
3. Press [Two-Sided].
4. Press [ ] or [ ] to select <2 > 1-SIDED>,
then press [OK].
5. Press [ ] or [ ] to select <BOOK TYPE>
or <CALENDAR TYPE>, then press [OK].
<BOOK TYPE>: The front and back sides of the document have
the same top-bottom orientation.
<CALENDAR TYPE>: The front and back sides of the document
have opposite top-bottom orientations.
6. Press [Start].
To cancel all settings, press [Reset].
NOTE
When you set the document on the platen glass, press [Start] for
each document. When scanning is complete, press [OK].
■ 2 on 1 Combination
2 on 1 combination automatically reduces two documents to fit
on the selected paper size. This feature can be used together
with both “Collate Copy” (see p. 2-2) and “Two-Sided Copying”
(see p. 2-3).
1. Set documents.
2. Press [COPY].
3. Press [2 on 1].
4. Press [ ] or [ ] to select <ON>, then
press [OK].
2
1
1
2
Originals
Copy
Page 64

1
2
3
4
5
7
8
9
6
TOP
Back Previous Next
2-7
Table of Contents
Index
Advanced Send
Features
Advanced Copy
Features
Network
Remote UI
System Monitor
System Manager
Settings
Reports and Lists
Troubleshooting
Appendix
5. Press [ ] or [ ] to select the size of the
document, then press [OK].
6. Press [ ] or [ ] to select the paper size,
then press [OK].
7. Use the numeric keys to enter the desired
copy quantity (1 to 99).
8. Press [Start].
To cancel all settings, press [Reset].
NOTE
– When you set the document on the platen glass, press [Start]
for each document. When scanning is complete, press [OK].
– A maximum of 2 to 3 mm margin will be produced between
the two reduced documents in 2 on 1 combination copying.
■ Frame Erase
You can erase shadows and lines that appear when copying
various types of documents.
Original Frame Erase Copying
Original (A5)
Copy (A4)
Original Frame
Erase Selected
Original Frame
Erase Not
Selected
Copy (A4)
Page 65

1
2
3
4
5
7
8
9
6
TOP
Back Previous Next
2-8
Table of Contents
Index
Advanced Send
Features
Advanced Copy
Features
Network
Remote UI
System Monitor
System Manager
Settings
Reports and Lists
Troubleshooting
Appendix
Book Frame Erase Copying
Binding Hole Frame Erase Copying
Original Frame Erase
Original frame erase can erase the dark borders and frame lines
that appear around the copy when the document is smaller than
the selected paper size.
1. Set documents.
2. Press [COPY].
3. Press [Frame Erase].
4. Press [ ] or [ ] to select <ORIGINAL
FR.>, then press [OK].
5. Press [ ] or [ ] to select the size of the
document, then press [OK].
6. Use [ ], [ ], or the numeric keys to set
the frame erase width for all four borders,
then press [OK].
The width ranges 1 to 50 mm.
Original
Copy
Book Frame
Erase
Selected
Book Frame
Erase Not
Selected
Copy
Original
Copy
Binding Hole
Erase
Selected
Binding Hole
Erase Not
Selected
Copy
Page 66

1
2
3
4
5
7
8
9
6
TOP
Back Previous Next
2-9
Table of Contents
Index
Advanced Send
Features
Advanced Copy
Features
Network
Remote UI
System Monitor
System Manager
Settings
Reports and Lists
Troubleshooting
Appendix
7. Use the numeric keys to enter the desired
copy quantity (1 to 99).
8. Press [Start].
To cancel all settings, press [Reset].
Book Frame Erase
Book frame erase can erase the dark borders, as well as center
and contour lines that appear when copying facing pages in a
book or bound document onto a single sheet of paper.
1. Set documents.
2. Press [COPY].
3. Press [Frame Erase].
4. Press [ ] or [ ] to select <BOOK
FRAME>, then press [OK].
5. Press [ ] or [ ] to select the book size,
then press [OK].
6. Use [ ], [ ], or the numeric keys to set
the book frame erase width for all four
borders, then press [OK].
The book frame erase width ranges 1 to 50 mm.
7. Use [ ], [ ], or the numeric keys to set
the frame erase width for the center of the
book, then press [OK].
The width ranges 1 to 50 mm.
8. Use the numeric keys to enter the desired
copy quantity (1 to 99).
9. Press [Start].
To cancel all settings, press [Reset].
Binding Hole Erase
Binding hole erase can erase the shadows that appear on
copies from binding holes on the documents.
Page 67

1
2
3
4
5
7
8
9
6
TOP
Back Previous Next
2-10
Table of Contents
Index
Advanced Send
Features
Advanced Copy
Features
Network
Remote UI
System Monitor
System Manager
Settings
Reports and Lists
Troubleshooting
Appendix
1. Set documents.
2. Press [COPY].
3. Press [Frame Erase].
4. Press [ ] or [ ] to select <BINDING
HOLE>, then press [OK].
5. Press [ ] or [ ] to specify the location of
the binding holes (<LEFT>, <RIGHT>, <TOP>,
or <BOTTOM>), then press [OK].
6. Use [ ], [ ], or the numeric keys to set
the binding hole erase width, then press
[OK].
The width ranges 3 to 20 mm.
7. Use the numeric keys to enter the desired
copy quantity (1 to 99).
8. Press [Start].
To cancel all settings, press [Reset].
The locations of the binding holes to be erased are shown in the
illustration below.
A: LEFT
B: RIGHT
C: TOP
D: BOTTOM
C
D
A
B
ADF
C
D
A
B
Platen Glass
Page 68

1
2
3
4
5
7
8
9
6
TOP
Back Previous Next
2-11
Table of Contents
Index
Advanced Send
Features
Advanced Copy
Features
Network
Remote UI
System Monitor
System Manager
Settings
Reports and Lists
Troubleshooting
Appendix
Canceling Copy Jobs
Cancel an ongoing job as follows.
1. Press [Stop].
2. When the <STOP KEY PRESSED> message
appears, press [OK].
●When scanning using the ADF:
●When scanning using the platen glass:
When the <CANCEL COPYING?> message
appears, press [ ] to select <YES>.
STOP KEY PRESSED
PRESS OK KEY
STOP KEY PRESSED
CANCEL COPYING?
< YES NO >
Page 69

1
2
3
4
5
7
8
9
6
TOP
Back Previous Next
3-1
Table of Contents
Index
Advanced Send
Features
Advanced Copy
Features
Network
Remote UI
System Monitor
System Manager
Settings
Reports and Lists
Troubleshooting
Appendix
3Network
System Requirements............................................................................. 3-4
Printing or Sending a Fax from a Computer ........... 3-4
Using E-Mail/I-Fax .................................................. 3-5
Sending Data.......................................................... 3-5
Network Environment Setup Procedures.............................................. 3-7
Interface Settings .................................................................................... 3-8
Communication Environment Setup.................................................... 3-10
Using a TCP/IP Network........................................................................ 3-13
Page 70

1
2
3
4
5
7
8
9
6
TOP
Back Previous Next
3-2
Table of Contents
Index
Advanced Send
Features
Advanced Copy
Features
Network
Remote UI
System Monitor
System Manager
Settings
Reports and Lists
Troubleshooting
Appendix
Protocol Settings for TCP/IP Network.................................................. 3-14
Settings from the Operation Panel of the
Machine ................................................................ 3-14
Setting Up a Computer for Printing/Sending a Fax............................ 3-23
Machine Connection Method (LPD/Raw) ............. 3-23
Print Server Settings............................................. 3-26
Setting Up a Computer as a FTP Server.............................................. 3-27
Using a NetBIOS Network..................................................................... 3-37
Protocol Settings for NetBIOS Network............................................... 3-38
Settings from the Operation Panel of the
Machine ................................................................ 3-38
Page 71

1
2
3
4
5
7
8
9
6
TOP
Back Previous Next
3-3
Table of Contents
Index
Advanced Send
Features
Advanced Copy
Features
Network
Remote UI
System Monitor
System Manager
Settings
Reports and Lists
Troubleshooting
Appendix
Setting Up a Computer as a File Server .............................................. 3-41
Connecting to a TCP/IP Network.......................... 3-41
Connecting to a NetBIOS Network and
Configuring a Shared Folder ................................ 3-41
Machine Management ........................................................................... 3-52
Machine Management Using Web Browser
(Remote UI) .......................................................... 3-52
Machine Management Using NetSpot Device
Installer ................................................................. 3-52
Machine Management Using NetSpot Console.... 3-52
Page 72

1
2
3
4
5
7
8
9
6
TOP
Back Previous Next
3-4
Table of Contents
Index
Advanced Send
Features
Advanced Copy
Features
Network
Remote UI
System Monitor
System Manager
Settings
Reports and Lists
Troubleshooting
Appendix
System Requirements
This section describes the system environments with
which the machine is compatible.
■ Printing or Sending a Fax from a
Computer
The following system environments are compatible when
printing or sending a fax from a computer:
● OS
– Microsoft Windows 98/98SE
– Microsoft Windows Me
– Microsoft Windows 2000 Server
– Microsoft Windows 2000 Professional
– Microsoft Windows XP Professional
– Microsoft Windows XP Home Edition
– Microsoft Windows Server 2003
● Computers
– Windows; IBM PC/compatibles
● Protocol
–TCP/IP
NOTE
If you are using Windows 2000, you need to install Service Pack 4 or
later.
Page 73

1
2
3
4
5
7
8
9
6
TOP
Back Previous Next
3-5
Table of Contents
Index
Advanced Send
Features
Advanced Copy
Features
Network
Remote UI
System Monitor
System Manager
Settings
Reports and Lists
Troubleshooting
Appendix
■ Using E-Mail/I-Fax
The following system environments are confirmed for using the
e-mail/I-fax functions.
● Mail forwarding server software
– Sendmail 8.93 or later (UNIX)
– Microsoft Exchange Server (Windows)
(Microsoft Exchange Server 5.5 + Service Pack 1 or later)
– Lotus Domino R4.6 or later (Windows)
● Mail receiving server software
– Qpopper 2.53 or later (UNIX)
– Microsoft Exchange Server (Windows)
(Microsoft Exchange Server 5.5 + Service Pack 1 or later)
– Lotus Domino R4.6 or later (Windows)
NOTE
– The machine sends e-mail or I-fax messages to mail servers using
SMTP.
The machine can receive incoming messages from a mail server
using the POP3 protocol or directly using the machine’s own SMTP
receiving function.
If the latter method is used, it is not necessary for the mail server to
support the POP3 protocol.
– The machine can receive I-fax images and error e-mail messages
sent when errors occur during communication, but not any other type
of e-mail.
■ Sending Data
The following system environments are compatible when
sending data from the machine to a file server, depending on the
type of network used:
Page 74

1
2
3
4
5
7
8
9
6
TOP
Back Previous Next
3-6
Table of Contents
Index
Advanced Send
Features
Advanced Copy
Features
Network
Remote UI
System Monitor
System Manager
Settings
Reports and Lists
Troubleshooting
Appendix
With a TCP/IP Network (Using FTP)
● Servers
– Microsoft Windows 2000 Server and Internet Information
Services 5.0
– Microsoft Windows XP Professional and Internet Information
Services 5.1
– Microsoft Windows Server 2003 and Internet Information
Services 6.0
– Solaris Version 2.6 or later
–Mac OS X
– FTP server for imageWARE Gateway
● Protocol
–TCP/IP
With a NetBIOS Network
● Servers
– Microsoft Windows 98
– Microsoft Windows Me
– Microsoft Windows 2000 Server
– Microsoft Windows 2000 Professional
– Microsoft Windows XP Professional
– Microsoft Windows XP Home Edition
– Microsoft Windows Server 2003
● Protocol
– NetBIOS over TCP/IP (NetBT)
NOTE
If you are using Windows 2000, you need to install Service Pack 4 or
later.
Page 75

1
2
3
4
5
7
8
9
6
TO P
Ba
c
k
Pre
vious Ne
xt
3-7
Table of Contents
Inde x
Ad
vanced Send
Feat
ur es
Ad vanced Cop
y
Feat
ur
es
Netw ork
Remot
e UI
System Monitor
System Mana
g
er
Settings
Repor ts and Lists
Tr
oub
l
eshooting
Appendix
Network Envir
onment Setup Pr
ocedures
Before using the machine in a network environment, it is
necessary to perform the following setup procedures.
1. Network Cable Connection (See “Set the
Machine for Network Usage,” in the Quick
Start Guide.)
Connect the machine to your network using the network cables.
2. Preparation for Protocol Settings (See “Set
the Machine for Network Usage,” in the Quick
Start Guide.)
Specify the machine’s IP address so that the machine and the
network computer can communicate before making protocol
settings. Any of the following can be used to specify the settings.
– Machine’s operation panel (Additional Functions menu)
– NetSpot Device Installer (BLUE utility software included in
the User Software CD)
3. Interface Settings (See p. 3-8)
Specify the interface settings for communication between the
machine and computers on your network. To specify the settings,
use:
– Machine’s operation panel
– Web browser (Remote UI)
4. Communication Environment Setup (See
p. 3-10)
Set up a configuration for communication between the machine
and computers on your network. To specify the settings, use:
– Machine’s operation panel
– Web browser (Remote UI)
Page 76

1
2
3
4
5
7
8
9
6
TOP
Back Previous Next
3-8
Table of Contents
Index
Advanced Send
Features
Advanced Copy
Features
Network
Remote UI
System Monitor
System Manager
Settings
Reports and Lists
Troubleshooting
Appendix
Interface Settings
Ethernet Driver
You can specify the communication method and Ethernet
connection type.
1. Press [Additional Functions].
2. Press [ ] or [ ] to select <SYSTEM
SETTINGS>, then press [OK].
If the System Manager ID and System Password have been set,
enter the System Manager ID and System Password using the
numeric keys, then press [Log In/Out].
3. Press [ ] or [ ] to select <NETWORK
SETTINGS>, then press [OK].
4. Press [ ] or [ ] to select <ETHERNET
DRIVER>, then press [OK].
5. Confirm that <DETECT> is displayed, then
press [OK].
6. Press [ ] or [ ] to select the desired
detection method, then press [OK].
<AUTO>: Automatically determines the communication mode
(Half duplex/Full duplex) and Ethernet type (10Base-T/100BaseTX). Skip to step 11.
<MANUAL>: You have to manually specify the communication
mode and Ethernet type.
NOTE
If you reconnect the network cable (for example, reconnect the
cable to a different Ethernet hub) with the power on, the Auto
Detect function will not work even if you set <DETECT> to
<AUTO>. (Connect the cable with the power off.)
7. Confirm that <DUPLEX> is displayed, then
press [OK].
8. Press [ ] or [ ] to select the desired
communication method, then press [OK].
<HALF DUPLEX>: Sends and receives alternately.
<FULL DUPLEX>: Sends and receives simultaneously.
Page 77

1
2
3
4
5
7
8
9
6
TOP
Back Previous Next
3-9
Table of Contents
Index
Advanced Send
Features
Advanced Copy
Features
Network
Remote UI
System Monitor
System Manager
Settings
Reports and Lists
Troubleshooting
Appendix
9. Confirm that <ETHERNET TYPE> is
displayed, then press [OK].
10.Press [ ] or [ ] to select the desired
Ethernet connection type, then press [OK].
<10 BASE-T>: Establish a 10Base-T network connection.
<100 BASE-TX>: Establish a 100Base-TX network connection.
11.Press [Stop] to return to the standby mode.
12.Restart the machine.
Page 78

1
2
3
4
5
7
8
9
6
TOP
Back Previous Next
3-10
Table of Contents
Index
Advanced Send
Features
Advanced Copy
Features
Network
Remote UI
System Monitor
System Manager
Settings
Reports and Lists
Troubleshooting
Appendix
Communication Environment Setup
To set up a configuration for communication between the
machine and computers on your network, use the following
procedure.
SNMP
SNMP helps monitor the state of the machine and collects
information on it. The following two items can be set:
<COMMUNITY NAME>:
Sets the SNMP community name. You can specify up to two
community names.
<SNMP WRITABLE>:
Enables the computers on the network to access the machine
and modify its settings if this item is activated. You can specify
this setting for each community separately.
1. Press [Additional Functions].
2. Press [ ] or [ ] to select <SYSTEM
SETTINGS>, then press [OK].
If the System Manager ID and System Password have been set,
enter the System Manager ID and System Password using the
numeric keys, then press [Log In/Out].
3. Press [ ] or [ ] to select <NETWORK
SETTINGS>, then press [OK].
4. Press [ ] or [ ] to select <SNMP
SETTINGS>, then press [OK].
5. Confirm that <USE SNMP> is displayed, then
press [OK].
Page 79

1
2
3
4
5
7
8
9
6
TO P
Ba
c
k
Pre
vious Ne
xt
3-11
Table of Contents
Inde x
Ad
vanced Send
Feat
ur es
Advanced Cop
y
Feat
ur
es
Netw ork
Remot
e UI
System Monitor
System Mana
g
er
Settings
Repor ts and Lists
Tr
oub
l
eshooting
Appendix
6.
Press [
]
or [
]
to
select <ON> or
<OFF>, then press [OK].
<ON
>
: W
hen
you
set orbro
w
se each
item
of the
machi
ne
with a
uti
lity that uses SNMP to obtaininfo
rmation
.
<OFF> : Whenyou
do
no
t u
se
a n
SNMP
utili
ty.
NO
T
E
– I
f y
ou w
ant to
use a BLUE printe
r dr
iver or utility, select <
O
N>
f
o
r both <
USE
SNMP> an
d <DEDICA
T ED POR T>.
–
You can restr
ict the IP ad
dresses o
f comp
uters on which items
canbeset or
browsed. If you restrict the
IP a
ddresse
s,
i
t
is no
t
po
ssi b
le to use th
e Remote UI
to set
or brow
se det
a
iled
inf
o
r
mation on computers ot
her than those who
se IP
addresses are allowed,
even if both <U
SE SNMP> and
<DE
D
ICA
TEDPOR
T> are <ON>. For details
, see “Protocol
Setti
ngs f or TCP/IP Network,” on p.3-14 .
7.
Conrm that <COMM
UNITY NAME 1> is
displa
yed, then press [OK].
8. Use the numeric ke
ys
to enter the desired
comm
unity name
other than “pub
lic,
” then
press [OK].
9.
If y
ou want to sp
ecify <COMMUNITY
NA M
E 2>, press [O K]
.
Otherwise ,
press [ ], then
skip
to
step 11.
10.
Use the n
umeric keysto enter the desired
comm
unity name
,
then press [OK].
11.
Con f
irm tha
t <SNMP WRIT
ABLE 1> is
displa
yed, then press [OK].
12.
Press [ ]
or [ ]
to select <ON>, then
press [OK].
13. If y
ou want to specify
<SNMP WRIT
ABLE 2>,
press [OK].
Otherwise , skip to step
15.
14. Press [ ]
or [ ]
to select <ON>, then
press [OK].
15. Press [Stop] to return to the standby mode
.
16. Restar t the machine
.
Page 80

1
2
3
4
5
7
8
9
6
TO P
Ba
c
k
Pre
vious Ne
xt
3-12
Table of Contents
Inde x
Ad
vanced Send
Feat
ur es
Advanced Cop
y
Feat
ur
es
Netw ork
Remot
e UI
System Monitor
System Mana
g
er
Settings
Repor ts and Lists
Tr
oub
l
eshooting
Appendix
Dedi
cat
ed P
o
r
t
To se t or
br
owse deta
iled in
f
ormat
io
n onthe
machin
e wit
h
a
BLUE pr
inter driv
er or utility,
set <D
EDIC
A
T
ED POR
T>to
<ON>.
NO
TE
–Ify
o
u want
to use a BLUE
on pr
i
n
terdr
iv
er
or utility, select <ON> for
b
o
th <USE SNMP>
and <
DEDICAT
ED PORT>.
–You
can restri
ct the IP addresses
of computers on w h
ich
items ca
n
b
e
set or brow
sed. If yourestrict the IP addresses,
it
i
s not possib
l
e
to
us e theRemote UI to se t or bro
wse de ta
iled infor
mation on
computers other tha n
those whose IP
a ddressesare al lowed, even
if
b
o
th <USE SNMP>
and <
D
EDICAT
ED PORT>
are <ON>. F
o
r
details, se e “Pro
tocol Se
ttingsforTCP/IP Netw
or
k,
” on
p.
3-14.
1.
Press [Ad
d
itional Functions].
2.
Press [ ]
or [ ] to select <SYSTEM
SETTINGS>, then press [OK].
If
the Syste
m
Manager ID a
nd System P
ass word ha ve bee
n set,
e
n
ter the
System Manager
ID and Syste
mPass word using
the
numer
ic k e
ys
, then
press [Log
In/O
ut].
3.
Press [ ]
or [
]
to select <NETW
O
RK
SETTINGS>, then press [OK].
4.
Press [
]
or [ ]
to select <DEDICAT ED
POR
T>, then press [OK].
5.
Press [ ]
or [
]
to select <ON> or
<OFF>, then press [OK].
<ON>
: If y
ou w
ant to
set or browse detailed inf
orma
tion on the
machin
e with a BLUE pr
inter dr
i
ver or uti
lity.
<OFF>
: If y ou are not usinga
BLUE printerdriver o r util
ity
.
6. Press [Stop] to return to the standby mode
.
7. Restart the machine
.
Page 81

1
2
3
4
5
7
8
9
6
TO P
Back
Pre
vious Ne
xt
3-13
Table of Contents
Inde x
Ad
vanced Send
Feat
ur es
Ad vanced Cop
y
Feat
ur es
Netw ork
Remot
e UI
System Monitor
System Mana
ger
Settings
Repor ts and Lists
Tr
oub
leshooting
Appendix
Using a TCP/IP Network
This chapter describes the settings and procedures necessary to connect and use the machine with a TCP/IP
network.
1. Protocol Settings for TCP/IP Network (See p. 3-14)
Specify the machine’s protocol settings. Any of the following can be used to specify the settings.
– Machine’s operation panel (Additional Functions menu)
– Web browser (Remote UI)
– NetSpot Device Installer (BLUE utility software included in the User Software CD)
2. Setting Up a Computer for Printing/Sending a Fax (See p. 3-23)
Specify the settings for each computer you use for printing / sending a fax.
3. Setting Up a Computer as a FTP Server (See p. 3-27)
Specify the settings of the computer receiving data sent from the machine.
Page 82

1
2
3
4
5
7
8
9
6
TO P
Ba
c
k
Pre
vious Ne
xt
3-14
Table of Contents
Inde x
Ad
vanced Send
Feat
ur es
Advanced Cop
y
Feat
ur
es
Netw ork
Remot
e UI
System Monitor
System Mana
g
er
Settings
Repor ts and Lists
Tr
oub
l
eshooting
Appendix
Protocol Settings for TCP/IP Network
Settings fr
om the Operation P
a
nel of
th
e M
a
chine
TCP/IP Settings
1.
Press [Add
itional Functions].
2.
Press [ ]
or [ ]
to select <SYSTEM
SETTINGS>, then press [OK].
If the System Manag
er ID andSystem P
ass word ha v
e been
set,
en
ter the System Mana
ger ID an
d System P a
ss word usin
g the
n
umeri
c k
eys
, then pre
ss [Log In/Out].
3.
Press [ ]
or [
]
to select <NETWORK
SETTINGS>, then press [OK].
4.
Con firm tha t
<T
CP/IP SETTINGS> is
displa
yed, then press [OK].
5. Press [ ]
or [
]
to select <DNS
SETTINGS>, then press [OK].
You can specify the machine’s protocol settings on the
computer using any of the following software.
– Machine’s operation panel (Additional Functions menu)
– Web browser (Remote UI)
– NetSpot Console (via a web browser) (BLUE utility
software)
NOTE
– For more details about NetSpot Console, see online help or the
NetSpot Console readme file.
– To specify the protocol settings using NetSpot Console, you must log
in as Administrator. For instructions on how to use NetSpot Console,
see online help for NetSpot Console.
– If you change the IP address etc. on the web browser (Remote UI),
the change is not reflected in the setting display. When you check on
the machine, you can check by <VIEW IP ADDRESS> in
<NETWORK SETTINGS> located in the <SYSTEM SETTINGS>, or
by printing a USER’S DATA LIST. (See Chapter 14, “Machine Settings,”
in the Basic Operation Guide.)
Page 83

1
2
3
4
5
7
8
9
6
TOP
Back Previous Next
3-15
Table of Contents
Index
Advanced Send
Features
Advanced Copy
Features
Network
Remote UI
System Monitor
System Manager
Settings
Reports and Lists
Troubleshooting
Appendix
6. Confirm that <PRIMARY SERVER> is
displayed, then press [OK].
7. Use the numeric keys to enter the IP address
of a primary DNS server, then press [OK].
8. If you want to specify <SECONDARY
SERVER>, press [OK].
Otherwise, press [ ], skip to step 10.
9. Use the numeric keys to enter the IP address
of a secondary DNS server, then press [OK].
10.Confirm that <HOST NAME> is displayed,
then press [OK].
11.Use the numeric keys to enter the desired
host name, then press [OK].
12.Confirm that <DOMAIN NAME> is displayed,
then press [OK].
13.Use the numeric keys to enter the network
domain name, then press [OK].
14.Press [Additional Functions] so that <DNS
SETTINGS> in <TCP/IP SETTINGS> is
displayed.
15.Press [ ] or [ ] to select <USE LPD>,
then press [OK].
16.Press [ ] or [ ] to select <ON> or
<OFF>, then press [OK].
<ON>: Uses LPD as the print application.
<OFF>: Does not use LPD.
17.Press [ ] or [ ] to select <RAW
SETTINGS>, then press [OK].
18.Press [ ] or [ ] to select <ON> or
<OFF>, then press [OK].
<ON>: Uses Raw as the print application.
<OFF>: Does not use Raw.
HOST NAME :a
host name
Ex.
DOMAIN NAME :a
org.company.com
Ex.
Page 84

1
2
3
4
5
7
8
9
6
TOP
Back Previous Next
3-16
Table of Contents
Index
Advanced Send
Features
Advanced Copy
Features
Network
Remote UI
System Monitor
System Manager
Settings
Reports and Lists
Troubleshooting
Appendix
19.Confirm that <USE BIDIRECTIONAL> is
displayed, then press [OK].
20.Press [ ] or [ ] to select <ON>, then
press [OK].
<ON>: Establishes bidirectional communication using Port 9100.
<OFF>: Does not establish bidirectional communication using
Port 9100.
21.Press [ ] or [ ] to select <USE PASV
MODE>, then press [OK].
22.Press [ ] or [ ] to select <ON> or
<OFF>, then press [OK].
<OFF>: Disable the PASV mode for FTP.
<ON>: Enables the PASV mode for FTP.
NOTE
Whether you use the PASV mode for FTP depends on the
network environment you are using and the settings of the file
server you are sending to. Before specifying the PASV mode for
FTP, consult your network administrator.
23.Press [ ] or [ ] to select <FTP
EXTENSION>, then press [OK].
24.Press [ ] or [ ] to select <ON> or
<OFF>, then press [OK].
<OFF>: Disable the FTP extension.
<ON>: Enables the FTP extension.
25.Press [ ] or [ ] to select <USE HTTP>,
then press [OK].
<ON>: Uses the Remote UI.
<OFF>: Does not use the Remote UI.
26.Press [ ] or [ ] to select <ON>, then
press [OK].
27.Press [ ] or [ ] to select <PORT NO.>,
then press [OK].
28.Press [ ] or [ ] to select the protocol of
which you want to change the port number
(LPD, RAW, HTTP, SMTP RX, POP3 RX, FTP
SENDING, SMTP TX or SNMP), then press
[OK].
29.Use the numeric keys to enter the port
number, then press [OK].
Page 85

1
2
3
4
5
7
8
9
6
TOP
Back Previous Next
3-17
Table of Contents
Index
Advanced Send
Features
Advanced Copy
Features
Network
Remote UI
System Monitor
System Manager
Settings
Reports and Lists
Troubleshooting
Appendix
30.Press [Additional Functions] so that <PORT
NO.> in <TCP/IP SETTINGS> is displayed.
31.Press [ ] or [ ] to select <SET IP ADD
RANGE>, then press [OK].
32.Press [ ] or [ ] to select <ON>, then
press [OK].
33.Confirm that <PERMIT/REJECT> is
displayed, then press [OK].
34.Press [ ] or [ ] to select <REJECT> or
<PERMIT>, then press [OK].
<REJECT>: Restricts the IP addresses of computers from which
data (print/fax job) can be sent to the machine.
<PERMIT>: Permits the IP addresses of computers from which
data (print/fax job) can be sent to the machine.
35.Confirm that <SET IP ADDRESS> is
displayed, then press [OK].
36.Press [ ] or [ ] to select from <IP
ADDRESS 1> through <IP ADDRESS 4>, then
press [OK].
37.Confirm that <START IP ADDRESS> is
displayed, then press [OK].
38.Use the numeric keys to enter the start IP
address, then press [OK].
39.Confirm that <END IP ADDRESS> is
displayed, then press [OK]
40.Use the numeric keys to enter the end IP
address, then press [OK].
NOTE
To enter another IP address range, repeat step 36 to 40. After
you specified the <END IP ADDRESS> of <IP ADDRESS 4>,
confirm that <RX MAC ADD SET.> is displayed, press [OK],
then skip to step 43.
41.Press [Additional Functions] so that <SET IP
ADD RANGE> in <TCP/IP SETTINGS> is
displayed.
42.Press [ ] or [ ] to select <RX MAC ADD
SET.>, then press [OK].
Page 86

1
2
3
4
5
7
8
9
6
TOP
Back Previous Next
3-18
Table of Contents
Index
Advanced Send
Features
Advanced Copy
Features
Network
Remote UI
System Monitor
System Manager
Settings
Reports and Lists
Troubleshooting
Appendix
43.Press [ ] or [ ] to select <ON> or
<OFF>, then press [OK].
<OFF>: Disables a MAC address filter. Skip to step 46.
<ON>: Enables a MAC address filter.
NOTE
If you select <ON>, you will be unable to access from MAC
addresses which have not been specified.
44.Press [ ] or [ ] to select from <PERMIT
RX ADD1> through <PERMIT RX ADD5>, then
press [OK].
45.Specify the MAC addresses to allow access
to, then press [OK].
Repeat step 44 and 45 to specify other MAC addresses.
46.Press [Stop] to return to the standby mode.
47.Restart the machine.
E-mail/I-Fax Settings
1. Press [Additional Functions].
2. Press [ ] or [ ] to select <SYSTEM
SETTINGS>, then press [OK].
If the System Manager ID and System Password have been set,
enter the System Manager ID and System Password using the
numeric keys, then press [Log In/Out].
3. Press [ ] or [ ] to select <NETWORK
SETTINGS>, then press [OK].
4. Press [ ] or [ ] to select <E-MAIL/l-
FAX>, then press [OK].
5. Confirm that <SMTP RX> is displayed, then
press [OK].
Page 87

1
2
3
4
5
7
8
9
6
TOP
Back Previous Next
3-19
Table of Contents
Index
Advanced Send
Features
Advanced Copy
Features
Network
Remote UI
System Monitor
System Manager
Settings
Reports and Lists
Troubleshooting
Appendix
6. Press [ ] or [ ] to select <ON> or
<OFF>, then press [OK].
<OFF>: Does not receive e-mail/I-faxes using the machine’s own
SMTP receiving function. If you want to receive e-mail/I-faxes
using a POP server, select <OFF>.
<ON>: Receives e-mail/l-faxes using the machine’s own SMTP
receiving function.
NOTE
The machine can receive I-fax images and communication error
notices only.
7. Confirm that <SMTP SERVER> is displayed,
then press [OK].
8. Use the numeric keys to enter the SMTP
server name, then press [OK].
– Enter the SMTP server name if the SMTP server name is
already registered in the DNS server.
– Enter the IP address of the SMTP server if the SMTP server
name is not registered in the DNS server.
9. Confirm that <POP> is displayed, then press
[OK].
10.Press [ ] or [ ] to select <ON> or
<OFF>, then press [OK].
<OFF>: Does not receive e-mail/I-faxes using a POP server. If
you want to receive e-mail/I-faxes using the machine’s own
SMTP receiving function, select <OFF>.
<ON>: Receives e-mail/l-faxes using a POP server.
NOTE
The machine can receive I-fax images and communication error
notices only.
11.Confirm that <POP BEFORE SEND> is
displayed, then press [OK].
12.Press [ ] or [ ] to select <ON> or
<OFF>, then press [OK].
<OFF>: Does not use an SMTP server that requires POP before
SMTP.
<ON>: Uses an SMTP server that requires POP before SMTP
(method for authenticating users who have logged in the POP
server before sending e-mail).
SMTP SERVER :a
smtp.company.com
Ex.
Page 88

1
2
3
4
5
7
8
9
6
TOP
Back Previous Next
3-20
Table of Contents
Index
Advanced Send
Features
Advanced Copy
Features
Network
Remote UI
System Monitor
System Manager
Settings
Reports and Lists
Troubleshooting
Appendix
13.Confirm that <E-MAIL ADDRESS> is
displayed, then press [OK].
14.Use the numeric keys to enter the e-mail
address your machine will use, then press
[OK].
15.Confirm that <POP SERVER> is displayed,
then press [OK].
16.Use the numeric keys to enter the POP server
name, then press [OK].
– Enter the POP server name if the POP server name is
already registered in the DNS server.
– Enter the IP address of the POP server if the POP server
name is not registered in the DNS server.
17.Confirm that <POP ADDRESS> is displayed,
then press [OK].
18.Use the numeric keys to enter the login name
for access to the POP server, then press
[OK].
19.Confirm that <POP PASSWORD> is
displayed, then press [OK].
20.Use the numeric keys to enter the password
for access to the POP server, then press
[OK].
21.Confirm that <POP INTERVAL> is displayed,
then press [OK].
E-MAIL ADDRESS :a
cal@pop.company.com
Ex.
POP SERVER :a
pop.company.com
Ex.
POP ADDRESS :1
account1
Ex.
Page 89

1
2
3
4
5
7
8
9
6
TOP
Back Previous Next
3-21
Table of Contents
Index
Advanced Send
Features
Advanced Copy
Features
Network
Remote UI
System Monitor
System Manager
Settings
Reports and Lists
Troubleshooting
Appendix
22.Use [ ], [ ], or numeric keys to set the
interval at which you want to check the POP
server for incoming e-mail, then press [OK].
NOTE
If the interval is set to 0, the POP server is not checked
automatically. For instructions on how to manually check the
POP server, see “Checking the Arrival of I-Fax,” on p. 5-5
23.Press [Stop] to return to the standby mode.
24.Restart the machine.
Startup Time Settings
If you connect the machine to a switching hub, it may not be able
to connect to a network even though your network settings are
set correctly.
This occurs because the spanning tree process performed
between switching hubs prevents them from communicating
with each other immediately after the machine connects to a
switching hub.
In this case, use the following procedure to delay the startup of
network communication.
1. Press [Additional Functions].
2. Press [ ] or [ ] to select <SYSTEM
SETTINGS>, then press [OK].
If the System Manager ID and System Password have been set,
enter the System Manager ID and System Password using the
numeric keys, then press [Log In/Out].
3. Press [ ] or [ ] to select <NETWORK
SETTINGS>, then press [OK].
4. Press [ ] or [ ] to select <STARTUP
TIME SET.>, then press [OK].
5. Use [ ], [ ], or numeric keys to set the
time period required to delay the startup of
network communications for the machine,
then press [OK].
You can enter the value from 0 to 300 (seconds).
6. Press [Stop] to return to the standby mode.
7. Restart the machine.
Page 90

1
2
3
4
5
7
8
9
6
TOP
Back Previous Next
3-22
Table of Contents
Index
Advanced Send
Features
Advanced Copy
Features
Network
Remote UI
System Monitor
System Manager
Settings
Reports and Lists
Troubleshooting
Appendix
Checking the Current Network Settings
1. Press [Additional Functions].
2. Press [ ] or [ ] to select <SYSTEM
SETTINGS>, then press [OK].
If the System Manager ID and System Password have been set,
enter the System Manager ID and System Password using the
numeric keys, then press [Log In/Out].
3. Press [ ] or [ ] to select <NETWORK
SETTINGS>, then press [OK].
4. Press [ ] or [ ] to select <VIEW IP
ADDRESS>, then press [OK].
5. Press [] or [] to select <IP ADDRESS>,
<SUBNET MASK>, or <GATEWAY ADDRESS>
for displaying the setting you want to check,
then press [OK].
6. Press [Stop] to return to the standby mode.
Page 91

1
2
3
4
5
7
8
9
6
TOP
Back Previous Next
3-23
Table of Contents
Index
Advanced Send
Features
Advanced Copy
Features
Network
Remote UI
System Monitor
System Manager
Settings
Reports and Lists
Troubleshooting
Appendix
Setting Up a Computer for Printing/Sending a Fax
● Connecting to a TCP/IP Network:
All computers that use the machine must have TCP/IP client
software installed and must be enabled for TCP/IP network
use. For details, see the manuals provided with the operating
system.
● Installing the Printer Driver and Specifying the Machine
Destination Setting:
To print from a computer, you must install a printer driver and
specify a setting for the machine destination. The machine
destination setting differs depending on the print application
used for printing. Use the following information as a guide to
determine the print application you are using, and then
perform the necessary operations.
– LPD: This is the print application generally used with TCP/
IP.
– Raw: This is a print application used with Windows 2000/
XP/Server 2003. It can print at higher speeds than
LPD.
■ Machine Connection Method (LPD/Raw)
NOTE
In the following procedures, items displayed on the screen for
Windows XP are used; items might differ depending on your operating
system.
1. Open the printer properties dialog box.
– For Windows 2000, click [Start] on the Windows task bar →
[Settings] → [Printers].
– For Windows XP Professional/Server 2003, click [start] on the
Windows task bar → [Printers and Faxes].
– For Windows XP Home Edition, click [start] on the Windows
task bar → [Control Panel] → [Printers and Other Hardware]
→ [Printers and Faxes].
2. Right-click the icon of the printer you
installed → select [Properties].
Page 92

1
2
3
4
5
7
8
9
6
TOP
Back Previous Next
3-24
Table of Contents
Index
Advanced Send
Features
Advanced Copy
Features
Network
Remote UI
System Monitor
System Manager
Settings
Reports and Lists
Troubleshooting
Appendix
3. Display the [Ports] sheet by clicking the
[Ports] tab.
4. Open the [Printer Ports] dialog box by
clicking [Add Port].
5. From [Available ports types], select
[Standard TCP/IP Port] → click [New Port].
The Add Standard TCP/IP Printer Port Wizard starts.
6. Click [Next].
7. In [Printer Name or IP Address], enter the
machine IP address or machine host name →
click [Next].
After the computer has confirmed that there is a machine in
which the entered IP address is assigned, the [Completing the
Add Standard TCP/IP Printer Port Wizard] window appears.
Page 93

1
2
3
4
5
7
8
9
6
TOP
Back Previous Next
3-25
Table of Contents
Index
Advanced Send
Features
Advanced Copy
Features
Network
Remote UI
System Monitor
System Manager
Settings
Reports and Lists
Troubleshooting
Appendix
8. Click [Finish].
If the dialog box displays [Additional Port Information Required],
follow the instructions on the screen to search again, or click
[Standard] → click [Canon Network Printing Device with P9100]
from the pull-down list → click [Next].
9. Click [Close] to close the [Printer Ports]
dialog box.
If you want to use Raw, skip to step 12.
10.In the printer properties dialog box, click
[Configure Port] → Click [LPR] under
[Protocol] → enter a print queue in [Queue
Name] under [LPR Settings].
NOTE
You can specify a print queue in [Queue Name]. The following
three print queues are available:
– LP: The machine prints according to its spool settings.
Normally select this option.
– SPOOL: The machine prints only after spooling a print job on
the hard disk, regardless of its spool settings.
– DIRECT: The machine prints without spooling a print job on
the hard disk, regardless of its spool settings.
11.Click [OK].
12.Click [Close].
Page 94

1
2
3
4
5
7
8
9
6
TOP
Back Previous Next
3-26
Table of Contents
Index
Advanced Send
Features
Advanced Copy
Features
Network
Remote UI
System Monitor
System Manager
Settings
Reports and Lists
Troubleshooting
Appendix
■ Print Server Settings
If Windows 2000/XP/Server 2003 is on your network, the
following procedure enables you to set up a print server for more
efficient management of network printers. Once a print server is
set up, print jobs can be managed by the print server. Also, by
setting up an alternate driver for the print server, printer drivers
can be installed in each computer via the network.
1. Open the printer properties dialog box.
– For Windows 2000, click [Start] on the Windows task bar →
[Settings] → [Printers].
– For Windows XP Professional/Server 2003, click [start] on the
Windows task bar → [Printers and Faxes].
– For Windows XP Home Edition, click [start] on the Windows
task bar → [Control Panel] → [Printers and Other Hardware]
→ [Printers and Faxes].
2. Right-click the icon of the printer you
installed → select [Sharing].
3. Select [Share this printer] (Windows 2000:
[Shared as]) and enter a share name.
4. If this machine is shared with users running
different versions of Windows, click
[Additional Drivers].
When the alternate driver is installed, additional windows will
open for entering the location of the file containing the printer
driver. Follow the instructions in these windows.
NOTE
To install the printer driver on another computer, use the [Add
Printer Wizard] window for selecting the printer destination →
select [Network printer] or [A network printer, or a printer
attached to another computer] → select the shared printer for
the computer selected in the print server.
5. Click [OK].
The shared printer settings are complete.
Page 95

1
2
3
4
5
7
8
9
6
TOP
Back Previous Next
3-27
Table of Contents
Index
Advanced Send
Features
Advanced Copy
Features
Network
Remote UI
System Monitor
System Manager
Settings
Reports and Lists
Troubleshooting
Appendix
Setting Up a Computer as a FTP Server
To send data from the machine to a computer on your
network, you need to specify the settings of the computer
for receiving data.
You can send data over a TCP/IP network to any of the
following:
– FTP server (Windows 2000/XP/Server 2003, UNIX,
Mac OS X, imageWARE Gateway series)
– Windows shared folder (Windows 98/Me/2000/XP/Server
2003)
This section describes how to set up a computer as an FTP
server.
For instructions on how to configure a Windows shared
folder, see “Setting Up a Computer as a File Server,” on
p. 3-41.
NOTE
– This section describes only the procedures for setting up a computer
to receive data sent from the machine. To send data from the
machine to a server on the network, you must enter an address
setting from the operation panel. For instructions on how to specify
destination address settings, see “Address Book Settings,” on
p. 1-23.
– The following procedure explains a sample FTP server setup.
Depending on your environment, the actual setup procedure may
differ.
Windows 2000/XP/Server 2003
NOTE
– It is recommended that the FTP server be configured by the network
administrator.
– The use of Windows 2000 Server as an FTP server requires the
installation of Microsoft Internet Information Services 5.0 (IIS 5.0).
If IIS is not installed in the computer you are using, you will need to
install IIS before entering these settings. For installation procedures,
see the documentation provided with your operating system.
– The use of Windows XP Professional as an FTP server requires the
installation of Microsoft Internet Information Services 5.1 (IIS 5.1).
If IIS is not installed in the computer you are using, you will need to
install IIS before entering these settings. For installation procedures,
see the documentation provided with your operating system.
– The use of Windows Server 2003 as an FTP server requires the
installation of Microsoft Internet Information Services 6.0 (IIS 6.0).
If IIS is not installed in the computer you are using, you will need to
install IIS before entering these settings. For installation procedures,
see the documentation provided with your operating system.
Page 96

1
2
3
4
5
7
8
9
6
TOP
Back Previous Next
3-28
Table of Contents
Index
Advanced Send
Features
Advanced Copy
Features
Network
Remote UI
System Monitor
System Manager
Settings
Reports and Lists
Troubleshooting
Appendix
– Verification of users for access to FTP servers is done by referencing
the local account database Windows 2000 Server/XP Professional/
Server 2003 that is used as the FTP server. Therefore, it is not
possible to use the account of a domain user registered in
Windows 2000 Server/XP Professional/Server 2003 to send data
directly from the machine to FTP servers in other domains.
– This section describes the procedures for using the default home
directory under [Default FTP Site]. To use other settings, enter the
FTP site and home directory by referring to the documentation for IIS.
– In the following procedures, items displayed on the screen for
Windows XP are used; items might differ depending on your
operating system.
1. Log on to Windows as a member of the group
with access rights to the directory to be
designated as the FTP site directory.
NOTE
Depending on your environment, the access rights settings for a
drive or directory may differ. For details, see the Windows
documentation.
2. Start IIS.
– For Windows 2000, click [Start] on the Windows taskbar →
[Settings] → [Control Panel] → [Administrative Tools] →
[Internet Services Manager].
– For Windows XP, click [start] on the Windows taskbar →
[Control Panel] → [Performance and Maintenance] →
[Administrative Tools] → [Internet Information Services].
– For Windows Server 2003, click [Start] on the Windows
taskbar → [Administrative Tools] → [Internet Information
Services Manager].
3. Enter the FTP site settings.
– For Windows 2000, right-click the [Default FTP Site] icon →
click [Properties].
– For Windows XP/Server 2003, double-click the [FTP Sites]
icon → right-click the [Default FTP Site] icon → click
[Properties].
Page 97

1
2
3
4
5
7
8
9
6
TOP
Back Previous Next
3-29
Table of Contents
Index
Advanced Send
Features
Advanced Copy
Features
Network
Remote UI
System Monitor
System Manager
Settings
Reports and Lists
Troubleshooting
Appendix
– In the [Default FTP Site Properties] dialog box, click the
[Security Accounts] tab to display the [Security Accounts]
sheet.
– For Windows 2000, deselect [Allow Anonymous
Connections]. For Windows XP/Server 2003, deselect [Allow
only anonymous connection].
– Click the [Home Directory] tab to display the [Home Directory]
sheet → select both [Read] and [Write].
– Click [OK] to close the [Default FTP Site Properties] dialog
box.
4. Confirm [Full computer name].
● For Windows 2000:
– Right-click the [My Computer] icon on the desktop → click
[Properties].
– Click the [Network Identification] tab to display the [Network
Identification] sheet → confirm [Full computer name].
– Click [Cancel] to close the [System Properties] dialog box.
Page 98

1
2
3
4
5
7
8
9
6
TOP
Back Previous Next
3-30
Table of Contents
Index
Advanced Send
Features
Advanced Copy
Features
Network
Remote UI
System Monitor
System Manager
Settings
Reports and Lists
Troubleshooting
Appendix
● For Windows XP/Server 2003:
– Click [start] or [Start] on the Windows taskbar, right-click [My
Computer] → click [Properties].
– Click the [Computer Name] tab to display the [Computer
Name] sheet → confirm [Full computer name].
– Click [Cancel] to close the dialog box.
5. Set up the users and passwords for access to
the FTP server.
– For Windows 2000, right-click the [My Computer] icon on the
desktop → click [Manage] to open the [Computer
Management] window.
– For Windows XP/Server 2003, click [start] or [Start] on the
Windows taskbar, right-click [My Computer] → click [Manage]
to open the [Computer Management] window.
– Under [System Tools], double-click [Local Users and Groups]
→ right-click the [Users] folder → click [New User].
Page 99

1
2
3
4
5
7
8
9
6
TOP
Back Previous Next
3-31
Table of Contents
Index
Advanced Send
Features
Advanced Copy
Features
Network
Remote UI
System Monitor
System Manager
Settings
Reports and Lists
Troubleshooting
Appendix
– In the [New User] dialog box, enter the user name in [User
name] → enter the password in [Password] → re-enter the
password in [Confirm password].
– Enter a user name not longer than 20 alphanumeric
characters, and a password not longer than 24 (14 for
Windows 2000) alphanumeric characters. If [User must
change password at next logon] is selected, any new users
added must change their passwords in order to send data
from the machine. (You cannot change the password from the
operation panel.)
– Confirm the settings → click [Create].
– Close the [Computer Management] window.
6. Set a destination address using the operation
panel.
● Sample destination setting:
– Server side settings:
[Full computer name]: starfish.organization.company.com
Create a directory named “share”
in the specified FTP server’s
directory “\Inetpub\ftproot”, and
then set “share” as the data
destination.
– The machine’s destination settings:
The server protocol: <FTP>
<NAME>: The destination’s name
<HOST NAME>: starfish.organization.company.com
< FI LE PAT H>: s ha re
<LOGIN NAME>: User name entered in step 5
<PASSWORD>: Password for the above user
Page 100

1
2
3
4
5
7
8
9
6
TOP
Back Previous Next
3-32
Table of Contents
Index
Advanced Send
Features
Advanced Copy
Features
Network
Remote UI
System Monitor
System Manager
Settings
Reports and Lists
Troubleshooting
Appendix
NOTE
– To use [Full computer name], which was confirmed in step 4,
as the host name for <HOST NAME> as shown in the
example, it is necessary to use a DNS server. (This applies
even if the machine and the FTP server are in the same
subnet.) If no DNS server is available, the host name setting
should be specified using the IP address of the FTP server.
– A maximum of 120 alphanumeric characters can be entered
for both <HOST NAME> and <FILE PATH> on the operation
panel.
– If you switch the language of the LCD display, <HOST NAME>
and <FILE PATH> may not be displayed correctly.
– For instructions on how to specify destination address
settings, see “Address Book Settings,” on p. 1-23.
UNIX
NOTE
– UNIX users must have Solaris 2.6 or later installed in order to use the
computer as an FTP server.
– In some environments, detailed settings may be required in order to
use FTP. For details, consult your network manager.
1. Log in to a workstation as a superuser.
2. Set up the users who send documents from
the machine, and their passwords.
Enter a user name and a password not longer than 24
alphanumeric characters.
3. Create a shared directory to be used for
destination addresses, and then enable read
access and write access by the users who
will be sending data.
 Loading...