


654
WELLS BLOOMFIELD, LLC
2 ERIK CIRCLE, P. O. Box 280 Verdi, NV 89439
telephone: 775-689-5707 |
fax: 775-689-5976 |
www.wellsbloomfield.com
PROGRAMMING MANUAL for
E-MAX™ COFFEE AND TEA BREWERS
E-Max BREWERS are covered under
U. S. Patents #5704275, 5862738 & 6,095,031.
Other U.S. Patents and Canadian Patents Pending
|
PRINTED IN UNITED STATES OF AMERICA |
p/n 73674 Rev. J ECN-13315 |
M654 071107 cps |

TABLE OF CONTENTS
Thank You for purchasing this Wells Bloomfield appliance.
Proper installation, professional operation and consistent maintenance
of this appliance will ensure that it gives you the very best performance and a long, economical service life.
PRECAUTIONS & GENERAL INFORMATION |
1 |
OPERATION |
2 |
PROGRAMMING |
|
CONTROL PANEL CONFIGURATIONS |
4 |
OPERATOR LEVEL PROGRAMMING |
5 |
ADVANCED PROGRAMMING |
8 |
PROGRAMMING TABLE |
10 |
PROCEDURES |
|
BREW SETTINGS |
12 |
TIME FUNCTIONS |
13 |
SERVICE & COUNTERS |
14 |
MACHINE SETTINGS |
14 |
FACTORY SETTINGS |
16 |
ADJUSTING INLET VALVE TIME |
17 |
CALIBRATION |
18 |
PULSE BREW AND PRE-INFUSION |
19 |
TEST PROGRAM E-MAX™ |
24 |
ADDENDUM Extract of Service Bulletin |
26 |
|
|
APPLICATION
Proper setup is essential to achieving the optimum performance this appliance can provide.
This manual contains the information needed to perform operator level programming, and to setup initial program parameters for this appliance.
Note: This manual also applies to those E-Max™ brewer model having suffix letters (e.g. 2074FRL).
This manual applies to the following E-Max™ brewers:
Decanter Brewer Models
2012 2015 2016 2072 2074 2075
Airpot Brewer Models
2082 2083 2088
Thermal Brewer Models
2080 2085 2086
Tea Brewer Models
2030 2032
<![endif]>654 p/n 73674 E-Max™ Programming Manual
xi

<![endif]>654 p/n 73674 E-Max™ Programming Manual
PRECAUTIONS AND GENERAL INFORMATION
 WARNING: ELECTRIC SHOCK HAZARD
All servicing requiring access to non-insulated components must be performed by qualified service personnel. Do not open any access panels which require the use of tools.
Failure to heed this warning can result in electrical shock.
WARNING: INJURY HAZARD
All installation procedures must be performed by qualified personnel with full knowledge of all applicable electrical and plumbing codes. Failure could result in property damage and personal injury.
WARNING: ELECTRIC SHOCK HAZARD
Brewer must be properly grounded to prevent possible shock hazard. DO NOT assume a plumbing line will provide such a ground. Electrical shock will cause death or serious Injury.
WARNING: BURN HAZARD
This appliance dispenses very hot liquid. Serious bodily injury from scalding can occur from contact with dispensed liquids.
This appliance is intended for commercial use only.
This appliance is intended for use to brew beverage products for human consumption. No other use is recommended or authorized by the manufacturer or its agents.
This appliance is intended for use in commercial establishments, where all operators are familiar with the appliance use, limitations and associated hazards. Operating instructions and warnings in the corresponding Service Manual must be read and understood by all operators and users.
Except as noted, this piece of equipment is made in the USA and has American sizes on hardware. Please note: Metric hardware is used to mount the inlet (Fill) solenoid. All metric conversions are approximate and can vary in size.
Any trouble shooting, component views and parts lists included in this manual are for general reference, and are intended for use by qualified service personnel.
This manual should be considered a permanent part of this appliance. The manual must remain with the appliance if it is sold or moved to another location.
CAUTION:
EQUIPMENT DAMAGE
DO NOT plug in or
energize this appliance until all Installation Instructions are read and followed. Damage to the Brewer will occur if these instructions are not followed.
CAUTION:
BURN HAZARD
To avoid splashing or overflowing hot liquids, ALWAYS use an empty decanter before starting the brew cycle. Failure to comply can cause serious burns.
CAUTION:
BURN HAZARD
After a brew cycle, brew basket contents are HOT. Remove the brew basket and dispose of used grounds with care. Failure to comply can cause serious burns.
CAUTION:
BURN HAZARD
Exposed surfaces of the brewer, brew basket and decanter may be HOT to the touch, and can cause serious burns.
1
OPERATION
OPERATING INSTRUCTIONS
IMPORTANT:
All E-Max™ brewers are tested and set at the factory. If programming adjustments are necessary, refer to the appropriate section of this manual.
To over-ride the Brew Wait mode, press and hold the BREW key for 3 seconds when the brewer is in Brew Wait
mode (i.e. when brew light is flashing). The brew will proceed immediately regardless of water temperature. This feature should only be used when testing water volume, otherwise the brew will proceed with the water below the precise brew temperature.
Note: the following safety features have been incorporated to prevent multiple unattended brews:
The brew key is disabled during a brew cycle. This minimizes the possibility of double brewing.
When the “Brew” light is on or flashing, repeated pressing of the BREW switch will be ignored, (there will be a beep each time it is pressed). A Brew will only be activated when the “Brew” light is off.
1. Energizing the Brewer: When electricity has been connected to the unit, there will be a momentary flash of the power light. Turn 
 the brewer on by pressing the POWER key. The
brewer will start to fill the tank. With the proper water supply the tank should be filled in about 2½ minutes. Once filled, the heating element will come on until the proper tank temperature has been reached, (which will take about 20 minutes on 120-Volt models or about 12 minutes on 120/240 Volt models).
2.Brewing (Precise Temperature for Brewing™ — PTB™): In the regular operating mode, the E-Max™ maintains the tank
temperature within +/- 1ºF of the brew temperature. Normally this will mean that a brew will be started
as soon as the BREW key is pressed. However, there may be a slight delay if the BREW key is
pressed immediately after a brew has been completed (notably on 120 volt models). If the tank temperature is below the brew temperature, the brew will be delayed, going into the “Brew Wait” mode, with the brew light flashing. As soon as the correct temperature is reached the brew will
commence with the brew light on continuously during the brew. When the brew begins the main warming station will be turned on automatically (if it is not already on). During the brew cycle, if the BREW key is pressed, it will be ignored. Only when the brew is complete can another brew be started.
3. Brew Cancel: To cancel a brew in progress, press the CANCEL
KEY: two beeps will sound and the “Brew” light will go out. Water flowing to the brew chamber will be stopped immediately, but if there is already water in the brew chamber, it will take a few moments before this drips through as coffee.
4.Normal Operation (Non Brewing): When the unit is not brewing, the E-Max™ maintains the water temperature at the Precise Temperature for Brewing™ (PTB™). The heating element will cycle on and off automatically to maintain this temperature.
5.After Hours Mode: If no brew is detected for a pre-selected length of time, the brewer will enter the After Hours mode. Temperature will be allowed to drop to save energy. Pressing the BREW KEY returns the brewer to normal operation.
<![endif]>654 p/n 73674 E-Max™ Programming Manual
2

<![endif]>654 p/n 73674 E-Max™ Programming Manual
OPERATION (continued)
USER’S GUIDE
1.Remove the brew chamber from under the spray head. Place one (1) genuine Bloomfield paper filter into the brew chamber. Add your choice of pre-measured ground coffee. Shake the brew chamber gently to level the coffee.
Slide the brew chamber back into place.
2.Place an empty decanter under the brew chamber.
3.To begin the brew cycle, press BREW key. Hot water will start spraying over the coffee, and brewed coffee will start filling the decanter. When the coffee stops flowing from the brew chamber, the fresh coffee is ready to serve.
NOTE: Brewing will not begin until the Precise Temperature for Brewing™ has been reached. (See page 6)
4.At the end of the brew cycle, the view screen will read “Brew complete”. After all dripping has stopped, remove the brew chamber from the brewer. Discard the used paper filter and grounds.
Brew complete
5. The brewer is now ready to begin another brewing cycle.

 WARNING:
BURN HAZARD
This appliance dispenses very hot liquid. Serious bodily injury from scalding can occur from contact with dispensed liquids.
CAUTION:
BURN HAZARD
To avoid splashing or overflowing hot liquids, ALWAYS use an empty decanter before starting the brew cycle. Failure to comply can cause serious burns.
CAUTION:
BURN HAZARD
After a brew cycle, brew chamber contents are HOT. Remove the brew chamber and dispose of used filter and grounds with care. Failure to comply can cause serious burns.
CAUTION:
BURN HAZARD
Exposed surfaces of the appliance, as well as brew chamber and decanter may be HOT to the touch, and can cause serious burns.
3

PROGRAMMING - CONTROL PANEL CONFIGURATIONS
DECANTER BREWERS
1 |
BREW |
Key 1 |
2 |
BREW CANCEL |
Key 2 |
3 |
POWER |
Key 3 |
4 |
MAIN WARMER |
Key 4 |
5 |
FRONT WARMER |
Key 5 |
6 |
REAR WARMER |
Key 6 |
AIRPOT & THERMAL
BREWERS
TEA BREWERS WITH
VOLUME KEY
1 |
BREW |
Key 1 |
2 |
BREW CANCEL |
Key 2 |
3 |
POWER |
Key 3 |
4 |
STANDARD |
|
|
VOLUME |
Key 4 |
5 |
SMALL |
|
|
VOLUME |
Key 5 |
6 |
LARGE |
|
|
VOLUME |
Key 6 |
TEA BREWERS WITHOUT
VOLUME KEY
|
|
1 |
BREW |
Key 1 |
|
|
|
2 |
BREW CANCEL |
Key 2 |
|
|
|
3 |
POWER |
Key 3 |
|
|
|
4 |
HIDDEN UNDER |
|
|
|
|
|
|
“E” |
Key 4 |
|
|
5 |
HIDDEN UNDER |
|
|
|
|
|
|||
|
|
|
|
“a” |
Key 5 |
|
|
6 |
HIDDEN UNDER |
|
|
|
|
|
|
“T” |
Key 6 |
|
|
|
|
|
|
<![endif]>654 p/n 73674 E-Max™ Programming Manual
4

|
|
PROGRAMMING - OPERATOR LEVEL |
|
PROGRAMMING FEATURES AND OPTIONS |
|
|
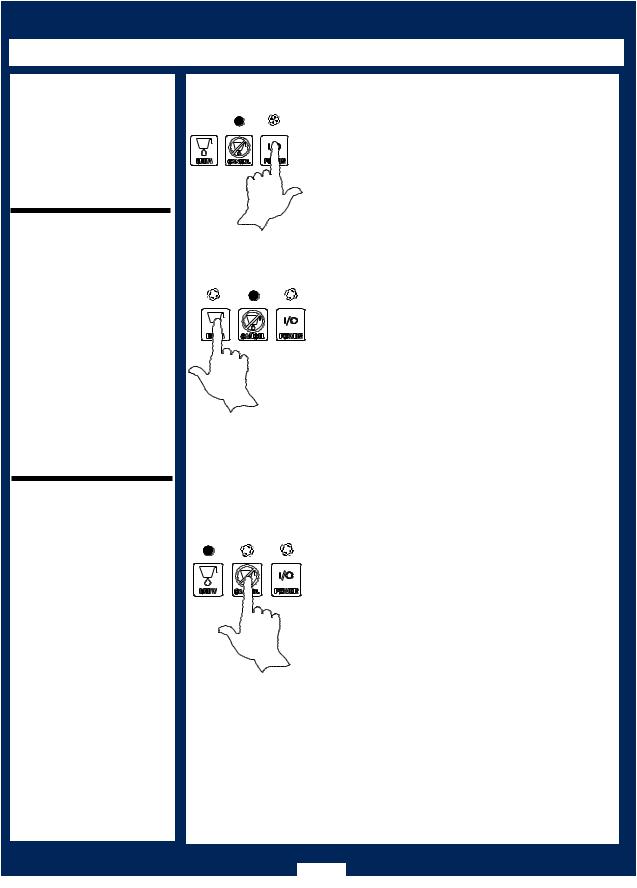
1. |
View Water Temperature in Tank: To view the water temperature on the screen, the brewer |
|
|
brewer must be ON, and not brewing or in the filling mode. Press and hold the 4th key, and |
|
|
depress the 6th key. The actual water temperature will be displayed for 3 seconds. |
|
2. Daily Brew Count: The brewer maintains a count of the number of completed brews for a 7-day |
|
|
|
period. To access the count, turn the brewer OFF by pressing the 3rd key. In the OFF mode, |
|
|
press and hold the 2nd (CANCEL) key for 3 seconds. The current day and brew count will be |
|
|
displayed. Depress the 3rd key repeatedly to view each preceding day. When all 7 days |
|
|
have been displayed a 7-day total will be displayed. If you wish to exit the daily brew count |
|
|
before viewing all of the days, press the 2nd key. |
|
3. ON/OFF – Non Automatic Timer: To turn the brewer OFF, press the 3rd key (ON/OFF ): |
|
|
|
2 beeps will be heard and the brewer will be turned OFF, indicated by all lights being off, |
|
|
(including any warmer plates on decanter brewers). To turn the brewer ON, press the 3rd key: |
|
|
2 beeps will sound, all lights will flash once, then the “Power” light will remain on, (the “Heat” light |
|
|
may come on if water temperature is too low). |
|
4. ON/OFF – Automatic Timer Feature: The factory programmed brewer has the automatic |
|
|
|
timer turned off. To set the automatic timer, refer to page 13, “Time Functions” Menu. If the |
|
|
Automatic Timer feature is programmed off, the brewer can be turned on and off by depressing |
|
|
the 3rd (ON/OFF) key, as noted above. |
|
|
* When the Automatic Timer feature is programmed ON, the brewer will turn on and off |
|
|
automatically, at a programmed time, Monday to Friday; with a separate on and off |
|
|
programmed time schedule for Saturday and Sunday. |
|
|
* Temporarily Overriding the Automatic ON/OFF function. While in the automatic timed OFF |
|
|
mode the brewer can be started by depressing the 3rd (ON/OFF) key. The brewer will |
|
|
remain ON until the automatic programmed off time, when it will turn OFF and resume normal |
|
|
automatic timed functioning. Similarly, if turned OFF during the automatic timed ON mode |
|
|
the brewer will remain OFF until the next programmed on time, when it will turn on and |
|
|
resume normal automatic timed functioning. |
|
5. Automatic Start-Up in Previous Mode: If the brewer automatic timer is OFF (the factory |
|
|
|
setting) and power is disconnected, the brewer will start up when power is restored, in the mode |
|
|
it had been in prior to the power disconnection. If the brewer has the timer setting ON and |
| <![if ! IE]> <![endif]>Manual |
|
power is disconnected, the brewer will start up in the mode that it should be in at the time the |
|
power is restored. |
|
|
|
|
| <![if ! IE]> <![endif]>Programming |
6. Viewing Programmed Brew Volume: (Airpot & Thermal Brewers Only) The brewer can have |
|
|
up to 4 different brew volumes. When a volume other than the standard, or first brew volume, is |
|
|
|
|
|
|
selected, the brewer will complete that volume and then automatically reset to the standard, or |
|
|
first brew volume. With the brewer ON, press and hold the 2nd key. The 1st, or standard, |
| <![if ! IE]> <![endif]>E-Max™ |
|
volume will be displayed for 3 seconds (i.e. Volume #1 64 oz)., followed by the day and time. |
7. Changing Brew Volume: (Airpot & Thermal Brewers Only) As outlined above, display the |
||
|
current brew volume and, before the display changes to day and time, depress the 2nd key |
|
| <![if ! IE]> <![endif]>73674 |
|
momentarily, (not for 3 seconds). The next programmed brew volume (e.g. Volume#2 32 oz.) |
|
will be displayed for 3 seconds, after which the display will return to the day and time. Repeatedly |
|
| <![if ! IE]> <![endif]>p/n |
|
press the 2nd key while programmed volumes are shown to view all brew volumes. (If there is |
|
only one brew volume programmed, only that volume will be displayed.) The last brew volume |
|
| <![if ! IE]> <![endif]>654 |
|
displayed, before the LCD returns to the day and time, is the brew volume that the brewer will |
|
|
brew the next time the BREW switch is depressed. When a brew volume other than the 1st brew |
volume is selected, the brewer will complete the brew then return to the 1st or standard brew volume automatically.
5

PROGRAMMING - OPERATOR LEVEL (continued)
8. |
Clock |
|
|
A. Time – Battery Backup. The E-Max™ has a battery backup system which will maintain the |
|
|
proper time during power failures, or when the brewer is unplugged (even for very prolonged |
|
|
periods of time). Normally there will not be a need to set the time except for Daylight Saving |
|
|
Time changes, or moving the brewer to different time zones. |
|
|
B. Changing Day and Time: To change time, turn the E-Max™ off. Press the 2nd key twice |
|
|
followed by the 1st key twice to access the time change mode, (i.e. press CANCEL, CANCEL, |
|
|
BREW, BREW). In the time change mode the screen will read “Day:” followed by the current |
|
|
day setting. Use the 6th key to advance the day, or the 5th key to reverse. When day has |
|
|
been properly set, press the 3rd key. The screen will now read “Time:” with the set time on |
|
|
the screen, the hour and am or pm flashing. Use the 5th key to go back or the 6th key to |
|
|
advance the hour, making sure that the am or pm is correct. When the hour and am/pm is |
|
|
correctly set, press the 3rd key, and the screen will read “Time:” with the set time on the |
|
|
screen, minutes flashing. As previously use the 5th or 6th keys to adjust the minutes, and |
|
|
press the 3rd key when complete. The E-Max will return to the off mode. (Changing time can |
|
|
also be done in the regular programming mode. Consult the E-Max™ Programming Manual) |
|
|
C. After Hours™: Consult page 13 “Time Functions” to set the After Hours™ mode. The |
|
|
factory programming has the After Hours™ mode turned OFF. The After Hours™ can be |
|
|
programmed to come on from 1 to 6 hours after the last brew. When the E-Max™ goes into |
|
|
the After Hours™ mode, any warmer plates left on will be turned off (on decanter brewers), |
|
|
the water in the tank will be allowed to drop from the normal brewing temperature and will re |
|
|
heat less frequently – this feature saves energy and extend component life. While in the After |
|
|
Hours mode, the power light will flash continuously. When the BREW switch is pressed the |
|
|
E-Max™ automatically reverts back to normal operation, heating the water to the Precise |
|
|
Temperature for Brewing™ (PTB™), before starting the brew. (The power light will be on |
|
|
continuously and the Brew light will flash until the correct water temperature is reached.) |
|
9. |
Countdown Quality Timer™: The E-Max™ factory programming has the Countdown Quality |
|
|
Timer™ turned OFF. Consult page 13 “Time Functions” to activate the Countdown Quality |
|
|
Timer™ feature: |
|
|
This feature offers independent Countdown Quality Timers for each warmer plate. The count |
|
|
down timer can be set from 20 to 360 minutes (in 5-minute increments). When a warmer plate is |
|
|
turned on (or, for the main warmer, as soon as a brew is complete,) the countdown time begins. |
|
|
At the end of the selected time there will be two beeps and the warmer plate light will flash |
|
|
continuously until reset. While the light is flashing the heating element for the warmer plate |
<![if ! IE]> <![endif]>Manual |
|
re-start the countdown time. |
|
|
remains on. Push the warmer plate switch to turn the warmer off, and switching it again will |
<![if ! IE]> <![endif]>Programming |
10. |
that the second programmed brew volume has utilized the pulse or pre-infusion program options. |
|
Pulse or Pre-Infusion Volume Options: To set these features, refer to page 19, “Brew Settings |
|
|
|
Menu”. If a particular brew volume has utilized the pulse or pre-infusion option, that volume will be |
|
|
displayed with an asterisk (*) after the volume. As an example “Volume#2 64oz*” would indicate |
|
11. |
Keypadlock™: This feature is OFF in the standard factory settings. To set the feature refer to |
<![if ! IE]> <![endif]>-Max™ |
|
page 14, “Machine Settings Menu”. If the Keypadlock™ feature is activated, there will be no |
|
|
response by the brewer when the keys are depressed (except for the beep after a key is pressed). |
<![if ! IE]> <![endif]>E |
|
<![if ! IE]> <![endif]>73674 |
|
|
To temporarily “unlock” the keypad, press and hold the CANCEL key for 6 seconds. A beep will |
|
|
be heard indicating the keypad is now “unlocked”, — a brew can be initiated, warmer plates |
|
|
turned on or off, etc. The keypad will remain unlocked until the brew is completed, then |
<![if ! IE]> <![endif]>p/n |
|
automatically return to keypadlock™ mode. If a brew is not initiated 60 seconds after “unlocking”, |
<![if ! IE]> <![endif]>654 |
|
the system will time out and return to the “locked” position. |
|
|
|
|
|
|
|
6

PROGRAMMING - OPERATOR LEVEL (continued)
12.View Filter Statistics: To view filter statistics, turn the brewer off. Press and hold the 1st key (Brew), and depress the 3rd (ON/OFF) key. Total water volume will be displayed (TotalVol.). Press the 3rd key to view the Filter Life (FltrLife:). Press the 3rd key to view the percentage of the filter that has been used. (If the filter option is used, the filter life volume needs to be entered in the program – see page 14, Service & Counters Menu.)
13.Diagnostic Messages – Programmed Safety Features: When the E-Max™ senses a problem, it will automatically turn off all elements and valves, flash lights, display the message
“Call For Service” and display one of the messages below. (Additionally: a service phone number may appear if it has been programmed into the system.)
*To reset the brewer it can be re-energized (or press and hold the 2nd key for 3 seconds for all faults except the Valve Fault, which must be reset by re-energizing). The brewer will try to re-start, but if the same problem persists, the appropriate error message will appear again.
|
Consult the Trouble Shooting section to determine how to solve the problem. |
|
|
A. “Probe/Heater Error”: Overheating Detection (1): If the heating element is on for 5 minutes |
|
|
and the temperature does not change by +2°F (1°C) in the five minute period, the unit will go |
|
|
into the Over Temperature Mode with all lights flashing. When in this mode the brewer turns |
|
|
off the heating elements, the solenoid valves are turned off; the switches disabled; (and all |
|
|
lights flashing continuously). The LCD display will read “Probe/Heater Error”, followed by the |
|
|
message “Call for Service”, and then the service phone number (if it has been entered into |
|
|
memory). To reset press and hold the 2nd key for 3 seconds, or re-energize the brewer. |
|
|
(Possible causes of problem: high limit needs to be re-set; defective high limit, element, triac, |
|
|
water level probe or control board.) |
|
|
B. “Overheat Error”: Overheating Detection (2): If the E-Max™ senses a temperature over the |
|
|
Maximum Temperature set in the program (factory set at 208ºF or 98ºC) it will go into the over |
|
|
temperature mode as above with all lights flashing, except the LCD will read “overheat error”, |
|
|
and “Call for Service”. To reset press and hold the 2nd key for 3 seconds, or re-energize the |
|
|
brewer. (Possible cause of problem is a defective triac, temperature probe or related wiring |
|
|
and connections.) |
|
|
C. “No Water Sensed” — Time-Out —Inlet Valve: When filling for the first time, the inlet valve |
|
|
will remain open for 4¼ minutes, (the screen will read “filling…”). If water is not detected at |
|
|
the end of this time the E-Max™ will shut down with the message “no water sensed”. The |
|
|
valves and all elements are turned off, and the Brew and Power light flash alternately with the |
|
|
Heat light, until the brewer is reset. To reset press and hold the 2nd key for 3 seconds, or |
|
| <![if ! IE]> <![endif]>Manual |
re-energize the brewer. (Possible causes of the problem are: no incoming water; slow flow of |
|
incoming water (i.e. less than 45 oz/minute); sensor not reading (check for placement, |
||
connections or lime scale). |
||
| <![if ! IE]> <![endif]>Programming |
D. “No Water Sensed” — Time-Out – Brew Valve: During the brew the inlet solenoid valve |
|
cycles on intermittently to maintain the proper level in the tank. If the valve is open for |
||
|
||
|
60 seconds without water being detected at the proper level, the brewer will go into the same |
|
|
error mode as above (“no water sensed”). To reset press and hold the 2nd key for 3 seconds, |
|
| <![if ! IE]> <![endif]>Max™- |
or re-energize the brewer. (Possible causes of the problem are: no incoming water; slow flow |
|
of incoming water, sensor not reading, etc.). |
||
| <![if ! IE]> <![endif]>E |
E. Keyswitch Locked: If a key switch is depressed for 10 seconds this error message will |
|
occur. Lights will flash alternately and the brewer will turn off all valves and elements. Press |
||
| <![if ! IE]> <![endif]>73674 |
||
problem re-occurs this indicates a defective switch on the key pad. |
||
|
and hold the 2nd key for 3 seconds to reset the brewer (or re-energize the brewer). If the |
|
| <![if ! IE]> <![endif]>p/n |
F. “Valve Fault”- Faulty Valve Detection: When an electric or switching problem is detected |
|
| <![if ! IE]> <![endif]>654 |
with either the inlet or brew valve the brewer turns off all elements and valves and displays |
|
“valve fault…”. All of the lights will be turned on. Before re-setting the brewer the valves |
||
|
||
|
must be checked to determine the problem. The brewer must be re-energized to re-set, |
|
|
(pressing the 2nd key for 3 seconds will not reset a valve fault). |
7
 Loading...