

Page 1
Using the IR Remote Control (sold separately)
You need to set the xture to “IR mode” via the LCD control panel
prior to using the IR remote control. To do this, just repeatedly
press the <MENU> button to navigate the LCD display menu until
it reads “IR MODE”, then push the <ENTER> button.
Then here’s what to do:
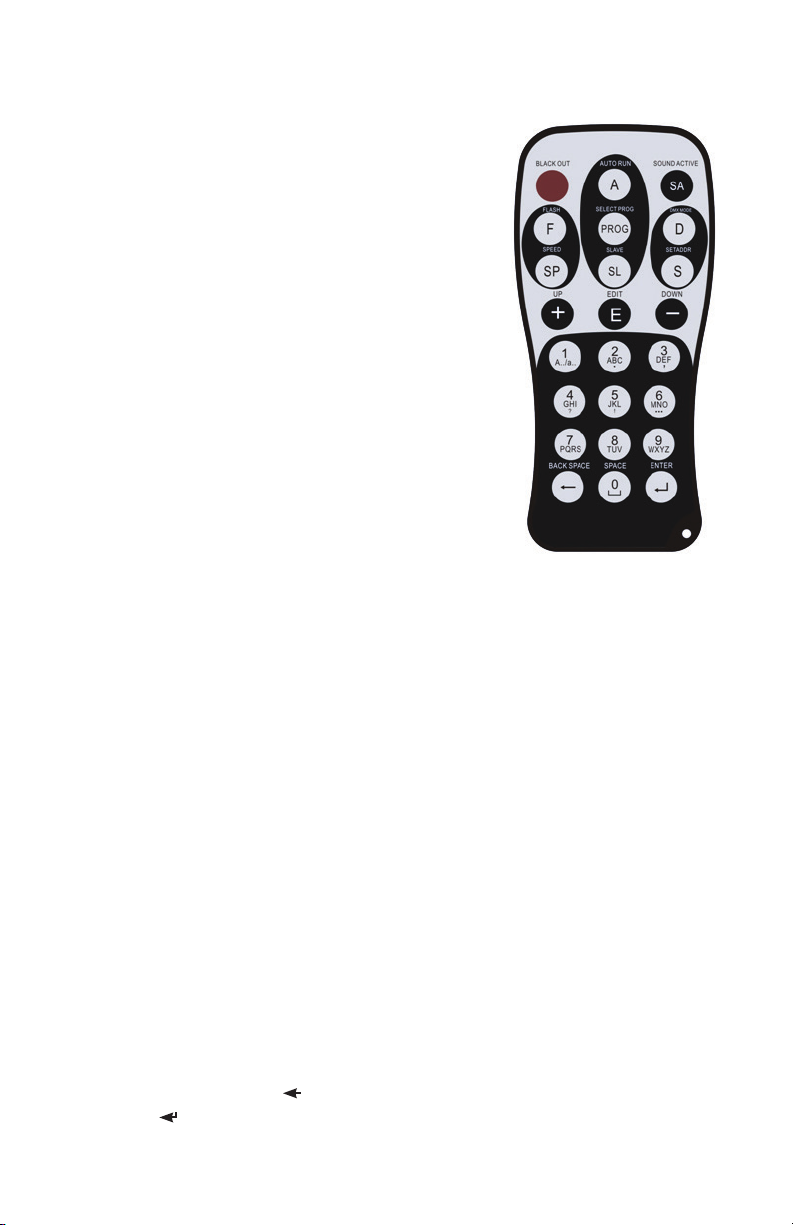
Blackout - The top left red colored button labeled <BLACKOUT>
on the remote control will turn off the LEDs, regardless of what
mode you are currently running. Push the blackout button again
to return to its previous mode.
Auto Run - The auto run button <A> sets the xture to run
in auto mode. You can adjust the speed by pressing the speed
button <SP>, then use the <+/-> buttons to adjust the speed
accordingly.
Sound Active Mode - Pressing the <SA> button will cause the
xture to self destruct. No, really it just sets the xture to run in
sound active mode.
Strobe Mode - The <F> button sets the xture to run in strobe
/ ash mode. You can adjust the strobe rate by pressing the
<SP> button, then use the <+/-> buttons to adjust the speed
accordingly.
Built-in Programs - Press the <PROG> button to run in built-in
program mode. You can cycle through different built-in programs
by using the <+/-> buttons. To adjust the speed of the built-in
program, press the speed button <SP>, then use the <+/->
buttons to adjust the speed accordingly.
Set Address - Press the <S> button to begin setting the starting
DMX address. Then use the <+/-> buttons to adjust the starting
DMX channel from 001-512. Press the <D> button to conrm
DMX mode.
DMX Mode - Pressing the <D> button sets the xture to run in DMX mode. The currently set address
will be used for the starting address. To change the starting DMX channel, see the above “Set Address”
instructions.
Slave Mode - Want to set this xture(s) as a slave unit(s) via remote? No problem, just push the <SL>
button. And note, the rst xture in the DMX chain will serve as the master xture.
LCD Backlight - Press the edit button <E> to turn on the LCD backlight. The LCD backlight illumination
off after 20 seconds.
Color Mixing:
Red Intensity - Press the <1> button, then press the <+/-> buttons to adjust intensity level.
Green Intensity - Press the <2> button, then press the <+/-> buttons to adjust intensity level.
Blue Intensity - Press the <3> button, then press the <+/-> buttons to adjust intensity level.
Amber Intensity - Press the <4> button, then press the <+/-> buttons to adjust intensity level.
White Intensity - Press the <5> button, then press the <+/-> buttons to adjust intensity level.
UV Intensity - Press the <6> button, then press the <+/-> buttons to adjust intensity level.
Static Colors:
Full On - Press the <7> button for full RGBAW+UV intensity.
Magenta - Press the <8> button for magenta color.
Aqua - Press the <9> button for aqua color.
UV - Press the <0> button for ultraviolet lighting.
Backspace Button - Press the < > in any mode to activate IR MODE.
Enter - The < > button is used to save a selected user setting.
SkyBox W-DMX™ Manual Rev. C © 2016 Blizzard Lighting, LLC
Page 16
 Loading...