


Taurus Series
Multimedia Players
Quick Start Guide
Version: V1.0.0
Doc. ID: NS120100144

Taurus Series Multimedia Players |
|
Quick Start Guide |
www.novastar.tech |
Change History
Version |
Release Date |
Description |
|
|
|
V1.0.0 |
2017-07-20 |
First release. |
|
|
|
V1.0.0 |
i |

Taurus Series Multimedia Players |
|
Quick Start Guide |
www.novastar.tech |
Table of Contents
Change History ................................................................................................................... |
i |
|
Table of Contents................................................................................................................ |
i |
|
1 Overview.......................................................................................................................... |
1 |
|
1.1 |
Scenario....................................................................................................................................................... |
1 |
1.2 |
Procedures .................................................................................................................................................. |
1 |
2 Preparation...................................................................................................................... |
2 |
|
2.1 |
Getting and Installing Software.................................................................................................................... |
2 |
2.2 |
Getting Documents ...................................................................................................................................... |
3 |
2.3 |
Getting Required Account Information ........................................................................................................ |
3 |
3 Taurus Connections ....................................................................................................... |
4 |
|
3.1 |
Connecting via Ethernet Cable .................................................................................................................... |
4 |
3.2 |
Connecting via Local Area Network (LAN) .................................................................................................. |
4 |
3.3 |
Connecting via Wi-Fi.................................................................................................................................... |
5 |
3.3.1 Wi-Fi AP Mode.......................................................................................................................................... |
5 |
|
3.3.2 WiFi Sta Mode .......................................................................................................................................... |
6 |
|
3.3.3 WiFi AP+Sta Mode ................................................................................................................................... |
6 |
|
4 Receiving Card Parameter Configuration..................................................................... |
8 |
|
4.1 |
Loading Configuration File or Configuring the Parameters Manually Through NovaLCT-Taurus .............. |
8 |
4.2 |
Loading the Configuration File Through ViPlex Handy ............................................................................... |
9 |
5 Screen Configuration ................................................................................................... |
10 |
|
5.1 |
Configuring a Screen Through ViPlex Handy............................................................................................ |
10 |
6 General Operations....................................................................................................... |
11 |
|
6.1 |
Taurus Login with ViPlex Handy (Android and iOS).................................................................................. |
11 |
6.2 |
Taurus Login with ViPlex Express (Windows) ........................................................................................... |
11 |
V1.0.0 |
ii |
Taurus Series Multimedia Players |
|
Quick Start Guide |
www.novastar.tech |
1 Overview
1.1 Scenario
This document introduces a quick way to use Taurus series multimedia players and provides instructions for the first-timer.
1.2 Procedures
V1.0.0 |
1 |

Taurus Series Multimedia Players |
|
Quick Start Guide |
www.novastar.tech |
2 Preparation
2.1 Getting and Installing Software
Item |
|
Description |
|
How to get |
How to install |
|
|
|
|
|
|
ViPlex Handy |
|
It is a LAN-based |
|
Scan the following |
Software |
|
|
display |
|
OR code to download |
installation is |
|
|
management |
|
and install the APP. |
the same as |
|
|
software, including |
|
|
other |
|
|
the one applicable |
|
|
applications. |
|
|
to Android and iOS |
|
|
|
|
|
operating systems, |
|
|
|
|
|
is mainly used for |
|
|
|
|
|
display |
|
|
|
|
|
management as |
|
|
|
|
|
well as solution |
|
Use the App Store on |
|
|
|
editing and |
|
|
|
|
|
|
your iPhone to get |
|
|
|
|
publishing. |
|
|
|
|
|
|
ViPlex Handy for iOS. |
|
|
|
|
|
|
|
|
|
|
|
|
|
|
ViPlex Express |
|
It is a LAN-based |
|
Visit |
|
|
|
display |
|
www.novastar.tech, |
|
|
|
management |
|
download and install |
|
|
|
software applicable |
|
the required software. |
|
|
|
to the Windows |
|
|
|
|
|
operating system, |
|
|
|
|
|
and is mainly used |
|
|
|
|
|
for display |
|
|
|
|
|
management as |
|
|
|
|
|
well as solution |
|
|
|
|
|
editing and |
|
|
|
|
|
publishing. |
|
|
|
|
|
|
|
|
|
NovaLCT-Taurus |
|
Screen |
|
Visit |
|
|
|
configuration |
|
www.novastar.tech, |
|
|
|
software, which only |
|
download and install |
|
|
|
supports Windows |
|
the required software. |
|
|
|
and is mainly used |
|
|
|
|
|
for adjusting |
|
|
|
|
|
screens to the |
|
|
|
|
|
optimal display |
|
|
|
|
|
status. |
|
|
|
|
|
|
|
|
|
V1.0.0 |
2 |

Taurus Series Multimedia Players |
|
Quick Start Guide |
www.novastar.tech |
2.2 Getting Documents
Item |
Description |
How to get |
|
|
|
Taurus Series |
Describing application |
Visit www.novastar.tech to |
Multimedia Players |
scenarios, features, safety |
download the required |
Product |
instructions, hardware |
documents. |
Description-V1.0.0 |
structure, software structure |
|
|
and specifications of Taurus |
|
|
series products. |
|
|
|
|
2.3 Getting Required Account Information
Item |
Account Name |
Default Password |
|
|
|
Connect Taurus WiFi AP |
AP+ last 8 digits of the SN, |
12345678 |
|
For example: AP10000033 |
|
|
|
|
Log into the Taurus |
admin |
123456 |
|
|
|
V1.0.0 |
3 |
Taurus Series Multimedia Players |
|
Quick Start Guide |
www.novastar.tech |
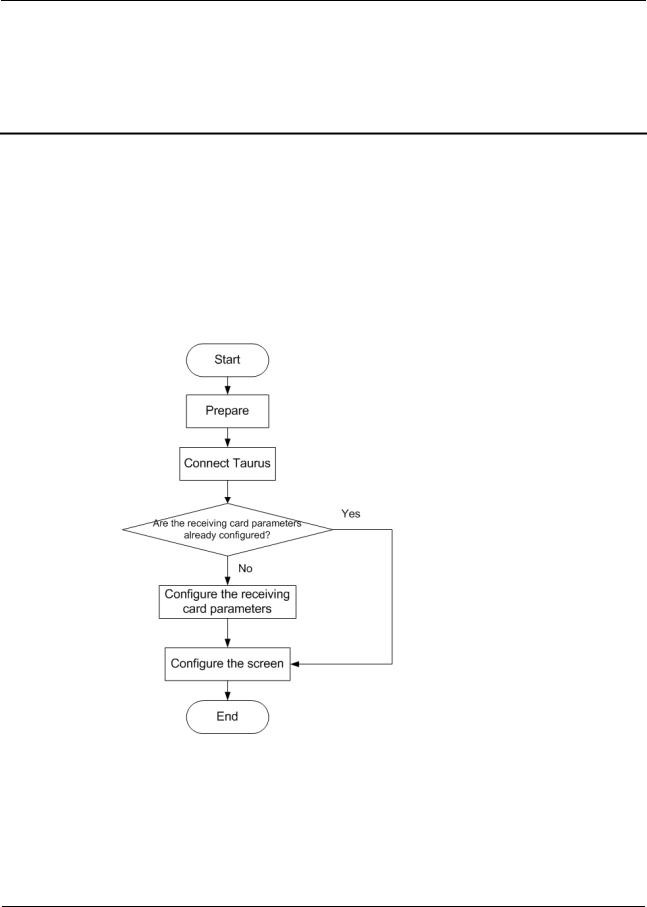
3 Taurus Connections
In this chapter, the picture of T6 is taken as an example to introduce the Taurus series products.
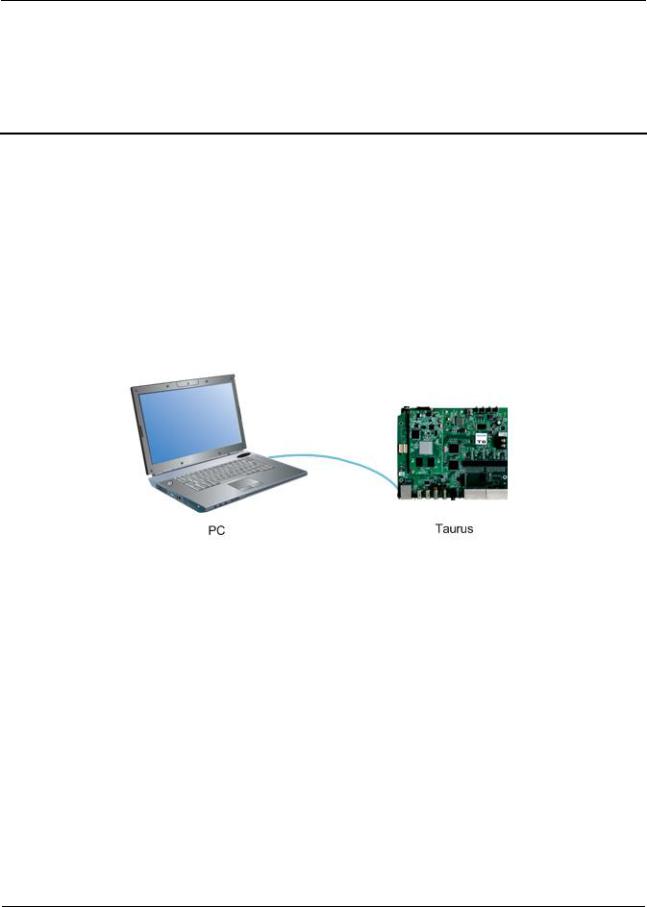
3.1 Connecting via Ethernet Cable
Network Diagram
Users can access the Taurus directly when it is connected via the Ethernet cable.
Configuration
Step 1 Refer to “6 General Operations” to log in to the Taurus.
Step 2 Turn off DHCP and set static IP address for the Taurus.
ViPlex Handy: Select Network Setting, Wired Network Setting in the Screen management page.
ViPlex Express: Select Screen Control, Network configuration.
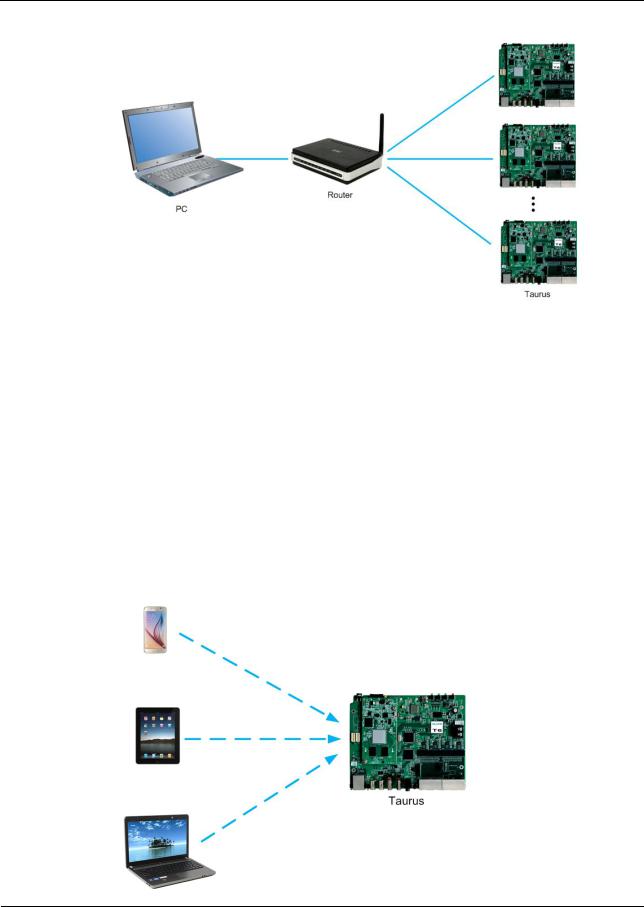
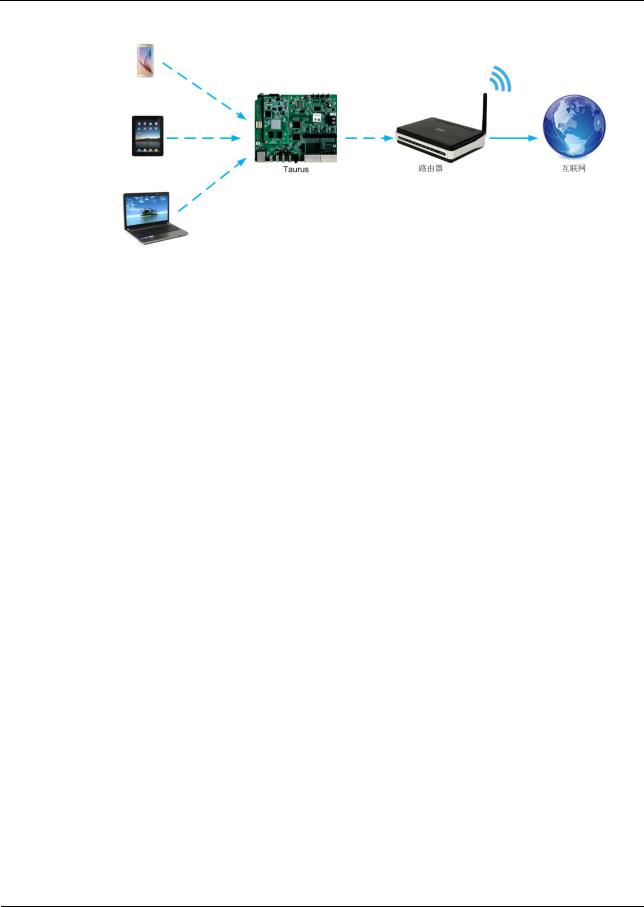
3.2Connecting via Local Area Network (LAN)
Network Diagram
Users can access the Taurus through LAN when it is connected via LAN.
V1.0.0 |
4 |
Taurus Series Multimedia Players |
|
Quick Start Guide |
www.novastar.tech |
Configuration
No need for configuration.
3.3 Connecting via Wi-Fi
The Taurus series products have dual WiFi function which can provide Wi-Fi hotspot as well as serve as WiFi Station at the same time.
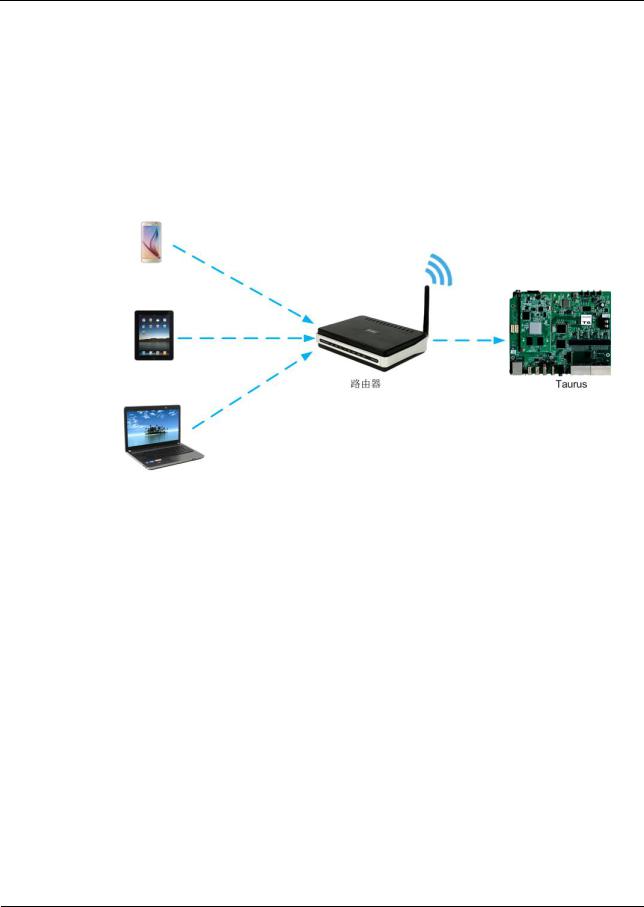
3.3.1 Wi-Fi AP Mode
Network Diagram
Users can access the Taurus directly when it is connected via WiFi AP.
V1.0.0 |
5 |
Taurus Series Multimedia Players |
|
Quick Start Guide |
www.novastar.tech |
Configuration
No need for configuration. Please connect the WiFi AP of the Taurus. SSID is “AP + last 8 digits of the SN”, for example, “AP10000033”.
3.3.2 WiFi Sta Mode
Network Diagram
Users can access Taurus through external router when it is connected via WiFi Sta.
Configuration
Step 1 Refer to “6 General Operations” to log in to the Taurus.
Step 2 Turn on Wi-Fi Sta mode. Click the Wi-Fi name of the external router and then enter the password of the Wi-Fi.
ViPlex Handy: Select Network Setting, WiFi Setting in the Screen management page.
ViPlex Express: Select Screen Control, Network configuration.
3.3.3WiFi AP+Sta Mode
Network Diagram
By using WiFi AP+Sta connection, users can directly access the Taurus or access the Internet through bridging connection.
V1.0.0 |
6 |
Taurus Series Multimedia Players |
|
Quick Start Guide |
www.novastar.tech |
Configuration
Step 1 Refer to “6 General Operations” to log in to the Taurus.
Step 2 Turn on Wi-Fi Sta mode. Click the Wi-Fi name of the external router and then enter the password of the Wi-Fi.
ViPlex Handy: Select Network Setting, WiFi Setting in the Screen management page.
ViPlex Express: Select Screen Control, Network configuration.
Related Information
The Taurus can be connected to the Internet through following three ways. The priority order of the three ways is from high to low.
Wired network
WiFi Sta
4G network
Models of the Taurus must have 4G module while using 4G network. Users can enter following relevant menus to turn on the mobile network:
ViPlex Handy: Select Network Setting, Mobile Data Setting in the Screen management page.
ViPlex Express: Select Screen Control, Network configuration.
V1.0.0 |
7 |
Taurus Series Multimedia Players |
|
Quick Start Guide |
www.novastar.tech |
4 Receiving Card Parameter Confi
guration
If receiving card parameters are already configured, please skip this chapter and perform the operations in “5 Screen Configuration”.
4.1 Loading Configuration File or Configuring the Parameters Manually Through NovaLCT-Taurus
Step 1 Start NovaLCT-Taurus.
Step 2 Select System, Search All Display.
|
System will display the screen information list. |
|
Step 3 Click screen information and click Connect System. |
||
|
The gray button on the page will become normal. |
|
Step 4 |
Select User, Advanced login. |
|
Step 5 |
Enter password and click Login. |
|
|
Default password is “admin”. |
|
Step 6 |
Click |
to enter the Screen Config page. |
Step 7 |
Confirm whether the local PC has the required receiving card configuration file. |
|
Yes. Please perform Load Configuration File.
No. Please perform Manual Configuration.
Loading Configuration File
Step 1 Select Cascading scan board and Load Configuration File. Click Browse to choose a configuration file from the local PC.
Step 2 Click Next to load the configuration file.
Manual Configuration
Step 1 Select Cascading scan board and click Next.
Step 2 Configure receiving card parameters based on actual conditions.
V1.0.0 |
8 |

Taurus Series Multimedia Players |
|
Quick Start Guide |
www.novastar.tech |
Step 3 Click Send To HW.
Step 4 Set parameters based on actual conditions and click Send.
Step 5 Adjust parameters until the screen displays normally and then click Save to Screen.
Step 6 (Optional) Click Save Config File to back up the receiving card configuration file to the local PC.
4.2 Loading the Configuration File Through ViPlex Handy
Step 1 Save the receiving card configuration file to mobile phone.
Step 2 Refer to “6 General Operations” to log in to the Taurus.
Step 3 Click screen name to enter the Screen management page.
Step 4 Select Screen Setting, Receiving card configuration to enter the Receiving card configuration page.
Step 5 Select the receiving card configuration file and click Send.
V1.0.0 |
9 |

Taurus Series Multimedia Players |
|
Quick Start Guide |
www.novastar.tech |
5 Screen Configuration
5.1 Configuring a Screen Through ViPlex Handy
Step 1 Refer to “6 General Operations” to log in to the Taurus.
Step 2 Click screen name to enter the Screen management page.
Step 3 Select Screen Setting, Screen configuration to enter the Screen configuration page.
Step 4 Configure screen information based on actual conditions and click OK.
V1.0.0 |
10 |

Taurus Series Multimedia Players |
|
Quick Start Guide |
www.novastar.tech |
6 General Operations
6.1 Taurus Login with ViPlex Handy (Android and iOS)
Before You Begin
Acquire the SSID and password of Wi-Fi AP of Taurus series products. SSID is default to be composed of AP and the last 8 numbers of SN, and the password is default as “12345678”.
Acquire the login password of user “admin” of which the default password is
“123456”.
Operating Procedures
ViPlex Handy can connect numerous Taurus series products.
Step 1 Connect Wi-Fi AP of the Taurus series products.
Step 2 Start ViPlex Handy.
System can automatically detect the Taurus series products and refresh Screen list. Users can also slide down Screen list to manually refresh the list.
 : denotes that Taurus is online and you can log into it.
 : denotes that Taurus is offline and you cannot log into it.
 : denotes that Taurus login is successful.
Step 3 Click Connect next to the screen name.
Step 4 Enter the user name and password and click Login.
6.2 Taurus Login with ViPlex Express (Windows)
Before You Begin
Acquire the SSID and password of Wi-Fi AP of Taurus series products. SSID is default to be composed of AP and the last 8 numbers of SN, and the password is default as “12345678”.
Acquire the login password of user “admin” of which the default password is
“123456”.
V1.0.0 |
11 |

Taurus Series Multimedia Players |
|
Quick Start Guide |
www.novastar.tech |
Operating Procedures
ViPlex Express can connect numerous Taurus series products.
Step 1 Connect Wi-Fi AP of the Taurus series products.
Step 2 Start the ViPlex Express.
Step 3 Click Refresh and the screen list will be displayed on the page.
 : denotes that Taurus is online and you can log into it.
 : denotes that Taurus is offline and you cannot log into it.
 : denotes that Taurus login is successful.
After the Taurus is found by ViPlex Express, the ViPlex express will try to log into to the Taurus with the default account or the account used for last login.
Step 4 Taurus login is successful or not.
Yes.  appears and no further operation is required.
No.  appears and then perform Step 5.
Step 5 Click Connect on the right of the screen information.
Step 6 Enter the username and password, and click OK.
V1.0.0 |
12 |

Taurus Series
Multimedia Players
Application Solution
Version: V1.0.0
Document Number: NS120100150

Taurus Series Multimedia Players |
|
Application Solution |
www.novastar.tech |
Change History
Version |
Release Date |
Description |
|
|
|
V1.0.0 |
2017-07-20 |
The first version. |
|
|
|
V1.0.0 |
i |

Taurus Series Multimedia Players |
|
Application Solution |
www.novastar.tech |
Table of Contents
Change History.................................................................................................................................. |
i |
|
Table of Contents ............................................................................................................................ |
ii |
|
1 Overview......................................................................................................................................... |
1 |
|
1.1 |
About This Solution...................................................................................................................................... |
1 |
1.2 |
Characteristics of the Application Solution .................................................................................................. |
1 |
1.2.1 Synchronous Playing ................................................................................................................................ |
1 |
|
1.2.2 Smart Brightness Adjustment ................................................................................................................... |
2 |
|
1.2.3 4G Module ................................................................................................................................................ |
2 |
|
1.2.4 Cluster Management ................................................................................................................................ |
3 |
|
1.3 |
Software Acquiring Method ......................................................................................................................... |
3 |
2 AD Player and Mirror Screen Solution..................................................................................... |
5 |
|
2.1 |
Overview ...................................................................................................................................................... |
5 |
2.2 |
Single Application ........................................................................................................................................ |
7 |
2.2.1 Networking Diagram ................................................................................................................................. |
7 |
|
2.2.2 Required Software .................................................................................................................................... |
7 |
|
2.2.3 Relevant Configurations ........................................................................................................................... |
7 |
|
2.3 |
Cluster Application....................................................................................................................................... |
8 |
2.3.1 Networking Diagram ................................................................................................................................. |
8 |
|
2.3.2 Required Software .................................................................................................................................... |
8 |
|
2.3.3 Required Hardware Devices..................................................................................................................... |
8 |
|
2.3.4 Relevant Configurations ........................................................................................................................... |
9 |
|
2.4 |
Splicing ...................................................................................................................................................... |
12 |
2.4.1 Networking Diagram ............................................................................................................................... |
12 |
|
2.4.2 Required Software .................................................................................................................................. |
13 |
|
2.4.3 Relevant Configuration ........................................................................................................................... |
13 |
|
3 Post Screen Solution................................................................................................................... |
15 |
|
3.1 |
Overview .................................................................................................................................................... |
15 |
3.2 |
Networking Diagram .................................................................................................................................. |
17 |
3.3 |
Required Software ..................................................................................................................................... |
17 |
3.4 |
Required Hardware Devices...................................................................................................................... |
17 |
3.5 |
Relevant Configuration .............................................................................................................................. |
18 |
4 General Operations..................................................................................................................... |
22 |
|
4.1 |
Taurus Login .............................................................................................................................................. |
22 |
4.1.1 Taurus Login upon ViPlex Handy (Android and iOS) ............................................................................. |
22 |
|
V1.0.0 |
ii |
|

Taurus Series Multimedia Players |
|
Application Solution |
www.novastar.tech |
4.1.2 Taurus Login upon ViPlex Express (Windows) |
...................................................................................... 23 |
V1.0.0 |
iii |

Taurus Series Multimedia Players |
|
Application Solution |
www.novastar.tech |
1 Overview
1.1 About This Solution
Taurus series products are the second-generation multimedia players developed by NovaStar specially designed for the medium-small size LED full color displays, and applicable to all kinds of display devices as well as many application scenes.
AD player, mirror screen and post screen are used here as examples to describe the application solution of Taurus series products. Pictures of Taurus series products used in networking diagram are taken from T6 model.
For more information of Taurus series products, please visit www.novastar.tech to download relevant documents.
1.2 Characteristics of the Application Solution
1.2.1 Synchronous Playing
This function makes several displays play the same image at the same time with high accuracy based on advanced synchronous playing and scheduling technologies.
The synchronous playing function could be enabled for different displays as long as following three requirements are met:
The synchronous playing function has been enabled on the ViPlex or VNNOX.
The time of multiple Taurus products are synchronized.
Playing plans of multiple Taurus products are the same without random transition or media.
Advantages of the synchronous playing function are shown in Table 1-1.
Table 1-1 Synchronous playing
|
Object |
Advantage |
|
|
|
|
User |
Improve advertisement and information broadcast |
|
|
effects |
|
|
|
|
Environment |
Improve city image and make the city more colorful |
|
|
|
|
Display |
Improve visual experience |
|
|
|
|
Time could be synchronized through NTP and Lora modes from which the user could |
|
|
select one as required: |
|
|
|
|
V1.0.0 |
1 |
|
Taurus Series Multimedia Players |
|
Application Solution |
www.novastar.tech |
NTP time synchronization: Taurus time synchronization is based on NTP server. No hardware is required to be added, and time synchronization accuracy depends on network speed. Consequently, network traffic will be consumed by using 4G network.
Lora time synchronization: Master and slave devices are required to be set for Taurus. Time of the slave device is synchronized with that of the master device through Lora network, and therefore Lora device is required. This time synchronization method is applicable to events with high time synchronization requirement and does not consume network traffic, but its signal receiving depends on the environment and is limited by distance.
1.2.2Smart Brightness Adjustment
Smart brightness adjustment includes auto brightness adjustment and timing brightness adjustment.
Auto brightness adjustment: Display brightness will automatically adjust according to environment brightness.
Timing brightness adjustment: Display brightness will automatically adjust to a specific value at a given point of time.
Taurus products have brightness sensor connectors. Connect the light sensor and set smart brightness adjustment rules on ViPlex to enable the smart brightness adjustment function.
Advantages of smart brightness adjustment are as shown in Table 1-2.
Table 1-2 Smart brightness adjustment
Object |
Advantage |
|
|
User |
Reduce manual operations |
|
|
Environment |
Avoid light pollution |
|
|
Display |
Smarter |
|
|
Taurus products support manual brightness adjustment as well.
1.2.3 4G Module
Taurus series products provide models of onboard 4G modules, and therefore 4G network could be used for Internet connection.
When mobile data network is enabled on ViPlex and priority requirements for signal selection are met, Taurus products with 4G module could connect to Internet.
Advantages of 4G module are as shown in Table 1-3.
Table 1-3 4G module
|
Object |
Advantage |
|
|
|
|
User |
Solution transmission speed is fast without wiring |
|
|
operation |
|
|
|
|
Environment |
- |
|
|
|
|
|
|
V1.0.0 |
2 |
|
 Loading...