

Page 1

Lucid DMX
Page 2

Table of contents
I Welcome to Lucid DMX
1
II Installation
4
1. 1. Software
3
2. 2. USB - DMX Interface
7
III Quick start guide
10
1. 1. Add fixtures
9
2. 2. Design the stage
12
3. 3. Make the program
14
4. 4. Play the show
23
IV Setup and programming tools
29
1. 1. Add a generated effect
28
2. 2. Setup a LED matrix
30
3. 3. How to use the XY Moving Area
33
4. 4. How to use the RGB / CMY Color Picker
37
5. 5. Desktop's features
39
6. 6. Scene, Sequence and Cue features
46
V Playback tools
52
1. 1. Cues and Sequences Playback
51
2. 2. Live Tools
55
3. 3. Live Desktop and Presets
57
4. 4. EasyRemote (tablet/smartphone control)
60
VI Configuration tools
65
1. 1. How to open the Library editor
64
2. 2. General Settings
65
2.1. 2.1 General
65
2.2. 2.2 Desktop
67
2.3. 2.3 Shortcuts
70
3. 3. DMX Output levels
71
VII 180IQ features
74
1. 1. Setup and programming tools
73 1.1. MIDI and DMX IN Links
Page 3

73
2. 2. Playback tools
76
2.1. MIDI and Ports Triggers
76
3. 3. Configuration tools
77
3.1. Configure the StandAlone Mode
77
3.2. How to configure the multi universes mode
83
3.3. How to test the ports
87
VIII FAQ - Troubleshooting
90
IX Appendices
92
1. DMX512 brief description
91
Page 4

Page 5

Lucid DMX
I Welcome to Lucid DMX
I Welcome to Lucid DMX
Thank you for your interest in the
Lucid DMX
lighting control software.
Throughout this manual you will find useful information that will help you get the most from your lighting
fixtures using our software.
You will find the following sections in this manual:
Installation
How to install the software and USB-DMX interface
Quick Start Guide
Explains the most basic concepts in the software, to allow you to get your lighting fixtures working in no
time.
Setup and Programming Tools
A comprehensive look at all setup and programming tools.
Playback Tools
Explains all tools used for live playback of your lighting shows.
Configuration Tools
Everything from DMX output to modifying fixture libraries/profiles
180IQ Edition Features
Tools that are exclusive of the 180IQ version of our software
FAQ – Troubleshooting
Any question, start here.
Appendices
Introduction to DMX, useful accessories, etc.
If you already purchased one of our Lucid DMX packages, you will find it contains:
1 USB-DMX interface, 1 installation CD, and 1 USB cable.
Once again, thank you for your interest in the Lucid DMX software… enjoy!
Page 1
Page 6

Lucid DMX
I Welcome to Lucid DMX
Page 2
Page 7
Lucid DMX
II Installation
II Installation
1. 1. Software
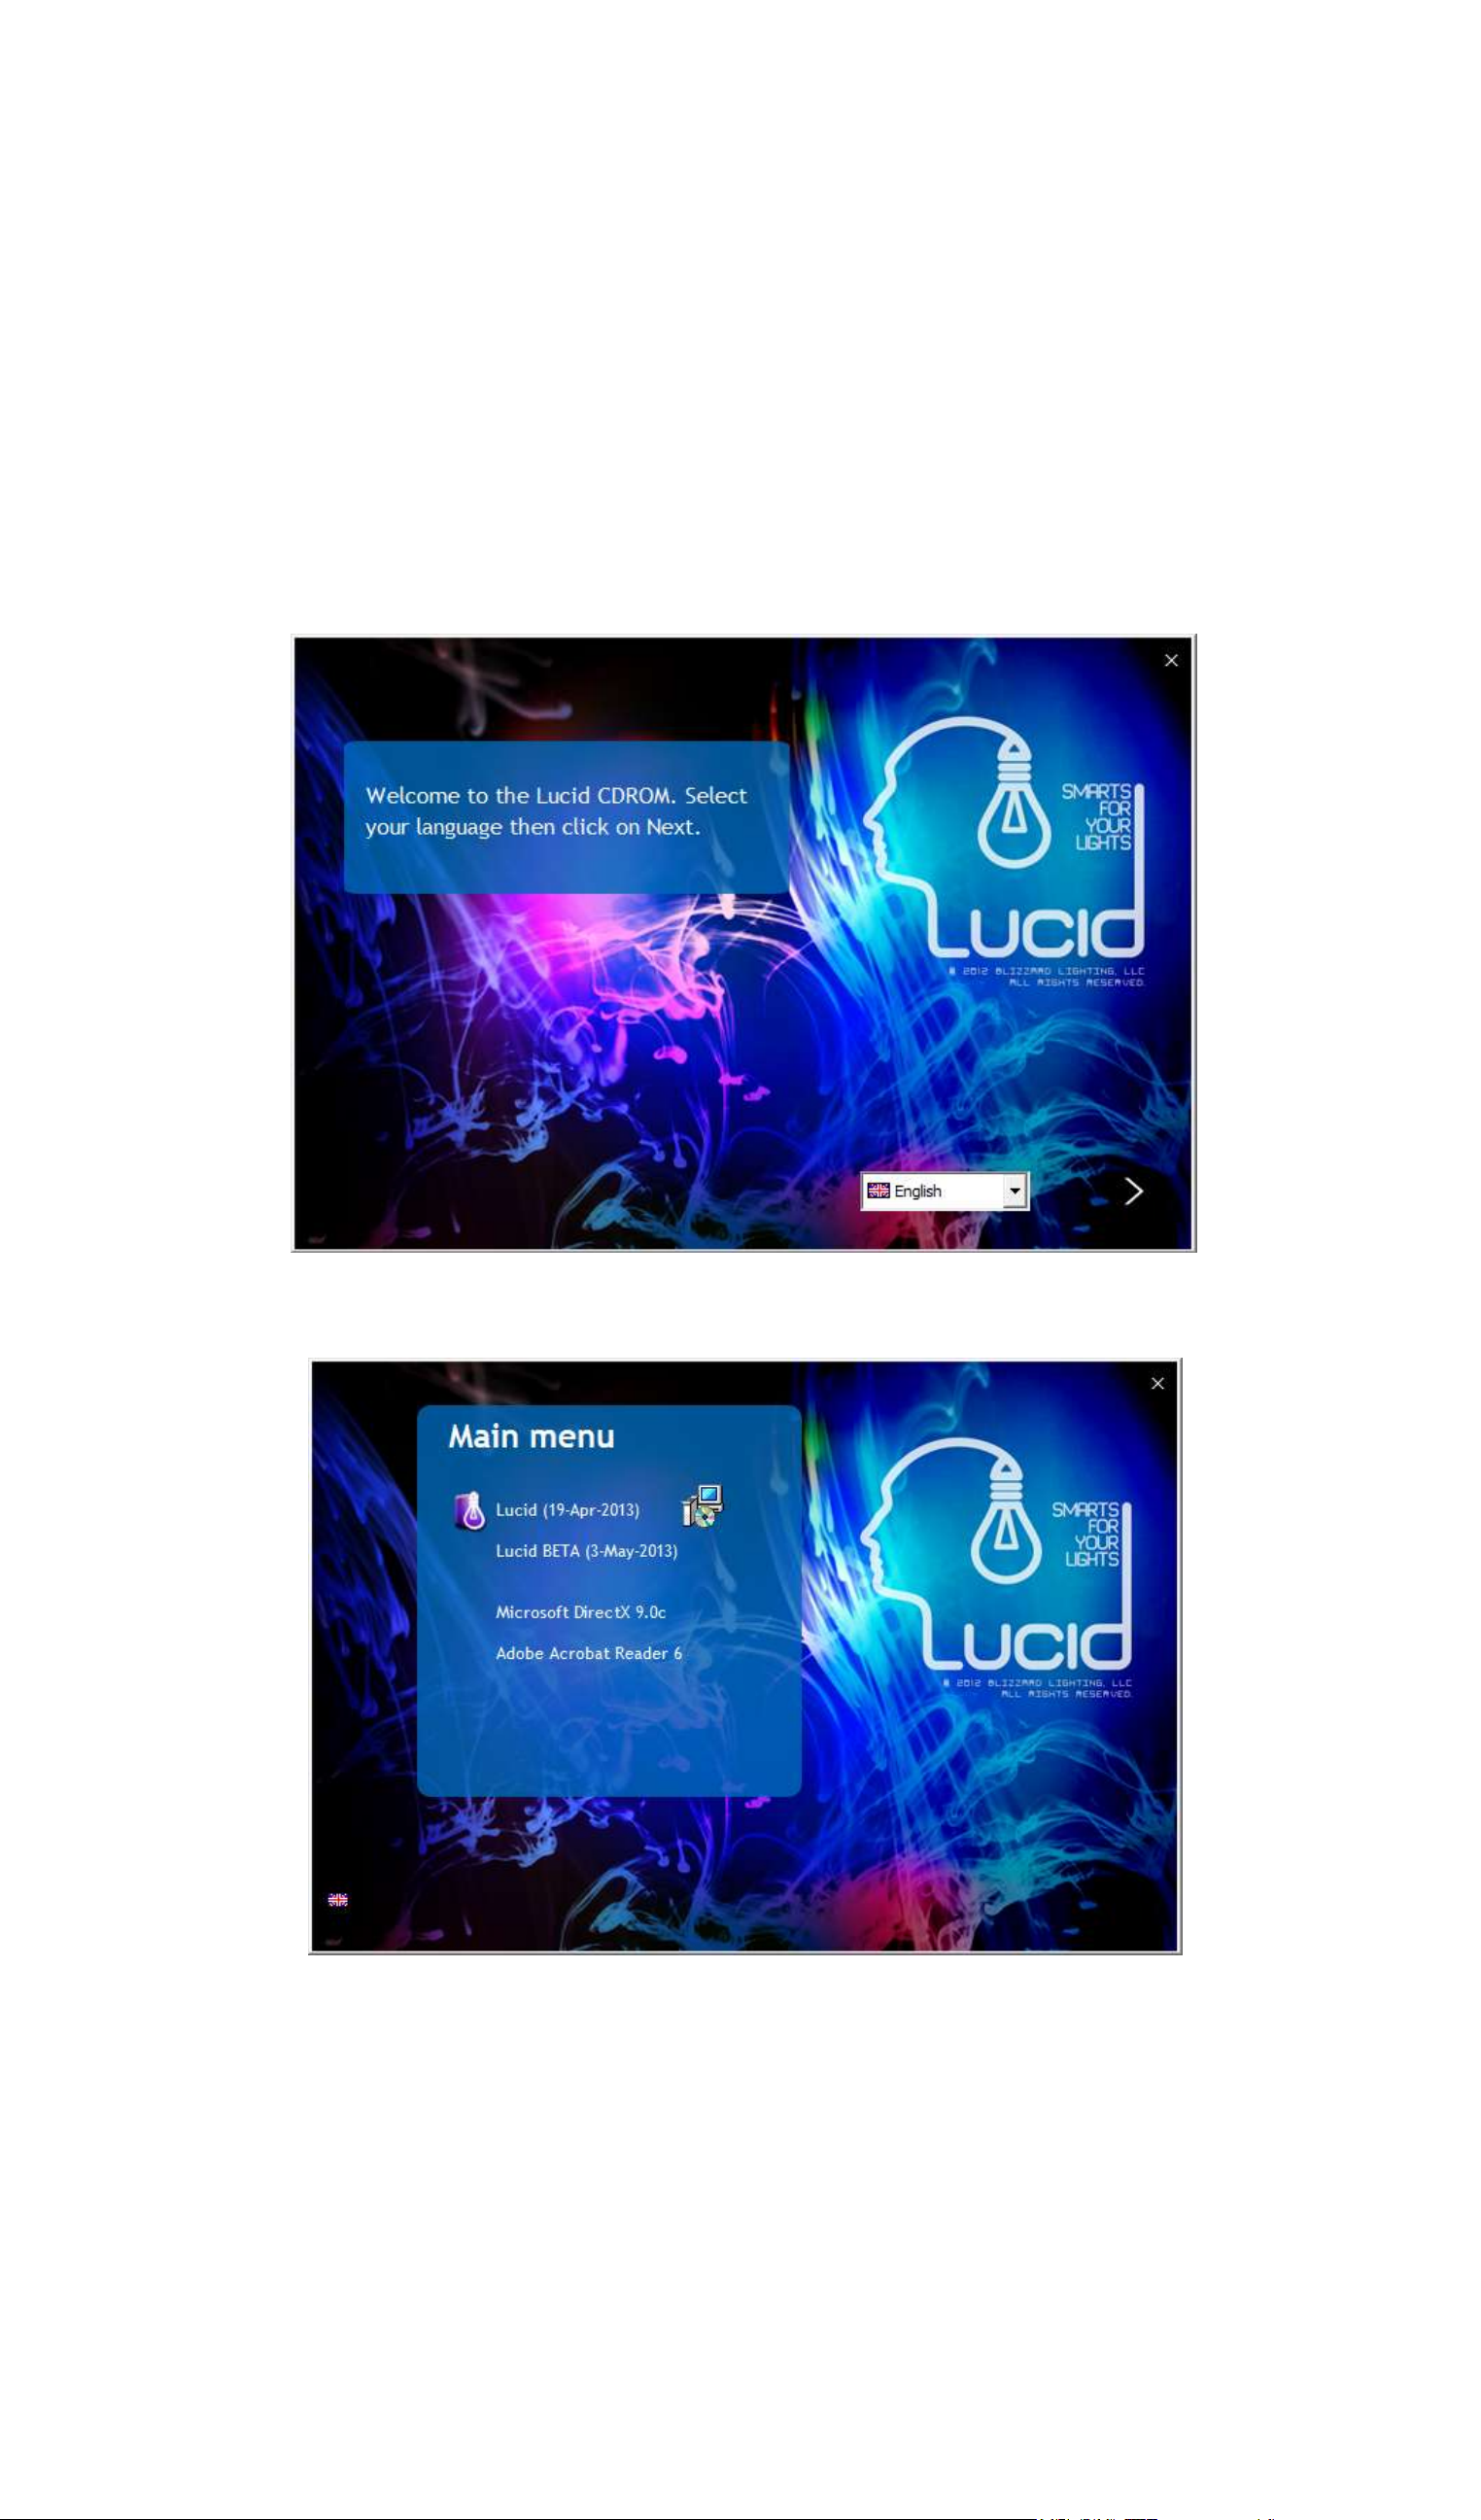
You can install the Lucid DMX software from the installation CD included in the Lucid DMX package, or
by downloading the latest installation file from the website's product page (if this is your case, ignore
the next paragraph).
Insert the installation CD in your computer. Once the installation screen is open, select your language
and click NEXT.
You must accept the license agreement. Finally, on the following screen, click on the INSTALL icon.
Page 3
Page 8
Lucid DMX
II Installation
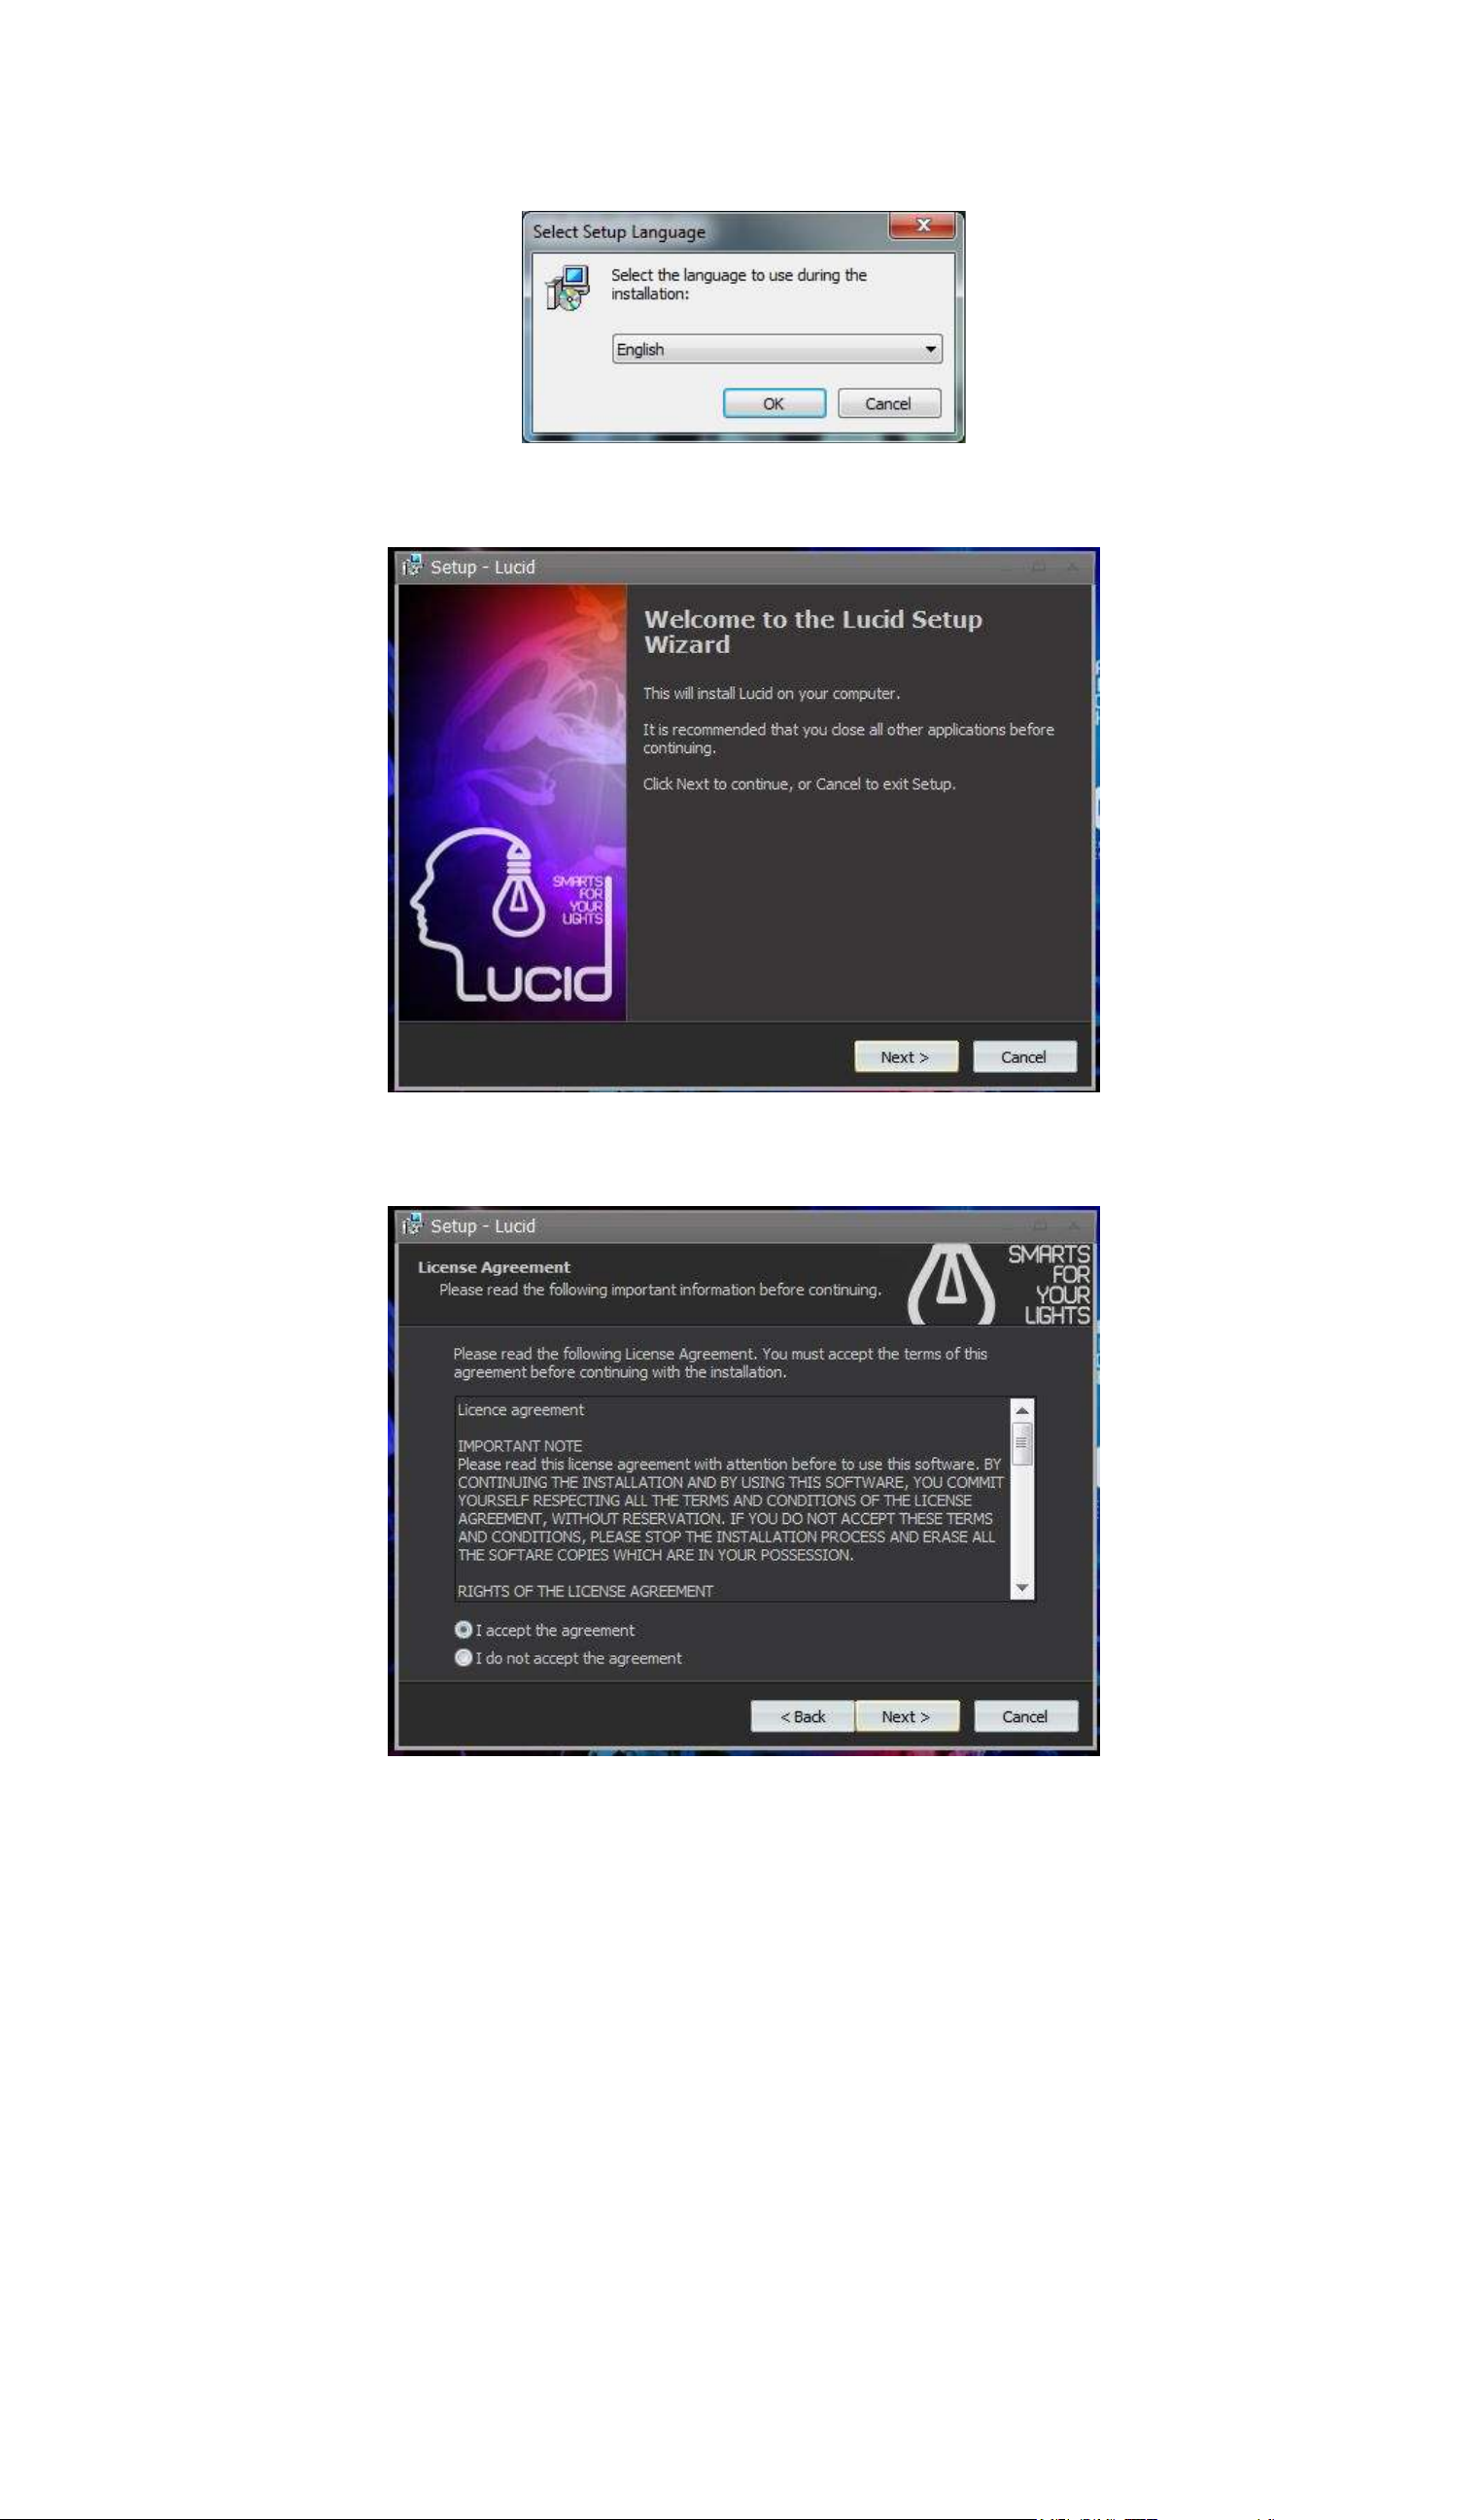
Select the installation Language.
Click Next.
Accept the License Agreement, then click Next.
Select the Lucid DMX's destination folder on your hard drive. Then click Next.
Page 4
Page 9
Lucid DMX
II Installation
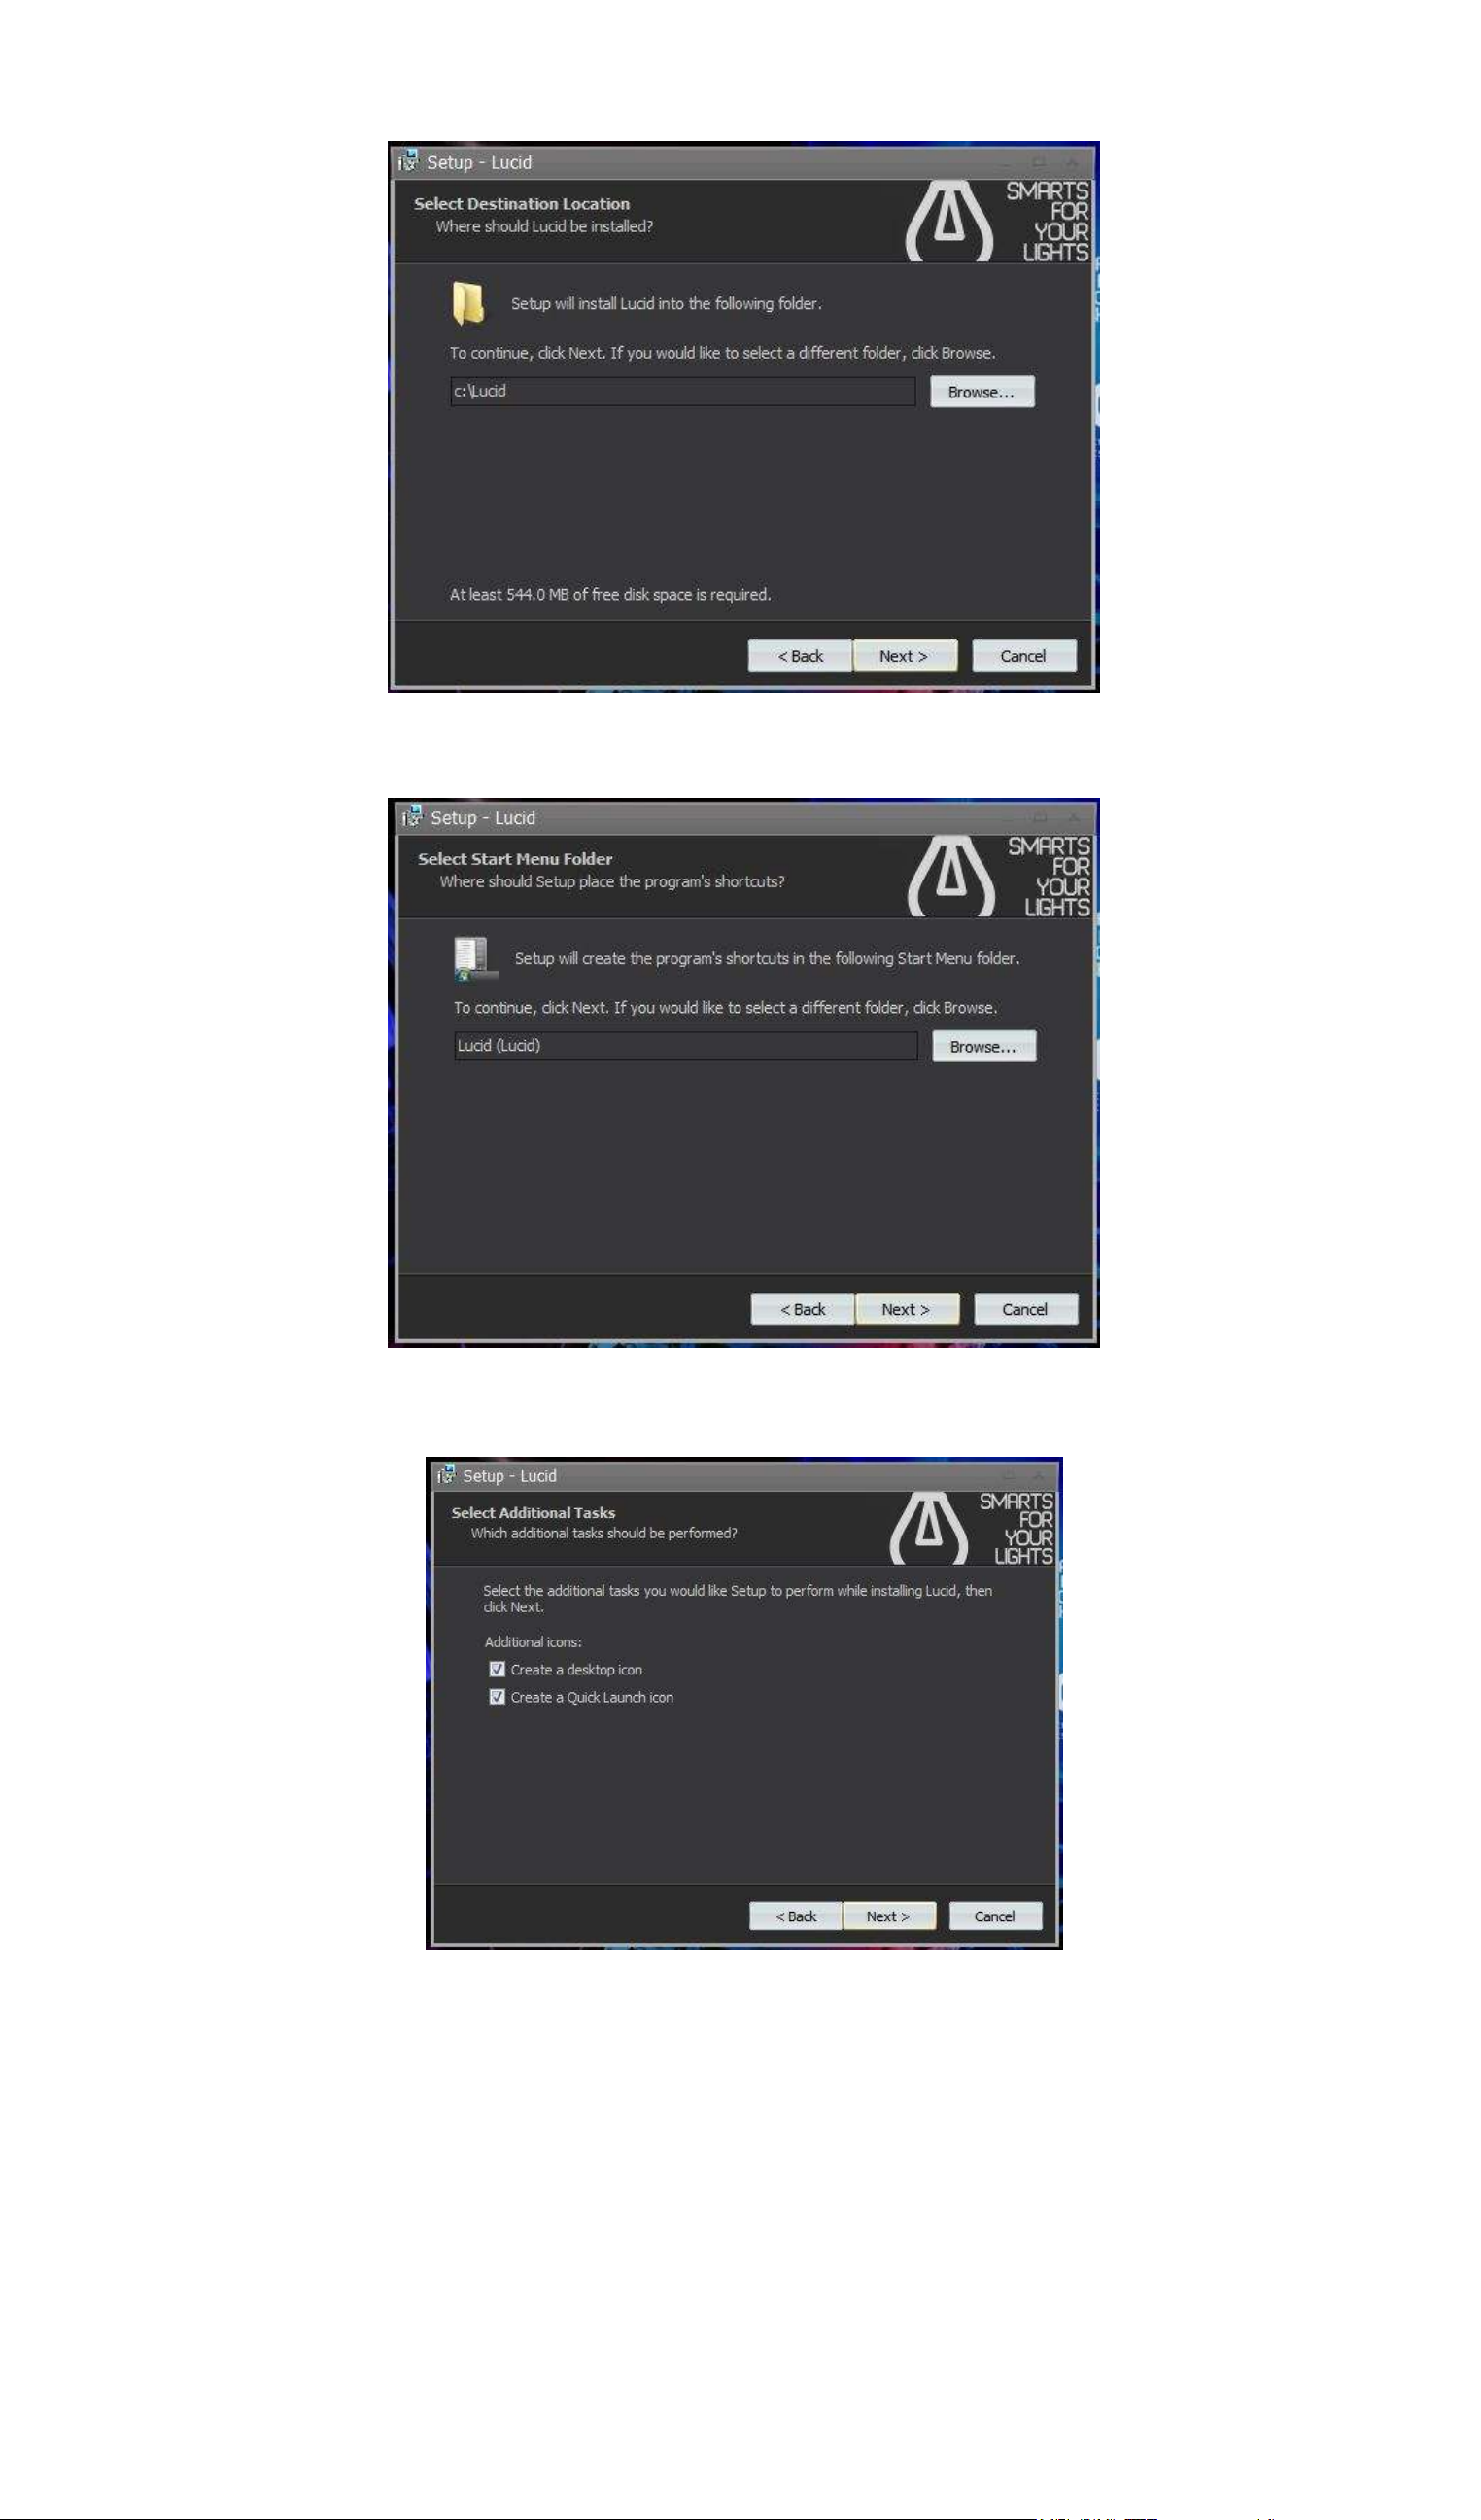
Select the name for the Start menu folder, then click Next.
If you want to create a desktop icon click Next.
Page 5
Page 10
Lucid DMX
II Installation
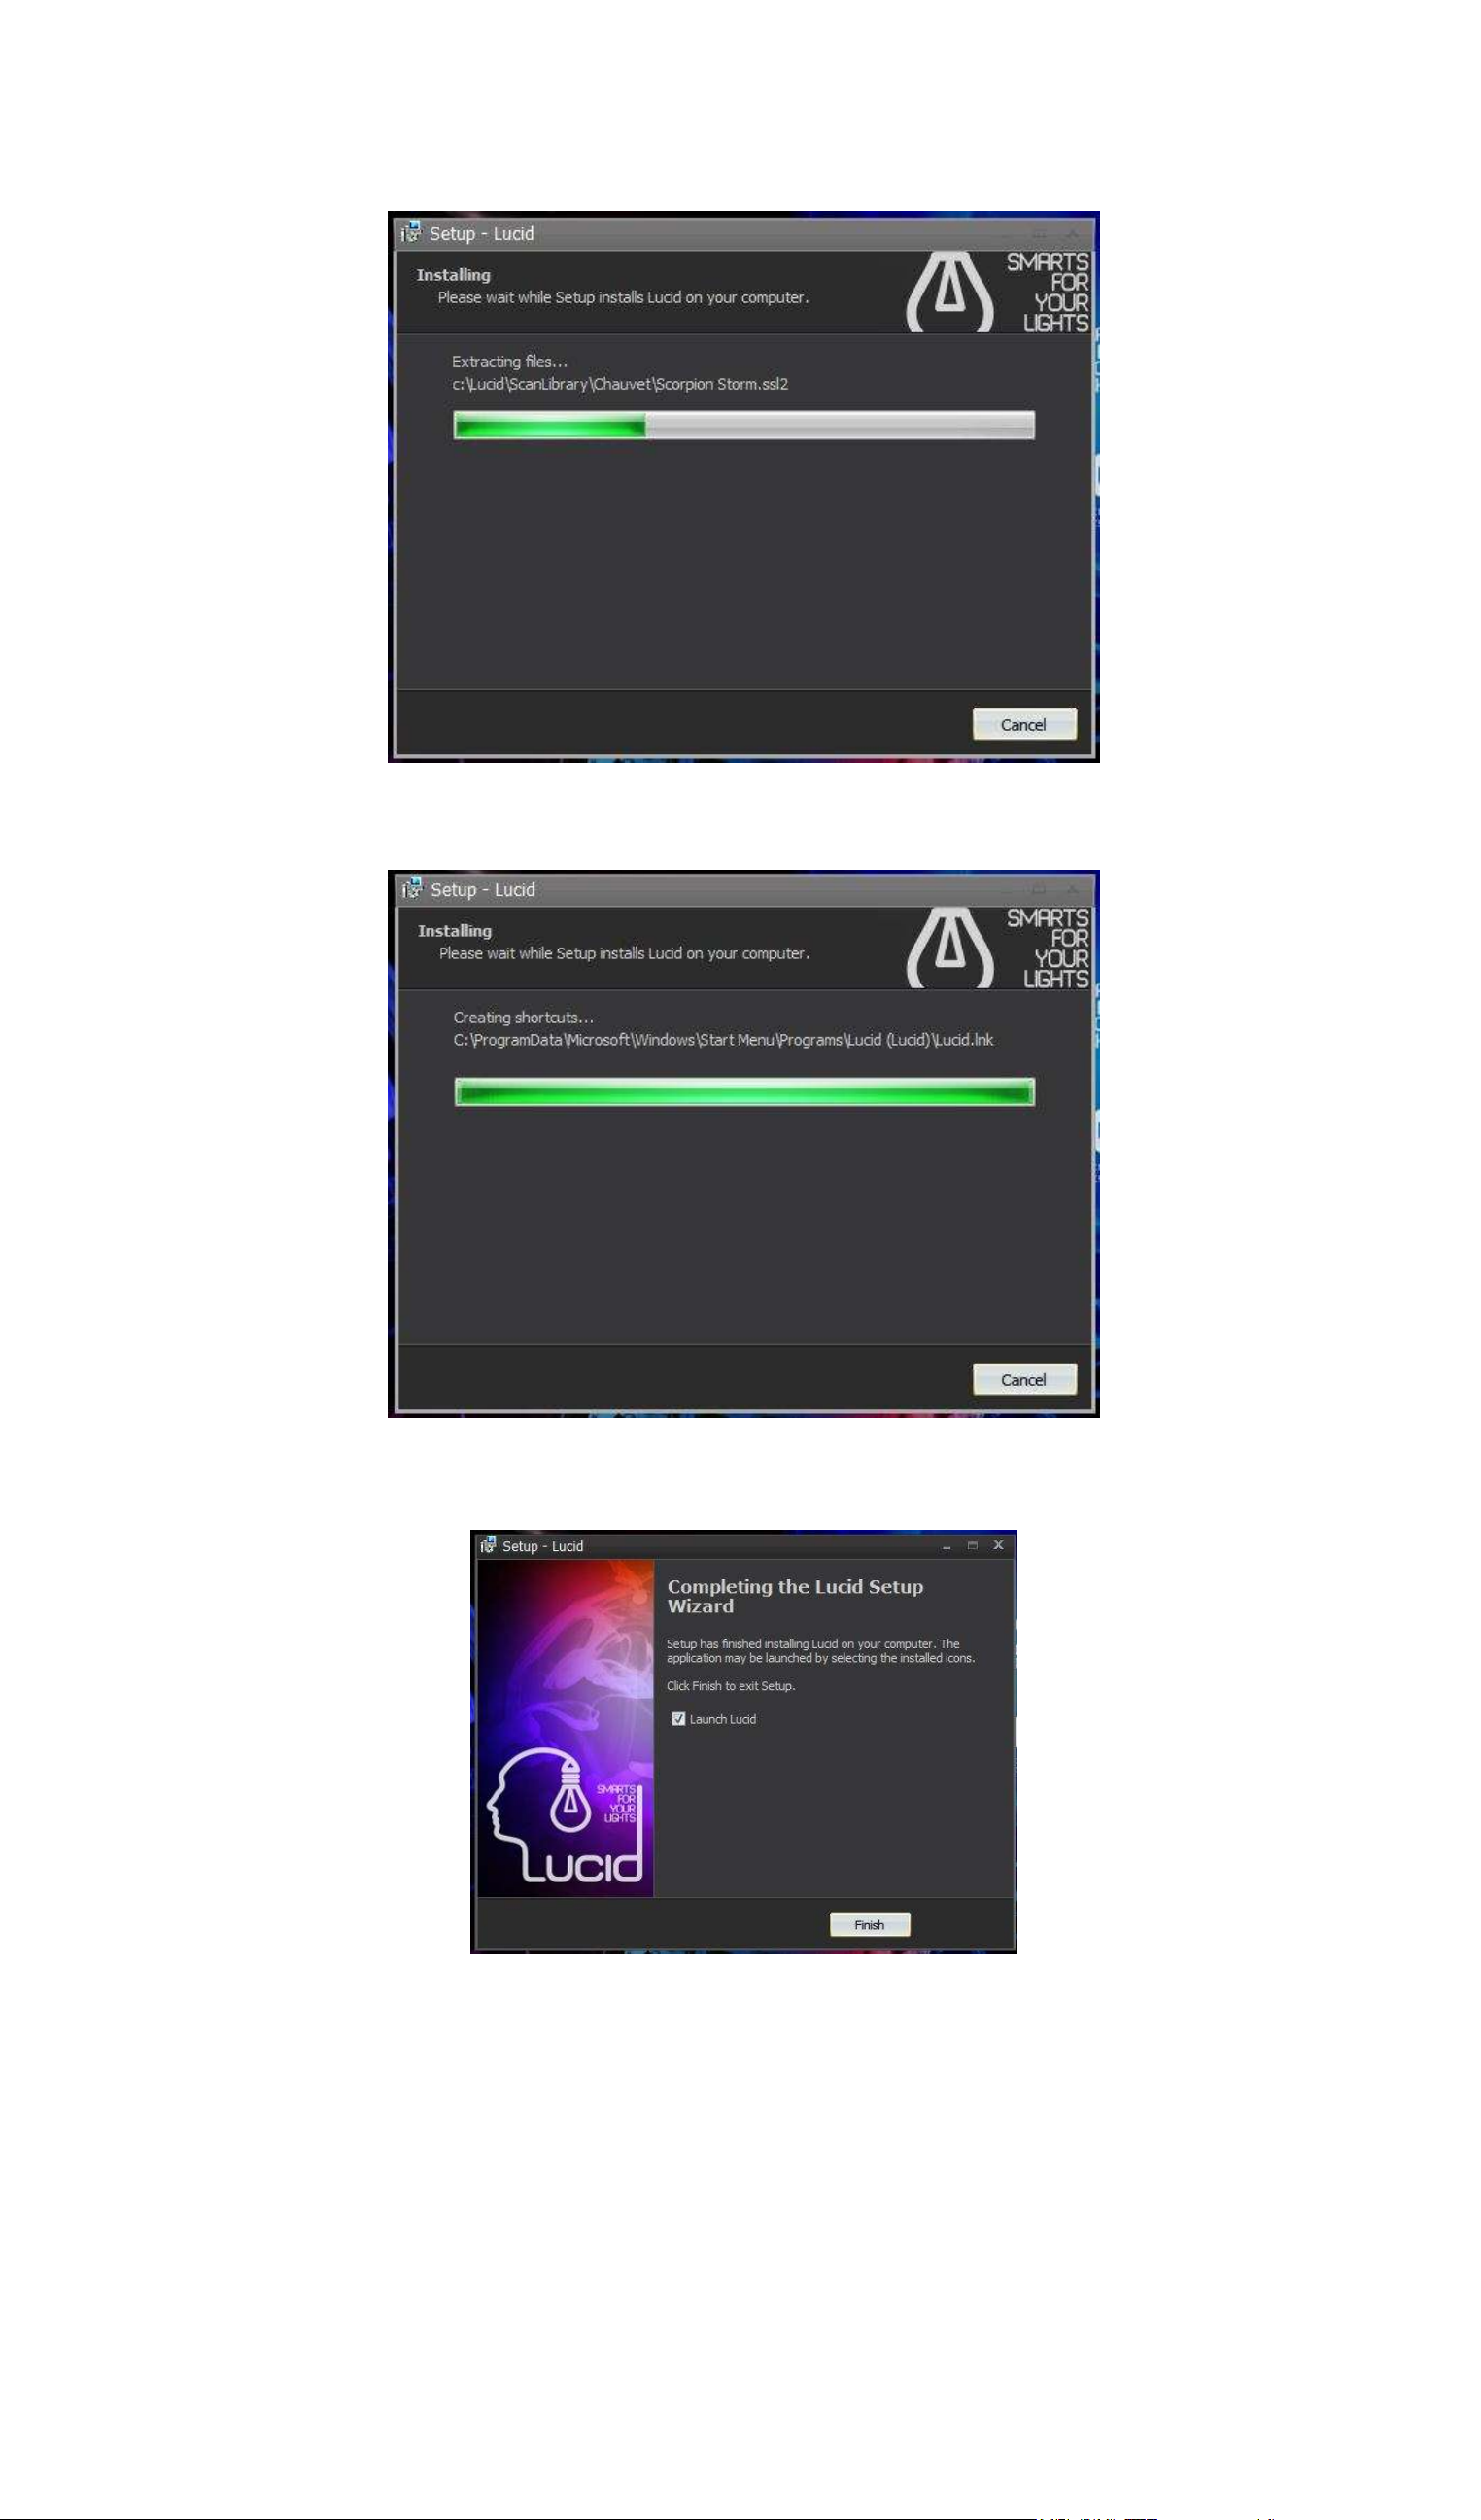
The Setup is now ready to begin installing the Lucid DMX software on your computer, click Install.
Wait while the Setup installs Lucid DMX.
You are done! Now, it is time to start playing with our software. Click Finish to launch Lucid DMX.
Page 6
Page 11
Lucid DMX
II Installation
Enjoy!
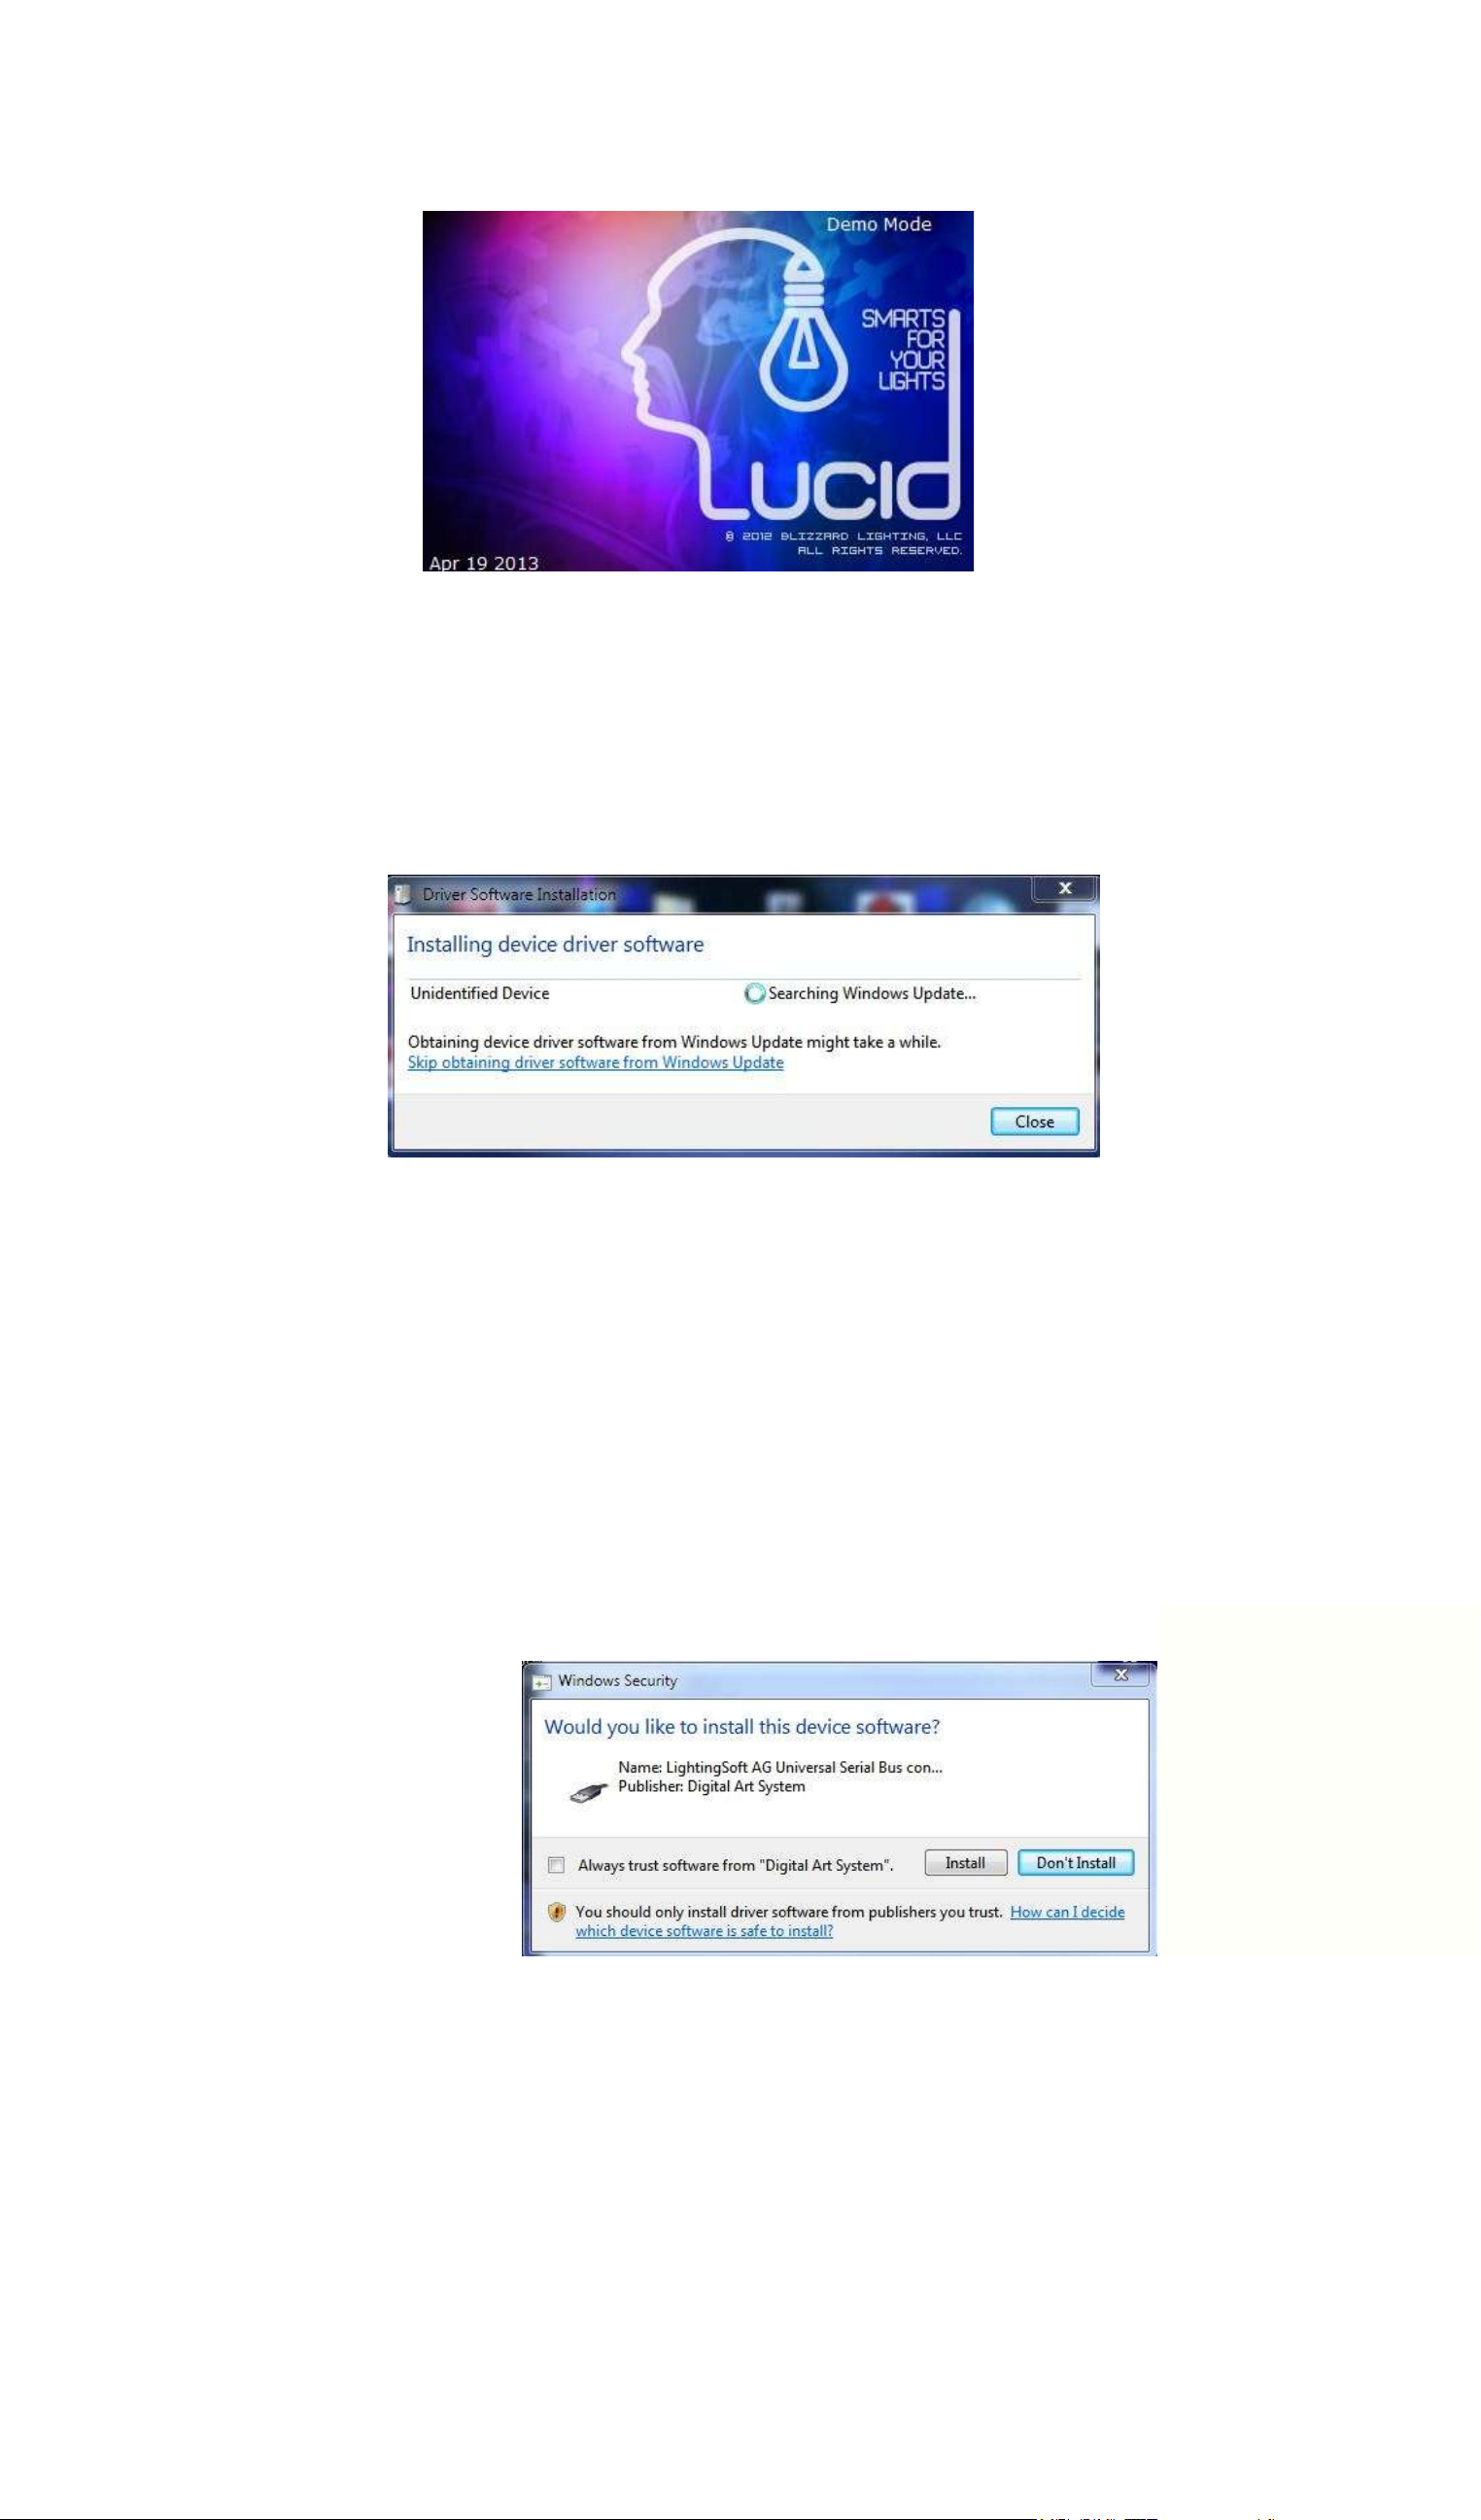
2. 2. USB - DMX Interface
If you purchased a software package and received a USB to DMX interface, you will need to install the
drivers for it. You can use the full software without the interface, but you will need this USB-DMX device
if you want to control real lighting fixtures.
Windows will find the driver and will tell you the device is not validated, and will ask if you wish to
continue. Although Microsoft does not have a numerical registry for this driver, there is no risk of
incompatibility. Click "Install".
Page 7
Page 12

Lucid DMX
II Installation
You are done! But remember, the software detects the USB interface when it starts. This means that
you must have the USB interface connected to your computer before you open the control software.
Otherwise, there will be no communication between the software and the interface.
Page 8
Page 13

Lucid DMX
III Quick start guide
III Quick start guide
This section of the manual will show you in very few and simple steps how to add fixtures into the
software, how to create lighting programs and shows, and how to play them.
1. 1. Add fixtures
Whether you purchased the electronic interface already or simply downloaded the free software from
the internet, you probably have an idea of what type of lighting fixtures you want to control. Lucid DMX
includes a library of about 3,000 profiles from lighting manufacturers from around the world.
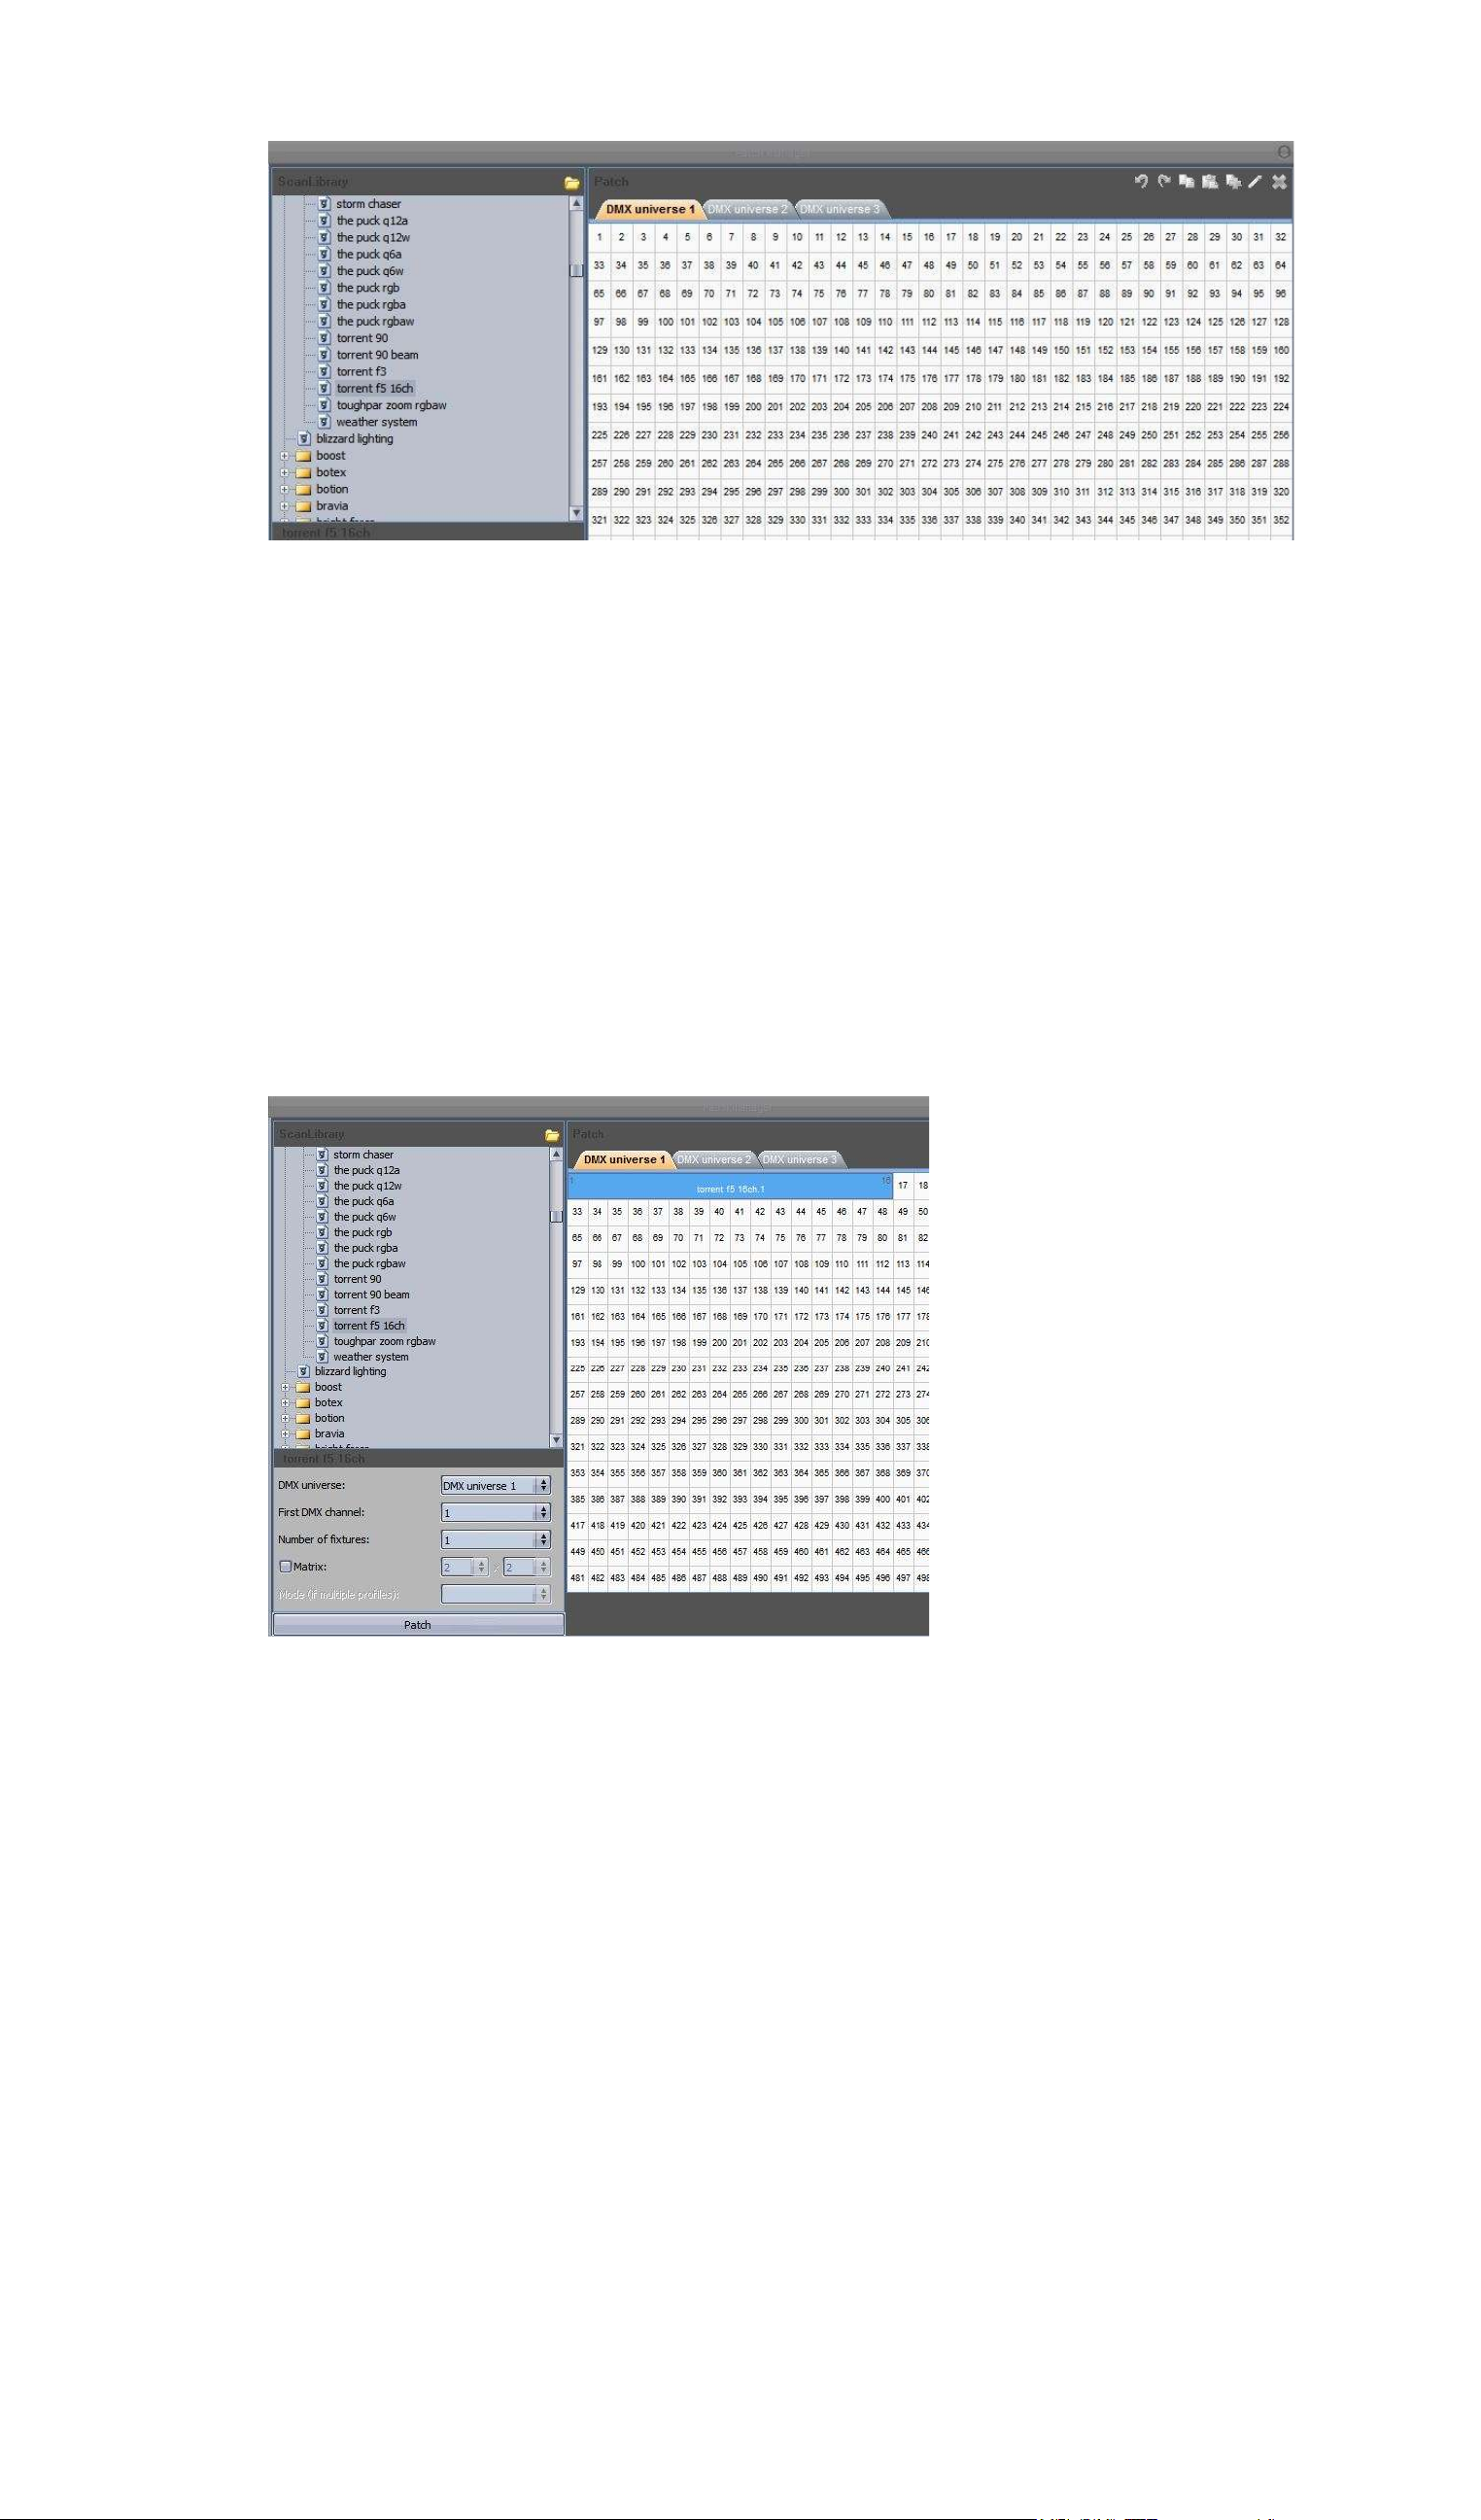
To add your fixtures into the software, click the
Patch
button inside the
Tools tab.
The
Patch Manager
window appears.
First select the desired manufacturer on the folder list on the left, then select a particular lighting fixture
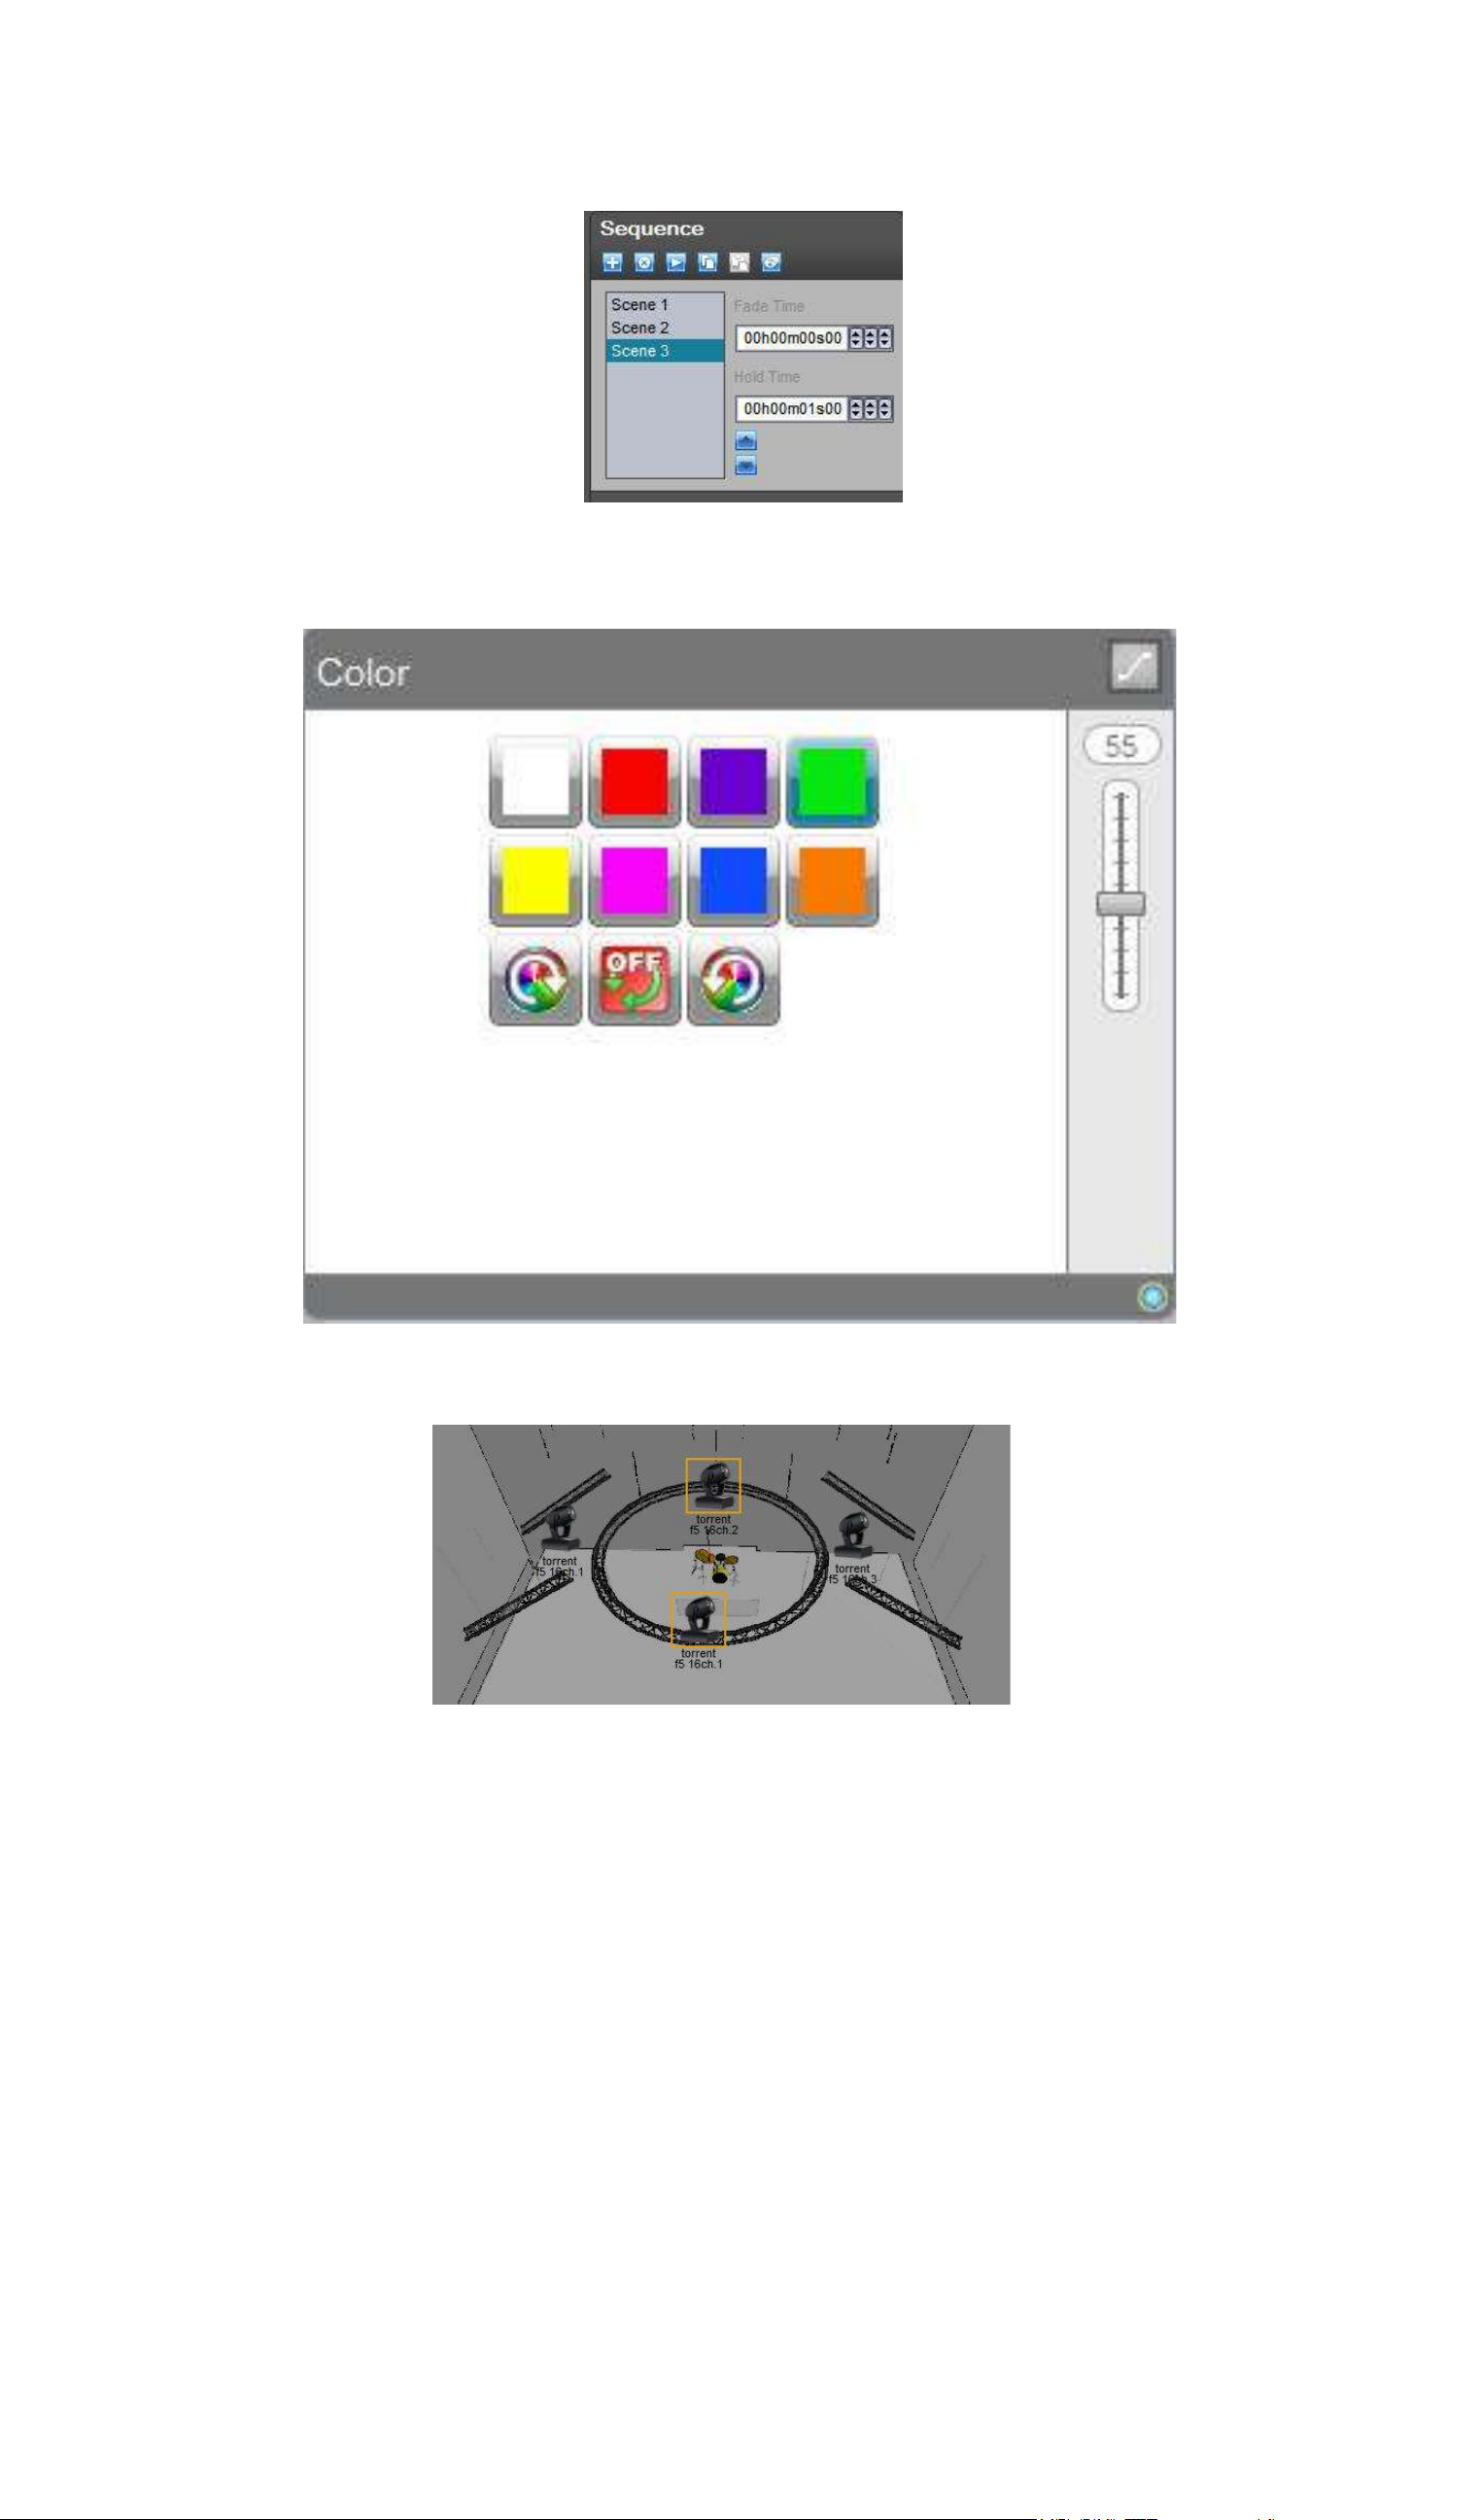
from this manufacturer. For example, we could select the "Blizzard Lighting" manufacturer folder, then the Torrent F5
Page 9
Page 14
Lucid DMX
III Quick start guide
There are two ways to patch a fixture into the address map. The first is to drag and drop a particular
profile from the list on the left into the address map. The second is to use the tools located at the
bottom left-hand area of the Patch Manager window.
Let us try to Drag and Drop, for example. Left click and hold the "Torrent F5" item on the list,
do not release the mouse click while moving the cursor over the address map. Release the mouse click
once you have chosen an appropriate DMX address.
You can modify the fixture's address whenever you want, just left click and hold on to the colored area
that represents the fixture on the address map, do not release the mouse button while moving the
cursor until you reach the desired address.
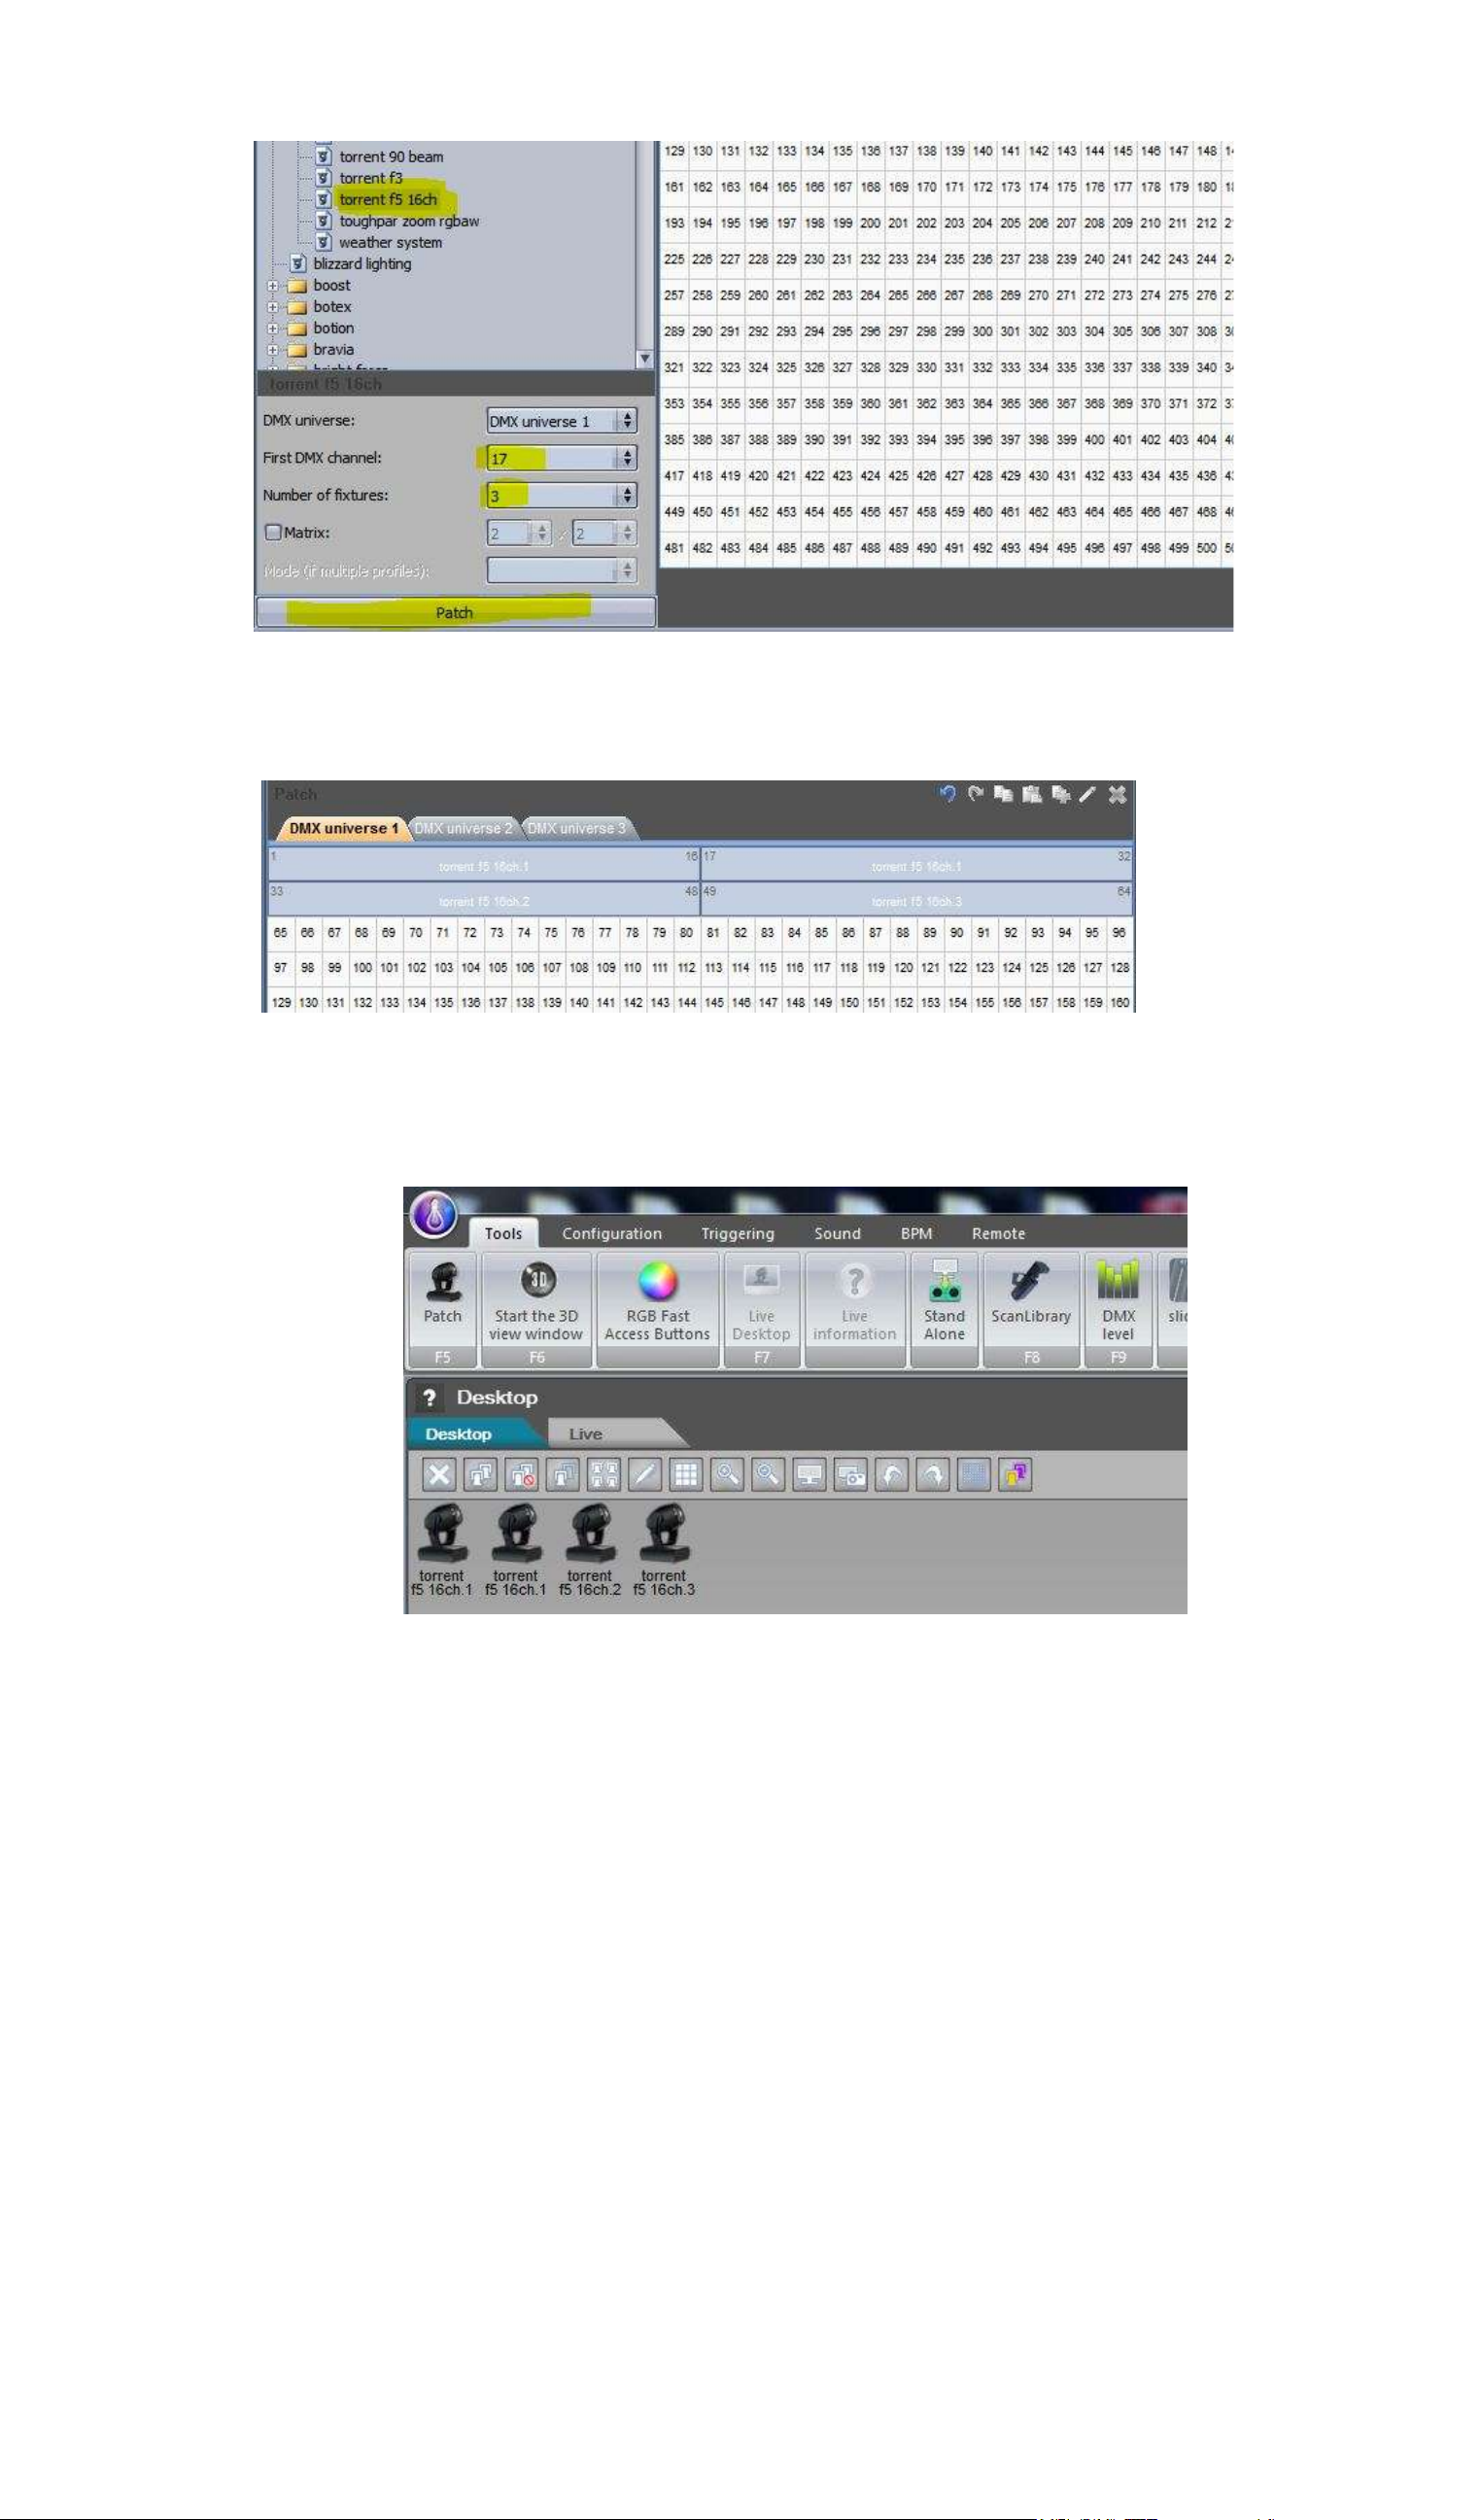
Continuing with our example, let us add more "Torrent F5" fixtures, except that now we will
not drag and drop the item from the list, but instead use the tools at the bottom-left hand area of the
window.
Select the "Torrent F5" item from the list. As you do this, the tools in the bottom left area
will become enabled. Select the First DMX channel for your new fixture, in this case we can select
17. Select the Number of fixtures that you want to add, we can select 3, for example. To add the
fixtures to the address map, click on the Patch button.
Page 10
Page 15
Lucid DMX
III Quick start guide
You can now see 3 new fixtures in the address map.
Finally, click OK to accept the patch into the software. In your Desktop area you should see 1 icon to represent each
of the 4 "Torrent F5" fixtures.
Page 11
Page 16
Lucid DMX
III Quick start guide
2. 2. Design the stage
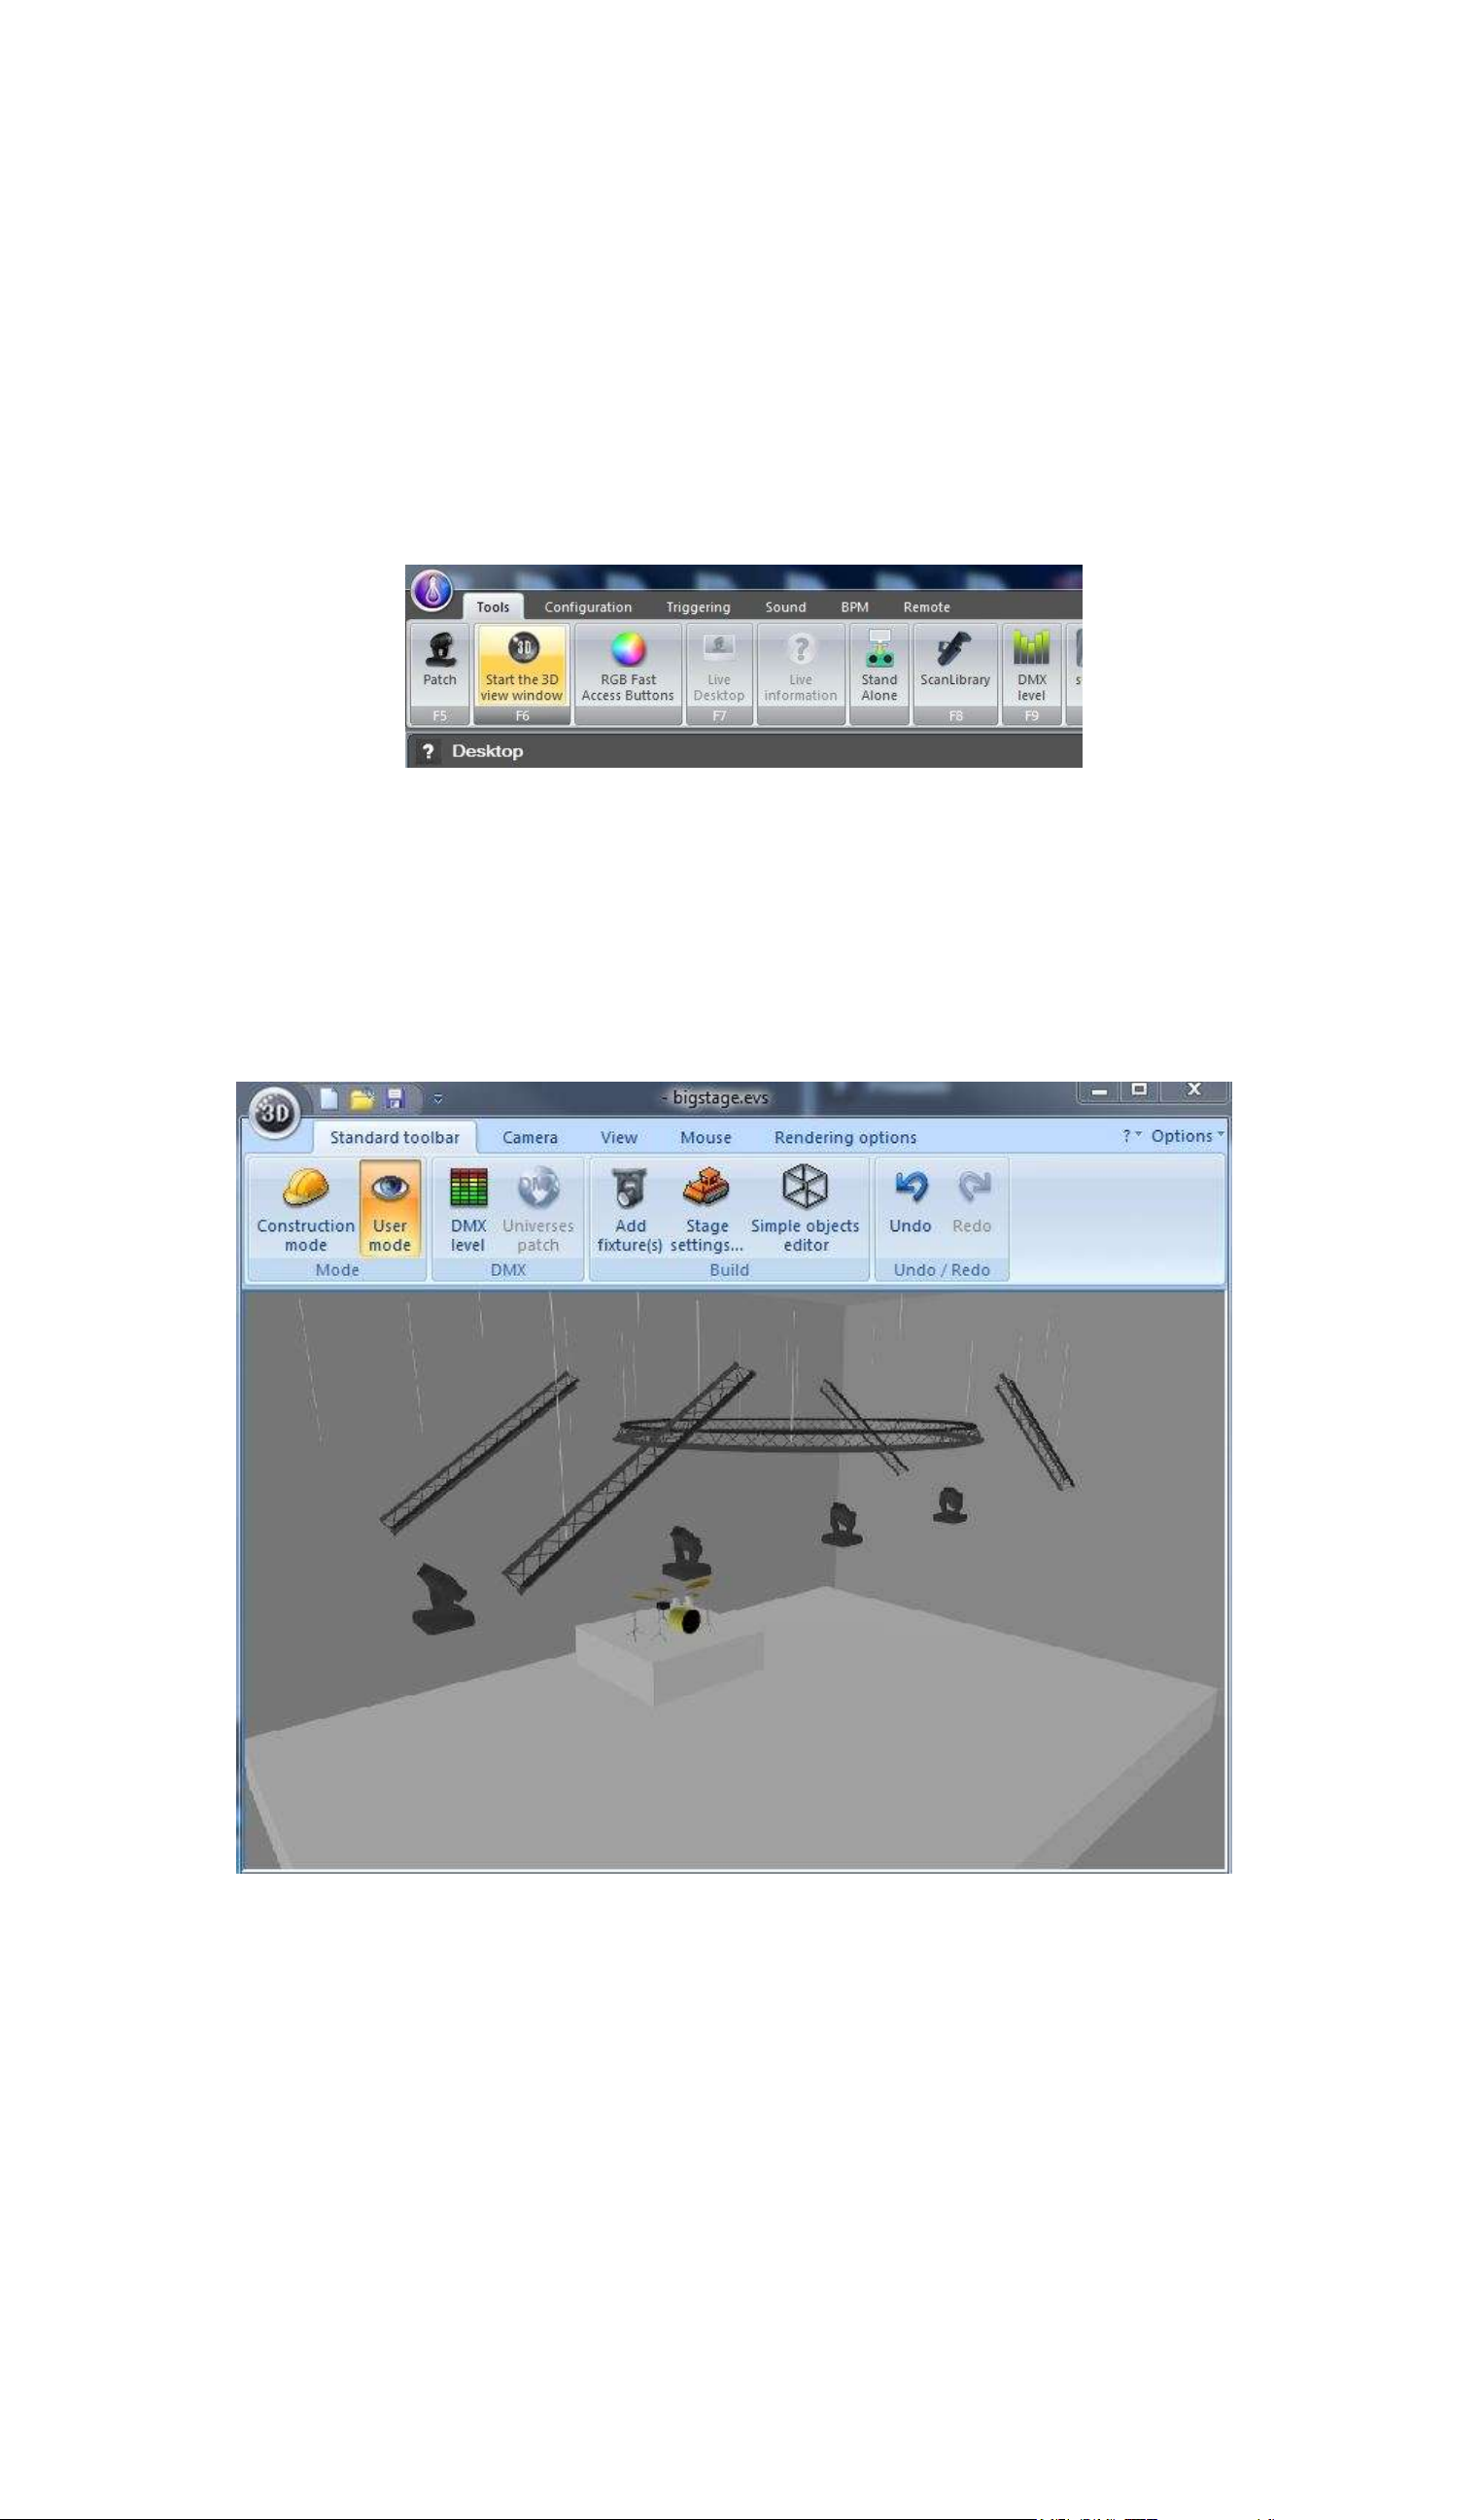
One of Lucid DMX's powerful features is the communication with the 3D view. You can design your
stage in 3D and then import all the fixtures' positions along with a screenshot to Lucid DMX's Desktop.
The first step is to create your 3D stage. To start the 3D view click on the "Start the 3D view
window" button on the Tools tab.
The 3D view window appears, to create your stage, please refer to the
Easy View
manual.
Page 12
Page 17
Lucid DMX
III Quick start guide
To import the fixtures' positions and the screenshot, click on the ScreenShot button in the Tools tab
(Warning! the 3D view must be opened). Click Yes to assign the positions. Then you can close the 3D
View window.
Now we see a screenshot of the 3D view as the Desktop's background along with all the fixtures in their
relevant positions.
Page 13
Page 18
Lucid DMX
III Quick start guide
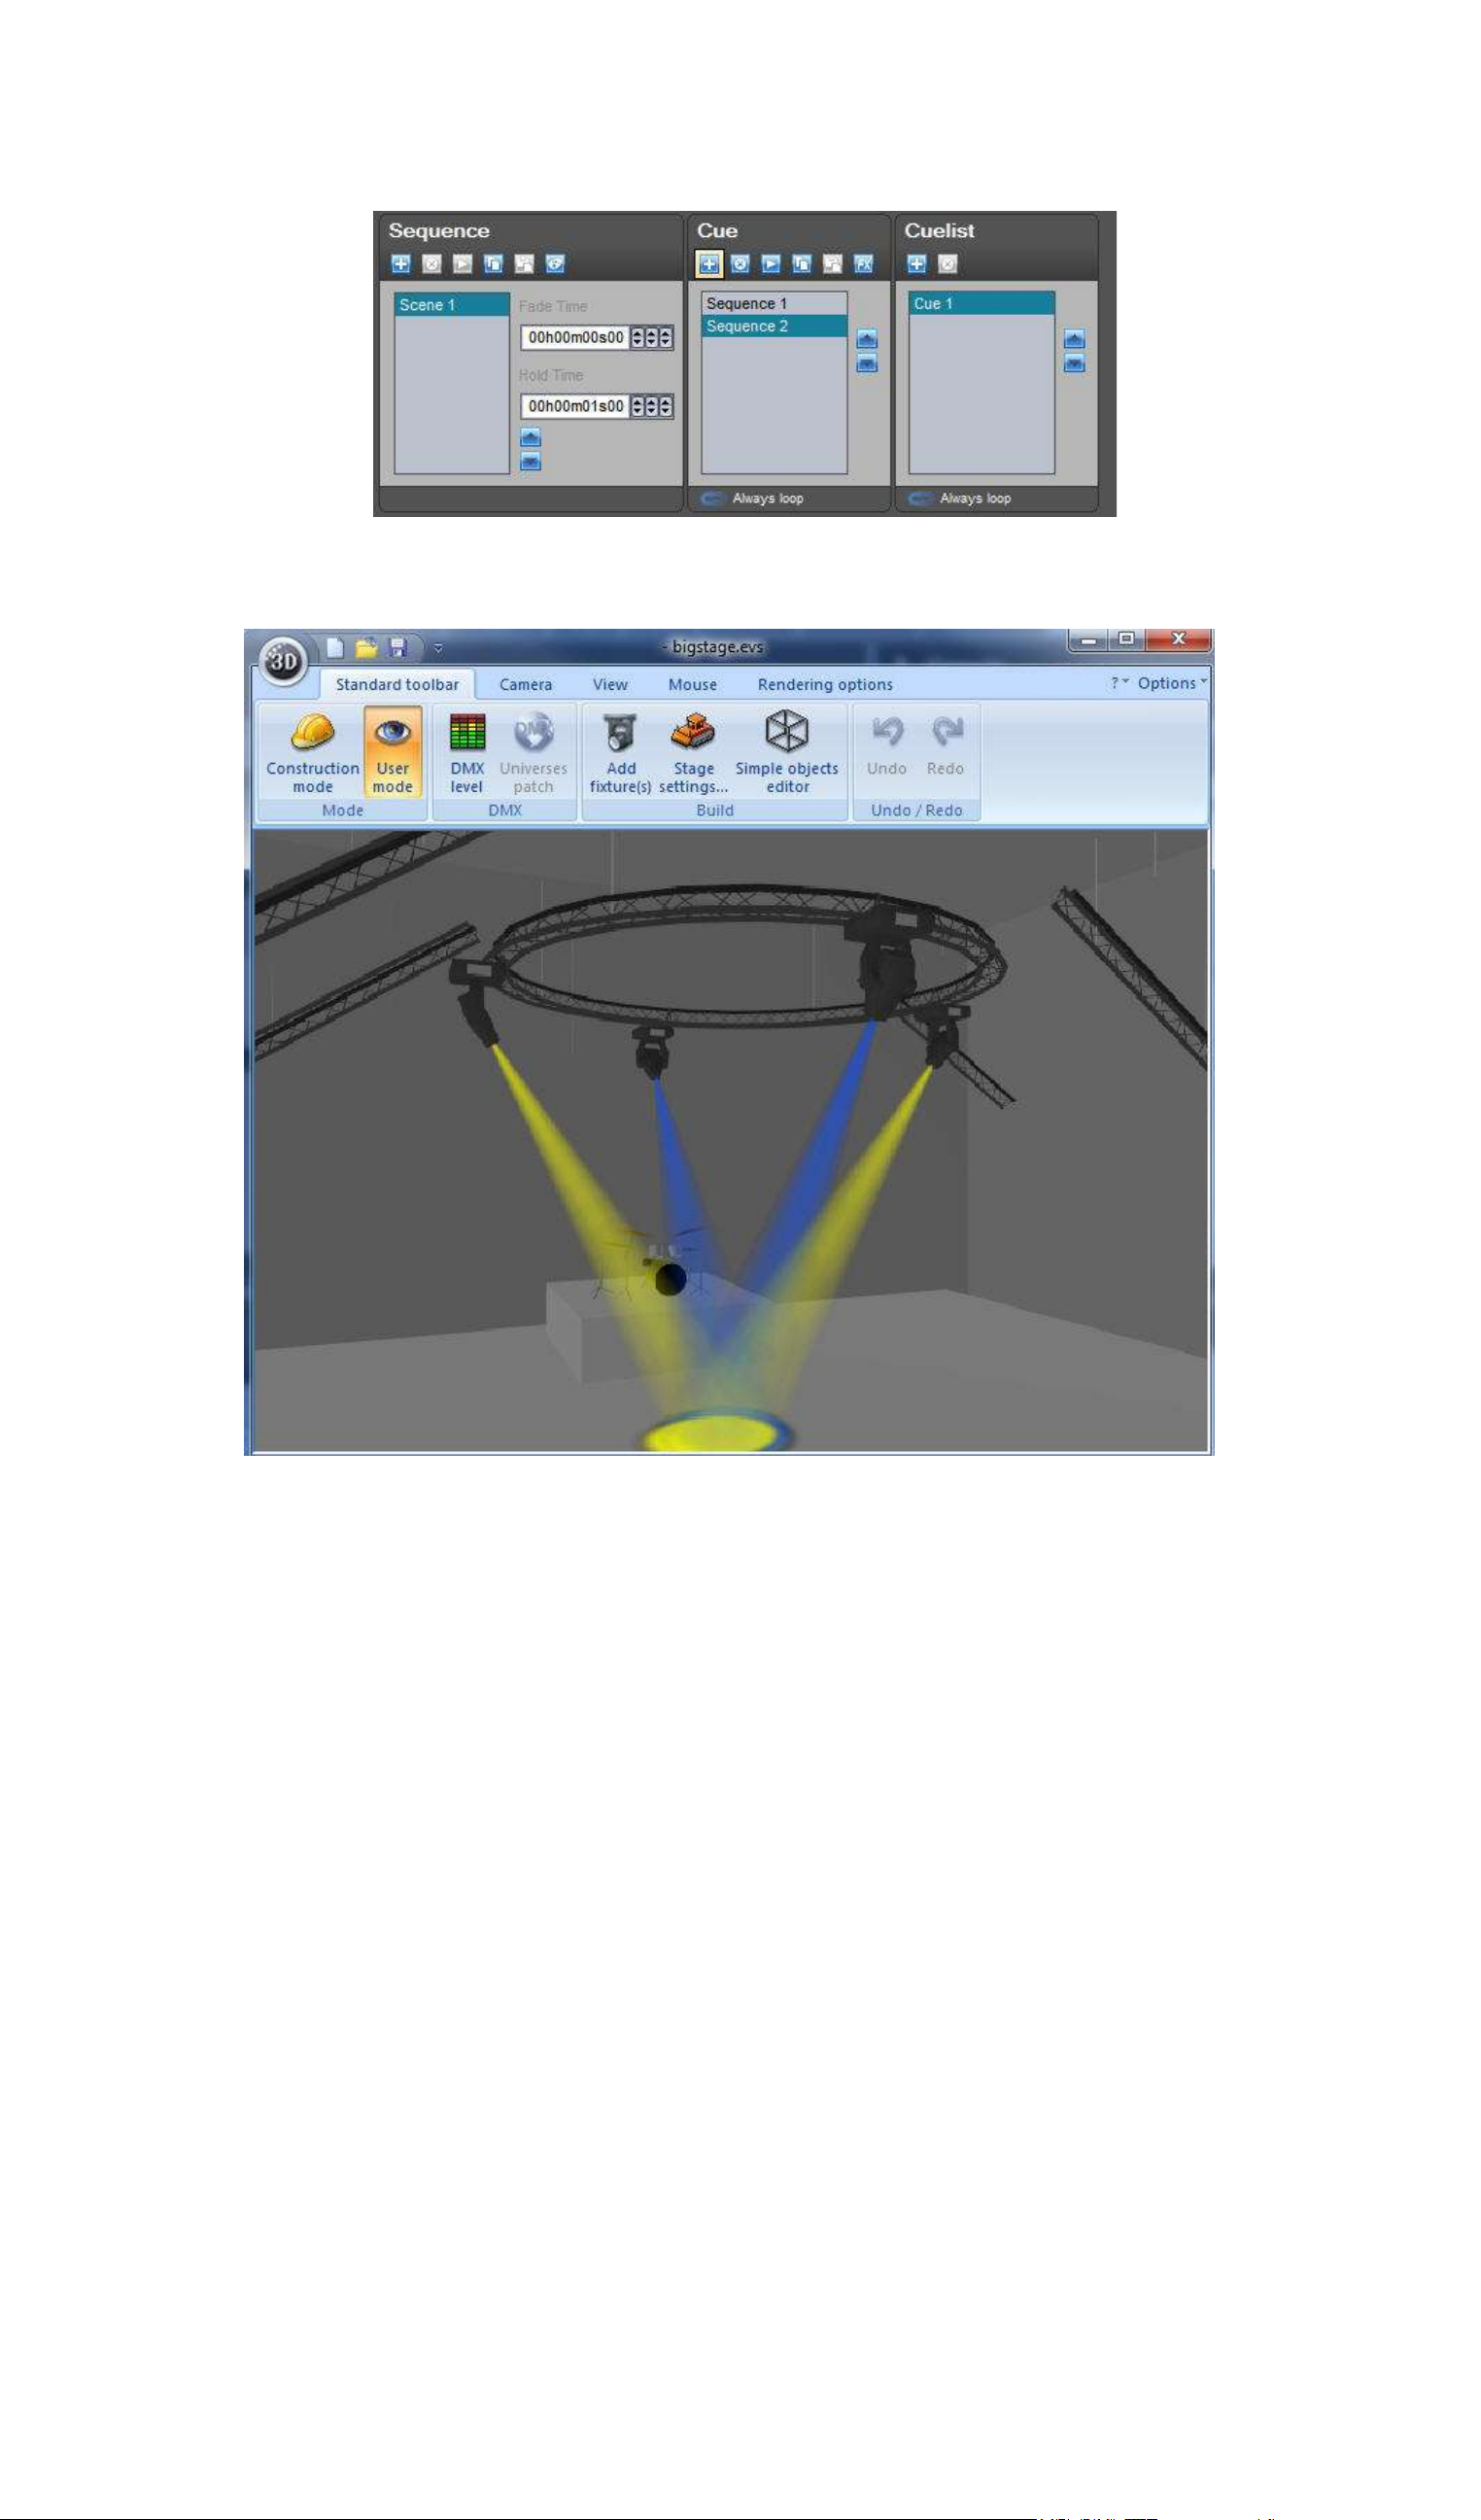
3. 3. Make the program
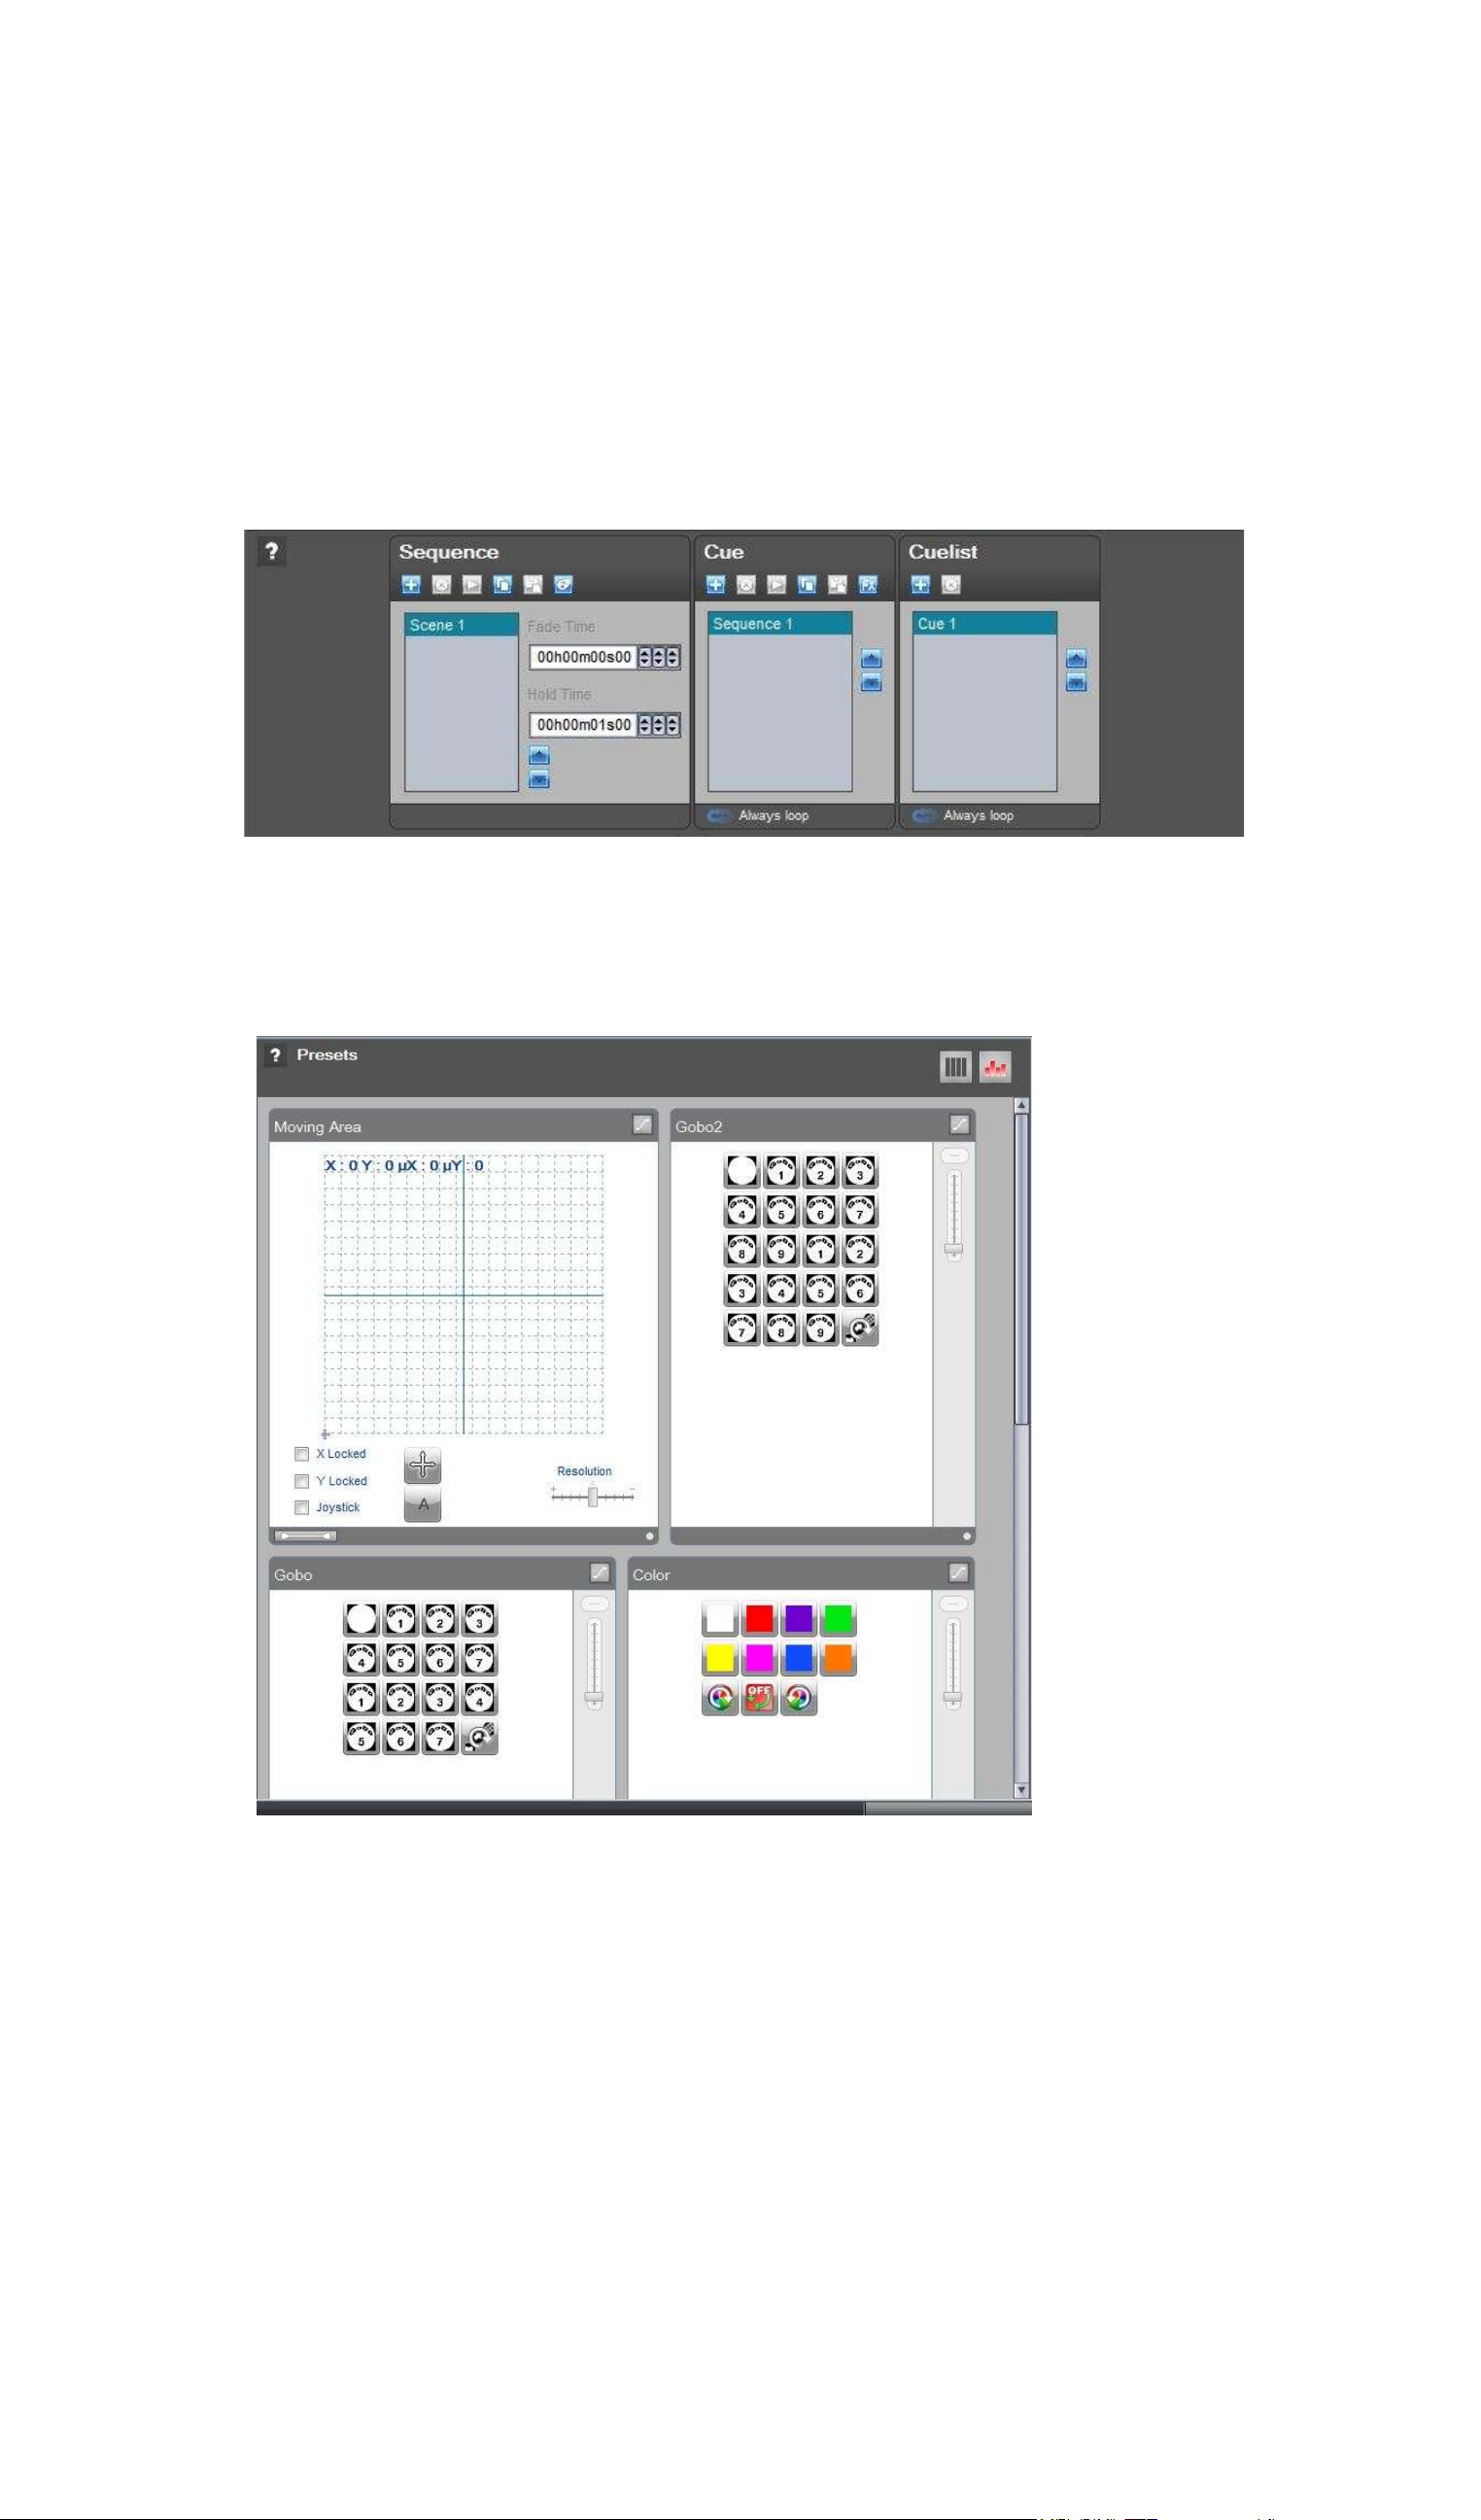
The Lucid DMX program architecture is composed of 4 parts. The first one, the basic element, is the
Scene. Scenes can have a FADE time and a WAIT time. The parent element is the sequence, so within
a sequence you have scenes. All the sequences are inside a Cue and all the cues are inside the
Cuelist. In fact your show is the Cuelist.
In live mode you'll be able to control the cues and sequences.
The preset viewer controls all the DMX channels of your fixtures. For each channel you can assign a
new value which will be saved on the current scene.
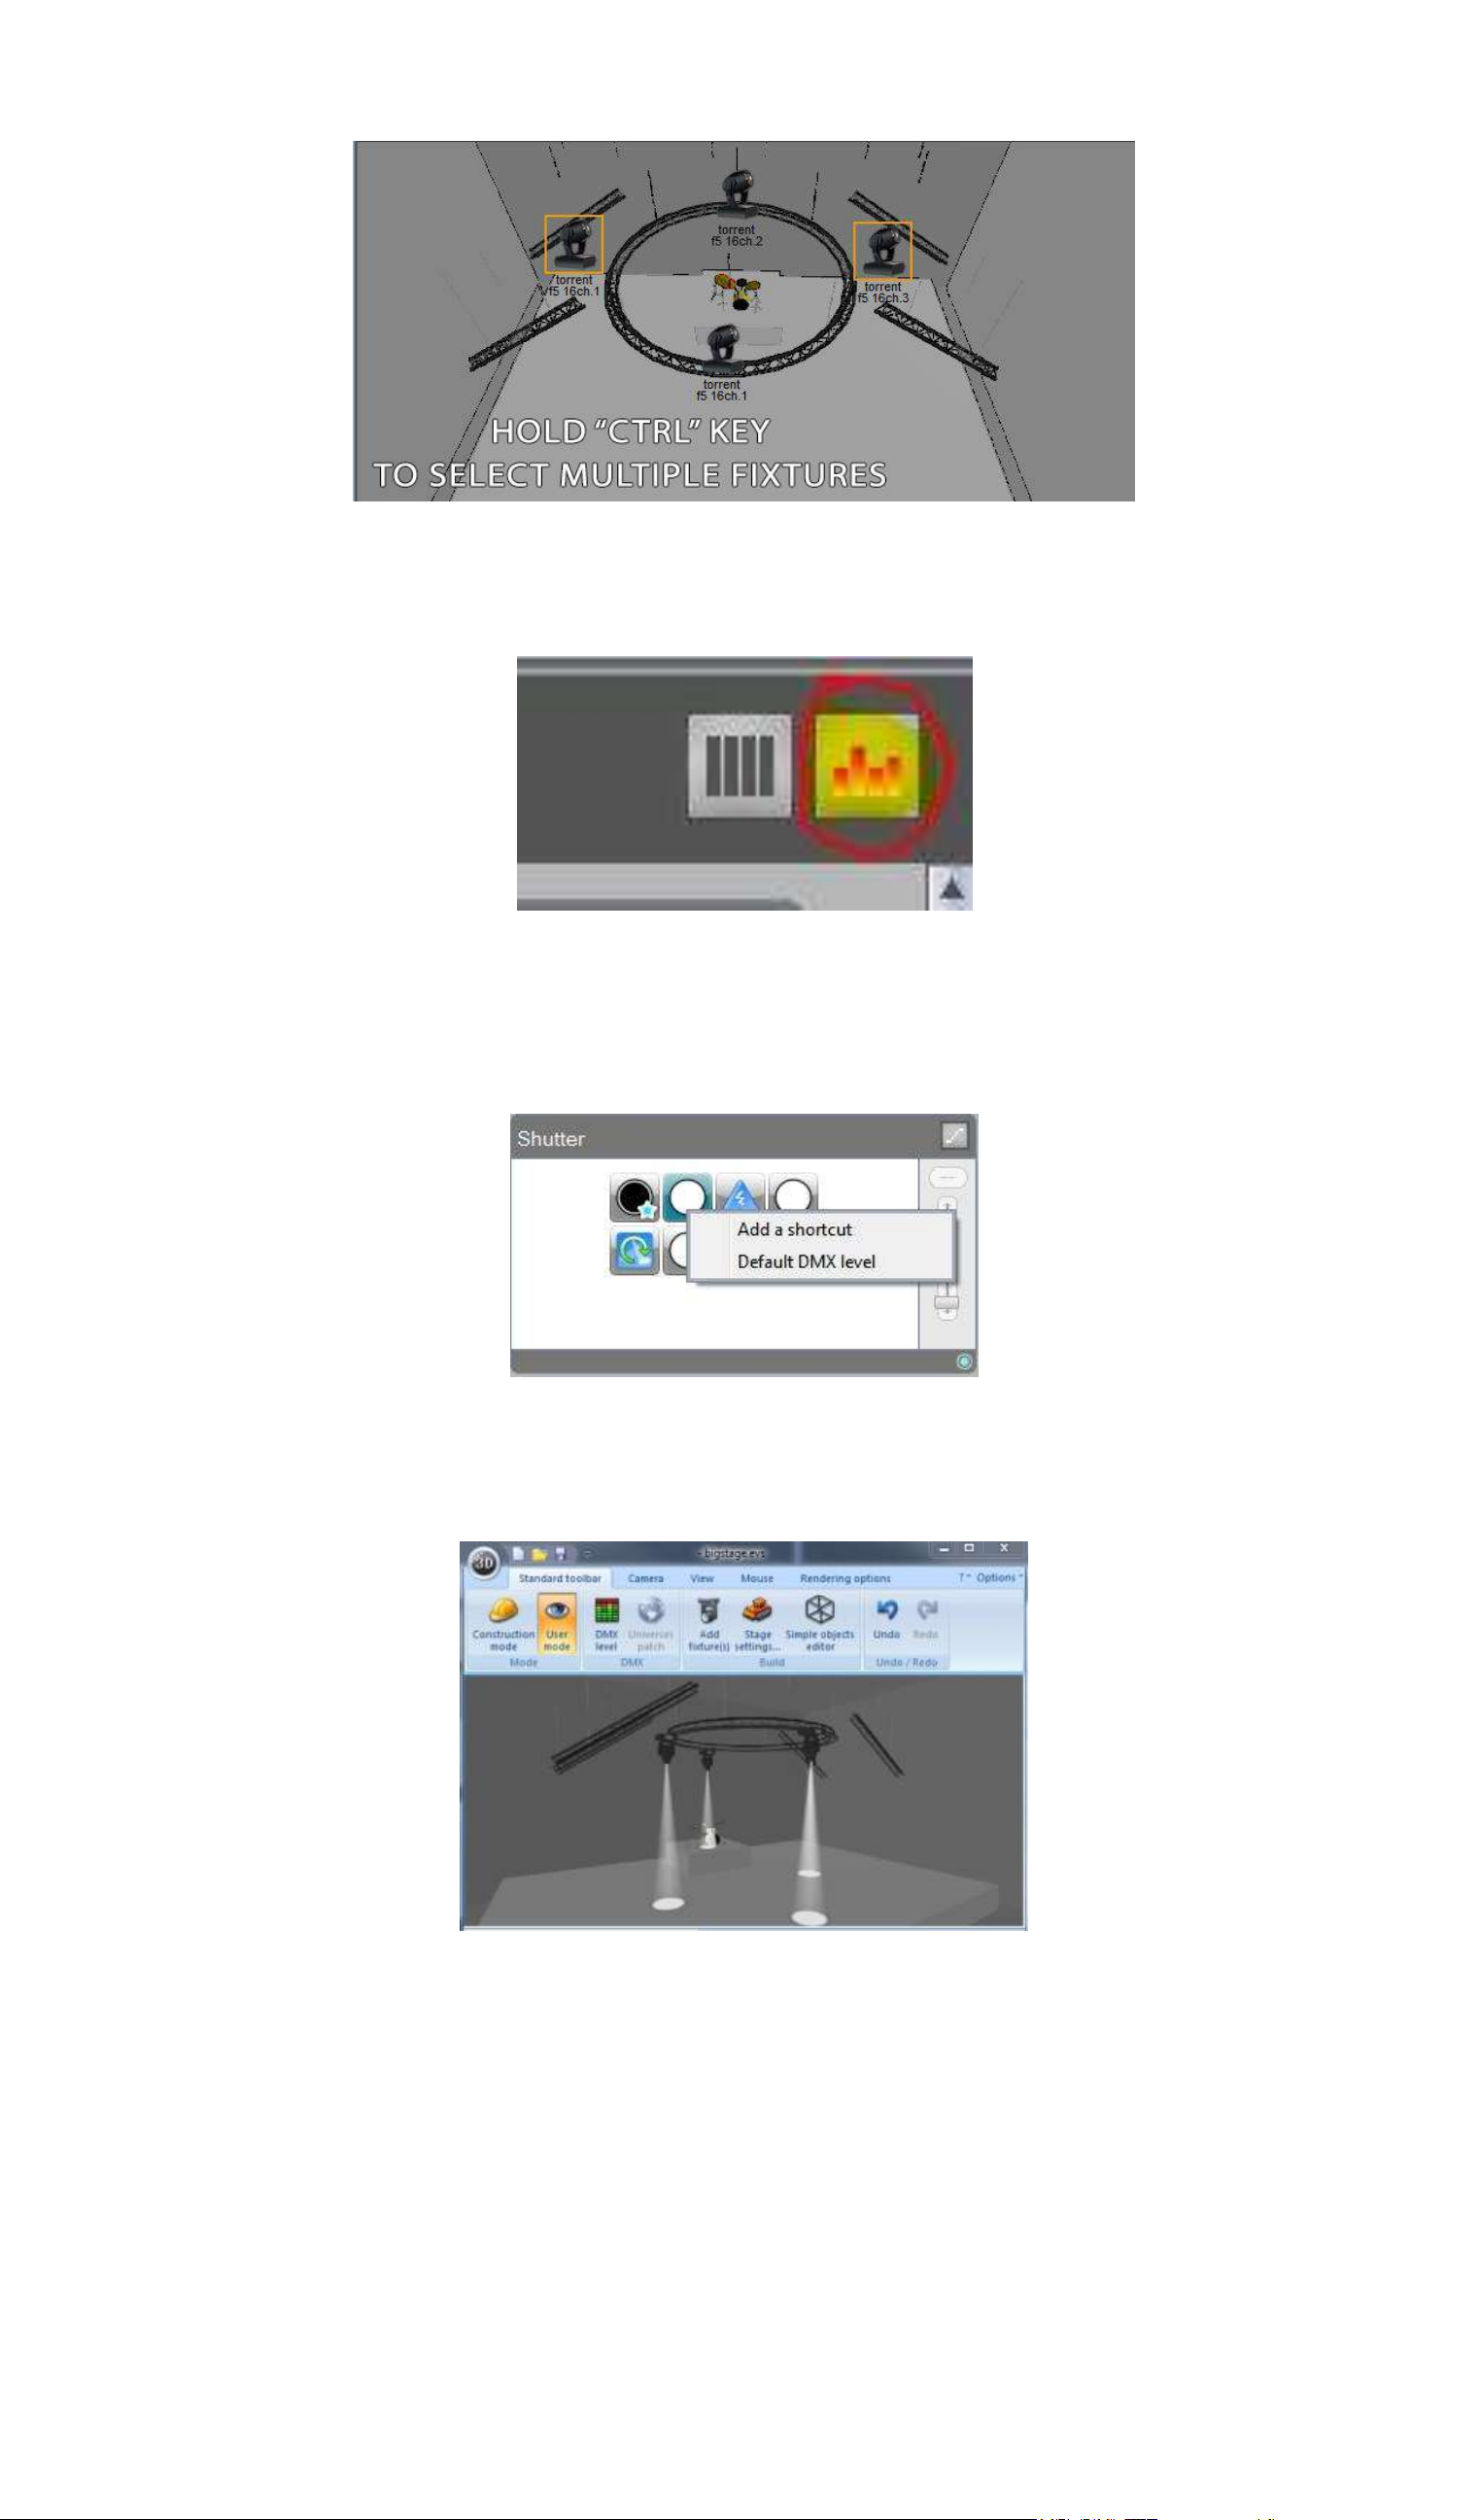
Select the fixtures that you want to control. Hold the "Ctrl" key to make a multi-selection.
Page 14
Page 19
Lucid DMX
III Quick start guide
If you want, you can set the DMX channels to the default value, values written inside the fixture profile.
If the default value is not good you can rewrite it, right click on the preset and select "Default DMX
level".
You can now see a center white beam.
Page 15
Page 20
Lucid DMX
III Quick start guide
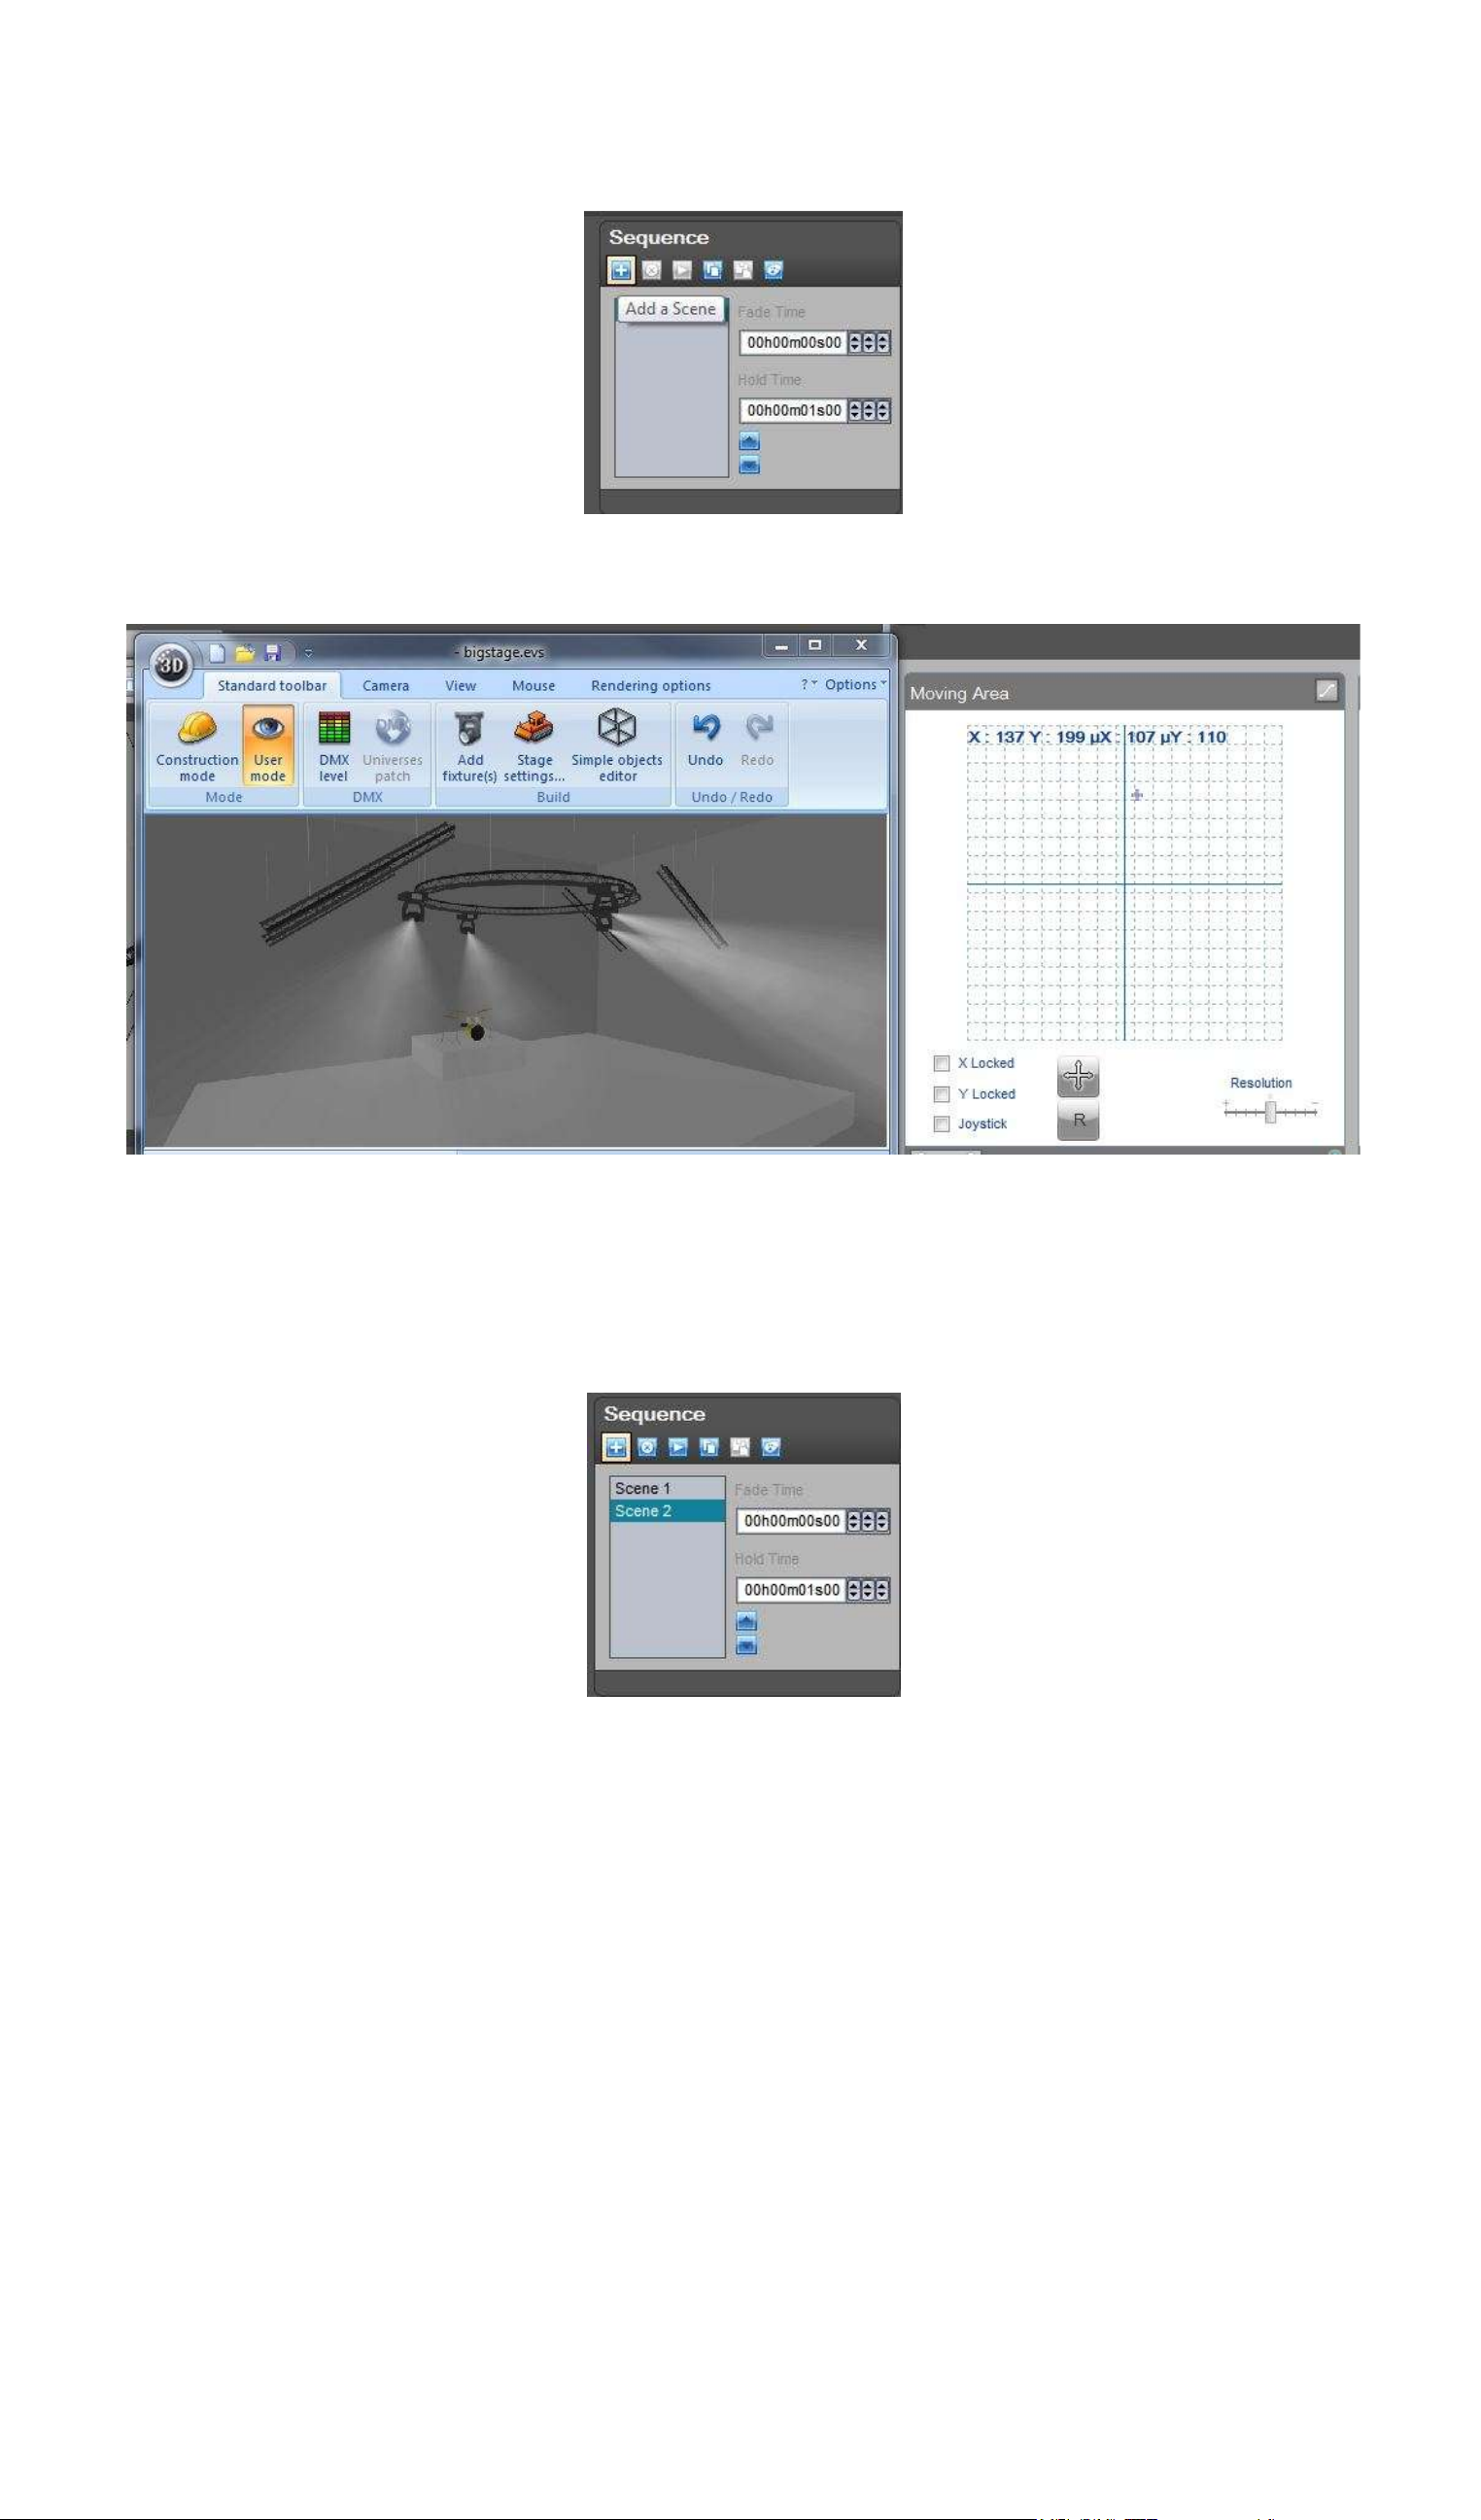
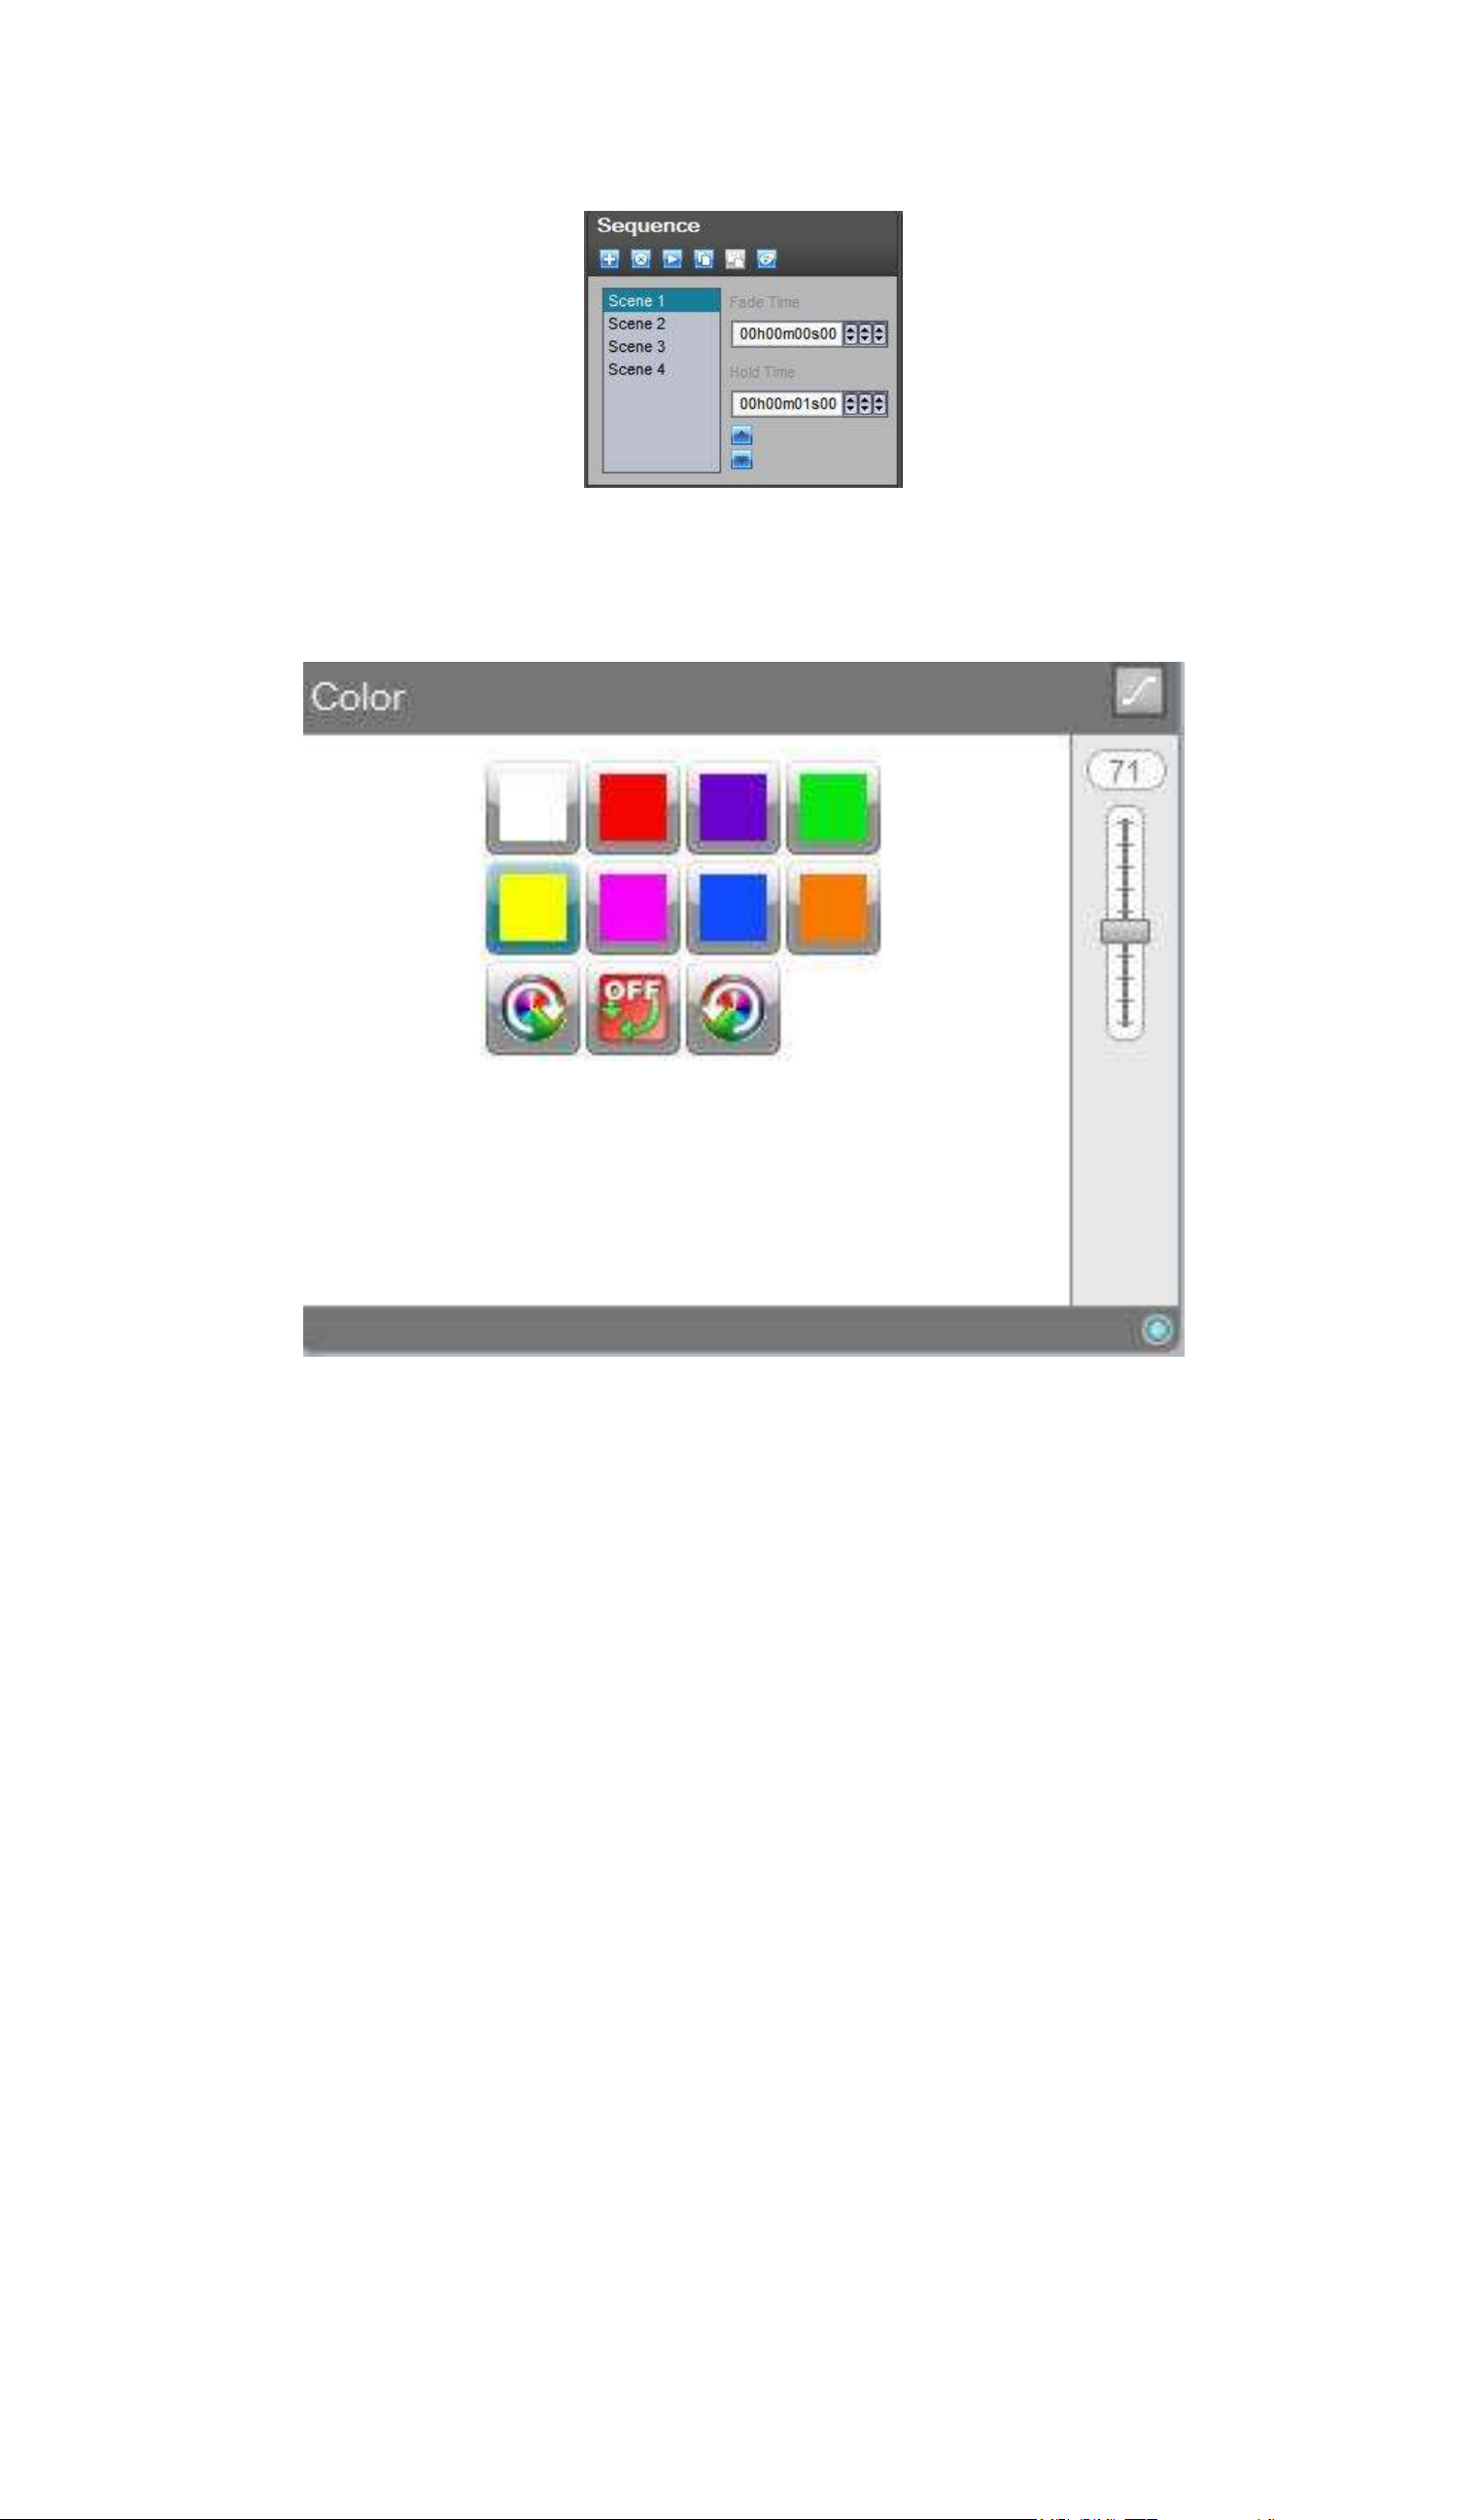
To add a new scene, just click "Add".
Change the X and Y position.
Add a new scene.
Modify the position.
Page 16
Page 21
Lucid DMX
III Quick start guide
Try your sequence, click the "Play" icon.
Stop the sequence.
Add a new sequence.
Page 17
Page 22
Lucid DMX
III Quick start guide
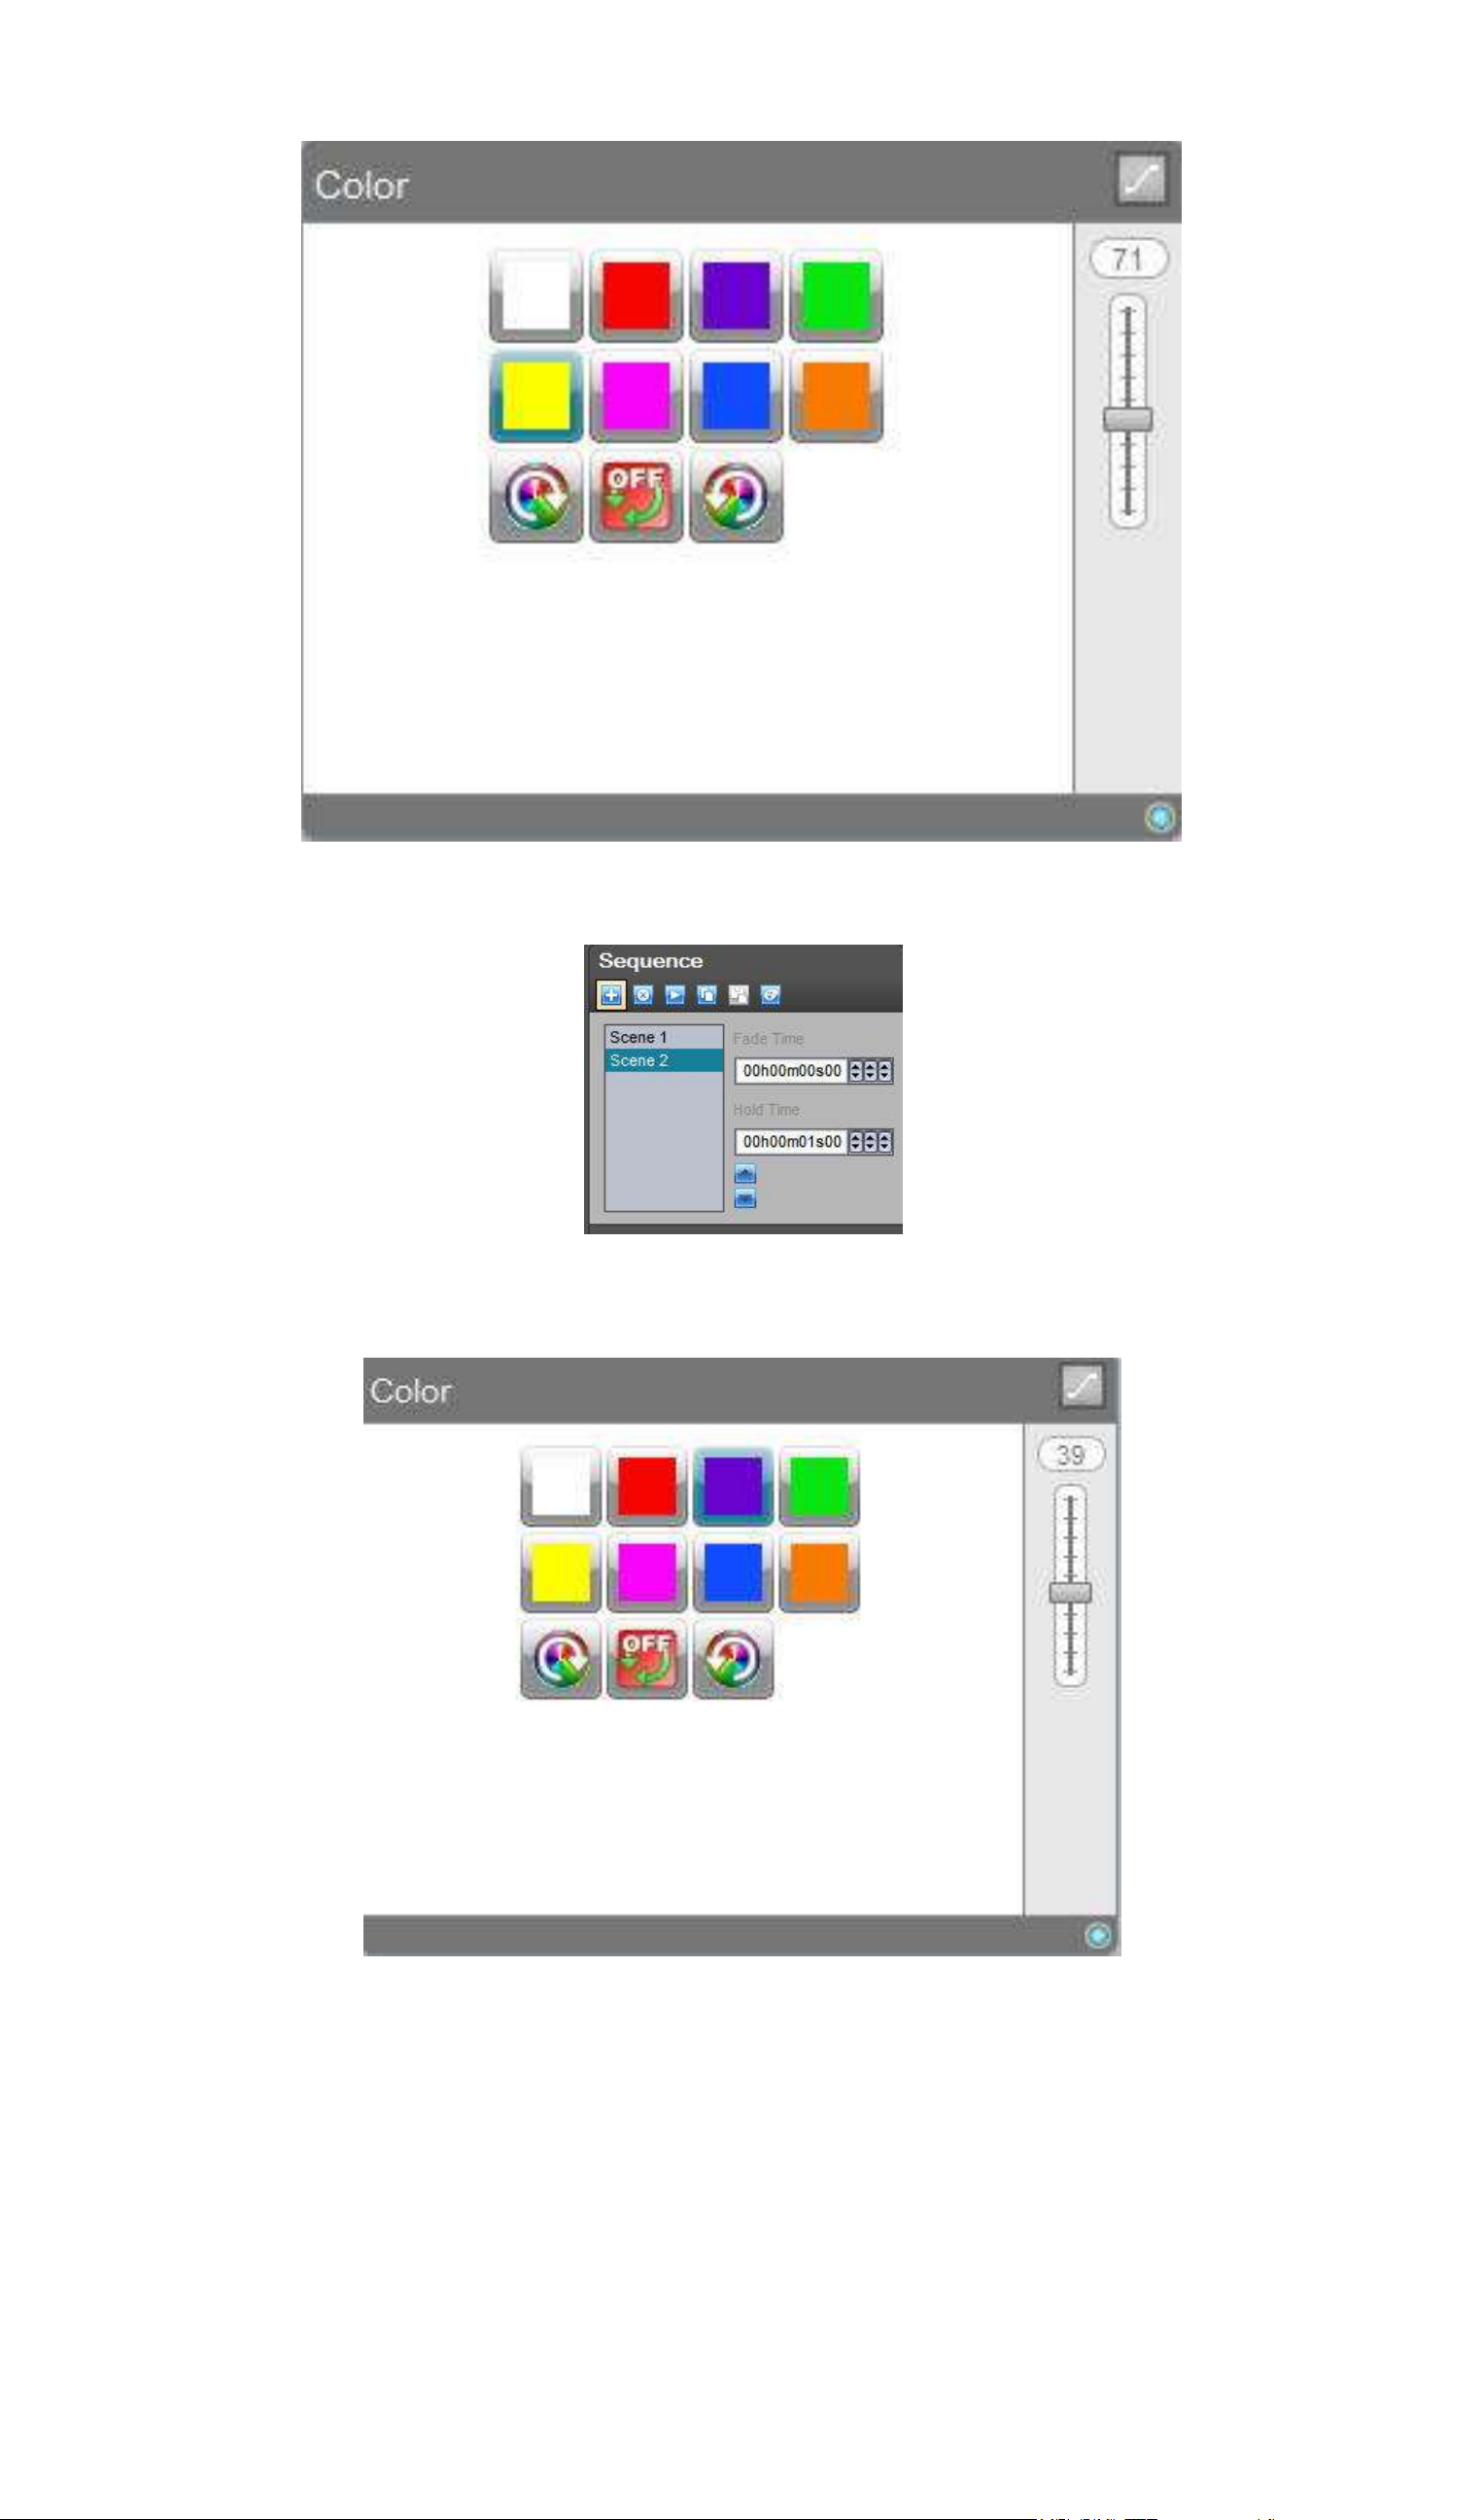
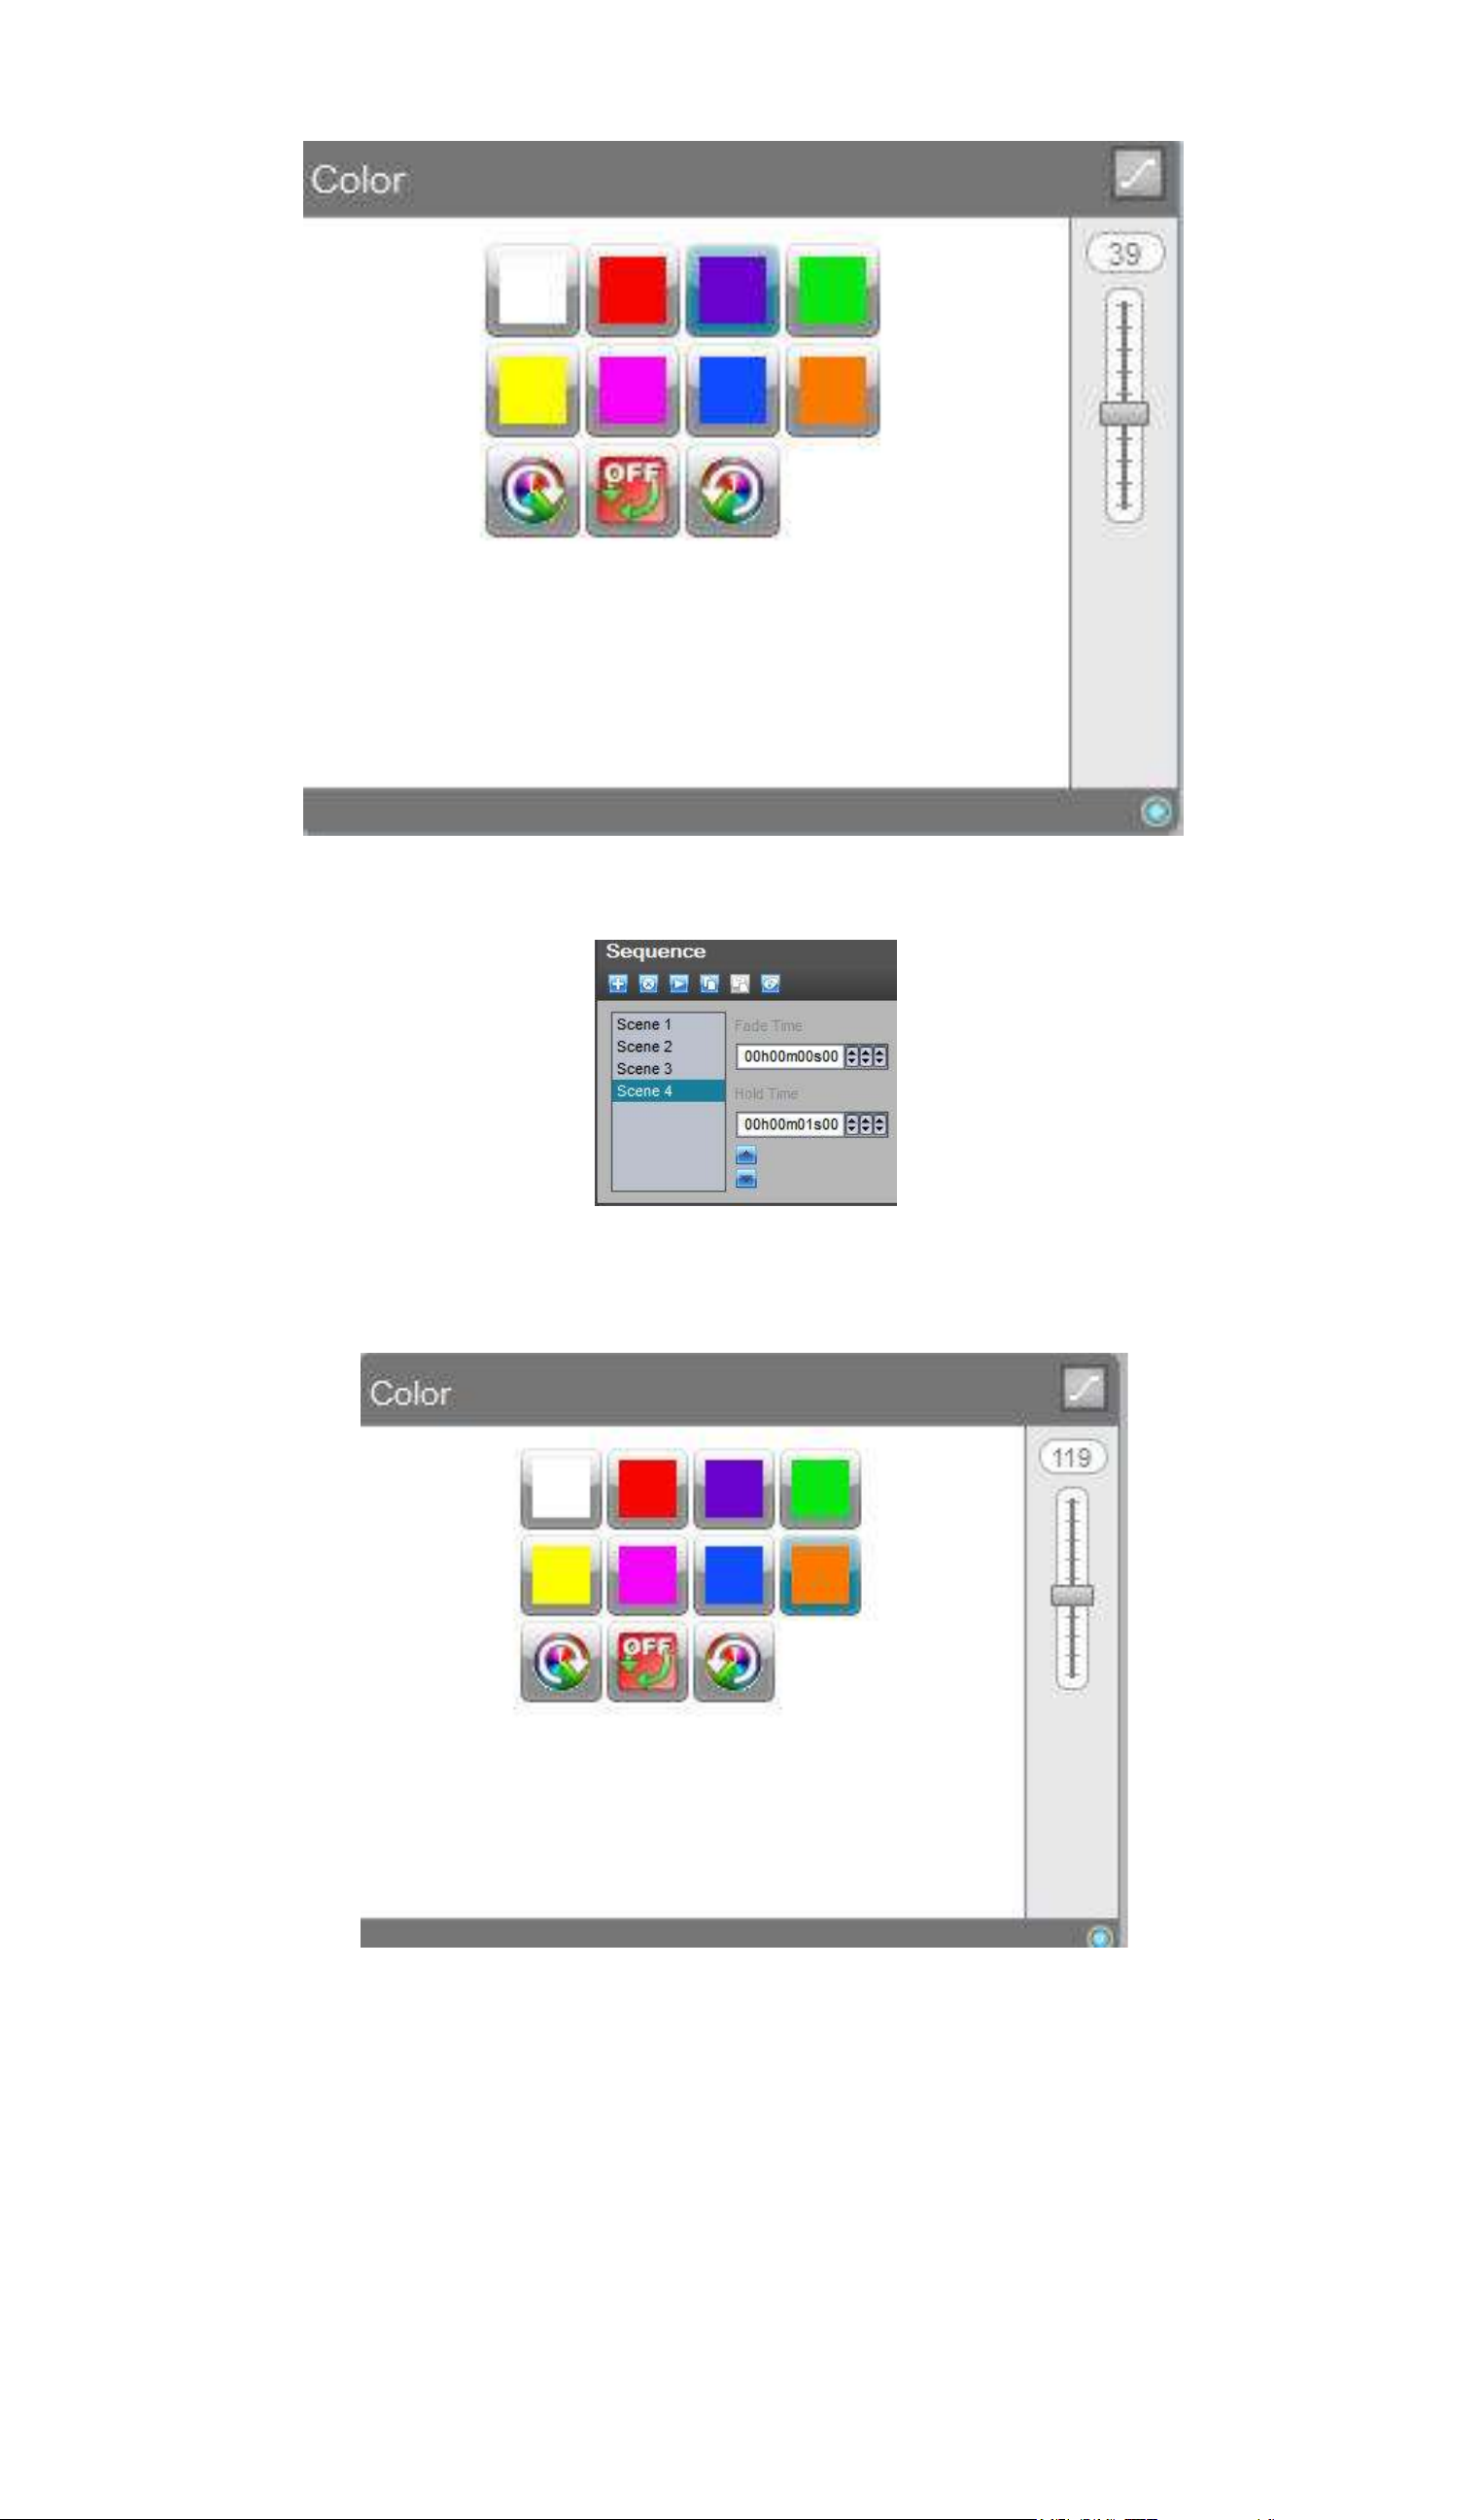
Now we want to make a color changing sequence.
We want this kind of result.
so change a color.
Page 18
Page 23
Lucid DMX
III Quick start guide
Add a scene.
Select another color.
Page 19
Page 24
Lucid DMX
III Quick start guide
Add a new scene.
Change the color.
Change the selection.
Select the purple color.
Page 20
Page 25
Lucid DMX
III Quick start guide
Select another scene.
Change the color.
Page 21
Page 26
Lucid DMX
III Quick start guide
Select the first scene.
Change the color. Your show is now ready, go to the next section to find out how to playback your
show!
Page 22
Page 27
Lucid DMX
III Quick start guide
4. 4. Play the show
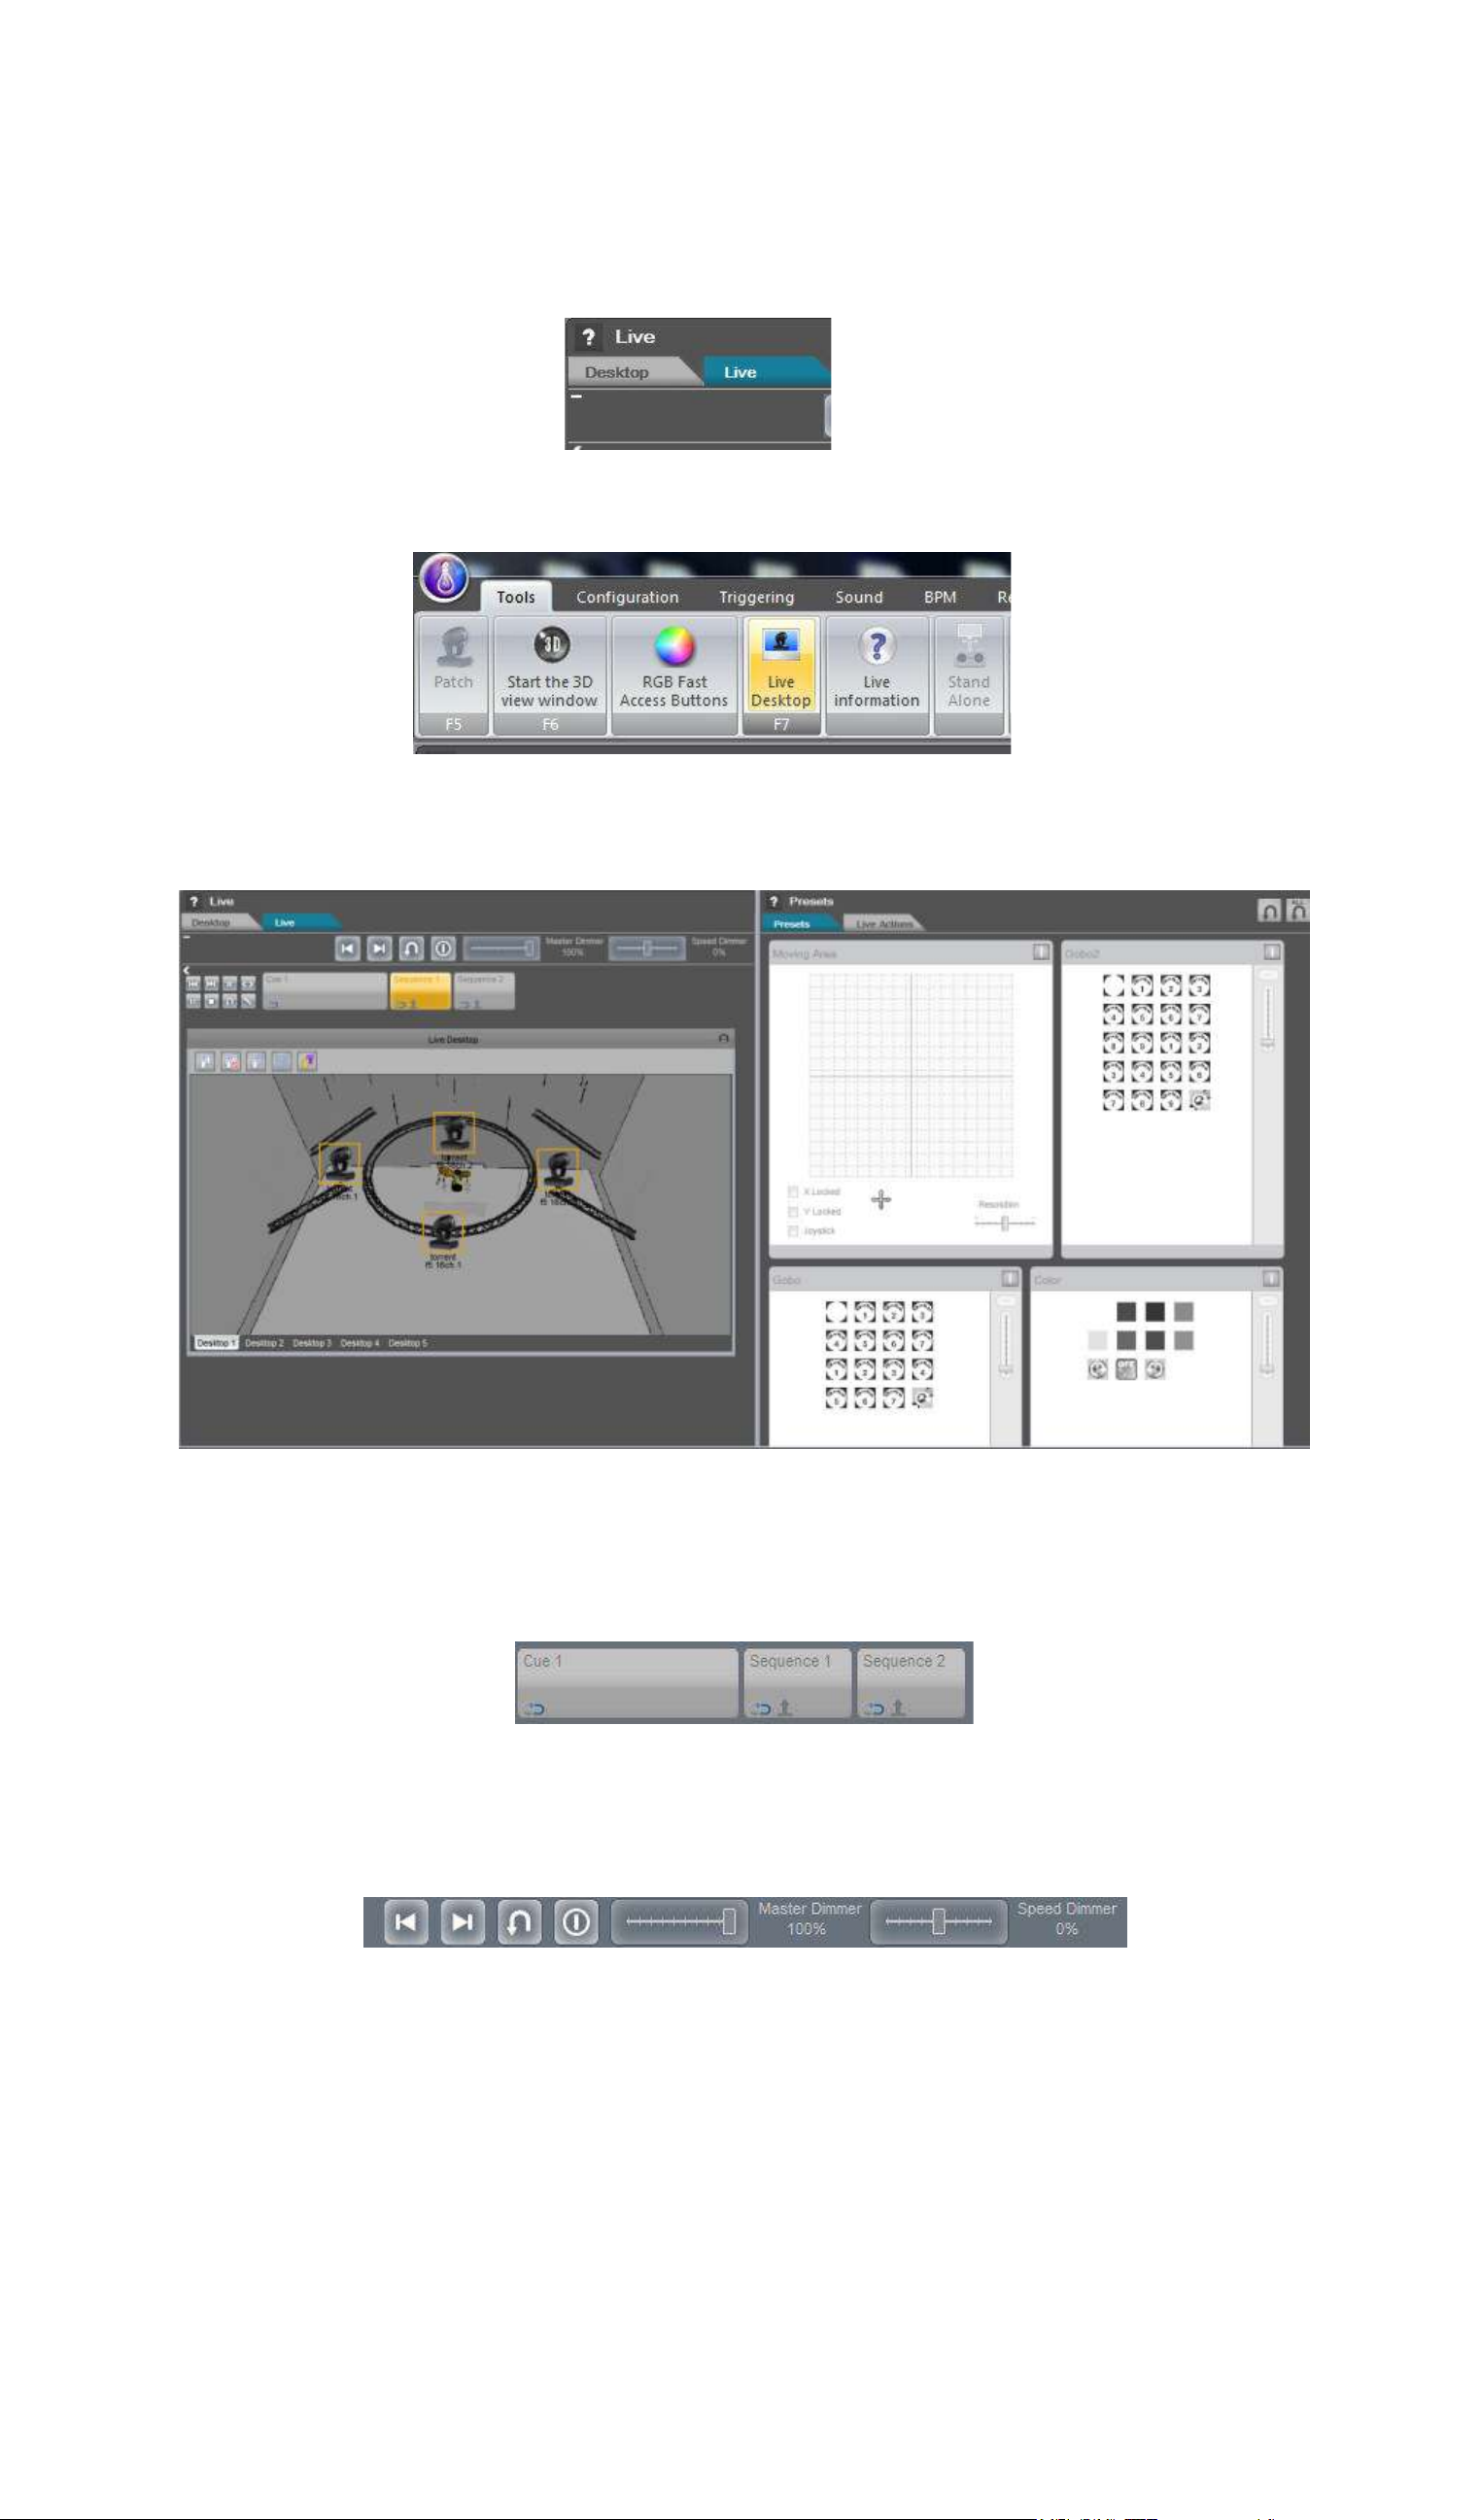
Select the "Live" tab.
Click "Live Desktop" to close the Live desktop window.
The Live mode is composed of two areas. The left area shows the Show architecture with the Cues and
Sequences. The right area shows the fixtures' presets that can be controlled in Live mode.
The buttons represent Cues and Sequences. The first one is always a Cue, this is larger than the
sequence buttons.
Use the toolbar to help you control your live show. The first item is a "Previous Sequence" function, the
second a "Next Sequence" function, third a "Live Clear" function, fourth a "BlackOut" function, then the
"Master Dimmer" and finally a "Speed Dimmer".
Page 23
Page 28
Lucid DMX
III Quick start guide
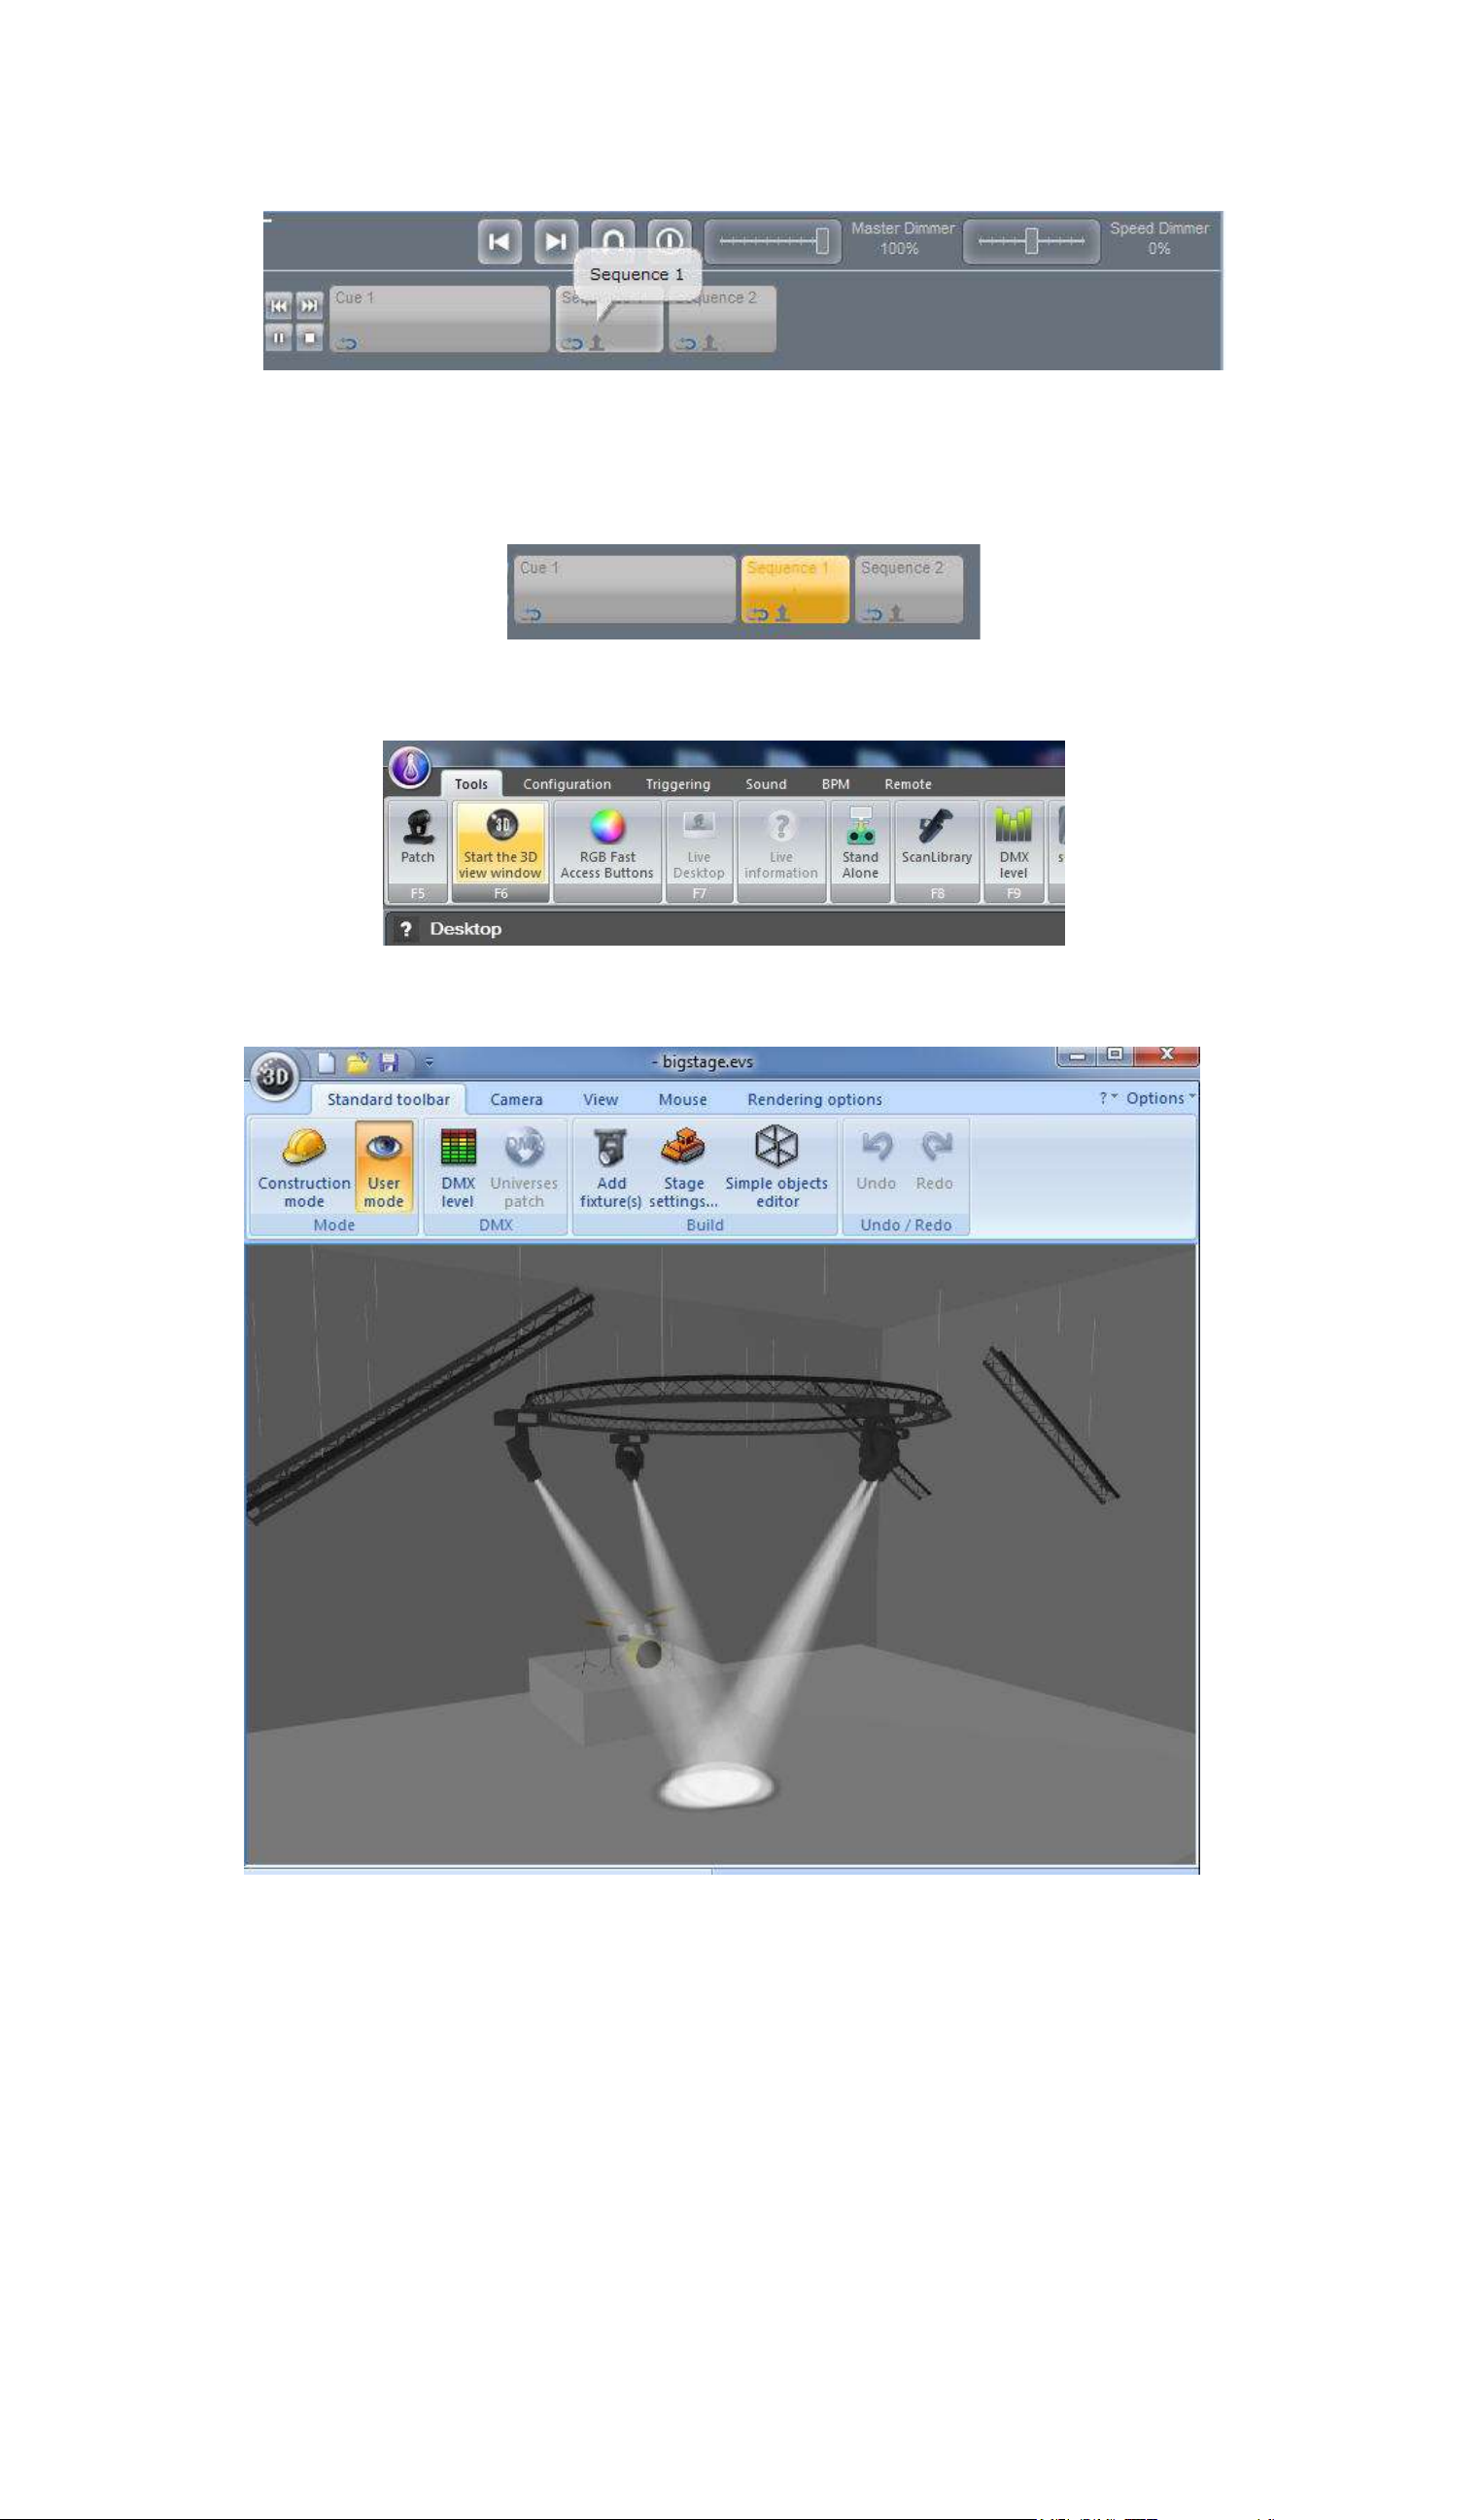
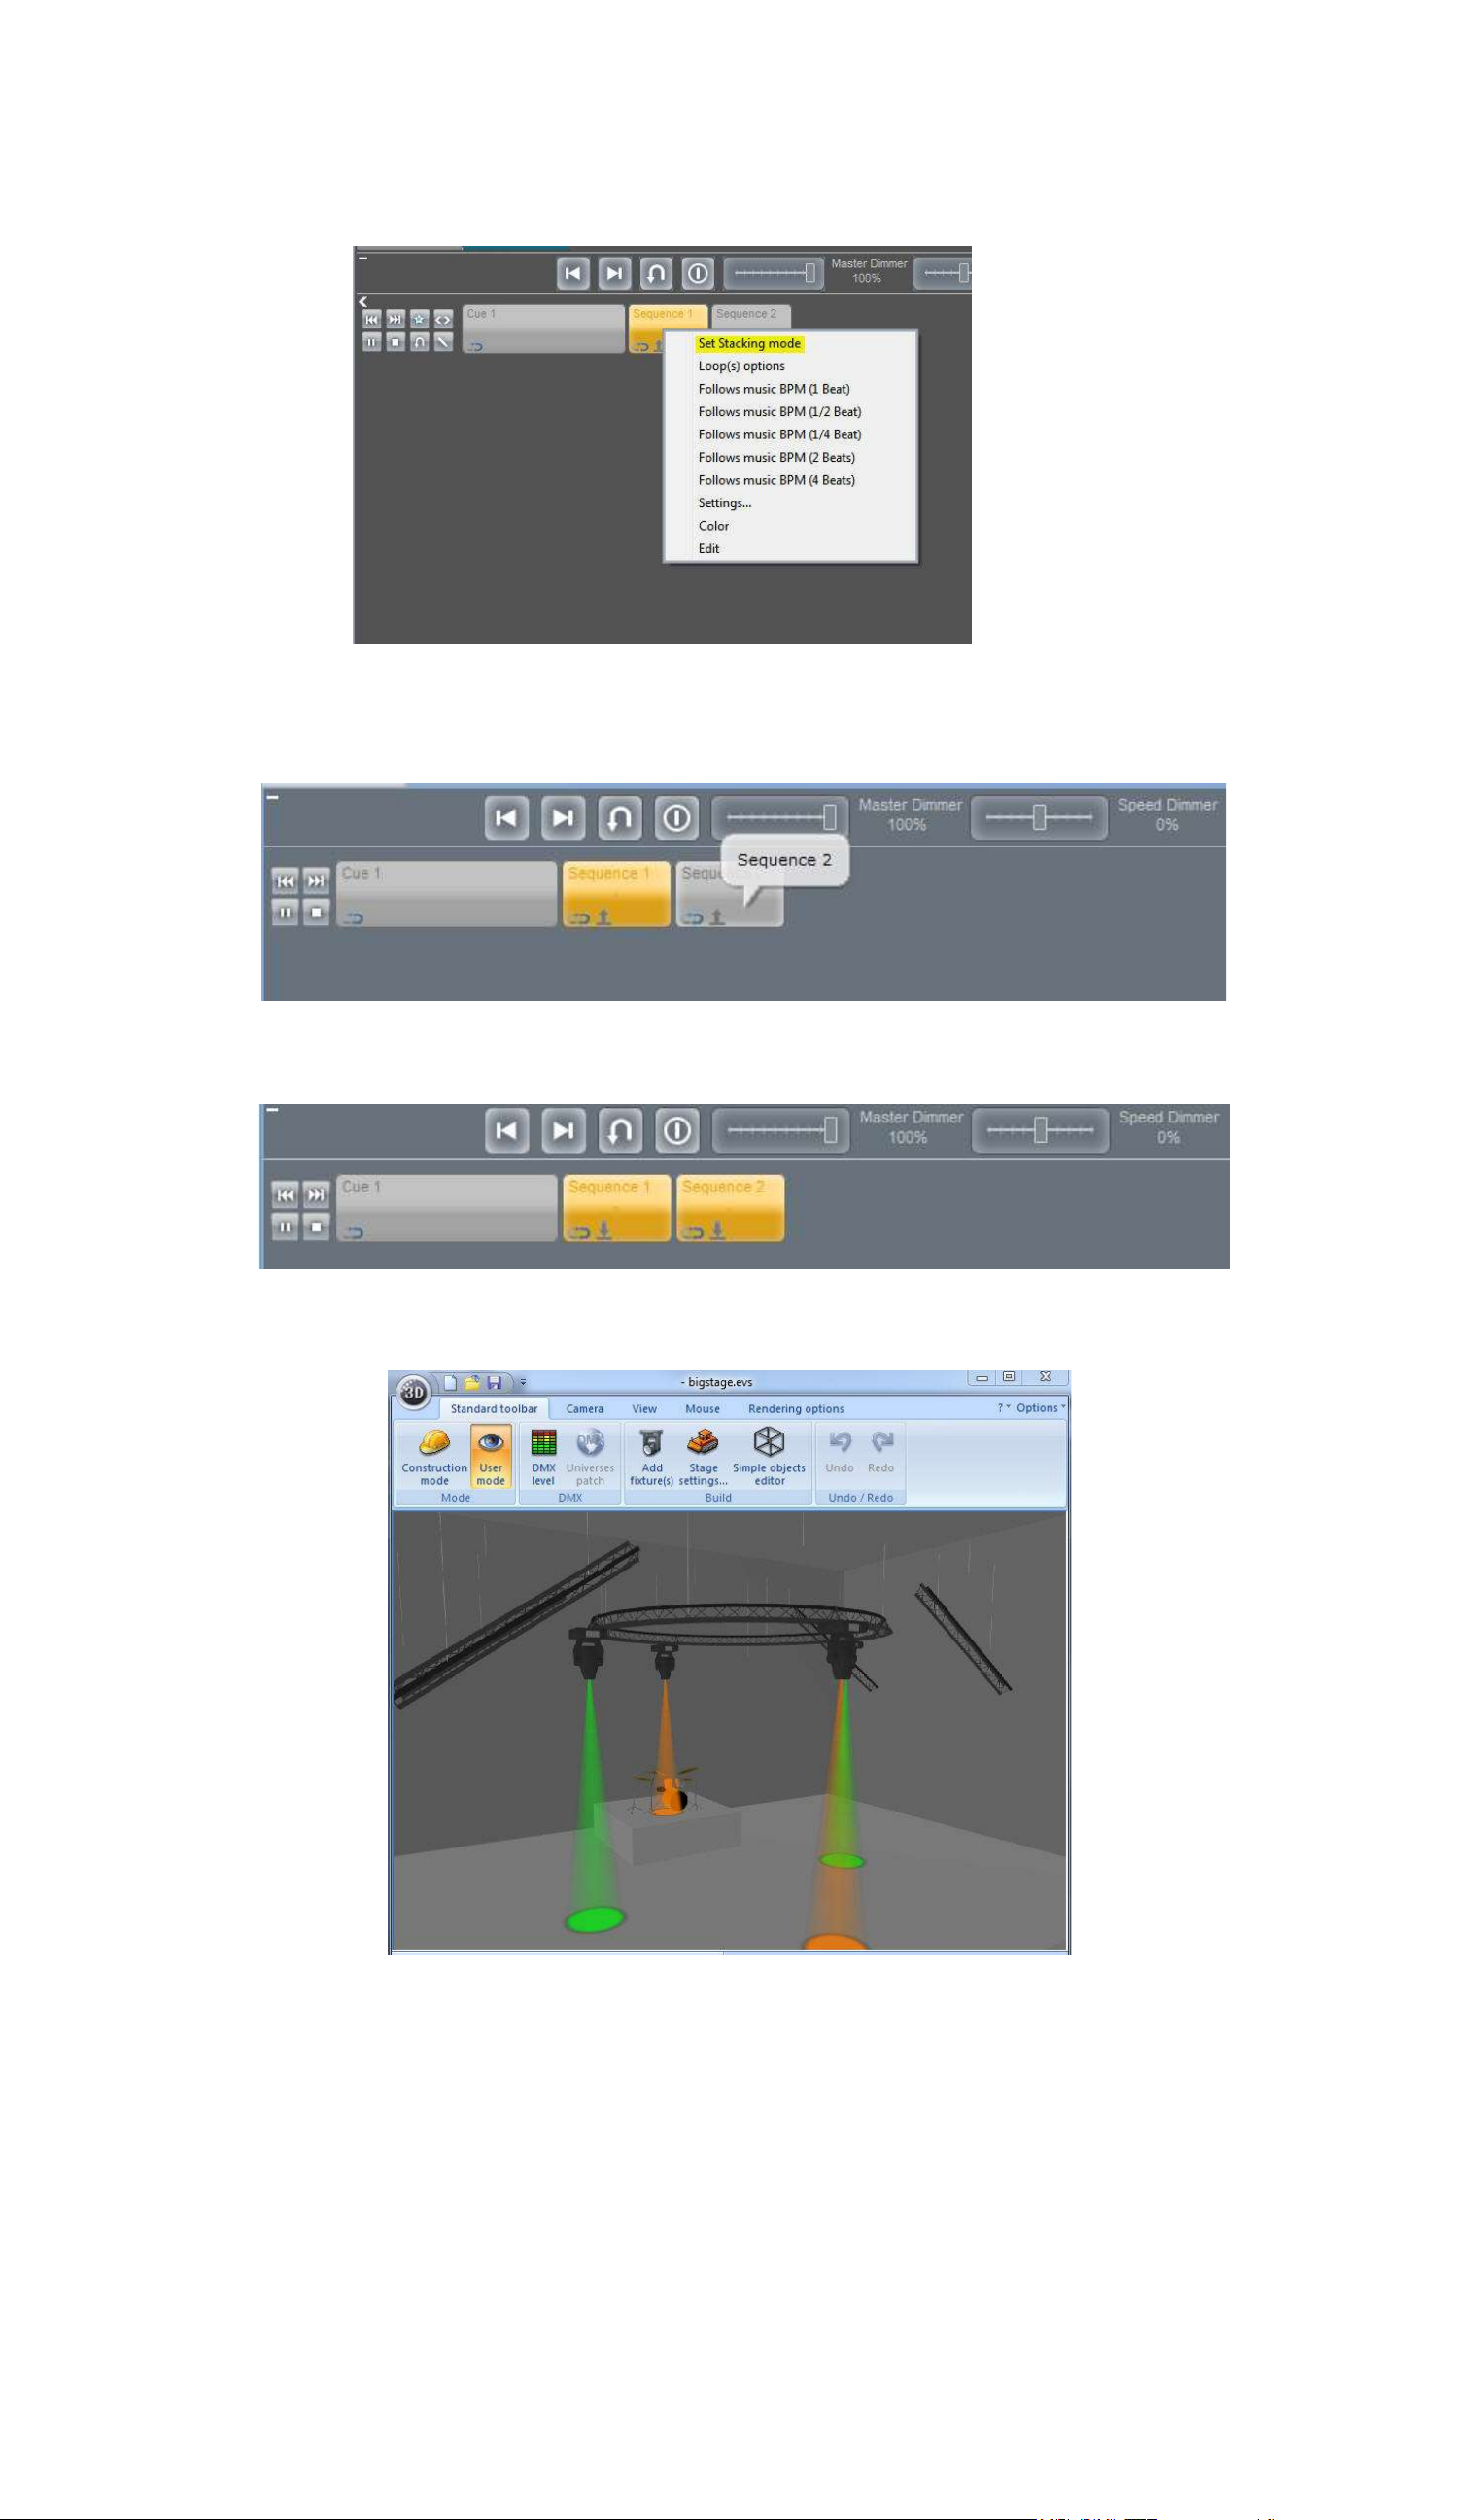
Try the first sequence, click "Sequence 1".
The Sequence 1 button is now Orange, this means that the sequence is being played back. Notice that
a number 1 appears, this means that the sequence is the first playback sequence, if you click sequence
2, the number will be 2 ...
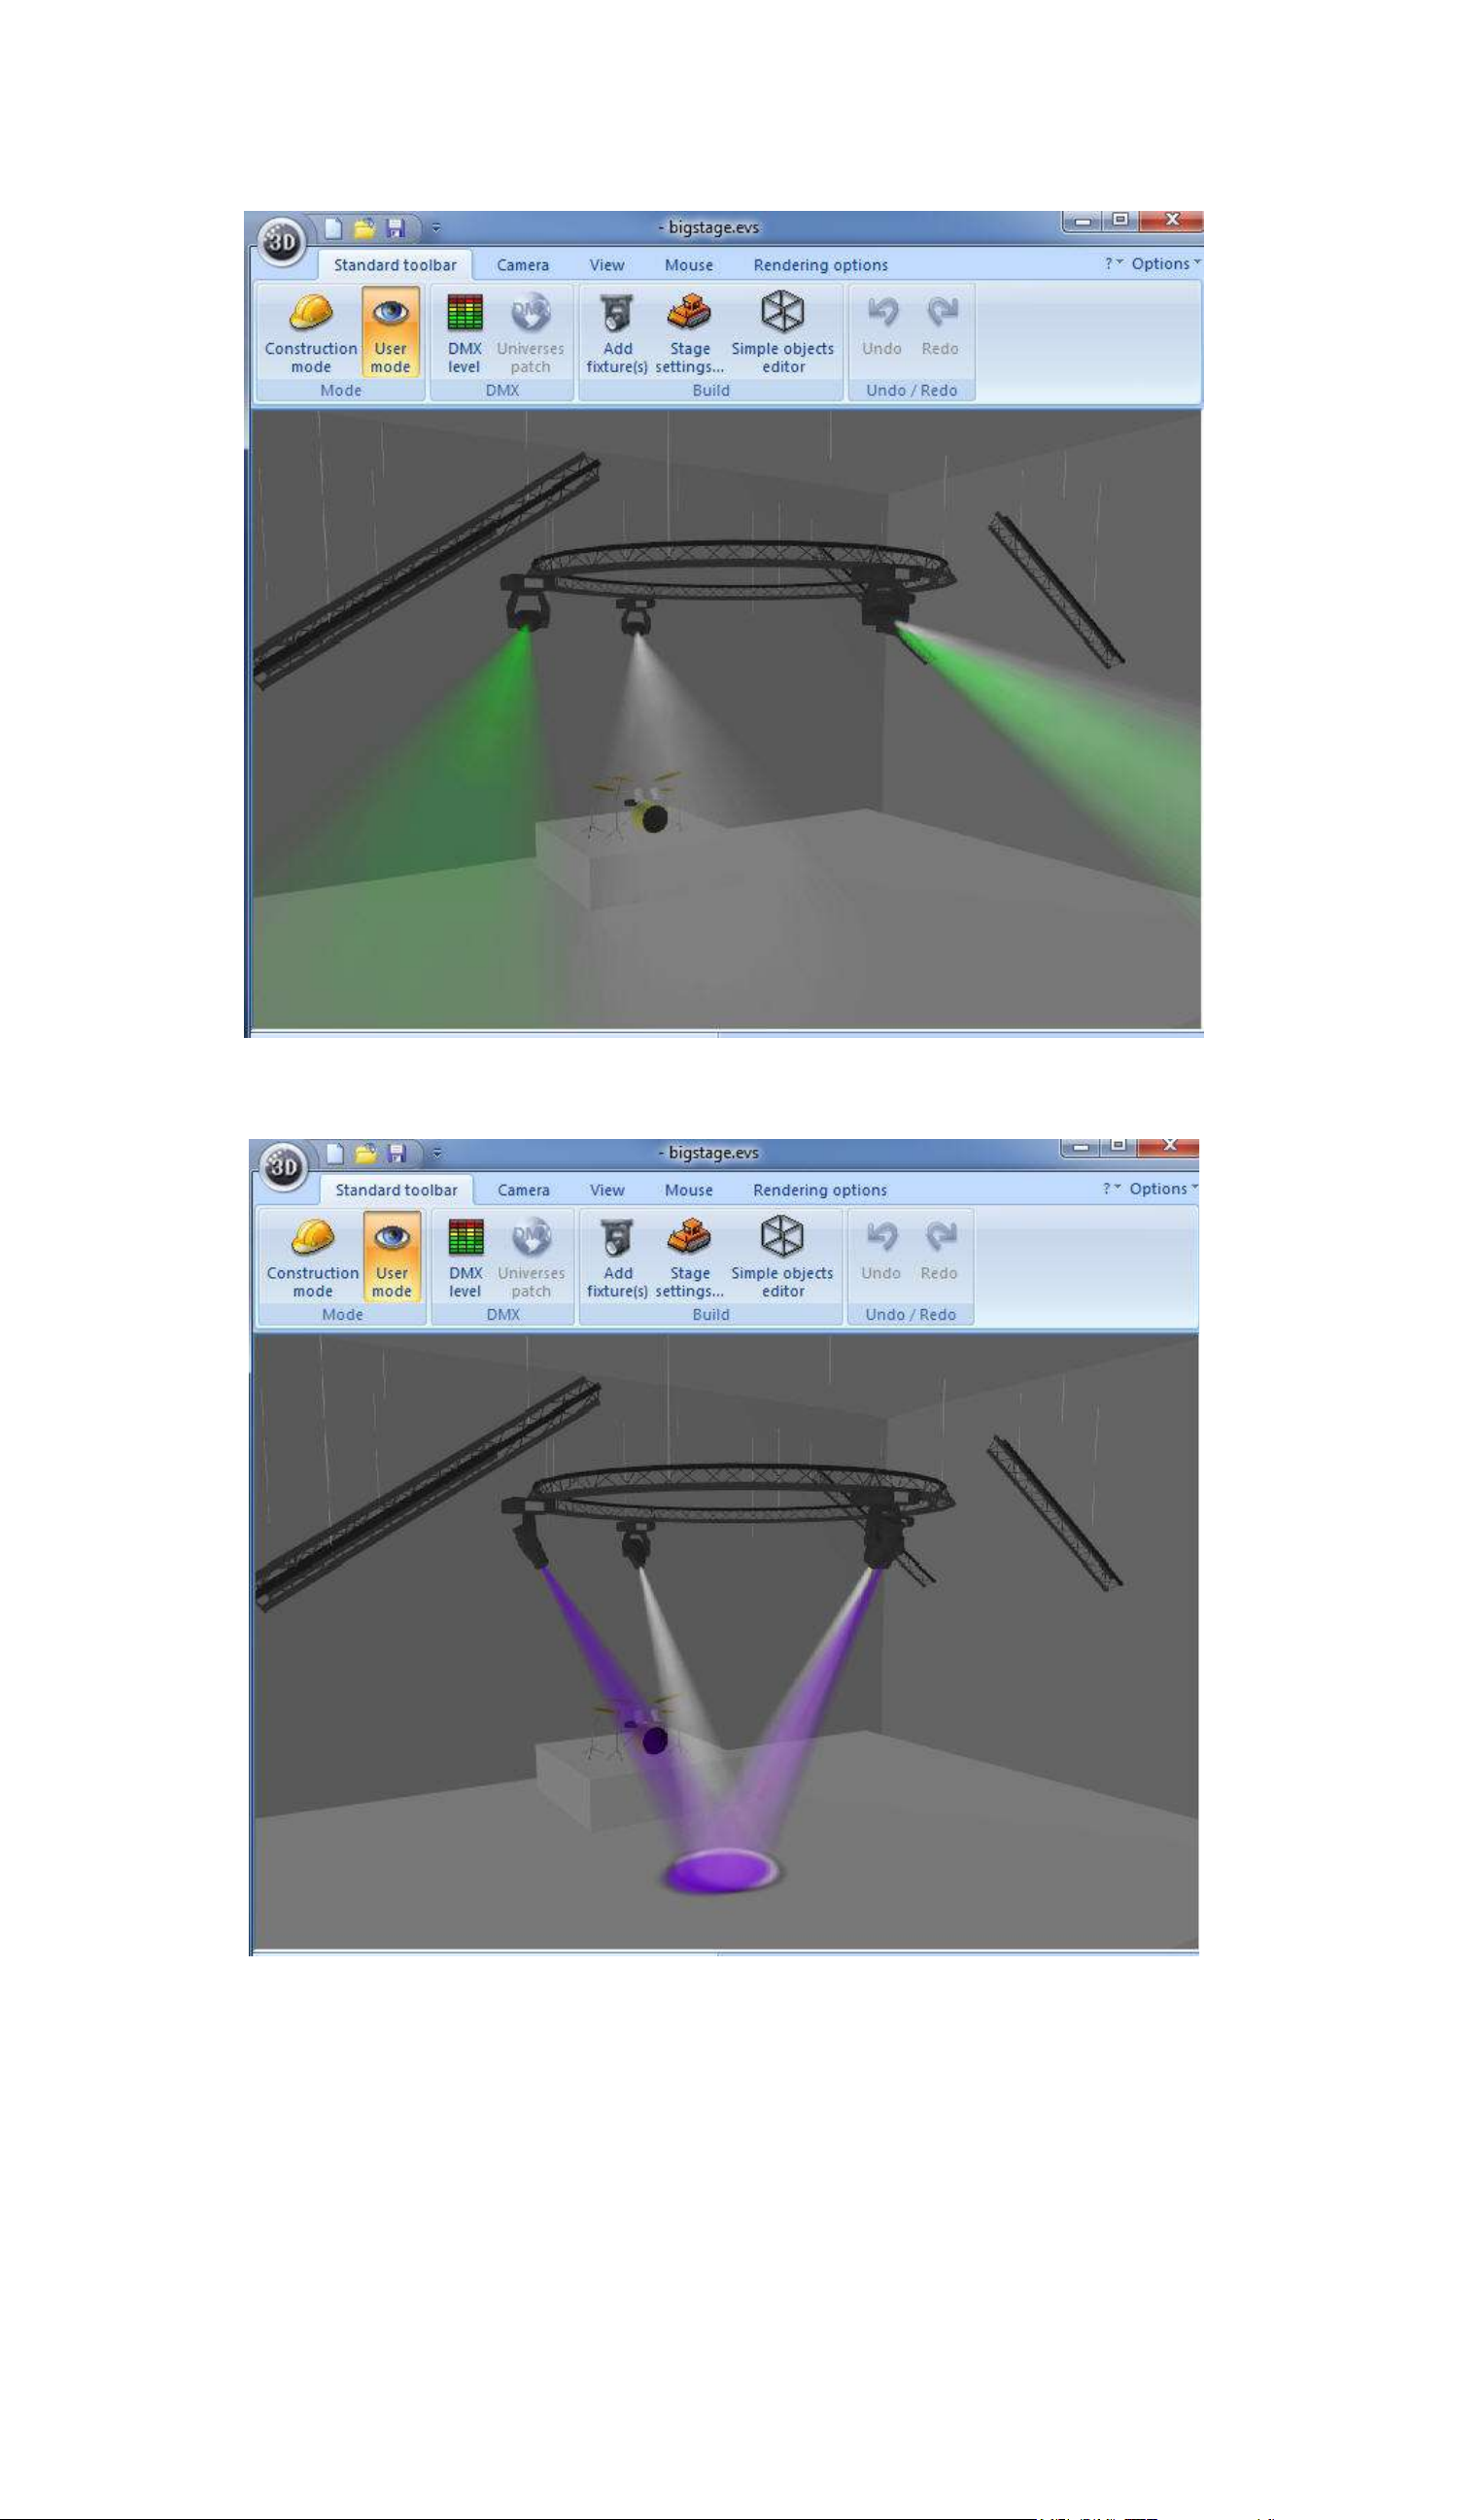
Open the 3D view to show the result.
Sequence 1, a movement sequence, is now playing.
Change the playing mode. Select the "Stacking mode". This mode will allow you to play different
Page 24
Page 29
Lucid DMX
III Quick start guide
sequences at the same time and on the same cue. The other mode is the release mode, just one
sequence can be played.
The Cue mode icon changes. Click on the Sequence 2 button.
The Sequence 2 is now enabled.
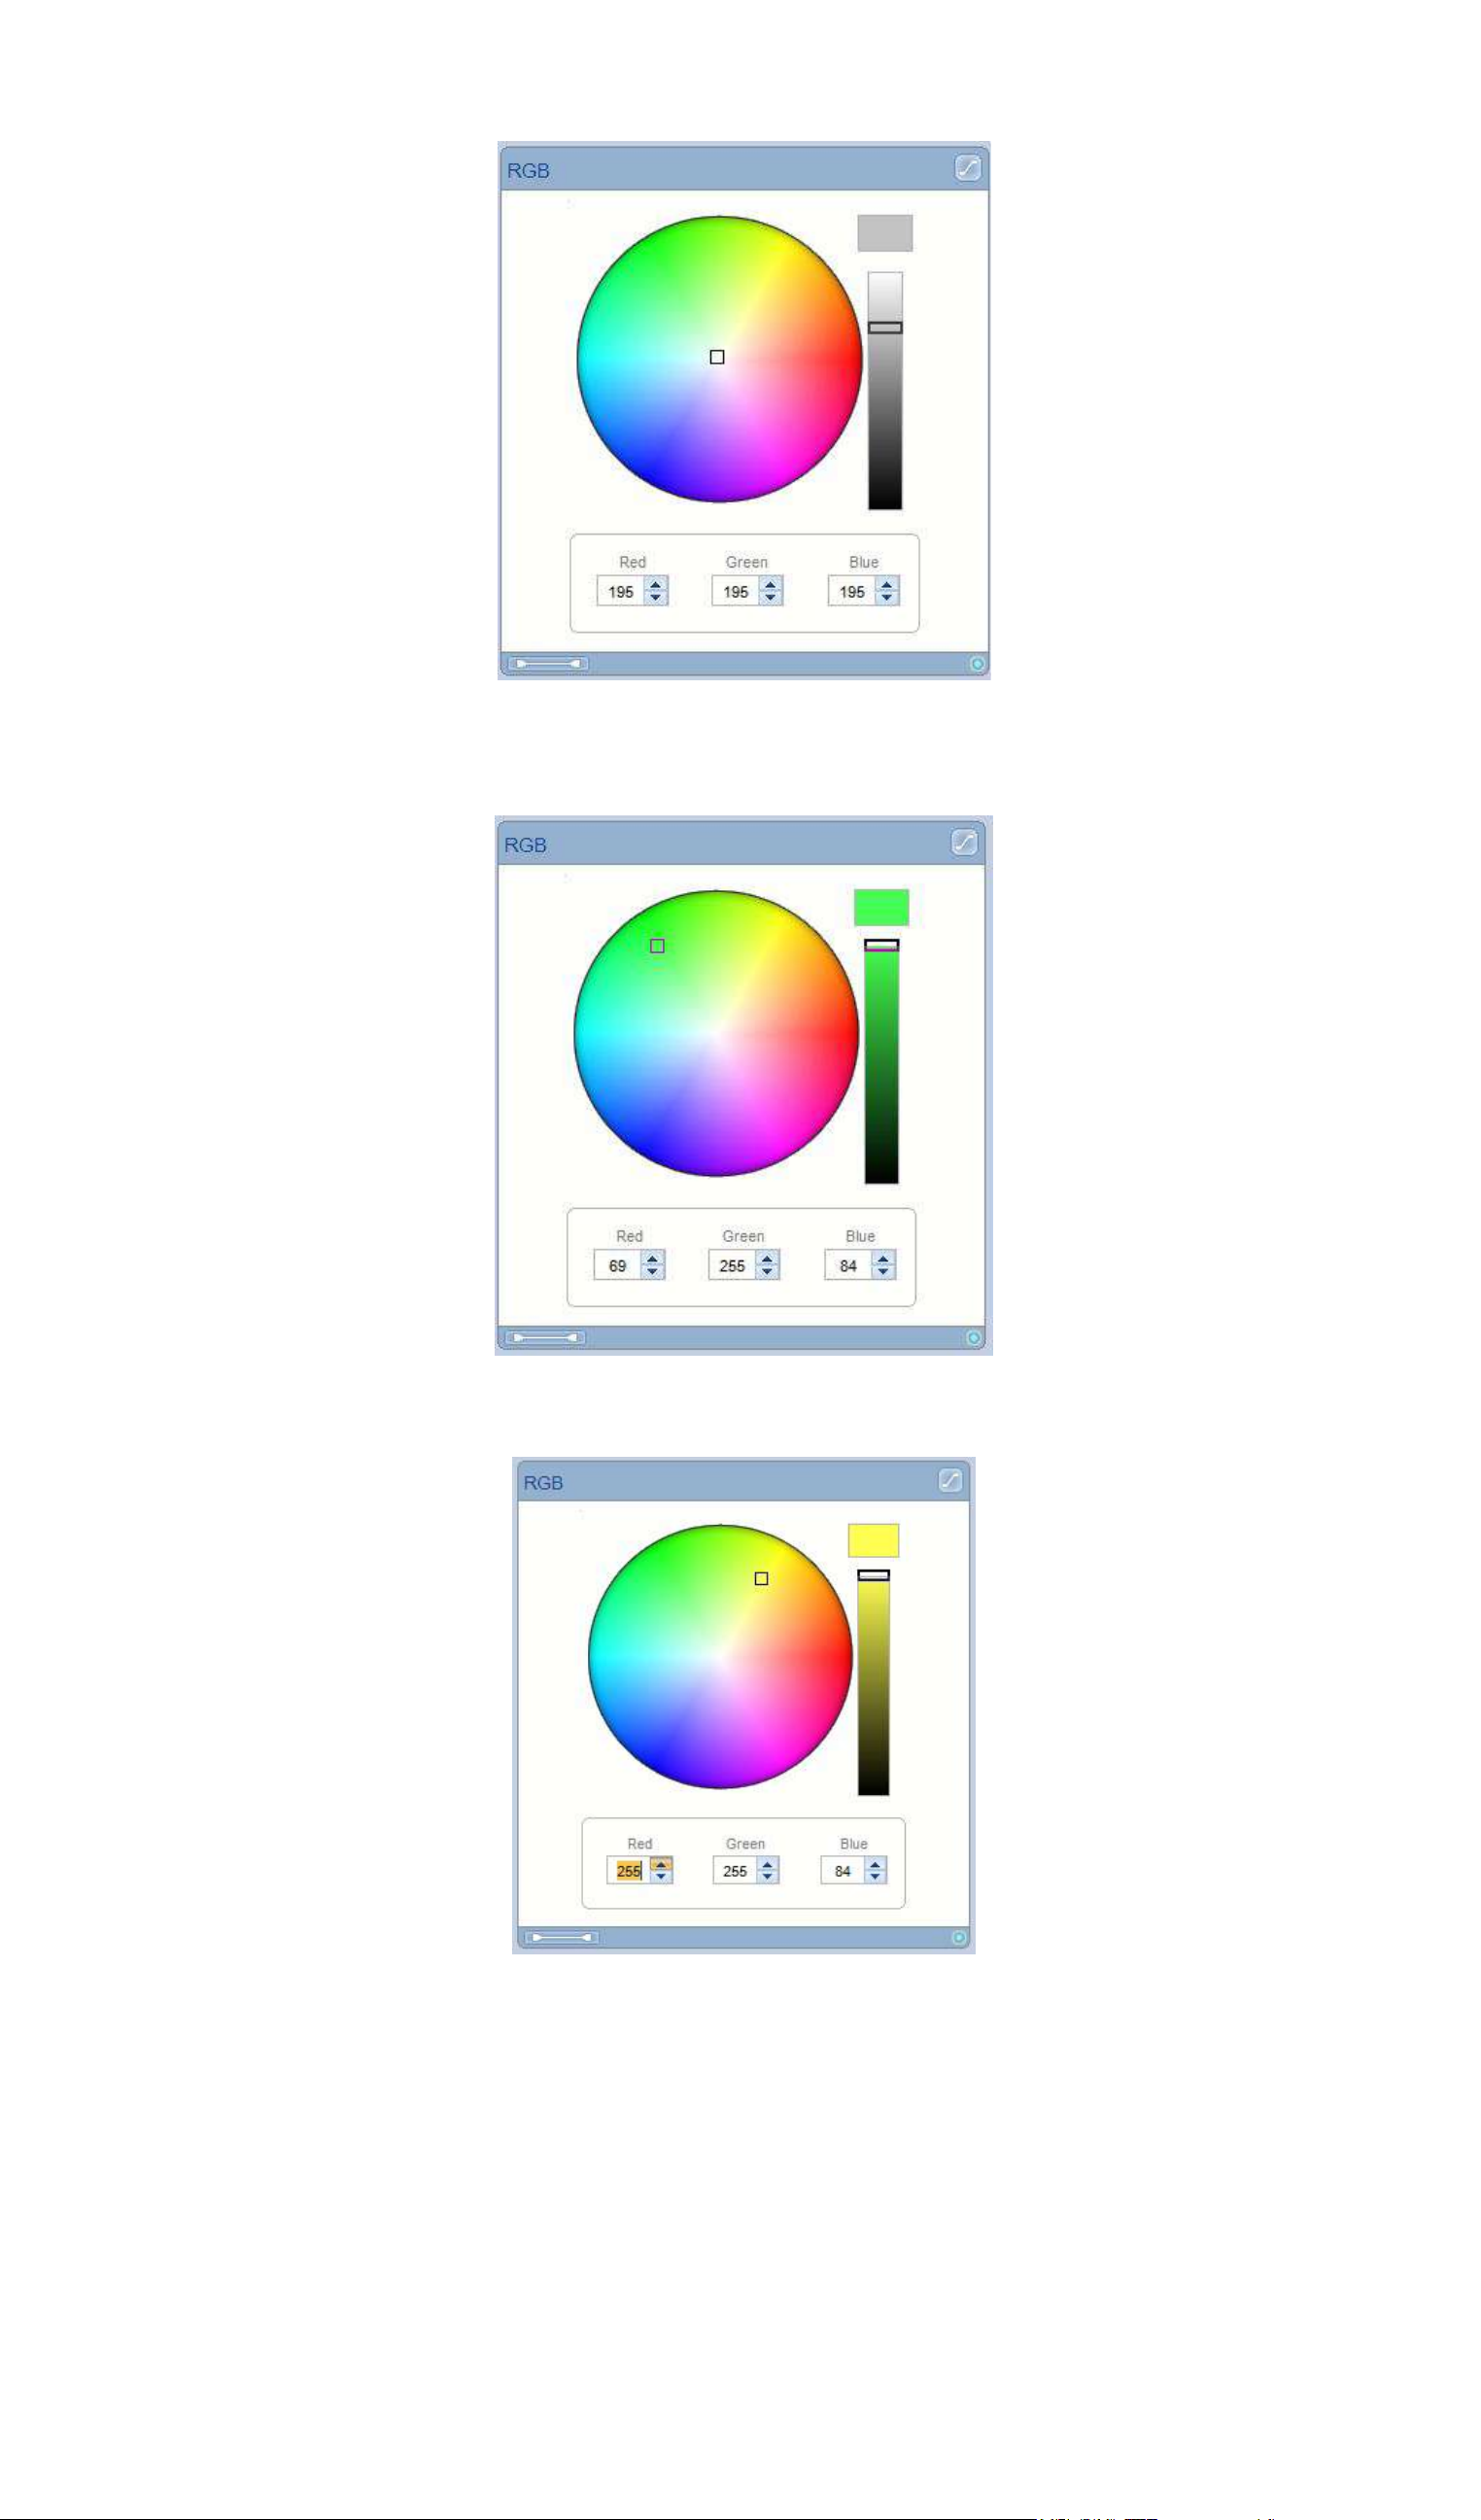
Now you can see a movement with a color change.
Page 25
Page 30
Lucid DMX
III Quick start guide
Page 26
Page 31

Lucid DMX
III Quick start guide
If you want to "Clear" all the live presets, click the "Live Clear" button or press Control+F7. If you want
to restore the previous Live state just click the button again or hit Control+F7.
The two sequences are now disabled.
Page 27
Page 32

Lucid DMX
IV Setup and programming tools
IV Setup and programming tools
1. 1. Add a generated effect
Now we can learn how to add automatically generated effects. Select the fixtures.
Click on the "Add an effect" button.
The "Effect Manager" window appears.
To find out how to use the Effect manager, please refer to the "Effect Manager" online manual.
To generate the effect click the "Generate" button.
Page 28
Page 33

Lucid DMX
IV Setup and programming tools
A dialog box appears where you can select the generation mode. The first option adds all the generated
scenes on a new sequence. The second adds all scenes to the current sequence. Select the first one
and click OK.
You can see a new sequence (Sequence 3) with all the generated scenes. If you click play you will see
the effect that you just programmed.
Page 29
Page 34

Lucid DMX
IV Setup and programming tools
2. 2. Setup a LED matrix
On the patch window, select an RGB fixture from the "_generic" folder. You can create a matrix with
any kind of fixture...
Check the Matrix box and put the right size, in our example : 10 x 10.
Click on the "Patch" button to add the fixtures on the address map.
A window appears, you can setup the Matrix (set the index, create sub-matrix and more).
Click OK to validate.
Page 30
Page 35

Lucid DMX
IV Setup and programming tools
The matrix fixtures are added, click OK to validate.
You now see a new fixture icon on the Desktop. In the case of the matrix, all fixtures in the matrix are
represented by a single icon.
Page 31
Page 36

Lucid DMX
IV Setup and programming tools
To control the matrix fixtures, click on the "Matrix" icon on the desktop toolbar or right click on the matrix
icon on the desktop and select the "Matrix" item.
The matrix window appears. To select or deselect a fixture just click on the fixture icon, the blue color
means that the fixture is selected. You can select all the fixtures at the same time by right clicking in the
matrix window and choosing "Select All". Additionally, you can highlight individual rows and columns by
right clicking on a cell in the row or column you wish to highlight and choosing either "Select row" or
"Select col".
All the fixtures are selected.
Page 32
Page 37

Lucid DMX
IV Setup and programming tools
To check that the matrix is working fine, click the "DMX Level" button on the "Tools" tab.
When you modify a RGB value, all the DMX levels are updated, the matrix works fine.
3. 3. How to use the XY Moving Area
To control the X and Y channels, you can use a Moving area.
There is an XY grid with a cursor. The positions are shown on the top of this grid. Under the grid, you
can see a "Center" button, this function centers the light position. The "Resolution" slider selects the
moving speed of the cursor. The X and Y locked check box stops the X or Y movement. When a
joystick is detected the "Joystick" checkbox will be enabled. To control the movement with a Joystick
just enable the checkbox.
Page 33
Page 38

Lucid DMX
IV Setup and programming tools
To center the position click "Center".
We can see the position's information on the grid.
Modify the position, left click and move the cursor, release the button.
Page 34
Page 39

Lucid DMX
IV Setup and programming tools
Try the X lock, enable "X Locked" and move the cursor.
Only the Y value changes...
Page 35
Page 40

Lucid DMX
IV Setup and programming tools
Do the same for the Y position.
Only the X position changes.
Change the resolution to change the moving speed of the cursor.
When a joystick is detected an icon appears on the bottom status bar.
Check the Joystick checkbox, calibrate a new center by pushing button 1 on your joystick, when you
release the position the cursor will stay on the new center. To release this center push button 2 on your
joystick.
Page 36
Page 41

Lucid DMX
IV Setup and programming tools
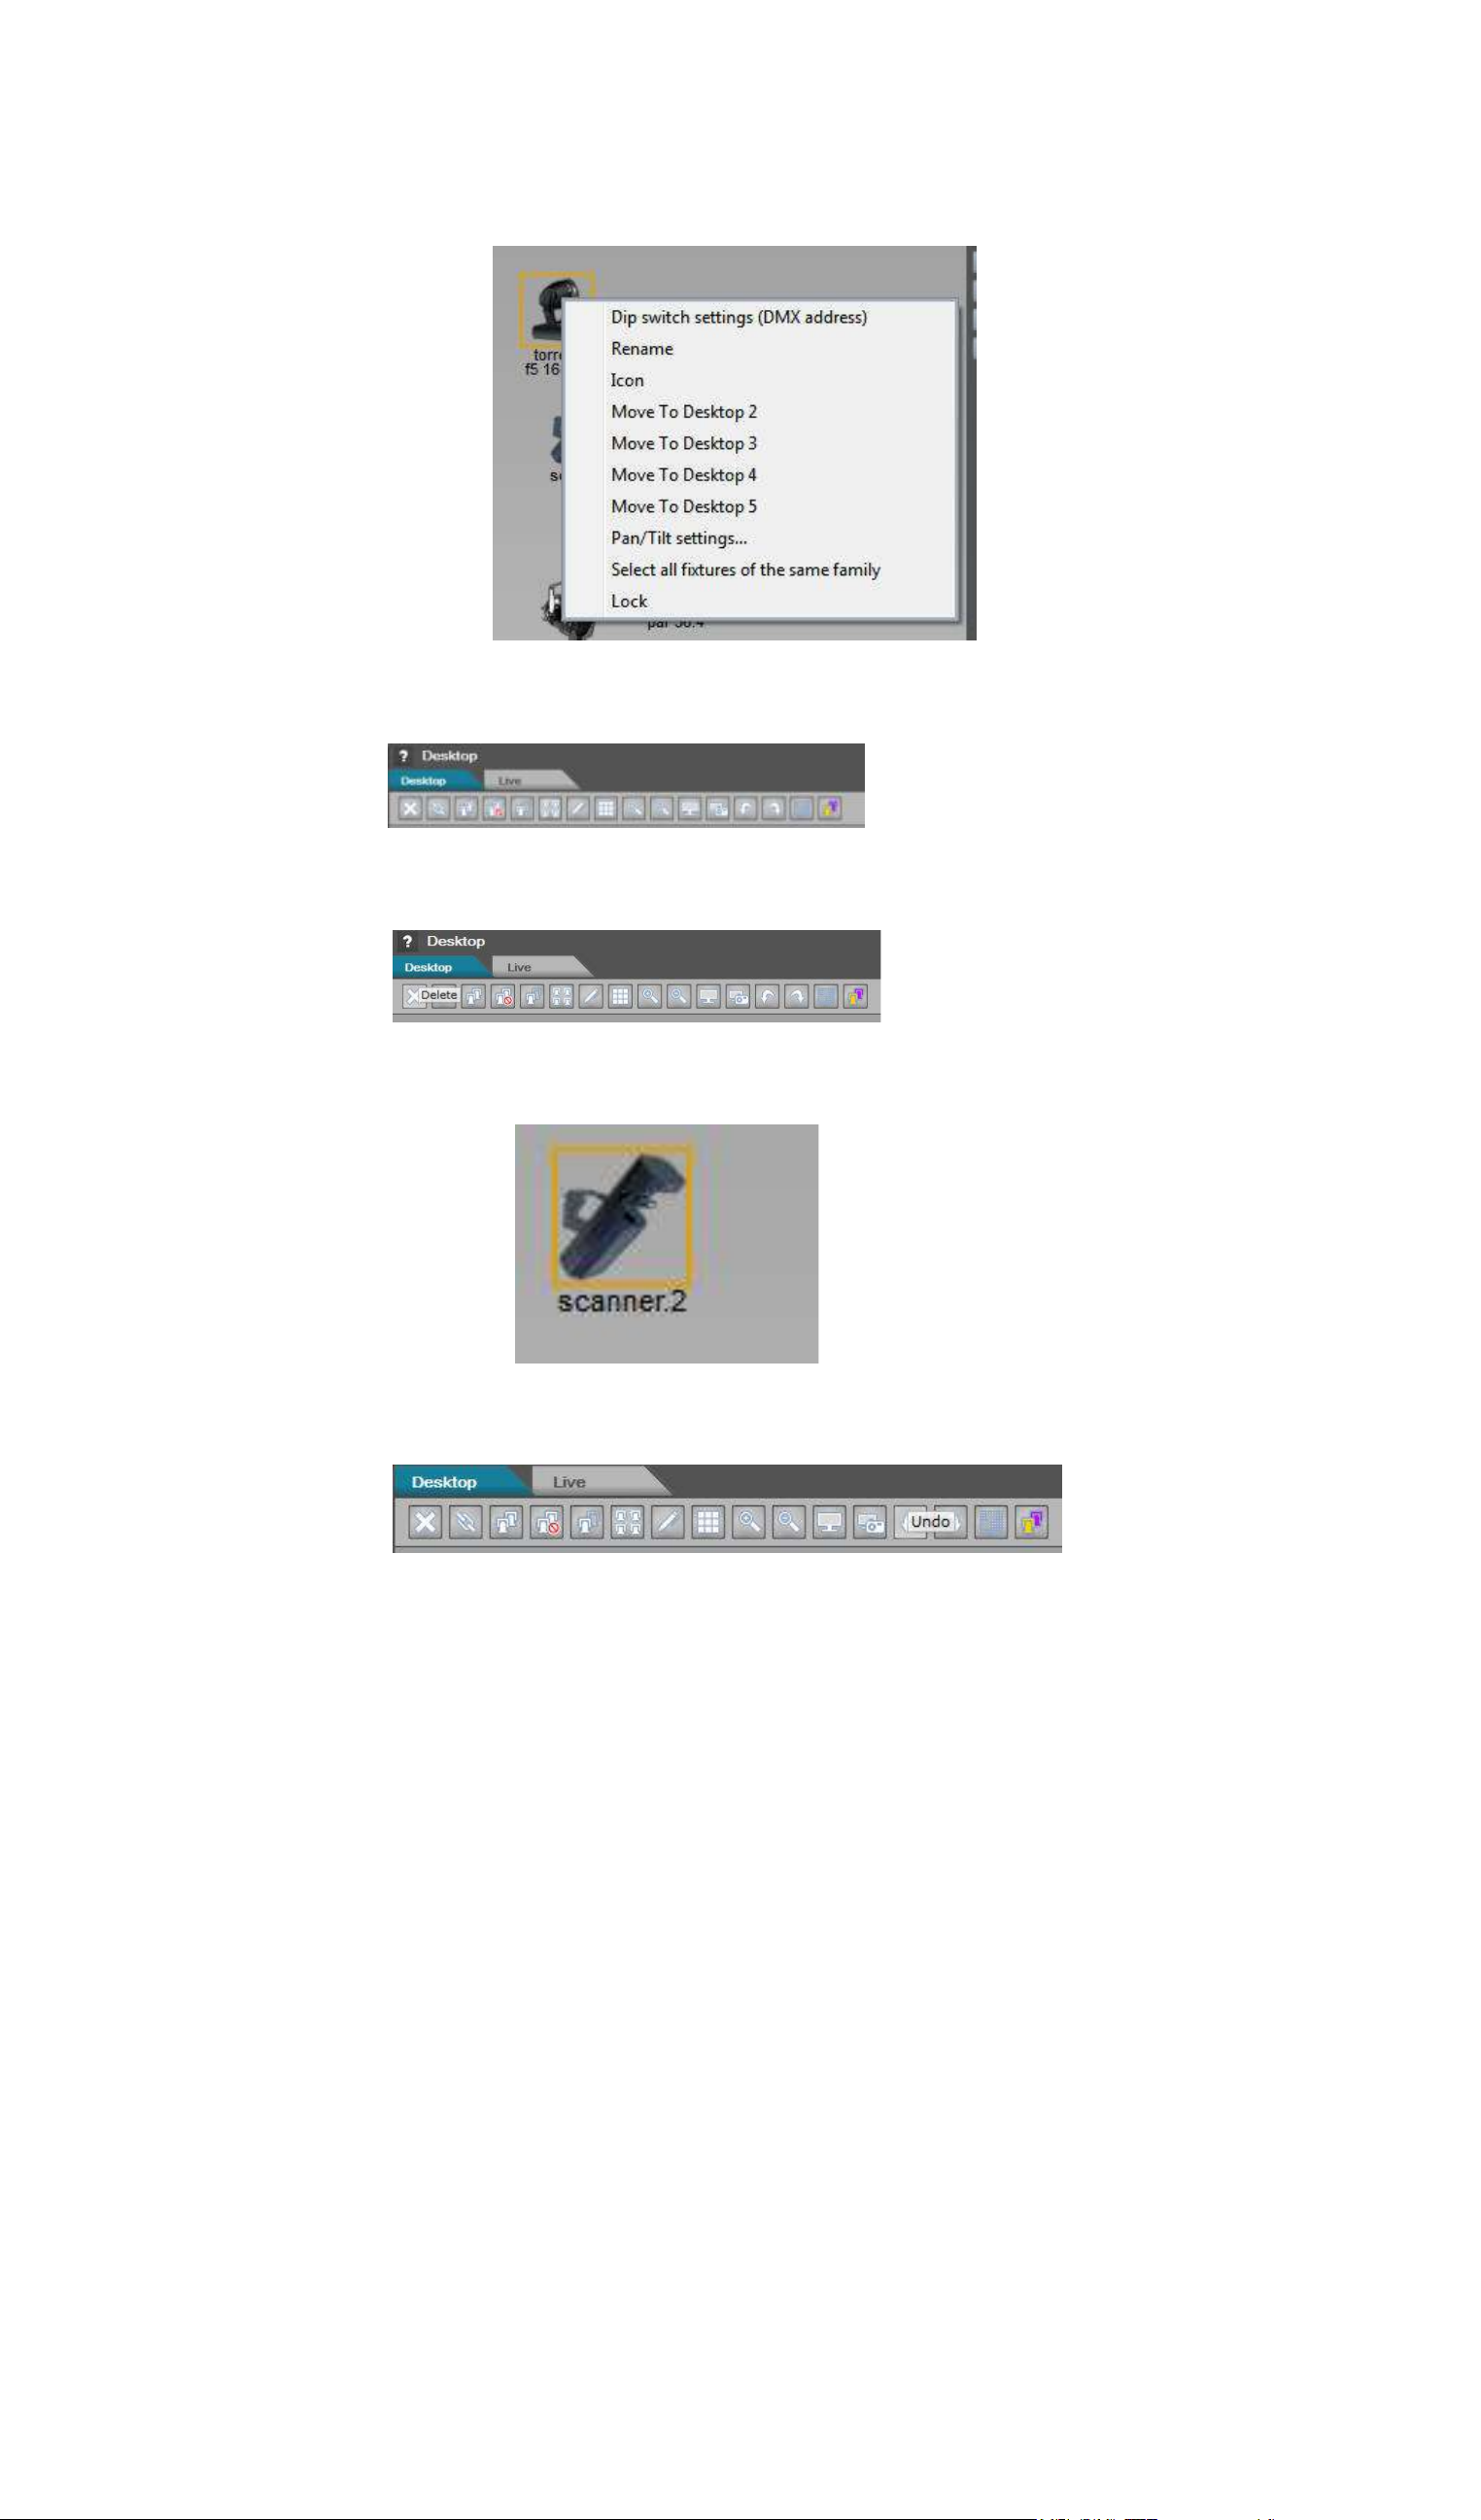
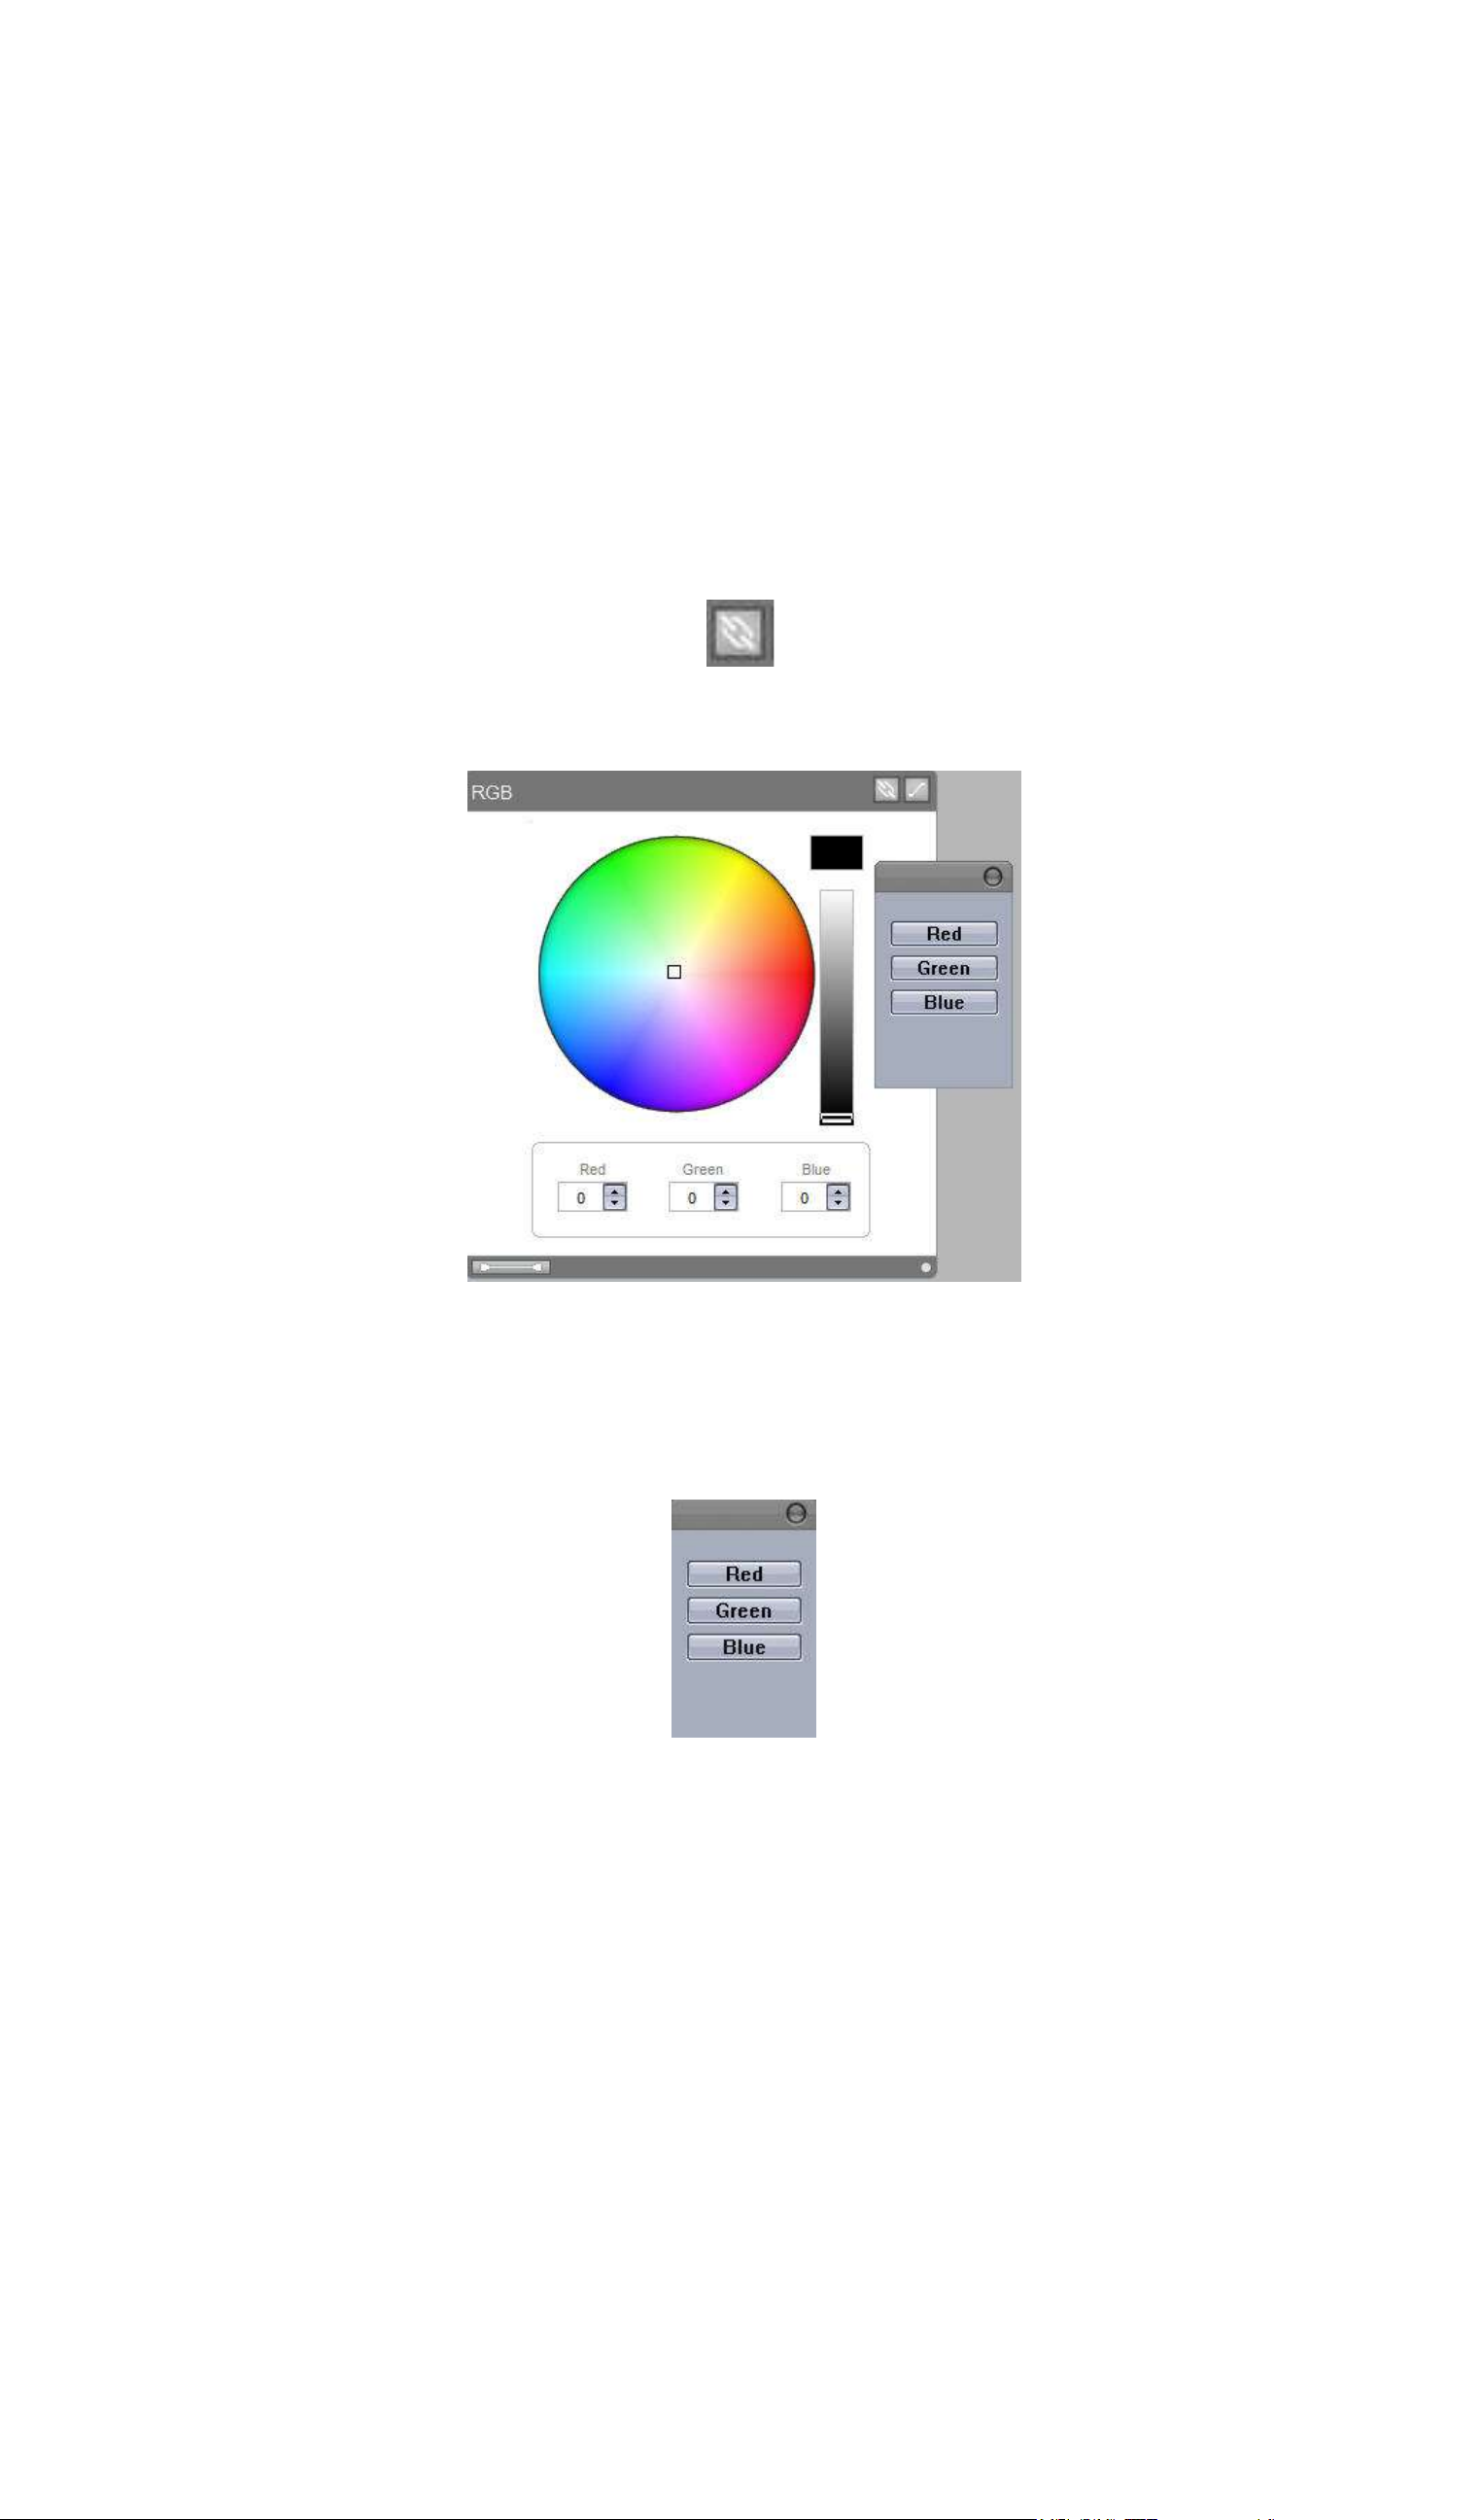
4. 4. How to use the RGB / CMY Color Picker
You can control the CMY and RGB channels with this tool. You have a big color wheel, a luminosity
slider on the right side and a value setup area on the bottom.
Move the right slider position, on the top left corner you can see a preview of the color. The RGB values
change, here we have a 195 grey color.
Page 37
Page 42
Lucid DMX
IV Setup and programming tools
Change the wheel cursor position. Left click, move the cursor and release the left button.
Modify the Red value directly. In this example if you change the value to 255 you'll have a yellow color.
Page 38
Page 43

Lucid DMX
IV Setup and programming tools
On the CMY mode, the values are inverted, if you put a 0 level on the CMY channels you will have a
white color.
5. 5. Desktop's features
When you add fixtures on the software, icons appear on the desktop area. An icon means a fixture or a
group of fixtures (matrix case).
Each fixture can be selected. You can also make a multiselection.
When you move your cursor over the icon, you will see some information about the fixture such as the
DMX address, the fixture's name ...
Page 39
Page 44
Lucid DMX
IV Setup and programming tools
If you right click the fixture you will see a new menu. The same functions are available as on the
desktop's toolbar.
Try the fixture's delete function. Select a fixture and click the "Delete" icon.
The fixture is deleted.
To Undo and restore the fixture. Click "Undo"
The fixture is restored.
Page 40
Page 45
Lucid DMX
IV Setup and programming tools
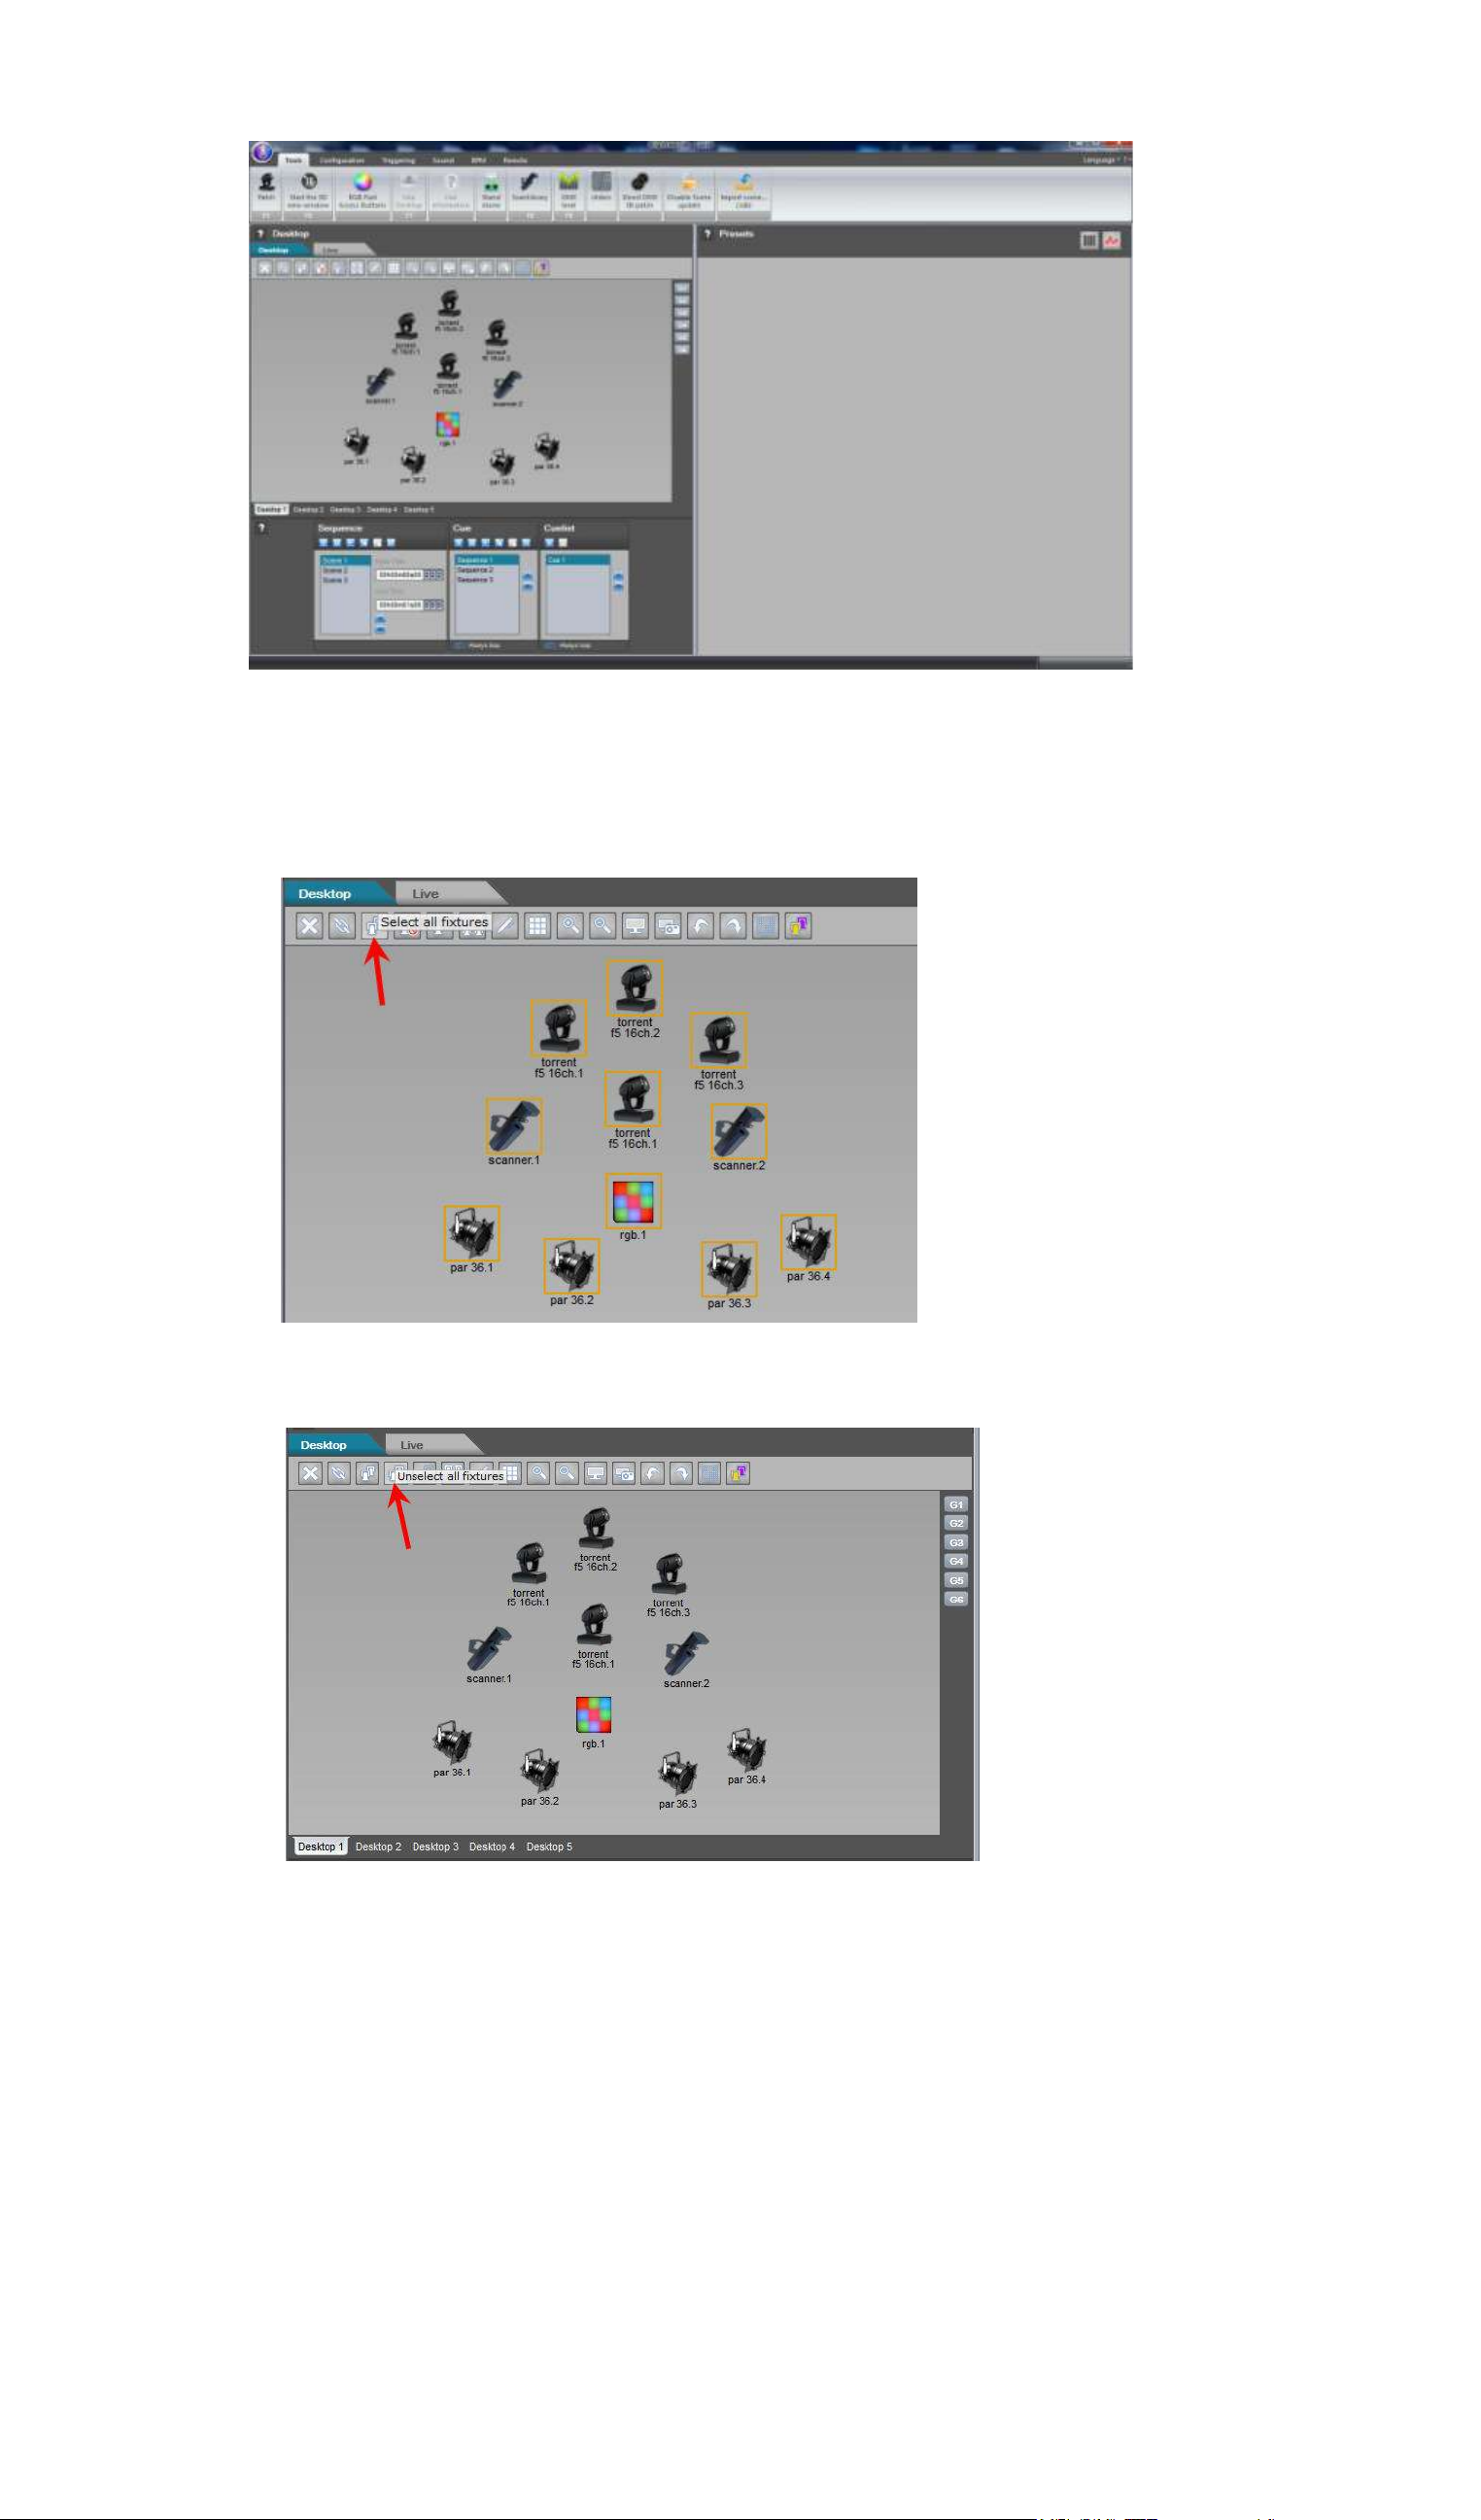
Several kinds of fixtures selections are available. A family kind selection, where you can select all the
exact same fixtures, select all the fixtures, invert the current selection... Click on the "Select all fixtures"
button. All the fixtures are selected.
Click "Unselect all fixtures", all the fixtures are unselected, only the main fixture is selected.
Click "Select all the same family fixtures".
Page 41
Page 46

Lucid DMX
IV Setup and programming tools
All of the PAR kind fixtures are selected.
Click "Invert the selection".
The PAR fixtures are not selected, all the other fixtures are selected
Page 42
Page 47

Lucid DMX
IV Setup and programming tools
You can zoom to change the icon's size. A range of sizes are available. Click "Zoom Out".
The icon size changes...
The multiselection function is very powerful, you can control different kinds of fixtures with the same
presets. If the presets are the same, or almost the same the software allows you to control with a
common preset area.
Select a moving head and a scanner.
Two preset areas are available, the moving area and the dimmer. Change the XY positions, the moving
head and the scanner positions change.
Page 43
Page 48
Lucid DMX
IV Setup and programming tools
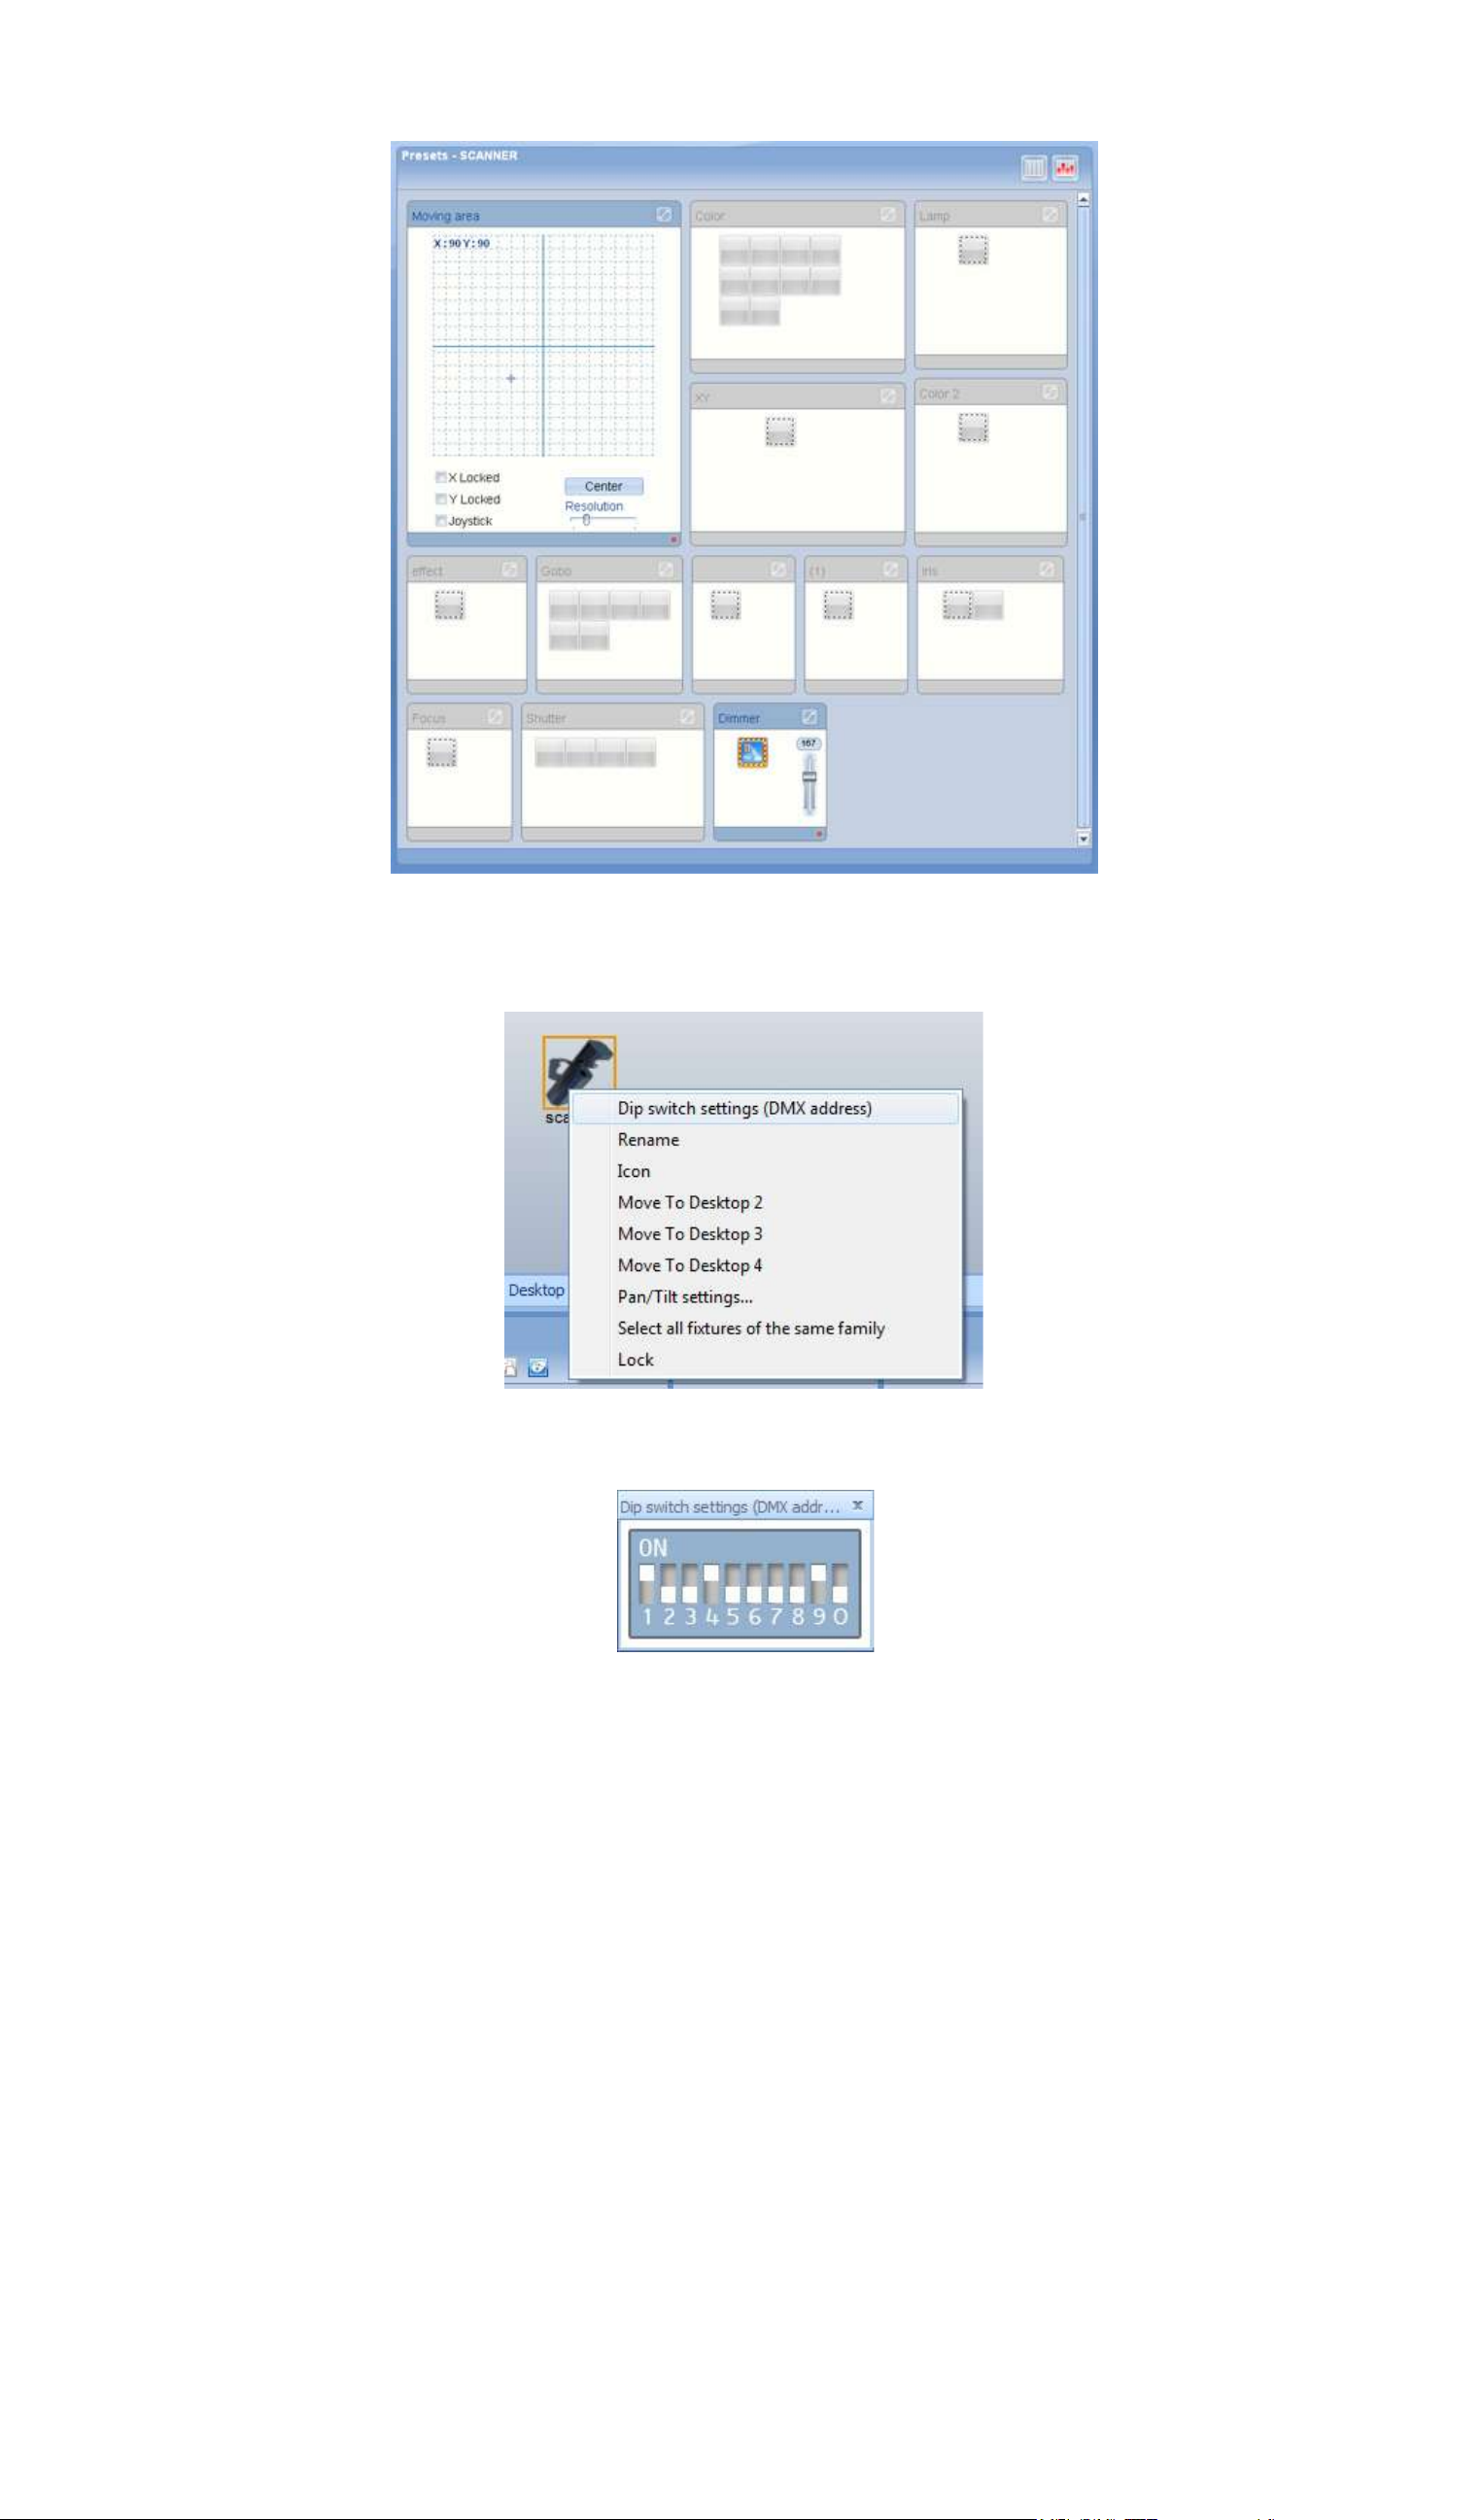
A Dipswitch tool can help you to setup the fixture address. Right click on the fixture and click "Dip
Switch settings (DMX address)".
The Dipswitch window appears, setup your lighting fixture like the window shows.
You can see some information about the selected fixture. Click "Info".
Page 44
Page 49

Lucid DMX
IV Setup and programming tools
A window appears with the fixture's name, manufacturer's name, Type of fixture, number of channels,
the address range and the number of fixtures for this icon.
You can rename the fixture, click "Rename".
Put a new name then click OK.
The new name appears under the fixture's icon.
Page 45
Page 50

Lucid DMX
IV Setup and programming tools
You're allowed to restore the basic background. Click "reset the background".
6. 6. Scene, Sequence and Cue features
The programming section is composed of 3 areas : Sequence, Cue and Cuelist area. On the Sequence
area you'll add the Scenes with fade time and wait time. On the Cue area you'll add all the sequences
and on the Cuelist area you'll add all the Cues.
On the Sequence and Cue section, you can copy and paste the selection (scene or sequence) just by
clicking on the small toolbar icons.
We can add a new scene, just click the "Add a scene" button.
To remove a scene, select a scene on the list and click the "Delete scene" button.
To change the scene settings select the scene(s) on the list and change a setting, in this example we
Page 46
Page 51

Lucid DMX
IV Setup and programming tools
can modify the fade time to 3 seconds.
Now we can change the wait time to 2 seconds for all the scenes.
To copy the selected scene click the "copy" button.
To paste the scene after the selected scene on the list, click the "paste" button.
To test, you can playback the sequence, click the "play" button.
Page 47
Page 52

Lucid DMX
IV Setup and programming tools
To stop the playback, click the "stop" button.
All the Scenes, Sequences and Cues can be renamed. In this example we can rename the selected
sequence, right click and select "rename".
The rename window appears. Enter a name and click "OK".
Add a new sequence.
Page 48
Page 53

Lucid DMX
IV Setup and programming tools
For the moment the Sequence will have an "always loop" on the Live mode. To change the number of
loops click the loop icon.
The "Loop options" window appears. Choose 3 loops and click OK.
Now you can see "3 loops" on the cue area.
Page 49
Page 54

Lucid DMX
IV Setup and programming tools
You can enable or disable the fade function for the selected sequence, just click the fade icon on the
desired channel.
Page 50
Page 55

Lucid DMX
V Playback tools
V Playback tools
1. 1. Cues and Sequences Playback
In live mode, the buttons represent the Cues and the Sequences of the show. The Cue button is bigger
than the sequence button.
The Loops for each sequence and cue can be setup. A circle arrow icon shows that the Loop is
enabled. When you have a number with the icon, it shows that you have defined a number of loops, if
you don't have a number, you'll have the "always loop" option.
To setup the loops, right click on the sequence or cue and select "Loop Options".
A new window appears. If you want the "Always loop" option just click OK. If you want a "Loop Count"
select Loop Count and put a number of loops. Click OK. With the time option, you can set a sequence
to loop for a specified period of time.
The Auto release option will release the control of the fixtures when the sequence has finished looping.
When disabled the fixtures will remain as they were in the final scene of the sequence.
With the BPM option you can set a sequence to ignore the timing of scenes and instead move to the
next scene based on BPM.
Set this sequence to loop 4 times and press OK.
Page 51
Page 56

Lucid DMX
V Playback tools
Now, you can see the number 4 on the button.
If you want, you can play an audio file when you start the sequences or cues.
You can adjust the volume through the slider on the "Sound" tab. The sound can be muted by clicking
the "Mute" button.
To add an audio file click "Settings...." and go to the Audio File tab
A new dialog appears. Select your audio file. Please use the audio file folder in Lucid DMX to store all the
files.
You can use MP3, WMA and WAV formats.
Page 52
Page 57

Lucid DMX
V Playback tools
A music note appears on the button. Now, your audio file can be played.
You can remove the audio file when you want. Select the "Remove the audio file" option.
We can create a shortcut trigger. So when you push the saved shortcut, the Sequence or the Cue will
start. To add a new shortcut, right click on the Cue or Sequence, select "Settings..." and go to the
"Shortcut" tab.
Page 53
Page 58

Lucid DMX
V Playback tools
Push the key. New information appears on the button : the letter "A", in this example, indicates that the
shortcut will be the A key.
Press "A", the sequence starts.
The shortcut can be deleted, return to the Shortcut tab of the sequence settings and click "Delete the
shortcut"
Page 54
Page 59
Lucid DMX
V Playback tools
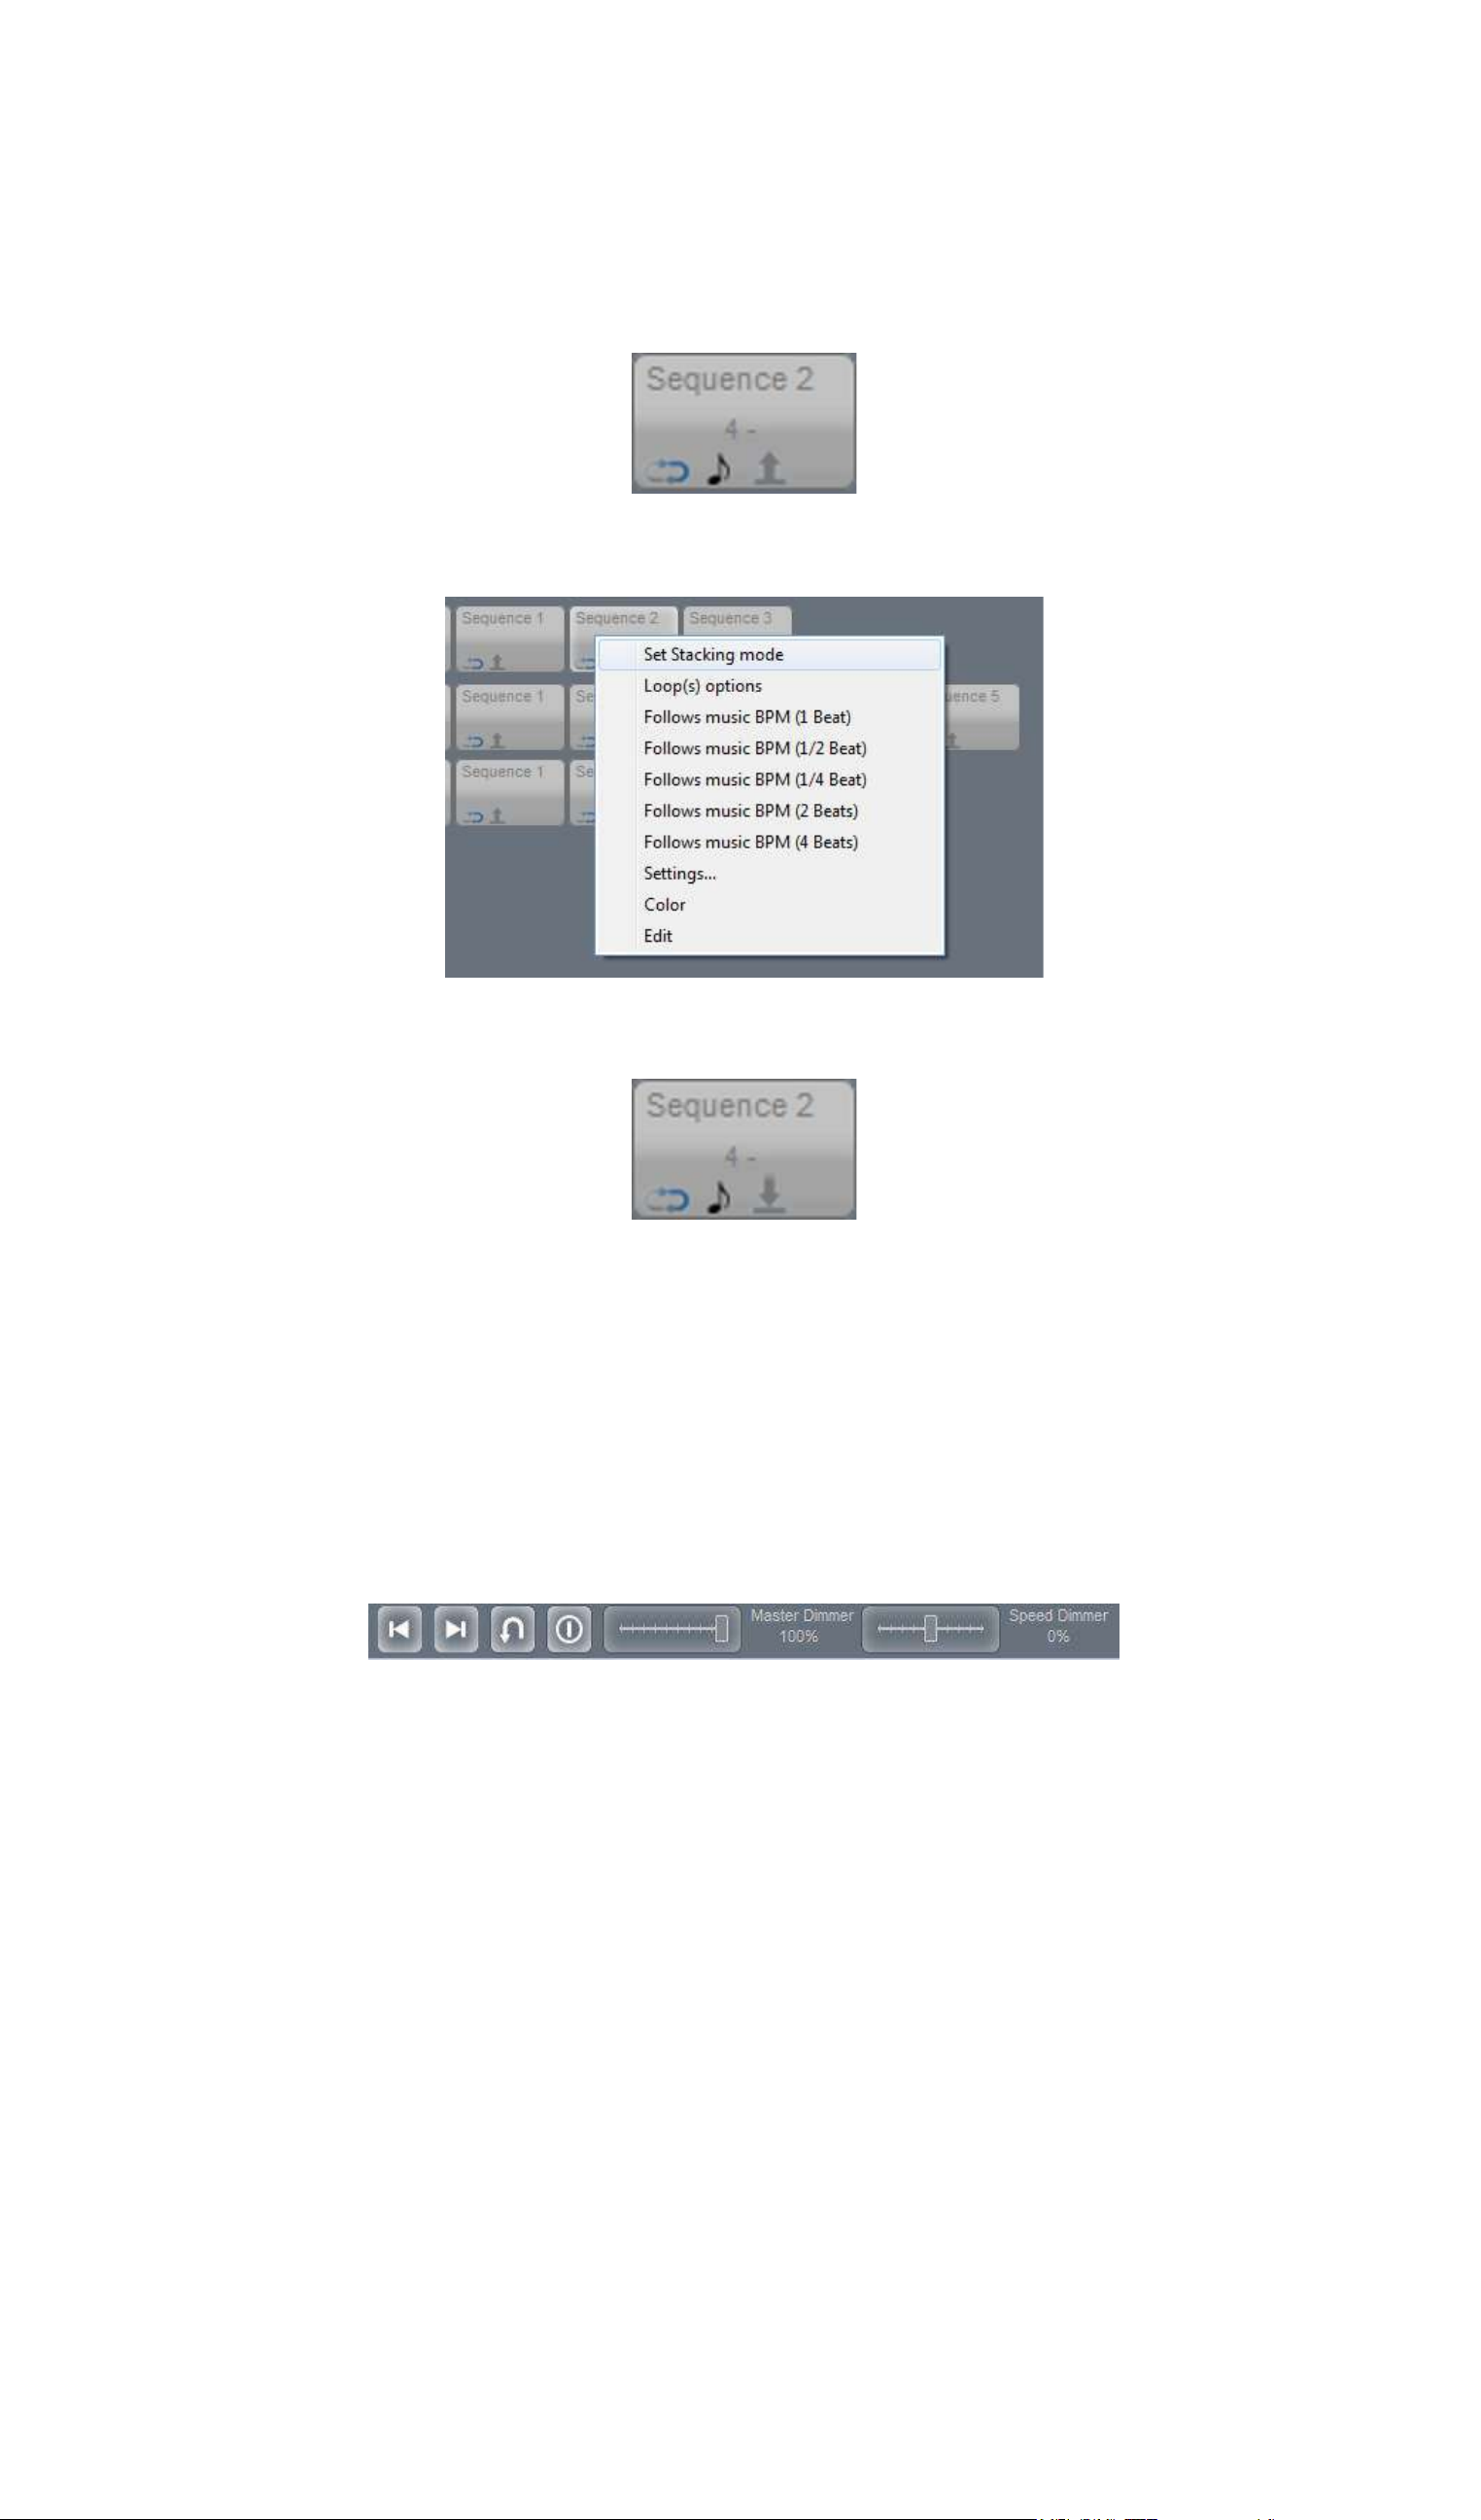
Two playback modes can be setup for the Cues. The Release mode or the Stacking mode.
The Stacking mode allows you to play many sequences at the same time and on the same cue, the last
sequence will have the highest priority. The Release mode stops the current sequence's playback, so
you'll have only one sequence at once.
The up arrow means that you have the Release mode, the down arrow means the Stacking mode.
To switch between the Release and Stacking modes, click "Set Stacking mode".
The Stacking icon appears, you are allowed to start many sequences on the Cue 1.
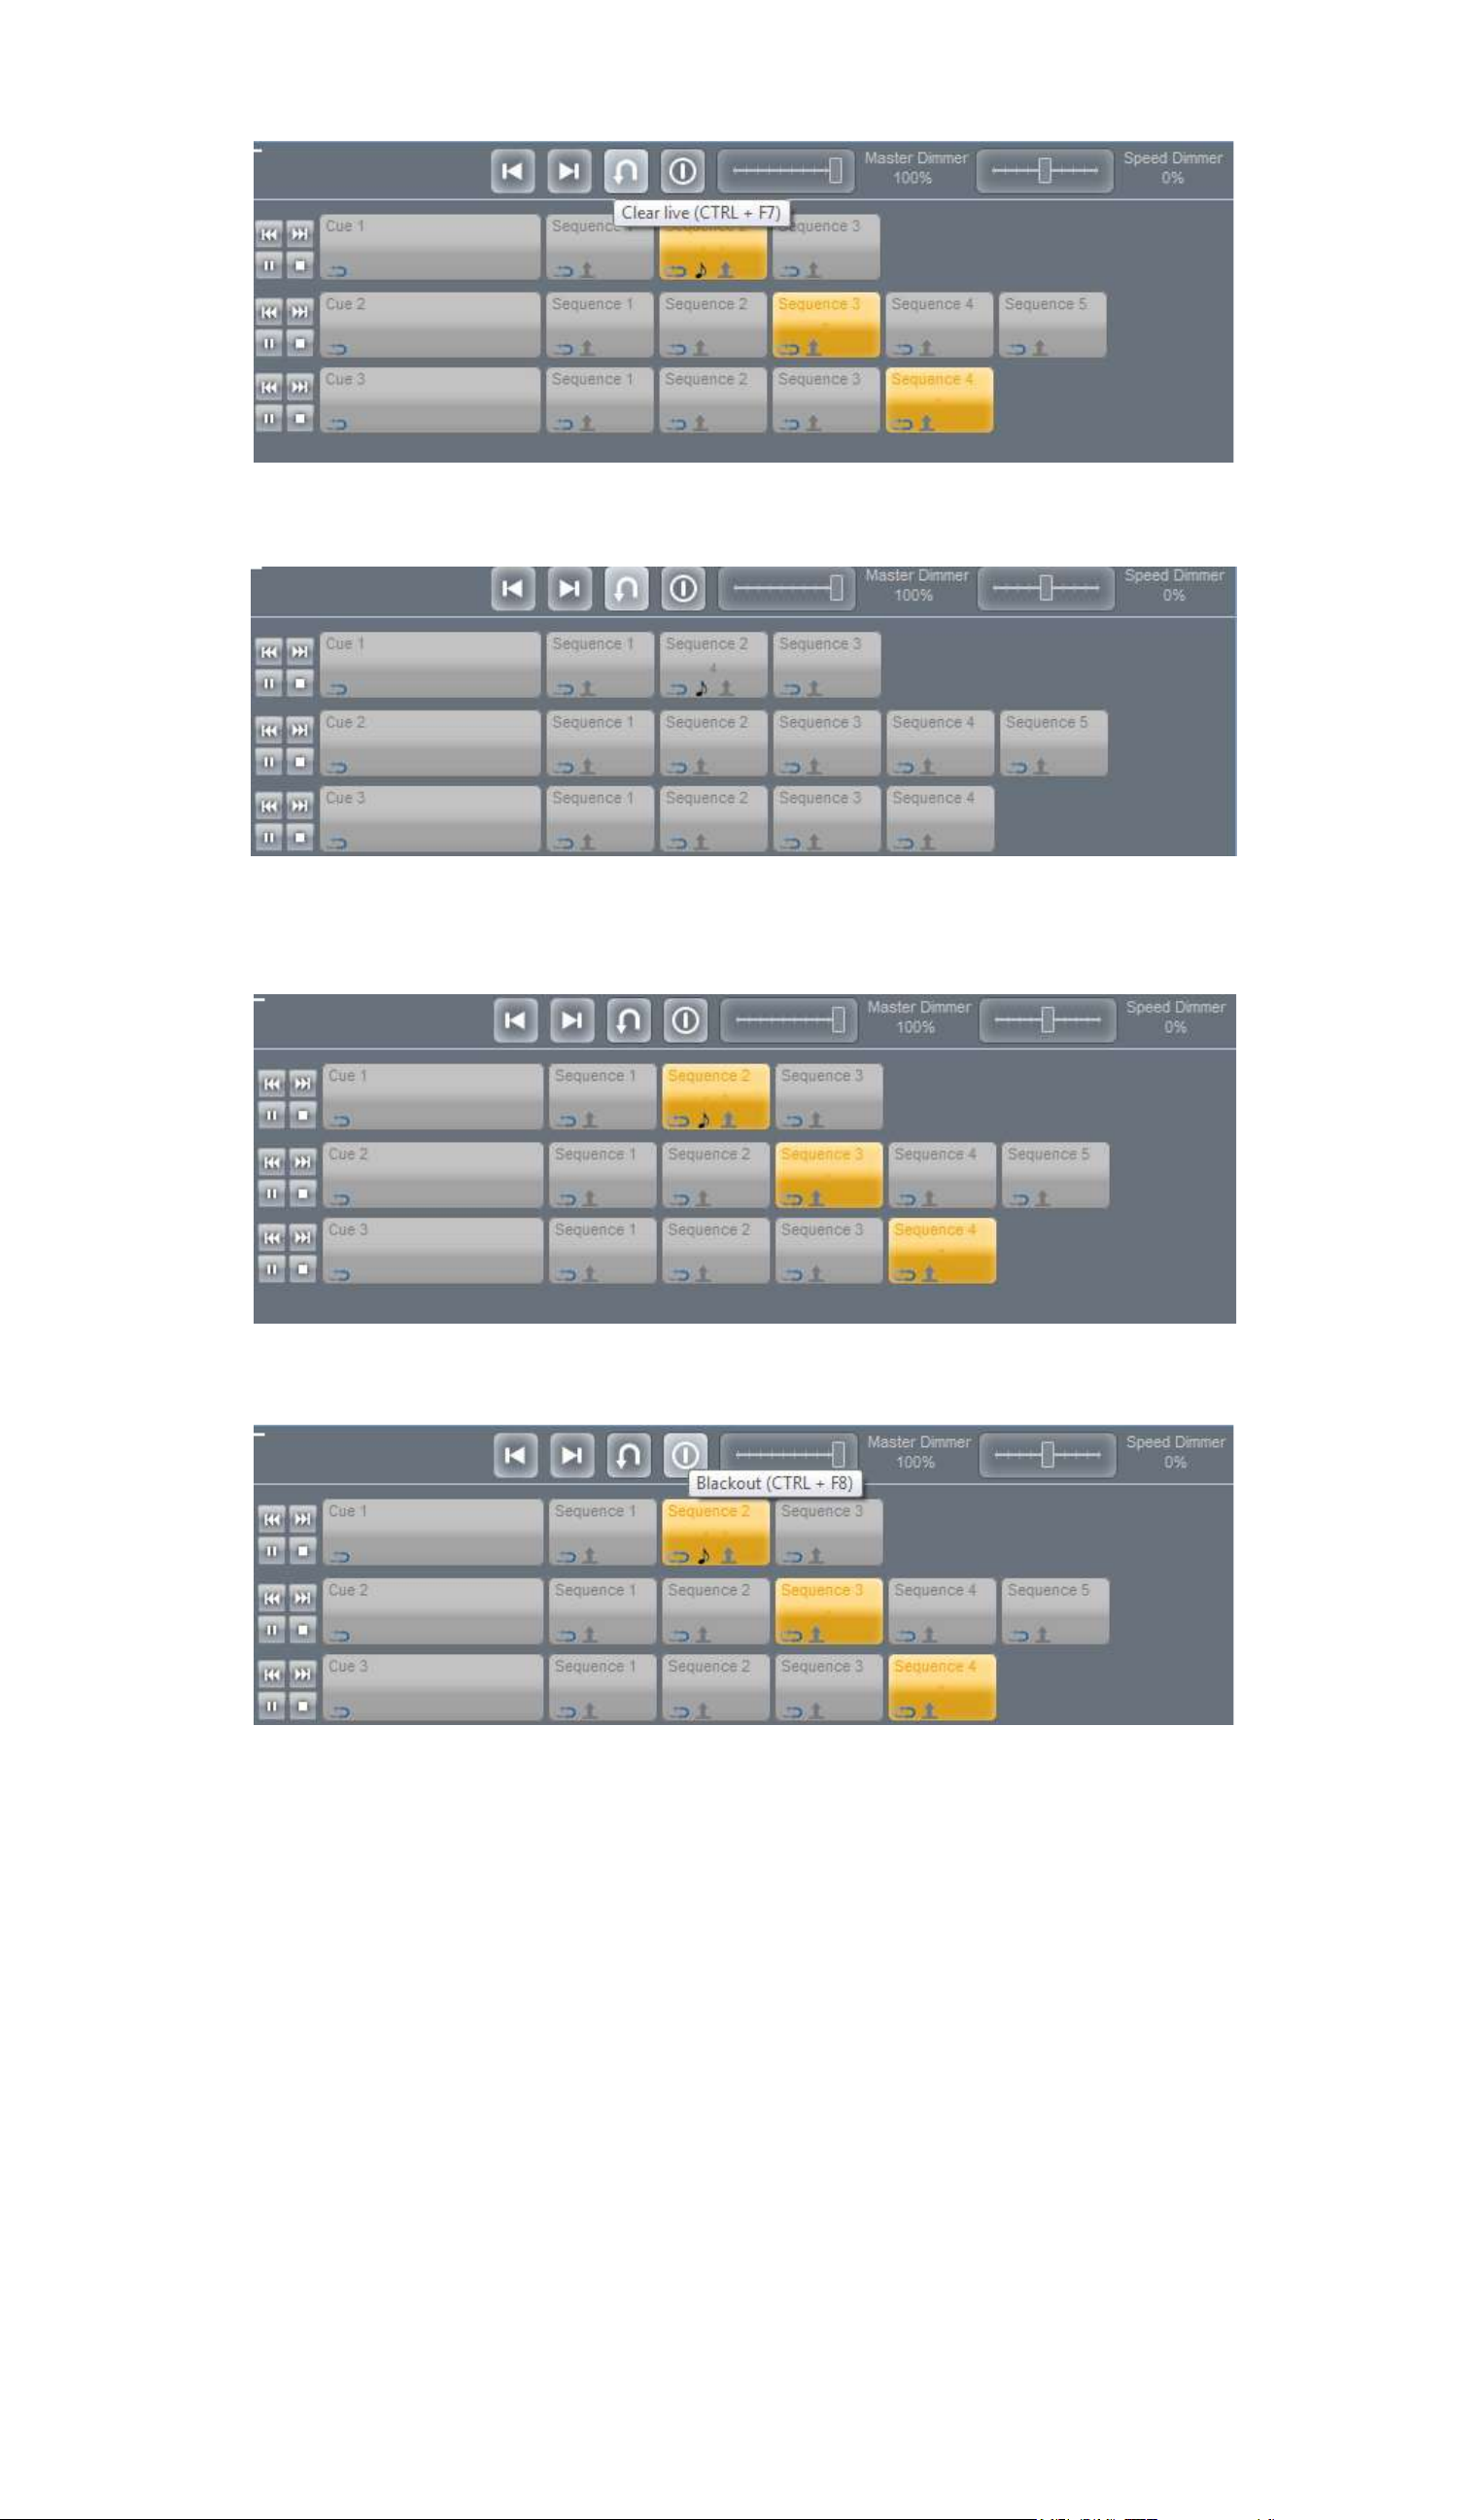
2. 2. Live Tools
In Live mode, you can directly control the channels. Six tools are available. The first one is a "Previous
Sequence" button. Second is a "Next Sequence" button. The third one is a "Live Clear" button. If you
click on that button you'll release all the enabled Cues and Sequences. The fourth one is a "Blackout"
function. When you enable that function, all the light beams will be disabled. The next tool is a Master
Dimmer, you can control all the fixture dimmers. The final tool is a Speed Dimmer, this adjusts the
speed of all fixtures.
Try the "Live Clear" function. Enable some sequences, click the "Live Clear" button (or Control+F7).
Page 55
Page 60
Lucid DMX
V Playback tools
Now, all the sequences are disabled.
If you want to restore the previous state, just click again on the "Live Reset" button (or Control+F7). The
sequences are enabled
Now, let's try the "Blackout" function. Click on the Blackout Button (or press Control+F8).
The button is blinking, the Blackout is now enabled. To disable that function click the Blackout button
again (or press Control+F8).
Page 56
Page 61

Lucid DMX
V Playback tools
To use the "Master Dimmer", change the slider position. To disable that function right click on the slider.
3. 3. Live Desktop and Presets
In Live mode, you can control all your fixtures. For example, if you have scanners, two sequences are
enabled: one for the XY movement and another for the colors. You can add a gobo in live for example.
To select all the fixtures, we have the "Live Desktop" window, same as the Desktop window, but you
cannot move the fixtures...
Click on the "Live Desktop" button on the "Tools" menu.
The "Live Desktop" window appears.
Page 57
Page 62

Lucid DMX
V Playback tools
Select two scanners.
On the right area, you can see all the common presets.
We can control the XY position of two scanners.
Page 58
Page 63

Lucid DMX
V Playback tools
To enable that preset, click the "1" button.
The moving area is now enabled. You can control the positions. To disable the preset, click the "0"
button again.
You can deactivate all the presets with the "Preset Clear" button.
Page 59
Page 64

Lucid DMX
V Playback tools
4. 4. EasyRemote (tablet/smartphone control)
Easy Remote is a tool which allows you to control your lighting software remotely over a WIFI
connection using a tablet or smartphone.
EasyRemote Designer
A customized screen can be designed with the EasyRemote designer and then sent over to the tablet
or smartphone.
Select "EasyRemote Designer" to open the tool. Once your design has been saved as a .srm file click
"Send Setup to Device" to send the setup to the tablet or smartphone.
Select your device
When the designer is opened, you will first be asked to select the device you want to work with. The
designer's resolution will then be set accordingly.
Page 60
Page 65

Lucid DMX
V Playback tools
In the top right corner of the designer, you can save the remote design, create a new design or open a
saved design. On the left side, you are able to add or remove pages of controls to the design as well as
navigate between the pages.
Right click in a blank space to add a button, slider or text label.
Right clicking on a component allows you to:
-change the color
-change the text
-re-size the component
-convert to a push button
-remove the component
-pair with a software command
You can also drag and drop cues and sequences from Lucid DMX's live mode onto the EasyRemote
design area. In Desktop mode, you can drag and drop movement and RGB controls for fixtures onto the
EasyRemote design area.
The iPad app can be downloaded from the app store. Make sure the software and the iPad are both
connected to the same wireless network.
It is also possible to set up a direct connection between your computer and tablet or smartphone device
so that no wireless router is required. This is explained in more detail at the end of this topic.
Your device will detect all lighting control software instances on the network. Select the software
instance you would like to use. Your user interface will load automatically. (Do not forget to send the
.srm setup file from the software!)
Page 61
Page 66

Lucid DMX
V Playback tools
Editing your EasyRemote design
You can edit your design on the computer with the EasyRemote designer. Once you have edited and
saved your design either refresh the EasyRemote app (select "back", then select your software
instance) or resend the setup file from the software.
You can also edit your design from the EasyRemote app, however your changes will not be saved once
the design is reloaded.
-Click the lock icon in the top right
-Pinch a component to rise
-Drag the component to move
-Drag the component to the edge of the screen to move to another page
Page 62
Page 67

Lucid DMX
V Playback tools
Creating a computer-computer network
If you do not have a wireless network, you can create an Ad-Hoc network between your computer and
tablet or smartphone.
Windows XP
1.Open the Start menu
2.Click on Control Panel
3.Under Pick a category, click Network and Internet Connections
4.Under Pick a Control Panel icon, click Network Connections
5.Right-click your wireless network connection, and then click Properties
6.In the Wireless Network Connection Properties dialog box, click the Wireless Networks tab
7.On the Wireless Networks tab, under Preferred networks, click Add.
8.In the Wireless network properties dialog box, on the Association tab, type the name of your ad hoc
wireless network in Network name (SSID) box. For example, you could name your wireless network
"LightingControlNetwork".
9.Clear the The key is provided for me automatically check box.
10.Select the This is a computer-to-computer (ad hoc) network check box.
11.Create a password and type it in both the Network key and Confirm network key boxes. For the best
security, include letters, numbers, and punctuation. Then click OK.
12.Click OK again to save your changes.
Windows Vista
1.Open the Start menu.
2.Click Connect to
3.Click Set up a connection or network
4.Select Set up a wireless ad hoc network and click Next
5. Enter the new network name such as "LightingControlNetwork"
6.Enter a Security key
7.Check Save this network
Windows 7
1.Open the Start Menu
2.Click Control Panel
3.Click Network and Internet
4.Click Network and Sharing Center
5.Under Change your networking settings, click Set up a new connection or network
6.Select Set up a wireless ad hoc (computer-to-computer) network
7.Click on Next twice
8.Enter the Network name such as "LightingControlNetwork"
9.Select the Security WAP (or WEP)
10.Enter the Security key or password
11.Check Save this network check box
12.Click Turn on Internet connection sharing
Connect your tablet or smartphone in the same way as you would normally connect to a wireless
network.
Page 63
Page 68

Lucid DMX
VI Configuration tools
VI Configuration tools
1. 1. How to open the Library editor
Click the "ScanLibrary" button on the "Tools" tab.
The Scanlibrary software starts.
Now you can create or open a fixture's library.
Page 64
Page 69

Lucid DMX
VI Configuration tools
2. 2. General Settings
Click the "General Settings" button on the "Configuration" tab.
The General settings window appears.
2.1. 2.1 General
If you want to "Automatically start the last saved show" at startup, check this option. If you want to "Start
the 3D visualizer when you open the software" check this option. Select the MIDI device in the list. If
you want to protect the programming mode with a password, go to the Protections tab and click "Set
the Password".
Page 65
Page 70

Lucid DMX
VI Configuration tools
Set the password, confirm the entry and click "OK".
To reset the password, click "Reset the password"
Confirm the action by clicking "Yes".
Page 66
Page 71

Lucid DMX
VI Configuration tools
2.2. 2.2 Desktop
Click the "Desktop" tab.
Change the default icon size. You can see a global preview on the right.
Page 67
Page 72

Lucid DMX
VI Configuration tools
Change the text color.
Change the selection color. Now we can set the background picture, click "Explore".
Select a bitmap file.
Page 68
Page 73

Lucid DMX
VI Configuration tools
You can see a preview on the bottom.
Page 69
Page 74

Lucid DMX
VI Configuration tools
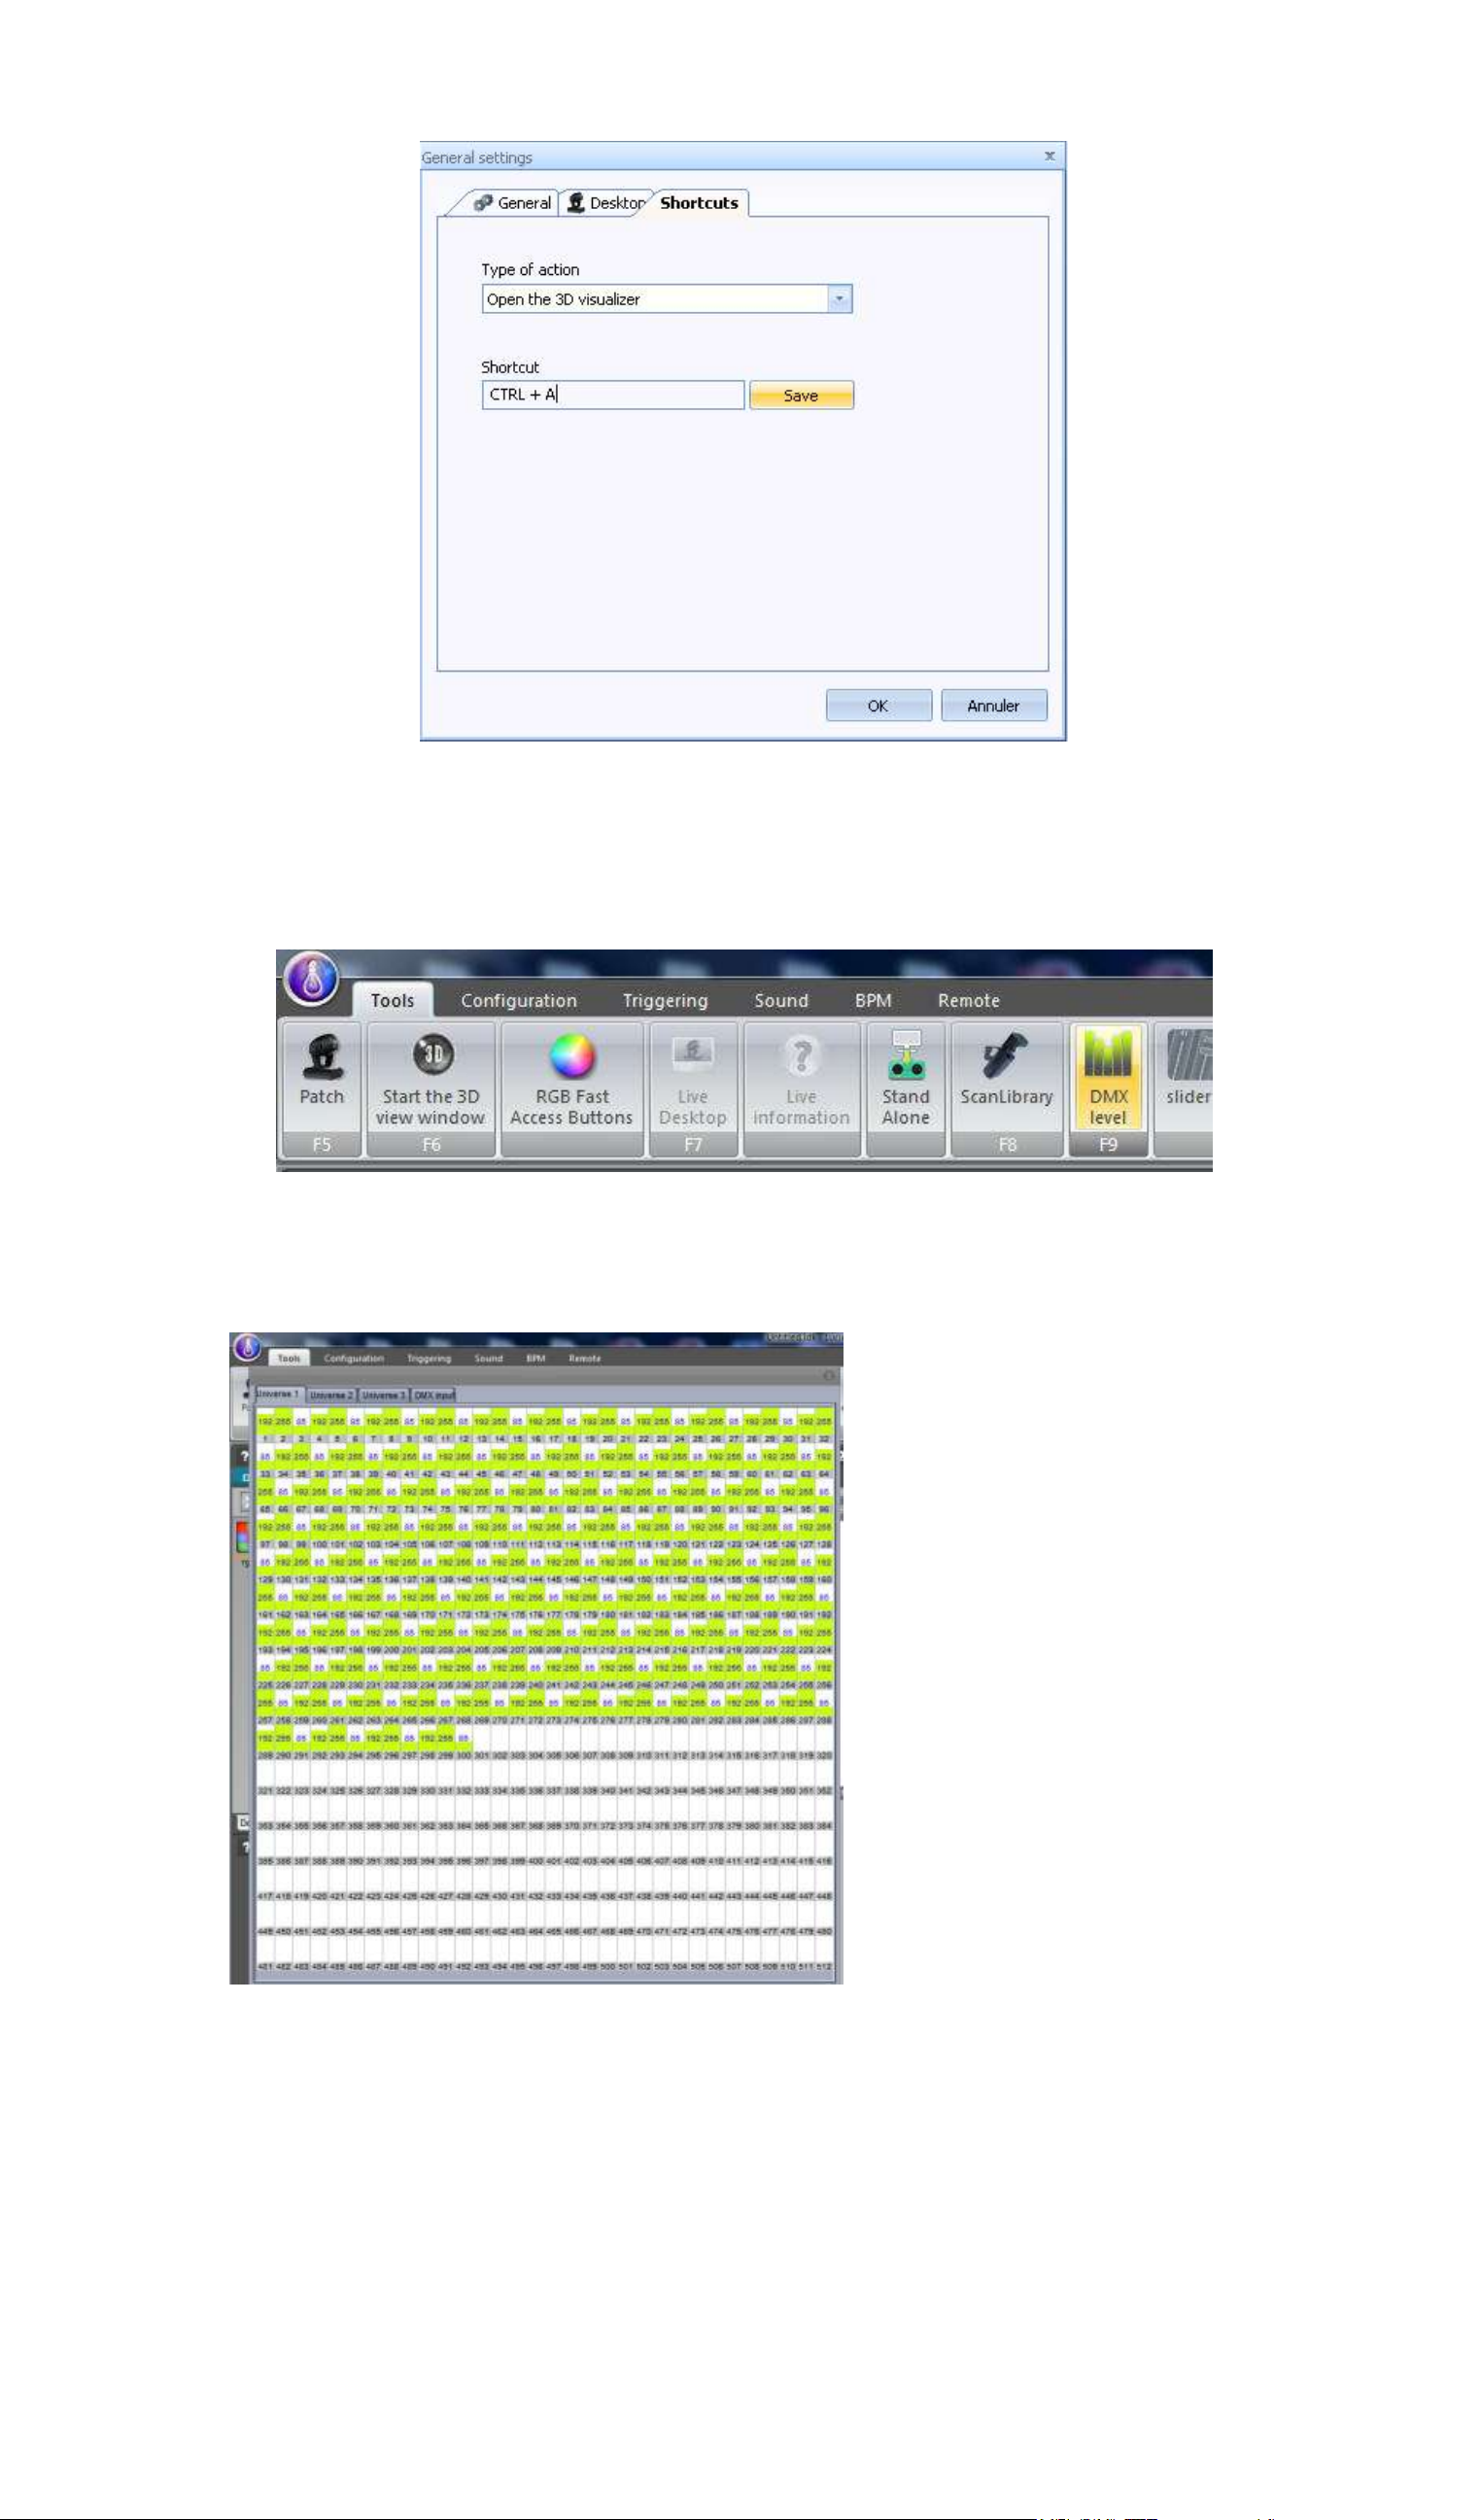
2.3. 2.3 Shortcuts
Select the "Shortcuts" tab.
Select the action to do when the shortcut is enabled.
Click the "Shortcut" edit box then press a key. Click "Save".
Page 70
Page 75
Lucid DMX
VI Configuration tools
3. 3. DMX Output levels
Click the "DMX Levels" button on the "Tools" tab.
The DMX levels window appears.
Page 71
Page 76

Lucid DMX
VI Configuration tools
The DMX Level is in green, in this example the value is 127 for the address 234.
Page 72
Page 77
Lucid DMX
VII 180IQ features
VII 180IQ features
1. 1. Setup and programming tools
1.1. MIDI and DMX IN Links
To link an Output DMX channel with a DMX Input channel or a MIDI channel, click the link input button.
If you have a CMY, RGB or XY preset, you can choose which channel you wish to link up with the MIDI
command.
Select the red channel.
Page 73
Page 78

Lucid DMX
VII 180IQ features
A waiting window appears.
Move a DMX board slider.
Click "YES" to add this link.
To see the Input DMX level click on the "DMX level" button on the "Tools" tab.
Page 74
Page 79

Lucid DMX
VII 180IQ features
Select the "DMX Input" tab.
If a MIDI board is connected to your PC you will have two choices: DMX Link or MIDI link. Select MIDI
Link then "OK".
Select the Green channel.
A waiting window appears.
Move a MIDI board slider.
Page 75
Page 80

Lucid DMX
VII 180IQ features
Click "Yes" to create this link.
2. 2. Playback tools
2.1. MIDI and Ports Triggers
To add a MIDI trigger you must plug in a USB MIDI Keyboard. A Keyboard icon on the status bar shows
that the MIDI functions are enabled.
Go to the "Live mode", right click on a Sequence or Cue button and select "Scan MIDI Input".
A waiting window appears.
Push a key on your MIDI keyboard.
Page 76
Page 81

Lucid DMX
VII 180IQ features
Now you can see a small MIDI keyboard icon, this icon means that the MIDI trigger is working on this
Sequence.
To add a port trigger, do the same as the MIDI trigger but select "Add a port triggering"
A window appears, select the port number and click "OK".
3. 3. Configuration tools
3.1. Configure the StandAlone Mode
To open the Stand Alone configuration window, click on the "Stand Alone" icon on the "Tools" tab.
The Stand Alone configuration window appears.
Page 77
Page 82

Lucid DMX
VII 180IQ features
The left tree list on this window shows the cuelist structure. Select the sequences and cues that you
want to add in the Stand Alone memory, then drag and drop them to the area on the right. The right area
shows the Stand Alone memory configuration. You can change the memory architecture at anytime
(delete sequences...).
Page 78
Page 83

Lucid DMX
VII 180IQ features
To write the configuration to the Interface's StandAlone memory, click the Update button. You can see
the available memory space through the right progress control.
Page 79
Page 84

Lucid DMX
VII 180IQ features
When the memory writing process is done, a popup window appears.
To use the USB/DMX interface in StandAlone mode configuration, you must use an external 9V DC
0.65A USB power supply.
Plug the 6V DC power supply in.
Page 80
Page 85

Lucid DMX
VII 180IQ features
To change the current sequence push the "+" button (the LED display show the current sequence).
Page 81
Page 86

Lucid DMX
VII 180IQ features
To come back to the previous sequence, push the "-" button.
Page 82
Page 87

Lucid DMX
VII 180IQ features
3.2. How to configure the multiuniverses mode
With the 180IQ version you can convert the DMX Input into a second DMX output. You will have
1024 DMX channels (2 DMX universes).
To convert the DMX input to an DMX output you need a DMX converter like the one pictured.
Plug the converter into the DMX input.
Plug your DMX cable into the converter.
Page 83
Page 88

Lucid DMX
VII 180IQ features
Now you have 2 DMX OUT lines.
Now the interface is configured to have one DMX Output and one DMX Input. There is "PC" on the
display and the red LED (showed by the arrow on the picture) is not blinking.
Page 84
Page 89

Lucid DMX
VII 180IQ features
Click the "Hardware" button on the "Configuration" tab.
The "Hardware settings" window appears.
Page 85
Page 90

Lucid DMX
VII 180IQ features
Drag from the port on the interface to the Universe 2 port displayed below
You can check that you have two DMX universes on the Patch window.
Page 86
Page 91

Lucid DMX
VII 180IQ features
The interface shows "CP" and the red LED is blinking.
3.3. How to test the ports
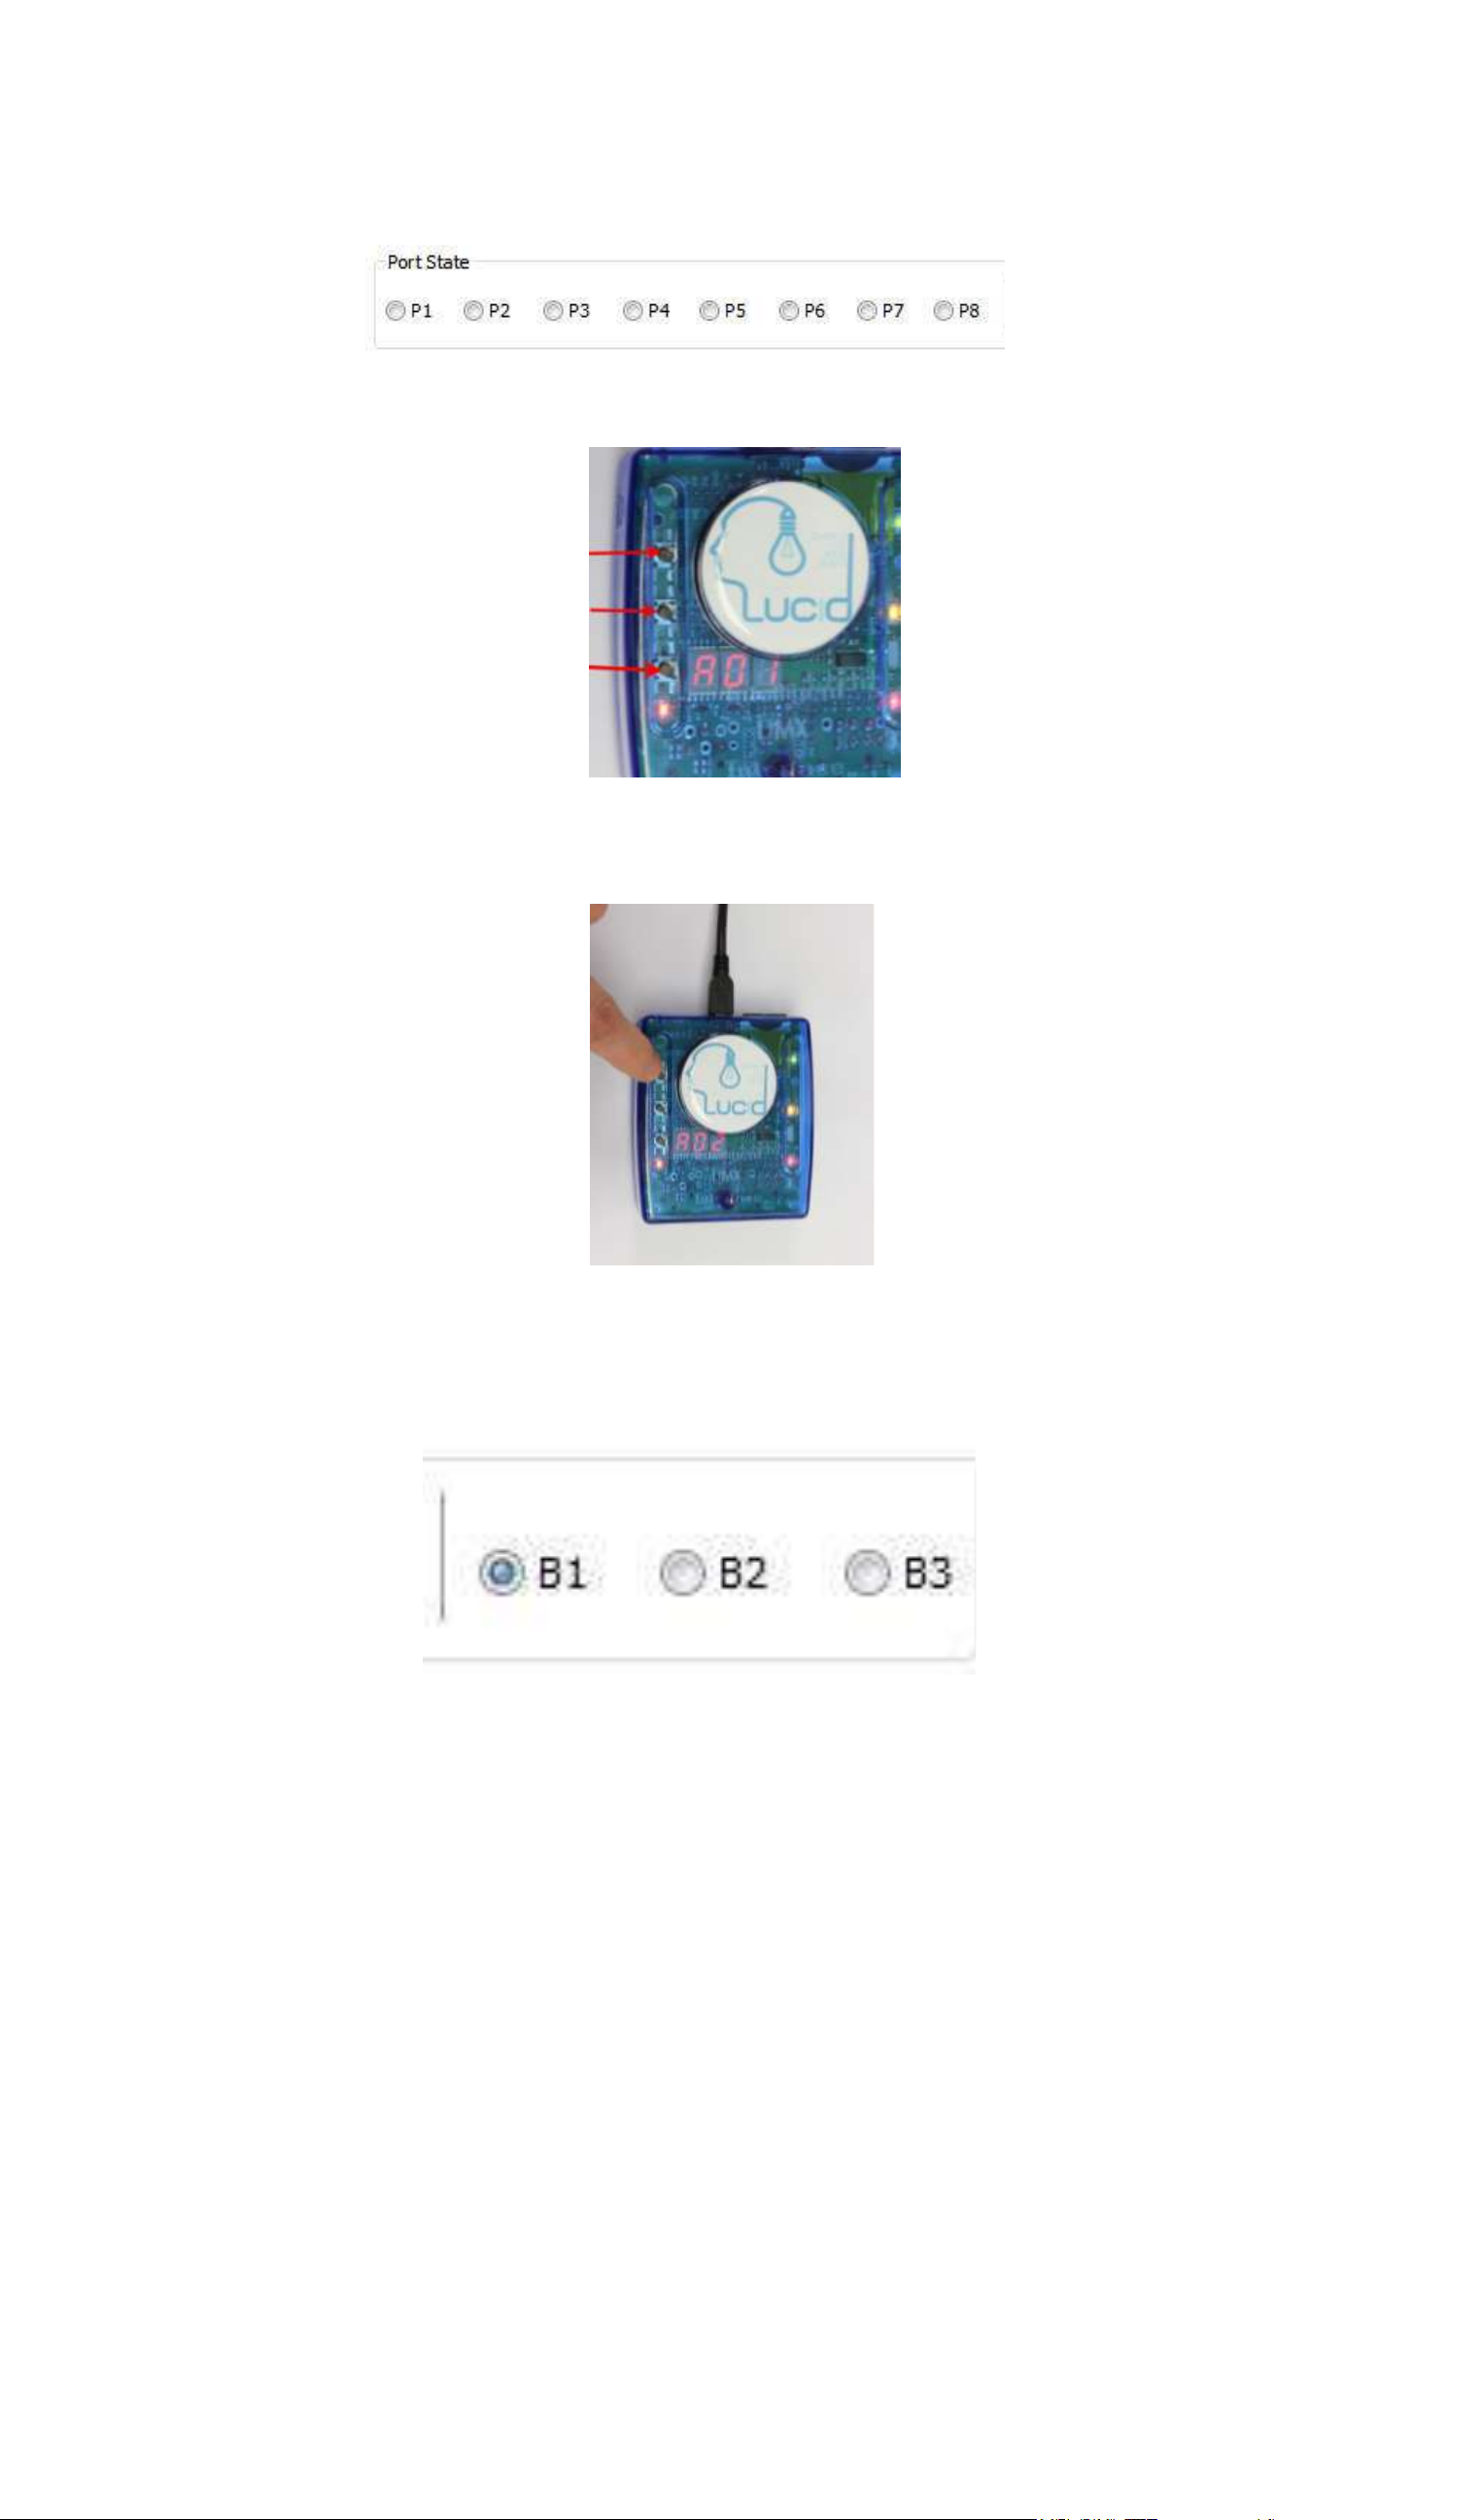
To open the Hardware configuration window, click on the "Hardware" icon on the "Configuration" tab.
The Hardware configuration window appears. You can see the HE-10 port item in the top left area of
the window.
Plug you port panel to the HE10 interface port socket. Push some buttons to test your panel.
Page 87
Page 92
Lucid DMX
VII 180IQ features
You can check that your panel is working fine within the tools.exe program in the software. When the
port is enabled, the LED is green.
This tool can check the interface's buttons.
Push a button.
If the button is working fine you'll see a green LED on the control.
Page 88
Page 93

Lucid DMX
VIII FAQ - Troubleshooting
VIII FAQ - Troubleshooting
Fixtures going crazy
1. DMX addresses
Make sure the addresses for your lighting fixtures are the same as those defined within the software
controller. You can check the addresses from the control software.
2. Fixture profiles/libraries
Sometimes fixtures have different "modes" that increase the number of channels or swap them around.
Make sure you are using the right profile for your fixtures.
3. DMX cable
If you are still having problems, try using a different cable (make sure it is a good one).
Software and/or interface do not work
1. Check the USB interface
Connect the interface to the computer. You should see 3 LEDs turn on, green, yellow, and red. Green
should be blinking slowly. Yellow should be completely on. Red should be blinking fast.
If none of the LEDs are on, check the back of the interface, there is a small switch that turns power
ON/OFF. If only the yellow LED is on, then your interface is broken, please contact your retailer to have
it replaced.
2. Check software/interface communication
Connect the interface to the computer BEFORE you start the software. After you open the software, the
green LED should start blinking fast. If you go to the “?” menu, then “About”, a popup window will
appear with our logo in it. You should be able to read software name and a release date for the
software. If there is good communication between the software and the interface, you should see a
description of your interface inside this box as well.
If the green LED is not blinking fast, or you do not see the red letter description, there is no
communication between the software and the interface. You probably did not install the drivers
correctly.
3. Check the interface drivers
If you are using Windows XP, reconnect your interface to any USB port (a different one, if possible).
Windows will tell you whether the hardware found is new or already installed in your computer.
If it is new, the NEW HARDWARE WIZARD window will appear. Insert the installation CD in your
computer, and select Automatic Search (if you do not have the installation CD, go to the
Support/Downloads section in our website). Click “Continue Anyway” when Windows asks you about
verification.
After this, Windows should tell you that your device is ready to be used. Restart the software and check
communication (previous step).
Page 89
Page 94

Lucid DMX
VIII FAQ - Troubleshooting
4. Double-check interface drivers
If during the installation of the drivers, when asked about Windows verification and compatibility, you
selected "Stop installation" instead of "Continue anyway", the drivers will not be installed correctly.
To check if the drivers were installed correctly, you should go into
- Windows Control Panel - System - Hardware - Device Manager
You will see a list that includes all USB devices. If the interface is connected and the drivers are
installed correctly, the name of the device will be "Intelligent Usb Dmx Interface". If, on the contrary, you
read "Unknown device" with a yellow exclamation point next to it, the drivers are not installed correctly.
To fix this:
- Uninstall unknown device
- Disconnect USB interface, wait a couple seconds, and reconnect
- The "Add New Hardware Wizard" will appear, just follow the instructions (previous step)
- Make sure you select "Continue anyway" when asked about Windows verification and compatibility
5. Test on a different computer
If nothing seems to work, please try testing on a different PC before contacting your retailer to get an
exchange. Typically, you should only ask for an exchange if:
- No LEDs turn on, even when you have moved the power switch in the back of the interface
- Only the yellow LED turns on
- The drivers seem to be installed correctly, but the interface/software does not work, and the Device
Manager name for the USB device is "SUIDI-OUT" instead of "Intelligent Usb Dmx Interface"
Page 90
Page 95

Lucid DMX
IX Appendices
IX Appendices
1. DMX512 brief description
By the time you are done reading this section, you will understand how DMX works and why the lighting
world uses this standard communication protocol. For a more technical and detailed description, please
visit www.dmx512-online.com
1. The need for a standard
About 20 years ago, most lighting and console manufacturers had their own proprietary communication
protocols. During installations, it was necessary to use all lighting fixtures from the same manufacturer,
of course with their own controller board. If you wanted to use lighting fixtures from different
manufacturers (even simple dimmers), each group required their own lighting desk. It is clear that a
standard form of communication between controllers and the fixtures was necessary.
2. Understanding DMX
To understand the DMX512 communication protocol (commonly referred to as “DMX”), we will use the
“Cable TV” analogy.
Imagine a simplistic cable TV system, with only 4 relevant parts:
a. TV station
b. cable
c. decoder
d. TV set
The TV station broadcasts a signal that travels through a cable network until it reaches a decoder. The
decoder receives information on hundreds of channels, but only displays on the TV set the information
(in this case video and audio) from that single channel that we select. The TV set ignores the
information from any channel that is not selected. It only displays the information from the channel
selected in the decoder.
DMX can be related to this cable TV system, where:
a. the TV station is the controller (Lucid)
b. the cable is a DMX cable
c. the cable decoder is the DMX decoder (which usually is inside each lighting fixture)
d. the TV set is the lighting fixture
In DMX, the number of channels that are broadcasted is always 512. Maybe some of them will be
empty or unused, but they are still broadcasted because it is a necessary component of the standard.
So, the controller sends out a signal (512 channels of information), which travels through a DMX cable
until it reaches the decoder inside the lighting fixture. In the same way you set the channel you want to
Page 91
Page 96

Lucid DMX
IX Appendices
watch on your TV, in a lighting fixture you set the channel that you want your fixture to display the
information for. This is known as the DMX address.
In other words, if I set my lighting fixture to channel 21, then my fixture’s DMX address is 21. Both
expressions are common in the lighting world.
Example
Imagine we have a DMX dimmer that controls a simple light bulb. This dimmer is set to DMX address
21, so the lighting fixture will only receive the information from channel 21 and ignore the rest.
We have a controller that sends a signal through a DMX cable and this cable goes into a decoder (the
DMX dimmer) that receives the signal. So if the controller sends the “turn on” information on channel
21, the dimmer will turn on the light bulb.
Conventional lighting fixtures (simple dimmers) require 1 channel of information only. However,
intelligent lighting fixtures require more than 1 channel to work. For example, if I have a lighting fixture
that requires 5 channels of information, and its DMX address is 21 (again, address is the first channel
used by the fixture), then this fixture will use channels 21, 22, 23, 24, 25. The decoder knows that the
fixture needs 5 channels of information, so it will decode 5 channels only and ignore the rest. The
controller knows the fixture uses 5 channels also, so it will send 5 channels of information.
Example
Imagine you have a very simple robotic moving head that uses 5 channels:
1. pan
2. tilt
3. color wheel
4. gobo wheel
5. dimmer
You set your moving head to address 21 and you tell the controller that you have this particular moving
head on address 21. The controller then knows that channel 23 corresponds to color wheel, for
example. If you want to change the color of the light beam, you tell the controller what color you want,
the controller automatically sends this information through channel 23, and the lighting fixture reacts
accordingly.
Typically, intelligent lighting fixtures use 1 channel (sometimes more) for every function they can
perform (color, gobo, prism, dimmer, etc). Some robotic moving heads use over 20 channels, some
simple scanners only 4 channels, etc.
3. The protocol
So far, we’ve been referring to “information” traveling through DMX cables from the controller into the
fixture’s decoder. This “information” is nothing but a number between 0 and 255. This number is called
the DMX value for a particular channel. Then, the DMX signal is nothing but a series of DMX values
along 512 DMX channels.
Example
Back to our 5 channel simple robotic moving head; channel 3 controls the color wheel, which has 25
Page 92
Page 97

Lucid DMX
IX Appendices
different color combinations. The color displayed will depend on the DMX value on channel 3 (as it is
being sent by the controller) as follows:
0-10 White
11-20 Red
21-30 Purple
…
241-255 “whatever color”
So, if the lighting fixture receives a DMX value of 25 for Channel 3, it will display the Purple color. If that
DMX value changes to 15, it will automatically change to Red, and so on.
Luckily for us, the Lucid software (and most controllers) includes profiles for these lighting fixtures.
These profiles contain all the DMX values and channel information required to have full control of the
lighting fixture. Typically, all you will need to do is set the DMX addresses right, and the controller will
make everything else easy (some controllers are easier to use and learn than others, but that is the
overall idea).
When a lighting fixture is manufactured, a DMX chart is provided in the user’s manual. This DMX chart
contains all the information that controller manufacturers need to create these profiles. Most controllers
include only the most popular fixtures in their particular market. We can proudly say that Lucid (and
our OEM partners) are the only controllers with over 2,000 different profiles from manufacturers from all
around the world, so no matter where you purchased your lighting equipment, chances are we will have
profiles for it, which will allow you to control them without a problem.
Page 93
 Loading...