

Page 1
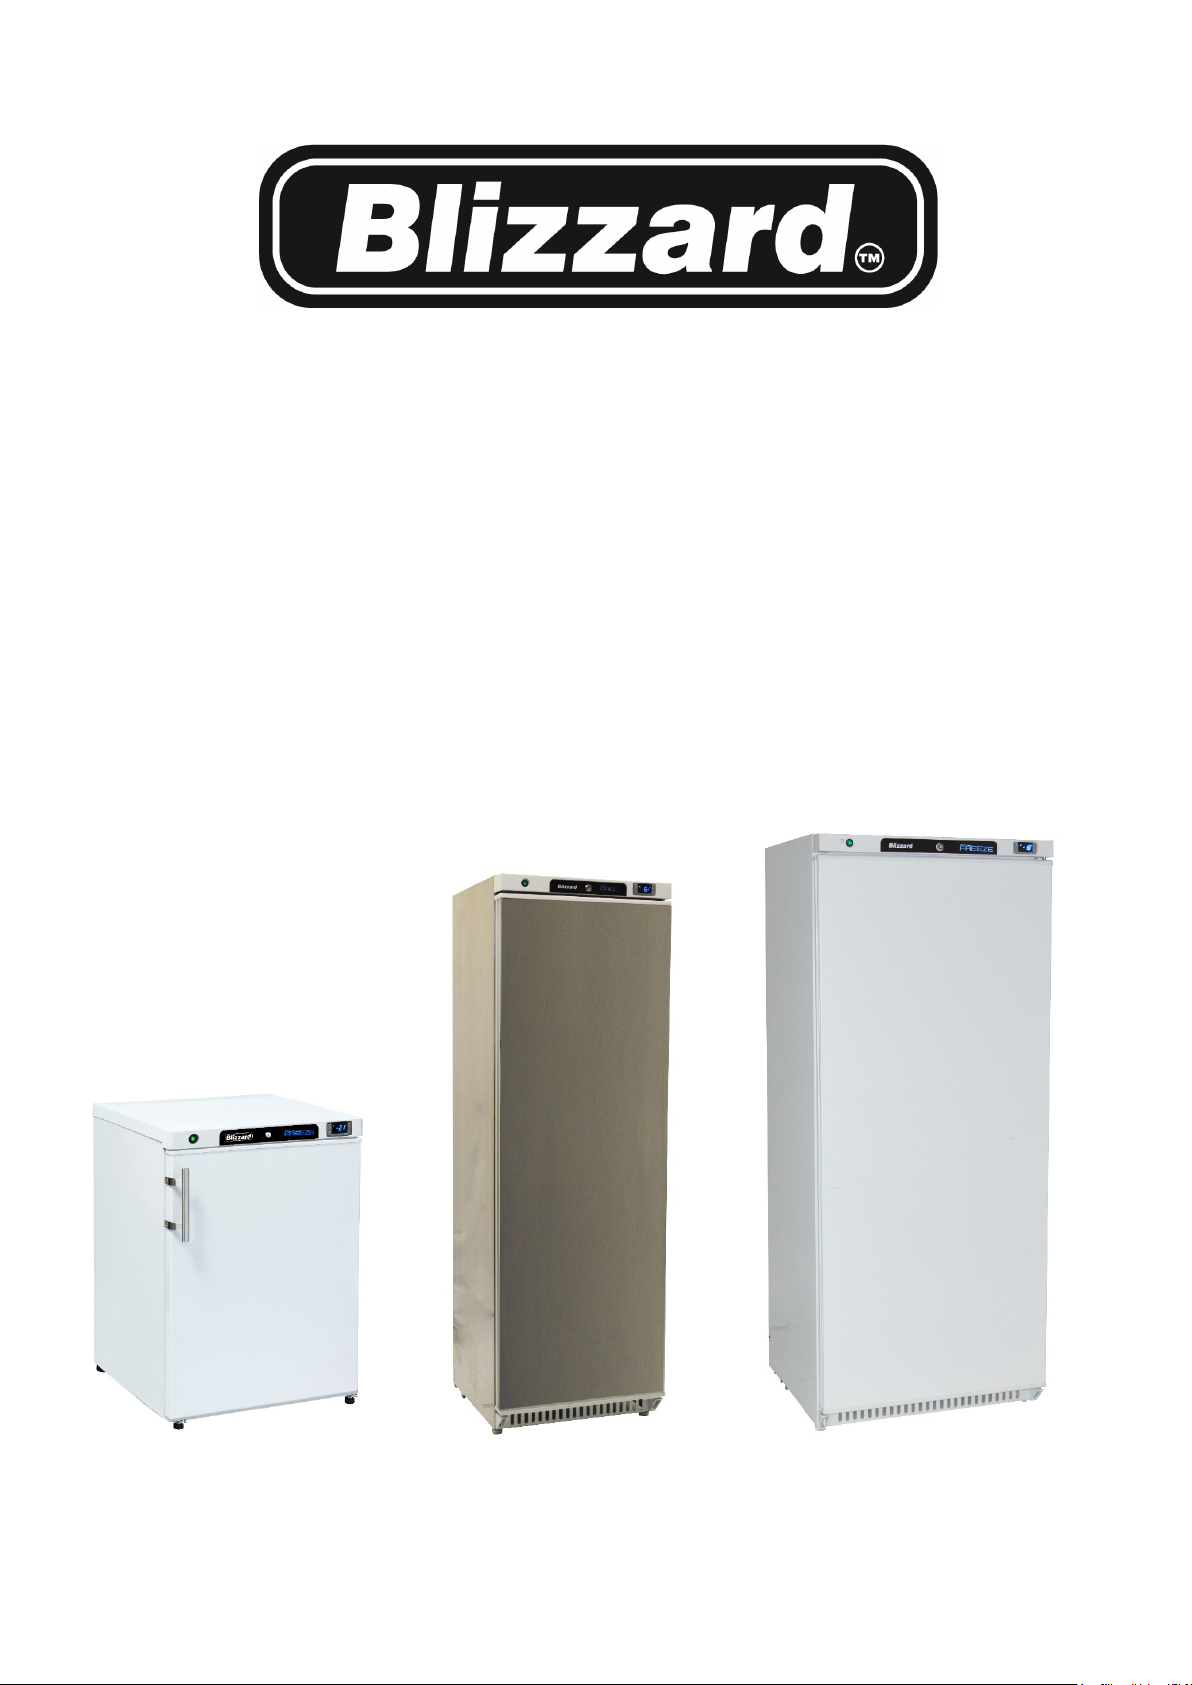
Refrigerators and Freezers
H200/400/600
L200/400/600
Page 2
Original Instruction
Dear Customer,
Congratulations on your purchase of this product. Like all our products , this product has also been
developed on the basis of the latest technology and produced using reliable and modern electrical components.
Please take a few minutes before starting operation of the appliance and read the following operating instructions. Save this manual for
further reference.
Table of contents
Safety Tips..............................................................................................................................................................................................2
Intended Use .........................................................................................................................................................................................3
Parts ................................................................................................................................................................................................ 3 - 4
Location and Installation ........................................................................................................................................................................5
Power Requirements .............................................................................................................................................................................5
Starting Up .............................................................................................................................................................................................6
Operation ...............................................................................................................................................................................................6
Temperature setting and control(EVCO) ...............................................................................................................................................7
Defrosting Procedure .............................................................................................................................................................................8
Changing the Door Hinge ...............................................................................................................................................................8 - 13
Cleaning, Care & Maintenance ............................................................................................................................................................14
Trouble shooting ...................................................................................................................................................................................15
Disposal ...............................................................................................................................................................................................16
Technical data .................................................................................................................................................................................16-17
Warranty ............................................................................................................................................................ .................................17
.
GB
1
Page 3
GB
Safety Tips
2
Page 4
Intended Use
Only use this appliance for cooling and storage of food and beverage for commercial purposes.
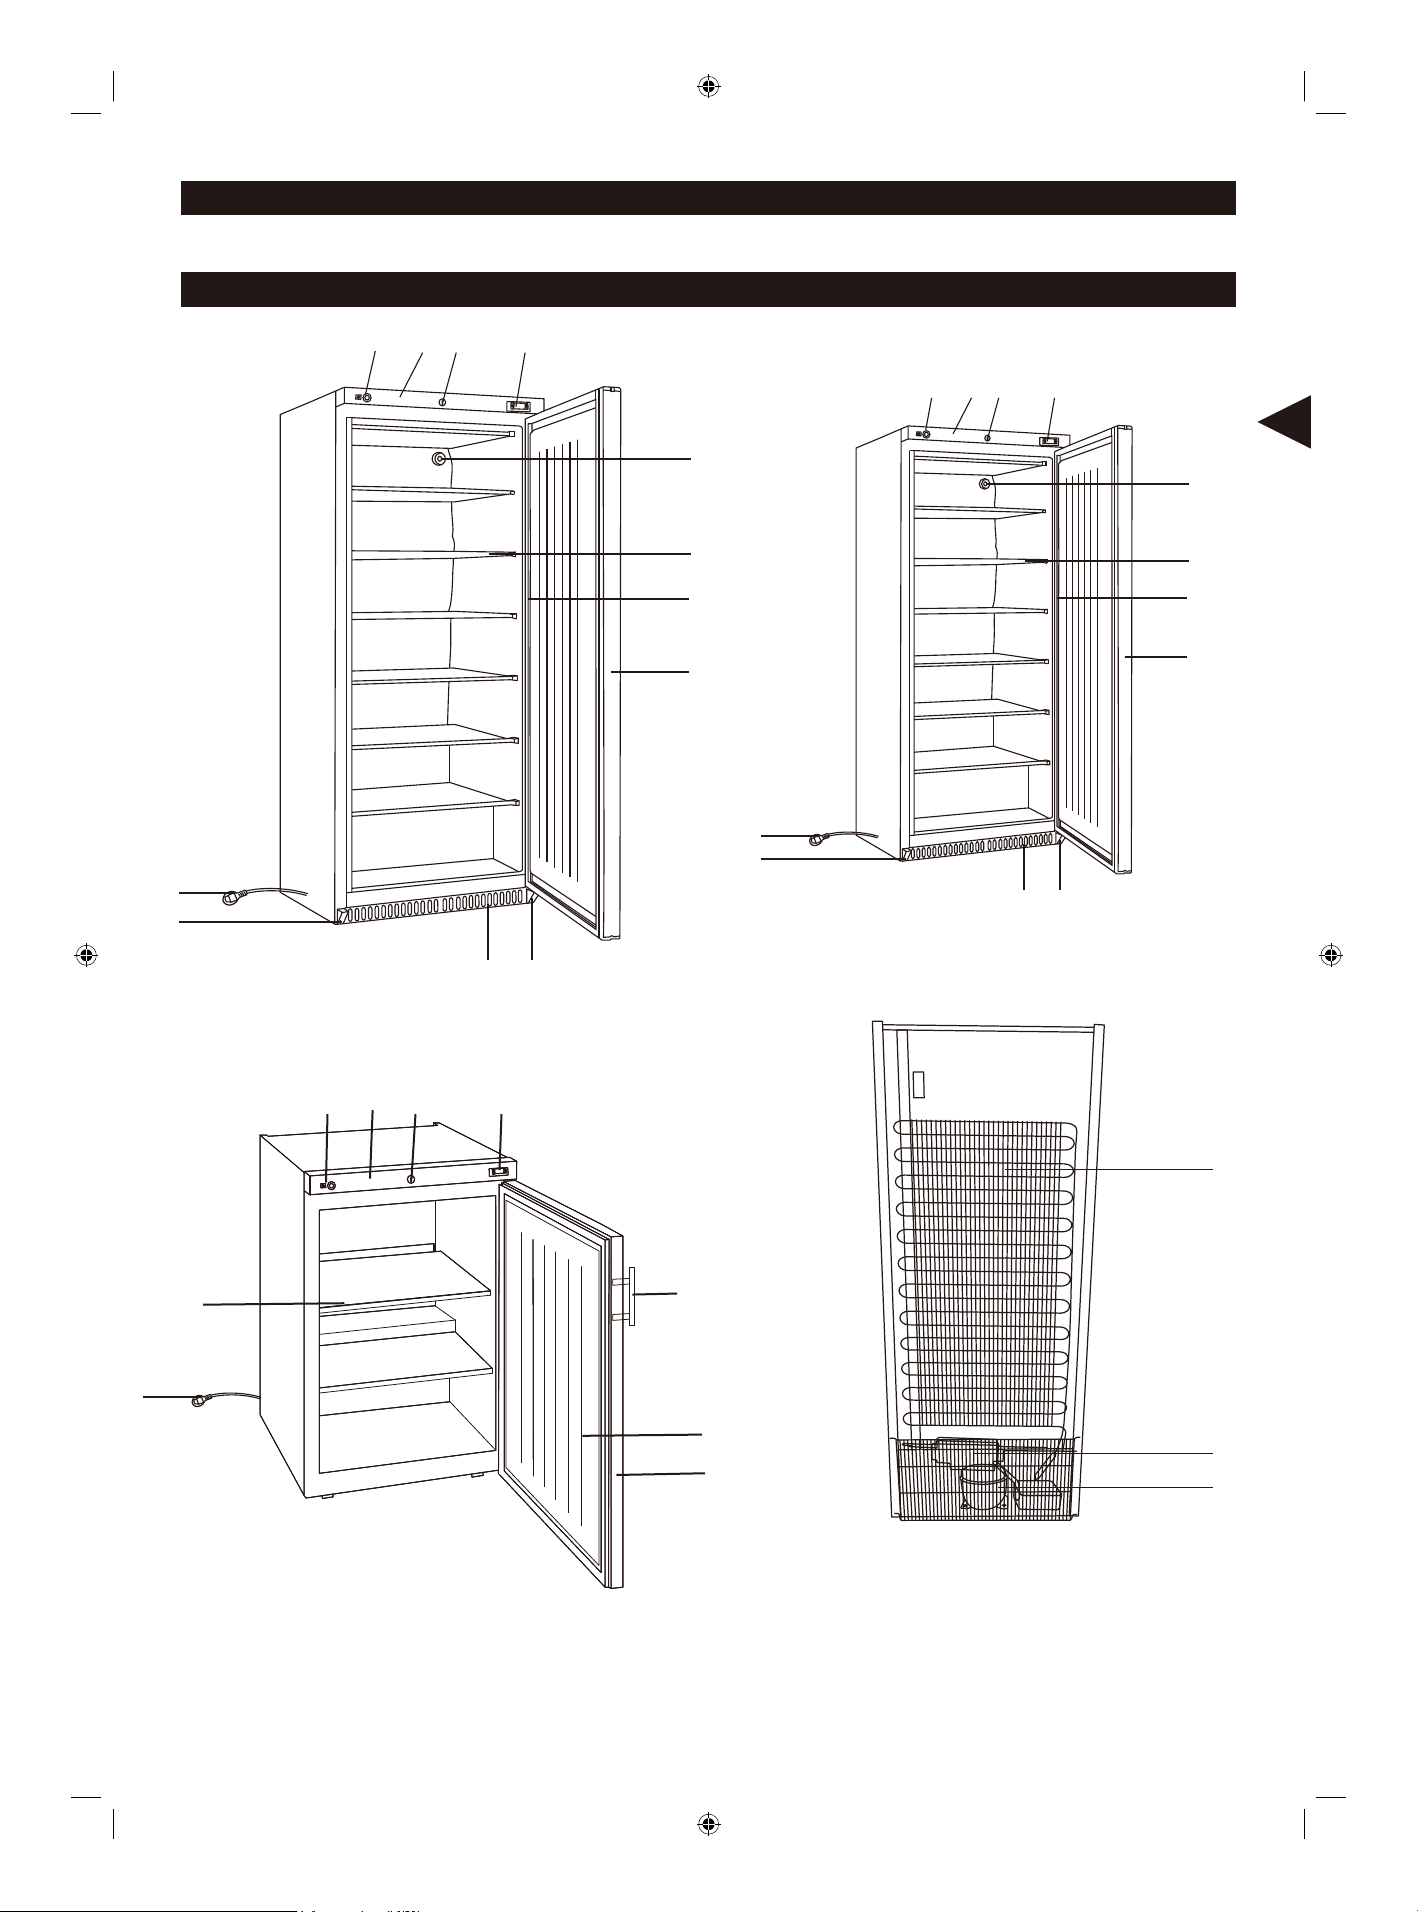
Parts
9
10
Freezer
1 2 3 4
1 2 3 4
GB
5
5
6
7
6
7
8
8
9
10
11 12
RN600
11 12
RN400
1 2 3 4
14
6
9
16
8
15
RN200
7
Main switch (Optional)
1.
2. Front panel
3. Lock
4. Controller
5. Pressure valve* (see remark)
6. Evaporator / shelf
7. Gasket
8. Door
Remark: It keeps the inside and outside pressure of the freezer in the
3
same level for easy door opening.
9. Plug
10. Door support
11. Down panel
12. Door down hinge
13. Compressor
14. Condenser
15. Condenser fan motor only for 400L
16. Handle
13
Page 5
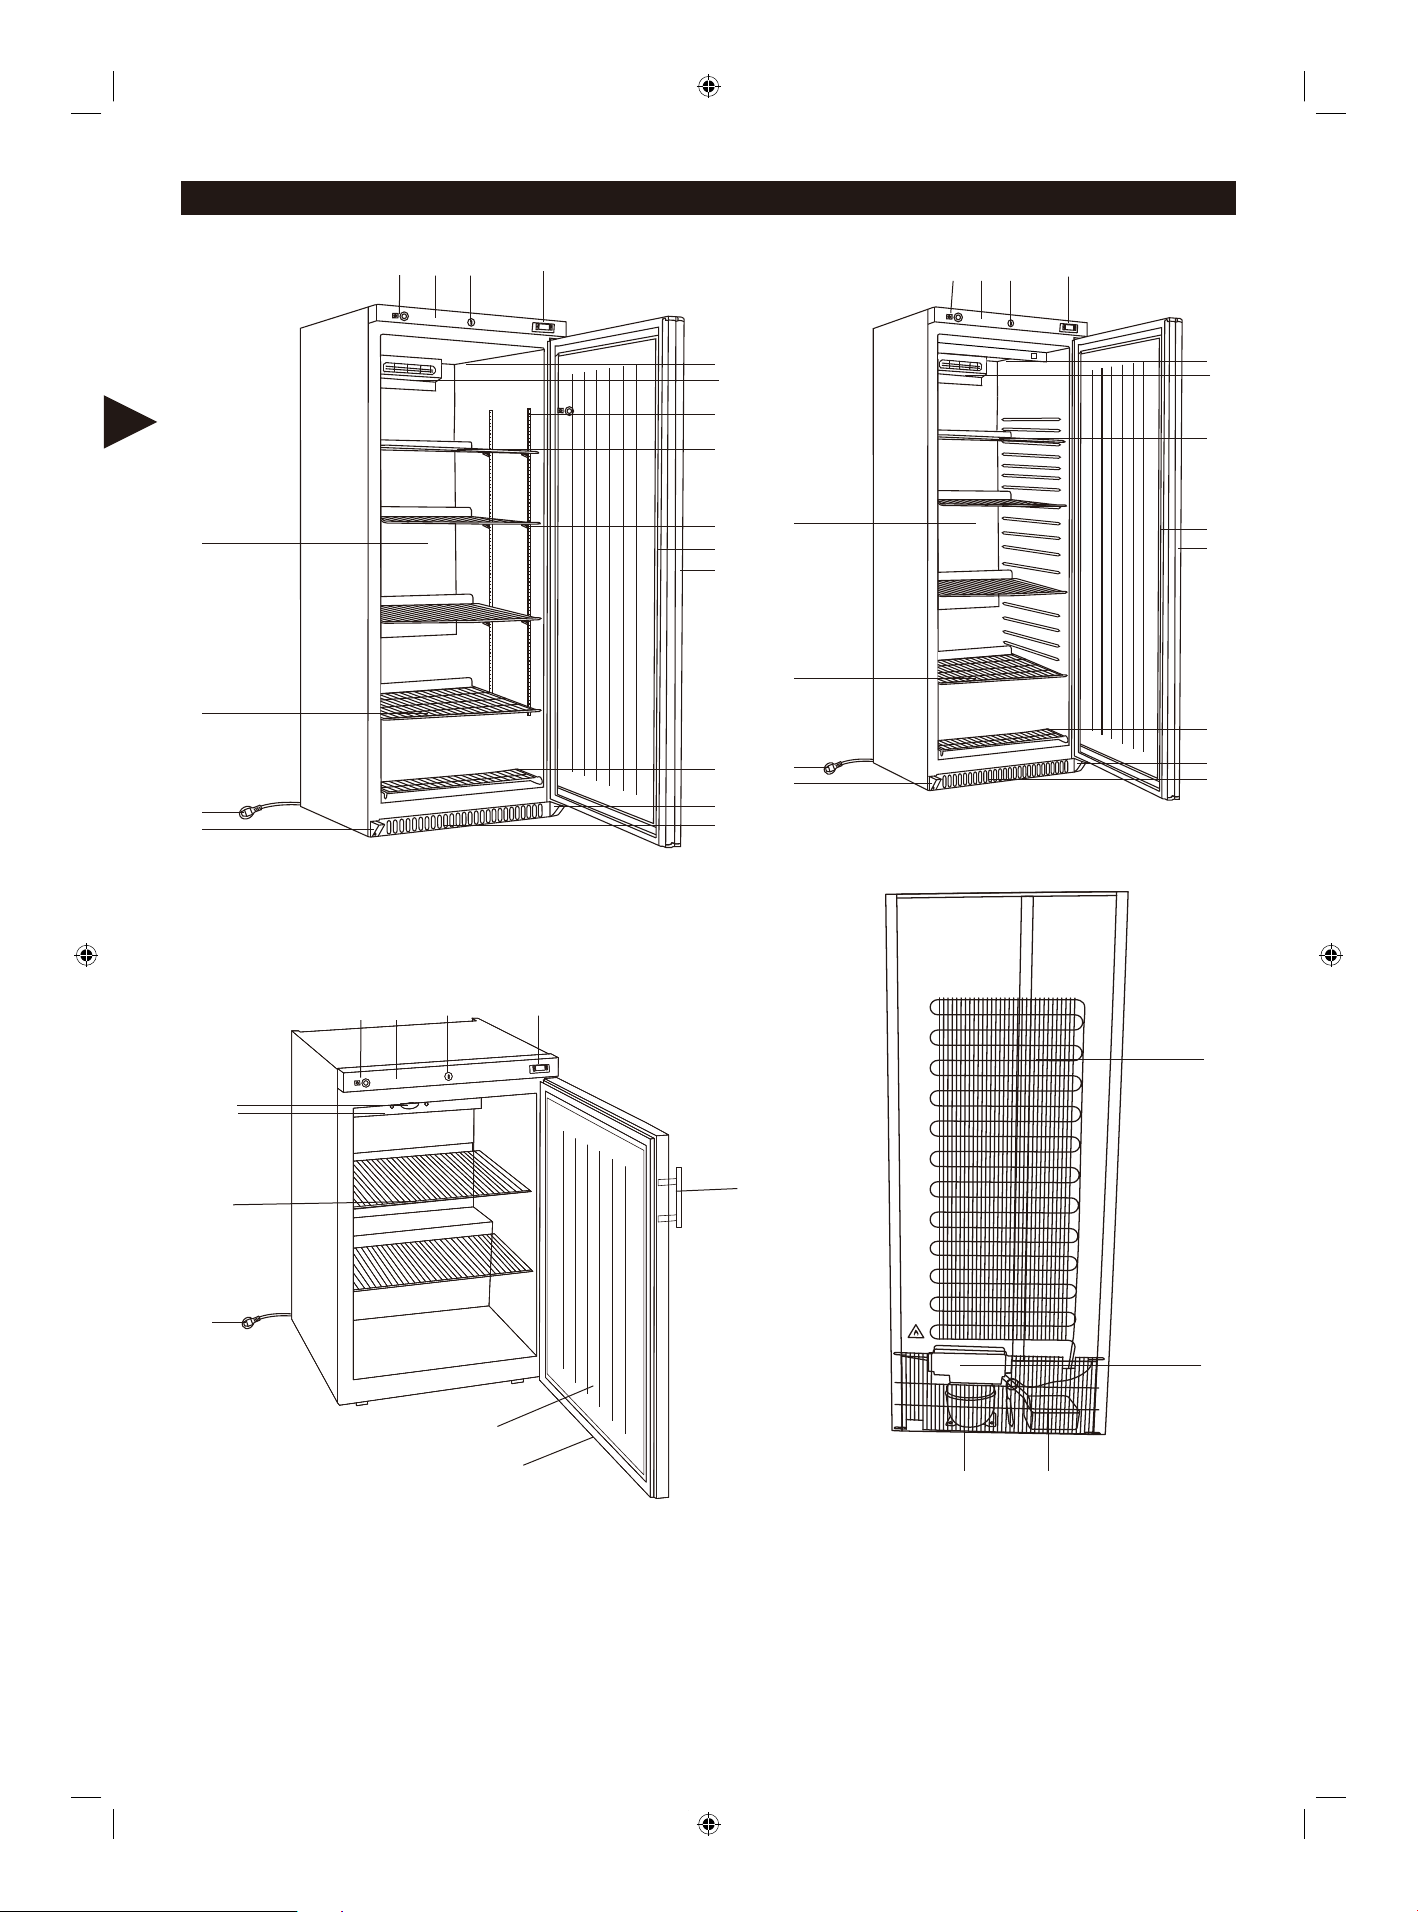
Parts
Refrigerator
1 3 42
1 3 42
GB
17
19
16
15
RC600
5
6
7
8
9
10
11
12
13
14
17
19
16
15
RC400
5
6
8
10
11
12
13
14
1 3 42
22
5
6
8
16
11
10
RC200
23
21
20 18
1.
Main switch (optional)
2. Front panel
3. Lock
4. Controller
5. Fan panel
6. Fan
7. Shelf support
8. Shelf
9. Clip
10. Gasket
11. Door
4
12. Small shelf
13. Door down hinge
14. Down panel
15. Door support
16. Plug
17. Evaporator
18. Water container
19. Discharge outlet
20. Compressor
21. Condenser fan
22. Condensator
23. Handle
Page 6
Location and Installation
The cabinet should be placed in a room that is dry and sufficiently ventilated. To operate efficiently it should not be
positioned in direct sunlight or near warm appliances. Please note that optimal cabinet performance is obtained at an
ambient temperature between +16 °C and +35 °C.
Freezer, Refrigerator: By placing the cabinet in an environment with high air humidity, it may be necessary to acquire extra equipment
for evaporation of the drip water in the pan near the compressor.
The cabinet can be installed freestanding against a wall.
Important
The cabinet must have sufficient ventilation and free air circulation beneath, above and behind the cabinet. The legs under the
cabinet will help ensure sufficient air space.
• Remove the appliance from the packaging. Make sure that all protective plastic film and coatings are thoroughly removed from all
surfaces. To prevent injury or damage to the unit, we recommend that the appliance should be unpacked and set up by two people.
• The appliance should be placed on a solid level floor to reduce noise and vibration. Level the appliance by adjusting the screw feet.
• Check that the power supply and voltage used comply with the details on the rating plate. The plug must be accessible after installation
• Correctly connect and disconnect the plug. When inserting ensure the plug is fully engaged. When unplugging do so by holding the
body of the plug. Never pull the supply cord directly.
• If the appliance is to be shut down for long period, switch it off and disconnect the plug from socket outlet. Clean the appliance and
leave the door open to prevent odour.
• Important! For your personal safety, this appliance must be properly grounded (earthed). This appliance is equipped with a cord having
a grounding wire with a grounding plug. The plug must be insert ed into an outlet that is properly grounded and installed. Consult a
qualified electrician or service center if you do not completely understand the grounding instructions. If doubt exists whether the
appliance is properly grounded, have a qualified electrician check the circuit to make sure the outlet is properly grounded.
• If the cable does not reach the nearest socket, either rearrange your store layout or ask a qualified electrician to fix a ne w socket.
• If power is cut off, wait for at least 3 minutes before restarting the appliance to avoid damaging the compressor.
GB
Note: If the unit has not been stored or moved in an upright position, let it stand upright for approximately 12 hours before operation.
Note: Before using the appliance for the first time, clean the shelves and interior with soapy water.
Power Requirements
The cabinet is intended for connection to an alternating current. The connection voltage (V) and frequency (Hz) are shown on the
nameplate in the cabinet. The power connection is made using a three-pin plug to a wall socket. Any requirement for earthing from
the local power supply must be met. The cabinet plug and wall socket should then give a correct earthing. If you are in doubt,
contact your local supplier or authorized electrician.
Warning - This appliance must be earthed
The flexible cord fitted to this appliance has three cores for use with a 3-pin 13 Amp plug. If a B.B. 1363 (13 Amp)
fused plug is used, it should be fitted with a 13 Amp fuse or a moulded right-angled Schuko plug. Note the plate with a
hole in it between and above the two pins - this connects to French and Belgian sockets, which have an earth pin that
sticks out. Running in a slot coming from that plate is a continuation strip from the plate. Other European countries use
a socket with a scrolled metal connector emerging from the side which mates with that strip. This ensures that the
Schuko can be used in most mainland European countries.
Important
The wires in this mains lead are coloured in accordance with the following code:
Green-and-yellow: earth
Blue: neutral
Brown: live
The colours of the wires in the mains lead of this appliance might not correspond with the coloured markings identifying the terminals in
your plug. Proceed as follows:
The wire which is coloured green-and-yellow must be connected to the terminal in the plug which is marked “E”, marked by the earth
symbol or coloured green-and-yellow. The wire, which is coloured blue, must be connected to the terminal, which is marked with the
letter “N”, or coloured black. the wire which is coloured brown must be connected to the terminal which is marked with the letter “L” or
coloured red.
5
Page 7

pU gnitratS
GB
Plug in the cabinet.
Main switch
The display shows the actual cabinet temperature
Servicing
Make sure the appliance is switched off at the mains before service is performed on electrical parts.
Lock Thermostat Display
Operation
Storing food
To get the best results from your appliance, follow these instructions:
• Only store foodstuffs in the appliance when it has reached the correct operating temperature.
• Always close the door, when not in use and appliance is switched on.
• Do not place uncovered hot food or liquid inside the appliance.
• Wrap or cover food where possible.
• Do not obstruct the fans inside the appliance. (Refrigerator)
• Avoid opening the door for prolonged periods of time.
• The maximum load for a shelf is 25 kg.
• The food must be put into container before placed into cabinet or on the shelf. Food must not be placed into food cabinet directly.
Turn on
• Close the door of the appliance.
• Ensure the power switch is set to [O] and insert plug into socket.
• Switch on the Power [I]. The current temperature within the appliance is displayed.
• The on the display will flash for 3-min to indicate a delay between the motor compressor being stopped and then restarted.
Temperature setting and control
Thermostat display and control panel
1 2
6
SET
4
3
1. Defrosting light
2. Compressor operation light
3. Digital thermostat
4. Programming key (Service agent only)
5. Temperature modifi cation keys
6. Manual defrost
How to see the set point
• Push and immediately release the SET key, the set point will be showed;
• Push and immediately release the SET key again or wait about 5s to return to normal visualisation.
How to change the set point
• Push the SET key for more than 2 seconds to change the set point value;
• The value of the set point will be displayed and the “°C“ starts blinking;
• To change the set value push the „ ” (up) or „ ” (down) arrows within 10s.
• To memorise the new set point value push the SET key again or wait 10s.
5
6
Page 8

Temperature setting and control (EVCO)
The front panel of the thermostat
1. Compressor operation light
2. Defrosting light
3. Energy saving light
4. Stand-by light
5. Programming key (service agent only)
6. Machine On/Stand -by (keep pushed)
7. Manual defrost (keep pushed)
GB
How to unlock the keyboard (»Loc» message)
- Push any button for more than 2s, «UnL» message will appear and the keyboard will be unlocked.
Note:for safety reasons the keyboard locks automatically after 30s of keys inactiv
T
o execute any operation, please unlock the keyboard first.
How to see and mo
- Push and immediately release the key, the set point will be showed and starts blinking;
- To change the set value push or arrows within 20s.
- To memorize the new set point value push the key again or wait 20s.
Automatic defrost
The appliance will automatically run defrost cycles.
Note: the cycle starts from the time the appliance is initially powered up.
To manually defrost the applicance:
- Press and hold the DEFROST button for 3s;
-
The defrost cycle will start immediately and the Defrost LED illuminates.
Note: Starting a manual defrost also resets the automatic defrost timer. The next automatic defrost will start according
to the set parameter after the manual defrost has finished.
dify the set point
ity.
How to turn the machine in ON / STAND -BY status
- Press and hold the
During the button hold the LED will blink to show status changing.
key for 4s, the machine will turn from ON to STAND -BY status and vice-versa.
7
Page 9

Defrosting Procedure
Refrigerator:
Automatic Defrosting using automatic water evaporation.
Automatic defrost
The appliance will automatically run defrost cycles
Note: The cycle starts from the time the appliance is initially powered up.
To manually defrost the appliance:
GB
wait until all the ice inside has been melted. The condensation water must be collected.
• Press and hold the DEFROST button for 5 seconds.
• The defrost cycle will start immediately and the Defrost LED illuminates.
Note: Starting a manual defrost also resets the automatic defrost timer. The next automatic defrost will start according to the set
parameter after the manual defrost has finished.
Freezer:
Manual defrosting by switching off and disconnecting the plug from the mains socket. Please empty the freezer first and
Never use a sharp or pointed object that may damage the freezer / refrigerator.
egniH rooD eht gnignahC
The door can be changed from right hand-hinged to left hand-hinged, or vice versa.
To do so, proceed as follows:
1. Switch off power and disconnect from the main socket
Hinge 3 (Upper door hinge)
Hinge 4 (Lower door hinge)
Hinge 1*
(see remark)
Remark: It has a small roller that helps slide the door when closing and function as a door support.
Hinge 2
8
Page 10

3. Take off the door
egniH rooD eht gnignahC
2egnih evomeR .2
GB
9
Page 11

GB
Changing the Door Hinge
4. Remove hinge 1
5. Change the two hinge positions
6. Fix hinge1
Hinge 1
Hinge 2
Hinge 2
Hinge 1
10
Page 12

Changing the Door Hinge
7. Remove Hinge 4 (Lower door hinge)
8. Remove Hinge 3 (Upper door hinge)
GB
11
Page 13

GB
Changing the Door Hinge
9. Exchange the position of Hinge 3 and Hinge 4
Hinge 4 Hinge 4Hinge 3 Hinge 3
10. Fix Hinge 3 and Hinge 4 on the door
Hinge 3
12
Hinge 4
Page 14

Changing the Door Hinge
11. Turn the door up side down and connect to the upper hinge.
GB
12. Fix Hinge2
13
Page 15

Cleaning, Care & Maintenance
Before cleaning, switch off the cabinet and disconnect from the mains.
The cabinet should be kept clean using a mild soap solution. Do not use abrasive cleansers. The plastic parts cannot withstand
boiling water (max. temperature +85 °C).
GB
When regular cleaning is performed, be sure to wipe clean the rubber door gasket to ensure any sticky substances are removed that
would otherwise damage the gasket.
The condenser fan air outlet above the compressor must be free of leaves, paper etc. to ensure normal operation of the cabinet.
The condenser on the back of the cabinet must be regularly cleaned as well. This is best done with a vacuum cleaner and a brush
Routine maintenance
Switch off and disconnect from the power supply before cleaning.
• Clean the enclosure and interior of the appliance as often as possible.
• Clean the unit with moist cloth. Never allow the switch, control panel, cable or plug to get wet.
• Do not use abrasive cleaning agents. These can leave harmful residues. Use only mild soapy water.
• Clean the door seal with water only.
• Ensure that no cleaning water penetrates into the electrical components.
• Must not be cleaned by a water jet.
• Always wipe dry after cleaning with soft cloth.
• Take care when cleaning the rear of the appliance.
• An agent or qualified technician must carry out repairs if required.
• If the appliance is to be left inactive for long periods, unplug the appliance after having turned the switch to OFF position, empty the
refrigerating compartment and clean thoroughly. Please leave the door open to avoid the development of odor and mildew.
Special maintenance
The instructions given in the following paragraph are for SKILLED PERSON.
Periodic Operations
• Periodically clean the condenser using suitable tools (vacuum cleaner or soft brushes).
• Check that the electrical connections are not loose.
• Check that the thermostat and the sensor are in proper working order.
• Periodically cleaning the condenser can extend the life of the appliance.
• Recommend that an agent or qualified technician clean the condenser.
• The key to the electrical cabinet should be kept out of the reach of children and users.
• Only use the key to open the lock.
14
Page 16
Trouble shooting
If your Refrigerator, Freezer appliance develop a fault, please check the following table.
Fault
The appliance is not working
The appliance turns on, but the
temperature is too high/low
The appliance is leaking water
(Refrigerator)
The appliance is unusually loud
Probable Cause
The unit is not switched on
Plug and/or lead are damaged
Power supply
Internal wiring fault
Too much ice on the evaporator
Condenser blocked with dust
The door is not shut properly
Appliance is located near a heat
source, or air flow to the
condenser is blocked
Ambient temperature is too high
Unsuitable foodstuffs are being stored
in the appliance
Appliance is overloaded
The appliance is not properly levelled
The discharge outlet is blocked
The water container is damaged
Loose nut/ screw
The appliance has not been installed in a
level or stable position
Action
Check that the unit is plugged in
correctly and switched on
Call our agent or qualified
technician
Check power supply
Call our agent or qualified
technician
Defrost the appliance
Clean the condenser thoroughly
Check that the door is shut and seals are
not damaged
Move the refrigerator to a more
suitable location
Increase ventilation or move appliance
to a cooler position
Remove any excessive hot
foodstuffs or blockages to the fan
Reduce the amount of food stored
in the appliance
Adjust the screw feet to level the appliance
Clear the discharge outlet
Call our agent or qualified technician
Check and tighten all nuts and screws
Check installation position and change if
necessary
GB
Disposal
If the cabinet is no longer of use and you wish to dispose of it, please do so in an environmentally correct way. There may be
special requirements or conditions. You can obtain information on the disposal of refrigeration appliances from:
- Your supplier
- Government authorities (The local council, Ministry of the Environment, etc.)
15
Page 17

atad lacinhceT
GB
Model
Climate Class
Temp.Range (°C)
Refrigerant
Voltage Supply
Model
Climate Class
Temp.Range (°C)
Refrigerant
x
Voltage Supply
Model
Climate Class
Temp.Range (°C)
Refrigerant
Voltage Supply
RC200
4
0 ~ +8°C
R134/R600a
220V-240V/50Hz
RC400
4
0 ~ +8°C
R134/R600a
220V-240V/50Hz
RC600
4
0 ~ +8°C
R134/R600a
220V-240V/50Hz 220V-240V/50Hz 220V-240V/50Hz 220V-240V/50Hz 220V-240V/50Hz 220V-240V/50Hz
RCX200
4
0 ~ +8°C
R134/R600a
220V-240V/50Hz 220V-240V/50Hz 220V-240V/50Hz 220V-240V/50Hz 220V-240V/50Hz 220V-240V/50Hz 220V-240V/50Hz
RCX400
4
0 ~ +8°C
R134/R600a
220V-240V/50Hz
RCX600
4
0 ~ +8°C
R134/R600a
RCG200
4
+2 ~ +8°C
R134/R600a
RCG400
4
+2 ~ +8°C
R134/R600a
220V-240V/50Hz
RCG600
4
+2 ~ +8°C
R134/R600a
RCGX200
4
+2 ~ +8°C
R134/R600a
RCGX400
4
+2 ~ +8°C
R134/R600a
220V-240V/50Hz 220V-240V/50Hz 220V-240V/50Hz
RCGX600
4
+2 ~ +8°C
R134/R600a
RN200
4
-23 ~ -18°C
R134/R600a
RN400
4
-23 ~ -18°C
R134a
RN600
4
-23 ~ -18°C
R134a
RNX200
4
-23 ~ -18°C
R134/R600a
RNX400
4
-23 ~ -18°C
R134a
RNX600
4
-23 ~ -18°C
R134a
RNG200
4
-23 ~ -18°C
R134a
RNGX200
4
-23 ~ -18°C
R134a
FOR TECHNICAL DETAILS AND ELECTRICAL DIAGRAM SEE LABEL ON THE BACK OF THE
PRODUCT.
R=Rating label
R
WW=Wiring diagram
R
16
Page 18

Environmental Protection
Discarded electric appliances are recyclable and should not be discarded in the domestic waste! Please actively support us
in conserving resources and protecting the environment by retur ning this appliance to the collection centres (if available).
CAUTION: RISK OF FIRE AND EXPLOSION WITH FLAMMABLE REFRIGERANT R600a.
WARRANTY
A statutory warranty applies for this product.
Damages caused by wrong treatment or operation, by false placement or storage, improper connection or installation,
as well as force or other external influences are not covered by this warranty. We recommend careful reading of the
operating instructions as it contains important information.
Note:
1. In case this product does not function correctly, please firstly check if there are other reasons, e.g. for electrical
appliances interruption of the power supply, or generally incorrect handling are the cause.
2. Please note that, where possible, the following documents or rather information should be provided together with
your faulty product:
- Purchase receipt
- Model description/Type/Brand
- Describe the fault and problem as detailed as possible
In the case of a claim for guarantee or defects, please contact the seller.
GWL 8/14 EN
GB
ENGLISH
17
 Loading...