

Page 1

Quick Start Guide
Q-Pro Alarm System & Smart Home
Enjoy it.
Smart Home Alarm System
Page 2

Page 3

EN Quick Start Guide
Q-Pro & Starter Kit
4
DE Schnellstart-Anleitung
Q-Pro & Starter-Kit
FR Guide de démarrage rapide
Q-Pro & Kit de démarrage
IT Guida di avvio rapido
Q-Pro & Kit iniziale
ES Guía rápida
Q-Pro & Kit de Inicio
PL Instrukcja szybkiego startu
Q-Pro & Zestaw startowy
FI Pikaopas
Q-Pro & Aloituspaketti
15
26
37
48
59
70
Enjoy it.
Page 4
English
English | Quick Start Guide
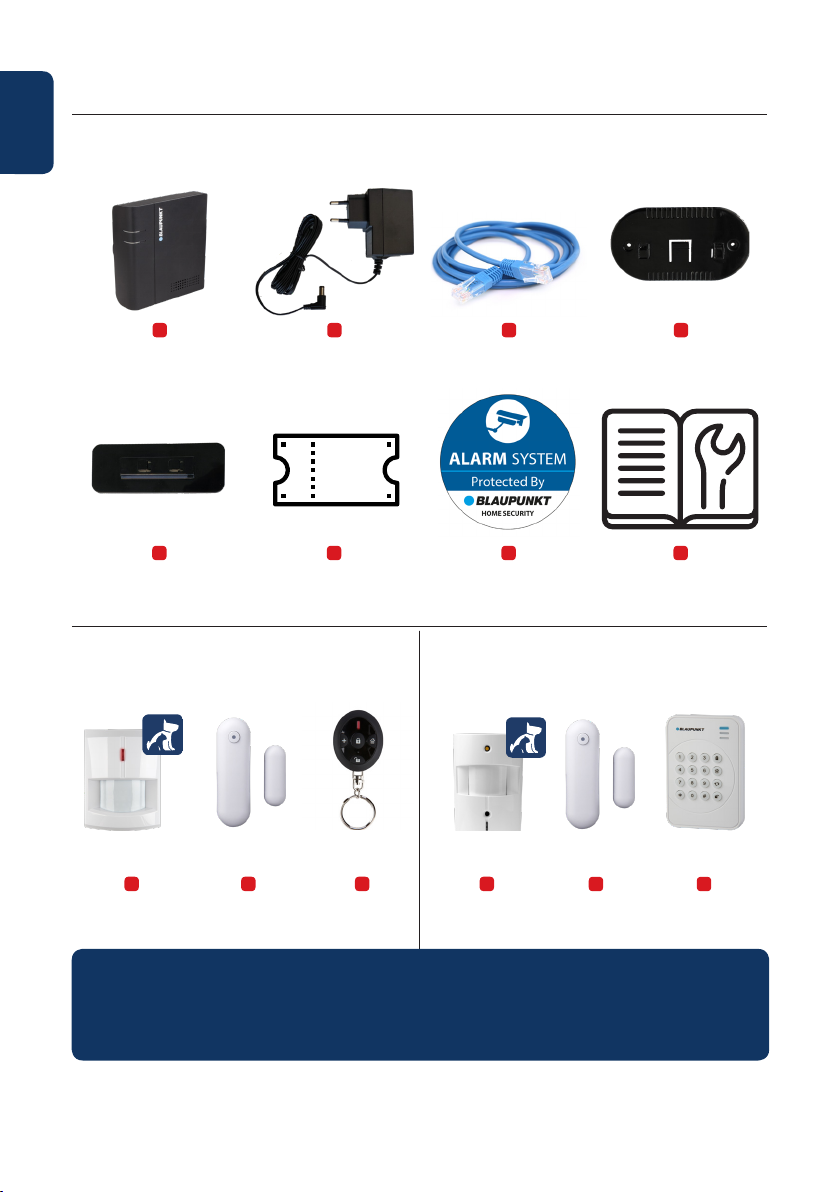
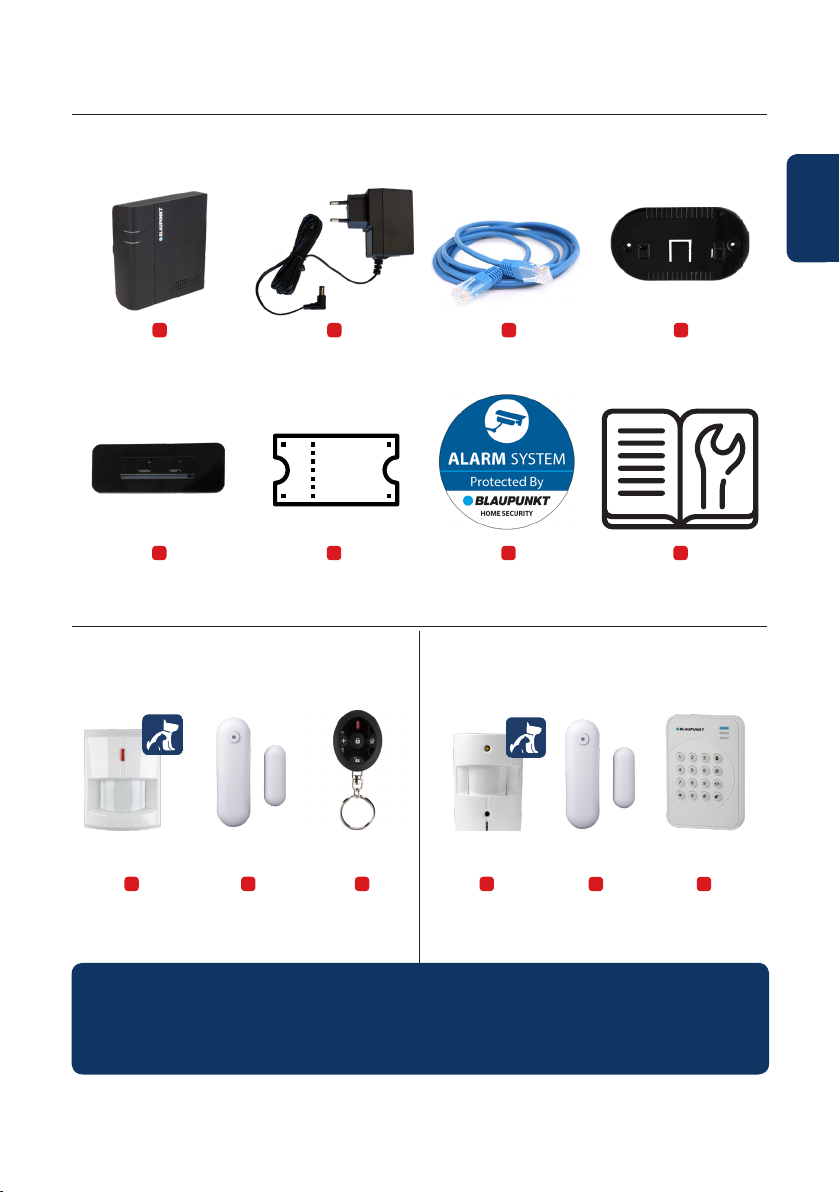
1. Content Q-Pro6300, Q-Pro6600 & Q-Pro System Panel
a
Q-ProHub – Central Panel
e
Stand base
Incl. in Q-Pro6300 Incl. in Q-Pro6600
i
Pet Immune
Motion Detector
b
AC Adaptor Ethernet Cable
PREMIUM
VOUCHER
f
Premium voucher Alarm-Sticker
j
Door Contact Pet immune
k
Remote
Control
c
g
l
PIR Camera
m
Door Contact
d
Mounting bracket
h
Quick Start Guide
n
Remote
Keypad
NOTE:
This Quick Start Guide focuses on the installation and 1st time conguration of the
Security System with the Secure4Home APP. For more information,
please visit our website: service.blaupunkt-security.com
4
Page 5
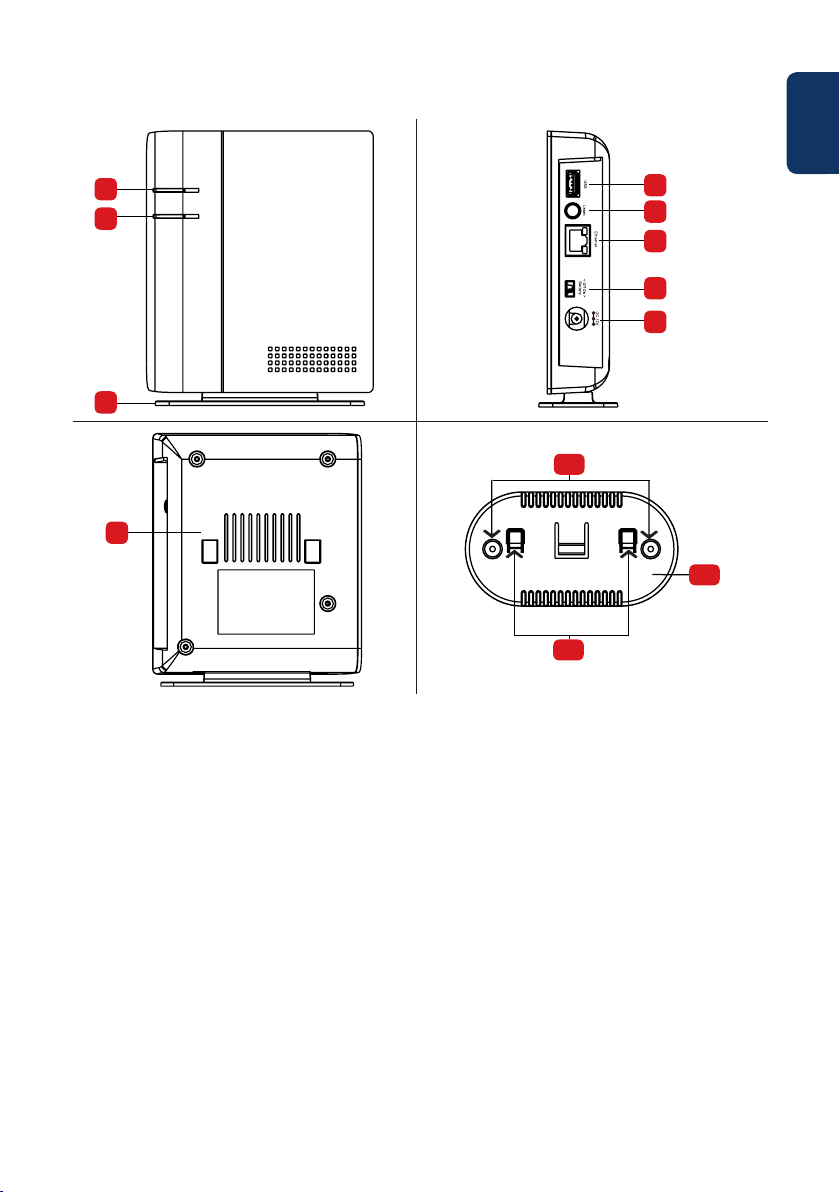
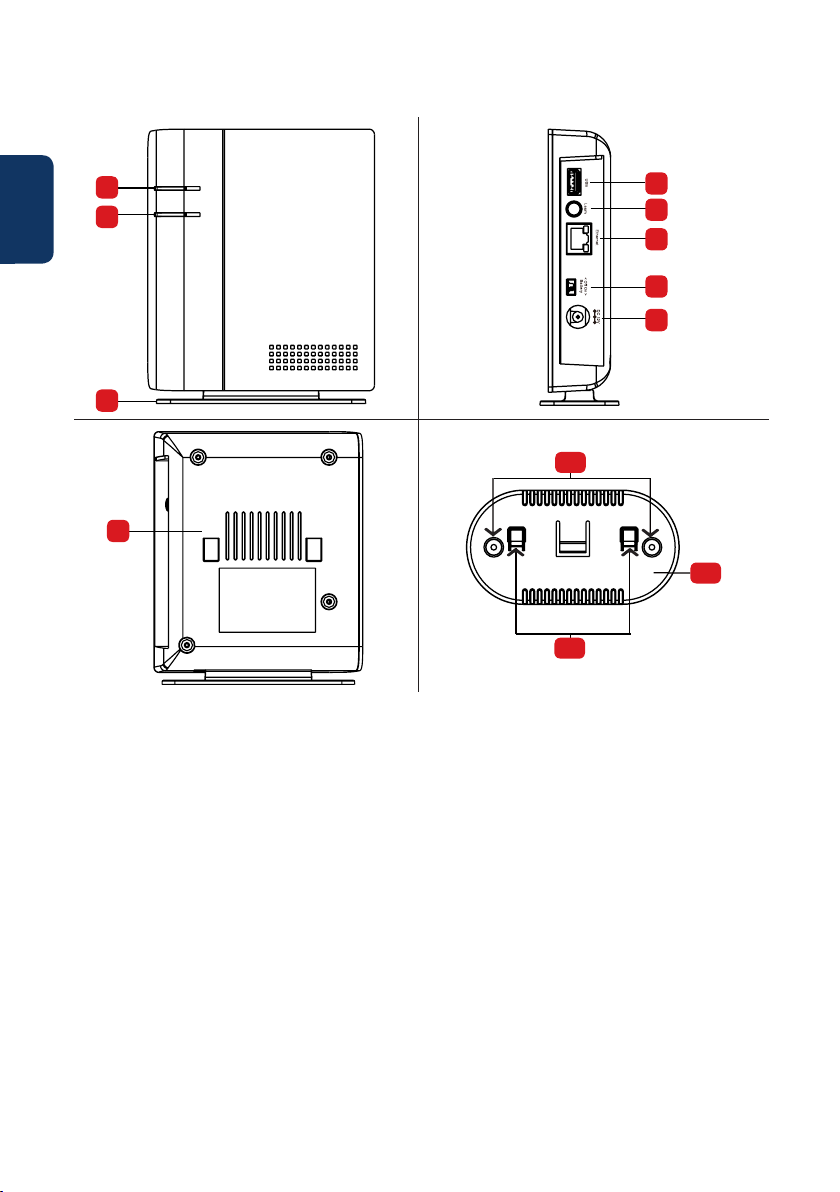
2. Q-ProHub Appearance
1
1
2
2
3
3
English
4
4
5
5
6
6
7
7
8
8
11
10
11
10
9
9
1. Status LED (Red & Green)
Red On – Arm mode
Red Flash – Home mode
Green Flash – Learning mode
Green Off – Walk Test mode or Disarmed
2. Alarm & Fault Status LED (Red & Yellow)
Red On – Alarm in Memory
Red Flash – Alarm
Yellow On / Flash – System Fault
3. Standing Bracket (For desktop deployment)
4. USB Port: For DG2-Pro and DG4-Pro
IMPORTANT - Read before installation
• Make sure the installation sight is close to the router or a network Ethernet port.
• Do not install the Q-ProHub at open visible sight to avoid non-authorized manipulation.
• Tamper protection for the Q-ProHub is working only for wall installation. This is because the detachment of the
Q-Pro from the wall mounting bracket will activate the tamper alarm.
• The Q-ProHub tamper is pressed by the wall mounting bracket. Do not remove the wall mounting bracket even if you
decide to use the desk-stand. The Q-ProHub will not function properly without the mounting bracket attached at its back.
5. Learn / Reset Button
6. Ethernet Port
7. ON/OFF Battery Power Switch
8. Power Supply connector. DC 12V 1A
9. Panel Tamper
10. Wall Mounting Knockouts x 2
11. Bracket Hooks
12. Mounting Bracket
11
10
12
12
5
Page 6
English
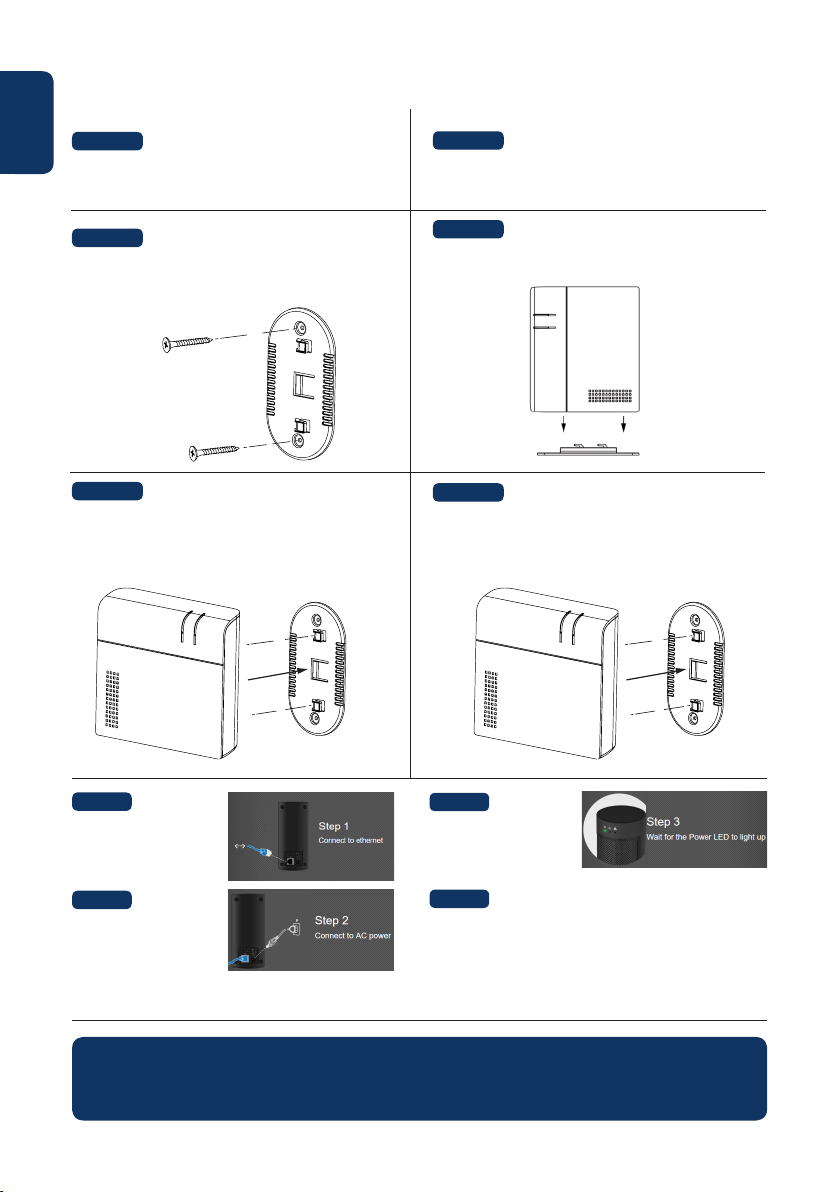
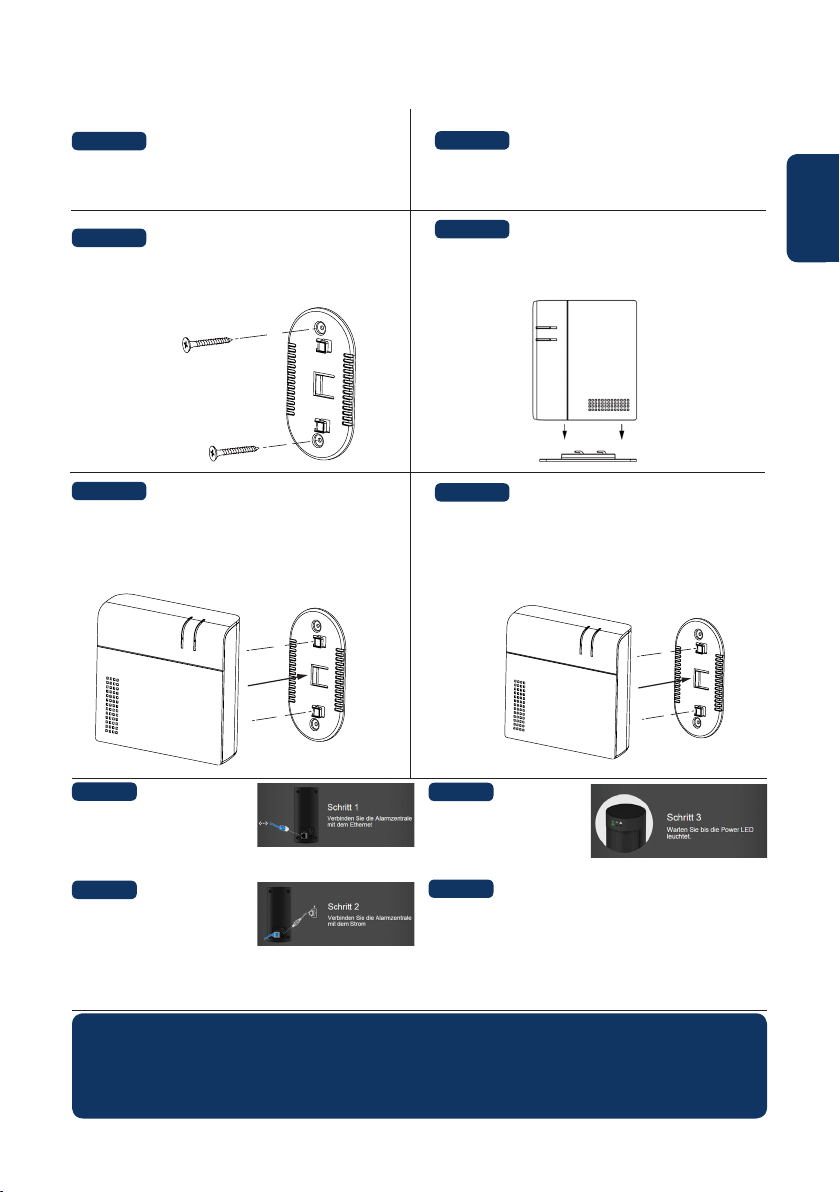
3. Q-ProHub Installation
Option A: Wall installation
Step 1a:
Place the wall mounting bracket on the wall in vertical
position and use it as a template to mark the positions of
the two holes on the wall.
Option B: Desk Stand installation
Step 1b:
Remove the strip located on the left side of the Q-ProHub.
Step 2a:
Drill two holes on the marked positions into the wall
and place the wall mounting bracket with the hooks
pointing to the right. Fix the wall mounting bracket with
the screws and dowel provided.
Step 3a:
Hook the Q-ProHub to the mounting bracket and slide
it to the left to press the tamper protection inside the
Q-ProHub. Optional: mark on wall or panel bottom how
to unhook the panel from the bracket.
Step 4:
Connect the Q-ProHub to
the internet router with
the included ethernet
cable.
Step 5:
Connect Q-ProHub to an
electricity socket with the
included AC Adaptor. Flip
the Battery Power Switch
to ON with a thin screw
driver or pen.
Step 2b:
Hook the Q-ProHub to the stand base pointing to the left
and slide it to the right.
Step 3b:
Despite of the desk stand installation, please hook the
Q-ProHub to the mounting bracket and slide it to the left
to press the tamper protection inside the Q-ProHub, to
assure that the tamper is pressed.
Step 6:
Wait until the Power LED
lights up.
Note:
The Q-ProHub has to be connected to Ethernet and
electricity at all times. Any problem with the router and
the connection to the network and power may disturb the
operation of the system.
NOTE: As soon as the Q-ProHub is connected and switched on, the server gives you 15 minutes in order to
complete the registration. If the registration is not completed within 15 minutes, please remove the AC Adaptor
and move the switch to the OFF position. Then restart by reinserting the AC Adaptor and switching to ON. You
now have 15 more minutes to complete the registration.
6
Page 7

4. Registration
For computer registration visit https://eu. bphomeconnect.com from your Web Browser and follow the same
steps as bellow. Avoid using Web Browsers as Microsoft IE Explorer/ Edge.
Step 1:
Please download and install the “Secure4Home” APP to your smartphone.
Step 2:
Launch the Secure4Home app and select First Time Registration
Step 3:
Ensure that the Q-ProHub is powered ON and connected to the router.
Step 4:
Follow the instructions on screen and enter the required information. Username and
password need to have at least 8 characters.
You will be asked to enter the MAC address of your Security System, which you will find on the back of the Q-ProHub. Please
enter the last 6 digits of the MAC address. Input a name for you security system and select the appropriate language and
country.
Step 5:
Once the registration choose your service plan. With the Premium Service Voucher code you can try out the Premium Service
for free for one month. For more information on the premium service, please refer to chapter 12 “Premium Service”.
Step 6:
You will receive an account authentication e-mail. Go to your e-mail inbox and authenticate your account.
The Secure4Home App is intended to register and manage your Security System from anywhere.
For conguration please refer to chapter 10 “Operation through the Web Portal”.
Secure4Home
English
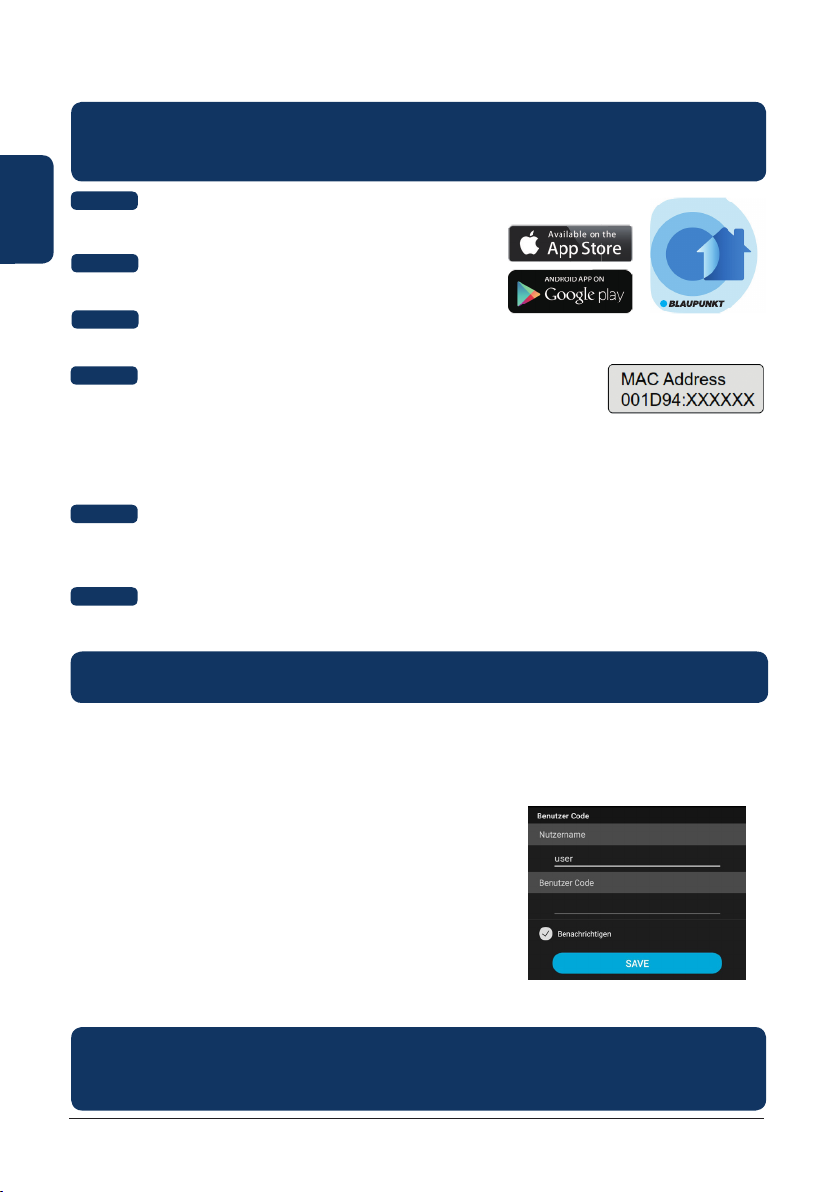
5. Default Security Codes change
Launch the Secure4Home app and enter your username and password.
At the top right corner tap on the engine icon. Tap on “Code” and type your user account password.
User PIN:
Here you can edit and create new “User PIN Codes” . Rename the default “user”
and change the default user PIN (1234) with a 4 digit code from your own.
Select Latch and save the settings. User PIN code is used to Arm, Home Arm
and Disarm the Security System.
Master Code:
Replace the default master code (1111) with a 4 digit code from your own and
save the settings. Master Code is used for configuration to access to the Security
System settings.
NOTE: User PIN Code and Master PIN Code cannot be identical. If they are identical, the System Mode change
will not work. For more information, see the Home Connect Server Manual. For conguration of the Arm Home
Mode, see chapter 2.6.1 Device Setting in the Home Connect Server Manual (Download at service.blaupunkt-security.com).
7
Page 8
English
6. Kit Accessories Installation
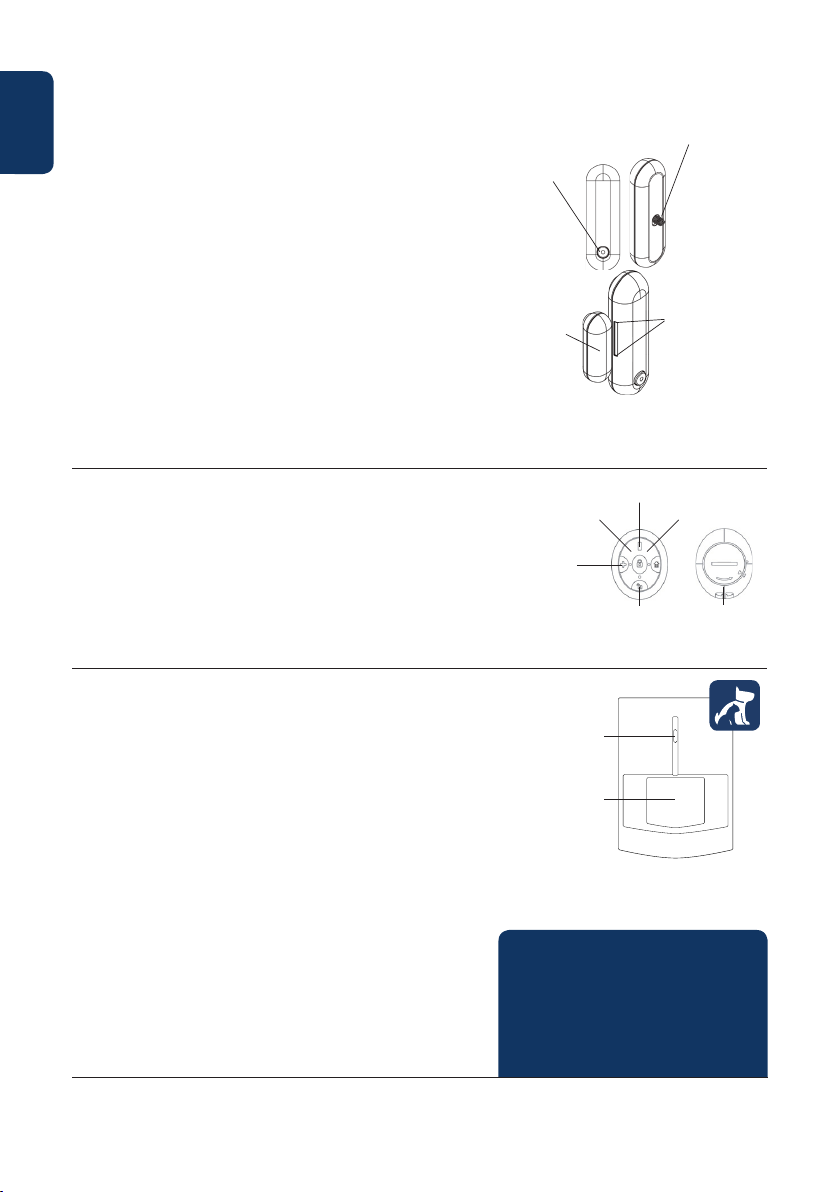
Door Contact (DC-S4)
(included in Kit Q-Pro 6300/6600)
The Door Contact DC-S4 monitors doors and windows in your home
ensuring ideal protection.
The DC-S4 can be mounted with screws or with adhesive tape to the door
or window frame. For a proper operation we do not recommend to install
the DC-S4 on steel doors/windows.
For screw installation, remove the back cover and push through the 2
knockouts on the back (for example with a screwdriver) where plastic is
thinner. Drill holes into the surface using the knockouts as template. Fix the
Door Contact base onto the surface with the screws and plugs provided.
Place the back cover again onto the Door Contact.
Make sure that the tamper protection is pressed down against the door/
window surface, otherwise the accessory will trigger a tamper alert.
The magnet should be installed adjacently at the sensor mark. Fix the
magnet in the same way as the main body of the door contact, either by
screw installation or adhesive tape.
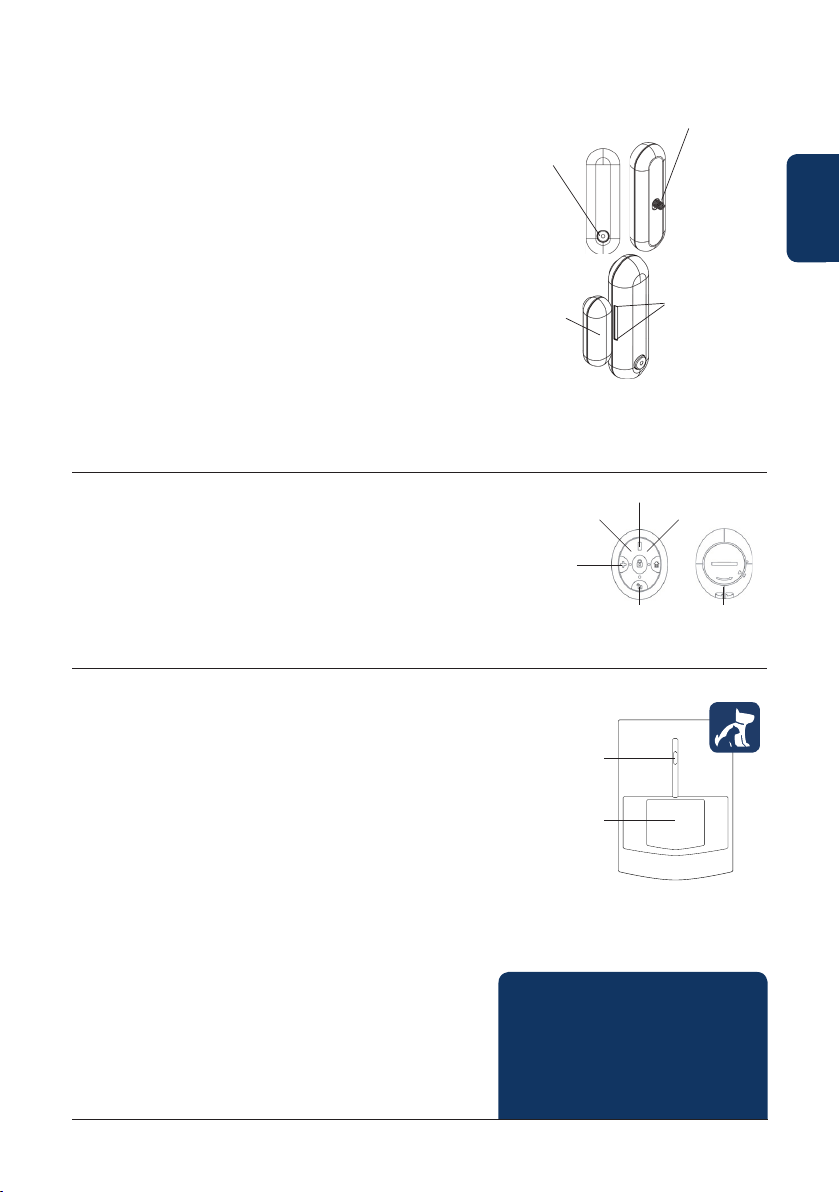
Remote-Control (RC-R3B)
(included in Kit Q-Pro 6300)
With the Blaupunkt Remote Control RC-R3B you can easily change the
status of the system between Arm, Disarm and Home mode.
Additionally the RC-R3B can be used to trigger a panic alarm by pressing
the emergency button for 3s. The RC-R3B cannot disarm a panic alarm
triggered by itself, it can be done via the App.
The RC-R3B works with rolling code encryption technology, for an
improved security against manipulation by third parties.
Pet immune Motion Detector (IR-P4)
(included in Kit Q-Pro 6300)
When the IR-P4 detects a movement during arm mode, it will
automatically trigger an alarm and notify the user. The tamper protection
is inside the device and is pushed down by the screw. If the device is
removed by an intruder, the tamper protection will trigger an alarm.
The IR-P4 needs to be mounted or glued to the wall with screws or
adhesive tape. The best location is in a corner to have wide motion
detection range. Install the motion detector at 2m above the ground for
best performance.
Remove the back cover and push through the knockouts on the back
(for example with a screwdriver) where plastic is thinner. There are six
knockouts on the back of the device that can be pushed though. If you
mount the device in a corner, push through the perforations on the side; if
you mount the device on a plane surface, push through the perforations in
the center. Drill holes into the wall using the knockouts as template. Fix the
IR-P4 base onto the wall with the screw and plugs provided. Place back the
back cover onto the IR-P4.
The pet immune feature will ignore pets up to 25 kgs. For a correct pet
immune detection do not aim the motion detector at stairways or areas
where a pet can climb on.
LED / Test-/
Learn Button
Magnet
Fig.1
The Magnet has to be placed next to the
Sensor marker! Max 15mm
Arm Away-Button Arm Home-Button
Emergency-
Button
Fig.2
LED/Walk Test/
Learn Button
Tamper protection
LED
Disarm-Button
Sensor
marker
Battery Cover
PIR-Sensor
Fig.3
NOTE: The IR-P4 will go on sleep mode
for 1 min. when detecting someone
while alarm is deactivated. Please wait
more than 1 minute without detecting
anyone to be sure the device its out of
sleep mode before testing.
8
Page 9
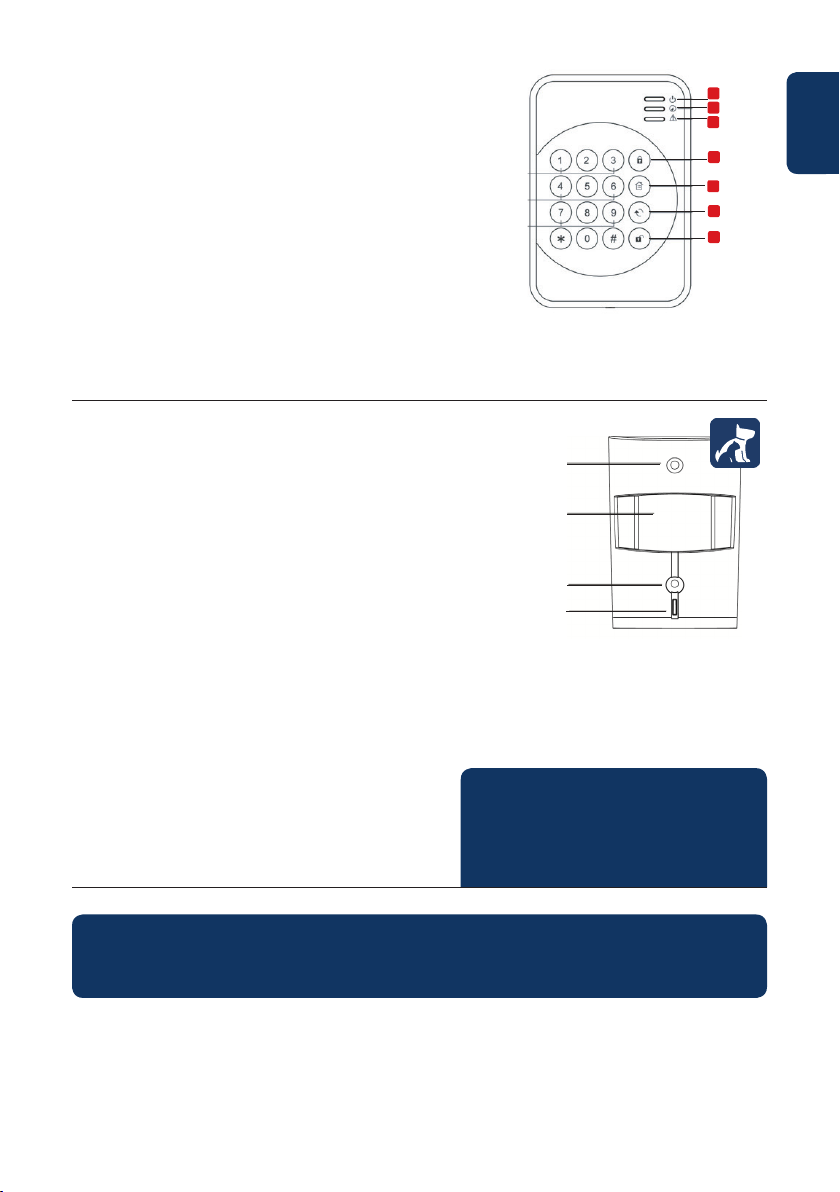
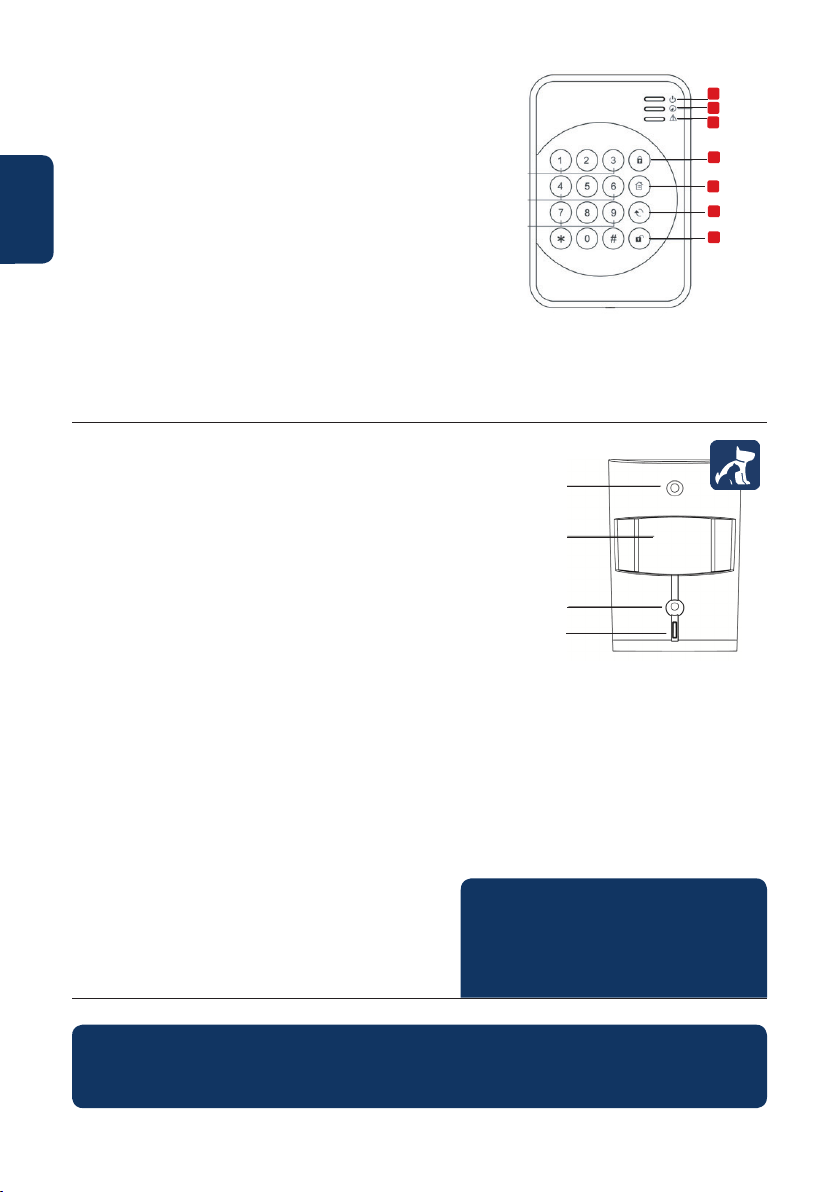
Remote Keypad (KP-R1)
(included in Kit Q-Pro 6600)
With the Blaupunkt keypad KP-R1 You can easily change the status
of the Security System between Arm, Disarm and Home mode.
Enter the Security System PIN code (same as set in chapter 5) and
press the desired mode button.
We recommend to mount the keypad at the door entrance for
entry control.
Remove the back cover and push through the 2 knockouts on the
back (for example with a screwdriver) where plastic is thinner. Drill
holes into the wall using the knockouts as template. Fix the keypad
base onto the wall with the screw and plugs provided. Place back
the back cover onto the Keypad.
Make sure that the tamper protection is pressed down against the
wall surface, otherwise the accesory will trigger a tamper alert.
Pet immune Motion Detector with camera (IRC-P4)
(included in Kit Q-Pro6600)
When the IRC-P4 detects an movement during arm-mode, it will
automatically take 3 photos, save them on the cloud, trigger an
alarm and notify the user. User can request and see the photos at
any time using the App or the Web Portal. The tamper protection
is inside the device and is pushed down by the screw. If the device
is removed by an intruder, the tamper protection will trigger an
alarm.
The IRC-P4 needs to be mounted or glued to the wall with screws
or adhesive tape. The best location is in a corner to have wide
motion detection range. Install he motion detector at 2m above
the ground, for best performance.
Remove the back cover and push through the knockouts on the
back (for example with a screwdriver) where plastic is thinner.
There are six knockouts on the back of the device that can be
pushed through If you mount the device in a corner, push through
the perforations on the side; if you mount the device on a plane
surface, push through the perforations in the center. Drill holes
into the wall using the knockouts as template. Fix the IRC-P4 base
onto the wall with the screw and plugs provided. Place back the
back cover onto the IRC-P4.
The pet immune feature and will ignore pets up to 25kg. For a
correct pet immune detection do not aim the motion detector at
stairways or areas where a pet can climb on.
1. Active LED (Blue/Orange)
2. Status LED (Blue/Red)
3. Fault LED (Orange)
5. Home Arm Switch
6. Status Key
7. Disarm Key
4. Away Arm Key
LED-Flash
PIR-Sensor
Lense of PIR-
Camera
Blue LED/Test-/
Learn-Button
NOTE: The IRC-P4 will go on sleep mode for 2
min. when detecting someone while alarm is
deactivated. Please wait more than 2 minutes
without detecting anyone to be sure the
device is out of sleep mode before testing.
Fig.4
1
2
3
4
5
6
7
English
Fig.5
For more information about the accessories included on the kit visit service.blaupunkt-security.com for detailed
user manual for each accessory.
The Q-Pro Series equipped with rolling code. A feature to encrypt and make the Security System even more
secure against so called replay attacks.
9
Page 10
English
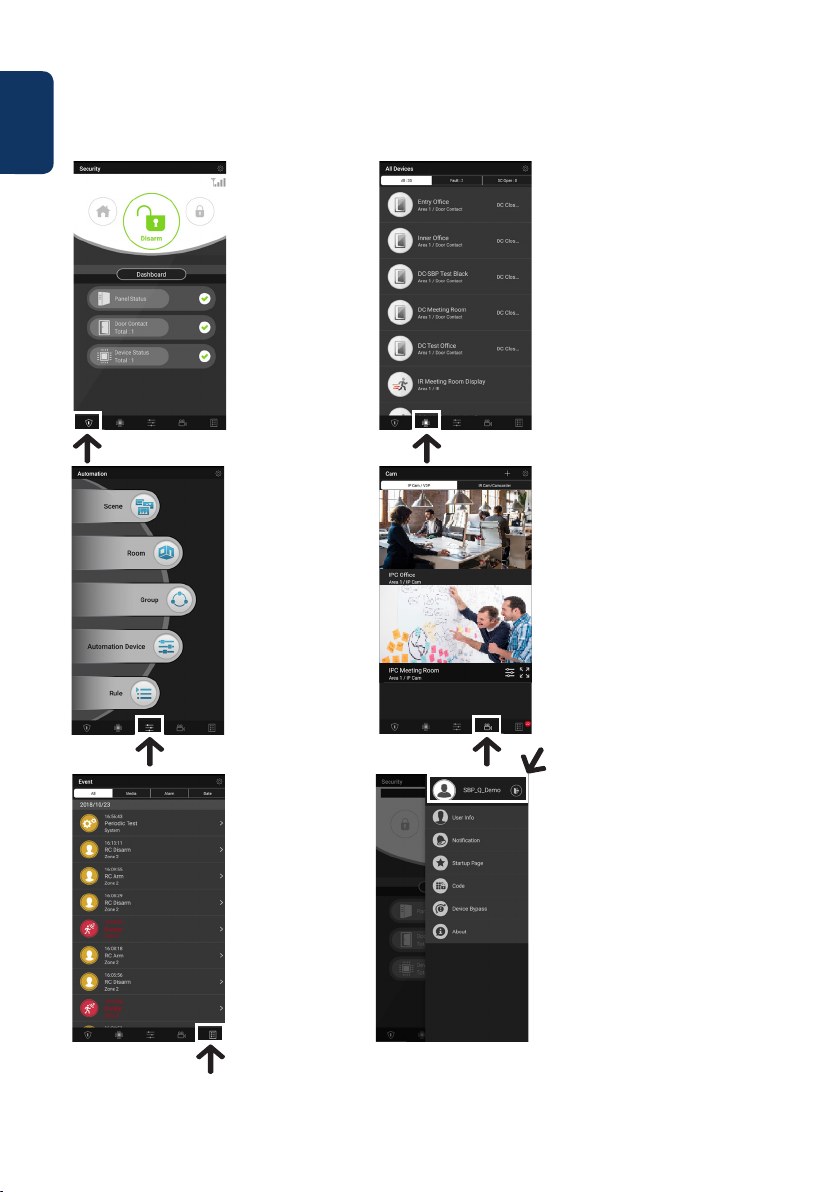
7. Operation through App
The Secure4Home App is intended to register and manage your Security System from anywhere. For
conguration please refer to chapter 10 “Operation through the Web Portal”.
In the Security Menu
you can change the
System Modes, check
the System Dashboard
status, if there is any
Door Contact open
and if your accessories
have any fault.
If a GSM module is
installed on the panel
the signal strenght
will (see chapter 12)
be displayed at the
top right.
In the Device Menu you can have a
general overview of all the accesories,
check if there is any fault on them and if
the Door contacts are open or closed.
If one or more accessories show low
battery you should replace it so the
sytem continues working properly.
If any other supervision failiures
are displayed please follow the
troubleshooting in the manual of the
specific accessory device in the full
manual to solve the issue.
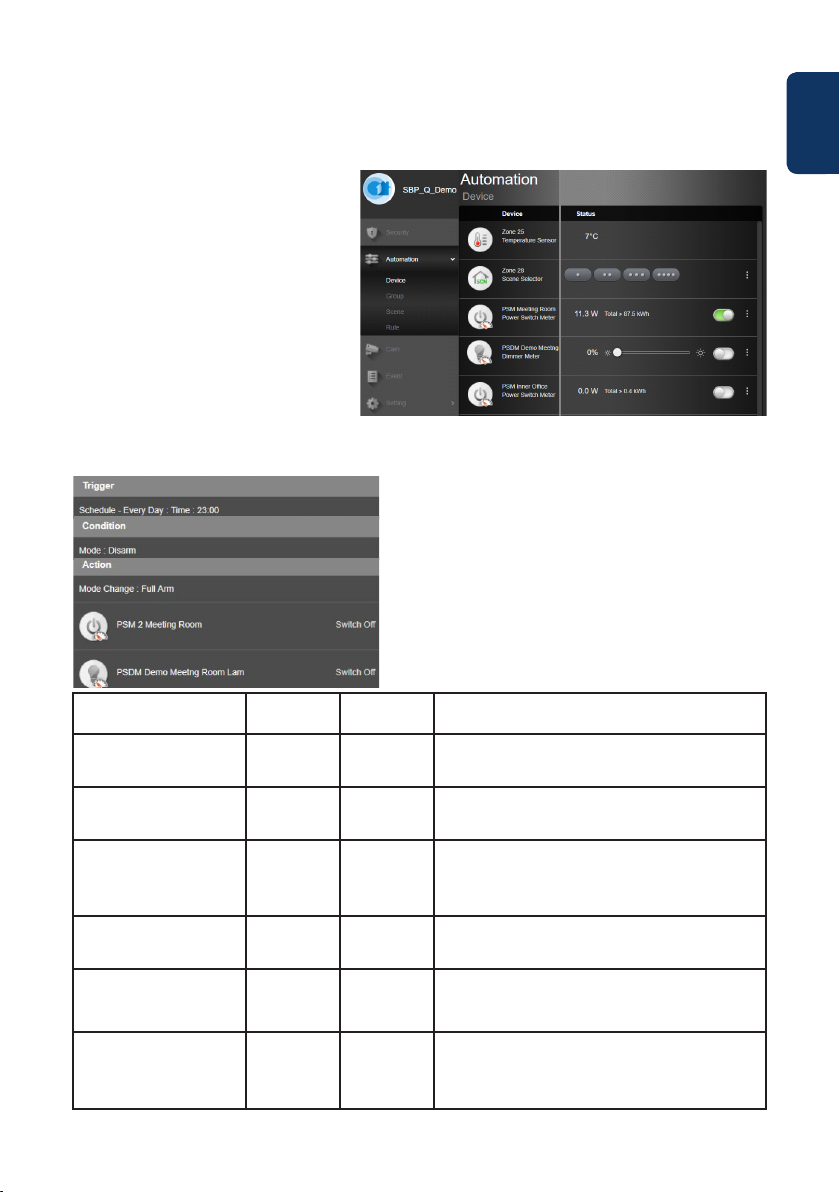
In the Automation
Menu you can trigger
manually any of your
scenarios, control
group accessories,
manage and use
individually all the
Home Automation
accessories and
activate or deactivate
existing rules.
In the Events Menu,
you will get an
overview of past
events. You can mail/
forward events or call
someone in order to
notify of the alarm.
All the intrusion alarms
will be displayed in
red, while technical
alerts or system
changes will be
displayed in yellow.
On the Cam Menu you can see the
Optional Video Survaillance WiFi Camera
(IPC-S1) and the optional PIR photo
camera (IRC-P4 or IRC-S2).
The IPC-S1 provides you a reliable
HD-quality video surveillance with
automatic video recording during
alarms, live-streaming, two-way voice
communication and night vision.
The IRC-P4 triggers an alarm when
movement is detected and captures
3 colour photos to provide visual
verification/ evidence.
If you click on the settings icon at the
top right, you can access your personal
info, modify your password, configure
notification, setup an App startup page,
bypass any accesory and find contact
support information. You can also log
out.
10
Page 11
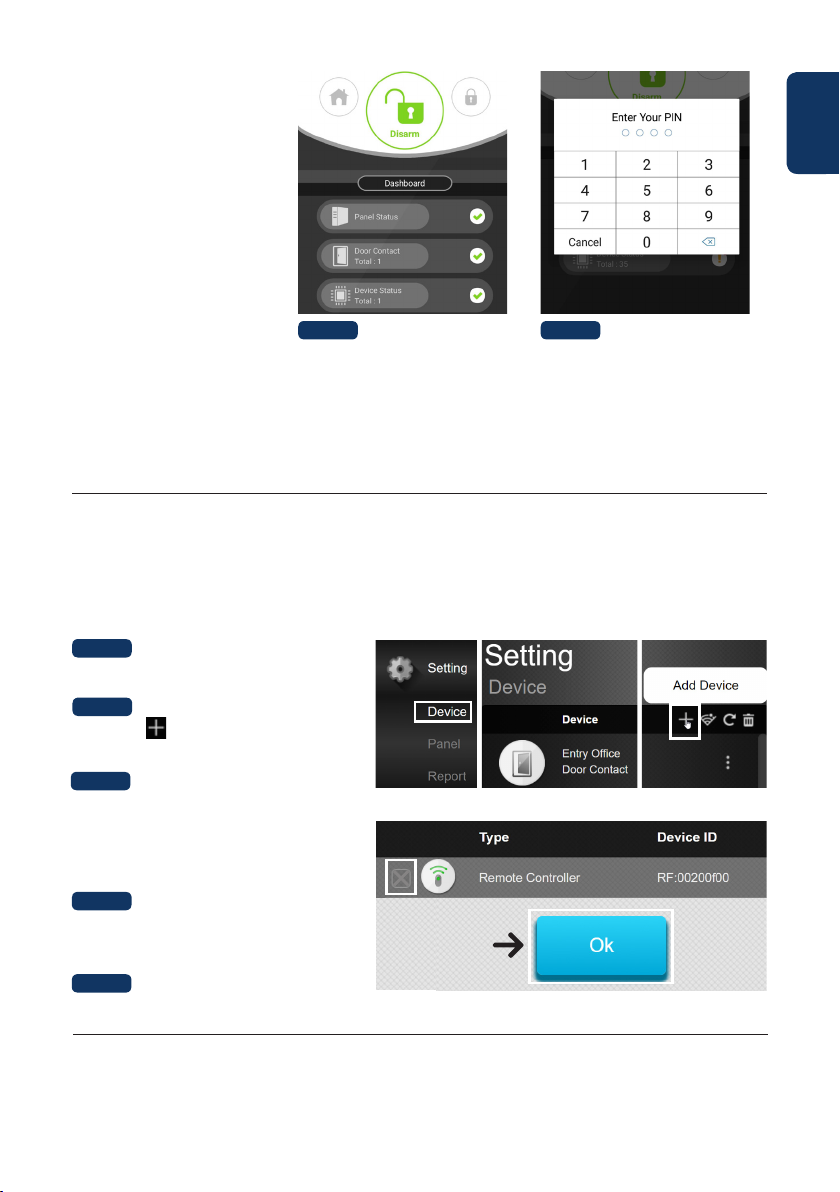
8. System Modes
Disarm: The Disarm Mode disarms
all burglary sensors.
Arm Away: The Arm Away Mode
arms all burglary sensors. An alarm
is triggered as soon as a sensor
is activated. If a sensor has been
assigned the attribute Entry, an
Entry- Countdown is triggered,
so the user has time to disarm
the system and no alarm will be
triggered.
Arm Home:
Sensors that have been assigned
the Arm Home attribute, cannot be
activated if the system is switched
into the Arm Home Mode. Usually
motion detectors in the interior
are assigned this attribute, so that
you can move freely inside the
appartment while the doors and
windows are protected.
Step 1:
Click the System Mode
Button that you would like
to activate.
Step 2:
Enter the PIN Code
(default code: 1234). If the
code is correct the Mode
change will be applied
and new selected mode
will light up.
9. Learn in new additional Accessories
All new accessories which where not included in the Kit Content must be added to the Q-ProHub with the following steps.
You can add up to 50 accessories.
To learn in any new accesory you should go to the Home Portal “eu.bphomeconnect.com“.
Step 1:
Go to Settings and click on Device.
English
Step 2:
Click on the icon at the top right corner
to access the “Add Device” function.
Step 3:
Refer to each accessory device manual to
transmit the “learn signal” from each device.
When the Q-ProHub receives the “learn signal”,
it will emit a double beep tone and the web
interface will display the device info.
Step 4:
Check the box in front of device info, then click
OK to add the device into the Q-ProHub.
Step 5:
Give the new accessory a name and edit attributes, by clicking on the 3 dots on the right side of this accessory.
11
Page 12
English
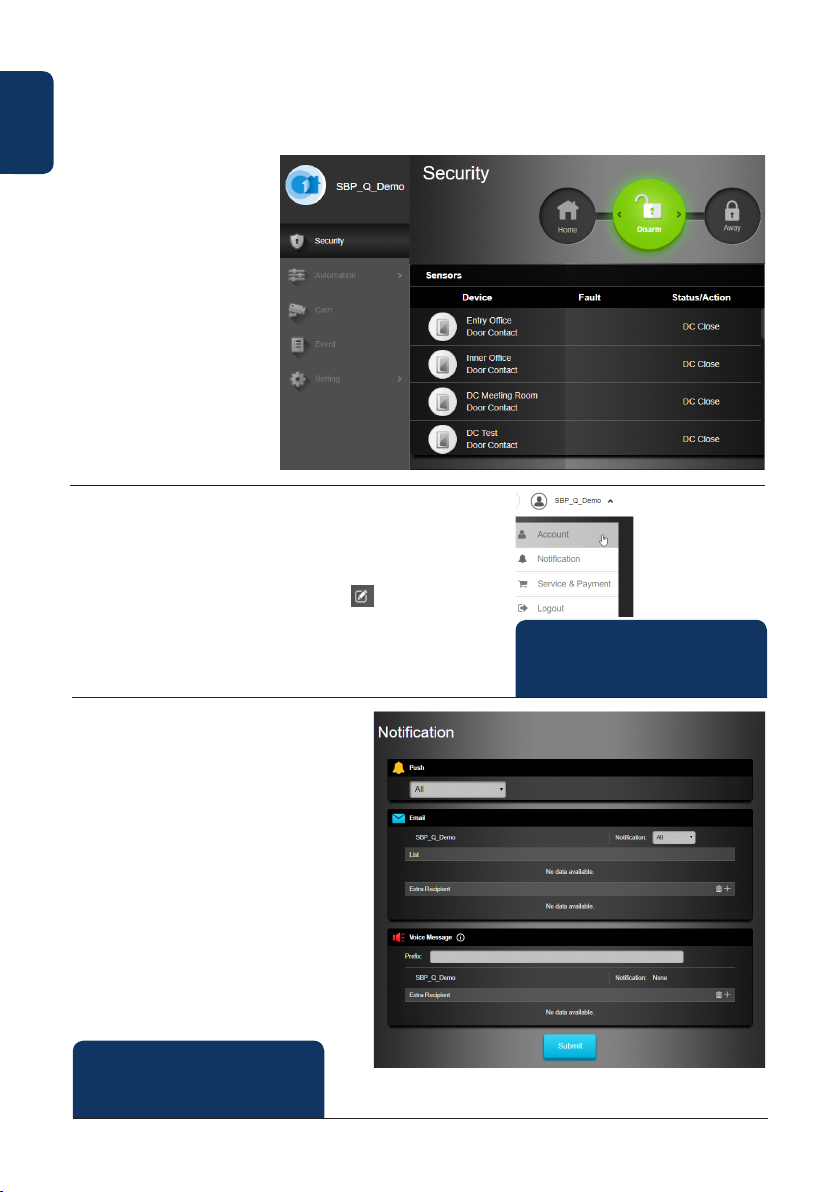
10. Operation and configuration through the Web Portal
Go to the Home Portal “eu.bphomeconnect.com“.
Overview Web Portal:
In the Security Menu, you are able
to change the System modes and
to get an overview of the devices
and manually request a photo
image.
For Automation Menu, please
refer to 11. Home Automation.
In the Camera Menu you will see
your real-time video as soon as
you have integrated the IPC-S1
Blaupunkt Camera.
In the Events Menu, you will get
an overview of the events reported
to the Q-ProHub.
In the Settings Menu you can
program the Q-ProHub settings.
Conguration via Web Portal:
To change Account Settings, click on your account name (top right corner)
and selec t “Account”.
On this menu you can change your account details, Home Portal language
and create secondary user accounts. To edit, click, once finished click
submit on the bottom to save the changes.
Secondary user accounts are tied to a main account. User and password for
secondary accounts are only for login on Home Portal and app. PIN for arm/
disarm are tied to the Q-ProHub and will remain the same.
NOTE: Only ONE user at a time can be
logged into the account with an
identical user name.
To change the Notification settings click on
your account name (top right corner) and select
“Notification”.
In the Notication Menu you are able to modify
the notification settings:
Push: Setup the push configurations for your
smartphone. Secure4Home app needs to be
installed and logged to receive push notifications.
E-mail: The Home Portal server will send an e-mail
to the configured e-mail account.
Voice Message: Blaupunkt Alarm center will
automatically call you on the case of a burglar
event. Only for premium users, for more information
regarding premium service please refer to chapter
12, Premium Service.
NOTE: Make sure that the volume in
your smartphone settings has been
set to high for Push and call Reports.
12
Page 13
11. Home Automation
To make any changes to your Home Automation you need to go to the Home Portal
“eu.bphomeconnect.com“.
Device - Allows you to manage and use
individually all the Home Automation accessories.
Room - Assign each accessories to the appropriate
room for easier management. (only for Home
Automation accessories)
Group - You can add accesories of the same type
to a group to manage all the accesories with a
single command.
Scenario - Create your scenario to define preset
actions for your Home Automation accessories.
Scenarios can be triggered via the scenario swich
selector (SSW-S1) or your mobile. The maximum
amount of actions per Scenario is 5.
Rule - Create your rule to initiate automatic actions
of your panel and Home Automation devices
under a trigger & conditions.
How to create a rule:
Step 1: Go to Automation - Rule and click the + button.
Step 2: Write a name for the rule, e.g. “Auto Arm”.
Step 3: Select a trigger for the rule. (e.g. “Schedule” --> “Every Week“
select the days and time)
Step 4: If you want, add any condition (status of system for the rule
to happen). E.g time period or system mode, up to 2 conditions.
Step 5: Select from the list an action to trigger rule. E.g. Device
action --> Power swich ( PSM-S1) to Switch On.
Step 6: If you would like to add more actions press the +
button on the right (up to 5 actions are possible).
Step 7: Click “Submit” to save the changes.
English
Recomended Rules Trigger Condition Action
Whenever there is an alarm Turn the
lights ON, roll the blinds UP and start a
video recording.
When you open the door of your
home between 19:00 and 7:00 turn
the lights ON for 20s
Simulate presence when you are on
holidays:
Eveyday at specific times e.g. 20:00 the
blinds will turn UP and the light will turn
ON by 30minutes."
Everyday at 6:00 change the Security
system to disarm and open your blinds
Whenever you Arm the system turn
OFF your lights, turn down the heating
system to 18ºC and close your blinds
Everyday at 23:00 change the Security
system to Home arm, turn all the lights
OFF, close all your blinds and turn
down the heating system to 18ºC.
Trigger alarm
Alarm --> Any
alarm
Door Contact
Open
Schedule -->
Weekly ->
Everyday 20:00
Schedule -->
Weekly ->
Everyday 6:00
Mode Change
--> Arm
Schedule -->
Weekly ->
Everyday 23:00
None "Device Action --> Power Switch PSM-S1 or PRM2-S1 --> ON
Time Period -->
Daily --> From
19:00 to 7:00
None "Device Action --> Power Switch PSM-S1 or PRM-S1 --> ON for -> 30min
None "Mode Change --> Disarm
None "Device Action --> Power Switch PSM-S1 or PRM-S1 --> OFF
None "Mode Change --> Home Arm
Device Action --> Roller Shutter SCM-S1 Open 100%
Request Video --> IPC-S1"
Device Action --> Power Switch PSM-S1 or PRM2-S1 --> ON for -> 20 seconds
Device Action --> Roller Shutter SCM-S1 Close"
Device Action --> Roller Shutter SCM-S1 Open 100%"
Device Action --> Thermostat TRV-S1 or TMST-S1 --> ON ->18ºC
Device Action --> Roller Shutter SCM-S1 Close"
Device Action --> Power Switch PSM-S1 or PRM-S1 --> OFF
Device Action --> Roller Shutter SCM-S1 Close
Device Action --> Thermostat TRV-S1 or TMST-S1 --> Turn Down to 18ºC"
13
Page 14
English
12. Security Recommendations
1| Hybrid Backup communication method:
You can acquire and connect the Blaupunkt DG2-Pro or DG4-Pro GSM modules to the USB located at the back of the
Q-ProHub to avoid losing communication with your security system even if the Internet connection fails or it’s cut off by an
intruder.
The DG2-Pro works on 2G network and offers backup for alarm notifications and standard App overview we recommend to
use this backup option in areas where there is no 4G communication.
The DG4-Pro works on 4G high speed network and can be used as backup for alarm notifications and standard App
management. Please assure that there is 4G network on the instllation location. We do not recommend to use the DG4-Pro
as standalone communication method, it is meant to be backup only.
The GSM modules would need to have a SIM card installed with available Internet data. (SIM card not included)
2| Mute the Q-ProHub siren:
To avoid that an intruder locates where the Q-ProHub is installed we recommend to mute the internal siren from the
Q-ProHub and install an outdoor or indoor additional siren.
You can install one of the following additional sirens to increase security and prevent the panel to be found by a intruder:
Indoor AC powered siren: SRAC-S1, Indoor battery siren SR-S1 or Outdoor battery siren BX-S1).
To mute the internal siren please go to Settings --> Type the Master Code --> Panel --> Internal Siren --> OFF.
3| Premium service:
With the Blaupunkt Premium Service, your Security System will be enabled with a innovative feature set:
Our premium call notifications will provide automatic calls to up to 3 different Telephone numbers by our alarm center in
case of an intrusion. This works additional to the standard Push-message and E-Mail service.
Premium Service additionally offers a cloud storage of more than 50 field event Videos of your IPC-S1, 30 captured images of
the PIR-Photo-Camera (IRC-P4 and IRC-S2) and a general EventLog of 90 days.
Additionally with the 12 months Premium Service Plan product warranty will be extended one aditional year.
For more information on the Premium Service, go to: premium.blaupunkt-security.com
4| Firmware Updates:
The Q-ProHub includes an automatic FW upgrade service. (There is a daily FW upgrade service which keeps your device up-to
date.). If you bought a new Q-Series product you should wait at least one working day so all the necessary updates are ready.
If the device is updating please don’t turn it off since it could harm the Security System.
13. Support
For more information on Q-ProHub and accesories, please visit
security.blaupunkt-service.com
Blaupunkt Competence Center Security & Care
www.blaupunkt.com
Security Brand Pro GmbH
Mondstrasse 2-4
85622 Feldkirchen-München, Germany
© Technical changes and errors excepted
14
Page 15
Deutsch | Schnellstart-Anleitung
1. Inhalt Q-Pro6300, Q-Pro6600 & Q-Pro Alarmzentrale
Deutsch
a
Q-ProHub – Alarmzentrale
e
Standfuß
Inkl. im Q-Pro6300 KIT Inkl. im Q-Pro6600 KIT
i
Tierimmuner
Bewegungsmelder
b
Netzteil Ethernetkabel
PREMIUM
SERVICE
GUTSCHEIN
Premium-Service Gutschein Alarm-Aufkleber
j
Tür/
Fensterkontakt
f
k
Funk-
Fernbedienung
c
g
l
Tierimmuner
Bewegungsmelder
inkl. PIR-Kamera
Schnellstartanleitung
m
Tür/
Fensterkontakt
d
Montagehalterung
h
n
Funk-
Bedienteil
HINWEIS:
Diese Kurzanleitung konzentriert sich auf die Installation und die erstmalige Konguration des
Sicherheitssystem mit der Secure4Home-APP. Für mehr Informationen besuchen Sie bitte unsere
Website: service.blaupunkt-security.com
15
Page 16
2. Q-ProHub Gerätebeschreibung
Deutsch
1
1
2
2
3
3
9
9
1. Status-LED (Rot/Grün)
Rot AN – Scharf-Modus
Rot blinkt – Zuhause-Modus
Grün blinkt – Lernmodus
Grün aus – Signalreichweitentest oder Unscharf-Modus
2. Alarm- und Fehlerstatus-LED (Rot/Gelb)
Rot AN – Alarm gespeichert
Rot blinkt – Alarmmeldung
Gelb AN / blinkt – Fehler im System
3. Standfuß
4. USB-Anschluss: Für DG2-Pro und DG4-Pro
11
10
11
11
10
5. Lern- / Reset-Taste
6. Ethernet Anschluss
7. EIN / AUS-Batterie-Netzschalter
8. Netzteilanschluss. DC 12V 1A
9. Sabotagekontakt
10. Montagelöcher für Wandmontage x 2
11. Halterungshaken
12. Wandhalterung
10
4
4
5
5
6
6
7
7
8
8
12
12
WICHTIG - Vor der Installation lesen
• Stellen Sie sicher, dass sich die gewünschte Installationsposition in der Nähe des Routers oder eines
Netzwerk-Ports befindet.
• Installieren Sie den Q-ProHub nicht an einem offen sichtbaren Ort, um Manipulationen zu vermeiden.
• Der Sabotageschutz für das Q-ProHub funktioniert nur für die Wandmontage. Dies liegt daran, dass durch das
Abnehmen des Q-ProHub von der Wandhalterung der Sabotagealarm ausgelöst wird.
• Der Q-ProHub Sabotagekontakt wird durch das Einrasten der Wandhalterung deaktiviert. Entfernen Sie die
Wandhalterung nicht, auch wenn sie den Standfuß nutzen. Der Q-ProHub funktioniert nicht ordnungsgemäß, wenn die
Wandhalterung nicht angebracht ist.
16
Page 17
3. Q-ProHub Installation
Option A: Wandinstallation
Schritt 1a:
Bringen Sie die Wandhalterung in vertikaler Position an
der Wand an und verwenden Sie diese als Vorlage, um die
Positionen der beiden Löcher an der Wand zu markieren.
Option B: Standfuß installation
Schritt 1b:
Entfernen Sie den schwarzen Klebestreifen auf der linken
Seite des Q-ProHub.
Schritt 2a:
Bohren Sie zwei Löcher an den markierten Stellen in die
Wand und platzieren Sie die Wandhalterung mit den Haken
nach rechts. Befestigen Sie die Wandhalterung mit den
mitgelieferten Schrauben und Dübeln.
Schritt 3a:
Hängen Sie den Q-ProHub in die Wandhalterung und
schieben Sie diese nach links, um den Sabotagekontakt in
dem Q-ProHub einzudrücken. Optional: Markieren Sie an
der Unterseite der Wand oder der Alarmzentrale, wie Sie die
Alarmzentrale von der Wandhalterung lösen können.
Schritt 4:
Verbinden Sie das
Q-ProHub über das
mitgelieferte Ethernetkabel
mit dem Router.
Schritt 5:
Schließen Sie das Q-ProHub mit
dem mitgelieferten Netzteil an
eine Steckdose an. Schieben Sie
den Batterie-Netzschalter mit
einem Schraubendreher oder
Stift auf ON.
Schritt 2b:
Setzen Sie das Q-ProHub auf den Standfuß. Die Haken
des Standfußes müssen wie abgebildet nach links zeigen.
Schieben Sie daraufhin den Standfuß nach rechts bis dieser
einrastet.
Schritt 3b:
Der Q-ProHub Sabotagekontakt wird durch das einrasten
der Wandhalterung deaktiviert. Daher müssen Sie auch,
wenn Sie den Standfuß nutzen die Wandhalterung mit dem
Q-ProHub verbinden. Legen Sie hierfür die Wandhalterung
auf das Q-ProHub und schieben die Wandhalterung nach
rechts bis diese in das Q-ProHub einrastet.
Schritt 6:
Warten Sie, bis die
Power-LED leuchtet.
Hinweis:
Das Q-ProHub muss immer mit dem Netzwerkkabel und
Netzteil verbunden sein. Probleme mit dem Router und
der Verbindung zum Netzwerk und zur Stromversorgung
können den Betrieb des Systems stören.
Deutsch
HINWEIS: Sobald das Q-ProHub angeschlossen und eingeschaltet ist, gibt Ihnen der Server 15 Minuten Zeit, um
die Registrierung abzuschließen. Wenn die Registrierung nicht innerhalb von 15 Minuten abgeschlossen ist,
entfernen Sie bitte das Netzteil und bringen Sie den Batterie-Netzschalter in die Position OFF. Starten Sie dann
das Q-ProHub neu, indem Sie das Netzteil wieder einstecken und den Batterie-Netzschalter in die Position ON
schalten. Sie haben jetzt weitere 15 Minuten Zeit, um die Registrierung abzuschließen.
17
Page 18
4. Anmeldung
Für die Computerregistrierung besuchen Sie https://eu.bphomeconnect.com von Ihrem Webbrowser aus und
befolgen Sie die gleichen Schritte, wie unten beschrieben. Vermeiden Sie die Verwendung von Webbrowsern,
wie Microsoft IE Explorer / Edge. Wir empfehlen die Browser Mozilla Firefox und Google Chrome.
Deutsch
Schritt 1:
Laden Sie die “Secure4Home” APP auf Ihr Smartphone herunter und
installieren Sie diese.
Schritt 2:
Starten Sie die Secure4Home-App und wählen Sie “Erstmalige Registrierung”.
Schritt 3:
Stellen Sie sicher, dass das Q-ProHub eingeschaltet und mit dem Router verbunden ist.
Schritt 4:
Folgen Sie den Anweisungen auf dem Bildschirm und geben Sie die erforderlichen
Informationen ein. Benutzername und Passwort müssen mindestens 8 Zeichen umfassen.
Sie werden aufgefordert, die MAC-Adresse Ihres Sicherheitssystems einzugeben, die Sie auf der Rückseite des Q-ProHub
finden. Bitte geben Sie die letzten 6 Ziffern der MAC-Adresse ein. Geben Sie einen Namen für Ihr Sicherheitssystem ein und
wählen Sie die entsprechende Sprache und das Land aus.
Schritt 5:
Nach der Registrierung wählen Sie Ihren Serviceplan aus. Mit dem Code des Premium Service Voucher können Sie den
Premium Service einen Monat lang kostenlos testen. Weitere Informationen zum Premium-Service Gutscheins finden Sie in
Kapitel 12 „Premium-Service“.
Schritt 6:
Sie erhalten eine E-Mail mit der Kontoauthentifizierung. Gehen Sie zu Ihrem E-Mail-Posteingang und authentifizieren Sie Ihr
Konto.
Mit der Secure4Home App können Sie Ihr Sicherheitssystem bequem registrieren und von überall aus
verwalten. Informationen zur Konguration nden Sie in Kapitel 10 „Bedienung über das Webportal“.
Secure4Home
5. Standard-Sicherheitscodes ändern
Starten Sie die Secure4Home-App und geben Sie Ihren Benutzernamen und Ihr Passwort ein.
Tippen Sie oben rechts auf das Einstellungssymbol. Tippen Sie auf “Code” und geben Sie Ihr Benutzerkontokennwort ein.
Benutzer-PIN:
Hier können Sie neue „Benutzer-PIN-Codes“ bearbeiten und erstellen. Benennen
Sie den Standardbenutzer um und ändern Sie die Standardbenutzer-PIN
(1234) mit einem vierstelligen Code. Wählen Sie “Verriegeln” und speichern
Sie die Einstellungen. Der Benutzer-PIN-Code wird verwendet, um das
Sicherheitssystem in den Scharf, Zuhause-, Unscharf-Modus zu versetzen.
Master-PIN-Code:
Ersetzen Sie den voreingestellten Master-PIN-Code (1111) durch einen
vierstelligen Code, und speichern Sie die Einstellungen. Der Mastercode wird
für die Konfiguration verwendet, um auf die Sicherheitssystemeinstellungen
zuzugreifen.
HINWEIS: Der Benutzer-PIN-Code und der Master-PIN-Code können nicht identisch sein. Wenn diese identisch
sind, funktioniert die Änderung des Systemmodus nicht. Weitere Informationen nden Sie im Home Connect
Server-Handbuch. Zur Konguration des Zuhause-Scharf-Modus siehe Kapitel 2.6.1 “Geräteeinstellung” im
Home Connect Server-Handbuch (Download unter service.blaupunkt-security.com).
18
Page 19
6. Installation des Kit-Zubehörs
Tür/Fensterkontakt (DC-S4)
(im Kit Q-Pro6300/6600 enthalten)
Der Tür/Fensterkontakt DC-S4 überwacht Türen und Fenster in Ihrem
Zuhause und gewährleistet einen idealen Schutz.
Der DC-S4 kann mit Schrauben oder Klebeband am Tür- oder
Fensterrahmen montiert werden. Für einen ordnungsgemäßen Betrieb
empfehlen wir, den DC-S4 nicht an Stahltüren oder Stahlfenstern zu
installieren.
Entfernen Sie für die Schraubenmontage die hintere Abdeckung
und drücken Sie (z. B. mit einem Schraubendreher) durch die zwei
Aussparungen auf der Rückseite an der Stelle, an der der Kunststoff dünner
ist. Bohren Sie Löcher in die Oberfläche, wobei Sie die Aussparungen
als Schablone verwenden. Befestigen Sie die Türkontaktplatte mit den
mitgelieferten Schrauben und Dübeln an der gewünschten stelle. Setzen
Sie die hintere Abdeckung wieder auf den Türkontakt.
Stellen Sie sicher, dass der Sabotagestift gegen die Tür- / Fensteroberfläche
gedrückt wird. Andernfalls löst das Zubehör einen Sabotagealarm aus.
Der Magnet sollte neben der Sensormarkierung installiert werden.
Befestigen Sie den Magneten genauso wie das Hauptteil des Türkontakts,
entweder mit den Schrauben oder dem Klebeband.
Fernbedienung (RC-R3B)
(im Kit Q-Pro6300 enthalten)
Mit der Blaupunkt-Fernbedienung RC-R3B können Sie den Status des
Systems zwischen Scharf, Unscharf und Zuhause-Modus leicht ändern.
Zusätzlich kann mit dem RC-R3B ein Panikalarm ausgelöst werden, indem
die Notfall-Taste für 3 Sekunden gedrückt halten. Der RC-R3B kann einen
von ihm ausgelösten Panikalarm nicht deaktivieren. Dies kann nur über die
App oder den Browser erfolgen.
Der RC-R3B arbeitet mit der Rolling-Code Verschlüsselungstechnologie,
um die Sicherheit gegen Manipulationen durch Dritte zu erhöhen.
Tierimmuner Funk-Bewegungsmelder (IR-P4)
(im Kit Q-Pro6300 enthalten)
Wenn der IR-P4 im Scharf-Modus eine Bewegung erkennt, wird
automatisch ein Alarm ausgelöst und der Benutzer benachrichtigt. Der
Sabotageschutz befindet sich im Gerät und wird durch die Schraube nach
unten gedrückt. Wenn das Gerät von einem Eindringling entfernt wird, löst
der Sabotagealarm umgehend aus.
Der IR-P4 muss mit Schrauben oder Klebeband an der Wand befestigt
oder geklebt werden. Der beste Ort ist in einer Ecke mit einem
möglichst großen Bewegungserkennungsbereich. Installieren Sie den
Bewegungsmelder 2 m über dem Boden, um eine optimale Sicherung zu
erzielen.
Entfernen Sie die hintere Abdeckung und drücken Sie (z. B. mit einem
Schraubendreher) durch die Aussparungen auf der Rückseite, an der
Stelle, an der der Kunststoff dünner ist. Es gibt sechs Aussparungen auf
der Rückseite des Geräts. Wenn Sie das Gerät in einer Ecke montieren,
drücken Sie die seitlichen Aussparungen durch. Wenn Sie das Gerät auf
einer ebenen Fläche montieren, drücken Sie durch die Aussparungen in
der Mitte. Bohren Sie Löcher in die Wand, wobei Sie die Aussparungen als
Schablone verwenden. Befestigen Sie die hintere Abdeckung des IR-P4
mit den mitgelieferten Schrauben und Dübeln an der Wand. Setzen Sie die
rückseitige Abdeckung wieder auf den IR-P4.
Der IR-P4 ignoriert Haustiere bis zu 25 kg. Richten Sie den
Bewegungsmelder nicht auf Fensterfronten, Treppen oder auf Bereiche,
auf welche ein Haustier klettern kann.
LED / Test- /
Lerntaste
Magnet
Abb.1
Der Magnet muss neben der
Sensormarkierung platziert werden!
Max 15 mm
Scharf-Taste Zuhause-Taste
Notfall-
Taste
Abb.2
LED/Test-/
Lerntaste
PIR-Sensor
HINWEIS: Der IR-P4 hat nach
Scharfschaltung eine 1-minütige
Energiesparmodus, in der er keine Bewegungsereignisse erfasst. Bitte warten
Sie länger als 1 Minuten, bevor Sie das
Gerät testen.
Sabotagekontakt
LED
Unscharf-Taste
Sensormarkierung
Batterieabdeckung
Abb.3
Deutsch
19
Page 20
Funk-Bedienteil (KP-R1)
(im Kit Q-Pro 6600 enthalten)
Mit dem Funk-Bedienteil KP-R1 können Sie den Status des
Sicherheitssystems leicht zwischen dem Scharf-, Unscharf- und
dem Zuhause-Modus ändern. Geben Sie den PIN-Code des
Deutsch
Sicherheitssystems ein (wie bereits in Kapitel 5 eingestellt) und
drücken Sie die gewünschte Modustaste.
Wir empfehlen, das Funk-Bedienteil hinter der Eingangstür für die
Zugangskontrolle zu montieren.
Nehmen Sie die hintere Abdeckung ab und drücken Sie (z. B. mit
einem Schraubendreher) durch die zwei Aussparungen auf der
Rückseite an der Stelle, an der der Kunststoff dünner ist. Bohren
Sie Löcher in die Wand, wobei Sie die Aussparungen als Schablone
verwenden. Befestigen Sie den Tastenfuß mit den mitgelieferten
Schrauben und Steckern an der Wand. Setzen Sie die rückseitige
Abdeckung wieder auf die Tastatur.
Stellen Sie sicher, dass der Sabotagestift gegen die Wandoberfläche
gedrückt wird. Andernfalls löst das Zubehör einen Sabotagealarm
aus.
Tierimmuner Funk-Bewegungsmelder mit Kamera (IRC-P4)
(im Kit Q-Pro6600 enthalten)
Wenn der IRC-P4 im Scharf-Modus eine Bewegung erkennt,
nimmt er automatisch 3 Fotos auf, speichert sie in der Blaupunkt
Cloud, löst einen Alarm aus und benachrichtigt den Benutzer.
Der Benutzer kann die Fotos jederzeit über die App oder das
Webportal anfordern und anzeigen. Der Sabotageschutz befindet
sich im Gerät und wird durch die Schraube nach unten gedrückt.
Wenn das Gerät von einem Eindringling entfernt wird, löst der
Sabotageschutz einen Alarm aus.
Der IRC-P4 muss mit Schrauben oder Klebeband an der Wand
befestigt oder geklebt werden. Der beste Ort ist in einer Ecke
für einen großen Bewegungserkennungsbereich. Installieren Sie
den Bewegungsmelder in 2 m Höhe über dem Boden, um eine
optimale Sicherung zu erzielen.
Entfernen Sie die hintere Abdeckung und drücken Sie (z. B.
mit einem Schraubendreher) durch die Aussparungen auf der
Rückseite an der Stelle, an der der Kunststoff dünner ist. Es gibt
sechs Aussparungen auf der Rückseite des Geräts. Wenn Sie
das Gerät in einer Ecke montieren, drücken Sie die seitlichen
Aussparungen durch. Wenn Sie das Gerät auf einer ebenen Fläche
montieren, drücken Sie durch die Aussparungen in der Mitte.
Bohren Sie Löcher in die Wand, wobei Sie die Aussparungen als
Schablone verwenden. Befestigen Sie die hintere Abdeckung
des IRC-P4 mit den mitgelieferten Schrauben und Dübeln an der
Wand. Setzen Sie daraufhin die hintere Abdeckung wieder auf den
IRC-P4.
Der IRC-P4 ignoriert Haustiere bis zu 25 kg. Richten Sie den
Bewegungsmelder nicht auf Fensterfronten, Treppen oder auf
Bereiche, auf welche ein Haustier klettern kann.
Abb.4
1. Aktivitäts-LED (Blau/Orange)
2. Status-LED (Blau/Rot)
3. Fehler-LED (Orange)
5. Anwesend-Scharf Taste
6. Status-Taste
7. Unscharf-Taste
4. Abwesend Scharf-Taste
LED-Blitz
PIR-Sensor
Linse der PIR-
Kamera
Blaue LED / Test-
/ Lerntaste
HINWEIS: Der IRC-P4 hat nach Scharfschaltung
einen 2-minütigen Energiesparmodus, in der
er keine Bewegungsereignisse erfasst. Bitte
warten Sie länger als 2 Minuten, bevor Sie das
Gerät testen.
1
2
3
4
5
6
7
Abb.5
Weitere Informationen sowie eine detailierte Bedienungsanleitung zu den im Kit enthaltenen Zubehörteilen
nden Sie unter service.blaupunkt-security.com. Die Q-Pro6300/6600 ist mit Rolling Code ausgestattet. Eine
Funktion, die das Sicherheitssystem vor so genannten “Replay-Angrien” schützt.
20
Page 21

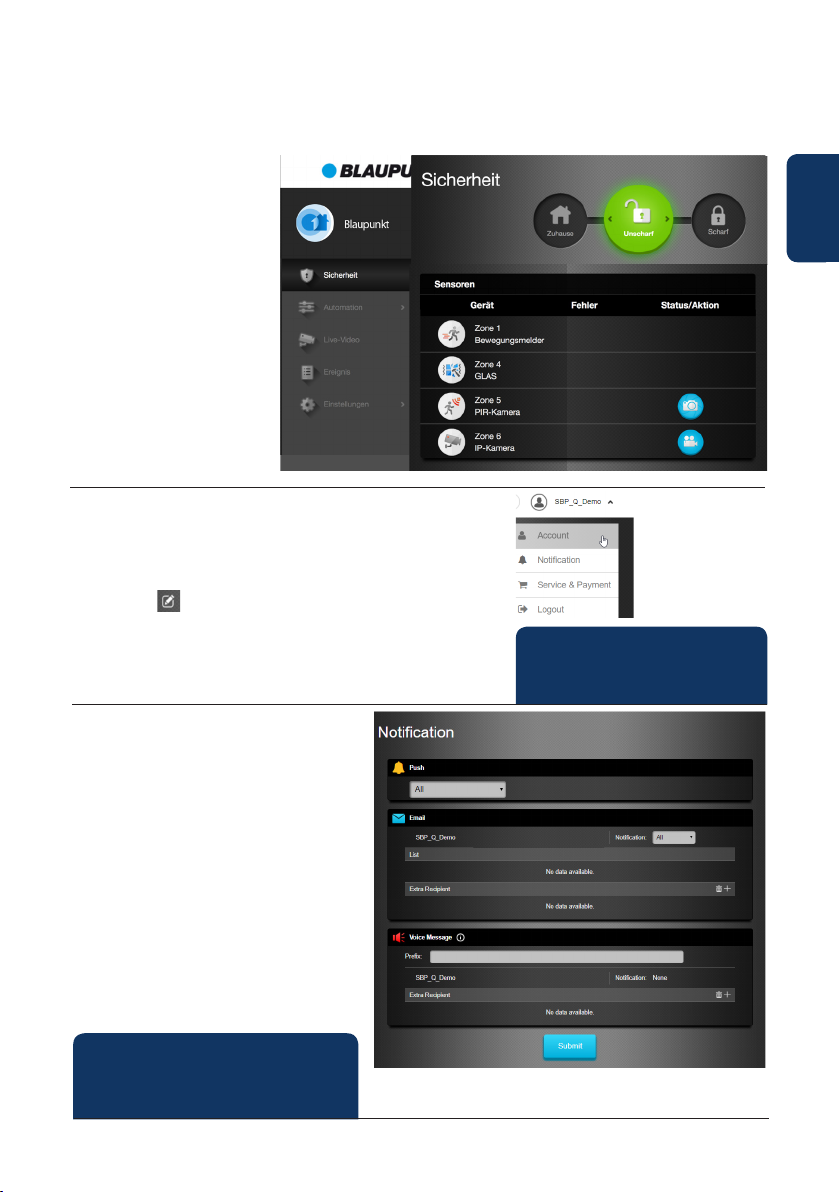
7. Bedienung der Secure4Home App
Mit der Secure4Home App können Sie Ihr Sicherheitssystem bequem registrieren und von überall aus verwalten.
Informationen zur Konguration nden Sie in Kapitel 10 „Bedienung über das Webportal“.
Im Menü Sicherheit
können Sie den Modus
ändern, den Status
der Instrumententafel
überprüfen, , ob
bei dem/den
Fensterkontakt/en, den
restlichen Zubehör oder
bei der Alarmzentrale
ein Fehler vorhanden
ist.
Wenn auf dem Panel
ein GSM-Modul
installiert ist, wird die
Signalstärke (siehe
Kapitel 12) oben rechts
angezeigt.
Im Menü Automation
können Sie manuell
Szenarien auslösen, die
Geräte einer Gruppe
steuern.
Verwalten und
verwenden Sie
alle AutomationsZubehörteile einzeln
und aktivieren oder
deaktivieren Sie
vorhandene Regeln.
Im Menü Gerät können Sie sich einen
allgemeinen Überblick über alle
Zubehörteile verschaffen, prüfen, ob ein
Fehler vorliegt und ob die Türkontakte
geöffnet oder geschlossen sind.
Wenn bei einem oder mehreren
Zubehörteilen der Akku schwach ist,
sollten Sie ihn austauschen, damit das
System ordnungsgemäß funktioniert.
Wenn Überprüfungsfehler
angezeigt werden, befolgen Sie die
Fehlerbehebungen im Handbuch des
jeweiligen Zubehörgeräts ,um das
Problem zu beheben.
Im Menü Live-Video sehen
Sie die optionale Blaupunkt IP
Überwachungskamera (IPC-S1) und die
optionalen PIR-Fotokameras (IRC-P4
oder IRC-S2).
Die IPC-S1 bietet Ihnen eine
zuverlässige Videoüberwachung
in HD-Qualität mit automatischer
Videoaufzeichnung bei Alarmen,
Live-Streaming, Zwei-WegeSprachkommunikation und Nachtsicht.
Der IRC-P4 löst einen Alarm aus,
wenn eine Bewegung erkannt wird,
und erfasst 3 Farbfotos. So können
Sie überprüfen, ob es sich um einen
Einbrecher handelt und sofort reagieren.
Deutsch
Im Menü Ereignis
erhalten Sie einen
Überblick über
vergangene Ereignisse.
Sie können Ereignisse
versenden oder
weiterleiten oder
jemanden anrufen,
um über den Alarm zu
informieren.
Alle Einbruchsalarme
werden rot angezeigt,
während technische
Alarme oder
Systemänderungen
gelb angezeigt
werden.
Wenn Sie oben rechts auf das
Einstellungssymbol klicken, können
Sie auf Ihre persönlichen Daten
zugreifen, Ihr Passwort ändern,
Benachrichtigungen konfigurieren,
eine App-Startseite einrichten, ein
beliebiges Zubehör umgehen und
Kontaktinformationen für den Support
finden. Sie können sich von dort aus
auch abmelden.
21
Page 22
8. Systemmodi
Unscharf/Entschärfen: Der
Unscharf-Modus deaktiviert alle
Einbruchschutz-Sensoren.
Deutsch
Scharf: Der Scharf-Modus versetzt
alle Sensoren in der Alarmzentrale
in Alarmbereitschaft. Der Alarm
wird ausgelöst, sobald ein Sensor
aktiviert wird. Ist ein Sensor mit
dem Attribut “Eingang” hinterlegt,
so löst dieser zunächst den
Eingangs-Countdown aus. Solange
haben Sie noch Zeit, das System zu
deaktivieren, ohne das der Alarm
ausgelöst wird.
Zuhause: Sie können Sensoren
Ihrer Wahl mit dem Attribut
“Zuhause” belegen. In der Regel
werden Sensoren im Inneren
für diesen Modus gewählt.
Diese Sensoren sind dann im
Zuhause-Modus deaktiviert. So
ist die Außenhaut des Zuhauses
alarmgesichert, während Benutzer
sich innerhalb des Hauses frei
bewegen können.
Schritt 1:
Klicken Sie auf die
SystemmodusSchaltfläche, die Sie
aktivieren möchten.
Schritt 2:
Geben Sie den PIN-Code
ein (Standardcode: 1234).
Wenn der Code korrekt ist,
wird der Moduswechsel
angewendet und der
neu ausgewählte Modus
leuchtet auf.
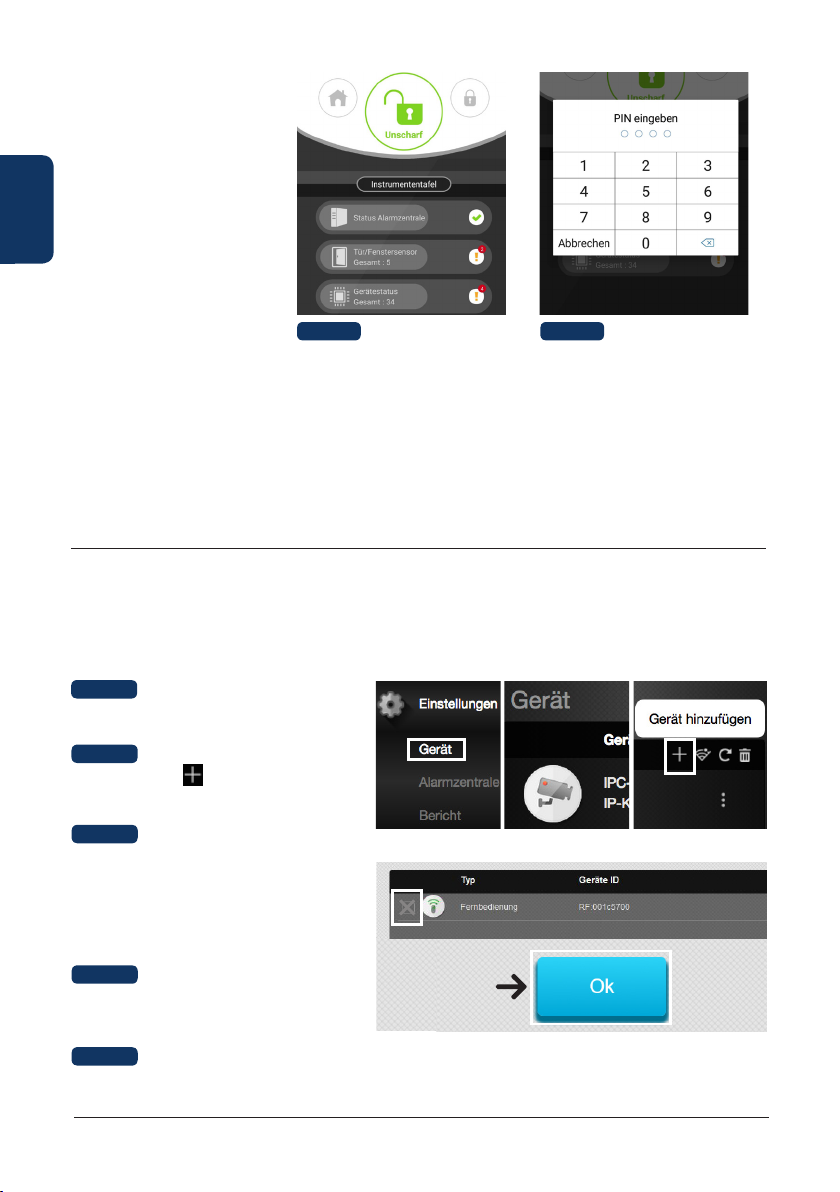
9. Einlernen zusätzlicher Zubehörteile
Alle neuen Zubehörteile, die nicht im Kit-Inhalt enthalten sind, müssen mit den folgenden Schritten zum Q-ProHub
hinzugefügt werden. Sie können bis zu 50 Zubehörteile hinzufügen.
Um weitere neue Zubehöre einzulernen, besuchen Sie das Home-Portal „eu.bphomeconnect.com“.
Schritt 1:
Gehen Sie zu Einstellungen und
klicken Sie auf Gerät.
Schritt 2:
Klicken Sie auf das Symbol in der oberen
rechten Ecke, um auf die Funktion “Gerät
hinzufügen” zuzugreifen.
Schritt 3:
Informationen zum Übertragen des „EinlernSignal “ von jedem Gerät finden Sie in den
jeweiligen Zubehörhandbüchern. Wenn der
Q-ProHub das „Einlern-Signal “ empfängt, ertönt
ein doppelter Piepton und das Home-Portal
zeigt die Geräteinformationen an.
Schritt 4:
Aktivieren Sie das Kontrollkästchen vor den
Geräteinformationen, und klicken Sie auf OK,
um das Gerät zum Q-ProHub hinzuzufügen.
Schritt 5:
Geben Sie dem neuen Zubehör einen Namen und bearbeiten Sie die Attribute, indem Sie auf die drei Punkte auf der rechten
Seite des Zubehörs klicken.
22
Page 23
10. Bedienung und Konfiguration über das Home-Portal
Gehen Sie zum Home-Portal „eu.bphomeconnect.com“.
Übersicht Home-Portal:
Im Menü Sicherheit können Sie
die Systemmodi ändern, einen
Überblick über die Geräte erhalten
und manuell ein Foto anfordern.
Informationen zum Menü
Automatisierung finden Sie unter
11. Hausautomation.
Im Live-Video-Menü sehen Sie
Ihr Echtzeit-Video, sobald Sie die
IP-Kamera (IPC-S1) in das System
integriert haben.
Im Ereignis-Menü erhalten Sie eine
Übersicht über die Ereignisse, die an
den Q-ProHub gemeldet wurden.
Im Menü Einstellung können
Sie die Q-ProHub-Einstellungen
vornehmen.
Konguration über das Webportal:
Um die Kontoeinstellungen zu ändern, klicken Sie auf Ihren Kontonamen
(oben rechts) und wählen Sie “Konto”.
In diesem Menü können Sie Ihre Kontodetails und die Sprache des Home
Portals ändern und sekundäre Benutzerkonten erstellen. Klicken Sie zum
Bearbeiten auf wenn Sie fertig sind, klicken Sie unten auf “Senden”, um
die Änderungen zu speichern.
Sekundäre Benutzerkonten sind an ein Hauptkonto gebunden. Benutzer und
Passwort für sekundäre Konten sind nur für die Anmeldung auf dem Home
Portal und der App gedacht. Die PIN für die Aktivierung / Deaktivierung ist an
den Q-ProHub gebunden und bleibt gleich.
Um die Benachrichtigungseinstellungen zu ändern,
klicken Sie auf Ihren Kontonamen (oben rechts) und
wählen Sie “Benachrichtigung”.
Im Menü Benachrichtigung können Sie die
Benachrichtigungseinstellungen ändern:
Push: Richten Sie die Push-Konfigurationen für Ihr
Smartphone ein. Sie müssen die Secure4HomeApp installieren und sich einloggen, um PushBenachrichtigungen zu erhalten.
E-Mail: Der Home Portal-Server sendet eine E-Mail
an das konfigurierte E-Mail-Konto.
Anruf Bericht: Die Blaupunkt Alarmzentrale ruft Sie
automatisch an, wenn ein Einbruch eintritt. Nur
für Premium-Benutzer. Weitere Informationen zum
Premium-Service finden Sie in Kapitel 12, PremiumService.
HINWEIS: Stellen Sie sicher, dass die
Lautstärke in den Einstellungen Ihres
Smartphones für Push- und Anrufberichte
auf hoch eingestellt ist.
HINWEIS: Jeder Benutzer kann nur
einmal angemeldet sein, entweder im
Webportal oder in der App.
Deutsch
23
Page 24
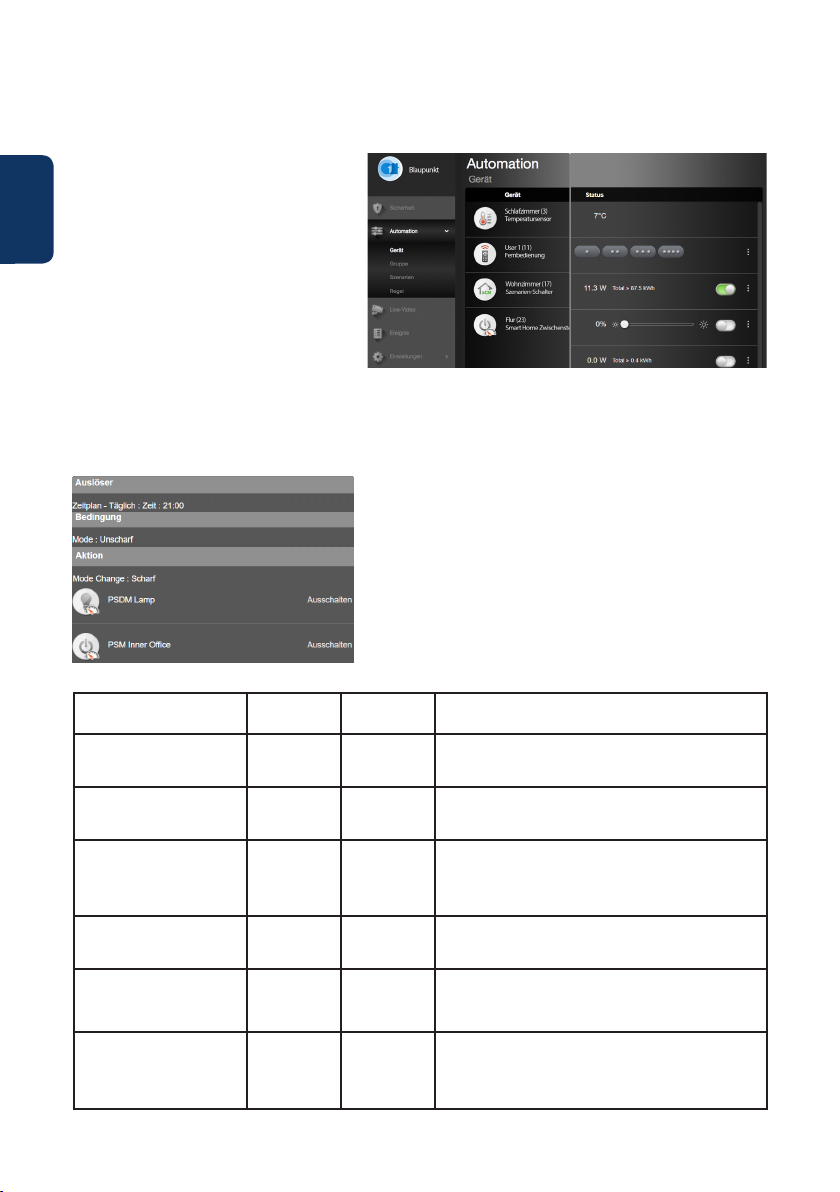
11. Hausautomation
Um Änderungen an Ihrer Hausautomation vorzunehmen, müssen Sie das Home-Portal aufrufen
“eu.bphomeconnect.com“.
Gerät - ermöglicht es, alle Zubehörgeräte der
Deutsch
Hausautomation zu konfigurieren und zu steuern.
Raum - Weisen Sie jedes Zubehör für eine
einfachere Verwaltung dem entsprechenden Raum
zu. (nur für Hausautomations Zubehöre)
Gruppe - Sie können einer Gruppe Zubehöre
desselben Typs hinzufügen, um alle Zubehöre der
Gruppe mit einem einzigen Befehl zu verwalten.
Szenarien - Erstellen Sie Ihr Szenario, um
voreingestellte Aktionen für Ihr Home AutomationZubehör zu definieren. Szenarien können über den
Szenarioschalter (SSW-S1) oder Ihr Smartphone
ausgelöst werden. Die maximale Anzahl an Aktionen
pro Szenario beträgt 5.
Regel - Erstellen Sie Regeln, um automatische
Aktionen Ihres Panels und Ihrer Home AutomationGeräte unter Auslöser- und Bedingungen auszulösen.
So erstellen Sie eine Regel:
Schritt 1: Gehen Sie zu Automation - Regel und klicken Sie auf die
Schaltfläche +.
Schritt 2: Schreiben Sie einen Namen für die Regel, z.B. “Automatisch
Scharfschalten”.
Schritt 3: Wählen Sie einen Auslöser für die Regel aus. (z. B. „Zeitplan“
-> „Jede Woche“ wählen Sie die Tage und die Uhrzeit aus)
Schritt 4: Wenn Sie möchten, fügen Sie eine beliebige Bedingung
hinzu (Systemstatus, damit die Regel ausgeführt wird). Zum Beispiel
Zeitdauer oder System-Modus, bis zu 2 Bedingungen sind möglich.
Schritt 5: Wählen Sie aus der Liste eine Aktion aus, um die Regel
auszulösen. z.B. Geräteaktion -> Netzschalter (PSM-S1) Einschalten.
Schritt 6: Wenn Sie weitere Aktionen hinzufügen möchten, drücken
Sie die + -Taste rechts (bis zu 5 Aktionen sind möglich).
Schritt 7: Klicken Sie auf “Senden”, um die Änderungen zu speichern.
Empfohlene Regeln Auslöser Bedingung Aktion
Schalten Sie bei jedem Alarm die
Lichter ein, fahren die Rolladen hoch
und starten Sie eine Videoaufnahme.
Wenn Sie die Tür Ihres Hauses
zwischen 19:00 und 7:00 Uhr öffnen,
schalten Sie die Beleuchtung für 20s ein
Simulieren Sie Anwesenheit im
Urlaub: Täglich zu bestimmten Zeiten,
z.B. 20:00 Uhr werden die Jalousien
hochgefahren und das Licht schaltet
sich nach 30 Minuten ein.
Schalten Sie das Sicherheitssystem
täglich um 6:00 Uhr unscharf und
öffnen Sie die Jalousien.
Immer wenn Sie das System scharf
schalten, schalten Sie das Licht aus,
stellen das Heizungssystem auf 18 ° C
und schließen die Jalousien.
Wechseln Sie täglich um 23:00 Uhr das
Sicherheitssystem in den Zuhause-Modus, schalten Sie alle Lichter aus,
schließen alle Jalousien und stellen das
Heizungssystem auf 18 ° C herunter.
Alarm auslösen ->
Beliebiger Alarm
Tür/ Fenstersensor
auf
Zeitplan ->
Wöchentlich ->
Jeden Tag 20:00
Uhr
Zeitplan ->
Wöchentlich ->
Jeden Tag 6:00 Uhr
Modus ändern->
Scharf
Zeitplan ->
Wöchentlich ->
Jeden Tag 23:00
Keine “Geräteaktion -> Netzschalter PSM-S1 oder PRM2-S1 -> Einschalten
Zeitperiode ->
Jeden Tag -> Von
19:00 bis 7:00 Uhr
Keine “Geräteaktion -> Netzschalter PSM-S1 oder PRM-S1 -> AN für -> 30 Minuten
Keine “Modus ändern-> Unscharf
Keine “Geräteaktion -> Netzschalter PSM-S1 oder PRM-S1 -> Ausschalten
Keine “Modus ändern -> Zuhause
Geräteaktion -> Rollladen SCM-S1 geöffnet 100%
Video anfordern -> IPC-S1 “
Geräteaktion -> Netzschalter PSM-S1 oder PRM2-S1 -> Einschalten für ->
20sekunden
Geräteaktion -> Rollladen SCM-S1 Schließen “
Geräteaktion -> Rollladen SCM-S1 offen 100% “
Geräteaktion -> Thermostat TRV-S1 oder TMST-S1 -> AN -> 18ºC
Geräteaktion -> Rollladen SCM-S1 Schließen “
Geräteaktion -> Netzschalter PSM-S1 oder PRM-S1 -> Ausschalten
Geräteaktion -> Rollladen SCM-S1 Schließen
Geräteaktion -> Thermostat TRV-S1 oder TMST-S1 -> AN -> 18ºC
24
Page 25

12. Sicherheitsempfehlungen
1| Hybrid-Backup-Kommunikationsmethode:
Sie können die Blaupunkt GSM-Module DG2-Pro oder DG4-Pro erwerben und an den USB Anschluss an der Rückseite des
Q-ProHub anschließen, um zu vermeiden, dass die Kommunikation mit Ihrem Sicherheitssystem unterbrochen wird. Selbst
wenn die Internetverbindung ausfällt oder durch einen Eindringling unterbrochen wird, sind Sie weiterhin geschützt.
Der DG2-Pro arbeitet im 2G-Netzwerk und bietet Ihnen ein Backup für Alarmbenachrichtigungen und eine Standard-AppÜbersicht. Wir empfehlen, diese Backup-Option an Orten, in denen keine 4G-Kommunikation möglich ist.
Der DG4-Pro arbeitet mit dem 4G-Hochgeschwindigkeitsnetzwerk und kann als Backup für Alarmbenachrichtigungen
und das Standard-App-Management verwendet werden. Stellen Sie sicher, dass sich am Installationsort ein
4G-Netzwerk mit ausreichender Signalstärke vorhanden ist. Es wird nicht empfohlen, den DG4-Pro als eigenständige
Kommunikationsmethode zu verwenden. Er ist nur als Backup gedacht.
Für die GSM-Module muss eine SIM-Karte mit Datenflatrate installiert sein. (SIM-Karte nicht enthalten)
2| Stummschalten der Sirene des Q-ProHub:
Um zu vermeiden, dass ein Eindringling den Installationsort des Q-ProHub ermittelt, empfehlen wir, die interne Sirene vom
Q-ProHub stummzuschalten und eine zusätzliche Sirene für den Außen- oder Innenbereich zu installieren.
Sie können eine der folgenden zusätzlichen Sirenen installieren, um die Sicherheit zu erhöhen und zu verhindern, dass ein
Eindringling das Q-ProHub findet: Funk-Innensirenen (SRAC-S1, SR-S1) , Funk-Außensirene (BX-S1).
Um die interne Sirene stummzuschalten, gehen Sie zu Einstellungen -> Geben Sie den Mastercode ein -> Gerät -> Interne Sirene ->
AUS.
3| Premium-Service:
Mit unserem neuen Premium-Service erhält Ihr Q-ProHub innovative Zusatzfeatures:
Durch unseren neuen Premium Anruf-Service werden Sie und bis zu drei weitere Personen, wie z.B. Ihr Nachbar, im Falle
eines Notfalls automatisch von unserem Alarm Call Center angerufen.
Der Premium Service bietet zusätzlich einen Cloud-Speicher für mehr als 50 Videos Ihrer IPC-S1, 30 aufgenommene Bilder
der PIR-Foto-Kamera (IRC-P4 und IRC-S2) und ein erweitertes Ereignisprotokoll von 90 Tagen.
Mit dem 12-monatigen Premium-Service-Plan wird die Produktgarantie um ein weiteres Jahr verlängert.
Weitere Informationen zum Premium Service finden Sie unter: premium.blaupunkt-security.com
Deutsch
4| Firmware-Aktualisierungen:
Der Q-ProHub beinhaltet einen automatischen FW-Upgrade-Service. (Es gibt einen täglichen FW-Aktualisierungsdienst, der
Ihr Gerät auf dem neuesten Stand hält.). Wenn Sie ein neues Q-Serien-Produkt gekauft haben, sollten Sie mindestens einen
Arbeitstag warten, bis alle erforderlichen Updates verfügbar sind. Wenn das Gerät aktualisiert wird, schalten Sie es bitte nicht
aus, da dies das Sicherheitssystem beschädigen kann.
13. Support
Weitere Informationen zum Q-ProHub und Zubehören finden Sie unter:
security.blaupunkt-service.com
Blaupunkt Competence Center Security & Care
www.blaupunkt.com
Security Brand Pro GmbH
Mondstrasse 2-4
85622 Feldkirchen-München, Germany
© Technische Änderungen und Irrtümer vorbehalten
25
Page 26

Français | Guide de démarrage rapide
1. Contenu du Q-Pro6300, Q-Pro6600 & Q-Pro Système Central
Français
a
Q-ProHub – Panneau Central
e
Socle
Inclus dans le Q-Pro6300 Inclus dans le Q-Pro6600
i
Détecteur de mouvement
Animaux acceptés
b
Adaptateur Câble Ethernet
PREMIUM
VOUCHER
f
Bonication Premium Autocollant
j
Contact
d’ouverture
k
Télécommande Clavier déporté
c
g
l
Détecteur de
mouvement photo
Animaux acceptés
Support de montage
Guide de démarrage rapide
m
Contact
d’ouverture
d
h
n
Important:
Ce guide de démarrage rapide est axé sur l’installation et la conguration initiale du système de
sécurité avec l’application Secure4Home.
Pour plus d’informations, s’il vous plaît visitez notre site Web: http://security.blaupunkt-service.com
26
Page 27

2. Disposition du Q-ProHub
1
1
2
2
3
3
4
4
5
5
6
6
7
7
8
8
Français
11
10
11
10
9
9
1. Etat de la lumière LED (rouge et verte):
Rouge activé - mode armé.
Flash rouge - Mode maison
Flash vert - Mode d’apprentissage.
Vert éteint - Mode Test de marche ou Désarmé.
2. Etat de la LED pour Alarme & Défaut (rouge & jaune):
Rouge allumé - Alarme en Mémoire
Flash rouge - alarme
Jaune allumé / clignotant - Défaut du système
3. Socle (Pour le déploiement de bureau):
4. Port USB: Pour DG2-Pro et DG4-Pro
IMPORTANT - Lire avant l’installation
• Assurez-vous que la vue d’installation est proche du routeur ou d’un port Ethernet du réseau.
• N’installez pas le Q-ProHub à vue visible afin d’éviter toute manipulation non autorisée.
• La protection anti-sabotage du Q-ProHub ne fonctionne que pour une installation murale. Cela est dû au fait que le
détachement du Q-Pro du support de fixation mural déclenchera l’alarme de sabotage.
• L’anti-sabotage Q-ProHub est pressé par le support de fixation mural. Ne retirez pas le support de montage mural, même
si vous décidez d’utiliser le support de bureau. Le Q-Pro ne fonctionnera pas correctement sans le support de montage
fixé à l’arrière.
5. Bouton d’apprentissage / Réinitialisation
6. Port Ethernet
7. Interrupteur ON/OFF pour alimentation par batterieh
8. Connecteur d’alimentation. DC 12V 1A.
9. Protection anti-sabotage du panneau
10. Entrées débrayables pour montage mural x 2
11. Crochets de support
12. Support de montage
11
10
12
12
27
Page 28

3. Installation du Q-ProHub
Option A: Installation murale
Étape 1a:
Placez le support de montage mural sur le mur en
position verticale et utilisez-le comme gabarit pour
marquer les positions des deux trous sur le mur.
Option B: Installation sur pied
Étape 1b:
Retirez la bande située sur le côté gauche du Q-ProHub.
Étape 2a:
Français
Percez deux trous dans le mur et placez le support
de montage mural avec les crochets pointant vers la
droite. Fixez le support de montage mural avec les vis et
chevilles fournis.
Étape 3a:
Accrochez le Q-ProHub au support de montage et faitesle glisser vers la gauche pour appuyer sur la protection
anti-sabotage située à l’intérieur du Q-ProHub. Facultatif:
indiquez au mur ou au bas du panneau comment
détacher le panneau du support..
Étape 4:
Connectez le Q-ProHub au
routeur Internet à l’aide du
câble Ethernet fourni..
Étape 2b:
Accrochez le Q-ProHub au socle pointant vers la gauche et
faites-le glisser vers la droite.
Étape 3b:
Malgré l’installation du support de bureau, veuillez
accrocher le Q-ProHub au support de montage et le faire
glisser vers la gauche pour appuyer sur la protection
anti-sabotage située à l’intérieur du Q-ProHub, afin de vous
assurer que le sabotage est enfoncé..
Étape 6:
Wait until the Power LED
lights up.
Étape 5:
Connectez le Q-ProHub à
une prise électrique avec
l’adaptateur fourni. Basculez
l’interrupteur d’alimentation
de la batterie sur ON avec
un tournevis fin ou un stylo.
REMARQUE: Dès que le Q-ProHub est connecté et allumé, le serveur vous accorde 15 minutes pour terminer
l’enregistrement. Si l’enregistrement n’est pas terminé dans les 15 minutes, retirez l’adaptateur secteur et placez
le commutateur sur la position OFF. Puis redémarrez en réinsérant l’adaptateur secteur et en basculant sur ON.
Vous avez maintenant 15 minutes de plus pour terminer l’enregistrement.
Remaruque:
Le Q-ProHub doit être connecté à Ethernet et à l’électricité
à tout moment. Tout problème avec le routeur et la
connexion au réseau et à l’alimentation peut perturber le
fonctionnement du système..
28
Page 29

4. Enregistrement
Pour l’enregistrement sur ordinateur, visitez https: // eu. bphomeconnect.com à partir de votre navigateur Web
et suivez les mêmes étapes que ci-dessous. Évitez d’utiliser navigateurs Web comme Microsoft Explorer / Edge.
Étape 1:
Téléchargez et installez l’application «Secure4Home» sur votre smartphone.
Étape 2:
Lancez l’application Secure4Home et sélectionnez Première enregistrement..
Étape 3:
Assurez-vous que le Q-ProHub est allumé et connecté au routeur.
Étape 4:
Suivez les instructions à l’écran et entrez les informations requises. Le nom d’utilisateur et le
mot de passe doivent comporter au moins 8 caractères..
Vous serez invité à saisir l’adresse MAC de votre système de sécurité, que vous trouverez à l’arrière du Q-ProHub. Veuillez
entrer les 6 derniers chiffres de l’adresse MAC. Entrez un nom pour votre système de sécurité et sélectionnez la langue et le
pays appropriés.
Étape 5:
Une fois l’enregistrement terminé, veuillez choisir votre plan de service. Avec le code de bon de service Premium, vous
pouvez essayer le service Premium gratuitement pendant un mois. Pour plus d’informations sur le service Premium, veuillez
vous reporter au chapitre 12 «Service Premium»..
Étape 6:
Vous recevrez un e-mail d’authentification de compte. Accédez à votre boîte de réception et authentifiez votre compte.
L’application Secure4Home est conçue pour enregistrer et gérer votre système de sécurité de n’importe où.
Pour la conguration, veuillez vous reporter au chapitre 10 «Utilisation via le portail Web».
Secure4Home
5. Changement des Codes de Sécurité par Défaut
Lancez l’application Secure4Home et entrez votre nom d’utilisateur et votre mot de passe.
En haut à droite, appuyez sur l’icône du moteur. Tapez sur «Code» et tapez le mot de passe de votre compte utilisateur.
PIN de l’utilisateur
Ici, vous pouvez éditer et créer de nouveaux «codes PIN d’utilisateur».
Renommez l’utilisateur par défaut et changez le code PIN utilisateur par défaut
(1234) avec un code à 4 chiffres. Sélectionnez Verrouiller et enregistrez les
paramètres. Le code PIN de l’utilisateur sert à armer, à armer à la maison et à
désarmer le système de sécurité.
Code Maître:
Remplacez le code maître par défaut (1111) par un code à 4 chiffres et
enregistrez les paramètres. Le code maître est utilisé pour la configuration pour
accéder à la Sécurité.
Français
REMARQUE: Le code PIN de l’utilisateur et le Code Maître ne peuvent pas être identiques. S’ils sont identiques,
le changement de mode système ne fonctionnera pas. Pour plus d’informations, consultez le manuel de Home
Connect Server. Pour la conguration du mode “Partiel”, voir le chapitre 2.6.1 Conguration de l’appareil dans le
manuel du Home Connect Server (à télécharger sur service.blaupunkt-security.com).
29
Page 30

6. Installation des Accessoires du Kit
Contact d’ouverture (DC-S4)
(inclus dans le kit Q-Pro 6300/6600)
Le contact d’ouverture DC-S4 surveille les portes et les fenêtres de votre
maison, assurant ainsi une protection idéale.
Le DC-S4 peut être monté avec des vis ou avec du ruban adhésif sur le
cadre de la porte ou de la fenêtre. Pour un fonctionnement correct, il est
déconseillé d’installer le DC-S4 sur des portes ou des fenêtres en acier.
Français
Pour l’installation par vis, retirez le capot arrière et poussez à travers les 2
entrées défonçables à l’arrière (par exemple avec un tournevis) là où le
plastique est plus mince. Percez des trous dans la surface en utilisant les
découpes comme gabarit. Fixez la base de contact de porte sur la surface
à l’aide des vis et des bouchons fournis. Replacez le couvercle arrière sur le
contact de porte.
Assurez-vous que la protection anti-sabotage est appuyée contre la
surface de la porte / fenêtre, sinon l’accessoire déclenchera une alerte
d’inviolabilité.
L’aimant doit être installé de manière adjacente à la marque du capteur.
Fixez l’aimant de la même manière que le contact principal de la porte,
soit par une vis ou un ruban adhésif..
Télécommande (RC-R3B)
(inclus dans le kit Q-Pro 6300)
Avec la télécommande RC-R3B de Blaupunkt, vous pouvez facilement
changer l’état du système en mode Armé, Désarmé ou Domicile.
De plus, le RC-R3B peut être utilisé pour déclencher une alarme de panique
en appuyant sur le bouton d’urgence pendant 3 secondes. Le RC-R3B ne
peut pas désarmer une alarme de panique déclenchée par lui-même, cela
peut être fait via l’application.
Le RC-R3B fonctionne avec une technologie de cryptage à code roulant,
pour une sécurité accrue contre les manipulations par des tiers..
LED / Test-/
Bouton
d’apprentissage
Aimant
Fig.1
L’aimant doit être placé à côté du “repère
aimant”! Max 15mm
Bouton Marche totale Bouton Marche partielle
Bouton
d’urgence
Fig.2
Anti-sabotage
LED
Bouton Arrêt
Repère
aimant
Trappe pile
Détecteur de mouvement photo - Animaux acceptés (IR-P4)
(inclus dans le kit Q-Pro 6300)
Lorsque l’IR-P4 détecte un mouvement en mode armé, il déclenche
automatiquement une alarme et en informe l’utilisateur. La protection
anti-sabotage est à l’intérieur de l’appareil et est enfoncée par la vis.
Si le périphérique est retiré par un intrus, la protection anti-sabotage
déclenchera une alarme.
L’IR-P4 doit être monté ou collé au mur à l’aide de vis ou de ruban adhésif.
Le meilleur emplacement est dans un coin pour avoir une large zone de
détection de mouvement. Installez le détecteur de mouvement à 2 m du
sol pour obtenir les meilleures performances.
Retirez le capot arrière et poussez à travers les entrées défonçables à
l’arrière (par exemple avec un tournevis) là où le plastique est plus fin. Il y a
six entrées défonçables à l’arrière de l’appareil qui peuvent être poussées.
Si vous montez l’appareil dans un coin, poussez les perforations sur le
côté. si vous montez l’appareil sur une surface plane, poussez à travers les
perforations situées au centre. Percez des trous dans le mur en utilisant les
entrées défonçables comme gabarit. Fixez la base IR-P4 au mur à l’aide de
la vis et des bouchons fournis. Replacez le capot arrière sur l’IR-P4.
La fonction immunitaire des animaux ignorera les animaux pesant jusqu’à
25 kg. Pour une détection immunitaire correcte des animaux domestiques,
ne dirigez pas le détecteur de mouvement vers les escaliers ou les zones
où un animal domestique peut grimper.
30
LED/Walk Test/
Bouton
d’apprentissage
Capteur
PIR
Fig.3
REMARQUE: L’IR-P4 restera en mode
veille pendant 1 min. lors d’une détection alors que l’alarme est désactivée.
Attendez plus de 1 minute avant de
tester si personne n’a été détecté pour
s’assurer que le périphérique est en
mode veille.
Page 31

Clavier(KP-R1)
(inclus dans le kit Q-Pro6600)
Avec le clavier KP-R1 de Blaupunkt, vous pouvez facilement
changer l’état du système de sécurité entre les modes armé,
désarmé et partiel. Entrez le code PIN du système de sécurité
(identique à celui défini au chapitre 5) et appuyez sur la touche du
mode souhaité.
Nous vous recommandons de monter le clavier à l’entrée près la
porte pour contrôler l’entrée.
Retirez le capot arrière et poussez à travers les 2 entrées
déformables à l’arrière (par exemple avec un tournevis) là où le
plastique est plus fin. Percez des trous dans le mur en utilisant les
entrées déformables comme gabarit. Fixez la base du clavier au
mur avec la vis et les bouchons fournis. Placez la couverture arrière
sur le clavier.
Assurez-vous que la protection anti-sabotage est appuyée contre
la surface du mur, sinon l’accessoire déclenchera une alerte antisabotage.
Détecteur de mouvement photo - Animaux acceptés (IRC-P4)
(inclus dans le kit Q-Pro6600)
Lorsque l’IRC-P4 détecte un mouvement en mode armé, il prend
automatiquement 3 photos, les enregistre sur le cloud, déclenche
une alarme et en informe l’utilisateur. L’utilisateur peut demander
et voir les photos à tout moment en utilisant l’application ou
le portail Web. La protection anti-sabotage est à l’intérieur de
l’appareil et est enfoncée par la vis. Si le périphérique est retiré par
un intrus, la protection anti-sabotage déclenchera une alarme.
L’IRC-P4 doit être monté ou collé au mur avec des vis ou du ruban
adhésif. Le meilleur emplacement est dans un coin pour avoir une
large plage de détection de mouvement. Installez le détecteur
de mouvement à 2 m au-dessus du sol pour des performances
optimales.
Retirez le capot arrière et poussez à travers les entrées défonçables
à l’arrière (par exemple avec un tournevis) là où le plastique est
plus fin. Il y a six entrées défonçables à l’arrière de l’appareil qui
peuvent être insérées. Si vous installez l’appareil dans un coin,
poussez à travers les perforations sur le côté; si vous montez
l’appareil sur une surface plane, poussez à travers les perforations
situées au centre. Percez des trous dans le mur en utilisant les
entrées défonçables comme gabarit. Fixez la base IRC-P4 au mur
avec la vis et les bouchons fournis. Replacez la couverture arrière
sur l’IRC-P4.
La fonction immunité aux animaux de compagnie ignorera les
animaux de compagnie pesant jusqu’à 25 kg. Pour une détection
immunitaire correcte des animaux domestiques, ne dirigez pas
le détecteur de mouvement vers les escaliers ou les zones où un
animal domestique peut grimper.
Fig.4
1. LED Actif (Bleu/Orange)
2. LED Situation (Bleu/
Rouge)
5. Marche Partiel
6. Clé Situation
7. Clé Arrêt
3. Fault LED (Orange)
4. Clé de Marche Totale
LED-Flash
PIR-Sensor
Lense of PIR-
Camera
Blue LED/Test-/
Learn-Button
REMARQUE: L’IRC-P4 passera en mode
veille pendant 2 min. lors de la détection de
quelqu’un alors que l’alarme est désactivée.
Attendez plus de 2 minutes sans que personne
ne soit détecté pour vous assurer que
l’appareil est en mode veille avant de tester.
1
2
3
4
5
6
7
Français
Fig.5
Pour plus d’informations sur les accessoires inclus dans le kit, rendez-vous sur service.blaupunkt-security.com
pour obtenir un manuel d’utilisation détaillé pour chaque accessoire.
La série Q-Pro équipée du rolling code. Une fonctionnalité permettant de chirer et de renforcer la sécurité du
système de sécurité contre les attaques “Replay”.
31
Page 32

7. Opération via l’application
L’application Secure4Home est conçue pour enregistrer et gérer votre système de sécurité de
n’importe où. Pour la conguration, veuillez vous reporter au chapitre 10 «Utilisation via le portail
Web».
Français
Dans le menu
Sécurité, vous pouvez
modifier les modes
du système, vérifier
l’état du tableau de
bord du système, s’il
ya des contacts de
porte ouverts et si
vos accessoires sont
défectueux.
Si un module GSM est
installé sur le panneau,
la force du signal (voir
le chapitre 12) sera
affichée en haut à
droite.
Dans le menu
Domotique, vous
pouvez déclencher
manuellement l’un
de vos scénarios,
contrôler les
accessoires du groupe,
gérer et utiliser
individuellement
tous les accessoires
d’automatisation
domestique et activer
ou désactiver les
règles existantes..
Dans le menu Accessoires, vous pouvez
avoir un aperçu général de tous les
accessoires, vérifier s’ils sont défectueux
et si les contacts de la porte sont
ouverts ou fermés.
Si un ou plusieurs accessoires
présentent une pile faible, remplacezla pour que le système continue de
fonctionner correctement.
Si d’autres problèmes de supervision
s’affichent, veuillez suivre les
instructions de dépannage du manuel
de l’accessoire concerné dans le manuel
complet pour résoudre le problème.
Dans le menu Vidéo, vous pouvez voir
la caméra Wi-Fi Video Survaillance en
option (IPC-S1) et le caméscope PIR en
option (IRC-P4 ou IRC-S2).
L’IPC-S1 vous fournit une
vidéosurveillance fiable de qualité HD
avec enregistrement vidéo automatique
pendant les alarmes, diffusion en direct,
communication vocale bidirectionnelle
et vision nocturne.
L’IRC-P4 déclenche une alarme
lorsqu’un mouvement est détecté et
capture 3 photos couleur pour fournir
une vérification / preuve visuelle.
32
Dans le menu
Événements, vous
aurez un aperçu
des événements
passés. Vous pouvez
poster / transférer
des événements ou
appeler quelqu’un
pour notifier l’alarme.
Toutes les alarmes
d’intrusion seront
affichées en rouge,
tandis que les alertes
techniques ou les
modifications du
système seront
affichées en jaune.
Si vous cliquez sur l’icône des
paramètres en haut à droite, vous
pouvez accéder à vos informations
personnelles, modifier votre mot de
passe, configurer une notification,
configurer une page de démarrage
d’application, ignorer tout accessoire et
rechercher des informations de support
technique. Vous pouvez également
vous déconnecter.
Page 33

8. Modes du système
Arrêt: Le mode Arrêt désarme tous
les capteurs de cambriolage.
Marche: Le mode Marche arme
tous les capteurs de cambriolage.
Une alarme est déclenchée
dès qu’un capteur est activé. Si
l’attribut Entrée a été attribué à un
capteur, un compte à rebours est
déclenché pour que l’utilisateur ait
le temps de désarmer le système et
aucune alarme ne soit déclenchée.
Partiel:
Les capteurs auxquels l’attribut
Partiel a été attribué ne peuvent
pas être activés si le système est
basculé en mode Marche. En règle
générale, cet attribut est attribué
aux détecteurs de mouvement
à l’intérieur, ce qui vous permet
de vous déplacer librement à
l’intérieur de l’appartement lorsque
les portes et les fenêtres sont
protégées.
Étape1:
Cliquez sur le mode
du système que vous
souhaitez activer.
Étape 2:
Entrez le code PIN
(code par défaut: 1234).
Si le code est correct,
le changement de
mode sera appliqué
et le nouveau mode
sélectionné s’allumera.
9. Apprentissage de nouveaux accessoires supplémentaires
Tous les nouveaux accessoires qui ne figuraient pas dans le contenu du kit doivent être ajoutés au Q-ProHub en procédant
comme suit.
Vous pouvez ajouter jusqu’à 50 accessoires.
Pour apprendre dans tout nouvel accessoire, vous devez vous rendre sur le portail d’accueil «eu.bphomeconnect.com».
Français
Étape 1:
Allez dans Configurations et cliquez
sur Accessoires.
Étape 2:
Cliquez sur icône en haut à droite pour
accéder à la fonction «Ajouter un accessoire»..
Étape 3:
Reportez-vous au manuel de chaque
accessoire pour transmettre le «signal
d’apprentissage» de chaque appareil. Lorsque
le Q-ProHub reçoit le “signal d’apprentissage”,
il émet un double bip et l’interface Web
affiche les informations relatives à l’appareil.les
informations relatives à l’appareil.
Étape 4:
Cochez la case en regard d’informations sur
l’accessoire, puis cliquez sur OK pour ajouter
cet accessoire dans le Q-ProHub.
Étape 5:
Attribuez un nom au nouvel accessoire et modifiez ses attributs en cliquant sur les 3 points situés à droite de cet accessoire.
33
Page 34

10. Fonctionnement et Configuration via le Portail Web
Accédez au portail d’accueil «eu.bphomeconnect.com».
Vue d’ensemble du portail Web:
Dans le menu Sécurité, vous pouvez modifier
les modes du système, obtenir une vue
d’ensemble des périphériques et demander
manuellement une photo.
Pour le menu Domotique, veuillez vous
Français
référer à 11. Domotique.
Dans le menu Vidéo, vous verrez votre vidéo
en temps réel dès que vous aurez intégré la
caméra IPC-S1 Blaupunkt.
Dans le menu Événements, vous obtiendrez
un aperçu des événements rapportés au
Q-ProHub.
Dans le menu Configurations, vous pouvez
programmer les paramètres du Q-ProHub.
Conguration via portail Web:
Pour modifier les paramètres du compte, cliquez sur le nom de votre compte
(coin supérieur droit) et sélectionnez «Compte».
Dans ce menu, vous pouvez modifier les détails de votre compte, la langue
du portail principal et créer des comptes d’utilisateurs secondaires. Pour
modifier, cliquez sur, oune fois terminé, cliquez sur Soumettre en bas
pour enregistrer les modifications.
Les comptes d’utilisateurs secondaires sont liés à un compte principal.
L’utilisateur et le mot de passe des comptes secondaires servent uniquement
à se connecter sur le portail personnel et l’application. Les codes PIN pour
armer / désarmer sont liés au Q-ProHub et resteront les mêmes.
REMARQUE: UN SEUL utilisateur à la
fois peut être connecté au compte
avec un nom d’utilisateur identique.
Pour modifier les paramètres de notification, cliquez sur le
nom de votre compte (coin supérieur droit) et sélectionnez
«Notification».
Dans le menu Notification, vous pouvez modifier les
paramètres de notification:
Push: Configurez les configurations Push pour votre
smartphone. L’application Secure4Home doit être installée
et connectée pour recevoir les notifications push.
E-mail: le serveur Home Portal envoie un e-mail au compte
de messagerie configuré.
Message vocal: Blaupunkt Alarm center vous appellera
automatiquement en cas d’événement cambrioleur. Réservé
aux utilisateurs Premium. Pour plus d’informations sur le
service Premium, veuillez vous reporter au chapitre 12,
Service Premium.
REMARQUE: Assurez-vous que le volume dans les
paramètres de votre smartphone a été déni sur
Elevé pour les rapports Push et Appels.
34
Page 35

11. Domotique
Pour apporter des modications à votre domotique, vous devez vous rendre sur le portail principal.
“eu.bphomeconnect.com“.
Accessoires - Vous permet de gérer et d’utiliser
individuellement tous les accessoires domotiques.
Pièce- Attribuez chaque accessoire à la pièce
appropriée pour une gestion plus facile.
(uniquement pour les accessoires de la domotique)
Groupe - Vous pouvez ajouter des accessoires
du même type à un groupe pour gérer tous les
accessoires en une seule commande.
Scénario - Créez votre scénario pour définir des
actions prédéfinies pour vos unités domotiques.
Les scénarios peuvent être déclenchés via le
sélecteur de scénario (SSW-S1) ou votre téléphone
portable. Le nombre maximum d’actions par
scénario est de 5.
Règle - Créez votre règle pour lancer des actions
automatiques de votre panneau et de vos appareils domotiques dans un déclencheur et dans des conditions.
Comment créer une règle:
Étape 1: Allez à Domotique - Règle et cliquez sur le bouton +.
Étape 2: Écrivez un nom pour la règle, par ex. “Armement
automatique”.
Étape 3: Sélectionnez un déclencheur pour la règle. (par exemple,
“Horaire” -> “Toutes les semaines”, sélectionnez les jours et l’heure)
Étape 4: Si vous le souhaitez, ajoutez n’importe quelle condition
(état du système pour que la règle arrive). Par exemple, période de
temps ou mode système, jusqu’à 2 conditions.
Étape 5: Sélectionnez dans la liste une action pour déclencher
la règle. Par exemple. Action de l’appareil -> Prise Commandée à
mesure (PSM-S1) à allumer.
Étape 6: Si vous souhaitez ajouter d’autres actions, appuyez sur le
bouton + à droite (jusqu’à 3 actions possibles).
Étape 7: Cliquez sur “Valider” pour enregistrer les modifications.
Français
Règles recommandées Libération Condition Action
En cas d’alarme: allumez les lumières,
relevez les stores et démarrez un
enregistrement vidéo.
Lorsque vous ouvrez la porte de votre
maison entre 19h00 et 19h00, allumez
les lumières pendant 20 secondes
Simulez l’activité dans la maison
lorsque vous êtes en vacances:
Tous les jours à des heures précises, par
exemple 20:00, les stores se lèveront
et la lumière s’allumera pendant 30
minutes. “
Tous les jours à 6h00, changez le
système de sécurité pour désarmer et
ouvrir vos stores
Lorsque vous armez le système,
éteignez vos lumières, baissez le
système de chauffage à 18 ° C et
fermez vos stores
Tous les jours à 23h00, changez le
système de sécurité en bras de maison,
éteignez toutes les lumières, fermez
tous vos stores et baissez le système de
chauffage à 18 ° C.
Déclenchement
d’alarme--> Any
Alarm
Contact de porte
ouvert
Horaire--> Tous les
jours 20:00
Horaire--> Tous les
jours 6:00
Mode Change -->
Marche Totale
Horaire--> Tous les
jours 23:00
None "Action du dispositif’ --> Power Switch PSM-S1 or PRM2-S1 --> ON
Période--> Tous les
jours--> de19:00
to 7:00
None "Action du dispositif --> Power Switch PSM-S1 or PRM-S1 --> ON pendent
None "Mode Change --> Arrêt
None "Action du dispositif --> Power Switch PSM-S1 or PRM-S1 --> OFF
None "Mode Change --> Home Arm
Action du dispositif --> Roller Shutter SCM-S1 Open 100%
Demande vidéo--> IPC-S1"
Action du dispositif --> Power Switch PSM-S1 or PRM2-S1 --> ON pendent
20 secondes
30min
Action du dispositif--> Roller Shutter SCM-S1 Fermer"
Action du dispositif--> Roller Shutter SCM-S1 ouvert 100%"
Action du dispositif--> Thermostat TRV-S1 or TMST-S1 --> baisser à 18ºC
Action du dispositif--> Roller Shutter SCM-S1 Fermer"
Action du dispositif --> Power Switch PSM-S1 or PRM-S1 --> OFF
Action du dispositif --> Roller Shutter SCM-S1 Fermer
Action du dispositif--> Thermostat TRV-S1 or TMST-S1 --> baisser à 18ºC"
35
Page 36

12. Recommandations de Sécurité
1| Méthode de communication de sauvegarde hybride:
Vous pouvez acquérir et connecter les modules GSM Blaupunkt DG2-Pro ou DG4-pro à l’USB situé à l’arrière du Q-ProHub
pour éviter de perdre la communication avec votre système de sécurité même en cas de défaillance de la connexion
Internet ou de coupure par un intrus.
Le DG2-pro fonctionne sur un réseau 2G et offre une sauvegarde des notifications d’alarmes et une présentation générale
des applications standard. Nous vous recommandons d’utiliser cette option de sauvegarde dans les zones où il n’ya pas de
communication 4G.
Le DG4-Pro fonctionne sur un réseau haute vitesse 4G et peut être utilisé comme sauvegarde pour les notifications d’alarmes
Français
et la gestion des applications standard. Veuillez vous assurer qu’il y a un réseau 4G sur l’emplacement d’installation. Nous
vous déconseillons d’utiliser le DG4-Pro comme méthode de communication autonome, il s’agit uniquement de sauvegarde.
Les modules GSM devraient disposer d’une carte SIM avec les données Internet disponibles. (Carte SIM non incluse)
2| Désactiver la sirène Q-ProHub:
TPour éviter qu’un intrus ne localise l’emplacement du Q-ProHub, il est recommandé de couper la sirène interne du
Q-ProHub et d’installer une sirène supplémentaire extérieure ou intérieure.
Vous pouvez installer l’une des sirènes supplémentaires suivantes pour renforcer la sécurité et empêcher la détection du
panneau par un intrus: sirène alimentée en courant alternatif intérieur: SRAC-S1, sirène de batterie intérieure SR-S1 ou sirène
de batterie extérieure BX-S1).
Pour désactiver la sirène interne, sélectionnez Configurations -> Tapez le code principal -> Panneau -> Sirène interne -> OFF
3| Service Premium:
Avec le service Blaupunkt Premium, votre système de sécurité sera activé avec un ensemble de fonctionnalités innovantes:
Nos notifications d’appels premium fourniront des appels automatiques à 3 numéros de téléphone différents maximum
par notre centrale d’alarme en cas d’intrusion. Cela fonctionne en plus de la “notification push” standard et du service de
messagerie.
Le service Premium offre en outre un stockage en nuage de plus de 50 vidéos d’événements sur le terrain de votre IPC-S1, 30
images capturées de la caméra PIR-Photo-Camera (IRC-P4 et IRC-S2) et un journal d’événements général de 90 jours.
De plus, avec la garantie produit du plan de service Premium de 12 mois, il sera prolongé d’une année supplémentaire.
Pour plus d’informations sur le service Premium, rendez-vous sur: premium.blaupunkt-security.com
4| Mises à jour du logiciel:
Le Q-ProHub comprend un service de mise à jour automatique du firmware. (Il existe un service de mise à jour quotidienne
du firmware qui maintient votre appareil à jour.). Si vous avez acheté un nouveau produit Q-Series, vous devez attendre au
moins un jour ouvrable pour que toutes les mises à jour nécessaires soient prêtes. Si le périphérique est en cours de mise à
jour, veuillez ne pas l’éteindre, cela pourrait endommager le système de sécurité..
13. Support
Pour plus d’informations sur le Q-ProHub et ses accessoires, visitez le site
security.blaupunkt-service.com
Blaupunkt Competence Center Security & Care
www.blaupunkt.com
Security Brand Pro GmbH
Mondstrasse 2-4
85622 Feldkirchen-München, Germany
© Technical changes and errors excepted
36
Page 37

Italiano | Guida di Avvio Rapido
1. Contenuto Q-Pro6300, Q-Pro6600 e Pannello di controllo Q-Pro
a
Q-ProHub – Pannello Centrale
e
Base di appoggio
Inclusi nel Q-Pro6300 Inclusi nel Q-Pro6600
i
Rilevatore di
movimento
con PET immunity
Contatto porta Videocamera PIR
b
Adattatore AC Cavo Ethernet
PREMIUM
VOUCHER
f
Buono premium Adesivo
j
k
Telecomando Tastiera
con PET immunity
c
d
Supporto a staa
Italiano
g
l
m
Contatto porta
h
Guida di avvio rapido
n
remota
NOTA:
Questa Guida di Avvio Rapido è incentrata sull’installazione e la prima congurazione del Sistema di
Sicurezza con l’Applicazione Secure4Home.
Per ulteriori informazioni, security.blaupunkt-service.com
37
Page 38

2. Descrizione Q-ProHub
1
1
2
2
Italiano
3
3
4
4
5
5
6
6
7
7
8
8
11
10
11
10
9
9
1. LED di stato (Rosso e Verde):
Rosso Acceso - Modalità attivo.
Rosso Lampeggiante - Modalità domestica
Verde Lampeggiante - Modalità di apprendimento.
Verde Spento - Modalità Test di passaggio o Inattivo.
2. Allarme e LED stato di guasto (Rosso e Verde):
Rosso Acceso - Allarme in memoria
Rosso Lampeggiante - Allarme
Giallo Acceso / Lampeggiante - Guasto del sistema
3. Base di appoggio (per l’utilizzo da scrivania):
4. Porta USB Per DG2-Pro e DG4-Pro
IMPORTANTE - Leggere prima dell’installazione
• Assicurarsi che il luogo di installazione sia vicino al router o a una porta di rete Ethernet.
• Non installare il Q-ProHub in uno spazio aperto e accessibile, per evitare manomissioni non autorizzate.
• La protezione contro la manomissione del Q-ProHub funziona solo in caso di installazione a parete. Ciò è dovuto al fatto
che l’allarme anti-manomissione si attiva quando il supporto a staffa del Q-Pro è rimosso dalla parete.
• L’anti-manomissione del Q-ProHub è tenuta premuta dal supporto a staffa da parete. Non rimuovere il supporto a staffa
da parete, nemmeno se si decide di utilizzare la base da scrivania. Il Q-Pro non funzionerà correttamente senza il supporto
a staffa.
5. Tasto Apprendimento / Reset
6. Porta Ethernet
7. Interruttore alimentazione batteria ON/OFF
8. Connettore alimentazione elettrica CC 12V 1A.
9. Manomissione pannello
10. Passacavi supporto da parete x 2
11. Ganci della staffa
12. Supporto a staffa
11
10
12
12
38
Page 39

3. Installazione Q-ProHub
Opzione A: Installazione a parete
Passo 1a:
Posizionare il supporto a staffa in verticale sulla parete e
utilizzarlo come mascherina per segnare la posizione dei
due fori sul muro.
Opzione B: Installazione come base da scrivania
Passo 1b:
Rimuovere il nastro sito sul lato sinistro del Q-ProHub.
Passo 2a:
Praticare due fori in corrispondenza di quelli segnati sul
muro e posizionare il supporto a staffa da parete con i
ganci rivolti verso di voi. Fissare il supporto a staffa con le
viti e i tasselli in dotazione.
Passo 3a:
Agganciare il Q-ProHub al supporto a staffa e farlo
scorrere verso sinistra per inserire la protezione antimanomissione nel Q-ProHub. Opzionale: segnare sul
muro o sul retro del pannello come sganciare il pannello
dalla staffa.
Passo 4:
Collegare il Q-ProHub al
router internet mediante il
cavo Ethernet in dotazione.
Passo 2b:
Agganciare il Q-ProHub alla base, facendolo scorrere da
sinistra verso destra.
Italiano
Passo 3b:
Anche se è installato sulla base, vi preghiamo di agganciare
il Q-ProHub al supporto a staffa e di farlo scorrere verso
sinistra per inserire la protezione anti-manomissione nello
stesso, assicurandosi che tale protezione sia ben premuta.
Passo 6:
Attendere finché non si
accenda il LED di accensione.
Passo 5:
Collegare il Q-ProHub a una
presa elettrica mediante
l’adattatore CA in dotazione.
Girare l’interruttore di alimentazione della batteria sulla
posizione ON con un piccolo
cacciavite o una penna.
NOTA: Appena il Q-ProHub sia collegato e acceso, il server darà 15 minuti per completare la registrazione. Se la
registrazione non si completa entro tali 15 minuti, si dovrà rimuovere l’adattatore CA e spostare l’interruttore
sulla posizione OFF. Poi si dovrà riavviare il dispositivo, inserendo l’adattatore AC e spostando l’interruttore su
ON. Ora si avranno a disposizione ulteriori 15 minuti per completare la registrazione.
Nota:
Q-ProHub deve essere collegato a Internet e alla presa
elettrica in ogni momento. Qualsiasi problema con il router
e la connessione alla rete e all’alimentazione potrebbero
disturbare il funzionamento del sistema.
39
Page 40

4. Registrazione
Passo 1:
Si prega di scaricare e installare la App “Secure4Home” sul cellulare.
Passo 2:
Aprire la App Secure4Home e selezionare Prima registrazione.
Passo 3:
Assicurarsi che il Q-ProHub sia accesso e collegato al router.
Passo 4:
Seguire le istruzioni sullo schermo ed inserire le informazioni richieste. Username e password
devono avere una lunghezza di almeno 8 caratteri.
Italiano
Si dovrà inserire l’indirizzo MAC del Sistema di Sicurezza, che si trova sul retro del Q-ProHub. Inserire gli ultimi 6 caratteri
dell’indirizzo MAC. Inserire un nome per il sistema di sicurezza e selezionare la lingua e il Paese opportuni.
Passo 5:
Dopo essersi registrati, scegliere il piano di servizi desiderato. Grazie al Buono Servizi Premium, si potrà provare gratuitamente
il Servizio Premium durante un mese.
Per ulteriori informazioni sui servizi premium, vi preghiamo di vedere il capitolo 12 “Servizi Premium”.
Passo 6:
Si riceverà un e-mail di autenticazione dell’account. Entrare nella sezione di posta in arrivo e autenticare l’account.
Per la registrazione del computer, visita https: //eu.bphomeconnect.co dal tuo browser Web e segui la stessa
procedura di cui sopra. Evitare l’uso di browser Web come Microsoft IE Explorer / Edge.
La App Secure4Home serve per registrare e gestire il Sistema di Sicurezza ovunque ci si trovi. Per la
congurazione, si prega di vedere il capitolo 10 “Funzionamento tramite il Portale web”.
Secure4Home
5. Cambio del Codice di sicurezza di default
Aprire la App Secure4Home e inserire username e password.
Premere l’icona a forma di ingranaggio in alto a destra. Premere su “Codice” e inserire la password dell’account utente.
PIN utente:
Qui si possono modificare e creare nuovi “Codici PIN Utente”, rinominare l’”utente”
di default e sostituire il PIN utente di default (1234) con un codice di 4 caratteri
a scelta. Selezionare il Lucchetto e salvare le impostazioni. Il codice PIN utente si
usa per l’Attivazione, l’Attivazione casa e la Disattivazione del Sistema di Sicurezza.
Codice principale:
Sostituire il codice principale di default (1111) con un codice di 4 caratteri a scelta
e salvare le impostazioni. Il Codice principale si usa per configurare l’accesso alle
impostazioni del sistema di sicurezza.
NOTA: Il codice PIN utente e il codice PIN principale non possono essere uguali. Se lo fossero, il cambio di modalità
del sistema non funzionerà. Per ulteriori informazioni, vedere il manuale del server Home Connect.
Per la congurazione della modalità Attivazione casa, vedere il capitolo 2.6.1 Impostazione dispositivo nel
manuale del server Home Connect (download disponibile in service.blaupunkt-security.com).
40
Page 41

6. Kit di accessori per l’installazione
Contatto porta (DC-S4)
(in dotazione nel kit del Q-Pro 6300/6600)
Il contatto porta DC-S4 monitora le porte e le finestre della casa, garantendo
una protezione ideale.
Il DC-S4 si può montare con viti o con nastro adesivo sui montanti delle porte
e delle finestre. Per un corretto funzionamento, sconsigliamo di installare il
DC-S4 su porte o finestre metalliche.
Per l’installazione con le viti, rimuovere la carcassa posteriore e far passare i
cavi attraverso i 2 passacavi sul retro (ad esempio, con un cacciavite), dove la
plastica è più sottile. Praticare dei fori sulla superficie, utilizzando i passacavi
come modello. Fissare la base del contatto porta sulla superficie con le viti
e i tasselli in dotazione. Posizionare nuovamente la carcassa posteriore sul
contatto porta.
Assicurarsi che la protezione anti-manomissione sia premuta contro
la superficie della porta/finestra, altrimenti farà saltare un allarme di
manomissione.
Il magnete deve essere installato di fianco al sensore. Fissare il magnete
come fatto per il corpo principale del contatto porta, mediante le viti in
dotazione o il nastro adesivo.
Protezione
LED / Test/ Tasto
apprendimento
Magnete
Fig.1
Il magnete deve essere posizionato vicino
al sensore! Max 15mm
anti-manomissione
Sensore
Italiano
Telecomando (RC-R3B)
(in dotazione nel kit del Q-Pro 6300)
Grazie al telecomando RC-R3B di Blaupunkt si può cambiare facilmente lo
stato del sistema, passando da Attivazione a Disattivazione e Modalità casa.
Il RC-R3B può anche essere utilizzato per attivare un allarme di panico,
premendo il tasto di emergenza per 3s.
Per disattivare un allarme attivato tramite telecomando è necessario usare la
App, giacché il RC-R3B non può farlo.
Il RC-R3B funziona con la tecnologia di codifica a codice variabile, per
aumentare la sicurezza contro manomissioni da parte di terzi.
Rilevatore di movimento immune agli animali (IR-P4)
(in dotazione nel kit del Q-Pro 6300)
Quando il IR-P4 rileva un movimento nella modalità attivo, farà scattare
automaticamente un allarme e notificherà l’utente. La protezione antimanomissione si trova dentro il dispositivo ed è tenuta premuta dalla vite.
Se il dispositivo è rimosso da un intruso, la protezione anti-manomissione
farà scattare un allarme.
Il IR-P4 deve essere montato a parete con viti oppure attaccato con nastro
adesivo. Il miglior luogo per l’installazione è un angolo, per avere un ampio
spettro di rilevazione di movimento. Per delle prestazioni ottimali, installare
il rilevatore di movimento a 2m di altezza.
Rimuovere la carcassa posteriore e far passare i cavi attraverso i 2 passacavi
sul retro (ad esempio, con un cacciavite), dove la plastica è più sottile. Sul
retro del dispositivo ci sono sei passacavi, attraverso i quali far passare i fili.
Se si monta il dispositivo in un angolo, far passare i cavi attraverso i fori
laterali; se si monta il dispositivo su una superficie piana, far passare i cavi
attraverso i fori centrali; Praticare dei fori nel muro, utilizzando i passacavi
come modello. Fissare la base del IR-P4 alla parete con le viti e i tasselli in
dotazione. Riposizionare la carcassa posteriore del IR-P4.
La funzionalità immune agli animali ignorerà animali fino a 25kg. Per una
corretta rilevazione degli animali, non dirigere il rilevatore di movimento
verso scale o zone che tali animali possano scalare.
Tasto Attivazione
a distanza
Tasto
emergenza
Fig.2
LED / Test di
passaggio/
Tasto
apprendimento
LED
Tasto Attivazione casa
Tasto
disattivazione
Coperchio
batteria
Sensore PIR
Fig.3
NOTA: Se l’allarme non è attivo, il IR-P4
entrerà in modalità di sospensione per
1 min quando rileva qualcuno. Prima
di comprovare il dispositivo, attendere
che trascorra più di 1 minuto senza
rilevazioni, per essere sicuri che non si
trovi più in modalità di sospensione.
41
Page 42

Tastiera remota (KP-R1)
(in dotazione nel KIT del Q-Pro 6600)
Grazie alla tastiera KP-R1 di Blaupunkt si può cambiare facilmente
lo stato del sistema di sicurezza, passando da attivo a disattivo e a
Modalità casa.
Inserire il codice PIN del sistema di sicurezza (come impostato nel
capitolo 5) e premere il tasto della modalità desiderata.
Consigliamo di riporre la tastiera su un supporto vicino alla porta
per controllare gli accessi.
Rimuovere la carcassa posteriore e far passare i cavi attraverso i 2
passacavi sul retro (ad esempio, con un cacciavite) dove la plastica
è più sottile. Praticare dei fori nel muro, utilizzando i passacavi
come modello. Fissare il supporto della tastiera alla parete con le
viti e i tasselli in dotazione. Riposizionare la carcassa posteriore
Italiano
della tastiera.
Assicurarsi che la protezione anti-manomissione sia premuta
contro la superficie del muro, altrimenti l’accessorio farà scattare
un allarme di manomissione.
Rilevatore di movimento immune agli animali con videocamera
(IRC-P4)
(in dotazione nel kit del Q-Pro6600)
Quando il IRC-P4 rileva un movimento nella modalità attiva, scatterà
automaticamente 3 fotografie, le salverà nel cloud, farà scattare un
allarme e notificherà l’utente. L’utente può richiedere e vedere le
fotografie in qualsiasi momento, mediante la App o il Portale web.
La protezione anti-manomissione si trova dentro il dispositivo ed è
tenuta premuta dalla vite. Se il dispositivo è rimosso da un intruso,
la protezione anti-manomissione farà scattare un allarme.
Il IRC-P4 deve essere montato con viti sulla parete oppure attaccato
con nastro adesivo. Il miglior luogo per l’installazione è un angolo,
per avere un ampio spettro di rilevazione di movimento. Per delle
prestazioni ottimali, installare il rilevatore di movimento a 2m di
altezza.
Rimuovere la carcassa posteriore e far passare i cavi attraverso i
passacavi sul retro (ad esempio, con un cacciavite), dove la plastica
è più sottile. Sul retro del dispositivo sono presenti sei passacavi,
attraverso i quali far passare i cavi: se si monta il dispositivo in un
angolo, utilizzare i fori laterali; se si monta il dispositivo su una
superficie piana, utilizzare i fori centrali. Praticare dei fori nel muro,
utilizzando i passacavi come modello. Fissare la base del IRC-P4 alla
parete con le viti e i tasselli in dotazione. Riposizionare la carcassa
posteriore del IRC-P4.
La funzionalità immune agli animali ignorerà animali fino a 25kg.
Per una corretta rilevazione degli animali, non dirigere il rilevatore
di movimento verso scale o zone che tali animali possano scalare.
8
9
10
Fig.4
1. LED attivo (Blu/Arancione)
2. LED di stato (Blu/Rosso)
3. LED di guasto (Arancione)
4. Tasto Attivazione a
distanza
6. Tasto dello stato
7. Tasto di disattivazione
8. Panic Alarm
9. Fire Alarm
10. Emergency Alarm
5. Interruttore allarme
domestico
LED Lampeggiante
Sensore PIR
Lente del PIR-
Videocamera
LED Blu / Test / Tasto
apprendimento
NOTA: Se l’allarme non è attivo, il IRC-P4
entrerà in modalità di sospensione per 2 min
quando rileva qualcuno. Prima di comprovare
il dispositivo, attendere che trascorra più di 2
minuto senza rilevazioni, per essere sicuri che
non si trovi più in modalità di sospensione.
1
2
3
4
5
6
7
Per ulteriori informazioni riguardo gli accessori compresi nel kit, visitare service.blaupunkt-security.com, dove si
trovano i manuali utenti specici di ogni accessorio.
Il Q-Pro Series possiede un codice variabile, che è una funzionalità per codicare e rendere il Sistema di Sicurezza
ancor più sicuro contro i cosiddetti attacchi di riproduzione.
42
Page 43

7. Funzionamento tramite App
La App Secure4Home serve per registrare e gestire il Sistema di Sicurezza ovunque ci si trovi. Per la
congurazione, si prega di vedere il capitolo 10 “Funzionamento tramite il Portale web”.
Nel Menù Sicurezza
si possono cambiare le
modalità del sistema,
verificare lo stato del
Pannello strumenti del
sistema, se ci sono
Contatti porta aperti e se
gli accessori presentano
qualche guasto.
Se nel pannello è installato un modulo GSM,
la potenza del segnale
apparirà (vedere capitolo
12) in alto a destra.
Nel Menù Dispositivo si può avere
una panoramica generale di tutti gli
accessori, verificare se presentano guasti
e se i Contatti porta siano aperti o chiusi.
Se uno o più accessori presentano un
livello di batteria basso, si possono
sostituire affinché il sistema continui a
funzionare correttamente.
Se appare una qualsiasi altra carenza, si
prega di fare riferimento alla risoluzione
dei problemi nel manuale del relativo
dispositivo accessorio, compreso nel
manuale generale, per risolvere il
problema.
Italiano
Nel Menù
Automatizzazione
si può attivare
manualmente qualsiasi
scenario, controllare
i gruppi di accessori,
gestire ed utilizzare
singolarmente tutti gli
accessori dell’Impianto
domotico o
disattivare le regole
esistenti.
Nel Menù Eventi
si otterrà una panoramica dei precedenti
eventi. Si può inviare
una e-mail/trasmettere
o chiamare qualcuno
per notificare l’allarme.
Tutti gli allarmi di
intrusione saranno
visualizzati in rosso,
mentre le allerte
tecniche o i cambi
nel sistema saranno
visualizzati in giallo.
Nel Menù Videocamera si potranno
vedere la Videocamera Wi-Fi di videosorveglianza opzionale (IPC-S1) e la
fotocamera PIR opzionale (IRC-P4 o
IRC-S2).
La IPC-S1 offre un’affidabile videosorveglianza con qualità HD e
registrazione automatica del video
quando salta un allarme, trasmissione
in diretta, comunicazione vocale
bidirezionale e visione notturna.
La IRC-P4 fa saltare un allarme quando
rileva un movimento e scatta 3
fotografie a colori, per fornire verifica
visiva/prove.
Se si clicca sull’icona delle impostazioni,
in alto a destra, si potrà accedere alle
informazioni personali, modificare la
password, configurare le notifiche,
configurare una pagina iniziale per la
App, bypassare qualsiasi accessorio e
trovare informazioni di contatto per
l’assistenza. Si può anche effettuare il
log out.
43
Page 44

8. Modalità del Sistema
Disattivazione:
La Modalità disattivazione disattiva tutti i
sensori antifurto.
Attivazione a distanza:
La Modalità Attivazione a distanza attiva
tutti i sensori antifurto. Scatterà un allarme
appena si attiva un sensore.
Se a un sensore è stato assegnato un
attributo Entrata, si attiverà un Conto alla
rovescia di Entrata, per dare all’utente il
tempo di disattivare il sistema e non far
scattare alcun allarme.
Attivazione casa:
I sensori ai quali sia stato assegnato
Italiano
l’attributo Attivazione casa non potranno
essere attivati se il sistema si trova nella
Modalità Attivazione casa. Di solito
tale attributo si assegna ai rilevatori
di movimento per interni, pertanto
ci si potrà muovere tranquillamente
nell’appartamento, mentre le porte e le
finestre saranno protette.
Passo 1:
Premere il Tasto Modalità
del sistema che si voglia
attivare.
Passo 2:
Inserire il codice PIN (codice di
default: 1234). Se il codice è corretto,
il cambio di Modalità sarà applicato
e la nuova modalità selezionata si
illuminerà.
9. Scoprite i nuovi Accessori aggiuntivi
Tutti i nuovi accessori non compresi nel Contenuto del kit, dovranno essere aggregati al Q-ProHub applicando i seguenti passi.
Si possono aggregare fino a 50 accessori.
Per scoprire tutti i nuovi accessori, entrare nel Portale principale “eu.bphomeconnect.com“.
Passo 1:
Entrare in Impostazioni e cliccare su Dispositivo.
Passo 2:
Cliccare sull’icona in alto a destra per accedere
alla funzione “Aggiungi dispositivo”.
Passo 3:
Fare riferimento al manuale specifico di ogni
accessorio per inviare il “segnale di apprendimento”
ad ogni dispositivo. Quando il Q-ProHub riceve
il “segnale di apprendimento” invia un doppio
bip e l’interfaccia web mostra le informazioni del
dispositivo.
Passo 4:
Segnare la casella davanti alle informazioni del
dispositivo, poi cliccare su OK per aggregare il
dispositivo al Q-ProHub.
Step 5:
Dare un nome al nuovo accessorio e modificare gli attributi, cliccando sui 3 puntini sulla destra dell’accessorio stesso.
44
Page 45

10. Funzionamento e configurazione tramite il Portale web
Entrare nel Portale principale “eu.bphomeconnect.com“.
Panoramica del Portale web:
Nel Menù Sicurezza si possono
cambiare le modalità del Sistema,
ottenere una panoramica dei
dispositivi e richiedere manualmente
una fotografia.
Per il Menù Automatizzazione, si
prega di vedere 9. Impianti domotici
Nel Menù Videocamera si potrà
vedere il video in tempo reale,
appena si aggreghi la Videocamera
IPC-S1 di Blaupunkt.
Nel Menù Eventi si otterrà una
panoramica degli eventi registrati
dal Q-ProHub.
Nel Menù Impostazioni si potranno
programmare le impostazioni del
Q-ProHub.
Congurazione tramite Portale Web:
Per cambiare le Impostazioni Account, cliccare sul nome dell’account
(nell’angolo in alto a destra) e selezionare “Account”.
In questo menù si possono cambiare i dettagli dell’account, la lingua del
Portale principale e creare un account per un utente secondario.
Per modificare, cliccare su .
Al termine, cliccare su invia, sito in basso, per salvare i cambi.
Gli account utenti secondari sono legati a un account principale. Lo username
e la password per account secondari servono solo per effettuare il login nel
Portale principale e nella App. I PIN per attivare/disattivare sono legati al
Q-ProHub e rimarranno gli stessi.
NOTA: solo un utente alla volta può
eettuare il login con lo stesso
user name.
Italiano
Per cambiare le Impostazioni Notifiche, cliccare sul
nome dell’account (nell’angolo in alto a destra) e
selezionare “Notifiche”.
Nel Menù Notiche si potranno cambiare le
impostazioni delle notifiche.
Premere: Configura le configurazioni push dello
smartphone. La App Secure4Home deve essere
installata e bisogna aver effettuato il login per
ricevere le notifiche push.
E-mail: Il server del Portale principale invierà una
e-mail all’account e-mail configurato.
Messaggio Vocale: Il centro Allarmi Blaupunkt
chiamerà automaticamente l’utente se si verifica un
evento dell’antifurto. Riservato agli utenti premium,
per ulteriori informazioni sul servizio premium, si
prega di vedere il capitolo 12, Servizio Premium.
NOTA: Assicurarsi che il volume delle
impostazioni dello smartphone sia
alto per i Rapporti Push e di chiamata.
45
Page 46

11. Impianti domotici
Per eseguire cambi nell’Impianto domotico si deve entrare nel Portale principale
“eu.bphomeconnect.com“.
Dispositivo - Consente di gestire e di utilizzare
individualmente tutti gli accessori dell’Impianto
domotico.
Stanza - Assegna ogni accessorio alla relativa
stanza, per agevolare la gestione.
Gruppo - Si possono aggregare a un gruppo
accessori dello stesso tipo, per gestirli tutti con un
solo comando.
Scenario - Creare uno scenario per definire
le azioni predefinite per le unità dell’Impianto
domotico. Gli scenari possono essere attivati
Italiano
tramite l’interruttore selettore dello scenario
(SSW-S1) o il cellulare. È possibile effettuare un
massimo di 5 azioni per ogni Scenario.
Regola - Creare una regola per avviare le azioni
automatiche del pannello e dei dispositivi
dell’Impianto domotico con determinati inneschi
e condizioni.
Come creare una regola:
Passo 1: Entrare in Automatizzazione - Regola e cliccare sul tasto +
Passo 2: Scrivere il nome della regola, ad es. “Attivazione automatica”
Passo 3: Selezionare un innesco per la regola. (ad es. “Programma-
zione”--> “Ogni settimana” e selezionare i giorni e le ore)
Passo 4: Se si desidera, aggiungere una condizione (stato del sistema
perché si applichi la regola). Ad es., periodo di tempo o modalità del
sistema, e fino a 2 condizioni.
Passo 5: Selezionare nell’elenco un’azione per innescare la regola.
Ad es. Azione dispositivo --> Interruttore alimentazione (PSM-S1) in
posizione Acceso.
Passo 6: Se si desidera aggiungere alte azioni, premere il tasto + sulla
destra (si possono aggiungere un massimo di 5 azioni).
Passo 7: Cliccare su “Invia” per salvare i cambi.
Regole consigliate Innesco Condizione Azione
Quando si verifica un allarme, accendere le luci, avvolgere le persiane e
iniziare una registrazione video.
Quando si apre la porta di casa fra
le 19:00 e le 7:00 accendere le luci
per 20s
Simulare presenza quando si
è in vacanza: Ogni giorno a
un’ora specifica, ad es. le 20:00,
le persiani si apriranno e le luci si
accenderanno per 30 minuti.
Ogni giorno alle 6:00 disattivare
il Sistema di Sicurezza e aprire le
persiane
Ogni volta che si attiva il sistema,
spegnere le luci, abbassare il
riscaldamento a 18ºC e aprire le
persiane
Ogni giorno alle 23:00 cambiare
il Sistema di Sicurezza a
Attivazione casa, spegnere tutte
le luci, chiudere tutte le persiane
e abbassare riscaldamento a 18ºC
Innesco
allarme-->
Qualsiasi allarme
Contatto porta
aperto
Programmazione
-->Tutti i giorni
alle 20:00
Programmazione
-->Tutti i giorni
alle 6:00
Cambio Modalità Nessuno
Programmazione
-->Tutti i giorni
alle 23:00
Nessuno
Periodo
tempo-->Tutti
i giorni-->Dalle
19:00 alle 7:00
Nessuno
Nessuno
Nessuno
“Azione Dispositivo-->Interruttore alimentazione PSM o PRM2-S1-->ON
Azione Dispositivo-->Avvolgitore persiane SCM-S1 Aprire 100%
Richiedere video-->IPC-S1”
Azione Dispositivo-->Interruttore alimentazione PSM o PRM2-S1
-->ON per 20s
“Azione Dispositivo-->Interruttore alimentazione PSM o PRM-S1-->
ON per 30 min
Azione Dispositivo-->Avvolgitore persiane SCM-S1 Chiuso”
“Cambio Modalità-->Disattivare
Azione Dispositivo-->Avvolgitore persiane SCM-S1 Aprire 100%”
Azione Dispositivo-->Interruttore alimentazione PSM o PRM2-S1
-->ON per 20s
“Azione Dispositivo-->Termostato TRV-S1 o TMST-S1-->Abbassare
a 18ºC
Azione Dispositivo-->Avvolgitore persiane SCM-S1 Chiuso”
Cambio Modalità-->Attivazione casa
“Azione Dispositivo-->Interruttore alimentazione PSM o PRM-S1--> OFF
Azione Dispositivo-->Avvolgitore persiane SCM-S1 Chiuso
Azione Dispositivo-->Termostato TRV-S1 o TMST-S1-->Abbassa a 18ºC ”
46
Page 47

12. Raccomandazioni di sicurezza
1| Metodo di comunicazione Backup Ibrido:
Per evitare che un intruso scopra la posizione di installazione del Q-ProHub, raccomandiamo di silenziare la sirena interna del
Q-ProHub e di installare una sirena aggiuntiva all’interno o all’esterno.
Si può installare una delle seguenti sirene aggiuntive per aumentare la sicurezza ed evitare che gli intrusi localizzino il pannello:
Sirena da interni alimentata tramite CA: SRAC-S1, Sirena da interni a batteria SR-S1 o Sirena da esterni a batteria BX-S1).
Per silenziare la sirena, entrare in Impostazioni --> Inserire il Codice Principale --> Pannello --> Sirena Interna --> OFF.
2| Metodo di comunicazione Backup Ibrido:
È possibile acquistare e collegare i moduli Blaupunkt DG2-Pro o DG4-Pro GSM alla USB sita sul retro del Q-ProHub, per evitare la
perdita di comunicazione con il sistema di sicurezza anche se la connessione Internet si interrompe o è esclusa da un intruso.
Il DG2-Pro funziona con la rete 2G ed offre dei backup per le notifiche di allarme e una panoramica standard della App.
Raccomandiamo di utilizzare quest’opzione di backup se non si possiede una comunicazione 4G.
Il DG4-Pro funziona con la rete ad alta velocità 4G e si può usare come backup per le notifiche di allarme e la gestione standard
della App. Si prega di assicurarsi che nella località di installazione sia presente una rete 4G. Non raccomandiamo di utilizzare il
DG4-Pro come unico metodo di comunicazione, giacché è pensato solo per il backup.
I moduli GSM richiederanno l’installazione di un scheda SIM con dati Internet. (Scheda SIM non compresa)
3| Servizio premium:
Grazie al Servizio Premio di Blaupunkt, il Sistema di Sicurezza possiederà una innovativa gamma di funzionalità:
Le nostre notifiche premium mediante chiamata emetteranno chiamate automatiche verso un massimo di 3 diversi numeri
di telefono dal nostro centro allarmi, in caso di intrusioni. Tali chiamate si aggiungono ai normali messaggi Push e al servizio
E-Mail.
Il Servizio Premium, inoltre, offre una memorizzazione nel cloud per più di 50 video di eventi del IPC-S1, 30 catture di immagini
della Fotocamera PIR (IRC-P4 e IRC-S2) e un Registro Eventi generale di 90 giorni.
Con il Piano Servizio Premium, inoltre, la garanzia del prodotto sarà estesa per un ulteriore anno.
Per ulteriori informazioni sul Servizio Premium, entrare in: premium.blaupunkt-security.com
4| Aggiornamenti del Firmware:
Il Q-ProHub comprende un servizio di aggiornamento automatico FW. (Offre un sistema di aggiornamento automatico FW
giornaliero, per tenere sempre aggiornato il dispositivo). Se si acquista un nuovo prodotto Q-Series, si dovrà attendere almeno
un giorno lavorativo affinché tutti gli aggiornamenti necessari siano pronti.
Quando il dispositivo si stia aggiornando, si prega di non spegnerlo perché potrebbe attivare il Sistema di Sicurezza.
Italiano
13. Assistenza
Per ulteriori informazioni riguardo il Q-ProHub e gli accessori, si prega di
visitare il sito:
security.blaupunkt-service.com
Centro di competenza Blaupunkt Sicurezza e assistenza:
www.blaupunkt.com
Security Brand Pro GmbH
Mondstrasse 2-4
85622 Feldkirchen-München, Germany
© Technical changes and errors excepted
47
Page 48

Español | Guía Rápida
1. Contenido del kit Q-Pro6300 & Q-Pro6600
Panel Q-Pro – Central de Alarma
Español
Base/Soporte horizontal
i
Detector PIR
anti-mascotas
a
e
b
Adaptador AC Cable Ethernet
PREMIUM
VOUCHER
f
Código Premium Pegatina
c
Soporte de montaje
g
Incl. en Q-Pro6300 Incl. en Q-Pro6600
j
Contacto de
Puerta
k
Mando a
Distancia
l
Detector PIR
anti-mascotas
con cámara
m
Contacto de
Puerta
d
h
Guía Rápida
n
Teclado
remoto
NOTA
Esta Guía Rápida se enfoca en la instalación y en la primera conguración del sistema de seguridad
con la APP Secure4Home. Para más información, por favor visite: security.blaupunkt-service.com
48
Page 49

2. Características del Panel Q-Pro
1
1
2
2
3
3
4
4
5
5
6
6
7
7
8
8
11
10
11
10
9
9
1. LED de Modo (Rojo & Verde):
Rojo Encendido – Modo Activado/Armado.
Rojo Parpadea – Modo Hogar/En casa
Verde Parpadea – Modo Aprendizaje.
Verde Apagado – Modo Desarmado o Prueba Alcance.
2. LED de Fallos y Alarma (Rojo & Amarillo):
Rojo Encendido – Aviso de Evento en Memoria
Rojo Parpadea – Alarma
Amarillo Encendido / Parpadea – Fallo en el Sistema
3. Base/Soporte Horizontal (Para escritorio):
4. Puerto USB: Para DG2-Pro y DG4-Pro
IMPORTANTE - Leer antes de Instalar
• Asegúrese de que el lugar de instalación esté cerca del router o a un puerto de red Ethernet.
• No instale el Panel Q-Pro en un lugar abierto visible para evitar una minupulacion indeseada.
• El soporte de montaje es lo que presiona el sabotaje del Panel Q-Pro. La separación del Q-Pro
del soporte de montaje en pared activará la alarma de sabotaje.
• Siempre instale el soporte de montaje de pared y no lo quite aunque decida usar la base horizontal. El Panel Q-Pro no
funcionará correctamente sin el soporte de montaje adjunto al panel.
5. Botón de Aprendizaje / Restablecimiento de Fábrica
6. Puerto Ethernet
7. Interruptor ON/OFF de la Batería
8. Conector de Alimentción DC 12V 1A.
9. Interruptor de Sabotaje del Panel
10. Agujeros Ciegos de Montaje en Pared x 2
11. Enganches del Soporte
12. Soporte de Montaje
11
10
12
12
Español
49
Page 50

3. Instalación del Panel Q-Pro
Opción A: Instalación en Pared
Paso 1a:
Coloque el soporte de montaje en la pared en posición
vertical para usarlo como plantilla para marcar la
posicion de los 2 agujeros a realizar en la pared..
Opción B: Instalacion en Escritorio
Paso 1b:
Retire la tira que se encuentra en el lateral izquierdo del
Panel Q-Pro
Paso 2a:
Taladre dos agujeros en las posiciones marcadas y
coloque el soporte de montaje con los enganches
apuntando hacia la derecha. Asegure el soporte de
montaje con los tacos y tornillos.
Español
Paso 3a:
Enganche el Panel Q-Pro al soporte de instalación y
deslícelo hacia la izquierda para presionar el botón de
sabotaje interior del Panel Q-Pro. Opcional: marque
en la pared o en la parte inferior del panel como
desenganchar el panel del soporte.
Paso 4:
Conecte el Panel Q-Pro al
router mediante el cable
Ethernet.
Paso 2b:
Enganche el Panel Q-Pro a la base horizontal con el panel
apuntando hacia la izquierda y deslícelo hacia la derecha.
Paso 3b:
A pesar de la instación en escritorio, por favor enganche el
soporte de instalación en pared al Panel Q-Pro y deslícelo
hacia la izquierda para presionar el botón de sabotaje
interior del Panel Q-Pro.
Paso 6:
Espere a que se ilumine
el LED de encendido.
Paso 5:
Conecte el panel Q a
alimentación mediante
el adaptador. Cambie el
interruptor e la batería
a ON.
NOTA: Una vez encendido el panel, tendrá 15 minutos para completar el registro. Si no pudo completar el
registro en dicho tiempo, por favor desconecte la alimentación y apague el interruptor de la batería (OFF). Posteriormente vuelva a conectar la alimentación y encienda el interruptor de la batería (ON). Ahora usted tendrá
15 minutos adicionales para completar el registro.
Nota:
El Panel Q-Pro siempre debe estar conectado a la corriente
eléctrica y a internet. Cualquier problema con el internet
o el router puede alterar el funcionamiento del sistema de
seguridad.
50
Page 51

4. Registro
Para realizar el registro desde un PC, visite https://eu.bphomeconnect.com desde su navegador web y siga las
instrucciones que se muestran a continuación. Evite usar navegadores web como Microsoft IE Explorer/Edge.
Paso 1:
Por favor descargue e instale la APP “Secure4Home” en su smartphone.
Paso 2:
Abra la app Secure4Home y seleccione Nuevo Usuario
Paso 3:
Asegúrese de que el Panel Q-Pro está encendido y conectado al router.
Paso 4:
Siga las instrucciones en pantalla e introduzca la información necesaria. El nombre de usuario
y la contraseña deben tener al menos 8 caracteres.
Se le pedirá que introduzca la dirección MAC de su sistema de seguridad, que encontrará en la parte trasera del Panel Q-Pro.
Introduzca los últimos 6 digitos de la dirección MAC. Asignale un nombre a su sistema de seguridad y seleccione el idioma y
el país segun corresponda.
Paso 5:
Una vez finalizado el registro, elija el tipo de servicio. Con el código del Servicio Premium podrá probar el Servicio Premium
de forma gratuita durante un mes. Para más información sobre el servicio premium, véase el apartado 12.3 “Servicio
Premium”.
Paso 6:
Recibirás un email de autentificación de su cuenta. Vaya a la bandeja de entrada de su email y autentifique su cuenta.
La aplicación Secure4Home está diseñada para registrar y administrar su sistema de seguridad desde cualquier
lugar. Para realizar la conguración, véase 10 “Operación y Cong. Mediante el Portal Web”.
Secure4Home
5. Cambiar los Códigos de Seguridad por Defecto
Abra la app Secure4Home e introduzca su nombre de usuario y contraseña.
En la esquina superior derecha aprieta el icono del engranaje. Aprieta “Código” e introduzca la contraseña de cuenta del usuario.
PIN del Usuario:
Aquí puede editar y crear nuevos “Códigos PIN de Usuario“. Sustituye el nombre
de usuario por defecto (“user”) y cambie el código PIN por defecto (1234) por
un código de 4 dígitos de su elección. Seleccione Bloquear and guarde los
ajustes. El código PIN de Usuario se utiliza para activar, desactivar y activar la
alarma en modo hogar.
Código Maestro:
Cambie el Código Maestro por defecto (1111) por un código de 4 dígitos de
su elección y guarde los ajustes. El Código Maestro se usa para entrar en la
configuracion del sistema.
Español
NOTA: El código PIN de usuario y el código PIN maestro no pueden ser idénticos. Si son idénticos, el cambio de
modo del sistema no funcionará. Para obtener más información, consulte el Manual Completo. Para congurar
el Modo En Casa, vaya al apartado 2.6.1 Conguración de Dispositivos en el manual completo (Descargue en
service.blaupunkt-security.com).
51
Page 52

6. Instalación de los Accesorios del Kit
Contacto de Puerta (DC-S4)
(incluido en el Kit Q-Pro 6300/6600)
El Contacto de Puerta DC-S4 monitoriza las puertas y ventanas de su hogar
asegurando una protección ideal.
El DC-S4 puede montarse con tornillos o con cinta adhesiva a la puerta o al
marco de la ventana. Para un correcto funcionamiento no recomendamos
instalar el DC-S4 en puertas o ventanas de acero/hierro (magnéticos).
Para una instalación con tornillos, debe retirar la cubierta trasera y
perforar los 2 agujeros ciegos que tiene la cubierta trasera (p.ej. con un
destornillador) donde el plástico es más fino. Taladra los agujeros en la
superficie usando los agujeros ciegos como plantilla. Asegura la cubierta
trasera a la superficie con los tacos y tornillos. Coloque el contacto de
puerta de vuelta sobre su cubierta trasera.
Asegúrese de que el botón de sabotaje está presionado correctamente
contra la supercifie de la puerta/ventana, de lo contrario el accesorio
activará un aviso de sabotaje.
Español
El imán debe colocarse adyacente a la marca del sensor. Asegure el imán
de igual forma que el contacto de puerta, por tornillos o cinta adhesiva.
Mando Remoto (RC-R3B)
(incluido en Kit Q-Pro 6300)
Con el mando de control remoto RC-R3B de blaupunkt puede cambiar el
modo de su alarma de forma sencilla entre armado, desactivado y en casa.
Además el RC-R3B puede activar una alarma de pánico al apretar el botón
de emergencia durante 3s. El RC-R3B no podrá desactivar una alarma de
pánico que haya activado dicho mando, pero sí podrá desactivarlo desde
la App..
El RC-R3B trabaja con tecnología de encriptación (rolling code), para una
mejor seguridad contra la manipulación por parte de terceros.
Detector de Movimiento Anti-mascotas (IR-P4)
(incluido en Kit Q-Pro 6300)
Cuando el IR-P4 detecta movimiento en el modo armado, activará
automáticamente una alarma y notificará al usuario. El botón de sabotaje
se encuentra dentro del dispositivo y lo presiona el tornilo de apertura. Si
un intruso retira el dispositivo, el botón de sabotaje activará una alarma.
El IR-P4 debe montarse en la pared mediante tornillos o cinta adhesiva.
El mejor lugar de instalación es una esquina con un rango de detección
amplio. Instale el detector de movimiento a 2m del suelo para obtener el
mejor rendimiento.
Retire la cubierta trasera y perfora los agujeros ciegos que tiene la cubierta
(p.ej. con un destornillador) donde el plástico es más fino. Hay 6 agujeros
ciegos que pueden ser perforados. Si monta el dispositivo en una esquina,
perfora los agujeros ciegos laterales; si monta el dispositivo sobre una
superfice plana, perfora los agujeros ciegos centrales. Taladre los agujeros
en la pared usando los agujeros ciegos como plantilla. Asegure la base del
IR-P4 a la pared con los tacos y tornillos. Coloque de vuelta el sensor IR-P4
sobre su cubierta trasera.
La función anti-mascotas ignorará las mascotas hasta los 25 kgs. Para una
correcta detección anti-mascotas, no apunte el detector de movimiento a
unas escaleras o a areas donde la mascota pueda escalar.
LED / Botón
de Prueba /
Aprendizaje
Imán
Fig.1
¡El Imán debe colocarse adyacente a la
marca del sensor! Max 15mm de distancia
Botón Modo
Armado
Botón de
Emergencia
Fig.2
LED / Botón
de Prueba /
Aprendizaje
Botón de Sabotaje
LED
Botón Modo En casa
Botón Modo
Desactivado
Marca del
Sensor
Cubierta de la
Batería
Sensor PIR
Fig.3
NOTA: EL IR-P4 entrará en el modo
reposo durante 1 min al detectar a
alguien estando la alarma desactivada.
Por favor espere durante más de 1 min
sin que el sensor detecte a nadie para
asegurarse de que ha salido del modo
reposo para realizar una prueba.
52
Page 53

Teclado Remoto (KP-R1)
(incluido en Kit Q-Pro 6600)
Con el teclado KP-R1 de Blaupunkt puede cambiar el modo de
su alarma de forma sencilla entre armado, desactivado y en casa.
Introduzca su Código PIN de Seguridad (el PIN que configuró en la
sección 5) y apriete el botón del modo deseado.
Recomendamos montar el teclado en la entrada para un control
sencillo.
Retire la cubierta trasera y perfore los 2 agujeros ciegos que tiene la
cubierta (p.ej. con un destornillador) donde el plástico es más fino.
Taladre los agujeros en la pared usando los agujeros ciego como
plantilla. Asegure la base del teclado a la pared con los tacos y
tornillos. Coloque de vuelta el teclado sobre su cubierta trasera.
Asegúrese de que el botón de sabotaje está presionado
correctamente contra la pared, de lo contrario el accesorio
activará un aviso de sabotaje.
Detector de Movimiento Anti-mascotas con Cámara (IRC-P4)
(incluido en Kit Q-Pro6600)
Cuando el IRC-P4 detecta movimiento estando la alarma armada,
automácticamente realizará 3 fotos, los guardará en la nube,
activará una alarma y notificará al usuario. El usuario puede realizar
una petición y ver las fotos en cualquier momento usando la App
o la página web. El botón de sabotaje se encuentra dentro del
dispositivo y lo presiona el tornilo de apertura. Si un intruso retira
el dispositivo, el botón de sabotaje activará una alarma.
El IRC-P4 debe montarse en la pared mediante tornillos o cinta
adhesiva. El mejor lugar de instalación es una esquina con un
rango de detección amplio. Instale el detector de movimiento a
2m del suelo para obtener el mejor rendimiento.
Retire la cubierta trasera y perfora los agujeros ciegos que tiene
la cubierta (p.ej. con un destornillador) donde el plástico es más
fino. Hay 6 agujeros ciegos que pueden ser perforados. Si monta
el dispositivo en una esquina, perfora los agujeros ciegos laterales;
si monta el dispositivo sobre una superfice plana, perfora los
agujeros ciegos centrales. Taladre los agujeros en la pared usando
los agujeros ciegos como plantilla. Asegure la base del IRC-P4 a la
pared con los tacos y tornillos. Coloque de vuelta el sensor IRC-P4
sobre su cubierta trasera.
La función anti-mascotas ignorará las mascotas hasta los 25 kgs.
Para una correcta detección anti-mascotas, no apunte el detector
de movimiento a unas escaleras o a areas donde la mascota pueda
escalar.
1. LED ON (Azul/Naranja)
2. LED Estado (Azul/Rojo)
3. LED Fallo (Naranja)
5. Botón Modo En Casa
6. Botón de Estado
7. Botón Modo Desactivado
4. Botón Modo Armado
LED-Flash
PIR-Sensor
Lense of PIR-
Camera
Blue LED/Test-/
Learn-Button
NOTA: EL IRC-P4 entrará en el modo reposo
durante 1 min al detectar a alguien estando la
alarma desactivada. Por favor espere durante
más de 1 min sin que el sensor detecte a nadie
para asegurarse de que ha salido del modo
reposo para realizar una prueba.
Fig.4
1
2
3
4
5
6
7
Español
Fig.5
Para más información en cuanto a los accesorios incluidos en el kit visite la página web service.blaupunkt-security.com para un manual de usuario detallado de cada accesorio.
La Serie Q-Pro incorpora rolling code. Una característica para cifrar y hacer que el sistema de seguridad sea aún
más seguro contra los llamados ataques de repetición (replay attacks).
53
Page 54

7. Manejo de la App
La aplicación Secure4Home está diseñada para registrar y administrar su sistema de seguridad desde
cualquier lugar. Para realizar la conguración, véase 10 “Operación y Cong. Mediante el Portal Web”.
Español
En el Menú
Seguridad puede
cambiar el Modo del
Sistema, revisar el
estado del sistema, ver
si hay algún contacto
de puerta abierto y
ver si algún accesorio
tiene fallos.
Si el módulo GSM está
instalado podrá ver
en la parte superior
derecha la instensidad
de la señal (véase el
apartado 12)
En el Menú Dispositivos puede
tener una visión general de todos los
accesorios, verificar si alguno tiene fallo
y ver además si los contactos de puerta
están abiertos o cerrados.
Si uno o más accesorios muestran
batería baja, debe reemplazar la/s
batería/s para que el sistema continúe
funcionando correctamente.
Si se muestra algún fallo de
supervisión, siga las instrucciones de
solucionamiento de problemas del
accesorio específico en el manual
completo.
En el Menú
Domótica podrá
activar manualmente
cualquier escenario,
activar cualquier
accesorio del grupo
de control, gestionar
y usar de forma
individual todos
los accesorios de
domótica además de
activar y desactivar
todas las reglas.
En el Menú Eventos,
obtendrá una visión
general de los eventos
que han transcurrido.
Puede enviar / reenviar
eventos o llamar a
alguien para notificar
el evento de alarma.
Todas las alarmas de
robo se mostrarán en
rojo, mientras que las
alertas técnicas o los
cambios del sistema se
mostrarán en amarillo.
En el Menú Cámara podrá visualizar la
Cámara WiFi de Videovigilancia opcional
(IPC-S1) el detector PIR con cámara de
fotos (IRC-P4 or IRC-S2).
El IPC-S1 le proporciona una
videovigilancia confiable de calidad
HD con grabación de video automática
durante los eventos de alarma,
transmisión en vivo, comunicación de
voz bidireccional y visión nocturna.
El IRC-P4 dispara una alarma cuando
detecta movimiento y captura 3 fotos
de color para proporcionar verificación /
evidencia visual.
Si aprieta el icono de configuración
en la parte superior derecha, podrá
acceder a su información personal,
modificar su contraseña, configurar las
notificaciones, configurar la página de
inicio de la aplicación, anular cualquier
accesorio y encontrar la información de
soporte tecnico. También puede cerrar
sesión.
54
Page 55

8. Modos del Sistema
Desactivado: El modo desactivado
desactiva todos los sensores de
robo.
Armado/Activado: El modo
armado activa todos los sensores
de robo. Se activa una alarma al
activarse un sensor. Si el sensor
tiene el atributo entrada, se iniciará
una cuenta atrás, para dar tiempo
al usuario para desactivar la alarma
y que no se active el aviso de robo.
Hogar/En Casa:
Los sensores que tengan el
atributo omitir en casa no se
pueden activar si el sistema está
en el modo en casa. Normalmente
los sensores de movimiento tienen
este atributo para que puedas
moverte con libertad dentro de la
vivienda mientras que las puertas y
ventanas están protegidas.
Paso 1:
Apriete el botón de modo
del sistema que desea
activar.
Paso 2:
Introduzca el Código
PIN (por defecto:
1234). Si el código es
correcto se aplicará el
cambio de modo y se
iluminará el nuevo modo
seleccionado.
9. Añadir Accesorios Adicionales
Todos los accesorios nuevos que no se incluyen en el kit deben agregarse al Panel Q-Pro siguiendo los pasos siguientes.
Puedes añadir hasta 50 accesorios.
Para añadir cualquier accesorio nuevo, debe ir al portal de inicio “https:\\eu.bphomeconnect.com”.
Paso 1:
Ve a Configuración-Dispositivo.
Español
Paso 2:
Apriete el icono en la parte superior
derecha para “Añadir Dispositivo”.
Paso 3:
Consulte el manual de cada dispositivo
para conocer como transmitir su “señal de
aprendizaje”. Cuando el Panel Q-Pro reciba la
señal, emitirá un doble pitido y la interfaz web
mostrará la información del dispositivo.
Paso 4:
Marque la casilla del dispositivo y apriete
Aceptar para agregar el dispositivo al Q-Pro.
Paso 5:
Puedes asignale un nombre y editar el atributo del accesorio, haciendo clic en los 3 puntos en el lado derecho del accesorio.
55
Page 56

10. Operación y Configuración Mediante el Portal Web
Ve al portal web “eu.bphomeconnect.com“.
Vista General del Portal Web:
En el Menú Seguridad, puede
cambiar los modos del sistema,
obtener una visión general de los
dispositivos y solicitar una foto del
sensor PIR con cámara.
Para el Menú Domótica, vaya al
apartado 11. Domótica.
En el Menú Cámara IP verá su
video en tiempo real tan pronto
como haya integrado la cámara
Blaupunkt IPC-S1.
En el Menú Eventos, obtendrá una
visión general de los eventos que
Español
han transcurrido.
En el Menú Conguración puede
programar los ajustes del Q-Pro.
Conguración vía Portal Web:
Para cambiar la Conguración de la Cuenta, haga clic en el nombre de su
cuenta (esquina superior derecha) y seleccione “Mi Cuenta”.
Aquí puede cambiar los detalles de su cuenta, el idioma del portal web y
crear cuentas de usuario secundarias. Para editar, haga clic en . Una vez
terminado, apriete enviar en la parte inferior para guardar los cambios.
Las cuentas de usuario secundarias están vinculadas a una cuenta principal.
El usuario y la contraseña para cuentas secundarias son solo para iniciar
sesión en el portal web y en la App. El PIN para activar/desactivar está
vinculado al Panel Q-Pro y seguirá siendo el mismo.
NOTA: Solo UN usuario a la vez puede
iniciar sesión en la cuenta con un
mismo nombre de usuario.
Para cambiar los ajustes de notificación, haga clic en
el nombre de su cuenta (esquina superior derecha)
y seleccione “Notificación”.
En el Menú Noticaciones puedes modificar la
configuración de notificaciones:
Push: Configura las notificaciones push en
su smartphone. Debe haber instalado la app
Secure4Home y haberse registrado para recibir
estas notificaciones.
E-mail: El servidor del Portal Web enviará un email a
la cuenta de correo electrónico que haya registrado.
Llamada/Mensaje de Voz: Una central automatizada
de Blaupunkt le llamará en caso de robo. Solo para
usuarios Premium. Para más información, véase el
apartado 12.3 Servicio Premium.
NOTA: Asegúrese de que el volumen
de su smartphone esté alto para las
llamadas y noticaciones push.
56
Page 57

11. Domótica
Para realizar cambios en su domótica, debe ir al Portal Web “eu.bphomeconnect.com“.
Dispositivo - Le permite gestionar de forma
individual todos los accesorios de domótica.
Habitación - Asigne cada accesorio a una
habitación para una gestión más sencilla. (solo
para accesorios de domótica)
Grupo - Puede agregar accesorios del mismo tipo
a un grupo para administrar todos los accesorios
con un solo comando.
Escena - Cree su escenario para definir acciones
preestablecidas para sus dispositivos de domótica.
Los escenarios pueden activarse a través del
selector de escenas (SSW-S1) o desde su móvil. La
cantidad máxima de acciones por Escena es 5.
Regla - Cree su regla para iniciar acciones
automáticas con su panel y dispositivos de
domótica mediante un desencadenante y unas condiciones.
Cómo crear una regla:
Paso 1: Ve a Domótica - Regla y apriete el botón +.
Paso 2: Escribe un nombre para la regla, por ej. “Auto Armar”.
Paso 3: Seleccione un desencadenante para la regla. (p.ej. “Horario”
-> “Semanal”, seleccione los días y la hora)
Paso 4: Si lo desea, agregue una condición (estado del sistema
para que ocurra la regla). P.ej. período de tiempo o modo del
sistema, hasta 2 condiciones.
Paso 5: Seleccione de la lista una acción para activar la regla. P.ej.
Acción del dispositivo -> Interruptor (PSM-S1) -> encender.
Paso 6: Si desea agregar más acciones, presione el botón + a la
derecha (hasta 5 acciones).
Paso 7: Haga clic en “Enviar” para guardar los cambios.
Español
Reglas Recomendadas Desencad. Condición Acción
Cuando se active cualquier tipo de
alarma:, encienda las luces, levante las
persianas y graba un video.
Cuando abra la puerta de su casa entre
las 19:00 y las 7:00, encienda las luces
durante 20 segundos
Simular presencia cuando estés de
vacaciones:
Todos los días a una hora específica
p.ej. 20:00 la persiana subirá y la luz se
encenderá durante 30 min."
Todos los días a las 6:00 cambie el
modo del sistema actual al modo
desactivado y abre las persianas.
Siempre que arme el sistema: apaga las
luces, baja la calefaccion hasta los 18ºC
y abre las persianas
Todos los días a las 23:00 cambie el
modo del sistema al modo en casa,
apague todas las luces, cierra todas las
persianas y baje la calefaccion hasta
los 18ºC.
Lanzar Alarma -->
Cualquier Alarma
Apertura del
Contacto de
Puerta
Horario --> Diario
20:00
Horario --> Diario
6:00
Cambio de
Modo --> Modo
Activado
Horario --> Diario
23:00
Ninguno "Acción del dispositivo --> Interruptor intelig. PSM-S1 or PRM2-S1 --> Encender
Periodo de
tiempo--> Diario
--> 19:00 a 7:00
Ninguno "Acción del dispositivo --> Power Switch PSM-S1 or PRM-S1 --> Encender
Ninguno "Cambio de Modo--> Desactivar
Ninguno "Acción del dispositivo --> Power Switch PSM-S1 or PRM-S1 --> Apagado
Ninguno "Cambio de Modo --> Modo en casa
Acción del dispositivo --> Control Persianas SCM -S1 Abrir 100%
Solicitar Video --> IPC-S1"
Acción del dispositivo --> Interruptor intelig. PSM-S1 or PRM2-S1 --> Encender
Para 20s
Para 30min
Acción del dispositivo --> Roller Shutter SCM-S1 Cerrar"
Accion del dispositivo --> Roller Shutter SCM-S1 Abrir 100%"
Acción del dispositivo --> Termoestato TRV-S1 or TMST-S1 --> Bajar hasta los
18ºC
Acción del dispositivo --> Roller Shutter SCM-S1 Cerrar"
Acción del dispositivo --> Power Switch PSM-S1 or PRM-S1 --> OFF
Acción del dispositivo --> Roller Shutter SCM-S1 Cerrar
Acción del dispositivo --> Termoestato TRV-S1 or TMST-S1 --> Bajar hasta los
18ºC"
57
Page 58

12. Recomendaciones de Seguridad
1| Sistema de comunicacion híbrida de respaldo:
Puede adquirir y conectar los módulos DG2-Pro o DG4-pro GSM de Blaupunkt al puerto USB ubicado en la parte posterior
del Panel Q-Pro para evitar perder la comunicación con su sistema de seguridad, incluso si la conexión a Internet falla o si un
intruso la interrumpe.
El DG2-pro funciona con la red 2G y sirve como sistema de respaldo para poder recibir las notificaciones de la alarma.
Recomendamos utilizar esta opción de respaldo en áreas donde no hay comunicación 4G.
El DG4-Pro funciona con la red 4G de alta velocidad y se puede usar como sistema de respaldo para poder recibir las
notificaciones de la alarma. Asegúrese de que haya una red 4G en el lugar de instalación. No recomendamos utilizar el DG4Pro como método de comunicación independiente, está destinado a ser solo un sistema de respaldo.
Los módulos GSM requieren tener una tarjeta SIM instalada con conexión a datos móviles. (Tarjeta SIM no incluida)
2| Silenciar la sirena interna del Panel Q-Pro:
Para evitar que un intruso localice el lugar de instalación del Panel Q-Pro recomendamos silenciar la sirena interna del panel
e instalar una sirena adicional para interiores o exteriores.
Español
Puede instalar una de las siguientes sirenas adicionales para aumentar la seguridad y prevenir que el panel sea descubierto
por el intruso: Sirena interior por enchufe AC: SRAC-S1, Sirena interior con pilas SR-S1 o Sirena exterior con pilas BX-S1).
Para silenciar la sirena interna, ve a configuración --> Introduzca el Código Maestro --> Panel --> Sirena interna --> Apagado.
3| Servicio premium:
Con el Servicio Premium de Blaupunkt, su Sistema de Seguridad dispondrá de las siguientes funciones innovadoras:
Nuestras notificaciones premium le permitirá recibir llamadas automatizadas desde nuestra central de alarmas hasta un
máximo de 3 números de teléfono distintos en caso de robo. Esto funciona de forma adicional y paralela al servicio estandar
de notificaciones push y de correo electrónico.
El Servicio Premium también permite habilita el almacenaje en la nube de hasta 50 grabaciones de su IPC-S1, 30 imágenes
de su sensor PIR con cámara de fotos (IRC-P4 and IRC-S2) una lista de eventos general de 90 días.
Además, con el Servicio Premium de 12 meses, se amplía la garantía un año adicional.
Para obtener más información sobre el Servicio Premium, vaya a: premium.blaupunkt-security.com
4| Actualizaciones del rmware:
El Panel Q-Pro incluye un servicio de actualización de FW automático. (Hay un servicio diario de actualización que mantiene
su dispositivo actualizado). Si compró un nuevo panel Q, debe esperar al menos un día hábil para que las actualizaciones
necesarias estén listas. Si el dispositivo se está actualizando, no lo apague ya que podría dañar el sistema de seguridad.
13. Soporte Técnico
58
Para obtener más información sobre el Panel Q-Pro y sus accesorios, visite
security.blaupunkt-service.com
Blaupunkt Competence Center Security & Care
www.blaupunkt.com
Security Brand Pro GmbH
Mondstrasse 2-4
85622 Feldkirchen-München, Germany
© Cambios técnicos y errores exceptuados
Page 59

Polski | Skrócona instrukcja obsługi
1. Zawartość Q-Pro6300, Q-Pro6600 & Q-Pro panel systemu
a
Q-ProHub – Panel centralny
e
Podstawka
Incl. in Q-Pro6300 Incl. in Q-Pro6600
i
Detektor ruchu
zwierząt domowych
j
Kontakt do
drzwi
b
Zasilacz AC Kabel sieciowy
PREMIUM
VOUCHER
f
Kupon premium Naklejka
k
Pilot Zdalna
c
g
l
Kamera dla
zwierząt
Uchwyt montażowy
Skrócona instrukcja obsługi
m
Kontakt do
drzwi
d
h
n
klawiatura
Polski
UWAGA:
Niniejszy przewodnik szybkiego startu koncentruje się na instalacji i pierwszej konguracji urządzenia
systemu bezpieczeństwa z aplikacją Secure4Home. Po więcej informacji odwiedź naszą stronę
internetową: security.blaupunkt-service.com
59
Page 60

2. Wygląd Q-ProHub
1
1
2
2
3
3
4
4
5
5
6
6
7
7
8
8
10
10
10
Polski
9
9
11
11
1. Dioda LED (czerwona i zielona):
Czerwona włączona – tryb uzbrojenia
Czerwona migająca – tryb domowy
Zielona migająca – tryb nauki.
Zielona wyłączona – tryb testowy lub rozbrojony
2. Dioda LED stan alarmu i usterki (czerwona i żółta):
Czerwona włączona – alarm w pamięci
Czerwona migajaca – alarm
Żółta włączona/migająca – awaria systemu
3. Stały wspornik (do instalacji stacjonarnej):
4. Port USB: dla DG2-Pro i DG4-Pro
WAŻNE - Przeczytaj przed instalacją
• Upewnij się, że pole instalacji znajduje się blisko routera lub sieciowego portu Internetowego.
• Nie instaluj Q-ProHub przy otwartym polu widzenia, aby uniknąć nieautoryzowanej manipulacji.
• Zabezpieczenie antywłamaniowe Q-ProHub działa tylko przy instalacji na ścianie. To dlatego, że oderwanie Q-Pro ze
wspornika do montażu na ścianie aktywuje alarm antywłamaniowy.
• Q-Pro Hub współdziała z uchwytem ściennym. Nie zdejmuj uchwytu ściennego, nawet jeśli zdecydujesz się na korzystanie
ze stojaka na biurko. Q-Pro nie będzie działać poprawnie bez zamocowanego wspornika montażowego z tyłu.
5. Przycisk Ucz się/Resetuj
6. Ethernet Port
7. Przełącznik włącz / wyłącz
8. Złącze zasilania
9. Czujnik ruchu
10. Uchwyty do montażu na ścianie
11. Haki wspornikowe
12. Uchwyt montażowy
11
12
12
60
Page 61

3. Instalacja Q-ProHub
Opcja a: instalacja naścienna
Krok 1a:
Umieść wspornik ścienny na ścianie w pozycji pionowej
i użyj go jako szablonu do zaznaczania pozycji dwóch
otworów na ścianie.
Opcja b: Instalacja stojaka na biurko
Krok 1b:
Usuń pasek znajdujący się po lewej stronie Q-ProHub.
Krok 2a:
Wywierć dwa otwory w zaznaczonych miejscach
w ścianie i umieść uchwyt ścienny na hakach.
Przymocuj wspornik do montażu ściennego za pomocą
dostarczonych śrub i kołków.
Krok 3a:
Podłącz Q-ProHub do wspornika i przesuń w lewą stronę,
aby nacisnąć zabezpieczenie antywłamaniowe wewnątrz
Q-ProHub.
Krok 4:
Podłącz Q-ProHub do
routera internetowego
za pomocą kabla Ethernet.
Krok 2b:
Wsuń Q-ProHub w podstawę stojaka i przesuń w prawo.
Krok 3b:
Pomimo instalacji na biurku, proszę podłącz Q-ProHub do
wspornika montażowego i przesuć w lewo zabezpieczenie
antywłamaniowe wewnątrz Q-ProHub, aby zapewnić, że
alarm jest aktywowany.
Krok 6:
Zaczekaj, aż dioda LED
zasilania się zapali.
Polski
Krok 5:
Podłącz Q-ProHub do
do gniazdka elektrycznego
i naciśnij przycisk ON.
UWAGA: Gdy tylko Q-ProHub jest podłączony i włączony, serwer potrzebuje 15 minut na zakończenie
rejestracji. Jeśli rejestracja nie zostanie zakończona w ciągu 15 minut, odłącz wtyczkę AC i przestaw przełącznik
w pozycję OFF. Następnie uruchom ponownie, wkładając zasilacz sieciowy i przełączając na ON. Poczekaj 15
minut na dokończenie rejestracji.
Uwaga:
Q-ProHub musi być podłączony do Internetu i prądu przez
cały czas. Każdy problem z routerem i siecią może zakłócić
działanie systemu.
61
Page 62

4. Rejestracja
Krok 1:
Pobierz i zainstaluj aplikację “Secure4Home” na smartfonie.
Krok 2:
Uruchom aplikację Secure4Home i wybierz opcję Pierwsza rejestracja.
Krok 3:
Upewnij się, że Q-ProHub jest włączony i podłączony do routera.
Krok 4:
Postępuj zgodnie z instrukcjami na ekranie i wprowadź wymagane informacje. Nazwa
użytkownika i hasło musi mieć co najmniej 8 znaków.
Zostaniesz poproszony o podanie adresu MAC swojego Systemu Bezpieczeństwa, który znajdziesz na odwrocie Q-ProHub.
Proszę wprowadź 6 ostatnich cyfr adresu MAC. Wprowadź nazwę systemu bezpieczeństwa i wybierz odpowiedni język i kraj.
Krok 5:
Po rejestracji wybierz swój abonament. Za pomocą kodu Vouchera Premium Service możesz wypróbować usługę Premium
za darmo przez jeden miesiąc. Więcej informacji na temat usługi premium można znaleźć w rozdziale 12 “Usługa Premium”.
Polski
Krok 6:
Otrzymasz wiadomość e-mail z potwierdzeniem konta. Przejdź do skrzynki odbiorczej poczty e-mail i uwierzytelnij swoje
konto.
Aby zarejestrować komputer, odwiedź https://eu. bphomeconnect.co z przeglądarki internetowej i wykonaj te
same kroki jak wyżej. Unikaj używania przeglądarek internetowych jako Microsoft IE Explorer / Edge.
Aplikacja Secure4Home służy do rejestrowania i zarządzania systemem zabezpieczeń z dowolnego miejsca. Dla
konguracji - patrz rozdział 10 “Obsługa za pośrednictwem portalu internetowego”.
Secure4Home
5. Zmiana domyślnych kodów bezpieczeństwa
Uruchom aplikację Secure4Home i wprowadź swoją nazwę użytkownika i hasło.
W prawym górnym rogu kliknij ikonę silnika. Stuknij w “Kod” i wpisz swoje hasło do konta użytkownika.
PIN użytkownika:
Tutaj możesz edytować i tworzyć nowe “kody PIN użytkownika”. Zmień nazwę
domyślnego “użytkownika” i zmień domyślny kod PIN użytkownika (1234),
używając 4-cyfrowego kodu od siebie.
Wybierz przycisk Save i zapisz ustawienia. Kod PIN użytkownika służy do
uzbrajania, Home Arm i rozbrajania systemu zabezpieczeń.
Kod główny:
Zastąp domyślny kod główny (1111) 4-cyfrowym kodem własnym i zapisz
ustawienia. Kod główny służy do konfiguracji w celu uzyskania dostępu do
zabezpieczeń ustawień systemowych.
UWAGA: Kod PIN użytkownika i główny kod PIN nie mogą być identyczne. Jeśli są identyczne, urządzenie nie
będzie działać. Aby uzyskać więcej informacji, patrz Instrukcje serwera Home Connect. Do konguracji Arm
Home Tryb, patrz rozdział 2.6.1 Ustawienia urządzenia w Podręczniku serwera Home Connect (Pobierz na
stronie service.blaupunkt-security.com).
62
Page 63

6. Instalacja akcesoriów zestawu
Czujka do drzwi (DC-S4)
(w zestawie Q-Pro 6300/6600)
Door Contact DC-S4 monitoruje drzwi i okna w Twoim domu zapewnia
idealną ochronę.
DC-S4 można przymocować za pomocą śrub lub taśmą montażową
do drzwi lub ramy okna. Dla prawidłowego działania nie zalecamy
instalowania DC-S4 na stalowych drzwiach lub oknach.
Aby zamontować śrubę, zdejmij tylną pokrywę i dociśnij drugą pokrywe
z tyłu (np. za pomocą śrubokręta), gdzie znajduje się cieńszy plastik.
Wywierć otwory w powierzchni. Przymocuj podstawę czujki drzwi do
powierzchni za pomocą dostarczonej śruby i wtyczek. Ponownie załóż
tylną pokrywę.
Upewnij się, że ochrona antywłamaniowa jest dociśnięta do drzwi/
powierzchni okna, w przeciwnym razie akcesorium uruchomi alarm.
Magnes powinien być zainstalowany przylegle do znacznika czujnika.
Ochrona przed
naruszeniem
Lampka
kontrolna
Magnes
Fig.1
Magnes należy umieścić obok znacznika
czujnika! Maks. 15 mm
integralności
Czujnik
Pilot(RC-R3B)
(w zestawie Q-Pro 6300)
Dzięki pilotowi zdalnego sterowania Blaupunkt RC-R3B możesz łatwo
zmienić status systemu między trybem uzbrojenia, rozbrojenia i startu.
Dodatkowo RC-R3B może być użyty do wywołania alarmu napadowego
przez naciśnięcie przycisku awaryjnego na 3 s. RC-R3B nie może
rozbroić alarmu uruchomionego przez użytkownika, można to zrobić za
pośrednictwem aplikacji.
RC-R3B działa z technologią szyfrowania kodu, dla lepszego zabezpieczenia
przed włamaniem do systemu z zewnątrz.
Detektor ruchu odporny na ruch zwierząt domowych (IR-P4)
(w zestawie Q-Pro 6300)
Kiedy IR-P4 wykryje ruch podczas trybu uzbrojenia, automatycznie
uruchamia alarm i powiadamia użytkownika. Ochrona antywłamaniowa
znajduje się wewnątrz urządzenia. Jeśli to urządzenie zostanie usunięte
przez intruza, ochrona antywłamaniowa wywoła alarm.
IR-P4 należy przymocować do ściany za pomocą śrub lub taśmy
montażowej. Sugerujemy umieszczenie urządzenia w narożniku
pomieszczenia, aby detektor miał szeroki zakres wykrywania. Należy
zainstalować czujnik ruchu na wysokości 2 m nad ziemią.
Jeśli zdecydujesz się na montaż przy użyciu śrub, zdejmij tylną pokrywę
i przebij otwory (na przykład za pomocą śrubokręta), w miejscu gdzie
plastik jest cieńszy. Do zestawu dołączony jest szablon ułatwiający montaż
urządzenia na powierzchni płaskiej. Należy wywiercić otwory w ścianie.
Prosimy o zastosowanie śrub oraz zaślepek znajdujących się w zestawie.
Dzięki funkcji “pet immune” urządzenie nie będzie reagować na zwierzęta
o wadze mniejszej niż 25 kg. Aby urządzenie działało prawisłowo, nie kieruj
detektora ruchu w stronę schodów lub obszarów, na które zwierzę może
się wspiąć.
Przycisk Przycisk HOME
Przycisk
bezpieczeństwa
Fig.2
lampka
testowa LED
LED
Przycisk
rozbrojenia
PIR-Sensor
Fig.3
UWAGA: IR-P4 przejdzie w tryb uśpienia
przez 1 min. Proszę czekać więcej niż 1
minutę, aby upewnić się, że urządzenie
jest w trybie uśpienia przed testowaniem.
Polski
Pokrywa baterii
63
Page 64

Zdalna klawiatura(KP-R1)
(w zestawie Q-Pro 6600)
Za pomocą klawiatury Blaupunkt KP-R1 możesz łatwo zmienić
status systemu bezpieczeństwa pomiędzy trybem uzbrojenia,
rozbrojenia i trybu domowego. Wprowadź kod PIN systemu
bezpieczeństwa (taki sam jak ustawiony w rozdziale 5) i naciśnij
przycisk żądanego trybu.
Zalecamy zamontowanie klawiatury przy wejściu do drzwi
- kontrola wejścia.
Zdejmij tylną pokrywę i przyciśnij 2 wybicia (na przykład za
pomocą śrubokrętu), gdzie plastik jest cieńszy. Wywierć dziury
w ścianie za pomocą wzoru z szablonu.
Ustaw klawiaturę, montując ją na ścianie za pomocą dostarczonej
śruby i zatyczek.
Upewnij się, że ochrona antywłamaniowa jest dociśnięta do
powierzchni ściany, w przeciwnym razie akcesorium uruchomi
alarm antywłamaniowy.
Detektor ruchu odporny na ruch zwierząt domowych (IRC-P4)
(w zestawie Q-Pro6600)
Kiedy IRC-P4 wykryje ruch podczas trybu uzbrojenia, będzie
Polski
automatycznie wykonywać 3 zdjęcia, zapisuje je w chmurze,
uruchamia alarm i powiadamia użytkownika. Użytkownik może
wykonać i zobaczyć zdjęcia za każdym razem za pomocą aplikacji
lub portalu internetowego. Ochrona antywłamaniowa znajduje się
wewnątrz urządzenia i jest dociśnięta przez śrubę. Jeśli urządzenie
jest usuwane przez intruza, ochrona antywłamaniowa spowoduje
wyzwolenie alarmu.
IRC-P4 należy zamontować lub przykleić do ściany za pomocą śrub
lub taśmy klejącej. Najlepsza lokalizacja jest w rogu, aby mieć szeroki
zakres wykrywania ruchu. Zainstaluj czujnik ruchu na wysokości 2
metrów od podłoża, dla najlepszej wydajności.
Jeśli zdecydujesz się na montaż przy użyciu śrub, zdejmij tylną
pokrywę i przebij otwory (na przykład za pomocą śrubokręta),
w miejscu gdzie plastik jest cieńszy. Do zestawu dołączony jest
szablon ułatwiający montaż urządzenia na powierzchni płaskiej.
Należy wywiercić otwory w ścianie. Prosimy o zastosowanie śrub oraz
zaślepek znajdujących się w zestawie.
Dzięki funkcji “pet immune” urządzenie nie będzie reagować na
zwierzęta o wadze mniejszej niż 25 kg. Aby urządzenie działało
prawisłowo, nie kieruj detektora ruchu w stronę schodów lub
obszarów, na które zwierzę może się wspiąć.
8
9
10
1. Aktywna dioda LED (niebieska/
pomarańczowa)
2. Dioda LED (niebieska/czerwona)
3. Dioda LED awarii (pomarańczowa)
4. Klucz
6. Klucz statusu
7. Wyłącz klucz
8. Alarm napadowy
9. Alarm pożarowy
10. Alarm awaryjny
5. Przełącznik
LED-Flash
PIR-Sensor
Lense of PIR-
Camera
Blue LED/Test-/
Learn-Button
UWAGA: IRC-P4 przejdzie w tryb uśpienia na
2 min. podczas wykrywania kogoś podczas
alarmu nieaktywny. Proszę czekać dłużej niż
2 minuty, żeby mieć pewność że urządzenie
jest wyłączone ztrybu uśpienia przed
testowaniem.
Fig.4
1
2
3
4
5
6
7
Aby uzyskać więcej informacji o akcesoriach dołączonych do zestawu, odwiedź stronę service.blaupunktsecurity.com lub szczegółową instrukcję dla każdego akcesorium.
Seria Q-Pro wyposażona w kod zabezpieczenia. Funkcja szyfrowania zwiększa bezpieczeństwo systemu.
64
Page 65

7. Zarządzanie przez aplikację
Aplikacja Secure4Home służy do rejestrowania i zarządzania systemem zabezpieczeń z dowolnego
miejsca. Dla konguracji - patrz rozdział 10 “Obsługa za pośrednictwem portalu internetowego”.
W Menu
bezpieczeństwa
możesz zmienić
Tryby systemowe.
Sprawdź status pulpitu
systemowego, jeśli
występuje problem.
Jeśli moduł GSM
zainstalowany jest na
panelu siła sygnału
będzie (patrz rozdział
12) wyświetlana na
górnym prawym rogu.
W Menu urządzenia możesz mieć
ogólny przegląd wszystkich akcesoriów,
sprawdź, czy są jakieś usterki i czy
styki drzwi są otwarte lub zamknięte
Jeśli jeden lub więcej akcesoriów
wykazuje niski poziom baterii należy
je wymienić, aby system nadal działa
poprawnie.
Jeżeli jakiekolwiek inne awarie są
wyświetlane, postępuj zgodnie
z instrukcją obsługi.
W Menu Automation
Device można ręcznie
uruchomić dowolny
scenariusz (patrz także
rozdział 11)
W Menu zdarzeń
wyswietlany jest
harmonogram zdarzeń
oraz możliwość
przekierowania
informacji do
wyznaczonej osoby.
Wszystkie alarmy
włamaniowe
zostaną wyświetlone
na czerwono, podczas
gdy techniczny
alert lub system będą
wyświetlane na żółto.
W Menu kamery możesz zobaczyć
opcje kamery WiFi do nadzoru wideo
(IPC-S1) i opcjonalne zdjęcie PIR
kamera (IRC-P4) lub IRC-S2.
IPC-S1 zapewnia niezawodny
nadzór wideo w jakości HD
z automatycznym nagrywaniem wideo
podczas alarmu, transmisje na żywo,
dwukierunkowy głos,
komunikacja i noktowizja.
IRC-P4 uruchamia alarm, kiedy
ruch jest wykrywany i przechwytywany.
3 kolorowe zdjęcia zapewniają
weryfikacje/dowód.
Jeśli klikniesz ikonę ustawień u góry
po prawej, możesz uzyskać dostęp do
swoich danych osobowych, możesz
zmienić dane, hasło, skonfigurować
powiadomienie, skonfigurować stronę
startową aplikacji, ominąć wszelkie
akcesoria i znaleźć kontakt lub inne
informacje. Możesz również się
zalogować.
Polski
65
Page 66

8. Tryby systemowe
Rozbrojenie: Rozbrojone zostają
wszystkie czujniki
antywłamaniowe.
Uzbrojenie:
Tryb uzbrojenia aktywuje wszystkie
czujniki antywłamaniowe. Alarm
jest uzbrojony w momencie
aktywowania czujnika. Gdy sensor
jest w trybie “Wejście?”, rozpoczyna
się odliczanie alarmu, więc
użytkownik ma czas na rozbrojenie
systemu i alarm się nie włączy.
Arm Home:
Czujniki, które zostały przypisane
funkcją Arm Home, nie mogą
być aktywowane, jeśli system
jest włączony do trybu Home
Arm. Zazwyczaj czujniki ruchu
w środku są przypisane do funkcji,
dzięki czemu możesz swobodnie
poruszać się wewnątrz mieszkania,
podczas gdy drzwi i okna są
chronione.
Krok 1:
Kliknij Tryb Systemowy
Przycisk, który chcesz
aktywować.
Krok 2:
Wprowadź kod PIN
(kod domyślny: 1234).
Jeśli kod jest poprawny
zmiana zostanie
zastosowana.
Polski
9. Dowiedz się o dodatkowych akcesoriach
Wszystkie nowe akcesoria, które nie są zawarte w zestawie, należy dodać do Q-ProHub w następujących krokach. Możesz
dodać 50 akcesoriów.
Aby nauczyć się nowych opcji czujników, powinieneś udać się do portalu “eu.bphomeconnect.com”.
Krok 1:
Przejdź do Ustawień i kliknij Urządzenie
Krok 2:
Kliknij ikonę w prawym górnym rogu
aby uzyskać dostęp do funkcji “Dodaj urządzenie”.
Krok 3:
Przy dodawaniu nowego urządzenia występuje
sygnał uczenia się. Gdy Q-ProHub otrzyma “sygnał
do nauki”, wyda podwójny sygnał dźwiękowy i sieć
interfejsu wyświetli informacje o urządzeniu.
Krok 4:
Zaznacz pole przed informacjami o urządzeniu,
a następnie kliknij OK, aby dodać urządzenie
do Q-ProHub.
Krok 5:
Nadaj nowe akcesorium, nazwę i edytuj funkcję, klikając 3 kropki po prawej stronie tego akcesorium.
66
Page 67

10. Obsługa i konfiguracja za pośrednictwem portalu internetowego
Przejdź do portalu macierzystego “eu.bphomeconnect.com”.
Przegląd portalu internetowego:
W Menu Bezpieczeństwa możesz
zmienić tryby systemowe i uzyskać
przegląd urządzeń oraz wykonać
zdjęcie.
W Menu automatyzacji proszę
zobacz 9. Automatyka domowa.
Po integraji IPC-S1 Blaupunkt w
Menu kamery zobaczysz wideo w
czasie rzeczywistym.
W Menu wydarzeń otrzymasz
przegląd zgłaszanych zdarzeń do
Q-ProHub.
W Menu ustawień możesz
zaprogramować ustawienia
Q-ProHub.
Konguracja za pośrednictwem portalu internetowego:
Aby zmienić ustawienia konta, kliknij nazwę swojego konta (prawy górny
róg) i wybierz “Konto”.
W tym menu możesz zmienić dane swojego konta, język
i tworzyć dodatkowe konta użytkowników. Aby edytować, kliknij po
zakończeniu zapisz zmiany.
Dodatkowe konta użytkowników są powiązane z kontem głównym.
Użytkownik i hasło dla konta wtórnego są przeznaczone tylko do logowania
w portalu domowym i aplikacji. PIN do rozbrojenia są związane z Q-ProHub i
pozostaną takie same.
UWAGA: Na raz może być tylko JEDEN
zalogowany na koncie za pomocą
identycznej nazwy użytkownika.
Polski
Aby zmienić ustawienia powiadomień, kliknij nazwę
swojego konta (prawy górny róg) i wybierz “Powiadomienie”.
W menu powiadomień możesz modyfikować
ustawienia:
Wciśnij: przycisk konfigurujący połączenie z twoim
smartfonem. Aplikacja Secure4Home musi być
zainstalowana i zalogowana, aby otrzymywać powiadomienia
E-mail: serwer Home Portal wyśle wiadomość e-mail do
skonfigurowanego konta e-mail.
Wiadomość głosowa: centrum alarmowe Blaupunkta
automatycznie zadzwoni do ciebie w sprawie
włamywacza. Opcja tylko dla użytkowników premium,
aby uzyskać więcej informacji w sprawie usługi premium
zapoznaj się z rozdziałem
12, Usługa Premium.
UWAGA: Upewnij się, że głośność w Twoim
smartfone została ustawiona na wysoki
poziom połączeń.
67
Page 68

11. Automatyka domowa
Aby wprowadzić zmiany w automatyzacji domu, musisz przejść do portalu domowego
“eu.bphomeconnect.com”.
Urządzenie – pozwala zarządzać i używać
indywidualnie wszystkie akcesoria do automatyki
domowej.
Pokój – przypisz każdemu akcesorium odpowiedni
pokój dla łatwiejszego zarządzania.
Grupa – Możesz dodać akcesoria tego samego
typu do grupy, która zarządza wszystkimi
akcesoriami za pomocą jednego polecenia.
Scenariusz – Utwórz scenariusz, aby zdefiniować
ustawienie wstępne działania dla jednostek
automatyki domowej. Scenariusz może być
wyzwalany za pomocą scenariusza
(SSW-S1) lub telefonu komórkowego. Maksymalny
poziom działania na scenariuszu to 5.
Reguła – Utwórz regułę, aby zainicjować
automatyczne działania twojego panelu.
Jak utworzyć regułę:
Krok 1: Przejdź do Automatyzacji - Reguła i kliknij przycisk +.
Polski
Krok 2: Wpisz nazwę reguły, np. “Auto Arm”.
Krok 3: Wybierz wyzwalacz reguły. (np. “Zaplanuj” -> “Co tydzień”
wybierz dni i godzinę)
Krok 4: Jeśli chcesz, dodaj dowolny warunek, np. okres czasu lub
tryb systemowy, maksymalnie 2 warunki.
Krok 5: Wybierz z listy regułę wyzwalania akcji. Na przykład.
Urządzenie akcji -> Power switch (PSM-S1) do włączenia.
Krok 6: Jeśli chcesz dodać więcej akcji, naciśnij +
przycisk po prawej stronie (możliwe jest do 5 akcji).
Krok 7: Kliknij “Prześlij”, aby zapisać zmiany.
Zalecane zasady Co uru-
Ilekroć pojawia się alarm, nagrywanie włącza się automatycznie.
Kiedy otworzysz drzwi swojego
domu między 19:00 a 7:00
światła będą włączone przez
20 sekund.
Symuluj obecność, gdy jesteś
na wakacjach: Codziennie
w określonych godzinach,
np. 20:00 rolety zaświecą się,
a światło się włączy co 30 minut.
Codziennie o 6:00 zmień
bezpieczeństwo systemu: aby
rozbroić i otworzyć swoje rolety.
Za każdym razem, gdy uzbroisz
system, wyłącz światła, zmniejsz
ogrzewanie do 18ºC i otwórz
rolety.
Codziennie o 23:00 zmienia
bezpieczeństwo systemu do
systemu domowego, włącz
wszystkie światła, zamknij
wszystkie rolety i skręć system
grzewczy do 18ºC.
68
chamia
Stan Akcja
Dowolny Alarm Żaden Działanie urządzenia -> Przełącznik zasilania PSM-S1 lub PRM2-S1 -> WŁ
Ruch przy
otwartych
drzwi
Harmonogram
-> Codziennie
20:00
Harmonogram
-> Codziennie
6:00
Zmiana trybu
-> Arm
Harmonogram
-> Codziennie
23:00
Dziennie --> od
19:00 do 7:00
Żaden Działanie urządzenia -> Przełącznik zasilania PSM-S1 lub PRM-S1
Żaden Zmiana trybu -> Rozbrój
Żaden Działanie urządzenia -> Przełącznik zasilania PSM-S1 lub PRM-S1 -> OFF
Żaden Mode Change --> Home Arm
Działanie urządzenia -> Roller Shutter SCM-S1 Open 100%
Zażądaj wideo -> IPC-S1 “
Działanie urządzenia -> Przełącznik zasilania PSM-S1 lub PRM2-S1
-> WŁĄCZONY przez 20 s
-> WŁĄCZ przez 30 min
Działanie urządzenia -> Roler Shutter SCM-S1 Close
Działanie urządzenia -> Roller Shutter SCM-S1 Open 100%
Działanie urządzenia -> Termostat TR V-S1 lub TMST-S1 -> Zmniejsz do 18ºC
Działanie urządzenia -> Roler Shutter SCM-S1 Zamknięte
Device Action --> Power Switch PSM-S1 or PRM-S1 --> OFF
Device Action --> Roller Shutter SCM-S1 Close
Device Action --> Thermostat TRV-S1 or TMST-S1 --> Turn Down
to 18ºC
Page 69

12. Zalecenia dotyczące bezpieczeństwa
1| Wycisz syrenę Q-ProHub:
Aby uniknąć sytuacji, w której intruz znajdzie się w miejscu zainstalowania Q-ProHub, zalecamy wyciszyć wewnętrzną syrenę
Q-ProHub i zainstaluj dodatkową syrenę.
Możesz zainstalować jedną z następujących dodatkowych syren, aby zwiększyć bezpieczeństwo i uniemożliwić odnalezienie
panelu przez intruza. Wewnętrzna syrena zasilana prądem zmiennym: SRAC-S1, syrena wewnętrzna baterii SR-S1 lub
sygnalizator zewnętrzna baterii BX-S1).
Aby wyciszyć wewnętrzną syrenę, przejdź do Ustawienia -> Wpisz kod główny -> Panel -> Syrena wewnętrzna -> WYŁ.
2| Metoda komunikacji:
Możesz pobrać i podłączyć moduły Blaupunkt DG2-Pro lub DG4-pro GSM do USB znajdującego się z tyłu urządzenia
Q-ProHub, aby uniknąć utraty komunikacji z systemem bezpieczeństwa, nawet jeśli połączenie z Internetem nie powiedzie
się lub zostanie przerwane przez intruza.
DG2-pro działa w sieci 2G i oferuje kopie zapasowe powiadomień o alarmach i zalecanych standardowych przeglądach
aplikacji, aby użyć tej opcji kopii zapasowej w obszarach, w których nie ma komunikacji 4G.
DG4-Pro działa na szybkich sieciach 4G i może być używany jako backup dla powiadomień o alarmach i standardowej
aplikacji zarządzania. Upewnij się, że w lokalizacji instaliazacji znajduje się sieć 4G. Nie zalecamy używania DG4-Pro jako
samodzielnej metody komunikacji, ma być tylko kopią zapasową.
Moduły GSM musiałyby mieć zainstalowaną kartę SIM z pakietem internetu (Karta SIM nie jest dołączona).
3| Serwis premium:
Dzięki usłudze Blaupunkt Premium Twój system zabezpieczeń zostanie włączony dzięki innowacyjnemu zestawowi funkcji:
Nasze powiadomienia o połączeniach premium umożliwiają automatyczne nawiązywanie połączeń z maksymalnie trzema
różnymi numerami telefonów w naszym centrum alarmowym w przypadku wtargnięcia. Działa to dodatkowo w stosunku do
standardowej usługi Push i E-Mail.
Usługa Premium dodatkowo oferuje przechowywanie w chmurze ponad 50 zdarzeń terenowych, filmy z twojego IPC-S1, 30
zrobionych zdjęć PIR-Photo-Camera (IRC-P4 i IRC-S2). Ogólna wartość EventLog wynosi 90 dni.
Dodatkowo w ramach 12-miesięcznego abonamentu Premium Service gwarancja na produkt zostanie przedłużona o jeden
dodatkowy rok.
Aby uzyskać więcej informacji na temat usługi Premium, przejdź do: premium.blaupunkt-security.com
Polski
Aktualizacje oprogramowania układowego:
Q-ProHub zawiera automatyczną usługę aktualizacji FW. (Istnieje codzienna usługa aktualizacji FW, która utrz ymuje twoje
urządzenie w gotowości.). Jeśli kupiłeś nowy produkt Q-Series, odczekaj przynajmniej jeden dzień roboczy, aby wszystkie
niezbędne aktualizacje były gotowe.
Jeśli urządzenie się aktualizuje, nie wyłączaj go, ponieważ może to zaszkodzić systemowi bezpieczeństwa.
13. Wsparcie
Aby uzyskać więcej informacji na temat Q-ProHub i akcesoriów, odwiedź
stronę:
security.blaupunkt-service.com
Blaupunkt Competence Centrum Bezpieczeństwa i Opieki:
www.blaupunkt.com
Security Brand Pro GmbH
Mondstrasse 2-4
85622 Feldkirchen-München, Germany
© Technical changes and errors excepted
69
Page 70

Suomi | Pikaopas
1. Pakkaussisältö: Q-Pro6300, Q-Pro6600 & Q-Pro -järjestemät
Suomi
a
Q-ProHub – Keskusyksikkö
e
Jalka
Lisäksi Q-Pro6300 Lisäksi Q-Pro6600
i
Liiketunnistin
Ovitunnistin Liiketunnistin-
b
Virtalähde Verkkokaapeli
PREMIUM
VOUCHER
f
Premium-arvolipuke Tar ra
j
k
Kauko-ohjain Näppäimistö
l
kamera
c
g
m
Ovitunnistin
d
Asennuskiinnike
h
Pikaopas
n
HUOMIO:
Tämä pikaopas keskittyy asennukseen ja laitteen ensimmäiseen käyttöönottoon Secure4Home-sovellusta käyttäen.
Lisätietoja löytyy verkkosivuiltamme: security.blaupunkt-service.com
70
Page 71

2. Q-ProHub -tuotteen kuvaus
1
1
2
2
3
3
4
4
5
5
6
6
7
7
8
8
11
10
11
10
9
9
1. Laitteen tila LED-valo (Punainen & Vihreä):
Punainen palaa – Hälytin päällä
Punainen vilkkuu – Kotona tila päällä
Vihreä vilkkuu – Opetustila
Vihreä palaa – Liiketesti tai hälytys pois päältä
2. Välytys & Vikatila LED-valo (Punainen & Keltainen):
Punainen palaa – Hälytys muistissa
Punainen vilkkuu – Hälytys
Keltainen palaa / Vilkkuu – Vika järjestelmässä
3. Jalka (Mikäli laitetta käytetään tasolla):
4. USB -portti: DG2-Pro ja DG4-Pro -varten
TÄRKEÄÄ - LUE ENNEN ASENNUSTA
• Asenna laite riittävän lähelle verkkolaitetta, kytkintä tai reititintä laitteen liittämiseksi verkkoon.
• Älä asenna laitetta näkyvälle paikalle.
• Suojakytkin toimii vain seinäasennuksessa. Suojakytkin laukaisee hälytyksen kun laite irroitetaan seinätelineestä..
• Jos käytät laitetta tasolla, älä kuitenkaan irroita seinätelinettä laitteesta. Mikäli irroitat seinätelineen suojakytkin aiheuttaa
hälytyksen.
5. Opetus / Reset -napppi
6. Verkkoliitin
7. ON/OFF -kytkin akkukäytölle
8. Virtalähteen liitin: DC 12V 1A.
9. Suojakytkin
10. Seinäkiinnityksen reiänpaikat x 2
11. Kiinnityskoukut
12. Seinäkiinnike
11
10
12
12
Suomi
71
Page 72

3. Q-ProHub -asennus
Vaihtoehto A: Asennus seinään
Kohta 1a:
Aseta seinäkiinnike seinälle pystysuoraan asentoon ja
käytä sitä mallina merkitsemällä seinään kahden reiän
paikat.
Vaihtoehto B: Asennus tasolle
Kohta 1b:
Poista suojanauha, joka sijaitsee Q-ProHubin vasemmalla
puolella.
Kohta 2a:
Poraa kaksi reikää merkittyihin kohtiin seinään ja aseta
seinäkiinnike niin että koukut osoittavat oikealle. Kiinnitä
seinäkiinnike propuilla ja kiinnitysruuveilla.
Kohta 3a:
Kiinnitä Q-ProHub seinäkiinnikkeeseen liuttamalla
sitä vasemmalle ja samalla painamalla Q-ProHubin
suojakytkintä. Valinnainen: merkitse seinälle tai paneelin
pohjalle, miten laite irrotetaan kannattimesta.
Suomi
Kohta 4
Liitä Q-ProHub
verkkolaitteeseen
mukanatoimitetulla
verkkokaapelilla.
Kohta 5
Kytke Q-ProHub virtalähde
laitteeseen ja virtalähde
pistorasiaan. Käännä
akkukäytön kytkin ON
-asentoon pienellä
meisselillä tai kynällä.
Kohta 2b:
Kiinnitä Q-ProHub jalustalle, jonka koukut osoittavat
vasemmalle, liu’utamalla laitetta oikealle.
Kohta 3b:
Asenna kuitenkin myös seinäkiinnike laitteeseen. Liu’uta
seinäkiinnike koukkuihinsa samalla suojakytkintä painaen.
Kohta 6
Odota kunnes laitteen
LED-valo syttyy.
HUOM:
Q-ProHub on oltava kytkettynä Internettiin ja
virtalähteeseen. Kaikki reitittimen ongelmat ja
verkkoyhteyden ja virran häiriöt voivat häiritä järjestelmän
toimintaa.
HUOMIO: Kun Q-ProHub on kytketty ja kytketty päälle, palvelin antaa sinulle 15 minuuttia rekisteröinnin
suorittamiseksi. Jos rekisteröintiä ei ole suoritettu 15 minuutin kuluessa, irrota verkkolaite ja siirrä katkaisin
OFF-asentoon. Käynnistä sitten uudelleen asettamalla verkkolaite ja kytkemällä se päälle. Sinulla on vielä 15
minuuttia aikaa rekisteröinnin suorittamiseen.
72
Page 73

4. Rekisteröinti
Mikäli haluat rekisteröidä tuotteen käyttäen tietokonetta mene osotteeseen https://eu. bphomeconnect.com ja
katso ohjeet alta. Emme suosittele Microsoft IE Explorer/ Edge -selainten käyttöä rekisteröidessäsi tuotetta
Kohta 1
Lataa “Secure4Home” -sovellus puhelimeesi sovelluskaupasta.
Kohta 2
Käynnistä Secure4Home -sovellus ja valitse ensimmäinen kirjautuminen
Kohta 3
Varmista että Q-ProHub -laite on päällä ja kytkettynä internettiin.
Kohta 4
Noudata näyttöön tulevia ohjeita ja anna tarvittavat tiedot. Käyttäjänimen ja salasanan on
oltava vähintään 8 merkkiä.
Sinua pyydetään syöttämään suojausjärjestelmän MAC-osoite, joka löytyy Q-ProHub-laitteen takaosasta. Syötä MACosoitteen viimeiset 6 numeroa. Syötä nimi suojausjärjestelmään ja valitse haluamasi kieli ja maa.
Kohta 5
Rekisteröinti pyytää valitsemaan palvelusuunnitelman. Premium Service -arvokoodin avulla voit kokeilla Premium-palvelua
maksutta kuukauden ajan. Lisätietoja premium-palvelusta on luvussa 12 “Premium Service”.
Kohta 6
Saat tilin tunnistusta koskevan sähköpostiviestin. Siirry sähköpostin postilaatikkoon ja vahvista tilisi.
Secure4Home -sovellus on tarkoitettu laitteen käyttämiseen missä ja mistä tahansa. Lisätietoja
verkkosovelluksen käytöstä löytyy kohdasta 10 “Käyttö web-portaalin kautta”.
Secure4Home
5. Vakioiden turvakoodien vaihtaminen
Käynnistä Secure4Home -sovellus ja anna käyttäjätunnuksesi sekä salasanasi.
Napauta oikeassa yläkulmassa moottorin kuvaketta. Napauta “Code” ja kirjoita käyttäjätunnuksesi salasana.
Käyttäjän PIN-koodi:
Tässä voit muokata ja luoda uusia “Käyttäjän PIN-koodeja”. Nimeä oletusarvoinen
“käyttäjä” ja muuta oletusarvoisen käyttäjän PIN-koodi (1234) omalla
4-numeroisella koodilla. Valitse Latch ja tallenna asetukset. Käyttäjän PIN-koodia
käytetään kytke (Arm), Kotona kytketty (Home Arm) sekä häiriötilanteissä.
Pääkäyttökoodi:
Vaihda oletuspääkäyttökoodi (1111) ja tallenna asetukset. Master-koodia
käytetään konfigurointiin sekä päästäksesi suojausjärjestelmän asetuksiin.
Suomi
HUOMIO: Käyttäjän PIN-koodi ja Pääkäyttö-koodi eivät voi olla samat. Jos ne ovat identtisiä, Järjestelmätilan
muutos ei toimi. Lisätietoja osoitteessa service.blaupunkt-security.com.
73
Page 74

6. Lisälaitteiden ja tunnistimien asennus
Ovitunnistin (DC-S4)
(Mukana Q-Pro 6300/6600 -sarjoissa)
Ovitunnistin DC-S4 voit valvoa ovia tai ikkunoita.
DC-S4 voidaan kiinnittää ruuveilla tai teipillä oven tai ikkunan kehykseen.
Emme suosittele tunnistimen asentamista teräsoviin tai -ikkunoihin.
Asetaessasi tunnistimen ruuveilla poista takakansi ja avaa ruuvinreiät
esimerkiksi ruuvimeisselillä. Asenna tunnistin mukana toimitetuilla ruuveilla
ja kiinnikkeillä. Voit käyttää takakantta mallina merkitessäsi reikien paikkoja.
Lopuksi asenna tunnistin takaisin takakanteen.
Varmista että suojakytin on painettuna oven tai ikkunan kiinnityspintaan.
Muuten laite hälyttää.
Vastamagneetti on asennettava tunnistimen senrosimerkinnän kohdalle.
Asennus tehddään kuten tunnistimen, joko teipillä tai ruuveilla.
Remote-Control (RC-R3B)
(Mukana Q-Pro 6300 -sarjassa)
Blaupunkt-kauko-ohjaimen RC-R3B avulla voit helposti vaihtaa järjestelmän
tilan Arm, Disarm ja Home -tilan välillä.
Lisäksi RC-R3B: tä voidaan käyttää paniikkihälytyksen käynnistämiseen
Suomi
painamalla hätäpainiketta 3 sekunnin ajan. RC-R3B ei voi kuitata itse
laukaistua paniikkihälytystä, vaan se voidaan suorittaa sovelluksen kautta.
RC-R3B toimii vaihtuvan koodin salaustekniikalla.
Lemmikeille Immuuni liiketunnistin (IR-P4)
(Mukana Q-Pro 6300 -sarjassa)
Kun IR-P4 havaitsee liikkeen arm-tilassa, se käynnistää automaattisesti
hälytyksen ja ilmoittaa käyttäjälle. Laitteen peukalointi-suojaus on laitteen
sisällä takakannen alla. Jos laiteseen kosketaan tunkeilijan toimesta,
hälytyksen suojaus käynnistää hälytyksen.
IR-P4 on asennettava tai liimattava seinään ruuveilla tai teipillä. Paras
sijainti on nurkassa laajan liiketunnistuksen alueelle. Asenna liiketunnistin
2 m maan/latttian pinnan yläpuolelle, jotta sen toiminta olisi paras
mahdollinen.
Irrota takakansi ja avaa ruuvinkohdat (esimerkiksi ruuvitaltalla), jossa muovi
on ohuempi. Jos kiinnität laitteen nurkkaan, työnnä sivulle rei’itettyjä reikiä;
jos kiinnität laitteen tasaiselle alustalle, työnnä lävistyksiä keskeltä. Poraa
reikiä seinään käyttäen kuorta mallina. Kiinnitä IR-P4 seinälle toimitetuilla
ruuveilla ja tulpilla. Aseta takakansi takaisin IR-P4: een.
Lemmikkieläinten immuunitoiminto jättää huomioimatta lemmikkieläimiä
enintään 25 kg asti. Portaa tai muu lemmikin kiipeäminen voi kuitenkin
laukaista hälytyksen.
LED / Test-/
Learn Button
Magnet
Fig.1
Magneetti sensorimerkinnän kohdalle.
Maksimi etäisyys 15mm.
Arm Away-Button Arm Home-Button
Emergency-
Button
Fig.2
LED/Walk Test/
Learn Button
Tamper protection
LED
Disarm-Button
Sensor
marker
Battery Cover
PIR-Sensor
Fig.3
HUOMIO: IR-P4 siirtyy lepotilaan minuutiksi havaittuaan liikettä kun hälytys
ei ole kytkettynä. Testetessasi laitetta
huomioi tämä aika ja varmista ettei laite
ole lepotilassa.
74
Page 75

Näppäimistö (KP-R1)
(Mukana Q-Pro 6600-sarjassa)
Blaupunkt-näppäimistön KP-R1 avulla Voit helposti vaihtaa
turvajärjestelmän tilan Arm, Disarm ja Home -tilan välillä. Syötä
suojausjärjestelmän PIN-koodi (sama kuin luvussa 5) ja paina
haluamaasi toimintatilapainiketta.
Suosittelemme asentamaan näppäimistö sisäänkäynnin lähelle.
Irrota takakansi ja työnnä takakappaleen reiänpäikkojen läpi
esimerkiksi ruuvimeisseli. Poraa reiät seinään käyttäen takakantta
mallina. Kiinnitä näppäimistön pohja seinään mukana toimitetulla
ruuvilla ja propuilla. Aseta takakuori takaisin näppäimistöön.
Varmista, että suojakansi on painettu kiinni seinään, muuten
peukaloitisuoja laukaisee hälytyksen.
Lemmikki-immuunni liiketunnistin kameralla (IRC-P4)
(Mukana Q-Pro6600 -sarjassa)
Kun IRC-P4 havaitsee liikkeen hälytys-tilassa, se ottaa
automaattisesti kolme kuvaa, tallentaa ne pilveen, laukaisee
hälytyksen ja ilmoittaa käyttäjälle. Käyttäjä voi pyytää ja katsoa
valokuvia milloin tahansa App- tai Web-portaalin avulla. Laitteen
peukalointi-suojaus on laitteen sisällä/takana ja laukeaa jos laite
irroitetaan seinästä.
IRC-P4 on kiinnitettävä tai liimattava seinään ruuveilla tai teipillä.
Paras sijainti on nurkassa laajan liiketunnistuksen alueelle. Asenna
liiketunnistin 2 m maan/lattian pinnan yläpuolelle, jotta toiminta
olisi paras mahdollinen.
Irrota takakansi ja avaa reiät takakannesta (esimerkiksi ruuvitaltalla).
Laitteen takaosassa on kuusi knockoutia, jotka voidaan työntää
läpi. Jos asennat laitteen nurkkaan, työnnä sivulle rei’itettyjä reikiä;
jos kiinnität laitteen tasaiselle alustalle, työnnä lävistyksiä keskeltä.
Poraa reikiä seinään käyttäen takakantta mallina. Kiinnitä IRC-P4:n
takakansi seinälle toimitetuilla ruuveilla ja liittimillä. Aseta takakansi
takaisin IRC-P4: een.
Lemmikkieläinten immuunitoiminto sivuuttaa lemmikit jopa 25 kg
asti. Portaa tai lemmikin muu kiipeäminen voi kuitenkin aiheuttaa
hälytyksen.
1. Active LED (Blue/Orange)
2. Status LED (Blue/Red)
3. Fault LED (Orange)
5. Home Arm Switch
6. Status Key
7. Disarm Key
4. Away Arm Key
LED-Flash
PIR-Sensor
Lense of PIR-
Camera
Blue LED/Test-/
Learn-Button
HUOMIO: IRC-P4 siirtyy lepotilaankahdeksi
minuutiksi havaittuaan liikettä kun hälytys ei
ole kytkettynä. Testetessasi laitetta huomioi
tämä aika ja varmista ettei laite ole lepotilassa.
Fig.4
1
2
3
4
5
6
7
Fig.5
Suomi
Lisätietoja lisälaitteista sekä lisää ohjeita löytyy osoitteesta service.blaupunkt-security.com.
Q-Pro -sarjan tuotteissa on vaihtovat turvakoodit (laitteiden välillä). Tämä hankaloittaa vaitteen suojauksen
murtamista tai hämäämistä lisäten entisestään laiteen ja sinun turvallisuutta.
75
Page 76

7. Käyttö sovelluksen kautta
Secure4Home -sovellus on tarkoitettu laitteen käyttämiseen missä ja mistä tahansa. Lisätietoja
verkkosovelluksen käytöstä löytyy kohdasta 10 “Käyttö web-portaalin kautta”.
Suojausvalikossa voit
vaihtaa järjestelmän
toimintatilat,
tarkistaa järjestelmän
ohjauspaneelin tilan,
jos ovi on auki ja jos
lisävarusteissa on vika.
Jos GSM-moduuli on
asennettu paneeliin,
signaalin voimakkuus
näkyy oikeassa
yläkulmassa (ks. Luku
12).
Laitevalikossa on yleiskatsaus kaikista
lisävarusteista, tarkista onko niissä vikoja
ja ovatko ovikoskettimet auki tai kiinni.
Jos yksi tai useampi lisälaite näyttää
alhaista akkujännitettä, vaihda patteri
uuteen.
Jos näytössä näkyy muita
valvontatoimenpiteitä, noudata
vianmääritystä ongelman
ratkaisemiseksi.
Suomi
Automation-valikossa
voit käynnistää
manuaalisesti minkä
tahansa toimintosi,
hallita lisävarusteiden
ryhmiä sekä hallita ja
käyttää kaikkia Home
Automation -varusteita
erikseen ja aktivoida
tai poistaa nykyiset
säännöt.
Tapahtumavalikossa
saat yleiskuvan
aiemmista
tapahtumista. Voit
lähettää / välittää
tapahtumia tai soittaa
jollekin ilmoittaaksesi
hälytyksestä.
Kaikki tunkeutumisen
hälytykset näytetään
punaisena, kun
tekniset hälytykset
tai järjestelmän
muutokset näkyvät
keltaisina.
Kameravalikossa näet valinnaisen
videovalvonnan WiFi-kameran (IPC-S1)
ja valinnaisen PIR-kameran (IRC-P4 tai
IRC-S2).
IPC-S1 tarjoaa luotettavan HDlaadun videovalvonnan, jossa
on automaattinen hälytysten
videotallennus, live-streaming,
kaksisuuntaisen ääniviestintä ja
yönäkymän.
IRC-P4 tekee hälytyksen, kun havaitsee
liikkeen ja ottaa 3 värikuvaa, jotta
saadaan visuaalinen todentaminen /
näyttö.
Jos napsautat oikeassa yläkulmassa
olevaa asetuskuvaketta, voit muuttaa
henkilökohtaisia tietojasi, muuttaa
salasanasi, määrittää ilmoitukset,
määrittää App-käynnistyksen sivun,
ohittaa haluamasi lisävarusteet ja löytää
Blaupunktin yhteystiedot. Voit myös
kirjautua ulos.
76
Page 77

8. Toimintotilat
Disarm: Kytkee murtohälyttimet
käytöstä.
Arm Away: Kytkee
murkohälyttimet käyttöön.
Laite hälyttää heti havaitessaan
liikettä, oven avaamisen tai muun
signaalin. Mikäli sensorille on
asennettu sisääntuloviive hälyttää
laite viiveen jälkeen mikäli sitä ei
ennen ajan loppua ole kytketty
pois käytöstä.
Arm Home:
Tässä toiminnossa voidaan poistaa
osa tunnistimista käytöstä niin että
hälytin voi olla päällä myös kotona
ollessa. Esimerkiksi liiketunnistimet
voidaan kytkeä pois käytöstä.
Näin talossa voidaan liikku, mutta
ulko-oven tai ikkunan avaaminen
laukaisee hälytykset (mikäli
kyseisessä ovessa on tunnistin)
Kohta 1
Napsauta Toimintotilapainiketta, jonka haluat
aktivoida.
Kohta 2
Anna PIN-koodi
(oletuskoodi: 1234). Jos
koodi on oikea, tilan
muutos otetaan käyttöön
ja uusi valittu tila syttyy.
9. Uusien lisälaitteiden liittäminen/opettaminen
Kaikki uudet lisävarusteet, jotka eivät kuulu sarjan sisältöön, on lisättävä Q-ProHubiin seuraavilla tavoilla.
Voit lisätä enintään 50 lisävarustetta.
Jos haluat isätietoja kaikissa uusista lisälaitteista, sinun tulee mennä kotiportaaliin “eu.bphomeconnect.com“.
Kohta 1
Mene asetuksiin/Settings ja klikkaa
laite/Device.
Kohta 2
Klikkaa plus -painiketta yläkulmassa
päästäksesi lisäämään laitteet “Add Device”
Kohta 3
Katso kunkin lisälaitteen käyttöoppaasta, kuinka
“paritussignaali” lähetetään kustakin laitteesta.
Kun Q-ProHub vastaanottaa signaalin, se
lähettää kaksinkertaisen äänimerkin ja webrajapinta näyttää laitteen tiedot.
Kohta 4
Valitse/klikkaa ruksi laitteen laatikkoon ja paina
OK lisätäksesi laitteen Q-ProHub -laitteeseesi.
Kohta 5
Anna uuden lisävarusteen nimi ja muokkaa laitetta napsauttamalla tämän lisälaitteen oikealla puolella olevia 3 pistettä.
Suomi
77
Page 78

10. Käyttö Web-portaalin kautta
Mene osoitteeseen “eu.bphomeconnect.com“.
Katsaus Web Portaaliin:
Security Menussa voit vaihtaa
laitteiden tilaa sekä nähdä
laitteiden tilanteen. Lisäksi voit
pyytä laitteita ottamaan kuvia (jos
kyseessä on kamera).
Automation Menun toiminnoista
löytyy tietoa kohdasta 11.
Camera Menussa näet
reaaliaikaisen videokuvan,
jos sinulla on käytössä IPC-S1
Blaupunkt kamera.
Events Menussa näet raportoidun
tapahtumahistorian.
Settings Menussa voit muuttaa
Q-ProHubin asetuksia.
Asetukset Web Portaalin kautta:
Muuttaakseni käyttäjätilin asetuksia valitse tilisi oikeasta yläkulmasta ja
valitse “Account”.
Tässä valikossa voit muuttaa tilisi asetuksia, portaalin kielen tai luoda uusia
Suomi
käyttäjiä. Tallentaaksesi asetukset paina kuvaketta:
Toissijaiset käyttäjätilit on sidottu päätilille. Käyttäjän ja salasanan toissijaiset
tilit ovat vain kotisivuille ja sovellukseen kirjautumista varten. PIN-koodi
hälyttimen kytkemiseksi ja pois kytkemiseksi on sidottu Q-ProHubiin ja pysyy
samana.
HUOMIO: Vain yksi käyttäjä samalla
käyttäjänimellä voi kerrallaan olla
kirjautuneena portaaliin.
identical user name.
Ilmoitusasetusten muuttamiseksi napsauta tilin
nimeä (oikeassa yläkulmassa) ja valitse“Notification”.
Ilmoitusvalikossa voit muuttaa ilmoitusasetuksia:
Push: Aseta älypuhelimen push-asetukset.
Secure4Home -sovellus on asennettava ja
kirjauduttava vastaanottaaksesi push-ilmoituksia
älypuhelimeesi.
E-mail: Kotiportaalin palvelin lähettää
sähköpostiviestin määritettyyn sähköpostitiliin.
Voice Message: Blaupunkt-hälytyskeskus soittaa
sinulle automaattisesti hälytyksen sattuessa. Vain
premium-käyttäjille, lisätietoja Premium-palveluista
on luvussa 12 Premium Service.
HUOMIO: Varmista, että älypuhelimen äänenvoimakkuus puheluille ja
Push-viestelle on riittävä.
78
Page 79

11. Kotiautomaatio
Jos haluat tehdä muutoksia kotiautomaatioasetuksiin, sinun on mentävä kotiportaaliin:
“eu.bphomeconnect.com“.
Device - Voit hallita ja käyttää
erikseen kaikkia Home Automation -varusteita.
Room - Määritä kaikki lisävarusteet kyseiseen
huoneeseen hallinnan helpottamiseksi.
Group - Voit lisätä saman tyyppisiä lisävarusteita
ryhmään, jotta voit hallita kaikkia lisävarusteita
yhdellä komennolla.
Scenario - Luo toimintoketjuja määrittääksesi
esiasetettuja toimia kotiteatteriyksiköille. Toiminnot
voidaan laukaista toimintokytkimen (SSW-S1)
tai matkapuhelimen kautta. Suurin mahdollinen
määtä toimintoja per toimintoketju on 5.
Rule - Luo sääntöjä joilla kotiautomaatio aloittaa
automaattisesti toimintoja tunnistimien havantojen
perusteella.
Sääntöjen luominen:
Kohta 1: Mene kohtaan Automation - Rule ja paina +
Kohta 2: Anna säännölle nimi esimerkiksi “Automaattisesti päälle”.
Kohta 3: Valitse mikä käynnistää säännön. (esimerkiksi aikataulu
“Schedule” -->joka viikko “Every Week“ ) ja kellosta ajat.
Kohta 4: Voit lisätä lisämääritteitä säännölle. Enintään kaksi per
sääntö.
Kohta 5: Valitse minkä toiminnon sääntö käynnistää. Esimerkiksi
Laitetoiminta/Device action --> Virtakytkin/Power swich ( PSM-S1)
käälle/ON.
Kohta 6: Mikäli haluat lisätä toimintoja paina + oikealla
(maksimissaan 5 toimintoa).
Kohta 7: Paina Lähetä/ “Submit” tallentaaksesi muutokset.
Suomi
Suositeltuja sääntöjä Trigger
Laukaisija
Hälytyksen sattuessa laita valot päälle,
ava kaihtimet ja aloita videotallennus.
(Vaatii lisälaitteita)
Jos avaat kotioven19.00-07.00 valot
menevät päälle 20 sekunniksi. (Vaatii
lisälaitteita tai esimerkiksi HUE-valot.
Talo esittää että joku on kotona vaikka
olisit lomilla.
Joka päivä kaitimet kiinni ja valot päälle
määrättyyn aikaan määrätyksi ajaksi.
Joka päivä hälytin pois päältä 06.00 ja
kaihtimet auki. ( Vaatii lisälaitteita)
Aina kun hälytin kytketään päälle
sammutetaan valot ja lämmitys säätyy
18-asteeseen. (Vaatii lisälaitteita)
Joka päivä kello 23:00 laita hälytin
koti-hälytys-tilaan, sammuta valot ja
säädä lämmitys 18-asteeseen. (Vaatii
lisälaitteita)
Trigger alarm
Alarm --> Any
alarm
Door Contact
Open
Schedule --> Daily
20:00
Schedule -->
Daily 6:00
Mode Change
--> Arm
Schedule --> Daily
23:00
Condition
Ehto
None "Device Action --> Power Switch PSM-S1 or PRM2-S1 --> ON
Time Period -->
Daily --> From
19:00 to 7:00
None "Device Action --> Power Switch PSM-S1 or PRM-S1 --> ON for 30min
None "Mode Change --> Disarm
None "Device Action --> Power Switch PSM-S1 or PRM-S1 --> OFF
None "Mode Change --> Home Arm
Device Action --> Roller Shutter SCM-S1 Open 100%
Request Video --> IPC-S1"
Device Action --> Power Switch PSM-S1 or PRM2-S1 --> ON for 20s
Device Action --> Roller Shutter SCM-S1 Close"
Device Action --> Roller Shutter SCM-S1 Open 100%"
Device Action --> Thermostat TRV-S1 or TMST-S1 --> Turn down to 18ºC
Device Action --> Roller Shutter SCM-S1 Close"
Device Action --> Power Switch PSM-S1 or PRM-S1 --> OFF
Device Action --> Roller Shutter SCM-S1 Close
Device Action --> Thermostat TRV-S1 or TMST-S1 --> Turn Down to 18ºC"
Action
Toiminto
79
Page 80

12. Turvasuosituksia
1| Hybridiviestintämenetelmä:
Voit hankkia ja liittää Blaupunkt DG2-Pro- tai DG4-pro-GSM-moduulit Q-ProHubin takana olevaan USB-liittimeen. Tämä takaa
yhteyden vaikka muu verkkoyhteys ei toimisi tai olisi katkaistu mahdollisen tunkeutujan toimesta.
DG2-pro toimii 2G-verkossa ja tarjoaa varmuuden hälytysten ilmoittamiselle ja tavallisen App-yleiskatsauksen. Suosittelemme
käyttämään tätä vaihtoehtoa alueilla, joilla ei ole 4G-tiedonsiirtoa.
DG4-Pro toimii 4G-nopealla verkolla ja sitä voidaan käyttää varmuusvaihtoehtona hälytysilmoituksille ja normaaliin
App-hallintaan. Varmista, että 4G-verkko on saatavilla kyseisellä alueella. Emme suosittele DG4-Pro:n käyttöa ainoana
viestintämenetelmänä, vaan sen on tarkoitus olla vain varmuusvaihtoehto.
GSM-moduulit tarvitsevat SIM-kortin tietoliikenneyhteydellä. (SIM-kortti ei sisälly hintaan)
2| Q-ProHub sireenin mykistäminen:
Hankaloittaaksesi laitteen löytymistä voit mykistää hälyttimen sireenin ja asentaa lisävarusteena myytävän sisä- tai
ulkosireenin (tai molemmat).
Seuraavilla sireeneillä lisäät turvallisuutta ja hankaloitat itse hälytinlaitteen löytämistä: Sisäsireeni virtalähteellä SRAC-S1,
sisäsireeni paristolla SR-S1 tai ulkosireeni paristolla BX-S1.
Mykistääkseni laitteen sireenin mene sovelluksessa asetuksiin --> allapääkäyttökoodi --> Panel --> Internal Siren --> OFF.
3| Premium service -palvelu:
Blaupunkt Premium -palvelun avulla turvajärjestelmäsi otetaan käyttöön innovatiivisella ominaisuusryhmällä:
Premium-puhelut ilmoittaa hälytyksistä jopa kolmeen eri puhelinnumeroon. Tämä toimii Push-viestien- ja sähköpostipalvelun
Suomi
lisäksi. Premium-palvelu tarjoaa lisäksi pilvi-tallennustilaa yli 50 tapahtumavideolle (IPC-S1-kamera), 30 kuvalle PIRvalokuvakamerasta (IRC-P4 ja IRC-S2) ja 90 päivän tapahtumalogin.
Lisäksi 12 kuukauden Premium Service Plan -tuotteen takuuaikaa jatketaan yhden lisävuoden ajan.
Lisätietoja Premium-palvelusta on osoitteessa premium.blaupunkt-security.com
4| Laitteen ohjelmistopäivitykset:
Q-ProHub sisältää automaattisen FW-päivityspalvelun. (Päivittäinen FW-päivityspalvelu on päivitettynä.). Jos olet ostanut
uuden Q-sarjan tuotteen, odota vähintään yksi työpäivä, jotta kaikki tarvittavat päivitykset ovat valmiina. Jos laite päivittyy, älä
poista sitä, koska se voi vahingoittaa turvajärjestelmää.
13. Tuki
80
Listietoja tuotteesta sekä lisäohjeita:
security.blaupunkt-service.com
Blaupunkt Competence Center Security & Care
www.blaupunkt.com
Security Brand Pro GmbH
Mondstrasse 2-4
85622 Feldkirchen-München, Germany
© Technical changes and errors excepted
 Loading...