

Page 1

Manual
Q-Serie:
Smart Home Alarm
Enjoy it.
IP-Alarm System
Smart Home Alarm
Installation and operation of the Blaupunkt Q-Series
Blaupunkt Competence Center Security
Page 2

Table of Contents
1. Introduction and registration 4
1.1 Preparation 4
1.2 Registration 4
1.3 Handling error massages during registration 5
1.4 Conrmation of registration and log-in 5
2. Extension of the security system 6
3. Assembly and planning of the security system 7
3.1 Kit Content Installation 7
3.2 General instructions for installation 9
3.3 Before mounting: walk test 9
3.4 Tamper protection 9
3.5 Positioning of the individual elements 9
3.6 Mounting Devices 10
4. Operation of the Internet portal 12
4.1 Security 12
4.1.1 Sensors 12
4.1.2 System Modes 13
4.1.3 IP cameras 13
4.2 Automation 14
4.2.1 Device 14
4.2.2 Group 15
4.2.3 Scene 16
4.2.3.1 Create a scenario 17
4.2.3.2 Examples of scenarios 18
4.2.3.3 Delete a Scene 20
4.2.4 Rule 21
4.2.4.1 Create a Rule 21
4.2.4.2 Edit a rule 23
4.2.4.3 Delete a Rule 24
4.2.4.4 Examples of rules 25
4.3 Live-Video 26
4.4 Event 26
4.5 Settings 27
4.6 Device Settings 27
4.6.1 Setting the devices 27
4.6.2 Walk-Test 29
4.6.3 Update device list 30
4.6.4 Remove device 30
4.6.5 Add device 30
4.7 Panel Setting 31
4.7.1 General Settings 31
4.7.2 Away and Home Arm Settings 32
4.7.3 Panel Settings 32
4.7.4 Master Code Setting 33
4.7.5 Sirene Setting 33
4.7.6 PIN Code Setting 34
4.7.7 Time Setting 34
4.8 Report Setting 35
4.9 Account 38
4.9.10 Service and Payment 42
Page 3

5. Operation of the mobile app Secure4Home 43
5.1 Log In 43
5.2 Security 44
5.3 Device 44
5.4 Home Automation 45
5.5 Cam 47
5.6 Event 48
5.7 Account 49
6. Troubleshooting and Reset to default settings 51
6.1 Q-Hub 51
6.2 Motion detector 52
6.3 Door/ Window Sensor 53
6.4 Reset/ Reboot 53
7. Specications 54
8. Declaration of conformity 55
NOTE:
Information and illustrations are subject to chage within the document. Blaupunkt reserves the right to alter the
specification and product design at any time without notice.
Support:
For more information on panel and devices, please visit: www.blaupunkt.com/service
Firmware Upgade Service:
The Q-Hub includes a free FW upgrade service. (There is a daily FW upgrade service which keeps your device up-to date.). If
you bought a new Q-Series product you should wait at least one working day so all the necessary updates are ready. If the
device is updating please don’t turn it off since it could harm the system.
Page 4

4
Blaupunkt Competence Center Home Security
1. Introduction and registration
These instruction is intended to help you with the installation and operation of your Blaupunkt Q Series
Smart Home Alarm System. You can download the Secure4Home app for free from the Apple Store or
Google Play.
IMPORTANT:
Be sure to read the quick start guide that comes with the kit. It contains important information and helps to get the system
up and running quickly.
NOTE:
The system has to be connected to Ethernet and
electricity at all times. Any problem with the router
and the connection to the network and power may
disturb the operation of the system.
1.1 Preparation
Place in a suitable location (close to your Internet router
and electricity outlet, hidden from potential intruders).
To open the Webportal visit https://eu.bphomeconnect.
com from your browser and click “New User”. Avoid using
Microsoft IE Explorer/ Edge.
Step 1:
Connect the Q Hub to
the Internet router with
the included Ethernet
cable. Position the Q
Hub at least 1 Meter
away from the router.
Step 2:
Connect Q Hub to
an electricity outlet
with the included AC
Adapter. Flip the power
switch to ON.
Step 3:
Wait until the Power
LED lights up.
1.2 Registration
For Registration, please continue following the instructions on screen
and enter the required information. You will then be asked to enter
the MAC address of your Q3000/Q3200 system, which you will find
on the back of the panel. Please enter the last 6 digits of the MAC
address.
NOTE:
As soon as the Q-Hub is connected and switched on, the server gives you 15 minutes in order to complete the registration. If the registration is not completed within 15 minutes, please remove the AC Adapter and move the switch to
the OFF position. Then restart by reinserting the AC Adapter and switching to ON. You now have 15 more minutes to
complete the registration.
Page 5

5
Blaupunkt Competence Center Home Security
1.3 Handling error massages during registration
1.4 Conrmation of registration and log-in
If you receive an error message during or after registration, it may be due to one of the following reasons:
Server connection error: The Q-Hub can´t connect to the Home Portal Server. The Q-Hub is either
switched o or there are problems with the internet connection. Please check the power supply and network status.
• If the Q-Hub is detected as a malware or virus, please check your firewall settings. Port TCP 5222 must be
open and added to the firewall exception list.
• Check the setting of the MAC address filter. The MAC address of your Q-Hub must be enabled in your
router.
• If you are using a dial-up Internet connection, your router must support the ADSL PPPoE function.
Registration time expired: As soon as the Q-Hub is connected and switched on, the server gives you 15
minutes in order to complete the registration. If the registration is not completed within 15 minutes, please
remove the AC Adapter and move the switch to the OFF position. Then restart by reinserting the AC Adapter and switching to ON. You now have 15 more minutes to complete the registration.
Error with MAC address: Each MAC address can only be registered once. Otherwise, an error message will
be displayed. If you are the owner of the Q-Hub and have not previously registered this Q-Hub, please contact
Blaupunkt Support.
NOTE:
The Internet portal works best using the Firefox browser. Using LTE routers and powerline adapters can cause problems.
Once the registration process is complete the server will send a confirmation e-mail to your registered e-mail
address. Follow the link on the e-mail and log in to the server. To do this, enter the registered username and the
registered password. Registration is now complete. If you do not receive a confirmation e-mail, please check
your spam folder.
Page 6

6
Blaupunkt Competence Center Home Security
2. Extension of the security system
You can improve the performance of your alarm system by adding additional sensors or detectors (see
gure bellow ).
These include further motion detectors or door / window sensors to enlarge the protected area. Remote controls are also helpful for convenient operation. Hazard detectors, such as smoke detectors, increase your protection against fire, gas and water hazards. For a better security, an extra indoor or outdoor siren would allow you
to mute and hide the alarm panel siren making it impossible to find your security system. With a temperature
sensor, you can comfortably measure and regulate the temperatures in your rooms. Additional wireless intermediate plugs (PSM-S1) enable modern smart home functionality, e.g. the regulation of the electric and heating
systems.
Informations about more sensors and detectors can be found at www.blaupunkt.com
Door Contact
(White/Brown) DC-S1
Motion Detector
IR-S1 / IRP-S1*
Glassbreak Sensor
SVGS-S2
Key Pad KP-R1/
KPT-R1 with Tags
PIR-Sensor with
Camera IRC-S2
IP System
Camera IPC-S1
Outdoor Siren
BX-S1
Indoor Power-Plug
Siren SRAC-S1
Smoke Detector
SD-S1
Carbon Monoxide
Detector CO-S2
Heat Detector
HD-S1
Water Sensor
WS-S1
Radiator Thermostat
TRV-S1
Smart System
Thermostat TMST-S1
5in1 Multi Detector
MD-S1
Smart Power Meter
Switch PSM-S1
Power Meter Relay
Switch PRM2-S1
Roller Shutter
Relay SCM-S1
Security
Hazard
Alert
Smart Home
Page 7
7
Blaupunkt Competence Center Home Security
3. Assembly and planning of the security system
IMPORTANT:
Before you install the devices, you should first register the system in the Blaupunkt Home Portal at
https://eu.bphomeconnect.com/.
3.1 Kit Content Installation
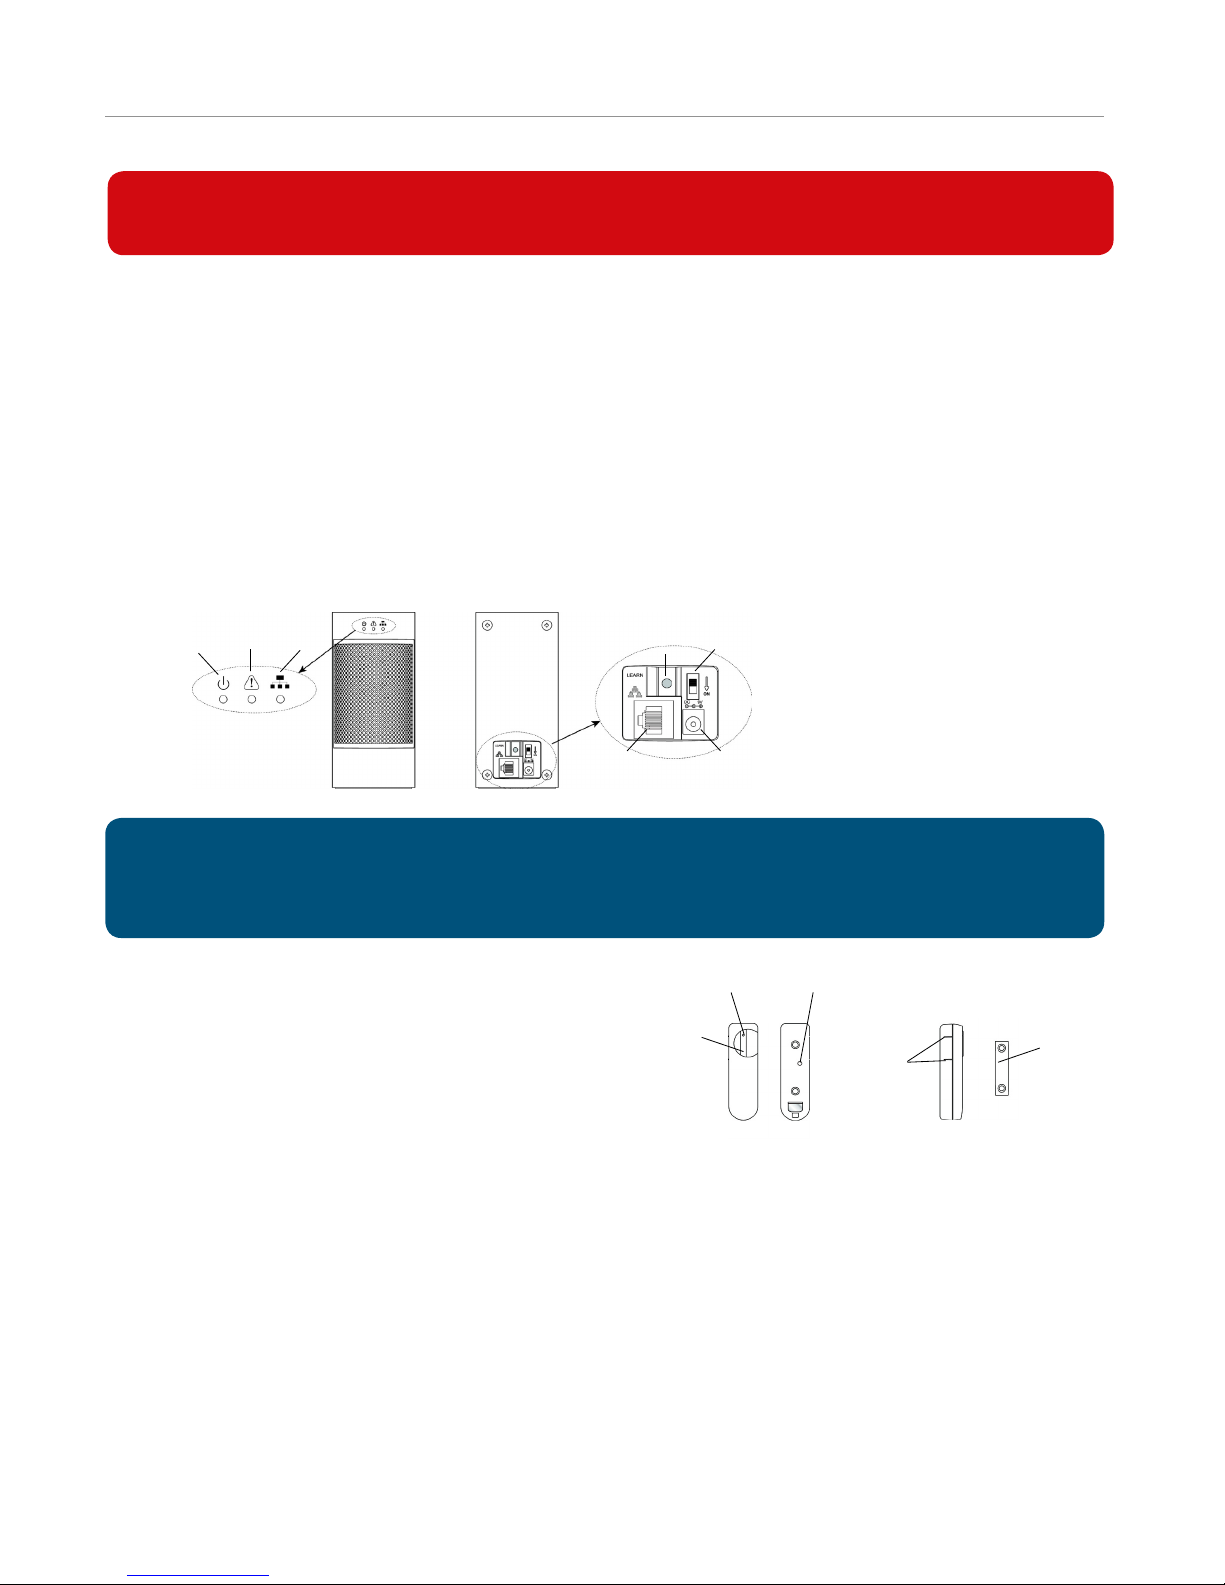
Panel
System mode-LED (Green/Red):
Green ON – Disarm Mode
Green flashes – Learning Mode
Red ON – Arm Away Mode
Red flashes – Home Arm Mode
OFF – Walk Test
Status-LED (Amber /Red):
Amber ON – System Error
Amber flashes – Power Outage
Red flashes – System Alarm
Red ON – Alarm Memory
OFF – Normal Operation
Network-LED (Amber):
Amber ON – Network Error
OFF – Normal Operation
Learn/Reset-Button:
Used for learning new devices
or resetting panel to default settings.
NOTE: Please conduct a Walk Test while holding the devices at the planned location previous to installing your devices (chapter
4.6.2. Walk Test).All of the devices included in the Q3000/ Q3200 Starter Kit are already pre-linked to the Q Hub and do not need
to be learned manually.
Door Contact (Q3000 Kit/Q3200 Kit)
(DC-S1) (Fig.1)
The door / window sensors (DC-S1) guarantee optimal
control of possible access to your home. This ensures
that thieves do not go unnoticed in the house.
The sensor sends an alert when the door or window is
opened triggering an alarm. Additionally the built-in
tamper protects the sensor from any unauthorized
removal, sabotage or unsteady installation.
It features a 4 years long battery life to reduce
maintenance costs and hassles. Additionally, it has low
battery detection to inform when the battery is nearly
to be depleted.
The LED serves as a fault and test mode indicator.
The Magnet has to be placed next to the Sensor
marker! Max 15mm
Fig.1
LED-Display
Test-/LearnButton
Tamper protection
Sensor
marker
Magnet
Mode
LED
Status
LED
Network
LED
Learn/Reset
Button
Battery
Switch
DC Jack
Ethernet
Port
Page 8

8
Blaupunkt Competence Center Home Security
Motion Detector (Q3000 Kit)
(IR-S1L)(Fig. 2)
The Motion Detector (IR S1L) detects moving heat
masses in its detection field with a great reliability
against false alarms. Ensures the detection in large
spaces with reliability thanks to the wide detection
range of up to 12 meters in length and its “vision” of
110 °.
The infrared sensor triggers an alarm when an intruder
is detected. Additionally the built-in tamper protects
the sensor from any unauthorized removal, sabotage
or unsteady installation.
Features a 5 years long battery life to reduce
maintenance costs and hassles. Additionally it has low
battery detection to inform when the battery is nearly
to be depleted.
The LED serves as a fault and test mode indicator.
LED/Walk Test/
Learn Button
PIR-Sensor
Fig.2
NOTE: The IR-S1L has a 1min sleep mode when the
alarm is deactivated. Please wait more than 2 minutes
without detecting anyone to be sure the device its out of
sleep mode before testing.
Motion Detector with camera (Q3200 Kit)
(IRC-S2) (Fig. 3)
The Motion Detector with camera (IRC-S2) detects
moving heat masses in its detection field with a great
reliability against false alarms. Ensures the detection
in large spaces with reliability thanks to the wide
detection range of up to 12 meters in length and its
“vision” of 110 °.
The infrared sensor triggers an alarm when an intruder
is detected, takes 3 pictures and sends them to the
user. You can also request a picture at any time using
the App or the Web Portal. Additionally the built-in
tamper protects the sensor from any unauthorized
removal, sabotage or unsteady installation.
NOTE: The IRC-S2 has a 2min sleep mode when the
alarm is deactivated. Please wait more than 2 minutes
without detecting anyone to be sure the device its out
of sleep mode before testing.
NOTE: The Q-Series is compatible with rolling
code. A new feature to encrypt and make the
system even more secure.
Blue LED/Test-/Learn-Button
LED-Flash
PIR-Sensor
Lense of PIR-
Camera
Fig.3
Fig.4
LED-Display
Arm Away-Button Arm Home-Button
Emergency-
Button
Disarm-Button
Battery Cover
Remote-Control (Q3200 KIT) (RC-R3B) (Fig.4)
With the RC-R3B you can operate your Blaupunkt
security system comfortably. By pressing the buttons,
it’s possible to change the system arm mode and
trigger an emergency alarm.
For a increased security the RC-R3B has encrypted
rolling code feature.
It features a 2 years battery life to reduce maintenance
costs and hassles. Additionally it has low battery
detection to inform when the battery is nearly to be
depleted. The LED serves as a fault and test mode
indicator.
Page 9

9
Blaupunkt Competence Center Home Security
3.2 General instructions for installation
Do not mount the Q-Hub and sensors near larger metal or electrical interference sources such as a refrigerator
or microwave oven, as these may affect signal strength. Also, the building material used plays a major role, the
signal strength is significantly lower in a wall of bricks than a wooden wall. Devices equipped with a sabotage
contact must be mounted on a flat surface so that the sabotage contact is completely pressed in when mounting.
3.3 Before mounting: walk test
All sensors, detectors and accessories communicate with the Q-Hub via RF or ZigBee. This saves you the trouble of connecting the devices to the control panel via cable. All sensors of the Q-Hub have a wireless range of
approx. 30 m in a typical domestic environment. Before you mount the devices firmly, test the radio signal of the
device at the installation site. How to carry out the walk test can be found in chapter 4.6.2.
3.4 Tamper protection
Sensors that protect you from intruders, such as motion detectors and door / window sensors, are protected
against unauthorized manipulation by a sabotage contact. This sabotage contact is triggered when the device
is removed from its mounting location or the cover is forcibly opened. When the sabotage contact is triggered,
the sensor sends a signal to the Q-Hub. The user then knows that the sensor has either not been properly
mounted or manipulated. For the sabotage contact to function properly, it must be fully pressed after
attaching the sensor.
DC 9V
ON
LEARN
Wireless Door / Window Sensor
• Mount the main body of the
detector on the door/window
frame, and the magnet on the door/
window. Installation point should
be as high as possible.
• For optimal performance do not
mount on metallic surface
• Do not point a motion detector
directly at a door or window
contact.
Q-Hub
• The Q-Hub should be set up so
that it is not visible from the outside.
• It must be connected to your
router via Ethernet.
Motion Detector
• For optimal performance intall
the PIR at 1.9-2m height. When
mounted at a height of 2 m, the
motion detector has a range of 12
m.
• The motion detector is most
effective when the burglar moves
across the field of view. Therefore,
it should not be placed so that
it points directly to a potential
burglar.
• Do not expose the motion
detector to direct sunlight, this
may affect detection sensitivity.
•Avoid mounting PIR near large
metal objects
• Do not point the PIR sensor
at window, or heat sources
directly, such as stove, boilers
or radiators.
3.5 Positioning of the individual elements
Page 10

10
Blaupunkt Competence Center Home Security
3.6 Mounting Devices
Mounting the Motion Detector (Q3000 Kit) (IR-S1L)
The IR-S1L is fixed to the wall with screws or double adhesive tape. The best location is on a corner. The IR-S1L
has a total of six mounting knock-outs where the plastic is thinner. The 2 central knock-outs are for flat wall
mounting, and the four side knock-outs are for corner mounting. For optimal performance intall the PIR at 1.92m height.
1.Remove the IR-S1L back cover and locate the mounting knock-outs.
2.Break through the knock-outs and use the knock-outs to mark the position on the wall or corner.
3.Drill holes into the wall or corner using the knock-outs as template.
4.Fix the IR-S1L back cover onto the wall with the screws and plugs provided.
5.Place the IR-S1L again onto the back cover. Make sure that the tamper protection is pushed down, other-
wise the tamper will be triggered.
Corner Fixing
Knock-outs x4
Surface Fixing
Knock-outs x 2
(Inside)
Mounting the Door Contact (Q3000 Kit/Q3200 Kit) (DC-S1)
The DC-S1 is fixed to the door or window frame with screws or double adhesive tape. The DC-S1 has two
knock-outs on the inside of the back cover where plastic is thinner.
The DC-S1 should be mounted on the door/window frame, while the magnet should be mounted on the door/
window as shown in the picture below. The gap between the Door Contact and the magnet should be no more
than 15 mm.
1.Remove the DC-S1 back cover and locate the mounting knock-outs.
2.Break through the knock-outs and use the knock-outs to mark the position on the door/window frame.
3.Drill holes into the door/window frame using the knock-outs as template.
4.Fix the DC-S1 back cover onto the door/window frame with the screws and plugs provided.
5.Place the DC-S1 cover again onto the base. Make sure that the tamper protection is pushed down, other-
wise the tamper will be triggered.
6.Repeat the same process for the magnet. The magnet should be installed adjacently at the sensor marker.
Page 11

11
Blaupunkt Competence Center Home Security
Mounting the motion detector with camera (Q3200 Kit)(IRC-S2)
The IRC-S2 is fixed to the wall with screws or double adhesive tape. The best location is on a corner. The motion
detector has a total of six mounting knock-outs where the plastic is thinner. The 2 central knock-outs are for
flat wall mounting, and the four side knock-outs are for corner mounting. For optimal performance install the
motion detector at 1.9-2m height.
1. Remove the IRC-S2 back cover and locate the mounting knock-outs.
2. Break through the knock-outs and use the knock-outs to mark the position on the wall or corner.
3. Drill holes into the wall or corner using the knock-outs as template.
4. Fix the IRC-S2 back cover onto the wall with the screws and plugs provided.
5. Place the IRC-S2 again onto the back cover. Make sure that the tamper protection is pushed down, otherwise
the tamper will be triggered.
Corner Fixing
Knock-outs x4
Surface Fixing
Knock-outs x 2
Door/Window
Frame
Alternatively, you can also use the double side adhesive tape provided to fix the DC-S1 the frame.
Page 12
12
Blaupunkt Competence Center Home Security
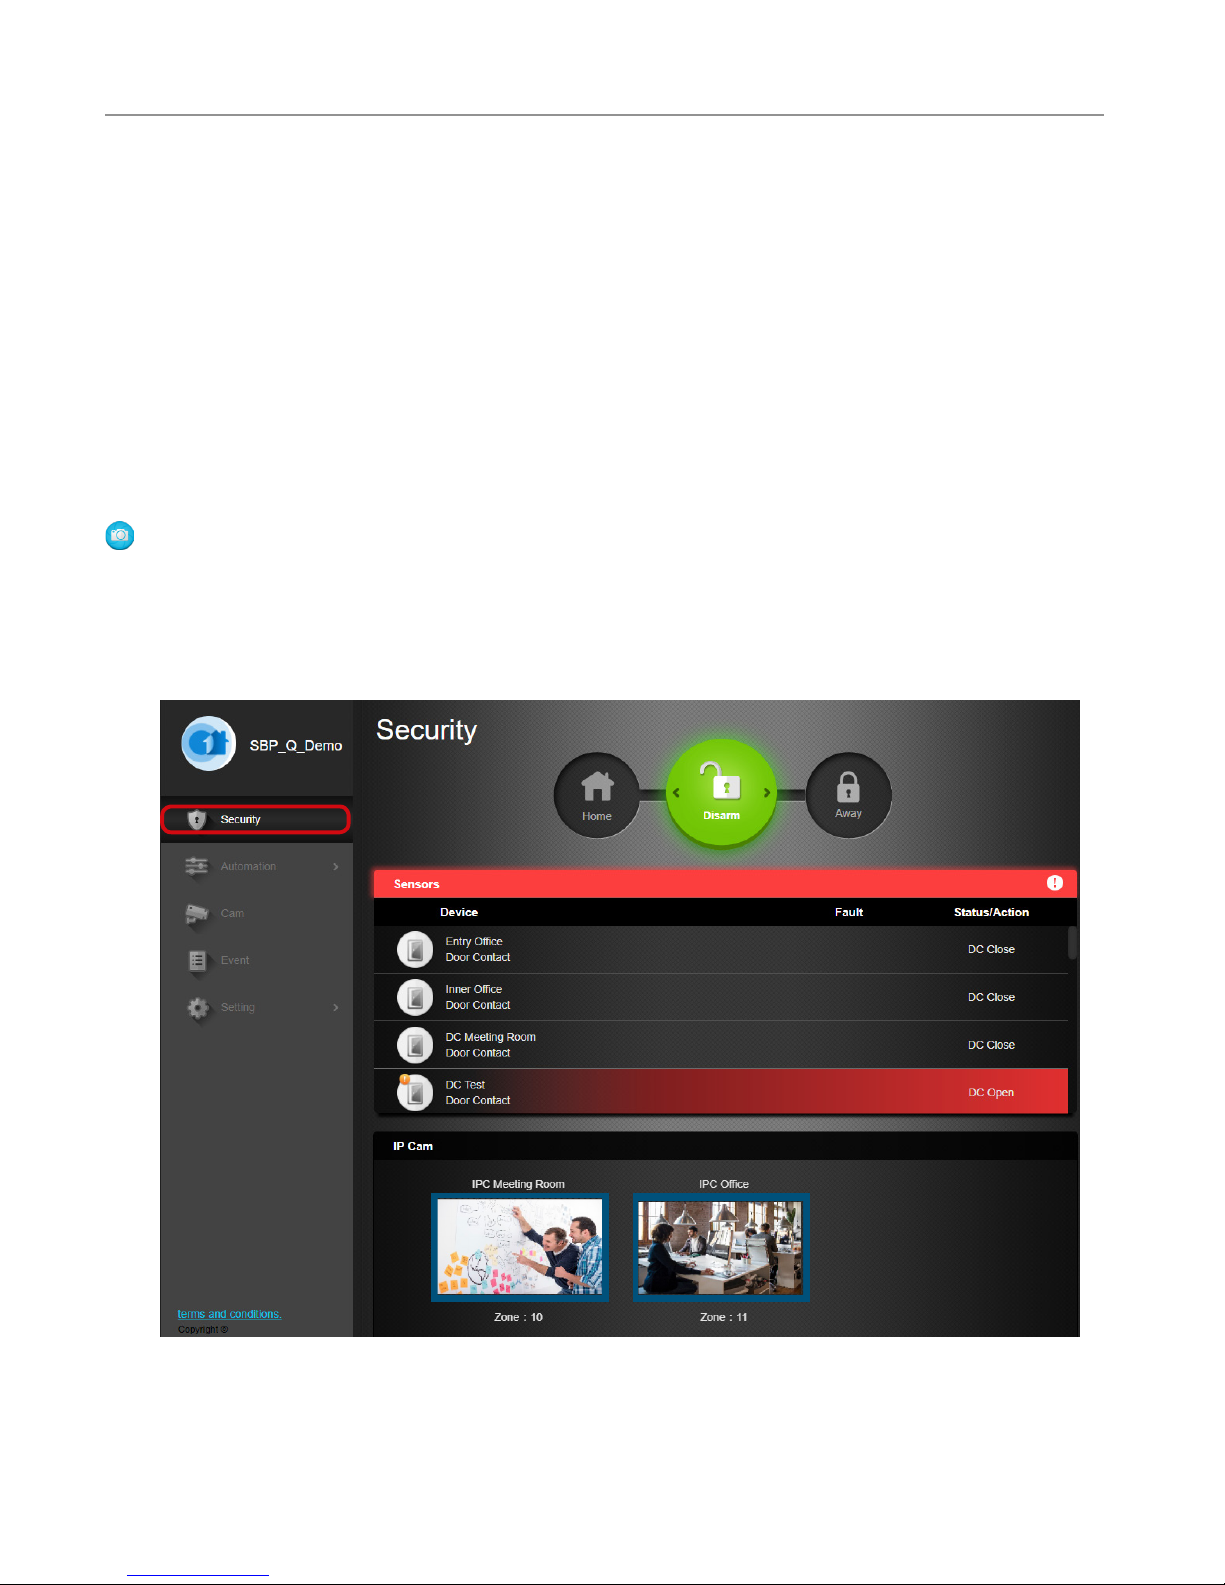
4. Operation of the Internet portal
4.1 Security
4.1.1 Sensors
The Registration and user interface of the Internet portal (https://eu.bphomeconnect.com/) has been
already described in the Q3000/3200 Quick Start Guide. The Internet portal includes all functions possible
with the Q-Series, including registration, user administration, conguration of scenarios and rules, device
settings and operation of the Q-Hub. This guide will explain you through each area step by step.
The sensors list contains all devices that assume a safety function in the Q-Hub, except the home automation
devices. If there is any failure on a device, the device will be marked with a red line and the error status is
displayed. Additionally, here it is possible to manually take a picture with the PIR camera by clicking on the
button.
Page 13

13
Blaupunkt Competence Center Home Security
Step 1: Step 2: Step 3:
4.1.2 System Modes
4.1.3 IP cameras
The IP Camera List displays the IP cameras learned in the alarm panel. Click on the IP camera image to get to the
IP Camera page and see the video live stream.
Disarm:
The Disarm Mode deactivates all
burglary sensors.
Arm Away:
The Arm Away Mode activates
all sensors. An alarm is triggered
as soon as a sensor is activated.
If a sensor has been assigned
the attribute Entry, an EntryCountdown is triggered. The user
has time to deactivate the system
and no alarm will be triggered.
Arm Home:
Sensors that have been assigned
the Arm Home attribute, cannot
be activated if the system is
switched into the Arm Home
Mode. Usually motion detectors
in the interior are assigned this
attribute, so that you can move
freely inside your home while the
doors and windows are protected.
Click the System Mode Button that
you would like to activate. You
are now asked to enter the user
PIN-Code in order to confirm the
System Mode change.
Enter the PIN Code (default code:
1234). If the code is correct the
Mode change will be applied (Exit
Countdown will start depending
on your settings).
If Arming/Disarming has been
successful, the Home/Away
Button will light up.
Page 14
14
Blaupunkt Competence Center Home Security
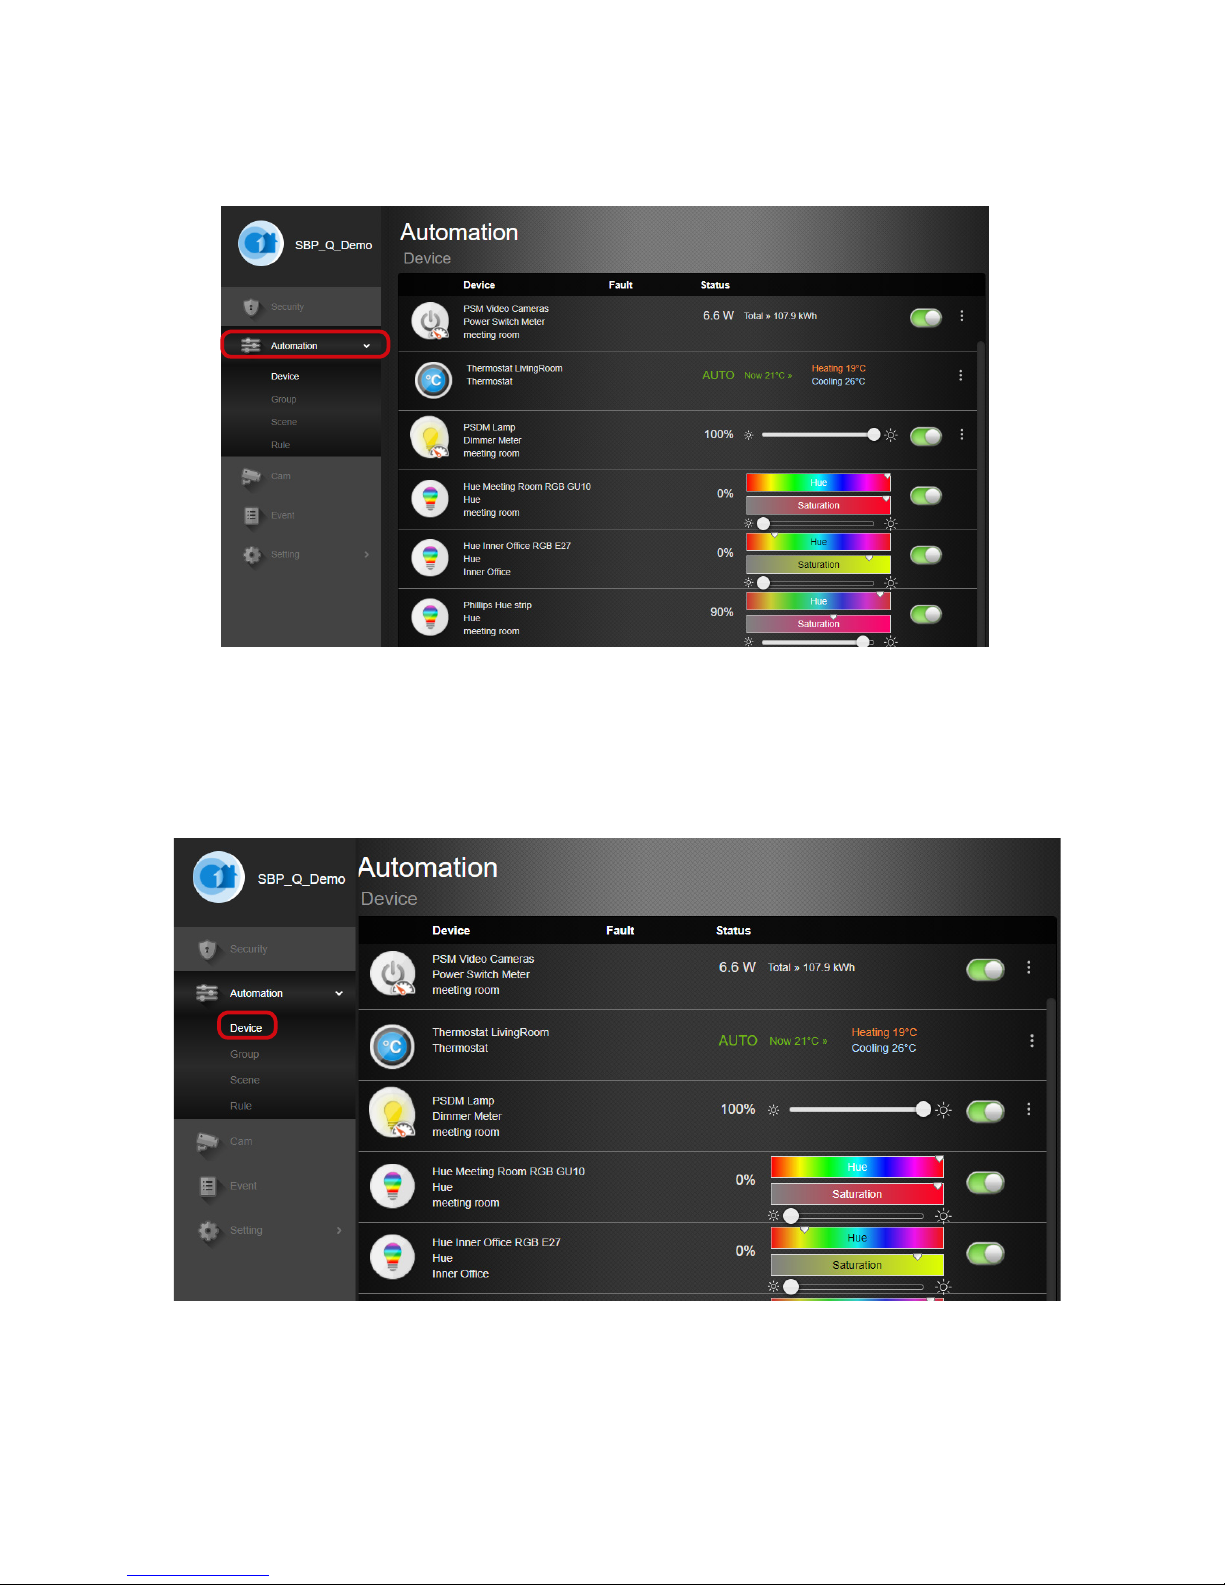
4.2 Automation
The Automation page provides access to the home automation features of the alarm system.
4.2.1 Device
All home automation accessories are displayed on this page. Here you can have an overview, manage and use
each of them individually.
Page 15

15
Blaupunkt Competence Center Home Security
4.2.2 Group
In the group menu you can assign several devices to a group. For example, you can map the devices in a room
to a specific group, easily monitoring the status of all devices in a room.
• To manage and use the Home Automation accessories:
»Accessories as PSM-S1, PRM2-S1 or Phillips HUE indicate whether they are switched on or off.
Click the ON / OFF button to turn on or off manually.
»In addition for accessories with power meter ( as PSM-S1), the current wattage and the current
consumption will be displayed. Click on the icon , to track the progress graph of energy usage
» To manage and control the temperature in accessories as Smart System Thermostat TMST-S1 click
the button to open the management interface.
Page 16

16
Blaupunkt Competence Center Home Security
• To add a Group press
• Under Name, enter the name of the group.
• Check the box in front of the device you want to associate with this group.
• You can upload a suitable group picture under picture upload to replace the
standard picture. Click on the symbol , select a suitable image file on your
computer to upload the image.
• When the process is complete, click OK.
• You can create more groups by clicking on the icon in the top right corner.
• An accessory can be linked only to a group at a time.
4.2.3 Scene
Use the Scene menu to configure your home automation scenarios. A scenario involves a series of actions that
can be triggered manually from the app / portal or triggered automatically by linking them to other sensors.
Refer to point 4.2.3.2 for some examples.
You add up to 3 actions per scene and a maximum amount of 10 scenes.
Page 17

17
Blaupunkt Competence Center Home Security
4.2.3.1 Create a scenario
Step 1
Here you can create a scenario by clicking on the - Click symbol.
Step 2
Enter a name for the scenario.
Step 3
Choose an icon for the scenario that you can easily recognize.
Step 4
For Action Type, select which action should be taken(e.g. Device action or Mode Change).
Optional: To add more than 1 action to a scene click the + icon at the right to add a new action for the current
scene. (up to 3 actions per scene).
Step 5
Click Submit to confirm the scenario setting. The new scenario will now be displayed in the list.
Whenever you want to trigger a scene manually click Apply to trigger the desired scene manually.
This is also possible via the app. For more information, refer to “Secure4Home App”.
Page 18

18
Blaupunkt Competence Center Home Security
4.2.3.2 Examples of scenarios
Using three different examples, you will be shown how to configure scenarios in detail.
Example 1
Set up to take a picture of the entrance when a door contact is opened. That means that with each door opening from the door contact, a photo will be taken with the photo motion detector (IRC-S2).
Step 1:
Go to the Scene Menu (follow the steps in chapter “4.2.3.1 Creating a Scenario”) , select the parameters
as follows: On “Action Type” select “Request Image”, then select the IRC-S2 (PIR-Camera) and press “Submit”.
Step 2:
Once the scenario is created go to Settings> Devices. Click the three dots on the right of the desired door
contact to open the sensor settings.
Page 19

19
Blaupunkt Competence Center Home Security
The scenario is now linked to the desired sensor. With each door opening the IRC-S2 will take a picture.
Step 3:
Now under “Trigger Response” select the scenario you want link to the Door Contact. Save and confirm the
selection with “Send”.
Example 2
Set up to turn on a lamp for 30 seconds via the Smart Power Switch Meter (PSM-S1) when the
Motion detector detects movement in the room.
Step 1:
Go to the Scene Menu (follow the steps in chapter “4.2.3.1 Creating a Scenario”) , select the parameters
as follows: On “Action Type” select Device Action -> PSM-S1(Smart Power Switch Meter) -> Switch On For
-> 30 sec and press “Submit”.
Step 2:
Once the scenario is created go to Settings> Devices. Click the three dots at the right of the desired motion
detector to open the sensor settings.
For images please refer to “Example 1”
Page 20

20
Blaupunkt Competence Center Home Security
Step 1
Click on the icon and select which scenario you want to delete.
Then confirm with OK to delete the scenario.
4.2.3.3 Delete a Scene
Step 3:
Now under “Trigger Response” select the scenario you want link to the Motion Detector. Save and confirm the
selection with “Send”.
Now, evertime the motion detections detects movement, the Smart Power Switch Meter (PSM-S1) will be activated for 30 seconds and the lamp is switched on.
NOTE: The IR-S1L has a 1 minute sleep mode when the alarm is deactivated. Please wait more than 2 minutes
without detecting anyone to be sure the device its out of sleep mode and triggers the scene properly.
Page 21

21
Blaupunkt Competence Center Home Security
4.2.4 Rule
You can use the “Rule” sub-page to congure your home automation rules. A rule includes triggers, conditions, and actions. You have a variety of trigger mechanisms for the rule to choose from, which you can
optionally associate with a condition to perform one or more actions. You can add up to 3 actions per rule
and a maximum amount of 20 rules.
4.2.4.1 Create a Rule
Step 1
Click on the Icon to get to the Add Rule menu.
Step 2
Enter a Name for the rule.
Step 3
Select a Trigger for the rule (e.g. Schedule).
Page 22

22
Blaupunkt Competence Center Home Security
Step 4
Optionally select up to 2 Conditions (e.g. arm mode).
Step 5
Select an Action. (e.g. Device action).
Optional: To add more than 1 action to a rule click the + icon at the right to add a new action for the current
rule. (up to 3 actions per rule).
Step 6
Click Save to confirm the rule setting. The new rule will now be displayed in the rule list.
Page 23

23
Blaupunkt Competence Center Home Security
4.2.4.2 Edit a rule
Step 1
Click on the rule in the list to see the rule content.
Step 2
Click on the top right corner Icon to get to the Edit Rule menu.
Step 3
Now you can edit the rule.
Step 4
Click Submit to conrm the rule change.
Activate / Deactivate a rule
Click the ON / OFF switch button to activate or deactivate a rule.
A rule with the switch button green means that its activated while in grey means deactivated.
Page 24

24
Blaupunkt Competence Center Home Security
4.2.4.3 Delete a Rule
Step 1
Click on the Icon, to get to the “delete rule” menu.
Step 2
Check the box in front of the rule and click OK.
Page 25

25
Blaupunkt Competence Center Home Security
4.2.4.4 Examples of rules
1. Example
The Q-Hub should switch on the Smart Power Switch Meter plug (PSM-S1) every day at 07:00, only if the alarm
system is armed. This would look like this:
2. Example
The disarming of the Q-Hub automatically opens roller shutter A and roller shutter B.
This would look like this:
Page 26

26
Blaupunkt Competence Center Home Security
4.3 Live-Video
The cam menu provides real time video streaming from your IP Cameras (IPC-S1).
4.4 Event
The Event page displays all alarm / status events, pictures and videos transmitted by the alarm panel. Using the
icons, you can filter media or alarm events, or search for events on a specific date.
If you have multiple IP Cameras you can change to the desired camera by clicking the respective IP camera image from the bottom IP Cam List.
To configure the IP camera video settings, click on the icon . For other settings please refer to chapter 4.6.1
Setting the devices.
To manually record a video clip, click on the Symbol. The IP camera will record a 30s video clip according to
the predefined settings.
Page 27

27
Blaupunkt Competence Center Home Security
4.6.1 Setting the devices
Click on the Icon at the end of the line of the respective device. The Device Settings page contains the
following options (options will vary depending the accessory type):
• Trigger Response: This feature is only for home automation. Select a previously created scenario to be
activated every time the accessory gets trigged. Please refer to 4.2.3 Scene for scenario creation and examples.
• Chime: If chime function is enable the Q-Hub will emit a double “beep” sound notification
whenever this sensor gets triggered under Home or Disarm mode.
• Zone: The “Zone” is the number by which the device is recognized in the system. Each device takes up a
single zone in the system.
• Name: Give the device a name that you can easily recognize.
• Bypass: Use this function to deactivate a device. A bypassed device will be ignored by the system. All
trigger responses from this sensor will be discarded by the system and no alarm will be activated. The
system will also stop checking for any fault condition (supervision or low battery), and any previous faulty
condition will be ignored. Hazard accessories as Smoke or Water detectors will still work locally with the
in-built siren.
4.5 Settings
Click “Setting” on the left menu to open the settings interface.
To access the settings menu the system will ask to input the Master Code. (Default Master Code 1111).
After entering the Master Code, you will enter the Device setting sub-menu.
4.6 Device Settings
The Device settings menu displays the information and status of all the accessory devices learnt in the Control
Panel.
Page 28

28
Blaupunkt Competence Center Home Security
• Burglar: When an accessory set as Burglar is triggered, while the Q-Hub is in Away or
Home Arm Mode, an intruder alarm will be triggered immediately. If the accessory is triggered during Entry or Exit countdown, the alarm will not be activated immediately.
• Home Omit: When an accessory set as Home Omit is triggered, while the Q-Hub is in Away
Arm Mode, an intruder alarm will be triggered immediately. When an accessory set as Home
Omit is triggered, while the Q-Hub is in Home Arm Mode, the alarm will not be triggered
• Entry 1 / Entry 2: When an accessory set as Entry 1 or Entry 2 is triggered, while the Q-Hub
is in Away or Home Arm Mode, a Entry Delay countdown will be triggered according to the
programmed Away Entry 1 Delay or Away Entry 2 Delay setting. (Please refer to 4.7 Panel
Setting to change the Entry Delay period).
The user must disarm the system before the countdown ends or the Q-Hub will trigger a
burglar alarm. Disarming the Q-Hub within the Entry Delay period will return the system to
Disarm Mode and no alarm will be reported.
• 24 h: With this attribute, the accessory is permanently armed regardless of the arm mode
from the Q-Hub .
• Home Access: When an accessory set as Home Access is triggered, while the Q-Hub is in
Home Arm Mode, an Entry Delay countdown will triggered according to the programmed
Home Entry 1 Delay. (Please refer to 4.7 Panel Setting to change the Entry Delay period).
The user must disarm the system before the countdown ends or the Q-Hub will trigger a
burglar alarm. Disarming the Q-Hub within the Entry Delay period will return the system to
Disarm Mode and no alarm will be reported
• Burglar Outdoor: This attribute its exclusive for the IRC-S2 (motion detector with photo
camera). When a IRC-S2 detects movement the detector will take pictures and you will be
notified via push notification, but it will not trigger the siren. This is also called “silent alarm”.
• Personal Attack/Silent Panic: These attributes exist only for the remote control accesso-
ries. It determines the function of the panic button.
The attribute Person Attack triggers an alarm immediately.
The silent panic alerts you via push notification, but will not trigger the panel siren.
Note: If the panic button on the remote control is triggered, the control panel can no longer
be disarmed by the same remote control. This must be done with another device or the app.
Click Submit when you have finished setting the device and want to save it.
• Attributes: The attribute parameter denes when the system should trigger an alarm
due to sensor activation.
The sub-menu Attributes contains the following options depending on the sensor type:
Page 29

29
Blaupunkt Competence Center Home Security
4.6.2 Walk-Test ( )
The Walk Test function is used to check the radio transmission range and strength of your accessories. Before
installing each device, we recommend to use this function to make sure the device signal can be received by
the Q-Hub from the desired installation location.
Step 1
Click the icon at top right to enter Walk Test mode.
Step 2
Press and hold the accessory test button to transmit the test signal (refer to accessory QSG to locate the test
button). The Q-Hub will emit a notification sound whenever it receives the accessory signal. The page will be
updated with the accessory information and the RSSI value indicating the received signal strength.
The signal strength range goes from 9 (excelent) to 1 (very poor). Make sure the signal strength is at least 5. A
signal strength of 6 or higher is recommended. If no signal is received or bellow 5, please choose a different
mounting location and run the test again.
With the IP camera, the signal is transmitted automatically upon entering Walk Test and does not require button
press. IP Camera will be displayed always as 0.
Page 30

30
Blaupunkt Competence Center Home Security
4.6.3 Update device list ( )
Click on the icon , to update the information displayed in the device list.
4.6.4 Remove device ( )
To remove a learnt-in device, click on the icon at the top right to open the “Remove devices” function.
Check the boxes of the accessories you want to remove at the right end of the device list and click OK to remove the selected accessories from the system.
4.6.5 Add device ( )
Please refer to the manual/quick start guide of the accessory for specific details as start-up, installation or test
button location.
Step 1
Click the icon at top right corner icon to start the Add Device process.
Step 2
Refer to the manual/quick start guide of the accessory for transmitting the learn signal from the accessory. The
Q-Hub will emit a double notification sound whenever it receives the accessory learn in signal. The page will be
updated with the accessory information.
Step 3
Check the box in front of accessory info, and click OK to add the accessory into the Q-Hub. The device will be
assigned automatically to the first available empty zone number. Refer to 4.6.1 Setting the devices to
set up the accessory configurations.
Page 31

31
Blaupunkt Competence Center Home Security
4.7 Panel Setting
The Panel setting page provides access to the Q-Hub operation settings. After making any change on the settings, click the SUBMIT button at the bottom of the webpage to confirm and save the changes.
4.7.1 General Settings
• Alarm Length: The alarm length determines how for long the Q-Hub built-in siren and any other external
sirens in the system would alert when an alarm event is triggered.
• Supervision Timer: Accessories will transmit regularly a check-in signal to the Q-Hub to monitor the accessory
status. If the Q-Hub fails to receive a signal from a particular accessory for the set period it will consider the device “Out of order” and send a report to server. Any accessory detected as “Out of order” will display a Supervision
Failure status. Use this function to determine the supervision period allowed for your accessories.
• Internal Siren: Use this function to activate/deactivate the Q-Hub built-in siren. Deactivated siren will not alert
during alarm but any other siren accessory will still work and alert.
• Door Chime: Here you can adjust the volume of your Door Chime (low, medium or high volume). The Q-Hub
will emit a double “beep” sound notification when a sensors with the “Chime” feature enabled gets triggered.
• Warning Beep: If a fault is detected in the system and this feature is enabled, the Q-Hub will emit a “beep”
sound notification(low, medium, or high volume) every 30 seconds to alert the user of a failure.
• Disarming Beep: Here you can adjust the volume for the disarming notification sound (low, medium or high
volume).
Page 32

32
Blaupunkt Competence Center Home Security
4.7.2 Away and Home Arm Settings
• Entry Delay Time / Entry Delay Time 2: When an accessory set with Away Entry 1 or Away Entry 2 attribute
is triggered under Away or Home Arm Mode, the Q-Hub will begin entry countdown time according to length
set on this menu. Entry 1 attribute corresponds to Entry Delay Time length and Entry 2 attribute corresponds to
Entry Delay Time 2. When an accessory set with Home Access is triggered under Home Arm Mode, the Q-Hub
will begin entry countdown time according to length set on Home Entry Delay Time.
• Entry Delay Sound: Set the Entry Delay countdown volume.
• Exit Delay Time: When the Q-Hub changes to Away or Home Mode, it will begin counting down Exit Delay
time according to length set on this menu. When the time expires, the panel will enter set arm mode. All home
occupants must leave the detection area before Exit Delay Time expires or they will trigger an alarm.
• Exit Delay Sound: Set the Exit Delay countdown volume.
4.7.3 Panel Settings
• High Temperature: When the temperature rises above the set value, the Q-Hub will notify the user about the
High Temperature condition. If the temperature drops back under the set value again, the Q-Hub will send a
High Temperature Restore report to the user.
• Low Temperature: When temperature drops below the set value, the Q-Hub will notify the user about the
Low Temperature condition. If the temperature rises above the set value again, the Q-Hub will send Low Temperature Restore report to the user.
Page 33

33
Blaupunkt Competence Center Home Security
• AC Fail Report: The Q-Hub will notify the user whenever detects that the connection to the mains was lost for
a certain time. Time range goes from 1min to 60min.
• Jamming Report: The Q-Hub will notify the user whenever detects a jamming attempt from frequency jammers or blockers.
• Voice language: Use this function to change the language from the prompt voice messages of the Q-Hub.
4.7.5 Sirene Setting
If you have purchased an extra outdoor or indoor siren to expand the system, use the program siren functions to
change your siren settings. Select the desired option from the drop down menu and click the “OK” button from
the desired option. (Do not click the SUBMIT button). The panel will transmit a signal to the siren, if the signal
is received, the siren will emit a notify tone to confirm that the configuration was successful.
• Conrm: Determines whether the siren should emit a confirmation tone when the Q-Hub is armed or disarmed.
• Entry Sound: Determine whether the siren should emit a countdown sound along with Q-Hub during the
Entry Delay time.
• Siren Tamper: By selecting OFF it will disable temporarily the siren’s tamper protection function for one hour.
You can also reactivate the siren tamper protection by selecting ON again. This function should be used to avoid
a tamper alarm whenever you wish to change the siren location or batteries.
4.7.4 Master Code Setting
Here you can change the master code. (Default code is 1111). We suggest you to change the default PIN code as
soon as possible.
The Master Code its only to access to the settings menu and can not be used to Arm / Disarm the system.
User PIN Code and Master PIN Code cannot be identical. If they are identical, the System Mode change will not
work.
Page 34

34
Blaupunkt Competence Center Home Security
4.7.7 Time Setting
Under “Time Zone Setting” open the dropdown menu and select your time zone
Use the Date & Time Settings to configure the date and time
4.7.6 PIN Code Setting
The User PIN Codes are used to arm / disarm the Q-Hub. You are required to enter a User PIN Code when changing system modes with the web interface, mobile app or Remote Keypad accessory device.
• User Name: Enter a name to identify the User No. The name will be displayed in Event page if this PIN Code is
used to arm/disarm the system. The name of User 1 is set to “user” by default.
• User Code: Enter a 4-digit code. The User PIN Code 1 is set to 1234 by default. All other Pin Codes are disabled
by default. We suggest you to change the default PIN code as soon as possible.
• Latch: Checking the Latch box will enable the system to record the arm/disarm actions performed by this user.
If “Latch” is unchecked, this user’s action will not be recorded on the Event page.
• Delete: Check this box to remove this User PIN Code. User 1 cannot be deleted. Click Submit at the bottom to
delete the User PIN Code
User PIN Code and Master PIN Code cannot be identical. Is not possible to add several users with the same PIN
Code. If they are identical, the System Mode change will not work.
Page 35

35
Blaupunkt Competence Center Home Security
4.8 Report Setting
The Report setting page allows you to program the system notification path.
Call notications:
With the premium service, user will be able to receive telephone calls from Blaupunkt Calling Alarm Center.
Whenever the Q-Hub detects an intrusion it will send a report to our Calling Alarm Center, and perform automaticly loop calls to your telephone number. Up to 3 different telephone numbers.
In the field Prefix, you can determine the announcement for your alarm call notification. If it remains empty, you
will hear the standard announcement in case of an alarm.
Page 36

36
Blaupunkt Competence Center Home Security
Click on the Icon to enter a new phone number for the call report.
On the left field write the name of whom you desire to call.
On the second field select your country prefix
On the third field write your telephone number
For each Telephone number, select the event type to be sent to this number. Click the right dropdown menu
and select one of the following options:
None: No event will be report
Burglar: Only alarm events will be reported
To remove current telephone numbers , from the report list click on the icon at the right to open the
“Remove” function.
Check the boxes of the telephone numbers you want to remove at the right end of the telephone number list
and click Submit to remove the selected telephone numbers from the system.
For calls you need credit. Every call to a telephone number consumes a call credit. When the call balance reaches 0, the server stops calling. The status of your call credit can be seen by hovering the mouse over the icon.
You have 12 call credits per month.
Refer to premium.blaupunkt-security.com for more information regarding the premium service.
Page 37

37
Blaupunkt Competence Center Home Security
Email Report
When the Home Portal Server receives a report from the Q-Hub, it will forward the event via e-mail.
The e-mail address used during the registration process will be used as the default e-mail destination.
If there is a IRC-S2 or IPC-S1 on the system and a burglar events is detected, the Home Portal will send an e-mail
to alert the user with a video or photo attached.
Click on the icon to add a new additional e-mail address field.
The maximum amount of additional e-mail addresses is 15
For each e-mail address, select the event type to be sent to this e-mail. Click the right dropdown menu and
select one of the following options:
None: No event will be reported.
All: Alarm and status events will be reported.
Burglar: Only alarm events will be reported.
To remove a current e-mail address, from the report list click on the icon at the right to open the
“Remove” function.
Check the boxes of the e-mail addresses you want to remove at the right end of the e-mail address list
and click Submit to remove the selected e-mail addresses from the system.
The default e-mail address can not be deleted.
Page 38

38
Blaupunkt Competence Center Home Security
4.9 Account
The account page displays the user account info. To access the account page, click on your user name at the top
right to open a drop down menu and select “Account”.
This page displays your registered user info, secondary user account list, language and
push notifications settings.
Please click on the icon to edit the account information (see screenshot below).
Page 39

39
Blaupunkt Competence Center Home Security
Edit account:
• User Info:
Edit your personal information and e-mail. Account username can not be changed.
• Secondary User Account List:
This function is used to add secondary user accounts under the registered main user account.
Your registered account is the “Main User”, which can be used to create secondary user accounts to allow multiple users’ login to the system at the same time.
Click the icon to add new secondary user account and fill the mandatory fields.. Then click the icon
to expand the page and enter the additional personal information.
To remove a secondary user account, from the list click on the icon at the right to open the “Remove account” function.
Check the boxes of the accounts you want to remove at the right end of the user account list and click Submit
to remove the selected user accounts from the system.
Page 40

40
Blaupunkt Competence Center Home Security
• Language Setting:
Open the dropdown menu and select the desired language. This would change the Home Portal Interface
language. To change the Q-Hub Prompt voice language refer to
4.7.3 Panel Settings
Click SUBMIT at bottom of the page to confirm the changes.
• Change Avatar:
Click “Change Avatar” to change your avatar profile picture.
Click icon, select the new avatar picture from your computer, then click “Upload” to confirm.
• Change Password:
Click “Change Password”, enter your current log in password, then enter the new password and repeat the
new password. Then click “Submit” to confirm.
To keep your account secure from hackers we recommend a strong password with at least 8 characters including lower letters, upper letter, numbers and special symbols.
• Account Info:
Click icon to access to your account info where the MAC address of the panel and the
account number will be displayed.
Page 41

41
Blaupunkt Competence Center Home Security
Notications:
Program the Push Notification setting for smartphone devices via Secure4Home App. Click the dropdown menu
and select one of the following options:
None: No event will be report
All: Alarm and status events will be reported.
Burglar: Only alarm events will be reported
Click “SUBMIT” to confirm after finishing all settings.
Page 42

42
Blaupunkt Competence Center Home Security
4.9.10 Service and Payment
The Service and Payment page displays the user account service package choices.
With the premium service, the user will be able to receive telephone calls from Blaupunkt Calling Alarm Center.
Our premium service call notifications will provide the peace of mind that whenever the Q-Hub detects an
intrusion it will send a report to our Calling Alarm Center, and perform automaticly loop calls to your telephone
number. This works additional to the standard Push-message and E-Mail service.
With our SSL Secured Cloud Servers we offer a cloud storage of more than 50 field event Videos of your IPC-S1,
30 captured images of the PIR-Photo-Camera (IRC-S2) and a general EventLog of 90 days. Another great bonus
for users with the 12 months Premium Service Plan is one additional year of product warranty.
For more information on the Premium Service, go to:
premium.blaupunkt-security.com
Page 43

43
Blaupunkt Competence Center Home Security
5. Operation of the mobile app Secure4Home
The app gives you quick and remote access to manage your security system. Download the “Secure4Home”
app on Google Play for Android or the Apple App Store for iPhone for free.
The Secure4Home app supports the core security functions, live video streaming, event
history and Home Automation management.
User registration, add new devices and Q-Hub, user account or home automation conguration are not supported. For these functions please use the Home Portal.
5.1 Log In
Start the Secure4Home app. Enter your registered username and password and tap “Login” to log in to your account. Activate “Stay logged in” for the app to save your credentials for the next time. After successfully logging
in, you will first be redirected to the “Security” page. To switch between the function pages, tap the respective
function icons at the bottom.
Page 44

44
Blaupunkt Competence Center Home Security
5.2 Security
Arm Mode:
The Security page displays the system arm mode indicated by 3 mode buttons. The current arm mode button will be lighted up. To change the mode, press the respective mode button and enter the User PIN Code
(default PIN Code 1234).
Also the Security page oers a quick overview of the security system and if there is any device failure or
door contact open it will be displayed here. For more information refer to 5.3 Device.
5.3 Device
Device:
The Device menu will display all the learned-in accessories on the system.
Accessories will be displayed by zone number order. Each accessory will display the name of the accessory and
the accessory type bellow.
In addition, if the Q-Hub detects a problem (e.g. low battery) with any accessory will mark it in red. A Open Door
Contact will be also marked in red. Tap once on the accessory to check the status and the error message.
Use the button to filter and display only accessories with any kind of error.
Use the button to filter and display only Door Contacts with Open status.
Page 45

45
Blaupunkt Competence Center Home Security
5.4 Home Automation
The Home Automation page allows you to manage the Home Automation accessories, and scenes. Additionally
you can also activate / deactivate rules.
Scene list:
To trigger manually a scene go to Scene list select and click the button of the scene you desire.
By clicking on the scene its possible to check the actions of that scene.
Group:
On the group menu its possible to manage the accessors by groups. To link accessories to a certain group please
use the Web Home Portal.
Page 46

46
Blaupunkt Competence Center Home Security
Automation Device:
This menu will display all the Home Automation accessories learnt-in on the Q-Hub.
Accessories will be displayed by zone number order. Each accessory will display the name of the accessory and
the accessory type bellow. Additionally relevant information (e.g. ON, OFF, temperature) will be displayed depending on the accessory function.
You may control the device on this page or access extra device functions by selecting the device.
Rule:
This menu allows the user to activate / Deactivate any existing rule.
Click the ON / OFF switch button to activate or deactivate a rule.
A rule with the switch button green means that it’s activated while in grey means deactivated.
Page 47

47
Blaupunkt Competence Center Home Security
On the Cam menu its possible to see live stream videos from the IPC-S1 IP Camera and manage the motion
detector with camera (IRC-S2) for photo verification.
IP Cam:
In this sub-menu the IP Camera IPC-S1 will display a video live preview of the camera. Click on the video image
to open the video in full screen mode.
Under full-screen mode the IP Camera will open the cam microphone automatically . Additionally its possible to:
Record a 30s video by clicking the icon.
Take a snapshot by clicking the icon.
Click the icon to open / close the IP camera speaker for 2-way communication audio. (By default camera
speaker will be muted)
Click the icon to go back to the IP Cam menu.
IR Cam:
In this sub-menu you can manage the motion detector with camera (IRC-S2).
Click the icon to take a photo with the IRC-S2. The snapshot will be loaded to the Home Portal and displayed on the Event menu.
5.5 Cam
Page 48

48
Blaupunkt Competence Center Home Security
5.6 Event
In the Events Menu, you will get an overview of all the events registered by the Q-Hub in chronological order.
Alarm events will be displayed in red,while technical alerts or system changes will be displayed in yellow.
Its possible to filter the events by:
All: All the events will de displayed.
Media: Only events that contain videos or photos will be displayed.
Alarm: Only alarm events will be displayed.
Date: Only events from the selected day will be displayed.
Press a event for details as Date, Time, and accessory triggered. Additionally events captured by the IRC-S2 will
display the captured photo.
Press the phone button to access the telephone function to make a call
Press the mail button to forward and share this event via mail or whatsapp.
Page 49

49
Blaupunkt Competence Center Home Security
5.7 Account
Access the Account page by pressing the list button at top right of screen.
Personal Info:
The Personal Info page display registered user information.
Change Password:
Use this to change your current password account for a new one.
Notication Settings:
Program the Push Notification setting for smart phone devices via Secure4Home App. Click the check-box and
select one of the following options:
None: No event will be reported.
All: Alarm and status events will be reported.
Burglar: Only alarm events will be reported.
Burglar push notifications uses the alarm volume and settings from your smart phone, therefore even if the
phone its in silence mode you will get a Alarm type push notification.
Any other push notification uses the standard notification tone from your phone and won’t disturb you if the
phone is on silence mode.
Page 50

50
Blaupunkt Competence Center Home Security
About:
Under this menu it will be displayed the Blaupunkt Technical support contact Info according to your app language.
Additionaly, at the bottom can be found the App version.
Page 51

51
Blaupunkt Competence Center Home Security
6. Troubleshooting and Reset to default settings
This chapter discusses possible problems that may occur when operating the alarm system, as well as the
factory reset function.
6.1 Q-Hub
The LEDs from the Q-Hub indicates the system status. An amber status LED will indicate a fault in the system.
Refer to point 3.1 Kit Content Installation for more information about LEDs indicators.
If the status LED is amber please log into Home Portal Server account to see the check the fault events. The most
common fault events are:
• Q-Panel low battery:
Recharge the Q-Hub batteries by connecting the AC power supply.
Battery switch is OFF. Please turn battery switch ON.
• AC Power failure:
Check the mains connection and the power supply.
• Supervision error:
Check on the device menu for any accessory with supervision error. Check accessory battery status and perform
a Walk Test to confirm if the Q-Hub can receive accessory signal. If the Q-Panel does not receive the signal means
that the accessory is out of reach, out of battery or defective.
• Tamper error:
Check on the device menu for any accessory with tamper error. Refer to the accessory manual to locate the tamper and check if it’s properly pressed.
• Radio interference:
Perform Walk Test on all your accessories to check if Q-Hub can still receive their signals.
Page 52

52
Blaupunkt Competence Center Home Security
6.2 Motion detector
• The motion detector LED ashes when activated:
The battery level for the motion detector is low or the sabotage contact has been interrupted.
• The motion detector does not react to movements:
When the alarm is deactivated the IR-S1L and IRC-S2 will enter in sleep mode for 1 and 2 minutes respectively.
Please wait for more than 2 minutes without detecting anyone to be sure the device its out of sleep mode before testing.
If the previous point does not solve the issue perform a walk test to assure that the accessory is able to
communicate with the Q-Hub.
• The motion detector reacts slowly:
This is normal because the motion detector has a sophisticated filter to prevent the triggering of unwanted
alarms. He is also less sensitive when approaching him directly.
• The motion detector gives a false alarm:
If using a IR-S1L make sure that pets do not have access to the secure area. For a pet immune motion detector
please use a IRP-S1L.
Make sure that the motion detector is not aiming at a source of heat or moving objects.
Page 53

53
Blaupunkt Competence Center Home Security
6.3 Door/ Window Sensor
• Door Contact LED ashes when activated:
Door Contact is on low battery or tamper switch was triggered.
• Door / window sensor does not respond when opening the window / door:
The battery is empty, please replace.
The magnet is too far away from the door / window sensor, check the distance between magnet and door /
window sensor. Reduce the distance and test the door / window sensor again.
6.4 Reset/ Reboot
The Reset / Restart function clears all device information and returns all system settings to factory defaults. After
the reset, you can register the Q-Hub on the Home Portal server as a new device. Please be aware that factory
reseting a Q-Panel will delete all the information on the panel, including the pre-learn kit accessories.
• Turn off the alarm panel by unplugging it and turning off the battery switch.
• Reconnect the power plug while holding down the red button on the back.
• Press the button for about 5 seconds until the alarm panel emits a long beep and all 3 LEDs light up.
• Release the button: the factory reset is complete.
Page 54

54
Blaupunkt Competence Center Home Security
7. Specications
Environmental conditions: All sensors and detectors
-10 ° C to + 40 ° C, relative humidity 85%, with no condensation for the alarm center and all sensors
and detectors.
Wireless range: All sensors and detectors
Approximately 30 m in a typical domestic environment, the range may vary depending on the condition of the
walls, the location of the equipment and other environmental factors.
Q-Hub
• 96 dBA sound pressure / min. 1m
• 50 wireless sensors and detectors
• Radio frequency: 868 MHz and 2.4 GHz
• Power supply: 9 V DC 1A power adapter
• Battery: 4.8 V 1100 mAH Ni-MH battery, charging time 72 hours
• Emergency power supply: 15 hours
Wireless Motion detector
• Radio frequency: 868 MHz
• Battery: 1 x 3 V lithium battery
Wireless Door / Window Sensor
• Radio frequency: 868 MHz
• Battery: 1 x CR2 3V lithium battery
Page 55

55
Blaupunkt Competence Center Home Security
8. Declaration of conformity
This device complies with the requirements of the R & TTE Directive 1999/5 / EC and the following unified
standards have been met:
Health: EN62479:2010
Safety: EN60950-1:2006+A11:2009+A1:2010+A12:2011+A2:2013
EMC: EN 301 489-1 V1.9.2:2011
EN 301 489-3 V1.6.1:2013
EN 301 489-17 V2.2.1:2012
Radio: EN 300 328 V1.8.1:2012
EN 300 220-1 V2.4.1:2012
EN 300 220-2 V2.4.1:2012
Page 56

Enjoy it.
BLAUPUNKT Competence Center Security
Security Brand Pro GmbH
Mondstrasse 2-4
85622 Feldkirchen-München, Germany
© Technical changes and errors excepted
 Loading...