

Page 1
CAR MULTIMEDIA
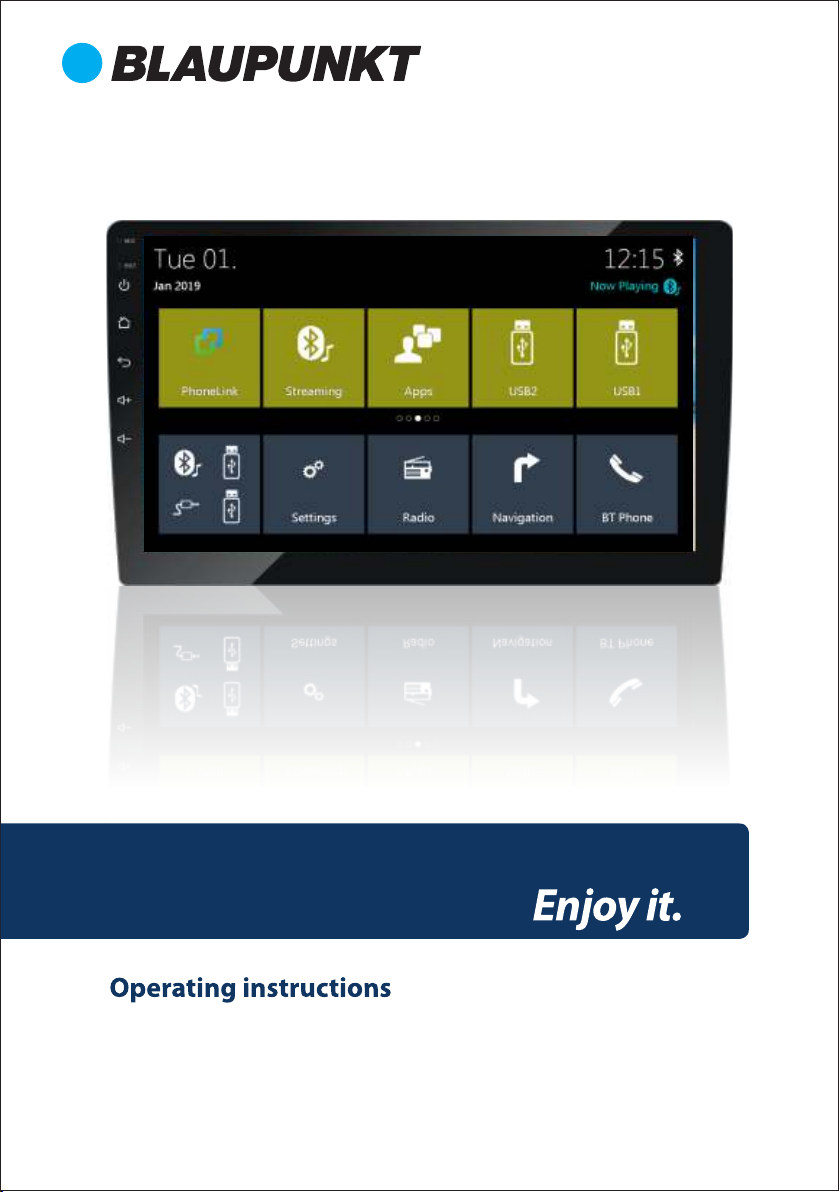
Jamaica 970
NOTE: Please do not watch videos or use other Apps while the vehicle is in motion.
Doing so, is a safety violation. To watch videos or use Apps, please ensure that the vehicle is in
parked mode with handbrake activated.
Please check compatibility of the device with your mobile phone before purchase.
New phone software versions in the future may or may not be compatible with the device.
In-Warranty replacement will not be applicable for non compatibility of the mobile phone with
the device.
Page 2
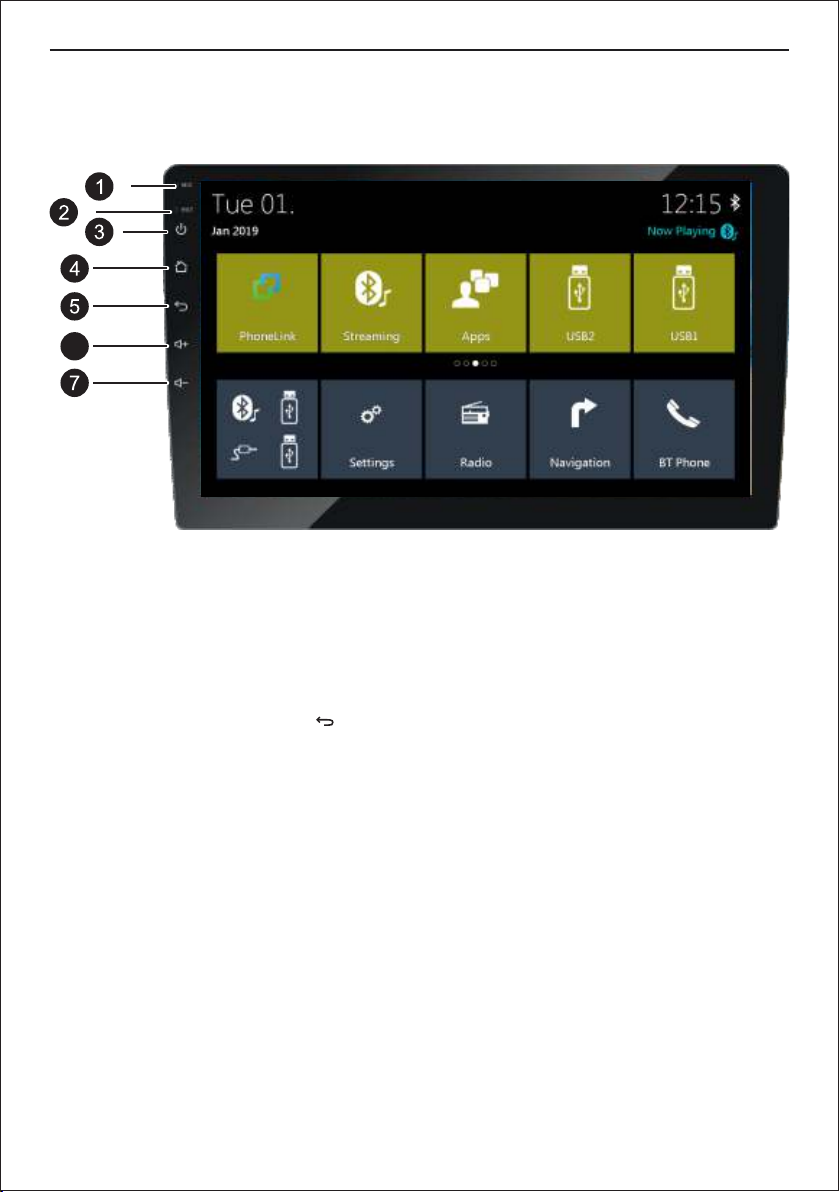
Panel Introduction
Jamaica 970 features a brilliant 10.1 inch capacitive display with a high-end tuner and runs
on Android OS Version 6.0
6
1. Internal microphone
2. Reset
3. In any state, press this button to power on/off the device / light touch to
mute audio output
4. Press this button to go to home menu
5. Press this button to return to the previous page. Under any interface,
touch the icon [ ] to return to the previous page.
6. Touch this button to increase audio volume
7. Touch this button to decrease audio volume
Page 3

Contents
Contents
Safety notes 04
Symbols used 04
General Warning 04
Road safety 04
Instructions to read this User Manual 05
Cleaning the unit 05
Disposal notes 05
Warning 05
Scope of delivery 05
Placing the device in operation 06
Instructions to the panel buttons 06
Switching on/off with the touch 06
Switch on/off via vehicle Ignition 06
Main menu 06
Volume 06
Main interface 06
Radio Function 07
Radio function operation 07
Setting the reception area 07
Tuning Into a station 07
Storing stations manually 07
Scanning stations 07
Band Switch 08
Tune and Seek 08
Auto Seek and Store stations 08
Select memory bank 08
Sound settings 08
Equalizer settings 08
Audio distribution (fader/balance) 08
Navigation Function 09
Navigation settings 10
Take me home 10
Route 10
Favourites 10
History 10
Settings 11
Phone Feature 11
Making a call via Bluetooth 11
Dialling 12
Answer a call 12
View Call History 12
View Phone Book 12
Play Music 13
Bluetooth Music Function 13
USB Music Function 13
Audio playback from USB 13
Video from USB 14
PhoneLink 15
Phone debugging 16
SWC 17
File explorer 17
Aux-In 17
Settings 18
General 18
Video 18
Time 18
Volume 18
Network 19
Personal 19
Device 19
System 19
Useful information 20
Warranty 20
Service 20
Connection Diagram 21
USB Support Files 22
Page 4

Safety notes
Safety notes
The car audio system is manufactured according to
recommended and established safety guidelines in a
state of the art facility. Even so, dangers may occur if
you do not observe the safety notes in their instruction
manual.
These instructions are intended to familiarise you with
the most important functions.
Ÿ For best results, please read the user manual
carefully and completely before using the car audio
system.
Ÿ Always keep the user manual accessible to all users.
Ÿ Always handover the car audio system to any third
party along with these instructions.
Ÿ In addition, observe the instructions of the devices
used in combination with this car audio system.
Symbols used
Below are the symbols used in this user manual, please
go through them carefully:
CAUTION:
Warns about possibilities of any injuries that
might occur.
DANGER:
Warns about damages to the DVD/CD drive
(Not applicable to all Series 900 Model)
LOUD VOLUME:
Warns about high volume
ü Identies a sequencing step
Ÿ Identies a listing
General Warning
To avoid any injury or damage to yourself, your car and
others, please make sure to do as following. Observe
the following note to protect yourself against injuries:
Ÿ Do not modify or open the device. Do not do any
unauthorised modication to the device. In case you
need any assistance, please visit the nearest service
centre. The device should be open by an authorised
person only.
Ÿ Use as Directed: this car audio system is intended
for installation and operation in a vehicle with 12V
(negative ground) vehicle system voltage. Observe
the output limits of the device. Only an authorised
specialist should perform repairs and installation, if
necessary.
Ÿ Installation Instructions: You may only install the
car audio system yourself if you are experienced in
installing car audios systems, and are very familiar
with the electrical system of the vehicle. For this
purpose, observe the connection diagram at the
end of these instructions. For self-installation make
sure you have the right tools with you.
Ÿ Use your device in such a way that you can always
safely control your vehicle. In case of doubt, stop
at a suitable location and operate your device while
the vehicle is parked. As the driver, you must not use
the applications that will distract you from traffic
(depending on the scope of functions of the device,
e.g. viewing videos, searching for a destination)
( Na vig at ion eq u i pp ed ra di os a n d ot he r
downloaded application)
Ÿ Follow driving recommendations during the
route guidance only if you are not violating any
tr affic regu lati ons : Tra ffic si gns and traffi c
regulations always have priority over driving
recommendations.
Ÿ Always listen at moderate volume to protect your
hearing and to be able to hear warning signals (e.g.
police sirens and other external alerts while driving).
During mute phases (e.g. when changing the audio
source), changing the volume is not advisable. Do
not increase the volume during this mute phase.
Ÿ Do not ingest the battery, chemical burn hazard
¡ The remot e co nt ro l i s pro vi de d w it h a
coin/button cell battery. This battery is charged
and if this button battery is swallowed, it can
cause severe internal burns & may lead to death
in 2 hours.
¡ Keep new & used batteries away from the reach of
children.
¡ If the battery compartment does not close
securely, stop using the product & keep it away
from the reach of children.
¡ If you think batteries might have been swallowed
or placed inside any part of the body, seek
immediate medical attention.
Road safety
Observe the following notes about road safety:
To avoid any injury or damage to yourself, your car and
others, please make sure to do as following. Observe
the following note to protect yourself against injuries:
Ÿ Before using this unit, please read all related
instructions carefully.
Ÿ Any damage to this unit caused by improper
operations will void the warranty.
Ÿ Please do not watch videos or use other Apps while
the vehicle is in motion. Doing so, is a Safety
violation. To watch videos or use Apps, please
ensure that the vehicle is in parked mode with
handbrake activated.
04
Page 5

Safety notes
Ÿ The below-listed applications while driving the
vehicle may divert your attention form the traffic
situation and may lead to serious accidents:
¡ Using the navigation feature like entering the
destination address
¡ Video playback or watching any kind of video
¡ Usage of internet via the browser
¡ Use of connected phone via PhoneLINK
¡ Use or Download of Google PlayStore / Google
Map s / You tub e is no t perm itte d in th e
automotive environment
Ÿ You are advised to refrain from any activity which
could possibly divert your attention while driving.
The best way to use these applications is when your
vehicle is parked in a safe location.
Ÿ To avoid short circuit, please do not dispose the unit
into the water and please do not place or leave any
kind of metal object (such as a coin or metal tools) in
the unit.
Ÿ Please operate the unit as per this Manual, it is not
allowed to open the unit for maintenance; In case if
maintenance is required, please seek professional
help.
Ÿ After the car engine is off, please do not use the car
audio for a long time, otherwise, the battery could
be drained.
Instructions to read this User Manual
Illustrations are used in th is manual to expl ain
operations and precautions. The illustrations used in
this manual are only for reference, please take the
actual unit as standard.
Marks
Mark for important preventive measures; please
read carefully to prevent any injury.
Ma rk for a specia l ex pla nat io n, auxi lia ry
interpretation, imitation and references.
Mark for additional information to operate this
unit. Warm notes: When there is any difference
between the Manual and the actual unit, please
take the actual units
as standard.
screen of the audio system.
Ÿ Use only a dry or slightly moistened cloth for
cleaning the audio system.
Disposal notes
Ÿ Do not dispose of your old unit/batteries in the
household trash.
Ÿ Use the return and collection systems available to
dispose of the old device, the remote control and
exhausted batteries.
Scope of delivery
The scope of delivery includes:
Ÿ Car audio system
Ÿ GPS antenna
Ÿ External Bluetooth microphone
Ÿ Small parts set, installation material
Ÿ Screws and fasteners
Ÿ Connecting cables
Declaration of conformity
Blaupunkt India Pvt. Ltd. declares that the device
complies with the basic requirements and the other
relevant regulations of the RED Directive 2014/53/EU.
Cleaning notes
Ÿ Solvents, cleaning and scouring agents as well as
dashboard spray and plastics care products may
contain ingredients that will damage the surface &
05
Page 6
Placing the device in operation
Placing the device in operation
Switching on/off with the touch button
To switch-on. Touch the button (For switch off, hold
the button pressed for more than 2 seconds.
Turn the unit on/off with ignition switch
Turn the unit on:
When the ignition switch is at ACC ON position, press
the button [ ] on the panel to turn the unit on.
Turn the unit off:
When the unit is ON, long-press the button [ ] on the
panel for more than 2s, to turn off the unit.
Main menu (Home)
In the main menu, please touch the buttons on the
touchscreen to call up different sources and operating
modes
In any source, press the button. The main menu
(home page) is displayed. As long as you do not select a
new audio source, the last active audio source
continues to play. Note: The icons used in these
instructions are intended to facilitate the explanation
and actual details may vary in your device.
Volume
You can adjust the volume in steps from 0 (minimum)
to 40 (maximum).
Touch the button + to raise volume and – button to
lower the volume
You can mute the car audio system by touching the
icon lightly while playing music.
Briey press the button to unmute the device or to
return the previous volume.
11
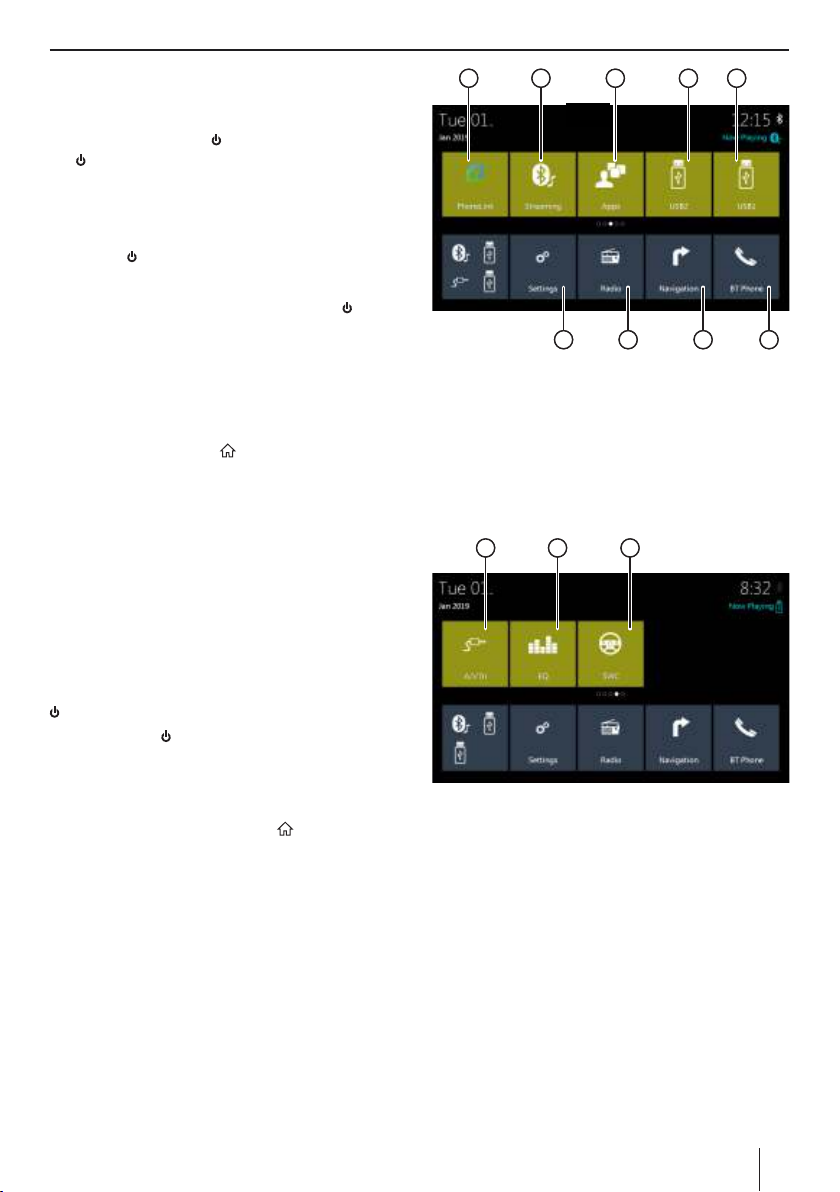
1. PhoneLINK
2. Bluetooth Music
3. Apps
4. WiFi Dongle icon
5. USB
6. Setting
7. Radio
8. Navigation
9. Phone
12 13 14 15
10 11
6
7 8 9
12
Main Interface
After the unit is turned on, the system will enter Radio
mode by default, then tap the icon to enter the main
interface.
10. Aux In
11. EQ
12. Steering Wheel Control
06
Page 7
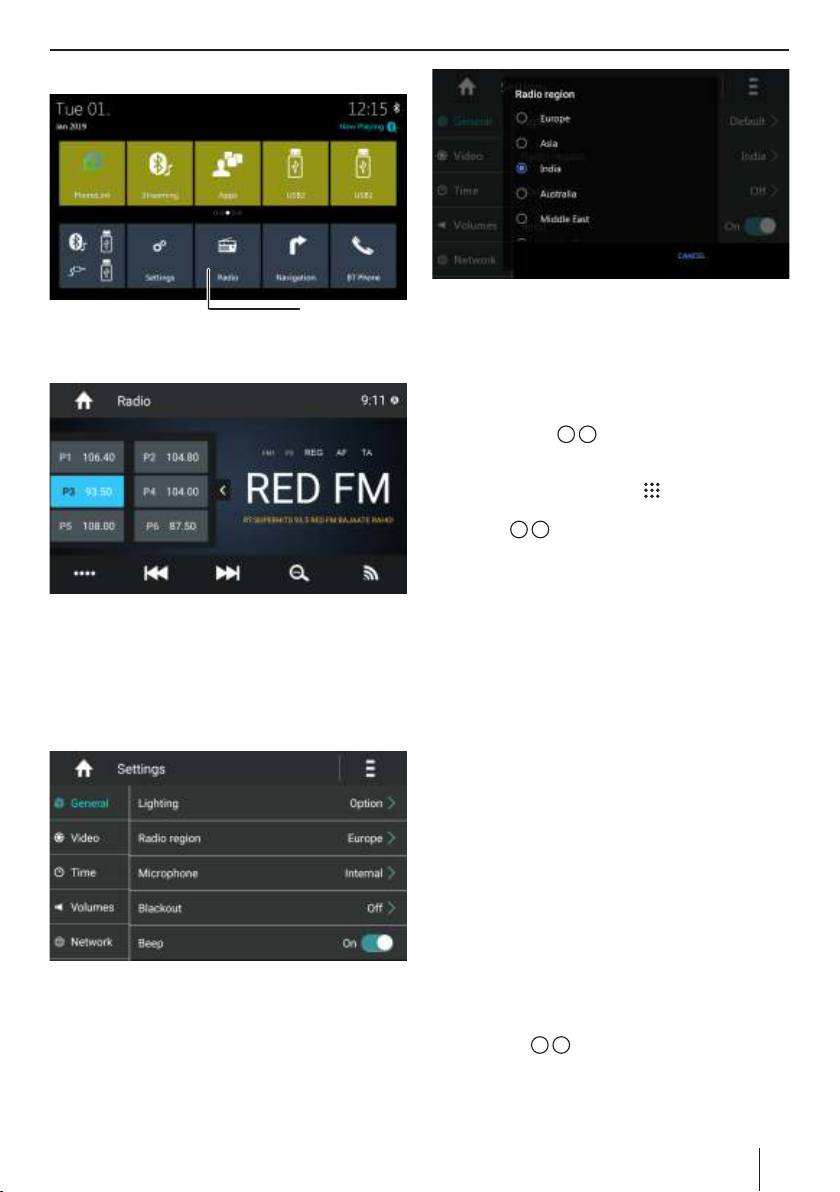
Radio function
Radio
Radio Icon
Radio function operation
Touch the icon [Radio] in the main interface to enter
the Radio interface.
Setting the reception area
This car audio system is designed for operation In
different regions with different frequency ranges and
station technologies. The factory default of the
reception area is 'EUROPE'. If you operate the car audio
system in Asia. You may change the setting to 'INDIA' or
select set a suitable reception area on the menu:
Ÿ Select on the Radio region button to display the list
of available reception areas.
Ÿ Select the desired reception area by double clicking.
Ÿ The list is hidden, the selected reception area is set.
Ÿ The main menu is displayed again.
Tuning Into a station
Ÿ Briey press the 7 8 button once or several times
to change the frequency in Increments.
Ÿ You can select broadcast frequency directly by
entering the frequency in the icon.
Ÿ The frequency selected is played back on the radio.
Ÿ Press the 7 8 button for approx. 2 seconds to start
station seek tuning.
Ÿ The radio tunes into the next receivable station.
Note: For the reception area Europe: In the FM
waveband, only traffic information (TA) stations are
tuned into if the priority for traffic information feature
is switched on.
Storing stations manually
Ÿ Select the desired memory bank with the FM/AM
button.
Ÿ Set the desired station.
Ÿ Press one of the memory buttons for approx. 2
seconds to store the current station at the button.
Ÿ The station is stored and can be switched by
selecting the desired station.
With this device, you can automatically search for and
store 6 FM stations offering the strongest reception in
the region in the current memory bank. Any previously
stored stations in this memory bank are deleted In the
process.
Ÿ On the home page, press the (Settings) icon. The
settings menu is displayed.
Ÿ At the top area of the Settings menu. Press the
(General) button.
Ÿ Select the 'Radio' option
Ÿ The current setting is displayed as 'EUROPE' region'.
Please leave it at the current setting or select the
appropriate region this unit is being used in. In this
case please select India.
Scanning stations
You can use the scan function to play all the receivable
stations of the current wave band for a few seconds.
Long press the 7 8 button. The seek tuning searches
for stations In the current waveband. Each receivable
station is played for a few seconds in the process.
07
Page 8

Radio | Sound Setting
Band Switch
Tap the band icon to switch the radio bands among
FM1/FM2/FM3/AM1/AM2.
Tune and Seek
Short press the icon 7 8 to tune point by point; Long
press the icon 7 8 to seek manually; It will stop
seeking when a station sought.
Auto Seek and Store stations
Long-press the icon L to auto seek, and auto store the
sought stations. During seek, tap the icon L again to
stop seeking.
18 stations will be stored in FM band (6 stations in
each FM1 / FM2 / FM3 each memory band); 12
stations will be stored in AM band (6 stations in
AM1 / AM2 each band). The system will stop
seeking after one-circle seeking.
Ÿ Start radio mode
Ÿ Select memory bank
Ÿ Tune Into a station
Select memory bank
On the home screen, your will nd the 'Radio' icon.
Touch the 'Radio' icon to enjoy the radio on the go.
Different memory banks and wave bands are available
Up to 6 stations can be stored in each memory
bank.FM1+FM2+FM3/AM1+AM2. Press the button
repeatedly until the desired memory bank is displayed.
Sound Setting
Equalizer settings:
In the main menu or on the control bar of the current
audio source. Press the (Equalizer) button. To manage
the Equalizer settings Select 'EQ ' form the main menu .
EQ Icon
The equalizer menu is displayed. You can adjust the
equalizer for all sources. The 10-band equaliser allows
the user to ne tune reproduced sound to suit
individual taste.
This option offer s simplied sound turning and
displays 6 bands. The 'Custom' setting allows you to
ne-tune the music just right to your taste. The options
available to you are listed below.
Click on each of the setting to choose the right EQ
setting for the genre of music.
Ÿ Flat
Ÿ Pop
Ÿ User
Ÿ Rock
Ÿ Classical
Ÿ Jazz
Ÿ Flat
Ÿ Custom
Audio Distribution (fader/balance)
Press the to adjust the Balance (L-R) & Fader (FrontRear) bands according to the passenger preferences.
Ÿ Left Front
Ÿ Left Rear
Ÿ Right Front
Ÿ Right Front
Ÿ Touch the blue dot to adjust your preference OR use
the arrow keys to adjust your preference.
08
Page 9

Ÿ The Bal and Fad reading will be displayed on the top
right of the screen.
Ÿ Once you have achieved your desired setting touch
the return tab to return to the previous menu. It’s
recommended to leave the Balance/Fader at 0-0.
Ÿ You can also use the Touch the button 5 to raise
level & 6 button to lower the level of the subwoofer
pre-out.
Sound Setting | Navigation Function
Navigation Function
This device is equipped with navigation on board.
Insert the mSD card (sold separately) into the map slot
and type your destination. Follow turn-by-turn voiceguided commands to get to your destination hasslefree.
Because of the rapid development of the urban
construction and the road planning, the navigation
map company constantly updates the navigation map.
If the route directed by the navigation map is found to
not conform with the actual road condition or the
actual traffic control condition, please drive the car as
per the actual road condition, traffic control and traffic
rules.
Steps to open the navigation:
Ÿ Insert SD card in the N avigati on Slot before
installation
Ÿ Touch the icon [Navigation] in the main interface to
enter the navigation interface.
Navigation Icon
Ÿ Enter the desired destination using the input keys.
Ÿ Once destination is set, the system will plan the
route and begin navigating.
09
Page 10

In the area where the driver is familiar with the
neighborhood, it may be more advisable for the driver
to drive by himself than to rely on the navigation
system.
Navigation settings
There are ve icons to enhance your navigation
experie nce a nd ease your ever yday us e of the
navigation feature.
Click on the icon at the bottom left to expose the
features listed below:
Navigation Function
Touch on the icon the access the rich navigation
features:
Take me home:
Set the address and use this option to plan your route
back to home.
Route:
This tab shows vital information about your current trip
in session.
Favourites:
Here you can store your favourite or frequently
travelled destinations. This will save you time in
inputting the address every time.
Ÿ
Ÿ Take me home: Auto detects your location and plans
your route back home
Ÿ Route: Show the trip starts
Ÿ Favourites: You can save your favourite/frequently
travelled locations
Ÿ History: Shows your trip history
Ÿ Setting: General navigation settings
History:
Check your travel history and places travelled. This is
quite helpful in computing the travel done by you in
the recent past.
10
Page 11

Navigation Function | Phone Feature
Setting
Several settings are available to may your ride safer and
comfortable. Like the Speed alert and the safety
camera alert. Please keep them checked for a good
ri de. You c an a lso de act ivate the optio ns by
unchecking them.
In case of error
In normal condition, the error of satellite signal
reception is about 7 meters, while in several situations,
some error may still occur after the auto-correcting of
the software, at these moments, the driver should pay
attention to the road condition and drive according to
the actual road condition.
Note: Using environ ment of nav igati on
system can be complicated and varying, the
system operation may have some issues (such
as failing to enter the map interface, no image
e t c. ) wh en en c ou nt er e d b y a la rg e
electromagnetic disturbance. It will require a
re-start operation to deal with these issues.
Phone Feature
Phone Icon
Please be aware that using a hand-held phone while
driving is an offence. You can use this device to make &
receive calls hands-free. However, it is suggested to
make minimal use of this feature & talk only when
required. Talk ing while driv ing may dive rt your
attention from traffic conditions ahead.
Making a call via Bluetooth
For the rst time to pair the mobile and the unit, it is
required to operate as below instructions:
Ÿ Turn the Bluetooth of the mobile on;
Ÿ Search the Bluetooth device with the mobile or the
unit, and connect - Device name is Jamaica 970;
Ÿ A prompt message will show on the mobile, input
the password 0000 and Conrm on the mobile;
Ÿ After pairing successfully, the system will enter the
interface below:
Ÿ
ü After the unit is powered off and on, the Bluetooth
of the un it w il l co nn ect to the mobil e last
disconnected.
ü Device name and the pin to connect is available on
the interface
lt is required to turn on the function "Visible to all
nearby Bluetooth devices" on the mobile & then
the unit will be able to nd the mobile Bluetooth
device.
11
Page 12

Phone Feature
Dialing
After the mobile is connected to the unit successfully,
input a series of numbers via the numeric buttons on
the screen, and then tap the icon [ ] to make a call.
While dialing, if a wrong number was input, you may
tap the icon [ ] to delete one by one, or long-press the
icon [ ] to delete all. As is shown in below interface:
9821000000
You may also make a call via your mobile directly.
Tap the [ ] icon to activate Mute mode.
You may also hang up a call via your phone directly.
Answer a call
When there is an incoming call, the system will switch
to Bluetooth interface automatically
As shown in the interface below:
Å
View Call History
Tap the [ ] icon in Bluetooth interface to enter the call
history interface as shown below:
Touch the [ ] icon for Incoming call, [ ] Outgoing
call and [ ] Missed call.
View Phone Book
Touch the [ ] icon in Bluetooth mode to enter the
below interface.
Tap the [ ] icon to answer a call.
You may also answer or refuse a call via your mobile
directly.
Note: After Bluetooth is connected successfully, the
system will send a request message to the mobile
[Android would like to access your contacts and call
history. Give access to Android?] Press Yes on your
mobile, the unit will begin to download the phonebook;
After downloading successfully, the call history &
phonebook of the mobile will display on the unit.
12
Page 13

Play Music
Bluetooth Music Function
The Bluetooth music function allows user to directly
stream music stored on their mobile devices to the
radio.
Touch the [Blueto ot h m usic] i con to e nter the
following interface.
BT Music
Tap the icon [9] / [:] to play previous/next song.
Tap the icon [;] to switch between Pause/Play
USB data carrier
This device features 2 USB ports (Type A)at the Rear.
Basic information
Jamaica 970 comes equipped with 2 Rear USB ports
(Type A). The Hardwired USB port allows for quick
charging of portable devices (up to 2A) and the other
via a patch harness upto 1.5A.
For safety reasons, playback of movies and images on
the integrated monitor is allowed only while the
vehicle is parked and the handbrake is applied. The
BRAKE cable must be connected with the handbrake
connection of the vehicle (see Connection diagram at
the end of these instructions). Movie playback on a
Rear Seat Monitor is possible while driving.
Notes:
Ÿ Blaupunkt cannot guarantee awless function of
USB data carriers and microSD cards available in
the market.
Audio playback from USB
The principles of audio playback (MP3/WMA) from data
carriers are identical for all sources. Select the desired
source via the main menu. The device changes to the
desired source and the playback starts.
Depending on the model o f the mobile phone, you
may need to press start to play music les via your
mobile.
USB
The music formats supported by this unit include MP3,
M4A, WAV, AMR, WMA, OGG, AAC, MID etc.
USB
When playing a music le that is not supported, the
system will prompt "fail to play as the le format is not
supported". Touch the [Music] icon in the mai n
interface to enter below interface:
13
Page 14

Video playback from USB
Select the desired source from the main menu. The
device changes to the desired source and the playback
starts.
Important: Please do not watch video while driving.
Play Music
Pictures
You can view pictures saved in the USB and other
collaborative locations. Click on the [Pictures] icon to
launch this feature.
16
14
Page 15

PhoneLINK
PhoneLINK
Instructions on PhoneLINK
The PhoneLINK feature mirrors the phone screen on
the head unit. Please note PhoneLINK feature is
available for Android/iOS phones only for this model.
You can access apps, emails & messages while on the
go.
Touch the icon [PhoneLINK] on the main interface to
enter the interface below:
To activa te Pho neL INK pleas e fo llow deta ile d
instru ctions o n the n ex t page to turn on US B
debugging.
iPhone PhoneLINK operation
Ÿ Turn on the hotspot on the iPhone:
Ÿ Turn on the iPhone hotspot in [Settings], record the
hotspot name and password;
Ÿ Turn on WiFi in [Settings] on the unit, search the
iPhone hotspot, input password and connect.
Ÿ Open the Shortcuts control bar on the mobile, nd
Airplay - EC - Mirror to turn on Mirror switch and
connect.
Note: After the Mobile and the unit are connected
successfully, the unit will display the mobile screen.
PhoneLINK.: New PhoneLINK feature allows
you to connect your Android Smartphone to
this Blaupunkt. Touchscreen radio using your
mobile phone data cable.
Enjoy all functions & applications on your
Android phone via the in-dash radio.
Ÿ View your smartphone images on the radio
display
Ÿ Play music from your phone
Ÿ N av i ga t e w it h ou t to uc h in g yo ur
smartphone
Ÿ Access your phone contacts & apps
Ÿ Check your Email / Messages
'Check compatibility with your Android phone
before purchase.
15
Page 16

Please follow the below instructions to turn on debugging on your phone.
Some steps may be different on different phones please also refer to your mobile phone instruction manual.
1. Go to Settings
2. About Phone 3. Build Number
4. Tap on Build no for
6 to 8 times
7. Turn on Developer
Option
5 & 6. You will now see Developer mode activated
under Developer Option
8. Switch on USB Debugging,
Say OK to the message
9. USB debugging is
now ON
After the above connect the USB cable to radio & mobile
16
Page 17

SWC | File Explorer | AUX-in
SWC (Steering wheel control)
Steering wheel control allows you up to 8 functions
depending upon the number of control buttons in the
specic vehicle the device is being installed that can be
operated vi a existing stee ring w he el -m ount ed
controls. This requires assigning the desired function to
the buttons on the SWC.
Note: The SWC function operates with analog control
signals, depending on the vehicle type an additional
interface may be required.
Ÿ Select the SWC icon form the main interface
Ÿ Assign the desired function up to 8 placeholders
(Select any from 1 to 8)
Ÿ The assigned placeholder is identied by the check
mark and the selected function is identied by
placeholder number
Ÿ Repeat the steps to assign the additional function to
the SWC controls
Ÿ Thereafter assign the relevant placeholders to the
buttons of steering wheel-mounted controls
Ÿ Tap on 'Begin Learn' to start
Ÿ Pla cehol der 1 an d t he assigne d f unction are
displayed
Ÿ Press any button of the steering remote control for
approximately 1 second
Ÿ The displayed function is assigned to the button
being pressed
Ÿ Tap on the to assign the next function
Ÿ You can tap the to return to a previous function
and reassign if needed.
²
±
File Explorer
The 'File Explorer' icon on the main interface allows you
to browse the content of your les used on the device
The 'Classify' tab can help you quickly identify the les
you are looking for based on its classication. The
options available range from Apk, Image, Video, music
or any other type.
When you tap on the 'sd card' tab you get to see
content from the different folders you have. Select the
desired folder to access your les.
AUX in
AUX in Icon
Connect the video RCA to video input socket and the
audio RCA’s (L+R) to the audio input RCA’s, tap the icon
[AUX-IN] in the main inter face to enter AUX-IN
interface.
Warning: Do not watch Video while driving
17
Page 18

Settings
Settings
Setting
Under 'Settings,' you will nd a various settings which
you will need to access from time to time. Tap the icon
the explore and make the required settings.
General
Time
Sync from GPS: Turn on to activate & Synchronize
clock from GPS services.
Set date: Access to set the current date
Set time: Access to set the current time
Select time zone: Depending on the area of operation
of this unit, please select appropriate time zone
Use 24 hour format: Please select if you want to
display in 24 hours format
Volumes
Lighting:
Radio Region: Please select India as preferred region
of operation
Blackout: Turn on to blank out the screen. It helps
reduce the glare in the cabin will driving at night.
Beep Turn on to activate Beep function every time a
button or icon is touched
Video
Parking: Turn on to allow user to watch videos while
vehicle is in parked condition.
Volumes: Please select the source & adjust the overall
volume (gain). This function is to be used only to
balance the overall levels between various sources
18
Page 19

Settings
Network
WiFi: Show available networks & lets user pick the one
he / she desires.
Personal
Location: Turn on the location option to help get
better results.
Language & Input: Select from the language option.
Factory data reset: Access to reset device to factory
setting.
All data erase: Erase all data.
System
Device
Brigtness: Adjust overall brightness of the display.
19
Page 20

Useful information
Warranty
We provide a 2 year manufacturer's warranty for
products bo ught within t he India. For devices
purchased outside the India, the warranty terms issued
by our respective responsible domestic agency is valid.
Register ONLINE within 15 days of PURCHASE to
activate WARRANTY.
The procedure to activate the warranty is given below;
Thank you for buying Blaupunkt
Model: Palm Beach 550
Serial No.:
BP76103550000001
Please activate the e-warranty within 15 days of purchase.
To activate your e-warranty, please follow the below steps:
Service
If your device should need service or to get more
information about our local authorised service centers,
you can email us at
Email: Support@blaupunkt.in
OR
Call 1800 209 6820
SERIAL <space> <serial number> to 07760962759
Step 2. In response to the sent SMS, you should
E-user manual is available at www.blaupunkt.com
the link at the bottom on the page to download.
Step 1. Please send SMS
receive back a link via SMS, please Click on it
Step 3. Complete a simple form to register
your product & activate e-warranty.
or upon completion of registration, follow
Should you require further assistance,
please call: Customer Support 1800 209 6820
Thank You!!
20
Page 21

Connection Diagram
A
11121314151617181920
12345678910
20
C
12345678910111213141516171819
20
16
171819
B
123456789101112131415
Description
PIN NO
1
2
4
5
A
6
7
8
9
10
PIN NO
1
2
4
5
B
6
7
8
9
10
GND
FRONT L+
FRONT R+3
REAR L+
REAR R+
REVERSE
KEYA
ACC
KEYB
Description
AGND
RCA_FR
RCA_FL3
R_AUX_L
R_AUX_R
AUX_CVBS
VGND
CAMERA_CVBS
CAM_POWER
PIN NO
NC
PIN NO
GND
11
12
13
14
15
16
17
18
19
20
11
12
13
14
15
16
17
18
19
20
Description
B+
FRONT LFRONT R-
REAR LREAR R-
P_ANT
ILL
BRAKE
KEY_GND
NC
Description
USB2-
GND
USB2+
USB_5V
USB1-
USB1+
NC
NC
NC
NC
C
PIN NO
1
2
4
5
6
7
8
9
10
11
12
13
14
15
16
17
18
19
20
Description
MIC+
MIC-
V_OUT3
GND
RCA_RL
RCA_RR
NC
AGND
NC
NC
NC
NC
NC
NC
NC
NC
NC
NC
NC
NC
21
Page 22

Multimedia Support list
File Format
MPEG
AVI
RM
FLV
ASF/WMV
MP4
MKV
OGM
TS
File Format
Supported File Extension
.mpg, .mpeg, .dat, .vob, .m2v, .m1v
.avi, .xvid
.rm, .rmvb, .ra (audio only)
.v, .hlv
.asf, .wmv, .wma (audio only)
.mp4, .mov, .m4v, .3gp,
.m4a (audio only)
.webm, .mkv, .mka (audio only)
.ogm, .ogg (audio only)
.ts, .m2ts, .m2t, .tp, .trp
MP3
WAV
FLAC
APE
Supported Video Code
MPEG-1, MP EG-2 ,H.264
MPEG-1, MP EG-2, MPEG-4, H.264,
VC-1, MJPE G, H.263, Sorenson
RV30; RV40
H.264; Sorenson H263 PCM, MP3, A AC
MPEG-1, MPEG-2, MPEG-4,
H.264, H.263, VC-1
MPEG-1, MPEG-2, MPEG-4,
H.264, H.263, MJPEG
MPEG-1, MPEG-2, MPEG-4, H.264, RV,
H.263, MJPEG, VC-1, Sorenson H263
MPEG-2, MPEG-4, H.264, RV,
H.263, VC-1
MPEG-2, H.264, MPEG-4, VC-1 MPE G, MP3, AAC, PCM
Supported File Extension
.mp1, .mp2, .mp3
.wav, .pcm
.ac ac
.ape ape
Supported Audio Code
MPEG, PCM, MP3
MPEG, MP3, PCM,
WMA, AAC, FLAC
COOK, AAC
MP3, PCM, A AC, MPEG, WMA
AAC, MPEG, MP3, PCM
MP3, AAC, PCM,
MPEG, FL AC, VORBIS, WMA
MPEG, MP3, PCM, AAC,
COOK, VOBI S, WMA
Supported Audio Code
MPEG / MP3
PCM / Microsoft A DPCM / IMA ADPCM
22
Page 23

Blaupunkt India Private Limited
47, Atlanta Society, Nariman Point
Mumbai‐ 400 021. Maharashtra. India.
www.blaupunkt.com
 Loading...