

Page 1
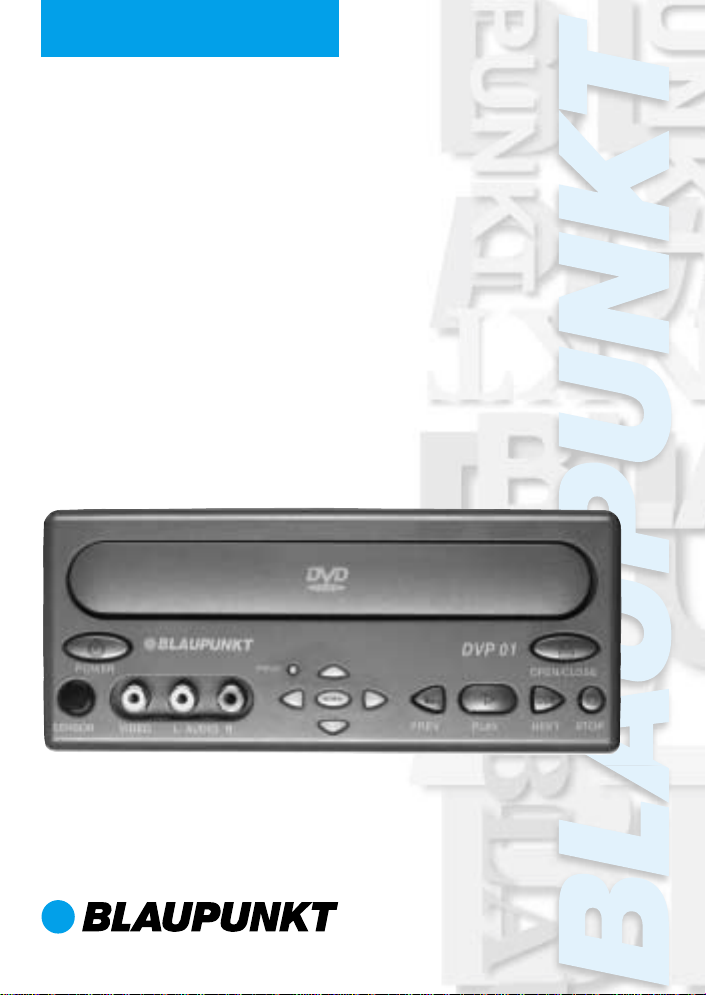
DVD-Player
DVP 01
Operating instructions
Page 2
30
1
29
28
27
2
21
24 23
7
8
18
15
19
26 14
31
32
33
34
35
2
Page 3
DEUTSCH
1
2
3
4
5
6
7
8
9
10
11
12
13
14
26
25
24
23
22
20
19
17
15
21
18
16
ENGLISCH
FRANÇAIS
ITALIANO
ESPAÑOL
PORTUGUÊS
NEDERLANDS
SVENSKA
NORGE
SUOMI
TÜRKÇE
3
Page 4

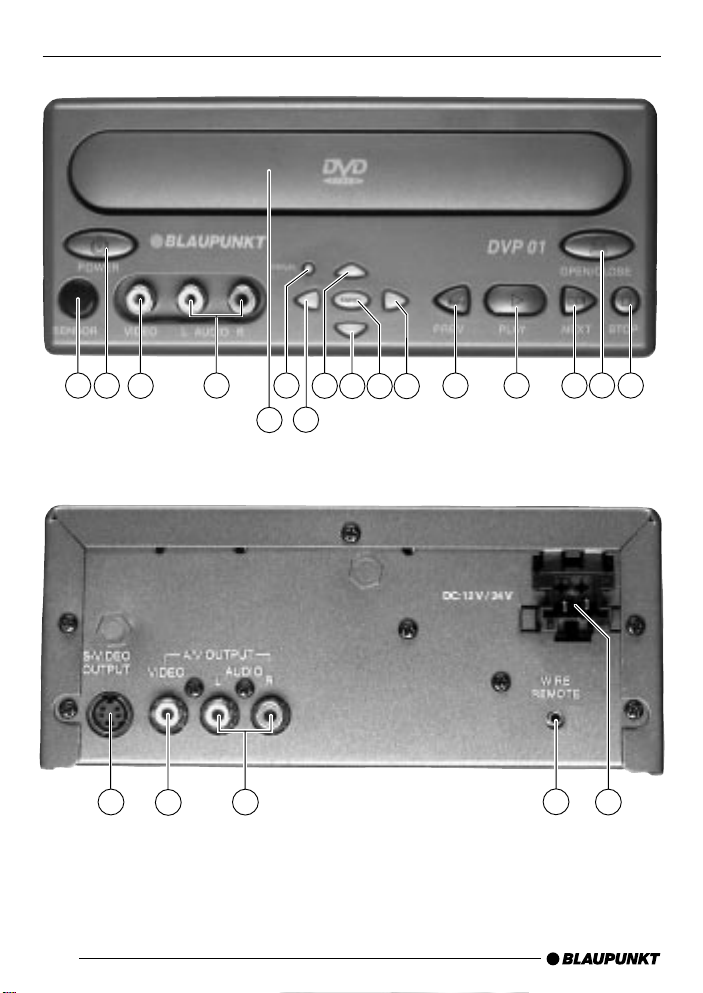
CONTROLS
1 POWER button - to switch the
unit on/off
2 DISPLAY button - to show/hide
the status bar on the monitor
3 ANGLE button - to select a cam-
era angle
4 SUBTITLE button - to select film
subtitles
5 AUDIO button - to select the film
language
6 ZOOM button - to enlarge a
screen section during playback
7
button - to move the selection
pointer in menus
8 button - to move the selection
pointer in menus
9 MENU button - to open a DVD’s
main menu
: RETURN button - to exit a menu
item in a menu
; A-B button - to mark a custom
sequence on a DVD
< SLOW button - to start/stop slow
motion
= PAUSE button - to pause play-
back
> STOP button - to stop playback
? PLAY button - to start playback
@
A button - to fast forward
B button - to skip to the start of
C
D REPEAT button - to repeat a
E
button - to fast rewind
the chapter
button - to skip to the start of
the next chapter
chapter or title of a film
button - to move the selection
pointer in menus
F SETUP button - to open the
setup menu of the DVP 01
G
button - to move the selection
pointer in menus
H ENTER button - to select menu
items
I 0-9 buttons - to enter numbers
J OPEN/CLOSE button - to open
and close the drive drawer
K Drive drawer
L AUDIO inputs - to connect an
external audio source
M VIDEO input - to connect an
external video source
N SENSOR - IR remote control
sensor
O S-VIDEO OUTPUT - S-VHS
output
P VIDEO output - to connect a
monitor
Q AUDIO outputs - to connect a
Blaupunkt audio system
R WIRE REMOTE - to connect a
cable remote control (option)
S DC 12V/24V input - to connect
the DVP 01 to a 12 V / 24 V voltage source
20
Page 5

CONTENTS
Information............................. 22
Road safety ................................... 22
Installation.............................. 22
Mounting ....................................... 22
Electrical connection ..................... 22
Audio / video connection ............... 23
Remote control ...................... 23
Inserting batteries .......................... 23
DVD - video technology of
the future ............................... 24
Basic functions ...................... 24
Switching on/off ............................ 24
Inserting a DVD ............................. 24
Removing a DVD ........................... 25
Playing a DVD ............................... 25
On-screen display ......................... 25
Fast forwarding and rewinding ...... 26
Slow motion .................................. 26
Stopping and resuming playback ... 26
Still image ..................................... 26
Skipping chapters ......................... 26
Playing a DVD title ......................... 27
Repeating chapters, titles or
sequences .................................... 27
Displaying subtitles / selecting
the language ................................. 27
Selecting the playback language.... 28
Enlarging a screen section............. 28
Changing the camera angle ........... 28
Setup menu ........................... 29
Opening the setup menu ............... 29
Selecting the language for
the on-screen display..................... 29
Selecting the playback language .... 29
Setting the subtitle language .......... 30
Setting the DVD menu language .... 30
Selecting the monitor settings ........ 31
Rating level / child lock .................. 31
Setting the colour television
standard of the TV unit .................. 33
DVD menu .............................. 34
Opening the DVD menu ................ 34
Selecting DVD menu items ............ 34
Closing the DVD menu .................. 34
Specifications ........................ 35
DEUTSCH
ENGLISCH
FRANÇAIS
ITALIANO
ESPAÑOL
PORTUGUÊS
NEDERLANDS
SVENSKA
21
NORGE
SUOMI
TÜRKÇE
Page 6
INFORMATION
INSTALLATION
Thank you for deciding to purchase a
Blaupunkt product. We hope you enjoy
using this new piece of equipment.
Before using the device, please read
these instructions carefully. The
Blaupunkt editors are constantly working on making the operating instructions
clearer and easier to understand. However, if you still have any questions on
how to operate the unit please contact
your dealer or the telephone hotline for
your country. You will find the hotline
telephone numbers printed at the back
of this booklet.
Road safety
Road safety has priority. Only
operate the unit if the road and traffic conditions allow you to do so . Familiarize yourself with the unit before
setting off on your journey.
You should always be able to hear
police, fire and ambulance sirens
from afar. For this reason, set the
volume of whatever you are listening to to a reasonable level.
Risk of injury. The DVP 01 is a
CLASS 1 laser product. Never look
at the laser beam. Never try looking
inside the unit’s housing. Nev er open
the unit’s housing.
Never expose the DVP 01 to direct sunlight or ambient temperatures over 80°C since this could result in damage to the DVP 01 and
the DVD.
Installation
Mounting
If you want to install the DVP 01 yourself, please use the supplied installation brackets. The DVP 01 can be installed in any position.
Note
Use the supplied screws when in-
stalling the DVP 01. Other screws
could damage parts inside the DVP
01.
Please make sure that the connected
cables are not squashed when installing the DVP 01.
If you install the player with its underside facing upwards, the DVD
may fall out when the drive compartment is opened.
Electrical connection
If the AMP plug that is required for the
voltage supply connection is not already
integrated in the Blaupunkt connection
cable (special accessory from the “Professional Line”), use the 4-pin AMP plug
and contacts that are included with the
player. When preparing the cable,
please make sure the polarity is correct.
Connect the cable to the voltage source
and insert the AMP plug into the DC
12 V/ 24 V S jack at the back of the
DVP 01.
22
Page 7

INSTALLATION REMOTE CONTROL
Audio / video connection
To connect the DVP 01 to your coach
system, use the cable that is available
from Blaupunkt (special accessories).
Connect the cable to the connections
Q at the back of the unit. Make sure
that the video and audio cables correspond with the unit’s jacks.
Remote control
The supplied infrared (IR) remote control gives you access to all of the unit’s
functions. The buttons located on the
front of the unit can be operated in the
same way and offer the same functions
as those on the IR remote control.
To ensure that the remote control functions properly , point the IR remote control at the IR sensor N when you want
to operate the controls.
Instead of the IR remote control, you
can also connect a Blaupunkt cable remote control (available from the standard product range) to the WIRE RE-
MOTE R connection at the back of the
unit. The cable remote control only offers a limited number of control functions.
Y ou can also control the main functions
of the DVP 01 using the Blaupunkt
BCA... control panel on the coach system.
Inserting batteries
The IR remote control requires two AA
type batteries to be able to work. They
are supplied with the unit.
➮ Open the battery compartment at
the back of the remote control.
➮ Insert the batteries in the battery
compartment as shown in the diagram.
➮ Close the battery compartment.
DEUTSCH
ENGLISCH
FRANÇAIS
ITALIANO
ESPAÑOL
PORTUGUÊS
NEDERLANDS
SVENSKA
NORGE
SUOMI
23
TÜRKÇE
Page 8

INTRODUCTION
BASIC FUNCTIONS
DVD - video technology of the future
DVD is not only a forward-pointing technology in the video area. After all, DVD
does stand for Digital “Versatile” Disc.
The DVD has the same format as a CD
or CD-ROM but can store up to 17
gigabytes of data. In comparison, a CDROM can only store 650 megabytes.
This kind of storage capacity is large
enough for high-quality audio and video
recordings - and for a few extras.
A DVD video does not just contain the
film itself, it also includes extras like the
trailer or the “making of”. The film can
also be watched in various languages
and with various subtitles. Y ou can conveniently access all of these functions
using the menu provided by the DVD.
Basic functions
You can also use the DVP 01 to play
standard audio CDs. However, these
operating instructions will only deal with
playing DVDs. The button functions for
playing audio CDs are the same as
those for DVDs.
The DVP 01 is equipped to play DVDs
with the country code 2. If the unit is
intended for use with other country
codes, you will be informed of this by a
sticker on the back of these operating
instructions and on the unit.
Switching on/off
To switch the unit on/off:
➮ Press the POWER button 1.
If the unit already contains a DVD when
you switch it on, the DVD’s menu will
appear automatically or playback will
begin. This depends on the DVD that is
inserted.
Inserting a DVD
➮ To insert a DVD, press the OPEN/
CLOSE button J.
The DVD drawer opens.
➮ Place the DVD with the printed
side uppermost in the drawer’s recess.
➮ Press the OPEN/CLOSE button J
again.
The DVD drawer is retracted. Either the
DVD’ s menu will now appear on-screen
or playback will begin. This depends on
the DVD that is inserted.
24
Page 9

BASIC FUNCTIONS
Removing a DVD
➮ Press the OPEN/CLOSE button
J.
The DVD drawer opens.
➮ Remove the DVD from the drawer.
To close the drawer again:
➮ Press the OPEN/CLOSE button J
again.
Playing a DVD
Once you insert the DVD in the unit, either the D VD’s menu will appear or pla yback will begin. This depends on the
DVD that is inser ted. After you have
selected (if need be) the playback language, follow the menu instr uctions
(“Start Film”).
➮ Press the PLAY button ?.
Playback begins.
On-screen display
At any time you can view the various
settings provided by the DVD and the
current device mode in an on-screen
display.
The information shown in the display
depends on the DVD that is inserted.
Some standard types of information are:
● T 1/3: The first of three titles on the
DVD is currently being played.
● C 7/23: The seventh of 23 chapters
on the DVD is currently being
played.
● T 01:07:12: One hour, seven min-
utes and twelve seconds of the
current title’s playing time have
elapsed.
The right edge of the on-screen display
contains symbols to display:
● Whether you made a selection
from the DVD menu.
● What mode the device is currently
in, e.g. playback, still image or slow
motion mode.
● Whether you tried to access a cer-
tain function that is not available for
the current device mode or the current DVD.
If the on-screen display is switched off ,
these symbols will be displayed briefly
when you operate a corresponding function.
Switching on the on-screen display
➮ Press the DISPLAY button 2.
The on-screen display will appear at the
top edge of the screen.
Note:
Certain DVDs provide more settings
than can be displayed in one go in the
on-screen display. You can browse
through all of the available settings by
repeatedly pressing the DISPLAY but-
ton 2.
If you access certain functions, the onscreen display will appear automatically .
You can switch off the display again
manually.
Switching off the on-screen display
➮ Keep pressing the DISPLAY button
2 until the on-screen display disappears.
25
DEUTSCH
ENGLISCH
FRANÇAIS
ITALIANO
ESPAÑOL
PORTUGUÊS
NEDERLANDS
SVENSKA
NORGE
SUOMI
TÜRKÇE
Page 10

BASIC FUNCTIONS
Fast forwarding and rewinding
Fast forwarding
T o fast f orward or super-fast f orward the
DVD:
➮ Press the button A once or
twice respectively.
Fast rewinding
To fast rewind or super-fast rewind the
DVD:
➮ Press the button @ once or
twice respectively.
Stopping fast forwarding /
rewinding
To stop fast forwarding / rewinding:
➮ Press the PLAY button ?.
The DVD will then be played at normal
speed.
Slow motion
You can slow down DVD playback.
➮ To reduce the playback speed,
press the SLOW button < once or
several times.
Every press of the button causes the
speed to be slowed down by half.
➮ If you press the SLOW button <
four times, you can slow down the
playback speed to a maximum of
one sixteenth of the normal playback speed.
To play a DVD at normal speed again:
➮ Press the PLAY button ?.
Stopping and resuming playback
Stopping playback
➮ Press the STOP button >.
Playback is interrupted.
Resuming playback
➮ Press the PLAY button ?.
Playback is resumed.
Still image
➮ Press the PAUSE button =.
Playback is interrupted and is frozen as
a still image.
Note:
Y ou can mov e forwards frame-b y-frame
by repeatedly pressing the PAUSE but-
ton =.
To continue playback, press the PLAY
button ?.
Skipping chapters
DVD titles may be divided into several
smaller chapters. To skip to the next or
any other subsequent chapter:
➮ Press the button C once or
several times.
Playback will skip to the start of the next
or another subsequent chapter accordingly.
To skip to the start of the current or a
previous chapter:
➮ Press the button B once or
several times.
26
Page 11

BASIC FUNCTIONS
Playback will skip to the start of the current or another previous chapter accordingly.
Playing a DVD title
DVDs are divided into various titles,
which can be chosen individually.
Repeating chapters, titles or sequences
Repeating chapters or titles
➮ Press the REPEAT button D to
repeat the current chapter.
➮ Press the REPEAT button D a
second time to repeat the entire title.
Repeating custom sequences
➮ Whilst the DVD is playing, press
the A-B button ; to mark the start
of the sequence.
➮ Press the A-B button ; a second
time to mark the end of the sequence.
The sequence that you selected will be
played again.
Stopping repeat mode
➮ Press the PLAY button ? to stop
repeating the chapter, title or custom sequence.
Normal playback will then resume.
➮ To hide the menu item, press the
DISPLAY button 2.
Resuming playback from the
beginning of the first title on the
DVD
➮ Press the STOP button > twice.
➮ Press the PLAY button ?.
Playback will resume from the beginning of the title.
Displaying subtitles / selecting the language
To display subtitles:
➮ Press the SUBTITLE button 4.
Subtitles will be displayed. The onscreen display appears. The current language and the number of available languages will be displayed next to the
subtitle symbol.
To change the subtitle language:
➮ Press the SUBTITLE button 4
once or several times until subtitles
appear in the required language.
Note:
You can also use the DVD menu to
switch subtitles on/off or select the language in which they are displayed (see
DVD menu).
DEUTSCH
ENGLISCH
FRANÇAIS
ITALIANO
ESPAÑOL
PORTUGUÊS
NEDERLANDS
SVENSKA
NORGE
SUOMI
27
TÜRKÇE
Page 12

BASIC FUNCTIONS
Selecting the playback language
To select the playback language:
➮ Press the AUDIO button 5 once
or several times.
The playback language changes. The
on-screen display appears. The current
language, the language number and the
number of available playback languages will be displayed next to the
loudspeaker symbol.
Note:
You can also use the DVD menu to
change the playback language (see
DVD menu).
Enlarging a screen section
Y ou can enlarge a section of the screen
in two steps up to four times its normal
size.
To enlarge a screen section twofold:
➮ Press the ZOOM button 6 once.
To enlarge a screen section fourfold:
➮ Press the ZOOM button 6 a sec-
ond time.
The screen section will be displayed in
the lower left corner of the full screen.
Scroll bars will be displayed at the lower
left of the screen indicating the position
of the displayed screen section in relation to the full screen.
T o mov e the screen section horizontally
and vertically within the full screen:
➮ Press the 8/ G or 7/
E button.
Changing the camera angle
Some DVDs provide two or more different camera angles for the same
scene.
The number of the current camera angle and the number of possible camera
angles is displayed next to the camera
symbol in the on-screen display.
To change the camera angle:
➮ Press the ANGLE button 3.
The scene will be displayed from the
next camera angle. The on-screen display will appear.
Note:
If no additional camera angles are available, the
symbol will appear briefly.
28
Page 13

SETUP MENU
Setup menu
Y ou can configure the D VD pla yer in the
setup menu.
Opening the setup menu
If there is a DVD playing in the unit, stop
it playing.
➮ Press the STOP button >.
To open the SETUP menu:
➮ Press the SETUP button F.
Note:
If you interrupted playback in order to
access the SETUP menu, you can
resume playback when you close the
SETUP menu by pressing the PLAY
button ?.
Selecting the language for the on-screen display
Open the SETUP menu.
➮ Press the 7/ E buttons to
select the “LANGU AGE” menu
item.
➮ Confirm your choice by pressing
the ENTER button H.
The language menu appears. The current language will be displayed next to
the “OSD LANGU AGE” menu item.
If you want to set another language:
➮ Press the 7/ E buttons to
select the “OSD LANGUA GE”
menu item.
➮ Confirm your choice by pressing
the ENTER button H.
The languages that are available f or the
on-screen display will appear.
➮ Press the 7/ E buttons to
select the required language.
➮ Confirm your choice by pressing
the ENTER button H.
You will return to the languages menu.
Your chosen language will now appear
next to the “OSD LANGUAGE” menu
item.
➮ Press the RETURN button : to
return to the SETUP menu
➮ Press the RETURN button : a
second time to close the SETUP
menu.
Selecting the playback language
➮ Open the SETUP menu.
➮ Press the 7/ E buttons to
select the “LANGU AGE” menu
item.
➮ Confirm your choice by pressing
the ENTER button H.
The language menu appears. The current language will be displayed next to
the “AUDIO” menu item.
If you want to set another language:
➮ Press the 7/ E buttons to
select the “A UDIO” menu item.
➮ Confirm your choice by pressing
the ENTER button H.
The available playback languages will
appear.
➮ Press the 7/ E buttons to
select the required language.
DEUTSCH
ENGLISCH
FRANÇAIS
ITALIANO
ESPAÑOL
PORTUGUÊS
NEDERLANDS
SVENSKA
NORGE
SUOMI
29
TÜRKÇE
Page 14

SETUP MENU
Confirm your choice by pressing the
ENTER button H.
You will return to the languages menu.
Your chosen language will now appear
next to the “AUDIO” menu item.
➮ Press the RETURN button : to
return to the SETUP menu
➮ Press the RETURN button : a
second time to close the SETUP
menu.
Setting the subtitle language
Open the SETUP menu.
➮ Press the 7/ E buttons to
select the “LANGU AGE” menu
item.
➮ Confirm your choice by pressing
the ENTER button H.
The language menu appears. The current language will be displayed next to
the “SUBTITLE” men u item.
If you want to set another language:
➮ Press the 7/ E buttons to
select the “SUBTITLE” menu item.
➮ Confirm your choice by pressing
the ENTER button H.
The available subtitle languages will
appear.
➮ Press the 7/ E buttons to
select the required language.
➮ Confirm your choice by pressing
the ENTER button H.
You will return to the languages menu.
Your chosen language will now appear
next to the “SUBTITLE” menu item.
➮ Press the RETURN button : to
return to the SETUP menu
➮ Press the RETURN button : a
second time to close the SETUP
menu.
Setting the DVD menu language
Open the SETUP menu.
➮ Press the 7/ E buttons to
select the “LANGU AGE” menu
item.
➮ Confirm your choice by pressing
the ENTER button H.
The language menu appears. The current language will be displayed next to
the “MENU LANGUA GE” menu item.
If you want to set another language:
➮ Press the 7/ E buttons to
select the “MENU LANGU A GE”
menu item.
➮ Confirm your choice by pressing
the ENTER button H.
The languages that are available for the
DVD menu will appear.
➮ Press the 7/ E buttons to
select the required language.
➮ Confirm your choice by pressing
the ENTER button H.
You will return to the languages menu.
Your chosen language will now appear
next to the “MENU LANGUAGE” menu
item.
30
Page 15

SETUP MENU
➮ Press the RETURN button : to
return to the SETUP menu.
➮ Press the RETURN button : a
second time to close the SETUP
menu.
Selecting the monitor settings
➮ Open the SETUP menu.
The currently selected monitor setting
will be displayed next to the “TV
SCREEN” menu item
If you want to set another monitor setting:
➮ Press the 7/ E buttons to
select the “TV SCREEN” men u
item.
➮ Confirm your choice by pressing
the ENTER button H.
The available monitor settings will appear:
● 4:3 LETTERBOX: The DVD player
is connected to a 4:3 monitor. A
widescreen picture will cover the
entire width of the monitor and
black bars will appear at the top
and bottom edges of the screen.
● 4:3 PAN-SCAN: The DVD player is
connected to a 4:3 monitor. A
widescreen picture will cover the
entire height of the monitor and the
left and right edges of the picture
will be cut automatically.
● 16:9 WIDE: The DVD player is
connected to a 16:9 monitor. The
widescreen picture will be displayed fully on the screen.
➮ Press the 7/ E buttons to
select the required monitor setting.
➮ Confirm your choice by pressing
the ENTER button H.
Y ou will return to the SETUP menu. Y our
chosen settings will now appear next to
the “TV SCREEN” menu item.
➮ Press the RETURN button : to
close the SETUP menu.
Rating level / child lock
You can password protect the unit
against unauthorised use. You can also
specify a “rating level”. “Rating level”
in this case means that certain DVDs
include a code that sets the minimum
age limit for persons viewing that
particular DVD. If you set a rating level
that lies below the rating level for the
DVD that is inserted in the drive, you
will only be able to play the DVD after
you have entered a password.
Note:
Not all DVDs support the rating level
function.
The following list explains the rating level
numbering system:
Level 1: DVD playback is blocked.
Level 2-7: DVDs suitable for children
can be played. All others
are blocked.
Level 8: All DVDs can be played.
DEUTSCH
ENGLISCH
FRANÇAIS
ITALIANO
ESPAÑOL
PORTUGUÊS
NEDERLANDS
SVENSKA
NORGE
SUOMI
31
TÜRKÇE
Page 16

SETUP MENU
Note:
Some DVDs will allow you to unlock
locked DVDs directly at the start with
YES (ENTER) and the password. In the
case of other DVDs, you will first have
to change the rating level in the SETUP
menu before playing the DVD. This depends on the DVD that is inserted.
Setting the rating level
To set the rating level:
➮ Open the SETUP menu.
➮ Press the 7/ E buttons to
select the “RATING LEVEL” menu
item.
➮ Confirm your choice by pressing
the ENTER button H.
Y ou will be ask ed to enter the password.
If you have not set a password yet:
➮ Enter 7890 using the numerical
keypad 0-9 I,
Note:
The 7890 code is always valid and can
be used if ever you forget the password.
➮ Confirm your choice by pressing
the ENTER button H.
➮ Press the 7/ E buttons to
select the required rating level 1 ...
8.
➮ Confirm your choice by pressing
the SETUP button F.
Changing the password
To change the password:
➮ Open the SETUP menu.
➮ Press the 7/ E buttons to
select the “RATING LEVEL” menu
item.
➮ Confirm your choice by pressing
the ENTER button H.
Y ou will be asked to enter the pass word.
If you have not set a password yet:
➮ Enter 7890 using the numerical
keypad 0-9 I,
Note:
The 7890 code is always valid and can
be used if ever you forget the password.
➮ Confirm your choice by pressing
the ENTER button H.
➮ Press the 7/ E buttons to
select the “CHANGE PWD” men u
item.
➮ Confirm your choice by pressing
the ENTER button H.
Y ou will be asked to enter the ne w pass-
word.
➮ Enter the new password using the
numerical keypad 0-9 I,
➮ Confirm your choice by pressing
the ENTER button H.
32
Page 17

SETUP MENU
Setting the colour television standard of the TV unit
To ensure an optimum picture quality,
set the colour television standard that
is used by the monitor connected to the
DVD player.
➮ Open the SETUP menu.
➮ Press the 7/ E buttons to
select the “CUSTOM SETUP”
menu item.
➮ Confirm your choice by pressing
the ENTER button H.
“TV SYSTEM” appears on-screen. The
currently set colour television standard
“PAL” or “NTSC” will be displayed next
to “TV SYSTEM”.
PAL is the standard that is valid in Europe, and NTSC is the standard that is
valid in America and Asia.
Note:
If you set a standard that is not supported by your monitor, it may not be
able to display a picture.
➮ If you want to set another standard
press ENTER H.
The available television standards will
appear.
➮ Press the 7/ E buttons to
select the colour television standard used by the monitor .
Confirm your choice by pressing the
ENTER button H.
“TV SYSTEM” appears on-screen again
alongside the selected standard.
➮ Press the RETURN button : to
return to the SETUP menu
➮ Press the RETURN button : a
second time to close the SETUP
menu.
DEUTSCH
ENGLISCH
FRANÇAIS
ITALIANO
ESPAÑOL
PORTUGUÊS
NEDERLANDS
SVENSKA
NORGE
SUOMI
33
TÜRKÇE
Page 18

DVD MENU
DVD menu
The D VD menu is provided b y the D VD
that is inserted in the player. When you
insert and play a DVD, the DVD menu
will automatically appear on-screen.
Note:
The type of options offered in the
DVD menu depends on the particular DVD.
As an example, a DVD VIDEO may offer the following options in its DVD
menu:
● You can choose between various
languages for playback and subtitles.
● Besides the actual film, you can
also watch the trailer that ran in
cinemas or on the TV to promote
the film, and you can watch the
film’s “making of”.
● A film is divided into several con-
secutive chapters. You can select a
chapter and start playback from
that point without having to fast forward to that particular point in the
film as you would have to do if you
were watching a video cassette.
Selecting DVD menu items
➮ Press the buttons to se-
lect the required menu item in the
DVD menu.
➮ Confirm your choice by pressing
the ENTER button H.
➮ After confirming your choice, the
submenu will open. You can then
use the
and ENTER H buttons to make
your selection.
8/ G or 7/ E
Closing the DVD menu
If you choose a menu item in the DVD
menu (e.g. the option to play the film),
the DVD menu will close automatically
and playback will begin.
If you did not choose anything in the
DVD menu:
➮ Press the RETURN button :.
You will return to the mode that the unit
was in when you opened the DVD
menu. If, for instance, you opened the
DVD menu whilst watching a film, the
film will resume playing from that particular point.
Opening the DVD menu
➮ Press the MENU button 9.
The DVD menu appears on-screen.
Note:
You do not have to interrupt playback
to be able to open the DVD menu.
34
Page 19

SPECIFICATIONS
Specifications
Operating voltage: 12 V/ 24 V
Pow er consumption: ≤20 W att
Current consumption:
In operation: 800 mA
During standby: 50 mA
Operating
temperature: -15°C to +60°C
Air humidity: 10% to 90%
Laser: 650 nm
Colour standards: PAL and NTSC
Video resolution:
720 pixels horiz. x 576 pixels vertic.
720 pixels horiz. x 480 pixels vertic.
Frequency ranges
Video: 5 MHz / - 2 dB
Audio: 20 Hz - 20 kHz
Video output level: 1 Vss, 75 Ω
Audio output level: 2 Veff, 100 Ω
Weight: 2.3 kg
DEUTSCH
ENGLISCH
FRANÇAIS
ITALIANO
ESPAÑOL
PORTUGUÊS
NEDERLANDS
Dimensions: 170 x 73 x
245 mm
Subject to changes
SVENSKA
NORGE
SUOMI
TÜRKÇE
35
 Loading...