

Page 1
In Car Video
DVP 01C
Operating instructions
Page 2
30
1
29
28
27
2
21
24 23
7
18
15
19
26 14
8
31
32
33
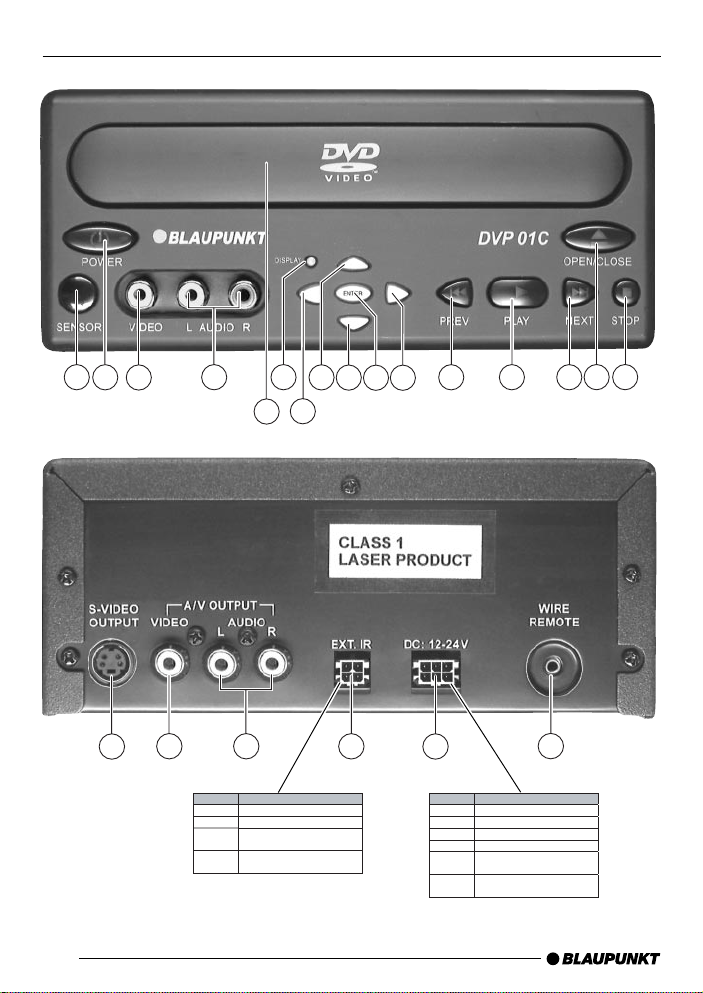
Pin
1 +VCC (I
2IR-dat
3Ground ( IR signal and cable
4Signal (cable remote
R)
a
remote control
l)
contro
)
34
35 36
Pin
1 –
ound
2Gr
a
3IR-dat
4 12V-
24V
5Ground ( IR signal and cable
remote control
6Signal (cable remote
contro
)
l)
2
Page 3
DEUTSCH
1
2
3
4
5
6
7
8
9
10
11
12
13
14
26
25
24
23
22
20
19
17
15
21
18
16
ENGLISH
FRANÇAIS
ESPAÑOL
PORTUGUÊS
ITALIANO
NEDERLANDS
SVENSKA
3
NORGE
SUOMI
TÜRKÇE
Page 4

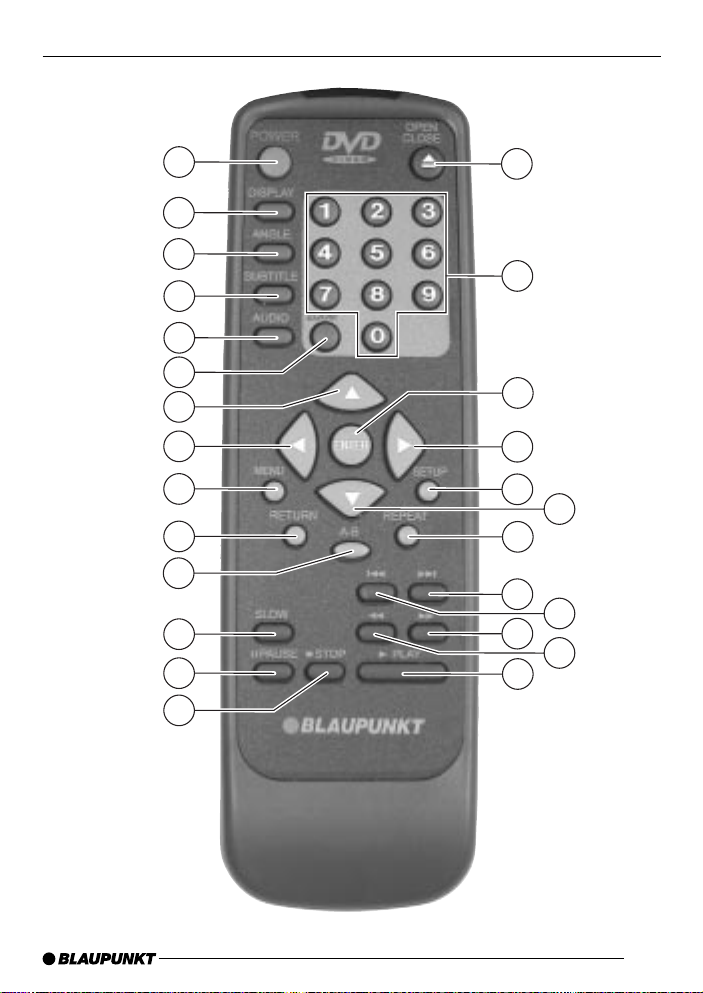
CONTROLS
1 POWER button, to switch the
unit on/off
2 Display button, to display/hide
the status bar on the monitor
3 ANGLE button, to select a cam-
era angle
4 SUBTITLE button, to select film
subtitles
5 AUDIO button, to select the film
language
6 ZOOM button, to enlarge a
screen section during playback
7
button, to move the selection
marker in menus
button, to move the selection
8
marker in menus
9 MENU button, to open a DVD’s
main menu
: RETURN button, to exit a menu
item in a menu
; A-B button, to mark a custom
sequence on a DVD
< SLOW button, to start/stop slow
motion
= PAUSE button, to pause play-
back
> STOP button, to stop playback
? PLAY button, to start playback
@
button, to fast rewind
A button, to fast forward
B
button, to skip to the begin-
ning of the chapter
C
button, to skip to the begin-
ning of the next chapter
D REPEAT button, to repeat a
chapter or a title in a film
button, to move the selection
E
marker in menus
F SETUP button, to open the
setup menu of the DVP 01C
button, to move the selection
G
marker in menus
H ENTER button, to select menu
items
I 0-9 buttons, to enter numbers
J OPEN/CLOSE button, to open
and close the drive tray
K Drive tray
L AUDIO inputs, to connect an ex-
ternal audio source
M VIDEO input, to connect an ex-
ternal video source
N SENSOR, IR remote control
sensor
O S-VIDEO OUTPUT, S-VHS out-
put
P VIDEO output, to connect a
monitor
Q AUDIO outputs, to connect a
Blaupunkt audio system
R EXT. IR, to connect an external
IR sensor (optional)
S DC 12V/24V input, to connect
the DVP 01C to a 12 V/24 V
voltage source
T WIRE REMOTE, to connect a
wire remote control (optional)
DEUTSCH
ENGLISH
FRANÇAIS
ESPAÑOL
PORTUGUÊS
ITALIANO
NEDERLANDS
SVENSKA
NORGE
SUOMI
19
TÜRKÇE
Page 5

CONTENTS
Information............................. 21
Road safety ................................... 21
Installation.............................. 22
Mounting ....................................... 22
Electrical connection ..................... 22
Audio / video connection ............... 22
Remote control ...................... 22
Inserting batteries .......................... 22
DVD – video technology of
the future ............................... 23
Main functions........................ 23
Switching on/off ............................ 23
Inserting DVDs .............................. 23
Ejecting DVDs ............................... 24
Starting playback ........................... 24
On-screen display ......................... 24
Fast forward/reverse ..................... 24
Slow motion .................................. 25
Pausing and resuming playback ..... 25
Still image ..................................... 25
Skipping chapters ......................... 25
Repeating chapters, titles or
sequences .................................... 26
Resuming playback from the
beginning of the first title on
the DVD ........................................ 26
Displaying subtitles / selecting
the language ................................. 26
Selecting the playback language.... 27
Magnifying a screen section .......... 27
Changing the camera angle ........... 27
Setup menu ........................... 28
Opening the setup menu ............... 28
Selecting the playback language.... 28
Selecting the subtitle language ...... 28
Selecting the DVD menu language 28
Selecting the monitor settings ........ 29
Parental lock ................................. 29
Setting the colour television
standard of the TV set ................... 31
Displaying the camera angle .......... 31
DVD menu .............................. 32
Opening the DVD menu ................ 32
Selecting menu items in the
DVD menu .................................... 32
Closing the DVD menu .................. 32
CD and MP3 mode ................. 33
Specifications ........................ 33
20
Page 6
INFORMATION
Thank you for choosing a Blaupunkt
product. We hope you enjoy using this
new piece of equipment.
Please read these operating instructions
before using the equipment for the first
time. The Blaupunkt editors are constantly working on making the operating instructions clearer and easier to
understand. However, if you still have
any questions on how to operate the
equipment, please contact your dealer
or the telephone hotline for your country. You will find the telephone numbers
in the enclosed list of customer service
centres.
We provide a manufacturer guarantee
for our products bought within the European Union. The guarantee conditions
are provided in the enclosed list of customer service centres and on the
Internet at www.blaupunkt.com.
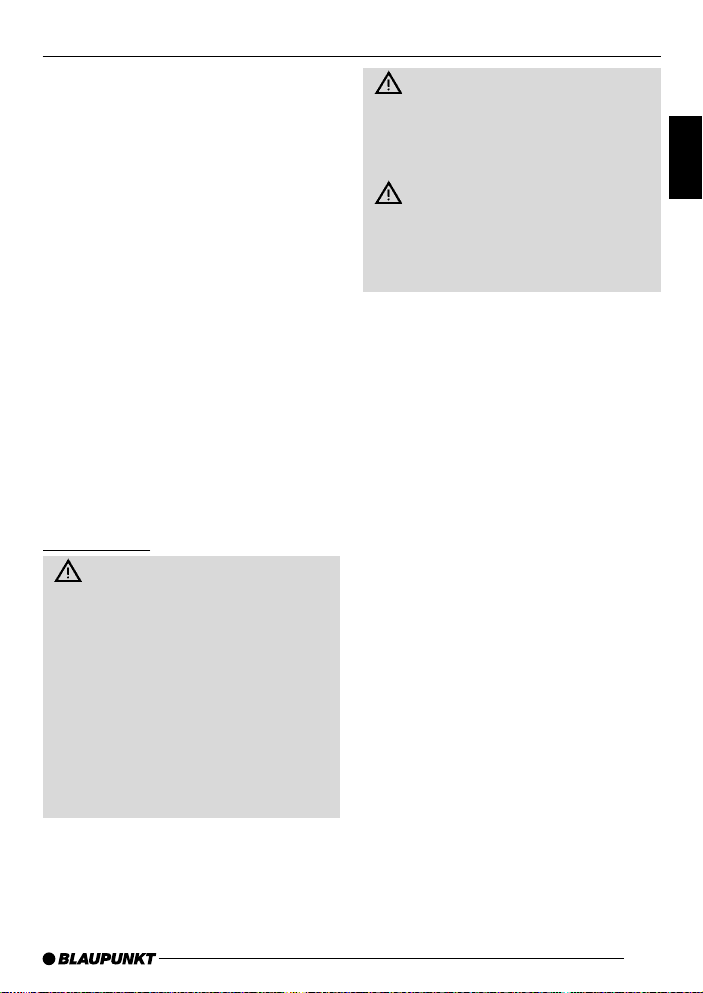
Road safety
Road safety has absolute priority. Only operate the device if the road
and traffic conditions allow you to do
so. Familiarise yourself with the device before setting off on your journey.
You should always be able to hear
police, fire and ambulance sirens
from afar. For this reason, set the
volume of whatever you are listening to during your journey to a reasonable level.
Risk of injury. The DVP 01C is a
CLASS 1 laser product. Never look
at the laser beam. Never try looking
inside the unit’s housing. Never open
the unit’s housing.
Never expose the DVP 01C to
direct sunlight or ambient temperatures over 80°C, since this could result in damage to the DVP 01C and
the DVD.
DEUTSCH
ENGLISH
FRANÇAIS
ESPAÑOL
PORTUGUÊS
ITALIANO
NEDERLANDS
SVENSKA
NORGE
21
SUOMI
TÜRKÇE
Page 7

INSTALLATION
REMOTE CONTROL
Installation
Mounting
If you want to install the DVP 01C yourself, please use the supplied installation brackets.
Notes:
Use the supplied screws to secure
the unit. Using other screws could
damage components inside the DVP
01C.
Please make sure that the connection cables are not squashed when
installing the unit.
Electrical connection
If the plug for connecting the voltage
supply is not already integrated in the
Blaupunkt connecting cable (special
accessory from the “Professional Line”),
use the 6-pin Molex plug and contacts
that are included.
When preparing the cable, please make
sure the polarity is correct. Connect the
cable to the voltage source and plug the
Molex connector into the 12 V/ 24 V S
jack at the back of the DVP 01C.
Audio / video connection
To connect the DVP 01C to your coach
system, use the cables available from
Blaupunkt (special accessories). Connect the cables to the connections P
and Q at the back of the unit. Make
sure that the video and audio cables
correspond with the unit’s jacks.
22
Remote control
The supplied infrared (IR) remote control
gives you access to all of the unit’s functions. The buttons located on the front of
the unit are labelled the same way and
offer the same functions as those on the
IR remote control. To ensure that the remote control functions properly, point the
IR remote control at the IR sensor N
when you want to operate the controls.
If you install the DVP 01C in a concealed
place and want to operate it using the IR
remote control, you can install an external IR receiver (special accessory) in a
clearly visible location in the vehicle and
connect it to the EXT. IR R connection
on the back of the unit.
Instead of the IR remote control, you can
also connect a Blaupunkt wire remote
control (available from the standard product range) to the WIRE REMOTE T con-
nection at the back of the unit. The wire
remote control only offers a limited range
of control functions.
You can also operate the main functions
of the DVP 01C using a Blaupunkt BCA/
CPA … control panel from the coach system.
Inserting batteries
The IR remote control requires two AAtype batteries to operate. They are supplied with the unit.
➮ Open the battery compartment at
the back of the remote control.
➮ Insert the batteries as shown in the
diagram inside the battery compartment.
➮ Close the battery compartment.
Page 8

INTRODUCTION
MAIN FUNCTIONS
DVD – video technology of
the future
DVD has not only become established
as a forward-pointing technology in the
area of video. After all, DVD does stand
for Digital “Versatile” Disc. DVDs have
the same format as audio CDs or CDROMs but can store up to 17 gigabytes
of data. In comparison, a standard CDROM can only store 650 megabytes.
This kind of storage capacity is large
enough for high-quality audio and video
recordings – and for a few extras.
A DVD video does not just contain the
film itself, it also includes extras like the
trailer or the “making of”. The film can
also be watched in various languages
and with various subtitles. You can conveniently access all of these functions
using the DVD’s own menu.
Main functions
You can also use the DVP 01C to play
DVDs, VCDs and SVCDs that conform
to the standards (not XSVCDs), as well
as normal audio CDs and MP3-CDs.
These operating instructions refer to
usage with DVDs. The button functions
for playing audio CDs are the same.
The DVP 01C is designed to play DVDs
with regional code 2. If the device is
designed for use with other regional
codes, labels at the back of these instructions and on the device will inform
you of this (1=US).
Switching on/off
To switch the unit on/off,
➮ press the POWER button 1.
If the unit already contains a DVD when
you switch it on, the DVD’s menu will
appear automatically or playback will
begin. This depends on the DVD that is
inserted.
Inserting DVDs
➮ To insert a DVD, press the OPEN/
CLOSE button J.
The DVD compartment tray opens.
➮ Place the DVD with the printed
side uppermost in the tray’s recess.
➮ Press the OPEN/CLOSE button J
again.
The DVD compartment tray slides shut.
The DVD’s menu will now appear onscreen or playback will begin. This depends on the DVD that is inserted.
DEUTSCH
ENGLISH
FRANÇAIS
ESPAÑOL
PORTUGUÊS
ITALIANO
NEDERLANDS
SVENSKA
NORGE
SUOMI
23
TÜRKÇE
Page 9

MAIN FUNCTIONS
Ejecting DVDs
➮ Press the OPEN/CLOSE button
J.
The DVD compartment tray opens.
➮ Remove the DVD from the tray.
To close the tray again,
➮ press the OPEN/CLOSE button J
again.
Starting playback
Once you have inserted the DVD in the
device, the DVD menu appears or playback begins. This depends on the DVD
that is inserted.
After you have selected (if required) the
playback language, follow the menu instructions (“Start Film”).
➮ Press the PLAY button ?.
Playback begins.
On-screen display
At any time you can view the various
settings provided by the DVD and the
current device mode in an on-screen
display.
The actual information shown in the display depends on the DVD that is inserted.
Some standard items of information are,
for instance:
● T 1/3: The first of three titles on the
DVD is currently being played.
● C 7/23: The seventh of 23 chapters
on the DVD is currently being
played.
● T 01:07:12: One hour, seven min-
utes and twelve seconds of the
current title’s playing time have
elapsed.
Activating the on-screen display
➮ Press the DISPLAY button 2.
The on-screen display is shown at the
top edge of the screen.
Note:
Certain DVDs provide more settings
than can be displayed in one go in the
on-screen display. You can browse
through all of the available settings stepby-step by repeatedly pressing the DIS-
PLAY button 2.
If you access certain functions, the onscreen display will appear and disappear again automatically. You can deactivate the display again manually.
Hiding the on-screen display
➮ Press the DISPLAY button 2 re-
peatedly until the on-screen display
disappears.
Fast forward/reverse
You can fast search DVDs at twice, four
times, six times and eight times the normal playing speed.
Fast-forwarding
To fast forward or super-fast forward the
DVD,
➮ press the button A repeatedly
until the film is displayed at the required speed.
24
Page 10

MAIN FUNCTIONS
Fast-rewinding
To fast rewind or super-fast rewind the
DVD,
➮ press the button @ repeatedly
until the film is displayed at the required speed.
Stopping fast forwarding/rewinding
To stop fast forwarding/rewinding,
➮ press the PLAY button ?.
The DVD will then be played at normal
speed.
Slow motion
You can slow down playback of the DVD
to half, a quarter or an eighth of the normal playback speed.
➮ To decrease the playback speed,
press the SLOW button < once or
several times.
Every press of the button causes the
speed to be slowed down by half.
➮ If you press the SLOW button <
three times, you can slow down the
playback speed to a maximum of
one eighth of the normal playing
speed.
To play the DVD at normal speed again,
➮ press the PLAY button ?.
Pausing and resuming playback
Pausing playback
➮ Press the STOP button >.
Playback is paused.
Resuming playback
➮ Press the PLAY button ?.
Playback is resumed.
Still image
➮ Press the PAUSE button =.
Playback is paused and is frozen as a
still image.
To continue playback, press the PAUSE
= or PLAY button ?.
Skipping chapters
Titles on a DVD may be divided into
several smaller chapters.
To skip to the next or any other subsequent chapter,
➮ press the button C once or
several times.
Playback will skip to the beginning of
the next or another subsequent chapter accordingly.
To skip to the beginning of the current
or a previous chapter,
➮ press the button B once or
several times.
Playback will skip to the beginning of
the current or another previous chapter
accordingly.
DEUTSCH
ENGLISH
FRANÇAIS
ESPAÑOL
PORTUGUÊS
ITALIANO
NEDERLANDS
SVENSKA
NORGE
SUOMI
25
TÜRKÇE
Page 11

MAIN FUNCTIONS
Repeating chapters, titles or
sequences
Repeating chapters or titles
(REPEAT)
➮ Press the REPEAT button D to
repeat the current chapter.
➮ Press the REPEAT button D a
second time to repeat the entire
title.
Cancelling REPEAT
➮ Press the REPEAT button D re-
peatedly until “REPEAT OFF” appears in the display.
Repeating custom sequences
➮ Whilst the DVD is playing, press
the A-B button ; to mark the beginning of the sequence.
➮ Press the A-B button ; once
more to mark the end of the sequence.
The sequence that you selected will
be repeated.
Cancelling repeating the sequence
➮ Press the A-B button ; to cancel
repeating the marked sequence.
Normal playback is then resumed.
Resuming playback from the
beginning of the first title on the
DVD
➮ Press the STOP button > twice.
➮ Press the PLAY button ?.
Playback will resume from the beginning of the DVD.
Displaying subtitles / selecting
the language
To display subtitles,
➮ Press the SUBTITLE button 4.
Subtitles are displayed. The on-screen
display appears. The current language
and the number of available subtitle languages are displayed.
To change the subtitle language,
➮ press the SUBTITLE button 4
once or several times until subtitles appear in the required language.
Note:
You can also use the DVD menu to
switch subtitles on/off or to select the
language in which they are displayed
(see DVD menu).
Deactivating subtitles
➮ Press the SUBTITLE button 4
repeatedly until ”SUBTITLE OFF”
appears.
26
Page 12

MAIN FUNCTIONS
Selecting the playback language
To select the playback language,
➮ press the AUDIO button 5 once
or several times.
The playback language changes. The
on-screen display appears. The current
language, the language number and the
number of available playback languages are displayed.
Note:
You can also use the DVD menu to
change the playback language (see
DVD menu).
Magnifying a screen section
You can magnify a section of the
screen in three steps up to four times
its normal size.
To magnify a screen section to one and
a half times its size,
➮ press the ZOOM button 6 once.
To magnify a screen section to twice
its size,
➮ press the ZOOM button 6 a sec-
ond time.
To magnify a screen section to four
times its size,
➮ press the ZOOM button 6 three
times.
To move the screen section horizontally and vertically over any part of the
picture,
➮ press one of the 8/ G or
7/ E buttons.
Changing the camera angle
Some DVDs provide two or more different camera angles for the same
scene.
The number of the current camera angle and the number of possible camera angles is displayed next to the camera symbol in the on-screen display.
To change the camera angle,
➮ press the ANGLE button 3.
The scene will be displayed from the
next camera angle. The on-screen display appears.
Note:
In the setup menu, you can configure
the system to display a camera symbol whenever additional camera angles
are available. For further information,
read the section entitled “Displaying
camera angles” in the “Setup menu”
chapter.
DEUTSCH
ENGLISH
FRANÇAIS
ESPAÑOL
PORTUGUÊS
ITALIANO
NEDERLANDS
SVENSKA
NORGE
SUOMI
27
TÜRKÇE
Page 13

SETUP MENU
Setup menu
You can configure the device’s settings in the setup menu.
Opening the setup menu
If there is a DVD playing in the unit,
stop it playing.
➮ Press the STOP button > twice.
To open the setup menu,
➮ press the SETUP button F.
Selecting the playback language
➮ Open the SETUP menu.
➮ Press the 7/ E buttons to
select the “PREFERENCES” menu
item.
➮ Confirm your choice by pressing
the ENTER button H.
➮ Press the 7/ E buttons to
select the “AUDIO” menu item.
The currently selected language and
the available languages are displayed
next to the “AUDIO” menu item.
If you want to set another language,
➮ press the button G.
➮ Press the 7/ E buttons to
select the required language.
➮ Confirm your choice by pressing
the SETUP button F.
The settings are saved and the setup
menu closes.
Selecting the subtitle language
➮ Open the SETUP menu.
➮ Press the 7/ E buttons to
select the “PREFERENCES” menu
item.
➮ Confirm your choice by pressing
the ENTER button H.
➮ Press the 7/ E buttons to
select the “SUBTITLE” menu item.
The currently selected language for the
subtitles and the available languages
are displayed next to the “SUBTITLE”
menu item.
If you want to set another language,
➮ press the button G.
➮ Press the 7/ E buttons to
select the required language.
➮ Confirm your choice by pressing
the SETUP button F.
The settings are saved and the setup
menu closes.
Selecting the DVD menu
language
➮ Open the SETUP menu.
➮ Press the 7/ E buttons to
select the “PREFERENCES” menu
item.
➮ Confirm your choice by pressing
the ENTER button H.
➮ Press the 7/ E buttons to
select the “DISC MENU” menu
item.
28
Page 14

SETUP MENU
The currently selected language and the
available languages for the DVD menu
are displayed next to the “DISC MENU”
menu item.
If you want to set another language,
➮ press the button G.
➮ Press the 7/ E buttons to
select the required language.
➮ Confirm your choice by pressing
the SETUP button F.
The settings are saved and the setup
menu closes.
Selecting the monitor settings
➮ Open the SETUP menu.
➮ Press the 7/ E buttons to
select the “GENERAL SETUP”
menu item.
➮ Confirm your choice by pressing
the ENTER button H.
➮ Press the 7/ E buttons to
select the “TV DISPLAY” menu
item.
The available monitor settings are displayed next to the “TV DISPLAY” menu
item:
● NORMAL/LB: The DVD player is
connected to a 4:3 monitor. The
widescreen picture covers the entire width of the monitor and black
bars appear at the top and bottom
edges of the screen.
● NORMAL/PS: The DVD player is
connected to a 4:3 monitor. The
widescreen picture is displayed using the full height of the screen.
The left and right edges of the
widescreen picture are cut off automatically.
● WIDE: The DVD player is con-
nected to a 16:9 monitor. The
widescreen picture is displayed
fully on-screen.
If you want to select another setting,
➮ press the button G.
➮ Press the 7/ E buttons to
select the required setting.
➮ Confirm your choice by pressing
the SETUP button F.
The settings are saved and the setup
menu closes.
Parental lock
You can password protect the unit
against unauthorised use.
You can also specify a “rating level”.
”Rating level” in this case means that
certain DVDs include a code that sets
the minimum age limit for persons
viewing that particular DVD. If you set
a rating level that lies below the rating
level for the DVD that is inserted in the
drive, you will only be able to play that
DVD after you have entered the password.
Note:
Not all DVDs support the rating level
function.
DEUTSCH
ENGLISH
FRANÇAIS
ESPAÑOL
PORTUGUÊS
ITALIANO
NEDERLANDS
SVENSKA
NORGE
SUOMI
29
TÜRKÇE
Page 15

SETUP MENU
The following list explains the rating level
numbering system:
Level 1: DVD playback is blocked.
Level 2-7: DVDs suitable for children
can be played. All others
are blocked.
Level 8: All DVDs can be played.
Note:
Some DVDs allow you to unlock locked
DVDs directly at the start with YES (ENTER) and the password. Other DVDs
first require you to change the rating
level in the setup menu before playing
the DVD. This depends on the DVD.
Setting the parental lock
To set the rating level,
➮ open the SETUP menu.
➮ Press the 7/ E buttons to
select the “PREFERENCES” menu
item.
➮ Confirm your choice by pressing
the ENTER button H.
➮ Press the 7/ E buttons to
select the “PARENTAL” menu item.
If you want to change the rating level,
➮ press the button G.
You will be asked to enter the password.
If you have not set a password yet,
➮ enter 3308 using the numerical
keypad 0-9 I.
Note:
The 3308 code is always valid and can
be used if ever you forget your password.
➮ Press the 7/ E buttons to
select the required rating level 1 …
8.
➮ Confirm your choice by pressing
the SETUP button F.
The settings are saved and the setup
menu closes.
Changing the password
To change the password,
➮ open the SETUP menu.
➮ Press the 7/ E buttons to
select the “PREFERENCES” menu
item.
➮ Confirm your choice by pressing
the ENTER button H.
➮ Press the 7/ E buttons to
select the “PASSWORD” menu
item.
If you want to change the password,
➮ press the button G.
You will be asked to enter the password.
If you have not set a password yet,
➮ enter 3308 using the numerical
keypad 0-9 I.
You will be asked to enter the new password twice.
➮ enter the new password twice us-
ing the numerical keypad 0-9 I.
➮ Confirm your choice by pressing
the SETUP button F.
The settings are saved and the setup
menu closes.
30
Page 16

SETUP MENU
Setting the colour television
standard of the TV set
To ensure an optimum picture quality,
in the DVD player’s settings menu set
the colour television standard used by
the connected monitor.
➮ Open the SETUP menu.
➮ Press the 7/ E buttons to
select the “GENERAL SETUP”
menu item.
➮ Confirm your choice by pressing
the ENTER button H.
➮ Press the 7/ E buttons to
select the “TV TYPE” menu item.
The currently set colour television
standard “PAL” or “NTSC” is displayed
alongside “TV TYPE”.
PAL is the standard used in Europe, and
NTSC is the standard used in America
and Asia.
Note:
If you set a standard that is not supported by your monitor, it may not be
able to display a picture.
If you want to select another setting,
➮ press the button G.
➮ Press the 7/ E buttons to
select the required setting.
➮ Confirm your choice by pressing
the SETUP button F.
The settings are saved and the setup
menu closes.
Displaying the camera angle
You can set the system to display a “ ”
camera symbol whenever there is more
than one camera angle available on the
DVD. To do so, select the “ON” setting.
➮ Open the SETUP menu.
➮ Press the 7/ E buttons to
select the “GENERAL SETUP”
menu item.
➮ Confirm your choice by pressing
the ENTER button H.
➮ Press the 7/ E buttons to
select the “ANGLE MARK” menu
item.
If you want to select another setting,
➮ press the button G.
➮ Press the 7/ E buttons to
select the required setting.
➮ Confirm your choice by pressing
the SETUP button F.
The settings are saved and the setup
menu closes.
DEUTSCH
ENGLISH
FRANÇAIS
ESPAÑOL
PORTUGUÊS
ITALIANO
NEDERLANDS
SVENSKA
NORGE
31
SUOMI
TÜRKÇE
Page 17

DVD MENU
DVD menu
The DVD menu is provided by the DVD
that you inserted in the player. After you
insert a DVD and playback begins, the
DVD menu appears on-screen automatically.
Note:
The type of options offered in the
DVD menu depends on the particular DVD.
As an example, a DVD VIDEO might
offer the following options in its DVD
menu:
● You can choose between various
languages for playback and subtitles.
● Besides the actual film, you can
also watch the trailer that ran in
cinemas or on the TV to promote
the film, and you can watch the
film’s “making of”.
● A film is divided into several con-
secutive chapters. You can select a
chapter and start playback from
that point without having to fast forward to that particular point in the
film as you would have to do if you
were watching a video cassette.
Opening the DVD menu
➮ Press the MENU button 9.
The DVD menu appears on-screen.
Note:
You do not have to stop or pause playback if you want to open the DVD menu.
Selecting menu items in the
DVD menu
➮ Press the buttons to se-
lect the required menu item in the
DVD menu.
➮ Confirm your choice by pressing
the ENTER button H.
➮ After you confirm your choice, the
submenu opens. You can then use
8/ G or 7/ E but-
the
tons and the ENTER button H to
make your selection.
Closing the DVD menu
If you choose an appropriate menu item
in the DVD menu (e.g. the option to play
the film), the DVD menu closes automatically and playback begins.
32
Page 18

CD AND MP3 MODE
SPECIFICATIONS
CD and MP3 mode
In addition to DVDs and video CDs, you
can also play audio CDs and MP3-CDs.
If you insert and play an audio CD, you
can use the play, search, pause and
repeat functions as described for DVD
mode.
If you want to play MP3-CDs, they must
be formatted in the “Joliet” or “ISO 9660”
format.
After you insert an MP3-CD, a menu
(Smart Navi) appears on-screen to help
you navigate through the CD’s contents.
You can then use the
7/ E buttons and the ENTER but-
ton H in the Smart-Navi menu to easily switch between tracks and directories.
Note:
You cannot change directories during
playback.
The other play, search, pause and repeat functions as described for DVD
mode can also be used in MP3 mode.
8/ G or
Specifications
Operating voltage: 12/24 V
Power consumption: ≤ 20 watts
Current consumption:
14.4 V: 950 mA
50 mA standby
28.8 V: 600 mA
40 mA standby
Operating temperature: -15°C to 60°C
Air humidity: 10% to 90%
Laser: 650 nm
Colour standards: PAL and NTSC
Video resolution:
720 pixels horizontal x 576 pixels
vertical (PAL)
720 pixels horizontal x 480 pixels
vertical (NTSC)
Frequency range:
Video: 5 MHz / - 2 dB
Audio: 20 Hz - 20 kHz
Video output level: 1 Vss, 75 Ω
Audio output level: 2 V eff, 100 Ω
Weight: 2.3 kg
Dimensions: 170 x 75 x 248
mm
DEUTSCH
ENGLISH
FRANÇAIS
ESPAÑOL
PORTUGUÊS
ITALIANO
NEDERLANDS
SVENSKA
Subject to changes.
33
NORGE
SUOMI
TÜRKÇE
Page 19

Blaupunkt GmbH
03/03 CM/PSS - 8 622 403 514
/
 Loading...