

Page 1

In Car Entertainment Multimedia
Aspen IVDM-7003 7 607 003 531
Chicago IVDM-7003 7 607 004 504
Operating Instructions www.blaupunkt.com
Page 2
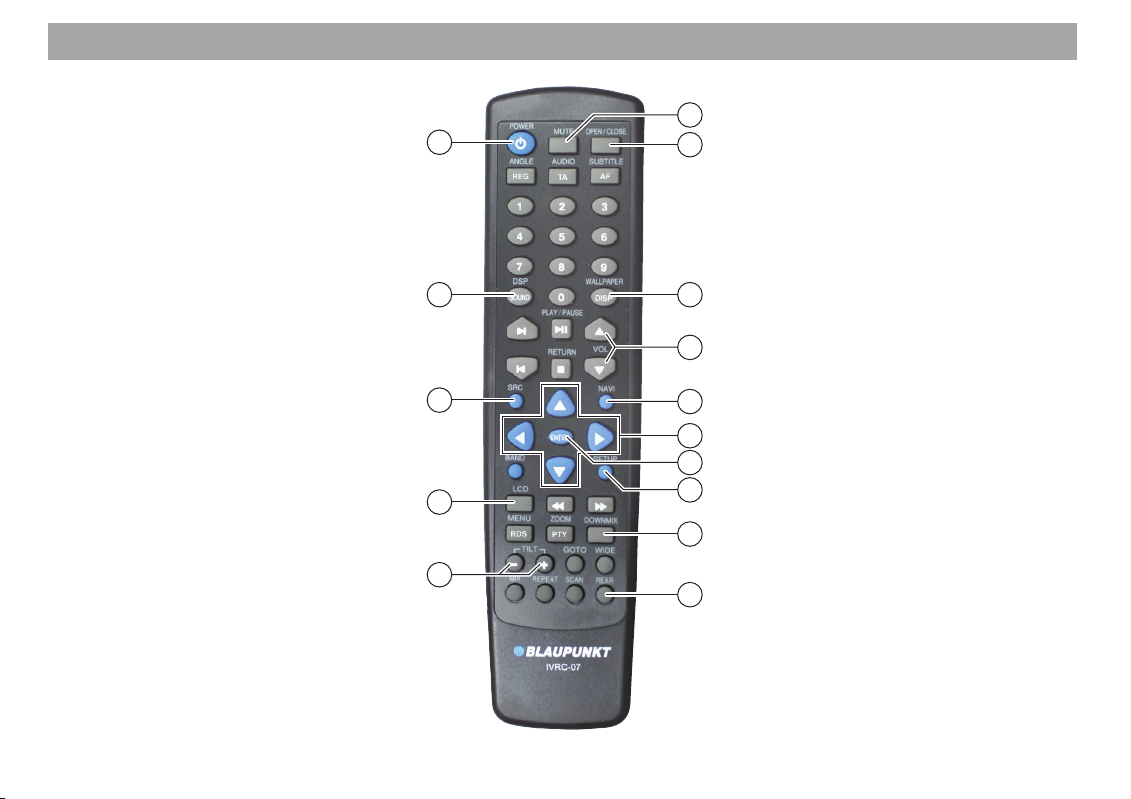
Remote control – General functions
31
2
1
2
29
27
25
23
6
8
10
11
12
13
15
18
Page 3

Remote control – General functions
1 MUTE button
Press once to mute the car sound system
Press again to cancel mute
2 OPEN/CLOSE button
Open or close the monitor
6 DISP / WALLPAPER button
Monitor closed: Toggle between time display and display
of active signal source
Monitor open: Change the wallpaper
8 VOL
: NAVI button
;
< ENTER button
= SETUP button
? DOWNMIX button
B REAR button
/ buttons
Increase the volume by pressing the
Decrease the volume by pressing the
Select the navigation mode (only with connected navigation system, e.g. TravelPilot EX-V)
/ and / buttons
Select menu entries
Confirm the selected menu entry
Call and exit the setup menu
Change the multi-channel surround signal to stereo signal
Display the image of a connected back-up camera
(optional equipment)
button
button
-
G TILT
I LCD button
K SRC button
M SOUND / DSP button
O
/ + buttons
Tilt monitor forward with
Tilt monitor backward with
Select the colour of the display illumination
Select the signal source
On the setup menu: Select among the setup menus
(DVD > AUDIO > SCREEN > USER)
Call up the menu for the sound settings
/ POWER button
Switch the unit on/off
-
button
+
button
3
Page 4
Remote control – DVD operation
30
28
4
3
4
5
6
7
9
11
12
24
21
14
16
17
19
Page 5

Remote control – DVD operation
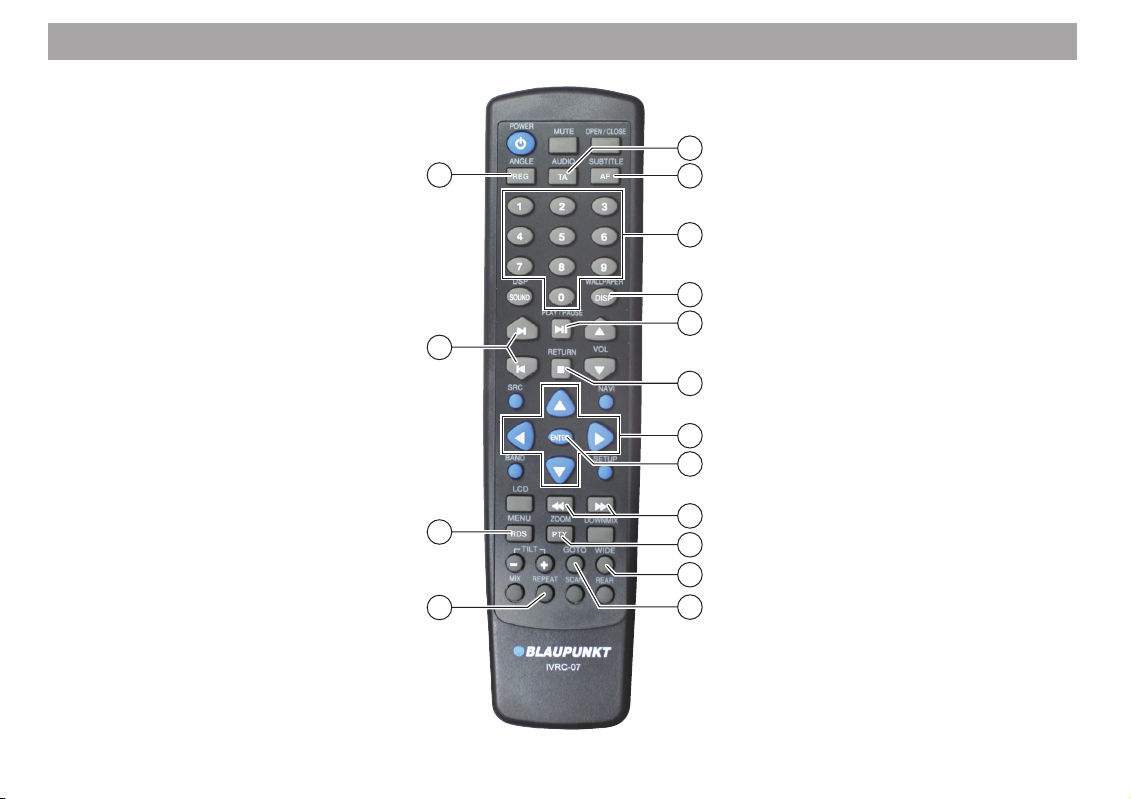
3 TA / AUDIO button
Select playback language
4 AF / SUBTITLE button
Select the language of the subtitles or hide the subtitles
5 Number buttons 0 - 9
Enter the title and chapter number
6 DISP / WALLPAPER button
Call and exit the DVD menu
/ PLAY/PAUSE button
7
Pause and restart playback
/ RETURN button
9
Stop playback
/ and / buttons
;
Select menu entries in the DVD main menu
< ENTER button
Confirm the selection in the DVD main menu
>
@ PTY / ZOOM button
A WIDE button
C GOTO button
/ button
Fast scan forward/back
Enlarge the image area
Change image format
Call DVD menu for direct selection of a title or chapter
E REPEAT button
Repeat a chapter or title
H RDS / MENU button
Call and exit the DVD main menu
/ button
L
Select a chapter up/down
N REG / ANGLE button
Select the camera perspective if different camera perspectives are stored on the DVD
5
Page 6

Remote control – Radio operation
3
30
28
26
24
4
5
14
16
3 TA / AUDIO button
Switch priority for traffic announcements on/off
4 AF / SUBTITLE button
Switch AF function (Alternate Frequency) on/off
5 Number buttons 1 - 6
Call up stored stations
>
/ buttons
Manual station search up/down
@ PTY / ZOOM button
Call up a list with available programme types
H RDS / MENU button
Call up the menu for RDS settings
J BAND button
Select the waveband/memory bank
(FM1 > FM2 > FM3 > MW)
/ buttons
L
Automatic station search up/down
N REG / ANGLE button
Switch REG function (regional programmes) on/off
6
Page 7
Remote control – CD/CD changer/MP3 mode
7 / PLAY/PAUSE button
9
;
< ENTER button
>
D SCAN button
E REPEAT button
F MIX button
L
28
22
21
11
12
14
20
21
7
9
Pause and restart playback
button
Stop playback
/ buttons
Scroll file list up/down
/ buttons
Select CD or folder up/down
Call up the file selected in the file list via scrolling
/ buttons
Fast scan forward/back
Scan and play tracks or files for approx. 10 seconds
Repeat track or CD and file or folder
Random playback of tracks or files
/ button
Select title of file up/down
7
Page 8
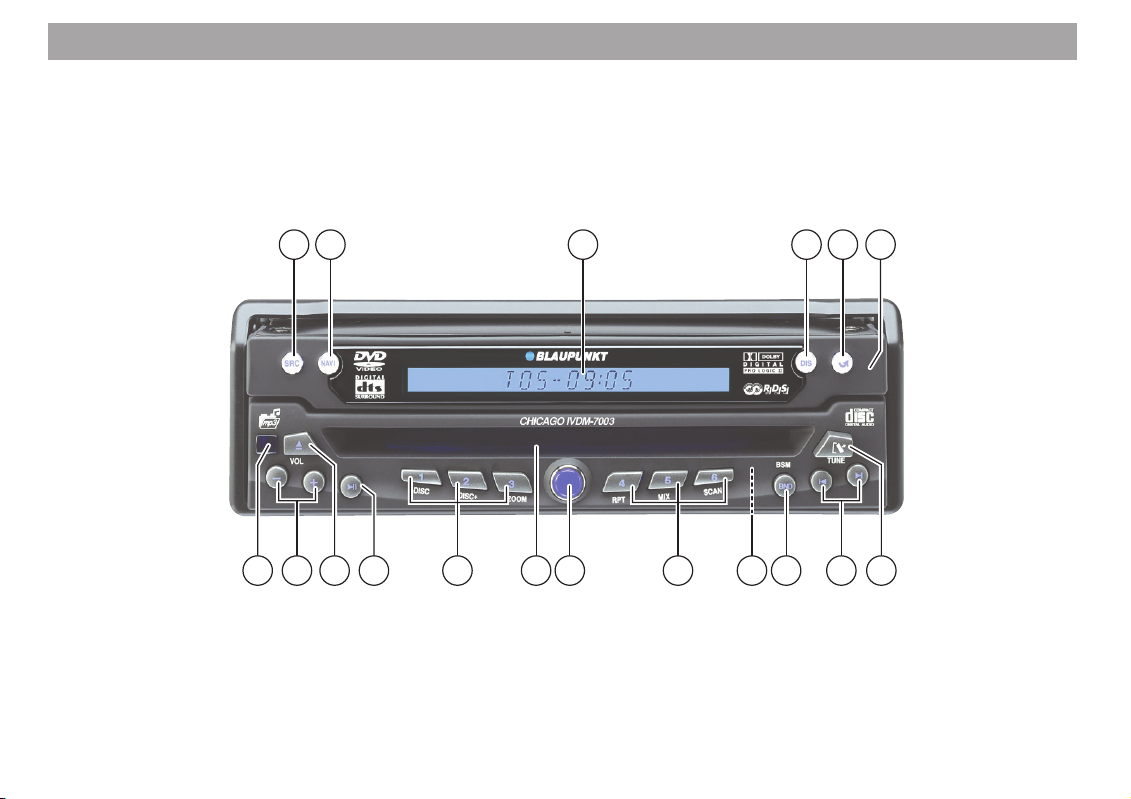
Controls – Device
8
32 33 35 3634 37
4548 40 39 3847 46 43 4242 44 41
Page 9

Controls – Device
P SRC button
Select the signal source
Q NAVI button
Select the navigation mode (only with connected navigation system, e.g. TravelPilot EX-V)
R LCD display
S DIS / FLIP button
Monitor closed
Press short: Switching between time display and display
of active signal source
Press long: Select colour of display illumination
Monitor open
Tilt monitor horizontally to the front
T
U Retractable TFT monitor
V
W TUNE
X BND / BSM button
Y Reset button
/ CLOSE button
Open or close the monitor
button
Unlock the detachable control panel
/ button
Radio operation: Automatic station search
DVD operation: Select chapter
CD/CD changer/MP3 mode: Select track/file
Press short: Select waveband/memory bank
Press long: Store station automatically
Z Station button 1 / -DISC
CD changer/MP3 mode: Select CD/folder downward
Station button 2 / DISC+
CD changer/MP3 mode: Select CD/folder upward
Station button 3 / ZOOM
DVD operation: Enlarge the image area
Station button 4 / RPT
DVD/CD/CD changer/MP3 mode: Repeat chapter
or title/track or CD/file or folder
Station button 5 / MIX
CD/CD changer/MP3 mode: Play tracks/files in
random order
Station button 6 / SCAN
CD/CD changer/MP3 mode: Play each track/file for
approx. 10 seconds
[
\ CD/DVD tray
]
a
b VOL
c Infrared receiver for remote control
button
Press short: Mute the car sound system
Press long: Switch the device on/off
button
Interrupt and restart CD/DVD playback
button
Eject CD/DVD
-
/ + buttons
Adjust the volume
9
Page 10
Safety notes
Road safety
Failure to observe traffic may result in serious accidents.
To avoid any distraction from the traffic, observe the following items:
• Familiarise yourself with the operation of the Aspen/Chicago IVDM-7003 before driving.
• Operate the Aspen/Chicago IVDM-7003 while driving only if the traffic situation allows it. In case of doubt, stop at a
suitable location and operate the Aspen/Chicago IVDM-7003 while the vehicle is standing.
• Insert or eject a CD/DVD only while the vehicle is standing.
• For safety reasons, the image playback of DVD only occurs while the vehicle is standing.
• You should always be able to hear police, fire and ambulance sirens in good time from inside your vehicle. Listen to
your car sound system at a suitable volume level during your journey.
Laser product
The internal CD/DVD drive is a class 1 laser product with a visible/invisible laser beam that may pose a dangerous
radiation to humans. The CD/DVD drive may only be operated according to the specified instructions. Never open the
housing and do not attempt to perform any repairs yourself. Service should always be performed by trained personnel.
10
Page 11

Contents
Controls – Remote control ............................................ 2
Controls – Device ........................................................... 8
Safety notes .................................................................. 10
User notes..................................................................... 14
Safety precautions ................................................................. 14
Care instructions for CDs/DVDs ........................................... 15
Usable media .......................................................................... 15
Region code............................................................................ 16
License .................................................................................... 16
Inserting batteries in the remote control ............................. 16
Notes about these instructions .................................. 17
Theft protection ............................................................ 18
Detachable control panel ...................................................... 18
Removing the control panel .................................................................. 18
Attaching the control panel ................................................................... 18
Activating the device code .................................................... 19
Switching on coded devices after a voltage interruption ....................... 19
Introduction .................................................................. 20
Operating options .................................................................................. 20
Switching the device on/off ................................................................... 20
Inserting a CD/DVD .............................................................................. 21
Ejecting a CD/DVD ............................................................................... 21
Adjusting the volume ............................................................................. 22
Activating mute ..................................................................................... 22
Cancelling mute .................................................................................... 22
Closing/opening the monitor ................................................................. 23
Setting the monitor tilt ........................................................................... 23
Selecting the signal source ................................................................... 23
Sound settings ...................................................................................... 24
Switching the Downmix mode on/off ..................................................... 25
Selecting the display illumination colour ............................................... 25
Show/hide the image of a back-up camera ........................................... 26
Automatic through connection of telephone calls ................................. 26
Radio mode................................................................... 27
Radio menu ........................................................................................... 27
Touch screen menu in radio mode ........................................................ 27
Switching to radio mode ........................................................................ 28
Switching RDS (Radio Data System) on/off .......................................... 28
Switching the RDS function AF (Alternate Frequency) on/off ............... 29
Switching the RDS function REG (Regional Programmes) on/off......... 29
Selecting the waveband/memory bank ................................................. 30
Automatic station search ....................................................................... 30
Manual station search ........................................................................... 30
Storing stations manually ...................................................................... 31
Automatically storing stations ............................................................... 31
Calling up stored stations ...................................................................... 31
Station search by programme type ....................................................... 32
Traffic information stations .................................................................... 33
Switching traffic announcement priority on/off ...................................... 33
Setting the volume for traffic announcements ....................................... 34
Cancelling the current traffic announcement......................................... 34
11
Page 12

Contents
12
DVD operation .............................................................. 35
DVD menu ............................................................................................ 35
Touch screen menu in DVD mode ........................................................ 35
Switching to DVD mode ........................................................................ 36
Starting playback .................................................................................. 36
Interrupting playback (freeze frame) ..................................................... 36
Exiting playback .................................................................................... 36
Selecting a chapter ............................................................................... 37
Direct selection of a title or chapter ....................................................... 37
Fast search ........................................................................................... 38
Selecting the playback language .......................................................... 38
Selecting the subtitle language ............................................................. 39
Repeating a chapter or title ................................................................... 39
Switching the image format ................................................................... 39
Enlarging an image area (Zoom) .......................................................... 39
Image settings ....................................................................................... 40
Selecting the camera perspective (Angle) ............................................ 40
Calling the DVD main menu .................................................................. 41
Audio CD mode ............................................................ 42
Audio CD menu ..................................................................................... 42
Touch screen menu in Audio CD mode................................................. 42
Activating the audio CD mode .............................................................. 43
Interrupting playback (pause) ............................................................... 43
Exiting playback .................................................................................... 43
Selecting tracks ..................................................................................... 43
Fast search ........................................................................................... 44
Repeating tracks (Repeat) .................................................................... 44
Random track play (MIX) ...................................................................... 45
Scanning all tracks (Scan) .................................................................... 45
CD-changer mode ........................................................ 46
CD changer menu ................................................................................. 46
Touch screen menu in CD changer mode ............................................. 46
CD changers ......................................................................................... 47
Activating the CD changer mode .......................................................... 47
Interrupting playback (pause) ............................................................... 47
Exiting playback .................................................................................... 47
Selecting CDs ....................................................................................... 47
Selecting tracks on the currently playing CD ........................................ 48
Fast search ........................................................................................... 48
Repeating tracks (Repeat) .................................................................... 48
Random track play (MIX) ...................................................................... 49
Scanning all tracks (Scan) .................................................................... 49
MP3 CD mode ............................................................... 50
MP3 CD menu ...................................................................................... 50
Touch screen menu in MP3 CD mode .................................................. 50
Activating the MP3 CD mode ................................................................ 51
Interrupting playback (pause) ............................................................... 51
Exiting playback .................................................................................... 51
Selecting folders ................................................................................... 51
Selecting files ........................................................................................ 51
Fast search ........................................................................................... 52
Repeating files (Repeat) ....................................................................... 52
Random play of files (MIX) .................................................................... 53
Scanning all files (Scan) ....................................................................... 53
External sources .......................................................... 54
Add-on equipment ................................................................. 54
Navigation system ................................................................. 55
Voice output during navigation mode .................................................... 55
Page 13

Contents
Setup menu................................................................... 56
Setup menu ........................................................................................... 56
Selecting the setup menu ..................................................................... 56
Performing settings in the setup menu ................................................. 57
DVD setup ............................................................................... 57
Selecting a language ............................................................................ 57
Selecting the screen display mode ....................................................... 58
Setting the parental control level ........................................................... 59
Audio setup ............................................................................ 60
Setting the input level for external audio sources ................................. 60
Setting Dolby ProLogic 2 (Chicago IVDM-7003 only) ........................... 60
Setting environment audio effects (Chicago IVDM-7003 only) ............. 61
Setting bass and treble (Aspen IVDM-7003 only) ................................. 61
Setting the speaker balance ................................................................. 62
Downmix function (Aspen IVDM-7003) ................................................. 62
Downmix function (Chicago IVDM-7003) .............................................. 63
7-band equaliser (Chicago IVDM-7003 only) ........................................ 64
Speaker setup (Aspen IVDM-7003) ...................................................... 65
Speaker setup (Chicago IVDM-7003) ................................................... 66
Setting a delay time .............................................................................. 67
Adjusting the speaker level ................................................................... 67
Setting the dynamic range .................................................................... 68
Setting volume decrease for voice output ............................................. 69
Sending a test sound to the speakers ................................................... 69
Monitor setup ......................................................................... 70
Setting the monitor position .................................................................. 70
Image settings ....................................................................................... 71
Activating/deactivating the touch screen monitor .................................. 72
Setting the touch position ...................................................................... 73
User setup............................................................................... 74
Changing the password ........................................................................ 74
Wallpapers ............................................................................................ 74
Selecting the wallpaper ......................................................................... 75
Automatic image change ...................................................................... 76
Deleting wallpapers ............................................................................... 76
Loading wallpapers ............................................................................... 77
Setting date and time ............................................................................ 79
Selecting the external signal source ..................................................... 79
Factory settings ..................................................................................... 80
Restart of the device software .............................................................. 81
Glossary ........................................................................ 82
Specifications ............................................................... 83
DVD language code table ............................................ 84
13
Page 14

User notes
14
Thank you for choosing a Blaupunkt product. We hope you enjoy
using this new piece of equipment.
Please read these operating instructions before using the
equipment for the first time.
The Blaupunkt editors are constantly working on making the operating instructions clearer and easier to understand. However, if
you still have any questions on how to operate the device, please
contact your dealer or the telephone hotline for your country. You
will find the telephone number printed at the back of this booklet.
We provide a manufacturer guarantee for our products bought
within the European Union. Devices purchased outside the European Union are subject to the warranty terms published by our
respective regional agency.
You can view the guarantee conditions at www.blaupunkt.de or
ask for them directly at:
Blaupunkt GmbH
Hotline
Robert-Bosch-Str. 200
D-31139 Hildesheim
Please note that changes or modifications to the device that are
not explicitly authorised by the manufacturer void any warranty
claims.
Safety precautions
Observe all warnings, safety precautions and notes for service in
these operating instructions to extend the useful life of the device.
●
The device may only be operated with the recommended power supply of 12 V DC voltage.
●
Do not attempt to open or dismantle the device – danger of
electrical shock.
●
If the device is defective, return it to a local dealer or send it to
our customer service department.
●
Avoid using the device in an environment in which it is exposed to dust, dirt or humidity.
Risk of severe damage to the CD/DVD drive!
CD/DVD singles with a diameter of 8 cm and noncircular contoured CDs/DVDs (shape CDs) must not
be used. We accept no responsibility for any damage
to the CD/DVD drive that may occur as a result of the
use of unsuitable CDs.
To avoid damaging the drive, do not affix any labels
to the surface of the CD/DVD and do not use any protective film or stabiliser (commercially available as
accessory).
Page 15

User notes
Care instructions for CDs/DVDs
If a CD/DVD becomes soiled, never clean it in a circular motion;
instead, use a soft, lint-free cloth and wipe from the inside to the
outside. For extreme soiling, we recommend immersing the CD/
DVD in a solution with commercial liquid detergent. Once again,
please do not wipe the CD/DVD in a circular motion; instead,
always clean from the inside to the outside and let it dry.
We also recommend treating the CD/DVD with care on either
side since the information layer of the CD/DVD is located immediately below the print layer (label side).
If possible, only grasp the CD/DVD at the edge.
Not the following comments with respect to the read quality:
Any soiling or damage of a CD/DVD can lead to read problems.
The severity of the read error is dependent upon the soiling as
well as the severity of the mechanical damage. Heavy scratches
cause read errors (data errors), which may cause the CD/DVD to
skip or hang. For this reason, always handle a CD/DVD with care
and always store it in its case.
Usable media
The Aspen/Chicago IVDM-7003 can be used to play DVDs, video CDs (VCD), super-video CDs (SVCD) and commercial audio
CDs and MP3 CDs with a diameter of 12 cm.
Self-burnt storage media such as CD-Rs, CD-RWs and CD-Rs
with MP3 music files, VCDs, SVCDs and DVD-Rs can generally
be played. The various combinations of burners, burning software, blanks and ambient temperature inside the vehicle may
lead to problems with the device’s ability to play certain media.
Blaupunkt does not provide any guarantee for faultfree playback.
To ensure proper functioning of audio CDs, use only CDs with
the Compact-Disc logo. Copy-protected CDs can cause playback
problems. Blaupunkt cannot guarantee the proper functioning of
copy-protected CDs!
15
Page 16

User notes
16
Region code
The Aspen/Chicago IVDM-7003 and the DVDs are labelled with
the region code that is applicable for the pertinent country.
This device is permanently set to the region code that is valid for
the country in which it was sold.
Playing a DVD with a different region code is not possible.
Code Region
1 North America, incl. the US and Canada
2 Japan, Europe (excl. Eastern Europe), Middle East,
South Africa
3 Korea and South-East Asia
4 Oceania incl. Australia, New Zealand, Central and
South America
5 India, Eastern Europe, Africa, Russia
6 China
All regions
License
Manufactured under license of Dolby Laboratories.
“Dolby”, “Pro Logic” and the double-D symbol are trademarks of
Dolby Laboratories.
This product contains technologies that are copyright-protected
under certain US-American patents. The copyrights are property
of Macrovision Corporation and other copyright owners. The use
of this copyright-protected technology must be approved by Macrovision Corporation and is intended exclusively for private use
and other presentations in a limited scope, unless Macrovision
Corporation first issued a respective permission.
Inserting batteries in the remote control
The remote control requires two AAA batteries for operation which
are part of the scope of delivery.
1. Open the battery compartment at the back of the remote
control.
2. Insert the battery with the correct polarity as displayed in
the battery compartment.
3. Close the battery compartment.
Used batteries do not belong in the household trash! Dispose of
used batteries in accordance with the legal regulations.
Page 17

Notes about these instructions
These instructions describe the functions of the Aspen/Chicago
IVDM-7003 and are intended to familiarise you with its operation.
Read these instructions before starting up the device.
To help you in quickly locating information, the following symbols
are used in these instructions:
Safety and warning notes contain important information
concerning the safe usage and point to accident sources.
1. Marks instructional steps to be performed to reach the
goal of an action.
✔ Devise responses that must follow an action are marked
like this.
Note: Text marked by “Note” provides additional
information about a topic.
The monitor views shown in these instructions are intended to
support the explanation. The actual monitor displays may differ.
If required, the corresponding illustrations of the device display
are shown with retracted monitor.
17
Page 18
Theft protection
18
The device is equipped with a detachable control panel (fliprelease panel) as theft protection and a four-digit device code.
Detachable control panel
Protect your device against theft by taking the control panel with
you whenever you leave your vehicle. Do not leave the control
panel inside the vehicle - not even in a hiding place. The device
is worthless to a thief without this control panel.
The structural design of the control panel allows for simple handling of the control panel during removal and attaching.
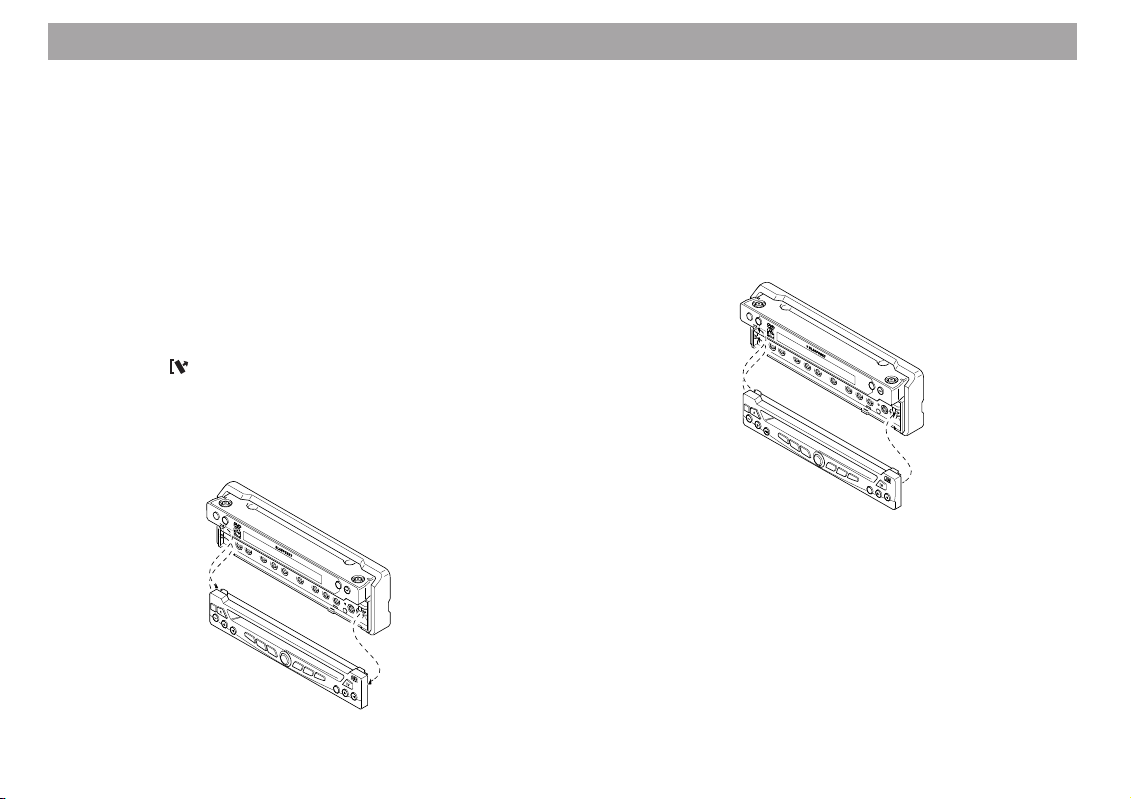
Removing the control panel
1. Press the
✔ The locking mechanism of the control panel is unlocked.
2. Pull the control panel straight out of the device and to
the right.
button.
SRC
NAVI
VOL
DIS
C
HIC
1
AG
-D
O IVDM
I
S
C
2
-7002
DISC+
3
ZOOM
4
RPT
5
MIX
6
S
C
A
N
B
SM
TU
BND
N
E
✔ After removing the control panel from the device, device
switches off after approx. 30 seconds. All the current
settings are saved. Any inserted CD/DVD remains in
the device.
Attaching the control panel
1. Push the control panel into the guides of the device from
the right to the left.
SRC
NAVI
D
IS
V
OL
C
HICAG
1
-D
O
IS
IV
C
DM
2
-7002
DISC+
3
ZOOM
4
RPT
5
MIX
6
S
C
A
N
B
SM
TUNE
B
N
D
2. Push the right side of the control panel into the device until
it clicks into place.
Notes: If the device was switched on while removing
the control panel, it does not automatically switch back
on after attaching it.
Never drop the control panel. Never expose the control panel to direct sunlight or other heat sources.
Store the control panel in the supplied case.
Page 19

Theft protection
Activating the device code
In addition to a detachable control panel, the device is equipped
with a four-digit device code. The device code is set to 0000 at
the factory. With this setting, the coding is not active and the device can be switched on without code query after a voltage interruption.
To activate the coding of your device, you must enter a freely
selectable code. How to change the code is described in the chapter “Setup menu” under “Changing the password”.
Note: Record your personal code and keep it in a safe
place. If you ever forget the code, the device cannot
be switched back on after a voltage interruption. In
this case, the device must be decoded by returning it
to a local dealer or sending it to our customer service
department.
Switching on coded devices after a voltage interruption
If a coded device is switched on after disconnecting the battery
voltage, e.g. in case of a repair to the vehicle, the code query
appears.
PASSWORD
PASSWORD
1. Enter the four-digit code using the number buttons 0 to 9
on the remote control.
2. Press the
button to correct any incorrect entries.
3. Confirm the entry with the ENTER button.
✔ The device switches on.
19
Page 20
Introduction
TP
20
This chapter contains a description of the most important basic
functions.
Operating options
Several options are available to operate the Aspen/Chicago IVDM-
7003.
The buttons of the remote control allow you to operate all the
functions of the device. The buttons on the front of the device
allow you to operate the most important functions.
In addition, the Aspen/Chicago IVDM-7003 features a touch
screen monitor that responds to touch. Operating the device is
done by using the visible buttons in the individual operating modes
and via the buttons on the touch screen menu. Touch the center
of the screen to call up the touch screen menu. If no additional
operation is performed, the touch screen menu is hidden again
after approx. 30 seconds.
Note: Operating the device by means of the touch
screen monitor is only possible if this function was
activated in the setup menu. For further details, read
the section “Activating/deactivating the touch screen
monitor” in the chapter “Setup menu”.
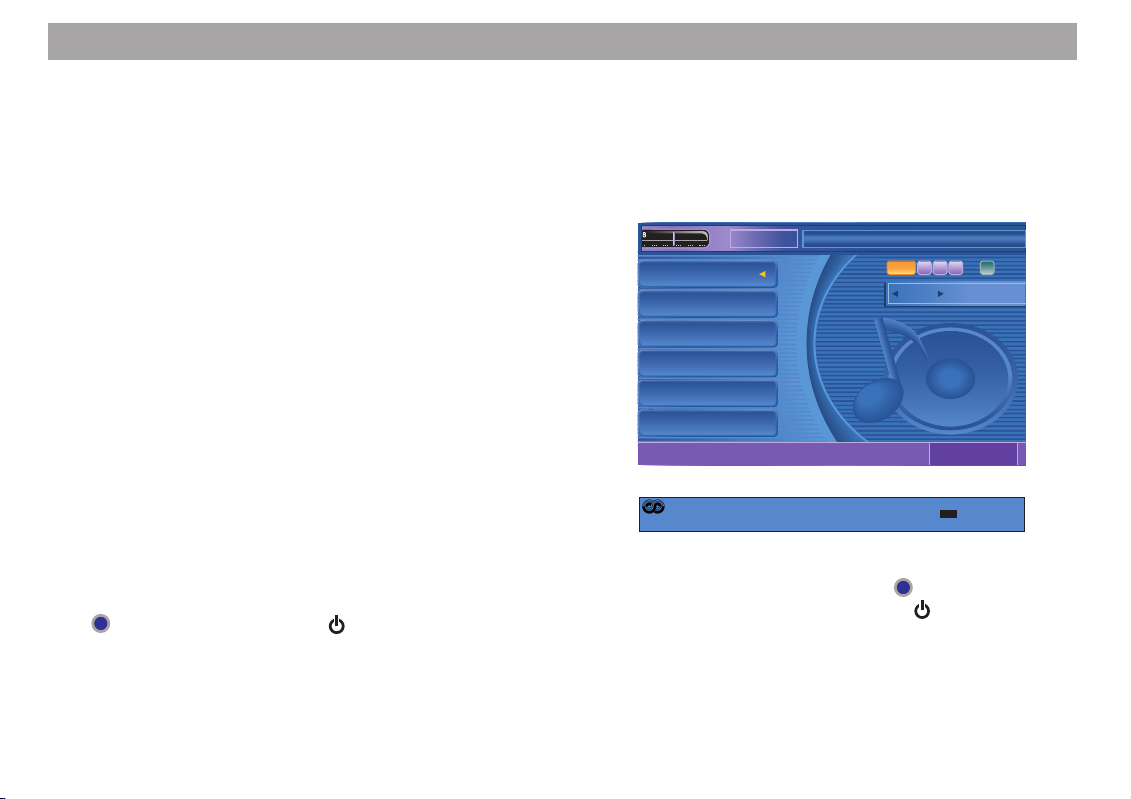
Switching the device on/off
1. To switch the Aspen/Chicago IVDM-7003 on, press the
button on the device or the / POWER button on the
remote control.
✔ The devices switches on and the playback of the previous-
ly set operating mode starts.
Note: The monitor is automatically opened at switchon if this function was activated in the setup menu.
For further details, read the section “Configuring the
monitor position” in the chapter “Setup menu”. If the
monitor was closed at switch-off, it remains in this
position after switch-on.
92 94 100 104
1. Radio 21
1. Radio 21
2. NDR 2
2. NDR 2
3. Antenne
3. Antenne
4. ffn
4. ffn
5. 89.0 RTL
5. 89.0 RTL
6. N–JOY
6. N–JOY
R•D•S
AF TP
RADIO
RADIO
RADIO 21
Radio display with closed monitor
STATIO
n
REG
R·D· S
FM1
FM1
AF TA
Radio 21
Radio 21
13:05
13:05
TP
TP
P
1
1. To switch it off, press and hold the button on the device
for more than 2 seconds or press the
/ POWER button
of the remote control.
✔ The device switches off.
Page 21
Introduction
Inserting a CD/DVD
1. Push the CD/DVD into the CD/DVD tray with the printed
side facing up.
✔ The drive automatically pulls in the CD/DVD.
Note: You must not hinder or assist the drive as it
draws in the media.
LOADING
LOADING
LOADING
Load display with closed monitor
✔ The CD/DVD is loaded and playback starts.
Ejecting a CD/DVD
1. Press the
button on the device.
EJECT
EJECT
EJECT
Eject display with closed monitor
✔ The CD/DVD is ejected.
2. Carefully remove the CD/DVD.
Note: If the CD/DVD is not removed, it is automatically
drawn in again after approx. 10 seconds.
21
Page 22
Introduction
REG
REG
22
Adjusting the volume
1.
On the device: To increase the volume, press the
+
button.
VOL
To decrease the volume, press the VOL
-
button.
On the remote control: To increase the volume, press the
button.
VOL
To decrease the volume, press the VOL
button.
✔ During the adjustment, the current value is displayed at
the bottom of the monitor A.
92 94 100 104
1. Radio 21
1. Radio 21
2. NDR 2
2. NDR 2
3. Antenne
3. Antenne
4. ffn
4. ffn
5. 89.0 RTL
5. 89.0 RTL
6. N–JOY
6. N–JOY
R•D•S
AF TP
RADIO
RADIO
VOL 12
Volume display with closed monitor
STATIO
n
REG
AF TA
R·D· S
FM1
FM1
Radio 21
Radio 21
VOL
TP
TP
A
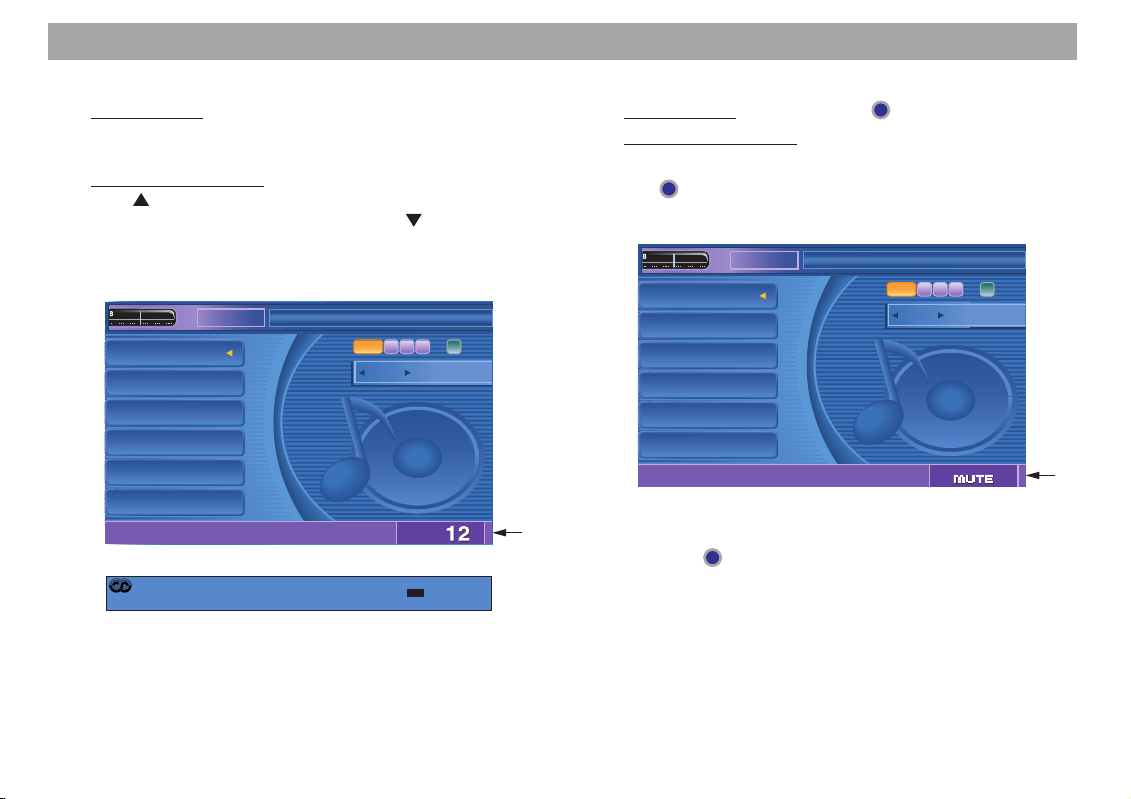
Activating mute
1.
On the device: Briefly press the button.
On the remote control: Press the MUTE button.
✔ Playback is muted.
✔ The
button on the device flashes and the bottom of the
monitor displays “MUTE” B.
92 94 100 104
1. Radio 21
1. Radio 21
2. NDR 2
2. NDR 2
3. Antenne
3. Antenne
4. ffn
4. ffn
5. 89.0 RTL
5. 89.0 RTL
6. N–JOY
6. N–JOY
RADIO
RADIO
STATIO
n
R·D· S
Cancelling mute
1. Press the
button again to cancel mute.
✔ Mute is cancelled.
FM1
FM1
AF TA
REG
Radio 21
Radio 21
TP
B
Page 23
+1
REG
CD - C
Introduction
Closing/opening the monitor
1.
On the device: Press the / CLOSE button.
On the remote control: Press the OPEN/CLOSE button.
✔ The monitor is closed or opened.
Setting the monitor tilt
On the remote control: Press the TILT - button to tilt the
1.
monitor forward by one increment.
+
Press the TILT
button to tilt the monitor backward by
one increment.
92 94 100 104
1. Radio 21
1. Radio 21
2. NDR 2
2. NDR 2
3. Antenne
3. Antenne
4. ffn
4. ffn
5. 89.0 RTL
5. 89.0 RTL
6. N–JOY
6. N–JOY
RADIO
RADIO
Note: To tilt the monitor horizontally to the front, press
STATIO
n
REG
AF TA
R·D· S
Radio 21
FM1
Radio 21
FM1
MONITOR TILT
MONITOR TILT
0–1–2+1
+1 +2
13:05
13:05
the DIS / FLIP button on the device. Press the button
again to return the monitor to its original position.
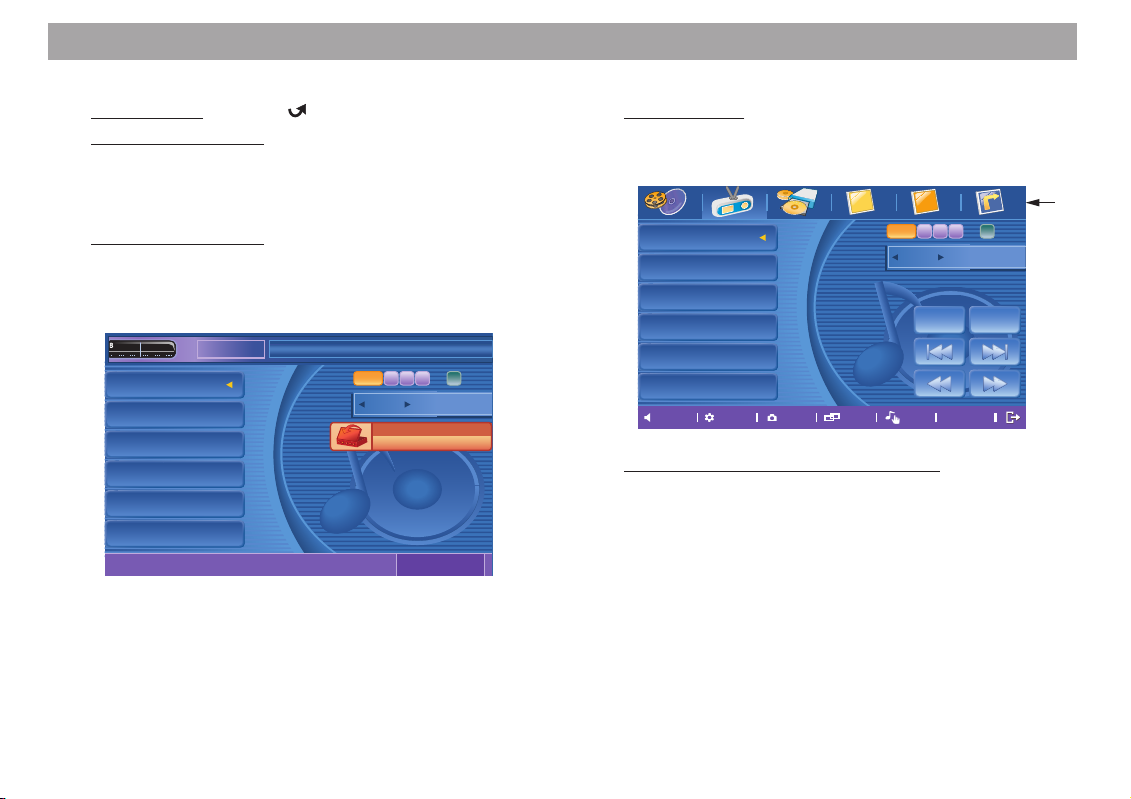
Selecting the signal source
On the monitor: Touch the center of the monitor to call up
1.
the touch screen menu. Touch the button of the desired
signal source A.
RADIORADIODVDDVD CD - C
1. Radio 21
1. Radio 21
2. NDR 2
2. NDR 2
3. Antenne
3. Antenne
4. ffn
4. ffn
5. 89.0 RTL
5. 89.0 RTL
TP
6. N–JOY
6. N–JOY
Sound
Sound
Setup
Setup
CD - C AAUX 1AUX 1 AAUX 2AUX 2 NANAVINAVI
R·D· S
FM1
FM1
AF TA
REG
Radio 21
Radio 21
BANDBAND BSMBSM
Rear
Rear
Disp
Disp
PTY
PTY
R·D·S
R·D·S
TP
A
On the device and on the remote control: Press the
SRC button until the desired signal source appears
on the monitor.
Available signal sources:
CD/MP3/DVD > RADIO > CD-C > AUX1 > AUX2 > (IVSC) > NAVI
Note: The selectable signal sources are dependent
upon the connected devices and the settings in the
setup menu.
23
Page 24
Introduction
24
Sound settings
The following sound settings are possible:
Aspen IVDM-7003
Bass
-7 … -1 < 0 > +1 … +7
Treble
-7 … -1 < 0 > +1 … +7
Balance (left/right volume distribution)
L15 … L1 < 0 > R1 … R15
Fader (front/rear volume distribution)
R15 … R1 < 0 > F1 … F15
Downmix
OFF > Stereo > Lt/Rt
Chicago IVDM-7003
ProLogic 2
OFF > ProLogic > Music > Movie > Matrix
SFC (environment audio effects)
OFF > Studio > Hall > Church > Stadium > Movie > Club
Downmix
OFF > Stereo > Lt/Rt
Balance (left/right volume distribution)
L15 … L1 < 0 > R1 … R15
Fader (front/rear volume distribution)
R15 … R1 < 0 > F1 … F15
Note: For additional details about sound settings, refer
to the section “Audio setup” in the chapter “Setup
menu”.
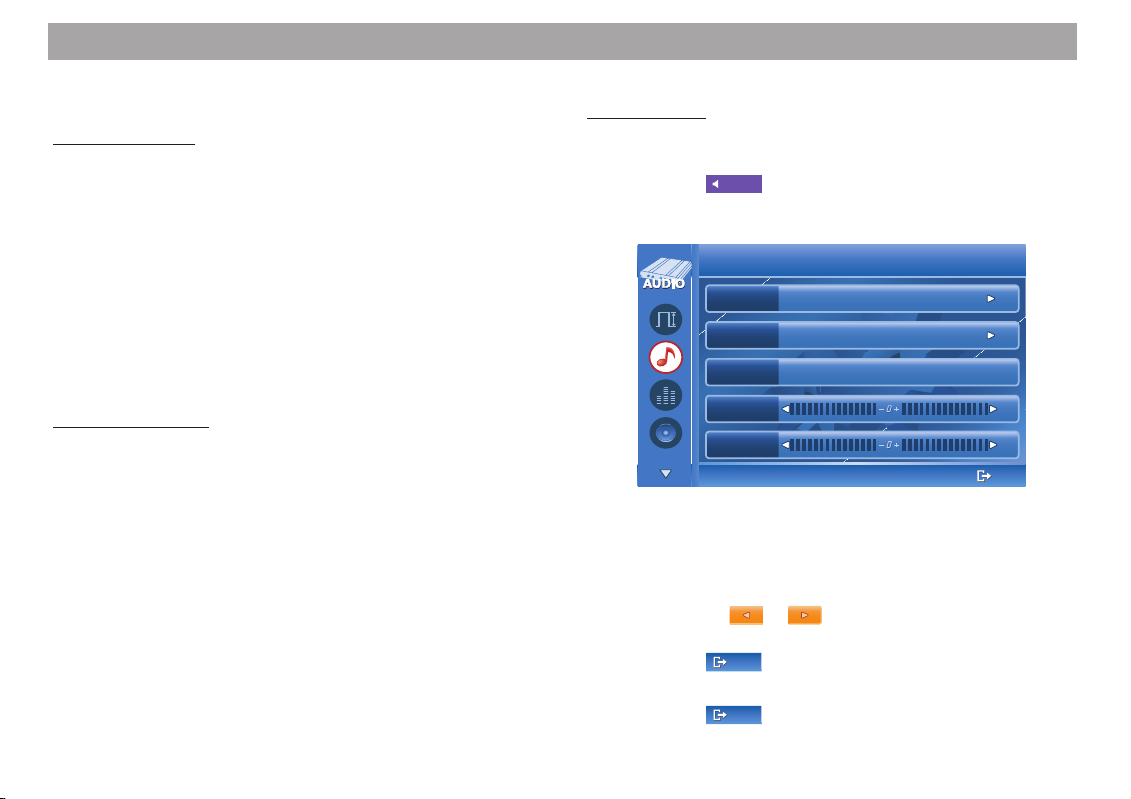
Selecting and setting sound effects:
On the monitor:
1. Touch the center of the monitor to call up the touch screen
menu.
Sound
Sound
2. Touch the
button.
✔ The sound effects menu appears on the display.
Audio Effect Control
Audio Effect Control
NEXTNEXT
ProLogic2
ProLogic2
SFC
SFC
DownMIX
DownMIX
BALANCE
BALANCE
FADER
FADER
OFFOFF
ProLogic Music
OFFOFF
Studio Hall Church
OFF StereoStereo Lt/Rt
EXIT
EXIT
+0+0
+0+0
Chicago IVDM-7003
3. Select the sound effect to be set by touching it.
4. Perform the setting by repeatedly touching the left or right
area of the scale or by touching the desired setting.
Touching the
or button displays additional set-
ting options.
EXIT
EXIT
5. Touch the
button to confirm the setting.
6. To perform additional settings, repeat steps 3 - 5.
EXIT
EXIT
7. Touch the
button to hide the sound effects menu.
Page 25
Introduction
On the remote control:
1. Press the SOUND / DSP button.
✔ The sound effects menu appears on the display.
Audio Effect Control
Audio Effect Control
NEXTNEXT
ProLogic2
ProLogic2
SFC
SFC
DownMIX
DownMIX
BALANCE
BALANCE
FADER
FADER
OFFOFF
ProLogic Music
OFFOFF
Studio Hall Church
OFF StereoStereo Lt/Rt
EXIT
EXIT
+0+0
+0+0
Chicago IVDM-7003
2. Press the ENTER button.
3. Select the sound effect to be set with the
4. Select the desired setting with the
or button.
or button.
5. To perform additional settings, repeat steps 3 - 4.
6. Touch the SETUP button to hide the sound effects menu.
✔ The settings are automatically saved.
Switching the Downmix mode on/off
If the Downmix mode is activated, the multi-channel surround signal is transferred into a conventional stereo signal.
On the remote control: Press the DOWNMIX button to acti-
1.
vate the downmix mode.
2. Press the button again to deactivate the downmix mode.
Selecting the display illumination colour
The following colours are available for the display illumination of
the device:
Turquoise > Red > Violet > Yellow > White > Blue > Green >
On the device: Hold the DIS / FLIP button pressed until
1.
the colour changes. Repeat the process until the desired
colour is set.
On the remote control: Press the LCD button repeatedly
until the desired colour is set.
25
Page 26

Introduction
26
Show/hide the image of a back-up camera
A back-up camera (optional equipment) can be connected to the
Aspen/Chicago IVDM-7003. The camera image is automatically
displayed when the reverse gear is selected if the back-up camera was connected to the device as described in the installation
instructions. In the setup menu you can configure whether you
want to display the image of the back-up camera as horizontal
mirror. That gives the same impression as a rear-view mirror. For
further details, read the section “Selecting the external signal
source” in the chapter “Setup menu”.
Note: To manually display the camera image, press
the REAR button of the remote control or touch the
Rear
Rear
button on the touch screen menu. Press the
button again or touch the center of the monitor to hide
the camera image again.
Automatic through connection of telephone calls
If your Aspen/Chicago IVDM-7003 is connected to a hands-free
system for cell phones, the active signal source is muted if a telephone call arrives and the call is played back using the car sound
system. For this purpose, the hands-free system must be connected to the device as described in the installation instructions.
Traffic announcements and acoustic driving suggestions from a
connected navigation system are not connected through during a
telephone call.
You can change the volume during a telephone call.
On the device: Use the VOL - / + buttons.
1.
On the remote control: Use the VOL / buttons.
If the volume is changed during a call, this value remains valid
until the volume is changed again during a call.
Page 27

Radio mode
REG
CD - C
Radio menu
E
92 94 100 104
1. Radio 21
1. Radio 21
2. NDR 2
2. NDR 2
3. Antenne
3. Antenne
4. ffn
4. ffn
5. 89.0 RTL
5. 89.0 RTL
6. N–JOY
6. N–JOY
RADIO
RADIO
STATIO
n
R·D· S
FM1
FM1
AF TA
Info
Info
REG
PTY
Radio 21
Radio 21
13:05
13:05
TP
A Display: programme type, if selected
B Display: RDS functions
Button: call up the menu for RDS settings
C Display: waveband/memory bank and station name/
frequency
Button: Select waveband/memory bank
D Display: time
E Display: list of stored stations
Button: call up stored stations
A
B
C
D
Touch screen menu in radio mode
1. Radio 21
1. Radio 21
2. NDR 2
2. NDR 2
3. Antenne
3. Antenne
4. ffn
4. ffn
5. 89.0 RTL
5. 89.0 RTL
6. N–JOY
6. N–JOY
Sound
Sound
RADIORADIODVDDVD CD - C
Setup
Setup
CD - C AAUX 1AUX 1 AAUX 2AUX 2 NANAVINAVI
R·D· S
FM1
FM1
AF TA
REG
Radio 21
Radio 21
BANDBAND BSMBSM
Rear
Rear
Disp
Disp
PTY
PTY
R·D·S
R·D·S
TP
A Selecting the signal source
B Selecting the waveband/memory bank
C Automatically storing stations
D Automatic station search up/down
E Manual station search up/down
F Exit the touch screen menu
G Call up the menu for RDS settings
H Call up a list with programme types
I Change the wallpaper
K Display the image of a connected back-up camera
L Call up the setup menu
M Call up the menu for sound settings
A
B
C
D
E
FGHJKLM
27
Page 28

Radio mode
TP
28
Switching to radio mode
1.
On the monitor: Touch the center of the monitor to call up
the touch screen menu. Touch the
button to switch
RADIORADIO
to radio mode.
On the device or on the remote control: Press the SRC
button until the radio menu is displayed.
✔ The station selected last is playing.
R•D•S
AF TP
RADIO 21
F1 10580
Display with closed monitor: RDS functions, station
name or waveband/memory bank and frequency, memory location
TP
P
1
P
1
Switching RDS (Radio Data System) on/off
RDS is a service of the radio stations that offers more comfort for
listening to the radio on the FM waveband. The radio stations
broadcast additional information to the programme, such as the
station name. The station name is displayed on the monitor or
the device display as soon as it is received.
Note: The RDS function must be activated before the
advantages of RDS can be used.
On the monitor:
R·D·S
1. Touch the
R·D·S
button on the touch screen menu.
✔ The RDS menu is displayed at the bottom of the monitor.
92 94 100 104
1. Radio 21
1. Radio 21
2. NDR 2
2. NDR 2
3. Antenne
3. Antenne
4. ffn
4. ffn
5. 89.0 RTL
5. 89.0 RTL
6. N–JOY
6. N–JOY
RDS Set
RDS Set
RADIO
RADIO
Flip Item
Flip Item
STATIO
n
Change Value
Change Value
R·D· S
FM1
FM1
AF TA
REG
Radio 21
Radio 21
OKOK
TP
ON
ON
2. Select the “RDS Set” menu entry with the or button.
3. Touch the
or button to activate (ON) or deactivate
(OFF) RDS.
OKOK
4. Touch the
button to hide the RDS menu.
On the remote control:
1. Press the RDS / MENU button.
✔ The RDS menu is displayed at the bottom of the monitor.
2. Select the “RDS Set” menu entry with the
3. Press the
or button to activate (ON) or deactivate
or button.
(OFF) RDS.
4. Press the RDS / MENU button to hide the RDS menu.
Page 29

Radio mode
Switching the RDS function AF (Alternate Frequency) on/off
If the RDS function AF (Alternate Frequency) is activated, the
device automatically tunes into the best receivable frequency for
the station that is currently set.
On the monitor:
1. Touch the
R·D· S
button or touch the
R·D·S
R·D·S
button on the
touch screen menu.
✔ The RDS menu is displayed at the bottom of the monitor.
2. Select the “AF Set” menu entry with the
3. Touch the
or button to activate (ON) or deactivate
or button.
(OFF) the AF function.
OKOK
4. Touch the
button to hide the RDS menu.
On the remote control:
1. Press the RDS / MENU button.
✔ The RDS menu is displayed at the bottom of the monitor.
2. Select the “AF Set” menu entry with the
3. Press the
or button to activate (ON) or deactivate
or button.
(OFF) the AF function.
4. Press the RDS / MENU button to hide the RDS menu.
Note: The AF function can also be switched on/off by
using the AF / SUBTITLE button. If the function is
activated, the monitor displays the AF symbol.
Switching the RDS function REG (Regional Programmes)
on/off
At certain times, some RDS stations divide their programme into
regional programmes providing different content. If the RDS function REG (Regional Programmes) is activated, it prevents the
device from switching to a different regional programme when it
is searching for the best receivable frequency.
On the monitor:
1. Touch the
R·D· S
button or touch the
R·D·S
R·D·S
button on the
touch screen menu.
✔ The RDS menu is displayed at the bottom of the monitor.
2. Select the “REG Set” menu entry with the
3. Touch the
or button to activate (ON) or deactivate
or button.
(OFF) the REG function.
OKOK
4. Touch the
button to hide the RDS menu.
On the remote control:
1. Press the RDS / MENU button.
✔ The RDS menu is displayed at the bottom of the monitor.
2. Select the “REG Set” menu entry with the
3. Press the
or button to activate (ON) or deactivate
or button.
(OFF) the REG function.
4. Press the RDS / MENU button to hide the RDS menu.
Note: The REG function can also be switched on/off
by using the REG / ANGLE button. If the function is
activated, the monitor displays the REG symbol.
29
Page 30

Radio mode
REG
30
Selecting the waveband/memory bank
This device can receive programmes broadcast over the FM and
AM wavebands. Three memory banks are available for the FM
waveband and one memory bank for the AM waveband. Six
stations can be stored in each memory bank.
Selecting the memory bank or waveband:
On the monitor: Touch the or button repeatedly or
1.
touch the
BANDBAND
button repeatedly on the touch screen
menu.
On the device: Press the BND / BSM button repeatedly.
On the remote control: Press the BAND button repeatedly.
✔ The current memory bank or the current waveband and
the station set last are displayed on the monitor A.
92 94 100 104
1. Radio 21
1. Radio 21
2. NDR 2
2. NDR 2
3. Antenne
3. Antenne
4. ffn
4. ffn
5. 89.0 RTL
5. 89.0 RTL
6. N–JOY
6. N–JOY
RADIO
RADIO
STATIO
n
REG
AF TA
R·D· S
FM1
FM1
Radio 21
Radio 21
13:05
13:05
TP
A
Automatic station search
1.
On the monitor: Touch the or button on the
touch screen menu.
On the device or on the remote control: Press the or
button.
✔ The radio tunes into the next receivable station.
Manual station search
You can also search for stations manually.
On the monitor: Touch the or button repeatedly
1.
on the touch screen menu.
On the remote control: Press the or button repeatedly.
✔ The frequency is changed in increments.
This allows you to set a station with a known frequency:
On the device: For coarse tuning, hold the or button
1.
pressed until the frequency of the desired station is
reached.
2. For fine tuning, press the
or until the exact frequency
of the station is displayed.
Page 31

Radio mode
Storing stations manually
18 memory locations are available in the FM waveband (6 on
each memory bank) and 6 memory locations in the AM waveband.
1. Select the memory bank FM1, FM2, FM3 or the waveband
MW.
2. Tune into the desired station.
On the monitor: Touch the button of the station list for ap-
3.
prox. 2 seconds where you want to store the tuned station.
On the device: Hold the station button (1 to 6) of the memory location pressed for approx. 2 seconds where you
want to store the tuned station.
✔ If the station is stored, the frequency or the station name is
displayed next to the selected number in the station list.
Any existing entry is overwritten.
Automatically storing stations
You can automatically store the six FM stations offering the strongest reception in the region. These stations are stored on memory
bank FM3.
Note: Any stations that were previously stored in this
memory bank are replaced in the process.
On the monitor: Touch the
1.
screen menu.
On the device: Hold the BND / BSM button pressed for
longer than 2 seconds.
BSMBSM
button on the touch
✔ The device changes to memory bank FM3, if necessary,
and automatic storing of stations starts.
✔ After the process is completed, each stored station is
played for approx. 3 seconds. The station name is also
stored if the RDS function is activated.
Note: For stations with changing RDS displays, it is
possible that currently transmitted commercials or
other information is stored instead of the station name.
Calling up stored stations
1. Select the memory bank or waveband.
On the monitor: Touch the memory location of the desired
2.
station in the station list.
On the device or on the remote control: Select the desired
memory location by using the station buttons 1 to 6.
✔ The desired station is playing.
31
Page 32

Radio mode
CD - C
REG
32
Station search by programme type
Some RDS stations broadcast information about the type of programme broadcast (e.g. news, sports, rock, pop). By using this
information, the device perform a directed search for stations of
a certain programme type.
Selecting the programme type:
PTY
On the monitor: Touch the
1.
PTY
button on the touch
screen menu.
On the remote control: Press the PTY / ZOOM button.
✔ The available programme types appear on the monitor.
RADIORADIODVDDVD CD - C
PTY Search
PTY Search
All
All
News
News
Current Affairs
Current Affairs
Information
Information
Sport
Sport
Sound
Sound
Setup
Setup
2. On the monitor: Select the desired programme type with
or button and touch the button of the selected
the
CD - C AAUX 1AUX 1 AAUX 2AUX 2 NANAVINAVI
R·D· S
FM1
FM1
AF TA
REG
Radio 21
Radio 21
BANDBAND BSMBSM
Rear
Rear
Disp
Disp
PTY
PTY
R·D·S
R·D·S
TP
programme type.
On the remote control: Select the desired programme type
with the
or button and press the ENTER button.
Note: If “All” is selected, the PTY function is deactivated.
✔ Seek tuning starts and the next station with the selected
programme type is tuned.
✔ The PTY symbol and the selected programme type are
displayed on the monitor A.
92 94 100 104
1. Radio 21
1. Radio 21
2. NDR 2
2. NDR 2
3. Antenne
3. Antenne
4. ffn
4. ffn
5. 89.0 RTL
5. 89.0 RTL
6. N–JOY
6. N–JOY
RADIO
RADIO
STATIO
n
R·D· S
FM1
FM1
AF TA
Info
Info
REG
PTY
NDR Info
NDR Info
13:05
13:05
TP
Note: If the device does not locate a corresponding
station, the PTY function is deactivated and the station set last is played.
A
A
Page 33

Radio mode
REG
REG
Traffic information stations
Traffic information stations are RDS stations broadcasting traffic
announcements. If you are listening to a traffic information station,
the TP symbol is displayed on the monitor A.
92 94 100 104
1. Radio 21
1. Radio 21
2. NDR 2
2. NDR 2
3. Antenne
3. Antenne
4. ffn
4. ffn
5. 89.0 RTL
5. 89.0 RTL
6. N–JOY
6. N–JOY
RADIO
RADIO
STATIO
n
REG
R·D· S
FM1
FM1
AF TA
Radio 21
Radio 21
13:05
13:05
TP
A
The Aspen/Chicago IVDM-7003 is equipped with a RDS-EON
receiving unit. EON stands for Enhanced Other Network.
EON allows for listening to traffic announcements even if the tuned
station does not broadcast traffic information. In the event of a
traffic announcement, the device switches within a station chain
to the traffic information station of station chain that is connected
via EON.
After the traffic announcement, the device switches back to the
previously played station.
Switching traffic announcement priority on/off
The priority for traffic announcements is activated if the display
shows the TA symbol B.
92 94 100 104
1. Radio 21
1. Radio 21
2. NDR 2
2. NDR 2
3. Antenne
3. Antenne
4. ffn
4. ffn
5. 89.0 RTL
5. 89.0 RTL
6. N–JOY
6. N–JOY
RADIO
RADIO
STATIO
n
REG
R·D· S
FM1
FM1
AF TA
Radio 21
Radio 21
13:05
13:05
TP
B
On the monitor:
1. Touch the
R·D· S
button or touch the
R·D·S
R·D·S
button on the
touch screen menu.
✔ The RDS menu is displayed at the bottom of the monitor.
2. Select the “TA Set” menu entry with the
3. Touch the
or button to activate (ON) or deactivate
or button.
(OFF) the priority for traffic announcements.
OKOK
4. Touch the
button to hide the RDS menu.
33
Page 34

Radio mode
34
On the remote control:
1. Press the RDS / MENU button.
✔ The RDS menu is displayed at the bottom of the monitor.
2. Select the “TA Set” menu entry with the
3. Press the
(OFF) the priority for traffic announcements.
4. Press the RDS / MENU button to hide the RDS menu.
Note: The priority for traffic announcements can also
be switched on/off by using the TA / AUDIO button.
If he priority is activated, the monitor displays the TA
symbol.
Setting the volume for traffic announcements
In radio mode, the traffic announcement is played with the volume
set for traffic announcements.
In other operating modes, the playback is muted during a traffic
announcement and the announcement is played with the set value.
Note: Traffic announcements are not played if mute is
activated or during a telephone call.
You can change the volume during a traffic announcement.
On the device: Use the VOL - / + buttons.
1.
On the remote control: Use the VOL / buttons.
If the volume is changed during a traffic announcement, this value
remains valid until the volume is changed again during a traffic
announcement.
or button to activate (ON) or deactivate
or button.
Cancelling the current traffic announcement
A current traffic announcement can be cancelled if you do not
want to listen to it.
On the device: During a traffic announcement, press the
1.
button.
✔ The current announcement is cancelled. The priority for
traffic announcement remains activated.
Note: A traffic announcement, during which the device
switched to the traffic information station connected
via EON, cannot be cancelled.
Page 35

DVD operation
CD - C
DVD menu
TITLE TImE
DVD
DVD
Angle
Angle
OFF
OFF
A Display: Current title
Button: Direct selection of title
B Display: Current chapter
Button: Direct selection of chapter
C Display: Expired playing time
D Button: Exit DVD menu
E Display: Playback language
Button: Select playback language
F Display: Subtitle language
Button: Select subtitle language
G Display: Camera perspective
Button: Change camera perspective
A B C
CHAP
02
007
02
007
2 English
2 English
00:16’35
00:16’35
Touch screen menu in DVD mode
RADIORADIODVDDVD CD - C
CD - C AAUX 1AUX 1 AAUX 2AUX 2 NANAVINAVI
A
B
C
D
E
Sound
Sound
Setup
Setup
Rear
Rear
Track
Track
Pict
Pict
FGHJKLM
DEFG
A Selecting the signal source
B Start/interrupt playback
C Exit playback
D Chapter selection up/down
E Fast scan forward/back
F Exit the touch screen menu
G Call up the menu for image format, zoom, repeat and
image settings
H Call up the DVD menu
I Call up the controls for the DVD main menu
K Display the image of a connected back-up camera
L Call up the setup menu
M Call up the menu for sound settings
35
Page 36

DVD operation
36
Switching to DVD mode
1.
On the monitor: Touch the center of the monitor to call up
the touch screen menu. Touch the
On the device or on the remote control: Press the SRC
button until the DVD mode is displayed as the signal
source.
✔ The DVD menu is briefly displayed.
Note: When you insert a DVD, the device automatically switches to DVD mode. For safety reasons, the
image playback of a DVD only operates if the vehicle
is standing and the hand brake is applied. While
driving, only the sound playback is possible. The
monitor displays a warning. The image playback for
passengers in the rear seats continues while driving
if a monitor is connected.
button.
DVDDVD
T02 C007
Display with closed monitor: Dolby digital, title, chapter.
Press the DIS / FLIP button repeatedly to display
additional information.
Starting playback
After an inserted DVD is loaded, either the DVD main menu is
displayed or the playback starts. This action is dependent upon
the DVD.
On the monitor: Touch the button on the touch
1.
screen menu.
On the device: Press the button.
On the remote control: Press the / PLAY/PAUSE button.
✔ The DVD starts playing.
Interrupting playback (freeze frame)
Playback can be interrupted and restarted.
On the monitor: Touch the button on the touch
1.
screen menu. To continue playback, touch the button
again.
On the device: Press the button. To continue playback,
press the button again.
On the remote control: Press the / PLAY/PAUSE button.
To continue playback, press the button again.
Exiting playback
On the monitor: Touch the button on the touch
1.
screen menu.
On the remote control: Press the button.
Page 37

Men
DVD operation
Selecting a chapter
A DVD title can be divided into several chapters.
Selecting the next chapter:
On the monitor: Touch the button repeatedly on the
1.
touch screen menu.
On the device or on the remote control: Press the button
repeatedly.
Selecting the previous chapter:
On the monitor: Touch the button repeatedly on the
1.
touch screen menu.
On the device or on the remote control: Press the button
repeatedly.
Note: For a fast chapter selection, hold the
or
button of the remote control pressed until the fast
selection for the next or previous chapter starts.
Direct selection of a title or chapter
A DVD is divided into different titles and chapters which can be
directly selected.
On the monitor:
Track
Track
1. Touch the
button on the touch screen menu.
✔ The DVD menu is displayed.
TITLE
2. Touch the
button.
✔ A cursor is displayed instead of the title number and but-
tons with numbers are displayed.
TITLE TImE
DVD
DVD
CHAP
_
_
007
007
00:16’35
00:16’35
332211
665544
998877
OKOK
00
Men
uMenu
Angle
Angle
3. Touch the
CHAP
OFF
OFF
button for direct selection of a chapter.
4. Enter the desired title or chapter number with the buttons
00
to 99 and confirm the entry with the
✔ Playback is continued at the selected position.
On the remote control:
1. Press the GOTO button.
✔ The DVD menu is displayed. A cursor is displayed instead
of the title number.
2. Press the GOTO button again for the direct selection of a
chapter.
3. Enter the desired title or chapter number with the number
buttons 0 to 9 and confirm the entry with the ENTER button.
✔ Playback is continued at the selected position.
2 English
2 English
OKOK
button.
37
Page 38

DVD operation
38
Fast search
To search for a specific section during the playback of a DVD,
you can use the fast search function.
On the monitor: Touch the or button on the
1.
touch screen menu repeatedly for fast forward or reverse
search.
On the remote control: Press the or button for fast
forward or reverse search.
2. Repeatedly touching the button or pressing the button
changes the search speed (2x, 4x, 6x, 8x).
✔ The selected speed is displayed on the monitor A.
x2
x2
A
Note: Sound and subtitle are not being while fast
searching forward or back.
You found the desired position and want to continue the playback with regular speed.
On the monitor: Touch the button on the touch
1.
screen menu.
On the remote control: Press the / PLAY/PAUSE button.
Selecting the playback language
On the monitor:
Track
Track
1. Touch the
button on the touch screen menu.
✔ The DVD menu is displayed.
2. To select the desired playback language, touch the
button once or several times.
✔ The playback language is changed.
On the remote control:
1. To select the desired playback language, press the
TA / AUDIO button once or several times.
✔ The playback language is changed.
Page 39

DVD operation
Selecting the subtitle language
On the monitor:
Track
Track
1. Touch the
button on the touch screen menu.
✔ The DVD menu is displayed.
2. To select the desired language of the subtitles or to completely hide the subtitles, touch the
button once or
several times.
On the remote control:
1. To select the desired language of the subtitles or to
completely hide the subtitles, press the AF / SUBTITLE
button once or several times.
Repeating a chapter or title
The Repeat function is used to repeatedly play the current chapter or the current title.
The selected Repeat function is displayed on the monitor.
REPEAT
(repeat a chapter)
REPEAT
(repeat a title)
Pict
1.
On the monitor: Touch the
screen menu and then touch the
Pict
button on the touch
Repeat
Repeat
button once or
several times.
On the device: Press the 4 / RPT button once or several
times.
On the remote control: Press the REPEAT button once or
several times.
Switching the image format
Pict
1.
On the monitor: Touch the
Pict
button on the touch
screen menu. To toggle between wide image 16:9 (WIDE)
Wide
Wide
and normal image 4:3 (NORMAL), touch the
but-
ton.
On the remote control: To toggle between wide image 16:9
(WIDE) and normal image 4:3 (NORMAL), press the WIDE
button.
Enlarging an image area (Zoom)
An image area can be enlarged using different zoom levels.
Pict
On the monitor: Touch the
1.
screen menu and then touch the
Pict
button on the touch
Zoom
Zoom
button once or
several times.
On the device: Press the 3 / ZOOM button once or several
times.
On the remote control: Press the PTY / ZOOM button once
or several times.
✔ Every time you touch or press the button, the central im-
age area is enlarged by one level (1.5x, 2x, 3x, normal).
The selected zoom level is displayed on the monitor.
On the remote control: After setting the desired zoom,
2.
you can move the image area with the buttons
/
and / .
39
Page 40

DVD operation
Image settings
During playback, you can adjust brightness, colour, contrast, tint
and dimmer.
Pict
On the monitor: Touch the
1.
screen menu and then touch the
✔ The menu for the image settings is displayed.
2. Select “Brightness”, “Colour”, “Contrast”, “Tint” or “Dimmer”
by touching it.
✔ The image of the DVD and a scale for the setting are
displayed.
Pict
button on the touch
Scrn
Scrn
button.
EXIT
5. Use the
EXIT
button to end the setting and call up the
menu for the image settings again.
EXIT
EXIT
6. Touch the
button to exit the menu.
Selecting the camera perspective (Angle)
If scenes with different camera perspectives are stored on the
DVD, you can change the camera perspective during playback.
On the monitor:
Track
Track
1. Touch the
button on the touch screen menu.
✔ The DVD menu is displayed.
2. To select from the available camera perspectives, touch
Angle
Angle
the
button once or several times.
On the remote control:
1. To select from the available camera perspectives, touch
the REG / ANGLE button once or several times.
40
Brightness
Brightness
+0+0
EXIT
EXIT
3. Repeatedly touch the left or right area of the scale to
perform the setting.
Brightness
4. Use the
Brightness
button to perform additional image
settings.
Page 41

DVD operation
Calling the DVD main menu
The main menu is stored on the DVD. The selection options offered by the main menu are dependent upon the respective DVD.
The main menu of a DVD can offer the following:
●
You can select from different languages for the playback or
for the subtitles.
●
A movie is divided into several sequential chapters. You can
select a chapter and directly start the playback.
On the monitor:
1. Touch the
then touch the
✔ The DVD main menu is displayed.
Note: If the buttons cover menu entries of the main
menu, use the
of the buttons.
2. Use the
individual menu entries.
3. To confirm a menu entry, touch the
4. To hide the buttons, touch the
On the remote control:
1. Press the RDS / MENU button.
✔ The DVD main menu is displayed.
2. Use the
individual menu entries.
3. To confirm a menu entry, press the ENTER button.
button on the touch screen menu and
button.
MenuMenu
or button to change the position
/ / / buttons to select from the
OKOK
button.
button.
/ / / buttons to select from the
41
Page 42

Audio CD mode
TEXT
CD - C
42
Audio CD menu
No Title
1Track 1
1Track 1
2Track 2
2Track 2
3Track 3
3Track 3
4Track 4
4Track 4
5Track 5
5Track 5
TEXT
No Title
K
J
H
–
CD
Audio
Audio–CD
A
TRACK TImE
01
01
00:02’35
00:02’35
NORMAL
13:05
13:05
A Display: Currently playing track
B Display: Expired playing time
C Display: Playback mode (Normal, Repeat, Scan, Mix)
D Display: Playback, pause, fast scan
Button: Interrupt/start playback
E Button: Forward/reverse track selection
F Display: Graphical equaliser (Chicago IVDM-7003 only)
G Display: Time
H Display: CD text information (if available)
J Display: Track list
K Display: Name of CD (if CD text is available)
B
C
D
E
F
G
Touch screen menu in Audio CD mode
AUDIO
AUDIO
1Track 1
1Track 1
2Track 2
2Track 2
3Track 3
3Track 3
4Track 4
4Track 4
5Track 5
5Track 5
Sound
Sound
- CD
- CD
No Title
No Title
RADIORADIO CD - C
Setup
Setup
Rear
Rear
CD - C AAUX 1AUX 1 AAUX 2AUX 2 NANAVINAVI
NORMAL
Disp
Disp
Func
Func
A Selecting the signal source
B Start/interrupt playback
C Exit playback
D Track selection up/down
E Fast scan forward/back
F Exit the touch screen menu
G Call up the menu for Mix, Repeat, Scan function
H Change the wallpaper
I Display the image of a connected back-up camera
K Call up the setup menu
L Call up the menu for sound settings
A
B
C
D
E
FGHJKL
Page 43

Audio CD mode
Activating the audio CD mode
1.
On the monitor: Touch the center of the monitor to call up
the touch screen menu. Touch the
AUDIO
AUDIO
- CD
- CD
button.
On the device or on the remote control: Press the SRC
button until the Audio CD menu is displayed.
✔ The track selected last is playing.
Note: When you insert an audio CD, the device automatically switches to Audio CD mode. Track 1 of the
inserted CD is playing.
T02-0248
Display with closed monitor: Track, playing time
-
Interrupting playback (pause)
Playback can be interrupted and restarted.
On the monitor: Touch the button or touch the
1.
button on the touch screen menu. To continue playback,
touch the button again.
On the device: Press the button. To continue playback,
press the button again.
On the remote control: Press the / PLAY/PAUSE
button. To continue playback, press the button again.
Exiting playback
On the monitor: Touch the button on the touch
1.
screen menu.
On the remote control: Press the button.
Selecting tracks
Selecting the next track:
On the monitor: Touch the button repeatedly or touch
1.
the
button repeatedly on the touch screen menu.
On the device or on the remote control: Press the button
repeatedly.
Selecting the previous track:
On the monitor: Touch the button repeatedly or touch
1.
the
button repeatedly on the touch screen menu. If
you touch the button once, the current track will be played
again from the beginning.
On the device or on the remote control: Press the
button repeatedly. If you press the button once, the current
track will be played again from the beginning.
Note: For a fast track selection, hold the
or button
of the remote control pressed until the fast selection
for the next or previous track starts.
43
Page 44

Audio CD mode
44
Fast search
To search for a specific section during the playback of a track,
you can use the fast scan function.
On the monitor: Touch the or button on the
1.
touch screen menu repeatedly for fast forward or reverse
search.
On the remote control: Press the or button for fast
forward or reverse search.
2. Repeatedly touching the button or pressing the button
changes the search speed (1.5x, 2x, 3x, 4x).
✔ The selected speed is displayed on the monitor A.
TRACK TImE
–
CD
1Track 1
1Track 1
2Track 2
2Track 2
3Track 3
3Track 3
4Track 4
4Track 4
5Track 5
5Track 5
TEXT
No Title
No Title
Audio
Audio–CD
01
01
00:02’35
00:02’35
NORMAL
x2
x2
13:05
13:05
A
You found the desired position and want to continue the playback with regular speed.
On the monitor: Touch the button on the touch
1.
screen menu.
On the remote control: Press the / PLAY/PAUSE
button.
Note: When the start/end of the track is reached, the
fast scan automatically ends.
Repeating tracks (Repeat)
The Repeat function repeats the current track until this function
is deactivated.
Func
On the monitor: Touch the
1.
screen menu and then touch the
Func
button on the touch
Repeat
Repeat
button.
On the device: Press the 4 / RPT button.
On the remote control: Press the REPEAT button.
REPEAT
✔ Display on the monitor:
T02-0248
.
RPT
-
Repeat display with closed monitor
If you want to cancel the repeat function,
1. Touch the button again or press the button again.
NORMAL
✔ Display on the monitor:
.
Page 45

Audio CD mode
Random track play (MIX)
The Mix function plays the tracks of a CD in random order.
Func
On the monitor: Touch the
1.
screen menu and then touch the
Func
button on the touch
+
Mix
Mix
button.
On the device: Press the 5 / MIX button.
On the remote control: Press the MIX button.
MIX
✔ Display on the monitor:
T02-0248
Mix display with closed monitor
.
-
MIX
If you want to cancel the Mix function,
1. Touch the button again or press the button again.
NORMAL
✔ Display on the monitor:
.
Scanning all tracks (Scan)
The Scan function plays all the tracks of the CD in sequential
order for approx. 10 seconds each.
Func
On the monitor: Touch the
1.
screen menu and then touch the
Func
button on the touch
Scan
Scan
button.
On the device: Press the 6 / SCAN button.
On the remote control: Press the SCAN button.
SCAN
✔ Display on the monitor:
T01-0002
Scan display with closed monitor
.
SCAN
-
If you want to cancel the Scan function,
1. Touch the button again or press the button again.
NORMAL
✔ Display on the monitor:
.
45
Page 46

CD-changer mode
CD - C
46
CD changer menu
1. TRACK 1
1. TRACK 1
2. TRACK 2
2. TRACK 2
3. TRACK 3
H
3. TRACK 3
4. TRACK 4
4. TRACK 4
5. TRACK 5
5. TRACK 5
6. TRACK 6
6. TRACK 5
CD
CD–C
–
C
A
TRACK TImE
01
01
CD1
CD1
00:00’35
00:00’35
NORMAL
13:05
13:05
A Display: Currently playing track
B Display: Expired playing time
C Display: Playback mode (Normal, Repeat, Scan, Mix)
D Display: Playback, pause, fast scan
Button: Interrupt/start playback
E Display: Currently playing CD
Button: Select CD
F Button: Forward/reverse track selection
G Display: Time
H Display: Track list of currently playing CD
B
C
D
E
F
G
Touch screen menu in CD changer mode
1. TRACK 1
1. TRACK 1
2. TRACK 2
2. TRACK 2
3. TRACK 3
3. TRACK 3
4. TRACK 4
4. TRACK 4
5. TRACK 5
5. TRACK 5
6. TRACK 6
6. TRACK 5
Sound
Sound
RADIORADIODVDDVD CD - C
Setup
Setup
CD - C AAUX 1AUX 1 AAUX 2AUX 2 NANAVINAVI
NORMAL
CD1
CD1
Rear
Rear
Disp
Disp
Func
Func
A Selecting the signal source
B Start/interrupt playback
C Exit playback
D Track selection up/down
E Fast scan forward/back
F Exit the touch screen menu
G Call up the menu for Mix, Repeat, Scan function
H Change the wallpaper
I Display the image of a connected back-up camera
K Call up the setup menu
L Call up the menu for sound settings
A
B
C
D
E
FGHJKL
Page 47

CD-changer mode
CD changers
The following Blaupunkt CD changers can be connected: CDC A03, CDC - A08 and IDC - A09.
Notes: How to fill the magazine with CDs and insert
the magazine in the changer is described in the instructions of your CD changer.
If the magazine was newly inserted, all CDs in the
magazine are loaded once (magazine scan). Playback
is not possible during this time.
Activating the CD changer mode
On the monitor: Touch the center of the monitor to call up
1.
-
CD - CCD - C
button.
DISC
8
the touch screen menu. Touch the
On the device or on the remote control: Press the SRC
button until the CD changer menu is displayed.
✔ The track selected last is playing.
T02-0248
Display with closed monitor: Track, playing time,
CD number
Interrupting playback (pause)
Playback can be interrupted and restarted.
On the monitor: Touch the button or touch the
1.
button on the touch screen menu. To continue playback,
touch the button again.
On the device: Press the button. To continue playback,
press the button again.
On the remote control: Press the / PLAY/PAUSE
button. To continue playback, press the button again.
Exiting playback
On the monitor: Touch the button on the touch
1.
screen menu.
On the remote control: Press the button.
Selecting CDs
Selecting the next or previous CD:
On the monitor: Touch the or button once or several
1.
times.
On the device: Press the 1 / -DISC or 2 / DISC+ button
once or several times.
On the remote control: Press the or button once or
several times.
✔ The selected CD is loaded and playback starts with track 1.
47
Page 48

CD-changer mode
48
Selecting tracks on the currently playing CD
Selecting the next track:
On the monitor: Touch the button repeatedly or touch
1.
the
button repeatedly on the touch screen menu.
On the device or on the remote control: Press the button
repeatedly.
Selecting the previous track:
On the monitor: Touch the button repeatedly or touch
1.
the
button repeatedly on the touch screen menu.
If you touch the button once, the current track will be
played again from the beginning.
On the device or on the remote control: Press the
button repeatedly. If you press the button once, the
current track will be played again from the beginning.
Note: For a fast track selection, hold the
or button
of the remote control pressed until the fast selection
for the next or previous track starts.
Fast search
To search for a specific section during the playback of a track,
you can use the fast scan function.
On the monitor: Touch the or button repeatedly
1.
on the touch screen menu.
On the remote control: Press the or button.
✔ The track is audibly scanned forward or back.
2. Touch the button again or press the button again to
continue playback at regular speed.
Repeating tracks (Repeat)
The Repeat function is used to repeatedly play the current track
or the current CD.
The selected Repeat function is displayed on the monitor.
REPEAT
(repeat a track)
REPEAT
(repeat a CD)
NORMAL
(repeat function ended)
DISC
T02-0248
Repeat display with closed monitor
1. On the monitor: Touch the
screen menu and then touch the
-
Func
Func
button on the touch
Repeat
Repeat
button once or
RPT
8
several times.
On the device: Press the 4 / RPT button once or several
times.
On the remote control: Press the REPEAT button once or
several times.
Page 49

CD-changer mode
Random track play (MIX)
The Mix function plays the tracks of the current CD or all CDs in
the magazine in random order.
The selected Mix function is displayed on the monitor.
MIX
(random playback of current CD)
MIX
(random playback of all CDs)
NORMAL
(random playback ended)
DISC
T02-0248
-
8
MIX
Mix display with closed monitor
Func
1. On the monitor: Touch the
screen menu and then touch the
Func
button on the touch
+
Mix
Mix
button once or
several times.
On the device: Press the 5 / MIX button once or several
times.
On the remote control: Press the MIX button once or
several times.
Scanning all tracks (Scan)
The Scan function plays all the tracks of the current CD or all
CDs in the magazine in sequential order for approx. 10 seconds
each.
The selected Scan function is displayed on the monitor.
SCAN
(play track of current CD)
SCAN
(play track of all CDs)
NORMAL
(scan function ended)
SCAN
DISC
T01-0002
-
8
Scan display with closed monitor
Func
1. On the monitor: Touch the
screen menu and then touch the
Func
button on the touch
Scan
Scan
button once or
several times.
On the device: Press the 6 / SCAN button once or several
times.
On the remote control: Press the SCAN button once or
several times.
49
Page 50

MP3 CD mode
CD - C
50
MP3 CD menu
Kuschelrock
K
J
H
Kuschelrock
1 Abba - I have a
1 Abba - I have a
2 America _ The L
2 America _ The L
3Art Garfunkel
3Art Garfunkel
4Austria 3 - Weu
4Austria 3 - Weu
5 B.O.N - Take my
5 B.O.N - Take my
ID3
I have a dream
I have a dream
–
MP3
CD
CD–MP3
A
FILE TImE
001
001
00:02’44
00:02’44
NORMAL
13:05
13:05
A Display: Currently playing file
B Display: Expired playing time
C Display: Playback mode (Normal, Repeat, Scan, Mix)
D Display: Playback, pause, fast scan
Button: Interrupt/start playback
E Button: Scroll up/down in file list
F Display: Graphical equaliser (Chicago IVDM-7003 only)
G Display: Time
H Display: ID3 tag information (if available)
J Display: File list of currently playing folder
Button: Call file
K Display: Currently playing folder
Button: Select folder up/down
B
C
D
E
F
G
Touch screen menu in MP3 CD mode
Kuschelrock
Kuschelrock
1 Abba - I have a
1 Abba - I have a
2 America _ The L
2 America _ The L
3Art Garfunkel
3Art Garfunkel
4Austria 3 - Weu
4Austria 3 - Weu
5 B.O.N - Take my
5 B.O.N - Take my
Sound
Sound
Setup
Setup
RADIORADIO CD - C
Rear
Rear
CD - C AAUX 1AUX 1 AAUX 2AUX 2 NANAVINAVIMP3MP3
NORMAL
Disp
Disp
Func
Func
A Selecting the signal source
B Start/interrupt playback
C Exit playback
D File selection up/down
E Fast scan forward/back
F Exit the touch screen menu
G Call up the menu for Mix, Repeat, Scan function
H Change the wallpaper
I Display the image of a connected back-up camera
K Call up the setup menu
L Call up the menu for sound settings
A
B
C
D
E
FGHJKL
Page 51

MP3 CD mode
Activating the MP3 CD mode
1.
On the monitor: Touch the center of the monitor to call up
-
button.
MP3MP3
1
the touch screen menu. Touch the
On the device or on the remote control: Press the SRC
button until the MP3 CD menu is displayed.
✔ The file played last is playing.
Note: When you insert an MP3 CD, the device automatically switches to MP3 CD mode.
Note: Umlauts and special characters should not be
used while burning a folder and files since they are
not correctly displayed.
T02-0248
MP3
Display with closed monitor: File, playing time, folder
Interrupting playback (pause)
Playback can be interrupted and restarted.
On the monitor: Touch the button or touch the
1.
button on the touch screen menu. To continue playback,
touch the button again.
On the device: Press the button. To continue playback,
press the button again.
On the remote control: Press the / PLAY/PAUSE
button. To continue playback, press the button again.
Exiting playback
On the monitor: Touch the button on the touch
1.
screen menu.
On the remote control: Press the button.
Selecting folders
Selecting the next or previous folder:
On the monitor: Touch the or button once or several
1.
times.
On the device: Press the 1 / -DISC or 2 / DISC+ button
once or several times.
On the remote control: Press the or button once or
several times.
Selecting files
Selecting the next file:
On the monitor: Touch the button repeatedly on the
1.
touch screen menu.
On the device or on the remote control: Press the button
repeatedly.
Selecting the previous file:
On the monitor: Touch the button repeatedly on the
1.
touch screen menu. If you touch the button once, the current file will be played again from the beginning.
On the device or on the remote control: Press the
button repeatedly. If you press the button once, the
current file will be played again from the beginning.
51
Page 52

MP3 CD mode
52
Scrolling up/down in file list:
1.
On the monitor: Touch the or button repeatedly. To
confirm the selected file, touch the button of the file in the
list.
On the remote control: Press the or button repeatedly.
To confirm the selected file, press the ENTER button.
Fast search
To search for a specific section during the playback of a file, you
can use the fast search function.
1.
On the monitor: Touch the or button on the
touch screen menu repeatedly for fast forward or reverse
search.
On the remote control: Press the or button for fast
forward or reverse search.
2. Repeatedly touching the button or pressing the button
changes the search speed (2x, 4x, 6x, 8x).
✔ The selected speed is displayed on the monitor.
You found the desired position and want to continue the playback with regular speed.
On the monitor: Touch the button on the touch
1.
screen menu.
On the remote control: Press the / PLAY/PAUSE
button.
Note: When the start/end of the file is reached, the fast
scan automatically ends.
Repeating files (Repeat)
The Repeat function is used to repeatedly play the current file or
the current folder.
The selected Repeat function is displayed on the monitor.
REPEAT
(repeat a file)
REPEAT
(repeat a folder)
NORMAL
(repeat function ended)
DISC
RPT
1
RPT
1
T02-0248
MP3
Display with closed monitor: Repeat file
T02-0248
MP3
Display with closed monitor: Repeat folder
1. On the monitor: Touch the
screen menu and then touch the
-
-
Func
Func
button on the touch
Repeat
Repeat
button once or
several times.
On the device: Press the 4 / RPT button once or several
times.
On the remote control: Press the REPEAT button once or
several times.
Page 53

MP3 CD mode
Random play of files (MIX)
The Mix function plays the files of the current folder or all folders
on the CD in random order.
The selected Mix function is displayed on the monitor.
MIX
(random playback of current folder)
MIX
(random playback of all folders)
NORMAL
(random playback ended)
T02-0248
MP3
-
1
MIX
Display with closed monitor: Random playback of
current folder
DISC
T02-0248
MP3
-
1
MIX
Display with closed monitor: Random playback of all
folders
Func
1. On the monitor: Touch the
screen menu and then touch the
Func
button on the touch
+
Mix
Mix
button once or
several times.
On the device: Press the 5 / MIX button once or several
times.
On the remote control: Press the MIX button once or
several times.
Scanning all files (Scan)
The Scan function plays all the files of the current folder or all
folders on the CD in sequential order for approx. 10 seconds each.
The selected Scan function is displayed on the monitor.
SCAN
(scanning files of current folder)
SCAN
(scanning files of all folders)
NORMAL
(scan function ended)
SCAN
T01-0002
MP3
-
1
Display with closed monitor: scanning files of current
folder
SCAN
DISC
T01-0002
MP3
-
1
Display with closed monitor: scanning files of all folders
Func
1. On the monitor: Touch the
screen menu and then touch the
Func
button on the touch
Scan
Scan
button once or
several times.
On the device: Press the 6 / SCAN button once or several
times.
On the remote control: Press the SCAN button once or
several times.
53
Page 54

External sources
54
Add-on equipment
Two external audio/video sources can be connected to the AUX
inputs of the Aspen/Chicago IVDM-7003. If the AUX inputs are
activated in the setup menu, they can be selected as signal source.
For further details, please read the section “Selecting the external signal source” in the chapter “Setup menu”.
Alternatively, the signal converter IVSC-3302 or IVSC-5502
can also be connected to the Aspen/Chicago IVDM-7003. The
IVSC signal source can be used to display all the sources
connected to the signal converter on the monitor of the Aspen/
Chicago IVDM-7003.
Note: If a signal converter is connected to the device,
the buttons of the signal sources AUX 1 and AUX 2
are no longer available on the touch screen menu. In
this case, it is meaningful to connect all external sources to the signal converter and selected them via the
signal converter. However, if a device should be connected to the AUX inputs, you ca select it with the SRC
button on the device or on the remote control.
Selecting a connected device as signal source.
On the monitor: Touch the button of the desired signal
1.
source on the touch screen menu.
On the device and on the remote control: Press the SRC
button until the desired signal source appears on the
monitor.
✔ The selected AUX source is briefly displayed at the top of
the monitor.
AUX1
Brief AUX display with closed monitor, then display of
the time.
Page 55

External sources
Navigation system
If a navigation system (e.g. TravelPilot EX-V) is connected to the
Aspen/Chicago IVDM-7003, you can display the navigation screen
on the monitor.
Note: To allow for dynamic destination guidance
(automatic traffic jam detours), the navigation system
must be connected to a suitable TMC source.
On the monitor: Touch the
1.
screen menu.
On the device or on the remote control: Press the NAVI
button.
✔ The navigation screen is displayed on the monitor.
Note: Touch screen operation is not possible during
navigation mode.
button on the touch
NAVINAVI
On the monitor: Touch the center of the monitor to return
2.
to the previous operating mode.
On the device or on the remote control: Press the NAVI
button again to return to the previous operating mode.
Voice output during navigation mode
If the navigation system is connected to the Aspen/Chicago IVDM7003 as described in the installation instructions, its voice output
for the driving suggestions are played back over the car sound
system. For this purpose, the volume of the currently set signal
source is decreased. The percentage decrease of the volume
can be set in the setup menu. For further details, read the section
“Volume decrease for voice output” in the chapter “Setup menu”.
You can change the volume of the driving suggestions during a
voice output.
On the device: Use the VOL - / + buttons.
1.
On the remote control: Use the VOL / buttons.
If the volume is changed during a voice output, this value remains
valid until the volume is changed again during a voice output.
Note: If the setting range is insufficient, you can also
increase the volume of the TravelPilot EX-V. For this
purpose, read the operating instructions of the
TravelPilot EX-V.
55
Page 56

Setup menu
56
Setup menu
Language
E
D
Language
AUDIO FRE SPA OTHERSENGENG
AUDIO
SUB–TITLE
SUB–TITLE
MENU
MENU
ENGENG FRE OFFSPA OTHERS
ENGENG GER SPAFRE ITA
A Display: Selected submenu
B Display: Menu entries of selected submenu
Button: Select menu entries
C Button: Exit setup menu
D Display: Submenus of selected setup menu
Button: Select submenu
E Display: Selected setup menu
Button: Select setup menu
EXIT
EXIT
A
B
C
Selecting the setup menu
The setup menu of the Aspen/Chicago IVDM-7003 offers a
variety of options to customise the device.
Setup
On the monitor: Touch the
1.
Setup
button on the touch
screen menu.
On the remote control: Press the SETUP button.
✔ The DVD setup menu is displayed.
Note: When you call up the setup menu, the DVD
setup menu is always displayed first.
You can select the following setup menus:
DVD > AUDIO > SCREEN > USER.
On the monitor: Touch the button of setup menu E
2.
repeatedly.
On the remote control: Press the SRC button repeatedly.
Each setup menu is divided into several submenus.
On the monitor: Touch the button of the desired submenu D.
3.
On the remote control: Select the desired submenu using
or button.
the
Exiting the setup menu
EXIT
On the monitor: Touch the
4.
EXIT
button.
On the remote control: Press the SETUP button.
More detailed information is available in the descriptions of the
individual menus.
Page 57

DVD setup menu
Performing settings in the setup menu
The settings in the setup menu can be performed using the buttons of the setup menu or the buttons of the remote control.
The detailed information about the individual menus contain only
descriptions of the operation via buttons.
The following overview features a description of the principal
operation using the buttons of the remote control. It allows you to
perform all the settings in the setup menu.
●
To call up the setup menu,
press the SETUP button.
●
To select between the setup menus,
press the SRC button repeatedly.
●
To select between the submenus,
press the
●
To activate menu entries,
or button repeatedly.
press the ENTER button.
●
To select menu entries,
press the
●
To perform settings,
press the
●
To confirm settings you made,
or button repeatedly.
or button repeatedly.
press the ENTER button.
●
To cancel settings without saving them,
press the
●
To exit the setup menu,
/ RETURN button.
press the SETUP button.
DVD setup
Selecting a language
You can preset your preferred playback language for the DVD
sound and whether and in which language subtitles are shown.
This requires that the selected language is stored on the DVD
and that the DVD supports this function. With some DVDs, the
standard language is preset.
In addition, you can select the language of the menu texts for the
setup menu.
Note: English is the selected language for the figures
used in these instructions.
Setup
Setup
1. Touch the
✔ The DVD “Language” submenu is displayed.
button on the touch screen menu.
Language
Language
AUDIO FRE SPA OTHERSENGENG
AUDIO
SUB–TITLE
SUB–TITLE
MENU
MENU
ENGENG FRE OFFSPA OTHERS
ENGENG GER SPAFRE ITA
EXIT
EXIT
57
Page 58

DVD setup menu
2. Select by touching “AUDIO” (playback language),
“SUB-TITLE” (subtitle) or “MENU” (language of menu
texts).
3. Perform the setting by touching the desired menu entry.
EXIT
EXIT
4. Touch the
Note: Use the “OTHERS” menu entry to select languages listed on the DVD language code table (see
page 83). Enter the four-digit code of the desired language using the buttons
entry with the
5. Repeat steps 2 - 4 to perform additional settings, or
5. touch the
button to confirm the setting.
00
OKOK
button.
EXIT
EXIT
button to exit the menu.
to 99 and confirm the
Setup
Setup
1. Touch the
2. Touch the
button on the touch screen menu.
button.
✔ The DVD “Display” submenu is displayed.
Display
Display
ASPECT NARROWWIDE 16:9WIDE 16:9
ASPECT
TYPE
TYPE
PAN & SCANPAN & SCAN LETTER BOX
58
Selecting the screen display mode
You can select from the aspect ratios for wide-screen display
16:9 (WIDE) and normal screen display 4:3 (NARROW).
In the “PAN & SCAN” setting, the image fills the entire screen.
The left and right margin of wide images (16:9 aspect ratio) is cut
off. If you select the “LETTER BOX” setting, a black stripe
appears at the top and bottom edge of the screen during the playback of wide images.
EXIT
EXIT
3. Select by touching “ASPECT” (aspect ratio) or “TYPE”
(display format).
4. Perform the setting by touching the desired menu entry.
EXIT
EXIT
5. Touch the
button to confirm the setting.
6. Repeat steps 3 - 5 to perform additional settings, or
EXIT
EXIT
6. touch the
button to exit the menu.
Page 59

DVD setup menu
Setting the parental control level
You can set the parental control level so that children can view
only movies that are age appropriate. If a DVD features a higher
parental control level, it can be played only after entering the password.
Note: Not all DVDs support the parental control feature.
The following options can be selected:
●
1. General (G) – Suitable for all ages
●
2. Most audiences – Suitable for most age levels
●
3. Mature young audience (PG) – With parental guidance
●
4. Teenage audience (PG-13) – For children under the
age of 13 with parental guidance
●
5. Mature teenage audience – For mature teenagers
●
6. Mature audience (R) – For children under the age of
17 with parental guidance
●
7. Adult audience (NC-17) – Not suitable for children
under the age of 17
●
8. Unrated – No defined guidance
Note: A password is required to change the parental
control level. For instructions, please read the section “Changing the password” in this chapter.
Setup
Setup
1. Touch the
2. Touch the
button on the touch screen menu.
button.
✔ The DVD “Parental Control” submenu is displayed.
3. Activate “LEVEL” by touching it.
Parental Control
Parental Control
LEVEL 8.unrated8.unrated
LEVEL
EXIT
EXIT
4. Select the desired parental control level using the or
button and touch the selected parental control level.
✔ The password entry menu appears.
00
99
5. Enter the four-digit password using the buttons
and confirm the entry with the
EXIT
EXIT
6. Touch the
button to exit the menu.
OKOK
button.
to
59
Page 60

AUDIO setup menu
60
Audio setup
Setting the input level for external audio sources
Setup
Setup
1. Touch the
then touch the
✔ The “Input Level” AUDIO submenu appears.
NEXTNEXT
2. Select “AUX1” or “AUX2” by touching it.
3. Touch the desired input voltage.
4. To confirm the setting, touch the
5. Repeat steps 2 - 4 to perform additional settings, or
5. touch the
button on the touch screen menu and
button.
Input Level
Input Level
AUX1 4V2V2V
AUX1
AUX2
AUX2
EXIT
EXIT
button to exit the menu.
2V2V 4V
EXIT
EXIT
button.
EXIT
EXIT
Setting Dolby ProLogic 2 (Chicago IVDM-7003 only)
Setup
1. Touch the
then touch the
2. Touch the
Setup
button on the touch screen menu and
button.
button.
✔ The “Audio Effect Control” AUDIO submenu is displayed.
3. Activate “ProLogic2” by touching it.
Audio Effect Control
Audio Effect Control
NEXTNEXT
ProLogic2
ProLogic2
SFC
SFC
DownMIX
DownMIX
BALANCE
BALANCE
FADER
FADER
ProLogic MusicOFFOFF
OFFOFF
Studio Hall Church
OFF StereoStereo Lt/Rt
EXIT
EXIT
+0+0
+0+0
The following settings are available:
OFF > ProLogic > Music > Movie > Matrix
4. Touch the desired setting. Touching the
or
button displays additional setting options.
EXIT
EXIT
5. Touch the
button twice to exit the menu.
Page 61

AUDIO setup menu
Setting environment audio effects (Chicago IVDM-7003
only)
Setup
Setup
1. Touch the
then touch the
2. Touch the
button on the touch screen menu and
button.
button.
✔ The „Audio Effect Control“ AUDIO submenu is displayed.
3. Activate “SFC” (environment audio effects) by touching it.
Audio Effect Control
Audio Effect Control
NEXTNEXT
ProLogic2
ProLogic2
SFC
SFC
DownMIX
DownMIX
BALANCE
BALANCE
FADER
FADER
OFFOFF
ProLogic Music
Studio Hall
OFFOFF
OFF StereoStereo Lt/Rt
Church
EXIT
EXIT
+0+0
+0+0
The following settings are available:
OFF > Studio > Hall > Church > Stadium > Movie > Club
4. Touch the desired setting. Touching the
or
button displays additional setting options.
EXIT
EXIT
5. Touch the
button twice to exit the menu.
Setting bass and treble (Aspen IVDM-7003 only)
Setup
1. Touch the
then touch the
2. Touch the
Setup
button on the touch screen menu and
button.
button.
✔ The “Audio Effect Control” AUDIO submenu is displayed.
Audio Effect Control
Audio Effect Control
NEXTNEXT
BASS
BASS
TREBLE
TREBLE
BALANCE
BALANCE
FADER
FADER
DownMIX
DownMIX
OFF StereoStereo Lt/Rt
EXIT
EXIT
+0+0
+0+0
+0+0
+0+0
3. Activate “BASS” or “TREBLE” by touching it.
4. Repeatedly touch the left or right area of the scale to
adjust bass or treble.
EXIT
EXIT
5. To confirm the setting, touch the
button.
6. Repeat steps 3 - 5 to perform additional settings, or
EXIT
EXIT
6. touch the
button to exit the menu.
61
Page 62

AUDIO setup menu
62
Setting the speaker balance
Setup
1. Touch the
then touch the
2. Touch the
Setup
button on the touch screen menu and
button.
button.
✔ The “Audio Effect Control” AUDIO submenu is displayed.
Audio Effect Control
Audio Effect Control
NEXTNEXT
ProLogic2
ProLogic2
SFC
SFC
DownMIX
DownMIX
BALANCE
BALANCE
FADER
FADER
OFFOFF
ProLogic Music
OFFOFF
Studio Hall Church
OFF StereoStereo Lt/Rt
EXIT
EXIT
+0+0
+0+0
3. Touch “BALANCE” (volume distribution left - right) or
“FADER” (volume distribution front - rear) to activate it.
4. Repeatedly touch the left or right area of the scale to
adjust the volume distribution.
EXIT
EXIT
5. To confirm the setting, touch the
button.
6. Repeat steps 3 - 5 to perform additional settings, or
EXIT
EXIT
6. touch the
button to exit the menu.
Downmix function (Aspen IVDM-7003)
The downmix function in the audio setup’s “Audio Effect Control”
submenu is used to control the downmix mode for the audio/video outputs (VIDEO 1 OUT, VIDEO 2 OUT) and loudspeaker/
preamp outputs.
The downmix function on the remote control is used to control
the downmix mode for the loudspeaker/preamp outputs. If the
downmix mode is activated using the DOWNMIX button on the
remote control, this will have the same effect as deactivating
(“OFF” setting) the centre loudspeaker and subwoofer in the audio setup’s “Speaker Setup” submenu.
Since the Aspen IVDM-7003 is equipped with only one digital
signal processor (DSP), the downmix function for the audio/video outputs and for the loudspeaker/preamp outputs cannot be
configured independently of one another.
Note: If the downmix function has been deactivated
(“OFF” setting) in the audio setup’s “Audio Effect
Control” submenu and a signal source is selected that
has been encoded using the Dolby Digital 5.1 or DTS
5.1 process, there will be no centre sound information present at the audio outputs of VIDEO 1 OUT and
VIDEO 2 OUT. In order to indicate that this configuration does not make sense, the system mutes the audio outputs of VIDEO 1 OUT and VIDEO 2 OUT. On the
Aspen IVDM-7003, it therefore only makes sense to
deactivate the downmix function if an external amplifier and a centre loudspeaker are being used with the
system.
Note: For the Aspen IVDM-7003, downmix can be set
only if you called the setup menu in DVD mode. The
setting affects only the DVD mode.
Page 63

AUDIO setup menu
Stereo
Setup
1. Touch the
then touch the
2. Touch the
✔ The “Audio Effect Control” AUDIO submenu is displayed.
3. Activate “DownMIX” (tow-zone mode) by touching it.
NEXTNEXT
The following settings are possible:
OFF: Keep the surround signal, i.e. no downmix
Stereo: Convert surround signal to stereo signal
Lt/Rt: Mix surround signal for rear speakers into the signal for
the front speakers
4. Touch the desired setting.
5. Touch the
Setup
button on the touch screen menu and
button.
button.
Audio Effect Control
Audio Effect Control
BASS
BASS
TREBLE
TREBLE
BALANCE
BALANCE
FADER
FADER
DownMIX
DownMIX
EXIT
EXIT
OFF Stereo
Stereo Lt/Rt
button twice to exit the menu.
EXIT
EXIT
+0+0
+0+0
+0+0
+0+0
Downmix function (Chicago IVDM-7003)
The downmix function on the remote control is used to control
the downmix mode for the loudspeaker/preamp outputs. If the
downmix mode is activated using the DOWNMIX button on the
remote control, this will have the same effect as deactivating
(“NONE” or “NO” setting) the centre loudspeaker and subwoofer
in the audio setup’s “Speaker Setup” submenu.
Since the Chicago IVDM-7003 is equipped with a second digital
signal processor (DSP), the downmix function is always activated for the audio outputs of VIDEO 1 OUT and VIDEO 2 OUT.
Irrespective of this, the downmix function for the loudspeaker and
preamp outputs can be set by activating/deactivating the centre
loudspeaker and subwoofer. As a result, the “DownMIX” menu
item in the audio setup’s “Audio Effect Control” submenu is not
applicable and will not be displayed.
Setup
Setup
1. Touch the
then touch the
2. Touch the
button on the touch screen menu and
button.
button.
✔ The “Audio Effect Control” AUDIO submenu is displayed.
3. Activate “DownMIX” (tow-zone mode) by touching it.
63
Page 64

Stereo
AUDIO setup menu
Audio Effect Control
Audio Effect Control
ProLogic2
ProLogic2
SFC
SFC
DownMIX
DownMIX
BALANCE
BALANCE
FADER
NEXTNEXT
FADER
The following settings are possible:
OFF: Keep the surround signal, i.e. no downmix
Stereo: Convert surround signal to stereo signal
Lt/Rt: Mix surround signal for rear speakers into the signal for
the front speakers
4. Touch the desired setting.
EXIT
5. Touch the
EXIT
OFFOFF
ProLogic Music
OFFOFF
Studio Hall Church
OFF Stereo
Stereo Lt/Rt
button twice to exit the menu.
EXIT
EXIT
+0+0
+0+0
7-band equaliser (Chicago IVDM-7003 only)
The Chicago IVDM-7003 model features a 7-band equaliser which
allows you to optimise the music sound to your vehicle or to optimise the music style. Six sound presettings and one customised
setting (USER) are available for this purpose. The linear setting
(FLAT), which cannot be changed, deactivates the equaliser.
Sound presettings for the following music styles are available:
CLASSIC > JAZZ > ROCK > POPS > BALLAD > DANCE
The customised setting allows you to adjust the music playback
to your personal taste by decreasing or increasing the available
frequency bands.
Note: We recommend you use a familiar CD/DVD to
make changes to the settings.
Setup
Setup
1. Touch the
then touch the
2. Touch the
button on the touch screen menu and
button.
button.
✔ The “7Band Equalizer” AUDIO submenu is displayed.
3. Activate “7EQ ITEM” (music style) by touching it.
4. Select the desired sound presetting with the
or
button.
5. Select the frequency band to be changed by touching it.
64
Page 65

AUDIO setup menu
7Band Equalizer
7Band Equalizer
7EQ ITEM BALLADBALLAD
7EQ ITEM
+6
0
–6
NEXTNEXT
6. Adjust the level of the frequency band to the desired value
with the
/ buttons.
7. To change the level of additional frequency bands, move
the selection mark with the
8. To exit the setting, touch the
9. You can now perform additional settings or exit the menu
by touching the
Speaker setup (Aspen IVDM-7003)
If you connected a center speaker or subwoofer to the Aspen
IVDM-7003, you must activate the corresponding speaker output
(setting “ON”).
If the speakers are not connected, select the setting “OFF”.
75 150 400 1K 2.4K 6K 15K
/ buttons.
EXIT
EXIT
EXIT
EXIT
button twice.
button.
EXIT
EXIT
Setup
Setup
1. Touch the
then touch the
2. Touch the
button on the touch screen menu and
button.
button.
✔ The “Speaker Setup” AUDIO submenu is displayed.
Speaker Setup
Speaker Setup
NEXTNEXT
CENTER
CENTER
SUB WOOFER
SUB WOOFER
OFFOFFON
OFFONON
EXIT
EXIT
3. Select “CENTER” or “SUB WOOFER” by touching it.
4. Perform the setting by touching the desired speaker
setting.
EXIT
EXIT
5. To confirm the setting, touch the
button.
6. Repeat steps 3 - 5 to perform additional settings, or
EXIT
EXIT
6. Touch the
button to exit the menu.
Note: If the center speaker output is set to “OFF”, its
audio signal is evenly distributed to the left and right
front speaker.
The subwoofer signal is not distributed since the
other signals already contain bass.
65
Page 66

AUDIO setup menu
66
Speaker setup (Chicago IVDM-7003)
The Chicago IVDM-7003 can be set according to the playback
frequency ranges of the connected speakers. Before performing
the settings, check which speakers (except for the subwoofer)
can produce low frequencies.
Select the setting “LARGE” if the connected speaker can
produce low frequencies.
Select the setting “SMALL” if the connected speaker cannot
produce low frequencies.
Select the setting “NONE” or “NO” if no speaker is connected.
Setup
Setup
1. Touch the
then touch the
2. Touch the
button on the touch screen menu and
button.
button.
✔ The “Speaker Setup” AUDIO submenu is displayed.
Speaker Setup
Speaker Setup
NEXTNEXT
FRONT
FRONT
REAR
REAR
CENTER
CENTER
SUB WOOFER
SUB WOOFER
SMALLLARGELARGE
SMALL NONELARGELARGE
SMALL NONENONELARGE
NOYESYES
EXIT
EXIT
3. Select “FRONT” (front speaker), “REAR” (rear speaker),
“CENTER” (center speaker) or “SUB WOOFER” by
touching it.
4. Perform the setting by touching the desired speaker
setting.
Note: The settings for the front speaker do not feature
the entry “NONE” since all vehicles are equipped with
front speakers.
EXIT
EXIT
5. To confirm the setting, touch the
button.
6. Repeat steps 3 - 5 to perform additional settings, or
EXIT
EXIT
6. touch the
button to exit the menu.
Note: The audio signals for non-connected speakers
(setting “NONE” or “NO”) are added to the audio
signals of the connected speakers.
In the process, the audio signal of the center speaker
is evenly distributed to the left and right front speaker.
The audio signals of the rear speakers are added to
the front speakers.
The subwoofer signal is not distributed since the other
signals already contain bass.
Page 67

AUDIO setup menu
Setting a delay time
You can set a delay time in milliseconds for the center and rear
speakers. This simulates a greater distance to the respective
speakers.
Note: For the Aspen IVDM-7003, the delay time can be
set only if you called the setup menu in DVD mode.
The setting affects only the DVD mode.
Setup
Setup
1. Touch the
then touch the
2. Touch the
first touch the
button on the touch screen menu and
button.
button. With the Chicago IVDM-7003,
button.
✔ The “Speaker Delay” (delay time) AUDIO submenu is
displayed.
Speaker Delay
Speaker Delay
PREVPREV
NEXTNEXT
CENTER
CENTER
REAR
REAR
+0ms+0ms
+0ms+0ms
EXIT
EXIT
3. Select “CENTER” (center speaker) or “REAR” (rear speaker)
by touching it.
4. Repeatedly touch to the left or right of the scale to adjust
the desired delay.
EXIT
EXIT
5. To confirm the setting, touch the
button.
6. Repeat steps 3 - 5 to perform additional settings, or
EXIT
EXIT
6. Touch the
button to exit the menu.
Adjusting the speaker level
You can adjust the volume distribution of the individual speakers.
Note: For the Aspen IVDM-7003, the speaker levels can
be adjusted only if you called the setup menu in DVD
mode. The setting affects only the DVD mode.
Setup
Setup
1. Touch the
then touch the
2. First, touch the
button on the touch screen menu and
button.
button, followed by the button.
✔ The “Speaker Gain” (speaker level) AUDIO submenu is
displayed.
Speaker Gain
Speaker Gain
PREVPREV
NEXTNEXT
FRONT L
FRONT L
FRONT R
FRONT R
REAR L
REAR L
REAR R
REAR R
NEXTNEXT
+0+0
+0+0
+0+0
+0+0
EXIT
EXIT
67
Page 68

AUDIO setup menu
3. Select “FRONT L/R” (left/right front speaker), “REAR L/R”
(left/right rear speaker), “CENTER” (center speaker) or
“SUB WOOFER” by touching it. The
can be used to scroll back and forth in the menu.
Note: Deactivated speakers cannot be selected. For
instructions, please read the section “Speaker setup”
in this chapter.
4. Repeatedly touch to the left or right of the scale to
increase or decrease the speaker level for the selected
speaker.
5. To confirm the setting, touch the
6. Repeat steps 3 - 5 to perform additional settings, or
EXIT
EXIT
6. Touch the
button to exit the menu.
/ buttons
EXIT
EXIT
button.
Setup
Setup
1. Touch the
then touch the
2. First, touch the
button on the touch screen menu and
button.
button, followed by the button.
✔ The “Dynamic Range” AUDIO submenu is displayed.
Dynamic Range
Dynamic Range
PREVPREV
D.RANGE
D.RANGE
OFFOFF
68
Setting the dynamic range
You can adjust the dynamic range between loud and soft
passages. For this purpose, the volume of soft passages is
increased and that of loud passages is decreased.
Note: The dynamic range can be set in increments from
“OFF” to “FULL” (maximum). Select the “FULL” setting for full dynamic adjustment.
Note: For the Aspen IVDM-7003, the dynamic range
can be adjusted only if you called the setup menu in
DVD mode. The setting affects only the DVD mode.
NEXTNEXT
EXIT
EXIT
3. Activate “D RANGE” (dynamic range) by touching it.
4. Repeatedly touch to the left or right of the scale to
increase or decrease the dynamic range.
EXIT
EXIT
5. Touch the
button twice to exit the menu.
Page 69

AUDIO setup menu
Setting volume decrease for voice output
If a navigation system is connected, the voice output of the navigation system is mixed with the sound of the currently set signal
source. In the process, the volume of the signal source is
decreased. The percentage decrease of the volume can be adjusted.
The setting “+0” mutes the sound of the signal source for the
duration of a voice output.
With the setting “+100”, the volume of the signal source is not
decreased during a voice output.
Setup
Setup
1. Touch the
then touch the
2. First, touch the
With the Chicago IVDM-7003, touch the
button on the touch screen menu and
button.
button, followed by the button.
button twice.
✔ The “Navigation” AUDIO submenu is displayed.
Navigation
Navigation
PREVPREV
RESIDUAL
RESIDUAL
+50+50
3. Activate “RESIDUAL” (residual value) by touching it.
4. Repeatedly touch to the left or right of the scale to adjust
the desired volume difference.
EXIT
EXIT
5. Touch the
button twice to exit the setting.
Sending a test sound to the speakers
This option allows you to send a test sound to the connected
speakers to test its proper function.
Setup
Setup
1. Touch the
then touch the
2. First, touch the
With the Chicago IVDM-7003, touch the
button on the touch screen menu and
button.
button, followed by the button.
button twice.
✔ The “TEST TONE” AUDIO submenu is displayed.
Test Tone
Test Tone
PREVPREV
FRONT L
FRONT L
REAR L
REAR L
CENTER
CENTER
SUB WOOFER
SUB WOOFER
FRONT R
FRONT R
REAR R
REAR R
EXIT
EXIT
EXIT
EXIT
69
Page 70

SCREEN setup menu
70
3. Touch the desired speaker.
Note: Deactivated speakers cannot be selected. For
instructions, please read the section “Speaker setup”
in this chapter.
✔ A test sound is emitted from the selected speaker for
approx. 3 seconds.
4. Repeat the check for the other speakers.
EXIT
EXIT
5. Touch the
button twice to exit the test.
Monitor setup
Setting the monitor position
Set the monitor tilt so that you have the best possible view of the
screen.
The monitor can be set to two positions. The “BACKWARD” setting moves the monitor back and “FORWARD” moves it to the
front.
Setting the monitor for automatic opening/closing The setting
“Automatic” automatically opens or closes the monitor when the
ignition is turned on or off.
Setup
Setup
1. Touch the
2. Touch the
✔ The “Tilt” (monitor tilt) SCREEN submenu is displayed.
button on the touch screen menu.
button, followed by the button.
Tilt
Tilt
TILT
TILT
POSITION
POSITION
OPEN/CLOSE
OPEN/CLOSE
–1–2 0 +1+1+1 +1+2+2
BACKWARDBACKWARD FORWARD
AutomaticAutomatic Manual
EXIT
EXIT
Page 71

SCREEN setup menu
3. Select “TILT” (monitor tilt), “POSITION” or “OPEN/CLOSE”
by touching it.
4. Touch the desired setting.
Note: The setting “+2” for the monitor tilt cannot be
selected if “BACKWARD” was set for the position and
vice versa.
EXIT
EXIT
5. To confirm the setting, touch the
6. Repeat steps 3 - 5 to perform additional settings, or
EXIT
EXIT
6. Touch the
button to exit the menu.
Image settings
The image quality of the monitor can be customised.
Note: We recommend to perform the image settings
while a DVD is inserted.
Setup
Setup
1. Touch the
2. Touch the
3. Touch the
button on the touch screen menu.
button, followed by the button.
button.
✔ The “Control” (image setting) SCREEN submenu is
displayed.
button.
Control
Control
Brightness
Brightness
Color
Color
Contrast
Contrast
Tint
Tint
Dimmer
Dimmer
AUTOAUTO 1 2 3 4
+0+0
+0+0
+0+0
+0+0
EXIT
EXIT
4. Select “Brightness”, “Colour”, “Contrast”, “Tint” or
“Dimmer” by touching it.
✔ The image of the inserted DVD and a scale for the setting
are displayed.
5. Repeatedly touch the left or right area of the scale to
perform the setting.
Brightness
Brightness
6. Use the
button to perform additional image
settings.
EXIT
7. Use the
EXIT
button to end the setting and call up the
“Control” SCREEN submenu again.
EXIT
EXIT
8. Touch the
button to exit the menu.
71
Page 72

SCREEN setup menu
72
Activating/deactivating the touch screen monitor
Before the screen can respond to the touch of a finger, the function must be activated (ON). With deactivated function (OFF),
the device can be operated only with the buttons of the remote
control and the buttons on the front of the device.
Activating the touch screen monitor:
1. Press the SETUP button on the remote control and select
the SCREEN setup menu by repeatedly pressing the SRC
button.
2. Use the
or button to select the “Touch Screen”
submenu and press the ENTER button.
✔ The “Touch” menu entry is selected.
Touch Screen
Touch Screen
Touch
Touch
Adjust
Adjust
ON
OFFOFF
INITIALIZINGINITIALIZING
EXIT
EXIT
3. Use the or button to select the entry “ON” and press
the ENTER button to confirm the setting.
4. Press the SETUP button to exit the menu.
Deactivating the touch screen monitor:
Setup
1. Touch the
2. Touch the
3. Touch the
Setup
button on the touch screen menu.
button, followed by the button.
button.
✔ The “Touch Screen” SCREEN submenu is displayed.
Touch Screen
Touch Screen
Touch
Touch
Adjust
Adjust
ONON
OFF
INITIALIZINGINITIALIZING
EXIT
EXIT
4. Activate “Touch” by touching it.
EXIT
EXIT
5. Touch the entry “OFF”, followed by the
button, to
confirm the setting.
6. Exit the menu by pressing the SETUP button on the
remote control.
Page 73

SCREEN setup menu
Setting the touch position
This setting is required if the display position on the monitor and
the touch position on the monitor do no longer match. This may
be required after operating the device for several years.
Setup
Setup
1. Touch the
2. Touch the
3. Touch the
button on the touch screen menu.
button, followed by the button.
button.
✔ The „Touch Screen“ SCREEN submenu is displayed.
Touch Screen
Touch Screen
Touch
Touch
Adjust
Adjust
ONON
OFF
INITIALIZINGINITIALIZING
EXIT
EXIT
4. Activate “Adjust” by touching it.
5. Touch the “INITIALIZING” entry.
✔ The settings menu is displayed.
6. Touch the top left field on the monitor.
7. Now touch the top right field on the monitor.
8. Sequentially touch the fields at the bottom left and right on
the monitor.
✔ This concludes the setting and the “Touch Screen”
submenu is displayed again.
Note: If you touch the entry “RETURN”, no setting is
performed and the “Touch Screen” submenu is
displayed again.
EXIT
EXIT
9. Touch the
button twice to exit the menu.
73
Page 74

USER setup menu
74
User setup
Changing the password
You must change the password (0000 in the delivery state) to
protect your device against theft. The password is queried if the
device is to be operated again after an interruption of the supply
voltage.
In addition, the password is queried for the playback of DVDs
that are protected by parental control.
Setup
Setup
1. Touch the
2. Sequentially touch the
✔ The “ID Code” (password) USER submenu is displayed.
button on the touch screen menu.
, and button.
ID Code
ID Code
OLD CODE
OLD CODE
NEW CODE
NEW CODE
RE–CODE
RE–CODE
EXIT
EXIT
3. Activate “OLD CODE” (old password) by touching it.
4. To change the password, first enter the current password
00
using the buttons
OKOK
button.
to 99 and confirm the entry with the
5. Next, enter the new password in the “NEW CODE” (new
password) field.
6. After entering the new password, you are asked to confirm
it by re-entering it in the “RE-CODE” (repeat new password) field.
EXIT
EXIT
7. Touch the
button to exit the menu.
Wallpapers
The Aspen/Chicago IVDM-7003 allows for displaying seven different wallpapers. You can load your own images into the device
from a CD-ROM which can then be selected as wallpaper. In
addition, you can specify that the selected image is always displayed or that an automatic change of the stored images is performed.
Page 75

USER setup menu
Selecting the wallpaper
You can select the wallpaper to be displayed in radio, MP3,
audio CD and CD changer mode.
Note: The automatic image change should be deactivated for this operation. For instructions, please read
the section “Automatic image change” in this chapter.
Setup
Setup
1. Touch the
2. Sequentially touch the
3. Touch the
button on the touch screen menu.
, and button.
button.
✔ The “Image Manager” USER submenu is displayed.
Image Manager
Image Manager
PREVIEW
PREVIEW
IMG SWING
IMG SWING
IMG1IMG1
IMG2 IMG3 IMG4
OFFONON
EXIT
EXIT
4. Activate “PREVIEW” by touching it.
5. Touch a memory location (IMG1 - IMG7) to activate the
preview mode.
IMAGE1
IMAGE1
6. Select the desired wallpaper with the
IMAGE
IMAGE
CLEARRETURNRETURN WALLPAPER
button.
7. Touch the “WALLPAPER” entry.
✔ The “Image Manager” submenu is displayed.
EXIT
EXIT
8. Touch the
button twice to exit the menu.
✔ The selected image is displayed as wallpaper.
Note: The wallpaper for the active audio source can
also be selected directly. For this purpose, touch the
Disp
Disp
button once or several times in the touch
screen menu or press the DISP / WALLPAPER button
on the remote control until the desired image is displayed.
75
Page 76

USER setup menu
76
Automatic image change
If image change is activated, the wallpaper changes with every
track played by an audio or MP3 CD. In radio mode, the wallpaper changes approx. every five minutes.
Setup
Setup
1. Touch the
2. Sequentially touch the
3. Touch the
button on the touch screen menu.
, and button.
button.
✔ The “Image Manager” USER submenu is displayed.
Image Manager
Image Manager
PREVIEW
PREVIEW
IMG SWING
IMG SWING
IMG1IMG1
IMG2 IMG3 IMG4
OFFONON
EXIT
EXIT
4. Activate “IMG SWING” (image change) by touching it.
5. Touch “ON” or “OFF” to activate or deactivate the
automatic image change.
EXIT
EXIT
6. Touch the
button twice to exit the menu.
Deleting wallpapers
Proceed as follows to delete stored images:
Setup
1. Touch the
2. Sequentially touch the
3. Touch the
Setup
button on the touch screen menu.
, and button.
button.
✔ The “Image Manager” USER submenu is displayed.
Image Manager
Image Manager
PREVIEW
PREVIEW
IMG SWING
IMG SWING
IMG1IMG1
IMG2 IMG3 IMG4
OFFONON
EXIT
EXIT
4. Activate “PREVIEW” by touching it.
5. Touch a memory location (IMG1 - IMG7) to activate the
preview mode.
Page 77

USER setup menu
Loading wallpapers
You can also load your own wallpaper into the device from a CDROM. The software required for this purpose is located on the
enclosed CD-ROM.
1. Create a download CD according to the programme
instructions. Use a CD-R blank for this purpose.
2. Insert the download CD into the CD tray.
✔ The download menu appears after a few seconds.
IMAGE1
IMAGE1
6. Select the wallpaper to be deleted with the
CLEARRETURNRETURN WALLPAPER
IMAGE
IMAGE
button.
7. Touch the “CLEAR” entry.
✔ A confirmation dialogue appears.
8. If you want to delete the image, touch “YES” and “OK”.
✔ The image is deleted and the monitor displays a black
area.
9. If you want to delete additional images, repeat steps 6 - 8.
10. If you want to exit the preview mode, touch the “RETURN”
entry.
EXIT
EXIT
11. Touch the
button twice to exit the menu.
Image Download
Image Download
IMAGE 1
IMAGE 1
IMAGE 4
IMAGE 4
IMAGE 7
IMAGE 7
or download a new image from your CD-ROM.
After you select the image file you would like to
edit (1–7). Hightlight file and press ENTER.
Choose "Clear" to delete stored image.
Choose "Update" to download new image from CD-ROM.
Press "SETUP" to exit when complete.
IMAGE 2
IMAGE 2
IMAGE 5
IMAGE 5
From this menu you can delete
a currently stored image,
IMAGE 3
IMAGE 3
IMAGE 6
IMAGE 6
EXIT
EXIT
Note: The operating steps for loading images is
performed using the buttons on the remote control.
3. Select the desired memory location using the
or
button and press the ENTER button.
✔ The content of the selected memory location is displayed.
77
Page 78

USER setup menu
You have the following options:
1. If you want to delete the displayed image, select the
“CLEAR” entry and press the ENTER button.
✔ A confirmation dialogue appears.
2. Confirm with “YES” and “OK” by pressing the ENTER
button.
Or
1. If you want to replace the displayed image with a new
image, select the “UPDATE” entry and press the ENTER
button.
✔ A list with the images stored on the download CD is
displayed.
IMAGE LIST IN CD–ROM
IMAGE LIST IN CD–ROM
ENTER
: Preview & Store
IMAGE_1.jpg
IMAGE_2.jpg
IMAGE_3.jpg
IMAGE_4.jpg
IMAGE_5.jpg
2. Use the or button to select the desired image and
press the ENTER button.
✔ The image is loaded and then displayed on the monitor.
SETUP
: End
FILE–001
FILE–001
RETURNRETURN STORE
3. If this is not the desired image, use the or button to
load additional images from the download CD.
4. If you want to save the loaded image, select the “STORE”
entry and press the ENTER button.
✔ A confirmation dialogue appears.
5. Confirm with “YES” and “OK” by pressing the ENTER
button.
✔ The image is stored at the selected memory location.
6. If you want to load additional images from the download
CD, select the “RETURN” entry and press the ENTER
button.
✔ The download menu is displayed again.
Or
6. If you want to exit the download process, press the
SETUP button.
✔ The download CD is ejected.
78
Page 79

USER setup menu
Setting date and time
You can set the date, the time format (12/24 hours) and the time.
In audio sources, the time is displayed at the bottom right of the
monitor.
Setup
Setup
1. Touch the
2. Sequentially touch the
3. Touch the
✔ The “Adjust Date & Time” USER submenu is displayed.
4. Select “YEAR”, “MONTH”, “DAY”, “FORMAT”, “HOUR” or
“MIN” by touching it. The
scroll back and forth in the menu.
5. Perform the setting by repeatedly touching the
button.
button on the touch screen menu.
, and button.
button.
Adjust Date & Time
Adjust Date & Time
YEAR
YEAR
MONTH
MONTH
DAY
DAY
FORMAT
FORMAT
20052005
44
1414
24H Style24H Style
/ buttons can be used to
NEXTNEXT
EXIT
EXIT
or
EXIT
EXIT
6. Touch the
button to confirm the setting.
7. Repeat steps 4 - 6 to perform additional settings, or
EXIT
EXIT
7. touch the
button to exit the menu.
Selecting the external signal source
In the setup menu you can configure whether you want to display
the image of a connected back-up camera as horizontal mirror.
For this purpose, the back-up camera must be connected to the
device as described in the installation instructions.
Two external audio/video sources can be connected to the AUX
inputs of the Aspen/Chicago IVDM-7003. If the AUX inputs are
activated, they can be selected as signal source.
You have the option of selecting different signal source for the
front and the rear of the vehicle. This allows the driver to listen to
the radio or another audio source while the rear passengers can
view a DVD by means of additional connected monitors and headphones.
The following settings are possible:
Mirroring the camera image while backing up
REVERSE: ON > OFF
Switching AUX inputs on/off
AUX 1/2: ON > OFF
Selecting the signal source for additional monitors
MONITOR 1/2: AUTO > DISC > RADIO > CDC > AUX1 > AUX2
79
Page 80

USER setup menu
Setup
1. Touch the
2. Sequentially touch the
3. Touch the
✔ The “External Source Setup” USER submenu is displayed.
4. Select “REVERSE” (mirroring the camera image), “AUX1”,
“AUX2”, “MONITOR1” or “MONITOR2” by touching it.
5. Touch the desired setting. Touching the
button displays additional setting options for the monitors.
6. touch the
7. Repeat steps 4 - 6 to perform additional settings, or
7. touch the
Setup
button on the touch screen menu.
, and button.
button.
External Source Setup
External Source Setup
REVERSE
REVERSE
AUX1
AUX1
AUX2
AUX2
MONITOR1
MONITOR1
MONITOR2
MONITOR2
EXIT
EXIT
button to confirm the setting.
EXIT
EXIT
button to exit the menu.
OFFONON
ON
ON
OFFOFF
ON OFFOFF
DISC RADIO CDCAUTOAUT O
DISC RADIO CDC
AUTOAUTO
or
EXIT
EXIT
Factory settings
You can reset the Aspen/Chicago IVDM-7003 to the standard
values (factory setting).
Note: To return the settings to their original value, you
need a password. For instructions, please read the
section “Changing the password” in this chapter.
Setup
Setup
1. Touch the
2. Sequentially touch the
3. Touch the
button on the touch screen menu.
, and button.
button.
✔ The “Protected Configuration” (factory settings) USER
submenu is displayed.
Protected Configuration
Protected Configuration
Reset
Reset
Load Default ConfigLoad Default Config
EXIT
EXIT
80
Page 81

USER setup menu
4. Activate “RESET” by touching it.
5. Touch the “Load Default Config” entry.
✔ The password entry menu appears.
00
99
6. Enter the four-digit password using the buttons
and confirm the entry with the
OKOK
button.
7. Switch the device off and on again.
✔ All settings performed by you (except for password, date
and time) are returned to the factory settings.
Restart of the device software
If the Aspen/Chicago IVDM-7003 should be blocked due to a malfunction or no longer be operable in all functions, you can press
the reset button, e.g. with the tip of a ball-point pen, to initiate a
restart of the device software. The reset button is located behind
the detachable control panel. If the problem should still exist, please
contact your authorised dealer.
to
81
Page 82

Glossary
82
CD text
Information on an audio CD that may contain the following data:
- Name of track
- Name of artist
- CD name
Dolby Digital
The digital multi-channel technology Dolby Digital operates with
up to 6 channels, thereby offering a true impression of spatial
depth and close reality. This is ensured by separate channels for
the left, the right and the center speaker in the front of the vehicle
as well as two full-range surround speakers in the rear of the
vehicle and a subwoofer.
Downmix
The downmix function allows you to create a stereo signal from a
Dolby Prologic signal.
DVD video
DVD video is a software standard specifically defined for video
signals by the DVD forum. An application layer is required in
addition to the DVD which specifies standards such as playback
speed, forward/reverse, interactivity, up to 8 sound tracks with
up to 8 channels or change of camera perspective.
ID3 tag
Identification in an MP3 file that may contain the following data:
- Name of track
- Name of artist
- Name of volume on which the title was released
- Year of release
- Music type
- Comments
This information can be stored in the MP3 file via the PC.
MP3
MP3 is a process developed by the Fraunhofer Institute for compressing CD audio data. Compression allows data to be reduced
to around 10% of their original size without a noticeable loss in
quality (at a bit rate of 128 kbit/s). If a lower bit rate is used to
convert CD audio data to MP3, you will be able to create smaller
files but this will be accompanied by a loss in audio quality.
Page 83

Specifications
Control panel / Monitor
System: NTSC/PAL auto switch
Power supply: 10.8 - 16.0 volt
Current consumption max: 5 A
Standby: 7.3 mA
Operating temperature: -20 °C - +70 °C
Storage temperature: -30 °C - +80 °C
Screen size (diagonal): 7" (17.5 cm)
Resolution (pixel): 1440 (H) x 234 (W) =
336,960 Pixel
Viewable screen size: 152 (W) x 86 (H) mm
Control panel dimensions (WxHxD): 180 x 50 x 26.7 mm
Amplifier
Dimensions (WxHxD): 175 x 50 x 235 mm
Power supply: 10.8 - 16.0 volt
Max. current consumption: 10 A
Standby: < 1 mA
Video input level (typ.): 1 Vpp, 75 ohm
Audio output level (typ.): 4 Vrms +/- 0.2 Vrms
Channel separation: < 55 dB
Signal-to-noise ratio: < 75 dB
Bandwidth: 20 Hz - 20 kHz +/- 2 dB
Channel tracking: > 0.5 dB
Harmonic distortion (RMS): < 0.05 %
Output power: 4 x 16 watt sine according
to DIN 45 324 at 14.4 V
4 x 45 watt max. power
Center speaker (Chicago IVDM-7003 only):
1 x 12 watt sine according
to DIN 45 324 at 14.4 V
1 x 25 watt max. power
AUX 1, 2
Signal-to-noise ratio: > 85 dB
Harmonic distortion: < 0.01 %
Speaker bandwidth: 20 Hz - 20 kHz +/- 2 dB
Bandwidth (subwoofer): -3 dB at 100 Hz +/- 2 dB
DVD, CD, CDC
Signal-to-noise ratio: > 95 dB
Harmonic distortion: < 0.01 %
Bandwidth: 20 Hz - 20 kHz +/- 2 dB
Tuner
Wavebands
FM : 87.5 - 108 MHz
AM : 531 - 1,602 kHz
FM bandwidth: 20 - 16,000 Hz
Subject to change without notice!
83
Page 84

DVD language code table
84
6566 Abkhazian
6565 Afar
6570 Afrikaans
8381 Albanian
6577 Amharic
6582 Arabic
7289 Armenian
6583 Assamese
6569 Avestan
6588 Aymara
6590 Azerbaijani
6665 Bashkir
6985 Basque
6669 Belarussian
6678 Bengali
6672 Bihari
6673 Bislama
6683 Bosnian
6682 Breton
6671 Bulgarian
7789 Burmese
6765 Catalan
6772 Chamorro
6769 Chechen
7889 Chichewa
9072 Chinese
6785 Church Slavic
6786 Chuvash
7587 Cornish
6779 Corsican
7282 Croatian
8372 Croatian
6783 Czech
6865 Danish
7876 Dutch
6890 Dzongkha
6978 English
6979 Esperanto
6984 Estonian
7079 Faroese
7074 Fijian
7073 Finnish
7082 French
7089 Frisian
7168 Gaelic
7176 Gallegan
7565 Georgian
6869 German
6976 Greek
7178 Guarani
7185 Gujarati
7265 Hausa
7387 Hebrew
7290 Herero
7273 Hindi
7279 Hiri Motu
7285 Hungarian
7383 Icelandic
7378 Indonesian
7365 Interlingua
7369 Interlingue
7385 Inuktitut
7375 Inupiaq
7165 Irish
7384 Italian
7465 Japanese
7487 Javanese
7576 Kalaallisut
7578 Kannada
7583 Kashmiri
7575 Kazakh
7577 Khmer
7573 Kikuyu
8287 Kinyarwanda
7589 Kirghiz
7586 Komi
7579 Korean
7574 Kuanyama
7585 Kurdish
7679 Lao
7665 Latin
7686 Latvian
7666 Letzeburgesch
7678 Lingala
7684 Lithuanian
7775 Macedonian
7771 Malagasy
7783 Malay
7776 Malayalam
7784 Maltese
7186 Manx
7773 Maori
7782 Marathi
7772 Marshall
7779 Moldavian
7778 Mongolian
7865 Nauru
7886 Navajo
7868 Ndebele, North
7882 Ndebele, South
7871 Ndonga
7869 Nepali
8369 Northern Sami
7879 Norwegian
7866 Norwegian
Bokmål
7878 Norwegian
Nynorsk
7967 Occitan
7982 Oriya
7977 Oromo
7983 Ossetian
8073 Pali
8065 Panjabi
7065 Persian
8076 Polish
8084 Portuguese
8083 Pushto
8185 Quechua
8277 Raeto-Romance
8279 Romanian
8278 Rundi
8285 Russian
8377 Samoan
8371 Sango
8365 Sanskrit
8367 Sardinian
8382 Serbian
8378 Shona
8368 Sindhi
8373 Sinhalese
8375 Slovak
8376 Slovenian
8379 Somali
8384 Sotho, Southern
6983 Spanish
8385 Sundanese
8387 Swahili
8383 Swati
8386 Swedish
8476 Tagalog
8489 Tahitian
8471 Tajik
8465 Tamil
8484 Tatar
8469 Telugu
8472 Thai
6679 Tibetan
8473 Tigrinya
8479 Tonga
8483 Tsonga
8478 Tswana
8482 Turkish
8475 Turkmen
8487 Twi
8571 Uighur
8575 Ukrainian
8582 Urdu
8590 Uzbek
8673 Vietnamese
8679 Volapumk
6789 Welsh
8779 Wolof
8872 Xhosa
7437 Yiddish
8979 Yoruba
9065 Zhuang
9085 Zulu
Page 85

Country: Phone: Fax: www:
Germany (D) 0180-5000225 05121-49 4002 http://www.blaupunkt.com
Austria (A) 01-610 39 0 01-610 39 391
Belgium (B) 02-525 5444 02-525 5263
Denmark (DK) 44-898 360 44-898 644
Finland (FIN) 09-435 991 09-435 99236
France (F) 01-4010 7007 01-4010 7320
Great Britain (GB) 01-89583 8880 01-89583 8394
Greece (GR) 210 94 27 337 210 94 12 711
Ireland (IRL) 01-46 66 700 01-46 66 706
Italy (I) 02-369 62331 02-369 62464
Luxembourg (L) 40 4078 40 2085
Netherlands (NL) 0800 400 1010 0800 400 1040
Norway (N) 66-817 000 66-817 157
Portugal (P) 2185 00144 2185 00165
Spain (E) 902 52 77 70 91 410 4078
Sweden (S) 08-7501850 08-7501810
Switzerland (CH) 01-8471644 01-8471650
Czech. Rep. (CZ) 02-6130 0446 02-6130 0514
Hungary (H) 76 511 803 76 511 809
Poland (PL) 0800-118922 022-8771260
Turkey (TR) 0212-335 06 71 0212-346 00 40
Blaupunkt GmbH, Robert-Bosch-Straße 200, D-31139 Hildesheim
02/06 CM-AS/SCS1 (GB) 8 622 404 595 Index B
/
 Loading...