

Page 1

Changer
CDC A01
Operating and Installation Instructions
http://www.blaupunkt.com
Page 2

CONTENTS
GENERAL INFO
General Info ............................. 2
Safety Instructions ................... 3
Tips for Safe Operation............ 3
Condensation .................................. 3
Before Installing
the Equipment ......................... 4
Transport Locking Screws ............... 4
Precautions for Installation
and Wiring ...................................... 4
Position of the Built-in
Anti-Vibration Armature .................... 5
Using the Changer ................... 6
Loading a CD .................................. 6
Installing the Magazine .................... 7
Handling CDs ........................... 8
New CDs ........................................ 8
Parts Used in Installation ......... 9
Wiring ........................................... 10
Reset Function .............................. 10
Installation.............................. 11
Installation Procedure for
Installation on Carpet
(Horizontal Position) ...................... 11
Installation Procedure for
Installation on Carpet
(Vertical Position) ........................... 12
Installation Procedure for
Installation on Carpet
(at a 45° Angle) ............................. 14
Installation Procedure
(Suspended Installation) ................ 15
Thank you for choosing this Blaupunkt
product. We hope that you will enjoy it
for a long time to come.
Please read these Operating Instructions before using the product for the
first time.
Our editors constantly strive to make our
Operating Instructions clear and easyto-understand. If you still have questions
about how to use or install this product,
please contact your dealer or call the
telephone hotline for your country . The
hotline number is listed on the inside
back cover of this booklet.
We grant a manufacturer’s guarantee
on all of our products purchased within
the European Union. You can read the
terms and conditions of guarantee on
the Internet at www.blaupunkt.de or
request them directly by writing to:
Blaupunkt GmbH
Hotline CM/PSS 6
Robert Bosch Str. 200
D-31 139 Hildesheim, Germany
2
Page 3

SAFETY INSTRUCTIONS
Safety Instructions
When carrying out installation work
and making connections please
observe the following safety
instructions:
- Electronic vehicle systems may fail
if they are incorrectly installed or serviced.
- Disconnect the negative terminal of
the battery! When doing so, please
observe the vehicle manufacturer’s
safety instructions.
- Make sure you do not damage vehicle components when drilling any
holes.
- Depending on the model, your vehicle may differ from the description
provided here. We accept no responsibility for any damages due to incorrect installation or connection or
for any consequential damages.
If the information provided here is not
suitable for your specific installation requirements, please contact your
Blaupunkt dealer, your vehicle manufacturer or our telephone hotline.
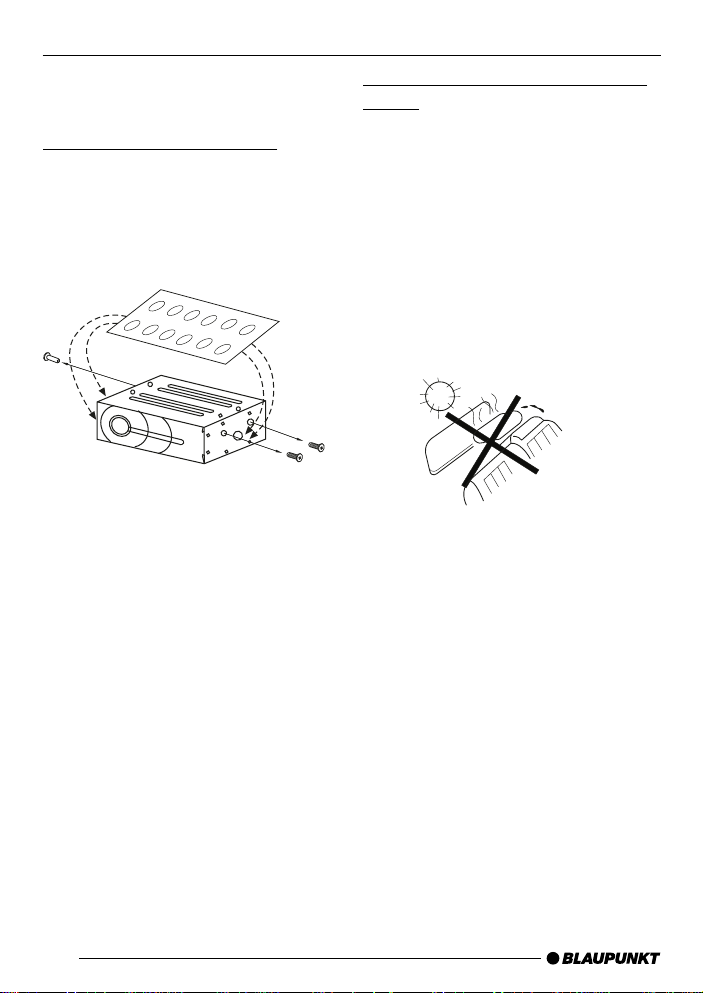
Tips for Safe Operation
- This CD changer is designed only for
operation in negatively grounded,
+12 V DC systems. This device cannot be used in +24 V or positively
grounded systems.
- This equipment may not function
properly at extremely high or low
temperatures. This device is
equipped with a built-in automatic
protection circuit. If the temperature
reaches a pre-set value, the automatic protection circuit will shut down
the entire device. If this happens,
open a window and let the car cool
down.
Condensation
On rainy, damp days or just after turning
on the car heater, water vapour may
condense on the laser lens of the CD
changer. If this happens, the equipment
will not function properly . To counteract
this, remove the magazine from the
device and wait for approximately one
hour. During this time, the water vapour
will evaporate, after which the
equipment will function normally again.
Remove the magazine from the CD
changer at temperatures above 60° C
if it is not in use, or before long periods
of disuse at any temperature.
FRANÇAIS ENGLISHESPAÑOL
PORTUGUÊS
3
Page 4
BEFORE INSTALLING THE EQUIPMENT
Before Installing the
Equipment
Transport Locking Screws
The mechanism in the CD changer is
“locked” by the transport screws during
shipping. Make
certain to remove these screws before
installing the changer.
Note:
After removing the transport locking
screws, place the enclosed seals over
the screw holes. These seals prevent
dust from entering the device, which
could lead to malfunctions.
Precautions for Installation and
Wiring
1. Do not install the equipment in the
following locations:
- Locations that are exposed to di-
rect sunlight.
- Locations at which warm air exits
the car heating system.
- Locations in which proper instal-
lation is impossible and locations
in which many vibrations are produced.
2. - Make certain to use the brackets
and screws supplied.
- When installing the equipment, do
not use any screws that are part
of the braking or steering systems.
3. The device may only be installed in
the approved manner (on one of its
sides, on one of its ends, at an angle
of 45°, or suspended. If it is installed
upside-down or with the front facing
down, malfunctions may occur.
4
Page 5

BEFORE INSTALLING THE EQUIPMENT
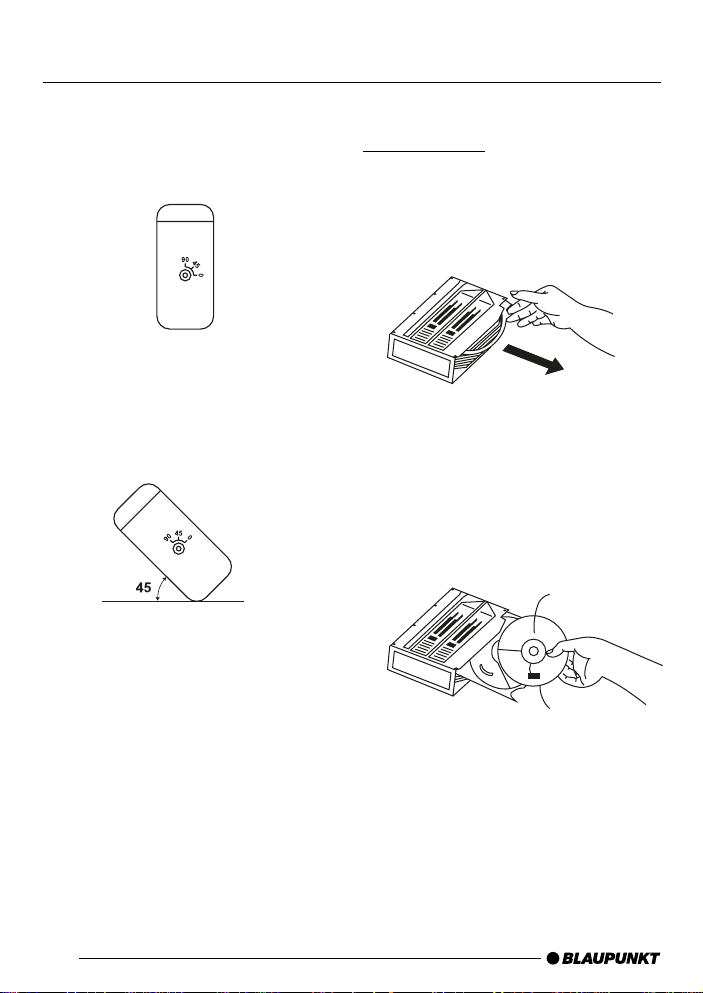
Position of the Built-in AntiVibration Armature
This device can be installed horizontally
(suspended), vertically , or at a 45° angle. Once you have chosen an installation
procedure, you have to set the position
of the built-in anti-vibration armature
accordingly. Please do this before
carrying out the procedures explained
below. Vibration may cause CDs to skip
if the equipment is used before the antivibration system has been configured
correctly.
- The anti-vibration armature is set to
“0” (for horizontal installation) at the
factory before shipping.
- The built-in anti-vibration armature
adjusts on both the left and right
sides.
- Before attaching the brackets, use a
screwdriver to set the position of the
anti-vibration armature.
For horizontal or suspended installation:
Make certain that the built-in anti-vibration armature is set to the “0” position.
FRANÇAIS ENGLISHESPAÑOL
PORTUGUÊS
5
Page 6
BEFORE INSTALLING
THE EQUIPMENT
USING THE CHANGER
For vertical installation:
The built-in anti-vibration armature
should be set to the “90” position.
For installation at a 45° angle:
The built-in anti-vibration armature
should be set to the “45” position.
Using the Changer
Loading a CD
1. Press the button on the CD drawer
of the magazine and slide out only
one drawer
2. Insert the CD in the drawer with the
playable side down (in other words,
with the label facing up). Each drawer
can only hold one CD.
.
Printed side
faces up
Playable side
faces down
3. Press the button on the CD drawer
so that it closes by sliding inside the
magazine.
6
Page 7
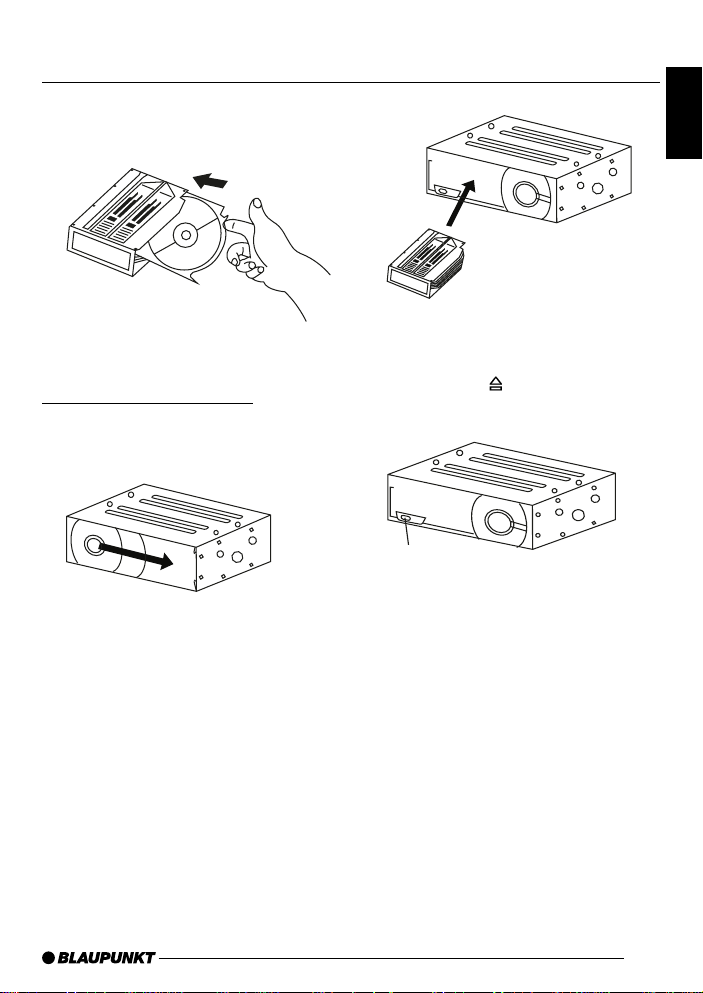
You can load up to ten CDs.
Installing the Magazine
1. Slide the cover to the right.
2. First make certain that the magazine
is oriented so that the CD labels face
up and so that the magazine faces
in the proper direction for installation.
Insert the magazine until it engages
and thus is locked. When the magazine is used for the very first time, it
will not engage until the changer is
connected to electrical power.
USING THE CHANGER
FRANÇAIS ENGLISHESPAÑOL
T o eject the magazine:
To eject the magazine, press the
Eject button ( ).
PORTUGUÊS
Eject button
Note:
Always close the cover after loading a
CD or removing the magazine.
In order to prevent equipment malfunctions, always close the cover. That way
the equipment is impervious to dust, dirt,
and other foreign bodies.
7
Page 8

HANDLING CDS
Handling CDs
New CDs
The following symptoms often occur
when using new CDs:
- The CD does not play evenly after
Centre
hole
.
Bur
Outer
circumference
being inserted
- The changer changes to the next CD
before it has finished playing the first
CD.
- The changer plays the same CD over
and over again.
- The system will not play a specific
CD.
Bur
Remove from the CD surface all plastic
particles from burs before inserting the
CD in the magazine.
These symptoms occur when there are
burs on the CD in the centre hole or
along the outer circumference of the CD
and, as a result, the CD is not drawn
into the changer properly or sticks
somewhat inside the magazine. If these
things happen, use a pen or a similar
object to remove the burs as shown in
the figure at right.
Note:
Although there are protective films marketed as CD accessories, use of these
products leads to malfunctions and
should be strictly avoided.
Dirt, dust, scratches, and deformations
cause skipping and diminished sound
quality during playback. Here are some
tips on how to take care of your CDs:
1. Use CDs that bear the following symbol.
2. Use a soft cloth to wipe away fingerprints and dust from the playable
(shiny) side of the CD. Unlike phonograph records, CDs have no
grooves to collect dust and small
particles. Thus gentle wiping is usually sufficient to remove most particles. Wipe from the centre of the
CD straight outwards. Small dust
particles and spots do not affect playback quality .
3. Never use chemicals such as record
cleaner, anti-static spray or fluid, benzene or paint thinner to clean your
CDs. Use of these chemicals will lead
to irreparable damage to the plastic
surface of the CD.
8
Page 9

HANDLING CDS
PARTS USED IN
INSTALLATION
4. After use, return the CDs to their protective cases to avoid major
scratches that can lead to skipping
on playback.
5. Never store CDs where they are exposed to direct sunlight, high humidity, or high temperatures over long
periods. CDs may warp if exposed
to high temperatures over long periods.
6. The playable side of the CD should
not be pasted with paper or marked
with a ballpoint pen.
Parts Used in Installation
Bracket (A)
2 x
Bracke (B)
2 x
Hex bolt (M6 x 12)
4 x
Console bolt (M4 x 5)
FRANÇAIS ENGLISHESPAÑOL
PORTUGUÊS
T ap screw (M5 x 12)
4 x
4 x
9
Page 10

PARTS USED IN INSTALLATION
8-pin DIN cable
1 x
Seals
1 x
Double-sided adhesive tape
2 x
Wiring
Connect this cable
to the main unit
Reset Function
10
Reset button
You must use a ballpoint pen or a thin
piece of metal to press the reset button. It should be pressed in the following situations:
- During initial installation of the unit,
after wiring has been completed.
- If some functions do not work.
Page 11

INSTALLATION
Installation Procedure for
Installation on Carpet
(Horizontal Position)
1.
- Make certain that the built-in anti-vibration armature has been set to the
“0” position on both the right and left
sides.
- Using the hex bolts (M4 x 5), fasten
the left and right brackets (A).
- Fasten the left and right brackets (A)
to the corresponding brackets (B).
Do this using the hex bolts (M6 x 12)
and hex nuts (M6).
Position of the built-in antivibration armature
Hex bolts
(M6x12)
2.
- Lift up the carpet and decide where
you want to mount the unit.
- Fasten the double-stick tape supplied to the bottoms of the brackets
(B) and remove the protective backing from the tape.
- Fasten the unit to the floor by pressing it down firmly .
3.
- Unscrew the hex nuts and remove
the CD changer.
FRANÇAIS ENGLISHESPAÑOL
PORTUGUÊS
Hex bolts
(M4x5)
11
Page 12

INSTALLATION
4.
- Using a knife, cut through the carpet
directly above the bolts of the mounting bracket (B).
- Replace the carpet in its original position, so that the bolts poke through
the carpet.
5.
- Using the hex bolts again, refasten
the changer on top of the carpet.
Installation Procedure for
Installation on Carpet
(Vertical Position)
1.
- Make certain that the built-in anti-vibration armature has been set to the
“90” vertical installation position on
both the right and left sides.
- Using the hex bolts (M4 x 5), fasten
the left and right brackets (A).
- Fasten the left and right brackets (A)
to the corresponding brackets (B).
Do this using the hex bolts (M6 x 12)
and hex nuts (M6).
Position of the built-in antivibration armature
Hex bolts
(M6x12)
12
Hex bolts
(M4x5)
Page 13

INSTALLATION
2.
- Lift up the carpet and decide where
you want to mount the unit.
- Fasten the double-stick tape supplied to the bottoms of the brackets
(B) and remove the protective backing from the tape.
- Fasten the unit to the floor by pressing it down firmly .
3.
- Unscrew the hex nuts and remove
the CD changer.
4.
- Using a knife, cut through the carpet
directly above the bolts of the mounting bracket (B).
- Replace the carpet in its original position, so that the bolts poke through
the carpet.
5.
- Using the hex bolts again, refasten
the changer on top of the carpet.
FRANÇAIS ENGLISHESPAÑOL
PORTUGUÊS
13
Page 14
INSTALLATION
Installation Procedure for
Installation on Carpet
(at a 45° Angle)
1.
- Set the built-in anti-vibration armature to the 45° position “45” on both
the right and left sides.
- Using the hex bolts (M4 x 5), fasten
the left and right brackets (A).
- Fasten the left and right brackets (A)
to the corresponding brackets (B).
Do this using the hex bolts (M6 x 12)
and the hex nuts (M6).
Position of the built-in
anti-vibration armature
Hex bolts (M6x12)
2.
- Lift up the carpet and decide where
you want to mount the unit.
- Fasten the double-stick tape supplied to the bottoms of the brackets
(B) and remove the protective backing from the tape.
- Fasten the unit to the floor by pressing it down firmly .
3.
- Unscrew the hex nuts and remove
the CD changer.
14
Hex bolts
(M4x5)
Page 15

INSTALLATION
4.
- Using a knife, cut through the carpet
directly above the screws of the
mounting bracket (B).
- Replace the carpet in its original position, so that the screws poke
through the carpet.
5.
- Using the hex bolts again, refasten
the changer on top of the carpet.
Installation Procedure
(Suspended Installation)
1.
- Make certain that the built in anti-vibration armature has been set to the
“0” position on both the left and right
sides.
- Using the hex bolts (M4 x 5), fasten
the left and right brackets (A).
Position of the built-in
anti-vibration armature
Hex bolts
Hex bolts
FRANÇAIS ENGLISHESPAÑOL
PORTUGUÊS
15
Page 16

INSTALLATION
2.
- Determine where you want to install
the unit and drill four mounting holes.
3,6 ø
3.
- Fasten the CD changer using the tap
screws (M5 x 12).
16
Page 17

Service numbers / Numéros du service après-vente / Números de
servicio / Números de serviço␣
Country: Phone: Fax: WWW:
Germany (D) 0180-5000225 05121-49 4002 http://www.blaupunkt.com
Austria (A) 01-610 390 01-610 393 91
Belgium (B) 02-525 5454 02-525 5263
Denmark (DK) 44 898 360 44-898 644
Finland (FIN) 09-435 991 09-435 99236
France (F) 01-4010 7007 01-4010 7320
Great Britain (GB) 01-89583 8880 01-89583 8394
Greece (GR) 0800-550 6550 01-576 9473
Ireland (IRL) 01-4149400 01-4598830
Italy (I) 02-369 6331 02-369 6464
Luxembourg (L) 40 4078 40 2085
Netherland (NL) 023-565 6348 023-565 6331
Norway (N) 66-817 000 66-817 157
Portugal (P) 01-2185 00144 01-2185 111 11
Spain (E) 902-120234 916-467952
Sweden (S) 08-7501500 08-7501810
Switzerland (CH) 01-8471644 01-8471650
Czech. Rep. (CZ) 02-6130 0441 02-6130 0514
Hungary (H) 01-333 9575 01-324 8756
Poland (PL) 0800-118922 022-8771260
Turkey (TR) 0212-3350677 0212-3460040
USA (USA) 800-2662528 708-6817188
Brasil
(Mercosur) (BR) +55-19 3745 2769 +55-19 3745 2773
Malaysia
(Asia Pacific) (MAL) +604-6382 474 +604-6413 640
Blaupunkt GmbH
02/02 CM/PSS 8 622 403 245
 Loading...