

Page 1
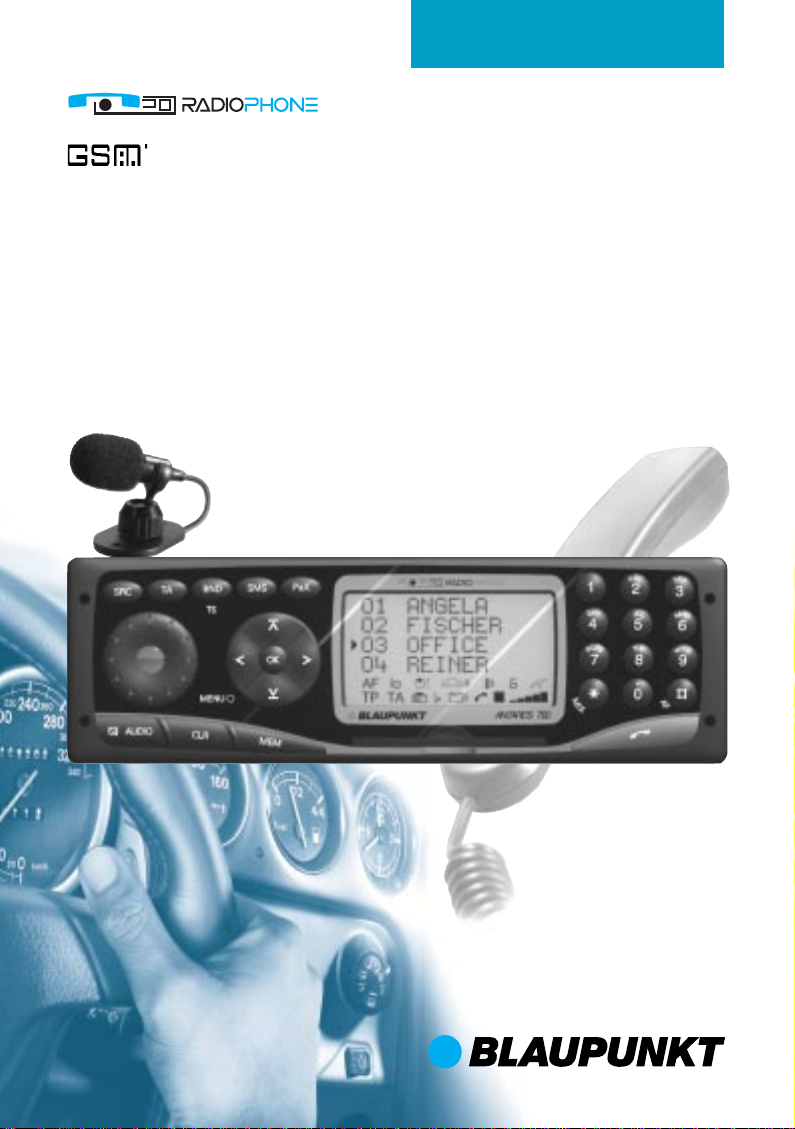
Radiophone
Antares T60
Operating and installation instructions
Page 2
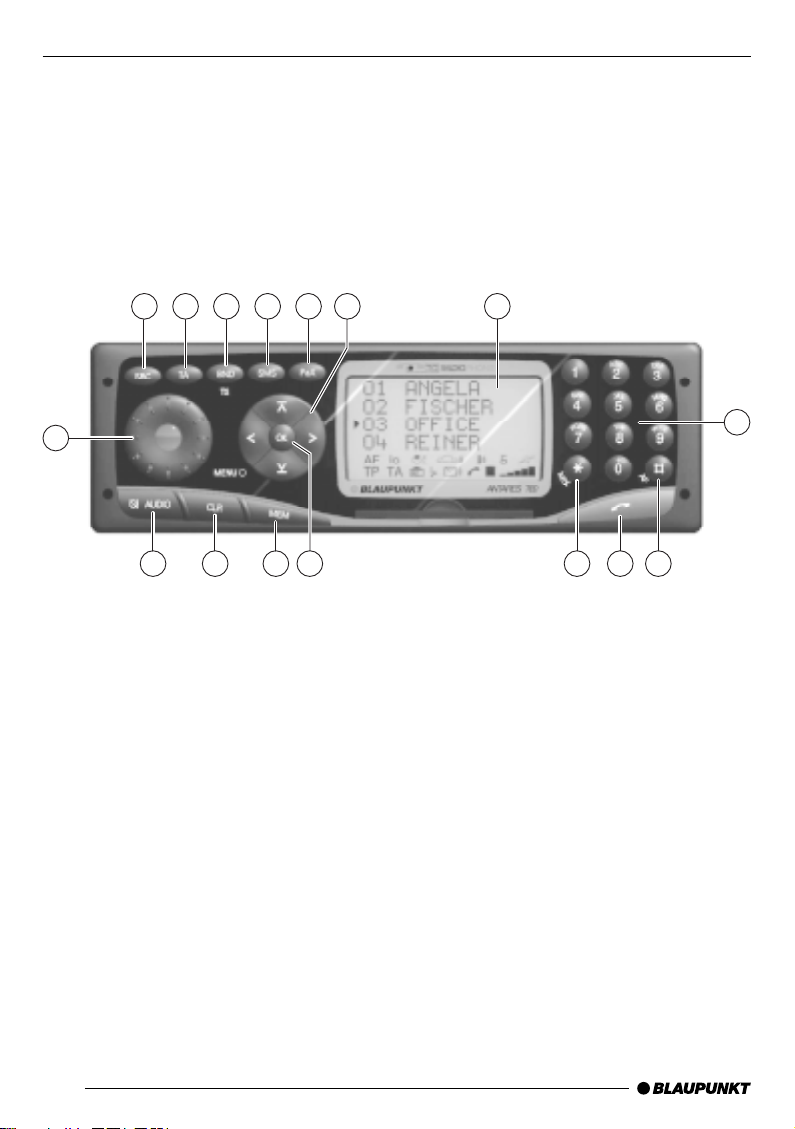
EQUIPMENT ILLUSTRATION
2 3 4 5 6 7
1
8
9
121415 1316
1011
2
Page 3

EQUIPMENT DESCRIPTION
RADIOPHONE ANTARES T 60
1 Volume control, on/off switch
2 SRC button, source selection between
radio, CD changer (if connected) or
auxiliary equipment/AUX (if connected)
Switch from telephone to radio or CD
changer operation (CD changer optional)
3 TA button, on/off switch for traffic an-
nouncement priority
4 BND button, to select the FM memory
banks and the MW and L W wavebands
T o activate the T ravelstore function
To switch from handset to hands-free
telephone operation (handset optional)
5 SMS button, to retrieve new SMS
messages
6 PaX button, to activate preset function
7 Multifunctional rocker switch
8 Display
9 Numbers buttons 0 - 9
:
#/AF button, to switch RDS conven-
ience functions on/off
; T elephone button
<
/MIX button, to adjust station seek
*
tuning sensitivity
To play CD titles in random order
= OK button, to access the DSC menu
and submenu items, to confirm settings
> MEM button, list of radio stations
stored in the memory , to display CDs
in the unit and telephone book entries
? CLR button, clear (delete) and back
button
@ AUDIO button, to adjust tone and bal-
ance/fader,
To switch Loudness on/off
Microphone mute
Radiophone Antares T 60 and you can be sure safety
is first
Because the Antares T 60 is the symbiosis
consisting of a powerful GSM mobile telephone with full-duplex hands-free operation
and an excellent audio system with a digital
tuner and CD changer option.
When the quality of your in-car telephone and
road safety are important issues, the Antares
T 60 makes no compromises. And that’s to
your advantage.
And if you want to be absolutely sure that
safety is first, leave your hands where they
belong - on the steering wheel.
VOCS 08, the optional voice control system,
the TH 07 handset and the RCT 07 steering
wheel remote control unit transform the
Antares T 60 into one of the safest mobile
telephones on the market.
So, have fun paging through and reading this
manual. Take some time and get acquainted
with your new Radiophone.
ENGLISH DEUTSCHFRANÇAISITALIANO
NEDERLANDS
SVENSKAESPAÑOL
PORTUGUÊS
3
Page 4

CONTENTS
Radiophone Antares T 60 - and
you can be sure safety is first ..... 3
Safety information ...................... 7
Safety standards ............................... 8
Installation ......................................... 8
Accessories ...................................... 8
SIM card ........................................... 8
Operating the Radiophone.......... 9
Audio operation (without the
telephone) ......................................... 9
For audio and telephone operation..... 9
Removing the SIM card ..................... 9
Switching the Radiophone on/off with
the vehicle ignition ............................. 9
Switching on the Radiophone when
the ignition is switched off ............... 10
Switching the Radiophone on after
the unit has been disconnected from
its power supply .............................. 10
Basic functions ......................... 10
Selecting the audio mode ................ 10
Direct access to functions (PaX) ...... 10
Controlling/adjusting the volume ...... 11
Tone and balance/fader ................... 12
Loudness ........................................ 12
Adjusting brightness, colour and
legibility ........................................... 13
Selecting the system language ........ 13
Optical theft protection .................... 14
Changing the DSC access code ..... 14
Resetting personal settings.............. 14
Connecting auxiliary equipment ....... 14
CODE theft protection..................... 15
Radio operation......................... 15
Selecting the radio mode ................. 15
RDS convenience functions
(AF, REG) ....................................... 15
Selecting the memory bank/
waveband........................................ 16
Selecting a radio station .................. 16
Paging through station networks...... 16
Storing stations manually ................. 16
Storing the stations with the
strongest signals automatically
(Travelstore) .................................... 17
Recalling stored stations.................. 17
Switching between stereo and mono . 17
Selecting Radiotext display .............. 17
Traffic radio reception............... 18
Switching priority for traffic
announcements on/off ..................... 18
CD changer operation............... 18
Selecting the CD changer mode...... 18
Selecting a CD ................................ 18
Selecting a track on a CD ............... 18
Fast Cue/Review (audible) .............. 18
Playing tracks in random order (MIX) . 19
Displaying the list of CDs in the
changer........................................... 19
Naming CDs ................................... 19
4
Page 5

CONTENTS
General information .................. 21
Emergency call ................................ 21
Starting telephone operation .... 21
Selecting the telephone mode ......... 21
Inserting the SIM card ..................... 21
Entering the PIN code ..................... 21
Switching the PIN code on/off............. 22
Changing the PIN code ....................... 22
Unblocking the SIM card ................. 23
Basic functions ......................... 23
Adjusting the volume ....................... 23
Adjusting the ringing tone volume ........ 23
Adjusting the hands-free volume .......... 24
Adjusting the handset volume (handset
optional).............................................. 24
Traffic announcements (TA) during
hands-free operation........................ 24
Selecting the ringing tone ................ 25
Service functions ...................... 25
Audible call timer ............................. 25
Setting the timer.................................. 25
Displaying call charges/time ............ 26
Resetting the counter .......................... 26
Setting the Charges, Time display
during a call ........................................ 26
Using the telephone.................. 27
Dialing phone numbers .................... 27
Manual dialing ..................................... 27
One-touch dialing (from the Radio-
phone memory) ................................... 27
Speed-dial (from the SIM card
memory) ............................................. 27
Selecting a number from the phone
book ................................................... 27
Finding an entry by name .................... 27
Selecting the phone number from
the list of last numbers dialed........... 28
Selecting the phone number from
the list of missed calls...................... 28
Selecting the phone number from
the list of calls received ................... 28
Deleting an entry from the incoming/
outgoing call list .................................. 28
Deleting the incoming/outgoing call list 28
Answering a call .............................. 28
Automatic answer ............................... 29
Rejecting a call ................................ 29
Switching the microphone to mute ... 29
Switching off the mute function ........... 29
Redial.............................................. 29
Automatic redial .................................. 29
Ending the automatic redial function .... 29
Call waiting (2nd call on hold) .......... 29
Answering the 2nd call ........................ 29
Rejecting the 2nd call.......................... 29
Hold/broker’s calls .......................... 30
Hold ................................................... 30
Broker’s calls ...................................... 30
Conference calls ............................. 30
Ending a conference call ..................... 30
Notebook function ........................... 30
Foreign calls.................................... 30
What do you have to do before
travelling to a foreign country? ............ 31
How do I place a telephone call to a
foreign country? .................................. 31
How can I be reached?....................... 31
How do I call a wired network telephone
number in the foreign country? ............ 31
Selecting a network ......................... 31
Displaying the available networks ........ 31
Adjusting the network search method.. 31
Editing the network list .................... 32
Adding a GSM network to the list........ 32
Moving an entry on the list................... 32
Deleting an entry on the list ................. 32
ENGLISH DEUTSCHFRANÇAISITALIANO
NEDERLANDS
SVENSKAESPAÑOL
PORTUGUÊS
5
Page 6

CONTENTS
Call forwarding ................................ 32
Registering call forwarding .................. 33
Activating call forwarding .................... 33
Deactivating call forwarding ................ 33
Displaying call forwarding status ......... 33
Deleting individual call forwarding
functions ............................................. 33
Deleting all the call forwarding
functions ............................................. 33
Call barring ..................................... 33
Activating call barring .......................... 33
Deactivating call barring ...................... 34
Displaying call barring status ............... 34
Changing the password for call
barring ................................................ 34
Locking the Phone .......................... 34
Switching on the phone lock ............... 34
Switching off the phone lock ............... 34
Phone book ............................... 35
Entering names and telephone
numbers .......................................... 35
Moving the input cursor....................... 35
Deleting entries ................................... 35
Adding characters............................... 35
Storing names / telephone numbers 35
Finding entries................................. 36
Editing entries ................................. 36
Changing an entry............................... 36
Deleting an entry ................................. 36
Moving an entry in the phone book ...... 36
Copying an entry in the phone book .... 36
Capacity query ................................ 37
Locking/unlocking access to the
phone book ..................................... 37
Locking the phone book ...................... 37
Unlocking the phone book ................... 37
Entering your own phone number .... 37
Messages (SMS) / Mailbox ....... 38
Reading new messages................... 38
Sending messages .......................... 38
Entering the service number ................ 38
Setting message validity ...................... 39
Reading old messages .................... 39
Deleting messages .......................... 39
Mailbox (Mobile box)........................ 39
Entering the mailbox phone number /
calling the mailbox ............................... 39
Cell broadcast messages ................ 40
Special functions ...................... 40
Determining the user group ............. 40
Switching user group on/off ................ 40
Entering AOC parameters ............... 40
Specifications ........................... 41
Amplifier .......................................... 41
Tuner............................................... 41
Telephone ....................................... 41
Operating the Radiophone with
the RCT 07 remote control unit
(optional) ................................... 42
Radio operation ............................... 42
Telephone operation ........................ 42
CD changer operation (optional) ...... 42
Telephone menu overview ........ 43
Radio menu overview................ 47
Glossary of Technical Terms ..... 49
Installation instructions ............. 52
6
Page 7
SAFETY INFORMATION
Safety information
Traffic safety
Traffic safety always has the highest priority.
As the driver of a motor vehicle, it is your
responsibility to pay attention to the traffic
situation at all times. Never use your car
radio in a way that could distract you.
Please keep in mind that you travel a distance of 14 m per second at a speed of
only 50 km/h.
Should the traffic situation become particularly demanding, we advise you not to use
this equipment.
Always make sure that you are still able to
hear any warning signals coming from outside of your vehicle, such as police or fire
engine sirens, so that you can react accordingly.
Consequently, you should always select a
moderate volume for playing your car audio equipment while you are driving.
Using the telephone while driving
Please observe all laws and regulations
regarding the use of mobile telephones in
motor vehicles.
• Concentrate fully on your driving.
• Stop at a safe place before using the
telephone.
• If otherwise unavoidable:
Use only hands-free operation if you
have to use the telephone while you are
driving.
Traffic safety always has the highest priority.
Using the telephone can result in interference with the correct functioning of medical equipment that is not sufficiently
shielded, particularly near the antenna.
Please consult a doctor or the manufacturer of the medical device if you have any
questions. Other electronic equipment can
also be affected by electromagnetic interference.
If you are in an area where there is danger
of explosion, e.g. filling stations, chemical
factories or places where blasting work is
being done, switch your telephone off.
Emergency calls
As with every other mobile telephone, the
Radiophone operates using a combination
of mobile radio and cross-country networks, radio signals and functions programmed by the user. As a result, there is
no guarantee that your call will always go
through. Never depend exclusively on a
mobile telephone or similar equipment
under life-threatening circumstances (e.g.
in medical emergencies).
The telephone interface of the Radiophone
is only able to make and receive calls when
it is activated, located in an area served
by a GSM 900 radio network and when
the signal is strong enough.
Emergency calls may not be possible on
all mobile telephone networks or only if
certain network services and/or certain
performance features are active. Contact
the local network operators for more detailed information.
ENGLISH DEUTSCHFRANÇAISITALIANO
NEDERLANDS
SVENSKAESPAÑOL
PORTUGUÊS
Using the telephone in critical
areas
Always switch off the mobile telephone in
areas where it is forbidden to use a mobile phone or if this equipment could cause
electromagnetic interference or otherwise
dangerous situations.
Please read this instruction manual for further information and consult your local service provider.
When placing an emergency call, be sure to
supply all the necessary information as accurately as possible. Remember that your
mobile telephone may be the only means of
communication at the scene of an accident.
7
Page 8

IMPORTANT INFORMATION
Do not hang up until you are told to do so.
Also read the information in the section on
“Telephone operation - GSM emergency
calls”.
Safety standards
The mobile telephone has been manufactured
in accordance with all of the applicable radio
frequency (RF) safety standards and recommendations determined by the government
offices and organisations responsible (e.g. the
VDE standard DIN-0848).
Installation
Only a trained service technician is authorised to install and service the Radiophone in
your vehicle. Faulty installation or servicing
can be dangerous and will result in the expiry
of your guarantee.
This equipment must not be operated without a suitable GSM or combination antenna
mounted on the outside of the vehicle. The
equipment including the GSM or combination
antenna must be installed by an authorised
Bosch service centre only.
T o ensure trouble-free operation, the positive
power supply line must be connected via the
ignition and the permanent +12 V lead.
Do not ground the speaker outputs!
Accessories
Use Blaupunkt-approved accessories and
spare parts only.
Y ou can use the following Blaupunkt products
with this equipment:
CD changers
The Blaupunkt CDC A 08 and the IDC A 09
CD changers can be connected to the Radiophone.
Remote control
Using the RCT 07 infrared remote control
(7 607 570 510) you can conveniently control
all of the most important functions of your
Radiophone from the steering wheel.
Handset (telephone receiver)
With the TH 07 Blaupunkt handset (7 607 570
512) it is possible to place telephone calls with
or without using the hands-free function.
The system will switch automatically from
hands-free to handset operation when the
handset is removed from the cradle.
There is a relatively strong magnet in
the handset.
Keep everything that could react adversely
to magnetic fields well away from the handset. This includes diskettes, check cards,
etc. Important data may be deleted.
Amplifiers
All Blaupunkt amplifiers
V oice control system
(Available for German only)
Using the VOCS 08 voice control system, you
can control the most important system functions by speaking certain commands aloud
in German.
Because the motorist is subjected to a minimum amount of distraction when operating
the equipment using a voice control system,
this feature makes an important contribution
to road safety.
SIM card
This Radiophone has been equipped for telephone operation using modern 3-V SIM
cards. Please ask your dealer for more information.
8
Page 9
OPERATING THE RADIOPHONE
Operating the Radiophone
Audio operation (without the
telephone)
➮ Press ON.
Note:
If the card tongue is not pushed in when you
switch on the unit, the Radiophone will switch
off again automatically after 15 seconds.
If you push the card tongue in within the first
15 seconds, the Radiophone will not switch
off.
When you switch on the Radiophone for the
first time,
➮ enter the four-digit safety code in the ra-
dio pass using the 0 - 9 buttons.
If you enter an incorrect digit,
➮ press CLR to delete the digit.
➮ Press OK to confirm the code.
For audio and telephone
operation
With the card tongue pushed in,
➮ press the card tongue gently in the direc-
tion of the Radiophone until you feel
slight resistance.
➮ Release the card tongue.
The card tongue will now eject from the Radiophone.
➮ Lay the SIM card on the card tongue
with the chip facing upwards and towards the Radiophone and push it into
the slot until you feel slight resistance.
➮ Press the SIM card gently down at the
back onto the card tongue so that it is
lying completely on the card tongue.
➮ Push the card tongue into the Radio-
phone gently until you feel slight resistance and you hear the card tongue click
into position.
The Radiophone will switch on. If the PIN inquiry has been activated,
ENTER PIN
will
appear in the display . Also refer to “Switching
the PIN code on/off”.
Removing the SIM card
Never just pull out the SIM card.
Y ou could destroy it.
➮ Push the SIM card in gently, towards the
Radiophone.
The card tongue holding the SIM card will
eject.
➮ Remove the SIM card.
Switching the Radiophone on/off
with the vehicle ignition
➮ When the Radiophone is on, switch off
the vehicle ignition and remove the ignition key.
The Radiophone will switch off.
➮ Switch on the ignition.
The Radiophone will switch on if you switched
it off with the vehicle ignition.
Note:
If the ignition timer is switched on, the Radiophone will not switch off until after the time
set has elapsed.
If the SIM card is still in the Radiophone when
it is switched off, you will hear two beeps.
If the ignition is switched off during a telephone
call, the Radiophone will remain switched on
until the telephone call has been completed.
Set the ignition timer
You can set the ignition timer to determine
whether and how long the Radiophone should
continue to play after the ignition has been
switched off.
➮ If you are in telephone mode, press the
SRC button to switch to radio operation.
➮ Press OK to access the DSC menu.
➮ Use / to select the menu item
➮ Press OK.
➮ Press / to select the menu item
timer
.
Setup
Ignit.
ENGLISH DEUTSCHFRANÇAISITALIANO
NEDERLANDS
SVENSKAESPAÑOL
PORTUGUÊS
.
9
Page 10

OPERATING THE RADIOPHONE
BASIC FUNCTIONS
➮ Press OK.
➮ Press / to select the desired setting
from between 0 (no delay) and
90 min
.
➮ Press OK.
➮ Press SRC to exit the DSC menu.
Switching on the Radiophone
when the ignition is switched off
➮ Press ON.
The Radiophone will switch on.
To avoid running down the battery, the Ra-
diophone will switch off again automatically
after one hour.
Switching the Radiophone on
after the unit has been
disconnected from its power
supply
If the Radiophone has been disconnected
from the battery (e.g. when the vehicle is being repaired) and is reconnected, you will be
required to enter the security code in the radio pass the first time you switch it on again.
Basic functions
Selecting the audio mode
You can switch between radio, CD changer
operation and the operation of an auxiliary
audio source (if connected).
➮ Press SRC repeatedly until the functions
for the operating mode you want to select appear in the display .
Direct access to functions (PaX)
You can program the PaX button with one
function you use frequently for direct access.
Select one of the following functions:
● Radiotext
● T elephone number
● Mailbox
● Send SMS
● Network selection
● Call forwarding
● T elephone book
Note:
You can change the function you have selected for the PaX button at any time.
Programming the PaX button
➮ Press and hold down the PaX button for
longer than one second.
The list of available functions will appear in
the display . If the PaX button has already been
programmed, the cursor will indicate the function currently selected.
➮ Press / to select the desired func-
tion.
➮ Press OK.
PaX program. finished
play .
The main telephone menu will now appear in
the display . The PaX button is ready to use.
will appear in the dis-
10
Page 11

BASIC FUNCTIONS
Activating the PaX function
T o activate the function you have programmed
on the PaX button,
➮ press the PaX button briefly .
Controlling/adjusting the volume
Controlling the system volume
Once the Radiophone has been switched on,
it will play at the pre-defined power-on volume.
➮ To increase the system volume, turn the
volume control to the right.
➮ To decrease the system volume, turn the
volume control to the left.
The volume level selected will appear in the
display.
Adjusting the power-on volume
(Volume FIX)
➮ Press OK to access the DSC menu.
➮ Press / to select the menu item
Radio
.
➮ Press OK.
➮ Press / to select the menu item
Volume FIX
➮ Press OK.
➮ Press / or turn the volume control
knob to adjust the Radiophone to the desired power-on volume level.
➮ Press OK.
➮ Press SRC to exit the DSC menu.
If you select the
power-on volume will be the volume last set
before the Radiophone was switched off.
Adjusting the beep volume
You will hear a beep whenever you activate
functions that require you to press a button
for longer than one second.
You can set the beep volume to a level from
0 to 9.
.
Last Volume
option, the
➮ Press OK to access the DSC menu.
➮ Press / to select the menu item
Setup
.
➮ Press OK.
➮ Press / to select the menu item
Beep
.
➮ Press OK.
➮ Press / to adjust the Radiophone to
the desired volume level.
➮ Press OK.
➮ Press SRC to exit the DSC menu.
Adjusting the volume for traffic
announcements (TA Volume)
You can adjust the volume for traffic announcements and for the message that there
is no traffic radio station currently available.
The traffic announcement will be broadcast
at this volume, even if the system volume is
lower.
➮ Press OK to access the DSC menu.
➮ Press / to select the menu item
Radio
.
➮ Press OK.
➮ Press / to select the menu item
T A volume
.
➮ Press OK.
➮ Press / or turn the volume control
knob to adjust the Radiophone to the desired volume level.
➮ Press OK.
➮ Press SRC to exit the DSC menu.
ENGLISH DEUTSCHFRANÇAISITALIANO
NEDERLANDS
SVENSKAESPAÑOL
PORTUGUÊS
11
Page 12

BASIC FUNCTIONS
Tone and balance/fader
Treble
➮ Press AUDIO.
➮ To adjust the treble, press or .
Bass
➮ Press AUDIO.
➮ To adjust the bass, press or .
Balance
➮ Press AUDIO twice.
➮ To adjust the balance between the left/
right speakers, press
Fader
➮ Press AUDIO twice.
➮ To adjust the fader between the front/
rear speakers, press
T o exit the Audio menu, press AUDIO again.
Or, after a few seconds, the menu will switch
back to the main menu automatically .
Music/Speech tone adjustment
RDS radio stations differentiate between
music and speech programs.
Y ou can adjust the tone for speech programs:
Off - no tone adjustment
Level 1 - linear (no bass, treble and Loud-
ness changes)
Level 2 - 4 - different adjustments for volume,
bass and treble with Loudness
switched off
Choose the setting you prefer.
Traffic announcements are always played in
the “Speech” mode.
➮ Press OK to access the DSC menu.
➮ Press / to select the menu item
Radio
.
➮ Press OK.
➮ Press / to select the menu item
Music/Speech
.
or .
or .
➮ Press OK.
➮ Press / to select the desired setting.
➮ Press OK to confirm your selection.
➮ Press SRC to exit the DSC menu.
Loudness
Switching Loudness on/off
➮ T o switch Loudness on/off,
press AUDIO for approx. 1 second until
you hear a beep.
LOUDNESS ON
appear briefly in the display.
Adjusting Loudness increase
Loudness boosts low frequencies for more
bass, especially at low volume, for a more
natural sound.
You can adjust the Loudness setting as follows:
LOUD 1 - minimum boost
LOUD 6 - maximum boost
➮ Press OK to access the DSC menu.
➮ Press / to select the menu item
Radio
.
➮ Press OK.
➮ Press / to select the menu item
Loudness
➮ Press OK.
➮ Press / to select the desired setting.
➮ Press OK to confirm your selection.
➮ Press SRC to exit the DSC menu.
or
LOUDNESS OFF
.
will
12
Page 13

BASIC FUNCTIONS
Adjusting brightness, colour and
legibility
Adjusting the colour of the Radiophone
lighting
You can adjust the equipment lighting in
stages to match it to the dashboard lighting
in your vehicle.
The colours can be changed in different
shades between green and red.
➮ Press OK to access the DSC menu.
➮ Press / to select the menu item
Setup
.
➮ Press OK.
➮ Press / to select the menu item
Vario Colour
➮ Press OK.
➮ Press / to select the desired setting.
➮ Press OK to confirm your selection.
➮ Press SRC to exit the DSC menu.
Adjusting the brightness of the
Radiophone lighting
You can adjust the brightness of the lighting
for day (D) and night lighting (N) in stages,
depending on how the instrument lighting has
been connected.
➮ Press OK to access the DSC menu.
➮ Press / to select the menu item
Setup
➮ Press OK.
➮ Press / to select the menu item
Brightness
➮ Press OK.
➮ Press / to select
➮ Press OK.
➮ Press / to select the desired setting.
➮ Press OK to confirm your selection.
➮ Press SRC to exit the DSC menu.
.
.
.
D
or N.
Optimising display legibility (Angle)
You can adjust the legibility of the display to
the best angle.
➮ Press OK to access the DSC menu.
➮ Press / to select the menu item
Setup
.
➮ Press OK.
➮ Press / to select the menu item
Angle
.
➮ Press OK.
➮ Press / to select the desired setting.
➮ Press OK to confirm your selection.
➮ Press SRC to exit the DSC menu.
Selecting the system language
Y ou can select the language in which the text
will appear in the display. If there is no SIM
card in the Radiophone, the text will appear
in English if you select the setting
T ext. If there is a SIM card in the Radiophone,
the language used by the SIM card will appear.
➮ Press OK to access the DSC menu.
➮ Press / to select the menu item
Setup
.
➮ Press OK.
➮ Press / to select the menu item
Language
.
➮ Press OK.
➮ Press / to select the desired setting.
➮ Press OK to confirm your selection.
➮ Press SRC to exit the DSC menu.
Automatic
ENGLISH DEUTSCHFRANÇAISITALIANO
NEDERLANDS
SVENSKAESPAÑOL
PORTUGUÊS
13
Page 14

BASIC FUNCTIONS
Optical theft protection
Y ou can select whether or not the card tongue
should flash as optical theft protection.
➮ Press OK to access the DSC menu.
➮ Press / to select the menu item
Setup
.
➮ Press OK.
➮ Press / to select the menu item
LED
.
Card
➮ Press OK.
➮ Press / to select
Off
or On.
➮ Press OK.
➮ Press SRC to exit the DSC menu.
Changing the DSC access code
Before you can make any changes to important settings in the DSC menu, you will be
required to enter a code. This code is set to
0000 at the factory. Y ou can alter this code at
any time.
➮ Press OK to access the DSC menu.
➮ Press / to select the menu item
Setup
.
➮ Press OK.
➮ Press / to select the menu item
Change code
➮ Press OK.
➮ Use the number keys to enter the factory
code, or if the code has already been
changed, the currently valid code.
➮ Use the number keys to enter the new
code.
➮ Enter the new code a second time.
➮ Press SRC to exit the DSC menu.
.
Resetting personal settings
Y ou can reset any of the settings made in the
DSC menu for the radio, the phone or the SIM
card.
➮ Press OK to access the DSC menu.
➮ Press / to select the menu item
Setup
.
➮ Press OK.
➮ Press / to select the menu item
Reset
.
➮ Press OK.
➮ Use the number keys to enter the DSC
access code.
➮ Press / to select the desired setting.
➮ Press OK twice.
➮ Press SRC to exit the DSC menu.
Connecting auxiliary equipment
In place of a CD changer, you can also connect any other auxiliary audio source with a
line output. These sources include a portable
CD player, MiniDisc player or MP3 player.
To connect an external audio source, you
need an adapter cable. Y ou can purchase an
adapter cable from any authorised Blaupunkt
dealer.
Switching the auxiliary equipment on/off
➮ During radio operation, press OK to ac-
cess the DSC menu.
➮ Press / to select the menu item
Radio
.
➮ Press OK.
➮ Press / to select the menu item
➮ Press OK.
➮ Press / to select
Off
or On.
➮ Press OK.
➮ Press SRC to exit the DSC menu.
If the auxiliary audio source is connected
properly and switched on in the DSC menu,
it can be selected by pressing SRC.
Aux
.
14
Page 15

BASIC FUNCTIONS
RADIO OPERATION
CODE theft protection
The Radiophone has been equipped with a
code for effective protection against theft. The
code must be entered each time the unit is
disconnected from its power supply. The code
inquiry can be switched on or off.
Switching the code inquiry on/off
➮ With the Radiophone switched off, press
and hold down number keys 1 and 4.
➮ Switch the Radiophone on by inserting
the SIM card or pressing the ON button.
A code inquiry will appear in the display.
➮ Use the number keys to enter the valid
code.
The code inquiry will be switched either on or
off.
Note:
You will find the valid code in the radio pass
included with the Radiophone.
If the code is entered incorrectly three times,
you will have to wait for a fixed time period.
“WAIT 1 HOUR” appears in the display. The
unit must remain switched on during this hour.
Radio operation
This Radiophone has been equipped with an
RDS radio receiver. Many FM stations now
transmit a signal along with their regular programming to provide such additional information as the station name. The station name
will appear in the display as soon as it is received.
Other RDS advantages include the AF and
REG functions.
Selecting the radio mode
If the Radiophone is currently in the telephone
or CD changer mode,
➮ press SRC repeatedly until the radio
mode functions appear.
Note:
The telephone mode has priority . If the phone
is in use, you cannot switch to the radio or
CD changer modes.
RDS convenience functions
(AF, REG)
The RDS convenience functions, AF (Alternate Frequency) and REG (REGional), enhance the performance of your car radio.
● AF: When this RDS function has been
activated, the radio will automatically
search for the best frequency in reception range of the station selected.
● REG: A number of radio stations broad-
cast special programs for different regions with different contents. If you activate the REG function, the radio will not
automatically switch to an alternate frequency with different regional programming.
Switching AF on/off
➮ Press #/AF briefly.
“AF” will light up in the display when this RDS
function has been activated.
ENGLISH DEUTSCHFRANÇAISITALIANO
NEDERLANDS
SVENSKAESPAÑOL
PORTUGUÊS
15
Page 16

RADIO OPERATION
Switching REG on/off
➮ Press #/AF for approx. 1 second until
REGIONAL ON
pears in the display.
REG
will appear in the display when this RDS
function has been activated.
or
REGIONAL OFF
ap-
Selecting the memory bank/
waveband
With this radio, you can tune into stations on
the FM and AM (MW and LW) wavebands.
➮ Press BND to switch between the wave-
bands or memory banks.
Selecting a radio station
There are different ways in which you can
select a radio station.
Automatic station selection
(seek tuning)
➮ Press or .
The radio will tune into the next station within
reception range.
Selecting seek tuning sensitivity
Use this function to determine whether the
radio tunes into only those stations with strong
reception signals or into weaker stations as
well.
➮ Press
ity (stations with weaker signals) and low
sensitivity (local stations).
lo will light up in the display if you have selected low sensitivity.
In the DSC menu you can also select the
degree of sensitivity for LO (local) and DX
(distant) reception.
➮ Press OK to access the DSC menu.
➮ Press / to select the menu item
Radio
➮ Press OK.
to switch between high sensitiv-
*
.
➮ Press / to select the menu item
Sensitivity
.
➮ Press OK.
➮ Press / to select the menu item
or LO.
DX
➮ Press OK.
➮ Press / to select the desired setting.
➮ Press OK.
➮ Press SRC to exit the DSC menu.
Searching for/selecting radio stations
manually
Y ou can also select a radio station manually.
➮ Press or .
Note:
Y ou will not be able to select a station manually unless AF is deactivated.
Entering a station frequency directly
For FM and FMT you can also enter a station
frequency directly with the number buttons.
➮ Press 0.
➮ Enter the frequency without adding the
decimal point.
➮ If you want to delete your entry, press
CLR.
Paging through station networks
If one radio station has several different programs, you can page through this “station
network”.
➮ Press or to tune into the next station
in the station network.
Note:
T o use this function, you must have activated
the RDS convenience functions first.
Storing stations manually
➮ Select the desired memory bank: FM,
FMT, MW or L W.
➮ Select the desired station.
16
Page 17

RADIO OPERATION
For the station presets 1 - 9
➮ press one of the buttons 1 - 9 for approx.
1 second until you hear a beep.
For the station presets 10 - 19 (for FM only)
➮ press 1 briefly and
➮ then press one of the button 0 - 9 for
approx. 1 second until you hear a beep.
Storing the stations with the
strongest signals automatically
(Travelstore)
Y ou can automatically store the nine stations
with the strongest reception signals in the
region (FM only). These stations will be stored
in the FMT memory bank.
Note:
Any stations already stored in this memory
bank will be deleted automatically.
➮ Press BND/TS.
The storing process will begin.
TRAVELSTORE
Once the storing process has been completed, the radio station stored on preset 1 in
the FMT memory bank will begin to play . The
station list will appear in the display for several seconds.
will flash in the display.
Recalling stored stations
There are different ways in which you can
recall stored radio stations.
Numbers buttons
➮ Select the memory bank or the wave-
band.
For station presets 1 - 9
➮ press the desired button from 1 - 9
briefly.
For station presets 10 - 19
➮ first press the 1 briefly
➮ then press the desired button from 0 - 9
within 2 seconds.
Menu
➮ Press BND to select the memory bank
or waveband.
➮ Press MEM.
A menu listing the stations stored will appear
in the display .
➮ Press / to select the desired station.
➮ Press OK to tune into the station se-
lected.
Switching between stereo and
mono
When you switch the Radiophone on, it will
automatically begin to play in stereo. If station reception should begin to deteriorate, the
Radiophone will automatically switch to mono.
Selecting Radiotext display
➮ Press OK to access the DSC menu.
➮ Press / to select the menu item
Radio
.
➮ Press OK.
➮ Press / to select the menu item
Radiotext
➮ Press OK.
➮ Press / to select one of the following
settings:
Off - switched off
On - switched on
On/Eng. off - switched on only when the
➮ Press OK to confirm your selection.
➮ Press SRC to exit the DSC menu.
.
engine is off
ENGLISH DEUTSCHFRANÇAISITALIANO
NEDERLANDS
SVENSKAESPAÑOL
PORTUGUÊS
17
Page 18

TRAFFIC RADIO RECEPTION CD CHANGER OPERATION
Traffic radio reception
Switching priority for traffic
announcements on/off
➮ Press TA.
When traffic announcement priority is
switched on, T A will light up in the display .
Note:
Y ou will hear a warning beep,
● if you leave the reception range of the
traffic radio station you are listening to
● if you leave the reception range of the
traffic radio station you are tuned into
while listening to a CD and the automatic
seek tuning function is unable to find another traffic radio station
● if you switch from a traffic radio station to
a radio station that does not broadcast
traffic information
In this case, either switch off traffic announcement priority or switch to a radio station that
broadcasts traffic information.
CD changer operation
Selecting the CD changer mode
If the Radiophone is currently in the telephone
or radio mode,
➮ press SRC repeatedly until the CD
changer functions appear in the display.
Note:
The telephone mode has priority . If the phone
is in use, you cannot switch to the radio or
CD changer modes.
Selecting a CD
There are different ways in which you can
select a CD.
Selecting the next CD up or down
➮ T o select the next CD up or down, press
or once or as often as necessary.
Selecting the CD directly using the
numbers buttons
➮ Press the corresponding numbers button
from 1 - 9.
Selecting a CD directly from the menu
➮ Press MEM.
A menu listing the CDs available will appear
in the display .
➮ Press / to select the desired CD.
➮ Press OK to begin CD playback.
18
Selecting a track on a CD
➮ T o select a track up or down on the CD
currently playing, press
repeatedly as required.
or once or
Fast Cue/Review (audible)
For fast Cue or Review
➮ press and hold down or until Cue or
Review begins.
Page 19

CD CHANGER OPERATION
Playing tracks in random order
(MIX)
➮ Press
All of the tracks on the CD currently playing
will be played in random order. When all the
tracks on a CD have been played, the next
CD will be selected and its tracks will play in
random order.
➮ To end the MIX function, press
again briefly .
/MIX briefly.
*
*
/MIX
Displaying the list of CDs in the
changer
➮ Press MEM.
Naming CDs
To allow you to recognise your CDs more
quickly, you can enter individual names for
up to 99 CDs. The names can contain up to
seven characters.
➮ In the CD changer mode, press OK to
access the DSC menu.
➮ Press / to select the menu item
Radio
.
➮ Press OK.
➮ Press / to select the menu item
Naming
.
➮ Press OK.
➮ Press / to select the menu item
Change name
.
➮ Press OK.
➮ Press / to select the desired CD.
➮ Press OK.
The first input field will flash. Y ou can begin to
enter the characters.
➮ Use the numbers buttons to enter a
name. For more information, read the
section on “Entering names” in the chapter on the “Telephone”.
➮ Press OK to confirm your entry.
Disc
To continue to name other CDs, proceed as
follows.
➮ Press / to select the next CD you
want to name.
➮ Press OK.
➮ Use the numbers buttons to enter the
name.
➮ Press OK to confirm your entry.
To stop naming CDs,
➮ press SRC.
To exit Disc Naming without saving the entries made,
➮ press CLR twice for a longer time.
Deleting one or all the characters
While entering a name you can delete one or
all the characters.
To delete one character,
➮ press / to select the character you
want to delete.
➮ Press CLR briefly.
To delete all of the characters,
➮ press CLR for longer than 1 second.
ENGLISH DEUTSCHFRANÇAISITALIANO
NEDERLANDS
SVENSKAESPAÑOL
PORTUGUÊS
19
Page 20

CD CHANGER OPERATION
Deleting CD names
➮ Press OK to access the DSC menu.
➮ Press / to select the menu item
Radio
.
➮ Press OK.
➮ Press / to select the menu item
Naming
.
➮ Press OK.
➮ Press / to select the menu item
Clear name
.
➮ Press OK.
A selection menu with the names stored will
appear.
To clear the name of one CD,
➮ press / to select the desired name.
➮ Press OK.
The name will be deleted. Then the selection
menu with the names will appear again.
To clear all of the names stored,
➮ press OK for longer than 1 second.
To exit the DSC menu,
➮ press SRC.
Disc
20
Page 21

TELEPHONE FUNCTIONS
STARTING TELEPHONE
OPERATION
General information
Emergency call
Using the Antares T 60 telephone, you can
make emergency calls at any time anywhere
in the world. Emergency calls can also be
made without a valid SIM card. All you need
is a GSM 900 network.
The emergency number in the GSM network
is 112 all over the world. Your call is always
put through to the nearest rescue control centre.
➮ Switch the Radiophone on by pushing
in the card tongue in.
If the Radiophone was switched off by pressing the on/off button,
➮ press the on/off button.
The Radiophone will switch on.
➮ Press .
The telephone mode will be activated, but
please note:
in the display.
➮ Enter 112 on the 12-button keypad.
➮ Press .
The call will be put through to the nearest rescue control centre.
Provide them with all of the necessary information as accurately as possible.
Do not end the call until you are told to do so!
Important:
Use the 112 number in emergency situations
only . Any improper use of the emergency call
number could have legal consequences.
No valid SIM card
will appear
Starting telephone
operation
Selecting the telephone mode
If you have already inserted a valid SIM card,
➮ press .
The telephone mode will be activated. The
network selected will appear in the display .
Inserting the SIM card
With the card tongue pushed in,
➮ press the card tongue gently in the di-
rection of the Radiophone until you feel
slight resistance.
➮ Release the card tongue.
The card tongue will now eject from the Radiophone.
➮ Lay the SIM card on the card tongue
with the chip facing upwards and towards the Radiophone and push it into
the slot until you feel slight resistance.
➮ Press the SIM card gently down at the
back onto the card tongue so that it is
lying completely on the card tongue.
➮ Push the card tongue into the Radio-
phone gently until you feel slight resistance and you hear the card tongue click
into position.
The Radiophone will switch on. If the PIN inquiry has been activated,
appear in the display . Also refer to “Switching
the PIN code on/off”.
Entering the PIN code
The PIN code (personal identification number)
protects your telephone against being used
by unauthorised persons. The PIN code and
the PUK (Personal Unblock code) are supplied along with the SIM card by your service
provider. Y ou can change the PIN code at any
time; for more information, read “Changing the
PIN code”.
ENTER PIN
will
ENGLISH DEUTSCHFRANÇAISITALIANO
NEDERLANDS
SVENSKAESPAÑOL
PORTUGUÊS
21
Page 22

STARTING TELEPHONE OPERATION
Important:
Be sure to memorise your PIN code and
do not reveal it to any unauthorised persons.
When
ENTER PIN
appears in the display,
➮ enter your PIN number on the 0 - 9
keypad, beginning with the first digit.
➮ After you have entered the PIN code
completely , press OK or
Note:
If you enter the PIN code incorrectly three
times in succession, the SIM card will be
locked. For more information, refer to the section on “Unblocking the SIM card”.
Once the PIN code has been entered correctly and confirmed, the Radiophone will
switch on and the operating mode used last
(radio, CD changer or telephone) will be activated.
Switching the PIN code on/off
If your SIM card supports this function, it is
possible to switch the PIN inquiry on or off. If
the PIN inquiry is switched off, anyone can
use your SIM card and the Antares T 60 telephone. If the PIN inquiry is active, the valid
PIN must be entered each time you switch
the Radiophone on.
Note:
It is not possible to switch off the PIN inquiry
unless your SIM card supports this function.
#.
➮ Press to switch to the telephone
mode.
➮ Press OK.
The DSC menu will appear in the display. The
cursor
will mark
Setup
.
➮ Press OK.
➮ Press as often as necessary until the
cursor
code
marks the menu item
.
PIN-
➮ Press OK.
➮ Press / to select the PIN code you
want to switch on or off (normally
PIN 1).
➮ Press OK.
A menu
available will appear in the display .
PIN 1
containing all the functions
➮ Press / to select the desired func-
tion On or
Off
.
➮ Press OK.
The PIN code must be entered to confirm this
change.
➮ Enter your PIN on the 0 - 9 keypad, be-
ginning with the first digit.
➮ Press OK.
Now the Radiophone will return to the original
PIN 1
menu.
➮ Press CLR repeatedly until you return
to the main menu or press and hold
down CLR for longer than one second
to return to the DSC menu.
Changing the PIN code
➮ Access the
the section on “Switching the PIN code
on/off”.
PIN 1
menu as described in
➮ Press / to select the function
Change
.
➮ Press OK.
➮ Enter your old PIN on the 0 - 9 keypad,
beginning with the first digit.
➮ Press OK.
➮ Enter your new PIN on the 0 - 9 keypad,
beginning with the first digit
➮ and confirm the new number by enter-
ing it again.
➮ Press OK.
You will return to the
PIN 1
menu.
➮ Press CLR repeatedly until you return
to the main menu or press and hold
down CLR for longer than one second
to return to the DSC menu.
22
Page 23

OPERATION
TELEPHONE SETTINGSSTARTING TELEPHONE
Unblocking the SIM card
If you enter an incorrect PIN three times in
succession, the SIM card will be locked. To
unblock the SIM card, you have to enter the
PUK. PUK stands for Personal UnblocK code.
The PUK is an eight-digit number, supplied
by your service provider along with your SIM
card and the PIN code. The PUK cannot be
changed!
If you insert a blocked SIM card into the Radiophone,
play.
ENTER PUK
will appear in the dis-
➮ Enter your eight-digit PUK on the 0 - 9
keypad, beginning with the first digit and
➮ press OK or #.
Basic functions
Adjusting the volume
Y ou can adjust the volume for the ringing tone,
hands-free function and for the handset (the
handset is available as a special accessory)
during a telephone call.
➮ During a telephone call (while the
phone is ringing or while you are speaking), turn the volume control knob to the
left to decrease the volume and to the
right to increase the volume.
It is also possible to adjust the volumes for
the ringing tone, hands-free function and for
the handset in a menu.
Adjusting the ringing tone volume
The ringing tone volume can be adjusted in
the menu in stages from 0 to 9.
Note:
By selecting 0 you will switch the ringing tone
off. Incoming calls will then be indicated visually in the display only .
➮ In the telephone mode, press OK.
The DSC menu will appear in the display . The
cursor
➮ Press OK.
The Setup menu will appear in the display.
The cursor
➮ Press OK.
➮ Press to select
➮ Press OK.
You will hear the phone ring at the volume
currently selected.
➮ Press / or turn the volume control
➮ Press OK.
Y ou will return to the V olume menu.
will mark
knob to select the desired volume.
Setup
will mark
.
Volume
Ringing tone
.
.
ENGLISH DEUTSCHFRANÇAISITALIANO
NEDERLANDS
SVENSKAESPAÑOL
PORTUGUÊS
23
Page 24

TELEPHONE SETTINGS
➮ Press CLR repeatedly until you return
to the main menu or press and hold
down CLR for longer than one second
to return to the DSC menu.
Adjusting the hands-free volume
The hands-free volume can be adjusted in
stages from 0 to 63.
➮ In the telephone mode, press OK.
The DSC menu will appear in the display. The
cursor
will mark
Setup
.
➮ Press OK.
The Setup menu will appear in the display.
The cursor
will mark
Volume
.
➮ Press OK.
➮ Press to select
Handsfree
.
➮ Press OK.
You will hear the phone ring at the volume
currently selected.
➮ Press / or turn the volume control
knob to select the desired volume.
➮ Press OK.
Y ou will return to the V olume menu.
➮ Press CLR repeatedly until you return
to the main menu or press and hold
down CLR for longer than one second
to return to the DSC menu.
Adjusting the handset volume (handset
optional)
The handset volume can be adjusted in
stages from 1 to 8. This menu item will not be
available unless the optional handset has
been connected.
➮ In the telephone mode, press OK.
The DSC menu will appear in the display. The
cursor
will mark
Setup
.
➮ Press OK.
The Setup menu will appear in the display.
The cursor
will mark
Volume
.
➮ Press OK.
➮ Press to select
Handset
.
➮ Press OK.
On the handset, you will hear the phone ring
at the volume currently selected.
➮ Press / or turn the volume control
knob to select the desired volume.
➮ Press OK.
Y ou will return to the V olume menu.
➮ Press CLR repeatedly until you return
to the main menu or press and hold
down CLR for longer than one second
to return to the DSC menu.
Traffic announcements (TA)
during hands-free operation
Y ou can select whether you want traffic messages to be put through or held back while
you are using the phone.
➮ In the telephone mode, press OK.
The DSC menu will appear in the display . The
cursor will mark
Setup
.
➮ Press OK.
➮ Press to select
TA / Call
.
➮ Press OK.
The
TA DURING CALL
the display.
➮ Press to select the desired option
or
Off
.
menu will appear in
On
➮ Press OK.
If you have selected On, you must also select the channel over which the traffic information will be emitted.
➮ Press to make the desired setting
Left
or
Right
.
➮ Press OK.
You will return to the Setup menu.
➮ Press CLR repeatedly until you return
to the main menu or press and hold
down CLR for longer than one second
to return to the DSC menu.
24
Page 25

TELEPHONE SETTINGS
Selecting the ringing tone
Y ou can select from among six different ringing tones:
● Up and down,
● Oktave,
● Trill,
● 2x Oktave,
● 2x Trill,
● Triad and
● Off.
➮ In the telephone mode, press OK.
The DSC menu will appear in the display. The
cursor will mark
Setup
.
➮ Press OK.
➮ Press to select
Ring. tones
.
➮ Press OK.
The
RING. TONES
display.
➮ Press to select
menu will appear in the
Ringing tone
.
➮ Press OK.
The ringing tone currently selected will be
played repeatedly.
➮ Press / to select the desired ringing
tone.
➮ Press OK.
Y ou will return to the
RING. TONES
menu.
➮ Press CLR repeatedly until you return
to the main menu or press and hold
down CLR for longer than one second
to return to the DSC menu.
Service functions
Audible call timer
With the audible call timer you can have a
signal sound at selected intervals during a
phone call. This function allows you to keep
track of the telephone costs.
The time interval for the audible call timer function can be set from 15 to 300 seconds.
➮ In the telephone mode, press OK.
The DSC menu will appear in the display . The
cursor will mark
➮ Press OK.
➮ Press to select
➮ Press OK.
The
AUDIBLE CALL TIMER
pear. The number of seconds selected is indicated after
➮ Press to select the desired setting
Off
or
TIMER
➮ Press OK.
If you select
menu.
If you select
terval for the signal sound.
Setting the timer
➮ Use the 0 - 9 keypad to enter the de-
sired interval. Use CLR to correct your
entry if necessary.
➮ Press OK.
You will return to the Setup menu.
➮ Press CLR repeatedly until you return
to the main menu or press and hold
down CLR for longer than one second
to return to the DSC menu.
Setup
.
Audib. timer
TIMER
.
.
Off
, you will return to the Setup
TIMER
, you can set the time in-
.
menu will ap-
ENGLISH DEUTSCHFRANÇAISITALIANO
NEDERLANDS
SVENSKAESPAÑOL
PORTUGUÊS
25
Page 26

TELEPHONE SETTINGS
Displaying call charges/time
If this function is supported by your service
provider, you can display the call time and
the charges for the last call and for all calls.
➮ In the telephone mode, press OK.
The DSC menu will appear in the display. The
cursor
➮ Press to select
will mark
Setup
Menu
.
.
➮ Press OK.
➮ Press to select
Call meters
.
➮ Press OK.
The
CALL METERS
display.
menu will appear in the
➮ Press to select the option for display-
ing the last calls or all calls.
➮ Press OK.
The desired information will appear in the display.
➮ If you want to return to the previous
menu, press OK.
Resetting the counter
➮ In the
CALL METERS
menu item
Reset
menu, select the
.
➮ Use the 0 - 9 keypad to enter the Radio-
phone access code.
You will return to the
CALL METERS
menu.
➮ Press CLR repeatedly until you return
to the main menu or press and hold
down CLR for longer than one second
to return to the DSC menu.
Setting the Charges, Time display during
a call
During a call, you can have either the current
charges or the elapsed call time displayed.
➮ In the
The
in the display.
CALL METERS
menu item
SHOW DURING CALL
During call
menu, select the
.
menu will appear
➮ Press OK.
➮ Press to select the desired setting for
Charge
or
Time
.
➮ Press OK.
You will return to the
CALL METERS
menu.
➮ Press OK.
➮ Press CLR repeatedly until you return
to the main menu or press and hold
down CLR for longer than one second
to return to the DSC menu.
26
Page 27

USING THE TELEPHONE
Using the telephone
Dialing phone numbers
Y ou can dial phone numbers in four dif ferent
ways:
● Manual dialing
● One-touch dialing
● Speed-dial and
● Selecting numbers from the phone
book.
Manual dialing
➮ Use the 0 - 9 number keys to enter the
number you want to dial, including the
area code.
➮ If you enter an incorrect digit by mistake,
you can press CLR, and to correct
your mistake.
➮ Once you can see the complete number
in the display, press .
The Radiophone will now dial the number.
Note:
When you dial numbers in the GSM network,
you are always required to dial the area code
first. Even if you dial the mobile phone number
of a subscriber in the same network, you must
still dial the area code first. The only numbers
which do not require an area code are the
service numbers supplied to you by your provider.
One-touch dialing (from the Radiophone
memory)
You can dial the phone numbers stored for
keys 1 to 9 on your Radiophone at the touch
of a button.
➮ Press down the corresponding key from
1 - 9 to dial the number stored in the
Radiophone memory .
The corresponding number or the name entered for the number will appear in the display and the dialing process will begin.
Speed-dial (from the SIM card memory)
You can dial the phone numbers stored for
keys 1 to 9 on your SIM card at the touch of a
button.
➮ Press
.
*
➮ Press down the corresponding key from
1 - 9 to dial the number stored in the
SIM card memory .
The corresponding number or the name entered for the number will appear in the display and the dialing process will begin.
Selecting a number from the phone book
Telephone numbers that you have already
stored in the phone book can also be selected
directly . For more information on storing numbers and names in the phone book, please
refer to the chapter entitled “Phone book”.
➮ While the Radiophone is in the tel-
ephone mode, press MEM.
The phone book will appear. Y ou can choose
as to whether you want to find the entry by its
name or its position in the memory .
➮ Press to select the search method
you want to use.
➮ Press OK.
Finding an entry by name
If you select the option
you will be required to enter the first few letters of the name.
Find entry by name
➮ Use the 0 - 9 keys to enter up to the first
three letters of the entry . For more information, read the section on “Entering
names and telephone numbers” in the
chapter entitled “Phone book”.
➮ Press OK.
The corresponding section of the phone book
will appear in the display. If there is no entry
matching the letters entered, the section with
the next closest letter will appear.
➮ Use / to select the desired entry.
➮ Press .
The Radiophone will now dial this number.
ENGLISH DEUTSCHFRANÇAISITALIANO
NEDERLANDS
SVENSKAESPAÑOL
,
PORTUGUÊS
27
Page 28

USING THE TELEPHONE
Selecting the phone number from
the list of last numbers dialed
The last numbers you dialed will automatically be stored on the SIM card. Y ou can use
this list to place calls to these numbers.
➮ While the Radiophone is in telephone
mode, press
The list with the numbers dialed last will appear.
briefly .
➮ Use / to select the desired number.
➮ Press .
The Radiophone will now dial this number.
Selecting the phone number from
the list of missed calls
Any calls you may have missed will be stored
in a list. You can use this list to place calls to
these numbers. These numbers will not be
stored unless the caller has activated call line
identification.
➮ While the Radiophone is in telephone
mode, press briefly .
The list indicating the numbers of the calls
that have been missed will appear in the display. If the caller’s number has been stored
along with the name in the phone book, the
corresponding name will appear in the display.
➮ Use / to select the desired entry.
➮ Press .
The Radiophone will now dial this number.
Selecting the phone number from
the list of calls received
The calls you receive are also stored on a
list. Y ou can use this list to place calls to these
numbers. These numbers will not be stored
unless the caller has activated call line identification.
➮ While the Radiophone is in telephone
mode, press briefly .
The list indicating the numbers of the calls
that have been received will appear in the display. If the caller’s number has been stored
along with the name in the phone book, the
corresponding name will appear in the display.
➮ Use / to select the desired entry.
➮ Press .
The Radiophone will now dial this number.
Deleting an entry from the incoming/
outgoing call list
➮ Select the desired list (incoming/outgo-
ing calls).
➮ Use / to select the desired entry.
➮ Press or .
➮ Confirm the following query with OK.
Deleting the incoming/outgoing call list
➮ Select the desired list (incoming/outgo-
ing calls).
➮ Use / to select the corresponding
list (
Redial list, Rec’d calls, Calls
).
➮ Press or
➮ Confirm the following query with OK.
Answering a call
Incoming calls are indicated by the ringing
tone, the message
the display will change colour.
If you want to accept the call,
Accept?
in the display and
➮ press or
➮ pick up the handset receiver (if con-
nected).
Note:
It is possible to switch off the ringing tone. For
more information, refer to the section on “Setting the ringing tone volume” in the chapter
on “Basic functions”.
28
Page 29

USING THE TELEPHONE
Automatic answer
In the Setup menu, you can make a setting
so that all incoming calls are answered automatically.
➮ In the telephone mode, press OK.
The DSC menu will appear. The cursor will
mark
Setup
.
➮ Press OK.
➮ Press to select
Auto. answer
.
➮ Press OK.
The
AUTOMATIC ANSWER
pear in the display.
➮ Press to select the desired setting
or
Off
.
menu will ap-
On
➮ Press OK.
You will return to the Setup menu.
Rejecting a call
If you do not want to answer a call,
➮ press CLR while the phone is ringing.
The caller will hear a busy signal.
Switching the microphone to
mute
During a call, you can switch the microphone
to mute.
➮ Press AUDIO.
Mute On
Switching off the mute function
will appear in the display .
➮ Press AUDIO again.
Mute Off
Redial
Y ou can have a number redialled from the list
of the numbers called last. For more information, refer to the section on “Dialling telephone
numbers from the list of the last calls made”
in this chapter.
will appear briefly in the display .
Automatic redial
In the Setup menu, you can make a setting
so that the number is redialled automatically
until the call goes through.
➮ In the telephone mode, press OK.
The DSC menu will appear. The cursor will
mark
Setup
.
➮ Press OK.
➮ Press to select
Auto. redial
.
➮ Press OK.
The
AUTOMA TIC REDIAL
in the display .
➮ Press to select the desired setting
or
Off
.
menu will appear
On
➮ Press OK.
You will return to the Setup menu.
Ending the automatic redial function
➮ Once the dialling process has begun,
press to end automatic redial.
Call waiting (2nd call on hold)
During a telephone call, you can also accept
a second incoming call. The first caller will
then be put on “hold”.
Note:
It might be necessary to order “Call waiting”
service from your provider. Your service provider has more detailed information.
Answering the 2nd call
If you receive a second call while you are already using the telephone, you will hear a signal; if you want to answer the 2nd call,
➮ press OK.
The first caller will be put on “hold”.
Rejecting the 2nd call
➮ Press CLR.
The caller will hear a busy signal.
ENGLISH DEUTSCHFRANÇAISITALIANO
NEDERLANDS
SVENSKAESPAÑOL
PORTUGUÊS
29
Page 30

USING THE TELEPHONE
Hold/broker’s calls
Hold means that you place or receive a second call, while you are already using the telephone. Y ou can only speak to one caller at a
time. The callers have no contact with one
another.
Hold
When you are already using the phone,
➮ press MEM to activate the hold function.
➮ Now you can use the 0 - 9 buttons to
enter the telephone number for the second call.
➮ Once the complete number appears in
the display, press
The call will be put through to the second
number. The first caller will stay on “hold”.
Broker’s calls
A broker’s call means you switch from one
caller to the other.
.
➮ Press MEM to switch between the two
callers.
Note:
With a caller on “hold”, you can also accept a
third incoming call. Press OK to accept the
call or CLR to reject it.
If you accept a third call, the connection to
the active caller will be terminated.
Conference calls
With conference calls there is a direct connection between all of the callers.
Once you have two callers as described in
the section on “Hold/broker’s calls”,
➮ press OK.
The conference call will be set up.
ENCE
will appear in the display .
Ending a conference call
To end the conference call,
CONFER-
➮ press CLR.
Note:
During a conference call you can also answer
a call from a third caller. Press OK to answer
the call or CLR to reject it. The conference
will be put on “hold”. Then you can press MEM
to switch between the conference call and the
third caller (broker’s call).
Notebook function
During a telephone call you can use the
keypad to enter a telephone number. After the
call has ended, the number will appear in the
display and can be used as desired.
Note:
If the vehicle ignition is switched off during a
telephone call, the Radiophone will switch off
automatically after the call has ended. Any
telephone number you have entered in the
notebook will be deleted.
Foreign calls
The internationally uniform GSM standard
allows you to place telephone calls with your
RADIOPHONE in foreign countries as well.
It is necessary that there is a roaming agreement between the service providers in the two
countries. In addition, your service provider
must activate international roaming for your
SIM card.
You can obtain a current list of the countries
with the service providers responsible (network code and name) and the different
charges involved.
Note:
If you want to place calls using your RADIOPHONE in a foreign country, contact your
service provider well in advance.
30
Page 31

USING THE TELEPHONE
What do you have to do before travelling
to a foreign country?
➮ If you have not already done so, have
your service provider activate your SIM
card for international roaming.
How do I place a telephone call to a
foreign country?
➮ Dial the corresponding country code,
➮ enter the area code and then
➮ the telephone number .
Note:
Y ou can replace the first two digits of the country code with + (press 0 for approx. one second).
Example:
Country code: 0049 Germany
Area code: 05121 Hildesheim
Phone number: 49 . . . . Blaupunkt
The number you
enter: +49512149 . . . . .
Note:
Enter the country code for all the telephone
numbers you want to store.
How can I be reached?
Callers from your home country simply dial
your Radiophone number. Callers outside of
your home country must first dial your usual
country code, even if you are currently in a
foreign country.
How do I call a wired network telephone
number in the foreign country?
➮ Dial the area code and
➮ then the telephone number.
The country code is not entered because your
Radiophone has logged onto the foreign network.
Selecting a network
In areas served by more than one GSM network, you can select a preferred network. It is
necessary for your provider to have a roaming agreement with that network. In addition,
you can also list the networks according to
priority. This can prove useful for your trips
abroad because sometimes the difference in
the charges made by the different networks
is considerable. For more information, read
the section on “Foreign calls”.
Displaying the available networks
➮ In the telephone mode, press OK.
➮ Press to select
Menu
.
➮ Press OK.
➮ Press to select
Network sel.
➮ Press OK.
The
NETWORK SELECTION
pear in the display.
➮ Press to select
Available
menu will ap-
.
➮ Press OK.
After a short search, a list of the available
GSM networks will appear.
Adjusting the network search method
Y ou can select whether a manual or an automatic search is made for the GSM networks.
➮ In the telephone mode, press OK.
➮ Press to select
Menu
.
➮ Press OK.
➮ Press to select
Network sel.
➮ Press OK.
The
NETWORK SELECTION
pear in the display.
➮ Press to select
Search method
menu will ap-
.
➮ Press OK.
➮ Press / to select the desired
method.
➮ Press OK.
ENGLISH DEUTSCHFRANÇAISITALIANO
NEDERLANDS
SVENSKAESPAÑOL
PORTUGUÊS
31
Page 32

USING THE TELEPHONE
You will return to the
TION
menu.
NETWORK SELEC-
➮ Press CLR as often as necessary until
you return to the main menu or press
and hold CLR for longer than one second to return to the DSC menu.
Editing the network list
You can edit the network list to select preferred GSM networks.
Adding a GSM network to the list
➮ In the telephone mode, press OK.
➮ Press to select
Menu
.
➮ Press OK.
➮ Press to select
Network sel.
➮ Press OK.
The
NETWORK SELECTION
pear in the display.
➮ Press to select
Pref. list
menu will ap-
.
➮ Press OK.
➮ Press to select
Add
.
➮ Press OK.
Now you can either enter a new GSM network or add one which has already been
stored in the Radiophone to the list.
➮ Press to select
Note:
If you want to add a new GSM network to the
list, you will be required to enter the network
code and the network name. Your provider
can supply you with this information.
If you select
grammed GSM networks will appear.
Known
Known
or
New
.
, a list of the factory-pro-
➮ Press / to select the desired net-
work.
➮ Press OK.
Y ou will return to the
PREF. LIST
menu.
Moving an entry on the list
➮ Select the menu item
PREF. LIST
menu.
Move
in the
➮ Press OK.
The current network list will appear in the display .
➮ Press to select the entry you want to
move.
➮ Press OK.
➮ Press / to move the GSM network
to its new position.
➮ Press OK.
Y ou will return to the
Deleting an entry on the list
➮ Select the menu item
PREF. LIST
menu.
PREF. LIST
Delete
menu.
in the
➮ Press OK.
The current network list will appear in the display .
➮ Press to select the entry you want to
delete.
➮ Press OK.
The GSM network selected will be deleted
from the list. Y ou will return to the
menu.
Call forwarding
Y ou can set call forwarding for different situations.
● General call forwarding
● Call forwarding if busy
● Call forwarding if no answer
● Call forwarding if unreachable (outside
of your provider’s service area)
PREF . LIST
32
Page 33

USING THE TELEPHONE
Registering call forwarding
➮ In the telephone mode, press OK.
➮ Press to select
Menu
.
➮ Press OK.
➮ Press to select
Forwarding
.
➮ Press OK.
The
FORWARDING
display.
menu will appear in the
➮ Press to select the situation for which
you want to activate call forwarding.
➮ Press OK.
➮ Press to select whether you want to
activate call forwarding for any or all of
the following services: telephone calls,
data transmission, faxes.
➮ Press OK.
➮ Select
Register
.
➮ Press OK.
➮ Enter the complete telephone number
to which you want to forward the calls
on the 0 - 9 buttons.
➮ Press OK.
Activating call forwarding
➮ Proceed as described for “Registering
call forwarding”
➮ For your last selection, select
Activate
➮ Press OK.
Y ou will return to the
Deactivating call forwarding
FORWARDING
menu.
➮ Proceed as described for “Registering
call forwarding”
➮ For your last selection, select
vate
.
Deacti-
➮ Press OK.
Displaying call forwarding status
➮ Proceed as described for “Registering
call forwarding”
➮ For your last selection, select
The status of the call forwarding function will
be indicated in the display .
➮ Press OK.
Deleting individual call forwarding
functions
➮ Proceed as described for “Registering
call forwarding”
➮ For your last selection, select
➮ Press OK.
The call forwarding function selected will be
deleted.
Deleting all the call forwarding functions
➮ Select the menu item
FORW ARDING
Delete
menu.
➮ Press OK.
An inquiry will appear in the display . Y ou must
confirm it if you really want to delete.
➮ Select
Yes
if you really want to delete all
the call forwarding functions.
➮ Press OK.
Call barring
.
You can bar incoming or outgoing calls. In
order to do so, you require a password, which
you can obtain from your provider.
Activating call barring
➮ In the telephone mode, press OK.
➮ Press to select
Menu
.
➮ Press OK.
➮ Press to select
Barring
.
➮ Press OK.
The
BARRING
play.
menu will appear in the dis-
Status
Delete
in the
.
ENGLISH DEUTSCHFRANÇAISITALIANO
.
NEDERLANDS
SVENSKAESPAÑOL
PORTUGUÊS
33
Page 34

USING THE TELEPHONE
➮ Press to select call barring for incom-
ing or outgoing calls.
➮ Press OK.
➮ Press to select whether you want to
activate call forwarding for any or all of
the following services: telephone calls,
data transmission, faxes.
➮ Press OK.
➮ Press to select
Activate
.
➮ Press OK.
➮ Enter the password with buttons 0 - 9.
➮ Press OK.
Y ou will return to the
Deactivating call barring
BARRING
menu.
➮ Proceed as described under “Activating
call barring”.
➮ For your last selection, select
vate
.
Deacti-
➮ Enter the password with buttons 0 - 9.
➮ Press OK.
Displaying call barring status
➮ Proceed as described under “Activating
call barring”.
➮ For your last selection, select
Status
.
➮ Press OK.
The call barring status will appear in the display.
Changing the password for call barring
➮ Select the menu item
BARRING
menu.
Password
in the
➮ Press OK.
➮ Enter the old password with the buttons
0 - 9.
➮ Press OK.
➮ Enter the new password with the but-
tons 0 - 9 twice.
➮ Press OK.
Locking the Phone
There are different ways in which you can lock
your Radiophone.
● No calls possible except for emergency
calls (
All
)
● Only the numbers stored from 1-9 on
the SIM card (
● SIM card numbers and Radiophone
numbers (
Switching on the phone lock
One-touch
One-touch and speed-dial
)
).
➮ In the telephone mode, press OK.
➮ Press to select
Menu
.
➮ Press OK.
➮ Press to select
Phone lock
.
➮ Press OK.
The
PHONE LOCK
display.
menu will appear in the
➮ Press to select one of the phone lock
options as described above.
➮ Press OK.
➮ Enter the access code using the buttons
0 - 9.
You will return to the
Switching off the phone lock
PHONE LOCK
menu.
➮ In the telephone mode, press OK.
➮ Press to select
Menu
.
➮ Press OK.
➮ Press to select
Phone lock
.
➮ Press OK.
The
PHONE LOCK
display.
➮ Press to select
menu will appear in the
Off
.
➮ Press OK.
➮ Enter the access code using the buttons
0 - 9.
You will return to the
PHONE LOCK
menu.
34
Page 35

PHONE BOOK
Phone book
Entering names and telephone
numbers
Names and telephone numbers are entered
using the buttons 0 - 9.
The buttons are sequence buttons, so that
you are required to sometimes press the button repeatedly to get the desired character.
The character set has been allocated to the
buttons as follows
1 1 (space) . , ! ? : ’ " ( ) %
&
2 ABC2Äà
3DEF3É
4GHI 4 ì
5JKL5
6MNO6 Ñö ò
7PQRS7ß
8TUV8üù
9WXYZ9
00+-x*/ =><
#@
Moving the input cursor
When you enter characters using different
buttons, the input cursor will move one space
to the right automatically. If two or more characters must be entered in succession using
the same button, the input cursor must be
moved manually.
➮ Press / to move the input cursor.
Deleting entries
If you have entered an incorrect letters or
numbers,
➮ press CLR as often as necessary.
Adding characters
Y ou can add characters to existing text.
➮ Press / to move the input cursor.
➮ Add another character using the buttons
0 - 9.
Storing names / telephone
numbers
➮ Press OK in the telephone mode.
The DSC menu will appear in the display . The
cursor
➮ Press to select
will mark
Setup
.
Phone book
.
➮ Press OK.
The menu will appear in the display . The cursor
will mark
➮ Press to select
Find name
Add entry
.
.
➮ Press OK.
The
ADD ENTRY
play .
menu will appear in the dis-
➮ Press to choose between the Radio-
phone memory and the SIM card
memory.
➮ Press OK.
➮ Enter the phone number with the but-
tons 0 - 9.
➮ Press OK.
➮ Enter the name with the buttons 0 - 9.
Note:
The length of the phone book names entries
depends on the SIM card (usually 16 characters). The phone number can have up to 20
digits.
➮ Press OK.
You will be required to enter a memory
number for the entry .
➮ Enter a memory number with the but-
tons 0 - 9 or
➮ Press OK to allocate the number auto-
matically .
Y ou will return to the
ADD ENTRY
menu.
ENGLISH DEUTSCHFRANÇAISITALIANO
NEDERLANDS
SVENSKAESPAÑOL
PORTUGUÊS
35
Page 36

PHONE BOOK
Finding entries
Y ou can search for entries in the phone book
by either name or memory number.
➮ Press MEM in the telephone mode.
The menu will appear in the display. The cursor
will mark
➮ Press to select
pos.
Find name
Find name
.
or
Find
➮ Press OK.
The menu selected, either
NAME
or
FIND ENTRY BY POSITION
appear in the display.
FIND ENTRY BY
, will
➮ Use the buttons 0 - 9 to enter the first
three characters of the name or the position number (memory number).
➮ Press OK.
The phone will appear in the display, indicating the entry matching name or number entered in the top line.
If no matching entry is found, the nearest
match will appear in the first line.
Editing entries
Changing an entry
➮ Select the entry you would like to
change in the phone book as described
in the section on “Finding entries”.
➮ Press OK.
A menu with the functions
Move
and
Copy
will appear in the display .
➮ Press to select
Change, Delete
Change
.
➮ Press OK.
The name of the entry will appear in the top
line, the phone number in the second line.
➮ Press / to move the cursor in the
first line.
➮ Use the buttons 0 - 9 to make any
changes, press CLR to delete characters.
➮ Press OK to move to the second line.
➮ Use the buttons 0 - 9 to make any
changes, press CLR to delete characters.
➮ Once you have made all the changes,
press OK.
You will return to the phone book list.
Deleting an entry
➮ Select the entry you would like to delete
in the phone book as described in the
section on “Finding entries”.
➮ Press OK.
A menu with the functions
Move
and
Copy
will appear in the display.
➮ Press to select
Change, Delete
Delete
.
➮ Press OK.
The entry will be deleted. You will return to
the phone book list.
Moving an entry in the phone book
➮ Select the entry you would like to move
in the phone book as described in the
section on “Finding entries”.
➮ Press OK.
A menu with the functions
Move
and
Copy
will appear in the display.
➮ Press to select
Change, Delete
Move
.
➮ Press OK.
➮ Press / to move the entry.
,
➮ Press OK.
The entry will be moved. Y ou will return to the
phone book list.
Copying an entry in the phone book
➮ Select the entry you would like to move
in the phone book as described in the
section on “Finding entries”.
➮ Press OK.
A menu with the functions
Move
and
Copy
will appear in the display.
➮ Press to select
Change, Delete
Copy
.
➮ Press OK.
,
,
,
36
Page 37

PHONE BOOK
➮ Press / to move the entry to the po-
sition in which you want to copy it.
➮ Press OK.
The entry will be copied. Y ou will return to the
phone book list.
Capacity query
➮ Press OK in the telephone mode.
➮ Press to select
Phone book
.
➮ Press OK.
➮ Press to select
➮ Press to select
Capacity
SIM card
.
or
Phone
.
➮ Press OK.
The number of memory positions available
will appear briefly in the display. Then the
phone book menu will appear.
Locking/unlocking access to the
phone book
You can lock the phone book memory of the
Radiophone itself, of the SIM card or both.
Locking the phone book
➮ Press OK in the telephone mode.
➮ Press to select
Phone book
.
➮ Press OK.
➮ Press to select
➮ Press to select
All
.
Access
Phone, SIM card
.
or
➮ Press OK.
➮ Enter the access code with the buttons
0 - 9.
➮ Press OK.
Unlocking the phone book
➮ Proceed as described under “Locking
the phone book”.
➮ Select the menu item
No locks
.
➮ Press OK.
➮ Enter the access code with the buttons
0 - 9.
➮ Press OK.
Entering your own phone number
Y ou can enter up to three phone numbers for
yourself and the mailbox number.
➮ Press OK in the telephone mode.
The DSC menu will appear in the display . The
cursor
will mark
Setup
.
➮ Press OK.
➮ Press to select
➮ Press to select
Mailbox
.
My number
Number 1...3
.
or
➮ Press OK.
➮ Use buttons 0 - 9 to enter the corre-
sponding number.
➮ Press OK.
➮ Use buttons 0 - 9 to enter the corre-
sponding name.
➮ Press OK.
ENGLISH DEUTSCHFRANÇAISITALIANO
NEDERLANDS
SVENSKAESPAÑOL
PORTUGUÊS
37
Page 38

MESSAGES / MAILBOX
Messages (SMS) / Mailbox
You can send and receive SMS messages
with your Radiophone.
Reading new messages
New messages are indicated in the display
with a symbol. When a new message is
received you will hear a beep.
When you have received a new message,
➮ press SMS.
The message will appear in the display .
To “page through” the messages,
➮ press / .
If you want to place a call to the sender,
➮ press .
Once you have read the message,
➮ press CLR.
A selection will appear in the display . You can
choose whether you want to delete the message or store it in the memory .
➮ Press / to select the corresponding
option.
➮ Press OK.
If you select No, the message will be put into
storage.
Sending messages
➮ Press OK in the telephone mode.
The DSC menu will appear in the display . The
cursor
➮ Press to select
➮ Press OK.
The menu will appear in the display. The cursor
➮ Press to select
➮ Press OK.
➮ Press to select
The
play.
will mark
will mark
OUTPUT
Setup
.
Menu
.
Mailbox
menu will appear in the dis-
.
Messages
Output
.
.
➮ Press to select
New
.
➮ Press OK.
➮ Now use the buttons 0 - 9 to enter the
message. For more information on how
to enter text, refer to “Entering names/
telephone numbers” in the chapter entitled “Phone book”.
Note:
Message texts can have up to a maximum of
160 characters.
➮ Press OK.
➮ Use the buttons 0 - 9 to enter the phone
number.
➮ Press OK.
➮ Press / to either send, store or send
and store the message.
➮ Press OK.
The message will be sent. You will return to
the Message output menu.
Entering the service number
To be able to send messages, you must first
enter your provider’s service number. The
service number is usually stored on the SIM
card and used automatically .
If you have to enter the service number again
or would like to change it,
➮ press OK in the telephone mode.
➮ Press to select
Menu
.
➮ Press OK.
➮ Press to select
Messages
.
➮ Press OK.
➮ Press to select
Parameters
.
➮ Press OK.
➮ Press to select
Service no.
➮ Press OK.
➮ Enter the service number with the but-
tons 0 - 9.
➮ Press OK.
The
PARAMETERS
display .
menu will appear in the
38
Page 39

MESSAGES / MAILBOX
Setting message validity
Y ou can select a setting to determine how long
the Service Center should try and send the
message to its recipient. Y ou can select a time
frame of one to seven days.
➮ Press OK in the telephone mode.
➮ Press to select
Menu
.
➮ Press OK.
➮ Press to select
Messages
.
➮ Press OK.
➮ Press to select
Parameters
.
➮ Press OK.
➮ Press to select
Validity
.
➮ Press OK.
➮ Enter the number of days with the but-
tons 0 - 9.
➮ Press OK.
The
PARAMETERS
display.
menu will appear in the
Reading old messages
➮ Press OK in the telephone mode.
➮ Press to select
Menu
.
➮ Press OK.
➮ Press to select
Messages
.
➮ Press OK.
➮ Press to select
The
Storage
sages will appear in the display. The messages received will indicate the date, time and
sender’s number.
with prepared and sent mes-
Storage
.
➮ Press / to select the desired mes-
sage.
➮ Press OK.
If you want to place a call to the sender,
➮ press .
Once you have read the message,
➮ press CLR.
A selection will appear in the display . You can
choose whether or not to delete the message.
➮ Press / with the desired option.
➮ Press OK.
Deleting messages
You can delete messages directly after you
have read them.
Once you have read the message,
➮ press CLR.
A selection will appear in the display . You can
choose whether or not to delete the message.
➮ Press / to select
Yes
.
➮ Press OK.
Note:
If you want to delete an old message, you
have to retrieve it first as described under
“Reading old messages”.
Mailbox (Mobile box)
The mailbox (also known as Mobile box) is
an answering machine made available to you
by your provider. T o use the mailbox, you have
to enter the mailbox number. You can obtain
the mailbox number from your provider.
So that any incoming calls you miss are forwarded to the mailbox, you have to set up
call forwarding for the mailbox. For information on setting up call forwarding and the instructions, refer to the section on “Call forwarding” in the chapter on “Using the telephone”.
Entering the mailbox phone number /
calling the mailbox
➮ Press OK in the telephone mode.
➮ Press to select
Menu
.
➮ Press OK.
The menu will appear in the display . The cursor
will mark
Mailbox
.
➮ Press OK.
ENGLISH DEUTSCHFRANÇAISITALIANO
NEDERLANDS
SVENSKAESPAÑOL
PORTUGUÊS
39
Page 40

MESSAGES / MAILBOX
SPECIAL FUNCTIONS
If no number has been entered as yet,
➮ enter the mailbox number with the but-
tons 0 - 9.
➮ Press OK.
A call will be placed to your mailbox.
If the mailbox number has already been en-
tered, you will be connected with the mailbox
directly once you select the menu item
Mailbox
For more information on the mailbox and how
to use your mailbox, please contact your provider.
.
Cell broadcast messages
Cell broadcast is a regional short message
service available from your provider. These
short messages are broadcast in numbered
channels.
Your provider can supply you with other information such as a list of the channels and
categories as well as the charges involved.
If you want to use Cell Broadcast,
➮ press OK in the telephone mode.
➮ Press to select
Menu
.
➮ Press OK.
➮ Press to select
Messages
.
➮ Press OK.
➮ Press to select
Broadcast
.
➮ Press OK.
➮ Press to select
On
.
➮ Press OK.
➮ Enter the number of the channel you
want to use with the buttons 0 - 9.
➮ Press OK.
The
MESSAGES
play.
menu will appear in the dis-
Special functions
Determining the user group
User group is a function that is available from
your provider.
With “user group”, the telephone can be used
by a limited group of people only .
Note:
Please contact your provider to set up the user
groups.
Switching user group on/off
➮ Press OK in the telephone mode.
➮ Press to select
➮ Press OK.
➮ Press to select
➮ Press OK.
➮ Press to select whether the calls can
be placed within a special group only
(
Group only
cial
Index
.
➮ Press OK.
➮ Use with the buttons 0 - 9 to enter the
access code for the group, if required.
➮ Press OK.
The
USER GROUP
display.
Entering AOC parameters
With a SIM card that supports AOC (Advice
of Charge), you can enter a charges rate and
a credit amount. When the credit has been
used up, it can be refilled by an authorised
holder of the phone access code or the PIN2.
➮ Press OK in the telephone mode.
The DSC menu will appear in the display . The
cursor
will mark
➮ Press OK.
➮ Press to select
Menu
.
User group
) or in a group with a spe-
menu will appear in the
Setup
.
AOC param.
.
40
Page 41

SPECIAL FUNCTIONS SPECIFICATIONS
➮ Press OK.
➮ Use the buttons 0 - 9 to enter the phone
access code or PIN2.
➮ Press to select between
have the charges per unit indicated and
the input of a
Credit
Charge
.
to
➮ Press OK.
➮ Use the buttons 0 - 9 to enter your set-
tings.
➮ Press OK.
The
AOC PARAMETERS
in the display .
menu will appear
Specifications
Amplifier
Output power: 4 x 23 watts RMS
according to
DIN 45 324
at 14.4 V
4 x 35 watts
max. power
Tuner
Wavebands:
FM 87.5 – 108 MHz
MW 531 – 1 602 kHz
L W 153 – 279 kHz
FM sensitivity: 0.9 µV at 26 dB
Signal/Noise ratio
FM frequency range: 30 - 16 000 Hz
Telephone
Standard: GSM
Frequency band:
Transmit 890 – 915 MHz
Receive 935 – 960 MHz
ENGLISH DEUTSCHFRANÇAISITALIANO
NEDERLANDS
SVENSKAESPAÑOL
Transmission power: Class 2 / 8 watts
Sensitivity: -108 dBm
Impedance:
Antenna connection 50 ohms
Hands-free microphone 660 ohms
PORTUGUÊS
41
Page 42

REMOTE CONTROL (OPTIONAL)
Operating the Radiophone
with the RCT 07 remote
control unit (optional)
With the optional RCT 07 remote control unit,
you can operate the most important functions
of the Antares T 60 conveniently and safely
from the steering wheel.
Radio operation
Activates the telephone mode
V- Decreases the volume
V+ Increases the volume
TA Switching traffic radio standby on/off
Seek tuning up, moves cursor in lists
Seek tuning down, moves the cursor
in lists
SRC Source switch between radio, CD
changer (optional) or an auxiliary audio source (AUX)
ME Retrieves the station list and makes
selections in the station list
Telephone operation
Retrieves the list of calls dialled last
Places a call to the number in the
display
V- Decreases the volume
V+ Increases the volume
TA Switches traffic radio standby on/off
Retrieves the list of calls received,
moves cursor in lists
Retrieves the list of missed calls,
moves the cursor in lists
SRC Returns to the audio source activated
last
ME Press briefly: Retrieves the phone
book, sorted alphabetically .
Press long: Retrieves the phone
book, sorted numerically
CD changer operation (optional)
Activates the telephone mode
V- Decreases the volume
V+ Increases the volume
TA Switches traffic radio standby on/off
Plays next track, moves cursor in lists
Plays previous track, restarts the cur-
rent track, moves the cursor in lists
SRC Source switch to radio
ME Retrieves the CD list and makes se-
lections in the CD list
42
Page 43

TELEPHONE MENU OVERVIEW
OK
DSC menu – Telephone
Setup
Menu
Phone book
Setup
Volume Ringing tone
Handfree
Auto. answer On / Off
Auto. redial On / Off
Ring. tones Ringing tone Up and down
My number Number 1*
Number 2*
Number 3*
Mailbox
AOC param.* PIN 2
Charge* Home net
Roaming net
Audib. timer Off
15 ... 300 s
PIN-code PIN 1 Change
PIN 2* Change
TA / Call On / Off
select with
back with CLR
back to radio SRC
Oktave
Trill
2x Oktave
2x Trill
Triad
Off
ENGLISH DEUTSCHFRANÇAISITALIANO
NEDERLANDS
SVENSKAESPAÑOL
PORTUGUÊS
* Display of the menu item depends on the SIM card used.
43
Page 44

TELEPHONE MENU OVERVIEW
OK
DSC menu – Telephone
Setup
Menu
Phone book
Menu
Mailbox Call
Messages Input
Output New
Storage No more messages
Broadcast On / Off
Parameters V alidity 1 ... 7 days
select with
back with CLR
back to radio SRC
Patterns Return call
Delay
Meeting
Appointment
Confirmat.
Edit
Service no. – – – –
44
Network sel. Available Search
Search method Automatic / Manual
Pref. list Add Known / New
Move
Delete
List
Call meters Last call – – – – – . – – Euro*, – – – – – . – – Min
All calls – – – – – . – – Euro*, – – – – – . – – Min
Home calls* – – – – – . – – Euro*, – – – – – . – – Min
Roam calls* – – – – – . – – Euro*, – – – – – . – – Min
Reset PIN 2 ?*
During call Charge / Time
* Display of the menu item depends on the SIM card used.
Page 45

TELEPHONE MENU OVERVIEW
Menu
Forwarding All calls Speech Status
If busy Data Delete
If no answer FA X Register
unreachable All service Activate
Clear all Yes / No Deactivate
Service
no.
Barring Outgoing all calls Speech
Internation Data
Roaming net FAX
All service
Incoming all calls
Roaming net
Status
Activate
Deactivate
Password change password
Phone lock All On / Off
Off Access code
One-touch – – – –
One-touch
+ speed-dial
Fixed no. List
New number PIN 2 ?
Activate PIN 2 ?
User group Index Preferred
Select Index: ?
No
Group only Access code – – – –
ENGLISH DEUTSCHFRANÇAISITALIANO
Service no.
NEDERLANDS
SVENSKAESPAÑOL
* Display of the menu item depends on the SIM card used.
PORTUGUÊS
45
Page 46

TELEPHONE MENU OVERVIEW
OK
DSC menu – Telephone
Setup
Menu
Phone book
Phone book
Find name Name? (use 10-key keypad - ABC)
Find Pos. Position? (use 10-key keypad - 1 ... 0)
Add entry SIM card Number?
Phone Number?
Access Lock Phone
SIM card Access code
All – – – –
No locks
Capacity SIM card Free entries
Phone Free entries
My number*
select with
back with CLR
back to radio SRC
* Display of the menu item depends on the SIM card used.
46
Page 47

RADIO MENU OVERVIEW
SRC
OK
DSC menu – Radio
Setup
Radio
Setup
Language Deutsch
English
Italiano
Français
Español
Nederlands
Svenska
Português
Automatic
Card LED On / Off
Beep Volume Off / 1 ... 9
Keytones Volume Off / 1 ... 9
Vario Colour G . . . . .". . . . . R
Brightness D . . . . .I. . . . .
N . . . . .I. . . . .
Angle . . . . . . .II. . . . . .
Ignit. timer 0 ..... 90 min
Change code old Code – – – – 2x new Code – – – –
Reset Access code – – – – Radio
select with
back with CLR
back to radio SRC
Phone
SIM card
ENGLISH DEUTSCHFRANÇAISITALIANO
NEDERLANDS
SVENSKAESPAÑOL
PORTUGUÊS
47
Page 48

RADIO MENU OVERVIEW
DSC menu – Radio
Setup
Radio
Radio
Radiotext Off / On / On/Eng. off
Loudness Level 1 ... 6
TA volume Level 0 ... 63
Volume FIX Level 0 ... 63
Sensitivity DX Low / Middle / High
LO Low / Middle / High
Aux On / Off
Disc Naming** Change name
Clear name
Music/Speech Off ... Level 4
SRC
OK
select with
back with CLR
back to radio SRC
** if a CD changer is connected
48
Page 49

GLOSSARY
Glossary of Technical
Terms
Access code
Barred functions can be operated after the
access code has been entered.
Adapter card
Holder for small SIM cards. With the help of
an adapter card, it is possible to use small
SIM cards in equipment which was otherwise
designed for use with standard-sized SIM
cards.
AF - Alternative Frequency
This function enables the equipment to auto-
matically select the best available frequency
for the reception of an RDS program.
Amplifier
Amplifies the output power.
AOC parameter - Advice of Charge
List of charges in which a charge per unit and
a credit balance can be entered.
AUD - Audio
Tone adjustments for bass and treble, fader
(front and rear) and balance (left and right).
BND (Band)
Switches between wavebands and memory
levels.
Broker’s call
It is possible to make a second call without
ending the first one. Y ou can then switch from
one call to the other.
You can also answer a call from a second
party without ending the call to the first.
Call waiting
A quiet beep during a telephone call informs
you that another caller is trying to reach you.
Cell Broadcast
Cell Broadcast is a short message service
which operates in numbered “channels”.
The channels transmit different special messages.
Request more detailed information and a list
of the available channels from your network
operator/service provider.
Changer
CD changer (accessory)
CLR - Clear (delete)
Returns to previous menu.
DSC - Direct Software Control
With the help of DSC you can adjust the basic factory settings and functions to your personal needs and to store these settings.
EON - Enhanced Other Networks
EON is an RDS service which makes it pos-
sible to exchange station information within a
station broadcasting network. The radio will,
for example, automatically switch from a non
TA station to a TA station in the same radio
network in order to broadcast a traffic announcement. After the traffic announcement
has been broadcast, the radio will switch back
to the previous network once again.
GSM network - Global System for Mobile
Communication
European cellular telephone standard available world-wide
ENGLISH DEUTSCHFRANÇAISITALIANO
NEDERLANDS
SVENSKAESPAÑOL
PORTUGUÊS
49
Page 50

GLOSSARY
Handset
T elephone receiver complete with cradle (accessory).
IMEI - International Mobile Equipment Identity
International identity for mobile equipment.
The IMEI code entered at the factory includes
the serial number, manufacturer and country
code. You can find this code in the car radio
pass.
International Roaming
Making telephone calls in foreign countries
with your own telephone or your own SIM card
using a different network operator/service
provider. There must be a roaming agreement
between your service provider and the foreign network.
Mailbox
Electronic mailbox provided by network operators/service providers for spoken messages. The mailbox can be compared to an
answering machine.
MEM - Memory
Retrieves stored data, such as radio stations,
telephone numbers.
MIX
CDs/CD tracks are played in random order.
MUTE
Switches off the microphone in the telephone
mode.
PaX - Personal Access
Allows direct access to a function in radio or
CD mode which was previously stored.
PIN code - Personal Identification Number
PIN 1
Prevents your SIM card from being used by
unauthorised persons. Y ou must enter the PIN
code each time you insert the SIM card.
PIN 2
Code required for special functions.
If you have authorisation for the use of special functions with your card, you need a PIN
2-code.
Both codes come with the SIM card and can
be altered.
PUK - Personal Unblock Key, Master PIN
Code, Super PIN, etc.
Eight-digit unblock code which can reactivate
the SIM card. This becomes necessary if the
PIN code for the SIM card has been entered
incorrectly three times.
The PUK code comes with the SIM card and
cannot be altered. Make sure you keep it in a
safe place.
Radiotext
Additional RDS information provided by the
station, for example, on the program broadcast.
RDS - Radio Data System
Service provided by radio stations for more
convenient radio listening pleasure.
The station name appears in the display, for
example, rather than the frequency .
Other RDS functions include:
AF - Alternative Frequency
EON - Enhanced Other Networks
RT - Radiotext
T A - Traf fic Announcement
TP - T raffic Program
50
Page 51

GLOSSARY
Scrolling
Moves you through a directory.
SIM card - Subscriber Identification Module
For radio and telephone operation. The SIM
card used here is in credit-card format. It is
also possible to use the small SIM card (plugin card) with an adapter card.
The SIM card contains all of the data required
to identify the subscriber, to allocate the telephone number and the personal phone
book.
SMS - Short Message Service
Using this function it is possible to send other
subscribers messages up to 160 characters
in length, even if the recipient’s cellular phone
is not switched on or a call cannot be put
through at the present time.
The text is stored in the network until the recipient retrieves it or the time allowed by the
sender expires.
Speed-dial
This function allows you to dial telephone
numbers at the touch of a button.
TS - Travelstore
Automatically stores the radio stations with
the strongest reception signals, can be retrieved by pressing the station preset buttons.
Very useful on trips.
User group
It is possible to limit the use of the telephone
to a certain group of users. Your network operator/service provider can provide more detailed information.
ENGLISH DEUTSCHFRANÇAISITALIANO
NEDERLANDS
SVENSKAESPAÑOL
SRC - Source
Switches audio source between radio, CD
changer and AUX. Returns the system from
telephone to radio operation.
TA - Traffic Announcement (priority for traffic
messages)
“TA” in the display indicates that traffic announcement priority is switched on.
TP - Traffic Program
“TP” in the display indicates that the radio is
currently tuned into a radio station which
broadcasts traffic information.
PORTUGUÊS
Subject to modifications!
51
Page 52

Service numbers
Country: Phone: Fax: WWW:
Germany (D) 0180-5000225 05121-49 4002 http://www.blaupunkt.com
Austria (A) 01-610 390 01-610 393 91
Belgium (B) 02-525 5454 02-525 5263
Denmark (DK) 44 898 360 44-898 644
Finland (FIN) 09-435 991 09-435 99236
France (F) 01-4010 7007 01-4010 7320
Great Britain (GB) 01-89583 8880 01-89583 8394
Greece (GR) 0800-550 6550 01-576 9473
Ireland (IRL) 01-4149400 01-4598830
Italy (I) 02-369 6331 02-369 6464
Luxembourg (L) 40 4078 40 2085
Netherland (NL) 023-565 6348 023-565 6331
Norway (N) 66-817 000 66-817 157
Portugal (P) 01-2185 00144 01-2185 11111
Spain (E) 902-120234 916-467952
Sweden (S) 08-7501500 08-7501810
Switzerland (CH) 01-8471644 01-8471650
Czech. Rep. (CZ) 02-6130 0441 02-6130 0514
Hungary (H) 01-333 9575 01-324 8756
Poland (PL) 0800-118922 022-8771260
Turkey (TR) 0212-3350677 0212-3460040
USA (USA) 800-2662528 708-6817188
Brasil
(Mercosur) (BR) +55-19 3745 2769 +55-19 3745 2773
Malaysia
(Asia Pacific) (MAL) +604-6382 474 +604-6413 640
Blaupunkt GmbH
02/01 TRO CM/PSS2 - 8 622 402 456 (GB)
 Loading...