


DR380-HD
www.blackvue.com
User's Manual
DR380-HD / DR380G-HD / DR400G-HD / DR400G-HD II
BlackVue_Eng_0726.indd 1 2012-07-26 �� 4:00:45

BlackVue_Eng_0726.indd 2 2012-07-26 �� 4:00:45

Table of Contents
Preparations
2 Before Reading the User's Manual
3 Safety Instructions
5 Product Features
6 What's included
7 BlackVue At a Glance
BlackVue Usage
8 Installation
12 Recording
14 Playing Recorded Videos
BlackVue Software
17 Running BlackVue Software
18 Screen At a Glance
19 Playing Recorded Files
23 Saving as an Image File / Printing
24 Configuring BlackVue Settings
Others
34 Installing the BlackVue Software
35 Upgrading the Firmware
36 Product Specifications
BlackVue_Eng_0726.indd 1 2012-07-26 �� 4:00:45

2
Preparations
Before Reading the User's Manual
Thank you for purchasing Pittasoft's BlackVue. This product is a video event
data recorder (VEDR) for vehicles.
X
Please read the User's Manual carefully before using the BlackVue.
X
Pittasoft is planning to supple ment its product and add new features via
firmware on a constant basis. All information and specifications in this manual
are subject to change without a prior notice.
X
Screens and pictures of the User's Manual may be different from the actual object.
Descriptions of Symbols Used in the Manual
Symbol Name Description
Caution
Cases where the device fails to work properly or its settings are
disabled.
Tip Additional notes that are helpful in working the device
Warranty and Disclaimer
X
We shall take no responsibility for accidental damage, injuries and other losses
caused by improper use of the product.
X
This product is a video event data recorder for vehicles but does not guarantee
that all accidents will be recorded. This device may fail to record a minor
accident caused by too light an impact to trigger the impact sensor.
X
This product creates a record of video to help determine what happened before,
during and after the crash or event.
Pittasoft Co. shall not take any responsibility for damages (property, business
and/or indirect damages).
BlackVue_Eng_0726.indd 2 2012-07-26 �� 4:00:45

3
Preparations
Safety Instructions
This manual is about what should be done to protect the user's safety and
prevent property damage.
Please make sure to read it thoroughly before using the product.
Do not disassemble, repair and/or alter the product.
This may cause a fire, an electric shock and/or malfunction. Contact the service
center if you need to have the product fixed. User may not be entitled to free
service if and when product malfunction is caused by user's fault.
Do not spray water on each parts of the product when cleaning it. Make
sure not to wet the product.
This may cause a fire, an electric shock and/or malfunction.
Do not spray a cleansing agent on the surface of the product.
This may cause discoloration and/or cracks on the sur face and re sult in
malfunction.
Do not give the product a shock, and make sure foreign matter does not
enter the product.
This may result in malfunction.
Do not operate the product while driving.
This may cause a traffic accident because it distracts you from keeping your
eyes on the road. Use after stopping/parking your car in a safe place.
Do not install the product in a location where it may interrupt a safe driving
or block your view while driving.
This may cause a traffic accident.
Excessively dark tinting on the windshield may make recorded images look
blurry or distorted.
The optimum temperature for picture quality ranges from 0 to 50 °C. The
picture quality may vary according to seasons, especially in midsummer or
winter season.
This product is fitted with a camera. Drastic changes in brightness (on
entry/exit of tunnels), strong backlight in the daytime, and no light source at
midnight may result in defective recorded images.
If power supply to the device is interrupted by a crash or accident, it may
cause video not to be recorded.
BlackVue_Eng_0726.indd 3 2012-07-26 �� 4:00:45

4
Cautions for GPS Usage GPS models Only
X
Poor GPS reception will not affect video recording.
It will only lead to a failure to record a vehicle's coordinates and speed.
X
Please maintain the optimum temperature, which ranges 0 to 50 ºC from for
proper working of GPS. GPS reception may get unstable or its connection time
may be delayed in the midsummer or wintertime.
X
When you use the product for the first time or you have not used it for an
extended period of time (over 3 days), it may take some time for GPS to identify
the current location. (at least 1 to 5 minutes)
X
Install the product avoiding the following instances where GPS reception is
interrupted, and check the GPS reception.
yAn instance where an object in put on top of GPS
yAn instance where the windshield is tinted with metallic substances
yAn instance where devices producing RF radiation interrupting GPS signals are installed
in a car (certain models of remote car alarms and MP3/CD players)
yAn instance where another device using GPS is used
yAn instance where it is dark and overcast
yAn instance where GPS is used under an overpass; in a tunnel, underpass, underground
parking lot, and an area concentrated with large buildings; and near a power station,
barracks, and broadcast relay station
Cautions for BlackVue Installation
X
Installing or operating the device while driving may cause an accident. Please
install or operate the device after stopping/parking your car in a safe place.
X
If the cigarette lighter receptacle emits fumes or a funny smell, stop using the
product immediately and contact us or our dealerships.
X
Dust and built-up dirt on the cigarette lighter receptacle may cause heat or a fire.
Clean it on a regular basis.
X
Check frequently if the product is installed properly. Due to vibration, the BlackVue
comes off, resulting in an injury or damage.
X
We do not take any responsibility for malfunction, an injur y or damage to the
product caused by inappropriate use.
Preparations
Safety Instructions
BlackVue_Eng_0726.indd 4 2012-07-26 �� 4:00:45

5
Preparations
Product Features
High-definition Video
The BlackVue uses high quality mega-pixel lenses, which produce clear and sharp
images even at night.
Smartphone/PC Viewer
The product comes with a PC viewer and applications for smartphones (running on
Android). You can check images easily and customize various settings.
Normal Recording
The product makes a high-definition video recording of all the events while driving.
Parking Mode Recording
The product automatically shifts to the parking mode. If there is no movement of
a vehicle for a certain period of time, the device automatically shifts to the parking
mode; and if the movement of a vehicle continues, the parking mode becomes
automatically deactivated. In the parking mode, only if the camera detects motion
or an impact occurs, recording gets started. (The product is equipped with motion
detection technology developed by Pittasoft, which specializes in IP cameras.)
Event (G-sensor) Recording
If the vehicle is given an impact, the G-sensor built in the BlackVue detects the
impact and starts recording the event.
Sound Recording
The microphone built in the BlackVue records surrounding sounds while recording
video.
Check Images on Various Devices
You can check recorded images on a variety of devices that can play MP4 files.
Refined and Easy-to-Use Design
The BlackVue with its sleek and cylindrical design makes the vehicle's interior look
even better.
In addition, you can easily adjust the camera angle so that it can record the inside
of the car.
Voice Guide
The voice guide provides information about the current status of the BlackVue.
GPS Driving Record GPS models only (DR380G-HD, DR400G-HD, DR400G-HD II )
The built-in high-sensitivity GPS creates a record of the speed and location of the
vehicle at the time of recording. You can check the driving records via BlackVue
software. (when connected to the Internet)
BlackVue_Eng_0726.indd 5 2012-07-26 �� 4:00:46
6
Preparations
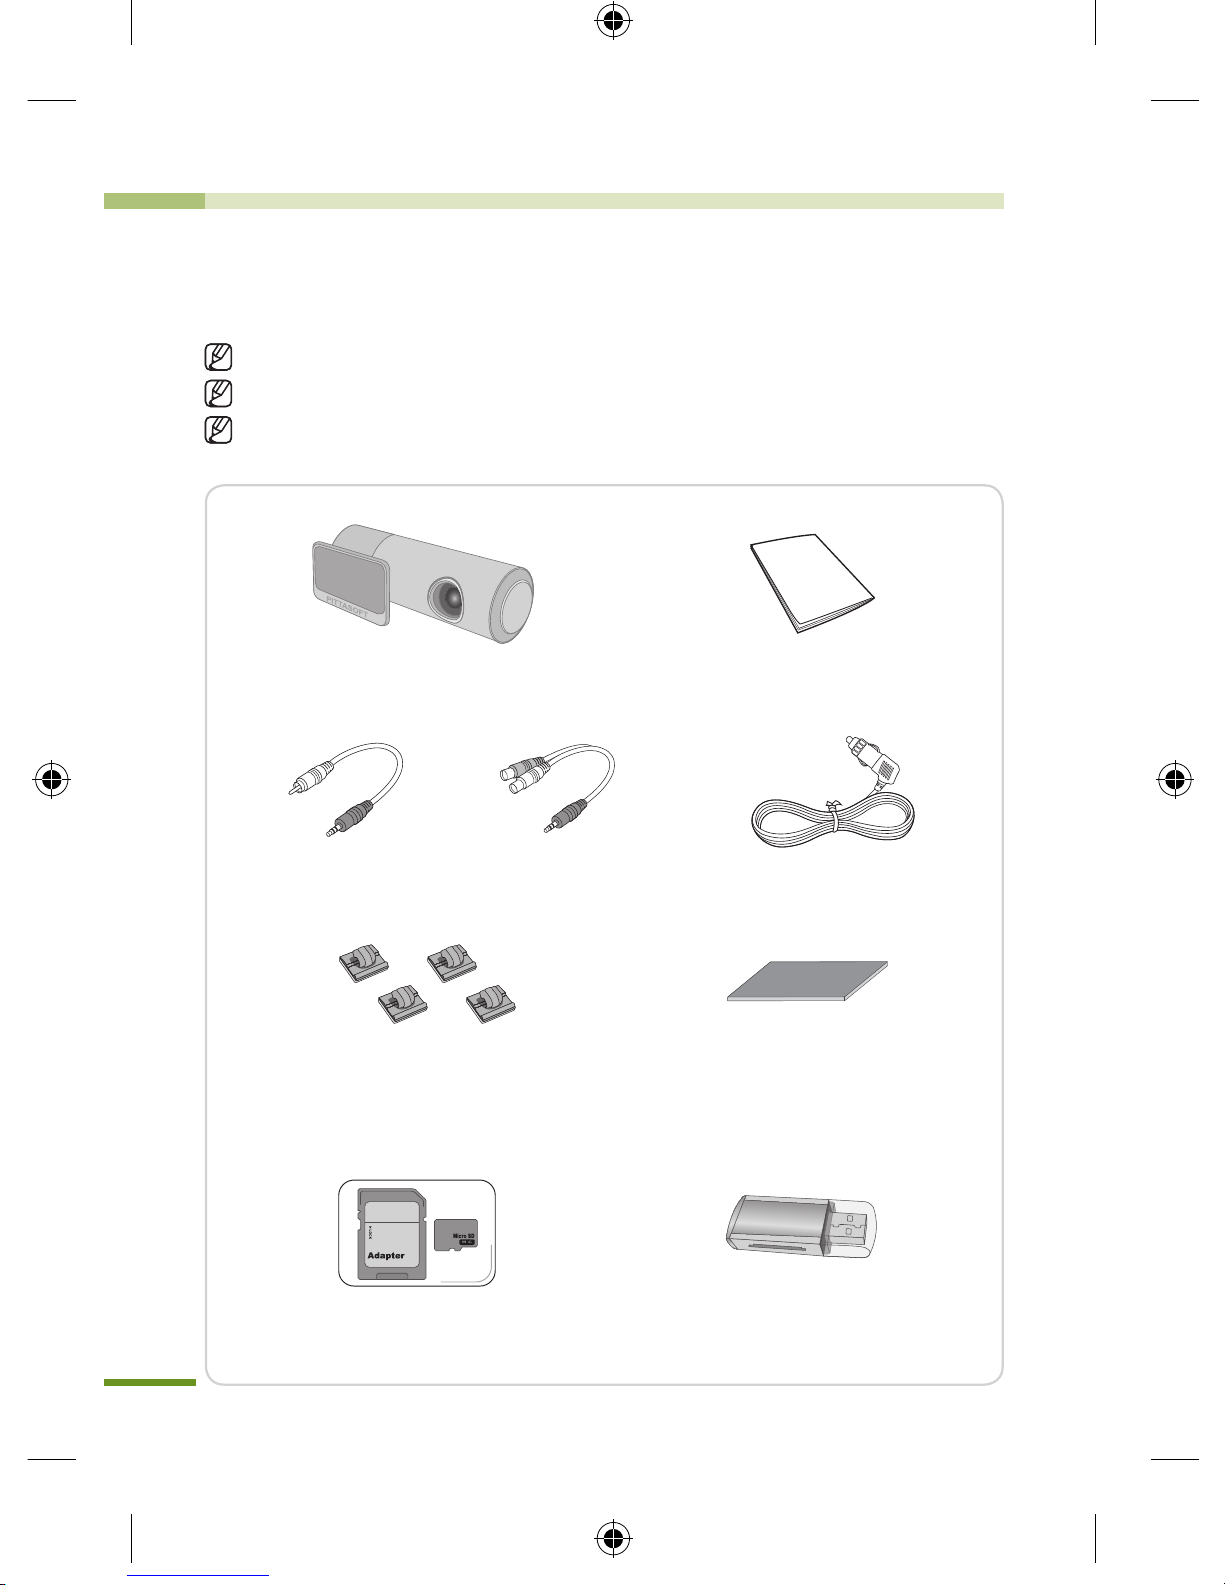
What's included
Check the product and the accompanied accessories contained in the product
package.
Please contact your dealership if there is a problem with the components.
*Components provided and optional items may vary depending on a model.
Components provided and optional items are subject to change without a prior
notice.
BlackVue User Manual
Video OUT Cable* Video IN Cable* Power Cable
Cable Clips Double-sided Tape
(spare item for mounting the
BlackVue on the windscreen)
Micro SD Card
(including BlackVue software)
Micro SD Card Reader*
BlackVue_Eng_0726.indd 6 2012-07-26 �� 4:00:46
7
Preparations
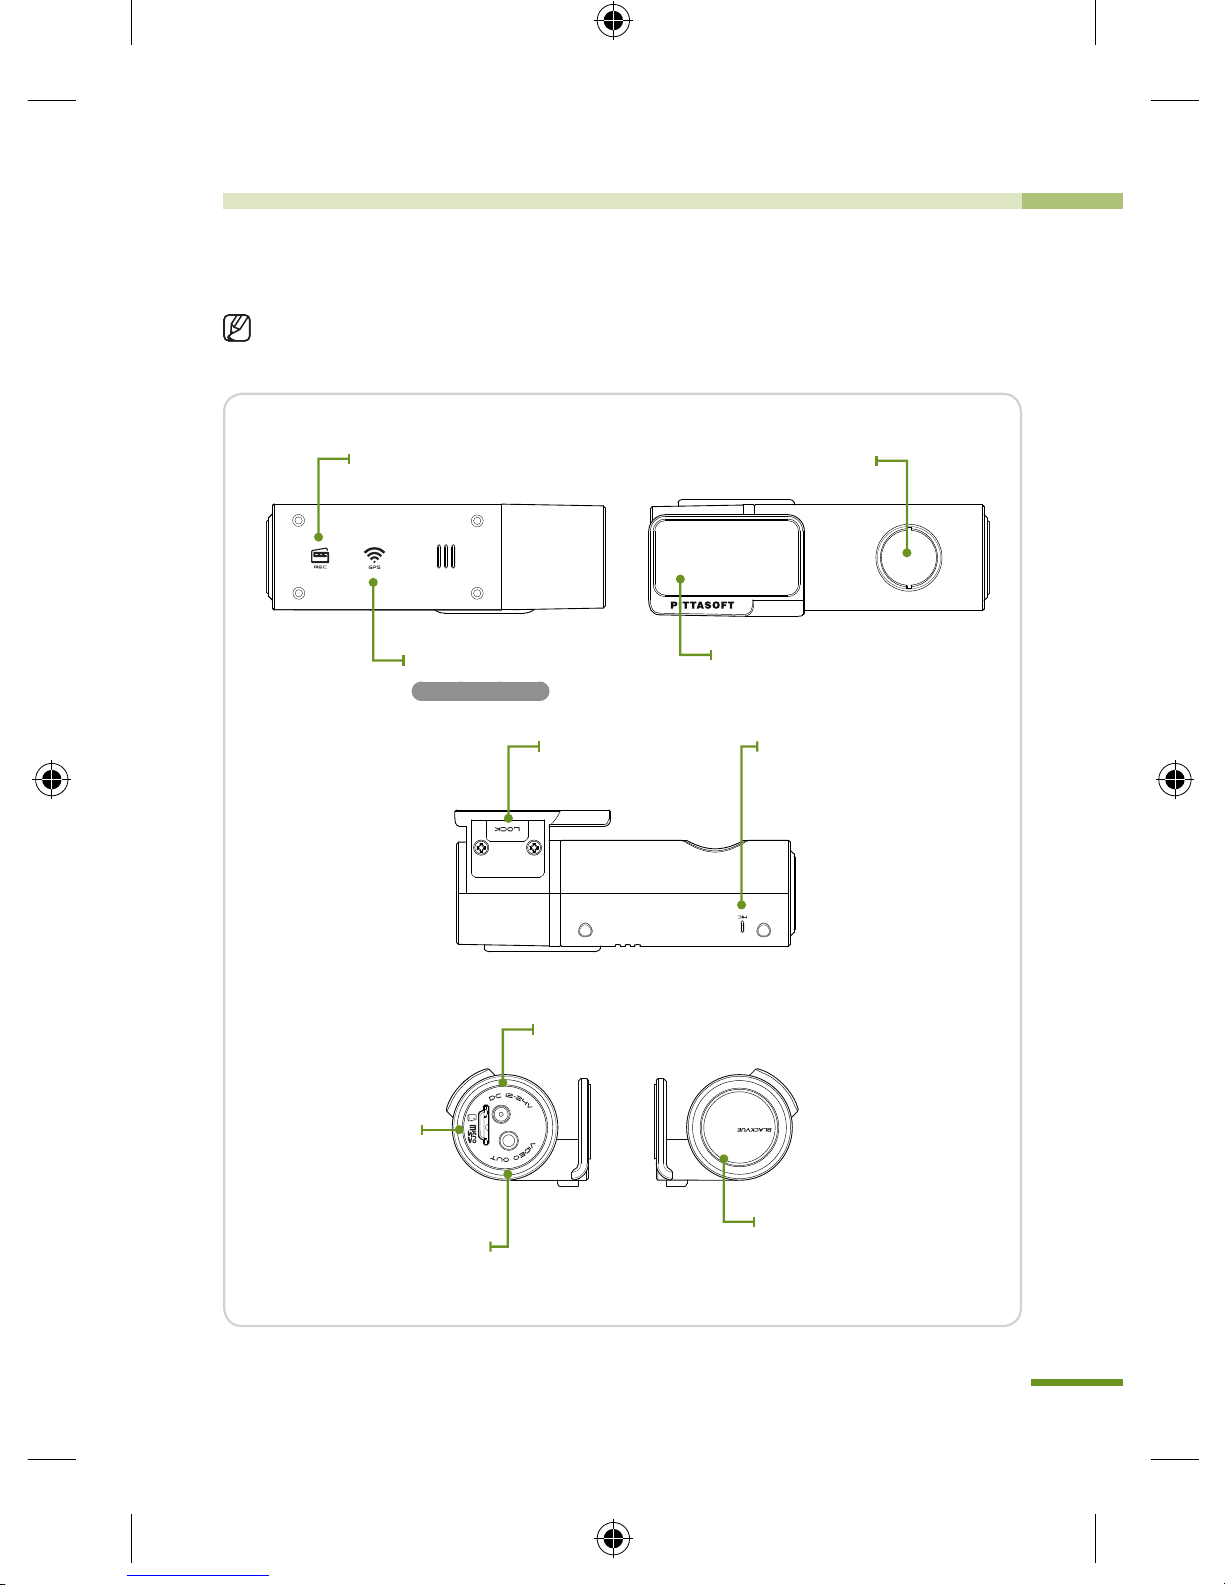
BlackVue At a Glance
Check the main body of the BlackVue.
For more information on the use of each part, refer to the relevant page.
Recording Mode LED
Microphone
Main Body Button (Parking
Mode Recording Button)
(X See page 12)
[DC IN] terminal (X See page 9)
Micro SD Card Slot
[VIDEO OUT] terminal
(X See page 11)
Holder
GPS Reception LED
GPS models only
Holder lock button
(X See page 11)
Camera Lens
BlackVue_Eng_0726.indd 7 2012-07-26 �� 4:00:47
8
BlackVue Usage
Installation
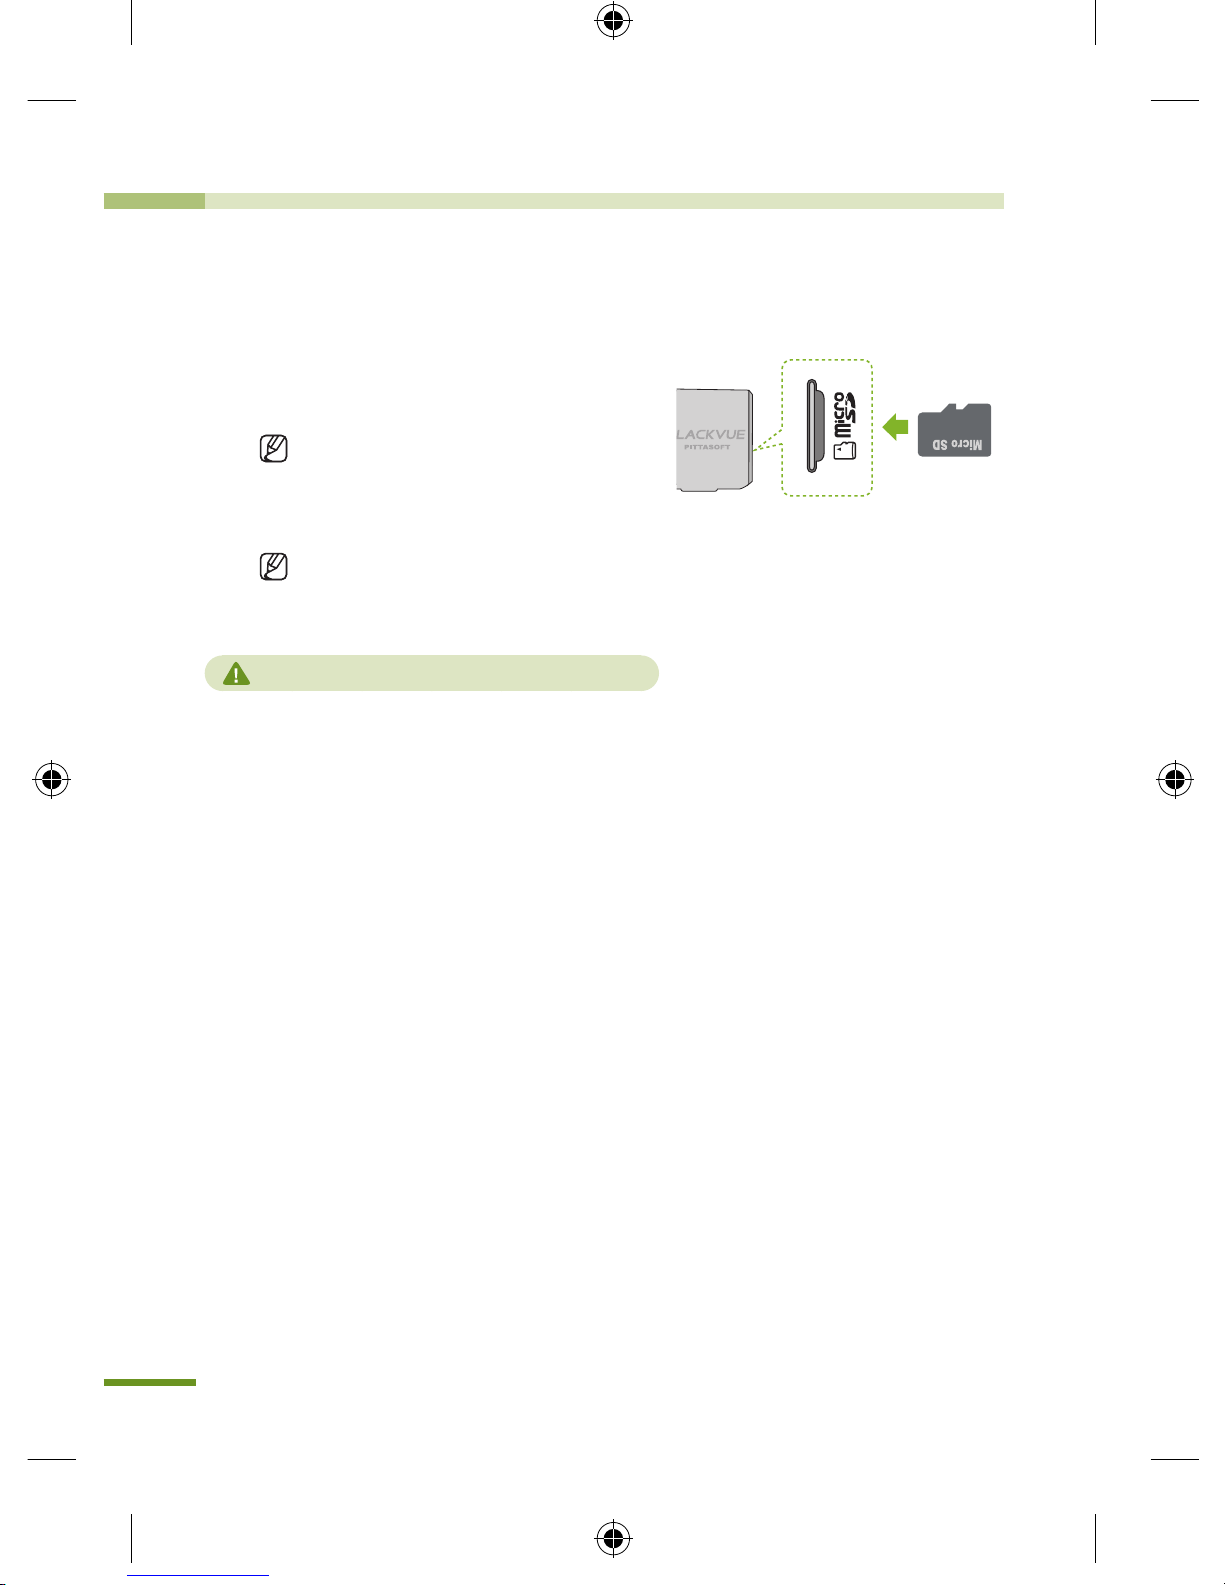
Insert the Micro SD Card into the BlackVue
1.
Insert the Micro SD card into the
Micro SD slot in the same direction
as shown in the picture.
Press the card again to remove
it. While doing this, be careful so
that the Micro SD card won't pop
out.
Tu r n of f th e Bl a c k Vu e be f o r e
inserting the card into it.
Cautions for Using the Micro SD Card
yInsert/remove the Micro SD card with the BlackVue off.
(Check to see if all the LEDs on the BlackVue are off.)
yDo not remove the Micro SD card while saving data on the card or reading data from
it. This may cause data loss and product malfunction.
yCheck the data stored on the Micro SD card to see if the product is working properly.
yWe recommend you use the genuine memory cards provided by Pittasoft. We do not
take any responsibility for problems caused by the use of other memory cards.
yThe Micro SD card is consumable. Replace it with a new one after a longtime use.
yMake sure to store important data on another storage medium. We do not take any
responsibility for data loss caused by user's fault.
BlackVue_Eng_0726.indd 8 2012-07-26 �� 4:00:47
9
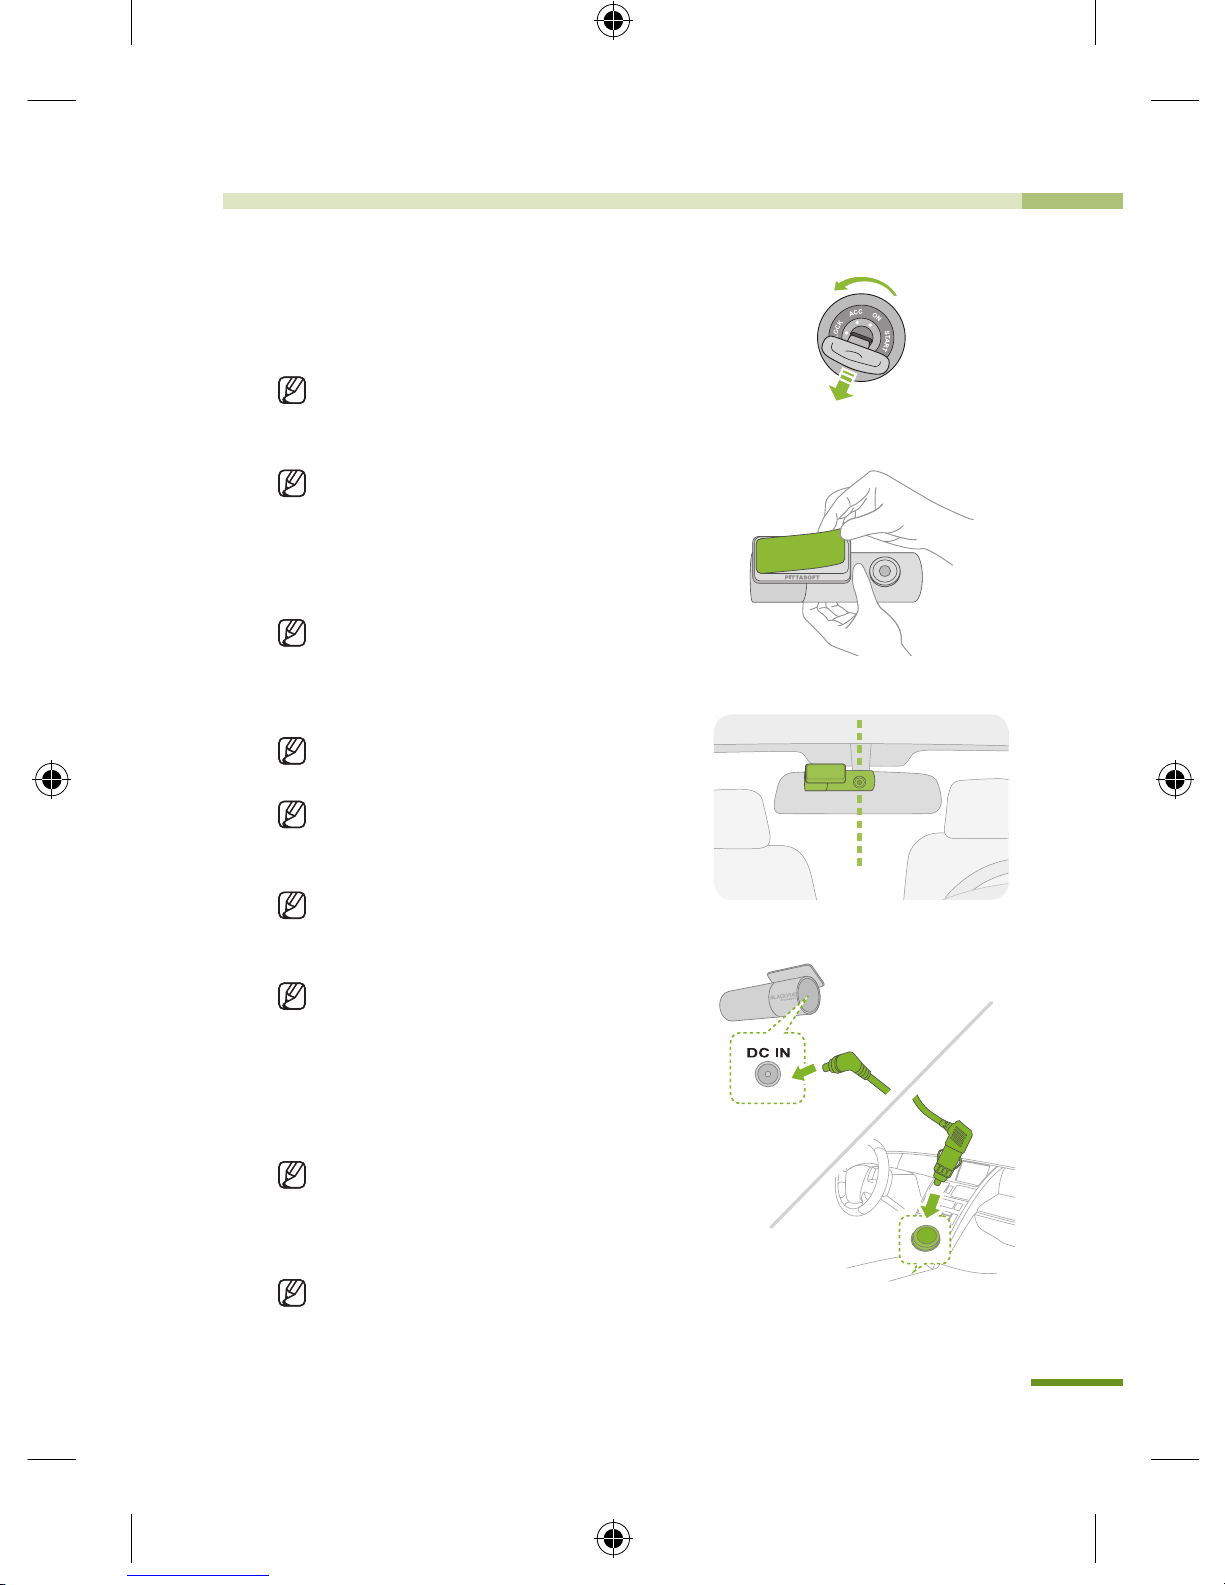
Install the BlackVue in the Car
1.
Turn off the ignition and pull out the car key.
Install the device in a bright and safe place.
2.
Insert the Micro SD Card into the BlackVue.
For instructions for use of Micro SD card,
please refer to page 8.
3.
Attach the BlackVue on the vehicle's window
using double-sided tape.
We recommend you install the device on the
backside of the rear view mirror so that the
BlackVue camera lens is at the center of the
vehicle.
Install the device in an area where it does not
block the driver's view.
Clean the area, on which a double-sided tape
will be put, with a dry cloth to remove any
foreign matter and moisture.
I f mo u n te d o n th e e l e c t r i c al l y h e a te d
windscreen, the product may cause damage
to the heating grid when demounted later.
If the mount of the BlackVue has come off,
see Page 11.
4.
Connect the BlackVue's [DC IN] connector
to the cigarette lighter receptacle using the
power cable.
When recording in the parking mode, you
are advised to connect the Power Magic, an
uninterrupted power supply (UPS) unit, to the
product.
If you intend to use the BlackVue along with
other car accessori e s u s ing the cigarette
lighter receptacle, you are advised to use a
multi-socket outlet (cigar socket).
BlackVue_Eng_0726.indd 9 2012-07-26 �� 4:00:47

10
BlackVue Usage
Installation
5.
Organize the power cable.
Use the provided cable clips if necessary.
6.
Adjust the position of the BlackVue's
camera lens.
Install the product in such a way that
the BL ACK VUE lo go in th e button
section faces slightly lower than the
level.
Ch e ck th e st or ed d a ta af t er t e s t
driving, and adjust the position of the
lens if necessary.
If you connect the product to portable
vi de o de vi ce s (sm ar t ph on e, GP S
navigator, etc.), you can adjust the lens
angle checking video. (X See Page 11)
7.
Start the engine.
Check to see if the product is properly
installed.
If the BlackVue's LED is turned on, it is
properly installed.
The type of LED may vary depending
on the model.
BlackVue_Eng_0726.indd 10 2012-07-26 �� 4:00:47
11
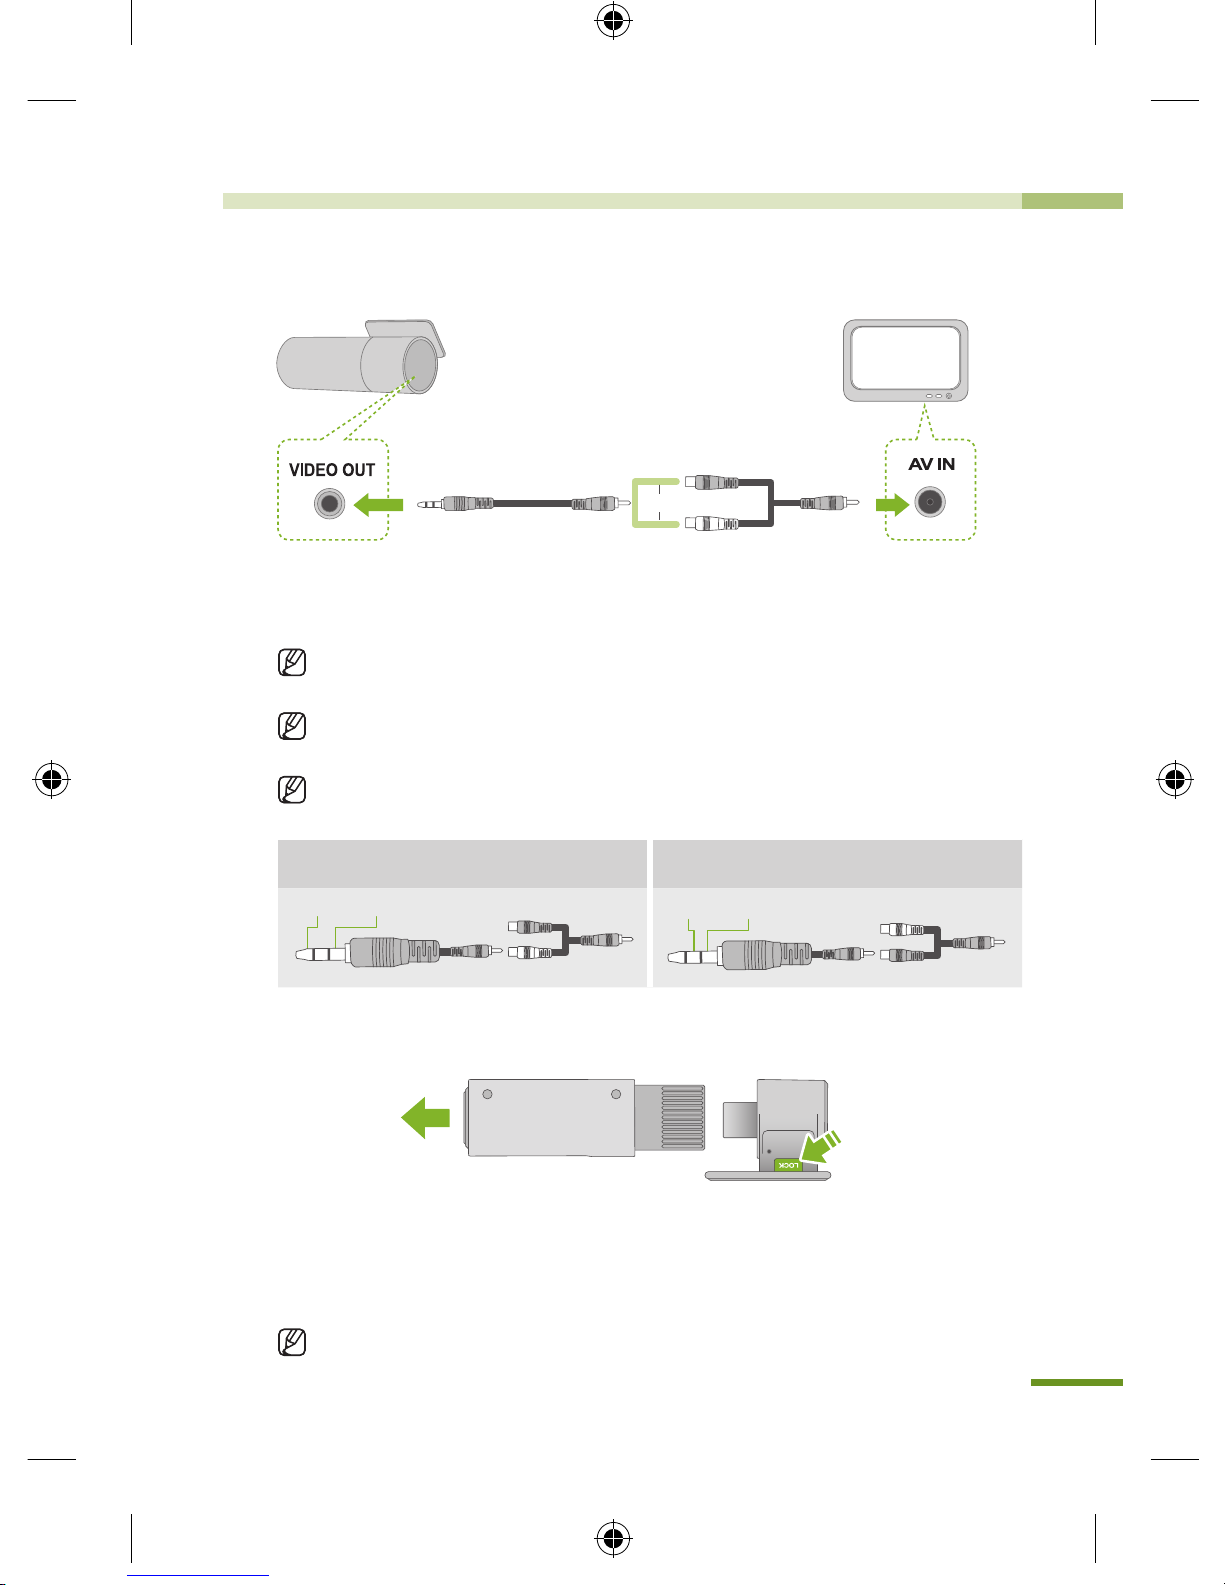
Connecting the BlackVue to AV Product
Video OUT Cable Video IN Cable*
Or
1.
Connect the BlackVue's [VIDEO OUT] terminal, to the AV product using
the Video OUT/IN cable (accessory).
You can check the BlackVue's real-time video on the connected AV
product.
If you use the BlackVue's [VIDEO OUT] port, you can reduce the video
frame rate.
The Video IN* cable may not be compatible with certain GPS navigators.
Check the compatibility before use.
When connected to the white connector of the
Video IN cable*
When connected to the yellow connector of the
Video IN cable*
GroundVideo
GroundVideo
Disconnecting from the Holder
1.
Pull the BlackVue's main body holding down the [LOCK] button on the
mount as shown in the picture.
2.
The BlackVue's main body will be easily disconnected from the mount.
Connect to the Mount : Insert the BlackVue's main body into the groove
on the mount until the ‘click’ sound.
BlackVue_Eng_0726.indd 11 2012-07-26 �� 4:00:47

12
BlackVue Usage
Recording
Normal Recording
Start the ignition.
Doing this will turn on the BlackVue and start the normal recording. Recording
will go on as long as the BlackVue is on.
Connected to the Power Magic (UPS unit), the BlackVue will remain on.
If you set [Set Normal Recording] in the configuration to [Normal Recording
Off], normal recording becomes deactivated. (
X
See Page 27)
Parking Mode Recording
This product has [Automatic Shift to
Parking Mode] as a default setting.
(X See Page 28)
If there is no movement of a vehicle for
over 10 minutes, the device automatically
shifts to the parking mode.
If the movement of a vehicle continues
for about 30 seconds, the parking
mode
becomes automatically deactivated.
If you want to activate the parking mode
or turn it off, press the button on the
main body of the BlackVue.
In the parking mode, only if the camera detects motion (motion detection) or
an impact occurs (G-sensor), recording gets started.
For recording in the parking mode, you are advised to connect the BlackVue
to the Power Magic (UPS unit).
Motion Detection Algorithms
yThis is a technology of capturing motion in the camera.
yThe product is equipped with security solution technologies developed by Pittasoft,
which specializes in IP cameras.
BlackVue_Eng_0726.indd 12 2012-07-26 �� 4:00:47
 Loading...