

Page 1
Installation and Operation Manual
Blackmagic URSA Mini
and URSA Mini Pro
Includes Blackmagic URSA Viewfinder, URSA Studio Viewfinder,
URSA Mini Shoulder Kit, URSA Mini Lens Mounts, Blackmagic Camera
Fiber Converter, Studio Fiber Converter and URSA Mini SSD Recorder.
November 2018
English,
日本語, Français, Deutsch, Español, 中文,
한국어, Русский
,
Italiano, Português and Türkçe.
Page 2

Contents
Blackmagic URSA Mini
Which camera are you using? 6
URSA Mini 7
URSA Mini Pro 4.6K 7
Getting Started 8
Attaching a Lens 8
Powering your Camera 11
Storage Media 14
CFast Cards 14
SD Cards 18
SSDs 23
Preparing Media for Recording 27
Preparing Media on Blackmagic URSA Mini 27
Preparing Media on Blackmagic
URSA Mini Pro 4.6K 29
Preparing Media on Mac 30
Preparing Media on Windows 30
Recording 32
Recording Clips 32
Blackmagic RAW 32
Recording to Blackmagic RAW 33
Constant Bitrate Settings 34
Constant Quality Settings 34
Blackmagic RAW Player 34
Sidecar Files 34
Blackmagic RAW in DaVinci Resolve 35
Blackmagic RAW Software Development Kit 35
Choosing the Codec, Resolution
and Sensor Area 36
Choosing Frame Rates 36
Trigger Record 42
Record Duration Table 43
Playback 45
Playing Back Clips 45
Introduction to URSA Mini 47
Camera Front 47
Left Side – URSA Mini 48
Left Side – URSA Mini Pro 4.6K 49
Right Side 50
Rear Panel 51
Top Panel 53
Underside 53
URSA Mini Controls 54
Control Buttons 54
Side Handle 56
URSA Mini Pro 4.6K Control Buttons 58
Forward Control Panel 58
Ergonomic Control Panel 61
Internal Control Panel 67
Touchscreen Controls 70
Touchscreen 70
Touchscreen Features 70
Settings
90
Dashboard 90
Record Settings 90
File Naming Convention 95
Monitor Settings 96
Audio Settings 104
Audio Settings – URSA Mini 104
Audio Settings – URSA Mini Pro 4.6K 106
Setup Settings 108
Presets 120
LUTS 123
Entering Metadata 126
Using Servo Zoom Lenses 132
Camera Video Output 134
HD Monitoring Output 134
12G-SDI Output 134
URSA Mini Shoulder Mount Kit 136
Blackmagic URSA Viewfinder 140
Mounting and Connecting
toBlackmagic URSA 140
Adjusting the Eyepiece 141
Button Features 141
Menu Settings 142
Blackmagic URSA Studio Viewfinder 147
Mounting and Connecting
toBlackmagic URSA Mini 148
Adjusting the Blackmagic URSA
Studio Viewfinder 150
Button Features 153
Menu Settings 155
Mounting Batteries 160
Mounting V-mount or GoldMount Batteries 160
Using your own Battery Plate 161
Blackmagic Fiber Converters 163
Getting Started with
BlackmagicFiber Converters 164
About SMPTE Fiber 164
Page 3

Connecting SMPTE Fiber 166
Why Connections on the Front? 170
Plugging in Camera SDI 171
Plugging in Return SDI Outputs 171
Mounting BlackmagicCamera
Fiber Converter 171
Attaching the URSA Studio Viewfinder 174
Plugging in a Talkback Headset 174
Operating the CameraFiberConverter 175
Selecting a Return Feed 175
Using Talkback 176
Using Tally 176
Status Indicators 177
Audio Inputs 178
IP Video 179
Power Specifications 179
Additional Camera Controls 179
Operating the StudioFiberConverter 181
Selecting the LCD Source 181
Rack Mounting the Studio Unit 181
Camera Unit Connections 185
Camera Power Connection 185
PTZ Interface 185
Talkback Connection 186
Tracker Interface 187
DC Connection 187
D-Tap Output 188
Reference Output and Operation 188
Studio Unit Connections 189
12G-SDI Output 189
Return SDI Inputs 189
Reference Input and Output 190
Talkback Interface 191
PTZ Interface 192
Audio Outputs 192
Updating Internal Software 193
Updating Blackmagic Camera
Fiber Converter 193
Updating Blackmagic Studio Fiber
Converter 193
Interchangeable Lens Mount 194
Blackmagic URSA Mini Pro PL Mount 195
Blackmagic URSA Mini Pro B4 Mount 197
Blackmagic URSA Mini Pro F Mount 199
Blackmagic URSA Mini Pro EF Mount 202
Blackmagic URSA Mini Pro Shim Kit 204
URSA Mini SSD Recorder 205
Mounting and connecting
URSAMini SSD Recorder 206
Using URSA Mini SSD Recorder 208
Updating URSA Mini SSD
Recorder’s internal software 209
Using DaVinci Resolve 210
Importing your Clips 211
Saving Your Project 211
Working with RAW files 212
Blackmagic RAW 213
Editing your Clips 216
Trimming Clips 217
Adding Transitions 218
Adding Titles 219
Color Correcting your Clips 220
Using Scopes 221
Secondary Color Correction 223
Qualifying a Color 223
Adding a Power Window 224
Tracking a Window 225
Using Plugins 226
Mixing Your Audio 226
Adding VFX and Compositing 232
The Fusion Page 232
Getting Started with Fusion 234
Using the Motion Tracker andAdding Text 238
Mastering your Edit 241
Understanding StudioCameraControl 243
Using Camera Control 244
DaVinci Resolve Primary ColorCorrector 250
Blackmagic Camera Setup Utility 253
Working with Third Party Software 255
Working with Files from CFast2.0
and SD cards 255
Working with Files from SSDs 256
Using Final Cut Pro X 256
Using Avid Media Composer 2018 257
Using Adobe Premiere Pro CC 258
Blackmagic URSA Mini B4 Mount 259
Shimming Lens Mounts 261
Shimming URSA Mini PL 261
Shimming URSA Mini Pro 4.6K 263
Developer Information 264
Blackmagic SDI Camera Control Protocol 264
Blackmagic Embedded
TallyControl Protocol 273
Help
275
Regulatory Notices 276
Safety Information 277
Warranty
278
Contents
Page 4
Which camera are you using?
You’ll notice while reading this manual that occasionally a feature will be specific to a particular
Blackmagic URSA Mini camera. All URSA Mini cameras produce incredible, wide dynamic range
images and share the same basic chassis. There are some differences between different
models, though.
The available models are
URSA Mini 4K
URSA Mini 4.6K
URSA Mini Pro 4.6K
URSA Mini 4K EF
4K
SDI OUT
12V OUT
URSA Mini 4.6K PL
4.6K
LENS
SDI OUT
12V OUT
ND
FILTER
4.6K
AUTO
W/B
LENS
12 pin broadcast
connector
URSA Mini Pro 4.6K
ND
FILTER
4.6K
AUTO
W/B
LENS
SDI OUT
12V OUT
ND
FILTER
ND filters
ND
FILTER
4.6K
AUTO
W/B
LENS
12 pin broadcast
connector
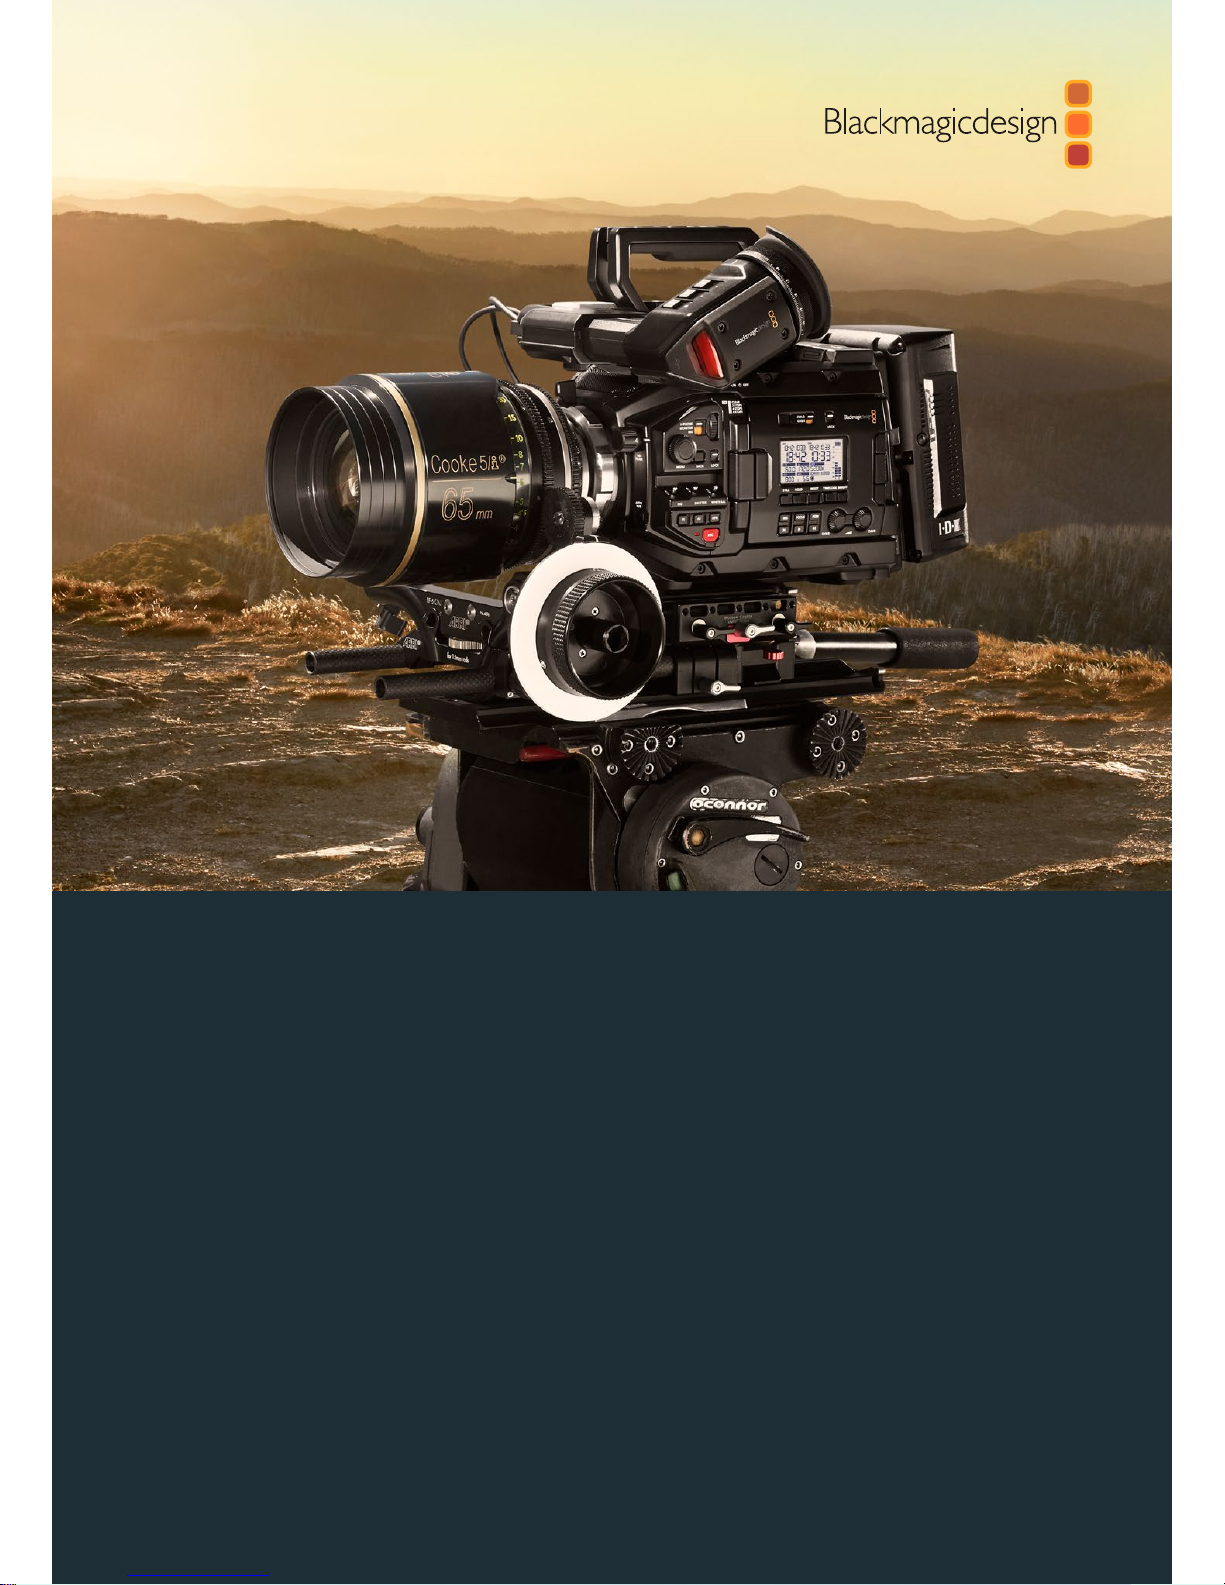
6Which camera are you using
Page 5
URSA Mini
Aside from the sensors used, URSA Mini 4K and 4.6K models are nearly identical. The control
buttons and software menus are laid out the same way, and operating the cameras is
essentially the same. You’ll simply find a few more resolution options on cameras using the
4.6Ksensor, together with a greater range of ISO settings. An easy way to tell which sensor
your camera has is to look for a ‘4K’ or ‘4.6K’ icon above the lens mount.
It’s also worth noting that URSA Mini cameras are available with EF and PL lens mounts.
Aneasy way to tell the difference between these is the presence of a 12 pin broadcast lens
connector near the lens mount on PL models, and of course, the mounts themselves if you are
familiar with EF and PL mounting systems. See the ‘getting started’ section for more information
on these mounts.
URSA Mini, left side
URSA Mini Pro 4.6K
Blackmagic URSA Mini Pro 4.6K is a little different. This camera is only available as a 4.6K
model with an EF mount, but it can accept other lens types via its interchangeable lens mount.
For more information on the interchangeable lens mount, see the 'interchangeable lens
mount' section.
URSA Mini Pro 4.6K is easy to recognize by the additional control buttons and LCD status
screen on the left side of the chassis, as well as the ND filters near the lens mount. Naturally,
the additional control buttons will mean that you have different options for controlling your
camera and changing settings.
URSA Mini Pro 4.6K, left side
Now that you know how to identify the different URSA Mini models, you can get started using
your camera!
F1 F2
7Which camera are you using
Page 6
Getting Started
Getting started with your Blackmagic URSA Mini is as simple as attaching the side handle,
mounting a lens, and powering your camera.
Attaching a Lens
Attaching a lens to your camera is the same process for URSA Mini 4K, URSA Mini 4.6K and
URSA Mini Pro 4.6K, however the EF, PL, B4 and F mounts have slightly different ways of
operating. In all cases, the first step is to remove the protective dust cap.
To remove the protective dust cap from the EF lens mount, hold down the locking button and
rotate the cap counterclockwise until it is released. For the PL and B4 mount lenses, rotate the
locking ring counterclockwise and pull the protective dust cap away from the mount. For the F
mount, hold down the locking button and rotate the cap clockwise until it is released.
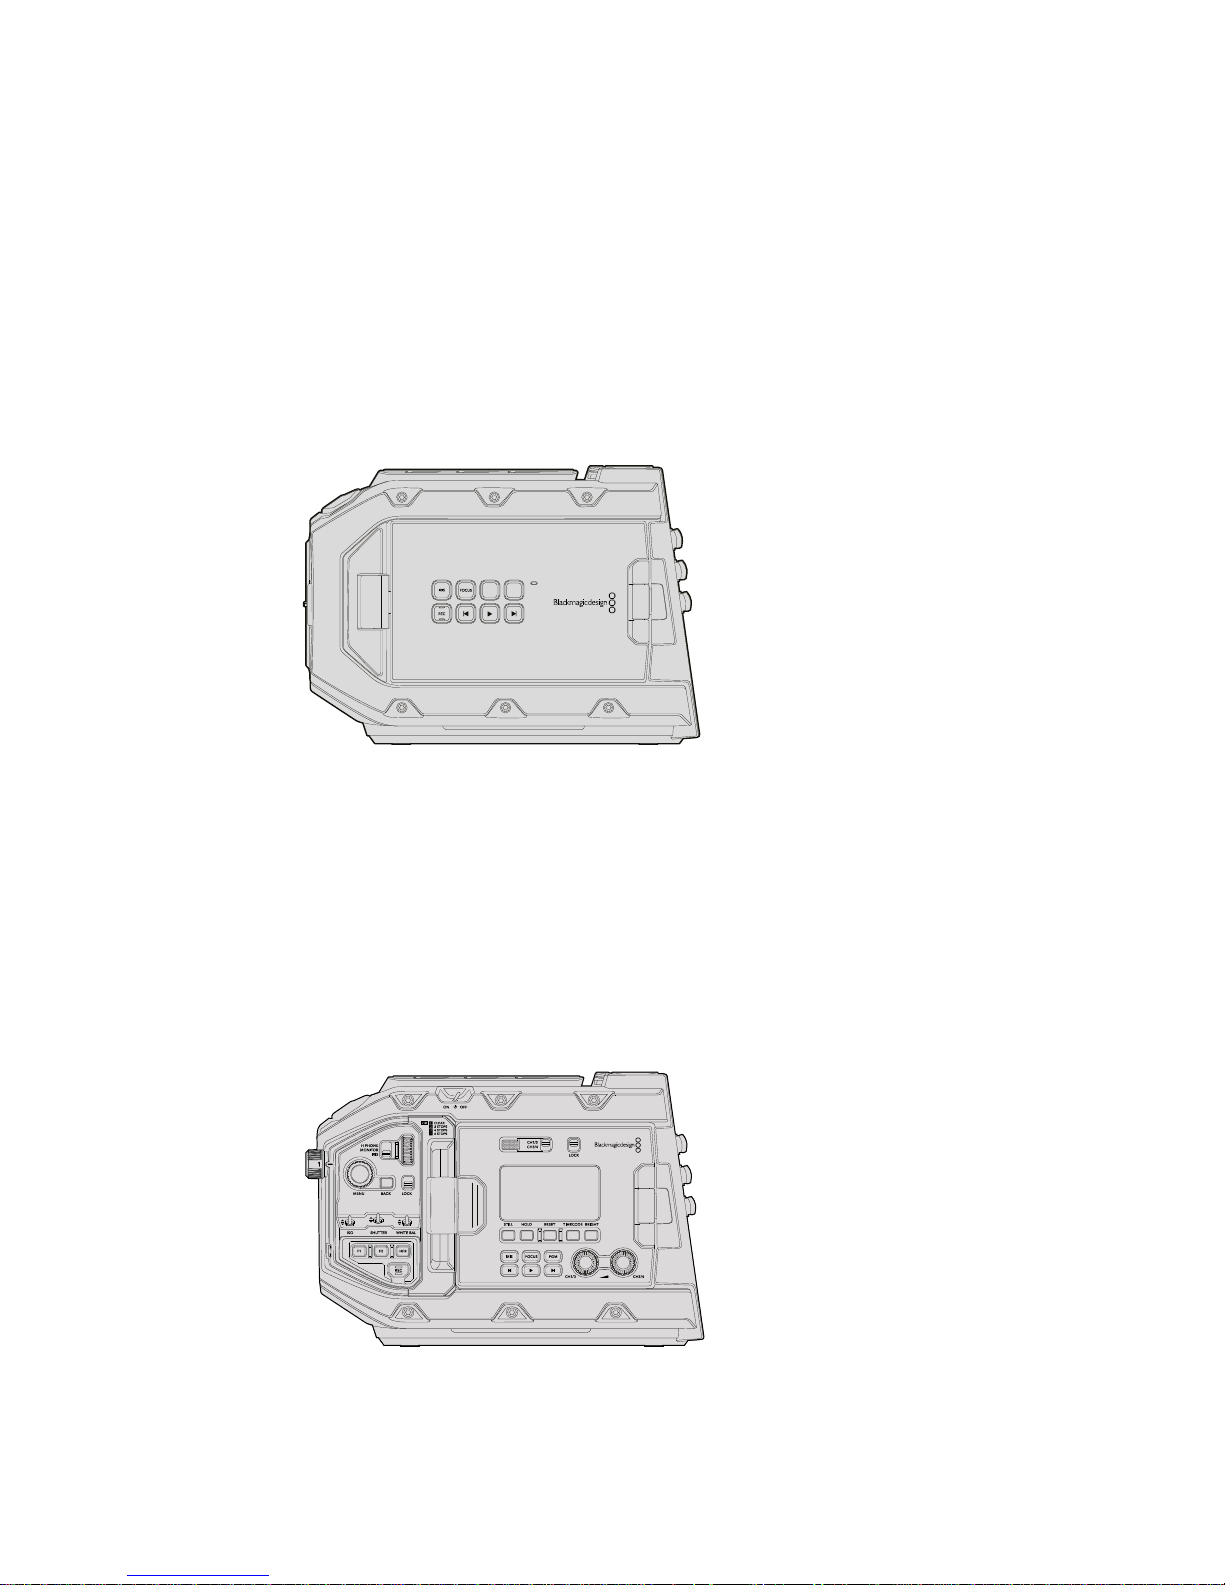
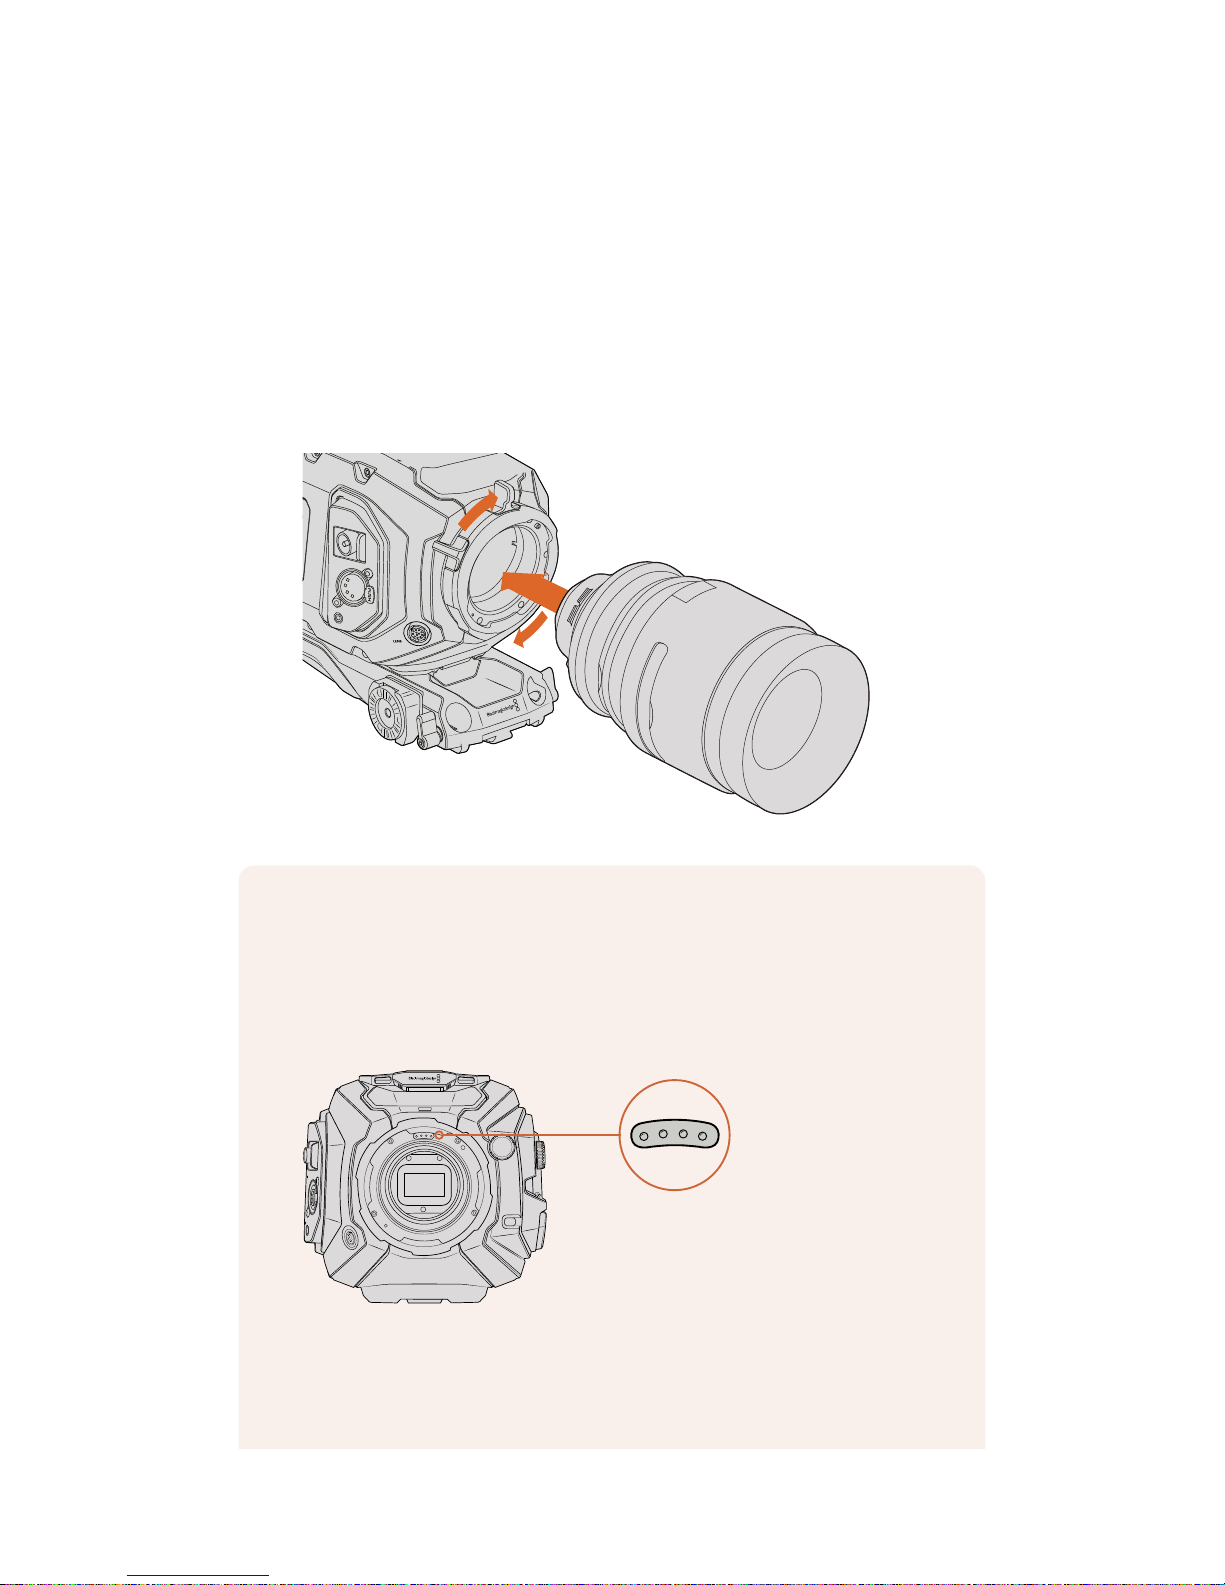
To attach an EF mount lens:
1 Align the dot on your lens with the dot on the camera mount. Many lenses have a visual
indicator, for example a blue, red or white dot.
2 Insert the lens into the mount and twist clockwise until it locks into place.
3 To remove the lens, hold down the locking button, rotate the lens counterclockwise
until its dot or indicator reaches the 12 o’clock position, and gently remove.
Attaching and removing an EF mount lens on Blackmagic URSA Mini EF
NOTE Blackmagic URSA Mini Pro 4.6K features an interchangeable lens mount
capable of accepting EF, PL, B4 and F mount lenses, as well as additional lens mounts
with accessories. Formore information on switching between mount types on
URSAMiniPro 4.6K, refer to the 'interchangeable lens mount' section in this manual.
TIP URSA Mini Pro 4.6K comes out of the box configured to accept EF lenses.
To get shooting right away, simply attach an EF mount lens as detailed below.
LENS
12V OUT
SDI OUT
8Getting Started
Page 7
To attach a PL mount lens:
1 Open your camera’s PL locking ring by rotating it counterclockwise until it stops.
2 Align one of the lens’ four flange notches with the locating pin on the camera mount.
Be sure to align the lens for easy viewing of the lens marks.
3 Tighten the PL locking ring by rotating it clockwise. If attaching a PL lens with a servo
unit to URSA Mini PL or URSA Mini Pro 4.6K, you can also connect the 12 pin broadcast
connector for servo control.
4 To remove the lens, rotate the locking ring counterclockwise until it stops, then gently
remove the lens by pulling it directly out from the camera body. There is no need to
rotate the lens.
Attaching and removing a PL lens on Blackmagic URSA Mini PL
LENS
URSA Mini Pro 4.6K
URSA Mini Pro 4.6K's PL mount features four pins at the 12 o'clock position that are
used to communicate with lenses featuring Cooke’s /i Technology interface. The lenses
that support this interface include lenses from Canon, Cooke, Fujinon, Leica and Zeiss.
Thislets you record lens information in your clips’ metadata such as the lens model,
focal length, aperture setting, focus distance and other lens specific information.
The information that is recorded as metadata via Cooke's /i Technology interface
canbe very helpful in post production and VFX. Knowing the lenses used in
productionand their precise settings can be helpful in the event that the setup
needsto be replicated at a later date.
ND
FILTER
4.6K
AUTO
W/B
LENS
SDI OUT
12V OUT
When mounting a PLlens with
/iTechnology to URSAMini Pro 4.6K,
make sure the lens pins align withthe
mount pins at the 12o'clock position
9Getting Started
Page 8

URSA Mini Pro 4.6K PL and URSA Mini PL support control of PL 35mm lenses with servo
handgrips. When the lens is plugged in to the 12-pin broadcast connector on the camera,
URSAMini will provide power and control signals to your lens in the same way it does with
B4lenses. For more information refer to the 'Using Servo Zoom Lenses' section in this manual.
To attach a B4 mount lens:
1 Turn the B4 lens locking ring counterclockwise to reveal the alignment pin inside the
top of the mount. Align the B4 lens to your URSA Mini’s B4 mount so the registration
slot on the lens mount matches the position of the alignment pin.
2 Hold the lens against the B4 mount so the mount plates are against each other.
Make sure the alignment pin is secured inside the registration slot.
3 Turn the locking ring clockwise to tighten the lens against the mount and lock it
into position.
To power the lens and provide lens control, simply plug the lens cable into the connector
marked ‘Lens’ on the front of your URSA Mini PL or URSA Mini Pro 4.6K's turret. Most B4 lenses
will have the hirose 12 pin connector and cable built in. This will provide power and control
signals from your URSA Mini to the lens. For information on the types of B4 lenses and how to
use them with your camera, refer to the 'Using Servo Zoom Lenses' section in this manual.
This detailed information can also be utilized by powerful applications such as
DaVinciResolve and Blackmagic Fusion for a wide variety of advanced functions.
Forexample, the recorded metadata can be used to simulate the specific lens in
3Dspace, or correct lensdistortions.
NOTE When no lens is attached to the camera, the glass filter covering the sensor
isexposed to dust and other debris. Ensure that you keep the dust cap on whenever
possible.
ZOOM
F1
F2
F3
DISP
PEAK
LENS
Attaching and removing a B4 lens on
BlackmagicURSA Mini PL with B4 mount
10Getting Started
Page 9
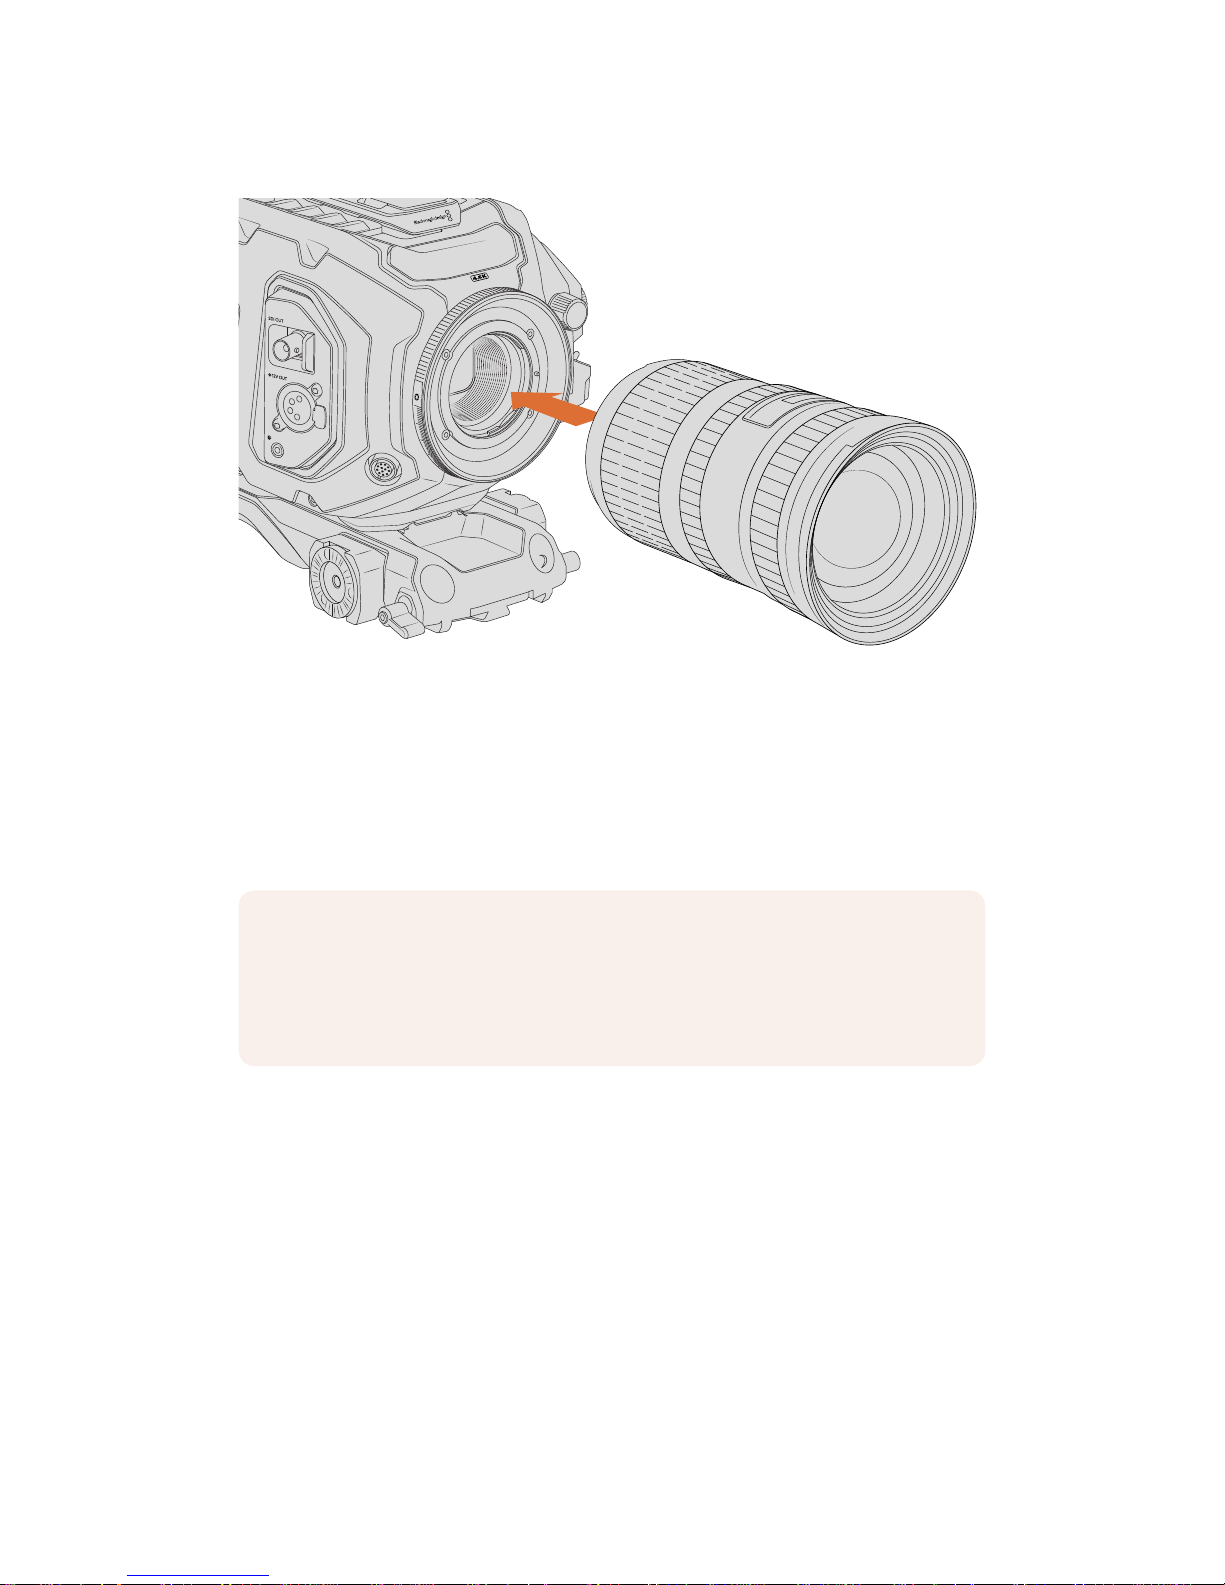
To attach an F mount lens:
Attaching and removing an F mount lens on Blackmagic URSAMiniPro 4.6K
with the optional F mount f itted
1 Align the dot on your lens with the dot on the camera mount. Many lenses have a visual
indicator, for example a blue, red or white dot.
2 Insert the lens into the mount and twist counterclockwise until it locks into place.
3 To remove the lens, hold down the locking button, rotate the lens clockwise until its dot
or indicator reaches the 2 o’clock position, and gently remove.
Powering your Camera
Now that you’ve attached a lens, you will need to supply power. The quickest way to power
your camera is to connect external power using the supplied AC to 12V DC adapter.
To plug in external power:
1 Connect the AC to 12V DC adapter plug to your mains power socket.
2 Connect the AC to 12V DC adapter’s 4 pin XLR connector to the 12-20V DC power
connector on the camera.
If you have both external and battery power connected, only external power will be used. If you
remove external power while a charged battery is connected, your camera will switch to battery
power without interruption.
PUSH
LENS
NOTE Blackmagic URSA Mini Pro F mount features a mechanical iris adjuster. To use
older style F mount lenses with built in focus rings with this mount, your lenses aperture
will need to be set and locked to its smallest setting, such as f/22. For more information
on adjusting aperture with Blackmagic URSA Mini Pro F mount's manual iris adjuster,
see the section 'Blackmagic URSA Mini Pro F Mount' in this manual.
11Getting Started
Page 10
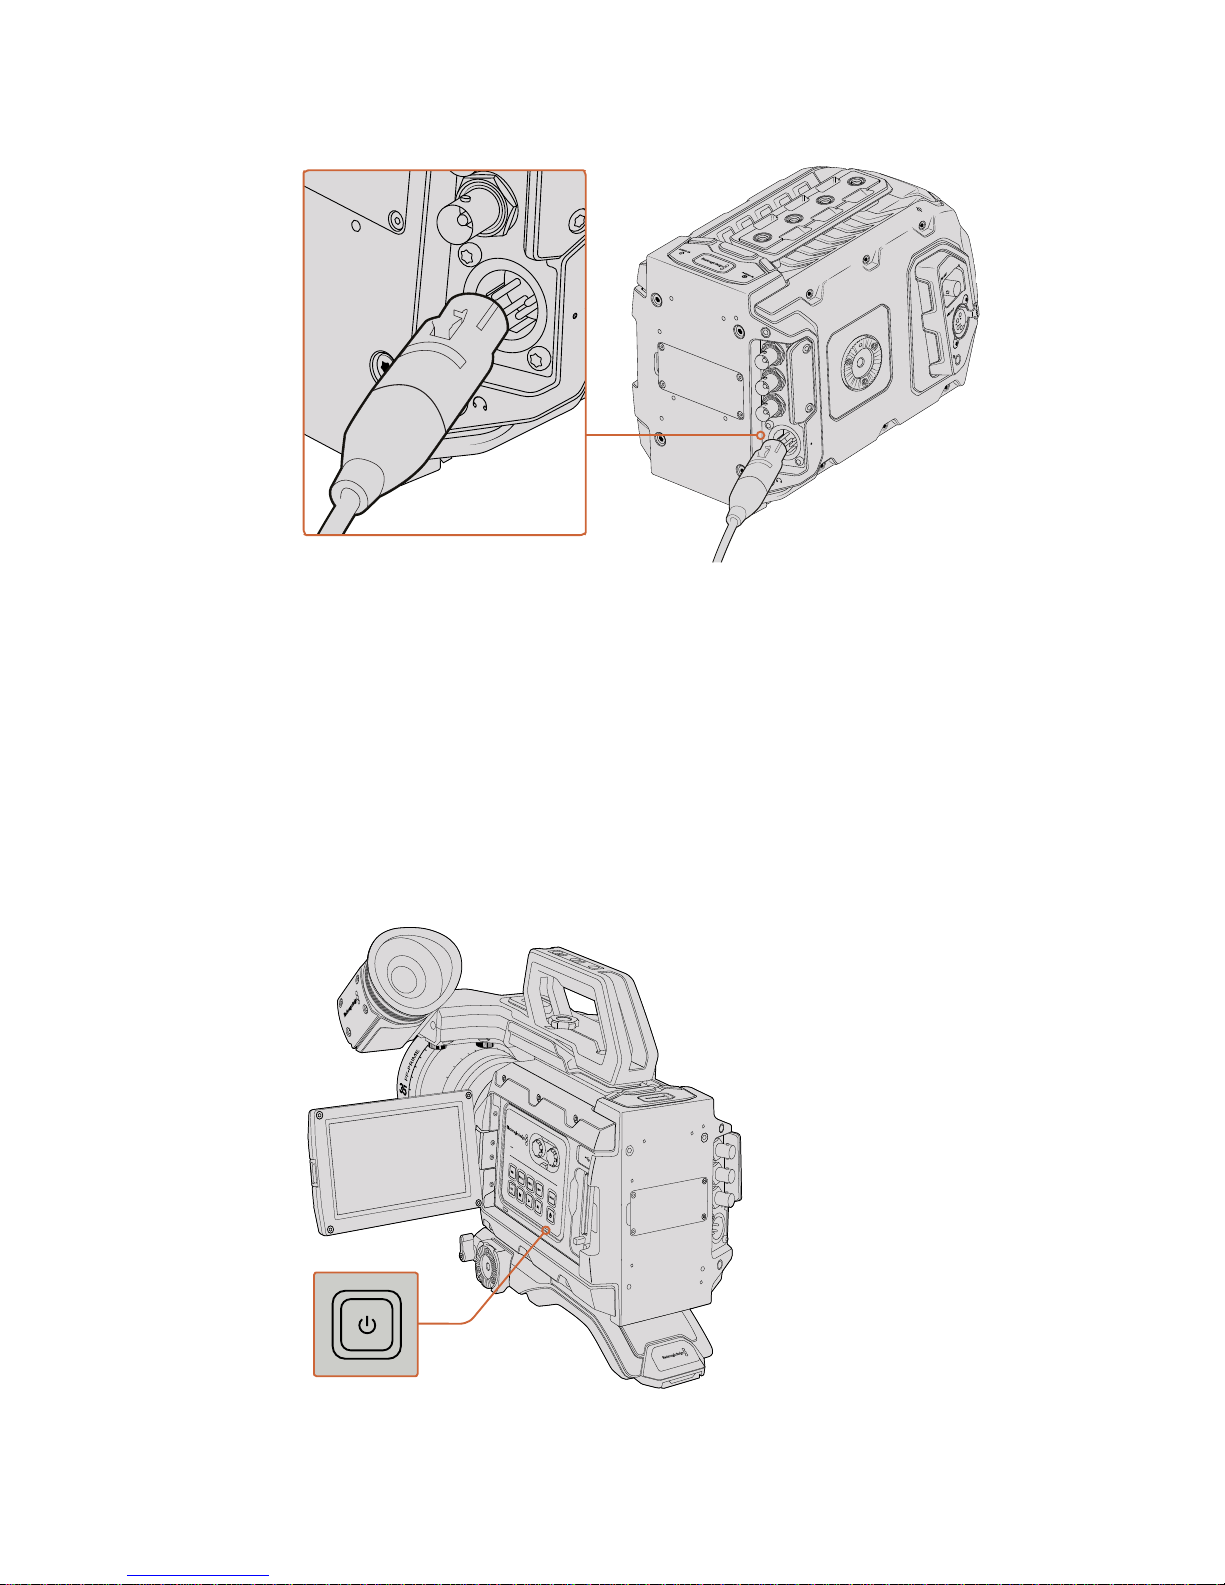
Use the supplied AC to 12V DC adapter to power your Blackmagic URSA Mini
You can use industry standard third party external batteries such as V mount or Gold
Mount batteries with your URSA Mini. Refer to the ‘mounting batteries' section for more
information about mounting the different types of battery plates to support different
batteries.
To turn on URSA Mini:
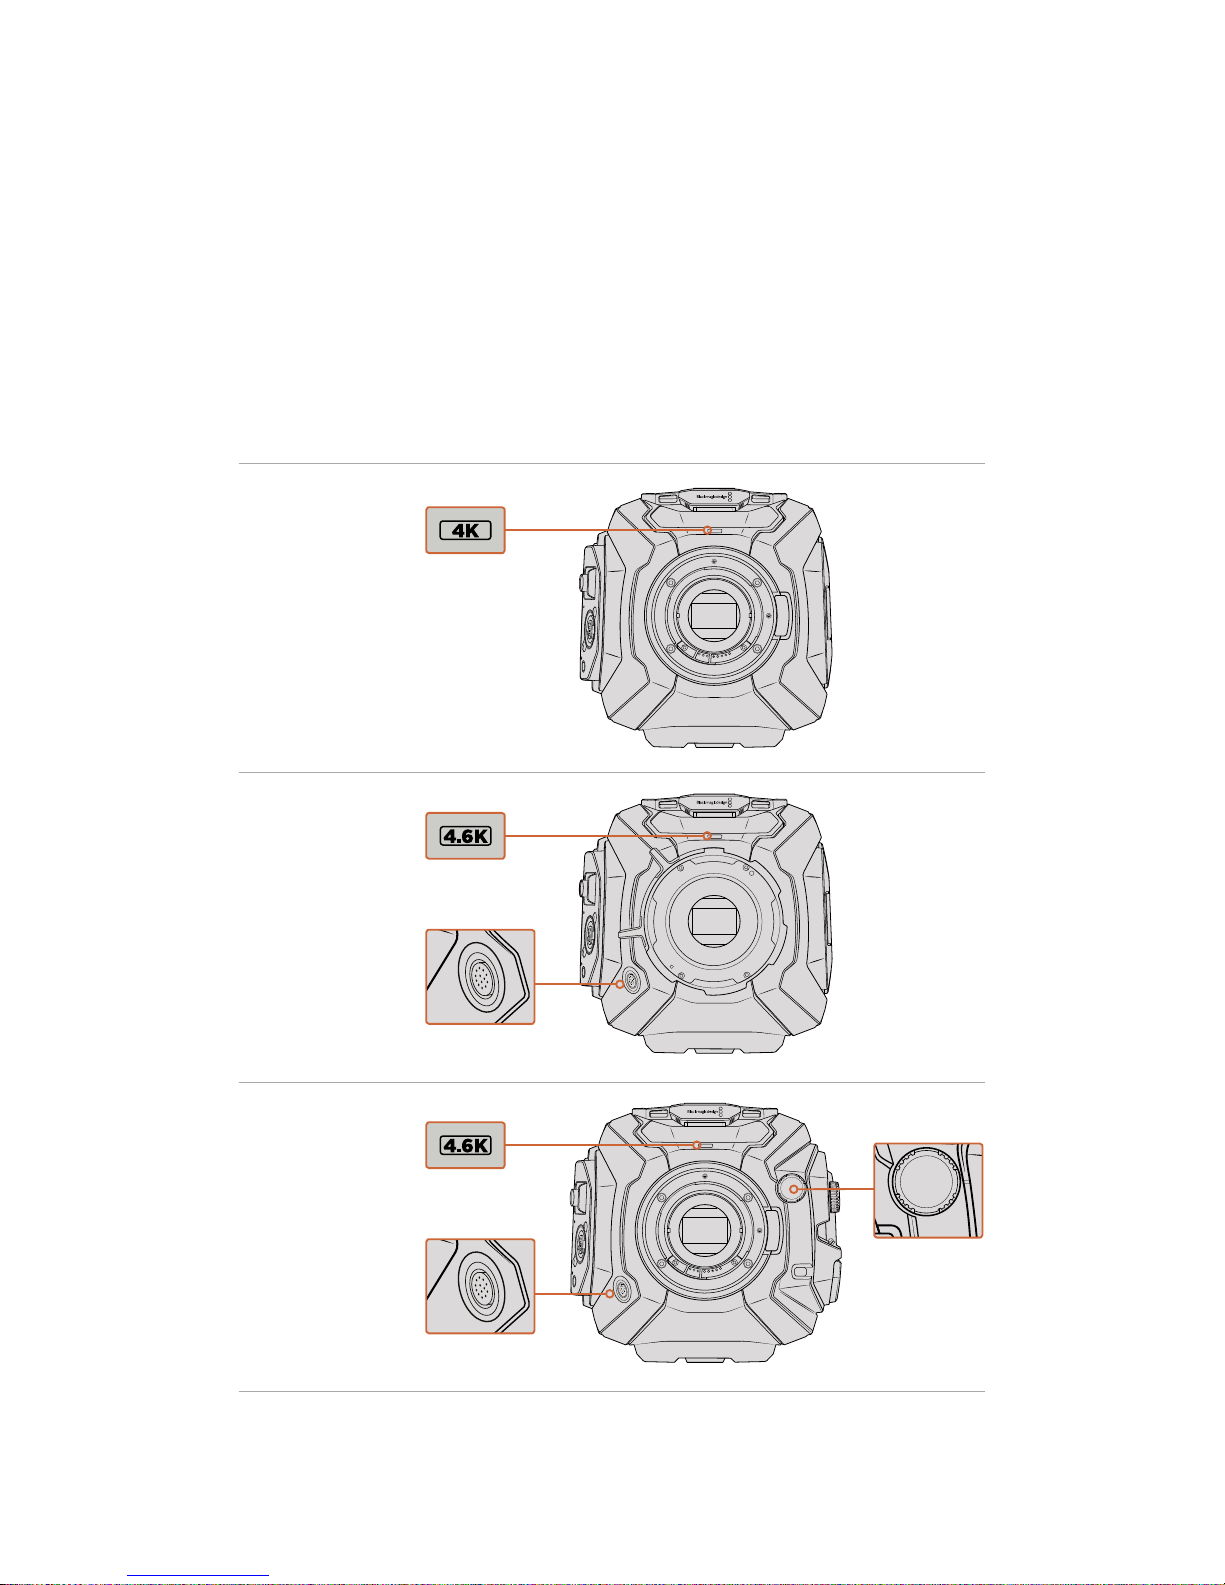
1 Press and release the ‘power’ button. On Blackmagic URSA Mini, the power button is
located on the control panel behind the fold out LCD. Simply open the LCD to access
the control panel.
2 Press and hold the ‘power’ button to turn your camera off.
You are now ready to insert CFast 2.0 cards and start recording!
To turn on your URSA Mini, open the fold out LCDtouchscreen, then press and
release the power button on the control panel. Press and hold to turn off
SDI OUT
SDI IN
REF IN
TC IN
12V
SDI OUT
SDI IN
REF IN
TC IN
12V
IRIS
REC
FOCUS
PEAK
DISP
MENU
12Getting Started
Page 11
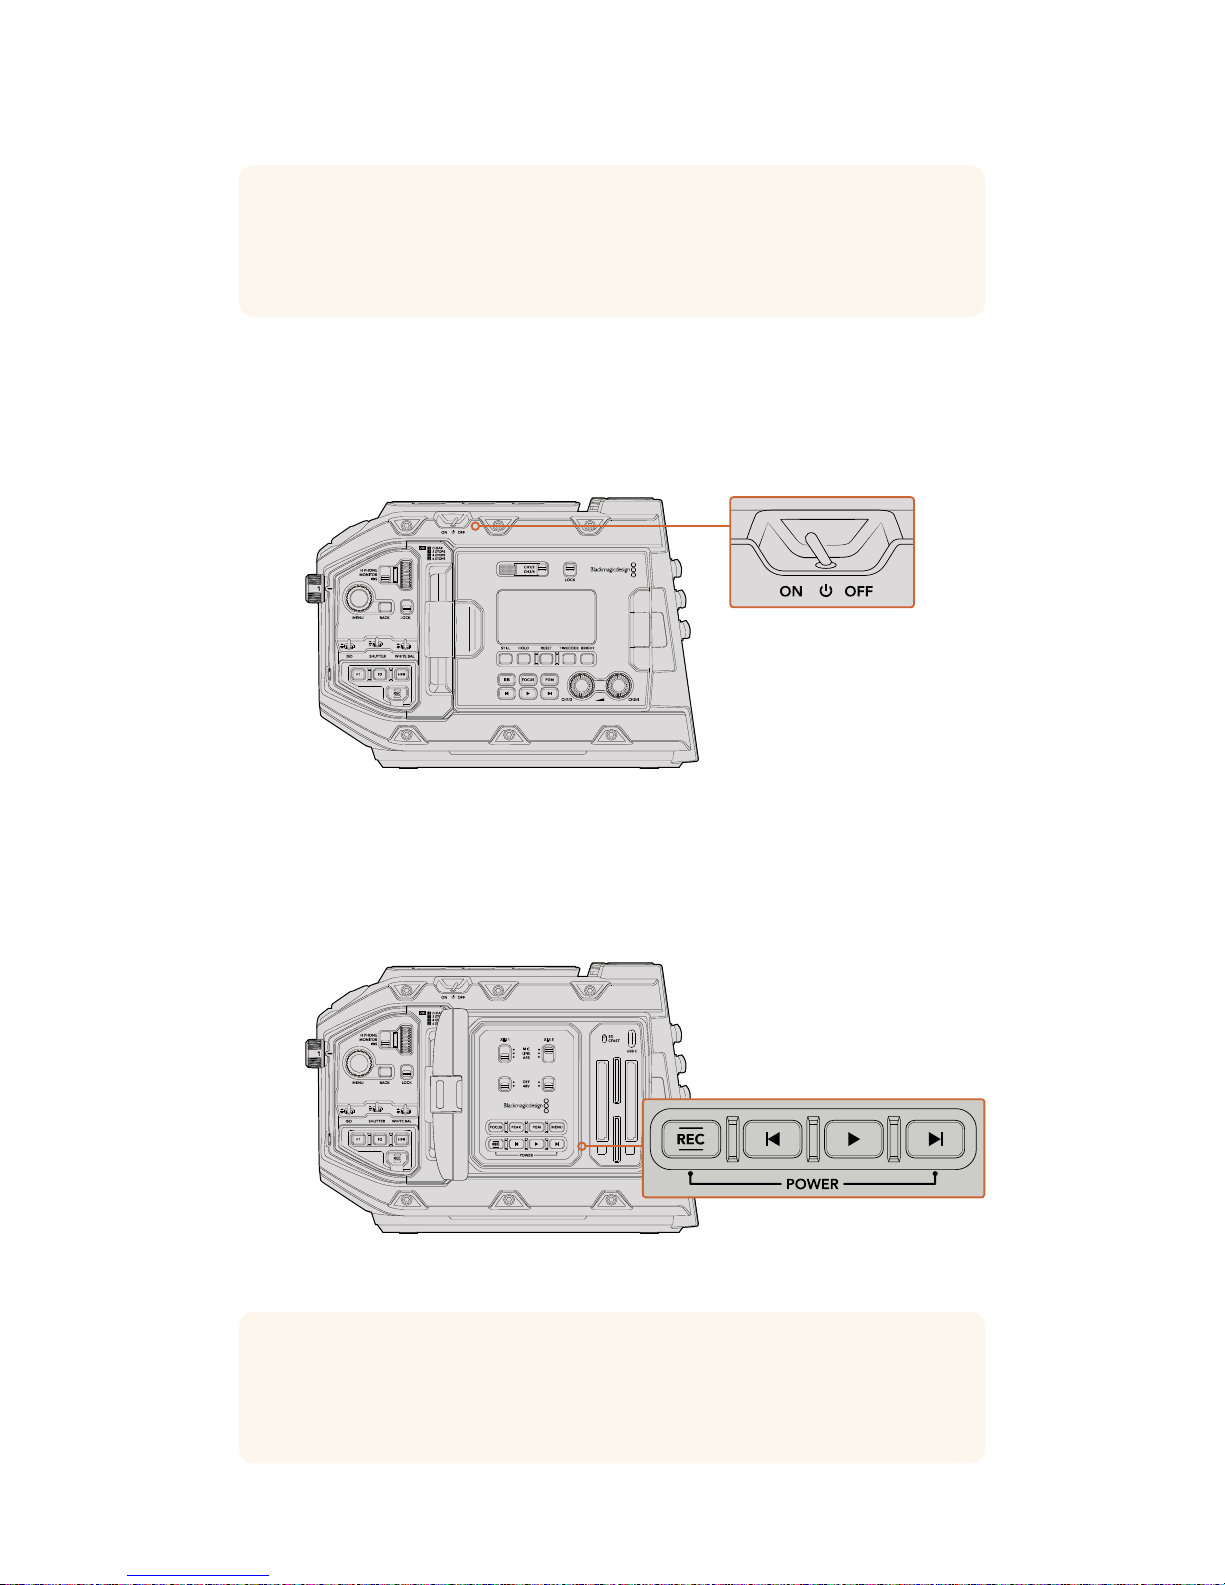
To turn on URSA Mini Pro 4.6K:
1 On Blackmagic URSA Mini Pro 4.6K, a power switch is also located above the
foldoutLCD. Move the switch to the 'on' position to power your camera.
2 To turn the camera off, move the switch to the 'off' position.
Move the power switch to 'on' to power your camera
URSA Mini Pro 4.6K also features a redundant power switch, which allows the camera to be
turned on and off by holding down the 'rec' and 'forward skip' buttons on the inside control
panel. While you wouldn't normally power your camera using this method, it is provided as a
helpful alternative if the power switch along the top edge is obscured, for example when
mounted on a custom rig.
If you need to, you can also hold down the record and forward skip buttons
on the control panel behindthe LCD to power your camera on or off
TIP When turning the camera on, make sure you promptly press and releasethe
button. Your camera will take approximately 10 seconds to boot up, but there is no
need to press the button again. When turning off, press and hold the button until the
camera powers off.
XLR 1 XLR 2
TIP If your URSA Mini Pro 4.6K is turned off when the power switch is set to 'on', your
camera may have been powered down via Bluetooth® control or by holding down the
record and forward skip control panel buttons. Simply toggle the power switch 'off' and
'on,' or hold down the relevant control panel buttons to power the camera on.
13Getting Started
Page 12
Storage Media
Your Blackmagic URSA Mini camera has a number of storage options. All URSA Mini cameras
use CFast 2.0 cards to record video. URSA Mini Pro 4.6K can also record to fast UHS-II and
UHS-I SD cards.
Using the optional URSA Mini SSD Recorder, all URSA Mini cameras can record to high capacity
solid state drives, or "SSDs".
CFast Cards
CFast 2.0 cards are capable of supporting very high data rates, so are perfect for recording
HDand 4K video at high frame rates. Refer to the record duration table in the ‘recording’
section for details on the maximum frame rates that can be recorded in each format.
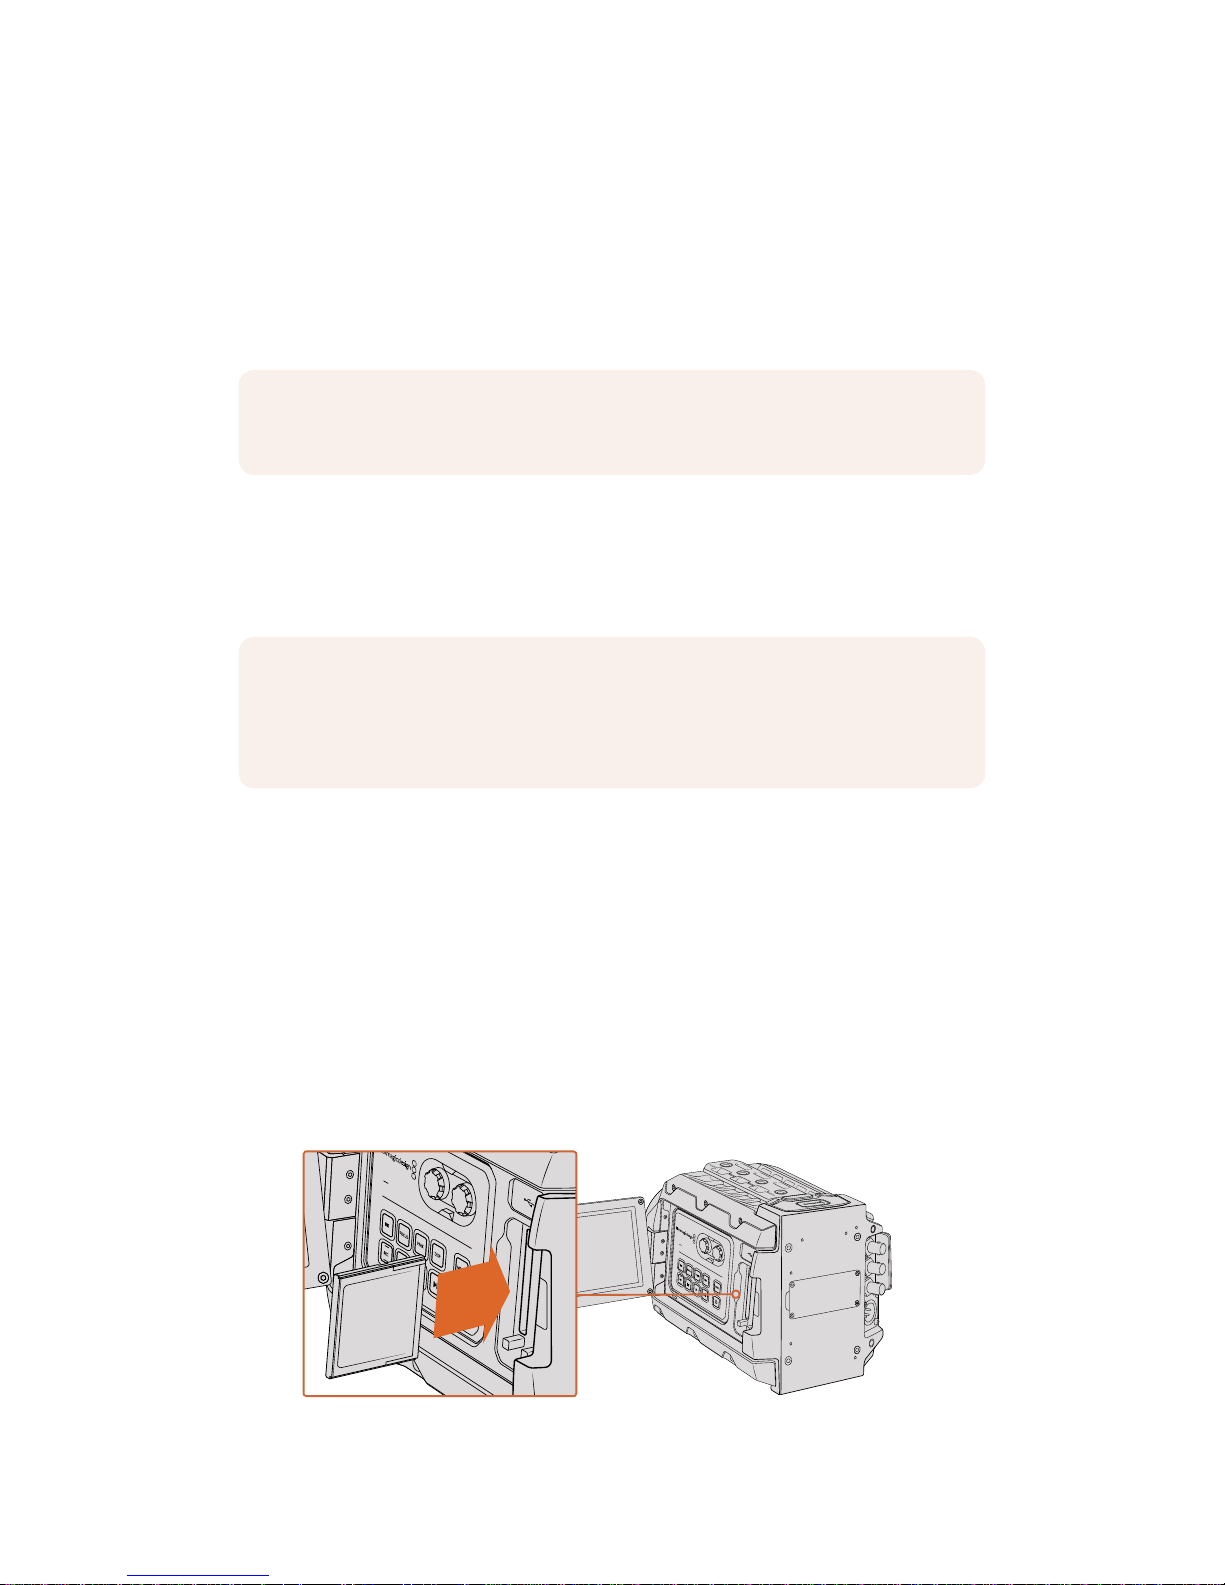
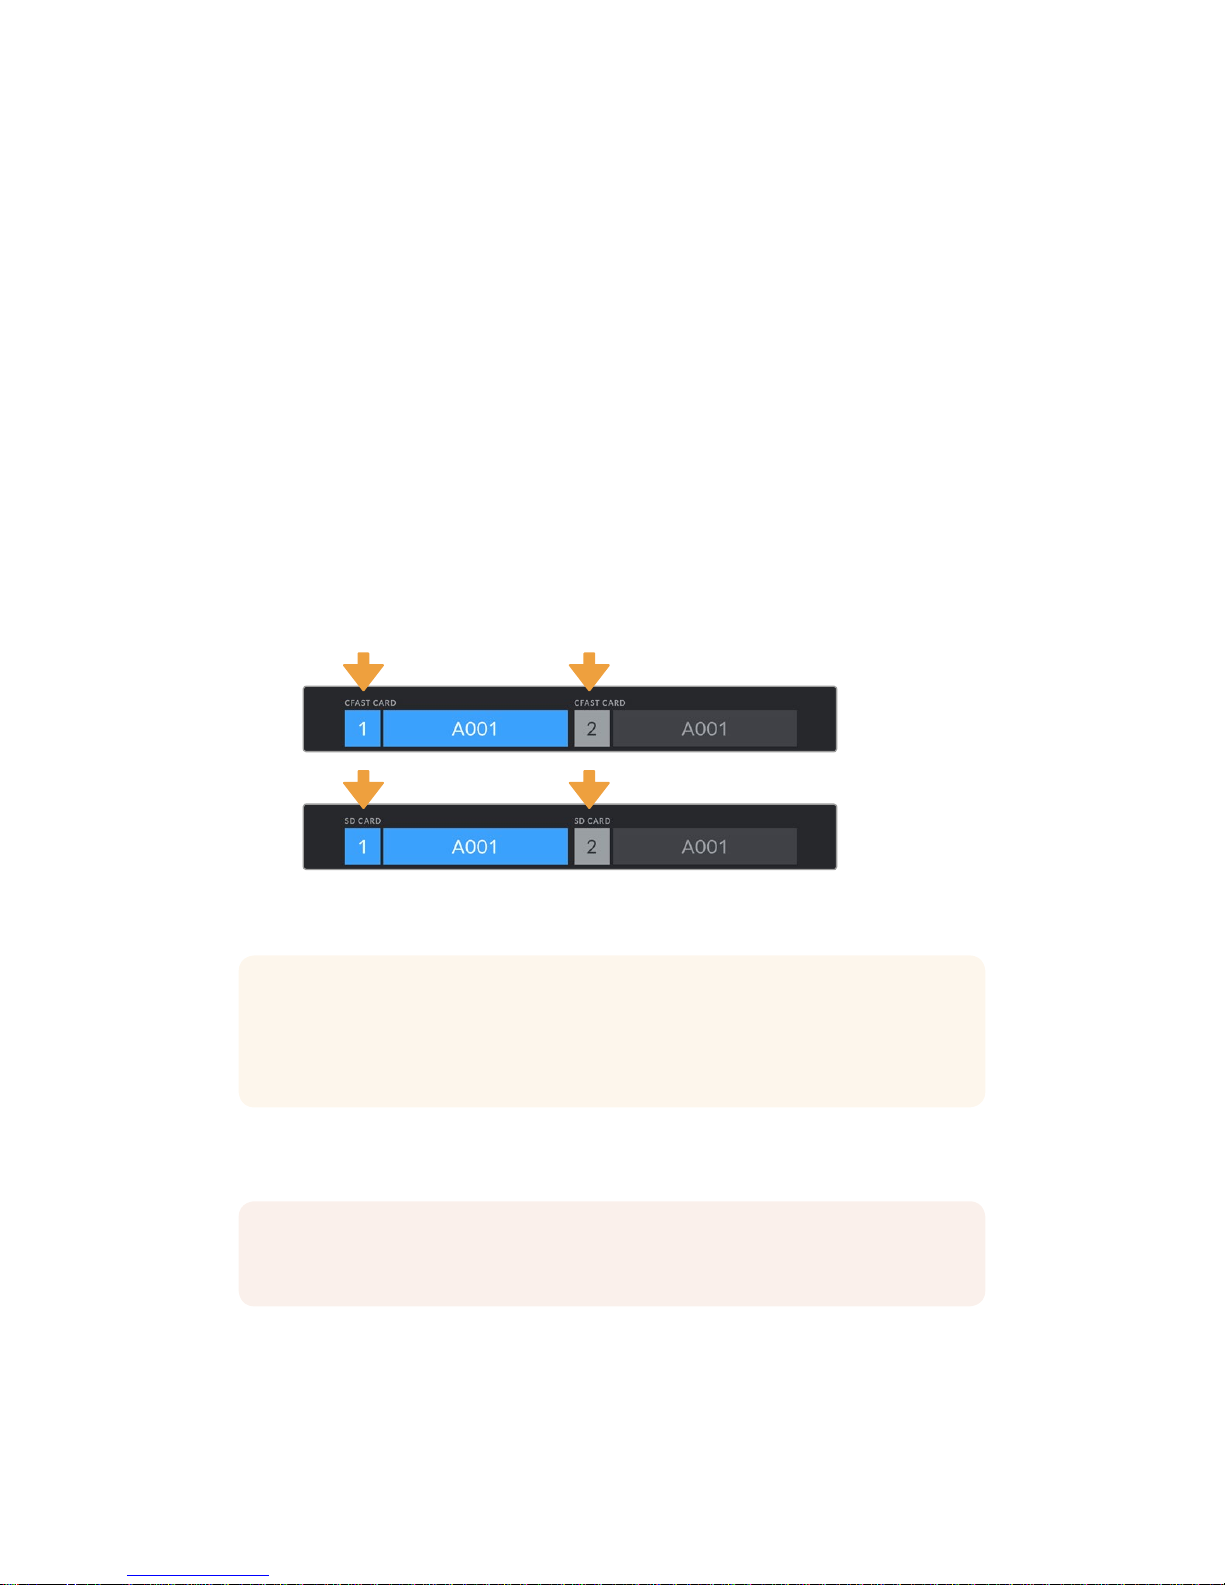
Inserting a CFast Card
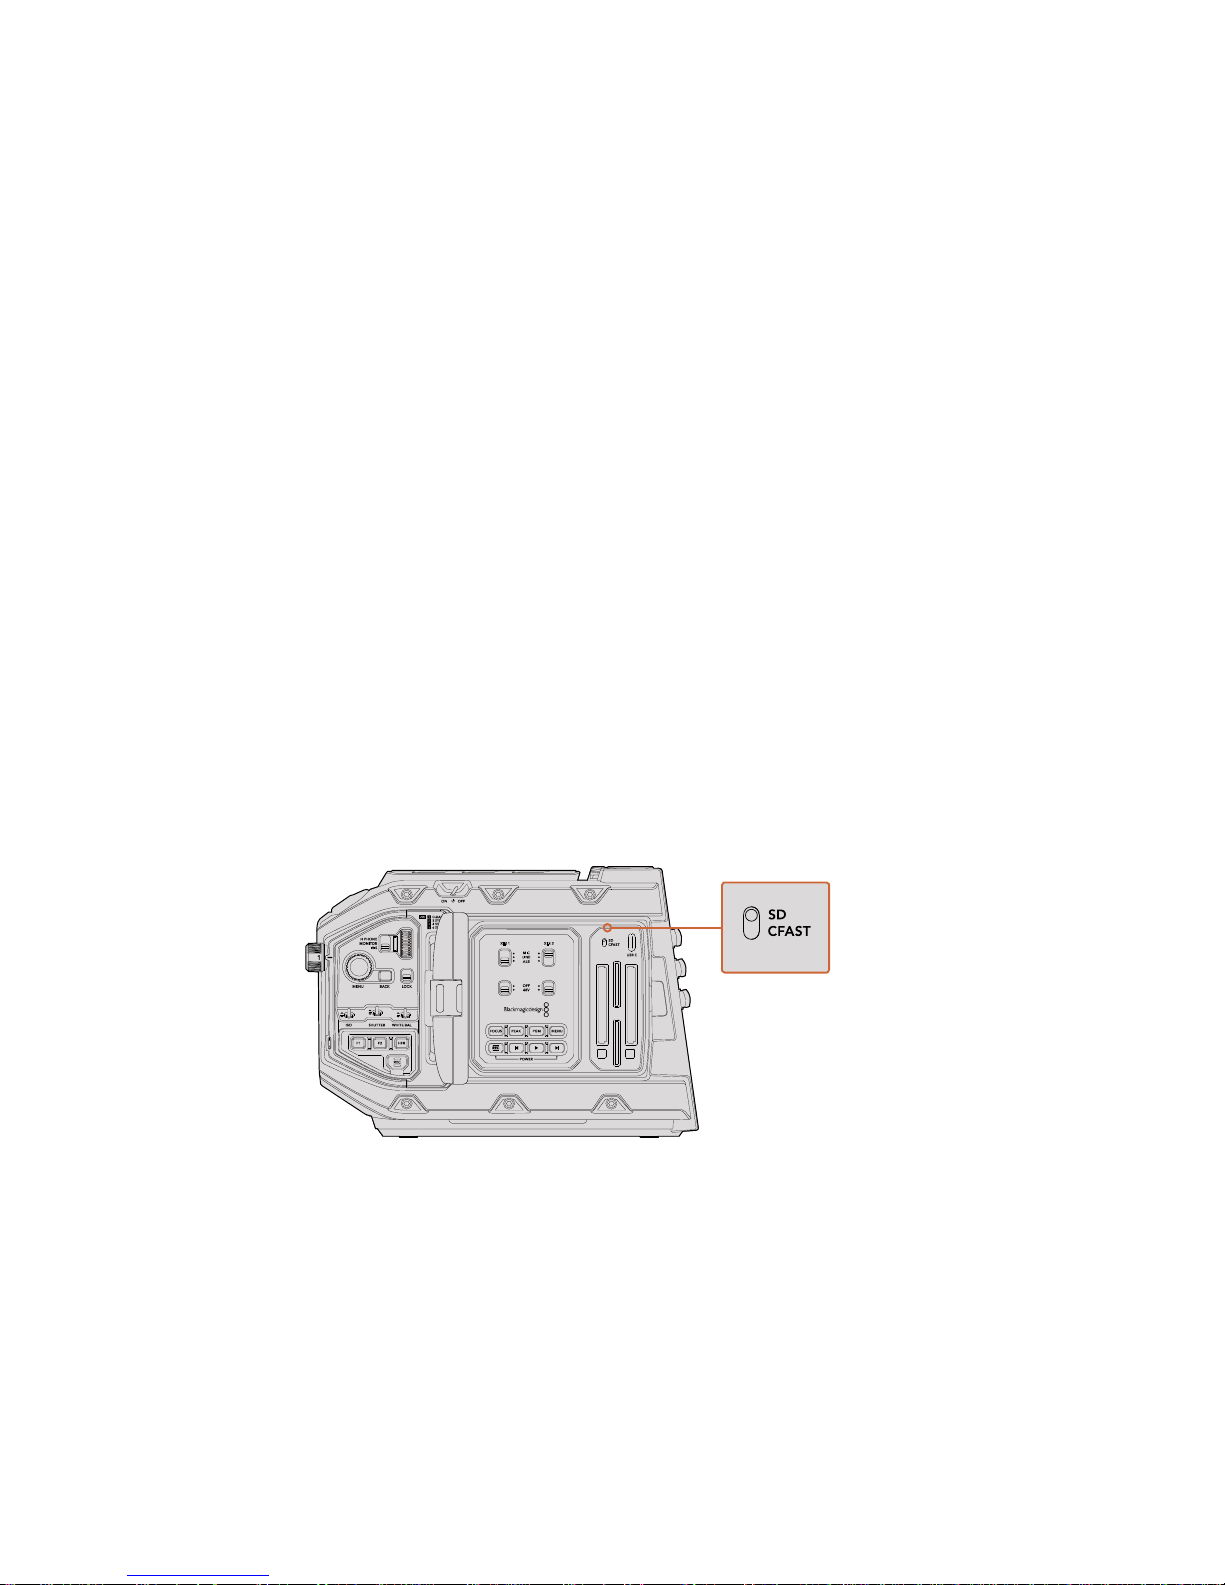
If you're using URSA Mini Pro 4.6K, your camera can also record to SD cards. To record using
CFastcards you need to set your camera accordingly. To do this, set the storage mediaswitch
above the media slots to the 'CFAST' position.
To insert a CFast card.
1 Open the fold out monitor to access the CFast slots.
2 Insert the CFast card into the CFast card slot until you feel it lock into place. The card
should insert easily without the need for excessive force. Push the CFast card ejector
button to eject the card.
The storage information at the bottom of the LCD touchscreen will show the name and
record time remaining of the detected CFast cards.
Blackmagic URSA Mini has two CFast slots for continuous recording
NOTE For more information on connecting URSA Mini SSD Recorder to your camera
see the section 'Blackmagic URSA Mini SSD Recorder' in this manual.
NOTE While CFast 2.0 cards are generally high speed cards, some cards have slower
write speeds compared to read speeds, and maximum data rates can differ between
models. Toensure reliable recording in your chosen frame rates, use only the
recommended cards listed in this section.
IRIS
REC
FOCUS
PEAK
DISP
MENU
IRIS
REC
FOCUS
PEAK
DISP
MENU
14Storage Media
Page 13

Choosing a CFast 2.0 Card
When working with high data rate video it’s important to carefully check the CFast card you
would like to use. This is because CFast 2.0 cards have different read and write speeds.
Somecards can record sustained RAW video, and some are suited to compressed recording
using ProRes and compressed RAW formats. The tables below identify the CFast cards
recommended for use when shooting with Blackmagic URSA Mini.
Which CFast cards should I use with the Blackmagic URSA Mini and URSA Mini Pro Cameras?
The following CFast 2.0 cards are recommended for recording 4.6K Blackmagic RAW 3:1 up to
60 frames per second.
Brand Card Name Storage
Cinedisk Pro 510MB/s CFast 2.0 256GB
KomputerBay 3600x CFast 2.0 Card 64GB
KomputerBay 3700x CFast 2.0 Card 256GB
ProGrade Digital 550MB/s CFast 2.0 64GB
ProGrade Digital 550MB/s CFast 2.0 128GB
ProGrade Digital 550MB/s CFast 2.0 256GB
SanDisk Extreme Pro CFast 2.0 SDCFSP-128G-x46D 128GB
SanDisk Extreme Pro CFast 2.0 SDCFSP-256G-x46D 256GB
SanDisk Extreme Pro CFast 2.0 SDCFSP-512G-x46D 512GB
Sony CFast 2.0 G Series CAT-G64 64GB
Sony CFast 2.0 G Series CAT-G128 128GB
Transcend CFX650 CFast 2.0 TS128GCFX650 128GB
Transcend CFX650 CFast 2.0 TS256GCFX650 256GB
Transcend CFX650 CFast 2.0 TS128GCFX650BM 128GB
Transcend CFX650 CFast 2.0 TS256GCFX650BM 256GB
Wise CFast 2.0 3400x 256GB
Wise CFast 2.0 3500x 512GB
The following CFast 2.0 cards are recommended for recording 4.6K Blackmagic RAW 3:1 up to
60 frames per second but have been discontinued by the manufacturers.
Brand Card Name Storage
KomputerBay 3400x CFast 2.0 Card 64GB
KomputerBay 3400x CFast 2.0 Card 128GB
Lexar Professional 3500x CFast 2.0 64GB
Lexar Professional 3500x CFast 2.0 128GB
Lexar Professional 3500x CFast 2.0 256GB
15Storage Media
Page 14

The following CFast 2.0 cards are recommended for Ultra HD lossless RAW up to 30 frames
per second.
Brand Card Name Storage
Angelbird AVPro CF XT 256GB
Angelbird AVPro CF XT 512GB
Cinedisk Pro 510MB/s CFast 2.0 256GB
KomputerBay 3400x CFast 2.0 Card 64GB
KomputerBay 3400x CFast 2.0 Card 128GB
KomputerBay 3600x CFast 2.0 Card 64GB
ProGrade Digital 550MB/s CFast 2.0 128GB
ProGrade Digital 550MB/s CFast 2.0 256GB
ProGrade Digital 550MB/s CFast 2.0 512GB
SanDisk Extreme Pro CFast 2.0 SDCFSP-128G-x46D 128GB
SanDisk Extreme Pro CFast 2.0 SDCFSP-256G-x46D 256GB
SanDisk Extreme Pro CFast 2.0 SDCFSP-512G-x46D 512GB
Transcend CFX650 CFast 2.0 TS128GCFX650 128GB
Transcend CFX650 CFast 2.0 TS256GCFX650 256GB
Transcend CFX650 CFast 2.0 TS128GCFX650BM 128GB
Transcend CFX650 CFast 2.0 TS256GCFX650BM 256GB
Wise CFast 2.0 3400x 128GB
Wise CFast 2.0 3400x 256GB
Wise CFast 2.0 3500x 512GB
The following CFast 2.0 cards are recommended for Ultra HD lossless RAW up to 30 frames
persecond, but have beendiscontinued by the manufacturer.
Brand Card Name Storage
Angelbird AVpro CF 160GB
Angelbird AVpro CF 240G B
Lexar Professional 3400x CFast 2.0 128GB
Lexar Professional 3400x CFast 2.0 256GB
Lexar Professional 3500x CFast 2.0 128GB
Lexar Professional 3500x CFast 2.0 256GB
Lexar Professional 3600x CFast 2.0 128GB
Lexar Professional 3600x CFast 2.0 256GB
NOTE Only the 'D-series' of Sandisk CFast2.0 cards have been certified for use with
Blackmagic URSA Mini. These cards can be identified by a large ‘D’printed on the back
of the card in the lower left corner, and we have also listed the model numbers to make
them easier to identify. This model number varies slightly fromregion to region, with
the'x' in the model number changing in different markets. Forexample, an 'A' in the
UnitedStates and a 'G' in the Asia Pacific and Europe region.
16Storage Media
Page 15

The following CFast 2.0 cards are recommended for Ultra HD ProRes 422 HQ up to 60 frames
per second.
Brand Card Name Storage
Angelbird AVpro CF X T 256GB
Angelbird AVpro CF X T 512GB
Cinedisk Pro 510MB/s CFast 2.0 256GB
KomputerBay 3400x CFast 2.0 Card 64GB
KomputerBay 3400x CFast 2.0 Card 128GB
KomputerBay 3600x CFast 2.0 Card 64GB
ProGrade Digital 550MB/s CFast 2.0 128GB
ProGrade Digital 550MB/s CFast 2.0 256GB
ProGrade Digital 550MB/s CFast 2.0 512GB
SanDisk Extreme Pro CFast 2.0 SDCFSP-128G-x46D 128GB
SanDisk Extreme Pro CFast 2.0 SDCFSP-256G-x46D 256GB
SanDisk Extreme Pro CFast 2.0 SDCFSP-512G-x46D 512GB
Silicon Power CFX310 256GB
Sony CFast 2.0 G Series CAT-G64 64GB
Sony CFast 2.0 G Series CAT-G128 128GB
Transcend CFX650 CFast 2.0 TS128GCFX650 128GB
Transcend CFX650 CFast 2.0 TS256GCFX650 256GB
Transcend CFX650 CFast 2.0 TS128GCFX650BM 128GB
Transcend CFX650 CFast 2.0 TS256GCFX650BM 256GB
Wise CFast 2.0 3400x 128GB
Wise CFast 2.0 3400x 256GB
Wise CFast 2.0 3500x 512GB
The following CFast 2.0 cards are recommended for Ultra HD ProRes 422 HQ up to 60 frames
per second, buthavebeen discontinued by the manufacturer.
Brand Card Name Storage
Angelbird AVpro CF 160GB
Angelbird AVpro CF 240G B
Lexar Professional 3400x CFast 2.0 32GB
Lexar Professional 3400x CFast 2.0 64GB
Lexar Professional 3400x CFast 2.0 128GB
Lexar Professional 3400x CFast 2.0 256GB
Lexar Professional 3500x CFast 2.0 64GB
Lexar Professional 3500x CFast 2.0 128GB
Lexar Professional 3500x CFast 2.0 256GB
Lexar Professional 3600x CFast 2.0 128GB
Lexar Professional 3600x CFast 2.0 256GB
17Storage Media
Page 16
For the most up to date information on supported CFast cards for Blackmagic URSA Mini please
refer to the Blackmagic Design support center at www.blackmagicdesign.com/support.
SD Cards
In addition to CFast 2.0 cards, Blackmagic URSA Mini Pro 4.6K can record on high speed UHS-I
and UHS-II type SD cards. Using high end SDXC UHS-II cards, you can even record ProRes HQ
footage in 2160p for Ultra HD content!
With SD cards, you can use more affordable storage media when shooting compressed video
formats in HD. SDXC and SDHC are a very common media storage format for consumer still and
video cameras.
If you've ever shot video using a DSLR, or use a Blackmagic Micro Cinema Camera, Pocket Cinema
Camera or Blackmagic Video Assist, you probably already have compatible SD cards to use.
For projects that don't require the highest resolution RAW files, or for when long recording
durations are needed, using SD cards can be very economical. Lower capacity and lower
speed SD cards can also be used for storing and loading LUTs and Presets.
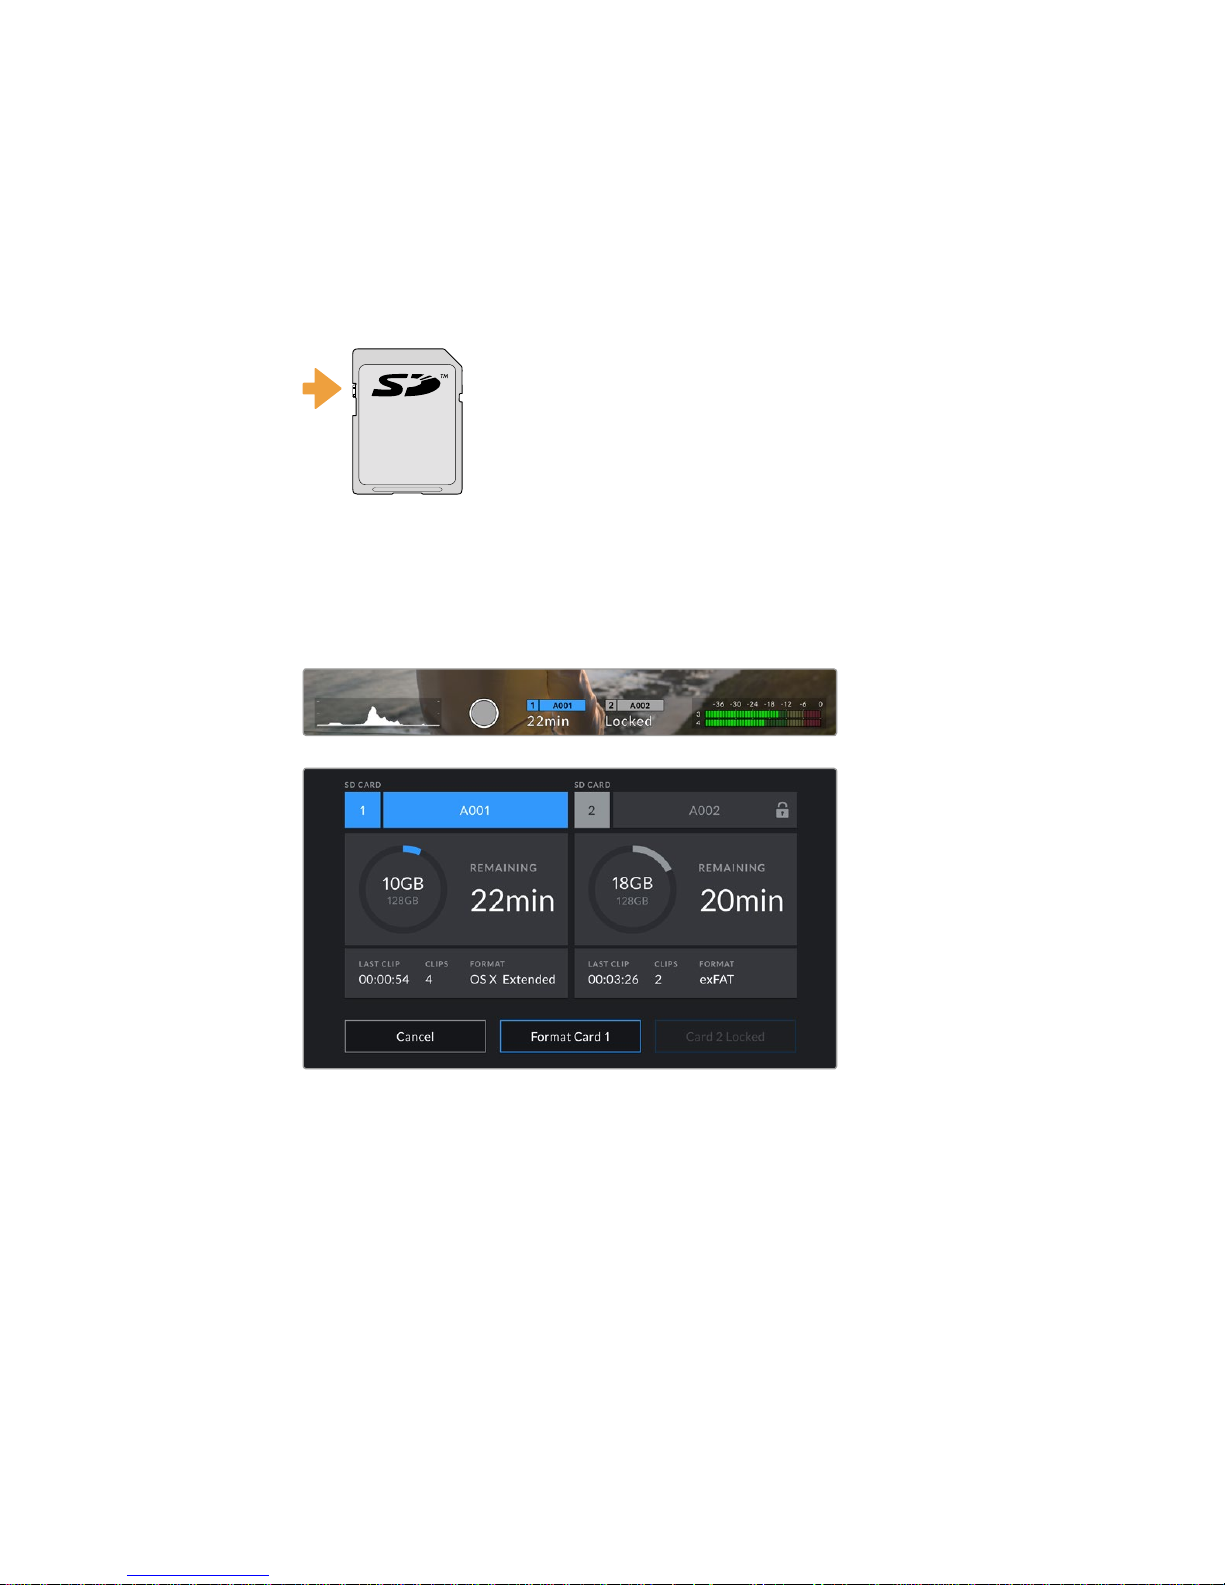
Inserting an SD Card
To insert an SD Card.
1 Open the fold out monitor to access the SD card slots. These are the smaller slots
located between the CFast slots.
2 Set the storage media toggle switch above the slots to 'SD'.
3 With the label on the SD card facing away from the touchscreen, insert the card until
you feel it lock into place. To remove an SD card, push the SD card in to eject it.
4 The storage indicator at the bottom of the LCD touchscreen will show the name and
record time remaining of detected cards.
When recording to SD cards on URSA Mini Pro 4.6K make
sure the storage media selection switch is set to 'SD'
Choosing a fast SD Card
If you are recording Ultra HD on Blackmagic URSA Mini Pro 4.6K, then we recommend using the
fastest high speed UHS-II type SD cards available. It’s important to use high speed UHS-II
SDcards for Ultra HD and HD recording, or UHS-1 cards for HD recording. These cards are
rated for fast data speeds and support larger storage sizes. Generally the faster the cards,
thebetter. Refer to the recommended SD cards table earlier in this section for more information.
XLR 1 XLR 2
18Storage Media
Page 17

Before using your cards, you will need to format them to either HFS+ or exFAT formats. It’s easy
to format your media via your camera's ‘storage’ settings. Refer to the ‘settings’ section for more
information on storage settings.
If you want to, you can format your cards using a Mac or Windows computer. When using your
media on Mac OS, you can use HFS+ which is the Mac disk format. If you are using Windows
then you should use exFAT format, which is the Windows disk format that Mac computers can
also read.
The tables below identify the SD cards recommended for use when shooting with Blackmagic
URSA Mini Pro 4.6K. It’s worth regularly checking the latest version of this manual for more up to
date information. Updated manuals are available for download from the Blackmagic Design
website at www.blackmagicdesign.com/support
Which SD cards should I use with URSA Mini Pro 4.6K?
The following SD cards are recommended for recording 4K DCI Blackmagic RAW 12:1 up to
30frames per second.
Brand Card Name Storage
Angelbird AV Pro 300MB/s UHS- II SDXC 64GB
Angelbird AV Pro 300MB/s UHS- II SDXC 128GB
Lexar Professional 2000x UHS-II 300MB/s SDXC 64GB
Lexar Professional 1000x UHS -II 150MB/s SDXC 64GB
SanDisk Extreme Pro UHS-I 95MB/s SDXC 64GB
SanDisk Extreme Pro UHS-I 95MB/s SDXC 128GB
SanDisk Extreme Pro UHS-I 95MB/s SDXC 256GB
SanDisk Extreme Pro UHS-I 95MB/s SDXC 512GB
SanDisk Extreme Pro UHS-II 280MB/s SDXC 64GB
SanDisk Extreme Pro UHS-II 300MB/s SDHC 32GB
SanDisk Extreme Pro UHS-II 300MB/s SDXC 128GB
Sony SF-G64 300MB/s UHS-II SDXC 64GB
Sony SF-G128 300MB/s UHS -II SDXC 128GB
Toshiba Exceria Pro UHS-II 270MB/s SDXC 64GB
Toshiba Exceria Pro UHS-II 270MB/s SDXC 128GB
Toshiba Exceria Pro UHS-II N502 SDHC 32GB
Toshiba Exceria Pro UHS-II N502 SDXC 64GB
Toshiba Exceria Pro UHS-II N502 SDXC 128GB
Toshiba Exceria Pro UHS-II N502 SDXC 256GB
Transcend Ultimate UHS- II 180MB/s SDXC 64GB
Wise 285MB/s UHS-II SDXC 64GB
Wise 285MB/s UHS-II SDXC 128GB
NOTE For high resolution, high frame rate and RAW recording, we recommend using
CFast 2.0 media, which is typically faster and is available in higher capacities.
19Storage Media
Page 18

The following SD cards are recommended for Ultra HD ProRes 422 HQ up to 30 frames
persecond.
Brand Card Name Storage
Angelbird AV Pro 300MB/s UHS- II SDXC 64GB
Angelbird AV Pro 300MB/s UHS- II SDXC 128GB
Delkin Devices UHS-II 250MB/s SDHC 32GB
ProGrade Digital V90 UHS-II 250MB/s SDXC 128GB
SanDisk Extreme Pro UHS-II 280MB/s SDHC 32GB
SanDisk Extreme Pro UHS-II 280MB/s SDXC 64GB
SanDisk Extreme Pro UHS-II 300MB/s SDHC 32GB
SanDisk Extreme Pro UHS-II 300MB/s SDXC 128GB
Sony SF-G64 300MB/s UHS-II SDXC 64GB
Sony SF-G128 300MB/s UHS -II SDXC 128GB
Toshiba Exceria Pro UHS-II 270MB/s SDXC 64GB
Toshiba Exceria Pro UHS-II N502 SDHC 32GB
Toshiba Exceria Pro UHS-II N502 SDXC 64GB
Toshiba Exceria Pro UHS-II N502 SDXC 128GB
Toshiba Exceria Pro UHS-II N502 SDXC 256GB
Transcend Ultimate UHS- II 180MB/s SDXC 64GB
Wise 285MB/s UHS-II SDXC 64GB
Wise 285MB/s UHS-II SDXC 128GB
The following SD cards are recommended for HD lossless RAW up to 30 frames per second.
Brand Card Name Storage
Angelbird AV Pro 300MB/s UHS- II SDXC 64GB
Angelbird AV Pro 300MB/s UHS- II SDXC 128GB
Delkin Devices UHS-II 250MB/s SDHC 32GB
Lexar Professional2000x UHS-II 300MB/s SDHC 32GB
Lexar Professional 2000x UHS-II 300MB/s SDXC 64GB
ProGrade Digital V90 UHS-II 250MB/s SDXC 128GB
ProGrade Digital V60 UHS-II 200MB/s SDXC 128GB
SanDisk Extreme Pro UHS-I 95MB/s SDXC 64GB
SanDisk Extreme Pro UHS-I 95MB/s SDXC 128GB
SanDisk Extreme Pro UHS-I 95MB/s SDXC 256GB
SanDisk Extreme Pro UHS-I 95MB/s SDXC 512GB
SanDisk Extreme Pro UHS-II 280MB/s SDXC 64GB
Sony SF-G64 300MB/s UHS-II SDXC 64GB
Sony SF-G128 300MB/sUHS -II SDXC 128GB
Toshiba Exceria Pro UHS-II 270MB/s SDXC 64GB
Toshiba Exceria Pro UHS-II 270MB/s SDXC 128GB
Toshiba Exceria Pro UHS-II 270MB/s SDXC 256GB
Toshiba Exceria Pro UHS-II N502 SDHC 32GB
20Storage Media
Page 19

Brand Card Name Storage
Toshiba Exceria Pro UHS-II N502 SDXC 64GB
Toshiba Exceria Pro UHS-II N502 SDXC 128GB
Toshiba Exceria Pro UHS-II N502 SDXC 256GB
Transcend Ultimate UHS- II 180MB/s SDXC 64GB
Wise 285MB/s UHS-II SDXC 64GB
Wise 285MB/s UHS-II SDXC 128GB
The following SD cards are recommended for HD ProRes 422 HQ up to 60 frames per second.
Brand Card Name Storage
Angelbird AV Pro 300MB/s UHS- II SDXC 64GB
Angelbird AV Pro 300MB/s UHS- II SDXC 128GB
Delkin Devices UHS-II 250MB/s SDHC 32GB
Lexar Professional2000x UHS-II 300MB/s SDHC 32GB
Lexar Professional 2000x UHS-II 300MB/s SDXC 64GB
Lexar Professional 1000x UHS -II 150MB/s SDXC 64GB
ProGrade Digital V90 UHS-II 250MB/s SDXC 128GB
ProGrade Digital V60 UHS-II 200MB/s SDXC 64GB
ProGrade Digital V60 UHS-II 200MB/s SDXC 128GB
SanDisk Extreme Pro UHS-I 95MB/s SDXC 64GB
SanDisk Extreme Pro UHS-I 95MB/s SDXC 128GB
SanDisk Extreme Pro UHS-I 95MB/s SDXC 256GB
SanDisk Extreme Pro UHS-I 95MB/s SDXC 512GB
SanDisk Extreme Pro UHS-II 280MB/s SDHC 32GB
SanDisk Extreme Pro UHS-II 280MB/s SDXC 64GB
SanDisk Extreme Pro UHS-II 300MB/s SDXC 64GB
SanDisk Extreme Pro UHS-II 300MB/s SDXC 128GB
Sony SF-G64 300MB/s UHS-II SDXC 64GB
Sony SF-G128 300MB/sUHS -II SDXC 128GB
Toshiba Exceria Pro UHS-II 270MB/s SDXC 64GB
Toshiba Exceria Pro UHS-II 270MB/s SDXC 128GB
Toshiba Exceria Pro UHS-II 270MB/s SDXC 256GB
Toshiba Exceria Pro UHS-II N502 SDHC 32GB
Toshiba Exceria Pro UHS-II N502 SDXC 64GB
Toshiba Exceria Pro UHS-II N502 SDXC 128GB
Toshiba Exceria Pro UHS-II N502 SDXC 256GB
Transcend Ultimate UHS- II 180MB/s SDXC 64GB
Wise 285MB/s UHS-IISDXC 64GB
Wise 285MB/s UHS-II SDXC 128GB
For the most up to date information on supported SD cards for URSA Mini Pro 4.6K please refer
to the Blackmagic Design support center at www.blackmagicdesign.com/support.
21Storage Media
Page 20
Locking and Unlocking SD Cards
SD cards can be write protected, or 'locked', to prevent data from being overwritten.
When inserting an SD card, make sure the card is not write protected. Write protection is
disabled by moving the plastic switch on the left side of the card to the position closest to
theconnectors. After recording, you can then write protect the card by sliding the switch
backdown to the bottom position.
Move the lock tab up or down
to lock or unlock an SD card
Your URSA Mini Pro 4.6K will let you know if you've inserted a locked SD card by displaying a
'locked' icon on the LCD touchscreen and storage menu. If the card is locked, you won't be able
to record video, capture stills, or export LUTs and presets until it is unlocked.
Your URSA Mini Pro 4.6K will indicate when locked SD storage media is inserted
LOCK
▼
22Storage Media
Page 21

SSDs
With the optional Blackmagic URSA Mini SSD Recorder, URSA Mini can record video directly to
solid state drives, or ‘SSDs’. These fast, high capacity drives can are readily available from a
variety of consumer electronics outlets.
Inserting an SSD
To insert an SSD:
1 Hold your SSD with the connection pins facing towards the front of your camera.
2 Open the spring loaded cover on URSA Mini SSD Recorder and gently insert the
SSDintothe slot.
3 Once your SSD is all the way into the slot gently push it home until you feel it register,
then lower URSA Mini SSD Recorder's cover.
To remove an SSD:
Open URSA Mini SSD Recorder’s cover and gently grasp the drive between your thumb and
forefinger. There’s a small recess in the top of the bay to let you get a grip on the drive. Simply
pull the drive out and close the cover.
Choosing a fast SSD
SSDs are designed to offer fast, affordable storage for a wide range of devices it's important to
note that film making is only one part of the SSD market though, so choosing the right drive is
vital to ensuring that you have enough bandwidth to record 4.6K RAW or Ultra HD footage.
Many SSDs are designed for home computing and aren't fast enough to record Ultra HD video.
We highly recommend using only the SSDs from our recommended list, which have been tested
with Blackmagic URSA Mini to ensure support for continuous filming at the specified
resolutions. For the most up to date list of recommended SSD’s please go to
www.blackmagicdesign.com/support
NOTE See the section ‘Blackmagic URSA Mini SSD Recorder’ in this manual
for information on installing Blackmagic URSA Mini SSD Recorder.
TIP URSA Mini SSD Recorder has a pressure plate to keep different sized
SSDs in place, so there’s no need to use spacers to fit your drive.
NOTE Blackmagic URSA Mini SSD Recorder occupies the second storage slot in
URSAMini's operating system. This means that, while URSA Mini SSDRecorder is
connected and a compatible SSD is inserted, your camera’s second CFast 2.0 and
SDcard slot will be unavailable.
To use these slots instead, disconnect the SSD Recorder SDI connection from
URSAMini. There is no need to remove the SSD Recorder itself from your camera. For
more information, see the section ‘Blackmagic URSA Mini SSDRecorder’ in this manual.
23Storage Media
Page 22

Blackmagic URSA Mini SSD Recorder SSDs
The following SSDs are recommended for 4.6K lossless RAW up to 30 frames per second.
Brand SSD Name Storage
Angelbird AV Pro 500GB
Angelbird AV Pro Mk 3 250GB
Angelbird AV Pro Mk 3 500GB
Angelbird AV Pro XT 500GB
Angelbird AV Pro XT 1TB
Angelbird AV Pro XT 2TB
Angelbird AV Pro XT 4TB
Kingston SSDnow KC400 128GB
Kingston DC400 480GB
Kingston DC400 960GB
Samsung 860 EVO 2TB
Samsung 860 EVO 4TB
Samsung 860 PRO 2TB
Samsung 860 PRO 4TB
Sony G Series Professional SSD. SVGS48 480GB
Sony G Series Professional SSD. SVGS96 960GB
Transcend SSD370 512GB
The following SSDs are recommended for 4.6K lossless RAW up to 30 frames per second, but
have been discontinued by the manufacturer.
Brand SSD Name Storage
Samsung 850 PRO 1TB
Samsung 850 EVO 4TB
24Storage Media
Page 23

The following SSD’s are recommended for 4.6K ProRes 444 XQ up to 30 frames per second.
Brand SSD Name Storage
Angelbird AV Pro 500GB
Angelbird AV Pro Mk 3 250GB
Angelbird AV Pro Mk 3 500GB
Angelbird AV Pro XT 500GB
Angelbird AV Pro XT 1TB
Angelbird AV Pro XT 2TB
Angelbird AV Pro XT 4TB
Kingston SSDnow KC400 128GB
Kingston DC400 480GB
Kingston DC400 960GB
Samsung 860 EVO 2TB
Samsung 860 EVO 4TB
Samsung 860 PRO 2TB
Samsung 860 PRO 4TB
SanDisk Ultra 3D 1TB
Sony G Series Professional SSD. SVGS48 480GB
Sony G Series Professional SSD. SVGS96 960GB
Transcend SSD370 512GB
Western Digital WD Blue 3D NAND SATA SSD 1TB
The following SSD’s are recommended for 4.6K ProRes 444 XQ up to 30 frames per second,
but have been discontinued by the manufacturer.
Brand SSD Name Storage
Samsung 850 PRO 1TB
Samsung 850 EVO 1TB
Samsung 850 EVO 4TB
25Storage Media
Page 24

The following SSD’s are recommended for Ultra HD ProRes 422 HQ up to 60 frames
per second.
Brand SSD Name Storage
Angelbird AV Pro 500GB
Angelbird AV Pro Mk 3 250GB
Angelbird AV Pro Mk 3 500GB
Angelbird AV Pro XT 500GB
Angelbird AV Pro XT 1TB
Angelbird AV Pro XT 2TB
Angelbird AV Pro XT 4TB
Innodisk 3MG2- P 2TB
Kingston SSDnow KC400 128GB
Kingston DC400 480GB
Kingston DC400 960GB
Samsung 860 EVO 2TB
Samsung 860 EVO 4TB
Samsung 860 PRO 2TB
Samsung 860 PRO* 4TB
Sandisk SDSSDP-064G 64GB
SanDisk Ultra 3D 1TB
Sony G Series Professional SSD. SVGS48 480GB
Sony G Series Professional SSD. SVGS96 960GB
Transcend SSD370 512GB
Western Digital WD Blue 3D NAND SATA SSD 1TB
Wise Cinema 240GB. CMS-0240 240GB
* Recording 1080p60 ProRes HQ for longer than 20 hours to Samsung 860 PRO SSDs is not recommended.
The following SSD’s are recommended for Ultra HD ProRes 422 HQ up to 60 frames per second,
but have been discontinued by the manufacturer.
Brand SSD Name Storage
Samsung 850 PRO 1TB
Samsung 850 EVO 1TB
Samsung 850 EVO 4TB
26Storage Media
Page 25

Preparing Media for Recording
You can format your CFast cards, SD cards or SSDs using the ‘format card’ feature on
URSAMini’s storage and formatting screen, or via a Mac or Windows computer. We recommend
formatting storage media using URSA Mini for best performance.
HFS+ is also known as Mac OS X extended and is the recommended format as it supports
'journaling'. Data on journaled media is more likely to be recovered in the rare event that your
storage media becomes corrupted. HFS+ is natively supported by Mac OS. exFAT is supported
natively by Mac OS and Windows without needing to purchase any additional software.
However, exFAT does not support journaling.
Preparing Media on Blackmagic URSA Mini
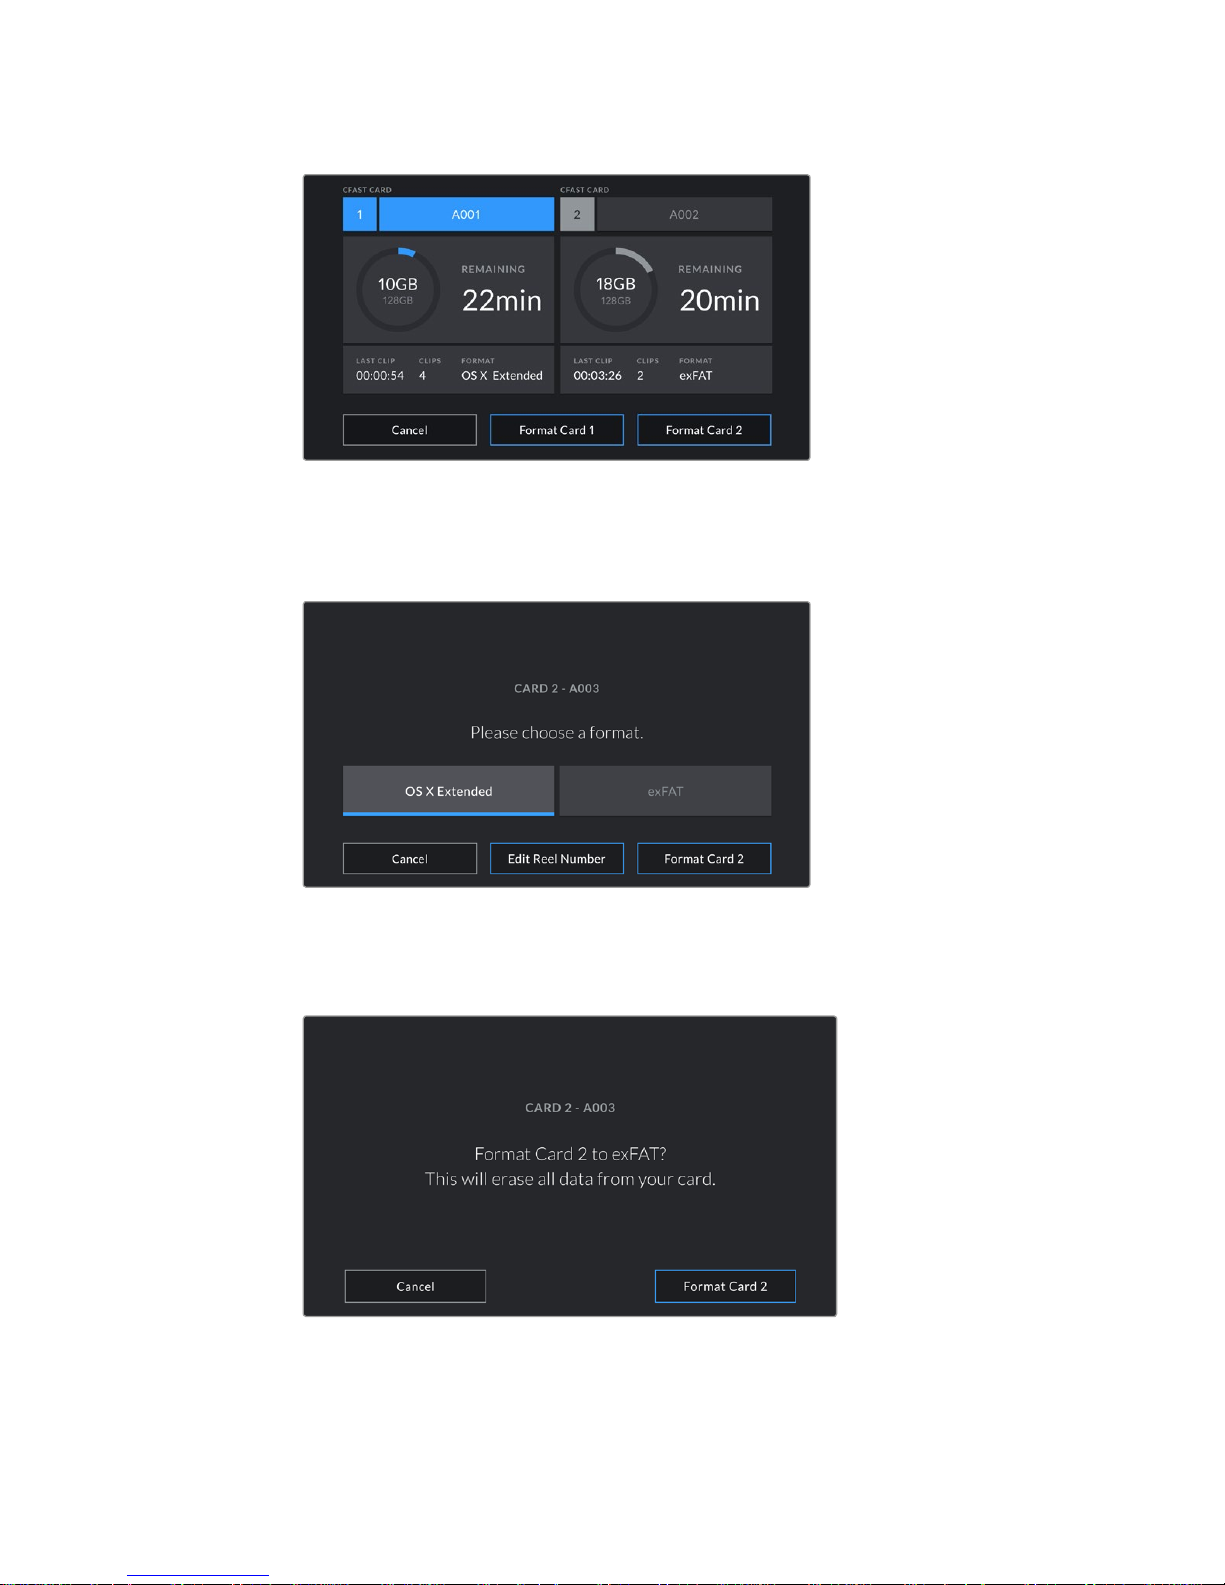
1 Tap either storage indicator at the bottom of the LCD touchscreen to enter the
storage manager.
2 Tap 'Format Card 1' or 'Format Card 2' to format the CFast card in slot 1 or 2, respectively.
Important Notes About SSD Speed
Some models of SSD can’t save video data at the speed the manufacturer claims.
Thisis due to the disk using hidden data compression to attain higher write speeds.
This data compression can only save data at the manufacturer’s claimed speed when
storing data such as blank data or simple files. Video data includes video noise and
pixels which are more random so compression will not help, therefore revealing the true
speed of the disk.
Some SSDs can have up to 50% lower write speed than the manufacturer’s claimed
speed. Soeven though the disk specifications claim an SSD has speeds fast enough to
handle video, in reality the disk isn’t fast enough when used to store video data for real
time capture.
Use Blackmagic Disk Speed Test to accurately measure whether your SSD will be able
to handle high data rate video capture and playback. Blackmagic Disk Speed Test uses
data to simulate the storage of video so you get results similar to what you’ll see when
capturing video to a disk. During Blackmagic testing, we have found newer, larger
models of SSD and larger capacity SSDs are generally faster.
NOTE Before formatting your media, it's important to make sure the media storage
switch has been set correctly to either SD card or CFast card. Always check the
settings carefully before formatting.
27Storage Media
Page 26
Use your URSA Mini's storage manager to format your camera's CFast cards
3 Tap 'edit reel number' if you would like to manually change the reel number.
4 Choose OS X Extended or exFAT format and tap the 'format card' button.
Tap 'edit reel number' to manually edit the reel number
5 You will be asked to confirm your selection. Tap 'format card' again to continue or
'cancel' to cancel the format.
Check that you have selected the correct card before formatting
6 You will be notified when the format is complete.
7 Tap 'ok' to return to the storage manager.
8 Tap 'exit' to leave the storage manager.
28Storage Media
Page 27
When formatting CFast cards, SD cards or SSD's using the storage manager, your URSA Mini
will use the Camera ID from the slate and reel number to name the card. Your URSA Mini
automatically increments reel numbers each time you format. Ifyou need to manually enter a
specific reel number, tap the 'edit reel number' and enter the number you want to format
the card as.
When you start a new project, reel numbering will reset to 1 when you tap on ‘reset project data’
in the 'project' tab of the slate.
When URSA Mini SSD Recorder is connected and an SSD is loaded, the recorder takes over
from URSA Mini's number '2' storage slot and you’ll see an 'SSD'indicator over slot 2 on your
camera’s storage manager.
Preparing Media on Blackmagic URSA Mini Pro 4.6K
The process for preparing storage media on your URSA Mini Pro 4.6K is exactly the same as the
URSA Mini process outlined above. The only difference is the added option to format SD cards
in addition to CFast cards and SSD's. It's worth mentioning that if your camera's media storage
switch is set to SD or CFast, only the selected card type will be formatted when you tap 'format
card'. When using URSA Mini SSD Recorder with URSA Mini Pro, the SSD will appear in slot 2
regardless of the position of the media storage switch.
The storage manager on your camera will indicate whether you
are currently managing CFast, SD or SSD media
For information on switching between CFast and SD storage see the 'SD Cards' section earlier
in this manual.
TIP If your URSA Mini Pro 4.6K is set to record to SD cards and you have inserted
alocked card, you will be unable to format that card. A padlock icon will appear next to
the card's name in the storage manager. Simply unlock thecard to format and record.
For more information on locking SD cards, see the 'SDcards' section of this manual.
NOTE If you have the optional URSA Mini SSD Recorder connected, an "SSD" indicator
will appear over storage slot 2.
29Storage Media
Page 28
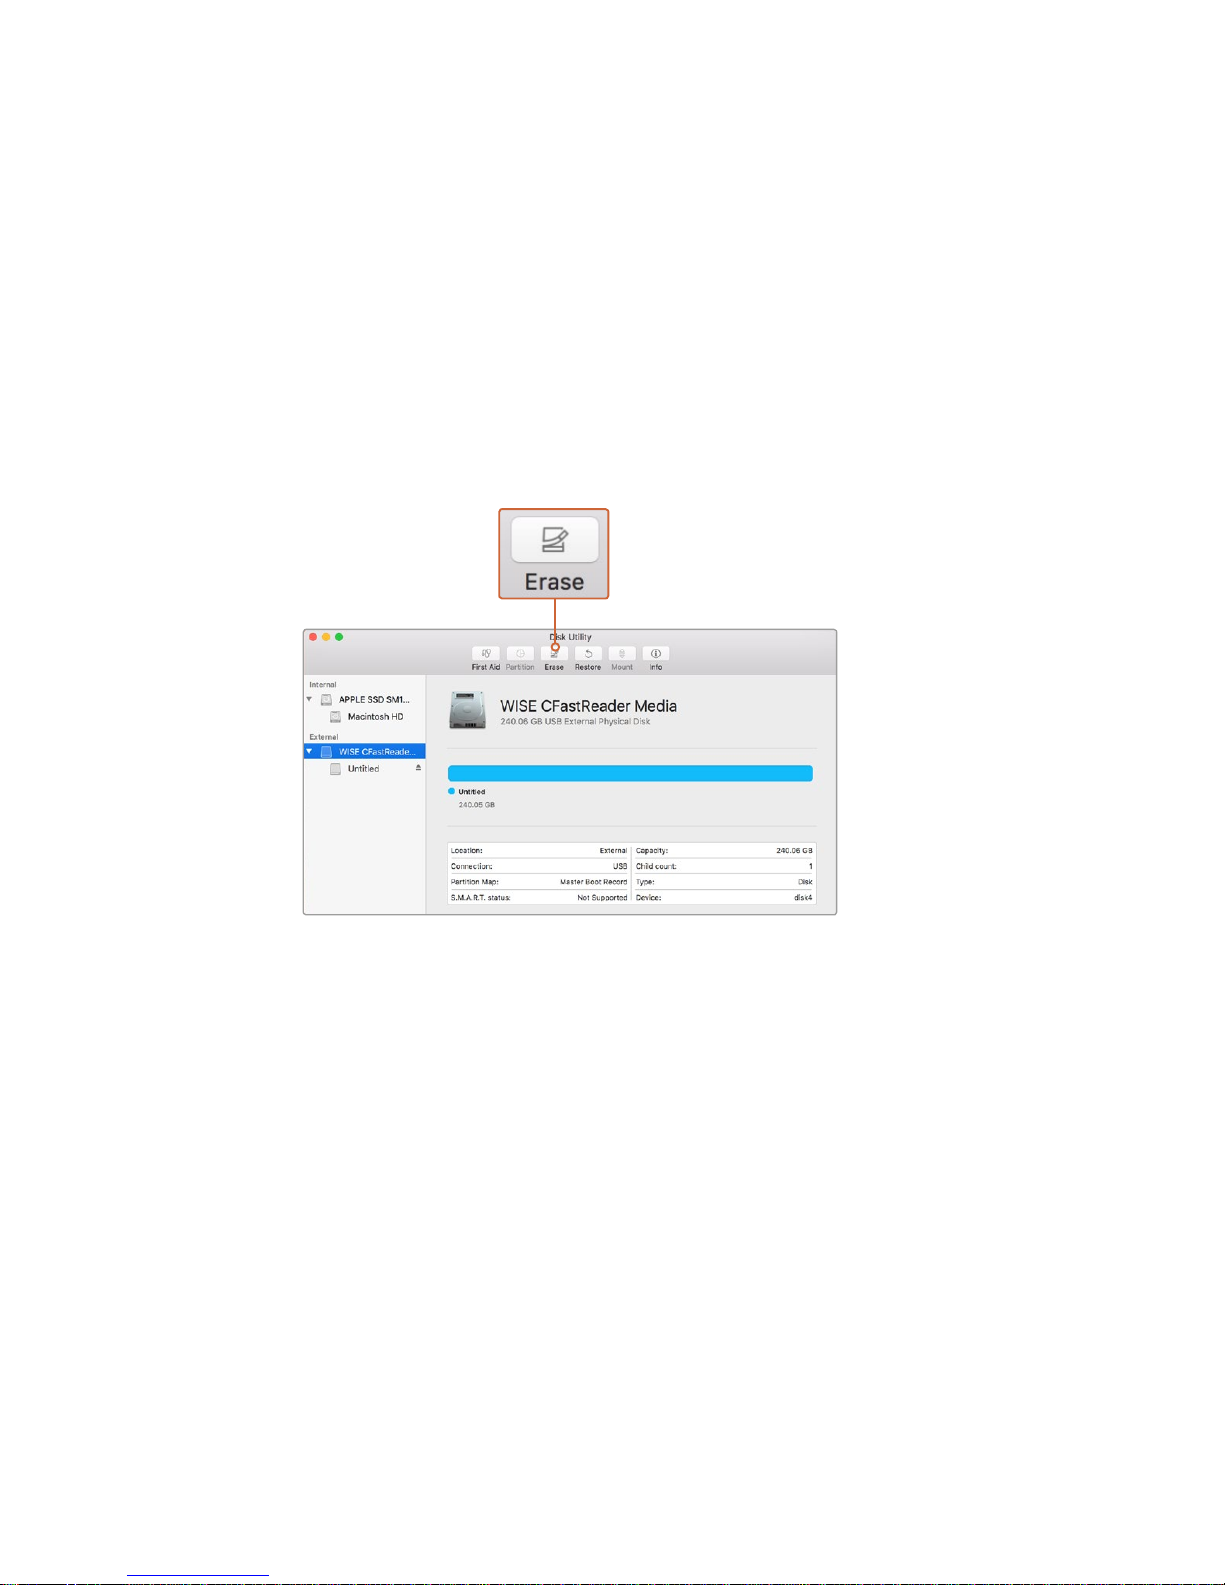
Preparing Media on Mac
Use the Disk Utility application included with Mac OS to format your CFast card, SD card, or
SSD in the HFS+ or exFAT formats. Remember to back up anything important from your
mediafirst as all data will be lost when it is formatted.
1 Connect the storage media to your computer using a SD card reader, dock or adapter,
and dismiss any message offering to use your media for Time Machine backups.
2 Go to applications/utilities and launch Disk Utility.
3 Click on the disk icon for your camera's storage media and then click the ‘erase’ tab.
4 Set the ‘format’ to ‘Mac OS extended ( journaled)’ or ‘exFAT’.
5 Type a ‘name’ for the new volume and then click ‘erase’. Your camera's storage media
will quickly be formatted and made ready for use.
Use Disk Utility on Mac OS to erase your camera's storage
media in the Mac OS extended ( journaled) or exFAT format
Preparing Media on Windows
The ‘format’ dialog box can format your camera's storage media in the exFAT format on a
Windows PC. Remember to back up anything important from your media first as all data will be
lost when it is formatted.
1 Connect the your camera's storage media to your computer using an external reader/
writer orSSD dock or adapter.
2 Open the ‘start’ menu or ‘start’ screen and choose ‘computer’.
Right click on your camera's storage media.
3 From the contextual menu, choose ‘format’.
4 Set the file system to 'exFAT' and the allocation unit size to 128 kilobytes.
5 Type a volume label, select ‘quick format’ and click ‘start’.
6 Your storage media will quickly be formatted and made ready for use.
30Storage Media
Page 29
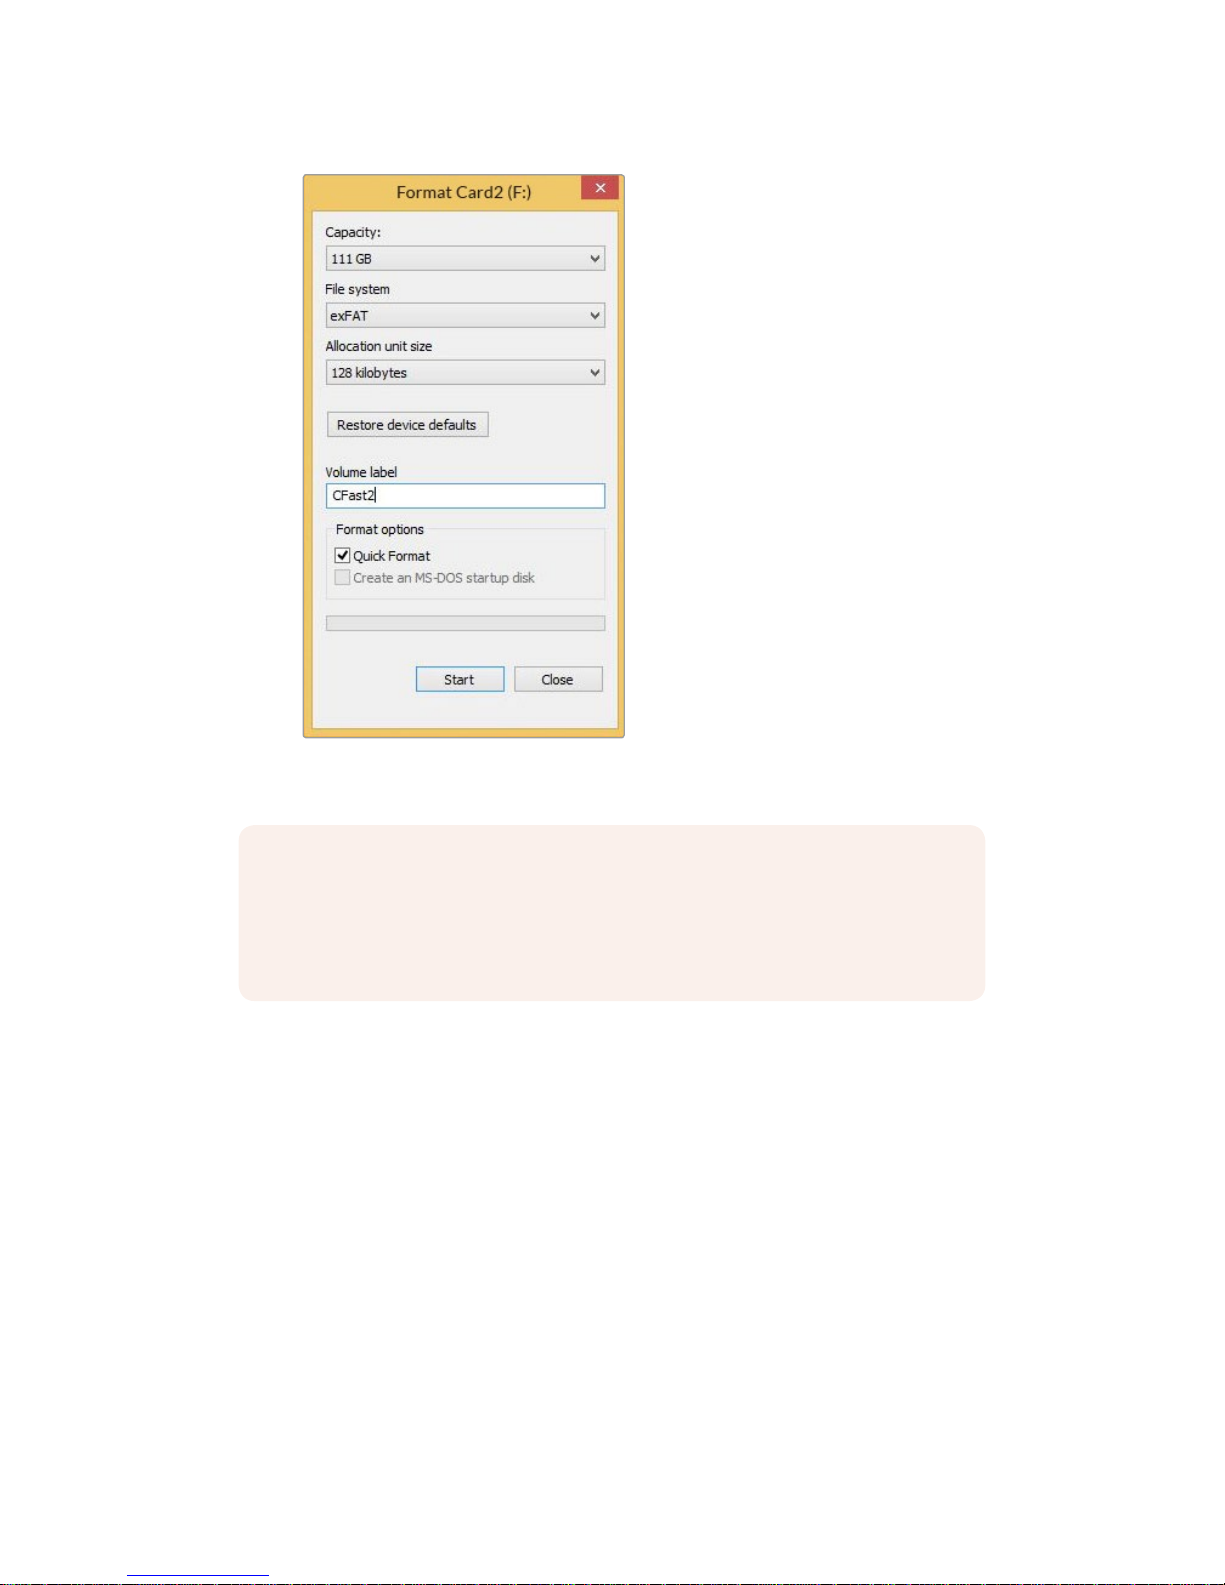
Use the ‘format’ dialog box feature in Windows to format
yourcamera's storage media in the exFAT format
NOTE If your recordings are dropping frames, check that your card or drive is on our
list of recommended media for the codec and frame size you are using. For lower data
rates try lowering your frame rate, resolution, or try a compressed codec such as
ProRes. Check the Blackmagic Design website for the latest information at
www.blackmagicdesign.com
31Storage Media
Page 30
Recording
Recording Clips
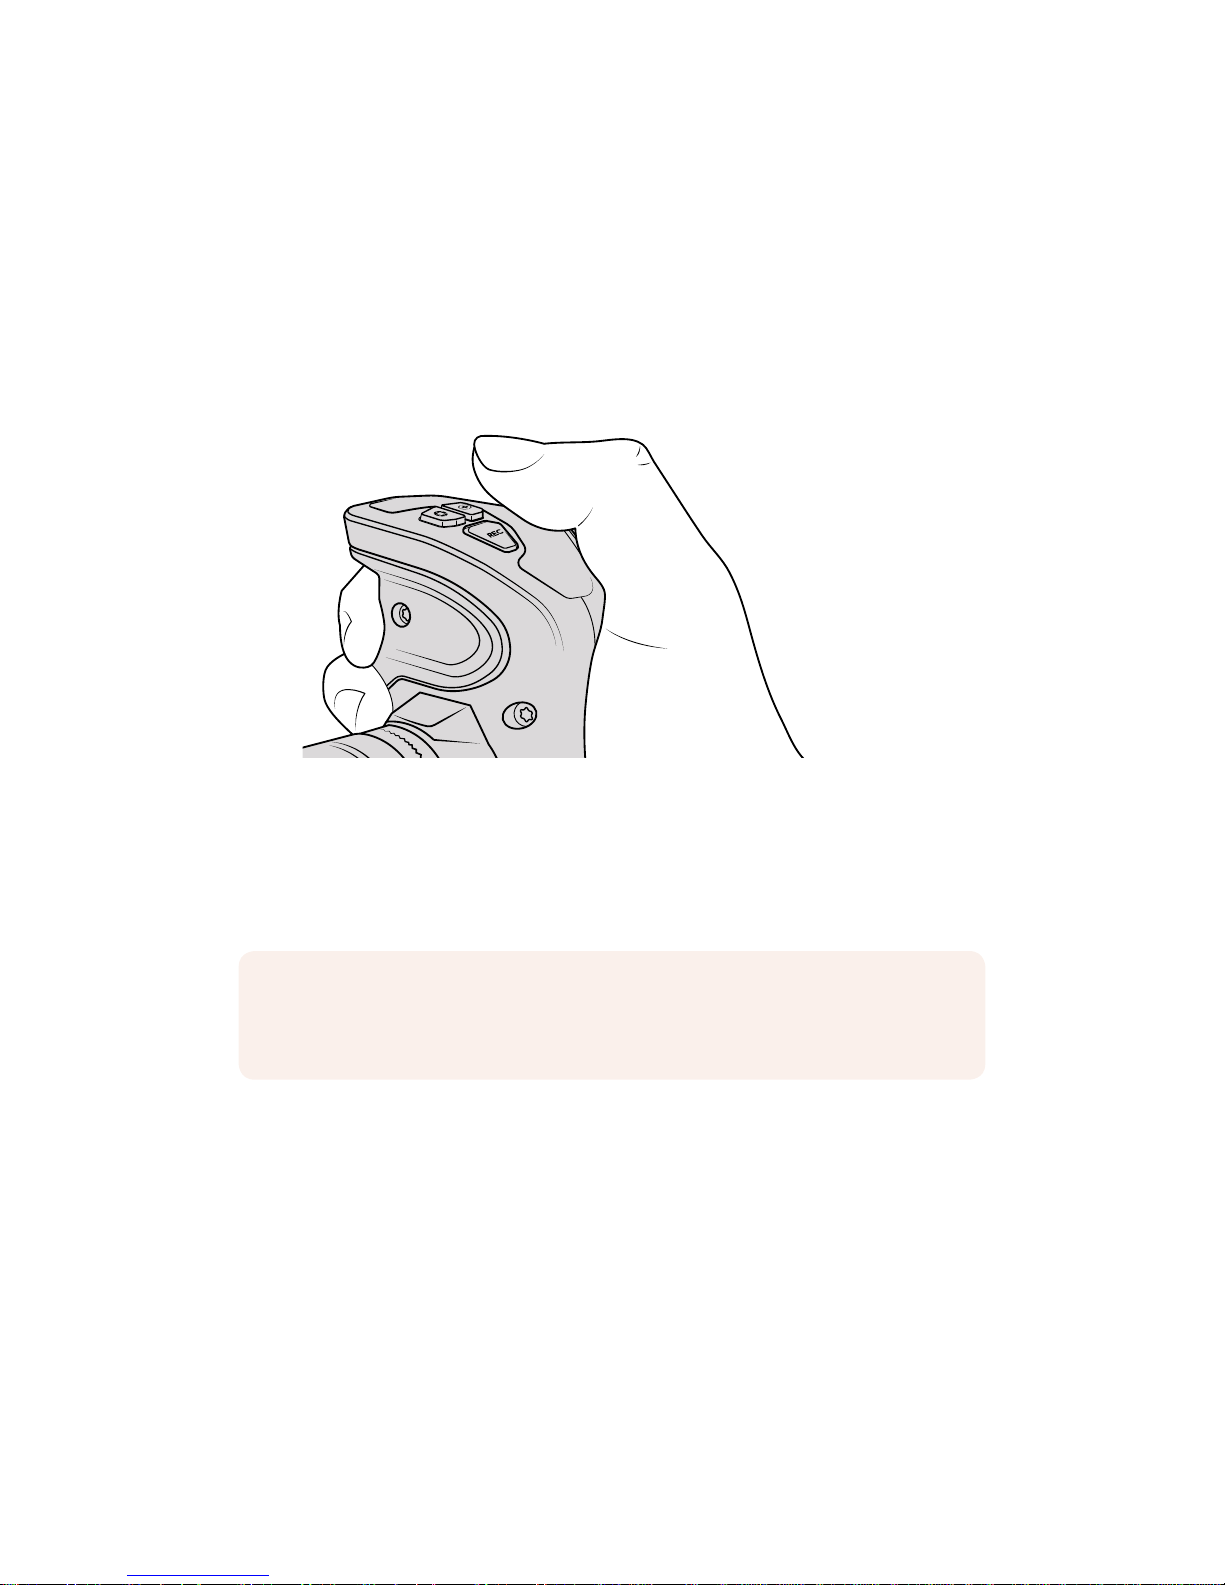
On Blackmagic URSA Mini you can start recording by pressing the red 'record' button on the
inside control panel, the touchscreen, or the side handle. A 'record' button is also on the
outside of the fold out monitor. Press the 'record' button again to stop recording.
On Blackmagic URSA Mini Pro 4.6K, the external record button is located in the forward control
panel for convenient access when shooting from the shoulder.
You can also record clips by pressing the ‘record’
buttonmarked REC on URSA Mini’s side handle
Another option for starting and stopping record is to attach an external LANC controller to your
URSA Mini's LANC input and trigger the record externally. For example, you may want to attach
a LANC controller to your tripod so you can trigger the recording without taking your hands off
the focus ring and tripod handle.
Blackmagic RAW
Blackmagic URSA Mini Pro 4.6K supports the new Blackmagic RAW file format. This format
offers superior image quality, wide dynamic range and a broad selection of compression ratios.
Blackmagic RAW keeps all the benefits of RAW recording, but the files are very fast because
part of the de-bayer is performed in the camera where it can be hardware accelerated.
The Blackmagic RAW format is also intelligent because it understands the image sensor in the
camera. This means you get much better quality for a smaller file format. Smaller files that are
higher quality means Blackmagic RAW is a good alternative to other video and RAW
file formats.
NOTE If you toggle the 'storage media selection' switch mid-recording, the camera will
complete the current recording before switching to the other type of media. This
ensures that you can not damage your recording if the switch is adjusted during a take.
32Recording
Page 31

Blackmagic RAW also includes powerful metadata support so the software reading the files
knows your camera settings. If you like shooting in video gamma because you need to turn
around edits quickly and you don't have time for color correction, then this metadata feature
means you can select video gamma, shoot in video gamma, and the file will display with video
gamma applied when you open it in software. However underneath, the file is actually film
gamma and the metadata in the file is what's telling the software to apply the video gamma.
So what all this means is if you want to color grade your images at some point, then you have
allthat film dynamic range preserved in the file. You don't have your images hard clipped in the
whites or the blacks, so you retain detail and you can color grade to make all your images look
cinematic. However, if you don't have time for color grading, that's fine because your images
will have the video gamma applied and look like normal video camera images. You are not
locked in on the shoot and you can change your mind later during post production.
Blackmagic RAW files are extremely fast and the codec is optimized for your computer’s CPU
and GPU. This means it has fast smooth playback and eliminates the need for hardware
decoder boards, which is important for laptop use. Software that reads Blackmagic RAW also
gets the advantage of processing via Apple Metal, Nvidia CUDA and OpenCL.
This means that Blackmagic RAW plays back at normal speed like a video file on most
computers, without needing to cache it first or lower the resolution.
It's also worth mentioning that lens information is recorded in the metadata on a frame by frame
basis. For example, when using compatible lenses, any zoom or focus changes performed over
the length of a clip will be saved, frame by frame, to the metadata in the Blackmagic RAW file.
Recording to Blackmagic RAW
Blackmagic RAW works in 2 different ways. You have a choice to use either the constant bitrate
codec, or the constant quality codec.
The constant bitrate codec works in a similar way to most codecs. It tries to keep the data rate
at a consistent level and won't let the data rate go too high. This means even if you are shooting
a complex image that might need a bit more data to store the image, a constant bitrate codec
will just compress the image harder to make sure the images fit within the space allocated.
This can be fine for video codecs, however when shooting RAW you really want to ensure the
quality is predictable. What would happen if the images you were shooting needed more data,
but the codec just compresses harder to make a specified data rate? It's possible you could
lose quality, but not be sure it's happening until you return from a shoot.
To solve this problem, Blackmagic RAW also has an alternative codec choice called constant
quality. This codec is technically called a variable bitrate codec, but what it's really doing is
allowing the size of the file to grow if your images need extra data. There is no upper limit on
the file size if you need to encode an image but maintain quality.
So Blackmagic RAW set to the constant quality setting will just let the file grow as big as it
needs to be to encode your images. It also means the files could be larger or smaller
depending on what you are shooting. I guess if you leave your lens cap on the lens, you won't
waste space on your media!
It is also worth noting that the quality settings for Blackmagic RAW are not obscure names,
butare more meaningful as they are derived from what's happening technically. So for example
when you have selected the constant bitrate codec, you will see quality settings of 3:1, 5:1, 8:1
and 12:1. These are the ratios of the uncompressed RAW file size vs the file sizes you should
expect when shooting in Blackmagic RAW. 3:1 is better quality as the file is larger, while 12:1 is
the smallest file size with the lowest quality. Many users of Blackmagic RAW find that 12:1 has
been perfectly ok and they have not seen any quality limitations. However it's best to
experiment and try various settings for yourself.
33Recording
Page 32

When using Blackmagic RAW in constant quality you will see the settings are Q0 and Q5.
Theseare the compression parameters passed to the codec and they are setting how much
compression is applied in a more technical way. This setting is different because the codec
operates differently between constant bitrate vs constant quality. In this constant quality setting,
you really cannot tell what the file size ratio will become as it varies a lot based on what you
areshooting. So in this case the setting is different and the file will become the size needed
tostore your media.
Constant Bitrate Settings
The names for 3:1, 5:1, 8:1 and 12:1 represent the compression ratio. For example, 12:1
compression produces a file size roughly 12 times smaller than uncompressed RAW.
Constant Quality Settings
Q0 and Q5 refer to different levels of quantization. Q5 has a greater level of quantization but
offers a greatly improved data rate. As mentioned above, the constant quality setting can result
in files that grow and shrink quite a lot, depending on what you are shooting. This also means
it's possible to shoot something and see the file size increase to beyond what your media card
can keep up with. It could result in dropped frames. However the benefit is that you can
instantly see if this happens on a shoot and then investigate your settings vs quality.
Blackmagic RAW Player
The Blackmagic RAW player included in your Blackmagic camera’s software installer is a
streamlined application for reviewing clips. Simply double click on a Blackmagic RAW file to
open it, and you can quickly play and scroll through the file with its full resolution and bit depth.
When decoding frames, the CPU acceleration in the SDK library supports all main architectures,
and also supports GPU acceleration via Apple Metal, Nvidia CUDA and OpenCL. It also works
with the Blackmagic eGPU for extra performance. Blackmagic RAW player is currently available
on macOS and will be available for Windows in an upcoming release.
Sidecar Files
Blackmagic RAW sidecar files let you override metadata in a file without overwriting embedded
metadata in the original file. This metadata includes the RAW settings as well as information on
iris, focus, focal length, while balance, tint, color space, project name, take number and more.
Metadata is encoded frame by frame over the duration of the clip, which is important for lens
data if the lens is adjusted during a shot. You can add or edit metadata in sidecar files with
DaVinci Resolve or even a text editor because it’s a human readable format.
Sidecar files can be used to automatically add new RAW settings to a playback simply by
moving the sidecar file into the same folder as the corresponding RAW file. If you move the
sidecar file out of the folder and reopen the Blackmagic RAW file, the RAW settings are not
applied and you see the file as it was originally shot. Any software that uses the Blackmagic
RAW SDK can access these settings. Changes made are saved in the sidecar file and can then
be seen by Blackmagic RAW Player or any other software capable of reading Blackmagic
RAW files.
When shooting video gamma, the file stays in film gamma, and the metadata tells the
Blackmagic RAW processing to display using video gamma. Video gamma is great when you
don’t want to grade the image and want to deliver content quickly, however if you want to pull
up the black parts of the image, or pull down the white areas, all the detail is retained. You
never clip the video and all the detail is still there if you want to access it at any time.
34Recording
Page 33

Blackmagic RAW in DaVinci Resolve
Settings can be adjusted for each Blackmagic RAW file, and then saved as a new sidecar file
from the RAW tab in DaVinci Resolve for creative effect or optimized viewing. This also means
you can copy your media for another DaVinci Resolve artist and they will have access to your
modified gamma settings automatically on import. In addition to the other metadata your
camera files contain, DaVinci Resolve can read your selected dynamic range, so your clips will
automatically display in DaVinci Resolve with ‘film’, ‘extended video’ or ‘video’ dynamic range.
You can then customize these settings by adjusting the saturation, contrast and midpoint,
aswell as the highlight and shadow rolloff. Any adjustments can then be saved as a sidecar file,
sothe changes can be seen by anyone else working with the files in post. You can always
return to the original camera metadata at any time.
You can also export a single Blackmagic RAW frame from the RAW tab in DaVinci Resolve,
which contains all adjustments, metadata, full resolution and color information so it is easy to
share a single frame grab or reference file with others.
For more information on how to use Blackmagic RAW in DaVinci Resolve, see the ‘Using
DaVinci Resolve’ chapter in this manual.
Blackmagic RAW Software Development Kit
The Blackmagic RAW Software Development Kit is an API developed by Blackmagic Design.
You can use the Blackmagic RAW SDK to write your own applications to use the Blackmagic
RAW format. This SDK library can be used by any developer to add support for reading, editing,
and saving Blackmagic RAW files. The Blackmagic RAW SDK includes all the generation 4 color
science so you can achieve organic cinematic images across any app that supports it. The
Blackmagic RAW SDK supports Mac, Windows and Linux, and is available as a free download
from the developer page of the Blackmagic website at www.blackmagicdesign.com/developer
The following diagram illustrates the components of the Blackmagic RAW API:
Blackmagic RAW API
METAL
SSE
CUDA
AVX
Decoder
OPENCL
AVX2
.Braw
Reader
.Sidecar
Reader
35Recording
Page 34

Choosing the Codec, Resolution and Sensor Area
Your Blackmagic URSA Mini and URSA Mini Pro 4.6K can record using CinemaDNG RAW with
achoice of lossless RAW or compressed RAW, as well as Apple ProRes compressed codecs.
Sensor frame rate options will vary depending on the codec and resolution you choose.
It’s worth noting that clips recorded using CinemaDNG 3:1 and CinemaDNG 4:1 compression are
compatible with DaVinci Resolve, but may be incompatible with other software applications.
Ifyou plan on using other editing software, you should check its compatibility with compressed
RAW formats before filming.
Choosing Frame Rates
Your camera's sensor frame rate can have a big impact on the 'look' of footage. The table
belowlists the maximum sensor frame rates available at each resolution and codec offered
byyour camera. While the 'touchscreen controls' section of this manual details how high frame
rates can be used to create creative slow motion effects, it's also worth considering some
everyday settings.
The consistent use of particular frame rates and shutter angles over the last 100 years of
cinema has conditioned audiences to associate the characteristics of certain camera settings
with a 'filmic' look. Frame rates of 24 or 25 frames per second, combined with a 180º shutter
angle, typically achieves this look, notable for a certain amount of motion blur. The equivalent
setting for shutter speed is 1/50th of a second.
When shots dictate the use of fast pans, however, these frame rates can introduce an
unpleasant judder effect. That's why broadcast content, such as sport and news reportage,
tends to use faster frame rates. Setting your camera to 50, 59.94 or 60frames per second
allows you to capture smooth motion at the loss of some cinematic 'feel.'
Depending on the style of your project, be it cinema, documentary, broadcast and so on,
achieving the appropriate style may mean adjusting your sensor frame rate or filming technique,
with a particular emphasis on camera movement and pan speed.
TIP If you're shooting ProRes HQ and lower with the URSA Mini Pro 4.6K, you can
record onto SD cards as they provide the speeds required. Blackmagic RAW 8:1 and
12:1 will also allow continuous recording to SD cards.
36Recording
Page 35

Maximum Sensor Frame Rates
The table below contains the available codecs and maximum sensor frame rates for shooting
4K, Ultra HD and HD on URSA Mini.
Resolution Codec
URSA Mini Pro
4.6K
URSA Mini
4.6K
URSA Mini
4K
Sensor
scan
Max
Frame
Rate
Sensor
scan
Max
Frame
Rate
Sensor
scan
Max
Frame
Rate
HD
1920x1080
Blackmagic RAW 3:1 Window 120 – – – –
Blackmagic RAW 5:1 Window 120 – – – –
Blackmagic RAW 8:1 Window 120 – – – –
Blackmagic RAW 12:1 Window 120 – – – –
Blackmagic RAW Q0 Window 120 – – – –
Blackmagic Raw Q5 Window 120 – – – –
ProRes 444XQ Window 120 Window 120 Window 80
ProRes 444 Window 120 Window 120 Window 80
ProRes HQ Window 120 Window 120 Window 120
ProRes 422 Window 120 Window 120 Window 120
Pr o Res LT Window 120 Window 120 Window 120
ProRes Proxy Window 120 Window 120 Window 120
ProRes 444XQ Full 60 Full 60 Full 60
ProRes 444 Full 60 Full 60 Full 60
ProRes HQ Full 60 Full 60 Full 60
ProRes 422 Full 60 Full 60 Full 60
Pr o Res LT Full 60 Full 60 Full 60
ProRes Proxy Full 60 Full 60 Full 60
CinemaDNG RAW Window 120 Window 120 – –
CinemaDNG 3:1 Window 120 Window 120 – –
CinemaDNG 4:1 Window 120 Window 120 – –
37Recording
Page 36

Resolution Codec
URSA Mini Pro
4.6K
URSA Mini
4.6K
URSA Mini
4K
Sensor
scan
Max
Frame
Rate
Sensor
scan
Max
Frame
Rate
Sensor
scan
Max
Frame
Rate
ULTRA H D
3840x2160
Blackmagic RAW 3:1 Window 60 – – – –
Blackmagic RAW 5:1 Window 60 – – – –
Blackmagic RAW 8:1 Window 60 – – – –
Blackmagic RAW 12:1 Window 60 – – – –
Blackmagic RAW Q0 Window 60 – – – –
Blackmagic RAW Q5 Window 60 – – – –
ProRes 444XQ
full or
window
40
full or
window
40 Full 40
ProRes 444
full or
window
40
full or
window
40 Full 40
ProRes HQ
full or
window
60
full or
window
60 Full 60
ProRes 422
full or
window
60
full or
window
60 Full 60
Pr o Res LT
full or
window
60
full or
window
60 Full 60
ProRes Proxy
full or
window
60
full or
window
60 Full 60
CinemaDNG RAW Window
60
(dual card)
Window
60
(dual card)
– –
CinemaDNG 3:1 Window 60 Window 60 – –
CinemaDNG 4:1 Window 60 Window 60 – –
4K
4000x2160
CinemaDNG RAW – – – – Full
60
(dual card)
CinemaDNG 3:1 – – – – Full 60
CinemaDNG 4:1 – – – – Full 60
38Recording
Page 37

The tables below contain available codecs, resolutions and their maximum sensor frame rates
for URSA Mini 4.6K and URSA Mini Pro 4.6K models.
Resolution Codec
URSA Mini Pro 4.6K URSA Mini 4.6K
Sensor
scan
Max Frame
Rate
Sensor
scan
Max Frame
Rate
4.6K
4608x2592
Blackmagic RAW 3:1 Full 60 – –
Blackmagic RAW 5:1 Full 60 – –
Blackmagic RAW 8:1 Full 60 – –
Blackmagic RAW 12:1 Full 60 – –
Blackmagic RAW Q0 Full 60 – –
Blackmagic RAW Q5 Full 60 – –
ProRes 444XQ Full 30 Full 30
ProRes 444 Full 30 Full 30
ProRes HQ Full 40 Full 40
ProRes 422 Full 40 Full 40
Pr o Res LT Full 40 Full 40
ProRes Proxy Full 40 Full 40
CinemaDNG RAW Full 60 (dual card) Full 60 (dual card)
CinemaDNG 3:1 Full 60 Full 60
CinemaDNG 4:1 Full 60 Full 60
4.6K 2.4:1
4608x1920
Blackmagic RAW 3:1 Window 60 – –
Blackmagic RAW 5:1 Window 60 – –
Blackmagic RAW 8:1 Window 60 – –
Blackmagic RAW 12:1 Window 60 – –
Blackmagic RAW Q0 Window 60 – –
Blackmagic RAW Q5 Window 60 – –
ProRes 444XQ Window 40 Window 40
ProRes 444 Window 40 Window 40
ProRes HQ Window 50 Window 50
ProRes 422 Window 50 Window 50
Pr o Res LT Window 50 Window 50
ProRes Proxy Window 50 Window 50
CinemaDNG RAW Window 60 (dual card) Window 60 (dual card)
CinemaDNG 3:1 Window 60 Window 60
CinemaDNG 4:1 Window 60 Window 60
39Recording
Page 38

Resolution Codec
URSA Mini Pro 4.6K URSA Mini 4.6K
Sensor
scan
Max Frame
Rate
Sensor
scan
Max Frame
Rate
4K 16:9
4096x2304
Blackmagic RAW 3:1 Window 60 – –
Blackmagic RAW 5:1 Window 60 – –
Blackmagic RAW 8:1 Window 60 – –
Blackmagic RAW 12:1 Window 60 – –
Blackmagic RAW Q0 Window 60 – –
Blackmagic RAW Q5 Window 60 – –
ProRes 444XQ
Full or Window
30
Full or Window
30
ProRes 444
Full or Window
30
Full or Window
30
ProRes HQ
Full or Window
50
Full or Window
50
ProRes 422
Full or Window
50
Full or Window
50
Pr o Res LT
Full or Window
50
Full or Window
50
ProRes Proxy
Full or Window
50
Full or Window
50
CinemaDNG RAW Window 60 (dual card) Full 60 (dual card)
CinemaDNG 3:1 Window 60 Full 60
CinemaDNG 4:1 Window 60 Full 60
4K DCI
4096x2160
Blackmagic RAW 3:1 Window 60 – –
Blackmagic RAW 5:1 Window 60 – –
Blackmagic RAW 8:1 Window 60 – –
Blackmagic RAW 12:1 Window 60 – –
Blackmagic RAW Q0 Window 60 – –
Blackmagic RAW Q5 Window 60 – –
ProRes 444XQ
Full or Window
40
Full or Window
40
ProRes 444
Full or Window
40
Full or Window
40
ProRes HQ
Full or Window
50
Full or Window
50
ProRes 422
Full or Window
50
Full or Window
50
Pr o Res LT
Full or Window
50
Full or Window
50
ProRes Proxy
Full or Window
50
Full or Window
50
CinemaDNG RAW Window 60 (dual card) Window 60 (dual card)
CinemaDNG 3:1 Window 60 Window 60
CinemaDNG 4:1 Window 60 Window 60
40Recording
Page 39

Resolution Codec
URSA Mini Pro 4.6K URSA Mini 4.6K
Sensor
scan
Max Frame
Rate
Sensor
scan
Max Frame
Rate
3K
Anamorphic
3072x2560
Blackmagic RAW 3:1 Window 60 - -
Blackmagic RAW 5:1 Window 60 - -
Blackmagic RAW 8:1 Window 60 - -
Blackmagic RAW 12:1 Window 60 - -
Blackmagic RAW Q0 Window 60 - -
Blackmagic RAW Q5 Window 60 - -
ProRes 444XQ Window 40 Window 40
ProRes 444 Window 40 Window 40
ProRes HQ Window 60 Window 60
ProRes 422 Window 60 Window 60
Pr o Res LT Window 60 Window 60
ProRes Proxy Window 60 Window 60
CinemaDNG RAW Window 60 (dual card) Full 60 (dual card)
CinemaDNG 3:1 Window 60 Full 60
CinemaDNG 4:1 Window 60 Full 60
2K 16:9
2048x1152
&
2K DCI
2048x1080
Blackmagic RAW 3:1 Window 120 - -
Blackmagic RAW 5:1 Window 120 - -
Blackmagic RAW 8:1 Window 120 - -
Blackmagic RAW 12:1 Window 120 - -
Blackmagic RAW Q0 Window 120 - -
Blackmagic RAW Q5 Window 120 - -
ProRes 444XQ Window 120 Window 120
ProRes 444 Window 120 Window 120
ProRes HQ Window 120 Window 120
ProRes 422 Window 120 Window 120
Pr o Res LT Window 120 Window 120
ProRes Proxy Window 120 Window 120
ProRes 444XQ Full 60 Full 60
ProRes 444 Full 60 Full 60
ProRes HQ Full 60 Full 60
ProRes 422 Full 60 Full 60
Pr o Res LT Full 60 Full 60
ProRes Proxy Full 60 Full 60
CinemaDNG RAW Window 120 Window 120
CinemaDNG 3:1 Window 120 Window 120
CinemaDNG 4:1 Window 120 Window 120
41Recording
Page 40

To select your desired codec and resolution on Blackmagic URSA Mini.
1 Press the 'menu' button on the control panel.
2 Navigate to the first page of the 'record' tab.
3 Tap your desired combination of codec, quality, and resolution.
4 If you want to record using a windowed sensor area, navigate to page 2 of the 'record'
menu and enable 'window sensor.' To record with the full sensor, set this to 'off'.
5 Press 'menu' to exit.
Recording Formats and Project Frame Rates
After setting your codec and resolution, you should set your ‘project’ and ‘sensor’ frame rates.
Refer to the 'recording' section in this manual for more information about frame rates.
The project frame rates available for all URSA Mini cameras are as follows:
23.98, 24, 25, 29.97, 30, 50, 59.94, and 60 frames per second.
The only exception is ProRes 444XQ or ProRes 444, which offers project frame rates of 23.98,
24, 25, 29.97 and 30 when shooting higher than 2K 16:9 resolution. For 4.6K and 4K lossless
RAW ensure that you are using a card on our supported RAW list and for frame rates above
30fps use 'record RAW on 2 cards’ which can be found in the second page of the
'record' menu.
Trigger Record
Your URSA Mini automatically sends a signal via the SDI outputs that will trigger recording
whenconnected to equipment that supports the SDI trigger record feature, such as Blackmagic
Video Assist. This means when you press record on your camera, your external SDI equipment
will also start recording, and will stop recording when you press record again.
You will also need to set your equipment to enable SDI trigger recording to make sure it
responds to the trigger signal from your URSA Mini. If your SDI equipment supports SDI trigger
recording, it can usually be enabled using your SDI equipment’s settings menu.
You can trigger recording on other SDI video equipment, for example
BlackmagicVideo Assist 4K, using the trigger record feature on your camera
42Recording
Page 41

Record Duration Table
Tables are provided showing approximate record duration in minutes and seconds relative
toformat, project frame rate and media size. The maximum recording time for your storage
media will vary depending on the data size of the CFast or SD card and the recording format
and framerate you choose. For example, the storage rate for Apple ProRes 422 HQ at 3840 x
2160 is approximately 880 Mbps. At 24 frames per second, you can record approximately
47minutes ofvideo on a 256GB CFast 2.0 or SD card. At the same settings you can record
approximately 23minutes of video on a 128GB CFast 2.0 or SD card, which is approximately half
the record duration of the 256GB card. These durations are also the same for when recording
to SSDs using the URSA Mini SSD Recorder.
It should be noted that record duration on CFast 2.0 and SD cards can also vary slightly
between cards from different manufacturers. It can also vary depending on whether the storage
media is formatted as exFAT or Mac OS X Extended.
Simple scenes containing less detail tend to require less data than more dense compositions.
The values in these tables assume shots with a high complexity, which means you may get
slightly longer record times depending on the nature of your shoot.
Record duration table for recording on URSA Mini.
HD
CFast
Card
Frame
Rate
Blackmagic
RAW 3:1*
Blackmagic
RAW 5:1*
Blackmagic
RAW 8:1*
Blackmagic
RAW 12:1*
ProRes
444 XQ
ProRes
422 HQ
ProRes
42 2 LT
CinemaDNG
RAW
CinemaDNG
RAW 4:1
Duration Duration Duration Duration Duration Duration Duration Duration Duration
256GB
23.98 159 mins 264 mins 418 mins 619 mins 84 mins 189 mins 403 mins 75 mins 175 mins
24 159 mins 264 mins 418 mins 618 mins 84 mins 189 mins 403 mins 75 mins 175 mins
25 153 mins 253 mins 402 mins 595 mins 81 mins 182 mins 387 mins 72 mins 168 mins
29.976 128 mins 212 mins 336 mins 499 mins 68 mins 152 mins 324 mins 60 mins 141 mins
30 127 mins 212 mins 336 mins 499 mins 67 mins 152 mins 324 mins 60 mins 140 mins
50 76 mins 127 mins 203 mins 303 mins 40 mins 91 mins 196 mins 36 mins 84 mins
59.94 64 mins 106 mins 170 mins 254 mins 34 mins 76 mins 163 mins 30 mins 70 mins
60 64 mins 106 mins 170 mins 253 mins 33 mins 76 mins 163 mins 30 mins 70 mins
TIP Sometimes in extremely cold weather conditions, for example 0-5º Celsius and
32-41º Fahrenheit, your URSAMini 4K may take up to thirty seconds to reach optimal
running temperature. During this time you can record if you need to, but we recommend
waiting for your camera to warm up andstabilize. When optimal running temperature is
achieved, your camera will recalibrate to compensate for the sensor’s temperature
change and you maynotice a single white flash frame. This will only occur while not
recording and will improve your results when shooting in cold climates.
43Recording
Page 42

ULTRA HD
CFast
Card
Frame
Rate
Blackmagic
RAW 3:1*
Blackmagic
RAW 5:1*
Blackmagic
RAW 8:1*
Blackmagic
RAW 12:1*
ProRes
444 XQ
ProRes
422 HQ
ProRes
42 2 LT
CinemaDNG
RAW
CinemaDNG
RAW 4:1
Duration Duration Duration Duration Duration Duration Duration Duration Duration
256GB
23.98 41 mins 68 mins 110 mins 164 mins 21 mins 47 mins 101 mins 19 mins 45 mins
24 41 mins 68 mins 109 mins 164 mins 21 mins 47 mins 101 mins 19 mins 45 mins
25 39 mins 66 mins 105 mins 157 mins 20 mins 45 min 97 mins 18 mins 43 mins
29.976 33 mins 55 mins 88 mins 131 mins 16 mins 38 mins 81 mins 15 mins 36 mins
30 33 mins 55 mins 88 mins 131 mins 16 mins 38 mins 81 mins 15 mins 36 mins
50 19 mins 33 mins 52 mins 79 mins – 22 mins 48 mins 9 mins 21 mins
59.94 16 mins 27 mins 44 mins 66 mins – 18 mins 40 mins 7 mins 18 mins
60 16 mins 27 mins 44 mins 66 mins – 18 mins 40 mins 7 mins 18 mins
Record duration table for recording on URSA Mini 4.6K and URSA Mini Pro 4.6K.
4.6K
CFast
Card
Frame
Rate
Blackmagic
RAW 3:1*
Blackmagic
RAW 5:1*
Blackmagic
RAW 8:1*
Blackmagic
RAW 12:1*
ProRes
444 XQ
ProRes
422 HQ
ProRes
42 2 LT
CinemaDNG
RAW
CinemaDNG
RAW 4:1
Duration Duration Duration Duration Duration Duration Duration Duration Duration
256GB
23.98 28 mins 48 mins 76 mins 115 mins 14 mins 33 mins 70 mins 13 mins 31 mins
24 28 mins 48 mins 76 mins 114 mins 14 mins 33 mins 70 mins 13 mins 31 mins
25 27 mins 46 mins 73 mins 110 mins 14 mins 31 mins 66 mins 13 mins 30 mins
29.976 23 mins 38 mins 61 mins 92 mins 11 mins 26 mins 56 mins 10 mins 25 mins
30 23 mins 38 mins 61 mins 92 mins 11 mins 26 mins 56 mins 10 mins 25 mins
50 13 mins 23 mins 36 mins 55 mins – – – 6 mins 15 mins
59.94 11 mins 19 mins 30 mins 46 mins – – – 5 mins 12 mins
60 11 mins 19 mins 30 mins 46 mins – – – 5 mins 12 mins
* Blackmagic RAW is available on the URSA Mini Pro 4.6K only.
Constant quality settings for Q0 and Q5 will display varying record time remaining durations.
The estimated duration for Q0 is similar to constant bitrate 3:1, and Q5 will display a similar
duration to 12:1, however, as the estimated duration updates every 10 seconds while recording,
the best way to gauge how much recording time you have is to record for 20 seconds and
monitor the duration in the media area of the touchscreen display.
44Recording
Page 43

Playback
Playing Back Clips
Once you have recorded your video, you can use the transport control buttons to play back
your clips.
Press the ‘play’ button once for instant playback and you’ll see your recorded video on
URSAMini's LCD touchscreen. Your clips can also be viewed on any display connected to
yourURSAMini's SDI outputs.
URSA Mini Camera
URSA Mini Pro 4.6K Camera
1
2
CFAST
TIP Blackmagic URSA Mini has playback and transport controls buttons on both the
internal and ergonomic control panels.
45Playback
Page 44

The controls of your camera work just like a CD player, so pressing the ‘forward skip’ button
willskip to the start of the next clip. Press the ‘reverse skip’ button once to go to the start of the
current clip or press twice to skip back to the start of the previous clip. Hold the ‘forward’ or
‘reverse skip’ button to play or reverse at 2x speed. Once shuttling forward or backwards, press
the 'fast forward' or 'reverse skip' buttons twice for 4x, three times for x8 and four times for x16.
You can also use the forward and reverse skip buttons to open or close the iris on compatible
lenses while recording clips.
When recording a clip using a sensor frame rate that differs from your project frame rate, your
clip’s playback speed will also differ. For example, imagine you have set your camera’s project
frame rate to match your post production timeline of 24 frames per second. If you record a clip
with your sensor frame rate set to 60 frames per second, your clips will play back in slow motion
on both the camera and on your post production timeline.
NOTE Blackmagic URSAMini will playback clips of different quality settings as long as
they are in the same codec, framerate and resolution.
TIP Refer to the 'recording' section of this manual for more information about
framerate.
46Playback
Page 45

Introduction to URSA Mini
Industry standard BNC connectors are located on the right and rear panel of your URSA Mini
forSDI connections. There are also two separate LANC inputs, one for the side handle and one
at the rear of the camera for an external LANC controller.
XLR inputs are on the top panel behind the mounting points for professional balanced analog
audio on URSA Mini and URSA Mini Pro 4.6K, and AES digital audio input on URSA Mini
Pro4.6K. A 4 pin XLR connector is provided on the rear panel for external power input, and an
output is available on the right side for powering accessories such as Blackmagic
URSAViewfinder.
The USB port above the storage media slots on your URSA Mini is for connecting to a
computerwhen updating your camera’s internal software.
Camera Front
4.6K
LENS
SDI OUT
12V OUT
3
1
2
ND
FILTER
4.6K
AUTO
W/B
LENS
SDI OUT
12V OUT
4
5
URSA Mini PL model URSA Mini Pro 4.6K model
1 Stereo Microphone
Built in high quality stereo microphone. Refer to the ‘settings’ section for information on
microphone audio settings.
2 Lens Mount
URSA Mini cameras feature either an EF or PL lens mount. URSA Mini Pro 4.6K features
an interchangeable lens mount that allows switching between EF, F, PL and B4 mounts.
Refer to the 'interchangeable lens mount' section for more information.
3 Broadcast Lens Connector
This connector provides power and control to compatible PL and B4 mount lenses
with12 pin connections. This connector is only available on URSA Mini PL and
URSAMini Pro 4.6K models. Refer to the 'using servo zoom lenses' section in this
manual for a list of compatible lenses, including PL and B4 models.
NOTE URSA Mini Pro 4.6K features additional ergonomic controls that make it easy
toquickly access the camera’s essential settings and functions without opening the
foldout touchscreen.
47Introduction to URSA Mini
Page 46

4 ND Filters
Use this wheel to cycle through three built in neutral density filters, as well as a clear
setting. See the section 'URSA Mini Pro 4.6K control buttons' for more information.
5 Auto White Balance
The auto white balance button is marked 'Auto W/B' and is used when you want to set
the white balance based on what is currently in the center of the screen. Forexample,
setting auto white balance on a gray card placed in front of the lens. Seethe section
'URSA Mini Pro 4.6K control buttons' for more information.
Left Side – URSA Mini
URSA Mini’s left side panel lets you insert CFast cards, access the control panel and change
settings. The USB port is located just above the CFast slots so you can easily plug into a
computer when updating your URSA Mini’s internal software.
6 Fold Out Touchscreen
5 inch fold out touchscreen monitor, pivots for viewing at different camera heights.
Refer to the 'touchscreen controls' section for more information.
7 Audio Level Adjustment Knobs
Adjustment knobs to set the recording levels for audio channels 1 and 2.
Refer to the 'URSA Mini controls' section.
8 Mini USB Port
Mini USB Port for updating internal software. Refer to the ‘Blackmagic Camera Setup
Utility’ section for more information.
9 Control Panel Buttons
Buttons for powering the camera, record and playback control, focus peaking,
accessing the settings menu, plus iris and auto focus control on compatible EF lenses.
Refer to the 'URSA Mini controls' section for more information.
10 Memory Card Slots
Insert CFast 2.0 cards into the slots for record and playback. Refer to the
'storagemedia' section.
1
2
CFAST
6
7
8
9
10
48Introduction to URSA Mini
Page 47

Left Side – URSA Mini Pro 4.6K
URSA Mini Pro 4.6K's left side panel features additional controls for easy access to all of your
camera's essential functions. These controls are split between the forward control panel, the
ergonomic control panel located on the outside of the foldout touchscreen monitor, and a
control panel on the inside of the foldout monitor.
CFast and SD card slots are located behind the foldout monitor. The USB-C port is above these
memory card slots, and is used to connect to a computer to update your URSA Mini Pro 4.6K's
internal software.
URSA Mini Pro 4.6K model, foldout touchscreen closed
11 Power Switch
Power switch for turning on the camera. There is also a backup power switch inside the
fold out monitor that allows the camera to be powered on by pressing both the record
and forward skip buttons at the same time.
12 ND Filters
Your URSA Mini has three internal neutral density filters to adjust the amount of light
reaching the sensor. Four settings are available, ranging from clear to six stops of light
reduction. Simply turn this wheel to move through the available settings. The filter will
click into place for each setting. For more information see the section 'URSAMini Pro
4.6K control buttons' in this manual.
13 Forward Control Panel
The forward control panel provides quick access to all of your URSA Mini Pro 4.6K's
essential functions. These controls are located for easy access when shooting on
a tripod or on the shoulder, and you can use them to adjust settings such as ISO,
shutterangle or shutter speed, iris, white balance, frame rate, and more. See the
section 'URSA Mini Pro 4.6K control buttons' for more information.
14 Ergonomic Control Panel
On the outside of your URSA Mini Pro 4.6K's foldout touchscreen monitor, you'll find an
LCD status monitor and a variety of controls for fast, powerful monitoring control. Here
you can see all of your camera's status information at a glance, as well as controlling a
variety of powerful monitoring functions. See the section 'URSA Mini Pro 4.6K control
buttons' for more information.
12
11
13
14
49Introduction to URSA Mini
Page 48

URSA Mini Pro 4.6K model, foldout touchscreen open
15 Storage Media Selection Switch
Use this switch to choose between CFast and SD storage media.
16 USB Port
USB-C port for updating internal software. See the section 'Blackmagic Camera Setup
Utility' for more information.
17 Internal Control Panel
When your URSA Mini Pro 4.6K's foldout monitor is open, you have access to the
internal control panel. Use the controls here to set your audio inputs as well as phantom
power settings. You can also access iris, focus, menu and playback controls and more.
See the section 'URSA Mini Pro 4.6K control buttons' for more information.
18 Memory Card Slots
Insert CFast 2.0 cards, SDXC or SDHC cards for record and playback. Please note that
you should check the list of certified cards in this manual or on our website. See the
section 'storage media' for more information.
Right Side
URSA Mini’s right side panel gives you access to all the video, audio and power connectors plus
the side handle rosette mount.
URSA Mini PL model
19 Side Rosette Mount
Standard rosette mount for the side handle. Refer to the ‘Getting Started’ and
‘BlackmagicURSA Mini Shoulder Mount Kit’ sections.
XLR 1 XLR 2
1615
18
17
19
20
21
22
23
50Introduction to URSA Mini
Page 49

20 HD Monitoring Output
3G-SDI connector for down converted 1080HD output. Use with Blackmagic URSA
Viewfinder or external monitors. Refer to the 'camera video output' and ‘Blackmagic
URSA Viewfinder’ sections for more information.
21 +12V Power Output
4 pin XLR connector for powering Blackmagic URSA Viewfinder, Blackmagic URSAStudio
Viewfinder or external monitors and accessories. Refer to the ‘Blackmagic URSA
Viewfinder’ and ‘Blackmagic URSA Studio Viewfinder’ sections for more information.
22 LANC Input
Dedicated 2.5mm TRS LANC connector for Blackmagic URSA Mini side handle.
Refertothe 'getting started' section for more information on connecting
theside handle.
23 Broadcast Lens Control Connector
Provides power and control to compatible PL and B4 mount lenses with 12pin connections.
This connection is available on URSA Mini PL and URSA Mini Pro4.6K models.
Rear Panel
24 Battery Mount Plate
Your Blackmagic URSA Mini has 4 mounting points and a molex connector behind
asmall cover for attaching the optional V mount or gold mount battery plate.
Refer to the 'mounting batteries' section for more information.
25 LANC
This 2.5mm jack is used for external LANC remote control, such as an external record
start stop control mounted to a tripod arm. LANC supports record start and stop, plus
iris and focus control using compatible EF lenses.
26 12G-SDI Out
Blackmagic URSA Mini’s 12G-SDI output is used to send HD and Ultra HD video
to SDIequipment such as routers, monitors, SDI capture devices, and broadcast
switchers. You can also connect the 12G-SDI output to an external recorder such as
theBlackmagic Video Assist for backup recording.
24
25
26
27
28
29
30
51Introduction to URSA Mini
Page 50

27 12G-SDI In
The 12G-SDI input is used for connecting to a switcher or external recorder and can be
used to view playback, talkback, tally or external reference signals. When used with an
ATEM switcher, you can also adjust the camera functions using the switcher’s ‘camera
control’ feature.
If you’re using URSA Mini in a live broadcast, you can plug in the switcher’s program
output and monitor it during the shoot, or check playback from an external recorder.
Press and hold the ‘pgm’ button to see the program feed. For more information, refer
tothe ‘control buttons’ section for URSA Mini or ‘ergonomic control panel’ section for
URSA Mini Pro 4.6K.
To receive tally and talkback via the SDI input, make sure you have set your ATEM
Camera ID in the camera’s setup menu. If you want to use the SDI input to receive an
external reference signal, you will need to select ‘program’ as your reference source in
the setup settings. ‘REF’ will appear next to the timecode display on your camera’s LCD
screen when the external reference is locked. Refer to the 'setup settings' in the manual
for more information.
On URSA Mini Pro 4.6K the SDI Input can be used for feeding external timecode to the
camera as well. This will lock to the incoming timecode automatically if the frame rate of
the incoming SDI signal matches and has valid timecode. The 'EXT' logo will appear on
URSA Mini Pro 4.6K's LCD when external timecode is locked. If you unplug the cable
timecode will remain jammed and the logo will switch to 'INT' to let you know it is now
running from URSA Mini Pro's internal timecode clock.
28 Reference and Timecode In
This input automatically recognizes and switches between timecode and reference
input signals. Synchronize Blackmagic URSA Mini to a common reference signal, such
as tri-level sync, by connecting to the ‘reference’ BNC input marked ‘REF In’. It's worth
noting that to use a reference signal through this input, you must set your reference
source to 'external' in your URSA Mini's setup menu.
You can also use this connector to match an external timecode source to sync up
multiple cameras, or audio and picture when shooting dual-system. This ensures audio
and picture, or video from multiple cameras, can be easily synchronized during post
production. When external timecode with a matching frame rate is plugged into this
connector the camera will lock to the incoming timecode automatically. The 'EXT' logo
will appear on URSA Mini's LCD when external timecode is locked. If you unplug the
cable, timecode will remain jammed and the logo will switch to 'INT' to let you know it
isnow running from URSA Mini Pro's internal timecode clock.
You can also set your camera to use the reference signal from an ATEM switcher via the
SDI Input. This is helpful when working with ATEM switchers because all cameras can
receive program return, camera control, tally, talkback, reference and timecode using
asingle SDI signal. See the 'setup settings' section in this manual for more information.
29 12V+ Power Input
Use the 4 pin 12-20 Volt DC XLR connector to plug in power from external sources such
as the supplied power adapter, or portable batteries.
30 Headphone/Headset
The 3.5mm jack output is used for headphone monitoring and talkback. You can plug in
iPhone and Android compatible headsets that have a built in microphone for quick and
easy talkback. Talkback audio is embedded in channels 15 and 16 of the SDI output.
52Introduction to URSA Mini
Page 51

Top Panel
31 1/4 Inch Mounting Points
Your camera’s top panel contains 4 strong mounting points for attaching the top handle
andaccessories.
32 XLR Audio In
Use the balanced XLR inputs to plug in external analog audio from professional
equipment such as audio mixers, PA systems or external microphones. The XLR
connectors supply 48V phantom power so you can use microphones that aren’t self
powered. To enable phantom power select ‘inputs’ on the ‘audio input’ setting, plus
‘mic low’ or ‘mic high’ on the audio ‘input levels’ settings. Scroll the menu to reveal the
‘phantom power’ setting and select ‘on’. To disable phantom power, select ‘off’. Phantom
power is active only when external audio inputs are selected in the audio settings.
External analog audio can be plugged into the
balanced XLR connectors on the top panel
Underside
33 1/4 Inch Mounting Points
The 5 mounting points on the underside are used for attaching tripod heads,
theoptional URSA Mini shoulder mount kit and other accessories.
TIP When using URSA Mini or URSA Mini Pro 4.6K's 3.5mm jack for talkback, a very
affordable option is using an iPhone or Android compatible headset. These typically
feature inline button that can be used to mute and unmute their microphone. If you
would like to use a broadcast headset without this inline switch you can configure your
URSA Mini or URSA Mini Pro 4.6K's function buttons to offer the same functionality.
Seethe 'setup settings' section of this manual for more information.
PUSHPUSH
3231
Blackmagic URSA Mini
33
53Introduction to URSA Mini
Page 52

URSA Mini Controls
Your Blackmagic URSA Mini has a control panel on the left side, behind the fold out monitor and
contains all the buttons and adjustment knobs you need to change settings and control audio
levels. You can monitor your audio levels using the audio meters on the LCD touchscreen.
Adjust camera settings using the inside control panel buttons and touchscreen
Control Buttons
In addition to the inside control panel, your Blackmagic URSA Mini has control buttons on the
outside of the LCD and on the side handle. The iris, focus, record and playback buttons all
perform the same function.
The outside panel buttons let you record and play back clips, turn focus
peaking on or off, switch between the program and camera view on the LCD,
plus adjust the iris and auto focus when using compatible EF lenses
Iris
The ‘Iris’ button activates the automatic aperture setting on compatible lenses. When
using video dynamic range settings, a single press of the iris button will set an average
exposure based on the highlights or shadows in your shot. When using film dynamic
range settings, pressing the iris button sets your exposure to the brightest highlight in
your shot.
IRIS
REC
FOCUS
PEAK
DISP
MENU
1
2
CFAST
F1 F2
F1 F2
54URSA Mini Controls
Page 53

On URSA Mini EF models, this button works with compatible EF lenses. On URSAMiniPL
models, this button works with compatible lenses connected to the broadcast
lenscontroller.
To set your aperture manually, press the forward and reverse skip transport buttons.
Focus
When using an EF mount with an EF lens that supports electronic focus adjustments,
press the ‘focus’ button to activate auto focus. A white focus square will appear on the
fold out monitor. Anything within the square will be correctly focused. When the lens is
focused, the square will disappear.
Peak
Press the peak button to activate focus peaking. Your camera has two focus peaking
modes, traditional focus peaking, which artificially sharpens areas of the image that are
in focus, and 'colored lines' with overlays the sharp areas of your image with black,
white, red, green or blue colored lines. See the 'monitor settings' section of this manual
for more information. Focus peaking is not recorded to storage media, but can be
displayed via the HD monitoring output and on the fold out monitor by activating
overlays using the touchscreen menu.
Program
The program button is marked PGM and lets you switch the LCD between the camera
view and any signal plugged into the 12G-SDI input on the rear panel. This means if
you’re using URSA Mini in a live broadcast, you can plug in the switcher’s program
output and monitor it during the shoot. Press and hold the program button to see your
program feed. The program feed will continue to display whilst the program button is
being held. Double pressing the program button will switch to the program feed, and
pressing the program button again will exit the program feed. It's worth mentioning that
to display a switcher’s program output, your camera and switcher must be set to the
same frame rate.
Menu
Press the ‘menu’ button to open the dashboard. Refer to the ‘settings’ section for more
information about the dashboard feature and how to adjust settings.
Record
The ‘record’ button is marked REC on your Blackmagic URSA Mini’s control panel,
foldout LCD and side handle. Press any of the record buttons to start and stop
recording. Refer to the ‘recording’ section for more information.
NOTE It’s important to know that while most EF lenses support electronic
focus, some lenses can be set to manual or auto focus modes, and so you
need to ensure your lens is set to auto focus mode.
NOTE When you are setting your reference source for URSA Mini, or
URSAMini Pro 4.6K, you may experience a small dropout on your camera’s
outputs when switching between your reference sources. This is because the
camera is adjusting its referencing timing to match that of the external source.
For this reason it is important not to change this setting during a production,
only whilst setting up.
55URSA Mini Controls
Page 54

Playback Control Buttons
The playback buttons let you start and stop playback, plus skip to the next or previous
clip. OnBlackmagic URSA Mini EF, the forward and reverse skip buttons can also be
used to openor close the iris when using compatible lenses. Refer to the ‘playback’
section for more information on how to use the playback buttons.
Audio Level Adjustment Knobs
Use the built in adjustment knobs to set the recording levels for audio channels 1 and 2.
Turn each knob clockwise or counterclockwise to increase or decrease the recording
level for each channel of audio. Monitor the corresponding on screen audio meters as
you adjust each knob so you can see the best level to set it to.
Turn the audio level adjustment knobs clockwise or counter
clockwise to increase or decrease your audio recording levels
Function Buttons
On the outside of Blackmagic URSA Mini’s LCD there are two ‘function’ buttons marked
F1 and F2. You can map these to your choice of a variety of commonly used functions
using your URSA Mini's 'setup' menu. For more information, see the 'setup settings'
section of this manual.
Side Handle
Your Blackmagic URSA Mini ships with a side handle that provides a comfortable, secure grip
for the camera. The side handle also lets you trigger auto iris and focus on compatible
EFlenses, plus start or stop recording with the simple press of a button. To enable these
functions, you must connect the included LANC cable and connector between the camera and
the side handle.
Control buttons on the side handle let you controlyour Blackmagic
URSAMini via the dedicated LANC port on theside of your camera
1
2
CFAST
1
2
CFAST
56URSA Mini Controls
Page 55

Attaching the Handle
Attaching URSA Mini’s side handle is easy.
1 Open the plastic cap on the right side of the handle to access the tightening screw.
2 Align the handle with URSA Mini’s side rosette mount. Fasten the handle to suit your
desired position and tighten the side handle screw with a large flat head screw driver,
or by twisting the D ring. Close the plastic cap.
Attaching the side handle to Blackmagic URSA Mini
3 URSA Mini is shipped with a short LANC cable so you can control your camera using
the side handle buttons. Connect the LANC cable from the side handle LANC output
tothe camera’s LANC input.
SDI OUT
SDI IN
REF IN
TC IN
12V
57URSA Mini Controls
Page 56

URSA Mini Pro 4.6K Control Buttons
Blackmagic URSA Mini Pro 4.6K has control panels on the chassis, outside and inside of the
foldout touchscreen monitor to give you quick, easy access to all of its essential functions as
well as powerful monitoring tools. These panels are designed to be close to hand whether
shooting from a tripod, handheld or with the shoulder mount kit.
Forward Control Panel
Your URSA Mini Pro 4.6K's forward control panel groups together all of the controls you might
need to adjust when setting up a shot and recording. These are all designed for easy access
while shooting with the foldout monitor closed, such as when using the shoulder mount kit.
URSA Mini Pro 4.6K forward control panel
1 Power Switch
Power your URSA Mini Pro 4.6K by moving this switch to the ‘on’ position. Power off by
moving the switch to the 'off' position.
6
8
1
4 5
9
7
3
2
TIP You can also power your URSA Mini Pro 4.6K on or off via a combination
ofcontrol panel switches. Holding the ‘rec’ and 'forward skip' buttons will
power upthe camera if it is turned off, or power it off if it is turned on. If your
camera’s power switch is set to ‘on’ but your camera is powered down, it may
have been powered down via the control panel. Toggle the power switch to
return it to normaloperation.
58URSA Mini Pro 4.6K Control Buttons
Page 57

2 ND Filters
Your URSA Mini has three internal neutral density filters. Together with a clear filter, the
available settings are ‘2,’ ‘4’ and ‘6’ stops. These filters allow you to reduce the amount
of light reaching your URSA Mini’s sensor by a preset number of exposure 'stops'.
Byreducing the exposure, you can continue shooting at wide apertures in bright
conditions such as outdoors on sunny days.
To adjust your neutral density setting, rotate the wheel upwards or downwards.
The'clear' setting means there is no ND filter being used. From settings 2 to 4, the
NDfilters gradually increase in density so you can decrease light if you need to.
Because different people prefer to use different terms for each ND filter, the
measurement of your ND settings can be customized in the LCD menu. You can identify
the ND filter number, amount of stops in light reduction, or the fraction representing the
amount of light reduced for the filters to suit your preference.
Neutral Density Filter Settings
Wheel position ND number Stops Fraction
1 clear 0 all
2 0.6 2 1/4
3 1.2 4 1/16
4 1.8 6 1/64
3 Settings Wheel
Set this wheel's function by adjusting the adjacent three position switch next to the
wheel. The options are ‘headphone,’ ‘monitor’ and 'iris'.
Headphone
When set to 'headphone', the settings wheel will adjust headphone audio levels.
Rotatethe wheel upwards to increase volume, and downwards to decrease.
Monitor
When set to 'monitor', the settings wheel adjusts audio levels on your URSA MiniPro
4.6K’s built in monitor speaker. The speaker is located on the outside of the
LCDmonitor door and can be used to monitor audio without headphones. Rotate the
wheel upwards to increase volume, and downwards to decrease. This function is
disabled while recording from the camera's internal microphone to prevent
unwanted feedback.
Iris
When set to 'iris', the settings wheel is used to adjust the aperture of compatible lenses
mounted to your URSA Mini Pro 4.6K. Rotating the wheel downwards opens the iris,
and turning the wheel upwards closes the iris. These directions mimic the operation of
aperture on adjustable still and cinema lenses.
TIP To change aperture settings via the settings wheel, URSA Mini Pro 4.6K
must be fitted with a lens that supports changing aperture via the camera.
Ifyou are using a B4 or PL lens connected via the broadcast 12 pin connector,
make sure that the lens iris switch on the handgrip is set to ‘A’ or 'auto'.
59URSA Mini Pro 4.6K Control Buttons
Page 58

4 Menu Wheel
When 'status text' is turned on for your URSA Mini's front SDI output, you can use the
menu wheel to navigate many of the head up display features usually accessed via the
LCD touchscreen.
Simply press the menu wheel as you would a button to access your URSA Mini Pro 4.6K's
head up display on an external monitor such as Blackmagic SmartView, Video Assist or
URSA Viewfinder. While the menu wheel is active, turn the wheel to select features
such as LCDmonitor options, frame rate, ISO, white balance and tint. Press the wheel to
confirm selections and make additional changes, and use the 'back' button next to the
wheel to cancel. You can also use the back button to move up a menu level, or exit the
menu completely if you're at the top level. The menu will automatically close after one
minute of inactivity.
For more information on setting status text and the controls available, see the
'touchscreen controls' and 'monitor settings' sections of this manual.
5 Lock
Toggle this switch to lock all of the controls on the forward control panel to prevent
them from being accidentally adjusted while shooting. Move this switch to the lower
position to lock, and the upper position to unlock.
6 ISO, Shutter and White Balance Switches
These small switches are used to adjust your ISO, white balance, and shutter settings.
They are helpful when you want to make fast adjustments without taking your eyes off
the shot. Gently push the switches up or down to make setting adjustments.
Theswitches are spring loaded so they always return to a neutral position.
ISO
Push this switch up or down to adjust your camera’s ISO setting. Pushing up will
increase the setting one interval, and pushing down will decrease one interval.
Theavailable settings are 200, 400, 800 and 1600 for URSA Mini and 200, 400, 800,
1600 and 3200 on the URSA Mini Pro 4.6K.
Shutter
Use this switch to adjust the camera’s shutter angle or shutter speed, depending on
what you have selected in the setup menu. Pushing up will increase the shutter angle
or shutter speed to the next available preset, and pushing down will decrease the
shutter angle or shutter speed to the next available preset. Holding the switch up or
down will move more quickly through available values. There are twenty shutter angle
presets between 11.2and 360 degrees.
TIP When shooting in busy or uncontrolled environments, you can lock your
URSAMini Pro 4.6K's forward control panel when you leave your camera
unattended. Thisensures that your settings are not changed unintentionally
byothers.
60URSA Mini Pro 4.6K Control Buttons
Page 59

White Balance
This switch is used to adjust the camera’s white balance. Pushing up will increase the
color temperature by 50K, and pushing down will decrease it by 50K. Holding the
switch up or down will move more quickly through available values.
Auto White Balance
Pressing this button will reveal a white ‘auto white balance’ box in the center of the
LCDfor five seconds. This box will also appear on any SDI output that has ‘status text’
enabled in the menu settings. The white box indicates the specific area of your image
where the white balance will be calculated from, so your gray card should be
positioned within this box. Pressing and holding the 'Auto W/B’ button for three
seconds will perform an ‘auto white balance’, and the square will change from white to
green to confirm that this has been performed successfully.
For more information on enabling status text for your URSA Mini's front or main
SDIoutputs, see the 'monitor settings' section in this manual.
7 F1 and F2
The F1 and F2 keys are ‘function’ keys that can be programmed to a variety of
commonly used functions using your URSA Mini Pro 4.6K’s 'setup' menu. By default,
F1issetto 'false color' while F2 is set to 'display LUT'.
For more information, see the 'touchscreen controls' section of this manual.
HFR
Use the HFR or ‘high frame rate’ button to toggle off speed frame rates. To use this
button, simply set the off speed frame rate you’d like to use in your URSA Mini Pro
4.6K’s ‘frame rate’ menu. Pressing this button will toggle between your chosen off
speed frame rate and project frame rate. It's worth mentioning that this setting can only
be adjusted when the recording is stopped.
For more information on project and off speed frame rates, see the ‘touchscreen
controls’ section in this manual.
8 Record
The ‘record’ button is marked REC on your Blackmagic URSA Mini Pro 4.6K's left side.
Pressthe record button to start and stop recording. Refer to the ‘recording’ section for
more information.
Ergonomic Control Panel
On the outside of your URSA Mini Pro 4.6K's touchscreen monitor, you'll find an LCD status
monitor and a variety of monitoring controls. This panel lets you see all of your camera's status
information at a glance, as well as monitoring and adjusting audio levels. Automatic focus can
be set using compatible lenses and the transport controls let you playback clips.
TIP Your URSA Mini Pro 4.6K can also suggest flicker free shutter angles or
shutter speeds based on the power frequency in your region. These must be
selected through the LCDtouchscreen menu. For more information see the
‘touchscreencontrols’ section in this manual.
61URSA Mini Pro 4.6K Control Buttons
Page 60

URSA Mini Pro 4.6K ergonomic control panel
9 Monitor Speaker
The small speaker built into the outside control panel lets you monitor audio when
inplayback. It is located where your ear would normally be when shooting with the
camera on your shoulder.
To adjust the volume of the speaker, simply rotate the settings wheel as described
inthe 'URSA Mini Pro 4.6K Control Buttons' section.
10 Monitor Channel Select
Your URSA Mini Pro 4.6K currently supports two channels of audio. In a future software
update, up to four channels will be available, divided into pairs. You will be able to
choose the pair monitored by your LCD status display and monitor speaker by using
this switch.
11 Lock
Use this switch to lock all of the settings on your URSA Mini Pro 4.6K's ergonomic
control panel. The only controls that will remain active while the lock switch is 'on'
arethe monitor channel select switches.
12 Status LCD
This display shows you your URSA Mini Pro 4.6K’s essential settings at a glance,
without needing to open the internal touchscreen. This screen is designed to be
visibleeven in bright daylight. The following information is available:
15
14
10 11
13
16
12
62URSA Mini Pro 4.6K Control Buttons
Page 61

Timecodes
Your URSA Mini Pro 4.6K displays three timecodes. If you have an external timecode
connected, this will be shown under the 'ext' indicator in the top left of the status LCD.
Your URSA Mini's internally generated timecode is shown next to this under the 'gen'
indicator. Both the external and generated timecodes are shown in hours, minutes,
seconds and frames.
The larger, main timecode indicator displays your current timecode as either clip
duration or timecode. You can switch between these two display modes by pressing
the 'timecode' button underneath the status LCD.
Battery indicator
If your URSA Mini Pro 4.6K is running on battery power, this indicator displays remaining
battery life in 25% increments. Each of the battery indicator’s four bars corresponds to
25% battery life remaining. When your battery drops below 20% charge, the color of the
status LED, near the record button begins to flash. It will alternate slowly between red
and orange during recording and alternate between white and orange during
standby mode.
This indicator is not shown when your camera is running off mains power.
FPS, Shutter Angle, White Balance
The ‘FPS,’ ‘SA,’ and ‘WB’ indicators display your camera’s current frame rate, shutter
angle and white balance. The ‘fps’ indicator shows the current sensor frame rate.
Formore information on sensor and project frame rates, see the 'touchscreen controls'
section in this manual.
ISO
Displays your camera’s currently set ISO.
Iris
Displays your current lens aperture. Depending on your lens type, this will be
displayedas an ‘f' or ’T’ stop.
Battery indicator
Audio metersCard indicatorIris
Low record
time remaining
FPS, Shutter Angle, White Balance
Record
indicator
Timecodes
ISO
Dropped
frame
indicator
63URSA Mini Pro 4.6K Control Buttons
Page 62

Card Information
The ‘card 1’ and ‘card 2’ indicators will appear on your URSA Mini Pro 4.6K’s status
LCDwhen these slots are occupied.
The ‘SD’ indicator appears if you are recording on SD cards, and disappears if you are
recording on CFast cards.
Record Indicator
While recording, a circular indicator will appear under the card or cards being currently
written to.
Low Time Remaining
A ‘low’ indicator will appear under the relevant card when you have approximately
5minutes of record time remaining.
Audio Meters
The peak audio meters display audio levels when using the internal microphone, or via
external audio when connected. The display is calibrated to dBFS units and features
peak hold indicators which stay visible for a short time so you can clearly see the
maximum levels reached.
To achieve optimum audio quality, ensure your audio levels do not reach 0 dBFS.
Thisis the maximum level that your camera can record, meaning that any audio that
exceeds this level will be clipped, resulting in distortion.
Dropped Frame Indicator
This indicator will flash when your camera detects dropped frames. Once you stop
recording, the indicator will remain on the screen to let you know that the previous clip
detected dropped frames. This warning disappears the next time you start recording,
or if you power cycle the camera. For more information on avoiding dropped frames,
see the ‘storage media’ section in this manual.
13 Status LCD Controls
URSA Mini Pro 4.6K status LCD controls
NOTE You can set your URSA Mini Pro 4.6K to stop recording if dropped
frames are detected. See the ‘recordsettings’ section in this manual for more
information. This feature is user selectable as you may be able to get away with
brief periods of 'burst' recording at higher frame rates or resolutions when
shooting to slower media.
64URSA Mini Pro 4.6K Control Buttons
Page 63

Still
Press this button to capture a still image as a single uncompressed DNG frame. Image
files will be saved to the 'stills' folder in the root directory of the media you are currently
recording to. These will follow the file naming convention for video clips but the
filename will have an ‘S001’ representing the ‘still number’ as the last four digits of the
filename. To confirm you have successfully saved a still, an image of a camera will show
in the top right corner of the URSA Mini touchscreen and the record indicator on the
status LCD will flash three times.
Hold
Use this button to temporarily hold the main status LCD timecode when the timecode is
in free running time of day code. The timecode will continue to run in the background
and return to its actual position when you release the ‘hold’ button. While holding you
can take note of the timecode for a particular event. This can be useful in electronic
news gathering or documentary situations for noting key timecode points.
Reset
The reset button allows you to reset the timecode to 00:00:00:00 when you are setting
your preset timecode.
Timecode
Press the ‘timecode’ button to toggle the main timecode display’s format between clip
duration and timecode. By default the timecode will be free running time of day code as
this is the most frequently used. If you press and hold the ‘timecode’ button for five
seconds it will switch the camera into record run timecode and the timecode generator
will flash as well as the first two digits of the large timecode display. This indicates that
you are now editing your preset timecode and allows you to set a specific timecode
number for your preset timecode.
Pressing ‘reset’ at this stage will zero the timecode and then you can turn and press
themenu wheel to set the desired value starting with hours, minutes, seconds and then
frames. When you are happy with the timecode, press and hold the ‘timecode’ button
again for three seconds to set this as your preset timecode point. You will notice that
the timecode generator now shows this value and will only increment when the camera
is recording giving you continuous ascending timecode values. To switch your
timecode back to free running time of day code, press the ‘timecode’ and ‘hold’ buttons
simultaneously for three seconds.
Bright
Press the ‘bright’ button to cycle through four brightness settings for your URSA Mini
Pro 4.6K’s LCD status display. The settings are ‘off,’ ‘low,’ ‘medium’ and ‘high.’
14 Control and Playback Buttons
URSA Mini Pro 4.6K control and playback buttons
65URSA Mini Pro 4.6K Control Buttons
Page 64

Iris
The 'iris' button activates the automatic aperture setting on compatible lenses. When
using video dynamic range settings, a single press of the iris button will set an average
exposure based on the highlights or shadows in your shot. When using film dynamic
range settings, pressing the iris button sets your exposure to the brightest highlight in
your shot. This button works with compatible EF lenses and PLlenses connected with
acompatible broadcast lens controller.
To set your aperture manually, press the forward and reverse skip transport buttons.
Focus
When using an EF lens that supports electronic focus adjustments, press the ‘focus’
button to activate auto focus. A white focus square will appear on any viewfinder or
monitor connected to your URSA Mini Pro 4.6K. Anything within the square will be
correctly focused. When the lens is focused, the square will disappear.
Program
The program button is marked PGM and lets you switch the LCD between the camera
view and any signal plugged into the 12G-SDI input on the rear panel. This means if
you’re using URSA Mini Pro 4.6K in a live broadcast, you can plug in the switcher’s
program output and monitor it during the shoot. Press and hold the program button to
see your program feed. The program feed will continue to display whilst the program
button is being held.
If you want to lock the monitor to display the program input feed, then double press the
program button to lock the display to the program feed. Pressing the program button
again will exit the program feed and return to the camera view.
Playback Control Buttons
The playback buttons let you start and stop playback, plus skip to the next or previous
clip. When using an EF lens, the forward and reverse skip buttons can also be used to
open or close the iris when using compatible lenses. Refer to the ‘playback’ section for
more information on how to use the playback buttons.
15 Audio Level Adjustment Knobs
URSA Mini Pro 4.6K audio adjustment knobs
NOTE Some lenses have both manual and auto focus modes. In order for
URSA Mini to be able to auto focus with your lens, you need to ensure that your
lens is set to auto focus mode.
66URSA Mini Pro 4.6K Control Buttons
Page 65

Use the built in adjustment knobs to set the recording levels for audio channels 1 and 2.
Turn each knob clockwise or counterclockwise to increase or decrease the recording
level for each channel of audio. Monitor the corresponding on screen audio meters as
you adjust each knob so you can see the best level to set it to.
Internal Control Panel
With your URSA Mini Pro 4.6K's foldout monitor open, you can access the internal control panel.
Use the controls here to set your audio inputs as well as phantom power settings, iris, focus,
menu and playback controls and more.
URSA Mini Pro 4.6K internal control panel
16 XLR1 / XLR2
Use these switches to set how your URSA Mini Pro 4.6K's XLR inputs behave when
selected as an input source. The options available are mic audio, line level audio and
AES digital audio.
17 Phantom Power
Your URSA Mini Pro 4.6K’s XLR inputs can provide 48V phantom power so you can use
microphones that aren’t self powered. Move this switch to ‘48V’ to enable phantom
power for any microphone connected to the XLR above, or ‘off’ to disable
phantom power.
18 Control and Playback Buttons
Focus
When using an EF mount with an EF lens that supports electronic focus adjustments,
press the ‘focus’ button to activate auto focus. A white focus square will appear on the
fold out monitor. Anything within the square will be correctly focused. When the lens is
focused, the square will disappear.
XLR 1 XLR 2
XLR 1 XLR 2
17
18
19
NOTE It is standard practice to plug in your XLR cable before switching
phantom power on. It is also important to switch phantom power to ‘off' when
you no longer have a phantom powered microphone connected. Connecting
devices that don’t have phantom power protection built into their AES XLR
outputs whilst still sending phantom power from the camera’s XLR audio inputs
may damage your equipment. Always ensure that the 48V switch is turned ‘off’
when you disconnect your microphone.
67URSA Mini Pro 4.6K Control Buttons
Page 66

Peak
Press the ‘Peak’ button to activate focus peaking. Your camera has two focus peaking
modes, traditional focus peaking, which artificially sharpens areas of the image that are
in focus, and 'colored lines' with overlays the sharp areas of your image with black,
white, red, green or blue colored lines. See the 'monitor settings' section of this manual
for more information. Focus peaking is not recorded to storage media, but can be
displayed via the HD monitoring output and on the fold out monitor by activating
overlays using the touchscreen menu.
Program
The program button is marked PGM and lets you switch the LCD between the camera
view and any signal plugged into the camera's 12G-SDI input. This means if you’re using
URSA Mini Pro 4.6K in a live broadcast, you can plug in the switcher’s program output
and monitor it during the shoot. Press and hold the program button to see your
program feed. Double press the button to lock the program feed on. Press again to turn
the program feed off.
To display a switcher’s program output, your camera and switcher must be set to the
same resolution and frame rate.
Menu
Press the ‘menu’ button to open the dashboard. Refer to the ‘settings’ section for more
information about the dashboard feature and how to adjust settings.
Record
Press any of the record buttons marked REC to start and stop recording. Refer to the
‘recording’ section for more information.
Playback Control Buttons
The playback buttons let you start and stop playback, plus skip to the next or previous
clip. When using the EF mount, the forward and reverse skip buttons can also be used
to open or close the iris when using compatible lenses. Refer to the ‘playback’ section
for more information on how to use the playback buttons.
NOTE Some lenses have both manual and auto focus modes. In order for
URSA Mini to be able to auto focus with your lens, you need to ensure that your
lens is set to auto focus mode.
TIP If you are recording your video output to a Blackmagic Video Assist or
HyperDeck Studio Mini, you may want to ensure that you don’t have peaking
switched on for that output. This can be done by using our 'clean feed’ feature
on your front SDI or main SDI.
For more information on outputting a 'clean feed' see the 'monitor settings'
section in this manual.
68URSA Mini Pro 4.6K Control Buttons
Page 67

NOTE You can power your URSA Mini Pro 4.6K on or off via a combination of
internal control panel buttons. Holding the ‘rec’ and 'forward skip' buttons will
power up the camera if it is turned off, or power it off if it is turned on. If your
camera’s power switch is set to ‘on’ but your camera is powered down, it may
have been powered down via the control panel. Toggle the power switch to
return it to normal operation.
XLR 1 XLR 2
69URSA Mini Pro 4.6K Control Buttons
Page 68

Touchscreen Controls
Touchscreen
Your Blackmagic URSA Mini’s fold out LCD touchscreen pivots for shooting high and low angles.
Buttons on the outside of the LCD panel let you control your URSA Mini when mounted on your
shoulder using the URSA Viewfinder and the LCD closed.
Touchscreen Features
The LCD touchscreen features a touch and gesture based interface that is specifically designed
for fast and intuitive user operation. By touching and swiping on different areas of URSA Mini’s
LCD touchscreen, you can quickly access the camera's functions while shooting.
Your URSA Mini's LCD touchscreen has a comprehensive head up display
and gives you easy access to your camera's most used settings
LCD Monitor Options
Tap the 'monitor' icon at the top left of your URSA Mini’s LCD touchscreen to access the
LCDmonitor settings. These settings let you toggle and adjust the appearance of your
URSAMini’s monitoring features, including zebra, focus assist, frame guide, and grids. When
accessing LCDmonitor options, the controls for these features appear in a tabbed menu along
the bottom edge of the LCD touchscreen.
Tap the icon at the top left of your URSA Mini's
LCDtouchscreen to access LCD monitor options
Zebra
The ‘zebra’ setting toggles the appearance of zebra on the LCD touchscreen, as well as setting
the zebra level for all URSA Mini outputs.
Zebra displays diagonal lines over areas of your image that exceed a set exposure level.
Forexample, setting zebra to 100% shows which areas are completely overexposed. This is
useful for achieving optimum exposure in fixed lighting conditions.
70Touchscreen Controls
Page 69

Tap the 'zebra' icon while accessing 'LCD monitor
options' to access your URSA Mini's zebra settings
To toggle zebra for the LCD touchscreen, tap the switch icon in the bottom left of the screen
while in the 'zebra' tab.
Set the exposure level that zebra appears at by dragging the slider left and right, or tapping the
arrow buttons next to the zebra level percentage. Zebra level is adjustable in five percent
increments between 75 and 100 percent exposure.
For information on enabling zebra on your camera’s front and main SDIoutputs, see the
‘monitor settings’ section in this manual.
Focus Assist
The ‘focus assist’ setting toggles the appearance of focus assist on the LCD touchscreen,
aswell as setting the level of focus assistance for all outputs on your URSA Mini.
Tap the 'focus assist' icon while accessing 'LCD monitor options'
toaccess your URSA Mini's focus assist settings
To toggle focus assistance for the LCD touchscreen, tap the switch icon in the bottom left of the
screen while in the ‘focus assist’ tab.
To set the level of focus assistance for all outputs on your URSA Mini, tap the ‘low,’ ‘medium’ or
‘high’ titles along the bottom of your touchscreen.
The optimum level of focus assistance varies shot by shot. When focusing on actors, for
example, a higher level of focus assistance can help resolve edge detail in faces. A shot of
foliage or brickwork, on the other hand, may show distracting amounts of focus information
athigher settings.
For information on enabling focus assist on your camera’s front and main SDI outputs, see the
‘monitor settings’ section in this manual.
TIP If you’re shooting in variable light such as outdoors on a partly overcast day,
setting your zebra level lower than 100 can warn you of potential overexposure.
TIP Your URSA Mini has two focus assist modes. You can switch between ‘peaking’
and ‘colored lines’ focus assistance in the ‘monitor’ settings menu. Formore
information, see the ‘monitor settings’ section in this manual.
71Touchscreen Controls
Page 70

Frame Guides
The ‘frame guide’ setting toggles the appearance of frame guides on the LCD touchscreen.
Youcan also choose from eight frame guide options for all outputs on your URSA Mini.
Frame guides include aspect ratios for various cinema, television and online standards.
Tap the 'frame guides' icon while accessing 'LCD monitor options'
to access your URSA Mini's frame guide settings
To toggle the appearance of frame guides on your URSA Mini's LCD touchscreen, tap the switch
icon in the bottom left of the screen.
Choose the frame guide you want to use by dragging the slider left and right, or tapping the
arrow buttons on either side of the currently selected aspect ratio.
The available guides are:
2.35:1, 2.39:1 and 2.40:1
Displays the broad widescreen aspect ratio compatible with anamorphic or flat
widescreen cinema presentation. The three widescreen settings differ slightly based
on the changing cinema standards over time. 2.39:1 is one of the most prominent
standards in use today.
URSA Mini LCD touchscreen with 2.40:1 frame guides enabled
2:1
Available on the URSA Mini Pro 4.6K, this displays a ratio slightly wider than 16:9 but
notas wide as 2.35:1.
1.85:1
Displays another common flat widescreen cinema aspect ratio. This ratio is slightly
wider than HDTV 1.78:1 but not as wide as 2.39:1.
16:9
Displays a 1.78:1 aspect ratio compatible with 16:9 HD television and computer screens.
This ratio is most commonly used for HD broadcasting and online videos. The same
aspect ratio has also been adopted for Ultra HD broadcasting.
72Touchscreen Controls
Page 71

14:9
Displays a 14:9 aspect ratio used by some television broadcasters as a compromise
between 16:9 and 4:3 television sets. Ideally, both 16:9 and 4:3 footage remains legible
when center cropped to fit 14:9. You can use this as a compositional guide if you know
your project may be broadcast by a television station that uses 14:9 cropping.
4:3
Displays the 4:3 aspect ratio compatible with SD television screens, or to help with
framing when using 2x anamorphic adapters.
Grids
The ‘grids’ setting toggles the appearance of a rule of thirds grid, crosshair or center dot on the
LCD touchscreen, as well as setting the overlay that will be visible on all URSA Mini outputs.
Tap the 'grids' icon while accessing 'LCD monitor options'
to access your URSA Mini's grid settings
Grids and crosshairs are overlays that can help with image composition. When ‘grids’ are
enabled, your URSA Mini can show a rule of thirds grid, crosshairs, or center dot.
To toggle the appearance of grids on your URSA Mini touchscreen, tap the switch icon in the
bottom left of the screen while in the 'frame guides' tab.
When your URSA Mini is set up and connected to an ATEM switcher as the current program
source, and 'grids' are set to 'on', the red 'program' tally outline will automatically illuminate
on your LCD.
When connected to an ATEM switcher sending a tally signal, a red border will
appear around your camera's image preview when grids are set to 'on'
TIP You can change the opacity of frame guide overlays. For more information
see the ‘monitor settings’ section of this manual.
NOTE For information on enabling frame guides on your camera’s front and
main SDIoutputs, see the ‘monitor settings’ section in this manual.
73Touchscreen Controls
Page 72

To set which overlay you want to display on all URSA Mini outputs, tap the ‘thirds,’ ‘crosshairs,’
or ‘center dot’ options.
The rule of thirds grid automatically scales to any on screen frame guides
Thirds
The ‘thirds’ setting displays a grid with two vertical and horizontal lines placed in each
third of the image. Thirds are an extremely powerful tool to help compose your shots.
For example, the human eye typically looks for action near the points where the lines
intersect, so it’s helpful to frame key points of interest in these zones. An actor’s eyeline
is commonly framed along the top third of the screen, so you can use the top horizontal
third to guide your framing. Thirds are also useful to maintain framing consistency
between shots.
Crosshairs
The ‘crosshair’ setting places a crosshair in the center of the frame. Like thirds, the
crosshair is a very useful compositional tool, making it easy to frame the subject of a
shot in the very center of a frame. This is sometimes used when filming scenes that will
be assembled using very fast cuts. Keeping viewers’ eyes focused on the center of a
frame can make rapid editing easier to follow.
Center Dot
The 'center dot' setting places a dot in the center of the frame. This works in exactly
the same way as the 'crosshair' setting, albeit with a smaller overlay that you may find
lessintrusive.
You can enable a combination of 'thirds' and 'crosshairs' or 'thirds' and 'center dot' by
tapping both options in the 'grids' menu. 'Crosshairs' and 'center dot' cannot be
selected together.
Safe Area Guides
The ‘safe area guides’ setting toggles the safe area guides on or off the LCDtouchscreen, as
well as setting the size of safe area guides for all outputs on your URSA Mini.
Safe areas can be used in broadcast production to ensure that the most important parts of a
shotcan be seen by viewers. By keeping the most important parts of your shot within a central
‘safearea,’ you can avoid cropping on some televisions, as well as leaving space for
abroadcaster to add bugs, news tickers and other overlays along the edges of the screen.
Manybroadcasters require footage to be submitted within a 90% safe area.
TIP For information on enabling grids on your URSA Mini’s front and main
SDIoutputs, see the ‘monitor settings’ section in this manual.
74Touchscreen Controls
Page 73

Safe area guides can also be used to assist with framing your shot where you know that the
shot will be stabilized in post production, which can crop the edges of the image. They can also
be used to indicate a specific crop. For example by setting it to 50% whilst recording at Ultra
HD 3840x2160 you can see what a 1920x1080 crop of the frame would look like. The safe area
guides also scale to your frame guides, so they will adjust to indicate the chosen percentage of
your target frame.
The 'safe area' indicator set to 85%
To toggle safe area guides for the LCD touchscreen, tap the switch icon in the bottom left of the
screen while in the ‘safe area guides’ tab. To set the level of safe area guides for all outputs on
your URSA Mini, tap the left or right arrows on either side of the current numerical value at the
bottom of your touchscreen. Alternatively, you can drag the slider left or right.
False Color
The ‘false color’ setting toggles the appearance of false color exposure assistance on the
LCDtouchscreen.
False color overlays different colors onto your image that represent exposure values for
different elements in your image. For example, pink represents optimum exposure for caucasian
skin tones, while green is a good match to darker skin tones. By monitoring the pink or green
false color when recording people, you can maintain consistent exposure for their skin tones.
Similarly, when elements in your image change from yellow to red, that means they are now
over exposed.
False Color Chart
To toggle false color for the LCD touchscreen, tap the switch icon in the bottom left of the
screen while in the ‘false color’ tab.
The ‘false color’ exposure assistance tab
75Touchscreen Controls
Page 74

ND Filter indicator
Adjusting your URSA Mini Pro 4.6K's ND filter will display the ND filter indicator in the top left of
the LCD touchscreen and any SDI outputs set to show status text. This indicator will be shown
for four seconds and use the format you've selected in your URSA Mini Pro 4.6K's setup menu.
Adjusting your URSA Mini Pro 4.6K's ND filter setting will reveal the ND filter indicator
Frames Per Second
The ‘FPS’ indicator displays your currently selected frames per second.
URSA Mini's frames per second indicator. Tap this to access frame rate settings
Tapping the ‘FPS’ indicator lets you change your camera’s sensor and project frame rates via
amenu at the bottom of your LCD touchscreen.
Project frame rate
The project frame rate is URSA Mini’s recording format frame rate and provides a
selection of common frame rates used in the film and television industry. This frame
rate is normally set to match your playback speed used in your post
production workflow.
Your Blackmagic URSA Mini has 8 project frame rate settings including 23.98, 24, 25,
29.97, 30, 50, 59.94 and 60 frames per second.
To adjust your URSA Mini’s project frame rate while in the ‘FPS’ menu, tap the left or
right arrows next to the current frame rate at the bottom left of your touchscreen.
Alternatively, you can drag the slider left or right.
Tap the arrows on either side of the project frame
rate or move the slider to make adjustments
NOTE You can adjust the terminology used by the ND filter indicator to reflect
the conventions you're used to. The options are ND number, stops and
fractions. You can set your preferred format in your URSA Mini Pro 4.6K's 'setup'
menu.
TIP Your URSA Mini's project frame rate also sets the frame rate of the front
and main SDI outputs.
76Touchscreen Controls
Page 75

Sensor frame rate
The sensor frame rate sets how many actual frames from the sensor are recorded every
second. This frame rate will affect how fast or slow your video will play back at your set
project frame rate.
With 'off speed frame rate' enabled, tap the arrows on either side of
the sensor frame rate or move the slider to make adjustments
By default, your URSA Mini’s project and sensor frame rates are matched for a natural
playback speed. However, by tapping the ‘off speed frame rate’ switch icon in the
bottom right hand side of your URSA Mini’s ‘FPS’ menu, you can independently set your
sensor frame rate.
To change your sensor frame rate, tap the arrows next to the sensor frame rate
indicator in the lower left of your touchscreen. You can also drag the slider left or right
to increase or decrease the frame rate. Once you release the slider, the sensor frame
rate will be selected.
You can create dynamic and interesting speed effects in your clips by varying the
sensor frame rate. Setting the sensor frame rate higher than your project frame rate
willcreate slow motion during playback. Alternatively, the lower your sensor frame rate,
the faster your clips will appear. The principle is similar to overcranking and
undercranking a film camera. Overcranking speeds up the sensor frame rate so you
can stretch out moments in time during playback to enhance emotion. Undercranking
slows down the sensor frame rate so you can increase the action in fast moving scenes.
The creative possibilities are endless and entirely up to you!
For information on the maximum frame rates available for each recording format and codec,
refer to the table in the ‘recording’ section of this manual.
NOTE When 'off speed frame rate' is selected your URSA Mini's audio and video are
no longer synced. This is true even if you set the same project and sensor frame rate.
For this reason, 'off speed frame rate' should never be selected if you want to
guarantee audio syncing.
77Touchscreen Controls
Page 76

Shutter
The ‘Shutter’ indicator displays your shutter angle or shutter speed. By tapping this indicator,
you can manually change your URSA Mini’s shutter values or configure shutter priority auto
exposure modes. On URSA Mini 4.6K and URSA Mini Pro 4.6K, the shutter measurement setting
can be used to select whether to display shutter information as 'shutter angle' or 'shutter
speed'. See the ‘setup settings’ section in this manual for more information.
Your URSA Mini's shutter indicator. Tap this to access shutter settings
Shutter angle or shutter speed defines the level of motion blur in your video, and can be used
to compensate for varying light conditions. 180 degrees is the optimum shutter angle for
capturing satisfying motion blur in most conditions, with the equivalent being a shutter speed of
1/50th of a second. However as lighting conditions change, or the amount of movement in your
scene increases, you may decide to adjust accordingly.
For example, 360 degrees is considered ‘wide open’ and allows maximum light onto the sensor.
This is useful for low light conditions with subtle movement in your scene. Alternatively,
ifshooting subjects with a lot of movement, a narrow shutter angle like 90degrees will provide
minimal motion blur for sharper, crisper images. The equivalent shutter speeds compared to
shutter angle depends on the frame rate you are using. For example, if you are shooting at
25frames per second, then 360 degrees will equate to 1/25th, and 90 degrees will equate to
1/100th of a second.
Tapping the ‘shutter’ indicator brings up the suggested shutter values along the bottom of your
URSAMini’s touch screen. If you have auto exposure set to ‘off,’ this screen will show you your
currently selected shutter value, as well as the available flicker free shutter values, based on
the mains power frequency you have selected in your URSA Mini’s 'setup' menu. For more
information, see the 'setup settings' section in this manual.
To select one of the flicker free shutter values, simply tap on one of the displayed shutter
values. Tap the arrows on either side of the current shutter value indicator to cycle through
some of the most commonly used values.
NOTE When shooting under lights, your shutter can affect the visibility of flicker. Your
URSA Mini will automatically calculate a flicker free shutter value for your current frame
rate. It will display up to three suggested flicker free shutter options at the bottom of the
heads up display when adjusting your shutter. These shutter values are affected by
mains power frequency in your region. You can set your local power frequency to
50Hzor60Hz in your URSA Mini’s setup menu. See the ‘setup settings’ section in
thismanual for more information.
NOTE The characteristics of individual light sources may still cause flicker even when
using flicker free values. We recommend always performing a test shoot when not
using continuous lights.
78Touchscreen Controls
Page 77

Your URSA Mini will suggest flicker free shutter values based on the
mains power frequency you choose in the 'setup' menu
If you would like to choose a specific shutter value, you can do so by double tapping the current
shutter indicator at the bottom left of your screen. This opens a keypad that allows you to type
in any shutter value with up to two decimal places.
If you type in a shutter speed that is incompatible with your current frame rate, the nearest
achievable shutter speed will be used.
The manual shutter keypad allows you to type in any shutter value you wish
Your URSA Mini has three shutter based auto exposure modes. To select one of these, tapthe
'auto exposure' button in the far right of the shutter menu.
Shutter
This setting automatically adjusts shutter value to maintain a constant exposure while
keeping iris aperture constant. If you want to maintain a fixed depth of field, this is the
setting to choose. It’s worth mentioning that the subtle automatic adjustments of the
shutter may have an effect on motion blur. It’s also worth keeping an eye out for any
flicker that may be introduced from various light fixtures on indoor shoots. URSA Mini’s
auto iris feature is not available when the ‘shutter’ auto exposure mode is selected.
Shutter + Iris
Maintains the correct exposure levels by adjusting the shutter, then the aperture. If the
maximum or minimum available shutter value is reached and exposure still cannot be
maintained, URSA Mini will begin adjusting the aperture to keep exposure constant.
Iris + Shutter
Maintains the correct exposure levels by adjusting the aperture, then the shutter value.
If the maximum or minimum available aperture is reached and exposure still cannot be
maintained, URSA Mini will begin adjusting the shutter value to keep
exposure constant.
While in the shutter menu, tap 'auto exposure'
toaccessshutter based auto exposure modes
79Touchscreen Controls
Page 78

Iris
The ‘Iris’ indicator displays your current lens aperture. By tapping this indicator, you can change
the aperture of compatible lenses and configure iris based auto exposure modes.
Your URSA Mini's iris indicator. Tap this to access iris settings
Tapping the ‘iris’ indicator once brings up the iris menu along the bottom of your URSAMini
touchscreen. You’ll see your current lens aperture at the far left of this menu. You can change
the aperture by tapping the left and right arrows on either side of the current aperture, or
moving the slider left or right.
While in the 'iris' menu, tap the arrows on either side of the iris
indicator or use the slider to adjust iris settings
Tapping the ‘auto exposure’ switch icon at the far right of the iris menu opens the iris auto
exposure menu.
This gives you the following auto exposure options.
Iris
This setting automatically adjusts the aperture to maintain a constant exposure, while
keeping shutter angle constant. This will keep motion blur constant, but may affect your
depth of field.
Iris + Shutter
Maintains the correct exposure levels by adjusting the aperture, then the shutter value.
If the maximum or minimum available aperture is reached and exposure still cannot be
maintained, URSA Mini will begin adjusting the shutter value to keep exposure constant.
Shutter + Iris
Maintains the correct exposure levels by adjusting the shutter, then the aperture. If the
maximum or minimum available shutter value is reached and exposure still cannot be
maintained, URSA Mini will begin adjusting the aperture to keep exposure constant.
TIP When an auto exposure mode that effects the shutter is enabled, a small 'A' will
appear next to the shutter angle indicator at the top of your URSA Mini touchscreen.
NOTE To adjust your Iris from the LCD touchscreen, your URSA Mini must befitted with
a lens that supports changing aperture via the camera. If you are using a B4 or PL lens
connected via the broadcast 12 pin connector on URSA Mini PL, make sure that the lens
iris switch on the handgrip is set to ‘A’ or ‘auto.’
80Touchscreen Controls
Page 79

While in the iris menu, tap 'auto exposure' to access
iris based auto exposure modes
When an auto exposure mode that effects the iris is enabled, a small 'A' will appear next to the
iris indicator at the top of your URSA Mini touchscreen.
Duration Display
At the top of your URSA Mini LCD touchscreen, you’ll see your camera’s duration display.
Your URSA Mini's duration display. This will turn red while recording
The duration display provides a timecode counter for checking the duration of your clips and
monitoring timecode during recording and playback. The counter displays a time sequence
showing Hours:Minutes:Seconds:Frames and will progress through the sequence as you record
or play back clips. The timecode will turn red during recording.
The displayed duration of each clip starts from 00:00:00:00 for each clip. The clip duration of
the current, or last recorded, clip is displayed on the touchscreen. Time of day timecode is
embedded into clips for easier post production.
To see the timecode, simply tap the duration display. Tap the duration display again to return
toclip duration.
Additional status indicators may appear around the duration display:
Appears to the left of the duration display when your URSAMini is
using a windowed sensor mode.
Appears to the right of the duration display when showing timecode.
Appears to the right of the duration display if an external timecode is
connected and valid.
Appears to the right of the duration display if the camera is running off
an internal timecode after being ‘jam synced’ anddisconnected.
REF
Appears when a valid reference source is connected andlocked,
based on the reference input settings.
TIP Automatic exposure works smoothly with compatible B4 or PL lenses which are
designed for video or film production. EF lenses may produce noticeable ‘steps’ in
exposure when changing aperture. For this reason, werecommend using only ‘shutter’
auto exposure mode if shooting on URSA Mini EF.
81Touchscreen Controls
Page 80

ISO
The ‘ISO’ indicator displays your URSA Mini’s current ISO setting, or light sensitivity. Tapping this
indicator lets you adjust your ISO to suit varying lighting conditions.
The optimum ISO for URSA Mini 4K is 400. The optimum ISO for URSA Mini 4.6K and URSA Mini
Pro 4.6K is 800.
Your URSA Mini's ISO indicator. Tap this to access ISO settings
While in the 'ISO' menu, your URSA Mini's ISO settings appear along the bottom of
the LCD touchscreen. ISO 3200 is available on the URSA Mini Pro 4.6K only
Depending on your situation, you may choose a lower or higher ISO setting. For example,
inlowlight conditions ISO 1600 can be suitable when shooting on URSA Mini 4.6K but may
introduce some visible noise. In bright conditions ISO 200 can provide richer colors.
White Balance
The ‘WB’ and ‘TINT’ indicators display your camera’s current white balance and tint.
Tappingthese indicators lets you adjust your camera’s white balance and tint to suit varying
lighting conditions.
Your URSA Mini's white balance and tint indicators.
Tapthese to access white balance and tint settings
Every light source emits a color. For example, a candle flame emits a warm color, and an
overcast sky emits a cool color. White balance settings are used to color balance your image so
white stays white by adjusting the mix of orange and blue in your image. For example, when
shooting under tungsten lamps which emit a warm, orange light, selecting 3200K adds some
blue to the image. This balances the color so white is accurately recorded.
Your URSA Mini comes with white balance presets for a variety of color temperature conditions.
These are:
Bright sunlight (5600K)
Incandescent bulbs (3200K)
Fluorescent bulbs (4000K)
Mixed light (4500K)
Cloud (6500K)
82Touchscreen Controls
Page 81

You can customize any of these presets by tapping or holding the arrow icons to the left and
right of the temperature indicator in the bottom left of the ‘white balance’ menu. Each tap moves
the color temperature up or down 50K, but holding the arrow icons down will increase these
increments for faster changes. Alternatively, you can move the temperature slider in the middle
of the ‘white balance’ menu.
To further dial in your image, you can adjust the ‘tint.’ This adjusts the mix of green and magenta
inyour image. For example, adding some magenta can compensate for the green cast of many
fluorescent lights. Many of your URSA Mini’s white balance presets include some tint.
Tapping the white balance and tint indicator on your URSA Mini gives you access to
fivepresets, as well as a white balance indicator and slider on the left, and a tint indicator
on the right. Adjust these to set a custom white balance for your lighting conditions
While in the ‘white balance’ menu, your camera’s current tint setting is shown at the bottom right
of the screen. To adjust the tint, simply tap or hold the arrows to the left and right of the tint
indicator. The available range is -50 to +50 in one unit increments. Holding down on the arrows
speeds up adjustment.
Auto White Balance
Your URSA Mini can set white balance automatically. Tapping ‘AWB’ will bring up the
white balance screen.
When setting white balance automatically, a square will be overlaid on the center of
your image. Fill this square with a neutral surface such as a white or gray card and tap
‘update.’ Your URSA Mini will automatically adjust its white balance and tint values to
ensure that the average of the white or gray within the white balance square is as neutral
as possible. Once updated, this will be set as your camera's custom white balance.
Tapping the 'AWB' icon in the white balance menu will bring up theauto white balance screen.
Use this with a white or neutralgray surface to automatically set a neutral white balance
NOTE Customizing the white balance or tint will change your preset to‘CWB,’ or
custom white balance. Custom white balances are persistent; your CWB settings will
stay configured between power cycles, and when switching to a preset and back to
CWB. This makes iteasy to compare a custom white balance to the last preset used.
83Touchscreen Controls
Page 82

Power
Your URSA Mini’s power status is displayed in the top right of the LCD screen.
There are four possible indicators:
Your URSA Mini's power indicator is at the top right of the LCD touchscreen. While
usingbattery power, tapping this toggles between 'voltage' and 'percentage' displays
AC
Displayed when your URSA Mini is
pluggedintomains power.
Percentage
If you are using a percentage accurate battery and plate
combination and have your battery display set to
‘percentage,’ theindicator will display your battery level
as a percentage. At20% charge remaining, the indicator
will turn red.
Battery bars
If your battery display is set to ‘percentage’ but your
battery plate andbattery combination does not support
percentage accurate battery information, your URSA
Mini will display a battery icon that drains in 25%
increments. At 20% charge remaining, the battery bar
will turn red.
Voltage
When your battery display is set to ‘voltage,’ this
indicator will display your battery’s remaining voltage.
When your battery drops below 12.5 volts, this indicator
will turn red. Your URSA Mini will automatically shut
down once the battery reaches 11.9 volts.
When using battery power, you can switch between 'voltage' and 'percentage' or
'battery bars' power indicators by tapping the power indicator.
Histogram
At the bottom left of your URSA Mini touchscreen, you’ll see the histogram. The histogram
shows the contrast between whites and blacks along a horizontal scale.
The histogram gives you an indication of the tonal
rangebetween shadows and highlights in your clip.
Itis also a helpful tool for checking thebalance of your
exposure and to prevent your highlights from clipping
TIP A list of batteries that support percentage accurate power information is provided
in the ‘mounting batteries’ section of this manual.
84Touchscreen Controls
Page 83

The left edge of the histogram displays shadows, or blacks, and the far right displays highlights,
or whites. When you close or open the lens aperture, you’ll notice the information in the
histogram moves to the left or right accordingly. You can use this to check 'clipping' in your
image shadows and highlights. If the left and right of your edges of the histogram come to an
abrupt stop rather than falling off gradually, you may be losing highlight or shadow detail.
Record button
Next to the histogram at the bottom of your URSA Mini’s touchscreen, you’ll see a round gray
button. This is the ‘record’ button. Tap this once to begin recording, and tap it again to stop. While
recording, the button and the timecode at the top of your URSA Mini touchscreen will turn red.
Your URSA Mini's 'record' button, next to the storage
indicatorsat the bottom of the LCD touchscreen
The 'record' button turns red when recording
Dropped Frame Indicator
The ‘record’ button will be overlaid with a flashing ‘!’ indicator if your URSA Mini begins
dropping frames while recording. The time remaining indicator for the affected card or cards will
also turn red. For example, if you are recording in dual card mode and card 1 is dropping frames,
the ‘!’ indicator will appear over the ‘record’ button, and the time remaining indicator on card 1
will turn red. This lets you know if a particular card is too slow for your currently selected codec
and resolution. The 'dropped frame indicator' will also display if you have dropped a frame on
the previously recorded clip. This indicator will continue to display until another clip is recorded,
or the camera is power cycled. Refer to ‘Choosing a CFast 2.0 card’ section in this manual, for
more information on how to avoid dropping frames.
Dropped frame indicator for CFast card 1 dropping frames
NOTE If you don’t see a histogram in the bottom left of your touchscreen, your
LCDmonitor settings may be set to display 'codec and resolution.' See the 'monitor
settings' section in this manual for more information.
TIP If you have the your URSA Mini’s door LED enabled, this will rapidly flash red when
dropped frames are detected. For more information, see the ‘setup settings’ section in
this manual.
85Touchscreen Controls
Page 84

Recording Time Remaining
At the bottom of your URSA Mini touchscreen, you’ll see the storage indicators.
When a CFast card, SD card or SSD is inserted, the storage indicator will show how much
recording time is left on the card. The time is shown in minutes and will vary according to your
selected frame rate and codec.
The indicator will automatically recalculate if either of these settings are changed. When there is
approximately 5 minutes remaining on your card or drive, the indicator text will turn red, and will
blink intermittently when there is only 2 minutes remaining. The indicator displays FULL when a
card or drive reaches maximum capacity.
Your URSA Mini's storage indicator will display the name of your
CFastcard, SD card or SSD and the record time remaining in minutes
The card or drive name will also be shown in a small bar above the time remaining. This bar will
turn blue to indicate that the camera will be recording to this card or drive. While recording, the
bar will turn red.
Tapping the storage indicators will bring up the storage and formatting menu.
Tap the storage indicators on your URSA Mini's
LCDtouchscreen to access the storage manager
This menu displays the amount of free space on each CFast card, SD card or SSD currently in
your URSA Mini, as well as the name of the card or drive, length of the last clip, total number of
clips, and the file format for each card or drive.
NOTE You can set your URSA Mini to stop recording if dropped frames are detected
toprevent a situation where you waste time shooting unusable footage if you don't
notice the dropped frame indicator. See the 'record settings' section in this manual for
more information.
86Touchscreen Controls
Page 85

You can format your media from this menu. For more information on formatting media using
URSA Mini, see the 'preparing media on Blackmagic URSA Mini' section of this manual.
Audio Meter
The peak audio meters display audio levels for channels 1 and 2 when using the internal
microphone, or via external audio when connected. The display is calibrated to dBFS units and
features peak hold indicators which stay visible for a short time so you can clearly see the
maximum levels reached.
To achieve optimum audio quality, ensure your audio levels do not reach 0 dBFS. This is the
maximum level that your camera can record, meaning that any audio that exceeds this level will
be clipped, resulting in distortion.
The colored bars on the audio meter represent
peak audio levels. Ideally your peak audio levels
should fall in the upperend of the green zone,
between -20 and -12dBFS. Ifyour peaks enter
into the yellow or red zones, corresponding to
-12and-6dBFS your audio is in danger of clipping
You can tap the audio meter to bring up volume controls for audio input channels 1 and 2,
aswell as headset or speaker volume.
Tap the audio meters on your URSA Mini LCD touchscreen to
easily access volume and headset or speaker settings
Double tap to zoom
You can magnify any part of your URSA Mini's preview image by double tapping the
LCDtouchscreen. Thearea you tap will be magnified, and you can move around the
imagebydragging your finger around the LCD touchscreen. This is very helpful when checking
focus. Toreturn to standard magnification, simply double tap your camera’s touchscreen again.
TIP Tapping the card or drive name in the storage menu sets it as the active card or
drive. YourURSAMini will fill this card or drive first.
87Touchscreen Controls
Page 86

While zoomed in, an indicator in the top lef t of your LCD touchscreen will show
which part of the image you are viewing. You can move around the image by
dragging your finger along the screen as you would on a smartphone or tablet
Full Screen Mode
It can be useful when framing or focusing a shot to temporarily hide your touchscreen’s
statustext and meters. Simply swipe up or down on URSA Mini’s LCD touchscreen to hide
these. Therecord indicator, frame guides, grids, focus assist and zebra will remain visible.
Swipe up or down to hide all status indicators
on your URSA Mini LCD touchscreen
Playback Menu
Tap the ‘play’ control button on your URSA Mini to access the playback menu. You can control
previously recorded clips with your camera’s control buttons or the LCD touchscreen.
When using the LCD touchscreen, tap ‘play’ once to start playback and again to pause. Use the
forward and reverse buttons just as you would on a CD player. Tapping ‘forward’ once will move
you to the next clip, while tapping ‘reverse’ once will move you back to the beginning of the
current clip. Tapping ‘reverse’ twice will move to the beginning of the previous clip. Playback of
clips can also be looped by activating the loop icon.
The reverse, play, forward and loop icons
88Touchscreen Controls
Page 87

To shuttle, hold down either the forward or reverse transport buttons. This will play your footage
back at twice regular speed in either forward or reverse, depending on which transport key
you held.
Once shuttling, you can change the shuttle rate by tapping the transport keys again. Each time
you tap the transport key in the same direction you will double the shuttle rate. The maximum
shuttle rate is x16 normal speed. Tapping the transport key again at x16 speed will return you to
x2 speed. Tapping the opposite direction will halve the current shuttle speed until you reach
2xspeed. You can return to normal playback by tapping the ‘play’ button.
The shuttle speed indicator displays the speed and direction
of footage being fast forwarded or reversed
Tapping the 'record' control button in playback mode will return your camera to 'standby' mode,
ready to record.
TIP Swipe up or down on your URSA Mini’s touchscreen to hide status text while
playing back footage. Entering the slate in playback mode will allow you to mark the
current clip ‘good take’ in metadata. For more information, see the ‘entering metadata’
section in this manual.
89Touchscreen Controls
Page 88

Settings
Dashboard
Pressing the ‘menu’ control button on your URSA Mini will bring up your camera's dashboard.
This is a tabbed menu containing the settings not available from your URSA Mini's head up
display. Settings are divided by function into ‘record,’ ‘monitor,’ ‘audio,’ ‘setup,’ ‘presets,’ and
‘LUTS’ tabs. Some tabs, such as ‘record,’ ‘monitor,’ and ‘setup’ contain multiple pages. You can
cycle between these pages by tapping the arrows on the left and right of the settings screen,
orswiping left or right as you would on a smartphone or tablet.
Tap the 'record,' 'monitor,' 'audio,' 'setup,' 'presets,' and 'LUTS'
headings to move between your URSA Mini's dashboard tabs
Record Settings
The ‘record’ tab allows you to set your video format, codec, and resolution, as well as other
settings which affect the footage saved by your URSA Mini, such as preferred card and detail
sharpening. This menu has three pages, which you can cycle through by tapping the arrows at
the edge of your camera’s touchscreen, or swiping left or right.
Record Settings 1
The first page of the 'record' settings tab contains the following settings.
NOTE On URSA Mini Pro 4.6K, the camera dashboard times out after one
minute of inactivity, returning you to the heads up display.
90Settings
Page 89

Codec and Quality
The ‘codec and quality’ menu is split into two rows. The top row on all URSA Mini models lets
you choose between ProRes and CinemaDNG. On URSA Mini Pro 4.6K you can also select
Blackmagic RAW. Thebottom row offers quality options within those families, for example,
thequality options available within the CinemaDNG codec family are ‘lossless’, ‘3:1’ and '4:1'.
Blackmagic RAW options are divided between four 'constant bitrate' and two
'constant quality'settings.
Resolution
This setting works in combination with the ‘codec’ setting. Use it to select the resolution for your
desired recording format.
For example, if you want to record Ultra HD clips using ProRes HQ, select ‘ProRes’ and ‘HQ’ in
the ‘codec and quality’ menu. Now choose 'Ultra HD' in the resolution menu.
Record Settings 2
The second page of the 'record' settings tab contains the following settings.
TIP The amount of video you can record on your camera's storage media
increases when choosingcodecs that utilize higher compression. Refer to the
‘record duration table’ inthe ‘recording’ section for more information.
NOTE Blackmagic URSA Mini supports a wide range of Cinema DNGRAW and
AppleProRes resolutions from 4.6K or 4K on URSA Mini 4.6K and URSAMini
4K, respectively, down to HD.
91Settings
Page 90

Dynamic Range
Adjust the ‘dynamic range’ setting by tapping the dynamic range icons. Blackmagic URSA Mini
has two dynamic range settings:
Film
The ‘film’ setting shoots video using a log curve giving you 12 to 15 stops of dynamic
range, depending on your URSA Mini model, and maximizes the information in
your video signal to help you get the most out of color grading software, such as
DaVinci Resolve.
Video
The ‘video’ setting is similar to the REC 709 color standard for high definition video.
This lets you work faster by recording directly to the compressed video formats in a
color space suitable for direct delivery or minimal post processing.
URSA Mini Pro 4.6K has an additional setting available:
Extended Video
The ‘extended video’ setting offers a good balance between ‘video’ and ‘film’ dynamic
range settings. This setting offers a wider dynamic range than ‘video,’ while applying a
mild contrast change with a smooth roll off in the highlights. ‘Extended video’ is suitable
for use with standard broadcast monitors and is a helpful setting if you have limited time
for post production and want to record your clips with a pleasing ‘look’ applied.
Window Sensor
URSA Mini can be set to use the ‘full’ sensor area. Alternatively, for even higher frame rates you
can use ‘window’ mode. This will use only the amount of sensor pixels needed for a given video
format rather than downscaling images from the entire sensor.
As the HD 'window sensor' and 2K 'window sensor' modes use only the very center of
URSAMini’s sensor, the field of view of any given lens will appear narrower due to the crop
factor involved. When using a 20mm lens to shoot HD footage in windowed sensor mode,
forinstance, field of view of URSA Mini will be equivalent to a 48mm lens.
This setting is available when shooting below your URSA Mini’s maximum resolution.
Forexample, ‘window sensor’ is available when shooting 4.6K 2.4:1, 4K, 3K anamorphic, 2K or
HD ProRes footage on URSA Mini 4.6K.
The fastest frame rates are available when shooting HD footage in windowed mode.
NOTE When recording in CinemaDNG RAW formats, only the film dynamic
range setting is available. However, you can still monitor your RAW clips using
video dynamic range by loading the default Blackmagic film to video LUT in
your camera's LUTs menu. For more information, refer to the LUTS section in
this manual.
NOTE If you are using 'video' or 'extended video' dynamic range, make sure
that display LUT is not enabled on any of the monitor outputs, LCD, Front SDI
orMain SDI. If the display LUT is enabled, the image appears to have more
saturation and contrast than intended. To check your display LUTs setting,
seethe 'monitor' settings laterin thismanual.
92Settings
Page 91

Project Frame Rate
The project frame rate is URSA Mini’s recording format frame rate and provides a selection of
common frame rates used in the film and television industry. For example, 23.98 frames per
second using 4K ProRes HQ. This frame rate is normally set to match your playback speed and
audio sync used in your post production workflow and delivery requirements.
Your Blackmagic URSA Mini has 8 project frame rate settings including 23.98, 24, 25, 29.97, 30,
50, 59.94 and 60 frames per second.
Off Speed Recording
By default, your URSA Mini’s project and sensor frame rates are matched for a natural playback
speed. However, by tapping the 'off speed recording' switch icon you can set your sensor frame
rate independently.
Off Speed Frame Rate
With ‘off speed frame rate’ enabled, tap the arrows next to the ‘off speed frame rate’ indicator to
set your URSA Mini’s sensor frame rate.
The sensor frame rate sets how many actual frames from the sensor are recorded every
second. This frame rate will affect how fast or slow your video will play back at your set project
frame rate.
For more information on off speed frame rates, see the 'frames per second' section in the
‘touchscreen features’ section of this manual.
Preferred Card for Recording
Use this setting to select which storage card or drive your URSA Mini will record to first when
both slots are in use. The options are ‘card 1,’ ‘card 2,’ and 'fullest card'. When using an SSD the
options will be 'Card 1', 'SSD' and 'fullest card'. Picking either ‘card 1’ or ‘card 2,’ isa matter of
personal preference, but using either consistently will let you know which card to swap out first
as your storage fills up. 'fullest card' can help group files chronologically when shooting a single
camera project.
The setting you choose is applied when a CFast card, SD card or SSD is inserted. You can
override this setting at any time by entering the storage manager and setting a different card as
'active.' It's important to note, however, that ejecting and reinserting cards will revert to the
current 'preferred card for recording' setting. When URSA Mini SSD Recorder is connected and
an SSD is loaded, the recorder takes over from URSA Mini's number '2' storage slot.
For more information refer to the 'URSA Mini SSD Recorder’ section in this manual.
TIP When using ‘window sensor’ mode, your URSA Mini’s ‘resolution’ settingswill be
labelled ‘resolution - sensor windowed’ to reflect this.
NOTE For information on the maximum frame rates available for each recording format
and codec, refer to the ‘maximum sensor frame rates’ table in the ‘recording’ section of
this manual.
93Settings
Page 92

Record RAW on 2 Cards
Blackmagic URSA Mini lets you record CinemaDNG RAW clips at higher frame rates by
recording to both CFast cards simultaneously. When this setting is enabled your URSA Mini will
record to both cards when available. If only one CFast card is inserted, your camera will attempt
to record at the chosen frame rate to the single card. Turn ‘record RAW on 2 cards’ on or off by
tapping the switch icon.
You can also enable ‘record RAW on 2 cards’ to increase the reliability of CFast cards if you find
a single card is dropping frames while recording CinemaDNG RAW clips.
This setting also applies to SD cards for URSA Mini Pro 4.6K.
Record Settings 3
The third page of the 'record' settings tab contains the following settings.
Timelapse
This setting activates the time lapse feature to automatically record a still frame at the following
intervals:
Frames 2 - 10
Seconds 1 - 10, 20, 30, 40, 50
Minutes 1 - 10
For example, you can set the camera to record a still frame every 10 frames, 5 seconds,
30seconds, 5 minutes etc.
The time lapse feature offers many creative options. For example, setting a 2 frame time lapse
interval will give your recorded video a high speed effect when played back.
The format of each still frame is based on your recording format, so if you set the camera to
record in 4K ProRes HQ, the time lapse setting will maintain this format. The frame rate will be
based on your project frame rate setting, i.e., 24 fps. This is so your time lapse footage can be
easily incorporated into your post production workflow.
TIP The 'fullest card first' setting is based on the percentage that your storagecards
are filled, rather than their sizes or the amount of data used.
94Settings
Page 93

Your URSA Mini will indicate it is in time lapse mode
with an icon over the 'record' button
Detail Sharpening
Use this setting to sharpen your URSA Mini’s image. When sharpening is enabled, decrease or
increase the level of sharpening by selecting ‘default’, ‘medium’ or ‘high’.
When sharpening is enabled, it will be applied to ProRes video recorded on camera as well as
your URSA Mini’s SDI output.
This setting is intended for live studio production where there is no time for post production
andyou want to output the image live to air. We recommend leaving it ‘off’ for images you are
recording for further post production. For this reason, sharpening is not applied to RAW files
that are intended for significant post processing.
Stop Rec If Card Drops Frames
Use this setting to configure your URSA Mini's behavior when dropped frames are detected.
When set to 'off,' recording will continue with dropped frames. When set to 'on,' your camera
willstop recording if dropped frames are detected. This can prevent you wasting time shooting
unusable footage if you don't spot the dropped frame indicator.
File Naming Convention
Clips are recorded to your CFast card, SD card or SSD in .braw file format when recording
Blackmagic RAW, .DNG for CinemaDNG RAW, or to a ProRes QuickTime movie depending on
which recording format you have chosen.
The table below shows an example of the file naming convention:
A001_08151512 _C001.mov QuickTime Movie Filename
A001_08151512_C001.mov Camera index
A001_08151512_C001.mov Reel Number
A001_08151512_C001.mov Month
A001_08151512_C001.mov Day
A001_08151512_C001.mov Hour
A001_08151512_C001.mov Minute
A001_08151512_C001.mov Clip Number
TIP When you record footage in time lapse mode, the timecode counter
updates when a frame of video is recorded.
TIP Refer to the ‘Choosing a CFast 2.0 card’ for more information on how to
avoid dropping frames.
95Settings
Page 94

For CinemaDNG files, the folder of the image sequence will also be named the same way.
Still image files captured using the still button will follow the file naming convention for video
clips, however the filename will have an ‘S001’ representing the ‘still number’ as the last four
digits of the filename in place of the clip number. For more information, refer to the 'Status
LCDControls' section in this manual.
Monitor Settings
The ‘monitor’ tab lets you adjust status text, overlays, and other monitoring options for your
URSA Mini’s LCD touchscreen, front and main SDI outputs. Options are arranged by output
between ‘LCD’, ‘front SDI’ and ‘main SDI’, as well as ‘all,’ which covers monitor settings that
affect all outputs on your URSA Mini. Each of these menus has two pages of options, which
youcan cycle through by tapping the arrows at the edge of your camera’s touchscreen,
orswiping left or right.
LCD, Front SDI, Main SDI Monitor Settings 1
The first page of the 'LCD,' 'front SDI,' and 'main SDI,' monitor tab contains identical settings for
each output. Forexample, you can set 'zebra' on for the LCD touchscreen, but off the front or
main SDI outputs.
Clean Feed
Tap the ‘clean feed’ switch in the ‘LCD,’ ‘front SDI’ and ‘main SDI’ menus to disable
allstatus text and overlays for that output, except the record tally indicator.
Your URSA Mini LCD touchscreen will still display a record tally in clean feed mode
96Settings
Page 95

Display 3D LUT
Your URSA Mini can apply 3D LUTs to any output to approximate the look of color
graded footage. This is especially useful when shooting with ‘film’ dynamic range, as
these produce an intentionally ‘flat’ low contrast image.
If your URSA Mini has a 3D LUT active, use this setting to independently apply that
LUTto your LCD touchscreen, front or main SDI output.
Zebra
Tap the ‘zebra’ switch in the ‘LCD,’ ‘front SDI’ and ‘main SDI’ menus to enable zebra
guides for those outputs. For more information on zebra guides and setting zebra
levels, see the ‘touchscreen features’ section in this manual.
Focus Assist
Tap the ‘focus assist’ switch in the ‘LCD,’ ‘front SDI’ and ‘main SDI’ menus to enable
focus assist for those outputs. For more information on focus assist and setting focus
assist levels, see the ‘touchscreen features’ section in this manual.
Frame Guide
Tap the ‘frame guide’ switch in the ‘LCD,’ ‘front SDI’ and ‘main SDI’ menus to enable
frame guides for those outputs. For more information on frame guides and choosing
different guides, see the ‘touchscreen features’ section in this manual.
Grid
Tap the ‘grid’ switch in the ‘LCD,’ ‘front SDI’ and ‘main SDI’ menus to enable a rule of
thirds grid for those outputs. For more information on the rule of thirds grid, see the
‘touchscreen features’ section in this manual.
Safe Area Guide
Tap the ‘safe area’ switch in the ‘LCD,’ ‘front SDI’ and ‘main SDI’ menus to enable safe
area overlay for those outputs.
For more information on safe area guides, and setting the level of safe area guides,
seethe ‘touchscreen features’ section in this manual.
False Color
Tap the ‘false color’ switch in the ‘LCD,’ ‘front SDI’ and ‘main SDI’ menus to enable false
color exposure assistance for those outputs.
For more information on false color, see the ‘touchscreen features’ section in
this manual.
NOTE LUTs will still be applied to outputs with ‘clean feed’ enabled. To disable
LUTS, disable the ‘display LUT’ switch in the ‘Monitor’ menu for that output.
NOTE For more information on loading and using 3D LUTs, see the ‘LUTS’
section of this manual.
NOTE Use the 'safe area guide %' setting in your URSA Mini's 'all' monitoring
settings to set the size of the safe area guide.
97Settings
Page 96

LCD Monitor Settings 2
The second page of your URSA Mini's 'LCD' monitor tab contains settings unique to your
LCDtouchscreen.
Text Surrounds Image
This setting is available on URSA Mini 4K and URSA Mini 4.6K models only. Tap the ‘text
surrounds image’ switch in the ‘LCD’ menu to scale the image on your LCD touchscreen
down 75%. This puts the image in the center of the LCD touchscreen away from status
indicators at the top and bottom edges, giving you an unobstructed view of your URSA
Mini's preview image while keeping status text on screen.
'Text surrounds image' gives you a clear view of your URSA Mini EF or PL's
preview image for framing purposes while keeping status text on screen
Status Text On/Off
This setting is only available for URSA Mini Pro 4.6K. It can be useful to hide the status
text and meters on your LCD HUD, leaving only the information necessary to compose
or direct a shot. Tap the ‘status text’ switch icon to toggle the appearance of status text
and meters for URSA Mini Pro 4.6K's LCD touchscreen. Overlays such as frame guides,
grids, focus assist and zebra will remain visible, if enabled. Swiping up or down on your
URSA Mini Pro 4.6K's LCD touchscreen has the same effect.
Display
Instead of a histogram and audio meters, your URSA Mini can display codec and
resolution information at the left and right bottom edges of the LCD touchscreen. This
can be useful if you prefer to use false color for dialling in exposure, or are recording
audio separately and want to display additional information in the space normally used
by the histogram and audio meter.
98Settings
Page 97

Simply tap ‘meters’ or ‘codec and resolution’ in the ‘LCD’ menu to select your
preferred view.
Your URSA Mini can display codec and resolution information
in place of the histogram and audio meters
Screen Brightness
Drag the ‘screen brightness’ slider in the ‘LCD’ menu left or right to adjust the
brightness of your URSA Mini’s LCD touchscreen.
Front SDI and Main SDI Monitor Settings 2
The second page of your URSA Mini's 'front SDI' and 'main SDI' monitor tab contains settings
unique to your front and main SDI outputs.
2160p and 1080p resolutions are available on your main SDI output as all times
when shooting at resolutions above 3K anamorphic. 1080i is only available for your
camera's main or front SDI output when shooting at framerates of 50, 59.94, or 60.
St a tus Text
It can be useful to hide the status text and meters on your front SDI or main SDI output,
leaving only the information necessary to compose or direct a shot. Tap the ‘status text’
switch icon in the ‘front SDI’ or ‘main SDI’ monitor menus to toggle the appearance of
status text and meters for that output. Overlays such as frame guides, grids, focus assist
and zebra will remain visible, if enabled.
Swiping up or down on your URSA Mini’s LCD touchscreen has the same effect for
thetouchscreen.
Display Status Text For Cinematographer or Director
Your URSA Mini’s LCD touchscreen displays information such as ISO, white balance,
and aperture that is useful to a camera operator or cinematographer setting up
individual shots on that camera. URSA Mini’s front and main SDI outputs, however, can
also show information useful to a director or script supervisor who is keeping track of
multiple shots or cameras.
99Settings
Page 98

Your URSA Mini can display director specific status text
on its front and main SDI outputs
Setting the status text to ‘director’ in your URSA Mini’s 'front SDI' or 'main SDI' monitor
settings changes the status text for that output to show the following information.
FPS
Displays the currently selected frames per second for that camera. If off speed frame
rate is disabled, only the project frame rate will be shown. If an off speed frame rate is
being used, the sensor frame rate will be shown, followed by the project frame rate.
CAM
Displays the camera index as set in your URSA Mini’s Slate. See the ‘slate’ section later
in this manual for more information.
OPERATOR
Identifies the camera operator as set in your URSA Mini’s Slate. See the ‘slate’ section
later in this manual for more information.
DURATION DISPLAY
Displays the duration of the current clip, while recording, or the last recorded clip in the
following format: hours:minutes:seconds
REEL, SCENE, TAKE
Displays the current reel, scene and take. For more information on reels, scenes, takes
and their labelling conventions, refer to the ‘slate’ section later in this manual.
DYNAMIC RANGE
The bottom left hand corner of the monitor displays your URSA Mini’s currently
appliedLUT, if applied to that output. If no LUT is applied, ‘film’ or ‘video’ dynamic
range will bedisplayed.
TIMECODE
The bottom right of the monitor displays your URSA Mini’s timecode, in the following
format: hours:minutes:seconds:frames
SDI Output
Both outputs allow you to choose between progressive and interlaced HD output,
while your URSA Mini's main SDI output also has to option of progressive Ultra HD.
The options available in this setting depend on your camera's resolution and frame rate
settings.
Progressive HD, or '1080p' is always available regardless of your recording resolution
and framerate, while interlaced HD, or '1080i' is available when your project frame rate
is set to 50, 59.94 or 60.
100Settings
Page 99

Ultra HD SDI output, or '2160p' is available on your URSA Mini's main SDI when
shooting at Ultra HD resolutions.
SDI Output - front SDI
SDI Output - main SDI
All Monitor Settings 1
Monitor settings that affect all of your URSA Mini's outputs are grouped within the 'all' menu.
Forexample, setting 'safe area guide %' to 90% in this menu will set the safe area guide to 90%
for your camera's LCD, front SDI and main SDI outputs.
There are two pages of 'all' settings. The first page of your URSA Mini's 'all' monitor tab contains
the following settings.
Frame Guides
Tap the left or right arrows in the ‘frame guides’ menu setting to cycle through seven
frame guide options for all outputs on your URSA Mini, including EVFs such as
Blackmagic URSA Viewfinder. The options are detailed in the ‘touchscreen’ section of
this manual, and are also accessible from the LCD monitoring menu in your LCD
touchscreen head up display. It’s worth noting that you can individually select whether
frame guides will appear on your LCD touchscreen, front SDI and main SDI output in
their respective ‘monitor’ menus.
Guide Opacity
Tap the left or right arrows in the ‘guide opacity’ menu setting to choose the opacity of
the areas blocked out by frame guides on your LCD touchscreen, front and main
SDIoutputs. Theoptions are 25%, 50%, 75% and 100%.
101Settings
Page 100

Focus Assist
Your URSA Mini camera has two focus assist modes, ‘peak’ and ‘colored lines.’
Peak
When ‘peak’ style focus assist is selected, areas of the shot that are in focus are
heavily sharpened on your LCD touchscreen or SDI outputs, but not in the recorded
image itself. This causes focused parts of your shot to ‘pop’ out of the softer
background on screen. As no additional overlays are used, this can be a very intuitive
way to tell when focus is dialled in, especially when the subject you’re focusing on is
physically well separated from other elements in shot.
Colored Lines
When ‘colored lines’ style focus assist is selected, a colored line is superimposed
around the parts of the image that are in focus. This can be a little more intrusive than
‘peak’ style focus assistance as the lines are drawn over your image, but especially in
busy shots with a lot of visible elements, it can be a precise focus aid.
Focus Assist Intensity
To set the level of focus assistance for your LCD touchscreen, front SDI and main SDI,
tap the ‘low,’ ‘medium’ or ‘high’ setting.
Focus Color
Use this setting to change the color of focus line overlays when using ‘colored lines’
style focus assistance. Changing the focus line color can make it easier to tell focus
assistance lines apart from your image. The available options are ‘white,’ ‘red,’ ‘green,’
‘blue’ and ‘black.’
Zebra Levels
Set the exposure level that zebra appears at by tapping the arrow icons on either side
of this setting. Zebra level is adjustable in five percent increments between 75 and 100
percent exposure.
For more information, see the ‘zebra’ guide in the ‘touchscreen features’ section of
this manual.
NOTE Setting the focus assist intensity level does not affect whether focus
assistance is enabled on your URSA Mini’s LCD touchscreen or SDI outputs.
You’ll still need to turn focus assistance on individually for each output in the
'LCD,' 'front SDI, or 'main SDI' monitor menus.
TIP The optimum level of focus assistance varies shot by shot. When focusing
on actors, for example, a higher level of focus assistance can help resolve
edge detail in faces. A shot of foliage or brickwork, on the other hand, may
show distracting amounts focus information at higher settings.
102Settings
 Loading...