

Page 1
Installation and Operation Manual
Blackmagic OpenGear Converters
October 2013
Page 2

2
Welcome
Welcome to Blackmagic OpenGear Converters.
We hope you share our dream of making the video industry truly creative
by allowing everyone access to the highest quality video and sound.
™
openGear
being locked into a proprietary rack standard. Blackmagic OpenGear
Converters fully support the openGear
compatible with a wide range of third party equipment from openGear
partners worldwide.
We think it should take you approximately 5 minutes to complete
installation. The instruction manual you’re reading now contains most
of the information you’ll need for installing your Blackmagic OpenGear
Converter. Please take the time to check it out. It’s also a good idea
to review the manual for your openGear
installation information which should be read in conjunction with this
manual.
Before you install Blackmagic OpenGear Converter, please visit our
support page at www.blackmagicdesign.com to download the latest
updates to this instruction manual. We have more helpful tech notes on
our support page, and you might also find a newer version of the manual.
gives customers the freedom to build their facilities without
™
frame standard so they are
™
frame as it contains general
™
Lastly, please register your Blackmagic OpenGear Converter serial
number with us, when you download the latest Blackmagic OpenGear
Converter manual, so we can keep you updated when a new manual or
software is released.
We are constantly working on new features and improvements, so we
would love to hear from you!
Grant Petty
CEO Blackmagic Design
Page 3
Contents
OpenGear Converter Operation Manual
Introduction
4
Overview 4
Installing your Blackmagic OpenGear Converter card 5
Installation
5
8
Support
9
OpenGear Converter Diagrams
Blackmagic OpenGear SDI to Analog 9
Blackmagic OpenGear Analog to SDI 10
Blackmagic OpenGear SDI to HDMI 11
Blackmagic OpenGear HDMI to SDI 12
Blackmagic OpenGear SDI to Audio 13
Blackmagic OpenGear Audio to SDI 14
Blackmagic OpenGear Optical Fiber 15
Blackmagic OpenGear Sync Generator 16
Blackmagic OpenGear UpDownCross 17
Blackmagic OpenGear SDI Distribution 18
19
Warranty
Page 4

Introduction
4
Introduction
Overview
“Brick” style mini converters are very popular for
converting and processing video and audio. However
using lots of mini-converters can become cumbersome
as they each require their own power supply and each
needs to be independently secured to avoid damage
to attached equipment. Rack-based converters solve
this problem as a single, rack-mounted frame can
hold multiple converter cards securely and power only
needs to be supplied to the frame itself.
Blackmagic OpenGear Converters are designed to
™
be used in openGear
rack frames. openGear™ is the
television industry’s open standard for rack-based
conversion and processing. If you already own an
™
openGear
frame, you can use it with your Blackmagic
OpenGear Converters without having to purchase
anything extra.
Blackmagic OpenGear Converters include the rear
modules which means you only need a standard
™
openGear
rack frame and don’t need to spend money on
rear modules you might not use. The rear modules feature
industry standard BNC connectors for SDI and analog
™
video as well as openGear
standard WECO 3-pin block
connectors (type 930-HFL) for balanced audio which can
be switched between AES/EBU and analog audio.
Blackmagic OpenGear Converters are compatible with
™
20-card models of the 2 RU (rack unit) openGear
frames.
Some models such as SDI to HDMI, HDMI to SDI and
Optical Fiber, don’t require settings because they are
completely automatic! Other models use the DashBoard
network control, USB or mini switches as three different
ways to change settings on the converters. These
converters are virtually identical to Blackmagic Design’s
popular Mini Converters, and the OpenGear Converter
range includes models for analog video, HDMI, audio
and optical fiber to and from SDI.
USB ports are included on some models where a
firmware update might be useful in the future. Firmware
updates may support new formats and standards or
provide increased compatibility with other video and
audio hardware.
Before installing Blackmagic OpenGear Converters, you
™
will need to install an openGear
to the manual which accompanied your openGear
frame. Please refer
™
frame for full installation instructions, including general
installation instructions for installing cards in to a frame.
The Blackmagic OpenGear Converter manual provides
information specific to the installation of Blackmagic
OpenGear Converter cards. It should be read in
™
conjunction with the openGear
not a substitute for the openGear
frame manual and is
™
frame manual.
There is no need to switch off the power to the
openGear
OpenGear Converter. The openGear
™
frame before installing a Blackmagic
™
frames are hot
swappable meaning that cards can be installed or
removed while the frame is powered on.
A few additional steps are required if installing a
Blackmagic OpenGear Optical Fiber card. Blackmagic
OpenGear Optical Fiber installs in to your openGear
frame in just the same way as any other Blackmagic
OpenGear Converter card. However the fiber optic
module must be temporarily removed from the card
before attempting to install the card in an openGear
frame. The fiber optic module is a standard SFP
transceiver module which includes an LC connector
port for attaching fiber optic cables. While other kinds
of optical connectors exist, the SMPTE standard for
Optical Fiber SDI specifies that LC type optical fiber
connectors be used and this makes it easy for all
compliant optical equipment to connect together.
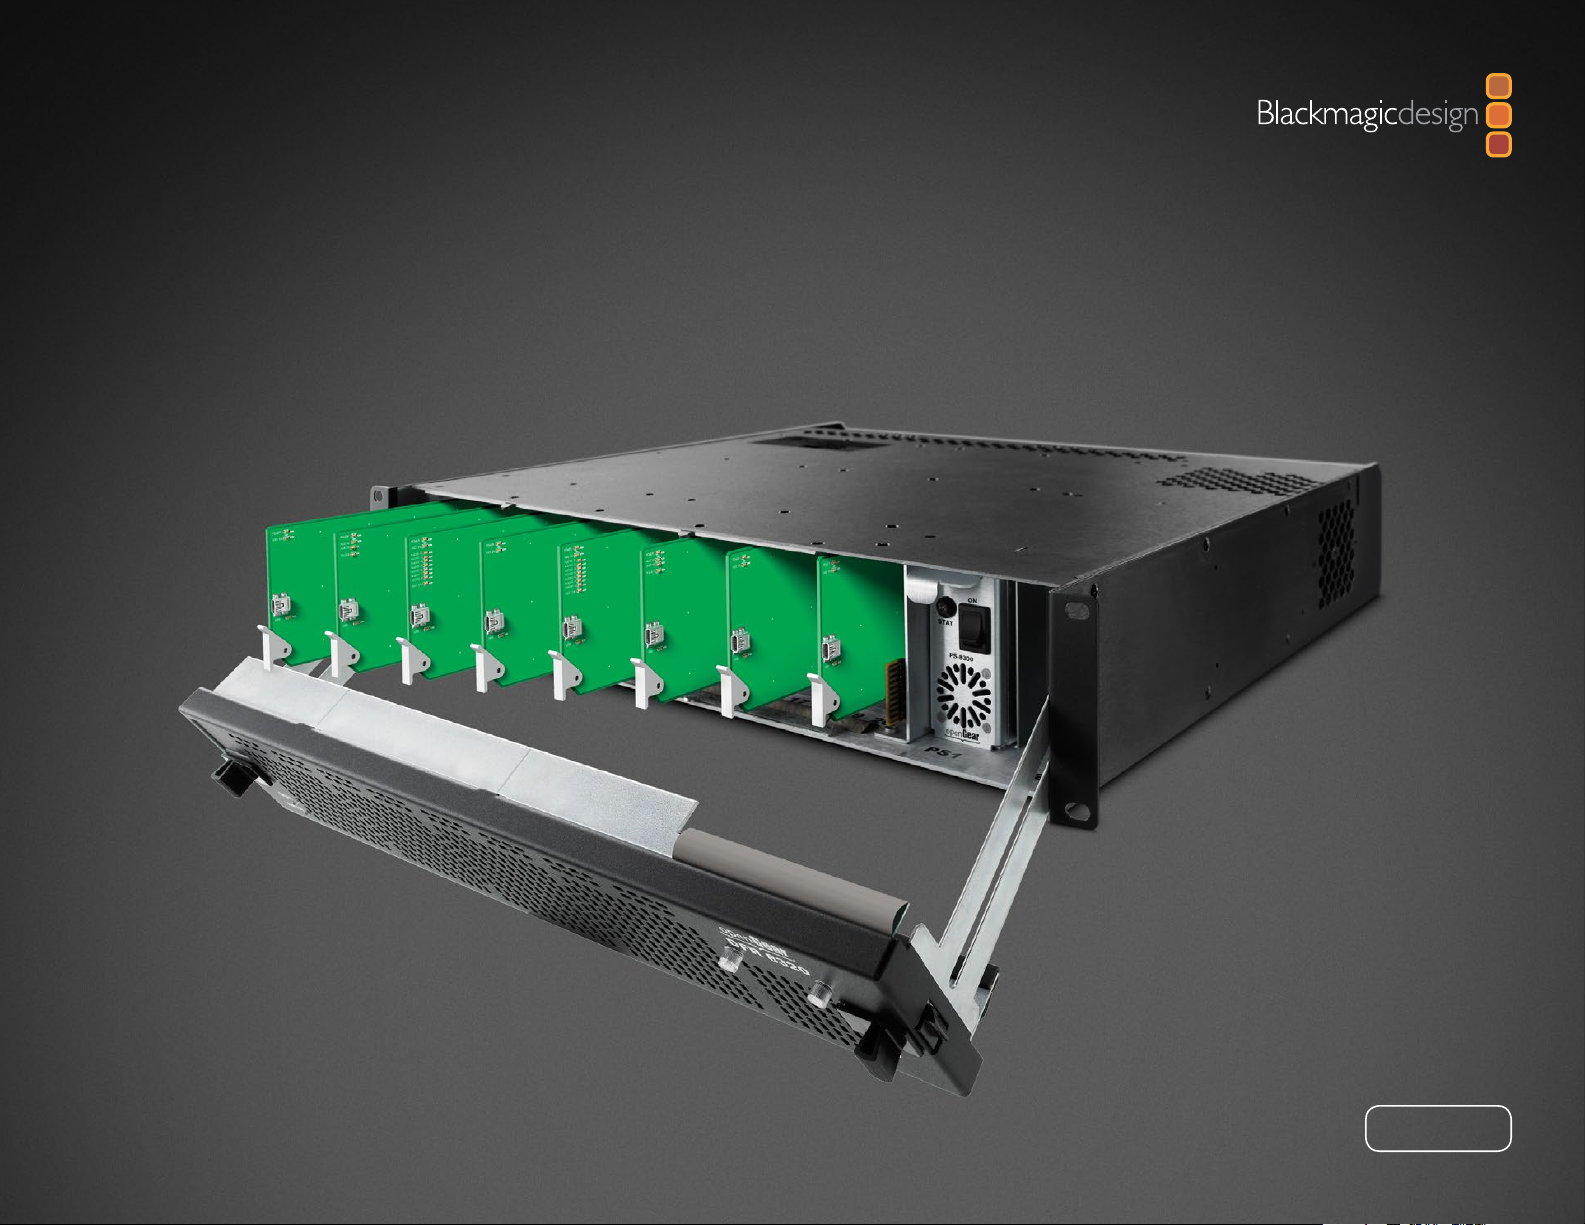
Installing a Blackmagic OpenGear Converter is easy and
this manual contains illustrated, step-by-step guides
to help you start using your Blackmagic OpenGear
Converter immediately.
™
™
Page 5
Installation
5
Installation
Installing your Blackmagic OpenGear Converter card
Ensure that electrostatic discharge precautions have been taken when
touching the openGear
Use a number 01 size Phillips head screwdriver to unscrew and remove a blank
rear I/O module, from the rear of the frame. Save the screw and the rubber
O-ring for use with the Blackmagic rear module. The blank module can be
discarded.
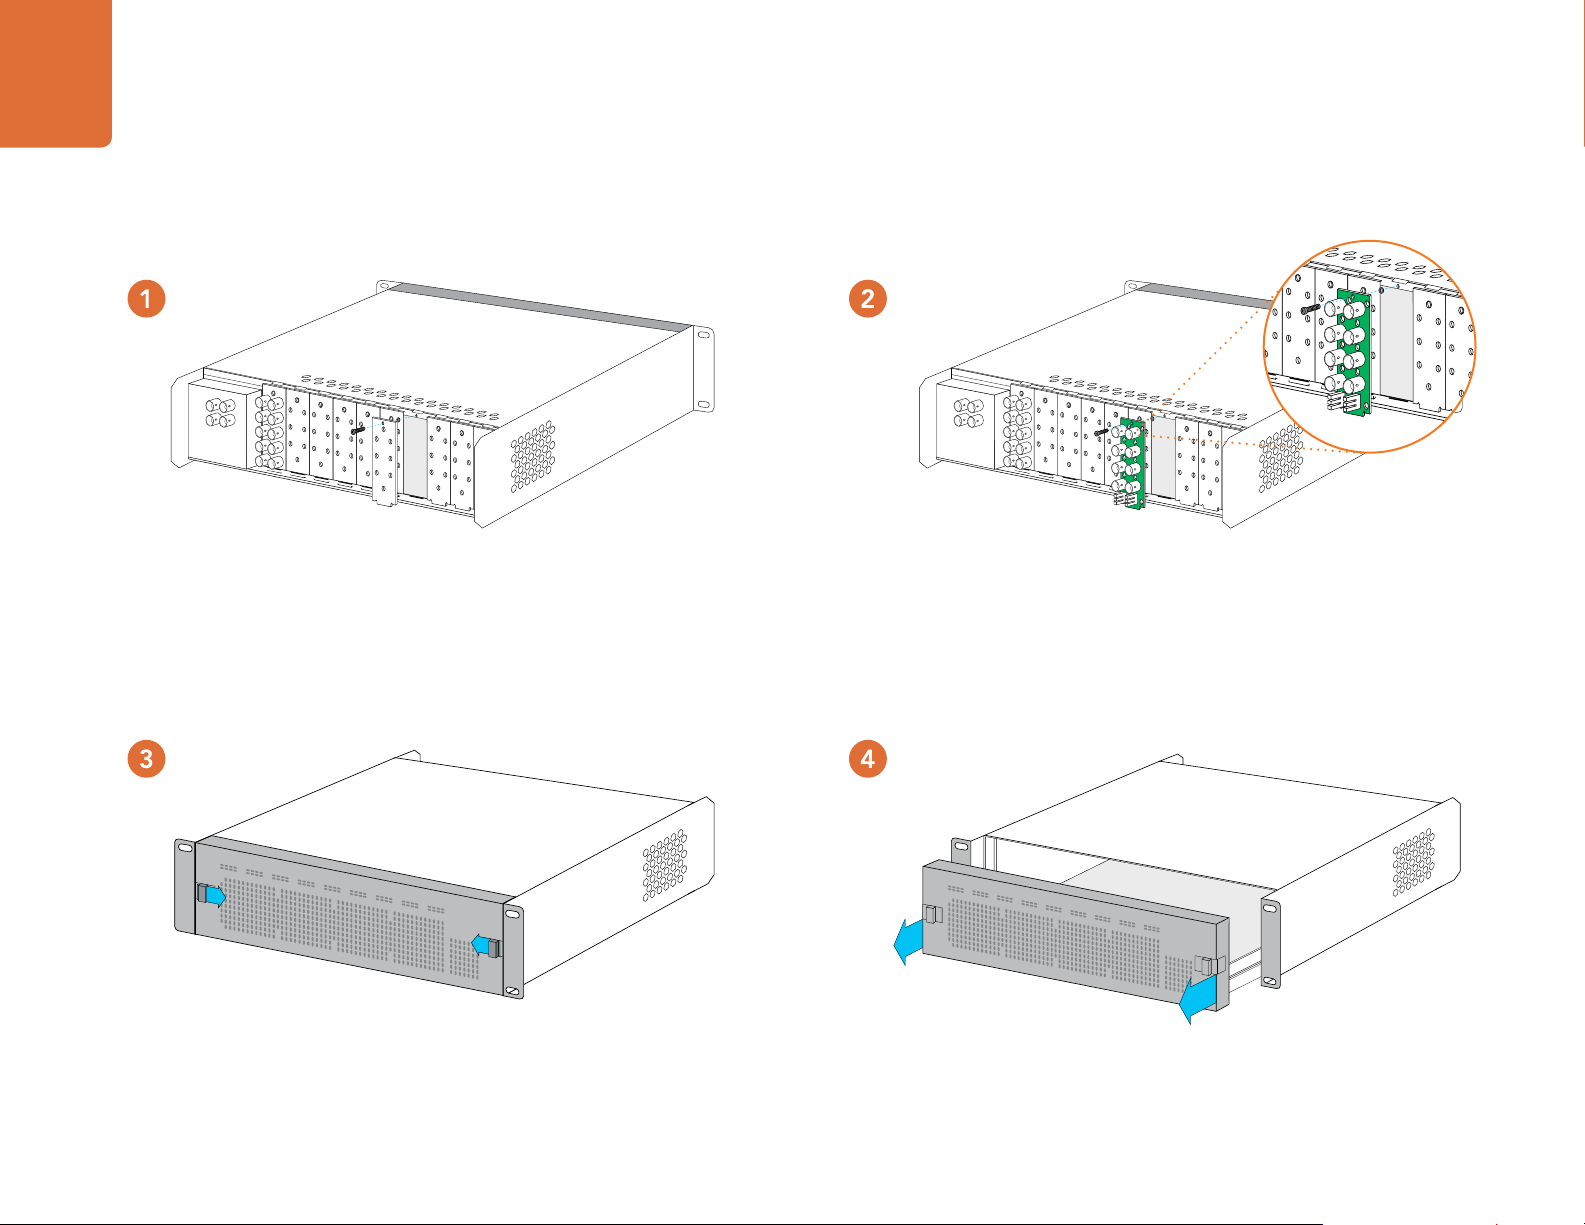
On the front of the frame, press the two, door catches toward each other.
™
frame and the Blackmagic OpenGear Converter.
Replace the blank module with the Blackmagic rear module which was
included with your Blackmagic OpenGear Converter. First, insert the foot of
the Blackmagic rear module in to the module seating slot. Next, secure the
module with the previously saved screw and O-ring. Any I/O connectors and
descriptions, on the Blackmagic rear module, should face outwards.
While pressing the door catches together, pull the door outwards as if opening
a drawer. The two frame extender arms will appear as the door is withdrawn.
Page 6
6
Installation
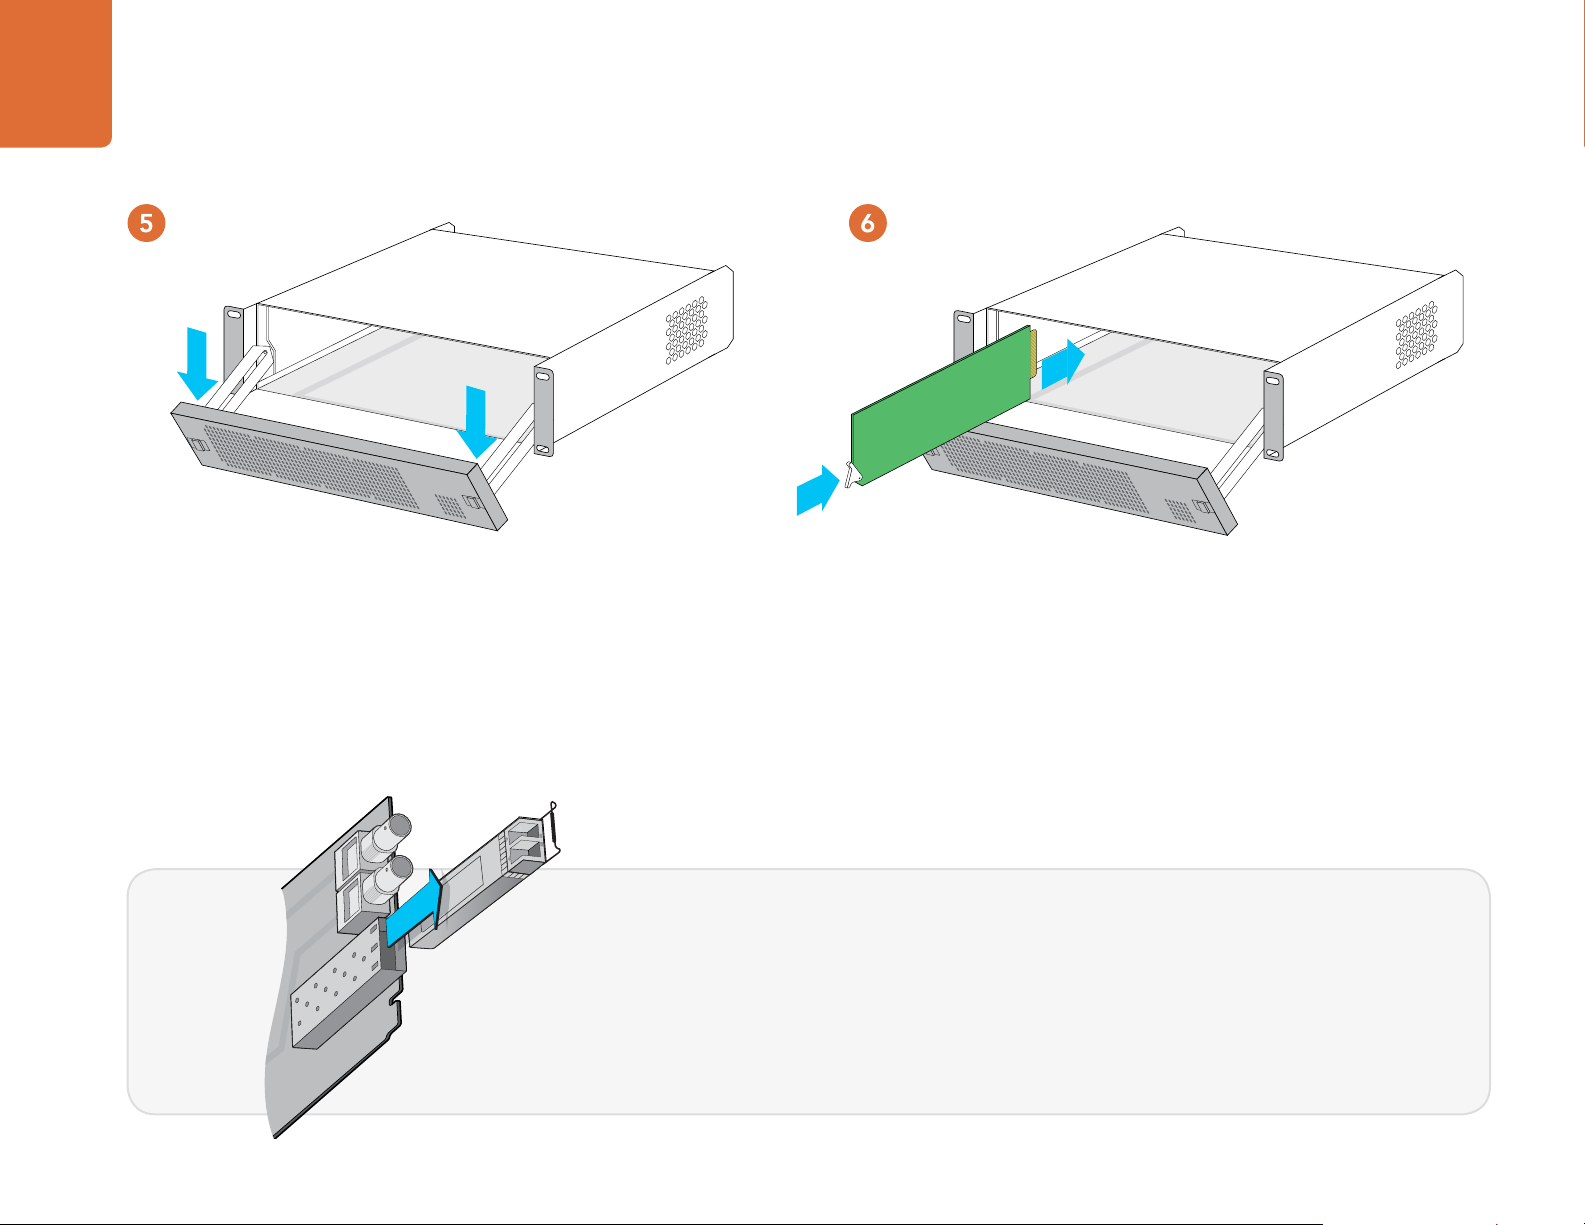
When the door has been withdrawn to its maximum extent, gently lower
the door on its frame extender arms, so it no longer obscures access to the
inside of the frame.
NOTE: Before installing a Blackmagic OpenGear Optical Fiber
If you are installing a Blackmagic OpenGear Optical Fiber card, remove the protective cap from the LC
connector port of the fiber optic module. Save the protective cap as it will be needed to prevent dust if the
LC connector port is exposed when no fiber optic cables are connected.
Pull the wire tab outward to an angle of 90° to release the SFP module latch.
Grip the main portion of the SFP module, between your thumb and forefinger, and pull it from the SFP
module port. Do not pull the wire tab as it might break and prevent the SFP module from being removed.
With the frame door open, insert the Blackmagic OpenGear Converter card
into the card guides which correspond with the Blackmagic rear module. The
card should be inserted so that the white lever faces the front of the frame
and rests on the inside base of the frame. The white lever serves no purpose
during installation and is only used when removing a card.
Gently slide the card along the card guides until you feel the card press in to
a slot at the rear of the frame. Any integrated I/O connectors, such as HDMI
and optical fiber connectors, should protrude through the corresponding
holes of the Blackmagic rear module.
Page 7

7
Installation
This step can be skipped unless your card has integrated I/O connectors.
Secure any protruding BNC connectors, to the Blackmagic rear module,
by screwing the supplied nuts clockwise on the screw thread of each BNC
connector. Each screw should only be finger-tight as over-tightening may
damage the rear module. Securing the BNC connectors should prevent
damage to the card if one of the I/O connectors is accidentally tugged by an
attached cable.
If you have just installed a Blackmagic OpenGear Optical Fiber, replace the SFP module and push the wire
tab back to its original position.
If you are not ready to connect fiber optic cables to the LC connector port, replace the protective cap
At the front of the frame, raise the door until the frame extender arms are
horizontal and then push the door in to the frame until the door catches click
in to place. The frame door should now be secured.
You can now connect cables to your Blackmagic OpenGear Converter.
Page 8

Support
8
Support
If things go wrong
There are four steps to getting help.
Step 1. Check out the Blackmagic Design web site www.blackmagicdesign.com and click on the
“Support” page for the latest support information.
Step 2. Call your dealer.
Your dealer will have the latest technical updates from Blackmagic Design and should be able
to give you immediate assistance. We also recommend you check out the support options your
dealer offers as they can arrange various support plans based on your workflow requirements.
Step 3. The next option is to email us with your questions using the web form at
www.blackmagicdesign.com/support/contact
Step 4. Phone a Blackmagic Design support office. Check our web site for current support phone
numbers in your area. www.blackmagicdesign.com/company.
Please provide us with as much information as possible regarding your technical problem and
system specifications so that we may try to respond to your problem as quickly as possible.
Page 9

OpenGear Converter Diagrams
9
OpenGear Converter Diagrams
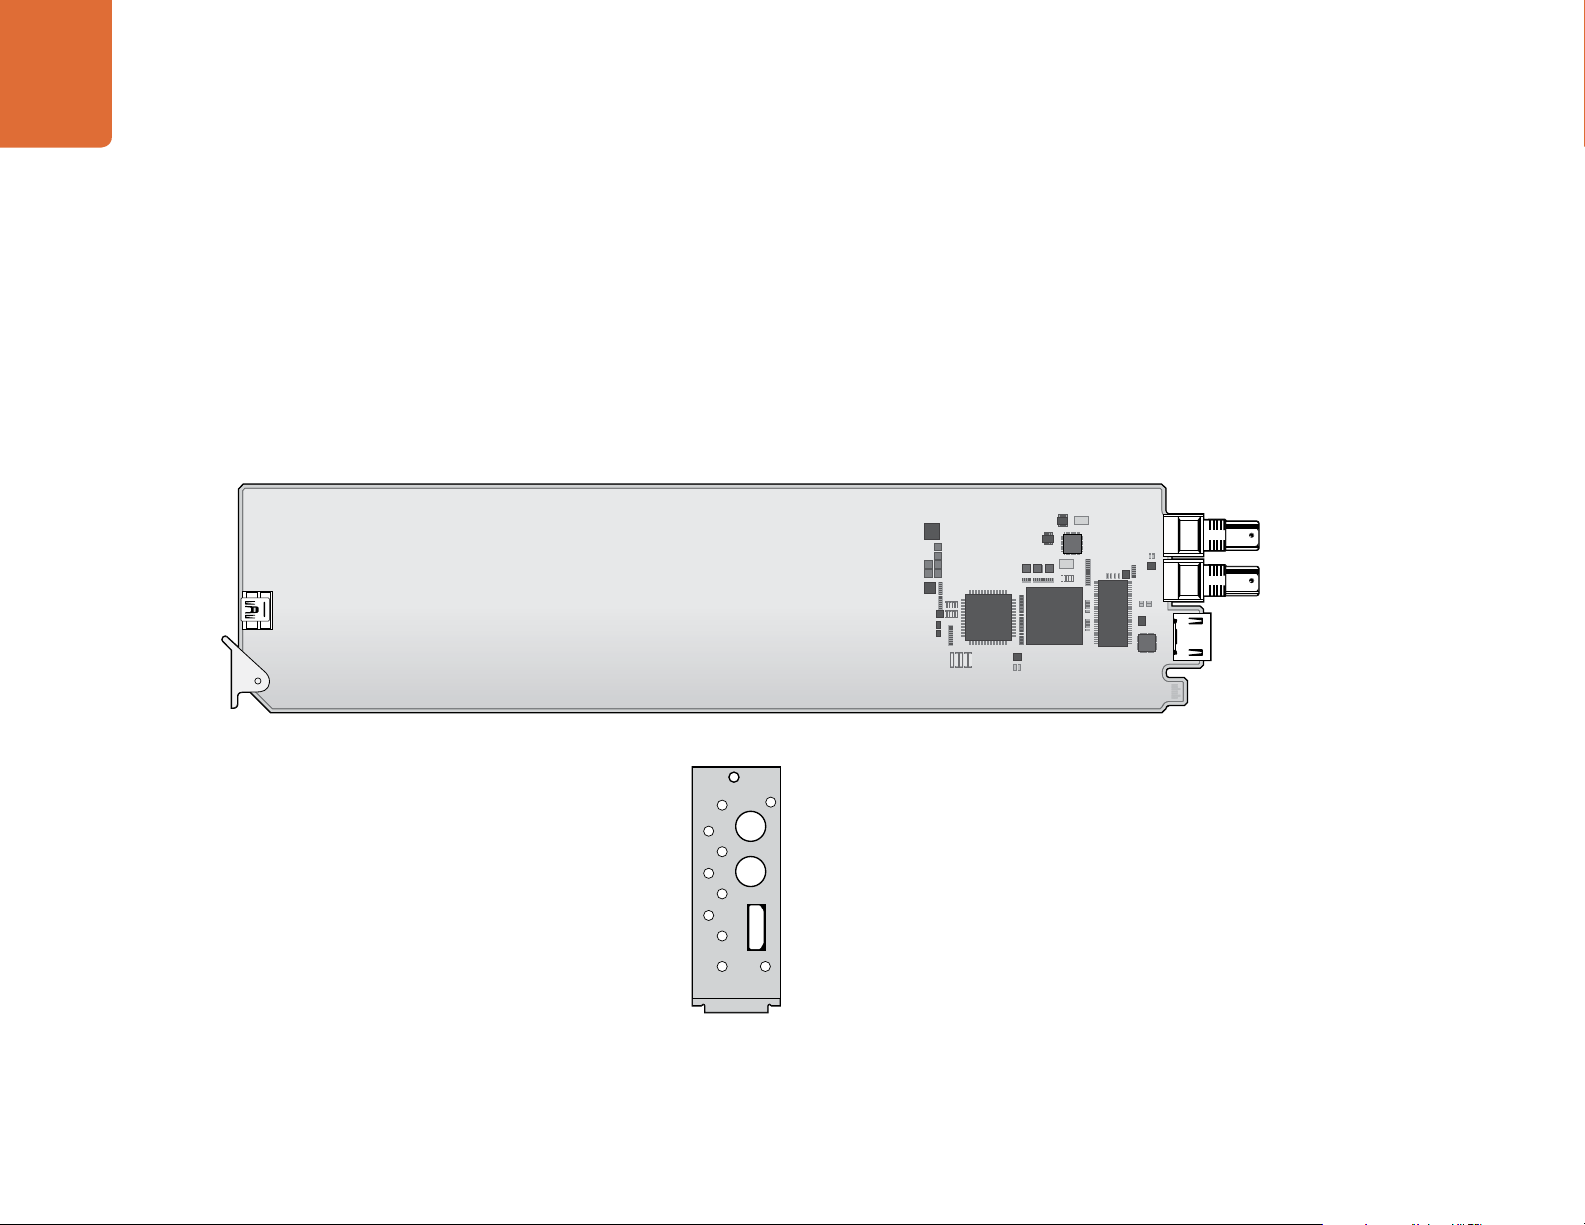
Blackmagic OpenGear SDI to Analog
All SDI and component analog connections support standard definition and high definition.
SD-SDI can be converted to component, S-Video or composite analog video. The hardware
downconverter can be enabled to convert HD-SDI to standard definition analog video.
A third-party, dual BNC to S-Video breakout cable can be connected to the S-Video Y
(luminance) and S-Video C (chrominance) outputs when connecting to a regular S-Video port.
The Y output can be used for composite analog video.
USB port
HD/SD-SDI Input (BNC)
Y or Composite
Output (BNC)
B-Y or S-Video Y
Output (BNC)
R-Y or S-Video C
Output (BNC)
Left Analog or CH 1&2 AES/EBU
Audio Output (3-pin)
Blackmagic OpenGear
SDI to Analog rear module
Alternate HD/SD-SDI
Input (BNC)
HD/SD-SDI Output (BNC)
Right Analog
Audio Output (3-pin)
Page 10

10
OpenGear Converter Diagrams
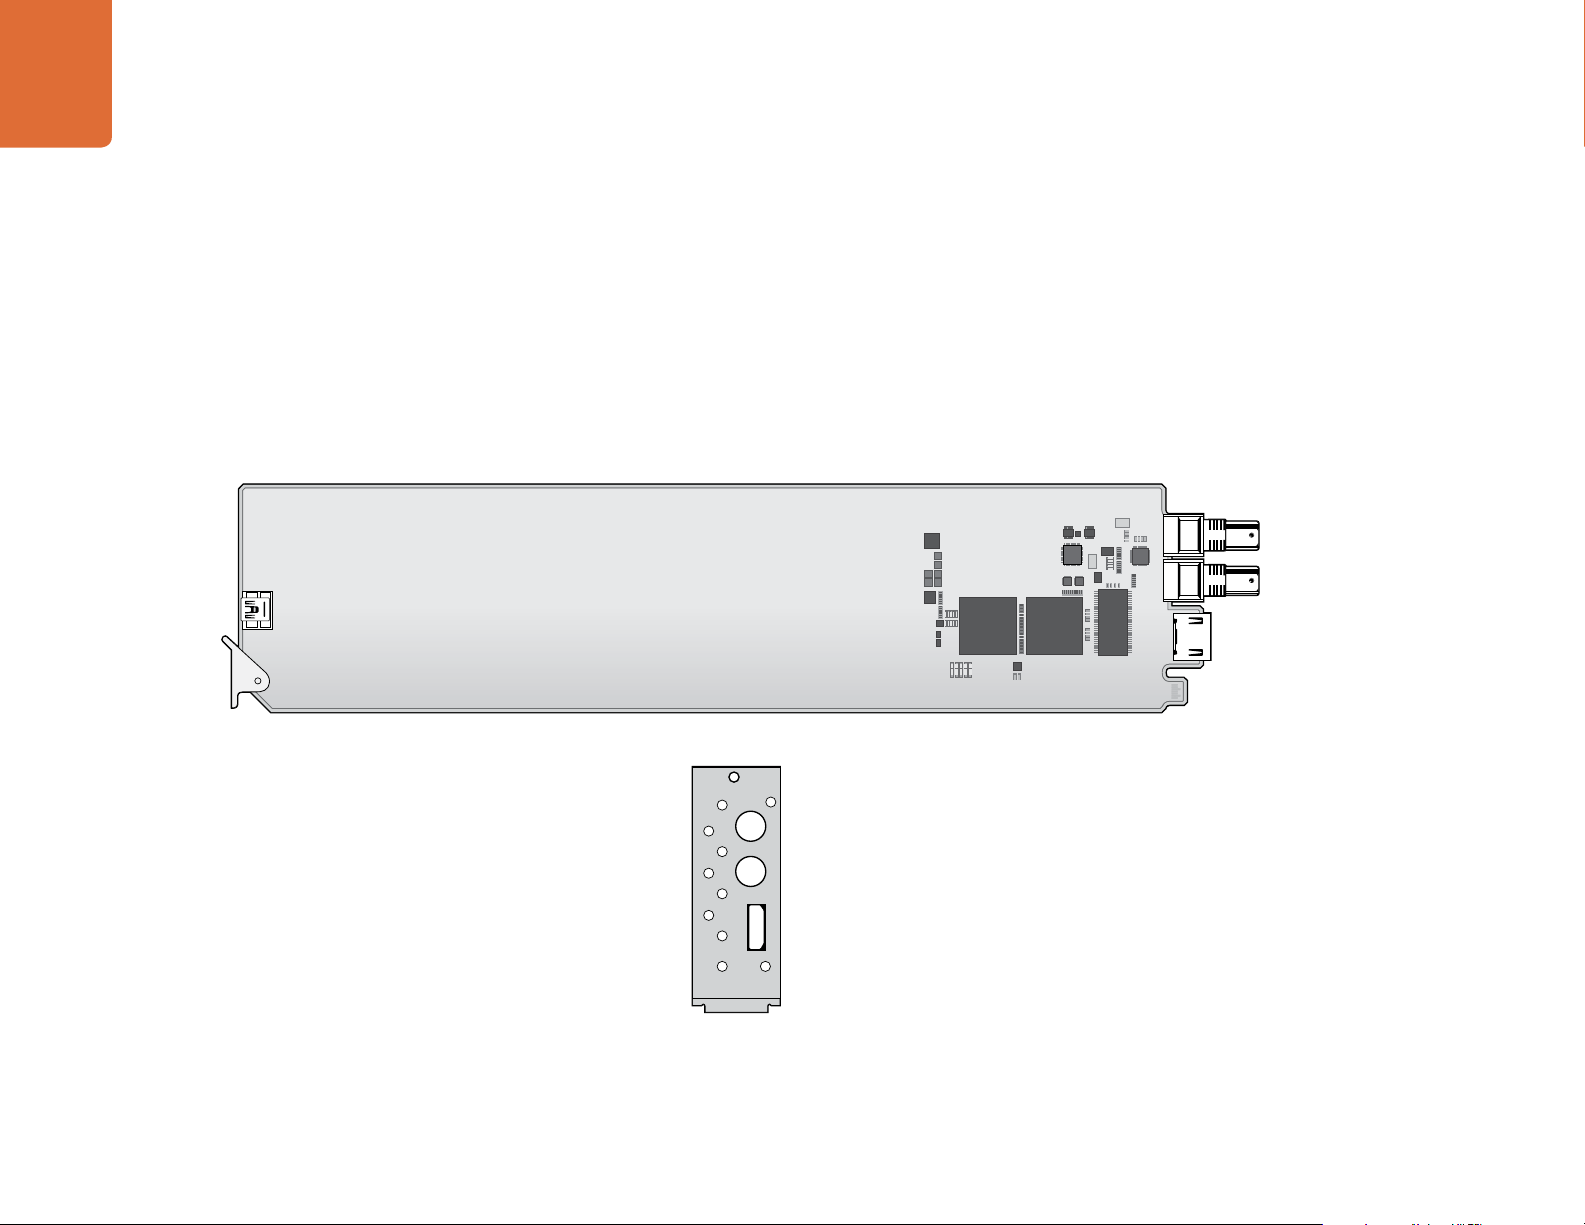
Blackmagic OpenGear Analog to SDI
All component analog and SDI connections support standard definition and high definition.
The same SDI video and audio is available from both SDI outputs.
USB port
HD/SD-SDI Output (BNC)
Y Input (BNC)
B-Y Input (BNC)
R-Y Input (BNC)
Left Analog or CH 1&2 AES/EBU
Audio Input (3-pin)
Blackmagic OpenGear
Analog to SDI rear module
HD/SD-SDI Output (BNC)
Right Analog
Audio Input (3-pin)
Page 11
11
OpenGear Converter Diagrams
Blackmagic OpenGear SDI to HDMI
All SDI and HDMI connections support standard definition and high definition. All connectors
are integrated with the card.
HD/SD-SDI Input (BNC)
HD/SD-SDI Output (BNC)
USB port
HDMI Output
Blackmagic OpenGear
SDI to HDMI rear module
HD/SD-SDI Input
HD/SD-SDI Output
HDMI Output
Page 12
12
OpenGear Converter Diagrams
Blackmagic OpenGear HDMI to SDI
All SDI and HDMI connections support standard definition and high definition. The same SDI
video and audio is available from both SDI outputs. All connectors are integrated with the card.
HD/SD-SDI Output (BNC)
HD/SD-SDI Output (BNC)
USB port
HDMI Input
Blackmagic OpenGear
HDMI to SDI rear module
HD/SD-SDI Output
HD/SD-SDI Output
HDMI Input
Page 13
13
OpenGear Converter Diagrams
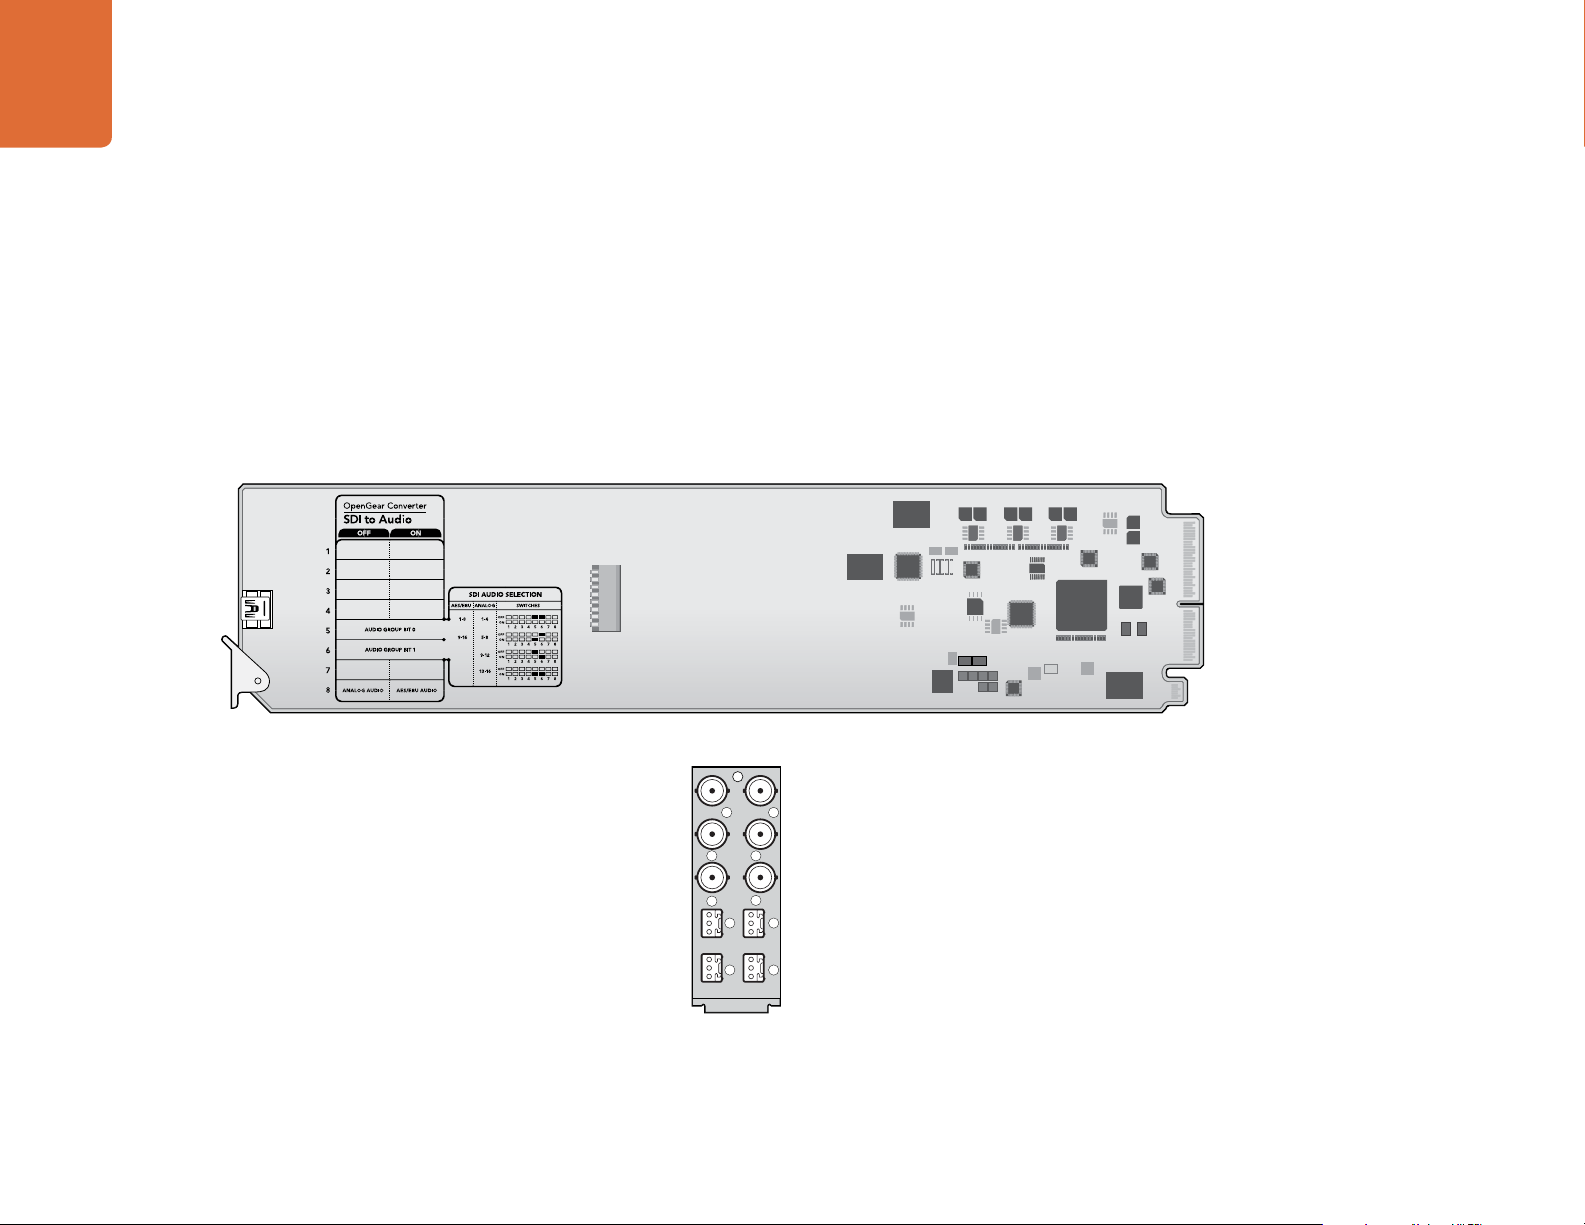
Blackmagic OpenGear SDI to Audio
All SDI connections support standard definition and high definition. Audio can be switched
between 4 channels of professional balanced analog audio and 8 channels of professional
balanced AES/EBU digital audio.
USB port
HD/SD-SDI Input (BNC)
Alternate HD/SD-SDI
Input (BNC)
HD/SD-SDI Output (BNC)
CH 2 Analog or CH 3&4 AES/EBU
CH 1 Analog or CH 1&2 AES/EBU
Audio Output (3-pin)
Audio Output (3-pin)
Blackmagic OpenGear
SDI to Audio rear module
CH 4 Analog or CH 7&8 AES/EBU
Audio Output (3-pin)
CH 3 Analog or CH 5&6 AES/EBU
Audio Output (3-pin)
Page 14
14
OpenGear Converter Diagrams
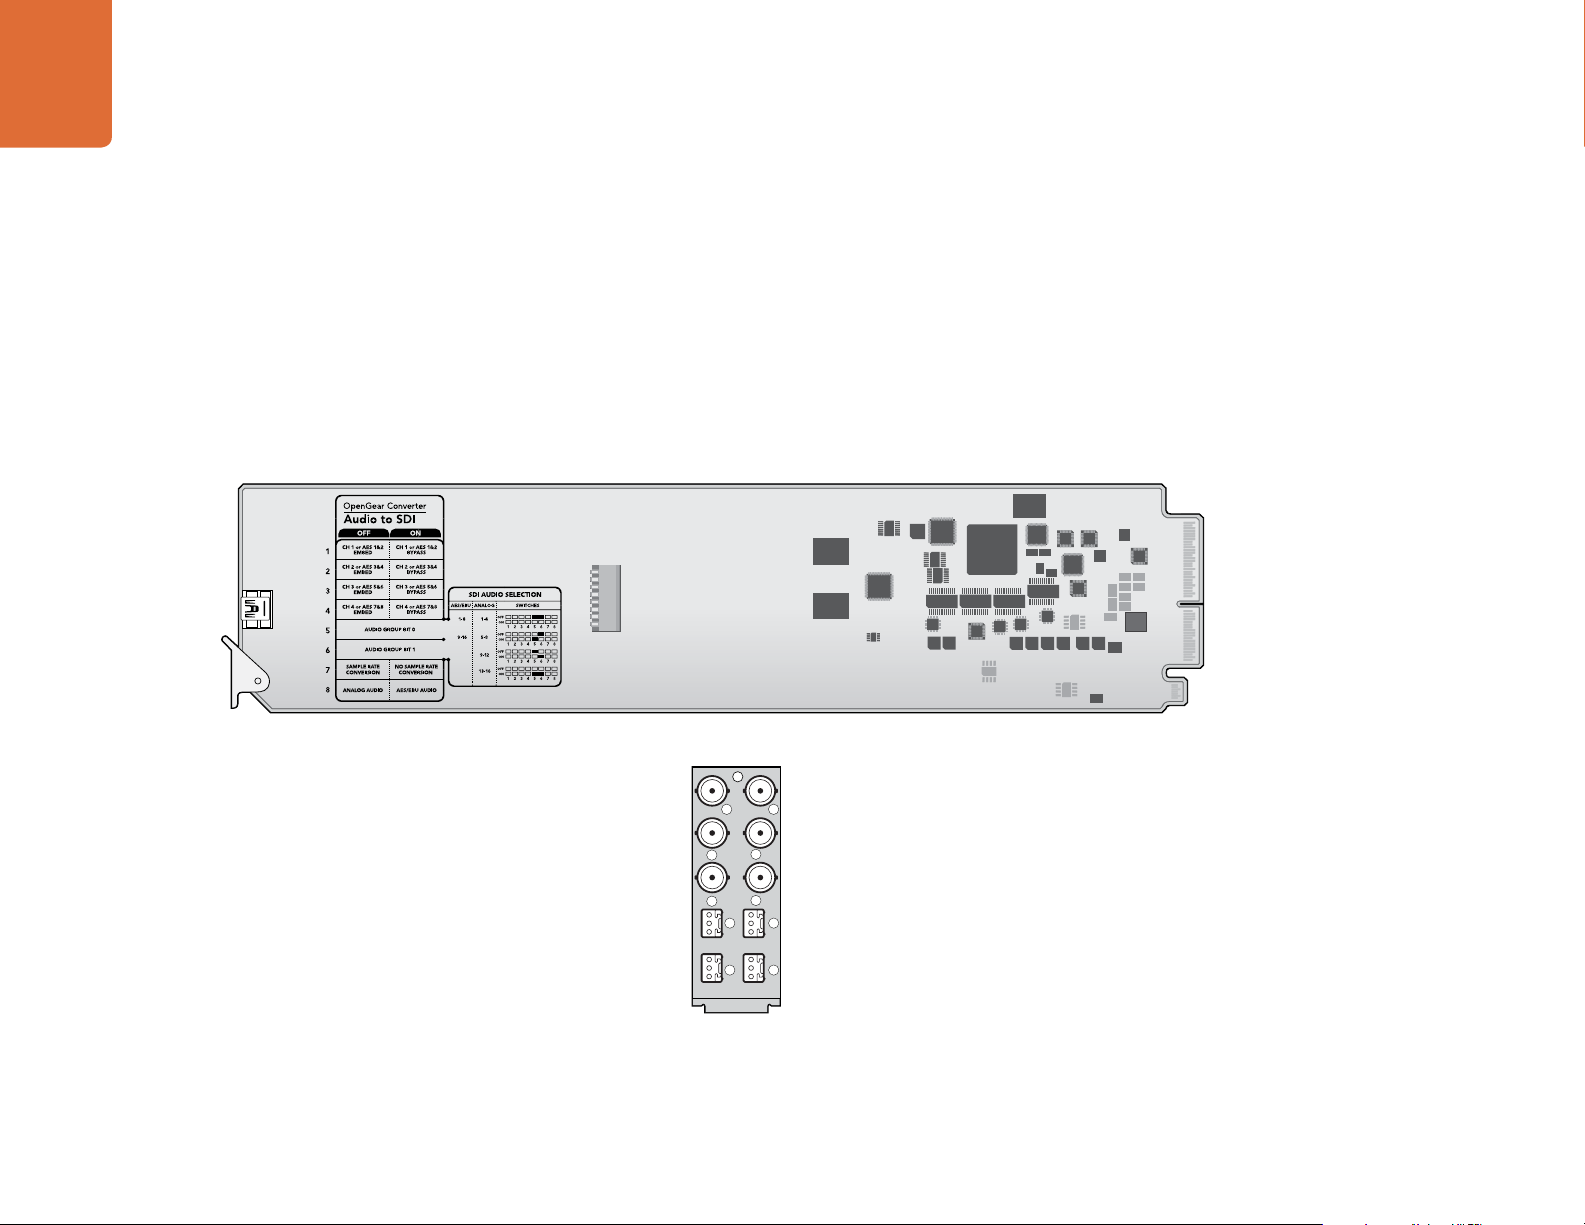
Blackmagic OpenGear Audio to SDI
All SDI connections support standard definition and high definition. Audio can be switched between
4 channels of professional balanced analog audio and 8 channels of professional balanced AES/EBU
digital audio. In the absence of any video input, the audio will be embedded in to a black SDI output
signal of the same format as the last video signal received by the converter.
USB port
HD/SD-SDI Input (BNC)
Alternate HD/SD-SDI
Input (BNC)
HD/SD-SDI Output (BNC)
CH 2 Analog or CH 3&4 AES/EBU
CH 1 Analog or CH 1&2 AES/EBU
Audio Input (3-pin)
Audio Input (3-pin)
Blackmagic OpenGear
Audio to SDI rear module
CH 4 Analog or CH 7&8 AES/EBU
Audio Input (3-pin)
CH 3 Analog or CH 5&6 AES/EBU
Audio Input (3-pin)
Page 15

15
OpenGear Converter Diagrams
Blackmagic OpenGear Optical Fiber
All SDI and Optical Fiber SDI inputs and outputs support SD-SDI, HD-SDI, 3G-SDI and 2K.
All connectors are integrated with the card. Each direction is completely independent allowing
one to use different formats simultaneously, e.g. standard definition video, from SDI to Optical
Fiber SDI, and high definition from Optical Fiber SDI to SDI.
Multi-rate 3G-SDI
4:2:2/4:4:4 video output (BNC)
Multi-rate 3G-SDI
4:2:2/4:4:4 video input (BNC)
Multi-rate Optical Fiber SDI
4:2:2/4:4:4 video input and output (LC)
Blackmagic OpenGear
Optical Fiber rear module
Multi-rate 3G-SDI
4:2:2/4:4:4 video output
Multi-rate 3G-SDI
4:2:2/4:4:4 video input
Multi-rate Optical Fiber SDI
4:2:2/4:4:4 video input and output
Page 16

16
OpenGear Converter Diagrams
Blackmagic OpenGear Sync Generator
All reference outputs can be set to either high definition tri-sync or standard definition black burst.
The same format of reference signal is available from all reference outputs.
USB port
Reference Output (BNC)
Reference Output (BNC)
Reference Output (BNC)
Reference Output (BNC)
Reference Output (BNC)
Blackmagic OpenGear
Sync Generator rear module
Reference Output (BNC)
Reference Output (BNC)
Reference Output (BNC)
Reference Output (BNC)
Reference Output (BNC)
Page 17

17
Up down cross
OpenGear Converter Diagrams
Blackmagic OpenGear UpDownCross
The video input and outputs support SD-SDI, HD-SDI and 3G-SDI. The reference BNC connector
supports Blackburst and Tri-level sync reference signals. When processing is set to OFF OpenGear
UpDownCross acts as an SDI distribution amplifier.
USB port
SDI In
Passive Loop
Sync In
SDI Out
SDI Out
UpDownCross rear module
SDI Out
SDI Out
SDI Out
SDI Out
SDI Out
Blackmagic OpenGear
Page 18

18
SDI Distibution
OpenGear Converter Diagrams
Blackmagic OpenGear SDI Distribution
All SDI inputs and outputs support SD-SDI, HD-SDI, 2K and 3G-SDI video formats with embedded
audio. The same SDI video and audio is available from all SDI outputs. OpenGear SDI Distribution
also handles ASI and is compatible with ancillary data.
SDI In
SDI Out
SDI Out
SDI Out
SDI Out
Blackmagic OpenGear
SDI Distribution rear module
SDI Out
SDI Out
SDI Out
SDI Out
SDI Out
Page 19

Warranty
19
Warranty
3 Year Warranty
Blackmagic Design warrants that this product will be free from defects in materials and workmanship for
a period of 36 months from the date of purchase excluding user-servicable cooling fans and fiber optic
modules which will be free from defects in materials and workmanship for a period of 12 months from
the date of purchase. If a product proves to be defective during this warranty period, Blackmagic Design,
at its option, either will repair the defective product without charge for parts and labor, or will provide a
replacement in exchange for the defective product.
In order to obtain service under this warranty, you the Customer, must notify Blackmagic Design of the
defect before the expiration of the warranty period and make suitable arrangements for the performance
of service. The Customer shall be responsible for packaging and shipping the defective product to a
designated service center nominated by Blackmagic Design, with shipping charges pre paid. Customer
shall be responsible for paying all shipping changes, insurance, duties, taxes, and any other charges for
products returned to us for any reason.
This warranty shall not apply to any defect, failure or damage caused by improper use or improper or
inadequate maintenance and care. Blackmagic Design shall not be obligated to furnish service under
this warranty: a) to repair damage resulting from attempts by personal other than Blackmagic Design
representatives to install, repair or service the product, b) to repair damage resulting from improper
use or connection to incompatible equipment, c) to repair any damage or malfunction caused by the
use of non Blackmagic Design parts or supplies, or d) to service a product that has been modified or
integrated with other products when the effect of such a modification or integration increases the time or
difficulty of servicing the product. THIS WARRANTY IS GIVEN BY BLACKMAGIC DESIGN IN LIEU OF ANY
OTHER WARRANTIES, EXPRESS OR IMPLIED. BLACKMAGIC DESIGN AND ITS VENDORS DISCLAIM
ANY IMPLIED WARRANTIES OF MERCHANTABILITY OR FITNESS FOR A PARTICULAR PURPOSE.
BLACKMAGIC DESIGN’S RESPONSIBILITY TO REPAIR OR REPLACE DEFECTIVE PRODUCTS IS THE
WHOLE AND EXCLUSIVE REMEDY PROVIDED TO THE CUSTOMER FOR ANY INDIRECT, SPECIAL,
INCIDENTAL OR CONSEQUENTIAL DAMAGES IRRESPECTIVE OF WHETHER BLACKMAGIC DESIGN
OR THE VENDOR HAS ADVANCE NOTICE OF THE POSSIBILITY OF SUCH DAMAGES. BLACKMAGIC
DESIGN IS NOT LIABLE FOR ANY ILLEGAL USE OF EQUIPMENT BY CUSTOMER. BLACKMAGIC IS
NOT LIABLE FOR ANY DAMAGES RESULTING FROM USE OF THIS PRODUCT. USER OPERATES THIS
PRODUCT AT OWN RISK.
Copyright 2009 Blackmagic Design. All rights reserved. ‘Blackmagic Design’, ‘DeckLink’, ‘HDLink’, ‘Workgroup Videohub’, ‘ Videohub’,
‘DeckLink’, ‘Intensity’ and ‘Leading the creative video revolution’ are registered trademarks in the US and other countries. All other
company and product names may be trade marks of their respective companies with which they are associated.
 Loading...