


FULL ONE-YEAR WARRANTY
Applica warrants this product against any defects that are due to faulty materials or workmanship for a one-year period after the original date of purchase. This warranty is not valid if: a) the product is used under conditions different from those considered normal, b) the product is operated without following the use and care instructions provided, c) the product is altered or repaired by unauthorized people. If the product should become defective within the warranty period we will repair it or replace if necessary, free of charge. In order for this warranty to be valid you must present the product along with a receipt as proof of purchase and/or the corresponding registration card. This warranty gives you specific legal rights and you may have other legal rights that could vary in your country. Should you have any question, contact your nearest Black & Decker store or service center.
Note: You can acquire parts, components, supplies and accessories through our authorized service centers. This warranty includes transportation costs associated with its fulfillment within the service area.
UN AÑO COMPLETO DE GARANTIA
Applica garantiza este producto contra cualquier defecto originado por fallas en los materiales o en la mano de obra por un período de un año a partir de la fecha original de compra. Esta garantía no es válida cuando: a) el producto ha sido utilizado en condiciones distintas a las normales, b) el producto no ha sido operado conforme al instructivo de uso y cuidado que le acompaña, c) el producto ha sido alterado o reparado por personas no autorizadas. Si el producto resulta con defectos dentro del período de garantía, se le reparará o reemplazará de ser necesario, sin cargo alguno. Para que esta garantía sea válida debe presentar el producto con su recibo de compra y/o la tarjeta de registro correspondiente. Esta garantía le otorga derechos específicos, y usted podría tener otros que pueden variar en su país. Si tiene alguna pregunta, comuníquese con una sucursal o centro de servicio más cercano autorizado por Black & Decker.
NOTA: Usted puede encontrar partes, componentes, consumibles y accesorios en los centros de servicio autorizados. Esta garantía incluye los gastos de transportación que se deriven de su cumplimiento dentro de su red de servicio.
Product may vary slightly from what is illustrated.
El producto puede variar ligeramente del ilustrado.
* 


 is a trademark of The Black & Decker Corporation, Towson, Maryland, USA *Marca registrada de The Black & Decker Corporation, Towson, Maryland, E.U.
Applica Consumer Products, Inc.
Copyright © 2001 Applica Consumer Products, Inc.
Pub. No. 177661-00-RV00
Printed in People’s Republic of China
Impreso en la República Popular China
READ AND SAVE THIS USE AND CARE BOOK
POR FAVOR LEA ESTE INSTRUCTIVO ANTES DE USAR EL PRODUCTO
*
Aspiradoras
1200W & 1300W Vacs (English, page 2)
de 1200W & 1300W (Español, página 8)
VC-50 |
VC-80 |
VC50 |
1200W |
120V |
60 Hz |
VC50 |
1200W |
220V |
50/60 Hz |
VC80 |
1300W |
120V |
60 Hz |
VC80 |
1300W |
220V |
50/60 Hz |
http://www.applicaconsumerproductsinc.com
Series VC50-VC80
16
IMPORTANT SAFEGUARDS
When using electrical appliances, basic safety precautions should always be followed, including the following:
Read all instructions.
■Close supervision is necessary when any appliance is used by or near children. Do not allow to be used as a toy.
■Do not use the vacuum to pick up liquids, toxic substances, flammable or combustible liquids, such as gasoline, or operate in the presence of explosive or flammable fumes or liquids.
■Do not use to pick up sharp objects, toys, etc. They may damage the vacuum or dust bag.
■Do not abuse the cord. Never carry the unit by the cord or yank to disconnect from an outlet; instead, be sure the vacuum is OFF, then grasp the plug and pull to disconnect. Keep cord away from heated surfaces. Do not pull cord around sharp edges or corners. Do not run the vacuum over the cord. Do not allow cord to swing or whip when rewinding.
■Keep hair, clothing, and all parts of body away from openings and moving parts.
■Do not insert/attach accessories while unit is running. Always turn unit OFF before unplugging. Unplug from outlet when not in use and before cleaning or servicing.
■Do not handle plug or appliance with wet hands.
■Do not put any object into unit openings. Do not use with any openings blocked; keep free of dust, lint, hair, and anything that may reduce air flow.
■Do not vacuum burning or smoking materials, such as lit cigarette butts, matches, or hot fireplace ashes.
■Use extra caution when vacuuming on stairs.
■Use only as described in this manual. Use only manufacturer’s recommended attachments. The use of accessory attachments not recommended by the manufacturer may result in fire, electric shock, or injury to persons.
■Do not operate any appliance with a damaged cord or plug or after the appliance malfunctions, or has been damaged in any manner. Return the appliance to the nearest authorized service facility for examination, repair, or electrical or mechanical adjustment.
■Do not use outdoors or on wet surfaces.
■This appliance is provided with double insulation (220V models only). Use only identical replacement parts. See instructions for servicing of doubleinsulated appliances in “Service & Repair.”
■This product is intended for household use only and not for commercial or industrial use. Use for anything other than intended will void the warranty.
SAVE THESE INSTRUCTIONS
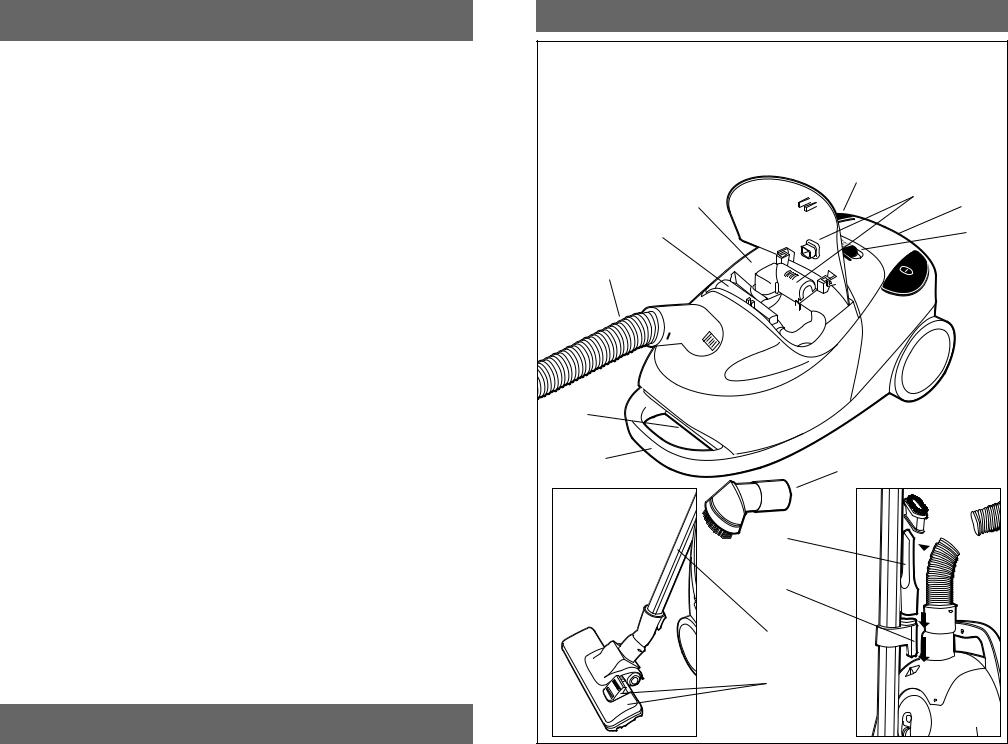
Parts
1 Flexible swivel hose
2 Crevice tool (VC80)
3 On-board accessory storage (VC80)
4 Retractable cord foot pedal
5 Dust bag “Full” Indicator
6 Micro-air filter (under Filter Cover/Vent)
7 Variable suction control (VC80)
8 On/Off foot pedal
3
2
1
K
J
9 Dusting brush (VC80) J Carry handle
K Release latch
L 2-in-1 Accessory (VC50) M Storage clip (VC50)
N Extension tubes
O Sweeper with floor/carpet heights
4
5
6
7
 8
8
9
L 


M
N
O
2 |
3 |

POLARIZED PLUG (120V Models Only)
This appliance has a polarized plug — one blade is wider than the other. To reduce the risk of electric shock, this plug will fit into a polarized outlet only one way. If the plug does not fit fully into the outlet, reverse it. If it still does not fit, contact a qualified electrician. Do not attempt to defeat this safety feature by modifying the plug in any way.
How To Use
1. Insert the Swivel Hose connection by pushing it |
A1 |
|
||
into the Vacuum canister until it clicks/locks into |
|
|||
place. (A1 & A2) |
|
VC80 |
|
|
2. Fit the 2 Extension Tubes together by pushing the |
|
|
||
thin end of one into the wide end of the other. You |
|
|
||
may have to twist the Tubes slightly for a firm fit. |
|
|
||
Push the assembled Extension Tubes onto the end |
|
|
||
of the Swivel Hose (see Parts Illus.). |
|
|
|
|
3. Attach the Sweeper or other accessories to the |
|
|
||
lower Extension Tube as needed. You may want to |
|
|
||
attach the Crevice Tool directly to the end of the |
|
|
||
Swivel Hose when vacuuming between furniture |
|
|
||
cushions. For VC50: Pull the 2-in-1 Accessory off |
A2 |
|
||
the Clip on the Extension Tube and remove the |
|
|
||
Dusting Brush accessory to use the Crevice Tool. |
|
|
||
For both models: the Sweeper is designed for use |
|
|
||
on hard floors and carpets. Use the foot pedal to |
|
|
||
switch the Sweeper for floors ( |
) or |
|
|
|
carpets ( |
). For hard floors (wood, tile, |
|
|
|
cement), use the setting with the brushes down. |
|
|
||
4. Pull out the power cord and plug it into a standard |
|
|
||
outlet. Press the On/Off Pedal with your foot to |
|
|
||
start and stop the vacuum. For 220V models: |
|
|
||
These models are double insulated and do not need grounding. |
|
|||
5. For VC80: Adjust the suction power by sliding the |
|
|
||
Variable Suction Control to MIN or MAX (B). For |
B |
|
||
example, you may want to use MIN suction |
|
|||
|
|
|||
control with the Dusting Brush accessory when |
|
|
||
dusting lamp shades or table tops, use MAX |
|
|
||
suction with the Sweeper accessory on carpets or |
MAX |
MIN |
||
hard floors. |
|
|
|
|
6.A Dust Bag “Full” Indicator will appear in color in the window of the canister lid when the Dust Bag is full (see “Parts” Illustration). When this happens, the vacuum will lose some suction power and the Dust Bag should be emptied. See “Cleaning & Storage.”
7.When finished vacuuming, press the On/Off Foot Pedal to turn the Vacuum Off and unplug. Press the Retractable Cord Pedal with your foot and the cord will wind into the unit. CAUTION: The cord moves fast when retracting. Stand clear of the cord as it rewinds so it does not swing into you as it retracts. See “Cleaning & Storage.”
CLEANING & STORAGE
1.NOTE: Always turn off and unplug the unit before cleaning. Carpet freshener or fine powder can clog the bag and cause it to burst if too full. The Dust Bag Full Indicator will alert you that airflow may be blocked or your Dust Bag needs to be emptied. Also check the Dust Filter and Micro-Air Filter regularly to see if they need cleaning (see #6 below).
2. To empty the reusable cloth Dust Bag, for VC80: press the Release Latch at the front of the unit and lift the canister lid. For VC50: Pull up on the Release Latch at the front of the unit and lift the
canister lid. (C1 & C2) 3. For VC80: Carefully remove the Dust Bag by
grasping it at the collar, sliding it up the track guides, and lifting it out of the unit. For VC50: Pull
the Dust Bag Latch forward, grab the bag collar and carefully remove the Dust Bag (see C1 & C2). Slide the Dust Bag Clip off and empty the bag into
the trash. Slide the Dust Bag Clip
back into place before replacing the bag in the canister.
4. The cloth Dust Bag may be hand-
washed with soap and water. Hang it up to air dry thoroughly before
replacing it in the vacuum. 5. To replace the bag, for VC80: slide
the Dust Bag collar all the way down
into the track guides. For VC50: Pull the Dust Bag Latch back and clip it
onto the collar of the Dust Bag. Be sure to fit the hole in the collar of the
Bag over the opening on the inside of the vacuum canister. For both models, the vacuum lid and be sure it latches shut before operating.
6.Both models are equipped with 2 filters. A Dust Filter, which helps prevent dust getting into the motor, is located on the inside of the canister and visible once remove the Dust Bag. A Micro-Air Filter
is located under the Vent at the back of the unit to help filter out dust particles
that may escape into the air. These
should be washed every few months and should be replaced after a few washes.
7. To clean or replace the Dust Filter, open the vacuum canister lid. Remove the
Dust Bag as explained for your model, and pull the filter holder straight up out
of the canister (D). Shake debris into a trash can or use a small whisk broom or
sweep away particles. Wash the filter in soap and water. Allow it to air dry completely before replacing it in the Vac.
4 |
5 |
 Loading...