

Page 1
Multi Purpose Kitchen Machine
First Use Safety Recommendation
Please read through this booklet for safe and efficient use of the appliance.
We urge you to read the "Hint's" section and also follow all detailed
instructions even if you are familiar with using this appliance.
Keep this guide handy for future reference.
English Page 02
Arabic Page 25
PRSM600
Page 2

English
IMPORTANT SAFEGUARDS
While using electrical appliances, in order to reduce the risk of fire, electric shock,
and/or injury to persons, basic safety precautions should be followed, including the
following:
• Read all instructions carefully, even if you are familiar with the appliance.
• To protect against the risk of electric shock, DO NOT IMMERSE the appliance,
cord set or plug in water or other liquids.
• To clean, wipe the exterior with a damp cloth.
• Close supervision is necessary when any appliance is used near children. Never
leave an appliance unattended when in use.
• If the supply cord is damaged, it must be replaced by the manufacturer or its
service agent or a similarly qualified person in order to avoid a hazard.
• Switch off and remove the plug from the power outlet when not in use before
assembling or disassembling parts, cleaning or carrying out any maintenance of
the appliance. Never pull the cord while unplugging out from power outlet.
• Do not operate the appliance if its damage in any manner. Return the complete
appliance to your nearest authorized service facility for examination, electrical
repair, mechanical repair or adjustments to avoid any hazard.
• The use of attachments or accessories not recommended or sold by this
appliance manufacturer may result in fire, electric shock or personal injury.
• Do not let the cord hang over the edge of a table, counter, or touch hot surfaces.
• Avoid touching hot surfaces, use handles and knobs.
• Do not operate or place any part of this appliance on or near any hot surfaces
(such as gas or electric burner or in a heated oven).
• Do not abuse the cord. Never carry the appliance by the cord or yank it to
disconnect it from the outlet; instead, grasp the plug and pull to disconnect.
• When using an extension cord with your appliance, make sure the extension cord
is correctly wired, and rated for its use.
• This product is intended for household use only.
• Do not attempt to repair the appliance yourself; instead, take it to your Black &
Decker-owned or Authorized Service Centre for repair.
SAVE THESE INSTRUCTIONS
-2-
Page 3
English
8
9
6
7
10
5
1
2
3
11
4
15
12
Fig A
14
13
16
17
-3-
Page 4
English
Fig B
Fig C
-4-
19
18
20
Page 5
English
Fig D
25
30
26
22
23
34
27
24
28
31
21
29
30
31
23
Fig E
-5-
32
33
Page 6
English
Fig F
Intended use
Your Black & Decker stand mixer has been
designed for blending and mixing food and
beverage ingredients. With the attachments
provided, it is also possible to mince
ingredients & extrude cookie dough into
various shapes. Do not use this appliance
for any other purpose.
This product is intended for household use
only.
Safety instructions
Warning! When using mains-powered
appliances, basic safety precautions,
including the following, should always be
followed to reduce the risk of fire, electric
shock, personal injury and material
damage.
Read all of this manual carefully
before using the appliance.
• The intended use is described in this
manual. The use of any accessory or
attachment or the performance of any
operation with this appliance other than
those recommended in this instruction
manual may present a risk of personal
injury.
• Retain this manual for future reference.
Using your appliance
• Make sure that the appliance is switched
off before connecting to or
disconnecting from the power supply.
• Always take care when using the
appliance.
• Do not use the appliance outdoors.
• Always protect the motor unit from water
or excessive humidity.
• Do not operate the appliance if your
hands are wet.
• Do not operate the appliance if you are
barefoot.
• Do not touch moving parts. Keep long
hair and loose clothing out of the way of
the moving parts.
• Guide the power supply cord neatly so it
does not hang over the edge of a work
top and cannot be caught accidentally or
tripped over.
• Never pull the power supply cord to
disconnect the plug from the socket.
Keep the power supply cord away from
heat, oil and sharp edges.
• Switch off and wait for the motor to stop
running before disconnecting the
appliance from the power supply.
• Never detach any part or accessory
while the appliance is still connected to
the power supply. Always disconnect the
appliance from the power supply first.
• If the power supply cord is damaged
during use, disconnect the appliance
from the power supply immediately. Do
not touch the power supply cord before
disconnecting from the power supply.
• Disconnect the appliance from the power
supply when not in use, before fitting or
removing parts and before cleaning.
• Misuse could cause an injury.
• Keep loose clothing, hair, jewellery etc.
away from moving parts.
-6-
Page 7

English
• Care is needed when handling cutting
blades, especially when removing the
blades and during cleaning.
• After cleaning, refit the bowl. This
ensures the coupling underneath is
protected.
• This appliance is fitted with overload
protection. If the unit stops working,
switch the unit off and remove the plug
from the power supply, wait for 5 minutes
then replace the plug.
• If the unit does not function please return
it to your local service agent.
Safety of others
• Do not allow children or any person
unfamiliar with these instructions to use
the appliance.
• Do not allow children or animals to come
near the work area or to touch the
appliance or power supply cord. Close
supervision is necessary when the
appliance is used near children.
• This appliance is not intended for use by
persons (including children) with reduced
physical, sensory or mental capabilities,
or lack of experience and knowledge,
unless they have been give supervision
or instruction concerning use of the
appliance by a person responsible for
their safety.
• Children must be supervised to make
sure that they do not play with the
appliance.
After use
• Switch off the appliance before cleaning,
changing accessories or approaching
parts which move in use.
• Switch off and remove the plug from the
socket before leaving the appliance
unattended and before changing,
cleaning or inspecting any parts of the
appliance.
• When not in use, the appliance should be
stored in a dry place. Children should not
have access to stored appliances.
Inspection and repairs
• Before use, check the appliance for
damaged or defective parts. Check for
breakage of parts, damage to switches
and any other conditions that may affect
its operation.
• Do not use the appliance if any part is
damaged or defective.
• Have any damaged or defective parts
repaired or replaced by an authorised
repair agent.
• Before use, check the power supply cord
for signs of damage, ageing and wear.
• Do not use the appliance if the power
supply cord or mains plug is damaged or
defective.
• If the supply cord is damaged, it must be
replaced by the manufacturer or an
authorised Black & Decker Service Centre
in order to avoid a hazard.
• Never attempt to remove or replace any
parts other than those specified in this
manual.
Electrical safety
This product must be earthed.
Always check that the power supply
corresponds to the voltage on the rating
plate.
Power plugs must match the outlet. Never
modify the plug in any way. Do not use any
adapter plugs with earthed (Class 1)
appliances. Unmodified plugs and matching
outlets will reduce the risk of electric shock.
Extension cables & Class 1 product
A 3 core cable must be used as your
appliance is earthed and of Class 1
construction. Up to 30m (100 ft) can be
used without loss of power.
To avoid the risk of electric shock, do not
immerse the cord, plug or motor unit in
water or other liquid.
-7-
Page 8

English
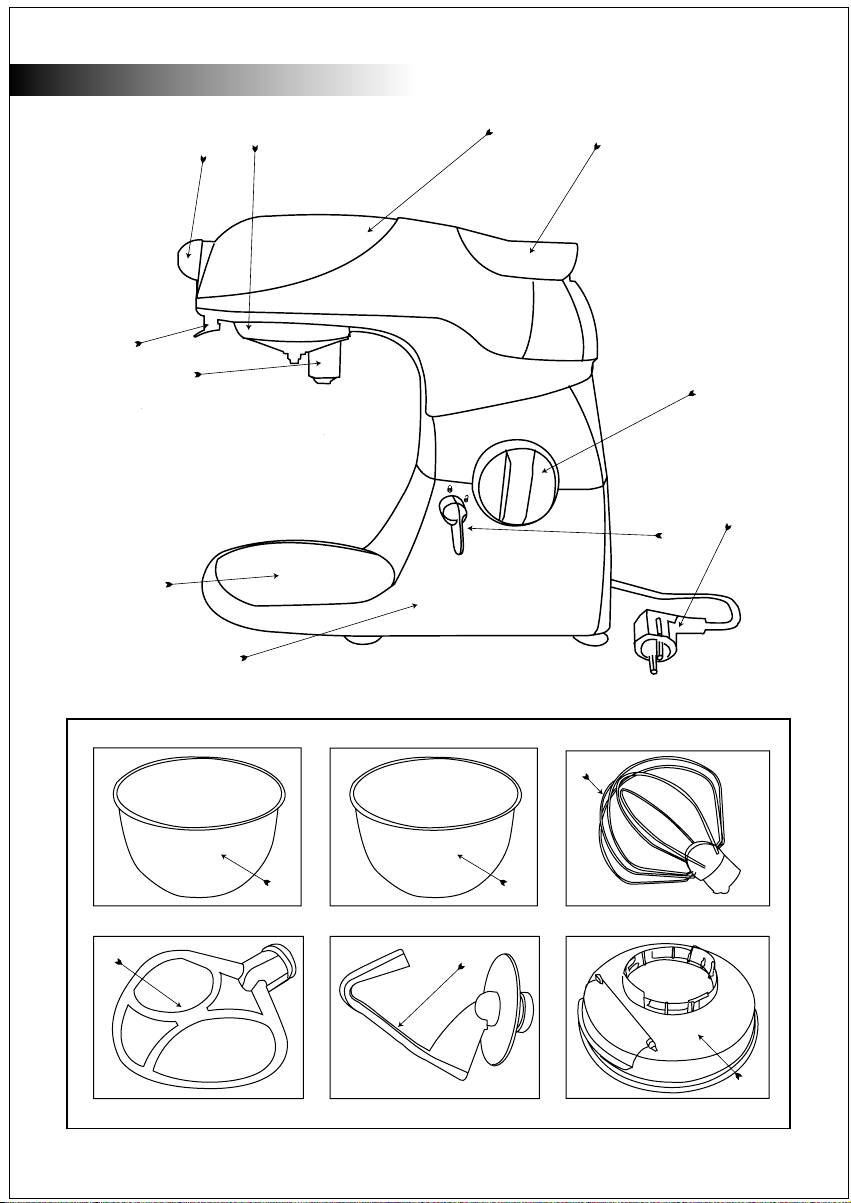
Features
1. Aluminium body
2. 4.5L and 3L Stainless steel bowl
3. 1.25L Blender jar
4. Electronic speed control
5. Meat mincer attachment
6. Beater, whisk and dough hook.
7. Cookie attachment
Parts Identification
1. Mixer head
2. Outlet cover
3. peed control dial
4. Head release lever
5. Mixer base
6. Release lever
7. Coupling
8. Bowl lid holder
9. Front cap
10. Recess
11. Power cord
12 & 13. Steel bowls
14. Whisk
15. Beater
16. Dough hook
17. Bowl lid
18. Blender jar
19. Blender lid
20. Filler cap
21. Mincer
22. Blade
23. Nut
24. Slotted coupling
25. Coarse mincing die
26. Fine mincing die
27. Tray
28. Pusher
29. Spanner
30. Plastic bowl
31. Mincer feeder tube
32. Cookie cup
33. Cookie shape selector
34. Screw
35. Kebbe attachment
Unpacking
Remove the unit from the packaging.
Wash thoroughly before first use.
Assembly
Warning! Before assembly, make sure that
the appliance is switched off and
unplugged.
Use
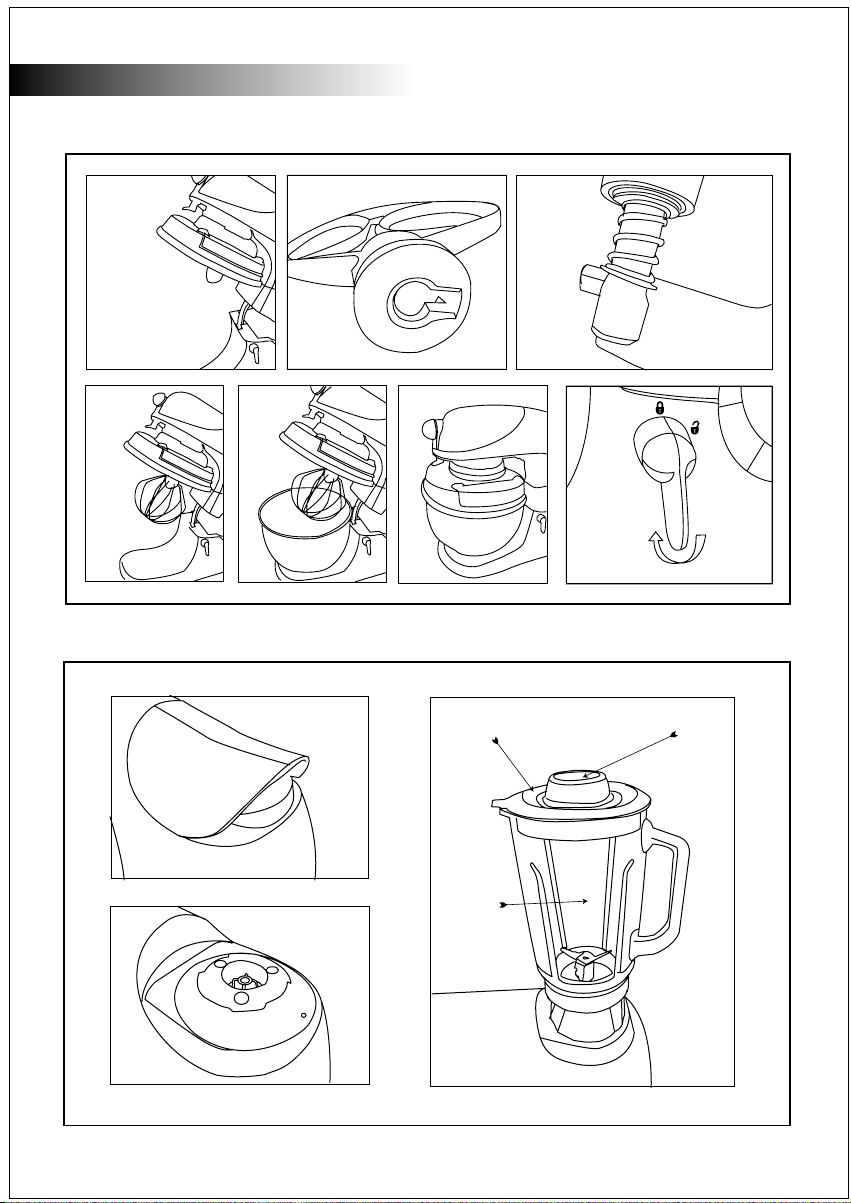
Figures A&B: Using the Whisk, Beater &
Dough Hook:
Place the Mixer on a flat surface. With one
hand on top of the Mixer to prevent sudden
movement, rotate the head release lever (4)
to the "UNLOCKED" position & raise the
head to the upper position.
Releasing the lever "LOCKS" the bowl in
the raised position.
-8-
Page 9

English
If required, the bowl lid (17) can be fitted
over the location (8) on the mixer head
(making sure the door is facing you once it
is fitted) & turned anti-clockwise. The
bayonet fittings on the 2 parts will lock the
lid in place. Push the required attachment -
whisk (14), beater (15) or dough hook (16)
onto the coupling (7) & washer so the
horizontal pin enters the slot in the
attachment. Turning the attachment
clockwise will lock it in place. Place the
required bowl (12 or 13) in the recess (10) in
the stand & rotate it clockwise to lock it in
position
Add the required ingredients to the bowl.
Press the head release lever (4) and lower
the head. Releasing the lever will lock the
head in position.
Connect the Mixer to a suitable electrical
supply.
For short operation, hold the control dial (3)
& rotate it anti-clockwise. Once complete,
release the dial. It will automatically return
to the "0" (OFF) position.
For longer operating times, rotate the
control dial clockwise to select the
appropriate speed.
Once mixing is completed and the unit
turned off, the head can be raised and the
bowl & ingredients removed.
from the blender jar (18), and add the
ingredients. Replace the lid & cap.
Place the Mixer on a flat surface.
Ensure the Mixer head (1) is locked in the
horizontal position.
Remove the outlet cover (2) from the Mixer
head. Place the Blender (17) onto the outlet
& rotate it anti-clockwise until it locks in
place.
Connect the appliance to a suitable
electrical supply.
For short operation, hold the control dial (3)
& rotate it anti-clockwise. Once complete,
release the dial. It will automatically return to
the "0" (OFF) position.
For longer operating times, rotate the
control dial clockwise to select the
appropriate speed.
Once blending is completed and the unit
turned off, the blender can be removed by
rotating it clockwise to overcome the
bayonet fitting.
Always operate the blender with the lid
fitted.
Never approach any moving parts until they
have come to a complete stop.
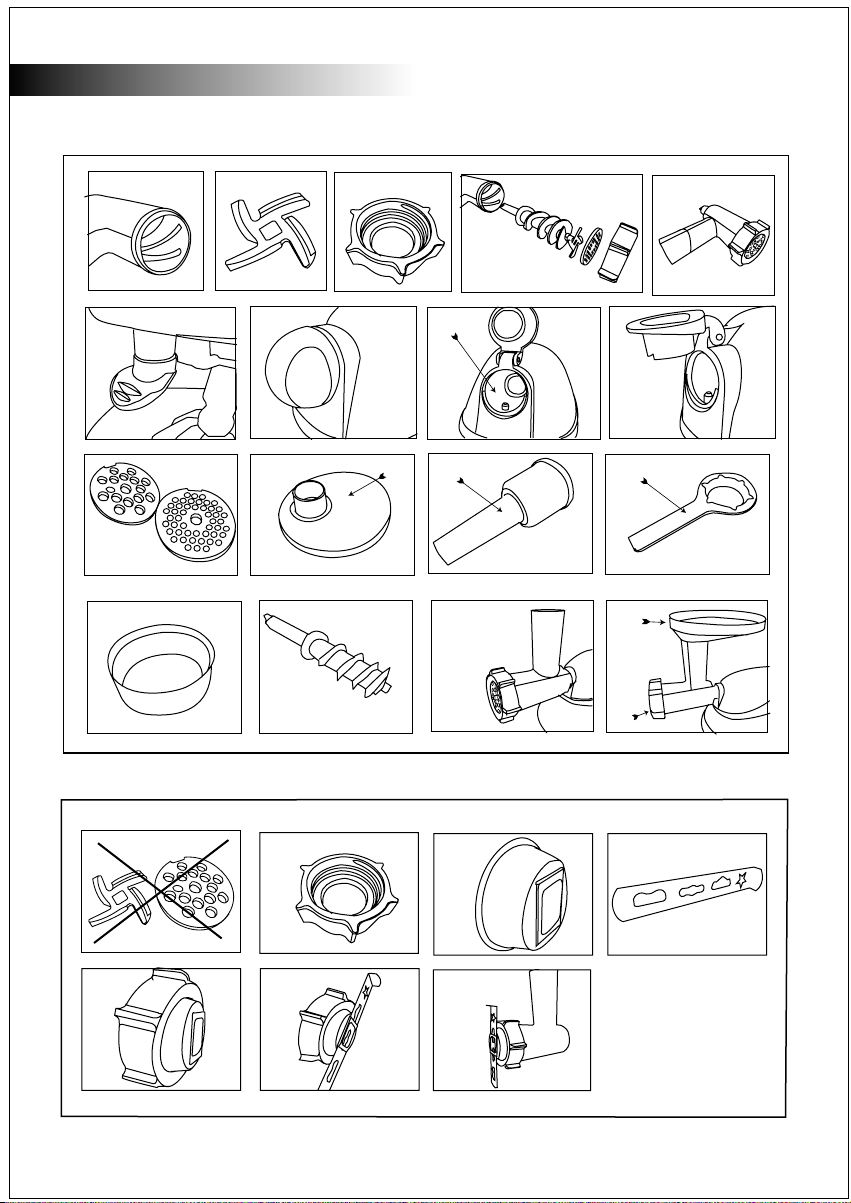
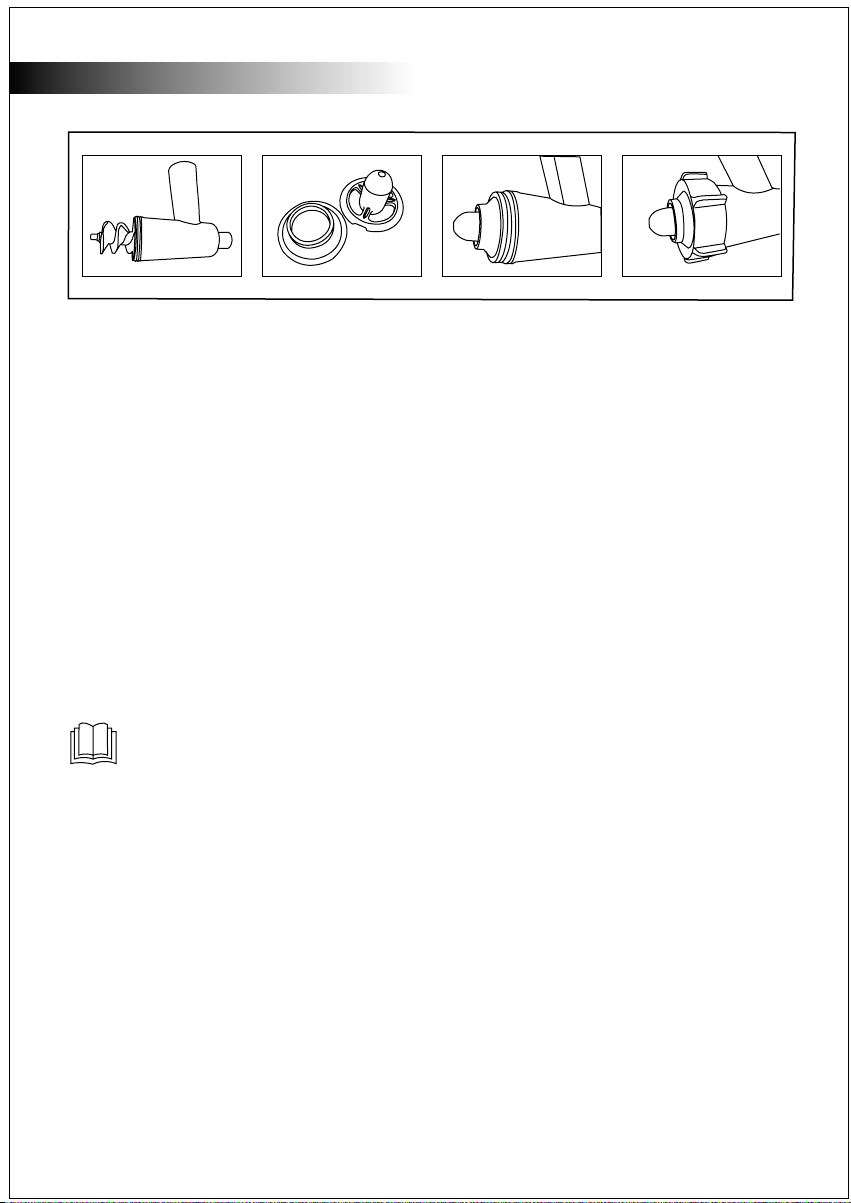
Figure D: Using the Mincer:
Place the Mixer on a flat surface.
Never approach any moving parts until they
have come to a complete stop.
Figure C: Using the Blender:
Remove the blender lid (19) & filler cap (20)
Ensure the Mixer head (1) is locked in the
horizontal position.
Press the attachment release lever (6) down
and lift the front cap (9) to reveal a hole and
slotted coupling.
-9-
Page 10

English
Holding the release button (6) down, fit the
assembled Mincer (21) into the hole, and
turn it to make sure the flat on the end of
the screw engages in the slotted coupling.
Release the button, & rotate the Mincer
assembly again. The screw should be
connected to the coupling. When the pin on
the release button aligns with the hole in the
Mincer, the spring will push the pin through,
locking it in place.
The feeder tube should be facing up. Fit the
tray (30) into the feeder (31) in the Mincer
head.
Remove the nut (23) by rotating it in an
anti-clockwise direction. The spanner (29)
may be required. Remove the round die (25
or 26) & replace with the one required for
the task. Locate the cut-out in the die with
the tab on the Mincer head. Replace the
nut. Place the ingredients on the tray, and a
bowl under the Mincer head.
The tray (27) can be used as lid on plastic
bowl (30) making it a storage bowl.
Figure E: Using the Cookie shape
selector:
Place the Mixer on a flat surface.
Ensure the Mixer head (1) is locked in the
horizontal position.
Press the attachment release lever (6) down
and Lift the front cap (9) to reveal a hole and
slotted coupling.
Holding the release button (6) down, fit the
Mincer (21) into the hole, and turn it to make
sure the flat on the end of the screw
engages in the slotted coupling. Release the
button, & rotate the Mincer assembly again.
The screw should be connected to the
coupling. When the pin on the release
button aligns with the hole in the Mincer, the
spring will push the pin through, locking it in
place.
Connect the appliance to a suitable
electrical supply.
Rotating the control dial clockwise, select a
slow speed. Using the pusher (28), push the
ingredients into the hole in the tray & down
into the Mincer.
The screw will collect the ingredients,
compressing them & moving them forward.
The blade will cut the ingredients, which will
then be forced through the die and fall into
the bowl.
Never insert fingers into the feed chute.
Only use the pusher provided.
Never approach any moving parts until they
have come to a complete stop.
The feeder tube should be facing up. Fit the
tray (23) into the feeder (31) in the Mincer
head.
Remove the nut (23) by rotating it in an
anti-clockwise direction. The spanner (29)
may be required. Remove the round die (25
& 26) and blade (22).
Place the cookie cup (32) (without shape
selector (33)) in the nut, and fasten it back
onto the Mincer head.
Fit the shape selector through the 2 slots in
the cookie attachment. Fit the tray (27) into
the vertical tube (31) in the Mincer head.
-10-
Page 11

English
Place the ingredients on the tray, and place
a tray under the Mincer head.
Connect the appliance to a suitable
electrical supply.
Rotate the control dial clockwise & select a
slow speed. Using the pusher, push the
ingredients into the hole in the tray & down
into the Mincer.
The screw will collect the ingredients,
compressing them & moving them forward.
They will then be forced through the
selected shape in the shape selector. This
should be collected on the tray.
The machine should be stopped before
changing the shape in the shape selector.
Never approach any moving parts until they
have come to a complete stop.
Never insert fingers into the feed chute.
Only use the pusher provided.
Using the Kebbe attachment (Fig. F)
The Kebbe attachment is used with the
meat mincer attachment.
The Kebbe maker attachment (35) has two
parts, the shaper and the cone.
Follow the assembly instructions of the
mincer through to the assembly of the worm
(34) (do not assemble the cutting blade (22)
or the fine or course mincing dies (25 or
26)).
Insert the shaper and the cone onto the end
of the worm.
Secure the Kebbe in place using the
securing nut (23).
Feed the Kebbe mixture through the food
feeder tube and use the pusher provided.
The mince will roll out as a hollow cylinder.
Cut the continuous hollow cylinder into the
desired lengths while it flows out.
Operating times and preparations
Attachment Function
Food Speed
Mixing Making cakes, 5-9
mashed potatoes & cookie
Suggested Types Of Recommended
Mixing & Mixes & kneads all kinds of yeast 2-6
kneading mixtures for homemade bread
Whisking Used for egg, meringues, 10-12
creams & mousses
Blending Soups*, purees, 10-12
drinks, milkshakes
Mincing Mincing meat, cookies 1-3
(with cookie attachment)
Mincing Kebbe 1-3
Shredding vegetables Slicer, fine shredding & coarse shredding
(PRSM600VS - vegetables, such as carrots, beets, 4
Optional Accessory) turnips, potatoes, coconut & celery
Extruding pasta
(PRSM600PM - Making pasta & Macaroni 1-3
Optional Accessory)
* Do not blend hot liquids, allow to cool first
-11-
Page 12

English
Switching On and Off
For short operation, hold the control dial (3)
& rotate it anti-clockwise. Once complete,
release the dial. It will automatically return
to the "0" (OFF) position.
For longer operating times, rotate the
control dial clockwise to select the
appropriate speed.
Warning! Never run the mixer for longer
than 10 minutes to prevent over-heating.
After 10 minutes of continuous operation,
allow the mixer to cool to room temperature
before re-using.
Warning! After switching off always allow
the motor to stop before approaching the
blade.
Warning! All loose clothing and hair must
be kept clear of moving parts.
Warning! Always discount the unit from the
supply if it is to be left unattended and
before assembling, dissembling or cleaning.
Warning! Never raise the mixer head when
the blender, mincer, pasta maker or
shredder attachments are fitted. Remove all
attachments before lifting or moving the
mixer.
Cleaning and maintenance
Warning! Switch the appliance off and
unplug it before cleaning or maintenance.
Be careful when cleaning the blades; they
are sharp.
Warning! Care is needed when handling
cutting blades, especially when removing
blades and during cleaning.
Warning! Do not immerse the appliance, the
cord set or the plug in water or any other
liquid.
• Wash the attachments in warm soapy
water and dry well.
• Wipe the motor unit (2) with a damp cloth.
Do not use any abrasive or solvent-based
cleaner.
Always clean the appliance immediately
after use. Do not let food dry on to the
blades as this will make cleaning difficult.
Technical data
PRSM600
Voltage V 230
Wattage W 800
Weight Kg 10.5
Warning! Never run the Mixer, the Blender
and the front attachment simultaneously -
the unit will overheat. All other
combinations will work fine.
-12-
Page 13

English
Protecting the environment
Separate collection. This product must not be disposed of with normal household
waste.
Should you find one day that your Black & Decker product needs replacement, or if it is of no
further use to you, do not dispose it off with other household waste. Make this product
available for separate collection.
Separate collection of used products and packaging allows materials to be recycled and used
again. Use of recycled materials helps prevent environmental pollution and reduces the
demand for raw materials.
Local regulations may provide for separate collection of electrical products from the
household, at municipal waste sites or by the retailer when you purchase a new
product.
Black & Decker provides a facility for the collection and recycling of Black & Decker products
once they have reached the end of their working life. To take advantage of this service please
return your product to any authorised repair agent who will collect them on our behalf. You
can check the location of your nearest authorised repair agent by contacting your local Black
& Decker office at the address indicated in this manual. A list of authorised Black & Decker
repair agents and full details of our after-sales service and contact are available on the
Internet at: www.2helpU.com
BLACK & DECKER HOME APPLIANCE 2 YEAR WARRANTY
Black & Decker provides a 2 Year Warranty for this product from the date of purchase against
defects due to defective materials or workmanship. Motor/element burn-outs due to voltage
fluctuations are not covered under warranty. If the product should become defective within the
warranty period, Black & Decker will repair or (at Black & Decker's discretion) replace it free of
charge.
The warranty provisions do not cover failure due to accident, misuse, abuse, negligence or non
observation of local regulations on the part of the user. Equally, the warranty provisions do not apply
where the appliance has been serviced by a person not authorized by Black & Decker or serviced
with non-approved parts and this has contributed to the fault of the product. Superseded models
without a replacement equivalent will either be repaired or (at Black & Decker's discretion) replaced
with another product of similar retail value.
UPON PURCHASE
Fill in the Warranty Registration Card with the original Authorized Dealer's stamp (indicating date of
purchase) and attach your purchase receipt to it. Retain in case of claims in the future.
MAKING A CLAIM
Take your defective product together with the Warranty Registration Card & purchase receipt to your
local service Centre. You can either do this in person or send it freight prepaid. If mailing or shipping
your appliance, ensure that it is packed carefully in a sturdy carton with enough packing material to
prevent damage. Include a note describing the problem to the service Centre and be sure to give
your return address.
DESIGNED FOR DOMESTIC PURPOSES ONLY.
-13-
Page 14

Arabic
•LU¥W «∞∂OµW
¥πV ´b «∞∑ªKh ±s ≥c« «∞LM∑Z ±l °IOW «∞MHU¥U‹ «∞LMe∞OW.
≈–« ˧b‹ ≠w ¥u ±s «_¥U √≤p °∫U§W ∞Ad«¡ §NU“ °ö„ √≤b œ¥Jd §b¥b, √Ë ∞r ¢Fb °∫U§W ∞KπNU“ «∞Ib¥r, ô ¢∑ªKh ±Mt ±l «∞
MHU¥U‹ «∞LMe∞OW «_îdÈ. §Ne ≥c« «∞LM∑Z ∞ûß∑öÂ «∞LMHBq.
«ùß∑ö «∞LMHBq ∞KLM∑πU‹ «∞Lº∑FLKW ˱u«œ «∞∑GKOn ¥ºL` °S´Uœ… ¢BMOl «∞Lu«œ Ë«ß∑FLU∞NU ±s §b¥b. ≈ß∑FLU‰ «∞
∞OW.
Lu«œ «∞LFUœ ¢BMOFNU ¥ºU´b ´Kv ±Ml «∞∑KuÀ «∞∂Oµw Ë¥IKq «∞DKV ´Kv «∞Lu«œ «_Ë
«_≤ELW «∞L∫KOW Æb ¢Mh ´Kv {d˸… «ùß∑ö «∞LMHBq ∞KLM∑πU‹ «∞JNd°UzOW ±s «∞LMU“‰, ≠w ±u«Æl «∞∂Kb¥W ∞KMHU¥U‹ √Ë °u«ßDW
°Uzl «∞∑πezW ´Mb±U ¢A∑dÍ ±M∑πUÎ §b¥b«Î.
¢u≠d °ö„ √≤b œ¥Jd «∞∑ºNOö‹ ôß∑ö Ë≈´Uœ… ¢BMOl ±M∑πU‹ °ö„ √≤b œ¥Jd ´Mb±U ¢Bq ≈∞v ≤NU¥W •OU¢NU «∞FLKOW. ∞ûß∑HUœ…
±s ≥cÁ «∞ªb±W, ¥d§v ≈´Uœ… §NU“„ ≈∞v √Í ËØOq ¢BKO` ±F∑Lb Ë«∞cÍ ßOIu °Uß∑ö±t °U∞MOU°W ´MU. ¥LJMp ±Fd≠W ±uÆl √Æd»
ËØOq ¢BKO` ±F∑Lb °U∞Mº∂W ∞p °Ld«§FW ±J∑V °ö„ √≤b œ¥Jd «∞L∫Kw ´Kv «∞FMu«Ê «∞L∂Os ≠w ≥c« «∞J∑OV. ¢∑u≠d ÆUzLW °QßLU¡
ËØö¡ «∞∑BKO` «∞LF∑Lb¥s ±s °ö„ Ë œ¥Jd, ØLU ¢∑u≠d ¢HUÅOq ØU±KW ´s îb±U‹ ±U °Fb «∞∂Ol Ë´MUË¥s «ô¢BU‰ ´Kv ®∂JW «ù≤∑d
≤X : moc.Upleh2.www
BLACK & DECKER
Black & Decker
{LUÊ ®U±q ∞Lb… ßM∑Os _§Ne… «∞LMe∞OW
Black & Decker
Black & Decker
◊ «∞CLUÊ ≈–« ¢LX ÅOU≤W √Ë ¢BKO` «∞LM∑Z ∞bÈ ©d· ¨Od ±F∑Lb ±s Æ∂q ®dØW , √ Ë ≠w •U∞W «ß
Black & Decker
∑U§d «∞LF∑Lb (Ë¢u{O` ¢U¸¥a «∞Ad«¡) £r «¸≠o ≈¥BU‰ «∞Ad«¡ °U∞∂DUÆW.
∞LU¡ ØKOUÎ ËÆr °∑GKOHt §Ob«Î ≠w ÅMbË‚ Ød¢uÊ ±IuÈ ±l ≈{U≠W
-41-
¢LM` {LU≤UÎ ®U±öÎ ±b¢t ßM∑Os ∞Nc« «∞LM∑Z «´∑∂U¸«Î ±s ¢U¸¥a «∞Ad«¡.
¥GDw «∞CLUÊ ´Ou» «∞∑BMOl √Ë «∞Lu«œ «∞b«îKW ≠w «∞∑BMOl. Ë≠w •U∞W ≈ÅU°W «∞LM∑Z °QÍ ´Dq √£MU¡ ≠∑d… «∞CLUÊ, ß∑Iu ®dØW
°SÅö•t √Ë (Ë≠IUÎ ∞∑Ib¥d ) «ß∑∂b«∞t ±πU≤UÎ.
ô ¥GDw «∞CLUÊ «_´DU‰ «∞MU¢πW ´s «∞∫u«œÀ, ßu¡ «ôß∑FLU‰, «ù≥LU‰, «ôß∑FLU‰ «∞ªU©T, √Ë ´b «¢∂UŸ «∞MEr «∞LFLu‰ °NU ±∫KOUÎ.
Øc∞p, ô ¢MD∂o ®dË
∑ªb«Â ÆDl ¨OU¸ °bËÊ «∞d§uŸ ≈∞v «∞AdØW √Ë «∞∫Bu‰ ´Kv ±u«≠I∑NU, Ë¢º∂∂X ≥cÁ «∞IDl ≠w «∞FDq. Ë≈–« ¢uÆn ≈≤∑Uà √Í ©d«“ ±l ´bÂ
˧uœ «∞∂b¥q «∞LMUßV, ≠SÊ ∞AdØW •o «î∑OU¸ ≈ÅöÕ «∞LM∑Z √Ë «ß∑∂b«∞t °Dd«“ ¬îd °MHf «∞IOLW «∞Ad«zOW.
´Mb «∞Ad«¡
«±ú °DUÆW ¢ºπOq «∞CLUÊ ±l «∞∑QØb ±s ˧uœ «∞ª∑r «_ÅKw ∞K
«∞d§U¡ «ô•∑HUÿ °NLU ù°d«“≥LU ≠w •U∞W ˧uœ ±DU∞∂U‹ ≠w «∞Lº∑I∂q.
´LKOW «∞LDU∞∂W
îc «∞LM∑Z «∞LFDq ±l °DUÆW «∞CLUÊ Ë≈¥BU‰ «∞Ad«¡ °MHºp ≈∞v ±dØe «∞BOU≤W «∞L∫Kw √Ë ¥LJMp ≈¸ßU∞t °U∞∂d¥b «∞Lb≠u´W √§d¢t ßKHUÎ.
Ë≠w •U∞W ≈¸ßU‰ «∞πNU“ °U∞∂d¥b √Ë «∞A∫s, ¢QØb ±s ¢Hd¥m «∞LM∑Z ±s «
±u«œ ¢GKOn ∞LKv¡ «∞Hd«¨U‹ ∞∑HUœÍ ≈ÅU°∑t °QÍ {d¸. «¸≠o ±ö•EW ¢Bn ≠ONU «∞LAJKW ∞LdØe «∞BOU≤W Ë¢QØb ±s Ø∑U°W ´Mu«≤p.
ÅÔLr ∞öß∑FLUô‹ «∞LMe∞OW ≠Ij.
Page 15

™£≤dG äGôØ°T ™e πeÉ©àdG óæY ¢UôëdGh QòëdG »NƒJ Öéj !ôjòëJ
.∞«¶æàdG AÉæKCGh äGôØ°ûdG ádGREG óæY á°UÉN ,IOÉëdG
hCG AɪdG »a ¢ùHÉ≤dG hCG ∂∏°ùdG hCG RÉ¡édG ¢ùªZ ΩóY Öéj !ôjòëJ
.ôNBG πFÉ°S …CG
É¡ØØLh ÅaGO ¿ƒHÉ°U AÉe ΩGóîà°SÉH á≤aôªdG äGóMƒdG π°ùZG •
.Gkó«L
Éd .á∏∏Ñe ¢Tɪb á©£b ΩGóîà°SÉH (2) ∑ôëªdG IóMh í°ùeG •
.ᣰTɵdG OGƒªdG hCG áÑjòªdG OGƒªdG äÉضæe Ωóîà°ùJ
ΩóY »¨Ñæjh .GkQƒa ΩGóîà°SÉdG Ö≤Y RÉ¡édG ∞«¶æJ ÉkªFGO »¨Ñæj
áHƒ©°U øe ∂dP ójõj å«M ;äGôØ°ûdG ¥ƒa ∞éJ ≈àM ᪩WCÉdG ∑ôJ
.∞«¶æàdG á«∏ªY
Arabic
𫨰ûàdG ±É≤jEGh 𫨰ûàdG
ºµëàdG ¢Uôb ≈∏Y QGôªà°SÉdG ™e §¨°VG ,Iô«°üb IôàØd 𫨰ûà∏d
ó©H .áYÉ°ùdG ÜQÉ≤Y ácôM √ÉéJG ¢ùµY »a ¬JQGOEÉH ºbh (3)
"0" ™°VƒdG ≈dEG Ék«FÉ≤∏J ¢Uô≤dG Oƒ©j ±ƒ°Sh ,¢Uô≤dG QôM ,AÉ¡àfÉdG
.(±É≤jEG)
ácôM √ÉéJG »a ºµëàdG ¢Uôb IQGOEÉH ºb ,á∏jƒW äGôàØd 𫨰ûà∏d
.áÑ°SÉæªdG áYô°ùdG ójóëàd áYÉ°ùdG ÜQÉ≤Y
øY ójõJ Ióªd π°UGƒàe πµ°ûH •É∏îdG 𫨰ûJ Ék«FÉ¡f ÖæéJ !ôjòëJ
π°UGƒàªdG 𫨰ûàdG ó©Hh .áWôتdG IQGôëdG Öæéàd ;≥FÉbO 10
IQGôM áLQO iƒà°ùe ≈dEG OôÑj ≈àM •É∏îdG ∑ôJG ,≥FÉbO 10 Ióªd
.¬eGóîà°SG IOÉYEG πÑb áaô¨dG
á«æØdG äÉfÉ«ÑdG
PRSM600
230 âdƒa ó¡édG
800 äGh á«FÉHô¡µdG Iƒ≤dG
10^5 ºéc ¿RƒdG
∑ôëªdG ∑ôJ ≈∏Y ÉkªFGO ¢UôMG ,𫨰ûàdG ±É≤jE
G ó©H !ôjòëJ
.IôØ°ûdG øe ÜGôàbÉdG πÑb ÉkeɪJ ∞bƒàj ≈àM
Gkó«©H ô©°ûdGh IQôëàªdG ¢ùHÉ∏ªdG ™«ªéH ®ÉØàMÉdG Öéj !ôjòëJ
.ácôëàªdG AGõLCÉdG øY
ádÉM »a ,AÉHô¡µdG Qó°üe øY IóMƒdG π°üa ÉkªFGO »¨Ñæj !ôjòëJ
.∞«¶æàdG hCG ∂«µØàdG hCG Ö«côàdG πÑbh É¡eGóîà°SG ΩóY
hCG êõªdG AÉYh Ö«côJ AÉæKCG •É∏îdG ¢SCGQ ™aQ Ék«FÉ¡f ÖæéJ !ôjòëJ
™«ªL ádGREÉH ºb .™«£≤àdG IóMh hCG Éà°SÉÑdG OGóYEG IóMh hCG áeôتdG
.¬µjôëJ hCG •É∏îdG ™aQ πÑb á≤aôªdG äGóMƒdG
IóMƒdGh êõªdG AÉYhh •É∏îdG 𫨰ûJ Ék«FÉ¡f ÖæéJ !ôjòëJ
áLQO ´ÉØJQG ≈dEG ∂dP …ODƒj ±ƒ°S – óMGh âbh »a á«eÉeCÉdG
iôNCÉdG äÉYƒªéªdG »bÉH πª©J ±ƒ°S .•ôØe πµ°ûH IóMƒdG IQGôM
.ó«L πµ°ûH
áfÉ«°üdGh ∞«¶æàdG
QÉ«àdG Qó°üe øY ¬∏°üah RÉ¡édG 𫨰ûJ ±É≤jEG Öéj !ôjòëJ
¢UôëdGh QòëdG »NƒJ »¨Ñæj .áfÉ«°üdG hC
-51-
.IQƒ£N πµ°ûJh IOÉM É¡fEG å«M ;äGôØ°ûdG ∞«¶æJ óæY
G ∞«¶æàdG πÑb »FÉHô¡µdG
Page 16

Arabic
("h" πµ°ûdG) áѵdG IóMh ΩGóîà°SG
.Ωƒë∏dG áeôØe IóMh ™e áѵdG IóMh ΩGóîà°SG ºàj
π«µ°ûàdG IóMh ,øjCGõL ≈∏Y (35) áѵdG OGóYEG IóMh πªà°ûJ
.™ª≤dGh
(34) Ödƒ∏dG Ö«côJh áeôتdÉH á°UÉîdG Ö«côàdG äGOÉ°TQEG ™ÑJG
ºYÉædGh ø°ûîdG ΩôØdG »ÑdÉb hCG (22) ™«£≤àdG IôØ°T ÖcôJ Éd)
.((26 hCG 25)
.Ödƒ∏dG ájÉ¡f »a ™ª≤dGh π«µ°ûàdG IóMh ∫ÉNOEÉH ºb
.(23) §HôdG ádƒª°U ΩGóîà°SÉH É¡©°Vƒe »a áѵdG IóMh âÑK
IóMh Ωóîà°SGh ájò¨àdG ܃ÑfCG ∫É∏N øe áѵdG §«∏N ájò¨àH ºb
.áaƒée áfGƒ£°SCG áÄ«g ≈∏Y ΩhôتdG êôîj ±ƒ°S .á≤aôªdG ™aódG
.áeôتdG ¢SCGQ πØ°SCG á«æ«°U ™°Vh ,á«æ«°üdG »a äÉfƒµªdG ™°V
.Ö°SÉæe AÉHô¡c Qó°üªH RÉ¡édG π«°UƒàH ºb
OóMh áYÉ°ùdG ÜQÉ≤Y ácôM √ÉéJG »a ºµëàdG ¢Uôb IQGOEÉH ºb
πNGO ≈dEG äÉfƒµªdG ™aód ™aódG IóMh Ωóîà°SG .áÄ«£H áYô°S
.áeôتdG √ÉéJ πØ°SCÉdh á«æ«°üdG »a IOƒLƒªdG áëàØdG
.ΩÉeCÉdG ≈dEG É¡∏≤fh É¡£¨°Vh äÉfƒµªdG ™«ªéàH Ödƒ∏dG Ωƒ≤j ±ƒ°S
IóMh »a OóëªdG πµ°ûdG ∫É∏N øe äÉfƒµªdG êôîJ ±ƒ°Sh
.á«æ«°üdG »a èJÉædG ™«ªéJ »¨Ñæj .π«µ°ûàdG
IóMh »a Ωóîà°ùªdG πµ°ûdG ô««¨J πÑb RÉ¡édG 𫨰ûJ ±É≤jEG Öéj
øY ∞bƒàJ ≈àM ácôëàe AGõLCG ájCG øe ÜGôàbÉdG Ék«FÉ¡f ÖæéJ
áHƒ∏£ªdG ∫GƒWCÉdG ≈dEG á∏°üàªdG áaƒéªdG áfGƒ£°SCÉdG ™«£≤àH ºb
.É¡LhôN AÉæKCG
IóMh Ωóîà°SG .ájò¨àdG ܃ÑfCG »a ™HÉ°UCÉdG ∫ÉNOEG Ék«FÉ¡f ÖæéJ
𫨰ûàdG äÉbhCGh äGOGóYEG
áYô°ùdG
É¡H ≈°UƒªdG
9-5 ∂©µdGh á°Shô¡ªdG ¢ùWÉ£ÑdGh ∂«µdG OGóYEG êõªdG
6-2 »dõæªdG õÑîdG OGóYEÉd ø«é©dG ´GƒfCG ™«ªL øéYh êõe øé©dGh êõªdG
áMôà≤ªdG ᪩WCÉdG ´GƒfCG áØ«XƒdG IóMƒdG
.π«µ°ûàdG
.ÉkeɪJ ácôëdG
.§≤a á≤aôªdG ™aódG
12-10 á«°SƒªdGh Ió°û≤dGh ≠fôªdGh ¢†«ÑdG ≥ØN ≥ØîdG
12-10 äÉHhô°ûªdGh ¬jQƒÑdGh *áHQƒ°ûdG §∏îdGh êõªdG
øÑ∏dG ¥ƒØîeh
3-1 ∂©µdG ø«éY OGóYEGh Ωƒë∏dG Ωôa øë£dG
(∂©µdG IóMh ΩGóîà°SÉH)
3-1 áѵdG OGóYEG øë£dG
ø°ûîdGh ºYÉædG ™«£≤àdGh íFGô°ûdG ™«£≤J äGhô°†îdG ™«£≤J IóMh
4 âØ∏dGh ôµ°ùdG ôéæHh QõédG πãe ,äGhô°†î∏d - PRSM600VS)
¢ùaôµdGh óæ¡dG RƒLh ¢ùWÉ£ÑdGh (ájQÉ«àNG IóMh
Éà°SÉÑdG π«µ°ûJ IóMh
3-1 áfhôµªdGh Éà°SÉÑdG OGóYEG - PRSM600PM)
(ájQÉ«àNG IóMh
.É¡LõeG ºK ,kÉdhCG OôÑàd πFGƒ°ùdG ∑ôJG ,áæNÉ°ùdG πFGƒ°ùdG êõªd RÉ¡édG Ωóîà°ùJ Éd *
-61-
Page 17

á«fÉ£∏°ùdG ¥ƒa ™°Vƒj AÉ£¨c (27) á«æ«°üdG ΩGóîà°SG øµªj
.øjõîJ á«fÉ£∏°ùc É¡dɪ©à°SÉd (30) ᫵«à°SÉ∏ÑdG
∂©µdG π«µ°ûJ IóMh ΩGóîà°SG :(`g) πµ°ûdG
Arabic
ºb ,πØ°SCÉd (6) ôjôëàdG QR ≈∏Y QGôªà°SÉdG ™e §¨°†dG AÉæKCG
ócCÉà∏d É¡JQGOEÉH ºbh ,áëàØdG »a (21) ᩪéªdG áeôتdG Ö«côàH
áfô≤ªdG »a Ödƒ∏dG ájÉ¡æH OƒLƒªdG í£°ùªdG ±ô£dG ∫ƒNO øe
ƒà°ùe í£°S ¥ƒa •É∏îdG ™°V
.
m
.»≤aCÉdG ™°VƒdG »a (1) •É∏îdG ¢SCGQ â«ÑãJ ócCÉJ
»eÉeCÉdG AÉ£¨dG ™aQGh πØ°SCÉd (6) IóMƒdG ôjôëJ ´GQP ≈∏Y §¨°VG
.áHƒ≤°ûe áfô≤eh áëàa QÉ¡XEÉd (9)
ºb ,πØ°SCÉd (6) ôjôëàdG QR ≈∏Y QGôªà°SÉdG ™e §¨°†dG AÉæKCG
∫ƒNO øe ócCÉà∏d É¡JQGOEÉH ºbh ,áëàØdG »a (21) áeôتdG Ö«côàH
.áHƒ≤°ûªdG áfô≤ªdG »a Ödƒ∏dG ájÉ¡æH OƒLƒªdG í£°ùªdG ±ô£dG
π«°UƒJ Öéj .iôNCG Iôe áeôتdG ᩪée IQGOEÉH ºbh QõdG QôM
™e ôjôëàdG QR »a OƒLƒªdG QƒHÉîdG IGPÉëe óæY .áfô≤ªdÉH Ödƒ∏dG
∫É∏N QƒHÉîdG ∑ôÑfõdG ™aój ±ƒ°S ,áeôتdG »a IOƒLƒªdG áëàØdG
.¬©°Vƒe »a ô≤à°ù«d áëàØdG
á«æ«°üdG Ö«côàH ºb .≈∏YCÉd Ék¡éàe ájò¨àdG ܃ÑfCG ¿ƒµj ¿CG Öéj
.áeôتdG ¢SCGQ »a (31) ájò¨àdG IóMh »a (27)
ácôM √ÉéJG ¢ùµY »a É¡JQGOEG ∫É∏N øe (23) ádƒª°üdG ádGREÉH ºb
§HôdG ìÉàØe ΩGóîà°SÉd áLÉM ∑Éæg ¿ƒµJ ób .áYÉ°ùdG ÜQÉ≤Y
Öéj .iôNCG Iôe áeôتdG ᩪée IQGOEÉH ºbh QõdG QôM .áHƒ≤°ûªdG
QR »a OƒLƒªdG QƒHÉîdG IGPÉëe óæY .áfô≤ªdÉH Ödƒ∏dG π«°UƒJ
∑ôÑfõdG ™aój ±ƒ°S ,áeôتdG »a IOƒLƒªdG áëàØdG ™e ôjôëàdG
.¬©°Vƒe »a ô≤à°ù«d áëàØdG ∫É∏N QƒHÉîdG
á«æ«°üdG Ö«côàH ºb .≈∏YCÉd Ék¡éàe ájò¨àdG ܃ÑfCG ¿ƒµj ¿CG Öéj
.áeôتdG ¢SCGQ »a (31) ájò¨àdG IóMh »a (27)
ácôM √ÉéJG ¢ùµY »a É¡JQGOEG ∫É∏N øe (23) ádƒª°üdG ádGREÉH ºb
§HôdG ìÉàØe ΩGóîà°SÉd áLÉM ∑Éæg ¿ƒµJ ób .áYÉ°ùdG ÜQÉ≤Y
Ö«côJ óYCGh (26 hCG 25) ôjóà°ùªdG ÖdÉ≤dG ádGREÉH ºb .(29)
ΩGóîà°SÉH ÖdÉ≤dG »a ™«£≤àdG IóMh âÑK .᪡ª∏d ܃∏£ªdG ÖdÉ≤dG
.ádƒª°üdG Ö«côJ IOÉYEÉH ºb .áeôتdG ¢SCGQ »a OƒLƒªdG ¿É°ù∏dG
.áeôتdG πØ°SCG á«fÉ£∏°S ™°Vh ,á«æ«°üdG »a äÉfƒµªdG ™°V
.Ö°SÉæe AÉHô¡c Qó°üªH RÉ¡édG π«°UƒàH ºb
OóM ,áYÉ°ùdG ÜQÉ
≤Y ácôM √ÉéJG »a ºµëàdG ¢Uôb IQGOEG AÉæKCG
≈dEG äÉfƒµªdG ™aód (28) ™aódG IóMh Ωóîà°SG .áÄ«£H áYô°S
.áeôتdG √ÉéJ πØ°SCÉdh á«æ«°üdG »a IOƒLƒªdG áëàØdG πNGO
.(22) IôØ°ûdGh (26 hCG 25) ôjóà°ùªdG ÖdÉ≤dG ádGREÉH ºb .(29)
,ádƒª°üdG »a ((33) π«µ°ûàdG IóMh ¿hO) (32) ∂
©µdG AÉYh ™°V
.áeôتdG ¢SCGQ »a É¡à«ÑãàH ºbh
IóMh »a ø«JOƒLƒªdG ø«àëàØdG ∫É∏N π«µ°ûàdG IóMh Ö«côàH ºb
»a (31) »°SCGôdG ܃ÑfCÉdG »a (27) á«æ«°üdG Ö«côàH ºb .∂©µdG
.áeôتdG ¢SCGQ
.ΩÉeCÉdG ≈dEG É¡∏≤fh É¡£¨°Vh äÉfƒµªdG ™«ªéàH Ödƒ∏dG Ωƒ≤j ±ƒ°S
∂dP ó©H êôîJ ±ƒ°S »àdGh ,äÉfƒµªdG ™«£≤àH IôØ°ûdG Ωƒ≤J ±ƒ°S
.á«fÉ£∏°ùdG »a §≤°ùJh ÖdÉ≤dG äÉëàa ∫É∏N øe
IóMh Ωóîà°SG .ájò¨àdG ܃ÑfCG »a ™HÉ°UCÉdG ∫ÉNOEG Ék«FÉ¡f ÖæéJ
.§≤a á≤aôªdG ™aódG
øY ∞bƒàJ ≈àM ácôëàe AGõLCG ájCG øe ÜGôàbÉdG Ék«FÉ¡f ÖæéJ
.ÉkeɪJ ácôëdG
-71-
Page 18

êõªdG AÉYh ΩGóîà°SG :(ê) πµ°ûdG
øe (20) áÄÑ©àdG áëàa AÉ£Zh (19) êõªdG AÉYh AÉ£Z ádGREÉH ºb
AÉYh AÉ£Z IOÉYEÉH ºb .äÉfƒµªdG áaÉ°VEÉH ºbh ,(18) êõªdG AÉYh
.ɪ¡«©°Vƒe ≈dEG áÄÑ©àdG áëàa AÉ£Zh êõªdG
Arabic
¢SCGQ »a (8) ™°VƒªdG »a (17) á«fÉ£∏°ùdG AÉ£Z Ö«côJ øµªj
»a ÜÉÑdG OƒLh øe ócCÉàdG ™e) ∂dP ôeCÉdG Ωõd GPEG ,•É∏îdG
ácôM √ÉéJG ¢ùµY »a IQGOEÉdÉH ºbh ,(¬Ñ«côJ AÉæKCG ∂à¡LGƒe
.mƒà°ùe í£°S ¥ƒa •É∏îdG ™°V
.»≤aCÉdG ™°VƒdG »a (1) •É∏îdG ¢SCGQ â«ÑãJ øe ócCÉJ
êõªdG AÉYh ™°V .•É∏îdG ¢S
CGQ øe (2) òØæªdG AÉ£Z ádGREÉH ºb
ÜQÉ≤Y ácôM √ÉéJG ¢ùµY »a IQGOEÉdÉH ºbh ,òØæªdG ¥ƒa (18)
.¬©°Vƒe »a ¬à«ÑãJ ºàj ≈àM áYÉ°ùdG
.Ö°SÉæe AÉHô¡c Qó°üªH RÉ¡édG π«°UƒàH ºb
ºµëàdG ¢Uôb ≈∏Y QGôªà°SÉdG ™e §¨°VG ,Iô«°üb IôàØd 𫨰ûà∏d
ó©H .áYÉ°ùdG ÜQÉ≤Y ácôM √ÉéJG ¢ùµY »a ¬JQGOEÉH ºbh (3)
™°VƒdG ≈dEG Ék«FÉ≤∏J ¢Uô≤dG Oƒ©j ±ƒ°Sh ,¢Uô≤dG QôM ,AÉ¡àfÉdG
.(±É≤jEG) "0"
ácôM √ÉéJG »a ºµëàdG ¢Uôb IQGOEÉH ºb ,á∏jƒW äGôàØd 𫨰ûà∏d
.áÑ°SÉæªdG áYô°ùdG ójóëàd áYÉ°ùdG ÜQÉ≤Y
AÉYh ádGREG øµªj ,IóMƒdG 𫨰ûJ ±É≤jEGh êõªdG ∫ɪàcG OôéªH
¢ü∏îà∏d áYÉ°ùdG ÜQÉ≤Y ácôM √ÉéJG »a ¬JQGOEG ∫É∏N øe êõªdG
.áææ°ùªdG Ö«côàdG øe
¢UÉîdG AÉ£¨dG Ö«côJ AÉæKCG êõªdG AÉYh 𫨰ûJ ≈∏Y ÉkªFGO ¢UôMG
øY ∞bƒàJ ≈àM ácôëàe AGõLCG ájCG øe ÜGôàbÉdG Ék«FÉ¡f ÖæéJ
.ÉkeɪJ ácôëdG
»a IOƒLƒªdG áææ°ùªdG äÉÑ«côàdG πª©J ±ƒ°S .áYÉ°ùdG ÜQÉ≤Y
(14) ≥ØîdG IóMh ™aOG .¬©°Vƒe »a AÉ£¨dG â«ÑãJ ≈dEG øjCGõédG
áfô≤ªdG √ÉéJ áHƒ∏£ªdG (16) øé©dG ±É£N hCG (15) êõªdG hCG
,IóMƒdG áëàa »a »≤aCÉdG QƒHÉîdG πNój å«ëH á≤∏ëdGh (7)
≈dEG áYÉ°ùdG ÜQÉ≤Y ácôM √ÉéJG »a IóMƒdG IQGOEG …ODƒJ ±ƒ°Sh
(13 hCG 12) áHƒ∏£ªdG á«fÉ£∏°ùdG ™°V .É¡©°Vƒe »a IóMƒdG â«ÑãJ
ácôM √ÉéJG »a É¡JQGOEÉH ºbh πeÉëdG »a (10) ∞jƒéàdG »a
.É¡©°Vƒe »a É¡à«Ñãàd áYÉ°ùdG ÜQÉ≤Y
´GQP ≈∏Y §¨°VG .á«fÉ£∏°ùdG »a áHƒ∏£ªdG äÉfƒµªdG áaÉ°VEÉH ºb
ôjôëJ …ODƒj ±ƒ°S .πØ°SCÉd ¢SCGôdG ¢†ØNGh (4) ¢SCGôdG ôjôëJ
.É¡©°Vƒe »a ¢SCGôdG â«ÑãJ ≈dEG ´GQòdG
.Ö°SÉæe AÉHô¡c Qó°üªH •É∏îdG π
ºµëàdG ¢Uôb ≈∏Y QGôªà°SÉdG ™e §¨°VG ,Iô«°üb IôàØd 𫨰ûà∏d
ó©H .áYÉ°ùdG ÜQÉ≤Y ácôM √ÉéJG ¢ùµY »a ¬JQGOEÉH ºbh (3)
"0" ™°VƒdG ≈dEG Ék«FÉ≤∏J ¢Uô≤dG Oƒ©j ±ƒ°Sh ,¢Uô≤dG QôM ,AÉ¡àfÉdG
.¬H
ácôM √ÉéJG »a ºµëàdG ¢Uôb IQGOEÉH ºb ,á∏jƒW äGôàØd 𫨰ûà∏d
«°UƒàH ºb
.(±É≤jEG)
áeôتdG ΩGóîà°SG :(O) πµ°ûdG
.mƒà°ùe í£°S ¥ƒa •É∏îdG ™°V
.»≤aCÉdG ™°VƒdG »a (1) •É∏îdG ¢SCGQ â«ÑãJ ócCÉJ
AÉ£¨dG ™aQGh πØ°SCÉd (6) IóMƒdG ôjôëJ ´GQP ≈∏Y §¨°VG
.áHƒ≤°ûe áfô≤eh áëàa QÉ¡XEÉd (9) »eÉeCÉdG
.áÑ°SÉæªdG áYô°ùdG ójóëàd áYÉ°ùdG ÜQÉ≤Y
¢SCGôdG ™aQ øµªj ,IóMƒdG 𫨰ûJ ±É≤jEGh êõªdG ∫ɪàcG OôéªH
.äÉfƒµªdGh á«fÉ£∏°ùdG ádGREGh
øY ∞bƒàJ ≈àM ácôëàe AGõLCG ájCG øe ÜGôàbÉdG Ék«FÉ¡f ÖæéJ
.ÉkeɪJ ácôëdG
-81-
Page 19

Arabic
áeôتdG 21
IôØ°ûdG 22
ádƒª°üdG 23
áHƒ≤°ûªdG áfô≤ªdG 24
ø°ûîdG ΩôØdG ÖdÉb 25
ºYÉædG ΩôØdG ÖdÉb 26
á«æ«°üdG 27
™aódG IóMh 28
§HôdG ìÉàØe 29
᫵«à°SÉ∏H á«fÉ£∏°S 30
áeôتdG ájò¨J ܃ÑfCG 31
∂©µdG AÉYh 32
∂©µdG π«µ°ûJ IóMh 33
Ödƒ
∏dG 34
áѵdG IóMh 35
IƒÑ©dG øe êGôNEÉdG
.IƒÑ©dG øe IóMƒdG êGôNEÉH ºb
.Iôe ∫hCÉd ¬eGóîà°SG πÑb Gkó«L RÉ¡édG π°ùZG
Ö«côàdG
CÉØ£e RÉ¡édG ¿CG øe ócCÉàdG Öéj ,Ö«côàdG πÑb !ôjòëJ
.»FÉHô¡µdG QÉ«àdG Qó°üe øY ∫ƒ°üØeh
ΩGóîà°SÉdG
êõªdG IóMhh ≥ØîdG IóMh ΩGóîà°SG :(Ü)h (CG) ¿É∏µ°ûdG
øé©dG ±É£Nh
≈∏YCG øjó«dG ióMEG ™°Vh AÉæKCG .mƒà°ùe í£°S ¥ƒa •É∏îdG ™°V
¢SCGôdG ôjôëJ ´GQP IQGOEÉH ºb ,áÄLÉتdG ácôëdG ™æªd •É∏îdG
.…ƒ∏©dG ™°VƒdG ≈dEG ¢SCGôdG ™aQGh ( )"íàØdG" ™°Vh ≈dEG (4)
ÉjGõªdG
Ωƒ«fƒªdCÉdG øe πµ«g 1
ôàd 3h ôàd 4^5 á©°S CGó°ü∏d ΩhÉ≤ªdG PÉdƒØdG øe á«fÉ£∏°S 2
ôàd 1^25 á©°S êõe AÉYh 3
»fhôàµdEG äÉYô°S ºµëJ 4
Ωƒëd áeôØe 5
øé©dGh ≥ØîdGh êõªdG ±É£N 6
∂©µdG IóMh 7
AGõLCÉdG ∞jô©J
•É∏îdG ¢SCGQ 1
òØæªdG AÉ£Z 2
áYô°ùdG »a ºµëàdG ¢Uôb 3
¢SCGôdG ôjôëJ ´GQP 4
•É∏îdG IóYÉb 5
ôjôëàdG ´GQP 6
áfô≤ªdG 7
á«fÉ£∏°ùdG AÉ£Z ∂°ùe IóMh 8
»eÉeCÉdG AÉ£¨dG 9
∞jƒéJ 10
»FÉHô¡µdG QÉ«àdG ∂∏°S 11
PÉdƒØdG øe ¿Éà«fÉ£∏°S 13 ,12
≥ØîdG IóMh 14
êõªdG IóMh 15
øé©dG ±É£N 16
á«fÉ£∏°ùdG AÉ£Z 17
êõªdG AÉYh 18
™°VƒdG »a á«fÉ£∏°ùdG ( ) "â«ÑãJ" ≈dEG ´GQòdG ôjôëJ …ODƒj
.™ØJôªdG
êõªdG AÉYh AÉ£Z 19
áÄÑ©àdG áëàa AÉ£Z 20
-91-
Page 20

Arabic
ìÉ∏°UEÉdGh ¢üëØdG
áØdÉàdG AGõLCÉdG ≈∏Y ±ô©à∏d RÉ¡édG ¢üëaG ,ΩGóîà°SÉdG πÑb •
AGõLCÉdG øe √ƒ∏N øe ócCÉà∏d RÉ¡édG ¢üëaG .áÑ«©ªdG hCG
≈∏Y ôKDƒJ ób iôNCG ´É°VhCG ájCGh í«JÉتdG ∞∏Jh IQƒ°ùµªdG
.¬∏«¨°ûJ IAÉØc
.¬H Ö«Y OƒLh hCG AõL …CG ∞∏J ádÉM »a RÉ¡édG Ωóîà°ùJ Éd •
AGõLCG ájCG ìÉ∏°UEÉd óªà©ªdG áfÉ«°üdG π«cƒH áfÉ©à°SÉdG »¨Ñæj •
.É¡dGóÑà°SG hCG áÑ«©e hCG áØdÉJ
ócCÉà∏d »FÉHô¡µdG QÉ«àdG ∂∏°S ¢üëa Ωõ∏j ,ΩGóîà°SÉdG πÑb •
.πcBÉàdG hCG ≠dÉÑdG Ωó≤dG hCG ∞∏àdG äÉeÉ∏Y øe √ƒ∏N øe
QÉ«àdG ∂∏°S ∞∏J ádÉM »a RÉ¡édG ΩGóîà°SG ΩóY Öéj •
.ɪ¡æe …CÉH Ö«Y OƒLh hCG ¢ùHÉ≤dG hCG »FÉHô¡µdG
πÑb øe ¬dGóÑà°SG Öéj ,»FÉHô¡µdG QÉ«àdG ∂∏°S ∞∏J ádÉM »a •
óªà©e ôµjO ófBG ∑É∏H áfÉ«°U õcôe hCG á©æ°üªdG ácô°ûdG
.ôWÉîªdG Öæéàd
∂∏J ô«Z AGõLCG ájCG ∫GóÑà°SG hCG ádGREG É
.π«dódG Gòg »a áë°VƒªdG
≥aGƒJ øe ÉkªFGO ócCÉàdG »¨Ñæjh .èàæªdG Gòg ¢†jQCÉJ Ωõ∏
áMƒd ≈∏Y í°VƒªdG ó¡édG ™e »FÉHô¡µdG QÉ«àdG Qó°üe
.»FÉHô¡µdG QÉ«àdG Qó°üe ™e »FÉHô¡µdG QÉ«àdG ¢ùHGƒb ≥aGƒJ Ωõ∏j
¢ùHGƒb ájCG Ωóîà°ùJ Édh ,á≤jôW ájCÉH ¢ùHÉ≤dG πjó©J É
ô«Z ¢ùHGƒ≤dG …ODƒJ ±ƒ°S .(1 áÄØdG) á°VQCɪdG Iõ¡LCÉdG ™e ÅjÉ¡e
ô£N π«∏≤J ≈dEG á≤aGƒàªdG »FÉHô¡µdG QÉ«àdG QOÉ°üeh ádó©ªdG
"1" бДШdG дЙйажeh »aЙ°VEЙdG π«°UƒàdG äÉ∏Ñc
Iõ¡LCÉdG øe RÉ¡édG Gòg ¿CÉd ;±GôWCÉdG »KÉ∏K πÑc ΩGóîà°SG ø«©àj
πÑc ΩGуоа°SG шµªjh ."1" бДШdG дЙйажe шeh ¢†jQCЙJ Й¡H »аdG
…CG çhóM ¿hO (Ωób 100) kGôàe 30 ≈dEG ¬dƒW π°üj »aÉ°VEG π«°UƒJ
∂∏°ùdG ¢ùªZ ÖæéJ Ωõ∏j ,á«FÉHô¡c áeó°üd ¢Vô©àdG IQƒ£N Öæéàd
BG πFÉ°S …CG hCG AɪdG »a ∑ôëªdG IóMh hCG ¢ùHÉ≤dG hCG
.ôN
k
≤∏£e ∫hÉëJ Éd •
á«FÉHô¡µdG áeÉ∏°ùdG
j
.∞«æ°üàdG
k
≤∏£e ÖæéJ
.á«FÉHô¡c áeó°üd ¢Vô©àdG
.ábÉ£∏d ¿Gó≤a
á°UÉN ,™£≤dG äGôØ°T ™e πeÉ©àdG óæY QòëdG »NƒJ Ωõ∏j •
.∞«¶æàdG AÉæKCGh äGôØ°ûdG ádGREG óæY
øª°†j å«M ;á«fÉ£∏°ùdG Ö«côJ IOÉYEÉH ºb ,∞«¶æàdG ó©H •
.Iô°TÉÑe É¡∏Ø°SCG IOƒLƒªdG áfô≤ªdG ájɪM ∂dP
ádÉM »a .óFGõdG πªëdG ó°V ájɪM ΩɶæH CÉ«¡e RÉ¡édG √òg •
ºbh IóMƒdG 𫨰ûJ ±É≤jEÉH ºb ,πª©dG øY IóMƒdG ∞bƒJ
,≥FÉbO 5 Ióªd ô¶àfGh AÉHô¡µdG Qó°üe øe ¢ùHÉ≤dG ádGREÉH
.¢ùHÉ≤dG π«°UƒJ IOÉYEÉH ºb ºK
áfÉ«°üdG π«ch ≈dEG ´ƒLôdG ≈Lôj ,IóMƒdG πªY ΩóY ádÉM »a •
.»∏ëªdG
øjôNBÉdG áeÉ∏°S
√òg ≈∏Y ™∏£e ô«Z ¢üî°T …CG hCG ,∫ÉØWCÉ∏d íª°ùJ Éd •
.RÉ¡édG Gòg ΩGóîà°SÉH ,äGOÉ°TQEÉdG
πª©dG á≤£æe øe ÜGôàbÉdÉH äÉfGƒ«ëdG hCG ∫ÉØWCÉ∏d íª°ùJ Éd •
QòëdG »NƒJ Ωõ∏j .»FÉHô¡µdG QÉ«àdG ∂∏°S hCG RÉ¡édG ¢ùªd hCG
øe Üô≤dÉH RÉ¡édG ΩGóîà°SG óæY á≤«bódG á©HÉàªdGh
.∫ÉØWCÉdG
äGQó≤dG hhP ¢UÉî°TCÉdG ¬eóîà°ù«d ºª°üe ô«Z RÉ¡édG Gòg •
IôÑîdGh áæjóàªdG á«∏≤©dGh á«°ùëdGh á«ægòdGh ájó°ùédG
πX »a ÉdEG (∫ÉØWCÉdG ∂dP »a ɪH) ø«à∏«∏≤dG áaô©ªdGh
ΩGóîà°SÉH á≤∏©àªdG äɪ«∏©àdG º¡FÉ£YEG hCG º¡«∏Y ±Gô°TEÉdG
.º¡àeÉ∏°S øY ∫hDƒ°ùªdG ¢üî°ûdG πÑb øe RÉ¡édG
.RÉ¡édÉH º¡ãÑY ΩóY ¿Éª°†d ∫ÉØWCÉdG ≈∏Y ±Gô°TEÉdG Ωõ∏j •
ΩGóîà°SÉdG ó©H
äGQGƒ°ù°ùcEÉdG ô««¨Jh ∞«¶æàdG πÑb RÉ¡édG 𫨰ûJ ±É≤jEÉH ºb •
.
ΩGóîà°SÉdG AÉæKCG ácôëàªdG AGõLCÉdG øe ÜGôàbÉdG hCG
AÉHô¡µdG òNCÉe øe ¢ùHÉ≤dG ´õfGh RÉ¡édG 𫨰ûJ ±É≤jEÉH ºb •
hCG ¬FGõLCG øe …CG ô««¨J πÑb hCG RÉ¡édG ΩGóîà°SG ΩóY óæY
.É¡àfÉ«°U hCG É¡Ø«¶æJ
¿Éµe »a ¬æjõîJ Öéj ,RÉ¡édG ΩGóîà°SG ΩóY ádÉM »a •
Iõ¡LCÉdG ≈dEG ∫ƒ°UƒdG øe ∫ÉØWCÉdG ø«µªJ ΩóY Öéjh .±ÉL
.áfõîªdG
-02-
Page 21

(h πµ°ûdG)
Arabic
.ø«à∏àÑe ∑Gójh RÉ¡édG π¨°ûJ Éd •
.ø«eó≤dG »aÉM ¿ƒµJ ÉeóæY RÉ¡édG π¨°ûJ Éd •
ÜÉ«ãdGh πjƒ£dG ô©°ûdÉH ßØàMGh ,ácôëàªdG AGõLCÉdG ¢ùª∏J Éd •
.ácôëàªdG AGõLCÉdG øY Gkó«©H IQôëàªdG
±GƒM ¥ƒa ≥∏©àj Éd å«ëH ábóH »FÉHô¡µdG QÉ«àdG ∂∏°S OôaG •
hCG Oƒ°ü≤e ô«Z πµ°ûH ¬H ≥∏©àdG ºàj Éd å«ëHh πª©dG í£°S
.¬bƒa QhôªdG
øY ¢ùHÉ≤dG π°üØd »FÉHô¡µdG QÉ«àdG ∂∏°S ó°T Ék≤∏£e ∫hÉëJ Éd •
IQGôëdG øY Gkó«©H »FÉHô¡µdG QÉ«àdG ∂∏°ùH ßØàMG .¢ùÑ≤ªdG
.IOÉëdG ±GƒëdGh âjõdGh
øY ∑ôëªdG ∞bƒJ ≈àM ô¶àfGh RÉ¡édG 𫨰ûJ ±É≤jEÉH ºb •
.»FÉHô¡µdG QÉ«àdG Qó°üe øY RÉ¡édG π°üa πÑb πª©dG
AÉæKCG á≤aôe IóMh hCG AõL …CG ∂a ádhÉëe Ék«FÉ¡f ÖæéJ •
≈∏Y ÉkªFGO ¢UôMGh .»FÉHô¡µdG QÉ«àdG Qó°üªH RÉ¡édG π«°UƒJ
.»FÉHô¡µdG QÉ«àdG Qó°üe øY RÉ¡édG π°üØH kÉdhCG ΩÉ«≤dG
»¨Ñæj ,ΩGóîà°SÉdG AÉæKCG »FÉHô¡µdG QÉ«àdG ∂∏°S ∞∏J ádÉM »a •
.»FÉHô¡µdG QÉ«àdG Qó°üe øY RÉ¡édG π°üØH QƒØdG ≈∏Y Ω
øY ¬∏°üa πÑb »FÉHô¡µdG QÉ«àdG ∂∏°S ¢ùªd ÖæéJ »¨Ñæjh
.»FÉHô¡µdG QÉ«àdG Qó°üe
QÉ«àdG Qó°üe øY ¬∏°üaG ,RÉ¡édG ΩGóîà°SG ΩóY ádÉM »a •
AGõLCG ájCG ádGREG hCG Ö«côàH ΩÉ«≤dG πÑb ∂dòch ,»FÉHô¡µdG
.äÉHÉ°UEÉ∏d ¢Vô©àdG ≈dEG ΩGóîà°SÉdG Aƒ°S …ODƒj ¿CG øµªj •
∂dP ≈dEG Éeh äGôgƒéªdGh ô©°ûdGh IQôëàªdG ¢ùHÉ∏ªdÉH ßØàMG •
.ácôëàªdG AGõLCÉdG øY Gkó«©H
É«≤dG
.∞«¶æàdG πÑbh
ΩGóîà°SÉdG ¢VôZ
äÉfƒµe §∏Nh êõªd ºª°üe πeÉëH OhõªdG ôµjO ófBG ∑É∏H •É∏N
á≤aôªdG äGóMƒdG ΩGóîà°SÉH Ék°†jCG øµªjh .äÉHhô°ûªdGh ᪩WCÉdG
Ωóîà°ùJ Éd .∫ɵ°TCG IóY »a ∂©µdG áæ«éY π«µ°ûJh äÉfƒµªdG Ωôa
.iôNCG ¢VGôZCG ájCG »a RÉ¡édG Gòg
.§≤a »dõæªdG ΩGóîà°SÉ∏d ºª°üe èàæªdG Gòg
áeÉ∏°ùdG äɪ«∏©J
IÉYGôe ÉkªFGO ø«©àj ,á«FÉHô¡µdG Iõ¡LCÉdG ΩGóîà°SG óæY !ôjòëJ
hCG ≥jôM ܃°ûf äÉdɪàMG øe óë∏d ;á«°SÉ°SCÉdG áeÉ∏°ùdG óYGƒb
∞∏J hCG á«°üî°T áHÉ°UEG hCG á«FÉHô¡c áeó°üd ¢UÉî°TCÉdG ¢Vô©J
:»∏j Ée ∂dP »a ɪH ,…OÉe
.RÉ¡édG ΩGóîà°SG πÑb ájÉæ©H π«dódG Gòg IAGôb »¨Ñæj
ΩGóîà°SG ¿EGh .π«dódG Gòg »a í°Vƒe ΩGóîà°SÉdG øe ¢Vô¨dG •
ΩGóîà°SÉH á«∏ªY ájC
…ƒ£æj ób π«dódG Gòg »a É¡H ≈°UƒªdG ∂∏J ô«Z RÉ¡édG Gòg
.kÉ∏Ñ≤à°ùe ¬«dEG ´ƒLô∏d π«dódG Gò¡H ®ÉØàMÉdG ≈Lôj •
QÉ«àdG Qó°üªH ¬∏«°UƒJ πÑb RÉ¡édG 𫨰ûJ ±É≤jEG øe ócCÉJ •
.RÉ¡édG ΩGóîà°SG óæY QòëdGh ¢UôëdG »NƒJ ÉkªFGO »¨Ñæj •
áHƒWôdG hCG AɪdG øe ∑ôëªdG IóMh ájɪM ÉkªFGO »¨Ñæj •
G ò«ØæJ hCG á≤aôe äGóMh hCG äÉ≤ë∏e ájCG
.á«°üî°T áHÉ°UEÉd ¢Vô©àdG IQƒ£N ≈∏Y
RÉ¡édG ΩGóîà°SG
.¬æY ¬∏°üa hCG »FÉHô¡µdG
.∫õæªdG êQÉN ¢VGôZCG »a RÉ¡édG Ωóîà°ùJ Éd •
.IóFGõdG
-12-
Page 22

(O πµ°ûdG)
Arabic
52
03
62
22
32
72
43
42
82
13
12
92
03
13
32
`g πµ°ûdG)
(
23
-22-
33
Page 23

Ü πµ°ûdG
ê πµ°ûdG
Arabic
-32-
91
81
02
Page 24

Arabic
8
9
1
2
6
7
3
11
4
01
5
(CG πµ°ûdG)
51
41
2131
61
71
-42-
Page 25

Arabic
≈¸®Uœ«‹ ≥U±W
≥MU„ «•∑OU©U‹ ßö±W ¥πV «¢∂U´NU √£MU¡ «ß∑ªb«Â «_§Ne… «∞JNd°UzOW ∞K∑IKOq ±s îDd «∞∫d¥o Ë«∞Bb±W «∞
JNd°UzOW Ë/√Ë ≈ÅU°W «_®ªU’ Ë¢ALq ≥cÁ «ô•∑OU©U‹ ±U ¥Kw:
• Æd«¡… Øq ≥cÁ «∞∑FKOLU‹ °FMU¥W •∑v Ë∞u ØMX ´Kv œ¸«¥W °Uß∑ªb«Â «∞πNU“
• ô ¢GLd «∞πNU“ √Ë ±πLu´W «_ßö„ √Ë «∞IU°f ≠w «∞LU¡ √Ë «∞ºu«zq «_îdÈ •∑v ô ¢∑Fd÷ ∞Bb±W ØNd°UzOW.
• «ß∑ªb ÆDFW ÆLU‘ ±∂KKW ∞∑MEOn ˱º` «∞πe¡ «∞ªU¸§w ±s «∞πNU“
W √£MU¡ «ß∑ªb«±t.
NU“ °ºKp √Ë ÆU°f ¢U∞n, ¥πV «ôß∑FU≤W °LdØe «∞ªb±W «∞LF∑Lb ∞LFU¥MW «∞πNU“ √Ë ≈Åö•t
• ¸«ÆV «_©HU‰ ´s Ø∏V ´Mb «ß∑ªb«Â «∞πNU“ °U∞Id» ±MNr. ô ¢∑d„ «∞πNU“ œËÊ ±d«Æ∂
• ≠w •U∞W ¢Kn ßKp «∞DUÆW, ¥d§v «ôß∑FU≤W °LBMl «∞πNU“ √Ë ËØOq «∞ªb±W «∞LF∑Lb √Ë √Í ≠Mw ´Kv ≤Hf
œ¸§W «∞∑Q≥Oq ôß∑∂b«‰ «∞ºKp «∞∑U∞n Ë–∞p ∞∑πMV √Í ±ªU©d ±LJMW
• Ær °HBq «∞πNU“ Ë«≤eŸ «∞IU°f ±s ±Qîc «∞∑OU¸ √£MU¡ ´b «ôß∑ªb«Â √Ë Æ∂q ¢dØOV √Ë ≠p √§e«zt √Ë ¢MEOn √
Ë ≈§d«¡ ÅOU≤W ∞KπNU“. ô ¢Ab «∞ºKp ∞MeŸ «∞IU°f ±s ±Qîc «∞∑OU¸.
• ô ¢AGq «∞π
ØNd°UzOUÎ √Ë ±OJU≤OJOUÎ ∞∑πMV √Í îDd.
• Æb ¢∑d¢V ±ªU©d «∞∫d¥o √Ë «∞Bb±W «∞JNd°UzOW √Ë ≈ÅU°W «_≠d«œ ´Kv «ß∑ªb«Â «∞LK∫IU‹ «∞∏U≤u¥W «∞∑w ∞r
¥uÅw °NU ±M∑Z «∞πNU“ √Ë ¥∂OFNU.
• ô ¢bŸ «∞ºKp ¥∑b∞v ≠u‚ •U≠W «∞LMCb… √Ë ¥ö±f √ßD∫UÎ ßUîMW.
• ¢π
MV ±ö±ºW «_ßD` «∞ºUîMW ±l ±d«´U… «ß∑ªb«Â «∞LIU°i
• ô ¢Cl «∞πNU“ √Ë √Í §e¡ ±s √§e«zt ´Kv √ßD` ßUîMW (±∏q ≠dÊ ¨U“ √Ë ≠dÊ ØNd°Uzw ßUîs √Ë ≠w ≠dÊ ¢r
≈•LUƒÁ) √Ë °U∞Id» ±MNU.
• ô ¢ºT «ß∑ªb«Â «∞ºKp. Ëô ¢∫Lq «∞πNU“ √°b«Î ´s ©d¥o «∞ºKp √Ë ®bÁ ∞HBKt ±s ±Qîc «∞∑OU¸. «Æ∂i ´Kv
«∞IU°f œ«zLUÎ Ë«ß∫∂t ∞HBKt.
• ≠w •U∞W «ß∑ªb«Â ßKp ¢Lb¥b, ¥d§v «∞∑QØb ±s ¢uÅOKt °AJq ßKOr Ë√≤t ÅU∞` ∞öß∑ªb«Â ±l ≥c« «∞πNU“
-52-
ªb«Â «∞LMe∞w ≠Ij
• ≥c« «∞πNU“ ±Fb ∞öß∑
• ô ¢∫Uˉ ≈ÅöÕ «∞πNU“ °MHºp. Ë°bô ±s –∞p, «ß∑Fs °QÆd» ±dØe îb±W ¢U°l √Ë ±F∑Lb ±s ®dØW °ö„ √≤b
œ¥Jd ùÅöÕ «∞πNU“
«•∑Hk °NcÁ «∞∑FKOLU‹
Page 26

Names & Addresses for Black & Decker Service Concessionaries
Afghanistan: Ishan National Co., Opp. Ministry of Justice, Kabul. Tel.: +93-2-2101727. Algeria: SARL Outillage Corporation, 04
Route De Dely Brahim Cheraga, Alger. Tel.: +213-21-364363/508, Fax: +213-21-369667. Bahrain: Fawaz Al Zayani, P.O.Box 26563,
Adliya, Manama. Tel.: +973-17-715252/712756, Fax: +973-17-713789. Bangladesh: Ultra Corporation, 8, Kushol Centre, Uttara,
Dhaka 1230. Tel.: +880-2-8919272/9756 Ext.28, Fax: +880-2-9887167. Egypt: Anasia Egypt for Trading S. A. E., P.O.Box 2443, 110
Mostafa Refaat Street, Sheraton Heliopolis 11361, Cairo. Tel.: +20-2-2684159, Fax: +20-2-2684169. Ethiopia: Tewfik Sherif & Co.
Ltd., P.O.Box 5583, Debre Zeit Road, Addis Ababa. Tel.: +251-1-651700/601, Fax: +251-1-650570. India: Gryphon Impex Pvt. Ltd.,
D-6/4, Okhla Industrial Area, Phase-I, New Delhi-110020. Tel.: +91-11-26372602-4, Fax: +91-11-26372601. Iran: Tehran - Service
Centre of Iran, No 510, South Karger Ave, Below Pasteur Sq. Tehran. Tel.: +98-21-6490608/0656/6407672. Kish Island: Cayhan
Electric Co., No. 69, Paradise Shopping Centre, Kish Island. Tel.: +98-76444-22894. Jordan: Bashiti Hardware, P.O.Box 1564, TLA
Ali, Amman. Tel.: +962-6-5350009/4770741, Fax: +962-6-5350012/4789783. Kenya: Zylog Enterprises, IPS Building, Kuanda Street,
P.O.Box 40877, Nairobi. Tel.: +254-2-338188/199, Fax: +254-2-330642. Kuwait: Al Omar Technical Co., P.O.Box 4062, 13041 Safat,
Kuwait. Tel.: +965-4848595/0039, Fax: +965-4845652. Lebanon: Est. F.A. Kettaneh SA, P.O.Box 110242, Dora Highway, Kettaneh
Building, Beirut. Tel.: +961-1-255860/6, Fax: +961-1-255891. Libya: El Ghoul Brothers, P.O.Box 348, Islamic Call Bldg., Office
201-202, Benghazi. Tel.: +218-61-9097681/4183, Fax: +218-61-9094123. Madagascar: Group Tana Confort S. A. R. L., B. P. 1770,
Antananarivo. Tel.: +261-20-2264505, Fax: +261-20-2264244. Malta: John G. Cassar Ltd., 36 Victory Str, Qormi QRM 06, Malta.
Tel.: +356-21-493251, Fax: +356-21-483231. Mauritius: Happy World Marketing Ltd., Block 2, Industrial Estate, Coromandel,
P.O.Box 429, Port Louis. Tel.: +230-2076700, Fax: +230-2337330/7400. Nepal: Universal Trading Centre, P.O.Box 1947,
Tripureswor, Kathmandu. Tel.: +977-1-262192/260587/785, Fax: 261154. Nigeria: Amin Bros. Eng. Co. Ltd., 30A (Plot 1291), Akin
Adesola Street, Victoria Island, Lagos. Tel.: +234-1-3201778, Fax: +234-1-2613667. Oman: Oman Mktg. & Service Co., P.O.Box
2734, Ruwi, Muscat. Tel.: +968-560232, Fax: +968-560255. Pakistan: Karachi - Ammar Service & Spares, 60, Bank Arcade, Serai
Road, Karachi. Tel.: +92-21-2426905, Fax: 2427214/5243. Pakistan: Lahore - Electronics Inn, 212-G Raja Centre, Main Market,
Gulberg, Lahore. Tel.: +92-42-5756750. Philippines: Modern House International Enterprises, 213 Rizal Ave. Extension, between 2nd
and 3rd Ave. Kalookan City. Tel.: +632 366-4487, Fax: +632 366-4489. Qatar: Al Muftah Trading & Cont., P.O.Box 875, Doha. Tel.:
+974-4650880/4446868, Fax: +974-4441415. Saudi Arabia: Dammam - Ebrahim Fawaz Al Zayani, P.O.Box 76026, Al Raka,
Dammam. Tel.: +966-3-8140914, Fax: +966-3-8140824. Jeddah: Anasia Trading Co. Ltd. Caravan Shopping Centre, Hail Street. P.
O. Box 50959, Jeddah-21477, Tel. 02 650 0948/02 636 3825, Fax 02 638 0720. Madina: Garziz Trdg. for Bldg. Mat.&Decor.,
P.O.Box 3364, Madina. Tel.: +966-4-8261490/8227636, Fax: +966-4-8265741. Riyadh: Anasia Trading Co Ltd. New Akaria Building,
60th St., 3rd Floor, Building # 4, Office # 3402, Malaz. P. O. Box. 18689, Riyadh-11425, Tel.: 01 478 2549, Fax: 01 478 2761. Yanbu:
Bin Afif, P.O.Box 530 Yanbu, Al Bahr. Tel.: +966-4-3222626/8867, Fax: +966-4-3222210. Sri Lanka: Delmege Gen. Equip. Pvt. Ltd.,
No. 428/1AT. B., Jaya Mawatha (Darley Road), Colombo-10. Tel.: +94-11-2665914, Fax: +94-11-2665915. Sudan: United
Distribution Company, P.O.Box 325, Sayed Abdul Rehman Street, Khartoum. Tel.: +249-11-772612/777296, Fax: +249-11-770919.
Tanzania: General Motors Investment, P. O Box 16541, 14 Vingunguti Nyerere Road, Dar Es Salaam. Tel.: +255-22-2862661/5022,
Fax: +255-22-2862667/5412/3. Tunisia: STE Tunisienne De Quincaillerie Stq., Nvelle Z.I 2013, Ben Arous, Tunis, Tunisia, Tel: +216
71386102, Fax: +216 71380412. UAE: Abu Dhabi - Light House Electric., P.O.Box 120, Abu Dhabi. Tel.: +971-2-6726131, Fax:
+971-2-6720667. Dubai - Black & Decker (O) A.G., P.O.Box 5420, Dubai. Tel.: +971-4-7028234/233, Fax: +971-4-2822765. Ideal
Mach. & Equipt. R. W/shop P.O.Box 37116, Al Quoz, Dubai. Tel.: +971-4-3474160, Fax: +971-4-3474157. Sharjah - McCoy Middle
East LLC, P.O.Box 20228, Sharjah. Tel.: +971-6-5336321, Fax: +971-6-5336320. Uganda:
Station Road, P.O.Box 7436, Kampala. Tel.: +256-41-234567, Fax: +256-41-236413. Yemen: Aden - Middle East Trad. Co. Ltd.,
Mulla Dakka, Aden. Tel.: +967-2-240950, Fax: +967-2-240952. Sana'a: Middle East Trad. Co. Ltd., P.O.Box 12363, Hayel Street,
Sana'a. Tel.: +967-1-204201, Fax: +967-1-204204. Taiz: Middle East Trad. Co. Ltd., Campa area near Al-Kair mosque, Taiz. Tel.:
+967-4-231610/232033, Fax: +967-4-219869. Zimbabwe: J.D.Distributors, P.O.Box 226, 17 Bessemer Road, Graniteside, Harare.
Tel.: +263-4-753913-7, Fax: 753918. Cyprus: G. Kyprianou Trading Co Ltd., 51 Prodromou AVE. Strovolos, 1681, P.O. Box 23318
Nicosia Cyprus. Tel.: 00357 22 468170/1, Fax: 00357 22 468186, Email gktltd@spidernet.com.cy
The Building Centre, Kitgum House, 52
YOUR NAME/
YOUR ADDRESS
POSTCODE
DATE OF PURCHASE
DEALER'S NAME & ADDRESS/
PRODUCT MODEL NO. PRSM600
«ùßr
«∞FMu«Ê
«∞d±e «∞∂d¥bÍ
WARRANTY REGISTRATION CARD
¢U¸¥a «∞Ad«¡
≈ßr Ë ´Mu«Ê «∞∂Uzl
 Loading...