

AR PT FR EN
www.blackanddecker.ae
PRMP1000
ENGLISH
2
3
1
4
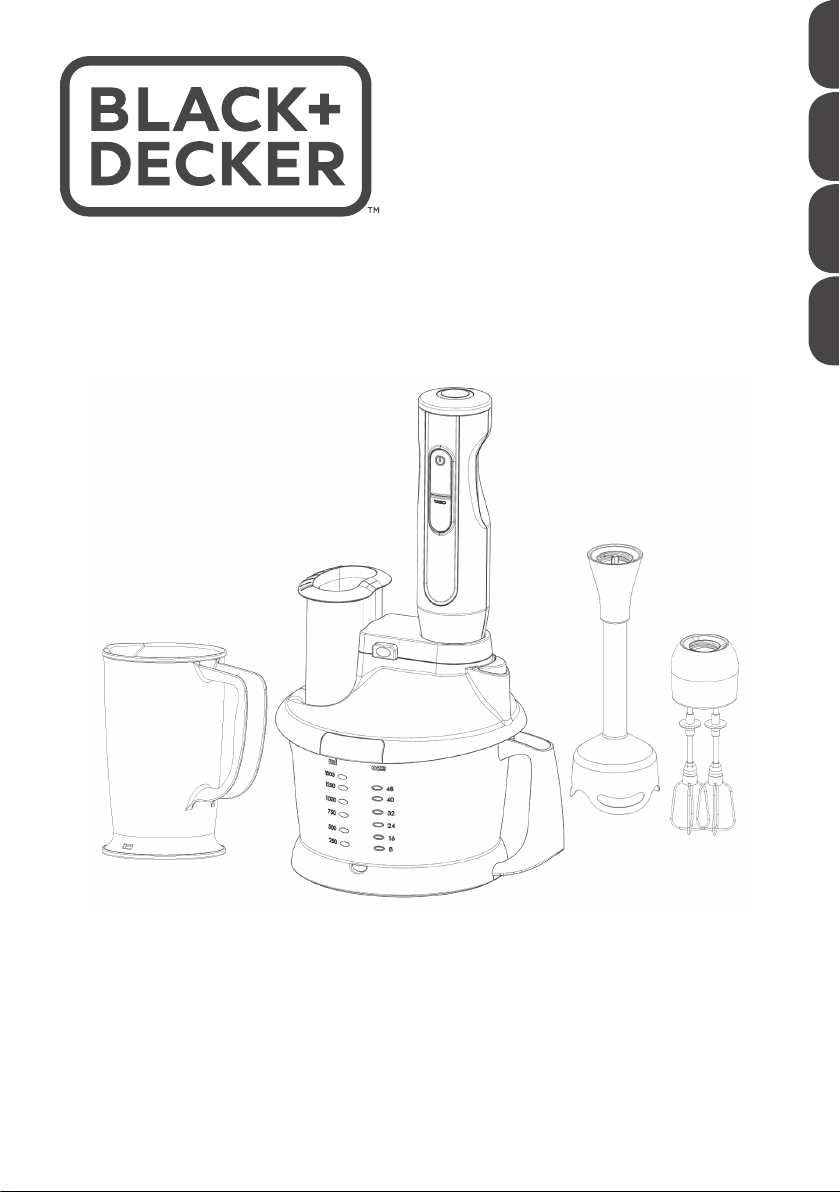
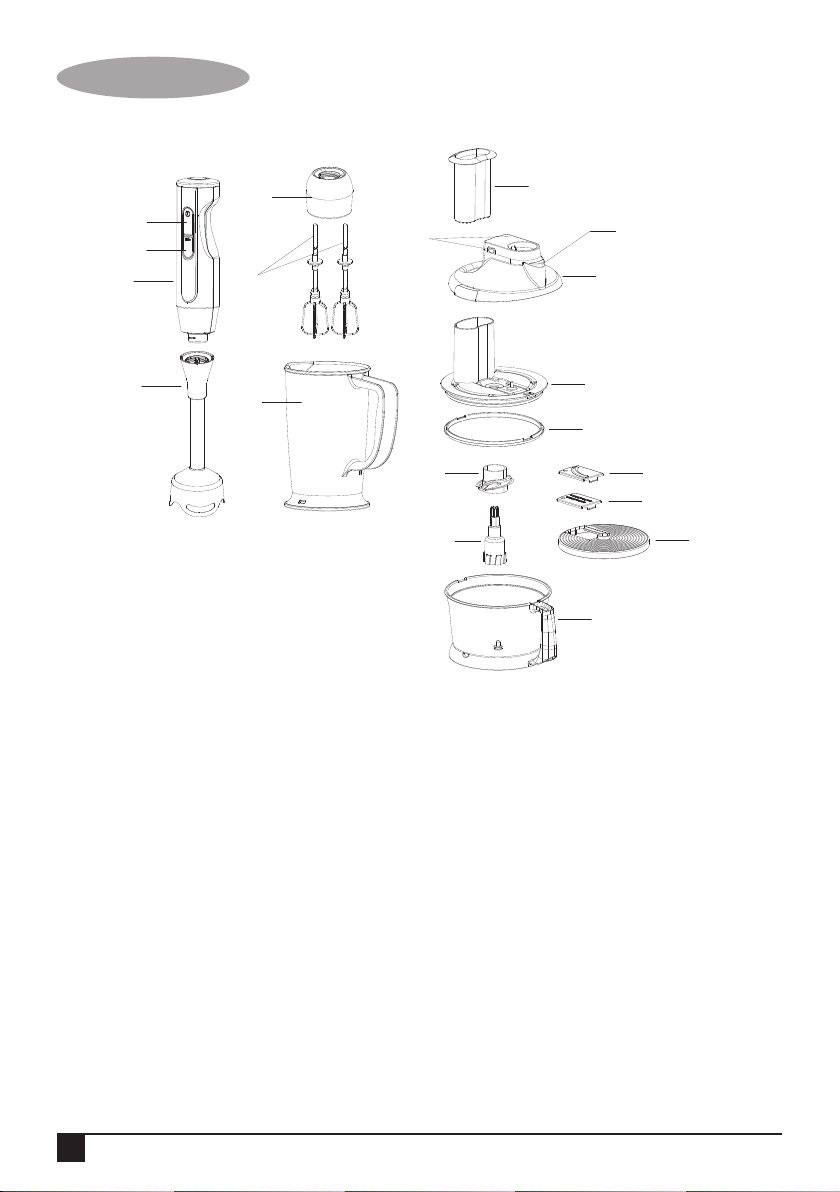
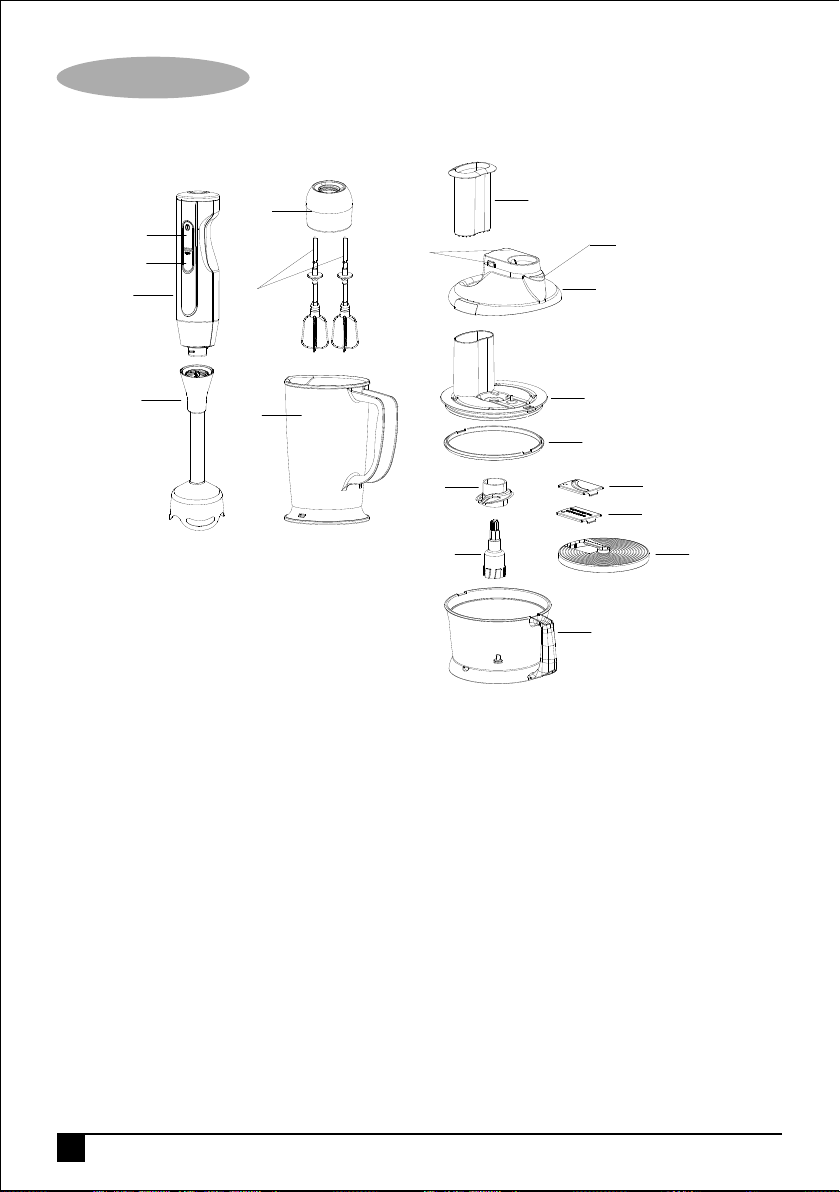
Parts Identification
1. Motor unit
6
8b
7
17
8a
8
9
5
10
13
15
16
12
14
11
9. Safety lid
2. On / o button
3. Turbo button
4. Blender attachment
5. Jar
6. Beater body
7. Beaters
8. Bowl lid
8a. Motor unit lock button
8b. Bowl lid lock buttons
2
10. Seal
11. Bowl
12. Drive spindle
13. Chopping blade
14. Cutter disc
15. Slicing blade
16. Shredding blade
17. Pusher
ENGLISH
Intended use
Your Black+Decker stick blender has been
designed for blending, mixing, beating,
whipping, whisking and chopping food and
beverage ingredients. Do not use this
appliance for any other purpose. This
product is intended for indoor, household
use only.
This appliance is intended to be used in
household and similar applications such as:
• Staff kitchen areas and shops
• Farm houses
• By clients in hotels, motels and
other residential type environments
• Bed and breakfast type environments
Read this entire manual carefully
before using the appliance.
Safety instructions
Warning! When using
mains-powered appliances, basic
safety precautions, including the following,
should always be followed to reduce the risk
of fire, electric shock, personal injury and
material damage.
• The intended use is described in this
manual. The use of any accessory or
attachment or the performance of any
operation with this appliance other than
those recommended in this instruction
manual may present a risk of personal
injury.
• Retain this manual for future reference.
• Always route the cord carefully to avoid
a tripping hazard.
Using your appliance
• Make sure that the appliance is switched
o before connecting to or disconnecting
from the power supply.
• Always take care when using the
appliance.
• Do not use the appliance outdoors.
• Always protect the motor unit from water
or excessive humidity.
• Do not operate the appliance if your
hands are wet.
• Do not operate the appliance if you are
barefoot.
• Do not touch moving parts.
• Guide the power supply cord neatly so it
does not hang over the edge of a
worktop and cannot be caught
accidentally or tripped over.
• Never pull the power supply cord to
disconnect the plug from the socket.
Keep the power supply cord away from
heat, oil and sharp edges.
• Switch off and wait for the motor to stop
running before disconnecting the
appliance from the power supply.
• Never detach any part or accessory while
the appliance is still connected to the
power supply. Always disconnect the
appliance from the power supply first.
• If the power supply cord is damaged
during use, disconnect the appliance from
the power supply immediately. Do not
touch the power supply cord before
disconnecting from the power supply.
3

ENGLISH
• Disconnect the appliance from the
power supply when not in use, before
fitting or removing parts and before
cleaning.
• Misuse could cause an injury.
• Care is needed when handling cutting
blades, especially when removing the
blades, emptying the bowl and during
cleaning.
Warning! Keep fingers, loose clothing, hair,
jewellery etc. away from moving parts and
blades. Be careful if hot liquid is poured into
the food processor as it can be ejected out
of the apliance due to sudden steaming
Safety of others
• This appliance is not intended for use by
persons (including children) with
reduced physical, sensory or mental
capabilities, or lack of experience and
knowledge, unless they have been given
supervision or instruction concerning use
of the appliance by a person responsible
for their safety.
• Children should be supervised to ensure
that they do not play with the appliance.
• Do not allow children or any person
unfamiliar with these instructions to use
the appliance.
• Do not allow children or animals to come
near the work area or to touch the
appliance or power supply cord. Close
supervision is necessary when the
appliance is used near children.
• It is not recommended that this product
is used by children.
• Never leave the appliance unattended
when in use.
• Always disconnect the appliance from
the supply if it is left uanttended and
before assembling, disassembling or
cleaning.
After use
• Switch off and remove the plug from the
socket before leaving the appliance
unattended and before changing,
cleaning or inspecting any parts of the
appliance.
• When not in use, the appliance should be
stored in a dry place. Children should not
have access to stored appliances.
• Care shall be taken when handling the
sharp cutting blades, when emptying the
bowl and during cleaning.
Inspection and repairs
• Switch off the appliance before cleaning,
changing accessories or approaching
parts which move in use.
• Always allow the motor to stop turning
before removing any cover or accessory
• Before use, check the appliance for
damaged or defective parts. Check for
breakage of parts, damage to switches
and any other conditions that may aect
its operation.
• Do not use the appliance if any part is
damaged or defective.
• Have any damaged or defective parts
repaired or replaced by an authorised
repair agent.
4
ENGLISH
• Before use, check the power supply cord
for signs of damage, ageing and wear.
• Do not use the appliance if the power
supply cord or mains plug is damaged or
defective.
• If the power supply cord or mains plug is
damaged or defective it must be
repaired by an authorised repair agent in
order to avoid a hazard. Do not cut the
power supply cord and do not attempt
to repair it yourself.
• Never attempt to remove or replace any
parts other than those specified in this
manual.
• Do not attempt to repair the appliance.
Take it to your nearest Black+Decker
owned or authorised Service Centre for
repair.
• Do not allow children to use the
appliance without supervision
Electrical safety
Before use, check that the mains voltage
corresponds to the voltage on the rating
plate.
This appliance is double insulated
in accordance with EN 60335;
therefore no earth wire is required.
• To avoid the risk of electric shock, do not
immerse the cord, plug or motor unit in
water or other liquid.
that of your electrical system. Any
connection error will invalidate the
guarantee.
Mains plug replacement
If a new mains plug needs to be fitted:
• Safely dispose of the old plug.
• Connect the brown lead to the live
terminal of the new plug.
• Connect the blue lead to the neutral
terminal.
• If the product is class l (earthed),
connect the green / yellow lead to the
earth terminal.
Warning! If your product is class ll
double insulated (only 2 wires in the
cord set), no connection is to be made to
the earth terminal.
Follow the fitting instructions supplied with
good quality plugs
Any replacement fuse must be of the same
rating as the original fuse supplied with the
product.
Assembly
Warning! Before assembly, make
sure that the appliance is switched
o and unplugged.
Remove all packaging from the parts of the
appliance.
• Check that the supply voltage shown on
the rating plate of the appliance matches
Clean the appliance before first use.
5

ENGLISH
Blending and whisk attachment
• Use the blending attachment (4) for
blending liquids or mashing solids.
• Use the whisk attachment (6) and
beaters (7) for mixing, beating, whipping
and creaming liquids
Fitting and removing an
attachment
• Fit the motor body (1) into the beater
body (6) or blending attachment (4) and
rotate the motor unit clockwise to lock it
in place.
• Push the beaters (7) into the beater
body
• To remove the attachment, press the
motor unit lock button (8a) then rotate
the motor unit anti clockwise, and pull
the attachment from the motor unit
Use
Blending
• Place the ingredients into a measuring
jug or a suitable container.
• Using a stabbing motion, push the
blades into the ingredients until the
correct consistency is reached.
• When blending liquids or fluid
ingredients, use short pulses to prevent
spillages.
• Keeping the blades submerged will help
to prevent spillages. Take extra care
when blending hot ingredients.
Chopping
• Fit the chopping blade (13) to the drive
spindle (12) and fit the spindle over the
pin in the chopping bowl (11).
• Place the ingredients in the chopping
bowl.
• Fit the safety lid (9) on the bowl. The
tabs on the lid fit into the recesses in the
bowl.
• Press the butttons (8b) and place the lid
(8) on the safety lid (9), pressing down
to lock it in place.
• Fit the motor unit (1) to the lid (8) &
rotate it clockwise to lock it in place.
• Chop the ingredients until the correct
consistency is reached. Additional
ingredients can be added through the
chute using the pusher.
• Once chopping is completed, unplug the
appliance & allow the blades to stop
moving.
• Press the motor unit button (8a) and
rotate the motor anti-clockwise to
remove. Press the bowl lid lock buttons
(8b) to remove the lid and safety lid.
• Carefully remove the drive spindle &
chopping blade before transferring the
ingredients to a suitable container.
• Do not operate when the appliance is
empty.
Shredding / Slicing
• Place the drive spindle (12) over the pin
in the bowl (11). Carefully fit the required
blade (15 or 16) to the cutter disc (14)
and fit the disc to the drive spindle
• Fit the safety lid (9) on the bowl. The
tabs on the lid fit into the recesses in the
bowl.
• Press the buttons (8b) and place the lid
(8) on the safety lid (9), pressing down
to lock it in place.
6
ENGLISH
• Fit the motor unit (1) to the lid (8) &
rotate it clockwise to lock it in place
• Press the on/off (2) or turbo (3) button &
insert ingredients through the chute. The
pusher (17) can be used to guide
ingredients to the blade.
• Once shredding / slicing is completed,
unplug the appliance & allow the blades
to stop moving.
• Press the motor unit button (8a) and
rotate the motor unit anti-clockwise to
remove. Press the bowl lid lock buttons
(8b) to remove the lid and safety lid.
• Carefully remove the drive spindle &
chopping blade before transferring the
ingredients to a suitable container.
• Do not operate when the appliance is
empty.
Operating times and preparations
Ingredients Maximum Speed Time Blade
Quantities (Sec)
Onions (Cut in 8) 500g On/turbo 3-6 Chopping
Garlic (Cut in 8) 500g On/turbo 3-6 Chopping
Parsley 100g On/turbo 5-10 Chopping
Raw meat
(fat free) 400g Turbo 10 Chopping
Nuts 300g On/turbo 5-10 Chopping
Fruits 700g Turbo 10 Chopping
Biscuit 300g On/turbo 5-10 Chopping
Carrots 400g On/turbo 5-10 Chopping
Carrots 400g On/turbo 5-10 Shredding
Radish 400g Turbo 5-10 Shredding
Potato 400g On/turbo 5-10 Slicing
Squash 800g On/turbo 5-10 Slicing
Cucumber 800g On 5-10 Slicing
Switching on and o
Warning! Make sure your appliance
is switched o before connecting to
or disconnecting from the power supply.
Ensure that the voltage rating on the base
plate corresponds to the main voltage at
your home.
• To switch the appliance on, press the On
/ O button (1) or Turbo button (3)
• Keep the switch pressed for continuous
operation.
• To switch off, release the On / Off switch
(1) or Turbo button (3)
Warning! Do not operate the
appliance continuously for more
than 20 seconds. After operating the
appliance continuously for more than 20
seconds, let it cool down for at least 20
seconds before operating again.
Warning! This appliance is fitted
with a safety cut-out. If the
appliance stops working during use, please
unplug it and allow to cool to room
temperature before trying again.
Warning! After switching off always
allow the motor to stop before
approaching the blade.
Maintenance
Your Black+Decker stick blender has been
designed to operate over a long period of
time with a minimum of maintenance.
Continuous satisfactory operation depends
upon proper care and regular cleaning.
Warning! Before performing any
maintenance or cleaning of the stick
blender, disconnect the appliance from the
power supply.
7
ENGLISH
Cleaning
Warning! Switch the appliance o
and unplug it before cleaning or
maintenance. Be careful when cleaning the
blades; they are sharp.
Warning! Do not immerse the
appliance, the cord set or the plug
in water or any other liquid.
• Wash the attachments in warm soapy
water and dry well.
• Wipe the motor unit (1) with a damp
cloth. Do not use any abrasive or
solvent-based cleaner.
Always clean the appliance immediately
after use. Do not let food dry on to the
blades as this will make cleaning dicult.
Note: Do not use abrasives or chemical
cleaners on any part of this appliance.
Technical data
PRMP1000
Voltage 220 – 240 Volts
Supply 50 / 60 Hz
Power 1000 W
Net Weight 2.6 kg
Protecting the environment
Separate collection. This product must
not be disposed of with normal
household waste.
Should you find one day that your
Black+Decker product needs replacement,
or if it is of no further use to you, do not
dispose of it with other household waste.
Make this product available for separate
collection.
• Black+Decker provides a facility for
recycling Black+Decker products once
they have reached the end of their
working life. This service is provided free
of charge. To take advantage of this
service please return your product to any
authorised repair agent who will collect
them on our behalf.
• You can check the location of your
nearest authorised repair agent by
contacting your local Black+Decker
oce at the address indicated in this
manual. Alternatively, a list of authorized
Black+Decker repair agents and full
details of our after-sales service and
contact are available on the Internet at:
www.2helpU.com.
8

Warranty
Black+Decker is confident of the quality of
its products and oers an outstanding
warranty.
This warranty statement is in addition to and
in no way prejudices your statutory rights.
The warranty is valid within the territories of
the Member States of the European Union
and the European Free Trade Area.
If a Black+Decker product becomes
defective due to faulty materials,
workmanship or lack of conformity, within
24 months from the date of purchase,
Black+Decker warranty to replace defective
parts, repair products subjected to fair wear
and tear or replace such products to ensure
minimum inconvenience to the customer
unless:
The product has been subjected to
The product has sustained damage
Repairs have been attempted by
To claim on the warranty, you will need to
submit proof of purchase to the seller or an
authorised repair agent. You can check the
location of your nearest authorised repair
agent by contacting your local
Black+Decker oce at the address
indicated in this manual.
Alternatively, a list of authorised
Black+Decker repair agents and full details
of our after-sales service and contacts are
available on the Internet at:
www.2helpU.com.
The product has been used for
trade, professional or hire
purposes;
misuse or neglect;
through foreign objects,
substances or accidents;
persons other than authorised
repair agents or Black+Decker
service sta.
ENGLISH
9
FRANÇAIS
6
2
3
1
7
4
5
Identification des pièces
1. Bloc moteur
17
8b
13
12
9. Couvercle de sécurité
8a
8
9
10
15
16
14
11
2. Touche Marche / Arrêt
3. Touche Turbo
4. Pied de mixage
5. Récipient
6. Corps du batteur
7. Fouets
8. Couvercle du bol
8a. Touche de verrouillage du bloc moteur
8b. Touche de verrouillage du couvercle du bol
10
10. Joint
11. Bol
12. Broche d’entraînement
13. Lame hachoir
14. Disque de coupe
15. Lame pour trancher
16. Lame pour broyer
17. Poussoir
FRANÇAIS
Utilisation prévue
Votre mixeur plongeant Black+Decker a été
conçu pour mélanger, malaxer, battre,
fouetter, et hacher les aliments et les
ingrédients de boisson. N’utilisez pas cet
appareil à d’autres fins. Cet appareil est
uniquement destiné à un usage domestique
à l’intérieur.
Cet appareil est destiné à un usage
domestique ou similaire dans des lieux tels
que :
• Les arrière-cuisines à l’usage du
personnel dans les boutiques
• Les fermes
• Par les clients dans un hôtel, un motel ou
dans un autre lieu de type résidentiel
• Les maisons d’hôtes
Lire ce manuel attentivement avant
d’utiliser l’appareil.
Consignes de sécurité
Avertissement! Lorsqu’on utilise un
appareil électrique, il faut toujours
respecter certaines règles de sécurité
fondamentales, notamment les suivantes,
afin de prévenir les risques d’incendie, de
décharges électriques, de blessures
corporelles ou de dégâts matériels.
• Ce manuel décrit la manière d’utiliser cet
appareil. L’utilisation d’un accessoire ou
d’une fixation, ou l’utilisation de cet
appareil à d’autres fins que celles
recommandées dans ce manuel
d’instruction peut présenter un risque de
blessures corporelles.
• Conservez ce manuel pour un usage
ultérieur.
• Positionnez toujours le cordon
d’alimentation avec soin pour éviter de
trébucher dessus.
Utilisation de votre appareil
• Assurez-vous que l’appareil est éteint
avant de le brancher ou de le débrancher
du secteur.
• Faites preuve de prudence lorsque vous
utilisez l’appareil.
• N’utilisez pas l’appareil à l’extérieur.
• Protégez toujours le moteur contre l’eau
ou une humidité excessive.
• Ne faites pas fonctionner l’appareil si vos
mains sont mouillées.
• Ne faites pas fonctionner l’appareil si vous
êtes pieds nus.
• Ne touchez pas les parties en
mouvements.
• Guidez le cordon d’alimentation avec soin
pour éviter qu’il ne pende du plan de
travail, de le coincer ou qu’il ne fasse
tomber.
• Ne tirez jamais sur le cordon
d’alimentation pour débrancher la prise
du secteur. Gardez le cordon
d’alimentation à l’écart de la chaleur, de
l’huile et des objets tranchants.
• Eteignez l’appareil et attendez l’arrêt
complet du moteur avant de le
débrancher du secteur.
• Ne détachez jamais un accessoire lorsque
l’appareil est branché sur le secteur.
Débranchez toujours l’appareil en
premier.
11

FRANÇAIS
• Si le cordon d’alimentation est
endommagé pendant le fonctionnement,
débranchez l’appareil du secteur
immédiatement. Ne touchez pas le
cordon d’alimentation avant de l’avoir
débranché du secteur.
• Débranchez l’appareil du secteur lorsqu’il
n’est pas utilisé, et avant d’installer ou de
retirer des accessoires, et avant de le
nettoyer.
• Une mauvaise utilisation peut provoquer
des blessures.
• Soyez prudent lorsque vous manipulez
les lames coupantes, en particulier
lorsque vous retirez les lames, videz le
bol et pendant le nettoyage.
Avertissement! Tenir les doigts, les
vêtements amples, les cheveux, les bijoux,
etc. à l’écart des pièces en mouvement et
des lames. Soyez prudent lorsque du liquide
chaud est versé dans le robot culinaire car il
peut être soudainement projeté hors de
l’appareil par un jet de vapeur.
Sécurité d’autrui
• Ne laissez pas les enfants ou des
personnes non familières avec ces
instructions utiliser cet appareil.
• Ne laissez pas les enfants ou les animaux
s’approcher de la zone de travail, ni
toucher l’appareil ou le cordon
d’alimentation. Une surveillance étroite
est nécessaire lorsque l’appareil est
utilisé à proximité d’enfants.
• Il est déconseillé de laisser les enfants
utiliser cet appareil.
• Ne laissez jamais fonctionner l’appareil
sans surveillance.
• Débranchez toujours l’appareil lorsqu’il
est laissé sans surveillance et avant de
monter ou démonter des accessoires et
avant de le nettoyer.
Après utilisation
• Eteindre l’appareil puis retirer la fiche de
la prise avant de laisser l’appareil sans
surveillance et avant de changer,
nettoyer ou inspecter les pièces de
l’appareil.
• Cet appareil ne doit pas être utilisé par
des personnes (y compris les enfants)
ayant des déficiences physiques,
sensorielles ou mentales. Cette consigne
s’applique aussi aux personnes
manquant d’expérience ou de
connaissances du matériel, à moins que
celles-ci n’aient reçu les instructions
appropriées ou ne soient encadrées par
une personne responsable de leur
sécurité pour utiliser l’appareil.
• Ne laissez pas les enfants sans
surveillance pour éviter qu’ils ne jouent
avec l’appareil.
12
• Lorsque l’appareil n’est pas utilisé,
rangez-le dans un endroit sec. Les
enfants ne doivent pas avoir accès aux
appareils rangés.
• Prenez des précautions lorsque vous
manipulez les lames coupantes, lorsque
vous videz le bol et pendant le
nettoyage.
Inspection et réparations
• Eteignez l’appareil avant de le nettoyer,
de changer ou d’approcher les
accessoires en mouvement pendant la
phase de fonctionnement.

FRANÇAIS
• Attendre l’arrêt complet du moteur avant
d’enlever un couvercle ou un accessoire.
• Avant l’utilisation, vérifiez l’état de
l’appareil et des pièces. Vérifiez la
présence de pièces cassées,
d’interrupteurs endommagés ou d’autres
anomalies susceptibles de nuire au bon
fonctionnement de l’appareil.
• N’utilisez pas l’appareil si une pièce est
endommagée ou défectueuse.
• Faites réparer ou remplacer les pièces
endommagées ou défectueuses par un
réparateur agréé.
• Avant l’utilisation, vérifiez que le cordon
d’alimentation ne présente aucun signe
de dégât, de vieillissement ou d’usure.
• N’utilisez pas l’appareil si le cordon
d’alimentation ou la fiche secteur sont
endommagés ou défectueux.
• Si le cordon d’alimentation ou la fiche
secteur sont endommagés ou
défectueux, ils doivent être réparés par
un réparateur agréé pour éviter les
risques d’accident. Ne coupez pas le
cordon d’alimentation et n’essayez pas
de le réparer vous-même.
• Ne tentez jamais d’enlever ou de
remplacer des pièces autres que celles
citées dans ce manuel.
• Ne tentez pas de réparer l’appareil.
Portez-le en réparation dans un Centre
de Service après-vente Black+Decker ou
un réparateur agréé.
• Ne laissez pas les enfants utiliser cet
appareil sans supervision.
Sécurité électrique
Avant d’utiliser l’appareil, vérifiez que la
tension électrique correspond à celle
indiquée sur l’étiquette signalétique.
Cet appareil possède une double
isolation selon la norme EN 60335;
de ce fait un fil à la terre n’est pas
nécessaire.
• Pour éviter tout risque de décharge
électrique, n’immergez pas le cordon, la
prise ou le bloc moteur dans l’eau ou
tout autre liquide.
• Vérifiez que la tension électrique
indiquée sur l’étiquette signalétique de
l’appareil correspond bien à celle de
votre installation électrique. Toute erreur
de branchement annule la garantie.
Remplacement de la fiche
électrique
En cas d’installation d’une nouvelle fiche:
• Jetez l’ancienne prise avec prudence.
• Connectez le fil marron sur la borne sous
tension de la nouvelle fiche.
• Connectez le fil bleu sur la borne neutre.
• Si l’appareil est de classe l (mis à la
terre), connectez le fil vert / jaune sur la
borne terre.
Avertissement! Si votre appareil est
de classe ll double isolation
(seulement 2 fils dans le cordon),
aucune connexion n’est à faire sur la borne
terre.
Suivez les instructions de montage fournies
avec les fiches de bonne qualité
Tout fusible remplacé doit être du même
calibre que le fusible d’origine fourni avec
l’appareil.
13

FRANÇAIS
Montage
Avertissement! Avant le montage,
assurez-vous que l’appareil est
éteint et débranché.
Retirez tous les emballages des pièces de
l’appareil.
Nettoyez l’appareil avant la première
utilisation.
Accessoire pour mélanger et fouetter
• Utilisez le pied de mixage (4) pour
mélanger des liquides ou écraser des
aliments solides en purée.
• Utilisez le batteur (6) et les fouets (7)
pour mélanger, battre, fouetter et crémer
les liquides.
Installation et retrait d’un
accessoire
• Montez le bloc moteur (1) dans le corps
du batteur (6) ou le pied de mixage (4)
et tournez le bloc moteur dans le sens
horaire pour le verrouiller en place.
• Poussez les batteurs (7) dans le corps du
batteur
• Pour retirer les accessoires, appuyez sur
la touche de verrouillage du bloc moteur
(8a) puis tournez le bloc moteur dans le
sens antihoraire, et tirez l’accessoire hors
du bloc moteur.
Utilisation
Mélanger
• Placez les ingrédients dans un verre
gradué ou un récipient approprié.
14
• En utilisant un mouvement plongeant,
poussez les lames dans les ingrédients
jusqu’à l’obtention de la consistance
souhaitée.
• Lorsque vous mélangez des liquides ou
des ingrédients fluides, utilisez des
impulsions courtes pour éviter les
débordements.
• Garder les lames immergées permet
d’éviter les débordements. Redoublez de
prudence lorsque vous mélangez des
ingrédients chauds.
Hacher
• Montez la lame hachoir (13) sur la broche
d’entraînement (12) et enclenchez la
broche sur la goupille du bol hachoir (11).
• Placez les ingrédients dans le bol hachoir.
• Posez le couvercle de sécurité (9) sur le
bol. Les reliefs du couvercle s’emboîtent
dans les évidements du bol.
• Appuyez sur les touches de verrouillage
(8b) et placez le couvercle (8) sur le
couvercle de sécurité (9), et appuyez
dessus pour le verrouiller en place.
• Montez le bloc moteur (1) sur le
couvercle (8) et tournez-le dans le sens
horaire pour le verrouiller en place.
• Hachez les ingrédients jusqu’à l’obtention
de la consistance souhaitée. Des
ingrédients supplémentaires peuvent
être ajoutés par la goulotte en utilisant le
poussoir.
• Une fois le hachage terminé, débranchez
l’appareil et attendez l’arrêt complet des
lames.

FRANÇAIS
• Appuyez sur la touche de verrouillage du
bloc moteur (8a) et tournez le bloc
moteur dans le sens antihoraire pour le
retirer, appuyez sur la touche de
verrouillage du couvercle (8b) pour
enlever le couvercle et le couvercle de
sécurité.
• Retirez délicatement la broche
d’entraînement et la lame hachoir avant
de transférer les ingrédients dans un
récipient approprié.
• Ne faites pas fonctionner l’appareil
lorsqu’il est vide.
Broyer / Trancher
• Placez la broche d’entraînement (12) sur
la goupille du bol (11). Avec précaution
montez la lame souhaitée (15 ou 16) sur
le disque de coupe (14) et montez le
disque sur la broche d’entraînement
• Posez le couvercle de sécurité (9) sur le
bol. Les reliefs du couvercle s’emboîtent
dans les évidements du bol.
• Appuyez sur les touches de verrouillage
(8b) et placez le couvercle (8) sur le
couvercle de sécurité (9), et appuyez
dessus pour le verrouiller en place.
• Montez le bloc moteur (1) sur le
couvercle (8) et tournez-le dans le sens
horaire pour le verrouiller en place
• Appuyez sur la touche Marche/Arrêt (2)
ou Turbo (3) et insérez les ingrédients
par la goulotte. Le poussoir (17) peut être
utilisé pour guider les ingrédients vers la
lame.
• Une fois le broyage / tranchage terminé,
débranchez l’appareil et attendez l’arrêt
complet des lames.
• Appuyez sur la touche de verrouillage du
bloc moteur (8a) et tournez le bloc
moteur dans le sens antihoraire pour le
retirer. Appuyez sur la touche de
verrouillage du couvercle (8b) pour
enlever le couvercle et le couvercle de
sécurité.
• Retirez délicatement la broche
d’entraînement et la lame hachoir avant
de transférer les ingrédients dans un
récipient approprié.
• Ne faites pas fonctionner l’appareil
lorsqu’il est vide.
Temps d’exécution et préparations
Ingrédients Quantité Vitesse Durée Lame
max. (Sec)
Oignons (coupés en 8) 500g Marche/Turbo 3-6 Hachoir
Ail (coupé en 8) 500g Marche/Turbo 3-6 Hachoir
Persil 100g Marche/Turbo 5-10 Hachoir
Viande crue (sans graisse) 400g Turbo 10 Hachoir
Noix 300g Marche/Turbo 5-10 Hachoir
Fruits 700g Turbo 10 Hachoir
Biscuit 300g Marche/Turbo 5-10 Hachoir
Carottes 400g Marche/Turbo 5-10 Hachoir
Carottes 400g Marche/Turbo 5-10 Broyer
Radis 400g Turbo 5-10 Broyer
Pommes de terre 400g Marche/Turbo 5-10 Trancher
Courges 800g Marche/Turbo 5-10 Trancher
Concombre 800g Marche 5-10 Trancher
Mise en marche et arrêt
Avertissement! Assurez-vous que
votre appareil est éteint avant de le
brancher ou de le débrancher du
secteur. Vérifiez que la tension électrique
indiquée sur l’étiquette signalétique de
l’appareil correspond bien à celle de votre
installation électrique.
• Pour mettre l’appareil en marche,
appuyez sur la touche Marche / Arrêt (1)
ou la touche Turbo (3)
15

FRANÇAIS
• Pour un fonctionnement continu,
maintenez la touche enfoncée.
• Pour éteindre l’appareil, relâchez la
touche Marche / Arrêt (1) ou la touche
Turbo (3)
Avertissement! Ne faites pas
fonctionner l’appareil en continu
pendant plus de 20 secondes. Après une
utilisation en continu de 20 secondes,
laissez refroidir l’appareil pendant 20
secondes avant de l’utiliser à nouveau.
Avertissement! Cet appareil est
équipé d’un système d’arrêt de
sécurité. Si l’appareil s’arrête de fonctionner
pendant son utilisation, débranchez-le et
laissez-le refroidir à température ambiante
avant d’essayer à nouveau.
Avertissement! Après avoir éteint
l’appareil, attendez l’arrêt complet
du moteur avant d’approcher de la lame.
Entretien
Votre mixeur plongeant Black+Decker a été
conçu pour fonctionner pendant longtemps
avec un minimum d’entretien.
Un fonctionnement continu satisfaisant
dépend d’un entretien approprié de
l’appareil et d’un nettoyage régulier.
lames; elles sont très coupantes.
Avertissement! Ne plongez pas
l’appareil, le cordon ou la fiche dans
l’eau ou tout autre liquide.
• Lavez les accessoires dans de l’eau
chaude savonneuse et séchez-les bien.
• Essuyez le bloc moteur (1) avec un
chion humide. N’utilisez pas de produit
de nettoyage abrasif ou à base de
solvant.
Nettoyez toujours l’appareil juste après son
utilisation. Ne laissez pas des aliments
sécher sur les lames, cela rendrait leur
nettoyage dicile.
Remarque: N’utilisez pas de produit de
nettoyage abrasif ou chimique sur aucune
partie de l’appareil.
Données techniques
PRMP1000
Tension 220 – 240 Volts
Fréquence 50 / 60 Hz
Puissance 1000 W
Poids net 2.6 kg
Avertissement! Avant d’eectuer
toute opération d’entretien ou de
nettoyage du mixeur plongeant, débranchez
l’appareil du secteur.
Nettoyage
Avertissement! Eteignez l’appareil
et débranchez-le avant d’eectuer
une opération de nettoyage ou d’entretien.
Soyez prudent lorsque vous nettoyez les
16

FRANÇAIS
Protection de l'environnement
Collecte séparée. Ce produit ne doit
pas être jeté avec les déchets
domestiques normaux.
Si vous décidez de remplacer ce produit
Black & Decker, ou si vous n'en avez plus
l'utilité, ne le jetez pas avec vos déchets
domestiques Rendez-le disponible pour une
collecte séparée.
• Black & Decker fournit un dispositif
permettant de collecter et de recycler les
produits Black & Decker lorsqu'ils ont
atteint la fin de leur cycle de vie. Pour
pouvoir profiter de ce service, veuillez
retourner votre produit à un réparateur
agréé qui se chargera de le collecter pour
nous.
• Pour connaître l'adresse du réparateur
agréé le plus proche de chez vous,
contactez le bureau Black & Decker à
l'adresse indiquée dans ce manuel. Vous
pourrez aussi trouvez un liste des
réparateurs agréés de Black & Decker et
de plus amples détails sur notre service
après-vente sur le site Internet à l'adresse
suivante : www.2helpU.com
Garantie
Black & Decker est confiant dans la qualité
de ses produits et vous ore une garantie
très étendue.
Ce certificat de garantie est un document
supplémentaire et ne peut en aucun cas se
substituer à vos droits légaux.
La garantie est valable sur tout le territoire
des Etats Membres de l'Union Européenne
et de la Zone de Libre Echange Européenne.
Si un produit Black & Decker s'avère
défectueux en raison de matériaux en
mauvaises conditions, d'une erreur humaine,
ou d'un manque de conformité dans les 24
mois suivant la date d'achat, Black & Decker
garantit le remplacement des pièces
défectueuses, la réparation des produits
usés ou cassés ou remplace ces produits à la
convenance du client, sauf dans les
circonstances suivantes :
Le produit a été utilisé dans un but
commercial, professionnel, ou a été
loué.
Le produit a été mal utilisé ou avec
négligence.
Le produit a subi des dommages à
cause d'objets étrangers, de
substances ou à cause d'accidents.
Des réparations ont été tentées par
des techniciens ne faisant pas partie
du service technique de Black &
Decker.
Pour avoir recours à la garantie, il est
nécessaire de fournir une preuve d'achat au
vendeur ou à un réparateur agréé. Pour
connaître l'adresse du réparateur agréé le
plus proche de chez vous, contactez le
bureau Black & Decker à l'adresse indiquée
dans ce manuel.
Vous pourrez aussi trouver une liste des
réparateurs agréés de Black & Decker et de
plus amples détails sur notre service
après-vente sur le site Internet à l'adresse
suivante : www.2helpU.com
17

PORTUGUÊS
6
2
3
1
7
4
5
Identificação de peças
1. Unidade do motor
17
8b
13
12
9. Tampa de segurança
8a
8
9
10
15
16
14
11
2. Botão on/off
3. Botão turbo
4. Acessório liquidificador
5. Jarro
6. Corpo do batedor
7. Lâminas do batedor
8. Tampa da tigela
8a. Botão de bloqueio da unidade do motor
8b. Botões de bloqueio da tampa da tigela
18
10. Vedante
11. Tigela
12. Eixo
13. Lâmina picadora
14. Disco de corte
15. Lâmina para laminar
16. Lâmina de triturar
17. Empurrador

PORTUGUÊS
Utilização prevista
O liquidificador Black & Decker foi
concebido para misturar, bater e picar
ingredientes sólidos e líquidos. Não utilize
este aparelho para qualquer outra função.
Este produto é apenas para utilização
doméstica.
Este aparelho deve ser utilizado a nível
doméstico e em aplicações similares, tais
como:
• áreas de cozinha do pessoal em centros
comerciais
• casas rurais
• por clientes em hotéis, motéis e outros
ambientes de tipo residencial
• ambientes tipo alojamento com
pequeno-almoço
Leia este manual cuidadosamente
antes de utilizar o aparelho.
Instruções de segurança
Aviso! Quando utilizar aparelhos
elétricos, devem ser sempre
seguidas as precauções básicas de
segurança, incluindo as seguintes, para
reduzir o risco de incêndio, choque elétrico,
lesões pessoais e danos materiais.
• A utilização prevista está descrita neste
manual. A utilização de qualquer
acessório ou peça anexa ou a realização
de quaisquer operações com este
aparelho que não as recomendadas
neste manual de instruções podem
representar um risco de lesões pessoais.
• Conserve este manual para referência
futura.
• Posicione o cabo cuidadosamente de
modo a evitar o risco de tropeçamento.
Utilização do seu aparelho
• Certifique-se que o aparelho está
desligado antes de o ligar ou desligar da
corrente elétrica.
• Tome sempre as devidas precauções
quando utilizar este aparelho.
• Não utilize o aparelho no exterior.
• Proteja sempre o motor de água ou
humidade excessiva.
• Não opere o aparelho com as mãos
molhadas.
• Não opere o aparelho se estiver descalço.
• Não toque nas peças rotativas.
• Guie o cabo de alimentação de modo
organizado para que não fique
pendurado no balcão e não possa ser
apanhado acidentalmente ou tropeçar-se
nele.
• Nunca puxe o cabo de alimentação para
desligar a ficha da tomada. Mantenha o
cabo de alimentação afastado do calor,
óleo e extremidades afiadas.
• Desligue e aguarde que o motor pare de
funcionar antes de desligar o aparelho da
corrente elétrica.
• Nunca retire qualquer peça ou acessório
enquanto o aparelho está ligado à
corrente elétrica. Desligue sempre
primeiro o aparelho da corrente elétrica.
• Se o cabo de alimentação ficar danificado
durante a utilização, desligue de imediato
o aparelho da corrente elétrica. Não
toque no cabo de alimentação antes de o
desligar o aparelho da corrente elétrica.
19

PORTUGUÊS
• Desligue o aparelho da corrente elétrica
quando não o estiver a utilizar, antes de
montar ou desmontar peças, e antes da
limpeza.
• A má utilização pode causar uma lesão.
• É necessário cuidado quando se
manuseia as lâminas de corte,
especialmente quando se retira as
lâminas, se esvazia a tigela e durante a
limpeza.
Aviso! Mantenha a roupa larga, cabelo,
joias, etc., afastados das peças rotativas e
lâminas. Tenha cuidado se líquido quente
for vertido no robot de cozinha pois pode
sair do aparelho devido a um vapor súbito
Segurança de outras pessoas
• Este aparelho não se destina a ser
utilizado por pessoas (incluindo
crianças) com deficiência física ou
mental ou falta de experiência e
conhecimento, salvo se receberam
supervisão ou instruções relativas à
utilização do aparelho por parte da
pessoa responsável pela sua segurança.
• As crianças deverão ser vigiadas de
modo a garantir que não brincam com o
aparelho.
• Não permita que crianças ou qualquer
pessoa que não esteja familiarizada com
estas instruções utilize o aparelho.
• Não permita que crianças ou animais se
aproximem da área ou toquem no
aparelho ou no cabo de alimentação. É
necessária uma supervisão quando o
aparelho está a ser utilizado perto de
crianças.
• Nunca abandone um aparelho em
funcionamento.
• Desligue sempre a unidade da corrente
se a deixar sem supervisão e antes de
montar, desmontar ou limpar.
Após a utilização
• Desligue o aparelho e retire a ficha da
tomada antes de abandonar o aparelho e
antes de substituir, limpar ou inspecionar
quaisquer peças do aparelho.
• Quando não estiver a utilizar o aparelho,
deverá guardá-lo num local seco. As
crianças não deverão ter acesso a
aparelhos guardados.
• Deve ter cuidado quando manuseia as
lâminas de corte afiadas, esvazia a tigela
e durante a limpeza.
Inspeção e reparações
• Desligue o aparelho antes de o limpar,
substituir acessórios ou reunir peças
móveis.
• Permita sempre que o motor pare antes
de retirar qualquer tampa ou acessório
• Antes de o utilizar, verifique a existência
de peças danificadas ou com defeito.
Verifique peças partidas, interruptores
danificados ou quaisquer outras
situações que possam afetar o seu
funcionamento.
• Não utilize o aparelho se alguma peça
estiver danificada ou com defeito.
• Repare ou substitua quaisquer peças
danificadas ou com defeito por um
agente de reparação autorizado.
• Não se recomenda a utilização deste
aparelho por crianças.
20

PORTUGUÊS
• Antes de usar, verifique o cabo de
alimentação quanto a sinais de danos e
desgaste.
• Não utilize o aparelho se o cabo de
alimentação ou a ficha estiverem
danificados ou com defeito.
• Se o cabo de alimentação ou ficha
estiverem danificados ou com defeito,
devem ser reparados por um agente de
reparação autorizado, de modo a evitar
riscos. Não corte o cabo de alimentação
e não tente repará-lo sozinho.
• Nunca tente remover ou substituir
quaisquer peças que não as
especificadas neste manual.
• Não tente reparar o aparelho. Leve-o ao
Centro de Assistência Técnica
Autorizado Black & Decker mais próximo
para reparação.
• Não permita que crianças utilizem o
aparelho sem supervisão
Segurança elétrica
Qualquer erro de ligação irá invalidar a
garantia.
Substituição da ficha
Se for necessária uma nova ficha:
• Descarte em segurança a ficha antiga.
• Ligue o fio castanho ao terminal da nova
ficha.
• Ligue o fio azul ao terminal neutro.
• Se o produto for de classe I (com ligação
à terra), ligue o fio verde/amarelo ao
terminal terra.
Aviso! Se o produto é de duplo
isolamento classe II (apenas 2 fios
no conjunto de cabos), não deve ser feita
nenhuma ligação ao terminal terra.
Siga as instruções de montagem fornecidas
com as fichas de boa qualidade
Qualquer fusível de substituição deve ser da
mesma tensão que o fusível original
fornecido com o produto.
Antes de usar, verifique se a tensão elétrica
corresponde à tensão na placa de
características.
Este aparelho tem duplo
isolamento, conforme a norma EN
60335; assim, não é necessário
nenhum fio terra.
• Para evitar o risco de choque elétrico,
não mergulhe o cabo, ficha ou motor em
água ou outro líquido.
• Verifique se a tensão apresentada na
placa de características do aparelho
corresponde ao sistema elétrico.
Montagem
Aviso! Antes de montar,
certifique-se que o aparelho está
desligado da corrente.
Retire todas as embalagens das peças do
aparelho.
Limpe o aparelho antes da primeira
utilização.
Acessório para misturar e bater
• Utilize o acessório para misturar (4) para
misturar líquidos ou amassar sólidos.
21

PORTUGUÊS
• Utilize o acessório para bater (6) e as
lâminas do batedor (7) para misturar,
bater e pasteurizar líquidos
Colocar e retirar um acessório
• Coloque o corpo do motor (1) no corpo
do batedor (6) ou no acessório para
misturar (4) rode a unidade do motor no
sentido dos ponteiros do relógio para
bloquear no sítio.
• Empurre as lâminas do batedor (7) para
a cabeça do batedor.
• Para retirar o acessório, pressione o
botão de bloqueio da unidade do motor
(8a) e rode depois o motor no sentido
contrário ao dos ponteiros do relógio, e
puxe o acessório a partir da unidade do
motor
Utilização
Misturar
• Coloque os ingredientes num jarro
medidor ou num recipiente apropriado.
• Através de um movimento rápido,
empurre as lâminas para os ingredientes
até que alcance a consistência correta.
• Quando mistura ingredientes líquidos e
fluídos, utilize impulsos curtos para
prevenir salpicos.
• Manter as lâminas submergidas irá
prevenir salpicos. Tenha cuidado extra
quando mistura ingredientes quentes.
Picar
• Coloque a lâmina picadora (13) no eixo
(12) e coloque o eixo por cima do pino
na tigela da picadora (11).
• Coloque os ingredientes na tigela da
picadora.
• Coloque a tampa de segurança (9) na
tigela. As palas da tampa encaixam nas
reentrâncias da tigela.
• Pressione os botões (8b) e coloque a
tampa (8) na tampa de segurança (9),
pressionando para baixo para bloquear
no sítio.
• Coloque a unidade do motor (1) na
tampa (8) e rode no sentido dos
ponteiros do relógio para bloquear no
sítio.
• Pique os ingredientes até alcançar a
consistência correta. Podem ser
adicionados mais ingredientes através da
tremonha, utilizando o empurrador.
• Logo que termine de picar, desligue o
aparelho e deixe as lâminas pararem.
• Pressione o botão da unidade do motor
(8a) e rode o motor no sentido contrário
dos ponteiros do relógio para remover.
Pressione os botões de bloqueio da
tampa da tigela (8b) para remover a
tampa e a tampa de segurança.
• Retire cuidadosamente o eixo e a lâmina
picadora e antes de transferir os
ingredientes para um recipiente
apropriado.
• Não opere o aparelho quando estiver
vazio.
Triturar / Laminar
• Coloque o eixo (12) sobre o pino na
tigela (11). Encaixe cuidadosamente a
lâmina necessária (15 ou 16) no disco de
corte (14) e coloque o disco no eixo.
• Coloque a tampa de segurança (9) na
tigela. As palas da tampa encaixam nas
reentrâncias da tigela.
• Pressione os botões (8b) e coloque a
tampa (8) na tampa de segurança (9),
pressionando para baixo para bloquear
no sítio.
22

PORTUGUÊS
• Coloque a unidade do motor (1) na
tampa (8) e rode no sentido dos
ponteiros do relógio para bloquear no
sítio.
• Pressione o botão on/off (2) ou turbo (3)
e introduza os ingredientes através da
tremonha. O empurrador (17) pode ser
utilizado para orientar os ingredientes
para a lâmina.
• Logo que termine de picar/laminar,
desligue o aparelho e deixe as lâminas
pararem.
• Pressione o botão da unidade do motor
(8a) e rode o motor no sentido contrário
dos ponteiros do relógio para remover.
Pressione os botões de bloqueio da
tampa da tigela (8b) para remover a
tampa e a tampa de segurança.
• Retire cuidadosamente o eixo e a lâmina
picadora e antes de transferir os
ingredientes para um recipiente
apropriado.
• Não opere o aparelho quando estiver
vazio.
Tempo de funcionamento e
preparações
Ingredientes Quantidades Velocidade Tempo Lâmina
máximas (Seg)
Cebolas (Corta em 8) 500g On/turbo 3-6 Picar
Alho (Corta em 8) 500g On/turbo 3-6 Picar
Salsa 100g On/turbo 5-10 Picar
Carne crua 400g Turbo 10 Picar
Frutos de casca dura 300g On/turbo 5-10 Picar
Frutas 700g Turbo 10 Picar
Biscoitos 300g On/turbo 5-10 Picar
Cenouras 400g On/turbo 5-10 Picar
Cenouras 400g On/turbo 5-10 Triturar
Rabanete 400g Turbo 5-10 Triturar
Batata 400g On/turbo 5-10 Laminar
Abóbora 800g On/turbo 5-10 Laminar
Pepino 800g On 5-10 Laminar
Ligar e desligar
Aviso! Certifique-se que o aparelho
está desligado antes de o ligar ou
desligar da corrente. Certifique-se que a
tensão na placa de características
corresponde com a tensão em sua casa.
• Para ligar o aparelho, prima o botão
on/off (1) ou o botão turbo (3)
• Mantenha o botão pressionado para um
funcionamento contínuo.
• Para desligar, solte o botão on/off (1) ou
o botão turbo (3)
Aviso! Não opere o aparelho
continuamente por mais de 20
segundos. Depois de operar continuamente
por mais de 20 segundos, deixe arrefecer
durante pelo menos 20 minuto antes de o
operar novamente.
Aviso! Este aparelho está preparado
com limitador de temperatura. Se o
aparelho parar de funcionar durante a
utilização, desligue-o e deixe arrefecer à
temperatura ambiente antes de tentar
novamente.
Aviso! Depois de desligar permita
sempre que o motor pare antes de
se aproximar da lâmina.
Manutenção
O seu aparelho Black & Decker foi
concebido para operar durante um longo
período de tempo com um mínimo de
manutenção. Um funcionamento satisfatório
permanente depende de uma manutenção
adequada e de uma limpeza regular.
Aviso! Antes de efetuar qualquer
manutenção ou limpeza do
liquidificador, desligue o aparelho da
corrente.
23

PORTUGUÊS
Limpeza
Aviso! Desligue o aparelho e retire a
ficha antes de limpar ou fazer a
manutenção. Tenha cuidado ao
limpar as lâminas; elas são afiadas.
Aviso! Não mergulhe o aparelho, o
conjunto de cabos ou a ficha em
água ou em qualquer outro líquido.
• Lave os acessórios em água quente com
sabão e seque bem.
• Limpe a unidade (1) com um pano
húmido. Não utilize nenhum agente de
limpeza abrasivo ou à base de solvente.
Limpe sempre o aparelho imediatamente
após a utilização. Não deixe os alimentos
secarem nas lâminas pois isto pode
dificultar a limpeza.
Nota: Não utilize produtos de limpeza
abrasivos ou químicos em nenhuma peça
deste aparelho.
Dados técnicos
PRMP1000
Tensão 220 – 240 Volts
Alimentação 50/60 Hz
Potência 1000 W
Peso líquido 2,6 kg
Proteger o ambiente
Recolha separada. Este produto não
deve ser eliminado juntamente com
os resíduos domésticos
convencionais.
Se algum necessitar de substituir o seu
produto Black & Decker, ou se já não o
voltar a utilizar, não o elimine juntamente
com os outros resíduos domésticos.
Disponibilize este produto para recolha
separada.
• A Black & Decker disponibiliza uma
instalação para reciclagem de produtos
Black & Decker em fim de ciclo de vida.
Este serviço é fornecido gratuitamente.
Para beneficiar deste serviço, devolva o
seu produto a qualquer agente reparador
autorizado, que fará a recolha em seu
nome.
• Pode verificar a localização do agente
reparador mais próximo, contactando os
escritórios locais Black & Decker através
do endereço indicado neste manual.
Como alternativa, está disponível na
Internet uma lista de agentes reparadores
autorizados Black & Decker, dados
completos do serviço de pós-venda e
contactos em:
www.2helpU.com.
24

Garantia
A Black & Decker acredita na qualidade dos
seus produtos e oferece uma garantia
excelente.
Esta declaração de garantia é um
complemento aos seus direitos estatutários
e não os compromete em caso algum.
A garantia é válida nos territórios dos
Estados Membros da União Europeia e na
Associação Europeia de Comércio Livre.
Se um produto Black & Decker se avariar
devido a materiais com defeito, problemas
de fabrico ou faltas de conformidade no
período de 24 meses a partir da data de
compra, a Black & Decker garante a
substituição das peças avariadas, a
reparação de produtos sujeitos a desgaste
normal ou a substituição de tais produtos,
no sentido de de minimizar o inconveniente
causado ao cliente, salvo se:
O produto for utilizado para fins
comerciais, profissionais ou de
aluguer;
O produto for sujeito a má utilização
ou negligência;
O produto tiver sido danificado por
objetos, substâncias ou acidentes
estranhos;
Forem tentadas reparações por
pessoas que não os agentes
reparadores autorizados ou o pessoal
da assistência técnica da Black &
Decker.
Para reclamar a garantia, terá de apresentar
o comprovativo da compra ao vendedor ou
agente reparador autorizado. Pode verificar
a localização do agente reparador mais
próximo, contactando os escritórios locais
Black & Decker através do endereço
indicado neste manual.
Como alternativa, está disponível na Internet
uma lista de agentes reparadores Black &
Decker, dados completos do serviço de
pós-venda e contactos em:at:
www.2helpU.com.
PORTUGUÊS
25

Arabic
¿Éª°†dG
Ékfɪ°V ¢Vô©Jh É¡JÉéàæe IOƒL ‘ ôµjO ófBG ∑ÓH ≥ãJ
.πLC’G πjƒW
»àdG ∂bƒ≤M ¤EG áaÉ°VE’ÉH ¿ƒµj Gòg ¿Éª°†dG ¿É«H
.∫GƒMC’G øe ∫ÉM …CÉH É¡H πîj ’h ¿ƒfÉ≤dG É¡ëæÁ
OÉ–’G ‘ AÉ°†YC’G ∫hódG º«dÉbCG ‘ ¿Éª°†dG …öùj
.á«HhQhC’G Iô◊G IQÉéàdG á≤£æeh »HhQhC’G
‘ Ö«Y ÖÑ°ùH ôµjO ófBG ∑ÓH èàæe ‘ π∏N OƒLh ádÉM ‘
24 ∫ÓN ,ÒjÉ©ŸG ™e ≥aGƒàdG ΩóY hCG áYÉæ°üdG hCG OGƒŸG
∫GóÑà°SG ôµjO ófBG ∑ÓH øª°†J ,AGöûdG ïjQÉJ øe Gkô¡°T
πcBЙаdG IЙYGфe ™e дЙйажŸG мУ°UEGh бС«©ŸG AGхLC’G
πbCG ¿Йª°†d дЙйажŸG √тg ∫GуСа°SG hCG »©«С£dG ≈∏СdGh
:⁄ Ée 𫪩∏d êÉYREG
hCG á«æ¡e hCG ájQÉŒ ¢VGôZCG ‘ èàæŸG ΩGóîà°SG ºàj
;ÒLCÉJ ¢VGôZCG
;∫ɪgE’G hCG ΩGóîà°S’G Aƒ°ùd èàæŸG ¢Vô©àj
áÑjôZ OGƒe hCG AÉ«°TCG áé«àf ∞∏à∏d èàæŸG ¢Vô©àj
;çOGƒM hCG
26
ÒZ ¢UÉî°TCG ᣰSGƒH èàæŸG ìÓ°UEG ádhÉfi ºàj
™HÉàdG áfÉ«°üdG ≥jôa hCG øjóªà©ŸG áfÉ«°üdG AÓch
.ôµjO ófBG ∑ÓH ácöûd
Ëó≤J ¤EG êÉà– ±ƒ°S ,¿Éª°†dG ÖLƒÃ áÑdÉ£e Ëó≤àd
∂æµÁh .óªà©ŸG áfÉ«°üdG π«ch hCG ™FÉÑ∏d AGöûdG π«dO
∫ÓN øe óªà©e áfÉ«°U π«ch ÜôbCG ™bƒe ≈∏Y ±ô©àdG
¿Gƒæ©dG ‘ »∏ëŸG ôµjO ófBG ∑ÓH Öàµe ≈∏Y ∫É°üJ’G
.π«dódG Gòg ‘ í°VƒŸG
øjóªà©ŸG áfÉ«°üdG AÓcƒH áªFÉb óLƒJ ,∂dP øe k’óHh
äÉeóÿ á∏eɵdG π«°UÉØàdGh ôµjO ófBG ∑ÓH ácöûd Ú©HÉàdG
âfÎfE’G ≈∏Y ÉæH á°UÉÿG ∫É°üJ’G πFÉ°Shh ™«ÑdG ó©H Ée
.www.2helpU.com :ÊhεdE’G ™bƒŸG ≈∏Y

áÄ«ÑdG ájɪM
Arabic
ﻒﻴﻈﻨﺘﻟﺍ
Gòg øe ¢ü∏îàdG ΩóY Ωõ∏j .π°üØæŸG ™ª÷G
.ájOÉ©dG á«dõæŸG áeɪ≤dG ™e èàæŸG
ôµjO ófBG ∑ÓH èàæe ∫GóÑà°SG ΩÉjC’G øe Ωƒj ‘ Ωõd GPEG
™e ¬æe ¢ü∏îàJ Óa ,¬eóîà°ùJ ó©J ⁄ GPEG hCG ,∂H ¢UÉÿG
èàæŸG Gòg áMÉJEG øe ócCÉJ πH ,iôNC’G á«dõæŸG áeɪ≤dG
.π°üØæŸG ™ªé∏d
ôjhóJ IOÉYE’ ≥aôe ôµjO ófBG ∑ÓH ácöT ôaƒJ
бjЙ¡f ¤EG Й¡dƒ°Uh OфйГ фµjO уfBG ∑УH дЙйажe
√òg Ëó≤J ºàjh .πª©∏d É¡à«MÓ°U ΩóYh ÉgôªY
≈Lôj ,áeóÿG √òg øe IOÉØà°SÓd .ÉkfÉ› áeóÿG
±ƒ°S …òdGh óªà©e áfÉ«°U π«ch …CG ¤EG èàæŸG IOÉYEG
.ЙжY бHЙ«f дЙйажŸG ™ªL √QhуH ¤ƒаj
óªà©e áfÉ«°U π«ch ÜôbCG ™bƒe ≈∏Y ±ô©àdG ∂æµÁ
»∏ëŸG ôµjO ófBG ∑ÓH Öàµe ≈∏Y ∫É°üJ’G ∫ÓN øe
,∂dP øe k’óHh .π«dódG Gòg ‘ í°VƒŸG ¿Gƒæ©dG ‘
Ú©HÉàdG øjóªà©ŸG áfÉ«°üdG AÓcƒH áªFÉb óLƒJ
Ée äÉeóÿ á∏eɵdG π«°UÉØàdGh ôµjO ófBG ∑ÓH ácöûd
âfÎfE’G ≈∏Y ÉæH á°UÉÿG ∫É°üJ’G πFÉ°Shh ™«ÑdG ó©H
.www.2helpU.com :ÊhεdE’G ™bƒŸG ≈∏Y
.ﺬﺧﺄﳌﺍ ﻦﻣ ﺲﺑﺎﻘﻟﺍ ﻉﺰﻧﺍﻭ ،ﺯﺎﻬﳉﺍ ﻞﻴﻐﺸﺗ ﻑﺎﻘﻳﺈﺑ ﻢﻗ !ﺮﻳﺬﲢ
.ﺓﺩﺎﳊﺍ ﺕﺍﺮﻔﺸﻟﺍ ﻒﻴﻈﻨﺗ ﺪﻨﻋ ﺭﺬﳊﺍ ﻲﺧﻮﺗ ﺐﺠﻳ ﺎﻤﻛ
ﺀﺎﳌﺍ ﻲﻓ ﺲﺑﺎﻘﻟﺍ ﻭﺃ ﻙﻼﺳﻷﺍ ﺔﻋﻮﻤﺠﻣ ﻭﺃ ﺯﺎﻬﳉﺍ ﺮﻤﻐﺗ ﻻ !ﺮﻳﺬﲢ
.ﺮﺧﺁ ﻞﺋﺎﺳ ﻱﺃ ﻭﺃ
ﺎﻬﻔﻔﺟﻭ ﻥﻮﺑﺎﺻ ﺓﻮﻏﺭ ﻪﺑ ﺊﻓﺍﺩ ﺀﺎﲟ ﺕﺎﻘﺤﻠﳌﺍ ﻞﺴﻏﺍ •
•
،ﺔﻠﻠﺒﻣ ﺵﺎﻤﻗ ﺔﻌﻄﻗ ﻡﺍﺪﺨﺘﺳﺎﺑ (١) ﻙﺮﶈﺍ ﺓﺪﺣﻭ ﻒﹼﻈﻧ •
ﺓﺩﺎﻣ ﺔﻳﺃ ﻭﺃ ﺕﺎﺒﻳﺬﳌﺍ ﻰﻠﻋ ﻢﺋﺎﻗ ﻒﻈﻨﻣ ﻱﺃ ﻡﺪﺨﺘﺴﺗ ﻻﻭ
.ﺔﻄﺷﺎﻛ
ﺔﻤﻌﻃﻷﺍ ﻙﺮﺘﺗ ﻻﻭ ،ﻡﺍﺪﺨﺘﺳﻻﺍ ﺪﻌﺑ ﺭﻮﻔﻟﺍ ﻰﻠﻋ ﺯﺎﻬﳉﺍ ﹰﺎﻤﺋﺍﺩ ﻒﹼﻈﻧ
.ﻒﻴﻈﻨﺘﻟﺍ ﺔﻴﻠﻤﻋ ﺐﻌﺼﻳ ﺎﳑ ،ﺕﺍﺮﻔﺸﻟﺍ ﻰﻠﻋ ﻒﺠﺘﻟ
ﻰﻠﻋ ﺔﻴﺋﺎﻤﻴﻜﻟﺍ ﺕﺎﻔﻈﻨﳌﺍ ﻭﺃ ﺔﻄﺷﺎﻜﻟﺍ ﺩﺍﻮﳌﺍ ﻡﺪﺨﺘﺴﺗ ﻻ :ﻪﻴﺒﻨﺗ
•
.ﺯﺎﻬﳉﺍ ﺍﺬﻫ ﻦﻣ ﺀﺰﺟ ﻱﺃ
ﺔﻴﻨﻔﻟﺍ ﺕﺎﻧﺎﻴﺒﻟﺍ
PRMP١٠٠٠
ﻂﻟﻮﻓ ٢٤٠ – ٢٢٠ ﺔﻴﻄﻟﻮﻔﻟﺍ
ﺰﺗﺮﻫ ٦٠/٥٠ ﻲﺑﺮﻬﻜﻟﺍ ﺭﺎﻴﺘﻟﺍ
ﺕﺍﻭ ١٠٠٠ ﺔﻗﺎﻄﻟﺍ ﻙﻼﻬﺘﺳﺍ
ﻢﺠﻛ ٢٫٦ ﻲﻓﺎﺼﻟﺍ ﻥﺯﻮﻟﺍ
.ﹰﺍﺪﻴﺟ
27

Arabic
ﻪﻠﻴﻐﺸﺗ ﻑﺎﻘﻳﺇﻭ ﺯﺎﻬﳉﺍ ﻞﻴﻐﺸﺗ
ﻞﻴﺻﻮﺘﻟﺍ ﻞﺒﻗ ﺯﺎﻬﳉﺍ ﻞﻴﻐﺸﺗ ﻑﺎﻘﻳﺇ ﻦﻣ ﺪﻛﺄﺗ !ﺮﻳﺬﲢ
ﻖﻓﺍﻮﺗ ﻦﻣ ﻚﻟﺬﻛﻭ ،ﻪﻠﺼﻓ ﻭﺃ ﻲﺋﺎﺑﺮﻬﻜﻟﺍ ﺭﺎﻴﺘﻟﺍ ﺭﺪﺼﲟ
ﻊﻣ ﺯﺎﻬﳉﺎﺑ ﺔﺻﺎﳋﺍ ﻒﻴﻨﺼﺘﻟﺍ ﺔﺣﻮﻟ ﻰﻠﻋ ﺔﺤﺿﻮﳌﺍ ﺔﻴﻄﻟﻮﻔﻟﺍ
.ﻚﻟﺰﻨﲟ ﺹﺎﳋﺍ ﺲﻴﺋﺮﻟﺍ ﺬﺧﺄﳌﺍ ﺔﻴﻄﻟﻮﻓ
ﻑﺎﻘﻳﺇ /ﻞﻴﻐﺸﺘﻟﺍ ﺭﺯ ﻰﻠﻋ ﻂﻐﺿﺍ ،ﺯﺎﻬﳉﺍ ﻞﻴﻐﺸﺘﻟ •
(٣) ﻮﺑﺮﺘﻟﺍ ﺭﺯ ﻭﺃ (١) ﻞﻴﻐﺸﺘﻟﺍ
ﻞﻴﻐﺸﺘﻟﺍ ﺭﺍﺮﻤﺘﺳﻻ ﺡﺎﺘﻔﳌﺍ ﻰﻠﻋ ﻂﻐﻀﻟﺎﺑ ﺮﻤﺘﺳﺍ •
ﻑﺎﻘﻳﺇ /ﻞﻴﻐﺸﺘﻟﺍ ﺡﺎﺘﻔﻣ ﻙﺮﺗﺍ ،ﺯﺎﻬﳉﺍ ﻞﻴﻐﺸﺗ ﻑﺎﻘﻳﻹ •
(٣) ﻮﺑﺮﺘﻟﺍ ﺭﺯ ﻭﺃ (١ ﻞﻴﻐﺸﺘﻟﺍ
ﻦﻣ ﺮﺜﻛﻷ ﹰﺍﺮﻤﺘﺴﻣ ﹰﻼﻴﻐﺸﺗ ﺯﺎﻬﳉﺍ ﻞﻐﺸﺗ ﻻ !ﺮﻳﺬﲢ
ﺪﻳﺰﺗ ﺓﺪﳌ ﻪﻠﻴﻐﺸﺗ ﺪﻨﻋ ﺯﺎﻬﳉﺍ ﻙﺮﺗﺍ ﻞﺑ ،ﺔﻴﻧﺎﺛ ٢٠
ﺓﺮﻣ ﻪﻠﻴﻐﺸﺗ ﻞﺒﻗ ﻞﻗﻷﺍ ﻰﻠﻋ ﺔﻴﻧﺎﺛ ٢٠ ﺩﺮﺒﻴﻟ ﺔﻴﻧﺎﺛ ٢٠ ﻰﻠﻋ
.ﻯﺮﺧﺃ
ﺀﺍﺮﺟﺈﻛ ﺭﺎﻴﺘﻟﺍ ﻊﻄﻗ ﺓﺰﻴﲟ ﺩﻭﺰﻣ ﺯﺎﻬﳉﺍ ﺍﺬﻫ !ﺮﻳﺬﲢ
ﺀﺎﻨﺛﺃ ﻞﻤﻌﻟﺍ ﻦﻋ ﺯﺎﻬﳉﺍ ﻒﻗﻮﺗ ﻝﺎﺣ ﻲﻓ .ﻲﺋﺎﻗﻭ
ﺔﺟﺭﺩ ﻰﻟﺇ ﺩﺮﺒﻳ ﻰﺘﺣ ﻪﻛﺮﺗﻭ ﺲﺑﺎﻘﻟﺍ ﻦﻋ ﻪﻠﺼﻓ ﻰﺟﺮﻳ ،ﻡﺍﺪﺨﺘﺳﻻﺍ
.ﻯﺮﺧﺃ ﺓﺮﻣ ﻪﻣﺍﺪﺨﺘﺳﺍ ﺔﻟﻭﺎﺤﻣ ﻞﺒﻗ ﺔﻓﺮﻐﻟﺍ ﺓﺭﺍﺮﺣ
ﻒﻗﻮﺗ ﻦﻣ ﺯﺎﻬﳉﺍ ﻞﻴﻐﺸﺗ ﻑﺎﻘﻳﺇ ﺪﻌﺑ ﺪﻛﺄﺗ !ﺮﻳﺬﲢ
.ﺓﺮﻔﺸﻟﺍ ﻦﻣ ﺏﺍﺮﺘﻗﻻﺍ ﻞﺒﻗ ﻙﺮﶈﺍ
ﺔﻧﺎﻴﺼﻟﺍ
ﻞﻗﺄﺑ ﺔﻠﻳﻮﻃ ﺓﺮﺘﻓ ﻡﻭﺪﻴﻟ ﻢﻤﺼﻣ ﺪﻴﻟﺎﺑ ﻝﻮﻤﶈﺍ ﺮﻜﻳﺩ ﺪﻧﺁ ﻙﻼﺑ ﻁﻼﺧ
ﺀﺍﺩﺃ ﻲﻓ ﻁﻼﳋﺍ ﺭﺍﺮﻤﺘﺳﺍ ﺪﻤﺘﻌﻳ ﺚﻴﺣ .ﺔﻧﺎﻴﺼﻠﻟ ﺔﺟﺎﳊﺍ ﻦﻣ ﺭﺪﻗ
ﻒﻴﻈﻨﺘﻟﺍﻭ ﺔﺒﺳﺎﻨﳌﺍ ﺔﻳﺎﻨﻌﻟﺍ ﻰﻠﻋ ﻲﺿﺮﳌﺍ ﻮﺤﻨﻟﺍ ﻰﻠﻋ ﻪﻠﻤﻋ
.ﺮﻤﺘﺴﳌﺍ
،ﻁﻼﺨﻠﻟ ﻒﻴﻈﻨﺗ ﻭﺃ ﺔﻧﺎﻴﺻ ﺔﻳﺃ ﺀﺍﺮﺟﺇ ﻞﺒﻗ !ﺮﻳﺬﲢ
ﺭﺎﻴﺘﻟﺍ ﻦﻋ ﻪﻠﺼﻓﻭ ﻁﻼﳋﺍ ﻞﻴﻐﺸﺗ ﻑﺎﻘﻳﺇ ﺐﺠﻳ
.ﻲﺋﺎﺑﺮﻬﻜﻟﺍ
ﻩﺮﻳﻭﺪﺗ ﻊﻣ (٨) ﺀﺎﻄﻐﻟﺍ ﻰﻟﺇ (١) ﻙﺮﶈﺍ ﺓﺪﺣﻭ ﺖﻴﺒﺜﺘﺑ ﻢﻗ •
ﻪﻌﺿﻮﻣ ﻲﻓ ﻪﺘﻴﺒﺜﺗ ﻡﺎﻜﺣﻹ ﺔﻋﺎﺴﻟﺍ ﺏﺭﺎﻘﻋ ﻩﺎﲡﺎﺑ
.ﺢﻴﺤﺼﻟﺍ
ﻮﺑﺮﺘﻟﺍ ﺭﺯ ﻭﺃ ﻞﻴﻐﺸﺘﻟﺍ ﻑﺎﻘﻳﺇ /ﻞﻴﻐﺸﺘﻟﺍ ﺭﺯ ﻰﻠﻋ ﻂﻐﺿﺍ •
ﻦﻜﳝ .ﻞﺋﺎﳌﺍ ﺏﻮﺒﻧﻷﺍ ﻝﻼﺧ ﻦﻣ ﺕﺎﻧﻮﻜﳌﺍ ﻊﺿﻭ (٣)
ﻮﺤﻧ ﺕﺎﻧﻮﻜﳌﺍ ﻪﻴﺟﻮﺘﻟ (١٧) ﻊﻓﺪﻟﺍ ﺓﺍﺩﺃ ﻡﺍﺪﺨﺘﺳﺍ
.ﺓﺮﻔﺸﻟﺍ
ﻢﻗ ،ﺢﺋﺍﺮﺷ /ﺓﺮﻴﻐﺻ ﻊﻄﻗ ﻰﻟﺇ ﻊﻴﻄﻘﺗ ﻝﺎﻤﺘﻛﺍ ﺩﺮﺠﲟ •
ﺕﺍﺮﻔﺸﻟﺍ ﻒﻗﻮﺘﺗ ﻰﺘﺣ ﻪﻛﺮﺗﺍﻭ ﺲﺑﺎﻘﻟﺍ ﻦﻋ ﺯﺎﻬﳉﺍ ﻞﺼﻔﺑ
.ﻥﺍﺭﻭﺪﻟﺍ ﻦﻋ
ﻙﺮﶈﺍ ﺮﻳﻭﺪﺘﺑ ﻢﻗﻭ (ﺃ ٨) ﻙﺮﶈﺍ ﺓﺪﺣﻭ ﺭﺯ ﻰﻠﻋ ﻂﻐﺿﺍ •
ﺭﺍﺭﺯﺃ ﻰﻠﻋ ﻂﻐﺿﺍ .ﻪﺘﻟﺍﺯﻹ ﺔﻋﺎﺴﻟﺍ ﺏﺭﺎﻘﻋ ﻩﺎﲡﺍ ﺲﻜﻋ
.ﺔﻣﻼﺴﻟﺍ ﺀﺎﻄﻏ ﻦﻣ ﺀﺎﻄﻐﻟﺍ ﺔﻟﺍﺯﻹ (ﺏ ٨) ﺀﺎﻧﻹﺍ ﺀﺎﻄﻏ
ﺔﻳﺎﻨﻌﺑ ﻊﻴﻄﻘﺘﻟﺍ ﺓﺮﻔﺷﻭ ﺭﺍﻭﺪﻟﺍ ﺩﻮﻤﻌﻟﺍ ﺔﻟﺍﺯﺇ ﻰﻠﻋ ﺹﺮﺣﺍ •
.ﺐﺳﺎﻨﻣ ﺀﺎﻋﻭ ﻰﻟﺇ ﺮﻳﺩﺎﻘﳌﺍ ﻞﻘﻧ ﻞﺒﻗ
.ﹰﺎﻏﺭﺎﻓ ﻥﻮﻜﻳ ﺎﻣﺪﻨﻋ ﺯﺎﻬﳉﺍ ﻞﻴﻐﺸﺘﺑ ﻢﻘﺗ ﻻ •
ﺕﺍﺰﻴﻬﺠﺘﻟﺍﻭ ﻞﻴﻐﺸﺘﻟﺍ ﺓﺪﻣ
ﺓﺮﻔﺸﻟﺍ ﺖﻗﻮﻟﺍ ﺔﻋﺮﺴﻟﺍ ﺪﺣ ﻰﺼﻗﺃ ﺕﺎﻧﻮﻜﳌﺍ
(ﺔﻴﻧﺎﺜﻟﺎﺑ) ﺕﺎﻴﻤﻜﻠﻟ
ﻊﻴﻄﻘﺗ ٦-٣ ﻮﺑﺮﺗ / ﻞﻴﻐﺸﺗ ﻢﺟ ٥٠٠ (ﻊﻄﻗ ٨) ﻞﺼﺒﻟﺍ
ﻊﻴﻄﻘﺗ ٦-٣ ﻮﺑﺮﺗ / ﻞﻴﻐﺸﺗ ﻢﺟ ٥٠٠ (ﻊﻄﻗ ٨) ﻡﻮﺜﻟﺍ
ﻊﻴﻄﻘﺗ ١٠-٥ ﻮﺑﺮﺗ / ﻞﻴﻐﺸﺗ ﻢﺟ ١٠٠ ﺲﻧﻭﺪﻘﺒﻟﺍ
ﻊﻴﻄﻘﺗ ١٠ ﻮﺑﺮﺗ ﻢﺟ ٤٠٠ (ﻥﻮﻫﺪﻟﺍ ﻦﻣ ﻲﻟﺎﺧ) ﺀﻲﻧ ﻢﳊ
ﻊﻴﻄﻘﺗ ١٠-٥ ﻮﺑﺮﺗ / ﻞﻴﻐﺸﺗ ﻢﺟ ٣٠٠ ﺕﺍﺮﺴﻜﻣ
ﻊﻴﻄﻘﺗ ١٠ ﻮﺑﺮﺗ ﻢﺟ ٧٠٠ ﺔﻬﻛﺎﻓ
ﻊﻴﻄﻘﺗ ١٠-٥ ﻮﺑﺮﺗ / ﻞﻴﻐﺸﺗ ﻢﺟ ٣٠٠ ﺖﻳﻮﻜﺴﺑ
ﻊﻴﻄﻘﺗ ١٠-٥ ﻮﺑﺮﺗ / ﻞﻴﻐﺸﺗ ﻢﺟ ٤٠٠ ﺭﺰﺟ
ﺓﺮﻴﻐﺻ ﻊﻄﻗ ﻰﻟﺇ ﻊﻴﻄﻘﺗ ١٠-٥ ﻮﺑﺮﺗ / ﻞﻴﻐﺸﺗ ﻢﺟ ٤٠٠ ﺭﺰﺟ
ﺓﺮﻴﻐﺻ ﻊﻄﻗ ﻰﻟﺇ ﻊﻴﻄﻘﺗ ١٠-٥ ﻮﺑﺮﺗ ﻢﺟ ٤٠٠ ﻞﺠﻓ
ﺢﺋﺍﺮﺷ ﻰﻟﺇ ﻊﻴﻄﻘﺗ ١٠-٥ ﻮﺑﺮﺗ / ﻞﻴﻐﺸﺗ ﻢﺟ ٤٠٠ ﺎﻃﺎﻄﺑ
ﺢﺋﺍﺮﺷ ﻰﻟﺇ ﻊﻴﻄﻘﺗ ١٠-٥ ﻮﺑﺮﺗ / ﻞﻴﻐﺸﺗ ﻢﺟ ٨٠٠ ﺎﺳﻮﻛ
ﺢﺋﺍﺮﺷ ﻰﻟﺇ ﻊﻴﻄﻘﺗ ١٠-٥ ﻞﻴﻐﺸﺗ ﻢﺟ ٨٠٠ ﺭﺎﻴﺧ
28

Arabic
ﺖﻴﺒﺜﺗ ﻊﻣ ،ﺀﺎﻧﻹﺍ ﻰﻠﻋ (٩) ﺔﻣﻼﺴﻟﺍ ﺀﺎﻄﻏ ﺐﻴﻛﺮﺘﺑ ﻢﻗ •
.ﺀﺎﻧﻹﺍ ﻰﻠﻋ ﺕﺍﻮﺠﻔﻟﺍ ﻞﺧﺍﺩ ﺀﺎﻄﻐﻟﺍ ﺕﺍﻭﺮﻋ
ﺀﺎﻄﻏ ﻰﻠﻋ (٨) ﺀﺎﻄﻐﻟﺍ ﻊﺿﻭ (ﺏ ٨) ﺭﺍﺭﺯﻷﺍ ﻰﻠﻋ ﻂﻐﺿﺍ •
ﻪﺘﻴﺒﺜﺗ ﻡﺎﻜﺣﻹ ﻞﻔﺳﻷﺍ ﻰﻟﺇ ﻂﻐﻀﻟﺍ ﻊﻣ ،(٩) ﺔﻣﻼﺴﻟﺍ
.ﺢﻴﺤﺼﻟﺍ ﻪﻌﺿﻮﻣ ﻲﻓ
ﻩﺮﻳﻭﺪﺗ ﻊﻣ (٨) ﺀﺎﻄﻐﻟﺍ ﻰﻟﺇ (١) ﻙﺮﶈﺍ ﺓﺪﺣﻭ ﺖﻴﺒﺜﺘﺑ ﻢﻗ •
ﻪﻌﺿﻮﻣ ﻲﻓ ﻪﺘﻴﺒﺜﺗ ﻡﺎﻜﺣﻹ ﺔﻋﺎﺴﻟﺍ ﺏﺭﺎﻘﻋ ﻩﺎﲡﺎﺑ
.ﺢﻴﺤﺼﻟﺍ
ﻚﺳﺎﻤﺘﻟﺍ ﺔﺟﺭﺩ ﻰﻟﺇ ﹰﻻﻮﺻﻭ ﺕﺎﻧﻮﻜﳌﺍ ﻊﻴﻄﻘﺘﺑ ﻢﻗ •
ﻝﻼﺧ ﻦﻣ ﺔﻴﻓﺎﺿﺇ ﺕﺎﻧﻮﻜﻣ ﺔﻓﺎﺿﺇ ﻦﻜﻤﳌﺍ ﻦﻣﻭ .ﺔﺤﻴﺤﺼﻟﺍ
.ﻊﻓﺪﻟﺍ ﺓﺍﺩﺃ ﻡﺍﺪﺨﺘﺳﺎﺑ ﻞﺋﺎﳌﺍ ﺏﻮﺒﻧﻷﺍ
ﺲﺑﺎﻘﻟﺍ ﻦﻋ ﺯﺎﻬﳉﺍ ﻞﺼﻔﺑ ﻢﻗ ،ﻊﻴﻄﻘﺘﻟﺍ ﻝﺎﻤﺘﻛﺍ ﺩﺮﺠﲟ •
.ﻥﺍﺭﻭﺪﻟﺍ ﻦﻋ ﺕﺍﺮﻔﺸﻟﺍ ﻒﻗﻮﺘﺗ ﻰﺘﺣ ﻪﻛﺮﺗﺍﻭ
ﺲﻜﻋ ﻙﺮﶈﺍ ﺮﻳﻭﺪﺘﺑ ﻢﻗﻭ (ﺃ ٨) ﻙﺮﶈﺍ ﺓﺪﺣﻭ ﺭﺯ ﻰﻠﻋ ﻂﻐﺿﺍ •
ﺀﺎﻧﻹﺍ ﺀﺎﻄﻏ ﺭﺍﺭﺯﺃ ﻰﻠﻋ ﻂﻐﺿﺍ .ﻪﺘﻟﺍﺯﻹ ﺔﻋﺎﺴﻟﺍ ﺏﺭﺎﻘﻋ ﻩﺎﲡﺍ
.ﻥﺎﻣﻷﺍ ﺀﺎﻄﻏ ﻦﻣ ﺀﺎﻄﻐﻟﺍ ﺔﻟﺍﺯﻹ (ﺏ ٨)
ﺔﻳﺎﻨﻌﺑ ﻊﻴﻄﻘﺘﻟﺍ ﺓﺮﻔﺷﻭ ﺭﺍﻭﺪﻟﺍ ﺩﻮﻤﻌﻟﺍ ﺔﻟﺍﺯﺇ ﻰﻠﻋ ﺹﺮﺣﺍ •
.ﺐﺳﺎﻨﻣ ﺀﺎﻋﻭ ﻰﻟﺇ ﺮﻳﺩﺎﻘﳌﺍ ﻞﻘﻧ ﻞﺒﻗ
.ﹰﺎﻏﺭﺎﻓ ﻥﻮﻜﻳ ﺎﻣﺪﻨﻋ ﺯﺎﻬﳉﺍ ﻞﻴﻐﺸﺘﺑ ﻢﻘﺗ ﻻ •
ﺢﺋﺍﺮﺷ / ﺓﺮﻴﻐﺻ ﻊﻄﻗ ﻰﻟﺇ ﻊﻴﻄﻘﺘﻟﺍ
ﻢﻗ .(١١) ﺀﺎﻧﻹﺍ ﺭﺎﻤﺴﻣ ﻰﻠﻋ (١٢) ﻥﺍﺭﻭﺪﻟﺍ ﺩﻮﻤﻋ ﻊﺿ •
ﺹﺮﻗ ﻰﻟﺇ (١٦ ﻭﺃ ١٥) ﺔﻳﺎﻨﻌﺑ ﺔﺑﻮﻠﻄﳌﺍ ﺓﺮﻔﺸﻟﺍ ﺐﻴﻛﺮﺘﺑ
.ﻥﺍﺭﻭﺪﻟﺍ ﺩﻮﻤﻋ ﻰﻠﻋ ﺹﺮﻘﻟﺍ ﺖﻴﺒﺜﺗ ﻊﻣ (١٤) ﻊﻴﻄﻘﺘﻟﺍ
ﺖﻴﺒﺜﺗ ﻊﻣ .ﺀﺎﻧﻹﺍ ﻰﻠﻋ (٩) ﺔﻣﻼﺴﻟﺍ ﺀﺎﻄﻏ ﺐﻴﻛﺮﺘﺑ ﻢﻗ •
.ﺀﺎﻧﻹﺍ ﻰﻠﻋ ﺕﺍﻮﺠﻔﻟﺍ ﻞﺧﺍﺩ ﺀﺎﻄﻐﻟﺍ ﺕﺍﻭﺮﻋ
ﺀﺎﻄﻏ ﻰﻠﻋ (٨) ﺀﺎﻄﻐﻟﺍ ﻊﺿﻭ (ﺏ ٨) ﺭﺍﺭﺯﻷﺍ ﻰﻠﻋ ﻂﻐﺿﺍ •
ﻪﺘﻴﺒﺜﺗ ﻡﺎﻜﺣﻹ ﻞﻔﺳﻷﺍ ﻰﻟﺇ ﻂﻐﻀﻟﺍ ﻊﻣ ،(٩) ﺔﻣﻼﺴﻟﺍ
.ﺢﻴﺤﺼﻟﺍ ﻪﻌﺿﻮﻣ ﻲﻓ
ﻖﻔﳋﺍﻭ ﻂﻠﺨﻠﻟ ﺔﻘﺤﻠﳌﺍ ﺕﺍﺪﺣﻮﻟ
ﻂﻠﳋ (٤) ﺔﻘﺤﻠﳌﺍ ﻂﻠﳋﺍ ﺓﺪﺣﻭ ﻡﺍﺪﺨﺘﺳﺍ ﻰﻠﻋ ﺹﺮﺣﺍ •
.ﺱﺮﻬﻟﺍ ﺪﻣﺍﻮﺟ ﻭﺃ ﻞﺋﺍﻮﺴﻟﺍ
ﻖﻓﺎﺍﻭ (٦) ﺔﻘﺤﻠﳌﺍ ﻖﻔﳋﺍ ﺓﺪﺣﻭ ﻡﺍﺪﺨﺘﺳﺍ ﻰﻠﻋ ﺹﺮﺣﺍ •
.ﺲﻳﺮﻫ ﻰﻟﺇ ﺎﻬﻠﻳﻮﲢﻭ ﻞﺋﺍﻮﺴﻟﺍ ﻖﻔﺧﻭ ﺝﺰﳌ (٧)
ﺕﺎﻘﺤﻠﳌﺍ ﻚﻓﻭ ﺐﻴﻛﺮﺗ
ﻭﺃ (٦) ﺔﻘﻔﺍ ﻢﺴﺟ ﻲﻓ (١) ﻙﺮﶈﺍ ﻢﺴﺟ ﺐﻴﻛﺮﺘﺑ ﻢﻗ •
ﻩﺎﲡﺎﺑ ﻙﺮﶈﺍ ﺓﺪﺣﻭ ﺮﻳﻭﺪﺗ ﻊﻣ (٤) ﺔﻘﺤﻠﳌﺍ ﻂﻠﳋﺍ ﺓﺪﺣﻭ
.ﺢﻴﺤﺼﻟﺍ ﺎﻬﻌﺿﻮﻣ ﻲﻓ ﺎﻬﻘﻠﻐﻟ ﺔﻋﺎﺴﻟﺍ ﺏﺭﺎﻘﻋ
.ﺔﻘﻔﺍ ﻢﺴﺟ ﻲﻓ (٧) ﻖﻓﺎﺍ ﻊﻓﺩﺍ •
ﻙﺮﶈﺍ ﺓﺪﺣﻭ ﻖﻠﻏ ﺭﺯ ﻰﻠﻋ ﻂﻐﺿﺍ ،ﺔﻘﺤﻠﳌﺍ ﺓﺪﺣﻮﻟﺍ ﺔﻟﺍﺯﻹ •
ﻩﺎﲡﺍ ﺲﻜﻋ ﻙﺮﶈﺍ ﺓﺪﺣﻭ ﺮﻳﻭﺪﺘﺑ ﻢﻗ ﻢﺛ ﻦﻣﻭ ،(ﺃ ٨)
ﺓﺪﺣﻭ ﻦﻣ ﺔﻘﺤﻠﳌﺍ ﺓﺪﺣﻮﻟﺍ ﺐﺤﺳﺍﻭ ﺔﻋﺎﺴﻟﺍ ﺏﺭﺎﻘﻋ
.ﻙﺮﶈﺍ
ﻡﺍﺪﺨﺘﺳﻻﺍ
ﺝﺰﳌﺍ
.ﺐﺳﺎﻨﻣ ﺀﺎﻧﺇ ﻭﺃ ﺱﺎﻴﻗ ﻖﻳﺮﺑﺇ ﻲﻓ ﺕﺎﻧﻮﻜﳌﺍ ﻊﺿ •
ﺕﺎﻧﻮﻜﳌﺍ ﻮﺤﻧ ﺕﺍﺮﻔﺸﻟﺍ ﻊﻓﺪﻨﺗ ،ﻦﻌﻄﻟﺍ ﺔﻛﺮﺣ ﻡﺍﺪﺨﺘﺳﺎﺑ •
.ﺔﺤﻴﺤﺼﻟﺍ ﻖﻓﺍﻮﺘﻟﺍ ﺔﺟﺭﺩ ﻰﻟﺇ ﻝﻮﺻﻮﻟﺍ ﻢﺘﻳ ﻰﺘﺣ
ﺕﺎﻧﻮﻜﳌﺍ ﻭﺃ ﻞﺋﺍﻮﺴﻟﺍ ﺝﺰﻣ ﺪﻨﻋ ﺓﺮﻴﺼﻗ ﺕﺎﻀﺒﻧ ﻡﺪﺨﺘﺳﺍ •
.ﻞﺋﺍﻮﺴﻟﺍ ﺏﺎﻜﺴﻧﺍ ﻊﻨﳌ ﺔﻌﺋﺎﳌﺍ
ﺏﺎﻜﺴﻧﺍ ﻊﻨﻣ ﻲﻓ ﺕﺍﺮﻔﺸﻟﺍ ﺮﻤﻏ ﻰﻠﻋ ﺀﺎﻘﺑﻹﺍ ﺪﻋﺎﺴﻳ •
.ﺔﻨﺧﺎﺴﻟﺍ ﺕﺎﻧﻮﻜﳌﺍ ﺝﺰﻣ ﺪﻨﻋ ﺭﺬﳊﺍ ﺐﺠﻳ .ﻞﺋﺍﻮﺴﻟﺍ
ﻊﻴﻄﻘﺘﻟﺍ
ﻥﺍﺭﻭﺪﻟﺍ ﺩﻮﻤﻋ ﻰﻠﻋ (١٣) ﻊﻴﻄﻘﺘﻟﺍ ﺓﺮﻔﺷ ﺐﻴﻛﺮﺘﺑ ﻢﻗ •
ﺀﺎﻧﺇ ﻲﻓ ﺖﺒﺜﳌﺍ ﺭﺎﻤﺴﳌﺍ ﻰﻠﻋ ﺩﻮﻤﻌﻟﺍ ﺐﻴﻛﺮﺗ ﻊﻣ (١٢)
.(١١) ﻊﻴﻄﻘﺘﻟﺍ
.ﻊﻴﻄﻘﺘﻟﺍ ﺀﺎﻧﺇ ﻲﻓ ﺕﺎﻧﻮﻜﳌﺍ ﻊﺿ •
29

Arabic
ﺲﻴﺋﺮﻟﺍ ﺬﺧﺄﳌﺍ ﺲﺑﺎﻗ ﻝﺍﺪﺒﺘﺳﺍ
ﺎﻣ ﻉﺎﺒﺗﺍ ﻡﺰﻠﻳ ،ﺲﻴﺋﺮﻟﺍ ﺬﺧﺄﻤﻠﻟ ﺪﻳﺪﺟ ﺲﺑﺎﻗ ﺐﻴﻛﺮﺘﻟ ﺔﺟﺎﳊﺍ ﺪﻨﻋ
:ﻲﻠﻳ
.ﻦﻣﺁ ﻮﺤﻧ ﻰﻠﻋ ﱘﺪﻘﻟﺍ ﺲﺑﺎﻘﻟﺍ ﻦﻣ ﺺﻠﺨﺘﻟﺍ •
ﻲﻓ ﺭﺎﻴﺘﻟﺎﺑ ﻞﺼﺘﳌﺍ ﻑﺮﻄﻟﺎﺑ ﻥﻮﻠﻟﺍ ﻲﻨﺑ ﻚﻠﺴﻟﺍ ﻞﻴﺻﻮﺗ •
.ﺪﻳﺪﳉﺍ ﺲﺑﺎﻘﻟﺍ
.ﺪﻳﺎﶈﺍ ﻑﺮﻄﻟﺎﺑ ﻥﻮﻠﻟﺍ ﻕﺭﺯﺃ ﻚﻠﺴﻟﺍ ﻞﻴﺻﻮﺗ •
ﺬﺌﻨﻴﺤﻓ ،(ﺾﻳﺭﺄﺗ ﻚﻠﺳ) ١ ﺔﺌﻔﻟﺍ ﻦﻣ ﺞﺘﻨﳌﺍ ﻥﻮﻛ ﻝﺎﺣ ﻲﻓ •
ﻑﺮﻄﻟﺎﺑ ﻥﻮﻠﻟﺍ ﺮﻔﺻﺃ /ﺮﻀﺧﺃ ﻚﻠﺴﻟﺍ ﻞﻴﺻﻮﺗ ﲔﻌﺘﻳ
.ﻲﺿﺭﻷﺍ
ﻙﻼﺳﻷﺍﻭ ٢ ﺔﺌﻔﻟﺍ ﻦﻣ ﺞﺘﻨﳌﺍ ﻥﻮﻛ ﺔﻟﺎﺣ ﻲﻓ !ﺮﻳﺬﲢ
ﺔﻋﻮﻤﺠﻣ ﻲﻓ ﻂﻘﻓ ﻥﺎﻜﻠﺳ) ﻝﺰﻌﻟﺍ ﺔﺟﻭﺩﺰﻣ
.ﻲﺿﺭﻷﺍ ﻑﺮﻄﻟﺎﺑ ﻞﻴﺻﻮﺘﻟﺍ ﻲﻐﺒﻨﻳ ﻻ ﺬﺋﺪﻨﻌﻓ ،(ﻙﻼﺳﻷﺍ
ﺔﻴﻟﺎﻌﻟﺍ ﺲﺑﺍﻮﻘﻟﺍ ﻊﻣ ﺔﻘﻓﺮﳌﺍ ﻞﻴﺻﻮﺘﻟﺍﻭ ﺐﻴﻛﺮﺘﻟﺍ ﺕﺎﻤﻴﻠﻌﺗ ﻊﺒﺗﺍ
.ﺓﺩﻮﳉﺍ
ﻊﻃﺎﻗ ﺔﺌﻓ ﺲﻔﻧ ﻊﻣ ﺭﺎﻴﺘﻟﺍ ﻊﻃﺎﻘﻟ ﺔﻠﻳﺪﺑ ﻊﻄﻗ ﺔﻳﺃ ﻖﻓﺍﻮﺘﺗ ﻥﺃ ﺐﺠﻳ
.ﺞﺘﻨﳌﺎﺑ ﺩﻭﺰﳌﺍ ﻲﻠﺻﻷﺍ ﺭﺎﻴﺘﻟﺍ
ﻊﻴﻤﺠﺘﻟﺍ
ﻲﺋﺎﺑﺮﻬﻜﻟﺍ ﺭﺎﻴﺘﻟﺍ ﻚﻠﺳ ﺺﺤﻓ ﻡﺍﺪﺨﺘﺳﻻﺍ ﻞﺒﻗ ﻡﺰﻠﻳ •
.ﻞﻛﺂﺘﻟﺍ ﻭﺃ ﻰﻠﺒﻟﺍ ﻭﺃ ﻒﻠﺘﻟﺍ ﺕﺎﻣﻼﻋ ﻦﻣ ﻩﻮﻠﺧ ﻦﻣ ﺪﻛﺄﺘﻠﻟ
ﺭﺎﻴﺘﻟﺍ ﻚﻠﺳ ﻒﻠﺗ ﺔﻟﺎﺣ ﻲﻓ ﺯﺎﻬﳉﺍ ﻡﺍﺪﺨﺘﺳﺍ ﻡﺪﻋ ﺐﺠﻳ •
.ﺎﻤﻬﻨﻣ ﻱﺃ ﻲﻓ ﺐﻴﻋ ﺩﻮﺟﻭ ﻭﺃ ﺲﺑﺎﻘﻟﺍ ﻭﺃ ﻲﺋﺎﺑﺮﻬﻜﻟﺍ
ﻭﺃ ﹰﺎﻔﻟﺎﺗ ﺲﻴﺋﺮﻟﺍ ﺭﺎﻴﺘﻟﺍ ﺲﺑﺎﻗ ﻭﺃ ﺭﺎﻴﺘﻟﺍ ﻚﻠﺳ ﻥﺎﻛ ﺍﺫﺇ •
ﹰﺎﺒﻨﲡ ﺪﻤﺘﻌﻣ ﺔﻧﺎﻴﺻ ﻞﻴﻛﻭ ﺔﻓﺮﻌﲟ ﻪﺣﻼﺻﺇ ﲔﻌﺘﻳ ،ﹰﺎﺒﻴﻌﻣ
ﺔﻟﻭﺎﺤﻣﻭ ﺭﺎﻴﺘﻟﺍ ﻚﻠﺳ ﻊﻄﻗ ﹰﺎﻀﻳﺃ ﺐﻨﲡ .ﺮﻃﺎﺨﻣ ﺔﻳﻷ
.ﻚﺴﻔﻨﺑ ﻪﺣﻼﺻﺇ
ﺀﺍﺰﺟﻷﺍ ﺮﻴﻏ ﺀﺍﺰﺟﺃ ﺔﻳﺃ ﻝﺍﺪﺒﺘﺳﺍ ﻭﺃ ﻚﻓ ﹰﺎﻘﻠﻄﻣ ﻝﻭﺎﲢ ﻻ •
.ﻞﻴﻟﺪﻟﺍ ﺍﺬﻫ ﻲﻓ ﺓﺩﺪﶈﺍ
ﺰﻛﺮﻣ ﺏﺮﻗﺃ ﻰﻟﺇ ﻪﺑ ﺐﻫﺫﺍ ﻞﺑ ،ﺯﺎﻬﳉﺍ ﺡﻼﺻﺇ ﻝﻭﺎﲢ ﻻ •
.ﺪﻤﺘﻌﻣ ﺔﻧﺎﻴﺻ ﺰﻛﺮﻣ ﻱﺃ ﻭﺃ ﺮﻜﻳﺩ ﺪﻧﺁ ﻙﻼﺒﻟ ﻊﺑﺎﺗ ﺔﻧﺎﻴﺻ
.ﻑﺍﺮﺷﺇ ﻥﻭﺩ ﺯﺎﻬﳉﺍ ﻡﺍﺪﺨﺘﺳﺎﺑ ﻝﺎﻔﻃﻸﻟ ﺢﻤﺴﺗ ﻻ •
ﺔﻴﺋﺎﺑﺮﻬﻜﻟﺍ ﺔﻣﻼﺴﻟﺍ
ﻊﻣ ﺲﻴﺋﺮﻟﺍ ﺬﺧﺄﳌﺍ ﺔﻴﻄﻟﻮﻓ ﻖﻓﺍﻮﺗ ﻦﻣ ﺯﺎﻬﳉﺍ ﻡﺍﺪﺨﺘﺳﺍ ﻞﺒﻗ ﻖﻘﲢ
.ﻒﻴﻨﺼﺘﻟﺍ ﺔﺣﻮﻟ ﻰﻠﻋ ﺓﺩﺪﶈﺍ ﺔﻴﻄﻟﻮﻔﻟﺍ
ﺩﺍﻮﻤﻠﻟ ﻲﳌﺎﻌﻟﺍ ﺭﺎﻴﻌﳌﺍ ﻊﻣ ﺯﺎﻬﳉﺍ ﺍﺬﻫ ﻖﻓﺍﻮﺘﻳ
.ﺝﻭﺩﺰﳌﺍ ﻝﺰﻌﻟﺍ ﻉﻮﻧ ﻦﻣ ﻮﻬﻓ ،٦٠٣٣٥ :ﻢﻗﺭ ﺔﻴﺑﺮﻬﻜﻟﺍ
.ﺯﺎﻬﳉﺍ ﺍﺬﻫ ﺾﻳﺭﺄﺗ ﻡﺰﻠﻳ ﻻ ﺍﺬﻟ
ﻡﺪﻋﻭ ﺯﺎﻬﳉﺍ ﻖﻠﻏ ﻦﻣ ﻊﻴﻤﺠﺘﻟﺍ ﻞﺒﻗ ﺪﻛﺄﺗ !ﺮﻳﺬﲢ
.ﻲﺋﺎﺑﺮﻬﻜﻟﺍ ﺭﺎﻴﺘﻟﺍ ﺭﺪﺼﲟ ﻪﻠﻴﺻﻮﺗ
.ﺯﺎﻬﳉﺍ ﺀﺍﺰﺟﺃ ﻦﻣ ﺔﻴﻄﻏﻷﺍ ﺔﻓﺎﻛ ﺔﻟﺍﺯﺈﺑ ﻢﻗ
.ﺓﺮﻣ ﻝﻭﻷ ﻪﻣﺍﺪﺨﺘﺳﺍ ﻞﺒﻗ ﺯﺎﻬﳉﺍ ﻒﹼﻈﻧ
30
ﻱﺃ ﻭﺃ ﻩﺎﻴﳌﺍ ﻲﻓ ﻙﺮﶈﺍ ﺓﺪﺣﻭ ﻭﺃ ﺲﺑﺎﻘﻟﺍ ﻭﺃ ﻚﻠﺴﻟﺍ ﺮﻤﻐﺗ ﻻ •
.ﺔﻴﺑﺮﻬﻜﻟﺍ ﺕﺎﻣﺪﺼﻟﺎﺑ ﺔﺑﺎﺻﻹﺍ ﺮﻃﺎ ﹰﺎﻳﺩﺎﻔﺗ ﺮﺧﺁ ﻞﺋﺎﺳ
ﺔﺣﻮﻟ ﻰﻠﻋ ﺔﺤﺿﻮﳌﺍ ﺔﻴﻄﻟﻮﻔﻟﺍ ﻖﻓﺍﻮﺗ ﻦﻣ ﺪﻛﺄﺘﻟﺍ ﻡﺰﻠﻳ •
ﹰﺎﻤﻠﻋ ،ﻲﺋﺎﺑﺮﻬﻜﻟﺍ ﻡﺎﻈﻨﻟﺍ ﻊﻣ ﺯﺎﻬﳉﺎﺑ ﺔﺻﺎﳋﺍ ﻒﻴﻨﺼﺘﻟﺍ
ﻰﻟﺇ ﻱﺩﺆﻴﺳ ﻞﻴﺻﻮﺘﻟﺍ ﺔﻴﻠﻤﻋ ﻲﻓ ﺄﻄﺧ ﻱﺄﺑ ﻡﺎﻴﻘﻟﺍ ﻥﺄﺑ
.ﻥﺎﻤﻀﻟﺍ ﺀﺎﻐﻟﺇ

Arabic
ﺭﺎﻴﺘﻟﺍ ﺭﺪﺼﻣ ﻦﻋ ﻪﻠﺼﻓﺍ ،ﺯﺎﻬﳉﺍ ﻡﺍﺪﺨﺘﺳﺍ ﻡﺪﻋ ﺔﻟﺎﺣ ﻲﻓ •
ﺀﺍﺰﺟﺃ ﺔﻳﺃ ﺔﻟﺍﺯﺇ ﻭﺃ ﺐﻴﻛﺮﺘﺑ ﻡﺎﻴﻘﻟﺍ ﻞﺒﻗ ﻚﻟﺬﻛﻭ ،ﻲﺋﺎﺑﺮﻬﻜﻟﺍ
.ﻒﻴﻈﻨﺘﻟﺍ ﻞﺒﻗﻭ
ﻡﺍﺪﺨﺘﺳﻻﺍ ﺪﻌﺑ
ﻢﺛ ،ﺬﺧﺄﳌﺍ ﻦﻣ ﺲﺑﺎﻘﻟﺍ ﻉﺰﻧﺍﻭ ،ﺯﺎﻬﳉﺍ ﻞﻴﻐﺸﺗ ﻑﺎﻘﻳﺈﺑ ﻢﻗ •
ﺮﻴﻴﻐﺗ ﻞﺒﻗﻭ ﺔﺒﻗﺍﺮﻣ ﻥﻭﺩ ﻪﻛﺮﺗ ﻞﺒﻗ ﺩﺮﺒﻳ ﻰﺘﺣ ﺯﺎﻬﳉﺍ ﻙﺮﺗﺍ
.ﺎﻬﺼﺤﻓ ﻭﺃ ﺎﻬﻔﻴﻈﻨﺗ ﻭﺃ ﻪﺋﺍﺰﺟﺃ ﻦﻣ ﻱﺃ
ﻥﺎﻜﻣ ﻲﻓ ﻪﻨﻳﺰﺨﺗ ﺐﺠﻳ ،ﺯﺎﻬﳉﺍ ﻡﺍﺪﺨﺘﺳﺍ ﻡﺪﻋ ﺔﻟﺎﺣ ﻲﻓ •
ﻰﻟﺇ ﻝﻮﺻﻮﻟﺎﺑ ﻝﺎﻔﻃﻸﻟ ﺡﺎﻤﺴﻟﺍ ﻡﺪﻋ ﺐﺠﻳ ﺎﻤﻛ .ﻑﺎﺟ
.ﺔﻧﺰﺍ ﺓﺰﻬﺟﻷﺍ
ﺪﻨﻋ ﺍﺬﻛﻭ ،ﺓﺩﺎﳊﺍ ﻊﻄﻘﻟﺍ ﺕﺍﺮﻔﺷ ﻊﻣ ﻞﻣﺎﻌﺘﻟﺍ ﺪﻨﻋ ﺭﺬﺣﺍ •
.ﻒﻴﻈﻨﺘﻟﺍ ﺀﺎﻨﺛﺃ ﺀﺎﻧﻹﺍ ﻎﻳﺮﻔﺗ
ﺡﻼﺻﻹﺍﻭ ﺺﺤﻔﻟﺍ
ﺕﺎﻘﺤﻠﳌﺍ ﺮﻴﻴﻐﺗ ﻭﺃ ﻪﻔﻴﻈﻨﺗ ﻞﺒﻗ ﺯﺎﻬﳉﺍ ﻞﻴﻐﺸﺗ ﻑﺎﻘﻳﺇ ﻡﺰﻠﻳ •
.ﻡﺍﺪﺨﺘﺳﻻﺍ ﺀﺎﻨﺛﺃ ﻙﺮﺤﺘﺗ ﻲﺘﻟﺍ ﺀﺍﺰﺟﻷﺍ ﻦﻣ ﺏﺍﺮﺘﻗﻻﺍ ﻭﺃ
ﻭﺃ ﺀﺎﻄﻏ ﻱﺃ ﺔﻟﺍﺯﺇ ﻞﺒﻗ ﻙﺮﶈﺍ ﻥﺍﺭﻭﺩ ﻒﻗﻮﺗ ﻦﻣ ﺪﻛﺄﺗ •
.ﺕﺎﻘﺤﻠﻣ
ﻡﺪﻋ ﺔﻟﺎﺣ ﻲﻓ ﻲﺋﺎﺑﺮﻬﻜﻟﺍ ﺭﺎﻴﺘﻟﺍ ﻦﻋ ﺯﺎﻬﳉﺍ ﻞﺼﻓﺍ •
ﻪﻨﻋ ﺎﻬﺘﻟﺍﺯﺇ ﻭﺃ ﻪﺑ ﺀﺍﺰﺟﺃ ﺔﻳﺃ ﺐﻴﻛﺮﺗ ﻞﺒﻗﻭ ﻪﻣﺍﺪﺨﺘﺳﺍ
.ﻒﻴﻈﻨﺘﻟﺍ ﻞﺒﻗﻭ
.ﺔﻴﺼﺨﺷ ﺔﺑﺎﺻﺇ ﺐﺒﺴﺗ ﺪﻗ ﻡﺍﺪﺨﺘﺳﻻﺍ ﺓﺀﺎﺳﺇ •
ﹰﺎﺻﻮﺼﺧﻭ ﺓﺩﺎﳊﺍ ﻊﻄﻘﻟﺍ ﺕﺍﺮﻔﺷ ﻊﻣ ﻞﻣﺎﻌﺘﻟﺍ ﺪﻨﻋ ﺭﺬﺣﺍ •
.ﻪﻔﻴﻈﻨﺗﻭ ﺀﺎﻧﻹﺍ ﻎﻳﺮﻔﺗﻭ ﺕﺍﺮﻔﺸﻟﺍ ﺔﻟﺍﺯﺇ ﺪﻨﻋ
ﻭﺃ ﺮﻌﺸﻟﺍ ﻭﺃ ﺔﺿﺎﻔﻀﻔﻟﺍ ﺲﺑﻼﳌﺍﻭ ﻊﺑﺎﺻﻷﺍ ﺀﺎﻘﺑﺈﺑ ﻢﻗ !ﺮﻳﺬﲢ
ﻲﻓ ﺭﺬﳊﺍ ﺥﻮﺗ .ﺕﺍﺮﻔﺸﻟﺍﻭ ﺔﻛﺮﺤﺘﳌﺍ ﺀﺍﺰﺟﻷﺍ ﻦﻋ ﹰﺍﺪﻴﻌﺑ ﻲﻠﳊﺍ
ﺪﻗ ﻪﻧﻷ ﻡﺎﻌﻄﻟﺍ ﺩﺍﺪﻋﺇ ﺯﺎﻬﺟ ﻰﻠﻋ ﻦﺧﺎﺳ ﻞﺋﺎﺳ ﺐﻜﺳ ﻝﺎﺣ
.ﺊﺟﺎﻔﳌﺍ ﺭﺎﺨﺒﻟﺍ ﺔﺠﻴﺘﻧ ﺯﺎﻬﳉﺍ ﺝﺭﺎﺧ ﻊﻓﺪﻨﻳ
ﻦﻳﺮﺧﻵﺍ ﺔﻣﻼﺳ
ﺏﺎﺤﺻﺃ ﺹﺎﺨﺷﻷﺍ ﻪﻣﺪﺨﺘﺴﻴﻟ ﻢﻤﺼﻣ ﺮﻴﻏ ﺯﺎﻬﳉﺍ ﺍﺬﻫ •
ﺓﺮﺒﳋﺍ ﻭﺃ ﺓﺩﻭﺪﶈﺍ ﺔﻴﻠﻘﻌﻟﺍ ﻭﺃ ﺔﻴﺴﳊﺍ ﺔﻳﺪﺴﳉﺍ ﺕﺍﺭﺪﻘﻟﺍ
ﻞﻇ ﻲﻓ ﻻﺇ ،(ﻝﺎﻔﻃﻷﺍ ﻢﻬﻴﻓ ﻦﲟ) ﺔﻠﻴﻠﻘﻟﺍ ﺔﻓﺮﻌﳌﺍﻭ
ﺔﻘﻠﻌﺘﳌﺍ ﺕﺎﻤﻴﻠﻌﺘﻟﺍ ﻢﻬﺋﺎﻄﻋﺇ ﻭﺃ ﻢﻬﻴﻠﻋ ﻑﺍﺮﺷﻹﺍ
ﻦﻋ ﻝﻭﺆﺴﳌﺍ ﺺﺨﺸﻟﺍ ﻞﺒﻗ ﻦﻣ ﺯﺎﻬﳉﺍ ﻡﺍﺪﺨﺘﺳﺎﺑ
.ﻢﻬﺘﻣﻼﺳ
.ﺯﺎﻬﳉﺎﺑ ﻢﻬﺜﺒﻋ ﻡﺪﻋ ﻥﺎﻤﻀﻟ ﻝﺎﻔﻃﻷﺍ ﻰﻠﻋ ﻑﺍﺮﺷﻹﺍ ﻡﺰﻠﻳ •
ﺀﺍﺰﺟﺃ ﺔﻳﺃ ﻑﺎﺸﻜﺘﺳﻻ ﻡﺍﺪﺨﺘﺳﻻﺍ ﻞﺒﻗ ﺯﺎﻬﳉﺍ ﺺﺤﻓﺍ •
ﺓﺭﻮﺴﻜﻣ ﺀﺍﺰﺟﺃ ﺔﻳﺃ ﺩﻮﺟﻭ ﻡﺪﻋ ﻦﻣ ﺪﻛﺄﺘﻟﺍﻭ ﺔﺒﻴﻌﻣ ﻭﺃ ﺔﻔﻟﺎﺗ
ﺓﺀﺎﻔﻛ ﻰﻠﻋ ﺮﺛﺆﺗ ﺪﻗ ﻯﺮﺧﺃ ﻑﻭﺮﻇ ﺔﻳﺃ ﻭﺃ ﺢﻴﺗﺎﻔﳌﺍ ﻒﻠﺗ ﻡﺪﻋﻭ
.ﻪﻠﻴﻐﺸﺗ
.ﺐﻴﻌﻣ ﻭﺃ ﻒﻟﺎﺗ ﺀﺰﺟ ﻱﺃ ﺩﻮﺟﻭ ﺔﻟﺎﺣ ﻲﻓ ﺯﺎﻬﳉﺍ ﻡﺪﺨﺘﺴﺗ ﻻ •
ﺔﻳﺃ ﺡﻼﺻﻹ ﺪﻤﺘﻌﳌﺍ ﺔﻧﺎﻴﺼﻟﺍ ﻞﻴﻛﻮﺑ ﺔﻧﺎﻌﺘﺳﻻﺍ ﻲﻐﺒﻨﻳ •
.ﺎﻬﻟﺍﺪﺒﺘﺳﺍ ﻭﺃ ﺔﺒﻴﻌﻣ ﻭﺃ ﺔﻔﻟﺎﺗ ﺀﺍﺰﺟﺃ
ﻩﺬﻫ ﻰﻠﻋ ﻊﻠﻄﻣ ﺮﻴﻏ ﺺﺨﺷ ﻱﺃ ﻭﺃ ﻝﺎﻔﻃﻸﻟ ﺢﻤﺴﺗ ﻻ •
.ﺯﺎﻬﳉﺍ ﺍﺬﻫ ﻡﺍﺪﺨﺘﺳﺎﺑ ﺕﺎﻤﻴﻠﻌﺘﻟﺍ
ﻂﻴﺤﻣ ﻦﻣ ﺕﺎﻧﺍﻮﻴﳊﺍ ﻭﺃ ﻝﺎﻔﻃﻷﺍ ﺏﺍﺮﺘﻗﺎﺑ ﺢﻤﺴﺗ ﻻ •
.ﻲﺋﺎﺑﺮﻬﻜﻟﺍ ﺭﺎﻴﺘﻟﺍ ﻚﻠﺳ ﻭﺃ ﺯﺎﻬﺠﻠﻟ ﻢﻬﺴﳌ ﻭﺃ ﻞﻤﻌﻟﺍ
ﺯﺎﻬﳉﺍ ﻡﺍﺪﺨﺘﺳﺍ ﺪﻨﻋ ﺐﺜﻛ ﻦﻋ ﻝﺎﻔﻃﻷﺍ ﺔﺒﻗﺍﺮﻣ ﺐﺠﻳﻭ
.ﻢﻬﻨﻣ ﺏﺮﻘﻟﺎﺑ
.ﻝﺎﻔﻃﻷﺍ ﻞﺒﻗ ﻦﻣ ﺞﺘﻨﳌﺍ ﺍﺬﻫ ﻡﺍﺪﺨﺘﺳﺎﺑ ﺢﺼﻨﹸﻳ ﻻ •
.ﻪﻠﻴﻐﺸﺗ ﺀﺎﻨﺛﺃ ﺔﺒﻗﺍﺮﻣ ﻥﻭﺩ ﺯﺎﻬﳉﺍ ﻙﺮﺘﺗ ﻻ •
31

Arabic
ﻞﻗﺮﻌﺘﻟﺍ ﺮﻃﺎﺨﻣ ﻱﺩﺎﻔﺘﻟ ﹰﺎﻤﺋﺍﺩ ﻚﻠﺴﻟﺍ ﺭﺎﺴﻣ ﺪﻳﺪﲢ ﺐﺠﻳ •
.ﻪﺑ
ﺯﺎﻬﳉﺍ ﻡﺍﺪﺨﺘﺳﺍ
ﻲﺋﺎﺑﺮﻬﻜﻟﺍ ﺭﺎﻴﺘﻟﺍ ﺭﺪﺼﲟ ﻞﻴﺻﻮﺘﻟﺍ ﻞﺒﻗ ﺯﺎﻬﳉﺍ ﻖﻠﻏ ﻦﻣ ﺪﻛﺄﺗ •
.ﻪﻠﺼﻓ ﻭﺃ
.ﺯﺎﻬﳉﺍ ﻡﺍﺪﺨﺘﺳﺍ ﺪﻨﻋ ﹰﺎﻤﺋﺍﺩ ﺱﺮﺘﺣﺍ •
.ﻝﺰﻨﳌﺍ ﺝﺭﺎﺧ ﺯﺎﻬﳉﺍ ﻡﺪﺨﺘﺴﺗ ﻻ •
ﺔﺑﻮﻃﺮﻟﺍ ﻭﺃ ﻩﺎﻴﳌﺍ ﻦﻣ ﻙﺮﶈﺍ ﺓﺪﺣﻭ ﺔﻳﺎﻤﺤﺑ ﹰﺎﻤﺋﺍﺩ ﻢﻗ •
.ﺔﻴﻟﺎﻌﻟﺍ
.ﻥﺎﺘﻠﺘﺒﻣ ﻙﺍﺪﻳﻭ ﺯﺎﻬﳉﺍ ﻞﻐﺸﺗ ﻻ •
.ﲔﻣﺪﻘﻟﺍ ﻲﻓﺎﺣ ﻥﻮﻜﺗ ﺎﻣﺪﻨﻋ ﺯﺎﻬﳉﺍ ﻞﻐﺸﺗ ﻻ •
.ﺔﻛﺮﺤﺘﳌﺍ ﺀﺍﺰﺟﻷﺍ ﺲﻤﻠﺗ ﻻ •
ﻕﻮﻓ ﻖﻠﻌﺘﻳ ﻻ ﺚﻴﺤﺑ ﺔﻗﺪﺑ ﻲﺋﺎﺑﺮﻬﻜﻟﺍ ﺭﺎﻴﺘﻟﺍ ﻚﻠﺳ ﺩﺮﻓﺍ •
ﻭﺃ ﺮﺜﻌﺘﻟﺍ ﺐﻨﺠﺘﻟﻭ ﺓﺪﻀﻨﳌﺍ ﻭﺃ ﻞﻤﻌﻟﺍ ﺢﻄﺳ ﻑﺍﻮﺣ
.ﹰﺔﻓﺩﺎﺼﻣ ﻪﺑ ﻞﻗﺮﻌﺘﻟﺍ
ﻞﺼﻔﻟ ﻲﺋﺎﺑﺮﻬﻜﻟﺍ ﺭﺎﻴﺘﻟﺍ ﻚﻠﺳ ﺪﺷ ﹰﺎﻘﻠﻄﻣ ﻝﻭﺎﲢ ﻻ •
ﻲﺋﺎﺑﺮﻬﻜﻟﺍ ﺭﺎﻴﺘﻟﺍ ﻚﻠﺴﺑ ﻆﻔﺘﺣﺍﻭ ﺲﺒﻘﳌﺍ ﻦﻋ ﺲﺑﺎﻘﻟﺍ
.ﺓﺩﺎﳊﺍ ﻑﺍﻮﳊﺍﻭ ﺖﻳﺰﻟﺍﻭ ﺓﺭﺍﺮﳊﺍ ﻦﻋ ﹰﺍﺪﻴﻌﺑ
ﺯﺎﻬﳉﺍ ﻞﺼﻓ ﻞﺒﻗ ﻙﺮﶈﺍ ﻒﻗﻮﺗ ﻰﺘﺣ ﺮﻈﺘﻧﺍﻭ ﺯﺎﻬﳉﺍ ﻖﻠﻏﺍ •
.ﻲﺋﺎﺑﺮﻬﻜﻟﺍ ﺭﺎﻴﺘﻟﺍ ﺭﺪﺼﻣ ﻦﻋ
ﺭﺎﻴﺘﻟﺎﺑ ﺯﺎﻬﳉﺍ ﻝﺎﺼﺗﺍ ﺀﺎﻨﺛﺃ ﻖﺤﻠﻣ ﻭﺃ ﺔﻌﻄﻗ ﺔﻳﺃ ﻞﺼﻔﺗ ﻻ •
.ﻲﺋﺎﺑﺮﻬﻜﻟﺍ ﺭﺎﻴﺘﻟﺍ ﻦﻋ ﺯﺎﻬﳉﺍ ﹰﻻﻭﺃ ﻞﺼﻓﺍ ﻞﺑ ،ﻲﺋﺎﺑﺮﻬﻜﻟﺍ
،ﻡﺍﺪﺨﺘﺳﻻﺍ ﺀﺎﻨﺛﺃ ﻲﺋﺎﺑﺮﻬﻜﻟﺍ ﺭﺎﻴﺘﻟﺍ ﻚﻠﺳ ﻒﻠﺗ ﺔﻟﺎﺣ ﻲﻓ •
ﺎﻨﻫﻭ .ﻲﺋﺎﺑﺮﻬﻜﻟﺍ ﺭﺎﻴﺘﻟﺍ ﺭﺪﺼﻣ ﻦﻋ ﺭﻮﻔﻟﺍ ﻰﻠﻋ ﺯﺎﻬﳉﺍ ﻞﺼﻓﺍ
ﺭﺪﺼﻣ ﻦﻋ ﻪﻠﺼﻓ ﻞﺒﻗ ﻲﺋﺎﺑﺮﻬﻜﻟﺍ ﺭﺎﻴﺘﻟﺍ ﻚﻠﺳ ﺲﳌ ﺐﻨﲡ
.ﻲﺋﺎﺑﺮﻬﻜﻟﺍ ﺭﺎﻴﺘﻟﺍ
ﻡﺍﺪﺨﺘﺳﻻﺍ ﺽﺮﻏ
ﻡﺮﻓﻭ ﻖﻔﺧﻭ ﺝﺰﻣﻭ ﻂﻠﳋ ﹰﺎﺼﻴﺼﺧ ﻢﻤﺼﻣ ﺮﻜﻳﺩ ﺪﻧﺁ ﻙﻼﺑ ﻁﻼﺧ
ﻱﻷ ﺯﺎﻬﳉﺍ ﺍﺬﻫ ﺍﻮﻣﺪﺨﺘﺴﺗ ﻻ ،ﺍﺬﻟ .ﺕﺎﺑﻭﺮﺸﳌﺍﻭ ﺔﻤﻌﻃﻷﺍ ﺕﺎﻧﻮﻜﻣ
ﻲﻟﺰﻨﳌﺍ ﻡﺍﺪﺨﺘﺳﻼﻟ ﻢﻤﺼﻣ ﺞﺘﻨﳌﺍ ﺍﺬﻫ ﻥﺄﺑ ﹰﺎﻤﻠﻋ ،ﺮﺧﺁ ﺽﺮﻏ
.ﻂﻘﻓ
ﻯﺮﺧﺃ ﺕﺎﻣﺍﺪﺨﺘﺳﻻﻭ ﻲﻟﺰﻨﳌﺍ ﻡﺍﺪﺨﺘﺳﻼﻟ ﻢﻤﺼﻣ ﺯﺎﻬﳉﺍ ﺍﺬﻫ
:ﻞﺜﻣ
ﲔﻠﻣﺎﻌﻟﺍ ﺦﺑﺎﻄﻣ •
ﻉﺭﺍﺰﳌﺍ •
ﺔﻌﻴﺒﻄﻟﺍ ﺕﺍﺫ ﻯﺮﺧﻷﺍ ﻦﻛﺎﻣﻷﺍﻭ ﺕﺎﺣﺍﺮﺘﺳﻻﺍﻭ ﻕﺩﺎﻨﻔﻟﺍ ﺀﻻﺰﻧ •
ﺔﻴﻨﻜﺴﻟﺍ
ﺓﺀﺍﺮﻗ ﻲﻐﺒﻨﻳ ﺭﺎﻄﻓﻹﺍﻭ ﺖﻴﺒﻤﻠﻟ ﺔﺼﺼﺍ ﻑﺮﻐﻟﺍ ﻲﻓ
.ﺯﺎﻬﳉﺍ ﻡﺍﺪﺨﺘﺳﺍ ﻞﺒﻗ ﺔﻳﺎﻨﻌﺑ ﻞﻴﻟﺪﻟﺍ ﺍﺬﻫ
ﺔﻣﻼﺴﻟﺍ ﺕﺎﻤﻴﻠﻌﺗ
ﺭﺪﺼﲟ ﺔﻠﺼﺘﳌﺍ ﺓﺰﻬﺟﻷﺍ ﻡﺍﺪﺨﺘﺳﺍ ﺪﻨﻋ !ﺮﻳﺬﲢ
ﺕﺎﻃﺎﻴﺘﺣﺍ ﺓﺎﻋﺍﺮﻣ ﹰﺎﻤﺋﺍﺩ ﺐﺟﻮﺘﻳ ،ﻲﺴﻴﺋﺮﻟﺍ ﺭﺎﻴﺘﻟﺍ
ﻩﺎﻧﺩﺃ ﺓﺭﻮﻛﺬﳌﺍ ﺕﺎﻃﺎﻴﺘﺣﻻﺍ ﻚﻟﺫ ﻲﻓ ﺎﲟ ،ﺔﻴﺳﺎﺳﻷﺍ ﺔﻣﻼﺴﻟﺍ
ﻭﺃ ﺔﻴﺋﺎﺑﺮﻬﻛ ﺔﻣﺪﺼﻟ ﺽﺮﻌﺘﻟﺍﻭ ﻖﻳﺮﳊﺍ ﻉﻻﺪﻧﺍ ﺮﻃﺎﺨﻣ ﻦﻣ ﺪﺤﻠﻟ
.ﺔﻴﺼﺨﺷ ﺕﺎﺑﺎﺻﺇ
ﻊﻣ ،ﺯﺎﻬﳉﺍ ﺍﺬﻫ ﻡﺍﺪﺨﺘﺳﺍ ﻦﻣ ﺽﺮﻐﻟﺍ ﻞﻴﻟﺪﻟﺍ ﺍﺬﻫ ﺩﺪﺤﻳ •
ﻭﺃ ﺔﻘﻓﺮﻣ ﺕﺍﺪﺣﻭ ﻭﺃ ﺕﺎﻘﺤﻠﻣ ﺔﻳﺃ ﻡﺍﺪﺨﺘﺳﺍ ﻥﺃ ﺓﺎﻋﺍﺮﻣ
ﻰﺻﻮﳌﺍ ﻚﻠﺗ ﺮﻴﻏ ﺯﺎﻬﳉﺍ ﺍﺬﻫ ﻡﺍﺪﺨﺘﺳﺎﺑ ﺔﻴﻠﻤﻋ ﺔﻳﺃ ﺬﻴﻔﻨﺗ
ﺽﺮﻌﺘﻟﺍ ﺓﺭﻮﻄﺧ ﻰﻠﻋ ﻱﻮﻄﻨﺗ ﺪﻗ ﻞﻴﻟﺪﻟﺍ ﺍﺬﻫ ﻲﻓ ﺎﻬﺑ
.ﺔﻴﺼﺨﺷ ﺔﺑﺎﺻﻹ
.ﹰﻼﺒﻘﺘﺴﻣ ﻪﻴﻟﺇ ﻉﻮﺟﺮﻠﻟ ﻞﻴﻟﺪﻟﺍ ﺍﺬﻬﺑ ﻅﺎﻔﺘﺣﻻﺍ ﻰﺟﺮﻳ •
32

Arabic
٦
۲
۳
۱
٤
۷
٥
ﺏ ۸
۱۳
۱۲
۱۷
ﺃ ۸
۸
۹
۱۰
۱٥
۱٦
۱٤
۱۱
ﺀﺍﺰﺟﻷﺍ ﻒﻳﺮﻌﺗ
ﻥﺎﻣﻷﺍ ﺀﺎﻄﻏ .٩
ﻞﻔﻗ .١٠
ﺀﺎﻧﺇ .١١
ﻥﺍﺭﻭﺩ ﺩﻮﻤﻋ .١٢
ﻊﻴﻄﻘﺗ ﺓﺮﻔﺷ .١٣
ﻊﻃﺎﻗ ﺹﺮﻗ .١٤
ﺢﺋﺍﺮﺷ ﻰﻟﺇ ﻊﻴﻄﻘﺗ ﺓﺮﻔﺷ .١٥
ﺓﺮﻴﻐﺻ ﻊﻄﻗ ﻰﻟﺇ ﻊﻴﻄﻘﺗ ﺓﺮﻔﺷ .١٦
ﻊﻓﺩ ﺓﺍﺩﺃ .١٧
ﻙﺮﶈﺍ ﺓﺪﺣﻭ .١
ﻞﻴﻐﺸﺘﻟﺍ ﻑﺎﻘﻳﺇ /ﻞﻴﻐﺸﺘﻟﺍ ﺭﺯ .٢
ﻮﺑﺮﺗ ﺭﺯ .٣
ﻁﻼﳋﺎﺑ ﺔﻘﻓﺮﻣ ﺓﺪﺣﻭ .٤
ﻖﻳﺮﺑﺇ .٥
ﺔﻘﻔﺍ ﻢﺴﺟ .٦
ﻖﻓﺎﺨﻣ .٧
ﺀﺎﻧﻹﺍ ﺀﺎﻄﻏ .٨
ﻙﺮﶈﺍ ﺓﺪﺣﻭ ﻞﻔﻗ ﺭﺯ .ﺃ ٨
ﺀﺎﻧﻹﺍ ﺀﺎﻄﻏ ﻞﻔﻗ ﺭﺍﺭﺯﺃ .ﺏ ٨
33

N a me s & A d d r e s se s f or B la ck & D ec ke r S er vi c e C o n c e s si on a r i e s
ALGERIA: Sarl Outillage Corporation, DW, B&D Pet, HHD, 08, Rue Med Boudiaf (ex TELLA Achen) Cheraga, Alger, Tel:
0021 3- 0-21 3751 30/ 00 21 3-0- 2137 5131 , F ax: 00 213-0 -2 1369 667, Emai l: haki m. merd jadi@ ou till age- dz.c om;
nefissa.merdjadi@outillage-dz.com; sidahmed.merdjadi@outillage-dz.com. AZERBAIJAN: Kontakt - NN LLC, HHD, M.Qashqay 43, Baku
Azerbaijan Az1000, Tel: 00994 12 408 20 50, Mob: +994503442204, Fax: 00994 12 411 70 90, eganjaly@hotmail.com. BAHRAIN: Alfouz
Services Co. WLL, Tubli, DW, B&D PET, HHD, P.O. Box 26562, Tubli, Manama, Tel: +973-17783562/ 17879987, Fax: 17783479, Email:
alfouz@batelco.com.bh. EGYPT: Anasia Egypt for Trading S.A.E. (Mentrade), HHD, P.O. Box 2443, 9, Mostafa Refaat Street, Sheraton
Heliopolis 11361, Cairo, Tel: 00202 22684159, Fax: 00202 22684169, Email: wael.salah@anasia.com; nevien.elbeshbishy@anasia.com.
ETHIOPIA: Seif Tewfik Sherif, DW, B&D PET, HHD, Arada Sub City, Kebele 01/02, Global Insurance Bldg, 2nd Flr, Room 43, P.O. Box
2525, Addis Ababa, Tel: 00-251-11-1563968/ 1563969, Fax: 00-251-11-1558009, Email: seif@ethionet.et; nawanag@ethionet.et;
seifudint@hotmail.com. IRAQ: Financial Links, B&D PET, HHD, Kazzaz Building Arasat Al-Hindia, Block No: 629, Street: 31, Building No:
1, Baghdad, Iraq, Tel: 00964-(0)780-195-2223/ +964-(0)781-3763044, Email: info@financiallinks-truevalue.com. JORDAN: Bashiti
Hardware (Palestine), B&D pet, HHD, "93 King Abdullah, 2nd St., Opp ELBA House, P.O. Box 3005, Amman 11953, Tel:
00962- 6-534 9098, e xt.11, Fax: 00962-6 -5330 731, Ema il: mana l@bashit ihard ware.com ; info@b ashit ihardwar e.com ;
rami@bashitihardware.com. KENYA: Zylog Enterprises Ltd. (T/A Leading Concepts), HHD, IPS Building,Kaunda Street, P.O. Box
40877-00100, Nairobi, Tel: 0 0254-20 -690 5000, Fax: 0025 4-20 -6905 111, E ma il: ad min@a libh aisha ri ff.c o.k e;
leading@alibhaishariff.co.ke; info@alibhaishariff.co.ke. LEBANON: Aces Service Centre (Est. F.A.Ketaneh SA), HHD, P.O. Box 90-102,
Nahr El Mot, Seaside Highway, Pharaon Building, Beirut, Tel: 00961-1-898989/ + 961-(1)-262626, Fax: 0096-1-1245880, Email:
Nissrine.hajj@aces.com.lb; Nassim.aziz@Aces.com.lb; Johnny.sailian@Aces.com.lb; Paul.tahan@aces.com.lb. LIBYA: North Africa
Trading (El Ghoul Brothers), DW, B&D Pet, HHD, P.O. Box 348, 7 October Street 11, Benghazi, Tel: 00218-061-3383994, Fax:
00218-092-7640688, Email: nagte.ly@gmail.com; CC: nagte.dpt@gmail.com; elghol@technpower.com. North Africa Trading ( El Ghoul
Brothers), DW, B&D Pet, HHD, AlBarniq Dewalt Center, Mokhazin-elsukar St., ElFallah, Tripoli, Tel: 00218-021-3606430, Fax:
00218-092-6514813, Email: nagte.ly@gmail.com; cc: (nagte.dpt@gmail.com; elghol@technpower.com. Homeworld Co., HHD, Senidal St.
Amr Ibn Elaas Road, Benghazi, Libya, P.O. Box 18182, Salmany, Tel: 00218-61-9094183, ext. 103, Fax: 00218.61.9094123, ext. 108,
Email: nagte.ly@gmail.com. MAURITIUS: J.M. Goupille & Co.Ltd. The Brandhouse Ltd., HHD, Rogers Industrial Park 1, Riche Terre,
Mauritius, Tel: 00230-2069450/ +230-207-1700, Fax: 00230-2483188/ 00230-2069474, Email: claims(service.centre@goupille.mu;
stephanie.bijou@gmail.com; beatrice.li @gm ail .co m; sharon.laprovidence.jmg@gmail.com, tim.moszuti@goupille.mu; Cc.
Jfrancois.dromart@goupille.mu; mario.catherine@goupille.mu; gerard.gouges@goupille.mu. MOROCCO: UATS, HHD, "No. 37,
Lotissement KADIRIA, km 10 Route, Eljadida, LISASSFA, Casablanca, Morocco, Tel: 00212-522652602, Fax: 00212-522652603, Email:
farah1406@yahoo.fr; noureddine.uats@gmail.com. OMAN: Oman Marketing & Service Co.(Omasco), Wattayah/ Muscat, HHD, B&D
PET, P.O. Box 2734, Behind Honda Showroom, Wattayah, Oman, Tel: +968 24560232/ 24560255, Fax: 24560993, Email:
npservice@omasco.com.om; Cc. ashok.balan@omasco.com.om, damodaran.pillai@omasco.com.om; unnikrishnan@omasco.com.om.
Oman Marketing & Service Co.(Omasco), Sohar, HHD, B&D PET, Al Ohi, Sohar, Oman, Tel: +968 26846379, Fax: 26846379, Email:
sooraj.neeran@omasco.com.om. Oman Marketing & Service Co.(Omasco), Salalah, HHD, B&D PET, Sanaya, Salalah, Oman, Tel: +968
23212290, Fax: 23210936, Email: rajagopal.pr@omasco.com.om. Omar Mohammed Ali Bawain Trading Co., Salalah, Al-Awqadain, PC
217, P.O.Box 112, Salalah, Sultanate of Oman, Tel: +968 23214874, Fax: 23214874/ 23211878, Email: jithin@omartrad.com. PAKISTAN:
Ammar Service & Spares, B&D PET, HHD, Office No 6068, 6th Floor Central Plaza, Behind Gul Plaza Marston Road, Karachi, Tel:
0092-21-32426905/ 021-32775252, Fax: 0092-21-32427214, Email: babji93@yahoo.com. QATAR: Al Muftah Service Centre, Doha,
HHD, B&D PET, Al Wakrah, Road, P.O. Box 875, Doha, Qatar, Tel: +974 44650880/ 44650110/ 44446868, Fax: 44441415/ 44662599,
Email: service@almuftah.com; almuftah@almuftah.com. SAUDI ARABIA: Fawaz Ebrahim Al Zayani Trading Est., Dammam, DW, B&D
PET, HHD, P.O. Box 76026, Al Raka: 31952, Tel: +966-3-8140914, Fax: 8140824, Email: dewaltdammam@hotmail.com;
(vinoderakatyil@yahoo.com); Website: www.fawazalzayanigroup.com. Fawaz Ebrahim Al Zayani Trading Est., Makkah, DW, B&D PET,
HHD, 4753-Wali Alahed, Makkah, 9130-24353 Tel: +966-12-8140914/ 581121778, Fax: 128140914, Email: meraj2515@gmail.com.
Banaja Trading Co. Ltd., Riyadh, HHD, P.O. Box 566, Riyadh-11421, Tel: +966-1-4124444, Fax: 4033378, Email: jijophilip@hotmail.com.
Banaja Trading Co. Ltd, Jeddah, HHD P.O. Box 366, Jeddah-21411, Tel: +966-2-6511111, Fax: 6503668, Email: afouad@banaja.com;
jijophilip@hotmail.com. SOUTH AFRICA: Benray Tool Wholesalers C.C., B&D PET, HHD, 460 Koeberg Road, Cape Town, South Africa,
Tel: 021-551-7244, Fax: 021-552-6395, Email: dewaltct@benray.co.za. Stanley Black & Decker-RSA, BED, PET, HHD, 199 Winze Drive
Stormill Ext 9 Roodepoort Tel: (2711) 472-0454, Fax: (2711) 472-0482, Email: service@sbdinc.co.za; vincent.roets@sbdinc.co.za;
jacquesvincent.roets@sbdinc.com. SRI LANKA: Delmege Forsyth & Co. Ltd, DW, B&D Pet, HHD, Delmege Forsyth & Co. Ltd, Lifestyle
Cluster, 101, Vinayalankara Mawatha, Colombo 10, Sri Lanka, Tel: +94-11-2688462/ +94-11-2, Email: dgeservice@delmege.com;
Samith.lifestyle@delmege.com cc: Jayantha.lifestyle@delmege.com. TUNISIA: Societe Tunisienne De Maintenance (STM), B&D Pet,
HHD, Rue De La Physique. Nouvelle Zone Industrielle Ben Arous.2013 Ben Arous, TUNISIA. Tel: +216-79-389687, Fax: +216-71-385154,
Email: importa@stqu.com. UAE: (Abu Dhabi) Galaxy Equipment Trading, Abu Dhabi, DW, B&D PET, HHD, Madinath Zayed (Baada
Zaid), Abu Dhabi P.C. 58910, Tel: +971-2-8844279, Fax: 8844297, Email: galaxyeq@eim.ae; galaxyeq@emirates.net.ae. Light House
Electrical, Abu Dhabi, DW, B&D PET, HHD, P.O. Box 120, Abu Dhabi, Tel: +971-2-6726131, Fax: 6720667, Email:
dewalt_lhe@hotmail.com. Light House Electrical, Musaffah, DW, B&D PET, HHD, P.O. Box 120, Abu Dhabi, Tel: +971-2-5548315, Fax:
5540461, Email: dewalt_lhe@hotmail.com. (Al Ain) Zillion Equipment and Spare Parts Trading LLC. Al Ain, DW, B&D PET, HHD, P.O. Box
19740, Opp. Bin Sadal/ Trimix Redymix Sanaiya, Al Ain Tel: +971-3-7216690, Fax: 7216103, Email: zilliontrdg@gmail.com. (Dubai)
BLACK & DECKER (OVERSEAS) GmbH, Dubai, DW, B&D PET, HHD, P.O. Box 5420, Dubai, Tel: +971-4-8127400/ 8127406, Fax:
2822765, Email: service.mea@sbdinc.com. (Ras Al Khaimah) Mc Coy Middle East LLC, Ras Al Khaimah, DW, B&D PET, HHD, P.O. Box
10584, Ras Al Khaimah, Tel: +971-7-2277095, Fax: 2277096, Email: mccoyrak@gmail.com. (Sharjah) Mc Coy Middle East LLC, Sharjah,
DW, B&D PET, HHD, P.O. Box 25793, Sharjah, Tel: +971-6-5395931, Fax: 5395932, Email: mccoy@emirates.net.ae;
mccoydewalt@gmail.com. UGANDA: Anisuma Investment & Service Ltd. (Jacky's Electronics), HHD, J.R Comples, Ware house No.5,
Plot No.101. 3rd Ind ust ria l Area, Jinja Rd, Kampala, Tel: 0 025 6-414237106, M ob: 00256 779429501, Email:
ha.service.uganda@anisuma.com. YEMEN: Middle East Trading Co. (METCO) DW, B&D Pet, HHD, 5th Flr. Hayel Saeed Anam Bldg.
Al-Mugamma St. Taiz, Yemen, Tel: +00967-4-213455, Fax: 00967-4-219869, Email: metco@metcotrading.com; sami@metcotrading.com.
Middle East Trading Co. (METCO) DW, B&D Pet, HHD, Mualla Dakka, Aden, Tel: 00967-2-222670, Fax: 00967-2-222670,
metco@metcotrading.com; sami@metcotrading.com. Middle East Trading Co. (METCO), DW, B&D Pet, HHD, Hayel st., Sana'a, Yemen,
Tel: 00967-1-204201, Fax: 00967-1-204204, Email: metco@metcotrading.com; sami@metcotrading.com.


WARRANTY REGISTRATION CARD
YOUR NAME/
YOUR ADDRESS
POSTCODE
DATE OF PURCHASE
DEALER'S NAME & ADDRESS/
«ùßr
«∞FMu«Ê
«∞d±e «∞∂d¥bÍ
¢U¸¥a «∞Ad«¡
≈ßr Ë ´Mu«Ê «∞∂Uzl
PRODUCT MODEL NO.
PRMP1000
 Loading...