

Page 1
PlantSmart - Digital Plant Care Sensor
Catalog
Number
PCS10
INSTRUCTION MANUAL
Thank you for choosing Black & Decker!
PLEASE READ BEFORE RETURNING THIS PRODUCT FOR ANY REASON:
If you have a question or experience a problem with your Black & Decker purchase, go to
HTTP://WWW.BLACKANDDECKER.COM/INSTANTANSWERS for instant answers 24 hours a day.
If you canʼt find the answer or do not have access to the internet, call 1-800-544-6986 from 8 a.m. to 5 p.m. EST Mon. -- Fri. to speak with an agent.
Please have the catalog number available when you call.
NOTE: PLANTSMART WORKS ONLY IN THE UNITED STATES. IT WORKS IN ALL FIFTY STATES, PUERTO RICO AND GUAM.
SAVE THIS INSTRUCTION MANUAL FOR FUTURE REFERENCE.
VEA EL ESPAÑOL EN LA CONTRAPORTADA.
INSTRUCTIVO DE OPERACIÓN, CENTROS DE SERVICIO Y PÓLIZA DE GARANTÍA.
ADVERTENCIA: LÉASE ESTE INSTRUCTIVOANTES DE USAR EL PRODUCTO.
Page 2
WARNING: Important Safety Warnings and Instructions
TO REDUCE RISK OF INJURY:
• Read all instructions before operating product. Failure to follow all instructions listed below may result in electric shock, fire and or serious injury.
• Save these instructions and review frequently prior to use and in instructing others.
WARNING: When using electric gardening appliances, basic safety precautions should always be followed to reduce risk of fire,
electric shock, and personal injury, including the following.
SAFETY GUIDELINES - DEFINITIONS
It is important for you to read and understand this manual. The information it contains relates to protecting YOUR SAFETY and PREVENTING
PROBLEMS. The symbols below are used to help you recognize this information.
DANGER: Indicates an imminently hazardous situation which, if not avoided, will result in death or serious injury.
WARNING: Indicates a potentially hazardous situation which, if not avoided, could result in death or serious injury.
CAUTION: Indicates a potentially hazardous situation which, if not avoided, may result in minor or moderate injury.
CAUTION: Used without the safety alert symbol indicates a potentially hazardous situation which, if not avoided, may result in property damage.
TABLE OF CONTENTS
Table of Contents ...................................................2
PlantSmart: A New Way to Garden............................2
What is PlantSmart....................................................3
What PlantSmart Does...............................................3
Quick Tips...................................................................3
Getting Started...........................................................3
Recommend Mode.....................................................4
Monitor Mode.............................................................4
Water Mode ..............................................................5
Visual and Audio Feedback.......................................5
My Plants & My Readings......................................... 6
Glossary......................................................................6
Care and Maintenance...............................................6
Other Notes................................................................7
Warranty.....................................................................7
PlantSmart: A New Way to Garden
The PlantSmart Sensor is a revolutionary product that makes it easy for you to select and grow thriving plants.
PlantSmart takes the guesswork out of gardening through its powerful sensor coupled with specialized technologies
that interpret the collected data – itʼs like having your very own botanist.
Have you ever wondered why two plants – very close to one another—fare differently? The answer is pretty obvious
when you look at the world from a plantʼs perspective: different spots in your garden experience different conditions
based on how the sun moves through your yard, how well your soil drains, and how trees and plants shade areas of
your garden. The PlantSmart Sensor and website will assist you in choosing plants that will thrive in specific locations in your home or garden. We recommend that whenever you want to buy a plant for your yard or home that you
use your PlantSmart Sensor first so that you can garden with confidence.
PlantSmart is a complete solution that you can use over and over to:
• Recommend plants that will thrive in each location
• Diagnose what is wrong with an ailing plant
• Tell you on-the-fly which plants need watering
• Provide additional plant & plant care information on over 6,000 plants
2
Page 3
What is PlantSmart?
PlantSmart is comprised of two basic elements:
The PlantSmart Sensor helps you select the right plants for each location and to monitor existing plants. The reusable indoor/outdoor plant sen-
sor logs sunlight, temperature, moisture, soil conditions and more—in any location where it is placed. Also includes a fertilizer sensor that can be
activated for an additional charge.
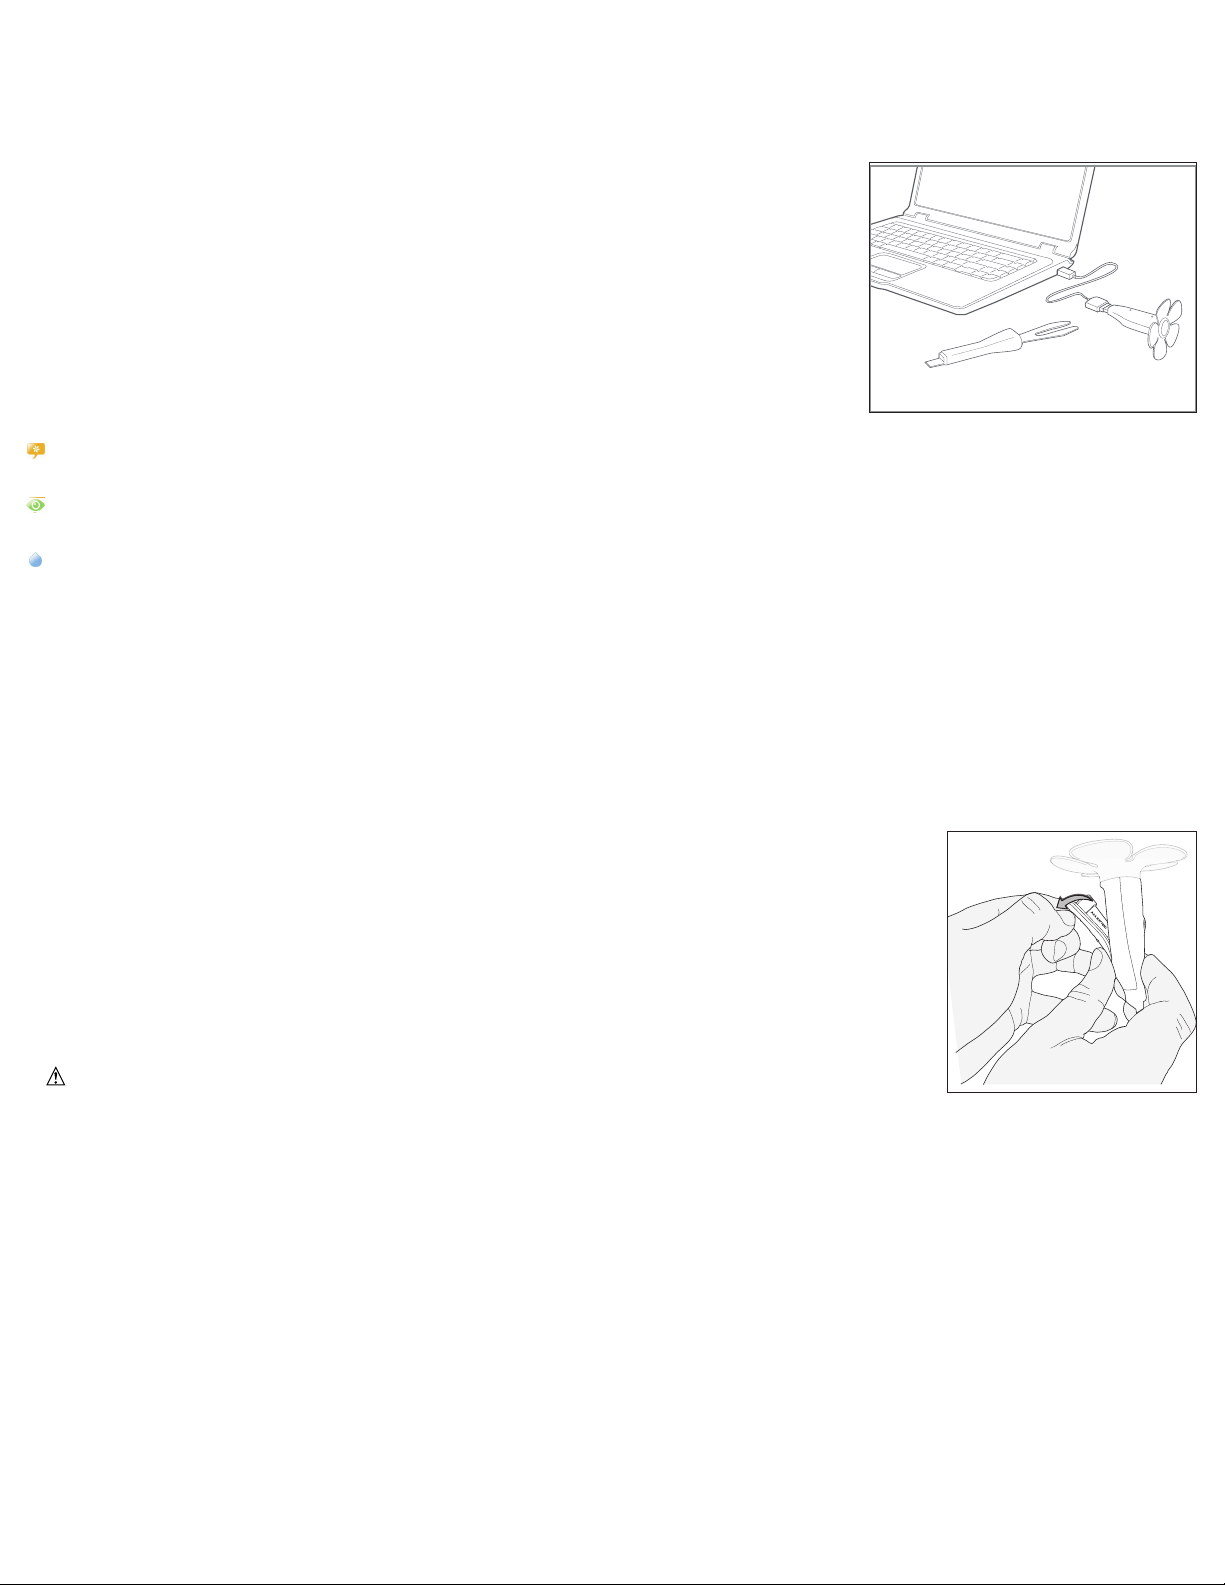
The PlantSmart Website (http://myplantsmart.com): The data collected by the PlantSmart Sensor is
uploaded to the website via a USB port on your computer (Please note: Always use the provided
USB cable when connecting to a computer). PlantSmartʼs exclusive plant science software then
processes the data, taking into account your geography, the local weather conditions on the day(s) that
the garden sensor was in use, and how weather is expected to be during different periods of the year.
The PlantSmart website also includes forums where you can learn and share information with other
users. You can also find and save plants you own or want to own to your personal database (My Plants)
and consult the entire PlantSmart plant database for plant care information.
What PlantSmart Does
The PlantSmart Sensor and website can be used in three modes:
• Recommend: In this mode, PlantSmart will find the optimal plant for each location where you do a reading. Leavethe plantsensor out for a minimum of
24 hours in any place where you want to put a plant.Then, plug the sensor into yourcomputer and the website willlaunch revealing a listing of the optimal
plants for that location.
• Monitor: PlantSmart tellsyou how your plants are doing. It can tell youif they need more or less water, if the soil is not draining well, or if the spot is too
sunny/shady forthe plantyou placed there. It then suggests corrective action as necessary. In addition, your sensor is able to recommend thebest
fertilizer for all of your plants.The fertilizer capability is available for an additional charge.
• Water: In this mode, you get instant feedback as to whether your plants needwater or not. Set the sensor to Water mode, turnit on, and move from
plant to plant as you insert the sensor into the soil; if it chirps, water the plant. Itʼs thatsimple!
Note: If you open the battery door, PlantSmart will switch to Water mode without connecting to your PC or MAC.
Quick Tips
The following are a few recommendations for getting the best resultswhen using the PlantSmart Sensor.
• When placing the PlantSmart Sensor in yourlawn, garden or within a container, make sure thatthere is nothingblocking or overhanging the top of your
PlantSmart Sensor. If leaves are obstructingit, your reading will not be as accurate. Also makesure yoursensor is completely upright to ensure accuracy.
• If the sensor (bottom) cannot easily be inserted intothe soil,you may need to loosen the soil.Also, the soil sensor needs to be placed all the way into the
soilso you cannot see the black portion.
• Plug the USB extension cable that was provided into the port, and then plug your plant sensorʼs USB controller into the USBextension cable.
Getting Started
1. Open a web browser. Type: http://go.myplantsmart.com in the address bar and press the enter key.
2. Fill in the registration information on screen.
3. After registering, you will be taken to the PlantSmart Companion Software download page. Select the
Companion Software to download that corresponds to your operating system - PlantSmartSetup.exe (windows) / PlantSmartSetup.mpkg.zip (MAC).
4. When asked to Run, Open or Save the file, choose Run or Open. Your PlantSmart Companion Software will
then install automatically. (If Save is your only option, choose Save, and save the file to your desktop. Then
open the PlantSmartSetup file on your desktop). During software installation, make sure to use the same login
information that you entered in Step 2.
5. Remove the battery compartment cover. Insert 1 fresh 1.5 volt AAA alkaline battery making sure to match (+)
and (-) terminals correctly. You should hear two rapid beeps that let you know the battery is installed correctly.
Replace battery compartment cover.
• WARNING: Battery can explode, or leak, and can cause injury or fire.
To reduce this risk:
• Carefully follow all instructions and warnings on the battery label and package.
• Always insert battery correctly with regard to polarity (+ and -), marked on the battery and the equipment.
• Do not short battery terminals.
• Do not charge battery.
• Remove dead battery immediately and dispose of per local codes.
• Do not dispose of battery in fire.
• Keep batteries out of reach of children.
• Remove battery if the device will not be used for several months.
“Transporting batteries can possibly cause fires if the battery terminals inadvertently come in contact with conductive materials such as keys,
coins, hand tools and the like. The US Department of Transportation Hazardous Material Regulations (HMR) actually prohibit transporting batteries in commerce or on airplanes (i.e. packed in suitcases and carryon luggage) UNLESS they are properly protected from short circuits. So
when transporting individual batteries, make sure that the battery terminals are protected and well insulated from materials that could contact
them and cause a short circuit.”
6. Insert your plant sensor into the USB port using the USB cable that was included. If you are using Windows, when you plug in your PlantSmart
device into the USB port, you may get the “Found New Hardware” wizard. Click through the wizard, select “Search files or the Internet for drivers” if
asked, and click “finish” at the end.
You are now ready to start using the PlantSmart Sensor! In the future, when you insert your PlantSmart Sensor intothe USB port on your computer,the
PlantSmart website will be launched automatically.
3
Page 4
Recommend Mode SET UP
To get an accurateplant recommendation, your PlantSmart Sensor needs to record 24 hours of environmental data.
Follow these steps:
1. Begin by plugging your plant sensor into the USB port on your computer using the USB cable that was included. You will be taken to the MY
PLANTSMART Dashboard page.
2. Click on the “RECOMMEND” button at the far left of the screen.
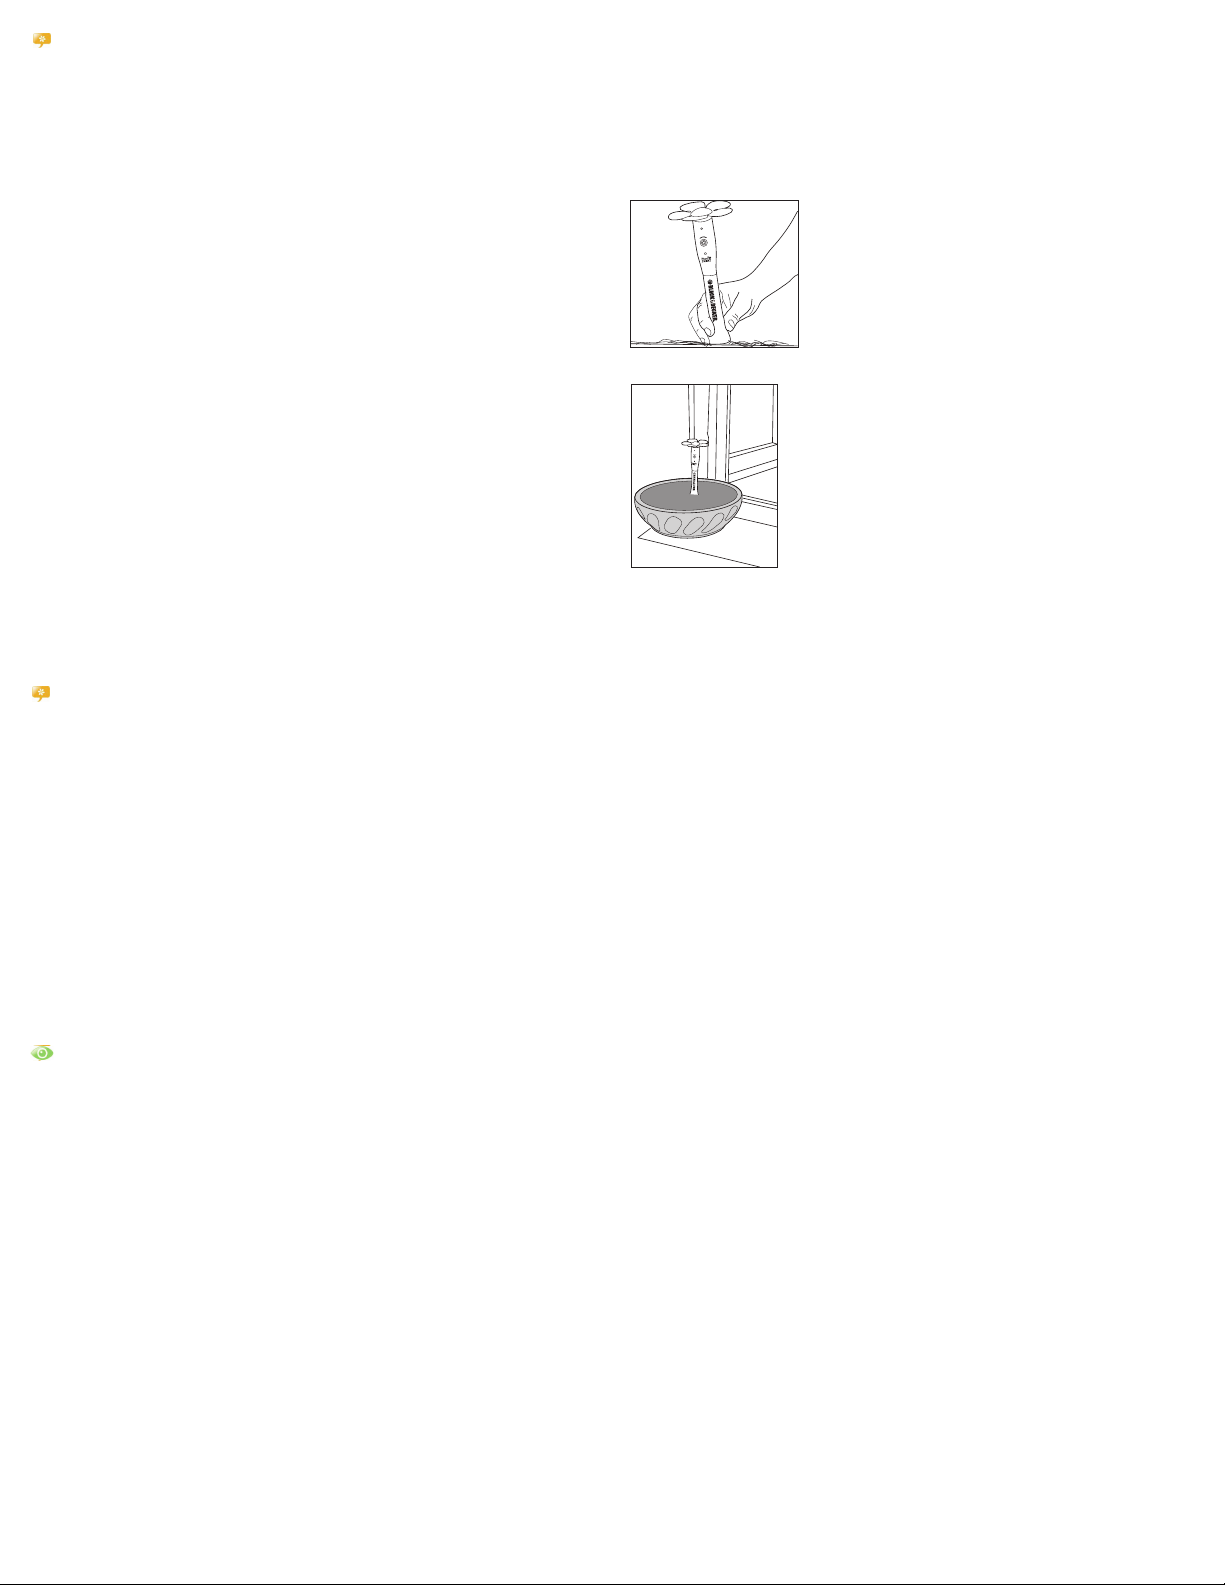
3. When instructed, remove the top sensor from the USB cable and connect the top sensor and bottom sensor so that both pieces fit firmly and there is
not visible gap.
If you are conducting an outdoor reading, place your PlantSmart sensor
into the soil in the desired location. Insert the sensor into the ground so
that the black prongs are fully covered by soil. Make sure the sensor if fully
upright. If the soil is hard, loosen the soil with a garden tool or screwdriver.
If you are conducting an indoor reading, place your PlantSmart sensor into
a flower pot in the desired location. The pot should have soil in it to ensure
that the sensor is upright.
4. Press the START/STOP button on the plant sensor to start the collection. The plant sensor light will blink green rapidly five times and the plant sensor
will emit three ascending tones to let you know the data collection has started. The light will continue to blink once every 5 seconds to let you know it
is collecting data.
Recommend Mode GET YOUR RESULTS
5. After at least 24 hours, press the START/STOP button on the plant sensor to stop collecting data. The sensor will make three descending tones
and the yellow light will blink five times.
• Plug the plant sensor into your USB port using the USB cable that was included.
• The web site auto-launches and a dialog box opens for you to save your reading.
• Name the location where you had the plant sensor (such as “front window” or “left corner of front planter”.) This information helps you keep track
of where you have placed the plant sensor.
• Select whether the location was INDOORS or OUTDOORS.
• Click the SAVE button.
• You will be taken to the TOP RECOMMENDATIONS tab within My Readings.
• PlantSmartʼs web site runs analysis that interpret the data recorded by the plant sensor. The analysis corrects for any weather conditions, and
takes into consideration where you live. The website will recommend plants that will thrive in this location. You can also view the sunlight,
temperature, moisture, and soil condition information collected by the plant sensor on the PLANTʼS VIEW tab.
6. You can narrow the recommendation results by choosing plant characteristics that are of interest to you. For example, when you specify
Bloom Color, Bloom Season, etc., the recommendations will change to match the specific characteristics you selected.
7. Click on any of the plants of interest to learn more about the plant.
8. When you find a plant you would like to remember, or one that you have purchased, click on “ADD TO MY PLANTS”, within that plantʼs page.
Monitor Mode SET UP
If you have a plant that is not doing well, you can use the PlantSmart Sensor to diagnose it.
1. Plug your plant sensor into the USB port on your computer using the USB cable that was included. You will automatically be logged in to the
My PlantSmart Dashboard page.
2. Click on the “MONITOR” button in the middle of the screen.
3. Find the type of plant that you would like to monitor. If it is a plant you previously saved to “MY PLANTS”, click on “MY PLANTS”, and select
the plant you would like to monitor from the list. Alternately, you can use the search option by typing the name of the plant into the search box
in the dialog. If you do not know the exact name of the plant, thatʼs fine—the common name will work (e.g. enter “fern” or “rose”, etc.).
4. Once you have selected a plant, follow the on screen directions to finish putting the plant sensor into MONITOR mode for that specific plant.
5. When the website instructs you, remove the plant sensor from the computer, put the plant sensor (top and bottom) together & place it in the soil near
the plant that you want to monitor.
6. Press the START/STOP button on the plant sensor and it will begin collecting data. The light on the sensor will blink green 5 times and the sensor will
make 3 ascending tones to let you know the device is working.
7. Water your plant well (this allows the PlantSmart Sensor to characterize how well your soil holds water over time). If you do not water your plant, the
plant sensor will emit an audible alarm any time the soil moisture is too low for that plant for an extended period of time.
8. The plant sensor needs a few days to gather soil moisture data to let you know when your plant needs watering. This is because the plant sensor is
determining how well your soil holds water. We recommend that you go through one watering cycle which could last anywhere between several days
to a week. Note: A “watering cycle” is the time between when you first water your plant until when PlantSmart tells you to water again (chirps with yel-
low light)." Note that during periods of heavy outdoor precipitation, the watering cycle may be very long. If the watering cycle has exceeded two
weeks, then remove your PlantSmart and upload the data without waiting for the watering signal.
9. The plant sensor will produce a chirp sound over time to let you know that you need to water your plant. Water your plant when you hear this sound.
10.After a full watering cycle, press the START/STOP button and insert the plant sensor (top) into the USB port using the USB cable that was includ-
ed. A report will be presented to you on screen, letting you know if the environmental conditions meet the plantʼs requirements or not. If you get a
“thumbs down” on any topic, read the information provided and make any changes necessary.
4
Page 5

Monitor Mode GET YOUR RESULTS
11. After the watering cycle is complete, press the START/STOP button on the plant sensor to stop collecting data. The sensor will make three descending tones and the yellow light will blink five times.
• Plug theplant sensor into yourUSB port using theUSB cable that was included.
• The PlantSmart websiteautomatically launches and a dialog box opens for you to save your reading.
• Name thelocation where you hadthe plantsensor (such as “front window”or “left corner of front planter”.) This information helps you keep track of where
you have placed the plant sensor.
• Select whether the location was INDOORS or OUTDOORS.
• Click the SAVE button.
• You will be taken to the PLANT DOCTORtab within My Readings.
PlantSmartʼs web site examines thedata recordedby the plant sensor.The analysis corrects for anyweather conditions, and takes into consideration
•
hereyou live.The website will provide youwith easy-to-follow gardening advice to improve the health of your plant. You can also view the sunlight,
w
emperature, moisture, and soil conditioninformationcollected by the plantsensor on the PLANTʼS VIEW tab. View otherplants that would thrive in this
t
ocation by clicking on the TOP RECOMMENDATIONS andALL RECOMMENDATIONS tabs.
l
Water Mode SET UP
1. Plug your plant sensor into the USB port on your computer using the USB cable that was included. You will automatically be logged in to the MY
PLANTSMART Dashboard page.
2. Click on the “WATER” button at the far right of the screen to set your plant sensor to Water mode. Water mode quickly determines if your plants need
immediate watering or not. NOTE: Water mode does not work for cacti or orchids.
3. When instructed, remove the sensor from the USB port and put the plant sensor together (top and bottom).
4. Press the START/STOP button on the sensor to begin Water mode. HOLD THE SENSOR BY THE TOP. The sensor light will blink green and the
sensor will emit three ascending tones to let you know that it is in Water mode. The light will stay green while it is on.
5. Insert the soil sensor fully in the soil near the roots of the plant whose moisture level you wish to check.
6. If a plant needs water, the sensor light will blink yellow and will make a chirping sound. Water the plant well if you hear this sound. If the sensor light
stays green, then that plant does not need water.
7. You can then move on to another plant by lifting the plant sensor out of the soil, and placing it in the soil near a different plant.
8. Continue to move the plant sensor from plant to plant to determine if they need watering.
9. When done checking plants that might need watering, press the START/STOP button. There is no need to press the START/STOP button for every
plant.
Visual and Audio Feedback
Mode Event Visual Audio
Connected to Computer Companion Software not
installed
Inserting Battery Closing battery door No light Ba-beep
Connected to Computer Sensor attached to USB Blink Green Up tone
Disconnecting from
Computer
Sensor detached from
USB
Recommend Mode Press start button Blink Green Up tone
Recommend Mode Press stop button Blink Yellow Down tone
Recommend Mode Taking a reading Blink green once every 5 sec No sound
Monitor Mode Press start button Blink Green Up tone
Monitor Mode Press stop button Blink Yellow Down tone
Monitor Mode Taking a reading Blink green once every 5 sec No sound
Monitor Mode Needs watering Blink yellow Siren
Monitor Mode Too much water Blink yellow Warning
Water Mode Needs watering Blink yellow Siren
Water Mode Doesn't need watering Blink green No sound
Solid yellow Up tone
No light Down tone
5
Page 6

MY PLANTS, MY READINGS, MY PROFILE
y Plants
M
lantSmart keeps track of all of the plants that you grow or would like to grow in the “MY PLANTS” section of the website. Whenever you are in
P
nother section of the website and you choose “ADD TO MY PLANTS”, the plant will be added to your “MY PLANTS” page. This is your own
a
ersonal plant catalog. “MY PLANTS” is also useful for when you choose to monitor a plant in your home or garden. You can simply select the plant
p
rom “MY PLANTS” when asked to find the plant to monitor, and the plant sensor is programmed with the details about the plant.
f
My Readings
My Readings is an area of the website that contains all the data for each reading you take in your home or garden. All of your “RECOMMEND” and
“MONITOR” readings are saved here. You can reference My Readings at any time when you want to see past results and advice. Your readings can
be sorted by type Name, Sun, Date, Location and Type.
My Profile
My Profile is a place on the website where you can change your personal information including your email address, password, and zip code.
PLEASE NOTE: If you change your profile zip code, all previous readings will retain the original zoning information for the original zip code. Future
readings will use the new zip code. If you move, you will need to change your zip code so that all future readings will be accurate.
PLEASE NOTE: Changing your user name or password on the website requires the same changes to your credentials in the companion software.
f you change your user name or password in “My Profile”, you also need to right click on the PlantSmart companion software logo in your
I
omputer’s system tray (or task menu icon for MAC computers). Choose “Preferences”, and change your user name and password here so that it
c
atches your My Profile user name and password.
m
Glossary
Companion Software
The PlantSmart Companion Software resides on your computer and connects your plant sensor to the PlantSmart website.
Environmental Data
The plant sensor collects environmental data which includes sunlight, temperature, moisture, and soil conditions from the site where you put the
plant sensor.
My Plants
This is a place where you can store all of the plants you have in your home or garden, plants you have looked up in the Plant Library, or plants
that were recommended when using the PlantSmart Sensor. By saving all of your plants to “MY PLANTS,” you end up with a personalized library
of the plants in your garden and house. You can refer to it for caring for your plants over time.
My Profile
This is where you can change your password, name, or offer information about you, etc.
Plant Library
The PlantSmart Plant Library is the entire set of plants in our database, which today numbers over 6000. The plants we recommend and that you
can monitor come from this Library. If there are plants you would like to see added, please email us at: plants@easybloom.com.
Reading
A reading consists of the entire data you collect from one time in one place in your garden or house. It includes all the sunlight, temperature,
moisture, and soil conditions information.
Recommendation
A recommendation is a list of the plants that are recommended from a Reading. All of the plants presented are designated to be ones which
would thrive in the spot where you took the reading in your garden or home.
PlantSmart Sensor
The PlantSmart sensor is made up of the sensor (top) and the sensor (bottom). The sensor (top) collects sunlight and temperature data. The top
also has the USB plug on it and it is what you plug into your computer USB port using the cable that was included to upload your data to the
PlantSmart website to get recommendation or monitor results. The sensor (bottom) has a black circuit board which is used to collect moisture
and soil condition information for recommendations or for monitoring plants.
Care and Maintenance
Changing The Battery
If your plant sensor no longer has a blinking light or is not making sounds when you press the START/STOP button, you probably need to
change your battery. To change the battery, complete the following steps:
1. Pull open the battery compartment using the knob on the Sensor (top).
2. Remove the depleted AAA battery.
3. Insert the new AAA battery positive (+) side down toward the USB interface.
4. Your sensor is by default placed in Water mode. If you want to change the mode, insert your sensor into the USB port using the cable that was
included and select a new mode on the MY PLANTSMART Dashboard page.
Care and Maintenance
• When not using the PlantSmart Sensor, make sure it is turned off to save battery power.
• When the sensor is plugged into the USB using the cable that was included, the MY PLANTSMART Dashboard will indicate when the battery is
near the end of its life.
• Do not submerge the PlantSmart Sensor in water. The device is water resistant to the extent that it can handle normal weather conditions
including rain.
• Do not expose the sensor to directed streams of water. (Such as directly by a sprinkler head.)
• Do not leave your PlantSmart near a fire or open flames such as gas stove tops.
• Do not use abrasive cleaners to clean your PlantSmart Sensor. Wipe the product with a soft cloth and water.
• Use only mild soap and damp cloth to clean the product. Neverlet any liquid getinside the product; never immerse any part of the product intoa liquid.
6
Page 7

FCC Compliance:
This device complies with Part 15 of the FCC Rules. Operation is subject to the following two conditions:
1. This device may not cause harmful interference, and
2. This device must accept any interference received, including interference that may cause undesired operation
ACCESSORIES
Recommended accessories for use with your tool are available from your local dealer or authorized service center. If you need assistance regarding
accessories, please call: 1-800-544-6986.
WARNING: The use of any accessory not recommended for use with this product could be hazardous.
IMPORTANT
To assure product SAFETY and RELIABILITY, repairs, maintenance and adjustment should be performed by authorized service centers or other
qualified service organizations, always using identical replacement parts.
SERVICE INFORMATION
All Black & Decker Service Centers are staffed with trained personnel to provide customers with efficient and reliable power tool service. Whether
you need technical advice, repair, or genuine factory replacement parts, contact the Black & Decker location nearest you. To find your local service
location, refer to the yellow page directory under "Tools—Electric" or call: 1-800-544-6986 or visit www.blackanddecker.com
FULL ONE-YEAR HOME USE WARRANTY
Black & Decker (U.S.) Inc. warrants this product for one year against any defects in material or workmanship. The defective product will be replaced
or repaired at no charge in either of two ways.
The first, which will result in exchanges only, is to return the product to the retailer from whom it was purchased (provided that the store is a
participating retailer). Returns should be made within the time period of the retailerʼs policy for exchanges (usually 30 to 90 days after the sale).
Proof of purchase may be required. Please check with the retailer for their specific return policy regarding returns that are beyond the time set for
exchanges.
The second option is to take or send the product (prepaid) to a Black & Decker owned or authorized Service Center for repair or replacement at our
option. Proof of purchase may be required.
Black & Decker owned and authorized Service Centers are listed under "Tools-Electric" in the yellow pages of the phone directory.
This warranty does not apply to accessories. This warranty gives you specific legal rights and you may have other rights which vary from state to
state or province to province. Should you have any questions, contact the manager of your nearest Black & Decker Service Center. This product is
not intended for commercial use.
FREE WARNING LABEL REPLACEMENT: If your warning labels become illegible or are missing, call 1-800-544-6986 for a free replacement.
LATIN AMERICA: This warranty does not apply to products sold in LatinAmerica. For products sold in Latin America, check country specific
warranty information contained in the packaging, call the local company or see the website for warranty information.
See ‘Tools-Electric’
– Yellow Pages –
for Service & Sales
Black & Decker (U.S.) Inc.,
Imported by
701 E. Joppa Rd.
Towson, MD 21286 U.S.A.
7
Page 8

PlantSmart: Sensor digital para el cuidado de plantas
MANUAL DE INSTRUCCIONES
Catálogo N°
PCS10
Gracias por elegir Black & Decker!
Visite www.BlackandDecker.com/NewOwner
para registrar su nuevo producto.
LEA EL MANUAL ANTES DE DEVOLVER
ESTE PRODUCTO POR CUALQUIER MOTIVO:
Si tiene una consulta o algún inconveniente con su producto Black & Decker, visite
HTTP://WWW.BLACKANDDECKER.COM/INSTANTANSWERS
para obtener respuestas instantáneas las 24 horas del día.
Si no encuentra la respuesta o no tiene acceso a Internet, llame al 1-800-544-6986 de
lunes a viernes de 8 a. m. a 5 p. m. hora del Este para hablar con un agente.
Cuando llame, tenga a mano el número de catálogo.
NOTA: PLANTSMART FUNCIONA ÚNICAMENTE EN LOS ESTADOS UNIDOS. FUNCIONA EN LOS
CINCUENTA ESTADOS, PUERTO RICO Y GUAM.
CONSERVE ESTE MANUAL PARA FUTURAS CONSULTAS.
88
Page 9

ADVERTENCIA: Instrucciones y advertencias de seguridad importantes
PARA REDUCIR EL RIESGO DE LESIONES:
• Lea todas las instrucciones antes de operar el producto. El incumplimiento de las instrucciones enumeradas a continuación puede provocar una
descarga eléctrica, un incendio o lesiones graves.
• Conserve estas instrucciones y revíselas con frecuencia antes del uso y al instruir a otras personas.
ADVERTENCIA: Al utilizar herramientas eléctricas para el jardín, siempre se deben tomar ciertas precauciones básicas de
seguridad para minimizar el riesgo de incendio, descarga eléctrica y lesiones personales, entre ellas:
PAUTAS DE SEGURIDAD/DEFINICIONES
Es importante que lea y comprenda este manual. La información que contiene se relaciona con la protección de SU SEGURIDAD y la
PREVENCIÓN DE PROBLEMAS. Los símbolos que siguen se utilizan para ayudarlo a reconocer esta información.
PELIGRO: indica una situación de peligro inminente que, si no se evita, provocará la muerte o lesiones graves.
ADVERTENCIA: indica una situación de peligro potencial que, si no se evita, provocará la muerte o lesiones graves.
PRECAUCIÓN: indica una situación de peligro potencial que, si no se evita, provocará lesiones leves o moderadas.
PRECAUCIÓN: utilizado sin el símbolo de alerta de seguridad indica una situación de peligro potencial que, si no se evita, puede provocar daños en la
propiedad.
ÍNDICE
Índice . .......................................................................................................9
PlantSmart: Una nueva forma de cultivar el jardín.....................................9
Qué es PlantSmart....................................................................................10
Qué hace PlantSmart................................................................................10
Consejos rápidos.......................................................................................10
Preparación...............................................................................................10
Modo Recomendación (Recommend).......................................................11
Modo Control (Monitor)..............................................................................11
Modo Agua (Water)....................................................................................12
Retroalimentación visual y auditiva...........................................................12
Mis plantas (My Plants) y Mis lecturas (My Readings).............................13
Glosario.....................................................................................................13
Cuidado y mantenimiento..........................................................................13
Otras notas................................................................................................13
Garantía.....................................................................................................14
PlantSmart: Una nueva forma de cultivar el jardín
El sensor PlantSmart es un producto revolucionario que le facilita la selección y el cultivo de plantas que crecen
bien. PlantSmart elimina las suposiciones del trabajo de jardinería gracias a su potente sensor asociado con tecnologías especializadas que interpretan los datos recolectados; es como tener su propio botánico.
¿Se ha preguntado alguna vez por qué dos plantas, muy cercanas entre sí, corren distinta suerte? La respuesta es
bastante obvia cuando se contempla el mundo desde la perspectiva de una planta: distintos lugares de su jardín
experimentan distintas condiciones en función de cómo se mueve el sol sobre su patio, qué tan bien drena la tierra
y cómo la sombra de los árboles y las plantas cubre las áreas de su jardín. El sensor y el sitio web de PlantSmart
Sensor le ayudarán a elegir plantas que crecerán bien en ubicaciones específicas de su hogar o jardín. Cada vez
que desee comprar una planta para su patio u hogar, le recomendamos que primero utilice el sensor PlantSmart
para que pueda trabajar en el jardín con confianza.
PlantSmart es una solución completa que puede utilizar una y otra vez para:
• Recomendar plantas que crecerán bien en cada ubicación
• Diagnosticar cuál es el problema con una planta enferma
• Indicarle al instante cuáles plantas necesitan riego
• Proporcionar información adicional sobre plantas y el cuidado de las mismas para más de 6.000 variedades
9
Page 10

Qué es PlantSmart
PlantSmart consta de dos elementos básicos:
El sensor PlantSmart que le ayuda a seleccionar las plantas correctas para cada ubicación y a controlar las plantas existentes. El sensor
reutilizable para plantas interiores/exteriores registra la luz solar, la temperatura, la humedad, las condiciones del suelo y mucho más, en
cualquier ubicación que se ponga. Además, incluye un sensor de fertilizante que puede activarse pagando un cargo adicional.
El sitio web de PlantSmart (http://myplantsmart.com): Los datos recolectados por el sensor
PlantSmart se cargan en el sitio web a través de un puerto USB de su computadora. (Tenga en
cuenta lo siguiente: Siempre utilice el cable USB provisto al conectar la unidad a una computadora).
Luego, el exclusivo software botánico de PlantSmart procesa los datos, tomando en cuenta su
ubicación geográfica, las condiciones climáticas locales correspondientes al día/los días en que se
utilizó el sensor y cómo se espera que esté el tiempo durante los distintos períodos del año. El sitio
web de PlantSmart incluye también foros donde puede conocer y compartir información con otros
usuarios. Además, puede buscar y guardar las plantas que posee o desea en su base de datos
personal (Mis plantas [My Plants]) y consultar la totalidad de la base de datos de PlantSmart para
obtener información para el cuidado de las plantas.
Qué hace PlantSmart
El sensor y el sitio web de PlantSmart pueden utilizarse en tres modos:
• Recomendación (Recommend): En este modo, PlantSmart buscará la planta óptima para cada ubicación en la que realice una lectura. Deje el
sensor para plantas instalado durante un mínimo de 24 horas en cualquier lugar que desee poner una planta. Luego, conecte el sensor en su
computadora y se iniciará el sitio web para mostrar una lista de las plantas óptimas para esa ubicación.
• Monitor (Control): PlantSmart le indica cómo están sus plantas. Puede indicarle si necesitan más o menos agua, si la tierra no drena bien o si el
lugar tiene demasiado sol/sombra para la planta que puso allí. Luego sugiere la medida correctiva según corresponda. En forma adicional, el
sensor puede recomendar el mejor fertilizante para todas sus plantas. La función para fertilizante está disponible pagando un cargo adicional.
• Agua (Water): En este modo, usted recibe retroalimentación instantánea que le indica si sus plantas necesitan agua o no. Ajuste el sensor en
modoAgua, enciéndalo y vaya de una planta a otra insertándolo en la tierra; si emite un sonido, riegue la planta. ¡Así de sencillo!
Nota: Si abre la tapa de la batería, PlantSmart cambiará al modoAgua sin conectarse a su PC o MAC.
Consejos rápidos
Las siguientes son algunas recomendaciones para obtener losmejores resultados al utilizar el sensor PlantSmart.
• Al poner el sensor PlantSmart en el césped, el jardín o dentro de un recipiente, asegúrese de que nada bloquee ni cubra la parte superior del
mismo. Si hay hojas que lo obstruyan, la lectura no será tan exacta. Además, asegúrese de que el sensor esté completamente vertical para
garantizar la exactitud.
• Si el sensor (parte inferior) no puede introducirse fácilmente en la tierra, es posible que tenga que removerla. Además, es necesario introducir la
totalidad del sensor para suelos en la tierra de modo que no pueda verse la parte negra.
• Conecte el cable prolongador USB provisto en el puerto y luego conecte el controlador USB del sensor para plantas en el cable prolongador USB.
Preparación
1. Abra un explorador web. Escriba: http://go.myplantsmart.com en la barra de direcciones y oprima la tecla
Entrar.
2. Rellene la información de registro en la pantalla.
3. Luego de registrarse, aparecerá la página de descarga del software complementario de PlantSmart.
Seleccione el software complementario para descargar que corresponda a su sistema operativo:
PlantSmartSetup.exe (Windows)/PlantSmartSetup.mpkg.zip (MAC).
4. Cuando se le pida Ejecutar (Run), Abrir (Open) o Guardar (Save) el archivo, elija Ejecutar o Abrir. Luego, el
software complementario de PlantSmart se instalará automáticamente. (Si Guardar es su única opción,
selecciónela y guarde el archivo en su escritorio. Luego, abra el archivo PlantSmartSetup en su escritorio).
Durante la instalación del software, asegúrese de utilizar la misma información de inicio de sesión que introdujo en el Paso 2.
5. Retire la tapa del compartimiento de la batería. Inserte 1 batería alcalina AAA de 1,5 voltios nueva y
asegúrese de que los terminales (+) y (-) coincidan correctamente. Debe escuchar dos pitidos breves que le
indican que la batería está correctamente instalada. Vuelva a colocar la tapa del compartimiento de la
batería.
• ADVERTENCIA: La batería puede explotar o tener pérdidas y provocar lesiones o incendios.
Para disminuir este riesgo:
• Siga cuidadosamente todas las instrucciones y las advertencias de la etiqueta y el envase de la batería.
• Inserte siempre la batería correctamente respetando la polaridad (+ y -) indicada en la batería y en el equipo.
• No haga puente con los terminales de la batería.
• No cargue la batería.
• Retire todas las baterías agotadas inmediatamente y elimínelas de acuerdo con los códigos locales.
• No elimine la batería incinerándola.
• Mantenga las baterías fuera del alcance de los niños.
• Retire la batería si el dispositivo no se utilizará durante varios meses.
“Transportar baterías puede provocar incendios si los terminales de la batería entran en contacto accidentalmente con materiales conductores
como llaves, monedas, herramientas de mano y objetos similares. De hecho, las Normas para Materiales Peligrosos (HMR, por sus siglas en
inglés) del Departamento de Transporte de los EE. UU. prohíben transportar baterías comercialmente o en aviones (es decir, empacadas en
maletas y equipaje de mano)A MENOS que estén debidamente protegidas contra cortocircuitos. Por lo tanto, cuando transporte baterías
individuales, asegúrese de que los terminales de la batería estén protegidos y bien aislados de materiales que puedan entrar en contacto con ellos
y causar un cortocircuito”.
6. Inserte el sensor para plantas en el puerto USB utilizando el cable USB que viene incluido. Si utiliza Windows, cuando conecte el dispositivo
PlantSmart en el puerto USB, es posible que se abra el asistente “Nuevo hardware encontrado” (Found New Hardware). Haga clic para avanzar en
el asistente y, si se le pregunta, seleccione “Buscar los controladores en archivos o en Internet” (Search files or the Internet for drivers) y haga clic en
“Finalizar” (Finish) al terminar.
Ahora puede comenzar a utilizar el sensor PlantSmart. En el futuro,cuando conecteel sensor PlantSmart en el puerto USB de su computadora, el sitio
web de PlantSmart se iniciará automáticamente.
10
Page 11

odo Recomendación (Recommend) CONFIGURACIÓN
M
Para obtener una recomendación exacta para las plantas, el sensor PlantSmart necesita registrar 24 horas de datos medioambientales.
Siga estos pasos:
1. Primero conecte el sensor para plantas en el puerto USB de su computadora utilizando el cable USB que viene incluido. Luego aparecerá la página
Tablero de control de Mi PlantSmart (My PlantSmart Dashboard).
2. Haga clic en el botón “RECOMENDACIÓN” (RECOMMEND) en el extremo izquierdo de la pantalla.
3. Cuando se le indique, desconecte el sensor superior del cable USB y conecte los sensores superior e inferior de manera que ambas piezas se
ajusten firmemente y no haya ninguna separación visible.
Si lleva a cabo una lectura al aire libre, introduzca el sensor PlantSmart en
la tierra en la ubicación deseada. Entierre el sensor de manera que las
clavijas negras queden completamente cubiertas por la tierra. Asegúrese
de que el sensor esté completamente vertical. Si el suelo está duro,
remuévalo con una herramienta de jardinería o un destornillador.
Si lleva a cabo una lectura bajo techo, introduzca el sensor PlantSmart en
una maceta en la ubicación deseada. La maceta debe tener tierra en su
interior para asegurar que el sensor quede vertical.
4. Oprima el botón de INICIO/DETENCIÓN (START/STOP) del sensor para plantas para iniciar la recolección. La luz del sensor para plantas se
encenderá intermitente y rápidamente en verde cinco veces y el dispositivo emitirá tres tonos ascendentes para indicarle que se inició la recolección
de datos. La luz seguirá intermitente una vez cada 5 segundos para indicarle que se están recolectando datos.
Modo Recomendación (Recommend) OBTENCIÓN DE RESULTADOS
5. Después de por lo menos 24 horas, oprima el botón de INICIO/DETENCIÓN (START/STOP) del sensor para plantas para detener la recolección de
datos. El sensor emitirá tres tonos descendentes y la luz amarilla se encenderá intermitentemente cinco veces.
• Conecte el sensor para plantas en el puerto USB utilizando el cable USB que viene incluido.
• El sitio web se inicia automáticamente y se abre un cuadro de diálogo para que guarde la lectura.
• Ponga un nombre a la ubicación donde tenía el sensor para plantas (como “ventana delantera” o “esquina izquierda del macetero delantero”).
Esta información le permite hacer un seguimiento del lugar en que ubicó el sensor para plantas.
• Seleccione si la ubicación estaba BAJO TECHO (INDOORS) o AL AIRE LIBRE (OUTDOORS).
• Haga clic en el botón GUARDAR (SAVE).
• Aparecerá la ficha PRINCIPALES RECOMENDACIONES (TOP RECOMMENDATIONS) dentro de Mis lecturas (My Readings).
• El sitio web de PlantSmart ejecuta un análisis que interpreta los datos registrados por el sensor para plantas. El análisis se corrige en función de
cualquier condición climática y toma en cuenta el lugar en el que usted vive. El sitio web recomendará plantas que crecerán bien en esta
ubicación. Además, en la ficha VISTA DE LA PLANTA (PLANTʼS VIEW) puede ver la información de luz solar, temperatura, humedad y
condiciones del suelo recolectada por el sensor para plantas.
6. Puede acotar los resultados de la recomendación eligiendo características de la planta que sean de interés para usted. Por ejemplo, cuando
especifica Color de floración (Bloom Color), Temporada de floración (Bloom Season), etc., las recomendaciones cambiarán para coincidir con
las características específicas que seleccionó.
7. Haga clic en cualquiera de las plantas de su interés para conocer más acerca de las mismas.
8. Cuando encuentre una planta que le gustaría recordar, o una que haya comprado, haga clic en “AGREGAR A MIS PLANTAS” (ADD TO MY
PLANTS), dentro de la página de dicha planta.
Modo Control (Monitor) CONFIGURACIÓN
Si tiene una planta que no está en buenas condiciones, puede utilizar el sensor PlantSmart para someterla a un diagnóstico.
1. Conecte el sensor para plantas en el puerto USB de su computadora utilizando el cable USB que viene incluido. Se iniciará automáticamente
la sesión en la página Tablero de control de Mi PlantSmart (My PlantSmart Dashboard).
2. Haga clic en el botón “CONTROL” (MONITOR) en medio de la pantalla.
3. Busque el tipo de planta que le gustaría controlar. Si se trata de una planta que guardó previamente en “MIS PLANTAS” (MY PLANTS), haga
clic en “MIS PLANTAS” y seleccione de la lista la planta que desearía controlar. Como alternativa, puede utilizar la opción de búsqueda
escribiendo el nombre de la planta en el cuadro de búsqueda del diálogo. No es un problema si no conoce el nombre exacto de la planta,
bastará con el nombre común (p. ej. escriba “helecho” o “rosa”, etc.).
4. Una vez que haya seleccionado una planta, siga las instrucciones en pantalla para terminar de poner el sensor para plantas en el modo
CONTROL (MONITOR) para esa planta específica.
5. Cuando el sitio web se lo pida, desconecte el sensor para plantas de la computadora, vuelva a armarlo (partes superior e inferior) e
introdúzcalo en la tierra cerca de la planta que desea controlar.
6. Oprima el botón de INICIO/DETENCIÓN (START/STOP) del sensor para plantas y éste iniciará la recolección de datos. La luz del sensor se
encenderá intermitentemente en verde 5 veces y el dispositivo emitirá 3 tonos ascendentes para indicarle que está funcionando.
7. Riegue bien la planta (esto permite que el sensor PlantSmart caracterice cuán bien el suelo retiene el agua con el paso del tiempo). Si no
riega la planta, el sensor para plantas emitirá una alarma sonora cada vez que la humedad del suelo sea demasiado baja para esa planta
durante un período prolongado.
8. El sensor para plantas necesita unos cuantos días para reunir los datos de humedad del suelo a fin de hacerle saber cuándo su planta
requiere riego. Esto se debe a que el sensor para plantas está determinando cuán bien el suelo retiene el agua. Le recomendamos
completar un ciclo de riego que podría durar entre varios días y una semana. Nota: Un “ciclo de riego” es el tiempo transcurrido entre la
primera vez que riega la planta y el momento en que PlantSmart le indica que la riegue nuevamente (emite sonidos con luz amarilla). Tenga
presente que durante períodos de lluvia abundante al aire libre, el ciclo de riego puede ser muy largo. Si el ciclo de riego ha superado las dos
semanas, retire el sensor PlantSmart y cargue los datos sin esperar la señal de riego.
9. Con el paso del tiempo, el sensor para plantas emitirá un sonido para indicarle que debe regar la planta. Riéguela cuando escuche este
sonido.
10. Después de un ciclo de riego completo, oprima el botón de INICIO/DETENCIÓN (START/STOP) y conecte el sensor para plantas (parte
superior) en el puerto USB utilizando el cable USB que viene incluido. Se le ofrecerá un informe en pantalla, para informarle si las
condiciones medioambientales cumplen con las necesidades de la planta o no. Si recibe una aprobación en cualquier área, lea la información
entregada y haga todos los cambios que sean necesarios.
11
Page 12

odo Control (Monitor) OBTENCIÓN DE RESULTADOS
M
1. Después de finalizado el ciclo de riego, oprima el botón de INICIO/DETENCIÓN (START/STOP) del sensorpara plantas para detener la recolección
1
e datos. El sensor emitirá tres tonos descendentes y la luz amarilla se encenderá intermitentemente cinco veces.
d
• Conecteel sensorpara plantas en el puerto USB utilizandoel cable USB que viene incluido.
• El sitio webde PlantSmartse iniciaautomáticamentey se abre un cuadro de diálogo para que guarde la lectura.
• Ponga un nombre a la ubicación donde tenía el sensor para plantas (como “ventana delantera” o “esquina izquierdadel macetero delantero”). Esta
información le permite hacerun seguimiento del lugar en que ubicó el sensor para plantas.
• Seleccione si la ubicación estaba BAJO TECHO (INDOORS) o ALAIRE LIBRE (OUTDOORS).
• Haga clic en el botón GUARDAR (SAVE).
• Aparecerá la ficha DOCTOR PARA PLANTAS (PLANTDOCTOR) dentro de Mis lecturas (My Readings).
• El sitio webde PlantSmartexamina los datos registrados porel sensorpara plantas. El análisis se corrige en función de cualquiercondición climática y
tomaen cuentael lugar en el que ustedvive. El sitio weble entregará consejos de jardinería fáciles de seguir para mejorar la salud de la planta.
Además, en la ficha VISTA DE LA PLANTA (PLANTʼS VIEW) puedever la información de luzsolar, temperatura,humedad y condiciones del suelo
recolectada porel sensorpara plantas.Para ver otras plantas que podrían crecer bien en esta ubicación hagaclic en las fichas PRINCIPALES
RECOMENDACIONES (TOP RECOMMENDATIONS) y TODAS LASRECOMENDACIONES(ALL RECOMMENDATIONS).
Modo Agua (Water) CONFIGURACIÓN
. Conecte el sensor para plantas en el puerto USB de su computadora utilizando el cable USB que viene incluido. Se iniciará automáticamente
1
a sesión en la página Tablero de control de MI PLANTSMART (MY PLANTSMART Dashboard).
l
. Haga clic en el botón “AGUA” (WATER) en el extremo derecho de la pantalla para fijar el sensor para plantas en el modo Agua (Water). El
2
odo Agua determina rápidamente si las plantas necesitan riego inmediato o no. NOTA: El modo Agua no funciona en cactus ni orquídeas.
m
3. Cuando se le indique, desconecte el sensor del puerto USB y vuelva a armar el sensor para plantas (partes superior e inferior).
4. Oprima el botón de INICIO/DETENCIÓN (START/STOP) del sensor para iniciar el modo Agua. SOSTENGA EL SENSOR POR LA PARTE
SUPERIOR. La luz del sensor se encenderá intermitentemente en verde y el dispositivo emitirá tres tonos ascendentes para indicarle que
está en el modo Agua. La luz se mantendrá verde mientras esté activo.
5. Introduzca la totalidad del sensor para suelos en la tierra cerca de las raíces de la planta cuyo nivel de humedad desea verificar.
6. Si una planta necesita agua, la luz del sensor se encenderá intermitentemente en amarillo y emitirá un sonido. Riéguela bien cuando
escuche este sonido. Si la luz del sensor se mantiene verde, significa que la planta no necesita agua.
7. Luego, puede pasar a otra planta sacando el sensor para plantas de la tierra e introduciéndolo en el suelo cerca de una planta distinta.
8. Siga moviendo el sensor para plantas de una planta a otra para determinar si necesitan riego.
9. Cuando haya terminado de verificar las plantas que podrían necesitar riego, oprima el botón de INICIO/DETENCIÓN (START/STOP). No es
necesario oprimir el botón de INICIO/DETENCIÓN para cada planta.
Retroalimentación visual y auditiva
Modo Evento Visual Auditiva
Conectado a la
computadora
Insertando de la batería Cerrando la tapa de la
Conectado a la
computadora
Desconectándose de la
computadora
Modo Recomendación
(Recommend)
Modo Recomendación
(Recommend)
Modo Recomendación
(Recommend)
Modo Control (Monitor) Oprima el botón de inicio Verde intermitente Tono ascendente
Modo Control (Monitor) Oprima el botón de
Modo Control (Monitor) Tomando una lectura Verde intermitente una vez
Modo Control (Monitor) Necesita riego Amarillo intermitente Sirena
Modo Control (Monitor) Demasiada agua Amarillo intermitente Advertencia
Modo Agua (Water) Necesita riego Amarillo intermitente Sirena
Modo Agua (Water) No necesita riego Verde intermitente Sin sonido
Software complementario
Amarillo constante Tono ascendente
no instalado
Sin luz Pitido
batería
Sensor conectado al USB Verde intermitente Tono ascendente
Sensor desconectado del
Sin luz Tono descendente
USB
Oprima el botón de inicio Verde intermitente Tono ascendente
Oprima el botón de
Amarillo intermitente Tono descendente
detención
Tomando una lectura Verde intermitente una vez
Sin sonido
cada 5 seg.
Amarillo intermitente Tono descendente
detención
Sin sonido
cada 5 seg.
12
Page 13

MIS PLANTAS (MY PLANTS), MIS LECTURAS (MY READINGS), MI PERFIL (MY PROFILE)
Mis plantas (My plants)
PlantSmart hace un seguimiento de todas las plantas que cultiva o que desearía cultivar en la sección “MIS PLANTAS” (MY PLANTS) del sitio
web. Siempre que esté en otra sección del sitio web y elija “AGREGAR A MIS PLANTAS” (ADD TO MY PLANTS), la planta se agregará a su
página “MIS PLANTAS” (MY PLANTS). Este es su propio catálogo personal de plantas. “MIS PLANTAS” también es útil cuando elija controlar una
planta en su hogar o jardín. Simplemente seleccione la planta de “MIS PLANTAS” cuando se le pida buscar la planta a controlar y el sensor para
plantas se programará con los detalles acerca de la misma.
Mis lecturas (My Readings)
Mis lecturas es un área del sitio web que contiene todos los datos para cada lectura que tome en su hogar o jardín. Todas las lecturas de
“RECOMENDACIÓN” (RECOMMEND) y “CONTROL” (MONITOR) se guardan aquí. Puede consultar Mis lecturas en cualquier momento que desee
ver resultados y consejos anteriores. Las lecturas se pueden ordenar por Nombre (Name), Sol (Sun), Fecha (Date), Ubicación (Location) y Tipo
(Type).
Mi perfil (My Profile)
Mi perfil es el lugar del sitio web en el que puede cambiar su información personal, incluida su dirección de correo electrónico, contraseña y código
postal.
ENGA EN CUENTA LO SIGUIENTE: Si cambia el código postal de su perfil, todas las lecturas anteriores mantendrán la información original de
T
ona del código postal original. Las lecturas futuras utilizarán el nuevo código postal. Si se muda, deberá cambiar su código postal de manera que
z
odas las lecturas futuras sean exactas.
t
TENGA EN CUENTA LO SIGUIENTE: Al cambiar su nombre de usuario o contraseña en el sitio web se requieren los mismos cambios en sus
credenciales del software complementario.
Si cambia su nombre de usuario o contraseña en “Mi perfil” (My Profile), también deberá hacer clic con el botón derecho del mouse sobre el
logotipo del software complementario de PlantSmart en la bandeja de sistema de su computadora (o en el icono del menú de tareas en las
computadoras MAC). Elija “Preferencias” (Preferences) y cambie su nombre de usuario y contraseña aquí de manera que coincida con su nombre
de usuario y contraseña en Mi perfil (My Profile).
Glosario
Software complementario
El software complementario de PlantSmart reside en su computadora y conecta el sensor para plantas al sitio web de PlantSmart.
Datos medioambientales
El sensor para plantas recolecta datos medioambientales que incluyen luz solar, temperatura, humedad y condiciones del suelo del lugar donde
lo pone.
Mis plantas (My plants)
Este es un lugar donde puede almacenar todas las plantas que tiene en su hogar o jardín, las plantas que ha buscado en la Biblioteca de plantas (Plant Library) o las plantas que se recomendaron al utilizar el sensor PlantSmart. Al guardar todas las plantas en “MIS PLANTAS” (MY
PLANTS), acabará teniendo una biblioteca personalizada de las plantas en su hogar y jardín. Puede consultarla para el cuidado de las plantas
con el paso del tiempo.
Mi perfil (My Profile)
Este es el lugar en el que puede cambiar su contraseña, nombre u otra información sobre usted, etc.
Biblioteca de plantas (Plant Library)
La Biblioteca de plantas de PlantSmart Plant es el conjunto completo de plantas de nuestra base de datos, el que actualmente asciende a más
de 6.000. Las plantas que recomendamos y que puede controlar provienen de esta Biblioteca. Si existen plantas que desearía que se
agregarán, envíenos un correo electrónico a: plants@easybloom.com.
Lectura
Una lectura consta de la totalidad de los datos que se recolectan en cierto momento en un lugar de su hogar o jardín. Ésta incluye toda la
información de luz solar, temperatura, humedad y condiciones del suelo.
Recomendación
Una recomendación es una lista de las plantas que se recomiendan a partir de una lectura. Todas las plantas que se ofrecen se eligen por ser
aquellas que crecerían bien en el lugar donde tomó la lectura en su hogar o jardín.
Sensor PlantSmart
El sensor PlantSmart consta del sensor (superior) y el sensor (inferior). El sensor (superior) recolecta datos de luz solar y temperatura. La parte
superior también tiene el enchufe USB y es la que se conecta al puerto USB de su computadora utilizando el cable que viene incluido para
cargar los datos en el sitio web de PlantSmart y obtener los resultados de recomendación o control. El sensor (inferior) tiene un tablero de
circuitos negro que se utiliza para recolectar información de humedad y condiciones del suelo para entregar recomendaciones o para controlar
las plantas.
Cuidado y mantenimiento
Cambio de la batería
Si el sensor para plantas ya no presenta una luz intermitente o ya no emite sonidos cuando oprime el botón de INICIO/DETENCIÓN
(START/STOP), probablemente deba cambiar la batería. Para cambiarla, lleve a cabo los pasos siguientes:
1. Tire de la perilla del sensor (superior) para abrir el compartimiento de la batería.
2. Retire la batería AAA agotada.
3. Inserte el positivo (+) de la nueva batería AAA mirando hacia abajo en dirección a la interfaz USB.
4. El sensor se configura en forma predeterminada en modo Agua (Water). Si desea cambiar el modo, conecte el sensor en el puerto USB
utilizando el cable USB que viene incluido y seleccione un nuevo modo en la página Tablero de control de MI PLANTSMART
(MY PLANTSMART Dashboard).
Cuidado y mantenimiento
• Cuando el sensor PlantSmart no esté en uso, asegúrese de que esté apagado para ahorrar energía de la batería.
• Cuando el sensor esté conectado al puerto USB mediante el cable que viene incluido, el Tablero de control de MI PLANTSMART (MY
PLANTSMART Dashboard) indicará cuando la batería esté acercándose al final de su vida útil.
• No sumerja el sensor PlantSmart en agua. El dispositivo es resistente al agua hasta el límite en que puede manejar condiciones climáticas
normales incluida la lluvia.
13
13
Page 14

• No exponga el sensor a chorros de agua a presión. (Como el caso del riego directo con un rociador).
SECCI N
AMARILLA
Si funciona…
yfunciona muy bien.
• No deje el sensor PlantSmart cerca del fuego o llamas expuestas como la parte superior de una cocina a gas.
• No utilice limpiadores abrasivos para limpiar el sensor PlantSmart. Limpie el producto con un paño suave y agua.
• Utilice únicamente jabón suave y un paño húmedo para limpiar el producto. Nunca permita que penetre líquido dentro del producto ni sumerja
ninguna de sus piezas en un líquido.
Cumplimiento con la FCC:
Este dispositivo cumple con la Parte 15 de las normas de la Comisión Federal de Comunicaciones (FCC, por sus siglas en inglés). Su
uncionamiento está sujeto a las dos condiciones siguientes:
f
1. Este dispositivo no debe causar interferencia perjudicial y
2. Este mecanismo debe aceptar cualquier interferencia recibida, incluida aquella que puede provocar un funcionamiento no deseado
ACCESORIOS
Los accesorios que se recomiendan para la herramienta están disponibles en su distribuidor local o en el centro de servicio autorizado. Si necesita
ayuda con respecto a los accesorios, llame al: 1-800-544-6986.
ADVERTENCIA: El uso de accesorios no recomendados para utilizar con esta herramienta puede resultar peligroso.
IMPORTANTE
Para garantizar la SEGURIDAD y la CONFIABILIDAD del producto, las reparaciones, el mantenimiento y el ajuste deben realizarse en los centros
de mantenimiento autorizados o en otras organizaciones de mantenimiento calificadas, utilizando siempre piezas de repuesto idénticas.
INFORMACIÓN DE MANTENIMIENTO
Todos los Centros de servicio de Black & Decker cuentan con personal altamente capacitado dispuesto a brindar a todos los clientes un servicio
eficiente y confiable en la reparación de herramientas eléctricas. Si necesita consejo técnico, reparaciones o piezas de repuesto originales de
fábrica, póngase en contacto con el centro de servicio de Black & Decker más cercano a su domicilio. Para ubicar su centro de servicio local,
consulte la sección “Herramientas eléctricas” (Tools-Electric) de las páginas amarillas, llame al
1-800-544-6986 o visite nuestro sitio www.blackanddecker.com.
GARANTÍA COMPLETA DE UN AÑO PARA USO DOMÉSTICO
Black & Decker (U.S.) Inc. garantiza este producto durante un año contra cualquier defecto de material o mano de obra. El producto defectuoso se
reemplazará o reparará sin costo alguno de una de dos maneras.
La primera opción, el reemplazo, es devolver el producto al comercio donde se adquirió (siempre y cuando se trate de un comercio participante).
Las devoluciones deben realizarse conforme a la política de devolución del comercio (generalmente, entre 30 y 90 días posteriores a la venta). Le
pueden solicitar comprobante de compra. Consulte en el comercio acerca de la política especial sobre devoluciones una vez excedido el plazo
establecido.
La segunda opción es llevar o enviar el producto (con flete pago) a un Centro de servicio propio o autorizado de Black & Decker para su reparación
o reemplazo según nuestro criterio. Le pueden solicitar el comprobante de compra. Los Centros de servicio autorizados y de propiedad de Black &
Decker se detallan en la sección
“Herramientas eléctricas” (Tools-Electric) de las páginas amarillas de la guía telefónica.
Esta garantía no se extiende a los accesorios. Esta garantía le concede derechos legales específicos; usted puede tener otros derechos que
pueden variar según el estado o la provincia. Si tiene alguna pregunta, comuníquese con el gerente del Centro de servicio de Black & Decker de su
zona. Este producto no está diseñado para uso comercial.
AMÉRICA LATINA: esta garantía no se aplica a los productos que se venden en América Latina. Para los productos que se venden en América
Latina, debe consultar la información de la garantía específica del país que viene en el empaque, llamar a la compañía local o visitar el sitio Web a
fin de obtener esa información.
Vea “Herramientas
eléctricas (Tools-Electric)”
– Páginas amarillas –
para Servicio y ventas
BOSQUES DE CIDROS ACCESO RADIATAS NO. 42
BLACK & DECKER S.A. DE C.V.
COL. BOSQUES DE LAS LOMAS.
05120 MÉXICO, D.F
TEL. (01 55) 5326 7100
01 800 847 2309/01 800 847 2312
Cat No. PCS10 Form No. 90560402 July 2010
Copyright © 2010 Black & Decker
1414
 Loading...