

Page 1
ENGLISH
FLASH SERIES THERMAL LAMINATORS
Catalog Numbers LAM95, LAM95FH, LAM125FH
COLD
3mil
5mil
Model No: LAM95 Model No: LAM95FH Model No: LAM125FH
REV
COLD
5 mil
3 mil
REV
COLD
5 mil
3 mil
Thank you for choosing Black & Decker!
Go to BlackandDecker.com/NewOwner
to register your new product.
PLEASE READ BEFORE RETURNING THIS
PRODUCT FOR ANY REASON:
If you have a question or experience a problem with your Black & Decker purchase,
call 1 (800) 343-9329 from 8 a.m. to 5 p.m. EST Monday - Friday to speak with an agent.
Please have the catalog number available when you call.
Want to discover a world of endless laminating possibilities? Get free printables for the
home, office and classroom at: Laminating.BlackandDecker.com
SAVE THIS MANUAL FOR FUTURE REFERENCE
1
Page 2

IMPORTANT SAFEGUARDS
When using electrical appliances, basic safety precautions should always be followed,
including the following:
PLEASE READ AND UNDERSTAND ALL INSTRUCTIONS BEFORE USING
SAFETY GUIDELINES – DEFINITIONS
It is important for you to read and understand this manual.
The information it contains relates to protecting YOUR SAFETY and PREVENTING PROBLEMS. The symbols below are used to help you recognize this
information.
DANGER: Indicates an imminently hazardous situation which, if not avoided,
will result in death or serious injury.
WARNING: Indicates a potentially hazardous situation which if not avoided,
could result in death or serious injury.
CAUTION: Indicates a potentially hazardous situation which if not avoided,
may result in minor or moderate injury.
CAUTION: Used without the safety alert symbol indicates a potentially hazardous situation which, if not avoided, may result in property damage.
TO REDUCE THE RISK OF INJURY
Before any use, be sure everyone using this laminator reads and understands all
safety instructions and other information contained in this manual.
CAUTION: Failure to comply with the recommendations outlined in this instruction manual will void warranty.
WARNING: Read all instructions before operating product. Failure to follow all
instructions may result in electric shock, fire and/or serious injury.
WARNING:
• Use laminator only for its intended use.
• To protect against risk of electric shock, do not use laminator close to water and
do not spill any liquids on laminator, power cord or outlet.
• Do not allow power cord to come in contact with any hot surfaces. Loop cord
around cord wrap when storing.
• Do not operate laminator with a damaged cord, or if the laminator has been
dropped or damaged.
• Let laminator cool completely before putting away.
• To avoid the risk of electric shock, do not disassemble the laminator. Call the
appropriate toll free number listed on the cover of this manual. Incorrect reassembly can cause a risk of electric shock when the laminator is used.
CAUTION:
• Place laminator on a flat, secure surface with sufficient space to work comfortably.
• Ensure laminator has adequate ventilation and vent holes in laminator housing
are not covered or obstructed.
• Laminator and pouches may become hot during use. Allow laminated items and
machine to cool prior to handling.
• Do not allow children to use unsupervised.
• Keep pets away from laminator during use.
• Always switch off and unplug the laminator when not in use.
POLARIZED PLUGS
Polarized plugs (one blade is wider than the other) are used on equipment to
reduce the risk of electric shock. When provided, this plug will fit a polarized outlet
in only one way. If the plug does not fit fully into the outlet, reverse the plug. If it
still does not fit, contact a qualified electrician to install the proper outlet. Do not
change the plug in any way.
2
Page 3
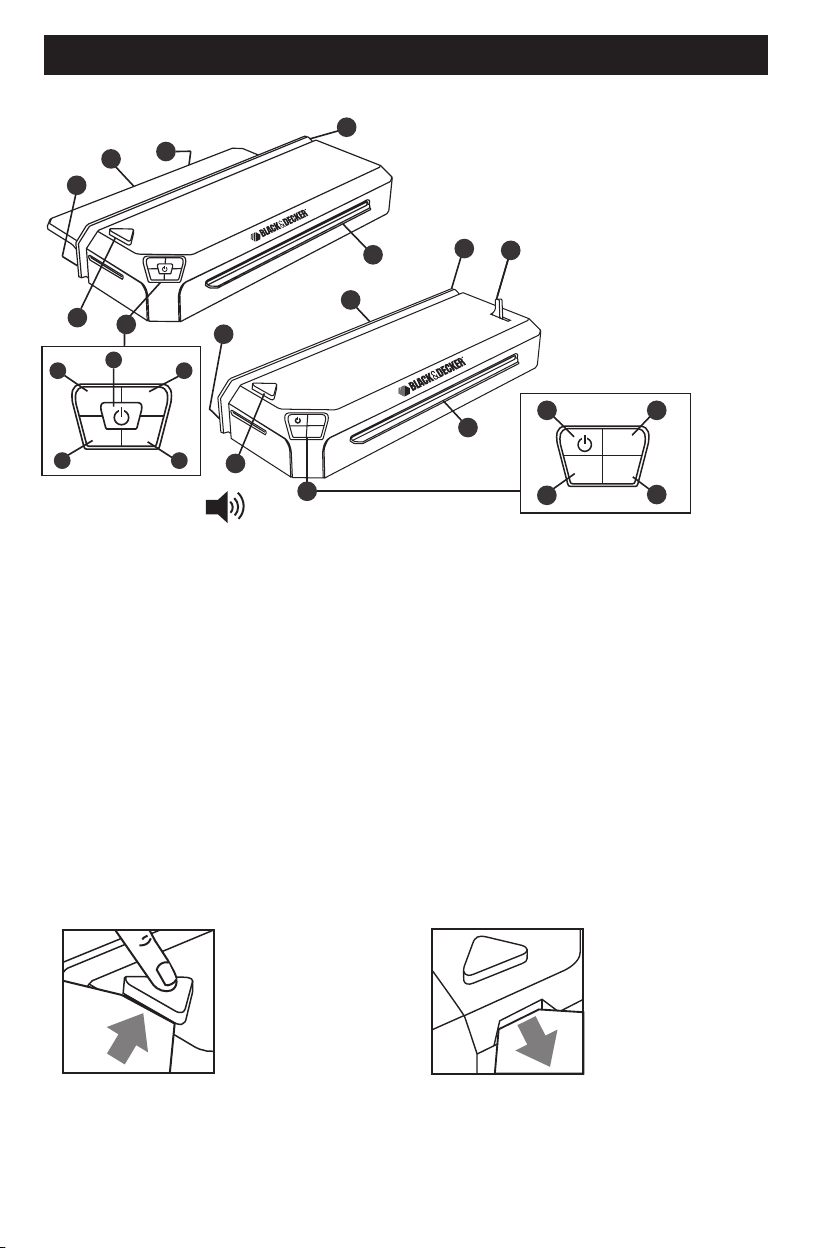
PRODUCT FEATURES
Control panel
Product may vary slightly from what is illustrated.
F
E
D
C
F
G
B
COLD REV
3
mil5 mil
L
COLD
REV
3 mil
5 mil
A
H
C
JM
3
mil
K
B
A
G
E
COLD
5
mil
AUDIBLE ALERTS
Black & Decker Flash Series laminators provide a series of audible alerts to aid its
user:
3 Beeps After the thermal/cold mode is selected and the laminator is
ready for use
1 Beep Every 10 minutes to notify that the unit is powered on
NOTE: Always power down and unplug the laminator when
not in use.
AUTO-SHUTOFF
Black & Decker Flash Series laminators feature an auto-shutoff mechanism that will
automatically power down the laminator after 60 minutes. This feature is an added
convenience in the event that the laminator is left on while not in use.
• If the laminator powers down during lamination, press the power button
and select the appropriate temperature mode.
• You may continue laminating once the light on the selected mode button is
steadily lit and the 3 beep audible alert sounds.
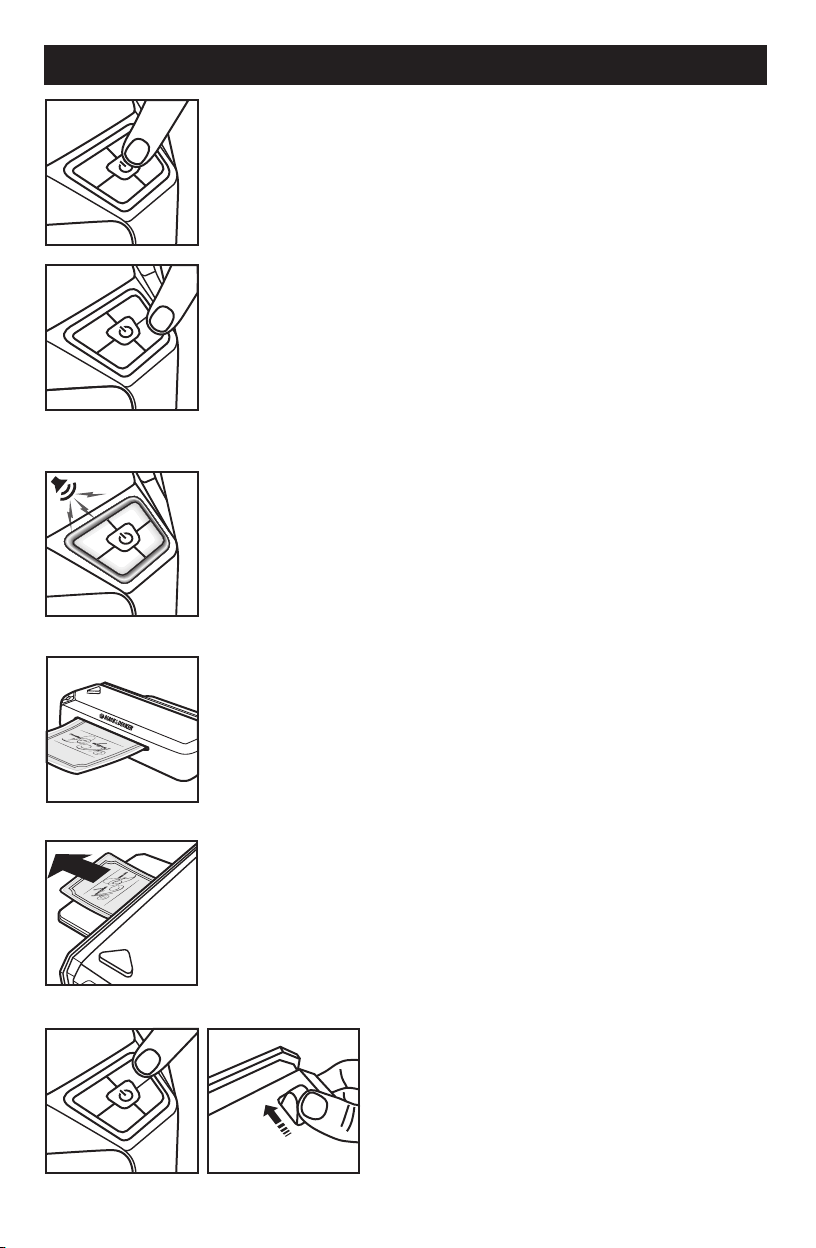
CORNER PUNCH
Black & Decker Flash Series laminators include an integrated corner punch to round
the corners of a trimmed, laminated item for a more professional appearance.
1. Insert the squared
corner of laminated
item into corner punch
slot and press down
on punch button.
A.
Corner punch
B.
Corner punch chip drawer
C.
Out-feed table (LAM95FH,
D.
LAM125FH)
Carry handle
E.
Power cord wrap
F.
In-feed slot
G.
I
Power on/off switch
H.
Reverse Lever (LAM95)
I.
Reverse mode select
J.
(LAM95FH, LAM125FH)
5 mil pouch select
K.
3 mil pouch select
L.
Cold mode pouch select
M.
H M
3
L
COLD
5
mil
mil
K
2. Remove laminated
item from punch slot
and repeat step 1 for
remaining squared
corners.
NOTE: Corner punch chips are captured in a small drawer located on the rear of the
laminator (Fig. C). Periodically empty this drawer by removing it from the unit and
emptying its contents into a waste basket.
3
Page 4
HELPFUL TIPS
• Do not laminate any heat sensitive documents such as tickets, ultrasounds, etc.
You may experiment using self-adhesive laminating pouches and the cold mode
setting with heat sensitive documents.
• Always test with a non-sensitive document first to ensure compatibility.
• Do not laminate any valuable or historical type documents.
• Never laminate an empty pouch.
• Always feed the pouch into the machine sealed edge first. This will prevent the
pouch from becoming jammed in the laminator rollers.
• If using a larger pouch for a smaller sized item, you can easily trim the pouch
after laminating using a paper trimmer or scissors. Laminated documents are
easily trimmed once cooled.
• A rotary paper trimmer is recommended.
• Do not use laminator with self-adhesive laminating sheets, only self-adhesive
pouches.
BEFORE LAMINATING
1. Place laminator on a flat, stable surface. Organize your materi-
als close by and ensure that you have space to work comfortably.
This entails having enough surface area to:
COLD
REV
3 mil
5 mil
• Align items in laminating pouches
• Let items lay flat for cooling post lamination
2. Locate the out-feed table, which is stored underneath the
laminator (certain models only). Fold open the table to its most
outright position.
3. Plug the power cord into a standard 120 V outlet.
DOCUMENT PREPARATION
For optimum results use Black & Decker TimeShield™ laminating pouches.
Please visit Laminating.BlackandDecker.com/Laminators for more information and
where to buy.
1. Select the pouch size and thickness that best fits the item you
wish to laminate and offers the level of protection you desire.
4
Page 5
COLD
Laminating
Pouch
REV
mil
5
mil
3
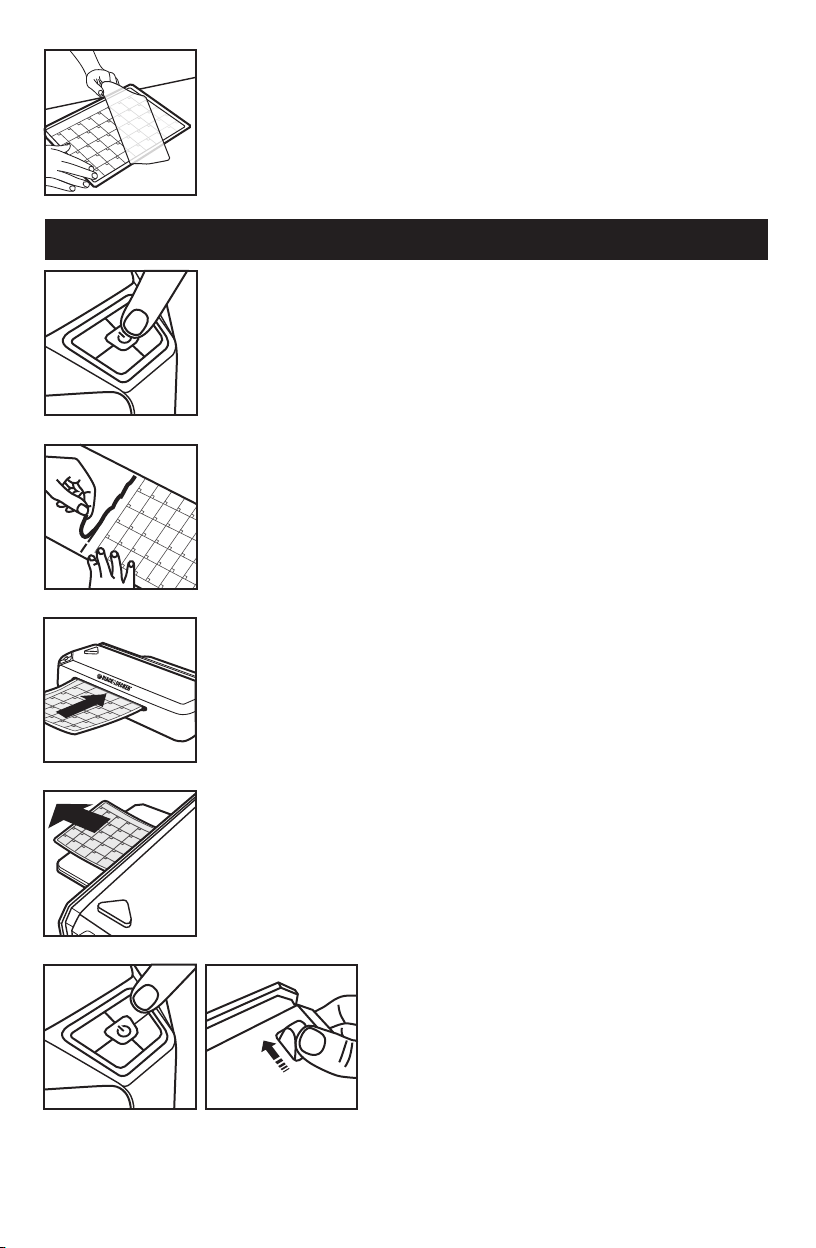
2. Center your item in the open pouch, with the top edge of your
item towards the sealed seam of the pouch. Ensure there’s a
minimum border of 1/8” on all sides of the item.
NOTE: If using Black & Decker TimeShield™ laminating pouches,
use the convenient positioning chart located on the back of each
package to ensure proper alignment and even borders.
COLD LAMINATING
1. Turn the laminator on by pressing the power button on the
control panel. The unit will automatically start in cold mode, with
the COLD button steadily lit.
2. Follow the instructions included with your self-adhesive
laminating pouches to position and inititally seal the item within
the pouch.
3. Insert the sealed end of the pouch straight into the in-feed slot
and gently guide forward until the machine pulls it through.
A
COLD
4. The pouch will automatically feed through the laminator and
exit through the rear. You can remove the laminated item once it
has stopped moving.
5. In the event of a misfeed:
REV
mil
5
mil
3
RELEASE
B
• LAM95: Pull jam release lever and remove
item through the front in-feed slot.
(See figure B)
• LAM95FH, LAM125FH: Press and hold the
reverse (REV) button on the control
panel while removing the item
through the front in-feed slot.
(See figure A)
5
Page 6
COLD
COLD
Beep
COLD
THERMAL LAMINATING
1. Turn the laminator on by pressing the power button on the
REV
mil
3
REV
mil
3
REV
mil
3
control panel.
mil
5
2. Select the appropriate thermal setting based on your pouch
thickness. The pouch thickness is typically marked on the laminating pouch packaging.
mil
5
• 3 mil: For use with 3 mil thick laminating pouches when
laminating standard printer paper or other thin
documents/items
• 5 mil: For use with all 5 mil thick laminating pouches or
for 3 mil thick pouches when laminating photo paper,
business cards or other thick documents
3. During laminator warm-up, the light on the selected thermal
mode will flash. Once the appropriate laminating temperature is
reached, the 3 beep audible alert will sound. The laminator is now
mil
5
ready.
A
COLD
4. Insert the sealed end of the pouch straight into the in-feed slot
and gently guide forward until the machine pulls it through.
5. The pouch will automatically feed through the laminator and
exit through the rear. Allow the laminated item to lay flat during
cooling for a more professional appearance.
6. In the event of a misfeed:
REV
mil
5
mil
3
RELEASE
B
• LAM95: Pull jam release lever and remove
item throughthe front in-feed slot.
(See figure B)
• LAM95FH, LAM125FH: Press and hold the
reverse (REV) button on the control panel
while removing the item through the front
in-feed slot. (See figure A)
6
Page 7
SWITCHING LAMINATING MODES
COLD TO THERMAL
Select the thermal mode setting by pressing the appropriate button. The button will
flash while the laminator is warming up. Once the appropriate temperature is
reached, the light on the selected mode button will remain steadily lit and the 3 beep
audible alert will sound. The machine is now ready for use.
THERMAL LAMINATING MODES
Select the thermal mode setting by pressing the appropriate button. The button will
flash while the laminator adjusts to the appropriate temperature. Once that
temperature is reached, the light on the selected mode button will remain steadily
lit and the 3 beep audible alert will sound. The machine is now ready for use.
THERMAL TO COLD
Select the cold mode setting by pressing the COLD button. The button will flash
while the laminator is cooling down. Once the appropriate temperature is reached,
the light on the COLD button will remain steadily lit and the 3 beep audible alert will
sound. The machine is now sufficiently cooled and ready for use.
NOTE: Due to the time required for the laminator to cool when switching to a
lower temperature or cold mode, it is recommended to always perform laminating projects in order of cold to most thermal (COLD > 3 mil > 5 mil).
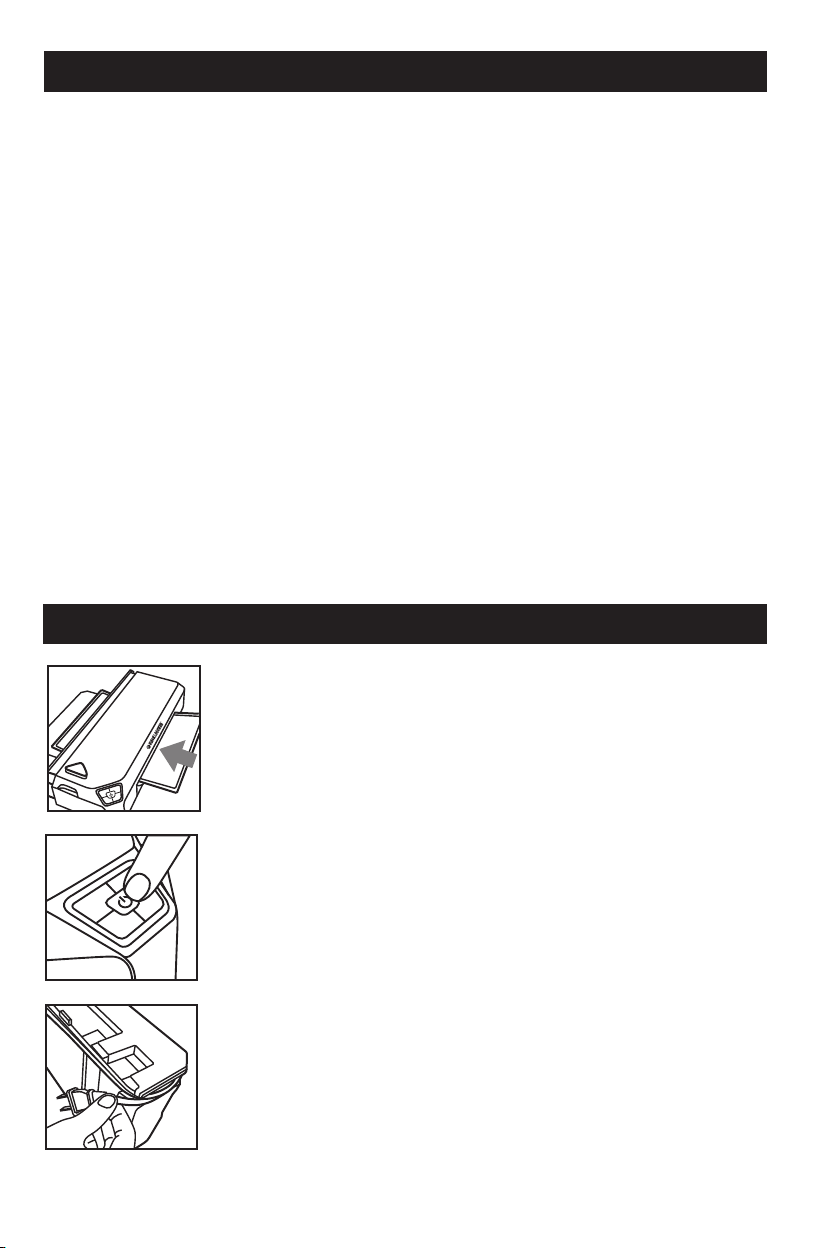
SHUTTING DOWN
COLD
1. While the machine is still hot, feed the included cleaning sheet
through the laminator. The sheet is designed to remove any
adhesive residue that may bleed out onto the rollers during
laminating. It will also ensure continued performace.
REV
COLD
5 mil
3 mil
2. Press the power button to shut off the laminator and unplug
REV
5
mil
3
the power cord. Give the laminator sufficient time to cool before
storing.
mil
3. Loop the cord around the integrated cord wrap and place
laminator in original shipping carton. Store in a cool, dry location.
7
Page 8

CARE AND MAINTENANCE
WARNING: Shut down and unplug laminator before cleaning exterior. Use only
a clean, dry cloth to remove dust. Never get any liquid inside the laminator.
• Save original packaging for storing the laminator when not in use.
• Always run cleaning sheet through laminator at the completion of each thermal
laminating project.
• The heating element of the laminator is fragile. Do not DROP or IMPACT the
laminator to avoid damaging the heating element.
• Regular emptying of the corner punch chip drawer is important to ensure smooth
operation of the corner punch feature.
TROUBLESHOOTING
If you have a problem with your laminator, check the possible causes and solutions
below.
Laminating.BlackandDecker.com or call the Black & Decker help line at 1 (800) 343-9329.
PROBLEM POSSIBLE CAUSE SOLUTION
For any additional assistance with your product, visit our website
Lamination
bubbling
White spots or hazy
areas in lamination
Odors
• Incorrect thermal
mode selected
• Pouch is too thin
for laminated item
• Pouch and/or
laminated
document is too
thick
• Adhesive
residue on
rollers
• Ensure thermal mode matches the
pouch thickness
• Use only 3-5 mil thick thermal
pouches
• Use only Black & Decker pouches for
optimum performance
• Run pouch through the laminator
again
• Use only 3-5 mil thick thermal
laminating pouches
• Select 5 mil thermal mode or reduce
the thickness of the document you are
laminating (copy or print item on
standard paper)
• Use only Black & Decker pouches for
optimum performance
• Run cleaning sheet through laminator
after each use
• Use laminator in a ventilated area
whenever possible
NOTE: It is common for some adhesives to seep onto the rollers during
lamination, which can cause odor
8
Page 9

Unit powers down
on its own
• Automatic
shut-off activated
• Press power button to turn unit on
and select the appropriate temperature setting
Document jammed
inside laminator
PRODUCT SPECIFICATIONS
Model
Dimensions
• Misfed document
(not centered or
straight when fed
through in-feed slot
or not fed with the
sealed edge first)
• Empty pouch
• Pouch was not used
• Glue residue on
rollers
• Self-adhesive
laminating sheets
used
LAM95
3.25 x 15.75 x 6.00
• LAM95: Pull jam release lever and
remove item through the front in-feed
slot
• LAM95FH, LAM125FH: Press and hold
the reverse (REV) button on the control
panel while removing the item through
the front in-feed slot
• Ensure item is centered at the in-feed
slot and fed straight through the
laminator with the sealed edge first
• Always use a pouch when laminating
• Run cleaning sheet through laminator
after each use
• Never feed an empty pouch or use
self-adhesive laminating sheets
LAM95FH
3.38 x 17.00 x 6.88
LAM125FH
3.38 x 21.75 x 7.50
Weight
Cord Length
Voltage
Power
Pouch Thickness Capacity
Maximum Pouch Width
Estimated Warm-Up Time
Laminating Speed
3.56 lbs.
5 Ft.
120 V
400 W
3 - 5 mil
9.5”
To 3 Mil – 150 Seconds
To 5 Mil – 190 Seconds
3 to 5 Mil – 190 seconds
12” / Minute
9
7.26 lbs.
5 Ft.
120 V
1050 W
3 - 5 mil
9.5”
To 3 Mil – 60 Seconds
To 5 Mil – 90 Seconds
3 to 5 Mil – 30 seconds
24” / Minute
11.66 lbs.
6 Ft.
120 V
1750 W
3 - 5 mil
12.5”
To 3 Mil – 60 Seconds
To 5 Mil – 70 Seconds
3 to 5 Mil – 70 seconds
48” / Minute
Page 10

2 YEAR LIMITED WARRANTY
Effective September 1, 2012 Amax Inc. warrants to the original retail
purchaser that the product purchased is free from defects in material
and workmanship, and agrees to repair or replace, at Amax’s option,
any defective Black & Decker® branded laminator, desk lamp, pencil
sharpener, stapler, or hole punch (2) years from date of purchase.
Warranty is not transferable. Proof of purchase date required. This
warranty covers only damage resulting from defects in material or
workmanship; it does not cover conditions or malfunctions resulting
from normal wear, neglect, abuse, accident or repairs attempted or
made by other than our national repair center or authorized warranty
service centers. Pencil sharpener cutters, punch heads, and cutting discs
are considered normally wearing parts. You are responsible for the costs
of shipping the defective product to Amax Inc. or its designated repair
center. For optimal performance of your Black and Decker® products,
always use genuine Black and Decker® staples and accessories.
THIS WARRANTY IS THE EXCLUSIVE WARRANTY OF AMAX INC., AND
IS IN LIEU OF ALL OTHER EXPRESS WARRANTIES INCLUDING, BUT
NOT LIMITED TO, IMPLIED WARRANTIES OF MERCHANTABILITY OR
FITNESS FOR A PARTICULAR PURPOSE.AMAX INC. SHALL NOT BE
LIABLE FOR ANY DIRECT, INDIRECT, INCIDENTAL OR CONSEQUENTIAL
DAMAGES.
Some states and countries do not allow the exclusion or limitation of
incidental or consequential damages, so the above limitations or
exclusions may not apply to you. This warranty gives you specific legal
rights, and you may also have other rights which vary from state to
state and country to country.For information on our warranty claim
procedure please visit us at BlackandDecker.com or contact us at
1-800-343-9329.
Latin America: This warranty does not apply to products sold in Latin
America. For products sold in Latin America, check country specific
warranty information contained in the packaging, call the local company
or see the website for warranty information.
Manufactured by:
Amax Incorporated East Greenwich, RI 02818
Under license from The Black and Decker Corporation
USA and Canada Only • États-Unis et au Canada
seulement
En México Importado por: Black & Decker S.A. de C.V.
Avenida Antonio Dovali Jaime # 70 Torre B Piso 9
Colonia La Fe, Santa Fé, Delegación Alvaro Obregón,
México D.F. 01210 • R.F.C.: BDE810626-1W7
• Contendio 7 piezas
Black & Decker and the Black & Decker logo are
trademarks of The Black & Decker Corporation and are
used under license. All rights reserved. Product in this box
may differ slightly from that pictured. Not all accessories
shown in photography are included in this package.
Copyright © 2012 Amax Incorporated
A00075
10
BlackandDecker.com
1-800-343-9329
Printed in China
Page 11

FRENCH
PLASTIFIEUSES THERMIQUES SÉRIE FLASH
Numéros de catalogue LAM95, LAM95FH, LAM125FH
COLD
3mil
5mil
No de modèle: LAM95 No de modèle: LAM95FH No de modèle: LAM125FH
REV
COLD
5 mil
3 mil
REV
COLD
5 mil
3 mil
Merci d’avoir choisi Black & Decker!
Allez sur BlackandDecker.com/NewOwner
pour enregistrer votre nouveau produit.
VEUILLEZ LIRE CE GUIDE AVANT DE RETOURNER
CE PRODUIT POUR QUELQUE RAISON:
Pour toute question ou en cas de problème avec votre achat Black & Decker, appelez le
1 (800) 343-9329 de 8 h à 17 h HNE, du lundi au vendredi, pour parler à un agent.
Veuillez avoir le numéro de catalogue à portée de la main lorsque vous appelez.
Voulez-vous découvrir tout un monde de possibilités infinies pour la plastification? Obtenez des
impressions gratuites pour la maison, le bureau et la salle de classe sur :
Laminating.BlackandDecker.com
CONSERVEZ CE GUIDE POUR RÉFÉRENCE FUTURE
11
Page 12

IMPORTANTES MISES EN GARDE
Vous devez toujours observer des précautions élémentaires lorsque vous utilisez des appareils
électriques, y compris les suivantes :
VEUILLEZ LIRE ET COMPRENDRE TOUTES LES INSTRUCTIONS AVANT UTILISATION
DIRECTIVES DE SÉCURITÉ – DÉFINITIONS
Il est important que vous lisiez et compreniez ce guide.
Les informations qu’il contient concernent VOTRE SÉCURITÉ et la façon de PRÉVENIR LES
PROBLÈMES. Les symboles suivants sont utilisés pour vous aider à reconnaître cette
information.
DANGER : Indique une situation dangereuse imminente qui, si elle n’est pas évitée,
occasionnera des blessures graves ou la mort.
AVERTISSEMENT : Indique une situation dangereuse possible qui, si elle n’est pas
évitée, pourra occasionner des blessures graves ou la mort.
MISE EN GARDE : Indique une situation dangereuse possible qui, si elle n’est pas
évitée, pourra occasionner des blessures mineures ou légères.
MISE EN GARDE : Utilisé sans le symbole d’alerte de sécurité, indique une situation
dangereuse possible qui, si elle n’est pas évitée, pourrait entraîner des dommages
matériels.
POUR RÉDUIRE LE RISQUE DE BLESSURES
Avant toute utilisation, assurez-vous que toute personne utilisant cette plastifieuse lit et
comprend toutes les consignes de sécurité et les autres informations contenues dans ce guide.
MISE EN GARDE : Le fait de ne pas se conformer aux recommandations décrites dans ce
guide d’utilisation annule la garantie.
AVERTISSEMENT : Lisez toutes les instructions avant de faire fonctionner le produit. Le
non-respect des instructions peut entraîner un choc électrique, un incendie et/ou des blessures
graves.
AVERTISSEMENT :
• Utiliser la plastifieuse uniquement pour son utilisation prévue.
• Afin d’éviter tout risque de choc électrique, ne pas utiliser la plastifieuse à proximité de l’eau
et ne pas renverser de liquides sur la plastifieuse, le cordon d’alimentation ou la prise
électrique.
• Ne pas laisser le cordon d’alimentation entrer en contact avec des surfaces chaudes. Enrouler
le cordon autour de l’enrouleur de cordon pour le ranger.
• Ne pas faire fonctionner la plastifieuse si le cordon est endommagé, ou si la plastifieuse est
tombée ou est endommagée.
• Laisser la plastifieuse refroidir complètement avant de la ranger.
• Afin d’éviter tout risque de choc électrique, ne pas démonter la plastifieuse. Composez le
numéro sans frais approprié indiqué sur la couverture de ce guide. Il y a risque de choc
électrique au moment d’utiliser la plastifieuse si celle-ci a été remontée de manière
inappropriée.
MISE EN GARDE :
• Placer la plastifieuse sur une surface plane et stable avec suffisamment d’espace pour
travailler confortablement.
• Veiller à ce que la plastifieuse ait une ventilation adéquate et à ce que les trous de ventilation
dans le boîtier de la plastifieuse ne soient pas couverts ou obstrués.
• La plastifieuse et les pochettes peuvent devenir très chaudes pendant l’utilisation. Laisser les
articles laminés et l’appareil refroidir avant toute manipulation.
• Ne pas laisser les enfants l’utiliser sans surveillance.
• Garder les animaux domestiques à bonne distance de la plastifieuse lorsqu’elle est utilisée.
• Toujours éteindre et débrancher la plastifieuse lorsqu’elle n’est pas utilisée.
FICHES POLARISÉES
Des fiches polarisées (une lame est plus large que l’autre) sont utilisées sur l’équipement afin
de réduire le risque de choc électrique. Lorsqu’elle est présente, cette fiche ne peut être insérée
dans une prise polarisée que dans un sens. Si la fiche n’entre pas complètement dans la prise,
inverser la fiche. S’il n’est toujours pas possible de l’insérer, contacter un électricien qualifié
pour installer une prise adéquate. Ne pas modifier la fiche de quelque façon.
12
Page 13

CARACTÉRISTIQUES DU PRODUIT
A.
Le produit peut différer légèrement de celui illustré.
F
E
D
C
F
G
B
COLD REV
3 mil 5 mil
L
COLD
REV
3 mil
5 mil
A
H
C
JM
3
mil
K
B
A
G
E
COLD
5
mil
ALERTES SONORES
Les plastifieuses série Flash Black & Decker produisent une série d’alertes sonores pour
aider son utilisateur :
3bips Après que le mode thermique/froid ait été sélectionné et une fois la
plastifieuse prête à l’emploi
1bip Toutes les 10 minutes pour indiquer que l’appareil est sous tension
REMARQUE : Toujours éteindre et débrancher la plastifieuse lorsqu’
elle n’est pas utilisée.
ARRÊT AUTOMATIQUE
Les plastifieuses série Flash Black & Decker disposent d’un mécanisme d’arrêt automatique qui
met la plastifieuse hors tension automatiquement après 60 minutes. Cette fonction représente
une fonction commode supplémentaire dans le cas où la plastifieuse est laissée en marche
lorsqu’elle n’est pas utilisée.
• Si la plastifieuse s’arrête pendant la plastification, appuyer sur la touche
d’alimentation et sélectionner le mode de température appropriée.
• Vous pouvez continuer à plastifier une fois que la lumière sur la touche du mode
sélectionné demeure allumée et que l’appareil émet 3 bips.
EMPORTE-PIÈCE DE COIN
Les plastifieuses série Flash Black & Decker comprennent un emporte-pièce de coin intégré
pour arrondir les angles d’un article coupé et plastifié pour une apparence plus
professionnelle.
1. Insérer le coin carré
du document plastifié
dans la fente de
l’emporte-pièce de
coin et appuyer sur
l’emporte-pièce de
coin.
Panneau de commande
B.
EMPORTE-PIÈCE DE COIN
C.
Tiroir de retailles de
l’emporte-pièce de coin
D.
Plateau de sortie (LAM95FH,
LAM125FH)
E.
Poignée de transport
F.
Enrouleur de cordon
G.
d’alimentation
H.
Fente d’alimentation
I
I.
Interrupteur Marche/Arrêt
J.
Levier de marche arrière
(LAM95)
K.
Sélecteur de mode marche
arrière (LAM95FH, LAM125FH)
L.
Sélecteur de pochette de 5 mil
M.
Sélecteur de pochette de 3 mil
Sélecteur de pochette mode
froid
H M
COLD
5 mil3 mil
L
2. Retirer le document
plastifié de la fente de
l’emporte-pièce de coin
et répéter l’étape1 pour
les autres coins carrés.
K
REMARQUE : Les retailles de l’emporte-pièce de coin sont recueillies dans un petit tiroir situé à
l’arrière de la plastifieuse (Fig.C). Vider périodiquement ce tiroir en le retirant de l’appareil et
vider son contenu dans une poubelle.
13
Page 14

CONSEILS UTILES
• Ne pas plastifier de documents sensibles à la chaleur tels que les tickets, les échographies,
etc. Pour les documents sensibles à la chaleur, vous pouvez expérimenter en utilisant des
pochettes de plastification auto-adhésives et le réglage du mode froid.
• Toujours faire un essai avec un document non sensible en premier afin de s’assurer de sa
compatibilité.
• Ne pas plastifier de documents de valeur ou historiques.
• Ne jamais plastifier une pochette vide.
• Toujours introduire la pochette dans l’appareil le bord fermé en premier. Cela permettra
d’éviter que la pochette se coince dans les rouleaux de la plastifieuse.
• Si vous utilisez une grande pochette pour un article de petite taille, vous pouvez facilement
découper la pochette après la plastification à l’aide d’un coupe-papier ou de ciseaux. Les
documents plastifiés sont faciles à couper une fois refroidis.
• Un massicot rotatif est recommandé.
• Ne pas utiliser la plastifieuse avec des feuilles de plastification autocollantes; utiliser
uniquement les pochettes auto-adhésives.
AVANT DE PLASTIFIER
1. Placer la plastifieuse sur une surface plane et stable. Organiser vos
matériaux de manière à ce qu’ils soient à proximité et vous assurer que
vous disposez d’un espace suffisant pour travailler confortablement. Cela
suppose d’avoir une surface suffisante pour :
COLD REV
3 mil
5 mil
• Aligner les articles dans les pochettes de plastification
• Laisser les articles reposer à plat pour qu’ils refroidissent après la
plastification
2. Localiser le plateau de sortie qui se trouve sous la plastifieuse (certains
modèles uniquement). Ouvrir le plateau en le dépliant en position la plus
ouverte.
3. Brancher le cordon d’alimentation sur une prise standard de 120 V.
PRÉPARATION DU DOCUMENT
Pour des résultats optimaux, utiliser les pochettes de plastification TimeShieldMC
Black & Decker. Aller sur Laminating.BlackandDecker.com/Laminators pour plus
d’informations et trouver où les acheter.
1. Sélectionner le format et l’épaisseur de pochette qui correspondent le
mieux à l’article que vous souhaitez plastifier et qui offre le niveau de
protection que vous désirez.
14
Page 15

COLD
Pochette de
plastication
REV
5 mil
3 mil
2. Centrer votre article dans la pochette ouverte, avec le bord supérieur
de votre article vers le bord scellé de la pochette. S’assurer que la
bordure est d’au moins 3,18 mm (1/8 po) sur tous les côtés de l’article.
REMARQUE : Si vous utilisez les pochettes de plastification
TimeShieldMC Black & Decker, utiliser le panneau de positionnement
commode situé à l’arrière de chaque paquet pour assurer un alignement
correct et des bordures égales.
PLASTIFICATION À FROID
1. Allumer la plastifieuse en appuyant sur la touche d’alimentation du
panneau de commande. L’appareil démarre automatiquement en mode
froid et la touche COLD (Froid) demeure allumée.
2. Suivre les instructions fournies avec vos pochettes de plastification
auto-adhésives afin de positionner et sceller une première fois l’article
dans la pochette.
3. Insérer l’extrémité scellée de la pochette directement dans la fente
d’alimentation et la faire entrer doucement vers l’avant jusqu’à ce que
l’appareil la tire.
4. La pochette sera tirée automatiquement dans la plastifieuse et en
sortira par l’arrière. L’article plastifié peut être retiré une fois qu’il a cessé
de bouger.
A B
REV
COLD
5 mil
3 mil
RELEASE
5. Dans le cas d’un bourrage :
• LAM95 : Tirer le levier anti-bourrage et retirer
l’article par la fente d’alimentation avant.
(Voir figure B)
• LAM95FH, LAM125FH : Appuyer et maintenir la
touche de marche arrière (REV) sur le
panneau de commande tout en retirant
l’article par la fente d’alimentation avant.
(Voir figure A)
15
Page 16

REV
COLD
3 mil
REV
COLD
3 mil
Signal sonore
REV
COLD
3 mil
PLASTIFICATION THERMIQUE
1. Allumer la plastifieuse en appuyant sur la touche d’alimentation du
panneau de commande.
5 mil
2. Sélectionner le réglage thermique approprié en fonction de l’épaisseur
de votre pochette. L’épaisseur de la pochette est généralement indiquée
sur l’emballage de la pochette de plastification.
5 mil
5 mil
• 3mil: Pour utilisation avec des pochettes de plastification de
3 mil d’épaisseur pour plastifier du papier d’imprimante
standard ou d’autres documents/articles légers
• 5mil: Pour utilisation avec des pochettes de plastification de 5
mil d’épaisseur ou des pochettes de 3 mil d’épaisseur pour
plastifier du papier photo, des cartes professionnelles ou autres
documents épais.
3. Pendant le réchauffement de la plastifieuse, la lumière sur le mode
thermique sélectionné se met à clignoter. Une fois la température de
plastification appropriée atteinte, l’appareil émettra 3 bips. La plastifieuse
est maintenant prête.
A
COLD
3 mil
REV
5 mil
4. Insérer l’extrémité scellée de la pochette directement dans la fente
d’alimentation et la faire entrer doucement vers l’avant jusqu’à ce que
l’appareil la tire.
5. La pochette sera tirée automatiquement dans la plastifieuse et en
sortira par l’arrière. Laisser le document plastifié à plat pendant le
refroidissement pour une apparence plus professionnelle.
6. Dans le cas d’un bourrage :
B
• LAM95 : Tirer le levier anti-bourrage et retirer
l’article par la fente d’alimentation avant.
RELEASE
(Voir figure B)
• LAM95FH, LAM125FH : Appuyer et maintenir la
touche de marche arrière (REV) sur le panneau
de commande tout en retirant l’article par la
fente d’alimentation avant. (Voir figure A)
16
Page 17

CHANGER DE MODE DE PLASTIFICATION
DE FROID À THERMIQUE
Sélectionner le réglage du mode thermique en appuyant sur la touche appropriée. La touche
clignote pendant que la plastifieuse se réchauffe. Une fois la température appropriée atteinte,
le voyant sur la touche de sélection de mode restera allumé et l’appareil émettra 3 bips.
L’appareil est maintenant prêt à l’emploi.
MODES DE PLASTIFICATION THERMIQUE
Sélectionner le réglage du mode thermique en appuyant sur la touche appropriée. La touche
clignote pendant que la plastifieuse s’adapte à la température appropriée. Une fois la
température atteinte, le voyant de la touche de mode sélectionnée restera allumé et l’appareil
émettra 3 bips. L’appareil est maintenant prêt à l’emploi.
DE THERMIQUE À FROID
Sélectionner le réglage du mode froid en appuyant sur la touche COLD (Froid). La touche
clignote pendant que la plastifieuse se refroidit. Une fois la température adéquate atteinte, le
voyant sur la touche COLD (Froid) restera allumé et l’appareil émettra 3 bips. L’appareil est
maintenant suffisamment refroidi et prêt à l’emploi.
REMARQUE : En raison du temps nécessaire pour que la plastifieuse refroidisse lorsque
vous passez à une température plus basse ou au mode froid, il est recommandé de
toujours réaliser des projets de plastification dans l’ordre de froid à thermique (FROID >
3 mil> 5 mil).
ARRÊT
COLD
1. Alors que l’appareil est toujours chaud, insérer la feuille de nettoyage
fournie dans la plastifieuse. La feuille est conçue pour éliminer tout résidu
d’adhésif qui peut s’écouler sur les rouleaux pendant la plastification. Elle
permettra également d’obtenir une bonne performance constante.
REV
COLD
5 mil
3 mil
2. Appuyer sur le bouton d’alimentation pour éteindre la plastifieuse et
débrancher le cordon d’alimentation. Allouer suffisamment de temps à la
REV
5 mil
3 mil
plastifieuse pour refroidir avant de la ranger.
3. Enrouler le cordon autour de l’enrouleur de cordon intégré et
mettre la plastifieuse dans le carton d’expédition d’origine.
Conserver dans un endroit frais et sec.
17
Page 18

SOIN ET ENTRETIEN
AVERTISSEMENT : Arrêter et débrancher la plastifieuse avant d’en nettoyer l’extérieur.
Utiliser uniquement un chiffon propre et sec pour enlever la poussière. Ne jamais laisser de
liquide entrer dans la plastifieuse.
• Conserver l’emballage d’origine pour ranger la plastifieuse lorsqu’elle n’est pas utilisée.
• Toujours introduire la feuille de nettoyage dans la plastifieuse à la fin de chaque projet de
plastification thermique.
• L’élément chauffant de la plastifieuse est fragile. Ne pas LAISSER TOMBER ni HEURTER la
plastifieuse afin d’éviter d’endommager l’élément chauffant.
• Il est important de vider régulière le tiroir de retailles de l’emporte-pièce afin de garantir le
bon fonctionnement de l’emporte-pièce de coin.
Dépannage
Si vous éprouvez un problème avec votre plastifieuse, vérifier les causes possibles et les
solutions ci-dessous. Pour toute assistance supplémentaire avec votre produit, visiter notre site
web Laminating.BlackandDecker.com ou appeler le service d’assistance Black & Decker au
1 (800) 343-9329.
PROBLÈME CAUSE POSSIBLE SOLUTION
Bulles dans la
plastication
Taches blanches ou
zones floues dans la
plastification
Odeurs
• Mode thermique
incorrect choisi
• Pochette trop mince
pour l’article plastifié
• Pochette et/ou
document plastifié
trop épais
• Résidus d’adhésif
sur les rouleaux
• Vérifier que le mode thermique
correspond à l’épaisseur de la pochette
• Utiliser seulement des pochettes
thermiques de 3 à 5 mil d’épaisseur
• Utiliser uniquement des pochettes
Black & Decker pour une performance
optimale
• Faire passer la pochette dans la
plastifieuse à nouveau
• Utiliser uniquement des pochettes de
plastification thermiques de 3 à 5 mil
d’épaisseur
• Sélectionner le mode thermique 5 mil ou
réduire l’épaisseur du document que vous
plastifiez (copier ou imprimer le document
sur du papier standard)
• Utiliser uniquement des pochettes
Black & Decker pour une performance
optimale
• Insérer la feuille de nettoyage dans la
plastifieuse après chaque utilisation
• Utiliser la plastifieuse dans un endroit
ventilé si possible
REMARQUE : Il est fréquent que certains
adhésifs s’écoulent sur les rouleaux pendant
la plastification, ce qui peut provoquer une
odeur
18
Page 19

L’appareil s’arrête de
lui-même
• Arrêt automatique
activé
• Appuyer sur la touche d’alimentation pour
mettre l’appareil en marche et sélectionner
le réglage de température approprié
Bourrage à l’intérieur
de la plastifieuse
FICHE TECHNIQUE
Modèle
Dimensions
Poids
• Bourrage de document
(pas centré ou droit
lorsque introduit dans la
fente d’alimentation ou
introduit par le bord non
scellé en premier)
• Pochette vide
• Pochette pas utilisée
• Résidus de colle sur les
rouleaux
• Feuilles de
plastification
auto-adhésives utilisées
LAM95
8,26 x 40, 01 x 15,24 cm
(3,25 x 15,75 x 6,00 po)
1,6 kg (3,56 lb)
• LAM95 : Tirer le levier anti-bourrage et
retirer l’article par la fente d’alimentation
avant
• LAM95FH, LAM125FH : Appuyer et
maintenir la touche de marche arrière (REV)
sur le panneau de commande tout en
retirant l’article par la fente d’alimentation
avant
• S’assurer que l’article est centré dans la
fente d’alimentation et introduit droit dans
la plastifieuse par le bord scellé en premier
• Toujours utiliser une pochette lors de la
plastification
• Insérer la feuille de nettoyage dans la
plastifieuse après chaque utilisation
• Ne jamais introduire une pochette vide
ni utiliser des feuilles de plastification
autocollantes
LAM95FH
8,59 x 43,18 x 17,48 cm
(3,38 x 17,00 x 6,88 po)
3,29 kg (7,26 lb)
LAM125FH
8,59 x 55,25 x 19,05 cm
(3,38 x 21,75 x 7,50 po)
5,28 kg (11,66 lb)
Longueur du cordon
Tension
Puissance
Épaisseur de la pochette
Largeur maximum de la
pochette
Estimation du délai
d’échauffement
Vitesse de la plastifieuse
12,7 cm (5 pi)
120 V
400 W
3 - 5 mil
9.5”
Á 3 Mil – 150 Seconds
Á 5 Mil – 190 Seconds
3 á 5 Mil- 190 seconds
304,8 cm (12 po) / minute
19
12,7 cm (5 pi)
120 V
1 050 W
3 - 5 mil
9.5”
Á 3 Mil – 60 Seconds
Á 5 Mil – 90 Seconds
3 á 5 Mil- 30 seconds
609,6 mm (24 po) / minute
15,24 cm (6 pi)
120 V
1 750 W
3 - 5 mil
12.5”
Á 3 Mil– 60 Seconds
Á 5 Mil – 70 Seconds
3 á 5 Mil- 70 seconds
1219,2 mm (48 po) / minute
Page 20

GARANTIE LIMITÉE DE 2 ANS
À compter du 1er septembre 2012, Amax Inc. garantit à l’acheteur initial que le
produit est exempt de défauts de matériau ou de fabrication, et convient de
réparer ou de remplacer, à sa discrétion, les plastifieuses, lampes de bureau,
taille-crayons, agrafeuses ou perforatrices de la marque Black & DeckerMD dans
un délai de (2) ans suivant la date de l’achat. La garantie n’est pas transférable. La
date de preuve d’achat est requise. La présente garantie couvre uniquement les
dommages résultant de défauts de matériau ou de main-d’oeuvre; ne couvre pas
les conditions ou les mauvais fonctionnements découlant de l’usure normale, la
négligence, l’abus, les accidents ou les tentatives de réparation effectuées par
quelqu’un d’autre que notre centre de réparation national ou les centres de
service de garantie autorisés. Les lames de taille-crayons, les têtes
d’emporte-pièce et les lames rotatives sont considérées comme des pièces à
usure normale. L’acheteur est responsable des frais d’expédition du produit
défectueux à Amax Inc. ou à son centre de réparation autorisé. Pour une
efficacité optimale de vos produits Black and DeckerMD, utilisez toujours les
agrafes et accessoires authentiques de Black and DeckerMD.
CETTE GARANTIE EST LA GARANTIE EXCLUSIVE DE AMAX INC. ET REMPLACE
TOUTES LES AUTRES GARANTIES EXPLICITES, Y COMPRIS MAIS SANS S’Y
LIMITER, LES GARANTIES IMPLICITES DE COMMERCIALISATION OU
D’ADAPTATION À UN USAGE PARTICULIER. AMAX INC. N’ASSUME AUCUNE
RESPONSABILITÉ POUR TOUT DOMMAGE DIRECT, INDIRECT, ACCESSOIRE OU
CONSÉCUTIF.
Certains États et pays n’autorisent pas l’exclusion ou la limitation des dommages
accessoires ou consécutifs; il est donc possible que les limitations ou exclusions
ci-dessus ne s’appliquent pas dans votre cas. Cette garantie vous donne des
droits juridiques spécifiques, et vous pouvez également avoir d’autres droits qui
varient d’une province et d’un territoire à l’autre et selon les pays. Pour plus
d’informations sur notre procédure de réclamation, visitez-nous sur
BlackandDecker.com ou contactez-nous au 1-800-343-9329.
Amérique latine : Cette garantie ne s’applique pas aux produits vendus en
Amérique latine. Pour les produits vendus en Amérique latine, consultez les
informations concernant la garantie du pays en question contenue dans
l’emballage, appelez la société locale ou rendez-vous sur le site Web pour y lire
les renseignements concernant la garantie.
Fabriqué de : Amax Incorporated
East Greenwich, RI 02818
Under license from The Black and Decker Corporation
USA and Canada Only • États-Unis et au Canada
seulement
En México Importado por: Black & Decker S.A. de C.V.
Avenida Antonio Dovali Jaime # 70 Torre B Piso 9
Colonia La Fe, Santa Fé, Delegación Alvaro Obregón,
México D.F. 01210 • R.F.C.: BDE810626‐1W7
• Contendio 7 piezas
La mention Black & Decker et le logo Black & Decker sont
des marques de commerce déposées de Black & Decker
Corporation et sont utilisés en vertu d’une licence. Tous
droits réservés. Le produit emballé peut différer
légèrement de celui illustré. Les accessoires illustrés ne
sont pas tous compris dans l’emballage.
Copyright © 2012 Amax Incorporated
A00075
20
BlackandDecker.com
1-800-343-9329
Imprimé en Chine
Page 21

SPANISH
PLASTIFICADORAS TÉRMICAS SERIE FLASH
Números de catálogo LAM95, LAM95FH y LAM125FH
COLD
3mil
5mil
REV
COLD
5 mil
3 mil
REV
COLD
5 mil
3 mil
N.º de modelo: LAM95 N.º de modelo: LAM95FH N.º de modelo: LAM125FH
¡Gracias por escoger Black & Decker!
Visite BlackandDecker.com/NewOwner
para registrar su producto.
LEA EL SIGUIENTE AVISO ANTES DE DEVOLVER
ESTE PRODUCTO POR CUALQUIER RAZÓN:
Si tiene preguntas o encuentra algún problema en la compra de un producto Black & Decker, llame al
1 (800) 343-9329 de 8 a. m. a 5 p. m. EST de lunes a viernes para hablar con un representante.
¿Desea descubrir un mundo de posibilidades infinitas de laminado? Obtenga documentos gratuitos
que se pueden imprimir para el hogar, la oficina y el salón de clases en:
Tenga el número de catálogo a mano cuando llame.
Laminating.BlackandDecker.com
GUARDE ESTE MANUAL PARA CONSULTAS FUTURAS
21
Page 22

PRECAUCIONES DE SEGURIDAD IMPORTANTES
Siempre que use aparatos eléctricos, debe seguir ciertas precauciones de seguridad básicas que
incluyen las siguientes:
LEA Y COMPRENDA TODAS LAS INSTRUCCIONES ANTES DE USAR EL PRODUCTO
PAUTAS DE SEGURIDAD: DEFINICIONES
Es importante que lea y comprenda este manual.
La información que contiene está destinada a proteger SU SEGURIDAD y EVITAR
PROBLEMAS. Los siguientes símbolos se utilizan para ayudarlo a identificar esta
información.
PELIGRO: indica una situación de peligro inminente que, de no evitarse, provocará
lesiones graves o la muerte.
ADVERTENCIA: indica una situación potencialmente peligrosa que, de no evitarse,
podría provocar lesiones graves o la muerte.
PRECAUCIÓN: indica una situación potencialmente peligrosa que, de no evitarse,
podría provocar lesiones leves o moderadas.
PRECAUCIÓN: cuando se usa sin el símbolo de alerta de seguridad, indica una situación
potencialmente peligrosa que, de no evitarse, podría provocar daños materiales.
PAUTAS PARA REDUCIR EL RIESGO DE SUFRIR UNA LESIÓN
Asegúrese de que todos los usuarios lean y comprendan todas las instrucciones de seguridad
y el resto de la información de este manual antes de usar la plastificadora.
PRECAUCIÓN: no cumplir con las recomendaciones que se detallan en este manual de
instrucciones anulará la garantía.
ADVERTENCIA: lea todas las instrucciones antes de usar este producto. No seguir las
instrucciones puede provocar descargas eléctricas, iniciar un incendio o causar lesiones
graves.
ADVERTENCIA:
• Use la plastificadora únicamente para el uso previsto.
• Para minimizar el riesgo de descargas eléctricas, no utilice la plastificadora cerca del agua ni
derrame líquidos sobre la plastificadora, el cable de alimentación o el tomacorriente.
• No permita que el cable de alimentación toque ninguna superficie caliente. Enrolle el cable
en el enrollacables cuando almacene la unidad.
• No use la plastificadora si el cable está dañado o si la plastificadora se ha caído o dañado.
• Espere a que la plastificadora se enfríe por completo antes de guardarla.
• Para minimizar el riesgo de descarga eléctrica, no desarme la plastificadora. Llame al número
gratuito que corresponda entre los que se indican en la carátula de este manual. Si la
plastificadora se vuelve a armar incorrectamente, puede ocurrir una descarga eléctrica al
momento de usarla.
PRECAUCIÓN:
• Coloque la plastificadora sobre una superficie plana y firme con suficiente espacio para
trabajar cómodamente.
• Asegúrese de que la plastificadora tenga ventilación adecuada y de que los orificios de
ventilación de la carcasa de la plastificadora no estén cubiertos ni obstruidos.
• La plastificadora y los sobres pueden calentarse durante el uso. Espere que los artículos
plastificados y la máquina se enfríen antes de manipularlos.
• No permita que los niños usen la unidad sin supervisión.
• Mantenga las mascotas alejadas de la plastificadora durante el uso.
• Siempre apague la plastificadora y desenchúfela mientras no la use.
ENCHUFES POLARIZADOS
Los enchufes polarizados (con una clavija más ancha que la otra) se usan en ciertos equipos
para reducir el riesgo de que ocurra una descarga eléctrica. Estos enchufes, cuando están
presentes, pueden enchufarse en un solo sentido en un tomacorriente polarizado. Si el
enchufe no entra completamente en el tomacorriente, invierta el enchufe. Si el enchufe no
entra en ninguno de los dos sentidos, póngase en contacto con un electricista calificado para
instalar el tomacorriente adecuado. No modifique el enchufe de ninguna forma.
22
Page 23

CARACTERÍSTICAS DEL PRODUCTO
Panel de control
El producto puede diferir ligeramente del que
se muestra en la ilustración.
E
D
C
COLD
REV
3 mil
5 mil
B
A
H
COLD REV
3 mil 5 mil
L
C
JM
K
B
F
G
E
COLD
3
mil
5
mil
A
F
G
ALERTAS SONORAS
Las plastificadoras Black & Decker serie Flash cuentan con una serie de alarmas sonoras para
ayudar al usuario:
3 pitidos Indica que la plastificadora está lista para usar luego de haber
seleccionado el modo térmico o en frío.
1 pitido Cada 10 minutos para indicar que la unidad está encendida
NOTA: siempre apague la plastificadora y desenchúfela cuando no la use.
A.
Cortador de esquinas
B.
Bandeja para esquinas cortadas
C.
Soporte de salida (LAM95FH,
D.
LAM125FH)
Manija para transporte
E.
Enrollacables
F.
Ranura de entrada
G.
Interruptor de encendido y
H.
I
apagado
I.
Palanca de reversa (LAM95)
J.
Selección de modo reversa
(LAM95FH, LAM125FH)
Selección de sobres de 5 mil
K.
Selección de sobres de 3 mil
L.
Selección de sobres para
M.
plastificado en frío
H M
L
COLD
5 mil3 mil
K
APAGADO AUTOMÁTICO
Las plastificadoras Black & Decker serie Flash cuentan con un mecanismo de apagado
automático que apaga la plastificadora automáticamente luego de 60 minutos. Esta
característica es una comodidad especial en caso de que la plastificadora se deje encendida
sin usar.
• Si la plastificadora se apaga durante el plastificado, presione el botón de encendido
y seleccione el modo de temperatura que corresponda.
• Puede continuar con el plastificado una vez que la luz del botón de modo
correspondiente permanezca encendida y se oigan 3 pitidos de aviso.
Cortador de esquinas
Las plastificadoras Black & Decker serie Flash cuentan con un cortador de esquinas
incorporado para redondear las esquinas de un artículo recortado y plastificado para darle un
aspecto más profesional.
1. Inserte la esquina
cuadrada del artículo
plastificado en la ranura
del cortador de bordes y
presione el botón de
2. Quite el artículo
plastificado de la
ranura y repita el paso
1 para las demás
esquinas cuadradas.
corte.
NOTA: las esquinas recortadas caen en una pequeña bandeja ubicada en la parte posterior de
la plastificadora (Fig. C). Vacíe esta bandeja periódicamente. Para hacerlo, quite la bandeja de
la unidad y vacíela en un cesto de basura.
23
Page 24

CONSEJOS ÚTILES
• No plastifique documentos sensibles al calor como tiques, ecografías, etc. Puede intentar
usar sobres para plastificado autoadhesivos y el modo de plastificado en frío para los
documentos sensibles al calor.
• Siempre pruebe con un documento que no sea de gran importancia para garantizar la
compatibilidad.
• No plastifique documentos valiosos ni de tipo histórico.
• Nunca plastifique un sobre vacío.
• Siempre introduzca primero en la máquina el extremo sellado del sobre. Esto evitará que el
sobre se atasque en los rodillos de la plastificadora.
• Si utiliza un sobre grande para un artículo más pequeño, puede recortar el sobre fácilmente
luego del plastificado con una recortadora de papel o unas tijeras. Los documentos
plastificados pueden recortarse fácilmente una vez que están fríos.
• Se recomienda usar una recortadora de papel rotativa.
• No use la plastificadora con hojas de plastificado autoadhesivas; utilice únicamente sobres
autoadhesivos.
ANTES DE PLASTIFICAR
1. Coloque la plastificadora sobre una superficie plana y firme. Organice
sus materiales para que estén al alcance y asegúrese de tener espacio
para trabajar cómodamente. Esto implica tener suficiente espacio para:
• Alinear los artículos en los sobres de plastificado
COLD
REV
3 mil
5 mil
• Colocar los artículos en posición horizontal luego del plastificado
para que se enfríen
2. Ubique el soporte de salida, que está debajo de la plastificadora
(solamente en ciertos modelos). Despliegue el soporte hasta su máxima
extensión.
3. Enchufe el cable de alimentación en un tomacorriente estándar de 120 V.
PREPARACIÓN DE LOS DOCUMENTOS
Para obtener resultados óptimos, utilice sobres para plastificado TimeShield™ de
Black & Decker Visite Laminating.BlackandDecker.com/Laminators para obtener más
información y conocer los lugares de venta.
1. Seleccione un sobre del tamaño y el espesor que mejor se ajusten al
artículo que desea plastificar y que ofrezcan el nivel de protección que
desee.
24
Page 25

COLD
Sobre de
plasticado
REV
5 mil
3 mil
2. Coloque el artículo en el centro de un sobre abierto, con el borde
superior del artículo hacia el extremo sellado del sobre. Asegúrese de
que haya un margen de al menos 3 mm (1/8 pulg.) hacia cada lado.
NOTA: si utiliza los sobres de plastificado TimeShield™ de Black & Decker,
utilice el práctico cuadro de posicionamiento ubicado en la parte posterior
de cada paquete para asegurar una correcta alineación y lograr bordes
parejos.
PLASTIFICADO EN FRÍO
1. Encienda la plastificadora con el botón de encendido del panel de
control. La unidad se iniciará automáticamente en modo de plastificado
en frío, con el botón COLD (FRÍO) encendido en forma permanente.
2. Siga las instrucciones que se incluyen con los sobres de plastificado
autoadhesivos para ubicar y sellar el artículo provisoriamente dentro del
sobre.
3. Inserte el extremo sellado del sobre directamente en la ranura de
entrada y guíe el sobre suavemente hacia delante hasta que la máquina
lo haga pasar.
4. El sobre pasará automáticamente a través de la plastificadora y saldrá
por la parte trasera. Puede quitar el artículo plastificado una vez que haya
dejado de moverse.
A B
REV
COLD
5 mil
3 mil
RELEASE
5. En caso de atasco:
• LAM95: tire de la palanca de liberación de atascos
y quite el artículo a través de la ranura de
entrada delantera. (Vea la figura B)
• LAM95FH, LAM125FH: mantenga presionado el
botón de reversa (REV) del panel de
control mientras quita el artículo a través
de la ranura de entrada delantera. (Vea
la figura A)
25
Page 26

COLD
PLASTIFICADO TÉRMICO
1. Encienda la plastificadora con el botón de encendido del panel de
control.
REV
5 mil
3 mil
COLD
Pitido
COLD
3 mil
3 mil
REV
REV
5 mil
5 mil
2. Seleccione el ajuste térmico que corresponda de acuerdo con el
espesor del sobre. El espesor del sobre normalmente se indica
en el empaque de los sobres de plastificado.
• 3 mil: para usar con los sobres de plastificado de 3 mil de
espesor al plastificar papel de impresora estándar u otros
documentos o artículos delgados
• 5 mil: para usar con los sobres de plastificado de 5 mil de
espesor o con los sobres de 3 mil de espesor al plastificar papel
fotográfico, tarjetas comerciales u otros documentos gruesos
3. Mientras la plastificadora se caliente, la luz del modo térmico
seleccionado titilará. Una vez que se alcance la temperatura de
plastificado adecuada, sonarán 3 pitidos de aviso. La plastificadora está
lista para usar.
4. Inserte el extremo sellado del sobre directamente en la ranura de
entrada y guíe el sobre suavemente hacia delante hasta que la máquina
lo haga pasar.
5. El sobre pasará automáticamente a través de la plastificadora y saldrá
por la parte trasera. Espere que el artículo plastificado se enfríe en
posición horizontal para lograr un aspecto más profesional.
A
COLD
3 mil
REV
5 mil
B
RELEASE
6. En caso de atasco:
• LAM95: tire de la palanca de liberación de atascos
y quite el artículo a través de la ranura de entrada
delantera. (Vea la figura B)
• LAM95FH, LAM125FH: mantenga presionado el
botón de reversa (REV) del panel de control
mientras quita el artículo a través de la ranura de
entrada delantera. (Vea la figura A)
26
Page 27

CAMBIAR DE MODO DE PLASTIFICADO
PASAR DE MODO DE PLASTIFICADO EN FRÍO A MODO TÉRMICO
Seleccione el modo térmico con el botón correspondiente. El botón titilará mientras la
plastificadora se calienta. Una vez que se alcance la temperatura adecuada, la luz del botón de
modo seleccionado se iluminará en forma permanente y sonarán 3 pitidos de aviso. La
máquina está lista para usarse.
MODOS DE PLASTIFICADO TÉRMICO
Seleccione el modo térmico con el botón correspondiente. El botón titilará mientras la
plastificadora se ajusta a la temperatura adecuada. Una vez que se alcance dicha temperatura,
la luz del botón de modo seleccionado se iluminará en forma permanente y sonarán 3 pitidos
de aviso. La máquina está lista para usarse.
PASAR DE MODO TÉRMICO A MODO DE PLASTIFICADO EN FRÍO
Seleccione el modo de plastificado en frío con el botón COLD (FRÍO). El botón titilará mientras
la plastificadora se enfría. Una vez que se alcance la temperatura adecuada, la luz del botón
COLD (FRÍO) se iluminará en forma permanente y sonarán 3 pitidos de aviso. La máquina está
suficientemente fría y lista para usarse.
NOTA: debido al tiempo que se necesita para que la plastificadora se enfríe al pasar a
una temperatura menor o al modo de plastificado en frío, se recomienda siempre
realizar los proyectos de plastificado de los más fríos a los que requieren más calor
(COLD > 3 mil > 5 mil).
APAGADO
COLD
1. Mientras la máquina esté caliente, pase la hoja de limpieza que se
incluye a través de la plastificadora. La hoja está diseñada para quitar
cualquier residuo de adhesivo que pudiera caer sobre los rodillos
durante el plastificado. También asegura un desempeño constante.
REV
COLD
5 mil
3 mil
2. Presione el botón de encendido para apagar la plastificadora y
desenchufe el cable de alimentación. Espere que la plastificadora se
REV
5 mil
3 mil
enfríe antes de almacenarla.
3. Enrolle el cable en el enrollacables incorporado y coloque la
plastificadora en la caja de envío original. Guárdela en un lugar fresco
y seco.
27
Page 28

CUIDADO Y MANTENIMIENTO
ADVERTENCIA: apague y desenchufe la plastificadora antes de limpiar el exterior. Utilice
únicamente paños secos y limpios para quitar el polvo. Nunca permita que entren líquidos en
la plastificadora.
• Guarde la caja original para guardar la plastificadora cuando no se use.
• Siempre pase la hoja de limpieza por la plastificadora luego de finalizar cada proyecto de
plastificado térmico.
• El elemento calentador de la plastificadora es frágil. No DEJE CAER ni GOLPEE la
plastificadora para evitar dañar el elemento calentador.
• Vaciar regularmente la bandeja para esquinas cortadas es importante para garantizar que el
cortador de esquinas funcione sin problemas.
LOCALIZACIÓN DE FALLAS
Si tiene algún problema con la plastificadora, consulte las posibles causas y soluciones a
continuación. Para obtener ayuda adicional con su producto, visite nuestro sitio web
Laminating.BlackandDecker.com o llame a la línea de ayuda de Black & Decker al
1 (800) 343-9329.
PROBLEMA POSIBLE CAUSA SOLUCIÓN
Burbujas en el
plasticado
Hay manchas
blancas o áreas
difusas en el
plastificado
Olores
• Se seleccionó el
modo térmico
incorrecto
• El sobre es
demasiado delgado
para el artículo por
plastificar
• El sobre o el
documento por
plastificar son
demasiado
gruesos
• Hay residuos de
adhesivo en los
rodillos
• Asegúrese de que el modo térmico sea
acorde al espesor del sobre
• Utilice únicamente sobres térmicos de 3 o
5 mil de espesor
• Utilice únicamente sobres Black & Decker
para obtener un desempeño óptimo
• Vuelva a pasar el sobre por la
plastificadora
• Utilice únicamente sobres térmicos para
plastificado de 3 o 5 mil de espesor
• Seleccione el modo térmico de 5 mil o
reduzca el espesor del documento que
desea plastificar (copie o imprima el artículo
en papel estándar)
• Utilice únicamente sobres Black & Decker
para obtener un desempeño óptimo
• Pase la hoja de limpieza por la
plastificadora luego de cada uso
• Use la plastificadora en un área ventilada
siempre que sea posible
NOTA: es normal que ciertos adhesivos
caigan sobre los rodillos durante el
plastificado, lo cual puede causar olor
28
Page 29

La unidad se apaga
sola
• Se activa el apagado
automático
• Presione el botón de encendido para
encender la unidad y seleccione el ajuste
de temperatura adecuado
El documento se
atascó en el interior
de la plastificadora
• El documento se
insertó de manera
incorrecta (no estaba
centrado o derecho
cuando se insertó por la
ranura de entrada o no
se insertó primero el
extremo sellado)
• El sobre está vacío
• No se usó un sobre
• Hay residuos de
adhesivo en los rodillos
• Se usaron hojas de
plastificado
autoadhesivas
ESPECIFICACIONES DEL PRODUCTO:
MODELO
Dimensiones
Peso
LAM95
8,25 cm (3,25 pulg.) x
40,00 cm (15,75 pulg.) x
15,24 cm (6,00 pulg.)
3,56 lb
• LAM95: tire de la palanca de liberación de
atascos y quite el artículo a través de la
ranura de entrada delantera.
• LAM95FH, LAM125FH: mantenga
presionado el botón de reversa (REV) del
panel de control mientras quita el artículo a
través de la ranura de entrada delantera
• Asegúrese de que el artículo esté centrado
en la ranura de entrada y que pase derecho
por la plastificadora con el extremo sellado
primero.
• Siempre utilice un sobre para plastificar
• Pase la hoja de limpieza por la
plastificadora luego de cada uso
• Nunca pase un sobre vacío ni hojas de
plastificado autoadhesivas
LAM95FH
8,58 cm (3,38 pulg.) x
43,18 cm (17,00 pulg.) x
17,47 cm (6,88 pulg.)
7,26 lb
LAM125FH
8,58 cm (3,38 pulg.) x
55,24 cm (21,75 pulg.) x
19,05 cm (7,50 pulg.)
11,66 lb
Longitud del cable
Voltaje
POTENCIA
Capacidad de espesor
del sobre
Ancho máximo del sobre
Tiempo estimado de
calentamiento
Velocidad de laminado
1,52 m (5 ft)
120 V
400 W
3-5 Mil
9.5”
A 3 Mil – 150 Seconds
A 5 Mil – 190 Seconds
3 a 5 Mil – 190 seconds
304,8 mm/minuto
(12 pulg./minuto)
1,52 m (5 ft)
120 V
1050 W
3-5 Mil
9.5”
A 3 Mil – 60 Seconds
A 5 Mil – 90 Seconds
3 a 5 Mil – 30 seconds
609,6 mm/minuto
(24 pulg./minuto)
29
1,82 m (6 ft)
120 V
1750 W
3-5 Mil
12.5”
A 3 Mil– 60 Seconds
A 5 Mil – 70 Seconds
3 a 5 Mil – 70 seconds
1219,2 mm/minuto
(48 pulg./minuto)
Page 30

GARANTÍA LIMITADA DE 2 AÑOS
Con vigencia a partir del 1° de septiembre de 2012, Amax Inc. declara al
comprador minorista original que el producto comprado está libre de
defectos de materiales y mano de obra, y acepta reparar o reemplazar, a
criterio de Amax, toda laminadora, lámpara de escritorio, máquina
sacapuntas, engrapadora o perforadora defectuosa de marca
Black & Decker® por (2) años a partir de la fecha de compra. La garantía
no es transferible. Se requiere fecha de prueba de compra. Esta garantía
cubre únicamente daños derivados de defectos en el material o mano
de obra; no cubre condiciones o averías resultantes de desgaste normal,
negligencia, abuso, accidente o reparaciones que se hayan intentado o
realizado a través de otro servicio que no sea el centro de reparación
nacional o un centro de servicio de garantía autorizado. Las cuchillas de
los sacapuntas, los cabezales de perforación y los discos de corte se
consideran piezas de desgaste normal. Usted es responsable de los
costos de envío del producto defectuoso a Amax Inc. o a su centro de
reparación designado. Para un rendimiento óptimo de sus productos
Black and Decker®, use siempre grapas y accesorios originales de Black
and Decker®.
ESTA GARANTÍA ES LA ÚNICA GARANTÍA QUE OFRECE AMAX INC., Y
REEMPLAZA TODA OTRA GARANTÍA EXPRESA INCLUIDAS, ENTRE
OTRAS, LAS GARANTÍAS IMPLÍCITAS DE COMERCIABILIDAD O
IDONEIDAD PARA UN PROPÓSITO EN PARTICULAR. AMAX INC. NO
SERÁ RESPONSABLE POR DAÑOS DIRECTOS, INDIRECTOS,
INCIDENTALES NI RESULTANTES.
Algunos estados y países no permiten la exclusión o limitación de
daños incidentales o resultantes, por lo que las limitaciones o
exclusiones anteriores pueden no ser de aplicación para usted. Esta
garantía le otorga derechos legales específicos y es posible que usted
tenga otros derechos que variarán según el estado. Para obtener
información sobre nuestro procedimiento de reclamo bajo garantía,
visite BlackandDecker.com o llame al 1-800-343-9329.
América Latina: esta garantía no es de aplicación a los productos
vendidos en América Latina. Para productos vendidos en América
Latina, consulte la información de la garantía específica del país incluida
en el embalaje, contacte a la compañía local o consulte el sitio web para
obtener información acerca de la garantía.
Fabricado por: : Amax Incorporated
East Greenwich, RI 02818
Under license from The Black and Decker Corporation
USA and Canada Only • États-Unis et au Canada
seulement
En México Importado por: Black & Decker S.A. de C.V.
Avenida Antonio Dovali Jaime # 70 Torre B Piso 9
Colonia La Fe, Santa Fé, Delegación Alvaro Obregón,
México D.F. 01210 • R.F.C.: BDE810626-1W7
• Contendio 7 piezas
Black & Decker y el logotipo de Black & Decker son marcas
comerciales de The Black & Decker Corporation y se usan
con licencia. Todos los derechos reservados. El producto
que se encuentra dentro de la caja puede diferir
levemente del la foto.
No todos los accesorios ilustrados en la fotografia.
Copyright © 2012 Amax Incorporated
A00075
30
BlackandDecker.com
1-800-343-9329
Impreso en China
 Loading...